


Forum
Slot-in Double Cavity Ceramic Electric
Cooker
INSTALLATION AND USER INSTRUCTIONS
Models: 351, 336, 358

Contents
Introduction
......................................................................................................
3
Installing Your Cooker
.........................................................
For your own safety - Never
..................................................
-Always
...............................................
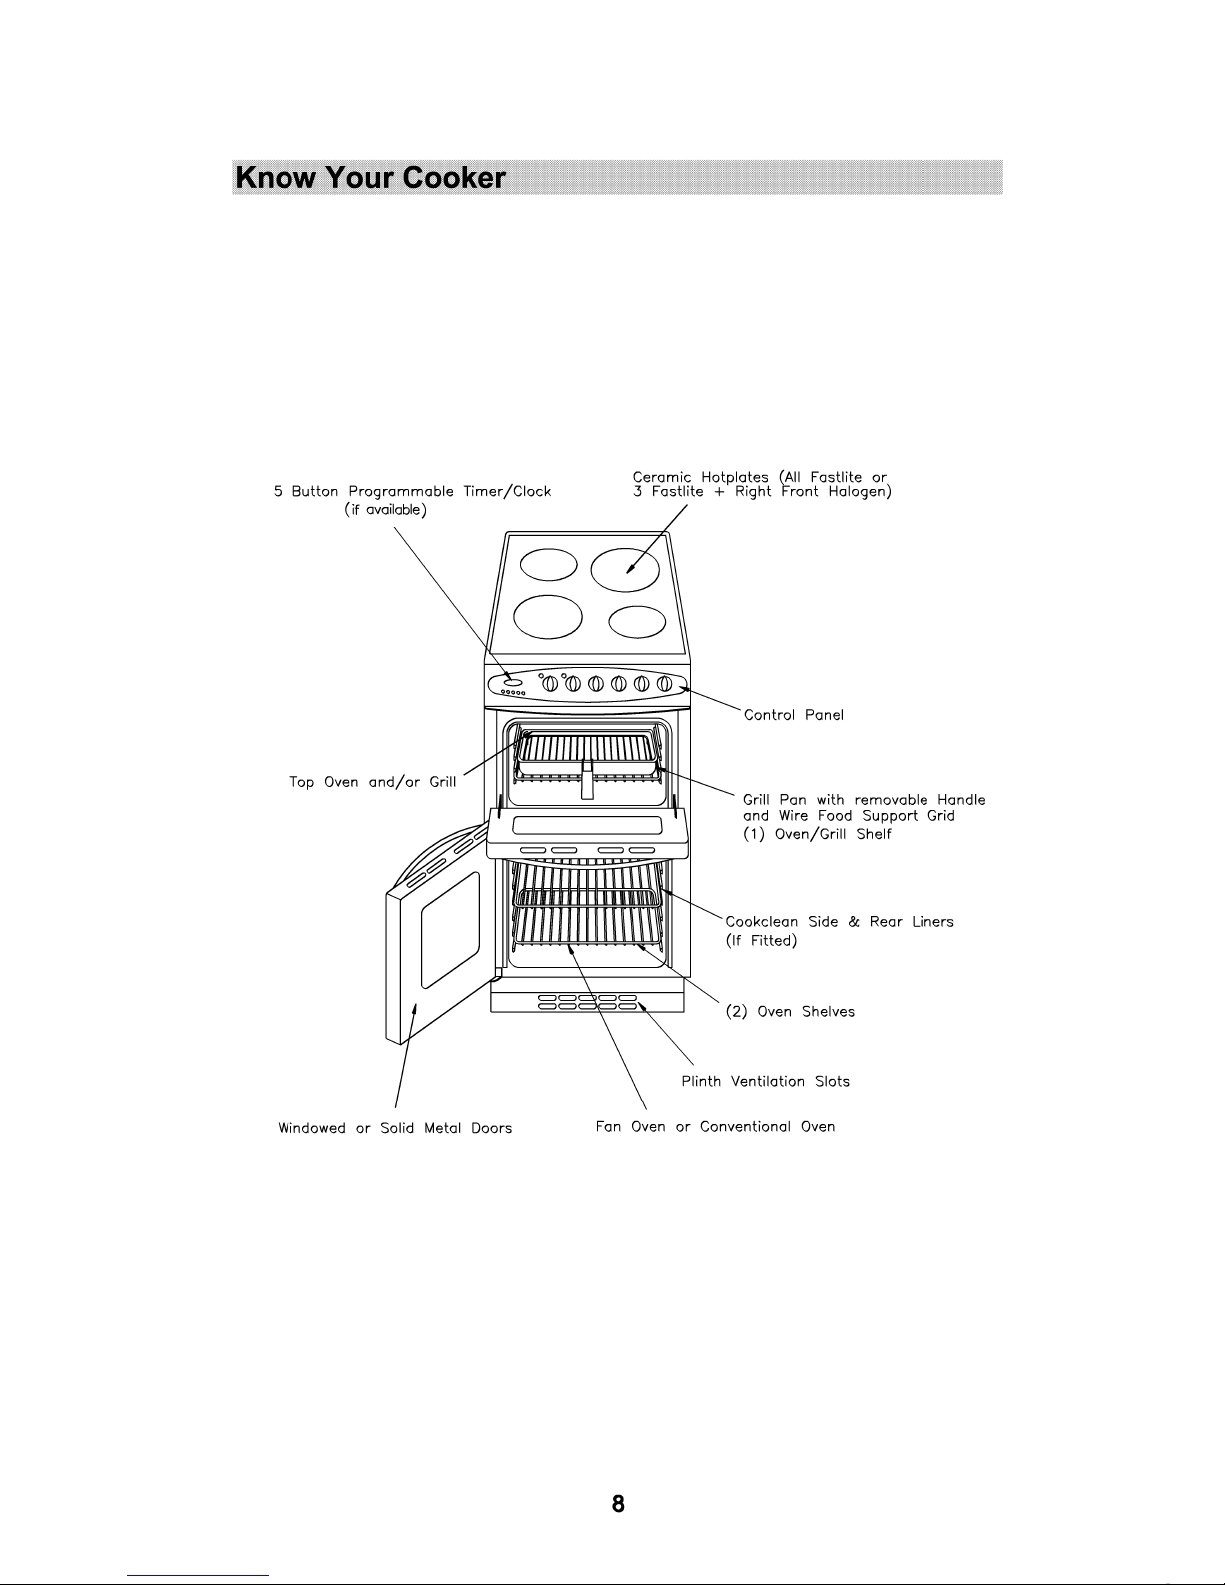
Know your Cooker
..............................................................
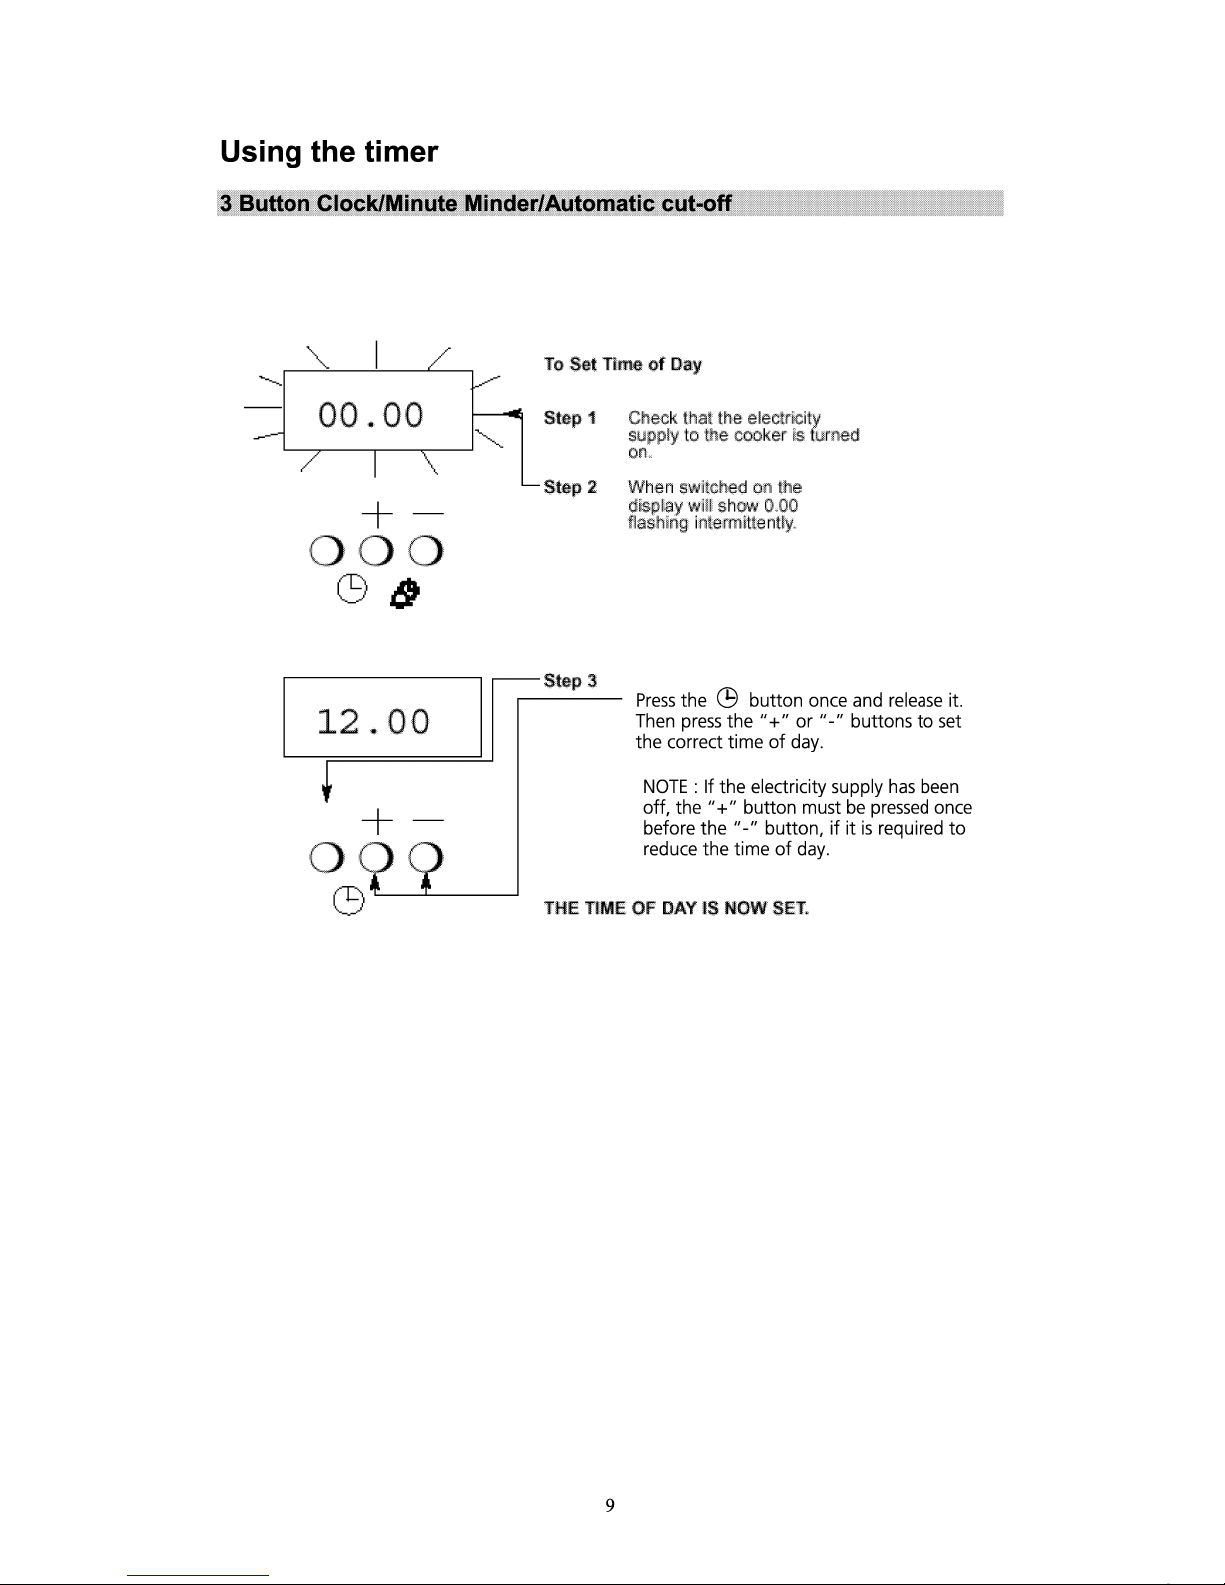
Using the Timer
..................................................................
4-5
6
7
8
9
3 Button Clock/Minute Minder
......................................
10
Minute Minder Operation
.............................................
11
Setting the time of day
................................................
12
Setting the minute minder
...........................................
12
Automatic Cooking Programmes
..................................
13&14
Using the ceramic Hob
.........................................................
15
Choosing your utensils
........................................................
17
Safety requirements for Deep FatFrying
........................
19
Using the Grill
.....................................................................
20
Use of the Grill Pan Handle
.................
20
Using the Top Oven
.............................................................
.
21
Using the Main Oven
...........................................................
23
Oven Cooking Guides.
........................................................
22&24
Care and Cleaning
..............................................................
26
Something Wrong With Your Cooker?
...................................
28
Service
...............................................................................
29
This appliance conforms to the following EEC Directives:
Low Voltage Equipment
73/23/EEC
93/68/EEC
Electromagnetic Compatibility
89/336/EEC
CE
92/31/EEC
93/68/EEC
2

Introduction
Your Belling
Thank you for purchasing a new Belling Forum Cooker. Its stylish
Cooker
and practical design will enhance your kitchen and make cooking a
pleasure.
It
features a fan oven, with a grill/top oven and a ceramic hob.
It
also features a fully programmable clock/timer with a minute minder and
automatic oven switch on.
Even if you have used an electric cooker before, it is important that you
read these instructions thoroughly before starting to cook, paying particular
attention to the installation and safety instructions.
Getting Help
If you have any problems with installing, operating, or cooking with your
Belling Cooker, please check through these instructions thoroughly to make
sure that you have not missed anything. If you still need help, then please
contact (including a daytime telephone number if possible):
Belling Customer Care Centre
Stoney Lane
Prescot
Merseyside
L35 2XW
Tel: 0871 22 22 503
Please quote
the cooker model and serial number with all enquiries.
This can be found on the rating plate on the plinth below the oven door.
WARNING! For your own safety, make sure that these instructions
on installation, use and maintenance are followed.
We advise you to keep these instructions in a safe place for future
reference.
If you sell or transfer ownership of this product, please pass on these
instructions to the new owner.
3

Installing your cooker
Unpacking
After unpacking your cooker, make sure that you remove all the
packing from the oven and grill, and any stickers from the oven
door and the hob.
Examine your cooker for any damage, particularly the hob glass.
Make sure there are no chips or cracks.
If there is any damage or there is anything missing, please contact your
supplier for advice. If the hob is cracked the cooker must not be connected
to the supply, and no part of it may be used.
Siting/Moving
Your cooker is heavy, so be careful when moving or
the Cooker
positioning it. Do not try to move the cooker by pulling on the
doors or handles. The Belling Forum is designed to fit between
600mm deep cabinets, spaced a minimum of 500mm apart. It can
also be used freestanding, with a cabinet to one side, in an angled
corner setting or with its back to a wall.
The cooker is a type X appliance, as such, adjacent side walls
which project above hob level must not be nearer to the cooker
than 150mm (6"). Any overhanging surface or cooker hood should
be at least 650mm (25 1/2 ") above the cooker hob. We do not
recommend positioning the cooker below wall cupboards, as the
heat and steam from the cooker may cause damage to the cupboard
and its contents.
Whatever the position, remember to leave enough room for the
cooker to be pulled out for cleaning and service.
Movement of your cooker is most easily achieved by lifting the
front as follows. Open the Top Oven/Grill door sufficiently to allow a
comfortable grip on the underside front edge of the oven roof,
avoiding any grill elements or oven interior furniture. Also take care
not to damage floor coverings.
To avoid damage to surrounding units a 10mm gap should be
left between the appliance and the units. If this is not possible,
a kit (part number 01 25552 00) may be ordered from Customer
Care which will protect the units.
For models with side opening doors, we recommend a side
clearance of 60mm between the cooker and any side wall to allow
the door to be opened fully.
Levelling
The appliance should be located on a level surface. The two front feet can
be adjusted to a maximum height of 910mm as required. To ensure that
your appliance is standing level adjust the two front feet by turning
clockwise or anticlockwise until the product is in firm contact with the floor.
4

Installing your cooker
I
mportant
Connecting the
Cooker
Before Cooking
WARNING! THIS APPLIANCE MUST BE EARTHED AND MUST
NOT BE INSTALLED ON A RAISED BASE!
Your cooker should have been checked to ensure that the voltage
corresponds with the supply voltage, this is stated on the rating
plate, which is situated on the plinth below the oven door.
The cooker must be connected by a qualified electrician to a
suitable double-pole control unit with a minimum of 32A and a
minimum contact clearance of 3mm, which should be fitted
adjacent to (but not above) the cooker, in accordance with
IEE
regulations. The power supply cable should conform to BS6004.
We recommend P.V.C. insulated twin and earth cable with a
conductor size of 6mm
2
.
The maximum size of cable that can be
used is 10mm
2
.
The control unit should be easily accessible in the
event of an emergency.
This appliance conforms to EN55014 regarding suppression of
radio and television interference.
For access to the mains terminal block, for supply cable
connection, it is necessary to remove the mains terminal cover,
located at the lower right-hand side of the rear panel. Pass the
cable through the cable clamp and connect to the appropriate
terminals provided. Tighten the screws on the cable clamp and
replace the cover. No part of the appliance will operate unless the
main control unit is switched
ON.
Allow sufficient cable length for
the cooker to be pulled out for cleaning, but do not let it hang closer
than 50mm (2") to the floor. The cable can be looped if necessary,
but make sure that it is not kinked or trapped when the cooker is in
position.
Before you cook for the first time, we recommend that you switch
on each element in turn to burn off any odours remaining from
manufacture. Simply operate each hob element and the grill on
maximum for a few minutes, and the oven for approximately 30
minutes. Ensure that the room is well ventilated (e.g. open a
window or use an extractor fan) and that persons who may be
sensitive to the odour avoid any fumes. It is suggested that any
pets be removed from the room until the smell has ceased.
Also, before you use the ceramic hob for the first time, we
recommend cleaning the hob surface with Belling Ceramic Hob
Cleaner and Conditioner available from our Spares Department on
0870 458 9961.
This applies a thin protective film to the hob, making it easier to
clean, and prolonging its life.
5

For your safety
Always..
•
Always take care when touching any part of the cooker which may be hot. Use dry
oven gloves when removing or replacing food or dishes. Care should be taken to
avoid touching the heating elements inside the oven.
•
Always stand back when opening the oven door to allow any build-up of heat or
steam to disperse.
•
Always keep the oven and grill doors closed when not in use to prevent accidents,
but remember that the grill door must be kept open when grilling to prevent
overheating.
•
Always make sure that the roof, side and back panels, and shelves are fitted
correctly before using the oven or grill.
•
Always keep your cooker clean, as a build-up of grease or fat from cooking may be
a fire hazard.
•
Always switch off at the mains supply and allow the cooker to cool before cleaning
your cooker.
•
Always supervise children and pets, particularly when grilling, as exposed parts of
the cooker may become hot.
•
Always use suitable pans for the hob, and make sure that they are stable.
•
Always keep handles away from the edge of the hob and any heat. For added
safety you should consider using a suitable hob guard.
•
Always make sure that all the controls are switched off when you finish cooking.
•
Always remember that your cooker may stay hot for a time even after you have
finished cooking.
•
Always keep ventilation slots clear of obstructions.
•
Always keep children away from cooker when cleaning at maximum
oven setting.
7
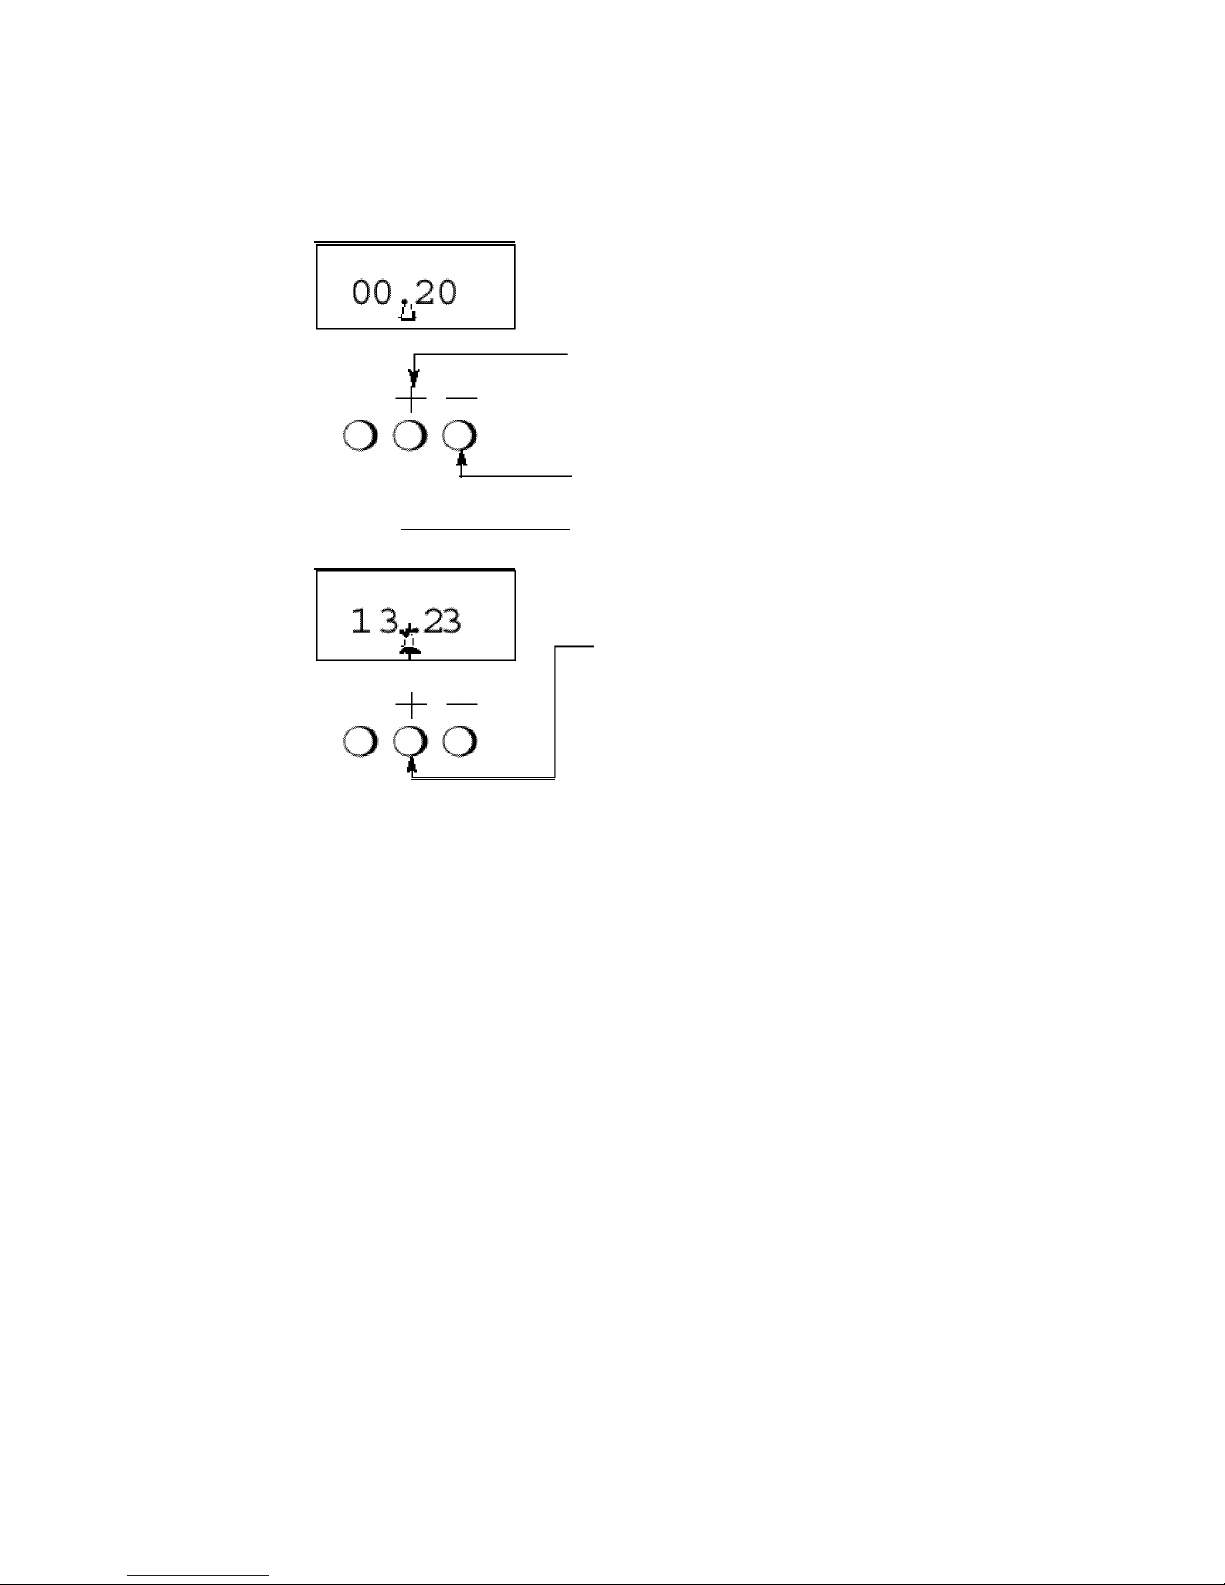
Minute minder operation/Automatic cut-off
To Set the Minute Minder
Step 'I
Press the "+" button once and release it.
Then press the "+" button again to set the
required time. During setting the time
adjusts in
10
second intervals up to a
maximum of 99 mins 50 secs. The "+"
and "-" signs are used for setting the
required time.
At the end of the set time, a bleeping sound
will be heard and the "bell" will disappear.
The bleeger can be cancelled by pressing
the "+" or "-" buttons.
NOTE:
If necessary the minute minder can be cancelled before the bleeper
sounds.
a)
Press
the "+" button
b)
with the "+" button still held in, press the "-" button untill
"0.00"
appears in the display window.
Sometimes
,
m-symbol appears or disappears during setting operation. A tapping
sound can also be heard. These are normal so must not be considered as a faulty.
If a temperature is selected for the main oven first the oven will switched
off after the set period.
10
 Loading...