

Page 1

08 25392 00 © 9.2003
Stoney Lane, Prescot, Merseyside, L35 2XW
Freestanding
Electric Double Oven & Grill
INSTALLATION AND USER INSTRUCTIONS
Model: E649
You must read these instructions prior to using the
appliance and retain them for future reference.
Page 2

User’s Section . . . . . . . . . . . . . . . . . . . . . . . . . . . . . . . . . . . . . 2 - 26
Introduction . . . . . . . . . . . . . . . . . . . . . . . . . . . . . . . . . . . . . . . . . . . . . . . . . 2
Be Safe - Not Sorry. . . . . . . . . . . . . . . . . . . . . . . . . . . . . . . . . . . . . . . . . . . . 4
Using the Hob . . . . . . . . . . . . . . . . . . . . . . . . . . . . . . . . . . . . . . . . . . . . . . . 5
Using the Grill . . . . . . . . . . . . . . . . . . . . . . . . . . . . . . . . . . . . . . . . . . . . . . . 7
Using the Top Oven . . . . . . . . . . . . . . . . . . . . . . . . . . . . . . . . . . . . . . . . . . . 9
Top oven baking guide . . . . . . . . . . . . . . . . . . . . . . . . . . . . . . . . . . . . . . . . 10
Conversion guide . . . . . . . . . . . . . . . . . . . . . . . . . . . . . . . . . . . . . . . . . . . . 11
Using the Main Oven . . . . . . . . . . . . . . . . . . . . . . . . . . . . . . . . . . . . . . . . . 12
Oven furniture . . . . . . . . . . . . . . . . . . . . . . . . . . . . . . . . . . . . . . . . . . . . . . 13
Slow cooking . . . . . . . . . . . . . . . . . . . . . . . . . . . . . . . . . . . . . . . . . . . . . . . 13
Cooking with a fanned oven . . . . . . . . . . . . . . . . . . . . . . . . . . . . . . . . . . . . 14
Defrosting & cooling . . . . . . . . . . . . . . . . . . . . . . . . . . . . . . . . . . . . . . . . . . 16
Baking guide . . . . . . . . . . . . . . . . . . . . . . . . . . . . . . . . . . . . . . . . . . . . . . . 16
Using the Ovens . . . . . . . . . . . . . . . . . . . . . . . . . . . . . . . . . . . . . . . . . . . . . 17
Traditional fruit cakes . . . . . . . . . . . . . . . . . . . . . . . . . . . . . . . . . . . . . . . . . 17
Roasting turkey. . . . . . . . . . . . . . . . . . . . . . . . . . . . . . . . . . . . . . . . . . . . . . 17
Roasting guide . . . . . . . . . . . . . . . . . . . . . . . . . . . . . . . . . . . . . . . . . . . . . . 18
Automatic cooking . . . . . . . . . . . . . . . . . . . . . . . . . . . . . . . . . . . . . . . . . . . 19
Programmer / Clock . . . . . . . . . . . . . . . . . . . . . . . . . . . . . . . . . . . . . . . . . . 21
Cleaning . . . . . . . . . . . . . . . . . . . . . . . . . . . . . . . . . . . . . . . . . . . . . . . . . . 25
Installation Instructions . . . . . . . . . . . . . . . . . . . . . . . . . . . . . 27 - 28
Connect to electricity supply. . . . . . . . . . . . . . . . . . . . . . . . . . . . . . . . . . . . . 29
Technical Data . . . . . . . . . . . . . . . . . . . . . . . . . . . . . . . . . . . . . . . 29
Belling Customer Care. . . . . . . . . . . . . . . . . . . . . . . . . . . . . . . . . . 30
1
Please keep this handbook for future reference, or for anyone else
who may use the appliance.
Contents
In case of difficulty within the UK and Northern Ireland, please call
Belling Customer Care Centre Helpline on
0151 432 7999
When you dial this number you will hear a recorded message and be given a
number of options. This indicates that your call has been accepted and is being
held in a queue. Calls are answered in strict rotation as our Customer Care
Representatives become available.
Opening Hours for Customer Care Centre
Monday to Friday 8am - 8pm
Saturday 8.30am - 6pm
Sunday 10am - 4pm
Enter appliance numbers here for future reference:
Please ensure you have the above details (Model No and Serial No) to
hand when calling Belling Customer Care. They are essential to
booking your call.
Outside the UK and Northern Ireland, refer to your local supplier.
Model No
Serial No
30
Belling Customer Care
Page 3

Data badge
On the bottom of the front frame
behind the oven door.
Electrical supply
220 - 240V ~ 50Hz
Warning: This appliance must be
earthed.
Electrical ratings @ 230V
Main fanned oven 2300W
Conventional top oven 1290W
Dual Grill 1655/2575W
Hotplate LHF ceramic 1100W
Hotplate LHR ceramic 1655W
Hotplate RHR ceramic 1100W
Hotplate RHF halogen 1655W
Oven lamp(s) 2 x 25W
Cooling fan 10W
Oven stir fan (main oven) 30W
Maximum load 10475W
Countries of Destination
GB - Great Britain, IE - Ireland
29
Technical Data
Thank you for choosing an
appliance from Stoves
We hope the following information
will help you to quickly familiarise
yourself with the features of the
appliance, and to use it successfully
and safely.
Our policy is one of constant
development and improvement. Strict
accuracy of illustrations and specifications
is not guaranteed. Modification to
design and materials may be necessary
subsequent to publication.
Please read the instructions in this
handbook before using or installing
this appliance.
Your new appliance is designed to be
installed flush to base units.
Your 1st Year Guarantee
To fulfil the conditions of your guarantee,
this appliance must be correctly
installed and operated, in accordance
with these instructions, and only be
used for normal domestic purposes.
Please note that the guarantee, and
Service availability, only apply to the
UK and Republic of Ireland.
Before using the appliance for
the first time, remove any protective
polythene film and wash the oven
shelves in hot soapy water, to remove
their protective coating of oil. Even so,
when you first turn on the oven or grill
you may notice a smell and some smoke.
Electrical connections
Please refer to installation instructions
for electrical connection.
In your own interest, and that of safety,
make sure that the installation is carried
out by a competent person.
Disconnection of electric appliances
should always be carried out by
competent persons.
Warning: This appliance must be
earthed.
Moving the cooker
Do not attempt to move the cooker by
pulling on the doors or handles. Open
the door and grasp the frame of the
cooker, taking care that the door does
not shut on your fingers.
Take care to avoid damage to soft or
uneven floor coverings when moving
the appliance. Some cushioned vinyl
floor coverings may not be designed
to withstand sliding appliances without
marking or damage.
2
Introduction
Page 4

Glass door panels
To meet the relevant Standards of
Domestic cooking appliances, all the
glass panels on this appliance are
toughened to meet the fragmentation
requirements of BS3193. This ensures
that, in the unlikely event that a panel
breaks, it does so into small fragments
to minimise the risk of injury.
Please take care when handling, using
or cleaning all glass panels as any
damage to the surfaces or edges may
result in the glass breaking without
warning or apparent cause at a later
date. Should any glass panel be
damaged, we strongly recommend
that it is replaced immediately.
Environmental Protection
We are committed to protecting the
environment and operate an
Environmental Management System
which complies with BS EN ISO
14001:1996.
Disposal of packaging
• All our packaging materials are
recyclable & environmentally friendly.
• Please help us to protect our
environment by disposing of all
packaging in an environmentally
friendly manner.
• Please contact your local authority
for the nearest recycling centre.
Caution: Packaging materials can
pose a risk of suffocation - keep away
from children.
To replace an oven light bulb
Caution: Switch off the electricity
supply to the cooker at the socket, to
avoid the risk of electric shock.
Wait until the oven is cool, then
remove the shelves.
The oven light is at the rear of the oven
cavity.
Main oven only - remove the loose
oven back - unscrew the 4 securing
screws (one at each corner).
Unscrew the lens cover (turn anticlockwise). Unscrew the bulb and replace.
Replace lens cover.
Main oven only - replace oven back.
Please note that the oven light bulb is not
covered by the guarantee. Replacement
bulbs can be ordered from your local
supplier, or bought from a hardware store.
3
Introduction
Connect to the electricity supply
Warning: This appliance must be
earthed.
The appliance must be installed by a
competent electrician using a double
pole control unit of 30 ampere
minimum capacity with 3mm minimum
contact separation at all poles.
We recommend that the appliance is
connected by a qualified electrician
who is a member of the N.I.C.E.I.C.
and who will comply with the I.E.E.
and local regulation.
1. Access to the mains terminal is
gained by opening the terminal
block cover at the rear of the
appliance (use a small flat-bladed
screwdriver).
2. Connection should be made with
6.0mm
2
twin and earth cable.
3. First strip the wires, then push the
cable through the cable clamp in
the terminal block cover.
4. Connect the cable to the terminal
block and tighten the cable clamp
screw (see diagram).
5. Close the terminal box, ensuring
that the cover is engaged on the
locking tabs.
28
Installation Instructions
1
2
3
4
5
Cable
clamp
Earth
(Green / Yellow
or sleeving)
Live
(Red or Brown)
Neutral
(Black or Blue)
Page 5

Whilst every care is taken to eliminate
burrs and raw edges from this product,
please take care when handling - we
recommend the use of protective
gloves during installation.
Moving the cooker
Please note that this appliance is very
heavy. Take care if the appliance
needs to be lifted during installation always use an appropriate method of
lifting.
Do not attempt to move the cooker by
pulling on the doors or handles. Open
the door and grasp the frame of the
cooker, taking care that the door does
not shut on your fingers.
Take care to avoid damage to soft or
uneven floor coverings when moving
the appliance. Some cushioned vinyl
floor coverings may not be designed
to withstand sliding appliances without
marking or damage.
This is a type X appliance regarding
installation requirements.
Important: Ensure that you route
all mains cables well clear of any
adjacent heat source.
Clearances
This cooker may be fitted flush to
base units. However, for models with
side opening doors, we recommend a
side clearance of 60mm between the
cooker and any side wall to allow the
door to be opened fully.
No shelf or overhang or cooker hood
shall be closer than a minimum of
650mm, but check with cooker hood
manufacturer’s recommendations.
The cooker must have a side
clearance above hob level of 90mm
up to a height of 400mm.
Dimensions
All sizes are nominal, and some
variation is to be expected. The
‘depth’ of the cooker, as given below,
is to the front of the door and
excluding knobs and handles.
Width: 600mm
Depth: 600mm
Height (adjustable): 900 - 915mm
27
Installation Instructions
When you are cooking, keep
children away from the vicinity
of the appliance.
This product is designed as a domestic
cooking appliance for the preparation
and cooking of domestic food
products, and should not be used for
any other purpose.
■ Remove all packaging, protective
films and oils from the appliance
before using for the first time.
■ Make sure you read and
understand the instructions before
using the appliance.
■ Keep electrical leads short so they
do not drape over the appliance
or the edge of the worktop.
■ Keep all flammable materials (such
as curtains, furnishings & clothing)
away from the appliance.
■ Parts of the appliance may be hot
during or immediately after use.
Care should be taken to avoid
touching heating elements inside
the oven. Allow sufficient time
for the appliance to cool after
switching off.
■ Never use the appliance for
heating a room.
■ Do not drape tea towels over the
flue vents or doors, as this creates
a fire hazard.
■ When opening the appliance
door, take care to avoid skin
contact with any steam which may
escape from the cooking.
■ Do not use aluminium foil to cover
the grill pan, or put items wrapped
in foil under the grill as this creates
a fire hazard. The high reflectivity
can also damage the element.
■ Do not use the oven with the door
inner glass panel removed.
■ Use oven gloves when removing
hot food / dishes from the oven or
grill. The oven / grill and utensils
will be very hot when in use.
■ Do not use foil on oven shelves, or
allow it to block the oven flue, as
this creates a fire hazard and
prevents heat circulation.
■ When cooking heavy items - eg;
turkeys - do not pull the oven shelf
out with the item still on the shelf.
■ Switch off the electricity supply
before replacing the oven light bulb,
to avoid the risk of electric shock.
Warning: This appliance must be
earthed.
When you have finished
cooking check that all controls
are in the off position.
4
Be Safe - Not Sorry
Page 6

Caution: Do not use the hob if the
glass is cracked, as electrical parts are
directly beneath. To avoid the possibility of electric shock, turn off the electricity supply to the hob at the socket
and arrange a Service call.
Before using the hob for the
first time
Before using the hob for the first
time, we recommend that you apply a
thin coating of cleaner conditioner eg; “Hob Brite” by Homecare*, and
polish the surface with a clean dry
cloth. Follow the instructions given in
the cleaning section.
* Homecare products are available
mail order - ✆ 0208 871 5027
To switch on the hob
Turn the hotplate selected control
clockwise to the required setting. To
switch off, return to the “off” position.
The hot hob light
The hot hob light comes on when one
of the hotplates is switched on, and
stays on for a short while after the last
hotplate is switched off to indicate that
the hob may still be warm.
Halogen ring
Warning: Do not stare at the halogen
hob element - doing so may temporarily
impair your vision.
Important:
■ Do not use the ceramic glass hob
as a work surface or chopping
board, as it will damage it, and if
any plastic utensils come into
contact with a warm hob, they
may melt onto it.
■ Do not
use the ceramic hotplate
surface for storage.
■ As pans are on a smooth surface,
they will move easily if knocked
accidentally; turning pan handles
so they are not overhanging the
edge of the hob, will help prevent
this happening, and keep them out
of the reach of children.
■
Be careful when cooking foods in
salted water, or foods containing
large amounts of sugar or syrup,
if they are spilt onto hot areas of
the hob they may damage it.
Use pans which are large enough
to avoid overflows onto the
ceramic glass hob.
■ Lift pans onto and off the hob, rather
than sliding them across the surface,
to avoid marks and scratches.
■ Aluminium foil must not
be placed
on the hob as it will reflect any
heat back into the element, which
can damage it.
■ Leaving a hotplate on for a length
of time, without it being covered
by a pan, can cause overheating
of surrounding areas which could
damage the glass.
5
Using the Hob
26
Glass parts
GLASS DOORS
Do not use abrasives or polishes as they
will scratch and damage the glass.
Use a mild cream cleaner - eg; “Cif”.
Rinse away excess cleaner and dry
with a soft cloth.
The oven door inner glass panel
(if fitted) can be removed for cleaning
by grasping the top and bottom edges
and sliding out. When refitting, take
care that the glass is held level and
straight with the grooves in the door,
before sliding back in.
Ceramic glass hotplate
Do not use abrasive powder cleaners,
“Brillo” pads, metal wire, detergents,
bleaches, bath stain removers, or chemical
oven cleaners; all these product types will
damage the ceramic glass.
The following recommendations will help
to keep the ceramic glass surface bright
and clean.
Allow the hob to cool.
Use a dampened paper towel or clean damp
cloth to apply a small dab of cleaner
conditioner to clean each heating area.
Use another paper towel or a clean dry
soft cloth to wipe dry, and then polish the
whole glass surface.
To remove any stubborn marks or heavy
soiling, a non scratching, mild cream
cleaner may be used - eg; “Cif”.
Alternatively, a ceramic hob scraper may
be used (available from Homecare*).
Important: If you use a wet paper towel
or clean damp cloth to remove spillage
from a warm heating area of the hob, be
careful to avoid steam burns.
Care and maintenance
Before using the hob for the first
time, apply a thin coating of cleaner
conditioner (eg; “Hob Brite”, by
Homecare*) to the ceramic glass, and
polish the surface with a clean cloth.
The conditioner gives a protective
covering to the ceramic glass which not
only makes the hob easier to clean, but
also ensures that you will gain maximum
life out of this product. Occasional use
will help prevent the build up of mineral
deposits which can cause discolouration
of the hob surface.
Discolouration of the hob
Do not use a dishcloth or dish sponge to
wipe the hob - this can leave a film of
detergent on the surface which will
discolour the hob next time a heating
area is used. Clean cloths kept for the
cleaning of the hob can be used.
Do not use too much cleaner conditioner
- only a thin coating is required, any
excess may burn on and discolour the
hob when it is next in use.
If persistent stains or marks remain on
the ceramic glass surface, it can be
cleaned using a mild cream cleaner - eg;
“Cif” - or a ceramic hob scraper. This
will also remove any accumulated salts
or minerals before they have an opportunity to discolour the ceramic glass.
Wipe clean with a damp paper towel or
clean damp cloth and re-apply cleaner
conditioner.
• Homecare products are available mail
order from ✆ 0208 871 5027.
Cleaning
Page 7

Caution: Any cleaning agent
used incorrectly may damage
the appliance.
Always let the appliance cool
before cleaning.
Some cooking operations generate a
considerable amount of grease. This,
combined with spillage, can become a
hazard if allowed to accumulate on
the cooker through lack of cleaning.
In extreme cases this may amount to
misuse of the appliance and could
invalidate your guarantee.
It is recommended that the appliance
is cleaned after open roasting.
Do not use caustic, corrosive or
abrasive cleaning products, products
containing bleach, coarse wire wool
or any hard implements, as they will
damage the surfaces.
All parts of the hob can be safely
cleaned with a cloth wrung out in hot
soapy water.
Chrome plated parts
SHELVES & SHELF RUNNERS, GRILL PAN TRIVET
Do not use abrasives or polishes, use
a moist soap pad - eg; “Brillo”.
Oven shelf runners can be removed for
cleaning. Grasp the runners, and slide
out of the hanging holes as shown.
Note: These items may also be
cleaned in a dishwasher.
Vitreous Enamel parts
GRILL PAN, TOP OVEN / GRILL COMPARTMENT,
MAIN OVEN COMPARTMENT BASE
& FAN BACK
Use a mild cream cleaner - eg; ”Cif”.
Stubborn marks may be removed with
a moistened “Brillo” pad.
The pan supports and grill pan may be
cleaned in a dishwasher, or with a
nylon brush in hot soapy water.
Easy care surfaces
(if fitted)
MAIN OVEN SIDES AND BACK
We recommend that the appliance is
cleaned after open roasting, and also
after roasting at temperatures higher than
200˚C, to help prevent a build up of
fats. Use of a trivet in a roasting tin when
roasting will help reduce fat splashing.
Caution: Most types of cleaning
agent will damage these surfaces.
Only use a few drops of washing up
liquid in hot water. Wipe the surfaces
with a clean cloth wrung out in hot soapy
water - if larger splashes of fat do not
readily disappear, scrub the area with
a nylon brush or nylon pan scourer
and hot soapy water. Rinse well and
heat the oven to dry the surfaces.
Painted, plastic & metal finish
parts (if fitted)
DOOR HANDLE, FACIA PANEL & CONTROL KNOBS
Only use a clean cloth wrung out in
hot soapy water.
25
Cleaning
Using the hotplate
When cooking with fat or oil, never
leave unattended.
Turn pan handles to a safe position,
so they are out of reach of children,
not overhanging the appliance, and
cannot be caught accidentally.
Choice of pans
Do not use double pans, rim based
pans, old misshapen pans or any pan
which is unstable when placed on a
flat surface.
Use pans with a flat base of minimum
100mm / 4ins diameter and maximum
280mm / 11ins diameter
which are
stable in use. The correct size of pan
base will ensure maximum contact
with the hob and rapid cooking times.
Pan bases that are much smaller or much
larger than the hotplate - eg; by 50mm
- will result in slower cooking times.
Commercial simmering aids should
not be used as they create excessive
temperatures that can damage the
surface and may cause a hazard.
When buying new pans, always refer
to the pan manufacturer’s guidelines.
Always use pans which are large
enough to prevent spillage, especially
for deep frying, making jam or cooking
with sugar or syrup based substances.
Trivets, round based woks, heat
diffuser pads and over-sized pans are
not recommended.
Cast iron, stainless steel, or enamelled
steel pans are all suitable for use on
ceramic glass and solid plate hobs.
Aluminium pans
will give good cooking
results but care must be taken in their use.
If they are slid across the surface of a
ceramic hob they tend to leave visible
marks which can be difficult to remove.
Certain types of copper based pans
may
become slightly concave when heated,
which can result in slower cooking times.
Glass pans
can be used, but if used on
halogen rings, the glow from the heating
areas transmitted through transparent
glass may cause some visual discomfort.
Pan bases should be thick, flat and
smooth, to ensure maximum heat
contact with the hob, maximum heat
conduction and rapid cooking times.
Pans with dull or dark coloured bases
will give the quickest cooking results.
Pans with thin, dented or ridge bases
can result in very slow cooking times
and should not be used.
Pans with highly polished bases reflect
heat back into the hob causing the
ceramic hob hotplate to cycle on and
off rapidly, which slows down cooking.
Certain makes / brands of pressure
cookers may not be suitable for use on
ceramic hobs - they do not come to
pressure. Stainless steel pressure
cookers will give optimum results.
When you have finished
cooking check that all controls
are in the off position.
6
Using the Hob
Page 8
Caution: Accessible parts may
be hot when grill is used, young
children should be kept away.
To switch on the grill
Open the top oven / grill door.
Turn the top oven control knob pas
t the
oven temperature markings to either
the single grill symbol, or the dual
grill symbol.
The grill regulator - to the left of the top
oven control - must then be switched
on. This enables variation of the heat
output from the grill on either the single
grill or dual grill settings.
The dual grill uses all of the top
element, and the single economy grill
setting uses the inner part of th e
element only.
Important: The door must be kept
open when the grill is used.
Note that the grill will not operate if
the top oven is switched on.
Preheating
Always preheat the grill for about
3 minutes
for best cooked results.
The cooling fan
When the grill is switched on, you will
hear the cooling fan come on - this
keeps the fascia and control knobs of
the appliance cool during grilling
only. The fan will continue to operate
for a period after the grill control has
been switched off.
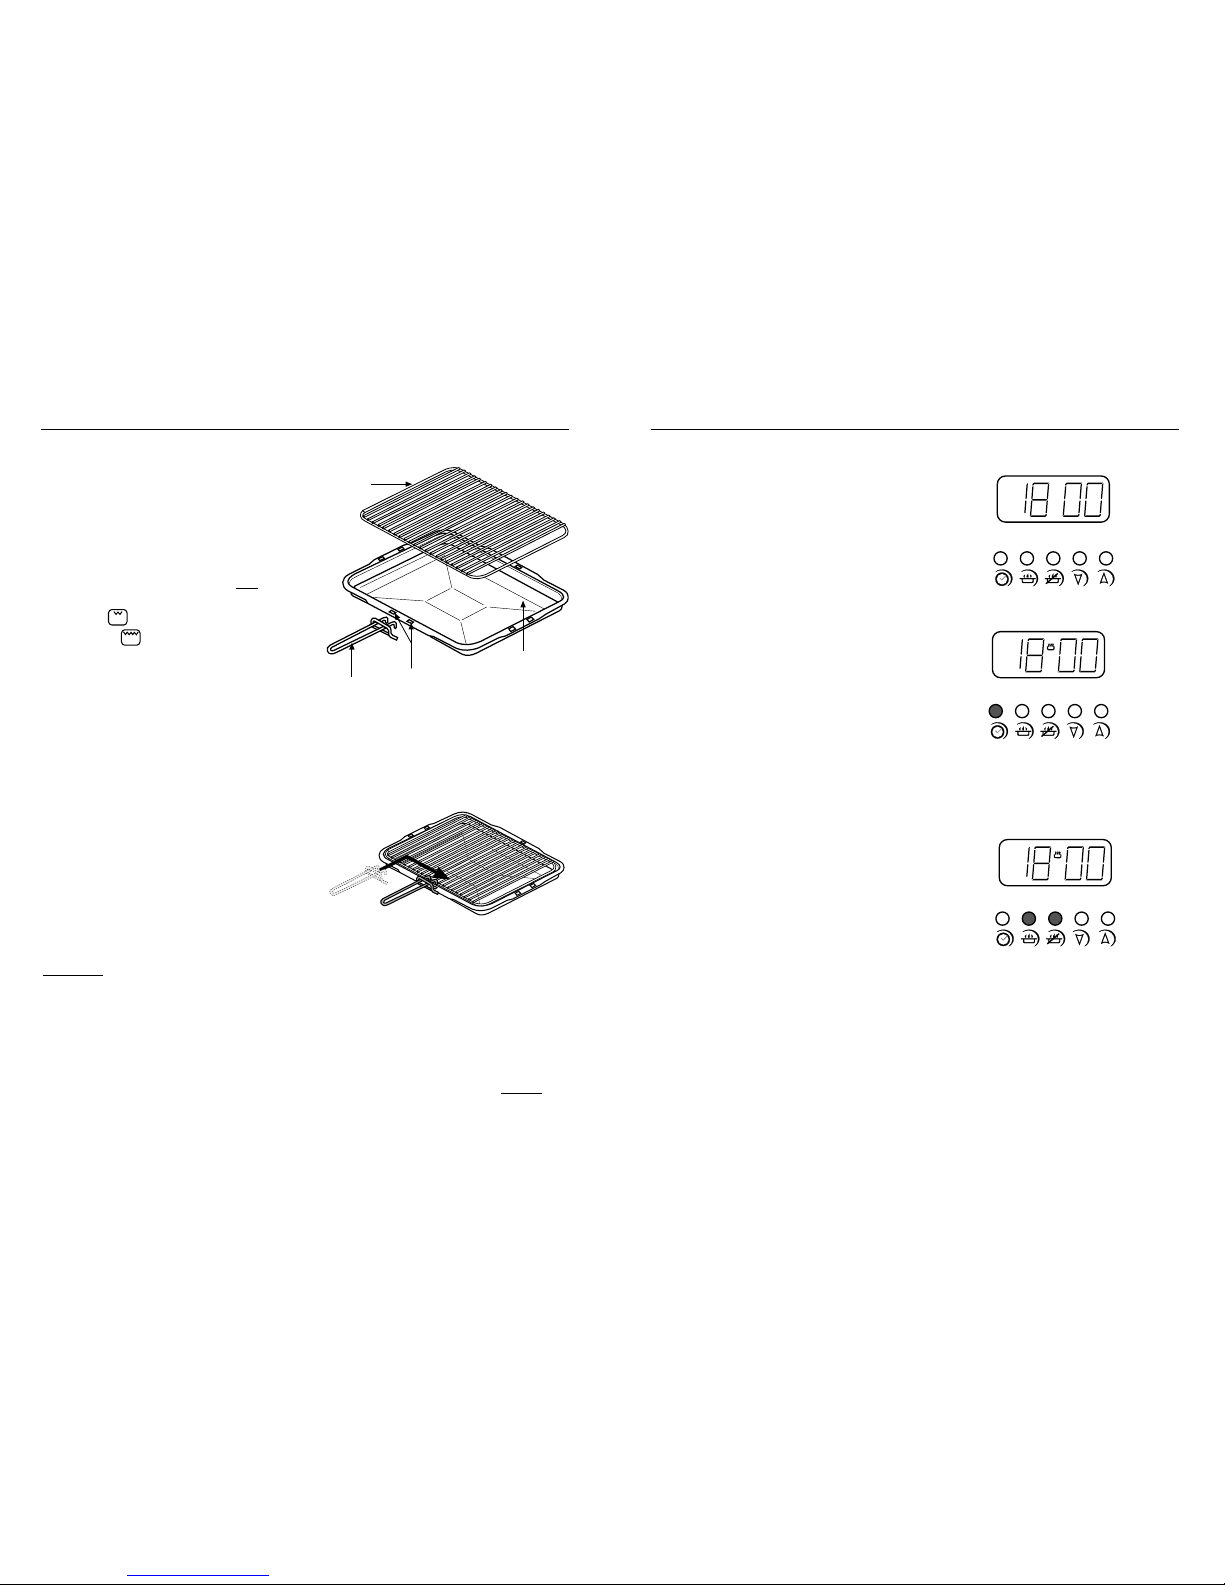
Detachable grill pan handle
Place the handle over the edge of the
grill pan, at the narrow side edges.
Slide the handle to the centre, and
locate between the handle position
indicators.
The handle should be removed from
the pan during grilling, to prevent
overheating.
The handle is designed for removing /
inserting the grill pan under the grill
when grilling.
If cleaning the grill pan when it is hot,
use oven gloves to move it. Do not
use
the handle to pour hot fats from the
grill pan.
Food for grilling should be positioned
centrally on the trivet.
7
Using the Grill
handle
grill pan
trivet
handle position
indicators
24
9. A (Auto) symbol will flash.
10.
11. A (Auto) symbol goes out.
The oven will automatically switch off
at 18.00 hours (6.00 pm) and the
alarm will sound (9).
To switch off the alarm press the
minute minder button (10).
When the oven has switched off,
return the oven control knob to the
“off” position, and press the cook time
and ready time buttons simultaneously
(11).
If you wish to cancel the automatic
setting before cooking has started,
and return to manual operation, press
the cook time and ready time buttons
simultaneously (11).
To cancel any remaining cooking time
left on the clock before the alarm
sounds, press the cook time and ready
time buttons simultaneously (11).
A
U
T
O
A
U
T
O
Programmer / Clock
Page 9
23
5. A (Auto) symbol appears.
6. The cookpot symbol will
disappear from display.
7. The cookpot symbol will appear
on display.
8.
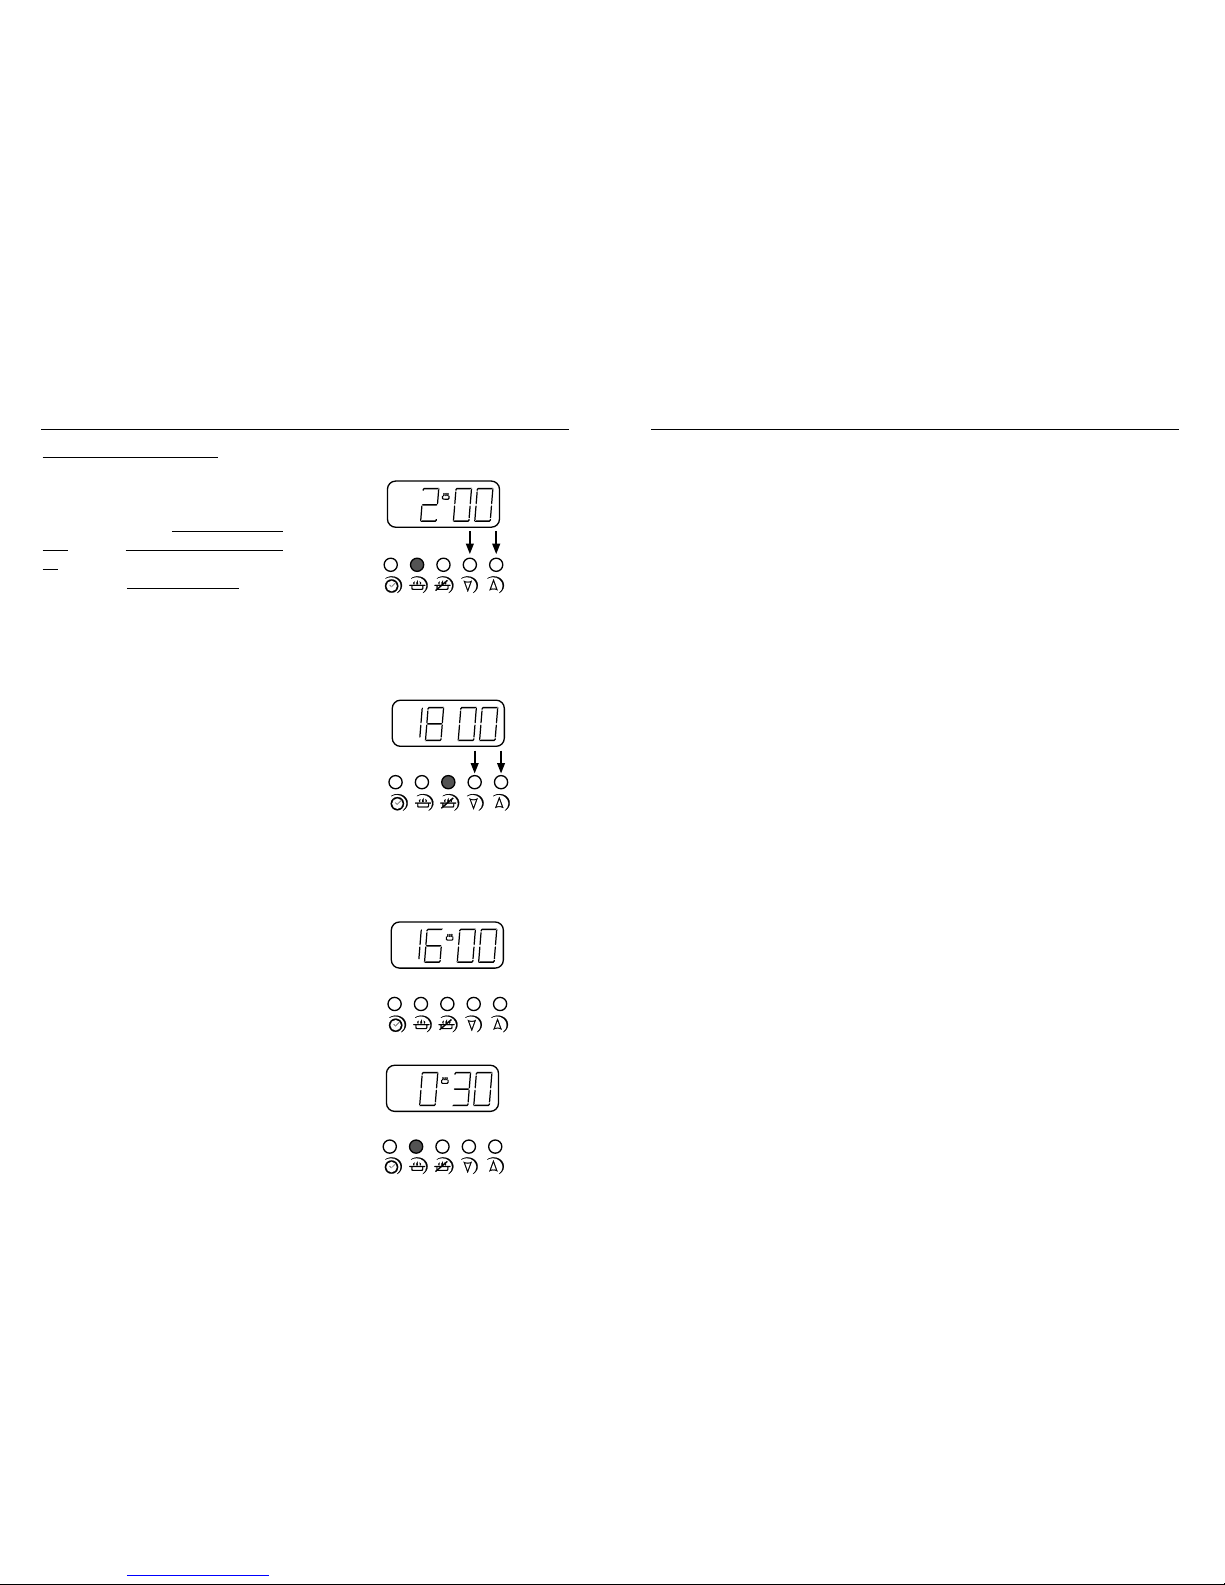
Fully automatic cooking
(example)
For use when a delayed start time is
required.
You want to set the length of cooking
time, and the time for the oven to switch
off. The programmer will automatically
calculate the cooking start time.
Press the cook time button, then use the
plus and minus buttons to set the
display to show the length of cooking
time required, eg; 2 hours as shown (5).
Press the ready time button, and the
present ready time will be displayed.
Using the plus and minus buttons you
can set the display to show the actual
time you want the oven to switch off,
eg; 18.00 hours (6.00 pm) (6).
The display will revert to show time of day.
After setting the programmer,
turn the oven control to the
required temperature.
The oven will automatically switch on
at the calculated start time of 16.00
hours (4.00 pm) (7).
A single press of the cook time button
shows the cooking time remaining
before the oven automatically switches
off (8).
A
U
T
O
A
U
T
O
A
U
T
O
A
U
T
O
Programmer / Clock
Grilling
For grilling smaller quantities of food,
the (single element) economy grill can
be utilised. This grill function can be
controlled between settings 1 and 8.
For grilling larger quantities of food,
the (dual element) full grill can also be
controlled between settings 1 and 8.
When using the grill in the top oven,
the speed of the grilling can be controlled by use of either the variable
control or by selecting higher or lower
shelf positions.
For toasting, and for grilling foods
such as bacon, sausages or steak, use
a higher shelf position.
For thicker foods such as chops or
chicken joint pieces, use a middle or
lower shelf position.
Aluminium foil
Using aluminium foil to cover the grill
pan, or putting items wrapped in foil
under the grill creates a fire hazard,
and the high reflectivity may damage
the grill element.
8
Using the Grill
Page 10
The top oven is a conventional electric
oven.
Accessible parts may be hot
when the oven is used. Young
children should be kept away.
To turn on the top oven
Turn the top oven / grill control knob
to the required temperature setting.
The red thermostat indicator will
come on until the selected temperature
is reached and then go off; it will
turn on and off periodically as the
thermostat operates to maintain the
selected temperature.
To switch off, return the control
knob to the “off” position.
The cooling fan
When the top oven is switched on, you
will hear the cooling fan come on - this
keeps the fascia and control knobs of
the appliance cool during cooking
only. The fan will continue to operate
for a period after the oven control has
been switched off.
When using the top oven
As part of the cooking process, hot air
is expelled through a vent at the top of
the oven(s). When opening the oven
door, care should be taken to avoid
any possible contact with potentially hot
air, since this may cause discomfort to
people with sensitive skin. We recommend
that you hold the underneath of the
oven door handle.
Important: Never put items directly
on the base of the oven with foil, as this
may cause the element to overheat.
Always position items on the shelf.
Caution: The top element gets
extremely hot when in use, so take
extra care to avoid touching it.
Preheating the top oven
The oven must be preheated when
cooking frozen or chilled foods, and
we recommend preheating for yeast
mixtures, batters, soufflés and whisked
sponges. Preheat the oven until the
indicator light switches off for the first
time - this will take up to 20 minutes
depending on the temperature selected.
If you are not preheating the oven,
the cooking times in the baking guide
may need to be extended, as they are
based on a preheated oven.
Shelf positions
As a general guide, when cooking
frozen or chilled food, use the highest
possible shelf position, while allowing
some clearance between the food and
the top element. Follow the instructions
given on packaging.
Cooking times
These times are based on cooking in a
preheated oven.
These cooking times are approximate,
because the size and type of cooking
dish will influence time as personal
preferences.
9
Using the Top Oven
22
1. A (Auto) symbol appears.
2.
3. A (Auto) symbol will flash.
4. A (Auto) symbol goes out.
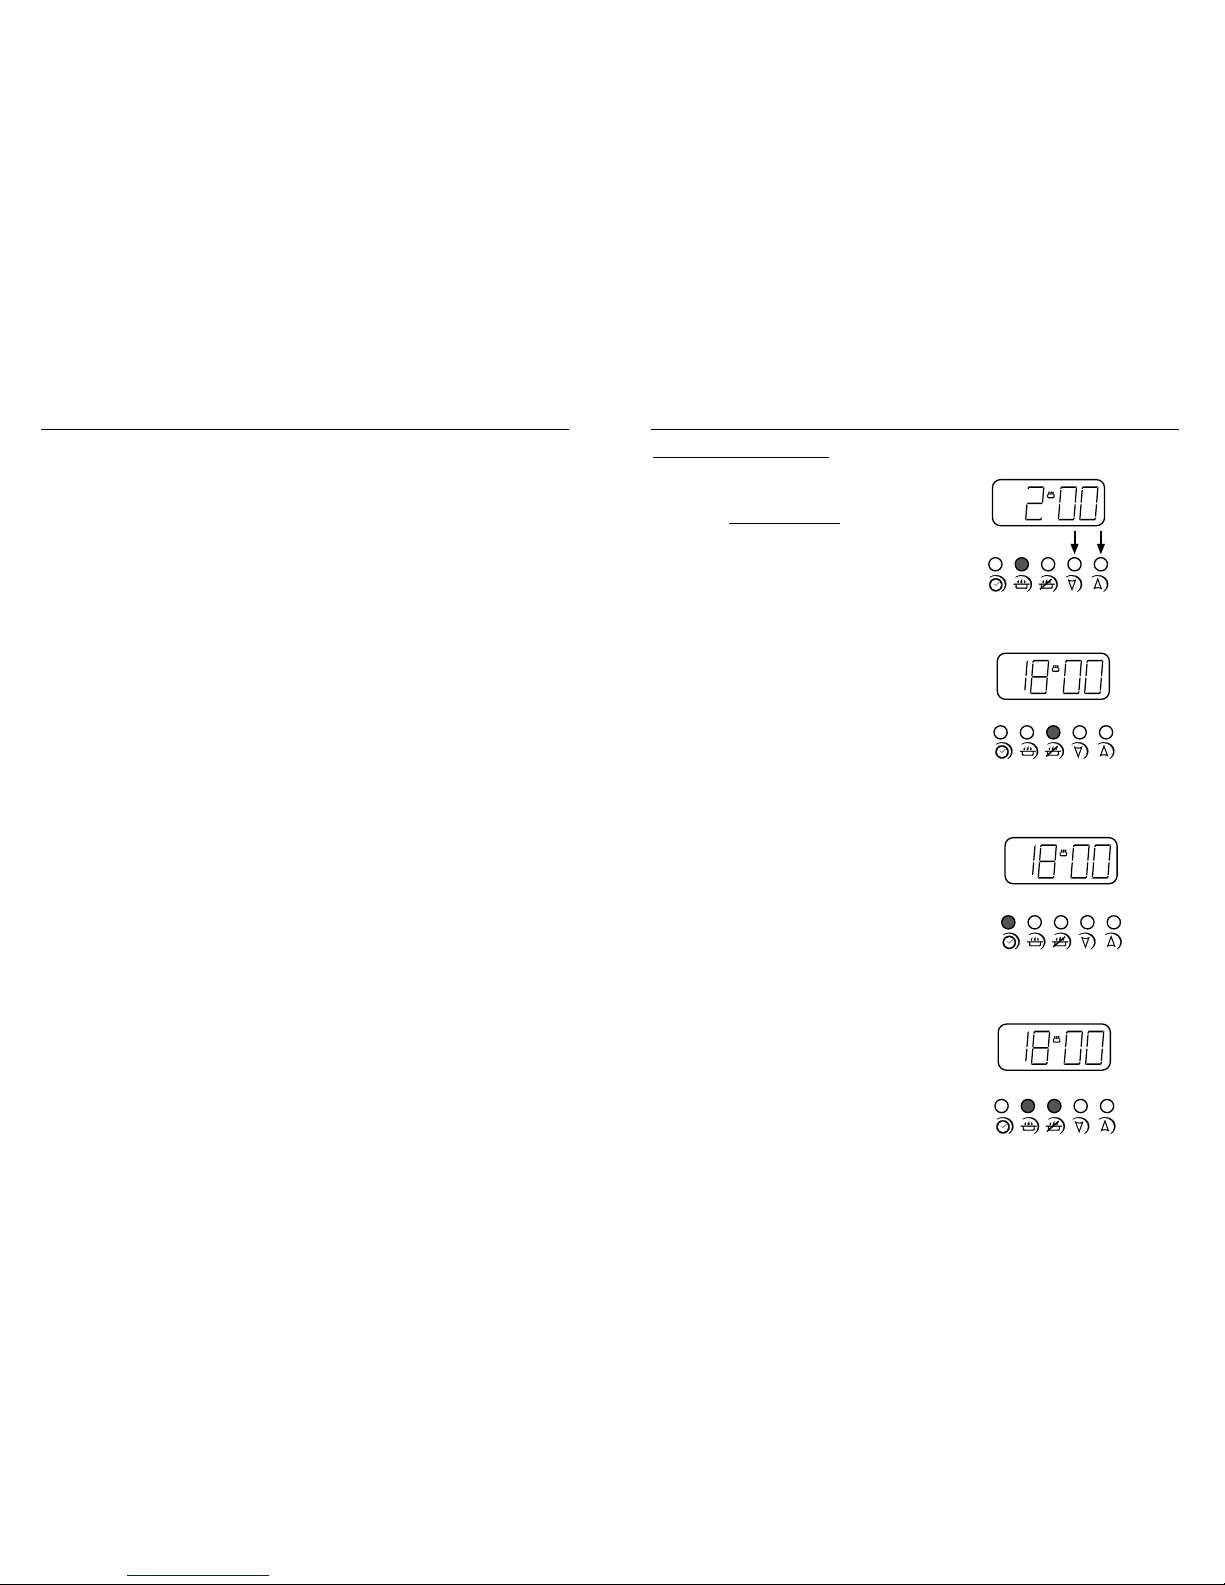
Semi-automatic cooking
(example)
You have started cooking a meal or
dish in the oven, and want to set the
time for the oven to switch off
.
Press the cook time button, then use the
plus and minus buttons to set the
display to show the length of cooking
time required, eg; 2 hours as shown (1).
After setting, the display will revert to
show the time of day, but you can
press the cook time button and the
display will show how much cooking
time still remains on the clock.
Press the ready time button, and the
display will show the actual time the
oven is going to switch off, eg; 3.30
as shown (2).
At the end of the cooking time, the
alarm will sound, and the oven will
automatically switch off.
To switch off the alarm, press the
minute minder button (3).
When the oven has switched off,
return the oven control knob to
the “off” position, and press the
cook time and ready time buttons to
return to manual operation (4).
If you wish to cancel the automatic
setting, or to cancel any remaining
cooking time left on the clock before
the alarm sounds, press the cook time
and ready time buttons simultaneously.
(4).
A
U
T
O
A
U
T
O
A
U
T
O
Programmer / Clock
Page 11
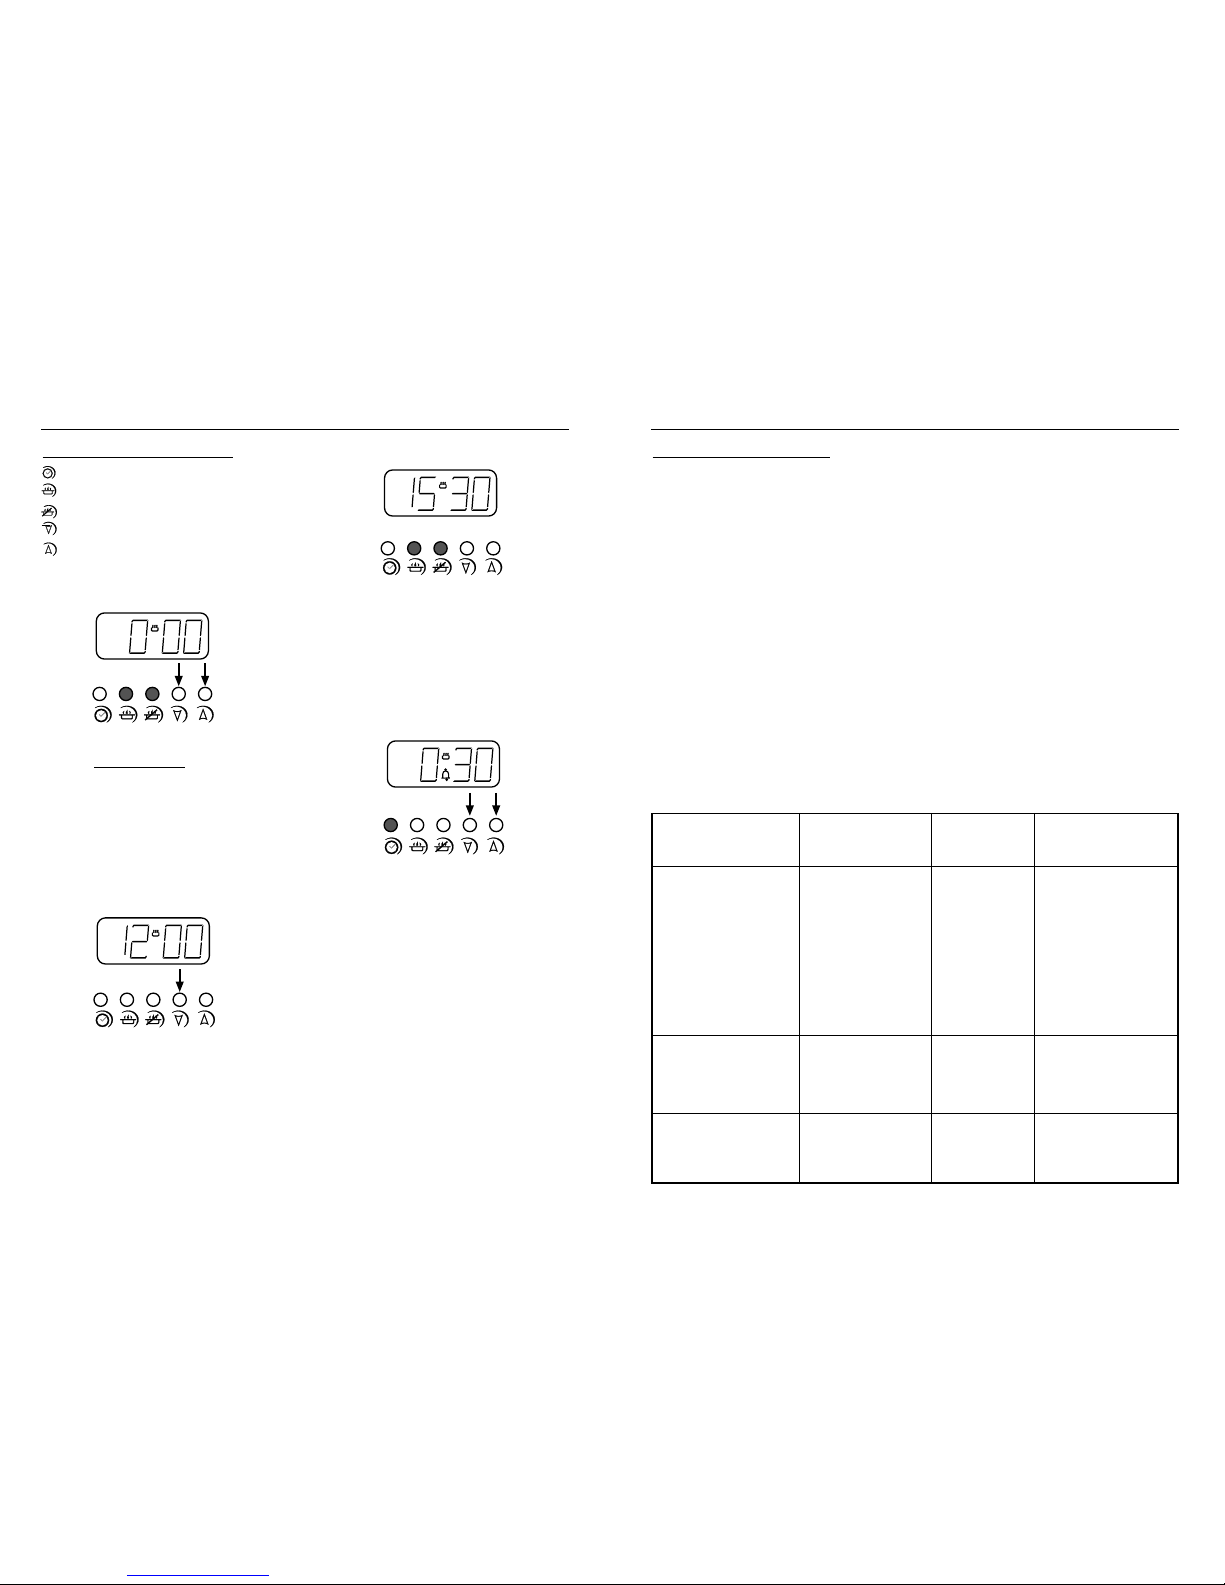
The Programmer Buttons
minute minder
cook time
ready time
minus
plus
To set the “Time of Day”
Press the cook time and ready time
buttons simultaneously
, and keep the
buttons depressed. Use the plus and
minus buttons to set the time of day,
eg; 12.00.
A (Auto) symbol goes out, cookpot
symbol comes on.
To select an alarm tone
Press the minus button to listen to the
first tone.
Release the minus button and press it
again to listen to the second tone, etc.
Releasing the minus button after the
tone has sounded will automatically
select that tone.
Manual operation
To set the programmer to manual
operation at any time (cancelling any
automatic setting), press the cook time and
ready time buttons simultaneously. The
programmer must be set to manual before
the appliance can be used manually.
Setting the minute minder
Press the minute minder button, then
use the plus and minus buttons to set
the required time.
The minute minder (bell) symbol will
appear on the display.
You can cancel the minute minder at
any time by pressing the minute
minder button and the minus button
until the display returns to 0.00.
After setting, the display will revert to
show the time of day, but you can press
the minute minder button, and the
display will show the minutes remaining.
The tone will sound at the end of the
time set - to cancel the tone, press the
minute minder button.
21
Programmer / Clock
Item Temperature Shelf Approximate
˚C position cooking time
Small cakes 180 middle 15 - 20 mins
Victoria sandwich 160 middle 20 - 25 mins
(2 x 180mm / 7”)
Swiss roll 200 middle 8 - 12 mins
Semi rich fruit cake 140 bottom 2
1
⁄
4 - 2
3
⁄
4 hours
(180mm x 7”)
Scones 215 top 10 - 15 mins
Meringues 90 - 100 bottom 2 - 3 hours
Shortcrust pastry 200 - 210 middle Depends on size &
Puff / flaky pastry 200 - 210 middle type of cooking dish
Choux pastry 200 - 210 middle & also the filling
Biscuits 160 - 200 top 10 - 20 mins
Sponge pudding 150 middle 30 - 45 mins
Milk pudding 140 bottom 2 - 2
1
⁄
2 hours
10
Top oven baking guide
Cooking temperatures
Because the top oven is more
compact, it may be necessary to
reduce cooking temperatures
specified in recipes by up to
20˚C.
The temperature settings and time
given in the Baking Guides are based
on dishes made with block margarine.
If soft tub margarine is used, it may be
necessary to reduce the temperature
setting. If a recipe gives a different
temperature setting to that shown in
the guide, the recipe instruction should
be followed.
Use the baking guide below and the
roasting guide on page 18 as a
reference for determining which
temperatures to use.
Using the Top Oven
Baking guide
Page 12

Accessible parts may be hot
when the oven is used. Young
children should be kept away.
When using the oven
As part of the cooking process, hot air
is expelled through a vent at the rear
of the oven. When opening the oven
door, care should be taken to avoid
any possible contact with potentially hot
air, since this may cause discomfort to
people with sensitive skin. We recommend
that you hold the underneath of the
oven door handle.
Oven furniture
Oven shelves
The oven shelf must be positioned with
the upstand at the rear of the oven and
facing upwards.
Position baking trays and roasting tins
on the middle of the shelves, and leave
one clear shelf position between
shelves, to allow for circulation of heat.
Baking tray and roasting tins
For best cooked results and even
browning, the maximum size baking
trays and roasting tins that should be
used are as follows;
Baking tray 350mm x 280mm
This size of baking tray will hold up to
16 small cakes.
Roasting tin 370mm x 320mm
We recommend that you use good --
quality cookware. Poor quality trays
and tins may warp when heated,
leading to uneven baking results.
Aluminium foil
Use foil only to cover food or cooking
dishes, using foil to cover the shelves
or oven base creates a fire hazard.
To switch on the oven
Turn the oven control knob clockwise
to the required setting.
The red thermostat indicator will co me
on until the selected temperature is
reached and then go off; it will turn on
and off periodically as the thermostat
operates to maintain the selected
temperature.
To switch off, return the control
knob to the “off” position.
Preheating
When cooking sensitive items such as
scouffle’s and Yorkshire puddings or,
when cooking bread, we recommend
that the oven is pre-heated until the
neon switches off for the first time. For
any other types of cooking, a pre-heat
is not required.
12
Using the Main Oven
20
Important:
Food is more susceptible to the growth
of food poisoning organisms in warm
conditions. If the weather is hot, either
take care to ensure that food is not left
standing in a warm oven, or avoid
using the automatic cooking facility.
Hints for automatic cooking
• Food is placed in a cold oven so
you will need to add about 10 - 15
minutes onto the cooking time to
allow for the oven to reach the
selected temperature.
• Wine or beer may ferment, and
cream may curdle during the delay
period, so it is best to add these
ingredients just before serving.
• Potatoes should be parboiled or
brushed with oil to prevent
discolouration during the delay
period.
• Meat can be brushed with oil to
prevent it drying.
• Lemon juice can be added to
certain fruits and vegetables such
as apples, pears, turnips and
parsnips to prevent discolouration
during the delay period.
Using the Ovens
Page 13

Automatic cooking
The automatic cooking facility is
controlled by the programmer (see
‘Programmer / Clock’ section) and
allows complete meals or individual
dishes to be cooked while you are out
of the house, to be ready for when you
return. The ‘
READY TIME’ should be set
as close as possible to, or just after,
your anticipated return, so food is not
left standing in a warm oven.
Do
• Select foods which are as fresh as
possible, and as cold as possible ie; preferably straight from the
refrigerator.
• Choose foods which are suitable
for cooking from a cold start, as
some dishes will be affected by
being left uncooked, at room
temperature, perhaps for several
hours - eg; a wet filling on a
pastry base.
• Make sure that meat and poultry
are thoroughly thawed (but still cold
from the refrigerator) before placing
them in the oven, and avoid using
rolled joints of meat, which can be
more susceptible to the growth of
food poisoning organisms.
• Cover dishes with lids or foil to keep
the food moist, and protect from
possible contamination; the food
can be uncovered towards the end
of cooking to crisp and brown.
Do not
• Warm food should never
be
placed in the oven if there is a
delay period.
• Stews prepared by frying the
meat and vegetables first should
be cooked as soon as possible,
or refrigerated prior to placing in
the oven.
• Some dishes are not suitable for
cooking on automatic - eg; dishes
containing left over meat or
poultry, dishes containing eggs,
cooked rice, or seafood.
• Do not
put food items (intended for
automatic cooking) into a warm
oven; allow the oven to cool before
setting for automatic cooking.
• Do not
over fill dishes containing
liquids, as they might boil over.
• Never
leave food in the oven to
cool slowly after cooking; serve
immediately or refrigerate.
• Never
use the automatic facility to
reheat ‘cook chill’ foods, as they
should go straight from the
refrigerator into a preheated oven.
19
Using the Ovens
Slow cooking
■ Make sure that frozen foods are
thoroughly
THAWED before cooking.
■ Do not
slow cook joints of meat or
poultry weighing more than 2
1
⁄4kg
/ 4
1
⁄2lb.
■ For roasting joints of meat or poultry,
and for pot roasts preheat the
oven to 160˚C and cook for 30
minutes, then adjust the oven
control to the 110˚C - 120˚C (slow
setting) for the remainder of the
cooking time.
■ Slow cooking times will be about
3 times as long as conventional
cooking times.
■ Do not open the oven door unnecessarily during slow cooking, as
this will result in heat loss at low
temperatures.
■ Always use dishes with tightly
fitting lids. To rectify badly fitting
lids, place foil over the dish
underneath the lid.
13
Using the Main Oven
Page 14
MAIN OVEN CONVERSION GUIDE
Note: this is a high efficiency oven, therefore some adjustment will have to be
made to conventional cooking temperatures. The table below shows conventional cooking temperatures, ‘A’ efficiency temperatures and gas marks. For optimum
results, conventional temperatures need to be converted to ‘A’ efficiency temperatures.
For example, an item which would normally cook at a conventional temperature
of 180 ˚C, will now cook at the ‘A’ efficiency temperature of 160˚C.
11
Conventional temperature ‘A’ Efficiency Oven Gas Mark
(˚C) (˚C)
100 100 1/4
110 110 1/4
130 120 1/2
140 130 1
150 140 2
160 150 3
180-190 160 4-5
200 170 6
220 180 7
230 190 8
250 200 9
Using the Ovens
Roasting guide
The times given in the roasting guide
are only approximate, because the
size and age of the bird will influence
cooking times as will the shape of a
joint and the proportion of the bone.
Frozen meat should be thoroughly
thawed before cooking. For large
joints it is advisable to thaw overnight.
Frozen poultry should be thoroughly
thawed before cooking. The time
required depends on the size of the
bird - eg; a large turkey may take up
to 48 hours to thaw.
Use of a trivet with a roasting tin will
reduce fat splashing and will help to keep
the oven interior clean. Alternatively,
to help reduce fat splashing, potatoes
or other vegetables can be roasted
around the meat / poultry.
Notes:
■ When cooking stuffed meat or
poultry calculate the cooking time
from the total weight of the meat
plus the stuffing.
■ For joints cooked in foil or covered
roasters, and for lidded casseroles,
add 5 minutes per 450g (1lb) to
the calculated cooking time.
■ Smaller joints weighing less than
1.25kg (2
1
⁄2
lb) may require 5
minutes per 450g (1lb) extra
cooking time.
■ Position the oven shelf so that the
meat or poultry will be in the
centre of the oven.
■ It is recommended that the appliance
is cleaned after open roasting.
Allow the appliance to cool before
attempting to clean it.
18
Cook in oven at: Approximate Cooking Time
160˚C - Main Oven (Fanned) (preheated oven)
180˚C - Top Oven (Conventional)
Beef Rare 20 minutes per 450g (1lb), plus 20 minutes
Medium 25 minutes per 450g (1lb), plus 20 minutes
Well done 30 minutes per 450g (1lb), plus 30 minutes
Lamb Medium 25 minutes per 450g (1lb), plus 25 minutes
Well done 30 minutes per 450g (1lb), plus 30 minutes
Pork 35 minutes per 450g (1lb), plus 35 minutes
Poultry 20 minutes per 450g (1lb), plus 20 minutes
Page 15

Defrosting and cooling in the
main oven
To defrost frozen foods, turn the
main oven control to the defrost
position, place the food in the centre
of the oven and close
the door.
To cool foods after cooking prior to
refrigerating or freezing, turn the
main oven control to the defrost
position and open
the door.
Defrosting times
Small or thin pieces of frozen fish or
meat - eg; fish filets, prawns & mince
will take approximately 1 - 2 hours.
Placing the food in a single layer will
reduce the thawing time.
A medium sized casserole or stew will
take approximately 3 - 4 hours.
A 1
1
⁄
2kg / 3lb oven ready chicken will
take approximately 5 hours, remove
the giblets as soon as possible.
Be safe
Do not
defrost stuffed poultry using this
method.
Do not
defrost larger joints of meat
and poultry over 2kg / 4lb using this
method.
Never
place uncooked food for
defrosting next to cooked food which
is to be cooled, as this can lead to
cross contamination.
Defrosting meat, poultry, and fish can
be accelerated using this method
but make sure they are completely
thawed before cooking thoroughly.
Place meat and poultry on a trivet in a
meat tin.
Cooking with a fanned oven
As this is a high efficiency oven,
you may notice the emission of
steam from the oven when the
door is opened. Please take
care when opening the door.
If you are used to cooking with a
conventional oven you will find a
number of differences to cooking with
a fan oven which will require a
different approach:
There are no zones of heat in a fan oven
as the convection fan at the back of
the oven ensures an even temperature
throughout the oven. This makes it
ideal for batch baking - eg; when
planning a party or stocking the
freezer - as all the items will be cooked
within the same length of time.
Foods are cooked at a lower temperature
than a conventional oven, so conventional recipe temperature may have to be
reduced. Please refer to the conversion
chart.
Preheating is generally not necessary
as a fan oven warms up quickly.
There is no flavour transference in a
fan oven, which means you can cook
strong smelling foods such as fish at
the same time as mild foods - eg; milk
puddings.
When batch baking foods that will rise
during cooking - eg; bread - always
ensure that enough space has been
left between the shelves to allow for
the rise.
Notes:
When 2 or more shelves are being
used, it may be necessary to increase
the cooking time slightly.
Because the 2 oven shelves are wider
than in many ovens, it is possible to
cook 2 items per shelf - eg; 2 victoria
sandwiches or 2 casseroles.
Although you need to keep in mind the
points ‘To help the air circulate freely’
with careful choice of dishes and tins,
it is possible to cook a complete meal,
and perhaps something else for the
freezer, in the oven at the same time.
When roasting meats, you will notice that
fat splashing is reduced, which is due
in part to the lower oven temperatures,
and will help keep cleaning of the
oven to a minimum.
Because a fan oven has an even
temperature throughout the oven, there
is no need to follow the shelf positions
given in the baking guide. There is no
need to interchange dishes onto
different shelves part way through
cooking, as with a conventional oven.
To help the air circulate freely
Position the shelves evenly within the
oven and maintain a clearance from
the oven roof and base.
If more than one cooking dish or
baking tray is to be used on a shelf,
leave a gap of at least 25mm
between the items themselves and the
oven interior.
14
Using the Main Oven
Page 16

16
USING THE OVENS
Baking guide
Dish Recommended Approximate
temperature ˚C cooking time
(preheated oven)
Scones 180 8 - 15
Meringues 110 2 - 3hrs
Cakes
Small cakes 160 15 - 25mins
Whisked sponge 160 15 - 20 mins
Swiss roll 170 10 - 12 mins
Victoria sandwich 140 20 - 30 mins
(2 x 180mm / 7”)
Genoese sponge 160 20 - 25 mins
Madeira (180mm / 7”)
160 1hr - 11⁄4 hrs
Semi rich fruit cake 130 21⁄2 - 3hrs
(205mm /8”)
Christmas cake depending on depending on
(205mm / 8”) recipe recipe
Dundee cake 130 2
1
⁄2 - 3hrs
(205mm / 8”)
Pastry
Flaky / Puff 180 depending on
Shortcrust 170 recipe and type
Choux 170 of filling
Plate tarts 170
(2 x 180mm / 7”)
Biscuits
Shortbread rounds 160 20 - 25 mins
Nut brownies 170 20 - 25 mins
Brandy snaps 160 10 - 12 mins
Flapjacks 160 20 - 25 min
Ginger nuts 160 10 - 20 mins
The temperature settings and times given in the baking guide are based on dishes made
with block margarine. If soft tub margarine is used it may be necessary to reduce
the temperature setting.
Traditional fruit cakes
It should be remembered that ovens
can vary over time, therefore cooking
times can vary, making it difficult to be
precise when baking fruit cakes.
It is necessary therefore, to test the
cake before removal from the oven.
Use a fine warmed skewer inserted
into the centre of the cake. If the
skewer comes out clean, then the cake
is cooked.
■ Follow the temperatures suggested
in the recipe and then adjust
accordingly to the conversion table
on page 12.
■ Do not attempt to make Christmas
cakes larger than the oven can cope
with, you should allow at least
25mm (1 inch) space between the
oven walls and the tin.
■ Always follow the temperatures
recommended in the recipe
.
■ To protect a very rich fruit cake
during cooking, tie 2 layers of
brown paper around the tin.
■ We recommend that the cake tin is
not stood on layers of brown
paper, as this can hinder effective
circulation of air.
■ Do not use soft tub margarine for
rich fruit cakes, unless specified in
the recipe.
■ Always use the correct size and
shape of tin for the recipe quantities.
Roast turkey
Roasting turkey involves cooking two
different types of meat - the delicate
light breast meat, which must not be
allowed to dry out, and the darker leg
meat, which takes longer to cook.
The turkey must be roasted long
enough for the legs to cook, so
frequent basting is necessary. The
breast meat can be covered once
browned.
■ Always make sure that the turkey
is completely thawed and that the
giblets are removed before cooking.
■ Turkey should be roasted at
150˚C - 160˚C for 20 minutes
per lb, plus 20 minutes, unless
packaging advises otherwise.
■ The turkey can be open roasted,
breast side down, for half of the
cook time, and then turned over for
the remainder of the cooking time.
■ If the turkey is stuffed, add
5
minutes per 1lb to the cooking time.
■ If roasting turkey covered with
foil, add
5 minutes per 1lb to the
cooking time.
To test if the turkey is cooked, push a
fine skewer into the thickest part of the
thigh. If the juices run clear, the turkey
is cooked. If the juices are still pink,
the turkey will need longer cooking.
17
Using the Ovens
 Loading...