

Belling E641, E622 Installation And User Instructions Manual
Electric Freestanding Cooker
with Electric Double Ovens and Electric Grill
INSTALLATION AND USER INSTRUCTIONS
Model: E641
E622
You must read these instructions prior to using the
appliance and retain them for future reference.

Contents
User’s Section . . . . . . . . . . . . . . . . . . . . . . . . . . . . . . . . . . . . . 2 - 20
Introduction . . . . . . . . . . . . . . . . . . . . . . . . . . . . . . . . . . . . . . . . . . . . . . . . . 2
Be Safe - Not Sorry. . . . . . . . . . . . . . . . . . . . . . . . . . . . . . . . . . . . . . . . . . . . 4
Using the minute minder . . . . . . . . . . . . . . . . . . . . . . . . . . . . . . . . . . . . . . . . 5
Using the Hob . . . . . . . . . . . . . . . . . . . . . . . . . . . . . . . . . . . . . . . . . . . . . . . 6
Using the Grill . . . . . . . . . . . . . . . . . . . . . . . . . . . . . . . . . . . . . . . . . . . . . . . 8
Using the Top Oven . . . . . . . . . . . . . . . . . . . . . . . . . . . . . . . . . . . . . . . . . . 10
Top oven baking guide . . . . . . . . . . . . . . . . . . . . . . . . . . . . . . . . . . . . . . . . 11
Using the Main Oven . . . . . . . . . . . . . . . . . . . . . . . . . . . . . . . . . . . . . . . . . 12
Slow cooking . . . . . . . . . . . . . . . . . . . . . . . . . . . . . . . . . . . . . . . . . . . . . . . 13
Cooking with a fanned oven . . . . . . . . . . . . . . . . . . . . . . . . . . . . . . . . . . . . 14
Defrosting & cooling . . . . . . . . . . . . . . . . . . . . . . . . . . . . . . . . . . . . . . . . . . 15
Conversion guide . . . . . . . . . . . . . . . . . . . . . . . . . . . . . . . . . . . . . . . . . . . . 16
Baking guide . . . . . . . . . . . . . . . . . . . . . . . . . . . . . . . . . . . . . . . . . . . . . . . 17
Using the Ovens . . . . . . . . . . . . . . . . . . . . . . . . . . . . . . . . . . . . . . . . . . . . . 18
Traditional fruit cakes . . . . . . . . . . . . . . . . . . . . . . . . . . . . . . . . . . . . . . . . . 18
Roasting turkey. . . . . . . . . . . . . . . . . . . . . . . . . . . . . . . . . . . . . . . . . . . . . . 18
Roasting guide . . . . . . . . . . . . . . . . . . . . . . . . . . . . . . . . . . . . . . . . . . . . . . 19
Cleaning . . . . . . . . . . . . . . . . . . . . . . . . . . . . . . . . . . . . . . . . . . . . . . . . . . 30
Installation Instructions . . . . . . . . . . . . . . . . . . . . . . . . . . . . . 23 - 24
Connect to electricity supply. . . . . . . . . . . . . . . . . . . . . . . . . . . . . . . . . . . . . 23
Technical Data . . . . . . . . . . . . . . . . . . . . . . . . . . . . . . . . . . . . . . . 25
Belling Customer Care . . . . . . . . . . . . . . . . . . . . . . . . . . . . back over
Please keep this handbook for future reference, or for anyone else
who may use the appliance.
1

Introduction
Thank you for choosing a British built
appliance by Belling
We hope the following information
will help you to quickly familiarise
yourself with the features of the
appliance, and to use it successfully
and safely.
Our policy is one of constant
development and improvement. Strict
accuracy of illustrations and specifications
is not guaranteed. Modification to
design and materials may be necessary
subsequent to publication.
Please read the instructions in this
handbook before using or installing
this appliance.
Electrical connections
Please refer to installation instructions
for electrical connection.
In your own interest, and that of safety,
make sure that the installation is carried
out by a competent person.
Disconnection of electric appliances
should always be carried out by
competent persons.
Warning: This appliance must be
earthed.
Moving the cooker
Do not attempt to move the cooker by
pulling on the doors or handles. Open
the door and grasp the frame of the
cooker, taking care that the door does
Your new appliance is designed to be
installed flush to base units.
Your 1st Year Guarantee
To fulfil the conditions of your guarantee,
this appliance must be correctly
installed and operated, in accordance
with these instructions, and only be
used for normal domestic purposes.
Please note that the guarantee, and
Service availability, only apply to the
UK and Republic of Ireland.
Before using the appliance for
the first time, remove any protective
polythene film and wash the oven
shelves in hot soapy water, to remove
their protective coating of oil. Even so,
not shut on your fingers.
Take care to avoid damage to soft or
uneven floor coverings when moving
the appliance. Some cushioned vinyl
floor coverings may not be designed
to withstand sliding appliances without
marking or damage.
when you first turn on the oven or grill
you may notice a smell and some smoke.
2

Introduction
Glass door panels
To meet the relevant Standards of
Domestic cooking appliances, all the
glass panels on this appliance are
toughened to meet the fragmentation
requirements of BS3193. This ensures
that, in the unlikely event that a panel
breaks, it does so into small fragments
to minimise the risk of injury.
Please take care when handling, using
or cleaning all glass panels as any
damage to the surfaces or edges may
result in the glass breaking without
warning or apparent cause at a later
date. Should any glass panel be
damaged, we strongly recommend
that it is replaced immediately.
Environmental Protection
We are committed to protecting the
environment and operate an
Environmental Management System
which complies with BS EN ISO
14001:1996.
Disposal of packaging
• All our packaging materials are
recyclable and environmentally
friendly.
• Please help us to protect our
environment by disposing of all
packaging in an environmentally
friendly manner.
• Please contact your local authority
for the nearest recycling centre.
Caution: Packaging materials can
pose a risk of suffocation - keep away
from children.
3

Be Safe - Not Sorry
When you are cooking, keep
children away from the vicinity
of the appliance.
This product is designed as a domestic
cooking appliance for the preparation
and cooking of domestic food
products, and should not be used for
any other purpose.
Remove all packaging, protective
l
films and oils from the appliance
before using for the first time.
Make sure you read and
l
understand the instructions before
using the appliance.
Keep electrical leads short so they
l
do not drape over the appliance
or the edge of the worktop.
l
Keep all flammable materials (such
as curtains, furnishings & clothing)
away from the appliance.
l
When opening the appliance
door, take care to avoid skin
contact with any steam which may
escape from the cooking.
Do not use aluminium foil to cover
l
the grill pan, or put items wrapped
in foil under the grill as this creates
a fire hazard. The high reflectivity
can also damage the element.
Use oven gloves when removing
l
hot food / dishes from the oven or
grill. The oven / grill and utensils
will be very hot when in use.
l
Do not use foil on oven shelves, or
allow it to block the oven flue, as
this creates a fire hazard and
prevents heat circulation.
When cooking heavy items - eg;
l
turkeys - do not pull the oven shelf
out with the item still on the shelf.
Parts of the appliance may be hot
l
during or immediately after use.
Care should be taken to avoid
touching heating elements inside
the oven. Allow sufficient time
for the appliance to cool after
switching off.
Do not drape tea towels over the
l
flue vents or doors, as this creates
a fire hazard.
l
Never use the appliance for
heating a room.
Do not use the oven with the door
l
inner glass panel removed.
Caution: Do not use the hob if
l
the glass is cracked, as electrical
parts are directly beneath. To
avoid the possibility of electric
shock, turn off the electricity supply
to the hob at the socket and
arrange a Service call.
Warning: This appliance must be
earthed.
When you have finished
cooking check that all controls
are in the off position.
4
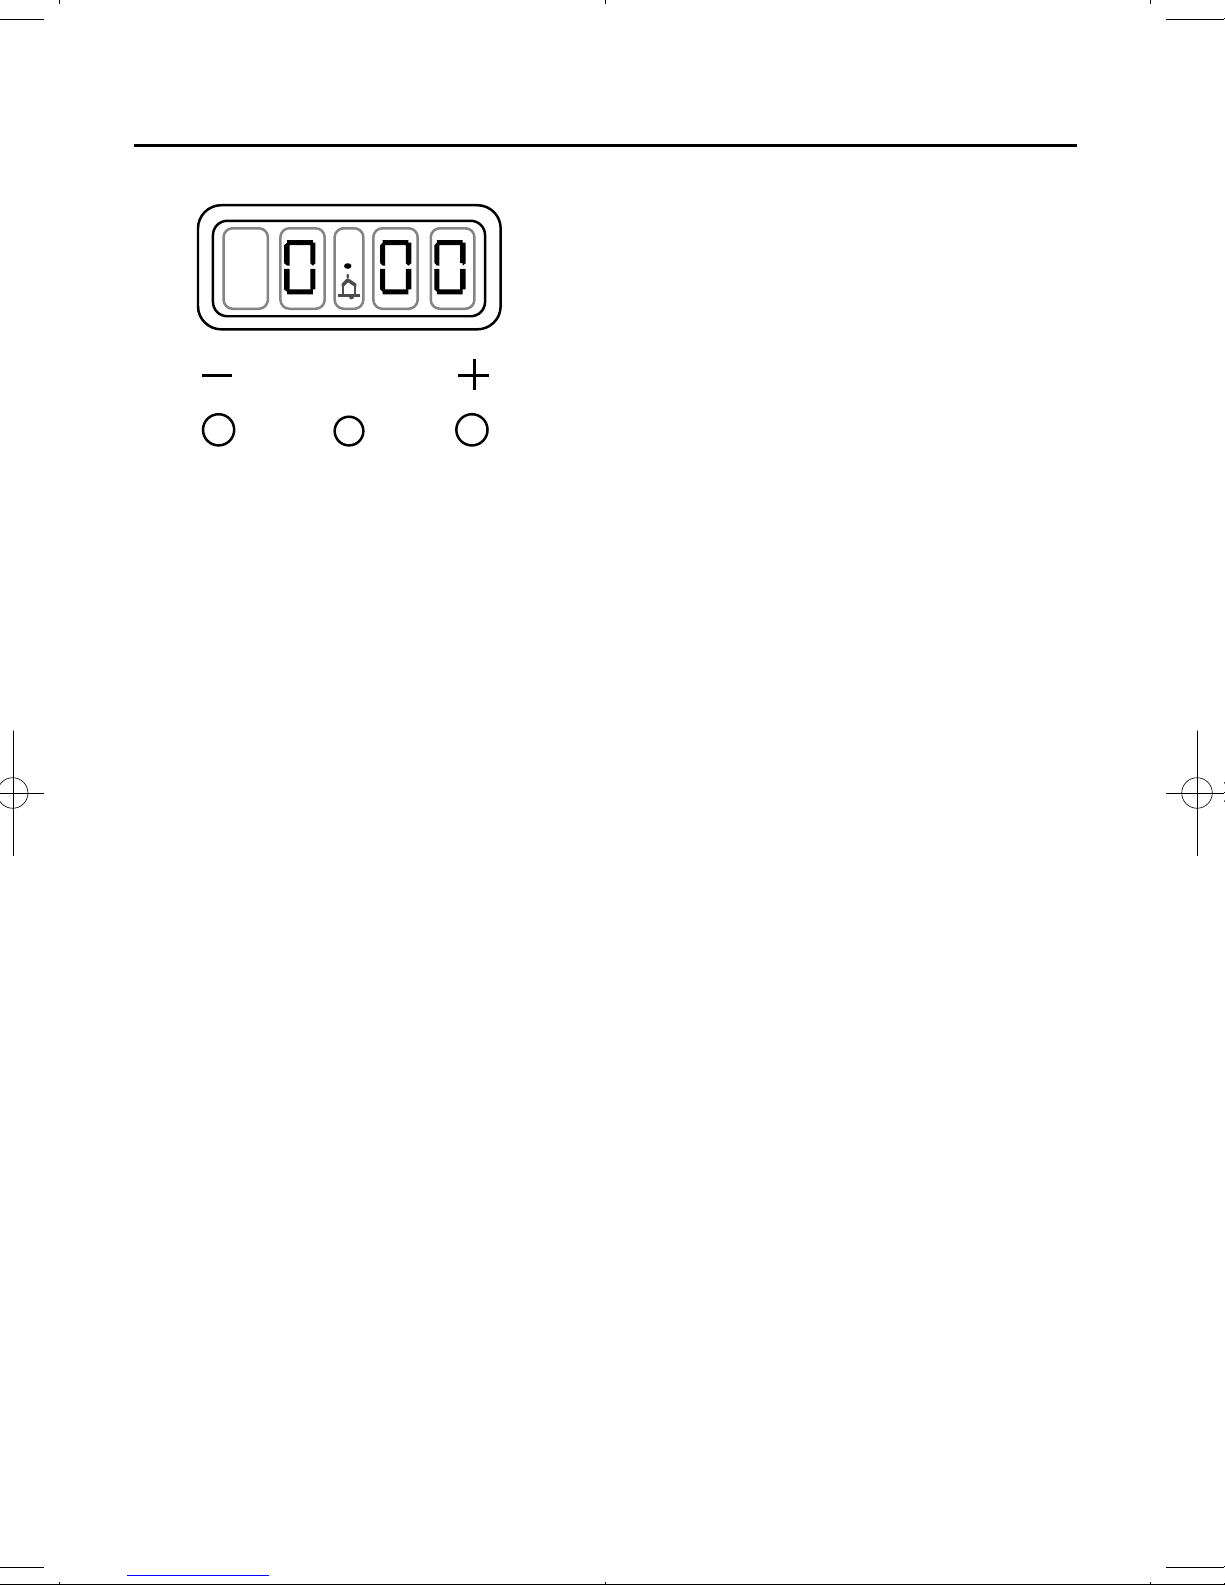
Minute Minder - if fitted
Function
Minus
button
Plus
button
Function
select
Initial display
The digital timer enables you to set the
time of day (24 hour clock) and the
minute minder alarm.
Setting the time of day
1. Switch on the electricity supply to
the appliance.
and press again to listen to the second
tone, etc.
Releasing the minus button after a tone
has sounded will automatically select
that tone.
Setting the minute minder
1. Press and release the plus button, to
change the display from clock to
minute minder - the bell symbol will
light.
2. Use the plus and minus buttons to
set the length of time before the
alarm tone will sound. The display
will increase / decrease in units of
10 seconds up to 99 minutes, 50
seconds, and in units of 1 minute
2. Press and release the function button.
3. Set the time of day, using the plus
and minus buttons.
4. The time will be set 7 seconds after
the last plus or minus operation.
Changing the time of day
1. Press the function button once.
2. Set the time of day, using the plus
and minus buttons.
3. The time will be set 7 seconds after
the last plus or minus operation.
Alarm tones
After setting the time of day, you can
select one of three alarm tones.
Press the minus button to listen to the
first tone, then release the minus button
from 1 hour 40 minutes upwards.
The maximum period which may be
set is 10 hours.
The display format will change after
99 minutes and 50 seconds to 1 hour
and 40 minutes.
During countdown, the minute minder
has priority on the display, which will
show (in minutes : seconds, or hours :
minutes) the time remaining.
When countdown is complete, the
tome will sound for 7 minutes, or it can
be reset with one touch of any button.
To cancel the minute minder at
any time.
Run down the set time with the minus
button. The display will show the time
of day
5

Using the Hob
Caution: Do not use the hob if the
glass is cracked, as electrical parts are
directly beneath. To avoid the possibility of electric shock, turn off the electricity supply to the hob at the socket
and arrange a Service call.
Before using the hob for the
first time
Before using the hob for the first
time, we recommend that you apply a
thin coating of cleaner conditioner,
and polish the surface with a clean dry
cloth. Follow the instructions given in
the cleaning section.
To switch on the hob
Turn the hotplate selected control
clockwise to the required setting. To
switch off, return to the “off” position.
Important:
Do not use the ceramic glass hob
l
as a work surface or chopping
board, as it will damage it, and if
any plastic utensils come into
contact with a warm hob, they
may melt onto it.
Do not use the ceramic hotplate
l
surface for storage.
l
As pans are on a smooth surface,
they will move easily if knocked
accidentally; turning pan handles
so they are not overhanging the
edge of the hob, will help prevent
this happening, and keep them out
of the reach of children.
Be careful when cooking foods in
l
salted water, or foods containing
large amounts of sugar or syrup,
if they are spilt onto hot areas of
the hob they may damage it.
The hot hob light
The hot hob light comes on when one
of the hotplates is switched on, and
stays on for a short while after the last
hotplate is switched off to indicate that
the hob may still be warm.
6
Use pans which are large enough
to avoid overflows onto the
ceramic glass hob.
Lift pans onto and off the hob, rather
l
than sliding them across the surface,
to avoid marks and scratches.
Aluminium foil must not be placed
l
on the hob as it will reflect any
heat back into the element, which
can damage it.
l
Leaving a hotplate on for a length
of time, without it being covered
by a pan, can cause overheating
of surrounding areas which could
damage the glass.

Using the Hob
Using the hotplate / choice of pans
When cooking with fat or oil, never
leave unattended.
Do not use double pans, rim based pans,
old misshapen pans or any pan which is
unstable when placed on a flat surface.
Turn pan handles to a safe position,
so they are out of reach of children,
not overhanging the appliance, and
cannot be caught accidentally.
Use pans with a flat base of minimum
100mm / 4ins diameter and maximum
250mm / 11ins diameter which are
stable in use.
Pan bases that are much smaller or much
larger than the hotplate - eg; by 50mm
- will result in slower cooking times.
Aluminium pans will give good cooking
results but care must be taken in their use.
If they are slid across the surface of a
ceramic hob they tend to leave visible
marks which can be difficult to remove.
Certain types of copper based pans may
become slightly concave when heated,
which can result in slower cooking times.
Pan bases should be thick, flat and
smooth, to ensure maximum heat
contact with the hob, maximum heat
conduction and rapid cooking times.
Pans with dull or dark coloured bases
will give the quickest cooking results.
Pans with thin, dented or ridge bases
can result in very slow cooking times
and should not be used.
Commercial simmering aids should
not be used as they create excessive
temperatures that can damage the
surface and may cause a hazard.
When buying new pans, always refer
to the pan manufacturer’s guidelines.
For best results and energy efficiency it
is important to use flat bottomed pans
of the correct type.
Always use pans which are large
enough to prevent spillage, especially
for deep frying, making jam or cooking
with sugar or syrup based substances.
Trivets, round based woks, heat diffuser pads
& over-sized pans are not recommended.
Cast iron, stainless steel, or enamelled
steel pans are all suitable for use on
ceramic glass hobs.
Certain makes / brands of pressure
cookers may not be suitable for use on
ceramic hobs - they do not come to
pressure. Stainless steel pressure
cookers will give optimum results.
Glass pans can be used, but if used on
halogen rings, the glow from the heating
areas transmitted through transparent
glass may cause some visual discomfort.
Pans with highly polished bases reflect
heat back into the hob causing the
ceramic hob hotplate to cycle on and
off rapidly, which slows down cooking.
The right size of pan base will ensure
maximum contact with the hob and
rapid cooking times.
When you have finished
cooking check that all controls
are in the off position.
7

Using the Grill
handle
grill pan
grid
handle position
indicators
Caution: Accessible parts may
be hot when grill is used, young
children should be kept away.
To switch on the grill
Open the top oven / grill door.
Turn the top oven control fully clock-
wise to the grill symbol.
The grill door must be fully open when
the grill is used.
To switch off, return the control knob to
the ‘off’ position.
Preheating
Always preheat the grill for about
3 minutes for best cooked results.
Detachable grill pan handle
Place the handle over the edge of the
grill pan, at the narrow side edges.
Slide the handle to the centre, and
locate between the handle position
indicators.
The cooling fan
When the grill is switched on, you will
hear the cooling fan come on - this
keeps the fascia and control knobs of
the appliance cool during grilling
only. The fan will continue to operate
for a period after the grill control has
been switched off.
The handle should be removed from
the pan during grilling, to prevent
overheating.
The handle is designed for removing /
inserting the grill pan under the grill
when grilling.
If cleaning the grill pan when it is hot,
use oven gloves to move it. Do not use
the handle to pour hot fats from the
grill pan.
Food for grilling should be positioned
centrally on the trivet.
8
 Loading...