

Belling db900E, db1000E Installation & User's Instructions

1
db900E & db1000E
electric cooker
Installation & User’s instructions
db900E & db1000E
electric cooker

2
Contents
Page
Product Specification ……………………………………………………. 3
Introduction Your Belling Cooker…………………………….. 4
Getting Help……………………………………… 4
Installation Instructions ……………………………………………………. 5-6
For Your Own Safety Never…………………………………………….. 7
Always…………………………………………… 8
Know Your Control Panel ……………………………………………………. 9
Timer Instructions …………………………………………………….. 10-14
Automatic Cooking (Large Oven) ……………………………………………………… 15
Rules to follow when cooking automatically
Using the Hob Ceramic Hob……………..………………………. 16
Hob Hot Light….………………………………….. 16
Hotplate Controls (Use of)……………………….. 16
Warming Zone…………………………………….. 16
Choosing Your Utensils………………………….. 17/18
Safety Requirements for Deep Fat Frying….….. 18
Main Multifunction Oven & Grill Operation…………………………………………….. 19
(Multifunction Settings) Off Light Only.…………………………………….. 19
Fan Oven ....................................................... 20
Preparation & Roasting of Large Poultry……….. 20
Conventional Oven, Defrost, Fan Grill................ 21
Full Grill, Half Grill, Using the Grill...…………..... 21/22
Grill Pan & Grid, Grill Chart................................. 23
Storage & Re-heating of Food Cook – Chill Dishes……………………………….. 24
Main Multifunction Oven Cooking Guide ……………………..……………………………….. 25/26
Small Oven Cooking Guide ……………………..……………………………….. 27
Temperature Conversion Scale ……………………..……………………………….. 28
Care & Cleaning Door Removal…………………………………….. 29
Cleaning (Glass Doors, Stainless Steel)..……..... 29
Cleaning (Vitreous Enamel)..……………………. 29
Cleaning (Paint, Ovens & Grill, Ceramic Hob)… 30
Cleaning (Belling Cookclean Panels)…………… 31
Is There Something Wrong With Your Cooker Replacing the Oven Lamp................................. 32
Fault Finding Guide……………………………… 32
Cooking Results Not Satisfactory ……………………..……………………………….. 33
Service ……………………..……………………………….. 34

3
This apliance was designed and made in accordance with the European standards listed below:
EN60 335-1 and EN60 335-2-6 (electrical) plus relative amendments.
This appliance complies with the prescriptions of the European Directives as listed below:
73/23 + 93/68 EC concerning electrical safety (BT).
89.336 + 92/31 + 93/68 EC concerning electromagnetic compatibility (EMC).
Oven accessories that could come into contact with foodstuffs are made with materials that comply with the
provisions of the 89/109 EC directive, dated 21/12/1988.
3
Product Specification
Electrical Supply 230V – 240V
Electrical Supply Frequency 50Hz
Total Heat Input (Electric) 10.98 – 11.96 kW
Front Left Ceramic Hotplate (Fastlite) 1.65 – 1.80kW
Rear Left Ceramic Hotplate (Fastlite) 1.38 – 1.50kW
Rear Right Ceramic Hotplate (Dual Fastlite) Part 1.38 – 1.50kW
Full 1.65 – 2.40kW
Front Right Ceramic Hotplate (Fastlite) 1.10 – 1.20kW
Warming Zone 0.175 – 0.190kW
Light Only (Large Oven) 0.014 – 0.015 kW
Fan Oven Wattage (Large Oven) (Timed) 2.37 – 2.58 kW
Conventional Large Oven Wattage (Timed) 2.04 – 2.22 kW
Fan Grilling Wattage (Large Oven) (Timed) 2.43 – 2.65 kW
Defrost (Large Oven) Wattage (Timed) 0.046 – 0.050 kW
Full Grill Wattage 2.41 - 2.62 kW
Half Grill Wattage 1.30 - 1.42 kW
Small Conventional Oven Wattage 2.04 - 2.22 kW
Grilling Area 780 cm2
Large Oven Capacity 55 Litres
Small Oven Capacity 32 Litres
Nominal External Dimensions H 900mm --915mm
(Excluding handles) DB900 -- W 912mm
DB1000 -- W 1000mm
D 600mm

4
Introduction
Your Belling Cooker Thank you for purchasing a new Belling cooker. Its stylish, practical design will
enhance your kitchen and make cooking a pleasure. It features a large
multifunction oven/Grill (Closed door), a small conventional oven, a storage
compartment, 4 ceramic hob elements and a warming zone. There is also an
electronic clock/timer featuring a minute minder and automatic cooking facilities
(large oven only).
Even if you have used an electric or gas cooker before, it is important that you
read these instructions thoroughly before starting to cook, paying particular
attention to the installation and safety instructions.
Getting Help If you have any problems with installing, operating, or cooking with your Belling
cooker, please check through these instructions thoroughly to make sure that you
have not missed anything. If you still need help, then please contact (including a
daytime telephone number if possible):-
Consumer Relations Department,
Belling Appliances
Stoney Lane
Merseyside
L35 2XW
BELLING HELPLINE Tel: 0870 444 9939
Please quote the cooker model and serial number with all inquiries. This can be
found on the left side of the chassis when the storage drawer is opened..
WARNING! For your own safety, make sure that these instructions on
installation, use and maintenance are followed.
We advise you to keep these instructions in a safe place for future reference.
If you sell or transfer ownership of this product, please pass on these instructions
to the new owner.

5
Installation Instructions
This appliance has been tested and certified by Advantica Technologies Ltd and
carries the C.E. Mark.
The installation must be in accordance with the current I.E.E. Wiring Regulations.
Unpacking After unpacking your cooker, make sure that you remove all the packing from the
grill compartment and ovens, and any stickers from the oven doors and the hob.
Examine your cooker for any damage. If there is any damage to your cooker or
anything is missing, please contact your supplier for advice.
Siting/Moving the Your cooker is heavy, so be careful when moving or positioning it. Do not try
Cooker to move the cooker by pulling on the doors or handles or control panel.
Your Belling electric cooker is designed to slot in between 600mm deep
cabinets spaced at least 915mm apart (DB9000E) or at least 1000mm apart
(DB1000E). It can also be used free-standing, with a cabinet to one side, in a
corner setting or with its back to a wall. However it must not be situated with
either side closer than 50mm to a combustible wall or cupboard that is higher
than the cooker.
The wall behind the cooker and 450mm above and across the width of the
cooker, should be of an incombustible material or easy clean surface such as
ceramic tiles. Please note, when positioning your cooker against a wall, ensure
there is sufficient clearance for the screw heads on the back panel.
This appliance can be of type X or type Y with regard to protection against
overheating of surrounding surfaces dependant on the location decided by the
user.
Any overhanging surface or cooker hood should be at least 650mm (25½") above
the cooker hob. We do not recommend positioning the cooker below wall
cupboards, as the heat and steam from the cooker may cause damage to the
cupboard and its contents.
Excess steam from the oven, vents out at the top back edge of the cooker, so
make sure that the walls behind and near the cooker are resistant to heat, steam
and condensation.
Your cooker must stand on a flat surface so that when it is in position the hob is
level. The cooker is fitted with rear wheels and will slide into position easily.
Movement of your cooker is most easily achieved by lifting the front, as follows.
Open the oven doors sufficiently to allow a comfortable grip on the underside front
edge of the oven roofs, avoiding grill elements or oven furniture.
“DO NOT LIFT THE COOKER BY THE HANDLES”
Adjust the cooker at the rear to the required height, using the 2 jacking screws
situated behind the rear access cover and secure with the lock-nuts. Position the
cooker and adjust the height at the front with the 2 jacking screws situated at the
front underside. Check that the cooker is level by using a spirit level (adjusting the
jacking screws if necessary). It is important that the cooker is stable and level for
the overall cooking performance.
Whatever the position, remember to leave enough room for the cooker to be
pulled out for cleaning and service.

6
Installation Instructions
Connecting to Electrical For your own safety, we recommend that your cooker is installed by a suitably
Supply qualified person.
The cooker should be installed in accordance with the latest edition of the
IEE Regulations.
WARNING: THIS APPLIANCE MUST BE EARTHED!
The cooker must be connected to the correct electrical supply as stated on the
rating plate, through a suitable cooker control unit incorporating a double pole
switch having a contact separation of at least 3mm in all poles, adjacent to (but
not above) the cooker. We recommend that the cooker circuit is rated to 45
Amps with a minimum of 32 Amps.
We also recommend that 6mm² P.V.C. (minimum 4.0mm²-maximum 10.0mm²)
Insulated twin and earth cable is used to connect the cooker control unit.
The power supply cable should conform to BS6004
IMPORTANT:
For access to the mains terminal block and for supply cable connection, it is
necessary to remove the access cover situated at the bottom of the back panel.
The live and neutral positions are marked with the letters L and N respectively,
marked in front of the terminal block. The earth terminal is marked by the earth
symbol. Secure the mains cable using the cable clamp.
Connect the mains cable as follows:Live to terminal L.
Neutral to terminal N
Earth to the earth stud.
Ensure clamping nuts are tightened sufficiently. Allow sufficient cable length for
the cooker to be pulled out for cleaning, but do not let it hang closer than 50mm
(2”) to the floor. The cable can be looped if necessary, but make sure that it is not
kinked or trapped when the cooker is in position.
No part of the appliance (including clock/timer) will operate unless the mains
control unit is live and switched on.
Before you cook for the first time, we recommend that you turn on each element
and hotplate in turn to burn off any odors remaining from manufacture. Simply
operate each hotplate and the grill on maximum for a few minutes and each oven
for about 30 minutes.
User
Instruct the user in the operation of the appliance and hand over the instructions.

7
For Your Own Safety
When used properly your Belling Cooker is completely safe, but as with any
cooker there are some precautions you must take in its use.
NEVER
Never allow anyone except an authorized Belling Service Agent to service or repair
your cooker.
Never remove any part of the cooker other than those intended in normal use, or
attempt to modify the cooker in any way.
Never use the cooker for commercial catering. It is designed for domestic use.
Never allow young children to operate or play with the cooker.
Never use a chip pan or deep fat fryer more than 1/3 full of oil, or use a lid while
frying and do not leave a fryer unattended while cooking.
Never line the shelves, floor, or sides of the ovens or grill with aluminum foil as
overheating and damage may result.
Never place anything which might catch fire, such as towels or tea towels, near to
the hotplates or over the flue outlet even when the cooker is not in use.
Never use an asbestos mat, trivet or rack of any kind under pans on any hotplate.
Never store anything that might catch fire in the oven, grill compartment or storage
compartment.
Never allow aluminum foil or plastic to touch any hotplate when it is hot.
Never store flammable liquids, aerosols, etc. in adjacent cabinetry.
Never dry clothes or place other items over or near to the hotplate or oven or grill
doors.
Never use large preserving pans or fish kettles across two hotplates as this will
damage the hob.
Never use cooker as a room heater.
Never leave hotplates switched on when not in use.

8
For Your Own Safety
ALWAYS
Always make sure you understand the controls prior to use.
Always take care when touching any part of the cooker that may be hot. Use good
quality dry oven gloves when removing or replacing food or dishes.
Always stand back when opening the oven door to allow any build-up of heat or
steam to disperse.
Always keep the oven and grill doors closed when not in use to prevent accidents.
Always make sure that the roof, sides, back panels and shelves are fitted correctly
before using the oven or grill.
Always keep your cooker clean, as a build-up of grease or fat from cooking may be
a fire hazard.
Always switch off at the mains supply before cleaning your cooker.
Always supervise children and pets, particularly when grilling, as exposed parts of
the grill may become hot.
Always place pans centrally over the hotplates and make sure that they are stable.
Always keep handles away from the edge of the hob and any other hotplates. For
added safety you should consider using a suitable hob guard.
Always make sure that all the controls are switched off when you finish cooking.
Always remember that your cooker may stay hot for a time even after you have
finished cooking.
Always keep ventilation slots at the rear of the cooker clear of obstructions.
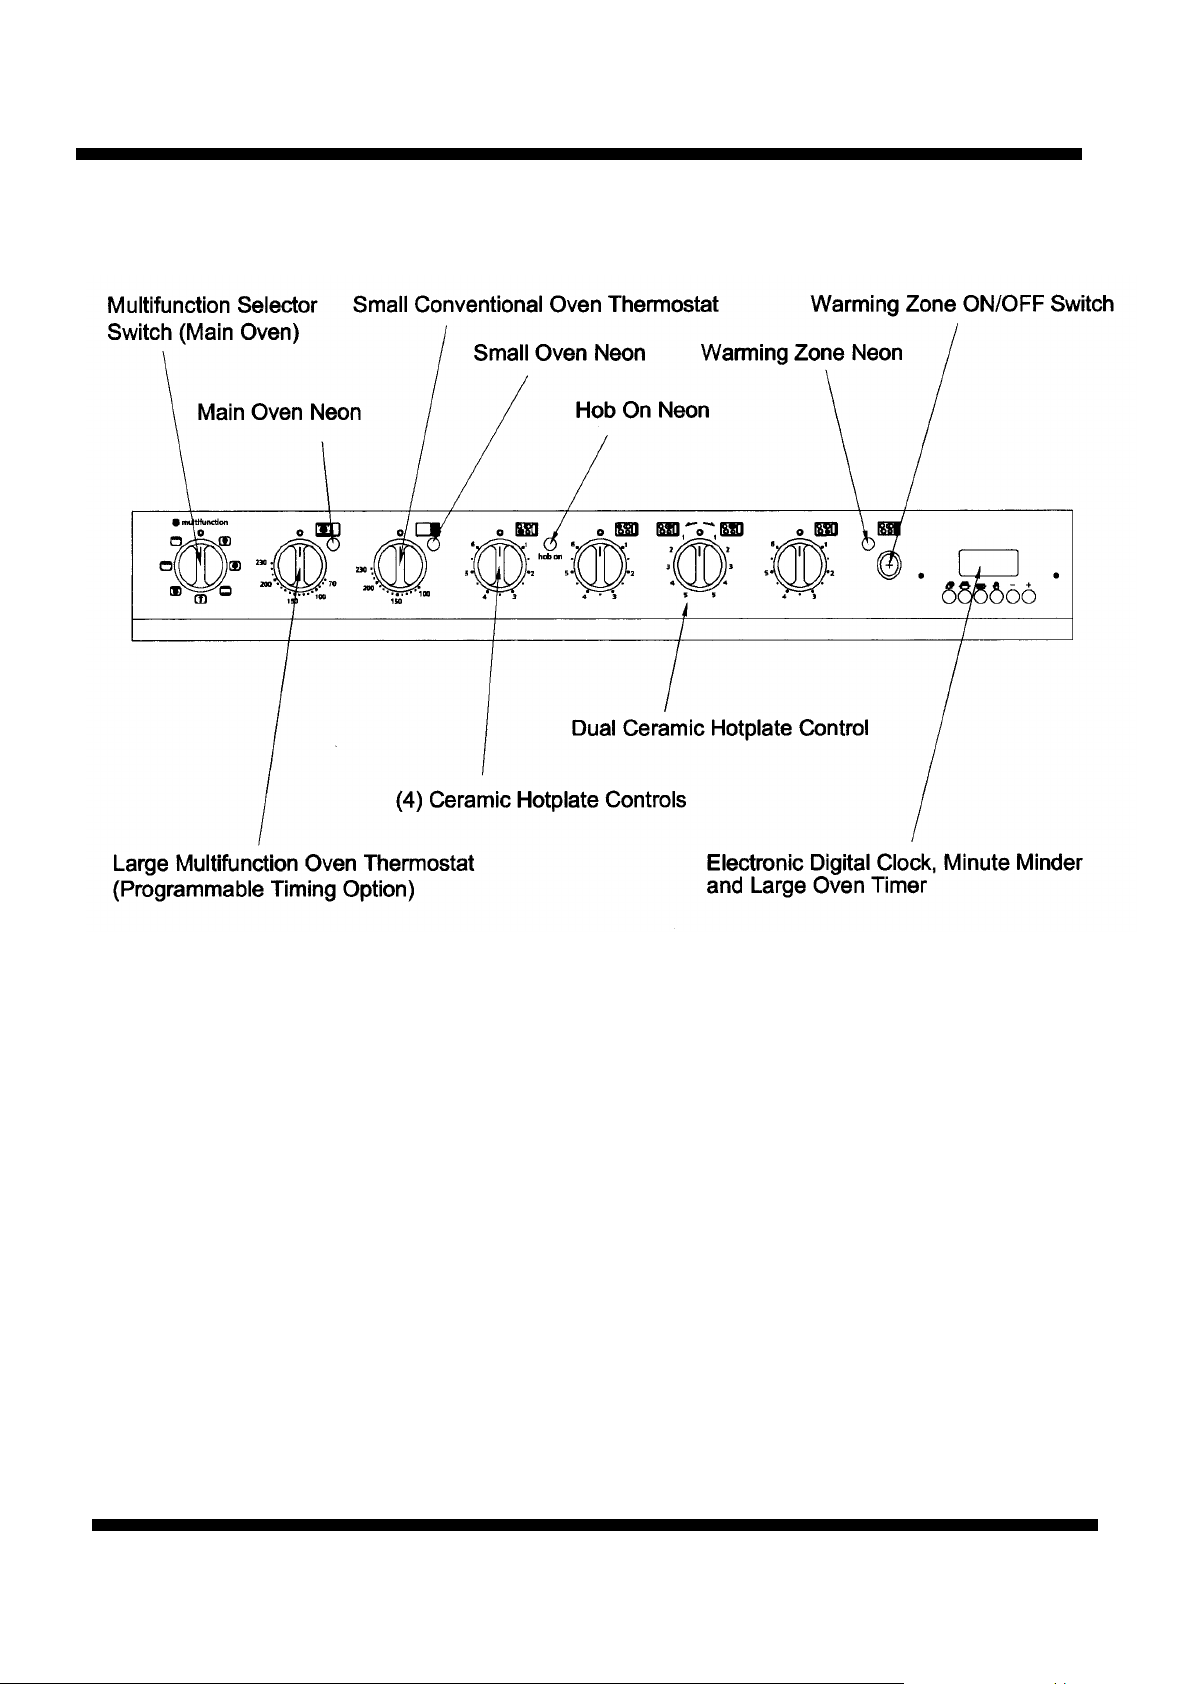
9
Know Your Control Panel
Control Knobs & The hob (Ceramic hotplates) control knobs can be rotated in either
Switches directionfrom the off position.
The ovens thermostat control knobs can only be rotated clockwise from the off
position.
The multifunction selector switch knob can be rotated in either direction from the
off position.
The warming zone ON/OFF switch is operated as follows:Depress and release the button - OFF to ON (ON to OFF).
(Depressed position = ON).

10
Timer Instructions
The oven timer offers you the following features:
1. Time of day
2. Automatic cooking (Large oven only)
3. Minute minder
The large oven can be controlled by the automatic timer. When the timer has
been set, the small oven remains functional.
Hints on Automatic 1. Select foods which will take the same amount of time to cook and require
Cooking approximately the same temperature.
2. Set the oven timer so that the food has just finished or about to finish
cooking on your return to the oven. This will ensure the food has not
cooled down and does not require re-heating before serving.
3. Food should be as cold as possible when it goes into the oven, ideally
straight from the refrigerator. Frozen meat and poultry should be thawed
thoroughly before being placed into the oven.
4. We advise that warm food should never be placed in the oven if there is to
be a delay period. Stews prepared by frying the meat and vegetables
should be cooked as soon as possible.
5. We advise dishes containing left over cooked poultry or meat (eg.
Shepherds pie) should not be cooked automatically if there is to be a delay
period.
6. Stews and joints should be cooked by the long slow method, so that the
delay start is kept to a minimum.
7. On warm days, to prevent harmful bacterial growth in certain foods (eg.
Poultry, joints etc.) the delay start should be kept to a minimum.
8. Wine or beer may ferment and cream may curdle during the delay period,
so it is best that these ingredients are added just before serving.
9. Foods that discolour should be protected by coating in fat or tossing in
water (to which lemon juice has just been added) prior to placing the food
into the oven.
10. Dishes containing liquid should not be overfilled. This will prevent boiling
over.
11. Foods should be well sealed (but not airtight) in a container to prevent the
loss of liquid during cooling. Aluminium foil gives a good seal.
12. Ensure food is cooked thoroughly before serving.

11
Timer Instructions
To set the Time of Day Step 1 Make sure all the oven controls are turned off.
Step 2 Check that the electricity supply to the oven is switched on.
Step 3 When switched on the display will show 0.00 and Auto flashing
intermittently.
Step 4 Press and hold the and buttons together (the
display shows 0.00). At the same time press either the or
button to set the correct time of day.
RELEASE AND THE TIME OF DAY IS NOW SET.
To set Timer to switch OFF (This allows you to cook immediately for a chosen period of time Automatically
before the oven switches OFF Automatically)
Step 1 Ensure the time of day is set correctly.
Step 2 Place food onto the correct shelf position in the oven.
Step 3 Turn the multi function selector to the desired setting and the oven
control to the required temperature. The oven should now be
operating.
Cookpot Symbol
Step 4
Press and release the button. The display will read 0.00 with the
cook-pot lit.
Within 2 seconds press and hold the or button until the required
cooking period is set.
(Adjustment can be made by pressing the button)
The timer display will revert to the time of day with the Auto symbol
Cookpot Symbol Disappears and Cook-pot lit.
At the end of the cooking period the Auto symbol will flash and an intermittent
bleeping sound will be heard. This will continue for approximately 2 minutes
unless the timer is reset within this period (See step 6).
The oven will no longer operate until the timer has been reset to
manual operation (See steps 5 & 6 on the next page).
 Loading...