

Page 1

1
db1000DF dual fuel cooker
Installation & User’s instructions
Db1000DF dual fuel - Natural Gas
(Liquid Petroleum gas convertible)
Note: This appliance is supplied for use with the category of gas
specified and can be converted to LP gas with the kit provided.
Page 2

2
Contents
Page
Product Specification ……………………………………………………. 3
Introduction Your Belling Cooker…………………………….. 4
Getting Help……………………………………… 4
Installation Instructions ……………………………………………………. 5-8
For Your Own Safety Never…………………………………………….. 9
Always…………………………………………… 10
Know Your Cooker ……………………………………………………. 11
Know Your Control Panel ……………………………………………………. 12
Timer Instructions …………………………………………………….. 13/17
Automatic Cooking (Large Oven) ……………………………………………………… 18
Rules to follow when cooking automatically
Using the Hob Description of Hotplates…………………………. 19
Use of Hotplates………………………………….. 19
Control Setting Guide…………………………….. 19
Cooking Chart…………………………………….. 19
Choosing Your Utensils …….. ………………….. 20
Energy Saving Tips….. ………………………….. 20
Safety Requirements for Deep Fat Frying….….. 21
Main Multifunction Oven & Grill Operation…………………………………………….. 22
(Multifunction Settings) Off Light Only.…………………………………….. 22
Fan Oven ....................................................... 23
Preparation & Roasting of Large Poultry……….. 23
Conventional Oven, Fan Grill............................. 24
Defrost, Full Grill, Half Grill, Using the Grill........ 24/25
Grill Pan & Grid, Grill Chart................................. 26
Storage & Re-heating of Food Cook – Chill Dishes……………………………….. 27
Main Multifunction Oven Cooking Guide ……………………..……………………………….. 28/29
Small Oven Cooking Guide ……………………..……………………………….. 30
Temperature Conversion Scale ……………………..……………………………….. 31
Care & Cleaning Door Removal, Cleaning (Stainless Steel)......... 32
Ovens & Grill............................................…….. 32-33
Pan Supports & Burner Caps/Burner Bodies. 33
Belling Cook-clean Panels………………………… 33
Replacing the Oven Lamp................................. 33
Is There Something Wrong With Your Cooker ……………………..……………………………….. 34
Cooking Results Unsatisfactory ……………………..……………………………….. 35
Service ……………………..……………………………….. 36
Product Specification
Page 3

3
Db1000DF
Gas Type I2H
Gas Supply Pressure 20mbar for G20 28mbar for G30 37mbar for G31
Convertible to LPG, but factory set for Nat. Gas
Electrical Supply 220V – 240V
Electrical Supply Frequency 50Hz
Total Heat Input (Gas) 11.0 kW (800 gms/hr – G30) (786 gms/hr – G31)
Front Left Hotplate (Rapide) 2.9 kW (218 gms/hr – G30) (215 gms/hr – G31)
Injector 115
Rear Left Hotplate (Semi-Rapide) 1.8 kW (127 gms/hr – G30) (125 gms/hr – G31) Injector
96
Centre Hotplate (Wok - Triple Ring) 3.5 kW (254 gms/hr – G30) (250 gms/hr – G31)
Injector 135
Rear Right Hotplate (Auxiliary) 1.0 kW (73 gms/hr – G30) (72 gms/hr – G31)
Injector 71
Front Right Hotplate (Semi-Rapide) 1.8 kW (127 gms/hr – G30) (125 gms/hr – G31)
Injector 96
Total Heat Input (Electric) 4.47 – 4.87 kW
Light Only (Large Oven) 2 x 0.015 kW (SES)
Fan Oven Wattage (Large Oven) (Timed) 2.37 – 2.58 kW
Conventional Large Oven Wattage (Timed) 2.04 – 2.22 kW
Fan Grilling Wattage (Large Oven) (Timed) 2.43 – 2.65 kW
Defrost (Large Oven) Wattage (Timed) 0.046 – 0.050 kW
Full Grill Wattage (Electric) 2.41 - 2.62 kW
Half Grill Wattage (Electric) 1.30 - 1.42 kW
Small Conventional Oven Wattage 2.04 - 2.22 kW
Grilling Area 780 cm2
Large Oven Capacity 55 Litres
Small Oven Capacity 32 Litres
Nominal External Dimensions H 900mm – 915mm
(Excluding handles) W 1000mm
D 600mm
Countries of Destination GB & IE
Introduction
Page 4

Your belling Cooker Thank you for purchasing a new belling platinum db3 cooker. Its stylish, practical
design will enhance your kitchen and make cooking a pleasure. It features a large
multifunction oven/Grill (Closed door), a small conventional oven, a storage
compartment, 5 gas hob burners and a utensil holder. There is also an electronic
clock/timer featuring a minute minder and automatic cooking facilities (large oven
only).
Even if you have used an electric or gas cooker before, it is important that
you read these instructions thoroughly before starting to cook, paying particular
attention to the installation and safety instructions.
Getting Help If you have any problems with installing, operating, or cooking with your belling
cooker, please check through these instructions thoroughly to make sure that you
have not missed anything. If you still need help, then please contact (including a
daytime telephone number if possible):-
Customer Care Centre
Belling Appliances Limited,
Stoney Lane,
Prescot,
Merseyside,
L35 2XW
BELLING HELPLINE Tel: 0151 432 7999
Please quote the cooker model and serial number with all inquiries. This can be
found on the chassis behind the drop down storage compartment panel.
WARNING! For your own safety, make sure that these instructions on
installation, use and maintenance are followed.
We advise you to keep these instructions in a safe place for future reference.
If you sell or transfer ownership of this product, please pass on these instructions
to the new owner.
Installation Instructions
This appliance has been tested and certified by Advantica Technologies Ltd and
Page 5

carries the C.E. Mark.
5
The installation must be in accordance with the current I.E.E. Wiring Regulations.
Gas safety (Installation & Use Regulations.)
This appliance must be installed in accordance with BS6172:
In your own interest and that of safety, it is LAW that all Gas Appliances are installed
by competent persons in accordance with Gas Safety Regulations. Failure to install
appliances correctly could lead to PROSECUTION.
Use only a CORGI registered installer.
This appliance shall be installed in accordance with the regulations in force, and
used only in a well-ventilated space. Read the instructions before installing or using
this appliance.
The use of a gas-cooking appliance results in the production of heat and moisture in
the room in which it is installed. Ensure that the kitchen is well ventilated, keep
natural ventilation holes open or install a mechanical ventilation device (mechanical
extractor hood).
Prolonged intensive use of the appliance may call for additional ventilation, for
example opening of a window, or more effective ventilation (where present).
Location The cooker may be located in a kitchen, kitchen/diner or a bed-sitting room, but not
in a room containing a bath or shower.
Provision for ventilation The room containing the cooker should have an air supply in accordance with
BS5440: Pt.2
All rooms require an opening window or equivalent, while some rooms require a
permanent vent in addition to the opening window. The cooker should not be
installed in a bed-sitting room of less than 21m3, and furthermore should not be
installed in any room of volume less than 5m3. If it is installed in a room of volume
between 5m3 and 10m3 an air vent of effective area 50cm2 is required., unless the
room has a door that opens directly to the outside, in which case no air vent is
required. If the room exceeds 11m3 no air vent is required
If there are other fuel burning appliances in the same room BS5440:Pt.2 should be
consulted to determine the requisite air vent requirements.
Unpacking After unpacking your cooker, make sure that you remove all the packing from the
grill compartment and ovens, and any stickers from the oven doors and the hob.
Examine your cooker for any damage. If there is any damage to your cooker or
anything is missing, please contact your supplier for advice.
Siting/Moving the Cooker Your cooker is heavy, so be careful when moving or positioning it. Do not try to
move the cooker by pulling on the doors or handles or control panel. The Belling
db3 is designed to 'slot-in' between 600mm deep cabinets, spaced at least
1000mm apart. It can also be used freestanding, with a cabinet to one side, in a
corner setting or with its back to a wall. However it must not be situated with either
side closer than 50mm to a combustible wall or cupboard that is higher than the
cooker.
Installation Instructions
The wall behind the cooker and 450mm above and across the width of the cooker,
should be of an incombustible material or easy clean surface such as ceramic
Page 6

tiles. Please note, when positioning your cooker against a wall, ensure there is
ADAPTER BACKPLATE
ELBOW
ELBOW BAYONET
SOCKET
15mm COPPER
PIPE
MAINS INLET ON
6
sufficient clearance for the screw heads on the back panel.
This appliance is designed not to project in front of standard 600mm worktops
(excluding handles). To achieve the best fit the cooker must be pushed against the
wall. If the wall mounted adapter back-plate (Fig.1) is to be fitted behind the
appliance then the suitable area for this fitting is shown as the area in (Fig.2).
Note: The adapter back-plate requires chasing into the wall if it protrudes
more than 40mm. This is to allow the cooker to be pushed back to the wall.
Fig. 1 Fig. 2
Any overhanging surface or cooker hood should be at least 760mm (30") above the
cooker hob. We do not recommend positioning the cooker below wall cupboards, as
the heat and steam from the cooker may cause damage to the cupboard and its
contents.
Excess steam from the oven, vents out at the top back edge of the cooker, so make
sure that the walls behind and near the cooker are resistant to heat, steam and
condensation.
Your cooker must stand on a flat surface so that when it is in position the hob is
level. The cooker is fitted with rear wheels and will slide into position easily.
Movement of your cooker is most easily achieved by lifting the front, as follows.
Open the oven doors sufficiently to allow a comfortable grip on the underside front
edge of the oven roofs, avoiding grill elements or oven furniture.
Adjust the cooker at the rear to the required height, using the 2 jacking screws
situated behind the rear access cover and secure with the lock-nuts. Position the
cooker and adjust the height at the front with the 2 jacking screws situated at the
front underside. Check that the cooker is level by using a spirit level (adjusting the
jacking screws if necessary). It is important that the cooker is stable and level for
the overall cooking performance.
Installation Instructions
Page 7
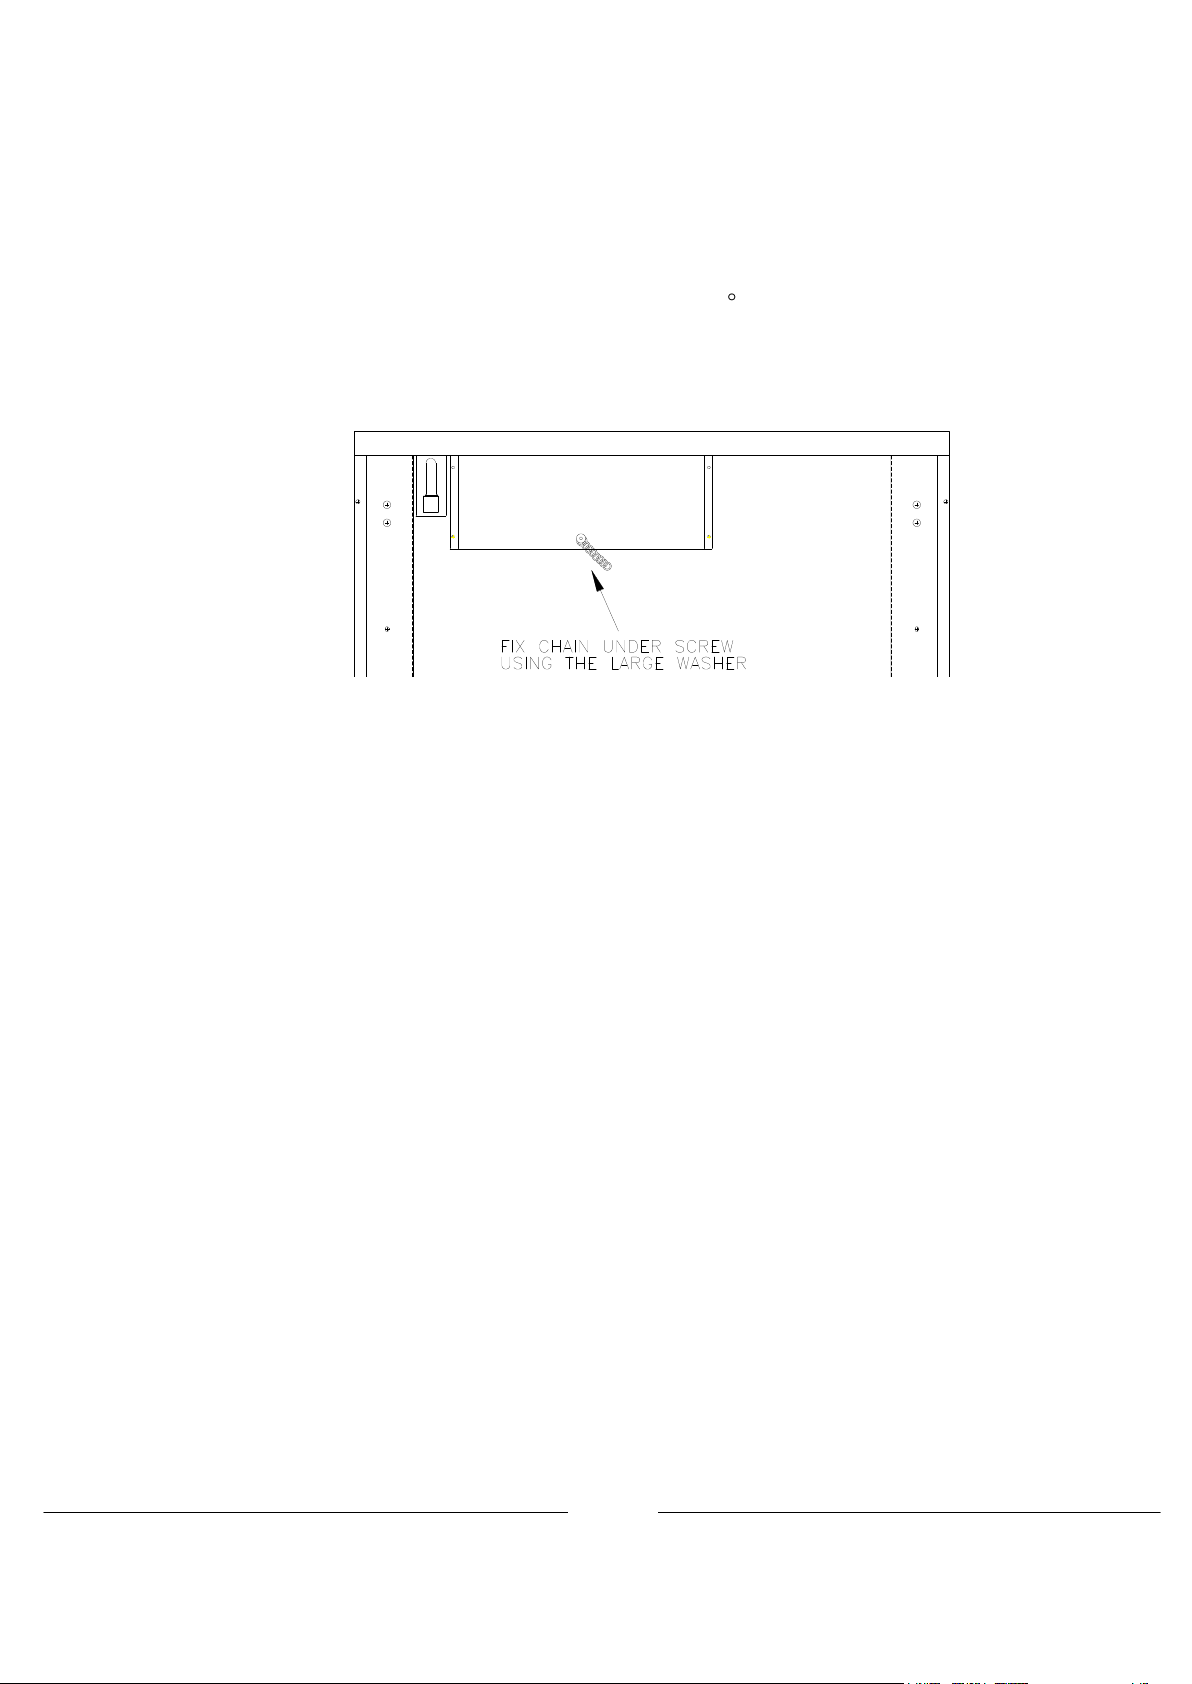
Stability Chain The cooker should be fitted with a stability device such as a proprietary stability
7
chain as shown in Figure 3 and firmly secured to the fabric of the building.
Whatever the position, remember to leave enough room for the cooker to be pulled
out for cleaning and service.
Connect to Gas Supply Connection to the appliance should be made with an approved appliance flexible
connection to BS669. A length of 1200mm is recommended.
The temperature at the rear of the appliance, which is likely to come into contact
with the flexible hose, does not exceed 70 C.
A Rp 1/2 elbow is fitted to the cooker.
If the position of the wall connection is within 250mm of the oven inlet, the loop of
hose will give maximum movement to the cooker.
Fig.3
Connecting to Electrical For your own safety, we recommend that your cooker is installed by a suitably
Supply qualified person.
The cooker should be installed in accordance with the latest edition of the
IEE Regulations.
WARNING: THIS APPLIANCE MUST BE EARTHED!
The cooker must be connected to the correct electrical supply as stated on the
rating plate, through a suitable cooker control unit incorporating a double pole
switch having a contact separation of at least 3mm in all poles, adjacent to (but not
above) the cooker. We recommend that the cooker circuit is rated to 30 Amps.
We also recommend that 4mm² P.V.C. (minimum 2.5mm² - maximum 6.0mm²)
Insulated twin and earth cable is used to connect the cooker control unit.
The power supply cable should conform to BS6004
IMPORTANT:
For access to the mains terminal block and for supply cable connection, it is
necessary to remove the access cover situated at the bottom of the back panel.
The live and neutral positions are marked with the letters L and N respectively,
marked in front of the terminal block. The earth terminal is marked by the earth
symbol. Secure the mains cable using the cable clamp.
Connect the mains cable as follows:Live to terminal L.
Neutral to terminal N
Earth to the earth stud.
Installation Instructions
Page 8

Ensure clamping nuts are tightened sufficiently. Allow sufficient cable length for
8
the cooker to be pulled out for cleaning, but do not let it hang closer than 50mm
(2”) to the floor. The cable can be looped if necessary, but make sure that it is not
kinked or trapped when the cooker is in position.
Both ovens, grill and clock will not operate unless the mains control unit is live and
switched on.
Check for Gas Soundness
Gas pressure should be checked on a semi-rapid hob burner. Remove the injector
and fit the pressure test nipple supplied. Light the other four burners and then note
the pressure. This should be as stated on the rating label.
Note: Replace the injector after checking.
Retain the test nipple in a safe place for future use.
Check the operation of the cooker
Check that the five hotplate electrodes spark correctly. The hotplate burners should
be checked for a steady flame (when turned down to the smallest flame setting
marked on the control panel).
Before you cook for the first time, we recommend that you turn on each element and
hotplate in turn to burn off any odors remaining from manufacture. Simply operate
each hotplate and the grill on maximum for a few minutes and each oven for about
30 minutes.
User
Instruct the user in the operation of the appliance and hand over the instructions.
For Your Own Safety
Page 9

NEVER
9
When used properly your Belling Cooker is completely safe, but as with any cooker
there are some precautions you must take in its use.
Never allow anyone except an authorized Belling Service Agent to service or repair
your cooker.
Never remove any part of the cooker other than those intended in normal use, or
attempt to modify the cooker in any way.
Never use the cooker for commercial catering. It is designed for domestic use.
Never allow young children to operate or play with the cooker.
Never use a chip pan or deep fat fryer more than 1/3 full of oil, or use a lid while
frying and do not leave a fryer unattended while cooking.
Never line the shelves, floor, or sides of the ovens or grill with aluminum foil as
overheating and damage may result.
Never place anything which might catch fire, such as towels or tea towels, near to
the burners or over the flue outlet even when the cooker is not in use.
Never use an asbestos mat, trivet or rack of any kind under pans on any hotplate.
Never store anything which might catch fire in the oven, grill compartment or storage
compartment.
Never allow aluminum foil or plastic to touch any hotplate when it is hot.
Never store flammable liquids, aerosols, etc. in adjacent cabinetry.
Never dry clothes or place other items over or near to the hotplate or oven or grill
doors.
Never use large preserving pans or fish kettles across two hotplates as this will
damage the hob.
Never use cooker as a room heater.
Never wear garments with long flowing sleeves whilst cooking.
Never leave burners lit when not in use.
For Your Own Safety
Page 10

ALWAYS
10
Never use the hotplates with the burner caps removed.
Never use badly designed or misshapen pans which may be unstable.
Never allow pan handles to stick out beyond the hotplate (where they can be
knocked) or over another burner.
IF YOU SMELL GAS turn off all gas controls on the hob, open windows and turn off
gas supply at the mains. Do not operate any electrical switches and contact your
local gas supplier immediately.
Always make sure you understand the controls prior to use.
Always take care when touching any part of the cooker that may be hot. Use good
quality dry oven gloves when removing or replacing food or dishes.
Always stand back when opening the oven door to allow any build-up of heat or
steam to disperse.
Always keep the oven and grill doors closed when not in use to prevent accidents.
Always make sure that the roof, side and back panels, and shelves are fitted
correctly before using the oven or grill.
Always keep your cooker clean, as a build-up of grease or fat from cooking may be
a fire hazard.
Always switch off at the mains supply before cleaning your cooker.
Always supervise children and pets, particularly when grilling, as exposed parts of
the grill may become hot.
Always place pans centrally over the hotplate burners and make sure that they are
stable.
Always keep handles away from the edge of the hob and any other burners. For
added safety you should consider using a suitable hob guard.
Always make sure that all the controls are switched off when you finish cooking.
Always remember that your cooker may stay hot for a time even after you have
finished cooking.
Always keep ventilation slots at the rear of the cooker clear of obstructions.
Page 11

11
conventional oven
Centre hotplate
(Wok-Triple Ring)
Small electric
KNOW YOUR COOKER
(Behind storage panel)
Rating label on chassis
Cookclean side & rear panels
Large Timed Electric Multifunction Oven
glass door
main oven
Easyfit
2 Oven shelves
PLinth
multi-function
Front left hotplate
Control panel
(Not shown)
detachable handle
food support grid &
Cookclean roof liner
Meat/grill pan c/w
Electric grill
(Closed door)
Rear left hotplate
(Semi-Rapide)
(Rapide)
Easyfit small oven glass door
Drop down storage panel
Cookclean side panels
large oven programmer
Electronic digital timer &
Utensil holder
Baking tray
1 Oven shelf
(Auxiliary)
Rear right hotplate
(Semi-Rapide)
Front right hotplate
stop
Page 12
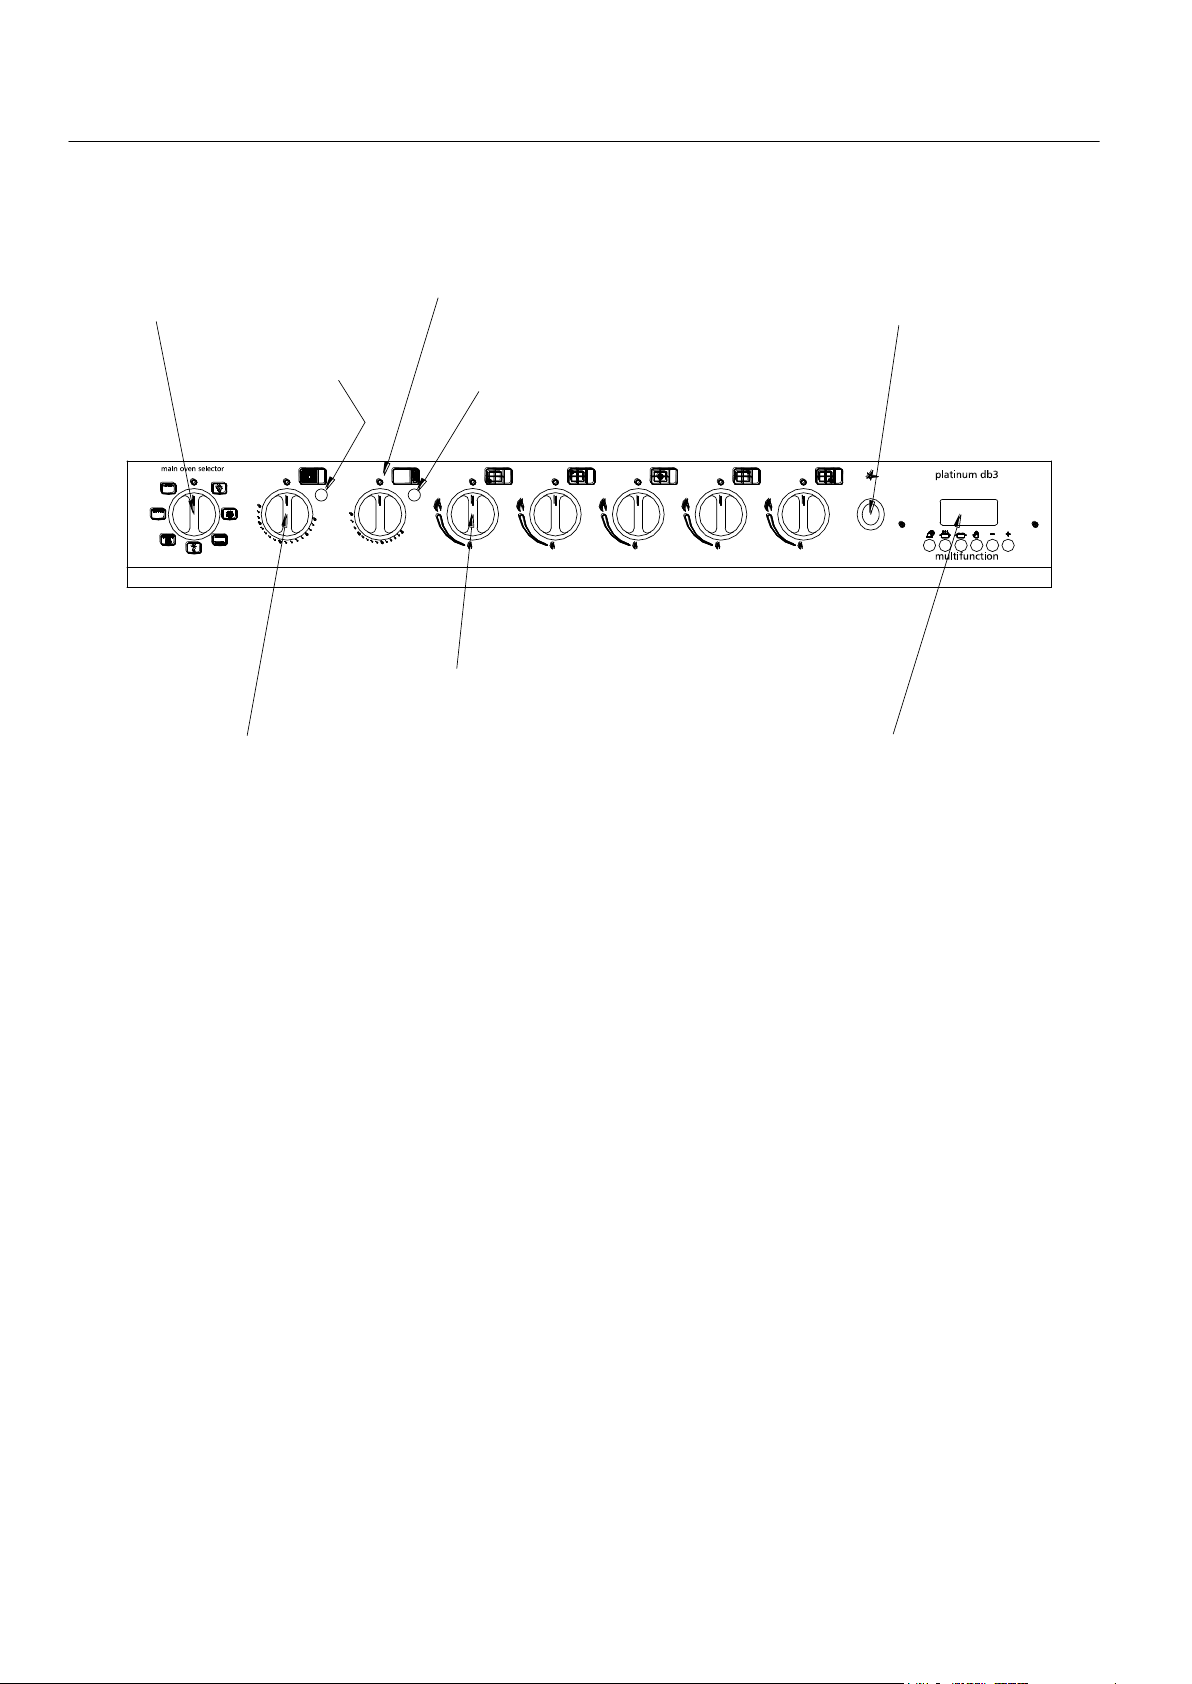
(5) Gas Hotplate Controls
Main Oven Neon
Multifunction Selector
(Programmable Timing Option)
Large Elec Multifunction Oven Thermostat
Switch (Main Oven)
200
230
150
100
70
200
230
m
100
150
and Large Elec Oven Timer
Electronic Digital Clock, Minute Minder
Spark Ignition Switch
stop
Small Oven Neon
Small Conventional Elec Oven Thermostat
12
Know Your Control Panel
Control Knobs & Switches The hob (Gas hotplates) control knobs can only be rotated anti-clockwise from
the off position.
The ovens thermostat control knobs can only be rotated clockwise from the off
position.
The multifunction selector switch knob can be rotated in either direction from
the off position.
The spark ignition switch is operated as follows.
Depress and hold in the push-button. This will provide a repetitive spark to the
burners.
Timer Instructions
Page 13
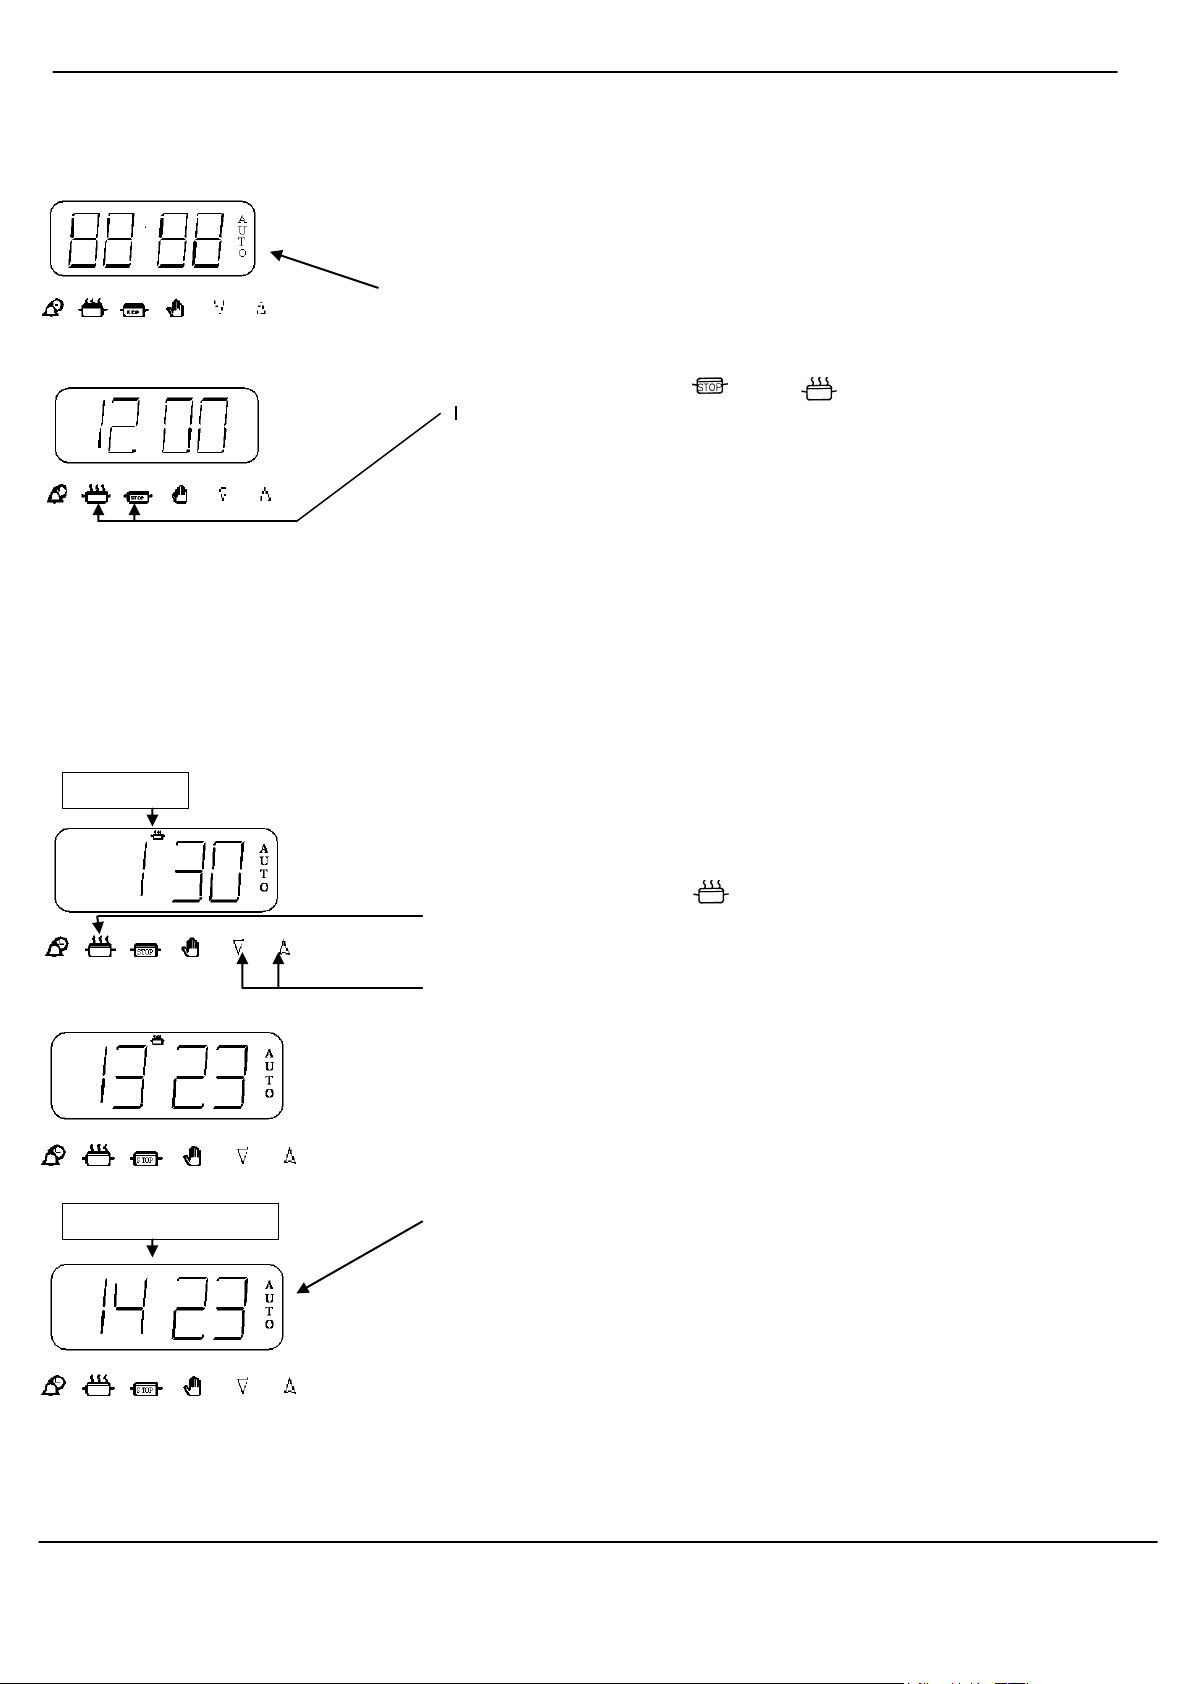
12
Cook pot
Cook pot symbol
To set the Time of Day Step 1 Make sure all the oven controls are turned off.
Step 2 Check that the electricity supply to the oven is switched on.
Step 3 When switched on the display will show 0.00 and Auto flashing
intermittently.
Step 4 Press and hold the and buttons together (the display
shows 12.00). At the same time press either the “+” or “-“ button to set
the correct time of day.
RELEASE AND THE TIME OF DAY IS NOW SET.
To set Timer to switch (This allows you to cook immediately for a chosen period of time OFF Automatically
before the oven switches OFF Automatically)
Step 1 Ensure the time of day is set correctly.
Step 2 Place food onto the correct shelf position in the oven.
Step 3 Turn the oven control to the required temperature (The oven should
now be operating).
Step 4 Press and release the button. The display will read 0.00 with the
cook-pot lit.
Within 2 seconds press and hold the “ Up ” or “Down “ button until the required
cooking period is set.
(Adjustment can be made by pressing the “ - “ button)
The timer display will revert to the time of day with the Auto symbol and Cook-
pot lit.
At the end of the cooking period the Auto symbol will flash and an intermittent
bleeping sound will be heard. This will continue for approximately 2 minutes
unless the timer is reset within this period (See step 6).
The oven will no longer operate until the timer has been reset to manual
operation (See steps 5 & 6 on the next page).
Timer Instructions
Page 14
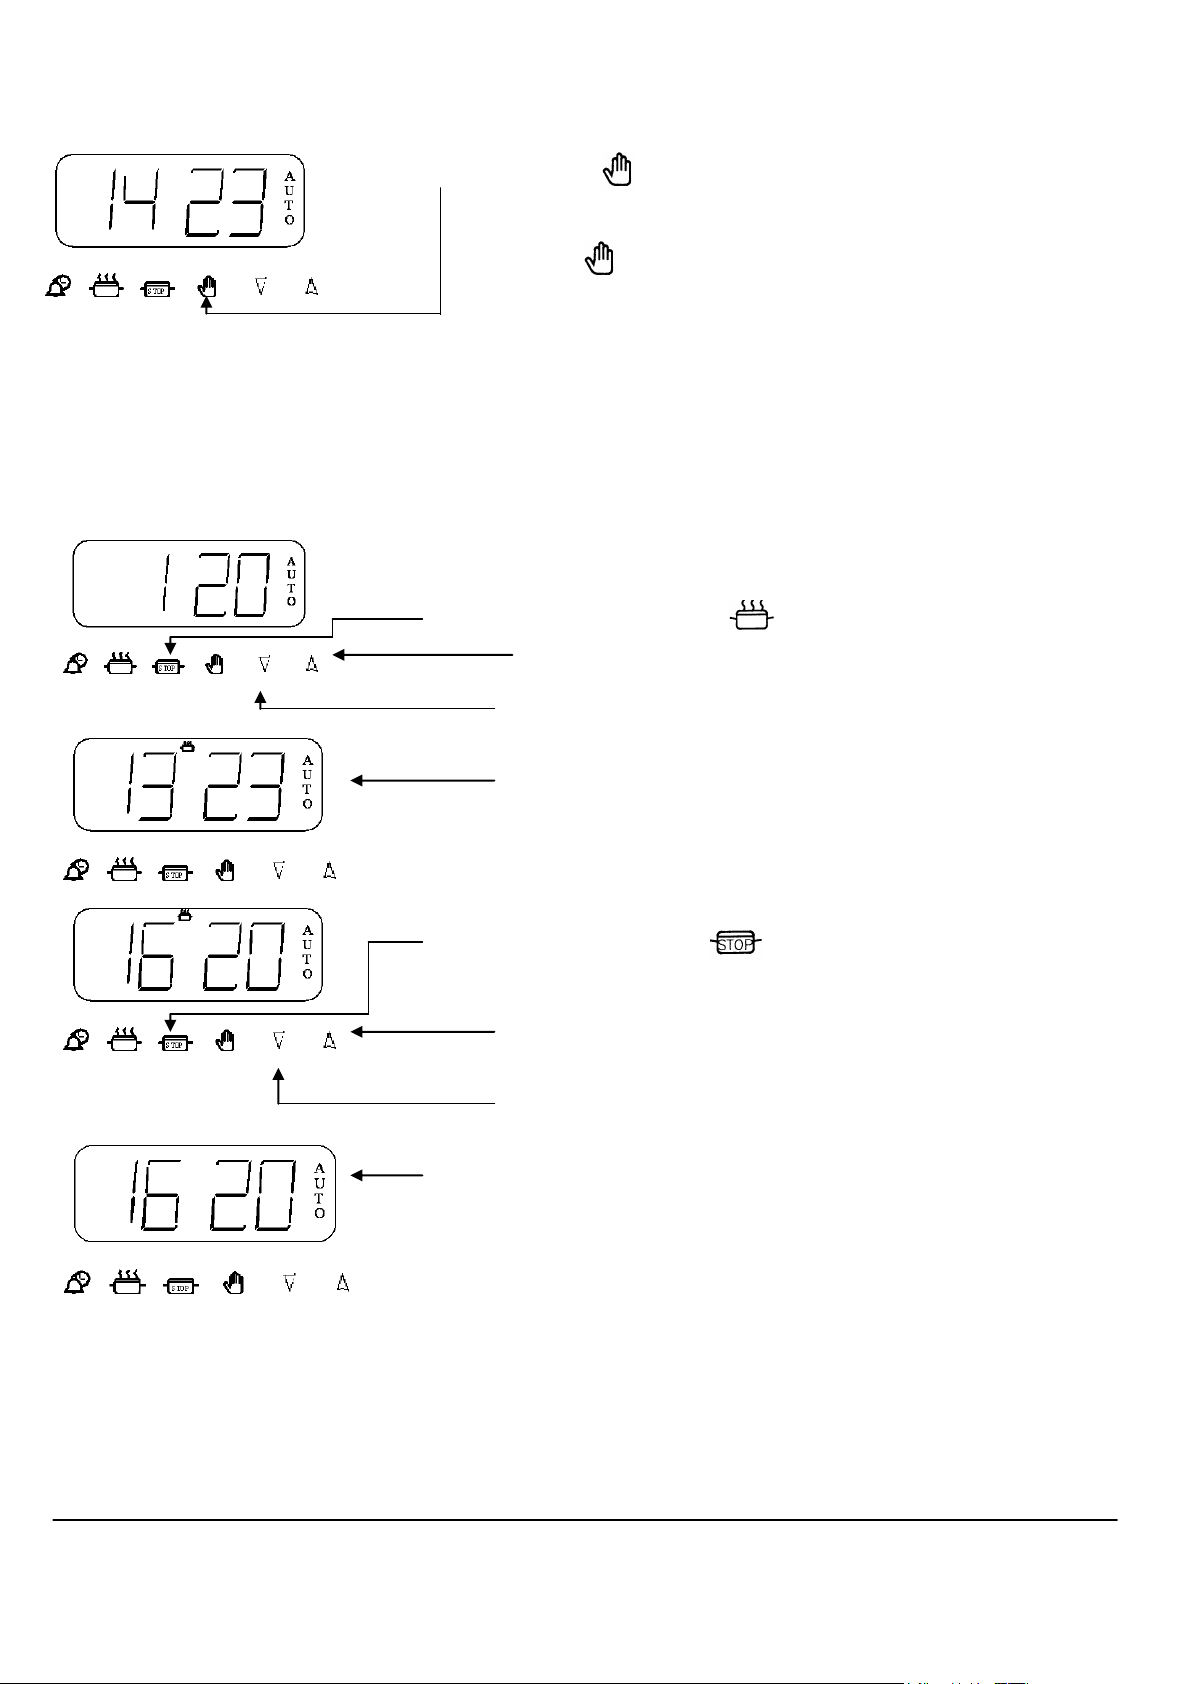
To set Timer to switch OFF Step 5 Turn off the oven control
13
Automatically (Continued)
Step 6 Press the button to cancel the bleeping (If 2 minutes has not
elapsed)
Press button again to return to manual operation.
To set Timer to switch ON (This allows you to cook at a specified time for a chosen period
& OFF Automatically before the oven switches OFF Automatically
Step 1 Ensure the time of day is set correctly.
Step 2 Place food onto the correct shelf position in the oven.
Step 3 Press and release the “ “ button. The display will read 0.00 with
the cook-pot lit. Within 2 seconds press and hold the “ Up ” button
until the required cooking period is set.
(Adjustment can be made by pressing the “ Down “ button).
The timer display will revert to the time of day with the Auto symbol
and cook-pot lit.
Step 4 Press and release the “ “ button. The display will read the
earliest possible end time with the cook-pot and Auto symbol lit.
Within 2 seconds press and hold the “ Up ” to set the time you require
the food to be ready, with only the Auto symbol lit.
(Adjustment can be made by pressing the “ Down “ button).
Step 5 Turn the oven control to the required temperature.
(The oven will now switch on later at the designated time, cook for the
required period and switch off automatically at the stop setting).
At the end of the cooking period the Auto symbol will flash and an intermittent
bleeping sound will be heard. This will continue for approximately 2 minutes
unless the timer is reset within this period (See Step 7).
The oven will no longer operate until the timer has been reset to manual operation (See steps 6 & 7 on the next page).
Timer Instructions
Page 15
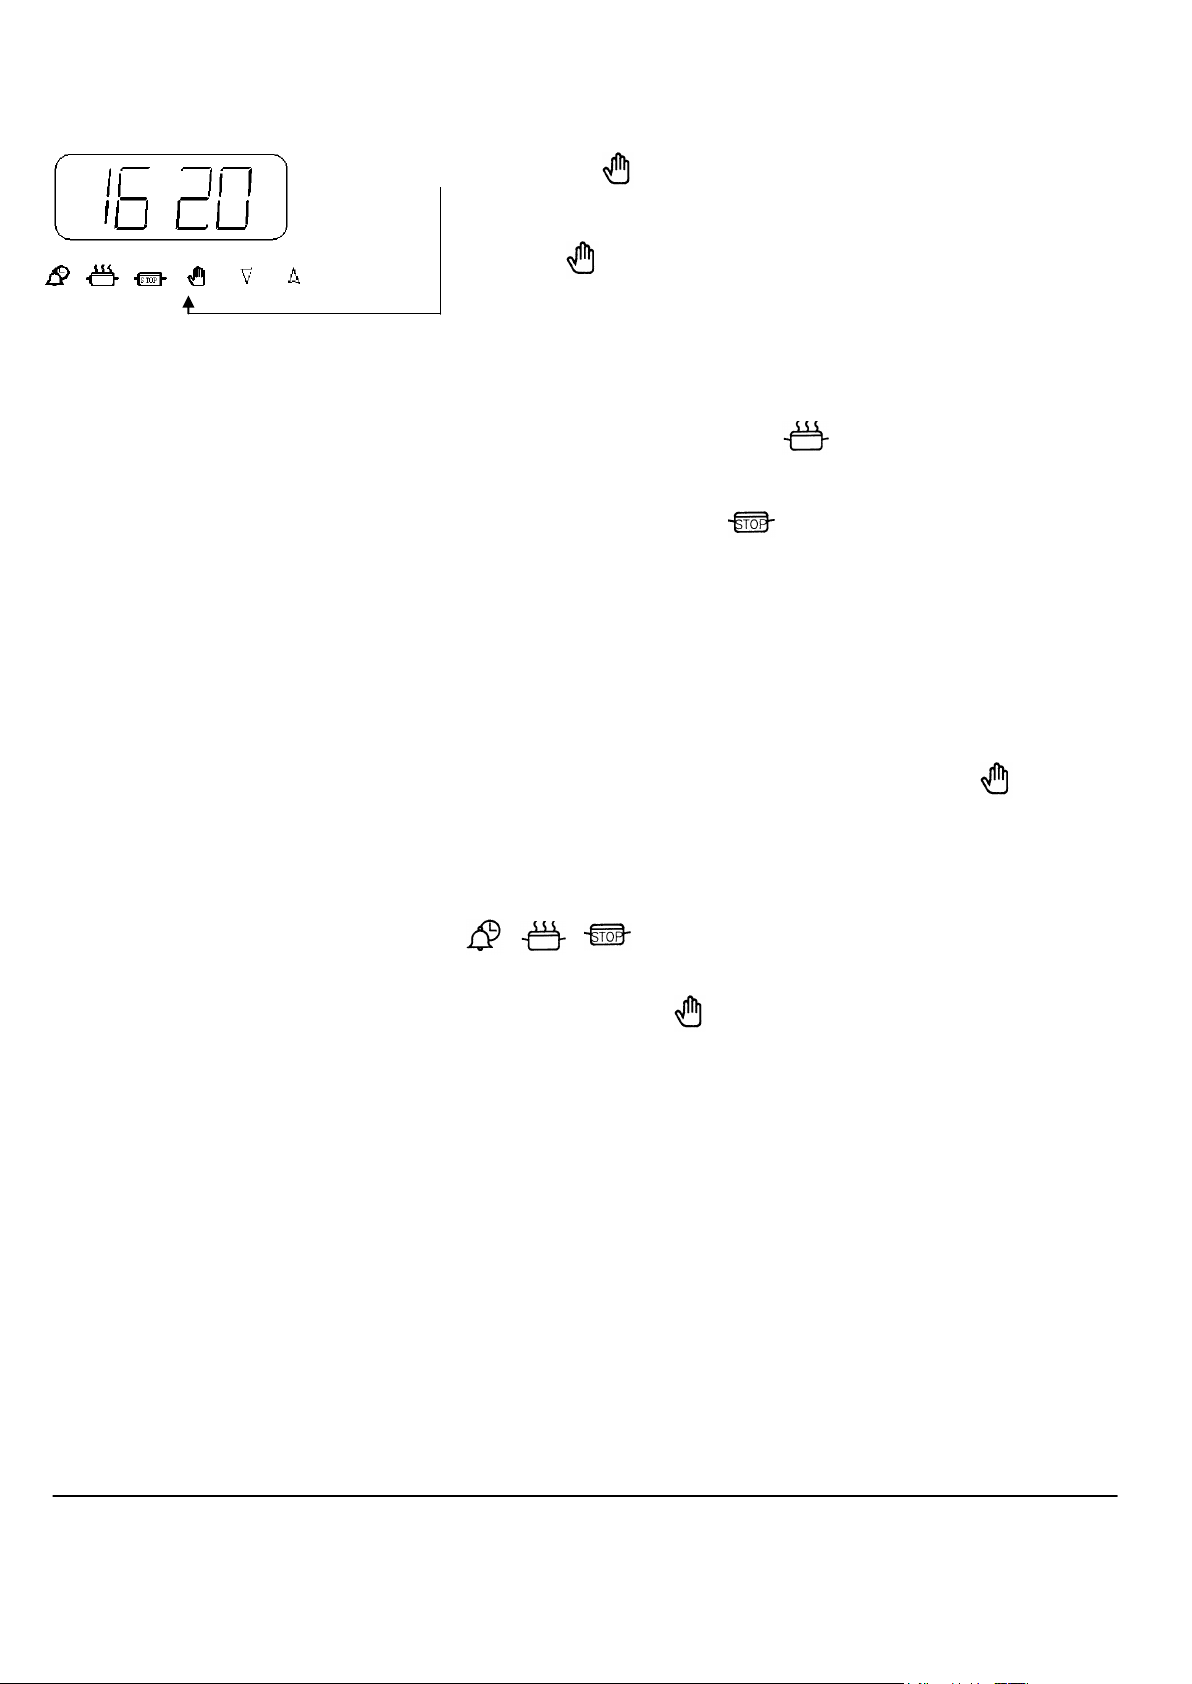
To set Timer to switch ON & Step 6 Turn off the oven control
14
OFF Automatically (Continued)
Step 7 Press the button to cancel the bleeping
(If 2 minutes has not elapsed)
Press button again to return to manual operation.
Other Notes On Timer 1. When cooking Automatically the cook period can be checked at Operation
any time simply by pressing the “ “ button.
2. When cooking Automatically the stop time can be checked at any time
simply by pressing the “ “ button. (This also can be altered at any time
by following Step 4 previously).
3. Having set a cooking period and stop time an electronic device stores the
information. The device within the timer will switch the oven on at the
required start time.
4. If a mistake is made and is not easily rectified, alter the cook period to show
0.00 (As per step 3 above) then press the “ “ button (See step 7
above).
5. After an automatic sequence the bleeping sound can be switched off by
pressing any of the following three buttons.
However, the large oven cannot be operated until the timer has been set to
manual. Press the Button (See Step 7 above).
6. If at any time the display shows three flashing zeros 0.00. It is likely that the
electricity supply to the oven has been interrupted. Reset the timer to the
correct time of day. If there is any food in the oven, make sure that it has
been cooked thoroughly before serving.
7. To give yourself more time to set each function press and hold the required
function button and at the same time press “ + “ or “ - “ button.
Note: Between the hours of 10.00 p.m. and 6.00 a.m. the intensity of the display
reduces.
Timer Instructions
Page 16
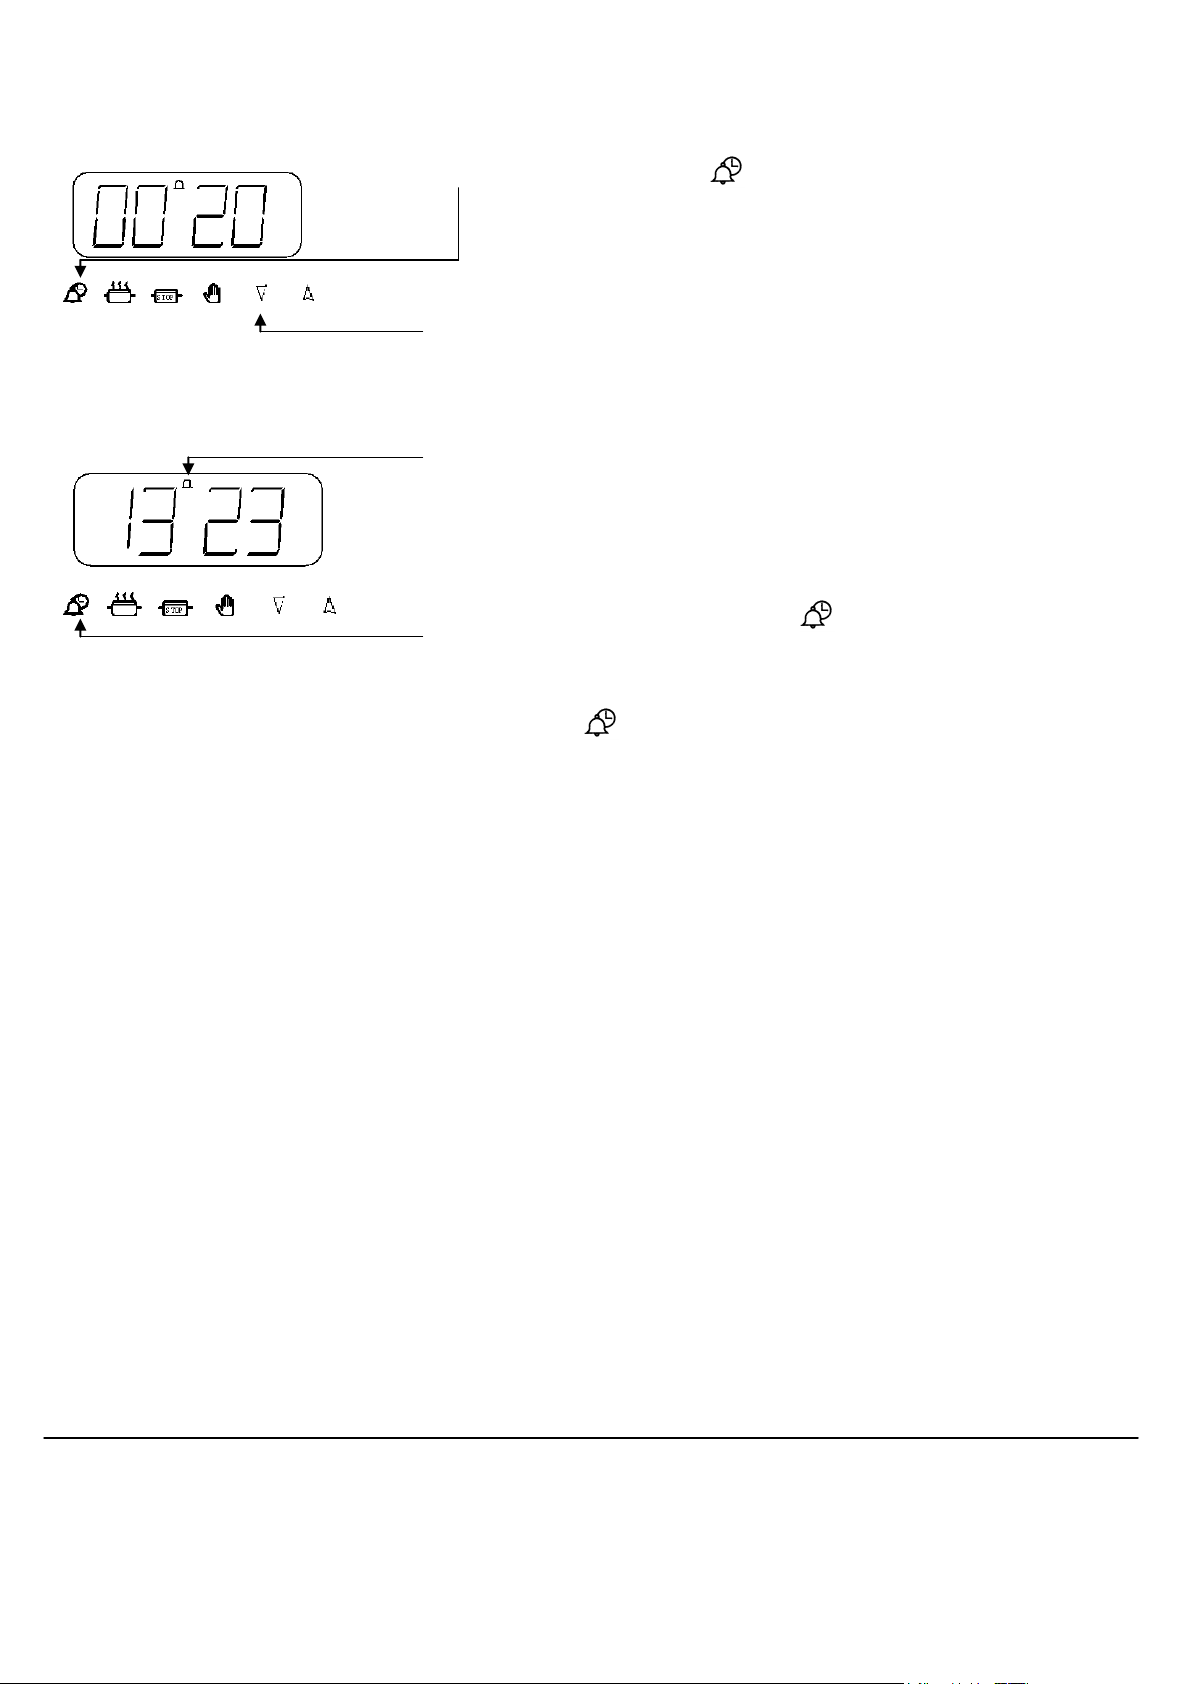
To Set the Minute Minder Step 1 Ensure the time of day is set correctly
15
Step 2 Press and release the “ “ button. Within 5 seconds press and
hold the “ Up ” button until the required time is set (A bell symbol
will light).
This can be adjusted by pressing the “ Down “ button.
On releasing the buttons the timer will revert back to the time of day.
At the end of the set time a bleeping sound will be heard and the bell symbol will
flash.
This can be cancelled by pressing the “ “.
Note: If necessary the Minute Minder can be cancelled before the tone sounds by
pressing the “ “ button and then press the “Down“ button until 0.00 appears
in the display window.
Automatic Cooking (Large Oven)
Rules to follow when When planning your meal, remember that the oven control setting
cooking automatically refers to the center of the oven - it is warmer above and cooler below.
Page 17

1. Food should be as cold as possible when it goes into the oven, ideally straight
18
from the refrigerator.
2. Frozen meat and poultry should be thawed thoroughly before it is put into the
oven.
3. The automatic timer should not be used in hot weather because of the
possible growth of food poisoning organisms.
4. NEVER use the automatic timer to re-heat Cook-Chill dishes.
5. Never leave food in the oven to cool slowly after cooking.
Serve immediately or refrigerate.
6. Dishes containing left over cooked meat or poultry, for example shepherds
pie, dishes containing eggs, cooked rice or seafood should not be cooked
automatically if there is to be a delay period.
7. Warm food should never be placed in the oven if there is to be a delay period.
Stews prepared by frying the meat and vegetables should be cooked as soon
as possible or refrigerated until loading the oven.
8. Try to set the stop time for a period beyond your anticipated return.
9. DO NOT leave food for an automatic program in a warm oven, i.e. one that
has just been used manually.
10. It is advisable to cover dishes where possible either with a lid or foil to
prevent the transfer of odours. If the food is to be served golden brown, it
may be uncovered or have the lid removed for a quick browning before
serving.
11. Dishes containing liquid should not be filled too full to prevent boiling over.
12. To prevent discoloration of certain fruit and vegetables such as apples,
pears, turnips and parsnips, a little lemon juice should be added to the
cooking liquid.
2. Potatoes should be par-boiled or brushed with fat to prevent discoloration
during delay time.
3. Wine or beer may ferment and cream may curdle during the delay period, so
it is best to add these ingredients just before serving.
Using The Hob
Description of The hob is made of enamelled mild steel and fitted with five gas
Hotplate Burners hotplate burners.
The left front hotplate burner (Rapide) is rated at 3.0kW.
Page 18
The left rear and right front hotplate burners (Semi – Rapide) are rated at
Burner Control Knob Uses Type of Food
position
Simmering Stews of fish, poultry and meet.
Milk puddings – steamed puddings.
Soups - boiled joints of meat e.g.
Ham, mutton, beef, scrambled egg.
SMALL FLAME Apple sauce.
Steady Boiling Vegetables.
Boiling jam after the sugar has been
added.
Shallow Frying Burgers, pancakes, omelettes, bacon
Eggs and raw fish.
LARGE FLAME Fast Boiling Bringing vegetables to the boil,
stir frying battered fruits fish and pasta.
19
1.75kW.
The centre hotplate burner (Wok – Triple Ring) is rated at 3.5Kw.
The right rear hotplate burner (Auxiliary) is rated at 1.0kW.
Use of Hotplates Check that the electricity supply is switched on. Select the burner to be used.
Push in and turn the control knob anti-clockwise to the large flame symbol:-
Press the ignition button until the burner lights. Turn the control knob to the
required setting.
A simmer position is achieved when the control knob is turned fully anticlockwise.
To turn off, turn the control knob fully clockwise to the „0‟ symbol.
Under certain conditions a slight „popping‟ noise can be heard from the
hotplates. This is perfectly normal and will not affect the performance of the
appliance.
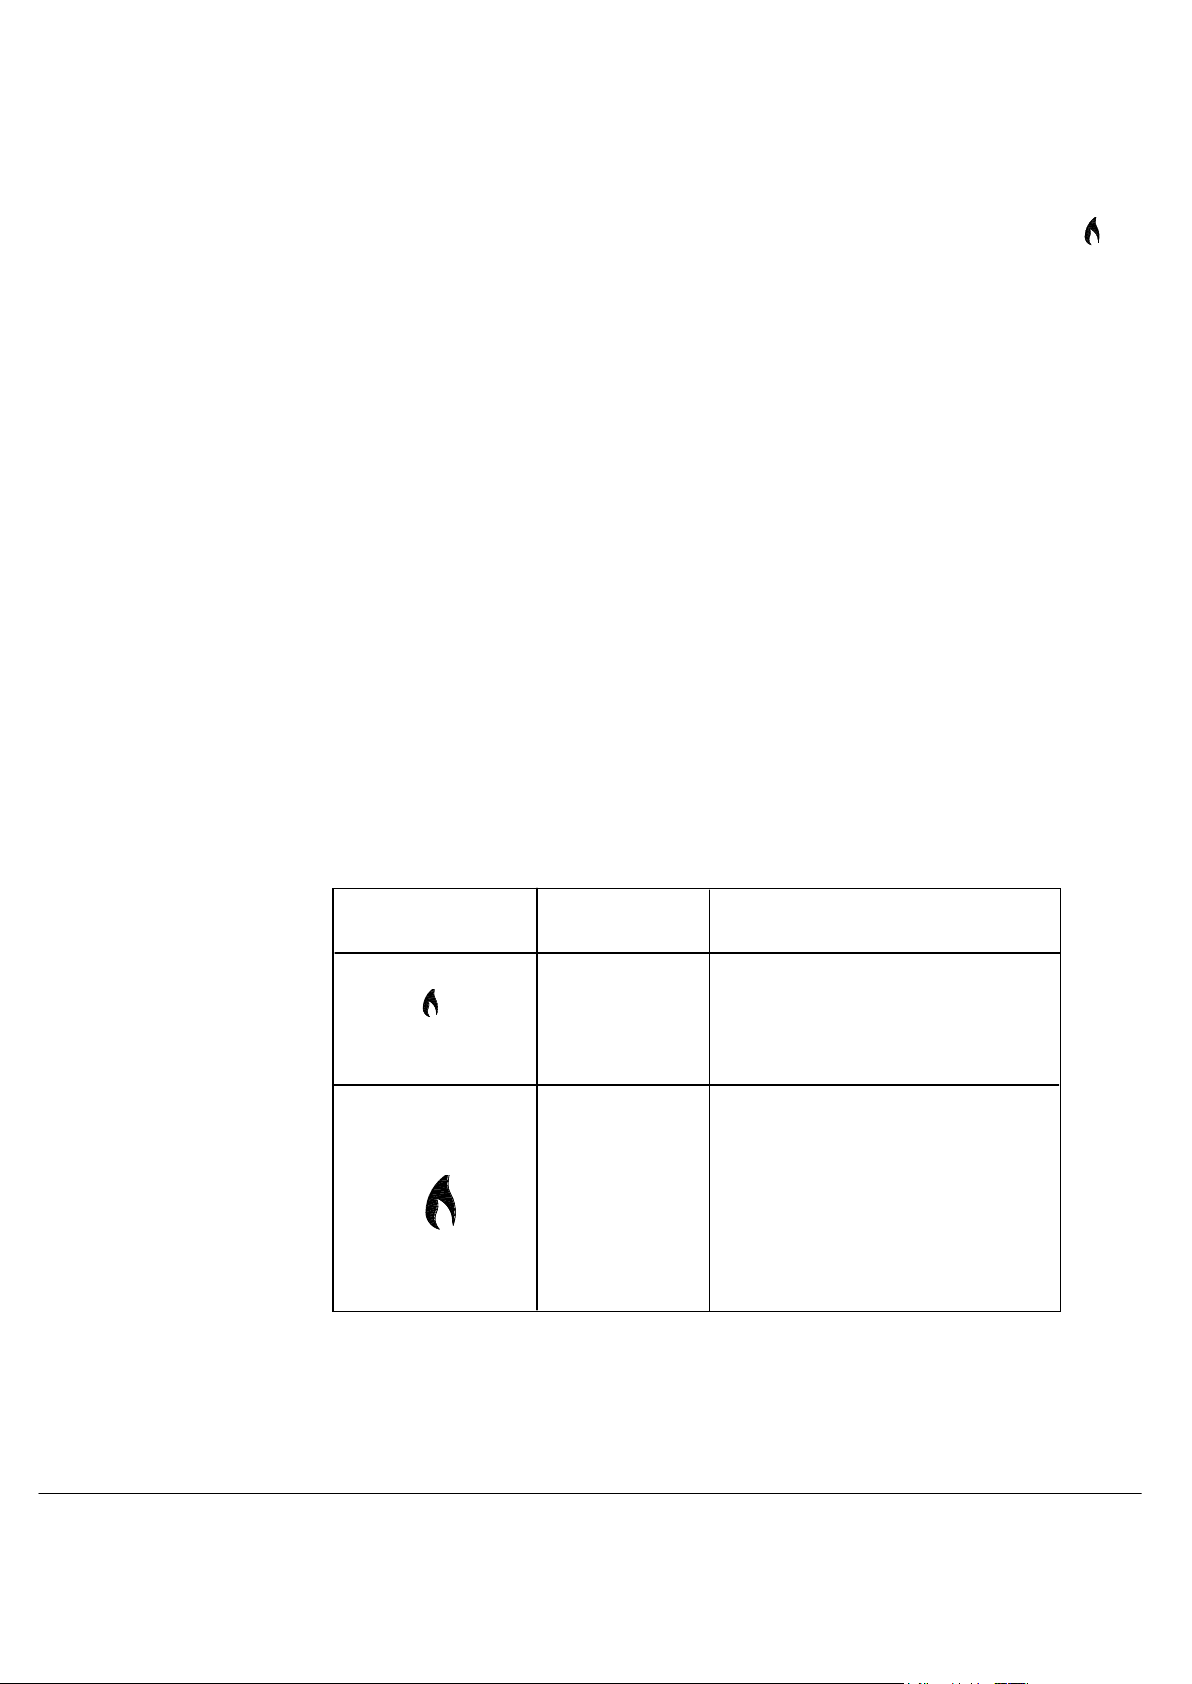
Control Setting Guide There are four sizes of hotplate burners on the hob and all are easily
Hotplates adjusted to any rate of cooking required.
The chart given below is provided as a guide only and personal experience will
soon familiarise you with the correct burner and setting to use. This depends on
the size, thickness, material of saucepans and the quantity and type of
ingredients being cooked.
COOKING CHART
Choosing Your Utensils Any type of flat based kettle or pan from 100mm (4in.) to 230mm (9in.) base
Using The Hob
Page 19
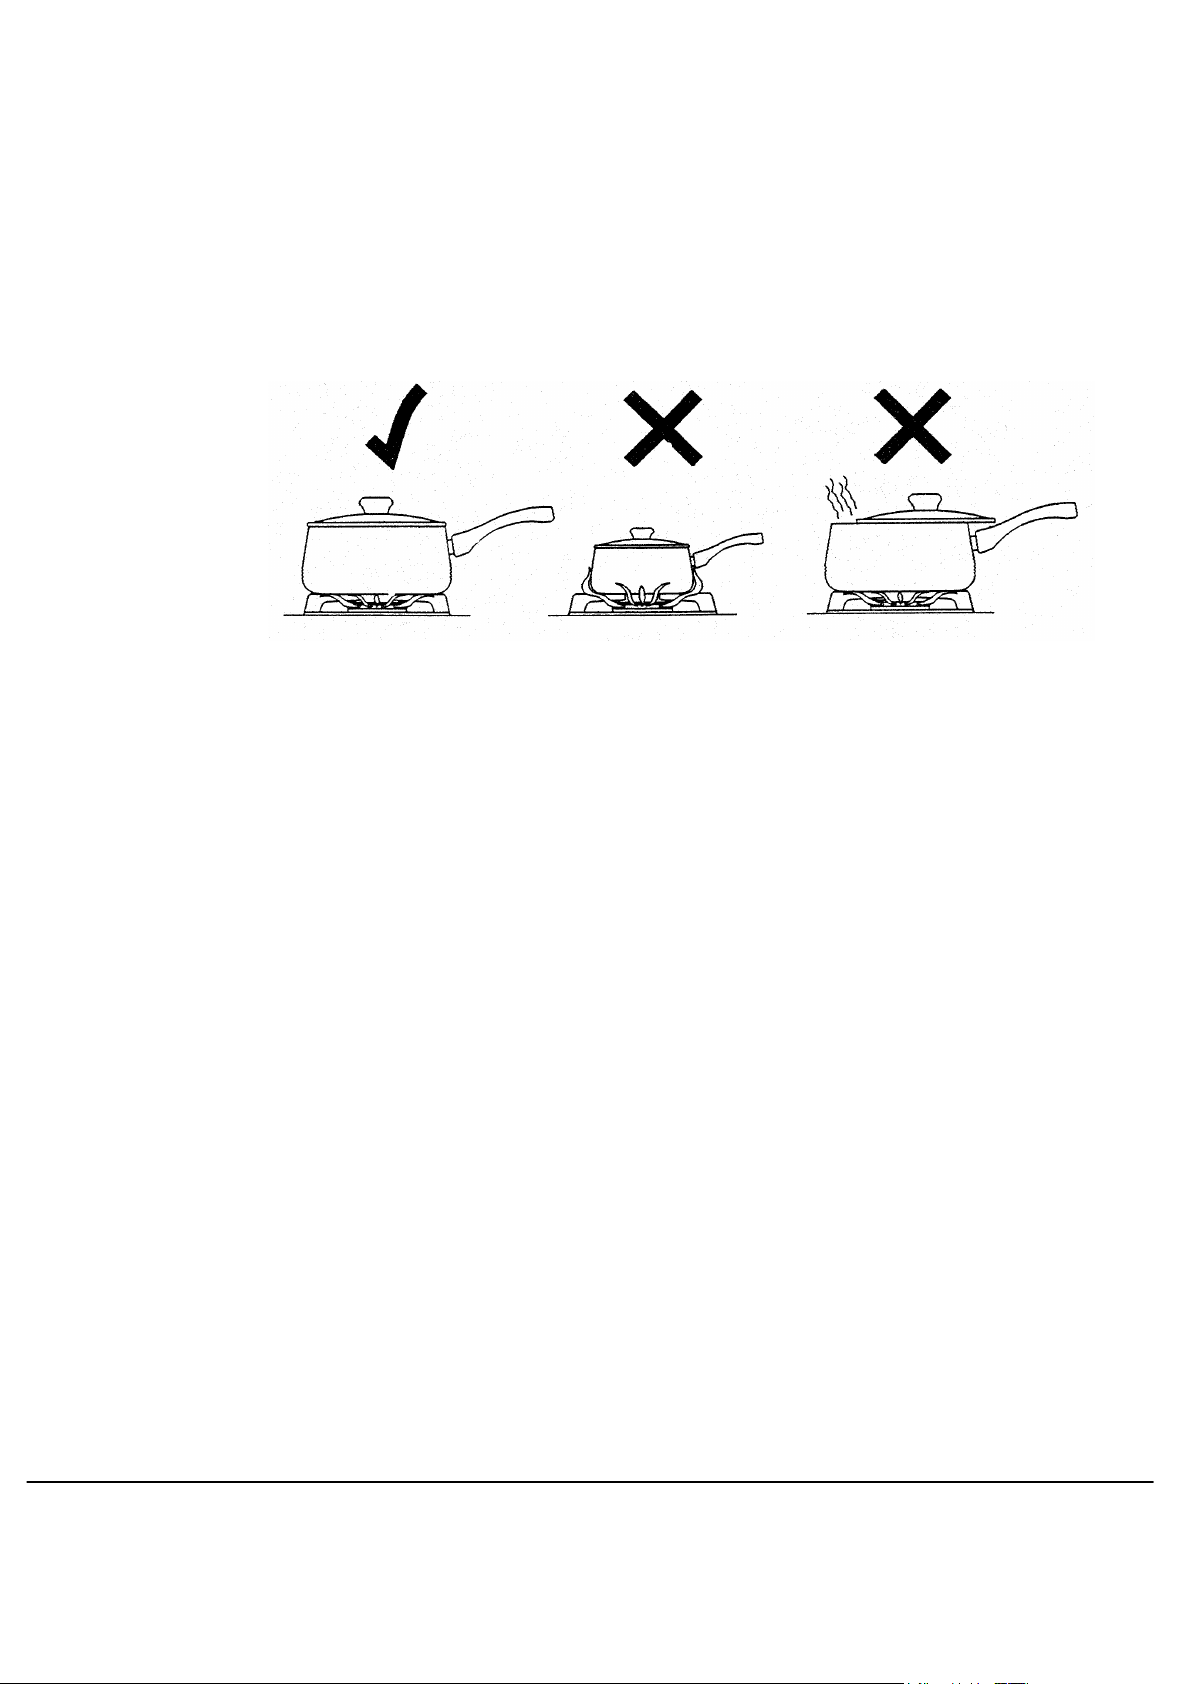
diameter may be used. Do not use pans which are unstable when placed on a flat
20
work-top. The use of split pans, i.e. those comprising two or more pans designed
to fit together over a single burner, is not recommended as these can be unstable
on the hotplate. Asbestos mats should not be used on the pan supports because
they may impede burner performance or damage the pan support.
In order to get best value out of your hob, the following economy tip is
recommended. Choose the correct burner for the size of pan.
Energy Saving Tips 1 Do use saucepans with lids
2 Place pans centrally over burner.
3 Do not allow flames to lick up the sides of the pan.
4 Only fill kettles or pans with the amount of liquid needed.
5 Turn down the gas as soon as the contents of the pan boil.
6 Do not light the burner until the pan is in position and turn off before removing
the pan.
7 Cut vegetables into smaller pieces so that they cook quicker and cook more
than one vegetable in the same pan, e.g. carrots and potatoes.
8 In hard water areas descale kettles regularly.
9 Consider using a pressure cooker.
Safety Requirements for IMPORTANT:
Using The Hob
Page 20

Deep Fat Frying As there could be some fire risk attached to the heating of oil,
21
particularly for deep fat frying, cooking utensils containing oil must not be
left unattended (e.g. to answer the telephone) or in close proximity to hotplates.
In the unfortunate event of a fire it will assist in smothering the flames if the pan lid
is replaced, and the power supply is switched OFF.
1 Use a deep pan, large enough to completely cover the appropriate heating
area.
2. Never fill the pan more than one-third full of fat or oil.
3. Never leave oil or fat unattended during the heating or cooking period.
4. Do not try to fry too much food at a time, especially frozen food. This only
lowers the temperature of the oil or fat too much, resulting in greasy food.
5. Always dry food thoroughly before frying, and lower it slowly into the hot oil or
fat. Frozen foods, in particular, will cause frothing and spitting, if added too
quickly.
6. Never heat fat, or fry, with a lid on the pan.
7. Keep the outside of the pan, clean and free from streaks of oil or fat.
Utensil Holder Adjacent to the hotplates on the right hand side is a “Utensil holder”
This provides a handy location for the resting of mixing spoons and utensils
whilst using the hob. The tray is removable for cleaning (see cleaning enamel).
Please note that as this tray is located close to burners it may become hot.
Care must be taken when removing. If in doubt, remove using oven gloves.
Main Multifunction Oven & Grill
Operation The main oven, on the left hand side of the cooker, is multifunctional and
incorporates both fan and conventional oven/grill facilities.
Page 21

For “Light Only” and “Defrost” turn the multifunction selector switch to the
22
required function only (Thermostat remains in the Off position).
The main oven light and fan (If selected) will come on.
If the thermostat is accidentally switched on during the “defrost” setting, it will
only activate the neon on the control panel. There will be no power
transferred to the oven elements.
For “Fan Oven”, “Conventional Oven”, “Fan Grilling”, “Full Grill” and “Half Grill”,
turn the multifunction selector switch to the required function. The main oven
light (plus fan if selected) will come On. Set the main oven thermostat to the
required temperature. The neon indicator lamp on the control panel will
immediately come On and will go out when the required temperature is reached,
subsequently switching On and Off at intervals to indicate that the correct
temperature is being maintained. The fan (If selected) and oven light will operate
continuously until the multifunction switch is turned Off or the timer is set to Auto.
NOTE: If the oven light and fan (If selected) does not come ON when the
multifunction switch is turned, Check that the electricity supply is switched On
and that the timer is set for manual operation. If the neon indicator does not
come On when the thermostat control is turned, check that a function has been
selected.
To turn off the multifunction switch, turn the control knob either way to the
zero position.
To turn off the oven thermostats, turn the control knobs fully anti-clockwise
to the zero position.
Note: If you find that the oven is getting hotter than normal, when using a
particular temperature, then the thermostat may need to be replaced.
WARNING:- DURING USE THE APPLIANCE BECOMES HOT. CARE SHOULD BE TAKEN
TO AVOID TOUCHING HEATING ELEMENTS INSIDE THE OVEN.
MULTIFUNCTION SETTINGS
Off The main oven will be off with the exception of the oven clock display.
O
Light Only Illumination to oven only. The main oven thermostat stays in the Off position.
Main Multifunction Oven & Grill
Fan Oven Rear element & Fan. Use the main oven thermostat to control the temperature.
Since a fan oven heats up more quickly, and generally cooks food at a lower
temperature than a conventional oven, pre-heating is often unnecessary.
Page 22

However, foods such as bread, scones, Yorkshire pudding etc. do benefit from
23
being placed in a pre-heated oven. The charts on pages 28 and 29 are a guide
only, giving approximate cooking temperatures and times. To suit personal taste
and requirements it may be necessary to increase or decrease temps by 10ºC.
Because the fan oven cooks so efficiently, we recommend that when cooking
recipes not designed for a fan oven, you reduce the temperature by about 25ºC
and the time by about 10 minutes in the hour. If large quantities are being
cooked, it will be necessary to increase the cooking time somewhat to
compensate for the extra load.
Unless otherwise indicated in the charts, food is placed in a cold oven, i.e. without
pre-heating. If food is placed in an already hot oven, the suggested cooking time
should be reduced, depending on the type and quantity of food being cooked.
It should be noted that at the end of the cooking period there might be a puff of
steam when the oven door is opened, this will disperse in a few seconds and is a
perfectly normal characteristic of an oven with a good door seal.
Since the distribution of heat in the fan oven is very even, most foods will cook
satisfactorily on any shelf position, but the shelves should be evenly spaced.
To ensure even circulation do not use meat pans larger than 415 x 320 (16½” x
12½”) and baking trays no larger than 330 x 255 (13” x 10”), these should be
positioned centrally on the oven shelf.
- Do not fit shelves upside down
- Never use more than three shelves in the oven (Two supplied with the
cooker), as air circulation will be restricted.
- Food or cooking utensils should not be placed on the floor of the oven
- To avoid unnecessary cleaning, rod shelves not in use should be removed
from the oven.
Cold start cooking
Preparation and Roasting Place the bird directly onto the shelf in the first or second shelf position,
Large Poultry with a large roasting tin on the oven base to collect the juices. It is important to
check that the bird and foil DO NOT overhang the burner at the back of the
oven.
The maximum weight of a turkey that can be accommodated is 25lbs (11.5kg)
provided it will fit within the constraints of the oven.
Main Multifunction Oven & Grill
Conventional Oven Outer Top & Under base elements. Use the main oven thermostat to control the
temperature. The charts on pages 28 and 29 are a guide only, giving
approximate cooking temperatures and times. To suit personal taste and
requirements it may be necessary to increase or decrease temps by 10ºC.
Page 23

If large quantities are being cooked, it will be necessary to increase the cooking
24
time somewhat to compensate for the extra load.
Anything requiring long slow cooking such as Casseroles and rich fruitcakes can be
put into a cold oven. Satisfactory results in a cold oven can also be obtained with
creamed mixture, rich pastries or yeast mixtures, but for perfection we recommend
preheating the oven for about 20 minutes.
Shelves should be evenly spaced. To ensure even circulation do not use meat
pans larger than 415 x 320 (16½” x 12½”) and baking trays no larger than 330 x
255 (13” x 10”), these should be positioned centrally on the oven shelf.
- Do not fit shelves upside down
- Never use more than two shelves in the oven (Two supplied with the cooker),
as air circulation will be restricted.
- Food or cooking utensils should not be placed on the floor of the oven
- To avoid unnecessary cleaning, rod shelves not in use should be removed
from the oven.
Defrost Fan only. The main oven thermostat stays in the Off position.
Inner & Outer top elements with Fan. Use the main oven thermostat to control
the temperature. The charts on pages 28 and 29 are a guide only, giving
approximate cooking temperatures and times. To suit personal taste and
requirements it may be necessary to increase or decrease temps by 10ºC.
If large quantities are being cooked, it will be necessary to increase the cooking
Fan Grill time somewhat to compensate for the extra load.
The food is placed directly on a shelf positioned low in the oven and the meat/grill
pan supplied is positioned on the floor of the oven to catch juices. For best results
and even cooking, it is necessary to turn the food occasionally. For small items of
food it may be advantageous to place the food support grid from the grill/meat pan
on the shelf. This will help to prevent food from dropping through the shelf.
- Do not fit shelves upside down
- Never use more than one shelf in the oven (Two supplied with the cooker),
as air circulation will be restricted.
- To avoid unnecessary cleaning, rod shelves not in use should be removed
from the oven.
Main Multifunction Oven & Grill
Full Grill Inner & Outer top elements. Use the main oven thermostat to control the
(Conventional) temperature.
The charts on pages 28 and 29 are a guide only, giving approximate cooking
Page 24

temperatures and times. To suit personal taste and requirements it may be
25
necessary to increase or decrease temps by 10ºC.
If large quantities are being cooked, it will be necessary to increase the cooking
time somewhat to compensate for the extra load.
NOTE: CLOSED DOOR GRILLING
Half Grill Inner top element. Use the main oven thermostat to control the temperature.
(Conventional) The cooking guides are generally as for Full Grill except that there is a 45%
power reduction and the heat is more central. This is especially good for
cooking small quantities of food positioned centrally on the shelf.
NOTE: CLOSED DOOR GRILLING
Using the grill THE GRILL WILL NOT OPERATE WHEN THE OVEN TIMER IS SET!
CAUTION
Grilling should never be undertaken with the grill/oven door open.
Never operate the grill without the grill roof in place.
WARNING! Accessible parts may become hot when the grill is in use.
DO NOT allow children near the appliance when the grill is in use.
DO NOT cover the grill pan or grid with aluminum foil as this can hold fat,
intensify the heat and create a fire hazard.
Check that the electricity supply is switched on.
Remove the grill pan, load with food and adjust the top shelf to the height
required.
Close the door, turn the multifunction switch knob to either full or half setting.
Turn the main oven thermostat control knob to max ºC and pre-heat the grill for
approximately 2 mins.
Open the door and place the loaded grill pan on the shelf centrally under the
element. Detach the handle (If used) and store.
Close the door and turn the control knob to the required temperature setting.
Use the detached grill pan handle or oven gloves to adjust or remove the pan.
Turn the food regularly.
Main Multifunction Oven & Grill
Grill Pan & Grid The grill pan is positioned centrally on a shelf and pushed back to the shelf stop.
Always use oven gloves when pulling the pan forward to turn/serve.
The height of the grill pan is determined by the shelf position. The top position is
most suited for toasting or sealing food. To avoid burning, or excessive smoking
Page 25
26
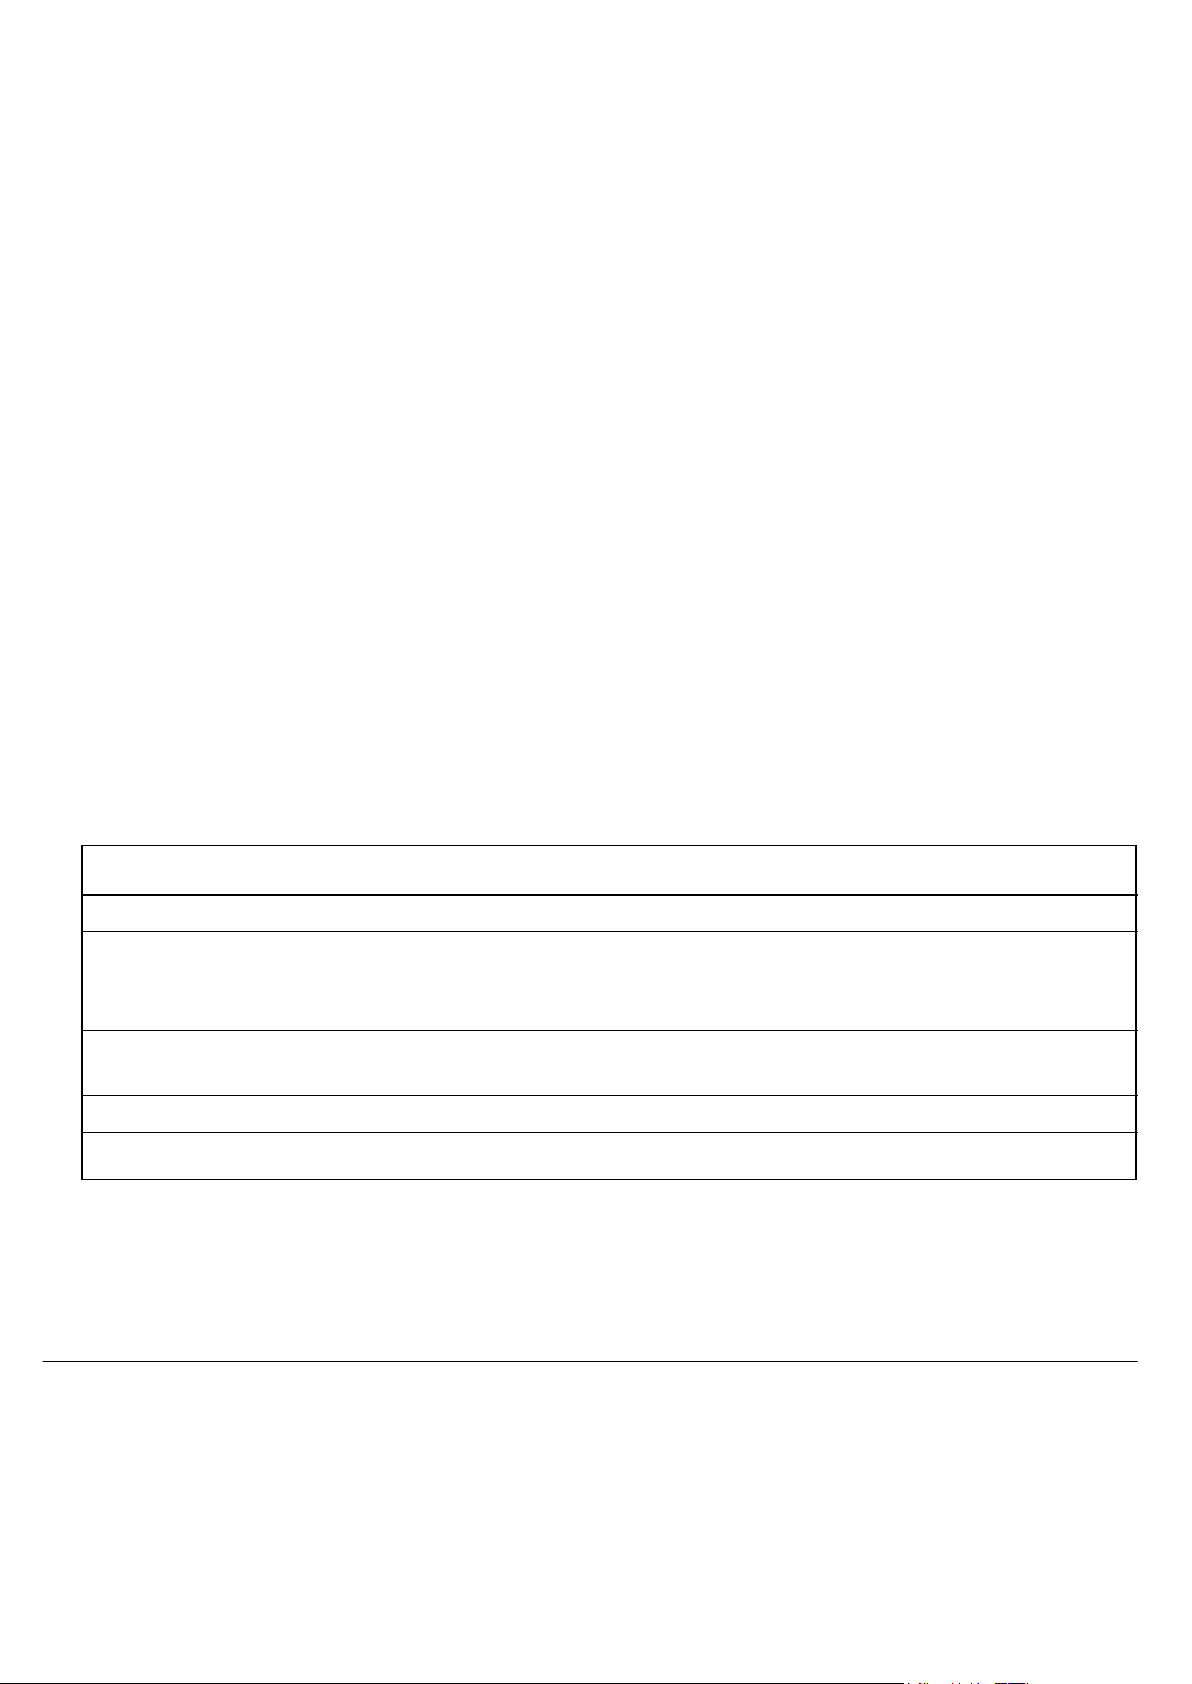
GRILL CHART
Food Preheat Shelf Position (from bottom) Setting ºC Approx. Cooking time
and spitting, make sure that the food is not too close to the element.
For thicker foods requiring longer cooking time, turn the thermostat to a lower
setting after sealing both sides on max setting.
The handle is detachable. To fit, gently squeeze the ends of the wire handle and
insert from below into the grill pan bracket. Do not use the grill pan handle to tip
the grill pan sideways, for example, to empty fat or crumbs from the pan, as the
handle may become detached from its fixing bracket.
CAUTION! WHEN REMOVING THE GRILL PAN HANDLE ALWAYS USE
OVEN GLOVES AS THE WIRE MAY BE HOT.
To obtain best results always use the wire grid. This will ensure that foods do not
cook in their own fats and will prevent any distortion of the grill pan. It can be used
either way up to position the food nearer to or further away from the grill element.
The heated area of the inner grill element is in the center of the grid, although
there is enough spread of heat around this area to cook items such as tomatoes
and mushrooms which require lower cooking temperatures.
The following chart is a guide only.
Toast 2 min 6 Up 230 2 mins
Small cuts- 2 min 5 Up 230 for 4 mins 15 – 20 mins
Sausages (reduce to 180)
Bacon
Chops etc 2 min 4 Up 180 30 – 40 mins
Gammon
Fish 2 min 5 Up (In base of pan) 230 8 – 10 mins
Pizzas 2 min 4 Up 180 12 – 15 mins
Storage and Reheating of Food.
It is vitally important to strictly adhere to the basic principles of food handling and
hygiene to prevent the possibility of bacterial growth.
1. If food is to be frozen or not served immediately, cool it in a clean container as
Page 26

quickly as possible.
Baking
Conventional Oven (Top & Base Heat)
Fan Oven
27
2. Thaw frozen food completely in the refrigerator before reheating.
3. Re-heat food thoroughly and quickly either on the hotplate or in a hot oven,
Mk.6 and then serve immediately.
4. Only re-heat food once.
'Cook - Chill Dishes' These should always be placed in a pre-heated oven ideally on the first or second shelf
position. Follow the packet instructions for the cooking time.
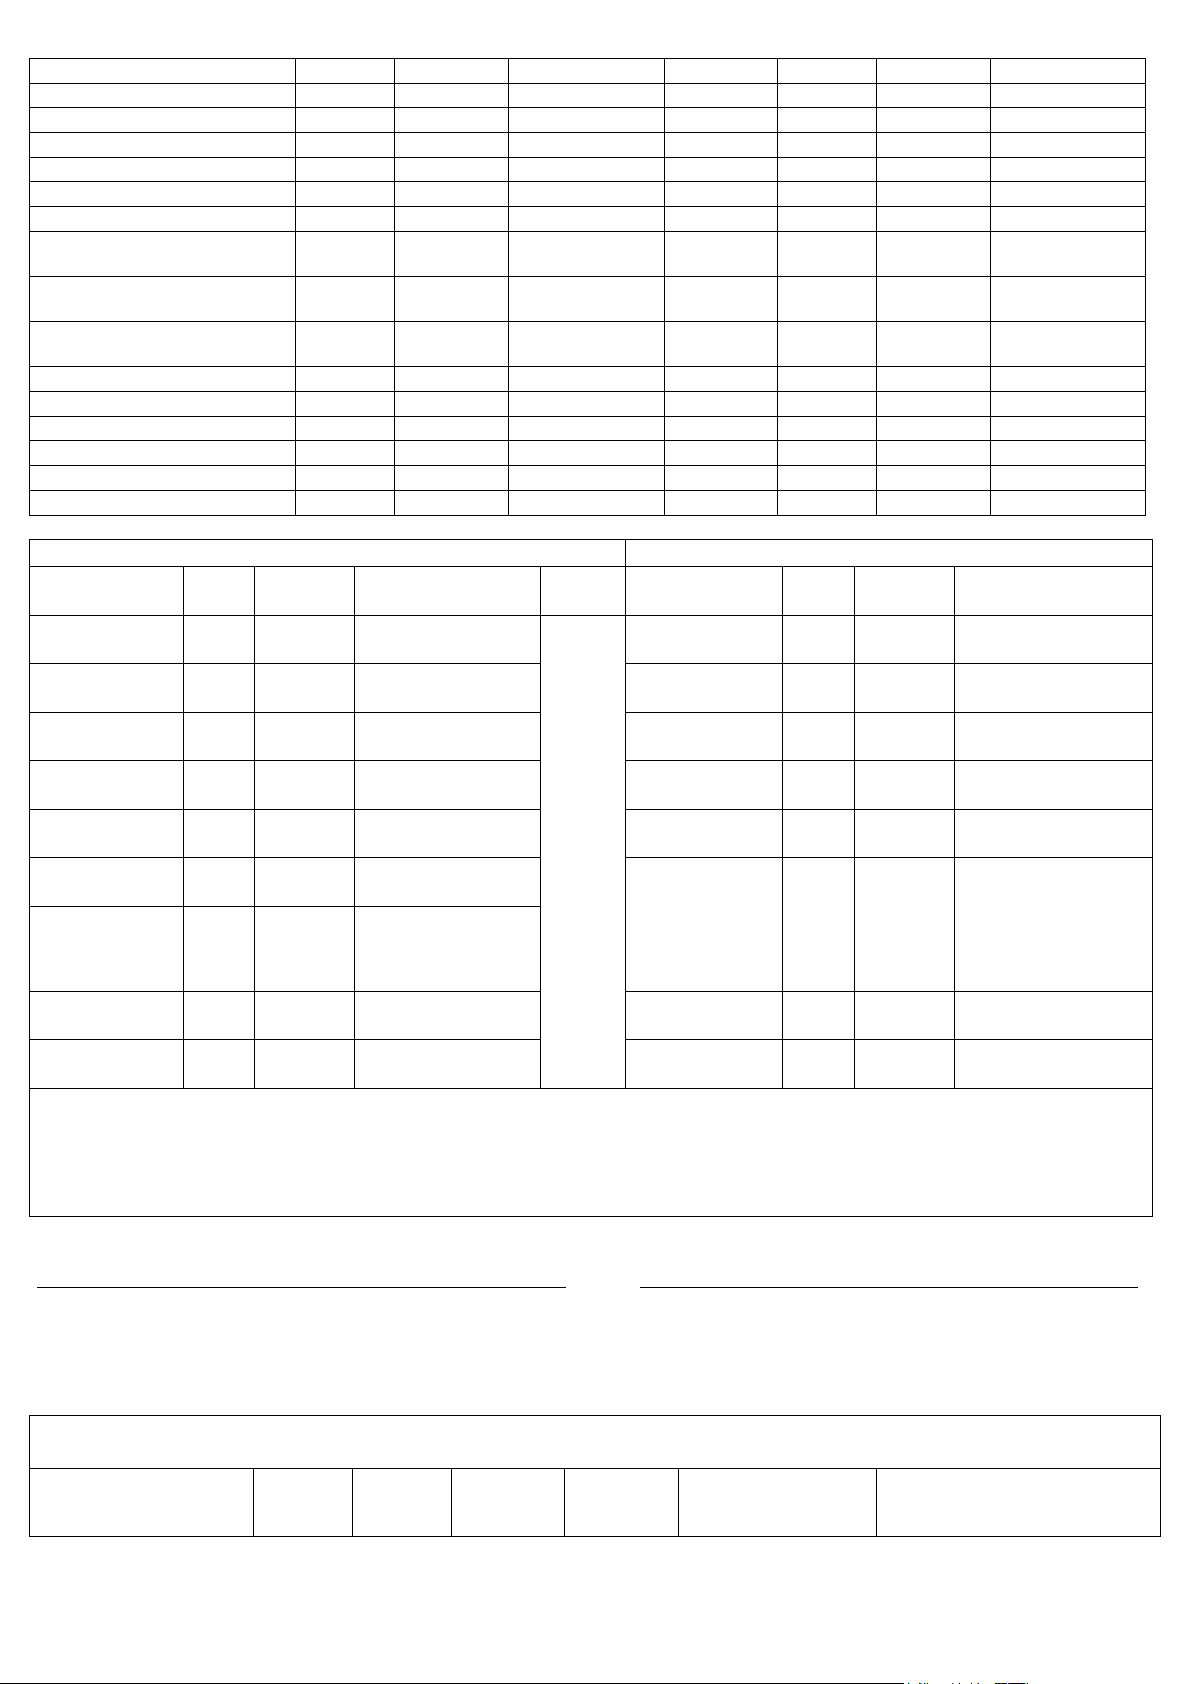
Main Multifunction Oven Cooking Guide
The following times and setting are for guidance only. You may wish to alter the setting to give a result more to your satisfaction.
When a different setting to that shown below is given in a recipe, the recipe instructions should be followed.
Shelf position 6 is the highest. It is not necessary to Pre-heat the fan oven before roasting. Note: Where times are stated they
are approximate only.
Page 27
Food
Preheat
Temp ºC
Time (approx)
Pos,n
Preheat
Temp ºC
Time (approx)
Scones
Yes
220/230
9-12 mins
2 Up
Yes
210/220
9-12 mins
Small cakes
Yes
180/190
15-25 mins
3 Up
No
180/190
20-25 mins
Victoria Sandwich
Yes
160/170
20-25 mins
2 Up
No
160/170
25-30 mins
Sponge Sandwich (Fatless)
Yes
180/190
15-20 mins
2 Up
Yes
170/180
15-20 mins
Swiss Roll
Yes
190/200
8-12 mins
2 Up
Yes
180/200
12-15 mins
Semi-rich Fruit Cakes (7”)
Yes
150/160
1¼-1¾ hrs
2 Up
No
140/150
1¼-1½ hrs
Rich Fruit Cakes
Yes
130/140
Depend on
recipe and size
2 Up
No
130/140
Depend on
recipe and size
Shortcrust Pastry
Yes
190/200
Depend on size
& filling
2 Up
No
190/200
Depend on size
& filling
Puff Pastry
Yes
190/200
Depend on size
& filling
2 Up
No
190/200
Depend on size
& filling
Yorkshire Pudding
Yes
190/200
40-45 mins
3 Up
Yes
180/190
40-50 mins
Individual Yorkshire Pudd‟s
Yes
200/210
20-30 mins
3 Up
Yes
190/200
20-25 mins
Milk Pudding
Yes
140/150
1¾-2 hrs
2 Up
No
130/140
1½-2 hrs
Baked Custard
Yes
130/140
40-50 mins
3 Up
No
140/150
35-45 mins
Bread
Yes
190/200
25-35 mins
3 Up
Yes
200/210
30-35 mins
Meringues
Yes
80/90
3-3½ hrs
3 Up
No
80/90
3-4 hrs
Conventional Oven (Top & Base Heat)
Fan Oven
Meat
Preheat
Temp
ºC
Time (approx)
Shelf
Pos’n
Meat
Preheat
Temp
ºC
Time (approx)
Beef/Lamb
(Slow roast)
Yes
170/180
35 mins per 450g (1 lb)
+ 35 mins over
2 or
3 Up
Beef
No
160/180
20-25 mins per 450g (1
lb) + 20 mins extra
Beef/Lamb
(Foil covered)
Yes
190/200
35-45 mins per 450g
(1 lb)
Lamb
No
160/180
20-30 mins per 450g (1
lb) + 25 mins extra
Pork
(Slow roast)
Yes
170/180
40 mins per 450g (1 lb)
+ 40 mins over
Pork
No
160/180
25-30 mins per 450g (1
lb) + 25 mins extra
Pork
(Foil covered)
Yes
190/200
40 mins per 450g (1 lb)
Veal
No
160/170
25-30 mins per 450g (1
lb) + 20 mins extra
Veal
(Slow roast)
Yes
170/180
40-45 mins per 450g
(1 lb) + 40 mins over
Chicken/Turkey
up to 4kg (8 lb)
No
160/180
18-20 mins per 450g (1
lb) + 20 mins extra
Veal
(Foil covered)
Yes
190/200
40-45 mins per 450g
(1 lb)
Turkey to 5.5kg
(8 to 12 lb)
No
150-160
or 150
12-14 mins per 450g (1
lb) + 12 mins extra
For every 450g (1 lb)
over 5.5kg (12 lb) allow
10 min per 450g (1 lb)
and roast at 150ºC
Poultry/Game
(Slow roast)
Yes
170/180
25-30 mins per 450g
(1 lb) + 25 mins over
Poultry/Game
(Foil covered)
Yes
190/200
25-30 mins per 450g
(1 lb)
Casserole
Stews
No
140-150
1½-2 hrs
Casserole
Cooking
Yes
150
2-2½ hrs
If using aluminum foil, never:
1. Allow foil to touch sides of oven.
2. Cover oven interior with foil.
3. Cover shelves with foil
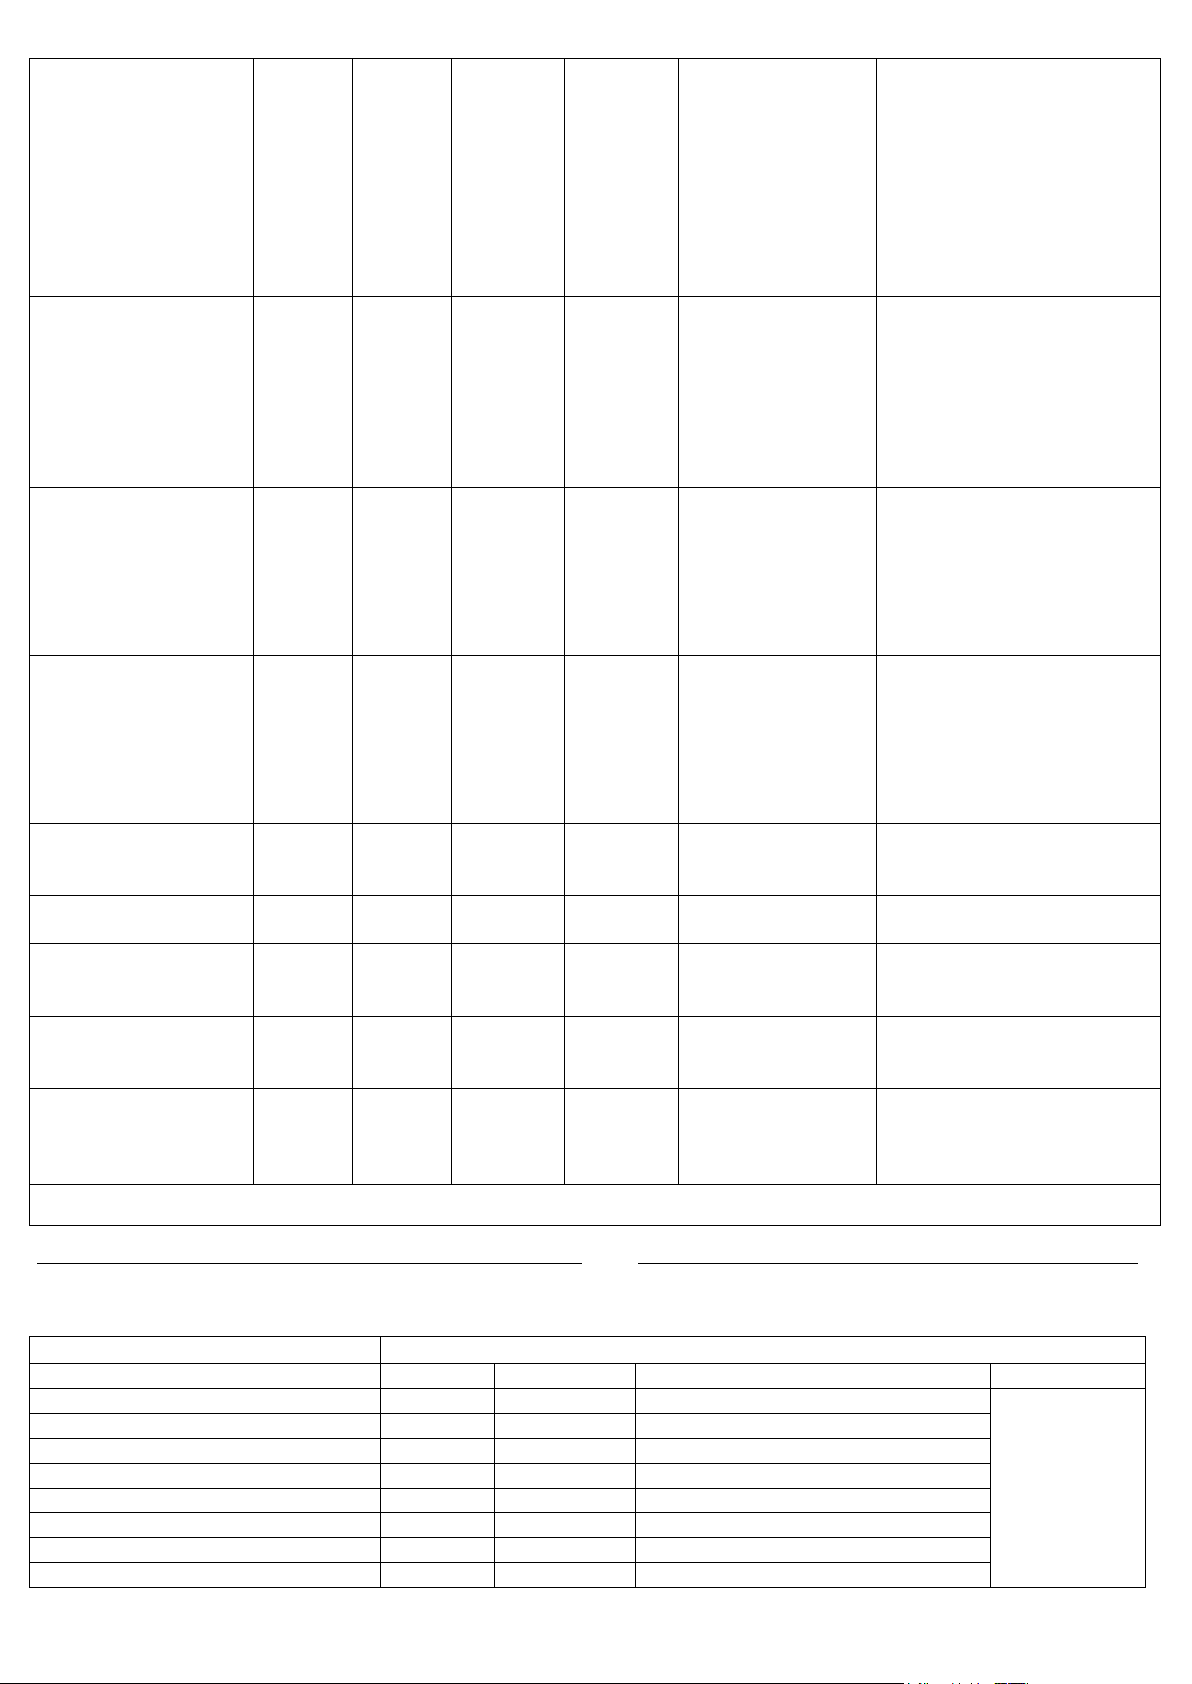
Fan Grilling
Type of meat or
poultry
Weight
kg
Temp
ºC
Time
(min/kg)
+ extra
time
(mins)
Total cooking time
(mins)
Tips
28
Shelf positions are counted from the base upwards i.e.: lowest shelf position is 1.
No Pre-heat required for Fan Grilling.
Main Multifunction Oven Cooking Guide
Page 28
PORK Chops – thick
Gammon Steaks
Pork joints (Any type)
1.0
1.5
2.0
2.5
over 2.5
170
160
160-170
150-170
140-150
140-150
140
25
30
60-70
60-70
65-75
65-75
70-75
45
45
50
50
50
Dependent on size
Dependent on size
105-120
130-150
180-230
220-240
-
Season, grill on shelf position 2 up.
Turn over after 15 mins.
Grill on shelf 2 up. Turn after 15 mins.
Score fat with sharp knife and rub on
salt. Pork should be thoroughly
cooked. Overcook rather than
undercook.
Grill on shelf position 1 up
LAMB Chops – thick
Lamb joints (Any type)
1.0
1.5
2.0
2.5
over 2.5
170
160-170
160-170
150-160
150-160
150
25
30-40
35-40
35-45
40-45
45-50
45
45
50
50
50
Dependent on size
78-88
90-110
120-140
150-170
-
Season, grill on shelf position 2 up.
Turn over after 15 mins.
Score fat. Season with pepper and
rosemary. If you prefer the lamb pink
choose the shorter time.
Grill on shelf position 1 up
BEEF joints which
have an outside layer
of fat
Eg. Rib, Rolled,
Sirloin.
Steak
1.0
1.5
2.0
2.5
over 2.5
0.5
170-180
170-180
160-170
160-170
160
170
40-50
40-50
40-50
45-50
45-50
30-40
20
20
20
30
40
-
60-70
80-90
100-110
140-150
-
15-20
Season. If joint preferred rare, grill for
the shorter time. If preferred well
done, grill for the longer time.
Grill on shelf position 1 up
Grill on shelf position 2 up
CHICKEN Whole
Chicken joints
1.0
1.5
2.0
2.5
over 2.5
Up to 1kg
180
180
170
170
160-170
180
30
30
35
35
40
30
30
30
30
30
30
30
60
75
100
115
-
60
Season and brush over with melted
butter to give nicely browned skin.
Grill on shelf position 1 up
Grill on shelf position 1 up
DUCK
1.5
2.0
2.5
180
180
180
30
30
30
30
30
30
75
90
115-130
Dry thoroughly and lightly salt.
Grill on shelf position 1 up
GOOSE
Up to 4
4-5
170-190
160-170
40
45
40
40 - -
Can be stuffed.
Grill on shelf position 1 up
TURKEY
Up to 5
6-8
170
150 - -
-
-
150-165
165-175
Season and brush over with melted
butter to give nicely browned skin.
Grill on shelf position 1 up
GAME Grouse
Partridge
Pheasant
Any
Any
Any
170-180
170-180
170-180
30-50
40-50
40-50
-
-
-
-
-
-
Well hung meat will require less
cooking time.
Grill on shelf position 1 up
Mixed Grill etc.
Beefburgers ,
Sausages, Bacon
450g
(1 lb)
170
25 mins
per 450g
(1 lb)
30
Prick sausages before cooking. Turn
food regularly for even cooking.
Grill on shelf position 2 up.
Turn food over half way through the cooking time.
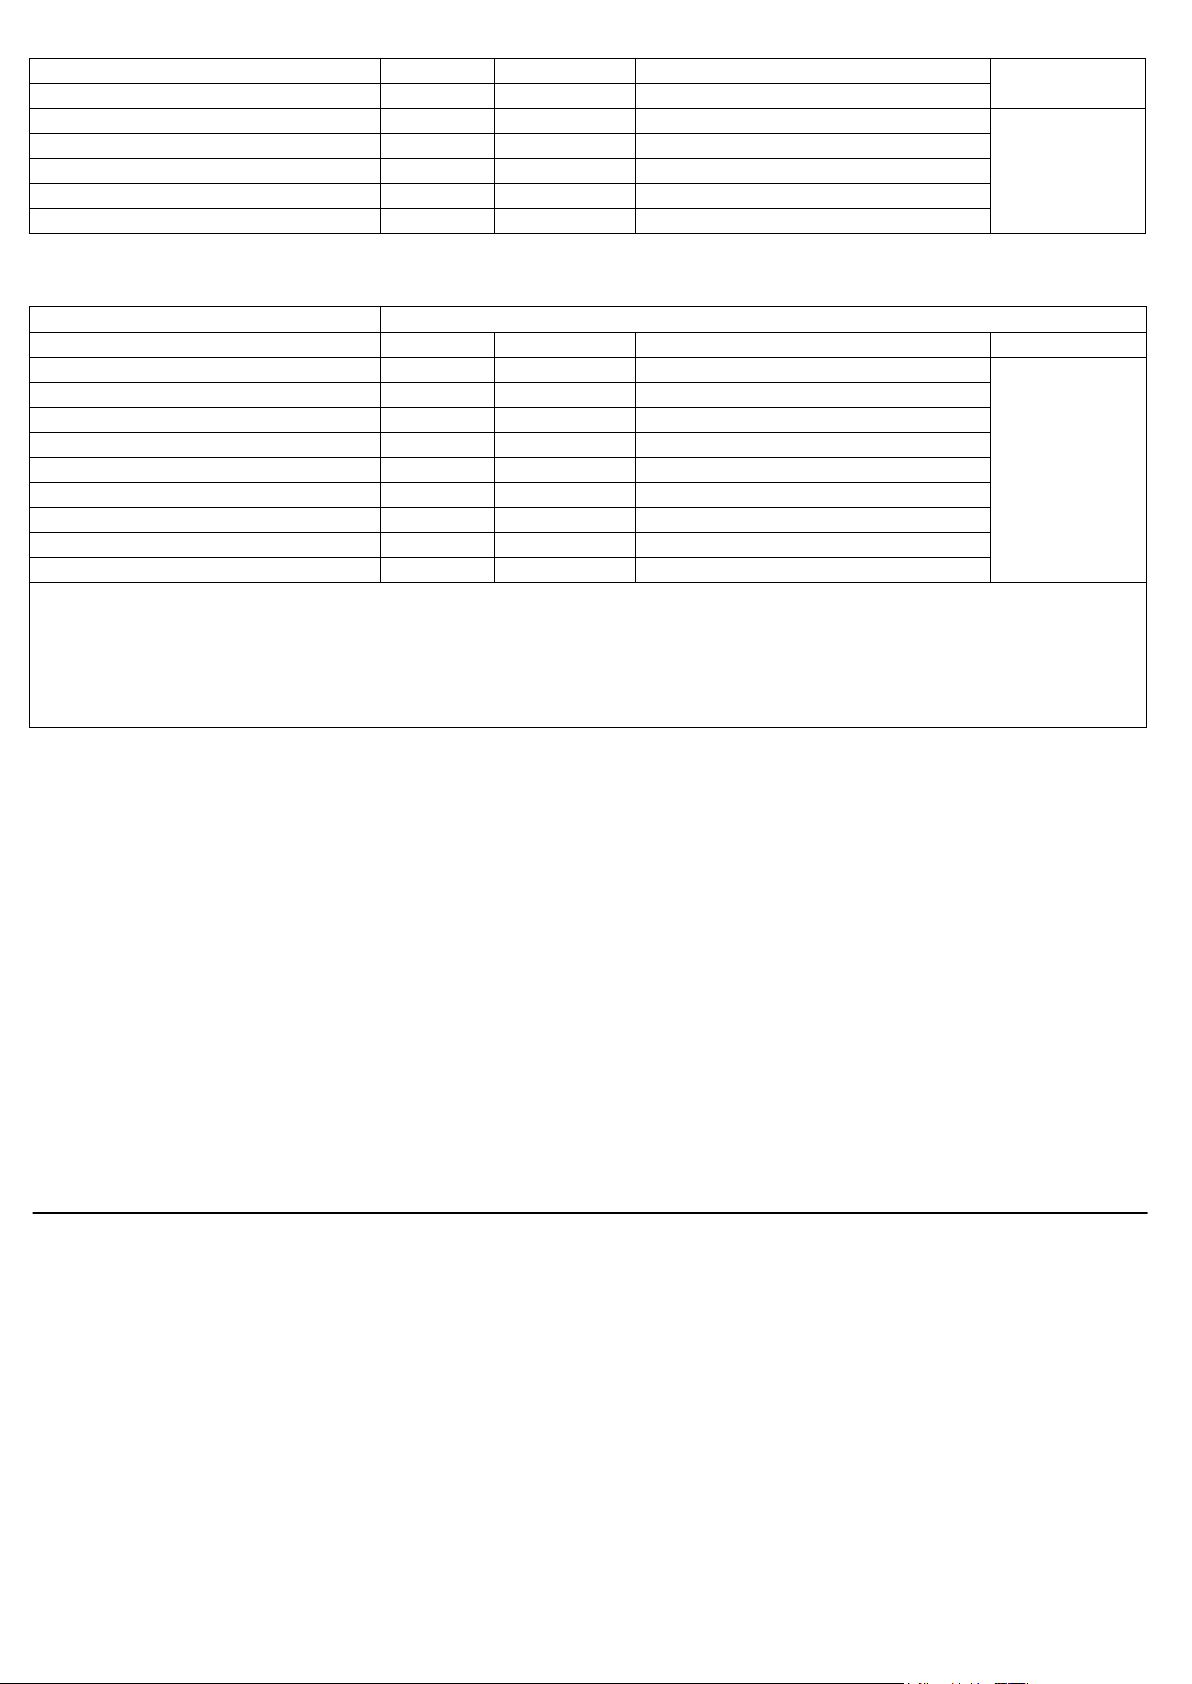
Small Oven Cooking Guide
Baking
Conventional Oven (Top & Base Heat)
Food
Preheat
Temp ºC
Time (approx)
Shelf Position
Scones
Yes
220/230
8-15 mins
2 Up
Small cakes
Yes
180/190
15-20 mins
Victoria Sandwich
Yes
160/170
20-25 mins
Sponge Sandwich (Fatless)
Yes
180/190
20-25 mins
Swiss Roll
Yes
200/210
8-12 mins
Semi-rich Fruit Cakes (7”)
Yes
150/160
1-1¼ hrs
Rich Fruit Cakes
Yes
130/140
Time dependent on size & recipe
Shortcrust Pastry
Yes
190/200
Time dependent on size & filling
29
Page 29
Puff Pastry
Yes
200/210
Time dependent on size & filling
1 Up
Yorkshire Pudding
Yes
200/210
30-40 mins
Individual Yorkshire Pudd‟s
Yes
200/210
20-30 mins
2 Up
Milk Pudding
Yes
130/140
90-120 mins
Baked Custard
Yes
140/150
40-50 mins
Bread
Yes
200/210
30-45 mins
Meringues
Yes
100
150-180 mins
Meat
Conventional Oven (Top & Base Heat)
Food
Pre-heat
Temp ºC
Time (approx)
Shelf Position
Beef/Lamb (Slow roast)
Yes
170/180
35 mins per 450g (1 lb) + 35 mins over
2 Up
Beef/Lamb (Foil covered)
Yes
190/200
35-45 mins per 450g (1 lb)
Pork (Slow roast)
Yes
170/180
40 mins per 450g (1 lb) + 40 mins over
Pork (Foil covered)
Yes
190/200
40 mins per 450g (1 lb)
Veal (Slow roast)
Yes
170/180
40-45 mins per 450g (1 lb) + 40 mins over
Veal (Foil covered)
Yes
190/200
40-45 mins per 450g (1 lb)
Poultry/Game (Slow roast)
Yes
170/180
25-30 mins per 450g (1 lb) + 25 mins over
Poultry/Game (Foil covered)
Yes
190/200
25-30 mins per 450g (1 lb)
Casserole Cooking
Yes
150
2-2½ hrs
If using aluminium foil:
1. Remember it is important to increase the cooking time by one third.
2. Never allow foil to touch sides of oven.
3 Never cover oven interior with foil.
4 Never cover shelves with foil
30
Note: If soft tub margarine is used for cake making, we would recommend using the all in one method and to
reduce the temperature by 10ºC.
Temperatures recommended in this chart refer to cakes made with block margarine or butter only.
The most accurate method of testing the readiness of joints of meat or whole poultry is to insert a meat
thermometer into the thickest part of a joint, or the thickest part of poultry thighs, during the cooker period.
The meat thermometer will indicate when the required internal temp has been reached.
Beef: Rare: 60ºC Lamb: 80ºC Poultry: 90ºC
Medium: 70ºC Pork: 90ºC
Well Done: 75ºC Veal: 75ºC
Ham: 75ºC
Temperature Conversion Scale
Approximate Oven Temperature
Conversion Chart
Page 30
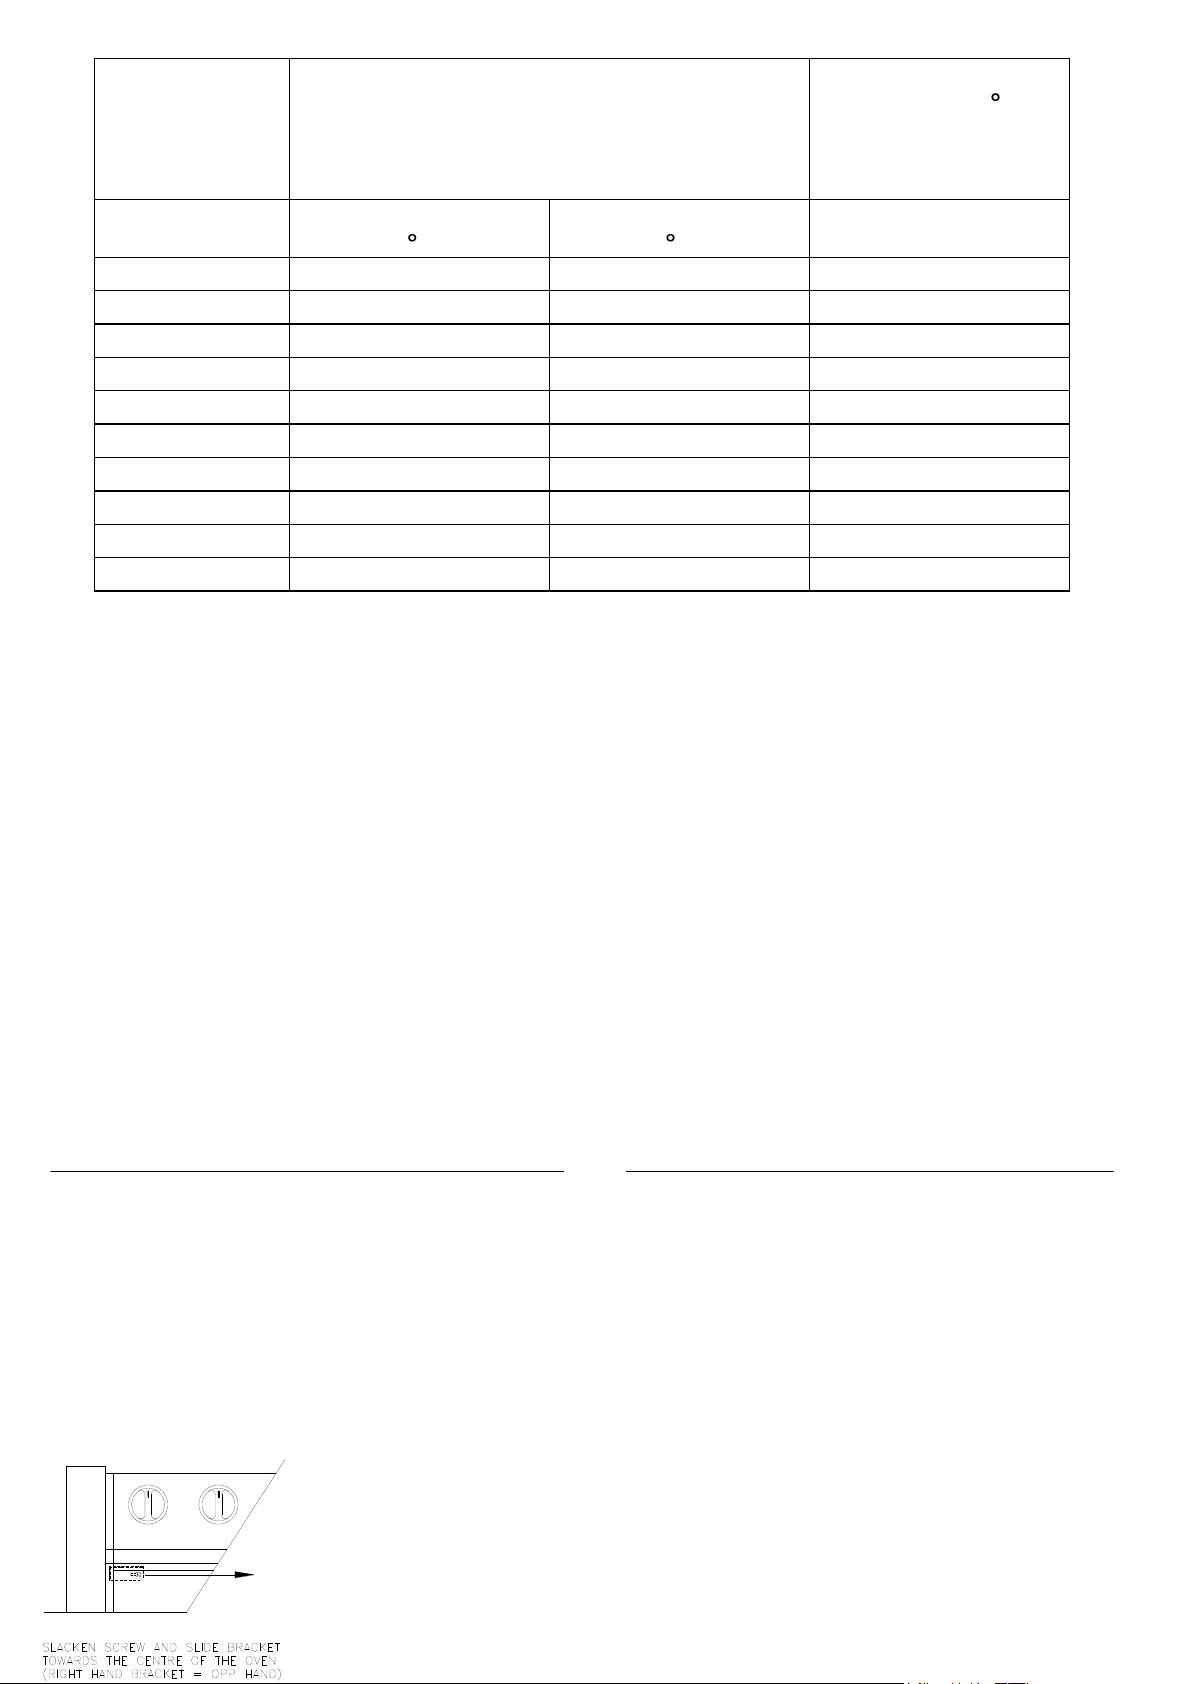
GAS MARK
CONVENTIONAL OVEN
FAN OVEN C
(It is not always
necessary to
pre-heat oven)
F
C
1/2
250
120
100
1
285
140
120
2
320
160
140
3
340
170
150
4
365
185
165
5
400
205
185
6
430
220
200
7
455
235
215
8
475
245
225
9
490
255
235
31
Care and Cleaning
In the interests of both safety and hygiene your Belling platinum DB2 needs to be
kept clean. A build-up of grease or fat from cooking could cause a fire hazard.
WARNING! For your own safety, always switch off your cooker at the mains
supply and allow to cool before cleaning.
Never use excessive amounts of water to clean your cooker, and remember that
your cooker is heavy - take care when pulling it out for access.
To move the cooker forward, open both oven doors and with two hands positioned
under the roof of the compartments, lift and pull forward. Replace by pushing the
cooker backwards. Check that the cooker is level. Take care to ensure that any
floor covering is not damaged.
Door Removal The doors are designed for easy removal. Open
Page 31

fully so that the door is at right angles to the oven cavity, slacken the screw holding
32
the securing bracket (see fig) and slide the bracket towards the center of the
oven. Lift the door up off its hinges and pull forward. The inner glass will now slide
out for cleaning.
To replace the doors reverse the procedure.
Please note that that the inner glass is specially treated and requires replacing with the correct face to the
oven (The Non-printed face).
When replacing, take care to ensure that the hinge pins line up with the holes in the
extrusion and that the door has dropped correctly into position before
closing the door.
DO NOT FORCE THE FITTING AS THIS WILL CAUSE DAMAGE.
Cleaning Stainless Steel (Doors caps, Control panel Storage panel, Plinth &
Side Buttresses).
Wipe or spray a proprietary stainless steel cleaner onto the surface. Leave for
a few seconds and polish with a lint free cloth.
Vitreous Enamel (Hob, Utensil holder, Pan supports, Burner caps, Grill pan,
baking tray, Oven Base & Oven rear panels) Base & Oven rear panels.
Wipe over with a cloth wrung out in hot soapy water, then wipe with a cloth
wrung out in clear water. Dry with a soft clean cloth. Stubborn stains can be
removed with a cream, paste, liquid cleaner or by rubbing with fine steel wool or
soap pads. The Grill pan/meat pan, baking tray and utensil holder may be washed
in a dishwasher.
Paint (Hob frame, Front supports, Control panel under-tray, Rear vent & Hob
frame).
Wash with a cloth wrung out in hot soapy water only.
DO NOT USE ABRASIVES
Ovens and Grill The rod shelves, small oven roof, and other enamel parts of both ovens and hob
can be cleaned using household cream cleanser with a nylon pad or sponge.
Heavier soiling may require the use of a proprietary oven cleaner or steel wool pad,
but do not allow these to contact the Cook-clean enamel, the hob or hob surround,
or any of the door seals or plastic parts of the cooker.
Care and Cleaning
Oven and Grill Only use oven cleaners which carry the Vitreous Enamel Development Council's
Approvals symbol, and always follow the manufacturers instructions for use.
Pan Supports and Burner As for enamel cleaning.
Caps / Burner Bodies NOTE: Care must be taken to prevent cleaning materials, water or dirt, from
entering and blocking the burner cap ports or the burner body, especially the gas
way and air hole. Remove any blockage with a nylon brush.
Belling Cookclean Panels both ovens have side runners that are coated with special enamel which will
absorb and gradually vaporize any splashes, which occur during cooking. This
Page 32

surface coating, which can be recognised by its matt finish, may be damaged by
Problem
Check
33
using aerosol oven cleaners, oven pads, detergents or scouring powders and their
use is not recommended.
Any particularly heavy soiling or splashing may indicate the cooking temperature
has been high, or that excess fat or water has been used when roasting. It can be
removed by 'blotting' the surface with a paper towel or soft sponge, or by running
the oven empty at 230 C for about 30 minutes.
Warning! Under these conditions the surfaces may become hotter than usual
and children should be kept away.
Whilst normal cleaning can be carried out with these panels in place, they can be
removed for cleaning manually, or for cleaning the rest of the oven interior. First,
remove the oven shelves. The side runners can then be removed from the ovens
by slackening the 2 screws on each panel, and then lifting them out.
To clean these Cook-clean panels by hand, scrub them with a nylon pad or brush,
using cold water and a little gentle detergent (although this may cause some
discoloration). Rinse in cold water and blot them dry with a paper towel or sponge.
Do not rub the surface too dry as this can damage the Cook-clean finish. After
cleaning, replace the panels immediately and run both the ovens at maximum
setting for about 30 minutes to prevent deterioration of the enamel.
Do not clean them in a dishwasher.
Replacing the Oven Lamp If the oven lamp fails you can replace it yourself by following these few instructions.
(Both ovens) WARNING! Switch off the cooker at the mains supply before attempting to replace
the oven lamp.
Remove the oven shelves. Unscrew and remove the lamp cover glass.
Unscrew the lamp and replace it with a new 15W S.E.S. lamp.
These are the only lamps suitable for use in your cooker.
Replace the lamp cover glass before switching on.
Note: The oven lamp is not covered by the guarantee.
For a replacement call our Spares Department on 01709 579907
Is There Something Wrong With Your Cooker?
Fault Finding Guide Before contacting your Belling Service Center/Installer, check the problem
guide below; there may be nothing wrong with your cooker.
Page 33
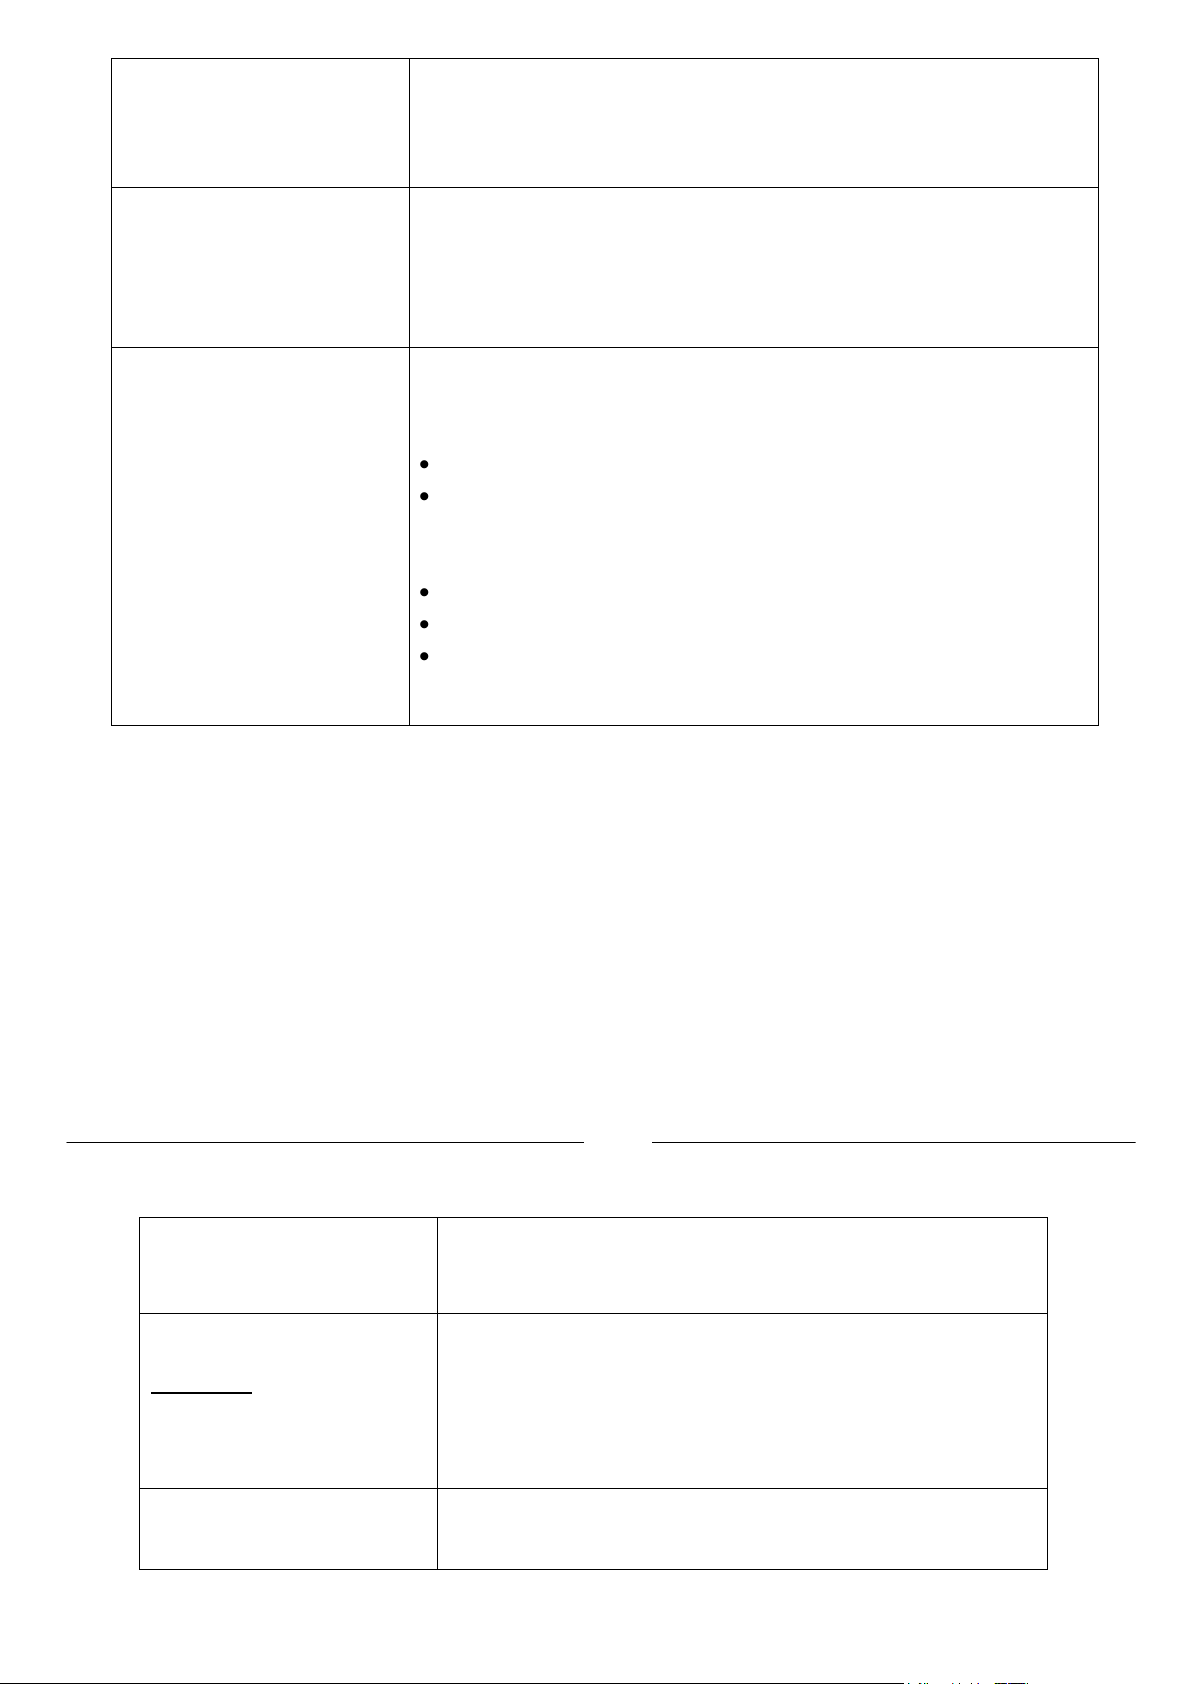
Nothing Works.
Is the main cooker wall switch turned on?
Is the timer working? If the timer is not working it is likely that there is
no electricity supply to your cooker.
Large oven does not work.
Small oven working OK!
Ensure timer is set to manual.
(Refer to „Timer Instructions‟ pages 14-18 )
Ensure the multifunction control is set to the required position.
Ignition failure
If all burners fail to ignite, check that sparks appear at the burners, a
clicking noise should be heard. If not first check that:
The electricity supply is turned on.
The mains cooker switch on the wall is in the ON position.
If only a hotplate burner is failing to light check that:
The burner cap and ring are fitted correctly.
The holes in the burner ring are not blocked.
The five hotplates may be lit with a match in the event of ignition
failure or power cut to the electricity supply.
PROBLEM
CHECK
GRILLING
Uneven cooking front to
back
Ensure that the grill pan is positioned centrally below the
grill burner.
Fat Splattering
Ensure that the grill is not set at too high a setting.
34
Cooking Results Not Satisfactory?
Page 34
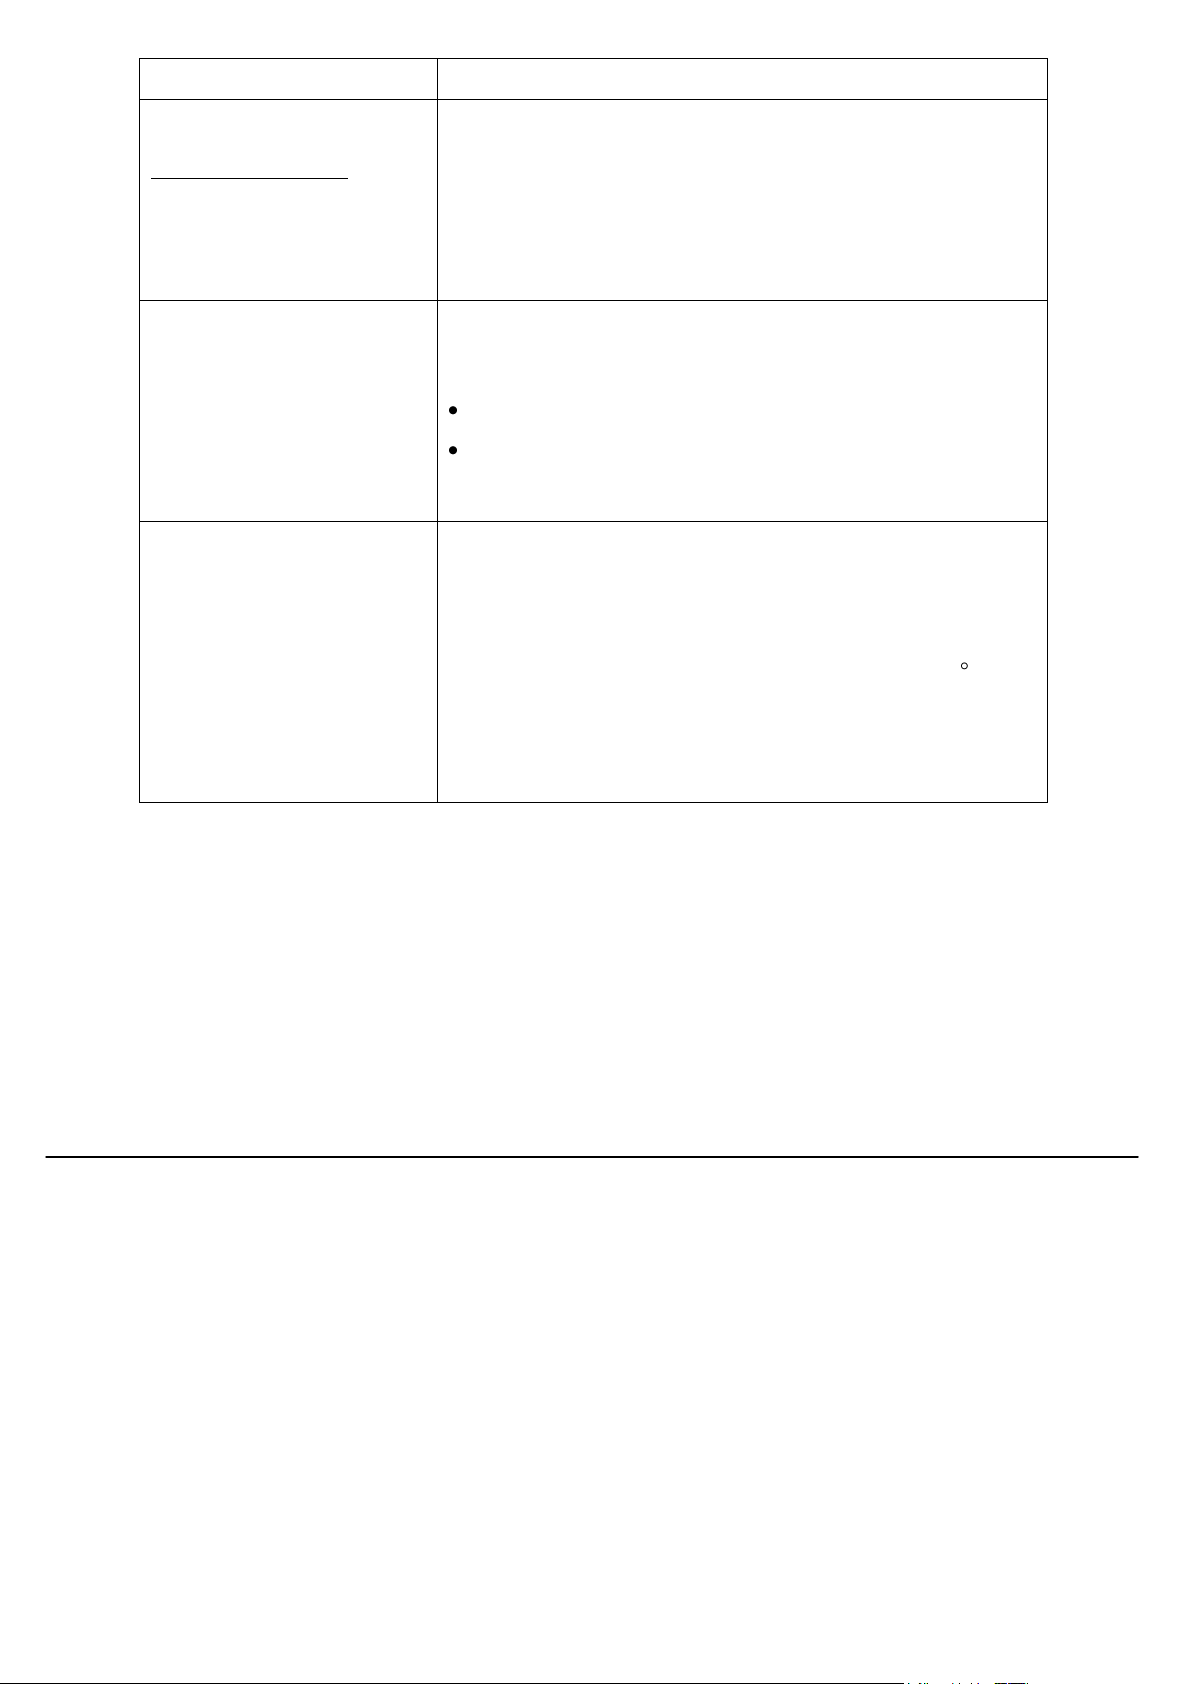
BAKING GENERAL.
Uneven rising of cakes
Ensure that the oven shelves are level by using a spirit level
on the rod shelf. The oven should be checked both left to
right and front to back.
Sinking of cakes
The following may cause cakes to sink:
Cooking at too high a temperature.
Using normal creaming method with soft margarine.
Use the all-in-one method.
Over/ Under Cooking.
Fast/Slow cooking
Refer to the cooking times and temperatures given in the
cook book provided, however, it may be necessary to
increase or decrease temperature by 1/2 gas mark (10 C) to
suit personal taste. Do not use oven/meat pans greater than
21/4" in height.
35
Service
Calling for Service Please consult your retailer in the first instance. If you experience difficulty, contact
Belling Appliances, After Sales Division. Remember that you may be charged for
the visit (even during the guarantee period) if nothing is found to be wrong with the
appliance, so always check the instructions to make sure that you have not missed
anything.
Belling Appliances After Sales Division (Service) Tel: 0151 432 7999(all calls will
be charged at local rate).
Belling recommend your cooker should be serviced by a competent person every
two years.
Before contacting a service agent, please note the following details about your
Page 35
cooker:-
Model Number . . . . . . . . . . . . . . . . . . . . . . . . . . . . . .
Serial Number . . . . . . . . . . . . . . . . . . . . . . . . . . . . . .
Date of Purchase . . . . . . . . . . . . . . . . . . . . . . . . . . . .
Also note your post-code . . . . . . . . . . . . . . . . . . . . . . . .
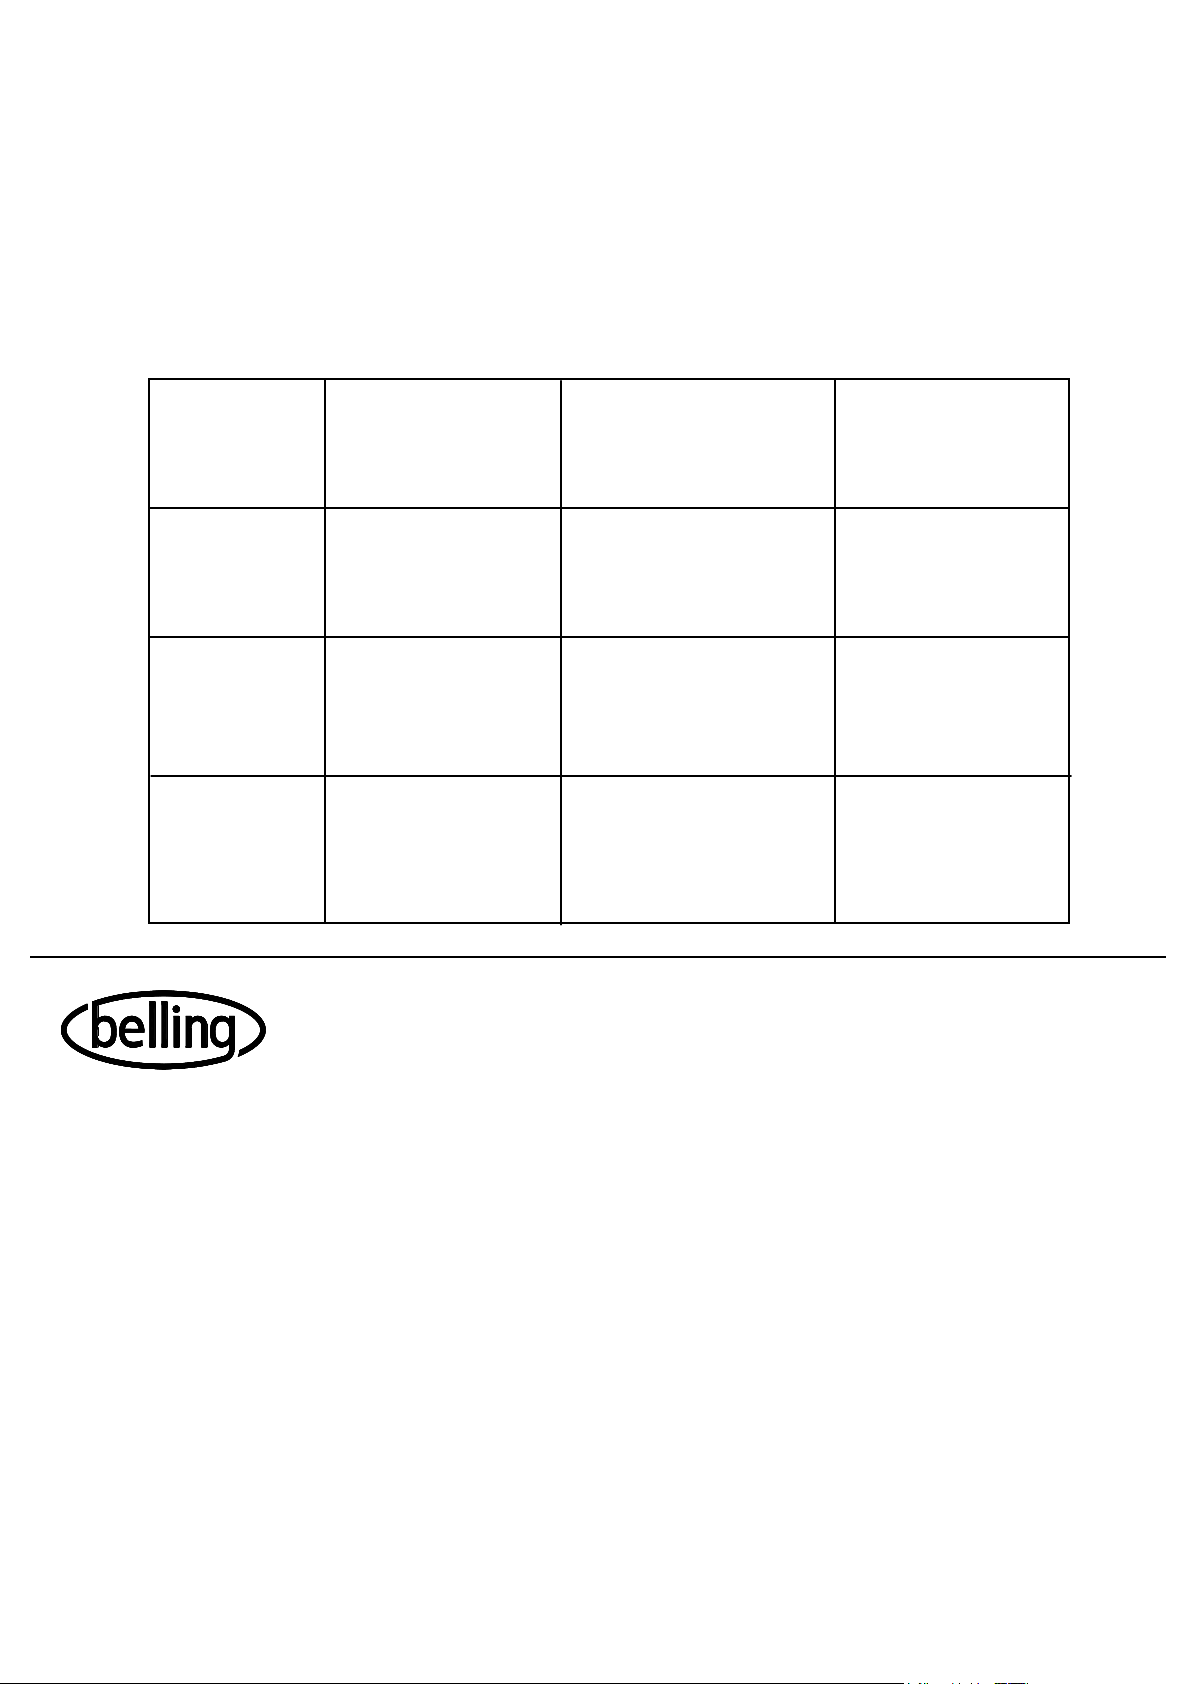
In order to provide a complete service history for your Belling platinum DB2, please
ask the service engineer to record the appropriate details in the chart below:-
Parts Replaced Authorized
Date Nature of fault Or repaired Stamp or
Signature
Belling Appliances Ltd, Stoney Lane, Prescot, Merseyside, L35 2XW
Tel: Belling Help Line 0151 432 7999
Part No. 08/18426/0
 Loading...