

Belling BDW60IC Instruction Manual
BDW60IC
14 place settings
half-load function
With each wash cycle.
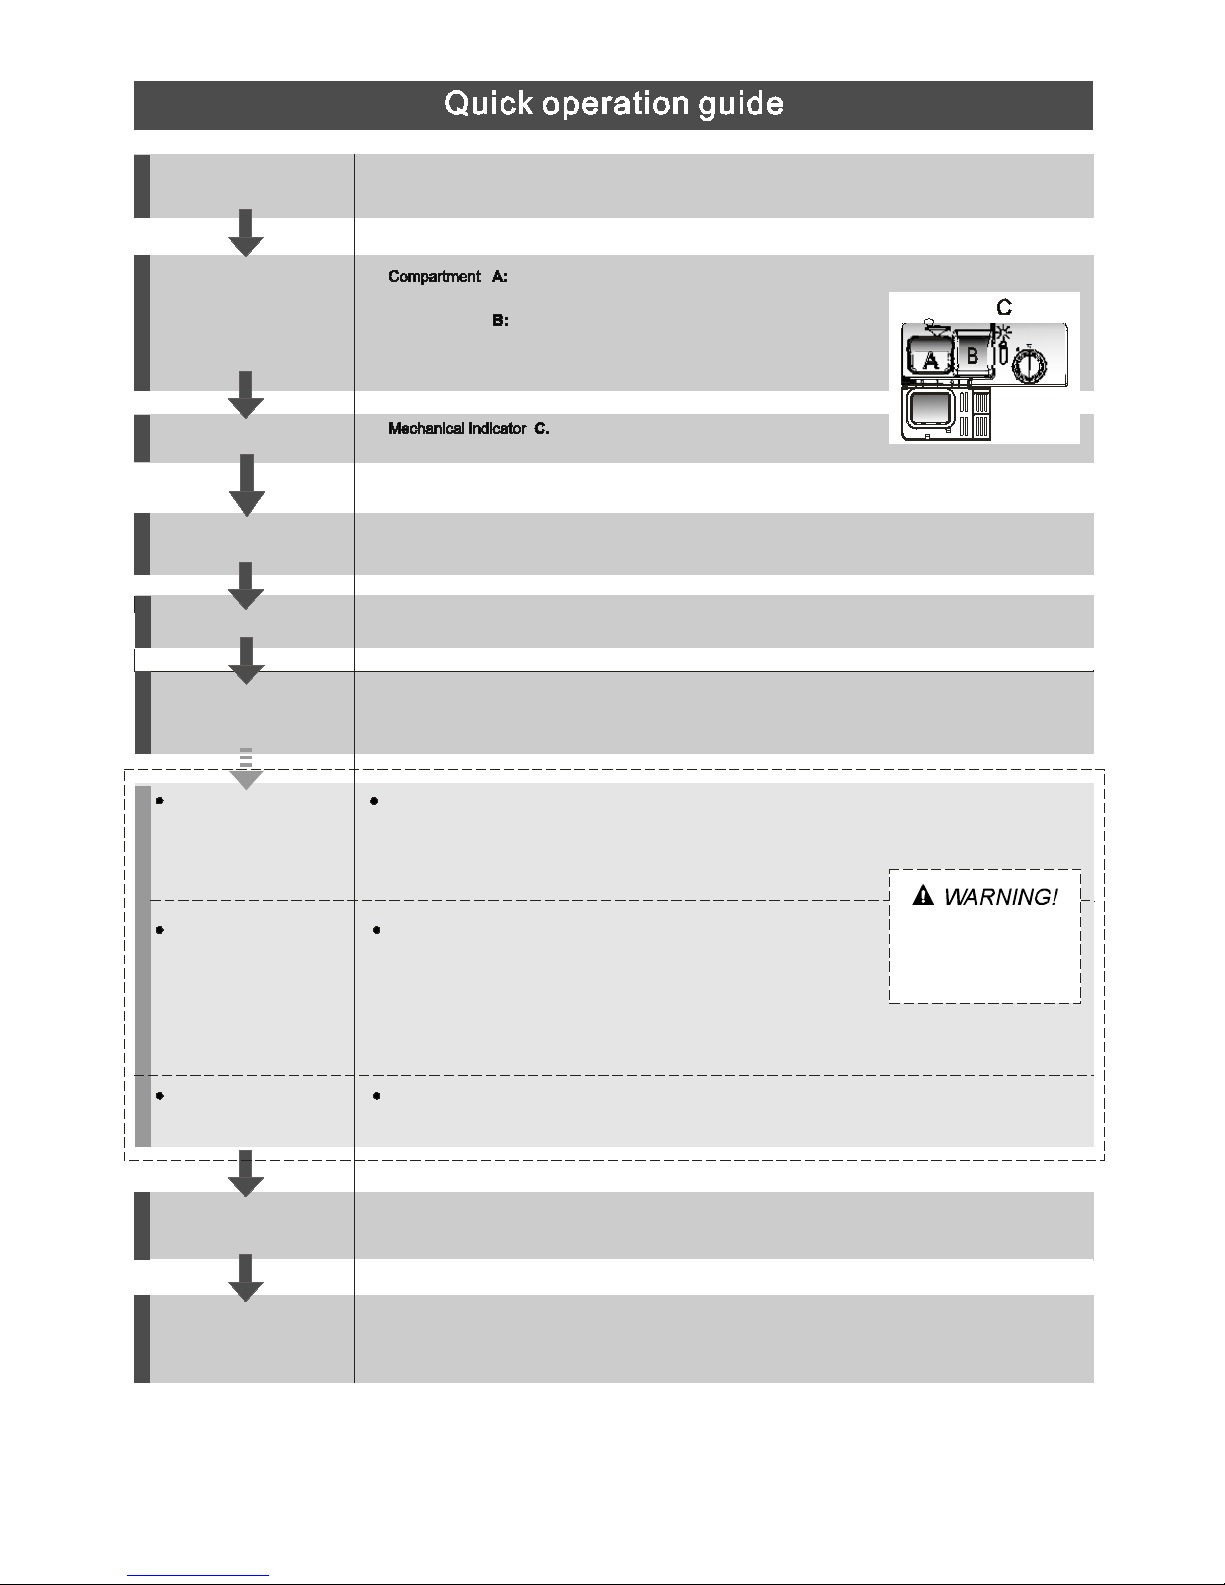
Compartment
For programmes with pre-wash only.
(Follow the user instructions!)
Electric indicator on control panel (if provided ).
Check the rinse aid level
Load the baskets
Switch off the appliance
Turn o ff the wate r tap,
unload the baskets
Fill the detergent dispenser
Warning : wait a few minutes (about 15 minutes) before unloading the dishwasher to avoid handling
the dishes and utensils while they are still hot and more susceptible to break.
They will also dry b etter.Unload the appliance, starting from the lower basket.
Scrape off any large amount of leftover food. Soften remnants of burnt food in pans,
then load the b askets. Refer to the dishwash er loading instructions.
When the working cycle has finished, the buzzer of the
dishwash er will sound 8 time s, then stop.
Turn off the appliance using the On/Off Button.
Switch on the ap pliance
For d e tail ed op erating m ethod read the co rrespondin g content on the inst r uct ion m anual.
Select a programme
Turn on the water tap , c lose the door . The machine will start working after about 10 sec onds.
Running the dishwasher
Changing th e programme
Add forgotten dishes in the
dishwasher.
If the appliance is switched
off during a w ash cycle.
O pen the do or carefully.
Ho t steam m ay es cap e
wh en the do or is ope n e d!
If the appliance is switched off during a wash cycle, w hen switc hed
on again, please re-select the wa shing cycle and operate the dishwasher
according to the original Power-on state ).
Press th e Programme Button until the selected p rogramme lights up.
( See th e section entitled Operationg instruction )“ ”
1. A running cycle can only be modified if it has been running for a short time. Otherwise the detergent
may have already been released and the water already drained. If this is the case, the detergent
dispenser must be refilled.
2. Open the door and p
ress the Programme Button for more than 3 seconds
to cancel the runing progarmme
3.Select a new programme.
4.Close the door,the machine will restart after about 10 seconds.
Open the door,press the On/Off button to switch on the appliance .
1.Open the door a little to stop the dishwasher.
2.After the spray arm s stop working, you c an open t he door completely.
3.Add the forgotten d ishes.
4.Close the door, the dishwasher will start running again after 10 seconds.

To re v iew th e se ct ion on trou bleshooting Tips
will help you to solve s om e co mmon probl ems
by yours elf .
De ar C us tomer,
Plea se care fully r ea d this manu al b efo re usin g the
dishwas he r, it will help you to us e an d ma int ain th e
dishwas he r pr ope rly.
Pass i t on to any s ub sequen t owner of the app lianc e.
This m anual c ont ai n s section s on sa fet y In str uctions,
Oper ati ng Ins t ru cti on s,
Install ati on Instruction s an d
Tro ubleshootin g Tips, etc.
The manufact urer, followin g a p oli cy o f co nstan t
de ve lopment an d upda ting of the pr odu ct , may
ma ke modifica tio ns wit hout givi n g prio r no tic e.
Keep it as a r efe r in the lat er days .
If you ca n not solve the pr oblems by y o ur self ,
please ask for the hel p of professiona l technici ans.
This a ppliance is inte nde d to be used in hou sehold
an d simila r app licatio ns such as:
-s ta ff kitche n ar eas in shops, offi ces and o the r
wo rk ing e nv ironme nts;
-far m house s;
-by clie nts in h ote ls, motels and othe r re sidential
type e nvi ro nme nts;
-bed and breakfast ty pe env iro nment s.
Dish wash er Fe atu r es.. .. ...... ... ... .... .. ... ...... ... ... ... .2
Att e ntion bef ore o r af te r loadi n g the Dish washe r
Bask ets... ......... ... ... ... ......... ..... . ... ... ....... ....... . ... 6
Fi lteri ng System................... ... ... ... ... ... ... ..........10
Ca ri n g fo r the Dishwa she r.. ... ... ... . .. ... ... . .... ... .. ..11.
A Fill the Ri nse Aid D is p enser. .. ... ... ... . .. . ... 3、 .. ... ...
B Fu nct ion o f Dete rgent .. ... ... ... ... ... .. ........4、 ....... .
............. ... 7
The Me thod Lo ading Normal D ishw are
Was h Cycle Table..... ... ... ............. .. ... ... ... ... ... ... ...8
Turni ng on the Appli ance ... ... ......... ...... ... ... ......... 8
Ch a nge the Programm e .. . ......... .. .. ................. .9....
At the Ene of the Wash Cyc le.. .. ................. .. ... ... ..9
Bef ore call ing for ser vic e........... ... .. ... ... ..... .......19.
Err or cod es. ...... ........ . ...... ... .... ....... ... ... ..........20.
Technica l infor mat ion........ .. ... ... .......... .. .. ..... ..2 1..
Control Pan el. .. ...... .... ... ... ...... ... . .. ... ...... ... .... .. .... 2
...... ... ... ... ..... . ... ... ... .. .... 12In stall ati on preparation
.....1 3Aesthetic pan el's dimen s io ns and insta l lation
....... ... ... ... 15Tensio n adjustmen t of t he doo r spring
.. ............... .. ............. 15C onnection o f drain hoses
.. ............ ... .. ........ 16Di shwasher installatio n st eps
About Elect ricity Connecting .. ... ... ... ... . .. ... ... ... .. .17
Co ld Water Co nnect i on... .. ... ... ... .. ............. .. ... .. 18
Sta rt of d ishwa sh er.... ... ... ... ... . .. ...... ... ... . ... . ....18..
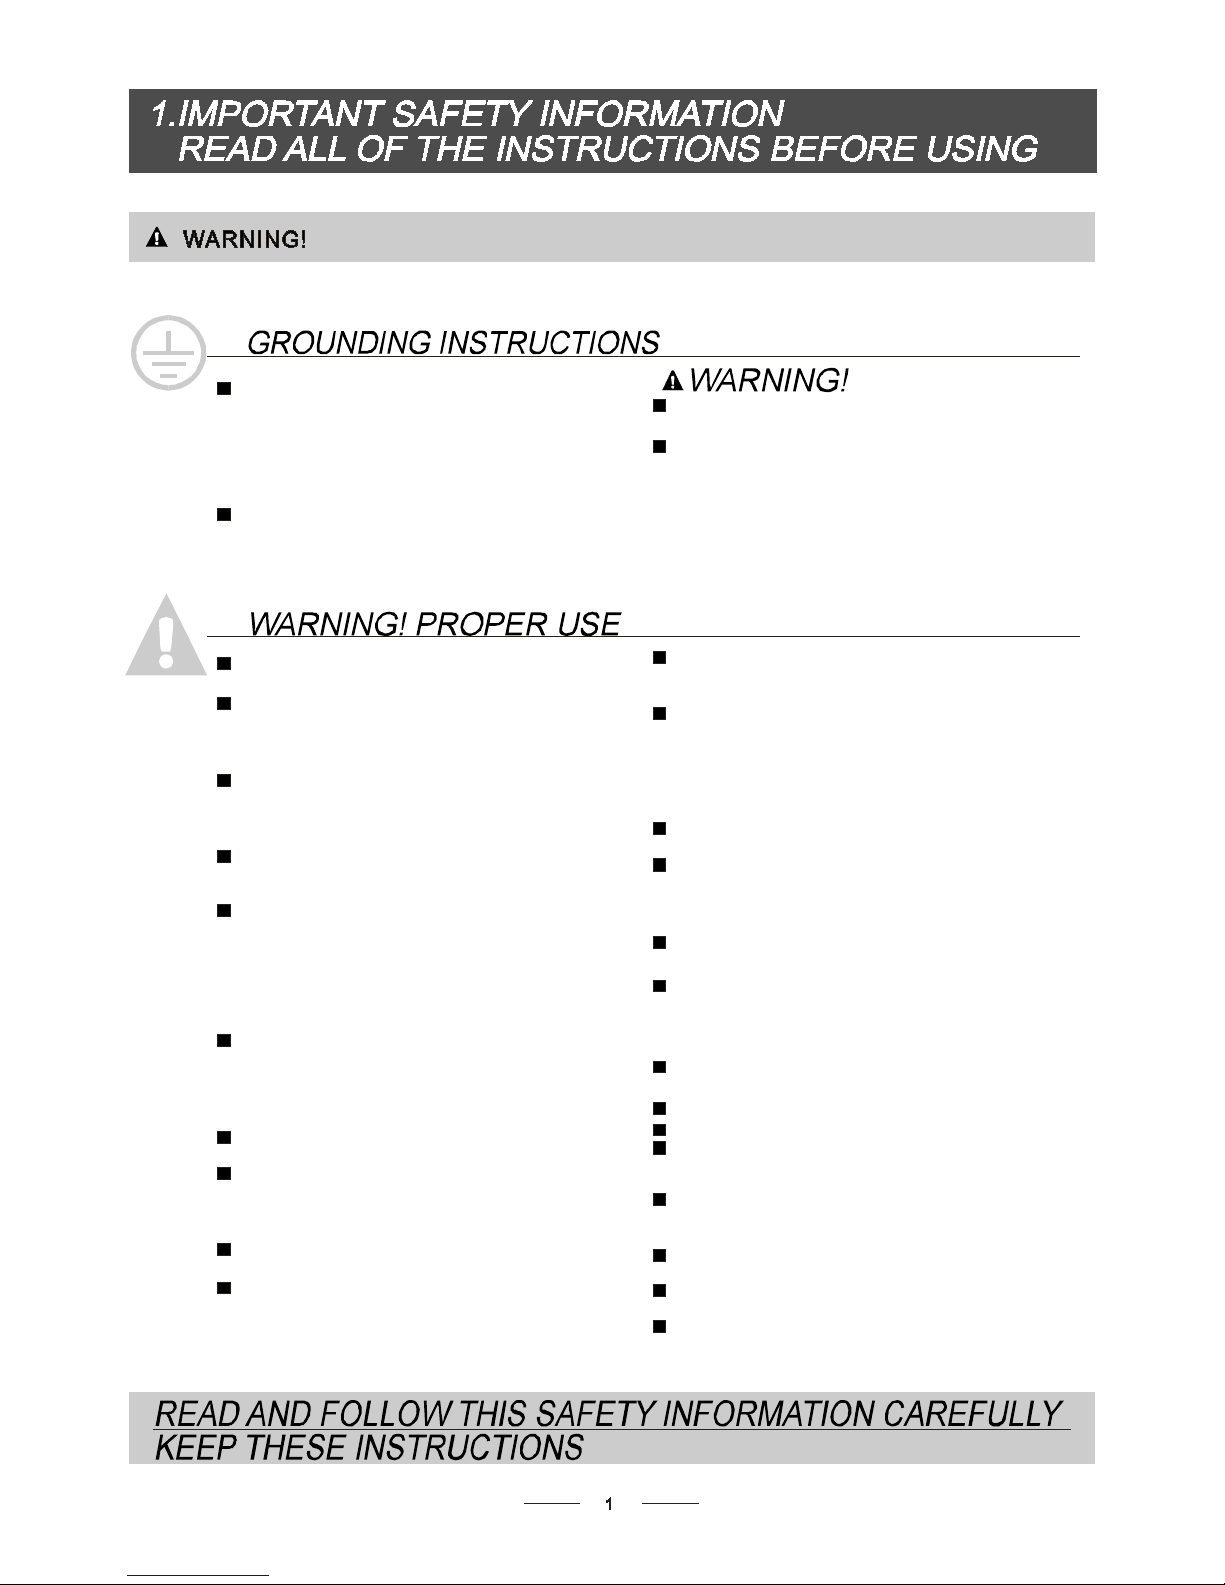
This appliance must be grounded. In the event of a
malfunction or breakdown, grounding will reduce
the risk of anelectric shock by providing a path of
least resistance of electric current. This appliance
is equipped with a cord having an equipmentgrounding conductor and a grounding plug.
The plug must be plugged into an appropriate outlet
that is installed and grounded in accordance with
all local codes and ordinances.
Keep children away from detergent and rinse aid, keep
child away from the open door of the dishwasher,
there could still be some detergent left inside.
ren
Do not abuse, sit on, or stand on the door or dish
rack of the dishwasher.
Do not touch the heating element during or
immediately after use.
(This instruction is only applicable to machines
with a visual heating element.)
Do not wash plastic items unless they are marked
dishwasher safe or the equivalent. For plastic items
n
ot so marked, check the manufacturer's
recommendations.
Use on ly deterg ent and rinse additives
de signed fo r an au tom atic di shwas her.
Ne ver use soap, laundry deterg ent, or han d
wa shing det er gent in your dishwas h er. K ee p
th ese pr odu ct s out of the r ea c h of ch ildren.
Du ring instal lat ion, the power supply must not
be ex cessivel y or d anger ously bent or flattened.
Do not tamper with controls.
Do not place any heavy objects the
door when it is open. The appliance could tip
forward.
on or stand on
When loading it ems to be wa shed:
1) Locat e sh arp it ems s o that they ar e not likely
to da mage the door sea l;
2 Warning: Kn ives and othe r ut en sils wi th
shar p poin ts must be load ed in the ba sket
with t heir points down or p laced in a
hori zon tal po sitio n.
)
When u sin g your dishwa sh er, you s hould
prev en t plast ic item s from com in g into contact
with the heating el em ent.( Thi s in str uc tion is onl y
ap plica bl e to machines wit h a visual heatin g
element .)
If the s upply c or d is damage d, it mu st be re pl a ced
by the manufacturer or i t s serv ice agent or a
si mi lar l y qualifi ed pers on in or der to avoid a
ha za rd.
Plea se disp ose of packin g ma te rials p roperly.
Use the dishwasher only for its intended function.
Remove the door to the washing compartment when
removing an old dishwasher from service or discarding it.
Dish washe r de ter gen ts are stro ng ly alkaline, t hey
can be ex t re mely dang erous i f swal low ed. Avo id
cont act wit h skin and e yes and keep chil dre n away
from the di shwasher when the door i s open .
Ch ec k that the detergent com parme nt is em pty
af te r co mplet ion of the wash cyc le.
The appliance is to be connected to t he wat er
ma in s using new ho s e se ts a nd tha t ol d hose -sets
shou ld not be reus e d.
The maxi mum number of plac e se ttings to b e
wa shed is 14.
The maxi mum per missible inlet wat er p ressure is
1M pa.
The mini mum per missi ble inlet w ater p ressure is
0. 04Mpa .
Children should be supervised to ensure that they do
not play with the appliance.
This appliance is not intended for use by persons
(including children with reduced physical, sensory or
mental capabilities, or lack of experience and
knowledge ,unless they have been given supervision
or instruction concerning use of the appliance by a
person responsible for their safety.
)
When using you r dishwasher, f ollow the precautions listed below:
The door s hou ld not be left open,
si nc e this c ould incr ease th e ris k of trippin g.
Improper connection of the equipment-grounding
conductor can result in the risk of an electric shock.
Check with a qualified electrician or service
representative if you are in doubt whether the
appliance is properly grounded. Do not modify the
plug provided with the appliance; If it does not fit
the outlet. Have a proper outlet installed by a
qualified electrician.
Do not operate your dishwasher unless all
enclosure panels are properly in place. Open
the door very carefully if the dishwasher is
operating, there is a risk of water squirting out.
be f ore usin g it f or the first time .
To get th e b est perfo rmanc e from y our dishw ashe r, re a d a l l oper atin g instruct ions
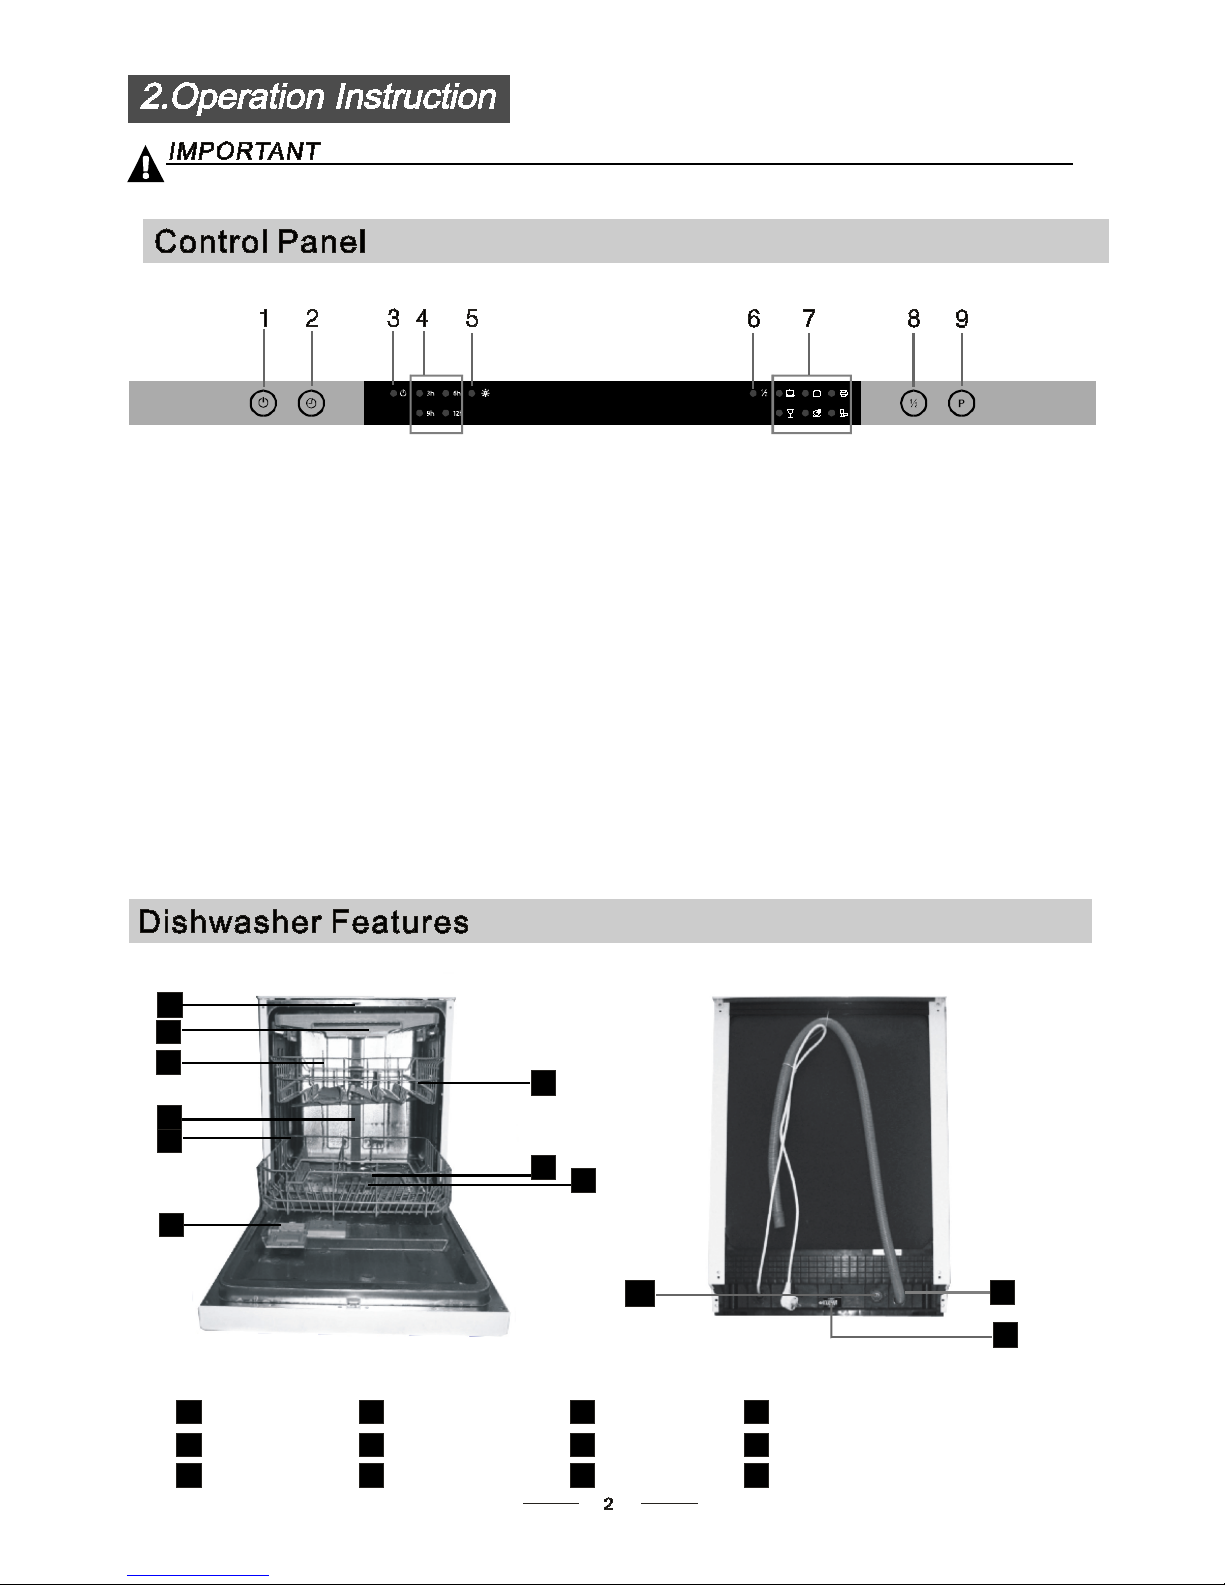
1. On /Off Butt on: To tur n on/off the power supply.
2. De lay But ton : To Pr ess the button to del ay.
5. Rinse ai d war nin g lights : To show
wh en the dis penser need to b e refill ed
7.P ro gra m indica t ors: to show wh ich p rogra m
you have cho se n;
4. De lay ind i ca tors: to show the delay tim e
(3h/6h/9h/12h )
3. Power ind ic a tor: To show whe n the po we r on .
9. Pr ogram B u tt on : To Pre s s the butt on to sele ct a
wa sh Progra m.
6. H aft lo ad ind ica to r : To s ho w wh en yo u s ele ct t he
haft l o ad fun cti on .
8. Ha lf loa d function Butt on: To sel ect Ha lf lo ad
function. (Wi th this Half load func ti on you c an
only use it when
an d yo u
will s ee les s wate r and energy co ns ump tion , c an
only be used with Intensive, Heavy, Nor ma l, Glass
and 1 hour .)
you have only about or les s th an
half of full lo ad dishes of the di shw asher,
11
12
Ba ck Vi ew
1
2
3
4
5
7
8
9
10
Fron t vi ew
Lowe r b as k et
Disp ense r
Cup shelf
Sp ray a rms
Fi lt e r as sembly
In let pip e co nn ect or
Dr ain p ipe
Up pe r bas ket
Cutlery rack
Top s pray arm
1
In ner pipe
5
6
7
8
9
10
12
11
3
2
4
6
Ad ju s t er
Before usin g yo ur di shwasher for the f irs t ti me:
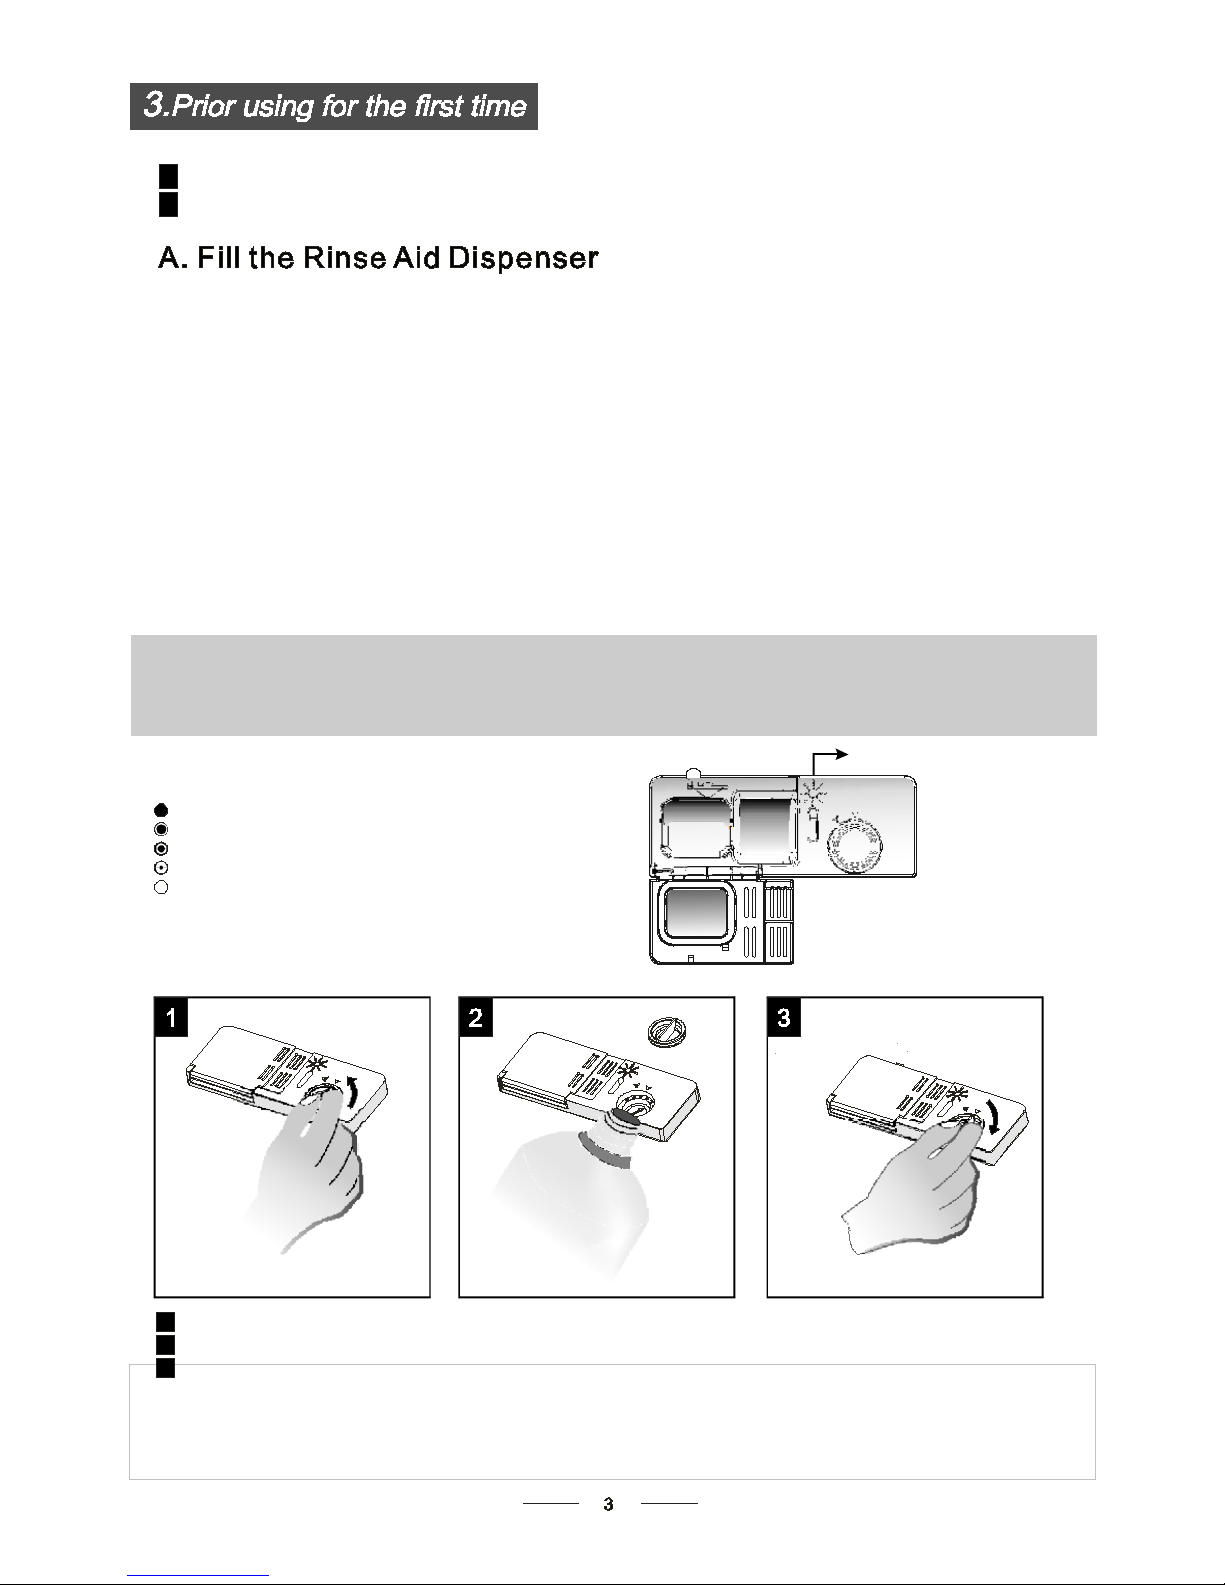
A. Fi ll t he ri nse ai d di spense r
B. Fi ll i n de terg en t
Th e rins e aid i s release d dur ing the fi n al rinse to pre vent wa ter f rom fo r mi ng dro p let s on yo ur dis hes, whic h c an
le a ve sp ot s and streak s . It also improve s d rying by allowing wa t er to r oll off the dis hes. Your dis hw a she r is
de signed t o use li quid ri ns e aids. The ri n se aid dispens er is lo cat ed inside the door ne xt t o t he det ergent dispe nser.
To fill th e di s pe n ser, op en t he c ap an d pour t h e rinse aid into t he di spenser until the level indi cat or turns complete ly
bl a ck. The volu me of th e rinse aid c on ta i n er is ab o ut 110m l.
Rinse Aid D ispenser
Function of Rinse Aid
Rin s e aid is automat ic ally a dded during the last rinse, e n suring tho rough rin sing, and spot and streak fre e dr yin g.
Attention!
O nl y us e br anded rinse a i d for dishwashe r. Nev er fill t he ri nse ai d d ispenser w it h any ot her s ub stance s
(e. g . Dish w ashe r c le ani n g ag ent, l iqu id de terge nt) . Th is would dama ge the app l ianc e .
As the rinse a id d i minis hes , th e size of the black d ot
on the rin se aid lev e l in dic at or ch ang es , as i llustrat ed below.
Full
3 / 4 full
1 / 2 full
1 / 4 full - Sho uld r efi ll to elimi nate spottin g
Empt y
If the re is no rinse -aid wa rning l ight in the cont ro l panel, yo u can jud ge th e amou nt of rinse - ai d by the co lor of the
op tic al level
indic ato r "C " loc ate d ne xt t o the ca p. When the rinse-aid container is fu ll, th e whole indica tor wil l be dark .A s th e
ri ns e -aid
dimin ishe s , the si ze of the dark dot d ecr eases. You sh ould ne ver let the rins e aid get below 1 / 4 full.
When to Refill the Rinse Aid Dispenser
RINSE AID DISPENS ER
To op en th e dispe nser, turn the c ap to th e " o pen" (lef t) arr ow and lif t it out .
Pour t he r inse aid into the disp ens er, being car eful n ot to o verfill.
Re place t he cap by inserting it al ig ned w it h "open" arrow and tu rni ng it to the closed (r igh t ) a r row.
Be caref ul not to ove rfil l the dispenser, becau s e this could ca use ove r sudsing. Wipe away an y s pills
with a dam p cloth. D o n 't forget t o r epl ace the ca p bef ore you clos e dishwa sher door.
Attention !
Clean up a ny r in s e aid split durin g f illing with an abs or bent cl oth to avoi d ex c es s f oaming
du rin g the n ext w a sh.
1
2
3
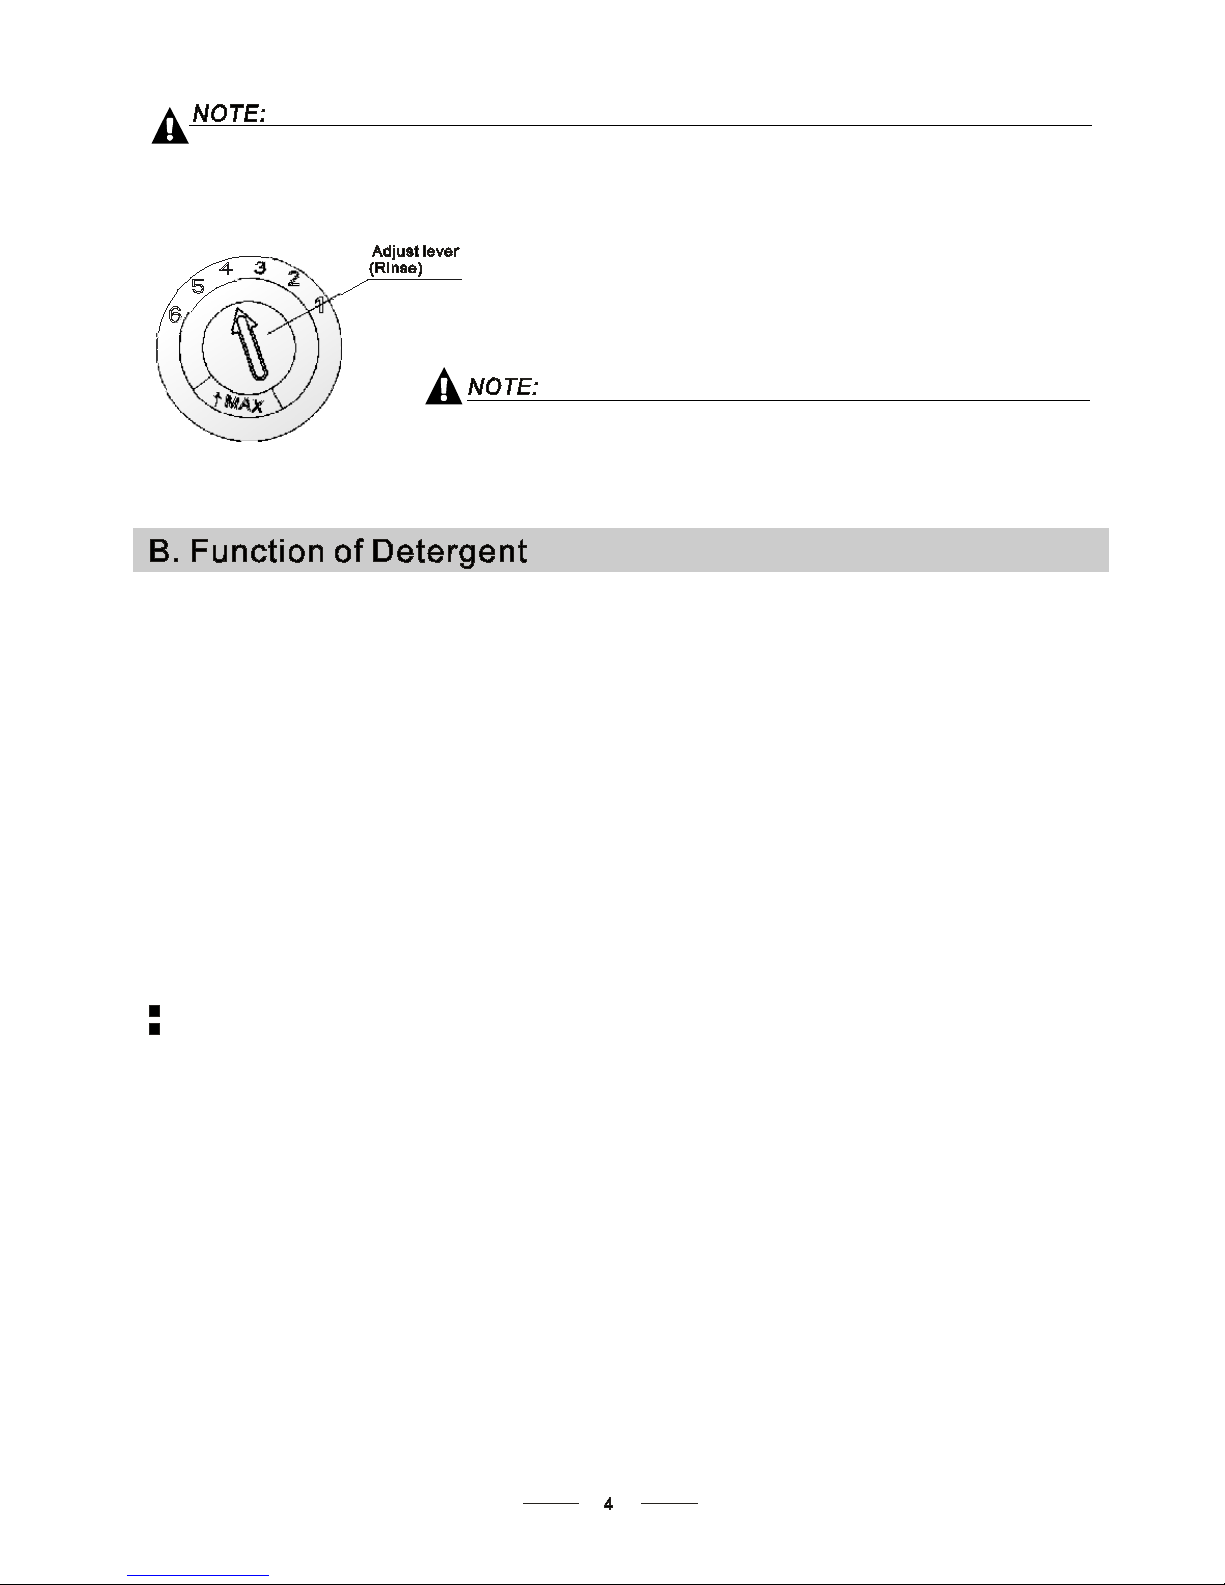
Adjus ting Rinse Aid Dispenser
The r ins e a id di spe n ser has si x o r fo ur set ti ngs . Al wa ys start wit h the disp enser
set on "4" . If spots and po or dr y in g a re a probl em, incr ease the am ount of rins e
ai d dis pens e d by remov ing t he di spens er l id and r ot ating the dia l to " 5". If th e
di shes s till are no t dr y in g p rop e rl y or ar e show spot s , a dju st t he dial t o the n ex t
hi gher lever un t il yo ur dis hes ar e s pot-free. The recomme nded sett ing is "4".
(F a ct ory va lue i s "4" .)
Increase t he do se i f t here a re dro ps of wat er or lim e spot s on the dish e s after was hin g.
Reduce it if there are s ti ck y whitish s ta i ns on y ou r dishes or a b luish f ilm on g la s sw ar e o r
kn ife bla des.
du ri ng t he next w as h. Don't fo rg et to re pl a ce t he cap bef ore you c lose dishwa sher door.
Clean up any r inse aid spil led wh i le d uri ng fil ling with an abso rbent c loth to avoid excess ive foa ming
Det er gents with it s chemic al ingr edi ent s are n e cess a ry t o rem ove di r t, c rus h d ir t and transpor t it out of the dish wa sher.
Most of t he com m ercial qual ity det erg ents are suit abl e for t his purp ose.
Deterg ents
Ther e ar e 3 sort s of deterg en ts
1.Wit h phosphate and with chlorine
2.W ith phos phate an d withou t chlorin e
3.Wit hout ph os phate and with ou t chlorine
Base d on their chemical co mpo sition, deterg ent s can be sp lit in two basic ty pe s:
De te rge nt tab lets of diffe re nt bran ds d is s olve at different speeds . For this r eason some
de terge nt tab l ets canno t dissolv e and de ve lop the ir full clean ing pow er d uring short
prog rams. T heref ore pleas e use long programs when usi ng detergen t tablets, to
en su re the comple te remova l of d ete rg ent resid ua l s.
The disp ens er must be refilled before the sta rt o f each wa sh cycle following the instructions
prov ide d in t he wash cy cle tab le . Your dishwa s her uses l e ss detergen t and rinse aid tha n
Co nv entional dis h wa she r. Gene rally, onl y one ta blespoon of deterg en t is needed f or
a nor mal w ash load. M or e heav ily so iled items need more dete rgent. Alw ays add the
de terge nt just be for e st arting th e di shwasher, otherwis e it cou ld get damp and will not
diss olve prop erly.
Concentrated Detergent
Detergent Tablets
Detergent Dispenser
conv en tio nal , al kaline de terge nts with ca ustic com po nents
low alkali n e co nc ent ra ted deter gents with natural enzymes
No rm all y ne w pulv e rised deter ge nt is witho ut pho s phate. Th us the wat er softener f unctio n of
ph ospha te is no t given. In th is c a se w e re comme nd to fill salt in t he salt containe r even w hen
th e hardnes s of water i s on ly 6 dH . If det er gen ts w ithout pho sphat e ar e us ed in the case of hard water
of te n white spots a ppear o n dishes an d glas ses. In thi s case ple ase add mo re deterge nt to reach
be tter results. Deterge nts wi thout chlorine do only bleac h a li ttl e. Str ong and coloured spo ts will not
be removed comple tely. In this cas e ple as e choose a prog ra m wi th a high er t em pe rature.
°
Amount of Det ergent to Use
Pr op er Use of De te rgent
Use on ly deterg ent speci ficall y made for the use in dishwashers. Kee p yo ur det er gent fr esh and dry.
Do n' t pu t po wdered de ter ge nt into the dis pen ser un til yo u'r e re ady to wash dish e s.
Dish washe r de ter gen t is corrosiv e! Take c a re to ke ep it out of re ac h of child ren.
Alwa ys add the detergent jus t before s t arting ea ch w ash cyc le.
Only use brande d dete rgent a id f or dis h wa sher.
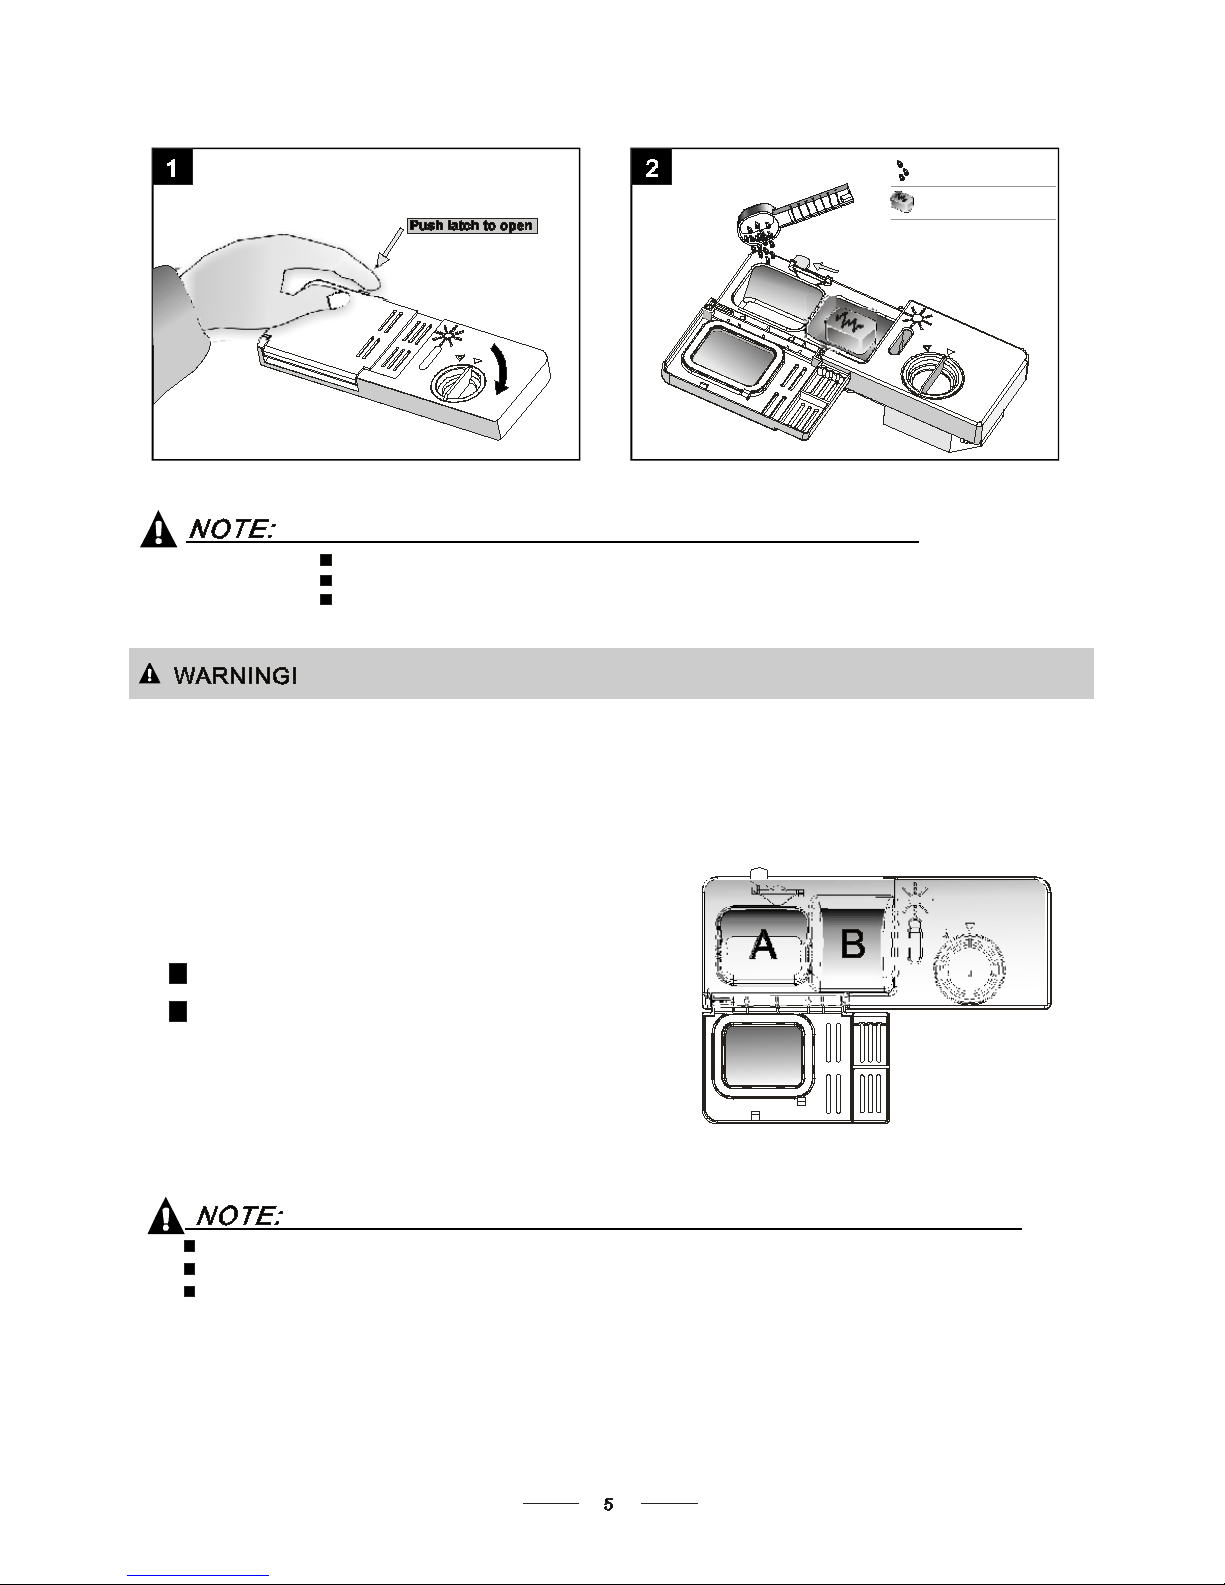
If the lid is c losed: press release b utton. The lid will spr ing op en.
D eter gent t ab let
D eter gent pow der
Fi ll the dete rg ent dispenser wi th d etergent.
The mark ing ind ic ates the do sing levels , a s
illustrat ed on th e ri ght:
The place of m ain wash cycle de ter gent plac ed.
The place of p re -wash cycle de te rgent pla ced.
Plea se observe the ma nufactur ers dosing an d st orage
Re comme nda ti ons as stated on the deterge nt packag ing.
Close the li d and pr es s unt il i t locks in pla ce.
If the dishes ar e heavily soi led, pl ace an add itional
de terge nt dos e in the p re -wash det erg en t chambe r. T his det erg en t will take effect du ring the pre-wash phase.
A
B
Fill in Detergent
You find informat ion abo ut the a mount of detergent for t he single pr ogramme on pa ge 8.
Plea se aware, t hat ac cordi n g to th e level soili ng and the spe c if ic hardness of water d iffer ences are possib l e.
Plea se observe the ma nufactur er's re co mme ndations on the d ete rg ent pa ck a ging.
 Loading...