

Page 1
4-SLICE TOASTER OVEN
HORNO TOSTADOR DE 4 REBANADAS
Instruction Manual
Manual de instrucciones
Register your product and get support at:
Para registrar y obtener asistencia de su producto ir:
www.bellahousewares.com
Ultimate Elite Collection
SO-314454_14622 BELLA ultimate Elite TOV IM_R2.indd 1 2017-07-04 8:14 AM
Page 2

Table of Contents
Important Safeguards ...............................................................................................................................2-3
Additional Important Safeguards ...............................................................................................................3
Notes on the Cord.........................................................................................................................................3
Notes on the Plug .........................................................................................................................................3
Plasticizer Warning ...................................................................................................................................... 3
Electric Power................................................................................................................................................3
Getting To Know Your 4-Slice Countertop Oven ..................................................................................... 4
Before using for the rst time .....................................................................................................................4
How To Use the Countertop Oven .............................................................................................................5
Control Panel ................................................................................................................................................. 5
Function Dial .......................................................................................................................................... 5
Power Indicator Light ...................................................................................................................................5
Timer/Toast dial .................................................................................................................................... 5
Cooking Instructions .................................................................................................................................... 6
Bake ......................................................................................................................................................... 6
Broil ......................................................................................................................................................... 6
Hints For Broiling ...................................................................................................................................6
Toa s t ........................................................................................................................................................ 7
Hints For Toast ....................................................................................................................................... 7
Bagel/ English Mufns ..........................................................................................................................7
Warm ....................................................................................................................................................... 7
Countertop Oven Helpful Hints ..................................................................................................................8
User Maintenance Instructions ...................................................................................................................8
Cleaning & Storage ......................................................................................................................................8
Warranty ........................................................................................................................................................9
Índice
Table of Contents
Important Safeguards ........................................................................................................................... 10 -11
Otras medidas de seguridad importantes .............................................................................................. 11
Notas sobre el cable ................................................................................................................................... 11
Notas sobre el enchufe .............................................................................................................................. 11
Advertencia sobre los plasticantes ....................................................................................................... 11
Corriente eléctrica ...................................................................................................................................... 11
Conozca su horno tostador de 4 rebanadas ........................................................................................... 12
Antes de utilizar por primera vez ............................................................................................................. 12
Cómo utilizar el horno de mesa .............................................................................................................. 13
Panel de control .......................................................................................................................................... 13
Dial del temporizador/tostar ............................................................................................................. 13
Luz de encendido .......................................................................................................................................13
Dial del temporizador/tostar .............................................................................................................. 13
Instrucciones para cocinar ........................................................................................................................ 14
Hornear .................................................................................................................................................14
Asar ....................................................................................................................................................... 14
Consejos para asar .............................................................................................................................. 14
Tos t ar ....................................................................................................................................................15
Consejos para tostar ...........................................................................................................................15
Rosca/mufns ingleses.......................................................................................................................15
Calentar ............................................................................................................................................ 15-16
Consejos útiles para el horno de mesa ................................................................................................... 16
Instrucciones de mantenimiento .............................................................................................................. 16
Instrucciones de cuidado y limpieza ........................................................................................................ 16
Garantía........................................................................................................................................................ 17
1
SO-314454_14622 BELLA ultimate Elite TOV IM_R2.indd 2-1 2017-07-04 8:14 AM
Page 3

IMPORTANT SAFEGUARDS
When using electrical appliances, basic safety precautions should always be
followed including the following:
1. READ ALL INSTRUCTIONS.
2. DO NOT touch hot surfaces. Use handles or knobs.
3. To protect against electrical shock do not immerse cord, plugs,
in water or other liquid.
4. Close supervision is necessary when any appliance is used by or near children.
5. Unplug from outlet when not in use and before cleaning. Allow to cool before
putting on or taking off parts.
6. DO NOT operate any appliance with a damaged cord or plug or after the
appliance malfunctions or has been damaged in any manner. Return appliance
to the nearest authorized service facility for examination, repair, or adjustment.
7. The use of accessory attachments not recommended by the appliance
manufacturer may cause injuries.
8. DO NOT use outdoors.
9. DO NOT let cord hang over edge of table or counter, or touch hot surfaces.
10. DO NOT place on or near a hot gas or electric burner, or in a heated oven.
11. Extreme caution must be used when moving an appliance containing hot oil or
other hot liquids.
12. Always attach plug to appliance rst, then plug cord into the wall outlet.
To disconnect, turn any control dial to “OFF”, then remove plug from wall outlet.
13. DO NOT use appliance for other than intended use.
14. Use extreme caution when removing tray or disposing of hot grease.
15. Oversize foods or metal utensils must not be inserted in a Countertop Oven as
they may create a re or risk of electric shock.
16. A re may occur if the Countertop Oven is covered or touching ammable
material, including curtains, draperies, walls, and the like, when in operation.
17. DO NOT store any item on top of the appliance when in operation.
18. DO NOT clean with metal scouring pads. Pieces can break off the pad and
touch electrical parts involving a risk of electric shock.
19. Extreme caution should be exercised when using containers constructed of
other than metal or glass.
20. DO NOT store any materials, other than manufacturers recommended
accessories, in this oven when not in use.
21. DO NOT place any of the following materials in the oven: paper, cardboard,
plastic, etc.
22. DO NOT cover crumb tray or any part of the oven with metal foil.
This will cause overheating of the oven.
23. This appliance is not intended for use by persons (including children) with
reduced physical, sensory or mental capabilities, or lack of experience and
knowledge unless they have been given supervision or instruction concerning
use of the appliance by a person responsible for their safety.
24. Children should be supervised to ensure that they do not play with the
appliance.
25. The appliance is not intended to be operated by means of an external timer or
separate remote-control system.
26. Place the Countertop Oven at least 2 to 4-inches away from the wall to allow
heat ow without causing damage to cabinets and walls.
FOR HOUSEHOLD USE ONLY
SAVE THESE INSTRUCTIONS
ADDITIONAL IMPORTANT
SAFEGUARDS
CAUTION HOT SURFACES: This appliance generates heat and escaping steam
during use. Proper precautions must be taken to prevent the risk of burns, res,
or other injury to persons or damage to property.
1. A person who has not read and understood all operating and safety
instructions is not qualied to operate this appliance. All users of this appliance
must read and understand this owner’s manual before operating
or cleaning this appliance.
2. If this appliance falls or accidentally becomes immersed in water, unplug it
from the wall outlet immediately. Do not reach into the water!
3. When using this appliance, provide adequate air space above and on all sides
for air circulation. Do not operate this appliance while it is touching or near
curtains, wall coverings, clothing, dishtowels or other ammable materials.
4. To reduce the risk of re, do not leave this appliance unattended during use.
5. If this appliance begins to malfunction during use, immediately turn the timer
control and temperature control to OFF; remove the plug from the wall outlet.
Do not use or attempt to repair a malfunctioning appliance!
6. The cord to this appliance should only be plugged into a 120V AC electrical wall outlet.
7. Do not use this appliance in an unstable position.
NOTES ON THE CORD
The provided short power-supply cord should be used to reduce the risk of
entanglement and tripping over a longer cord. Do not use an extension cord with
this product.
NOTES ON THE PLUG
This appliance has a polarized plug (one blade is wider than the other). To reduce
the risk of electric shock, this plug will t in a polarized outlet only one way. If the
plug does not t fully into the outlet, reverse the plug. If it still does not t, contact
a qualied electrician. Do not modify the plug in any way.
PLASTICIZER WARNING
To prevent Plasticizers from migrating to the nish of the counter top or table
top or other furniture, place NON-PLASTIC coasters or place mats between the
appliance and the nish of the counter top or table top. Failure to do so may
cause the nish to darken; permanent blemishes may occur or stains can appear.
ELECTRIC POWER
If the electrical circuit is overloaded with other appliances, your appliance may
not operate properly. It should be operated on a separate electrical circuit from
other appliances.
3 2
SO-314454_14622 BELLA ultimate Elite TOV IM_R2.indd 2-3 2017-07-04 8:14 AM
Page 4
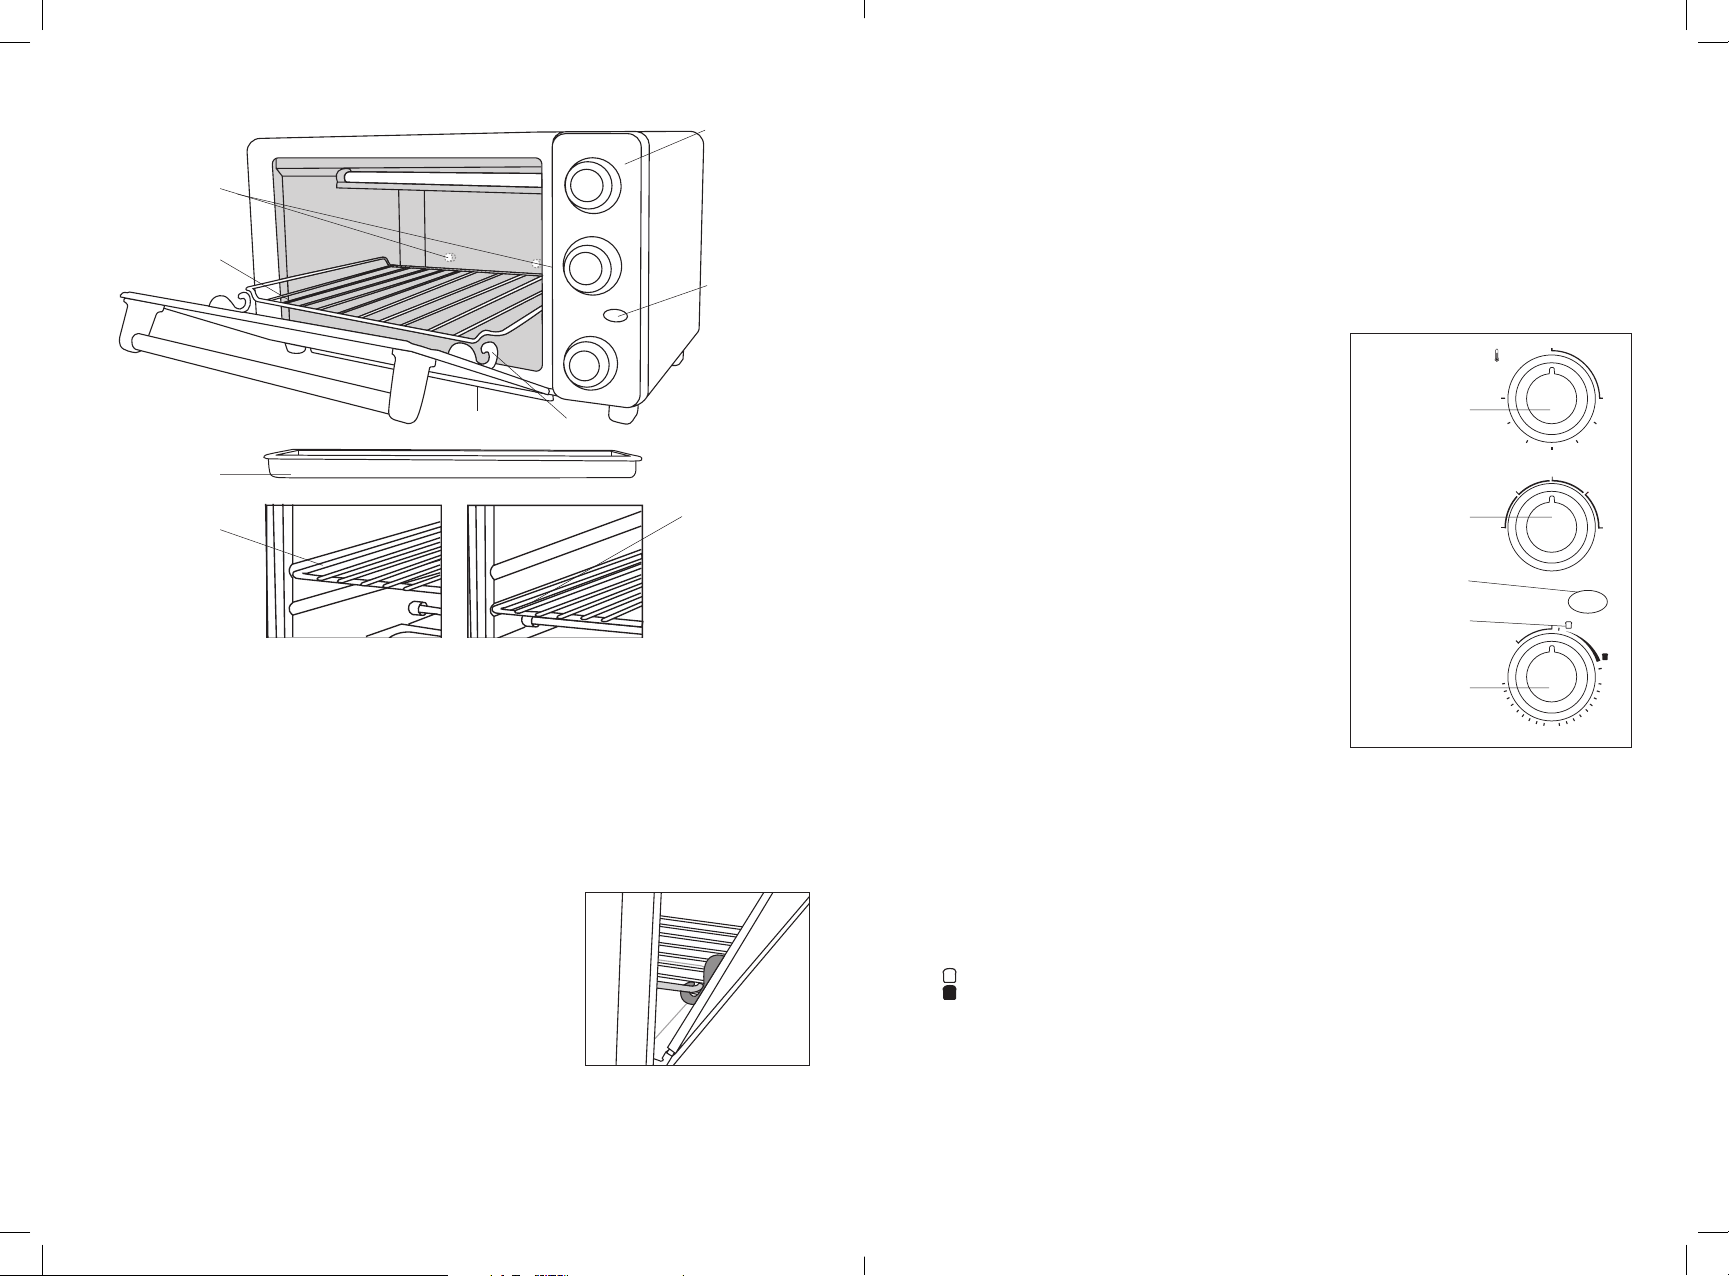
Getting To Know Your 4-Slice Countertop Oven
Product may vary slightly from illustration
Control
Panel
Rear Bumper
(Allows airow
between back of
oven and wall)
Oven Rack
Power
Indicator
Light
Slide Out
Crumb Tray
Rack Hooks
Baking Pan
Upper Oven
Rack Position
for broil
Lower oven rack
position for
bake/ toast
(Use this lower
position for pizza)
Before using for the rst time
• Remove all protective lm, accessories and shipping materials packed inside the oven; peel off clear
protective lm from control panel.
• Wash all removable parts in warm soapy water. Wipe the inside of the oven with a damp cloth or
sponge. Blot dry with paper towels to be sure the unit is dr y before using.
• Place oven on a at counter or other stable surface. Place the Countertop Oven at least 2 to 4-inches
away from the wall to allow heat ow without causing damage to cabinets and walls.
DO NOT OPERATE ON THE SAME CIRCUIT WITH ANOTHER APPLIANCE.
• Make sure the Crumb Tray is properly installed below the lower heating elements before using.
• Inser t reversible oven rack halfway into lower rack slot position.
• Lift oven door to bring up the rack hooks, then slide the rack along the slots until it engages with
thehooks.
IMPORTANT: The rack will not slide forward when the door is open unless it is inside the hooks
on the door (Figure 2).
NOTE: The hooks only function when rack is the lower slot.
• Close oven door, noting that rack slides completely into oven.
• Select a location where this unit is to be used allowing enough
space between the back of the unit and the wall to allow heat
ow without damage to cabinets and walls.
• Remove tie from cord and unwind.
• Plug unit into electrical outlet.
NOTE: During rst few minutes of use you may notice smoke
and slight odor. This is normal and should cause no concern.
• Before using for the rst time, set the Temperature Dial to 350°F, the function setting on BAKE
and the timer to 15 minutes without any food in oven to burn off any oils remained from
manufacturing.
IMPORTANT: The oven gets hot when in use. Always use oven mitts or pot holders when touching
the outer or inner surface of the oven.
Fig. 2
How To Use the Countertop Oven
IMPORTANT: The oven gets hot when in use. Always use oven mitts or pot holders when touching
the outer or inner surface of the oven.
• Place the oven rack in position that will accommodate the height of the food to be cooked.
Be sure that the food is at least 1 ½ inches away from the upper or lower heating elements.
• Set the food on the rack. Make sure that you always use ovenproof containers, never use plastic
or cardboard containers in the oven. Do not put any containers directly onto the lower heating
elements.
• Never use glass, ceramic pans or containers with lids.
• Do not let juices run to the bot tom of the oven. Use the baking pan and crumb tray when cooking.
• Turn the Temperature Dial to the desired cooking temperature.
• Securely shut the door and set the cooking time to begin operating the oven.
Control Panel
OFF
IMPORTANT: When using the timer for less than 10 minutes,
turn the dial past the 10 minute mark and then turn back to
Fig. 3
TEMP
°F
theappropriate time/ toast browning setting.
Temperature Dial
Turn the Temperature Dial clockwise to the desired setting.
The temperature can be set from 150 °F (65 °C) to 450 °F
(230 °C). To keep food warm after it has been cooked,
set the Function Dial to warm.
FUNCTION DIAL
This oven offers different functions for versatile cooking all
in one appliance.
• BAKE: Both the upper and lower heating elements are
operational in this setting.
• BROIL: Only the upper heating elements are operational
in this setting. Turn the Temperature Dial to MAX
for optimal performance.
• TOAST: The upper and lower heating elements
Temperature
Dial
Function
Dial
Power
Indicator Light
Toast Shade
Selector
450
400
FUNCTION
BAGEL
BAGEL
WARM
WARM
TIME
(MINUTES)
STAY ON
350
OFF
150
200
250
300
BROIL
BROIL
BAKE
BAKE
TOAST
TOAST
POWER
are operational. Turn the Temperature Dial to MAX
for optimal performance.
• BAGEL: Only the upper heating elements are operational.
Turn the Temperature Dial to MA X for optimal performance.
• WARM
Timer
Dial
30
10
20
Power Indicator Light
The power indicator light will illuminate when the unit is plugged in and the time has been set, or STAY
ON has been selected. When the time set has expired, or the Timer Dial has been turned to the OFF
position, the power indicator light will turn off.
TIMER/TOAST DIAL
• OFF: Turn the Timer Dial to the OFF position when cooking is complete. The power indicator light will go off.
• STAY ON: When cooking for more than 30 minutes, or to cook manually for an unlimited amount
of time, turn the Timer Dial to STAY ON to turn the Countertop Oven ON. The power indicator
light will illuminate.
NOTE: Bread may catch re if the toasting time is setting too long. Close supervision is necessary
during toasting.
• Toast Browning:
Light
Dark
• 0-30 MINUTES: To begin operation, set the time by turning the dial clockwise to STAY ON or to the
desired cooking time. Cook time may be adjusted during any cooking cycle. Turn the Timer Dial to
the desired time and continue cooking. When the time set has expired, the Timer Dial will move to
the OFF position, a bell will be heard and the Counter top Oven will automatically turn OFF. When
the Timer Dial is in the OFF position, the oven will not operate.
NOTE: To set the timer for less than 10 minutes, always turn the Timer Dial to 10 minutes and then
rotate back to your chosen time. This will ensure an accurate cooking time.
5 4
SO-314454_14622 BELLA ultimate Elite TOV IM_R2.indd 4-5 2017-07-04 8:14 AM
Page 5

Cooking Instructions
BAKE
• Inser t sliding oven rack into lower rack position, engaging rack hooks as directed in
BEFORE USING FOR THE FIRST TIME.
• Turn Temperature Dial to desired bake temperature.
• Turn Function Dial to BAKE.
• Set Timer Dial to the desired bake time, including the preheat time. The power indicator light
will illuminate.
NOTE: For best results, preheat the Countertop Oven before baking.
NOTE: To set the timer for less than 10 minutes, always turn the Timer Dial to 10 minutes and then
rotate back to your chosen time. This will ensure an accurate cooking time.
• Set Timer Dial to STAY ON to bake longer than 30 minutes or to manually control the cooking time.
The Counter top Oven will NOT stop automatically and will continue to cook until the Timer Dial
is turned to OFF.
IMPORTANT: You must set the timer or select STAY ON for the oven to turn on.
• Place the baking pan on the wire rack once preheating is complete.
• When BAKE time set has elapsed, a signal will sound, and the Timer Dial will nish in the OFF
position. The Countertop Oven and power indicator light will turn OFF.
NOTE: To stop baking at any time, turn the TIMER DIAL to OFF.
• Open the Oven door. Using oven mitts or pot holders, slide the oven rack out to remove the cooked
food. Unplug Countertop Oven when not in use.
BROIL
WARNING: NEVER LEAVE COUNTERTOP OVEN UNATTENDED DURING BROILING.
• When broiling, only the upper heating elements will operate. This setting should be used for
browning the top surface of food or broiling chops, steaks, etc.
• Inser t oven rack into upper rack position,
• Turn Temperature Dial to MAX.
• Turn Function Dial to BROIL.
• Set Timer Dial to the desired broil time. The power indicator light will illuminate.
NOTE: To set the timer for less than 10 minutes, always turn the Timer Dial to 10 minutes and then
rotate back to your chosen time. This will ensure an accurate cooking time.
NOTE: Do not set the Timer Dial to the STAY ON position when broiling.
• Place food on bake pan for broiling. Always use the bake pan on the oven rack when broiling.
Do not cover the oven rack with aluminum foil.
• When broil time set has elapsed, a signal will sound, and the Timer Dial will nish in the OFF
position. The Countertop Oven and power indicator light will turn OFF.
NOTE: To stop broiling at any time, turn the TIMER DIAL to OFF.
• Open the Oven door. Using oven mitts or pot holders, slide the oven rack out to remove the cooked
food. Unplug Countertop Oven when not in use.
HINTS FOR BROILING
• Broiling is used for tender cuts of meats or marinated meats, sh and some fruits and vegetables.
• When broiling meat, brush each side with melted butter or olive oil.
• When broiling sh or chicken, broil skin-side down rst.
• Broiling time is determined by the desired doneness and the distance between the food
and the element.
WARNING: Do not place aluminum foil on top of the bake/broil pan. This traps grease and can cause a re.
• For best results, thaw frozen meats, poultry and sh before broiling. Trim excess fat from meat and
score edges to prevent curling.
TOAST
It is not necessary to preheat the oven for toasting.
WARNING: NEVER LEAVE COUNTERTOP OVEN UNATTENDED DURING TOASTING.
• Inser t oven rack into upper rack position, to ensure uniform brownness on both sides.
• Turn Temperature Dial to MAX.
• Turn Function Dial to TOAST.
• Use the Toast Shade Selector on the Timer Dial to begin toasting. The power indicator light will illuminate.
NOTE: To set the timer for less than 10 minutes, always turn the Timer Dial to 10 minutes and then
rotate back to your chosen time. This will ensure an accurate cooking time.
NOTE: Do not set the TIMER DIAL to the STAY ON position when toasting.
• Always place the bread evenly on the rack. For example, when toasting one slice of bread, place the
slice on the center of the rack.
• Close the Countertop Oven door.
• When toasting time set has elapsed, a signal will sound, and the Timer Dial will nish in
the OFF position. The Countertop Oven and power indicator light will turn OFF.
NOTE: To stop toasting at any time, turn the Timer Dial to OFF.
• Open the Countertop Oven door. Using oven mitts or pot holders, slide the oven rack out to remove
the cooked food. Unplug Countertop Oven not in use.
CAUTION: Bread can burn easily, close supervision is necessar y.
HINTS FOR TOAST
• Remove all protective wrappings from food before placing in Countertop Oven. Follow food
directions.
• Frozen and heav y bread require a darker browning setting.
• One slice of bread requires a lighter setting than several slices of bread. When toasting more than
one slice of bread, use slices of similar size, thickness and freshness.
• Stale bread, thin bread or sweet bread products, such as tea cakes and fruit loaf, brown much more
quickly than ordinary bread, and should be toasted for less time.
BAGEL/ ENGLISH MUFFINS
It is not necessary to preheat the oven for toasting bagels and English mufns.
WARNING: DO NOT LEAVE COUNTERTOP OVEN UNATTENDED WHILE USING THE BAGEL FUNCTION.
• Inser t oven rack into upper rack position.
• Turn Temperature Dial to MAX.
• Turn Function Dial to BAGEL.
NOTE: Only the upper heating elements will cycle in this setting, allowing you to brown the cut half
and gently warm the outside.
• Use the Toast Shade Selector on the Timer Dial to begin. The power indicator light will illuminate.
NOTE: To set the timer for less than 10 minutes, always turn the TIMER DIAL to 10 minutes
and then rotate back to your chosen time. This will ensure an accurate cooking time.
NOTE: Do not set the Timer Dial to the STAY ON position when toasting bagels or English muf ns.
• Always place the bagels or English mufns on the rack, cut side facing up.
• Close the Countertop Oven door.
• When bagel toasting time set has elapsed, a signal will sound, and the Timer Dial will nish in
the OFF position. The Countertop Oven and power indicator light will turn OFF.
NOTE: To stop toasting at any time, turn the TIMER DIAL to OFF.
• Open the Countertop Oven door. Using oven mitts or pot holders, slide the oven rack out to remove
the cooked food. Unplug Countertop Oven when not in use.
WARM
This setting is designed to keep food warm after it has been cooked.
• Turn Temperature Dial to 150º - 200°F.
• Turn Function Dial to WARM.
• Set Timer Dial to the desired WARM time.
• Set Timer Dial to STAY ON to keep food warm longer than 30 minutes or to manually control
the WARM time. The Countertop Oven will NOT stop automatically and will continue to warm until
the Timer Dial is turned to OFF.
• When warming time set has elapsed, a signal will sound, and the Timer Dial will nish in
the OFF position. The Countertop Oven and power indicator light will turn OFF.
NOTE: To stop warming at any time, turn the Timer Dial to OFF.
• Open the Oven door. Using oven mitts or pot holders, slide the oven rack out to remove the warmed
food. Unplug Countertop Oven when not in use.
7 6
SO-314454_14622 BELLA ultimate Elite TOV IM_R2.indd 6-7 2017-07-04 8:14 AM
Page 6

Countertop Oven Helpful Hints
Limited TWO-YEAR Warranty
SENSIO Inc. hereby warrants that for a period of TWO YEARS from the date
of purchase, this product will be free from mechanical defects in material and
workmanship, and for 90 days in respect to non-mechanical parts. At its sole
discretion, SENSIO Inc. will either repair or replace the product found to be defective,
or issue a refund on the product during the warranty period.
The warranty is only valid for the original retail purchaser from the date of initial retail
purchase and is not transferable. Keep the original sales receipt, as proof of purchase is
required to obtain warranty validation. Retail stores selling this product do not have the
right to alter, modify, or in any way revise the terms and conditions of the warranty.
EXCLUSIONS:
The warranty does not cover normal wear of parts or damage resulting from any of the
following: negligent use of the product, use of improper voltage or current, improper
routine maintenance, use contrary to the operating instructions, disassembly, repair,
or alteration by anyone other than qualied SENSIO Inc. personnel. Also, the warranty
does not cover Acts of God such as re, oods, hurricanes, or tornadoes.
SENSIO Inc. shall not be liable for any incidental or consequential damages caused
by the breach of any express or implied warranty. Apart from the extent prohibited
by applicable law, any implied warranty of merchantability or tness for a particular
purpose is limited in time to the duration of the warranty. Some states, provinces or
jurisdictions do not allow the exclusion or limitation of incidental or consequential
damages, or limitations on how long an implied warranty lasts, and therefore, the
above exclusions or limitations may not apply to you. The warranty covers specic
legal rights which may vary by state, province and/or jurisdiction.
HOW TO OBTAIN WARRANTY SERVICE:
You must contact Customer Service at our toll-free number: 1-866-832-4843.
A Customer Service Representative will attempt to resolve warranty issues over the
phone. If the Customer Service Representative is unable to resolve the problem,
you will be provided with a case number and asked to return the product to SENSIO
Inc. Attach a tag to the product that includes: your name, address, daytime contact
telephone number, case number, and description of the problem. Also, include a
copy of the original sales receipt. Carefully package the tagged product with the sales
receipt, and send it (with shipping and insurance prepaid) to SENSIO Inc.’s address.
SENSIO Inc. shall bear no responsibility or liability for the returned product while in
transit to SENSIO Inc.’s Customer Service Center.
• Turn the Temperature Dial to MIN, the Function Dial to WARM and the Timer Dial to OFF before
inser ting or removing plug from electrical outlet.
• The power indicator light will illuminate when the unit is plugged in and the Timer Dial has been set
to any temperature or STAY ON. When the time set has expired, or the Timer Dial is manually
turned to OFF, the power indicator light will turn OFF.
• When setting BAKE time, include 15 minutes preheat time.
• This Countertop Oven has a 30 minute timer. If baking for longer than 30 minutes,
use the STAY ON feature.
• Never use lids with any glass, ceramic pans or metal bakeware. If foods require covering, use
aluminum foil. Be sure to tuck the edges of foil tightly against the sides of the baking dish or pan.
• Be sure the top of the container or food being baked or broiled is at least 1-1/2 inches away from
the upper heating elements.
• Never place any container directly on the lower heating element.
• To obtain the best performance from this Countertop Oven, do not overll the Oven.
• To avoid heat loss do not open the door too frequently.
User Maintenance Instructions
CAUTION: This appliance is for HOUSEHOLD USE ONLY.
This appliance requires little maintenance. It contains no user serviceable parts.
Do not try to repair it by yourself. Any servicing that requires disassembly other than cleaning must
be performed by a qualied appliance repair technician.
Cleaning & Storage
IMPORTANT: Before cleaning unplug the Countertop Oven and allow it to cool completely.
• Wash all attachments with mild, soaped water including the oven rack and baking pan.
• Do not use abrasive cleansers, scrubbing brushes, spray glass cleaners or chemical cleaners.
• Using a wet cloth, wipe the inside of the oven. To minimize scratching, use a polyester or nylon pad.
• To clean the glass door use a wet cloth saturated with detergent or soap. Do not use spray glass cleaner.
• To remove the oven rack, open the door, pull the rack for ward and out. Wash the oven rack in soapy
water. To remove stubborn spots, use a polyester or nylon pad.
• It is not recommended to wash baking pan in the dishwasher. Wash the baking pan and oven rack
in soapy water. To minimize scratching, use a polyester or nylon pad.
• Never immerse the unit in water or other liquid.
• Always dry parts thoroughly before using the Countertop Oven after cleaning.
• To remove crumb tray the glass door must be closed:
• Grasp the handle below the oven glass door and pull out the tray
• Dispose of crumbs and wipe the tray with a dampened cloth
• Be sure to dry thoroughly before inserting the tray back into the oven
• Unplug unit, allow cooling, and clean before storing.
• Store the Countertop Oven in its box in a clean, dry place.
• Never store appliance while it is hot or still plugged in.
• Never wrap cord tightly around the appliance. Do not put any stress on the cord where it enters
theunit, as it could cause the cord to fray and break.
8
SO-314454_14622 BELLA ultimate Elite TOV IM_R2.indd 8-9 2017-07-04 8:14 AM
9
Page 7

MEDIDAS DE SEGURIDAD
26. Coloque el horno de mesa al menos 2 a 4 pulgadas de distancia de la pared para
permitir el ujo de calor sin causar daños a los gabinetes y las paredes.
IMPORTANTES
Siempre se deben seguir las precauciones básicas de seguridad cuando se usan
artefactos eléctricos, incluso lo siguiente:
1. LEA TODAS LAS INSTRUCCIONES
2. NO TOQUE las supercies calientes. Utilice las asas o los mangos.
3. Para protegerse del riesgo de descarga eléctrica, no sumerja el cable, elenchufe ni la
unidad en agua ni en ningún otro líquido.
4. La supervisión cuidadosa es necesario cuando el electrodoméstico sea usado por o
cerca de niños. Desenchufe el electrodoméstico del tomacorriente cuando no esté en
uso y antes de limpiarlo. Deje que el horno se enfríe antes de colocar o retirar piezas.
5. NO UTILICE ningún electrodoméstico que tenga un cable o enchufe dañado, que
muestre un funcionamiento defectuoso o que se haya dañado de cualquier manera.
Lleve el electrodoméstico a un técnico calicado para que lo examine, lo repare o le
haga ajustes eléctricos o mecánicos.
6. El uso de accesorios no recomendados o vendidos por el fabricante puede causar
fuego, descarga eléctrica o lesiones.
7. NO lo utilice en exteriores.
8. NO PERMITA que el cable cuelgue del borde de la mesa o encimera o toque supercies
calientes.
9. NO coloque el aparato encima de, cerca de o en un quemador eléctrico o de gases
calientes, ni dentro una estufa encendida.
10. Se debe tener extrema precaución al mover un aparato que contenga aceite caliente
u otros líquidos.
11. Conecte siempre primero el enchufe al aparato y luego enchufe el cable a la toma de
corriente.
12. Para desconectar, gire cualquier dial de control a “OFF”, y luego retire el enchufe de la
toma de corriente.
13. NO UTILICE el aparato para otro uso que no sea el previsto.
14. Tenga mucho cuidado al retirar la bandeja para hornear o desechar la grasa caliente.
15. Las comidas de gran tamaño o utensilios de metal no deben ser insertados en el horno
ya que pueden crear un incendio o riesgo de descarga eléctrica.
16. Si el horno está cubierto o se toca materiales inamables, incluyendo cortinas,
tapicerías, paredes y demás, puede ocurrir un incendio cuando esté en funcionamiento.
17. NO ALMACENE ningún artículo en la encima del aparato cuando esté en funcionamiento.
18. NO LIMPIE con estropajos metálicos jabonosos. Las piezas pueden romper y tocar las
partes eléctricas que resultaría un riesgo de descarga eléctrica.
19. Se debe tener una cautela extrema cuando utilicen recipientes construidos de otros
materiales que no sean de metal o vidrio.
20. NO ALMACENE ningún material, aparte de los accesorios recomendados por el
fabricante en este horno cuando no esté en uso.
21. NO COLOQUE ninguno de los siguientes materiales en el horno: papeles, cartones,
plásticos y demás.
22. NO CUBRA la bandeja de migas ni ninguna parte del horno con papel metálico. Esto
provocará un sobrecalentamiento del horno.
23. Este electrodoméstico no debe ser utilizado por personas (incluidos niños) con
capacidades físicas, sensoriales o mentales reducidas, o con falta de experiencia
y conocimientos, a menos que una persona responsable de su seguridad les haya
brindado supervisión o instrucciones sobre el uso de los electrodomésticos.
24. Los niños deben ser supervisados para asegurarse de que no juegan con el aparato.
25. El aparato no está diseñado para funcionar con un temporizador externo o unsistema
de control al telemando.
SOLO PARA EL USO DOMESTICO
GUARDE ESTAS INSTRUCCIONES
OTRAS MEDIDAS DE
SEGURIDAD IMPORTANTES
PRECAUCIÓN. SUPERFICIES CALIENTES: Este electrodoméstico genera calor y libera vapor
mientras está en funcionamiento. Se deben tomar las medidas de precaución adecuadas
para evitar el riesgo de quemaduras, incendios u otros tipos de lesiones o daños materiales.
1. Las personas que no hayan leído y comprendido todas las instrucciones de funcionamiento
y seguridad no deben utilizar este electrodoméstico. Todos los usuarios de este
electrodoméstico deben leer y comprender este manual de instrucciones antes de poner
en funcionamiento o limpiar este electrodoméstico.
2. Si el electrodoméstico se cae o accidentalmente se sumerge en agua, desenchúfelo del
tomacorriente de pared de inmediato. ¡No introduzca la mano en el agua!
3. Cuando utilice este electrodoméstico, proporcione una buena ventilación por encima y a
los lados de la unidad para que circule el aire. No utilice este electrodoméstico mientras
esté en contacto con cortinas o cerca de cortinas, recubrimientos de pared, ropa, paños
de cocina u otros materiales inamables.
4. Para reducir el riesgo de incendio, no deje este electrodoméstico sin supervisión mientras
está en funcionamiento.
5. Si el electrodoméstico comienza a funcionar mal durante el uso, gire de inmediato el control
del temporizador y de temperatura a la posición OFF (Apagado) y luego retire el enchufe del
tomacorriente de pared. ¡No utilice ni intente reparar el electrodoméstico si funciona mal!
6. El cable de este electrodoméstico solo debe enchufarse en un tomacorriente eléctrico de
pared de 120 V CA.
7. No utilice este electrodoméstico en una posición inestable.
NOTAS SOBRE EL CABLE
El corto cable suministrado debe ser utilizado para reducir el riesgo de que se enreden o se
tropiecen con un cable más largo. No se puede utilizar los cables de extensión o alargadoras
con este producto. Siempre enchúfelo directamente en un tomacorriente de pared.
NOTAS SOBRE EL ENCHUFE
Este aparato tiene un enchufe polarizado (una hoja es más ancha que la otra). Para reducir el
riesgo de descarga eléctrica, este enchufe encajará en una toma decorriente polarizada sólo
de una manera. Si el enchufe no entra completamente en el tomacorriente, invierta el enchufe.
Si el enchufe no puede encajar en la toma eléctrica, póngase en contacto con un electricista
calicado. No modique el enchufe de ninguna manera.
ADVERTENCIA SOBRE LOS PLASTIFICANTES
A n de evitar que los plasticantes se adhieran al acabado de la encimera,
la mesa u otro mueble, coloque un posafuentes o salvamanteles que NO SEA
DE PLÁSTICO entre el electrodoméstico y la supercie de la encimera o mesa.
Si no se hace esto, es posible que el acabado se oscurezca, se formen marcas
permanentes o aparezcan manchas.
CORRIENTE ELÉCTRICA
Si el circuito eléctrico esta sobrecargado con otros artefactos, es posible que el
electrodoméstico no funcione correctamente. El electrodoméstico debe funcionar
enun circuito eléctrico separado de otros aparatos.
11 10
SO-314454_14622 BELLA ultimate Elite TOV IM_R2.indd 10-11 2017-07-04 8:14 AM
Page 8

Conozca su horno tostador de 4 rebanadas
El producto puede diferir levemente de las ilustraciones.
Marco trasero
del horno
Panel de
control
(Estepermite
el ujo de aire
entre el horno
ysu pared)
Rejilla del horno
Luz de
encendido
Bandeja de
migas deslizante
Ganchos de la rejilla
Bandeja para
hornear
Posición
superior del
estante
paraasar
Posición inferior
del estante para
hornear/tostar
(Utilice esta
posición para
cocinar pizzas)
Antes de utilizar por primera vez
• Retire toda la película protectora, los accesorios y los materiales de embalaje dentro del horno;
Pelee la película protectora transparente del panel de control.
• Lave todas las piezas extraíbles en agua tibia y jabonosa. Limpie el interior del horno con un trapo húmedo
o una esponja. Seque todo con toallas de papel para asegurarse de que la unidad esté seca antes de utilizar.
• Coloque el horno sobre una encimera plana u otra supercie estable. Coloque el horno tostador por lo menos
2 a 4 pulgadas lejos de la pared para permitir el ujo de calor sin causar daño a los gabinetes ya las paredes.
NO MANEJE EN EL MISMO CIRCUITO CON OTRO ELECTRODOMESTICO.
• Asegúrese de que la bandeja de migas esté bien instalada debajo de los elementos térmicos
inferiores antes de usarlos.
• Introduzca la rejilla reversible del horno por la mitad de la ranura inferior del estante.
• Levante la puerta del horno para abrir los ganchos de la rejilla, luego deslice la rejilla a lo largo de
las ranuras hasta que encaje con los ganchos.
IMPORTANTE: LA REJILLA NO SE DESLIZA ADELANTE CUANDO LA PUERTA ESTÉ ABIERTA, A MENOS
QUE ESTÉ DENTRO DE LOS GANCHOS DE LA PUERTA (FIGURA 2).
NOTA: Los ganchos sólo funcionan cuando la rejilla esté colocada en la ranura inferior.
• Cierre la puer ta del horno, observando que la rejilla se desliza completamente en el horno.
• Escoja un lugar donde se va a usar esta unidad, lo cual permite un espacio suciente entre la par te
posterior de la unidad y la pared parapermitir el ujo de calor sin dañar los gabinetes y las paredes
• Retire la corbata del cordón y desenróllela.
• Enchufe la unidad en la toma de corriente.
NOTA: Durante los primeros minutos de uso puede notar humo y olor ligero.
Esto es normal y no debe causar preocupación.
• Antes de utilizarlo por primera vez, ajuste el dial de temperatura a 350°F, el
ajuste de función en BAKE (HORNEAR) y el temporizador a 15 minutos sin
ningún alimento en el horno para que se puede quemar los aceites restantes
de fabricación. IMPORTANTE: El horno se calienta cuando está en uso.
Siempre use guantes de horno o agarraollas al tocar la supercie externa o
interna del horno.
Fig. 2
Cómo utilizar el horno de mesa
IMPORTANTE: El horno se calienta cuando está en uso. Siempre use guantes de horno o agarraollas al
tocar la supercie externa o interna del horno
• Coloque la rejilla del horno en posición que pueda acomodar la altura del alimento que se va
a cocinar. Asegúrese de que el alimento esté a por lo menos 1 ½ pulgada de distancia de los
elementos térmicos superiores o inferiores.
• Coloque los alimentos en la rejilla. Asegúrese de que siempre utilice recipientes resistentes
al horno, nunca utilice recipientes de plástico o cartón en el horno. No coloque recipientes
directamente sobre los elementos térmicos inferiores.
• Nunca utilice recipientes de vidrio, cerámica o recipientes con tapas.
• No permita que los jugos gotean hasta el fondo del horno. Utilice la bandeja para hornear y
labandeja para migas al cocinar.
• Gire el dial de temperatura a la temperatura de cocción deseada.
• Cierre rmemente la puerta y ajuste el tiempo de cocción para comenzar a utilizar el horno.
Panel de control
IMPORTANTE: Cuando use el temporizador por menos de
Fig. 3
TEMP
OFF
°F
10minutos, gire el dial más allá de la marca de 10 minutos yluego
regrese al ajuste apropiado de tiempo / tostar.
Dial de temperatura
Gire el dial de temperatura hacia la derecha hasta el ajuste
Dial de
temperatura
deseado. La temperatura se puede ajustar entre 150°F (65°C)
y450°F (230°C). Para mantener el alimento caliente después
decocinarlo, ajuste el dial de funciones a CALENTAR (WARM).
Dial de funciones
Este horno le ofrece funciones diferentes para una cocción
versátil en un solo aparato.
• HORNEAR (BAKE): Tanto el elemento térmico superior
comoel inferior están operativos en este ajuste.
• ASAR (BROIL): Sólo los elementos térmicos superiores
funcionan en este ajuste. Gire el dial de temperatura a
MAXpara un rendimiento óptimo.
• TOSTAR (TOAST): Los elementos térmicos superior e inferior
están operativos. Gire el dial de temperatura a MAX para
unrendimiento óptimo.
• ROSCA (BAGEL): Sólo los elementos térmicos superiores
están operativos. Gire el dial de temperatura a MAX para
unrendimiento óptimo.
• CALENTAR (WARM)
Dial de
funciones
Luz de
encendido
Dial para
seleccionar
el color del
pan tostado
Dial del
temporizador
450
400
FUNCTION
BAGEL
BAGEL
WARM
WARM
TIME
(MINUTES)
STAY ON
30
350
OFF
150
200
250
300
BROIL
BROIL
BAKE
BAKE
TOAST
TOAST
POWER
10
20
Luz de encendido
La luz de encendido se ilumina cuando la unidad esté enchufada y el tiempo haya sido ajustado, o se haya
seleccionado en STAY ON (ENCENDIDO). Cuando haya transcurrido el tiempo ajustado, o cuando el dial
del temporizador haya sido girado a la posición OFF (APAGADO), la luz de encendido se apagará.
Dial del temporizador/tostar
• APAGADO (OFF): Gire el dial del temporizador a la posición APAGADO cuando termine de cocinar.
La luz de encendido se apagará.
• ENCENDIDO (STAY ON): Cuando cocine por más de 30 minutos, o para cocinar manualmente por
untiempo ilimitado, gire el dial del temporizador a ENCENDIDO para encender el horno de mesa. La luz
de encendido se iluminará. NOTA: El pan puede incendiarse si el tiempo de tostar es demasiado largo. La
supervisión cuidadosa es necesaria al tostar.
• Color del pan tostado:
Claro (Light)
Oscuro (Dark)
• 0-30 MINUTOS: Para comenzar el funcionamiento, ajuste la hora girando el dial en el sentido
horario hasta ENCENDIDO o el tiempo de cocción deseado. El tiempo de cocción puede ajustarse
durante cualquier ciclo de cocción. Gire el dial del temporizador a la hora deseada y siga a cocinar.
Cuando haya transcurrido el tiempo, el dial del temporizador se moverá a la posición APAGADO, se
escuchará la señal y el horno de mesa se apagará automáticamente. Cuando el dial del temporizado
está en la posición APAGADO, el horno no funciona.
NOTA: Cuando use el temporizador por menos de 10 minutos, gire el dial más allá de la marca de 10
minutos y luego regrese al ajuste apropiado de tiempo / tostar.
13 12
SO-314454_14622 BELLA ultimate Elite TOV IM_R2.indd 12-13 2017-07-04 8:14 AM
Page 9

Instrucciones para cocinar
HORNEAR
• Inser te la rejilla del horno deslizante en la posición inferior del estante, engranando los ganchos del
estante como se indica en ANTES DE UTILIZAR POR PRIMERA VEZ.
• Gire el dial de temperatura a la temperatura de cocción deseada.
• Gire el dial de funciones a HORNEAR.
• Ajuste el dial del temporizador al tiempo de cocción deseado, incluyendo el tiempo de
precalentamiento. La luz de encendido se ilumina.
NOTA: Para obtener mejores resultados, precaliente el horno de mesa antes de hornear.
NOTA: Para ajustar el temporizador por menos de 10 minutos, gire siempre el dial del temporizador
a 10 minutos y gírelo de nuevo a la hora elegida. Esto garantizará un tiempo de cocción exacto.
• Ajuste el dial del temporizador en ENCENDIDO para hornear más de 30 minutos o para controlar el
tiempo de cocción. El horno de mesa NO se parará automáticamente, pero seguirá cocinando hasta
que el dial del temporizador esté apagado.
IMPORTANTE: DEBE AJUSTAR EL TEMPORIZADOR O SELECCIONAR ENCENDIDO PARA QUE EL
HORNO SE ENCIENDA.
• Coloque la bandeja para hornear en la rejilla cuando el precalentamiento esté completo.
• Cuando haya transcurrido el tiempo de cocción, una señal sonará y el dial del temporizador
regresará en la posición APAGADO. El horno de mesa y la luz de encendido se apagarán.
NOTA: Para parar de hornear en cualquier momento, gire el dial del temporizador a APAGADO.
• Abra la puerta del horno. Con guantes de horno o agarraollas, deslice la rejilla del horno para sacar
los alimentos cocidos. Desenchufe el horno de mesa cuando no esté en uso.
ASAR
ADVERTENCIA: NUNCA DEJE EL HORNO DE MESA SIN LA SUPERVISION DURANTE EL CICLO DE ASAR.
• Al asar, sólo funcionan los elementos térmicos superiores. Este ajuste se debe utilizar para dorar las
tapas de los alimentos o las chuletas de cerdo, letes, etc.
• Coloque la rejilla del horno en el estante superior.
• Gire el dial de temperatura a MAX
• Gire el dial de funciones a ASAR
• Ajuste el dial del temporizador al tiempo de asar deseado. La luz de encendido se iluminará
NOTA: Para ajustar el temporizador por menos de 10 minutos, gire siempre el dial del temporizador
a 10 minutos y gírelo de nuevo a la hora elegida. Esto garantizará un tiempo de cocción exacto.
NOTA: No ajuste el dial del temporizador a ENCENDIDO cuando ase.
• Coloque los alimentos en la bandeja para hornear para asar. Utilice siempre la bandeja para hornear
en la rejilla del horno al asar. No cubra la rejilla con el papel de aluminio.
• Cuando haya transcurrido el tiempo de asar, una señal sonará y el dial del temporizador regresará
en la posición APAGADO. El horno de mesa y la luz de encendido se apagarán.
NOTA: Para parar de asar en cualquier momento, gire el dial del temporizador a APAGADO.
• Abra la puerta del horno. Con guantes de horno o agarraollas, deslice la rejilla del horno para sacar
los alimentos cocidos. Desenchufe el horno de mesa cuando no esté en uso.
CONSEJOS PARA ASAR
• La función de asar se usa para cortes de carnes tiernas o carnes marinadas, pescado y algunas
frutas y verduras.
• Al asar la carne, aplica cada lado con mantequilla derretida o aceite de oliva.
• Al asar el pescado o el pollo, ase por primero la tapa de la carne y la piel para abajo.
• El tiempo de asar es determinado por la cocción deseada y la distancia entre la comida y el
elemento térmico.
ADVERTENCIA: No coloque papel de aluminio encima de la bandeja para hornear/asar. Esto atrapa
la grasa y puede causar un incendio.
• Para mejores resultados, descongelar las carnes congeladas, aves y pescados antes de asar. Corte
el exceso de grasa de la carne y haga cortes en los bordes para evitar que se curven.
TOSTAR
No necesita precalentar el horno para antes de utilizar la función de tostar
ADVERTENCIA: NUNCA DEJE EL HORNO DE MESA SIN LA SUPERVISION DURANTE EL CICLO DE TOSTAR.
• Coloque la rejilla del horno en el estante superior para asegurar un marrón uniforme en ambos lados.
• Gire el dial de temperatura a MAX.
• Gire el dial de funciones a TOSTAR.
• Utilice el selector de color del pan tostado en el dial del temporizador para comenzar a tostar. La luz
de encendido se iluminará.
NOTA: Para ajustar el temporizador por menos de 10 minutos, gire siempre el dial del temporizador
a 10 minutos y gírelo de nuevo a la hora elegida. Esto garantizará un tiempo de cocción exacto.
NOTA: No ajuste el dial del temporizador a ENCENDIDO cuando tueste.
• Coloque siempre el pan uniformemente sobre el estante. Por ejemplo, al tostar una rebanada de
pan, coloque la rebanada en el centro de la rejilla.
• Cierre la puer ta del horno de mesa.
• Cuando haya transcurrido el tiempo de tostar, una señal sonará y el dial del temporizador regresará
en la posición APAGADO. El horno de mesa y la luz de encendido se apagarán.
NOTA: Para parar de tostar en cualquier momento, gire el dial del temporizador a APAGADO.
• Abra la puerta del horno. Con guantes de horno o agarraollas, deslice la rejilla del horno para sacar
los alimentos cocidos. Desenchufe el horno de mesa cuando no esté en uso.
PRECAUCIÓN: EL PAN PUEDE QUEMARSE FÁCILMENTE, LA SUPERVISIÓN CUIDADOSA ES NECESARIA.
CONSEJOS PARA TOSTAR
• Retire todas las envolturas protectoras de los alimentos antes de colocarlos en el horno de la
encimera. Siga las instrucciones de comida.
• El pan congelado y pesado requiere un ajuste más oscuro para tostar.
• Una rebanada de pan requiere un ajuste más ligero que varias rebanadas de pan. Cuando tueste
más de una rebanada de pan, use rebanadas de tamaño, grosor y frescura similares.
• El pan correoso, los panes nos o los productos de pan dulce, como las tortas de té y el pan de
frutas, se doran mucho más rápidamente que el pan ordinario y deben tostarse por menos tiempo.
ROSCA/MUFFINS INGLESES
No necesita precalentar el horno para antes de utilizar la función de rosca/tostar mufns ingleses.
ADVERTENCIA: NUNCA DEJE EL HORNO DE MESA SIN LA SUPERVISION CUANDO SE UTILIZA LA
FUNCION DE ROSCA.
• Coloque la rejilla del horno en el estante superior.
• Gire el dial de temperatura a MAX.
• Gire el dial de funciones a ROSCA.
NOTA: Sólo los elementos térmicos superiores ocurrieren cíclicamente en este ajuste, permitiéndole
dorar la mitad cortada y caliente suavemente el exterior.
• Utilice el selector de color del pan tostado para comenzar. La luz de encendido se iluminará.
NOTA: Para ajustar el temporizador por menos de 10 minutos, gire siempre el dial del temporizador
a 10 minutos y gírelo de nuevo a la hora elegida. Esto garantizará un tiempo de cocción exacto.
NOTA: No ajuste el dial del temporizador a ENCENDIDO cuando tueste roscas o mufns ingleses.
• Coloque siempre las roscas o los mufns ingleses en el estante con los lados cortados hacia arriba.
• Cierre la puer ta del horno de mesa.
• Cuando haya transcurrido el tiempo de tostar la rosca, una señal sonará y el dial del temporizador
regresará en la posición APAGADO. El horno de mesa y la luz de encendido se apagarán.
NOTA: Para parar de tostar en cualquier momento, gire el dial del temporizador a APAGADO.
• Abra la puerta del horno. Con guantes de horno o agarraollas, deslice la rejilla del horno para sacar
los alimentos cocidos. Desenchufe el horno de mesa cuando no esté en uso.
CALENTAR
Este ajuste está diseñado para mantener los alimentos calientes después de haber sido cocidos.
• Gire el dial de temperatura a 150º - 200 ° F.
• Gire el dial de funciones a CALENTAR.
• Ajuste el dial del temporizador a la hora de CALENTAR deseada.
• Ajuste el dial del temporizador en ENCENDIDO para mantener la comida caliente durante más de
30 minutos o para controlar el tiempo de la función CALENTAR. El horno de mesa NO se parará
automáticamente, pero seguirá calentando hasta que el dial del temporizador esté apagado.
• Cuando haya transcurrido el tiempo de calentar, una señal sonará y el dial del temporizador
regresará en la posición APAGADO. El horno de mesa y la luz de encendido se apagarán.
NOTA: Para detener el calentamiento en cualquier momento, gire el dial del temporizador a APAGADO.
15 14
SO-314454_14622 BELLA ultimate Elite TOV IM_R2.indd 14-15 2017-07-04 8:14 AM
Page 10

• Abra la puerta del horno. Con guantes de horno o agarraollas, deslice la rejilla del horno para sacar
Garantía limitada de DOS AÑOS
Mediante la presente, SENSIO Inc. garantiza que, durante el plazo de DOS AÑOS a
partir de la fecha de compra, este producto no presentará defectos mecánicos en el
material ni en la mano de obra, y durante 90 días, no los presentará en las piezas no
mecánicas. A su entera discreción, SENSIO Inc. reparará o reemplazará el producto
que resulte defectuoso, o emitirá un reembolso por el producto durante el plazo de
garantía.
Esta garantía es válida únicamente para el comprador minorista original a partir de la
fecha de compra minorista inicial y no es transferible. Conserve el recibo de compra
original, ya que se exige una prueba de compra para obtener la validación de la
garantía. Las tiendas minoristas no tienen derecho a alterar, modicar ni corregir de
ninguna manera los términos y condiciones de la garantía.
EXCLUSIONES:
La garantía no cubre el desgaste normal de las piezas ni el daño ocasionado por
cualquiera de las siguientes causas: uso negligente del producto, uso de un voltaje
o corriente incorrectos, mantenimiento de rutina inadecuado, uso contrario al de
las instrucciones de funcionamiento, desarmado, reparación o alteración a cargo de
personas que no sean miembros del personal calicado de SENSIO Inc. Asimismo, la
garantía no cubre actos de la naturaleza, como incendios, inundaciones, huracanes o
tornados.
SENSIO Inc. no asumirá responsabilidad por daños incidentales o resultantes
ocasionados por la violación de cualquier garantía expresa o implícita. Salvo en
la medida en que lo prohíban las leyes aplicables, cualquier garantía implícita de
comerciabilidad o aptitud para un propósito particular se limita temporalmente a la
duración de la garantía. Algunos estados, provincias o jurisdicciones no permiten la
exclusión ni la limitación de daños incidentales o resultantes, o limitaciones sobre
la duración de una garantía implícita y, por lo tanto, es posible que las exclusiones o
limitaciones mencionadas no le correspondan. La garantía cubre derechos legales
especícos que pueden variar de un estado, una provincia o una jurisdicción a otros.
CÓMO OBTENER EL SERVICIO DE GARANTÍA:
Debe comunicarse con el Servicio de atención al cliente a nuestro número telefónico
gratuito: 1-866-832-4843. Un representante del Servicio de atención al cliente intentará
resolver los problemas referidos a la garantía por teléfono. Si este no puede resolver
el problema, le proporcionarán un número de caso y le solicitarán que devuelva el
producto a SENSIO Inc. Adhiera una etiqueta al producto que incluya: su nombre,
dirección, número telefónico de contacto durante el día, número de caso y descripción
del problema. Además, incluya una copia del recibo de compra original. Envuelva
cuidadosamente el producto etiquetado con el recibo de compra, y envíelo (con el
envío y el seguro prepagados) a la dirección de SENSIO Inc. SENSIO Inc. no asumirá
obligación ni responsabilidad alguna por el producto devuelto que esté en el trayecto
hacia el Centro de servicio al cliente de SENSIO Inc.
los alimentos cocidos. Desenchufe el horno de mesa cuando no esté en uso.
CONSEJOS ÚTILES PARA EL HORNO DE MESA
• Gire el dial de temperatura a MIN, el dial de funciones a CALENTAR y el dial de temporizador a
APAGADO antes de enchufar o desenchufar el enchufe del tomacorriente.
• La luz de encendido se ilumina cuando la unidad esté enchufada y el dial del temporizador esté
ajustado a cualquier temperatura o ENCENDIDO. Cuando el tiempo ajustado haya expirado, o el dial
del temporizador esté apagado manualmente, la luz del encendido se apagará
• Al ajustar el tiempo de cocción, incluya 15 minutos de tiempo de precalentamiento.
• Este horno de mesa tiene un temporizador de 30 minutos. Si se hornea por más de 30 minutos, use
la función ENCENDIDO.
• Nunca utilice las tapas con ningún recipiente de vidrio, cerámica o utensilios para horno de
metales. Si los alimentos requieren ser cubiertos, utilice el papel de aluminio. Asegúrese de plegar
los bordes del papel del aluminio rmemente en los lados de la bandeja o sar tén.
• Asegúrese de que la parte superior del recipiente o los alimentos que estén cocidos o asados estén
a por lo menos 1-1 / 2 pulgadas de distancia de los elementos térmicos superiores.
• Nunca coloque ningún recipiente directamente sobre el elemento térmico inferior.
• Para obtener el mejor rendimiento de este horno de mesa, no llene demasiado el horno.
• Para evitar la pérdida de calor, no abra la puerta con demasiada frecuencia.
Instrucciones de mantenimiento
PRECAUCIÓN: Este aparato es SOLO PARA EL USO DOMESTICO.
Este aparato requiere poco mantenimiento. No contiene piezas que el usuario pueda reparar. Cualquier
servicio que requiera el desmontaje que no sea la limpieza debe ser realizada por un técnico calicado.
Instrucciones de cuidado y limpieza
Importante: Antes de limpiar, desenchufe el horno de mesa y deje que se enfríe
completamente.
• Lave todos los accesorios con agua suave y con jabonosa, incluyendo la rejilla del horno y la
bandeja para hornear.
• No utilice limpiadores abrasivos, cepillos de fregar, limpiadores de vidrio o limpiadores químicos.
• Con un paño húmedo, limpie el interior del horno. Para minimizar los rasguños, utilice una
almohadilla de poliéster o nylon.
• Para limpiar la puerta de vidrio, utilice un paño húmedo saturado con detergente o jabón. No utilice
un aerosol de vidrio.
• Para sacar la rejilla del horno, abra la puerta, retire la rejilla adelante y fuera. Lave la rejilla del
horno en agua jabonosa. Para sacar manchas difíciles, use una almohadilla de poliéster o nylon.
• No se recomienda lavar la bandeja en el lavaplatos. Lave la bandeja y la rejilla del horno en agua
jabonosa. Para minimizar los rasguños, use una almohadilla de poliéster o nylon.
• Nunca sumerja el apar to en agua u otro líquido.
• Siempre seque bien las piezas antes de usar el horno de mesa después de limpiarlo.
• Para quitar la bandeja de migas, la puer ta de vidrio debe estar cerrada:
- Agarre el mango debajo de la puerta de vidrio del horno y saque la bandeja
- Deseche las migas y limpie la bandeja con un paño húmedo
- Asegúrese de secar bien antes de volver a colocar la bandeja en el horno
• Desenchufe la unidad, déjela enfriar y límpiela antes de guardarla.
• Guarde el horno de mesa en su caja en un lugar limpio y seco.
• No almacene nunca el horno si este todavía caliente o enchufado.
• Nunca envuelva el cable alrededor del aparato. No ponga tensión en el cable donde entra en la
unidad, ya que podría provocar que el cable se rompiera.
16
17
SO-314454_14622 BELLA ultimate Elite TOV IM_R2.indd 16-17 2017-07-04 8:14 AM
Page 11

For customer service questions or comments
Dudas o comentarios contactar el departamento de servicio al cliente
1-866-832-4843 / help@bellahousewares.com
BELLA is a registered trademark of Sensio Inc., Montréal, Canada H3B 3X9.
All rights reserved.
BELLA es una marca registrada de Sensio Inc., Montréal, Canada H3B 3X9.
Todos los derechos reservados.
SO_314454 Rev. 1
SO-314454_14622 BELLA ultimate Elite TOV IM_R2.indd 18 2017-07-04 8:14 AM
 Loading...