

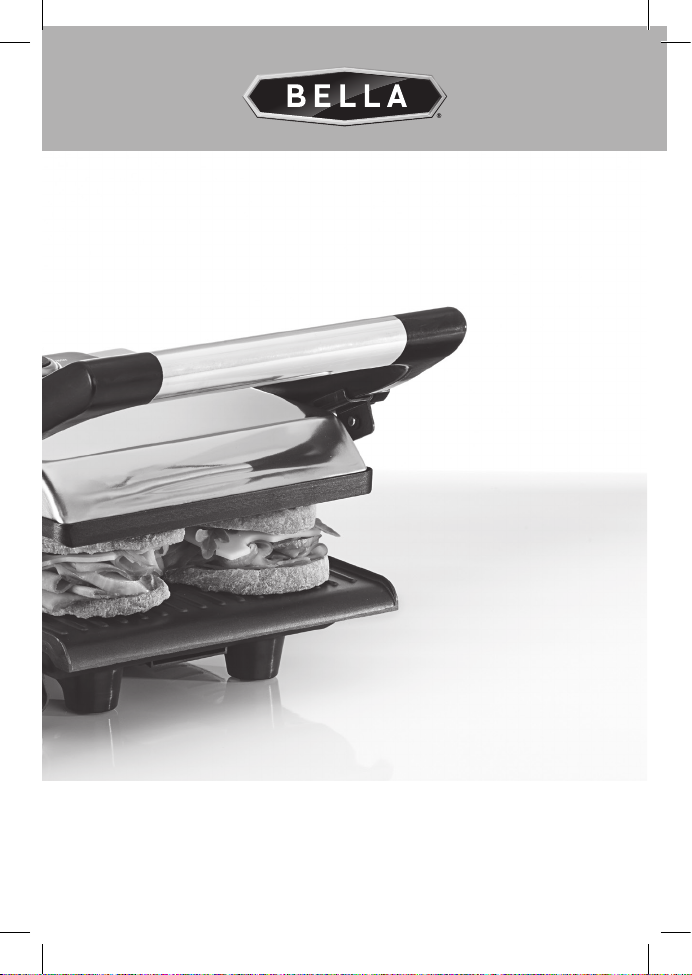
Page 1
PANINI GRILL
GRIL À PANINI
SANDWICHERA
Instruction Manual
Recipe Guide
Manuel d’instructions
Guide de recettes
Manual de instrucciones
Guía de recetas
Register your product and get support at:
Pour vous inscrire et obtenir l’aide de votre produit:
Para registrar y obtener asistencia de su producto ir:
www.bellahousewares.com/welcome
Page 2

Table of Contents
Important Safeguards ................................................................................ 2-3
Additional Important Safeguards .................................................................4
Notes on the Plug ...........................................................................................5
Notes on the Cord ..........................................................................................5
Getting To Know Your Panini Grill ........................................................... 6 -7
Before First Use .............................................................................................. 8
Operating Instructions ...................................................................................9
To Use as a Contact Grill (Open Position) ...................................................9
To Use as a Press Grill (Closed Position) ..................................................10
Panini Preparation: Sandwich Assembly .................................................. 11
Panini Hints for Best Results ....................................................................... 12
User Maintenance Instructions ..................................................................12
Care and Cleaning .........................................................................................13
Storage ........................................................................................................... 13
Recipes ...........................................................................................................14
Warranty ........................................................................................................15
Table des matières
Consignes de sécurité importantes ......................................................16 -17
Autres consignes de sécurité importantes ............................................... 18
Remarque à propos de la che ................................................................... 19
Remarque à propos du cordon ...................................................................19
Apprendre à connaître votre gril à panini ........................................... 20-21
Avant d’utiliser votre gril à panini pour la première fois ........................ 22
Mode d’emploi ..............................................................................................23
Pour utiliser comme gril contact : (position ouverte) ........................ 23-24
Pour utiliser comme un presse à panini : (position fermée) ..................24
Préparation de paninis : Préparation de sandwiches ..............................25
Suggestions pour des paninis parfaits ......................................................26
Instructions d’entretien pour l’utilisateur .................................................27
Soins et nettoyage .......................................................................................27
Rangement ....................................................................................................28
Recettes .........................................................................................................29
Garantie .........................................................................................................30
Page 3

Índice
Instrucciones de seguridad importantes ............................................. 31-32
Instrucciones de seguridad adicionales .....................................................33
Notas sobre el enchufe .................................................................................34
Notas sobre el cable ......................................................................................34
Conozca su sandwichera ........................................................................ 35-36
Antes del primer uso .....................................................................................37
Instrucciones de funcionamiento ................................................................38
Para utilizar como grill de contacto (posición abierta)....................... 38-39
Para utilizar como grill de prensado (posición cerrada) ..........................39
Preparación de los panini: cómo armar los sándwiches .........................40
Consejos para obtener mejores resultadoscon los panini ...................... 41
Instrucciones de mantenimiento para el usuario .....................................42
Cuidado y limpieza ........................................................................................42
Almacenamiento ............................................................................................43
Recetas ........................................................................................................... 44
Garantía...........................................................................................................45
Page 4

IMPORTANT
SAFEGUARDS
When using electrical appliances, basic safety precautions
should always be followed, including the following:
1. READ ALL INSTRUCTIONS.
2. The cord to this appliance should be plugged into a
120 V AC electrical outlet only.
3. To protect against risk of electric shock, do not immerse
the cord, plug or cooking unit
in water or any other liquid.
4. Do not touch hot surfaces. Use handles.
5. This appliance should not be used by children.
6. Extreme caution must be exercised when any appliance
is used near children.
7. Unplug from wall outlet when not in use and before
cleaning. Allow to cool before cleaning or storing this
appliance.
8. Never yank the cord to disconnect the Panini Grill
from the outlet. Instead, grasp the plug and pull to
disconnect.
9. Do not operate any appliance if the cord is damaged. Do
not use this appliance
if the unit malfunctions, if it is dropped or has been
damaged in any manner.
In order to avoid the risk of an electric shock, never try
to repair the Panini Grill yourself. Bring it to a qualied
technician for examination, repair or electrical or
mechanical adjustment. An incorrect reassembly could
present a risk of electric shock
when the Panini Grill is used.
10. The use of accessories or attachments not
recommended by the manufacturer
may cause re, electrical shock or injury.
11. Do not use outdoors or for commercial purposes.
12. Do not use this appliance for purposes other than the
one for which it was designed.
2
Page 5

13. Do not let the electrical cord hang over the edge of the
table or countertop, or touch
hot surfaces.
14. Do not place on or near a hot gas or electric burner or
heated oven.
15. Use on a heat-resistant, at level surface only.
16. Use extreme caution when moving any appliance
containing hot food, water, oil
or other liquids.
17. Always unplug after use. The appliance will remain ON
unless unplugged.
18. CAUTION HOT SURFACES: This appliance generates
heat during use.
Proper precautions must be taken to prevent the risk of
burns, re or other damage
to persons or property.
19. When using this appliance, provide adequate ventilation
above and on all sides for
air circulation. Do not allow this appliance to touch
curtains, wall coverings, clothing,
dish towels or other ammable materials during use.
20. Use with wall receptacle only.
FOR HOUSEHOLD
USE ONLY
SAVE THESE
INSTRUCTIONS
3
Page 6

ADDITIONAL IMPORTANT
SAFEGUARDS
CAUTION: This appliance is hot during operation and
retains heat for some time after turning OFF. Always use
oven mitts when handling hot materials and allow metal
parts to cool before cleaning. Do not place anything on top
of the appliance while it is operating or while it is hot.
1. All users of this appliance must read and understand
this Instruction Manual before operating or cleaning
this appliance.
2. Do not leave this appliance unattended during use.
4
Page 7

Notes on the Plug
This appliance has a polarized plug (one blade is wider than
the other). To reduce the risk of electric shock, this plug will
t in a polarized outlet only one way. If the plug does not t
fully into the outlet, reverse the plug. If it still does not t,
contact a qualied electrician. Do not modify the plug
in any way.
Notes on the Cord
The provided short power-supply cord (or detachable
power-supply cord) should be used to reduce the risk
resulting from becoming entangled in or tripping over a
longer cord. Do not use an extension cord with this product.
Plasticizer Warning
CAUTION: To prevent Plasticizers from migrating from the
nish of the counter top or table top or other furniture, place
NON-PLASTIC coasters or place mats between the appliance
and the nish of the counter top or table top. Failure to do
so may cause the nish to darken; permanent blemishes
may occur or stains can appear.
Electric Power
If the electrical circuit is overloaded with other appliances,
your appliance may not operate properly. It should
be operated on a separate electrical circuit from other
appliances.
5
Page 8
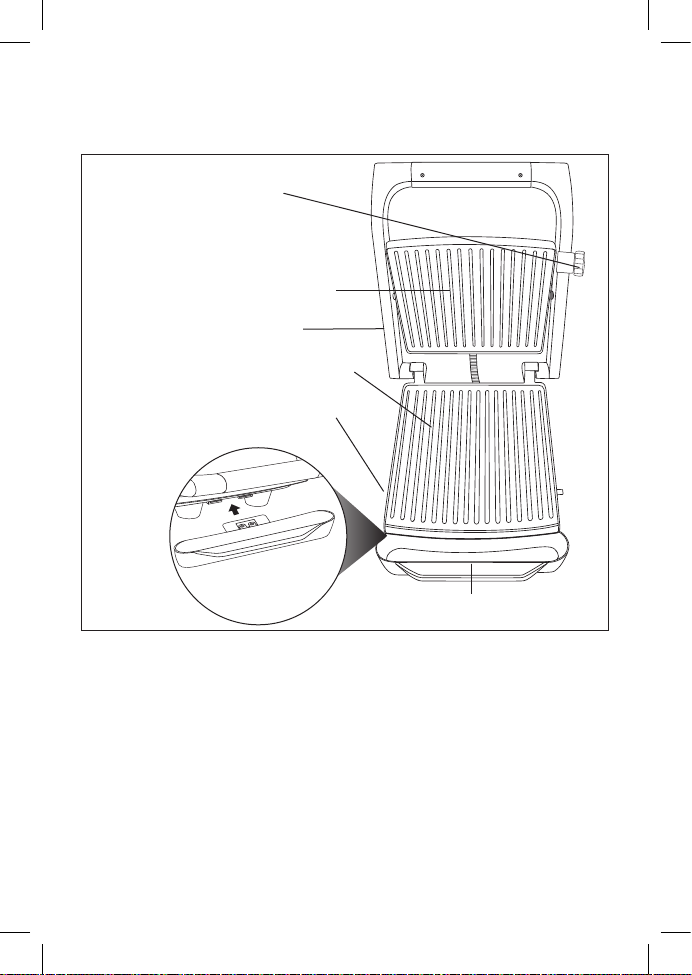
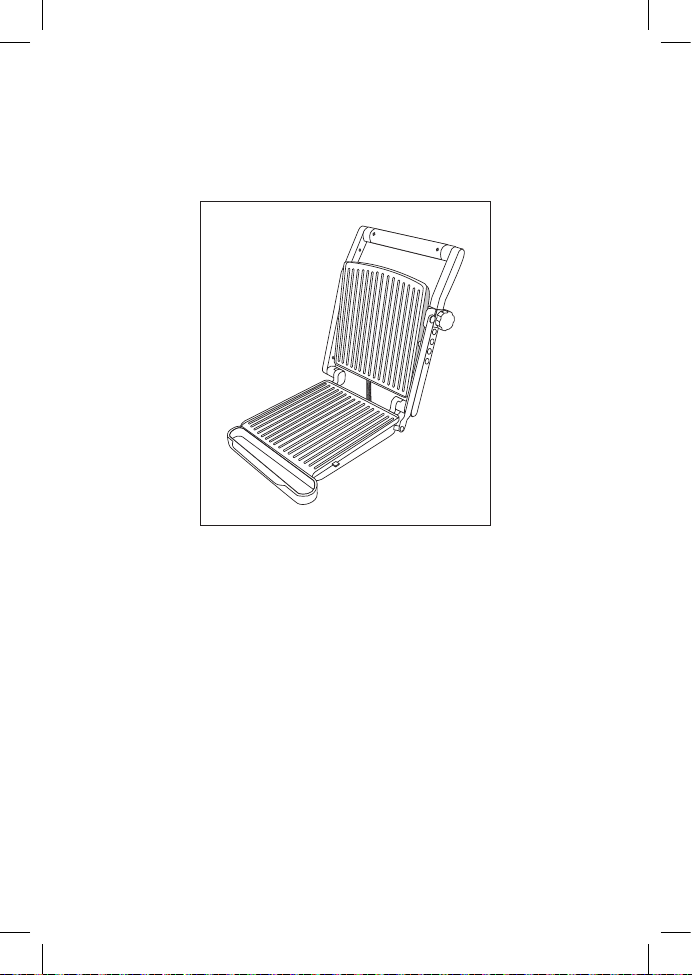
Getting To Know Your Panini Grill
120 V, 60 Hz, 1400 W
Figure 1
Grill Plate Lock
Top Non-Stick Grill Plate
Floating Hinge
(not shown)
Bottom Non-Stick Grill Plate
Locking Latch (not shown)
Removable Drip Tray
6
Page 9
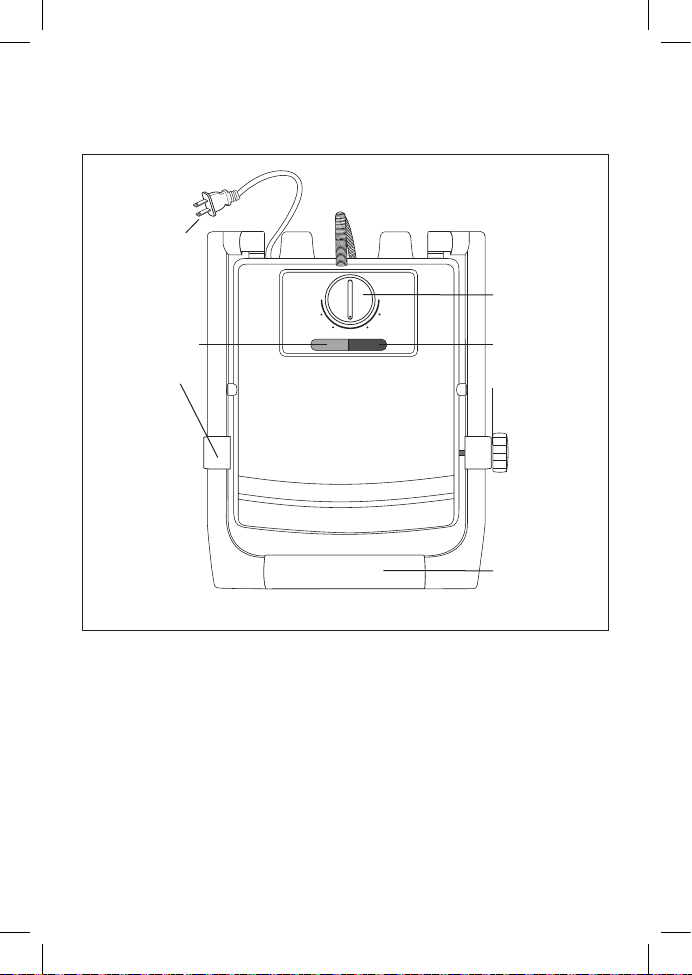
Figure 2
2-Polarized Plug
Cord Storage
(see Fig. 6)
Red POWER Light
Locking Latch
LOW HIGH
Power
Temperature
Control Dial
MED
Ready
Blue READY Light
Grill Plate Lock
Handle
7
Page 10
Before Using for the First Time
1. Carefully unpack the Panini Grill and remove all packaging
and materials.
2. Set the appliance on a dry, clean and at surface.
3. Slide the 2 prongs of the removable drip tray into the bottom front
of the unit. (See Figure 1.) Push rmly to ensure the drip tray is
securely attached.
4. Unfold the locking latch to release the top grill plate. (See Figure 3.)
5. Lift the top grill plate.
6. Before using your Panini Grill for the rst time, wipe the grill plates with
a damp cloth to remove all dust, and then dry. Wipe outer surfaces with
a slightly damp, soft cloth or sponge.
7. For best results, pour a teaspoon of vegetable oil onto an absorbent
kitchen towel. Spread onto the non-stick grill plates. Wipe off any
excess oil.
CAUTION:
Take care to prevent water from running into the appliance.
NEVER IMMERSE PANINI GRILL BODY IN WATER OR ANY OTHER LIQUIDS!
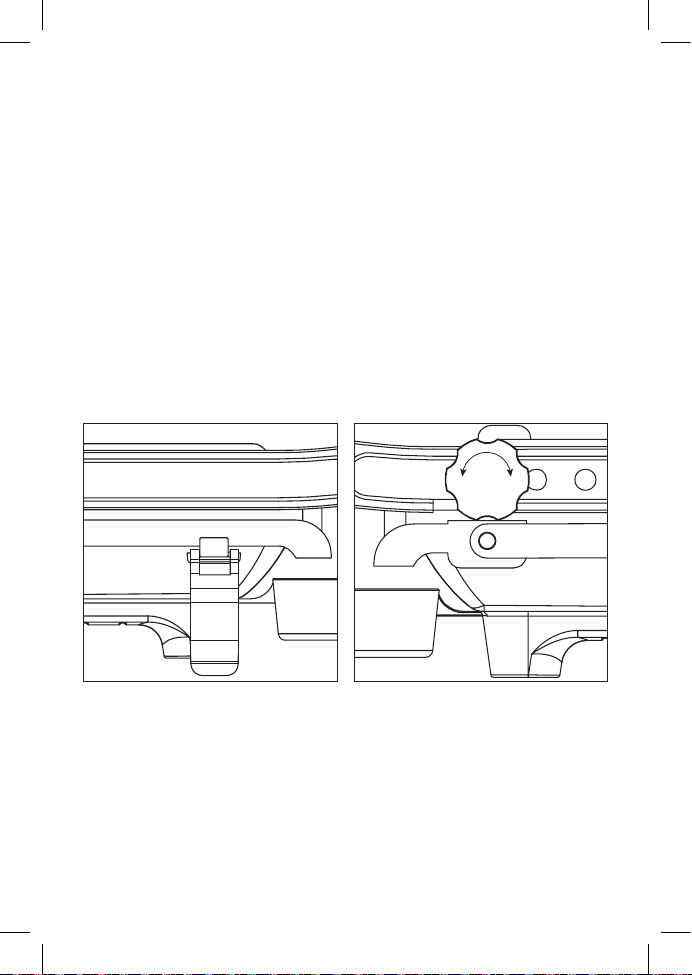
Figure 4Figure 3
Locking Latch
8
Grill Plate
Lock
Unlock
Lock
Page 11
Operating Instructions
The Panini Grill may be used in the open or the closed position. Cook burgers,
boneless, thin pieces of meat, sh, fruits, and vegetables easily. The non-stick
grill plates and drip tray make cleanup a snap.
To Use as a Contact Grill (Open Position)
Figure 5
NOTE: When your Panini Grill is heated for the rst time, it may emit slight
smoke or odor. This is normal and should disappear after one or two uses.
This does not affect the safety of the appliance.
1. Check to make sure that the cord is fully unwrapped and does not come
in contact with any exterior parts of the unit. Plug unit into a 120 V AC
electrical outlet. The red POWER light will illuminate and remain lighted
during use.
2. Turn the temperature control dial to the HIGH setting to preheat. Operate
the unit in the closed position during preheat.
3. While preheating, prepare food for cooking. After approximately 2
minutes the blue READY light will illuminate, indicating the unit is
preheated and is ready for use.
4. Using a potholder or oven mitt, grasp the handle to hold the top grill
plate open when placing or removing food on the cooking sur face to
prevent accidental closing and injury.
5. Using a potholder or oven mitt, center food on the bottom grill plate.
6. Adjust temperature control dial as needed; continue cooking on the open
grill until food is done.
9
Page 12

To Use as a Press Grill (Closed Position)
NOTE: When cooking more than one piece of food, prepare so that
the thickness of food items is consistent. This will allow food to cook
quickly, evenly and produces rich grill marks both top and bottom.
1. Follow steps 1 through 5 of the Operating Instructions section entitled:
“To Use as a Contact Grill (Open Position)” described previously.
2. To ensure perfectly grilled food, look to make sure that the top grill plate
lies evenly on the top of the food. Make sure food is centered on the grill
plate.
3. Using a potholder or oven mitt, pull down the arm and gently lower
the top grill plate. The oating hinge will automatically adjust to the
thickness of the food. Press the handle down rmly, then turn the grill
plate lock clock wise to secure. (g. 4)
4. Adjust temperature control dial as needed. During grilling, the blue
READY indicator light will cycle on and of f during cooking. This indicates
that the thermostat is maintaining the proper cooking temperature.
NOTE: The raised ridges and tilted bottom plate allow grease, fat and
other drippings to run off away from your food and into the drip tray.
5. Turn the grill plate lock counter-clockwise to unlock. Using an oven
mitt or potholder, grasp the handle and carefully lif t the top grill plate.
Always use a plastic or wooden spatula to remove cooked food. Test
food for doneness. Grill until the food is cooked to your liking.
WARNING: Never use a sharp or metal object as it may damage the non-
stick surface of the grill plates.
CAUTION: Do not leave appliance unattended during use!
10
Page 13

Panini Preparation: Sandwich Assembly
To prepare delicious pressed sandwiches, follow these simple steps. It is
customary to prepare panini from a heart y loaf of bread. However, panini
made from store-bought sliced breads or rolls can be delicious and simple
to prepare. Experiment with a variety of breads, tortillas, atbreads, even
pitas. For health-conscious cooks, the non-stick coating of the grill plates
assures crisp and delicious toasting without the use of oil or butter. The
raised ridges and tilted bottom plate allow grease, fat and other drippings to
run off away from your food and into the drip tray.
1. Assemble panini. Brush or wipe both sides of the outside of the
sandwich with olive oil, butter or margarine (optional). When the blue
READY light illuminates, the Panini Grill is ready to use.
2. Follow steps 1 through 5 of the Operating Instructions section entitled:
“To Use as a Contact Grill (Open Position)” described previously.
3. To ensure perfectly grilled panini, all sandwiches placed on the Panini
Grill at the same time must be the same thickness. Look to make sure
that the top grill plate lies evenly on the top of the bread. Make sure
sandwiches are centered on the grill plate.
4. Using a potholder or oven mitt, pull down the arm and gently lower
the top grill plate. The oating hinge will automatically adjust to the
thickness of the sandwiches. Press the handle down rmly, then turn the
grill plate lock clockwise to secure.
5. Adjust temperature control dial as needed. During grilling, the blue
READY indicator light will cycle on and of f during cooking. This indicates
that the thermostat is maintaining the proper cooking temperature.
NOTE: The raised ridges and tilted bottom plate allow cheese, fat, and
other drippings to run off away from your panini and into the drip tray.
6. Turn the grill plate lock counter-clockwise to unlock. Using an oven
mitt or potholder, grasp the handle and carefully lif t the top grill plate.
Continue grilling until the bread is toasted and food is cooked to your
liking.
7. To remove your grilled panini sandwiches, always use a plastic or
wooden spatula.
WARNING: Never use a sharp or metal object as it may damage the non-
stick surface of the grill plates.
CAUTION: Do not leave appliance unattended during use!
8. Allow panini to cool to a safe handling temperature before slicing.
11
Page 14

Panini Hints for Best Results
• Turn the temperature control dial to HIGH to preheat the Panini Grill
before each use.
• Have all ingredients at hand before preparing panini.
• A wide variety of breads may be used, such as whole wheat, rye, fruit
breads, tortillas, atbreads, even pitas.
• With the Panini Grill’s non-stick grill plates, it is not necessary to butter
or oil the outside of the bread. However, spreading a small amount of
butter or olive oil is recommended
to encourage even browning of the bread.
• NOTE: The Panini Grill is coated with a non-stick surface. Do not use
non-stick sprays as they can cause build-up on the grill plates.
Use olive oil instead.
• WARNING: Do not use non-fat spreads. They may burn and damage the
non-stick grill plates.
• When using soft or liquid llings, use thicker-sliced breads. Try
removing the insides of soft rolls to create a cup in which lling
can be added.
• Most fresh fruits release juice when heated. If the recipe calls for canned
fruit, drain and pat fruit dry with a clean paper towel.
• Avoid using processed cheeses, as they tend to “run” under
high temperatures.
• A teaspoon of sugar sprinkled on the buttered side makes grilled panini
crispier and adds avor when using sweet llings.
• Whole grain and sweet breads will grill quicker than white breads and
should be grilled at lower temperatures.
• After you have removed nished panini, close the top grill plate to retain
heat while assembling more sandwiches.
• Use the Panini Grill to keep food warm. Place grilled sandwiches onto
the grill, lower the top grill plate. The oating hinge will automatically
adjust to the thickness of the sandwiches. Press the handle down rmly,
then turn the grill plate lock clockwise to secure. Turn the temperature
control dial to LOW or to a lower setting before serving.
• To avoid food contamination, wearing oven mitts, use a soft, absorbent
paper towel to wipe the grill plates clean after each use.
User Maintenance Instructions
This appliance requires little maintenance. It contains no user serviceable
parts. Do not try to repair it yourself. Contact a qualied appliance repair
technician if the product requires servicing.
12
Page 15

Care and Cleaning
CAUTION: Unplug from electrical outlet and allow to cool thoroughly
before cleaning.
1. Never immerse appliance in water or other liquids. Never place Panini
Grill or drip tray in dishwasher.
2. The grill plates should be wiped clean, and if necessar y, conditioned
before heating.
3. To condition plates: pour a teaspoon of vegetable oil onto the non-stick
grill plates. Spread with an absorbent kitchen towel and wipe off any
excess oil. Recondition after cleaning or as needed.
4. To protect the premium quality non-stick grill plates: use only plastic,
nylon or wooden utensils.
5. Inside cleaning: remove stubborn stains with a plastic mesh puff or pad,
then wipe off with a paper towel or soft cloth. For best results, use only
products with directions stating that it is safe for cleaning non-stick
cooking sur faces. Do not use steel wool or coarse scouring pads. Allow
the run off to drip into the drip tray.
6. Pull drip tray out and away from the front of the Panini Grill. Empty the
drip tray and clean with warm soapy water. Wipe dry.
7. The exterior nish should be cleaned with a non-abrasive cleaner and a
soft, damp cloth. Dry thoroughly.
8. Make sure to hold the top grill plate open while cleaning to prevent
accidental closing or injury.
Storage
1. Make sure unit is unplugged and fully cooled.
2. Attach clean drip tray to the unit.
3. Lower top grill plate. Turn the grill plate lock clockwise to secure. Fold
the locking latch over the top grill plate. (See Figure 3.) Store the Panini
Grill in the locked position for neat and compact storage.
4. Store the cord on the bottom
of the Grill by wrapping it
around the base. (See Figure
6.) Do not put any stress on
cord where it enters unit, as
this could cause the cord to
fray and break.
Figure 6
13
Page 16

Recipes
Smoked Turkey and Cranberry Panini
• 2 slices Italian country loaf
• 1 Tbsp. extra virgin olive oil
• 2 Tbsp. Cranberry Conserve
1. Brush each slice of bread on one side with olive oil.
Spread 1 Tbsp. Cranberry Conserve on unoiled side of each slice
of bread.
2. Layer one side of bread with turkey and cheese.
3. Top with other slice unoiled side down.
4. Place panini sandwich on preheated grill and toast until desired
crispiness.
Sweet Dolci Chocolate Panini
• 1 Tbsp. melted butter
• 2 slices brioche or
challah bread
1. Brush each slice of bread with melted butter.
Spread chocolate sauce on one slice of bread, oiled side down.
2. Top with second slice. Place panini sandwich on preheated grill
and toast until golden brown and warm.
• 3 slices smoked turkey breast
• 3 slices swiss cheese
• 3 Tbsp. Dolci Nocciola
Chocolate Hazelnut Sauce
14
Page 17

Limited One-Year Warranty
SENSIO Inc. hereby warrants that for a period of ONE YEAR from the date of
purchase, this product will be free from mechanical defects in material and
workmanship, and for 90 days in respect to non-mechanical parts. At its sole
discretion, SENSIO Inc. will either repair or replace the product found to be
defective, or issue a refund on the product during the warranty period. Any
refund to the customer will be at a pro-rated value based on the remaining
period of the warranty.
The warranty is only valid for the original retail purchaser from the date of
initial retail purchase and is not transferable. Keep the original sales receipt,
as proof of purchase is required to obtain warranty validation. Retail stores
selling this product do not have the right to alter, modify, or in any way revise
the terms and conditions of the warrant y.
EXCLUSIONS:
The warranty does not cover normal wear of par ts or damage resulting from
any of the following: negligent use of the product, use of improper voltage
or current, improper routine maintenance, use contrary to the operating
instructions, disassembly, repair, or alteration by anyone other than qualied
SENSIO Inc. personnel. Also, the warranty does not cover Acts of God such as
re, oods, hurricanes, or tornadoes.
SENSIO Inc. shall not be liable for any incidental or consequential damages
caused by the breach of any express or implied warranty. Apart from the
extent prohibited by applicable law, any implied warranty of merchantability
or tness for a particular purpose is limited in time to the duration of the
warranty. Some states, provinces or jurisdictions do not allow the exclusion
or limitation of incidental or consequential damages, or limitations on how
long an implied warranty lasts, and therefore, the above exclusions or
limitations may not apply to you. The warranty covers specic legal rights
which may vary by state, province and/or jurisdiction.
HOW TO OBTAIN WARRANTY SERVICE:
You must contact Customer Service at our toll-free number: 1-866-832-4843.
A Customer Service Representative will at tempt to resolve warranty issues
over the phone. If the Customer Service Representative is unable to resolve
the problem, you will be provided with a case number and asked to return the
product to SENSIO Inc. Attach a tag to the product that includes: your name,
address, daytime contact telephone number, case number, and description
of the problem. Also, include a copy of the original sales receipt. Carefully
package the tagged product with the sales receipt, and send it (with shipping
and insurance prepaid) to SENSIO Inc.’s address. SENSIO Inc. shall bear no
responsibility or liability for the returned product while in transit to SENSIO
Inc.’s Customer Service Center.
15
Page 18

CONSIGNES DE
SÉCURITÉ IMPORTANTES
Lorsqu’on utilise des appareils électriques, certaines
mesures de sécurité élémentaires doivent être respectées :
1. LIRE ATTENTIVEMENT LES INSTRUCTIONS
2. Le cordon de cet appareil doit être branché dans une
prise de courant de 120 V CA seulement.
3. An de prévenir tout risque d’électrocution, ne pas
immerger le cordon, la che ou l’appareil dans l’eau ou
dans tout autre liquide.
4. Ne pas toucher aux surfaces chaudes. Utiliser les
poignées.
5. Cet appareil ne doit pas être utilisé par les enfants.
6. Une surveillance étroite est requise lorsqu’on utilise
l’appareil en présence d’enfants.
7. Débrancher de la prise murale lorsque l’appareil n’est
pas utilisé ou avant de le nettoyer. Laisser refroidir
avant de nettoyer ou de ranger cet appareil.
8. Ne jamais tirer sur le cordon pour débrancher le gril
à panini de la prise murale. Saisir la che puis la tirer
pour débrancher l’appareil.
9. Ne pas utiliser cet appareil si le cordon est endommagé.
Ne pas utiliser cet appareil s’il fonctionne mal, s’il a été
échappé ou a été endommagé de quelque façon que
ce soit. An de prévenir tout risque d’électrocution, ne
jamais tenter de réparer le gril à panini
soi-même. On doit le faire examiner, réparer ou faire
faire un ajustement mécanique ou électrique par un
technicien qualié. Un mauvais réassemblage peut
entraîner un risque d’électrocution lorsque le gril à
panini sera utilisé.
10. L’utilisation d’accessoires non recommandés par le
fabricant peut provoquer un incendie, une électrocution
ou des blessures.
11. Ne pas utiliser à l’extérieur ni à des ns commerciales.
12. Ne pas utiliser cet appareil à des ns autres que celles
pour lesquelles il a été conçu.
16
Page 19

13. Ne pas laisser le cordon électrique pendre d’un bord de
table ou d’un comptoir, ni entrer en contact avec une
surface chaude.
14. Ne pas placer sur ou à proximité d’un élément de
cuisinière électrique ou à gaz ni dans un four chaud.
15. Utiliser seulement sur une surface plane de niveau et
résistante à la chaleur.
16. Faire preuve d’une extrême prudence en déplaçant
l’appareil s’il contient des aliments, de l’eau, de l’huile
ou autre liquide chaud.
17. Toujours débrancher après usage. L’appareil demeure
en fonction à moins d’être débranché.
18. AVERTISSEMENT - SURFACES CHAUDES : Cet appareil
produit de la chaleur lorsqu’il est en fonction. Les
précautions d’usage doivent être prises pour prévenir
tout risque de brûlures, d’incendie ou autre types de
blessures ou de dommages à la propriété.
19. Lors de l’utilisation de l’appareil, s’assurer d’avoir une
bonne ventilation d’air au-dessus et sur tous les côtés
de l’appareil. S’assurer que l’appareil n’entre pas en
contact avec des rideaux, des revêtements muraux, des
vêtements, des torchons ou autre matériel inammable
lorsqu’il est en fonction.
20. Utiliser avec une prise de courant murale seulement.
POUR USAGE
DOMESTIQUE
SEULEMENT
CONSERVER CES
INSTRUCTIONS
17
Page 20

AUTRES CONSIGNES DE
SÉCURITÉ IMPORTANTES
MISE EN GARDE : Cet appareil est chaud lorsqu’il est en
fonction et le demeure un certain temps après avoir été
éteint. Toujours utiliser des gants de cuisine en manipulant
des surfaces chaudes et attendre que les pièces métalliques
soient refroidies avant de les nettoyer.
Ne rien placer sur le dessus de l’appareil lorsqu’il est en
fonction ou tant qu’il n’a pas refroidi.
1. Les utilisateurs de cet appareil doivent lire et
comprendre le manuel d’utilisation avant
de l’utiliser ou de lenettoyer.
2. Ne pas laisser cet appareil sans surveillance lorsqu’il est
en fonction.
18
Page 21

Remarque à propos de la che
Cet appareil est muni d’une che polarisée (une lame plus
large que l’autre). An d’éviter tout risque d’électrocution,
on ne peut brancher la che que dans un seul sens. Si la
che ne s’insère pas complètement dans la prise, on doit la
tourner dans l’autre sens. Si cela ne fonctionne toujours pas,
on doit communiquer avec un électricien qualié. On ne doit
pas modier la che soi-même en aucun cas.
Remarque à propos du cordon
Le cordon court fourni (ou cordon amovible) doit être
utilisé an de prévenir tout risque d’enchevêtrement ou de
trébuchement sur un cordon plus long. Ne pas utiliser de
rallonge avec cet appareil.
Avertissement sur les plastiants
MISE EN GARDE : Pour éviter la migration de plastiants
du ni des comptoirs, de la table ou de tout autre meuble,
placer des sous-verres ou des napperons QUI NE SONT
PAS FAITS DE MATIÈRE PLASTIQUE entre l’appareil et la
surface du comptoir ou de la table. Si cette consigne n’est
pas respectée, le ni noircira et s’en suivront des ternissures
permanentes ou des taches indélébiles.
Alimentation électrique
Si le circuit électrique est surchargé par d’autres appareils
en plus de votre appareil, ce dernier ne fonctionnera pas
correctement. Il est conseillé de faire fonctionner l’appareil
sur un circuit électrique différent.
19
Page 22

Apprendre à connaître votre gril à panini
120 V, 60 Hz, 1400 W
Figure 1
Verrou des plaques
de gril
Plaque supérieure
de gril antiadhésive
Charnière ottante
(non-visible)
Plaque inférieure
de gril antiadhésive
Tiroir à graisse amovible
20
Page 23

Figure 2
Fiche polarisée
Rangement du cordon
(Voir gure 6)
Voyant rouge
POWER
(En fonction)
Loquet
LOW HIGH
Power
Bouton de réglage
de la température
MED
Ready
Voyant bleu
READY (Prêt)
Verrou
des plaques de gril
Poignée
21
Page 24

Avant d’utiliser votre gril à panini pour la première fois
1. Déballer soigneusement le gril à panini et retirer tout le matériel
d’emballage.
2. Placer l’appareil sur une surface plane, propre et sèche.
3. Glisser les deux fourchons du plateau à graisse amovible dans la par tie
inférieure
avant de l’appareil. (Voir Figure 1.) Pousser fermement pour s’assurer
que le plateau
à graisse est solidement en place.
4. Soulever le loquet pour déverrouiller la plaque de gril supérieure. (Voir
Figure 3.)
5. Soulever la plaque supérieure.
6. Avant d’utiliser votre gril à panini pour la première fois, essuyer les
plaques de gril à l’aide d’un linge humide pour enlever la poussière puis
laisser sécher. Essuyer les sur faces ex térieures à l’aide d’un linge doux
ou d’une éponge légèrement humide.
7. Pour des résultats optimaux, verser une cuillère à thé d’huile végétale
sur une serviette absorbante. Appliquer sur les plaques de gril
antiadhésives. Essuyer tout excès d’huile.
MISE EN GARDE : Éviter de laisser de l’eau pénétrer dans l’appareil.
NE JAMAIS IMMERGER LE GRIL À PANINI DANS L’EAU OU DANS TOUT
AUTRE LIQUIDE !
Figure 4Figure 3
Loquet
Verrou des
plaques de gril
22
Unlock
Lock
Page 25

Mode d’emploi
Le gril à panini peut être utilisé en position ouverte ou fermée. On peut cuire
facilement des hamburgers, des morceaux de viande minces désossés, du
poisson, des fruits et des légumes. Les plaques de gril antiadhésives et le
plateau à graisse facilitent le nettoyage.
Pour utiliser comme gril contact : (position ouverte)
Figure 5
REMARQUE : Lorsque votre gril à panini chauffe pour la première fois, il se
peut que de la fumée ou une odeur se dégage. Ceci est normal et devrait
disparaître après une ou deux utilisations. Ceci n’affecte en rien la sécurité
de l’appareil.
1. Vérier que le cordon est entièrement déballé et qu’il ne touche pas
aux parties externes de l’appareil. Brancher l’appareil dans une prise
de courant 120 V CA. Le voyant rouge POWER (en fonction) s’allume et
demeure allumé pendant que le gril fonctionne.
2. Positionner le bouton de réglage de la température à HIGH (Élevée) pour
préchauffer l’appareil. Abaisser la plaque supérieure durant la période de
préchauffage.
3. Durant le préchauffage, préparer les aliments. Après environ 2 minutes,
le voyant bleu READY (Prêt) s’allume, ce qui indique que l’appareil est
prêt à être utilisé.
4. À l’aide d’une poignée ou d’un gant isolant, tenir la plaque supérieure
par la poignée ouverte tout en plaçant ou en retirant des aliments de la
surface de cuisson an d’éviter qu’elle ne se ferme accidentellement et
que cela n’occasionne des blessures.
23
Page 26

5. À l’aide d’une poignée ou un gant isolant, placer les aliments au centre
de la plaque inférieure.
6. Ajuster le bouton de réglage à la température désirée, poursuivre la
cuisson sur le gril ouvert jusqu’à ce que les aliments soient cuits.
Pour utiliser comme un presse à panini : (position fermée)
REMARQUE :
de façon à ce que l’épaisseur des morceaux soit la même. Ceci permet aux
aliments de cuire plus rapidement, de façon plus égale et produit de belles
marques de gril sur le dessus et le dessous des aliments.
1. Suivre les étapes 1 à 5 de la section « Pour utiliser comme gril contact :
(position ouverte) » décrite précédemment.
2. An de s’assurer que les aliments soient parfaitement grillés, s’assurer
que la plaque supérieure soit appuyée de façon égale sur le dessus des
aliments. S’assurer que les aliments soient centrés sur la plaque de gril.
Appuyer fermement sur la poignée, puis tourner le verrou de la plaque
de gril dans le sens horaire pour la verrouiller.
3. À l’aide d’une poignée ou un gant isolant, abaisser la poignée du gril
puis baisser lentement la plaque supérieure. La charnière ottante
s’ajustera automatiquement à l’épaisseur des aliments. (g. 4)
4. Ajuster le bouton de réglage de la température si nécessaire. Durant la
cuisson, le voyant bleu READY (prêt) s’allume et s’éteint plusieurs fois.
Ceci indique que le thermostat maintient la température de
cuisson désirée.
REMARQUE : Les côtés surélevés et la plaque inférieure inclinée
permettent à la graisse et aux autres liquides qui s’échappent des
aliments de tomber dans le plateau à graisse.
5. Tourner le verrou de la plaque de gril dans le sens antihoraire pour
la déverrouiller. À l’aide d’une poignée ou d’un gant isolant, saisir la
poignée du gril et relever prudemment la plaque supérieure. Toujours
utiliser une spatule de plastique ou de bois pour enlever les aliments
cuits. Vérier la cuisson. Griller jusqu’à ce que les aliments soient cuits
à votre goût.
MISE EN GARDE : Ne jamais utiliser d’objet pointu ou objet métallique
car cela pourrait endommager la surface antiadhésive des plaques de
gril.
MISE EN GARDE : Ne pas laisser l’appareil sans sur veillance lorsqu’il
fonctionne !
Lorsqu’on cuit plus d’un aliment, on doit préparer ceux-ci
24
Page 27

Préparation de paninis : Préparation de sandwiches
Suivre ces étapes simples pour préparer de délicieux sandwiches pressés.
La coutume veut que l’on prépare les paninis à partir d’une miche de pain
entière. Cependant, les paninis faits de tranches de pain du commerce ou
de petits pains peuvent aussi être délicieux et sont simples à préparer. On
peut expérimenter avec toute une variété de pains, de tortillas, de pains
plats et même avec des pitas. Pour les cuisiniers soucieux de leur santé, le
revêtement antiadhésif des plaques de gril procure un grillage croustillant
et délicieux sans utiliser d’huile ou de beurre. Les côtés surélevés et la
plaque inférieure inclinée permettent à la graisse et aux autres liquides qui
s’échappent des aliments de tomber dans le plateau à graisse.
1. Assembler le panini. Enduire l’extérieur des deux côtés du sandwich
d’huile d’olive, de beurre ou de margarine (optionnel). Le gril à panini est
prêt à utiliser lorsque le voyant bleu READY (Prêt) s’allume.
2. Suivre les étapes 1 à 5 de la section « Pour utiliser comme gril contact :
(position ouverte) » décrite précédemment.
3. Pour des paninis grillés à la perfection, tous les sandwiches placés
sur le gril à panini en même temps doivent être de la même épaisseur.
S’assurer que la plaque supérieure s’appuie également sur le dessus
du pain. S’assurer que les sandwiches soient bien centrés sur la plaque
inférieure. Appuyer fermement sur la poignée, puis tourner le verrou de
la plaque de gril dans le sens horaire pour la verrouiller.
4. À l’aide d’une poignée ou d’un gant isolant, abaisser la poignée du gril
et baisser lentement la plaque inférieure. La charnière ot tante s’ajuste
automatiquement à l’épaisseur des sandwiches.
5. Ajuster le bouton de réglage de la température si nécessaire. Durant la
cuisson, le voyant bleu READY (Prêt) s’allume et s’éteint plusieurs fois.
Ceci indique que le thermostat maintient la température
de cuisson désirée.
REMARQUE : Les côtés surélevés et la plaque inférieure inclinée
permettent au fromage, à la graisse et aux autres liquides qui
s’échappent du panini de tomber dans le plateau à graisse.
6. Tourner le verrou de la plaque de gril dans le sens antihoraire pour
la déverrouiller. À l’aide d’une poignée ou d’un gant isolant, saisir la
poignée puis relever prudemment la plaque supérieure. Cuire jusqu’à ce
que le pain soit grillé et que le panini soit cuit à votre goût.
7. Toujours utiliser une spatule de plastique ou de bois pour retirer le
panini grillé de la plaque.
MISE EN GARDE : Ne jamais utiliser d’objet pointu ou objet métallique
car cela pourrait endommager la surface antiadhésive des plaques
de gril.
MISE EN GARDE : Ne pas laisser l’appareil sans sur veillance
lorsqu’il fonctionne !
8. Attendre que le panini ait refroidi sufsamment pour éviter de se brûler
avant de le couper.
25
Page 28

Suggestions pour des paninis parfaits
• Positionner le bouton de réglage de la température à HIGH (Élevée) pour
préchauffer le gril à panini avant chaque utilisation.
• Avoir tous les ingrédients à portée de la main avant de préparer
les paninis.
• Une grande variété de pains peut être utilisée comme le pain de blé
entier, le pain de seigle, les pains aux fruits, les tortillas, les pains plats et
même les pitas.
• Avec les plaques antiadhésives du gril à panini, il n’est pas nécessaire
de beurrer ou de huiler l’extérieur du pain. Cependant, on obtiendra un
brunissement plus égal du pain si on badigeonne une petite quantité de
beurre ou d’huile d’olive.
• REMARQUE : Le gril à panini est possède une surface antiadhésive.
Ne pas utiliser d’aérosols antiadhésifs car ceux-ci peuvent causer une
accumulation de résidus sur les plaques de gril. Utiliser plutôt
de l’huile d’olive.
• MISE EN GARDE : Ne pas utiliser de produit à tartiner faible en gras. Ils
peuvent brûler et endommager les plaques de gril antiadhésives.
• Lorsqu’on utilise des garnitures molles ou des liquides dans les paninis,
on suggère d’utiliser des tranches de pain plus épaisses. Retirer la mie
des petits pains pour créer une cavité dans laquelle on peut y ajouter
les garnitures.
• Lorsqu’ils sont chauffés, la plupart des fruits frais produisent du jus. Si
la recette contient des fruits en conserve, les égoutter et les assécher à
l’aide d’un essuie-tout propre.
• Éviter d’utiliser des fromages fondus puisqu’ils ont tendance à « couler »
à haute température.
• Une cuillère à thé de sucre saupoudrée sur le côté beurré des paninis les
rend plus croustillants et ajoute de la saveur avec des garnitures sucrées.
• Les pains à grains entiers et les pains sucrés grilleront plus vite que les
pains blancs et doivent être grillés à température plus basse.
• Après avoir retiré les paninis, abaisser la plaque supérieure an de
conserver la chaleur pendant la préparation de d’autres paninis.
• Utiliser le gril à panini comme réchaud. Déposer les sandwichs sur le
gril, puis abaisser la plaque supérieure. La charnière ottante s’ajuste
automatiquement à l’épaisseur des sandwichs. Appuyer fermement
sur la poignée, puis tourner le verrou de la plaque de gril dans le sens
horaire pour la verrouiller. Placer le bouton de réglage à température
basse (LOW) ou à une valeur plus basse avant de servir.
• An d’éviter la contamination des aliments, porter des gants isolants et
utiliser un essuie-tout doux et absorbant pour essuyer les plaques de gril
après chaque utilisation.
26
Page 29

Instructions d’entretien pour l’utilisateur
Cet appareil nécessite un entretien minimal. Il renferme des pièces qui n’ont
pas a être remplacées par l’utilisateur. Ne pas tenter de le réparer soi-même.
Contacter un technicien qualié pour la réparation d’électroménagers si le
produit doit être réparé.
Entretient et nettoyage
MISE EN GARDE : Débrancher de la prise de courant et laisser refroidir
complètement avant de nettoyer.
1. Ne jamais plonger l’appareil dans l’eau ou d’autres liquides. Ne jamais
placer le gril à panini ou le plateau à graisse dans le lave-vaisselle.
2. Les plaques de gril doivent être essuyées et, si nécessaire, préparées
avant d’être chauffées.
3. Pour préparer les plaques : verser une cuillère à thé d’huile végétale
sur les plaques de gril antiadhésives. Étendre à l’aide d’une serviette
absorbante et essuyer l’excès d’huile. Préparer de nouveau après le
nettoyage ou au besoin.
4. Pour protéger les plaques de gril antiadhésives de qualité, n’utiliser que
des ustensiles de plastique, de nylon ou de bois.
5. Nettoyage intérieur : enlever les taches tenaces à l’aide d’une éponge à
récurer en nylon ou d’un tampon à récurer doux, puis essuyer à l’aide
d’un essuie-tout ou d’un linge doux. Pour des résultats optimaux,
n’utiliser que des produits qui conviennent au nettoyage de surfaces de
cuisson antiadhésives. Ne pas utiliser de laine d’acier ou de tampons
à récurer ordinaires. Permettre à l’eau de lavage de s’égout ter dans le
plateau à graisse.
6. Sortir le plateau à graisse de l’avant du gril à panini. Vider le plateau à
graisse puis le net toyer à l’eau chaude savonneuse. Essuyer.
7. Le ni extérieur doit être nettoyé à l’aide d’un nettoyant non abrasif et
d’un linge doux et humide. Sécher soigneusement.
8. S’assurer de tenir la plaque supérieure ouverte durant le nettoyage pour
éviter qu’elle ne se ferme accidentellement et qu’elle ne provoque
de blessures.
27
Page 30

RANGEMENT
1. S’assurer que l’appareil est débranché et entièrement refroidi.
2. Remettre le plateau à graisse propre dans l’appareil.
3. Abaisser la plaque de gril supérieure. Tourner le verrou de la plaque de
gril dans le sens horaire pour la verrouiller. Rabaisser le loquet sur la
plaque de gril supérieure.
(Voir Figure 3.) Ranger le gril à panini verrouillé. De cette façon, le
rangement est facile et pratique.
4. Ranger le cordon dans la partie inférieure du gril en l’enroulant autour
de la base. (Voir Figure 6). Ne pas forcer le cordon à l’endroit où il entre
dans l’appareil car il pourrait s’eflocher et se briser.
Figure 6
28
Page 31

Recettes
Panini à la dinde fumée et aux canneberges
• 2 tranches pain italien de
campagne
• 1 c. à. s. huile d’olive extra
vierge
1. Brossez chaque tranche de pain sur un côté avec l’huile d’olive.
2. Étendez 1 cu. à table conserves aux canneberges sur le côté sans
huile de chaque tranche de pain.
3. Ajoutez les tranches de dinde et de fromage sur un côté du pain.
Garnissez avec l’autre tranche, côté sans huile vers le bas.
4. Placez le sandwich panini sur le grill préchauffé et rôtissez jusqu’à
croustillant au goût.
Panini au chocolat Sweet Dolci
• 1 c. à. s. beurre fondu
• 2 tranches brioche ou
pain challah
1. Brossez chaque tranche de pain avec le beurre fondu.
2. Étendez la sauce au chocolat sur une tranche de pain, côté avec
l’huile vers le bas.
3. Garnissez avec la deuxième tranche. Placer le sandwich panini sur
le grill préchauffé et rôtir jusqu’à brun doré et chaud.
• 2 c. à. s. conserves aux
canneberges
• 3 tranches poitrine de dinde
fumée
• 3 tranches fromage suisse
• 3 c. à. s. sauce au chocolat et
aux noisettes Dolci Nocciola
29
Page 32

Garantie limitée de 1 an
SENSIO inc. garantit par les présentes que pour UNE ANNÉE (1) à partir
de la date d’achat, ce produit sera libre de défauts mécaniques en raison
de fabrication défectueuse, et pour quatre-vingt-dix jours (90) en ce qui
concerne les pièces non mécaniques. À son entière discrétion, SENSIO inc.
remboursera le produit durant la période de couverture de la garantie. Tout
remboursement au client sera à une valeur au prorata basée sur la période
restante de la garantie.
Cette garantie est seulement valide pour l’acheteur au détail original à partir
de la date d’achat au détail initial et n’est pas transférable. Gardez le reçu de
caisse original, car une preuve d’achat est exigée pour obtenir la validation
de la garantie. Les magasins de détail vendant ce produit n’ont pas le droit
d’altérer, de modier ou de changer, d’aucune manière que ce soit, les
modalités et les conditions de la garantie.
EXCLUSIONS : Cet te garantie ne couvre pas l’usure normale des pièces niles
dommages at tribuables aux suivants : l’utilisation négligente du produit, le
branchement sur un circuit de tension ou courant inapproprié, l’entretien de
routine inapproprié, l’utilisation contraire aux instructions d’utilisation, le
démontage ;la réparation ou l’altération par quiconque, sauf par le personnel
qualié de SENSIO inc. De plus, cette garantie ne couvre pas les cas de force
majeure,tels les incendies, inondations, ouragans ou tornades.
SENSIO inc. ne peut être tenu responsable pour tout dommage accessoire ou
indirect résultant de la rupture de toute garantie expresse ou implicite. Sauf
dans la mesure où la loi applicable l’interdit, toute garantie implicite de valeur
marchande ou de convenance à une n particulière est limitée à la durée
de la garantie. Certains états, certaines provinces et certaines juridictions
ne permettent pas l’exclusion ou la restriction des dommages accessoires
ou indirects et n’admettent pas de limites quant à la durée d’une garantie
implicite, de sorte que les exclusions ou restrictions exprimées ci-dessus,
peuvent ne pas s’appliquer à vous. Cette garantie couvre des droits légaux
spéciques qui peuvent varier selon l’état, la province et/ou la juridiction.
COMMENT OBTENIR LE SERVICE DE GARANTIE : Vous devez entrer en
contact avec le service à la clientèle à notre numéro sans frais : 1-877-775-
3564. Un représentant de service à la clientèle essayera de résoudre les
problèmes couverts par la garantie par téléphone. Si le représentant de
service à la clientèle ne peut pas résoudre le problème, un numéro de cas
vous sera fourni et vous serez invité à renvoyer le produit à SENSIO inc.
Attachez une étiquette au produit qui inclut : vos nom, adresse, numéro de
téléphone en journée, numéro de cas, et description du problème. Incluez
également une copie du reçu d’achat original. Empaquetez soigneusement
le produit étiqueté y compris le reçu de caisse, et expédiez-le (expédition et
assurance prépayées) à l’adresse de SENSIO inc. SENSIO inc. ne pourra être
tenu responsable pour le produit en voie de retour pendant le transit vers le
centre de service à la clientèle de SENSIO inc.
30
Page 33

INSTRUCCIONES
DE SEGURIDAD
IMPORTANTES
Al utilizar electrodomésticos, siempre deben cumplirse las
precauciones de seguridad básicas, incluidas las siguientes:
1. LIRE ATTENTIVEMENT LES INSTRUCTIONS
2. El cable de este electrodoméstico sólo debe enchufarse
en un tomacorriente eléctrico
de CA de 120 V.
3. Para protegerse del riesgo de descarga eléctrica, no
sumerja el cable, el enchufe
ni la unidad de cocción en agua ni en ningún otro
líquido.
4. No toque las supercies calientes. Utilice el mango.
5. Este electrodoméstico no debe ser utilizado por niños.
6. Se debe ser sumamente cuidadoso cuando se utiliza
cualquier electrodoméstico cerca de niños.
7. Desenchufe el electrodoméstico del tomacorriente
de pared cuando no lo utilice y antes de limpiarlo.
Deje enfriar el electrodoméstico antes de limpiarlo o
guardarlo.
8. Nunca tire del cordón para desconectar la sandwichera
del tomacorriente. En lugar
eso, tome el enchufe y jale para desconectar.
9. No utilice ningún electrodoméstico si el cable está
dañado. No utilice este electrodoméstico si la unidad
presenta un funcionamiento defectuoso, si se ha caído
o se ha dañado de cualquier manera. Para evitar el
riesgo de descargas eléctricas, nunca intente reparar la
sandwichera usted mismo. Lleve el electrodoméstico a
un técnico autorizado para que lo examine, lo repare o
le haga ajustes eléctricos o mecánicos.
Si la sandwichera se vuelve a armar de manera
incorrecta, se corre el riesgo de sufrir
una descarga eléctrica al utilizarla.
31
Page 34

10. El uso de accesorios o dispositivos no recomendados
por el fabricante puede provocar incendios, descargas
eléctricas o lesiones.
11. No utilice la sandwichera en exteriores ni para
propósitos comerciales.
12. No utilice el electrodoméstico para otros nes que no
sean aquellos para los que fue diseñado.
13. No permita que el cable eléctrico cuelgue del borde de
la mesa o encimera ni que toque supercies calientes.
14. No coloque el electrodoméstico sobre un quemador a
gas o eléctrico, o cerca de él, ni en un horno caliente.
15. Utilícelo solamente sobre una supercie plana, nivelada
y resistente al calor.
16. Sea extremadamente cuidadoso al mover cualquier
electrodoméstico que contenga comida, agua, aceite u
otro líquido caliente.
17. Desenchufe el electrodoméstico después de su uso. El
electrodoméstico permanecerá Encendido (ON) a menos
que se lo desenchufe.
18. PRECAUCIÓN SUPERFICIES CALIENTES: Este
electrodoméstico genera calor mientras está en uso.
Se deben tomar las medidas adecuadas para evitar el
riesgo de quemaduras, incendios u otro tipo de daño a
personas o a la propiedad.
19. Cuando utilice el electrodoméstico, proporcione una
buena ventilación por encima
y a los lados de la unidad para que circule el aire. No
permita que el electrodoméstico entre en contacto
con cortinas, recubrimientos de pared, ropa, paños de
cocina u otros materiales inamables mientras está
en uso.
20. Utilícelo solamente con un receptáculo de pared.
PARA USO DOMÉSTICO
UNICAMENTE
GUARDE ESTAS
INSTURCCIONES
32
Page 35

INSTRUCCIONES
DE SEGURIDAD
ADICIONALES
PRECAUCIÓN: Este electrodoméstico se calienta durante
el funcionamiento y mantiene el calor un tiempo después
de Apagado (OFF). Siempre use manoplas al manipular
materiales calientes y deje que las piezas metálicas se
enfríen antes de limpiarlas. No coloque nada sobre el
electrodoméstico mientras esté en funcionamiento o
esté caliente.
1. Todos los usuarios de este electrodoméstico deben
leer y comprender este manual antes de poner en
funcionamiento o limpiar este electrodoméstico.
2. No descuide el electrodoméstico mientras esté en
funcionamiento.
33
Page 36

Notas sobre el enchufe
El producto tiene un enchufe polarizado (una pata es más
ancha que la otra). Para reducir el riesgo de electrocución,
este enchufe viene para entrar en tomas de corriente
polarizadas de una sola forma. Si el enchufe no entra
completamente en la toma, invierta la posición del enchufe.
Si sigue sin entrar, contacte un electricista calicado. No
intente modicar el enchufe de ninguna manera.
Notas sobre el cable
El cable de alimentación corto (o el cable de alimentación
desmontable) suministrado se debe utilizar para reducir los
riesgos de enredarse o tropezar con un cable más largo.
No utilice un cable de extensión con este producto.
Advertencia sobre el plasticante
PRECAUCIÓN: Para evitar que el plasticante se transera
del acabado de la encimera, la supercie de trabajo u otro
mueble, coloque posavasos o manteles individuales
NO PLÁSTICOS entre el electrodoméstico y el acabado de la
encimera o la supercie. De lo contrario, el acabado puede
oscurecerse o pueden aparecer manchas o
marcas permanentes.
Energía eléctrica
Si el circuito eléctrico está sobrecargado con otros
artefactos, su electrodoméstico puede dejar de funcionar
correctamente. El electrodoméstico debe funcionar en un
circuito eléctrico separado de otros artefactos.
34
Page 37

Conozca su sandwichera
120 V, 60 Hz, 1400 W
Figura 1
Cierre de la placa de grill
Placa de grill
antiadherente superior
Bisagra otante
(no visible)
Placa de grill
antiadherente inferior
Pestillo de bloqueo
Bandeja de goteo desmontable
35
Page 38

Figura 2
Enchufe polarizado
Almacenamiento
del cable
(Ver Fig. 6)
Luz roja de
“POWER”
(Encendido)
Pestillo de
bloqueo
LOW HIGH
Power
Indicador de
control
MED
Ready
de temperatura
Luz azul
“READY” (Listo)
Cierre de la
placa de grill
Mango
36
Page 39

Antes del primer uso
1. Retire con cuidado la sandwichera y todos los materiales del embalaje.
2. Coloque el electrodoméstico sobre una supercie plana, seca y limpia.
3. Deslice los dos dientes de la bandeja de goteo desmontable hacia la
parte inferior del frente de la unidad. (Ver Figura 1). Empuje con rmeza
para asegurarse de que la bandeja de goteo esté bien colocada.
4. Despliegue el pestillo de bloqueo para liberar la placa de grill superior.
(Ver Figura 3).
5. Levante la placa de grill superior.
6. Antes de utilizar la sandwichera por primera vez, limpie las placas de
grill con un paño húmedo para quitar el polvo y luego séquelas. Limpie
la supercie exterior con un paño suave o una esponja
ligeramente húmeda.
7. Para obtener mejores resultados, vierta una cucharadita de aceite
vegetal sobre un paño de cocina absorbente. Deslice el paño sobre las
placas de grill antiadherentes. Retire el exceso de aceite.
PRECAUCIÓN: Asegúrese de evitar que el agua ingrese en
el electrodoméstico.
¡NUNCA SUMERJA LA SANDWICHERA EN AGUA O CUALQUIER
OTRO LÍQUIDO!
Figura 3
Pestillo de
bloqueo
Figura 4
Cierre de la
placa de grill
37
Unlock
Lock
Page 40

Instrucciones de funcionamiento
La sandwichera se puede utilizar en la posición abierta o cerrada. Cocine
fácilmente hamburguesas, carnes deshuesadas, tajadas nas de carne,
pescados, frutas y verduras. Las placas de grill antiadherentes y la bandeja de
goteo son muy fáciles de limpiar.
Para utilizar como grill de contacto (posición abierta)
Figura 5
NOTA: Cuando la sandwichera se calienta por primera vez, puede emitir un
poco de humo u olor. Esto es normal y debería desaparecer después de uno o
dos usos. Esto no afecta la seguridad del electrodoméstico.
1. Asegúrese de que el cable esté completamente desenvuelto y de que
no toque ninguna de las piezas exteriores de la unidad. Enchufe la
unidad en un tomacorriente eléctrico de CA de 120 V. La luz roja de
POWER (Encendido) se prenderá y permanecerá encendida durante el
funcionamiento.
2. Lleve el indicador de control de temperatura al ajuste HIGH (Alto) para
precalentar la sandwichera. Coloque la unidad en la posición cerrada para
precalentarla.
3. Mientras se precalienta, prepare los alimentos que desea cocinar. Después
de aproximadamente 2 minutos, se prenderá la luz azul READY (Listo) para
indicar que la unidad está precalentada y lista para ser utilizada.
4. Con una manopla o un agarrador, sujete el mango para mantener abierta
la placa de grill superior mientras coloca o retira los alimentos de la
supercie de cocción, a n de evitar lesiones y que se
cierre accidentalmente.
38
Page 41

5. Con una manopla o un agarrador, coloque los alimentos en el centro de
la placa de grill inferior.
6. Ajuste el indicador de control de temperatura según sea necesario;
continúe cocinando en el grill abierto hasta que los alimentos
estén cocidos.
Para utilizar como grill de prensado (posición cerrada)
NOTA: Si cocina más de un trozo de alimento, prepárelos de modo que el
grosor de los alimentos sea uniforme. Esto permitirá que los alimentos se
cocinen de forma rápida y uniforme y que queden dorados de ambos lados.
1. Siga los pasos 1 a 5 de la sección de las Instrucciones de funcionamiento
titulada: “Para utilizar como grill de contacto (posición abier ta)”, descrita
anteriormente.
2. Con una manopla o un agarrador, deslice el brazo y baje suavemente la
placa de grill superior. La bisagra otante se ajustará automáticamente
al grosor de los alimentos.
3. Con una manopla o un agarrador, sujete el mango y levante
cuidadosamente la placa de grill superior. Siempre utilice una espátula
de plástico o madera para retirar los alimentos cocidos. Presione el
mango rmemente; luego, gire la traba de la placa de grill hacia la
derecha para cerrar. (g. 4)
4. Ajuste el indicador de control de temperatura según sea necesario.
Durante la cocción al grill, se encenderá y apagará la luz azul READY
(Listo). Esto indica que el termostato está manteniendo la temperatura
de cocción adecuada.
NOTA: Los bordes elevados y la placa inferior inclinada permiten que las
grasas salgan de los alimentos y caigan en la bandeja de goteo.
5. Para destrabar, gire la traba de la placa de grill hacia la izquierda. Con
una manopla o un agarrador, sujete el mango y levante cuidadosamente
la placa de grill superior. Siempre utilice una espátula de plástico o
madera para retirar los alimentos cocidos. Pruebe los alimentos para
saber si están cocidos. Cocine al grill los alimentos hasta que estén
cocidos a su gusto.
ADVERTENCIA: Nunca utilice un objeto loso o de metal ya que puede
dañar la super cie antiadherente de las placas de grill.
PRECAUCIÓN: No descuide el electrodoméstico mientras esté en
funcionamiento.
39
Page 42

Preparación de los panini: cómo armar los sándwiches
Para preparar deliciosos sándwiches prensados, siga estos sencillos pasos.
Se acostumbra preparar los panini con una hogaza de pan grande.
No obstante, los panini hechos con rebanadas de pan o pancitos comprados
en la tienda pueden ser deliciosos y simples de preparar. Experimente con
una variedad de panes, tortillas, panes planos e incluso pan árabe. Para los
cocineros que se preocupan por la salud, la capa antiadherente de las placas
de grill garantiza un tostado crujiente y delicioso sin necesidad de utilizar
aceite ni manteca. Los bordes elevados y la placa inferior inclinada permiten
que las grasas salgan de los alimentos y caigan en la bandeja de goteo.
1. Arme los panini. Pinte o frote ambos lados de la par te ex terior del
sándwich
con aceite de oliva, manteca o margarina (opcional). Cuando se enciende
la luz azul READY (Listo), la sandwichera está lista para ser utilizada.
2. Siga los pasos 1 a 5 de la sección de las Instrucciones de funcionamiento
titulada: “Para utilizar como grill de contacto (posición abier ta)”, descrita
anteriormente.
3. Para asegurarse de que los panini se cocinen perfectamente, todos
los sándwiches que se colocan en la sandwichera al mismo tiempo
deben tener el mismo grosor. Controle que la placa de grill superior
cubra uniformemente la parte superior del pan. Asegúrese de que los
sándwiches estén ubicados en el centro de la placa de grill.
Si lo desea, presione el mango hacia abajo varias veces durante la
cocción.
4. Con una manopla o un agarrador, deslice el brazo y baje suavemente la
placa de grill superior. La bisagra otante se ajustará automáticamente
al grosor de los sándwiches. Presione el mango rmemente; luego, gire
la traba de la placa de grill hacia la derecha para cerrar.
5. Ajuste el indicador de control de temperatura según sea necesario.
Durante la cocción al grill, se encenderá y apagará la luz azul READY
(Listo). Esto indica que el termostato está manteniendo la temperatura
de cocción adecuada.
NOTA: Los bordes elevados y la placa inferior inclinada permiten que el
queso y las grasas salgan de los panini y caigan en la bandeja de goteo.
6. Para destrabar, gire la traba de la placa de grill hacia la izquierda. Con
una manopla o un agarrador, sujete el mango y levante cuidadosamente
la placa de grill superior. Continúe cocinando al grill hasta que el pan
esté tostado y los alimentos estén cocidos a su gusto.
7. Siempre utilice una espátula de plástico o madera para retirar los
sándwiches panini cocidos al grill.
ADVERTENCIA: Nunca utilice un objeto loso o de metal ya que puede
dañar la super cie antiadherente de las placas de grill.
PRECAUCIÓN: No descuide el electrodoméstico mientras esté en
funcionamiento.
8. Deje enfriar los panini unos minutos antes de cortarlos.
40
Page 43

Consejos para obtener mejores resultados con los panini
• Lleve el indicador de control de temperatura a HIGH (Alto) para
precalentar la sandwichera antes de cada uso.
• Tenga todos los ingredientes a mano antes de preparar los panini.
• Se puede utilizar una amplia variedad de panes, tales como panes
integrales, de centeno, de frutas, tortillas, panes planos e incluso
pan árabe.
• Gracias a las placas de grill antiadherentes de la sandwichera, no es
necesario untar la parte exterior del pan con manteca o aceite. No
obstante, se recomienda untar una pequeña cantidad de manteca o
aceite de oliva para que el pan se dore
de forma pareja.
• NOTA: La sandwichera está cubierta con una supercie antiadherente.
No utilice aceites antiadherentes en aerosol ya que pueden producir una
acumulación sobre las placas de grill. En su lugar, utilice aceite de oliva.
• ADVERTENCIA: No utilice pastas para untar sin grasa. Pueden quemarse
y dañar las placas de grill antiadherentes.
• Cuando utilice rellenos blandos o líquidos, use rebanadas de pan más
gruesas. Intente retirar el interior de los pancitos blandos para crear una
cavidad en la cual se puede agregar el relleno.
• La mayoría de las frutas frescas sueltan jugo al calentarlas. Si la receta
incluye fruta en lata, cuele y seque la fruta con una servilleta
de papel limpia.
• Evite utilizar quesos procesados, ya que tienden a derretirse a
altas temperaturas.
• Una cucharadita de azúcar espolvoreada sobre el lado untado con
manteca hace que los panini sean más crujientes y sabrosos cuando se
utilizan rellenos dulces.
• Los panes integrales y dulces se cocinan al grill más rápido que los
panes blancos y deben cocinarse a temperaturas más bajas.
• Después de retirar los panini cocidos, cierre la placa de grill superior
para conservar el calor mientras arma más sándwiches.
• Use la sandwichera para mantener el alimento caliente. Coloque los
sándwiches tostados en la sandwichera y baje la placa de grill superior.
La bisagra deslizable se ajustará automáticamente al espesor de los
sándwiches. Presione el mango rmemente; luego, gire la traba de la
placa de grill hacia la derecha para cerrar. Gire el dial de control de
temperatura hasta LOW (Bajo) o una posición más baja mientras sirve.
• Para evitar la contaminación de los alimentos, usando manoplas,
limpie las placas de grill con una ser villeta de papel suave y absorbente
después de cada uso.
41
Page 44

Instrucciones de mantenimiento para el usuario
Este electrodoméstico requiere poco mantenimiento. No contiene piezas
que puedan ser reparadas por el usuario. No intente repararlo usted mismo.
Si el producto necesita mantenimiento, consulte a un técnico autorizado
para reparar electrodomésticos.
Cuidado y limpieza
PRECAUCIÓN: Desenchufe la sandwichera del tomacorriente y deje que se
enfríe completamente antes de limpiarla.
1. Nunca sumerja el electrodoméstico en agua o cualquier otro líquido.
Nunca coloque
la sandwichera ni la bandeja de goteo en el lavavajillas.
2. Las placas de grill se deben limpiar y, si es necesario, preparar antes de
calentar.
3. Para preparar las placas: vierta una cucharadita de aceite vegetal sobre
las placas de grill antiadherentes. Extiéndalo con un paño de cocina
absorbente y retire el exceso de aceite. Repita el procedimiento después
de la limpieza o según sea necesario.
4. Para proteger las placas de grill antiadherentes de primera calidad,
utilice sólo utensilios de plástico, nailon o madera.
5. Limpieza del interior: quite las manchas rebeldes con una esponja o
malla de plástico y luego limpie con una servilleta de papel o un paño
suave. Para obtener mejores resultados, utilice sólo productos en cuyas
instrucciones se indique que son aptos para limpiar supercies de
cocción antiadherentes. No utilice lana de acero ni esponjas metálicas
gruesas. Deje que los residuos líquidos caigan en la bandeja de goteo.
6. Retire la bandeja de goteo desde el frente de la sandwichera. Vacíe la
bandeja de goteo y límpiela con agua tibia y jabón. Séquela.
7. El acabado exterior se debe limpiar con un producto de limpieza no
abrasivo y un paño suave y húmedo. Seque completamente.
8. Asegúrese de mantener abier ta la placa de grill superior durante la
limpieza, a n de evitar lesiones o que se cierre accidentalmente.
42
Page 45

Almacenamiento
1. Asegúrese de que la unidad esté desenchufada y completamente
enfriada.
2. Coloque la bandeja de goteo limpia en la unidad.
3. Baje la placa de grill superior. Para trabar, gire la traba de la placa de grill
hacia la derecha. Pliegue el pestillo de bloqueo sobre la placa de grill
superior (vea la gura 3). Almacene la sandwichera cerrada para lograr
un almacenamiento prolijo y compacto.
4. Envuelva el cable alrededor de la base para almacenarlo en la par te
inferior de la sandwichera. (Ver Figura 6). No presione el cable donde
ingresa en la unidad, ya que esto podría hacer que el cable se desgaste y
se rompa.
Figura 6
43
Page 46

Recetas
Panini de pavo ahumado y arándano
• 2 rebanadas de pan molde
campestre italiano
• 1 cucharadas de aceite de oliva
extra virgen
1. Pinte cada rebanada de pan en un lado con aceite de oliva.
Unte 1 cucharadas conserva de arándano en el lado no aceitado de
cada rebanada.
2. Coloque por capas en un lado del pan la pechuga de pavoy
el queso.
3. Cubra con la otra rebanada rebanada, el nado no aceitado
hacia abajo.
4. Coloque el sandwich panini sobre la parrilla pre-calentada
y tueste hasta que quede dorado y caliente.
Panini au chocolat Sweet Dolci
• 1 c. à. s. beurre fondu
• 2 tranches brioche ou
pain challah
1. Brossez chaque tranche de pain avec le beurre fondu.
2. Étendez la sauce au chocolat sur une tranche de pain, côté avec
l’huile vers le bas.
3. Garnissez avec la deuxième tranche. Placer le sandwich panini sur
le grill préchauffé et rôtir jusqu’à brun doré et chaud.
• 2 cucharadas de conservas de
arándano
• 3 rebanadas de pechuga de
pavo ahumado
• 3 rebanadas de queso suizo
• 3 c. à. s. sauce au chocolat et
aux noisettes Dolci Nocciola
44
Page 47

Garantía limitada de un año
SENSIO Inc. garantiza mediante la presente que por el periodo de UN AÑO
a partir de la fecha de compra, este producto estará libre de defectos en
materiales y mano de obra y por 90 días para las piezas no mecánicas.
A su sola discreción, SENSIO Inc. reparará o reemplazará cualquier producto
que resultara defectuoso,o emitirá un reembolso sobre el producto durante
el periodo de garantía. Cualquier reembolso al cliente será a valor prorrateado
con base en el periodo restante de la garantía.
Esta garantía es válida únicamente para el comprador original al detal y no
es transferible. Conserve el recibo original de compra ya que se requiere
la prueba de compra para obtener la validación de la garantía.Las tiendas
de ventas al detal que venden este producto no tienen el derecho de alterar,
modicar o cambiar de ninguna manera los términos y condiciones de
esta garantía.
EXCLUSIONES: Esta garantía no cubre el desgaste normal de piezas ni
daños resultantes de cualquiera de los siguientes aspectos: uso negligente
de este producto, uso de voltaje o corriente inadecuada, mantenimiento
de rutina inadecuada, uso contrario a las instrucciones de operación,
desmontaje; reparación o alteraciónpor personas distintas del personal
calicado de SENSIO Inc. La garantía tampoco cubre Actos de Dios,como
incendios, inundaciones, huracanes o tornados.
SENSIO Inc. no será responsable de ningún daño inherente ni resultante
causado por el incumplimientode ninguna garantía expresa o implícita.
Excepto hasta el alcance prohibido por la ley vigente, cualquier garantía
implícita de mercabilidad o conveniencia para un n particular está limitada
en tiempo a la duración de la garantía. Algunos estados, provincias o
jurisdicciones no permiten la exclusión o limitación de daños inherentes o
resultantes o limitaciones sobre cuánto tiempo dura una garantía implícita,
y en consecuencia, puede que las limitaciones o las exclusiones estipuladas
arriba no se apliquen a su caso. La garantía cubre derechos legales
especícos que pueden variar según el estado, la provincia y/o jurisdicción.
CÓMO OBTENER SERVICIO BAJO GARANTÍA: Ud. Debe ponerse en
contacto con el Servicio al clienteen el número: 1-866-832-4843.
Un representante de Servicio al cliente tratará de resolver los problemas
de garantía por teléfono. Si el Representante de servicio al cliente no logra
resolver el problema, se le dará un número de caso y se le solicitará devolver
el producto a SENSIO Inc. Coloque una etiqueta en el producto que incluye: su
nombre, dirección, número de teléfono para contacto de día, número de caso
y descripción del problema. También, incluya una copia de recibo de venta
original. Empaque cuidadosamente el producto etiquetado con el recibo de
venta y envíelo (con envío y seguro prepagados) a la dirección de SENSIO
Inc. SENSIO Inc.no asumirá ninguna responsabilidad respecto al producto
devuelto durante el tránsito al Centro de servicio al cliente de SENSIO Inc.
45
Page 48

Page 49

Page 50

For customer service questions or comments
Pour le service à la clientèle, question ou commentaires
Dudas o comentarios contactar el departamento de servicio al cliente
1-866-832-4843
www.sensioinc.com
©2013 Sensio.
BELLA® is a registered trademark of Sensio Inc.,
BELLA® est un marque déposée de Sensio Inc.,
BELLA® es una marca registrada de Sensio, Inc.,
Montréal, Canada H3B 3X9
BellaLife
BellaLife
bellahousewares.com
BellaLifestyle
BellaLifestyle
 Loading...