

Page 1

12.6QT
TOUCHSCREEN AIR FRYER PIZZA OVEN
WITH ROTISSERIE
Instruction Manual
Page 2

Thank You for your purchase
Register & sign up for special
announcements and trendy recipes!
Tell us what you think!
Rate, review or ask us a question.
@bellahousewares.com
#getinspired
BellaLife BellaLifestyle
Page 3

Table of Contents
Important Safeguards ......................................................................................................2-3
Additional Important Safeguards .................................................................................. 4-5
Notes on the Plug ................................................................................................................ 6
Notes on the Cord ................................................................................................................ 6
Plasticizer Warning .............................................................................................................. 7
Electric Power .......................................................................................................................7
Getting to Know Your 12.6 QT Air Fryer Pizza Oven ................................................... 8-9
Touchscreen Control ................................................................................................... 10 -11
Menu Chart ......................................................................................................................... 11
Weight/Size Restrictions .................................................................................................. 12
Cooking Containers ........................................................................................................... 12
Before Using for the First Time ....................................................................................... 13
Operating Instructions ................................................................................................. 13-15
Manual Operation ......................................................................................................... 13 -14
Preset Menu ................................................................................................................15
Pizza .............................................................................................................................. 15
Air Fry For Best Results .................................................................................................... 16
A Note on Air Frying Pre-Packaged Frozen Foods ........................................................ 16
Air Frying Chart.................................................................................................................. 17
Rotisserie Assembly .....................................................................................................18-19
Dehydrate ..................................................................................................................... 20-21
User Maintenance Instructions ....................................................................................... 21
Care & Cleaning Instructions ...........................................................................................22
Storing Instructions ........................................................................................................... 22
Recipes .......................................................................................................................... 23-32
Warranty ....................................................................................................................... 34-35
Page 4

IMPORTANT SAFEGUARDS
When using electrical appliances, basic safety precautions shouldalways
be followed, including the following:
1. READ ALL INSTRUCTIONS.
2. Do not touch hot surfaces. Use handles or knobs. Use oven mitts or
potholders.
3. To protect against electric shock do not immerse cord, plugs, or
appliance in water or other liquid.
4. This appliance is not intended for use by persons (including children)
with reduced physical, sensory or mental capabilities, or lack of
experience and knowledge, unless they have been given supervision
or instruction concerning use of the appliance by a person responsible
for their safety.
5. Close supervision is necessary when any appliance is used by or near children.
6. Unplug from outlet when not in use and before cleaning. Allow to cool
before putting on or taking off parts, and before cleaning the appliance.
7. Do not operate any appliance with a damaged cord or plug or after
the appliance malfunctions, or has been damaged in any manner.
Bring it to a qualied technician for examination, repair or electrical or
mechanical adjustment.
8. The use of accessory attachments not recommended by the appliance
manufacturer may cause injuries.
9. Do not use outdoors.
10. Do not let cord hang over edge of table or counter, or touch
hot surfaces.
11. Do not place on or near a hot gas or electric burner, or in a heated oven.
12. Extreme caution must be used when moving an appliance containing
hot oil orother hot liquids.
13. Always attach plug to appliance rst, then plug cord into the wall
outlet. To disconnect, press and hold the POWER (
open the door, then remove plug from wall outlet.
14. Do not use appliance for other than intended use.
2
) button and then
Page 5

15. Oversize foods or metal utensils must not be inserted in the Air Fryer
Pizza Oven as they may create a re or risk of electric shock.
16. A re may occur if the Air Fryer Pizza Oven is covered or touching
ammable material, including curtains, draperies, walls, and the like,
when in operation. Do not store any item on top of the appliance
when in operation.
17. Do not clean with metal scouring pads. Pieces can break off the pad
and touch electrical parts involving a risk of electrical shock.
18. Extreme caution should be exercised when using containers
constructed of other than metal or glass.
19. Do not store any materials, other than manufacturer’s recommended
accessories, in this Air Fryer Pizza Oven when not in use.
20. Do not place any of the following materials in the Air Fryer Oven:
paper, cardboard, plastic, and the like.
21. Do not cover drip pan or any part of the Air Fryer Pizza Oven with
metal foil. This will cause overheating of the Air Fryer Pizza Oven.
22. Use extreme caution when removing the drip pan or disposing
of hot grease.
23. Do not cover the Air Fryer Pizza Oven with anything that would
prevent steam from escaping. This may cause warping, discoloration,
malfunction or even re.
WARNING: This Air Fryer Pizza Oven will not operate unless the Oven
door is fully closed.
CAUTION: After cooking, the crisping racks or rotisserie assembly,
drip pan and the cooked foods are hot. Extreme caution must be used
when handling the hot Air Fryer Pizza Oven and accessories.
SAVE THESE INSTRUCTIONS
FOR HOUSEHOLD USE ONLY
3
Page 6

ADDITIONAL
IMPORTANT SAFEGUARDS
CAUTION HOT SURFACES: This appliance generates heat and escaping
steam during use. Proper precautions must be taken to prevent the risk of
burns, res, or other injury to persons or damage to property.
CAUTION: This appliance is hot during operation and retains heat for
some time after turning OFF. Always use oven mitts when handling hot
materials and allow metal parts to cool before cleaning. Do not place
anything on top of the appliance while it is operating or while it is hot.
1. All users of this appliance must read and understand this instruction
manual before operating or cleaning this appliance.
2. The cord to this appliance should be plugged into a 120V AC electrical
outlet only.
3.
If this appliance begins to malfunction during use, press the white
POWER (
wall outlet. Do not use or attempt to repair the malfunctioning appliance.
4. Do not immerse power cord in any liquid. If the power cord to
this appliance isdamaged, it must be replaced by contacting
Customer Service.
5. If this appliance falls or accidentally becomes immersed in water,
unplug it from the wall outlet immediately.
DO NOT REACH INTO THE WATER!
6. Keep the cord out of reach from children and infants to avoid the risk
of electric shock and choking.
7. Place the Air Fryer Pizza Oven on a at, heat-resistant work area.
8. Do not obstruct the air outlet or air inlets on the back of the Air Fryer
Oven, with any objects. Avoid escaping steam from the air outlet
during air frying.
) button and open the Oven door. Then remove plug from
4
Page 7

9. When using this appliance, provide adequate air space above and
on all sides for air circulation. Do not operate this appliance while it
is touching or near curtains, wall coverings, clothing, dishtowels or
other ammable materials.
10. Keep appliance at least 4 inches away from walls or other objects
during operation.
11. Never move a hot Air Fryer Pizza Oven containing hot food.
Allow to cool before moving.
12. Do not use this appliance in an unstable position.
13. To reduce the risk of burns or other injuries, do not touch hot
surfaces. The use of protective oven mitts or gloves as well as
long-handled utensils is recommended.
14. Always use oven mitts and the rotisserie handle when removing
food locked onto the rotisserie bar assembly from inside the Air Fryer
Pizza Oven cavity.
15. Always keep the appliance unplugged from the wall outlet when not
in use.
16. Do not attempt to dislodge food or clean the Air Fryer Pizza Oven
while it is plugged in or while it is still hot.
17. Do not attempt to use the Air Fryer Pizza Oven without the drip pan
inplace on the Oven oor.
CAUTION: Never leave the Air Fryer Pizza Oven unattended while
inuse.
5
Page 8

NOTES ON THE PLUG
This appliance has a polarized plug (one blade is wider than the other).
To reduce the risk of electric shock, this plug will t in a polarized
outlet only one way. If the plug does not t fully into the outlet,
reverse the plug. If it still does not t, contact a qualied electrician.
Do not modify the plug in any way.
NOTES ON THE CORD
A. A short power-supply cord (or detachable power-supply cord)
is to be provided to reduce the risk resulting from becoming
entangled in or tripping over a longer cord.
B. Longer detachable power-supply cords or extension cords are
available and may be used if care is exercised in their use.
C. If a long detachable power-supply cord or extension cord is used :
1. The marked electrical rating of the cord or extension cord should
be at least as great as the electrical rating of the appliance;
2. If the appliance is of the grounded type, the extension cord should
be a grounding-type3-wire cord.
3. The longer cord should be arranged so that it does not drape over
the countertop or table top where it can be pulled on by children
or tripped over unintentionally.
6
Page 9

PLASTICIZER WARNING
CAUTION: To prevent Plasticizers from migrating to the nish of the
counter top or table top or other furniture, place NON-PLASTIC coasters
or place mats between the appliance and the nish of the counter top
or table top. Failure to do so may cause the nish to darken; permanent
blemishes may occur or stains can appear.
ELECTRIC POWER
If the electrical circuit is overloaded with other appliances, yourappliance
may not operate properly. It should be operated onaseparate electrical
circuit from other appliances.
7
Page 10
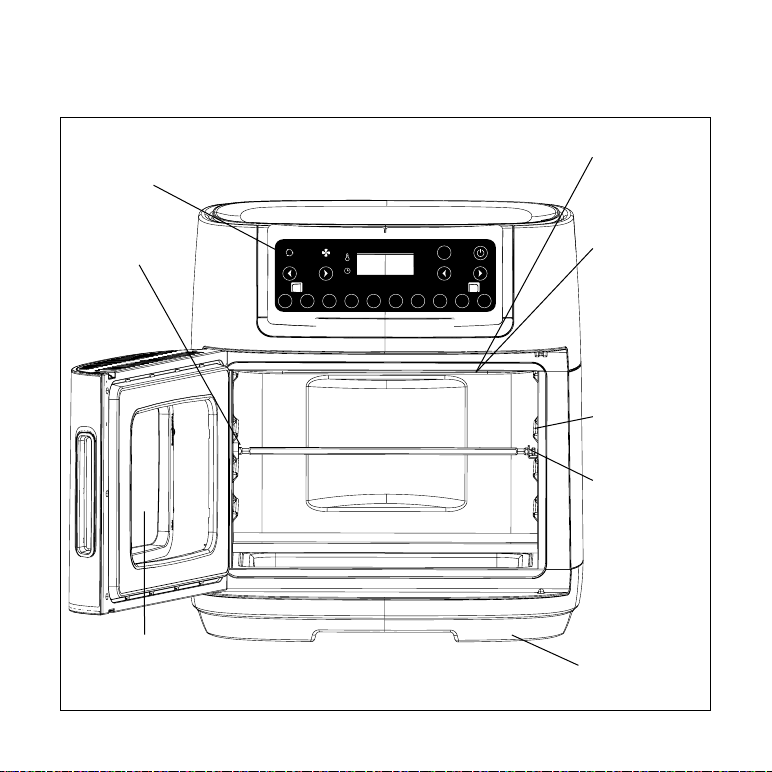
Getting to Know Your 12.6 QT Air Fryer Pizza Oven
Product may vary slightly from illustration
Figure 1
Touchscreen
Control
Upper Heating
Element
(not shown)
Rotisserie
Bar Notch
Oven Door
with Extra
Large Viewing
Window
TEMP
BROIL BAKEROASTAIR FRY REHEAT
Power Cord with
Polarized Plug
(Not shown)
8
LIGHT
˚F
MIN.
TIME
PIZZA BACON
DEHY-
ROTIS-
DRATE
SERIE
KEEP
WARM
Convection Fan
(Not shown)
Metal Notch
Rotisserie
Bar Slot
Non-Skid Feet
(Not shown)
Page 11
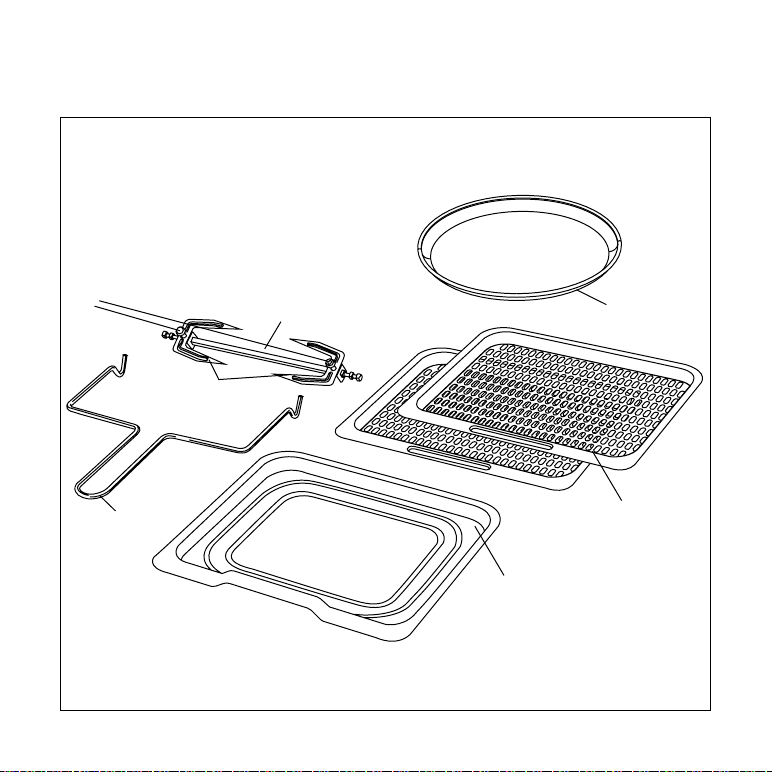
Figure 2
ROTISSERIE ASSEMBLY
Finger
Screws (2)
Meat Tines (2)
Rotisserie Bar
ACCESSORIES
Pizza Pan
Rotisserie
Handle
2 Crisping Racks
with Front Grip
Bake/Drip Pan
with Front Grip
9
Page 12
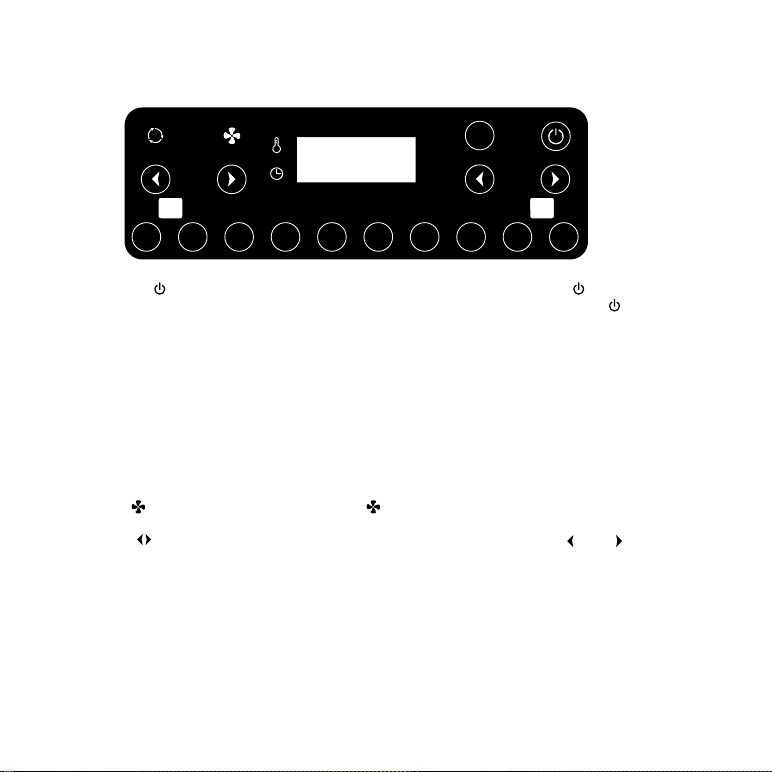
Touchscreen Control
Figure 3
TEMP
LIGHT
˚F
MIN.
TIME
BROIL BAKEROASTAIR FRY REHEAT
KEEP
WARM
PIZZA BACON
DEHYDRATE
ROTIS-
SERIE
1. POWER( ) button. Press the red POWER button to begin. The POWER( ) button will turn
white while the Air Fryer Pizza Oven is in operation. Press the white POWER(
) button to
pause or long press the power button to turn the Oven off
2. Digital Display. While in operation, the Air Fryer Pizza Oven’s set TEMPERATURE and
remaining TIME alternate on the digital display. When the time counts down to 00:00, “OFF”
will appear and 3 beeps sound as the Air Fryer Pizza Oven turns OFF automatically.
3. 10 Preset Menu Icons. To use any of the 10 preset menu options: Air Fry, Roast, Broil, Bake,
Reheat, Keep Warm, Pizza, Bacon, Dehydrate, Rotisserie, simply press the function button as
select, the button and display will ash 5 seconds and then the unit operation, the selected
button remains illuminated on the digital display.
4. Oven LIGHT button. Press to turn the LIGHT ON. check cooking and browning progress.
Press again to turn the Oven light OFF. Any time the Oven door is opened, the light will
illuminate. When the Oven door is properly closed, the light will turn OFF after 30 seconds.
5. FAN( ) Icon. The white convection fan( ) will ash when the Air Fryer is ON and for up to
30 seconds after it is turned OFF.
6. TIME(
) button. Press to change the TIME on the digital display. The ( ) and ( ) symbols
enable you to add or decrease cook TIME at a time. Hold the button down to rapidly change
the TIME.
NOTE: Cooking time can be added or reduced while cooking is in progress
10
Page 13

7. TEMPERATURE( ) button. button. Press to change the TEMPERATURE on the digital
display. The ( ) and ( ) symbols enable you to add or decrease cooking TEMPERATURE at a
time. Hold the button down to rapidly change the TEMPERATURE.
NOTE: Cooking temperature can be increased or reduced while cooking is in progress
8. ROTISSERIE(
ROTISSERIE (
) button. This button ash means the rotisserie bar begin to rotate, Press the
) button to turn OFF, press again to turn ON.
Menu Chart
NOTE: Rotisserie can be used along with the along with the AIR FRY and ROAST presets or
at the default temperature of 380°F for 15 mins.
MENU
Air Fry 400° 170°-400° 20:00 01:00-60:00
1
roAst 400° 350°-400° 35:00 01:00-60:00
2
Broil 400° - 10:00 01:00-30:00
3
BAke 350° 170°-400° 25:00 01:00-60:00
4
reheAt 250° 170°-400° 06:00 01:00-60:00
5
keep WArm 170° 150°-200° 60:00 01:00-60:00
6
pizzA 360° 170°-400° 08:00 01:00-60:00
7
BAcon 360° 180°-400° 10:00 01:00-30:00
8
DehyDrAte 130° 90°-170° 08:00hrs 01:00-24:00hrs
9
10 Rotisserie 380° 180°-400° 15:00 01:00-60:00
NOTE: Only cook bacon on middle and low shelf. Risk of bacon getting caught in fan on top shelf.
Default
TEMP (ºF)
ADJUSTABLE
TEMPERATURE (ºF)
TIME
(MINUTES)
ADJUSTABLE TIME
(MINUTES)
11
Page 14

Weight/Size Restrictions
• When utilizing both crisping racks, the Air Fryer Pizza Oven can DEHYDRATE 2 (3/4 oz.)
packages of fresh herbs such as fresh parsley, rosemary, thyme, tarragon, oregano, and
sage.
• The Air Fryer Pizza Oven can cook up to a 3 lb. chicken or turkey breast and up to a 4 lb.
beef or lamb roast.
• Food cooked on the Rotisserie must be no wider than 7-1/2 inches and must t comfortably
in the Air Fryer Pizza Oven without touching the upper heating elements.
• The Air Fryer Pizza Oven can bake any fresh or frozen 10-inch round pizza. For a crispier
crust, bake the pizza in the pizza pan. And place the pizza pan on the crisping racks.
Cooking Containers
• The drip pan included with the Air Fryer Pizza Oven is suitable for cooking items such
ascookies, rolls, biscuits, nachos and hot appetizers.
• A variety of standard baking dishes, such as a 7-inch x 8-inch casserole, any 7-inch
round or square cake pan, a 6-cup mufn pan, an 8-inch loaf pan, 1 quart round, square,
orrectangular casserole dishes may be used for cooking many different foods.
• Choose bakeware made of either metal or glass/ceramic without lids.
• Dark or dull pans absorb heat faster; foods will bake more rapidly, and crust will brown
more easily than in shiny bake pans.
• Check package directions on the container or contact the ovenware manufacturer
todetermine the container’s suitability for use in a convection oven.
• Do not use oven roasting bags in this Air Fryer Pizza Oven, as they may come in contact
with the heating elements.
CAUTION: Allow at least 1-inch air space between the top of the container and the upper
heating elements. Never use glass lids on glass or metal bakeware. If a lid is necessary,
cover tightly with aluminum foil.
12
Page 15

Before Using for the First Time
CAUTION: To protect against electric shock, do not immerse the Air Fryer Pizza Oven or allow
cord tocome into contact with water or other liquids.
1. Read all operating instructions carefully.
2. Carefully unpack the Air Fryer Pizza Oven and accessories, removing all packaging
materials. Remove any labels from the outer surfaces.
3. Place your Air Fryer Pizza Oven on a level surface such as a countertop or table. Be sure the
sides, back, and top of the Air Fryer Pizza Oven are at least 4 inches away from any walls,
cabinets, orobjects on the counter or table.
4. To avoid scratching, marring, or discoloration, do not store anything on top of the Air Fryer
Pizza Oven during operation.
5. Wash both crisping racks, drip pan, rotisserie assembly and in hot, soapy water.
6. Rinse and dry thoroughly before placing in the Air Fryer Pizza Oven.
7. Make sure the drip pan is in place on the Oven oor.
NOTE: During rst use, the Air Fryer Pizza Oven may emit a slight odor. This is normal.
Operating Instructions
1. Place the Air Fryer Pizza Oven on a at, heat-resistant work area, close to an electrical outlet.
2. Plug the power-supply cord into a 120V AC electrical wall outlet. A ash red POWER ( )
button will appear on a black background.
3. To begin, press the red POWER ( ) button.
4. The control panel will appear as the all function buttons. And display appear “----”.
5. The control panel will turn off as remains the red POWER ( ) button ash if no buttons are
pressed in 30 seconds.
AIR FRY MANUAL OPERATION
6. To adjust the cook TIME to your recipe, press the TIME adjust buttons (( ) and ( ) to advance
or decrease time. When dehydration is chosen, the time can be increased at an interval of
1hour for maximum dehydration of 24hours.
7. Press the TEMP adjust button a ( ) and ( ) to adjust TEMPERATURE from 150°F to 400°F in 5 F
increments. Choose temperature ranging from 90°F to 170°F when dehydration is selected
13
Page 16

8. When the desired TIME and TEMPERATURE appear, the LCD will ash 5 times and the
Air Fryer Pizza Oven ON. The POWER (
convection fan ( ) will ash, the Oven LIGHT button illuminate, and may be activated any
time the Air Fryer Pizza Oven is in operation. The TIME and TEMPERATURE will alternate on
the digital display, and can be changed, until the TIME counts down to 00:00.
IMPORTANT: The Air Fryer Pizza Oven will not heat until the function button is selected. If no
buttons are pressed, in 30 seconds, the Air Fryer Pizza Oven will automatically turn OFF.
9. To PAUSE the Air Fryer Pizza Oven, press the white POWER ( ) button. The white POWER ( )
button will ash. TEMPERATURE or TIME changes can be made. Press the ash white POWER
button to resume cooking.
10. While cooking, when the Oven door is opened, the Air Fryer Pizza Oven will PAUSE and the
Oven light will illuminate to allow you to remove, add, brush or rearrange food or alternate
crisping shelf positions. When the Oven door is closed and locked into position, the Oven light
will turn OFF after 30 seconds and the Air Fryer Pizza Oven will resume cooking.
11. To turn the Air Fryer Pizza Oven OFF at any time, long press the white POWER ( ) button and
then open the Air Fryer Pizza Oven door.
12. When the TIME counts down to 00:00, “OFF” will appear on the digital display and the white
convection fan ( ) will continue to ash until the lone red POWER ( ) button appears on a
black background. 3 beeps sound as the Air Fryer Pizza Oven turns OFF automatically.
WARNING! ALWAYS USE A MEAT THERMOMETER TO ENSURE THAT MEAT, POULTRY
AND FISH ARE COOKED THOROUGHLY BEFORE EATING.
CAUTION: INSIDE OVEN SURFACES ARE HOT DURING AND AFTER USE. ALWAYS WEAR
PROTECTIVE, INSULATED OVEN MITTS ON HANDS WHEN REACHING INSIDE THE HOT AIR
CONVECTION FRYER OVEN.
13. Allow cooked to rest for 10 to 15 minutes. Remove the crisping rack(s) from the Oven and
place on a at, heat resistant surface. Remove air fried foods to the serving area. Promptly
return the crisping rack(s) to the Air Fryer Pizza Oven. Continue air frying subsequent batches,
if any.
14. Unplug the Air Fryer Pizza Oven when not in use.
) button will illuminate white as long, the white
14
Page 17

MENU: 10 PRESET AIR FRY OPTIONS
(Air Fry | Roast | Broil | Bake | Reheat | Keep Warm | Pizza | Bacon | Dehydrate | Rotisserie)
1. To begin, press the red POWER ( ) button.
2. The control panel will appear as all function buttons.
3. Press the function button as you desire.
4. When the desired function button is ashing, check as the preset TIME and TEMPERATURE
alternate on the digital display. Adjust preset TEMPERATURE or TIME to your recipe. The
desired button and display will ash 5 time and then start cooking.
PIZZ A
Your Air Fryer Pizza Oven can accommodate a 10-inch fresh or frozen pizza.
1. Make sure the drip pan is in place on the Oven oor.
2. When cooking prepared pizza, fresh or frozen, remove all packaging, including cardboard,
plastic, paper, or other ammable materials before placing the pizza in the Air Fryer Pizza
Oven. When baking fresh pizza, use a lightly oiled pizza pan sprinkled with cornmeal to make
removing the baked pizza easier.
WARNING: Never cook pizzas directly on the crisping rack as melted cheese and other
ingredients may fall onto the drip pan.
3. Depending on the depth of the pizza, slide the crisping rack into the center or lower shelf
position. Carefully center pizza pan directly on the crisping rack and close the door.
CAUTION: Make sure the pizza is at least 1 inch away from the upper heating element at least.
4. Plug into a 120V AC electrical wall outlet. The backlighted digital display will illuminate.
5. Press PIZZA button as illuminates as ash.
6. Adjust TEMPERATURE or TIME to your recipe. When the desired TEMPERATURE and time
appear, PIZZA button and display will ash 5 times to turn the PIZZA function ON.
7. Set TEMPERATURE and remaining time will alternate on the digital display, and can be
changed, until the time counts down to 00:00.
8. When the time counts down to 00:00, “OFF” will appear on the digital display and the white
convection fan (
POWER( ) button appears on a black background. 3 beeps sound as the Air Fryer Pizza Oven
turns OFF automatically.
9. WARNING: Extreme caution must be used when handling the hot pizza pan, crisping racks
and drip pan. Always use oven mitts or long-handled utensils to grasp the front grips. Avoid
escaping steam hot food.
CAUTION: Be careful when removing cooked food from the Air Fryer Pizza Oven. The inside
ofthe Air Fryer Pizza Oven is very hot. Close Oven door.
) will continue to ash for 30 seconds until the ash red
15
Page 18

Air Fry For Best Results
1. Please consult the Air Fry Chart and/or follow package instructions for suggested convection
cook TEMPERATURE and time
NOTE: As a general rule, when air convection frying, reduce the package’s suggested
conventional COOK time by 20% to 30% depending on the food and amount to be cooked.
NOTE: The quantity, density, weight of food will alter the total air frying TIME necessary.
Remember, cooking smaller batches will result in shorter cook TIMES and more even
food quality.
2. When convection baking, the shelf position used will depend on the size of the food being
prepared. It is important to place your food as close to the center of the Air Fryer Oven as
possible to ensure even cooking. For best cooking results, it is recommended to use the
middle level for cooking foods when 1 layer is being used.
3. Always pat food dry before cooking to encourage browning and avoid excess smoke. When
cooking naturally high fat foods, such as chicken wings or sausages, it may be necessary to
empty fat from thedrip pan between batches.
4. For crispier results, air fry small batches of freshly breaded foods. Create more surface area
by cutting food into smaller pieces. Press breading onto food to help it adhere. Refrigerate
breaded foods for at least 30 minutes. Spray with oil before air frying.
5. Arrange breaded food on the crisping rack(s) so that food is not touching to allow air ow on
all surfaces.
6. Do not overll crisping racks with food.
7. Spray olive oil or vegetable oil works best as oil is distributed evenly and less oil is needed.
8. To assure even cooking/browning, ALWAYS open the Oven door halfway through the cook
TIME and check, turn or rotate the food and crisping racks from top to bottom. Check food
and adjust TIME or TEMPERATURE if needed.
9. If additional air frying is needed, adjust TEMPERATURE if desired, and set TIME for 2 to 5
minute intervals until fully cooked.
10. WARNING: Extreme caution must be used when handling the hot crisping racks and
drip pan. Alwaysuse oven mitts or long-handled utensils to grasp the front grips.
Avoid escaping steam hot food.
A Note on Air Frying Pre-Packaged Frozen Foods
1. This 1600W high performance heating system circulates heat for fast air frying and recovery.
As a general rule, reduce the package conventional COOK time by 20% to 30% depending on
the food and amount to be cooked.
2. Always check food halfway though cook TIME to determine nal cook time and temperature.
3. Always check cooking progress after TIME has expired. If additional air frying is needed,
adjust TEMPERATURE if desired, and set TIME for 2 to 5 minutes intervals until fully cooked.
16
Page 19

Air Fry Chart
WARNING! ALWAYS USE A MEAT THERMOMETER TO ENSURE THAT MEAT, POULTRY AND
FISH ARE COOKED THOROUGHLY BEFORE EATING.
The following chart is intended as a general guide only. The quantity of food air fried at one time,
the thickness or density of the food, and whether the food is fresh, thawed, or frozen will alter the
total cook TIME necessary.
FOOD TEMP AIR FRY TIME
Root Vegetables, fresh, roasted, 2 cups, 1/2 chunks (roasted) 370°F 15-20 minutes
Asparagus, fresh thin stems, 3 cups 370°F 7-9 minutes
Green Beans, Sugar Snap Peas, fresh, 2 cups 370°F 7-9 minutes
Brocoli, fresh (roasted), 3 cups 370°F 6-8 minutes
Brussels Sprouts, fresh, halved, 3 cups (roasted) 370°F 8-10 minutes
Butternut Squash, seeded, 1/2-in. chunks, 3 - 4 cups fresh 370°F 15 minutes
Fennel, fresh, chopped, 3 cups (roasted) 370°F 7-9 minutes
Kale Chips, 3 cups stemmed, chopped 370°F 3 minutes
Mushrooms, fresh, cleaned, dry, sliced, 3 cups 370°F 7-9 minutes
Fried Sweet Potato Fries, 3 cups
(fresh, hand cut, 1/8 to 1/4-in. thick)
French Fries, Idaho Potatoes, 3 cups (fresh, hand cut, 1/4 to 1/3-in. thick) 400°F 18 minutes
Meat, Roast, Chops, 1lb 350°F 25 minutes
Meatloaf, 1lb 350°F 25 minutes
Steak, 1lb, room temp. medium rare 400°F 12 minutes
Hamburgers, 1/4 lb. (up to 2), med-rare-well 350°F 6-10 minutes
Chicken Wings, 1 lb. (fresh/thawed) 360°F 20 minutes
Chicken Tenders/Fingers, boneless, 1lb 360°F 20 minutes
Chicken Pieces, breaded or bare, 1lb 360°F 20-30 minutes
Carsh ngers (thawed, battered) 11lb 350°F 10 minutes
Fish Filet (fresh, thawed, battered) 350°F 10 minutes
Shrimp (thawed, battered), 1 lb. 330°F 8 minutes
PLEASE NOTE: The USDA recommends that meats such as beef and lamb, etc. shouldbe cooked
to an internal temperature of 145°F/63°C. Pork should be cooked to an internal temperature of
160°F/71°C and poultry products should be cooked to an internal temperature of 170°F/77°C
- 180°F/82°C to be sure any harmful bacteria has been killed. When reheating meat/poultry
products, they should also be cooked to an internal temperature of 165°F/74°C.
400°F 13-15 minutes
17
Page 20

Rotisserie Assembly
TIME
LIGHT
DEHY-
DRATE
TEMP
˚F
MIN.
BROIL BAKEROASTAIR FRY REHEAT
KEEP
WARM
PIZZA BACON
ROTIS-
SERIE
1. Remove both crisping trays from the Air Fryer Pizza Oven. Make sure the drip pan is in place
on the Oven oor.
2. It is best to secure meat on the rotisserie bar with butcher’s cooking twine.
3. When preparing rotisserie chicken or game birds, truss the bird into a tight package.
Tie both chicken legs together, tie the breast area together with the wings, then wrap more
string around the middle
4. Push the rotisserie bar through the center of meat or poultry to be cooked. Make sure food is
centered on the bar.
IMPORTANT: If the food is not centered it will cause a jerking motion during cooking.
This results in undue stress on the motor.
5.
Thread the square hole of the meat tine over the end of the bar and press into food to secure.
Tighten nger screw to hold food in place. Repeat with the second meat tine. (See Fig.4.)
Figure 4
6. Plug the power-supply cord into a 120V AC electrical wall outlet.
7. Open the Oven door. The Oven light will illuminate. insert one square end of the rotisserie bar
into the rotisserie slot on the left side of the Oven’s interior. Rest the other square end into the
metal notch on the right side of the Air Convection Fryer Oven’s interior. (See Fig.5.)
Figure 5
Rotisserie Slot
Drip Pan
Metal Notch
18
Page 21

8. Close the Oven door. No preheat is necessary.
9. Press Rotisserie button as the button illuminates as ash.
10. Adjust cook TEMPERATURE or TIME to your recipe. When the desired TEMPERATURE and time
appear on the digital display, let it ash 5 time to turn the ROTISSERIE function ON.
Note: Rotisserie default temperature of 380°F for 15 mins.
IMPORTANT: Press the Oven LIGHT button and watch the food while the rotisserie bar rotates at
least 1 complete turn to ensure proper clearance of the heating elements and drip pan.
11. As the rotisserie bar turns, the ROTISSERIE button will illuminate. The POWER button and
the Oven LIGHT button will illuminate solid white. The white convection fan ( ) will ash.
12. Set TEMPERATURE and remaining time will alternate on the digital display, and can be
changed, until the time counts down to 00:00.
13. When the time counts down to 00:00, “OFF” will appear on the digital display and the
white convection fan ( ) will continue to ash for 30 seconds until the lone red POWER
button appears on a black background. 3 beeps sound as the Air Fryer Pizza Oven turns OFF
automatically.
WARNING! ALWAYS USE A MEAT THERMOMETER TO ENSURE THAT MEAT OR POULTRY
ARE COOKED THOROUGHLY BEFORE EATING.
14. Wearing protective oven mitts, grasp the rotisserie handle to lift the rotisserie bar, safely
remove the rotisserie bar from the air convection fryer oven.
CAUTION: Be careful when removing cooked food from the Air Fryer Pizza Oven. The inside
of the Air Fryer Pizza Oven is very hot. Close Oven door.
15. Unplug when not in use and allow the Air Fryer Pizza Oven to cool completely before
cleaning.
19
Page 22

Dehydrate
Dried meats, vegetables, and fruits are perfect for cooking, travel, camping, and snacking.
Preparing your own dried foods ensures healthy, safe, preservative-free results. Dehydrate
fresh, ripe foods to preserve nutrients and enhance avor. Bruised fruits or vegetables are also
acceptable for dehydrating. Trim away any bruises with a knife. Your Air Fryer Oven’s automated
drying makes home dehydration both simple and rewarding.
DRIED HERBS
Makes about 1/3 cup
NOTE: When utilizing both crisping racks, the Air Fryer Oven can DEHYDRATE 2 (1/2 oz./14 g.)
packages of fresh herbs such as fresh parsley, rosemary, thyme, tarragon, oregano, and sage.
CAUTION: Light and leafy herbs such as parsley or cilantro, should not be placed on the top shelf
as the convection currents may cause the herbs to get caught in the fan.
If herbs are very small, line the crisping racks with parchment paper. Spread fresh herbs evenly
onto the crisping racks.
Place both crisping racks in top 2 shelves of the Air Fryer Oven.
Press the DEHYDRATE button.
Adjust TEMPERATURE or TIME to your recipe. When the desired TEMPERATURE and time
appear, DEHYDRATE button and display will ash 5 times to turn the DEHYDRATE function ON.
DRIED HERBS TEMP TIME Notes
Oregano 125°F 2 hrs.
Parsley 125°F 1hr 30 minutes
Thyme 125°F 3 hrs.
Rosemary 125°F 2 hrs.
Tarragon 125°F 3 hrs.
Sage 125°F 3 hrs.
Kale Chips 125°F 1 hr. 30 mins. Massage kale with olive oil.
20
Page 23

FRUIT
Wash all fruit skins well.
Slice fruit into 1/4-inch thick slices and arrange on both crisping racks to ensure even drying.
Rotate shelves halfway through DEHYDRATE TIME for even drying.
FRUIT TEMP TIME Notes
Apples 135°F 8 - 10 hrs.
Mango/Papaya 135°F 10 hrs.
Kiwi 135°F 6 hrs. 1/4-in. rounds. Rotate shelves.
Orange Slices 135°F 10 hrs. Citrus is crisp when fully dried. Rotate shelves.
Tomatoes (Roma) 145°F 10 hrs. Skin-side down. Rotate shelves.
Tomatoes (Cherry/
Grape)
BEEF JERKY TEMP TIME Notes
1/2 lb. London Broil
or Flank
145°F 5 - 9 hrs. Skin-side down. Rotate shelves.
145°F 5 - 6 hrs. Flip and rotate shelves halfway.
User Maintenance Instructions
This appliance requires little maintenance. It contains no user-serviceable parts. Any servicing
requiring disassembly other than cleaning must be performed by a qualied appliance repair
technician.
21
Page 24

Care & Cleaning Instructions
WARNING! Unplug the Air Fryer Oven. And allow the Air Fryer Oven and all accessories to cool
completely before cleaning.
1. Clean the outside of the Air Fryer Pizza Oven with a damp cloth and dry thoroughly. A nonabrasive liquid cleaner may be used for stubborn stains. Do not use metal scouring pads or
abrasive cleaners that will scratch the surface.
2. Clean the Oven’s interior with a mild or non-abrasive cleaner and plastic scouring pad after
each use to avoid build-up. Do not rub too hard as surface can be scratched.
3. To remove baked-on food, pour a small amount of cooking oil onto the food and allow to
stand for 5 to 10 minutes. Remove the softened food with a soft cloth. Do not use steel
wool, scouring pads or abrasive cleaners.
4. Wash crisping racks and drip pan in soapy water and dry thoroughly. All Air Fryer Pizza
Oven accessories may be washed in the dishwasher.
5. If the ROTISSERIE was used, wash the rotisserie bar, meat tines, 2 nger screws, and
rotisserie bar handle in warm, soapy water and dry thoroughly. The ROTISSERIE accessories
may be washed in the dishwasher.
6. CAUTION: DO NOT use spray-on or other oven cleaners. Using these types of cleaners may
cause cosmetic and/or electrical damage to the Air Fryer Pizza Oven.
Storing Instructions
1. Assemble rotisserie bar with tines and nger screws (without food) inside the Air Fryer Pizza
Oven. Store both crisping racks and the drip pan and pizza pan inside the Oven.
2. Store Air Fryer Pizza Oven in its box in a clean, dry place.
3. Never store appliance while it is hot or still plugged in.
4. Never wrap cord tightly around the appliance. Do not put any stress on the cord where it
enters the unit, as it could cause the cord to fray and break.
22
Page 25

Recipes
Cinnamon Apple Crisps
Keep the apple skins on for additional ber. With no added sugar, these vegan, gluten-free,
Cinnamon Apple Crisps are healthy for snacking any time. Experiment with different varieties of
apples to taste their distinctive avor proles.
Serves 2 – 4
• 2 apples
• 1 tablespoon cinnamon
1. Peel apples, if desired. Remove the core using an apple corer or a knife. Slice the apples
into thin rings between 3/16-inch and 1/4-inch thick.
2. Add lemon juice to 1 cup of water in a large, shallow bowl. To prevent the apples from
turning brown, dip the apple slices into the acidulated water. Then press the excess
moisture from the apple rings using a clean kitchen towel or paper towels.
3. Arrange the apple slices in a single layer on both crisping racks. Sprinkle the apple rings
with cinnamon.
4. Choose DEHYDRATE menu option. Adjust the (
to 10:00 hours.
5. Flip apples and rotate crisping racks several times through drying. Remove apples when
they are browned and crispy to your liking.
6. Store dried apples in zippered bags.
• 1 cup water
• 1 tablespoon lemon juice
) TEMP ( ) to 135ºF and ( ) TIME ( )
23
Page 26

Recipes
Trail Mix Granola with Maple Syrup
These snack bars are both versatile and easy to make. Nuts, sweeteners and add-ins may be
altered to create various avored bars that everyone will love. Include pumpkin seeds, pistachios,
cashews and sesame seeds. Use honey, molasses or agave syrup. Vary your bars by adding
coconut akes, chocolate chips, peanut butter, almond butter, and exotic dried fruits. Possibilities
are endless.
Makes 12 bars
• 3 cups old fashioned rolled oats
• 1/2 cup sliced almonds
• 1/2 cup sunower seeds, roasted, salted
• 1 tablespoon pumpkin pie spice
1. Combine dry ingredients in a large bowl. Combine wet ingredients in another bowl.
2. Add wet ingredients to dry and mix well. Granola mixture should be slightly moist.
3. Line both crisping trays with parchment paper. Spread half the mixture onto each rack.
4. Choose BAKE menu option. Adjust the (
to 20 minutes and bake until golden brown. Cut into bars while warm. The granola will crisp
as it cools.
5. Store in a tightly sealed container.
• 3 tablespoons coconut oil, melted
• 6 tablespoons cup Grade B maple syrup
• 1/2 cup dried cranberries
• 2 oranges, zested and juiced
• 2 egg whites, whisked
) TEMP ( ) to 300°F and ( ) TIME ( )
24
Page 27

Recipes
Classic Beef Jerky
Homemade Jerky? This classic is protein-rich, low-fat and healthy. No nitrates! No chemical
additives! No nothing YOU don’t want… and everything YOU do!
HINT: Ask your butcher to cut meat into 1/4-inch thick strips.
Serves 4
• 1/2 – 3/4 lb. London broil or ank steak
• 1/2 teaspoon black pepper
• 1/2 teaspoon chili powder
• 1/2 teaspoon garlic powder
• 1/2 teaspoon cayenne pepper,
or more to taste
1. For ease of trimming, meat should be partially frozen. Trim fat from meat. Cut steak 1/4-inch
thick; then into 4-inch strips.
2. Add all marinade ingredients to a zipper bag or covered container.
3. Mix well. Add meat. Cover and refrigerate overnight.
4. Dry meat using a clean kitchen towel or paper towels. Arrange steak strips onto the crisping
racks so that pieces do not touch.
5. Choose DEHYDRATE menu option. Adjust (
06:00 hours. Flip meat and rotate crisping racks halfway through drying.
Jerky is done when meat is dried to your liking.
6. To store, place jerky into tightly covered containers or zippered bags.
• 1/2 teaspoon onion powder
• 1/8 cup soy sauce
(may substitute low sodium)
• 1/4 cup Worcestershire sauce
• 1/8 cup hot sauce, optional
) TEMP ( ) to 145ºF and ( ) TIME ( ) to 05:00 to
25
Page 28

Recipes
Rotisserie Chicken
Use kitchen twine to truss the bird into a tight package. Tie both chicken legs together, tie the
breast area together with the wings, then wrap more string around the middle. Please consult the
detailed instructions described in the Rotisserie Assembly section of this instruction manual.
(See Figures 9 and 10.)
Serves 2 - 3
• 1 (2-1/2 - 3 lb.) whole chicken, giblets
removed
• 1/4 cup butter, melted
• 2 teaspoons granulated garlic
1. Combine butter and seasonings in a small bowl. Coat the chicken generously and marinate
at room temperature for 30 minutes.
2. Truss the chicken and mount securely onto the rotisserie bar.
3. Assemble the Rotisserie following the detailed procedure described in Rotisserie Assembly
section in this instruction manual.
4. Choose ROTISSERIE menu option. Roast chicken at 400°F. Adjust (
to 15 minutes.
5. Baste chicken with marinade. Adjust the (
to 30 minutes.
NOTE: On average, cook chicken 15 minutes/lb.
6. Use a meat thermometer to measure the internal temperature. At 165°F, the chicken is done.
7. Allow chicken to rest 15 to 20 minutes before carving.
• 2 teaspoons granulated onion
• 1 teaspoon sea salt
• 1 teaspoon ground black pepper
• 2 teaspoons paprika
) TIME ( )
) TEMP ( ) to 350°F and ( ) TIME ( )
26
Page 29

Recipes
Honey Glazed Ham
A favorite for any holiday or special occasion. Treat your family to a scrumptious traditional
Honey Glazed Ham or…surprise everyone with your own spicy pepper touch of Sriracha!
Serves 6
• 1 (3 lb.) ham, pre-brined,
boneless, fully-cooked
Glaze
• 1 orange, zested and juiced
• 1/2 cup honey
• 1/2 cup Dijon mustard
1. Simmer the glaze ingredients in a small saucepan over medium heat.
2. Remove ham from the refrigerator 1 hour before preparation; allow meat to come to room
temperature and pat dry. Score ham by cutting a 1/4-inch deep 1-inch diamond pattern in
the top rind of the ham. Pour the glaze over the ham and refrigerate for 2 hours.
3. Assemble the Rotisserie following the detailed procedure described in Rotisserie Assembly
section in this instruction manual.
4. Choose ROTISSERIE menu option. Adjust (
( ) TIME ( ) to 60 minutes. During the last 30 minutes of cooking, glaze the ham
every 10 minutes.
NOTE: On average, cook ham 18 minutes/lb.
5. The ham will be warm enough to serve when the internal temperature reaches 140°F.
6. Allow the ham to rest for 5 to 10 minutes before slicing.
• 1/2 teaspoon allspice
• 4 tablespoons butter
• 1 tablespoon Sriracha sauce, optional
) TEMP ( ) to 300°F and
27
Page 30

Recipes
Fully Loaded Veggie Dorito® Nachos
Cool tomato relish spooned over these Loaded Veggie Nachos brightens the avors and enhances
the many delicious components. Game time, movie time, party time, lunch time, share time.
Serves 4
• 2 (1-3/4 oz.) bags Doritos
®
• 1 cup shredded white cheddar or white
American cheese
• 1/2 cup black olives, sliced
• 1/2 cup green olives, sliced
• 1/2 cup frozen corn kernels, defrosted
• 3 green onions, chopped
• 2 jalapeño peppers, seeded,
deveined, sliced,
1. Empty the rst bag of Doritos
®
onto a 7-inch or 8-inch pie tin.
2. Sprinkle half of the shredded cheddar cheese, olives, corn, and green onions over the chips.
3. Layer the remaining bag of Doritos
®
4. Sprinkle the remaining cheese, olives, corn, and green onions over the chips.
5. Center the pie tin on the lower shelf.
6. Choose AIR FRY menu option. Adjust (
7. Mix the chopped tomato, lime juice, and salt in a small bowl.
8. After 7 minutes, check to make sure cheese is melted to your satisfaction. Remove from
Oven and spoon tomato mixture over the nachos.
9. Serve with fresh cilantro, guacamole, sour cream, and plenty of fresh jalapeño peppers.
• 1/2 lime, juiced
• 1/2 teaspoon salt
• 2 large plum tomatoes, chopped
• 1/4 cup cilantro, chopped, for serving
• guacamole, for serving
• sour cream, for serving
• jalapeño peppers, sliced, fresh or jarred
onto the pile.
) TIME ( ) to 7 minutes.
28
Page 31

Recipes
Rosemary Peppercorn Beef Tenderloin
For an intimate dinner at home, this is beef llet is perfection. Serve with roasted rosemary
potatoes and fresh garden salad. #happydinner
Serves 4
• 1 (18 oz.) beef tenderloin
Rub
• 3 cloves garlic
• 3 sprigs rosemary, chopped
• 3 tablespoons Kosher salt
1. Trim tenderloin of all silver skin before roasting.
2. Combine rub ingredients in a small bowl. Coat the tenderloin generously and allow the
meat to rest at room temperature for 30 minutes.
3. Assemble the Rotisserie following the detailed procedure described in Rotisserie Assembly
section in this instruction manual.
4. Choose ROTESSERIE menu option. Adjust (
( ) TIME ( ) to 30 minutes.
NOTE: On average, cook beef 16 minutes/lb. for rare, 18 minutes/lb. for medium.
5. Use a meat thermometer to measure the internal temperature. (Rare: 145°F, Medium: 160°F.)
6. Due to carry-over cooking, it is best to remove meat slightly before the target temperature
as the meat’s temperature increases 5ºF to 10ºF after being removed from the heat
(while resting).
7. Allow meat to rest 15 minutes before slicing.
• 1 tablespoon onion powder
• 3 tablespoons olive oil
) TEMP ( ) to 350°F and
29
Page 32

Recipes
Buffalo Chicken Tacos
Tasty. A real mashup of crunchy air fried buffalo chicken tenders served in a convenient, easy-toeat our tortilla. These tacos are lled with fresh lettuce, tomato and celery crunch accented with
spicy wing sauce and cooled with traditional creamy blue cheese dressing.
Serves 4
• 4 our tortillas
• 3/4 lb. chicken tenders
• 1/2 cup our
• 1 packet taco seasoning
• 2 eggs, beaten
• 1-1/2 cups seasoned panko
(Japanese breadcrumbs)
1. Cut chicken tenders into 9 to 12 bite-sized pieces.
2. Set up 3-bowl breading station:
• our + taco seasoning
• whisk 2 eggs
• seasoned panko breadcrumbs
3. Dredge the chicken pieces in our. Pat gently to remove any excess.
4. Dip chicken into egg.
5. Swirl the coated chicken in the panko breadcrumbs until each piece is fully coated.
6. Add breaded chicken to both crisping racks. Spray with olive oil.
7. Choose ROTESSERIE menu option. Adjust (
8. Turn and rotate crisping racks halfway through air frying.
9. Assemble tacos. Prepare a bed of lettuce, tomatoes, and celery in the base of the tortilla.
Add chicken. Spoon wing sauce and blue cheese dressing over the chicken. Add a sprinkle
of chopped cilantro and a squeeze of fresh lime juice to nish.
• 4 tablespoons buffalo wing sauce
• 4 tablespoons blue cheese dressing
• 2 limes, cut into wedges
• 1/2 cup iceberg lettuce, shredded
• 1/2 cup grape tomatoes, halved
• 2 stalks celery, diced
• 1/2 cup cilantro, chopped
) TIME ( ) to 15 minutes.
30
Page 33

Recipes
Garlic Shrimp Skewers
Elegant party food can be assembled ahead and prepared for serving in minutes.
Serves 4
• 1 lb. (16-20) shrimp, peeled & deveined, tails on
Marinade
• 1 lime, zested and juiced
• 1 tablespoon olive oil
• 8 cloves garlic, minced
• 1/2 cup parsley, chopped
1. Combine marinade ingredients in a zipper bag.
2. Marinade shrimp 30 minutes before cooking.
3. Thread the shrimp onto the skewers. Brush shrimp with marinade.
4. Choose AIR FRY menu option. Adjust (
on the size of the shrimp. Turn and rotate crisping racks halfway through air frying.
Brush before serving.
• 1/2 teaspoon sea salt
• 2 limes, for garnish
) TIME ( ) to 5 to 7 minutes, depending
31
Page 34

Recipes
Homemade Oatbran Bread
Nothing beats bread warm from your Air Fryer Oven. The sweet, crunchy topping bakes perfect
for morning toast and jam, as a canvas for fruity or herbal cheese spreads, topped with meat,
sh or simply toasted and slathered with nut butter and sliced banana.
Makes 1 loaf
• 2 eggs
• 1 cup buttermilk
• 2 large apples, cored, grated
• 1 teaspoon vanilla extract
• 1/2 cup coconut oil, melted
• 1-1/3 cup plain bran cereal
(may substitute bran with raisins)
Topping
• 1/2 cup oats • 1/3 cup brown sugar
1. Whisk eggs and buttermilk in a large bowl. Add apple, vanilla, and coconut oil. Mix well.
2. Add bran cereal and allow to sit for 5 minutes until liquid is absorbed.
3. Combine dry ingredients in a large bowl. Whisk until well mixed.
4. Add wet ingredients to the dry. Do not overmix! Add to a well-oiled 8-inch x 5-inch loaf pan.
Combine topping ingredients and spoon over the top of the batter.
5. Choose BAKE menu option. Adjust the (
6. Bread is done when a toothpick inserted into the center of the loaf comes out clean.
Depending on the loaf pan, bake an additional 5 minutes if needed.
• 1 cup whole wheat our
• 1 teaspoon baking soda
• 1 teaspoon baking powder
• 1 teaspoon salt
• 1/2 teaspoon cinnamon
• 1/4 teaspoon nutmeg
) TIME ( ) to 35 minutes.
32
Page 35

33
Page 36

Limited Two-Year Warranty
SENSIO Inc. hereby warrants that for
a period of TWO YEARS from the date
of purchase, this product will be free
from mechanical defects in material
and workmanship, and for 90 days in
respect to non-mechanical parts. At its
sole discretion, SENSIO Inc. will either
repair or replace the product found to
be defective, or issue a refund on the
product during the warranty period.
Exclusions:
The warranty does not cover normal
wear of parts or damage resulting
from any of thefollowing: negligent
use of the product, use of improper
voltage or current, improper routine
maintenance, use contrary to the
operating instructions, disassembly,
repair, or alteration by anyone other than
qualied SENSIO Inc. personnel. Also,
the warranty does not cover
Acts of God such as re, oods,
hurricanes, or tornadoes.
SENSIO Inc. shall not be liable for any
incidental or consequential damages
caused by the breach of any express
or implied warranty. Apart from the
extent prohibited by applicable law, any
implied warranty of merchantability or
The warranty is only valid for the
original retail purchaser from the date
of initial retail purchase and is not
transferable. Keep the original sales
receipt, as proof of purchase isrequired
to obtain warranty validation. Retail
stores selling this product do not have
the right to alter, modify, or in any way
revise the terms and conditions of the
warranty.
tness for a par ticular purpose is limited
in time to the duration of the warrant y.
Some states, provinces or jurisdictions
do not allow the exclusion or limitation
of incidental or consequential damages,
or limitations on how long an implied
warranty lasts, and therefore, the above
exclusions or limitations may not apply
to you. The warranty covers specic
legal rights which may vary by state,
province and/or jurisdiction.
34
Page 37

How To Obtain Warranty Service:
You must contact Customer Service at
our toll-free number: 1-866-832-4843.
A Customer Service Representative
will attempt to resolve warranty issues
over thephone. If the Customer Service
Representative is unable to resolve the
problem, you will be provided with a
case number and asked to return the
product to SENSIOInc. Attach a tag to
the product that includes: your name,
address, daytime contact telephone
number, case number, and description of
the problem.
Also, include a copy of the original sales
receipt. Carefully package the tagged
product with the sales receipt, and send
it (with shipping and insurance prepaid)
to SENSIO Inc.’s address. SENSIO Inc.
shall bear no responsibility or liability
for the returned product while in transit
to SENSIO Inc.’s Customer Service
Center.
35
Page 38

For customer service questions or comments
1-866-832-4843
bellahousewares.com
Sensio Inc.
New York, NY 10016/USA
90116 R5
 Loading...