

Page 1
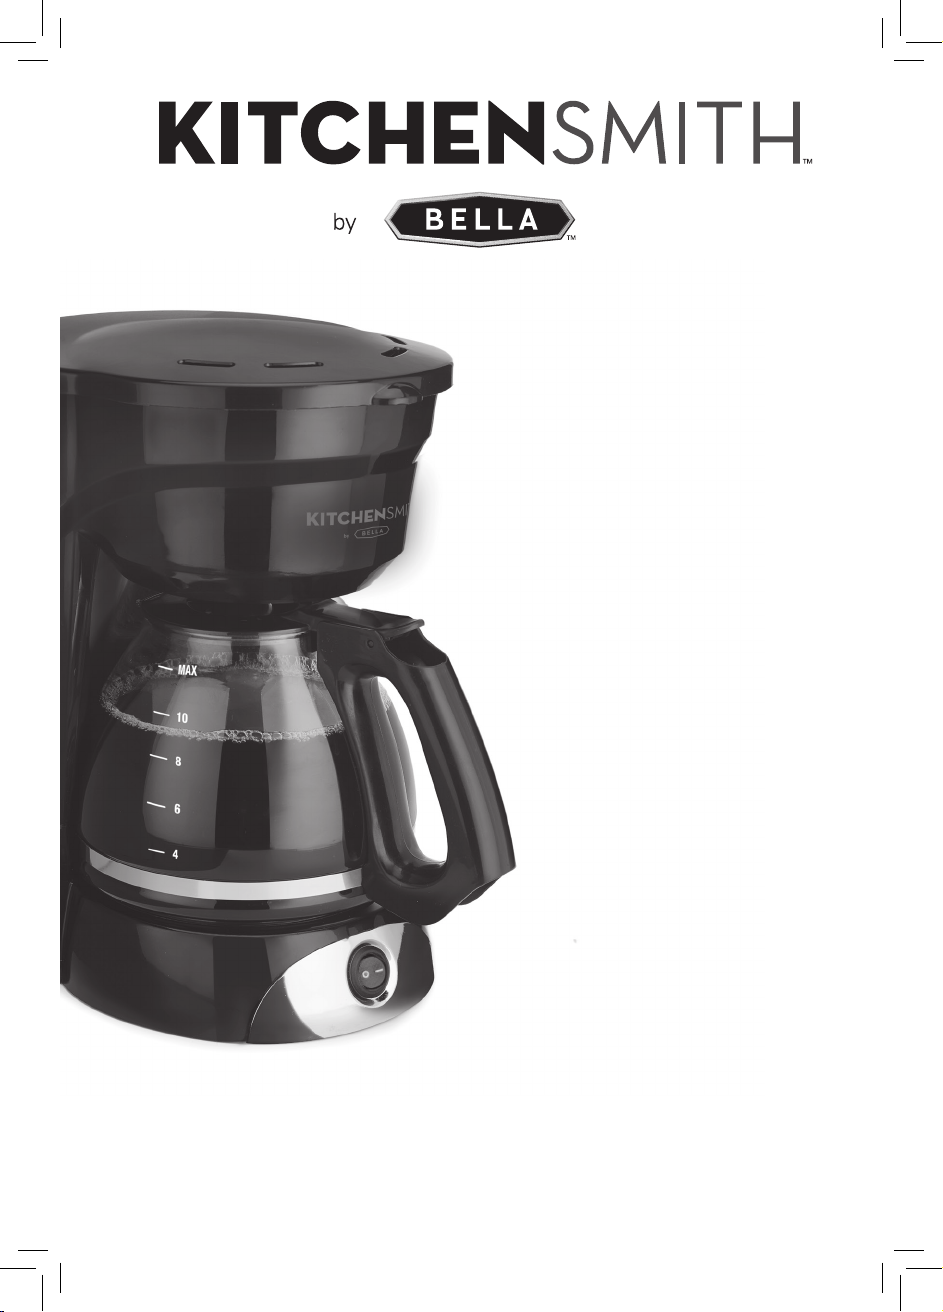
12 CUP COFFEE MAKER
CAFETIÈRE 12 TASSES
CAFETERA DE 12 TAZAS
Instruction Manual
Manuel d’instructions
Manual de instrucciones
Register your product and get support at:
Pour vous inscrire et obtenir l’aide de votre produit:
Para registrar y obtener asistencia de su producto ir:
www.bellahousewares.com
SO-312438_12050_KS 12 cup CM_145x210_IM_R7.indd 1 2017-04-17 5:09 PM
Page 2

SO-312438_12050_KS 12 cup CM_145x210_IM_R7.indd 2 2017-04-17 5:09 PM
Page 3

Table of Contents
Important Safeguards ..................................................................................................................................2
Additional Important Safeguards ...............................................................................................................3
Notes on the Plug ........................................................................................................................................ 4
Notes on the Cord.........................................................................................................................................4
Plasticizer Warning ....................................................................................................................................... 4
Electric Power................................................................................................................................................4
Getting To Know Your 12 cup coffee maker .............................................................................................4
Carafe Safety Precautions ...........................................................................................................................5
Permanent Coffee Filter Basket ................................................................................................................. 5
Before Using for the First Time .................................................................................................................. 5
Brewing Coffee Instructions ......................................................................................................................5
Pause and Serve .......................................................................................................................................... 6
Brewing a Second Carafe of Coffee ........................................................................................................... 6
Hints for Great Tasting Coffee .................................................................................................................... 6
User Maintenance Instructions ...................................................................................................................7
Care & Cleaning Instructions ......................................................................................................................7
Descaling .......................................................................................................................................................7
Storing Instructions ......................................................................................................................................7
Warranty ........................................................................................................................................................8
Table des matières
Consignes de sécurité importantes ......................................................................................................9 -10
Autres consignes de sécurité importantes ........................................................................................ 10 -11
Remarques sur la che ............................................................................................................................. 12
Remarques sur le cordon .......................................................................................................................... 11
Avertissement de migration de plastiants ........................................................................................... 11
Alimentation électrique ............................................................................................................................. 11
Apprendre à connaître votre cafetière 12 tasses ...................................................................................12
Consignes de sécurité relatives à la carafe ............................................................................................12
Panier-ltre à café réutilisable ..................................................................................................................13
Avant la première utilisation ..................................................................................................................... 13
Instructions pour l’infusion du café ......................................................................................................... 13
Service en cours d’infusion ......................................................................................................................13
Infuser une deuxième carafe de café.......................................................................................................14
Conseils pour infuser un café savoureux ................................................................................................14
Réparation .................................................................................................................................................. 14
Entretien et nettoyage ...............................................................................................................................15
Détartrage .................................................................................................................................................... 15
Rangement ..................................................................................................................................................15
Garantie........................................................................................................................................................16
Índice
Medidas de seguridad importantes .................................................................................................... 17-18
Medidas de seguridad importantes adicionales ...............................................................................18-19
Notas sobre el Enchufe .............................................................................................................................. 19
Notas sobre el Cable .................................................................................................................................. 19
Advertencia sobre plástico .......................................................................................................................19
Corriente eléctrica ......................................................................................................................................19
Introducción a la Cafetera de 12 Tazas .................................................................................................... 20
Medidas de seguridad de la Jarra ............................................................................................................ 20
Filtro permanente de Café .........................................................................................................................21
Antes de utilizar por primera vez ............................................................................................................. 21
Instrucciones de preparación de café ......................................................................................................21
Función Pausa y Servir .............................................................................................................................. 21
Preparar una segunda jarra de café .........................................................................................................22
Consejos para un café de gran sabor ......................................................................................................22
Instrucciones de mantenimiento ..............................................................................................................22
Instrucciones de cuidado y limpieza ........................................................................................................23
Descalcicación .......................................................................................................................................... 23
Instrucciones de Almacenamiento ...........................................................................................................23
Garantía........................................................................................................................................................24
SO-312438_12050_KS 12 cup CM_145x210_IM_R7.indd 3 2017-04-17 5:09 PM
Page 4

IMPORTANT SAFEGUARDS
When using electrical Coffee Makers, basic safety precautions should always
be followed, including the following:
1. READ ALL INSTRUCTIONS.
2. Do not touch hot surface. Use handles or knobs only.
3. This Coffee Maker is not intended for use by persons (including children) with
reduced physical, sensory or mental capabilities, or lack of experience and
knowledge, unless they have been given supervision or instruction concerning
use of the Coffee Maker by a person responsible for their safety.
4. Close supervision is necessary when any Coffee Maker is used by or near
children.
5. In order to minimize the risk of property damage, never place the Coffee Maker
under cabinets. Make sure the area several feet above the Coffee Maker is clear
from all furniture or cabinetry.
6. Do not open top cover while coffee is brewing. Scalding may occur if the cover
is lifted or removed during the brewing cycle.
7. Do not use outdoors.
8. Set the switch to the OFF (O) position and unplug unit from outlet when either
the appliance or display clock is not in use, and before cleaning. Allow to cool
before putting on or taking off parts, and before cleaning the appliance.
9. To protect against re, electrical shock and injury to persons, do not immerse
cord, plugs or appliance in water or other liquid.
10. Do not operate any Coffee Maker with a damaged cord or plug, or after
theCoffee Maker malfunctions, or has been damaged in any manner.
Return Coffee Maker to the nearest authorized service facility for examination,
repair or adjustment. NOTE: DO NOT ATTEMPT TO REPAIR THE COFFEE MAKER
YOURSELF. THIS WILL VOID THE WARRANTY.
11. The use of accessory attachments not recommended by the appliance
manufacturer may result in re, electric shock or injury to persons.
12. Never move the Coffee Maker by pulling the cord. Do not let the cord hang
over the edge of a table or counter or touch hot surfaces.
13. Stand the Coffee Maker on a table or at surface.
14. Do not use a cracked glass carafe or a carafe having a loose or weakened handle.
15. Only use the glass carafe with this Coffee Maker. Handle with care as the glass
is very fragile.
16. Snap lid securely onto glass carafe before using.
17. Never use your Coffee Maker without water in it.
18. Do not place Coffee Maker on or near a hot gas or electric burner or in a
heatedoven.
19. The carafe is designed for use with this Coffee Maker. It must never be used
ona range top.
20. Do not set hot glass carafe on a wet or cold surface.
21. Do not clean glass carafe with cleaners, steel wool pads, or other
abrasivematerial.
22. Set the switch to the OFF (O) position and unplug the Coffee Maker
fromthewall outlet when the Coffee Maker is not in use, left unattended,
orwhenthe carafe is empty.
23. Do not use this Coffee Maker for other than its intended use.
24. Scalding may occur if the lid is removed during the brewing cycles.
2
SO-312438_12050_KS 12 cup CM_145x210_IM_R7.indd 2 2017-04-17 5:09 PM
Page 5

25. To reduce the risk of re, do not mount Coffee Maker over or near any portion
of a heating or cooking Coffee Maker. To reduce the risk of electric shock, do not
mount over a sink.
26. To reduce the risk of re, do not store anything directly on top of the Coffee
Maker surface when the Coffee Maker is in operation.
27. WARNING: To reduce the risk of re or electric shock do not remove the base
cover. There are no user serviceable parts inside. Repairs should only be done
by an authorized service personnel.
FOR HOUSEHOLD USE ONLY
SAVE THESE INSTRUCTIONS
ADDITIONAL IMPORTANT
SAFEGUARDS
WARNING: This Coffee Maker generates heat and escaping steam during use.
Proper precautions must be taken to prevent the risk of burns, res, or other injury
to persons or damage to property
1. All users of this Coffee Maker must read and understand this Instruction
Manual before operating or cleaning this Coffee Maker.
2. The cord to this Coffee Maker should be plugged into a 120V AC electrical
outlet only.
3. Use water only in this Coffee Maker! Do not put any other liquids or food
products in this Coffee Maker. Do not mix or add anything to the water placed
in this Coffee Maker, except as instructed in the User Maintenance Instructions
to clean the Coffee Maker.
4. DO NOT attempt to move a Coffee Maker containing hot liquids. Allow Coffee
Maker to cool completely before moving.
5. Keep Coffee Maker at least 4 inches away from walls or other objects during
operation. Do not place any objects on top of Coffee Maker while it is
operating. Place the Coffee Maker on a surface that is resistant to heat.
6. If this Coffee Maker begins to malfunction during use, immediately unplug
thecord. Do not use or attempt to repair the malfunctioning Coffee Maker.
7. If this Coffee Maker falls or accidentally becomes immersed in water or any
other liquid, unplug it immediately. Do not reach into the water! Do not use this
Coffee Maker after it has fallen into or has become immersed in water.
8. The Coffee Maker must be left to cool down sufciently before adding more
water to avoid exposure to steam.
9. Always use fresh, cool water in your Coffee Maker. Warm water or other liquids,
except as listed in cleaning section, may cause damage to the Coffee Maker.
10. DO NOT put carafe into a microwave oven.
11. DO NOT leave empty carafe on keep warm plate when Coffee Maker is turned
ON (–), as the carafe may crack or become otherwise damaged.
12. The ow valve is located on the bottom of the removable lter holder and is
activated when the carafe is removed. This design makes it possible for you to
remove the carafe and pour a cup of coffee before the entire carafe is brewed.
13. CAUTION: To prevent injury when utilizing the auto pour pause and serve
feature, replace carafe within 30 seconds of removing during brewing process.
3
SO-312438_12050_KS 12 cup CM_145x210_IM_R7.indd 3 2017-04-17 5:09 PM
Page 6
Note: keep illustration
callouts aligned
NOTES ON THE PLUG
This product has a polarized plug (one blade is wider than the other). To reduce
the risk of electric shock, this plug will t in a polarized outlet only one way. If the
plug does not t fully into the outlet, reverse the plug. If it still does not t contact
a qualied electrician. Never use with an extension cord unless plug can be fully
inserted. Do not alter the plug.
NOTES ON THE CORD
A short power supply cord is provided to reduce the risk resulting from becoming
entangled in or tripping over a longer cord. If an extension cord is available,
it may be used if care is exercised. If an extension cord is used, the marked
electrical rating of the extension cord should be at least as great as the electrical
rating of the appliance. The extension cord should be arranged so that it will not
drape over the countertop or tabletop where it can be pulled on by children or
tripped over unintentionally.
PLASTICIZER WARNING
CAUTION: To prevent Plasticizers from migrating to the nish of the counter top or
table top or other furniture, place NON-PLASTIC coasters or place mats between
the Coffee Maker and the nish of the counter top or table top. Failure to do so may
cause the nish to darken; permanent blemishes may occur or stains can appear.
ELECTRIC POWER
If the electrical circuit is overloaded with other Coffee Makers, your Coffee Maker
may not operate properly. It should be operated on a separate electrical circuit
from other Coffee Makers.
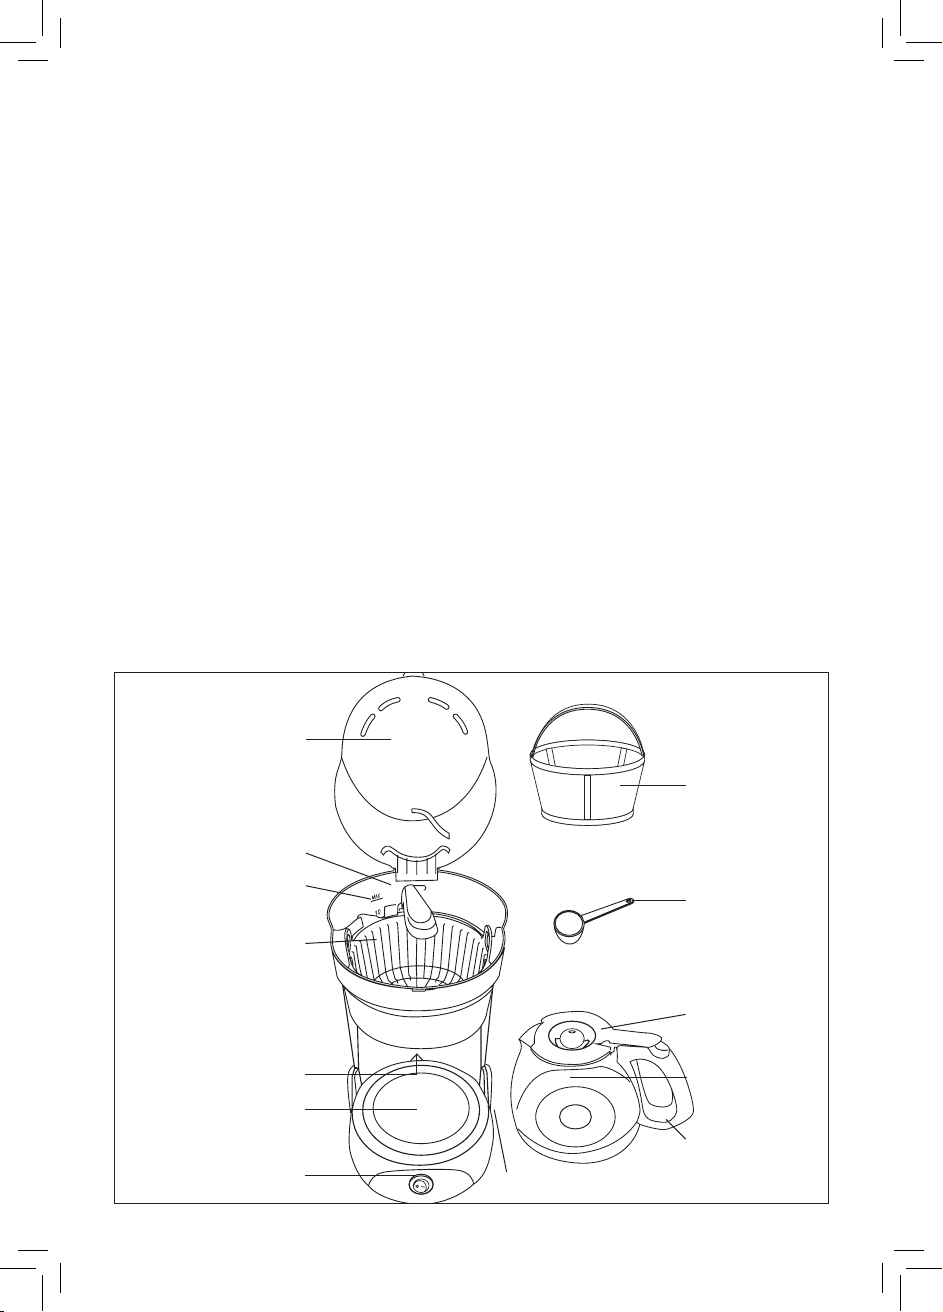
Getting To Know Your 12 cup coffee maker
Product may vary slightly from illustration
Figure 1
Coffee Maker Lid
Permanent
Coffee Filter
Water Tank
Water level indicator
Removable Filter Basket
Pause and Serve
Flow Valve
(not shown)
Warming Plate
ON/OFF Switch
SO-312438_12050_KS 12 cup CM_145x210_IM_R7.indd 4 2017-04-17 5:09 PM
Cord Storage
Polarized Plug (not shown)
4
Measuring scoop
Carafe Lid
Carafe
Carafe Handle
Page 7

Carafe Safety Precautions
1. Do not use a cracked carafe or any carafe with a loose or weakened handle.
2. This carafe is designed to be used only on the keep warm plate of your Coffee Maker. Do not use in
a conventional oven or on a stovetop.
3. To avoid breakage, handle carafe with care. Avoid impact. Glass will break as a result of impact.
Usecare when lling with water to avoid hitting faucet.
4. Do not place hot carafe on cool or wet surface. Allow carafe to cool before washing or adding liquids.
5. Do not set empty carafe on a hot heating surface. Do not clean with steel wool pads, abrasive
cleanser, or any other materials that may scratch.
6. Do not bump or scratch the carafe. Remove carafe from the keep warm plate to avoid burning
or scorching. Never operate the Coffee Maker with a carafe that has boiled dry.
7. Discard carafe if it is cracked, scratched, or heated while empt y for an extended period of time.
8. Coffee Yield 12 Cup Coffee Maker: 12 (~4-5 oz.) cups.
NOTE: A ~4-5 oz. cup is the American industry standard and is used by most Coffee Maker
manufacturers. To ll your favorite over-sized mug, ll Coffee Maker reservoir with enough water
for 3 to 4 cups.
WARNING: TO REDUCE THE RISK OF FIRE OR ELECTRIC SHOCK, DO NOT REMOVE THE BOTTOM
COVER. NO USER-SERVICEABLE PARTS INSIDE. REPAIR SHOULD BE DONE BY AUTHORIZED
SERVICE PERSONNEL ONLY.
Permanent Coffee Filter Basket
The permanent coffee lter basket takes the place of disposable paper lters. Simply place the permanent
coffee lter basket into the removable lter basket holder. Unfold and use handle to lift basket of used
coffee grounds up and out of the Coffee Maker; fold handle down to close the water reser voir lid.
Before Using For The First Time
CAUTION: To protect against electrical shock, do not immerse the Coffee Maker or allow power cord to
come into contact with water or other liquids.
1. Remove all packing material and labels from the inside and outside of the Coffee Maker. Place the
unit on a at, clean surface.
2. Before preparing coffee, thoroughly clean the glass carafe and lid, removable lter holder
and permanent cof fee lter in hot, sudsy water. Rinse and dry. Replace disassembled parts.
SeeCare&Cleaning Instructions for a detailed description.
3. Clean the inside of the Coffee Maker by brewing 2 full carafes of water (see Brewing Coffee
Instructions). Do not add the permanent coffee lter or ground coffee for this initial cleaning.
NOTE: At the end of the rst cycle, allow 15 minutes for the unit to cool.
4. Brew a second carafe of fresh water.
5. Wait an additional 15 minutes to allow the unit to cool before brewing your rst carafe of coffee.
Brewing Coffee Instructions
1. Lift to open the Coffee Maker lid. Fill carafe with cold water and pour into water reservoir at the
back of the unit. The water level indicator can be easily viewed inside unit.
IMPORTANT: Before brewing, always check to make sure water level is past the 4 Cup line and
addwater if needed. Never exceed the MAX ll line.
NOTE: The amount of brewed coffee will always be less than the amount of water placed into
thewater reservoir; as much as 10% is absorbed by coffee grounds and lter.
2. Place empty carafe on the warming plate.
3. Place the permanent lter in the removable lter holder. Measure 1 level tablespoon of drip or
regular grind coffee for each cup of coffee desired. For stronger or milder coffee, adjust amount
ofcoffee to suit your taste.
4. Drop the lter holder down into the housing. Close the lid.
5. Plug Coffee Maker into a 120V AC electrical wall outlet.
6. Set the switch to the ON (–) position. The Coffee Maker will begin the brew cycle.
NOTE: To interrupt the brewing cycle at any time, set the switch to OFF (O). Remove plug from wall outlet.
7. Upon completion of the brew cycle, wait at least 1 minute until the brew dripping from the lter
holder into the carafe has stopped. The carafe lid should be kept in place to facilitate safe serving
and help keep coffee at proper serving temperature. Tilt the carafe slightly and pour hot coffee very
slowly, so that the ow of the brewed coffee does not exceed the width of the spout.
8. Set the switch to OFF (O) when the carafe is empty or when unit is not in use; then remove plug
from wall outlet.
5
SO-312438_12050_KS 12 cup CM_145x210_IM_R7.indd 5 2017-04-17 5:09 PM
Page 8

Pause and Serve
1. If you wish to serve a cup of coffee before the brew cycle is completed, simply remove carafe from
warming plate. Dripping will automatically cease. Return carafe to position on warming plate;
dripping will resume.
CAUTION: To prevent injury when utilizing pause and serve feature, replace carafe within
30seconds after removing during the brewing process.
2. After approximately 2 cups of coffee have been brewed, the carafe may be slowly removed and
thecoffee will stop dripping.
3. The ow valve is located on the bottom of the lter holder and is activated when the carafe is
removed. This design makes it possible for you to remove the carafe and pour a cup of coffee
before the entire carafe is brewed.
IMPORTANT: When replacing the lter holder, the ow valve must be properly inserted into
thefront hole of the machine, so that it can be seen as it sits on the top of the carafe lid.
4. When using this feature, make sure that the carafe is replaced under the lter holder within
30seconds to prevent overow.
Brewing a Second Carafe of Coffee
1. To brew another carafe of coffee, set the switch to the OFF (O) position, if not already off. Remove
the plug from the wall outlet. It is recommended that the Coffee Maker be of f and allowed to cool
for 15 minutes between cycles.
CAUTION: Failure to allow Coffee Maker to cool suf ciently could cause hot steam and spray to
escape when water is added to the water reservoir. The hot steam and spray can cause severe burns.
2. Lift the Coffee Maker lid and then lif t and remove the permanent cof fee lter; discard used coffee
grounds, rinse.
3. Lift the removable lter holder up and out of the Coffee Maker.
4. Rinse the glass carafe and removable lter holder in cool, clean water.
IMPORTANT: Before brewing a second carafe, always check to make sure the water level is past
the4 cup line but never exceeds the MAX ll line. Add the desired amount of cold tap water into
thewater reservoir. Follow the instructions above for setting up the machine.
Hints for Great Tasting Coffee
• A clean Coffee Maker is essential for making great tasting coffee. Regular cleaning, as described
in the Care & Cleaning Instructions and Descaling sections of this Instruction Manual is
highlyrecommended.
• Always use fresh, cold water in your Coffee Maker.
• Finer grinds, promote a fuller extraction and provide rich, full-bodied coffee. Regular grinds
willrequire slightly more cof fee per cup to provide the strength of a ner grind.
• Store coffee in a cool, dry place. Once cof fee has been opened, keep it tightly sealed in
therefrigerator to maintain freshness.
• For optimum coffee avor, buy whole beans and grind them nely just before brewing.
• Do not re-use coffee grounds since this will greatly impair coffee avor.
• Reheating cof fee is not recommended. Coffee is at its peak avor immediately after brewing.
• Small oil droplets on the surface of brewed, black coffee is due to the ex traction of oil from
thecoffee grounds. Oiliness may occur more frequently if heavily roasted coffees are used.
Overextraction may also cause oiliness, indicating a need to clean your Coffee Maker.
6
SO-312438_12050_KS 12 cup CM_145x210_IM_R7.indd 6 2017-04-17 5:09 PM
Page 9

User Maintenance Instructions
This Coffee Maker requires little maintenance. It contains no user-serviceable parts. Any servicing requiring
disassembly other than cleaning must be performed by a qualied Coffee Maker repair technician.
Care & Cleaning Instructions
1. Always make sure Cof fee Maker is unplugged and the keep warm plate is cool before attempting
toclean.
2. After every use, remove the permanent coffee lter, discard used cof fee grounds, rinse thoroughly.
3. Wash the removable lter holder and glass carafe in hot, sudsy water. If necessary, scrub the inside
of the carafe lid with a soaped kitchen brush. The carafe, permanent lter and removable lter
holder are all top- rack dishwasher safe. The reusable scoop is also dishwasher safe but it should be
placed in the machine alongside the cutlery.
WARNING: To avoid breakage, handle carafe with care. Avoid impact. Glass will break as a result of
impact. Use care when lling with water to avoid hitting the faucet.
4. Wipe the exterior with a damp cloth to remove supercial stains. For stubborn stains, use a nylon
or plastic pad with a non-abrasive cleanser. Do not use metal scouring pads or abrasive cleansers.
5. Dry and replace disassembled parts. Make sure the removable lter holder is properly returned and
ts back into the Coffee Maker
6. Close the lid.
Descaling
Special cleaning of your Coffee Maker is recommended at least once a month, depending on frequency
ofuse and quality of water used in the Coffee Maker. If water in your area is especially hard, the following
cleaning procedure should be performed every 2 weeks, since minerals in water can detract from the
avor of the coffee and possibly lengthen brew time.
1. Fill carafe with 1 part white vinegar to 3 parts cold water. Pour water and vinegar solution into the
water reservoir.
2. Brew the vinegar solution until the carafe is half full.
NOTE: During cleaning, more steam will occur than during normal cof fee brewing.
3. Set the switch to OFF (O) position to turn the Coffee Maker OFF. When liquid stops dripping from
lter holder into the carafe, remove the carafe and allow liquid to cool for 15 minutes. When cooled,
lift lid and pour liquid back into the water reservoir.
4. Close the lid. Return carafe to the keep warm plate.
5. BREW THE VINEGAR SOLUTION again, allowing all the cleaning solution to empty into the carafe.
After dripping has stopped, discard contents of the carafe.
6. Allow Coffee Maker to cool for 15 minutes, run clean water through the coffee maker 3 times. Inser t
the clean permanent cof fee lter into the removable lter holder before brewing.
7. Set the switch to OFF (O) position to turn the Coffee Maker OFF. Discard water in the carafe.
Washcarafe, permanent cof fee lter, and removable lter holder in hot sudsy water.
Drypartsthoroughly.
8. When Coffee Maker has cooled, wipe exterior with a dry cloth.
Storing Instructions
1. Unplug Coffee Maker and allow it to cool.
2. Store Coffee Maker in its box or in a cool, dr y place.
3. Never store Coffee Maker while it is still plugged in.
7
SO-312438_12050_KS 12 cup CM_145x210_IM_R7.indd 7 2017-04-17 5:09 PM
Page 10

Limited TWO-YEAR Warranty
SENSIO Inc. hereby warrants that for a period of TWO YEARS from the date
of purchase, this product will be free from mechanical defects in material and
workmanship, and for 90 days in respect to non-mechanical parts. At its sole
discretion, SENSIO Inc. will either repair or replace the product found to be
defective, or issue a refund on the product during the warranty period.
The warranty is only valid for the original retail purchaser from the date of initial
retail purchase and is not transferable. Keep the original sales receipt, as proof
of purchase is required to obtain warranty validation. Retail stores selling this
product do not have the right to alter, modify, or in any way revise the terms and
conditions of the warranty.
EXCLUSIONS:
The warranty does not cover normal wear of parts or damage resulting from
any of the following: negligent use of the product, use of improper voltage or
current, improper routine maintenance, use contrary to the operating instructions,
disassembly, repair, or alteration by anyone other than qualied SENSIO Inc.
personnel. Also, the warranty does not cover Acts of God such as re, oods,
hurricanes, or tornadoes.
SENSIO Inc. shall not be liable for any incidental or consequential damages
caused by the breach of any express or implied warranty. Apart from the extent
prohibited by applicable law, any implied warranty of merchantability or tness
for a particular purpose is limited in time to the duration of the warranty. Some
states, provinces or jurisdictions do not allow the exclusion or limitation of
incidental or consequential damages, or limitations on how long an implied
warranty lasts, and therefore, the above exclusions or limitations may not apply to
you. The warranty covers specic legal rights which may vary by state, province
and/or jurisdiction.
HOW TO OBTAIN WARRANTY SERVICE:
You must contact Customer Service at our toll-free number: 1-866-832-4843.
A Customer Service Representative will attempt to resolve warranty issues
over the phone. If the Customer Service Representative is unable to resolve the
problem, you will be provided with a case number and asked to return the product
to SENSIO Inc. Attach a tag to the product that includes: your name, address,
daytime contact telephone number, case number, and description of the problem.
Also, include a copy of the original sales receipt. Carefully package the tagged
product with the sales receipt, and send it (with shipping and insurance prepaid)
to SENSIO Inc.’s address. SENSIO Inc. shall bear no responsibility or liability for
the returned product while in transit to SENSIO Inc.’s Customer Service Center.
8
SO-312438_12050_KS 12 cup CM_145x210_IM_R7.indd 8 2017-04-17 5:09 PM
Page 11

CONSIGNES DE SÉCURITÉ
IMPORTANTES
Respecter les consignes de sécurité de base au moment d’utiliser des appareils
électriques, y compris les suivantes
1. LIRE TOUTES LES INSTRUCTIONS.
2. Ne pas toucher les surfaces chaudes. Ne se servir que des poignées ou
desboutons de l’appareil.
3. Cet appareil n’est pas destiné à être utilisé par des personnes (y compris
les enfants) dont les capacités physiques, sensorielles ou mentales sont
limitées ou qui ne possèdent ni l’expérience ni les compétences nécessaires
pour utiliser l’appareil, à moins qu’elles soient supervisées ou qu’elles aient
reçu des directives d’utilisation adéquates de l’appareil par la personne
responsable de leur sécurité.
4. Une surveillance étroite est nécessaire quand un appareil est utilisé par un
enfant ou près de lui.
5. Pour réduire le risque de dommages matériels, ne jamais placer la cafetière
sous une armoire. S’assurer que le dessus de la cafetière dispose de quelques
pieds d’espace libre, non occupé par des armoires ou par d’autres articles.
6. Ne pas ouvrir le couvercle pendant que le café est en cours d’infusion.
Il y a risque de brûlure si le couvercle est soulevé ou retiré pendant l’infusion.
7. Ne pas utiliser l’appareil à l’extérieur.
8. Mettre l’interrupteur sur la position OFF (O) et débranchez l’appareil lorsque la
cafetière ou l’horloge ne sont pas utilisés, et avant de le nettoyer. Laisserl’appareil
refroidir avant d’installer ou d’enlever des pièces et avant de le nettoyer.
9. Pour éviter les incendies ou les décharges électriques, ne pas immerger
lecordon, la prise ou l’appareil dans de l’eau ou dans d’autres liquides.
10. Ne pas utiliser l’appareil lorsque le cordon ou la che électrique sont
endommagés, après une défectuosité ou lorsque l’appareil a été endommagé
de quelque façon que ce soit. Apporter l’appareil au centre de service autorisé
le plus près pour en faire faire l’évaluation, la réparation ou l’ajustement.
REMARQUE : NE PAS TENTER DE RÉPARER LA CAFETIÈRE SOI-MÊME.
CELAANNULERA LA GARANTIE.
11. L’utilisation d’accessoires non recommandés par le fabricant de l’appareil
peut causer un incendie, l’électrocution ou des blessures.
12. Ne jamais déplacer l’appareil en tirant sur le cordon. Ne pas laisser le cordon
pendre d’un bord de table ou d’un comptoir, ni entrer en contact avec une
surface chaude.
13. Placer l’appareil sur une table ou sur une surface plane.
14. Ne pas utiliser la verseuse en verre si elle est ssurée ou si sa poignée est
desserrée ou endommagée.
15. N’utiliser que la verseuse en verre fournie avec l’appareil. Manipuler avec
soin, car le verre est très fragile.
16. Bien fermer le couvercle de la verseuse en verre avant de servir du café.
17. Ne jamais faire fonctionner la cafetière si le réservoir est vide.
18. Ne pas poser l’appareil sur un élément de cuisinière électrique ou à gaz,
niàproximité, ni dans un four chaud.
19. La verseuse est conçue pour être utilisée avec cet appareil. Ne jamais
laplacer sur la cuisinière.
20. Ne pas mettre la verseuse chaude sur une surface mouillée ou froide.
9
SO-312438_12050_KS 12 cup CM_145x210_IM_R7.indd 9 2017-04-17 5:09 PM
Page 12

21. Ne pas nettoyer la verseuse à l’aide de nettoyants abrasifs, de laine d’acier
ou d’autres abrasifs.
22. Mettre l’interrupteur sur la position OFF (O) et débranchez l’appareil lorsqu’il
n’est pas utilisé, avant de le laisser sans surveillance ou lorsque la verseuse
est vide.
23. Ne pas utiliser l’appareil à une n autre que celle pour laquelle il a été conçu.
24. Il y a risque de brûlure si le couvercle est retiré pendant l’infusion.
25. Pour réduire le risque d’incendie, ne pas laisser l’appareil près d’une source
de chaleur ou d’un appareil de cuisson.
26. Pour réduire le risque de décharge électrique, ne pas placer l’appareil
au-dessus d’un lavabo.
27. MISE EN GARDE : Pour réduire le risque d’incendie, ne ranger aucun objet
sur le dessus de l’appareil pendant son fonctionnement.
POUR USAGE DOMESTIQUE
SEULEMENT
CONSERVER CES CONSIGNES
AUTRES CONSIGNES DE
SÉCURITÉ IMPORTANTES
AVERTISSEMENT : L’appareil dégage de la chaleur et de la vapeur pendant son
fonctionnement. Prendre les précautions nécessaires pour prévenir les risques
de brûlures, d’incendie, de blessures et de dommages matériels.
1. Lire et comprendre le mode d’emploi avant d’utiliser ou de nettoyer l’appareil.
2. Le cordon de l’appareil doit être branché dans une prise c.a. de 120 V seulement.
3. N’utiliser que de l’eau dans cet appareil! Ne placer aucun autre liquide ou
produit alimentaire dans l’appareil. Ne rien mélanger ni ajouter à l’eau dans
l’appareil, sauf lorsqu’il s’agit de respecter les consignes d’entretien et de
nettoyage de l’appareil.
4. NE PAS tenter de déplacer un appareil qui contient un liquide chaud. Laisser
l’appareil refroidir complètement avant de le déplacer.
5. Tenir l’appareil à au moins 10 cm (4 po) des murs ou des autres objets
pendant son fonctionnement. Ne pas placer d’objets sur le dessus de
l’appareil pendant son fonctionnement. Placer l’appareil sur une surface
quirésiste à la chaleur.
6. Si l’appareil se met à fonctionner anormalement, débrancher immédiatement
le cordon. Ne pas utiliser ni tenter de réparer l’appareil défectueux.
7. Débrancher immédiatement l’appareil s’il tombe ou s’il est immergé
accidentellement dans de l’eau ou dans un autre liquide. Ne pas plonger la main
dans l’eau! Ne pas utiliser l’appareil s’il est tombé dans l’eau ou y a été immergé.
8. Laisser l’appareil refroidir sufsamment avant d’ajouter de l’eau pour éviter
de s’exposer à un dégagement de vapeur.
9. Toujours utiliser de l’eau fraîche dans l’appareil. L’eau chaude, ou un autre
liquide chaud, sauf lorsqu’il s’agit de respecter les consignes d’entretien et
denettoyage, peut endommager l’appareil.
10. NE PAS mettre la verseuse dans un four à micro-ondes.
10
SO-312438_12050_KS 12 cup CM_145x210_IM_R7.indd 10 2017-04-17 5:09 PM
Page 13

11. NE PAS laisser la verseuse vide sur la plaque chauffante lorsque l’appareil
esten marche, car elle pourrait se fêler ou s’abîmer.
12. La soupape est située au fond du porte-ltre amovible et est activée lorsque
la verseuse est retirée. Ce concept permet de retirer la verseuse et de verser
une tasse de café avant la n de l’infusion du café.
13. MISE EN GARDE : Pour éviter les blessures pendant l’utilisation de la fonction
de service en cours d’infusion, remettre la verseuse en place dans un délai
de 30 secondes.
REMARQUES SUR LA FICHE
Utiliser le cordon d’alimentation court (ou cordon d’alimentation amovible)
fourniavec l’appareil an de réduire le risque d’emmêlement ou de trébuchement
que présente un cordon long. Ne pas utiliser de rallonge avec l’appareil.
Branchertoujours l’appareil directement dans une prise murale.
REMARQUES SUR LE CORDON
Cet appareil est doté d’une che polarisée (une broche est plus large que l’autre).
Pour réduire le risque de décharge électrique, la che s’insère d’une seule
manière dans une prise polarisée. Si la che ne s’insère pas complètement
dansla prise, la tourner pour l’insérer de l’autre côté. S’il est toujours impossible
de l’insérer complètement dans la prise, communiquer avec un électricien
qualié. Ne jamais utiliser de rallonge à moins que la che ne puisse s’insérer
complètement dans la prise. Ne pas modier la che.
AVERTISSEMENT DE MIGRATION DE PLASTFIANTS
MISE EN GARDE : Pour éviter la migration de plastiants vers le ni de comptoirs,
de tables ou de tout autre meuble, placer des sous-plats ou des napperons faits
de matière NON PLASTIQUE entre l’appareil et le dessus du comptoir ou de la
table. Si cette consigne n’est pas respectée, le ni de la surface pourrait noircir
etdes ternissures permanentes ou des taches indélébiles pourraient s’ensuivre.
ALIMENTATION ÉLECTRIQUE
Si le circuit électrique est surchargé parce qu’il doit également alimenter d’autres
appareils, l’appareil pourrait ne pas fonctionner correctement. Il doit être alimenté
par un circuit électrique distinct de tout autre appareil.
11
SO-312438_12050_KS 12 cup CM_145x210_IM_R7.indd 11 2017-04-17 5:09 PM
Page 14

Apprendre à connaître votre cafetière 12 tasses
L’appareil peut différer légèrement de l’illustration.
Figure 1
Couvercle de la
cafetière
Réservoir d’eau
Indicateur du
niveau d’eau
Porte-ltre amovible
Clapet de débit pour la
fonction de service en
cours d’infusion
(non-visible)
Plaque chauffante
Filtre à café
réutilisable
Cuillère à mesurer
Couvercle de
lacarafe
Carafe
Poignée de
la carafe
Consignes de sécurité relatives à la carafe
1. Ne pas utiliser une carafe ssurée ou dont l’anse est desserrée ou détériorée.
2. Cette carafe est conçue pour être utilisée seulement sur la plaque chauffante de votre cafetière.
Nepas l’utiliser dans un four conventionnel ou sur une cuisinière.
3. Manipuler la carafe avec soin pour ne pas la briser. Éviter les chocs. Le verre se brisera en cas
dechoc. Faire attention de ne pas heurter le robinet avec la carafe lors du remplissage d’eau.
4. Ne pas placer la carafe chaude sur une sur face froide ou humide. Laisser la carafe refroidir avant
dela laver ou d’ajouter des liquides.
5. Ne pas mettre une carafe vide sur une surface chauffante en fonction. Ne pas nettoyer avec
unelaine d’acier, un nettoyant abrasif ou tout autre matériel qui pourrait causer des rayures.
6. Ne pas heurter ou rayer la carafe. Retirer la carafe de la plaque chauffante pour éviter de la brûler
ou de la rendre très chaude. Ne jamais utiliser la cafetière si la carafe a chauf fé à vide.
7. Jeter la carafe si elle est ssurée, rayée ou si elle a été chauffée à vide pendant une longue période
de temps.
8. La cafetière 12 tasses donne : 12 tasses (~ 4 - 5 oz (120 - 150 ml)) de café
REMARQUE : Une tasse de ~ 4 - 5 oz (120 - 150 ml) est la norme de l’industrie américaine et est
utilisée par la majorité des fabricants de cafetières. Pour remplir une grande tasse à café, remplir
leréservoir de la cafetière avec sufsamment d’eau pour donner 3 à 4 tasses.
AVERTISSEMENT : POUR RÉDUIRE LE RISQUE D’INCENDIE OU DE DÉCHARGE ÉLECTRIQUE,
NEPAS RETIRER LE COUVERCLE INFÉRIEUR. L’APPAREIL NE CONTIENT AUCUNE PIÈCE POUVANT
ÊTRE RÉPARÉE OU REMPLACÉE PAR L’UTILISATEUR. TOUTE RÉPARATION DOIT ÊTRE EFFECTUÉE
PAR UN TECHNICIEN AGRÉÉ UNIQUEMENT.
12
SO-312438_12050_KS 12 cup CM_145x210_IM_R7.indd 12 2017-04-17 5:09 PM
Page 15

Panier-ltre à café réutilisable
Le ltre à café réutilisable remplace les ltres en papier jetables. Il suft de placer le ltre à café
réutilisable dans le porte-ltre amovible. Déplier et utiliser la poignée pour soulever le ltre contenant le
marc de café et le sortir de la cafetière. Replier la poignée pour fermer le couvercle du réservoir d’eau.
Avant la première utilisation
MISE EN GARDE : Pour éviter les décharges électriques, ne pas immerger la cafetière ou laisser le cordon
d’alimentation entrer en contact avec de l’eau ou d’autres liquides.
1. Retirer tous les matériaux d’emballage et les étiquettes qui se trouvent à l’intérieur et à l’extérieur
de la cafetière. Placer la machine sur une surface propre et plate.
2. Avant de préparer le café, nettoyer soigneusement la carafe en verre et son couvercle, le por te-ltre
amovible et le ltre à café réutilisable dans de l’eau chaude et mousseuse. Rincer et sécher.
Remettre les pièces démontées en place. Voir les Instructions d’entretien et de nettoyage pour
unedescription détaillée.
3. Nettoyer l’intérieur de la cafetière en infusant 2 carafes complètes d’eau (voir les Instructions pour
l’infusion du café). Ne pas ajouter le ltre à café réutilisable ou du café moulu pour ce nettoyage initial.
REMARQUE : À la n du premier cycle, laisser refroidir la machine pendant 15 minutes.
4. Infuser une deuxième carafe d’eau douce.
5. Attendre 15 minutes de plus pour laisser la machine refroidir avant d’infuser la première carafe de café.
Instructions pour l’infusion du café
1. Soulever le couvercle de la cafetière. Remplir la carafe d’eau froide et verser dans le réservoir d’eau
qui se trouve à l’arrière de la machine. L’indicateur de niveau d’eau se voit facilement à l’intérieur
dela cafetière.
IMPORTANT : Avant d’infuser, toujours s’assurer que le niveau d’eau est au-dessus de la ligne
de4tasses et ajouter de l’eau au besoin. Ne jamais dépasser la ligne de remplissage MAX.
REMARQUE : La quantité de café infusé sera toujours inférieure à la quantité d’eau mise dans
leréservoir, car environ 10 % de cette dernière est absorbée par le marc de café et le ltre.
2. Mettre la carafe vide sur la plaque chauffante.
3. Mettre le ltre réutilisable dans le porte-ltre amovible. Il est recommandé d’ajouter 1 c. à soupe de
café moulu pour chaque tasse de café désirée. Pour obtenir un café plus fort ou plus doux, ajuster
la quantité de café.
4. Placer le porte-ltre dans son compartiment. Fermer le couvercle.
5. Brancher la cafetière dans une prise murale c.a. de 120 V.
6. Mettre l’interrupteur sur la position ON (marche) (I). Le cycle d’infusion de la cafetière débutera.
REMARQUE : En tout temps, il est possible d’interrompre le cycle d’infusion en mettant
l’interrupteur à la position OFF (arrêt) (O). Retirer la che de la prise murale.
7. À la n du cycle d’infusion, attendre au moins 1 minute ou jusqu’à ce que le café du porte-ltre
cesse de s’égoutter dans la carafe. Le couvercle de la carafe doit rester en place pour faciliter le
service du café et le garder à la bonne température. Incliner légèrement la carafe et verser le café
chaud très lentement de façon à ce que le débit de café ne dépasse pas la largeur du bec.
8. Mettre l’interrupteur sur OFF (arrêt) (O) lorsque la carafe est vide ou lorsque la machine n’est pas
utilisée, puis retirer la che de la prise murale.
Service en cours d’infusion
1. Pour servir une tasse de café avant que le cycle d’infusion soit terminé, retirer simplement la carafe
de la plaque chauffante. L’égouttement cessera automatiquement. Remettre la carafe sur la plaque
chauffante; l’égouttement recommencera.
MISE EN GARDE : An d’éviter les blessures lors de l’utilisation de la fonction Service en cours
d’infusion, remettre la carafe en place moins de 30 secondes après l’avoir retirée durant le
processus d’infusion.
2. Une fois qu’environ 2 tasses de café ont été infusées, la carafe peut être tranquillement retirée et
lecafé arrêtera de s’égoutter.
3. Le clapet de débit se trouve en dessous du por te-ltre et est activé lorsque la carafe est retirée.
Ce concept permet de retirer la carafe et de verser une tasse de café avant que toute la carafe soit
infusée.
IMPORTANT : Pour remettre le porte-ltre en place, le clapet de débit doit être bien inséré dans
letrou avant de la machine pour qu’il puisse être vu lorsqu’il est appuyé sur le dessus du couvercle
dela carafe.
4. Lors de l’utilisation de cette fonction, s’assurer de remettre la carafe en place sous le porte-ltre
moins de 30 secondes après l’avoir retirée pour empêcher le débordement.
13
SO-312438_12050_KS 12 cup CM_145x210_IM_R7.indd 13 2017-04-17 5:09 PM
Page 16

Infuser une deuxième carafe de café
1. Pour infuser une autre carafe de café, mettre l’interrupteur sur la position OFF (arrêt) (O), si elle
n’est pas déjà éteinte. Retirer la che de la prise murale. Il est recommandé d’arrêter la cafetière et
de la laisser refroidir pendant 15 minutes entre chaque cycle.
MISE EN GARDE : Le fait de ne pas laisser la cafetière refroidir sufsamment peut faire en sorte que
de la vapeur chaude et un jet s’échappent lors de l’ajout d’eau dans le réservoir. La vapeur chaude
et le jet peuvent causer de graves brûlures.
2. Soulever le couvercle de la cafetière puis soulever et retirer le ltre à café permanent. Jeter le marc
de café et rincer.
3. Soulever le porte-ltre amovible et le retirer de la cafetière.
4. Rincer la carafe en verre et le porte-ltre amovible dans de l’eau fraîche et propre.
IMPORTANT : Avant d’infuser une deuxième carafe, toujours vérier que le niveau d’eau dépasse
laligne de 4 tasses, mais qu’il ne dépasse pas la ligne de remplissage MAX. Ajouter la quantité
d’eau froide du robinet voulue dans le réservoir d’eau. Suivre les instructions ci-dessus pour
préparer la machine.
Conseils pour infuser un café savoureux
• Il est essentiel d’avoir une cafetière propre pour faire un bon café. Un nettoyage régulier, tel que
décrit dans les Instructions d’entretien et de nettoyage et les sections sur le détar trage de ce
manuel, est fortement recommandé.
• Toujours utiliser de l’eau douce et froide dans la cafetière.
• Une mouture plus ne favorise une extraction plus complète et fournit un café riche et corsé.
Une mouture régulière nécessitera un peu plus de café par tasse pour obtenir la puissance
d’unemouture plus ne.
• Ranger le café dans un endroit frais et sec. Une fois que le sac de café a été ouvert, il doit être bien
scellé et conser vé au réfrigérateur pour garder sa fraîcheur.
• Pour une saveur de café optimale, acheter des grains de café entiers et les moudre nement juste
avant de les infuser.
• Ne pas utiliser le marc de café puisque cela altérera grandement la saveur du café.
• Il n’est pas recommandé de faire chauffer à nouveau le café. Le café est à son meilleur
immédiatement après l’infusion.
• Les petites gouttes huileuses sur la surface du café moulu noir sont causées par l’extraction de
l’huile provenant du marc de café. Les cafés fortement torréés produisent des gouttes huileuses
plus fréquemment. Une trop grande extraction peut aussi causer des gouttes huileuses et signie
que la cafetière doit être net toyée.
Réparation
Cette cafetière nécessite peu d’entretien. Il ne contient aucune pièce pouvant être réparée ou remplacée
par l’utilisateur. Toute opération d’entretien qui exige le démontage de l’appareil, autre que le nettoyage,
doit être exécutée par un technicien en réparation de cafetières qualié.
14
SO-312438_12050_KS 12 cup CM_145x210_IM_R7.indd 14 2017-04-17 5:09 PM
Page 17

Entretien et nettoyage
1. Toujours s’assurer que la cafetière est débranchée et que la plaque chauffante est fraîche avant de
commencer le net toyage.
2. Après chaque utilisation, enlever le ltre à café permanent, jeter le marc de café et rincer
soigneusement.
3. Laver le porte-ltre amovible et la carafe en verre dans de l’eau chaude et mousseuse. Au besoin,
frotter l’intérieur du couvercle de la carafe avec du savon et une brosse de cuisine. La carafe, le
ltre réutilisable et le porte-ltre amovible sont lavables dans le panier supérieur du lave-vaisselle.
La cuillère à mesurer réutilisable est aussi lavable au lave-vaisselle, mais devrait être placée avec
les couverts”.
AVERTISSEMENT : Manipuler la carafe avec soin pour ne pas la briser. Éviter les chocs. Le verre
se brisera en cas de choc. Faire attention de ne pas heurter le robinet avec la carafe lors du
remplissage d’eau.
4. Essuyer l’extérieur avec un chif fon humide pour enlever les taches supercielles. Pour les taches
tenaces, utiliser un tampon en nylon ou en plastique avec un nettoyant non abrasif. Ne pas utiliser
de tampons à récurer ou de nettoyants abrasifs.
5. Sécher et remettre les pièces démontées en place. S’assurer que le porte-ltre amovible se trouve
dans la cafetière et qu’il est bien en place.
6. Fermer le couvercle.
Détartrage
Un nettoyage particulier de la cafetière est recommandé au moins une fois par mois, selon la fréquence
d’utilisation et la qualité de l’eau utilisée dans la cafetière. Si l’eau de la région est particulièrement dure, la
procédure de nettoyage suivante devrait être effectuée toutes les 2 semaines, puisque les minéraux qui se
trouvent dans l’eau peuvent modier la saveur du café et possiblement rallonger le temps d’infusion.
1. Remplir la carafe avec 1 part de vinaigre blanc pour 3 parts d’eau froide. Verser la solution d’eau et
de vinaigre dans le réservoir d’eau.
2. Infuser la solution de vinaigre jusqu’à ce que la carafe soit à moitié remplie.
REMARQUE : Pendant le net toyage, il y aura plus de vapeur que durant l’infusion régulière du café.
3. Mettre l’interrupteur sur OFF (arrêt) (O) pour éteindre la cafetière. Lorsque le liquide ne s’égoutte
plus du porte-ltre vers la carafe, retirer la carafe et laisser le liquide refroidir pendant 15 minutes.
Lorsqu’il a sufsamment refroidi, soulever le couvercle et verser à nouveau le liquide dans le
réservoir d’eau.
4. Fermer le couvercle. Remettre la carafe sur la plaque chauffante.
5. INFUSER LA SOLUTION DE VINAIGRE à nouveau en la laissant se vider dans la carafe. Une fois que
l’égout tement a cessé, jeter le contenu de la carafe.
6. Laisser la cafetière refroidir pendant 15 minutes, puis infuser de l’eau propre dans la cafetière 3
fois. Insérer le ltre à café permanent propre dans le porte-ltre amovible avant d’infuser.
7. Mettre l’interrupteur sur OFF (arrêt) (O) pour éteindre la cafetière. Jeter l’eau qui se trouve dans la
carafe. Laver la carafe, le ltre à café réutilisable et le por te-ltre amovible dans de l’eau chaude et
mousseuse. Sécher les pièces complètement.
8. Lorsque la cafetière a refroidi, essuyer l’extérieur avec un chiffon sec.
Rangement
1. Débrancher la cafetière et la laisser refroidir.
2. Ranger la cafetière dans sa boîte ou dans un endroit frais et sec.
3. Ne jamais ranger la cafetière lorsqu’elle est encore branchée.
15
SO-312438_12050_KS 12 cup CM_145x210_IM_R7.indd 15 2017-04-17 5:09 PM
Page 18

Garantie limitée de DEUX ANS
SENSIO Inc. assure par la présente que le produit est garanti contre tout défaut
de matériel et de fabrication pendant une période de DEUX ANS à compter de
la date d’achat et contre tout défaut des pièces autres que mécaniques pendant
90 jours. À son entière discrétion, SENSIO Inc. réparera ou remplacera un produit
défectueux, ou accordera un remboursement pour ce produit, pendant la période
de la garantie.
Cette garantie s’applique uniquement à l’acheteur initial du produit, à compter
de la date initiale de l’achat, et est incessible. Pour que la garantie soit valide,
l’acheteur doit conserver le reçu de caisse original. Les magasins de détail qui
vendent ce produit n’ont pas le droit de l’altérer ou de le modier, ni de modier
de quelque façon les modalités de la garantie.
EXCLUSIONS :
La garantie ne couvre pas l’usure normale des pièces ou les dommages causés
par une utilisation négligente du produit, le branchement sur un circuit de tension
ou de courant inapproprié, un entretien de routine inadéquat, une utilisation
contraire aux instructions de fonctionnement, de démontage et de réparation, ou
par la modication du produit par une personne autre qu’un technicien qualié de
SENSIO Inc. De plus, la garantie ne couvre pas les cas de force majeure comme
les incendies, les inondations, les ouragans et les tornades.
SENSIO Inc. ne pourra être tenue responsable de tout dommage indirect ou
accessoire causé par la violation de toute garantie explicite ou implicite. Sauf
dans la mesure où cela est interdit par la loi, toute garantie implicite concernant
la valeur commerciale ou l’adéquation à la n visée se limite à la durée de la
garantie. Certains États et certaines provinces ou compétences administratives
ne permettent pas l’exclusion ou la limitation des dommages indirects ou
accessoires, ou les limitations quant à la durée des garanties implicites; par
conséquent, les exclusions ou limitations mentionnées précédemment peuvent
ne pas s’appliquer à vous. La garantie couvre les droits légaux spéciques qui
peuvent varier selon l’état, la province ou la compétence administrative.
COMMENT OBTENIR UN SERVICE SOUS GARANTIE :
Communiquez avec le service à la clientèle en composant notre numéro sans
frais : 1 866 832-4843. Un représentant du service à la clientèle tentera de
résoudre par téléphone les questions relatives à la garantie. Si le représentant
du service à la clientèle est incapable de résoudre le problème, il vous fournira
un numéro de demande et vous informera que vous devez retourner le produit
à SENSIO Inc. Apposez sur le produit une étiquette indiquant votre nom, votre
adresse, votre numéro de téléphone (de jour), le numéro de demande ainsi qu’une
description du problème. Incluez également une copie du reçu de caisse original.
Emballez soigneusement le produit avec son reçu de caisse et faites-le parvenir
(port et assurance payés) à l’adresse de SENSIO Inc. SENSIO Inc. n’assume
aucune responsabilité quant au produit retourné pendant son transport jusqu’au
centre de service à la clientèle de SENSIO Inc.
16
SO-312438_12050_KS 12 cup CM_145x210_IM_R7.indd 16 2017-04-17 5:09 PM
Page 19

MEDIDAS DE SEGURIDAD
IMPORTANTES
Al utilizar electrodomésticos, siempre se deben cumplir las precauciones
deseguridad básicas, incluidas las siguientes:
1. LEA TODAS LAS INSTRUCCIONES ANTES DE UTILIZAR EL
ELECTRODOMÉSTICO.
2. No toque las supercies calientes. Utilice sólo los mangos o las perillas.
3. Este electrodoméstico no debe ser utilizado por personas (incluidos niños) con
capacidades físicas, sensoriales o mentales reducidas, o falta de experiencia
y conocimientos, a menos que una persona responsable de su seguridad les
haya brindado supervisión o instrucciones sobre el uso del electrodoméstico.
4. Es necesario que haya una supervisión estricta cuando el electrodoméstico
sea utilizado por niños o cerca de ellos.
5. Para minimizar el riesgo de daño a la propiedad, nunca coloque la cafetera
debajo de los armarios. Asegúrese de que no haya muebles ni armarios
encima de la cafetera, inclusive a varios pies de ella.
6. No abra la tapa superior mientras se prepara el café. Se puede quemar si
levanta o retira la tapa durante el ciclo de preparación.
7. No utilice este electrodoméstico en exteriores.
8. Pulse el botón en la posición OFF (O) y desenchufe la unidad del tomacorriente
cuando no se utiliza la cafetera o el reloj, y antes de limpiarla. Deje que la
unidad se enfríe antes de colocar o retirar piezas y antes de limpiarla.
9. Para protegerse del riesgo de incendios o descargas eléctricas, no sumerja el
cable, el enchufe ni el electrodoméstico en agua ni en ningún otros líquidos.
10. No utilice ningún electrodoméstico que tenga un cable o enchufe dañado, que
muestre un funcionamiento defectuoso o que se haya dañado de cualquier
manera. Envíe el electrodoméstico al centro de servicio autorizado más
cercano para que lo examinen, lo reparen o le hagan ajustes.
NOTA: NO INTENTE REPARAR LA UNIDAD USTED MISMO.
ESTO ANULARÁ LA GARANTÍA.
11. El uso de accesorios no recomendados por el fabricante del aparato puede
provocar incendios, descargas eléctricas o lesiones.
12. Nunca mueva el electrodoméstico tirando del cable. No permita que el cable
cuelgue del borde de una mesa o una encimera ni que entre en contacto
con supercies calientes.
13. Coloque el electrodoméstico sobre una mesa o supercie plana.
14. No utilice una jarra de vidrio rajada ni una que tenga el mango ojo o endeble.
15. Utilice sólo la jarra de vidrio que se suministra con este electrodoméstico.
Manipúlela con cuidado, ya que el vidrio es muy frágil.
16. Coloque la tapa de la jarra de vidrio de modo tal que quede asegurada en su
lugar antes de servir café.
17. Nunca utilice la cafetera si no contiene agua.
18. No coloque el electrodoméstico sobre un quemador a gas o eléctrico, o cerca
de él, ni dentro de un horno caliente.
19. La jarra está diseñada para ser utilizada con este electrodoméstico. Nunca la
utilice sobre una cocina.
20. No coloque la jarra de vidrio caliente sobre una supercie húmeda o fría.
21. No limpie la jarra de vidrio con productos de limpieza, esponjas de lana de
acero u otro material abrasivo.
17
SO-312438_12050_KS 12 cup CM_145x210_IM_R7.indd 17 2017-04-17 5:09 PM
Page 20

22. Pulse el botón en la posición OFF (O) y desenchufe la cafetera de alimentación
del tomacorriente cuando no utilice el electrodoméstico, cuando no pueda
supervisarlo o cuando la jarra esté vacía.
23. No utilice el electrodoméstico para otros nes que no sean para los que fue
diseñado.
24. Puede sufrir quemaduras si retira la tapa durante los ciclos de preparación.
25. Para reducir el riesgo de incendio, no coloque la unidad sobre o cerca de
ninguna parte de un aparato de calefacción o para cocinar.
26. Para reducir el riesgo de descarga eléctrica, no instale el aparato sobre un
fregadero.
27. Para reducir el riesgo de incendio, no coloque nada directamente encima
de la supercie del aparato, cuando el aparato está en funcionamiento.
GUARDE ESTAS INSTRUCCIONES
PARA USO DOMÉSTICO
ÚNICAMENTE
OTRAS MEDIDAS DE
SEGURIDAD IMPORTANTES
ADVERTENCIA: Este electrodoméstico genera calor y libera vapor mientras está
en uso. Se deben tomar las medidas adecuadas para evitar el riesgo de
quemaduras, incendios u otro tipo de lesiones o daños a la propiedad.
1. Todos los usuarios de este electrodoméstico deben leer y comprender este
manual antes de ponerlo en funcionamiento o limpiarlo.
2. El cable de este electrodoméstico sólo debe enchufarse en un tomacorriente
eléctrico de CA de 120 V.
3. Utilice solamente agua en este electrodoméstico. No coloque otros líquidos
ni alimentos en este electrodoméstico. No mezcle ni agregue nada al agua
que se coloca en este electrodoméstico, excepto según se indica en las
Instrucciones de mantenimiento para el usuario para limpiarlo.
4. No intente mover un electrodoméstico que contenga líquidos calientes. Deje
que el electrodoméstico se enfríe completamente antes de moverlo.
5. Mantenga el electrodoméstico por lo menos a 4 pulgadas de distancia de
paredes u otros objetos mientras está en funcionamiento. No coloque ningún
objeto sobre el electrodoméstico mientras esté en funcionamiento. Coloque el
electrodoméstico sobre una supercie resistente al calor.
6. Si el electrodoméstico comienza a funcionar mal mientras está en
uso, desenchufe el cable de inmediato. No utilice ni intente reparar un
electrodoméstico que funcione mal.
7. Si el electrodoméstico se cae o accidentalmente se sumerge en agua u otro
líquido, desenchúfelo de inmediato. ¡No introduzca la mano en el agua! No
utilice el electrodoméstico después de que éste se haya caído o se haya
sumergido en agua.
8. Para evitar la exposición al vapor, deje enfriar el electrodoméstico el tiempo
suciente antes de agregarle más agua.
18
SO-312438_12050_KS 12 cup CM_145x210_IM_R7.indd 18 2017-04-17 5:09 PM
Page 21

9. Siempre coloque agua limpia fría en el electrodoméstico. El agua caliente
u otros líquidos, excepto los que se enumeran en la sección de limpieza,
pueden dañar el electrodoméstico.
10. NO coloque la jarra en un horno de microondas.
11. NO deje la jarra vacía sobre la placa térmica mientras el electrodoméstico
está encendido, ya que se puede rajar o dañar la jarra.
12. La válvula se encuentra en la parte inferior del soporte del ltro extraíble y se
activa cuando se retira la jarra. Este diseño le permite retirar la jarra y servir
una taza de café antes de que se termine de preparar toda la jarra.
13. PRECAUCIÓN: Para evitar lesiones al utilizar la función de pausa automática
para servir, vuelva a colocar la jarra dentro de los 30 segundos de quitarla
durante el proceso de preparación.
NOTAS SOBRE EL ENCHUFE
Este producto cuenta con un enchufe polarizado (una pata es más ancha
que la otra). Para reducir el riesgo de descarga eléctrica, este enchufe entra
en un tomacorriente polarizado de una sola manera. Si el enchufe no entra
completamente en el tomacorriente, invierta el enchufe. Si aun así no encaja,
comuníquese con un electricista calicado. Nunca use un cordón de extensión a
menos que el enchufe pueda insertarse en su totalidad. No altere el enchufe.
NOTAS SOBRE EL CABLE
El cable corto alimentación suministrado (o cable de alimentación desmontable)
debe ser utilizado para reducir el riesgo de enredarse o de tropezar con un cable
largo. No utilice un cable de extensión con este producto. Siempre conecte
directamente a una toma de corriente / receptáculo.
ADVERTENCIA SOBRE LOS PLASTIFICANTES
PRECAUCIÓN: Para evitar que el plasticante se transera sobre el acabado de
la mesa supercie de trabajo u otro mueble, coloque posavasos o manteles
individuales NO PLÁSTICOS entre el electrodoméstico y el acabado de mesa o
la supercie. De lo contrario, el acabado puede oscurecerse o pueden aparecer
manchas o marcas permanentes.
CORRIENTE ELÉCTRICA
Si el circuito eléctrico está sobrecargado con otros artefactos, su electrodoméstico
puede dejar de funcionar correctamente. El electrodoméstico debe funcionar
en un circuito eléctrico separado de otros artefactos.
19
SO-312438_12050_KS 12 cup CM_145x210_IM_R7.indd 19 2017-04-17 5:09 PM
Page 22

Introducción a la Cafetera de 12 Tazas
El producto puede diferir levemente de las ilustraciones.
Figura 1
Tapa de la cafetera
Tanque de agua
Indicador de
nivel de agua
Soporte del ltro
desmontable
Filtro permanente
de Café
Cuchara medidora
Valvula de ujo
du la funcion
Detener y servir
(no mostrada)
Placa calentadora
Tapa de la jarra
Jarra
Mango de
lagarrafa
Medidas de seguridad de la Jarra
1. No utilice una jarra agrietada o con asa oja.
2. Esta jarra está diseñada para ser utilizada sólo en la placa de calentamiento de esta cafetera.
No debe usarse en un horno convencional.
3. Para evitar roturas, manejar la jarra con cuidado. Evitar impactos. El vidrio se romperá como
consecuencia del impacto. Tenga cuidado al llenar con agua del grifo evitando golpes.
4. No coloque la jarra caliente sobre una supercie fría o húmeda. Deje que se enfríe antes de lavarse
o al agregar líquidos.
5. No coloque la jarra vacía sobre una supercie de calentamiento caliente. No limpie con estropajos
de acero, limpiadores abrasivos o cualquier otro material que pueda rayar.
6. No golpee, raye, o hierva en seco.
7. Deseche la jarra si está agrietada, rayada o calentada vacía durante un período prolongado de
tiempo.
8. Cafetera de 12 Tazas: 12 Tasas (5 onzas)
NOTA : La taza de 4-5 oz copa es el estándar de la industria estadounidense y es utilizado por la
mayoría de los fabricantes de cafeteras. Para llenar su taza de gran tamaño favorita, llene el tanque
con agua suciente para ~4-5 tazas (de 120-150 ml).
ADVERTENCIA: PARA REDUCIR EL RIESGO DE FUEGO O DESCARGA ELÉCTRICA, NO QUITAR
LA TAPA INFERIOR. NO HAY PARTES EN EL INTERIOR MANTENIDAS POR EL USUARIO. LA
REPARACIÓN DEBE SER REALIZADA POR PERSONAL DE SERVICIO AUTORIZADO SOLAMENTE.
Filtro permanente de Café
1. El ltro permanente de café incluido, elimina la necesidad de ltros de papel desechables.
2. Utilice la manija del ltro permanente de café para ex traerlo del soporte del ltro extraíble; deseche
los granos de café utilizados, enjuague y vuelva a colocar.
20
SO-312438_12050_KS 12 cup CM_145x210_IM_R7.indd 20 2017-04-17 5:09 PM
Page 23

Antes de utilizar por primera vez
PRECAUCIÓN: Para protegerse contra descargas eléctricas, no sumerja la cafetera, o permita que el cable
de alimentación entre en contacto con agua u otros líquidos.
1. Retire todo el material de embalaje y las etiquetas del interior y exterior de la cafetera. Coloque la
unidad sobre una supercie plana y limpia.
2. Antes de preparar el café, limpie la jarra de vidrio y tapa, soporte del ltro extraíble y ltro
permanente de café en agua caliente y jabonosa. Enjuague y seque. Ensamble las piezas
desmontadas. Ver las instrucciones de cuidado y limpieza para instrucciones detalladas.
3. Limpie el interior de la cafetera colando 2 jarras llenas de agua (ver instrucciones de preparación
decafé). No coloque el ltro permanente de café o el café molido en esta limpieza inicial.
NOTA : Al nalizar el primer ciclo, espere 15 minutos hasta que la unidad se enfríe.
4. Cole una segunda jarra con agua fresca.
5. Espere otros 15 minutos para permitir que la unidad se enfríe antes de colar su primera jarra de café.
Instrucciones de preparación de café
1. Levante la tapa de la cafetera. Llene la jarra con agua fría y viértala en el depósito de agua en
laparte posterior de la unidad. El indicador de nivel de agua escalonada puede verse fácilmente
dentro de la unidad.
IMPORTANTE: Antes de colar café, siempre verique que el nivel del agua esté encima de la línea
de MIN y agregue agua si es necesario. Nunca exceda la línea de llenado MAX.
NOTA : La cantidad de café preparado será siempre menor que la cantidad de agua ver tida en el
depósito de agua; tanto como 10% es absorbida por los granos de café y el ltro.
2. Coloque la jarra vacía en la placa de calentamiento.
3. Coloque el ltro permanente en el soporte del ltro desmontable. Mida 1 cucharada rasa de café
regular o café molido por cada taza de café deseada. Para café más fuerte o más suave, ajuste
lacantidad de café a su gusto.
4. Coloque el soporte del ltro dentro de la cafetera. Cierre la tapa.
5. Conecte la cafetera en una toma de corriente 120 V AC.
6. Pulse el botón en la posición ON (–). La cafetera iniciará el ciclo de preparación.
NOTA : Para interrumpir el proceso de elaboración en cualquier momento, presione el botón en
laposición OFF (O), a continuación, retire el enchufe del tomacorriente.
7. Uso de la función detener y servir: Si usted desea servir una taza de café antes de que el ciclo
de preparación sea completado, simplemente retire la jarra de cafetera. El goteo se detendrá
automáticamente. Al colocar nuevamente la jarra en la cafetera, el goteo se reanudará.
PRECAUCIÓN: Para evitar lesiones cuando utiliza la función Detener y Servir, vuelva a colocar la
jarra 30 segundos después de removerla durante el proceso de preparación
8. Una vez nalizado el ciclo de preparación, espere por lo menos 1 minuto hasta que el café pare de
gotear. La tapa de la jarra debe mantenerse en su lugar para facilitar servir seguramente y ayudar
a mantener el café a la temperatura adecuada. Incline la jarra ligeramente y vierta el café caliente
lentamente, de modo que el ujo del café no exceda la anchura de la boquilla.
9. Pulse el botón de en la posición OFF (O) para apagar la cafetera cuando la jarra está vacía o cuando
la unidad no está en uso, a continuación, retire el enchufe del tomacorriente.
Función Detener y Servir
1. Después de preparar aproximadamente 2 tazas de café, la jarra puede ser retirada lentamente y el
café dejará de gotear.
2. La válvula de ujo se encuentra en la parte inferior del soporte del ltro y se activa cuando la jarra
se retira. Este diseño hace posible retirar la jarra y verter una taza de café antes de nalizar el ciclo
completo de preparación.
IMPORTANTE: Al remover el soporte del ltro, la válvula de ujo debe ser insertada correctamente
en el oricio frontal de la máquina.
3. Al usar esta función, asegúrese de que la jarra sea recolocada en la cafetera dentro de los 30
segundos de ser removida para evitar derramamiento
21
SO-312438_12050_KS 12 cup CM_145x210_IM_R7.indd 21 2017-04-17 5:09 PM
Page 24

Preparar una segunda jarra de café
1. Para preparar otra jarra de café, presione el botón en la posición OFF (O) para apagar la cafetera.
Retire el enchufe del tomacorriente. Se recomienda que la cafetera este apagada y se deje enfriar
durante 15 minutos entre ciclos.
PRECAUCIÓN: Si no permite que la cafetera se enfríe lo suciente, podría rociar vapor caliente
cuando se añada agua en el depósito. El vapor caliente puede causar quemaduras graves.
2. Levante la tapa de la cafetera. Despliegue el asa, levante y retire el ltro permanente de café,
deseche los granos de café utilizados, enjuague con agua limpia y fría.
3. Levante y remueva de la cafetera el soporte del ltro extraíble.
4. Enjuague la jarra de vidrio y el soporte del ltro extraíble con agua fría y limpia.
IMPORTANTE: Antes de preparar la segunda jarra, siempre verique que el nivel de agua esté
encima de la línea de MIN, añada la cantidad deseada de agua fría en el depósito de agua.
5. Coloque la jarra vacía en la cafetera.
6. Coloque el ltro permanente en el soporte del ltro extraíble. Mida 1 cucharada rasa de café regular
o café molido por cada taza de café deseada.
7. Coloque el soporte del ltro dentro de la cafetera. Cierre la tapa.
8. Conecte la cafetera en una toma de corriente de 120 V AC.
9. Pulse el botón en la posición ON (–). La preparación del café comenzara.
Consejos para un café de gran sabor
• Una cafetera limpia es esencial para preparar café con gran sabor. La limpieza regular, como se
describe en las instrucciones de conservación y limpieza y descalcicación de este manual de
instrucciones es altamente recomendable.
• Utilice siempre agua fresca y fría en la cafetera.
• Moliendas más nas, como la de goteo, promueve una extracción completa y provee café más
rico y con más cuerpo. La molienda regular requerirá un poco más de café por cada taza para
proporcionar la fuerza de una molienda más na.
• Guarde el café en un lugar fresco y seco. Una vez que el café ha sido abier to, guárdelo
herméticamente cerrado en el refrigerador para mantener la frescura.
• Para un óptimo sabor de café, comprar granos enteros y se molerlos namente justo antes de
lapreparación.
• No reutilice los granos de café pues deterioraran enormemente el sabor del café.
• Recalentar el café no es recomendable. El café es en su máximo sabor inmediatamente después
deprepararlo.
• Las pequeñas gotas de aceite en la supercie del café negro preparado, se deben a la extracción de
aceites de los granos del café. Exceso de aceites puede ocurrir con más frecuencia si los granos de
café están fuertemente tostados. Sobre extracción también puede causar exceso de aceites, lo que
indica la necesidad de limpiar su cafetera.
Instrucciones de mantenimiento
Este aparato requiere poco mantenimiento. No contiene piezas que el usuario pueda reparar. Cualquier
servicio que requiera el desmontaje que no sea la limpieza debe ser realizada por un técnico calicado.
22
SO-312438_12050_KS 12 cup CM_145x210_IM_R7.indd 22 2017-04-17 5:09 PM
Page 25

Instrucciones de cuidado y limpieza
1. Siempre asegúrese que la cafetera está desenchufada y que la placa de calentamiento esté fría
antes de limpiarla.
2. Después de cada uso, retire el ltro permanente de café, deseche los granos de café utilizados,
enjuague a fondo.
3. Lave el soporte del ltro extraíble y la jarra de vidrio con agua caliente y jabonosa. Si es necesario,
frote el interior de la tapa de la jarra con un cepillo de cocina enjabonado.
ADVERTENCIA: Para evitar roturas, manipule la jarra con cuidado. Evite el impacto. El vidrio se romperá
como consecuencia del impacto. Tenga cuidado al llenar con agua del grifo para evitar golpes.
4. Limpie el exterior con un paño húmedo para quitar las manchas superciales. Para las manchas
persistentes, utilice una esponja de nylon o plástico con un limpiador no abrasivo. No utilice
estropajos metálicos ni limpiadores abrasivos.
5. Seque y vuelva a colocar las piezas desarmadas. Asegúrese de que el soporte del ltro extraíble
está colocado correctamente en la cafetera
6. Cierre la tapa.
Descalcicación
Se recomienda hacer una limpieza especial de su cafetera al menos una vez al mes, dependiendo de
lafrecuencia de uso y calidad del agua utilizada en la unidad. Si el agua en su área es especialmente
pesada, el siguiente procedimiento de limpieza se debe realizar cada 2 semanas, ya que los minerales en
el agua pueden deteriorar el sabor del café y posiblemente prolongar el tiempo de preparación.
1. Llene la jarra con 1 parte de vinagre blanco y 3 partes de agua fría. Vierta la solución de vinagre
enel depósito de agua.
2. Cole la solución de vinagre hasta que la jarra está medio llena.
NOTA : Durante la limpieza, más vapor puede ser producido que durante la preparación normal
decafé.
3. Pulse el botón en la posición OFF (O) para apagar la cafetera. Cuando el líquido deje de gotear del
sopor te del ltro en la jarra, retire la jarra y deje que el líquido se enfríe por 15 minutos. Cuando
sehaya enfriado, levante la tapa y vierta el líquido en el depósito de agua.
4. Cierre la tapa. Coloque la jarra en la cafetera.
5. Cole la solución de vinagre una vez más, permitiendo que toda la solución de limpieza se vierta
dentro de la jarra. Una vez que el goteo se detenga, deseche el contenido de la jarra.
6. Deje que la cafetera se enfríe durante 15 minutos, enjuague preparando una jarra llena
de agua fría. Inserte el ltro permanente café limpio en el soporte del ltro extraíble antes
deprepararlo.
7. Al nal del ciclo de preparación, presione el botón en la posición OFF (O) para apagar la cafetera.
Deseche el agua en la jarra. Lave la jarra, el ltro permanente de café, y el sopor te del ltro
extraíble con agua jabonosa caliente. Seque las piezas completamente.
8. Cuando la cafetera se ha enfriado, limpie la supercie ex terior con un paño seco.
Instrucciones de Almacenamiento
1. Desenchufe la unidad y deje que se enfríe.
2. Guarde la cafetera en su caja o en un lugar fresco y seco.
3. No guarde nunca la unidad mientras está enchufada.
23
SO-312438_12050_KS 12 cup CM_145x210_IM_R7.indd 23 2017-04-17 5:09 PM
Page 26

Garantía limitada de DOS AÑOS
Mediante la presente, SENSIO Inc. garantiza que, durante el plazo de DOS AÑOS
a partir de la fecha de compra, este producto no presentará defectos mecánicos
en el material ni en la mano de obra, y durante 90 días, no los presentará en las
piezas no mecánicas. A su entera discreción, SENSIO Inc. reparará o reemplazará
el producto que resulte defectuoso, o emitirá un reembolso por el producto
durante el plazo de garantía.
Esta garantía es válida únicamente para el comprador minorista original a partir
de la fecha de compra minorista inicial y no es transferible. Conserve el recibo de
compra original, ya que se exige una prueba de compra para obtener la validación
de la garantía. Las tiendas minoristas no tienen derecho a alterar, modicar ni
corregir de ninguna manera los términos y condiciones de la garantía.
EXCLUSIONES:
La garantía no cubre el desgaste normal de las piezas ni el daño ocasionado
por cualquiera de las siguientes causas: uso negligente del producto, uso de
un voltaje o corriente incorrectos, mantenimiento de rutina inadecuado, uso
contrario al de las instrucciones de funcionamiento, desarmado, reparación o
alteración a cargo de personas que no sean miembros del personal calicado
de SENSIO Inc. Asimismo, la garantía no cubre actos de la naturaleza, como
incendios, inundaciones, huracanes o tornados.
SENSIO Inc. no asumirá responsabilidad por daños incidentales o resultantes
ocasionados por la violación de cualquier garantía expresa o implícita. Salvo en
la medida en que lo prohíban las leyes aplicables, cualquier garantía implícita de
comerciabilidad o aptitud para un propósito particular se limita temporalmente
a la duración de la garantía. Algunos estados, provincias o jurisdicciones no
permiten la exclusión ni la limitación de daños incidentales o resultantes, o
limitaciones sobre la duración de una garantía implícita y, por lo tanto, es posible
que las exclusiones o limitaciones mencionadas no le correspondan. La garantía
cubre derechos legales especícos que pueden variar de un estado, una provincia
o una jurisdicción a otros.
CÓMO OBTENER EL SERVICIO DE GARANTÍA:
Debe comunicarse con el Servicio de atención al cliente a nuestro número
telefónico gratuito: 1-866-832-4843. Un representante del Servicio de atención
al cliente intentará resolver los problemas referidos a la garantía por teléfono.
Si este no puede resolver el problema, le proporcionarán un número de caso
y le solicitarán que devuelva el producto a SENSIO Inc. Adhiera una etiqueta
al producto que incluya: su nombre, dirección, número telefónico de contacto
durante el día, número de caso y descripción del problema. Además, incluya
una copia del recibo de compra original. Envuelva cuidadosamente el producto
etiquetado con el recibo de compra, y envíelo (con el envío y el seguro
prepagados) a la dirección de SENSIO Inc. SENSIO Inc. no asumirá obligación ni
responsabilidad alguna por el producto devuelto que esté en el trayecto hacia el
Centro de servicio al cliente de SENSIO Inc.
24
SO-312438_12050_KS 12 cup CM_145x210_IM_R7.indd 24 2017-04-17 5:09 PM
Page 27

SO-312438_12050_KS 12 cup CM_145x210_IM_R7.indd 25 2017-04-17 5:09 PM
Page 28

For customer service questions or comments
Pour le service à la clientèle, question ou commentaires
Dudas o comentarios contactar el departamento de servicio al cliente
1-866-832-4843
www.sensioinc.com
BELLA is a registered trademark of Sensio Inc., Montréal, Canada H3B 3X9.
All rights reserved.
KitchenSmith is a trademark owned by 8479950 Canada Inc.
All rights reserved.
BELLA est une marque déposée de Sensio Inc., Montréal, Canada H3B 3X9.
Tous droits réservés.
KitchenSmith est une marque détenue par 8479950 Canada Inc.
Tous droits réservés.
BELLA es una marca registrada de Sensio Inc., Montréal, Canada H3B 3X9.
Todos los derechos reservados.
KitchenSmith es una marca propiedad de 8479950 Canada Inc.
Todos los derechos reservados.
SO-312438 Rev.7 (2017-04-17)
SO-312438_12050_KS 12 cup CM_145x210_IM_R7.indd 26 2017-04-17 5:09 PM
 Loading...