

Page 1

Page 2

Table of Contents
Important Safeguards .....................................................................................2
Additional Important Safeguards ..................................................................3
Notes on the Cord............................................................................................4
Notes on the Plug ............................................................................................4
Plasticizer Warning ..........................................................................................4
Electric Power...................................................................................................4
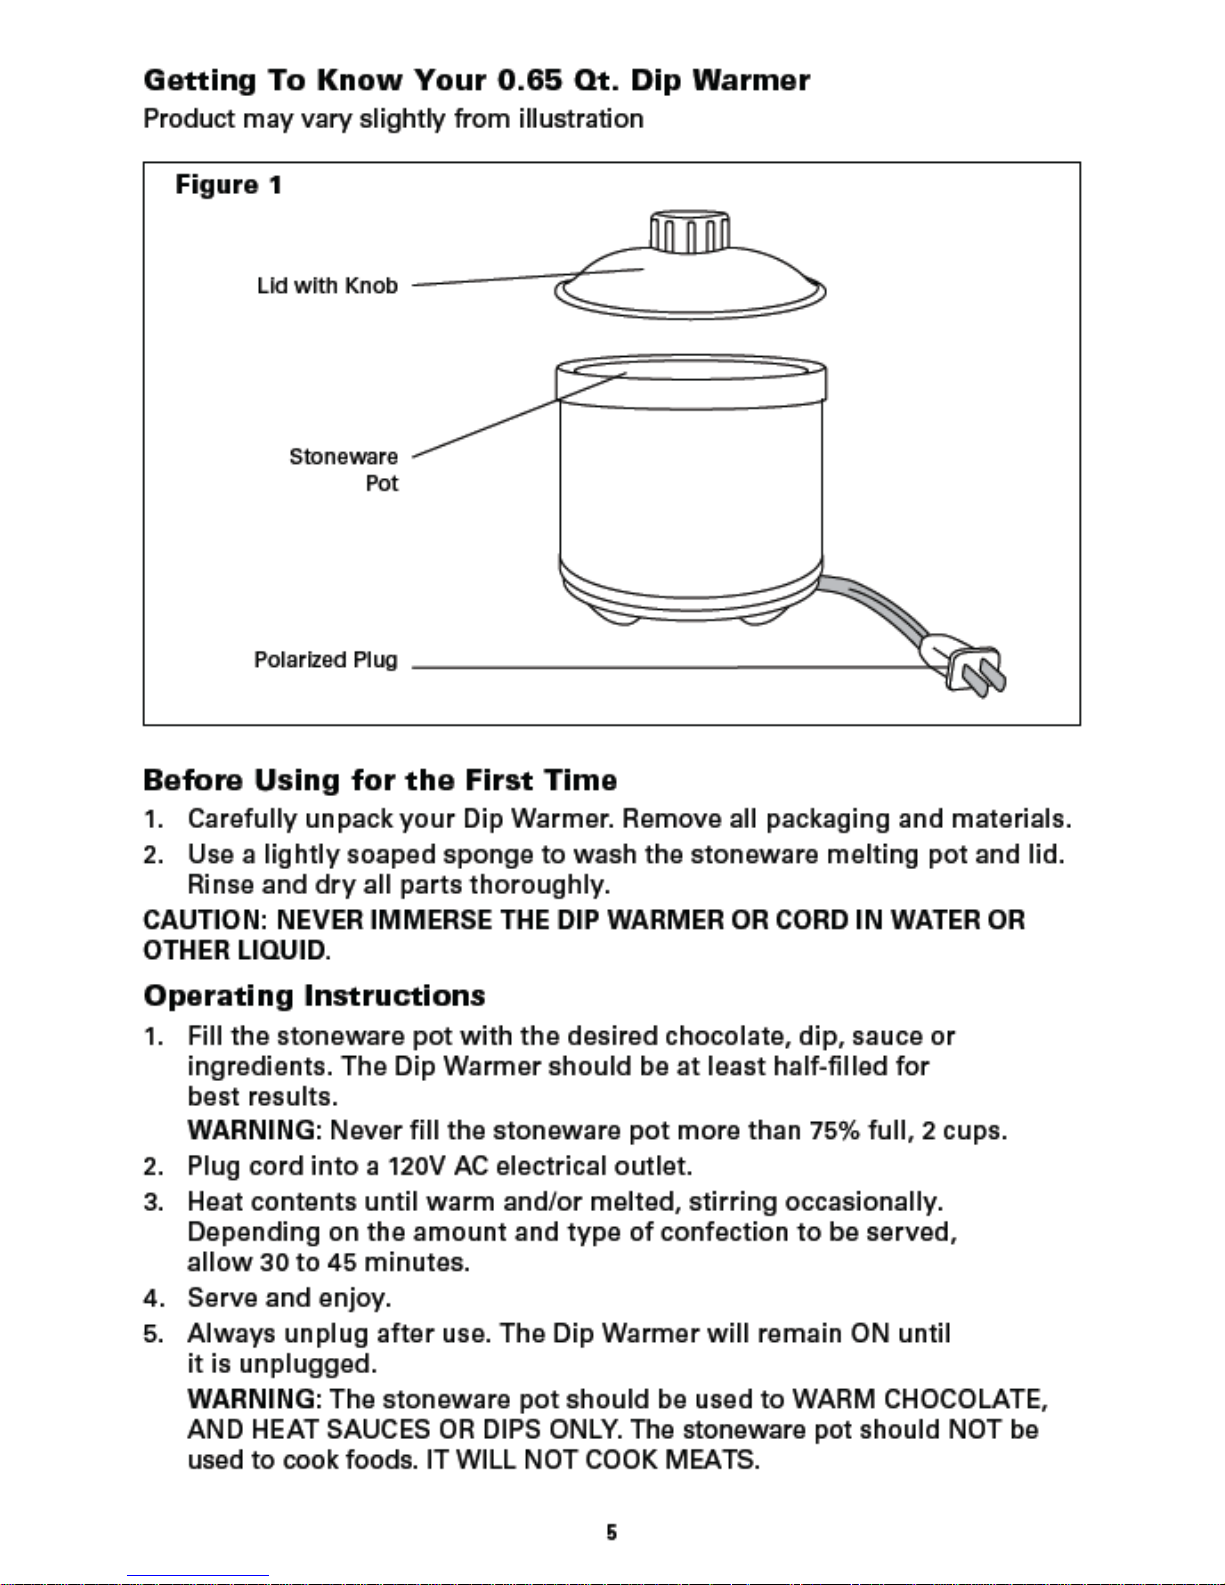
Getting to Know Your 0.65 Qt. Dip Warmer ................................................. 5
Before Using for the First Time .....................................................................5
Operating Instructions ...................................................................................5
User Maintenance Instructions ....................................................................6
Care & Cleaning Instructions ........................................................................6
Storing Instructions ......................................................................................... 6
Melting Chocolate : Hints for Best Results .............................................. 6-7
Chocolate Notes...............................................................................................7
Recipes ......................................................................................................... 8-11
Warranty .........................................................................................................12
Table des Matières
Consignes de sécurité importantes .......................................................13-14
Autres consignes de sécurité importantes ...........................................14-15
Remarques sur le cordon .............................................................................15
Remarques sur la che .................................................................................15
Avertissement de migration de plastiants ..............................................15
Alimentation électrique ................................................................................16
Caractéristiques du chauffe-chocolat.........................................................16
Avant la première utilisation ........................................................................ 16
Mode d’emploi .........................................................................................16-17
Réparation .....................................................................................................17
Nettoyage ......................................................................................................17
Rangement .....................................................................................................17
Les secrets d’un chocolat parfaitement fondu .......................................... 18
Chocolat et proportions ................................................................................19
Recettes .................................................................................................... 20-24
Garantie...........................................................................................................25
Page 3

Índice
Medidas de seguridad impo0rtantes .................................................... 26-27
Medidas de seguridad importantes adicionales ................................. 27-28
Notas sobre el cable ......................................................................................28
Notas sobre el enchufe ................................................................................. 28
Advertencia sobre los plasticantes ...........................................................28
Corriente eléctrica .........................................................................................28
Descripción de la máquina para derretir chocolate..................................29
Antes de usarla por primera vez .................................................................29
Instrucciones de funcionamiento .........................................................29-30
Instrucciones de mantenimiento para el usuario ....................................30
Instrucciones de cuidado y limpieza ..........................................................30
Instrucciones de almacenamiento ..............................................................30
Derretir chocolate: consejos para obtenir mejores resultados ...............31
Notas sobre el chocolate ..............................................................................32
Recetas ...................................................................................................... 33-38
Garantía...........................................................................................................39
Page 4

2
IMPORTANT
SAFEGUARDS
WARNING: When using electrical appliances, basic safety
precautions should always be followed, including the
following:
1. READ ALL INSTRUCTIONS.
2. Do not touch hot surfaces. Use handles or knobs.
3. To protect against electrical shock, do not immerse
cord, plugs or appliance in water or other liquid.
4. This appliance is not intended for use by persons
(including children) with reduced physical, sensory
or mental capabilities, or lack of experience and
knowledge, unless they have been given supervision or
instruction concerning use of the appliance by a person
responsible for their safety.
5. Close supervision is necessary when any appliance is
used by or near children.
6. Unplug from outlet when not in use and before
cleaning. Allow to cool before putting on or taking
off parts.
7.
Do not operate any appliance with a damaged cord
or plug or after the appliance malfunctions or has
been damaged in any manner. Bring it to a qualied
technician for examination, repair or electrical or
mechanical adjustment.
8. The use of accessory attachments not recommended by
the appliance manufacturer may cause injuries.
9. Do not use outdoors.
10. Do not let cord hang over edge of table or counter, or
touch hot surfaces.
11. Do not place on or near a hot gas or electric burner, or
in a heated oven.
12. Extreme caution must be used when moving an
appliance containing hot oil or other hot liquids.
13. To disconnect, remove plug from wall outlet.
14. Do not use appliance for other than intended use.
Page 5

3
15. Do not use Dip Warmer if lid or stoneware pot is
cracked or damaged.
FOR HOUSEHOLD
USE ONLY
SAVE THESE
INSTRUCTIONS
ADDITIONAL IMPORTANT
SAFEGUARDS
CAUTION HOT SURFACES: This appliance generates heat
and escaping steam during use. Proper precautions must
be taken to prevent the risk of burns, res or other injury to
persons or damage to property.
1. A person who has not read and understood all
operating and safety instructions is not qualied to
operate this appliance. All users of this appliance must
read and understand this instruction manual before
operating or cleaning this appliance.
2. If this appliance falls or accidentally becomes immersed
in water, unplug it from the wall outlet immediately.
Do not reach into the water!
3.
When using this appliance, provide adequate air space
above and on all sides for air circulation. Do not operate
this appliance while it is touching or near curtains, wall
coverings, clothing, dishtowels or other ammable
materials.
4. Do not leave this appliance unattended during use.
5. If this appliance begins to malfunction during use,
immediately unplug the cord. Do not use or attempt to
repair a malfunctioning appliance!
6. The cord to this appliance should be plugged into a
120V AC electrical wall outlet.
7. Do not use this appliance in an unstable position.
Page 6

4
Notes on the Plug
This appliance has a polarized plug (one blade is wider than
the other). To reduce the risk of electric shock, this plug will
t in a polarized outlet only one way. If the plug does not t
fully into the outlet, reverse the plug. If it still does not t,
contact a qualied electrician. Do not modify the plug in
any way.
Notes on the Cord
The provided short power-supply cord (or detachable
power-supply cord) should be used to reduce the risk
resulting from becoming entangled in or tripping over a
longer cord. Do not use an extension cord with this product.
Plasticizer Warning
CAUTION: To prevent Plasticizers from migrating from
the nish of the counter top or table top or other furniture,
place NON-PLASTIC coasters or place mats between the
appliance and the nish of the counter top or table top.
Failure to do so may cause the nish to darken; permanent
blemishes may occur or stains can appear.
Electric Power
If the electrical circuit is overloaded with other appliances,
your appliance may not operate properly. It should
be operated on a separate electrical circuit from other
appliances.
Page 7
Page 8

6
User Maintenance Instructions
This appliance requires little maintenance. It contains no user serviceable
parts. Do not try to repair it yourself. Any servicing requiring disassembly
other than cleaning, must be performed by a qualied appliance
repair technician.
Care & Cleaning Instructions
CAUTION: NEVER IMMERSE THE DIP WARMER OR CORD IN WATER
OR OTHER LIQUID.
1. When dipping or candy-making is nished, pour out melted unused
chocolate, confection/dip or sauces and discard. Using an oven mitt,
wipe remaining chocolate, sauce or dip out of the warm stoneware pot
with clean paper towels.
NOTE: If candy, chocolate, or dip/sauce has hardened, it may be
necessary to plug the unit in to liquefy remains.
2. Unplug Dip Warmer and allow stoneware pot and unit to cool completely
before cleaning or storing.
3. Hand wash the lid in warm, soapy water. DO NOT PLACE UNIT
IN DISHWASHER.
CAUTION: Do not use lid or stoneware pot if damaged in any way.
4. Wipe interior and exterior of the stoneware pot with a soft, slightly
damp cloth or sponge and dry thoroughly. Never use abrasive cleansers
or scouring pads, as they may damage the surfaces.
CAUTION: NEVER IMMERSE THE DIP WARMER OR CORD IN WATER
OR OTHER LIQUID.
Storing Instructions
1. Be sure all parts are clean and dry before storing.
2. Store Dip Warmer with lid in its box or in a cool, dry place.
3. Never store Dip Warmer while it is hot or wet.
4. Never wrap cord tightly around the appliance; keep it loosely coiled.
Melting Chocolate: Hints For Best Results
This 0.65 Qt. (21-oz.) Dip Warmer is intended to heat, hold and is perfect for
making chocolate dips, candies, desserts, and warming sauces and other dips.
Use your Dip Warmer to serve your favorite chocolate fondues.
1. Keep the Dip Warmer’s lid closed to retain heat and maintain the ideal
serving temperature.
2. Chocolate should be chopped into uniform pieces, about the size of
chocolate chips, to ensure even melting. Large blocks of unchopped
chocolate will not melt well in the Dip Warmer.
3. AVOID ALL CONTACT WITH WATER! Chocolate will seize and become
unworkable if it comes into contact with even a few drops of water.
Make sure stoneware pot and lid are completely dry before use.
4. Never add water to any chocolate or melted confection. Use oil, butter or
cream/milk to thin.
Page 9

7
5. Stir the chocolate frequently with a rubber spatula, at least every
10 minutes.
IMPORTANT: Always stir chocolate or confection during melting.
To prevent chocolate or any sugary confection from becoming stiff and
unusable, stir as needed.
6. To transfer melted chocolate or candy to molds or tray, use a spoon
or ladle. Fill the candy mold/tray to the top edge with melted chocolate.
Gently tap mold on the work surface to eliminate air bubbles.
Refrigerate until hardened.
7. For a fun presentation, use wooden skewers or popsicle sticks to thread
and dip: marshmallows, cake squares, fruits, or bacon.
8. Dip foods such as cookies, candies, dried fruits one at a time.
Use a chocolate skewer for easy serving.
9. Carefully place dipped food on wax/parchment paper or on a cooling
rack to harden.
10. Use a pastry brush to apply a thin chocolate coating to delicate surfaces
such as mint leaves.
11. When melting chocolate for dipping, melt the chocolate twice. Allow
chocolate to cool for at least 4 hours. Then melt again. The second
melting will create a looser and nicer dip.
Chocolate Notes
Chocolate Glaze or Dip: 1 part cream to 3 parts chocolate.
Trufe lling: 1 part cream to 2 parts chocolate.
Light lling: 1 part cream to 1 part chocolate.
Ganache: A simple mixture of chocolate and heavy whipping cream,
warmed ganache can be poured over cake or brownies to add a rich, shiny
fudgy coating. Chilled ganache is scooped and rolled into balls to make
trufes. Filled and dipped trufes are easy to prepare and make an exquisite
chocolate presentation.
Page 10

8
Rich White Chocolate Trufes
• 1-3/4 cups white
chocolate chips
• 1 tablespoon
confectioner’s sugar
• 5 tablespoons whipping cream
• 8 tablespoons butter
• 1/2 teaspoon vanilla extract
• Coatings:
Confectioner’s sugar,
roasted nely chopped nuts,
sweetened coconut, cocoa
powder, chocolate shavings, or
dip in milk or dark chocolate.
1. Combine all ingredients in the stoneware melting pot.
2. Plug Chocolate Melter into a 120V AC electrical outlet and allow
mixture to cook 30 to 35 minutes, using a small spatula to mix
well every 10 minutes.
CAUTION HOT SURFACES: This appliance generates heat during
use. Use caution when handling the outside of the unit.
3. Unplug unit. Transfer chocolate to a mixing bowl. Add vanilla
extract and any other avorings, stir until well-combined. To avoid
air bubbles, do not stir too vigorously.
4. Place plastic wrap over the top of the white chocolate and
refrigerate until rm enough to scoop, about 2 to 4 hours.
5. Use a teaspoon or a small candy scoop to form uniform
1-inch balls.
6. Return to the refrigerator to chill for another hour or freeze for
10 minutes.
7. Roll trufes in your choice of coatings.
8. Store White Chocolate Trufes in an airtight container in the
refrigerator for up to 1 week. Keep refrigerated before use.
9. Bring trufes to room temperature before serving.
NOTE: To avor trufes, add 1/2 teaspoon extract or 1 teaspoon
liqueur when adding vanilla extract.
Recipes
Page 11

9
Milk Chocolate Candy Cane Bark
• 2 cups milk chocolate chips
• 1/2 cup chopped peppermint candy canes
1. Line a large baking sheet with wax paper.
2. Plug Chocolate Melter into a 120V AC electrical outlet and allow
mixture to cook 30 to 35 minutes, using a small spatula to mix
well every 10 minutes.
CAUTION HOT SURFACES: This appliance generates heat
during use. Use caution when handling the outside of the unit.
3. Pour melted chocolate onto wax paper. Use a spatula to spread
to the desired thickness. Shake baking sheet gently to even
the thickness.
4. Sprinkle chopped candy canes over wet chocolate.
5. Chill tray 30 minutes or until rm.
6. Use wax paper to lift candy from baking sheet; break candy
into pieces.
7. Layer pieces between waxed paper and store in an airtight
covered container.
NOTE: Use white or dark chocolate. Replace peppermint candy
with roasted nuts, cereals, dried fruits to create your favorite
chocolate bark.
Deliciously Easy Caramel Sauce
Makes 3/4 cup
• 2/3 packed cup brown sugar
• 1/2 cup half-and-half
• 4 tablespoons butter
• Pinch salt
• 1 tablespoon vanilla extract
1. Place all ingredients except vanilla extract into the melting pot.
2. Plug Chocolate Melter into a 120V AC electrical outlet and allow
mixture to cook 30 to 35 minutes, using a small spatula to mix
well every 10 minutes.
3. CAUTION HOT SURFACES: This appliance generates heat
during use. Use caution when handling the outside of the unit.
4 Add vanilla and cook another minute to thicken further.
5. Unplug, cool slightly, and pour the sauce into an airtight container.
6. Refrigerate until cold.
7. Leftover caramel sauce can be refrigerated in an airtight container
for up to 2 weeks.
Page 12

10
Chili Chocolate Dipped Strawberries
• 6 oz. bittersweet chocolate,
chopped
• 3 tablespoons heavy cream
• 1 tablespoon butter
• 3 teaspoons ground pure
ancho chili powder
• 1 teaspoon cinnamon
• 10 large long-stem
strawberries, washed and
completely dry
1. Combine all ingredients in the stoneware melting pot.
2. Plug Chocolate Melter into a 120V AC electrical outlet and allow
mixture to cook 30 to 35 minutes, using a small spatula to mix
well every 10 minutes.
3. CAUTION HOT SURFACES: This appliance generates heat
during use. Use caution when handling the outside of the unit.
IMPORTANT! Make sure strawberries are completely dry
before dipping.
4. Holding a strawberry by the stem, dip into the melted chocolate.
5. Coat well, allow excess chocolate to drip and place on waxed
paper lined sheet plate. Repeat with all the strawberries
6. Refrigerate 30 minutes to set.
When melting chocolate for dipping, melt the chocolate twice.
Allow chocolate to cool for at least 4 hours. Then melt again.
The second melting will create a looser and nicer dip.
Chocolate Dipped Bacon
• 16 slices applewood smoked
bacon, thick cut
• 2 cups high quality semisweet,
dark or milk chocolate,
chopped
IMPORTANT: To avoid crumbling bacon, always use thick-cut slices.
1. Place chocolate into the melting pot.
2. Plug Chocolate Melter into a 120V AC electrical outlet and allow
mixture to cook 30 to 35 minutes, using a small spatula to mix
well every 10 minutes.
3. CAUTION HOT SURFACES: This appliance generates heat
during use. Use caution when handling the outside of the unit.
4. While chocolate melts, cook bacon until crisp.
5. Add 1 teaspoon bacon grease to the chocolate to thin.
6. Drain bacon on brown paper bag, cool, and cut into halves.
7. Using small tongs, dip cooked bacon into the melted chocolate.
Coat well, allow excess chocolate to drip off and place dipped
bacon onto a metal cooling rack. Repeat with all the bacon slices.
Put the plate in the refrigerator to set, about 20 to 30 minutes.
Page 13

11
Chocolate Dipped Mint Leaves
• Collect large, well veined and dened mint leaves from the garden.
1. Place 2 -4 oz. dark chocolate into the melting pot. When melting
chocolate for dipping, melt the chocolate twice. Allow chocolate
to cool for at least 4 hours.
2. Then melt again. The second melting will create a looser and
nicer dip.
IMPORTANT: Be careful not get any water into the melted
chocolate.
3. Using small tongs, dip dry mint leaf into the melted chocolate.
4. Coat well, allow excess chocolate to drip off and place dipped leaf
onto a waxed paper lined plate. Repeat with all the mint leaves.
5. Put the plate in the freezer to set, about 30 minutes. Use or
serve frozen!
Creamy Horseradish Shrimp Dip
Makes about 1-1/2 cups dip or 4 to 5 servings.
• 1/2 package (4 oz.) cream
cheese, cut into 1/2 inch cubes
• 1/4 cup cocktail sauce
• 2 tablespoons prepared
white horseradish
• 1/8 cup light or regular
mayonnaise
• 2 thinly sliced green onions
• 4 oz. frozen cooked small
salad shrimp
• thawed crackers or crostini
1. Place thawed shrimp in a colander.
2. Combine cream cheese, cocktail sauce, horseradish, mayonnaise
and green onions in the cooking pot, mixing well.
3. Cover and cook for 1 hour or until hot, stirring after 40 minutes
of cooking.
4. Run hot water over shrimp. Add to cooking pot 20 minutes
before serving.
5. Stir dip and serve with crackers or grilled crostini.
Page 14

3
Limited TWO-YEAR Warranty
SENSIO Inc. hereby warrants that for a period of TWO YEARS from the date
of purchase, this product will be free from mechanical defects in material and
workmanship, and for 90 days in respect to non-mechanical parts. At its sole
discretion, SENSIO Inc. will either repair or replace the product found to be defective,
or issue a refund on the product during the warranty period.
The warranty is only valid for the original retail purchaser from the date of initial retail
purchase and is not transferable. Keep the original sales receipt, as proof of purchase is
required to obtain warranty validation. Retail stores selling this product do not have the
right to alter, modify, or in any way revise the terms and conditions of the warranty.
EXCLUSIONS:
The warranty does not cover normal wear of parts or damage resulting from any of the
following: negligent use of the product, use of improper voltage or current, improper
routine maintenance, use contrary to the operating instructions, disassembly, repair,
or alteration by anyone other than qualied SENSIO Inc. personnel. Also, the warranty
does not cover Acts of God such as re, oods, hurricanes, or tornadoes.
SENSIO Inc. shall not be liable for any incidental or consequential damages caused
by the breach of any express or implied warranty. Apart from the extent prohibited
by applicable law, any implied warranty of merchantability or tness for a particular
purpose is limited in time to the duration of the warranty. Some states, provinces or
jurisdictions do not allow the exclusion or limitation of incidental or consequential
damages, or limitations on how long an implied warranty lasts, and therefore, the
above exclusions or limitations may not apply to you. The warranty covers specic
legal rights which may vary by state, province and/or jurisdiction.
HOW TO OBTAIN WARRANTY SERVICE:
You must contact Customer Service at our toll-free number: 1-866-832-4843.
A Customer Service Representative will attempt to resolve warranty issues over the
phone. If the Customer Service Representative is unable to resolve the problem, you will
be provided with a case number and asked to return the product to SENSIO Inc. Attach
a tag to the product that includes: your name, address, daytime contact telephone
number, case number, and description of the problem. Also, include a copy of the
original sales receipt. Carefully package the tagged product with the sales receipt,
and send it (with shipping and insurance prepaid) to SENSIO Inc.’s address. SENSIO
Inc. shall bear no responsibility or liability for the returned product while in transit to
SENSIO Inc.’s Customer Service Center.
Page 15

13
CONSIGNES DE
SÉCURITÉ IMPORTANTES
MISE EN GARDE : Respecter les consignes de sécurité de
base au moment d’utiliser des appareils électriques,
y compris les suivantes.
1.
Lire toutes les instructions.
2. Ne pas toucher les surfaces chaudes. Ne se servir que
des poignées ou des boutons de l’appareil.
3. Pour éviter les décharges électriques, ne pas immerger
le cordon, la prise ou l’appareil dans de l’eau ou dans
d’autres liquides.
4. Cet appareil n’est pas destiné à être utilisé par des
personnes (y compris les enfants) dont les capacités
physiques, sensorielles ou mentales sont limitées ou
qui ne possèdent ni l’expérience ni les compétences
nécessaires pour utiliser l’appareil, à moins qu’elles
soient supervisées ou qu’elles aient reçu des directives
adéquates par la personne responsable de leur sécurité.
5. Une supervision attentive est de rigueur lorsque
l’appareil est utilisé par un enfant ou près de lui.
6. Débrancher l’appareil de la prise murale lorsqu’il n’est
pas utilisé et avant de le nettoyer. Laisser refroidir
l’appareil avant de poser ou d’enlever des pièces.
7. Éviter d’utiliser l’appareil si son cordon d’alimentation
ou sa che électrique sont endommagés, ou si l’appareil
est défectueux ou endommagé de quelque façon
que ce soit. Coner plutôt son examen, sa réparation
ou son réglage électrique ou mécanique à un technicien
qualié.
8.
L’utilisation d’accessoires non recommandés par
le fabricant de l’appareil peut causer des blessures.
9.
Ne pas utiliser à l’extérieur.
10. Ne pas laisser le cordon pendre d’un bord de table
ou d’un comptoir, ni entrer en contact avec
une surface chaude.
1
1
. Ne pas poser l’appareil sur un élément de cuisinière
électrique ou à gaz, ni à proximité, ni dans un four chaud.
Page 16

14
12. Être très prudent pendant le déplacement d’un
appareil contenant de l’eau, de l’huile ou d’autres
liquides chauds.
13.
Pour débrancher l’appareil, retirer la che électrique
de la prise murale.
14.
Ne pas utiliser l’appareil à une n autre que celle pour
laquelle il a été conçu.
15. Ne pas utiliser le pot-réchaud si le couvercle ou le pot
de grès sont ssurés ou endommagés.
POUR USAGE
DOMESTIQUE
SEULEMENT
CONSERVER CES
CONSIGNES
AUTRES CONSIGNES DE
SÉCURITÉ IMPORTANTES
MISE EN GARDE! SURFACES CHAUDES : L’appareil dégage
de la chaleur et de la vapeur pendant son fonctionnement.
Prendre les précautions nécessaires pour prévenir
les risques de brûlures, d’incendie, de blessures et
de dommages matériels.
1.
Une personne n’ayant pas lu et compris toutes
les instructions en matière de fonctionnement et de
sécurité n’est pas apte à faire fonctionner cet appareil.
Lire et comprendre le mode d’emploi avant d’utiliser
ou de nettoyer l’appareil.
2.
Débrancher immédiatement l’appareil s’il tombe ou
s’il est immergé accidentellement dans de l’eau ou dans
un autre liquide. Ne pas plonger la main dans l’eau!
3.
Pendant l’utilisation, veiller à ce qu’il y ait sufsamment
de ventilation au-dessus et autour de l’appareil.
Ne pas utiliser l’appareil s’il touche ou jouxte
Page 17

15
des rideaux, un revêtement mural, des vêtements,
un linge à vaisselle ou toute autre matière inammable.
4.
Ne pas laisser l’appareil sans surveillance pendant
son fonctionnement.
5.
Si l’appareil se met à fonctionner anormalement,
débrancher immédiatement le cordon. Ne pas utiliser
ni tenter de réparer l’appareil défectueux.
6.
Le cordon de l’appareil doit être branché dans une prise
c.a. de 120 V.
7. Ne jamais utiliser l’appareil dans une position instable.
Remarques sur la che
Cet appareil est doté d’une che polarisée (une broche
est plus large que l’autre). Pour réduire le risque de
décharge électrique, la che s’insère d’une seule manière
dans une prise polarisée. Si la che ne s’insère pas
complètement dans la prise, la tourner pour l’insérer
de l’autre côté. S’il est toujours impossible de l’insérer
complètement dans la prise, communiquer avec un
électricien qualié. Ne jamais modier la che de quelque
façon que ce soit.
Remarques sur le cordon
Utiliser le cordon d’alimentation court (ou cordon
d’alimentation amovible) fourni avec l’appareil an
de réduire le risque d’emmêlement ou de trébuchement
que présente un cordon long. Ne pas utiliser de rallonge
avec l’appareil.
Avertissement de migration de plastiants
MISE EN GARDE :
Pour éviter la migration de plastiants
vers le ni de comptoirs, de tables ou de tout autre meuble,
placer des sous-plats ou des napperons faits de matière
NON PLASTIQUE entre l’appareil et le dessus du comptoir
ou de la table. Si cette consigne n’est pas respectée, le ni
de la surface pourrait noircir et des ternissures permanentes
ou des taches indélébiles pourraient se former.
Page 18

Page 19

17
4. Servir et savourer.
5. Toujours débrancher l’appareil après son utilisation. Le pot-réchaud
demeure sous tension tant qu’il est branché.
AVERTISSEMENT : Le pot de grès doit servir à FAIRE CHAUFFER
DU CHOCOLAT, ET CHAUFFER LES SAUCES ET TREMPETTES
UNIQUEMENT. Il ne faut pas l’utiliser pour cuire des aliments.
IL NE CUIRA PAS LA VIANDE.
Réparation
L’appareil exige peu d’entretien. Il ne contient aucune pièce pouvant être
réparée ou changée par l’utilisateur. Il ne faut donc pas tenter de le réparer
soi-même. Toute opération d’entretien qui exige le démontage de l’appareil,
autre que le nettoyage, doit être exécutée par un technicien en réparation
d’appareils ménagers qualié.
Nettoyage
MISE EN GARDE : NE JAMAIS IMMERGER LE POT DE GRÈS OU LE CORDON
DANS L’EAU OU DANS D’AUTRES LIQUIDES.
1. Une fois l’enrobage ou la préparation des friandises terminés,
vider le restant du chocolat, du mélange fondu, de la trempette,
ou de la sauce et les jeter. Tenir le pot de grès encore chaud à l’aide
d’un gant de cuisine et en essuyer les restes de chocolat, de la sauce
ou de la trempette avec un essuie-tout.
REMARQUE : Si le chocolat, le mélange à friandise, la sauce ou
la trempette restant a durci, il peut être nécessaire de le liquéer
en remettant l’appareil en marche.
2. Débrancher le pot-réchaud et laisser l’appareil et le pot de grès refroidir
complètement avant de les nettoyer ou de les ranger.
3. Laver le pot de grès et le couvercle à la main dans de l’eau chaude
savonneuse. NE PAS METTRE L’APPAREIL AU LAVE-VAISSELLE.
MISE EN GARDE : Ne pas utiliser le couvercle ni le pot de grès s’ils sont
endommagés de quelque façon que ce soit.
4. Essuyer le pot en grès à l’intérieur et à l’extérieur avec une éponge
douce légèrement humide, ou le rincer et le sécher à fond. Ne jamais
utiliser de nettoyants forts ou de tampons à récurer, car ils peuvent
endommager les surfaces.
MISE EN GARDE : NE JAMAIS IMMERGER LE POT DE GRÈS OU
LE CORDON DANS L’EAU OU DANS D’AUTRES LIQUIDES.
Rangement
1. Avant de ranger l’appareil, s’assurer que toutes ses pièces sont propres
et sèches.
2. Ranger le pot-réchaud et son couvercle dans leur boîte ou dans
un endroit frais et sec.
3. Ne jamais ranger le pot-réchaud s’il est encore chaud ou mouillé.
4. Toujours enrouler le cordon de façon lâche (non de façon serrée)
autour de l’appareil.
Page 20

18
Les secrets d’un chocolat parfaitement fondu
Ce pot-réchaud à capacité de 0,6 l (21 oz) est destiné à chauffer, fondre et
réserver du chocolat et est idéal pour préparer des enrobages, des friandises,
des desserts, et pour réchauffer des sauces et des trempettes. Il se prête aussi
très bien à la préparation de délicieuses fondues au chocolat.
1. Garder le couvercle en place sur le pot pour conserver la chaleur
et maintenir le mélange à la parfaite température de service.
2. Pour que le chocolat fonde uniformément, le couper en morceaux
uniformes, soit environ de la taille d’une brisure de chocolat. Les gros
morceaux ne fondront pas convenablement dans ce pot-réchaud.
3. ÉVITER TOUT CONTACT AVEC DE L’EAU! Le chocolat pourrait ger et
perdre sa malléabilité si on lui ajoute ne serait-ce que quelques gouttes
d’eau. S’assurer que le pot de grès, et le couvercle sont complètement
secs avant de les utiliser.
4. Ne jamais ajouter d’eau au chocolat ou au mélange fondu. Utiliser plutôt
de l’huile, du beurre, de la crème ou du lait pour éclaircir le mélange.
5. Remuer le chocolat fréquemment avec une spatule de caoutchouc,
au moins toutes les dix minutes.
IMPORTANT : Toujours brasser le chocolat ou le mélange pendant
qu’il fond. Brasser le chocolat ou le mélange sucré au besoin pour
l’empêcher de ger et de perdre sa malléabilité.
6. Utiliser une louche ou une cuillère pour verser le chocolat ou le mélange
fondu dans un moule ou sur une plaque. Remplir le moule ou la plaque à
friandise jusqu’au bord. Cogner doucement le moule contre la surface de
travail pour éliminer les bulles d’air du mélange. Réfrigérer le mélange
jusqu’à ce qu’il soit gé.
7. Pour ajouter un peu de fantaisie à la présentation, utiliser des broches
ou des bâtons de bois pour enler ou enrober guimauves, quartiers
de fruits, bouchées de gâteau et morceaux de bacon.
8. Enrober un morceau à la fois les biscuits, les friandises et les fruits
séchés, par exemple. Utilisez une brochette de chocolat pour
servir facilement
9. Placer avec soin les aliments enrobés sur du papier ciré ou du papier
parchemin posé sur une grille à refroidir pour laisser le chocolat ger.
10. Utiliser un pinceau à pâtisserie pour appliquer une mince couche
de chocolat sur les aliments délicats, comme les feuilles de menthe.
11. Faire fondre deux fois le chocolat qui servira à enrober.
Laisser le chocolat refroidir au moins quatre heures, puis le fondre
de nouveau. Faire fondre le chocolat deux fois donne une consistance
plus claire et un enrobage plus lisse.
Page 21

19
Chocolat et proportions
Glacis ou enrobage de chocolat : 1 part de crème pour 3 parts de chocolat.
Garniture à truffe : 1 part de crème pour 2 parts de chocolat.
Garniture légère : 1 part de crème pour 1 part de chocolat.
Ganache : Mélange tout simple de chocolat et de crème à fouetter épaisse,
la ganache peut être chauffée pour napper du gâteau ou des brownies
d’un glaçage chocolaté riche et brillant. La ganache froide peut être
confectionnée en boules pour créer des truffes. Les truffes fourrées
et enrobées sont faciles à préparer et sont aussi exquises qu’élégantes.
Page 22

20
Recettes
Riches truffes au chocolat blanc faites à la main
• 16 fetas gruesas de tocino
Applewood ahumado
2 tazas de chocolate
semiamargo, negro o
de leche, de buena calidad,
triturado
• Enrobage:
Rouler les truffes dans
du sucre à glacer, des noix
grillées hachées nement,
de la noix de coco sucrée,
du cacao en poudre ou
des copeaux de chocolat,
ou encore les enrober
de chocolat au lait ou
de chocolat noir.
1. Mélanger tous les ingrédients dans le pot de grès.
2. Brancher le chauffe-chocolat dans une prise électrique c.a.
de 120 V et faire chauffer le mélange de 30 à 35 minutes,
en remuant toutes les dix minutes à l’aide d’une petite spatule
pour bien mélanger.
MISE EN GARDE! SURFACES CHAUDES : L’appareil dégage
de la chaleur pendant son fonctionnement. Manipuler l’extérieur
de l’appareil avec prudence.
3. Débrancher l’appareil. Verser le chocolat dans un bol à mélanger.
Ajouter l’extrait de vanille et tous les autres ingrédients,
et mélanger pour bien l’incorporer.
4. Ne pas trop brasser pour éviter la formation de bulles d’air.
5. Couvrir le chocolat blanc d’une pellicule plastique et le placer
au réfrigérateur jusqu’à ce qu’il soit assez ferme pour être façonné,
soit de deux à quatre heures.
6. Utiliser une cuillère à thé ou une petite louche pour former
des boules d’environ 1 po de diamètre.
7. Replacer au réfrigérateur pendant une heure ou placer
au congélateur pendant dix minutes.
8. Rouler les truffes dans la garniture désirée.
9. Conserver les truffes de chocolat blanc au réfrigérateur dans
un contenant hermétique (jusqu’à une semaine). Les garder au
réfrigérateur jusqu’à ce qu’il soit temps de les sortir pour les
laisser tempérer an de les servir (à la température de la pièce).
VARIANTE : Pour rehausser la saveur des truffes, on peut remplacer
l’extrait de vanille par 1 cuillerée à thé de liqueur de vanille.
Page 23

21
Éclats de chocolat au lait aux brisures
de bonbons à la menthe
• 2 tasses de brisures
de chocolat au lait
• 1/2 tasse de bonbons
à la menthe hachés (de style
canne de Noël)
1. Couvrir une grande plaque à pâtisserie de papier ciré.
2. Brancher le chauffe-chocolat dans une prise électrique c.a.
de 120 V et faire chauffer le mélange de 30 à 35 minutes,
en remuant toutes les dix minutes à l’aide d’une petite spatule
pour bien mélanger.
MISE EN GARDE! SURFACES CHAUDES : L’appareil dégage
de la chaleur pendant son fonctionnement. Manipuler l’extérieur
de l’appareil avec prudence.
3. Verser le chocolat sur le papier ciré. Étendre le chocolat à l’aide
d’une spatule, selon l’épaisseur désirée. Agiter doucement
la plaque pour égaliser l’épaisseur de la couche de chocolat.
4. Parsemer le chocolat liquide des brisures de bonbons à la menthe.
5. Placer la plaque au réfrigérateur pendant trente minutes,
ou jusqu’à ce que le mélange ait gé. Retirer le mélange
de chocolat en soulevant le papier ciré; casser le chocolat
en morceaux.
6. Placer les morceaux de chocolat dans un contenant hermétique,
en prenant soin d’en séparer chaque couche par un morceau
de papier ciré.
VARIANTE : Utiliser du chocolat blanc ou noir de très bonne qualité.
Remplacer les bonbons à la menthe par des noix grillées, des céréales
ou des fruits séchés pour créer de nouvelles variétés d’éclats
de chocolat.
Page 24

22
Sauce au caramel délicieusement simple
• 2/3 tasse de cassonade, tassée
• 1/2 tasse de crème à 10 % de
matière grasse
• 4 c. à soupe de beurre
• Une pincée de sel
• 1 c. à soupe d’extrait de vanille
1. Placer tous les ingrédients dans le pot de grès, sauf l’extrait
de vanille.
2. Brancher le chauffe-chocolat dans une prise électrique c.a.
de 120 V et faire chauffer le mélange de 30 à 35 minutes,
en remuant toutes les dix minutes à l’aide d’une petite spatule
pour bien mélanger.
MISE EN GARDE! SURFACES CHAUDES : L’appareil dégage
de la chaleur pendant son fonctionnement. Manipuler l’extérieur
de l’appareil avec prudence.
3. Ajouter la vanille et continuer de chauffer le mélange pendant
une minute pour le faire épaissir.
4. Débrancher l’appareil, laisser tiédir légèrement, puis verser
la sauce dans un contenant hermétique. Réfrigérer le mélange
jusqu’à ce qu’il soit froid.
5. Le restant de sauce au caramel peut se conserver au réfrigérateur
dans un contenant hermétique jusqu’à deux semaines
Fraises enrobées de chocolat au chili
• 6 oz de chocolat semi-sucré,
haché
• 3 c. à soupe de crème épaisse
• 1 c. à soupe de beurre
• 3 c. à soupe de poudre
de piment ancho
• 1 c. à thé de cannelle
• 10 fraises à longue tige, lavées
et bien séchées
1. Mélanger tous les ingrédients dans le pot de grès.
2. Brancher le chauffe-chocolat dans une prise électrique c.a. de 120 V
et faire chauffer le mélange de 30 à 35 minutes, en remuant toutes
les dix minutes à l’aide d’une petite spatule pour bien mélanger.
MISE EN GARDE! SURFACES CHAUDES : L’appareil dégage
de la chaleur pendant son fonctionnement. Manipuler l’extérieur
de l’appareil avec prudence.
IMPORTANT! S’assurer que les fraises sont bien sèches avant
de les enrober. Tremper une fraise dans le chocolat fondu en
la tenant par la tige.
3. Bien l’enrober; laisser couler l’excédent de chocolat et placer
la fraise sur une plaque de pâtisserie recouverte de papier ciré.
Faire de même avec toutes les fraises. Réfrigérer pendant trente
minutes pour faire ger le chocolat.
Page 25

23
4. Faire fondre deux fois le chocolat qui servira à enrober.
5. Laisser le chocolat refroidir au moins quatre heures, puis le fondre
de nouveau.
6. Faire fondre le chocolat deux fois donne une consistance
plus claire et un enrobage plus lisse.
Bacon enrobé de chocolat
• 16 tranches de bacon fumé au
bois de pommier, épaisses
• 2 tasses de chocolat semisucré, de chocolat noir ou
de chocolat au lait, haché
IMPORTANT : Pour éviter que le bacon ne s’émiette, toujours utiliser
des tranches épaisses.
1. Placer le chocolat dans le pot de grès.
2. Brancher le chauffe-chocolat dans une prise électrique c.a.
de 120 V et faire chauffer le mélange de 30 à 35 minutes,
en remuant toutes les dix minutes à l’aide d’une petite spatule
pour bien mélanger.
MISE EN GARDE! SURFACES CHAUDES : L’appareil dégage
de la chaleur pendant son fonctionnement. Manipuler l’extérieur
de l’appareil avec prudence.
3. Pendant que le chocolat fond, faire cuire le bacon jusqu’à ce qu’il
soit croustillant. Ajouter une cuillerée à thé de graisse de bacon
au chocolat pour l’éclaircir.
4. Égoutter le bacon au moyen d’un sac de papier brun, le laisser
refroidir, puis couper chaque morceau en deux.
5. Enrober les morceaux de bacon en les trempant dans le chocolat
fondu à l’aide de petites pinces. Bien l’enrober; laisser couler
l’excédent de chocolat et placer le morceau de bacon sur
une plaque de pâtisserie recouverte de papier ciré.
6. Faire de même avec tous les morceaux de bacon.
Placer la plaque au réfrigérateur pour faire ger le chocolat,
de vingt à trente minutes.
Page 26

24
Feuilles de menthe enrobées de chocolat
• Se procurer de grandes feuilles de menthe du jardin, bien dénies
et aux veinures bien apparentes.
1. Placer de 2 à 4 oz de chocolat noir dans le pot de grès. Faire fondre
deux fois le chocolat qui servira à enrober. Laisser le chocolat
refroidir au moins quatre heures, puis le fondre de nouveau.
Faire fondre le chocolat deux fois donne une consistance plus
claire et un enrobage plus lisse.
IMPORTANT : Veiller à ne pas verser d’eau dans le chocolat fondu.
2. Tremper à moitié les feuilles de menthe dans le chocolat fondu.
3. Enrober les feuilles de menthe bien sèches en les trempant
dans le chocolat fondu à l’aide de petites pinces. Bien l’enrober;
laisser couler l’excédent de chocolat et placer les feuilles
de menthe sur une plaque de pâtisserie recouverte de papier ciré.
4. Faire de même avec toutes les feuilles de menthe.
5. Placer la plaque au congélateur pour faire ger le chocolat,
environ trente minutes. Utiliser ou servir congelé!
Trempette crémeuse au raifort et aux crevettes
Donne environ 1 1/2 tasse de trempette (ou 4 à 5 portions).
• Un demi-paquet (4 oz)
de fromage à la crème,
coupé en dés.
• 1/4 tasse de sauce cocktail
• 2 c. à soupe de raifort blanc
préparé
• 1/8 tasse de mayonnaise
légère ou régulière
• 2 oignons verts, tranchés
nement
• 4 oz de petites crevettes
à salade cuites et surgelées,
décongelées
• Craquelins ou canapés
1. Mettre les crevettes décongelées dans une passoire.
2. Combiner le fromage à la crème, la sauce cocktail, le raifort,
la mayonnaise et les oignons verts dans le pot-réchaud.
Bien mélanger.
3. Couvrir et chauffer pendant une heure ou jusqu’à ce que
le mélange soit chaud; brasser après 40 minutes.
4. Rincer les crevettes à l’eau chaude. Les verser dans le pot-réchaud
20 minutes avant de servir.
5. Bien mélanger la trempette et la servir avec des craquelins
ou des canapés grillés.
Page 27

21
Garantie limitée de DEUX ANS
SENSIO Inc. assure par la présente que le produit est garanti contre tout défaut de
matériel et de fabrication pendant une période de DEUX ANS à compter de la date
d’achat et contre tout défaut des pièces autres que mécaniques pendant 90 jours. À
son entière discrétion, SENSIO Inc. réparera ou remplacera un produit défectueux, ou
accordera un remboursement pour ce produit, pendant la période de la garantie.
Cette garantie s’applique uniquement à l’acheteur initial du produit, à compter de la
date initiale de l’achat, et est incessible. Pour que la garantie soit valide, l’acheteur doit
conserver le reçu de caisse original. Les magasins de détail qui vendent ce produit
n’ont pas le droit de l’altérer ou de le modier, ni de modier de quelque façon les
modalités de la garantie.
EXCLUSIONS :
La garantie ne couvre pas l’usure normale des pièces ou les dommages causés par
une utilisation négligente du produit, le branchement sur un circuit de tension ou de
courant inapproprié, un entretien de routine inadéquat, une utilisation contraire aux
instructions de fonctionnement, de démontage et de réparation, ou par la modication
du produit par une personne autre qu’un technicien qualié de SENSIO Inc. De plus, la
garantie ne couvre pas les cas de force majeure comme les incendies, les inondations,
les ouragans et les tornades.
SENSIO Inc. ne pourra être tenue responsable de tout dommage indirect ou accessoire
causé par la violation de toute garantie explicite ou implicite. Sauf dans la mesure où
cela est interdit par la loi, toute garantie implicite concernant la valeur commerciale
ou l’adéquation à la n visée se limite à la durée de la garantie. Certains États et
certaines provinces ou compétences administratives ne permettent pas l’exclusion
ou la limitation des dommages indirects ou accessoires, ou les limitations quant
à la durée des garanties implicites; par conséquent, les exclusions ou limitations
mentionnées précédemment peuvent ne pas s’appliquer à vous. La garantie couvre les
droits légaux spéciques qui peuvent varier selon l’état, la province ou la compétence
administrative.
COMMENT OBTENIR UN SERVICE SOUS GARANTIE :
Communiquez avec le service à la clientèle en composant notre numéro sans frais :
1 866 832-4843. Un représentant du service à la clientèle tentera de résoudre par
téléphone les questions relatives à la garantie. Si le représentant du service à la
clientèle est incapable de résoudre le problème, il vous fournira un numéro de
demande et vous informera que vous devez retourner le produit à SENSIO Inc. Apposez
sur le produit une étiquette indiquant votre nom, votre adresse, votre numéro de
téléphone (de jour), le numéro de demande ainsi qu’une description du problème.
Incluez également une copie du reçu de caisse original. Emballez soigneusement
le produit avec son reçu de caisse et faites-le parvenir (port et assurance payés) à
l’adresse de SENSIO Inc. SENSIO Inc. n’assume aucune responsabilité quant au produit
retourné pendant son transport jusqu’au centre de service à la clientèle de SENSIO Inc.
Page 28

26
MEDIDAS DE
SEGURIDAD
IMPORTANTES
ADVERTENCIA: Cuando se utilizan aparatos eléctricos,
se deben seguir precauciones de seguridad básicas,
entre ellas:
1.
LEA TODAS LAS INSTRUCCIONES.
2. No toque las supercies calientes. Utilice las asas
o manijas.
3.
Para protegerse contra descargas eléctricas,
no sumerja el cable, los enchufes ni el aparato en agua
u otros líquidos.
4.
Este dispositivo no está diseñado para ser utilizado
por personas (incluidos niños) con capacidades físicas,
sensoriales o mentales reducidas, o falta de experiencia
y conocimiento, a menos que una persona responsable
de su seguridad los supervise o instruya en el uso
del aparato.
5.
Es necesario supervisar atentamente a los niños si usan
aparatos o están cerca de ellos.
6. Desenchufe el aparato del tomacorriente cuando no
lo use y antes de limpiarlo. Espere a que se enfríe antes
de colocarle o extraerle piezas.
7.
No utilice ningún aparato si el cable o el enchufe están
dañados, o si el aparato no funciona bien, o se ha caído
o dañado de alguna forma.
Llévelo a un técnico calicado para que lo examine,
repare o realice ajustes eléctricos o mecánicos.
8. El uso de accesorios que no estén recomendados por
el fabricante del aparato puede provocar lesiones.
9.
No lo utilice en exteriores.
10. No permita que el cable cuelgue por el borde de
la mesa o mesada, ni que toque las supercies calientes.
11.
No coloque el aparato encima ni cerca de un quemador
eléctrico o de gas calientes, ni en un horno caliente.
Page 29

27
12. Se debe tener sumo cuidado cuando se traslada
un aparato con aceite u otros líquidos calientes.
13.
Para desenchufarlo, quite el enchufe del tomacorriente
de pared.
14. No le dé al aparato otro uso que no sea el indicado.
15. No use la cacerola calentdora si la tapa o la cacerola
de cerámica de gres están agrietadas o dañadas.
PARA USO DOMÉSTICO
úNICAMENTE
GUARDE ESTAS
INSTRUCCIONES
OTRAS MEDIDAS
DE SEGURIDAD
IMPORTANTES
CUIDADO, SUPERFICIES CALIENTES: Este aparato genera
calor y vapor de escape durante el uso. Se deben tomar
las medidas necesarias para evitar riesgos de quemaduras,
incendios u otras lesiones a personas o daño a la propiedad.
1. La persona que no haya leído y comprendido todas
las instrucciones de funcionamiento y seguridad no está
en condiciones de usar este aparato. Todos los usuarios
de este aparato deben leer y comprender este manual
de instrucciones antes de manejar o limpiar la unidad.
2.
Si el aparato se cae o accidentalmente se lo sumerge en
agua, desenchúfelo del tomacorriente inmediatamente.
¡No lo saque del agua!
3. Cuando utilice este aparato, deje suciente ventilación
por encima y alrededor de él para que el aire circule.
No use el aparato si está cerca o en contacto con
cortinas, revestimientos de pared, ropas, paños u otros
materiales inamables.
4. No deje este aparato sin vigilancia durante el uso.
Page 30

28
5. Si este aparato comienza a funcionar mal durante
el uso, desenchufe el cable inmediatamente. No utilice
el aparato ni intente repararlo si funciona mal.
6.
El cable del aparato se debe enchufar únicamente
a un tomacorriente eléctrico de 120 V de CA.
7.
No use el aparato a menos que apoye de
manera estable.
Notas sobre el enchufe
Este aparato tiene un enchufe polarizado (una clavija es
más ancha que la otra). Para reducir el riesgo de descarga
eléctrica, este enchufe se debe colocar en un tomacorriente
polarizado en una sola dirección. Si el enchufe no entra
completamente en el tomacorriente, dé vuelta el enchufe.
Si aun así no encaja, llame a un electricista calicado.
No modique el enchufe de ninguna manera.
Notas sobre el cable
Se debe usar el cable de alimentación corto (o cable
de alimentación separable) para reducir el riesgo
de enredarse o tropezarse con un cable más largo.
No utilice un cable de extensión con este producto.
Advertencia sobre plasticantes
PRECAUCIÓN: A n de evitar que los plasticantes
se adhieran al acabado de la encimera, la mesa u otro
mueble, coloque un posafuentes o salvamanteles que
NO SEA DE PLÁSTICO entre el aparato y la supercie
de la encimera o mesa. Si no se hace esto, es posible
que el acabado se oscurezca; se pueden formar marcas
permanentes o aparecer manchas.
Corriente eléctrica
Si se recarga el circuito eléctrico con otros aparatos,
es posible que este aparato no funcione correctamente.
Se debe utilizar en un circuito eléctrico separado de
los otros aparatos.
Page 31

Page 32

30
ADVERTENCIA: La cacerola debe usarse para CALENTAR CHOCOLATE,
SALSAS O RECUBRIMIENTOS SOLAMENTE. La cacerola NO debe usarse
para cocinar alimentos. NO CUECE CARNE.
Instrucciones de mantenimiento para el usuario
Este aparato requiere de poco mantenimiento. No contiene piezas que
el usuario pueda reparar. No intente reparar la unidad usted mismo.
Cualquier servicio en el que se requiera desarmar la unidad, con la excepción
de la limpieza, debe realizarlo un técnico calicado de reparación de aparatos
eléctricos.
Instrucciones de cuidado y limpieza
PRECAUCIÓN: NUNCA INTRODUZCA LA CACEROLA NI EL CABLE EN AGUA
U OTRO LÍQUIDO.
1. Cuando nalice con el baño o la confección de bombones,
vacíe la cacerola, y descarte el chocolate o la salsa/el dulce de chocolate
que no haya usado. Use una manopla protectora para horno y,
usando toallas desechables limpias, elimine los restos de chocolate,
salsa o recubrimiento de la cacerola de cerámica de gres tibia.
NOTA: Si la mezcla para bombones o el chocolate se endureció, tal vez
deba enchufar la unidad para diluir los restos.
2. Desenchufe la cacerola calentadora y espere hasta que la cacerola
de cerámica de gres y la unidad se enfríen por completo antes de limpiar
o guardar la unidad.
3. Lave a mano la cacerola de cerámica de gres y la tapa, con agua tibia
y jabón. NO LAVE LA UNIDAD EN EL LAVAVAJILLAS.
PRECAUCIÓN: No use la tapa ni la cacerola de cerámica de gres si están
dañadas de alguna manera.
4. Limpie el interior y el exterior de la cacerola de cerámica de gres con
una esponja o paño suave y apenas húmedo, y seque la unidad por
completo. Nunca use esponjas metálicas ni limpiadores abrasivos,
ya que la supercie podría dañarse.
PRECAUCIÓN: NUNCA INTRODUZCA LA CACEROLA NI EL CABLE
EN AGUA U OTRO LÍQUIDO.
Instrucciones de almacenamiento
1. Asegúrese de que todas las piezas estén limpias y secas antes
de almacenarlas.
2. Guarde la cacerola calentadora con la tapa en la caja o en un lugar seco
y fresco.
3. Nunca guarde la cacerola calentadora mientras esté caliente o húmeda.
4. Nunca enrosque el cable alrededor del aparato; guárdelo ligeramente
enrollado.
Page 33

31
Derretir chocolate: consejos para obtener mejores resultados
Esta cacerola calentadora de 65 cuartos (21 onzas) está diseñada para
calentar, contener y hacer de manera ideal salsas, dulces y postres.
Use la cacerola para servir sus fondues preferidas.
1. Mantenga la tapa de la cacerola calentadora cerrada, a n de mantener
el calor y conservar la temperatura ideal para servir.
2. El chocolate debe trozarse en partes iguales, aproximadamente
del tamaño de las chispas de chocolate, para lograr que se derrita
de manera uniforme. Los trozos grandes de chocolate sin picar no se
derretirán debidamente en la cacerola.
3. EVITE TODO CONTACTO CON EL AGUA. Si entra en contacto aunque
sea con unas pocas gotas de agua, el chocolate se apelmazará y no
se podrá trabajar. Asegúrese de que la cacerola de cerámica de gres y
la tapa estén totalmente secos antes de usarlos.
4. Nunca agregue agua a ningún dulce o base de chocolate derretido.
Use aceite, mantequilla o crema/leche para diluir.
5. Revuelva el chocolate con frecuencia usando una espátula de goma,
al menos cada 10 minutos.
IMPORTANTE: Siempre revuelva el chocolate o el dulce mientras lo esté
derritiendo. Para evitar que el chocolate o cualquier preparación dulce
se endurezca y quede inutilizable, revuelva según sea necesario.
6. Para pasar la mezcla para bombones o el chocolate derretido a
los moldes o la placa, utilize una cuchara. Llene el molde o la placa
para bombones hasta el borde superior con la preparación derretido.
Dé unos golpes suaves al molde sobre la supercie de trabajo para
eliminar las burbujas de aire. Lleve al refrigerador hasta que
la preparación se endurezca.
7. Para lograr una presentación divertida, use palitos de brochetas o
de polos para pinchar malvaviscos, cuadrados de torta, frutas o tocino
y bañarlos con la preparación.
8. Bañe los alimentos, como galletas, golosinas, frutas secas, de a uno
por vez. Utilice un pincho para servir con facilidad.
9. Coloque cuidadosamente el alimento bañado sobre un papel de cera
(papel manteca) o sobre una rejilla de enfriamiento, y déjelo que se
endurezca.
10. Use un pincel de repostería para aplicar un baño no de chocolate sobre
supercies delicadas, como las hojas de menta.
11. Al derretir chocolate para baño, repita dos veces el proceso. Deje enfriar
el chocolate al menos durante 4 horas. Luego, vuelva a derretirlo.
Con este segundo paso logrará una mezcla más suelta y agradable.
Page 34

32
Notas sobre el chocolate
Glaseado o baño de chocolate: 1 parte de crema y 3 partes de chocolate.
Relleno para trufas: 1 parte de crema y 2 partes de chocolate.
Relleno liviano: 1 parte de crema y 1 parte de chocolate.
Ganache: El ganache tibio, que no es más que una mezcla de chocolate
y crema bien batida, puede usarse para cubrir tortas o brownies dándoles
un toque delicioso, dulce y brillante. Para hacer trufas, se deja enfriar
el ganache, se toma una porción con una cuchara y se forman pequeñas
esferas. Las trufas rellenas y bañadas son fáciles de preparar y son
una delicada exquisitez de chocolate.
Page 35

33
Recetas
Deliciosas trufas de chocolate blanco
• 1 3/4 taza de chispas
de chocolate blanco
• 1 cucharada sopera de azúcar
impalpable
• 5 cucharadas soperas
de crema batida
• 8 cucharadas soperas
de manteca
• 1/2 cucharadita de esencia
de vainilla
• Cobertura: Azúcar impalpable,
nueces tostadas cortadas en
trozos bien pequeños, coco
dulce, cacao en polvo, virutas
de chocolate, o baño de
chocolate de leche o negro
1. Coloque todos los ingredientes en la cacerola de cerámica de gres
para derretir chocolate.
2. Enchufe la máquina para derretir chocolate en un tomacorriente
de 120 V de CA y cocine la mezcla durante 30 o 35 minutos,
revolviendo con una espátula pequeña para mezclar bien cada
10 minutos.
CUIDADO, SUPERFICIES CALIENTES: Este aparato genera
calor durante el uso. Tenga cuidado cuando manipule la parte
exterior de la unidad.
3. Desenchufe la unidad. Pase el chocolate a un tazón de mezclado.
Agregue esencia de vainilla y cualquier otro saborizante, revuelva
hasta lograr una mezcla bien homogénea. Para evitar burbujas
de aire, no revuelva la mezcla con demasiado vigor.
4. Envuelva el chocolate blanco con un lm plástico y refrigérelo
hasta que esté lo sucientemente rme como para extraer
las porciones con una cuchara, que será de 2 a 4 horas.
5. Use una cucharita o un cucharón de helado para obtener esferas
uniformes de 1 pulgada.
6. Vuelva a refrigerar la preparación durante una hora más en
el refrigerador o 10 minutos en el congelador.
7. Pase las trufas por la cobertura que desee.
8. Guarde las trufas de chocolate blanco en un recipiente hermético
en el refrigerador durante 1 semana como máximo. Manténgalas
en el refrigerador hasta antes de usarlas.
9. Lleve las trufas a temperatura ambiente antes de servirlas.
NOTA: Para saborizar las trufas, agregue 1/2 cucharadita de extracto
o 1 cucharadita de licor cuando añada la esencia de vainilla.
Page 36

34
Mosaicos de chocolate de leche con bastones
de caramelos
• 2 tazas de chispas de
chocolate blanco
• 1/2 taza de bastones de
caramelos de menta triturados
1. Forre una placa de horneado con papel de cera (manteca).
2. Enchufe la máquina para derretir chocolate en un tomacorriente
de 120 V de CA y cocine la mezcla durante 30 o 35 minutos,
revolviendo con una espátula pequeña para mezclar bien cada
10 minutos.
CUIDADO, SUPERFICIES CALIENTES: Este aparato genera
calor durante el uso. Tenga cuidado cuando manipule la parte
exterior de la unidad.
3. Vierta el chocolate derretido sobre el papel de cera.
Desparrame la mezcla con una espátula dándole el espesor
deseado. Sacuda con suavidad la placa para que el espesor
quede uniforme.
4. Espolvoree con bastones de caramelo triturados sobre
el chocolate húmedo.
5. Enfríe la placa durante 30 minutos o hasta que esté rme.
6. Use el papel de cera para despegar la preparación de la placa
y quiébrela en trozos.
7. Guarde los mosaicos en un recipiente hermético, intercalándolos
con papel de cera.
NOTA: Use chocolate blanco o negro. En lugar de los caramelos
de menta, puede optar por nueces tostadas, cereales o frutas secas,
para crear su mosaico de chocolate preferido.
Page 37

35
Salsa de caramelo deliciosa y fácil de hacer
Rinde: 3/4 taza
• 2/3 de taza de azúcar morena
compacta
• 1/2 taza de mezcla de crema
y leche
• 4 cucharadas soperas de
manteca
• 1 pizca de sal
• 1 cucharada sopera de esencia
de vainilla
1. Coloque todos los ingredientes, menos la esencia de vainilla,
en la cacerola para derretir chocolate.
2. Enchufe la máquina para derretir chocolate en un tomacorriente
de 120 V de CA y cocine la mezcla durante 30 o 35 minutos,
revolviendo con una espátula pequeña para mezclar bien cada
10 minutos.
CUIDADO, SUPERFICIES CALIENTES: Este aparato genera
calor durante el uso. Tenga cuidado cuando manipule la parte
exterior de la unidad.
3. Agregue la vainilla y cocine la preparación otro minuto para que
se espese más.
4. Desenchufe la unidad, deje enfriar un poco la salsa y viértala en
un recipiente hermético.
5. Deje reposar la preparación en el refrigerador hasta que se enfríe.
6. El sobrante de la salsa de caramelo se puede refrigerar en
un recipiente hermético durante 2 semanas como máximo.
Page 38

36
Frutillas bañada en chocolate con chile
• 6 onzas de chocolate agridulce
triturado
• 3 cucharadas soperas de
crema doble
• 1 cucharada sopera de
mantequilla
• 3 cucharaditas de chile
poblano en polvo
• 1 cucharadita de canela
• 10 frutillas grandes de cabo
largo, lavadas y secas por
completo
1. Coloque todos los ingredientes en la cacerola de cerámica de gres
para derretir chocolate.
2. Enchufe la máquina para derretir chocolate en un tomacorriente
de 120 V de CA y cocine la mezcla durante 30 o 35 minutos,
revolviendo con una espátula pequeña para mezclar bien cada
10 minutos.
CUIDADO, SUPERFICIES CALIENTES: Este aparato genera
calor durante el uso. Tenga cuidado cuando manipule la parte
exterior de la unidad.
IMPORTANTE: Asegúrese de que las frutillas estén bien secas
antes de sumergirlas en el baño. Sostenga la frutilla por el cabo
y sumérjala en el chocolate derretido.
3. Báñela bien, deje escurrir el chocolate sobrante y colóquela
sobre una placa revestida con papel de cera. Haga lo mismo
con todas las frutillas. Llévelas al refrigerador durante 30 minutos
para asentarlas.
Al derretir chocolate para el baño, repita el proceso dos veces.
Deje enfriar el chocolate al menos durante 4 horas. Luego, vuelva
a derretirlo. Con este segundo paso logrará una mezcla más suelta
y agradable.
Page 39

37
Tocino bañado en chocolate
• 16 fetas gruesas de tocino
Applewood ahumado
• 2 tazas de chocolate
semiamargo, negro o de leche,
de buena calidad, triturado
IMPORTANTE: Para evitar que el tocino se quiebre, siempre use
fetas gruesas.
1. Coloque el chocolate en la cacerola para derretirlo.
2. Enchufe la máquina para derretir chocolate en un tomacorriente
de 120 V de CA y cocine la mezcla durante 30 o 35 minutos,
revolviendo con una espátula pequeña para mezclar bien cada
10 minutos.
CUIDADO, SUPERFICIES CALIENTES: Este aparato genera
calor durante el uso. Tenga cuidado cuando manipule la parte
exterior de la unidad.
3. Mientras el chocolate se derrite, cocine el tocino hasta que esté
crocante.
4. Agregue 1 cucharadita de grasa de tocino al chocolate para
diluirlo.
5. Escurra el tocino sobre una bolsa de papel madera, déjelo enfriar
y córtelo en mitades.
6. Con unas pinzas pequeñas, sumerja el tocino cocido en
el chocolate derretido. Báñelo bien, deje escurrir el chocolate
sobrante y coloque el tocino bañado sobre una rejilla metálica
de enfriamiento. Haga lo mismo con todas las fetas de tocino.
Lleve la placa al refrigerador durante unos 20 o 30 minutos para
asentar el contenido.
Page 40

38
Hojas de menta bañadas en chocolate
• Recoja del jardín hojas de menta grandes, con buena nervadura
y forma bien denida.
1. Coloque de 2 a 4 onzas de chocolate negro en la cacerola para
derretirlo. Al derretir chocolate para el baño, repita el proceso
dos veces. Deje enfriar el chocolate al menos durante 4 horas.
2. Luego, vuelva a derretirlo. Con este segundo paso logrará
una mezcla más suelta y agradable.
IMPORTANTE: Tenga la precaución de que no caiga nada de agua
en el chocolate derretido.
3. Con unas pinzas pequeñas, sumerja las hojas de menta en
el chocolate derretido.
4. Báñelas bien, deje escurrir el chocolate sobrante y coloque
las hojas de menta bañadas sobre una placa revestida con papel
de cera. Haga lo mismo con todas las hojas de menta.
5. Lleve la placa al congelador durante unos 30 minutos para asentar
las hojas.
6. Úselas o sírvalas congeladas.
Salsa cremosa de camarones y rábano picante
Rinde aproximadamente 1-1/2 tazas de salsa o 4 a 5 porciones.
• 1/2 paquete (4 onzas) de queso
crema, cortado en cubos
de 1/2 pulgada
• 1/4 taza de salsa rosa
• 2 cucharadas de rábano
picante blanco preparado
• 1/8 taza de mayonesa liviana
o común
• 2 cebollas de verdeo cortadas
en rodajas nas
• 4 onzas de camarones
pequeños para ensalada
congelados, descongelados
• Galletas o croutons
1. Coloque los camarones descongelados en un colador.
2. Coloque el queso crema, la salsa rosa, el rábano picante,
la mayonesa y las cebollas de verdeo en la olla de cocción
y mezcle bien.
3. Coloque la tapa y cocine durante 1 hora o hasta que esté caliente
y revuelva después de los 40 minutos de cocción.
4. Enjuague los camarones con agua caliente. Agréguelos a la olla
de cocción 20 minutos antes de servir.
5. Revuelva la salsa y sirva con galletas o croutons tostados.
Page 41

Garantía limitada de DOS AÑOS
Mediante la presente, SENSIO Inc. garantiza que, durante el plazo de DOS AÑOS a
partir de la fecha de compra, este producto no presentará defectos mecánicos en el
material ni en la mano de obra, y durante 90 días, no los presentará en las piezas no
mecánicas. A su entera discreción, SENSIO Inc. reparará o reemplazará el producto
que resulte defectuoso, o emitirá un reembolso por el producto durante el plazo de
garantía.
Esta garantía es válida únicamente para el comprador minorista original a partir de la
fecha de compra minorista inicial y no es transferible. Conserve el recibo de compra
original, ya que se exige una prueba de compra para obtener la validación de la
garantía. Las tiendas minoristas no tienen derecho a alterar, modicar ni corregir de
ninguna manera los términos y condiciones de la garantía.
EXCLUSIONES:
La garantía no cubre el desgaste normal de las piezas ni el daño ocasionado por
cualquiera de las siguientes causas: uso negligente del producto, uso de un voltaje
o corriente incorrectos, mantenimiento de rutina inadecuado, uso contrario al de
las instrucciones de funcionamiento, desarmado, reparación o alteración a cargo de
personas que no sean miembros del personal calicado de SENSIO Inc. Asimismo, la
garantía no cubre actos de la naturaleza, como incendios, inundaciones, huracanes o
tornados.
SENSIO Inc. no asumirá responsabilidad por daños incidentales o resultantes
ocasionados por la violación de cualquier garantía expresa o implícita. Salvo en
la medida en que lo prohíban las leyes aplicables, cualquier garantía implícita de
comerciabilidad o aptitud para un propósito particular se limita temporalmente a la
duración de la garantía. Algunos estados, provincias o jurisdicciones no permiten la
exclusión ni la limitación de daños incidentales o resultantes, o limitaciones sobre
la duración de una garantía implícita y, por lo tanto, es posible que las exclusiones o
limitaciones mencionadas no le correspondan. La garantía cubre derechos legales
especícos que pueden variar de un estado, una provincia o una jurisdicción a otros.
CÓMO OBTENER EL SERVICIO DE GARANTÍA:
Debe comunicarse con el Servicio de atención al cliente a nuestro número telefónico
gratuito: 1-866-832-4843. Un representante del Servicio de atención al cliente intentará
resolver los problemas referidos a la garantía por teléfono. Si este no puede resolver
el problema, le proporcionarán un número de caso y le solicitarán que devuelva el
producto a SENSIO Inc. Adhiera una etiqueta al producto que incluya: su nombre,
dirección, número telefónico de contacto durante el día, número de caso y descripción
del problema. Además, incluya una copia del recibo de compra original. Envuelva
cuidadosamente el producto etiquetado con el recibo de compra, y envíelo (con el
envío y el seguro prepagados) a la dirección de SENSIO Inc. SENSIO Inc. no asumirá
obligación ni responsabilidad alguna por el producto devuelto que esté en el trayecto
hacia el Centro de servicio al cliente de SENSIO Inc.
Page 42

Page 43

41
Page 44

 Loading...