

Belkin F5D8230, Wireless Pre-N Router User Manual

without cables
Wireless Pre-N Router

Advantages of a Wireless Network
Te
. . . . . . . . . . . . . . . . . . . . . . . . . . . . . . . . . .
. . . . . . . . . . . . . . . . . . . . . . . . . . . . . . . . .
. . . . . . . . . .
Viewing the DHCP Client List Page
. . . . . . . . . . . . . . . . . . . . . . . . . . .
. . . . . . . . . . . . . . . . . . . . . . . . .
with AOL
. . . . . . . . . . . . . . . . . . . . . . . . . . . . . . . . .

2
1
3
4
5
6
7
8
9
10
11
section
Thank you for purchasing the Belkin Wireless Pre-N Router (the
that maximize your wireless home network range and performance.
following our simple setup instructions you will be able to use your
Wireless Network:
– you’ll no longer need a dedicated “computer room”—now
you can work on a networked laptop or desktop computer anywhere
within your wireless range
– Belkin’s Easy Installation Wizard makes
– set up and access printers, computers, and other
– the wide range of Belkin networking products let
you expand your network to include devices such as printers and
– you can spare the expense and hassle of
Widespread industry acceptance
– choose from a wide range of

Introduction
with MIMO
Your Belkin Wireless Pre-N Router uses a new smart antenna
technology called Multiple Input Multiple Output (MIMO). MIMO is a
The element that makes Belkin’s Pre-N MIMO technology different
from a conventional radio is the use of three antennas and two
transmitting two data streams through the same channel, which
Think of conventional radio transmission as a two-lane highway. The
that lane. Compared with conventional radios, one-dimensional smart
traffic move at the speed limit and opens more lanes—to become the
the number of lanes that are opened.
V.K. Jones showed that a characteristic of radio transmission called
would be as if each route were a separate virtual wire. A channel with

2
1
3
4
5
6
7
8
9
10
11
section
Introduction
To exploit the benefits the virtual wires offer, MIMO uses multiple,
Wireless is not as well-behaved as a bundle of wires. Each signal
transmitted in a multipath environment travels multiple routes. This
The MIMO receiver uses mathematical algorithms to unravel and

Introduction
Your wireless connection will be stronger the closer your computer is
to your Router (or Access Point). Typical indoor operating range for
wireless devices is between 100 and 200 feet.
While some of the items listed below can affect network
functioning; if you are concerned that your network is not operating at
wireless network devices.
To achieve the best wireless network coverage for your “wireless
vertically (toward the ceiling). If your Router (or Access Point)
floor that is as close to the center of the home as possible.
This may mean placing the Router (or Access Point) on an

2
1
3
4
5
6
7
8
9
10
11
section
Introduction
Avoid placing your Router (or Access Point) near devices that may
your computers and Router or Access Point)
your wireless adapter to locate any other wireless networks that

Introduction
your Router (or Access Point) and computers to a channel as far
from neighboring cordless phones or other wireless devices.
wireless network card. See your network card’s user guide for
These guidelines should allow you to cover the maximum possible
A second alternative is to change your computer’s power

2
1
3
4
5
6
7
8
9
10
11
section
Introduction
website at
www.belkin.com/networking
or call Belkin Technical
310-898-1100 ext.2263
Australia: 1800 235 546

your new Belkin Wireless Pre-N Router an ideal solution for your home
Works with Both PCs and Mac
Computers
The Router supports a variety of networking environments including
®
®
95, 98, Me, NT
®
TCP/IP (the standard language of the Internet).
Web-Based Advanced User Interface
You can set up the Router’s advanced functions easily through your
web browser, without having to install additional software onto the
Your Router employs Network Address Translation (NAT) to share the
while saving the cost of adding additional IP addresses to your
SPI Firewall
Your Router is equipped with a firewall that will protect your network
from a wide array of common hacker attacks including IP Spoofing,

2
1
3
4
5
6
7
8
9
10
11
section
The Router has a built-in, four-port network switch to allow your wired
the speed of connected devices. The switch will transfer data between
Support for VPN Pass-Through
for the easiest possible connection of a network. The DHCP server
will assign IP addresses to each computer automatically so there is no
The Easy Install Wizard takes the guesswork out of setting up your
you and sets up the Router for connection to your Inter net Service
Easy Install Wizard software is compatible with Windows 98SE,

to bring you this unique feature. Your Belkin Wireless Pre-N Router is
the first home networking solution with an integrated web content filter
that allows you to block unwanted or offensive web content before it
you will never be charged a per-computer fee for the service. Your
that was visited from your network (refer to your Parental Control User
Product Overview

2
1
3
4
5
6
7
8
9
10
11
section
System Requirements
with RJ45 (Ethernet) connection
®
98SE, Me, 2000, or XP, or a Mac
®
®
9.x or OS X

Knowing your Router
The Router has been designed to be placed on a desktop. All of the
to provide you with information about network activity and status.
The Router has been designed to be placed on a desktop. All of the
to provide you with information about network activity and status.
2
1
3
4
5
6
7
8
9
10
11
section
Knowing your Router
Wireless network is OFF
Wireless network is ready
This LED lights in GREEN to indicate that your modem is
the modem.
to the modem
These LEDs are labeled 1– 4 and correspond to the numbered
AMBER means a 100Base-T device is connected. When

Knowing your Router
These ports are RJ45, 10/100 auto-negotiation, auto-uplinking

2
1
3
4
5
6
7
8
9
10
11
section
Knowing your Router
This port is for connection to your cable or DSL modem. Use the
to this port. Use of a cable other than the cable supplied with the
The “Reset” button is used in rare cases when the Router may
function improperly. Resetting the Router will restore the Router’s
forgotten your custom password.
the lights stop blinking, the reset is complete.
will momentarily flash. When the lights stop blinking, the reset

Verify the contents of your box. You should have the following:
the computer)
Your cable or DSL modem must be equipped with an RJ45 Ethernet port.
you can, in some cases, purchase a modem that has an RJ45 Ethernet
Ethernet USB
your Router a simple and easy task. You can use it to get your Router
Windows 98SE, Me, 2000, or XP computer be connected directly to
your cable or DSL modem and that the Internet connection is active
your Router. Additionally, if you are using an operating system other
than Windows 98SE, Me, 2000, or XP, you must set up the Router

2
1
3
4
5
6
7
8
9
10
11
section
Run the Easy Install Wizard from the computer
that is directly connected to the cable or DSL modem.
Step 1
Run the Easy Install Wizard Software
Shut down any programs that are running on your computer at
this time.
2.
Make sure you have the following items at the computer that is now
THE ROUTER AT THIS TIME.
Turn off any firewall or Internet-connection-sharing software on
your computer.
Insert the Easy Install Wizard software CD into your CD–ROM drive.
The Easy Install Wizard screen will automatically appear on your
from “My Computer” and double-click on the file named “Setup” on
the CD-ROM.
Follow the Easy Install Wizard to complete the installation

Connecting and Configuring your Router
Welcome Screen
After you insert the CD into your CD-ROM drive, the Wizard’s welcome
this point. If you have connected
your Router, please reconnect
your computer directly to the
The Wizard will now examine your
to the Internet. When the Wizard is
finished examining your computer,

2
1
3
4
5
6
7
8
9
10
11
section
Connecting and Configuring your Router
This screen will appear ONLY if you have more than one network
the Wizard will need to know which
the adapter at the top of the list. If you
Hardware Setup – Connect the Router to your
The Wizard will walk you through connecting your Router to your
This step instructs you to locate
the cable connected between your
your computer. Unplug this cable
from the computer and plug it into
the GREEN port on the Router.

Connecting and Configuring your Router
This step instructs you to locate
the BLUE cable that is included
with your Router. Plug one end
the other end of the cable into the
This step instructs you to locate
the power supply that is included
with your Router. Plug the power
This step instructs you to look at
the lights on the front of your

2
1
3
4
5
6
7
8
9
10
11
section
Connecting and Configuring your Router
Step 3
Checking the Connection
Once you have completed
will check the connection to the
what type of Internet connection
you have.
User Name and Password Needed
Your user name and password is
type in a user name and password
to connect to the Internet, then
type that same user name and
your service name, leave this

Connecting and Configuring your Router
This Step Is Optional. Click
Using this step, you can
the steps on the screen to
to continue.
Step 4
Configuring the Router
The Wizard will now transfer all of the configuration information to the
The Wizard will now check for
take a few minutes. The Wizard
the front panel of the Router will
flash during this time. Please be

2
1
3
4
5
6
7
8
9
10
11
section
Connecting and Configuring your Router
When the Internet connection
you that you are finished. The
the Router will be solid GREEN,
Your Router is now connected to the Internet. Now you can begin
web page.
You have finished installing your new Belkin Router.
You are ready to set up the other computers in your home. You can
Alternate Setup Method
Step 1
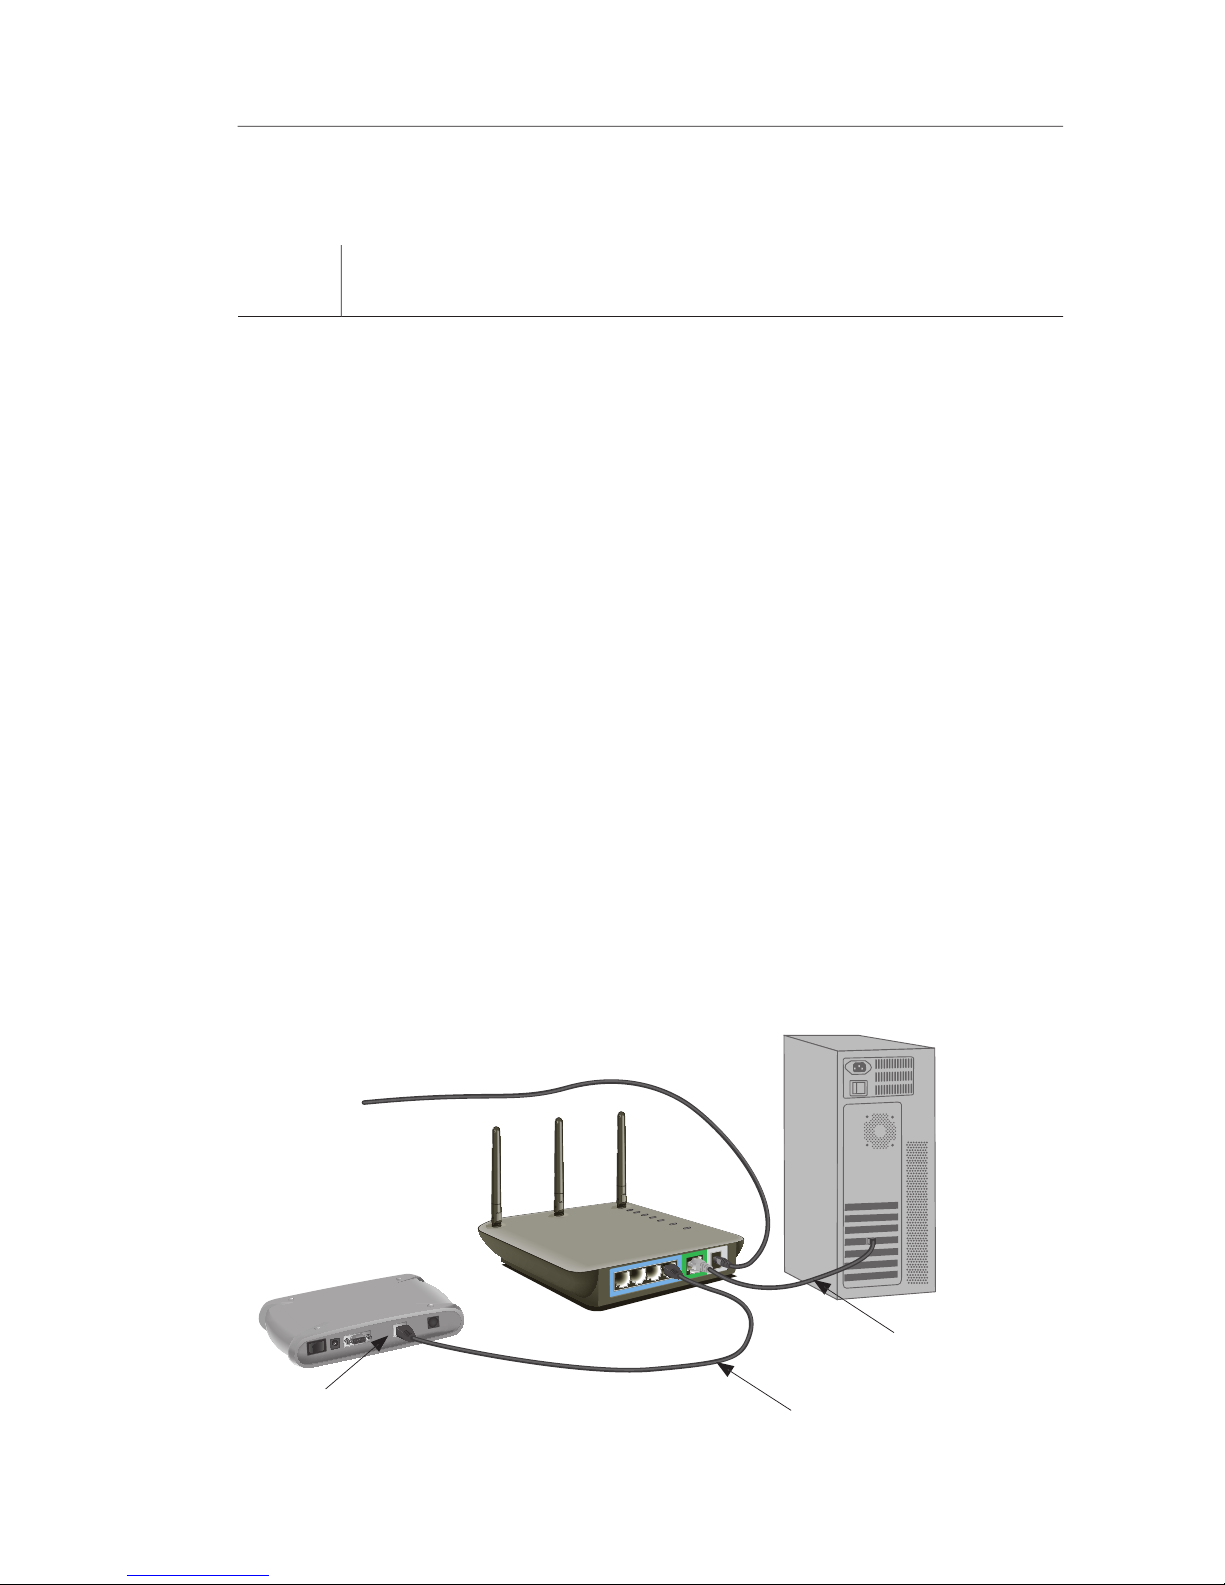
Connecting your Gateway Router
Turn off the power to your modem by unplugging the power supply
from the modem.
Locate the network cable that is connected between your modem
Plug the loose end of the cable you just unplugged into the port on
the back of the Router labeled “Internet/WAN”.
Connect a new network cable (not included) from the back of the
which numbered port you choose.
Turn your cable or DSL modem on by reconnecting the power
Before plugging the power cord into the Router, plug the cord into
the wall, then plug the cord into the Router’s power jack.
Supplied Blue Ethernet
was originally

2
1
3
4
5
6
7
8
9
10
11
section
Alternate Setup Method
Verify that your modem is connected to the Router by checking
the lights on the TOP of the Router. The green light labeled “WAN”
Verify that your computer is connected properly to the Router
Step 2
Set your Computer’s Network Settings to Work
with a DHCP Server
Step 3
Configuring the Router Using the Web-Based
Advanced User Interface
Advanced User Interface. In your browser, type “192.168.2.1” (do

Alternate Setup Method
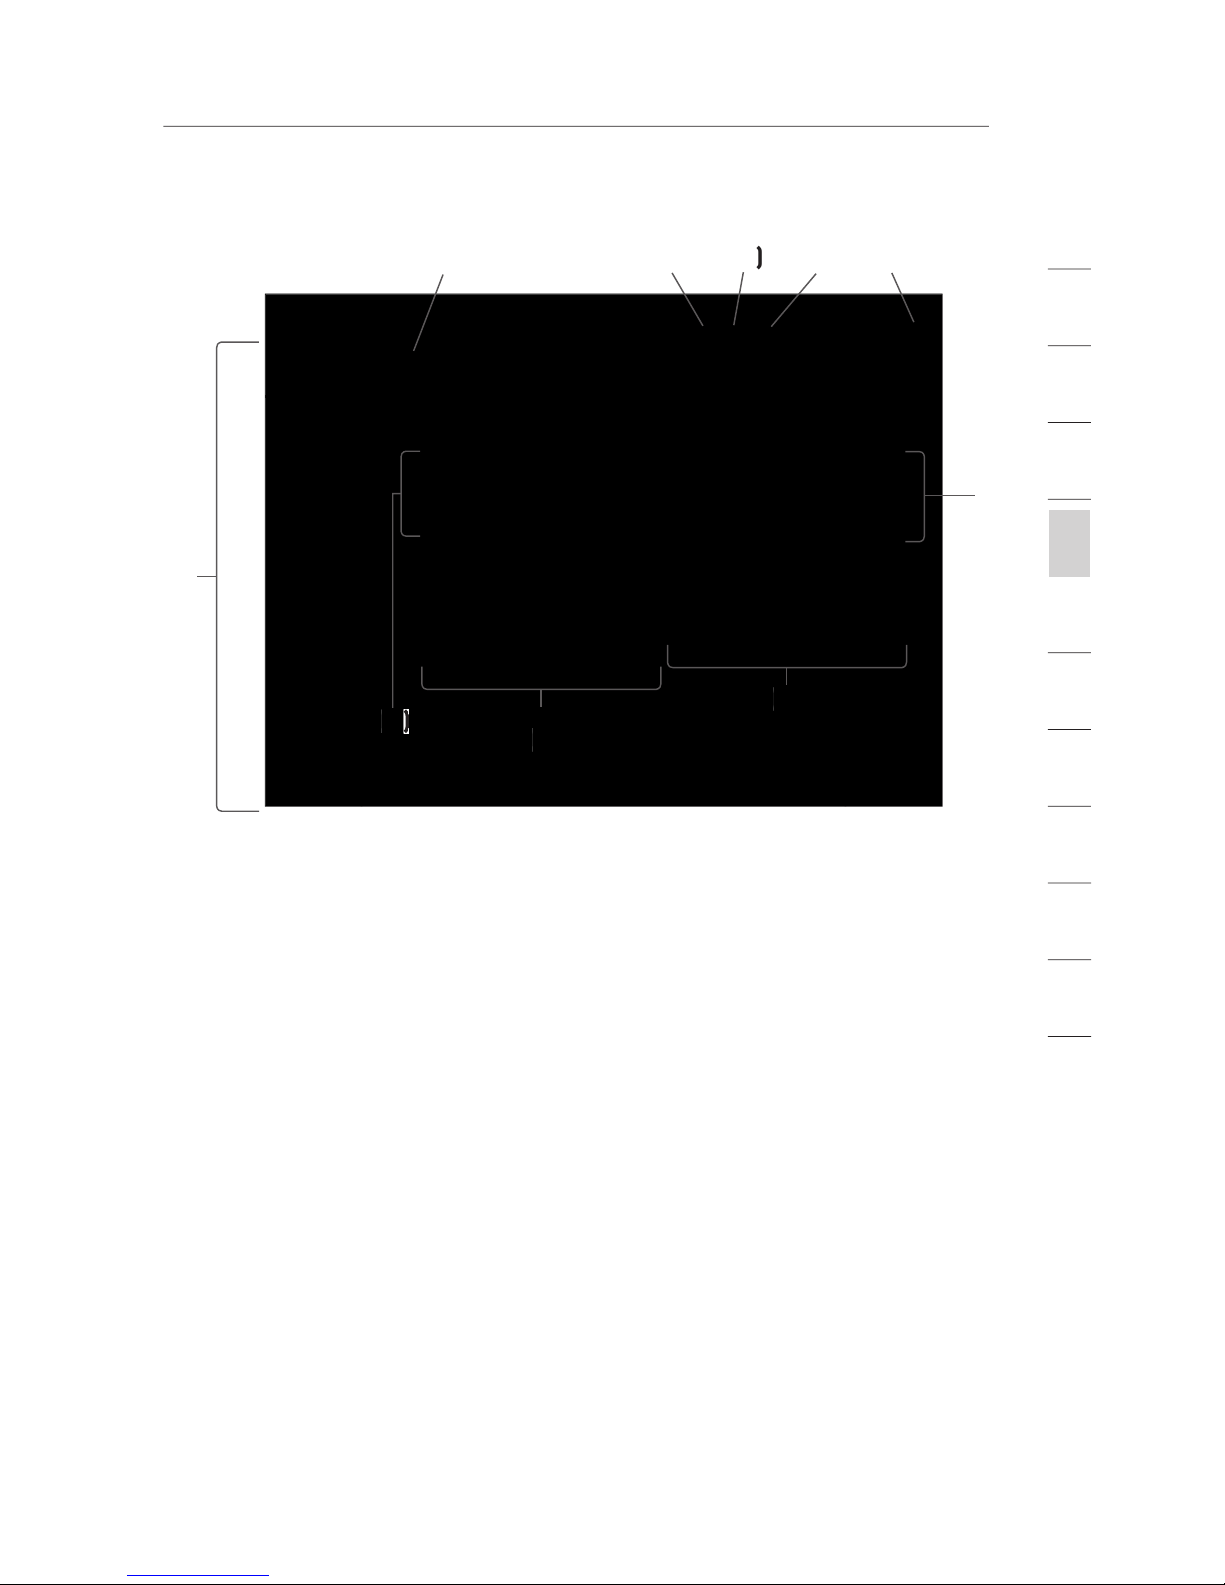
You will see the Router’s home page in your browser window. The
will take you to the login screen. The Router ships with no password
The home page is the first page you will see when you access the
Advanced User Interface (UI). The home page shows you a quick view
2
1
3
4
5
6
7
8
9
10
11
section
Alternate Setup Method
You can go directly to any of the Router’s advanced UI pages by
will show you a short description of the tab’s function.
The home button is available in every page of the UI. Pressing this
This indicator is visible in all pages of the Router, indicating
the connection status of the Router. When the indicator says
the Router.
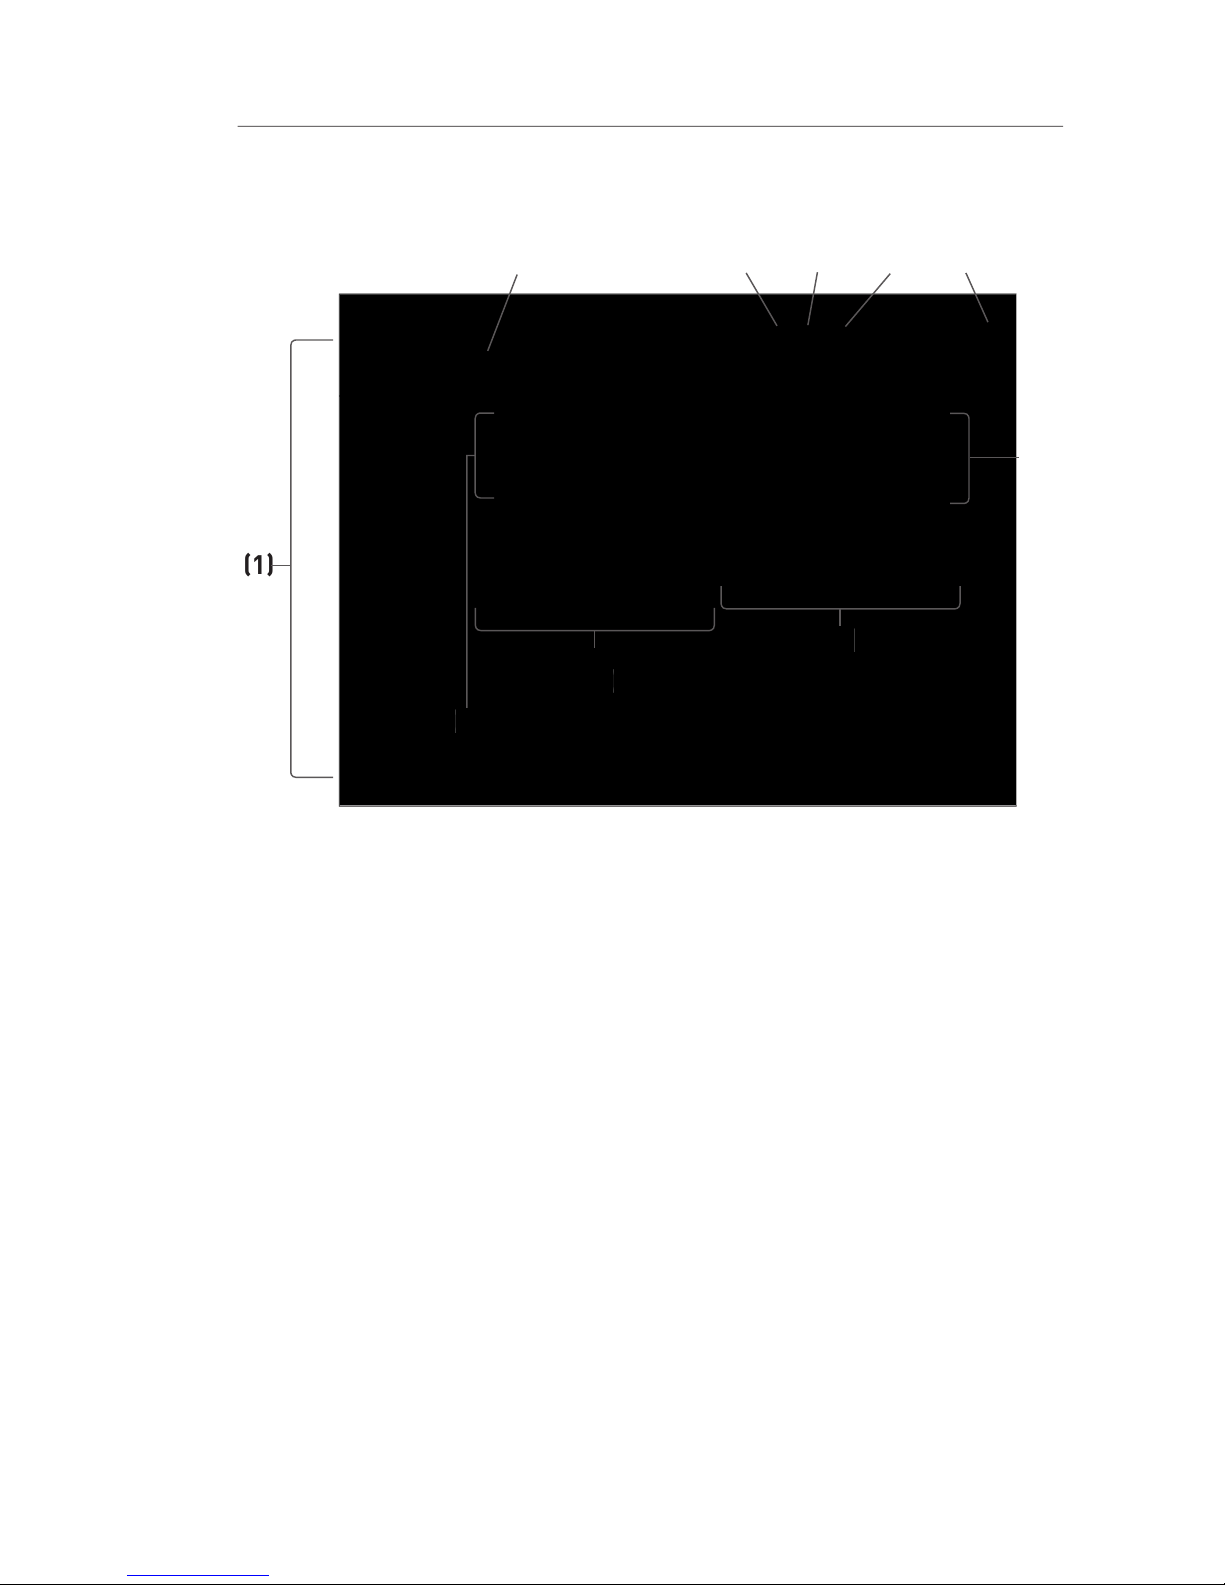
Alternate Setup Method
This button enables you to log in and out of the Router with the
take you to a separate login page where you will need to enter a
you can log out of the Router by clicking the “Logout” button. For
The “Help” button gives you access to the Router’s help pages.
to certain sections of each page.
the Router. Changes can be made to the settings by clicking on
 Loading...