

BELKIN BOÎTIER DE COMMUTATION KVM À 2 PORTS OMNIVIEW E, BOÎTIER DE COMMUTATION KVM À 4 PORTS OMNIVIEW E, SWITCH KVM 2 PORTS OMNIVIEW E (AVEC 2 CÂBLES), SWITCH KVM 4 PORTS OMNIVIEW E (AVEC 4 CÂBLES) User Manual
OmniView® E Series
EN
FR
dENlEs
it
KVM Switch
F1DB102P2ea
User Manual
F1DB104P2ea
F1DB102P2eaB
F1DB104P2eaB

Table of Contents
1. Introduction .......................................................................................1
Package Contents ......................................................................1
2. Overview ...........................................................................................2
Feature Overview ........................................................................2
Equipment Requirements ............................................................3
System Requirements .................................................................4
Unit Display Diagrams ................................................................5
Specifications .............................................................................6
3. Installation ........................................................................................7
Pre-Configuration .......................................................................7
Installation Guide ........................................................................7
Powering Up the Systems ........................................................10
4. Using your E Series KVM Switch ......................................................11
Selecting a Computer Using the Selector Button .......................11
Selecting a Computer Using Keyboard Hot-Key Commands ......11
LED Display ..............................................................................12
AutoScan Mode ........................................................................12
Keyboard Hot-Key-Command Shortcut Reference .....................13
5. Frequently Asked Questions ............................................................14
6. Troubleshooting ..............................................................................15
7. Glossary ..........................................................................................17
8. Information .....................................................................................18

Introduction
+6-#ABLE+ITS
&$"0"ONLY
+6-#ABLE+ITS
&$"0"ONLY
5SER-ANUAL
/MNI6IEW%3ERIES
+6-3WITCH
Congratulations on your purchase of this
Belkin OmniView KVM Switch (the KVM
Switch). Our diverse line of KVM solutions
exemplifies the Belkin commitment to
delivering high-quality, durable products
at an affordable price. Designed to give
you control over multiple computers from
one console, Belkin KVM switches come
in a variety of capacities suitable for all
configurations, large or small. This compact,
affordable KVM switch is backed by a Belkin 2-Year
Warranty and free technical support.
This User Manual will provide details about your new E Series KVM Switch, from
installation and operation to troubleshooting—in the unlikely event of a problem.
Thank you for purchasing the Belkin OmniView E Series KVM Switch. We
appreciate your business and have confidence that you will soon see for yourself
why Belkin is the number-one-selling brand in KVM switches worldwide.
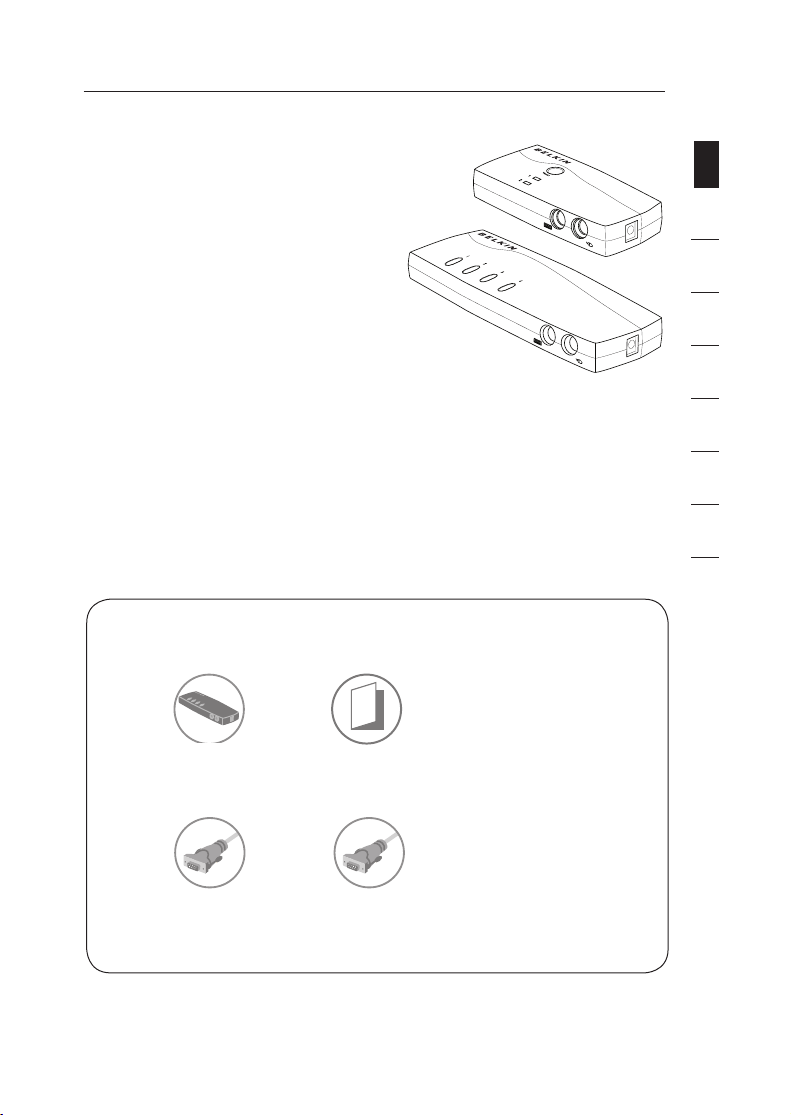
Package Contents
section
1
2
3
4
5
6
7
8
OmniView E Series
KVM Switch
2 KVM Cable Kits
(F1DB102P2eaB only)
User Manual
4 KVM Cable Kits
(F1DB104P2eaB only)
EN-1

EN-2
Overview
Feature Overview
• Hot Keys
Hot-key functionality allows you to select a desired port using designated
key commands. Control up to four computers, depending on the KVM Switch
model, using simple hot-key sequences on your keyboard. Full hot-key
instructions and commands are listed in this manual, on page 13.
• AutoScan
The AutoScan feature allows you to automatically scan and monitor the
activities of all connected computers, one by one.
• Video Resolution
The E Series KVM Switch supports video resolutions of up to
1920x1440@75Hz.
• Front-Panel Push Buttons
Push buttons, conveniently located on the front panel of the E Series KVM
Switch, allow for simple, manual port selection.
• LED Display
An LED display on the front panel of the E Series KVM Switch serves as
a status monitor. An LED illuminates to indicate the console that currently
controls the corresponding computer.
1
2
3
4
5
6
7
8
section
EN-3
Overview
Equipment Requirements
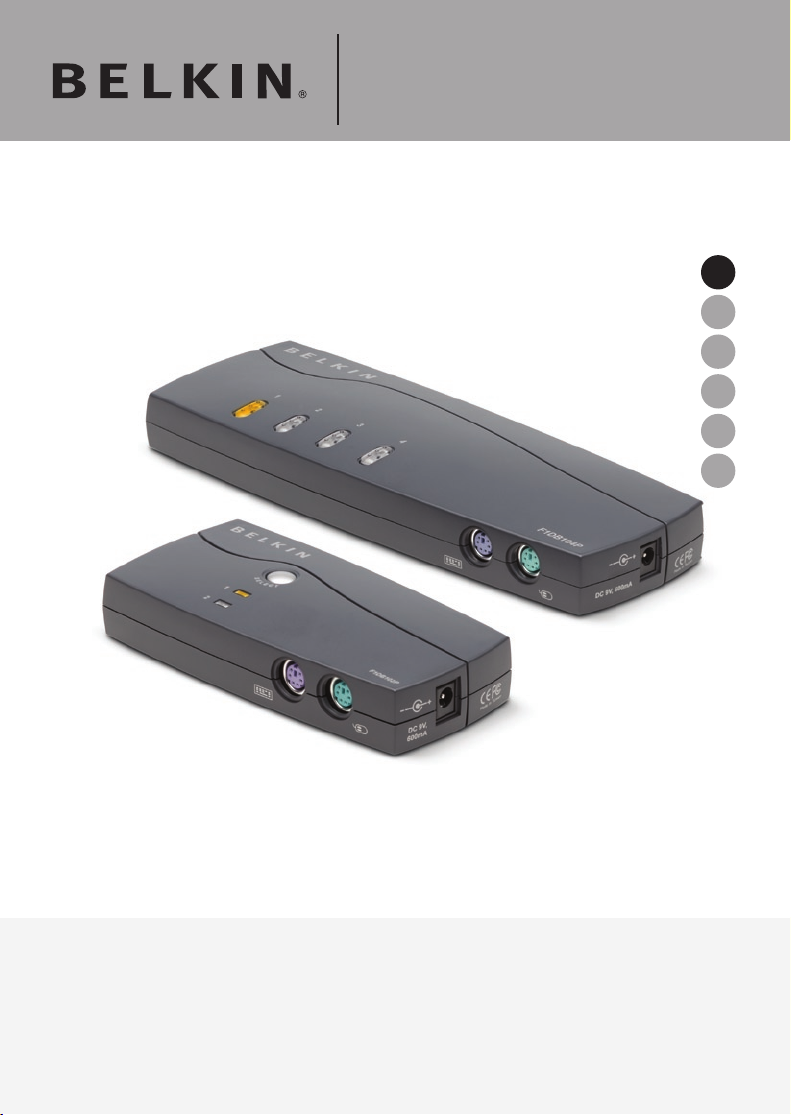
Cables:
Connecting the E Series KVM Switch to a computer requires a Belkin KVM Cable
Kit.
Belkin E Series Cable Kits:
F1D9002-XX (PS/2-style)
F1D9002x06 (PS/2-style)
(-XX denotes length in feet)
F1D9002-XX (PS/2-style)

EN-4
Overview
System Requirements
OS Platforms
The E Series KVM Switch is compatible with CPUs running on, but not limited to,
the following OS platforms:
• Windows® NT®, 2000, XP, Server 2003, or Vista
• Microsoft® DOS 5.x and above
• Red Hat® Linux® 8.x and above
Keyboards
• PS/2-compatible
• Supports 101-/102-/104-/106-standard-key keyboards
Mice
• PS/2-compatible mice having 2, 3, 4, or 5 buttons
• PS/2-compatible wireless or optical mice
Monitors
• CRT
• LCD (with VGA support)
Optional Power Supply
An optional 5V 2.5A power supply is available (Belkin Part number F1D065-PWR-GM
(With Schuko Plug) and F1D065-PWR-UK (With UK Plug)). This is only required in
rare cases where the power output from the connected computer is not adequate to
power the KVM Switch.
TM
1
2
3
4
5
6
7
8
section
EN-5
Overview
#/.3/,% 0# 0# 0# 0#
#/.3/,% 0# 0# 0# 0#
#/.3/,%
0# 0#
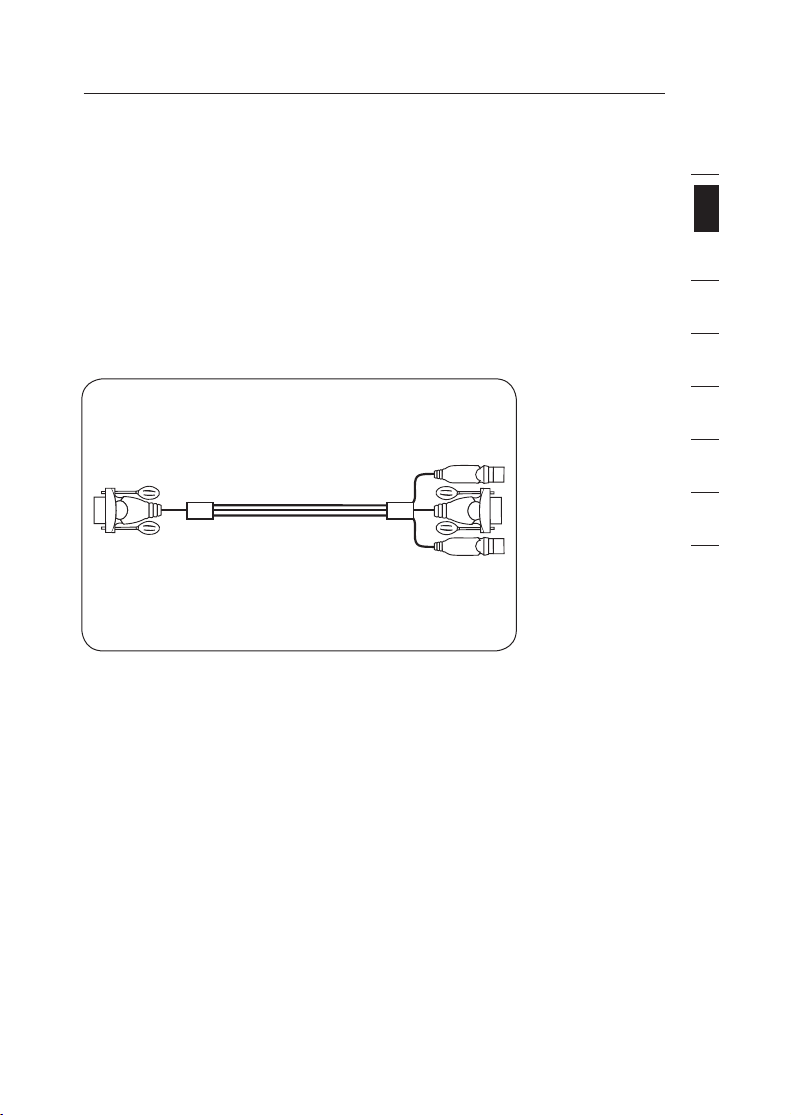
Unit Display Diagrams
Front/Rear View of the 4-Port E Series KVM Switch:
Direct-Access
Port Selector
Console Monitor
Port
Front/Rear View of the 2-Port E Series KVM Switch:
Port Selector
Console Monitor
Port
PC
Ports
Console Keyboard
PC
Ports
and Mouse
LED for Selected
Port Identification
Console keyboard
and mouse

Overview
Specifications
Part No.: F1DB102P2, F1DB104P2
Enclosure: High-impact plastic
Power: By PS/2 computer keyboard port; optional 5V DC,
No. of Computers Supported: 2 and 4 respectively for 2- and 4-port models
Monitors Supported: CRT and LCD (with VGA support)
Max. Resolution: Up to 1920x1440 @ 75Hz
Keyboard Input: PS/2 (miniDIN6)
Mouse Input: PS/2 (miniDIN6)
Monitor Port: VGA (HDDB15 female)
PC Ports: HDDB15 female
Operating Temp: 32° to 104° F (0~40° C)
Storage Temp: -4° to 140° F (20~60° C)
Humidity: 0-80% RH, non-condensing
Warranty: 2 years
Dimensions: (F1DB102P2) 5.2 x 2.5 x 1 in
Weight: (F1DB102P2) 7.2oz
(F1DB104P2) 4.2oz.
2.5A power adapter, centre-pin-positive polarity
(F1DB104P2) 8.5 x 3.2 x 1 in.
Note: Specifications are subject to change without notice.
EN-6

Installation
Pre-Configuration
Where to Place the KVM Switch
The OmniView E Series KVM Switch is designed to sit on top of your desktop.
Where you place the KVM Switch will be based on the location of your CPUs and
the length of your cables.
Consider the following when deciding where to place the KVM Switch:
• whether or not you intend to use the direct-access port selectors
• the lengths of the cables attached to your keyboard, monitor, and mouse
• the location of your computers in relation to your console
• the lengths of the cables you use to connect your computers to the KVM Switch
Cable-Distance Requirements:
For PS/2 Computers:
VGA signals transmit best up to 25 feet (7.6m). Beyond that length, the
probability of video degradation increases. For this reason, Belkin recommends
that the length of the cables between the KVM Switch and the connected
computers does not exceed 25 feet (7.6m).
Note: The Belkin OmniView CAT5 Extender (F1D084vea2) may be used to extend
your console (keyboard, mouse, and monitor) by up to 300 feet (91m).
Cautions and Warnings!
Avoid placing cables near fluorescent lights, air-conditioning equipment, or
machines that create electrical noise (e.g., vacuum cleaners).
1
2
section
3
4
5
6
7
8
Installation Guide
You are now ready to begin installation of your KVM Switch. The following
sections (pages 8–10) provide complete instructions for the hardware setup.
Before attempting to connect anything to the E Series KVM Switch or your
computers, ensure that everything is powered off. Plugging and unplugging cables
while computers are powered on may cause irreversible damage of the computers
and/or the KVM Switch. Belkin is not responsible for damage caused in this way.
EN-7
EN-8
Installation
#/.3/,% 0# 0# 0# 0#
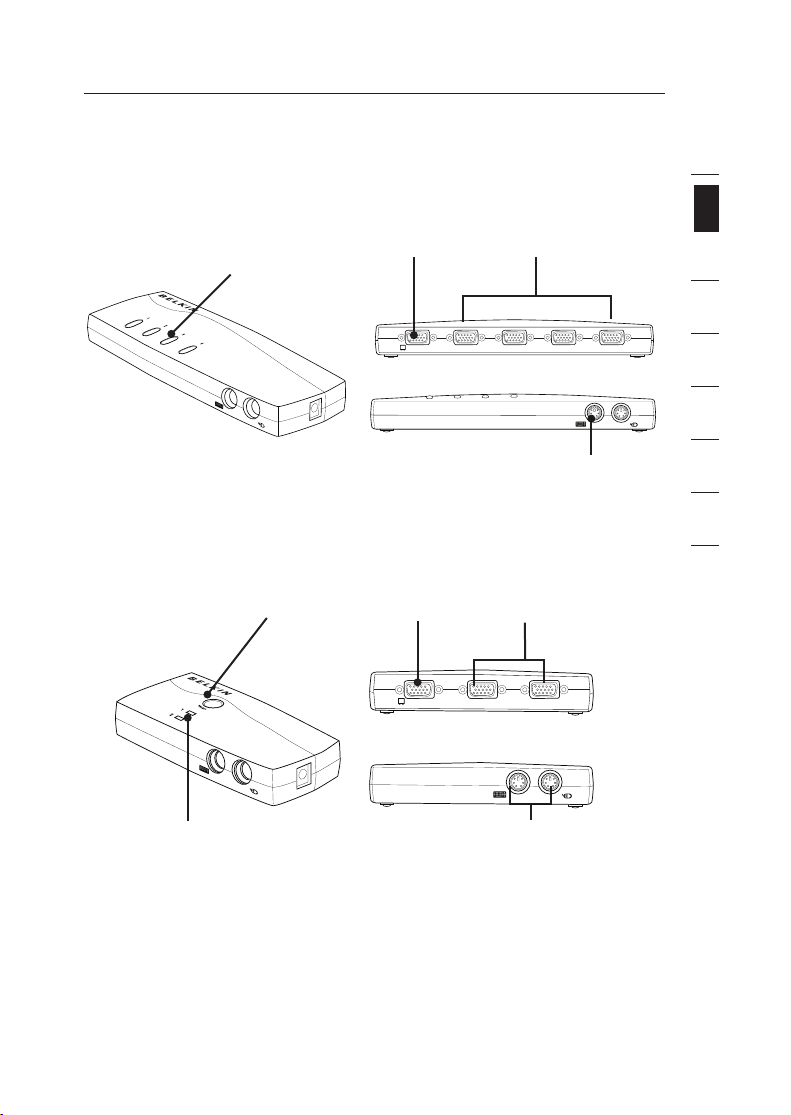
Keyboard, Monitor, and Mouse Connections
Connecting the Console
Step 1
Connect the monitor to the E Series KVM Switch. Using the cable that is
attached to your monitor, connect it to the HDDB15 female port on the rear left
side of the E Series KVM Switch labeled “Console”. (Refer to diagram below.)
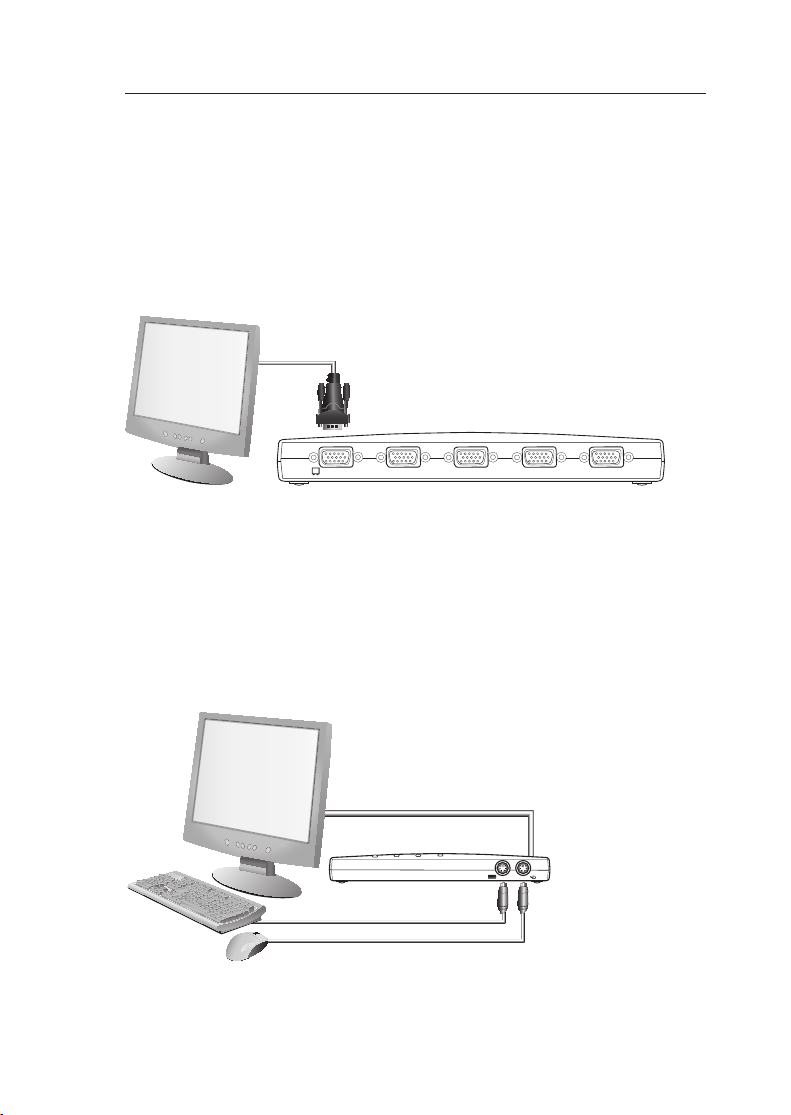
Step 2
Connect the PS/2 keyboard to the PURPLE keyboard port on the front of the
KVM Switch. (Refer to diagram below.)
Step 3
Connect the PS/2 mouse to the GREEN mouse port on the front of the KVM
Switch. (Refer to diagram below.)
You are ready to connect your computers.
1
2
3
4
5
6
7
8
section
EN-9
Installation
#/.3/,% 0# 0# 0# 0#
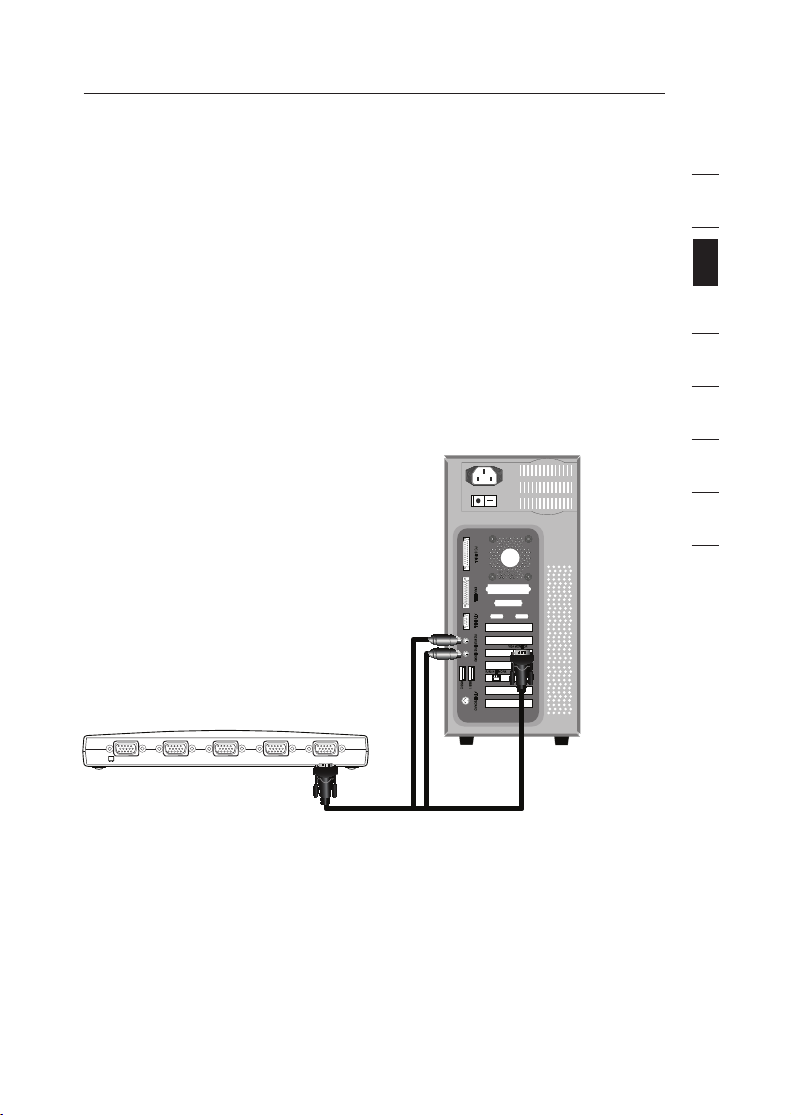
Connecting Computers to the E Series KVM Switch
Step 1
Make sure your computer is powered off.
Step 2
Using the Belkin E Series Cable Kit for PS/2 (F1D9002x06), connect the VGA
connector to the monitor port on your computer. (Refer to diagram below.)
Step 3
Connect the PS/2 mouse and keyboard connectors to the mouse and keyboard
ports on the computer. (Refer to diagram below.)
Step 4
Connect the Belkin E Series Cable Kit for PS/2 to the desired PC port on the rear
of the E Series KVM Switch. (Refer to diagram below.)
Step 5
Power up your computer.
Step 6
Repeat Steps 1 through 5 for each additional PS/2 computer you wish
to connect.

Installation
Powering Up the Systems
Verify that all computers connected to the E Series KVM Switch are powered on.
If any connected computers have not been powered on, it is okay to do so at this
time (computers can be powered on simultaneously). The E Series KVM Switch
emulates both a mouse and keyboard on each port and allows your computer to
boot normally. Your E Series KVM Switch is ready to use.
The computer connected to Port “1” will be displayed on the monitor. Check
that the keyboard, monitor, and mouse are working normally. Check all occupied
ports to verify that all computers are connected and responding correctly. If you
encounter an error, check your cable connections for that computer and reboot.
If the problem persists, please refer to the “Troubleshooting” section in this User
Manual.
EN-10
Using your E Series KVM Switch
Hl^iX]idegZk^djhVXi^kZedgi!PJERVggdl
Hl^iX]idcZmiVXi^kZedgi!P9DLCRVggdl#
Hl^iX]idegZk^djhVXi^kZedgi!PJERVggdl
Hl^iX]idcZmiVXi^kZedgi!P9DLCRVggdl#
Hl^iX]idEdgi'P'R!'`Zn
Hl^iX]idEdgi)P)R!)`Zn
Selecting a Computer Using the Selector Button
You can directly select a connected computer by pressing the selector button or
by using a hot-key command. The LED will be lit next to the number to indicate
which port is currently selected. It takes approximately 1–2 seconds for the video
signal to refresh after switching computers. Re-synchronization of the mouse and
keyboard signals also occurs. This is normal operation and ensures that proper
synchronization is established between the console and the connected computers.
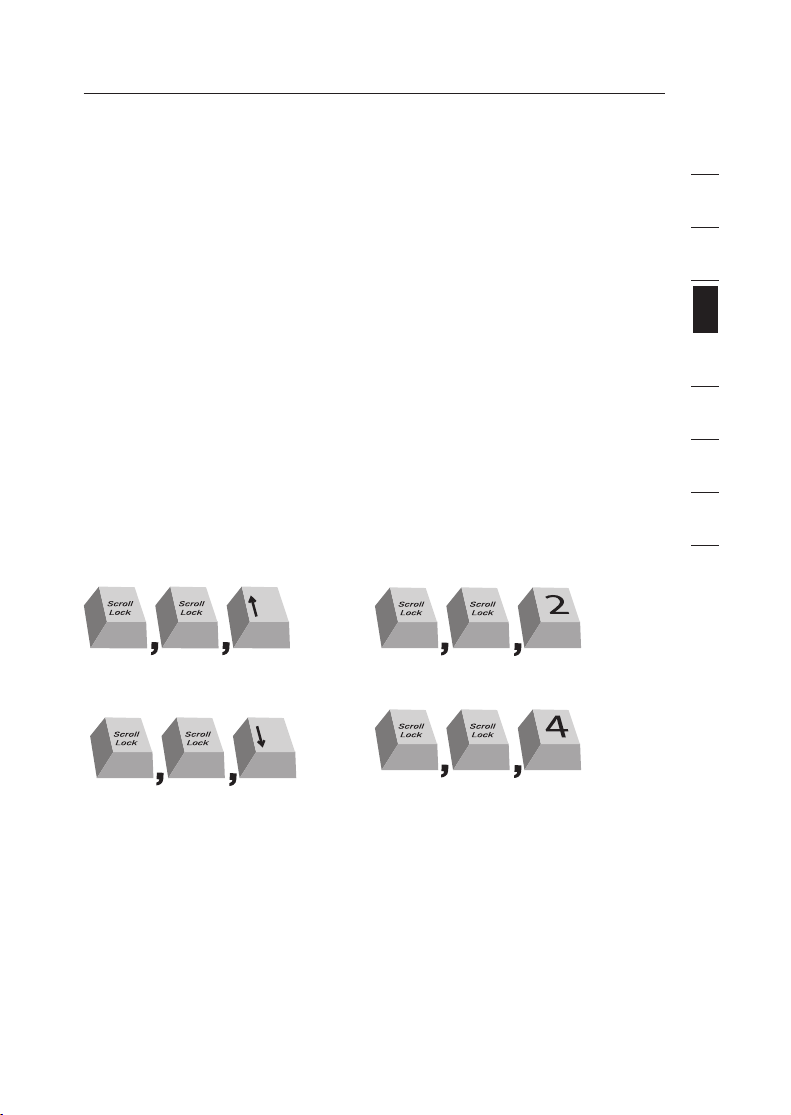
Selecting a Computer Using Keyboard Hot-Key Commands
Switch to the next or previous port with simple keyboard hot-key sequences
using the “Scroll Lock” key, and either the “Up” or “Down” arrow keys. To send
commands to the KVM Switch, the “Scroll Lock” key must be pressed twice within
two seconds. The E Series KVM Switch will beep, confirming that it is in hot-key
mode. Next, press the “Up” arrow key and the E Series KVM Switch will switch to
the previous active port. Press the “Down” arrow key to switch to the next active
port.
You can switch directly to any port by entering the number of the port you wish to
access. For example, if you press “Scroll Lock”, “Scroll Lock”, “2”, the KVM Switch
will switch to the computer connected on Port 2.
1
2
3
section
4
5
6
7
8
Note: You will have approximately three seconds to complete each hot-key sequence.
EN-11
EN-12
Using your E Series KVM Switch
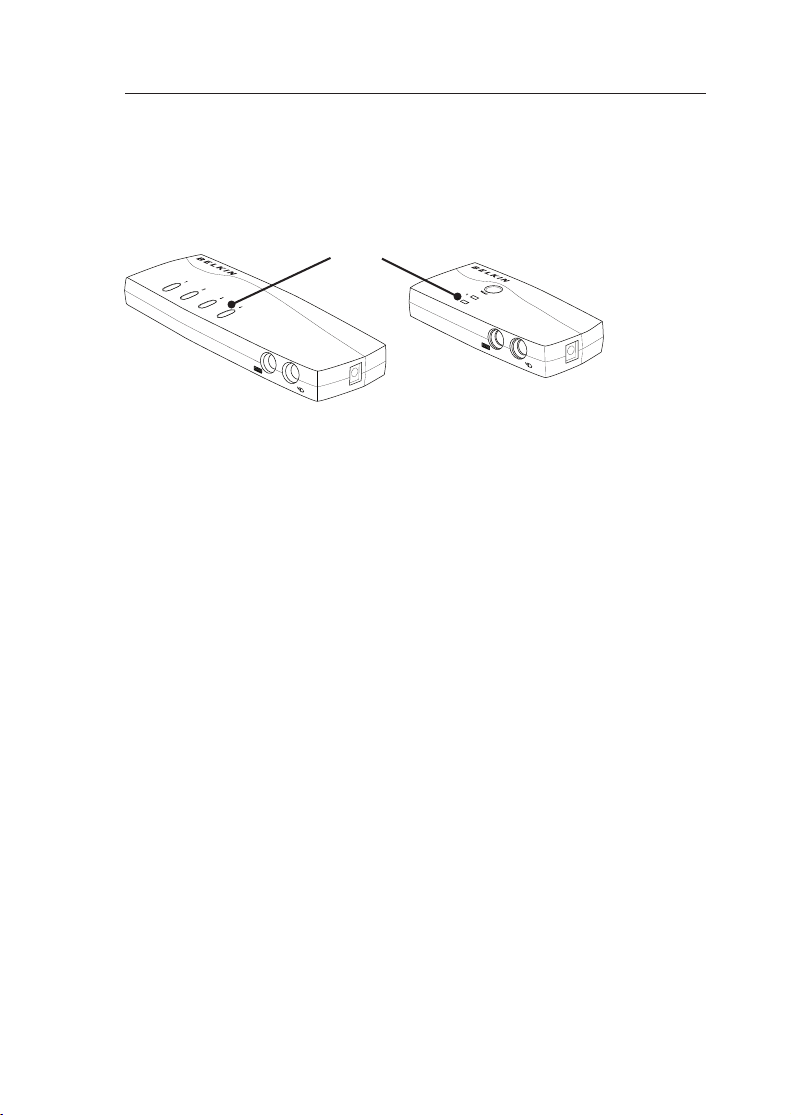
Selecting a Computer Using Port-Selector Buttons
You can directly select which computer you wish to control by pressing the
direct-access port selector next to the corresponding port. The LED will
illuminate to indicate the port is currently selected.
LED
LED Display
The LED display on the front panel of the E Series KVM Switch serves as a
status monitor. An LED illuminates to indicate that the console currently controls
the corresponding computer. As a port selector is pushed, the LED next to it will
light up. A flashing port LED indicates that there is no computer connected to
that port or that the computer connected is powered off. The LED will also blink
while the KVM Switch is in AutoScan mode.
Note: The port LED will remain solid for some computers that continuously
supply power to the keyboard PS/2 port even while they are shut down.
AutoScan Mode
In AutoScan mode, the E Series KVM Switch remains on one active port for five
seconds before switching to the next active port. This time interval cannot be changed.
To activate the AutoScan function, press “Scroll Lock”, “Scroll Lock”, “A”.
To stop AutoScan, press any button on the front panel or any key on the keyboard.
Note: There is no mouse or keyboard control in AutoScan mode. This is necessary to
prevent data and synchronization errors. If the user is using the mouse or keyboard
when the E Series KVM Switch is switching between ports, data flow may become
interrupted and could result in erratic mouse movement and/or wrong-character input
when using the keyboard.
section
1
2
3
4
5
6
7
8
EN-13
Using your E Series KVM Switch
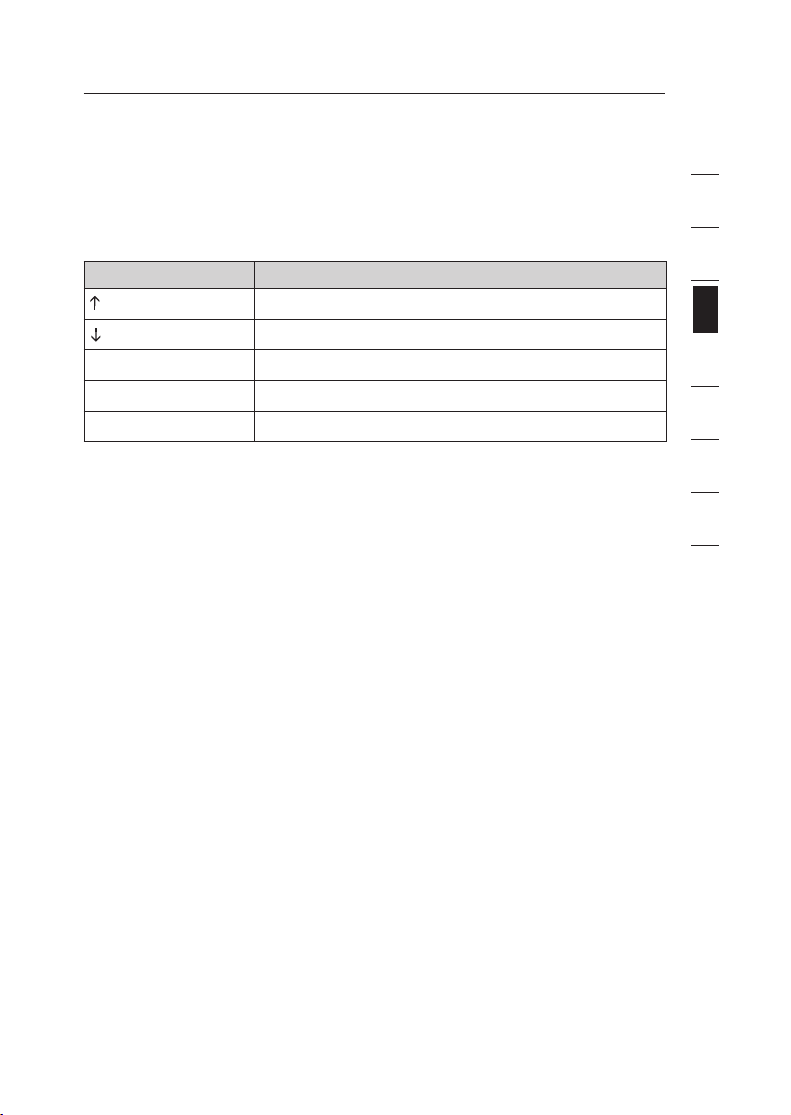
Keyboard Hot-Key-Command Shortcut Reference
Below is a complete list of hot-key commands that can be used for your E Series
KVM Switch:
Note: Each command needs to be preceded by “Scroll Lock”, “Scroll Lock”.
Command Function
Previous active computer
Next active computer
[1,2,3,4] Switch to port “x” (1, 2, 3, 4)
A Activates AutoScan
S Turn on/off beep sound
Note: You will have approximately three seconds to complete each
hot-key sequence.

Frequently Asked Questions
Q: What operating systems does the E Series KVM Switch support?
A: The E Series KVM Switch will support any operating system that runs on
a PS/2 platform only. Operating systems include, but are not limited to, DOS;
Windows 2000, NT, XP, Server 2003, Vista; and Linux.
Q: Can I connect USB computers on the host side?
A: No, the E Series KVM Switch will support PS/2 computers only.
Q: How far can the computer be from the KVM Switch?
A: The KVM Switch can be placed up to 25 feet away from your PS/2 computer.
Q: What is the maximum video resolution that the E Series KVM Switch
supports?
A: The advanced video circuit in the KVM Switch supports a maximum resolution
of up to 1920x1440@75Hz.
Q: Do I have to install any software to use the KVM Switch?
A: No, the KVM Switch does not require any drivers or software to be installed
in your computers. Simply connect all your computers to the Belkin KVM Cable
Kits, and then attach one keyboard, monitor, and mouse to the console port, and
it is ready for use.
Q: Does the KVM Switch require an AC adapter?
A: No, the KVM Switch can be used in the majority of cases without an external
power adapter.
Q: Can I use the E Series KVM Switch to switch video signals only?
A: No, the KVM Switch must be connected to both the video and keyboard/
mouse ports on your computers. The KVM Switch detects the power from the
PS/2 ports on your computers in order to function.
Q: Does the KVM Switch support Linux?
A: Yes, the KVM Switch works with Red Hat and other Linux distributions
configured for PS/2 support.
Q: How long is the warranty for the E Series KVM Switch?
A: The KVM Switch comes with a 2-Year Limited Warranty.

Troubleshooting
Troubleshooting Troubleshooting
My computer does not boot up when connected to the KVM Switch, but
works fine when I connect the keyboard, video, and mouse directly to
the computer.
• Make sure that the keyboard and mouse cables are connected tightly
between the KVM Switch and the computer.
• Check that the keyboard and mouse cables are not crossed.
• Check the cable connections.
I am getting ghosting, shadowing, or fuzzy images on my monitor.
• Check that all video cables are inserted properly to the Cable Kit.
• Check that the monitor you are using supports the resolution and refresh-
rate setting on your computer.
• Lower the video resolution of your monitor.
• Check that the cable length does not exceed 25 feet.
• Check that the graphics card you are using supports the resolution and
refresh-rate setting on your computer.
• Connect the monitor directly into the computer with which you are having
trouble to see if the problem still appears.
I am getting a black screen on my monitor.
• Check that all video cables are inserted properly.
• Check that the keyboard cable is connected and inserted properly between
the computer and the appropriate port on the KVM Switch.
• Move the mouse and see if it is necessary to log in as a user.
• Connect your monitor directly to the computer to verify that your monitor is
functioning properly.
The computer does not detect a keyboard and I get a keyboard error
reported at boot up.
• Check that the keyboard cable on the KVM Switch is completely connected
to your computer. Tighten any loose connections.
• If you are using the keyboard software that was included with your
keyboard, uninstall it and then reinstall the standard Microsoft keyboard
driver.
1
2
3
4
5
section
section section
6
7
8
EN-15

Troubleshooting
The mouse is lost when I switch to a different port.
• Check that the mouse you are using is connected properly to the console
port of the KVM Switch.
• Tighten any loose cable connections.
• If you are using a mouse driver that was included with your mouse, uninstall
it and install the standard Microsoft mouse driver.
• Make sure the mouse works when directly plugged into the computer.
• If the computer is coming out of standby mode, allow up to one minute to
regain mouse function.
• De-activate power-management schemes on the PC with which you are
experiencing problems.
• If you hot swapped or changed your KVM configuration, make sure you
power off all attached computers. Then, reinstall the KVM Switch as
described on pages 8-10 of this manual.
• Try a different mouse.
The mouse is not detected at boot up.
• Check the cables and make sure that they are inserted correctly.
The computer boots up, but the mouse does not work.
• Make sure the mouse is plugged in properly.
• Make sure the mouse works when directly plugged into the computer.
Rebooting may be necessary when trying this.
• Try a different mouse.
• Try booting the problem computer while the port is selected and wait until
the operating system loads before switching to another computer.
The computer boots up, but the mouse does not work.
• If you hot swapped or changed your KVM configuration, make sure you
power off all attached computers. Then, reinstall the KVM Switch as
described on pages 8-10 of this manual.
• Make sure you do not have more than one mouse driver installed. Make
sure that the driver is either for a standard PS/2 or USB mouse, or a PS/2
mouse compatible with Microsoft.
• Make sure you do not have any mouse drivers loaded in your “CONFIG.
SYS” or “AUTOEXEC.BAT” files.
• Avoid moving the mouse or pressing the mouse button when switching
ports on the KVM Switch.
• Try booting the problem computer while the port is selected and wait until
the operating system loads before switching to another computer.

Glossary
The following definitions are used throughout this User Manual.
AutoScan: A mode of operation where the KVM Switch scans from one port
to another, on an ongoing basis, as configured by the user.
Console: The all-in-one term for the keyboard, video monitor, and mouse
connected to a KVM switch.
Console Port: Receptors for the console to connect to the KVM Switch.
Control: When discussing switching between ports, control means that the
console is capable of sending input to the computer. Control requires that the
console also has focus on the port, and is viewing it.
KVM: Literally “Keyboard Video Mouse”, this term refers to technology that
allows two or more computers to be controlled by one keyboard, video
monitor, and mouse; some switches that use KVM technology enable sharing
of other peripherals such as audio speakers, microphones, and printers.
KVM Switch: A device that allows a user to access and control multiple
computers from a single console. It has at least one console port and multiple
computer ports.
Port: An interface receptor on a computer through which you can attach a
device or plug in a device cable.
1
2
3
4
5
6
section
7
8
EN-17

Information
EN-18
FCC Statement
CE Declaration of Conformity
We, Belkin International, Inc., declare under our sole responsibility that the
products F1DB102P2, F1DB104P2, to which this declaration relates, are in
conformity with Emissions Standard EN55022 and with Immunity Standard
EN55024, LVP EN61000-3-2, and EN61000-3-3.
ICES
This Class B digital apparatus complies with Canadian ICES-003. Cet appareil
numérique de la classe B est conforme á la norme NMB-003 du Canada.
Belkin International, Inc., Limited 2-Year Product Warranty
What this warranty covers.
Belkin International, Inc. (“Belkin”) warrants to the original purchaser of this
Belkin product that the product shall be free of defects in design, assembly,
material, or workmanship.
What the period of coverage is.
Belkin warrants the Belkin product for two years.
What will we do to correct problems?
Product Warranty.
Belkin will repair or replace, at its option, any defective product free of charge
(except for shipping charges for the product).
What is not covered by this warranty?
All above warranties are null and void if the Belkin product is not provided to
Belkin for inspection upon Belkin’s request at the sole expense of the purchaser,
or if Belkin determines that the Belkin product has been improperly installed,
altered in any way, or tampered with. The Belkin Product Warranty does not
protect against acts of God such as flood, lightning, earthquake, war, vandalism,
theft, normal-use wear and tear, erosion, depletion, obsolescence, abuse,
DECLARATION OF CONFORMITY WITH FCC RULES FOR
ELECTROMAGNETIC COMPATIBILITY
We, Belkin International, Inc., of 501 West Walnut Street, Compton CA
90220, declare under our sole responsibility that the products:
F1DB102P2, F1DB104P2
to which this declaration relates:
Comply with Part 15 of the FCC Rules. Operation is subject to the following
two conditions:
(1) this device may not cause harmful interference, and
(2) this device must accept any interference received, including interference
that may cause undesired operation.
EN-18

Information
section
1
2
3
4
5
6
7
8
EN-19
damage due to low voltage disturbances (i.e. brownouts or sags), non-authorized
program, or system equipment modification or alteration.
How to get service.
To get service for your Belkin product you must take the following steps:
1. Contact Belkin International, Inc., at 501 W. Walnut St., Compton, CA
90220, Attn: Customer Service, or call (800)-223-5546, within 15 days of the
Occurrence. Be prepared to provide the following information:
a. The part number of the Belkin product.
b. Where you purchased the product.
c. When you purchased the product.
d. Copy of original receipt.
2. Your Belkin Customer Service Representative will then instruct you on how to
forward your receipt and Belkin product and how to proceed with your claim.
Belkin reserves the right to review the damaged Belkin product. All costs of
shipping the Belkin product to Belkin for inspection shall be borne solely by the
purchaser. If Belkin determines, in its sole discretion, that it is impractical to ship
the damaged equipment to Belkin, Belkin may designate, in its sole discretion,
an equipment repair facility to inspect and estimate the cost to repair such
equipment. The cost, if any, of shipping the equipment to and from such repair
facility and of such estimate shall be borne solely by the purchaser. Damaged
equipment must remain available for inspection until the claim is finalized.
Whenever claims are settled, Belkin reserves the right to be subrogated under
any existing insurance policies the purchaser may have.
How state law relates to the warranty.
THIS WARRANTY CONTAINS THE SOLE WARRANTY OF BELKIN. THERE ARE
NO OTHER WARRANTIES, EXPRESSED OR, EXCEPT AS REQUIRED BY LAW,
IMPLIED, INCLUDING THE IMPLIED WARRANTY OR CONDITION OF QUALITY,
MERCHANTABILITY OR FITNESS FOR A PARTICULAR PURPOSE, AND SUCH
IMPLIED WARRANTIES, IF ANY, ARE LIMITED IN DURATION TO THE TERM OF
THIS WARRANTY.
Some states do not allow limitations on how long an implied warranty lasts, so
the above limitations may not apply to you.
IN NO EVENT SHALL BELKIN BE LIABLE FOR INCIDENTAL, SPECIAL, DIRECT,
INDIRECT, CONSEQUENTIAL OR MULTIPLE DAMAGES SUCH AS, BUT NOT LIMITED
TO, LOST BUSINESS OR PROFITS ARISING OUT OF THE SALE OR USE OF ANY
BELKIN PRODUCT, EVEN IF ADVISED OF THE POSSIBILITY OF SUCH DAMAGES.
This warranty gives you specific legal rights, and you may also have other rights,
which may vary from state to state. Some states do not allow the exclusion or
limitation of incidental, consequential, or other damages, so the above limitations
may not apply to you.
EN-19

Belkin Tech Support
UK: 0845 607 77 87
Europe: www.belkin.com/support
OmniView® E Series
KVM Switch
Belkin Ltd.
Express Business Park
Shipton Way, Rushden
NN10 6GL, United Kingdom
+44 (0) 1933 35 2000
+44 (0) 1933 31 2000 fax
Belkin SAS
130 rue de Silly
92100 Boulogne-Billancourt
France
+33 (0) 1 41 03 14 40
+33 (0) 1 41 31 01 72 fax
Belkin B.V.
Boeing Avenue 333
1119 PH Schiphol-Rijk
Netherlands
+31 (0) 20 654 73 00
+31 (0) 20 654 73 49 fax
Belkin Iberia
Avda. Cerro del Aguila 3
28700 San Sebastián de los Reyes
Spain
+34 91 625 80 00
+34 902 02 00 34 fax
Belkin GmbH
Hanebergstrasse 2
80637 Munich
Germany
+49 (0) 89 14 34 05 0
+49 (0) 89 14 34 05 100 fax
Belkin Sweden
Knarrarnäsgatan 7
164 40 Kista
Sweden
+46 (0) 8 5229 1870
+46 (0) 8 5229 1874 fax
© 2007 Belkin International, Inc. All rights reserved. All trade names are registered trademarks of
respective manufacturers listed. Windows, Windows Vista, NT, and Microsoft are either registered
trademarks or trademarks of Microsoft Corporation in the United States and/or other countries.
P75583ea

OmniView® Série E
EN
FR
dENlEs
it
Switch KVM
Manuel de
F1DB102P2ea
F1DB104P2ea
F1DB102P2eaB
F1DB104P2eaB
lutilisateur

Table des matières
1. Introduction .......................................................................................1
Contenu de lemballage ...............................................................1
2. Présentation ......................................................................................2
Caractéristiques .........................................................................2
Configuration requise ................................................................3
Configuration système requise ...................................................4
Illustrations de lunité .................................................................5
Spécifications ............................................................................6
3. Installation ........................................................................................7
Préconfiguration ........................................................................7
Mode demploi ............................................................................7
Mise en route des systèmes ......................................................10
4. Utilisation de votre switch KVM Série E ...........................................11
Sélection dun ordinateur à laide des sélecteurs de ports ...........11
Sélection dun ordinateur à laide des raccourcis clavier .............11
Voyants ....................................................................................12
Mode AutoScan ........................................................................12
Commandes avec raccourcis clavier .........................................13
5. Foire aux questions .........................................................................14
6. Dépannage ......................................................................................15
7. Glossaire .........................................................................................17
8. Information .....................................................................................18
Introduction
+6-#ABLE+ITS
&$"0"ONLY
+6-#ABLE+ITS
&$"0"ONLY
5SER-ANUAL
/MNI6IEW%3ERIES
+6-3WITCH
Merci davoir choisi ce Switch KVM
OmniView de Belkin (le switch). Notre
gamme variée de solutions KVM démontre
lengagement de Belkin à fournir des
produits de grande qualité, durables et à un
prix abordable. Conçus pour vous donner
le contrôle de plusieurs ordinateurs à partir
dune console, les switchs KVM de Belkin
offrent diverses possibilités applicables à
toutes les configurations, de petite ou de grande
taille. Ce switch KVM de Belkin, compact et abordable,
est assorti dune Garantie de 2 ans et dune assistance
technique gratuite.
Vous trouverez dans ce manuel des informations sur votre nouveau switch KVM
Série E, de son installation à son utilisation en passant par le dépannage, dans le
cas peu probable où vous rencontreriez un problème.
Merci davoir choisi le Switch KVM Série E OmniView de Belkin. Nous apprécions
votre confiance et sommes persuadés que vous constaterez rapidement
pourquoi Belkin est le premier vendeur de switchs KVM à travers le monde.
Contenu de lemballage
section
1
2
3
4
5
6
7
8
OmniView Série E Switch
KVM
2 Kits de câbles KVM
(F1DB102P2eaB
seulement)
Manuel de
lutilisateur
4 Kits de câbles KVM
(F1DB104P2eaB seulement)
FR-1

FR-2
Présentation
Caractéristiques
• Raccourcis clavier
Les raccourcis clavier permettent de sélectionner le port souhaité à laide de
commandes de clavier spécifiques. Contrôlez jusquà quatre ordinateurs, selon
le modèle du switch KVM, à laide de simples raccourcis sur votre clavier. Pour
de plus amples renseignements sur les raccourcis clavier, consultez la page
13.
• AutoScan
La fonction AutoScan vous permet danalyser et de surveiller les activités de
tous les ordinateurs connectés, lun après lautre.
• Résolution vidéo
Le switch KVM Série E prend en charge les résolutions vidéo jusquà 1920 x
1440 @ 75 Hz.
• Boutons de la façade
Ces boutons poussoirs, placés sur la façade du switch KVM Série E pour plus
de commodité, vous permettent de choisir un port manuellement en toute
simplicité.
• Voyants
Les voyants lumineux situés sur la face avant du switch KVM Série E servent
dindicateurs détat. Un voyant sallume pour indiquer la console qui contrôle
actuellement lordinateur correspondant.

1
2
3
4
5
6
7
8
section
FR-3
Présentation
Matériel requis
Câbles :
Un kit de câbles KVM Belkin est requis pour la connexion dun switch KVM Série
E à un ordinateur.
Kits de câbles Série E Belkin :
F1D9002-XX (PS/2)
F1D9002x06 (PS/2)
(-XX indique la longueur en pieds)
F1D9002-XX (PS/2)

FR-4
Présentation
Configuration requise
Systèmes dexploitation
Le Switch KVM Série E est compatible avec des unités centrales sous les plateformes suivantes (liste non exhaustive) :
• Windows® NT®, 2000, XP, Server 2003 ou Vista
• Microsoft® DOS 5.x et versions ultérieures
• Red Hat® Linux® 8.x et versions ultérieures
Claviers
• Compatible PS/2
• Prend en charge les claviers standards à 101, 102, 104 et 106 touches
Souris
• Souris compatibles PS/2 avec 2, 3, 4 ou 5 boutons
• Souris sans fil et optiques compatibles PS/2
Moniteurs
• Tubes cathodiques
• LCD (avec prise en charge VGA)
Bloc dalimentation (facultatif)
Un bloc dalimentation 5 V/2.5 A en option est disponible (référence Belkin F1D065PWR-GM (avec prise CEE) et F1D065-PWR-UK (avec prise mâle anglaise)). Il nest
requis que dans de rares cas où lalimentation en sortie de lordinateur connecté nest
pas suffisant pour alimenter le switch KVM.
TM

1
2
3
4
5
6
7
8
section
FR-5
Présentation
#/.3/,% 0# 0# 0# 0#
#/.3/,% 0# 0# 0# 0#
#/.3/,%
0# 0#
Illustrations de lappareil
Vue avant/arrière du Switch KVM 4 ports Série E :
Accès direct
Sélecteur de port
Vue avant/arrière du Switch KVM 2 ports Série E :
Sélecteur de port
Moniteur de la console
Port
Clavier et souris de la
Moniteur de la console
Port
PC
Ports
PC
Ports
console
Voyant pour lidentification
du port sélectionné
Clavier et souris de la
console

Présentation
Spécifications
Référence : F1DB102P2, F1DB104P2
Boîtier : Plastique à résistance élevée aux
Alimentation : Par le port clavier PS/2 ou un
Nombre dordinateurs pris en charge : 2 et 4 respectivement pour les
Moniteurs pris en charge : Tubes cathodiques et LCD (avec prise
Résolution maximale : Jusquà 1920 x 1440 @ 75 Hz
Entrée clavier : miniDIN6 (PS/2)
Entrée souris : miniDIN6 (PS/2)
Port moniteur : VGA (HDDB15 femelle)
Ports PC : HDDB15 femelle
Température de fonctionnement : 0° ~ 40 °C
Température de stockage : -20° ~ 60 °C
Humidité : 0 à 80 % dhumidité relative sans
Garantie : 2 ans
Dimensions : (F1DB102P2) 5.2 x 2.5 x 1 in
Poids : (F1DB102P2) 7.2oz
(F1DB104P2) 4.2oz.
chocs
adaptateur de courant 5 V CC 2.5 A
en option, avec polarité positive sur la
broche centrale
modèles à 2 et 4 ports
en charge VGA)
condensation
(F1DB104P2) 8.5 x 3.2 x 1 in.
Remarque : Ces spécifications peuvent faire lobjet de modifications sans
FR-6
préavis.

Installation
Préconfiguration
Où installer le switch KVM
Le switch KVM Série E OmniView est conçu pour être placé sur un bureau. Son
emplacement exact dépend de lemplacement de vos unités centrales et de la
longueur de vos câbles.
Prenez en considération les éléments suivants avant dinstaller votre
Switch KVM :
• Pensez-vous utiliser les sélecteurs de ports à accès direct ;
• la longueur des câbles reliés au clavier, au moniteur et à la souris ;
• lemplacement de vos unités centrales reliées à votre console ;
• la longueur des câbles utilisés pour brancher vos ordinateurs au switch
Distance des câbles :
Ordinateurs PS/2 :
La transmission des signaux VGA est optimale jusquà 7,6 mètres. Au-delà, les
risques de dégradation de la vidéo augmentent. Dès lors, Belkin recommande
de ne pas utiliser de câbles de plus de 7,6 mètres entre le switch KVM et les
ordinateurs branchés.
Remarque :Le Module dextension CAT5 OmniView de Belkin (F1D084vea2)
permet détendre la portée de votre console (clavier, souris et moniteur) de 91
mètres supplémentaires.
Avertissements !
Ne placez pas les câbles à proximité de lampes fluorescentes, de systèmes de
climatisation ou dappareils produisant du bruit électrique (les aspirateurs, par
exemple).
1
2
section
3
4
5
6
7
8
Mode demploi
Vous êtes maintenant prêt à installer votre switch. Les sections suivantes
(pages 8 à 10) contiennent des instructions complètes pour la mise en route du
matériel.
Avant de brancher un périphérique sur le switch KVM Série E ou sur les ordinateurs,
assurez-vous que le tous les appareils sont éteints. Le branchement ou le
débranchement de câbles lorsque les ordinateurs sont allumés risque dendommager
les ordinateurs ou le switch de façon irrémédiable. Belkin décline toute responsabilité
en cas de dommages causés par le non-respect de cette consigne.
FR-7

FR-8
Installation
#/.3/,% 0# 0# 0# 0#
Branchement du clavier, du moniteur et de la souris
Branchement de la console
Étape 1
Branchez le moniteur sur le switch KVM Série E. Saisissez le câble relié à votre
moniteur et branchez-le au port HDDB15 femelle à larrière du switch KVM Série
E libellé « Console ». (Reportez-vous à lillustration ci-dessous.)
Étape 2
Branchez le clavier PS/2 au port clavier VIOLET à lavant du switch KVM.
(Reportez-vous à lillustration ci-dessous.)
Étape 3
Branchez la souris PS/2 au port souris VERT à lavant du switch KVM. (Reportezvous à lillustration ci-dessous.)
Vous êtes maintenant prêt à brancher vos ordinateurs.

1
2
3
4
5
6
7
8
section
FR-9
Installation
#/.3/,% 0# 0# 0# 0#
Branchement des ordinateurs au switch KVM Série E
Étape 1
Assurez-vous que lordinateur est éteint.
Étape 2
À laide du Kit de câbles Série E PS/2 de Belkin (F1D9002x06), branchez le
connecteur VGA au port moniteur de votre serveur. (Reportez-vous à lillustration
ci-dessous.)
Étape 3
Branchez la souris et le clavier PS/2 aux ports clavier et souris de lordinateur.
(Reportez-vous à lillustration ci-dessous.)
Étape 4
Branchez le Kit de câbles PS/2 Série E de Belkin au port PC désiré, à larrière du
switch KVM Série E. (Reportez-vous à lillustration ci-dessous.)
Étape 5
Allumez votre ordinateur.
Étape 6
Répétez les étapes 1 à 5 pour chaque ordinateur PS/2 supplémentaire
à connecter.

Installation
Mise en route des systèmes
Assurez-vous que tous les ordinateurs branchés au switch KVM Série E sont sous
tension. Si lun des ordinateurs branchés nest pas encore allumé, vous pouvez le
faire maintenant (les ordinateurs peuvent être allumés simultanément). Le switch
KVM Série E émule une souris et un clavier sur chaque port et permet lamorçage
normal de votre ordinateur. Votre switch KVM Série E est prêt à lemploi.
Lordinateur connecté au port « 1 » saffiche sur le moniteur. Vérifiez si le clavier, le
moniteur et la souris fonctionnent normalement. Vérifiez tous les ports occupés,
afin de vous assurer que tous les ordinateurs sont connectés et répondent
correctement. Si vous une erreur se produit, vérifiez les branchements des câbles
de cet ordinateur et réamorcez-le. Si le problème persiste, reportez-vous à la
section « Dépannage » de ce manuel.
FR-10

Utilisation du switch KVM Série E
Hl^iX]idegZk^djhVXi^kZedgi!PJERVggdl
Hl^iX]idcZmiVXi^kZedgi!P9DLCRVggdl#
Hl^iX]idegZk^djhVXi^kZedgi!PJERVggdl
Hl^iX]idcZmiVXi^kZedgi!P9DLCRVggdl#
Hl^iX]idEdgi'P'R!'`Zn
Hl^iX]idEdgi)P)R!)`Zn
Sélection dun ordinateur à laide des sélecteurs de
ports
Vous pouvez sélectionner un ordinateur directement en appuyant sur le bouton
sélecteur ou à laide dune commande de raccourci au clavier. Le voyant sallume à
côté du numéro afin dindiquer le port actuellement sélectionné. Il faut environ une
à deux secondes pour rafraîchir le signal vidéo après le changement dordinateur.
La souris et le clavier sont également synchronisés. Cette opération est normale et
permet de vous assurer que la synchronisation a été correctement effectuée entre
la console et les ordinateurs connectés.
Sélection dun ordinateur à laide des raccourcis clavier
Passez au port suivant ou précédent à laide de séquences simples sur le clavier à
laide de la touche « Arrêt défil » et des touches de direction vers le haut ou vers le
bas. Pour envoyer vos commandes au switch KVM, vous devez appuyer deux fois
sur la touche « Arrêt Défil » dans un intervalle de deux secondes. Le switch KVM
Série E émet un bip pour confirmer qu’il entre en mode raccourci clavier. Ensuite,
appuyez sur la flèche « Haut ». Le switch KVM Série E passe au port actif précédent.
Appuyez sur la flèche « Bas » pour passer au port précédent.
Vous pouvez passer directement à un port en entrant le numéro du port à
sélectionner. Par exemple, si vous appuyez sur « Arrêt défil », « Arrêt défil », « 2 », le
switch KVM passe au serveur connecté au port 2.
1
2
3
section
4
5
6
7
8
Remarque : Vous disposez de trois secondes environ pour saisir la séquence en
entier.
FR-11

FR-12
Utilisation du switch KVM Série E
Sélection dun ordinateur à laide des boutons
sélecteurs de ports
Vous pouvez choisir directement lordinateur à contrôler en appuyant sur le
sélecteur de port à accès direct situé à côté du port correspondant. Le témoin
sallume pour indiquer que le port est actuellement choisi.
Voyant
Voyants
Les voyants lumineux situés sur la façade du switch KVM Série E servent
dindicateurs détat. Un voyant sallume pour indiquer la console qui contrôle
actuellement lordinateur correspondant. Lorsque vous appuyez sur un sélecteur
de port, le voyant situé à côté sallume. Un voyant clignotant indique quil ny
a pas dordinateur connecté à ce port ou que lordinateur qui y est connecté
est éteint. Le voyant clignote également lorsque le switch KVM est en mode
AutoScan.
Remarque : Le voyant du port est allumé en continu pour certains ordinateurs
qui fournissent une alimentation continue au port clavier PS/2, même si ces
ordinateurs sont éteints.
Mode AutoScan
En mode AutoScan, le switch KVM Série E reste sur un port pendant cinq secondes
avant de passer au port actif suivant. Il est impossible de modifier cet intervalle.
Pour activer la fonction AutoScan, appuyez sur « Arrêt défil », « Arrêt défil », « A ».
Appuyez sur lun des boutons de la façade ou une touche quelconque du clavier pour
désactiver la fonction AutoScan.
Remarque : En mode AutoScan, il nexiste aucun contrôle souris ou clavier. Ceci permet
déviter les erreurs de données et de synchronisation. Si lutilisateur se sert de la souris
ou du clavier lorsque le switch KVM Série E change de port, le flux de données risque
dêtre interrompu et de générer des mouvements de souris erratiques et/ou des saisies
de caractères erronées si vous utilisez le clavier.

section
1
2
3
4
5
6
7
8
FR-13
Utilisation du switch KVM Série E
Commandes avec raccourcis clavier
Vous trouverez ci-dessous une liste des commandes de raccourci clavier
pouvant être utilisées avec votre switch KVM Série E :
Remarque : Chacune de ces commandes doit être précédée de « Arrêt Défil »,
« Arrêt Défil ».
Remarque : Vous disposez de trois secondes environ pour effectuer
la séquence.

Foire aux questions
Q : Quels systèmes le switch KVM Série E prend-il en charge ?
R : Le switch KVM Série E prend en charge tous les systèmes dexploitation
fonctionnant sur une plate-forme PS/2. Systèmes dexploitation possibles (liste non
exhaustive) : DOS, Windows 2000, NT, XP, Serveur 2003, Vista et Linux.
Q : Puis-je connecter des ordinateurs USB sur un ordinateur hôte ?
R : Non, le switch KVM Série E ne prend en charge que des ordinateurs PS/2.
Q : Quelle est la distance maximum entre lordinateur et le Switch KVM ?
R : Il est possible de placer le switch KVM jusquà 7,6 mètres de votre ordinateur
PS/2.
Q : Quelle est la résolution vidéo maximum prise en charge par le switch KVM
Série E ?
R : Le circuit vidéo évolué du switch KVM Série E prend en charge une résolution
maximale de 1920 x 1440 @ 75 Hz.
Q : Dois-je installer un logiciel pour pouvoir utiliser le switch KVM ?
R : Non. Le switch KVM ne demande aucune installation de pilote ou de logiciel sur
vos ordinateurs. Il suffit de relier tous les ordinateurs au switch grâce aux Kits de
câbles KVM de Belkin, puis de brancher un clavier, un moniteur et une souris au port
de la console. Le switch est ensuite prêt à lemploi.
Q : Le switch KVM a-t-il besoin dun adaptateur de courant ?
R : Non, le switch KVM peut être utilisé sans adaptateur de courant externe, dans la
plupart des cas.
Q : Puis-je utiliser le switch KVM Série E pour permuter uniquement les signaux
vidéo ?
R : Non, le switch KVM Série E doit être branché aux ports vidéo et clavier/souris
des ordinateurs. Pour fonctionner, le switch KVM doit détecter lalimentation sur les
ports PS/2 des ordinateurs.
Q : Le switch KVM est-il compatible avec Linux ?
R : Oui, le switch KVM fonctionne avec Red Hat et dautres distributions Linux
configurées pour la prise en charge PS/2.
Q : Quelle est la durée de garantie du switch KVM Série E ?
R : Le switch KVM bénéficie dune garantie limitée de deux ans.

Dépannage
Dépannage Dépannage
Mon ordinateur ne démarre pas lorsquil est connecté au switch KVM,
mais fonctionne correctement lorsque je branche le clavier, le moniteur
et la souris directement sur lordinateur.
• Assurez-vous que les câbles du clavier et de la souris sont bien en place
entre le switch KVM et lordinateur.
• Vérifiez si les câbles du clavier et de la souris ne sont pas intervertis.
• Vérifiez que les câbles sont correctement branchés.
Jobtiens des images floues, ombragées ou dédoublées sur le moniteur.
• Vérifiez que tous les câbles vidéo sont correctement branchés au Kit de
câbles.
• Vérifiez sur votre ordinateur que le moniteur utilisé prend bien en charge la
résolution et le taux de rafraîchissement.
• Diminuez la résolution vidéo de votre moniteur.
• Assurez-vous que la longueur du câble ne dépasse pas 7,6 mètres.
• Vérifiez sur votre ordinateur que la carte graphique utilisée prend bien en
charge la résolution et le taux de rafraîchissement.
• Branchez le moniteur directement sur lordinateur qui vous pose problème
afin de savoir si ce problème se produit toujours.
Jobtiens un écran noir.
• Vérifiez que tous les câbles vidéo sont correctement branchés.
• Assurez-vous que le câble du clavier est correctement branché à
lordinateur et au port approprié sur le switch KVM.
• Bougez la souris et vérifiez sil est nécessaire douvrir une session utilisateur.
• Branchez directement le moniteur sur lordinateur afin de vérifier quil
fonctionne correctement.
Lordinateur ne détecte aucun clavier et jobtiens une erreur de clavier au
démarrage.
• Assurez-vous que le câble du clavier du switch KVM est bien branché à
lordinateur. Si cela nest pas le cas, resserrez-la.
• Si vous utilisez le pilote fourni avec votre clavier, désinstallez-le, puis
réinstallez le pilote de clavier Microsoft standard.
1
2
3
4
5
section
section section
6
7
8
FR-15

Dépannage
Je perds la souris lorsque je passe sur un autre port.
• Vérifiez que la souris utilisée est correctement branchée sur le port console
du switch KVM.
• Enfoncez le connecteur sil nest pas correctement branché.
• Si vous utilisez le pilote fourni avec votre souris, désinstallez-le, puis
installez le pilote de souris Microsoft standard.
• Assurez-vous que la souris fonctionne lorsquelle est directement branchée
sur lordinateur.
• Si lordinateur sort juste du mode de veille, attendez une minute avant que
la souris fonctionne.
• Désactivez les programmes de gestion de lénergie sur lordinateur qui
présente des problèmes.
• Si vous avez branché/débranché à chaud ou modifié votre configuration
KVM, assurez-vous davoir éteint tous les ordinateurs connectés. Ensuite,
réinstallez le switch KVM tel que décrit en pages 8 à 10 de ce manuel.
• Essayez une autre souris.
La souris nest pas détectée au démarrage.
• Vérifiez les câbles et assurez-vous quils sont correctement insérés.
Lordinateur démarre, mais la souris ne fonctionne pas.
• Assurez-vous que la souris est correctement branchée.
• Assurez-vous que la souris fonctionne lorsquelle est directement branchée
sur lordinateur. Il peut être nécessaire de redémarrer le serveur pour
effectuer cette vérification.
• Essayez une autre souris.
• Essayez de redémarrer lordinateur problématique tandis que le port est
sélectionné, et patientez jusquà ce que le système dexploitation soit
entièrement chargé avant de commuter vers un autre ordinateur.
Lordinateur démarre, mais la souris ne fonctionne pas.
• Si vous avez branché/débranché à chaud ou modifié votre configuration
KVM, assurez-vous davoir éteint tous les ordinateurs connectés. Ensuite,
réinstallez le switch KVM tel que décrit en pages 8 à 10 de ce manuel.
• Vérifiez quun seul pilote de souris est installé. Assurez-vous que le pilote
est prévu pour une souris USB ou PS/2 standard ou une souris PS/2
compatible Microsoft.
• Assurez-vous quaucun pilote de souris nest chargé dans vos fichiers «
CONFIG.SYS » ou « AUTOEXEC.BAT ».
• Ne déplacez pas la souris et nappuyez pas sur ses boutons lorsque vous
changez de port sur le switch KVM.
• Essayez de redémarrer lordinateur problématique tandis que le port est
sélectionné, et patientez jusquà ce que le système dexploitation soit
entièrement chargé avant de commuter vers un autre ordinateur.

Glossaire
Les définitions suivantes sont utilisées dans ce manuel :
AutoScan : Mode de fonctionnement dans lequel le switch analyse les ports
lun après lautre selon une base de progression définie par lutilisateur.
Console : Terme tout-en-un désignant le clavier, le moniteur et la souris
connectés à un switch KVM.
Port de la console : Récepteurs pour la console permettant de se connecter
au switch KVM.
Contrôle :Dans le domaine de la permutation de ports, le contrôle
correspond au fait que la console est capable denvoyer des données en
entrée à lordinateur. Le contrôle nécessite que le port soit activé et affiché par
la console.
KVM :Littéralement, « Keyboard Video Mouse ». Ce terme fait référence à
la technologie permettant à deux ordinateurs ou plus dêtre contrôlés par un
même ensemble clavier-moniteur-souris. Certains switchs proposent une
technologie KVM permettant de partager dautres périphériques, tels que des
enceintes, un microphone ou une imprimante.
Switch KVM :Dispositif permettant à un utilisateur daccéder à de multiples
ordinateurs et de contrôler ceux-ci à partir dune seule console. Il possède au
moins un port de console et plusieurs ports de serveurs.
Port : Récepteur dinterface sur un ordinateur au moyen duquel vous pouvez
relier un périphérique ou brancher un câble de périphérique.
1
2
3
4
5
6
section
7
8
FR-17

Informations
FR-18
Déclaration FCC
DÉCLARATION DE CONFORMITÉ À LA RÉGLEMENTATION FCC
Belkin International, Inc., dont le siège se situe au 501 West Walnut Street,
Compton, CA 90220, États-Unis, déclare sous sa propre et unique responsabilité
que les produits :
auquel se réfère la présente déclaration :
Sont conformes aux normes énoncées à lalinéa 15 de la réglementation FCC.
Le fonctionnement est assujetti aux deux conditions suivantes :
(1) cet appareil ne peut pas engendrer dinterférences nuisibles et
(2) cet appareil doit accepter toute interférence reçue, y compris les interférences
Déclaration de conformité CE
Belkin International, Inc., déclare sous sa propre et unique responsabilité que les
produits F1DB102P2, F1DB104P2, auxquels se réfère la présente déclaration, ont été
élaborés en conformité avec les normes démissions EN55022 ainsi que les normes
dimmunité EN55024, LVP EN61000-3-2 et EN61000-3-3.
ICES
This Class B digital apparatus complies with Canadian ICES-003. Cet appareil
numérique de la classe B est conforme à la norme NMB-003 du Canada.
Garantie limitée de 2 ans du produit de Belkin International, Inc.
Couverture offerte par la garantie
Belkin International, Inc. (« Belkin ») garantit à lacheteur initial de ce produit Belkin que le
produit est exempt de défauts de conception, de montage, de matériau et de fabrication.
Période de couverture
Belkin garantit ce produit Belkin pour une période de deux ans.
En cas de problème
Garantie du produit
Belkin sengage à réparer ou à remplacer gratuitement, à sa convenance, tout produit
défectueux (sans intervention dans les frais dexpédition du produit).
Limites de la couverture offerte par la garantie
Toutes les garanties précitées sont nulles et non avenues si le produit Belkin nest pas
retourné à Belkin, à la demande expresse de celui-ci, lacheteur étant responsable de
lacquittement des frais dexpédition, ou si Belkin détermine que le produit Belkin a été
installé de façon inappropriée ou modifié dune quelconque manière. La garantie du
produit Belkin ne protège pas contre des calamités naturelles comme les inondations,
les tremblements de terre, la foudre, la guerre, le vandalisme, le vol, lusure normale,
lérosion, lépuisement, lobsolescence, labus, les dommages provoqués par des
perturbations de basse tension (baisses ou affaissements de tension, par exemple),
EN MATIÈRE DE COMPATIBILITÉ ÉLECTROMAGNÉTIQUE
F1DB102P2, F1DB104P2
pouvant entraîner un fonctionnement non souhaité.
FR-18

Informations
section
1
2
3
4
5
6
7
8
FR-19
un programme non autorisé ou une modification de léquipement du système.
Pour une demande dintervention
Procédez comme suit pour obtenir une réparation de votre produit Belkin :
1. Contactez Belkin International, Inc., au 501 W. Walnut St., Compton CA 90220,
États-Unis, À lattention de : Customer Service (service client) ou appelez le
(800)-223-5546 15 jours maximum après lévénement. Préparez-vous à fournir
les informations suivantes :
a. Référence du produit Belkin.
b. Lieu dachat du produit.
c. Date dachat du produit.
d. Copie de la preuve dachat originale.
2. Le représentant du service clientèle de Belkin vous expliquera comment nous
faire parvenir votre facture et le produit Belkin, ainsi que la marche à suivre pour
présenter votre réclamation.
Belkin se réserve le droit dexaminer le produit Belkin endommagé. Tous les frais
dexpédition du produit Belkin à ladresse de Belkin en vue de son inspection seront
entièrement à la charge de lacheteur. Si Belkin détermine, à son entière discrétion, quil
serait impossible d’expédier l’équipement endommagé à Belkin, Belkin peut désigner
un atelier de réparation de son choix pour linspection du produit et létablissement dun
devis de réparation. Les coûts, s’il en est, pour l’expédition de l’équipement jusqu’à
l’atelier de réparation et le retour, et pour l’estimation, seront entièrement assumés
par l’acheteur. L’équipement endommagé doit être disponible pour inspection jusqu’à
ce que la demande de réclamation soit réglée. Lorsqu’un règlement intervient, Belkin
se réserve le droit dun recours en subrogation sous toute autre police dassurance
détenue par lacheteur.
Relation entre le Droit national et la garantie
CETTE GARANTIE NE COMPREND QUE LA GARANTIE BELKIN. BELKIN REJETTE PAR LE
PRÉSENT DOCUMENT TOUTES LES AUTRES GARANTIES, EXPLICITES OU IMPLICITES,
SAUF EXCEPTIONS PRÉVUES PAR LA LOI, Y COMPRIS MAIS SANS SY LIMITER, LES
GARANTIES IMPLICITES AFFÉRENTES À LA QUALITÉ LOYALE ET MARCHANDE ET
À LADÉQUATION À UNE FINALITÉ DONNÉE. CES GARANTIES IMPLICITES, LE CAS
ÉCHÉANT, SONT DUNE DURÉE LIMITÉE AUX CONDITIONS DE LA PRÉSENTE GARANTIE.
Certains pays ne permettent pas d’imposer de limite à la durée de validité des garanties
implicites. Il se peut donc que les limites précitées ne sappliquent pas dans votre cas.
BELKIN NE PEUT EN AUCUN CAS ÊTRE TENU RESPONSABLE DE DOMMAGES ACCESSOIRES,
DIRECTS, INDIRECTS OU MULTIPLES, Y COMPRIS, MAIS SANS SY LIMITER, LA PERTE DE
REVENUS OU DAFFAIRES DÉCOULANT DE LA VENTE OU DE LUTILISATION DE TOUT PRODUIT
BELKIN, MÊME LORSQUIL A ÉTÉ AVISÉ DE LA PROBABILITÉ DES DITS DOMMAGES.
La garantie vous confère des droits légaux spécifiques. Vous pouvez également
bénéficier dautres droits qui varient dun pays à lautre. Certains pays ne permettent
pas d’imposer de limite à la durée de validité des garanties implicites. Il se peut
donc que les limites ci-dessus ne sappliquent pas dans votre cas.
FR-19

Assistance technique Belkin
Royaume-Uni : 0845 607 77 87
Europe : www.belkin.com/support
OmniView® Série E
Switch KVM
Belkin Ltd.
Express Business Park
Shipton Way, Rushden
NN10 6GL, Royaume-Uni
+44 (0) 1933 35 2000
+44 (0) 1933 31 2000 fax
Belkin SAS
130 rue de Silly
92100 Boulogne-Billancourt
France
+33 (0) 1 41 03 14 40
+33 (0) 1 41 31 01 72 Fax
Belkin B.V.
Boeing Avenue 333
1119 PH Schiphol-Rijk
Pays-Bas
+31 (0) 20 654 73 00
+31 (0) 20 654 73 49 fax
Belkin Iberia
Avda Cerro del Aguila 3
28700 San Sebastián de los Reyes
Espagne
+34 91 625 80 00
+34 902 02 00 34 Fax
Belkin GmbH
Hanebergstraße 2
80637 Munich
Allemagne
+49 (0) 89 14 34 05 0
+49 (0) 89 14 34 05 100 Fax
Belkin Suède
Knarrarnäsgatan 7
164 40 Kista
Suède
+46 (0) 8 5229 1870
+46 (0) 8 5229 1874 fax
© 2007 Belkin International, Inc. Tous droits réservés. Toutes les raisons commerciales sont des
marques déposées de leurs fabricants respectifs. Windows, Windows Vista, NT et Microsoft sont
des marques déposées ou des marques de commerce de Microsoft Corporation aux États-Unis
et/ou dans dautres pays.
P75583ea

OmniView® E-Serie
EN
FR
dENlEs
it
KVM-Switch
Benutzerhandbuch
F1DB102P2ea
F1DB104P2ea
F1DB102P2eaB
F1DB104P2eaB

Inhaltsverzeichnis
1. Einleitung ..........................................................................................1
Verpackungsinhalt ......................................................................1
2. Übersicht ...........................................................................................2
Merkmale ...................................................................................2
Erforderliches Zubehör 3
Systemvoraussetzungen .............................................................4
Bestandteile ...............................................................................5
Technische Daten .......................................................................6
3. Installation ........................................................................................7
Vorbereitung des Geräts .............................................................7
Installationsanweisungen ............................................................7
Hochfahren der Computer .........................................................10
4. Verwenden des KVM-Switches aus der E-Serie ...............................11
Auswahl eines Computers mit Direktwahlschalter ......................11
Auswahl eines Computers mit Tastaturbefehlen .........................11
LED-Anzeigen ...........................................................................12
AutoScan-Modus ......................................................................12
Übersicht über die Tastaturbefehle ...........................................13
5. Häufig gestellte Fragen ...................................................................14
6. Fehlerbehebung ..............................................................................15
7. Glossar ............................................................................................17
8. Informationen .................................................................................18

Einleitung
+6-#ABLE+ITS
&$"0"ONLY
+6-#ABLE+ITS
&$"0"ONLY
5SER-ANUAL
/MNI6IEW%3ERIES
+6-3WITCH
Wir beglückwünschen Sie zum Kauf dieses
OmniView KVM Switches von Belkin (im
Folgenden als KVM-Switch bezeichnet).
Unsere vielfältige Reihe an KVM-Produkten
zeigt die hohen Qualitätsansprüche, die
Belkin an sich stellt. Der Name Belkin
steht für hochwertige, dauerhafte Produkte
zu einem günstigen Preis. Mit KVMSwitches von Belkin steuern Sie mehrere
Computer bzw. Server von einer Konsole aus.
Die KVM-Switches von Belkin sind in unterschiedlichen
Ausführungen für alle großen und kleinen Konfigurationen
erhältlich. Für den kompakten und preisgünstigen KVM-Switch von
Belkin erhalten Sie zwei Jahre Garantie sowie kostenlosen technischen Support.
Dieses Handbuch beschreibt Ihren KVM-Switch aus der E-Serie detailliert: von
der Installation über die Bedienung bis zur Fehlerbehebung, sollte einmal ein
Problem auftreten.
Wir danken Ihnen dafür, dass Sie sich für den OmniView KVM-Switch aus der
E-Serie von Belkin entschieden haben. Wir freuen uns über Ihre Wahl und sind
davon überzeugt, dass Sie schnell erkennen werden, warum Belkin die Nr. 1 ist,
wenn es um KVM-Switches geht.
Verpackungsinhalt
Kapitel
1
2
3
4
5
6
7
8
OmniView E-Serie KVMSwitch
2 KVM-Kabelsätze (nur
F1DB102P2eaB)
4 KVM-Kabelsätze (nur
F1DB104P2eaB)
Benutzerhandbuch
DE-1

DE-2
Übersicht
Merkmale
• Tastaturbefehle (Hot Keys)
Sie können die gewünschte Schnittstelle mit Hilfe von Tastaturbefehlen
auswählen. Je nachdem, über welches KVM-Switch-Modell Sie verfügen,
können Sie bis zu vier Computer über einfache Tastaturbefehle steuern.
Eine Anleitung für den Umgang mit Tastaturbefehlen finden Sie in diesem
Handbuch auf Seite 13.
• AutoScan
Mit der AutoScan-Funktion können Sie die Aktivitäten aller vernetzten
Computer einzeln abfragen und überwachen.
• Bildschirmauflösung
Der KVM-Switch aus der E-Serie unterstützt Bildschirmauflösungen bis zu
1920 x 1440 / 75 Hz.
• Direktwahltasten an der Vorderseite
Mit den Direktwahltasten, die bequem auf dem Bedienfeld des KVM-Switches
aus der E-Serie angebracht sind, können Sie Schnittstellen einfach manuell
auswählen.
• LED-Anzeigen
Die LED-Anzeige auf dem Bedienfeld des KVM-Switches aus der E-Serie dient
als Statusmonitor. Eine LED-Anzeige leuchtet auf, um die Konsole anzuzeigen,
die gerade den betreffenden Computer steuert.

1
2
3
4
5
6
7
8
Kapitel
DE-3
Übersicht
Erforderliches Zubehör
Kabel:
Zum Anschluss des KVM-Switches aus der E-Serie an einen Computer ist ein
KVM-Kabelsatz von Belkin erforderlich.
Kabelsätze für die E-Serie von Belkin:
F1D9002-XX (PS/2-Ausführung)
F1D9002x06 (PS/2-Ausführung)
(XX = Länge gemessen in Fuß)
F1D9002-XX (PS/2-Ausführung)

DE-4
Übersicht
Systemvoraussetzungen
Betriebssysteme
Der KVM-Switch aus der E-Serie ist kompatibel mit CPUs, die mit folgenden
Betriebssystemen betrieben werden, ist aber nicht auf diese beschränkt.
• Windows® NT®, 2000, XP, Server 2003 oder Vista
• Microsoft® DOS 5.x und höher
• Red Hat® Linux® 8.x und höher
Tastaturen
• PS/2-kompatibel
• Unterstützt Standard-Tastaturen mit 101/102/104/106 Tasten
Mäuse
• PS/2-kompatible Mäuse mit 2, 3, 4 oder 5 Tasten
• PS/2-kompatible Funk- oder optische Mäuse
Bildschirme
• CRT
• LCD (mit VGA-Unterstützung)
Optionales Netzteil
Ein optionales Netzteil (5 V, 2.5 A) ist erhältlich (Belkin Artikelnummer F1D065-PWRGM [mit Schuko-Stecker] und F1D065-PWR-UK [mit Stecker für GB]). Es wird nur
in Ausnahmefällen benötigt, wenn die abgegebene Leistung des angeschlossenen
Computers nicht für die Stromversorgung des KVM-Switches geeignet ist.
TM

1
2
3
4
5
6
7
8
Kapitel
DE-5
Übersicht
#/.3/,% 0# 0# 0# 0#
#/.3/,% 0# 0# 0# 0#
#/.3/,%
0# 0#
Bestandteile
Vorder-/Rückansicht des 4-Port KVM-Switches aus der E-Serie:
Direktwahlschalter
Konsolenbildschirm-
Schnittstelle
Vorder-/Rückansicht des 2-Port KVM-Switches aus der E-Serie:
Wahlschalter
Konsolenbildschirm-
Schnittstelle
PC-
Schnittstellen
Konsolentastatur und
-Maus
PC-
Schnittstellen
LED-Anzeige für ausgewählte
Schnittstelle
Konsolentastatur und
-Maus

Übersicht
Technische Daten
Artikelnr.: F1DB102P2, F1DB104P2
Gehäuse: Schlagfester Kunststoff
Stromversorgung: Über PS/2-Tastaturanschluss am
Anzahl unterstützter Computer: 2 oder 4 für 2- bzw. 4-Port-Modelle
Unterstützte Bildschirme: CRT und LCD (VGA-Unterstützung)
Maximale Bildschirmauflösung: Bis zu 1920 x 1440 / 75 Hz
Tastatureingang: PS/2 (6pol. miniDIN)
Mauseingang: PS/2 (6pol. miniDIN)
Bildschirmanschluss: VGA (HDDB15-Buchse)
PC-Anschlüsse: HDDB15-Buchse
Betriebstemperatur: 0° - 40° C
Lagertemperatur: 20 - 60°C
Relative Luftfeuchtigkeit: 0 bis 80%, nicht kondensierend
Garantie: 2 Jahre
Abmessungen: (F1DB102P2) 132,1 mm x 63,5 mm x 25,4
Gewicht: (F1DB102P2) 204 g
(F1DB104P2) 119 g
Computer oder Netzteil (5 V DC, 2.5 A)
mit positivem Mittelkontakt.”
mm
(F1DB104P2) 215,9 x 81,3 x 25,4 mm
Hinweis: Unangekündigte technische Änderungen jederzeit vorbehalten.
DE-6

Installation
Vorbereitung des Geräts
Aufstellung des KVM-Switches
Der OmniView KVM-Switch aus der E-Serie ist für die Aufstellung auf dem
Schreibtisch konstruiert. Die genaue Aufstellung ist abhängig von der Aufstellung
Ihrer Computer und der Länge Ihrer Kabel.
Bitte beachten Sie bei der Aufstellung des KVM-Switches Folgendes:
• Ob Direktwahlschalter verwendet werden sollen
• Die Länge der Tastatur-, Bildschirm- und Mauskabel
• Den Abstand zwischen den Computern und der Konsole
• Die Länge der Verbindungskabel zwischen Computern und KVM-Switch
Zulässige Kabellängen:
Für PS/2-Computer:
VGA-Signale werden am besten über Entfernungen von bis zu 7,6 m
übertragen. Bei größeren Abständen kann sich die Bildqualität verschlechtern.
Daher empfehlen wir für die Verbindung zwischen dem KVM-Switch und den
Computern Kabel von höchstens 7,6 m.
Hinweis:Mit der OmniView CAT5-Erweiterung (F1D084vea2) von Belkin kann
eine Entfernung von bis zu 91 m zur Konsole (Tastatur, Maus und Bildschirm)
überbrückt werden.
Warnhinweise!
Kabel sollten nicht in der Nähe von fluoreszierenden Lichtquellen, Klimaanlagen
oder Geräten, die elektrische Störeinflüsse hervorrufen (z. B. Staubsauger)
verlegt werden.
1
2
Kapitel
3
4
5
6
7
8
Installationsanweisungen
Jetzt können Sie mit der Installation Ihres KVM-Switches beginnen. In den
folgenden Abschnitten (S. 8–10) finden Sie genaue Anweisungen für die
Installation der Hardware.
Bevor Sie an den KVM-Switch aus der E-Serie oder einen der Computer Geräte
anschließen, müssen Sie unbedingt alle Komponenten ausschalten. Das Anschließen
oder Herausziehen von Kabeln bei eingeschaltetem Computer kann zu irreparablen
Schäden am Computer bzw. KVM-Switch führen. Belkin übernimmt keinerlei
Haftung für auf diese Weise verursachte Schäden.
DE-7

DE-8
Installation
#/.3/,% 0# 0# 0# 0#
Anschließen von Tastatur, Bildschirm und Maus
Anschluss der Konsole
Schritt 1
Schließen Sie den Bildschirm an den KVM-Switch aus der E-Serie an. Schließen
Sie das Bildschirmkabel an die HDDB15-Buchse mit der Aufschrift „Console”
(Konsole) an, die sich auf der Rückseite des KVM-Switches an der linken Seite
befindet. (Siehe Abbildung unten.)
Schritt 2
Schließen Sie die PS/2-Tastatur an den VIOLETTEN Tastaturanschluss an der
Vorderseite des KVM-Switches an. (Siehe Abbildung unten.)
Schritt 3
Schließen Sie die PS/2-Maus an den GRÜNEN Mausanschluss an der
Vorderseite des KVM-Switches an. (Siehe Abbildung unten.)
Nun können Sie die Computer anschließen.

1
2
3
4
5
6
7
8
Kapitel
DE-9
Installation
#/.3/,% 0# 0# 0# 0#
Anschließen von Computern an den KVM-Switch aus
der E-Serie
Schritt 1
Stellen Sie sicher, dass der Computer abgeschaltet ist.
Schritt 2
Schließen Sie den VGA-Stecker des PS/2-Kabelsatzes für die E-Serie von Belkin
(F1D9002x06) an den Bildschirmanschluss des Computers an. (Siehe Abbildung
unten.)
Schritt 3
Schließen Sie die PS/2-Maus- und -Tastatur an die Maus- und Tastaturanschlüsse
des Computers an. (Siehe Abbildung unten.)
Schritt 4
Schließen Sie den PS/2-Kabelsatz für die E-Serie an den ausgewählten PC-Anschluss
an der Rückseite des KVM-Switches aus der E-Serie an. (Siehe Abbildung unten.)
Schritt 5
Schalten Sie Ihren Computer ein.
Schritt 6
Wiederholen Sie Schritt 1 bis 5 für jeden weiteren anzuschließenden PS/2Computer.

Installation
Hochfahren der Computer
Überprüfen Sie, ob alle Computer, die mit dem KVM-Switch aus der E-Serie
verbunden sind, eingeschaltet sind. Sollte der ein oder andere angeschlossene
Computer noch nicht hochgefahren sein, können Sie dies jetzt tun (die Computer
können gleichzeitig hochgefahren werden). Der KVM-Switch aus der E-Serie
emuliert an jeder Schnittstelle eine Tastatur und eine Maus und ermöglicht dem
Computer einen normalen Systemstart. Jetzt ist der KVM-Switch aus der E-Serie
betriebsbereit.
Der Computer an Anschluss 1 (Port 1) wird auf dem Bildschirm angezeigt.
Überprüfen Sie, ob Tastatur, Bildschirm und Maus ordnungsgemäß funktionieren.
Überprüfen Sie alle belegten Schnittstellen, um sicherzustellen, dass alle Computer
angeschlossen sind und ordnungsgemäß reagieren. Wenn ein Fehler auftritt,
überprüfen Sie die Kabelverbindungen des betreffenden Computers, und starten
Sie ihn neu. Bleibt das Problem bestehen, finden Sie weitere Hinweise im Abschnitt
„Fehlerbehebung“ in diesem Handbuch.
DE-10

Verwenden des KVM-Switches aus der E-Serie
Hl^iX]idegZk^djhVXi^kZedgi!PJERVggdl
Hl^iX]idcZmiVXi^kZedgi!P9DLCRVggdl#
Hl^iX]idegZk^djhVXi^kZedgi!PJERVggdl
Hl^iX]idcZmiVXi^kZedgi!P9DLCRVggdl#
Hl^iX]idEdgi'P'R!'`Zn
Hl^iX]idEdgi)P)R!)`Zn
Auswahl eines Computers mit Direktwahlschalter
Sie können direkt auf einen angeschlossenen Computer zugreifen, indem Sie auf
den Direktwahlschalter drücken oder einen Tastaturbefehl verwenden. Die LEDAnzeige neben der Nummer leuchtet auf, um anzuzeigen, dass die Schnittstelle
ausgewählt ist. Nach dem Umschalten dauert es ca. 1 bis 2 Sekunden, bis
der Bildschirm aktualisiert wird. Außerdem werden Maus- und Tastatursignal
neu synchronisiert. Dies ist die normale Auswirkung einer Funktion, die die
ordnungsgemäße Synchronisierung der Konsole mit den angeschlossenen
Computern sicherstellt.
Auswahl eines Computers mit Tastaturbefehlen
Schalten Sie durch einfache Tastenfolgen aus der Taste „Rollen” und den
Tasten „Pfeil-nach-oben” bzw. „Pfeil-nach-unten” zur nächsten bzw. vorherigen
Schnittstelle um. Um Befehle an das KVM-Gerät zu senden, müssen Sie die
Rollen-Taste innerhalb von zwei Sekunden zweimal drücken. Der KVM-Switch
aus der E-Serie gibt einen Signalton aus und bestätigt damit den Betrieb mit
Tastaturbefehlen (Hotkey-Modus). Drücken Sie anschließend auf die Taste „Pfeilnach-oben”. Der KVM-Switch aus der E-Serie schaltet zu der Schnittstelle um,
die vorher aktiv gewesen ist. Drücken Sie auf die Taste „Pfeil-nach-unten”, um zur
nächsten aktiven Schnittstelle umzuschalten.
Sie können direkt zu einer bestimmten Schnittstelle umschalten, indem Sie die
Nummer der Schnittstelle eingeben. Wenn Sie zum Beispiel „Rollen”, „Rollen”, 2”
drücken, schaltet der KVM-Switch zum Computer an Schnittstelle 2 um.
1
2
3
Kapitel
4
5
6
7
8
Hinweis: Sie müssen jede Befehlstastenfolge innerhalb von ca. drei Sekunden
abschließen.
DE-11

DE-12
Verwenden des KVM-Switches aus der E-Serie
Auswahl eines Computers mit Direktwahlschalter
Sie können den gewünschten Computer mit dem Direktwahlschalter neben der
entsprechenden Schnittstelle direkt auswählen. Die entsprechende LED-Anzeige
leuchtet auf, um anzuzeigen, dass die Schnittstelle ausgewählt ist.
LED-Anzeige
LED-Anzeigen
Die LED-Anzeigen auf dem Bedienfeld des KVM-Switches aus der E-Serie
dienen als Statusmonitor. Eine LED-Anzeige leuchtet auf, um die Konsole
anzuzeigen, die gerade den betreffenden Computer steuert. Wenn ein
Direktwahlschalter gedrückt wird, leuchtet die LED-Anzeige neben dem Schalter
auf. Wenn eine LED-Anzeige blinkt, wird damit angezeigt, dass kein Computer
an diese Schnittstelle angeschlossen ist, oder dass der angeschlossene
Computer ausgeschaltet ist. Die LED-Anzeige blinkt auch, wenn der KVMSwitch sich im AutoScan-Modus befindet.
Hinweis: Die Schnittstellen-Anzeige zeigt Dauerlicht für manche Computer an,
die den PS/2-Tastaturanschluss kontinuierlich mit Strom versorgen, auch wenn
sie heruntergefahren sind.
AutoScan-Modus
Im AutoScan-Modus verbleibt der KVM-Switch aus der E-Serie fünf Sekunden lang an
jeder aktiven Schnittstelle, bevor er zur nächsten weiterschaltet. Dieses Intervall kann
nicht geändert werden.
Drücken Sie zur Aktivierung der AutoScan-Funktion die Tasten „Rollen” „Rollen” „ As”.
Drücken Sie eine beliebige Taste auf dem Bedienfeld oder auf der Tastatur, um die
AutoScan-Funktion wieder abzuschalten.
Hinweis:Im AutoScan-Modus können Maus und Tastatur nicht gesteuert werden.
Dadurch werden Daten- und Synchronisierungsfehler verhindert. Wenn der Benutzer die
Maus oder Tastatur während des Umschaltens des KVM-Switches aus der E-Serie zu
einer anderen Schnittstelle betätigt, wird der Datenfluss möglicherweise unterbrochen.
Dies kann zu fehlerhaften Mausbewegungen und falschen Tastatureingaben führen.

Kapitel
1
2
3
4
5
6
7
8
DE-13
Verwenden des KVM-Switches aus der E-Serie
Übersicht über die Tastaturbefehle
In der Tabelle unten finden Sie eine komplette Liste mit Tastaturbefehlen, die Sie
für Ihren KVM-Switch aus der E-Serie verwenden können:
Hinweis: Vor jedem Befehl muss die Rollen-Taste zweimal gedrückt werden
(„Rollen”, „Rollen”).
Befehl Funktion
Vorher aktiver Computer
Nächster aktiver Computer
[1,2,3,4] Umschaltung zu Schnittstelle „x” (1, 2, 3, 4)
A Aktiviert AutoScan
S Ein-/Ausschalten des Signaltons
Hinweis: Sie müssen jede Befehlstastenfolge innerhalb von
ca. drei Sekunden abschließen.

Häufig gestellte Fragen
F: Welche Betriebssysteme werden vom KVM-Switch aus der E-Serie
unterstützt?
A: Der KVM-Switch aus der E-Serie unterstützt nur PS/2-fähige Betriebssysteme.
Unter anderem werden DOS; Windows 2000, NT, XP, Server 2003, Vista und
Linux unterstützt.
F: Können an der Host-Seite USB-Computer angeschlossen werden?
A: Nein, der KVM-Switch aus der E-Serie unterstützt nur PS/2-Computer.
F: Wie groß darf der Abstand zwischen Computer und KVM-Switch sein?
A: Der KVM-Switch kann in einem Abstand von 7,6 Metern vom PS/2-Computer
aufgestellt werden.
F: Welche Bildschirmauflösung wird vom KVM-Switch aus der E-Serie
maximal unterstützt?
A: Das durchdachte Grafikmodul des KVM-Switches ermöglicht Auflösungen bis
zu 1920 x 1440 / 75 Hz.
F: Muss ich für den KVM-Switch Software installieren?
A: Nein. Für den KVM-Switch müssen weder Treiber noch andere Software
installiert werden. Verbinden Sie einfach alle Computer mit den KVM-Kabelsätzen
von Belkin und schließen Sie eine Tastatur, einen Bildschirm und eine Maus an
die Konsolenschnittstelle an. Das Gerät ist jetzt betriebsbereit.
F: Wird für den KVM-Switch ein Netzteil benötigt?
A: Nein, in den meisten Fällen ist für den KVM-Switch kein externes Netzteil
erforderlich.
F: Kann ich den KVM-Switch aus der E-Serie ausschließlich zum
Umschalten von Bildschirmsignalen verwenden?
A: Nein. Der KVM-Switch muss sowohl an die Grafik- als auch an die Tastaturund Mausschnittstellen Ihres Servers angeschlossen werden. Der KVM-Switch
benötigt die Stromversorgung der PS/2-Anschlüsse an Ihren Computern, um
ordnungsgemäß funktionieren zu können.
F: Unterstützt der KVM-Switch Linux?
A: Ja. Der KVM-Switch eignet sich für Red Hat und andere Linux-Distributionen,
die für PS/2-Unterstützung konfiguriert sind.
F: Wie lange ist die Garantiezeit für den KVM-Switch aus der E-Serie?
A: Wir gewähren zwei Jahre eingeschränkte Herstellergarantie für den KVMSwitch.
DE-14

Fehlerbehebung
Fehlerbehebung Fehlerbehebung
Mein Computer fährt nicht hoch, wenn er an den KVM-Switch
angeschlossen ist, funktioniert aber einwandfrei, wenn ich Tastatur,
Bildschirm und Maus direkt an den Computer anschließe.
• Stellen Sie sicher, dass Tastatur- und Mauskabel korrekt an KVM-Switch
und Computer angeschlossen sind.
• Überprüfen Sie, ob Tastatur- und Mauskabel vertauscht (überkreuzt)
wurden.
• Überprüfen Sie die Kabelanschlüsse.
Das Bild ist verschwommen oder Geisterbilder bzw. Schatten werden
angezeigt.
• Überprüfen Sie, ob alle Bildschirmkabel ordnungsgemäß mit dem
Kabelsatz verbunden sind.
• Überprüfen Sie, ob der verwendete Bildschirm die Auflösung und
Aktualisierungsrate unterstützt, die auf Ihrem Computer eingestellt wurde.
• Stellen Sie für den Bildschirm eine niedrigere Bildschirmauflösung ein.
• Überprüfen Sie, ob die Kabellänge 7,5 m nicht überschreitet.
• Überprüfen Sie, ob die verwendete Grafikkarte die Auflösung und
Aktualisierungsrate unterstützt, die auf Ihrem Computer eingestellt wurde.
• Schließen Sie den Bildschirm direkt an den betreffenden Computer an, und
überprüfen Sie, ob das Problem weiterhin auftritt.
Der Bildschirm bleibt dunkel.
• Überprüfen Sie, ob alle Bildschirmkabel ordnungsgemäß angeschlossen
wurden.
• Überprüfen Sie, ob das Tastaturkabel korrekt an den Computer und an die
entsprechende KVM-Schnittstelle angeschlossen ist.
• Bewegen Sie die Maus und überprüfen Sie, ob Sie sich als Benutzer
anmelden müssen.
• Schließen Sie den Bildschirm direkt an den Computer an, und überprüfen
Sie, ob der Bildschirm ordnungsgemäß funktioniert.
1
2
3
4
5
Kapitel
Kapitel Kapitel
6
7
8
Der Computer erkennt die Tastatur nicht und es wird beim Systemstart
ein Tastaturfehler gemeldet.
• Überprüfen Sie, ob das Tastaturkabel am KVM-Switch korrekt an den
Computer angeschlossen ist. Befestigen Sie lose Verbindungen.
• Wenn Sie die Tastatursoftware verwenden, die Sie mit der Tastatur erhalten
haben, deinstallieren Sie diese und installieren Sie dann einen StandardTastaturtreiber von Microsoft.
DE-15
DE-15

Fehlerbehebung
Wenn ich zu einer anderen Schnittstelle umschalte, wird die Maus nicht mehr
erkannt.
• Überprüfen Sie, ob die verwendete Maus ordnungsgemäß an die
Konsolenschnittstelle des KVM-Switches angeschlossen wurde.
• Befestigen Sie lose Verbindungen.
• Wenn Sie den Maustreiber verwenden, den Sie mit der Maus erhalten haben,
deinstallieren Sie diesen und installieren Sie dann einen Standard-Maustreiber von
Microsoft.
• Überprüfen Sie, ob die Maus funktioniert, wenn Sie sie direkt an den Computer
anschließen.
• Wenn der Computer aus dem Standby-Modus in den Betrieb schaltet, warten Sie
ab, ob die Maus nach einer Minute wieder funktioniert.
• Deaktivieren Sie die Energiesparmodi der Computer, an denen die Probleme
auftreten.
• Wenn Sie im laufenden Betrieb Geräte in Ihrer KVM-Konfiguration angeschlossen
oder ausgetauscht haben, schalten Sie alle angeschlossenen Computer aus.
Installieren Sie den KVM-Switch danach erneut, wie auf den Seiten 8-10 in diesem
Benutzerhandbuch beschrieben wird.
• Probieren Sie eine andere Maus aus.
Die Maus wird beim Systemstart nicht erkannt.
• Überprüfen Sie die Kabel, und stellen Sie sicher, dass sie richtig angeschlossen
sind.
Die Rechner fahren ganz normal hoch, aber die Maus funktioniert nicht.
• Überprüfen Sie, ob die Maus richtig angeschlossen ist.
• Stellen Sie sicher, dass die Maus funktioniert, wenn Sie direkt an den Computer
angeschlossen ist. Hierzu müssen Sie möglicherweise einen Neustart durchführen.
• Probieren Sie eine andere Maus aus.
• Versuchen Sie, den Computer, an dem Probleme auftreten, hochzufahren, wenn die
entsprechende Schnittstelle ausgewählt ist, und warten Sie, bis das Betriebssystem
hochgefahren ist, bevor Sie zu einem anderen Computer umschalten.
Der Rechner fährt ordnungsgemäß hoch, aber die Maus funktioniert nicht.
• Wenn Sie im laufenden Betrieb Geräte in Ihrer KVM-Konfiguration angeschlossen
oder ausgetauscht haben, schalten Sie alle angeschlossenen Computer aus.
Installieren Sie den KVM-Switch danach erneut, wie auf den Seiten 8-10 in diesem
Benutzerhandbuch beschrieben wird.
• Stellen Sie sicher, dass nicht mehr als ein Maustreiber installiert ist. Stellen Sie
sicher, dass der Treiber entweder für eine Standard-PS/2 oder USB-Maus oder eine
PS/2-Maus, die mit Microsoft kompatibel ist, geeignet ist.
• Stellen Sie sicher, dass in den Dateien „config.sys” und „autoexec.bat” keine
Maustreiber geladen sind.
• Beim Umschalten zwischen den Schnittstellen des KVM-Switches darf die Maus
nicht bewegt oder betätigt werden.
• Versuchen Sie, den Computer, an dem Probleme auftreten, hochzufahren, wenn die
entsprechende Schnittstelle ausgewählt ist, und warten Sie, bis das Betriebssystem

Glossar
hochgefahren ist, bevor Sie zu einem anderen Computer umschalten
3Für das Handbuch gelten die folgenden Begriffsdefinitionen:
AutoScan: Betriebsmodus, bei dem der KVM-Switch die Schnittstellen
ständig nacheinander abfragt, wie vom Benutzer vorgegeben.
Konsole: Besteht aus einer Tastatur, einem Bildschirm und einer Maus, die an
den KVM-Switch angeschlossen sind.
Konsolenschnittstelle: Anschlüsse zum Verbinden der Konsole mit dem
KVM-Switch.
Kontrolle: Beim Umschalten zwischen mehreren Schnittstellen bedeutet
Kontrolle, dass die Konsole Eingabedaten an den Computer senden kann.
Hierzu benötigt die Konsole Fokus auf die Schnittstelle und die Schnittstelle
muss angezeigt werden.
KVM:Wörtlich „Keyboard Video Mouse” (Tastatur Bildschirm Maus),
bezeichnet dieser Begriff eine Technologie, mit der einer oder viele Computer
über eine Tastatur, einen Bildschirm und eine Maus gesteuert werden können;
einige Switches, die mit KVM-Technologie arbeiten, ermöglichen auch die
gemeinsame Nutzung anderer Peripheriegeräte wie Lautsprecher, Mikrofone
oder Drucker.
KVM-Switch:Ein Gerät, mit dem der Zugriff auf und die Kontrolle über
mehrere Computer von einer Konsole aus ermöglicht wird. Es verfügt über
mindestens eine Konsolen- und mehrere Computer-Schnittstellen.
Schnittstelle/Port: Anschluss an einem Computer für ein Gerät oder ein
Gerätekabel.
1
2
3
4
5
6
Kapitel
7
8
DE-17

Informationen
DE-18
FCC-Erklärung
ERKLÄRUNG DER KONFORMITÄT MIT DEN VORSCHRIFTEN FÜR
Wir, Belkin International, Inc., 501 West Walnut Street, Compton, CA 90220,
USA, erklären hiermit alleinverantwortlich, dass die Artikel:
auf die sich diese Erklärung bezieht,
in Einklang mit Teil 15 der FCC-Regelungen stehen. Der Betrieb unterliegt den
beiden folgenden Bedingungen:
(1) Dieses Gerät verursacht keine schädlichen Interferenzen, und
(2) Dieses Gerät muss jedwede Störung annehmen, einschließlich der
Störungen, die einen unerwünschten Betrieb verursachen könnten.
CE-Konformitätserklärung
Wir, Belkin International, Inc., erklären hiermit in alleiniger Verantwortung, dass die
Artikel F1DB102P2, F1DB104P2, auf die sich diese Erklärung bezieht, in Einklang mit
der Fachgrundnorm Störaussendung EN55022 und der Fachgrundnorm Störfestigkeit
EN55024 sowie LVP EN61000-3-2 und EN61000-3-3 steht.
ICES-Erklärung
Dieses Digitalgerät der Klasse B entspricht der kanadischen Richtlinie ICES-003.
Cet appareil numérique de la classe B est conforme á la norme NMB-003 du
Canada.
Zwei Jahre beschränkte Herstellergarantie von Belkin International, Inc.
Garantieleistung.
Belkin International, Inc. („Belkin”) garantiert dem ursprünglichen Käufer dieses
Belkin-Produkts, dass dieses Produkt frei von Material-, Verarbeitungs-, und
Konstruktionsfehlern ist.
Garantiedauer.
Belkin gewährt für dieses Belkin-Produkt eine zweijährige Garantie.
Problembehebung.
Herstellergarantie.
Belkin wird das Produkt nach eigenem Ermessen entweder kostenlos (abgesehen von
den Versandkosten) reparieren oder austauschen.
Garantieausschluss.
Alle oben genannten Garantien verlieren ihre Gültigkeit, wenn das BelkinProdukt Belkin auf Anfrage nicht auf Kosten des Käufers zur Überprüfung zur
Verfügung gestellt wird oder wenn Belkin feststellt, dass das Belkin-Produkt nicht
ordnungsgemäß installiert worden ist, und dass unerlaubte Änderungen daran
vorgenommen worden sind. Die Herstellergarantie von Belkin gilt nicht für (Natur)
gewalten wie Überschwemmungen, Erdbeben und Blitzschlag sowie Krieg,
Vandalismus, Diebstahl, normalen Verschleiß, Erosion, Wertminderung, Veralterung,
schlechte Behandlung, Beschädigung durch Störungen aufgrund von Unterspannung
DE-18
DIE ELEKTROMAGNETISCHE VERTRÄGLICHKEIT
F1DB102P2, F1DB104P2

Informationen
Kapitel
1
2
3
4
5
6
7
8
DE-19
(z. B. Spannungsabfall oder -Senkung) oder nicht erlaubte Programm- oder
Systemänderungen.
Service.
Um Unterstützung von Belkin zu bekommen, gehen Sie nach folgenden Schritten vor:
1. Wenden Sie sich schriftlich an Belkin International, Inc., 501 W. Walnut St.,
Compton CA 90220, Attn: Customer Service oder wenden Sie sich innerhalb von 15
Tagen nach dem Vorfall telefonisch unter (800)-223-5546 an Belkin. Halten Sie die
folgenden Informationen bereit:
a. Die Artikelnummer des Belkin-Produkts.
b. Wo Sie das Produkt erworben haben.
c. Das Kaufdatum.
d. Kopie der Originalquittung.
2. Der/die Kundendienstmitarbeiter/in von Belkin erläutert Ihnen dann, wie Sie den
Kaufbeleg und das Belkin-Produkt verschicken können und wie in Ihrem Fall verfahren
wird.
Belkin behält sich vor, das beschädigte Belkin-Produkt zu überprüfen. Alle Kosten,
die beim Versand des Belkin-Produkts an Belkin zum Zweck der Überprüfung
entstehen, sind vollständig durch den Käufer zu tragen. Wenn Belkin nach eigenem
Ermessen entscheidet, dass es nicht angebracht ist, das beschädigte Gerät an
die Belkin zu schicken, kann Belkin nach eigenem Ermessen eine Reparaturstelle
damit beauftragen, das Gerät zu überprüfen und einen Kostenvoranschlag für die
Reparaturkosten des Gerätes zu machen. Die Kosten für den Versand zu einer solchen
Reparaturstelle und die eventuellen Kosten für einen Kostenvoranschlag gehen
vollständig zu Lasten des Käufers. Beschädigte Geräte müssen zur Überprüfung zur
Verfügung stehen, bis das Reklamationsverfahren abgeschlossen ist. Wenn Ansprüche
beglichen werden, behält sich Belkin das Recht vor, Ersatzansprüche an eine
bestehende Versicherung des Käufers zu übertragen.
Garantiegesetze.
DIESE GARANTIE BILDET DIE ALLEINIGE GARANTIE VON BELKIN. ES GIBT KEINE ANDERE
GARANTIE, EXPLIZIT ERWÄHNT ODER IMPLIZIT, AUSSER WENN DIES VOM GESETZ
VORGESCHRIEBEN IST, EINSCHLIESSLICH DER IMPLIZITEN GARANTIE ODER DES
QUALITÄTSZUSTANDS, DER ALLGEMEINEN GEBRAUCHSTAUGLICHKEIT ODER EIGNUNG
FÜR EINEN BESTIMMTEN ZWECK, UND SOLCHE IMPLIZITEN GARANTIEN, WENN ES
SOLCHE GIBT, BEZIEHEN SICH AUSSCHLIESSLICH AUF DIE DAUER, DIE IN DIESER
GARANTIE ZUGRUNDE GELEGT WIRD.
In manchen Ländern sind Einschränkungen bezüglich der Dauer der Garantie nicht zulässig.
Die oben erwähnten Einschränkungen treffen für Sie dementsprechend nicht zu.
UNTER KEINEN UMSTÄNDEN HAFTET BELKIN FÜR ZUFÄLLIGEN, BESONDEREN, DIREKTEN,
INDIREKTEN, MEHRFACHEN SCHADEN ODER FOLGESCHÄDEN WIE, ABER NICHT AUSSCHLIESSLICH,
ENTGANGENES GESCHÄFT ODER PROFITE, DIE IHNEN DURCH DEN VERKAUF ODER DIE BENUTZUNG
VON EINEM BELKIN-PRODUKT ENTGANGEN SIND, AUCH WENN SIE AUF DIE MÖGLICHKEIT SOLCHER
SCHÄDEN AUFMERKSAM GEMACHT WORDEN SIND.
Diese Garantie räumt Ihnen spezifische Rechte ein, die von Land zu Land
unterschiedlich ausgestaltet sein können. Da in manchen Ländern der Ausschluss oder
die Beschränkung der Haftung für durch Zufall eingetretene oder Folgeschäden nicht
zulässig ist, haben die vorstehenden Beschränkungen und Ausschlussregelungen
für Sie möglicherweise keine Gültigkeit.
DE-19

Belkin Technischer Support
GB: 0845 607 77 87
Europa: www.belkin.com/support
OmniView® E-Serie
KVM-Switch
Belkin Ltd.
Express Business Park
Shipton Way, Rushden
NN10 6GL, Großbritannien
+44 (0) 1933 35 2000
+44 (0) 1933 31 2000 Fax
Belkin SAS
130 rue de Silly
92100 Boulogne Billancourt
Frankreich
+33 (0) 1 41 03 14 40
+33 (0) 1 41 31 01 72 Fax
Belkin B.V.
Boeing Avenue 333
1119 PH Schiphol-Rijk
Niederlande
+31 (0) 20 654 73 00
+31 (0) 20 654 73 49 Fax
Belkin Iberia
Avda. Cerro del Aguila 3
28700 San Sebastián de los Reyes
Spanien
+34 91 625 80 00
+34 902 02 00 34 Fax
Belkin GmbH
Hanebergstraße 2
80637 München
Deutschland
+49 (0) 89 14 34 05 0
+49 (0) 89 14 34 05 100 Fax
Belkin Schweden
Knarrarnäsgatan 7
164 40 Kista
Schweden
+46 (0) 8 5229 1870
+46 (0) 8 5229 1874 Fax
© 2007 Belkin International, Inc. Alle Rechte vorbehalten. Alle Produktnamen sind eingetragene
Marken der angegebenen Hersteller. Windows, Windows Vista, NT und Microsoft sind in den
Vereinigten Staaten und/oder in anderen Ländern eingetragene Marken bzw. Marken der Microsoft
Corporation.
P75583ea

OmniView® E-Serie
EN
FR
dENlEs
it
KVM-switch
F1DB102P2ea
Handleiding
F1DB104P2ea
F1DB102P2eaB
F1DB104P2eaB

Inhoud
1. Inleiding ............................................................................................1
Inhoud van de verpakking ...........................................................1
2. Overzicht ...........................................................................................2
Productkenmerken ......................................................................2
Benodigde uitrusting ...................................................................3
Systeemvereisten ......................................................................4
De switch in beeld gebracht ......................................................5
Technische gegevens .................................................................6
3. Installeren .........................................................................................7
Voorconfigureren ........................................................................7
Installatie-instructies ..................................................................7
De systemen inschakelen .........................................................10
4. Gebruik maken van uw KVM-switch uit de E-Serie ...........................11
Een computer selecteren met behulp van een poortkeuzeknop . . 11
Een computer selecteren via sneltoetscommandos ....................11
LED-display ..............................................................................12
AutoScan-modus ......................................................................12
Overzicht sneltoetscommandos .................................................13
5. Veelgestelde vragen ........................................................................14
6. Problemen oplossen ........................................................................15
7. Verklarende woordenlijst ................................................................17
8. Informatie .......................................................................................18

Inleiding
+6-#ABLE+ITS
&$"0"ONLY
+6-#ABLE+ITS
&$"0"ONLY
5SER-ANUAL
/MNI6IEW%3ERIES
+6-3WITCH
Gefeliciteerd met de aankoop van de
OmniView KVM-switch van Belkin (de
KVM-switch). Ons gevarieerde programma
KVM-oplossingen illustreert onze inzet om
duurzame producten van hoge kwaliteit te
leveren voor een aantrekkelijke prijs. Met de
KVM-switches van Belkin kunt u meerdere
computers vanaf één console besturen.
Ze zijn leverbaar in een groot aantal
uitvoeringen, zowel voor kleine als voor zeer grote
configuraties. Deze compacte, betaalbare KVM-switch
wordt geleverd met twee jaar garantie en gratis technische
ondersteuning.
Deze handleiding geeft u alle informatie over uw nieuwe KVM-switch uit de
E-Serie, te beginnen met de installatie en de bediening tot en met het oplossen
van problemen – in het onwaarschijnlijke geval dat deze zich voordoen.
Hartelijk dank voor het kopen van de OmniView KVM-switch uit de E-Serie van
Belkin. Wij stellen uw vertrouwen in onze producten zeer op prijs. Ongetwijfeld
begrijpt u al snel waarom Belkin wereldwijd het best verkochte merk op het
gebied van KVM-switches is.
Inhoud van de verpakking
Hoofdstuk
1
2
3
4
5
6
7
8
(geldt uitsluitend voor
OmniView E-serie
KVM-switch
2 KVM-kabelsets
F1DB102P2eaB)
Handleiding
4 KVM-kabelsets
(geldt uitsluitend voor
F1DB104P2eaB )
NL-1

NL-2
Overzicht
Productkenmerken
• Sneltoetsfunctionaliteit
Deze functie stelt u in staat de gewenste poorten met specifieke
toetscombinaties te kiezen. Bestuur tot wel vier computers, afhankelijk van uw
KVM-switch, via uw toetsenbord met een eenvoudige sneltoetscombinaties.
Op pagina 13 van de handleiding vindt u meer informatie betreffende het
gebruik van sneltoetscommandos.
• AutoScan
Met de AutoScan-functie kunt u automatisch de activiteiten van alle
aangesloten computers een voor een scannen en monitoren.
• Videoresolutie
De KVM-switch ondersteunt videoresoluties tot 1920x1440 bij 75 Hz.
• Drukknoppen op het frontpaneel
De drukknoppen op het frontpaneel van de KVM-switch stellen u in staat de
op eenvoudige wijze de gewenste poort handmatig te selecteren.
• LED-display
Het LED-display op het frontpaneel van de KVM-switch fungeert als
statusmonitor. Wanneer de console een bepaalde computer bestuurt, brandt
er op de KVM-switch een lampje dat met deze computer correspondeert.

1
2
3
4
5
6
7
8
Hoofdstuk
NL-3
Overzicht
Benodigde uitrusting
Kabels:
Voor het aansluiten van de KVM-switch uit de E-Serie van Belkin dient u gebruik
te maken van een KVM-kabelset van Belkin.
Kabelsets voor de E-Serie van Belkin:
F1D9002-XX (PS/2-uitvoering)
F1D9002-XX (PS/2-uitvoering)
(-XX is de lengte in voet)
F1D9002-XX (PS/2-uitvoering)

NL-4
Overzicht
Systeemvereisten
Besturingssysteemplatformen
De KVM-switch is o.a. compatibel met CPUs die gebruik maken van de volgende
besturingssystemen:
• Windows® NT®, 2000, XP, Server 2003 en Vista
• Microsoft® DOS 5.x en hoger
• Red Hat® Linux® 8.x en hoger
Toetsenborden
• Compatibel met PS/2
• Ondersteunt toetsenborden met standaard 101/102/104/106-toetsindeling.
Muizen
• Met PS/2 compatibele muizen met 2, 3, 4 of 5 knoppen
• Met PS/2 compatible draadloze en optische muizen
Monitoren
• CRT
• LCD (met VGA-ondersteuning)
Voedingsadapter (optioneel)
Er is een optionele 5V/2.5A-voedingsadapter verkrijgbaar (Belkin-artikelnummer
F1D065-PWR-GM (met Schuko-stekker) en F1D065-PWR-UK (met UK-stekker)).
Gebruik van een voedingsadapter is slechts nodig in het uitzonderlijke geval dat de
aangesloten computer niet in staat is de KVM-switch van de benodigde voeding te
voorzien.
TM

1
2
3
4
5
6
7
8
Hoofdstuk
NL-5
Overzicht
#/.3/,% 0# 0# 0# 0#
#/.3/,% 0# 0# 0# 0#
#/.3/,%
0# 0#
De switch in beeld gebracht
Voor/achteraanzicht van de 4-poorts KVM-switch uit de E-Serie:
Rechtstreekse-
poortkeuzeknop
Monitorpoort console
Voor/achteraanzicht van de 2-poorts KVM-switch uit de E-Serie:
Poortkeuzeknop
Monitorpoort console
PC-
poorten
Toetsenbord- en
muispoorten console
PC-
poorten
LED voor herkenning van
de geselecteerde poort
Toetsenbord- en
muispoorten console

Overzicht
Technische gegevens
Artikelnummer: F1DB102P2, F1DB104P2
Behuizing: Slagvaste kunststof
Voeding: Via PS/2-toetsenbordpoort of via de
Aantal ondersteunde computers: 2 en 4, respectievelijk voor 2- en
Ondersteunde monitortypen: CRT en LCD (met VGA-ondersteuning)
Maximale resolutie: Tot 1920x1440 bij 75 Hz
Toetsenbordingang: PS/2 (miniDIN6)
Muisingang: PS/2 (miniDIN6)
Monitorpoort: VGA (HDDB15 female)
PC-poorten: HDDB15 female
Gebruikstemperatuur: 0~40 °C
Opslagtemperatuur: -20~60 °C
Vochtigheidsgraad: 0-80% relatief, niet-condenserend
Garantie: 2 jaar
Afmetingen: (F1DB102P2) 5.2 x 2.5 x 1 in
Gewicht: (F1DB102P2) 7.2oz
(F1DB104P2) 4.2oz.
optionele 5V/2.5A-voedingsadapter
(polariteit middenpool positief)
4-poorts-uitvoeringen
(F1DB104P2) 8.5 x 3.2 x 1 in.
Opmerking: Er wordt een voorbehoud gemaakt voor wijzigingen van deze
gegevens zonder voorafgaande waarschuwing.
NL-6

Installeren
Voorconfigureren
De beste plaats voor uw KVM-switch:
De OmniView KVM-Switch (E-Serie) is bedoeld voor plaatsing op uw bureau. De
exacte plaats zal afhankelijk zijn van de locatie van uw computers en de lengte
van uw kabels.
Wij raden u aan bij het bepalen van een plaats voor de KVM-switch
rekening te houden met het volgende:
• of u de knoppen voor rechtstreekse-poortkeuze wel of niet gaat gebruiken;
• de lengte van de kabels die op het toetsenbord, de monitor en de muis zijn
aangesloten
• de plaats van de computers ten opzichte van uw console;
• de lengte van de kabels die u gebruikt om uw computers aan te sluiten op de
KVM-switch.
Toegelaten kabelafstand:
Voor PS/2-computers:
VGA-signalen worden het beste verstuurd bij een kabellengte van tot 7,6 meter.
Bij grotere afstanden neemt de kans op achteruitgang van de beeldkwaliteit toe.
Daarom raden wij u aan de lengte van de kabels tussen de KVM-switch en de
aangesloten computers te beperken tot maximaal 7,6 meter
Opmerking: Met de OmniView CAT5-extender van Belkin (artikelnummer
F1D084vea2) kunt u de afstand tot de console (toetsenbord, muis en monitor)
vergroten tot 91 meter.
Praktische waarschuwingen
Leg kabels niet in de buurt van fluorescentielampen, airco-apparatuur of
machines die elektrische ruis veroorzaken (zoals stofzuigers).
1
2
Hoofdstuk
3
4
5
6
7
8
Installatie-instructies
U kunt nu beginnen met de installatie van de KVM-switch. De volgende
hoofdstukken (pagina 8-10) geven een compleet overzicht van de hardwareinstallatie.
Zorg er voor dat uw hele installatie is uitgeschakeld voordat u kabels/apparaten
op de KVM-switch of uw computers aansluit. Als uw computer aan staat kan het
loskoppelen of aansluiten van kabels onherstelbare schade veroorzaken aan deze
computer en/of de KVM-switch. Belkin is niet verantwoordelijk voor de schade die
hiervan het gevolg is.
NL-7

NL-8
Installeren
#/.3/,% 0# 0# 0# 0#
Toetsenbord, monitor en muis aansluiten
De console aansluiten
Stap 1
Sluit de monitor aan de op KVM-switch. Sluit de kabel van uw monitor aan op de
female HDDB15-poort, aangeduid met “Console”, op de achterkant van de KVMswitch. (Zie onderstaande afbeelding.)
Stap 2
Sluit het PS/2-toetsenbord aan op de PAARSE toetsenbordpoort aan de
voorkant van de KVM-switch. (Zie onderstaande afbeelding.)
Stap 3
Sluit de PS/2-muis aan op de GROENE muispoort aan de voorkant van de KVMswitch. (Zie onderstaande afbeelding.)
U mag nu computers aan gaan sluiten.

1
2
3
4
5
6
7
8
Hoofdstuk
NL-9
Installeren
#/.3/,% 0# 0# 0# 0#
Computers aansluiten op de KVM-switch
Stap 1
Zorg er voor dat uw computer is uitgeschakeld.
Stap 2
Sluit de VGA-connector van de PS/2-kabelset voor de E-Serie (artikelnummer
F1D9400-XX) aan op de monitorpoort van uw computer. (Zie onderstaande
afbeelding.)
Stap 3
Sluit de PS/2-muis- en het PS/2-toetsenbordconnectors aan op de muis- en
toetsenbordpoorten van de computer. (Zie onderstaande afbeelding.)
Stap 4
Sluit de PS/2-kabelset aan op de gewenste PC-poort aan de achterkant van de
KVM-switch. (Zie onderstaande afbeelding.)
Stap 5
Zet de computer aan.
Stap 6
Herhaal stap 1 tot en met 5 voor elke volgende PS/2-computer die u op de
switch wilt aansluiten.

Installeren
De systemen inschakelen
Controleer of alle computers die op de KVM-switch zijn aangesloten, ingeschakeld
zijn. Als er computers zijn aangesloten die nog niet zijn ingeschakeld, dan mag u
deze nu inschakelen (computers mogen tegelijkertijd worden ingeschakeld). De
KVM-switch emuleert op elke poort zowel een muis als een toetsenbord en stelt
zo uw computer in staat normaal op te starten. Uw KVM-switch is nu klaar voor
gebruik.
De op poort 1 aangesloten computer wordt op de monitor getoond. Controleer
of het toetsenbord, de monitor en de muis normaal functioneren. Controleer alle
gebruikte poorten om er zeker van te zijn dat alle computers zijn aangesloten en
correct reageren. Als er een fout optreedt, controleer dan de kabelverbindingen
van de betreffende computer en start deze opnieuw. Als u het probleem daarmee
niet kunt oplossen, zie dan het hoofdstuk “Problemen oplossen” in deze
handleiding.
NL-10

Gebruik maken van uw KVM-switch uit de E-Serie
Hl^iX]idegZk^djhVXi^kZedgi!PJERVggdl
Hl^iX]idcZmiVXi^kZedgi!P9DLCRVggdl#
Hl^iX]idegZk^djhVXi^kZedgi!PJERVggdl
Hl^iX]idcZmiVXi^kZedgi!P9DLCRVggdl#
Hl^iX]idEdgi'P'R!'`Zn
Hl^iX]idEdgi)P)R!)`Zn
Een computer selecteren met behulp van een
poortkeuzeknop
U kunt rechtstreeks een aangesloten computer selecteren door de poortkeuzeknop
in te drukken of door gebruik te maken van een sneltoetscommando. De LED
naast het nummer dat aangeeft welke poort geselecteerd is, zal gaan branden.
Het videosignaal heeft een tot twee seconden nodig om te verversen als u naar
een andere computer hebt overgeschakeld. Ook kan een hersynchronisatie van de
muis- en toetsenbordsignalen optreden. Dit valt onder de normale werking en zorgt
voor de juiste synchronisatie tussen de console en de aangesloten computers.
Een computer selecteren via sneltoetscommandos
U kunt naar de volgende of de voorgaande poort overschakelen via eenvoudige
toetsencombinaties door eerst de toets “ScrollLock” en daarna de pijltoetsen
“Omhoog” of “Omlaag” in te drukken. Als u een sneltoetscommando naar uw
KVM-switch wilt sturen, dient u eerst binnen twee seconden twee maal op de “Scroll
Lock”-toets te drukken. De KVM-switch geeft nu een piepsignaal als bevestiging
dat de sneltoetsmodus ingeschakeld is. Als u nu op de pijltoets “Omhoog” drukt,
schakelt de KVM-switch over naar de vorige actieve poort. Druk op de pijltoets
“Omlaag” om naar de volgende actieve poort over te schakelen.
U kunt ook rechtstreeks naar een poort overschakelen door het nummer in te voeren
van de poort die u wilt gebruiken. Typt u bijvoorbeeld de combinatie “ScrollLock”,
“ScrollLock”, “2” in, dan schakelt de KVM-switch over naar de computer die is
aangesloten op poort 2.
1
2
3
Hoofdstuk
4
5
6
7
8
Opmerking: Een volledig sneltoetscommando moet binnen ongeveer drie seconden
worden ingegeven.
NL-11

NL-12
Gebruik maken van uw KVM-switch uit de E-Serie
Een computer selecteren met behulp van de
poortkeuzeknoppen
U kunt meteen de gewenste computer selecteren door op de rechtstreeksepoortkeuzeknop te drukken die correspondeert met deze computer. De
bijbehorende LED gaat branden ten teken dat de poort is geselecteerd.
LED
LED-display
Het LED-display op het frontpaneel van de KVM-switch fungeert als statusmonitor.
Wanneer de console een bepaalde computer bestuurt, brandt er op de
KVM-switch een lampje dat met deze computer correspondeert. Als u een
poortkeuzeknop indrukt, licht de LED ernaast op. Een knipperende LED wil zeggen
dat er geen computer op de betreffende poort is aangesloten of dat de computer
die erop is aangesloten, is uitgeschakeld. De LED zal ook knipperen als de KVMswitch in AutoScan-modus staat.
Opmerking: Bij sommige computers die de PS/2-toetsenbordpoort van stroom
blijven voorzien, zal de poort-LED blijven branden, zelfs als ze uitgeschakeld zijn.
AutoScan-modus
In de AutoScan-modus blijft de KVM-switch vijf seconden op een actieve poort staan
voordat hij naar de volgende actieve poort overschakelt. Dit tijdsinterval kan niet worden
gewijzigd.
Om de AutoScan-functie te activeren, drukt u op het toetsenbord de toetsen “Scroll Lock”,
“Scroll Lock” en “A” in.
De AutoScan-functie kan worden uitgeschakeld door het indrukken van een willekeurige
knop op het frontpaneel of een toets op het toetsenbord.
Opmerking: In de AutoScan-modus kunt u de muis of het toetsenbord niet gebruiken.
Dit is een voorzorgsmaatregel die data- en synchronisatiefouten helpt voorkomen. Als de
gebruiker de muis of het toetsenbord gebruikt wanneer de KVM-switch van de ene naar
de andere poort overschakelt, kan de gegevensstroom worden onderbroken. Dit kan weer
resulteren in foutieve muisbewegingen en/of de invoer van verkeerde tekens wanneer u het
toetsenbord gebruikt.

Hoofdstuk
1
2
3
4
5
6
7
8
NL-13
Gebruik maken van uw KVM-switch uit de E-Serie
Overzicht sneltoetscommandos
Onderstaande tabel geeft een overzicht van de sneltoetscommandos die gebruikt
kunnen worden voor de KVM-switch.
Opmerking: Elk commando moet voorafgegaan worden door “Scroll Lock”,
“Scroll Lock”.
Commando Functie
Vorige actieve computer
Volgende actieve computer
[1,2,3,4] Overschakelen naar poort “x” (1, 2, 3, 4)
A Activeert de AutoScan-functie
S Geluidssignaal aan/uit
Opmerking: Voor het ingeven van een sneltoetscommando hebt u ongeveer
drie seconden de tijd.
V: Welke besturingssystemen worden door de KVM-switch ondersteund?
A: Deze KVM-switch uit de E-Serie van Belkin ondersteunt alle
besturingssystemen die op een PS/2-platform draaien. Als besturingssystemen
komen ondermeer in aanmerking: DOS; Windows 2000, NT, XP, Server 2003,
Vista en Linux.
V: Kan ik aan de host-kant USB-computers aansluiten?
A: Nee, deze KVM-switch uit de E-Serie ondersteunt uitsluitende PS/2computers.
V: Wat is de maximaal toegestane afstand tussen een computer en de KVMswitch?
A: De KVM-switch kan tot op een afstand van 25 feet van uw PS/2-computer
worden geplaatst.
V: Wat is de hoogste videoresolutie die de KVM-switch ondersteunt?
A: De geavanceerde videoverwerkingseenheid van de KVM-switch ondersteunt
een maximum resolutie van 1920x1440 bij 75 Hz.
V: Moet ik nog software installeren om de KVM-switch te kunnen gebruiken?
A: Nee, voor het gebruik van de KVM-switch hoeft u geen stuurprogrammas of

Veelgestelde vragen
andere software op uw computers te installeren. U verbindt eenvoudigweg alle
computers met de KVM-kabelsets van Belkin. Vervolgens sluit u een toetsenbord,
monitor en muis aan op de console en uw KVM-switch is klaar voor gebruik.
V: Heeft de KVM-switch een netvoedingsadapter nodig?
A: Nee, de KVM-switch kan in de meeste gevallen zonder externe
voedingsadapter gebruikt worden.
V: Kan ik de KVM-switch uit de E-Serie gebruiken om alleen van
videosignaal te wisselen?
A: Nee, u moet de KVM-switch zowel op de videopoorten aansluiten als op de
toetsenbord/muispoorten van de computers. Om te kunnen functioneren moet de
KVM-switch de voeding van de PS/2-poorten van de computers detecteren.
V: Wordt Linux door de KVM-switch ondersteund?
A: Ja, de KVM-switch werkt in combinatie met Red Hat- en andere Linuxproducten die voor PS/2-ondersteuning zijn geconfigureerd.
V: Hoe lang heb ik garantie op de KVM-switch?
A: De KVM-switch wordt geleverd met twee jaar beperkte garantie.

Problemen oplossen
Problemen oplossen Problemen oplossen
Mijn computer start niet op wanneer deze op de KVM-switch is
aangesloten maar functioneert feilloos als ik het toetsenbord, de
monitor en de muis rechtstreeks op de computer aansluit.
• Controleer of de toetsenbord- en muiskabels stevig tussen de KVM-switch
en de computer zijn aangesloten.
• Controleer of de toetsenbord- en muiskabels bij het aansluiten op de
poorten niet verwisseld zijn.
• Controleer de kabelverbindingen.
Op mijn beeldscherm krijg ik nalichten, schaduwen of vage beelden te
zien.
• Controleer of alle videokabels op de juiste wijze op de kabelset zijn
aangesloten.
• Controleer of de door u gebruikte monitor de resolutie en de op uw
computer ingestelde herhalingsfrequentie ondersteunt.
• Verlaag de videoresolutie van uw monitor.
• Controleer de lengte van de gebruikte kabels. Deze mogen niet langer dan
8,25 m zijn.
• Controleer ook of de gebruikte grafische kaart de herhalingsfrequentie van
de computer ondersteunt.
• Sluit de monitor rechtstreeks aan op de computer die problemen geeft om
te kijken of het probleem blijft bestaan.
Op mijn monitor krijg ik een zwart scherm.
• Controleer of alle videokabels goed zijn aangesloten.
• Controleer of de toetsenbordkabel op de juiste wijze is aangesloten op de
computer en de betreffende poort op de KVM-switch.
• Verplaats de muis en kijk of het nodig is als gebruiker in te loggen.
• Sluit uw monitor rechtstreeks op de computer aan om te controleren of uw
monitor correct functioneert.
1
2
3
4
5
Hoofdstuk
Hoofdstuk Hoofdstuk
6
7
8
Bij het opstarten ziet de computer geen toetsenbord en krijg ik de
melding dat er een toetsenbordfout is.
• Controleer of de toetsenbordkabel van de KVM-switch stevig op de
computer is aangesloten.
• Als u de software gebruikt die bij het toetsenbord is geleverd, verwijder
deze dan van de harde schijf en installeer het standaardstuurprogramma
van Microsoft voor toetsenborden opnieuw.
NL-15

Problemen oplossen
De muisaanwijzer verdwijnt als ik overschakel naar een andere poort.
• Controleer of de muis die u gebruikt correct op de consolepoort van de
KVM-switch is aangesloten.
• Zet eventuele losse kabelverbindingen vast.
• Als u de software gebruikt die bij de muis is geleverd, verwijder deze
dan van de harde schijf en installeer het standaardstuurprogramma van
Microsoft voor muizen.
• Controleer of de muis werkt als u deze rechtstreeks op de computer
aansluit.
• Als de computer uit standby opstart, duurt het ongeveer een minuut totdat
de muisfunctie hersteld is.
• Schakel het programma voor energiebeheer uit op de computer die problemen
geeft.
• Indien u elementen van uw KVM-configuratie hebt vervangen, eventueel
terwijl bepaalde apparaten nog aan stonden, raden wij u aan alle
aangesloten computers uit te schakelen. Vervolgens herinstalleert u de
KVM-switch volgens de instructies op pagina 8-10 van deze handleiding.
• Probeer een andere muis.
De muis wordt bij opstarten niet herkend.
• Controleer de kabels en zorg ervoor dat ze in de juiste poorten zijn
bevestigd.
De computer start wel op maar de muis werkt niet.
• Controleer of de muis correct is aangesloten.
• Controleer of de muis werkt als u deze rechtstreeks op de computer
aansluit. Het is mogelijk dat u hierbij de computer opnieuw moet opstarten.
• Probeer een andere muis.
• Herstart de probleemcomputer terwijl de poort is geselecteerd en wacht
tot het besturingssysteem geladen is, voordat u naar een andere computer
overschakelt.
De computer start wel op maar de muis werkt niet.
• Indien u elementen van uw KVM-configuratie hebt vervangen, eventueel
terwijl bepaalde apparaten nog aan stonden, raden wij u aan alle
aangesloten computers uit te schakelen. Vervolgens herinstalleert u de
KVM-switch volgens de instructies op pagina 8-10 van deze handleiding.
• Zorg er voor dat er maar een muisstuurprogramma op uw computer is
geïnstalleerd. Zorg er voor dat het gebruikte stuurprogramma ofwel voor
een standaard PS/2- of USB-muis is of voor een PS/2-muis die compatible
is met Microsoft.
• Zorg ervoor dat er in uw “CONFIG.SYS”- of “AUTOEXEC.BAT”-bestanden
geen muisstuurprogrammas zijn geladen.
• Beweeg de muis niet en druk niet op muisknoppen als u op de KVM-switch
van de ene naar de andere serverpoort overschakelt.
• Herstart de probleemcomputer terwijl de poort is geselecteerd en wacht
tot het besturingssysteem geladen is, voordat u naar een andere computer
overschakelt.

Verklarende woordenlijst
De volgende definities worden in deze handleiding gebruikt:
AutoScan: Modus waarin de KVM-switch continu de ene poort na de andere
scant, zoals door de gebruiker geconfigureerd.
Console: Verzamelwoord voor toetsenbord, monitor en muis die aangesloten
zijn op een KVM-switch.
Consolepoort: Aansluitingen voor de console voor verbinding met de KVM-
switch.
Besturen: Als gesproken wordt over het schakelen tussen poorten, betekent
besturen dat de console in staat is invoersignalen naar de computer te
zenden. Besturing is mogelijk als de console zich richt op een specifieke
poort en deze herkent.
KVM: Deze term, letterlijk “Keyboard Video Mouse” (Toetsenbord, Monitor,
Muis), verwijst naar een technologie die het mogelijk maakt twee of meer
computers (of servers) met één toetsenbord, monitor en muis te besturen.
Sommige switches die KVM-technologie gebruiken, maken ook het delen van
andere randapparatuur als luidsprekers, microfoons en printers mogelijk.
KVM-switch: Apparaat waarmee een gebruiker met behulp van één console
meerdere computers kan besturen. Het heeft minstens één consolepoort en
meerdere computerpoorten.
Poort: Interface-aansluiting op een computer waarop de gebruiker een
apparaat of een verbindingskabel kan aansluiten.
1
2
3
4
5
6
Hoofdstuk
7
8
NL-17

Informatie
NL-18
FCC-verklaring
VERKLARING VAN OVEREENSTEMMING MET DE FCC-REGELGEVING
VOOR
ELEKTROMAGNETISCHE COMPATIBILITEIT
Wij, Belkin International, Inc., gevestigd 501 West Walnut Street, Compton,
CA 90220, Verenigde Staten van Amerika, verklaren hierbij dat wij de volledige
verantwoordelijkheid aanvaarden dat de producten met de artikelnummers
F1DB102P2, F1DB104P2
waarop deze verklaring van toepassing is,
voldoen aan Deel 15 van de FCC-voorschriften. Het gebruik ervan is
onderworpen aan de beide volgende voorwaarden:
(1) deze apparaten mogen geen schadelijke stoorsignalen opwekken en
(2) deze apparaten moeten alle ontvangen stoorsignalen accepteren, waaronder
stoorsignalen die een ongewenste werking kunnen veroorzaken.
CE-conformiteitsverklaring
Wij, Belkin International, Inc., verklaren hierbij dat wij de volle verantwoordelijkheid
aanvaarden dat de producten met de artikelnummers F1DB102P2 en F1DB104P2,
waarop deze verklaring van toepassing is, voldoen aan de emissienorm EN55022 en
aan de immuniteitsnormen EN55024, LVP EN61000-3-2 en EN61000-3-3.
ICES
Dit digitale apparaat van klasse B voldoet aan de Canadese normen van ICES-003.
Cet appareil numérique de la classe B est conforme à la norme NMB-003 du
Canada.
Twee jaar beperkte productgarantie van Belkin International, Inc.
Deze garantie dekt het volgende:
Belkin International, Inc. (“Belkin”) garandeert de oorspronkelijke koper van dit
Belkin-product dat het product vrij is van ontwerp-, assemblage-, materiaal- en
fabricagefouten.
De geldigheidsduur van de dekking
Belkin biedt twee jaar garantie op dit Belkin product.
Hoe worden problemen opgelost?
Productgarantie
Belkin zal het product dat een defect vertoont naar eigen keus kosteloos (met
uitzondering van verzendkosten) repareren of vervangen.
Wat valt buiten deze garantie?
Alle hierin versterkte garanties zijn niet van toepassing als het Belkin-product op
verzoek van Belkin International, Inc. niet op kosten van de koper voor onderzoek
aan Belkin International, Inc. ter beschikking is gesteld of als Belkin International,
NL-18

Informatie
1
2
3
4
5
6
7
8
NL-19
Inc. constateert dat het Belkin-product verkeerd is geïnstalleerd, op enige wijze
is veranderd of vervalst. De productgarantie van Belkin biedt geen bescherming
tegen van buiten komend onheil zoals overstromingen, aardbevingen,
blikseminslag, oorlogsmolest, vandalisme, diefstal, normale slijtage, afslijting,
depletie, veroudering, misbruik, beschadiging door netspanningsdalingen (z.g.
“brown-outs” en “sags”), ongeoorloofde programmering en/of wijziging van de
systeemapparatuur.
Hoe wordt service verleend?
Om voor service voor uw Belkin-product in aanmerking te komen gaat u als volgt te werk:
1. Neem binnen 15 dagen na het voorval schriftelijk contact op met Belkin
International, Inc., 501 W. Walnut St., Compton CA 90220, t.a.v.: of bel
(800)-223-5546. Hou er rekening mee dat u de volgende gegevens moet kunnen
verstrekken:
a. Het artikelnummer van het Belkin-product.
b. Waar u het product hebt gekocht.
c. Wanneer u het product hebt gekocht.
d. Het originele aankoopbewijs.
2. De medewerker/ster van de klantenservice van Belkin instrueert u vervolgens
hoe u het aankoopbewijs en het product moet verzenden en hoe de claim verder
wordt afgewikkeld.
Belkin International, Inc. behoudt zich het recht voor het defecte Belkin-product
te onderzoeken. De kosten voor verzending van het Belkin-product naar Belkin
komen volledig voor rekening van de koper. Als Belkin naar eigen bevinding tot
de conclusie komt dat het onpraktisch is de beschadigde apparatuur naar Belkin
te verzenden, kan Belkin naar eigen goeddunken een deskundige reparatieinrichting aanwijzen en deze opdragen de betreffende apparatuur te inspecteren
en de reparatiekosten ervan te begroten. De eventuele verzendkosten van het
product naar de reparatie-inrichting en van de terugzending naar de koper en van
de kostenbegroting komen geheel voor rekening van de koper. Het beschadigde
product moet voor onderzoek beschikbaar blijven totdat de claim is afgehandeld.
Belkin behoudt zich bij de vereffening van claims het recht voor tot in-deplaatstreding bij alle geldige verzekeringspolissen waarover de koper van het
product beschikt.
Hoofdstuk
8
NL-19

Informatie
De garantie en de wet.
DEZE GARANTIE OMVAT DE ENIGE GARANTIE VAN BELKIN INTERNATIONAL,
INC. ER ZIJN GEEN ANDERE GARANTIES, NADRUKKELIJK OF TENZIJ
WETTELIJK BEPAALD IMPLICIET, MET INBEGRIP VAN IMPLICIETE
GARANTIES OF VOORZIENINGEN VAN KWALITEIT, VERHANDELBAARHEID
OF GESCHIKTHEID VOOR EEN BEPAALD DOEL, EN ZULKE IMPLICIETE
GARANTIES, MITS VAN TOEPASSING, ZIJN WAT HUN GELDIGHEID BETREFT
TOT DE DUUR VAN DEZE GARANTIE BEPERKT.
In sommige staten of landen is het niet toegestaan de duur van impliciete garanties
te beperken in welk geval de bovenstaande garantiebeperkingen wellicht niet voor
u gelden.
ONDER TOEPASSELIJK RECHT IS BELKIN INTERNATIONAL, INC. NIET
AANSPRAKELIJK VOOR INCIDENTELE, BIJZONDERE, DIRECTE, INDIRECTE,
BIJKOMENDE OF MEERVOUDIGE SCHADE ZOALS ONDERMEER SCHADE TEN
GEVOLGE VAN GEDERFDE WINST EN/OF GEMISTE OPBRENGSTEN VOORTKOMEND
UIT DE VERKOOP OF HET GEBRUIK VAN BELKIN PRODUCTEN, ZELFS ALS DE
BETROKKENE VAN DE MOGELIJKHEID VAN ZULKE SCHADE TEVOREN OP DE
HOOGTE WAS GESTELD.
Deze garantie verleent u specifieke wettelijke rechten en wellicht hebt u andere
rechten die van staat tot staat kunnen verschillen. In sommige staten en landen
is het niet toegestaan incidentele, gevolg- en andere schade uit te sluiten, reden
waarom de bovenstaande garantiebeperkingen wellicht niet voor u gelden.
NL-20

Technische ondersteuning
Verenigd Koninkrijk: 0845 607 77 87
Europa: www.belkin.com/support
OmniView® E-Serie
KVM-switch
Belkin Ltd.
Express Business Park
Shipton Way, Rushden
NN10 6GL, Verenigd Koninkrijk
+44 (0) 1933 35 2000
+44 (0) 1933 31 2000 fax
Belkin SAS
130 rue de Silly
92100 Boulogne-Billancourt
Frankrijk
+33 (0) 1 41 03 14 40
+33 (0) 1 41 31 01 72 fax
Belkin B.V.
Boeing Avenue 333
1119 PH Schiphol-Rijk
Nederland
+31 (0) 20 654 73 00
+31 (0) 20 654 73 49 fax
Belkin Iberia
Avda. Cerro del Aguila 3
28700 San Sebastián de los Reyes
Spanje
+34 91 625 80 00
+34 902 02 00 34 fax
Belkin GmbH
Hanebergstraße 2
80637 München
Duitsland
+49 (0) 89 14 34 05 0
+49 (0) 89 14 34 05 100 fax
Belkin Sweden
Knarrarnäsgatan 7
164 40 Kista
Zweden
+46 (0) 8 5229 1870
+46 (0) 8 5229 1874 fax
© 2007 Belkin International, Inc. Alle rechten voorbehouden. Alle handelsnamen zijn gedeponeerde
handelsmerken van de betreffende rechthebbenden. Windows, Windows Vista, NT en Microsoft zijn
in de Verenigde Staten en/of andere landen geregistreerde handelsmerken of handelsmerken van
Microsoft Corporation.
P75583ea

Conmutador KVM
EN
FR
dENlEs
it
Serie E OmniView
®
Manual del usuario
F1DB102P2ea
F1DB104P2ea
F1DB102P2eaB
F1DB104P2eaB

Índice de contenidos
1. Introducción ......................................................................................1
Contenido del paquete................................................................1
2. Generalidades ...................................................................................2
Esquema general de características ............................................2
Requisitos del equipo .................................................................3
Requisitos del sistema ................................................................4
Diagramas de los indicadores de la unidad .................................5
Especificaciones .........................................................................6
3. Instalación.........................................................................................7
Configuración previa ...................................................................7
Guía de la instalación .................................................................7
Encendido de los sistemas .....................................................10
4. Utilización del conmutador KVM Serie E ..........................................11
Selección de un ordenador mediante los selectores de puerto .. 11
Selección de un ordenador mediante teclas de acceso directo . . 11
Display LED ..............................................................................12
Modo AutoScan ........................................................................12
Referencia a las teclas de acceso rápido ..................................13
5. Preguntas frecuentes ......................................................................14
6. Resolución de problemas ................................................................15
7. Glosario ...........................................................................................17
8. Información .....................................................................................18

Introducción
+6-#ABLE+ITS
&$"0"ONLY
+6-#ABLE+ITS
&$"0"ONLY
5SER-ANUAL
/MNI6IEW%3ERIES
+6-3WITCH
Felicidades por la adquisición del
Conmutador KVM OmniView de Belkin
(el Conmutador KVM). Nuestra amplia
línea de soluciones KVM da muestra del
compromiso de Belkin por suministrar
productos duraderos de alta calidad
a un precio asequible. Diseñado para
proporcionarle el control sobre múltiples
ordenadores desde una única consola, los
conmutadores KVM de Belkin se presentan con
una gran variedad de propiedades adaptables a todas
las configuraciones, grandes o pequeñas. Este compacto y
asequible conmutador KVM de Belkin está respaldado por una
garantía de dos años y asistencia técnica de Belkin.
El presente manual de usuario le ofrece los detalles acerca de su nuevo conmutador
KVM Serie E, desde la instalación y el funcionamiento, hasta la resolución de
problemas para el improbable caso de que se presenten dificultades.
Gracias por adquirir el conmutador KVM Serie E OmniView de Belkin. Sabemos
valorar su negocio y estamos convencidos de que pronto podrá apreciar por
usted mismo por qué Belkin es el líder mundial en ventas de conmutadores KVM.
Contenido del paquete
sección
1
2
3
4
5
6
7
8
Conmutador KVM Serie E
OmniView
2 kits de cables KVM
(F1DB102P2eaB solo)
4 kits de cables KVM
(F1DB104P2eaB solo)
Manual del
usuario
ES-1

ES-2
Generalidades
Esquema general de características
• Teclas de acceso directo
La funcionalidad de las teclas de acceso directo le permiten seleccionar el
puerto deseado utilizando determinadas combinaciones de teclas. Controla
hasta cuatro ordenadores, dependiendo del modelo de conmutador
KVM, mediante sencillas secuencias de teclas directas. Para obtener más
información acerca de las teclas de función directa, consulte la página 13 de
este manual.
• AutoScan
La propiedad AutoScan (búsqueda automática) le permite efectuar un
rastreo y control automáticos de la actividad de todos los ordenadores en
funcionamiento conectados, uno por uno.
• Resolución de vídeo
El conmutador KVM Serie E es compatible con resoluciones de vídeo de hasta
1920 x 1440 a 75 Hz.
• Botones del panel frontal
Un pulsante, convenientemente ubicado en el panel frontal del conmutador
KVM Serie E, permite una sencilla selección manual de puertos.
• Pantalla LED
Un indicador LED en la parte frontal del conmutador KVM Serie E hace las
veces de monitor de estado. Un LED se ilumina para indicar la consola que
controla el ordenador correspondiente en ese momento.

1
2
3
4
5
6
7
8
sección
ES-3
Generalidades
Requisitos del equipo
Cables:
La conexión del conmutador KVM Serie E a un ordenador requiere un kit de
cables KVM de Belkin.
Kits de cables Serie E de Belkin:
F1D9002-XX (estilo PS/2)
F1D9002x06 (estilo PS/2)
(-XX indica la longitud en pies)
F1D9002-XX (estilo PS/2)

ES-4
Generalidades
Requisitos del sistema
Sistemas operativos
El conmutador KVM Serie E es compatible, pero no exclusivamente, con CPUs
que utilizan las siguientes plataformas:
• Windows® NT®, 2000, XP, Server 2003 o Vista
• Microsoft® DOS 5.x y versiones superiores
• Red Hat® Linux® 8.x y versiones superiores
Teclados
• Compatible con PS/2
• Admite teclados estándares de 101, 102, 104 y 106 teclas
Ratón
• Compatible con ratones PS/2 de 2, 3, 4 ó 5 botones
• Ratón óptico o inalámbrico compatible con PS/2
Monitores
• CRT
• LCD (con soporte VGA)
Suministro de alimentación opcional
Está disponible un suministro de alimentación opcional de 5V 2.5 A (número de
artículo de Belkin F1D065-PWR-GM -con enchufe Schuko- y F1D065-PWR-UK -con
enchufe británico-). Esto sólo es necesario cuando la salida de la alimentación del
ordenador conectado no es adecuada para la alimentación del conmutador KVM.
TM

1
2
3
4
5
6
7
8
sección
ES-5
Generalidades
#/.3/,% 0# 0# 0# 0#
#/.3/,% 0# 0# 0# 0#
#/.3/,%
0# 0#
Diagramas de los indicadores de la unidad
Vista frontal/trasera del conmutador KVM Serie E de 4 puertos:
Selector de puertos
de acceso directo
Puerto de monitor
de la consola
Vista frontal/trasera del conmutador KVM Serie E de 2 puertos:
Selector de puerto
Puerto de monitor
de la consola
Puertos PC
Teclado y ratón para
consola
Puertos PC
LED para la identificación
del puerto seleccionado
Teclado y ratón para
consola

Generalidades
Especificaciones
N° de artículo: F1DB102P2, F1DB104P2
Carcasa: plástico de gran resistencia a impactos
Alimentación: de puerto PS/2 para el teclado del
N° de ordenadores que admite: 2 y 4 respectivamente para los modelos de
Monitores compatibles: CRT y LCD (con soporte VGA)
Resolución máx.: Hasta 1920 x 1440 a 75 Hz
Entrada de teclado: PS/2 (miniDIN6)
Entrada de ratón: PS/2 (miniDIN6)
Puerto de monitor: VGA (hembra HDDB15)
Puertos PC: HDDB15 hembra
Temperatura de funcionamiento: 0~40° C
Temperatura de almacenamiento: de 20 a 60° C
Humedad: 0-80% HR, sin condensación
Garantía: de 2 años
Dimensiones: (F1DJ102P) 0,13 x 0,64 x 0,03 m
Peso: (F1DB102P2) 204,12 gramos
(F1DB104P2) 119,07 gramos
ordenador, adaptador de alimentación
5V CC 2.5 A, clavija central de polaridad
positiva
2 y 4 puertos
(F1DB104P2) 0,22 x 0,08 x 0,03 m
Nota: Las especificaciones pueden ser objeto de modificación sin previo aviso.
ES-6

Instalación
Configuración previa
Dónde colocar el conmutador KVM
El conmutador Serie E OmniView está diseñado para ubicarse en el escritorio.
El lugar de colocación del Conmutador KVM dependerá de la ubicación de sus
CPUs y de la longitud de sus cables.
Tenga en cuenta los siguientes aspectos a la hora de decidir dónde
colocar el conmutador KVM:
• tanto si tiene previsto utilizar los selectores de puerto de acceso directo como si no
• la longitud de los cables conectados a su teclado, monitor y ratón
• la ubicación de sus ordenadores con respecto a la consola
• la longitud de los cables que utiliza para conectar los ordenadores al
Conmutador KVM
Requisitos de distancia de los cables:
Para ordenadores PS/2:
Las señales VGA se transmiten con la mejor calidad a una distancia de hasta 7,6
metros. Cuando se supera esa longitud, aumenta la posibilidad de degradación
de la imagen. Por esta razón, Belkin recomienda que la longitud de los cables
entre el conmutador KVM y los ordenadores conectados no supere los 7,6
metros.
Nota:Puede utilizar el módulo de extensión CAT5 OmniView de Belkin
(F1D084vea2) para alargar la conexión a la consola (teclado, ratón, monitor)
hasta 91 metros.
Precauciones y advertencias
Evite colocar los cables cerca de luces fluorescentes, aparatos de aire
acondicionado o máquinas que produzcan ruido eléctrico (p. ej., aspiradores.)
Guía de instalación
Ahora puede comenzar con la instalación de su Conmutador KVM. Las
siguientes secciones (páginas 8–10) aportan las instrucciones completas para
instalar el hardware.
Antes de intentar conectar algún dispositivo al conmutador KVM Serie E o a los
ordenadores, asegúrese de que todos los elementos se encuentren desconectados.
La conexión y desconexión de cables mientras los ordenadores están encendidos
puede provocar daños irreversibles a sus ordenadores y al conmutador KVM. Belkin
no se responsabilizará del daño provocado de esta forma.
1
2
sección
3
4
5
6
7
8
ES-7

ES-8
Instalación
#/.3/,% 0# 0# 0# 0#
Conexiones de teclado, monitor y ratón
Conexión de la consola
Paso 1
Conecte el monitor al conmutador KVM Serie E. Conecte el puerto HDDB15
hembra situado en la parte posterior izquierda del conmutador KVM Serie E
llamado “Console” (consola) al monitor mediante al cable unido a este último.
(Consulte el siguiente diagrama).
Paso 2
Conecte el teclado PS/2 al puerto MORADO del teclado en la parte frontal del
conmutador KVM. (Consulte el siguiente diagrama).
Paso 3
Conecte el ratón PS/2 al puerto VERDE del ratón en la parte frontal del conmutador
KVM. (Consulte el siguiente diagrama).
Ya puede conectar los ordenadores.

1
2
3
4
5
6
7
8
sección
ES-9
Instalación
#/.3/,% 0# 0# 0# 0#
Conexión de los ordenadores al conmutador KVM
Serie E
Paso 1
Asegúrese de que su ordenador esté apagado.
Paso 2
Mediante el kit de cables Serie E de Belkin para PS/2 (F1D9002x06), conecte el
conector VGA al puerto monitor de su servidor. (Consulte el siguiente diagrama).
Paso 3
Conecte los conectores PS/2 de teclado y ratón a los puertos para teclado y
ratón del ordenador. (Consulte el siguiente diagrama).
Paso 4
Conecte el kit de cables Serie E de Belkin para PS/2 al puerto PC deseado en la
parte posterior del conmutador KVM Serie E. (Consulte el siguiente diagrama).
Paso 5
Arranque su ordenador.
Paso 6
Repita los pasos del 1 al 5 para cada ordenador PS/2 adicional que desee
conectar.
 Loading...