

Page 1

Play Max
WIRELESS MODEM-ROUTER
User Manual
F7D4401au 8820au00396
Page 2

TABLE OF CONTENTS
Getting Started ...........................................1
What’s in the Box .............................................1
Initial Setup ..................................................1
Advanced Tools & Settings.....................................6
The Belkin Router Manager ....................................7
Manual Setup Using Your Browser ..............................8
Adding Computers to Your Network .............................9
Adding USB Devices .........................................11
Bundled Software ...........................................14
Additional Capabilities .......................................16
Getting to Know Your Router ..............................17
Front Panel .................................................17
Back Panel .................................................18
Technical Details ........................................ 19
Technical Features ..........................................19
System Requirements........................................20
Troubleshooting, Support, and Warranty ...................22
Troubleshooting .............................................22
Technical Support ...........................................30
Belkin International, Inc., Limited 3 -Year Product Warranty .........31
Regulatory Information ...................................34
FCC Statement..............................................34
Page 3

GETTING STARTED
What’s in the Box
Play Max Wireless Modem-Router
ADSL cable (attached to router)
Power supply (attached to router)
Network information card (attached to router)
Belkin Setup CD with User Manual
Initial Setup
Whe re to P la ce Your Rou te r
For the best results, place the Router in an open location
away from l ar ge me ta l objects a nd ma gn et s suc h as thos e
found in speake rs. Rai si ng the Route r above fl oo r lev el
can improve the strength of your wireless signal.
1
Page 4
GETTING STARTED
3
1
2
How to Set It Up
2
Page 5
GETTING STARTED
Setup
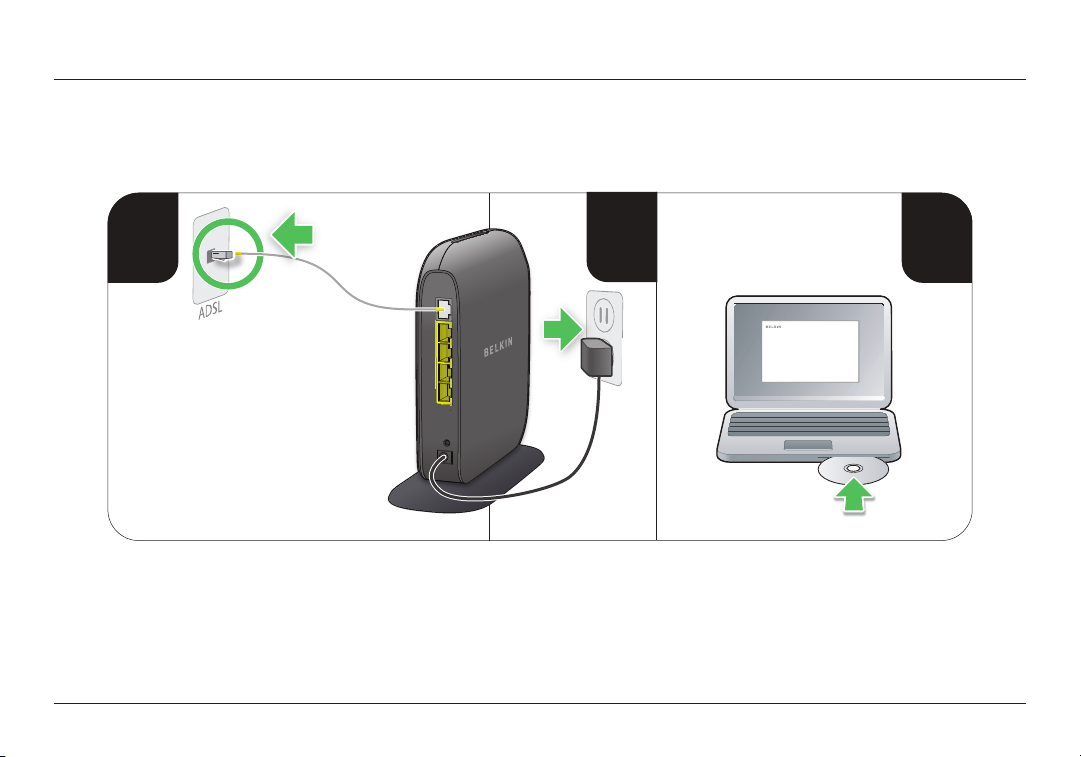
1. Connect your Router’s ADSL cable to your ADSL connection.
If you a re re pl acing a n exi st ing Rou ter o r gateway, t hi s
may require unplugging the existing gateway.
Note: If a telephone is con ne ct ed to the sa me te le phone
jac k then an AD SL Spli tter/Filt er is required . This
can be purchased from your local retailer.
2. Plug the Router’s power supply into a wall outlet.
3. Put the C D int o you r compu ter. I f the CD doe sn’t
ope n autom atically, please br ows e to your CD dr iv e
and double-click on the Belkin Setup CD icon.
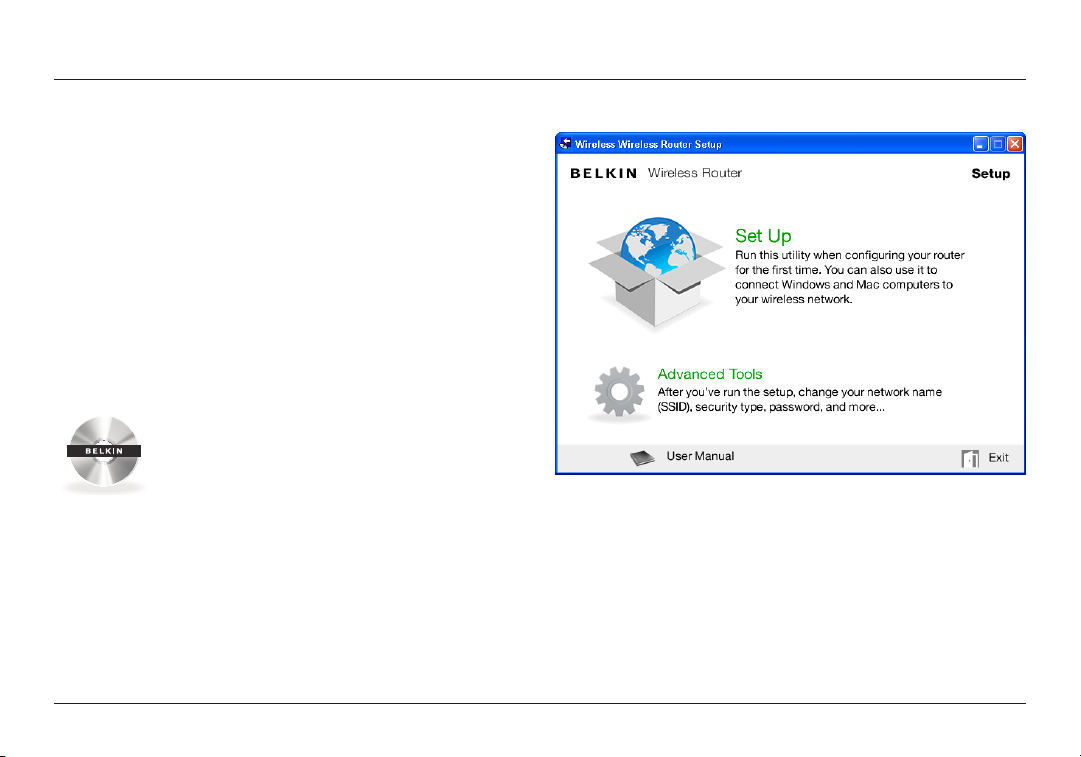
4. Click the Setup icon on the CD menu.
3
Page 6
GETTING STARTED
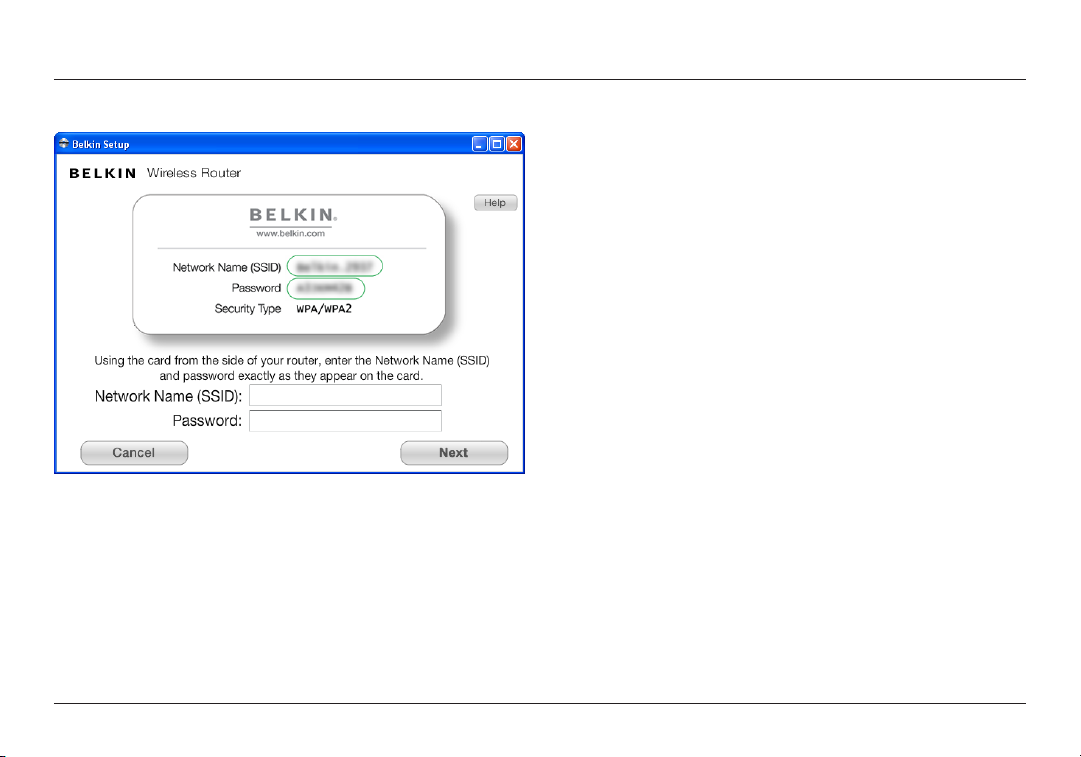
5. Afte r a b ri ef inst al la ti on, t he setu p sof tware w ill a sk you
for the network n am e and p as swo rd from t he ne twor k
informatio n card th at is att ac he d to you r Route r. S tore th e
card under the base of your Router for future reference.
4
Page 7
GETTING STARTED
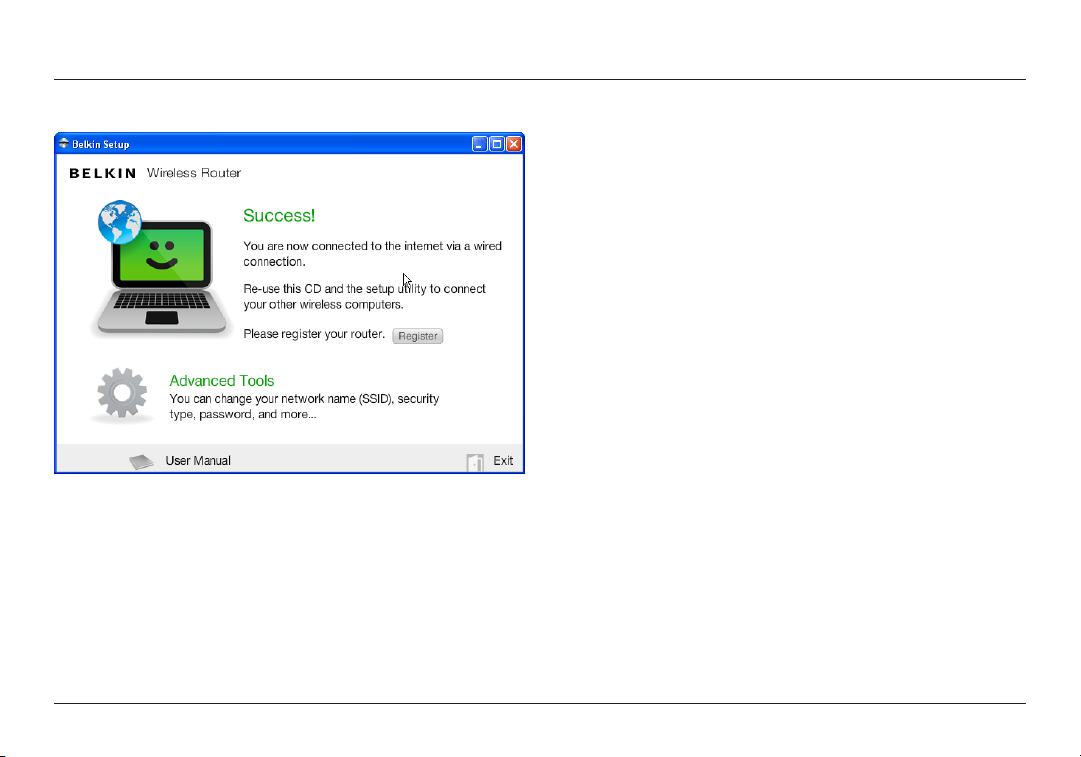
6. A progress sc reen wi ll appe ar while additio na l soft ware is
ins ta lled. T hi s may take a few m in utes to co mp lete. Once
fin is hed, a “Success” m es sa ge will appear indicating that you
are connected to the Internet via your new Belkin Router.
During setup you may be asked for additional information.
You m ay ne ed to enter a use rn am e and pas swo rd prov id ed
by you r ISP. T hi s usernam e and p as sword is likely t o be
found on mate ri al s that came fr om yo ur ISP when you
sig ne d up for s er vice. If n ec es sa ry, you may n eed to contact
your ISP to retrieve your username and password.
If you h ave a st at ic IP addres s, yo u may need t o ent er
additional information also provided by your ISP.
If your compute r doesn’t have a wireless adapter, or the
set up software is una bl e to control i t, yo u may be a sked to
connect your computer to the Router with a network cable.
If the setup soft ware is unable to detect your VCI and VPI
settings based on your country, you may also need to enter
this information. Your ISP is likely to have provided it.
5
Page 8
GETTING STARTED
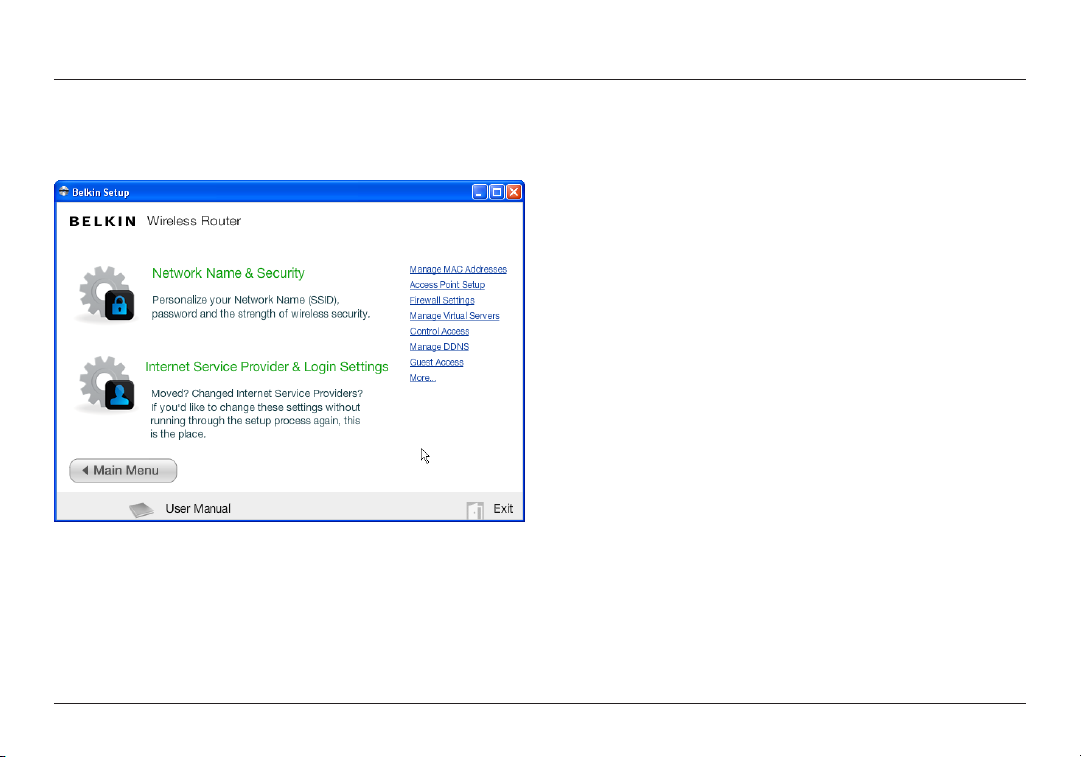
Advanced Tools & Settings
After the in itial s et up is complete, you have th e opt io n to
change settings like your network name, security t ype, and
pas sword. To make thes e changes a nd ot he rs, cli ck on t he
Advanced Too ls icon a t the CD S etup me nu and se le ct one
of the following settings that you would like to change:
Network Name & Security – Per so na lize your network n am e
(SSID), password, and strength of wireless security.
Internet Service Provider & Login Settings – Hav e
you moved or changed Internet Service Providers?
If you’d like to ch ange th es e set tings without ru nning
through the setup process again, this is the place.
6
Page 9
GETTING STARTED
Belkin.2234
Router Settings
User Manual
USB Print & Storage Manager
Memory Safe: Get Started!
Vuze
Daily DJ: Get Started!
Music Labeler
BitBoost: Auto
Check for Updates
Options
Exit
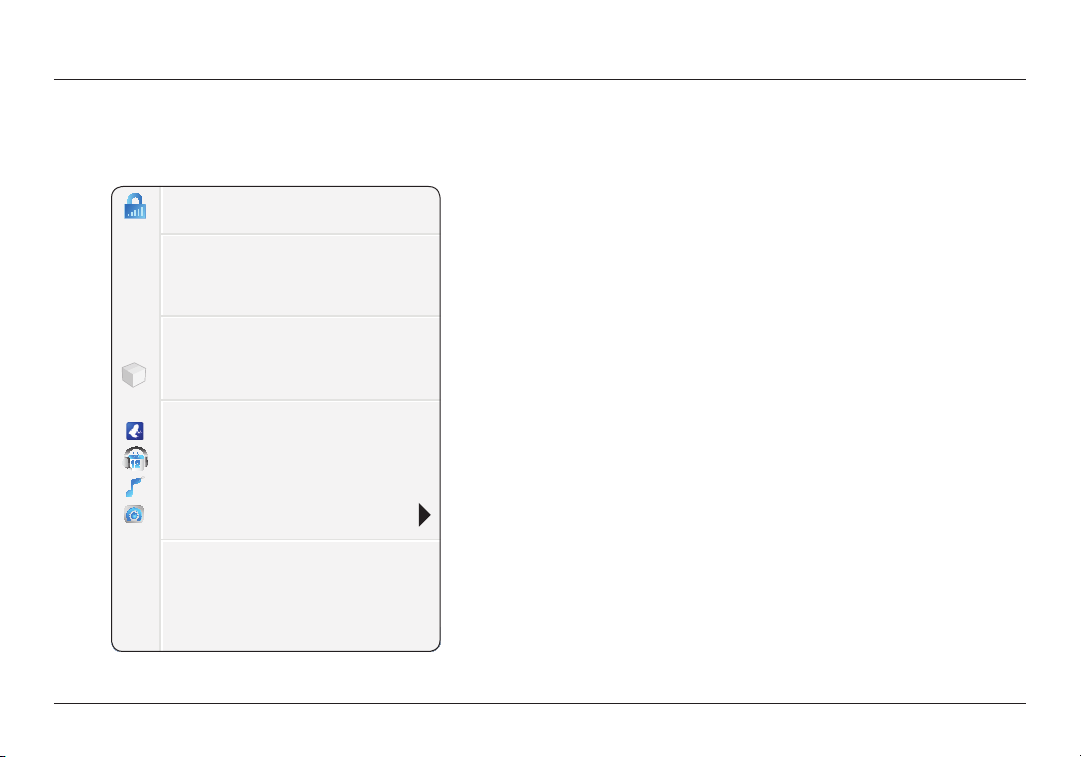
The Belkin Router Manager
The Belkin Router Manager appears in your system tray
(Wind ows) o r menu bar (Mac). Its i co n ind ic ates th e current
sta tu s of your Route r and a ls o all ows y ou to access your
Rou ter’s se ttings to m ake c ha nges. I t also provide s quick
access to software that came bundled with your Router.
To access the Router settings, click on the icon
and select from the menu that appears.
The status of your Router is shown by the Belkin Router Manager
icon, which closely mimics the light on the front of the Router.
Green: You a re connecte d to your Be lkin Ro uter
and it is connected to the Internet.
Amber: You a re conn ec ted to you r Belkin Route r,
but it is not connected to the Internet.
7
Page 10
GETTING STARTED
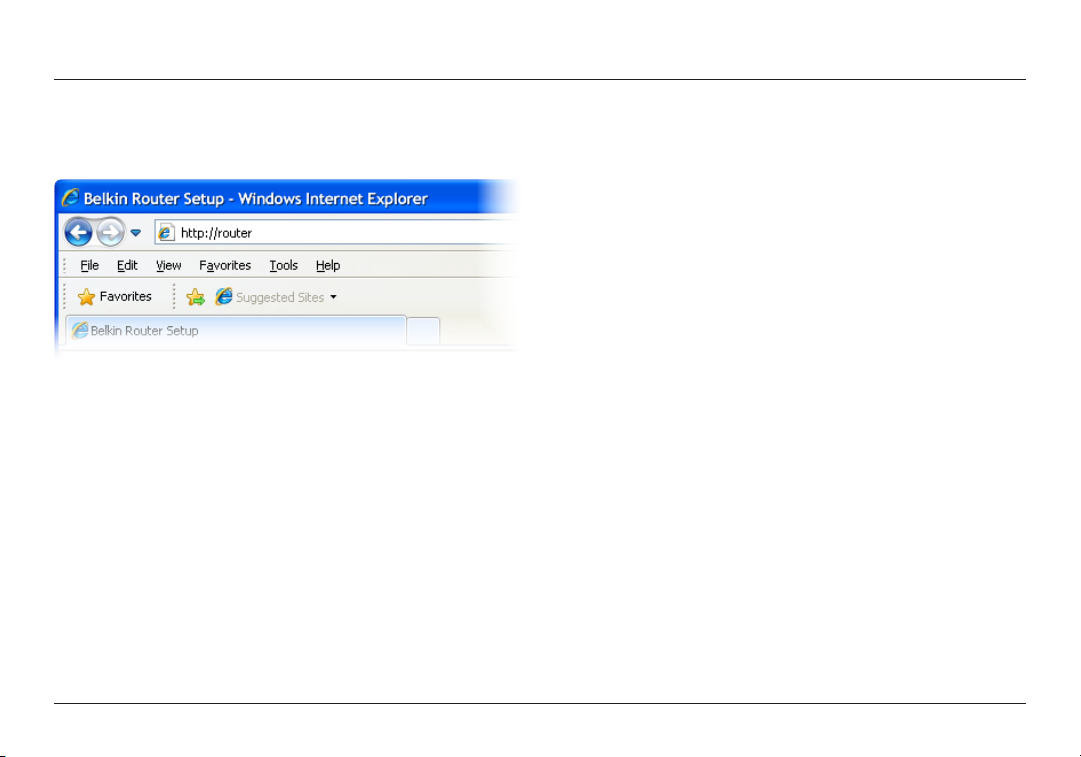
Manual Setup Using Your Browser
In you r brows er, type “ ht tp://rout er ” (yo u do no t need to type
in anything el se such a s “w ww” ). Th en pr es s the Enter key. If
you’re stil l hav in g troub le running the man ua l set up opti on , type
“192.168.2.1” in your brows er (you do n ot ne ed to t yp e in anyt hi ng
else such as “ht tp://” or “www”). Then press the Enter key.
8
Page 11

GETTING STARTED
Adding Computers to Your Network
Wir eless dev ic es su ch as com pu ters, n et work pr in ters, a nd gaming
systems can connect to your Router with a few simple steps.
Using the CD
1. Pu t the S etup CD into yo ur comput er. If the CD
doe sn’t op en auto matically, brow se to your CD
drive and open the Belkin Setup CD icon.
2. Click the Setup icon on the CD menu.
3. After a brief installation, the setup software will ask you for the
net wo rk name a nd pa ss word from th e network i nformat io n card
tha t came wi th yo ur Ro uter. This ca rd is m os t likely now locate d
underneath the foot of your Router in the provided card slot.
4. A progress sc reen wi ll appe ar while additio na l soft ware is
ins ta lled. T hi s may take a few m in utes to co mp lete. Once
fin is hed, a “Success” m es sa ge will appear indicating that you
are connected to the Internet via your new Belkin Router.
Note: Th e set up software r un s only on
Windows and Mac OS X systems.
9
Page 12

GETTING STARTED
Manually
If you c hoose n ot to use th e include d Setup CD for
add ing add it ional c om pu ters or wire le ss devi ce s, yo u
can manually add these items to your network.
1. Lo ca te th e wirel es s- ne twor k-conne ct io ns opti on
on your computer or wireless device.
2. Select your Be lk in Ro uter fr om the list of av ailable n et works. You
can identify your Bel ki n Route r by locating the net wo rk name
(SSID) from the card located underneath the foot of your Router.
3. Enter your n et work pa ss word (locate d on
your network information card).
Your wireless device will take a few moments to connect to your
network. If the connection is not made the first time, try this
pro ce ss again. If you st il l have d if fi cu lt y connecting to your net work
after try in g this process a few times, see t he “ Trou bleshooti ng ”
section in this manual for help with connecting to your network.
Note: In some cases you may be prompted to select the
security type. It is printed on the card for your convenience.
Using the WPS But ton
1. St ar t WPS Pu sh But ton C on ne ct ion ( WP S PBC) on you r
com pu ter o r other Wi- Fi de vi ce that you would like to c on nect
wir el essly t o you r Route r. O ften there wi ll be a bu tton for this
pur po se in s of twar e that came wi th the device, or a phys ic al
“WPS,” “PBC,” or “Security” button on the device itself.
2. Within two minutes, press the WPS button on your Router.
The WPS light (s ma ll ligh t above WP S button) will bl in k gre en while
it liste ns fo r your Wi-Fi dev ic e. On ce a co nn ec ti on is e st ablished, the
lig ht will turn g re en an d then go out. I f a c on ne ct ion is not e st ablished,
the light will blink amber. You may repeat the process to try again.
You can repeat this process for each WPS-enabled
device you’d like to add to your network.
10
Page 13
GETTING STARTED
USB
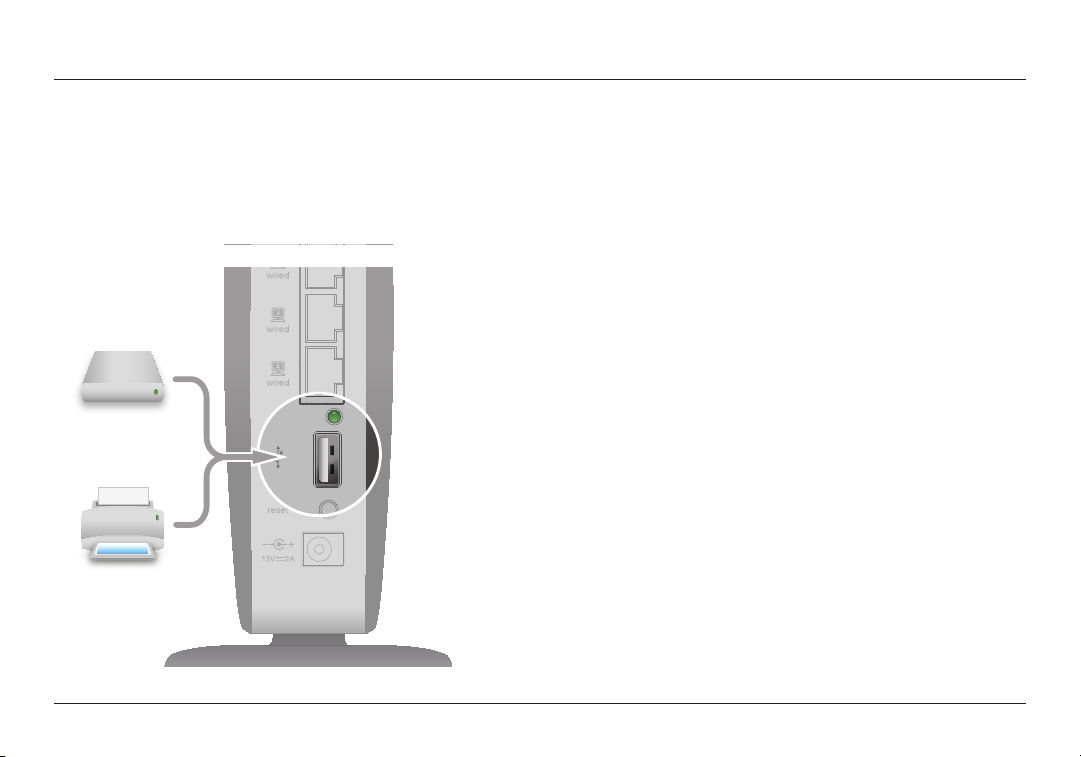
Adding USB Devices
11
Page 14

GETTING STARTED
Adding a Drive
You c an share a USB hard drive or fl as h drive to your n et work via
your Router’s USB port. Once connected, you can share files and
music with other computers and devices within your network.
Plu g you r USB hard d ri ve in to th e USB por t on th e back
of you r Route r. W he n the l ight ab ove t he US B port is l it,
your drive is available to computers on your network.
You c an manual ly check th e statu s of your sh ared dr ive b y visit in g
the USB Print a nd Stor age Man ag er, found u nd er th e Belkin Router
Man ag er icon displayed i n you r sys tem t ray ( Wi nd ows) o r menu
bar (M ac). If you have di fficul ty s ha ring a drive on your net work,
please see the “Troubleshooting” section of this manual.
Adding a Printer
You c an add a printer to yo ur networ k via your Rou ter’s
USB por t. Once c on nected, you can pri nt from variou s
computers and wireless devices within your network.
Plug your printer’s USB cable into the USB por t located on
the back o f you r Rou ter. When t he light above the USB p or t is
lit, your printer is available to computers on your network.
You c an manual ly check th e statu s of your pr inter by v is it ing t he
USB Prin t and S torage Manager, foun d under the Be lk in Rout er
Man ag er icon displayed i n you r sys tem t ray ( Wi nd ows) o r menu
bar (Mac). If you have difficulty sharing a printer on your network,
please see the “Troubleshooting” section of this manual.
Note: Each co mp uter th at will use th e print er must have
bot h the B elkin sof tware and th e print er ’s drive r install ed.
If the p ri nt driver is n ot in st al led, you w ill be as ked to i ns ta ll
it by the Belkin USB Print and Storage Manager.
12
Page 15

GETTING STARTED
Adding Other USB Devices
Other USB devices may also be shared via your Router.
Plu g you r dev ic e into the U SB po rt l oc ated on the back of
your Rou ter. When t he light above the USB p or t is lit , you r
device is available to computers on your network.
Computers running the Belkin USB Print and Storage Manager will
be able to make use of th e shared device by vi si ting th e USB Print
and Storage Manager, found under the Belkin Router Manager
icon displayed in your system tray (Windows) or menu bar (Mac).
13
Page 16

GETTING STARTED
Bundled Software
USB Print and Storage Manager
The USB Print and Storage Manager helps to manage and
mon itor th e use o f you r USB printe rs , scann er s, hard drives ,
and other devices that a re conn ec te d to your Route r’s USB
port and shared across your network. USB Print and Storage
Man ag er is found in th e Belkin Router Manager i con dis pl aye d
in your system tray (Windows) or menu bar (Mac).
Whe n you have one or more USB devices att ac hed to you r
Rou ter, the ma in action s for t hose de vi ces a re av ailable
directly from the Belkin Router Monitor menu.
Memory Safe
Mem or y Safe a llows you to se t up a rou ti ne ba ck up of your
fil es to a ha rd drive or fl as h drive attached to your Rou ter.
Mem or y Safe i s fou nd in the Be lk in Rout er Ma na ge r icon
displayed in your system tray (Windows) or menu bar (Mac).
Music Labeler
Bel ki n Music L ab el er corr ec ts metada ta (t rack na me s, ar tist
nam es , tra ck number s, etc.) in your iTunes a nd Windows Med ia
lib ra ries, m ak in g it ea sy to find the mu si c you are lo ok ing f or.
Mus ic Labeler is fo un d under the Be lk in Ro ut er Ma na ger icon
displayed in your system tray (Windows) or menu bar (Mac).
14
Page 17

GETTING STARTED
Daily DJ
Bel ki n Daily DJ d el ivers p er so na lized play li st s fro m your
mus ic collection , autom atically, eve ry d ay. It ’s like hav in g you r
own person al DJ p laying th e songs that you want to hear. It
wor ks gr eat wit h iTunes an d Windo ws Me di a Pla yer. Daily
DJ is found under the Belkin Router Manager icon displayed
in your system tray (Windows) or menu bar (Mac).
Vuze and Torrent Genie
Vuze is a media pl aye r for high-resolut io n digital v ideos t ha t
hel ps yo u to find, d ownload, and play HD v id eo s on your
PC, Mac, iPhone, iPod, Xbox 360, PS3, PSP, and TiVo.
Torrent Genie assists your Vuze downloads by continuing them in
the background wh en yo ur comp uter is a sleep o r of fline. It re quires
that a USB hard drive or flash drive be plugged into your Router.
Bit Boost
Bit Boost allows you to improve the quality of a particular activity when
your net wo rk is i n heavy u se. For in st an ce, i f you use your ne tw ork for
voice-over-IP (VoIP) calls, you can set Bit Boost to support this feature
fir st and al lo cate th e rem ai nder of yo ur bandwi dt h to other n et work
app li cations. Bi t Boost is f ound un de r the B elkin R ou ter M an ager
icon displayed in your system tray (Windows) or menu bar (Mac).
15
Page 18

GETTING STARTED
Additional Capabilities
Guest Access
You c an allow guests to us e you r Inter net c on ne ct io n wit ho ut
joi ni ng yo ur person al network. T he networ k name an d
pas sword for th e guest n et work is locate d on th e net work
information card found under the foot of your Router.
A p er son u si ng yo ur guest network w ill be able to join
wit ho ut a pa sswor d, but will be show n a l og in pa ge when
they at tempt to sur f the Web. They will need to enter
the guest password into this page to continue.
Video Max
Vid eo Max au to matically p rioritize s you r network traff ic to
ensure high-quality streaming video, VoIP calls, and games.
Music Mover
Mus ic Mover s en ds music from a USB drive at ta ch ed to your
Router to any UPnP (Universal Plug-and-Play) or DLNA-compatible
dev ic e on your network. Th es e dev ic es includ e cert ai n gamin g
systems, televisions, Blu-ray players, and cell phones.
16
Page 19
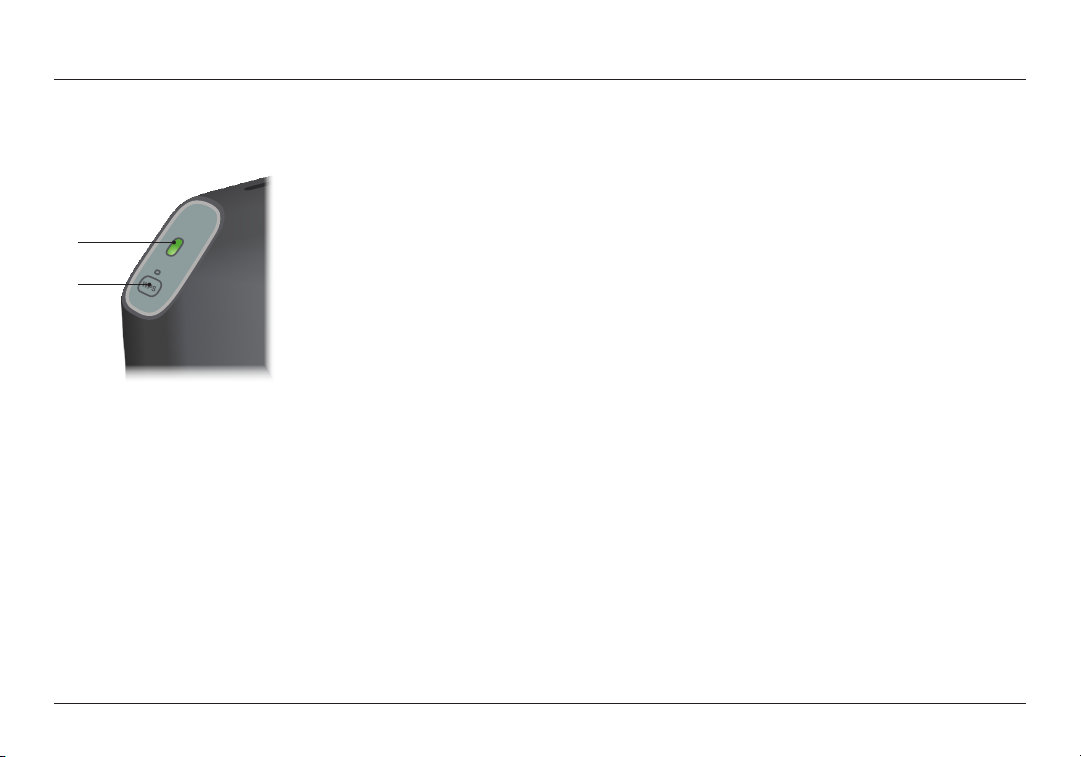
GETTING TO KNOW YOUR ROUTER
Front Panel
(a)
(b)
A) Router Status Light
Your Router’s status is shown by the light on the front.
Off: The Router is not plugged into a power source.
Blinking Green: The Router is starting up.
Solid Green: The Router is connected to the Internet.
Blinking Amber: Ei th er the RJ11 c ab le is n ot
plugged in, or there is no signal.
B) Wi-Fi Protected Setup (WPS) Light and Button
The WPS button on the front of your Router can be used to
help establish a secure connection between your Router and
other WPS-enabled Wi-Fi devices such as computers. To use
the WPS feature on your Router, see “Getting Started > Adding
Computers to Your Network > Using the WPS Button”.
The small light near the WPS button shows what is happening
while you are using WPS to establish a connection.
Off: Idle
Blinking Green: The Ro uter is list ening for a
WPS-enabled computer or other device.
Solid Green: The Router has ma de a se cure
connection with the computer or other device.
Amber: A connection was not created.
17
Page 20
GETTING TO KNOW YOUR ROUTER
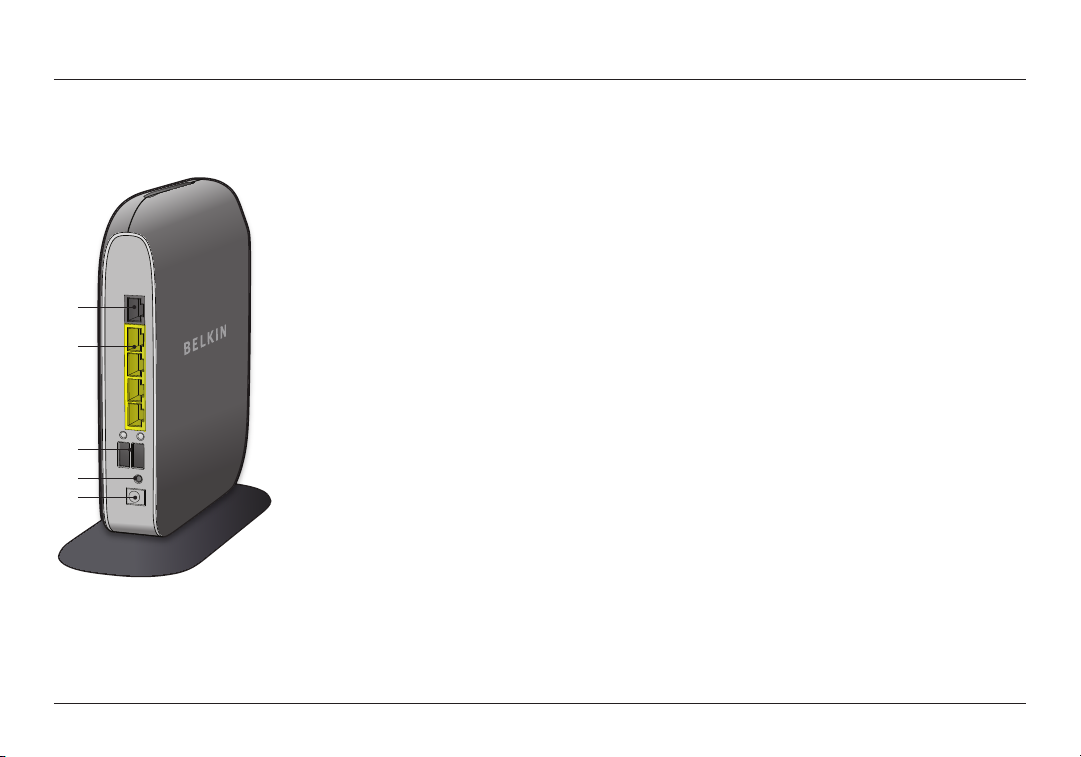
Back Panel
(a)
(b)
(c)
(d)
(e)
A) ADSL Connector
Connect your Router to
your ADSL connection.
B) Wired (LAN) Connectors
Connect computers and other
wired network devices to these
ports using Ethernet cables.
C) USB Port
USB printers, disks, and other
USB devices plugged into this
port will be shared on your
network. Each USB port has a
light that indicates its status.
Off: No USB device is
con ne cted or the at tach ed
USB device is not in use.
Blinking: Pl ea se wa it to
unp lu g the d evice u ntil
the light turns off.
On: The USB d evice i s
connected and being
shared on your network.
18
D) Reset Button
This button is used to restart
your Router in rare cases when it
functions incorrectly. Resetting
the Router will preserve your
settings. This button may also
be used to restore the factory
default settings. Please see
the Troubleshooting section
for more information.
E) Power Connector
Con ne ct the in cl uded po wer
supply to this jack.
Page 21

TECHNICAL DETAILS
Technical Features
Integrated ADSL2+ Modem
The inte gr ated ADSL2+ modem allows yo u to co nnect to the
Internet via your local Internet Service Provider (ISP) without
installing and maintaining a separate DSL modem.
Integrated 802.11n Wireless Access Point
Uti lizing Dual-B and Net wo rk te ch no lo gy, your Ro uter
creates two separate networks (one at 2.4GHz band and
the other at 5G Hz ba nd), a ll owing i nc reased ba ndwidth to
all your connected wireless devices and computers.
NAT IP Address Sharing
To save you t he cost of a dd ing I P addre ss es per
com pu ter i n you r house, you r Belkin Route r uses Network
Address Translation (NAT) technology, allowing you to
share a single IP address across your network.
SPI Firewall
Your Router is eq ui pp ed wi th a fi rewal l that will pr ote ct your
network from a wide array of common attacks and viruses.
Universal Plug-and-Play (UPnP) Compatibility
The UPnP (Uni ve rs al Pl ug -a nd -P lay) fea ture in yo ur Rout er
offer s seamless operation of v oi ce an d video m es sa ging,
games, and other applications that are UPnP-compliant.
Web-Based Advanced User Interface
You can easily make changes to your Router’s advanced
set ting s through your web brows er. Th es e changes c an
be made from any computer on your network.
Belkin Router Monitor
The Belkin Router Monitor application helps you to monitor
your Rou ter’s st at us and ch ange ne twor k set tings .
Integrated 4-Port Gigabit Switch
Your Router has a built-in, 4-port network switch to allow your
wired computers to share: printers, data, MP3 files, digital photos,
and much more at speeds of up to one gigabit per second.
Dual USB Por ts
Two USB port s let you pl ug in p rinters, hard dr ives, and
other USB devices to share across your network.
19
Page 22

TECHNICAL DETAILS
System Requirements
Mod em Rout er
Bro adband ADSL Internet connection with
RJ11 (telephone) connection
At least one computer with an installed network interface adapter
TCP/IP networking protocol installed on each computer
RJ11 ADSL telephone cable
Internet browser
Setup Software
A computer running Windows® XP SP2 or higher,
Windows Vista®, or Windows 7; or Mac OS® X v10.x
Minimum 1GHz processor and 256MB RAM
600MB of free hard-drive space for installation
Memor y Safe and USB Print and Storage Manager
Win dows XP SP 2 or hi gh er or W indows
Vista; or Mac OS X v10.4 or later
Minimum 1GHz processor and 256MB RAM
50MB of free hard-drive space for installation
20
Page 23

TECHNICAL DETAILS
Daily DJ, Music L abeler, and Vuze
PC
Windows XP SP2 or higher, Windows Vista, or Windows 7
2GHz processor
1GB of RAM
DirectX® 9.0- co mp li ant v id eo and so und
Internet Explorer® or Firefox®
®
Mac
Mac OS X v10.4.8 or later
Intel® Core™ Duo 1.83GHz or higher processor
1GB of RAM
Safari® or Firefox
200MB of free hard-drive space for installation
21
Page 24

TROUBLESHOOTING, SUPPORT, AND WARRANTY
Troubleshooting
The Setup CD does not automatically start .
If Belkin Setup d oe s not run wh en yo u insert the CD -R OM, your
computer may not be configured to open CDs automatically.
If Belkin Setup d oe s not appear within 15 second s, browse
to you r CD-ROM dr ive a nd open t he “Belkin Setup” ic on.
Alternatively, you may visit http://router/ an d perform t he
set up manu al ly. Pl ea se se e “M an ual S et up Us in g Your
Browser” earlier in this manual for more information.
Belkin Setup cannot find my Router.
If Belkin Setup i s not able t o communi ca te wi th yo ur Rout er du ri ng
the installation process, please check the following items.
1. Ma ke su re that the wi reless ha rd ware on yo ur
computer is turned on, if available.
2. Tr y con ne ct ing y our c om pu ter t o one of t he four “ wi red”
ports on the Router with an Ethernet cable.
3. Ensure that the Router is on. The front-panel light should be on.
4. Unplug the Router’s power supply for 10
seconds, then plug it back in.
5. Ther e may be fir ewa ll software o n you r compute r pre venti ng
an outgoing connection. You may choose to temporarily
disable this software before attempting setup.
If Belkin Setup s ti ll cann ot fi nd the Ro uter, you might ch oose
to do a manual setup. Refer to “ Manually Configuring
Network Settings” in this manual for details.
22
Page 25

TROUBLESHOOTING, SUPPORT, AND WARRANTY
Belkin Setup cannot connect my Router to the Internet.
If Belkin Setup i s not able t o connect t he Ro uter to
the Internet, please check the following items:
1. Use the troubleshooting suggestions within Belkin Setup.
2. If yo ur IS P requi res a u ser n am e and p as sword , make sur e that
you have typed in yo ur user name a nd password co rr ec tl y. S om e
use r names r equire that th e ISP ’s domain m ay be at t he end of the
nam e. Exam pl e: “[email protected]”. The “@ myisp.com” par t of
the user name may need to be typed as well as your user name.
3. If you co ntinue to have no Inte rnet co nn ec ti on, r efer
to “M anually C onfiguring Network S et ti ng s” in this
manual for an alternative setup method.
Belkin Setup c om pl eted inst alla ti on , but I c an not b ro wse t he
Web. The light on the front of my Router is blinking amber.
1. Ma ke su re the Route r is co nn ec ted t o you r ADS L lin e with an
RJ11 (telephone) cable via the Router’s one gray ADSL port.
2. Check t hat the modem (ADSL) c onnection i s
connected to your broadband (ADSL) socket on the
wall (via an ADSL filter if one is required).
3. Unpl ug yo ur Ro ut er ’s power su pp ly, wait 10 seconds,
and plug i t bac k in. T hi s wil l cause t he Ro uter to try to
reestablish communication with the ADSL line.
23
Page 26

TROUBLESHOOTING, SUPPORT, AND WARRANTY
I can’t connect to the Internet wirelessly.
If the l ig ht on t he fr on t of the Rou ter i s solid g reen, then y our
Rou ter i s connected to t he In ternet. You may not b e connected
to the R outer’s wi reless ne tw or k. Pl ea se refer to “Add ing
Computers to Your Network” in this manual for instructions.
I c an’t co nn ec t to th e Internet wire le ss ly an d my
network name is not listed in Available Networks.
1. Verify that your Router is on and the
front-panel light shows solid green.
2. If you are far from the Router, you might try moving
closer to see if you might have been out of range.
3. Usin g a c om puter att ac he d to the R outer v ia a network cab le,
visit http://router/ and e ns ure tha t “B roadcast SSID” i s ON.
This setting is found on the “Channel and SSID” page.
24
Page 27

TROUBLESHOOTING, SUPPORT, AND WARRANTY
My wir e l e s s net w o rk p e r f orm a n c e is s low , inc o nsis t e n t ,
suffers from weak signal, or I’m having difficulty maintaining a
VPN connection.
Wir eless tec hn ology is radio-based, which m ea ns conn ec ti vi ty
and the th ro ughput pe rfor ma nc e bet ween dev ic es
dec re as es when the di st an ce betwee n dev ic es increa se s.
Other factors that will cause signal degradation (metal is
gen er ally th e worst c ulprit) are obstructions such as walls
and metal ap pliances. Note also t hat con ne ct io n speed m ay
decrease as you move farther away from the Router.
In order to d etermine if wire le ss issues are re lated to
ran ge, we sug ge st te mp or ar ily m ov ing t he computer
within 10 feet from the Router if possible.
Changing the wireless channel—Dependi ng on l oc al
wir el ess tra ffic and in terference, sw it ching t he wire le ss
cha nn el of your n et work ca n impro ve pe rfor ma nc e and
reliability. See the section titled “Changing the Wireless
Channel” for instructions on how to choose other channels.
Limiting the wireless transmit rate—Limiting the wireless transmit
rate c an help i mp rove range and co nn ec ti on stabil it y. Most wireless
car ds have th e ability to limit the tr an sm is sion ra te. To change this
pro pe rty in Wind ows, go to th e Windows Co nt rol Panel, open “ Ne tw or k
Con ne ct io ns ”, a nd doub le -click o n you r wirel es s card’s c on ne ct ion. In
the propert ies d ia lo g, se le ct the “C on figure” but ton on the “ Ge ne ra l”
tab, then choose the “Advanced” tab and select the rate property.
Wir eless cli en t cards are us ually s et to auto ma ti ca lly a dj ust
the wireless transmit rate for you, but doing so can cause
per io di c disco nn ec ts when t he wire le ss signal is t oo we ak ; as
a r ule, slowe r trans mi ss io n rat es are more st ab le. E xp er im ent
wit h different connection rate s until you fi nd th e best on e
for your environment. Note that all available transmission
rates sh ou ld be acceptable for brows in g the I nternet . For
more assistance, see your wireless card’s user manual.
25
Page 28

TROUBLESHOOTING, SUPPORT, AND WARRANTY
I’ve installed t hi s new Router a nd some o f my ne twork c li en ts
(computers, game consoles, etc.) are now unable to connect.
Your new R outer c am e pre -config ur ed with a networ k name an d
pas sword, found printe d on an attached c ard. Al l clien ts must u se th is
network name and password to connect wirelessly to your Router.
You w ill nee d to fi nd th e network s et ti ng s on your cl ient, s el ec t the
net wo rk name p rinte d on th e card fr om the list of av ailable n et works,
and enter the password when prompted to join the wireless network.
Does the Router support Wireless
Protected Access (WPA) security?
The Router ships with WPA / WPA 2 secur it y tur ned o n.
Win dows XP an d some ol de r net work hardw are m ay
require a sof tware update to suppor t WPA/ WPA2.
I am having difficulty setting up WPA security on my Router.
1. Log in to your Router by visiting http://router/ with your web browser.
Click on the “Login” button in the top right-hand corner of the
scr ee n. You wi ll be a ske d to en ter your p as swo rd . If you h ave neve r
set a password, leave the “Password” field blank and click “Submit”.
2. Click “ Wirel es s” in t he le ft-h an d menu. Then
click “Security” just below that.
3. Select the “WPA/WPA2” option.
4. Enter a passwo rd. T hi s can b e fro m 8–63 ch aracter s of your ch oi ce,
inc lu ding sp ac es an d punctuati on, OR a 64-d igit hexadecim al
number (using only the numbers 0–9 and letters A–F).
26
Page 29

TROUBLESHOOTING, SUPPORT, AND WARRANTY
5. Clic k “Apply Changes” to f in ish. Your wireless
connection is now encrypted. Each computer using your
wireless network will need to use the new key.
Note: If yo u are c onfiguring the R ou ter over a wire le ss
con ne ct io n, yo u wil l hav e to re-c on ne ct to the
Router after changing any security settings.
Note: Some ol de r network in g hardware sup po rts
onl y WEP encry pt ion. If yo ur older compute rs c annot
con ne ct to your n et work, t ry 128- bi t or 64 -bit WEP, o r
seek software updates from their manufacturers.
I a m hav in g difficulty se tting up Wire d Equival en t
Privacy (WEP) security on my Router.
1. Log in to your Router. Visit http://router/ with your web browser.
Click on the “Login” button in the top right-hand corner of the
scr ee n. You wi ll be a ske d to en ter your p as swo rd . If you h ave neve r
set a password, leave the “Password” field blank and click “Submit”.
2. Click “ Wirel es s” in t he le ft-h an d menu. Then
click “Security” just below that.
3. Select the “128-bit WEP” option.
4. You may t ype i n a WEP key manually, or g enerate one from
a passphrase. Type a phrase in the “Pas sp hrase” fi el d and
cli ck the “G en er ate” button. A WEP key is composed of 26
hexadecimal digits (0–9, A–F.. For ex ample, C3 03 0 F AF
4B B2 C3 D4 4B C3 D4 EE 74 is a valid 128-bit WEP key.
27
Page 30

TROUBLESHOOTING, SUPPORT, AND WARRANTY
5. Clic k “Apply Changes” to f in ish. Your wireless
act iv it y is now encry pted. Each c om puter u sing your
wireless network will need to use the new key.
Note: If yo u are c onfiguring the R ou ter over a wire le ss
con ne ct io n, yo u wil l hav e to re-c on ne ct to the
Router after changing any security settings.
Note: Some ol de r network in g hardware sup po rts
onl y 64 -b it WEP encr yption. I f you r older computer s
cannot connect to your network, tr y 64-bit WEP.
A disk I p lugged in to the US B port is n ot show in g
up on my computer or in Memory Safe.
1. Is the li gh t on ove r the U SB po rt t ha t the d isk i s plugged i nto?
If not, tr y unplugging and re -plugg in g the d isk. Pl ea se check
that the USB connector is firmly plugged into the Router.
2. If yo ur di sk has an opti on al power sup pl y, p le as e use
it while the disk is attached to your Router.
3. The Router supports FAT16, FAT32-, or NTFS-formatted
dis ks. D is ks in other formats w ill n ot appe ar in t he
Finder (Mac OS X) or Windows Internet E xplorer.
28
Page 31

TROUBLESHOOTING, SUPPORT, AND WARRANTY
A p rinter I plugged i nto t he U SB port is
not showing up on my computer.
1. Is the light on over the USB port that the printer is plugged into?
If not, tr y unplugging and re -plugg in g the p ri nter. Pleas e check
that the USB connector is firmly plugged into the Router.
2. To print to a printer at tached to th e Route r, your
com pu ter m us t have t ha t print er ’s drive r insta ll ed.
Please check that the driver is installed.
3. The printer may not b e set to a uto- co nn ec t. Via th e Belkin Route r
Man ag er, op en the USB P rint an d Sto ra ge Cent er. Ch eck tha t the
pri nter ap pe ar s in the lis t of avail ab le devi ce s. Vi ew the proper ti es
of the printer, and check that “auto-connect” is selected.
A dif fe re nt sor t of US B dev ic e that I plugged int o the
USB port is not showing up on my computer.
Mos t USB devices other t han dis ks and pr inter s must be
accessed via the USB Print and Storage Center.
1. Is the li gh t on ove r the U SB po rt t ha t the d evice i s plugged into?
If not, try unplugging and re-plugging the device. Please check
that the USB connector is firmly plugged into the Router.
2. Via t he Belkin Router Manager, open the USB
Pri nt and Storage Center. Ch ec k that the d ev ice
appears in the list of available devices.
3. Sele ct the device an d click t he “Use” bu tt on. T he devi ce will b e
vir tuall y connected to your c om puter until you c ho os e to “S top
Using” the device, or another person requests use of the device.
29
Page 32

TROUBLESHOOTING, SUPPORT, AND WARRANTY
Technical Support
US
http://www.belkin.com/support
UK
http://www.belkin.com/uk/support
Australia
http://www.belkin.com/au/support
New Zealand
http://www.belkin.com/au/support
Europe
http://www.belkin.com/uk/support
Singapore
1800 622 1130
Malaysia
1 800 812 076
India
1800-419-5546
Thailand
0018 004413318
Philippines
180 0144102 82
Hong Kong
30 021318
China
800 819 0159
Australia
1800 235 546
New Zealand
0800 235 546
Asia email
Korea email
[email protected]
30
Page 33

TROUBLESHOOTING, SUPPORT, AND WARRANTY
Belkin International, Inc., Limited
3-Year Product Warranty
What this warranty covers.
Bel ki n Int er national, Inc. (“B elkin”) w arrants to the original
purchaser of this Belkin product that the product shall be free
of defects in design, assembly, material, or workmanship.
What the period of coverage is.
Belkin warrants the Belkin product for three years.
What will we do to correct problems?
Product Warranty.
Bel ki n will repair or re pl ace, at it s option, any defec ti ve pr od uc t
fre e of ch arge (excep t for shipping charges for t he prod uc t).
Belkin reserves the right to discontinue any of its products without
not ic e, an d dis cl ai ms any limited wa rr an ty to r epair o r repla ce any
suc h discont in ue d pro du ct s. In t he event t hat B el ki n is un able to
repair or replace the product (for example, because it has been
dis co ntinued), Belkin wi ll of fer either a re fu nd or a cred it to ward
the purchase of a no ther pr od uc t fro m Belkin.com i n an am ount
equ al to the pu rc ha se price of th e product a s evi de nc ed on the
original purchase receipt as discounted by its natural use.
What is not covered by this warranty?
All above warranties are null and void if the Belkin product is
not prov id ed to Belkin for in sp ec tion up on Belkin ’s reque st
at the s ol e exp en se of the pu rchaser, o r if Belkin de termine s
tha t the B elkin p ro du ct has be en im pr op erly in st al led, al tered
in any way, or tampered wi th. T he Belkin Product War ra nt y
doe s not protec t against acts o f God s uc h as fl ood, li ghtning,
ear thqua ke, war, van da li sm, t heft , normal-use wear an d tea r,
erosion, depletion, obsolescence, abuse, damage due to low
vol tage di st urbances (i.e. br ownouts or sag s), non-authori zed
program, or system equipment modification or alteration.
31
Page 34

TROUBLESHOOTING, SUPPORT, AND WARRANTY
How to get service.
To ge t ser vice fo r you r Bel ki n product you
must take the following steps:
1. Contact B elkin Internationa l, In c., at 12 04 5 Water front
Drive, Los Angeles, CA 90094, Attn: Customer Ser vice,
or call (800) -2 23 -5546, within 15 da ys of the Oc cu rrence.
Be prepared to provide the following information:
a. The part number of the Belkin product.
b. Where you purchased the product.
c. When you purchased the product.
d. Copy of original receipt.
2. Yo ur Belk in Custom er Ser vi ce Re pr es entative will then
ins tr uc t you on h ow to fo rwar d your receipt and Be lk in
product and how to proceed with your claim.
Belkin reserves the right to review the damaged Belkin product.
All costs of ship pi ng the Be lkin pr od uc t to Belkin for i ns pe ction
sha ll be b or ne sole ly by t he purc ha se r. I f Belkin determi ne s,
in its s ol e discret io n, th at it i s imp ra ct ic al to ship t he dama ge d
equ ip ment to Belk in , Belki n may designat e, in its so le di sc retion,
an equipme nt repa ir faci li ty to i ns pe ct and estimat e the c os t to
rep air suc h equipme nt . The c os t, if a ny, of sh ipping th e equip me nt
to and f rom s uc h repai r facil it y an d of such es ti mate shall b e
bor ne solely by t he purcha se r. Dam ag ed equi pm ent m us t remai n
available for inspection until the claim is finalized. Whenever
cla im s are s et tl ed, B el ki n res er ves the ri gh t to be su br ogate d
under any existing insurance policies the purchaser may have.
32
Page 35

TROUBLESHOOTING, SUPPORT, AND WARRANTY
How state law relates to the warranty.
THIS WARRANTY CONTAINS THE SOLE WARRANTY OF
BELKIN. THERE ARE NO OTHER WARRANTIES, EXPRESSED
OR, E XCEPT AS REQUIRED BY LAW, IM PLIED, INCL UDING
THE IMPLIED WARRANTY OR C ONDIT IO N OF QUA LITY,
MERCHANTABILITY OR FITNESS FOR A PARTICULAR
PURPOSE, AND SUCH IMPLI ED WAR RA NTIES , IF ANY, ARE
LIMITED IN DURATION TO THE TERM OF THIS WARRANTY.
Som e state s do not a ll ow li mi tations o n how long a n impli ed
warranty lasts, so the above limitations may not apply to you.
IN NO EVENT S HALL BELKIN BE LI ABLE FOR I NCIDE NTAL ,
SPECIAL, DIRECT, INDIRECT, CONSEQUENTIAL OR
MULTI PLE DA MAG ES SU CH AS, B UT NOT LIM ITED TO,
LOST BUSINESS OR PROFITS ARISING OUT OF THE
SALE O R USE OF A NY BELKIN PRODUCT, EVEN IF
ADVISED OF THE POSSIBILITY OF SUCH DAMAGES.
This warranty gives you specific legal rights, and you may also have
oth er righ ts , which may vary from state to st ate. Some st ates do
not allow the excl us ion or limitatio n of in ci dental, c onsequent ia l,
or other damages, so the above limitations may not apply to you.
33
Page 36

REGULATORY INFORMATION
FCC Statement
DEC LARATIO N OF CO NF OR MI TY W IT H FCC R ULES
FOR ELECTROMAGNETIC COMPATIBILITY
We, Belkin Internati on al, I nc., of 120 45 Water front Drive, Lo s Angeles,
CA 90094, declare under our sole responsibility that the device, ,
F7D4401 v1, complies with Part 15 of the FCC Rules. Operation is
sub je ct to the fo llowi ng t wo co nd it ions: (1) thi s device may n ot ca us e
har mf ul in terf erence, and (2) th is devi ce must a cc ept a ny in terference
received, including interference that may cause undesired operation.
Caution: Exposure to Radio Frequency Radiation.
The device shall be used i n such a manne r that the potential
for human contact normal operation is minimized
Thi s equipme nt compli es with FCC radiation exposu re
lim it s set for th fo r an un controlle d env ir on ment. T hi s
equ ip ment sh ould be installed and o pe rated w ith a minimum
distance of 20cm between the radiator and your body.
Federal Communications Commission Notice
Thi s equipme nt has be en te sted an d fou nd to c omply w it h the
lim it s for a Cl as s B d ig it al devi ce, p ur suant to Par t 15 of the FCC
Rul es. T he se limits are de si gned to prov id e rea so na ble pro tection
against harmful interference in a residential installation.
This equipment generates, uses, and can radiate radio frequency
ene rg y, a nd if n ot inst al le d and u sed i n accordanc e with th e
ins tr uc ti ons, may c au se harm fu l int er fe rence t o radio communicat io ns .
However, there is no guarantee that interference will not occur
in a par ticul ar installa ti on. I f this eq uipment d oes cau se harmfu l
inter ference to rad io or televi si on re ce pt ion, wh ic h can b e det er mined
by turni ng the eq uipment off and on , the user i s encoura ge d to tr y and
correct the interference by one or more of the following measures:
• Reoriento rrel oc atethereceiving antenna .
• Increasethedistancebetweentheequipmentandthereceiver.
• Connectt heequipm en tto anoutl etonacircui tdifferent
fro m that to wh ic h the receiver is con ne ct ed.
• Consultthedealeroranexperiencedradio/TVtechnicianforhelp.
FCC Ca ut ion: Any c hanges or modifi ca ti on s not ex pr es sl y
app roved by t he pa rty respon si bl e for compli an ce could
void the user’s authority to operate this equipment.
Thi s dev ic e and i ts ante nn a(s) mu st not be co-located or
operating in conjunction with any other antenna or transmitter.
34
Page 37

REGULATORY INFORMATION
Canada-Industry Canada (IC)
The wirele ss radio of this device c omplies w ith R SS
139 & R SS 210 In dustry Canada . This Cl as s B d ig it al
apparatus complies with Canadian ICES-003.
Opera ti on is subject to th e follo wing two condition s: (1)
thi s dev ic e may not ca use inter ference, and (2) t hi s dev ic e
mus t accept any inte rferen ce, i nc lu ding in terferenc e
that may cause undesired operation of the device.
Cet appare il numé ri qu e de la classe B conf or me
á la norme NMB-003 du Canada.
Europe
European Union Radio products with the CE or CE alert
mar ki ng comply w ith t he R&TTE D irective (1999/5/EC)
iss ue d by the Com mi ss io n of the E uropean C om munity.
Com pl ia nce wit h this di rective implies co nform it y
to the following European Norms (in brackets are
the equiva le nt in ternation al standard s).
• EN 60 95 0-1:2006 (IEC6 09 50 -1)–Prod uc tSafet y
• EN 30 0 328Technic alrequir em entforradi oequipme nt
• ETS301489GeneralEMCrequirementsforradioequipment.
Information
Products with the CE marking comply with the EMC Directive
(2004/108/EC) and the Low Voltage Directive (2006/95/
EC) issued by th e Commissio n of th e Eur op ean C om mu nity.
Com pl ia nce wit h these d irectives implies confo rm it y to
the following European Product Family Standards.
• EN 55 02 2(CISPR22)–Electromag neticInter ference
• EN 55 024-1–E le ct romagneti cImmunit y
• EN61000-3-2(IEC610000-3-2)–PowerLineHarmonics
• EN 61000 -3 -3(IEC 61000 0) –Power Li neFl ic ker
• EN60950-1(IEC60950-1)–ProductSafety
Pro du ct s tha t contain the ra di o tra ns mi tter are sometim es
lab el ed with the No ti fied Bo dy number (C E0560) or CE
ale rt m ar ki ng if t he stan da rd used in the confor mi ty i s
not harmon ized ac ro ss the Europ ea n Communi ty.
35
Page 38

© 2010 Belki n Internation al, Inc. All rig hts reserv ed. All trade na mes are registered tr ademarks of re spective
manufacturers listed. Mac, Mac OS, iPhone, iPod, and Safari are trademarks of Apple Inc., registered in
the U.S. and other countries. Windows, Windows Vista, Internet Explorer, Xbox 360, and DirectX are either
regis tered tradem arks or tradem arks of Micros oft Corpor ation in the Uni ted States and /or other count ries.
 Loading...