

Page 1
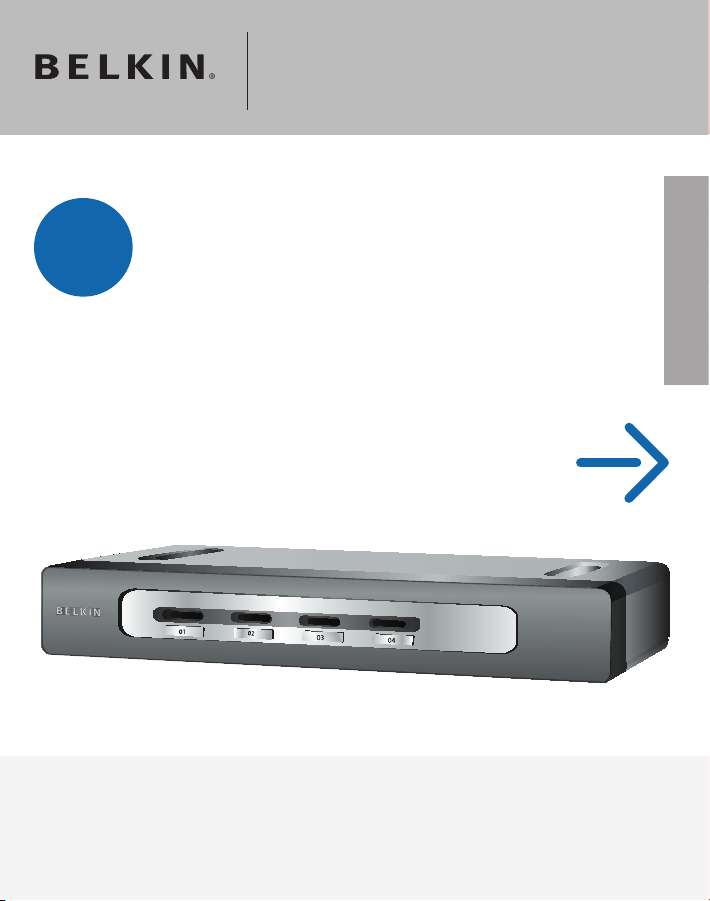
OmniView® Secure
Control
KVM Switch
Control your computer or KVM switch
through a web browser—from anywhere
Start Here
EN
FR
DE
NL
ES
IT
Quick Installation Guide
F1DN102Uea
F1DN104Uea
F1DN108Uea
Page 2
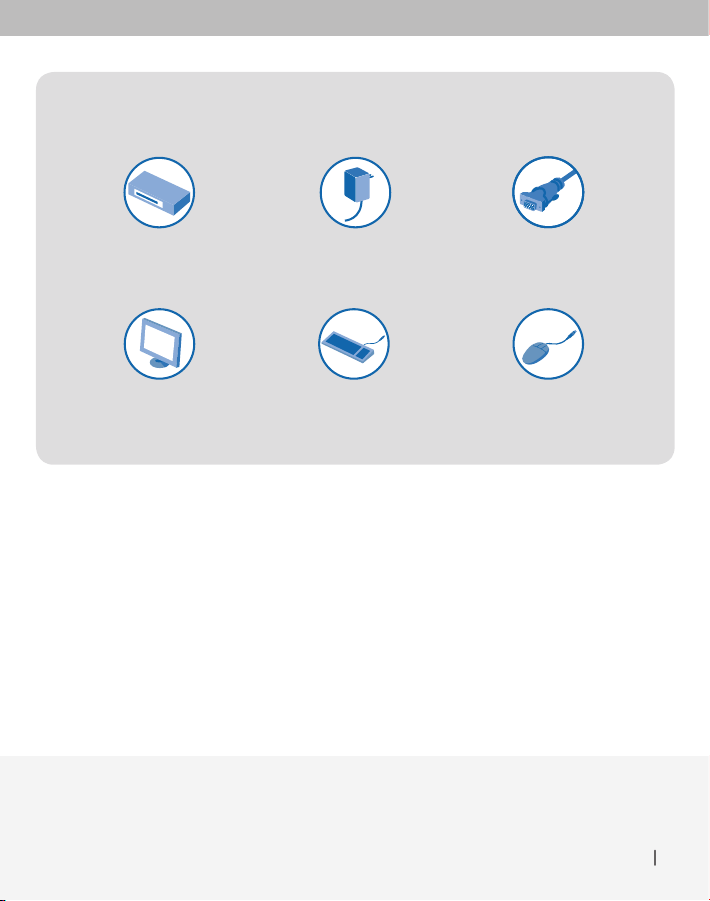
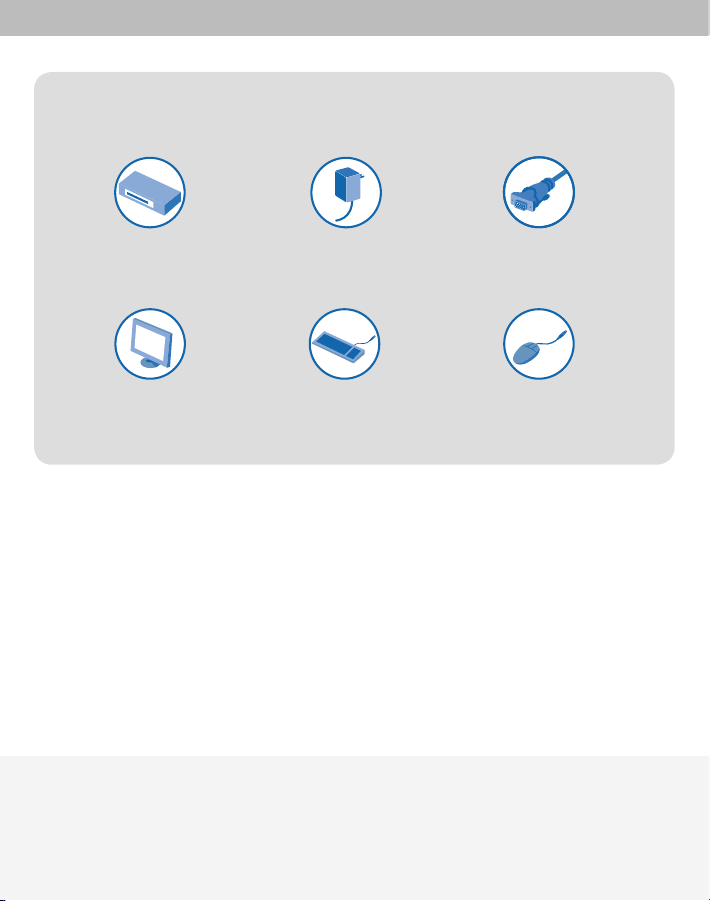
To install the Switch, you will need the following:
OmniView Secure
KVM Switch
(included)
5V DC, 2.6A
Power Adapter
(included)
USB KeyboardVGA Monitor
Belkin All-In-One USB KVM
Cable Kits (F3X1962bXX)
– 1 per computer
USB Mouse
(“XX” = length in feet)
Introduction
This Quick Installation Guide will guide you through the steps needed to install
the OmniView Secure KVM Switch (the Switch). If you have any problems during
this installation, please refer to the User Manual.
Introduction 1
Page 3
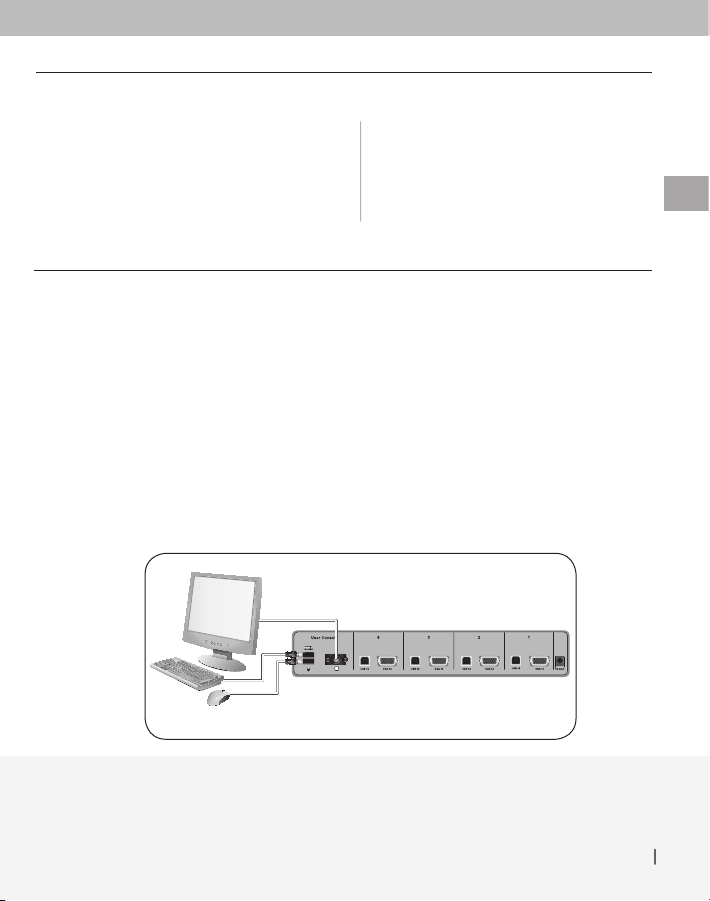
Step 1
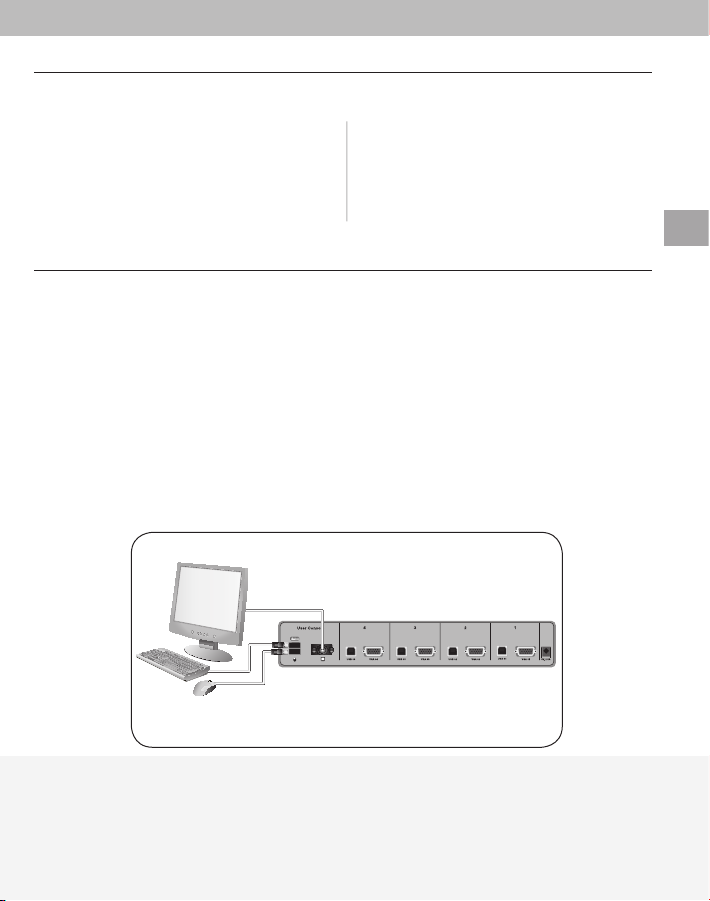
NOTE:
Before you begin, make sure that all computer equipment and devices
are powered off, and that your USB keyboard and mouse work properly with all
your computers.
1.1 Connect your monitor to the VGA port on the back of the Switch
in the “User Console” section.
1.2 Connect your keyboard and mouse to the USB ports on the back
of the Switch in the “User Console” section.
Connect the Console
to the Switch
EN
Connect the Console to the Switch 2
Page 4
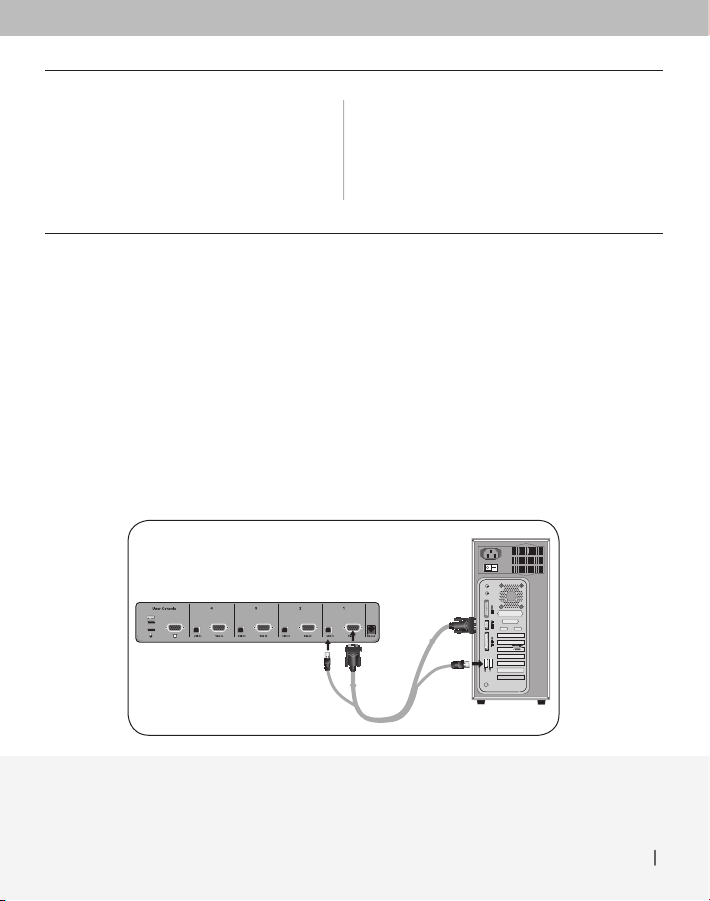
Step 2
2.1 Using the Belkin All-In-One USB KVM Cable Kit, connect one end
of the VGA and USB cables to your computer.
2.2 Connect the other end of the cables to the ports on the Switch labeled
“VGA 01” and “USB 01”.
2.3 Repeat steps 1 and 2 for each additional computer you wish to connect.
Connect Computers
to the Switch
Connect Computers to the Switch 3
Page 5
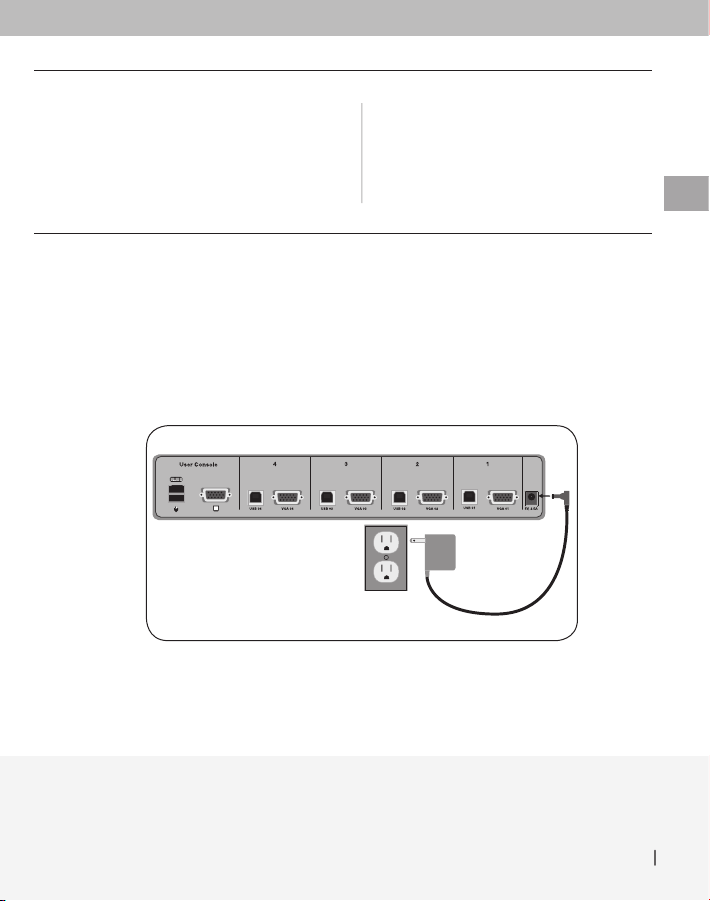
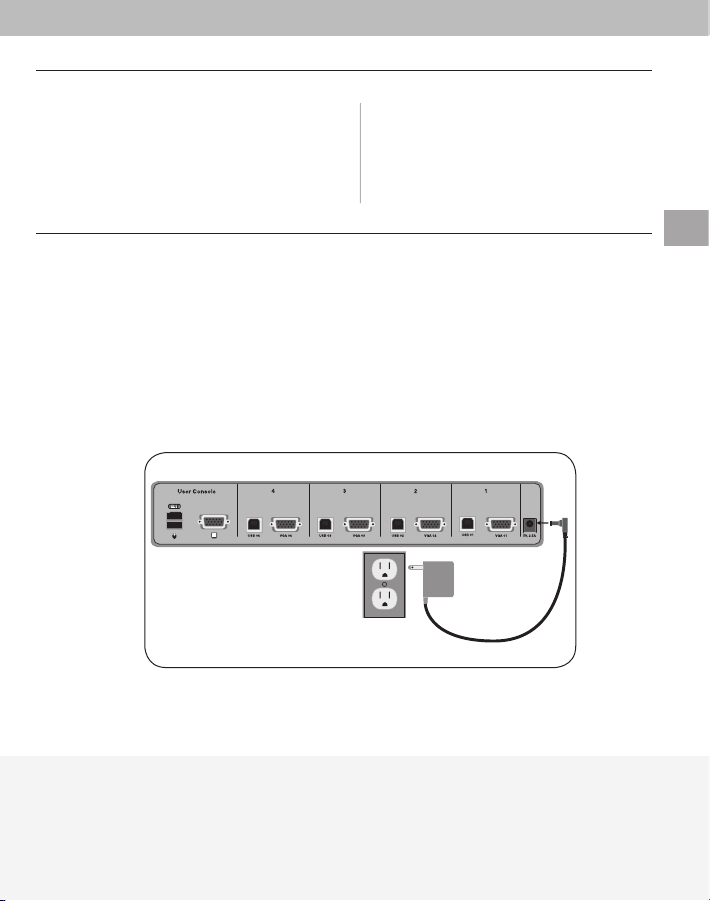
Step 3 Power Up the Systems
3.1 Attach the power adapter to the back of the Switch. Only use the power
adapter supplied with the Switch.
3.2 Power on your computers. All computers can be powered on simultaneously.
You are now ready to use the Switch. Please refer to your User
Manual for additional information.
EN
Power Up the Systems 4
Page 6

OmniView® Secure
KVM Switch
Belkin Ltd.
Express Business Park
Shipton Way, Rushden NN10 6GL
United Kingdom
+44 (0) 1933 35 2000
+44 (0) 1933 31 2000 fax
Belkin B.V.
Boeing Avenue 333
1119 PH Schiphol-Rijk
Netherlands
+31 (0) 20 654 7300
+31 (0) 20 654 7349 fax
Belkin Iberia
Avda. Cerro del Aguila 3
28700 San Sebastián de los Reyes
Spain
+34 9 16 25 80 00
+34 9 02 02 00 34 fax
Belkin SAS
130 rue de Silly
92100 Boulogne-Billancourt
France
+33 (0) 1 41 03 14 40
+33 (0) 1 41 31 01 72 fax
Belkin GmbH
Hanebergstrasse 2
80637 Munich
Germany
+49 (0) 89 143405 0
+49 (0) 89 143405 100 fax
Belkin Nordic
Knarrarnäsgatan 7
164 40 Kista
Sweden
+46 (0) 8 5229 1870
+46 (0) 8 5229 1874 fax
© 2006 Belkin Corporation. All rights reserved. All trade names are registered trademarks
of respective manufacturers listed.
P75210ea
Page 7
Switch KVM
Sécurisé OmniView
Commandez votre ordinateur ou votre switch
Contrôlez
KVM au moyen d’un navigateur Web – où que
vous soyez
Commencez ici
FR
Guide d’installation rapide
F1DN102Uea
F1DN104Uea
F1DN108Uea
Page 8
Pour installer le switch, vous avez besoin des éléments suivants :
Switch KVM
Sécurisé OmniView
(fourni)
Adaptateur de courant
5V CC, 2,6 A
(fourni)
Clavier USBMoniteur VGA
Kits de câbles KVM
USB tout-en-un Belkin
(F3X1962bXX) –
1 par ordinateur
Souris USB
(« XX » indique la longueur en pieds)
Introduction
Ce guide d’installation rapide vous guidera à travers les étapes nécessaires à
l’installation du Switch KVM Sécurisé OmniView (le switch). Si vous rencontrez
des problèmes lors de l’installation, reportez-vous au manuel de l’utilisateur.
Introduction | 1
Page 9
Étape 1
Branchement de
la console au switch
FR
REMARQUE :
et tous les appareils sont hors tension, et que le clavier et la souris USB fonctionnent
correctement sur tous les ordinateurs.
1.1 Branchez votre moniteur au port VGA à l’arrière du switch, dans
la partie « User Console » (console utilisateur).
1.2 Branchez votre moniteur au port VGA à l’arrière du switch, dans
la section « User Console » (console utilisateur).
Avant de commencer, assurez-vous que tout le matériel informatique
Branchement de la console au switch | 2
Page 10

Étape 2
2.1 À l’aide d’un Kit de câbles KVM USB tout-en-un Belkin, branchez une extrémité
du câble VGA et des câbles USB à votre ordinateur.
2.2 Branchez l’autre extrémité des câbles aux ports du switch « VGA 01 »
et « USB 01 ».
2.3 Répétez les étapes 1 à 2 pour chaque ordinateur supplémentaire devant
être raccordé.
Branchement des
ordinateurs au switch
Branchement de la console au switch | 3
Page 11
Étape 3
3.1 Branchez l’adaptateur de courant à l’arrière du switch. N’utilisez que
l’adaptateur de courant fourni avec l’unité.
3.2 Allumez vos ordinateurs. Tous les ordinateurs peuvent être allumés
simultanément.
Vous êtes maintenant prêt à utiliser le switch. Pour de plus amples
informations, reportez-vous au manuel de l’utilisateur.
Mise en route des
systèmes
FR
Mise en route des systèmes | 4
Page 12

Switch KVM
Sécurisé OmniView
Belkin Ltd.
Express Business Park
Shipton Way, Rushden NN10 6GL
Royaume-Uni
+44 (0) 1933 35 2000
+44 (0) 1933 31 2000 Fax
Belkin B.V.
Boeing Avenue 333
1119 PH, Schiphol-Rijk
Pays-Bas
+31 (0) 20 654 7300
+31 (0) 20 654 7349 Fax
Belkin Iberia
Avda. Cerro del Aguila 3
28700 San Sebastián de los Reyes
Espagne
+34 91 625 80 00
+34 9 02 02 00 34 Fax
© 2006 Belkin Corporation. Tous droits réservés. Toutes les raisons commerciales
sont des marques déposées de leurs fabricants respectifs.
Belkin SAS
130 rue de Silly
92100 Boulogne-Billancourt
France
+33 (0) 1 41 03 14 40
+33 (0) 1 41 31 01 72 Fax
Belkin GmbH
Hanebergstraße 2
80637 Munich
Allemagne
+49 (0) 89 143405 0
+49 (0) 89 143405 100 Fax
Belkin Nordic
Knarrarnäsgatan 7
164 40 Kista
Suède
+46 (0) 8 5229 1870
+46 (0) 8 5229 1874 Fax
P75210ea
Page 13

OmniView®
Secure KVM-Switch
Control
Steuerung von Computer oder KVM-Switch
mit einem Webbrowser—von jedem Ort aus
Start
Installationsanleitung
F1DN102Uea
F1DN104Uea
F1DN108Uea
DE
Page 14

Zur Installation des Switches benötigen Sie Folgendes:
OmniView Secure
KVM-Switch
(enthalten)
Bildschirm
Netzteil, 5 V DC, 2,6 A
(enthalten)
USB-TastaturVGA-
Belkin USB-KVM-
Komplettkabelgarnitur
(F3X1962bXX) – 1 je Computer
USB-Maus
(XX = Länge gemessen in Fuß)
Einleitung
Diese Installationsanleitung begleitet Sie Schritt für Schritt bei der Installation
des OmniView Secure KVM-Switch (dem Switch). Sollte es bei der Installation
zu Problemen kommen, finden Sie im Benutzerhandbuch weitere Informationen.
Einleitung | 1
Page 15

Schritt 1
Die Konsole an
den Switch anschließen
DE
HINWEIS:
Computern funktionieren und schalten Sie alle Computer und Peripheriegeräte aus.
1.1 Schließen Sie den Bildschirm an den VGA-Anschluss im Bereich
1.2 Schließen Sie die Tastatur und die Maus an die USB-Anschlüsse
Überprüfen Sie vor der Installation, ob USB-Tastatur und USB-Maus bei allen
„User Console” (Benutzerkonsole) an der Rückseite des Switches an.
im Bereich „User Console” (Benutzerkonsole) an der Rückseite des Switches an.
Die Konsole an den Switch anschließen | 2
Page 16

Schritt 2
2.1 Schließen Sie ein Ende der VGA- und USB-Kabel der USB-KVM-
Komplettkabelgarnitur von Belkin an den Computer an.
2.2 Schließen Sie das andere Ende der Kabel an die Switch-Anschlüsse
mit der Bezeichnung „VGA 01” und „USB 01” an.
2.3 Wiederholen Sie Schritt 1 und 2 für jeden weiteren anzuschließenden Computer.
Die Computer an den
Switch anschließen
Die Computer an den Switch anschließen | 3
Page 17

Schritt 3
3.1 Schließen Sie das Netzteil an den Anschluss an der Rückseite des Switches an.
Benutzen Sie nur das im Lieferumfang enthaltene Netzteil.
3.2 Fahren Sie die Computer hoch. Alle Computer können gleichzeitig eingeschaltet
werden.
Jetzt können Sie mit Ihrem Switch arbeiten. Weitere Informationen
finden Sie im Benutzerhandbuch.
Die Systeme hochfahren
DE
Die Systeme hochfahren | 4
Page 18

OmniView®
Secure KVM-Switch
Belkin Ltd.
Express Business Park
Shipton Way, Rushden NN10 6GL
Großbritannien
+44 (0) 1933 35 2000
+44 (0) 1933 31 2000 Fax
Belkin B.V.
Boeing Avenue 333
1119 PH Schiphol-Rijk
Niederlande
+31 (0) 20 654 7300
+31 (0) 20 654 7349 Fax
Belkin Iberia
Avda. Cerro del Aguila 3
28700 San Sebastián de los Reyes
Spanien
+34 91 625 80 00
+34 9 02 02 00 34 Fax
© 2006 Belkin Corporation. Alle Rechte vorbehalten.
Alle Produktnamen sind eingetragene Marken der angegebenen Hersteller.
Belkin SAS
130 rue de Silly
92100 Boulogne Billancourt
Frankreich
+33 (0) 1 41 03 14 40
+33 (0) 1 41 31 01 72 Fax
Belkin GmbH
Hanebergstraße 2
80637 München
Deutschland
+49 (0) 89 143405 0
+49 (0) 89 143405 100 Fax
Belkin Nordic
Knarrarnäsgatan 7
164 40 Kista
Schweden
+46 (0) 8 5229 1870
+46 (0) 8 5229 1874 Fax
P75210ea
Page 19

OmniView® Secure
KVM-switch
Control
Bestuur uw computer of KVM-switch via
een webbrowser — waar u zich ook bevindt
Hier beginnen
Beknopte installatiehandleiding
F1DN102Uea
F1DN104Uea
F1DN108Uea
NL
Page 20

Voor het installeren van de switch hebt u het volgende nodig:
OmniView Secure
KVM-switch
(in de verpakking)
Voedingsadapter
5 V DC, 2,5 A
(in de verpakking)
USB-toetsenbordVGA-monitor
Alles-in-één USB KVM-
kabelset van Belkin
(F3X1962bXX) –
1 per computer
USB-muis
(“XX” = lengte in voet)
Inleiding
Deze beknopte installatiehandleiding helpt u bij het installeren van de OmniView
Secure KVM-switch (de switch). Als u tijdens deze installatie een probleem hebt,
raadpleeg dan de handleiding.
Inleiding | 1
Page 21

Stap 1
De console op de
switch aansluiten
LET OP:
randapparatuur zijn uitgeschakeld en dat uw USB-toetsenbord en USB-muis naar behoren
werken met al uw computers.
1.1 Sluit uw monitor aan op de VGA-poort aan de achterkant van de switch,
1.2 Sluit uw toetsenbord en muis aan op de USB-poorten aan de achterkant
Voordat u begint, dient u er voor te zorgen dat alle betrokken computers en
in het “User Console”-gedeelte.
van de switch, in het “User Console”-gedeelte.
De console op de switch aansluiten | 2
NL
Page 22

Stap 2
2.1 Neem de alles-in-één USB-kabelset van Belkin en sluit het ene uiteinde
van de VGA- en USB-kabels aan op uw computer.
2.2 Sluit het andere uiteinde van de kabels aan op de poorten van de switch die
worden aangeduid met
“VGA 01” en “USB 01”.
2.3 Herhaal stap 1 en 2 voor elke extra computer die u wilt aansluiten.
De computers op
de switch aansluiten
De computers op de switch aansluiten | 3
Page 23

Stap 3 De systemen inschakelen
3.1 Sluit de voedingsadapter aan op de achterkant van de switch. Maak uitsluitend
gebruik van de voedingsadapter die met de switch is meegeleverd.
3.2 Zet uw computers aan. Alle computers kunnen tegelijk worden ingeschakeld.
De switch is nu klaar voor gebruik. Meer informatie vindt u in de
handleiding.
De systemen inschakelen | 4
NL
Page 24

OmniView® Secure
KVM-switch
Belkin Ltd.
Express Business Park
Shipton Way, Rushden NN10 6GL
Verenigd Koninkrijk
+44 (0) 1933 35 2000
+44 (0) 1933 31 2000 fax
Belkin B.V.
Boeing Avenue 333
1119 PH Schiphol-Rijk
Nederland
+31 (0) 20 654 7300
+31 (0) 20 654 7349 fax
Belkin Iberia
Avda. Cerro del Aguila 3
28700 San Sebastián de los Reyes
Spanje
+34 91 625 80 00
+34 9 02 02 00 34 fax
© 2006 Belkin Corporation. Alle rechten voorbehouden. Alle handelsnamen
zijn gedeponeerde handelsmerken van de betreffende rechthebbenden.
Belkin SAS
130 rue de Silly
92100 Boulogne Billancourt
Frankrijk
+33 (0) 1 41 03 14 40
+33 (0) 1 41 31 01 72 fax
Belkin GmbH
Hanebergstraße 2
80637 München
Duitsland
+49 (0) 89 143405 0
+49 (0) 89 143405 100 fax
Belkin Nordic
Knarrarnäsgatan 7
164 40 Kista
Zweden
+46 (0) 8 5229 1870
+46 (0) 8 5229 1874 fax
P75210ea
Page 25

Conmutador KVM
seguro OmniView
Controle su ordenador o un conmutador
Control
KVM mediante un buscador de Internet,
desde cualquier lugar
Comience aquí
®
ES
Guía de instalación rápida
F1DN102Uea
F1DN104Uea
F1DN108Uea
Page 26

Para instalar el Conmutador, necesitará lo siguiente:
Conmutador KVM seguro
OmniView (incluido)
Adaptador de alimentación
5 V CC, 2,6 A (incluido)
Teclado USBMonitor VGA
Kits de cables KVM USB
“todo en uno” de Belkin
(F3X1962bXX) – 1 para
cada ordenador
Ratón USB
(“XX” = longitud en pies)
Introducción
Esta Guía de instalación rápida le indicará los pasos necesarios para instalar
el Conmutador KVM seguro OmniView (el Conmutador). Si se presentase algún
problema durante la instalación, consulte el Manual del Usuario.
Introducción | 1
Page 27

Paso 1
NOTA:
Antes de comenzar, compruebe que todos los dispositivos y equipos informáticos
estén desconectados, y que su ratón y teclado USB funcionan correctamente con todos
sus ordenadores.
1.1 Conecte su monitor al puerto VGA que se encuentra en la parte trasera del
Conmutador, en el apartado de consola de usuario (User Console).
1.2 Conecte su ratón y teclado a los puertos USB que se encuentran en la parte
trasera del Conmutador, en el apartado de consola de usuario (User Console).
Conexión de la consola
al Conmutador
ES
Conexión de la consola al Conmutador | 2
Page 28

Paso 2
2.1 Utilizando el Kit de cables KVM USB “todo en uno” de Belkin,
inserte el conector VGA y los cables USB en su ordenador.
2.2 Conecte el otro extremo de los cables en los puertos del Conmutador con
la indicación “VGA 01” y “USB 01”.
2.3 Repita los pasos 1 y 2 para cada ordenador que desee conectar.
Conexión de los
ordenadores al Conmutador
Conexión de los ordenadores al Conmutador | 3
Page 29

Paso 3
3.1 Conecte el adaptador de alimentación a la parte trasera del Conmutador.
Utilice únicamente el adaptador de alimentación que ha sido suministrado
con el Conmutador.
3.2 Encienda sus ordenadores. Se pueden encender todos los ordenadores
de forma simultánea.
Ahora el Conmutador estará listo para ser utilizado.
Consulte su Manual del usuario para obtener más información.
Encendido de los sistemas
ES
Encendido de los sistemas | 4
Page 30

Conmutador KVM
seguro OmniView
®
Belkin Ltd.
Express Business Park
Shipton Way, Rushden NN10 6GL
Reino Unido
+44 (0) 1933 35 2000
+44 (0) 1933 31 2000 fax
Belkin B.V.
Boeing Avenue 333
1119 PH Schiphol-Rijk
Países Bajos
+31 (0) 20 654 7300
+31 (0) 20 654 7349 fax
Belkin Iberia
Avda. Cerro del Águila 3
28700 San Sebastián de los Reyes
España
+34 91 625 80 00
+34 902 02 00 34 fax
© 2006 Belkin Corporation. Todos los derechos reservados. Todos los nombres
comerciales son marcas registradas de los respectivos fabricantes enumerados.
Belkin SAS
130 rue de Silly
92100 Boulogne-Billancourt
Francia
+33 (0) 1 41 03 14 40
+33 (0) 1 41 31 01 72 fax
Belkin GmbH
Hanebergstrasse 2
80637 Múnich
Alemania
+49 (0) 89 143405 0
+49 (0) 89 143405 100 fax
Belkin Nordic
Knarrarnäsgatan 7
164 40 Kista
Suecia
+46 (0) 8 5229 1870
+46 (0) 8 5229 1874 fax
P75210ea
Page 31

Switch KVM
Secure OmniView
®
Controllo
Per controllare il computer o lo switch KVM
tramite un browser web, da qualsiasi parte
Inizio
Guida di installazione rapida
F1DN102Uea
F1DN104Uea
F1DN108Uea
IT
Page 32

Per installare lo switch sono necessari:
Switch KVM Secure
OmniView
(incluso)
Alimentatore di corrente
da 5V CC, 2,6 A
Tastiera USBMonitor VGA
(incluso)
Kit di cavi per KVM
USB All-In-One Belkin
(F3X1962bXX) – 1 per
computer
Mouse USB
(xx indica la lunghezza in piedi)
Introduzione
Questa guida di installazione rapida vi illustrerà le operazioni necessarie per
l’installazione dello Switch KVM Secure OmniView (lo switch). Per qualsiasi
problema nel corso dell’installazione, consultare il manuale d’uso.
Introduzione | 1
Page 33

Fase 1
Collegare la console
allo switch
NOTA BENE:
siano scollegati dalla corrente, e che la tastiera e il mouse USB funzionino correttamente
con tutti i computer.
1.1 Collegare il cavo VGA del monitor alla porta VGA sul retro dello
switch nella sezione “Console dell’utente”.
1.2 Collegare la tastiera e il mouser alle porte USB sul retro dello switch
nella sezione “Console dell’utente”.
Prima di cominciare, assicurarsi che tutti i dispositivi di rete e i computer
Collegare la console allo switch | 2
IT
Page 34

Fase 2
2.1 Utilizzando il kit di cavi per KVM USB All-in-One, collegare un’estremità
dei cavi VGA e USB al computer.
2.2 Collegare l’altra estremità dei cavi alle porte sullo switch marcate
“VGA 01” e “USB 01”.
2.3 Ripetere la fase 1 e 2 per ogni altro computer che si desidera collegare.
Collegare i computer
allo switch
Collegare i computer allo switch | 3
Page 35

Fase 3 Accendere i sistemi
3.1 Collegare l’adattatore di corrente allo switch. Utilizzare esclusivamente
l’adattatore fornito con lo switch.
3.2 Accendere i computer. Tutti i computer possono essere accesi
contemporaneamente.
Lo switch è così pronto per essere utilizzato. Leggere il manuale
d’uso per ulteriori informazioni.
IT
Accendere i sistemi | 4
Page 36

Switch KVM
Secure OmniView
®
Belkin Ltd.
Express Business Park
Shipton Way, Rushden NN10 6GL
Regno Unito
+44 (0) 1933 35 2000
+44 (0) 1933 31 2000 fax
Belkin B.V.
Boeing Avenue 333
1119 PH Schiphol-Rijk
Paesi Bassi
+31 (0) 20 654 7300
+31 (0) 20 654 7349 Fax
Belkin Iberia
Avda. Cerro del Aguila 3
28700 San Sebastián de los Reyes
Spagna
+34 91 625 80 00
+34 9 02 02 00 34 fax
© 2006 Belkin Corporation. Tutti i diritti riservati. Tutti i nomi commerciali
sono marchi registrati dei rispettivi produttori indicati.
Belkin SAS
130 rue de Silly
92100 Boulogne-Billancourt
Francia
+33 (0) 1 41 03 14 40
+33 (0) 1 41 31 01 72 fax
Belkin GmbH
Hanebergstrasse 2
80637 Monaco di Baviera
Germania
+49 (0) 89 143405 0
+49 (0) 89 143405 100 fax
Belkin Nordic
Knarrarnäsgatan 7
164 40 Kista
Svezia
+46 (0) 8 5229 1870
+46 (0) 8 5229 1874 fax
P75210ea
 Loading...