

Page 1
P73959ec_F5U230ec 16-08-2002 15:12 Page 1
Smartbeam®Manual
En
En
Fr
De
Manuel Smartbeam
Bedienungsanleitung
P73959ec
für Smartbeam
®
®
F5U230ec
Page 2
P73959ec_F5U230ec 16-08-2002 15:12 Page 2
Page 3
P73959ec_F5U230ec 16-08-2002 15:12 Page 3
En
English . . . . . . . . . . . . . . . . . . . . .1
Français (Europe) . . . . . . . . . . . .25
Deutsch . . . . . . . . . . . . . . . . . . .49
3
Fr
De
Page 4

r
t
B
B
u
P73959ec_F5U230ec 16-08-2002 15:12 Page 4
Int
Ins
US
US
Tro
Page 5
P73959ec_F5U230ec 16-08-2002 15:12 Page 1
Contents
Introduction. . . . . . . . . . . . . . . . . . . . . . . . . . . . . . . . . . . . . . . . . 3
Installation of USB-IrDA under Win98/ME . . . . . . . . . . . . . . . . . . 4
USB devices listing following installation . . . . . . . . . . . . . . . . . . . 7
Uninstallation. . . . . . . . . . . . . . . . . . . . . . . . . . . . . . . . . . . . . . . 10
USB-IrDA installeren under Win2000 . . . . . . . . . . . . . . . . . . . . . 11
USB devices listing following installation . . . . . . . . . . . . . . . . . . 13
Uninstallation. . . . . . . . . . . . . . . . . . . . . . . . . . . . . . . . . . . . . . . 14
USB-IrDA installeren under WinXP . . . . . . . . . . . . . . . . . . . . . . . 16
USB devices listing following installation . . . . . . . . . . . . . . . . . . 18
Uninstallation. . . . . . . . . . . . . . . . . . . . . . . . . . . . . . . . . . . . . . . 19
Troubleshooting. . . . . . . . . . . . . . . . . . . . . . . . . . . . . . . . . . . . . 21
1
En
Page 6
a
s
e
W
p
P73959ec_F5U230ec 16-08-2002 15:12 Page 2
Tha
Infr
Seri
Sy
•P
•1
•
o
Page 7

P73959ec_F5U230ec 16-08-2002 15:12 Page 3
Introduction
Thank you for choosing the USB-IrDA adapter. The USB-IrDA is an
Infrared adapter that connects to a PC or server via the Universal
Serial Bus (USB) port.
System Requirements
• Pentium-class PC with USB port.
• 1 available USB type A (downstream) port.
• Windows 98, Windows Me, Windows 2000 or Windows XP
operating system.
3
En
Page 8
P73959ec_F5U230ec 16-08-2002 15:12 Page 4
Installation of USB-IrDA under Win98/ME
Note: Please install USB-IrDA according to the procedure below. Do
not connect the USB-IrDA to your computer if the installation has not
yet been completed.
To install the USB-IrDA drivers
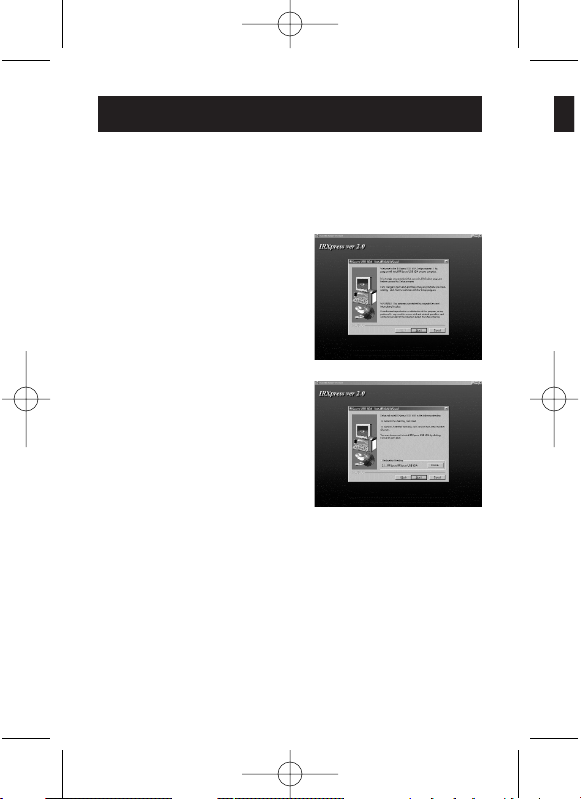
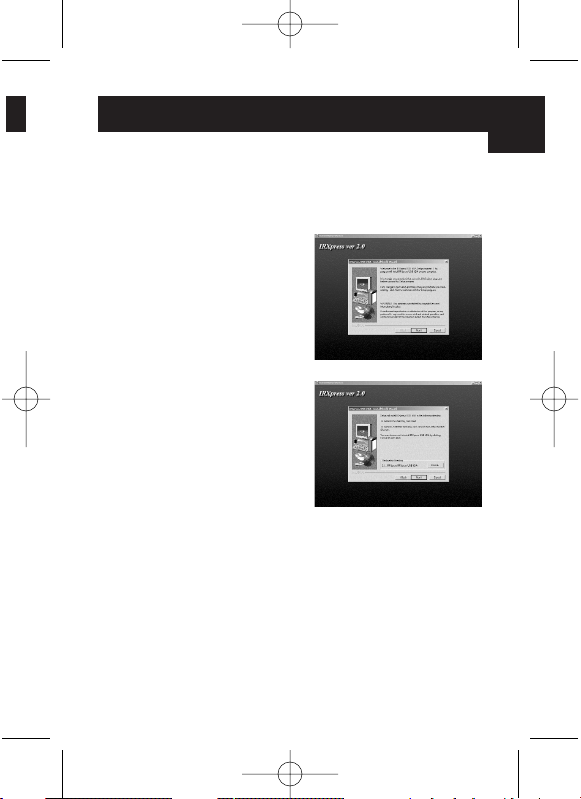
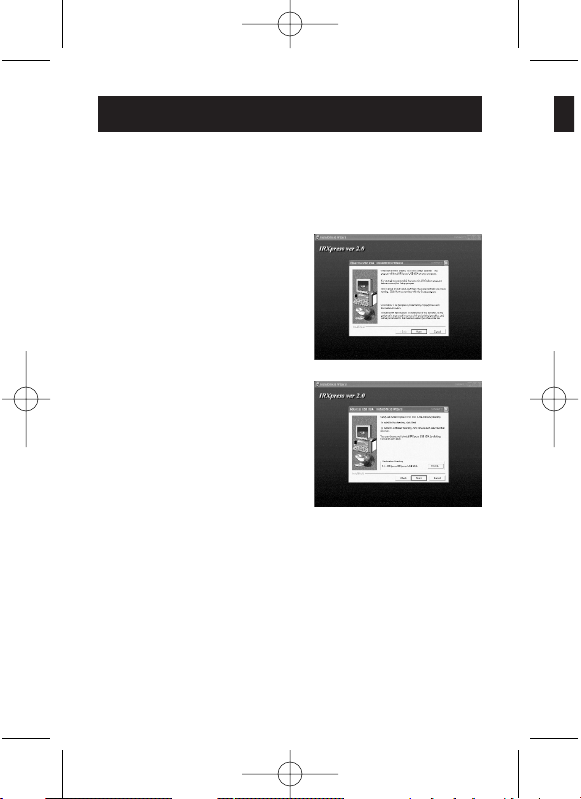
A1. Please insert the driver disk into
the Computer’s disk drive then
execute “IRXpress.exe”.
Click “Next” to continue.
(Figure A-1)
A2. Click “Next” to continue.
(Figure A-2)
4
A3.
A4.
A5.
Page 9
P73959ec_F5U230ec 16-08-2002 15:12 Page 5
Installation of USB-IrDA under Win98/ME
o
ot
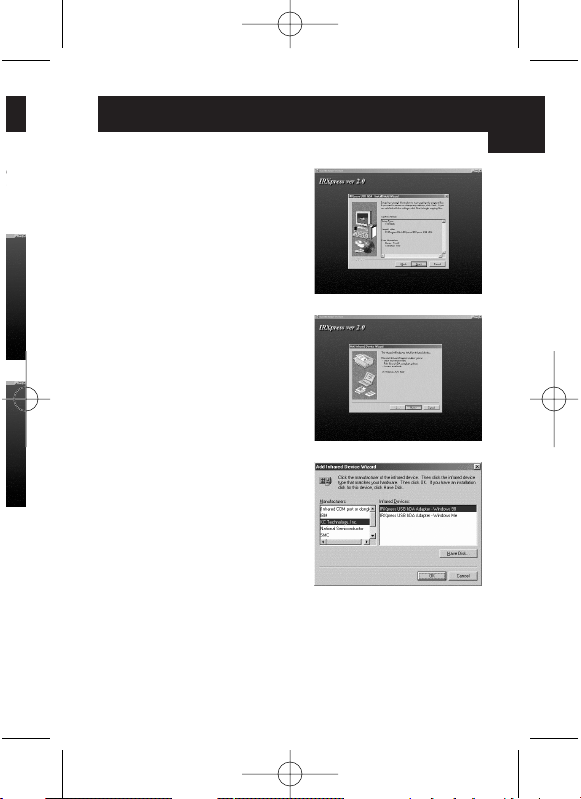
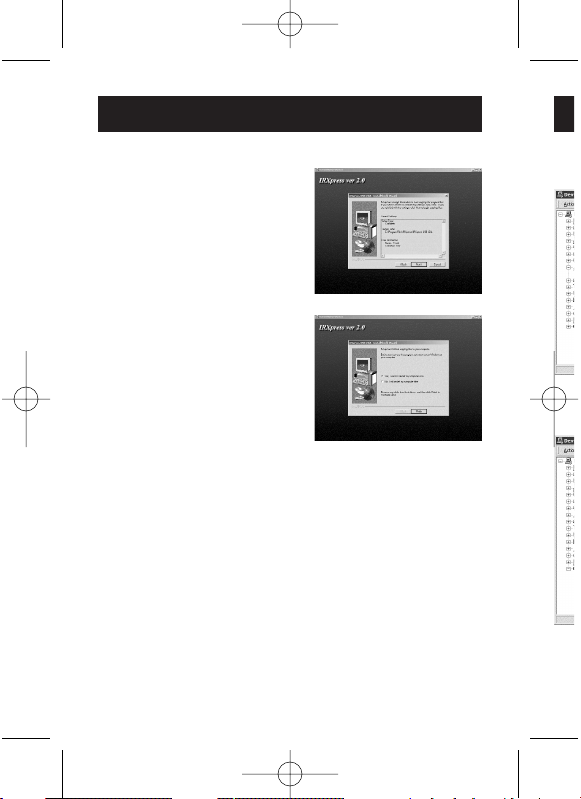
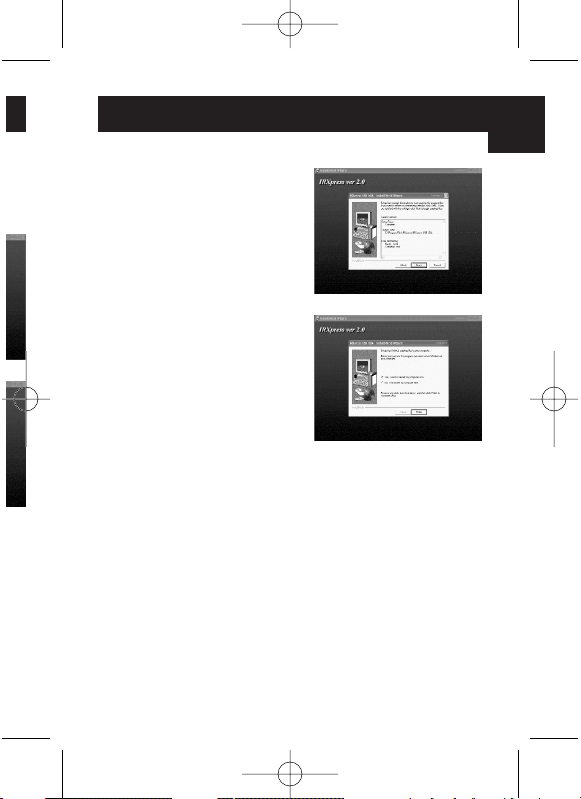
A3. Click “Next” to continue.
(Figure A-3)
A4. Click “Next” to continue.
(Figure A-4)
A5. For Win98, please select
“KC Technology, Inc.”,
and select “IRXpress USB IrDA
Adapter – Windows 98”.
Click “OK” to continue.
(Figure A-5)
En
5
Page 10
I
P73959ec_F5U230ec 16-08-2002 15:12 Page 6
Installation of USB-IrDA under Win98/ME
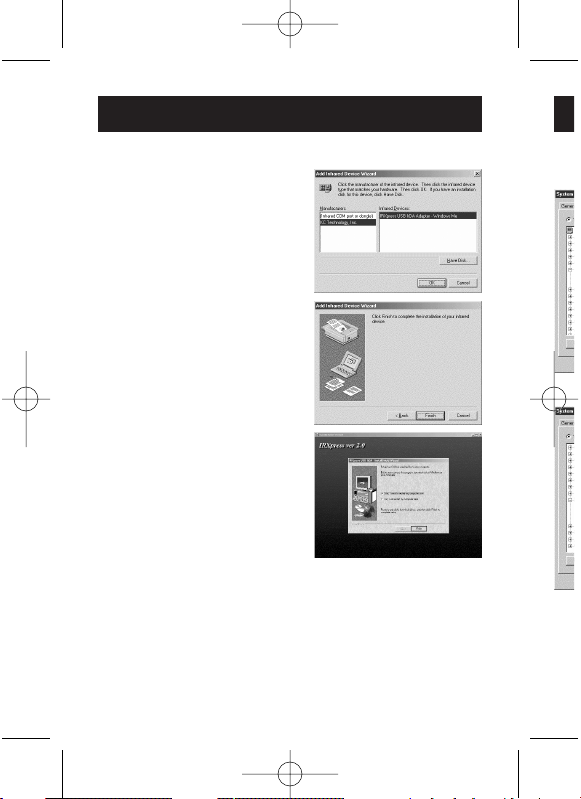
A6. For WinMe, please select
“KC Technology, Inc.”,
and select “IRXpress USB IrDA
Adapter - Windows Me”.
Click “OK” to continue.
(Figure A-6)
A7. Click “Finish”, Windows has
finished installing the device.
(Figure A-7)
A8. Select “Yes, I want to restart
my computer now”. Then click
“Finish” to restart the system
and complete the driver
installation.
(Figure A-8)
After restarting the computer, please
plug the flat end of the USB cable into
the downstream A connector located
at the back of your computer or USB
HUB port, and plug the upstream,
square, B connector into the USB-IrDA adapter.
6
US
Page 11
P73959ec_F5U230ec 16-08-2002 15:12 Page 7
Installation of USB-IrDA under Win98/ME
USB devices listing following installation
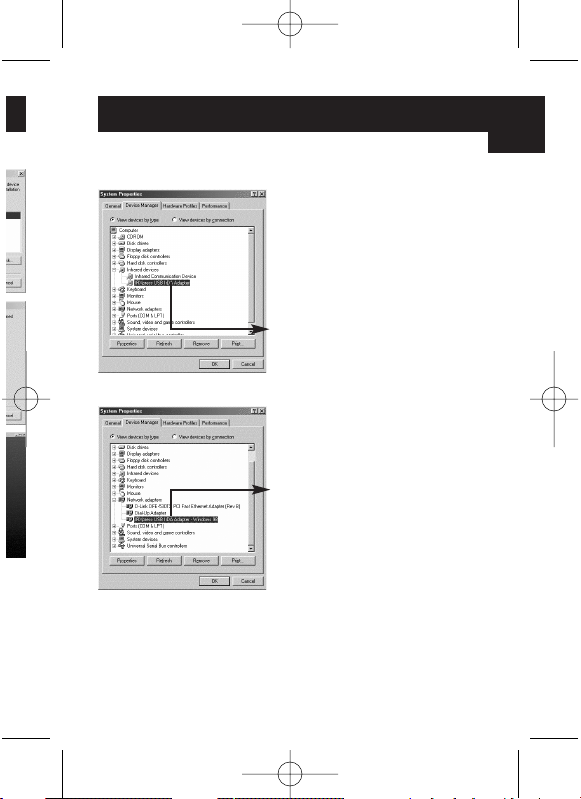
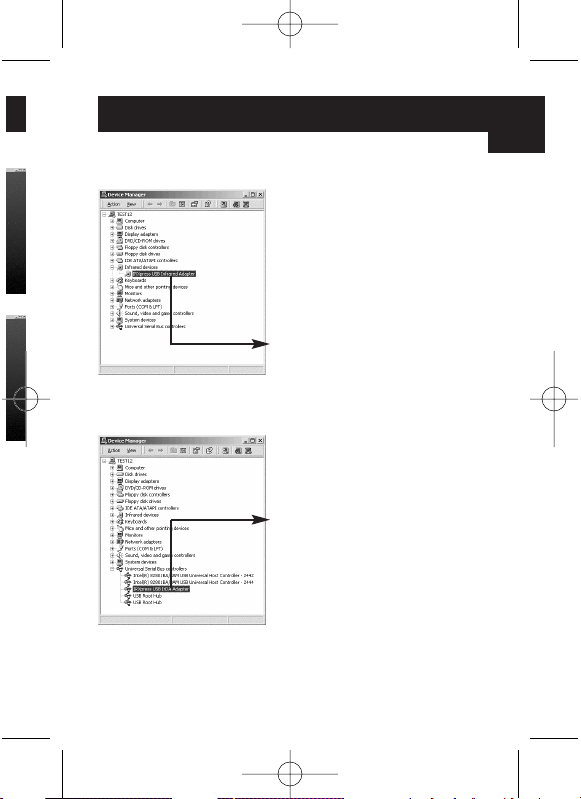
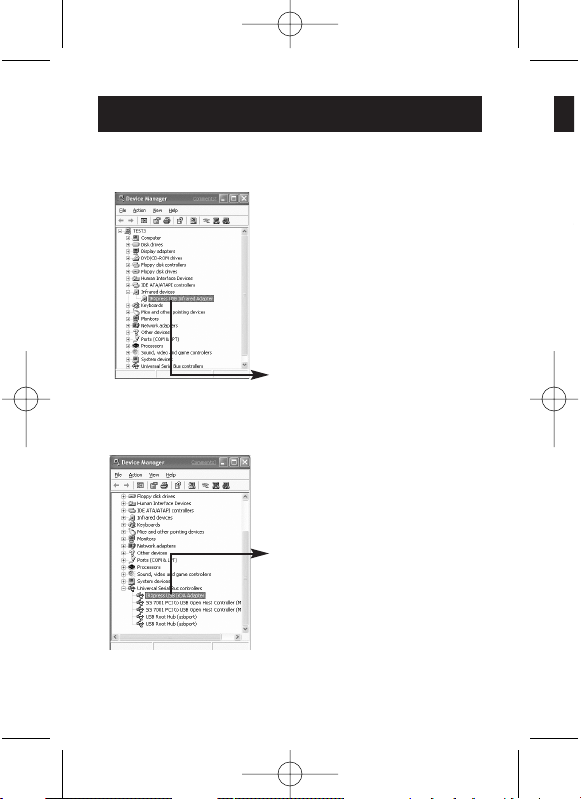
B1. To make sure you have installed
the device successfully, please
move the cursor to “My
computer” -> “Control Panel” ->
“System Properties” -> “Device
Manager” -> ”Infrared devices”.
It will show a new directory
“IRXpress USB IrDA Adapter“.
IRXpress USB IrDA Adapter
B2. And in the same window, you can
select ”Network adapters”. This
will show “IRXpress USB IrDA
Adapter – Windows 98”.
IRXpress USB IrDA
Adapter –Windows 98
7
En
Page 12
I
P73959ec_F5U230ec 16-08-2002 15:12 Page 8
Installation of USB-IrDA under Win98/ME
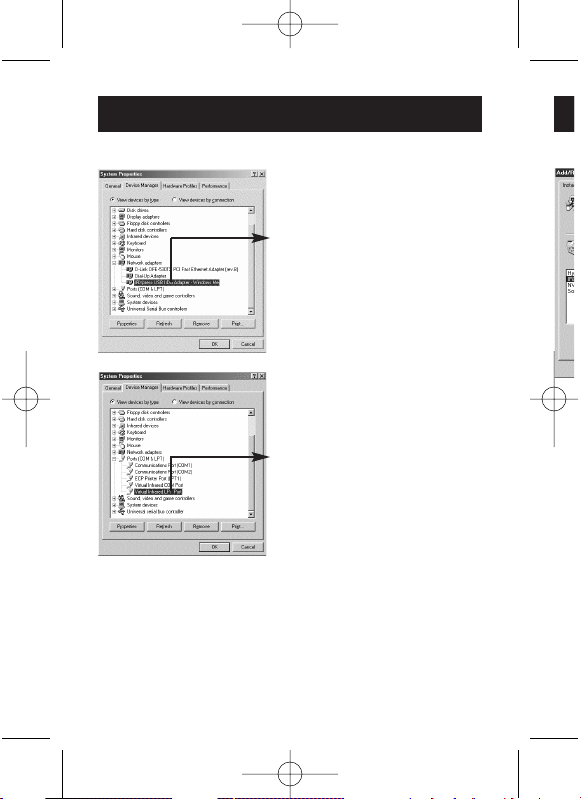
B3. It will show “IRXpress USB IrDA
Adapter – Windows Me” under
Win ME.
IRXpress USB IrDA Adapter –
Windows Me
B4. And in the same window, you can
select ”Ports [COM & LPT]”. It
will show “Virtual Infrared COM
Port”.
Virtual Infrared COM Port
8
Page 13
P73959ec_F5U230ec 16-08-2002 15:12 Page 9
Installation of USB-IrDA under Win98/ME
A
er
an
It
M
B5. And in the same window, you can
select ”Ports [COM & LPT]”. It
will show “Virtual Infrared LPT
Port”.
Virtual Infrared LPT Port
En
9
Page 14
t
P73959ec_F5U230ec 16-08-2002 15:12 Page 10
Installation of USB-IrDA under Win98/ME
Uninstallation
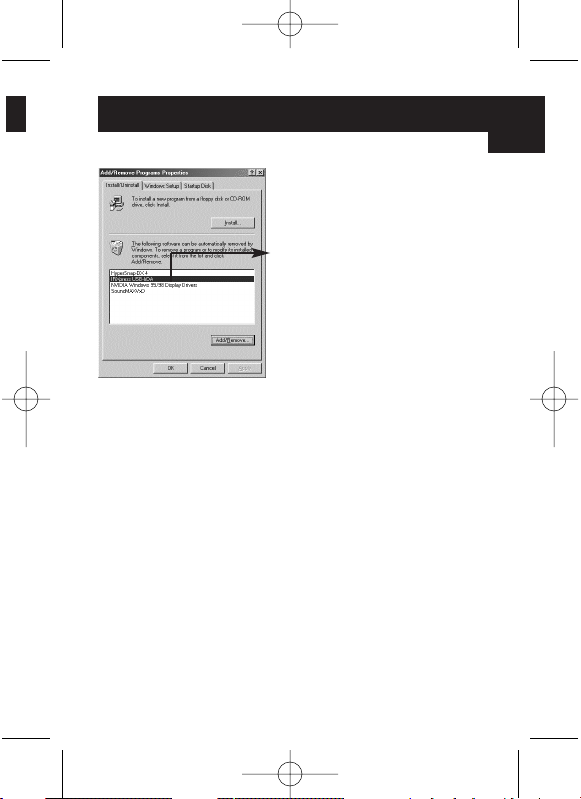
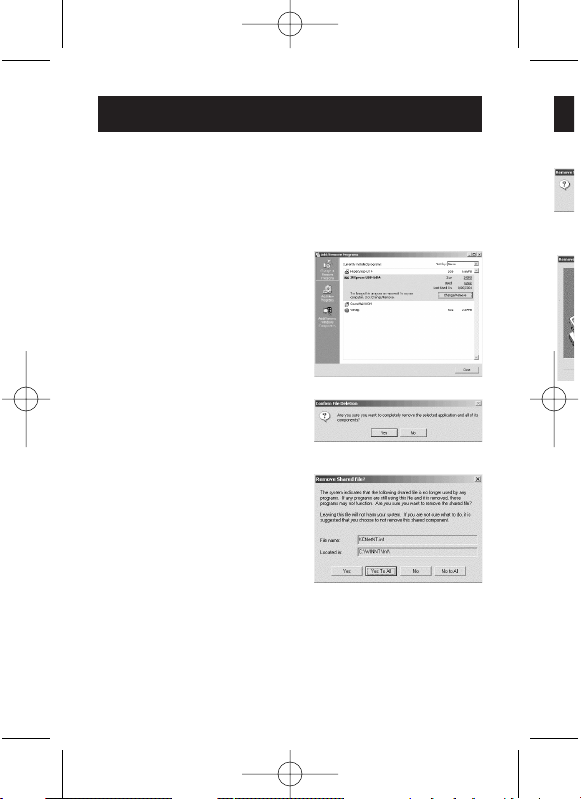
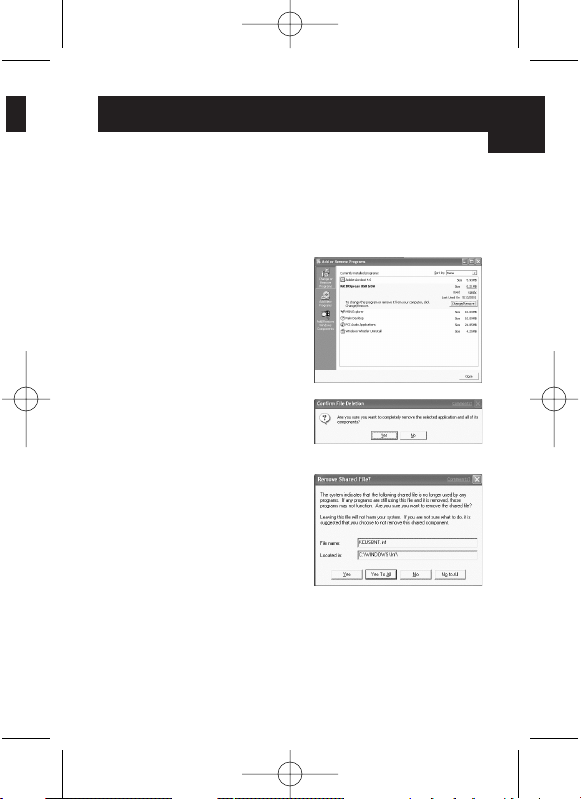
If you want to remove the driver for the USB-IrDA, you can move
the cursor to “My computer” -> “Control Panel” -> “Add/Remove
Programs”. It will show a dialog box then select “Install/Uninstall”
C1. Select “IRXpress USB-IrDA” from
the list.
Click “Add/Remove” to uninstall
the driver of the USB-IrDA.
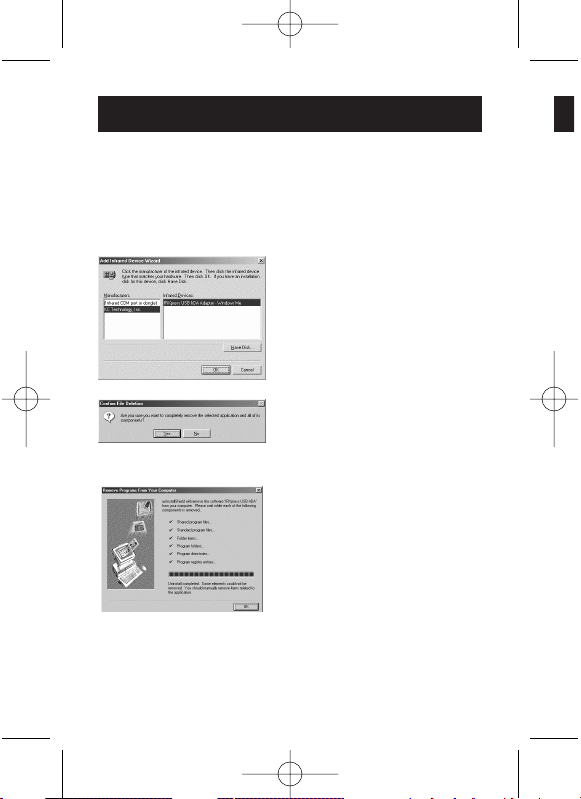
C2. Click “Yes” to continue.
C3. Click “OK” to complete the
driver’s removal.
10
No
not
yet
To
D1.
D2.
Page 15
P73959ec_F5U230ec 16-08-2002 15:12 Page 11
ll”
om
all
Installation of USB-IrDA under Win2000
Note: Please install USB-IrDA according to the procedure below. Do
e
e
not connect the USB-IrDA to your computer if the installation has not
yet been completed.
To install the USB-IrDA drivers
D1. Please insert the driver disk into
the Computer’s disk drive then
execute “IRXpress.exe”.
Click “Next” to continue.
(Figure D-1)
D2. Click “Next” to continue.
(Figure D-2)
En
11
Page 16
P73959ec_F5U230ec 16-08-2002 15:12 Page 12
Installation of USB-IrDA under Win2000
D3. Click “Next” to continue.
(Figure D-3)
D4. Select “Yes, I want to restart my
computer now”, then click
“Finish” to restart the system and
complete the driver installation.
(Figure D-4)
After restarting the computer, please
plug the flat end of the USB cable into
the downstream A connector located
at the back of your computer or USB
HUB port and plug the upstream,
square B connector into the USB-IrDA
adapter.
12
US
Page 17
P73959ec_F5U230ec 16-08-2002 15:12 Page 13
Installation of USB-IrDA under Win2000
USB devices listing following installation
E1. To make sure you have installed
the devicesuccessfully, please
move the cursor to “My
computer” -> “Control Panel” ->
“System Properties” ->
“Hardware” -> “Device
Manager” -> ”Infrared devices”.
It will show a new directory
“IRXpress USB Infrared
Adapter“.
IRXpress USB Infrared Adapter
E2. And in the same window, you can
select ”Universal Serial Bus
controllers”. This will show
“IRXpress USB IrDA Adapter”.
IRXpress USB IrDA Adapter
13
En
Page 18
P73959ec_F5U230ec 16-08-2002 15:12 Page 14
Installation of USB-IrDA under Win2000
Uninstallation
If you want to remove the driver for the USB-IrDA, you can move
the cursor to “My computer” -> “Control Panel” -> “Add/Remove
Programs”.
It will show a dialog box then select “Install/Uninstall”.
F1. Select “IRXpress USB-IrDA”
from the list.
Click “Change/Remove” to
uninstall the driver of the USBIrDA.
F2. Click “Yes” to continue.
F3. Click “Yes To All” to continue.
14
Page 19

P73959ec_F5U230ec 16-08-2002 15:12 Page 15
Installation of USB-IrDA under Win2000
F4. Click “Yes” to continue.
e
e
F5. Click “OK” to complete the
device driver’s removal.
En
15
Page 20
e
g
h
B
a
P73959ec_F5U230ec 16-08-2002 15:12 Page 16
Installation of USB-IrDA under WinXP
Note: Please install the USB-IrDA driver according to the procedure below.
Do not connect the USB-IrDA to your computer if the installation has
not yet been completed.
To install the USB-IrDA drivers
G1. Please insert the driver disk into
the Computer’s disk drive then
execute “IRXpress.exe”.
Click “Next” to continue.
(Figure G-1)
G2. Click “Next” to continue.
(Figure G-2)
16
G3.
G4.
Aft
plu
the
at t
HU
squ
ada
Page 21
P73959ec_F5U230ec 16-08-2002 15:12 Page 17
ow.
s
Installation of USB-IrDA under WinXP
G3. Click “Next” to continue.
(Figure G-3)
G4. Select “Yes, I want to restart
my Computer now”, then click
“Finish” to restart the system and
complete the driver installation.
(Figure G-4)
After restarting the computer, please
plug the flat end of the USB cable into
the downstream A connector located
at the back of your computer or USB
HUB port and plug the upstream,
square, B connector into the USB-IrDA
adapter.
17
En
Page 22
o
g
w
P73959ec_F5U230ec 16-08-2002 15:12 Page 18
Installation of USB-IrDA under WinXP
USB devices listing following installation
H1. To make sure you have installed
the device successfully, please
move the cursor to “My
computer” -> “Control Panel” ->
“Performance and maintenance”
-> “System” -> “System
Properties” -> “ Hardware” ->
“Device Manager” ->”Infrared
devices”. It will show a new
directory “IRXpress USB IrDA
Adapter“.
IRXpress USB Infrared Adapter
H2. And in the same window, you can
select ”Universal Serial Bus
controllers”.
This will show “IRXpress USB
IrDA Adapter”.
IRXpress USB Infrared Adapter
18
Un
If y
the
Pro
It
I1.
I2.
I3.
Page 23
P73959ec_F5U230ec 16-08-2002 15:12 Page 19
ce”
Installation of USB-IrDA under WinXP
En
Uninstallation
If you want to remove the driver for the USB-IrDA, you can move
the cursor to “My computer” -> “Control Panel” -> “Add/Remove
Programs”.
->
an
It will show a dialog box then select “Install/Uninstall”.
I1. Select “IRXpress USB-IrDA” from
the list.
Click “Change/Remove” to
uninstall the driver of the USB-IrDA.
I2. Click “Yes” to continue.
I3. Click “Yes to All” to continue.
19
Page 24

P73959ec_F5U230ec 16-08-2002 15:12 Page 20
Installation of USB-IrDA under WinXP
I4. Click “Yes” to continue.
I5. Click “OK” to complete the
device driver’s removal.
20
1.
2.
Page 25

P73959ec_F5U230ec 16-08-2002 15:12 Page 21
Troubleshooting
1. Cannot find the picture of
“Figure A-5” for installing
under Win98.
Please select “Have Disk”, and
click “OK” to continue.
Then, select “Browse” to select
the file “c:\windows\inf”. Click
“OK” to continue with the
installation.
2. The USB-IrDA does not work
after completing the installation
under Win98.
Please note than “enable infrared
communication” must be selected
after connecting the USB-IrDA
device
En
21
Page 26

P73959ec_F5U230ec 16-08-2002 15:12 Page 22
Troubleshooting
3. The USB-IrDA does not work
when it connects with PDA on
Win2000.
Please move the cursor to
“Control Panel” -> “Wireless
Link” -> “Image Transfer”, then
enable “Explore location after
receiving pictures.”
Click “OK” to finish the setting.
4. The USB-IrDA does not work
when it connects with a
digital camera in Win2000.
Please move the cursor to
“Control Panel” -> “Wireless
Link” -> “Image Transfer”, then
enable “Explore location after
receiving pictures.” and “Use
Wireless Link to transfer images
from a digital camera to your
computer.”
Click “OK” to finish the setting.
22
Page 27

P73959ec_F5U230ec 16-08-2002 15:12 Page 23
501 West Walnut Street • Compton • CA •
Belkin Components
90220-5221 • USA
Tel +1 310 898 1100
Fax +1 310 898 1111
Belkin Components, Ltd.
Express Business Park •
Shipton Way • Rushden •
NN10 6GL • United Kingdom
Tel +44 (0) 1933 35 2000
Fax +44 (0) 1933 31 2000
Belkin Components B.V.
Starparc Building • Boeing Avenue 333 •
1119 PH Schiphol-Rijk •
The Netherlands
Tel +31 (0) 20 654 7300
Fax +31 (0) 20 654 7349
Belkin Components, Ltd.
7 Bowen Cresent •
West Gosford •
NSW 2250 • Australia
Tel +61 (2) 4372 8600
Fax +61 (2) 4325 4277
© 2002 Belkin Components. All Rights Reserved. All Trade Names Are
Registered Trademarks of Respective Manufacturers Listed.
Page 28

o
t
t
t
P73959ec_F5U230ec 16-08-2002 15:12 Page 24
Intr
Ins
Ins
Ins
Pro
Page 29

P73959ec_F5U230ec 16-08-2002 15:12 Page 25
Contenu
Introduction . . . . . . . . . . . . . . . . . . . . . . . . . . . . . . . . . . . . . . . . 27
Installation de l’USB-IrDA sous Win98/ME . . . . . . . . . . . . . . . . . 28
Liste des périphériques USB installés sur l’ordinateur . . . . . . . . 31
Désinstallation . . . . . . . . . . . . . . . . . . . . . . . . . . . . . . . . . . . . . . 34
Installation de l’USB-IrDA sous Win2000 . . . . . . . . . . . . . . . . . . 35
Liste des périphériques USB installés sur l’ordinateur . . . . . . . . 37
Désinstallation . . . . . . . . . . . . . . . . . . . . . . . . . . . . . . . . . . . . . 38
Installation de l’USB-IrDA sous WinXP . . . . . . . . . . . . . . . . . . . . 40
Liste des périphériques USB installés sur l’ordinateur . . . . . . . . 42
Désinstallation . . . . . . . . . . . . . . . . . . . . . . . . . . . . . . . . . . . . . 43
Problèmes . . . . . . . . . . . . . . . . . . . . . . . . . . . . . . . . . . . . . . . . . 45
25
Fr
Page 30

r
B
P
i
r
W
P73959ec_F5U230ec 16-08-2002 15:12 Page 26
Me
US
un
ord
Co
•P
•1
•
d
Page 31

P73959ec_F5U230ec 16-08-2002 15:12 Page 27
Introduction
Merci d’avoir choisi l’adaptateur USB-IrDA. Il s’agit d’un adaptateur
USB-IrDA à infrarouge qui vous permet de réaliser une connexion avec
un PC ou un serveur via le port série universel (USB) de votre
ordinateur.
Configuration requise par le système
• Processeur Pentium PC et port USB.
• 1 port USB de type A libre (Downstream).
• Windows 98, Windows Me, Windows 2000 ou système
d’exploitation Windows XP.
27
Fr
Page 32

n
P73959ec_F5U230ec 16-08-2002 15:12 Page 28
Installation de l’USB-IrDA sous Win98/ME
Installation de l’USB-IrDA sous Win98/ME
Remarque : Veuillez installer l’USB-IrDA conformément à la procédure
indiquée ci-dessous. Ne pas brancher l’USB-IrDA à l’ordinateur avant
que l’installation ne soit entièrement terminée.
Installation des pilotes de l’USB-IrDA
A1. Introduisez la disquette contenant
les pilotes dans le lecteur de
l’ordinateur et exécutez
« IRXpress.exe ». Cliquez
« Next » (« Suivant ») pour
continuer.
(Voir la figure A-1)
A2. Cliquez « Next » pour continuer.
(Voir la figure A-2)
28
A3.
A4.
A5.
I
Page 33

P73959ec_F5U230ec 16-08-2002 15:12 Page 29
Installation de l’USB-IrDA sous Win98/ME
ure
A3. Cliquez « Next » pour continuer.
t
(Voir la figure A-3)
A4. Cliquez « Next » pour continuer.
(Voir la figure A-4)
A5. Si vous utilisez Win98, choisissez
« KC Technology, Inc. », et
sélectionnez « IRXpress USB
IrDA Adapter – Windows 98 ».
Cliquez «OK»pour continuer.
(Voir la figure A-5)
Fr
29
Page 34

n
t
P73959ec_F5U230ec 16-08-2002 15:12 Page 30
Installation de l’USB-IrDA sous Win98/ME
A6. Si vous utilisez WinMe, choisissez
« KC Technology, Inc. », et
sélectionnez « IRXpress USB
IrDA Adapter - Windows Me ».
Cliquez «OK»pour continuer.
(Voir la figure A-6)
A7. Cliquez « Finish » (« Terminer »).
Windows a terminé l’installation
du périphérique.
(Voir la figure A-7)
A8. Sélectionnez « Yes, I want to
restart my computer now »
(« Oui, je désire redémarrer
l’ordinateur maintenant »). Puis
cliquez « Finish » pour redémarrer
le système et parachever
l’installation.
(Voir la figure A-8)
Lorsque vous avez redémarré votre
ordinateur, branchez la terminaison plate du
câble USB au connecteur Downstream A
situé sur la partie arrière de votre ordinateur
ou au port USB HUB, et le connecteur
Upstream B à l’adaptateur USB-irDA.
30
Lis
I
Page 35

P73959ec_F5U230ec 16-08-2002 15:12 Page 31
Installation de l’USB-IrDA sous Win98/ME
Liste des périphériques USB installés sur l’ordinateur
B1. Pour être certain que l’installation
s’est parfaitement déroulée,
positionnez le curseur sur «My
computer » -> « Control Panel »
-> « System Properties » ->
« Device Manager » -> « Infrared
devices » (« Poste de travail » ->
« Panneau de configuration » ->
« Système » -> « Gestionnaire de
périphériques ») -> « Infrared
devices ». La nouvelle adresse vous
est indiquée, à savoir : « IRXpress
USB IrDA Adapter ».
IRXpress USB IrDA Adapter
B2. Dans la même fenêtre, vous
pouvez également
sélectionner « Network
adapters ». « IRXpress USB IrDA
Adapter – Windows 98 » est
affiché.
IRXpress USB IrDA Adapter –
Windows 98
31
Fr
Page 36

n
P73959ec_F5U230ec 16-08-2002 15:12 Page 32
Installation de l’USB-IrDA sous Win98/ME
B3. « IRXpress USB IrDA Adapter –
Windows Me » est affiché dans
Win ME.
IRXpress USB IrDA Adapter –
Windows Me
B4. Dans la même fenêtre, vous
pouvez sélectionner « Ports
[COM & LPT] ». « Virtual
Infrared COM Port » est affiché.
Virtual Infrared COM Port
32
I
Page 37

P73959ec_F5U230ec 16-08-2002 15:12 Page 33
Installation de l’USB-IrDA sous Win98/ME
–
s
é.
B5. Dans la même fenêtre, vous
pouvez aussi sélectionner « Ports
[COM & LPT] ». « Virtual
Infrared LPT Port » est affiché.
Virtual Infrared LPT Port
Fr
33
Page 38

m
iq
e
P73959ec_F5U230ec 16-08-2002 15:12 Page 34
Installation de l’USB-IrDA sous Win98/ME
Désinstallation
Si vous désirez désinstaller le pilote de l’USB-IrDA, positionnez le curseur
sur « My computer » -> « Control Panel » -> « Add/Remove Programs »
(« Poste de travail » -> « Panneau de configuration » -> « Ajout/Suppression
de programmes »). Vous sélectionnez l’option « Install/Uninstall »
(« Installer/Désinstaller ») dans la boîte de dialogue qui est alors ouverte.
C1. Sélectionnez « IRXpress USB-
IrDA » dans la liste. Cliquez
« Add/Remove »
(« Ajout/Suppression ») pour
désinstaller le pilote de l’USBIrDA.
C2. Cliquez «Yes»pour poursuivre la
désinstallation.
C3. Cliquez «OK»pour achever la
désinstallation du périphérique.
34
Re
ind
qu
Ins
D1.
D2.
Page 39

P73959ec_F5U230ec 16-08-2002 15:12 Page 35
Installation de l’USB-IrDA sous Win2000
s»
ion
e la
.
Remarque : Veuillez installer l’USB-IrDA conformément à la procédure
indiquée ci-dessous. Ne pas brancher l’USB-IrDA à l’ordinateur avant
que l’installation ne soit entièrement terminée.
Installation des pilotes de l’USB-IrDA
D1. Introduisez la disquette contenant
les pilotes dans le lecteur de
l’ordinateur et exécuter
« IRXpress.exe ». Cliquez
« Next » pour continuer.
(Voir la figure D-1)
D2. Cliquez « Next » pour continuer.
(Voir la figure D-2)
35
Fr
Page 40

t
P73959ec_F5U230ec 16-08-2002 15:12 Page 36
Installation de l’USB-IrDA sous Win2000
D3. Cliquez « Next » pour continuer.
(Voir la figure D-3)
D4. Sélectionnez « Yes, I want to
restart my computer now », puis
cliquez « Finish » pour
redémarrer le système et achever
l’installation des pilotes.
(Voir la figure D-4)
Lorsque vous avez redémarré votre
ordinateur, branchez la terminaison
plate du câble USB au connecteur
Downstream A situé sur la partie
arrière de votre ordinateur ou au port
USB HUB, et le connecteur Upstream
B à l’adaptateur USB-irDA.
36
Lis
Page 41

P73959ec_F5U230ec 16-08-2002 15:12 Page 37
Installation de l’USB-IrDA sous Win2000
Liste des périphériques USB installés sur l’ordinateur
E1. Pour être certain que l’installation
s’est parfaitement déroulée,
positionnez le curseur sur «My
computer » -> « Control Panel »
-> « System Properties » ->
« Hardware » -> « Device
Manager » -> « Infrared
devices ». Une nouvelle adresse
est affichée, à savoir « IRXpress
USB Infrared Adapter ».
IRXpress USB Infrared Adapter
E2. Dans la même fenêtre, vous
sélectionnez « Universal Serial
Bus controllers ». « IRXpress
USB IrDA Adapter » est affiché.
IRXpress USB IrDA Adapter
37
Fr
Page 42

P73959ec_F5U230ec 16-08-2002 15:12 Page 38
Installation de l’USB-IrDA sous Win2000
Désinstallation
Si vous désirez désinstaller le pilote de l’USB-IrDA, positionnez le
curseur sur « My computer » -> « Control Panel » -> « Add/Remove
Programs ». Vous sélectionnez l’option « Install/Uninstall » dans la
boîte de dialogue qui est alors ouverte.
F1. Sélectionnez « IRXpress USB-
IrDA » dans la liste. Cliquez
« Change/Remove » pour
désinstaller le pilote de l’USBIrDA.
F2. Cliquez «Yes»pour continuer.
F3. Cliquez «Yes»pour continuer.
38
Page 43

v
P73959ec_F5U230ec 16-08-2002 15:12 Page 39
Installation de l’USB-IrDA sous Win2000
F4. Cliquez «Yes»pour continuer.
e
F5. Cliquez «OK»pour achever la
désinstallation du périphérique.
Fr
39
Page 44

s
i
t
w
è
B
P73959ec_F5U230ec 16-08-2002 15:12 Page 40
Installation de l’USB-IrDA sous WinXP
Remarque : Veuillez installer l’USB-IrDA conformément à la procédure
indiquée ci-dessous. Ne pas brancher l’USB-IrDA à l’ordinateur avant
que l’installation ne soit entièrement terminée.
Installation des pilotes de l’USB-IrDA
G1. Introduisez la disquette contenant
les pilotes dans le lecteur de
l’ordinateur et exécuter
« IRXpress.exe ». Cliquez
« Next » pour continuer.
(Voir la figure G-1)
G2. Cliquez « Next » pour continuer.
(Voir la figure G-2)
40
G3.
G4.
Lor
ord
pla
Do
arri
US
B à
Page 45

P73959ec_F5U230ec 16-08-2002 15:12 Page 41
Installation de l’USB-IrDA sous WinXP
ure
t
G3. Cliquez « Next » pour continuer.
(Voir la figure G-3)
G4. Sélectionnez « Yes, I want to
restart my Computer now »,
puis cliquez « Finish » pour
redémarrer le système et achever
l’installation des pilotes.
(Voir la figure G-4)
Lorsque vous avez redémarré votre
ordinateur, branchez la terminaison
plate du câble USB au connecteur
Downstream A situé sur la partie
arrière de votre ordinateur ou au port
USB HUB, et le connecteur Upstream
B à l’adaptateur USB-irDA.
Fr
41
Page 46

o
s
g
t
P73959ec_F5U230ec 16-08-2002 15:12 Page 42
Installation de l’USB-IrDA sous WinXP
Liste des périphériques USB installés sur l’ordinateur
H1. Pour être certain que l’installation
s’est parfaitement déroulée,
positionnez le curseur sur «My
computer » -> « Control Panel »
-> « Performance and
maintenance » -> « System » ->
« System Properties » ->
« Hardware » -> « Device
Manager » -> « Infrared
devices ». Une nouvelle adresse
est affichée, à savoir « IRXpress
USB IrDA Adapter ».
IRXpress USB Infrared Adapter
H2. Dans la même fenêtre, vous
pouvez aussi sélectionner
« Universal Serial Bus
controllers ». « IRXpress USB
IrDA Adapter » est affiché.
IRXpress USB Infrared Adapter
42
Dé
Si v
cur
Pro
boî
I1.
I2.
I3.
Page 47

P73959ec_F5U230ec 16-08-2002 15:12 Page 43
Installation de l’USB-IrDA sous WinXP
ion
->
l»
e
s
r
Désinstallation
Si vous désirez désinstaller le pilote de l’USB-IrDA, positionnez le
curseur sur « My computer » -> « Control Panel » -> « Add/Remove
Programs ». Vous sélectionnez l’option « Install/Uninstall » dans la
boîte de dialogue qui est alors ouverte.
I1. Sélectionnez « IRXpress USB-
IrDA » dans la liste. Cliquez
« Change/Remove » pour
désinstaller le pilote de l’USBIrDA.
I2. Cliquez «Yes»pour continuer.
I3. Cliquez «Yes»pour continuer.
Fr
43
Page 48

P73959ec_F5U230ec 16-08-2002 15:12 Page 44
Installation de l’USB-IrDA sous WinXP
I4. Cliquez «Yes»pour continuer.
I5. Cliquez «OK»pour achever la
désinstallation du périphérique.
44
1.
2.
Page 49

P73959ec_F5U230ec 16-08-2002 15:12 Page 45
Problèmes
r.
la
.
1. Vous ne trouvez pas le masque
correspondant à la figure
« Figure A-5 » pour réaliser
l'installation sous Win98.
Veuillez sélectionner « Have
Disk », et cliquez «OK»pour
continuer.
Puis choisissez « Browse » pour
sélectionner le fichier
« c:\windows\inf ». Cliquez
«OK»pour poursuivre
l'installation.
2. L'USB-IrDA ne fonctionne pas
lorsque l'installation sous Win98
est terminée.
Assurez-vous que l'option
« enable infrared
communication » est activée
lorsque le périphérique USB-IrDA
est branché.
Fr
45
Page 50

P73959ec_F5U230ec 16-08-2002 15:13 Page 46
Problèmes
3. L'USB-IrDA ne fonctionne pas
lorsqu'un PDA est connecté
sous Win2000.
Positionnez le curseur sur
« Control Panel » -> « Wireless
Link » -> « Image Transfer »,
puis activez « Explore location
after receiving pictures. »
Cliquez «OK»lorsque vous avez
activé l’option.
4. L'USB-IrDA ne fonctionne pas
lorsqu'un appareil photo
numérique est raccordé sous
Win2000.
Positionnez le curseur sur
« Control Panel » -> « Wireless
Link » -> « Image Transfer »,
puis activez les options « Explore
location after receiving
pictures. » et « Use Wireless
Link to transfer images from a
digital camera to your
computer. » Cliquez 0 pour
confirmer la définition.
©
46
Page 51

P73959ec_F5U230ec 16-08-2002 15:13 Page 47
501 West Walnut Street • Compton • CA •
Belkin Components
90220-5221 • Etats Unis
Tel +1 310 898 1100
Fax +1 310 898 1111
Belkin Components, Ltd.
Express Business Park •
Shipton Way • Rushden •
NN10 6GL • Royaume-Uni
Tel +44 (0) 1933 35 2000
Fax +44 (0) 1933 31 2000
Belkin Components B.V.
Starparc Building • Boeing Avenue 333 •
1119 PH Schiphol-Rijk •
Pays-Bas
Tel +31 (0) 20 654 7300
Fax +31 (0) 20 654 7349
Belkin Components, Ltd.
7 Bowen Cresent •
West Gosford •
NSW 2250 • Australie
Tel +61 (2) 4372 8600
Fax +61 (2) 4325 4277
© 2002 Belkin Components. Tous droits réservés.Tous les noms de marque
sont des marques déposées des fabricants respectifs énumérés.
Page 52

f
t
t
t
h
P73959ec_F5U230ec 16-08-2002 15:13 Page 48
Ein
Ins
Ins
Ins
Fe
Page 53

P73959ec_F5U230ec 16-08-2002 15:13 Page 49
Contents
Einführung . . . . . . . . . . . . . . . . . . . . . . . . . . . . . . . . . . . . . . . . . 51
Installation des USB/IrDA unter Windows98/ME . . . . . . . . . . . . 52
USB-Geräteliste nach der Installation. . . . . . . . . . . . . . . . . . . . . 55
Deinstallation. . . . . . . . . . . . . . . . . . . . . . . . . . . . . . . . . . . . . . . 58
Installation des USB/IrDA unter Windows 2000 . . . . . . . . . . . . . 59
USB-Geräteliste nach der Installation. . . . . . . . . . . . . . . . . . . . . 61
Deinstallation. . . . . . . . . . . . . . . . . . . . . . . . . . . . . . . . . . . . . . . 62
Installation des USB/IrDA unter Windows XP . . . . . . . . . . . . . . . 65
USB-Geräteliste nach der Installation. . . . . . . . . . . . . . . . . . . . . 66
Deinstallation. . . . . . . . . . . . . . . . . . . . . . . . . . . . . . . . . . . . . . . 67
Fehlerbehebung. . . . . . . . . . . . . . . . . . . . . . . . . . . . . . . . . . . . . 69
De
49
Page 54

v
s
e
W
P73959ec_F5U230ec 16-08-2002 15:13 Page 50
Viel
ein
Ser
Sy
•P
•1
•
Page 55

P73959ec_F5U230ec 16-08-2002 15:13 Page 51
Einführung
Vielen Dank für den Kauf des USB/IrDA-Adapters. Der USB/IrDA ist
ein Infrarot-Adapter, der über die USB-Schnittstelle an einen PC oder
Server angeschlossen wird.
Systemanforderungen
• Pentium PC mit USB-Anschluß
• 1 freie USB-Schnittstelle Typ A (nachgeschaltet)
• Windows 98, Windows ME, Windows 2000 oder Windows XP
De
51
Page 56

n
P73959ec_F5U230ec 16-08-2002 15:13 Page 52
Installation des USB/IrDA unter Windows98/ME
Hinweis: Der USB/IrDA muß in der unten gezeigten Weise installiert
werden. Schließen Sie den USB/IrDA nicht an den Computer an, bevor
die Installation abgeschlossen ist.
Installation der USB/IrDA-Treiber
A1. Legen Sie den Treiber-
Datenträger in das Laufwerk des
Computers ein, und führen Sie
die Datei IRXpress.exe aus.
Klicken Sie auf Weiter, um
fortzufahren.
(siehe Abbildung A-1)
A2. Klicken Sie auf Weiter,
um fortzufahren.
(siehe Abbildung A-2)
52
A3.
A4.
A5.
I
Page 57

P73959ec_F5U230ec 16-08-2002 15:13 Page 53
Installation des USB/IrDA unter Windows98/MEE
t
vor
A3. Klicken Sie auf Weiter,
um fortzufahren.
(siehe Abbildung A-3)
A4. Klicken Sie auf Weiter,
um fortzufahren.
(siehe Abbildung A-4)
A5. Falls Sie Win98 einsetzen, wählen
Sie KC Technology, Inc. und dann
IRXpress USB IrDA Adapter –
Windows 98. Klicken Sie auf OK,
um fortzufahren.
(siehe Abbildung A-5)
53
De
Page 58

n
P73959ec_F5U230ec 16-08-2002 15:13 Page 54
Installation des USB/IrDA unter Windows98/ME
A6. Falls Sie Win ME einsetzen,
wählen Sie KC Technology, Inc.
und dann IRXpress USB IrDA
Adapter - Windows ME. Klicken
Sie auf OK, um fortzufahren.
(siehe Abbildung A-6)
A7. Klicken Sie auf Fertigstellen. Die
Installation des Geräts ist
abgeschlossen.
(siehe Abbildung A-7)
A8. Wählen Sie Yes, I want to restart
my computer now (Neustart
durchführen). Klicken Sie auf
Fertigstellen, um den Computer
neu zu starten und die
Geräteinstallation zu beenden.
(siehe Abbildung A-8)
Stecken Sie den Flachstecker des
USB-Kabels nach dem Neustart des
Computers in den nachgeschalteten
Anschluß (USB-A) an der Rückseite
des Computers oder in die USBSchnittstelle eines USB-Hubs, und den
vorgeschalteten B-Stecker in den
USB/IrDA-Adapter.
54
US
I
Page 59

P73959ec_F5U230ec 16-08-2002 15:13 Page 55
E
Installation des USB/IrDA unter Windows98/ME
USB-Geräteliste nach der Installation
B1. Überprüfen Sie, ob die Installation
erfolgreich verlaufen ist. Wählen
Sie hierzu Arbeitsplatz ->
Systemsteuerung -> System ->
Geräte-Manager ->
Infrarotgeräte. Die Geräteliste
enthält jetzt den Eintrag IRXpress
USB IrDA Adapter.
IRXpress USB/IrDA-Adapter
B2. Im gleichen Fenster finden Sie
den Ordner Netzwerkadapter. Er
enthält den Eintrag IRXpress USB
IrDA Adapter – Windows 98.
IRXpress USB/IrDA-Adapter –
Windows 98
De
55
Page 60

n
P73959ec_F5U230ec 16-08-2002 15:13 Page 56
Installation des USB/IrDA unter Windows98/ME
B3. Unter Windows ME enthält er den
Eintrag IRXpress USB IrDA
Adapter – Windows ME.
IRXpress USB/IrDA-Adapter –
Windows ME
B4. Im gleichen Fenster finden Sie
den Ordner Anschlüsse (COM
und LPT). Er enthält den Eintrag
Virtual Infrared COM Port.
Virtuelle Infrarot-COM-Schnittstelle
56
I
Page 61

P73959ec_F5U230ec 16-08-2002 15:13 Page 57
E
en
g
lle
Installation des USB/IrDA unter Windows98/ME
B5. Im gleichen Fenster finden Sie
den Ordner Anschlüsse (COM
und LPT). Er enthält den Eintrag
Virtual Infrared COM Port.
Virtuelle Infrarot-LPT-Schnittstelle
De
57
Page 62

n
w
r
P73959ec_F5U230ec 16-08-2002 15:13 Page 58
Installation des USB/IrDA unter Windows98/ME
Deinstallation
Wenn Sie den Treiber des USB/IrDA-Adapters entfernen möchten,
wählen Sie Arbeitsplatz -> Systemsteuerung -> Software.
Das Dialogfeld Installieren/Deinstallieren erscheint.
C1. Wählen Sie die Option IRXpress
USB-IrDA aus der Liste. Klicken
Sie auf die Schaltfläche
Hinzufügen/Entfernen, um den
USB/IrDA-Treiber zu
deinstallieren.
C2. Klicken Sie auf Ja, um
fortzufahren.
C3. Klicken Sie auf OK, um die
Deinstallation des Geräts
abzuschließen.
58
Hin
we
die
Ins
D1.
D2.
I
Page 63

P73959ec_F5U230ec 16-08-2002 15:13 Page 59
E
ss
n
Installation des USB/IrDA unter Windows 2000
Hinweis: Der USB/IrDA muß in der unten gezeigten Weise installiert
werden. Schließen Sie den USB/IrDA nicht an den Computer an, bevor
die Installation abgeschlossen ist.
Installation der USB/IrDA-Treiber
D1. Legen Sie den Treiber-
Datenträger in das Laufwerk des
Computers ein, und führen Sie
die Datei IRXpress.exe aus.
Klicken Sie auf Weiter, um
fortzufahren.
(siehe Abbildung D-1)
D2. Klicken Sie auf Weiter, um
fortzufahren.
(siehe Abbildung D-2)
De
59
Page 64

n
P73959ec_F5U230ec 16-08-2002 15:13 Page 60
Installation des USB/IrDA unter Windows 2000
D3. Klicken Sie auf Weiter,
um fortzufahren.
(siehe Abbildung D-3)
D4. Wählen Sie Yes, I want to restart
my computer now (Neustart
durchführen), um das System neu zu
starten und die Treiberinstallation
abzuschließen.
(siehe Abbildung D-4)
Stecken Sie den Flachstecker des
USB-Kabels nach dem Neustart des
Computers in den nachgeschalteten
Anschluß (USB-A) an der Rückseite
des Computers oder in die USBSchnittstelle eines USB-Hubs, und den
vorgeschalteten B-Stecker in den
USB/IrDA-Adapter.
60
US
I
Page 65

P73959ec_F5U230ec 16-08-2002 15:13 Page 61
Installation des USB/IrDA unter Windows 2000
USB-Geräteliste nach der Installation
E1. Überprüfen Sie, ob die Installation
erfolgreich verlaufen ist. Wählen
Sie hierzu Arbeitsplatz ->
Systemsteuerung -> System ->
Hardware -> Geräte-Manager ->
Infrarotgeräte. Die Geräteliste
enthält jetzt den Eintrag IRXpress
USB Infrared Adapter.
IRXpress USB Infrarot- Adapter
E2. Im gleichen Fenster finden Sie
den Ordner USB-Controller. Er
enthält den Eintrag IRXpress USB
IrDA Adapter.
IRXpress USB/IrDA-Adapter
61
De
Page 66

n
P73959ec_F5U230ec 16-08-2002 15:13 Page 62
Installation des USB/IrDA unter Windows 2000
Deinstallation
Wenn Sie den USB/IrDA-Adapter entfernen möchten, wählen Sie
Arbeitsplatz -> Systemsteuerung -> Software. Das Dialogfeld
Installieren/Deinstallieren erscheint.
F1. Wählen Sie die Option IRXpress
USB-IrDA aus der Liste. Klicken
Sie auf die Schaltfläche
Ändern/Entfernen, um den
USB/IrDA-Treiber zu
deinstallieren.
F2. Klicken Sie auf Ja, um
fortzufahren.
F3. Klicken Sie auf Alle löschen, um
fortzufahren.
62
I
Page 67

P73959ec_F5U230ec 16-08-2002 15:13 Page 63
Installation des USB/IrDA unter Windows 2000
F4. Klicken Sie auf Ja, um
fortzufahren.
F5. Klicken Sie auf OK, um die
Deinstallation des Geräts
abzuschließen.
De
63
Page 68

n
c
B
m
n
g
B
P73959ec_F5U230ec 16-08-2002 15:13 Page 64
Installation des USB/IrDA unter Windows XP
Hinweis: Der USB/IrDA-Treiber muß in der unten gezeigten Weise
installiert werden. Schließen Sie den USB/IrDA nicht an den Computer
an, bevor die Installation abgeschlossen ist.
Installation der USB/IrDA-Treiber
G1. Legen Sie den Treiber-
Datenträger in das Laufwerk des
Computers ein, und führen Sie
die Datei IRXpress.exe aus.
Klicken Sie auf Weiter, um
fortzufahren.
(siehe Abbildung G-1)
G2. Klicken Sie auf Weiter, um
fortzufahren.
(siehe Abbildung G-2)
64
G3.
G4.
Ste
US
Co
Ans
des
Sch
vor
US
I
Page 69

P73959ec_F5U230ec 16-08-2002 15:13 Page 65
Installation des USB/IrDA unter Windows XP
ter
G3. Klicken Sie auf Weiter, um
fortzufahren.
(siehe Abbildung G-3)
De
G4. Klicken Sie auf Yes, I want to
restart my computer now
(Neustart durchführen) und dann
auf Fertigstellen, um das System
neu zu starten und die
Treiberinstallation abzuschließen.
(siehe Abbildung G-4)
Stecken Sie den Flachstecker des
USB-Kabels nach dem Neustart des
Computers in den nachgeschalteten
Anschluß (USB-A) an der Rückseite
des Computers oder in die USBSchnittstelle eines USB-Hubs, und den
vorgeschalteten B-Stecker in den
USB/IrDA-Adapter.
65
Page 70

n
n
b
t
P73959ec_F5U230ec 16-08-2002 15:13 Page 66
Installation des USB/IrDA unter Windows XP
USB-Geräteliste nach der Installation
H1. Überprüfen Sie, ob die Installation
erfolgreich verlaufen ist. Wählen
Sie hierzu Arbeitsplatz ->
Systemsteuerung -> Leistung
und Wartung -> System ->
Hardware -> Geräte-Manager ->
Infrarotgeräte. Die Geräteliste
enthält jetzt den Eintrag IRXpress
USB IrDA Adapter.
IRXpress USB/Infrarot-Adapter
H2. Im gleichen Fenster finden Sie
den Ordner Universal Serial Bus-
Controller. Er enthält den Eintrag
IRXpress USB IrDA Adapter.
IRXpress USB/Infrarot-Adapter
66
De
We
Ar
Ins
I1.
I2.
I3.
I
Page 71

n
->
ess
us-
P73959ec_F5U230ec 16-08-2002 15:13 Page 67
Installation des USB/IrDA unter Windows XP
Deinstallation
ion
ag
Wenn Sie den USB/IrDA-Adapter entfernen möchten, wählen Sie
Arbeitsplatz -> Systemsteuerung -> Software. Das Dialogfeld
Installieren/Deinstallieren erscheint.
I1. Wählen Sie die Option IRXpress
USB-IrDA aus der Liste. Klicken
Sie auf die Schaltfläche
Ändern/Entfernen, um den
USB/IrDA-Treiber zu
deinstallieren.
I2. Klicken Sie auf Ja, um
fortzufahren.
I3. Klicken Sie auf Alle löschen, um
fortzufahren.
De
67
Page 72

P73959ec_F5U230ec 16-08-2002 15:13 Page 68
Installation des USB/IrDA unter Windows XP
I4. Klicken Sie auf Ja, um
fortzufahren.
I5. Klicken Sie auf OK, um die
Deinstallation des Geräts
abzuschließen.
68
1.
2.
Page 73

P73959ec_F5U230ec 16-08-2002 15:13 Page 69
Fehlerbehebung
1. Bei der Installation unter
Windows 98 erscheint das
Dialogfeld aus Abbildung A-5
nicht.
Klicken Sie auf Diskette, und
klicken Sie auf OK, um
fortzufahren.
Wählen Sie dann Durchsuchen,
um die Datei c:\windows\inf
auszuwählen. Klicken Sie auf OK,
um die Installation jetzt
fortzusetzen.
2. Nach der vollständigen
Installation unter Windows 98
funktioniert der USB/IrDAAdapter nicht.
Bitte beachten Sie, daß die
Infrarot-Übertragung erst nach
dem Anschließen des USB/IrDAGeräts aktiviert werden kann.
De
69
Page 74

2
P73959ec_F5U230ec 16-08-2002 15:13 Page 70
Fehlerbehebung
3. Der USB/IrDA funktioniert unter
Windows 2000 nicht, wenn er
mit dem PDA verbunden wird.
Wählen Sie Systemsteuerung ->
Drahtlose Verbindung ->
Bildübertragung, und aktivieren
Sie Ordner anzeigen, nachdem
Bilder empfangen wurden.
Klicken Sie auf OK, um die
Einstellung abzuschließen.
4. Der USB/IrDA funktioniert unter
Windows 2000 nicht, wenn er
mit der digitalen Kamera
verbunden wird.
Wählen Sie Systemsteuerung ->
Drahtlose Verbindung ->
Bildübertragung, und aktivieren
Sie Ordner anzeigen, nachdem
Bilder empfangen wurden sowie
Bilder mit “Drahtlose
Verbindung” von einer digitalen
Kamera auf den Computer
übertragen. Klicken Sie auf OK,
um die Einstellung abzuschließen.
©
70
Page 75

P73959ec_F5U230ec 16-08-2002 15:13 Page 71
501 West Walnut Street • Compton • CA •
Belkin Components
90220-5221 • USA
Tel +1 310 898 1100
Fax +1 310 898 1111
Belkin Components, Ltd.
Express Business Park •
Shipton Way • Rushden •
NN10 6GL • Großbritannien
Tel +44 (0) 1933 35 2000
Fax +44 (0) 1933 31 2000
Belkin Components B.V.
Starparc Building • Boeing Avenue 333 •
1119 PH Schiphol-Rijk •
Niederlande
Tel +31 (0) 20 654 7300
Fax +31 (0) 20 654 7349
Belkin Components, Ltd.
7 Bowen Cresent •
West Gosford •
NSW 2250 • Australien
Tel +61 (2) 4372 8600
Fax +61 (2) 4325 4277
© 2002 Belkin Components. Alle Rechte vorbehalten. Alle Produktnamen sind
eingetragene Warenzeichen der angegebenen Hersteller.
Page 76

P73959ec_F5U230ec 16-08-2002 15:13 Page 72
 Loading...