

Page 1
User’s Manual | Guide d’utilisation | Manual del usuario
P73877-F8GFPC001_n50_t_man.qxd 11/13/01 1:15 PM Page 1
Page 2
Glossary
Quick Start 1
Nostromo Array
Programming
Software Introduction 2
Making a Profile 2
Profile Editor 2
Main Screen 3
Make a Profile 3
Remapping Single Key
Assignments 3
Macro Editor 4
Creating a Macro 4
Programming an Axis 4
Other Remapping/
Reprogramming Options 5
Using the Profile 6
The Loadout Manager 6
Load the Profile You Just
Made 7
Troubleshooting 8
Glossaire
Démarrage rapide 10
Introduction au logiciel
de programmation
Nostromo Array 11
Création de profil 11
ProgrammeProfile Editor 11
Écran principal 12
Création de profil 12
Redéfinition des
touches individuelles 12
Éditeur de macros 13
Création d’une macro 13
Programmation d’un axe 13
Autres options de
redéfinition ou de
reprogrammation 14
Utilisation du profil 15
Programme Loadout
Manager 15
Chargement du profil
nouvellement créé 16
Dépannage 17
Contenido
Arranque rápido 19
Introducción al
Nostromo Array
Programming Software 20
Cómo hacer un perfil 20
Editor de perfiles 20
Pantalla principal 21
Cómo hacer un perfil 21
Cómo remapear la
asignación de una
tecla única 21
Editor de macros 22
Cómo crear un macro 22
Cómo programar un eje 22
Otras opciones de
remapeo y/o
reprogramación 23
Cómo usar el perfil 24
El Administrador de
rutinas de carga 24
Cargue el perfil que
acaba de hacer 25
Resolución de
problemas 26
Features Overview
Vue d'ensemble des caractéristiques
Presentación de las características
Welcome and Thanks
Thank you for purchasing the Nostromo n50 SpeedPad. You will find this is the tool
you need to increase your scores and dominate your opponents. In addition to the
Nostromo n50 SpeedPad, Belkin also manufactures additional Nostromo game devices,
as well as a wide array of PC accessories. Check out our website at belkin.com for
additional information.
Bienvenue et remerciements
Merci d’avoir choisi le SpeedPad Nostromo 50. Vous constaterez que c’est l’outil idéal
pour améliorer votre pointage et dominer vos adversaires. Outre le SpeedPad Nostromo
n50, Belkin fabrique d’autres périphériques de jeu Nostromo exceptionnels ainsi qu’une
vaste gamme d’accessoires pour PC. Visitez notre site Web à l’adresse belkin.com pour
de plus amples renseignements.
Bienvenido y gracias
Gracias por adquirir el Nostromo n50 SpeedPad. Encontrará que ésta es la herramienta
que necesita para aumentar su puntaje y dominar a sus oponentes. Además del
Nostromo n50 SpeedPad, Belkin también fabrica otros dispositivos de juego Nostromo, al
igual que una selección amplia de accesorios para computadoras PC. Visite nuestro sitio
Web en belkin.com para mayor información.
The Nostromo n50 SpeedPad is a simple Plug-and-Play controller that sets
up without the Array Programming Software should you prefer not to
install it.
Installation of the Nostromo Array Programming Software is highly
recommended, but not required. The n50 will function right out of the box
as a Human Interface Device (HID). All you need to do is plug in the SpeedPad
and follow the simple on-screen instructions to be ready to play.
For excellent programmability and functionality enhancements, however,
we strongly recommend that you follow the simple procedure to install and
use the Nostromo Array Programming Software. Please see the instructions
in the following section for setup using the enclosed CD.
Your Nostromo Array Programming Software will work with any Windows
®
98, 2000, or Me game. If you are using Windows 2000 or Windows XP, be
sure to plug in your SpeedPad before installing any software from the
enclosed CD.
1. Installing the Software
Installation of the Nostromo Array Programming Software will give you
added flexibility and up to 56 programmable functions. You will be able to
customize any Nostromo game controller for each game you play.
• Insert your Nostromo Array Programming Software into your CD/DVD drive
on your computer. For Windows 2000 and Windows XP installation, BE
SURE TO FIRST INSTALL THE SPEEDPAD, THEN INSTALL THE SOFTWARE.
• The software should start automatically. If it does not, click the “Start”
button and choose “Run”. Click “Browse” and choose your CD drive.
Select “setup.exe” and click “OK”.
• Follow the on-screen instructions to continue with the software installation.
• The first screen welcomes you to the Nostromo installation. Click “Next”.
• The next screen contains the license agreement. Click on the appropriate
spot to accept the agreement. If you do not accept, the installation will stop.
• The next screen asks you about the installation folder. The install setup will
create a directory for you. Also, it is highly recommended that you place
shortcuts for the Profile Editor and Loadout Manager on your desktop.
This will make it easier and quicker to use the software in the future.
Click “Next”.
• In the next window, select “Next” to start the installation.
• After the installation is done, select “Finish” and proceed to your game
controller installation.
2. Connect the Nostromo n50
• Connect your Nostromo n50 to an available USB port on your computer.
• Continue to follow the on-screen instructions to complete the installation.
3. Start the Software
• Start the Nostromo Array Programming Software.
• Double-click on * your desktop, or find the Nostromo Array Programming
Software in the “Start” menu under “Programs”.
• For more detailed information, please see the Nostromo Array
Programming Software section.
4. Select Profile
• The Nostromo Array Programming Software comes with pre-made
profiles. Additional profiles are available for download at
belkin.com/nostromo. To submit your own profiles, e-mail them as an
attachment to nostromoprofiles@belkin.com.
• To select a profile, open the Nostromo Array Programming Software Profile
Editor. Then select the “Open” icon in the taskbar of “Open” in the “File”
menu. This will take you to the Profile Folder where your profiles are normally
stored. Select the profile you would like to use and click “Open”.
• To create a new profile, select “New”. See the “Making a Profile” section
for additional details on creating new profiles.
• For more detailed information, please see the “Nostromo Array
Programming Software” section, following.
5. Assign Profile to Game in Loadout Manager
• Open the Loadout Manager by clicking on the * in the taskbar, your desktop,
or in the “Start” menu under Program Files. Click on the bar (on the left)
that shows your attached controller. Select “Load Profile” and then
select the profile you want to use.
• Then, click “Browse” (on the right) and find the game executable (.exe)
file you would like to use. You can select the game’s link on your desktop.
If you don’t have a link on your desktop, you can select the file by looking
in the directory where you installed the game.
• For additional details on the Loadout Manager, see the “Using the
Profile” section.
• For more detailed information, please see the following “Nostromo Array
Programming Software” section, on page 2.
• You are now installed and ready to go! Congratulations. Be sure to check
the options within your game to make sure you are taking advantage of
all the options available.
1
Quick Start
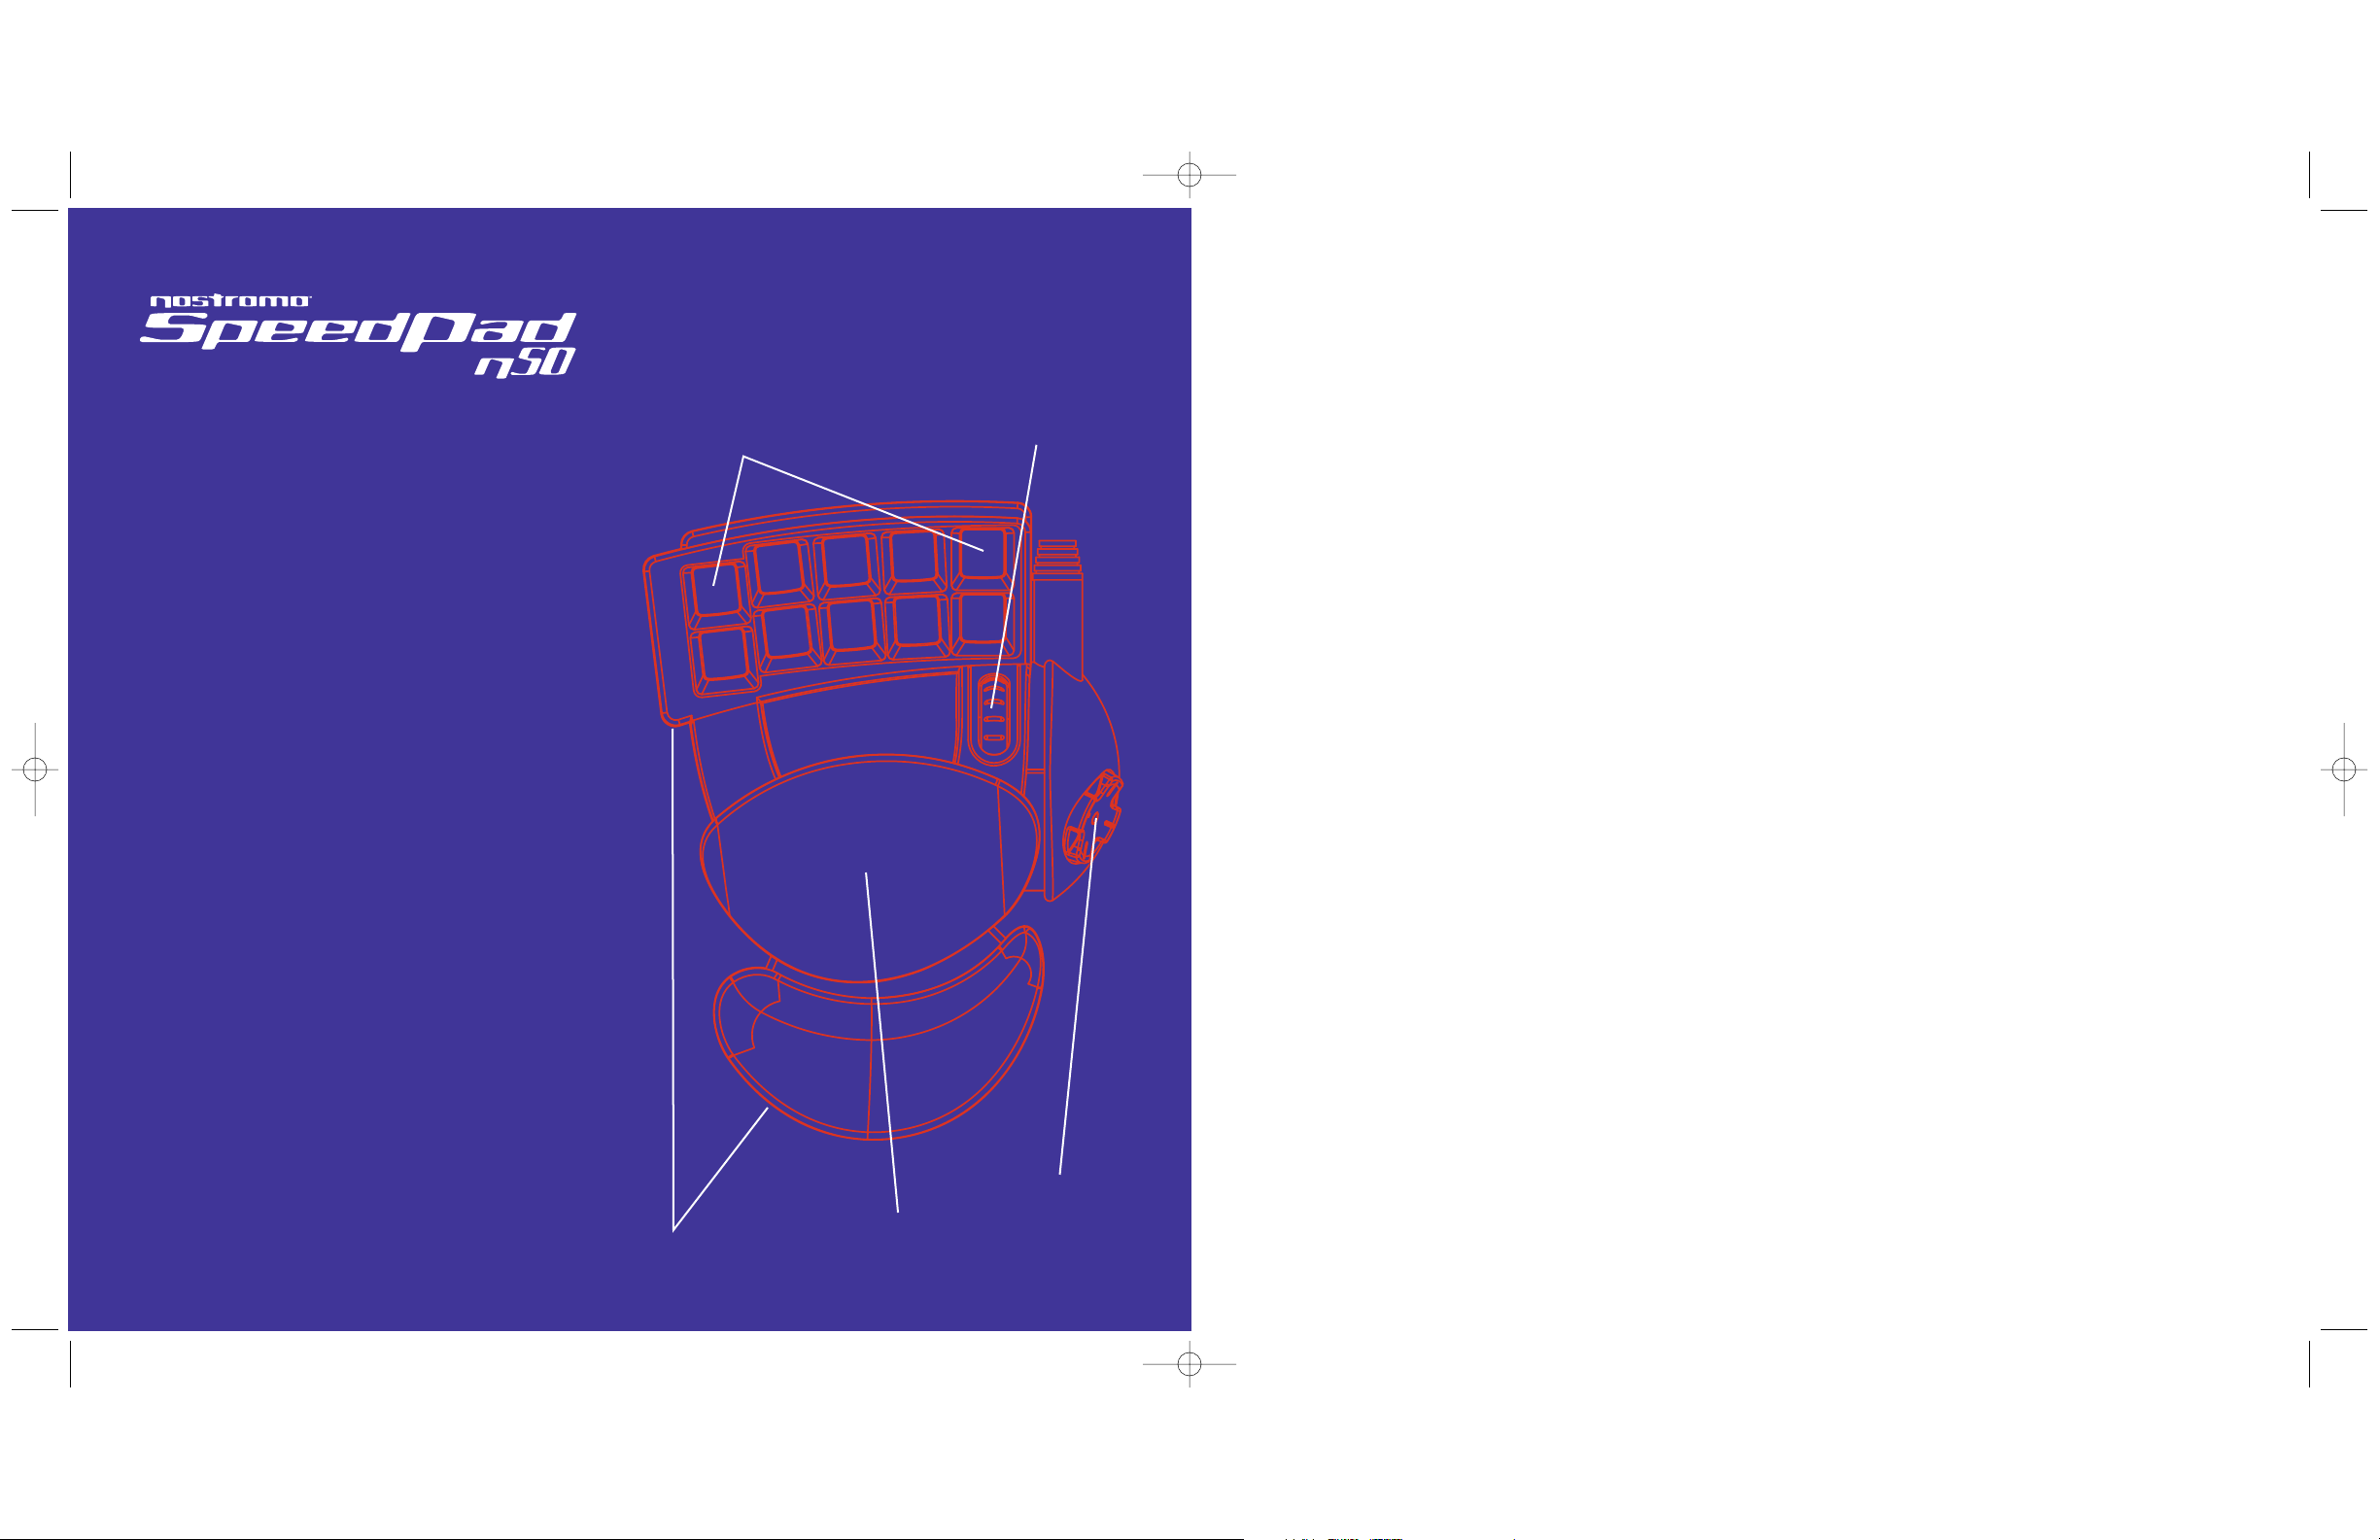
Stable Base
Base stable
Base estable
10 Programmable Action Buttons
10 boutons d’action programmables
10 botones de acción programables
Throttle Wheel
Roulette d’accélération
Descanso de mano ajustable
Adjustable Hand Rest
Appui-main ajustable
Rueda de acelerador
Programmable, 8-Way
Directional Pad
Pavé de commande
directionnel à 8 positions
Control programable de 8
direcciones
P73877-F8GFPC001_n50_t_man.qxd 11/13/01 1:15 PM Page 2
Page 3
Introduction
The Nostromo Array Programming Software is a suite of tools
that enhances your gaming experience when using the Nostromo
n50 SpeedPad.
The Nostromo Array Programming Software increases your play
functionality and customization options. It allows you to remap
your controller however you like, depending on which games you
are playing.
There are two major components to the Nostromo Array
Programming Software:
• The Profile Editor, which is used to create and change profiles.
A profile is a set of remapped button functions that can be saved
and assigned to specific games.
• The Loadout Manager programs the game controllers with a
profile for specific games.
With this software, you can:
CREATE AND SAVE YOUR OWN PROFILES
• Create customized profiles for each device.
• Download/upload profiles via the Internet.
ASSIGN PROFILES TO SPECIFIC GAMES
• Assign profiles to your favorite games for use each time you
start that game.
REMAP OR REPROGRAM BUTTONS 3 WAYS
• Remap SpeedPad buttons to correspond to the keyboard keys.
• Remap buttons to other buttons.
• Remap buttons with macros.
AXIS BANDING
• Divide any axis into bands, or areas, and assign every band a
key or macro.
UTILIZE THREE SHIFT STATES
• Red, green, and blue shift states quadruple the number of
functions that can be programmed into the other buttons.
Making a Profile
PROFILE EDITOR
The Profile Editor is the tool used to create and customize profiles.
A profile is a set of remapped button functions that can be saved
and assigned to specific games.
Some examples of the types of actions you can program are:
• Single Key – Make a button on the controller work like a
keyboard key.
• Macros – Record a sequence of keyboard keystrokes and/or
game controller events to be played back when a button
is pushed.
• Remap Buttons – Remap the buttons on the game controller to
one another to achieve various effects.
• Remap Axes – Move the axis on the game controllers between
joysticks or buttons, however you want to
use them.
• Enhanced Axis Features – Break an axis up into bands and
program different functions in each band.
• Three shift modes – Utilize one of three shift buttons for each
game controller and quadruple the number of functions you
can program.
• Mouse – Program the game controller to function as a mouse so
you can leave your hands on the controller to navigate game
menus and other desktop items.
2
Nostromo Array Programming Software
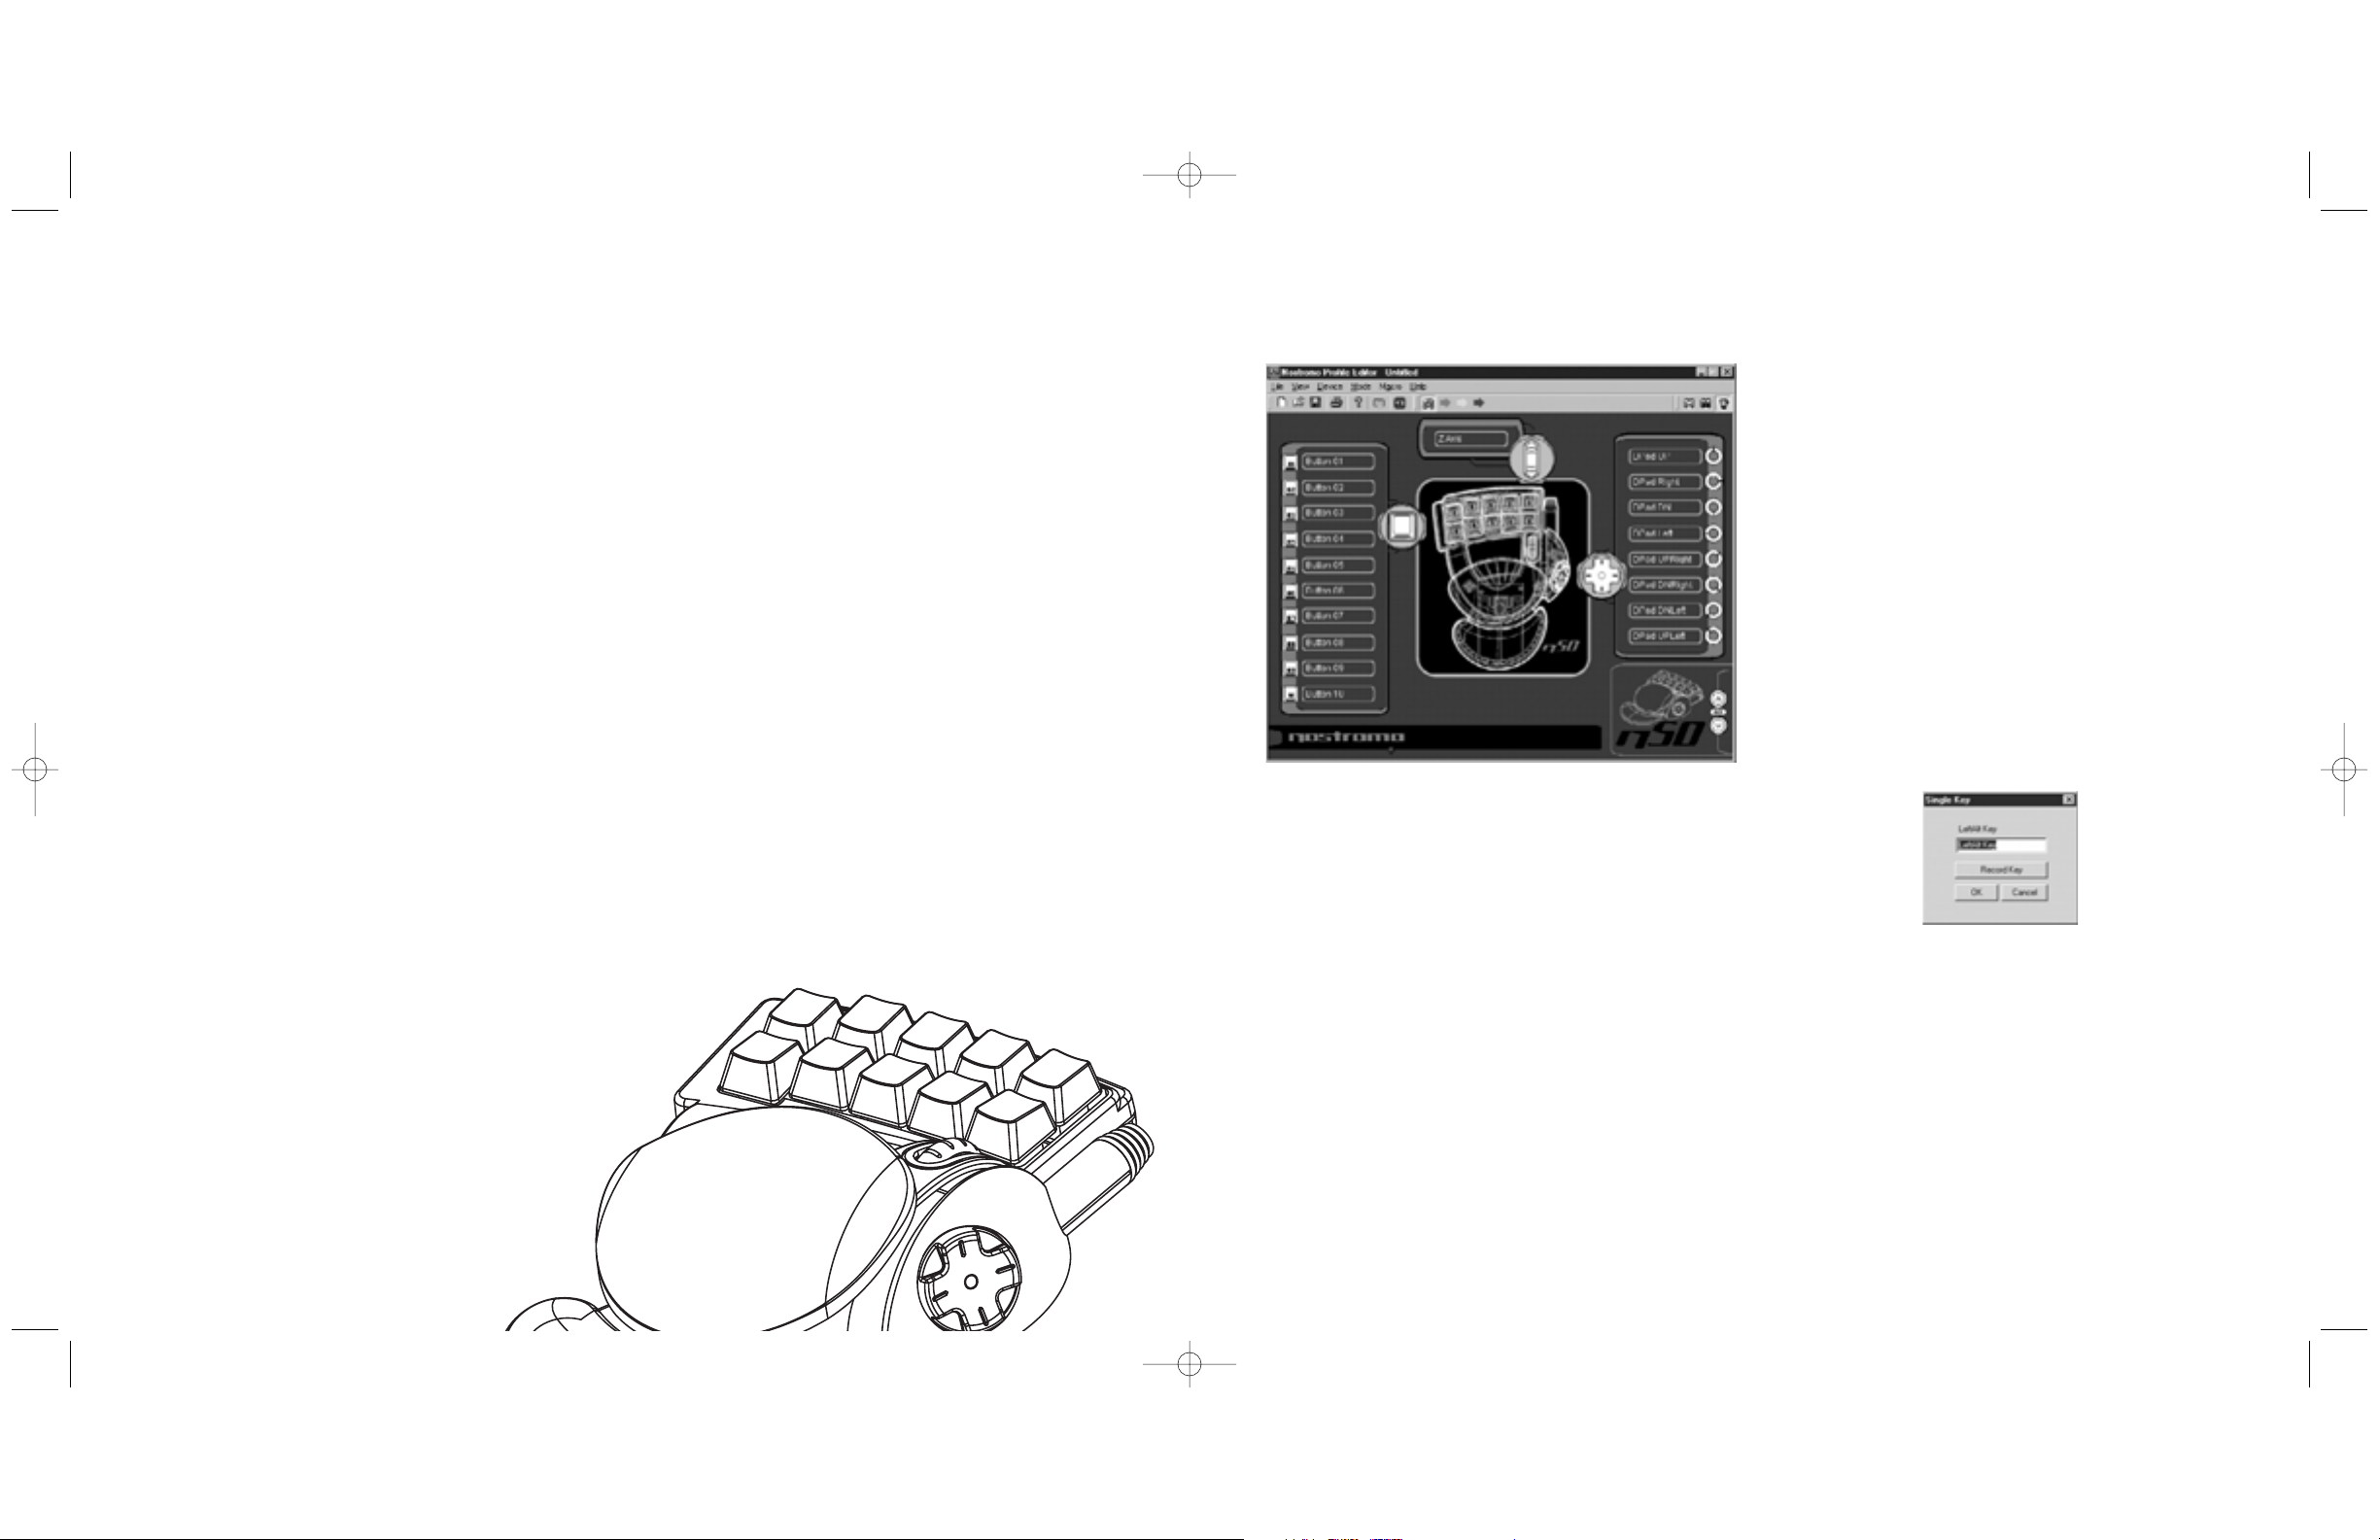
MAIN SCREEN
This figure shows the Profile Editor for the Nostromo n50 SpeedPad.
The main screen consists of:
• Views of the Device – This makes clear which keys
you are programming.
• Menu Bar & Tool Bar
• Mode Bar – This allows you to select between red, green, and
blue modes.
• Controller Selection Corner – This allows owners of multiple
Nostromo devices to easily switch back and forth between
controllers when programming.
• Function Assignment Hardpoints – These are the buttons or
axis identifiers, such as “Button 01”, that you click to open your
programming windows.
MAKE A PROFILE
This section will explain how to create a profile using the Profile
Editor. In general, creating a profile consists of three functions:
remapping single key assignments, creating macros, and
programming axes.
• To begin, click on “Start”, then “Programs”, then “Nostromo”,
then “Profile Editor”. This will display the main screen of the
“Profile Editor”.
• Left-click on the hardpoint labeled “Button 01”.
• Select “Single Key” from the pop-up menu. This will bring up
the “Single Key Assignment” screen.
REMAPPING SINGLE KEY ASSIGNMENTS
This screen is used to select a single key to assign to one of the
buttons on a Nostromo game controller.
When a single key is assigned to a button, pushing the button is the
same as pressing that key on the keyboard.
If this is the first time you have assigned a single key to one of the
hardpoints, the screen will look like this:
At this point, press a key on the keyboard or the space bar. The
screen will display the name of the key you pressed.
Notice that in addition to displaying the key you pressed, the edit
window in the middle displays and highlights the same key name.
You can elect to keep the default name, or type your own, such as
“Fire Guns”.
Now you can click “OK” if you are happy with the current setup, or
you can click “Cancel” to abort the key assignment. You can also
click “Record Key” to record a different key on the keyboard.
NOTE: if you record a new key, any name you type in the edit box
will be erased.
3
P73877-F8GFPC001_n50_t_man.qxd 11/13/01 1:15 PM Page 4
Page 4
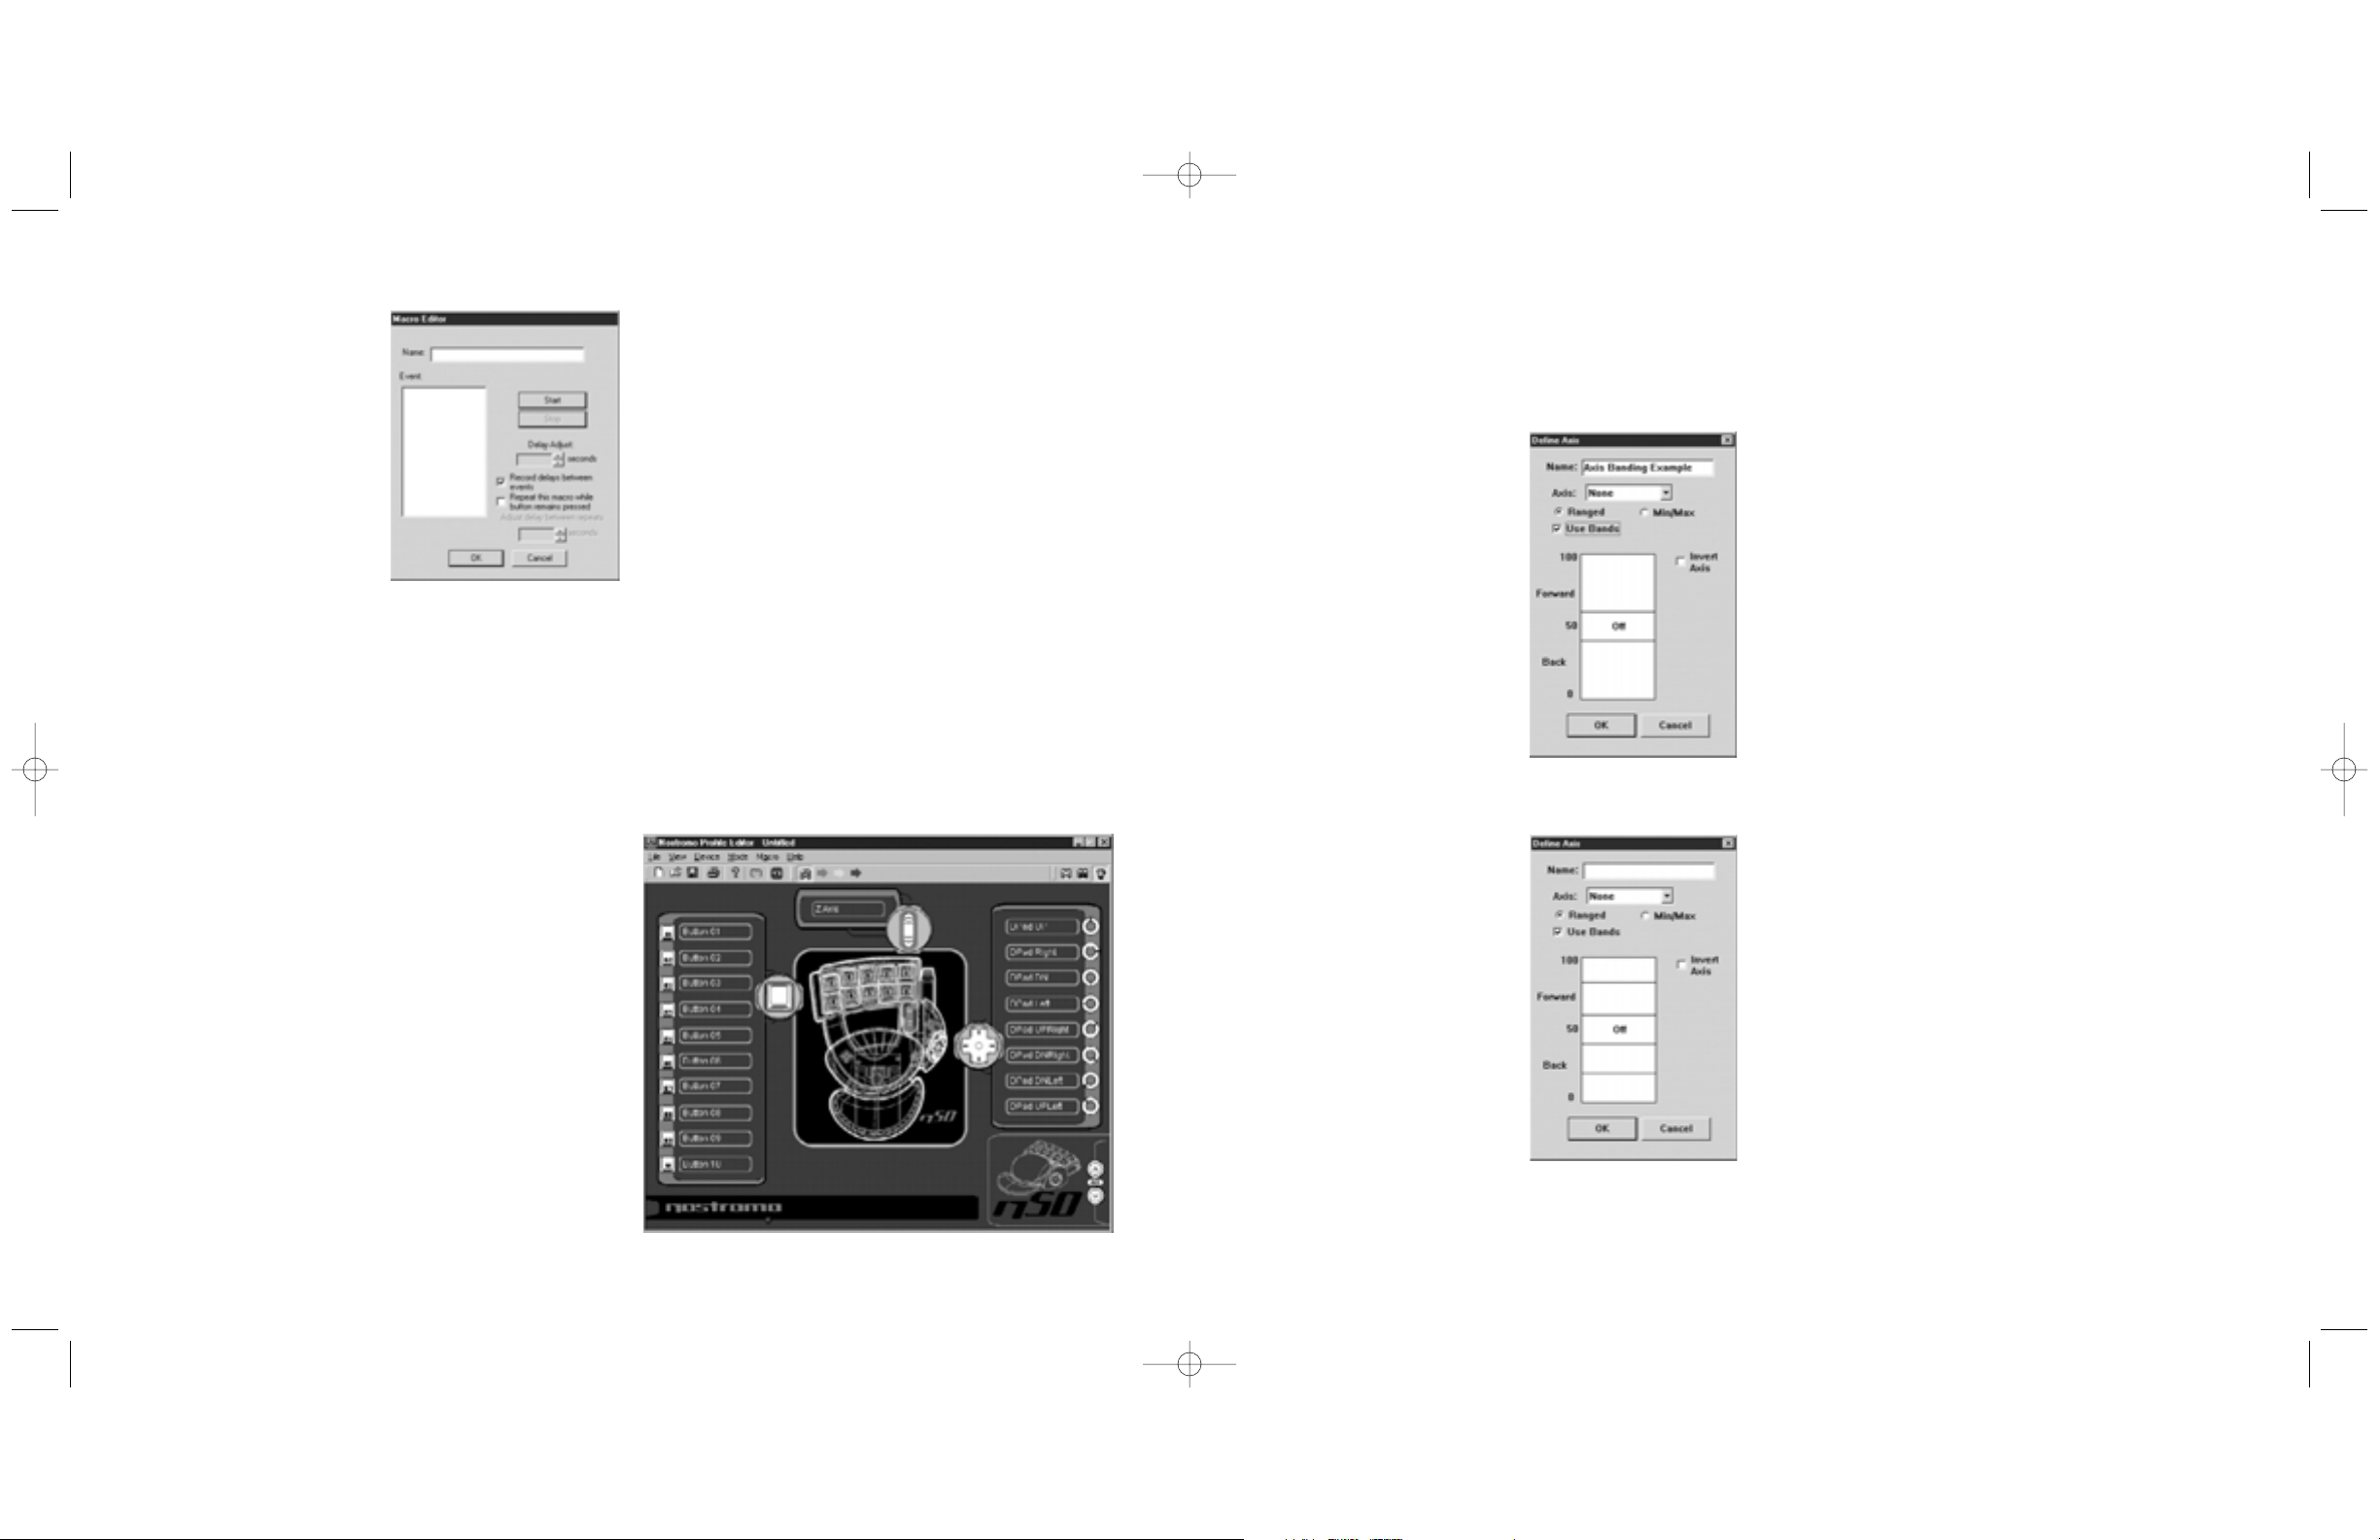
MACRO EDITOR
To make a macro for a specific
button, select another hardpoint
and select “New Macro”. A
macro is a combination of
buttons that enacts a special
function. Additionally, in many
games you can make a macro
to send messages (“cover me”
or “attack”, for example) with
one button press.
This screen is used to create
macros. You can also use it to
adjust properties of macros
after they are recorded.
• Event Field – As you record a macro, the keystrokes, game
controller events, and the delays between the events are listed
in the “Event” panel on the left.
• Start – Starts the recording of a new macro.
• Stop – As you probably guessed, this stops macro recording.
• Delay Adjust – This control allows you to adjust the duration
of a delay in the event list. Simply click on the delay in the
event list and then use the up and down arrows to change it.
• Record Delays Between Events – This switch turns recording
of delays on or off. A macro without recorded delays replays
the events at the maximum possible rate, which is about 10
milliseconds between events.
• Repeat This Macro While Button Remains Pressed – This
switch sets the macro to repeat as long as the button it is
assigned to is pressed.
• Repeat Delay Adjust – This control allows you to adjust the
repeat rate.
CREATING A MACRO
• Type a new name for the macro in the “Name” field at the top.
• Left-click on the “Start” button to start recording keyboard events.
• Using the keyboard, type in the key-press combination of the
macro you want to create. This will normally be a combination
of moves to create a new move, or a phrase, such as “cover
me”, that you would use during a game.
Notice the keys you press and release are recorded in the
“Event” field on the left side of the macro editor.
• Left-click on the “Stop” button to stop recording the macro.
• Click on the “OK” button. That saves your macro to the
assigned button.
Note the “Delay Adjust” function allows you to adjust the time
between each button press.
You can also choose to repeat the macro while the button remains
depressed. You can check the box that says “Repeat this macro
while button remains depressed” and the macro will function
repeatedly as long as the button is pressed.
You can even adjust the time delay between the finish and start of
the macros while they are repeating with the “Adjust Delay
Between Repeats” function at the bottom of the window.
PROGRAMMING AN AXIS
Assigning Functions to Axes
To reassign axes or to assign functions them, simply left-click
on the axis hardpoint you wish to change, as in the following
diagram:
You will see the “Axis” window open and list all the axes available
to reassign. To reassign an axis, simply select the axis you want to
assign to the current axis.
Axis Banding
Axis banding refers to dividing an
axis into sections, then assigning
functions to the individual sections.
With axis banding, you can
transform “X Axis Left” into any
keyboard function or macro that
you create.
To use axis banding, left-click on
the axis hardpoint you wish to
program. Then select “Define Axis”.
You will see the following “Define
Axis” window:
• Give a name to the new
functions this axis will have.
• Then select the “Use Bands” box.
To divide the axis, double-click on
the approximate range on the right
or left side of the axis. You will see
a line appear, as in the diagram to
the right:
Each band that you create will be
a new area to which you can
assign functions.
To assign functions to bands,
left-click on the band you want to
program. You will see a window
that offers the following choices:
“Single Key”, “New Macro”,
“Delete Region”, and “Off”.
Programming “Single Key” and
“New Macros” the same as
programming functions in the
Profile Editor.
Select “Delete Region” to eliminate the band. Select “Off” to close
the band to any functionality.
Adjusting the Dead Zone on an Axis
In the “Define Axis” window, there is a center band labeled “Off”.
This is normally referred to as the “dead zone”. The dead zone is
easily adjustable using your mouse to drag the boundaries of the
band labeled “Off” either inward or outward.
OTHER REMAPPING/REPROGRAMMING OPTIONS
Assigning a Direct Input Button to a Button
To assign a “Direct Input” button to a button on a Nostromo game
device, simply left-click on the button number you would like and
select “DI Button”. This will open the “Direct Input” window.
From the pull-down menu, select the “Direct Input” button which
you would like to program to the selected button on the controller.
You can then rename the button with the function of your choice in
the “Name” window. Select “OK” to remap the button.
Assigning a Direct Input Axis to a Button
To assign a “Direct Input” axis to a button on a Nostromo game
device, simply left-click on the button number you would like and
select “DI Axis Up” or “DI Axis Down”. This will open the “Direct
Input” window. From the pull-down menu, select the “Direct Input”
axis that you would like to program to the selected button on the
controller. You can then rename the axis with the function of your
choice in the “Name” window. Select “OK” to remap the button.
Assigning a Mouse Button to a Nostromo Game Controller
To assign a mouse button to a button on a Nostromo game device,
simply left-click on the button number you would like and select
“Mouse Button”. This will open the “Mouse Button” window. To
reassign the left, center, or right button, simply select the circle of
the mouse button you want to assign to your selected controller
button. Select “OK” to remap the button.
Shift States
The Nostromo Array Programming Software allows you to program
three shift states: red, green, and blue. A shift state allows you to
add another layer of programming to each button.
• To program shift states, you must choose one button each to
correspond to the red, green, or blue shift state. In any shift
state, that button will remain a shift button and cannot be
remapped with a function.
• To program a key as a shift button, left-click on the button you
would like to program and select “Red”, “Green”, or “Blue Shift
Key”. Then select “Momentary” or “Toggle”.
4 5
P73877-F8GFPC001_n50_t_man.qxd 11/13/01 1:15 PM Page 6
Page 5

• If you select “Momentary”, the shift function will only be in
effect while you hold the button down. If you select “Toggle”,
pressing the shift button will start the programmed shift state
and the controller will remain in that shift state until the shift
button is pressed again.
• Once the button is assigned as a shift key, you must go to
the corresponding shift window to assign the functions in
that shift state.
• You can view different shift state windows by clicking on the red,
green, or blue arrows in the toolbar at the top. You can return to
the original window by clicking on the “SpeedPad” icon.
• Once you are in the different shift state windows, you can remap
keys, create macros, and reprogram axes just as you did in the
original shift state.
• Save your work.
• Through use of these shift states, you can quadruple the
programmability of each Nostromo game device. This will also
allow you quick access to many functions during games while
giving you the flexibility of assigning shift keys to any position
on your Nostromo controller.
“Signing” and Sharing Your Profile
In the “Profile Editor” toolbar, the
icon between the question mark
and the “Loadout Manager” icon
is the “Profile Properties” window.
Click on that to get a window
similar to this:
By filling in this window, you
get something similar to a name
tag for your profile. You can
have the profile identified as
yours, including your comments,
e-mail address, etc. for the
Nostromo community.
Once your profile is saved and
identified, you can submit it to the
Belkin Nostromo team by e-mailing the profile in an e-mail attachment
to nostromoprofiles@belkin.com for inclusion on the Belkin
website. This way, you can have your unique profile and/or loadout
file made available to other users of Nostromo game devices
throughout the world.
When you are finished creating or editing your profiles, left-click
on the “File” menu on the toolbar and select “Save”.
Your profile is saved in C:\Program Files\Belkin\Nostromo\Profiles.
If you installed to a directory other than C:\ProgramFiles\Belkin\Nostromo,
then the profile is saved in YourInstallDirectory\Profiles.
Uploading and Downloading Profiles
Please submit any profiles you create for addition to the profile
list at belkin.com. To submit a profile, please send it as an e-mail
attachment to nostromoprofiles@belkin.com.
To download profiles, go to belkin.com/nostromo and
click on “Downloads”.
USING THE PROFILE THE LOADOUT MANAGER
The Loadout Manager is responsible for “programming” the game
controllers with profiles. The Loadout Manager can be used in two
modes: manual and automatic.
A loadout is a set of a profiles that are assigned to the Nostromo
game controllers on your system (one profile for each controller),
and an associated game (or really any application). Loading that
game causes the Loadout Manager to automatically load the profiles
you’ve set up. This conveniently enables you to create profiles that
will be associated with each game you play. The system will
automatically load those profiles for you as you start up each game.
Loadouts are built with the Loadout Manager. You assign a profile for
each controller, and select a game to associate with the set of profiles.
Manual Mode – Manual Mode is the simplest way to use the Loadout
Manager. In this mode, you directly select profiles for controllers.
You simply open the activator window and select a profile for each
controller it shows.
Automatic Mode – In Automatic Mode, you set up a loadout for
each game. The Loadout Manager then waits for that game to start.
When it does, the Loadout Manager loads all the profiles associated
with that loadout.
Automatic Mode has a complex initial setup, but once that is done,
you never need to think about it again. Simply launch the game you
want to play and the Loadout Manager makes sure the controllers
are configured the way you want them to be.
LOAD THE PROFILE YOU JUST MADE
After making a profile, you will need to activate it with a game in
the Loadout Manager. To do this, you simply select the controller,
the profile, and the game executable file. Then you can easily
launch the game from within the Loadout Manager.
Open the Loadout Manager.
If the Loadout Manager is currently running, there will be an icon in the
system tray on the right side of the taskbar at the bottom of the desktop:
If the Loadout Manager is not running, you can start it from the
“Start” menu: Start->Programs->Nostromo->Loadout Manager.
• Find the controller you want to load the profile for in the list
shown. If you have more than one of a type of controller, and it’s
not obvious which entry on the screen represents which controller,
simply press a couple of buttons on the controller and the image
representing that particular one will light up.
• Click on the profile button for that controller. Select “Load Profile…”
from the menu. This will bring up the typical file selection window.
• Find the profile you want, select it, and click “OK”.
• On the right half of the Loadout Manager, click “Browse” to
select the executable (.exe) file of the game you want to play.
You can do this by selecting the shortcut for the game on your
desktop if you have one there. If you do not, you can find the file
in the directory where you installed your game.
6 7
P73877-F8GFPC001_n50_t_man.qxd 11/13/01 1:15 PM Page 8
Page 6

TROUBLESHOOTING
When I start the game with the Loadout Manager, there is no
response or control from my n50 SpeedPad.
• Check the status in the “Game Controller” icon in the Control
Panel (click “Start”, “Control Panel”, “Game Controllers”). Make
sure the controller is listed in the “Game Controller” panel and
the status is listed as “OK”.
• In your game, make sure the keyboard is selected as the
default controller.
• Make sure your controller cable is connected properly.
• In the Windows “Control Panel/Game Controllers” window,
make sure the window shows the name of your Nostromo
controller and “OK”. If you don’t see this line, or if it says “not
connected”, unplug the controller and uninstall the software
and drivers. Then reboot, reinstall the software, and plug in
the controller. If you are using Windows 2000, be sure to plug in
the controller first.
• Make sure your button assignment is what you think it is.
After using the Loadout Manager, Windows is acting erratically, as
if a keyboard button was constantly pressed.
• If you are using the n50 SpeedPad, center the throttle wheel.
The throttle wheel is not auto-centering, so if there is a function
assigned to the forward position of the throttle in automatic
mode, the computer will recognize that function as being
constantly pressed.
° To eliminate this situation, keep the throttle wheel centered
when not playing, or assign that function to another button.
° Another way to alleviate the situation is to assign the
function to the throttle position, not as a button press but
as a macro, because a macro will register the pressing
and releasing of that function.
The button functions are not what they should be in the profile
I am using:
• Check to see if the original keyboard assignments within the
game options have been changed. If the original keyboard key
assignments in the game have changed, it will affect your profile
because your profile functions are based on keyboard functions.
In Windows 2000, the Nostromo drivers did not load and the
controller is only being recognized as an HID device.
• In Windows 2000, the controllers MUST BE PLUGGED IN BEFORE
AND WHILE INSTALLING THE SOFTWARE ON THE CD.
• Unplug the controller.
• Uninstall any Nostromo software, including device drivers.
• Restart the computer.
• Plug in the Nostromo game device you want to use. Allow the
device to install without the Nostromo Software Interface CD.
• While the controller is still plugged in, install the software
interface and drivers on the CD.
The game freezes.
• Restart your computer
The SpeedPad is not in the Windows Control Panel.
• Unplug your SpeedPad, and uninstall the software and drivers. Then
reboot, reinstall the software, and plug in the unit. If you are using
Windows 2000, be sure to plug in the SpeedPad before rebooting.
When I install the software in Windows XP, Microsoft recommends
ending the installation because the drivers have not been “signed”.
What should I do?
• You must select “Continue Anyway” to finish the installation.
Your controllers will function normally without being signed.
When I install the software on Windows XP, I am asked to install
several devices that I don’t have. Is this an error?
• This is not an error. These virtual devices are part of the
internal code of the Nostromo Array Programming Software
and are normally installed in the background. If you are asked
to install several virtual devices, it simply means that the
“digital signature” has not been detected by Windows XP.
Your controllers will function normally without being signed.
• To continue installation of the Nostromo Array Programming
Software, please follow the on-screen instructions in the “New
Hardware Installation” wizards and install all the virtual devices.
If you are still having problems, contact Belkin Tech Support at the
numbers below. First make sure that the problem you are having is
related to the Nostromo game controllers and the Nostromo Array
Programming Software, and is not an issue with the game you are
playing. If you are having problems with the game, please contact
the game publisher directly.
FCC Statement
DECLARATION OF CONFORMITY WITH FCC RULES FOR
ELECTROMAGNETIC COMPATIBILITY
We, Belkin Components, of 501 West Walnut Street, Compton CA 90220, declare
under our sole responsibility that the product,
F8GFPC001
to which this declaration relates,
complies with Part 15 of the FCC Rules. Operation is subject to the following two
conditions: (1) this device may not cause harmful interference, and (2) this device
must accept any interference received, including interference that may cause
undesired operation.
CE Declaration of Conformity
We, Belkin Components, declare under our sole responsibility that the
F8GFPC001, to which this declaration relates, is in conformity with Generic
Emissions Standard EN55022 1998 and with Generic Immunity Standard
EN55024 1998.
Belkin Components Limited Lifetime Warranty
Belkin Components warrants this product against defects in materials and
workmanship for its lifetime. If a defect is discovered, Belkin will, at its option,
repair or replace the product at no charge provided it is returned during the
warranty period, with transportation charges prepaid, to the authorized Belkin
dealer from whom you purchased the product. Proof of purchase may be required.
This warranty does not apply if the product has been damaged by accident,
abuse, misuse, or misapplication; if the product has been modified without the
written permission of Belkin; or if any Belkin serial number has been removed
or defaced.
THE WARRANTY AND REMEDIES SET FORTH ABOVE ARE EXCLUSIVE IN LIEU OF
ALL OTHERS, WHETHER ORAL OR WRITTEN, EXPRESSED OR IMPLIED. BELKIN
SPECIFICALLY DISCLAIMS ANY AND ALL IMPLIED WARRANTIES, INCLUDING,
WITHOUT LIMITATION, WARRANTIES OF MERCHANTABILITY AND FITNESS FOR A
PARTICULAR PURPOSE.
No Belkin dealer, agent, or employee is authorized to make any modification,
extension, or addition to this warranty.
BELKIN IS NOT RESPONSIBLE FOR SPECIAL, INCIDENTAL, OR
CONSEQUENTIAL DAMAGES RESULTING FROM ANY BREACH OF WARRANTY,
OR UNDER ANY OTHER LEGAL THEORY, INCLUDING BUT NOT LIMITED TO,
LOST PROFITS, DOWNTIME, GOODWILL, DAMAGE TO OR REPROGRAMMING,
OR REPRODUCING ANY PROGRAM OR DATA STORED IN OR USED WITH
BELKIN PRODUCTS.
Some states do not allow the exclusion or limitation of incidental or consequential
damages or exclusions of implied warranties, so the above limitations of
exclusions may not apply to you. This warranty gives you specific legal rights, and
you may also have other rights that vary from state to state.
8 9
Tech Support
US Tech Support
belkin.com/support/tech/
Phone: 800.223.5546, extension 2263
310.898.1100, extension 2263
Fax: 310.604.2089
E-mail: techsupp@belkin.com
Europe Tech Support
00 800 223 55 460
eurosupport@belkin.com
Australia Tech Support
Toll-Free 1800 666 040
New Zealand Tech Support
Toll-Free 0800 441 913
P73877-F8GFPC001_n50_t_man.qxd 11/13/01 1:15 PM Page 10
Page 7

10
Le SpeedPad Nostromo n50 est un contrôleur de jeu de type « branchez
et utilisez » que vous pouvez installer sans le logiciel de programmation
Nostromo Array, si c’est ce que vous désirez.
Cependant, même si le Nostromo Array n’est pas obligatoire, son
installation est fortement recommandée. Dès que vous sortez le
SpeedPad n50 de sa boîte, il peut servir d’interface utilisateur. Tout ce
qu’il vous reste à faire, c’est de le brancher et de suivre les instructions à
l’écran— et vous êtes prêt à vous mettre au jeu !
Pour pouvoir profiter des nouvelles fonctions et options de
d’installer et d’utiliser le logiciel de programmation Nostromo Array. Voir
les instructions de configuration à partir du CD à la section suivante.
Votre logiciel Nostromo Array fonctionnera avec n’importe quel jeu
compatible Windows® 98, 2000 ou Me. Si vous utilisez Windows 2000 ou
Windows XP, assurez-vous de brancher le SpeedPad avant d’installer
tout logiciel fourni sur le CD.
1. Installation du logiciel
L’installation du logiciel Nostromo Array vous donnera une plus grande souplesse
de jeu et jusqu’à 56 fonctions programmables. Vous pourrez personnaliser
n’importe quel contrôleur Nostromo pour chacun des jeux que vous utilisez.
• Insérez le CD contenant le logiciel de programmation Nostromo Array dans
votre lecteur de CD ou de DVD. Si vous utilisez Windows 2000 ou Windows XP,
ASSUREZ-VOUS D’INSTALLER D’ABORD LE SPEEDPAD ET ENSUITE, LE
LOGICIEL.
• Le logiciel devrait démarrer automatiquement. S’il ne le fait pas, cliquez sur le
bouton « Start » (Démarrer) et sélectionnez « Run » (Exécuter). Ensuite, cliquez
sur « Browse » (Parcourir) et sélectionnez votre lecteur de CD. Sélectionnez
« setup.exe » et cliquez sur OK.
• Suivez les instructions à l’écran pour continuer l’installation du logiciel.
• Le premier écran vous souhaite la bienvenue au programme d’installation
Nostromo. Cliquez sur « Next » (Suivant).
L’écran suivant contient le contrat de licence. Cochez la case appropriée pour
accepter les conditions. Si vous refusez, l’installation prendra fin.
• L’écran suivant concerne le dossier d’installation. Le programme créera un
répertoire d’installation pour vous. De plus, il est fortement recommandé de
placer les raccourcis des programmes Profile Editor et Loadout Manager sur
votre bureau car ils faciliteront l’utilisation du logiciel par la suite. Cliquez sur
« Next » (Suivant).
• Dans la fenêtre suivante, cliquez sur « Next » (Suivant) pour commencer
l’installation.
• Une fois l’installation terminée, sélectionnez « Finish » (Terminer) et passez à
l’installation de votre contrôleur de jeu.
2. Branchement du Nostromo n50
• Branchez votre Nostromo n50 dans un port USB libre sur votre ordinateur.
• Suivez les instructions à l’écran pour terminer l’installation.
3. Démarrage du logiciel
• Démarrez le logiciel de programmation Nostromo Array.
• Double-cliquez sur * sur votre bureau ou cherchez le logiciel Nostromo Array
en cliquant sur « Start » (Démarrer) et « Programs » (Programmes).
• Pour de plus amples renseignements, reportez-vous à la section « Logiciel de
programmation Nostromo Array ».
4. Sélection de profil
• Le logiciel Nostromo Array est fourni avec plusieurs profils préétablis. Vous
pouvez en télécharger d’autres à partir du site Web belkin.com/nostromo. Pour
soumettre vos propres profils, envoyez-les par courrier électronique sous
forme de pièce jointe à l’adresse nostromoprofiles@belkin.com.
• Pour sélectionner un profil, ouvrez le programme Profile Editor fourni avec
Nostromo Array. Ensuite, sélectionnez l’icône « Open » (Ouvrir) dans la barre de
tâches du menu « File » (Fichier). Vous arriverez alors au dossier où sont
habituellement stockés vos profils. Sélectionnez celui que vous voulez utiliser
et cliquez sur « Open » (Ouvrir).
• Pour créer un nouveau profil, sélectionnez « New » (Nouveau). Voir la section
« Création de profil » pour de plus amples renseignements sur la création de
nouveaux profils.
• Pour de plus amples renseignements, reportez-vous à la section « Logiciel de
programmation Nostromo Array » qui suit.
5. Attribution de profil à un jeu dans le Loadout Manager
• Ouvrez le Loadout Manager en cliquant sur * dans la barre de tâches sur votre
bureau ou encore, cliquez sur « Start » (Démarrer) sous « Program Files »
(Fichiers programmes). Cliquez sur la barre (à gauche) sur laquelle apparaît
votre contrôleur de jeu. Cliquez sur « Load Profile » (Charger profil) et
sélectionnez le profil que vous désirez utiliser.
• Ensuite, cliquez sur « Browse » (Parcourir) (à droite) et repérez le fichier de jeu
exécutable (.exe) que vous aimeriez utiliser. Vous pouvez sélectionner le lien
associé au jeu sur votre bureau. Si vous n’avez pas de lien sur votre bureau,
vous pouvez sélectionner le fichier en cherchant dans le répertoire où vous
avez installé le jeu.
• Pour de plus amples renseignements concernant le Loadout Manager, voir la
section « Utilisation de profil ».
• Pour de plus amples renseignements, reportez-vous à la section « Logiciel de
programmation Nostromo Array », page 2.
• Vous êtes maintenant prêt à passer à l’action. Félicitations ! N’oubliez pas de
vérifier les options comprises dans votre jeu pour être certain de profiter de
tout es celles qui vous sont offertes.
Démarrage rapide
11
Introduction
Le logiciel de programmation Nostromo Array est un ensemble d’outils qui
enrichissent votre expérience de jeu lorsque vous utilisez le SpeedPad
Nostromo n50.
Il vous permet d’augmenter vos fonctions de jeu et d’améliorer les
possibilités de personnalisation. Il vous permet également de reconfigurer
votre contrôleur à votre guise, selon les jeux que vous utilisez.
Le Nostromo Array comprend deux composants principaux :
• Le Profile Editor, qui sert à créer et à modifier des profils. Un profil est
un ensemble de fonctions associées à des boutons qu vous pouvez
sauvegarder et attribuer à des jeux spécifiques.
• Le Loadout Manager, qui sert à programmer des profils de jeu précis
sur les contrôleurs.
Avec ce logiciel, vous pouvez :
CRÉER ET SAUVEGARDER VOS PROPRES PROFILS
• Créez des profils personnalisés pour chaque périphérique.
• Téléchargez des profils sur Internet.
ATTRIBUER DES PROFILS À DES JEUX SPÉCIFIQUES
• Attribuez des profils à vos jeux préférés chaque fois que vous les
démarrez.
RECONFIGURER OU REPROGRAMMER DES BOUTONS DE 3 FAÇONS
• Reconfigurez les boutons du SpeedPad pour qu’ils correspondent aux
touches du clavier.
• Attribuez les fonctions de certains boutons à d’autres boutons.
• Attribuez des macros à des boutons.
DÉCOUPER LES AXES
• Divisez n’importe quel axe en bandes ou sections et attribuez une
touche ou une macro à chacune d’elles.
UTILILISER TROIS NIVEAUX DE PROGRAMMATION
• Les niveaux de programmation rouge, vert et bleu quadruplent le
nombre de fonctions qui peuvent être programmées sur
d’autres boutons.
Création de profil
PROGRAMME PROFILE EDITOR
Le Profile Editor est un outil qui sert à créer et à personnaliser des profils.
Un profil est un ensemble de fonctions associées à des boutons que vous
pouvez sauvegarder et attribuer à des jeux spécifiques.
Voici quelques exemples d’actions que vous pouvez programmer :
• Touche individuelle – Définissez un bouton sur le contrôleur pour qu’il
fonctionne comme une touche de clavier.
• Macros – Enregistrez une séquence de frappe et/ou des actions du
contrôleur de jeu que vous pourrez exécuter à partir d’une seule
touche.
• Redéfinition de boutons – Redéfinissez les boutons du contrôleur de jeu
pour produire différents effets.
• Redéfinition des axes – Déplacez l’axe du contrôleur de jeu entre les
manettes de jeu ou les boutons, selon vos préférences.
• Fonctions d’axe améliorées – Divisez un axe en plusieurs bandes et
programmez différentes fonctions sur chacune d’elles.
• Trois niveaux de programmation – Utilisez l’un des trois boutons de
changement de niveau sur chaque contrôleur et quadruplez le nombre
de fonctions que vous pouvez programmer.
• Souris – Programmez le contrôleur de jeu pour qu’il fonctionne comme
une souris, ce qui vous permettra de l’utiliser pour parcourir les menus
et autres éléments sur le bureau.
Introduction au logiciel de programmation Nostromo Array
P73877-F8GFPC001_n50_t_man.qxd 11/13/01 1:15 PM Page 10
Page 8

13
ÉDITEUR DE MACROS
Pour créer une nouvelle macro,
sélectionnez un autre bouton et
ensuite, « New Macro » (Nouvelle
macro). Une macro est une
combinaison de boutons qui
ensemble exécutent une fonction
spéciale. Dans plusieurs jeux, vous
pouvez aussi créer une macro pour
envoyer des messages (tels que
« Couvre-moi » ou « Attaque ») en
pressant un seul bouton.
Cet écran sert à créer des macros.
Vous pouvez aussi l’utiliser pour
modifier les propriétés des macros
après qu’elles ont été enregistrées.
• Champ « Event » – À mesure que vous enregistrez une macro, les
séquences de frappe, les événements et les délais entre les
événements apparaissent dans la fenêtre de gauche (Event).
• Start – Ce bouton sert à démarrer l’enregistrement d’une nouvelle
macro.
• Stop – Ce bouton sert à arrêter l’enregistrement d’une macro.
• Delay Adjust – Ce contrôle vous permet de régler la durée d’un délai
associé à un événement. Cliquez simplement sur le délai voulu dans la
liste d’événements et utilisez les flèches vers le haut et le bas pour le
modifier.
• Record Delays Between Events – Sert à activer ou désactiver
l’enregistrement des délais. Si une macro a été enregistrée sans délai,
les événements seront exécutés à la vitesse maximum, soit environ 10
millisecondes entre chaque événement.
• Repeat This Macro While Button Remains Pressed – Si ce paramètre
est activé, la macro sera répétée aussi longtemps que le bouton auquel
elle est associée restera pressé.
• Repeat Delay Adjust – Ce paramètre permet de régler de délai de
répétition.
CRÉATION D’UNE MACRO
• Tapez un nouveau nom pour la macro que vous voulez créer dans le
champ « Name » (Nom) dans le haut de l’écran.
• Avec le bouton gauche, cliquez sur le bouton « Start » (Démarrer) pour
commencer l’enregistrement des événements.
• À l’aide du clavier, entrez les combinaisons de touches pour la macro
que vous voulez créer. Il s’agit habituellement d’une combinaison de
manœuvres qui mènent à une nouvelle manœuvre, ou une phrase,
comme « Couvre-moi », que vous utiliserez dans un jeu.
Remarquez que les touches que vous pressez et relâchez sont
enregistrées dans le champ « Event » (Événement) dans la partie
gauche de l’écran.
• Avec le bouton gauche, cliquez sur « Stop » (Arrêter) pour arrêter
l’enregistrement de la macro.
• Cliquez sur « OK ». Cette commande sauvegardera la macro associée
au bouton.
Remarquez que la fonction « Delay Adjust » vous permet de régler le délai
entre chaque pression du bouton.
Vous pouvez aussi choisir de répéter la macro aussi longtemps que le
bouton reste enfoncé. Pour ce faire, cochez la case « Repeat this macro
while button remains depressed »; la macro continuera d’être répétée
aussi longtemps que le bouton restera enfoncé.
Vous pouvez même régler le délai entre la fin et le début d’une macro qui
se répète en utilisant la fonction « Adjust Delay Between Repeats » au
bas de la fenêtre.
PROGRAMMATION D’UN AXE
Attribution de fonctions à un axe
Pour redéfinir un axe ou lui attribuer des fonctions, cliquez simplement
sur le bouton que vous voulez modifier, comme le montre l’illustration
ci-dessous.
12
ÉCRAN PRINCIPAL
Voici une illustration de l’écran Profile Editor du SpeedPad Nostromo n50.
L’écran principal comprend ceci :
• Vues du périphérique – Permet de voir clairement les touches que
vous programmez.
• Barre de menu et barre d’outils
• Barre de changement de mode – Permet de sélectionner le mode rouge,
vert ou bleu.
• Zone de sélection de contrôleur – Permet aux utilisateurs possédant
plusieurs périphériques Nostromo de passer facilement d’un contrôleur
à l’autre pendant la programmation.
• Boutons d’attribution de fonction – Boutons ou identificateurs d’axe,
tels que « Button 01 » que vous sélectionnez pour ouvrir vos fenêtres
de programmation.
CRÉATION DE PROFIL
Cette section explique comment créer un profil à l’aide du Profile Editor.
En général, la création d’un profil consiste en trois fonctions : redéfinition
des touches individuelles, création de macros et programmation
des axes.
• Pour commencer, cliquez sur « Start » (Démarrer), « Programs »
(Programmes) puis sélectionnez « Nostromo » et « Profile Editor ».
L’écran principal « Profile Editor » apparaît.
• Avec le bouton de gauche, cliquez sur le bouton identifié « Button 01 ».
• Sélectionnez « Single Key » (Touche individuelle) dans le menu
contextuel. L’écran « Single Key Assignment » (Attribution de touche
individuelle) apparaît.
REDÉFINITION DES TOUCHES INDIVIDUELLES
Cet écran sert à sélectionner une touche et à l’associer à l’un des
boutons sur le contrôleur de jeu Nostromo.
Lorsqu’une touche est associée à un bouton, une pression sur ce bouton
exécutera la même fonction que la touche elle-même sur le clavier.
Si c’est la première fois que vous associez une touche à l’un des boutons
d’attribution de fonction, l’écran ressemblera à ceci :
À ce stade-ci, appuyez sur une touche du clavier ou sur la barre
d’espacement. Le nom de la touche que vous avez pressée apparaîtra
à l’écran.
Remarquez que le même nom apparaîtra en surbrillance dans la zone
d’édition au centre de l’écran. Vous pouvez soit garder ce nom, soit lui en
attribuer un autre, comme par exemple « Coups de feu ».
Vous pouvez maintenant cliquer soit sur « OK » si cette configuration vous
convient, soit sur « Cancel » (Annuler) pour l’annuler. Vous pouvez aussi
cliquer sur « Record Key » (Enregistrer touche) pour enregistrer une
touche différente sur le clavier. NOTE : Si vous enregistrez une nouvelle
touche, le nom que vous avez tapé dans la zone d’édition sera effacé.
P73877-F8GFPC001_n50_t_man.qxd 11/13/01 1:15 PM Page 12
Page 9

15
changement de niveau pour activer le niveau programmé; le contrôleur
restera à cet état jusqu’à ce que vous appuyez à nouveau sur le bouton.
• Une fois qu’un bouton a été défini comme bouton de changement de
niveau, vous devez ouvrir la fenêtre correspondante pour lui attribuer
des fonctions.
• Vous pouvez afficher différentes fenêtres de changement de niveau en
cliquant sur les flèches rouge, verte ou bleue dans la barre d’outils.
Vous pouvez revenir à la fenêtre initiale en cliquant sur l’icône
SpeedPad.
• Une fois que vous êtes dans les différentes fenêtres de changement de
niveau, vous pouvez redéfinir les touches, créer des macros et
reprogrammer les axes exactement comme vous l’avez fait au début.
• Sauvegardez votre travail.
• Grâce à ces changements de niveau, vous pouvez quadrupler les
options de programmation de chaque périphérique de jeu Nostromo.
Vous aurez ainsi rapidement accès à plusieurs fonctions durant les jeux,
ainsi que toute la souplesse voulue pour affecter des touches de
changement de niveau à n’importe quelle position sur votre contrôleur
Nostromo.
« Signature » et partage de votre profil
Dans la barre d’outils du Profile Editor, l’icône entre le point d’interrogation
et le Loadout Manager correspond à la fenêtre « Profile Properties ». Cliquez
sur cette icône pour ouvrir une fenêtre semblable à ceci.
Remplir les champs de cette fenêtre
équivaut à remplir une fiche d’identité
pour votre profil. Ce profil peut être
identifié comme votre réalisation
personnelle, avec vos commentaires,
votre adresse électronique, etc. pour le
groupe d’utilisateurs Nostromo.
Une fois que vous avez sauvegardé et
identifié votre profil, vous pouvez le
soumettre à l’équipe Nostromo de
Belkin par courrier électronique, sous
forme de pièce jointe, à l’adresse
nostromoprofiles@belkin.com pour qu’il
soit placé sur le site Web. De cette
façon, votre profil et/ou votre fichier de
configuration sera mis à la disposition de tous les autres utilisateurs de
jeu Nostromo partout dans le monde.
Lorsque vous avez fini de créer ou de modifier votre profil, cliquez sur le
menu « File » (Fichier) dans la barre d’outils et sélectionnez « Save »
(Sauvegarder).
Il sera sauvegardé dans le répertoire C:\Program
Files\Belkin\Nostromo\Profiles.
Si vous avez installé le programme dans un répertoire autre que
C:\ProgramFiles\Belkin\Nostromo, le profil sera sauvegardé dans le
répertoire de votre choix.
Téléchargement de profils
N’hésitez pas à soumettre à Belkin les profils que vous créez. Pour
soumettre un profil, envoyez-le par courrier électronique sous forme de
pièce jointe à l’adresse nostromoprofiles@belkin.com.
Pour télécharger des profils existants, rendez-vous à l’adresse
belkin.com/nostromo et cliquez sur « Downloads ».
UTILISATION DU PROFIL AVEC LE PROGRAMME LOADOUT MANAGER
Le Loadout Manager (Gestionnaire de configurations) a comme fonction
de programmer les profils sur les contrôleurs de jeu. On peut l’utiliser soit
en mode manuel, soit en mode automatique.
Une configuration préétablie est un ensemble de profils attribués aux
contrôleurs Nostromo sur votre système (un seul profil par contrôleur),
accompagnés d’un jeu (ou n’importe quelle autre application). Dès que
vous appelez ce jeu, le Loadout Manager charge automatiquement les
profils que vous avez établis. Vous pouvez ainsi facilement créer des
profils qui seront associés à chaque jeu que vous utilisez. Le système
chargera automatiquement ces profils chaque fois que vous démarrerez
un jeu.
Les configurations sont établies à l’aide du programme Loadout Manager.
Vous attribuez un profil à chaque contrôleur et ensuite, vous sélectionnez
un jeu à associer aux profils.
Mode manuel – C’est la façon la plus simple d’utiliser le Loadout
Manager. Lorsque vous êtes à ce mode, vous sélectionnez directement
les profils pour les contrôleurs. Ouvrez simplement la fenêtre de
commande et sélectionnez un profil pour chaque contrôleur affiché.
Mode automatique – Lorsque vous êtes à ce mode, vous établissez une
configuration pour chaque jeu. Le Loadout Manager attend alors que le
jeu commence et ensuite, il charge tous les profils associés à cette
configuration.
La configuration initiale dans le mode automatique est plus complexe
mais une fois qu’elle est faite, vous n’avez plus à vous en soucier. Lancez
simplement le jeu que vous voulez utiliser et le Loadout Manager
s’occupera de configurer les contrôleurs comme vous les voulez.
14
La fenêtre « Axis » s’ouvrira et affichera la liste de tous les axes qui
peuvent être redéfinis. Pour redéfinir un axe, sélectionnez simplement
celui qui vous voulez redéfinir.
Découpage des axes
Le découpage d’un axe consiste à
diviser l’axe en sections puis à
attribuer des fonctions à chacune
d’elles. Avec cette fonction, vous
pouvez transformer l’ « axe X gauche »
en n’importe quelle fonction clavier ou
macro que vous créez.
Pour découper un axe, cliquez sur le
bouton de l’axe que vous désirez
programmer et sélectionnez « Define
Axis ». La fenêtre « Define Axis »
apparaîtra.
• Donnez un nom aux nouvelles
fonctions de cet axe.
• Ensuite, cochez la case « Use
Bands ».
Pour diviser l’axe, double-cliquez sur
l’étendue approximative voulue à droite
ou à gauche de l’axe. Vous verrez
apparaître une ligne, comme sur
l’illustration de droite.
Chaque bande que vous créez sera une
nouvelle zone à laquelle vous pourrez
attribuer des fonctions.
Pour attribuer des fonctions aux
bandes (sections), cliquez sur celle que
vous désirez programmer. Les choix
suivants vous seront proposés. « Single
Key », « New Macro », « Delete
Region » et « Off ». La programmation
de « Single Key » et « New Macros »
ressemble à la programmation de
fonctions dans le Profile Editor.
Sélectionnez « Delete Region » pour éliminer la bande. Sélectionnez
« Off » pour fermer la bande à toute fonction.
Réglage de la zone morte sur un axe
Dans la fenêtre « Define Axis », la bande centrale porte la mention « Off ».
C’est ce qu’on appelle habituellement la « zone morte ». Vous pouvez
facilement modifier cette zone à l’aide de votre souris en déplaçant les
limites vers l’intérieur ou l’extérieur.
AUTRES OPTIONS DE REDÉFINITION OU DE REPROGRAMMATION
Affectation d’un bouton « Direct Input » à un bouton
Pour affecter un bouton « Direct Input » à un bouton sur un périphérique
de jeu Nostromo, cliquez simplement sur le numéro du bouton voulu et
sélectionnez « DI Button ». La fenêtre « Direct Input » s’ouvrira.
Au menu déroulant, sélectionnez le bouton « Direct Input » que vous
aimeriez associer au bouton voulu sur le contrôleur. Vous pouvez ensuite
renommer le bouton avec la fonction de votre choix dans la fenêtre
« Name ». Cliquez sur « OK » pour redéfinir le bouton.
Affectation d’un axe « Direct Input » à un bouton
Pour affecter un axe « Direct Input » à un bouton sur un périphérique de
jeu Nostromo, cliquez simplement sur le numéro du bouton voulu et
sélectionnez « DI Axis Up » or « DI Axis Down ». La fenêtre « Direct
Input » s’ouvrira. Au menu déroulant, sélectionnez l’axe « Direct Input »
que vous aimeriez associer au bouton voulu sur le contrôleur. Vous
pouvez ensuite renommer l’axe avec la fonction de votre choix dans la
fenêtre « Name ». Cliquez sur « OK » pour redéfinir le bouton.
Affectation d’un bouton de souris à un contrôleur de jeu Nostromo
Pour affecter un bouton de souris à un bouton sur un périphérique de jeu
Nostromo, cliquez simplement sur le numéro du bouton voulu et
sélectionnez « Mouse Button ». La fenêtre « Mouse Button » s’ouvrira.
Pour redéfinir le bouton de gauche, du centre ou de droite, sélectionnez
simplement le cercle du bouton que vous voulez associer au bouton de
votre choix sur le contrôleur. Cliquez sur « OK » pour redéfinir le bouton.
Niveaux de programmation
Le logiciel Nostromo Array vous permet de définir trois niveaux de
programmation : rouge, vert et bleu. Chaque changement de niveau
permet d’ajouter un autre niveau de programmation à chaque bouton.
• Pour programmer les changements de niveau, vous devez sélectionner
un bouton (rouge, vert ou bleu). Quel que soit l’état, ce bouton restera
un bouton de changement de niveau et ne pourra pas être associé à
une fonction.
• Pour programmer un bouton de changement de niveau, cliquez sur le
bouton voulu et sélectionnez « Red », « Green » ou « Blue Shift Key ».
Ensuite, sélectionnez « Momentary » ou « Toggle ».
• Si vous sélectionnez « Momentary », la fonction du bouton sera en
vigueur seulement lorsque vous maintiendrez le bouton enfoncé. Si vous
sélectionnez « Toggle », vous devrez appuyer sur le bouton de
P73877-F8GFPC001_n50_t_man.qxd 11/13/01 1:15 PM Page 14
Page 10

17
DÉPANNAGE
Lorsque je démarre le jeu à partir du Loadout Manager, je ne reçois
aucune réponse du SpeedPad n50.
• Vérifiez l’état du jeu en cliquant successivement sur « Start »
(Démarrer), « Control Panel » (Panneau de configuration) et « Game
Controllers » (Options de jeu). Assurez-vous que le contrôleur apparaît
dans la liste et que l’état indiqué est « OK ».
• Dans votre jeu, assurez-vous que le clavier est sélectionné comme
contrôleur par défaut.
• Vérifiez que le câble du contrôleur est branché correctement.
• Dans la fenêtre « Game Controllers » (Options de jeu), assurez-vous que
votre contrôleur Nostromo figure dans la liste et que l’état indiqué est
« OK ». Si vous ne voyez pas cette ligne ou si voyez le message « Not
connected », débranchez le contrôleur et désinstallez le logiciel et les
pilotes. Redémarrez, réinstallez le logiciel et branchez le contrôleur. Si
vous utilisez Windows 2000, assurez-vous de brancher d’abord le
contrôleur.
• Vérifiez que vos attributions de bouton sont correctes.
Après avoir utilisé le programme Loadout Manager, Windows se
comporte de façon erratique, comme si une touche du clavier était restée
enfoncée.
• Si vous utilisez le SpeedPad n50, centrez la roulette d’accélération. La
roulette d’accélération ne se centre pas d’elle-même. Par conséquent,
si une fonction est attribuée à la position de déplacement avant en
mode automatique, l’ordinateur agira comme si elle était constamment
activée.
° Pour éliminer cette situation, gardez la roulette d’accélération bien
centrée lorsque vous n’utilisez pas de jeu ou attribuez cette fonction à
un autre bouton.
° Une autre façon de corriger la situation serait d’attribuer la fonction
non pas à une bouton mais à une macro, car une macro enregistre les
pressions et relâchements du bouton.
Les fonctions du bouton ne sont pas comme elles devraient être dans le
profil que j’utilise.
• Vérifiez si les attributions initiales du clavier dans les options de jeu ont
changé. Dans l’affirmative, cela aura une incidence sur votre profil car
les fonctions du profil sont basées sur les fonctions du clavier.
Dans Windows 2000, les pilotes Nostromo n’ont pas été chargés et le
contrôleur est seulement reconnu comme interface utilisateur.
• Dans Windows 2000, les contrôleurs DOIVENT ÊTRE BRANCHÉS AVANT
ET PENDANT L’INSTALLATION DU LOGICIEL FOURNI SUR LE CD.
• Débranchez le contrôleur.
• Désinstallez tout logiciel Nostromo, y compris les pilotes du
périphérique.
• Redémarrez votre ordinateur.
• Branchez le périphérique de jeu Nostromo que vous voulez utiliser.
Laissez-le s’installer sans le CD Nostromo.
• Pendant que le contrôleur est toujours branché, installez le logiciel et
les pilotes fournis sur le CD.
Le jeu fige.
• Redémarrez votre ordinateur.
Le SpeedPad n’apparaît pas dans le panneau de configuration Windows.
• Débranchez votre SpeedPad et désinstallez le logiciel et les pilotes.
Redémarrez, réinstallez le logiciel et branchez le SpeedPad. Si vous
utilisez Windows 2000, assurez-vous de brancher d’abord le SpeedPad
avant de redémarrer.
Lorsque j’installe le logiciel dans Windows XP, Microsoft recommande de
mettre fin à l’installation parce que les pilotes n’ont pas été « signés ».
Que dois-je faire ?
• Vous devez sélectionner « Continue Anyway » (Continuer quand même)
pour terminer l’installation. Vos contrôleurs fonctionneront normalement
même s’ils n’ont pas été « signés ».
Lorsque j’installe le logiciel dans Windows XP, on me demande d’installer
divers périphériques que je n’ai pas. S’agit-il d’une erreur ?
• Non, ce n’est pas une erreur. Ces périphériques virtuels font partie du
code interne du logiciel de programmation Nostromo Array et sont
habituellement installés en arrière-plan. Si on vous demande d’installer
divers périphérique virtuels, c’est simplement que la « signature
numérique » n’a pas été détectée par Windows XP.
Vos contrôleurs fonctionneront normalement même s’ils n’ont pas été
« signés ».
• Pour continuer l’installation du logiciel Nostromo Array, suivez les
instructions à l’écran de l’Assistant « New Hardware Installation »
(Ajout de nouveau matériel) et installez tous les périphériques virtuels.
16
CHARGEMENT DU PROFIL NOUVELLEMENT CRÉÉ
Après avoir créé un profil, vous devez l’activer avec un jeu à l’aide du
Loadout Manager. Pour ce faire, sélectionnez simplement le contrôleur, le
profil et le fichier de jeu exécutable. Vous pouvez ensuite lancer le jeu à
partir du Loadout Manager.
Ouvrez le Loadout Manager.
S’il est actuellement en cours d’utilisation, vous verrez une icône dans la
barre d’état système, à droite de la barre de tâches au bas du bureau.
Sinon, vous pouvez le démarrer en cliquant successivement sur « Start »
(Démarrer), « Programs » (Programmes), « Nostromo » et « Loadout
Manager ».
• Repérez dans la liste le contrôleur dont vous voulez charger le profil. Si
vous avez plusieurs contrôleurs et que vous ne savez pas au juste
quelle icône à l’écran représente quoi, appuyez simplement sur
quelques boutons sur le contrôleur; l’icône représentant celui que vous
cherchez s’illuminera.
• Cliquez sur le bouton de profil pour ce contrôleur. Ensuite, sélectionnez
« Load Profile…» (Charger profil) au menu. La fenêtre de sélection
habituelle de fichier s’ouvrira.
• Repérez le profil voulu, sélectionnez-le et cliquez sur « OK ».
• Dans la partie droite de la fenêtre, cliquez sur « Browse » (Parcourir)
pour sélectionnez le fichier de jeu exécutable (.exe) que vous voulez
utiliser. Vous pouvez aussi cliquer sur le raccourci associé au jeu sur
votre bureau, s’il y en a un. Sinon, vous pouvez chercher le fichier dans
le répertoire où vous avez installé le jeu.
P73877-F8GFPC001_n50_t_man.qxd 11/13/01 1:15 PM Page 16
Page 11

El Nostromo n50 SpeedPad es un controlador sencillo de Conectar y Usar
que se instala sin el “Array Programming Software” (Software de
programación de la línea) si prefiriese no instalarlo.
Se recomienda ampliamente que se instale el Nostromo Array Software, pero
no se requiere. El n50 funcionará directo desde la caja como un “Human
Interface Device” (Dispositivo de interfaz humana - HID por sus siglas en
inglés). Todo lo que necesita hacer es enchufar el SpeedPad y llevar a cabo
las instrucciones sencillas en la pantalla para estar listo para jugar.
Sin embargo, para lograr una programación excelente y un
funcionamiento mejorado le recomendamos ampliamente que siga el
procedimiento sencillo para instalar y usar el Nostromo Array
Programming Software. Por favor vea las instrucciones en la siguiente
sección para la instalación con el CD incluido.
Su Nostromo Array Programming Software trabajará con cualquier juego
para Windows® 98, 2000 o Me. Si está utilizando Windows 2000 o
Windows XP, asegúrese de enchufar su SpeedPad antes de instalar
cualquier software del CD incluido.
1. Cómo instalar el software
El instalar el Nostromo Array Programming Software le dará flexibilidad adicional
y hasta 56 funciones programables. Podrá personalizar cualquier controlador de
juego Nostromo a cada juego que usted juegue.
• Inserte el Nostromo Array Programming Software en su unidad de CD o DVD
en su computadora. Para la instalación con Windows 2000 y Windows XP,
ASEGÚRESE DE PRIMERO INSTALAR EL SPEEDPAD, Y DESPUÉS INSTALAR EL
SOFTWARE.
• El software debe iniciar automáticamente. Si no inicia, haga clic en el botón de
“Start” (Inicio) y escoja “Run” (Correr). Haga clic en “Browse” (Examinar) y
escoja su unidad de CD. Seleccione “setup.exe” y haga clic en “OK” (Aceptar).
• Siga las instrucciones en la pantalla para continuar con la instalación del
software.
• La primera pantalla le da la bienvenida a la instalación de Nostromo. Haga clic
en “Next” (Próximo).
• La siguiente pantalla contiene el contrato de licencia. Haga clic en el sitio
apropiado para aceptar el contrato. Si no lo acepta, se detendrá la instalación.
• La siguiente pantalla le pregunta acerca de la carpeta de instalación. El
programa de instalación creará un directorio para usted. También, se
recomienda ampliamente que coloque atajos para el “Profile Editor” (Editor de
perfiles) y el “Loadout Manager” (Administrador de rutinas de carga) en su
escritorio. Esto hará que sea más fácil y rápido usar el software en el futuro.
Haga clic en “Next” (Próximo).
• En la siguiente ventana, seleccione “Next” (Próximo) para iniciar la instalación.
• Después de terminar la instalación, seleccione “Finish” (Terminar) y proceda
con la instalación de su controlador de juegos.
2. Conecte el Nostromo n50
• Conecte su Nostromo n50 a un puerto USB disponible en su computadora.
• Lleve a cabo las instrucciones en la pantalla para terminar la instalación.
3. Inicie el software
• Inicie el Nostromo Array Programming Software.
• Haga doble clic en * su escritorio, o encuentre el Nostromo Array
Programming Software en el menú “Start” (Inicio) bajo “Programs”
(Programas).
• Para información más detallada, por favor vea la sección de “Introducción
al Nostromo Array Programming Software”.
4. Seleccione el perfil
• El Nostromo Array Programming Software viene con perfiles predeterminados.
Hay perfiles adicionales disponibles para descargarse en belkin.com/nostromo.
Para someter sus propios perfiles, envíelos por correo electrónico cómo un
anexo a nostromoprofiles@belkin.com.
• Para seleccionar un perfil, abra el Nostromo Array Programming Software
Profile Editor (Editor de perfiles). Luego seleccione el icono “Open” (Abrir) en
la barra de tareas de “Open” (Abrir) en el menú de “File” (Archivo). Esto lo
llevará a la carpeta de perfiles dónde se almacenan normalmente sus perfiles.
Seleccione el perfil que le gustaría usar y haga clic en “Open” (Abrir).
• Para generar un nuevo perfil, seleccione “New” (Nuevo). Vea la sección
“Cómo hacer un perfil” para mayores detalles acerca de cómo crear
perfiles nuevos.
• Para información más detallada, por favor vea la siguiente sección
“Introducción al Nostromo Array Programming Software”.
5. Para asignar un perfil a un juego con el Administrador de rutinas de carga
• Abra el “Loadout Manager” (Administrador de rutinas de carga) haciendo clic en
* en la barra de tareas, su escritorio o en el menú de “Start” (Inicio) bajo
“Program Files” (Archivos de programas). Haga clic en la barra (a la izquierda)
que muestra su controlador conectado. Seleccione “Load Profile” (Cargar perfil)
y luego seleccione el perfil que quiere usar.
• Luego haga clic en “Browse” (Examinar) (ubicado a la derecha) y encuentre el
archivo ejecutable (.exe) del juego que quiera usar. Puede seleccionar el
vínculo al juego en su escritorio. Si no tiene un vínculo en su escritorio, puede
seleccionar el archivo buscando en el directorio a donde instaló el juego.
• Para mayores detalles acerca del Administrador de rutinas de carga, vea la
sección “Cómo usar el perfil”.
• Para información más detallada, por favor vea la siguiente sección
“Introducción al Nostromo Array Programming Software” en la página 2.
• ¡Ya está instalado y listo para empezar! Felicidades. Asegúrese de revisar las
opciones dentro de su juego para asegurarse que está aprovechando todas las
opciones disponibles.
19
18
Si vous avez toujours des problèmes, contactez l’Assistance technique
Belkin aux numéros indiqués ci-dessous. Assurez-vous d’abord qu’il s’agit
bien d’un problème concernant un contrôleur de jeu Nostromo et le
logiciel Nostromo Array, et non d’un problème concernant le jeu que vous
utilisez. Si vous avez des problèmes avec le jeu, contactez directement le
fabricant de jeux.
Assistance technique
Assistance technique – États-Unis
Téléphone : (800) 223-5546, poste 2263
(310) 898-1100, poste 2263
Fax : (310) 604-2089
Courriel : techsupp@belking.com
Assistance technique – Europe
00 800 223 55 460
Assistance technique – Australie
Sans frais (1800) 666-040
Assistance technique – Nouvelle-Zélande
Sans frais 0800 441 913
Déclaration FCC
DÉCLARATION DE CONFORMITÉ À LA RÉGLEMENTATION FCC
EN MATIÈRE DE COMPATIBILITÉ ÉLECTROMAGNÉTIQUE
Nous, Belkin Components, sis au 501 West Walnut Street, Compton CA 90220,
États-Unis, déclarons sous notre seule responsabilité que le produit
F8GP001
auquel se réfère la présente déclaration, est conforme aux normes énoncées à
l’alinéa 15 de la réglementation FCC. Le fonctionnement est assujetti aux deux
conditions suivantes : (1) cet appareil ne peut pas provoquer d’interférence nuisible
et (2) cet appareil doit accepter toute interférence reçue, y compris des
interférences pouvant entraîner un fonctionnement non désiré.
Déclaration de conformité CE
Nous, Belkin Components, déclarons sous notre seule responsabilité que le produit
F5D6230-3, auquel se réfère la présente déclaration, est conforme aux EN50022,
EN61000-3-2, EN61000-3-3, et EN55024.
Garantie à vie limitée de Belkin Components
Belkin Components garantit ce produit à vie contre tout défaut de matériau et de
fabrication. Si l’appareil s’avère défectueux, Belkin le réparera ou le remplacera
gratuitement, à sa convenance, à condition que le produit soit retourné, port payé,
pendant la durée de la garantie, au dépositaire Belkin agréé duquel le produit a été
acheté. Une preuve d’achat peut être exigée.
La présente garantie est caduque si le produit a été endommagé par accident,
abus, usage impropre ou mauvaise application, si le produit a été modifié sans
autorisation écrite de Belkin, ou si un numéro de série Belkin a été supprimé ou
rendu illisible.
LA GARANTIE ET LES VOIES DE RECOURS SUSMENTIONNÉES FONT FOI
EXCLUSIVEMENT ET REMPLACENT TOUTES LES AUTRES, ORALES OU ÉCRITES,
EXPLICITES OU IMPLICITES. BELKIN REJETTE EXPRESSÉMENT TOUTES LES
GARANTIES IMPLICITES, Y COMPRIS MAIS SANS RESTRICTION, LES GARANTIES
AFFÉRENTES À LA QUALITÉ LOYALE ET MARCHANDE ET À LA POSSIBILITÉ
D’UTILISATION À UNE FIN DONNÉE.
Aucun dépositaire, représentant ou employé de Belkin n’est habilité à apporter des
modifications ou adjonctions à la présente garantie, ni à la proroger.
BELKIN N’EST PAS RESPONSABLE DES DOMMAGES SPÉCIAUX, DIRECTS OU
INDIRECTS, DÉCOULANT D’UNE RUPTURE DE GARANTIE, OU EN VERTU DE
TOUTE AUTRE THÉORIE JURIDIQUE, Y COMPRIS MAIS SANS RESTRICTION LES
PERTES DE BÉNÉFICES, TEMPS D’ARRÊT, FONDS DE COMMERCE,
REPROGRAMMATION OU REPRODUCTION DE PROGRAMMES OU DE DONNÉES
MÉMORISÉS OU UTILISÉS AVEC DES PRODUITS BELKIN OU DOMMAGES
CAUSÉS À CES PROGRAMMES OU À CES DONNÉES.
Arranque rápido
P73877-F8GFPC001_n50_t_man.qxd 11/13/01 1:15 PM Page 18
Page 12

21
PANTALLA PRINCIPAL
Esta figura muestra el Profile Editor (Editor de Perfiles) para el Nostromo
n50 SpeedPad.
La pantalla principal consiste de:
• Imágenes del dispositivo – Esto ayuda para ver cuales teclas está
programando.
• Barra de menú y barra de herramientas
• Barra de modalidad – Esto le permite seleccionar entre la modalidad
roja, verde y azul.
• Esquina de selección del controlador – Esto le permite a los dueños de
varios dispositivos Nostromo a que conmuten fácilmente entre
controladores cuando están programando.
• Puntos fijos de asignación de funciones – Estos son los identificadores
de eje o botones, como “Botón 01”, en los que usted hace clic para
abrir sus ventas de programación.
CÓMO HACER UN PERFIL
Esta sección le explica cómo generar un perfil utilizando el Profile Editor
(Editor de Perfiles). En general, crear un perfil consiste de tres funciones:
remapeo de asignaciones a teclas únicas, crear macros y
programar ejes.
• Para iniciar, haga clic en “Start” (Iniciar), luego “Programs”
(Programas), luego “Nostromo”, luego “Profile Editor” (Editor de
perfiles). Esto exhibirá la pantalla principal del Editor de perfiles.
• Haga clic con el botón izquierdo en el punto fijo nombrado “Button 01”
(Botón 01).
• Seleccione “Single Key” (Tecla única) en el menú emergente. Esto hará
que aparezca la pantalla de “Single Key Assignment” (Asignación para
tecla única).
CÓMO REMAPEAR LA ASIGNACIÓN DE UNA TECLA ÚNICA
Esta pantalla se utiliza para seleccionar una tecla única para asignarle
uno de los botones en el controlador de juegos Nostromo.
Cuando una tecla única es asignada a un botón, el oprimir el botón es lo
mismo que oprimir esa tecla en el teclado.
Si esta es la primera vez que ha asignado una tecla única a uno de los
puntos fijos, la pantalla se verá de la siguiente manera:
En este momento, oprima una tecla en el teclado o la barra de espacio. La
pantalla exhibirá el nombre de la tecla que usted oprimió.
Tome nota que además de exhibir la tecla que oprimió, la ventana de
edición en el centro exhibe y resalta el mismo nombre de tecla. Puede
elegir conservar el nombre por defecto o puede escribir el suyo propio,
como por ejemplo “Pistolas de fuego”.
Ahora puede hacer clic en “OK” (Aceptar) si está contento con su
configuración actual, o puede hacer clic en “Cancel” (Cancelar) para
abortar la asignación de teclas. También puede hacer clic en “Record
Key” (Grabar tecla) para grabar una tecla diferente en el teclado. NOTA:
si graba una tecla nueva, se borrará cualquier nombre que escriba en el
cuadro de edición.
Introducción
El Nostromo Array Programming Software es un conjunto de
herramientas que mejora su experiencia de juegos cuando utiliza el
Nostromo n50 SpeedPad.
El Nostromo Array Programming Software aumenta el funcionamiento del
juego y las opciones de personalización. Le permite remapear su
controlador como usted quiera, dependiendo de los juegos que esté
jugando.
Hay dos componentes principales en el Nostromo Array Programming
Software:
• El Profile Editor (Editor de Perfiles), que se utiliza para generar y
cambiar perfiles. Un perfil es un conjunto de funciones de botones
remapeadas que se pueden guardar y asignar a juegos específicos.
• El Loadout Manager (Administrador de rutinas de carga) programa los
controladores de juego con un perfil para juegos específicos.
Con este software, puede:
CREAR Y GUARDAR SUS PROPIOS PERFILES
• Crear perfiles personalizados para cada dispositivo.
• Descargar/cargar perfiles a través del Internet.
ASIGNAR PERFILES A JUEGOS ESPECÍFICOS
• Asignar perfiles a sus juegos favoritos para usarlos cada vez que
inicie ese juego.
REMAPEAR O REPROGRAMAR BOTONES EN 3 MANERAS
• Remapear los botones de SpeedPad para que correspondan a las
teclas del teclado.
• Remapear botones a otros
botones.
• Remapear botones con macros.
BANDAS DE EJE
• Dividir cualquier eje en bandas o
áreas y asignar una tecla o macro
a cada banda.
UTILIZAR TRES ESTADOS DE
TRANSICIÓN
• Los estados de cambio rojo, verde
y azul cuadruplican el número de
funciones que se pueden
programar en los otros botones.
Cómo hacer un perfil
EDITOR DE PERFILES
El Editor de Perfiles es la herramienta que se usa para personalizar
perfiles. Un perfil es un conjunto de funciones de botones remapeadas
que se pueden guardar y asignar a juegos específicos.
Algunos ejemplos de los tipos de acciones que se pueden programar:
• Tecla única – Haga que un botón en el controlador trabaje como una
tecla del teclado.
• Macros – Grabe una secuencia de teclados y/o eventos del controlador
de juegos para que se reproduzcan cuando se oprime un botón.
• Remapeo de botones – Remapee los botones en el controlador de
juegos uno con el otro para lograr varios efectos.
• Remapeo de ejes – Mueva el eje en los controladores de juego entre
palancas de juegos o botones, como quiera usarlos.
• Funciones de eje mejoradas – Intercale un eje en bandas y programe
distintas funciones en cada banda.
• Tres modalidades de cambio – Utilice uno de tres botones de cambio
para cada controlador de juegos y cuadruplique el número de funciones
que puede programar.
• Mouse – Programe el controlador de juegos para que funcione como un
mouse para que pueda usar las manos en el controlador para navegar a
través de los menús de los juegos y otros artículos de escritorio.
Introducción al Nostromo Array Programming Software
20
P73877-F8GFPC001_n50_t_man.qxd 11/13/01 1:15 PM Page 20
Page 13

23
Se abrirá la ventana de “Axis” (Eje) y presentará todos los ejes
disponibles para reasignar. Para reasignar un eje, simplemente
seleccione el eje que quiere asignar al eje actual.
Bandas de eje
Las bandas de eje se refieren a dividir el eje en secciones, luego asignar
funciones a las secciones individuales. Con las bandas de eje puede
transformar el “X Axis Left” (Eje X izquierdo) en cualquier función o
macro que genere.
Para usar las bandas de eje, haga clic con el botón izquierdo en el punto
fijo del eje que desee programar. Luego seleccione “Define Axis” (Definir
eje). Verá la siguiente ventana de “Define axis” (Definir eje):
• Dele un nombre a las nuevas funciones que tendrá este eje.
• Luego seleccione el cuadro de “Use Bands” (Usar bandas).
Para dividir el eje, haga doble clic en el rango aproximado en el lado
derecho o izquierdo del eje. Verá que aparece una línea, como en el
diagrama a la derecha:
Cada banda que genere será una nueva área a la que puede asignar
funciones.
Para asignarle funciones a las bandas, haga clic con el botón izquierdo
en la banda que quiere programar. Verá una ventana que ofrece las
siguientes opciones: “Single Key” (Tecla única), “New macro” (Macro
nuevo), “Delete Region” (Borrar región) y “Off” (Apagado). El programar
“Single Key” (Tecla única) y “New macro” (Macro nuevo) es igual que
programar funciones en el Editor de perfiles.
Seleccione “Delete Region” (Borrar región) para eliminar la banda.
Seleccione “Off” (Apagado) para cerrar la banda para cualquier función.
Cómo ajustar la zona muerta en el eje
En la ventana de “Define Axis” (Definir eje), hay una banda central
etiquetada “Off” (Apagada). A esto se le refiere normalmente como la
“zona muerta”. La zona muerta se ajusta fácilmente usando su mouse
para arrastrar los limites de la banda etiquetada “Off” (Apagado) ya sea
hacia adentro o hacia afuera.
OTRAS OPCIONES DE REMAPEO Y/O REPROGRAMACIÓN
Para asignar un botón de entrada directa a un botón
Para asignar un botón de “Direct Input” (Entrada directa) a un botón en
un dispositivo de juegos Nostromo, simplemente haga clic con el botón
izquierdo en el número de botón que quiere y seleccione “DI Botton”
(Botón DI). Esto abrirá la ventana de “Direct Input” (Entrada directa).
Desde el menú descendente, seleccione el botón “Direct input” que
quisiera programar al botón seleccionado en el controlador. Ahora puede
darle un nuevo nombre al botón con la función de su preferencia en la
venta de “Name” (Nombre). Seleccione “OK” (Aceptar) para remapear el
botón.
Cómo asignar un eje de entrada directa a un botón
Para asignar un eje de “Direct Input” (Entrada directa) a un botón en el
dispositivo de juego Nostromo, simplemente haga clic con el botón
izquierdo en el número de botón que quiera y seleccione “DI Axis Up”
(Eje DI Arriba) o “DI Axis Down” (Eje DI abajo). Esto abrirá la ventana de
“Direct Input” (Entrada directa). Desde el menú descendiente, seleccione
el eje de “Direct Input” que quiera programar al botón seleccionado en el
controlador. Luego puede darle un nuevo nombre al eje con la función de
su preferencia en la ventana de “Name” (Nombre). Seleccione “OK”
(Aceptar) para remapear el botón.
Cómo asignar un botón de mouse a un controlador de juegos Nostromo
Para asignar un botón de mouse a un botón en un dispositivo de juegos
Nostromo, simplemente haga clic con el botón izquierdo en el número de
botón que quiere y seleccione “Mouse Botton” (Botón de mouse). Esto
abrirá la ventana de “Mouse Botton”. Para volver a asignar el botón
izquierdo, central o derecho, simplemente seleccione el círculo del botón
de mouse que quiere asignar a su botón seleccionado del controlador.
Seleccione “OK” (Aceptar) para remapear el botón.
Estados de cambio
El Nostromo Array Programming Software le permite programar tres
estados de cambio: rojo, verde y azul. El estado de cambio le permite
agregar otro nivel de programación a cada botón.
• Para programar estados de cambio, deberá escoger un botón para que
corresponda con cada uno de los estados de cambio rojo, verde o azul.
En cualquier estado de cambio, el botón permanecerá como en botón
de cambio y no podrá remapearse con una función.
22
EDITOR DE MACROS
Para hacer un macro para un botón específico, seleccione otro punto fijo y
seleccione “New Macro” (Macro nuevo). Un macro es una combinación
de botones que representa una función especial. Además, en muchos
juegos puede hacer que un macro envíe mensajes (“cúbreme” o “ataca”,
por ejemplo) con tan sólo oprimir un botón.
Esta pantalla se utiliza para generar macros. También puede usarla para
ajustar las propiedades de los macros después de que se hayan grabado.
• Campo de eventos – Al grabar un macro, las pulsaciones de las teclas,
los eventos del controlador de juegos y las demoras entre los eventos
se presentan en el panel de “Event” (Evento) a la izquierda.
• “Start” (Inicio) – Inicia la grabación de un nuevo macro.
• “Stop” (Parar) – Como se imaginará, esto detiene la grabación del macro.
• “Delay Adjust“ (Ajuste de demora) – Este control le permite ajustar la
duración de una demora en la lista de eventos. Simplemente haga clic
en la demora en la lista de eventos y luego use las flechas hacia arriba
y hacia abajo para cambiarla.
• “Record Delays Between Events” (Grabación de demoras entre
eventos) – Este interruptor apaga o prende la grabación de demoras. Un
macro sin demoras grabadas repite los eventos a la velocidad máxima
posible, lo cual es cerca de 10 milisegundos entre cada evento.
• “Repeat This Macro While Button Remains Pressed” (Repita este macro
mientras el botón está oprimido) – Este interruptor ajusta el macro para
que se repita mientras permanezca oprimido el botón que tiene asignado.
• “Repeat Delay Adjust” (Ajuste de la demora de repetición) – Este
control le permite ajustar la velocidad de repetición.
CÓMO CREAR UN MACRO
• Escriba un nuevo nombre para el macro en el campo de “Name”
(Nombre) en la parte de arriba.
• Haga clic con el botón izquierdo en el botón “Start” (Inicio) para iniciar
la grabación de los eventos del teclado.
• Utilizando el teclado, escriba la combinación de teclas del macro que
quiere crear. Normalmente esto es una combinación de movidas para
generar una nueva movida, o una frase como “cúbreme”, que usted
puede usar durante un juego.
Tome nota que las teclas que oprime y suelta se graban en el campo de
“Event” (Evento) al lado izquierdo del editor de macros.
• Haga clic con el botón izquierdo en el botón “Stop” (Parar) para parar
la grabación del macro.
• Haga clic en el botón “OK”. Esto guarda su macro en el botón asignado.
Tome nota que la función de “Delay Adjust” (Ajuste de demora) le
permite ajustar el tiempo entre cada oprimida del botón.
También puede escoger repetir el macro mientras el botón permanece
oprimido. Puede marcar el cuadro que dice “Repeat this macro while
button remains depressed” (Repita este macro mientras el botón
permanece oprimido) y el macro funcionará repetidamente mientras el
botón esté oprimido.
Hasta puede ajustar la demora de tiempo entre el final y el inicio de los
macros mientras se repiten con la función de “Adjust Delay Between
Repeats” (Ajuste de demora entre repeticiones) en la parte inferior de la
ventana.
CÓMO PROGRAMAR UN EJE
Cómo asignar funciones a los ejes
Para reasignar ejes o para asignarles funciones, simplemente haga clic
con el botón izquierdo en el punto fijo del eje que quiera cambiar, como
en el siguiente diagrama:
P73877-F8GFPC001_n50_t_man.qxd 11/13/01 1:15 PM Page 22
Page 14

25
CARGUE EL PERFIL QUE ACABA DE CREAR
Después de hacer un perfil, lo tendrá que activar con un juego en el
Administrador de rutinas de carga. Para hacer esto, simplemente
seleccione el controlador, el perfil y el archivo ejecutable del juego.
Luego podrá iniciar fácilmente el juego desde el Administrador de rutinas
de carga.
Abra el Administrador de rutinas de carga.
Si el Administrador de rutinas de carga está trabajando actualmente,
habrá un icono en la bandeja del sistema en el lado derecho de la barra
de tareas en la parte inferior del escritorio:
Si el Administrador de rutinas de carga no está trabajando, puede
iniciarlo desde el menú de “Start” (Inicio): “Start” (Inicio) -> ”Programs”
(Programas) -> Nostromo -> ”Loadout Manager” (Administrador de
rutinas de carga).
• Busque el controlador para el perfil que quiere cargar en la lista
mostrada. Si tiene más de un tipo de controlador y no es obvio cuál
registro en la pantalla representa cuál controlador, simplemente oprima
un par de botones en el controlador y la imagen que representa ese en
particular se encenderá.
• Haga clic en el botón de perfil para ese controlador. Seleccione “Load
profile…” (Cargar perfil…) desde el menú. Esto hará aparecer la
ventana típica de selección de archivos.
• Encuentre el perfil que quiere y haga clic en “OK” (Aceptar).
• En la mitad derecha del Administrador de rutinas de carga, haga clic en
“Browse” (Examinar) para seleccionar el archivo ejecutable (.exe) del
juego que quiere jugar. Puede hacer esto seleccionado el atajo para el
juego en su escritorio si tiene uno ahí. Si no lo tiene un atajo, podrá
encontrar el archivo en el directorio donde instaló su juego.
24
• Para programar una tecla como un botón de cambio, haga clic con el
botón izquierdo en el botón que quiere programar y seleccione “Red”
(Rojo), “Green” (Verde) o “Blue Shift Key” (Tecla de cambio azul). Luego
seleccione “Momentary” (Momentáneo) o “Toggle” (Conmutación).
• Si selecciona “Momentary” (Momentáneo), la función de cambio sólo
estará en efecto mientras está oprimiendo el botón. Si selecciona
“Toggle” (Conmutación), al oprimir el botón de cambio se iniciará el
estado de cambio programado y el controlador permanecerá en ese
estado de cambio hasta que el botón de cambio sea oprimido
nuevamente.
• Una vez que el botón tiene asignado una tecla de cambio, tendrá que ir
a la ventana de cambio correspondiente para asignar las funciones en
ese estado de cambio.
• Puede ver distintas ventanas de estado de cambio haciendo clic en las
flechas roja, verde o azul en la barra de herramientas en la parte
superior. Puede regresar a la ventana original haciendo clic en el icono
“SpeedPad”.
• Una vez que esté en una ventana de estado de cambio distinta, podrá
remapear las teclas, crear macros y reprogramar ejes tal como lo hizo
en el estado de cambio original.
• Guarde su trabajo.
• Al usar estos estados de cambio, puede cuadruplicar la capacidad de
programación de cada dispositivo de juego Nostromo. Esto le permitirá
tener acceso rápido a muchas funciones durante los juegos mientras le
da la flexibilidad de asignar teclas de cambio a cualquier posición en su
controlador Nostromo.
Cómo “firmar” y compartir su perfil
En la barra de herramientas del “Profile Editor” (Editor de perfiles), el
icono entre el signo de interrogación y el icono de “Loadout Manager”
(Administrador de rutinas de carga) es la ventana de “Profile Properties”
(Propiedades del perfil). Haga clic en él para obtener una ventana similar
a esta:
Al llenar la información en esta ventana, obtendrá algo similar a un
nombre para su perfil. Puede identificar el perfil como suyo, incluyendo
sus comentarios, dirección de correo electrónico, etc. para la comunidad
Nostromo.
Una vez que guarda e identifica su perfil, lo puede presentar al equipo de
Belkin Nostromo enviándolo como anexo por correo electrónico a
nostromoprofiles@belkin.com para incluirlo en la página Web de Belkin.
De esta manera, puede poner su perfil único y/o archivo de rutinas de
carga a disposición de otros usuarios de dispositivos de juegos Nostromo
en todo el mundo.
Cuando termine de crear o editar sus perfiles, haga clic con el botón
izquierdo en el menú de “File” (Archivo) en la barra de herramientas y
seleccione “Save” (Guardar).
Su perfil se guarda en C:\Program Files\Belkin\Nostromo\Profiles.
Si usted instaló un directorio distinto a C:\ProgramFiles\Belkin\Nostromo,
su perfil se guarda en YourInstallDirectory\Profiles.
Cómo cargar y descargar perfiles
Por favor presente cualquier perfil que crea para agregarlo a la lista de
perfiles en belkin.com. Para someter un perfil, por favor envíelo como
anexo en un correo electrónico a nostromoprofiles@belkin.com.
Para descargar perfiles, vaya a belkin.com/nostromo y haga clic en
“Downloads” (Descargas).
CÓMO USAR EL PERFIL CON EL ADMINISTRADOR DE RUTINAS DE CARGA
El Loadout Manager (Administrador de rutinas de carga) es responsable
del “programando” de los controladores de juego con los perfiles. El
Administrador de rutinas de carga puede usarse en dos modalidades:
manual y automática.
Una rutina de carga es un conjunto de perfiles asignados a los
controladores de juego Nostromo en su sistema (un perfil para cada
controlador) y un juego asociado (o cualquier aplicación). Al cargar el
juego provoca que el Administrador de rutinas de carga cargue
automáticamente los perfiles que usted estableció. Esto le da la
conveniencia de generar perfiles que estén asociados con cada juego
que usted juega. El sistema cargará automáticamente esos perfiles para
usted cuando inicie cada juego.
Las rutinas de carga se construyen con el Administrador de rutinas de
carga. Usted le asigna un perfil para cada controlador y selecciona un
juego para que se asocie con el conjunto de perfiles.
Modalidad manual – La modalidad manual es la manera más sencilla de
usar el Administrador de rutinas de carga. En esta modalidad usted
selecciona directamente los perfiles para los controladores. Simplemente
abra la venta de activación y seleccione un perfil para cada controlador
que muestra.
Modalidad automática– En la modalidad automática usted establece una
rutina de carga para cada juego. El Administrador de rutinas de carga
luego espera para que inicie ese juego. Cuando inicia, el Administrador
de rutinas de carga inicia todos los perfiles relacionados con esa rutina
de carga.
La modalidad automática tiene una instalación inicial compleja, pero una
vez que se hace, nunca tendrá que pensar en ella otra vez. Simplemente
inicie el juego que quiere jugar y el Administrador de rutinas de carga se
asegurará que los controladores estén configurados como usted los quiere.
P73877-F8GFPC001_n50_t_man.qxd 11/13/01 1:15 PM Page 24
Page 15

27
Si aún está teniendo problemas, póngase en contacto con el apoyo
técnico de Belkin a los números que se presentan abajo. Primero
asegúrese que el problema que tiene está relacionado con los
controladores de juego Nostromo y el Nostromo Array Programming
Software, y que no es un problema con el juego que está jugando. Si
tiene problemas con el juego, por favor póngase en contacto la editorial
del juego directamente.
Apoyo técnico
Apoyo técnico en EUA
Teléfono: 800.223.5546, extensión 2263
310.898.1100, extensión 2263
Fax: 310.604.2089
Correo electrónico: techsupp@belkin.com
Apoyo técnico en Europa
00 800 223 55 460
Apoyo técnico en Australia
Llamada sin cargo 1800 666 040
Apoyo técnico en Nueva Zelanda
Llamada sin cargo 0800 441 913
26
RESOLUCIÓN DE PROBLEMAS
Cuando inicio el juego con el Administrador de rutinas de carga, no hay
respuesta ni control por parte de mi n50 SpeedPad.
• Revise el estado en el icono de “Game Controller” (Controlador de
juegos) en “Control Panel” (Panel de control) - haga clic en “Start”
(Inicio), “Control Panel” (Panel de control), “Game Controllers”
(Controladores de juego). Asegúrese que el controlador está en la lista
del panel de “Game Controller” (Controlador de juegos) y que el estado
está listado como “OK”.
• En su juego, asegúrese que el teclado está seleccionado como el
controlador por defecto.
• Asegúrese que el cable de su controlador está conectado
correctamente.
• En la ventana de “Control Panel/Game Controllers” (Panel de
control/Controladores de juego) de Windows, asegúrese que la ventana
muestra el nombre de su controlador Nostromo y “OK”. Si no ve esta
línea, o si dice “not connected” (no conectado), desconecte el
controlador y desinstale el software y los controladores. Luego reinicie
la computadora, vuelva a instalar el software y conecte el controlador.
Si está utilizando Windows 2000, asegúrese de conectar el controlador
primero.
• Asegúrese que su asignación de botones es lo que usted piensa que
debe ser.
Después de usar el Administrador de rutinas de carga, Windows está
actuando erráticamente, como si un botón del teclado estuviera oprimido
constantemente.
• Si está utilizando el n50 SpeedPad, coloque la rueda del acelerador al
centro. La rueda del acelerador no se centra automáticamente, por lo
que si hay una función asignada a la posición de avance del acelerador
en la modalidad automática, la computadora reconocerá esa función
como que está siendo oprimida constantemente.
° Para eliminar esta situación, mantenga la rueda del acelerador
centrada cuando no está jugando, o asigne esa función a otro botón.
° Otra manera de aliviar la situación es asignar la función a la posición
de acelerador, no como el oprimido de un botón sino como un macro,
porque un macro registrará el oprimido y liberación de esa función.
Las funciones del botón no son las que deberían ser en el perfil que estoy
utilizando:
• Revise para ver si las asignaciones originales al teclado dentro de las
opciones del juego han sido cambiadas. Si han cambiado las
asignaciones originales del teclado para el juego, esto afectará su perfil
porque las funciones de su perfil están basadas en las funciones del
teclado.
En Windows 2000, los controladores Nostromo no fueron cargadas y el
controlador sólo se reconoce como dispositivo HID.
• En Windows 2000, los controladores DEBEN ESTAR ENCHUFADOS
ANTES Y DURANTE LA INSTALACIÓN DEL SOFTWARE EN EL CD.
• Desconecte el controlador.
• Desinstale cualquier software Nostromo, incluyendo los controladores
de los dispositivos.
• Reinicie la computadora.
• Enchufe en dispositivo de juego Nostromo que quiere usar. Permita que
el dispositivo se instale sin el CD de interfaz de software Nostromo.
• Con el controlador todavía enchufado, instale la interfaz del software y
los controladores que se encuentran en el CD.
El juego se congela.
• Reinicie su computadora
El SpeedPad no está en el panel de control de Windows.
• Desconecte su SpeedPad, y desinstale el software y los controladores.
Luego reinice la computadora, vuelva a instalar el software y conecte la
unidad. Si está usando Windows 2000, asegúrese de conectar el
SpeedPad antes de reiniciar.
Cuando instalo el software en Windows XP, Microsoft recomienda
terminar la instalación porque los controladores no han “signed”
(firmado). ¿Qué debería hacer?
• Deberá seleccionar “Continue Anyway” (Continuar de todos modos)
para terminar la instalación. Sus controladores funcionarán
normalmente sin estar firmados.
Cuando instalo el software en Windows XP, se me pide instalar varios
dispositivos que no tengo. ¿Esto es un error?
• Esto no es un error. Estos dispositivos virtuales son parte del código
interno del Nostromo Array Programming Software que están instalados
normalmente en el segundo plano. Si se le solicita que instale varios
dispositivos virtuales, esto simplemente significa que la “firma digital”
no ha sido detectada por Windows XP. Sus controladores funcionarán
normalmente sin estar firmados.
• Para continuar con la instalación del Nostromo Array Programming
Software, por favor siga las instrucciones en la pantalla en el asistente
de “New Hardware Installation” (Instalación de hardware nuevo) e
instale todos los dispositivos virtuales.
P73877-F8GFPC001_n50_t_man.qxd 11/13/01 1:15 PM Page 26
Page 16

Belkin Components
501 West Walnut Street
Compton • CA • 90220 • USA
Tel: 310.898.1100
Fax: 310.898.1111
Belkin Components, Ltd.
Unit 13 • Gatelodge Close • Round Spinney
Northampton • Northants • NN3 8RX • United Kingdom
Tel: +44 (0) 1604678300
Fax: +44 (0) 1604678330
Belkin Components B.V.
Starparc Building • Boeing Avenue 333
1119 PH Schiphol-Rijk • The Netherlands
Tel: +31 (0) 20 654 7300
Fax: +31 (0) 20 654 7349
Belkin Components, Ltd.
7 Bowen Cresent • West Gosford
NSW 2250 • Australia
Tel: +61 (2) 4372 8600
Fax: +61 (2) 4325 4277
© 2001 Belkin Components. All rights reserved. All trade names are registered trademarks of respective manufacturers listed.
© 2001 Belkin Components. Tous droits réservés. Toutes les marques de commerce sont des marques déposées des fabricants respectifs énumérés.
© 2001 Belkin Components. Todos los derechos reservados. Todas las marcas comerciales son marcas comerciales registradas de los fabricantes respectivos enumerados.
P73877
belkin.com
P73877-F8GFPC001_n50_t_man.qxd 11/13/01 1:15 PM Page 28
 Loading...