

Page 1

WIRELESS DUAL-BAND
User Manual
Trave l Rou te r
F9K1107au 8820au00920 Rev. A00
Page 2

TABLE OF CONTENTS
Getting Started ........................................... 1
What’s in the Box ............................................1
Initial Setup .................................................1
Getting to Know Your Router ............................... 4
Front Panel .................................................4
Back Panel ..................................................5
Technical Details ......................................... 6
Technical Features ...........................................6
System Requirements ........................................6
Using Your Router ........................................ 7
Troubleshooting, Support, and Warranty ................... 12
Troubleshooting ............................................12
Technical Support ...........................................15
Belkin International, Inc., Limited Lifetime Warranty ..............16
Page 3

GETTING STARTED
What’s in the Box
Wireless Dual-Band Travel Router
Carrying Case
Ethernet Cable
Power Supply
CD with User Manual
The Travel Router includes Plug Adapters to support
the various plug types in your region.
Initial Setup
1. Connect your Router to the Ethernet (network) connector in
your hotel room. (You may use either the cable provided by
the hotel or the cable provided with your Travel Router.)
1
Page 4
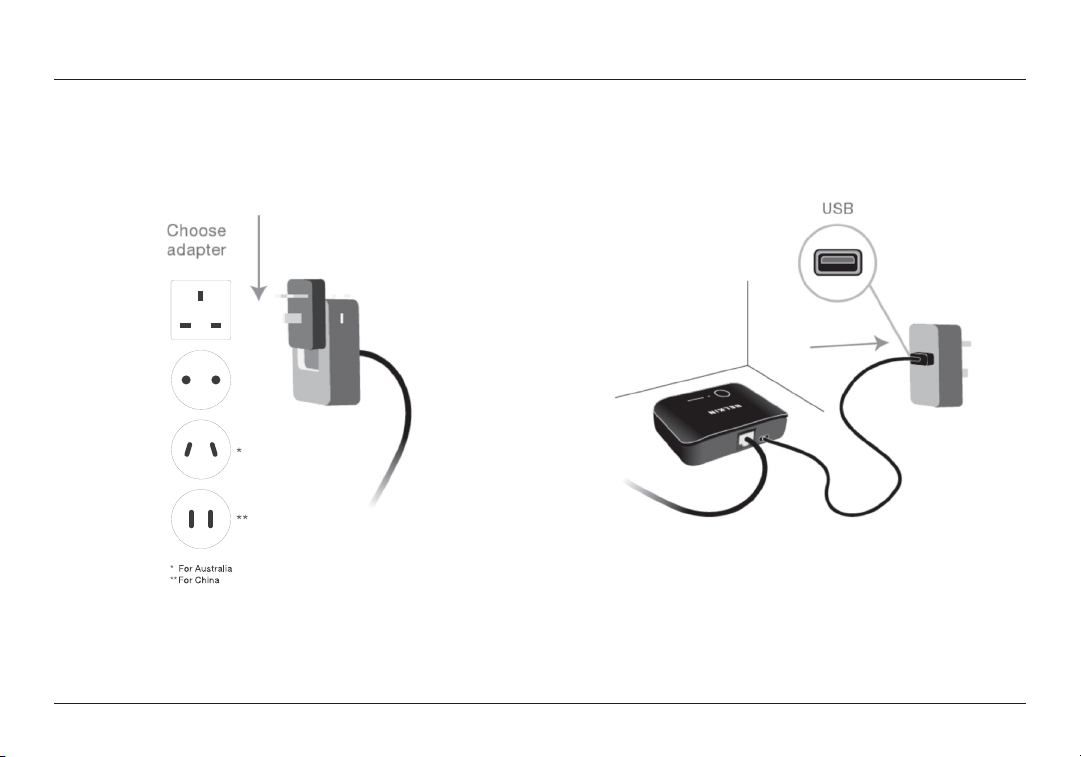
GETTING STARTED
2. If you purchased your Travel Router in Europe or Asia, it shipped
with adapters for the various plug types in your region. Please
attach the appropriate plug type to the power adapter.
3. Connect the power adapter to the Travel
Router using the provided cable.
2
Page 5
GETTING STARTED
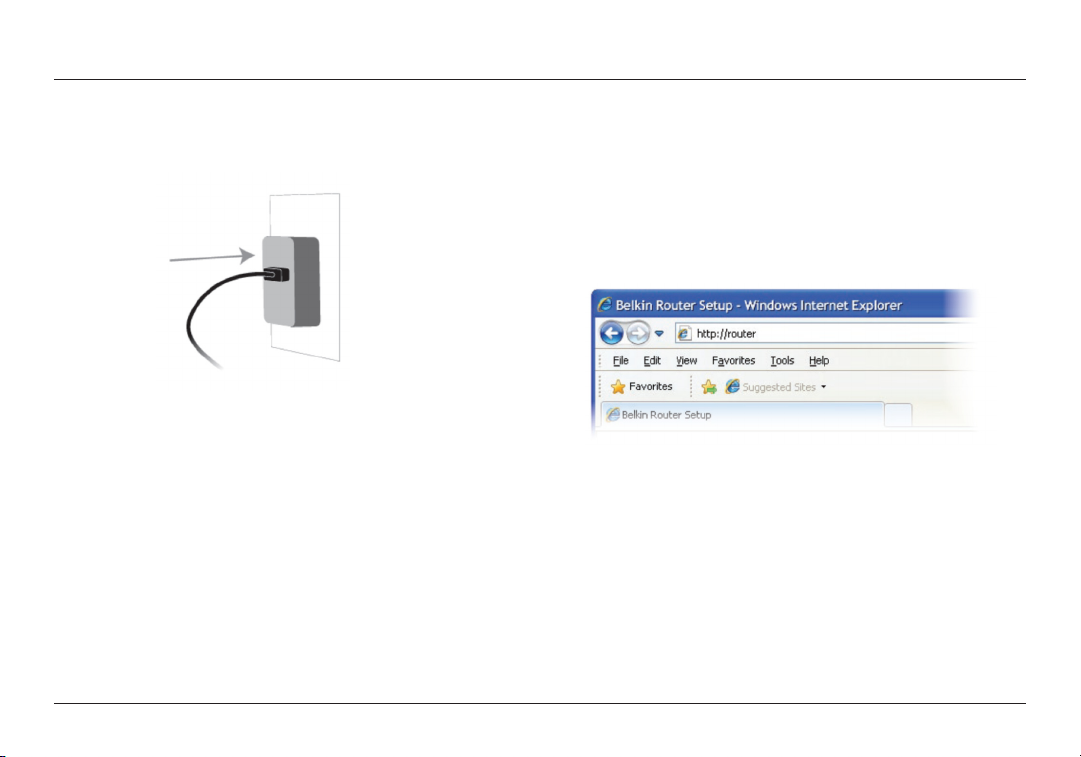
4. Plug the power adapter into the wall to start up your Travel Router.
5. Connect your devices to your Wi-Fi® network. The Travel
Router ships with a predefined network name (SSID)
and password for each band (2.4GHz and 5GHz); this
information is on your Quick Installation Guide.
Manual Setup Using Your Browser
In your browser, type “http://router” (you do not need to type
in anything else such as “www”). Then press the Enter key. If
you’re still having trouble running the manual setup option, type
“192.168.2.1” into your browser (you do not need to type in any thing
else such as “http://” or “w ww”). Then press the Enter key.
3
Page 6

GETTING TO KNOW YOUR ROUTER
Front Panel
A
B
A) Status Light
Your Router’s status is shown by the light on the front.
Off: The Router is not plugged into a power source.
Blinking Blue: The Router is star ting up.
Solid Blue: The Router is connected to the Internet.
Blinking Amber: The Router can’t detect the modem. Either the
modem is off, is not plugged into the Router, or is unresponsive.
B) Wi-Fi Protected Setup (WPS) Light and Button
The WPS button on the front of your Router can be used to
help establish a secure connection between your Router and
other WPS-enabled Wi-Fi devices such as computers. To use
the WPS feature on your Router, refer to the Router’s web
interface. The small light near the WPS button shows what is
happening while you are using WPS to establish a connection.
Off: Idle
Blinking Blue: The Router is listening for a WPS-enabled
computer or other device.
Solid Blue: The Router has made a secure connection with
the computer or other device.
Amber: A connection was not created.
4
Page 7

GETTING TO KNOW YOUR ROUTER
Back Panel
B
A
A) WAN Connector
Connect your hotel Internet connection to this port using the Ethernet
cable provided by the hotel or the cable included with your Router.
B) USB Power Port
This port is for the power supply.
Reset Button
There is a reset button on the bottom of the Router, which can
be depressed using a paper clip or other small object.
You may use this button if you need to reset the Travel Router for
some reason. See the Troubleshooting section for more details.
5
Page 8

TECHNICAL DETAILS
Technical Features
Wireless Standards with Link Rate:
• IEEE802.11n(upto300Mbps*)
• IEEE802.11g(upto54Mbps*)
• IEEE802.11a(upto54Mbps*)
• IEEE802.11b(upto11Mbps*)
Wireless Operating Spectrum:
• SimultaneousDual-Band2.4GHzand5GHz
Wireless Security:
• Pre-configuredsecurity
• Wi-FiProtectedSetup™
• 256-bitWPA2®encryption
• 64/128-bitWEPencryption
VPN Support:
• PPTP
• IPSecpass-through
*Thestandardtransmissionrates—150Mbps(for2.4GHz
and5GHz),54Mbps,and11Mbps—arethephysical
datarates.Actualdatathroughputwillbelowerandmay
dependonthemixofwirelessproductsused.
System Requirements
• BroadbandInternetservicewithRJ45Ethernetconnection
• Atleastonecomputerwith:
InstalledwirelessnetworkinterfacecardandTCP/IPprotocol
Windows®XP32(SP3orgreater),WindowsVista®32 /64,
orWindows7®32/64;orMacOS®Xv10.5orv10.6
InternetExplorer®v7orabove,Firefox®,
GoogleChrome™,orSafari®
Minimum1.8GHzprocessor
Minimum512MBRAM
6
Page 9

USING YOUR ROUTER
Opening the Router Firmware’s Web Interface
In your browser, type “http://router” (you do not need to type
in anything else such as “www”). Then press the Enter key. If
you’re still having trouble running the manual setup option, type
“192.168.2.1” in your browser (you do not need to type in anything
else such as “http://” or “w ww”). Then press the Enter key.
Updating the Router’s Firmware
via the Web Interface
The following steps show you how to update your Router’s
firmware using its web interface. You do not need to be connected
to the Internet as this interface is built into the Router itself.
Setup steps:
1. Locate and download the firmware file from the Belkin
suppor t site. (Type your par t number into the search box in
the top right corner and look for “ Firmware” in the title.)
2. Save the file to a location on your computer where
you can get to it easily, such as your desk top.
3. Connect the computer to your Router.
4. Open a web browser on the computer.
5. In the address bar of the web browser, type
“http://192.168.2.1” and press “Enter” on your keyboard.
6. Click “Login” in the upper right-hand corner of the page. The
Router does not ship with a password, so just click “Submit.”
7
Page 10

USING YOUR ROUTER
7. Click on “Firmware Update” toward the
bottom of the left-hand menu.
8. Click the “ Browse” button toward the middle of the screen to search
for the file you saved previously.
Note: The firmware version in the image
below is depicted as an example.
9. Select the firmware file by left-clicking on it and then click
the “Open” button in the lower-right corner of the window.
This will take you back into the Router’s inter face.
8
8
Page 11

USING YOUR ROUTER
10. Click the “ Update” button.
11. A prompt asking, “Are you sure you want to continue
with upgrading?” will appear. Click “OK.”
12. A second prompt will open telling you the Router will not
respond during the upgrade and warning you not to remove
the power supply from the Router. Click “OK” once more.
Congratulations. The firmware has been updated successfully.
Resetting the Router
Reset Button
The “Reset” button is used in rare cases when the Router
may function improperly. Resetting the Router will restore the
Router’s normal operation while maintaining the programmed
settings. You can also restore the factory default settings by
using the “Reset” button. Use the restore option in instances
where you may have forgotten your custom password.
Resetting the Router
Push and release the “Reset” button. The lights on the Router will
momentarily flash. The “Router” light will begin to blink. When
the “Router” light becomes solid again, the reset is complete.
Restoring Your Router to Factory Defaults
Press and hold the “Reset” button for at least 5 seconds,
and then release it. The lights on the Router will momentarily
flash. The “Router” light will begin to blink. When the “Router”
light becomes solid again, the restore is complete.
9
Page 12

USING YOUR ROUTER
Restoring the Router to Default
Settings Using the Web Interface
Symptoms
You need to restore the factory defaults using the web interface.
This may be because the Router is not performing as expected
or you wish to remove all previously configured settings.
Setup steps
1. Open a web browser on the computer.
2. In the address bar of the web browser, type “http://192.168.2.1”.
3. Click “Login” in the upper right-hand corner of the page. The
Router does not ship with a password, so just click “Submit.”
4. Click on “Restore Factory Defaults” in the left-hand column
under the “Utilities” heading.
5. Click on the “Restore Defaults” button.
10
Page 13

USING YOUR ROUTER
6. A warning box will open that says, “Warning: All your set tings
will be lost. Are you sure you want to do this?” Click “OK.”
7. The Router will begin the restoring process. Once the restore
is complete, the Router will reboot.
Note: This may take several minutes.
Your Router has successfully been restored to its factory settings.
11
Page 14

TROUBLESHOOTING, SUPPORT, AND WARRANTY
Troubleshooting
I can’t connect to the Internet wirelessly.
If the light on the front of the Router is solid blue, then your Router
is connected to the Internet. You may not be connected to the
Router’s wireless network. Please refer to “Adding Computers to
Your Network” in this manual for instructions. If your Windows XP
computer is running SP2, you will not be able to set up the Router
via the wireless setup process. You will need to either update to
Windows XP SP3 or complete the setup via a wired connection.
My wireless network performance is slow,
inconsistent, suffers from weak signal, or I’m having
difficulty maintaining a VPN connection.
Wireless technology is radio-based, which means connectivity
and the throughput performance between devices decreases
when the distance between devices increases. Other factors
that will cause signal degradation (metal is generally the worst
culprit) are obstructions such as walls and metal appliances.
Note also that connection speed may decrease as the computer
moves farther away from the Router. In order to determine if
wireless issues are related to range, we suggest temporarily
moving the computer within 10 feet from the Router if possible.
Changing the wireless channel
Depending on local wireless traffic and interference,
switching the wireless channel of your network
can improve performance and reliability.
12
Page 15

TROUBLESHOOTING, SUPPORT, AND WARRANTY
Limiting the wireless transmit rate
Limiting the wireless transmit rate can help improve range and
connection stability. Most wireless cards have the ability to limit the
transmission rate. To change this property in Windows, go to the
Windows Control Panel, open “Network Connections,” and doubleclick on your wireless card’s connection. In the properties dialog,
select the “Configure” button on the “General” tab, then choose
the “Advanced” tab and select the rate property. Wireless client
cards are usually set to automatically adjust the wireless transmit
rate for you, but doing so can cause periodic disconnects when the
wireless signal is too weak; as a rule, slower transmission rates
are more stable. Experiment with different connection rates until
you find the best one for your environment. Note that all available
transmission rates should be acceptable for browsing the Internet.
For more assistance, see your wireless card’s user manual.
Does the Router support Wireless Protected Access
(WPA) security?
The Router ships with WPA/WPA2 security turned on.
Windows XP and some older network hardware may
require a software update to support WPA/WPA2.
I am having difficult y setting up WPA security on my Router.
1. Log in to your Router by visiting http://router/ with your web browser.
Click on the “Login” button in the top right-hand corner of the
screen. You will be asked to enter your password. If you have never
set a password, leave the “Password” field blank and click “Submit.”
2. Click “Wireless” in the left-hand menu. Then click “Security”
just below that.
3. Select the “WPA/ WPA2” option.
4. Enter a password. This can be from 8– 63 characters of your choice,
including spaces and punctuation, OR a 64-digit hexadecimal
number (using only the numbers 0–9 and letters A–F).
5. Click “Apply Changes” to finish. Your wireless
connection is now encrypted. Each computer using your
wireless network will need to use the new key.
Note: If you are configuring the Router over a wireless
connection, you will have to re-connect to the
Router after changing any security settings.
Note: Some older networking hardware supports
only WEP encryption. If your older computers cannot
connect to your network, try 128-bit or 64-bit WEP, or
seek software updates from their manufacturers.
13
Page 16

TROUBLESHOOTING, SUPPORT, AND WARRANTY
I am having difficult y setting up Wired Equivalent
Privacy (WEP) security on my Router.
1. Log in to your Router. Visit http://router/ with your web browser.
Click on the “Login” button in the top right-hand corner of the
screen. You will be asked to enter your password. If you have never
set a password, leave the “Password” field blank and click “Submit.”
2. Click “Wireless” in the left-hand menu. Then
click “Security ” just below that.
3. Select the “128-bit WEP” option.
4. You may type in a WEP key manually, or generate one from
a passphrase. Type a phrase in the “Passphrase” field and
click the “Generate” button. A WEP key is composed of 26
hexadecimal digits (0 –9, A –F. For example, C3 03 0F AF 4B
B2 C3 D4 4B C3 D4 EE 74 is a valid 128-bit WEP key.
5. Click “Apply Changes” to finish. Your wireless
activity is now encrypted. Each computer using your
wireless network will need to use the new key.
Note: If you are configuring the Router over a wireless
connection, you will have to re-connect to the
Router after changing any security settings.
Note: Some older networking hardware supports
only 64-bit WEP encryption. If your older computers
cannot connect to your network, try 64-bit WEP.
14
Page 17

TROUBLESHOOTING, SUPPORT, AND WARRANTY
Technical Support
US
http://www.belkin.com/support
UK
http://www.belkin.com/uk/support
Australia
http://www.belkin.com/au/support
New Zealand
http://www.belkin.com/au/support
Europe
http://www.belkin.com/uk/support
Singapore
1800 622 1130
Malaysia
1 800 812 076
India
1800-419-5546
Thailand
0018 004 413318
Philippines
180 014410 282
Hong Kong
30 021318
China
4008-211-805
Australia
1800 235 546
New Zealand
0800 235 546
Asia email
asia-support@belkin.com
Korea email
koreasupport@belkin.com
15
Page 18

TROUBLESHOOTING, SUPPORT, AND WARRANTY
Belkin International, Inc., Limited
Lifetime Warranty
What this warranty covers.
Belkin International, Inc. (“Belkin”) warrants to the original
purchaser of this Belkin product that the product shall be free
of defects in design, assembly, material, or workmanship.
What the period of coverage is.
Belkin warrants the Belkin product for lifetime.
What will we do to correct problems?
Product Warranty.
Belkin will repair or replace, at its option, any defective product
free of charge (except for shipping charges for the product).
Belkin reserves the right to discontinue any of its products without
notice, and disclaims any limited warranty to repair or replace any
such discontinued products. In the event that Belkin is unable to
repair or replace the product (for example, because it has been
discontinued), Belkin will of fer either a refund or a credit toward
the purchase of another product from Belkin.com in an amount
equal to the purchase price of the product as evidenced on the
original purchase receipt as discounted by its natural use.
What is not covere d by this warranty?
All above warranties are null and void if the Belkin product is not
provided to Belkin for inspection upon Belkin’s request at the sole
expense of the purchaser, or if Belkin determines that the Belkin
product has been improperly installed, altered in any way, or tampered
with. The Belkin Product Warranty does not protect against acts
of God such as flood, lightning, earthquake, war, vandalism, theft,
normal-use wear and tear, erosion, depletion, obsolescence, abuse,
damage due to low voltage disturbances (i.e. brownouts or sags),
non-authorized program, or system equipment modification
or alteration.
How to get service
To get service for your Belkin product you must take the
following steps:
1. Contact Belkin International, Inc., at 12045 E. Waterfront
Drive, Playa Vista, CA 90094, Attn: Customer Ser vice,
or call 800-223-5546*, within 15 days of the Occurrence.
Be prepared to provide the following information:
a. The part number of the Belkin product.
b. Where you purchased the product.
c. When you purchased the product.
d. Copy of original receipt.
2. Your Belkin Customer Service Representative will then
instruct you on how to forward your receipt and Belkin
product and how to proceed with your claim.
* Refer to Technical Support section for contacts in your region
16
Page 19

TROUBLESHOOTING, SUPPORT, AND WARRANTY
Belkin reserves the right to review the damaged Belkin product.
All costs of shipping the Belkin product to Belkin for inspection
shall be borne solely by the purchaser. If Belkin determines,
in its sole discretion, that it is impractical to ship the damaged
equipment to Belkin, Belkin may designate, in its sole discretion,
an equipment repair facility to inspect and estimate the cost to
repair such equipment. The cost, if any, of shipping the equipment
to and from such repair facility and of such estimate shall be
borne solely by the purchaser. Damaged equipment must remain
available for inspection until the claim is finalized. Whenever
claims are settled, Belkin reserves the right to be subrogated
under any existing insurance policies the purchaser may have.
How state law relates to the warranty
THIS WARRANTY CONTAINS THE SOLE WARRANTY OF
BELKIN. THERE ARE NO OTHER WARRANTIES, EXPRESSED
OR, EXCEPT AS REQUIRED BY LAW, IMPLIED, INCLUDING
THE IMPLIED WARRANTY OR CONDITION OF QUALITY,
MERCHANTABILITY OR FITNESS FOR A PARTICULAR
PURPOSE, AND SUCH IMPLIED WARRANTIES, IF ANY, ARE
LIMITED IN DURATION TO THE TERM OF THIS WARRANTY.
Some states do not allow limitations on how long an implied
warranty lasts, so the above limitations may not apply to you.
IN NO EVENT SHALL BELKIN BE LIABLE FOR INCIDENTAL,
SPECIAL, DIRECT, INDIRECT, CONSEQUENTIAL OR
MULTIPLE DAMAGES SUCH AS, BUT NOT LIMITED TO,
LOST BUSINESS OR PROFITS ARISING OUT OF THE
SALE OR USE OF ANY BELKIN PRODUCT, EVEN IF
ADVISED OF THE POSSIBILITY OF SUCH DAMAGES.
This warranty gives you specific legal rights, and you may also have
other rights, which may vary from state to state. Some states do
not allow the exclusion or limitation of incidental, consequential,
or other damages, so the above limitations may not apply to you.
17
Page 20

© 2011 Belkin International, Inc. All rights reserved. All trade names are registered
trademarks of respective manufacturers listed. Windows, Windows Vista, and Internet
Explorer are either registered trademarks or trademarks of Microsoft Corporation in the
United States and/or other countries. Mac OS and Safari are trademarks of Apple Inc.,
registered in the U.S. and other countries. Google Chrome is a trademark of Google Inc.
 Loading...