

Page 1

N150 Wireless N Router
F9K1001v1
User Manual
8820-00773 Rev. A00
Page 2

TABLE OF CONTENTS
Getting Started ........................................... 1
What’s in the Box .............................................1
Initial Setup..................................................1
Advanced Tools & Settings.....................................6
The Belkin Router Manager ....................................7
Manual Setup Using Your Browser ..............................8
Adding Computers to Your Network .............................9
Getting to Know Your Router .............................. 11
Front Panel .................................................11
Back Panel .................................................12
Technical Details ........................................ 13
Technical Features ..........................................13
System Requirements ........................................14
Using Your Router .......................................15
Enabling Auto Update on Your Belkin Router.....................15
Updating Your Router via Your System Tray
(Windows) or Menu Bar (Mac) .................................17
Updating the Router’s Firmware via the Web Interface ............18
Resetting the Router .........................................22
Restoring Your Router to Factory Defaults .......................22
Restoring the Router to Default Set tings Using the Web Interface ...23
Troubleshooting, Support, and Warrant y ...................26
Troubleshooting .............................................26
Technical Suppor t ...........................................33
Belkin International, Inc., Limited 2-Year Product Warrant y .........34
Regulatory Information ................................... 37
FCC Statement..............................................37
CE Statement ...............................................38
Page 3

GETTING STARTED
What’s in the Box
N150 Wir eless Ro uter
Ethernet cable (attached to router)
Power supply (attached to router)
Network information card (attached to router)
Belkin Setup CD with User Manual
Initial Setup
Whe re to Pl ace Your Rou ter
For th e bes t r esult s, place the Rou ter next to yo ur mo dem in
an open location away from large metal objects and magnets
suc h as those found in spea kers. Ra ising the Rou ter above
floor level can improve the strength of your wireless signal.
1
Page 4
GETTING STARTED
2 3
modem
1
How to Set It Up
2
Page 5

GETTING STARTED
Setup
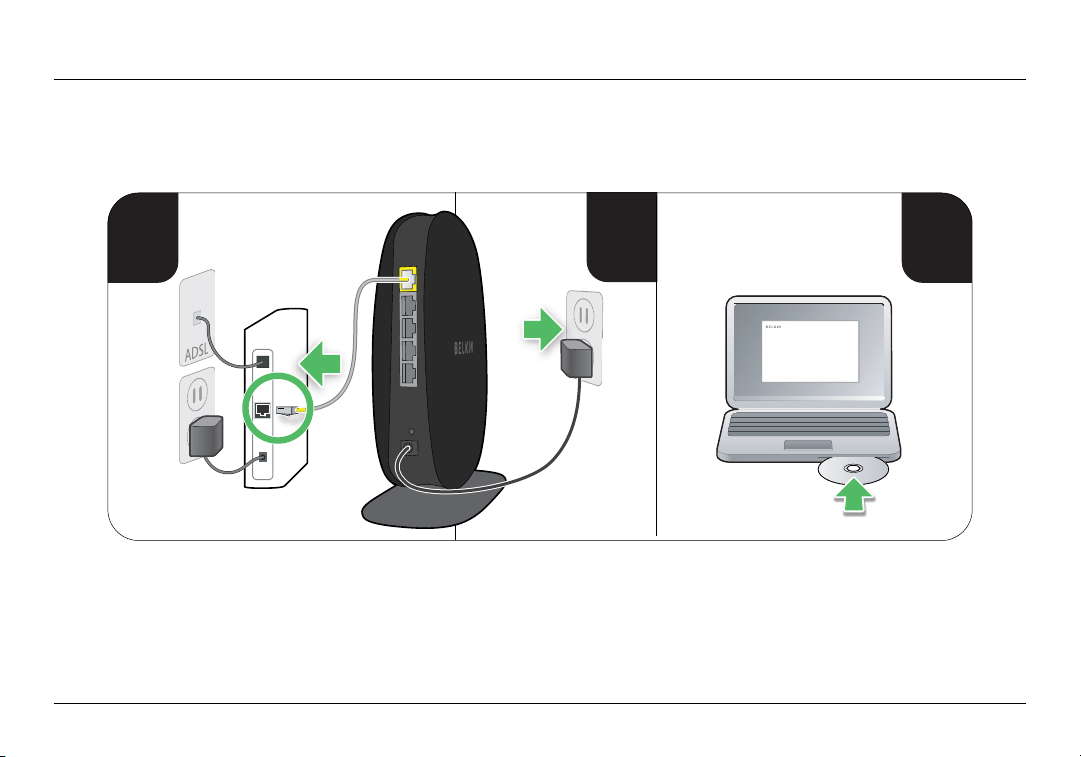
1. Co nn ect your Ro ute r’s Et herne t c ab le to you r mod em’s Et hernet
por t (on the back of yo ur modem). This port m ight be label ed
dif ferently on your pa rt ic ular mod em. If you are adding a
Rou ter fo r the fi rst t ime, thi s p or t may be co nn ected to your
computer by an Ethernet cable. It is OK to disconnect your
computer and plug the Router into the modem instead.
2. Plug the Router’s power supply into a wall outlet.
3. Put the CD into your compu ter. If th e CD doe sn’t
ope n automa tical ly, pleas e browse to yo ur CD drive
and double- click on the Belkin Setup CD icon.
4. Click the Setup icon on the CD menu.
3
Page 6
GETTING STARTED
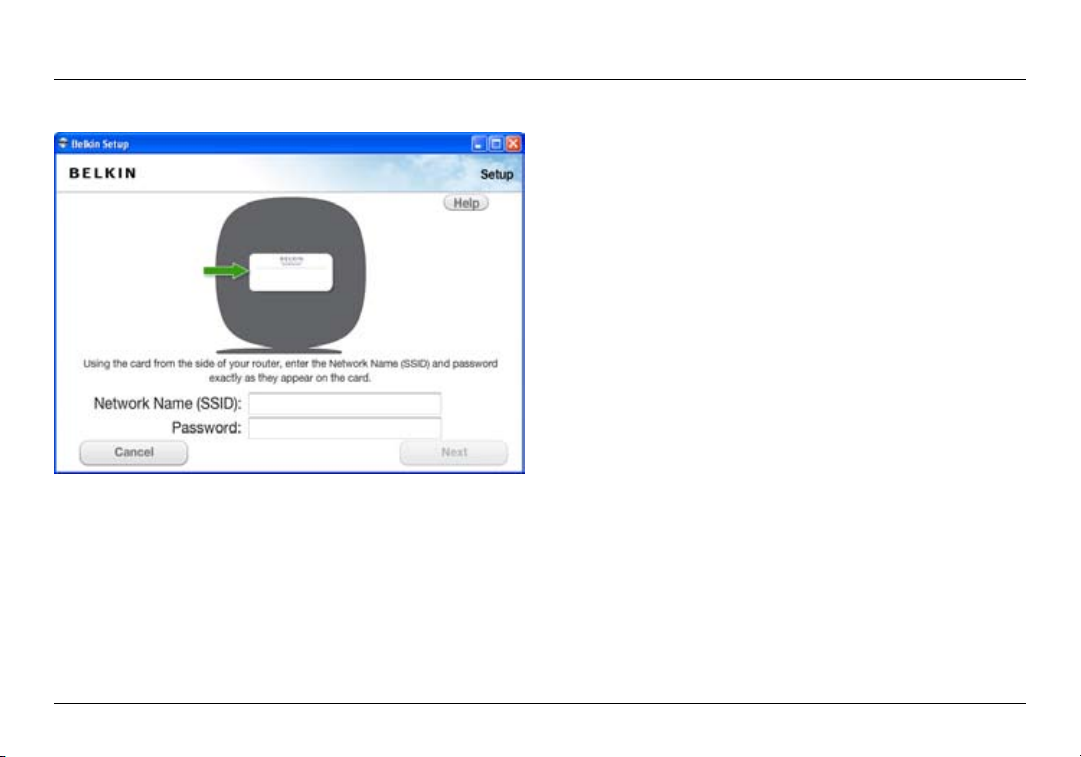
5. Afte r a brief ins talla tion, th e setup sof tware will as k you
for th e net work nam e and pa sswor d f rom t he netwo rk
information card that is at tache d to your Rout er. Sto re the
card under the base of your Router for future reference.
4
Page 7
GETTING STARTED
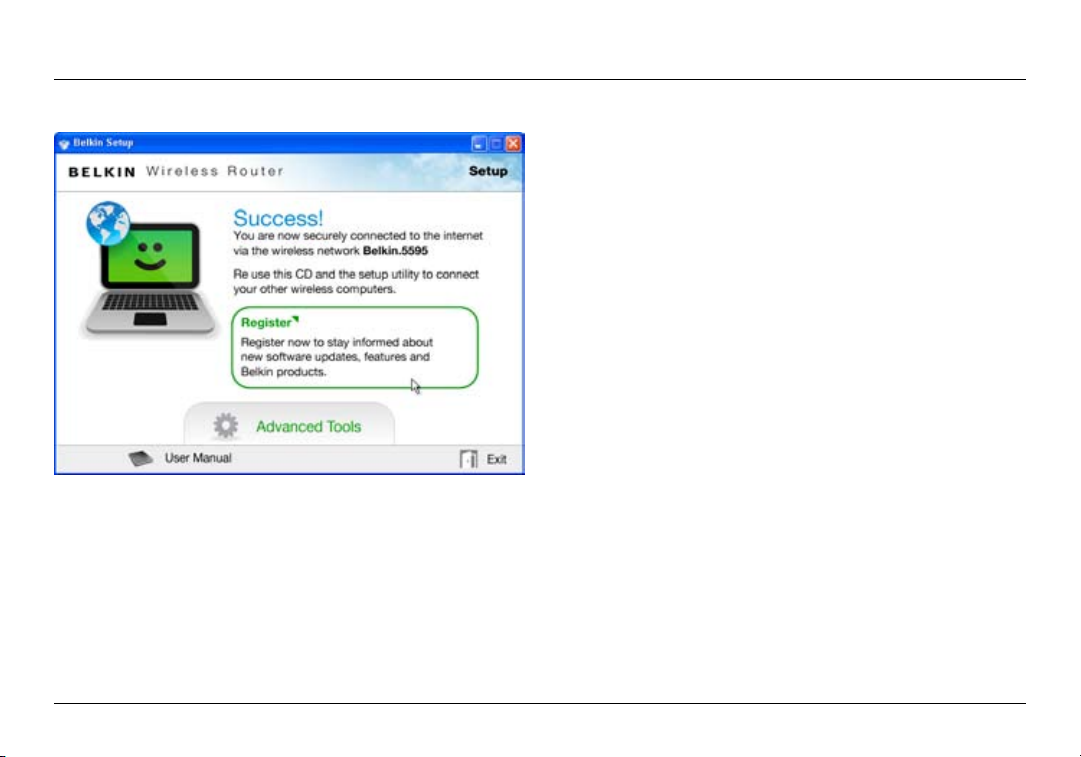
6. A progr es s s creen will ap pear whi le ad ditio nal software is
ins talle d. This may take a few minut es to complete. Onc e
fin ished , a “Succe ss” m essag e will a ppear in dicat ing t hat yo u
are connected to the Internet via your new Belkin Router.
During setup you may be asked for additional information.
You m ay need to ent er a use rname an d pas swo rd provi ded
by your I SP. Th is us ernam e and pa ssword i s l ike ly to be
found on mater ials that cam e from your IS P whe n you
sig ned u p f or serv ice. If neces sary, you may nee d t o c ontac t
your ISP to retrieve your username and password.
If you ha ve a s tatic IP address, you may need to enter
additional information also provided by your ISP.
If you r c omputer doesn’t have a wire less adapter, or the
set up soft war e is una ble to c ontro l i t, you may be asked to
connect your computer to the Router with a network cable.
5
Page 8
GETTING STARTED
Advanced Tools & Settings
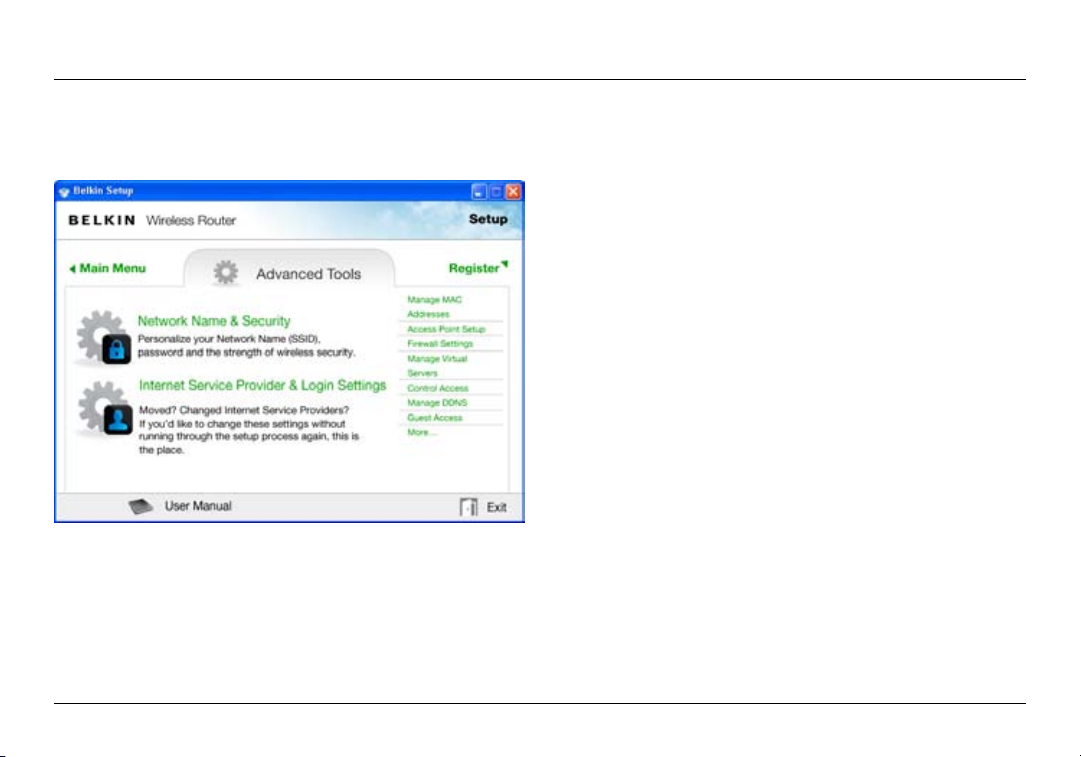
After th e i nitia l setup is complete, you have the op tion to
change settings like your network name, security t ype, and
pas sword. To make t hese chang es and othe rs, c lick on the
Advanc ed Tool s ico n at the CD Se tup menu and sel ec t o ne
of the following settings that you would like to change:
Network Name & Security – Pe rsona lize your n etwor k n ame
(SSID), password, and strength of wireless security.
Internet Service Provider & Login Settings – H ave
you moved or changed Internet Service Providers?
If you ’d l ike to chan ge th ese settin gs without ru nning
through the setup process again, this is the place.
6
Page 9
GETTING STARTED
belkin.310
Router Settings
User Manual
Check for Updates
Options
Exit
The Belkin Router Manager
The Belkin Router Manager appears in your system tray
(Windows) or menu ba r (Mac). I ts ic on indic ates the curr ent
sta tus of your Ro uter and also al lows you to ac cess you r
Rou ter ’s set tings to make ch anges . I t a lso p rov ides quick
access to software that came bundled with your Router.
To access the Router settings, click on the icon
and select from the menu that appears.
The status of your Router is shown by the Belkin Router Manager
icon, which closely mimics the light on the front of the Router.
Blue: You are con necte d to your B elkin Ro uter
and it is connected to the Internet.
Amber: You are conne cted to your B elkin Ro uter,
but it is not connected to the Internet.
7
Page 10
GETTING STARTED
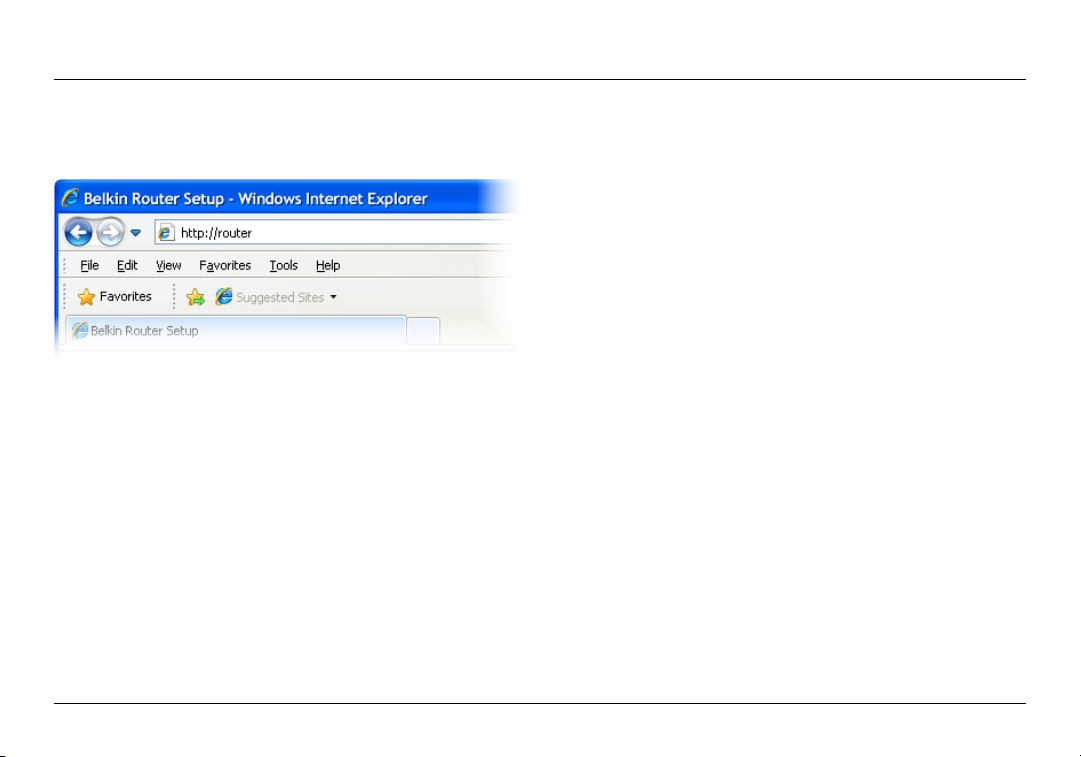
Manual Setup Using Your Browser
In you r b rowser, t ype “ ht tp: //rout er ” ( you do not need to type
in any thing el se su ch as “ww w”). Then pre ss th e Ente r key. If
you’re still having troub le runni ng th e m anual setu p o ption , t ype
“192.168.2.1” in your browser (you do not need to t ype in a nything
else such as “http://” or “www”). Then press the Enter key.
8
Page 11

GETTING STARTED
Adding Computers to Your Network
Wir eless devices such as computers, net work printers , and ga ming
systems can connect to your Router with a few simple steps.
Using the CD
1. Pu t the Se tup CD into your compu ter. If the CD
doe sn’t ope n automa tically, browse to your CD
drive and open the Belkin Setup CD icon.
2. Click the Setup icon on the CD menu.
3. After a brief installation, the setup software will ask you for the
net work name and pass wor d fro m t he network in forma tion card
tha t c am e w ith your Ro uter. T hi s c ard i s m ost like ly now located
underneath the foot of your Router in the provided card slot.
4. A progr ess s creen will ap pear whi le ad ditio nal software is
ins talle d. This may take a few minut es to complete. Onc e
fin ished , a “Suc ce ss” m essag e w ill a ppear in dicat ing t hat yo u
are connected to the Internet via your new Belkin Router.
Note: Th e s etup sof tware runs on ly on
Windows and Mac OS X systems.
9
Page 12

GETTING STARTED
Manually
If you ch oo se not to use the incl uded Setup CD for
add ing addi tiona l com puter s o r wireless de vices , y ou
can manually add these items to your network.
1. Lo cate the wire less- network- conne ct ions opt ion
on your computer or wireless device.
2. Select you r B elkin Router from the list of avail able net works. You
can iden tify your Bel kin R outer by lo catin g t he ne twork name
(SSID) from the card located underneath the foot of your Router.
3. Enter your ne twork pass wor d (locat ed on
your network information card).
Your wireless device will take a few moments to connect to your
network. If the connection is not made the first time, try this
pro cess again . I f you still have difficu lt y con necti ng to your net work
after tr ying this pro cess a f ew times , s ee th e “ Trouble shoot ing”
section in this manual for help with connecting to your network.
Note: In some cases you may be prompted to select the
security type. It is printed on the card for your convenience.
Using the WPS Button
1. St ar t WPS Push Butto n Con necti on (W PS PBC) on your
com puter or ot her W i- Fi devic e t hat you wou ld like to con nect
wir eless ly to your Router. Often the re wi ll be a but ton for this
pur pose in soft war e that c ame w ith the dev ice, or a p hys ic al
“WPS,” “PBC,” or “Security” button on the device itself.
2. Within two minutes, press the WPS button on your Router.
The WP S lig ht (small light a bove W PS button) wil l blink blue whi le it
listens for your Wi-Fi device. Once a connection is established, the
light will turn blue and then go out. If a connection is not established,
the light will blink amber. You may repeat the process to try again.
You can repeat this process for each WPS-enabled
device you’d like to add to your network.
10
Page 13

A
B
GETTING TO KNOW YOUR ROUTER
Front Panel
A) Router Status Light
Your Router’s status is shown by the light on the front.
Off: The Router is not plugged into a power source.
Blinking Blue: The Router is starting up.
Solid Blue: The Router is connected to the Internet.
Blinking Amber: The Rou ter can’ t d etect the mod em. Eith er the
modem is off, is not plugged into the Router, or is unresponsive.
B) Wi-Fi Protected Setup (WPS) Light and Button
The WPS button on the front of your Router can be used to
help establish a secure connection between your Router and
other WPS-enabled Wi-Fi devices such as computers. To use
the WPS feature on your Router, see “Getting Started > Adding
Computers to Your Network > Using the WPS Button”.
The small light near the WPS button shows what is happening
while you are using WPS to establish a connection.
Off: Idle
Blinking Blue: The Router is listening for a WPS-
enabled computer or other device.
Solid Blue: The Ro ute r has made a secure
connection with the computer or other device.
Amber: A connection was not created.
11
Page 14

A
B
C
D
GETTING TO KNOW YOUR ROUTER
Back Panel
A) Modem (WAN) Connector
Connect your modem to this
port using an Ethernet cable.
B) Wired (LAN) Connectors
Connect computers and other
wired network devices to these
ports using Ethernet cables.
C) Reset Button
This button is used to restart
your Router in rare cases when it
functions incorrectly. Resetting
the Router will preserve your
settings. This button may also
be used to restore the factory
default settings. Please see
the Troubleshooting section
for more information.
12
D) Power Connector
Con nect the i nclud ed power
supply to this jack.
Page 15

TECHNICAL DETAILS
Technical Features
Integrated 802.11n Wireless Access Point
The N150 te chnolog y enh ances yo ur Router’s
wir eless capa bilit ies, all owing for d ata tran sfer speed s
of up to 150Mbps across your net work.
NAT IP Address Sharing
To save you th e c ost o f a dding IP ad dresses pe r
com puter in yo ur house, your Belk in Route r u ses N etwor k
Address Translation (NAT) technology, allowing you to
share a single IP address across your net work.
SPI Firewall
Your Router i s e quipp ed wi th a firewall that wil l p rotec t your
network from a wide array of common attacks and viruses.
Universal Plug-and-Play (UPnP) Compatibility
The UPnP (Universal Pl ug -and- Pl ay) feature in you r Router
offer s s eamle ss op erati on of voice and video me ss aging,
games, and other applications that are UPnP-compliant.
Web-Based Advanced User Interface
You can easily make changes to your Router’s advanced
set ti ngs throug h your we b browse r. These cha nges can
be made from any computer on your network.
Belkin Router Monitor
The Belkin Router Monitor application helps you to monitor
your R outer ’s s tatus and cha nge n et wor k set ti ngs.
Integrated 4-Port 10/100 Switch
Your Router h as a bui lt- in, 4 -por t n et wor k swi tch to
all ow you r wired compu ters to share: prin ter s, data,
MP3 files, digit al photo s, and much more.
13
Page 16

TECHNICAL DETAILS
System Requirements
Rou ter
Broadband Internet connection such as a cable or
DSL modem with RJ45 (Ethernet) connection
At least one computer with an installed network interface adapter
TCP/IP networking protocol installed on each computer
RJ45 Ethernet networking cable
Internet browser
Setup Software
®
A computer running Windows
®
, or Windows 7; or Mac OS® X v10. 5 o r v 10.6 on ly
Vista
XP SP 3 or hig her, Wind ows
Minimum 1GHz processor and 512MB RAM
600MB of free hard-drive space for installation
14
Page 17

USING YOUR ROUTER
Enabling Auto Update on Your Belkin Router
The Router has the capab ility to auto mat ic ally check
for a newer ver si on of firmware and ale rt yo u whe n i t’s
availa ble. You c an choose to download th e n ew versi on or
ign ore i t. By defau lt this fea ture is disab led. If you want to
enable it, select “Enable” and click “Apply Changes”.
Note: We r ecomm end you use a computer t hat
has a wired connection to the Router.
Setup steps:
1. Open a web bro wse r on the comp uter.
2. In the address bar of the web browse r, t ype “ ht tp: //192 .168.2.1”.
3. Click “ Login ” i n t he up per r ight-han d cor ner of t he page. Th e
Rou ter does no t s hip w ith a pa ssword, so just cli ck “S ubmit ”.
15
Page 18

USING YOUR ROUTER
4. Click on “ System Settin gs ” i n the le ft-hand
column under the “Utilities” heading.
5. Toward the lower-ha lf si de of th e s creen yo u w ill
find “Auto Update Firmware Enabling”.
6. Select “Enab le” by clic ki ng the r adi o but ton a nd then
click “Apply Changes” at the bottom of the screen.
16
16
Page 19

USING YOUR ROUTER
Updating Your Router via Your System
Tray (Windows) or Menu Bar (Mac)
Once you have com plete d t he setup proc ess, you wi ll ne ed
to upd ate the new so ft ware for your Rou ter. This ca n be don e
easily via your computer’s system tray or menu bar.
Setup steps:
1. Click on the green Belkin Router Manager icon (right-click for
Windows) in your system tray (Windows) or menu bar (Mac).
2. Select “Check for Updates” or “Update Available” from the menu.
3. You should now see the Belkin Updater window.
4. Click on the “Install Update” icon.
17
17
Page 20

USING YOUR ROUTER
Updating the Router’s Firmware
via the Web Interface
The fo llowi ng steps sh ow you how to upd ate yo ur Router’s
fir mwa re us ing its web in terface. You do not nee d t o b e con necte d
to the Internet as this interface is built into the Router itself.
Setup steps:
1. Loc ate and dow nload th e fir mwa re file from the Belk in
sup port si te. (Type you r p ar t num ber into th e sea rch box in
the to p rig ht corner and look fo r “ Firmware ” i n the ti tle.)
2. Save t he file to a l oc ation on yo ur compu ter wher e
you ca n get to it ea sily, suc h as you r d esktop.
3. Connect the computer to one of the four LAN ports on the Router.
18
18
Page 21

USING YOUR ROUTER
4. Open a web browser on the computer.
5. In th e addres s bar of th e web br ows er, ty pe
“http://19 2.168. 2.1” a nd press “ Ent er ” o n your keyboar d.
6. Click “Log in” i n t he up per righ t-han d cor ner of t he page. Th e
Router does not ship with a password, so just click “Submit”.
7. Click on “Firmware Update” toward the
bottom of the left-hand menu.
19
19
Page 22

USING YOUR ROUTER
8. Click the “Browse” button toward the middl e o f the
screen to search for the file you saved previously.
Note: The firmware version in the images below is
depicted as an example. Your file name will vary
dep endin g on your m odel and ve rs ion.
9. Select the firmware file by left-clicking on it and then click
the “Open” button in the lower-right corner of the window.
This will take you back into the Router’s interface.
20
20
Page 23

USING YOUR ROUTER
10. Click the “Update” button.
11. A pro mpt a sking , “A re you sure yo u want to cont inue
wit h upg rading?” will ap pear. Cli ck “O K”.
12. A secon d p rompt wi ll op en telli ng you the Rou ter will not
res pond durin g t he up grade an d warnin g you not to remo ve
the power supp ly from the Rout er. Cli ck “O K” once more.
Congratulations. The firmware has been updated successfully.
21
21
Page 24

USING YOUR ROUTER
Resetting the Router
Reset Button – Red
The “ Reset ” but ton is u sed in r are case s whe n t he Ro ute r
may fu nctio n imp roper ly. Reset ting the Rout er will restore the
Router’s normal operation while maintaining the programmed
set ti ngs. You c an al so resto re the fact or y defaul t s et tings by
usi ng th e “ Reset ” but ton. Use th e res tor e option in inst an ces
where you may have forgotten your custom password.
Reset ti ng th e R ou ter
Pus h a nd re lease the “Reset” button. The light s on the Ro uter wil l
momentarily flash. The “Router” light will begin to blink. When
the “Router” light becomes solid again, the reset is complete.
Restoring Your Router to Factory Defaults
Press and hold the “ Reset ” button for at least 10 seconds,
and then re lease it. The ligh ts on th e R outer wi ll momenta rily
fla sh. T he “R outer ” lig ht will begin to bl ink. When the “Rou ter”
light becomes solid again, the restore is complete.
22
Page 25

USING YOUR ROUTER
Restoring the Router to Default
Settings Using the Web Interface
Symptoms
You n eed to rest ore the fac tory de fau lts u sing the we b interfac e.
Thi s may be be cause the Rou ter is not perfo rm ing as expe cted
or you wish to remove all previously configured settings.
Setup steps
1. Open a web bro wse r on the comp uter.
2. In the address bar of the web browse r, t ype “ ht tp: //192 .168.2.1”.
3. Click “ Login ” i n t he up per r ight-han d cor ner of t he page. Th e
Rou ter does no t s hip w ith a pa ssword, so just cli ck “S ubmit ”.
23
Page 26

USING YOUR ROUTER
4. Click on “Restore Factory Defaults” in the lef thand column under the “Utilities” heading.
5. Click on the “Restore Defaults” but ton.
24
Page 27

USING YOUR ROUTER
6. A warning box will open that says, “ Warning: All your settings
will be lost. Are you sure you want to do this?” Click “OK ”.
7. The Ro uter wil l beg in the r estoring proc ess. Once
the restore is complete, the Router will reboot.
Note: Thi s m ay take severa l m inute s.
Your Router h as success fully been re stored to i ts facto ry sett ings.
25
Page 28

TROUBLESHOOTING, SUPPORT, AND WARRANTY
Troubleshooting
The Setup CD does not automatically start.
If Belki n S etup doe s not ru n w hen you inser t the CD -R OM, yo ur
computer may not be configured to open CDs automatically.
If Belki n S etup doe s not ap pear wit hin 15 se conds , b rowse
to your C D- ROM driv e a nd op en the “ Be lkin Set up” icon.
Alternatively, you may visit http://router/ and perfo rm th e
set up manua lly. Plea se se e “ Manua l S etup Usi ng Your
Browser” earlier in this manual for more information.
Belkin Setup cannot find my Router.
If Belki n S etup is not able to comm unica te with your R outer du ring
the installation process, please check the following items.
1. Ma ke sure tha t t he wi reles s har dwa re on your
computer is turned on, if available.
2. Try co nnect ing your comp ute r to one of th e four “ wi red”
ports on the Router with an Ethernet cable.
3. Ensure that the Router is on. The front-panel light should be on.
4. Unplug the Router’s power supply for 10
seconds, then plug it back in.
5. Ther e may be fi rew all softwa re on your compu ter preventing
an outgoing connection. You may choose to temporarily
disable this software before attempting setup.
If Belki n S etup sti ll ca nnot fin d t he Ro ute r, you might ch oose
to do a m anual se tup. Refer to “Manu ally Configurin g
Network Settings” in this manual for details.
26
Page 29

TROUBLESHOOTING, SUPPORT, AND WARRANTY
Belkin Setup cannot connect my Router to the Internet.
If Belki n S etup is not able to conn ect t he Router to
the Internet, please check the following items:
1. Use the troubleshooting suggestions within Belkin Setup.
2. If yo ur ISP requ ires a user name and pas swo rd, make su re that
you have typed in your us er name and password cor re ctly. Som e
use r nam es requi re that the ISP’s doma in may be a t t he en d o f t he
nam e. Examp le: “myn ame@my isp.com”. Th e “@myisp.com” part of
the user name may need to be typed as well as your user name.
3. If you con tinue to have no Inter net conn ec tion, re fer
to “Manu ally Confi gurin g N et wor k Set ti ngs” in this
manual for an alternative setup method.
Belki n S et up compl eted install ation, but I ca nnot browse t he
Web. The light on the front of my Router is blinking amber.
1. Ma ke sure the Ro uter is conne cted to you r m odem with an
Ethernet cable via the Router’s one WAN (modem) port.
2. Unplug the modem from its power source and make sure
that it goes dark. Then reapply power to the modem.
3. Unpl ug your Rou ter’s power suppl y, wait 10 secon ds,
and plug it ba ck in. T his will caus e t he Ro ute r to try
to reestablish communication with the modem.
27
Page 30

TROUBLESHOOTING, SUPPORT, AND WARRANTY
Belki n S et up compl eted install ation, but I ca nnot browse t he
Web. The light on the front of my Router is solid amber.
1. Use the troubleshooting suggestions within Belkin Setup.
2. If yo ur ISP requ ires a user name and pas swo rd, make su re that
you have typed in your us er name and password cor re ctly. Som e
use r nam es requi re that the ISP’s doma in may be a t t he en d o f t he
nam e. Examp le: “myn ame@my isp.com”. Th e “@myisp.com” part of
the user name may need to be typed as well as your user name.
3. If you have a st atic conne ction , y our ISP wil l have
assig ned you an IP address, subn et mask, and gat eway
add ress. Pl ease re-run Bel kin S etup and en ter this
information when a static connection is mentioned.
4. You may n eed to conf igure yo ur Route r t o m eet
the specific requirements of your ISP. To search
our knowled ge ba se for ISP- speci fi c i ssues , go to:
http://www.belkin.com/support and type in “ISP”.
5. If you continue to have no Inter net connec tion, re fer
to “Manu ally Confi gurin g N et wor k Set ti ngs” in this
manual for an alternative setup method.
I can’t connect to the Internet wirelessly.
If the ligh t on the fr ont of t he Route r i s solid blue, th en your
Rou ter is connec ted to the Int ernet . You may not be conn ected
to the Ro uter’s wire less netwo rk. Please re fer to “Ad ding
Computers to Your Network” in this manual for instructions.
If you r W indows X P c omput er is ru nning SP 2, you will
not be able to se t u p the Ro uter via the wir eless setup
process. You will need to either update to Windows XP
SP3 or complete the setup via a wired connection.
28
Page 31

TROUBLESHOOTING, SUPPORT, AND WARRANTY
I c an’t con ne ct to th e Int ernet wire lessly and my
network name is not listed in Available Networks.
1. Verify that your Router is on and the
front-panel light shows solid blue.
2. If you are far from the Router, you might try moving
closer to see if you might have been out of range.
3. Usin g a comp ute r attac hed to the Router v ia a net work cable,
visit http://router/ and e nsure th at “B roadc ast S SID” is ON.
This setting is found on the “Channel and SSID” page.
My wi r ele s s net w ork pe r for m anc e i s sl ow, i n con s ist e nt,
suffers from weak signal, or I’m having dif ficulty maintaining a
VPN connection.
Wir eless te chnolog y is rad io -base d, which mean s c on necti vi ty
and the thr oughp ut pe rf orman ce between de vices
dec rease s whe n the di stanc e bet ween dev ices incre ases.
Other factors that will cause signal degradation (metal is
gen erall y the wo rst c ulpri t) are ob structi ons s uch as wall s
and meta l a pplia nces. Note also that con nection sp ee d m ay
decrease as you move farther away from the Router.
In ord er to deter mine if wirel ess i ssues are rel ate d to
ran ge, we sugg est temp orari ly movin g the comp ute r
within 10 feet from the Router if possible.
Changing the wireless channel—Depen ding on local
wir eless traf fi c a nd inter ference, sw itching the w ire less
cha nnel of you r net work can impr ove pe rformance an d
reliability. See the section titled “Changing the Wireless
Channel” for instructions on how to choose other channels.
29
Page 32

TROUBLESHOOTING, SUPPORT, AND WARRANTY
Limiting the wireless transmit rate—Limiting the wireless transmit
rate c an help improve ran ge an d c onnecti on st ability. Most wirel ess
car ds have the ab ility to l imit the tran smiss ion r ate. To chang e t his
pro pert y in Win dow s, go to the Wind ows Co ntrol Panel, o pen “ Network
Con nection s”, and doub le -c lick on your wir eless card ’s c on necti on. In
the prop er ties dialo g, selec t the “Con figur e” button on the “Gen eral”
tab, then choose the “Advanced” tab and select the rate property.
Wir eless clie nt cards are usu ally set to au tomat icall y adj ust
the wireless transmit rate for you, but doing so can cause
per iodic disc onnects wh en th e w irele ss si gnal is too weak ; a s
a r ule, s lower tr ansmi ssion rates a re more stabl e. Exper iment
wit h dif feren t c onnecti on rates un til you fin d the be st on e
for your environment. Note that all available transmission
rates shoul d b e acc eptab le for browsing the In terne t. For
more assistance, see your wireless card’s user manual.
I’ve i nstalle d thi s new Ro uter and s ome of my n et wor k cli ents
(computers, game consoles, etc.) are now unable to connect.
Your new Router came pre -config ured wit h a network n ame and
pas sword, foun d p rinte d o n an attac hed c ard. All cl ients must us e thi s
network name and password to connect wirelessly to your Router.
You w ill need to find th e net work setting s o n your clie nt, s elect the
net work name printed on the c ard from the lis t o f avai lable networks,
and enter the password when prompted to join the wireless network.
30
Page 33

TROUBLESHOOTING, SUPPORT, AND WARRANTY
Does the Router support Wireless
Protected Access (WPA) security?
The Router ships wi th WPA /WPA2 se curity turne d on.
Win dows XP and so me ol der networ k h ardwa re may
require a software update to support WPA/WPA2.
I am having difficulty setting up WPA security on my Router.
1. Log in to your Router by visiting http://router/ with your web browser.
Click on the “Login” button in the top right-hand corner of the
scr een. You w ill be a ske d to enter you r p as swo rd. If you have never
set a password, leave the “Password” field blank and click “Submit”.
2. Click “ Wirel es s” in th e l ef t-han d m enu. The n
click “Security ” just below that.
3. Select the “WPA/WPA2” option.
4. Enter a pa ssword. Thi s can be from 8 –63 chara cte rs of yo ur choice,
inc ludin g spaces and pun ct uatio n, OR a 64-di git h exa decim al
number (using only the numbers 0–9 and letters A–F).
5. Clic k “Apply Chang es” to f inish. You r wirele ss
connection is now encrypted. Each computer using your
wireless net work will need to use the new key.
Note: If you a re confi guring the Ro uter over a wi reles s
con ne ction , you will have to re- conne ct to th e
Router after changing any security settings.
Note: Some older netw orkin g har dwa re suppo rts
onl y WEP encr yptio n. If your old er co mpute rs ca nnot
con ne ct to your net work, try 128 -bit or 64 -b it WEP, o r
seek software updates from their manufacturers.
31
Page 34

TROUBLESHOOTING, SUPPORT, AND WARRANTY
I a m h aving di ffic ulty setting up Wire d Equ iva le nt
Privacy (WEP) security on my Router.
1. Log in to your Router. Visit http://router/ with your web browser.
Click on the “Login” button in the top right-hand corner of the
scr een. You w ill be a ske d to enter you r p as swo rd. If you have never
set a password, leave the “Password” field blank and click “Submit”.
2. Click “ Wirel es s” in th e l ef t-han d m enu. The n
click “Security ” just below that.
3. Select the “128-bit WEP” option.
4. You may t yp e i n a WEP key manua lly, or gene rate one fr om
a passph rase. Type a phrase in the “ Passp hrase ” f ield and
cli ck th e “ Ge nerate” butto n. A WEP key is comp osed of 26
hexadecimal digits (0–9, A–F.. For examp le, C3 03 0 F A F
4B B2 C3 D4 4B C3 D4 EE 74 is a valid 128-bit WEP key.
5. Clic k “Apply Chang es” to f inish. You r wirele ss
act iv it y i s now en cr ypted. E ach comp uter usi ng your
wireless net work will need to use the new key.
Note: If you a re confi guring the Ro uter over a wi reles s
con ne ction , you will have to re- conne ct to th e
Router after changing any security settings.
Note: Some older netw orkin g har dwa re suppo rts
onl y 64-bi t WEP encr yptio n. If your old er co mpute rs
cannot connect to your network, try 64-bit WEP.
32
Page 35

TROUBLESHOOTING, SUPPORT, AND WARRANTY
Technical Support
US
http://www.belkin.com/support
UK
http://www.belkin.com/uk/support
Australia
http://www.belkin.com/au/support
New Zealand
http://www.belkin.com/au/support
Singapore
1800 622 1130
Europe
http://www.belkin.com/uk/support
33
Page 36

TROUBLESHOOTING, SUPPORT, AND WARRANTY
Belkin International, Inc., Limited
2-Year Product Warranty
What this warranty covers.
Bel kin I nte rnati onal, In c. (“ Belki n” ) warrants to the o rigin al
purchaser of this Belkin product that the product shall be free
of defects in design, assembly, material, or workmanship.
What the period of coverage is.
Belkin warrants the Belkin product for two years.
What will we do to correct problems?
Product Warranty.
Bel kin w ill repa ir or replace, at its optio n, any defective product
fre e o f cha rge (except for sh ippin g c ha rges for th e pro duct).
Belkin reserves the right to discontinue any of its products without
not ice, and di sclaims an y l imite d warranty to re pair or rep lace any
suc h dis conti nued pro ducts. In the ev ent that Be lk in is unabl e to
repair or replace the product (for example, because it has been
dis conti nued), Belk in will offer ei ther a r efund or a credi t towa rd
the purc hase of another produ ct from Belki n.c om in an amount
equ al to th e p urcha se pr ice of t he produ ct as ev idenced on the
original purchase receipt as discounted by its natural use.
What is not covered by this warranty?
All above warranties are null and void if the Belkin product is
not pr ovide d t o B elkin fo r ins pection up on Be lkin’s re quest
at the sole ex pense of the pur chase r, o r if Bel kin d ete rmine s
tha t t he Be lkin pro du ct has b een improperly ins ta lled, al ter ed
in any way, or tampered with. Th e Bel kin Prod uct Warr anty
doe s not pr ote ct against ac ts of Go d s uc h a s flo od, ligh tning ,
ear thqua ke, wa r, vand alism , t heft, normal -use wea r and te ar,
erosion, depletion, obsolescence, abuse, damage due to low
vol tage dis turba nces (i.e. browno uts o r s ags), n on-au thorized
program, or system equipment modification or alteration.
34
Page 37

TROUBLESHOOTING, SUPPORT, AND WARRANTY
How to get service.
To ge t s er vi ce for your Be lkin produ ct you
must take the following steps:
1. Co ntact Belk in In ter natio nal, Inc., at 1204 5 E. Waterfro nt
Dri ve, Pl aya Vist a, CA 90 09 4, Attn: Custo mer Service, or
cal l (800)-223 -5546, withi n 15 days of the Occurr ence.
Be prepared to provide the following information:
a. The part number of the Belkin product.
b. Where you purchased the product.
c. When you purchased the product.
d. Copy of original receipt.
2. Your Be lkin Customer Service Rep resen tative w ill then
ins truct you on how to fo rward yo ur re ceipt an d B elkin
product and how to proceed with your claim.
Belkin reserves the right to review the damaged Belkin product.
All cost s o f shipping th e Bel kin prod uc t t o B elkin fo r ins pecti on
sha ll be bo rne s olely by th e pur chase r. I f B elkin determine s,
in its sole disc ret ion, that it is impra ctica l to shi p t he da maged
equ ipmen t t o B elkin, Bel kin may des ignat e, in its sole disc retio n,
an equipment repair facilit y to ins pect and esti mate the cost to
rep air such equi pment . T he co st, i f a ny, of shi pping the equ ipmen t
to and from su ch repai r facili ty and of such est imate sh all be
bor ne so lely by the purc haser. Da maged eq uipme nt mu st remai n
available for inspection until the claim is finalized. Whenever
cla ims a re settled , B elkin rese rv es the r ight to be subro gated
under any existing insurance policies the purchaser may have.
35
Page 38

TROUBLESHOOTING, SUPPORT, AND WARRANTY
How state law relates to the warranty.
THIS WARRANTY CONTAINS THE SOLE WARRANTY OF
BELKIN. THERE ARE NO OTHER WARRANTIES, EXPRESSED
OR, EXCEP T AS REQUIRED BY L AW, IMPL IED, INCLUDING
THE IM PLI ED WARR ANTY OR CO NDI TION OF QUALIT Y,
MERCHANTABILITY OR FITNESS FOR A PARTICULAR
PURPOS E, AND SUCH IM PLI ED WARR ANTIES, IF ANY, ARE
LIMITED IN DURATION TO THE TERM OF THIS WARRANTY.
Som e states do not all ow limit ation s on how lo ng an im plied
warranty lasts, so the above limitations may not apply to you.
IN NO EVENT SHALL BE LKIN BE LIA BLE FO R INCIDENTAL,
SPECIAL, DIRECT, INDIRECT, CONSEQUENTIAL OR
MULTI PLE DAMAGE S S UCH AS , B UT NOT LIMITED TO,
LOST BUSINESS OR PROFITS ARISING OUT OF THE
SALE OR U SE OF ANY BELKIN PRO DUCT, EVEN IF
ADVISED OF THE POSSIBILITY OF SUCH DAMAGES.
This warranty gives you specific legal rights, and you may also have
oth er right s, wh ich may var y from state t o s tate. So me state s d o
not al low the exclus ion o r l imitation of incidental, con seque ntial,
or other damages, so the above limitations may not apply to you.
36
Page 39

REGULATORY INFORMATION
FCC Statement
DEC LA RATION OF CONFOR MITY WI TH FC C R ULES
FOR ELECTROMAGNETIC COMPATIBILITY
We, Belki n I nte rn ation al, Inc., of 120 45 E. Water front Dr ive, Playa
Vis ta , CA 9 00 94, decl are u nder our sole re spons ibili ty that th e d evice,
F9K1001 v1, complies with Pa rt 15 of the FCC Rul es. O peration is
sub ject to the foll owi ng two con ditio ns: (1) t his devi ce may n ot cause
har mful int er feren ce, and (2) thi s d evice mu st ac cept any in ter feren ce
received, including interference that may cause undesired operation.
Caution: Exposure to Radio Frequency Radiation.
The device shall be used in such a manne r that t he potential
for human contact normal operation is minimized
Thi s equ ipmen t c ompli es wi th FCC radi ation exposure
lim its s et for th for a n u ncont rolle d enviro nment . Thi s
equ ipmen t s hould be inst al led and operated wi th a min imum
distance of 20cm between the radiator and your body.
Federal Communications Commission Notice
Thi s equ ipmen t h as be en tested a nd found to co mp ly with the
lim its for a C lass B d igital dev ice, pur suant to Part 15 of the FC C
Rul es. Thes e lim its are desig ned to p rov ide reason able pro tec ti on
against harmful interference in a residential installation.
This equipment generates, uses, and can radiate radio frequency
ene rgy, and if not inst alled and used in accor dance wi th th e
ins tructio ns, may cau se harmf ul inter feren ce to radio comm unica tions .
However, there is no guarantee that interference will not occur
in a p ar ticul ar in stall ation . I f thi s e quipm ent does caus e h ar mful
inter fer ence to radio or te lev is ion rece ption , w hich can b e d ete rm ined
by tur ning the equi pment of f and on, t he user is en coura ged to try an d
correct the interference by one or more of the following measures:
• Reorie nt or re locatet he receivi ng anten na.
• Increasethedistancebetweentheequipmentandthereceiver.
• C onnec ttheequipmenttoanou tl et on acir cuitdif fe rent
fro m t hat to w hich the rece iver is conne cted.
• Consultthedealeroranexperiencedradio/TVtechnicianforhelp.
FCC Caution: Any cha nges or modif ic ation s n ot expressly
app rov ed by the par ty re spons ible for comp lianc e cou ld
void the user’s authority to operate this equipment.
Thi s device and its antenna(s) mus t n ot be co -l oc ate d o r
operating in conjunction with any other antenna or transmitter.
37
Page 40

REGULATORY INFORMATION
Canada-Industry Canada (IC)
The wireless rad io of th is devic e com plies wi th RSS
139 & RSS 210 I ndust ry Cana da. T his Clas s B digi ta l
apparatus complies with Canadian ICES-003.
Operatio n is sub ject to the foll owing two con ditio ns: (1)
thi s device may not ca use inte rfere nce, and (2) th is devic e
mus t acc ept any interfer ence, in cludi ng inter feren ce
that may cause undesired operation of the device.
Cet ap parei l n umériqu e d e la cla ss e B conform e
á la norme NMB-003 du Canada.
CE Statement
Europe
European Union Radio products with the CE or CE alert
mar ki ng compl y wit h t he R&T TE Direc ti ve (1999/5/ EC)
iss ued by t he Commiss ion of t he Europ ean Comm unity.
Com plian ce wi th th is direc tive imp lies conformity
to the following European Norms (in brackets are
the equi val ent i nte rnati onal stand ards).
• EN6 09 50 -1:2006 (IEC60 95 0-1)–Prod uc tS afe ty
• EN3 0032 8Techn ical requi rementfor radioeq uipme nt
• ETS301489GeneralEMCrequirementsforradioequipment.
Europe – EU Declaration of Conformity
Thi s device comp lies with the esse ntial require ments of the
(R&TTE) Ra dio a nd Tele commu nicat ions Termina l Equipm ent
Dir ective 19 99/5/ EC, (EM C) Ele ctrom agnet ic co mpatibil it y Dir ective
2004/108/EC, and the (LVD) Low Voltage Directive 2006/95/
EC. A c opy of the Eur opean unio n C E m arking “Declar ati on of
Conformity” may be obtained at the website: www.belkin.com/doc.
Information
Products with the CE marking comply with the EMC Directive
(2004/108/EC) and the Low Voltage Directive (2006/95/
EC) iss ued by t he Commiss ion of t he Europ ean Comm unity.
Com plian ce wi th th ese dire ctive s i mplie s con for mi ty to
the following European Product Family Standards.
• EN5 5022 (CISPR 22)– Elect romag neticInterfere nce
• EN5 5024-1 –E lectr omagn etic Immun it y
• EN61000-3-2(IEC610000-3-2)–PowerLineHarmonics
• EN610 00-3-3(IEC6100 00) – Power LineFli cker
• EN60950-1(IEC60950-1)–ProductSafety
Pro ducts that co ntain the rad io tr ansmi tter are some times
lab eled with the Noti fied Bod y num ber (C E05 60) or CE
ale rt mark ing i f t he st andar d use d i n t he co nform it y i s
not ha rmonized acro ss th e E urope an Community.
38
Page 41

© 2011 Belkin International, Inc. All rights reserved. All trade names are registered trademarks
of respective manufacturers listed. Mac and Mac OS are trademarks of Apple Inc., registered
in the U.S. and other countries. Windows and Windows Vista are either registered trademarks
or trad emarks of Micr osoft Corporatio n in the United St ates and/or oth er countrie s.
 Loading...