

Page 1
N Wireless
USB Adapter
User Manual
F5D8053
Page 2

Table of Contents
1 Introduction. . . . . . . . . . . . . . . . . . . . . . . . . . . . . . . . . . . . . . . . . . . . . . . . . . . . . . 1
Benefits of a Home Network . . . . . . . . . . . . . . . . . . . . . . . . . . . . . . . . . . . . . .
Advantages of a Wireless Network . . . . . . . . . . . . . . . . . . . . . . . . . . . . . . . . .
Placement of your Wireless Networking Hardware
for Optimal Performance . . . . . . . . . . . . . . . . . . . . . . . . . . . . . . . . . . . . . . . . .
2 Overview
3 Installing and Setting up the Adapter . . . . . . . . . . . . . . . . . . . . . . . . . . . . . . . .
4 Using the Belkin Wireless Networking Utility . . . . . . . . . . . . . . . . . . . . . . . .
5 Troubleshooting . . . . . . . . . . . . . . . . . . . . . . . . . . . . . . . . . . . . . . . . . . . . . . . . .
6 Information . . . . . . . . . . . . . . . . . . . . . . . . . . . . . . . . . . . . . . . . . . . . . . . . . . . . .
. . . . . . . . . . . . . . . . . . . . . . . . . . . . . . . . . . . . . . . . . . . . . . . . . . . . . . . . 5
Product Features . . . . . . . . . . . . . . . . . . . . . . . . . . . . . . . . . . . . . . . . . . . . . . .
Applications and Advantages . . . . . . . . . . . . . . . . . . . . . . . . . . . . . . . . . . . . .
Product Specifications. . . . . . . . . . . . . . . . . . . . . . . . . . . . . . . . . . . . . . . . . . .
System Requirements . . . . . . . . . . . . . . . . . . . . . . . . . . . . . . . . . . . . . . . . . .
Package Contents . . . . . . . . . . . . . . . . . . . . . . . . . . . . . . . . . . . . . . . . . . . . .
A — Installation Process for Windows Vista . . . . . . . . . . . . . . . . . . . . . . . . .
B — Installation Process for Windows Operating Systems other than
Windows Vista . . . . . . . . . . . . . . . . . . . . . . . . . . . . . . . . . . . . . . . . . . . .
C — Configuration . . . . . . . . . . . . . . . . . . . . . . . . . . . . . . . . . . . . . . . . . . . . . 16
Accessing the Belkin Wireless Networking Utility from the
Windows System Tray . . . . . . . . . . . . . . . . . . . . . . . . . . . . . . . . . . . . . . . . . . 17
Network Status . . . . . . . . . . . . . . . . . . . . . . . . . . . . . . . . . . . . . . . . . . . . . . . 18
Available Networks . . . . . . . . . . . . . . . . . . . . . . . . . . . . . . . . . . . . . . . . . . . . 18
Network Status and Solution Tips . . . . . . . . . . . . . . . . . . . . . . . . . . . . . . . . 19
Setting Wireless Network Profiles . . . . . . . . . . . . . . . . . . . . . . . . . . . . . . . . 20
Securing your Wi-Fi Network . . . . . . . . . . . . . . . . . . . . . . . . . . . . . . . . . . . . 20
Configuring your Adapter to use Security . . . . . . . . . . . . . . . . . . . . . . . . . 25
13
17
34
42
1
1
2
5
6
6
7
7
8
8
Page 3

Introduction
Thank you for purchasin g t he Be lkin N W irel ess U SB Adapter. Now you
can take advan ta ge of th is grea t n ew te chnology and gain th e freedom
to network you r hom e a nd office co mp uters wirelessly. This Adapter
allows you to conne ct a not ebook computer to your ne tw ork. Please
be sure t o read through this User Ma nu al completel y, and pay special
attent io n t o t he se ct ion entitled “P la cement of your Wireless Netwo rking
Hardware f or Op timal Perfor ma nce”.
sec tion
1
2
3
Benefi ts of a Home Net wo rk
Your B elkin Home Networ k w il l a ll ow you t o:
• Share o ne hi gh-speed Int er net conn ec tion with all the compute rs in
your home
• Share resou rces , s uc h a s f il es, and hard dr ives among all the
connec te d c om puters in your home
• Share a si ng le printer with the entire famil y
• Share d oc uments, musi c, vi deo, and digital pic tu re s
• Store, retr ie ve, and copy files from one compute r t o ano th er
• Simultane ou sly play games onlin e, ch eck Intern et email, and chat
Advant ag es of a Wireles s N et work
Here are some of the advantages of setting up a Belkin wireless network:
•
Mobility – you’ll no longer need a dedicated “computer room”—now you
can work on a networked laptop or desktop computer anywhere within your
wireless range
• Easy installation – Belkin Easy Installation Wizards make setup simple
•
Flexibility – set up and access printers, computers, and other networking
devices from anywhere in your home
• Easy expansion – the wide range of Belkin networking products let you
expand your network to include devices such as printers and
gaming consoles
• No cabling required – you can spare the expense and hassle of retrofitting
Ethernet cabling throughout the home or office
• Widespread industry acceptance – choose from a wide range of
interoperable networking products
4
5
6
1
Page 4

Introduction
Placement of your Wireless Networking Hardware for
Optimal Performance
Your w irel ess c onnection wi ll be st rong er th e c lo ser your comput er
is to y our wireless router (or access point ). Typi ca l i ndoor operatin g
range for your wireless de vi ces is b etween 100 and 200 feet . In the
same way, yo ur wi re le ss connectio n a nd pe rf ormance will de gr ade
somewh at as th e dis ta nce between you r wireles s route r (or ac ce ss
point) and con ne cted devices increase s. Th is may o r m ay no t b e
notice ab le to yo u. As yo u m ove f arther from your wireless ro uter (or
access poin t) , c onnection sp ee d m ay de crea se. Factors that can
weaken sign al s s imply by getting in the way of your net wo rk’s radio
waves are m etal applian ce s o r o bstructio ns , a nd wa lls.
If you have concerns about your netwo rk’s perfo rm ance that might be
rel ated to range or obstru ct ion factors, try mov in g t he co mputer to a
positi on be tw een five and 10 feet from the w irel ess rou ter ( or access
point) in order to see if distance is the problem . If difficu lt ies p ersist
even at close range , p le ase contact Belki n Techn ic al Su pport.
Note: W hile some of the items liste d bel ow ca n a ffec t n et work
perfor ma nce, they will not prohibit your wireless ne tw ork fro m
functi on ing; if you a re co nc erned th at yo ur ne twork is not operati ng at
its maximum effect iv eness, this check li st may help.
1. Placement of your Wireless Router (or Access Point)
Place your wireles s router (or acce ss po int), the central co nn ection
point of your netwo rk , a s c lose as possible to the cent er of yo ur
wireless networ k d ev ices.
To ach ieve the best wireless networ k c ov erage for your “wireless
client s, ” ( i. e., computer s e na bled by Belkin Adapt er s o r C ards ):
• Ensure that your wireless router’s (o r a ccess point’s)
antenn as are paral le l t o e ac h o ther, and are p os itioned
vertic al ly (t oward t he ce iling). If your wireless router (or
access poin t) it self is positione d v er tically, p oint the
antenn as as mu ch as po ss ible in an upward di re ct ion.
• In multistory homes, place the wireless router (or access point)
on a floor that is as close to the center of the home as possible.
This may mean placing the wireless router (or access point) on
an upper floor.
• Try not to place the wireless router (or acces s poi nt) n ear a
cordless 2.4GHz ph on e.
2
Page 5

3
Introduction
2. Avoid Obstacles and Interference
Avo id placing your wireless router (or acc es s p oint) near device s t ha t
may emit radio “noi se ”, such as microwave ovens. Othe r o bj ects that
can inhibit wi rele ss co mm unicati on ca n i nc lude:
• Refrig er ators
• Washe rs an d/or dryers
• Metal cabin et s
• Large aq uariums
• Metall ic -based, UV-tint ed wi ndows
sec tion
1
2
3
4
5
If your wireless signal se em s w eak i n s ome s pots, make sure that
object s suc h a s the se are not bloc ki ng the s ignal’s pa th between your
comput er s a nd wi re le ss rout er (o r a ccess point).
3. Cordless Phone Placement
If the performan ce of yo ur wi re le ss ne twork is impaired after atten ding
to the above issues , a nd yo u h av e a co rdle ss ph one:
• Try moving cordles s pho ne s a way f ro m t he wi rele ss rout er
(or access poi nt ) a nd yo ur wire less-enab le d c omputers.
• Unplug and remove the batt er y f rom any cordless ph on e
that operat es on th e 2 .4 GHz band (check manu fa cturer’s
inform at ion). If this fixes the problem, your ph on e m ay
be interfer in g.
• If your phone suppo rt s c hannel selec ti on, change the
channe l on the phon e t o the fa rt hest channel from your
wireless networ k a s pos si ble. For exampl e, ch ange the
phone to chann el 1 and move yo ur wi rele ss rout er (o r
access poin t) to ch an nel 11. (Your c hannel selec ti on wi ll vary
depend in g o n you r regio n. ) S ee yo ur ph one’s us er ma nual for
detail ed in st ruction s.
• If necessar y, conside r s wi tching to a 9 00MHz or 5GHz
cordless phone.
6
3
Page 6

Introduction
4. Choose the “Quietest” Channel for your Wireless Network
In location s w he re home s o r offices are close toge th er, such as
apartm en t b ui ldings or office complex es , t here ma y b e wireles s
networ ks ne ar by that can conflict wi th yo urs. Use the Site Survey
capabi li ties of your Belkin Wireless Net wo rking Utilit y to loc at e a ny
other wireless net wo rks, and move your wireless router (or acces s
point) and com pu ters to a c hannel as far away from o ther network s
as possible .
Experi me nt wi th more th an on e o f t he av ailable channe ls in orde r to
find the clearest conne ct ion and avoid interf eren ce from neig hboring
cordless phones or othe r w irel es s d evices.
For more Be lkin wireless netwo rk ing pro ducts, use the detaile d S it e
Survey and wireles s cha nn el informati on in cluded in your
User Manual .
5. Secure Connections, VPNs, and AOL
Secure connecti on s t ypically require a user name and password, and
are us ed wh ere s ec urity is importan t. Se cure co nnections incl ude:
• Vir tual Private Ne tw ork ( VPN) connect io ns, often used to
connec t remotel y t o an office netwo rk
• The “Bring Your Own Access ” program from Americ a O nl ine
(AOL), whic h l et s y ou us e A OL th ro ug h b road band prov ided
by another cab le or DS L ser vice
• Most online ba nk ing w ebsites
• Many commercial we bs ites that re quire a us er na me an d
passwo rd to access your ac co unt
Secure connecti on s c an be in terrupted by a compu te r’s powe r
manage me nt se tting, which ca us es it to “g o t o sle ep.” The simplest
soluti on to av oi d t hi s i s t o s im ply rec onnect by re -running the VPN or
AOL software, or by re-logging into th e sec ure web si te.
A second alter native is to change your computer’s power management
settings so it does not go to sleep; however, this may not be appropriate
for portable computers. To change your power management setting in
Windows, see the “Power Options” item in the Control Panel.
If you continu e to hav e difficu lty w ith Secure C onnection s, VP Ns, and
AOL, please review step s 1 –4 in th e previou s p ag es to be su re you
have addressed the se is su es.
The se guidelines should al low yo u to cover the maxim um possible
area with your wirel ess router. Sho uld you ne ed to cove r an even wider
area, we suggest the Belkin Wireless Range Extend er/Access Poi nt.
For more informati on regarding our networking product s, vis it our
web site at ww w.belk in.com/ne tworking or call Belkin Technica l Support.
4
4
Page 7

Overview
Product Features
The Adapter c omplies with the IEEE draft-8 02.11n specif ication to
com municate with other dra ft-802.11 n-compliant w irele ss devices at up
to 300Mbps*. The Adapter is also compatibl e with 802 .11g devices at
54M bps as wel l as 802.1 1b products at 11Mbps . The Adap ter operates
on the same 2.4GHz frequency band as 802.11b /g Wi-Fi
• 2.4GHz ISM (Industrial, Science, and Medical) band operation
• Integrated easy-to-use Belkin Wireless Networking Utility
• USB 2.0 interface, for operation in virtually any computer
with a USB 2.0 bus-power port
• WPA, WPA2, 64-bit WEP (Wired Equivalent Privacy),
or 128-bit encryption
• Wireless access to networked resources
• Data rate of up to 300Mbps* (draft 802.11n), 54Mbps (802.11g),
or 11Mbps (802.11b)
• Easy installation and use
• LED power and network link/activity indicator
®
prod ucts.
1
sec tion
2
3
4
5
6
5
5
Page 8

Overview
Applications and Advantages
• Wireless roaming with a laptop around the hom e or office
Off ers the free dom of networki ng wi thout cables
• Connec ti on ra tes of u p t o 3 00Mbps*
Pro vides immedi at e h igh-speed wi rele ss co nn ectivit y at hom e,
work, and hots po t l oc ations witho ut co mpro mising the use of
existi ng 80 2. 11b/g products
• Compat ib ility with 802.11 b/ g p ro du cts
The Adapter is back wa rd -c ompatib le wi th ex isting
Wi-Fi (IEEE 80 2. 11b/g) products
• Difficult- to -wire e nv iron ments
Enable s net wo rking in buildi ng s w it h s olid or finished wal ls ,
or open are as where w iring is difficult to install
• Fre quently chan gi ng environments
Adapts easi ly in office s o r env iron ments that frequently rearrang e
or change loca ti ons
• SOHO (Small Office /H ome O ff ic e) networkin g n ee ds
Provides the easy and quick, small network installation SOHO
users need
Product Specifications
Host Interf ac e: USB 2.0
Ope rating Temperature: 32—1 40 de gree s F (0 —60 d egre es C)
Storag e Tempera tu re : -4—176 degrees F (-20—8 0 d eg re es C)
Humidi ty : Max. 90% (non- co ndensing)
Typical Operating Range: Up to 1,2 00 ft .* *
*
NOT E: T he s tan da rd tr an smi ss ion rat e— 300 Mb ps— is t he p hys ic al d ata r at e.
Act ua l data throu ghp ut w ill be lower.
**Wirel ess p er forma nc e may var y de pen di ng o n the net wo rki ng e nviro nme nt .
6
Page 9
7
Overview
(a)
(b)
(c)
(d)
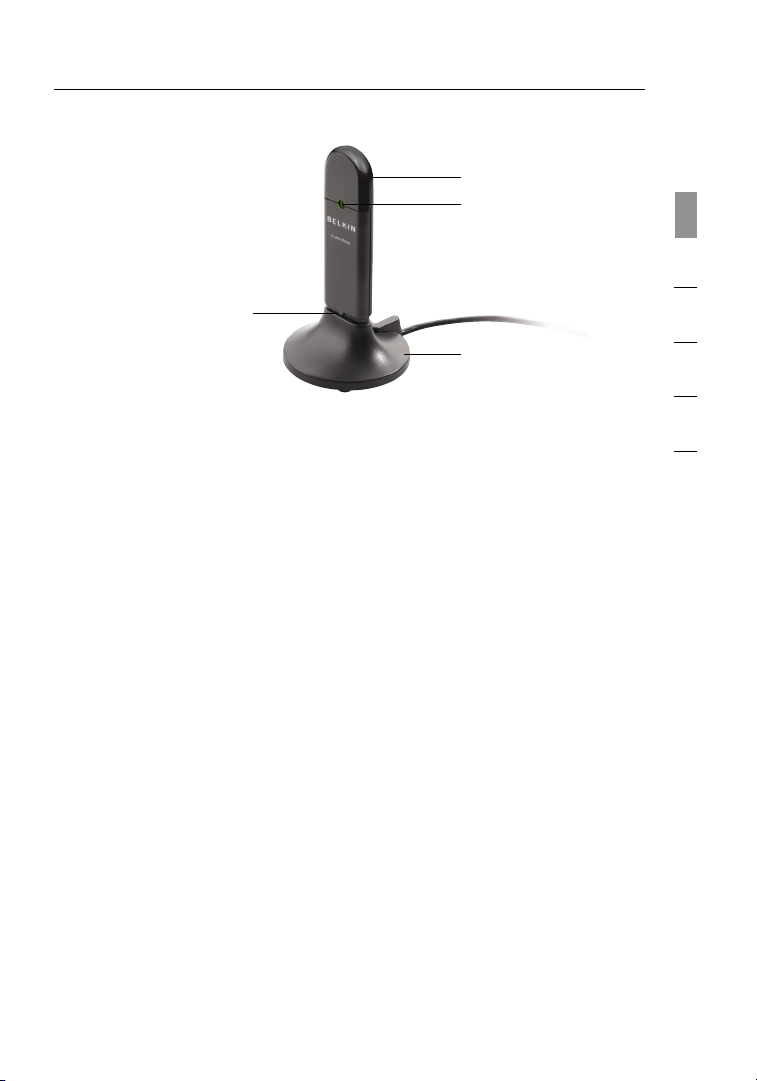
(a) Protective Cap
The cap is provided to protec t the USB connector during transpor tation.
Remove the cap before inserting the Adapter to your computer’s USB
port or through the provided Desktop Stand.
(b) Power/Activity LED
Lights when th e Ada pt er is powered o n a nd fl ashes when it is active .
(c) USB Connector
Part of the Adapter th at fi ts in to your computer’s USB port.
(d) Desktop Stand
Lets you move the Adap te r a way f ro m int erfering objec ts
aro und your comput er.
1
sec tion
2
3
4
5
6
System Requirements
• PC-com pa tible laptop with on e ava il able USB 2.0 bus-pow er po rt
• Window s
®
2 000, XP with SP2, or Vi staTM***
Package Contents
• N Wire less USB Adapter
• Quick Insta ll ation Guide
• CD with Instal la tion Software and User Manual
• Deskto p Sta nd
7
Page 10
Installing and Setting up the Adapter
A. Installation Process for Windows Vista
***NOTE:
drivers were not available for release and might not be included on the
CD shipped with your product. For information on updated drivers
for Windows Vista (if any), please visit the Belkin website at
www.belkin.com/support/vista.
At the time of initial release of this product, Windows Vista
IMPORTANT: INSTALL THE SOFTWARE BEFORE INSERTING
THE ADAPTER.
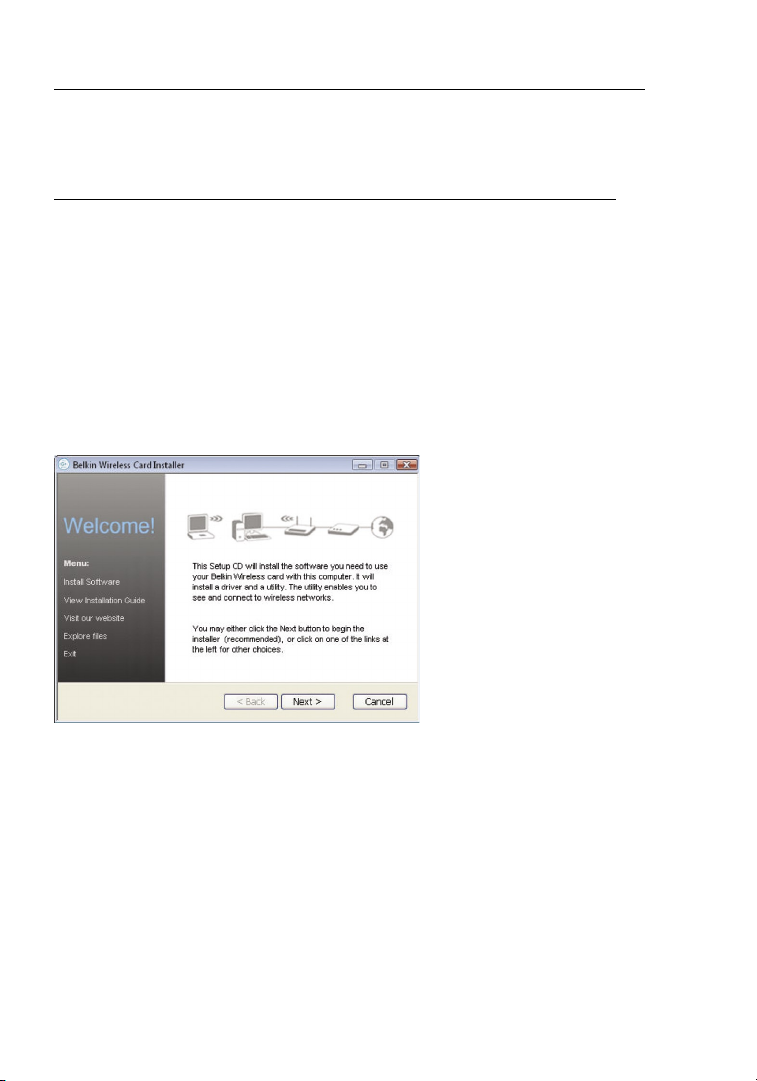
A.1 Insert the Installation Software CD into your CD-ROM drive.
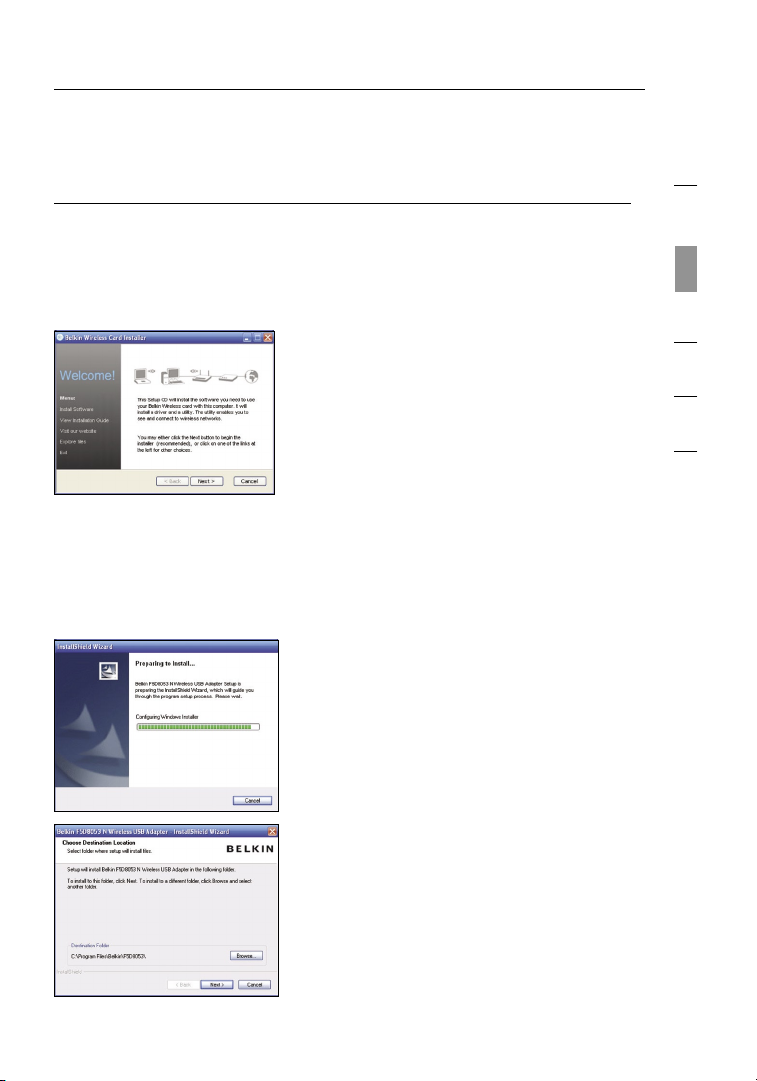
A.2 Click “Next” to begin the installation process.
Note: If the Belkin Wireless Card Installer screen does not appear within
20 seconds, access your CD-ROM by double-clicking on the “My
Computer” icon; then double-click on the CD-ROM drive into which the
installation CD has been placed. If the Installer does not start
automatically, double-click on the icon named “Setup.exe”.
8
Page 11
9
Installing and Setting up the Adapter
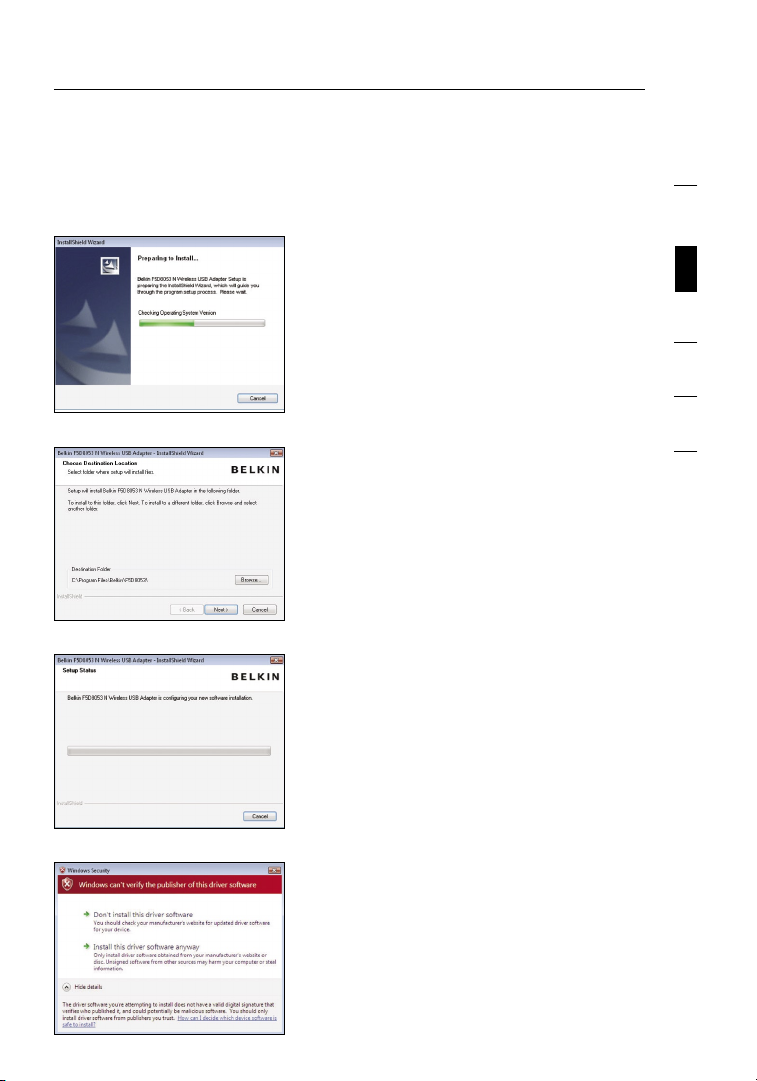
A.3 The InstallShield Wizard starts the
installation process.
A.4 Select a destination folder for the
software installation by clicking
“Browse”; or, simply click “Next” to
select a default location.
1
2
sec tion
3
4
5
6
A.5 A Setup Status screen will let you
know where you are in the
setup process.
A.6 A window may appear a second time
showing the message, “Windows
can’t verify the publisher of this driver
software”. This DOES NOT indicate a
problem. Our software has been fully
tested and is compatible with this
operating system.
9
Page 12
Installing and Setting up the Adapter
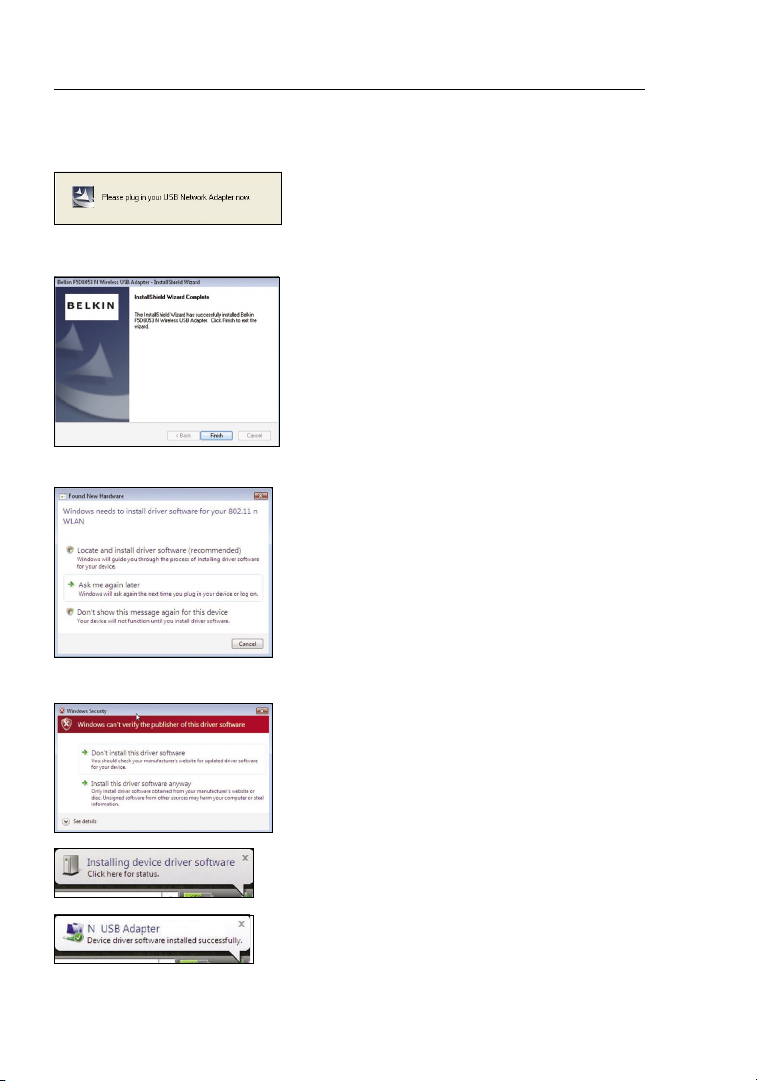
A.7 When prompted, turn off your
computer and plug in your Adapter.
Your installation is now complete.
A.8 When the installation completes,
click on “Finish”.
A.9 The Found New Hardware Wizard
might appear within 3–15 seconds.
If it does, continue to follow the
prompts. Select “Locate and install
the driver software” to continue.
A.10 You might see a screen similar to
the one pictured below. This DOES
NOT mean there is a problem. Our
software has been fully tested and
is compatible with this operating
system. Select “Install this driver
software anyway” and follow the
on-screen instructions.
Next, a screen appears indicating
that hardware installation is taking
place; then, another indicates that
the process is complete.
10
Page 13
11
Installing and Setting up the Adapter
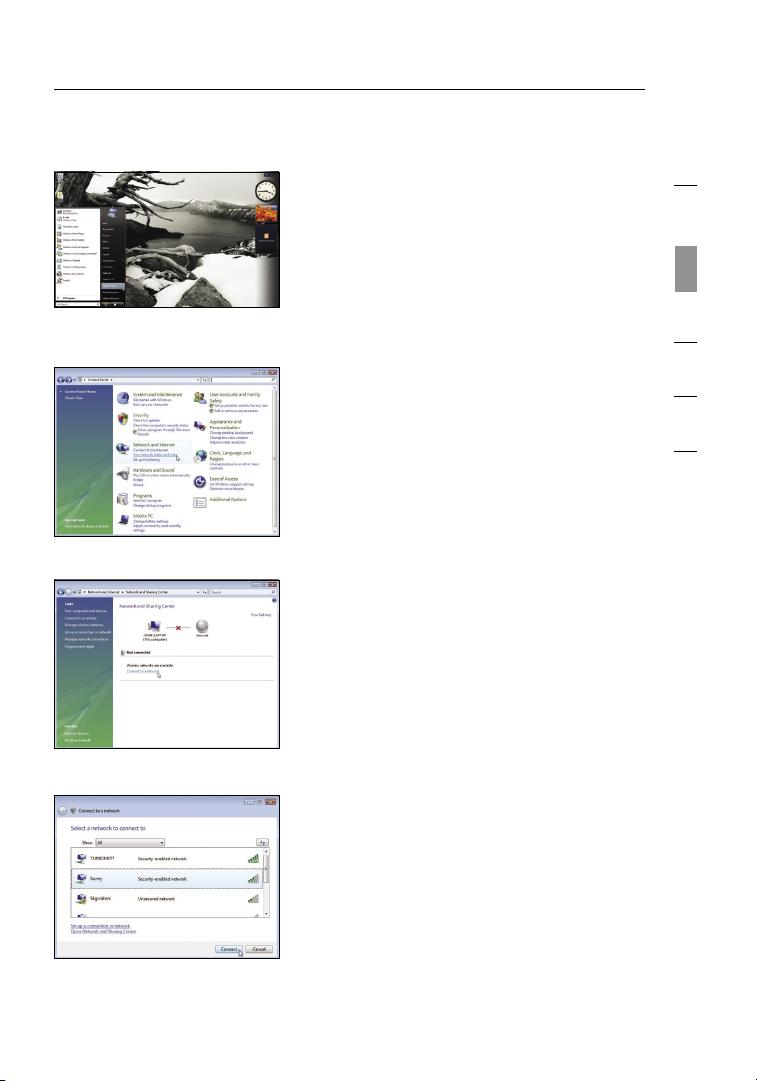
A.11 To connect to the Internet, open the
Network and Sharing Center by first
opening the Control Panel from the
“Start” menu.
A.12 In the Control Panel, click on “View
network status and tasks”.
A.13 In the Network and Sharing Center,
click on “Connect to a network”.
1
2
sec tion
3
4
5
6
A.14 In the next screen, select an
available wireless network and click
“Connect”.
11
Page 14
Installing and Setting up the Adapter
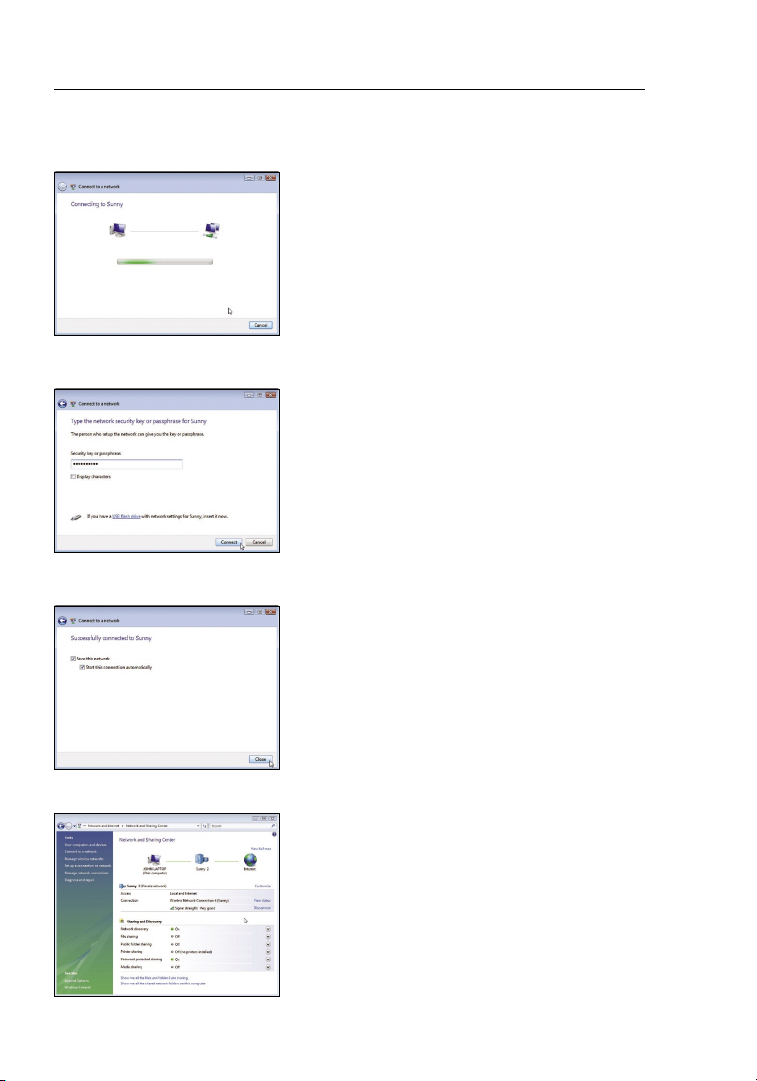
A.15 Your Adapter will attempt to
connect to the selected network.
A.16 Depending on the security settings
of your wireless network, you may
be prompted to enter a network
security key or a passphrase. Click
“Connect” after you have done so.
A.17 After connecting to the network,
you can choose to save this
network and connect automatically
when your Adapter is in range.
A.18 The Network and Sharing Center
now indicates the network
connection that you have just
made. The links on the left of the
window allow you to configure your
network connections.
12
Page 15
13
Installing and Setting up the Adapter
B. Installation Process for Windows Operating Systems other than
Windows Vista
IMPORTANT:
B.1 Insert the Installation Software CD into your CD-ROM drive.
INSTALL THE SOFTWARE BEFORE INSERTING THE ADAPTER.
B.2 The Belkin Wireless Card Installer
screen will automatically appear
within up to 20 seconds. Click “Install
Software” or “Next” to start
the installation
Note: If the Belkin Wireless Card
Installer screen does not appear within
20 seconds, access your CD-ROM by
double-clicking on the “My Computer”
icon; then double-click on the
CD-ROM drive into which the
installation CD has been placed. Then,
double-click on the icon
named “Setup.exe”.
B.3 The InstallShield Wizard starts the
installation process
.
.
1
2
sec tion
3
4
5
6
B.4 Select a destination folder for the
software installation by clicking
“Browse”; or, simply click “Next” to
select a default location.
13
Page 16

Installing and Setting up the Adapter
B.5 A Setup Status screen lets you know
where you are in the setup process.
B.6 After the software installation is
finished, the message “Please plug
in your USB Adapter now” will
appear. Connect the Adapter to your
computer.
B.7 The Found New Hardware Wizard
might appear in 3–15 seconds. If
it does, select “Install the software
automatically” and click “Next” to
install the hardware.
B.8 If the Found New Hardware Wizard
does not appear, click “Finish”.
B.9 You might see a screen similar to this
one. This DOES NOT mean there is a
problem. Our software has been fully
tested and is compatible with this
operating system. Select “Continue
Anyway” and follow the
on-screen instructions.
14
Page 17

15
Installing and Setting up the Adapter
B.10 The Wizard will now install
your software.
B.11 The installation is now complete.
Click “Finish” to close the “Found
New Hardware Wizard”.
B.12 Click “Finish” again to exit the
InstallShield Wizard.
1
2
sec tion
3
4
5
6
B.13 Depending on which operating
system you are using, you might be
required to reboot your computer
for the changes to take effect.
Save your data and close all other
applications. Then, reboot.
15
Page 18

Installing and Setting up the Adapter
C. Configuration
Using the Belkin Wireless Networking Utility
C.1 After restarting your computer,
double-click the Belkin Wireless
Networking Utility icon on the
desktop screen.
Note: The Belkin Wireless
Networking Utility icon can also be
found on the system tray.
C.2 The Belkin Wireless Networking
Utility screen will appear.
C.3 Select a network to which to connect
from the “Available Networks” list
and click “Connect”.
Note: In order to see your available
networks, you must be near a
working wireless router or
access point.
Installation is now complete.
16
16
Page 19

Using the Belkin Wireless Networking Utility
After succe ss fully instal li ng the B elkin Wireless Netw or king Utility
(WNU), conf ig uration s for wi rele ss co nn ection and secu ri ty are jus t a
few easy click s awa y.
Access in g t he Be lkin Wire less Network in g U tility from the
Window s Sys te m Tray
To acc ess t he WNU, simply place yo ur mo us e p ointer and right- click
over the WNU icon on the Windo ws ta sk tr ay.
If the icon is not pre sent, click on “Star t > Programs > Belki n
> N1 Wi re le ss USB Network Adapt er > Bel kin W irel ess
Networ ki ng Ut ility”.
1
2
3
sec tion
4
5
6
17
17
Page 20

Using the Belkin Wireless Networking Utility
The WNU’s default screen is the “Current Status” tab. The “Current
Status” tab displays the current Network Status and Available Networks.
Network Status
This window displays the connectivity status of the current network. It
even displays connectivity between the computer and router, and router
and Internet. In the event of a connectivity problem, this window can
be used to determine the problem’s source (e.g. computer, router, or
Internet/modem).
Available Networks
This window di sp lays the availabl e n et works at the current location
as well as their SSID, Sign al St re ng th, Security Type, Chann el , a nd
Networ k Type.
Lost Wireless Connection
If the current wireless connection is lost, a window will pop up and the
WNU will attempt to reconnect.
18
Page 21

19
Using the Belkin Wireless Networking Utility
Connection Failure
Other options will appear during attempts to reconnect. To stop
connecting, click “Stop” and to reattempt connection, click “Retry”.
Network Status and Solution Tips
To fur ther understan d t he cu rren t N et work Status, cl ic k
“Open Wireless Uti li ty”. The default screen will be the “Cur rent
Status ” tab an d the “N et work Status” sect ion d etermines wh ic h
connec ti ons a re go od an d/ or faulty.
1
2
3
sec tion
4
5
6
The WNU also features a “Solution Tips” section that provides
troubleshooting guidelines.
19
Page 22

Using the Belkin Wireless Networking Utility
Setting Wireless Network Profiles
The “My Connections” tab on the WNU allows you to add, edit, and delete
connection profiles. It also displays signal strength, security, and network type.
Securing your Wi-Fi® Network
If you choose to connect to a secure network, determine the type of
security (WPA or WEP*) and use the appropriate field in the dialog box.
*Not e: Types o f s ecur ity
20
Page 23

21
Using the Belkin Wireless Networking Utility
Note: Wh en yo u s el ect a network using enc ry ption, you will firs t s ee
the simple sec ur ity s cree n. Click the “Advanc ed” b utton to see other
securi ty op ti ons (below).
1
2
3
sec tion
4
5
6
21
Page 24

Using the Belkin Wireless Networking Utility
Wired Equivalent Privacy (WEP) is a le ss secure, but more
widely adop te d w irel ess s ecurity protocol . D ep ending on the securi ty
level (64- or 128-b it ), the user will be asked to input a 10- or
26-cha ra cter hex key. A hex key is a combinat ion o f l etters, a–f,
and numbers , 0 –9 .
Wireless Protected Access (WPA) is th e new st an dard in
the wireless secur it y. Howev er, n ot al l w irel es s c ards an d a da pters
suppor t thi s t ec hnology. P lease check your wireles s ada pt er’s use r
manual to chec k if it suppo rts W PA. Inst ea d o f a hex key, WPA uses
only passph ra ses, which are much easier to remember.
The followi ng se ction, inten de d f or th e h ome, home-office, and
small- offi ce us er, p re se nts a fe w d iffe rent wa ys to ma xi mize the
securi ty of yo ur wi rele ss ne twork.
At the time of publication, four encryption methods are available:
Encryption Methods:
Nam e 64- bi t Wi red
Equ iv al ent Privacy
Acr on ym 64- bi t WE P 128 -b it W EP WPA- TKIP WPA- AES
Sec ur it y Goo d Bet te r Bes t Bes t
Fea tu res Sta ti c ke ys Sta ti c ke ys Dynami c ke y
Enc ry pt ion keys
bas ed on RC4
alg or it hm ( typical ly
40- bi t ke ys )
128 -b it
Enc ry pt ion
Add ed sec ur ity
ove r 64-b it
WEP using a
key lengt h of
104 bits, plu s
24 addit io na l
bit s of syste mgen er at ed d ata
Wi- Fi
Pro te cted
Acc es s
enc ry pt ion
and mutua l
aut he nt icati on
TKI P (tem po ral
key integ ri ty
pro to col)
add ed so
tha t keys are
rot at ed a nd
enc ry pt ion is
str en gthen ed
Wi- Fi
Pro te cted
Acc es s
Dyn am ic k ey
enc ry pt ion
and mutua l
aut he nt icati on
AES
(Ad va nc ed
Enc ry pt ion
Sta nd ard)
doe s not
cau se any
thr ou ghput
los s
WEP
WEP is a common protocol that adds security to all Wi-Fi-compliant
wireless products. WEP gives wireless networks the equivalent level
of privacy protection as a comparable wired network.
22
Page 25

23
Using the Belkin Wireless Networking Utility
64-Bit WEP
64-bit WEP was first introduced with 64-bit encryption, which includes
a key length of 40 bits plus 24 additional bits of system-generated data
(64 bits total). Some hardware manufacturers refer to 64-bit as 40-bit
encryption. Shortly after the technology was introduced, researchers
found that 64-bit encryption was too easy to decode.
128-Bit Encryption
As a resu lt of 64 -bit WEP’s po te ntial securi ty we aknesses, a more
secure method of 128-bi t e nc ryption was devel oped. 128-bit
encryp ti on in cludes a key length of 104 bits plus 24 ad di tional
bits of system -g enerated dat a (12 8 b it s t otal). Some hardware
manufa ct urer s refer to 128- bi t a s 1 04-bit encrypt ion.
Most of the new wireless equipm ent i n t he ma rket today
suppor ts bo th 64 -bit WEP and 128-bit WEP enc ry ption, but you
might have old er eq ui pment that only supp orts 64-bit WEP. All
Belkin wireless produc ts wi ll su pport both 64-bit WE P and
128-bi t enc ry ption.
Encryption Keys
After selec ti ng either the 64-bit WE P or 128 -b it encryptio n mod e, it is
critic al th at yo u g en erate an encryp ti on key. If the encryp tion key is
not consist en t t hrou ghout the entire wireless network , y ou r w irel ess
networ ki ng de vices will be unable to comm unicate with one anoth er.
You ca n e nt er your key by t yping in the hex key. A hex (hex adecimal)
key is a c ombinatio n o f num bers and letters from A–F and 0–9. For
64-bit WEP, yo u m ust e nter 10 hex keys. For 128-bi t W EP, y ou must
enter 26 hex keys.
For instanc e:
AF
0F 4B C3 D4 = 64-bi t W EP ke y
C3
03 0F AF 0F 4B B2 C3 D4 4B C3 D4 E7 = 12 8- bit WEP key
Wri te down the hex WEP key from yo ur wire less ro ut er (or a ccess
point) and ent er it ma nu ally into the hex WEP key table in your
Adapte r’s configur ation screen.
1
2
3
sec tion
4
5
6
23
Page 26

Using the Belkin Wireless Networking Utility
WPA
WPA is a new Wi-Fi standard that improves upon the security features
of WEP. To use WPA security, the drivers and software of your wireless
equipment must be upgraded to support it. These updates will be found
on your wireless vendor’s website. There are three types of WPA security:
WPA-PSK (no server),WPA (with radius server), and WPA2.
WPA-PSK (no server) uses what is known as a pre-shared key as the
network key. A network key is a password that is between eight and
63 characters long. It can be a combination of letters, numbers, or
characters. Each client uses the same network key to access the network.
Typically, this is the mode that will be used in a home environment.
WPA (wi th ra dius server) work s b es t i n a busi ne ss environment,
in which a radius serv er au tomatical ly di stributes the net wo rk
key to clients .
WPA2 requires Adva nc ed En cryptio n Sta nd ard ( AE S) fo r
encryp ti on of da ta, w hich offers much greater securi ty th an WPA.
WPA use s b ot h Tempo ra l K ey In tegrity Protocol (T KI P) an d A ES
for encrypt io n.
Settin g up you r Bel ki n W irel ess Router (or Acces s P oi nt)
to use Securit y
To sta rt us ing security, you must first enab le WE P o r WPA for y our
wireless router (or access poi nt ). For B elkin Wireless Router s ( or
Access Poin ts ), these securi ty fe at ures ca n b e c on figured through
the web-bas ed in terface. See your wi rele ss router ’s (or access poin t’s)
manual for directi on s o n h ow to ac ce ss the m anagement in te rface.
IMPORTAN T: You mus t now se t all wi rele ss ne twork cards/adap te rs
to match these sett in gs.
24
Page 27

25
Using the Belkin Wireless Networking Utility
Configuring your Adapter to use Security
At this point, you sho ul d a lrea dy ha ve your wire less ro uter (or access
point) set to use WPA o r W EP. I n o rder fo r you to gain wi rele ss
connec ti on, y ou must set your N Wire less USB Adapter to use the
same securi ty se ttings.
Changing the Wireless Security Settings
The Belkin N Wireless USB Adapt er su pports the latest WPA security
feature as well as the legacy WEP secur ity s tandard. By default ,
wireless securi ty is di sa bled.
To ena ble s ecurity, y ou will first must dete rm ine w hich standard
is used by the ro uter (or access point) . ( Se e y our w irel ess rou ter’s
or access poin t’s manual for directi on s o n h ow to ac ce ss the
securi ty se tt ings.)
1
2
3
sec tion
4
5
6
To access the security settings on your Adapter, click the “My Connections”
tab and point to the connection for which you want to change security
settings. Click “Edit” to change settings.
25
Page 28

Using the Belkin Wireless Networking Utility
WEP Setup
64-Bit WEP Encryption
1. Selec t “ WE P” from th e “ Da ta En cryptio n” drop-d ow n m enu.
2. After selecting yo ur WEP enc ryption mode, you can enter your key
by typing in the hex key manually.
A hex (hexadecimal) key is a combination of numbers and letters from
A–F and 0–9. For 64-bit WEP, you must enter 10 hex keys.
For instanc e:
AF
0F 4B C3 D4 = 64-bi t W EP ke y
26
Page 29

27
Using the Belkin Wireless Networking Utility
3. Cli ck “Save” to finish. En cr yption in the wireless router
(or access poi nt ) i s n ow se t. Ea ch of yo ur computers on
your wireless netw or k w il l n ow must be configured with
the same secur it y s et tings.
WARNING: If you are u sing a wireless client to turn on th e s ec urity
settin gs in yo ur wi rele ss rout er (o r a cc ess point), you will te mp orarily
lose your wireless conn ec tion until you activ ate s ecurity on your
wireless client . P le ase rec ord the key pri or to ap pl ying changes in the
wireless router (or access poi nt ). If yo u d on’t rememb er th e h ex ke y,
your client wi ll be lo ck ed out o f t he wi re le ss ro ut er (o r a ccess point) .
1
2
3
sec tion
4
5
6
27
Page 30

Using the Belkin Wireless Networking Utility
128-Bit WEP Encryption
Select “WEP ” f rom the drop-dow n men u.
1.
2. After selec ti ng your WEP encrypti on mo de, you can enter your
key by typing in the hex key manual ly. A hex (hexadec imal) key
is a co mbinati on of nu mb ers and letters from A–F and 0–9. For
128-bi t WEP, y ou mu st en ter 26 h ex keys.
For instanc e:
C3
03 0F AF 0F 4B B2 C3 D4 4B C3 D4 E7 = 12 8- bit WEP key
28
Page 31

29
Using the Belkin Wireless Networking Utility
3. Click “Save” to finish. Encryption in the wireless router (or access
point) is now set. You must now configure each of the computers
on your wireless network with the same security settings.
WARNING: If you are u sing a wireless client to turn on th e s ec urity
settin gs in yo ur wi rele ss rout er (o r a cc ess point), you will te mp orarily
lose your wireless conn ec tion until you activ ate s ecurity on your
wireless client . P le ase rec ord the key pri or to ap pl ying changes in the
wireless router (or access poi nt ). If yo u d on’t rememb er th e h ex ke y,
your client wi ll be lo ck ed out o f t he wi re le ss ro ut er (o r a ccess point) .
1
2
3
sec tion
4
5
6
29
Page 32

Using the Belkin Wireless Networking Utility
WPA-PSK (no server)
Choose this setting if your network does not use a radius server. WPA-PSK
(no server) is typically used in home and small office networking.
1. Fro m t he “N etwork Authe nt ication ” drop-do wn me nu, select
“WPA-PSK (no server)” .
2. Enter yo ur ne twork key. Th is ca n b e f rom eight to 63 char ac ters
and can be letters, nu mb ers, or symbols. Thi s sam e k ey mu st be
used on all of the clients (ne tw ork cards) t hat you want to include
in your wireless networ k.
3. Cli ck “Save” to finish. You must now set all client s ( ne twork
cards) to m atch these sett in gs.
30
Page 33

31
Using the Belkin Wireless Networking Utility
Wireless Networking Utility Options
The “Option s” ta b o n t he WN U p rovi de s t he us er the a bility to
custom iz e h is or he r W NU se ttings.
1
2
3
sec tion
4
5
6
31
Page 34

Using the Belkin Wireless Networking Utility
Wireless Networking Utility Help
The WNU “Help” tab provide s use rs wi th access to online and
teleph on e s up port, one-cl ic k c heck for upgrades to upda ted v ersions
of software, and advanc ed di agnostic too ls .
32
Page 35

33
Using the Belkin Wireless Networking Utility
Advanced Diagnostic Tools
The “Advanc ed Di agnostic Tools” secti on is th e c en tral control panel
for all the setting s o f the ha rdwa re and softw are com po nents of
the wireless netwo rk . I t p rovi de s a n a rr ay of te sts and connect iv ity
servic es to en su re opti ma l n etwork perfo rm ance.
1
2
3
sec tion
4
5
6
33
Page 36

Troubleshooting
I can’t connect to the Internet wirelessly.
If you are unable to connect to the Internet from a wireless computer,
please check the following items:
1. Look at the lights on your wireless router. If you’re using a Belkin
Wireless Router, the lights should be as follows:
• The “Power” light should be on.
• The “Connected” light should be on, and not blinking.
• The “WAN” light should be either on or blinking.
If your Belkin Wireless Router’s lights have the above characteristics, go
to number
If this is
If you continue to have issues, please contact Belkin Technical Support.
If you are not using a Belkin Wireless Router, consult that router
manufacturer’s user guide.
2 below.
NOT the case, make sure:
• The router’s power cord is plugged in.
• All cables are connected between the router and the modem.
• All the modem’s LEDs are functioning correctly. If not, see your
modem’s user manual.
• Reboot the router.
• Reboot the modem.
2. Open your wireless utility software by clicking on the icon in the
system tray at the bottom right-hand corner of the screen. The
tray icon should look like this (the icon may be red or green):
3. The window that opens should have a list of “Available Networks”.
Available networks are wireless networks to which you can connect.
If you are using a Belkin 802.11g (G Plus) Router, or Belkin 802.11g
(54g) Router, “Belkin54g” is the default name.
If you are using a Belkin 802.11b Router, the default name should
be “WLAN”.
If you are NOT using a Belkin Router, please consult your router
manufacturer’s user manual for the default name.
34
Page 37

35
Troubleshooting
The name of your wireless network appears in
“Available Networks”.
If the correct network nam e is lis te d i n t he “Ava il able Network s”
list, pleas e f ol low t he steps below to conne ct wi rele ssly:
1. Click on the correct network name in the “Available Networks” list.
2. I f t he ne twork has secur it y ( en cryptio n) en ab led, you must
enter the netw or k k ey. Click “Co nn ect”. For more informati on
reg ardi ng security, see t he page entitle d: “S ec uring your Wi-F i
Networ k” on pa ge 20 of this Us er Ma nual.
3. W ithin a few seconds, th e tra y i co n i n t he lo wer
right- ha nd co rne r of you r screen sho ul d t urn green,
indica ti ng a s uc cessful conn ec tion to the network.
If you are s ti ll unable to access the Inte rnet after co nn ecting to
the wireless netwo rk , p le ase contact Bel ki n Techn ic al Support.
The name of your wireless network DOES NOT appear in the list
of “Available Networks”.
If the correct network nam e is not list ed, c heck the SSID settin gs
to see if they match. The SSID is case -s ensitive and th e spe ll ing
on each comput er mu st be ex actly the same in order f or the
Adapte r to con ne ct to th e w irel ess rou te r ( or ac cess point).
Note: To check the SSID settings or look for an available network,
double-click the Signal Indicator icon to bring up the “Wireless
Networks” screen. Click “Add” if you do not see the network
you are trying to connect to and type in the SSID. For more
information about setting up an SSID, please reference your
router manufacturer’s user manual.
If issues persist even at close range, please contact Belkin
Technical Support.
1
2
3
4
sec tion
5
6
35
Page 38

Troubleshooting
Installation CD-ROM does not start Belkin
Wireless Networking Utility.
If the CD-ROM d oe s not s ta rt the Belkin Wireless N etworking
Utility automatically, it could be that t he computer i s running o th er
applications that are interfering w it h the C D drive. If the Belkin
Wireless Networking Ut ility scre en does not appear within 15-20
seconds, open up yo ur CD-ROM d ri ve by double- cl ic ki ng on the
“My Computer” icon. N ex t, double-click o n the C D- RO M drive in
which the Installation CD has be en placed to start the installation.
If the installation d oe s not s ta rt automatically, right-click to select
“Explore”, then do ub le -click on t he icon nam ed “setup.exe”.
Power LED does not come ON; Adapter is not working.
If the LED indicato rs are not ON, the problem may be that the
Adapte r is not conn ec ted or installe d properl y. Verify that the
Adapte r is plu gg ed fi rmly into the USB port of your com pu ter.
Check to see that the drive rs fo r t he Ad apter have been inst al led.
Right- cl ick o n t he “M y C omputer” ico n on you r des ktop. Choose
“Propertie s” an d n av igate to the “Device Mana ger” and see if
your USB Netwo rk Ad ap ter is listed withou t a ny er rors . I f a n error
is indicate d, co ntact Belkin Technica l S up port.
Link LED is blinking slowly; I cannot connect
to a wireless network or the Internet.
If your Adapte r app ea rs to be fu nctioning proper ly, but you
cannot conn ec t t o a ne tw ork or y ou have a red wireless ic on
at the bottom of your screen, the problem may be that the re is
a mismatch bet we en th e n etwork name (SSID ) s et tings in your
wireless networ k p rope rt ies.
Check the SSID sett in gs to see i f t hey m atch. The SSID is
case-s en sitive and the spell in g o n e ac h c omputer must be
exactl y the sa me in order for the Adapt er to co nnect to the
wireless router (or access poi nt ).
Note: To ch eck the SSID setting s o r loo k f or an av ai lable
networ k, do ub le-clic k the Si gn al In dicator icon to brin g u p the
“Wireless Netwo rk s” scre en. C lick “Add” if you do not see the
networ k you are trying to conne ct to an d t yp e i n t he SS ID.
For more in formati on ab ou t s etting up an SSID, please reference
your router manufa ct urer ’s user manua l. If is su es persist even at
close range , p le ase c ontact Belki n Techn ic al Su pport.
36
Page 39

37
Troubleshooting
Link LED is solid but I cannot connect to the Internet.
If you have a signal but can’t get online or obtai n a n IP add ress ,
the problem may be that there is a mi smatch betwe en th e
encryp ti on ke y s ettings in your comp ut er and w irel ess rou ter ( or
access poin t) . C heck the WEP, WPA, or WPA2 key sett in gs to se e
if they match. The key is case -s ensitive and the spe ll ing on e ach
comput er an d w irel es s route r ( or ac cess point) must be exact ly
the same in order for the Adapter to conne ct to th e route r. Fo r
more i nformatio n a bo ut en cryptio n, pl ea se see “Securin g you r
Wi-Fi Netwo rk ” o n p ag e 2 0 o f t hi s U ser M anual.
If issues pers is t e ve n a t c lose range, pleas e con tact Belkin
Technical Suppo rt .
Data transfer is sometimes slow.
Wireless techno lo gy is ra dio-bas ed , w hi ch means connec ti vity
and the throughput perf or mance betwee n d ev ices decreases
when the dista nc e b et ween devices in crea se s. Other factors tha t
will cause sig na l d eg radatio n (me ta l i s g enerally the wors t cul prit)
are ob struction s s uc h a s w al ls and m etal applian ce s. As a resul t,
the typical in do or ra nge of your wireless device s wil l b e b et ween
100 to 200 feet. Note also tha t con nection speed may de crea se
as you move farther from the wireless router (or acce ss po in t).
In ord er to de termine if wireless issu es are related to range, we
sugges t tem po rarily movin g t he co mp uter, if possib le , t o f iv e t o
10 feet away from the wire less ro uter (or access poin t) . P le ase
see the sectio n tit le d “ Placement of your Wi rele ss Ne tworking
Hardware f or Op timal Perfor ma nce” on page 2 of t his User
Manual . If iss ue s p er sist even at close rang e, pl ease contact
Belkin Technica l Sup port.
1
2
3
4
sec tion
5
6
Signal strength is poor.
Wireless techno lo gy is ra dio-bas ed , w hi ch means connec ti vity
and the throughput perf or mance betwee n d ev ices decreases
when the dista nc e b et ween devices in crea se s. Ot her factors tha t
will cause sig na l d eg radatio n (me ta l i s g enerally the wors t cul prit)
are ob struction s s uc h a s w al ls and m etal applian ce s. As a resul t,
the typical in do or ra nge of your wireless device s wil l b e b et ween
100 to 200 feet. Note also tha t con nection speed may de crea se
as you move farther from the wireless router (or acce ss po in t).
In ord er to de termine if wireless issu es are related to range, we
sugges t tem po rarily movin g t he co mp uter, if possib le , t o f iv e t o
10 feet away from wireless rou ter (or access point ).
37
Page 40

Troubleshooting
Changi ng th e w irel es s c ha nnel – D ependin g on loc al wi rele ss
traffic and interf eren ce , s wi tching the wireless chan nel o f y our
networ k can im prov e per fo rmance and reliabil it y. The defaul t
channe l the router is ship pe d w ith i s c hannel 6. You m ay ch oose
fro m s everal other chan ne ls depending on your region ; see yo ur
rou ter’s (o r a cc ess p oint’s) us er manual for instru ct ions on how to
choose othe r c ha nnels.
Limiti ng th e w irel es s t ra nsmit rate – Limitin g t he wi rele ss
transm it ra te ca n h el p i mpro ve the m aximum wireless range , a nd
connec ti on st ability. M ost wireless cards have the ability to limit
the transmi ss ion rate. To ch ange this property, go to th e Win do ws
Control Panel, ope n “Ne tw ork Connecti on s” and double-c li ck
on your Adapte r’s connec ti on. I n t he “P ro pe rties” dialo g, se lect
the “Config ure” bu tt on on th e “ General” tab (Win do ws 98 us ers
will have to select th e USB Ne tw ork Adapter in the list box and
then click “Proper ti es”), then choose th e “Ad vanced” tab and
select the rat e propert y. Wireless clien t cards are usually set to
automa ti cally adjust the wireles s tra ns mit rate for you, but doing
so can cause period ic di sconnects wh en th e w irel es s s ignal is
too weak; as a rule, slower tr an smission rat es are more stable.
Experi me nt wi th diff eren t c on nection rate s u nt il you f ind the best
one for your environmen t; no te that all availabl e tra nsmission
rates shoul d b e acc ep table for browsing the Inte rnet. For more
assist an ce, s ee your wire less card’s lit er ature. If is sues persist
even at close range , p le ase contact Belki n Techn ic al Su pport.
Why are there two wireless utilities in my system tray?
Which one do I use?
There are sev er al features and advantag es from usin g t he Be lkin
Wireless Networ ki ng Utility over the Win do ws XP Wi re le ss
Zero C onfigurat io n u tility. We offer a site survey, detailed link
inform at ion, and adapter dia gn osis, to name a few.
It’s es se ntial to know which uti li ty is ma naging your Adapt er. We
rec ommend using th e Bel ki n W irel ess Networki ng Ut ility. To use
the Belkin Wireles s Net wo rking Utilit y, follow the step s b el ow:
Step 1 Righ t- click on the network stat us ic on in th e s ystem tray
and select the “Sta tu s” tab.
Step 2 From the “Status ” tab , u nc heck the “Use Window s t o
config ure my wireless netwo rk se ttings” box. Once th e box is
unchec ke d, cl ick the “Close” butt on to cl ose t he window.
You are now usin g the Be lk in Wi re le ss Networkin g U ti lity
to configure the Adapte r.
38
Page 41

39
Troubleshooting
The Adapter does not perform or connection is unstable
when computer has a second built-in wireless network
®
card (such as a mini PCI or Intel
This condit io n o ccurs if your comput er ha s a buil t-in wire less
card w hile your Belkin N Wireless USB Adapt er is al so ac tive.
This happen s b ec ause Windows must no w han dle t wo active
wireless connec ti ons.
You mu st di sable the built -i n w irel es s c ard from your compu ter
under “Netw or k A dapters” in the Devi ce Ma nager.
Centrino™).
The Adapter does not perform or connection is slow
when computer has a built-in wired Ethernet card.
This condit io n o ccurs if your comput er ha s a n act ive E thern et
card w hile your Adapter is also ac ti ve. This happens bec au se
Window s mus t n ow ha nd le two active networ k c on nections.
You mu st di sable the Ether net card f ro m you r c om puter under
“Netwo rk Ad ap ters” in the Device Man ag er.
What’s the difference between 802.11g and
draft 802.11n?
Currently there are th re e com monly used wireless networ king
standa rds, whic h t ra nsmit data at very different maximum
speeds . Eac h i s bas ed on th e d es ignation for cert ifying network
standa rds. The mos t com mo n w irel ess networki ng st andard,
802.11 g, ca n t ra nsmit inform at ion u p t o 5 4Mbps; 802.11a al so
suppor ts up to 54Mb ps , b ut in th e 5 GHz f re qu ency; and 802.1 1n
draft speci fi cation can conn ec t a t u p to 300 Mb ps. See the chart
on the next page for more detailed info rmation.
1
2
3
4
sec tion
5
6
39
Page 42

Troubleshooting
Belkin Wireless Comparison Chart
(draf t 802.11n
Wireless
Technology
Rate*
Speed /Data
G
(802. 11g)
Up to 5 4Mbps* Up to 54Mb ps* Up to 300Mbps * Up to 300Mbp s*
(802. 11g with
MIMO MRC)
G Plus MIMO
with MIMO)
N MIMO
(draf t 802.11n
with MIMO)
N1 MIMO
Commo n household
devic es such as
cordless phones
and micro wave
ovens may interf ere
with the unlicen sed
Frequency
band 2.4GHz
Compa tible with
802.1 1b/g
Compa tibility
Up to 4 00 ft.* Up to 1 ,000 ft. * Up to 1,20 0 ft.* Up to 1,400 ft.*
Cover age*
Commo n—
wides pread use fo r
Inter net sha ring
Advan tage
*Di st anc e an d co nne ct ion spe ed s will vary depen di ng on y our net wo rki ng e nviro nme nt .
**T hi s Adapt er i s compa ti ble w it h pro du cts bas ed o n the sam e ve rsion o f th e dr aft 8 02 .11n
spe ci fic at ions and may r equir e a so ftw are upg ra de for bes t re sul ts .
Commo n household
devic es such as
cordless phones
and micro wave
ovens may interf ere
with the unlicen sed
band 2.4GHz
Compa tible with
802.1 1b/g
Bette r coverage
and consistent
speed and range
Commo n household
devic es such as
cordless phones
and micro wave
ovens may interf ere
with the unlicen sed
band 2.4GHz
Compa tible with
draft 802.11n** and
802.1 1b/g
Enhan ced speed
and co verage
Commo n household
devic es such as
cordless phones
and micro wave
ovens may interf ere
with the unlicen sed
band 2.4GHz
Compa tible with
draft 802.11n** and
802.1 1b/g
Leadi ng edge—
best coverage an d
throughput
40
Page 43

41
Troubleshooting
41
sec tion
1
2
3
4
5
6
Technical Support
You ca n f in d t echnical sup po rt in formati on at ww w.b el kin.com
or www.belki n. com/netwo rk ing. If you want to contact tec hn ical
suppor t by pho ne , p le ase call:
US: 877-736-5771
310-898-1100 ext. 2263
UK: 0845 607 77 87
Australia: 1800 235 546
New Zealand: 0800 235 546
Singapore: 800 616 1790
Europe: www.belkin.com/support
Page 44

42
Information
FCC Statement
DECL ARATION O F CONF ORMITY WITH FCC RULES FOR
ELEC TROMAGNETIC CO MPATIBILITY
We, Belkin International, Inc ., of 5 01 West Walnut Stree t,
Comp ton, C A 90220, declare u nder o ur sole responsib ility
that the prod uct,
F5D8 053
to which th is declaration re lates, complie s with Part 15
of the FCC R ules. Operatio n is su bject to the followin g
two condit ions: (1) this d evice may not cause harmful
inte rference, and (2) this d evice must accept any
inte rference received, including inte rference that may
caus e unde sired operation.
Cautio n: Ex po sure to Ra di o F re qu ency Radiati on .
The radiated output power of this device is far below the FCC radio frequency
exposure limits. Nevertheless, the device shall be used in such a manner that
the potential for human contact during normal operation is minimized.
When connecting an external antenna to the device, the antenna shall be
placed in such a manner to minimize the potential for human contact during
normal operation. In order to avoid the possibility of exceeding the FCC radio
frequency exposure limits, human proximity to the antenna shall not be less
than 20cm (8 inches) during normal operation.
Federa l Com mu nicatio ns Co mm ission Notic e
This equipment has been tested and found to comply with the limits for a
Class B digital device, pursuant to Part 15 of the FCC Rules. These limits are
designed to provide reasonable protection against harmful interference in a
residential installation.
This equipment generates, uses, and can radiate radio frequency energy.
If this equipment does cause harmful interference to radio or television
reception, which can be determined by turning the equipment off and on, the
user is encouraged to try and correct the interference by one or more of the
following measures:
• Reorient or relocate the receiving antenna.
• Increase the distance between the equipment and the receiver.
• Connect the equipment to an outlet on a circuit different from that to
which the receiver is connected.
• Consult the dealer or an experienced radio/TV technician for help.
Page 45

43
Information
43
sec tion
1
2
3
4
5
6
Modifi ca tions
The FCC requires the user to be notified that any changes or modifications to
this device that are not expressly approved by Belkin International, Inc., may
void the user’s authority to operate the equipment.
Belkin International, Inc., Limited Lifetime Product Warranty
What this warranty covers.
Belkin International, Inc. (“Belkin”) warrants to the original purchaser of this
Belkin product that the product shall be free of defects in design, assembly,
material, or workmanship.
What the period of coverage is.
Belkin warrants the Belkin product for the lifetime of the product.
What will we do to correct problems?
Product Warranty.
Belkin will repair or replace, at its option, any defective product free of charge
(except for shipping charges for the product).
What is not covered by this warranty?
All above warranties are null and void if the Belkin product is not provided
to Belkin for inspection upon Belkin’s request at the sole expense of
the purchaser, or if Belkin determines that the Belkin product has been
improperly installed, altered in any way, or tampered with. The Belkin Product
Warranty does not protect against acts of God such as flood, earthquake,
lightning, war, vandalism, theft, normal-use wear and tear, erosion,
depletion, obsolescence, abuse, damage due to low voltage disturbances
(i.e. brownouts or sags), non-authorized program, or system equipment
modification or alteration.
How to get service.
To get service for your Belkin product you must take the following steps:
1. Contact Belkin International, Inc., at 501 W. Walnut St., Compton CA
90220, Attn: Customer Service, or call (800)-223-5546, within 15 days of
the Occurrence. Be prepared to provide the following information:
a. The part number of the Belkin product.
b. Where you purchased the product.
c. When you purchased the product.
d. Copy of original receipt.
2. Your Belkin Customer Service Representative will then instruct you on
how to forward your receipt and Belkin product and how to proceed
with your claim.
Page 46

44
Information
Belkin International, Inc., reserves the right to review the damaged Belkin
product. All costs of shipping the Belkin product to Belkin International, Inc.,
for inspection shall be borne solely by the purchaser. If Belkin determines,
in its sole discretion, that it is impractical to ship the damaged equipment
to Belkin International, Inc., Belkin may designate, in its sole discretion, an
equipment repair facility to inspect and estimate the cost to repair such
equipment. The cost, if any, of shipping the equipment to and from such
repair facility and of such estimate shall be borne solely by the purchaser.
Damaged equipment must remain available for inspection until the claim is
finalized. Whenever claims are settled, Belkin International, Inc., reserves the
right to be subrogated under any existing insurance policies the purchaser
may have.
How state law relates to the warranty.
THIS WARRANTY CONTAINS THE SOLE WARRANTY OF BELKIN. THERE
ARE NO OTHER WARRANTIES, EXPRESSED OR, EXCEPT AS REQUIRED
BY LAW, IMPLIED, INCLUDING THE IMPLIED WARRANTY OR CONDITION
OF QUALITY, MERCHANTABILITY OR FITNESS FOR A PARTICULAR
PURPOSE, AND SUCH IMPLIED WARRANTIES, IF ANY, ARE LIMITED IN
DURATION TO THE TERM OF THIS WARRANTY.
Some states do not allow limitations on how long an implied warranty lasts,
so the above limitations may not apply to you.
IN NO EVENT SHALL BELKIN BE LIABLE FOR INCIDENTAL, SPECIAL,
DIRECT, INDIRECT, CONSEQUENTIAL OR MULTIPLE DAMAGES SUCH AS,
BUT NOT LIMITED TO, LOST BUSINESS OR PROFITS ARISING OUT OF
THE SALE OR USE OF ANY BELKIN PRODUCT, EVEN IF ADVISED OF THE
POSSIBILITY OF SUCH DAMAGES.
This warranty gives you specific legal rights, and you may also have other
rights, which may vary from state to state. Some states do not allow the
exclusion or limitation of incidental, consequential, or other damages, so the
above limitations may not apply to you.
Page 47

45
Information
45
sec tion
1
2
3
4
5
6
Page 48

Belkin Ltd.
4 Pioneer Avenue
Tuggerah Business Park
Tuggerah, NSW 2259, Australia
+61 (0) 2 4350 4600
+61 (0) 2 4350 4700 fax
Belkin B.V.
Boeing Avenue 333
1119 PH Schiphol-Rijk, The Netherlands
+31 (0) 20 654 7300
+31 (0) 20 654 7349 fax
Belkin Tech Support
US: 877-736-5771
310-898-1100 ext. 2263
UK: 0845 607 77 87
Australia: 1800 235 546
New Zealand: 0800 235 546
Singapore: 800 616 1790
Europe: www.belkin.com/support
Belkin International, Inc.
501 West Walnut Street
Los Angeles, CA 90220-5221, USA
310-898-1100
310-898-1111 fax
Belkin Ltd.
Express Business Park, Shipton Way
Rushden, NN10 6GL, United Kingdom
+44 (0) 1933 35 2000
+44 (0) 1933 31 2000 fax
© 2007 Belkin International, Inc. All rights reserved. All trade names are registered trademarks of
respective manufacturers listed. Windows and Windows Vista are either registered trademarks or
trademarks of Microsoft Corporation in the United States and/or other countries.
P75451
N Wireless
USB Adapter
 Loading...