

Page 1
F5D8013ea
N Wireless
Notebook Card
User Manual
EN
FR
DE
NL
ES
IT
Page 2

Table of Contents
1 Introduction ................................................................................................1
Benefits of a Home Network ..........................................................................
Advantages of a Wireless Network ................................................................
Placement of your Wireless Networking Hardware
for
Optimal Performance ................................................................................2
2 Overview
3 Installing and Setting up the Card ..............................................................
4 Using the Belkin Wireless Networking Utility ..........................................
5 Troubleshooting ........................................................................................
6 Information ...............................................................................................
....................................................................................................5
Product Features ............................................................................................
Applications and Advantages .........................................................................
Product Specifications ....................................................................................
System Requirements ...................................................................................
Package Contents .........................................................................................
A — Installation Process for Windows Vista .................................................
B — Installation Process for Windows Operating Systems
other than Windows Vista ......................................................................
C — Configuration ........................................................................................
Accessing the Belkin Wireless Networking Utility
from the Windows System Tray ...................................................................
Network Status .............................................................................................17
Available Networks .......................................................................................17
Setting Wireless Network Profiles ................................................................
Securing your Wi-Fi Network .......................................................................
Configuring your Card to use Security ........................................................23
.12
15
16
16
19
19
30
39
1
1
5
6
6
7
7
8
8
Page 3

Introduction
Thank you for purchasing the Belkin N Wireless Notebook Card. Now
you can take advantage of this great new technology and gain the
freedom to network your home and office computers wirelessly. This
Card allows you to connect a notebook computer to your network.
Please be sure to read through this User Manual completely, and pay
special attention to the section entitled “Placement of your Wireless
Networking Hardware for Optimal Performance”.
Benefits of a Home Network
Your Belkin Home Network will allow you to:
• Share one high-speed Internet connection with all the computers in
your home
• Share resources, such as files, and hard drives among all the
connected computers in your home
• Share a single printer with the entire family
• Share documents, music, video, and digital pictures
• Store, retrieve, and copy files from one computer to another
• Simultaneously play games online, check Internet email, and chat
Advantages of a Wireless Network
• Mobility – you’ll no longer need a dedicated “computer room”—
now you can work on a networked laptop or desktop computer
anywhere within your wireless range
• Easy installation – Belkin Easy Installation Wizards make setup
simple
• Flexibility – set up and access printers, computers, and other
networking devices from anywhere in your home
• Easy expansion – the wide range of Belkin networking products
lets you expand your network to include devices such as printers
and gaming consoles
• No cabling required – you can spare the expense and hassle of
retrofitting Ethernet cabling throughout the home or office
• Widespread industry acceptance – choose from a wide range of
interoperable networking products
section
1
2
3
4
5
6
1
Page 4

Introduction
Placement of your Wireless Networking Hardware for
Optimal Performance
Your wireless connection will be stronger the closer your computer is
to your wireless router (or access point). Typical indoor operating range
for your wireless devices is between 100 and 200 feet. In the same way,
your wireless connection and performance will degrade somewhat as the
distance between your wireless router (or access point) and connected
devices increases. This may or may not be noticeable to you. As you
move farther from your wireless router (or access point), connection
speed may decrease. Factors that can weaken signals simply by getting
in the way of your network’s radio waves are metal appliances or
obstructions, and walls.
If you have concerns about your network’s performance that might be
related to range or obstruction factors, try moving the computer to a
position between five and 10 feet from the wireless router (or access
point) in order to see if distance is the problem. If difficulties persist even
at close range, please contact Belkin Technical Support.
Note: While some of the items listed below can affect network
performance, they will not prohibit your wireless network from
functioning; if you are concerned that your network is not operating at its
maximum effectiveness, this checklist may help.
1. Placement of your Wireless Router (or Access Point)
Place your wireless router (or access point), the central connection point
of your network, as close as possible to the center of your wireless
network devices.
To achieve the best wireless network coverage for your “wireless clients,”
(i.e. computers enabled by Belkin Wireless Notebook Cards, Wireless
Desktop Cards, and Wireless USB Adapters):
• Ensure that your wireless router’s (or access point’s) antennas
are parallel to each other, and are positioned vertically (toward
the ceiling). If your wireless router (or access point) itself is
positioned vertically, point the antennas as much as possible in
an upward direction.
• In multistory homes, place the wireless router (or access point)
on a floor that is as close to the center of the home as possible.
This may mean placing the wireless router (or access point) on
an upper floor.
• Try not to place the wireless router (or access point) near a
cordless 2.4GHz phone.
2
Page 5

3
Introduction
2. Avoid Obstacles and Interference
Avoid placing your wireless router (or access point) near devices that
may emit radio “noise”, such as microwave ovens. Other objects that
can inhibit wireless communication can include:
• Refrigerators
• Washers and/or dryers
• Metal cabinets
• Large aquariums
• Metallic-based, UV-tinted windows
section
1
2
3
4
5
If your wireless signal seems weak in some spots, make sure that
objects such as these are not blocking the signal’s path between
your computers and wireless router (or access point).
3. Cordless Phone Placement
If the performance of your wireless network is impaired after attending
to the above issues, and you have a cordless phone:
• Try moving cordless phones away from the wireless router
(or access point) and your wireless-enabled computers.
• Unplug and remove the battery from any cordless phone
that operates on the 2.4GHz band (check manufacturer’s
information). If this fixes the problem, your phone may be
interfering.
• If your phone supports channel selection, change the
channel on the phone to the farthest channel from your
wireless network as possible. For example, change the
phone to channel 1 and move your wireless router (or access
point) to channel 11. (Your channel selection will vary
depending on your region.) See your phone’s user manual for
detailed instructions.
• If necessary, consider switching to a 900MHz or 5GHz
cordless phone.
6
3
Page 6

Introduction
4. Choose the “Quietest” Channel for your Wireless Network
In locations where homes or offices are close together, such as
apartment buildings or office complexes, there may be wireless
networks nearby that can conflict with yours. Use the Site Survey
capabilities of your Wireless Networking Utility to locate any other
wireless networks, and move your wireless router (or access point) and
computers to a channel as far away from other networks as possible.
Experiment with more than one of the available channels, in order to
find the clearest connection and avoid interference from neighboring
cordless phones or other wireless devices.
For more Belkin wireless networking products, use the detailed Site
Survey and wireless channel information included in your User Manual.
5. Secure Connections, VPNs, and AOL
Secure connections typically require a user name and password, and
are used where security is important. Secure connections include:
• Virtual Private Network (VPN) connections, often used to
connect remotely to an office network
• The “Bring Your Own Access” program from America Online
(AOL), which lets you use AOL through broadband provided by
another cable or DSL service
• Most online banking websites
• Many commercial websites that require a user name and
password to access your account
Secure connections can be interrupted by a computer’s power
management setting, which causes it to “go to sleep.” The simplest
solution to avoid this is to simply reconnect by re-running the VPN or
AOL software, or by re-logging into the secure website.
A second alternative is to change your computer’s power management
settings so it does not go to sleep; however, this may not be
appropriate for portable computers. To change your power management
setting in Windows, see the “Power Options” item in the Control Panel.
If you continue to have difficulty with Secure Connections, VPNs, and
AOL, please review steps 1–4 above to be sure you have addressed
these issues.
These guidelines should allow you to cover the maximum possible area
with your wireless router. Should you need to cover an even wider area,
we suggest the Belkin Wireless Range Extender/Access Point.
For more information regarding our networking products, visit our
website at www.belkin.com/networking or call Belkin Technical Support.
44
Page 7

Overview
Product Features
The Card complies with the IEEE draft-802.11n specification to
communicate with other draft-802.11n-compliant wireless devices at
up to 300Mbps*. The Card is also compatible with 802.11g devices at
54Mbps as well as 802.11b products at 11Mbps. The Card operates
on the same 2.4GHz frequency band as 802.11b/g Wi-Fi® products.
• 2.4GHz ISM (Industrial, Science, and Medical)
band operation
• Integrated easy-to-use Wireless Networking Utility
• PCI interface, for operation in virtually any desktop computer
• WPA, WPA2, 64-bit WEP (Wired Equivalent Privacy), or 128bit encryption
• Wireless access to networked resources
• Support for both Infrastructure and Ad-Hoc (peer-to-peer)
networking modes
• Data rate of up to 54Mbps (802.11g), or 11Mbps (802.11b)
• Easy installation and use
• External antenna
• LED power and network link indicators
1
section
2
3
4
5
6
5
5
Page 8

Overview
Applications and Advantages
• Wireless roaming with a laptop around the home or office
Offers the freedom of networking—without cables
• Connection rates of up to 54Mbps
Provides immediate wireless connectivity at home, work, and hotspot
locations without compromising the use of existing 802.11b and
802.11g products
• Compatibility with 802.11b products
802.11g wireless LAN solutions are backward-compatible with existing
Wi-Fi (IEEE 802.11b) products and with other products that display
the 54g logo
• Difficult-to-wire environments
Enables networking in buildings with solid or finished walls, or open
areas where wiring is difficult to install
• Frequently changing environments
Adapts easily in offices or environments that frequently rearrange or
change locations
• Temporary LANs for special projects or peak time
Sets up temporary networks such as at trade shows, exhibitions, and
construction sites, which need networks on a short-term basis; also
companies who need additional workstations for a peak activity period
• SOHO (Small Office/Home Office) networking needs
Provides the easy and quick, small network installation SOHO users
need
Product Specifications
Host Interface: 32-bit CardBus
Operating Temperature: 32–140 degrees F (0–60 degrees C)
Storage Temperature: -40–194 degrees F (-40–90 degrees C)
Humidity: Max. 95% (non-condensing)
Typical Operating Range: Up to 365.8 Mrt.**
*NOTE: The standard transmission rate—300Mbps—is the physical data
rate. Actual data throughput will be lower.
**Wireless performance may vary depending on the networking
environment.
6
Page 9
7
Overview
(C)
1
section
2
3
4
(b)
(a)
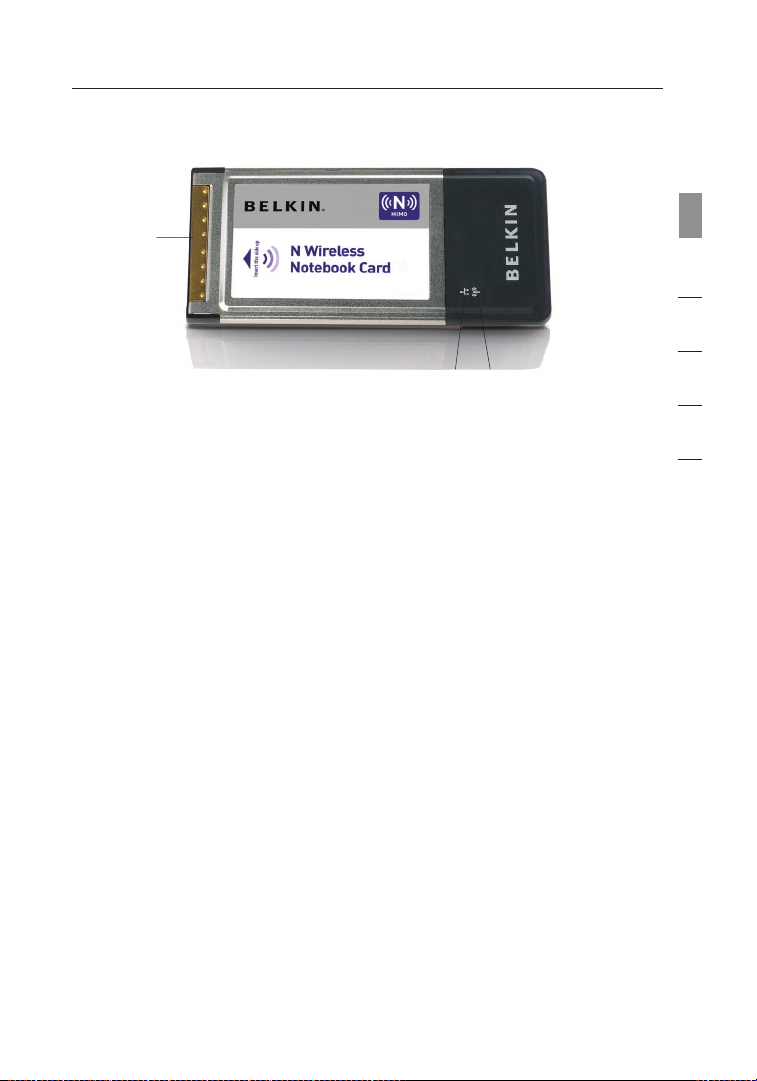
(a) Power LED
Lights up when the Card is powered up
(b) Link/Activity LED
Lights up when the Card is connected; flashes when
wireless activity is detected
(c) Card Connector
Part of the Card that fits into your computer’s CardBus slot
System Requirements
• PC-compatible computer with one available 32-bit, CardBus slot
• Windows® 2000, XP with SP2, or Vista™*** (clients are not Mac OS
compatible)
• Minimum 64MB of RAM
• CD-ROM drive
• Internet browser
Package Contents
• N Wireless Notebook Card
• Quick Installation Guide
• Installation Software and User Manual on CD-ROM
5
6
7
Page 10
Installing and Setting up the Card
8
A. Installation Process for Windows Vista
***NOTE: At the time of initial release of this product, Windows Vista
drivers were not available for release and might not be included on
the CD shipped with your product. For information on updated drivers
for Windows Vista (if any), please visit the Belkin website at www.belkin.
com/support/vista.
IMPORTANT: INSTALL THE SOFTWARE BEFORE INSERTING THE CARD.
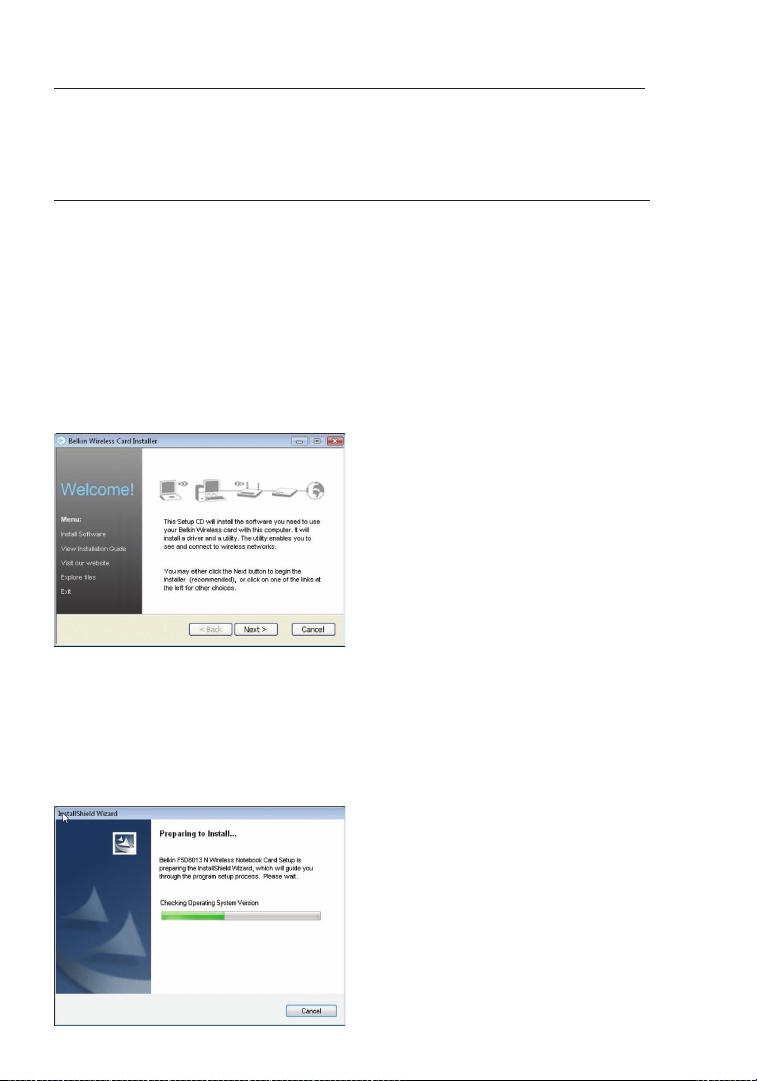
A.1 Insert the Installation Software CD into your CD-ROM drive.
A.2 Click “Next” to begin the installation process.
Note: If the Belkin Wireless Card Installer screen does not appear
within 20 seconds, access your CD-ROM by double-clicking on the
“My Computer” icon; then, double-click on the CD-ROM drive into
which the installation CD has been placed. If the Installer does not start
automatically, double-click on the icon named “Setup.exe”.
A.3 The InstallShield Wizard starts installation process
Page 11

9
Installing and Setting up the Card
A.4 Select a destination folder for the
software installation by clicking
“Browse”; or, simply click “Next” to
select a default location.
A.5 A Setup Status screen will let you
know where you are in the setup
process.
A.6 A window may appear a second
time showing the message,
“Windows can’t verify the
publisher of this driver software”.
This DOES NOT indicate a
problem. Our software has been
fully tested and is compatible
with this operating system.
1
2
section
3
4
5
6
A.7 When prompted, turn off your
computer and plug in your Card.
Your installation is now complete.
A.8 When the installation completes,
click on “Finish”.
9
Page 12
Installing and Setting up the Card
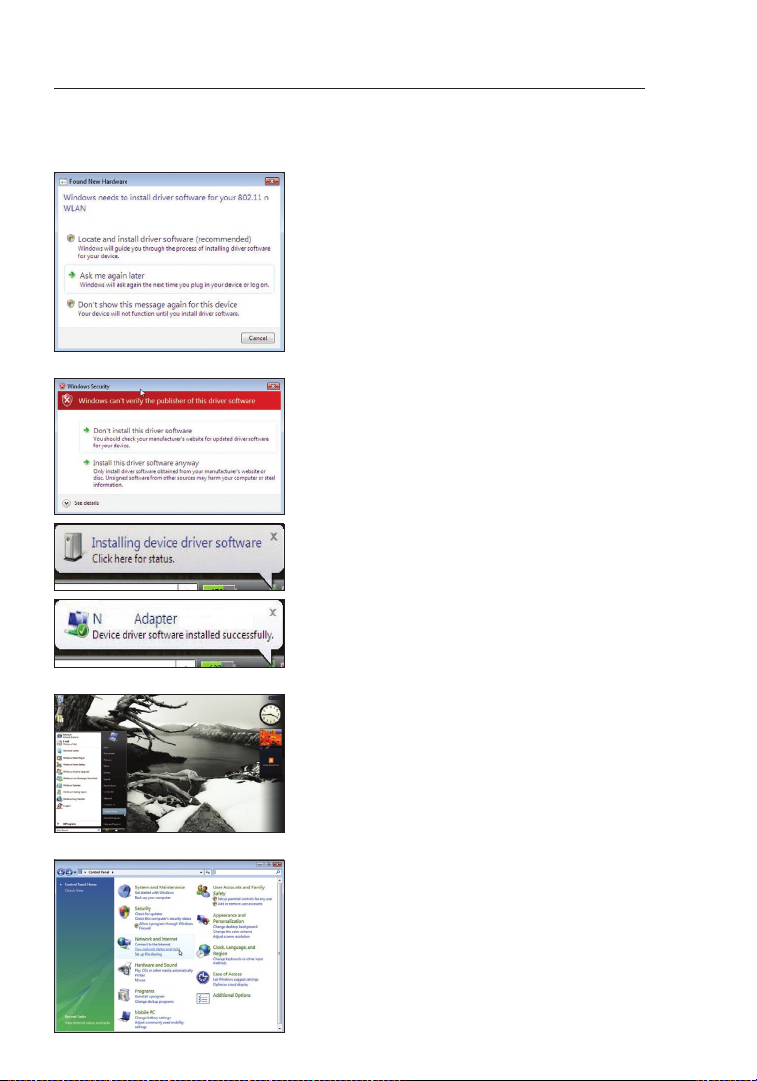
A.9 The Found New Hardware Wizard
might appear within 3–15 seconds.
If it does, continue to follow the
prompts. Select “Locate and install
the driver software” to continue.
A.10 You might see a screen similar to
the one pictured below. This DOES
NOT mean there is a problem. Our
software has been fully tested and
is compatible with this operating
system. Select “Install this driver
software anyway” and follow the
on-screen instructions.
Next, a screen appears indicating
that hardware installation is taking
place; then, another indicates that
the process is complete.
A.11 To connect to the Internet, open the
Network and Sharing Center by first
opening the Control Panel from the
“Start” menu.
A.12 In the Control Panel, click on “View
network status and tasks”.
10
Page 13

11
Installing and Setting up the Card
A.13 In the Network and Sharing Center,
click on “Connect to a network”.
A.14 In the next screen, select an
available wireless network and click
“Connect”.
A.15 Your Card will attempt to connect
to the selected network.
1
2
section
3
4
5
6
A.16 Depending on the security settings
of your wireless network, you may
be prompted to enter a network
security key or a passphrase. Click
“Connect” after you have done so.
11
Page 14
Installing and Setting up the Card
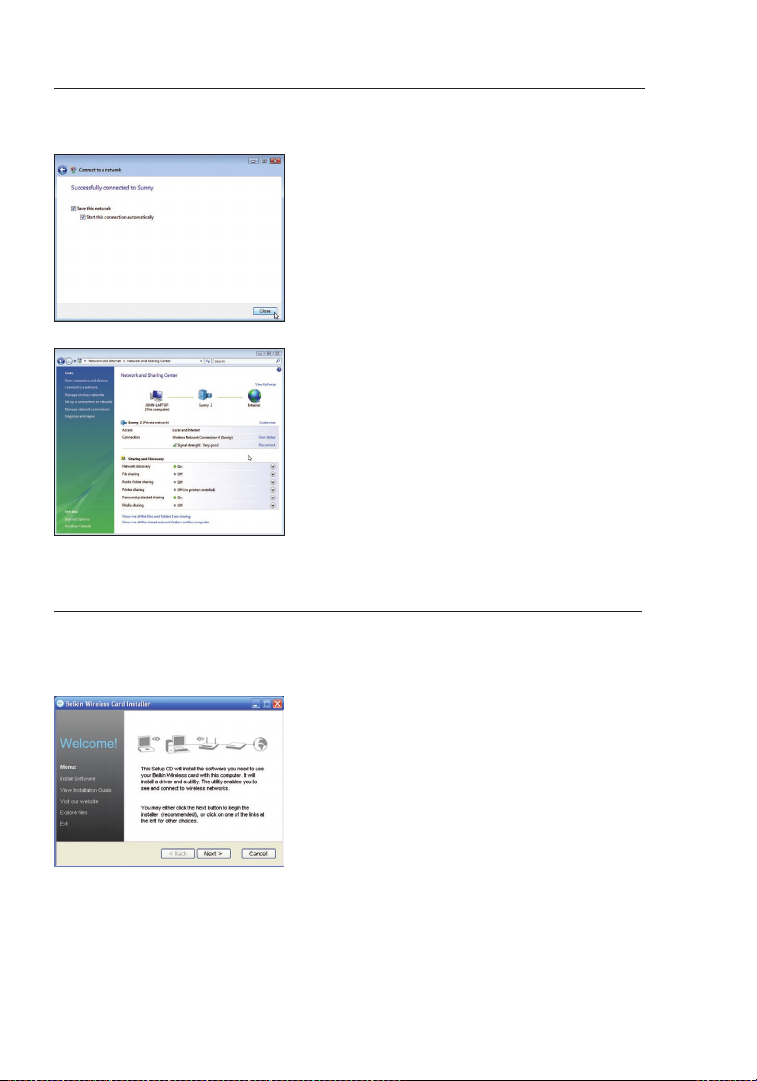
A.17 After connecting to the network,
you can choose to save this
network and connect automatically
when your Card is in range.
A.18 The Network and Sharing Center
now indicates the network
connection that you have just made.
The links on the left of the window
allow you to configure your network
connections.
B. IInstallation Process for Windows Operating Systems other than
Windows Vista
IMPORTANT
: INSTALL THE SOFTWARE BEFORE INSERTING THE CARD.
B.1 Insert the Installation Software CD into your CD-ROM drive.
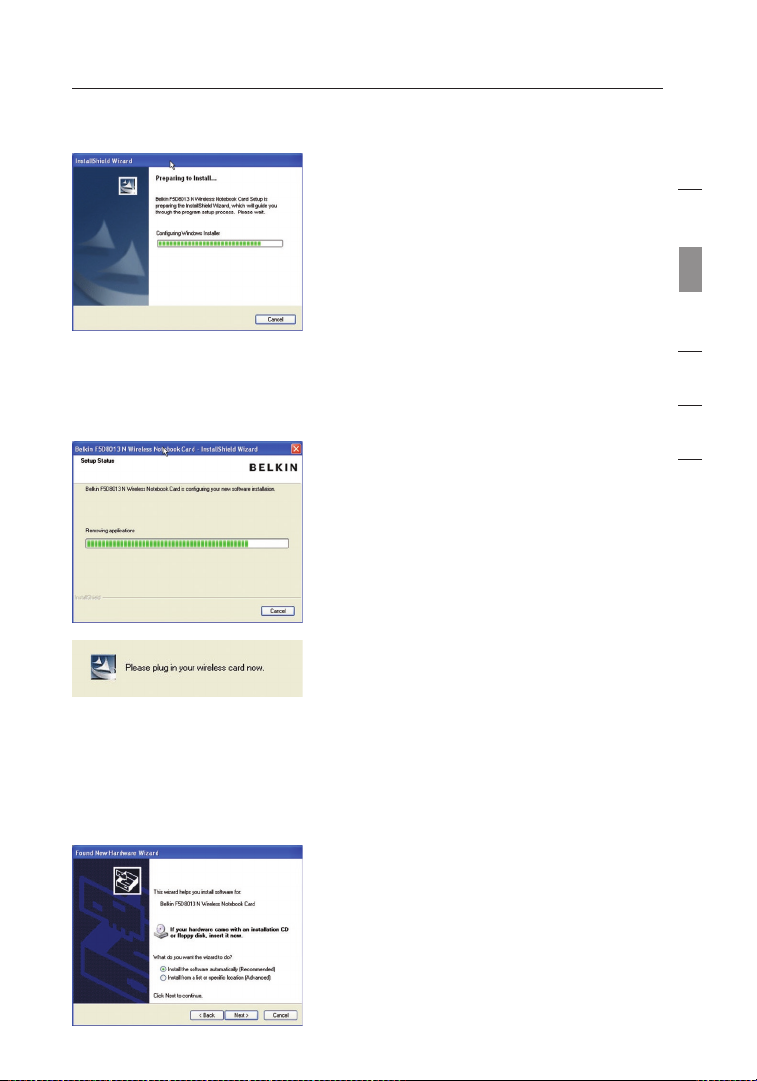
B.2 The Belkin Wireless Card Installer
screen will automatically appear
within up to 20 seconds. Click “Install
Software” or “Next” to start the
installation.
Note: If the Belkin Wireless Card
Installer screen does not appear
within 20 seconds, access your CDROM by double-clicking on the “My
Computer” icon; then, double-click
on the CD-ROM drive into which
the installation CD has been placed.
Then, double-click on the icon named
“Setup.exe”.
12
Page 15
13
Installing and Setting up the Card
B.3 The InstallShield Wizard starts the
installation process.
B.4 Select a destination folder for the
software installation by clicking
“Browse”; or, simply click “Next” to
select a default location.
B.5 A Setup Status screen lets you know
where you are in the setup process.
B.6 After the software installation is
finished, a prompt will instruct
you to insert the Card into your
computer’s CardBus slot.
B.7 The Found New Hardware Wizard
might appear in 3–15 seconds. If
it does, select “Install the software
automatically” and click “Next” to
install the hardware.
B.8 If the Found New Hardware Wizard
does not appear, click “Finish”.
1
2
section
3
4
5
6
13
Page 16

Installing and Setting up the Card
B.9 You might see a screen similar to
this one. This DOES NOT mean
there is a problem. Our software has
been fully tested and is compatible
with this operating system. Select
“Continue Anyway” and follow the
on-screen instructions.
B.10 The Wizard will now install your
software.
B.11 The installation is now complete.
Click “Finish” to close the “Found
New Hardware Wizard”.
B.12 Click “Finish” again to exit the
InstallShield Wizard.
B.13 Depending on which operating system
you are using, you might be required to
reboot your computer for the changes
to take effect. Save your data and close
all other applications. Then, reboot.
14
Page 17
15
Installing and Setting up the Card
C. Configuration
Using the Belkin Wireless Networking Utility
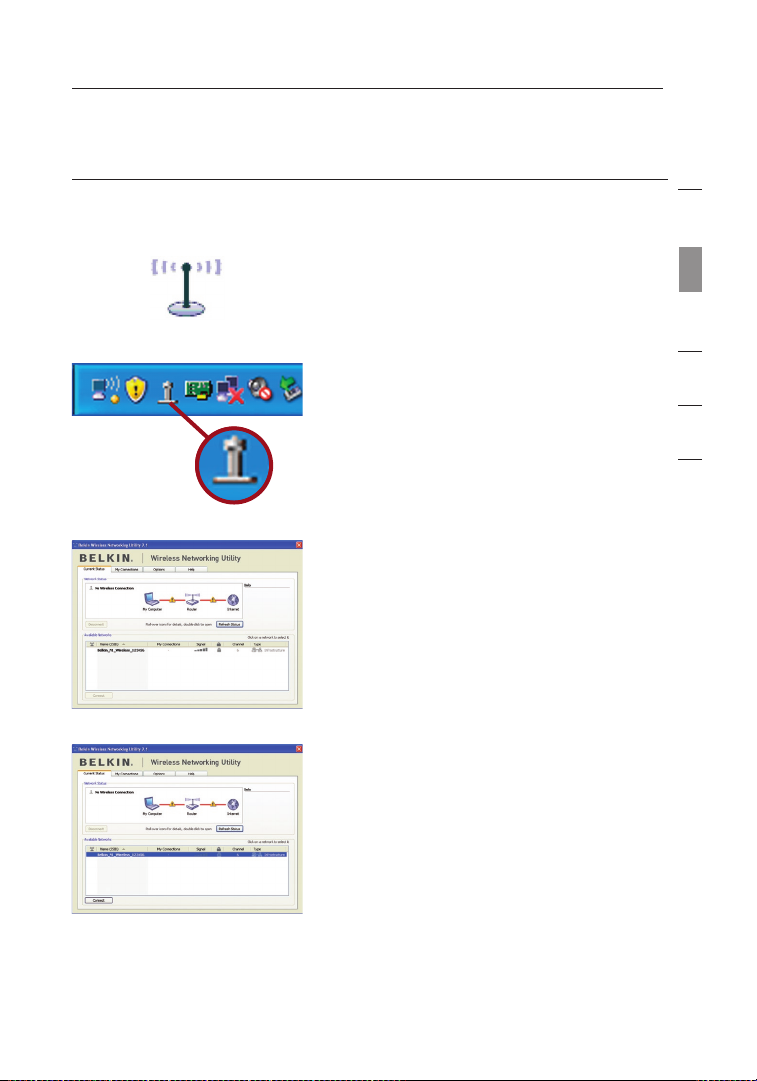
After restarting your computer,
C.1
double-click the Belkin Wireless
Networking Utility icon on the
desktop screen.
Note: The Belkin Wireless
Networking Utility icon can also be
found on the system tray.
C.2 The Belkin Wireless Networking
Utility screen will appear.
1
2
section
3
4
5
6
C.3 Select a network to which to
connect from the “Available
Networks” list and click “Connect”.
Note: In order to see your
available networks, you must be
near a working wireless router or
access point.
15
Page 18

Using the Belkin Wireless Networking Utility
After successfully installing the Belkin Wireless Networking Utility
(WNU), configurations for wireless connection and security are just a
few easy clicks away.
Accessing the Belkin Wireless Networking Utility
from the Windows System Tray
To access the WNU, simply place your mouse pointer and right-click
over the WNU icon on the Windows task tray.
If the icon is not present, click on “Start > Programs > Belkin >
Belkin Wireless Utility”.
16
Page 19
17
Using the Belkin Wireless Networking Utility
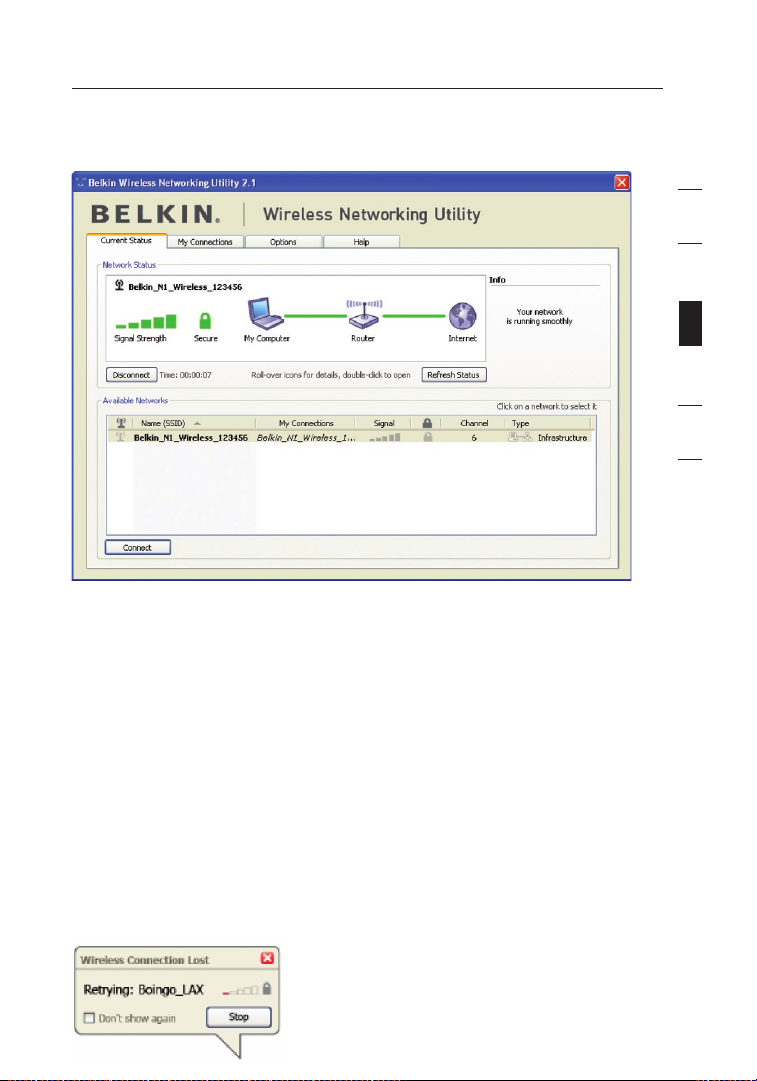
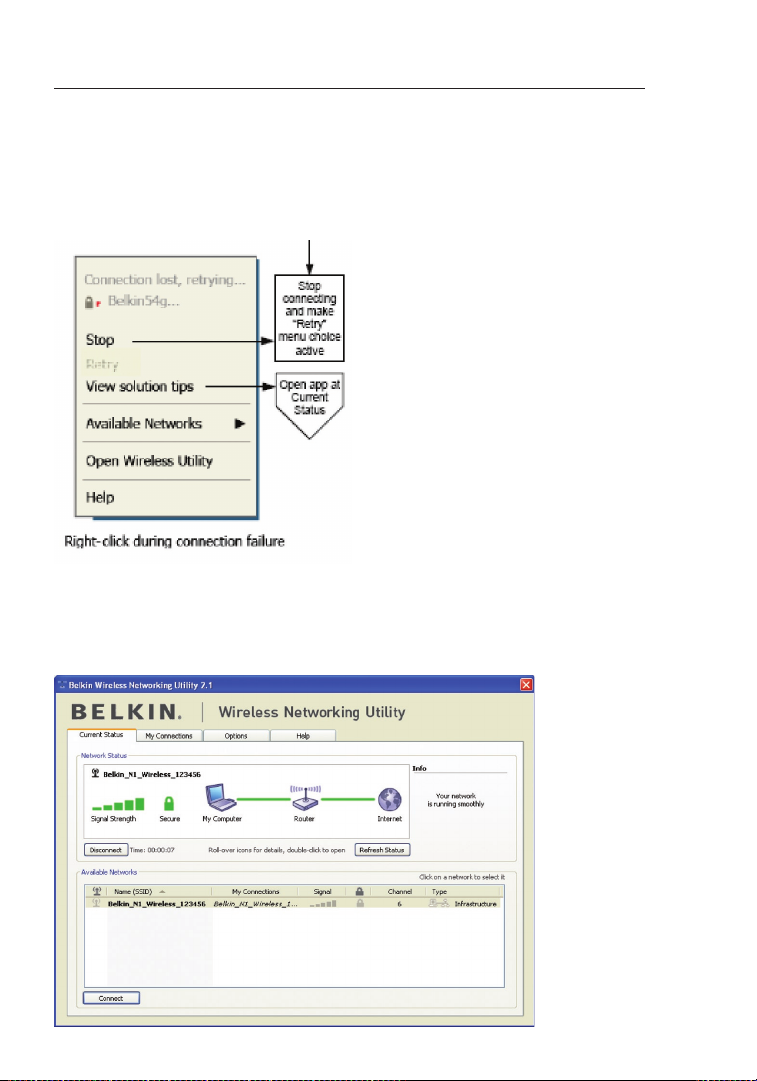
The WNU’s default screen is the “Current Status” tab. The “Current
Status” tab displays the current network status and available
networks.
Network Status
This window displays the connectivity status of the current network. It
even displays connectivity between the computer and router, and router
and Internet. In the event of a connectivity problem, this window can
be used to determine the problem’s source (e.g. computer, router, or
Internet/modem).
Available Networks
This window displays the available networks at the current location
as well as their SSID, Signal Strength, Security Type, Channel, and
Network Type.
Lost Wireless Connection
If the current wireless connection is lost, a window will pop up and the
WNU will attempt to reconnect.
1
2
3
section
4
5
6
17
Page 20
Using the Belkin Wireless Networking Utility
18
Connection Failure
Other options will appear during attempts to reconnect. To stop connecting,
click “Stop” and to reattempt connection, click “Retry”.
Network Status and Solution Tips
To further understand the current Network Status, click “Open Wireless Utility”.
The default screen will be the “Current Status” tab and the “Network Status”
section determines which connections are good and/or faulty.
Page 21

19
Using the Belkin Wireless Networking Utility
The WNU also features a “Solution Tips” section that provides
troubleshooting guidelines.
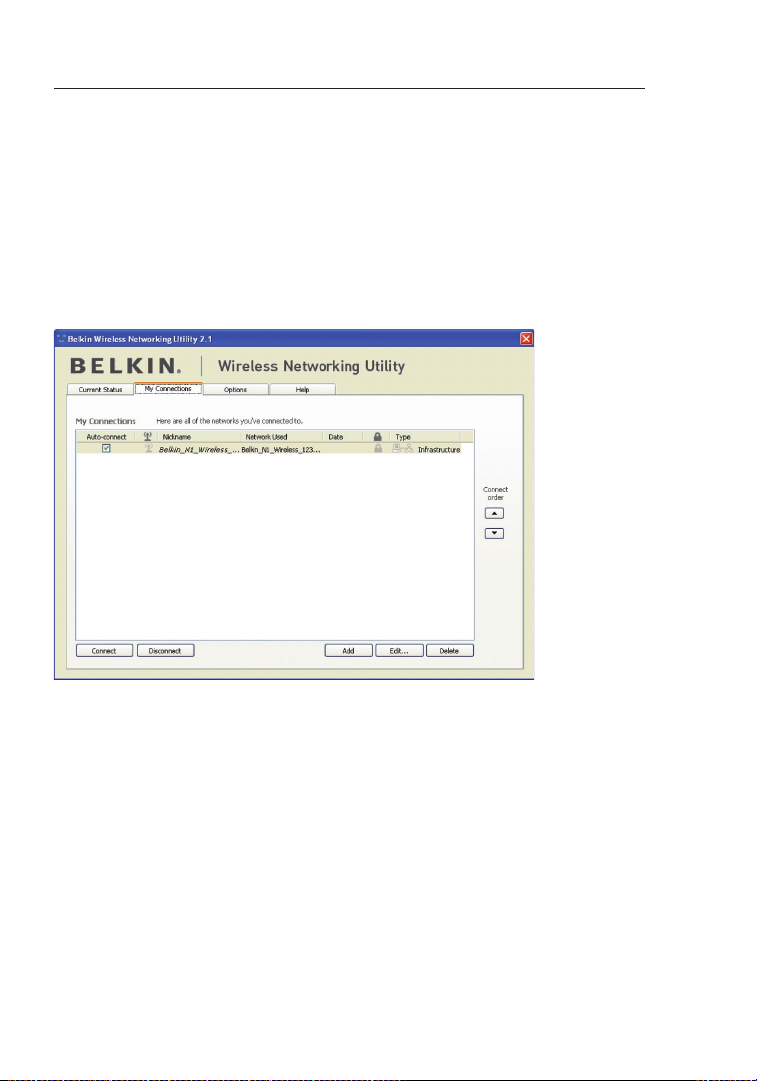
Setting Wireless Network Profiles
The “My Connections” tab on the WNU allows you to add, edit, and
delete connection profiles. It also displays signal strength, security, and
network type.
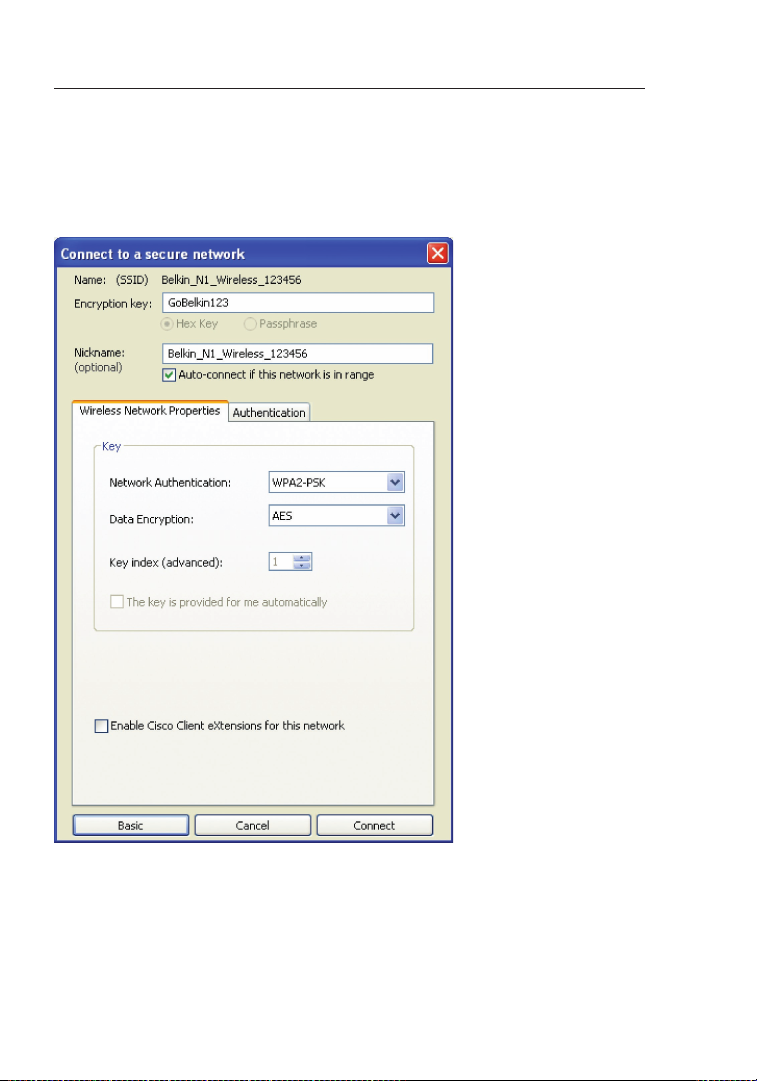
Securing your Wi-Fi® Network
If you choose to connect to a secure network, determine the type of
security (WPA or WEP*) and use the appropriate field in the dialog box.
1
2
3
section
4
5
6
*Note: Types of security
19
Page 22
Using the Belkin Wireless Networking Utility
Note: When you select a network using encryption, you will first see
the simple security screen. Click the “Advanced” button to see other
security options (below).
Wired Equivalent Privacy (WEP) is a less secure, but more
widely adopted wireless security protocol. Depending on the security
level (64- or 128-bit), the user will be asked to input a 10- or 26character hex key. A hex key is a combination of letters, a–f, and
numbers, 0–9.
20
Page 23
21
Using the Belkin Wireless Networking Utility
Wireless Protected Access (WPA) is the new standard in
the wireless security. However, not all wireless cards and adapters
support this technology. Please check your wireless adapter’s user
manual to check if it supports WPA. Instead of a hex key, WPA uses
only passphrases, which are much easier to remember.
The following section, intended for the home, home office, and small
office user, presents a few different ways to maximize the security of
your wireless network.
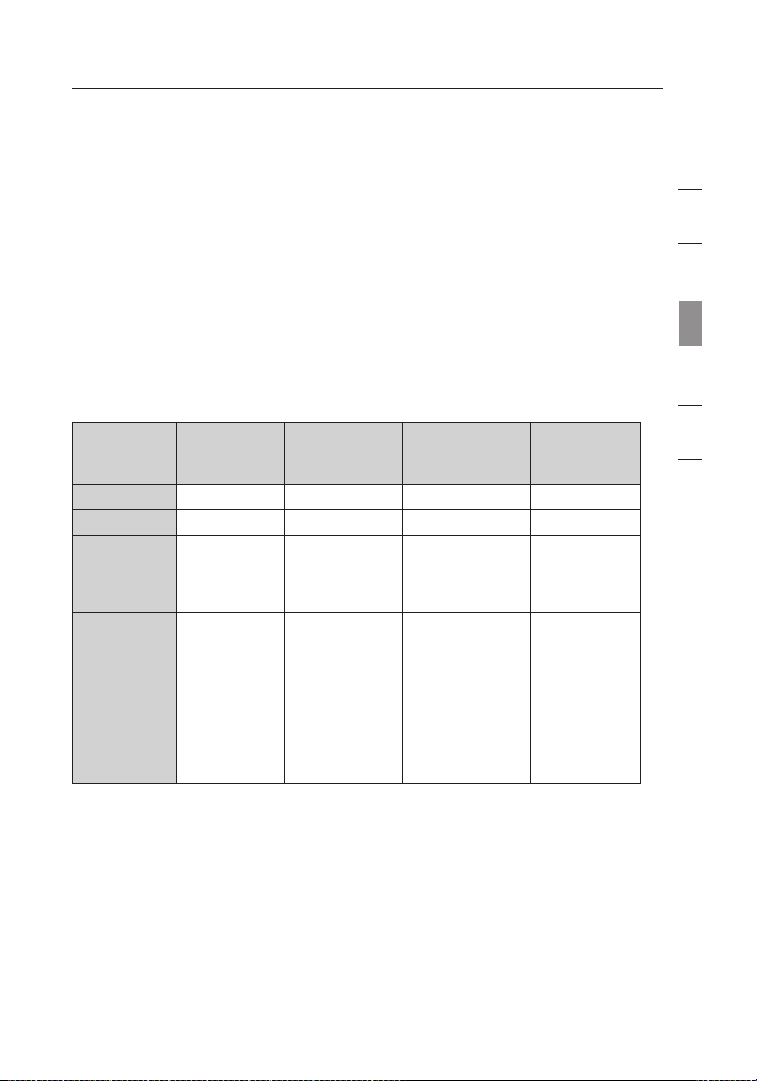
At the time of publication, four Encryption Methods are available:
Encryption Methods:
Name 64-Bit Wired
Equivalent
Privacy
Acronym 64-bit WEP 128-bit WPA-TKIP/AES WPA2-AES
Security Good Better Best Best
Features Static keys Static keys Dynamic key
Encryption
keys based
on RC4
algorithm
(typically
40-bit keys)
128-Bit
Encryption
Added security
over 64-bit
WEP using a
key length of
104 bits, plus
24 additional
bits of systemgenerated data
Wi-Fi Protected
Access
encryption
and mutual
authentication
TKIP (Temporal
Key Integrity
Protocol) added
so that keys
are rotated and
encryption is
strengthened
Wi-Fi
Protected
Access 2
Dynamic key
encryption
and mutual
authentication
AES
(Advanced
Encryption
Standard)
does not
cause any
throughput
loss
1
2
3
section
4
5
6
WEP
WEP is a common protocol that adds security to all Wi-Fi-compliant
wireless products. WEP gives wireless networks the equivalent level
of privacy protection as a comparable wired network.
64-Bit WEP
64-bit WEP was first introduced with 64-bit encryption, which includes
a key length of 40 bits plus 24 additional bits of system-generated data
(64 bits total). Some hardware manufacturers refer to 64-bit as 40-bit
encryption. Shortly after the technology was introduced, researchers
found that 64-bit encryption was too easy to decode.
21
Page 24

Using the Belkin Wireless Networking Utility
128-Bit Encryption
As a result of 64-bit WEP’s potential security weaknesses, a more
secure method of 128-bit encryption was developed. 128-bit
encryption includes a key length of 104 bits plus 24 additional
bits of system-generated data (128 bits total). Some hardware
manufacturers refer to 128-bit as 104-bit encryption. Most of the
new wireless equipment in the market today supports both 64bit WEP and 128-bit WEP encryption, but you might have older
equipment that only supports 64-bit WEP. All Belkin wireless
products will support both 64-bit WEP and 128-bit encryption.
Encryption Keys
After selecting either the 64-bit WEP or 128-bit encryption mode, it is
critical that you generate an encryption key. If the encryption key is
not consistent throughout the entire wireless network, your wireless
networking devices will be unable to communicate with one another.
You can enter your key by typing in the hex key. A hex (hexadecimal)
key is a combination of numbers and letters from A–F and 0–9. For
64-bit WEP, you need to enter 10 hex keys. For 128-bit WEP, you
need to enter 26 hex keys.
For instance:
AF
0F 4B C3 D4 = 64-bit WEP key
C3
03 0F AF 0F 4B B2 C3 D4 4B C3 D4 E7 = 128-bit WEP key
Write down the hex WEP key from your wireless router (or access
point) and enter it manually into the hex WEP key table in your Card’s
configuration screen.
22
Page 25

23
Using the Belkin Wireless Networking Utility
WPA
WPA is a new Wi-Fi standard that improves upon the security features
of WEP. To use WPA security, the drivers and software of your
wireless equipment must be upgraded to support it. These updates
will be found on your wireless vendor’s website. There are three types
of WPA security: WPA-PSK (no server),WPA (with radius server), and
WPA2.
WPA-PSK (no server) uses what is known as a pre-shared key as
the network key. A network key is a password that is between eight
and 63 characters long. It can be a combination of letters, numbers,
or characters. Each client uses the same network key to access
the network. Typically, this is the mode that will be used in a home
environment.
WPA (with radius server) works best in a business environment, in
which a radius server automatically distributes the network key to
clients.
WPA2 requires Advanced Encryption Standard (AES) for encryption of
data, which offers much greater security than WPA. WPA uses both
Temporal Key Integrity Protocol (TKIP) and AES for encryption.
Setting up your Belkin Wireless Router (or Access Point)
to use Security
To start using security, you need to first enable WEP or WPA for
your wireless router (or access point). For Belkin Wireless Routers
(or Access Points), these security features can be configured by
using the web-based interface. See your wireless router’s (or access
point’s) manual for directions on how to access the management
interface.
IMPORTANT:
to match these settings.
You must now set all wireless network cards/adapters
1
2
3
section
4
5
6
Configuring your Card to use Security
At this point, you should already have your wireless router (or access point) set
to use WPA or WEP. In order for you to gain wireless connection, you will need
to set your N Wireless Notebook Card to use the same security settings.
23
Page 26
Using the Belkin Wireless Networking Utility
Changing the Wireless Security Settings
The Belkin N Wireless Notebook Card supports the latest WPA
security feature as well as the legacy WEP security standard. By
default, wireless security is disabled.
To enable security, you will first need to determine which standard
is used by the router (or access point). (See your wireless router’s or
access point’s manual for directions on how to access the security
settings.)
To access the security settings on your Card, click the “My
Connections” tab and point to the connection for which you want to
change security settings. Click “Edit” to change settings.
24
Page 27

25
Using the Belkin Wireless Networking Utility
WEP Setup
64-Bit WEP Encryption
1. Select “WEP” from the “Data Encryption” drop-down menu.
2. After selecting your WEP encryption mode, you can enter your
key by typing in the hex key manually.
A hex (hexadecimal) key is a combination of numbers and letters
from A–F and 0–9. For 64-bit WEP, you need to enter 10 hex keys.
For instance:
AF
0F 4B C3 D4 = 64-bit WEP key
1
2
3
section
4
5
6
3. Click “Save” to finish. Encryption in the wireless router (or access
point) is now set. Each of your computers on your wireless
network will now need to be configured with the same security
settings.
25
Page 28

Using the Belkin Wireless Networking Utility
WARNING: If you are using a wireless client to turn on the security
settings in your wireless router (or access point), you will temporarily
lose your wireless connection until you activate security on your
wireless client. Please record the key prior to applying changes in the
wireless router (or access point). If you don’t remember the hex key,
your client will be locked out of the wireless router (or access point).
128-Bit WEP Encryption
Select “WEP” from the drop-down menu.
1.
2. After selecting your WEP encryption mode, you can enter your
key by typing in the hex key manually.
A hex (hexadecimal) key is a combination of numbers and letters
from A–F and 0–9. For 128-bit WEP, you need to enter 26 hex keys.
For instance:
C3
03 0F AF 0F 4B B2 C3 D4 4B C3 D4 E7 = 128-bit WEP key
26
Page 29

27
Using the Belkin Wireless Networking Utility
3. Click “Save” to finish. Encryption in the wireless router (or
access point) is now set. Each of the computers on your wireless
network will now need to be configured with the same security
settings.
WARNING: If you are using a wireless client to turn on the security
settings in your wireless router (or access point), you will temporarily
lose your wireless connection until you activate security on your
wireless client. Please record the key prior to applying changes in the
wireless router (or access point). If you don’t remember the hex key,
your client will be locked out of the wireless router (or access point).
WPA-PSK (no server)
Choose this setting if your network does not use a radius server. WPA-PSK
(no server) is typically used in home and small office networking.
1. From the “Network Authentication” drop-down menu, select
“WPA-PSK (no server)”.
2. Enter your network key. This can be from eight to 63 characters
and can be letters, numbers, or symbols. This same key must be
used on all of the clients (network cards) that you want to include
in your wireless network.
1
2
3
section
4
5
6
27
Page 30

Using the Belkin Wireless Networking Utility
3. Click “Save” to finish. You must now set all clients (network
cards) to match these settings.
Wireless Networking Utility Options
The “Options” tab on the WNU provides the user the ability to
customize his or her WNU settings.
Wireless Networking Utility Help
The WNU “Help” tab provides users with access to online and
telephone support, as well as advanced diagnostic tools.
28
Page 31

29
Using the Belkin Wireless Networking Utility
Advanced Diagnostic Tools
The “Advanced Diagnostic Tools” section is the central control panel
for all the settings of the hardware and software components of
the wireless network. It provides an array of tests and connectivity
services to ensure optimal network performance.
1
2
3
section
4
5
6
29
Page 32

Troubleshooting
I can’t connect to the Internet wirelessly.
If you are unable to connect to the Internet from a wireless
computer, please check the following items:
1. Look at the lights on your wireless router. If you’re using a
Belkin Wireless Router, the lights should be as follows:
• The “Power” light should be on.
• The “Connected” light should be on, and not blinking.
• The “WAN” light should be either on or blinking.
If your Belkin Wireless Router’s lights have the above
characteristics, go to number 2 below.
If this is NOT the case, make sure:
• The router’s power cord is plugged in.
• All cables are connected between the router and the modem.
• All the modem’s LEDs are functioning correctly. If not, see
your modem’s user manual.
• Reboot the router.
• Reboot the modem.
If you continue to have issues, please contact Belkin Technical
Support.
If you are not using a Belkin Wireless Router, consult that router
manufacturer’s user guide.
2. Open your wireless utility software by clicking on the icon in
the system tray at the bottom right-hand corner of the screen.
If you’re using a Belkin Wireless Card, the tray icon should
look like this (the icon may be red or green):
30
Page 33

31
Troubleshooting
3. The exact window that opens will vary depending on the
model of wireless card you have; however, any of the utilities
should have a list of “Available Networks”.
Available networks are wireless networks to which you can connect.
If you are using a Belkin 802.11g (G Plus) Router, or Belkin 802.11g
(54g) Router, “Belkin54g” is the default name.
If you are using a Belkin 802.11b Router, the default name should
be “WLAN”. If you are NOT using a Belkin Router, please consult
your router manufacturer’s user manual for the default name.
The name of your wireless network appears in “Available
Networks”.
If the correct network name is listed in the “Available Networks”
list, please follow the steps below to connect wirelessly:
1. Click on the correct network name in the “Available Networks”
list.
2. If the network has security (encryption) enabled, you will
need to enter the network key. Click “Connect”. For more
information regarding security, see the page entitled:
“Securing your Wi-Fi Network” on page 19 of this User
Manual.
3. Within a few seconds, the tray icon in the lower right-
hand corner of your screen should turn green, indicating a
successful connection to the network.
If you are still unable to access the Internet after connecting to
the wireless network, please contact Belkin Technical Support.
1
2
3
4
section
5
6
31
Page 34

Troubleshooting
The name of your wireless network DOES NOT appear in the list
of “Available Networks”.
If the correct network name is not listed, check the SSID settings
to see if they match. The SSID is case-sensitive and the spelling on
each computer must be exactly the same in order for the Card to
connect to the wireless router (or access point).
Note: To check the SSID settings or look for an available
network, double-click the Signal Indicator icon to bring up the
“Wireless Networks” screen. Click “Add” if you do not see the
network you are trying to connect to and type in the SSID. For
more information about setting up an SSID, please reference your
router manufacturer’s user manual.
If issues persist even at close range, please contact
Belkin Technical Support.
Installation CD-ROM does not start Belkin Wireless
Networking Utility.
If the CD-ROM does not start the Belkin Wireless Networking
Utility automatically, it could be that the computer is running
other applications that are interfering with the CD drive. If the
Belkin Wireless Networking Utility screen does not appear within
15-20 seconds, open up your CD-ROM drive by double-clicking
on the “My Computer” icon. Next, double-click on the CD-ROM
drive that the Installation CD has been placed in to start the
installation. Then double-click on the folder named “Files”. Next,
double-click on the icon named “setup.exe”.
Power LED does not come ON; Card is not working.
If the LED indicators are not ON, the problem may be that the
Card is not connected or installed properly. Verify that the
Card is plugged firmly into the CardBus slot of your computer.
Check to see that the drivers for the Card have been installed.
Right-click on the “My Computer” icon on your desktop. Choose
“Properties” and navigate to the “Device Manager” and see if
your CardBus Card is listed without any errors. If an error is
indicated, contact Belkin Technical Support.
32
Page 35

33
Troubleshooting
Link LED is blinking slowly; I cannot connect to a
wireless network or the Internet.
If your Card appears to be functioning properly, but you cannot
connect to a network or you have a red wireless icon at the
bottom of your screen, the problem may be that there is a
mismatch between the network name (SSID) settings in your
wireless network properties.
Check the SSID settings to see if they match. The SSID is case-sensitive
and the spelling on each computer must be exactly the same in order for
the Card to connect to the wireless router (or access point).
Note: To check the SSID settings or look for an available
network, double-click the Signal Indicator icon to bring up the
“Wireless Networks” screen. Click “Add” if you do not see the
network you are trying to connect to and type in the SSID. For
more information about setting up an SSID, please reference your
router manufacturer’s user manual. If issues persist even at close
range, please contact Belkin Technical Support.
Link LED is solid but I cannot connect to the Internet.
If you have a signal but can’t get online or obtain an IP address,
the problem may be that there is a mismatch between the
encryption key settings in your computer and wireless router (or
access point). Check the WEP, WPA, or WPA2 key settings to see
if they match. The key is case-sensitive and the spelling on each
computer and wireless router (or access point) must be exactly
the same in order for the Card to connect to the router. For more
information about encryption, please see “Securing your Wi-Fi
Network” on page 19 of this User Manual.
1
2
3
4
section
5
6
If issues persist even at close range, please contact Belkin
Technical Support.
33
Page 36

Troubleshooting
Data transfer is sometimes slow.
Wireless technology is radio-based, which means connectivity
and the throughput performance between devices decreases
when the distance between devices increases. Other factors that
will cause signal degradation (metal is generally the worst culprit)
are obstructions such as walls and metal appliances. As a result,
the typical indoor range of your wireless devices will be between
100 to 200 feet. Note also that connection speed may decrease
as you move farther from the wireless router (or access point).
In order to determine if wireless issues are related to range, we
suggest temporarily moving the computer, if possible, to five to
10 feet away from the wireless router (or access point). Please
see the section titled “Placement of your Wireless Networking
Hardware for Optimal Performance” on page 2 of this User
Manual. If issues persist even at close range, please contact
Belkin Technical Support.
Signal strength is poor.
Wireless technology is radio-based, which means connectivity
and the throughput performance between devices decreases
when the distance between devices increases. Other factors that
will cause signal degradation (metal is generally the worst culprit)
are obstructions such as walls and metal appliances. As a result,
the typical indoor range of your wireless devices will be between
100 to 200 feet. Note also that connection speed may decrease
as you move farther from the wireless router (or access point).
In order to determine if wireless issues are related to range, we
suggest temporarily moving the computer, if possible, to five to
10 feet away from wireless router (or access point).
Changing the wireless channel –
traffic and interference, switching the wireless channel of your
network can improve performance and reliability. The default
channel the router is shipped with is channel 6. You may choose
from several other channels depending on your region; see your
router’s (or access point’s) user manual for instructions on how
to choose other channels.
Depending on local wireless
34
Page 37

35
Troubleshooting
Limiting the wireless transmit rate – Limiting the wireless
transmit rate can help improve the maximum wireless range,
and connection stability. Most wireless cards have the ability
to limit the transmission rate. To change this property, go to
the Windows Control Panel, open “Network Connections” and
double-click on your Card’s connection. In the “Properties”
dialog, select the “Configure” button on the “General” tab
(Windows 98 users will have to select the Wireless Card in the
list box and then click “Properties”), then choose the “Advanced”
tab and select the rate property. Wireless client cards are usually
set to automatically adjust the wireless transmit rate for you, but
doing so can cause periodic disconnects when the wireless signal
is too weak; as a rule, slower transmission rates are more stable.
Experiment with different connection rates until you find the best
one for your environment; note that all available transmission
rates should be acceptable for browsing the Internet. For more
assistance, see your wireless card’s literature.
If issues persist even at close range, please contact Belkin
Technical Support.
Why are there two wireless utilities in my system tray?
Which one do I use?
There are several features and advantages from using the Belkin
Wireless Networking Utility over the Windows XP Wireless Zero
Configuration utility. We offer a site survey, detailed link information,
and adapter diagnosis, to name a few.
1
2
3
4
section
5
6
It’s essential to know which utility is managing your Card. We
recommend using the Belkin Wireless Networking Utility. To use
the Belkin Wireless Networking Utility, follow the steps below:
Step 1 Right-click on the network status icon in the system tray
and select the “Status” tab.
Step 2 From the “Status” tab, uncheck the “Use Windows to
configure my wireless network settings” box. Once the box is
unchecked, click the “Close” button to close the window.
You are now using the Belkin Wireless Networking Utility to
configure the Card.
35
Page 38

Troubleshooting
Card does not perform or connection is unstable when computer has
a second built-in wireless network card (such as a mini PCI or Intel
®
Centrino™).
This condition occurs if your computer has a built-in wireless card
while your Belkin Wireless Card is also active. This happens because
Windows must now handle two active wireless connections.
You need to disable the built-in wireless card from your computer
under “Network Adapters” in the Device Manager.
Card does not perform or connection is slow when computer has a builtin wired Ethernet card.
This condition occurs if your computer has an active Ethernet card
while your Wireless Card is also active. This happens because
Windows must now handle two active network connections. You need
to disable the Ethernet card from your computer under “Network
Adapters” in the Device Manager.
What’s the difference between 802.11g and draft 802.11n?
Currently there are three commonly used wireless networking
standards, which transmit data at very different maximum speeds.
Each is based on the designation for certifying network standards.
The most common wireless networking standard, 802.11g, can
transmit information up to 54Mbps; 802.11a also supports up to
54Mbps, but in the 5GHz frequency; and 802.11n draft specification
can connect at up to 300Mbps. See the chart on the next page for
more detailed information.
36
Page 39

37
Troubleshooting
Belkin Wireless Comparison Chart
Wirele ss
Techno logy
Speed/ Data Rate* Up to 54Mbps* Up to 5 4Mbps* Up to 300 Mbps* Up to 300Mbps*
Freque ncy
Compat ibility
Covera ge* Up to 400 ft.* Up to 1,000 ft .* Up to 1, 200 ft.* Up to 1,400 ft.*
G
(802.11g)
Common household
device s such as
cordle ss phones and
microw ave ovens
may i nterfere w ith
the u nlicensed band
2.4GHz
Compat ible with
802.11 b/g
G Plus MIMO
(802.11g with
MIMO MRC)
Common household
device s such as
cordle ss phones and
microw ave ovens
may i nterfere w ith
the u nlicensed band
2.4GHz
Compat ible with
802.11 b/g
N MIMO
(draft 802.11n
with MIMO)
Common household
device s such as
cordle ss phones and
microw ave ovens
may i nterfere w ith
the u nlicensed band
2.4GHz
Compat ible with
draft 802.11n** and
802.11 b/g
N1 MIMO
(draft 802.11n
with MIMO)
Common household
device s such as
cordle ss phones and
microw ave ovens
may i nterfere w ith
the u nlicensed band
2.4GHz
Compat ible with
draft 802.11n** and
802.11 b/g
1
2
3
4
section
5
6
Advant age
*Di stance a nd connectio n speeds will v ary depending on your netwo rking en viro nment.
**T his Card is compat ible with products based on the same v ersi on of the d raft 802 .11n
spe cifications and may requi re a so ftware u pgrade f or best results.
Common —
widesp read use for
Intern et sharing
Better coverage and
consis tent speed
and r ange
37
Enhanc ed speed
and coverage
Leadin g edge— b est
covera ge and
throug hput
Page 40

Troubleshooting
Free Tech Support* *National call rates may apply www.belkin.com
You can find additional support information on our website www.belkin.
com through the tech-support area. If you want to contact technical support
by phone, please call the number you need from the list below*.
CO UNT RY NU MBER IN TERNE T A DRESS
AU STR IA 0 820 2007 66 ww w.belkin.com/ uk/n etwo rking /
BE LGI UM 07 07 00 073 w ww.be lkin.com /nl/netw orking/
CZ ECH REPUB LIC 239 00 0 406 ww w.belkin.com/ uk/n etwo rking /
DE NMA RK 701 22 4 03 ww w.belkin.com/ uk/n etwo rking /
FI NLAND 0 97 25 19 12 3 ww w.belkin.com/ uk/n etwo rking /
FR ANCE 08 - 25 54 00 26 ww w.belkin.com/ fr/netwo rking /
GE RMA NY 018 0 - 5 00 57 09 ww w.belkin.com/ de/netwo rking/
GR EEC E 00 800 - 44 14 23 90 ww w.bel kin.com/ uk/n etwo rking /
HU NGA RY 06 - 17 7 7 49 06 www .belk in.com/uk/netwo rking /
IC ELAND 80 0 8534 ww w.belkin.com/ uk/n etwo rking /
IR ELAND 0 818 5 5 50 06 www.bel kin.c om/u k/ne twor king /
IT ALY 02 - 69 43 0 2 51 www.bel kin.c om/i t/support/ tech /iss ues_more.asp
LU XEM BOU RG 34 20 8 0 85 60 ww w.belkin.com/ uk/n etwo rking /
NE THE RL AND S 0 900 - 04 0 07 90
NO RWAY 81 50 028 7 www.belkin.c om/u k/ne twor king /
PO LA ND 00800 - 441 17 37 ww w.belkin.com/ uk/n etwo rking /
PO RTU GA L 707 200 676 ww w.belkin. com/ uk/n etwo rking/
RU SSI A 49 5 580 9541 ww w.belkin.com/ networki ng/
SO UTH AF RIC A 08 00 - 99 15 21 ww w.belkin.com/ uk/n etwo rking /
SP AIN 90 2 - 0 2 43 66
SW EDE N 07 - 71 40 04 5 3
SW ITZ ERLAN D 08 - 48 0 0 02 19 w ww.b elkin .com /uk/ netw orkin g/
UN ITE D K ING DOM 0 845 - 607 77 87 ww w.belkin.com/ uk/n etwo rking
OT HER CO UNT RIE S +44 - 19 33 3 5 20 00
€0.10 per minute w ww.belkin.com /nl/net working/
ww w.belk in.c om/es /sup port /te ch/n etwor king suppo rt. asp
ww w.belk in.c om/se /sup port /te ch/n etwor king suppo rt. asp
/
3838
Page 41

Information
FCC Statement
DECLARATION OF CONFORMITY WITH FCC RULES
FOR ELECTROMAGNETIC COMPATIBILITY
We, Belkin International, Inc., of 501 West Walnut
Street, Compton, CA 90220, declare under our sole
responsibility that the product,
F5D8013
to which this declaration relates,
complies with Part 15 of the FCC Rules. Operation is
subject to the following two conditions: (1) this device
may not cause harmful interference, and (2) this device
must accept any interference received, including
interference that may cause undesired operation.
Caution: Exposure to Radio Frequency Radiation.
The radiated output power of this device is far below the FCC radio frequency
exposure limits. Nevertheless, the device shall be used in such a manner that
the potential for human contact during normal operation is minimized. When
connecting an external antenna to the device, the antenna shall be placed in such
a manner to minimize the potential for human contact during normal operation.
In order to avoid the possibility of exceeding the FCC radio frequency exposure
limits, human proximity to the antenna shall not be less than 20cm (8 inches)
during normal operation.
Federal Communications Commission Notice
This equipment has been tested and found to comply with the limits for a
Class B digital device, pursuant to Part 15 of the FCC Rules. These limits are
designed to provide reasonable protection against harmful interference in a
residential installation.
This equipment generates, uses, and can radiate radio frequency energy.
If this equipment does cause harmful interference to radio or television
reception, which can be determined by turning the equipment off and on, the
user is encouraged to try and correct the interference by one or more of the
following measures:
• Reorient or relocate the receiving antenna.
• Increase the distance between the equipment and the receiver.
• Connect the equipment to an outlet on a circuit different from that to
which the receiver is connected.
• Consult the dealer or an experienced radio/TV technician for help.
1
2
3
4
5
section
6
39
39
Page 42

Information
Modifications
The FCC requires the user to be notified that any changes or modifications to
this device that are not expressly approved by Belkin International, Inc., may
void the user’s authority to operate the equipment.
Belkin International, Inc., Limited Lifetime Product Warranty
What this warranty covers.
Belkin International, Inc. (“Belkin”) warrants to the original purchaser of this
Belkin product that the product shall be free of defects in design, assembly,
material, or workmanship.
What the period of coverage is.
Belkin warrants the Belkin product for the lifetime of the product.
What will we do to correct problems?
Product Warranty.
Belkin will repair or replace, at its option, any defective product free of charge
(except for shipping charges for the product).
What is not covered by this warranty?
All above warranties are null and void if the Belkin product is not provided
to Belkin for inspection upon Belkin’s request at the sole expense of
the purchaser, or if Belkin determines that the Belkin product has been
improperly installed, altered in any way, or tampered with. The Belkin Product
Warranty does not protect against acts of God such as flood, earthquake,
lightning, war, vandalism, theft, normal-use wear and tear, erosion,
depletion, obsolescence, abuse, damage due to low voltage disturbances
(i.e. brownouts or sags), non-authorized program, or system equipment
modification or alteration.
How to get service.
To get service for your Belkin product you must take the following steps:
1. Contact Belkin International, Inc., at 501 W. Walnut St., Compton CA
90220, Attn: Customer Service, or call (800)-223-5546, within 15 days of
the Occurrence. Be prepared to provide the following information:
a. The part number of the Belkin product.
b. Where you purchased the product.
c. When you purchased the product.
d. Copy of original receipt.
2. Your Belkin Customer Service Representative will then instruct you on how
to forward your receipt and Belkin product and how to proceed with your
claim.
40
Page 43

41
Information
Belkin reserves the right to review the damaged Belkin product. All costs of
shipping the Belkin product to Belkin for inspection shall be borne solely by
the purchaser. If Belkin determines, in its sole discretion, that it is impractical
to ship the damaged equipment to Belkin, Belkin may designate, in its sole
discretion, an equipment repair facility to inspect and estimate the cost to
repair such equipment. The cost, if any, of shipping the equipment to and
from such repair facility and of such estimate shall be borne solely by the
purchaser. Damaged equipment must remain available for inspection until the
claim is finalized. Whenever claims are settled, Belkin reserves the right to be
subrogated under any existing insurance policies the purchaser may have.
How state law relates to the warranty.
THIS WARRANTY CONTAINS THE SOLE WARRANTY OF BELKIN. THERE
ARE NO OTHER WARRANTIES, EXPRESSED OR, EXCEPT AS REQUIRED
BY LAW, IMPLIED, INCLUDING THE IMPLIED WARRANTY OR CONDITION
OF QUALITY, MERCHANTABILITY OR FITNESS FOR A PARTICULAR
PURPOSE, AND SUCH IMPLIED WARRANTIES, IF ANY, ARE LIMITED IN
DURATION TO THE TERM OF THIS WARRANTY.
Some states do not allow limitations on how long an implied warranty lasts,
so the above limitations may not apply to you.
IN NO EVENT SHALL BELKIN BE LIABLE FOR INCIDENTAL, SPECIAL,
DIRECT, INDIRECT, CONSEQUENTIAL OR MULTIPLE DAMAGES SUCH AS,
BUT NOT LIMITED TO, LOST BUSINESS OR PROFITS ARISING OUT OF
THE SALE OR USE OF ANY BELKIN PRODUCT, EVEN IF ADVISED OF THE
POSSIBILITY OF SUCH DAMAGES.
This warranty gives you specific legal rights, and you may also have other
rights, which may vary from state to state. Some states do not allow the
exclusion or limitation of incidental, consequential, or other damages, so the
above limitations may not apply to you.
1
2
3
4
5
section
6
For information on product disposal please refer to
http://environmental.belkin.com
41
FOR USE IN
AT BE CY CZ DK
FI FR DE GR
EE
HU IE IT LV LT
LU MT NL PL PT
SI ES SE GB
SK
IS LI NO CH BG
RO TR
OPERATES ON
CHANNELS 1-13
Page 44

Information
d of c f5d8013 n wireless notebook card.doc
EC Declaration of Conformity
to R&TTE Directive 1999/5/EC
CE
Manufacturer : BELKIN LTD,
EXPRESS BUSINESS PARK,
SHIPTON WAY
,RUSHDEN
NN10 6GL ENGLAND
Representative : Belkin Ltd
(residing in the EC
holding the TCF)
Product / Apparatus : N Wireless Notebook Card
Type Number : F5D8013
Variants include : All Country Variants
Signature :
Name : K Simpson
Title : European Regulatory Compliance Manager
Date : _13 JULY 2007______________________
Declaration
I declare that above product conforms to all the applicable requirements of
EU Directive1999/5/EC and is CE-marked accordingly:
Article 3.1a:
(Standard(s)) used to show compliance with LVD, 73/23/EEC
EN 60950-2001
Article 3.1b:
(Standard(s)) used to show compliance with EMC Directive, 89/336/EEC:
EN301 489-1 V1.5.1 (2004-11);EN 489-17 V1.2.1 (2002-08)
Article 3.2:
Standard(s) used to show compliance:
EN300 328 V1.6.1 (2004-11)
42
Page 45

Belkin Tech Support
UK: 0845 607 77 87
Europe: www.belkin.com/support
N Wireless
Notebook Card
Belkin Ltd.
Express Business Park
Shipton Way, Rushden
NN10 6GL, United Kingdom
+44 (0) 1933 35 2000
+44 (0) 1933 31 2000 fax
Belkin Iberia
C/ Anabel Segura, 10 planta baja, Of. 2
28108, Alcobendas, Madrid
Spain
+34 91 791 23 00
+34 91 490 23 35 fax
© 2007 Belkin International, Inc. All rights reserved. All trade names are registered trademarks of
respective manufacturers listed. Windows and Windows Vista are either registered trademarks or
trademarks of Microsoft Corporation in the United States and/or other countries.
Belkin SAS
130 rue de Silly
92100 Boulogne-Billancourt,
France
+33 (0) 1 41 03 14 40
+33 (0) 1 41 31 01 72 fax
Belkin Italy & Greece
Via Carducci, 7
Milano 20123
Italy
+39 02 862 719
+39 02 862 719 fax
Belkin GmbH
Hanebergstrasse 2
80637 Munich
Germany
+49 (0 ) 89 143405 0
+49 (0 ) 89 143405 100 fax
Belkin B.V.
Boeing Avenue 333
1119 PH Schiphol-Rijk,
Netherlands
+31 (0) 20 654 7300
+31 (0) 20 654 7349 fax
P75448ea
Page 46

F5D8013ea
Carte Sans Fil N
pour ordinateur
portable
Manuel de l’utilisateur
EN
FR
DE
NL
ES
IT
Page 47

Table des matières
1 Introduction ................................................................................................. 1
Avantages d’un réseau domestique
Avantages d’un réseau sans fil .......................................................................
Choix de l’emplacement de votre dispositif réseau sans fil
pour
une performance maximale ................................................................... 2
2 Présentation ................................................................................................
Caractéristiques du produit .............................................................................
Applications et avantages ...............................................................................
Caractéristiques techniques du produit ..........................................................
Configuration requise .....................................................................................
Contenu de l’emballage .................................................................................
3 Installation et configuration de la carte ......................................................
A — Installation sous Windows Vista .............................................................
B — Procédure d’installation pour les systèmes d’exploitation Windows
autres que Windows Vista ...................................................................
C — Configuration .........................................................................................
4 Utilitaire de surveillance du réseau sans fil de Belkin ...............................
Accès à l’Utilitaire réseau sans fil à partir de la barre
des tâches Windows .....................................................................................
État du réseau ................................................................................................ 17
Réseaux disponibles ......................................................................................
Création de Profils réseau sans fil .................................................................
Protection de votre réseau Wi-Fi ..................................................................
Configuration des paramètres de sécurité de votre carte ........................... 23
5 Dépannage ..................................................................................................
6 Information .................................................................................................
............................................................... 1
12
15
16
16
17
19
19
30
39
1
5
5
6
6
7
7
8
8
Page 48

Introduction
Merci d’avoir choisi la Carte réseau Sans Fil N pour ordinateur portable
de Belkin (la carte). Vous pouvez désormais profiter de cette nouvelle
technologie en permettant à vos ordinateurs domestiques ou d’entreprise
de se connecter en réseau sans fil. Cette carte vous permet de connecter
un ordinateur portable à votre réseau. Lisez attentivement l’ensemble de
ce manuel, en insistant sur la section intitulée « Choix de l’emplacement
de votre dispositif réseau sans fil pour une performance maximale ».
Avantages d’un réseau domestique
Votre réseau domestique Belkin vous permettra de :
• Partager une connexion Internet à haut débit avec tous les ordinateurs
de votre domicile
• Partager des ressources, telles que des fichiers et des disques durs,
avec tous les ordinateurs de votre domicile
• Partager une imprimante avec toute la famille
• Partager des documents, des fichiers de musique et vidéo, ainsi que
des photos numériques
• Stocker, récupérer et copier des fichiers d’un ordinateur à un autre
• Simultanément jouer à des jeux en ligne, consulter une messagerie
électronique et discuter
Les avantages d’un réseau sans fil
• La Mobilité – nul besoin de confiner votre ordinateur à une seule
pièce. Vous pourrez maintenant travailler sur un ordinateur de bureau
ou portable, partout dans la zone couverte par votre réseau sans fil.
• Installation simple– l’Assistant Installation facile de Belkin vous
facilite la vie.
• Polyvalence – accédez à des imprimantes, des ordinateurs ou
d’autres périphériques réseau où que vous soyez dans votre domicile.
• Possibilité d’expansion – l’étendue de la gamme de produits réseau
de Belkin vous permet d’étendre votre réseau afin d’y inclure des
périphériques tels que des imprimantes ou des consoles de jeu.
• Aucun câblage nécessaire – plus besoin de perdre du temps et de
l’argent à réinstaller le câblage Ethernet chez vous ou au bureau.
• Reconnaissance de l’industrie – choisissez parmi une vaste gamme
de produits réseau captables de communiquer entre eux.
section
1
2
3
4
5
6
1
Page 49

Introduction
Choix de l’emplacement de votre dispositif réseau sans fil pour une
performance maximale
Plus votre ordinateur se rapproche de votre sans fil (ou votre point d’accès),
plus votre connexion sans fil gagne en force. De façon générale, la portée de
votre réseau sans fil à l’intérieur s’étend de 30 à 60 mètres. À l’opposé, plus
vos périphériques sans fil reliés à votre routeur ou votre point d’accès sont
éloignés de ceux-ci, moins grande est la performance de votre connexion
sans fil. Il se peut que vous vous en rendiez compte ou pas. Si vous éloignez
encore plus votre routeur (ou votre point d’accès), il est possible que la
vitesse de votre connexion diminue. Les appareils électroménagers, les
obstacles et les murs peuvent bloquer les signaux radio de votre réseau sans
fil et en diminuer la force.
Dans le but de vérifier si la performance de votre réseau est liée à la portée
ou à la présence d’obstacles, déplacez votre ordinateur afin qu’il soit dans
un rayon de 2 à 5 mètres du routeur (ou du point d’accès). Si les problèmes
persistent même dans une zone de couverture restreinte, veuillez contacter
l’assistance technique de Belkin.
Remarque :Alors que certains des objets énumérés ci-dessous peuvent
affecter les performances de votre réseau, ils n’empêcheront pas son
fonctionnement. Si vous croyez que votre réseau sans fil ne fonctionne pas à
pleine capacité, ces solutions peuvent vous aider.
1. Choix de l’emplacement de votre routeur sans fil ou de votre point
d’accès
Placez votre routeur Réseau Sans Fil (ou point d’accès), le centre nerveux de
votre réseau sans fil, aussi près que possible du centre de la zone de couverture
désirée.
Afin d’assurer une zone de couverture optimale pour vos « clients réseau »
(soit les ordinateurs dotés d’une carte réseau pour ordinateur de bureau ou
portable ou d’un adaptateur USB de Belkin) :
• Assurez-vous que les antennes de votre routeur ou de votre point d’accès
sont parallèles et disposées à la verticale (en pointant vers le plafond).
Si votre routeur (ou votre point d’accès) est posé à la verticale, essayez
autant que possible de disposer les antennes de façon à ce qu’elles
pointent vers le haut.
• Dans des habitations à plusieurs étages, placez le routeur (ou le point
d’accès) à l’étage le plus central de votre domicile. Ceci peut signifier que
devrez placer le routeur sans fil (ou le point d’accès) à un étage supérieur.
• Évitez de placer le routeur (ou le point d’accès) près d’un téléphone sans
fil 2.4 GHz.
2
Page 50

3
Introduction
2. Éviter les obstacles et les interférences
Évitez de placer le routeur ou le point d’accès près d’un appareil émettant
du « bruit » radio, comme un four à micro-ondes. Exemples d’objets
risquant d’empêcher la communication sans fil :
• Réfrigérateurs
• Lave-linge et/ou sèche-linge
• Étagère en métal
• Grands aquariums
• Fenêtre avec teinture anti-UV métallique
section
1
2
3
4
5
Si le signal de votre réseau semble faible à certains endroits, assurez-vous
qu’aucun de ces objets ne peut lui faire obstruction (entre les ordinateurs
et le routeur ou le point d’accès).
3. Téléphones sans fil
Si la performance de votre réseau est toujours affectée malgré les
solutions sus-mentionnées, et si vous possédez un téléphone sans fil :
• Éloignez votre téléphone de votre routeur ou votre point d’accès
sans fil ainsi que de vos ordinateurs sans fil.
• Débranchez et retirez la batterie de tout téléphone sans
fil fonctionnant sur la bande de 2.4 GHz. (Consultez la
documentation accompagnant votre téléphone à cet effet.) Si ces
gestes semblent résoudre le problème, c’est que votre téléphone
interfère avec les signaux du réseau sans fil.
• Si votre téléphone prend en charge le choix du canal, modifiez
le canal de votre téléphone en choisissant le canal le plus
éloigné possible de celui de votre réseau sans fil. Par exemple,
choisissez le canal 1 pour votre téléphone et modifiez le canal de
votre routeur sans fil (ou de votre point d’accès) en choisissant
le canal 11 (le choix du canal dépend de votre région). Reportezvous au mode d’emploi de votre téléphone pour obtenir les
instructions détaillées.
• Si le besoin se fait sentir, vous pouvez aussi changer votre téléphone
sans fil en choisissant un téléphone à 900 MHz ou à 5 GHz.
6
3
Page 51

Introduction
4. Choisissez le canal le plus « paisible » pour votre réseau sans fil
Dans des environnements domiciliaires ou d’entreprise rapprochés, tels que les
appartements et les immeubles à bureaux, il se peut qu’un autre réseau sans fil
interfère et entre en conflit avec votre réseau. Grâce à la fonction d’analyse du
site de l’Utilitaire de surveillance réseau sans fil, vous pourrez localiser d’autres
réseaux sans fil et faire passer votre routeur sans fil (ou point d’accès) et vos
ordinateurs à un canal aussi loin que possible du canal utilisé par ces réseaux.
Essayer plusieurs canaux parmi ceux disponibles afin de déterminer la connexion
la plus claire et éviter les interférences de la part de téléphones sans fil ou
d’autres dispositifs sans fil se trouvant dans votre voisinage.
Pour les dispositifs de réseau sans fil d’une marque différente, utilisez la fonction
d’analyse de site détaillée et consultez les informations concernant les canaux qui
se trouvent dans ce manuel.
5. Connexions sécurisées, VPN et AOL
Une connexion sécurisée est une connexion qui requiert un nom d’utilisateur
et un mot de passe et qui est utilisée là où la sécurité revêt une grande
importance. Parmi les connexions sécurisées :
• Les connexions de type Virtual Private Network (VPN - réseau privé
virtuel), souvent utilisées pour accéder à distance à un réseau
d’entreprise
• Le programme Bring your own access d’America Online (AOL) qui
vous permet d’utiliser AOL via une connexion à large bande (DSL ou
câble) offerte par un autre fournisseur d’accès à Internet (États-Unis
seulement).
• La plupart des banques en ligne
• Plusieurs sites commerciaux qui requièrent un nom d’utilisateur et un
mot de passe afin d’accéder à un compte
Les connexions sécurisées peuvent être interrompues par les paramètres de
gestion de l’énergie de votre ordinateur (lorsqu’il est en état de veille). La solution
la plus simple afin d’éviter cette situation est de vous reconnecter en lançant le
logiciel de VPN ou d’AOL ou en vous reconnectant via le site Web sécurisé.
Une solution alternative consiste à changer les paramètres de gestion de l’énergie
afin qu’il ne soit plus mis en état de veille. Toutefois, cette solution peut ne pas
être appropriée pour les ordinateurs portables. Pour modifier les paramètres de
gestion de l’énergie de Windows, reportez-vous aux « Options d’alimentation » du
Panneau de configuration.
Si les difficultés reliées aux connexions sécurisées, au VPN et à AOL persistent,
veuillez relire les étapes 1 à 4 ci-dessus afin de vous assurer d’avoir tenté les
solutions proposées.
44
Page 52

Présentation
Ces solutions devraient vous permettre d’obtenir une zone de couverture
maximale avec votre routeur sans fil. Si vous devez étendre votre
zone de couverture, nous vous suggérons le Point d’accès/Module
d’extension de Belkin.
Pour de plus amples informations à propos des produits réseau de
Belkin, visitez notre site Web à l’adresse www.belkin.com/networking ou
appelez l’assistance technique de Belkin.
Caractéristiques du produit
La carte est conforme aux spécifications du draft IEEE draft-802.11n,
pour communiquer avec d’autres dispositifs compatibles avec le
draft 802.11n à un débit pouvant atteindre 300 Mbps*. La carte est
compatible avec tous les dispositifs 802.11g à 54 Mbps, ainsi qu’avec
les dispositifs 802.11b à 11 Mbps. La carte 802.11g fonctionne sur
la même bande de fréquence de 2,4 GHz que les produits Wi-Fi®
802.11b.
• Fonctionnement sur la bande ISM (industriel, scientifique,
médical) 2,4 GHz
• Utilitaire réseau sans fil intégré et convivial
• Interface PCI pour utilisation avec pratiquement tout
ordinateur de bureau
• Chiffrement WPA, WPA2, WEP (Wired Equivalent Privacy) sur
64 et 128 bits
• Accès sans fil aux ressources du réseau
• Prise en charge des modes réseau Infrastructure et Ad-Hoc
(poste à poste).
• Débit de données jusqu’à 54 Mbps (802.11g) ou 11 Mbps
(802.11b)
• Facile à installer et à utiliser
• Antenne externe
• Témoins lumineux d’alimentation et de liaison réseau
1
section
2
3
4
5
6
5
5
Page 53

Présentation
Applications et avantages
• Connexion sans fil de votre portable chez vous ou au bureau
Permet une liberté de mise en réseau sans la gène liée aux câbles
• Débit de connexion jusqu’à 54 Mbps
Connexion sans fil immédiate chez soi, au bureau ou à un point d’accès
public sans compromettre l’utilisation des produits 802.11b et 802.11g
existants.
• Compatible avec les produits 802.11b
Les solutions LAN sans fil 802.11g offrent une compatibilité descendante
avec les produits Wi-Fi (IEEE 802.11b) existants ainsi qu’avec d’autres
produits arborant le logo 54g.
• Environnements impropres au câblage
Permet le partage d’imprimante dans des bâtiments comportant des murs
pleins ou dans des zones ouvertes où le câblage est difficile à effectuer
• Environnements changeants
S’adapte facilement aux bureaux ou environnements souvent réorganisés ou
lorsque vous changez souvent de site.
• LAN temporaires pour des projets spéciaux ou en période d’activité
accrue
Permet de créer des réseaux temporaires tels que pour des foires, des
expositions et des chantiers qui ont besoin d’un réseau pour peu de
temps ; de même pour les entreprises ayant besoin de postes de travail
supplémentaires en cas de forte période d’activité.
• Pour les besoins des particuliers ou des petites entreprises (SOHO)
Fournit une installation facile et rapide d’un petit réseau.
Caractéristiques techniques du produit
Interface hôte : CardBus 32 bits
Température de fonctionnement : 0 à 60 °C
Température de stockage : -40 à 90 °C
Humidité : Max. 95% (sans condensation)
Portée de fonctionnement habituelle : Jusqu’à to 365,8 mètres**
*REMARQUE : Le débit de transmission mentionné (300 Mbps) est le débit de
données physique. Le débit réel est inférieur.
**La performance dépend de l’environnement du réseau.
6
Page 54

7
Présentation
(C)
1
section
2
3
4
(b)
(a)
(a) Alimentation
S’allume lorsque la carte est alimentée
(b) Liaison/Activité
S’allume lorsque l’adaptateur est connecté, clignote lorsqu’une activité
sans fil est détectée
(c) Connecteur de la carte
Côté de la carte qui s’insère dans l’emplacement CardBus de votre
ordinateur
Configuration requise
• Ordinateur compatible PC avec un emplacement CardBus 32 bits libre
• Windows® 2000, XP avec SP2 ou Vista™***
(les clients ne sont pas compatibles avec Mac OS)
• Minimum 64 Mo de mémoire vive
• Lecteur de CD-ROM
• Navigateur Internet
Contenu de l’emballage
• Carte Sans Fil N pour ordinateur portable
• Guide d’installation rapide
• Logiciel d’installation et manuel de l’utilisateur sur CD-ROM
5
6
7
Page 55

Installation et configuration de la carte
8
A. Installation sous Windows Vista
***REMARQUE : Au moment du lancement de ce produit, les pilotes
Windows Vista n’étaient pas disponibles et peuvent ne pas être
inclus sur le CD vendu avec votre produit. Pour plus d’informations sur
d’éventuels pilotes mis à jour pour Windows Vista, consultez le site Internet
de Belkin à l’adresse www.belkin.com/support/vista.
IMPORTANT : VOUS DEVEZ INSTALLER LE LOGICIEL AVANT D’INSÉRER LA CARTE.
A.1 Insérez le CD d’installation dans le lecteur de CD-ROM.
A.2 Cliquez sur « Next [Suivant] » pour commencer l’installation.
Remarque : Si l’écran de l’utilitaire d’installation n’apparaît pas dans les
20 secondes, accédez à votre CD-ROM en double-cliquant sur l’icône
« Poste de travail ». Ensuite, double-cliquez sur le lecteur de CD-ROM
contenant le CD d’installation. Si l’assistant d’installation n’apparaît pas
automatiquement, cliquez deux fois sur l’icône « Setup.exe ».
A.3 L’assistant InstallShield commence le processus d’installation.
Page 56

9
Installation et configuration de la carte
A.4 Sélectionnez un dossier de
destination pour l’installation
du logiciel en cliquant « Browse
[Parcourir] » ou cliquez simplement
« Next [Suivant] » pour sélectionner
l’emplacement par défaut.
A.5 Un écran vous indique l’état du
processus d’installation.
A.6 Une fenêtre peut apparaître
pour une seconde fois, avec le
message « Windows ne peut
vérifier l’éditeur de ce logiciel ».
Ceci n’indique PAS qu’il y a
un problème. Notre logiciel a
été entièrement testé et est
compatible avec cette version de
Windows.
1
2
section
3
4
5
6
A.7 Lorsque vous êtes invité à le
faire, éteignez votre ordinateur
et branchez votre carte.
L’installation est terminée.
A.8 Lorsque le processus
d’installation est terminé, cliquez
« Finish [Terminer] ».
9
Page 57

Installation et configuration de la carte
A.9 L’assistant d’ajout de nouveau
matériel apparaît dans les
15 secondes. Si c’est le cas,
poursuivez la procédure en suivant
les instructions. Sélectionnez
« Locate and install the driver
software [Localiser et installer le
pilote] » pour continuer.
A.10 Il se peut qu’un écran similaire à
celui-ci apparaisse. Cela ne signifie
PAS que Windows a rencontré
un problème. Notre logiciel a été
entièrement testé et est compatible
avec cette version de Windows.
Cliquez sur « Install this driver
software anyway [Poursuivre
l’installation du pilote] » et suivez
les instructions qui apparaissent à
l’écran.
Ensuite, un écran vous indique que
l’installation est en cours. Puis, un
autre vous indique que le processus
est terminé.
A.11 Pour vous connecter à l’Internet,
ouvrez le Centre de réseau et de
partage en allant dans le Panneau
de configuration, sous le menu
Démarrer.
A.12 Dans le Panneau de configuration,
cliquez sur « Afficher l’état du
réseau et les tâches ».
10
Page 58

11
Installation et configuration de la carte
A.13 Dans le Centre de réseau et de
partage, cliquez sur « Connexion à
un réseau ».
A.14 À l’écran suivant, sélectionnez un
réseau sans fil disponible et cliquez
sur « Se connecter ».
A.15 Votre carte tentera de se connecter
au réseau sélectionné.
1
2
section
3
4
5
6
A.16 En fonction des paramètres de
sécurité en vigueur sur votre réseau
sans fil, il se peut que vous deviez
saisir une clé de sécurité ou une
expression mot de passe. Cliquez
« Se connecter » après avoir saisi la
clé ou le mot de passe.
11
Page 59

Installation et configuration de la carte
A.17 Après la connexion au réseau, vous
pouvez choisir d’enregistrer ce réseau
pour vous y connecter automatiquement
lorsque votre carte se trouve dans la zone
de couverture du réseau.
A.18 Le Centre de réseau et de partage indique
la connexion réseau qui vient d’être
établie. Les liens à la gauche de de la
fenêtre vous permet de configurer vos
connexions réseau.
B. Procédure d’installation pour les systèmes d’exploitation Windows autres
que Windows Vista
IMPORTANT
: VOUS DEVEZ INSTALLER LE LOGICIEL AVANT D’INSÉRER LA CARTE.
B.1 Insérez le CD d’installation dans le lecteur de CD-ROM.
B.2 L’utilitaire d’installation de Belkin apparaît
dans les 20 secondes. Cliquez sur « Install
Software [Installer le logiciel] » puis
sur « Next [Suivant] » pour commencer
l’installation.
Remarque : Si l’écran de l’utilitaire
d’installation n’apparaît pas dans les
20 secondes, accédez à votre CD-ROM
en double-cliquant sur l’icône « Poste
de travail ». Ensuite, double-cliquez sur
le lecteur de CD-ROM contenant le CD
d’installation. Ensuite, cliquez deux fois
sur l’icône « Setup.exe ».
12
Page 60

13
Installation et configuration de la carte
B.3 L’assistant InstallShield commence
le processus d’installation.
B.4 Sélectionnez un dossier de
destination pour l’installation
du logiciel en cliquant « Browse
[Parcourir] » ou cliquez simplement
« Next [Suivant] » pour sélectionner
l’emplacement par défaut.
B.5 Un écran vous indique l’état du
processus d’installation.
B.6 Après l’installation du logiciel, vous
serez invité à insérer la carte dans la
fente CardBus de votre ordinateur.
B.7 L’assistant d’ajout de nouveau
matériel apparaît dans les 15
secondes. Sélectionnez « Install
the software automatically [Installer
le logiciel automatiquement] » et
cliquez sur « Next [Suivant] » pour
poursuivre.
B.8 Si l’assistant d’ajout de nouveau
matériel n’apparaît pas, cliquez sur
« Finish [Terminer] ».
1
2
section
3
4
5
6
13
Page 61

Installation et configuration de la carte
B.9 Il se peut qu’un écran similaire à
celui-ci apparaisse. Cela ne signifie
PAS que Windows a rencontré
un problème. Notre logiciel a
été entièrement testé et est
compatible avec cette version de
Windows. Cliquez sur « Continue
Anyway [Poursuivre] » et suivez
les instructions qui apparaissent à
l’écran.
B.10 L’assistant installe le logiciel.
B.11 L’installation du pilote est maintenant
terminée. Cliquez sur « Finish
[Terminer] » pour quitter l’assistant.
B.12 Cliquez de nouveau sur « Finish
[Terminer] » pour quitter le
programme d’installation
InstallShield.
B.13 En fonction du système d’exploitation
de votre ordinateur, il est probable que
vous deviez redémarrer votre ordinateur
pour que l’installation soit prise en
compte. Enregistrez vos données et
fermez toutes les applications. Ensuite,
redémarrez votre ordinateur.
14
Page 62

15
Installation et configuration de la carte
C. Configuration
Utilisation de l’utilitaire réseau sans fil Belkin
Après avoir redémarré l’ordinateur,
C.1
cliquez deux fois sur l’icône de
l’Utilitaire réseau sans fil Belkin se
trouvant sur votre bureau.
Remarque : L’icône de l’utilitaire
sans fil Belkin se trouve également
dans la barre de tâches.
C.2 L’écran de l’Utilitaire réseau sans
fil apparaît.
1
2
section
3
4
5
6
C.3 Sélectionnez un réseau dans la
liste des « Available Networks
[Réseaux disponibles] » et cliquez
sur « Connect [Connexion] ».
Remarque : Afin de voir les
réseaux disponibles, vous devez
être près d’un routeur ou d’un
point d’accès sans fil.
15
Page 63

Utilitaire réseau sans fil de Belkin
Après avoir installé l’utilitaire réseau sans fil Belkin (URSF), la
configuration des connexions sans fil et la sécurité sera la prochaine
étape.
Accès à l’Utilitaire réseau sans fil à partir de la
barre des tâches Windows
Pour accéder à l’utilitaire réseau sans fil, placez simplement le
pointeur de votre souris et cliquez avec le bouton droit sur l’icône de
l’utilitaire réseau sans fil de la barre de tâches de Windows.
Si l’icône est introuvable, cliquez sur « Démarrer > Programmes
> Belkin > Utilitaire réseau sans fil ».
16
Page 64

17
Utilitaire réseau sans fil de Belkin
L’écran par défaut de l’utilitaire est l’onglet « Current Status [État actuel] »
. Il affiche l’état du réseau actuel ainsi que les réseaux disponibles.
État du réseau
Cette fenêtre montre l’état de la connexion du réseau actuel. Il affiche de
même l’état de la connexion entre le routeur et l’ordinateur, et entre le routeur
et l’Internet. En cas de problème, utilisez la fenêtre « État du réseau » pour
en déterminer la source (l’ordinateur, le routeur ou Internet/modem, par
exemple).
Réseaux disponibles
Cette fenêtre affiche les réseaux disponibles sur le site en cours ainsi que
leurs SSID, la force du signal, le type de sécurité, le canal et le type de
réseau.
Connexion sans fil perdue
Si la connexion sans fil en cours est perdue, une fenêtre apparaît et l’utilitaire
tente de se reconnecter.
1
2
3
section
4
5
6
17
Page 65

Utilitaire réseau sans fil de Belkin
18
Échec de connexion
D’autres options apparaîtront pendant la nouvelle tentative de connexion. Pour
arrêter la connexion, cliquez sur « Stop » et pour réessayer de vous connecter,
cliquez sur « Réessayer ».
État du réseau et astuces
Pour mieux comprendre l’état du réseau en cours, cliquez sur « Ouvrir l’utilitaire
sans fil ». L’écran par défaut est l’onglet « État actuel ». La section « État du
réseau » détermine les connexions qui sont bonnes et/ou mauvaises.
Page 66

19
Utilitaire réseau sans fil de Belkin
L’utilitaire contient également une section « Astuces » qui vous propose des
informations de dépannage.
Configuration des profils du réseau sans fil
L’onglet « Mes connexions » de l’utilitaire vous permet d’ajouter, de modifier
et de supprimer des profils de connexion. Il affiche également la force du
signal, la sécurité et le type de réseau.
Protection de votre réseau Wi-Fi®
Si vous choisissez de vous connecter à un réseau sécurisé, déterminez
le type de sécurité utilisée (WPA ou WEP*) et utilisez le champ approprié
de la boîte de dialogue.
1
2
3
section
4
5
6
*Remarque : Types de sécurité
19
Page 67

Utilitaire réseau sans fil de Belkin
Remarque :Lorsque vous sélectionnez un réseau qui utilise le
chiffrement, vous voyez d’abord la fenêtre de sécurité simple. Cliquez
sur le bouton « Advanced [Avancé] » pour voir d’autres options de
sécurité (ci-dessous).
Wired Equivalent Privacy (WEP) est un protocole de sécurité
moins sûr, mais plus fréquemment employé. Selon le niveau
de sécurité (64 ou 128 bits), l’utilisateur devra entrer une clé
hexadécimale à 10 ou 26 caractères. Une clé hexadécimale est une
association de lettres (de a à f) et de chiffres (de 0 à 9).
20
Page 68

21
Utilitaire réseau sans fil de Belkin
Le Wireless Protected Access (WPA) est la nouvelle norme
de sécurité sans fil. Cependant, toutes les cartes et adaptateurs sans
fil ne prennent pas en charge cette technologie. Veuillez consulter
le manuel de l’utilisateur de votre adaptateur sans fil pour savoir s’il
prend en charge le WPA. Au lieu d’une clé hexadécimale, le WPA
utilise uniquement des expressions mot de passe dont il est plus
facile de se souvenir.
La section suivante, prévue pour les particuliers, les professionnels
indépendants et pour les petits bureaux, présente quelques nouvelles
façons de maximiser la sécurité de votre réseau sans fil.
Au moment de mettre sous presse, quatre méthodes de chiffrement
étaient disponibles :
Méthodes de chiffrement :
Nom Wired
Acronyme WEP 64 bits 1 28 bits WPA-TKIP/AES WPA2-AES
Sécurité Bon Mieux Excellent Excellent
Caractéristiques Clés fixes Clés fixes Chiffrement
Equivalent
Privacy
64 bits
Clés de
chiffrement
basées sur
l’algorithme
RC4
(clés de 40
bits)
Chiffrement sur
128 bits
Sécurité
renforcée sur
WEP 64 bits
utilisant une
clé de 104 bits,
plus 24 bits
supplémentaires
pour des
données
générées par le
système
Wi-Fi Protected
Access
dynamique
de la clé et
authentification
mutuelle
Le TKIP
(temporal
key integrity
protocol)
s’ajoute afin
d’assurer la
rotation des clés
et de renforcer le
chiffrement
Wi-Fi Protected
Access 2
Chiffrement
dynamique
de la clé et
authentification
mutuelle
L’AES
(Advanced
Encryption
Standard)
n’entraîne pas
de perte de
performances
WEP
Le WEP (Wired Equivalent Privacy) est un protocole courant qui
renforce la sécurité de tous les dispositifs sans fil Wi-Fi. Le WEP
offre aux réseaux sans fil un niveau de protection comparable à
celui des réseaux câblés.
1
2
3
section
4
5
6
21
Page 69

Utilitaire réseau sans fil de Belkin
WEP 64 bits
Le WEP 64 bits a été introduit la première fois avec un chiffrement
de 64 bits, ce qui comprend une clé de 40 bits plus 24 bits
supplémentaires composés de données générées par le système (64
bits au total). Certains fabricants se réfèrent au chiffrement sur 64 bits
lorsqu’ils parlent du chiffrement sur 40 bits. Peu après le lancement
de la technologie, les chercheurs ont découvert que le chiffrement sur
64 bits était trop simple à décoder.
Chiffrement sur 128 bits
Pour contrer la faille de sécurité du WEP 64 bits, une méthode
de chiffrement plus sécurisée, le WEP 128 bits, a été créée.
Le WEP 128 bits comprend une clé de 104 bits plus 24 bits
supplémentaires composés de données générées par le système
(128 bits au total). Certains fabricants se réfèrent au chiffrement
sur 128 bits lorsqu’ils parlent du chiffrement sur 104 bits.
La plupart des dispositifs sans fil disponibles sur le marché
aujourd’hui prennent en charge le chiffrement WEP sur 64 et 128
bits, mais il se peut que vous possédiez un dispositif plus ancien
ne prenant en charge que le WEP sur 64 bits. Tous les produits
sans fil de Belkin prennent en charge le chiffrement WEP sur 64
et 128 bits.
Clés de chiffrement
Après avoir choisi le mode de chiffrement (64 ou 128 bits), il est
primordial de générer une clé de chiffrement. Si la clé de chiffrement
n’est pas la même dans tout le réseau sans fil, vos dispositifs sans
fil ne seront pas en mesure de communiquer entre eux. Vous pouvez
entrer votre clé en entrant la clé hexadécimale manuellement. Une clé
hexadécimale est une combinaison de chiffres et de lettres, compris
entre A et F et entre 0 et 9. Pour le WEP 64 bits, vous devez entrer
10 clés hexadécimales. Pour le WEP 128 bits, vous devez entrer
26 clés hexadécimales.
Par exemple :
AF
0F 4B C3 D4 = clé WEP 64 bits
C3
03 0F AF 0F 4B B2 C3 D4 4B C3 D4 E7 = clé 128 bits
Prenez note de la clé hexadécimale WEP de votre routeur ou de votre
point d’accès sans fil et entrez-la manuellement dans la table de clés
hex WEP, à l’écran de configuration de votre carte.
22
Page 70

23
Utilitaire réseau sans fil de Belkin
WPA
Le WPA (Wi-Fi Protected Access) est une nouvelle norme Wi-Fi,
surpassant les caractéristiques de sécurité du WEP. Pour utiliser
la sécurité WPA, les pilotes et le logiciel de vos dispositifs sans fil
doivent être mis à niveau. Ces mises à niveau sont disponibles sur
les sites web des fabricants de vos dispositifs sans fil. Il existe trois
types de sécurité par WPA : WPA-PSK (sans serveur), WPA (avec
Serveur Radius) et WPA2.
Le WPA-PSK (sans serveur) utilise ce qu’on appelle une « clé prépartagée » comme clé de sécurité. Une clé réseau est en quelque
sorte un mot de passe qui contient entre 8 et 63 caractères. Il peut
être composé de lettres, de chiffres ou de symboles. Chaque client
utilise la même clé pour accéder au réseau. De façon générale, ce
mode est utilisé pour les réseaux domestiques.
WPA (avec serveur Radius), qui fonctionne mieux dans un
environnement professionnel, consiste en un système où le serveur
Radius qui distribue automatiquement les clés réseau aux clients.
Le WPA2
chiffrement des données, ce qui apporte un niveau de sécurité
plus élevé que le WPA. Le WPA utilise à la fois le protocole appelé
Temporal Key Integrity Protocol (TKIP) et l’AES pour le chiffrement.
utilise l’AES (Advanced Encryption Standard) pour le
Configuration de votre routeur sans fil ou de votre point
d’accès pour utilisation d’un mode de sécurité
Pour utiliser un mode sécurisé, vous devez d’abord activer le WEP
ou le WPA de votre routeur ou de votre point d’accès. Pour les
routeurs et les points d’accès de Belkin, cette fonction de sécurité
peut être configurée en utilisant l’interface basée sur navigateur Web.
Consultez le manuel d’instructions de votre routeur ou de votre point
d’accès pour des instructions sur l’accès à l’interface de gestion.
IMPORTANT :
maintenant être configurés avec ces paramètres.
Tous les cartes/adaptateurs réseau sans fil doivent
1
2
3
section
4
5
6
Configuration des paramètres de sécurité de votre carte
Jusqu’à maintenant, vous avez configuré votre routeur ou point d’accès sans fil
afin qu’ils utilisent le WPA ou le WEP. Pour obtenir une connexion sans fil, vous
devrez configurer votre Carte Réseau Sans Fil N pour ordinateur portable afin
qu’elle utilise les mêmes paramètres de sécurité.
23
Page 71

Utilitaire réseau sans fil de Belkin
Modification des paramètres de sécurité sans fil
La Carte Réseau Sans Fil N Belkin prend en charge les fonctionnalités
de sécurité WPA les plus récentes ainsi que la norme de sécurité WEP
plus ancienne. Par défaut, la sécurité sans fil est désactivée.
Pour activer la sécurité, vous devrez d’abord déterminer la norme
utilisée par le routeur ou le point d’accès. (Consultez le manuel de
votre routeur ou votre point d’accès sans fil pour savoir comment
accéder aux paramètres de sécurité.)
Pour accéder aux paramètres de sécurité sur votre carte, cliquez sur
l’onglet « Mes connexions » et sélectionnez la connexion dont vous
voulez modifier les paramètres de sécurité. Cliquez sur « Modifier »
pour modifier les paramètres.
24
Page 72

25
Utilitaire réseau sans fil de Belkin
Configuration du WEP
Chiffrement WEP sur 64 bits
1. Sélectionnez « WEP » dans le menu déroulant « Chiffrement de
données ».
2. Après avoir sélectionné votre mode de chiffrement WEP, entrez
votre clé hexadécimale manuellement.
Une clé hexadécimale est une combinaison de chiffres et de
lettres, compris entre A et F et entre 0 et 9. Pour le WEP 64 bits,
vous devez entrer 10 clés hexadécimales.
Par exemple :
AF
0F 4B C3 D4 = clé WEP 64 bits
1
2
3
section
4
5
6
3. Cliquez sur « Save [Enregistrer] » pour terminer. Le chiffrement de
votre routeur ou de votre point d’accès est maintenant configuré.
Chaque ordinateur de votre réseau sans fil devra maintenant être
configuré avec les mêmes paramètres de sécurité.
25
Page 73

Utilitaire réseau sans fil de Belkin
AVERTISSEMENT : Si vous utilisez un client sans fil pour activer les
paramètres de sécurité de votre routeur ou de votre point d’accès,
vous perdrez temporairement votre connexion sans fil jusqu’à ce que
vous ayez activé la sécurité de votre client sans fil. Veuillez noter la
clé avant d’apporter des modifications aux paramètres du routeur ou
du point d’accès sans fil. Si vous avez oublié votre clé hexadécimale,
votre client ne sera plus en mesure de se connecter au routeur ou au
point d’accès sans fil.
Chiffrement WEP sur 128 bits
1. Sélectionnez « WEP » dans le menu déroulant.
2. Après avoir sélectionné votre mode de chiffrement WEP, entrez
votre clé hexadécimale manuellement.
Une clé hexadécimale est une combinaison de chiffres et de
lettres, compris entre A et F et entre 0 et 9. Pour le WEP 128 bits,
vous devez entrer 26 clés hexadécimales.
Par exemple :
C3
03 0F AF 0F 4B B2 C3 D4 4B C3 D4 E7 = clé 128 bits
26
Page 74

27
Utilitaire réseau sans fil de Belkin
3. Cliquez sur « Save [Enregistrer] » pour terminer. Le chiffrement de votre
routeur ou de votre point d’accès est maintenant configuré. Chaque
ordinateur de votre réseau sans fil devra maintenant être configuré avec les
mêmes paramètres de sécurité.
AVERTISSEMENT : Si vous utilisez un client sans fil pour activer les
paramètres de sécurité de votre routeur ou de votre point d’accès, vous
perdrez temporairement votre connexion sans fil jusqu’à ce que vous
ayez activé la sécurité de votre client sans fil. Veuillez noter la clé avant
d’apporter des modifications aux paramètres du routeur ou du point
d’accès sans fil. Si vous avez oublié votre clé hexadécimale, votre client
ne sera plus en mesure de se connecter au routeur ou au point d’accès
sans fil.
WPA-PSK (sans serveur)
Choisissez cette option si votre réseau n’utilise pas de serveur radius. Le
WPA-PSK (sans serveur) se retrouve généralement dans des réseaux à
domicile ou en entreprise.
1. Dans le menu déroulant « Authentification du réseau », sélectionnez
« WPA-PSK (no server) ».
2. Entrez votre clé réseau. Elle peut être composée de 8 à 63 caractères
(lettres, chiffres ou symboles). La même clé doit être utilisée sur chacun
des clients (cartes réseau) que vous désirez ajouter à votre réseau sans fil.
1
2
3
section
4
5
6
27
Page 75

Utilitaire réseau sans fil de Belkin
3. Cliquez sur « Save [Enregistrer] » pour terminer. Tous les clients (cartes
réseau) doivent maintenant être configurés avec ces paramètres.
Options de l’utilitaire réseau sans fil
L’onglet « Options » de l’Utilitaire permet à l’utilisateur de personnaliser les
paramètres de son utilitaire.
Aide de l’Utilitaire réseau sans fil
L’onglet « Aide » de l’utilitaire permet aux utilisateurs d’accéder à l’aide en
ligne et à l’aide téléphonique ainsi qu’à des outils de diagnostic avancés.
28
Page 76

29
Utilitaire réseau sans fil de Belkin
Outils de diagnostics avancés
La section « Outils de diagnostics avancés » est le panneau de
configuration central de tous les paramètres des composants
matériels et logiciels du réseau sans fil. Il fournit un éventail de tests
et de services de connectivité pour garantir des performances réseau
optimales.
1
2
3
section
4
5
6
29
Page 77

Dépannage
Je n’arrive pas à me connecter sans fil à Internet.
Si vous n’arrivez pas à vous connecter à l’Internet à partir d’un
ordinateur sans fil, veuillez vérifier les points suivants :
1. Observez les voyants de votre routeur sans fil. Si vous utilisez
un routeur sans fil Belkin, les voyants devraient être comme
suit :
• Le voyant d’alimentation doit être allumé.
• Le voyant « Connected [Connecté] » doit être allumé et ne pas
clignoter.
• Le voyant WAN doit être allumé ou clignoter.
Si les témoins de votre routeur sans fil de Belkin sont comme
décrits ci-haut, allez au point 2.
Si ce n’est pas le cas, assurez-vous que :
• Le cordon d’alimentation du routeur est bien branché.
• Tous les câbles entre le modem et le routeur sont bien
branchés.
• Les voyants du modem fonctionnent correctement. Sinon,
consultez le manuel de l’utilisateur de votre modem.
• Redémarrez le routeur
• Redémarrez le Modem.
Si les problèmes persistent, veuillez contacter l’Assistance
Technique Belkin.
Si nous n’utilisez pas un routeur sans fil Belkin, consultez son
manuel d’utilisation.
2. Lancez le logiciel de l’utilitaire sans fil en cliquant sur l’icône
dans la barre de tâches, à l’angle inférieur droit de l’écran. Si
vous utilisez une carte sans fil Belkin, l’icône de la barre de
tâches devrait ressembler à celle-ci (elle peut être rouge ou
verte) :
30
Page 78

31
Dépannage
3. L’allure générale de la fenêtre qui s’ouvre dépend du modèle
de la carte réseau sans fil que vous possédez. Toutefois,
n’importe quel utilitaire doit posséder une liste de « Available
Networks [Réseaux Disponibles] ».
Les réseaux disponibles représentent les réseaux auxquels vous
pouvez vous connecter. Si vous utilisez un routeur 802.11g (G+) de
Belkin ou 802.11g (54g), le nom par défaut est « Belkin54g ».
Si vous utilisez un routeur 802.11b de Belkin, le nom par défaut
est « WLAN ». Si vous utilisez un routeur d’un autre fabricant que
Belkin, consultez son manuel de l’utilisateur pour connaître le
nom par défaut.
Le nom de votre réseau sans fil apparaît dans la liste des
réseaux disponibles.
Si le nom de réseau qui apparaît dans la liste des réseaux
disponibles est valide, veuillez suivre les étapes suivantes afin de
vous connecter sans fil :
1. Cliquez sur le nom de réseau valide dans la liste des réseaux
disponibles.
2. Si le réseau est sécurisé (chiffrement), vous devrez entrer
la clé réseau. Cliquez « Connect [Connexion] ». Pour plus
d’informations sur la sécurité, rendez vous à la page intitulée
« Protection de votre réseau sans fil Wi-Fi » à la page 19 de
ce manuel.
3. Dans les secondes qui suivent, l’icône de la barre des tâches
dans l’angle inférieur droit de l’écran doit devenir verte, ce qui
indique que la connexion au réseau est réussie.
1
2
3
4
section
5
6
Si vous ne pouvez toujours pas accéder à l’Internet après vous
être connecté au réseau sans fil, veuillez communiquer avec
l’assistance technique de Belkin.
31
Page 79

Dépannage
Le nom de votre réseau N’APPARAÎT PAS dans la liste
des réseaux disponibles.
Si le nom de votre réseau n’apparaît pas dans la liste, vérifiez le SSID et
assurez-vous qu’il soit identique partout. Le SSID est sensible à la casse et
l’orthographie du nom sur chaque ordinateur doit être identique afin que la
carte puisse se connecter au routeur sans fil ou au point d’accès.
Remarque :Pour vérifier le SSID ou pour voir les réseaux disponibles,
cliquez deux fois sur l’icône donnant l’état du signal afin de faire
apparaître l’écran « Réseaux sans fil ». Cliquez sur « Ajouter » si vous ne
voyez pas le nom du réseau auquel vous essayez de vous connecter, puis
tapez le SSID. Pour de plus amples informations sur la configuration du
SSID, reportez-vous à la documentation accompagnant votre routeur sans
fil.
Si le problème persiste même dans un rayon restreint, veuillez
communiquer avec l’assistance technique de Belkin.
Le CD-ROM d’installation ne lance pas l’Utilitaire réseau sans fil
Si le CD-ROM ne lance pas automatiquement l’utilitaire réseau sans fil, il
se peut qu’un autre programme utilisé par votre ordinateur interfère avec
le lecteur de CD-ROM. Si l’écran de l’Assistant n’apparaît pas dans les
15 à 20 secondes, ouvrez votre lecteur de CD-ROM en double-cliquant
sur l’icône « My Computer [Poste de travail] ». Ensuite, cliquez deux fois
sur le lecteur de CD-ROM dans lequel se trouve le CD d’installation afin
de démarrer l’installation. Ensuite, cliquez deux fois sur le dossier « Files
[Fichiers] ». Ensuite, cliquez deux fois sur l’icône « setup.exe ».
Le voyant d’alimentation ne s’allume pas. La carte ne fonctionne
pas.
Si le voyant d’alimentation demeure éteint, il se peut que la carte ne
soit pas connectée ou installée correctement. Vérifiez à ce que la carte
soit insérée fermement dans la fente CardBus de votre ordinateur.
Vérifiez que les pilotes de la carte sont bien installés. Cliquez avec
le bouton droit sur l’icône « Poste de travail » du bureau. Choisissez
« Properties [Propriétés] » et accédez au « Device Manager [Gestionnaire
de périphériques] ». Assurez-vous que la carte y figure et qu’elle ne
présente aucune erreur. Si vous constatez une erreur, communiquez avec
l’assistance technique de Belkin.
32
Page 80

33
Dépannage
Le voyant de liaison clignote lentement. Impossible
de se connecter à un réseau sans fil ou à Internet.
Si votre carte semble fonctionner adéquatement mais vous ne
pouvez pas vous connecter au réseau, ou si vous voyez une
icône rouge au bas de votre écran, il est possible que l’origine du
problème soit une disparité entre le nom du réseau (SSID) dans
les propriétés de votre réseau sans fil.
Vérifiez le SSID et assurez-vous qu’il est identique sur l’ensemble de
votre réseau. Le SSID est sensible à la casse et l’orthographie du nom
sur chaque ordinateur doit être identique afin que la carte puisse se
connecter au routeur sans fil ou au point d’accès.
Remarque :Pour vérifier le SSID ou pour voir les réseaux
disponibles, cliquez deux fois sur l’icône donnant l’état du signal
afin de faire apparaître l’écran « Réseaux sans fil ». Cliquez sur
« Add [Ajouter] » si vous ne voyez pas le nom du réseau auquel
vous essayez de vous connecter, puis tapez le SSID. Pour de
plus amples informations sur la configuration du SSID, reportezvous à la documentation accompagnant votre routeur sans fil.
Si le problème persiste même dans un rayon restreint, veuillez
communiquer avec l’assistance technique de Belkin.
Le voyant de liaison est allumé mais je n’arrive pas à me
connecter à Internet.
Si vous obtenez un signal mais ne pouvez vous connecter à
l’Internet ou obtenir une adresse IP, il se peut que le problème
soit dû à une disparité entre les clés de chiffrement de votre
ordinateur et votre routeur ou votre point d’accès. Vérifiez les
paramètres de clé WEP, WPA et WPA2 et assurez-vous qu’il sont
identiques sur l’ensemble de votre réseau. La clé est sensible
à la casse et l’orthographie de celle-ci sur chaque ordinateur et
routeur sans fil (ou point d’accès) doit être identique afin que
la carte puisse se connecter au routeur sans fil. Pour de plus
amples informations sur le chiffrement, veuillez consulter la
section « Protection de votre réseau sans fil Wi-Fi » à la page 19
de ce manuel.
1
2
3
4
section
5
6
Si le problème persiste même dans un rayon restreint, veuillez
communiquer avec l’assistance technique de Belkin.
33
Page 81

Dépannage
Le transfert de données est parfois très lent.
La technologie sans fil est basée sur des ondes radio. Ceci implique
que les performances et le débit de transfert entre les appareils
diminuent lorsque ceux-ci sont éloignés les uns des autres. D’autres
facteurs peuvent engendrer une dégradation du signal : le métal en est
généralement responsable. Des obstacles tels des murs et des appareils
métalliques peuvent aussi affecter la qualité du signal. Ainsi, à l’intérieur,
la portée de vos appareils sans fil va de 30 à 60 mètres. Notez également
que la vitesse de connexion diminue si vous vous éloignez du routeur
sans fil ou du point d’accès.
Afin de déterminer si vos problèmes de connexion sans fil sont dus à la
portée, déplacez temporairement votre ordinateur dans un rayon d’environ
3 mètres de votre routeur (ou de votre point d’accès). Reportez-vous
à la section « Choix de l’emplacement de votre dispositif de réseau
sans fil pour une performance maximale » , à la page 2 de ce Manuel
de l’Utilisateur. Si le problème persiste même dans un rayon restreint,
veuillez communiquer avec l’assistance technique de Belkin.
La force du signal est faible.
La technologie sans fil est basée sur des ondes radio. Ceci implique
que la performance et le débit de transfert entre les appareils
diminuent lorsque ceux-ci sont éloignés les uns des autres. D’autres
facteurs peuvent engendrer une dégradation du signal : le métal en est
généralement responsable. Des obstacles tels des murs et des appareils
métalliques peuvent aussi affecter la qualité du signal. Ainsi, à l’intérieur,
la portée de vos appareils sans fil va de 30 à 60 mètres. Notez également
que la vitesse de connexion diminue si vous vous éloignez du routeur
sans fil ou du point d’accès. Afin de déterminer si vos problèmes de
connexion sans fil sont dus à la portée, déplacez temporairement votre
ordinateur dans un rayon d’environ 1,5 à 3 mètres de votre routeur (ou de
votre point d’accès).
Modification du canal sans fil –
interférences au niveau local, passer à un autre canal peut améliorer la
performance de votre réseau. Le canal par défaut de votre routeur est 6.
Vous pouvez choisir à partir de plusieurs autres canaux, dépendamment
de votre région. Consultez le manuel de votre routeur ou de votre point
d’accès pour de plus amples informations concernant le choix du canal.
Selon le trafic de données et les
34
Page 82

35
Dépannage
Limiter le débit de données sans fil – Limiter le débit de données
sans fil peut améliorer la portée sans fil maximale et la stabilité de la
connexion. La plupart des cartes sans fil sont en mesure de limiter le
débit de transmission. Pour modifier cette propriété, allez au Panneau
de Configuration de Windows, ouvrez les « Connexions Réseau »
et cliquez deux fois sur la connexion sans fil de votre carte. Dans
la boîte de dialogue Propriétés, sélectionnez le bouton « Configure
[Configurer] » à partir de l’onglet « Général ». (Les utilisateurs de
Windows 98SE devront sélectionner la carte sans fil à partir de la
liste, et cliquer ensuite sur « Properties [Propriétés] ».) Choisissez
ensuite l’onglet « Advanced [Avancé] » et sélectionnez la propriété
« Rate [Débit] ». Les cartes clients sans fil sont habituellement
configurées de façon à ajuster automatiquement le débit de
transmission. Toutefois, ceci peut mener à des déconnexions
périodiques lorsque le signal sans fil est trop faible. De façon
générale, les débits de transmission plus lents sont plus stables.
Faites des expériences avec différents débits de transmission jusqu’à
ce que vous trouviez celui qui convient à votre environnement.
Veuillez noter que chaque débit de transmission est acceptable pour
naviguer sur Internet. Pour de plus amples informations, consultez le
manuel de l’utilisateur de votre carte sans fil.
Si le problème persiste même dans un rayon restreint, veuillez
communiquer avec l’assistance technique de Belkin.
Pourquoi y a-t-il deux utilitaires sans fil dans ma barre de
tâches ?
Lequel dois-je utiliser ?
Il y a plusieurs avantages à utiliser l’Utilitaire de surveillance réseau
sans fil Belkin par rapport à l’Utilitaire Wireless Zero Configuration de
(WZC) Windows XP. Nous offrons une fonction d’analyse du site, des
informations de liaison détaillées et le diagnostic de l’adaptateur, entre
autres.
1
2
3
4
section
5
6
Il est essentiel de déterminer quel utilitaire administre votre carte.
Nous vous recommandons d’utiliser l’Utilitaire réseau sans fil
Belkin. Pour utiliser l’Utilitaire réseau sans fil de Belkin, procédez
comme suit.
Étape 1 Cliquez avec le bouton droit de votre souris sur l’icône
de l’état du réseau dans la barre de tâches et choisissez « Status
[État] ».
35
Page 83

Dépannage
Étape 2 À l’onglet « Status [État] », désélectionnez la case « Utiliser
Windows pour configurer mon réseau sans fil ». Ensuite, cliquez sur le
bouton « Close [Fermer] » pour fermer la fenêtre.
Vous utilisez désormais l’Utilitaire réseau sans fil pour configurer la
carte.
La carte fonctionne mal ou la connexion est instable lorsque l’ordinateur
possède une deuxième carte réseau intégrée (telle que mini PCI ou
®
Centrino™).
Intel
Ceci survient lorsque votre ordinateur possède une carte réseau sans
fil intégrée en même temps qu’une carte sans fil Belkin en fonction.
Ceci se produit parce que Windows doit gérer deux connexions
réseau sans fil actives.
Vous devez désactiver la carte réseau sans fil intégrée de votre
ordinateur sous « Network Adapters [Adaptateurs Réseau] », dans le
« Device Manager [Gestionnaire de Périphérique] ».
La carte fonctionne mal ou la connexion est lente lorsque l’ordinateur
possède une carte réseau Ethernet intégrée.
Ceci survient lorsque votre ordinateur possède une carte réseau
Ethernet intégrée en même temps que votre adaptateur sans fil
en fonction. Ceci se produit parce que Windows doit gérer deux
connexions réseau actives. Vous devez désactiver la carte réseau
Ethernet intégrée de votre ordinateur sous « Network Adapters
[Adaptateurs Réseau] », dans le « Device Manager [Gestionnaire de
Périphérique] ».
Quelle est la différence entre 802.11g et le projet 802.11n ?
À l’heure actuelle, il existe trois normes de réseaux sans fil les plus
courants, qui transmettent des données à des débits différents.
Chaque norme est basée sur la désignation pour certifier les normes
réseau. La norme réseau sans fil la plus courant, le 802.11b, transmet
les données à un débit de 54 Mbps. Le 802.11a prend également
en charge un débit à 54 Mbps, sur une fréquence de 5 GHz. De son
côté, le projet de norme 802.11n spécifie un débit de connexion à
300 Mbps. Consultez le tableau ci-dessous pour de plus amples
informations.
36
Page 84

37
Dépannage
Tableau comparatif des réseaux sans fil
G+MIMO
Techno logie
sans fil
Débit de donnée s* Jusqu’à 54 Mbps* Jusqu’à 54 Mbps* Jusqu’à 300 Mbps* Jusqu’à 300 Mbps*
Fréque nce
Compat ibilité
Couver ture* Jusqu’à 120 mètres* Jus qu’à 305 mètres* Jusqu’ à 365 mèt res* Jus qu’à 425 mètres*
G
(802.11g)
Les a ppareils
domest iques
couran ts tels q ue
téléph ones sans fil
et fo urs à mic roondes peuvent
interf érer avec
la ba nde sans
autori sation 2,4 GHz
Compat ible avec le
802.11 b/g
(802.11g avec
MIMO MRC)
Les a ppareils
domest iques
couran ts tels q ue
téléph ones sans fil
et fo urs à mic roondes peuvent
interf érer avec
la ba nde sans
autori sation 2,4 GHz
Compat ible avec le
802.11 b/g
N MIMO
(projet 802.11n
avec MIMO)
Les a ppareils
domest iques
couran ts tels q ue
téléph ones sans fil
et fo urs à mic roondes peuvent
interf érer avec
la ba nde sans
autori sation 2,4 GHz
Compat ible avec le
projet 802.11n** et
le 80 2.11b/g
N1 MIMO
(projet 802.11n
avec MIMO)
Les a ppareils
domest iques
couran ts tels q ue
téléph ones sans fil
et fo urs à mic roondes peuvent
interf érer avec
la ba nde sans
autori sation 2,4 GHz
Compat ible avec le
projet 802.11n** et
le 80 2.11b/g
1
2
3
4
section
5
6
Popula ire : gran de
Avanta ge
*La portée et le dé bit de la connexion dépendent de l’envir onne ment de votre réseau.
**C ette car te est compatible a vec les produ its basés sur la mêm e versio n des spécifications
du proje t 802.11 n. Une mise à jour logicielle peut êtr e nécessaire pour de me ille urs résu ltat s.
popula rité pour
le pa rtage d’un e
connex ion Intern et
Meille ure couver ture
avec débit plus
stable
37
Meille ure couver ture
et dé bit plus rapide
Techno logie de
pointe : le mei lleur
débit et la me illeure
couver ture
Page 85

Dépannage
Assistance technique gratuite**Hors coût de communication
www.belkin.fr
nationale
Vous trouverez des informations techniques sur le site www.belkin.com dans la
zone d’assistance technique. Pour contacter le service d’assistance technique par
téléphone, veuillez composer le numéro correspondant dans la liste ci-dessous*.
PAYS NUM ÉRO SI TE WEB
AU TRI CHE 0820 200 766 www.be lkin.com /uk/ networki ng/
BE LGI QUE 07 07 00 073 w ww.be lkin.com /nl/ networking/
RÉPUBL IQUE TCHÈQUE 23 9 00 0 406 ww w.belkin.c om/u k/ne twor king /
DA NEM ARK 7 01 22 40 3 www. belkin.co m/uk /net work ing/
FI NLAND E 09 7 25 19 123 www.belkin.c om/u k/ne twor king /
FR ANCE 08 - 25 54 00 2 6 w ww.belkin .com /fr/ networking/
AL LEM AGNE 0180 - 500 57 09 ww w.bel kin.c om/d e/ne tworking /
GR ÈCE 00800 - 44 14 2 3 90 w ww.belkin.com/uk /net work ing/
HO NGR IE 0 6 - 17 77 4 9 06 ww w.bel kin.com/ uk/n etwo rking /
IS LA NDE 800 8 534 w ww.be lkin. com/ uk/n etwo rking /
IR LA NDE 08 18 55 50 0 6 www.belk in.c om/uk/ne twor king /
IT ALI E 02 - 69 43 02 51 ww w.bel kin.c om/i t/support/ tech /issues_ more. asp
LU XEM BOU RG 3 4 20 80 85 60 w ww.be lkin.com /uk/ networki ng/
PAY S-B AS 0900 - 0 40 07 90
NO RVÈ GE 81 50 0287 ww w.belkin.com/ uk/n etwo rking /
PO LOG NE 0 0800 - 4 41 17 37 w ww.belkin.com/uk /net work ing/
PO RTU GA L 707 200 676 w ww.belkin.com/uk /net work ing/
RU SSI E 495 580 95 41 www.belkin.com/ networki ng/
AF RIQ UE DU S UD 0 800 - 99 15 21 w ww.belkin.com /uk /net worki ng/
ES PAG NE 902 - 02 43 6 6
SU ÈDE 07 - 71 40 0 4 53
SU ISS E 08 - 48 00 0 2 19 www.belkin.com/ uk/n etwo rking /
RO YAUM E-U NI 084 5 - 6 07 77 87 w ww.belkin.com /uk /net worki ng
AU TRE S PAYS +4 4 - 19 33 3 5 20 00
0,10 € par minute www. belkin.co m/nl /net work ing/
ww w.belk in.c om/es /sup port /te ch/n etwor king suppo rt. asp
ww w.belk in.c om/se /sup port /te ch/n etwor king suppo rt. asp
/
3838
Page 86

Information
Déclaration FCC
DÉCLARATION DE CONFORMITÉ À LA
RÉGLEMENTATION FCC EN MATIÈRE DE
COMPATIBILITÉ ÉLECTROMAGNÉTIQUE
Belkin International, Inc., dont le siège se situe 501 West
Walnut Street, Compton, CA 90220, États-Unis, déclare
sous sa propre et unique responsabilité que le produit :
F5D8013
auquel se réfère la présente déclaration, est conforme
aux normes énoncées à l’alinéa 15 de la réglementation
de la FCC. Le fonctionnement est assujetti aux deux
conditions suivantes : (1) cet appareil ne peut pas
provoquer d’interférence nuisible et (2) cet appareil
doit accepter toute interférence reçue, y compris les
interférences pouvant entraîner un fonctionnement non
désiré.
Attention : La puissance d’émission en sortie de cet
appareil reste largement en dessous des limites d’exposition aux fréquences radios
de la FCC. Toutefois, il est conseillé d’utiliser l’appareil de manière à minimiser les
risques d’exposition dans des conditions de fonctionnement normales. Lorsqu’une
antenne extérieure est raccordée à l’appareil, la placer de manière à minimiser les
risques d’exposition dans des conditions de fonctionnement normales. Pour éviter
la possibilité d’excéder les limites d’exposition aux fréquences radio de la FCC, il
est conseillé d’éviter qu’une personne se trouve à moins de 20 cm de l’antenne
dans des conditions de fonctionnement normales.
Avertissement de la Commission Fédérale des Communications (FCC)
L’appareil a été testé et satisfait aux limites de la classe B des appareils
numériques, conformément à l’alinéa 15 de la réglementation FCC. Ces limites
ont été conçues de manière à assurer une protection raisonnable contre les
interférences nuisibles au sein d’une installation domestique.
L’appareil génère, utilise et peut irradier une énergie de fréquence radio.
Si cet équipement cause des interférences nuisibles sur le plan de la réception
radio ou télévision, pouvant être déterminées en mettant l’appareil sous et hors
tension, l’utilisateur est invité à tester et à corriger l’interférence en prenant une
des mesures suivantes :
• Réorienter ou déplacer l’antenne de réception.
• Augmenter la distance entre l’appareil et le récepteur.
• Connecter l’appareil à une prise située sur un circuit différent de celui sur
lequel le récepteur est connecté.
• Consulter le revendeur ou un technicien en radio/TV pour obtenir de l’aide.
1
2
3
4
5
section
6
39
39
Page 87

Information
Modifications
La réglementation de la FCC souligne la nécessité d’indiquer à l’utilisateur que toute
modification, de quelque nature que ce soit et non agréée par Belkin International, Inc.,
lui retire le droit d’utiliser l’appareil.
Garantie à vie du produit limitée à vie de Belkin International, Inc.
Couverture offerte par la garantie.
Belkin International, Inc. (« Belkin »), garantit à l’acheteur initial de ce produit Belkin
que le produit est exempt de défauts de conception, de montage, de matériau et de
fabrication.
Période de garantie..
Belkin garantit le produit Belkin pour toute la durée de vie du produit.
Mesures correctives.
Garantie du produit.
Belkin s’engage à réparer ou à remplacer gratuitement, à sa convenance, tout produit
défectueux (à l’exception des frais d’expédition du produit).
Limites de la couverture offerte par la garantie.
Toutes les garanties susmentionnées sont caduques si le produit Belkin n’est pas
retourné à Belkin à la demande expresse de celui-ci, l’acheteur étant responsable de
l’acquittement des frais d’expédition, ou si Belkin détermine que le produit Belkin a
été installé de façon inadéquate, a été modifié d’une quelconque façon ou falsifié. La
garantie du produit Belkin ne protège pas contre des calamités naturelles (autre que la
foudre) comme les inondations, les tremblements de terre ou la guerre, le vandalisme,
le vol, l’usure normale, l’érosion, l’épuisement, l’obsolescence, l’abus, les dommages
provoqués par des perturbations de basse tension (baisses ou affaissements
de tension, par exemple), un programme non autorisé ou une modification de
l’équipement du système.
Entretien et réparation.
Vous devez prendre les mesures suivantes pour faire réparer ou entretenir votre produit
Belkin :
1. Contactez Belkin International, Inc. au 501 W. Walnut St., Compton CA 90220,
U.S.A. À l’attention de : Customer Service (service client) ou appelez le (800)-2235546 15 jours maximum après l’événement. Préparez-vous à fournir les informations
suivantes :
a. Référence du produit Belkin.
b. Lieu d’achat du produit.
c. Date d’achat du produit.
d. Copie de la preuve d’achat originale.
2. Le représentant du service client Belkin vous indiquera alors comment envoyer votre
facture et le produit Belkin, et comment présenter votre réclamation.
40
Page 88

41
Information
Belkin se réserve le droit d’examiner le produit Belkin endommagé. Tous les frais
d’expédition du produit Belkin à l’adresse de Belkin en vue de son inspection
seront entièrement à la charge de l’acheteur. Si Belkin détermine, à son entière
discrétion, qu’il serait impossible d’expédier l’équipement endommagé à Belkin,
Belkin peut désigner un atelier de réparation de son choix pour l’inspection
du produit et l’établissement d’un devis de réparation. Les coûts, s’il en est,
pour l’expédition de l’équipement jusqu’à l’atelier de réparation et le retour, et
pour l’estimation, seront entièrement assumés par l’acheteur. L’équipement
endommagé doit être disponible pour inspection jusqu’à ce que la demande de
réclamation soit réglée. Lorsqu’un règlement intervient, Belkin se réserve le droit
d’un recours en subrogation sous toute autre police d’assurance détenue par
l’acheteur.
Relation entre le Droit national et la garantie
BELKIN REJETTE PAR LE PRÉSENT DOCUMENT TOUTES LES AUTRES
GARANTIES, EXPLICITES OU IMPLICITES, SAUF EXCEPTIONS PRÉVUES PAR
LA LOI, Y COMPRIS MAIS SANS S’Y LIMITER, LES GARANTIES IMPLICITES
AFFÉRENTES À LA QUALITÉ LOYALE ET MARCHANDE ET À L’ADÉQUATION
À UNE FINALITÉ DONNÉE. CES GARANTIES IMPLICITES, LE CAS ÉCHÉANT,
SONT D’UNE DURÉE LIMITÉE AUX CONDITIONS DE LA PRÉSENTE GARANTIE.
Certains pays ne permettent pas d’imposer de limite à la durée de
validité des garanties implicites. Il se peut donc que les limites ci-dessus ne
s’appliquent pas dans votre cas.
BELKIN NE PEUT EN AUCUN CAS ÊTRE TENU RESPONSABLE DE
DOMMAGES ACCESSOIRES, DIRECTS, INDIRECTS OU MULTIPLES, Y
COMPRIS, MAIS SANS S’Y LIMITER, LA PERTE DE REVENUS OU D’AFFAIRES
DÉCOULANT DE LA VENTE OU DE L’UTILISATION DE TOUT PRODUIT BELKIN,
MÊME LORSQU’IL A ÉTÉ AVISÉ DE LA PROBABILITÉ DES DITS DOMMAGES.
1
2
3
4
5
section
6
La garantie vous confère des droits légaux spécifiques. Vous pouvez également
bénéficier d’autres droits qui varient d’un pays à l’autre.
Certains états n’autorisent pas l’exclusion ou la restriction des
dommages directs ou indirects. Dans ce cas, les limites cidessus peuvent ne pas s’appliquer à vous.
Pour en savoir plous sur la récupération du produit,
visitez http://environmental.belkin.com
41
POUR UTILISATION DANS LES
PAYS SUIVANTS
AT BE CY CZ DK
FI FR DE GR
EE
HU IE IT LV LT
LU MT NL PL PT
SI ES SE GB
SK
IS LI NO CH BG
RO TR
CANAUX DE
FONCTIONNEMENT 1-13
Page 89

Information
d of c f5d8013 n wireless notebook card.doc
EC Declaration of Conformity
to R&TTE Directive 1999/5/EC
CE
Manufacturer : BELKIN LTD,
EXPRESS BUSINESS PARK,
SHIPTON WAY
,RUSHDEN
NN10 6GL ENGLAND
Representative : Belkin Ltd
(residing in the EC
holding the TCF)
Product / Apparatus : N Wireless Notebook Card
Type Number : F5D8013
Variants include : All Country Variants
Signature :
Name : K Simpson
Title : European Regulatory Compliance Manager
Date : _13 JULY 2007______________________
Declaration
I declare that above product conforms to all the applicable requirements of
EU Directive1999/5/EC and is CE-marked accordingly:
Article 3.1a:
(Standard(s)) used to show compliance with LVD, 73/23/EEC
EN 60950-2001
Article 3.1b:
(Standard(s)) used to show compliance with EMC Directive, 89/336/EEC:
EN301 489-1 V1.5.1 (2004-11);EN 489-17 V1.2.1 (2002-08)
Article 3.2:
Standard(s) used to show compliance:
EN300 328 V1.6.1 (2004-11)
42
Page 90

Carte Sans Fil N
pour ordinateur
portable
Assistance technique Belkin
Royaume-Uni : 0845 607 77 87
Europe : www.belkin.com/support
Belkin Ltd.
Express Business Park
Shipton Way, Rushden
NN10 6GL, Royaume-Uni
+44 (0) 1933 35 2000
+44 (0) 1933 31 2000 fax
Belkin Iberia
C/ Anabel Segura, 10 planta baja, Of. 2
28108, Alcobendas, Madrid
Espagne
+34 91 791 23 00
+34 91 490 23 35 fax
© 2007 Belkin International, Inc. Tous droits réservés. Toutes les raisons commerciales sont des
marques déposées de leurs fabricants respectifs. Windows et Windows Vista sont des marques
déposées ou des marques de commerce de Microsoft Corporation aux États-Unis et/ou dans d’autres
pays.
Belkin SAS
130 rue de Silly
92100 Boulogne-Billancourt,
France
+33 (0) 1 41 03 14 40
+33 (0) 1 41 31 01 72 fax
Belkin Italie & Grèce
Via Carducci, 7
Milan 20123
Italie
+39 02 862 719
+39 02 862 719 fax
Belkin GmbH
Hanebergstraße 2
80637 Munich
Allemagne
+49 (0 ) 89 143405 0
+49 (0 ) 89 143405 100 fax
Belkin B.V.
Boeing Avenue 333
1119 PH, Schiphol-Rijk
Pays-Bas
+31 (0) 20 654 7300
+31 (0) 20 654 7349 fax
P75448ea
Page 91

F5D8013ea
Kabellose N
Notebook-Karte
Benutzerhandbuch
EN
FR
DE
NL
ES
IT
Page 92

Inhaltsverzeichnis
1 Einleitung .................................................................................................... 1
Vorzüge eines Netzwerks zu Hause
Vorzüge eines kabellosen Netzwerks ...............................................................
Aufstellung der Hardware
für
optimale Leistung des kabellosen Netzwerks ........................................... 2
2 Übersicht
3 Installieren und Einrichten der Karte ..........................................................
4 Verwenden des Dienstprogramms für kabellose Netzwerke von Belkin ...
5 Fehlerbehebung ..........................................................................................
6 Informationen .............................................................................................
..................................................................................................... 5
Produktmerkmale .............................................................................................
Anwendungsbereiche und Vorzüge ................................................................
Technische Daten ............................................................................................
Systemvoraussetzungen ................................................................................
Verpackungsinhalt ..........................................................................................
A — Installationsvorgang unter Windows Vista ..............................................
B — Installationsvorgang für andere Betriebssysteme als
Windows Vista ..........................................................................................1
C — Konfiguration .........................................................................................
Zugriff auf das Dienstprogramm für kabellose Netzwerke von
Belkin über das Windows System-Tray .......................................................
Netzwerkstatus .............................................................................................. 17
Verfügbare Netzwerke ...................................................................................
Einstellen von Netzwerkprofilen ....................................................................
Sicherung des Wi-Fi Netzwerks ....................................................................
Einstellung der Sicherheitsfunktion der Karte ............................................... 23
................................................................ 1
15
16
16
17
19
19
30
39
1
5
6
6
7
7
8
8
2
Page 93

Einleitung
Wir beglückwünschen Sie zum Kauf der Kabellosen N Notebook-Karte
von Belkin. Jetzt können Sie diese großartige neue Technologie zum
Vernetzen Ihrer Computer zu Hause und im Büro nutzen - ohne Kabel.
Mit dieser Karte können Sie Ihr Notebook in Ihr Netzwerk einbinden.
Bitte lesen Sie dieses Handbuch vollständig durch, und lesen Sie
besonders genau den Abschnitt „Aufstellung Ihrer Hardware für optimale
Leistung des kabellosen Netzwerks”.
Vorzüge eines Netzwerks zu Hause
Ein Heimnetzwerk von Belkin ermöglicht Ihnen Folgendes:
• Nutzung einer Hi-Speed Internetverbindung mit allen Computern bei
Ihnen zu Hause
• Nutzung von Ressourcen wie Dateien und Festplatten auf allen
angeschlossenen Computern bei Ihnen zu Hause
• Nutzung eines einzigen Druckers mit der ganzen Familie
• Gemeinsamer Zugriff auf Dokumente, Musik, Video und digitale Fotos
• Speichern von Dateien auf verschiedenen Computern; Aufrufen und
Kopieren dieser auf verschiedenen Computern
• Gleichzeitig Spielen von Spielen im Internet, Verschicken und
Empfangen von E-Mails und Chatten
Vorteile eines kabellosen Netzwerks
• Mobilität – Sie brauchen kein spezielles „Computerzimmer” mehr -
Sie können jetzt überall in der Reichweite des kabellosen Netzwerks
an einem vernetzten Notebook oder Desktop-Computer arbeiten
• Einfache Installation – Der Installationsassistent von Belkin (Easy
Installation Wizard) vereinfacht die Konfiguration
• Flexibilität – Sie können Drucker, Computer und andere
Netzwerkgeräte überall zu Hause aufstellen und benutzen
• Einfache Erweiterung – die große Palette an Netzwerkprodukten von
Belkin ermöglicht die Erweiterung Ihres Netzwerks mit Geräten wie
Druckern und Spielkonsolen
• Keine Verkabelung erforderlich – Sie können sich Kosten und Mühe
für die Aufrüstung der Ethernetverkabelung im ganzen Haus oder Büro
sparen
• Breite Akzeptanz auf dem Markt – wählen Sie aus einem großen
Angebot an Netzwerkprodukten aus, die vollständig kompatibel sind
Kapitel
1
2
3
4
5
6
1
Page 94

Einleitung
Aufstellung der Hardware für optimale Leistung des kabellosen Netzwerks
Je näher Ihr Computer an Ihrem kabellosen Router oder Access Point steht,
desto besser ist Ihre kabellose Verbindung. Die durchschnittliche Reichweite
für Ihre kabellosen Geräte liegt zwischen 30 und 60 Metern. Entsprechend wird
Ihre kabellose Verbindung und Leistung sich etwas verschlechtern, wenn Sie
den Abstand zwischen Ihrem kabellosen Router (oder Access Point) und den
angeschlossenen Geräten vergrößern. Das kann Ihnen möglicherweise auffallen.
Wenn Sie sich von Ihrem kabellosen Router oder Access Point entfernen, kann
sich die Verbindungsgeschwindigkeit unter Umständen verringern. Geräte aus
Metall oder Wände und andere Hindernisse sind Faktoren, die die Signale
möglicherweise abschwächen, da Sie die Funkwellen Ihres Netzwerks durch Ihre
bloße Anwesenheit stören können.
Um zu überprüfen, ob die Leistung Ihres Netzwerks durch die Reichweite oder
Hindernisse negativ beeinflusst wird, versuchen Sie Ihren Computer in einem
Abstand von 1,5 bis 3 m vom kabellosen Router (oder Access Point) aufzustellen.
Dann werden Sie sehen, ob eventuelle Probleme aufgrund des Abstands
auftreten. Wenn Sie auch bei geringem Abstand noch Probleme haben, nehmen
Sie Kontakt mit dem technischen Support von Belkin auf.
Hinwe
is: Obwohl manche der folgenden Faktoren die Funktion Ihres Netzwerks
beeinträchtigen können, werden Sie Ihr kabelloses Netzwerk nicht völlig
funktionsunfähig machen. Wenn Sie vermuten, dass Ihr Netzwerk nicht optimal
funktioniert, kann Ihnen diese Kontrollliste helfen.
1. Aufstellung Ihres kabellosen Routers oder (Access Points)
Stellen Sie Ihren kabellosen Router (oder Access Point), den zentralen
Verbindungspunkt Ihres Netzwerks, soweit wie möglich in den Mittelpunkt Ihrer
kabellosen Netzwerkgeräte.
Um den besten Empfang für Ihre „kabellosen Clients” (d. h. Computer, die mit
kabellosen Notebook- oder Desktop-Karten oder kabellosen USB-Adaptern von
Belkin ausgestattet sind) zu bekommen:
• Stellen Sie sicher, dass die Antennen des kabellosen Routers oder
Access Points parallel zueinander und vertikal aufgestellt sind (mit
Ausrichtung auf die Decke). Wenn Ihr kabelloser Router (oder Access
Point) vertikal aufgestellt ist, richten Sie die Antennen soweit wie
möglich nach oben aus.
• Wenn sich Ihr Wohnraum über mehrere Etagen erstreckt, stellen Sie
den kabellosen Router (oder Access Point) in einem Stockwerk auf,
das im Gesamtwohnraum so zentral wie möglich gelegen ist. Dies kann
bedeuten, dass Sie den kabellosen Router (oder Access Point) in einem
der oberen Stockwerke aufstellen müssen.
2
Page 95

3
Einleitung
• Stellen Sie den kabellosen Router (oder Access Point) nicht in
der Nähe eines schnurlosen Telefons, das das 2,4-GHz-Band
nutzt, auf.
2. Vermeiden Sie Hindernisse und Störungsquellen
Vermeiden Sie es, Ihren kabellosen Router (oder Access Point) in
der Nähe von Geräten, die elektromagnetische Strahlung abgeben
(z.B. Mikrowellenherde), aufzustellen Andere Objekte, die kabellose
Kommunikation behindern können sind z.B.:
• Kühlschränke
• Waschmaschinen und/oder Wäschetrockner
• Aktenschränke aus Metall
• Große Aquarien
• UV-Beschichtung von Fenstern auf Metallbasis
Wenn das Funksignal Ihrer kabellosen Verbindung an manchen Stellen
schwach ist, sorgen Sie dafür, dass solche Objekte den Weg des
Funksignals zwischen Ihren Computern und dem kabellosen Router (oder
Access Point) nicht blockieren.
3. Aufstellung schnurloser Telefone
Wenn die Leistung Ihres kabellosen Netzwerks noch beeinträchtigt
wird, nachdem Sie die oben genannten Hinweise beachtet und aber ein
schnurloses Telefon haben:
• Versuchen Sie die schnurlosen Telefone aus der Nähe von kabellosen
Routern (oder Access Points) und Ihren Computern, die für kabellose
Vernetzung ausgerüstet sind, zu entfernen.
• Entfernen Sie die Batterie jedes schnurlosen Telefons, das im
Frequenzband 2,4 GHz arbeitet, und ziehen Sie den Stecker am
Anschluss heraus (Sehen Sie sich hierzu die Informationen des
Herstellers an). Wenn das Problem dadurch behoben wird, ist Ihr
Telefon möglicherweise der Auslöser der Störung.
• Wenn Sie Ihr Telefon über eine Kanalauswahl verfügt, wählen Sie einen
Kanal für Ihr Telefon aus, der soweit wie möglich von dem Kanal Ihres
kabellosen Netzwerks entfernt ist. Stellen Sie z. B. den Kanal Ihres
Telefons auf 1 ein und den des kabellosen Routers oder Access Points
auf 11. (Die Kanalauswahl ist von Ihrer Umgebung abhängig.) Mehr
Informationen hierzu finden Sie im Benutzerhandbuch Ihres Telefons.
• Wenn es nötig ist, überlegen Sie sich, ein schnurloses Telefon
anzuschaffen, das mit 900 MHz oder 5 GHz funktioniert.
Kapitel
1
2
3
4
5
6
3
Page 96

Einleitung
4. Wählen Sie den „ruhigsten” Kanal für Ihr kabelloses Netzwerk
An Orten, an denen es eine hohe Konzentration an Wohnräumen und Büros
gibt, wie z. B. in Wohnblocks oder Bürogebäuden, kann Ihr kabelloses
Netzwerk durch andere Netzwerke gestört werden. Benutzen Sie die Funktion
Standortübersicht (Site Survey) Ihres Dienstprogramms für kabellose
Netzwerke, um andere kabellose Netzwerke ausfindig zu machen, und stellen
Sie Ihren kabellosen Router (oder Access Point) und Ihre Computer auf einen
Kanal ein, der soweit wie möglich von den anderen Netzwerken entfernt ist.
Probieren Sie mehr als einen der möglichen Kanäle aus, um herauszufinden,
welche Verbindung die beste ist und um Störungen durch schnurlose Telefone
oder andere kabellose Geräte in der Umgebung zu vermeiden.
Wenn Sie kabellose Netzwerkprodukte von Belkin benutzen, verwenden Sie die
detaillierte Standortübersicht (Site Survey) und die Informationen über Kanäle
für kabellose Geräte in Ihrem Benutzerhandbuch.
5. Sichere Verbindungen, VPNs und AOL
Sichere Verbindungen sind Verbindungen, für die normalerweise ein
Benutzername mit Kennwort erforderlich ist. Sie werden überall benutzt, wo
großer Wert auf Sicherheit gelegt wird. Zu sicheren Verbindungen zählen
folgende:
• Virtual Private Network (VPN) Verbindungen, die oft benutzt
werden, um auf Entfernung eine Verbindung mit einem Büronetzwerk
herzustellen
• Das „Bring Your Own Access”-Programm von America Online (AOL),
das Ihnen die Benutzung von AOL mit Breitband durch Kabel oder
DSL-Service ermöglicht
• Die meisten Internetseiten für Bankangelegenheiten
• Viele kommerzielle Internetseiten, für die ein Benutzername und ein
Kennwort erforderlich sind, um Ihnen Zugang zu Ihrem Konto zu
verschaffen
Sichere Verbindungen können durch die Einstellung der Energieverwaltung
(Power Management) eines Computers unterbrochen werden, die den
„Ruhezustand” aktiviert. Die einfachste Möglichkeit, dies zu vermeiden, ist die
Herstellung einer neuen Verbindung, indem Sie die VPN- oder AOL-Software
neu starten oder sich wieder auf einer sicheren Website anmelden.
Eine zweite Möglichkeit ist die Änderung der Einstellungen der
Energieverwaltung, so dass der Ruhezustand deaktiviert ist; dies ist allerdings
bei tragbaren Computern weniger angebracht. Wenn Sie die Einstellungen
der Energieverwaltung unter Windows ändern wollen, sehen Sie in der
Systemsteuerung unter „Energieoptionen” nach.
44
Page 97

Übersicht
Wenn Sie weiterhin Probleme mit sicheren Verbindungen, VPNs oder
AOL haben, sehen Sie sich bitte die Schritte 1-4 oben an, um sich zu
vergewissern, dass Sie die angesprochenen Aspekte berücksichtigt
haben.
Diese Richtlinien sollten Ihnen helfen, den größtmöglichen Bereich
mit Ihrem kabellosen Router abzudecken. Wenn Sie einen größeren
Bereich abdecken müssen, empfehlen wir Ihnen den Kabellosen
Range Extender/Access Point von Belkin.
Weitere Informationen über unsere Netzwerkprodukte finden Sie auf
unserer Websitewww.belkin.com/networking oder wenden Sie sich
telefonisch an den Technischen Support von Belkin.
Produktmerkmale
Die Karte entspricht dem Entwurf des Standards IEEE 802.11n zur
Kommunikation mit anderen kabellosen Geräten, die dem Entwurf
des 802.11n-Standards entsprechen und Daten bei bis zu 300 Mbit/s
übertragen*. Die Karte ist kompatibel zu allen Geräten des 802.11gStandards, die Übertragungsgeschwindigkeiten von 54 Mbit/s
erreichen, sowie Geräten des 802.11b-Standards, die Daten bei 11
Mbit/s übertragen. Die Karte nutzt ebenso wie 802.11b/g Wi-Fi-
®
Geräte das 2,4-GHz-Frequenzband.
• Funkbetrieb im 2,4-GHz-ISM-Band (Industrie, Wissenschaft
und Medizin)
• Benutzerfreundliches Dienstprogramm für kabellose
Netzwerke integriert
• PCI-Schnittstelle für den Betrieb von nahezu allen DesktopComputern
• WPA, WPA2, 64- oder 128-Bit WEP-Verschlüsselung (Wired
Equivalent Privacy)
• Kabelloser Zugriff auf Netzwerkressourcen
• Unterstützung für die beiden Netzwerkmodi Infrastruktur und
Ad-hoc (P2P)
• Datenraten von bis zu 54 Mbit/s (802.11g) oder 11 Mbit/s
(802.11b)
• Einfache Installation und Bedienung
• Externe Antenne
• Betriebs- und Netzwerkverbindungsanzeigen
1
Kapitel
2
3
4
5
6
5
5
Page 98

Übersicht
Anwendungsbereiche und Vorzüge
• Bewegungsfreiheit mit dem Laptop zu Hause oder im Büro
Arbeiten mit dem Netzwerk - ohne die Einschränkungen von Kabeln.
• Verbindungsraten von bis zu 54 Mbit/s
Sorgt für sofortige kabellose Verbindung zu Hause, am Arbeitsplatz und an
Hot Spots, ohne den Gebrauch der bestehenden 802.11b- und 802.11gProdukte zu beeinträchtigen
• Kompatibilität mit Produkten mit dem Standard 802.11b
Kabellose 802.11g-LANs sind abwärtskompatibel zu vorhandenen Wi-FiProdukten (IEEE 802.11b) und anderen Produkten mit dem 54g-Logo.
• Schwer zu verkabelnde Umgebungen
Einrichtung von Netzwerken in Gebäuden mit Massiv- oder Fertigwänden
oder auf Freiflächen, in denen eine Verkabelung zu aufwändig wäre
• Häufig wechselnde Umgebungen
Geeignet für Büros oder Umgebungen, die häufiger verändert oder verlagert
werden.
• Temporäre LANs für spezielle Projekte oder Spitzenauslastungen
Einrichtung von temporären Netzwerken, zum Beispiel auf Messen,
Ausstellungen oder Baustellen, die nur für kurze Zeit eingerichtet werden;
auch für Firmen, die in Hochlastzeiten zusätzliche Workstations benötigen
• Netzwerke im SOHO-Bereich (Kleinbüros und Privatanwender)
Schnelle und einfache Installation von Netzwerken für Privatanwender,
Freiberufler und kleine Unternehmen
Technische Daten
Host-Schnittstelle: 32-Bit CardBus
Betriebstemperatur: 0-60 Grad C
Lagertemperatur: -40-90 Grad C
Relative Luftfeuchtigkeit: Max. 95%, nicht kondensierend
Durchschnittliche Reichweite: Bis zu 365,8 m**
*HINWEIS:: Die Standard-Übertragungsrate—300 Mbit/s—ist die physische
Datenrate. Die tatsächliche Durchsatzrate ist niedriger.
**Die Funkleistung ist von der Netzwerkumgebung abhängig.
6
Page 99

7
Übersicht
(C)
1
Kapitel
2
3
4
(b)
(a)
(a) Betriebsanzeige
euchtet, wenn die Karte in Betrieb ist
(b) Betriebs-/Aktivitätsanzeige
Leuchtet bei hergestellter Verbindung; blinkt, wenn Funkaktivität
festgestellt wird
(c) Kartenschnittstelle
Seite der Karte, die in den Cardbus-Steckplatz Ihres Computers
eingesteckt wird
Systemvoraussetzungen
• PC-kompatibler Computer mit freiem 32-Bit CardBus-Steckplatz
• Windows® 2000, XP mit SP2 oder Vista™*** (Clients sind nicht mit
Mac OS kompatibel)
• Mindestens 64 MB Arbeitsspeicher
• CD-ROM-Laufwerk
• Internet-Browser
Verpackungsinhalt
• Kabellose N Notebook-Karte
• Installationsanleitung
• CD mit Installationssoftware und Benutzerhandbuch
5
6
7
Page 100

Installieren und Einrichten der Karte
8
A. Installationsvorgang unter Windows Vista
***HINWEIS: Zum Zeitpunkt der ersten Freigabe dieses Produkts waren
Windows Vista-Treiber noch nicht verfügbar und befinden sich deshalb
möglicherweise nicht auf der enthaltenen CD.
Informationen zu eventuellen
Treiber-Updates für Windows Vista finden Sie auf der Website von Belkin:
www.belkin.com/support/vista.
WICHTIGER HINWEIS: INSTALLIEREN SIE DIE SOFTWARE, BEVOR SIE DIE KARTE
EINSETZEN.
A.1 Legen Sie die Installations-CD in Ihr CD-ROM-Laufwerk ein.
A.2 Klicken Sie auf „Next” (Weiter), um die Installation zu starten.
Hinweis: Wenn das Programmfenster des Installationsprogramms von Belkin
nicht innerhalb von 20 Sekunden erscheint, öffnen Sie Ihr CD-ROM-Laufwerk,
indem Sie doppelt auf das Symbol „Arbeitsplatz” klicken und dann doppelt auf
das CD-Rom-Laufwerk klicken, in welchem sich die CD befindet. Doppelklicken
Sie auf das Symbol mit der Bezeichnung „Setup.exe”, wenn die Installation nicht
automatisch gestartet wird.
A.3 Der InstallShield-Assistent startet jetzt den Installationsvorgang
 Loading...