

User Manual
F5D7630-4A
F5D7630-4B
Network your computers with this one-box
solution that connects and shares your ADSL
Internet access
ADSL Modem with
Built-In 802.11g
Wireless Router

TABLE OF CONTENTS
Introduction . . . . . . . . . . . . . . . . . . . . . . . . . . . . . . . . . . . . . . . . . . . . 1
Overview . . . . . . . . . . . . . . . . . . . . . . . . . . . . . . . . . . . . . . . . . . . . . . 1
Key Features . . . . . . . . . . . . . . . . . . . . . . . . . . . . . . . . . . . . . . . . .1
Package Contents . . . . . . . . . . . . . . . . . . . . . . . . . . . . . . . . . . . . . . 3
System Requirements . . . . . . . . . . . . . . . . . . . . . . . . . . . . . . . . . . . 3
Knowing your Router . . . . . . . . . . . . . . . . . . . . . . . . . . . . . . . . . . . . . . 4
Placement of your Router . . . . . . . . . . . . . . . . . . . . . . . . . . . . . . . . . . . 7
Connecting and Configuring your Router . . . . . . . . . . . . . . . . . . . . . . . . . . 8
Navigating the Web Browser Interface . . . . . . . . . . . . . . . . . . . . . . . . . . 14
Understanding the Web-Based User Interface . . . . . . . . . . . . . . . . . . . . . . 17
Manually Configuring Network Settings . . . . . . . . . . . . . . . . . . . . . . . . . . 48
Glossary . . . . . . . . . . . . . . . . . . . . . . . . . . . . . . . . . . . . . . . . . . . . . . 55
Troubleshooting . . . . . . . . . . . . . . . . . . . . . . . . . . . . . . . . . . . . . . . . . 61
Information . . . . . . . . . . . . . . . . . . . . . . . . . . . . . . . . . . . . . . . . . . . . 63

1
INTRODUCTION
Thank you for purchasing the ADSL Modem with Built-In 802.11g Wireless Router
(the Router). In minutes, you will be able to share your Internet connection and
network your computers. The following is a list of features that make your new
Router an ideal solution for your home or small office network.
OVERVIEW
Key Features
Integrated 802.11g Wireless Access Point
802.11g is an exciting new wireless technology that provides up to 54Mbps
(nearly five times faster than 802.11b) data rates.
Works with Both PCs and Mac® Computers
The Wireless ADSL Modem Router supports a variety of networking environments
including Mac OS® 8.x, 9.x, X v10.x, AppleTalk®, Linux®, Windows® 95, 98, Me,
NT®, 2000, and XP, and others. All that is needed is an Internet browser and a
network adapter that supports TCP/IP (the standard language of the Internet).
Front-Panel LED Display
Lighted LEDs on the front of the Router indicate which functions are in
operation. You’ll know at-a-glance whether your Router is connected to the
Internet. This feature eliminates the need for advanced software and statusmonitoring procedures.
Web-Based User Interface
You can set up the Router’s functions easily through your web browser, without
having to install additional software onto the computer. There are no disks to
install or keep track of and, best of all, you can make changes and perform setup
functions from any computer on the network quickly and easily.
NAT IP Address Sharing
Your Router employs Network Address Translation (NAT) to share the single IP
address assigned to you by your Internet Service Provider while saving the cost
of adding additional IP addresses to your Internet service account.

INTRODUCTION
2
SPI Firewall
Your Router is equipped with a firewall that will protect your network from a wide
array of common hacker attacks including IP Spoofing, Land Attack, Ping of
Death (PoD), Denial of Service (DoS), IP with zero length, Smurf Attack, TCP Null
Scan, SYN flood, UDP flooding, Tear Drop Attack, ICMP defect, RIP defect, and
fragment flooding.
Integrated 10/100 4-Port Switch
The Router has a built-in, four-port network switch to allow your wired
computers to share printers, data and MP3 files, digital photos, and much more.
The switch features automatic detection so it will adjust to the speed of
connected devices. The switch will transfer data between computers and the
Internet simultaneously without interrupting or consuming resources.
Built-In Dynamic Host Configuration Protocol (DHCP) on-board makes for the
easiest possible connection of a network. The DHCP server will assign IP
addresses to each computer automatically so there is no need for a complicated
networking setup.
MAC Address Filtering
For added security, you can set up a list of MAC addresses (unique client
identifiers) that are allowed access to your network. Every computer has its own
MAC address. Simply enter these MAC addresses into a list using the web-based
user interface and you can control access to your network.
Applications and Advantages
• Economically connect multiple computers to a single Internet connection
• SOHO (Small Office/Home Office) networking needs
Provides the easy and quick small network installation SOHO users need

INTRODUCTION
Package Contents
• ADSL Modem with Built-In 802.11g Wireless Router
• RJ45 Ethernet Networking Cable (for connecting the Router to the computer)
• RJ11 Phone Line Cord (for connecting the Router to the ADSL line)
• ADSL In-Line Filter
•Power Supply
• Quick Installation Guide
•User Manual CD-ROM
• Registration Card
System Requirements
• ADSL connection
•At least one computer with an installed network interface adapter
•TCP/IP networking protocol installed on each computer
•CAT5 networking cable (or better)
•Microsoft® Internet Explorer 4.0 or later, or Netscape® 4.0 or later
3
KNOWING YOUR ROUTER
4
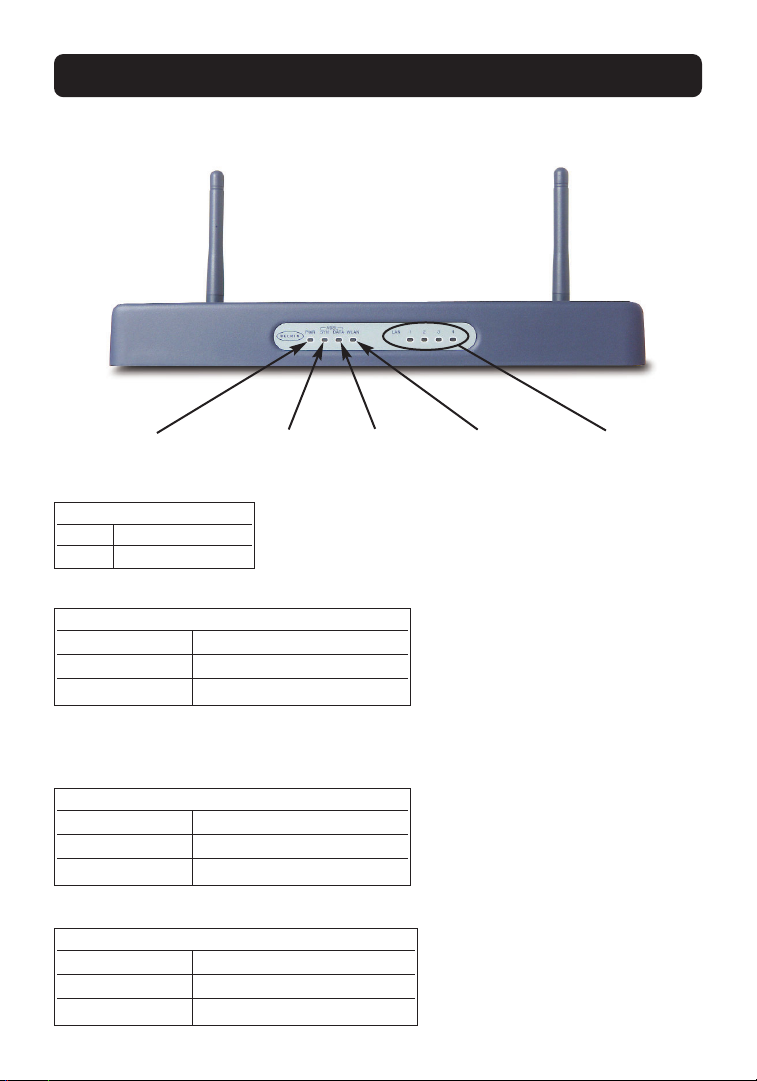
Front Panel
This LED lights in GREEN to indicate that your Modem Router is connected properly to the
ADSL line.
Wireless
Network LED
LAN Port
Status LEDs
ADSL – SYN
Status LED
Power LED
(PWR)
ADSL – Data LED
Power LED (PWR)
OFF Router is OFF
Green Router is ready
ADSL – SYN Status LED
OFF No ADSL connection
Solid Green ADSL connection is ready
Blinking Green Negotiating connection
ADSL – Data LED
OFF No WAN connection
Green WAN connection is ready
Blinking Indicates WAN activity
Wireless Network LED
OFF Wireless network is OFF
Green Wireless network is ready
Blinking Indicates wireless activity
KNOWING YOUR ROUTER
These LEDs are labeled 1–4 and correspond to the numbered ports on the rear of
the Router. When a computer is properly connected to one of the LAN ports on
the rear of the Router, the LED will light. When information is being sent over
the port, the LED blinks rapidly.
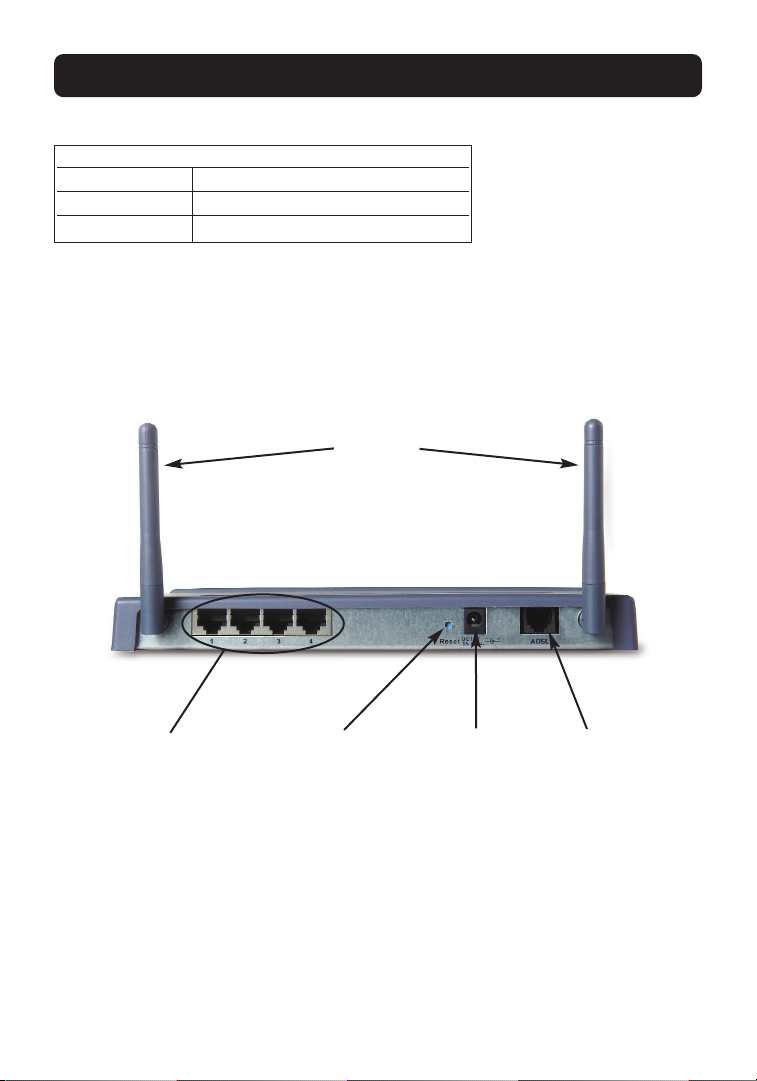
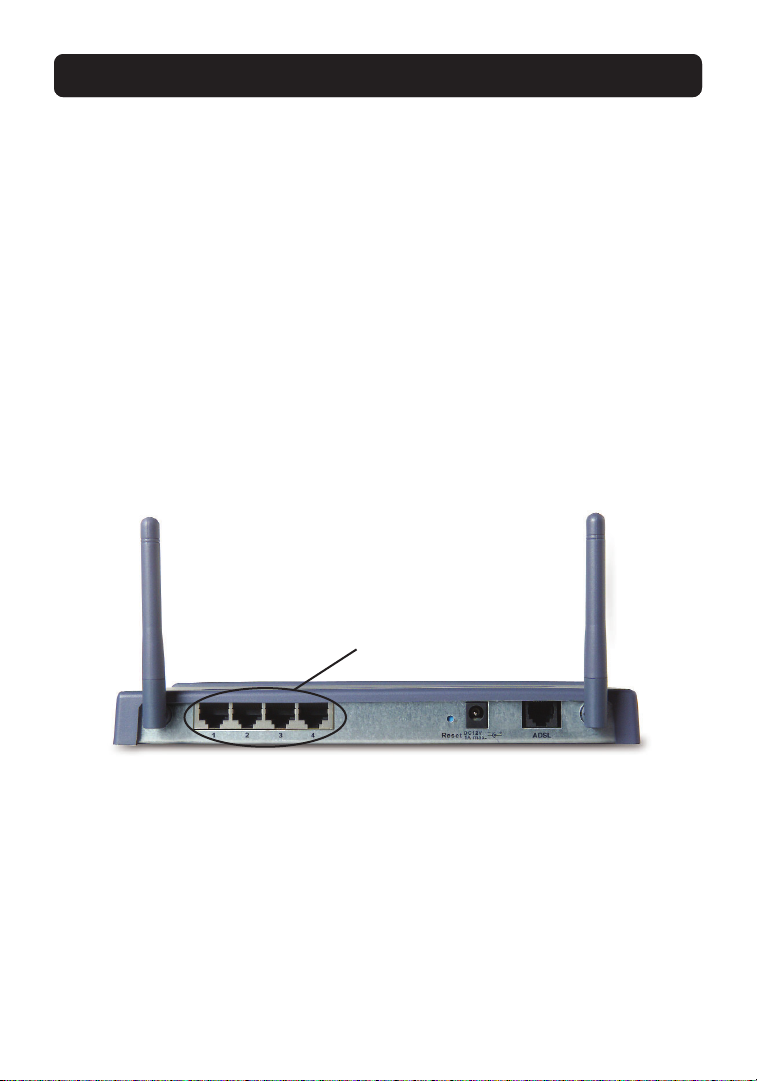
Rear Panel
LAN Ports
The LAN ports are RJ45, 10/100 auto-negotiation. The ports are labeled 1
through 4. These ports correspond to the numbered LEDs on the front of the
Router. Connect your LAN computers or any networking devices to one of
these ports.
Reset Button
The “Reset” button is used in rare cases when the Router may function
improperly. Resetting the Router will restore the Router’s normal operation while
5
LAN Port-Status LEDs
OFF No device is linked to the port
Solid Orange 10/100Base-Tx device connected
Blinking Orange Port activity
Power Jack ADSL PortLAN Ports Reset Button
Antennas

KNOWING YOUR ROUTER
6
maintaining the programmed settings. You can also restore the factory default
settings by using the Reset button. Use the restore option in instances where you
may have forgotten your custom password.
a. Resetting the Router
Push and release the Reset button. When the Power/Ready light becomes solid
again, the reset is complete.
b. Restoring the Factory Defaults
Press and hold the Reset button for 10 seconds then release it. When the
Power/Ready light becomes solid again, the restore is complete.
Power Jack
Connect the included 12V DC power supply to this inlet. Using the wrong type of
power adapter may cause damage to your Router.
ADSL Port
This port is for connection to your ADSL line. Connect your ADSL line to this port.

PLACEMENT OF YOUR ROUTER
7
Proper placement of your Router is important to ensure the best performance of
your wireless network. Typically, indoors your Wireless Router can provide a
circular coverage area of 250 feet or more. However, different types of
construction materials and other obstructions in a building can greatly affect the
wireless signal and decrease the range. Whenever possible, your Router should be
placed as close as possible to the center of the area that you want to cover. In
multi-story homes, place the Router on a floor that is as close to the center of
the home as possible; this may mean placing the Router on an upper floor.
Use care when choosing the location of your Router.
• Be aware of appliances or large objects such as a refrigerator or washer/dryer
unit that may be on the opposite side of a wall from where you decide to
place your Router.
• Place the Router on top of a desk and away from metal cabinets and
computer cases.
• Do not place objects or components on top of the Router.
•Make sure that both antennas are pointing UP at all times.
•Metallic-based UV window tint can affect wireless performance. Do not place
the Router next to a tinted window.
We realize that in the real world, it may not be possible to place your Router in
the center of your coverage area. In cases where you may experience difficulty
covering the entire area you want, try placing the Router as high as possible.
Wireless devices work best in a line-of-sight situation where there are no
obstacles between the wireless computer and the Router. The Router may also be
mounted to a wall with the antennas facing UP. There are other options for
expanding your wireless coverage area. Visit www. belkin.com/networking for
solutions.
The wireless signal can be affected by many things including neighboring wireless
networks, microwave ovens in operation, and 2.4GHz cordless phones. While
these things can affect the network performance, your wireless network typically
will work fine under most conditions where these devices exist.

CONNECTING AND CONFIGURING YOUR ROUTER
8
ISP Settings
Please collect the following information from your ISP before setting up the
Wireless ADSL Modem Router.
For PPPoE and PPPoA users
• VCI and VPI number
• An ISP account user name and password
For fixed IP users
• IP address and subnet mask
• IP address for your ISP’s Gateway Server and Domain Name Server
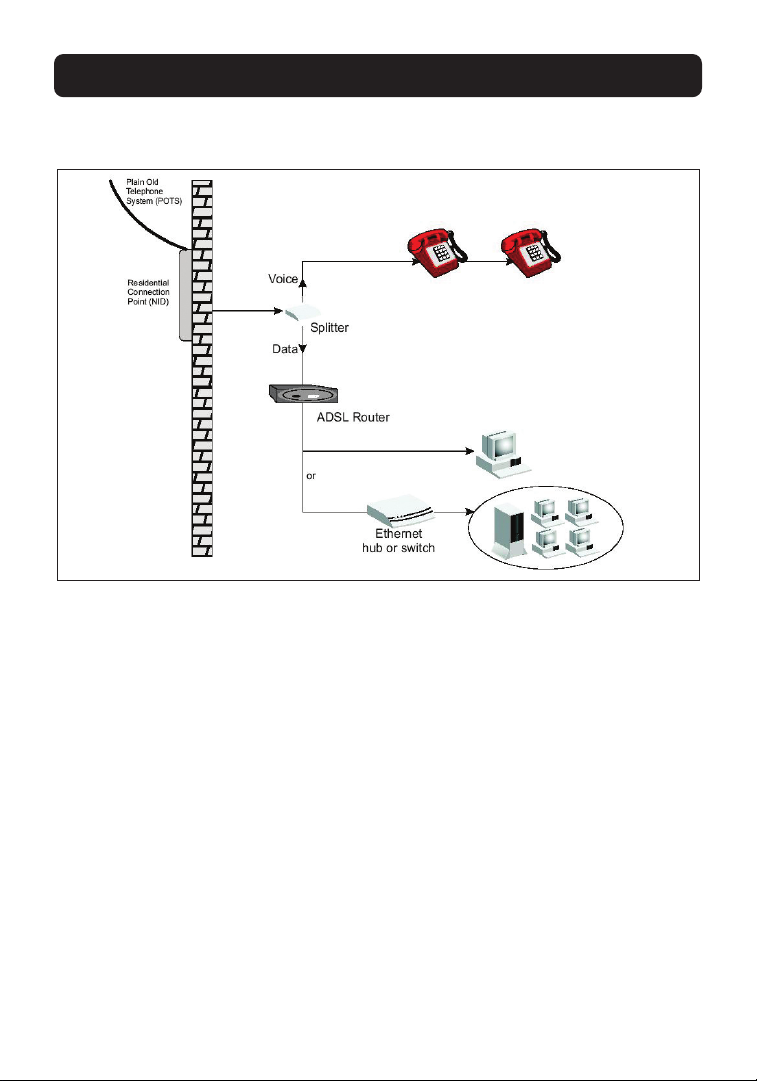
Connect the System
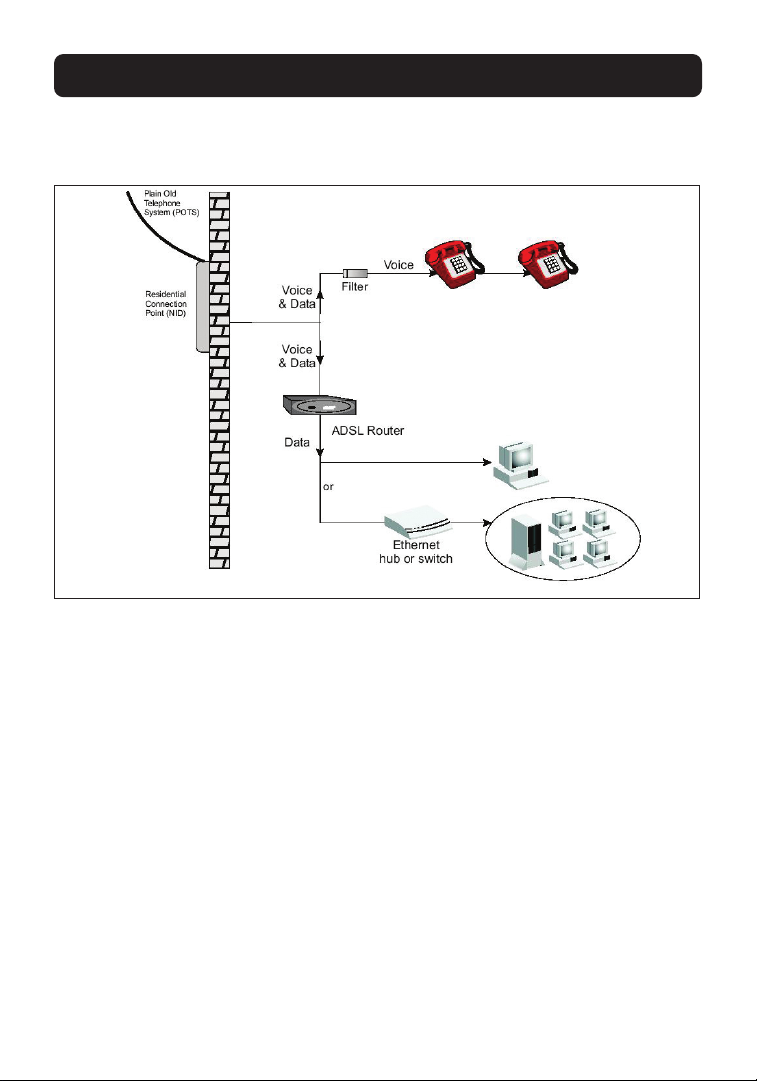
Connect the ADSL Line
Run standard telephone cable from the wall jack providing ADSL service to the
ADSL port on your Wireless ADSL Modem Router. When inserting an ADSL RJ11
plug, be sure the tab on the plug clicks into position to ensure that it is properly
seated. If you are using splitterless ADSL service, add low-pass filters between
the ADSL wall jack and your telephones. (These filters pass voice signals through
but filter data signals out.)
Phone Line Configuration
Installing a Full-Rate Connection
If you are using a full-rate (G.dmt) connection, your service provider will attach
the ADSL line to a data/voice splitter. In this case, you can connect your phones
and computer directly to the splitter as shown on the next page.
CONNECTING AND CONFIGURING YOUR ROUTER
9
Installing with a Splitter
Installing a Splitterless Connection
If you are using a splitterless (G.lite) connection, then your service provider will
attach the outside ADSL line directly to your phone system. In this case, you
can connect your phones and computer directly to the incoming ADSL line, but
you will have to add low-pass filters to your phones as shown on the next page.
CONNECTING AND CONFIGURING YOUR ROUTER
10
Installing without a Splitter
Attach to your Network Using Ethernet Cabling
The four LAN ports on the ADSL Modem Router auto-negotiate the connection
speed to 10Mbps Ethernet or 100Mbps Fast Ethernet, as well as the transmission
mode to half duplex or full duplex.
Configuring the Router
The Belkin Wireless ADSL Modem Router is equipped with a Web-Based Interface
that you can use to set up the Router. From the Web-Based Interface, you can
perform the following tasks:
•View the Router’s current settings and status.
• Configure the Router to connect to your ISP with the settings that they
provided you.
• Change the current network settings such as the internal IP address, the IP
address pool, DHCP settings, and more.
11
CONNECTING AND CONFIGURING YOUR ROUTER
• Set the Router’s firewall to work with specific applications (port forwarding).
• Set up security features such as client restrictions and MAC address filtering.
•Enable the DMZ feature for a single computer on your network.
• Change the Router’s internal password.
• Reset the Router.
• Reset the Router’s default settings.
• Update the Router’s firmware.
Step 1: Installing the Hardware
1. Power down your equipment.
2. Connect each PC to one of the ports on the rear of the Router labeled LAN by
using a RJ45 networking cable.
3. Connect the telephone cable from the wall jack providing ADSL service to the
ADSL port on your Router.
Note: When inserting an ADSL RJ11 plug, be sure the tab on the plug clicks into
position to ensure that it is properly seated.
4. Connect the power adapter to the Router.
5. After the Router is turned on, the Router’s Power light should be on.
LAN Ports
 Loading...