

Page 1

F5D723
3
Share
your hotel broadband
connection
Wireless G
Page 2

Advantages of a Wireless Network
. . . . . . . . . . . . . . . . . . . . . . . . . . . . . . . . . . . . .
. . . . . . . . . . . . . . . . . . . . .
Adapter Mode Installation
Access Point Mode Installation
. . . . . . . . . .
. .
Viewing
LAN Settings
Viewing the DHCP Client List Page
35
. . . . . . . . . . . . . . . . . .
36
. . . . . . . . . . . . . . . . . . . . . . . . . . . . . . . . . .
52
53
58
. . . . . . . . . . . . . . . . . . . . .
. . . . . . . . . . . . . . . . . . . . . . . . . . . . . . . . . . . . . . . . . .
Page 3

Thank you for purchasing the Belkin Wireless G Travel Router (the
Advanta ges of a Wireless Network
–
y ou n o long er n eed a dedi cated “comput er
T he B el kin Easy Installa ti on W izard makes
s et u p and acce ss p ri nters, comput ers, a nd o ther
t he w id e ra nge of B el kin networkin g products
y ou c an spa re the expense and hassle of
Widespread industr y ac ce ptance
c hoose from a wide range
1
section
2
3
4
5
6
7
8
9
10
11
Page 4

Introduction
Your wire less connecti on wil l be stronger the closer your com pu ter is
Place your
To achieve the best wireless network cover age for yo ur “ wirel es s
• Ensure tha t yo ur
n etworking
•
o n an upper flo or.
• Try not to pl ace the
n ear a
Page 5

Introduction
Avo id pla cing your
n
If your wirel ess si gnal seems weak in some spots, make sure th at
In locations whe re homes or offices are c lose together, such as
Use the Site
section
1
2
3
4
5
6
7
8
9
10
11
Page 6

Introduction
These guide li nes should allow you to cover the maximum
Secure co nnections can be interr upted by a com puter’s po we r
A second alternativ e is to change you r comp uter’s pow er
If you c ontinue to have difficulty with secure c onnection s, V PN s,
Page 7

Introduction
US: 877-736-5771
310-898-1100 ext. 2263
Europe: 00 800 223 55 460
Australia: 1800 235 546
New Zealand: 0800 235 546
Singapore: 800 616 1790
section
1
2
3
4
5
6
7
8
9
10
11
Page 8

The Router suppor ts a var ie ty o f ne tworking envi ronment s, i nc luding
You can set up t he R ou ter’s adva nced f unction s easi ly t hrough your
Your Router emplo ys N etwork Address Tran slation (NAT) to s hare the
Your Router is equipp ed w it h a firewall that will protect your network
Tear Drop Att ack, I CMP defect, RIP defect, and fra gm ent flooding.
Page 9

1
section
The Router has a built-in , 4-po rt n etwork switch to allow your wired
The Easy Install Wiza rd takes the guesswor k ou t of setti ng u p yo ur
2
3
4
5
6
7
8
9
10
11
Page 10

Product Overview
Page 11

section
1
9 8, M e, 200 0, o r XP
2
3
4
5
6
7
8
9
10
11
Page 12

Knowing your Router
Page 13

Knowing your Router
1
2
section
3
4
5
6
7
8
9
10
11
Page 14

The Belkin Wireless G Tra ve l Ro uter is a 3-in -1 s olution pro viding the
– crea te a wireless network in a hotel, home, or offi ce
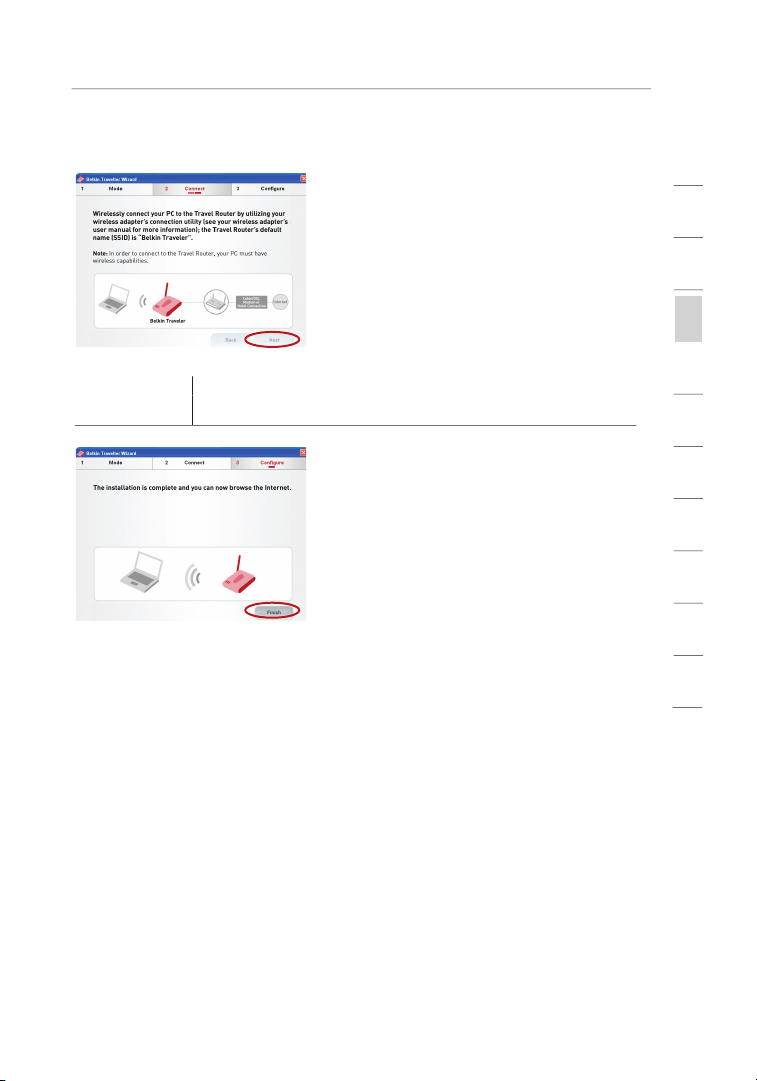
– connect your PC wire lessly to a router or hotspot
– expand the cover ag e of an exis ti ng n etwork
Page 15

section
1
The Easy Install Wiza rd will ask
The next scre en w il l sh ow y ou h ow
2
3
4
5
6
7
8
9
10
11
Page 16
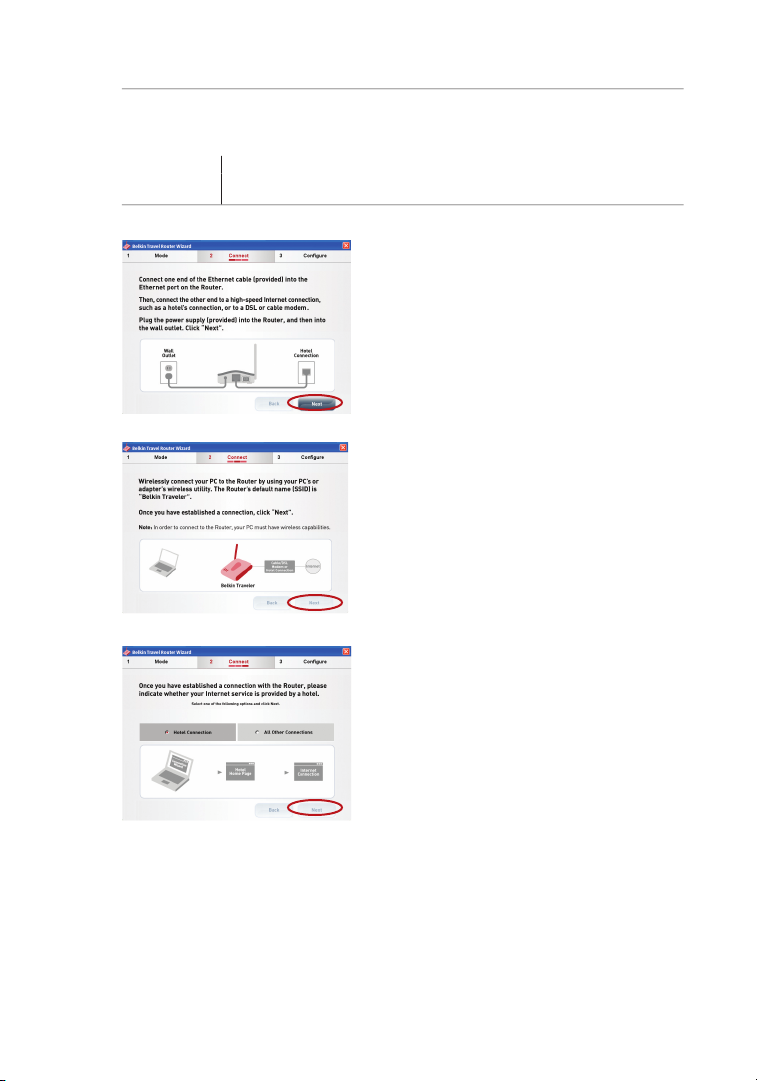
Connecting and Configuring your Router
F rom your PC, wire lessly connec t
S elect one of t he f ollowing:
– Sel ec t “H otel
– If you
Page 17
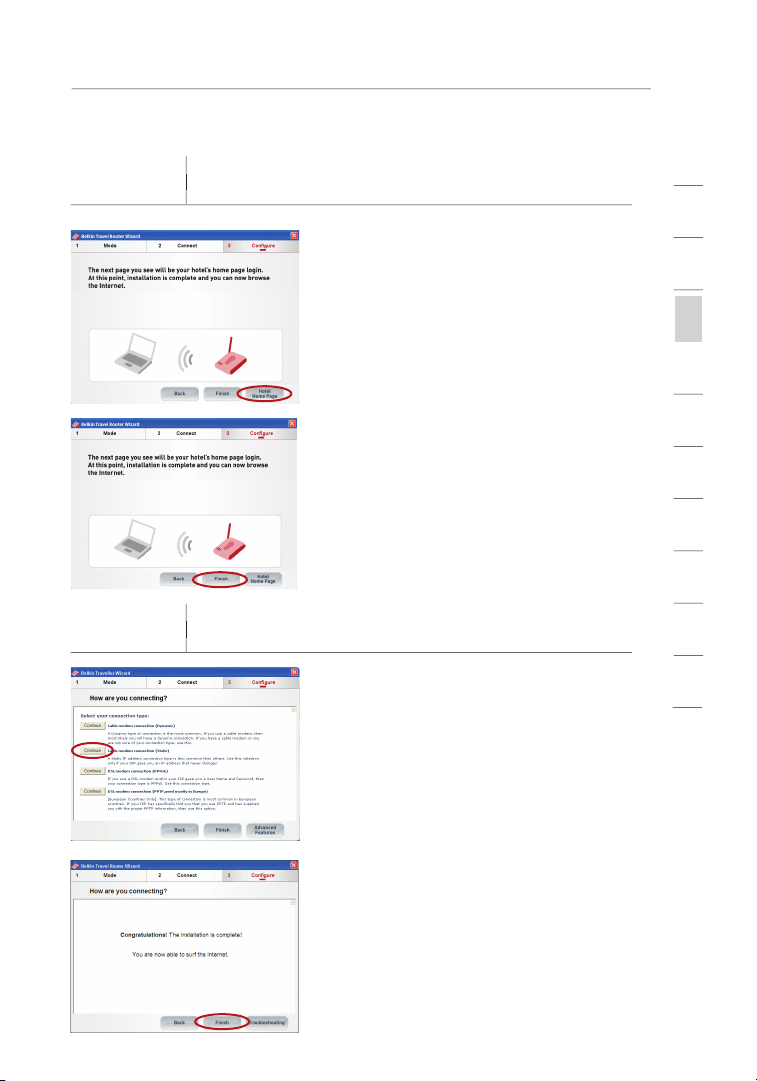
Connecting and Configuring your Router
You may be required t o ac cept the
Your installat io n is now com pl ete.
If you do not see the page
Your installation is now complete.
1
2
3
section
4
5
6
7
8
9
10
11
Page 18

Connecting and Configuring your Router
Page 19
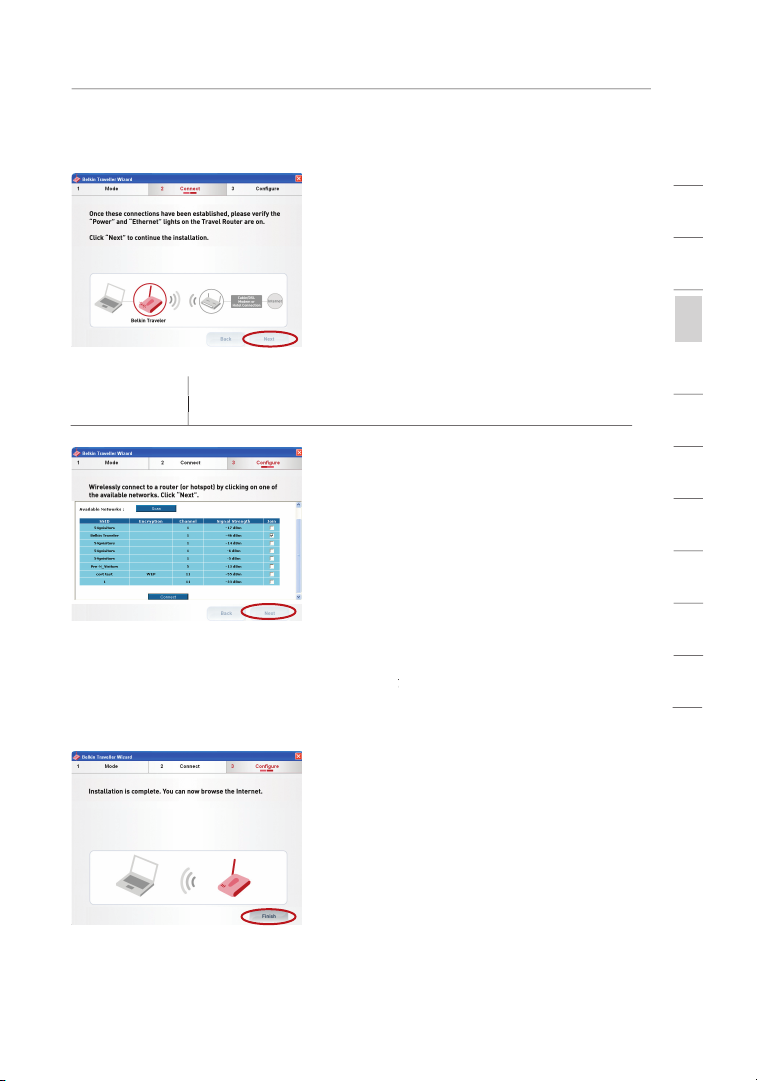
Connecting and Configuring your Router
The status window wil l te ll you
Your installation is now comple te.
1
2
3
section
4
5
6
7
8
9
10
11
Page 20

Connecting and Configuring your Router
Page 21
Connecting and Configuring your Router
1
2
3
section
4
5
6
7
8
9
10
11
Page 22

The Web-Base d Ad vanced User Interfa ce i s a web-ba sed tool t hat you
You can access the Router ’s Web-Base d Adva nced User Interfa ce
I f yo u have difficulty acc essing the Router’s
You will see the Router’s ho me p age in you r browser windo w. Th e
Page 23

section
1
2
3
4
5
6
7
8
9
10
11
Page 24
Using the Web-Based Advanced User Interface
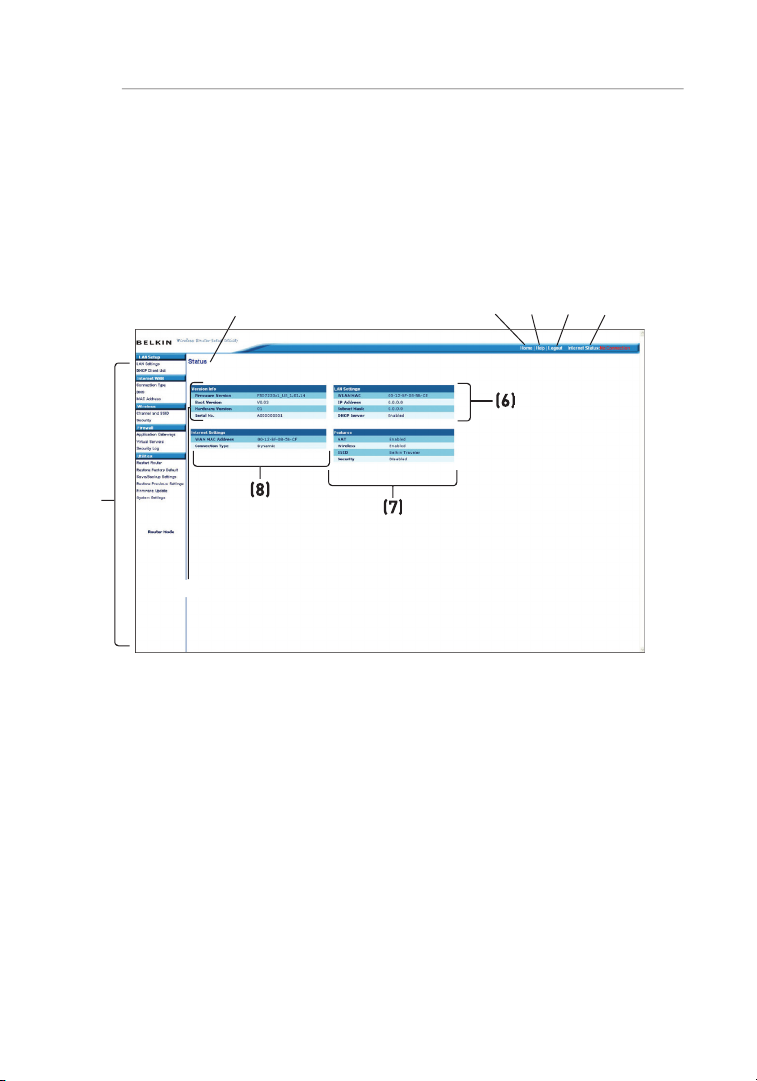
The home page is the f irst page you will see when you access the
You can go d irect ly to any of the Router’s U I pa ges by c li cking
The “Home” button is avai la ble in e very p age of t he U I. Pressing
This indicator is visible in all pages of the UI, indicating the connection
Page 25

Using the Web-Based Advanced User Interface
This button enabl es y ou t o log in and out of the R outer with the
The “Help” button giv es y ou acc ess to t he Rou ter’s help pag es .
The page you are on can be i dentified by this name. Thi s Us er
1
2
3
4
section
5
6
7
8
9
10
11
Page 26
Using the Web-Based Advanced User Interface
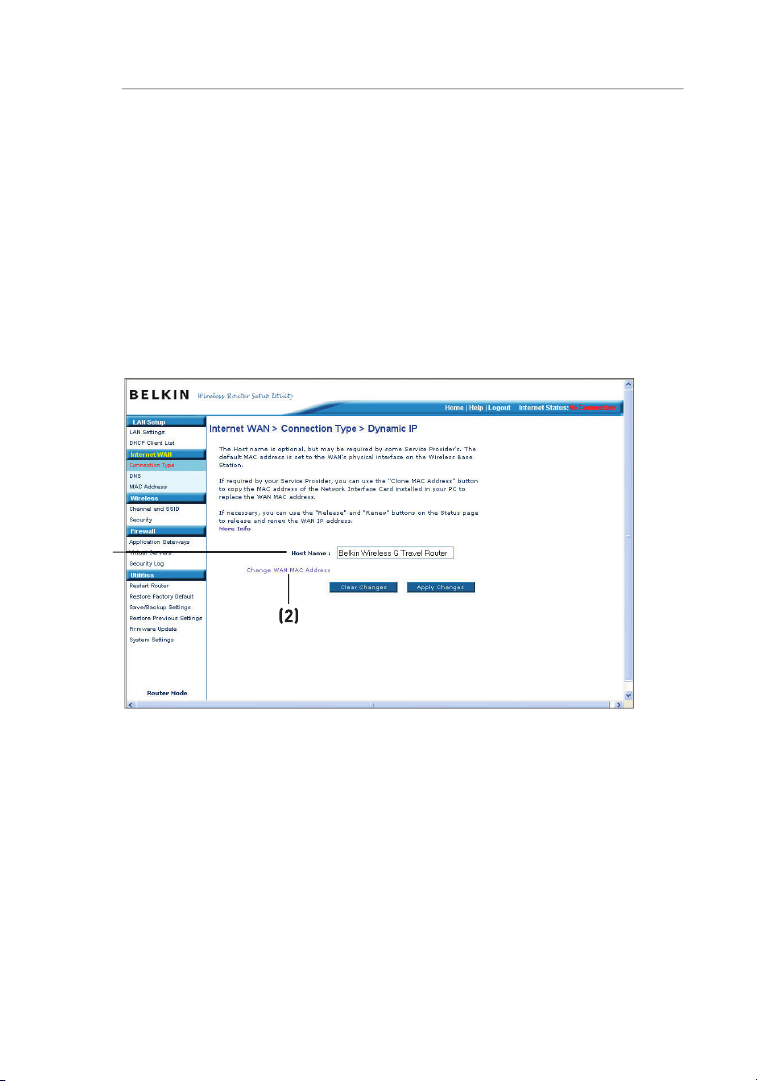
A dynamic connection is the most common connection type used with cable
Page 27

Using the Web-Based Advanced User Interface
A static IP connection is less common than other connection types. If your
1
2
3
4
section
5
6
7
8
9
10
11
Page 28

Using the Web-Based Advanced User Interface
Page 29

Using the Web-Based Advanced User Interface
This space is pro vi ded to t ype in you r us er n am e th at w as
Type in your password a nd re-type it into the “Retyp e Pa ss word”
A service name is rarel y require d by an ISP. If y ou a re not sure if
The MTU setting shoul d ne ve r be cha nged u nless your ISP gives
The “Maximu m Idle Tim e” f ea ture is used to automat ic ally
1
2
3
4
section
5
6
7
8
9
10
11
Page 30

Using the Web-Based Advanced User Interface
Type in the informati on p rovided by your ISP in the space prov ided.
Page 31

Using the Web-Based Advanced User Interface
Type your password here. The n re type it into t he “ Retype
The “Maximum Idle Time” feature is used to automatically disconnect
1
2
3
4
section
5
6
7
8
9
10
11
Page 32

Using the Web-Based Advanced User Interface
A “Domain Name Server” is a server located on the Internet that
should be checked if your ISP did not give you a specific DNS
to save
All network compo nents includi ng c ards, adapt er s, a nd routers, hav e
Page 33

Using the Web-Based Advanced User Interface
To clone your MAC addre ss, make s ure that you are usin g th e
You can manually ente r on e in the “MAC Address” page. Type in a
a nd c li ck “ Apply
1
2
3
4
section
5
6
7
8
9
10
11
Page 34

Using the Web-Based Advanced User Interface
Viewing LAN Settings
w ill ta ke y ou t o it s
To view the settings or make change s to any of the LAN settings , cl ic k
o r to view the list of connec ted co mputers,
Page 35

Using the Web-Based Advanced User Interface
All setting s for the inte rnal LAN set up of the Rout er can be view ed
The “IP addre ss” is the int er na l IP add ress of the Router. The
Advance d Us er Int erface, type this IP address into t he a ddres s
To change the IP addres s, t ype in the new IP address and click
There is no need to change the subnet mas k. T hi s is a uniqu e,
m ake ch anges to
1
2
3
4
section
5
6
7
8
9
10
11
Page 36

Using the Web-Based Advanced User Interface
The DHCP server funct ion ma kes setting up a n etwork very easy
The range of IP a ddress es se t aside for dynamic assignme nt to t he
The DHCP s erver can assign 100 IP addresses automat ically. This
The length of time the DHCP server will reserve the IP address
The default setting is “Belkin”. You can set a local domain name
Page 37

Using the Web-Based Advanced User Interface
Viewing the DHCP Client List Page
You can view a l ist of the com puters (known as client s) , wh ich are
o f
( if t he com puter has been assigned
o f th e comp uter’s net wo rk i nterface
b utton will update the list. If
1
2
3
4
section
5
6
7
8
9
10
11
Page 38

Using the Web-Based Advanced User Interface
The “Wireless” t ab le ts you make changes to the wireless network
F rom this tab, you can make change s to the wireless network
To identify your wireless networ k, a name call ed t he SSI D (S ervice Set
You can change this to a n ame of y ou r ch oice or le ave it u nchanged.
a nd c li ck “ Apply Changes ”
Page 39

Using the Web-Based Advanced User Interface
Network
This sectio n is inten ded fo r th e ho me, ho me o ffice , and smal l office
Acronym
TKIP (t emp oral
AES ( Advan ced
1
2
3
4
section
5
6
7
8
9
10
11
Page 40

Using the Web-Based Advanced User Interface
As a result of 64-bit WEP’s po tential secur ity we aknesse s, a more
After selecting either the 64-bit or 128-bit WEP encryption mode, it is
You can enter your key by typing in the hex key ma nually, or you can
The WEP passphras e is NOT the same as a WEP key. Your Router
Page 41

Using the Web-Based Advanced User Interface
u ses wh at i s kn own as a pre -shared key
1
2
3
4
section
5
6
7
8
9
10
11
Page 42

Using the Web-Based Advanced User Interface
Page 43

Using the Web-Based Advanced User Interface
A hexadecim al key is a combinat ion of n um bers and letters from A –F
1
2
3
4
section
5
6
7
8
9
10
11
Page 44

Using the Web-Based Advanced User Interface
Select “64-b it WEP ” from the drop-d own menu.
After select in g yo ur W EP e nc ryption mode, you can enter
A hex (h exadecima l) k ey i s a combin ation of n umbers and letter s
I f yo u are co nfiguring the Wireless G Trav el R outer or
Page 45

Using the Web-Based Advanced User Interface
After sel ec ting your WEP encrypt io n mo de, you ca n en ter
A hex (h exadecima l) k ey i s a combin ation of n umbers and letter s
Click “Ap pl y Ch anges”. Encry ption in t he R outer is n ow s et. Ea ch
I f yo u are co nfiguring the Wireless G Trav el R outer or
1
2
3
4
section
5
6
7
8
9
10
11
Page 46

Using the Web-Based Advanced User Interface
Your Router is equipp ed w it h WPA (Wi-Fi Pro tected Access ), the
To us e WPA s ecurity, all you r cl ie nts must be up graded to
Typical ly, this mode will be used in a hom e en vironme nt.
Page 47

Using the Web-Based Advanced User Interface
Select “Pre-share d ke y” a s th e auth enticatio n ty pe .
Enter you r pre-shared ke y. This can be from eight to 63
Enter your pre -shared key for guest acc ess. T his can be f rom
This guest pre-share d ke y al lo ws u sers only Internet access .
Click “Apply Chang es” to f in ish. You must now set all cl ients to
1
2
3
4
section
5
6
7
8
9
10
11
Page 48

Using the Web-Based Advanced User Interface
For “Encrypt io n Technique”, sel ect “T KIP” or “AES”. This setting
Enter you r pre-shared ke y. This can contai n eigh t to 63
T his se ction will prov ide you wi th i nformatio n on how to
At this po int, you should already have your Router or acce ss po int set
Page 49

Using the Web-Based Advanced User Interface
Under the “Wireless Networ k Propertie s” t ab, se lect a n etwork
Under “Da ta Enc ryption”, sel ect “W EP”.
Ensure that there is no check in the box next t o “N etwork key is
Type your WEP key in the network key box (desig nated as “ Key”
A WEP key is a combination of numbers and letters
Click “OK ”.
1
2
3
4
section
5
6
7
8
9
10
11
Page 50

Using the Web-Based Advanced User Interface
Under the “Wireless Networ ks” tab, s elect a network name from
Under “Ne tw ork Authentic ation”, selec t “WPA-PSK (No Serve r) ”.
Type your WPA ke y in the netwo rk k ey box , de signated as “Key”
A–Z and 0– 9. For WPA-PSK, your key can conta in from eight to 63
Click “OK ”.
Page 51

Using the Web-Based Advanced User Interface
Under the “Wireless Networ ks” tab, s elect a network name from
Under “Ne tw ork Authentic ation”, selec t WPA.
Under the “Auth enticatio n” t ab, se lect the settings that are
Click “OK ”.
The file that Microsoft has made available works only with
You also need to ensure tha t th e wireless- ca rd
Right -click on “Wire le ss N etwork Connec tion
1
2
3
4
section
5
6
7
8
9
10
11
Page 52

Using the Web-Based Advanced User Interface
Click ing on the “Wi reless Netw orks” tab will display the follow ing
Page 53

Using the Web-Based Advanced User Interface
For a home or small business user, select “WPA-PSK” under
Note:
S elect “WPA” if you are usi ng thi s co mputer to connect to
Selec t “T KI P” o r “A ES” un der “Data Encrypt ion”. This setting will
Type in your encryp tion k ey i n th e “N et work key” box.
Click “OK ” to apply set ti ngs.
1
2
3
4
section
5
6
7
8
9
10
11
Page 54

Using the Web-Based Advanced User Interface
Thi s screen lets you ma nage different paramet ers of the Router and
Page 55

Using the Web-Based Advanced User Interface
Click the “Rest art
The follo wi ng m essage
The follo wi ng m essage
A 25-second count down will appear on the scree n. W he n th e
1
2
3
4
section
5
6
7
8
9
10
11
Page 56

Using the Web-Based Advanced User Interface
Click the “Rest ore
The follo wi ng m essage
The following message will appe ar. Restor ing the defaults includes
A 25-seco nd c ountdown will appea r on the screen. When the
The Router’s h ome page s hould appear auto matically. I f it doe s
Page 57

Using the Web-Based Advanced User Interface
You can save your curre nt c onfigurat io n by usi ng t hi s fe ature . Savi ng
Click “Sa ve ”. A win dow
A window will open
You can name the file
1
2
3
4
section
5
6
7
8
9
10
11
Page 58

Using the Web-Based Advanced User Interface
When the save is
The conf iguration is
This option will allo w yo u to res tore a prev io usly saved config uration.
Click “Brow se”. A win dow will o pen that allows you to select the
Page 59

Using the Web-Based Advanced User Interface
You will be asked if y ou w ant to c on tinue. Click “OK” .
A reminder wind ow wil l ap pear. It wil l take up to 35 seconds for
A 35 -s econd countdo wn w il l ap pear on th e sc reen. When the
1
2
3
4
section
5
6
7
8
9
10
11
Page 60

Using the Web-Based Advanced User Interface
t ype in
Page 61

Using the Web-Based Advanced User Interface
You will now be taken to t he d ownload page of “F5D723 3 Firm ware
To dow nload the new version of firmwa re, click the downloa d
)
A window w ill open that allows you to select the loc ation where
We sug gest saving this to your desktop to make it easy to
1
2
3
4
section
5
6
7
8
9
10
11
Page 62

Using the Web-Based Advanced User Interface
In the “F irmware
Brow se to the
When t he s ave is c om plete, you will see the followi ng win dow.
The downloa d of the firmw are is c omplete. To updat e the firm ware,
Page 63

Using the Web-Based Advanced User Interface
The “Update Firmw are”
You will be asked if you
You will see one more
A 60-seco nd cou ntdown will appea r on the screen. W hen the
1
2
3
4
section
5
6
7
8
9
10
11
Page 64

Click “Start”, “Settings”, then “Control Panel”.
Double-click on the “Network and dial-up connections” icon
Right-click on the “Local Area Connection” associated with your
In the “Local Area Connection Properties” window, click “Internet
If “Use the following IP address”
is selected, your Router
If not already selected, select “Obtain an IP address automatically”
and “Obtain DNS server address automatically”
Your network adapter/s is/are now configured for use with the Router.
Page 65

section
1
Right -click on “My Network Neigh bo rhood” and select
Selec t “T CP /IP -> s ettings” for your insta lled n etwork adapte r.
You will see the followin g wind ow.
If “Speci fy an IP address” is s elected, your Rou te r wi ll n eed
Wri te i n th e IP address and subnet mask from the “IP Add ress”
Click the “Gate way” tab
Click the “DNS Conf iguration ” tab
If not alre ady se lected, selec t “O bt ain IP a ddress auto matically ”
2
3
4
5
6
7
8
9
10
11
Page 66

Start you r web browser. S elect “Tools” the n “Int er net Op tions”.
In the “Internet Opti on s” s creen , there are three s el ections:
Under the “Inte rn et O pt ions” scree n, c lick on “C onnection s” a nd
Page 67

section
1
Make sure t here are no check marks nex t to any of the displaye d
Navigator
4.0 or Higher
Start Net sc ape. Click on “Edit” then “Prefere nc es”.
In the “Pre ference s” w indow, click on “Advance d” t hen se lect
2
3
4
5
6
7
8
9
10
11
Page 68

This advanc ed fea ture should be empl oy ed b y ad vanced users
Move the center of the
Enabl e th e AP mode my selecti ng “ Enable” in the “Use as A ccess
Set your IP setting s to match you r ne tw ork. Click
Conne ct a cable from the WAN port on the Router to your
The Router is now acting as an access point. To acces s the Rout er’s
Page 69

section
1
The default IP address of t he R ou ter (while functi on ing in A dapter
Move the center of the switch on the back panel to align with the
Go to the Windows Control Panel and double-c lick o n th e
Right -click on the “Local Area Con ne ction” button for you r Rout er
In the “General ” wi ndow, select the Internet Protocol TCP/IP
Selec t th e “Use the fol lo wing IP address ” ra dio bu tton.
2
3
4
5
6
7
8
9
10
11
Page 70

Using the Adapter Mode
Enter an IP addre ss i n th e sa me sub net as t he acc ess point (for
Enter the follo wing subnet mask: 255.2 55.255.0. Cli ck “OK ”.
Advance d Us er Int erface. In your bro ws er, ty pe “19 2.168.2.2 25” (do
You will see the Web-Based Adv anced User Interfac e ho me pag e in
Page 71

Using the Adapter Mode
The login time-ou t op tion a llows you to s et t he p eriod of t ime that y ou
The timer starts when act iv ity stops. For exampl e, you hav e ma de
Advance d Us er Int erface at one time.
1
2
3
4
5
6
7
8
section
9
10
11
Page 72

Using the Adapter Mode
The home page is the f irst page you will see when you access the
You can go d irect ly to any of the pages by clicking directly on
Page 73

Using the Adapter Mode
The SSID is the wireles s ne twork name.
This gives the MAC address of the available network.
You can connect to a s pecific wireless network by select ing the
1
2
3
4
5
6
7
8
section
9
10
11
Page 74

Using the Adapter Mode
You can resta rt y ou r Ro uter (in A dapter Mode) with ou t lo sing any o f
You can save your curre nt c onfigurat io n by usi ng t hi s fe ature . Savi ng
This option will allo w yo u to res tore a prev io usly saved config uration.
Page 75

section
1
Problem:
I nstallati on CD does not autom atically star t.
If th e Easy Ins tall W izard screen does not appear withi n 15—2 0
Next, double-c li ck o n th e CD -R OM d rive that the Easy Install
The E asy In stall Wizard sh ould start within a few seconds. If,
2
3
4
5
6
7
8
9
10
11
Page 76

Troubleshooting
The Easy Install Wiza rd cannot find my Router.
Check t o se e if the switc h on the back of the Router has been
Unplug power to the Router for 10 seconds, and then plug the
The Easy Install Wiza rd cannot conne ct my Rout er t o the Inte rn et .
Ensure that you have a cable (use the cable includ ed w ith th e
If yo ur ISP requires a user name and passw ord, make sure th at
The Easy Install Wiza rd complete d in st allatio n and the Rout er ’s
Page 77

Troubleshooting
Unplug the cable or DSL m odem from its power source for three
Unplug the power to your Router, wait 10 seconds, and then
If the “ Ethernet” light on the Router is not lit after comple ting
Try shutt ing down a nd restarti ng y our computer.
If yo u have a “stat ic IP address” connec tion, your ISP must
If yo u have a “PPPo E” con nection, your ISP will assi gn y ou a
You may need to c onfigure yo ur R outer to m eet the specific
Look at the lig hts on you r Ro uter. Your B el kin Router’s l ights
• The “Powe r” l ig ht s hould be o n.
• The “Conn ected” light should be on and not blinkin g.
• The “WAN” l ight should be either on or blinkin g.
1
2
3
4
5
6
7
8
section
9
10
11
Page 78

Troubleshooting
Open your w irele ss uti lity software b y cl icking on the icon i n th e
The e xact w indow that opens will vary depe nd ing on t he m od el
Does the name of your wirel ess ne twork appear in the res ul ts?
Yes, m y ne tw ork name is li sted
If th e netw ork has security (encry ption) enable d, you wil l ne ed to
Within a fe w se conds, the tray icon in the lower, l eft-hand
—
Page 79

Troubleshooting
Tempor ar ily move your compute r, if possible , fi ve t o 10 feet
Using a com puter that is connected to the Router through a
1
2
3
4
5
6
7
8
section
9
10
11
Page 80

Troubleshooting
Page 81

Troubleshooting
You can find technica l su pp ort informati on a t:
o r
t hrough the
310-898 -1100 ext. 2263
Austral ia: 1800 235
1
2
3
4
5
6
7
8
section
9
10
11
Page 82

The radiated output power of this device is far below the FCC radio
This equipment has been tested and found to comply with the limits for a
This equipment generates, uses, and can radiate radio frequency energy.
.
Page 83

section
1
• Reorient or relocate the receiving antenna.
• Increase the distance between the equipment and the receiver.
• Connect the equipment to an outlet on a circuit different from that
• Consult the dealer or an experienced radio/TV
technician for help.
The FCC requires the user to be notified that any changes or modifications to
The wireless radio of this device complies with RSS 139 & RSS 210 Industry
• EN 60950 (IEC60950) – Product Safety
• EN 300 328 Technical requirement for radio equipment
• ETS 300 826 General EMC requirements for radio equipment.
To determine the type of transmitter, check the identification label
• EN 55022 (CISPR 22) – Electromagnetic Interference
• EN 55024 (IEC61000-4-2,3,4,5,6,8,11) – Electromagnetic Immunity
• EN 61000-3-2 (IEC610000-3-2) – Power Line Harmonics
• EN 61000-3-3 (IEC610000) – Power Line Flicker
• EN 60950 (IEC60950) – Product Safety
2
3
4
5
6
7
8
9
10
11
Page 84

Information
This warranty does not apply if the product has been damaged by accident,
THE WARRANTY AND REMEDIES SET FORTH ABOVE ARE EXCLUSIVE
Page 85

Australia: 1800 235 546
 Loading...