


Knowing Your Router
Belkin, Ltd.
7 Bowen Crescent • West Gosford
NSW 2250 • Australia
Tel: +61 (0) 2 4372 8600
Fax: +61 (0) 2 4372 8603
Belkin Components B.V.
Starparc Building • Boeing Avenue 333
1119 PH Schiphol-Rijk • The Netherlands
Tel: +31 (0) 20 654 7300
Fax: +31 (0) 20 654 7349
Belkin Tech Support
US: 877.736.5771
310.898.1100 ext. 2263
Europe: 00 800 223 55 460
Australia: 1800 666 040
Belkin Corporation
501 West Walnut Street
Compton • CA • 90220 • USA
Tel: 310.898.1100
Fax: 310.898.1111
Belkin Components, Ltd.
Express Business Park • Shipton Way
Rushden • NN10 6GL • United Kingdom
Tel: +44 (0) 1933 35 2000
Fax: +44 (0) 1933 31 2000
© 2004 Belkin Corporation. All rights reserved. All trade names are registered trademarks
of respective manufacturers listed. 54g is a trademark of Broadcom Corporation in the U.S.
and other countries. Apple, AirPort, Mac, Mac OS, and AppleTalk are trademarks of Apple
Computer, Inc., registered in the U.S. and other countries.
P7447 1- B
Wireless G USB
Network Adapter

F5D7050
2.4GHz • Wireless802.11g
Mbps
Connect your desktop or notebook
computer to a FAST wireless network
User Manual
Wireless G USB
Network Adapter

1
1 Introduction . . . . . . . . . . . . . . . . . . . . . . . . . . . . . . . . . . . 1
Benefits of a Home Network. . . . . . . . . . . . . . . . . . . . . . . . . . . . . . 1
Advantages of setting up a Belkin Wireless Network . . . . . . . . . . 1
Placement of your Wireless Networking
Hardware for Optimal Performance . . . . . . . . . . . . . . . . . . . . . . . . 2
Important Factors for Placement and Setup . . . . . . . . . . . . . . . . . 2
Features . . . . . . . . . . . . . . . . . . . . . . . . . . . . . . . . . . . . . . . . . . . . . . 6
Applications and Advantages . . . . . . . . . . . . . . . . . . . . . . . . . . . . 6
Product Specifications . . . . . . . . . . . . . . . . . . . . . . . . . . . . . . . . . . 7
System Requirements . . . . . . . . . . . . . . . . . . . . . . . . . . . . . . . . . . 7
2 Knowing your Wireless USB Network Adapter . . . . . . . . . . . 8
3 Installing and Setting Up the USB Network Adapter . . . . . . . 9
Step 1: Install the Software . . . . . . . . . . . . . . . . . . . . 9
Step 2: Conne ct your USB Ada pter t o your PC . . . . 10
Step 3: Let Windows Finish t he Ins talla tion . . . . . . . 11
4 Uninstalling the Software and Drivers . . . . . . . . . . . . . . . . 13
5 Using the Belkin Wireless LAN Monitor Utility . . . . . . . . . 14
6 Securing your Wireless Network . . . . . . . . . . . . . . . . . . . 2 6
7 Troubleshooting . . . . . . . . . . . . . . . . . . . . . . . . . . . . . . . 30
8 Information . . . . . . . . . . . . . . . . . . . . . . . . . . . . . . . . . . . 37
Table of Contents

1
1
2
1
3
4
5
6
7
sect ion
8
Thank you for purchasing the Belkin Wireless G USB Network Adapter
(the Adapter). Now you can take advantage of this great new technology
and gain the freedom you need around the home or office without using
cables. The Wireless USB Network Adapter works like a conventional
network adapter, but without the wires. The easy installation and setup
will have you networking wirelessly in minutes. Plea se be sure to read
through this U se r Manual comp le te ly, a nd p ay special at te ntion to th e
section en ti tled “Place me nt of your Wi reless N et working Hardware
for Opti ma l Performance ” on page 2. By f ol lowing our si mp le setup
instruct io ns your Belki n Ho me Network wi ll allow you to :
• Share on e h ig h- speed Intern et co nn ec tion with al l t he co mp ut ers
in your h ome
• Share resources, such as files, and hard dr iv es am on g all the
connecte d compu te rs in your home
• Share a sin gl e pri nt er wi th th e ent ire family
• Share do cuments, music, video, and digital pictures
• Store, retri ev e, an d cop y fil es from one computer to another
• Simultan eo us ly pl ay ga me s o nl ine, ch eck I nternet e-mail ,
and chat
Here are some of the advantages of setting up a Belkin
Wireless Network:
• Mobility – you’ll no longer need a d ed icated “computer room”—
now you c an wo rk on a network ed lapt op or deskto p compu te r
anywhere within your wirel ess r an ge
• Easy installati on – Belkin Easy Install at io n W iz ard makes
setup simple
• Flexibil it y – set up and a ccess p rinters, computers , and other
networki ng devi ce s f rom anywhere in yo ur ho me
• Easy Expansion – the wide range o f B el ki n n et working pro ducts
let you e xpand your n etwork to in clude devices such as pr inters
and gaming consoles
• No cabling re qu ired – you can spare the expe ns e and hass le of
ret ro fi tt ing E thernet cabl in g throughou t the home or off ice
• Widespread industry accept an ce – choos e from a w id e r an ge
of interoperable networkin g products
Introduction

Introduction
32
Placement of your Wireless Networking Hardware for
Optimal Performance
Your wireless connec ti on will be st ronger t he closer you r computer
is to yo ur W irel es s Router (o r Ac cess Point) . Typi ca l indoor oper at ing
range fo r yo ur wireless devic es i s between 1 00 a nd 200 feet . In the
same way, your wi reless c on nection and p er formance wi ll d egrade
somewhat a s the distanc e be tween your Wi rele ss R outer (or A cc es s
Point) a nd c onnected de vi ce s increases. This m ay or may not b e
noticeab le t o you. As y ou m ove further f rom yo ur Wirel ess Router
or Acces s Po int, connec ti on speed may de crea se . Factors tha t ca n
weaken s ig na ls simply b y ge tting in th e wa y of your n et wo rk’s ra di o
waves are meta l ap pliances or o bs tructions, an d walls.
If you h av e concern s about your ne tw ork’s p er formance th at m ight be
rel ated to ran ge o r obstructi on f actors, try m ov ing the com pu te r to a
position b et ween five a nd t en feet from the Wi rele ss R outer, in o rder
to see i f di stance is t he p ro bl em . If difficulties p er sist even a t cl ose
range, p le as e contact B el ki n Tech nical Suppo rt .
IMPORTANT FACTORS FOR PLACEMENT AND SETUP
Note: While so me o f the items l is ted below c an a ff ec t network
performa nc e, they will no t proh ib it your wireless ne tw ork from
function in g; if you are conce rned that y ou r network i s no t operating a t
its maxi mu m effe ct iveness, th is c hecklist ma y he lp.
1. Placement of your Wireless Networking Hardware
Place your Wire less Router (or A ccess P oint), the c entral connection
point of your network, as close a s p os sible t o t he cent er of your
wireless network devices.
To achieve the b es t wireless networ k coverage for yo ur “wireless
clients” ( i. e., compute rs e nabled by B el ki n Wire less Notebo ok N etwork
Cards, Wireless Desk to p Network Cards, an d Wire le ss USB Adapte rs ):
• Ensure t hat y ou r W ireles s Rou te r (or Acce ss Poin t) ne tw or king
antennas are pa rallel to ea ch ot her, an d a re position ed ve rt ic ally
(toward the c ei ling). If yo ur Wi rele ss Ro ut er (o r Acc es s Poi nt )
itself is positioned vertic al ly, point the antennas as much as
possible in an upward d irecti on .

3
Introduction
3
2
1
3
4
5
6
7
sect ion
8
• In multistory homes, place the Wireless Router (or Access Point)
on a fl oo r t ha t i s as close to the ce nter of th e hom e as possibl e.
This may mean placing the Router on an up pe r flo or.
• Try not t o p la ce th e Wireless Route r (or Access Point) near a
cordless 2.4GHz phone.
2. Avoid Obstacles and Interference
Avo id placing yo ur Wirel ess Router or A ccess Point n ea r devices t ha t
may emit r ad io “noise”, s uc h as microwave ov en s. Dense obje ct s that
can inhi bi t Wire le ss communic at io n can inclu de :
• Refriger at or s
• Washe rs and/ or dr ye rs
• Metal cabinets
• Large aq ua ri ums
• Metallic -b as ed UV ti nt ed wi nd ows
If your wi rele ss s ignal seems w ea k in some s po ts , make sure that
objects su ch as these a re not b lo cking the s ig na l’s p at h (between yo ur
computer s an d Wire less Router o r Access Poin t)
3. Cordless Phone Placement
If the pe rformance of your wirel ess n et work is im pa ired afte r att en di ng
to the ab ove i ssues, and y ou ha ve a cordless phone:
• Try moving cordless phones away from Wireless Router s (or
Access Points) and your wireless-enabl ed comp ut ers
• Unplug and re mo ve th e b at te ry from any cordless phone that
operates on the 2.4GHz band (check manufactu rers informat io n).
If this f ixes the p robl em , you r pho ne may be interferi ng .
• If your p hone supports channel selectio n, ch an ge th e cha nn el
on the ph one t o t he furt he st ch an nel f rom your wireless network,
as possible. For example, change the phone to channel 1 a nd
move your Wirel ess R outer t o c ha nnel 11 . S ee yo ur phon e’s user
manual for detailed instruc ti ons.
• If necessary, co ns ider switching to a 90 0M Hz or 5G Hz
cordless phone.

Introduction
54
4. Choose the “quietest” channel for your wireless network
In locat io ns where homes or o ffices a re c lo se together, su ch as
apartmen t bu ildings or office c om plexes, the re may b e wire less
networks n ea rby that ca n co nflict with y ou rs. Use the S it e Survey
capabili ti es of your Wi reless L AN Utility to l oc ate any oth er w irel es s
networks ( se e page 16 o f th is manual), a nd move your Wi rele ss R outer
(or Acce ss P oint) and computers to a channel as far away from other
networks as possible.
Experime nt w ith more than one o f the availab le c hannels, in o rder t o
find the c le ares t connection an d avoid inter fe renc e from n eighboring
cordless phone s or other wireless d ev ic es.
5. Secure connections, VPNs, and AOL
Secure connect io ns are c onnections th at typically require a us er name
and pass wo rd, an d are us ed where security i s important. Se cure
connecti on s include:
• Vir tual Private Network (VPN) connecti on s, of te n u se d to conne ct
rem otely to a n office network
• The “Bring Your Ow n Acc es s” program from America Online
(AOL), which lets you use AOL t hrou gh broadband provided by
another cable or DSL service
• Most on-line banking websit es
• Many commercial websites which re quire a user name and
password to a cc ess y our a cc ount
Secure connect io ns can be int er ru pted by a c om pu ter’s p ow er
manageme nt s etting, whi ch c auses it to “ go to sleep.” T he simplest
solution t o avoid this is t o simply reconnec t by re- ru nning the V PN o r
AOL soft wa re, or b y re -l ogging into t he secure web site.
A second a lt ernat iv e is to chang e yo ur computer ’s power
manageme nt s ettings so it d oes not go to s leep; howev er, this may
not be a pp ropr ia te for portab le c omputers. To chan ge your power
manageme nt s etting unde r Wi ndows, see th e “Power Opti on s” item in
the Cont rol Pa ne l.

5
Introduction
5
2
1
3
4
5
6
7
sect ion
8
If you c on ti nue to have d iffi cu lt y with Secu re Con ne ct ion, VPNs a nd
AOL plea se rev ie w steps 1-4 a bo ve to be sure you h av e addressed
these is su es .
These gu id el ines should a ll ow you to c ov er the maximu m po ssible
are a with your W irel es s Router. Sho ul d you need to c over an
even wid er a re a, p lease go to t he networking p rodu ct s ection on
(www.belkin .c om /networking ) fo r more details on B el kin’s W irel es s
Range Ex te nd er/Access P oi nt .
For more information regarding our networking products, visit our website
at www.belk in .c om/networki ng o r call our Techni ca l Support.

Introduction
76
Features
The Adap te r complies wi th t he IEEE 802 .1 1g standard in order
to commu ni ca te with oth er 8 02.11g and 80 2. 11b-complia nt
wireless devic es .
• 2.4GHz ISM (Industri al , Sci en ce, a nd Me di cal) ba nd op eration
• Integrat ed , eas y- to-use prof il e m an ager fo r s to ring mu ltiple
wireless network settings for work, school, home, or any
other setup
• USB 2.0 i nterface, for Plug-and- Pl ay in st allation and convenience
in virtually any desktop or notebook compute r
• WPA security (Windows XP only), 64-bit WEP or 128-bit Encryption
• Wireless access to n etworked re so urce s
• Support for both infrastruc tu re and ad-hoc (peer-to-p ee r)
networki ng mode s
• Packet transfer rate of up to 5 4M bps
• Easy installati on an d use
• LED link/activi ty in di ca tor
• Desktop stand allows you to position your Adapter for optimal
wireless performance
Applications and Advantages
• Wireless roa mi ng wi th a lapto p around the home o r o ffic e
Off ers t he freedo m of network in g— without cables.
• Compatib le with 802. 11 b
802 .11g wireless LAN solutions are backward -compatible with
exi sting Wi-Fi (80 2.11b) products and with other 802.11g product s.
• Difficult-to-w ire environments
Enables network in g i n build in gs wi th so li d o r finis he d w al ls , o r
open are as wh ere wiring is difficult to i nstall.
• Fre quently changing environments
Adapts easily in off ices or en vi ronm en ts th at frequent ly rearrang e
or change locations.

7
Introduction
7
2
1
3
4
5
6
7
sect ion
8
• Temporary LANs for s pecial proj ec ts or pe ak ti me
Sets up t emporary networks such as at trade s hows, e xhibitions,
and constructio ns si te s, wh ic h n ee d net wo rks o n a short- te rm
basis; also companie s who need addition al wo rk st ations for a
peak activity period .
• SOHO (Small Off ice/Home Office) n etworking needs
Pro vides the ea sy an d q ui ck sm al l n et wo rk in stallation SOHO
users need.
Product Specifications
Host Int er fa ce: USB 2.0
This product i s co mpatible wi th t he
USB 1.1 an d USB 2.0 spe ci fi cation.
To achieve max im um networking
speeds ( 54 Mb ps), this d ev ic e must be
connecte d to a USB 2.0 ho st port on a
PC. Conn ec ti on of this de vi ce to a USB
1.1 host p or t will yiel d a maximum of
11Mbps n et wo rking speed .
Power Co ns um ption: 500mA (m ax )
Certific at io n: FCC Clas s B, CE Mark, C -T ic k
Operatin g Temp er at ure: 32–131° F (0 –55° C)
Storage Temper at ure: -13–158° F ( -25–70° C)
Typical Operat in g Range: Up to 20 0’ *
*Distance and connection speeds will vary depending on your networking environment
System Requirements
• PC with o ne av ailable USB port
• Windows® 98SE, 2000, Me, or XP
Package Contents
• Belkin Wireless USB Network Adapter with Desktop Stand
• Quick Installat io n G ui de
• Installa ti on So ft ware CD
• User Manual
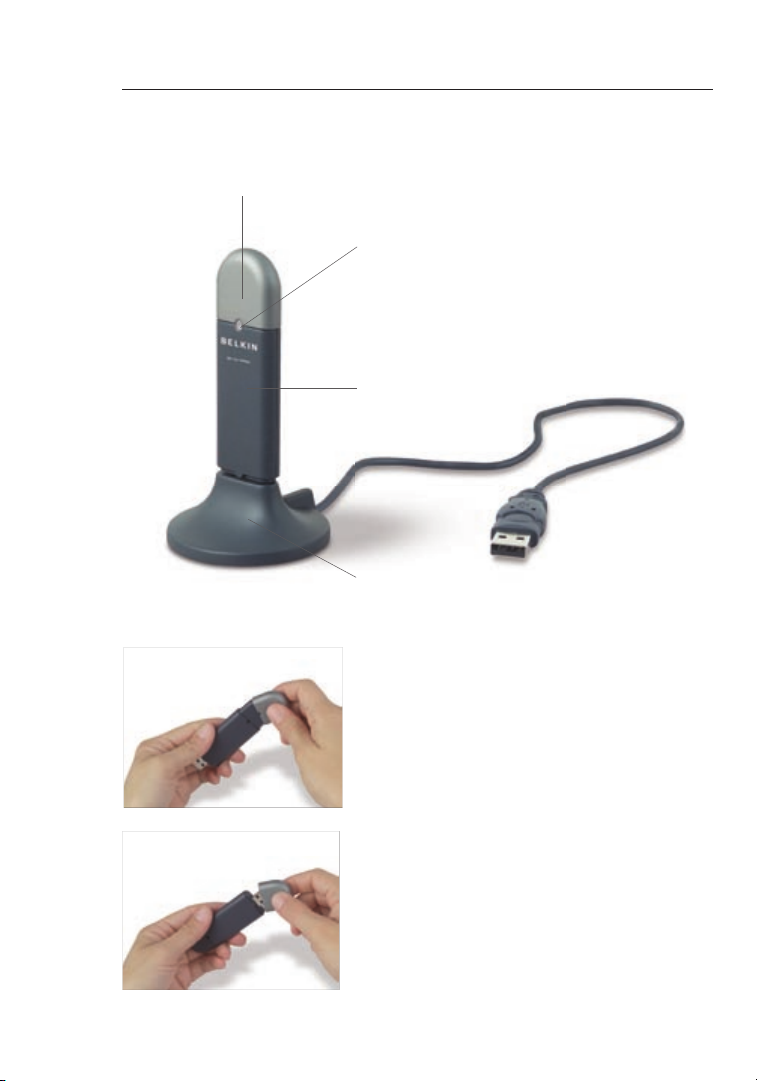
Knowing your Wireless USB Network Adapter
Protective Cap
Activity LED
Blinking Green: Scanning
Off: No Activity
On: Connected to network
USB Adapter
Desktop stand
(Optional Use)
The cap c an be st ored on the
opposite end of the U SB co nnector.
The cap s naps over th e U SB
connecto r for protection.
9
Installing and setting up the USB Network Adapter
9
sect ion
4
5
6
7
8
1
2
3
3
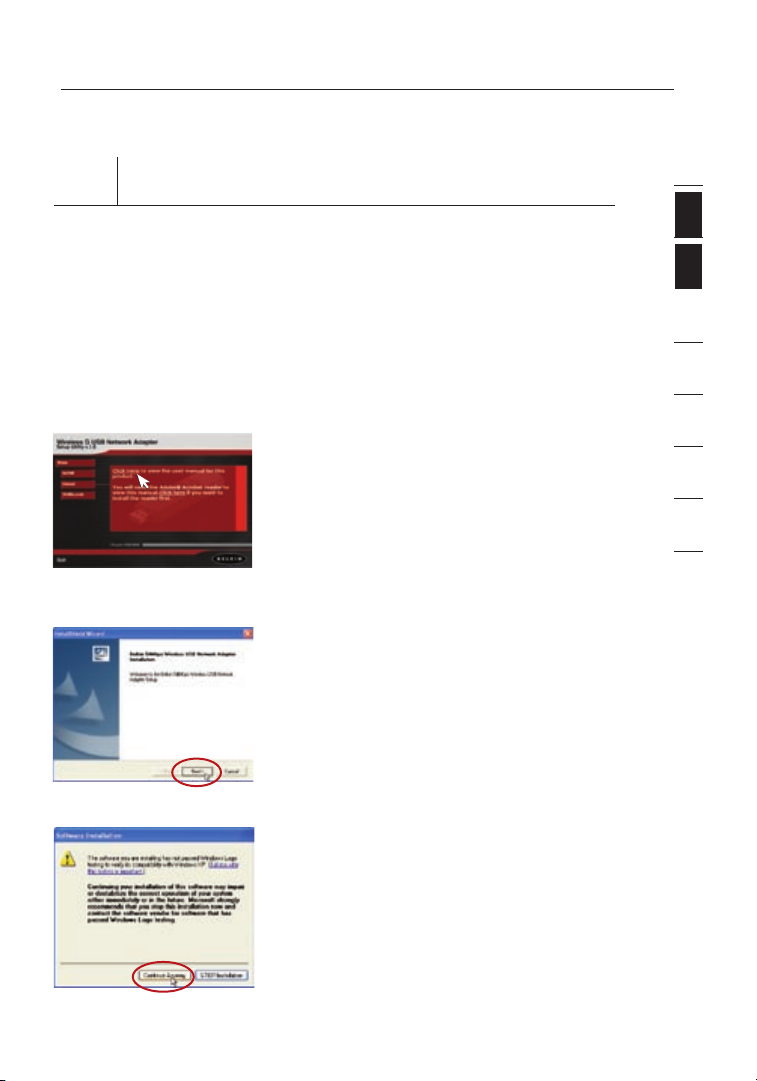
Step 1 Install the Software
WARNING: Install the software before inserting the Adapter
1.1 Insert the CD into yo ur CD -ROM dr ive.
1.2 The Belkin Wireless USB Network Adapter Setup Utility screen will
automati ca ll y a pp ear. If it does not appear within 15–20 second s,
then select your CD-ROM drive and double-cli ck on the folder
named “Files”. Next double- cl ick o n the icon named “Star t. ex e”.
1.3 In the menu window, drag y our m ou se
over the “Install” button then select
“Click here” to st ar t t he soft wa re
installa ti on program.
1.4 T he in st aller w ill s tart. C lick “Next”
to continue.
1.5 If you are usin g Win do ws 20 00 or
Windows XP, you will see a me ss age
similar to the one be low. T hi s D OE S
NOT mean there is a pro blem. C lick
“Continu e Anywa y” .

Installing and setting up the USB Network Adapter
1110
1.6 When the installe r is done installin g
the software, y ou wi ll se e the foll ow in g
screen. Click “ Finish”.
Step 2 Connect the USB Adapter to your PC
2.1 A ft er th e s of tw are insta ll ation i s
finished , the messag e “You can p lug
in your W LAN a dapter now” will ap pear.
Plug the Adapter into an a vailable
USB port on yo ur de sk top o r
notebook comput er.
For desktops: For notebooks:
Product Placement
The best location for your adapter is on to p of your compute r’s monitor.
Placing the Adapter on your desktop is acceptable, howev er, avo id
placing the Adapter near metal objects such as a c om puter case o r
speakers . Any object that is metal has the ab ility t o b lo ck th e rad io
signals from th e A da pter.
or

11
Installing and setting up the USB Network Adapter
11
sect ion
2
1
3
4
5
6
7
8
Step 3 Let Windows Finish the Installation
3.1 A ft er co nnecting your Adapter,
Windows will detect that new hardware
has been installed. Dependi ng on your
version of Windows, a window similar
to the on e p ic ture d here will appear.
Select the option “Install the software
automati ca ll y ( Re commended)” and
click “Next”.
3.2 If you are usin g Win do ws 20 00 or
Windows XP, you will see a me ss age
similar to this one. This DO ES NO T
mean there is a problem. Click
“Continu e Anywa y” .
3.3 If you are usin g Win do ws 98 SE or
Me, you w ill b e a sk ed to restart your
computer. Selec t “Re st ar t”. I f y ou are
using Windows 2000 or X P, you w il l s ee
a window similar to t his o ne.
Click “Finish”.
3.4 When the installa ti on is comp le te , t he
Belkin Wireless Monitor icon will appear
on your d esktop. To ope n the Monito r
Utility, do uble-click on this icon.

Installing and setting up the USB Network Adapter
Uninstalling the Software and Drivers
3.5 A small icon in yo ur sy stem tr ay (b ottom r ight corner of most
screens) will a ppear. This is yo ur sh or tcut to th e Bel ki n W ireles s
Monitor. It also indicates the status of your connection :
Red: No c onnection to a wi rele ss ne tw or k
Blue: Connected to a wire le ss ne twork.
If you al re ad y hav e a wireless rou te r ( or an access poin t) in your home or
off ice, the A da pter will au tomatically attemp t to connect to your wireless
network. In most cases, the Adapter will be a ble t o con ne ct to your
network automat ic ally. If you are using encr yp ti on, y ou wi ll ha ve to set
the encryption setti ng s of your adapter to match that of your wi re le ss
rou ter ( or ac ce ss po int) be fore the Adapt er can succe ss fu lly c onnect to
your wireless n etwork. For information about confi gu ri ng yo ur Ad ap ter,
see the s ection in th is ma nual ca lled “Pro fi le Tab: Creating a Prof il e” on
page 17.

13
Uninstalling the Software and Drivers
13
sect ion
2
1
3
4
5
6
7
8
If you ne ed to remove the software and d ri vers for a ny reason, you
can easily accomplis h this in one of t wo wa ys . You can insert the
software CD a nd cl ic k o n the “Unins ta ll ” o pt ion i n the menu , or you
can go to th e Win do ws Co nt rol Panel and select the “Add/Rem ov e
Pro grams” option. The Belkin Wizard wi ll wa lk yo u through the
rem oval proc es s.

Using the Belkin Wireless LAN Monitor Utility
1514
When you launch the W irel es s L AN Mo ni to r U ti lity (t he Ut ility), you will
be pre se nted wi th th e s creen below. The following small icon will also
be pre se nt in your syst em tray.
Double-c li ck ing o n t he icon in the system tray will open the W irel es s
Monitor window.
USING THE BELKIN WIRELESS MONITOR UTILITY
Status Tab
When the utility is o n y ou r d es kt op, y ou ca n con trol your USB adapter
through the u ti lity. The first tab you will s ee is th e “Stat us ” t ab . From
this tab you c an se e you r cur rent connecti on st at us on the screen.
The example below shows that there is a connect io n bet we en th e
computer and the Wireless R outer (or Ac cess Point) by di splaying 1’s
and 0’s betwee n the two. The diagram below also shows there is a
connecti on betw ee n y ou r com pu ter, th e W ireles s Rou te r (or Acce ss
Point), and the In terne t by displayin g 1’s an d 0’s be tw ee n t he Wireless
Router (or Access Point) and the Interne t.
If there is no connecti on betw ee n t he comp ut er an d Wireless Route r
(or Access Point), an “X” will be di sp layed. This is th e sam e for the
Intern et co nnection.
1’s and 0’s displayed here indicates a connection
(a)
(b)

15
Using the Belkin Wireless LAN Monitor Utility
15
sect ion
2
1
3
4
5
6
7
8
(a) Current Profile String
This indicates the name of the prof il e you are curren tly u si ng, i f a ny. If
a question mark appears next to t he te xt in this box, it indicates that
there is no profile set up f or th e net wo rk yo u are curre ntly co nnected
to. The n ame o f t he netw or k y ou are connected to will be d is played in
this box if no profile for that network exists.
(b) More Button
Pre ss th e “ Mo re” button to see detailed specific s abo ut the netwo rk
you are con ne ct ed (b elow) t o i nc luding the S ignal S tren gt h, Si gnal
Link Quality, IP information, and the name of the wireless network you
are connected to.

Using the Belkin Wireless LAN Monitor Utility
1716
Access Point (AP) List Tab
To vie w a list of all av ailable networks in your are a, se le ct th e “AP
List” tab. In the w in dow, y ou wi ll be presented with a l ist s ho wing you
the available networ ks .
(a) Network Name
This column shows you the name of th e wireless network that is
availabl e. On the left side of th e n et work na me are small icons which
tell you certain things about the network. A blue ci rc le around the
network icon (e) in di cates that y ou are currently connected to this
network. A small padlock (f) ne xt to a network name indicate s that
this network is secured ( ei ther by WE P or WPA en cr yption). It is no t
possible to connect to a secured network without the proper network key.
(b) Band
This column shows you which band the n etwork is op er ating on. “G ”
indicate s that this is 802.11g based network . “B” indica te s thi s is an
802.11b based networ k.
(c) Signal
This column indicate s the signal strength of the wi re le ss ne tw ork.
Typically, th e stronger the signal strength, the c loser the ne twork is t o
your physical locati on . The lowe r the signal strength, the further away
fro m t he ne tw or k y ou are.
(a)
(b)
(c)
(e)
(d)
(f)
(g)

17
Using the Belkin Wireless LAN Monitor Utility
17
sect ion
2
1
3
4
5
6
7
8
(d) Site Information
When you highlight a network name in t he AP list by clicking on it
one time, the detailed informati on abou t tha t netwo rk wi ll be availabl e
here. You will see what type o f n et work it is (Acc es s Poi nt or Peer-toPeer), what channel the network is operating on, status of encryption
(securit y) On or Off , a nd belo w “Su rv ey ed at :” yo u wil l see the MAC
address of th at wi reless netw or k.
How to connect to a wireless network in the Access Point (AP) list
The re are two ways to connect to a network that appear in the AP list.
1. Hig hlight the n etwork name by cl icking on it on e time, then click
the “Connect” button on the bottom of the w in dow.
or
2. Double click a network name that is in th e AP list. This will
connect you to the ne twork automaticall y.
Note: if the network you are attempting to connect to is using encryption,
you will be prompted to create a profile with the encryption settings.
How to update the Access Point (AP) list information
Pre ssing the “R efre sh ” (g) bu tt on wi ll ma ke th e USB adapte r scan the
“air” for available wireless networks. The list will be updated.
Profile Tab: Creating a Profile
Using Profiles allows you t o s av e c on fi gurations for diff eren t wireless
networks . For instan ce , if you use your Adapter at y our p lace of
work and also at yo ur ho me , y ou r wireless netwo rk sett in gs ma y be
differe nt fo r eac h locat io n. Profil es let you store se ttings for e ach
location and name them for easy i dentificati on . You can quickly
change from o ne profile to another profile without having to rem em ber
the particular setti ng s of a certain network .

Using the Belkin Wireless LAN Monitor Utility
1918
Creating a new Profile
1. Click “Add ” to open the new prof il e s creen. Type i n a name for
the prof ile. Th e n am e c an be anythi ng you want. You sh ould pick
somethin g easy to re member like “Work”, fo r y ou r w or k net wo rk
or “Home”, for your h ome n etwork. Click “Next” to co ntinue.
2. The next screen y ou wi ll se e all ow s y ou to type in the name of
the network you will be co nnecting to, the ty pe of netw or k i t is,
and optionally you can set the da ta ra te fo r tha t netwo rk .
(a) In the “Network Name” box, type in the e xact na me of the
network you will be c onnecting to. The “Network Name” is
the same as th e n et wo rk SS ID.
(a)

19
Using the Belkin Wireless LAN Monitor Utility
19
sect ion
2
1
3
4
5
6
7
8
(b) In the “Network Type” box, selec t th e ty pe o f ne twork you will
be conn ecting to. Sele ct “ Access Poin t” i f it is a networ k wi th
a wireless router or access point (This is most common). Select
“Peer-to-Peer” if this is a direct connection to another computer.
(c) In the “Tran sf er Ra te ” b ox , i t is suggest ed that you leave this
on “Automatic” unles s there is a sp ec if ic ne ed to chan ge
this setting.
Click “Next” to continue.
3. The next screen a llows you to in pu t s ec ur ity e ncryption settings
for the n etwork. If t he ne twork i s n ot en cr yp ted, th en le ave t he
mode in “ Off” and click “Compl et e.
If the ne twork is e nc rypted, you will need to have the network key and
key type (open or shared). This information is available from the network
administ ra to r o r is the same as y our w irel es s router or access point.
TIP: Most networks with WEP use “Open System” key type. For mo re
detailed inform at ion g o to the section title d “Secu ri ng yo ur Wi reless
Network” on page 26 o f t hi s m an ua l.
(a) Sel ect t he Au th entication Mode from th e d rop-do wn me nu .
(b)
(c)
(a)

Using the Belkin Wireless LAN Monitor Utility
2120
(b) After s electing the A uthenticati on Mode , sel ec t the encr yp ti on
type your network uses from th e Enc ry pt ion d rop- do wn me nu .
Please see the section of this ma nual titled “Securing your
Wireless Network” on page 2 6 f or in fo rm ation on w hi ch ty pe
of WEP en cryption to use. Click “ Next”.
(c) Th e nex t screen allows you to s elect the ke y i np ut me th od,
either Alphanum er ic, H ex adecimal or Passphrase. The method
you choose will be de termined by and s hould b e t he same as
the method used by yo ur wi rele ss router or access point.
TIP: Most keys are He xa de cimal (consists of letters and numbers
fro m 0 -9 an d A-F)
(b)
(c)

21
Using the Belkin Wireless LAN Monitor Utility
21
sect ion
2
1
3
4
5
6
7
8
(d) Enter t he ke y in the “Key” box and select the k ey to use in
the “Key Index” drop -down m enu. This in formation should be
pro vided by y ou r n et work ad ministrator.
TIP: Most keys use Key I ndex 1.
(e) Click “Complet e” to save the prof ile. To begin using your
new prof ile, hi ghlight the prof il e n am e b y click in g o n the
name one time, then c lick “Connect”.
(d)

Using the Belkin Wireless LAN Monitor Utility
2322
How to find and connect to a wireless network
1. Open the Wireless Monitor window by double-clic ki ng th e ico n in
your system tray.
2. Click on the “AP List” tab (a). T his w il l d is play a lis t of all of t he
networks in your are a.
3. Doubl e- click o n t he ne tw or k y ou wa nt to connec t to. A blue circ le
(b) s hould a ppear aro un d t he netw or k i co n nex t to the name
of the ne twork you se lected. This means you a re connec te d t o
the network. If the n etwork is us ing e ncryption security, y ou
will be p ro mp te d t o mak e a pro file for t ha t n et work in order to
connect. See the section of this manual called “Pro file Tab” on
page 17 f or in formation.
(a)
(b)

23
Using the Belkin Wireless LAN Monitor Utility
23
sect ion
2
1
3
4
5
6
7
8
Windows XP Users
If you are using Window s XP, please read this s ection.
Windows XP integrate s a wireless management utilit y referred to as
Windows XP Wire less Zero Conf ig ur ation service (WZC). The WZC can
be used t o c on trol your Adapte r or you can use t he Be lkin Wi re le ss
Network Monitor Util it y. We s ug ge st th at yo u use the Belkin Utili ty
to control yo ur Ca rd or Adapter. If you choose to us e the WZC,
directions for operation of the WZC a re availabl e in the Windows XP
help file. When you f irst install the Card or Adapter, the Belkin Utili ty
will be e nabled. If y ou wa nt to disa bl e t he Belk in Util it y i n order to
use the W ZC, f ollow t he st eps b el ow to di sa bl e t he Belk in Ut il it y.
Disabling the Belkin Wireless Network Monitor Utility in
Windows XP
1. Right-click on the system tray icon.
2. In th e men u, se le ct “E na bl e W in dows Ze ro Conf ig ur ation (WZC)”
3. To enable the Belkin Utility, r ight-click on the s ystem tray i con.
4. In th e men u, se le ct “D is ab le Wi ndows Z ero Con fi gu ration (WZC)”

Using the Belkin Wireless LAN Monitor Utility
2524
Setting Up Windows XP Wireless Network Utility to Use WPA-PSK
In ord er to use WPA-P SK, e nsure tha t you are us ing “ Wi ndows
Wireless Network Utility” by doing the following:
1. Right-click on “Wireless Network Connection” and select “Properties”.
2. Clicking on the “ Wi re le ss Ne tw orks” t ab wi ll di sp lay t he fo ll owing
screen. Ensure th e “Use Windo ws to config ure my wire le ss
network setting s” ch ec k box is checked.
3. Clicking the “Configure” button will allow you to ch oo se yo ur
Network Authent ic ation t ype.

25
Using the Belkin Wireless LAN Monitor Utility
25
sect ion
2
1
3
4
5
6
7
8
4. For h om e o r sma ll busi ne ss us er s s el ec t “ WPA-PSK ” under
“Network Authen ti cation”.
Note: Select WPA if you are u si ng th is co mp uter to co nn ect t o a
corporat e netwo rk th at supp or ts an auth en tication server such
as a ra di us se rver, p lease consult your network administ ra to r f or
further informa ti on.
5. Select “TKIP” or “A ES” u nd er “D ata E nc ryption”. This setting will
have to b e i de ntical to th e w ireles s router that you s et up .
6. Type in your encryption key in the “Network key” box.
Important: Enter your pre- shared ke y. This can b e from 8 t o 6 3
characte rs and can be letters, numbers, or symbols. This same key
must be u sed o n a ll of the clients that you set u p.
7. Click “ OK” t o a pp ly se tt in gs.
Setting up Windows XP WZC Utility to use WPA
Note: If yo u have not already, you must downloa d the WPA upd at e
fro m M ic roso ft Wi nd ow s U pd ate t o ena bl e W PA support. This can
be found at th e M ic roso ft webs it e b y searching for the term “WPA
Wireless”. Locate the update called KB826942, down lo ad it and
update your operatin g syste m.

Securing your Wireless Network
Securing your Wireless Network
Securing your Wireless Network
Here are a few differe nt ways t o maximize th e security of your w ireless
network an d prot ec t your da ta fro m unwanted in tr us io ns . This se ct io n is
intended f or the ho me , home office, an d small o ffice us er. At th e time of
publication, t hree e nc ry pt io n methods are a va il ab le .
Encryption Methods:
Nam e 64-bi t Wi red
Equ iv al ent Pri va cy
128 -b it
Enc ry pt ion
Wi- Fi P rotec te d
Acc es s
Acr onym 64- bi t WE P 128 -b it WPA
Sec ur it y Good Bet te r Bes t
Fea tu res Sta ti c ke ys Sta ti c ke ys Dyn am ic k ey
enc ry pt ion and mut ua l
aut he nt ica ti on
Enc ry pt ion key s ba se d
on RC4 algor it hm
(ty pi ca lly 40- bi t ke ys)
Add ed s ec urity
ove r 64 -b it W EP
usi ng a key len gt h
of 104 bits, plu s 24
add it io nal bit s of
sys te m- gen er at ed
dat a
TKI P (t em poral key
int eg ri ty proto co l)
add ed s o th at k eys are
rot ated and encry pt ion
is stren gthen ed

27
Securing your Wireless Network
27
sect ion
2
1
3
4
5
6
7
8
Mos t wi reless products ship with security turned off. So once you have
your network working , you may need to activate WEP o r W PA and
make sure a ll your wireless devices are s haring the s ame n et work key.
The following diagra m shows the effect of no t h av in g t he co rrect
network key throughout your network.
The Card ca nn ot ac ce ss th e net wo rk be ca use i t u se s a differe nt
network key than the one c onfigured o n the wireless router.
Setting Up your Belkin Wireless Router or Access Point
to Use Security
To sta rt us in g sec ur ity, you need to f irst en able WEP o r WPA fo r y ou r
wireless rou te r ( or acce ss po in t) . F or Be lk in Wi reless Rout er s and
Access Points, these securi ty fe at ures can be configured by us ing t he
web-base d inter fa ce. ( Se e y ou r w ireles s router or access point
manual for dire ctions on ho w t o acc es s the mana ge me nt in terface.)
Wireless G Router
Wireless G Notebook
Network Car
d
Wireless G Desktop
Network Car
d
Wireless G Desktop
Network Car
d
Network Key=
WRONG Password
Network Key=
MyPassword
Network Key=
MyPassword
Network Key=
MyPassword

Securing your Wireless Network
2928
WEP Setup
64-Bit WEP Encryption
1. Selec t “64 -b it WE P” from the drop -d own m enu.
2. Aft er se lecting your WEP en cryption mode, you can e nter your
key by ty ping in th e hex key manuall y, or yo u c an type in a
passphra se in the “Passphra se ” f ie ld an d cli ck “Gen er ate” to
cre ate a ke y.
A hex ( he xadecimal) key is a mi xt ure of numbers and letters from
A–F and 0 –9. F or 64 -b it WE P, you n eed t o ent er 10 hex keys.
For instance:
AF0F4BC3D4 = 64 -b it WE P Key
3. Cli ck “A pply Ch anges” to fi nish. Encryption in the wire le ss rout er
or access point is no w s et . E ac h of your compute rs on your
wireless network will now n eed t o b e confi gu red with the same
security settin gs .
WARNING: If you are using a wireless client to tu rn on the s ec urity
settings in your wireless rou te r or acces s point , you will tempor ar il y
lose your wirel ess c onnection until you activate security on your
wireless client. Please re cord the key prior to applying changes in the
wireless rou te r o r acces s poi nt . If you don’t reme mb er th e hex -k ey,
your client will be l ocked out of th e wireless router or ac cess po int.

29
Securing your Wireless Network
29
sect ion
2
1
3
4
5
6
7
8
128-Bit WEP Encryption
1. Select “128-bit WEP” from t he drop-d ow n m en u.
2. After selecting your WEP encrypt io n mod e, yo u can enter your
key manually by typing in the h ex ke y man ua ll y, or you c an ty pe
in a pa ss phrase in th e “ Pa ssphrase” field and click “Generate” to
cre ate a ke y.
A hex ( he xadecimal) key is a mi xt ure of numbers and letters from
A–F and 0 –9. F or 12 8- bit W EP, y ou ne ed to ente r 26 hex keys.
For instance:
C3030FAF0F4BB2C3D44BC3D4E7 = 12 8- bit W EP ke y
3. Click “App ly Chan ge s” to fini sh . E nc ry ption in t he wi reless router
or access point is no w s et . E ac h of the computer s on your
wireless network will now n eed t o b e confi gu red with the same
security settin gs .
WARNING: If you are using a wireless client to tu rn on the s ec urity
settings in your wireless rou te r or acces s point , you will tempor ar il y
lose your wirel ess c onnection until you activate security on your
wireless client.

Troubleshooting
Troubleshooting
I can’t connect to the Internet wirelessly
If you are unable to connect to the Interne t from a w irel es s
computer, pleas e che ck the follo wi ng it em s:
1. Look at th e l ig ht s o n you r Wireless Router. If you’re u sing a
Belkin Wireless Router, the lights should be as f ol lows:
• The “ Po wer” light s hould be o n.
• The “ Co nnected” light should be on, and n ot bl in ki ng.
• The “ WAN” light should be either on or bl inking.
If your B elkin Router’s li gh ts ha ve th e above char ac te ristics, go
to number 2. below.
If this i s N OT the case, please try the followin g:
• Make su re your Router ’s power c ord is plugged in.
• Make su re all cables are c on nected between the Router
and modem.
• Are all the modems LEDs functioni ng ? If not, see your
modem’s u se r m an ua l.
• Try reboo ti ng th e Rou te r.
• Try reboo ti ng th e mod em .
If you are still having problems, please call Belkin
Technical Support.
If you are not using a B elkin Wirel ess R ou ter, consult that
Wireless Routers manufactu rers user guide.
2. Open your wire le ss ut il ity s oftware b y click in g o n the icon in
the system tray at th e b ot tom r ig ht-hand corn er of the screen.
If you’re u si ng a Belki n USB Adapte r, the tray icon should look
like this (the icon m ay be red, or b lue):
3. The e xact window that opens w ill v ary d ep ending on th e m od el
of USB Ad apter you ha ve; h owever, any of th e uti li ties sh ould
have a li st of “Availab le Netw or ks”. Avai la bl e n et works a re
wireless networks you can c onnect to. I f you are us ing a Belk in
802.11g Router, “Belkin54g” is the default name.
If you are using a Belkin 802.11b router, the d efault name should
be “WLAN”.
If using a n on -Belkin Wirel ess route r, pl ea se co ns ult y our route r
manufact urers user manual for the default name.

31
Troubleshooting
31
sect ion
2
1
3
4
5
6
7
8
I can’t connect to the Internet wirelessly (continued)
The name of your wireless network appears in AP List
If the co rrec t net wo rk na me is list ed in the AP List, please follow
the steps below to co nnect wirel essly:
1. Click on t he co rrec t netwo rk na me in the AP list an d t he n
click “Connect” .
2. If th e n et work ha s s ec urity ( encryption) enable d, yo u will need
to enter the n etwork key. For more i nf ormation re ga rd in g
security, s ee th e pag e ent it le d: “P rofi le Tab: Cre ating a Ne w
Pro file” pg. 17 of the user manual.
3. Within a few seconds, the tray icon in the lower right-hand
corn er of your screen should turn blue, indic at in g a succ es sf ul
connecti on to the network.
If you are still unable to access the Inter ne t a ft er co nn ecting to
the wire less ne twork, please contact Belkin Technical Support
The name of your wireless network DOES NOT appear in
AP List
If the correct network name is not listed under AP List in the wireless
utility, pl ease at tempt the fo llowing tro ubleshooting steps :
1. If po ssible, temporaril y mov e the comput er five to ten feet
away from router. Close the wireless utility, and re-open it. If
the correct n etwork name now a pp ears under “ Av ai la ble
Networks ”, you may have a range o r i nt erfere nce p robl em .
Please see the suggestions liste d in the section of this
manual titled “Place me nt of your Wireless Networki ng
Hardware” pa ge 2.
2. Using a co mputer that is co nn ected to t he Wi reless Rout er (or
Access Point) via a n etwork cable (as opposed to w irel es sly),
ensure t hat “ Broa dc as t S SI D” is enab le d. If usin g a Belkin
Router, this setting is found on the “ Channel and SSID”
configur at io n p ag e. Fo r det ai led i ns tructions on accessing this
page and changing settings, plea se see your Wireless Router
or Access Point User Guide.

Troubleshooting
3332
If you are still unable to access the Inter ne t a ft er co mp leting these
steps, please contac t Belki n Technical Suppor t.
Installation CD-ROM does not start Setup Utility
If the CD -ROM does no t s ta rt th e Set up Ut il it y a ut om atically, it
could be that the c om puter is r un ning other a pplications that are
interfer in g wit h the CD drive.
If the Se tup U tility scre en do es no t appea r wit hi n 15- 20 se co nd s,
open up y our C D-ROM d rive by do ub le-clicking on the “My
Computer ” icon. Next , doubl e- click o n t he CD -R OM dr iv e a nd
double-c li ck on the folder named “Files ”. Ne xt , dou bl e-click on t he
icon named Start.exe .
Power LED does not come ON; Adapter is not working
If the LE D i nd icators are not ON, the prob lem m ay be that the
Adapter is not connected or installed properly.
Verify that the A dapter is pl ugged f irmly into t he US B s lo t of your
computer. Check to see that the d rivers for t he Ca rd have been
installe d. Righ t cli ck on the “My Computer” icon on your desktop.
Choose “Properties” and navigate to the “Device Manager” and see
if your A dapter is li sted without any erro rs . I f an error i s i nd ic ated
contact Belkin Technical Support.
Link LED is blinking slowly; Cannot connect to a wireless
network or the Internet
If your A dapter appears to be f un ctioning properly, but you cannot
connect to a n etwork or yo u h av e a red wi rele ss ic on at the bottom
of your s cree n, th e problem may be that th ere is a mismatch
between the settings in your wireless n etwork prop erties.
Check the settings to see if th ey ma tc h. Th e SSI D is case-se ns it ive
and the s pelling on e ach c omputer must be e xa ctly th e s am e i n
order for the Adapter to connect to the wireless router or access point.
Note: To check the Adapter settings or look for an a va ilable
network, double -c lick th e S ig nal I nd icator icon to br ing u p the
“Wireless Monitors” screen. Click the “AP L is t” if yo u do not see
the network you are try in g to conne ct to click the “re fres h” bu tt on
to scan t he “a ir” f or wi reless netw or ks .

33
Troubleshooting
33
sect ion
2
1
3
4
5
6
7
8
For more in fo rm ation about setting up a SS ID pl ea se reference
your rou ter’s user manual.
If issues persist even at close r ange, please contact Belkin
Technical Support.
Link LED is solid but cannot connect to the Internet
If you ha ve a sig na l but can’t get o nline or o bt ain a n I P address,
the prob lem m ay be that a mismatch between the Encrypt io n k ey
settings in your computer and ro uter.
Check the WEP key s et tings to s ee if they match. The key is
case-sen si ti ve an d t he spel li ng on each comp ut er an d router
must be e xactly the s ame i n o rder for the Adapter to connect
to the rout er. F or more informatio n about encr yp ti on pl ease se e
“Profile Tab: creating a Pro file” o n p ag e 1 7 of this manual.
If issues persist even at close r ange, please contact please
contact Belkin Technical Support
Data transfer is sometimes slow
Wireless Techn ology i s r ad io-based, which means connecti vi ty
and the t hrou gh put p erformance between device s dec reases
when the distance between device s increases. Other factor s that
will cause signal degradati on (m et al is gene ra ll y t he wo rs t cul pr it )
are ob st ructions such as wa lls a nd me ta l a pp liances. As a result,
the typical indoor range of your wire le ss de vices w ill b e b et we en
100 to 20 0 f ee t. No te al so th at conn ec tion sp eed m ay de crea se
as you mo ve fu rther f ro m the wireless rou ter o r acc es s p oi nt .
In ord er to determ in e i f wireless issues are relat ed to range,
we suggest temporari ly movi ng th e compu te r, if poss ib le, t o
five to t en from Wireless Router. Please see the section titled
“Placeme nt of your Wireless Networking Hardware f or Op ti mal
Performa nc e” on page 2 of this ma nual.
If issues persist even at close r ange, please contact please
contact Belkin Technical Support

Troubleshooting
3534
Why are there two wireless utilities in my system tray?
Which one do I use?
There are several features and advantages from using t he Be lkin
wireless utility over the W indows XP Wi re le ss Ze ro Configur at io n
utility. We offer a si te su rv ey, detailed link inform at io n a nd
adapter diagnos is , t o name a few.
It’s esse nt ial t o kno w whi ch util it y i s manag in g y ou r ada pt er. We
rec ommend using the Belkin wire le ss ut ility.
To use the Belkin wireless utility follow the steps below:
Step 1 R ight-click on the network status icon in the s ys tem t ray
and select Vi ew Availabl e Wireless Network s.
Step 2 C lick on th e Adv an ced b ut ton i n t he lowe r-l ef t c or ner of
the Av ai lable W irel es s N et works w indow.
Step 3 F ro m the Advanc ed tab unche ck Use Windo ws to
configure my wi re le ss ne tw ork. On ce th e b ox is unchec ke d cli ck
OK to c lo se th e W in do w.
You are now using the B elkin w irel ess u ti lity to co nf igure the
wireless adapter.

35
Troubleshooting
35
sect ion
2
1
3
4
5
6
7
8
What’s the difference between 802.11b, 802.11g and 802.11a?
Currently there a re three le vels of wi reless netw or ki ng st andard s,
which transmit data at very diff eren t max im um sp ee ds. E ac h i s bas ed
on the de signation 802.11(x ), so named by the IEEE, the b oard that
is res po nsible for c ertifying networki ng stan da rds. 802. 11 b tra ns mits
informat io n at 11Mbp s; 802. 11 a a nd 802. 11 g w or k at 54Mbp s. See
the following chart for more d et ailed i nformation.
Wireless Comparison
Wirel es s
Techn ol og y
802.1 1b 802.11g 802.1 1a
Speed 11 Mb ps 54 Mbps 5 4M bps
Fre qu en cy
Commo n
house ho ld dev ic es
such as co rdles s
phone s and
micro wa ve o ve ns
may interfere w it h
the unlicense d
band - 2 .4 GH z
Commo n
house ho ld dev ic es
such as co rdles s
phone s and
micro wa ve o ve ns
may interfere w it h
the unlicense d
band - 2 .4 GH z
5GHz - u nc rowde d
band
Compa ti bi li ty
Compa ti bl e wi th
802.1 1g
Compa ti bl e wi th
802.1 1b
Incom pa ti bl e wi th
802.1 1b or
802.1 1g
Range
Depen ds on
inter fe rence typic al ly 100 –2 00
ft. indoors
Depen ds on
inter fe rence typic al ly 100 –2 00
ft. indoors
Less interfer ence -
range is
typic al ly 50- 10 0 feet
Adopt io n
Matur e - widely
adopt ed
Expec te d to
conti nu e to gro w
in p opularity
Slow adoption for
consu me rs -
more popu la r in
busin es s
envir on ments
Price Inexp en si ve More expensi ve Most expensiv e

Troubleshooting
Technical Support
You ca n fin d techn ic al su pp ort i nformation at www.belkin.com
or www.belkin.com/networking. If you want to co ntact t echnical
support by phone, please call:
US: 877-736-5771
Europe: 00 800 223 55 460
Australia: 1800 666 040

37
sect ion
2
1
3
4
5
6
7
8
Caution: Exposure to Radio Frequency Radiation.
The radiated output power of this device is far below the FCC radio
frequency exposure limits. Nevertheless, the device shall be used in such
manner that the potential for human contact normal operation is minimized.
Federal Communications Commission Notice
This equipment has been tested and found to comply with the limits for a
Class B digital device, pursuant to Part 15 of the FCC Rules. These limits are
designed to provide reasonable protection against harmful interference in a
residential installation.
This equipment generates, uses, and can radiate radio frequency energy.
If not installed and used in accordance with the instructions, it may cause
harmful interference to radio or television reception, which can be determined
by turning the equipment off and on, the user is encouraged to try and
correct the interference by one or more of the following measures:
FCC Statement
DECLARATION OF CONFORMITY WITH F CC RULES FOR
ELECTROMAGNETIC COMPATIBILITY
We, Belk in Corporation, of 5 01 West Walnut Street,
Compton, CA 9 0220, declare under ou r sole
responsibility that the product,
F5D7050
to which this declaration relates,
complies with Part 15 of the FCC R ules. Operation is
subject to th e following two cond ition s: (1 ) this device
may not cause harmful interference, and (2) this d evice
must accept a ny interference received, inc ludin g
interference that ma y cause undesired oper ation .
This equipment complies with FCC radiation exposure limits set forth for an uncontrolled
environment. End users must follow the specific operating instructions for satisfying RF
exposure compliance. This transmitter must not be co-located or operating in conjunction with
any other antenna or transmitter.
Belkin declares that F5D7050 ( FCC ID: K7SF5D7050A ) is limited in CH1~CH11 by
specified firmware controlled in U.S.A.

Information
Information
• Reorient or relocate the receiving antenna.
• Increase the distance between the equipment and the receiver.
• Connect the equipment to an outlet on a circuit
different from that to which the receiver is connected.
• Consult the dealer or an experienced radio/TV
technician for help.
Modifications
The FCC requires the user to be notified that any changes or modifications to
this device that are not expressly approved by Belkin Corporation may void
the users authority to operate the equipment.
Canada-Industry Canada (IC)
The wireless radio of this device complies with RSS 139 & RSS 210 Industry
Canada. This Class B digital complies with Canadian ICES-003.
Cet appareil numérique de la classe B conforme á la norme NMB-003 du Canada.
Europe-European Union Notice
Radio products with the CE 0682 or CE alert marking
comply with the R&TTE Directive (1995/5/EC) issued by the
Commission of the European Community.
Compliance with this directive implies conformity to the following European
Norms (in brackets are the equivalent international standards).
• EN 60950 (IEC60950) – Product Safety
• EN 300 328 Technical requirement for radio equipment
• ETS 300 826 General EMC requirements for radio equipment.
To determine the type of transmitter, check the identification label
on your Belkin product.
Products with the CE marking comply with the EMC Directive (89/336/EEC)
and the Low Voltage Directive (72/23/EEC) issued by the Commission of the
European Community. Compliance with these directives implies conformity
to the following European Norms (in brackets are the equivalent international
standards).
• EN 55022 (CISPR 22) – Electromagnetic Interference
• EN 55024 (IEC61000-4-2,3,4,5,6,8,11) – Electromagnetic Immunity
• EN 61000-3-2 (IEC610000-3-2) – Power Line Harmonics
• EN 61000-3-3 (IEC610000) – Power Line Flicker
• EN 60950 (IEC60950) – Product Safety
Products that contain the radio transmitter are labeled with CE 0682
or CE alert marking and may also carry the CE logo.

39
Information
39
sect ion
2
1
3
4
5
6
7
8
12
Belkin Corporation Limited Lifetime Product Warranty
Belkin Corporation warrants this product against defects in materials and
workmanship for its lifetime. If a defect is discovered, Belkin will, at its
option, repair or replace the product at no charge provided it is returned
during the warranty period, with transportation charges prepaid, to the
authorized Belkin dealer from whom you purchased the product. Proof of
purchase may be required.
This warranty does not apply if the product has been damaged by accident,
abuse, misuse, or misapplication; if the product has been modified without
the written permission of Belkin; or if any Belkin serial number has been
removed or defaced.
THE WARRANTY AND REMEDIES SET FORTH ABOVE ARE EXCLUSIVE
IN LIEU OF ALL OTHERS, WHETHER ORAL OR WRITTEN, EXPRESSED
OR IMPLIED. BELKIN SPECIFICALLY DISCLAIMS ANY AND ALL IMPLIED
WARRANTIES, INCLUDING, WITHOUT LIMITATION, WARRANTIES OF
MERCHANTABILITY AND FITNESS FOR A PARTICULAR PURPOSE.
No Belkin dealer, agent, or employee is authorized to make any modification,
extension, or addition to this warranty.
BELKIN IS NOT RESPONSIBLE FOR SPECIAL, INCIDENTAL, OR
CONSEQUENTIAL DAMAGES RESULTING FROM ANY BREACH OF
WARRANTY, OR UNDER ANY OTHER LEGAL THEORY, INCLUDING BUT
NOT LIMITED TO, LOST PROFITS, DOWNTIME, GOODWILL, DAMAGE TO
OR REPROGRAMMING OR REPRODUCING ANY PROGRAM OR DATA
STORED IN, OR USED WITH, BELKIN PRODUCTS.
Some states do not allow the exclusion or limitation of incidental or
consequential damages or exclusions of implied warranties, so the above
limitations of exclusions may not apply to you. This warranty gives you
specific legal rights, and you may also have other rights that vary from state
to state.

Information
Wi-FI® Interoperability Certificate

41
 Loading...