


Refrigerator
User Manual
Refrigerador
Manual del usuario
RDNE455K30WN
EN/ES
58 4738 0000/AA-1/2- EN-ES

Please read this user manual first!
A
A
Dear Customer,
We hope that your product, which has been produced in modern plants and checked
under the most meticulous quality control procedures, will provide you an effective
service.
Therefore, read this entire user manual carefully before using the product and keep
it as a reference. If you handover the product to someone else, give the user manual
as well.
The user manual will help you use the product in a fast and safe way.
Read the manual before installing and operating the product.
Make sure you read the safety instructions.
Keep the manual in an easily accessible place as you may need it later.
Read the other documents given with the product.
Remember that this user manual is also applicable for several other models.
Differences between models will be identified in the manual.
Explanation of symbols
Throughout this user manual the following symbols are used:
Important information or
C
useful hints.
Risk of injury and damage to
A
the property.
Risk of electric shock.
B
Packaging materials of
the product are manufactured from recyclable materials in accordance with
our National Environment
Regulations.
INFORMATION
C
SUPPLIER’S NAME
A
MODEL IDENTIFIER
.The model information as stored in the product data base
can be reached by entering following website and searching
for your model identifier (*) found on energy label.
(*)
https://eprel.ec.europa.eu/
Contents
1. Safety and environment
instructions 3
1.1. General safety . . . . . . . . . . . . . . . . . . . 3
1.1.1 HC warning . . . . . . . . . . . . . . . . . . . . . . 5
1.1.2 For models with water dispenser 5
1.2. Intended use. . . . . . . . . . . . . . . . . . . . . 5
1.3. Child safety . . . . . . . . . . . . . . . . . . . . . . 5
1.4. Compliance with the WEEE Directive
and Disposing of the Waste
Product: . . . . . . . . . . . . . . . . . . . . . . . . . 6
1.5. Compliance with RoHS Directive 6
1.6. Package information . . . . . . . . . . . . 6
2 Your appliance 7
3 Installation 8
3.1. Appropriate installation location 8
3.2. Installing the plastic wedges. . . . 8
3.3. Adjusting the feet . . . . . . . . . . . . . . . 9
3.4. Electrical connection . . . . . . . . . . . . 9
3.5. Reversing the doors . . . . . . . . . . . .10
3.6. Reversing the doors . . . . . . . . . . . . 11
4 Preparation 12
4.1. Things to be done for energy
saving. . . . . . . . . . . . . . . . . . . . . . . . . . . 12
4.2. Initial use . . . . . . . . . . . . . . . . . . . . . . .13
4 Preparation 13
5 Operating the product 14
5.1. Te m pe r at u r e s e tt i n g b u t to n . . . 14
5.2. Fa st freeze . . . . . . . . . . . . . . . . . . . . . 14
5.3. Va cat io n fu nc tio n . . . . . . . . . . . . . . 15
5.4. Indicator panel. . . . . . . . . . . . . . . . . . 16
5.5. Indicator panel. . . . . . . . . . . . . . . . . .19
5.6. Twi st I ce – ma tic . . . . . . . . . . . . . . .24
5.7. Ice container . . . . . . . . . . . . . . . . . . . .25
5.8. Egg holder . . . . . . . . . . . . . . . . . . . . . .25
5.9. Fan . . . . . . . . . . . . . . . . . . . . . . . . . . . . . .25
5.10. Crisper. . . . . . . . . . . . . . . . . . . . . . . . . .25
5.11. Chiller compartment. . . . . . . . . . . .25
5.12.Moving door shelf . . . . . . . . . . . . . .26
5.13.Sliding storage container . . . . . .26
5.14.Humidity controlled crisper . . . . 27
5.15.Auto Icematic . . . . . . . . . . . . . . . . . . 27
5.16.Description and cleaning of odor
filter. . . . . . . . . . . . . . . . . . . . . . . . . . . . .28
5.17.HerbBox/HerbFresh. . . . . . . . . . . .28
5.18.Using the water dispenser . . . . .29
5.19.Using the water dispenser. . . . .29
5.20.Filling the water dispenser's tank 3 0
5.21. Cleaning the water tank . . . . . . . 31
5.22.Drip tray . . . . . . . . . . . . . . . . . . . . . . . .32
5.23.Blue light/HarvestFresh . . . . . . .32
5.24.Freezing fresh food . . . . . . . . . . . .33
5.25. Recommendations for preserving
the frozen food . . . . . . . . . . . . . . . . .34
5.26.Deep-freeze information . . . . . .34
5.27.Placing the food. . . . . . . . . . . . . . . .34
5.28.Door open warning . . . . . . . . . . . .35
5.29.Changing the door opening
direction . . . . . . . . . . . . . . . . . . . . . . . .35
5.30.Illumination lamp. . . . . . . . . . . . . . . 35
6 Maintenance and cleaning 36
6.1. Avoid ing ba d odor s . . . . . . . . . . . . .36
6.2. Protecting the plastic surfaces 36
6.3. Door Glasses . . . . . . . . . . . . . . . . . . .36
6 Maintenance and cleaning 37
7. Tr ou b l e s h o ot i n g 38
2 /39 EN
Refrigerator / User Manual
1. Safety and environment instructions
This section provides the safety
instructions necessary to prevent
the risk of injury and material
damage. Failure to observe these
instructions will invalidate all
types of product warranty.
Intended use
WARNING:
Keep ventilation
openings, in the appliance
A
A
A
A
This appliance is intended to be
used in household and similar
applications such as
– staff kitchen areas in shops,
offices and other working
environments;
enclosure or in the builtinstructure, clear of
obstruction.
WARNING:
Do not use mechanical
devices or other means
to accelerate the
defrosting process,
other than those
recommended by the
manufacturer.
WARNING:
Do not damage the
refrigerant circuit.
WARNING:
Do not use electrical
appliances inside
the food storage
compartments of
the appliance, unless
they are of the type
recommended by the
manufacturer.
– farm houses and by clients in
hotels, motels and other residential
type environments;
– bed and breakfast type
environments;
– catering and similar non-retail
applications.
1.1. General safety
This product should not be
used by persons with physical,
sensory and mental disabilities,
without sufficient knowledge
and experience or by children.
The device can only be used by
such persons under supervision
and instruction of a person
responsible for their safety.
Children should not be allowed to
play with this device.
In case of malfunction, unplug the
device.
After unplugging, wait at least 5
minutes before plugging in again.
Unplug the product when not in
use.
Do not touch the plug with wet
hands! Do not pull the cable to
plug off, always hold the plug.
Do not plug in the refrigerator if
the socket is loose.
Unplug the product during
installation, maintenance,
cleaning and repair.
If the product will not be used for
a while, unplug the product and
remove any food inside.
Do not use the product when the
compartment with circuit cards
located on the upper back part of
the product (electrical card box
cover) (1) is open.
Refrigerator / User Manual
3/39 EN

Instructions for safety and environment
1
1
Do not use steam or steamed
cleaning materials for
cleaning the refrigerator and
melting the ice inside. Steam
may contact the electrified
areas and cause short circuit
or electric shock!
Do not wash the product by
spraying or pouring water on
it! Danger of electric shock!
In case of malfunction, do
not use the product, as it may
cause electric shock. Contact
the authorised service before
doing anything.
Plug the product into an
earthed socket. Earthing
must be done by a qualified
electrician.
If the product has LED
type lighting, contact the
authorised service for
replacing or in case of any
problem.
Do not touch frozen food with
wet hands! It may adhere to
your hands!
Do not place liquids in bottles
and cans into the freezer
compartment. They may
explode.
Place liquids in upright
position after tightly closing
the lid.
Do not spray flammable
substances near the product,
as it may burn or explode.
Do not keep flammable
materials and products with
flammable gas (sprays, etc.)
in the refrigerator.
Do not place containers
holding liquids on top of the
product. Splashing water on
an electrified part may cause
electric shock and risk of fire.
Exposing the product to rain,
snow, sunlight and wind
will cause electrical danger.
When relocating the product,
do not pull by holding the
door handle. The handle may
come off.
Take care to avoid trapping
any part of your hands or
body in any of the moving
parts inside the product.
Do not step or lean on the
door, drawers and similar
parts of the refrigerator. This
will cause the product to fall
down and cause damage to
the parts.
Take care not to trap the
power cable.
4 / 39 EN
Refrigerator / User Manual
Instructions for safety and environment
1.1.1 HC warning
If the product comprises a
cooling system using R600a
gas, take care to avoid
damaging the cooling system
and its pipe while using and
moving the product. This gas
is flammable. If the cooling
system is damaged, keep the
product away from sources
of fire and ventilate the room
immediately.
The label on the inner left
side indicates the type of
C
gas used in the product.
1.1.2 For models with
water dispenser
Pressure for cold water inlet
shall be maximum 90 psi (6.2
bar). If your water pressure
exceeds 80 psi (5.5 bar), use
a pressure limiting valve in
your mains system. If you
do not know how to check
your water pressure, ask for
the help of a professional
plumber.
If there is risk of water
hammer effect in your
installation, always
use a water hammer
prevention equipment in
your installation. Consult
Professional plumbers if you
are not sure that there is no
water hammer effect in your
installation.
Do not install on the hot
water inlet. Take precautions
against of the risk of
freezing of the hoses. Water
temperature operating
interval shall be 33°F (0.6°C)
minimum and 100°F (38°C)
maximum.
Use drinking water only.
1.2. Intended use
This product is designed for
home use. It is not intended
for commercial use.
The product should be used
to store food and beverages
only.
Do not keep sensitive
products requiring controlled
temperatures (vaccines,
heat sensitive medication,
medical supplies, etc.) in the
refrigerator.
The manufacturer assumes
no responsibility for any
damage due to misuse or
mishandling.
Original spare parts will
be provided for 10 years,
following the product
purchasing date.
1.3. Child safety
Keep packaging materials
out of children’s reach.
Do not allow the children to
play with the product.
If the product’s door
comprises a lock, keep the
key out of children’s reach.
Refrigerator / User Manual
5/39EN

Instructions for safety and environment
1.4. Compliance with
the WEEE Directive
and Disposing of the
Waste Product:
This product complies with EU WEEE Directive
(2012/19/EU). This product bears a classification symbol for waste electrical and electronic
equipment (WEEE).
This symbol indicates that this product shall not be disposed with other
household wastes at the end of its
service life. Used device must be re-
turned to offical collection point for
recycling of electrical and electronic devices. To
find these collection systems please contact to
your local authorities or retailer where the product was puchased. Each household performs
important role in recovering and recycling of old
appliance. Appropriate disposal of used appliance helps prevent potential negative consequences for the environment and human
health.
1.5. Compliance with
RoHS Directive
The product you have purchased complies with
EU RoHS Directive (2011/65/EU). It does not
contain harmful and prohibited materials specified in the Directive.
1.6. Package
information
Packaging materials of the product
are manufactured from recyclable
materials in accordance with our
National Environment Regulations.
Do not dispose of the packaging materials together with the domestic or other wastes. Take
them to the packaging material collection points
designated by the local authorities.
6 / 39 EN
Refrigerator / User Manual

2 Your appliance
17
*16
*16
*1
14
*15
14
*13
18
8
1.
Fridge - compartment door shelf
2.
Temperature setting button
3.
Water dispenser filling tank
4.
Egg section
5.
Water dispenser reservoir
6.
Storage container under the door shelf
7.
Moving door shelf
8.
Adjustable feet
9.
Crisper
*12
*11
*10
*9
*3
*2
8
10.
Chiller compartment
11.
Lock and key
12.
Bottle shelf
13.
Fridge - compartment glass shelf
14.
Fan
15.
Freezer compartment shelf
16.
Icebox / Ice-making compartment
17.
Freezer compartment
18.
Fridge compartment
*4
*5
*6
*7
*optional:Figures in this user manual are given as an example and may not
match the product exactly. If the relevant parts are not available in the product you
C
purchased, the figure applies to other models.
Refrigerator / User Manual
7/39 EN

3 Installation
3.1. Appropriate
installation location
Contact an Authorized Service for the
installation of the product. In order to
prepare the product for use, refer the
information in the user manual and
ensure that electrical installation and
water installation are appropriate. If not,
call a qualified electrician and technician
to have any necessary arrangements
carried out.
WARNING: Manufacturer shall
not be held liable for damages that
B
B
A
may arise from procedures carried
out by unauthorized persons.
WARNING: Product must not
be plugged in during installation.
Otherwise, there is the risk of
death or serious injury!
WARNING: If the door clearance
of the room where the product
shall be place is so tight to prevent
passing of the product, remove
the door of the room and pass
the product through the door by
turning it to its side; if this does
not work, contact the authorized
service.
where the temperature falls below
-5°C.
3.2. Installing the
plastic wedges
Plastic wedges supplied with the
product are used to create the distance
for the air circulation between the
product and the rear wall.
1. To install the wedges, remove the
screws on the product and use the
screws supplied together with the
wedges.
2. Insert the 2 plastic wedges onto the
rear ventilation cover as illustrated in
the figure.
surface to prevent jolts.
away from heat sources such as hobs,
heater cores and stoves and at least 5
cm away from electrical ovens.
direct sun light and kept in humid
places.
provided around your product in order
to achieve an efficient operation. If the
product is to be placed in a recess in
the wall, pay attention to leave at least
5 cm distance with the ceiling and side
walls.
8 /39 EN
Refrigerator / User Manual

Installation
3.3. Adjusting the feet
If the product stands unbalanced
after installation, adjust the feet on
the front by rotating them to the right
or left.
3.4. Electrical
connection
WARNING:Do not make
connections via extension
A
B
C
cables or multi-plugs.
WARNING: Damaged power
cable must be replaced by the
Authorized Service Agent.
If two coolers are to be
installed side by side, there
should be at least 4 cm
distance between them.
C
Hot Surface Warning!
Side walls of your product is
equipped with refrigerant
pipes to improve the cooling
system. Refrigerant with
high temperatures may flow
through these areas, resulting
in hot surfaces on the side
walls. This is normal and does
not need any servicing. Please
pay attention while touching
these areas.
Our company shall not be liable
for any damages that will arise
when the product is used
without grounding and electrical
connection in accordance with the
national regulations.
Power cable plug must be within
easy reach after installation.
Do not extension cords or cordless
multiple outlets between your
product and the wall outlet.
Refrigerator / User Manual
9 /39 EN
Installation
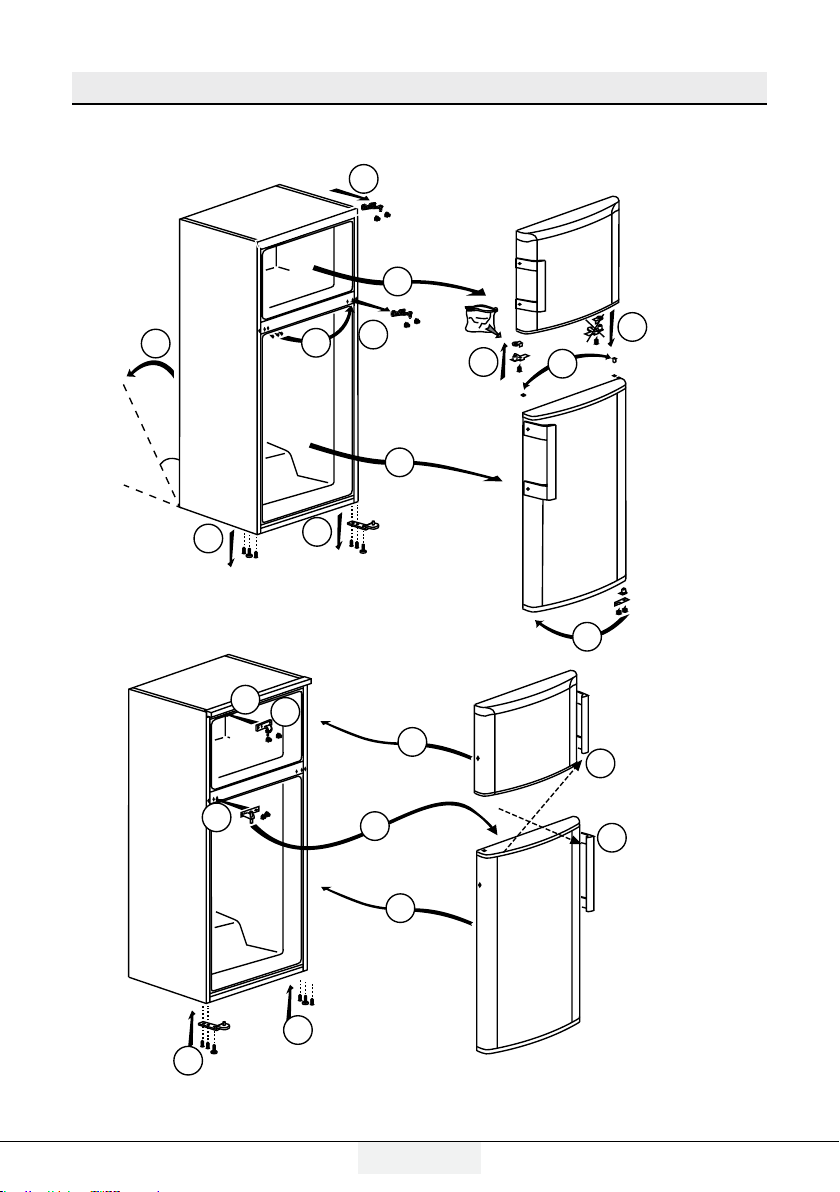
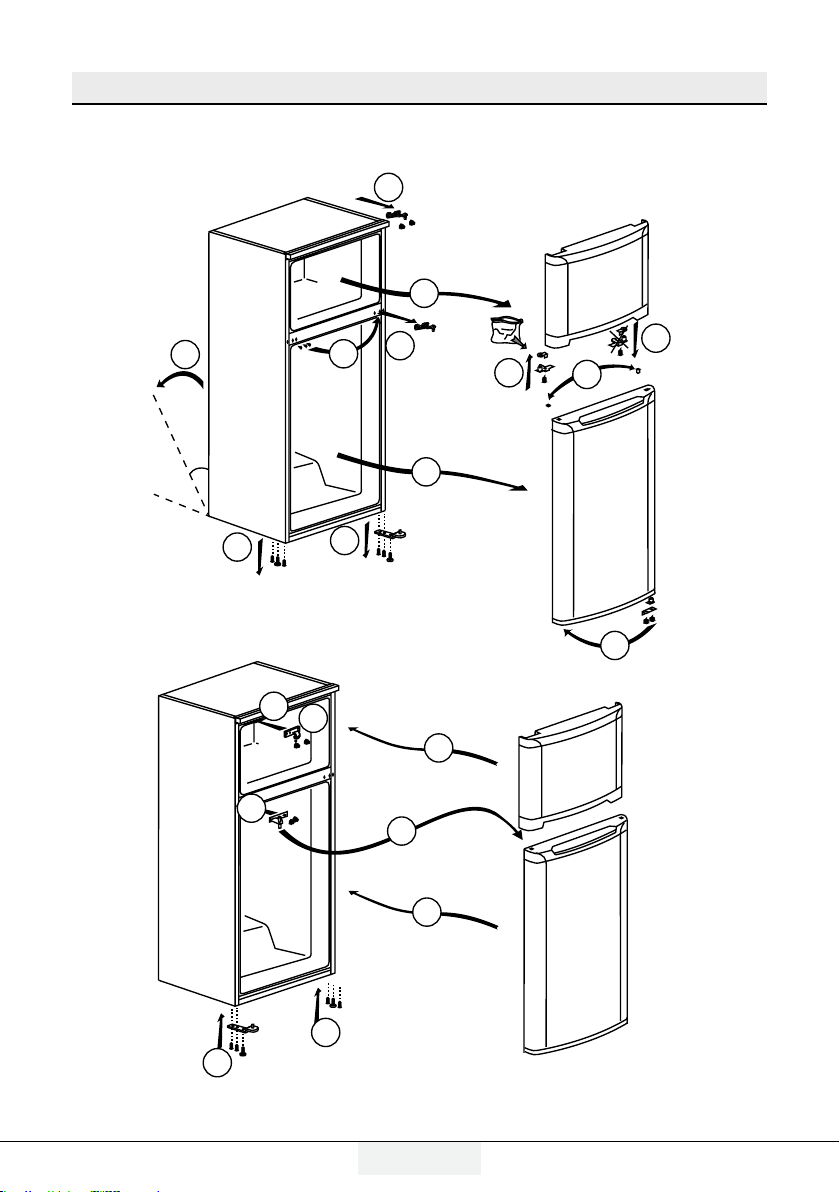
3.5. Reversing the doors
Proceed in numerical order .
4
2
1
6
45 °
5
10
11
9
3
7
8
12
16
15
19
21
20
18
21
13
14
17
10 / 39 EN
Refrigerator / User Manual
Installation
3.6. Reversing the doors
Proceed in numerical order .
4
2
1
6
45 °
5
10
11
9
3
7
8
12
16
15
19
20
18
17
13
Refrigerator / User Manual
14
11 /39 EN

4 Preparation
4.1. Things to be done
for energy saving
Connecting the product to electric
energy saving systems is risky
A
For a freestanding appliance;
Do not leave the doors of your
Do not put hot food or drinks in your
Do not overload the refrigerator,
In order to store maximum amount
Airflow should not be blocked by
Since hot and humid air will not
as it may cause damage on the
product.
‘this refrigerating appliance is not
intended to be used as a built-in
appliance.
refrigerator open for a long time.
refrigerator.
cooling capacity will fall when the air
circulation inside is hindered.
of food in the freezer compartment,
the icematic, available in the freezer
compartment and easily removable by
hand, shall be taken out. Net volume
and energy consumption values
declared on the power data plate of
your refrigerator are measured and
tested by removing the icematic. Do
not remove the shelves inside the
freezer compartment and on the door
of freezer compartment shall not be
removed and they shall always be
used they provide ease of use and
efficiency in energy consumption.
placing foods on the sides of the
freezer compartment fan. A minimum
distance of 3 cm shall be provided on
the sides of protective fan cover.
directly penetrate into your product
when the doors are not opened,
your product will optimize itself in
conditions sufficient to protect your
food. Functions and components
such as compressor, fan, heater,
defrost, lighting, display and so on
will operate according to the needs
to consume minimum energy under
these circumstances.
The baskets/drawers that are
provided with the chill compartment
must always be in use for low energy
consumption and for better storage
conditions.
Food contact with the temperature
sensor in the freezer compartment
may increase energy consumption of
the appliance. Thus any contact with
the sensor(s) must be avoided.
Depending on the features of your
product, thawing frozen food in
fridge compartment will both provide
energy saving and preserve the food
quality.
Do not allow contact of the food with
the fridge compartment temperature
sensor shown in the figure below.
12 /39 EN
Refrigerator / User Manual

4 Preparation
4.2. Initial use
Before starting to use your refrigerator,
ensure that all preparations are made
in accordance with the instructions in
sections "Instructions for safety and
environment" and "Installation".
Run the product without putting any
food for 6 hours and do not open its
door unless certainly required.
You will hear a noise when the
compressor starts up. The liquids
C
C
C
and gases sealed within the
refrigeration system may also
give rise to noise, even if the
compressor is not running and this
is quite normal.
Front edges of the product may
feel warm. This is normal. These
areas are designed to be warm to
avoid condensation.
In some models, the instrument
panel automatically turns off
5 minutes after the door has
closed. It will be reactivated when
the door has opened or pressed
on any key.
Refrigerator / User Manual
13/39 EN

5 Operating the product
5.1. Temperature
setting button
The interior temperature of your
refrigerator changes for the following
reasons;
Seasonal temperatures,
Frequent opening of the door and
leaving the door open for long periods,
Food put into the refrigerator
without cooling down to the room
temperature,
The location of the refrigerator in the
room (e.g. exposing to sunlight).
You may adjust the varying interior
temperature due to such reasons by
using the setting button.
The numbers around the control knob
indicate the temperature values in “°C”.
If the ambient temperature is 25°C,
we recommend you to use the
temperature control knob of your
refrigerator at 4°C. This value may be
increased or decreased as required in
other ambient temperatures.
5.2. Fast freeze
If large amounts of fresh food are going
to be frozen, adjust the temperature
control knob to (
before putting the fresh food in the fast
freeze compartment.
It is strongly recommended to keep the
knob at this position at least 24 hours
to freeze maximum amount of fresh
food declared as freezing capacity. Take
special care not to mix frozen food and
fresh food.
) max. 24 hours
14 /39 EN
Refrigerator / User Manual

Operating the product
Remember to turn the temperature
control knob back to its previous
position once food has frozen.
5.3. Vacation function
If the doors of the product are
not opened for 12 hours after the
temperature control knob is switched
to the hottest position, then the
vacation function will be activated
automatically.
When the setting operation is
completed, you may press the
temperature control knob and have
it hidden.
To cancel the function, change the
knob setting.
It is not recommended to store food
in cooler compartment when the
vacation function is active.
Refrigerator / User Manual
15/39EN

Operating the product
5.4. Indicator panel
Indicator panel allows you to set the temperature and control the other
functions related to the product without opening the door of the product. Just
press the inscriptions on relevant buttons for function settings.
1
2
*10
*12
11
1. Power failure/High temperature /
error warning indicator
This indicator ( ) illuminates during
power failure, high temperature
failures and error warnings. During
sustained power failures, the
highest temperature that the freezer
compartment reaches will flash on the
digital display. After checking the food
located in the freezer compartment (
) press the alarm off button to clear the
warning.
*Optional: Figures in this user manual are schematic and may not match
the product exactly. If the subject parts are not included in the product you
C
have purchased, then those parts are valid for other models.
16 / 39 EN
6
789
2. Energy saving function (display
off):
If the product doors are kept closed
for a long time energy saving
function is automatically activated
and energy saving symbol is
illuminated. ( )
When energy saving function is
activated, all symbols on the display
other than energy saving symbol will
turn off. When the Energy Saving
function is activated, if any button
is pressed or the door is opened,
energy saving function will be
canceled and the symbols on display
will return to normal.
45
Refrigerator / User Manual
3

Operating the product
Energy saving function is activated
during delivery from factory and
cannot be canceled.
3.Quick fridge function
The button has two functions. To
activate or deactivate the quick cool
function press it briefly. Quick Cool
indicator will turn off and the product
will return to its normal settings. ( )
Use quick cooling function
when you want to quickly cool
C
C
C
C
4. Fridge compartment
temperature setting button
Press this button to set the
temperature of the fridge
compartment to 8, 7,6, 5,4,3, 2, 8...
respectively. Press this button to set
the fridge compartment temperature
to the desired value. ( )
the food placed in the fridge
compartment. If you want to
cool large amounts of fresh
food, activate this function
before putting the food into
the product.
If you do not cancel it, quick
cooling will cancel itself
automatically after 8 hours or
when the fridge compartment
reaches to the required
temperature.
If you press the quick cooling
button repeatedly with short
intervals, the electronic circuit
protection will be activated
and the compressor will not
start up immediately.
This function is not recalled
when power restores after a
power failure.
5.Vacation Function
In order to activate vacation function,
press the this button (
seconds, and the vacation mode
indicator (
the vacation function is activated,
“- -” is displayed on the fridge
compartment temperature indicator
and no active cooling is performed
on the fridge compartment. It is not
suitable to keep the food in the fridge
compartment when this function is
activated. Other compartments shall
be continued to be cooled as per their
set temperature.
To cancel this function press Vacation
function button again.
6. Alarm off warning:
In case of power failure/high
temperature alarm, after checking
the food located in the freezer
compartment press the alarm off
button (
7. Key lock
Press key lock button ( )
simultaneously for 3 seconds. Key
lock symbol
) will light up and key lock mode
(
will be activated. Buttons will
not function if the Key lock mode
is active. Press key lock button
simultaneously for 3 seconds again.
Key lock symbol will turn off and the
key lock mode will be exited.
Press the key lock button if you
want to prevent changing of
the temperature setting of the
refrigerator (
) will be activated. When
) to clear the warning.
).
) for 3
Refrigerator / User Manual
17/39EN

Operating the product
8. Eco fuzzy
Press and hold eco fuzzy button
for 1 seconds to activate eco fuzzy
function. Refrigerator will start
operating in the most economic
mode at least 6 hours later and the
economic usage indicator will turn
on when the function is active (
). Press and hold eco fuzzy function
button for 3 seconds to deactivate
eco fuzzy function.
This indicator is illuminated after 6
hours when eco fuzzy is activated.
9. Freezer compartment
temperature setting button
Press this button to set the
temperature of the freezer
compartment to -18,-19,-20,-21,
-22, -23,-24, -18... respectively.
Press this button to set the freezer
compartment temperature to the
desired value.
10. Icematic off indicator
Indicates whether the icematic is on
or off. (
is not operating. To operate the
icematic again press and hold the OnOff button for 3 seconds.
C
( )
)If On, then the icematic
Water flow from water tank
will stop when this function is
selected. However, ice made
previously can be taken from
the icematic.
11. Quick freeze function button/
icematic on-off button
Press this button to activate or
deactivate the quick freezing
function. When you activate the
function, the freezer compartment
will be cooled to a temperature lower
than the set value. ( )
To turn on and off the icematic press
and hold it for 3 seconds.
Use the quick freeze function
when you want to quickly
C
C
C
12. Economic usage indicator
Indicates that the product is running
in energy-efficient mode.This
indicator will be active if the Freezer
Compartment temperature is set to
-18 or the energy efficient cooling
is being performed due to Eco-Extra
function.
freeze the food placed in fridge
compartment. If you want to
freeze large amounts of fresh
food, activate this function
before putting the food into
the product.
If you do not cancel it, Quick
Freeze will cancel itself
automatically after 4 hours or
when the fridge compartment
reaches to the required
temperature.
This function is not recalled
when power restores after a
power failure.
18 / 39 EN
C
Economic usage indicator is
turned off when quick cooling
or quick freeze functions are
selected.
Refrigerator / User Manual

Operating the product
5.5. Indicator panel
Indicator panels may vary according to the product model.
Audio – visual functions on the indicator panel helps you in using your product.
8
9
1
7
1. Fridge Compartment Indicator
2. Error status indicator
3. Temperature indicator
4. Vacation function button
5. Temperature setting button
6. Compartment selection button
7. Freezer compartment indicator
8. Economy mode indicator
9. Vacation function indicator
*optional
2
6
3
45
*Optional: Figures in this user manual are schematic and may not match
the product exactly. If the subject parts are not included in the product you
C
Refrigerator / User Manual
have purchased, then those parts are valid for other models.
19/39EN

Operating the product
1. Fridge compartment indicator
Fridge compartment light is
illuminated while the fridge
compartment temperature is set.
2. Error status indicator
If your refrigerator does not perform
enough cooling or in case of a sensor
fault, this indicator is activated.
When this indicator is activated,
“E” is displayed on the freezer
compartment temperature indicator,
and numbers such as “1,2,3...” are
displayed on the fridge compartment
temperature indicator. These
numbers on the indicator inform
service personnel about the error.
3. Temperature indicator
Indicates freezer, fridge compartment
temperature.
4. Vacation function button
Press on Vacation Button for 3
seconds to activate this function.
When the vacation function is
activated, “- -” is displayed on the
fridge compartment temperature
indicator and no active cooling
is performed on the fridge
compartment. It is not suitable
to keep the food in the fridge
compartment when this function is
activated. Other compartments shall
be continued to be cooled as per their
set temperature.
To cancel this function press Vacation
button again.
5. Temperature setting button
Changes the temperature of the
relevant compartment between
-24°C... -18°C and 8°C...1°C.
6. Compartment selection button
Selection button: Press compartment
selection button to switch between
fridge and freezer compartments.
7. Freezer compartment indicator
Fridge compartment light is
illuminated while the freezer
compartment temperature is set.
8. Economy mode indicator
Indicates that the refrigerator
operates in energy saving mode.
This display shall be activated if the
freezer compartment temperature is
set to -18°C.
9. Vacation function indicator
Indicates that vacation is activated.
20 / 39 EN
Refrigerator / User Manual

Operating the product
*1
11
1. Economy
This symbol is illuminated when
the freezer compartment is set to
-18°C'ye as the most economical
setting value ( ). Economy
indicator is turned off when quick
cooling or quick freeze functions are
selected.
2. High temperature / error
warning indicator
This indicator ( ) illuminates during
high temperature failures and error
warnings.
3. Energy saving function (display off)
If the product doors are kept closed
3
2
*7.2
910
for a long time energy saving function
is automatically activated and energy
saving symbol is illuminated. When
energy saving function is activated,
all symbols on the display other than
energy saving symbol will turn off.
When the Energy Saving function is
activated, if any button is pressed or
the door is opened, energy saving
function will be canceled and the
symbols on display will return to
normal.
Energy saving function is activated
during delivery from factory and
cannot be canceled.
*7.1
568
4
*Optional: Figures in this user manual are schematic and may not match
the product exactly. If the subject parts are not included in the product you
C
Refrigerator / User Manual
have purchased, then those parts are valid for other models.
21/39EN

Operating the product
4.Quick cool
Quick cooling indicator ( ) is
illuminated when quick cooling
function is activated and fridge
compartment temperature indicator
value is displayed as 1. To cancel this
function press Quick cooling button
again. Quick cooling indicator will
turn off and refrigerator will return
to its normal settings. Quick cooling
function is canceled automatically in
1 hour if you do not cancel it before.
If you want to cool large amounts of
fresh food, press the Quick cooling
button before putting the food into
the fridge compartment.
5. Vacation function
In order to activate vacation function,
press the button no.
) for 3 seconds, and the vacation
(
mode indicator activates. When
the vacation function is activated,
“- -” is displayed on the fridge
compartment temperature indicator
and no active cooling is performed
on the fridge compartment. It is not
suitable to keep the food in the fridge
compartment when this function is
activated. Other compartments shall
be continued to be cooled as per their
set temperature.
To cancel this function press Vacation
function button again.
6. Fridge compartment temperature setting
When the button no. is pressed, you
may set the temperature of the fridge
compartment to 8,7,6,5,4,3,2 and 1
respectively ( ).
7.1 Energy saving function (disp-
lay off):
Energy saving symbol ( ) is
illuminated and Energy saving
function is activated when you press
this button ( ). When energy saving
function is activated, all symbols
on the display other than energy
saving symbol will turn off. When the
Energy Saving function is activated,
if any button is pressed or the door
is opened, energy saving function
will be canceled and the symbols on
display will return to normal. Energy
saving symbol is turned off and
energy saving function is deactivated
when you press this button ( )
again.
7.2. Alarm off warning
In case of power failure/high
temperature alarm, after checking
the food located in the freezer
compartment press the alarm off
button to clear the warning.
8. Key lock
Press key lock button ( )
simultaneously for 3 seconds. Key
lock symbol
) will light up and key lock mode
(
will be activated. Buttons will
not function if the Key lock mode
is active. Press key lock button
simultaneously for 3 seconds again.
Key lock symbol will turn off and the
key lock mode will be exited.
Press the key lock button if you
want to prevent changing of
the temperature setting of the
refrigerator (
).
22 / 39 EN
Refrigerator / User Manual
Operating the product
9. Eco fuzzy
Press and hold eco fuzzy button
for 1 seconds to activate eco fuzzy
function. Refrigerator will start
operating in the most economic
mode at least 6 hours later and the
economic usage indicator will turn
on when the function is active (
). Press and hold eco fuzzy function
button for 3 seconds to deactivate
eco fuzzy function.
This indicator is illuminated after 6
hours when eco fuzzy is activated.
10. Freezer compartment temperature setting
Temperature setting for freezer
compartment is performed here.
When button no. is pressed, you may
set the temperature of the freezer
compartment to -18, -19, -20, -21,
-22, -23 and -24 respectively.
11. Fast freeze
Press button no. for fast freeze
operation, quick freeze indicator
) shall be activated.
(
Quick freeze indicator is illuminated
when quick freeze function is
activated and fridge compartment
temperature indicator is displayed
as -27. To cancel this function press
quick freeze button (
) again. Quick
freeze indicator will turn off and
refrigerator will return to its normal
settings. Quick freeze function is
canceled automatically in 24 hour
if you do not cancel it before. If you
want to freeze large amounts of fresh
food, press the quick freeze button
before putting the food into the
freezer compartment.
Refrigerator / User Manual
23/39EN

Operating the product
5.6. Twist Ice – matic
(This feature is optional)
Remove the water tank by rotating it
to the left.
Open the water tank cover by turning it
and add water to the water tank up to
the lower part of the water tank cover.
Place the water tank on its place as
shown in the figure after adding water
and have it seated by rotating it on the
direction of the arrow. Water shall be
poured down to the icebank.
When ice has formed, rotate icebank
knob in the direction of the arrow to
allow that the ice is dropped down to
the ice drawer.
Take the ice cubes by pulling ice
drawer out.
Pull the front face towards you in order
to wash the icebank, and put it on the
slides on the interior area and push it
to its place in order to replace it.
Pull the twist icematic unit towards
you in order to remove the unit, and
put it on the slides on the ceiling and
push it to its place in order to replace it.
24 / 39 EN
Refrigerator / User Manual
Operating the product
5.7. Ice container
Remove the ice container from the
freezer compartment.
Fill the ice container with water.
Place the ice container in the
freezer compartment. About two
hours later, the ice is ready.
Remove the ice container from the
freezer compartment and bend it
over the service plate. Ice cubes will
easily fall down to the service plate.
5.8. Egg holder
You can install the egg holder to
the desired door or body shelf. If
it will be placed on body shelves
than the lower cooler shelves are
recommended.
Never place the egg holder in
A
the freezer compartment
5.9. Fan
Fan is designed to ensure homogeneous distribution and circulation of
the cold air inside your refrigerator.
Operation time of the fan may vary
depending on the properties of your
product.
While the fan works only with the
compressor in some products, the
control system determines its operation time in some products in accordance with the cooling requirement.
5.10. Crisper
Crisper of the product is designed
specially to keep the vegetables
fresh without loosing their humidity.
For this purpose, cool air circulation
is intensified around the crisper in
general.
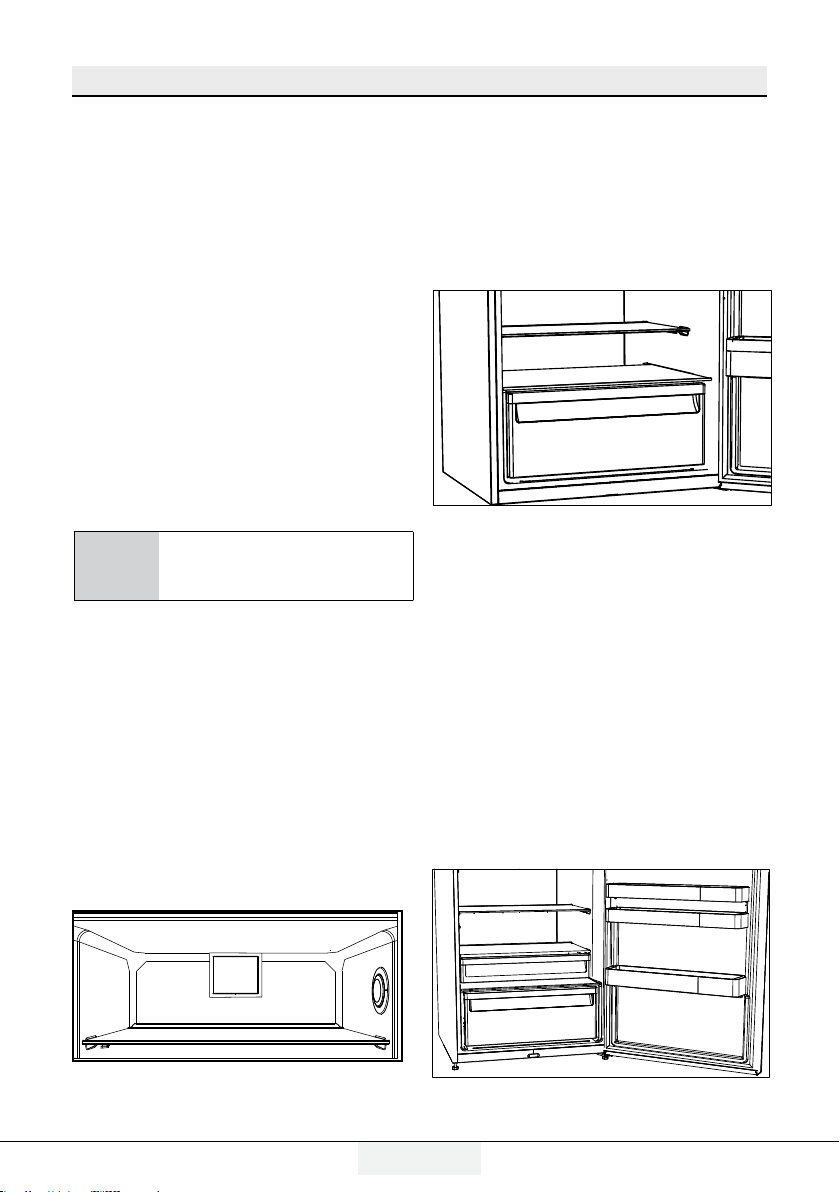
5.11. Chiller
compartment
(This feature is optional)
Use this compartment to store
delicatessen that shall be stored in a
lower temperature or meat products
that you will consume in a short time.
Chiller compartment is the coolest
place in your refrigerator where
you can keep dairy products, meat,
fish and poultry under ideal storage
conditions. Fruits and vegetables
should not be stored in this
compartment.
Refrigerator / User Manual
25/39EN

Operating the product
5.12. Moving
door shelf
(This feature is optional)
Moving door shelf may be fixed in 3
different positions.
Press the buttons shown in the sides
at the same amount in order to move
the shelf. Shelf shall be movable.
Move the shelf up or down.
Release the buttons when you have
the shelf in the desired position.
Shelf shall be fixed on the position
where you release the buttons.
5.13. Sliding
storage container
(This feature is optional)
This accessory is designed to increase
the usable volume of the door
shelves.
It allows you to easily place the tall
bottles, jars and tins to the lower
bottle shelf thanks to its ability to
move right or left.
26 / 39 EN
Refrigerator / User Manual

Operating the product
5.14. Humidity
controlled crisper
(FreSHelf)
(This feature is optional)
Humidity rates of the vegetables and
fruit are kept under control with the
feature of humidity-controlled crisper
and the food is ensured to stay fresh
for longer.
We recommend you to place the leafy
vegetables such as lettuce, spinach
and the vegetables which are sensitive
to humidity loss, in a horizontal manner
as much as possible inside the crisper,
not on their roots in a vertical position.
While the vegetables are being placed,
specific gravity of the vegetables
should be taken into consideration.
Heavy and hard vegetables should be
put at the bottom of the crisper and
the lightweight and soft vegetables
should be placed over.
Never leave the vegetables inside the
crisper in their bags. If the vegetables
are left inside their bags, this will cause
them to decompose in a short period
of time. In case contacting with other
vegetables is not preferred for hygiene
concerns, use a perforated paper and
other similar packaging materials
instead of a bag.
Do not place together the pear, apricot,
peach, etc. and apple in particular
which have a high level of generation
of ethylene gas in the same crisper
with the other vegetables and fruit.
The ethylene gas which is emitted by
these fruit may cause the other fruit
to ripen faster and decompose in a
shorter time.
5.15. Auto Icematic
(This feature is optional)
The Auto Icematic allows you
to make ice in the fridge easily.
Remove the water tank in the fridge
compartment, fill it wilt water and
install it back to obtain ice from the
Icematic.
First ice cubes will be ready in
approximately 2 hours in the Icematic
drawer located in the freezer
compartment.
If you fill the water tank completely,
you will be able to obtain
approximately 60-70 ice cubes.
Change the water in water tank if it
has waited around 2-3 weeks.
For the products having
automatic Icematic, sound may
C
be heard during ice pouring.
This sound is normal and does
not signal any error.
Refrigerator / User Manual
27/39EN

Operating the product
5.16. Description and
cleaning of odor filter
(This feature is optional)
Odor filter prevents unpleasant odor
build-up in your product.
1. Pull the cover into which the odor
filter is installed downwards from
the front section and remove as
illustrated.
2. Leave the filter under sunlight
for one day. Filter will be cleaned
during this time.
3. Install the filter back to its place.
Odor filter must be cleaned
C
once in a year.
5.17. HerbBox/
HerbFresh
Remove the film container from
HerbBox/HerbFresh+
Take the film out of the bag and put
it into the film container as shown in
the image.
Seal the container again and replace
it into HerbBox/HerbFresh+ unit.
HerbBox-HerbFresh+ sections are
especially ideal for storage of various
herbs that are supposed to be kept
in delicate conditions. You can store
your unbagged herbs (parsley, dill,
etc.) in this section horizontally and
keep them fresh for a much longer
period.
The film shall be replaced in every six
months.
28 / 39 EN
Refrigerator / User Manual

Operating the product
5.18. Using the
water dispenser
*optional
It is normal for the first few
C
C
1. Push in the lever of the water dispenser with your glass. If you are
using a soft plastic cup, pushing the
lever with your hand will be easier.
2. After filling the cup up to the level
you want, release the lever.
C
glasses of water taken from
the dispenser to be warm.
If the water dispenser is
not used for a long period
of time, dispose of first few
glasses of water to obtain
fresh water.
Please note, how much
water flows from the
dispenser depends on
how far you depress the
lever. As the level of water
in your cup / glass rises,
gently reduce the amount
of pressure on the lever
to avoid overflow. If you
slightly press the arm, the
water will drip; this is quite
normal and not a failure.
5.19. Using the
water dispenser
*optional
It is normal for the first few
C
C
1. Push in the lever of the water dispenser with your glass. If you are
using a soft plastic cup, pushing the
lever with your hand will be easier.
2. After filling the cup up to the level
you want, release the lever.
glasses of water taken from
the dispenser to be warm.
If the water dispenser is
not used for a long period
of time, dispose of first few
glasses of water to obtain
fresh water.
Refrigerator / User Manual
29/39EN

Operating the product
Please note, how much
C
water flows from the
dispenser depends on
how far you depress the
lever. As the level of water
in your cup / glass rises,
gently reduce the amount
of pressure on the lever
to avoid overflow. If you
slightly press the arm, the
water will drip; this is quite
normal and not a failure.
5.20. Filling the water
dispenser's tank
Water tank filling reservoir is located
inside the door rack.
1. Open the cover of the tank.
2. Fill the tank with fresh drinking
water.
3. Close the cover.
Do not fill the water tank
C
C
C
with any other liquid
except for water such as
fruit juices, carbonated
beverages or alcoholic
drinks which are not
suitable to use in the water
dispenser. Water dispenser
will be irreparably damaged
if these kinds of liquids are
used. Warranty does not
cover such usages. Some
chemical substances and
additives contained in these
kinds of drinks/liquids may
damage the water tank.
Use clean drinking water
only.
Capacity of the water tank is
3 litres; do not overfill.
30 / 39 EN
Refrigerator / User Manual

Operating the product
5.21. Cleaning
the water tank
1. Remove the water filling reservoir
inside the door rack.
2. Remove the door rack by holding
from both sides.
3. Grab the water tank from both sides and remove it with an angle of
45°C.
4. Remove the cover of the water
tank and clean the tank.
Components of the water
C
tank and water dispenser
should not be washed in
dishwasher.
Refrigerator / User Manual
31/39EN

Operating the product
5.22. Drip tray
Water that dripped while using the
water dispenser accumulates in the
spillage tray.
Remove the plastic filter as shown in
the figure.
With a clean and dry cloth, remove
the water that has accumulated.
5.23. Blue light/
HarvestFresh
*May not be available in all models
For the blue light,
Fruits and vegetables stored in
the crispers that are illuminated
with a blue light continue their
photosynthesis by means of the
wavelength effect of blue light and
thus preserve their vitamin content.
ForHarvestFresh,
Fruits and vegetables stored
in crispers illuminated with the
HarvestFresh technology preserve their vitamins for a longer time
thanks to the blue, green, red lights
and dark cycles, which simulate a day
cycle.
If you open the door of the refrigerator during the dark period of
the HarvestFresh technology, the
refrigerator will automatically detect
this and enable the blue-green or red
light to illuminate the crisper for your
convenience. After you have closed
the door of the refrigerator, the dark
period will continue, representing the
night time in a day cycle.
32 / 39 EN
Refrigerator / User Manual

Operating the product
5.24. Freezing
fresh food
In order to preserve the quality
of the food, it shall be frozen as
quickly as possible when it is
placed in the freezer compartment,
use the fast freezing feature for
this purpose.
You may store the food longer in
freezer compartment when you
freeze them while they are fresh.
Pack the food to be frozen and
close the packing so that it would
not allow entrance of air.
Ensure that you pack your food
before putting them in the freezer.
Use freezer containers, foils and
moisture-proof papers, plastic
bags and other packing materials
instead of traditional packing
papers.
Label each pack of food by adding
the date before freezing. You may
distinguish the freshness of each
food pack in this way when you
open your freezer each time. Store
the food frozen before in the front
side of compartment to ensure
that they are used first.
The freezer compartment
defrosts automatically.
C
Frozen food must be used
immediately after they are thawed
and they should not be re-frozen.
Do not freeze too large quantities
of food at one time.
Freezer
Compartment
Setting
-18°C 4°C This is the normal recommended setting.
-20,-22 or
-24°C
Quick Freeze 4°C
-18°C or colder 2°C
Refrigerator / User Manual
Fridge
compartment
Setting
4°C
Remarks
These settings are recommended when the ambient
temperature exceeds 30°C.
Use when you wish to freeze your food in a short time.
Your product will return to its previous mode when the
process is over.
Use these settings if you think that your fridge
compartment is not cold enough because of the hot
ambient conditions or frequent opening and closing of
the door.
33/39EN

Operating the product
5.25. Recommendations
for preserving the
frozen food
Compartment shall be set to -18°C at
least.
1.
Put packages in the freezer as quickly
as possible after purchase without
allowing the to thaw.
2.
Check whether the “Use By” and “Best
Before” dates on the packaging are
expired or not before freezing it.
3.
Ensure that the package of the food is
not damaged.
5.26. Deep-freeze
information
According to IEC 62552 standards, the
product shall freeze at least 4.5 kg of
food at 25°C ambient temperature to
-18°C or lower within 24 hours for every
100-litres of freezer volume.
It is possible to preserve the food for
a long time only at -18°C or lower
temperatures.
You can keep the freshness of food
for many months (at -18°C or lower
temperatures in the deep freeze).
Foods to be frozen should not be allowed
to come in contact with the previously
frozen items to prevent them from
getting thawed partially.
Boil the vegetables and drain their water
in order to store vegetables for a longer
time as frozen. After draining their water,
put them in air-proof packages and
place them inside the freezer. Food such
as bananas, tomatoes, lettuce, celery,
boiled eggs, potatoes are not suitable for
freezing. When these foods are frozen,
only their nutritional value and taste
shall be affected negatively. They shall
not be spoiled so that they would create
a risk for human health.
5.27. Placing the food
Various frozen
Freezer
compartment
shelves
Refrigerator
compartment
shelves
Door shelves
of fridge
compartment
Crisper
Fresh zone
compartment
food such as
meat, fish,
ice cream,
vegetables and
etc.
Food in pans,
covered plates
and closed
containers,
eggs (in closed
container)
Small and
packaged food
or beverage
Vegetables and
fruits
Delicatessen
(breakfast food,
meat products
that shall be
consumed in a
short time)
34 / 39 EN
Refrigerator / User Manual

Operating the product
5.28. Door open
warning
(This feature is optional)
Door open warning is given to user
both visually and acoustically. If the
warning continues for 10 minutes,
interior lights will be turned off.
5.29. Changing the
door opening direction
Door opening direction of your refrigerator can be changed according
to the place you are using it.If this is
necessary, please call your nearest
Authorized Service.
Above description is a general expression.For information on changing
the opening direction of the door, you
must refer to the warning label located on the inner side of the door.
5.30. Illumination lamp
LED lamps are used as illumination
lamps. Contact authorized service in
case of any problem with this type of
light.
The lamp(s) used in this appliance
is not suitable for household room
illumination. The intended purpose of
this lamp is to assist the user to place
foodstuffs in the refrigerator/freezer
in a safe and comfortable way.
Refrigerator / User Manual
35/39EN

6 Maintenance and cleaning
Service life of the product is increase if it
is regularly cleaned
WARNING: First unplug the product
B
Do not use sharp, abrasive tools,
before cleaning your refrigerator.
Never use any sharp and abrasive
tools, soap, household cleaners,
detergent and wax polish for cleaning.
Dissolve one teaspoon of carbonate
in half liter of water. Soak a cloth with
the solution and wrung it thoroughly.
Wipe the interior of the appliance with
this cloth and the dry thoroughly.
Make sure that no water enters the
lamp housing and other electrical
items.
Clean the door with a damp cloth.
To remove door and body shelves,
remove all of its contents. Remove
door shelves by moving them upwards.
After cleaning, slide them from top to
bottom to install.
Never use cleaning agents or water
that contain chlorine to clean the
outer surfaces and chromium coated
parts of the product. Chlorine causes
corrosion on such metal surfaces.
soap, household cleaning agents,
detergents, kerosene, fuel oil,
varnish etc. to prevent removal and
deformation of the prints on the
plastic part. Use lukewarm water and
a soft cloth for cleaning and then wipe
it dry.
6.1. Avoiding bad odors
Materials that may cause odor are not
used in the production of our appliances.
However, due to inappropriate food
preserving conditions and not cleaning
the inner surface of the appliance as
required can bring forth the problem of
odor.
Therefore, clean the refrigerator with
carbonate dissolved in water every 15
days.
Keep the food in closed containers.
Microorganisms spreading out from
uncovered containers can cause
unpleasant odours.
Never keep the food that have expired
best before dates and spoiled in the
refrigerator.
6.2. Protecting the
plastic surfaces
Clean with arm water immediately as the
oil may cause damage on the surface
when it is poured on plastic surfaces.
6.3. Door Glasses
Remove the protective foil on the
glasses.
There is a coating on the surface of
the glasses.This coating minimizes the
stain build-up and helps to remove the
possible stains and dirt easily.Glasses
that are not protected with such a
coating may be subject to persistent
binding of air or water based organic or
inorganic dirt such as limescale, mineral
salts, unburned hydrocarbons, metal
oxides and silicones that can easily and
quickly cause stains or material damage.
Keeping the glass clean becomes too
difficult despite the regular cleaning.
Consequently, the appearance and the
transparency of the glass deteriorates.
Harsh and corrosive cleaning methods
and compounds will intensify these
defects and speed up the deterioration
process.
Water-based cleaning products that are
not alkaline and corrosive must be used
for regular cleaning purposes.
Non-alkaline and non-corrosive materials
must be used for cleaning so that the
36 /39 EN
Refrigerator / User Manual

6 Maintenance and cleaning
service life of this coating lasts for a long
time.
These glasses are tempered to increase
their durability against impacts and
breaking.A safety film is also applied to
their rear surfaces as an extra safety
measure in order to prevent them from
causing damage to their surrounding in
case of a breakage.
*Alkali is a base that forms hydroxide
ions (OH¯) when it is dissolved in water.
Li (Lithium), Na (Sodium), K (Potassium)
Rb (Rubidium), Cs (Cesium) and artificial
and radioactive Fr (Fan-sium) metals are
called ALKALI METALS.
Refrigerator / User Manual
37/39 EN

7. Troubleshooting
Check this list before contacting the
service. Doing so will save you time
and money. This list includes frequent
complaints that are not related to faulty
workmanship or materials. Certain
features mentioned herein may not
apply to your product.
The refrigerator is not working.
The power plug is not fully settled. >>> Plug it
in to settle completely into the socket.
The fuse connected to the socket powering the
product or the main fuse is blown. >>> Check
the fuses.
Condensation on the side wall of the
cooler compartment (MULTI ZONE,
COOL, CONTROL and FLEXI ZONE).
The door is opened too frequently >>>
Take c ar e no t to op en t he p roduc t’s d oo r to o
frequently.
The environment is too humid. >>> Do not
install the product in humid environments.
Foods containing liquids are kept in unsealed
holders. >>> Keep the foods containing liquids
in sealed holders.
The product’s door is left open. >>> Do not
keep the product’s door open for long periods.
The thermostat is set to too low temperature.
>>> Set the thermostat to appropriate
temperature.
Compressor is not working.
In case of sudden power failure or pulling the
power plug off and putting back on, the gas
pressure in the product’s cooling system is
not balanced, which triggers the compressor
thermic safeguard. The product will restart after
approximately 6 minutes. If the product does not
restart after this period, contact the service.
Defrosting is active. >>> This is normal for
a fully-automatic defrosting product. The
defrosting is carried out periodically.
The product is not plugged in. >>> Make sure
the power cord is plugged in.
The temperature setting is incorrect. >>>
Select the appropriate temperature setting.
The power is out. >>> The product will continue
to operate normally once the power is restored.
The refrigerator’s operating noise is
increasing while in use.
The product’s operating performance may vary
depending on the ambient temperature variations.
This is normal and not a malfunction.
The refrigerator runs too often or for
too long.
The new product may be larger than the previous
one. Larger products will run for longer periods.
The room temperature may be high. >>> The
product will normally run for long periods in
higher room temperature.
The product may have been recently plugged
in or a new food item is placed inside. >>>
The product will take longer to reach the set
temperature when recently plugged in or a new
food item is placed inside. This is normal.
Large quantities of hot food may have been
recently placed into the product. >>> Do not
place hot food into the product.
The doors were opened frequently or kept open
for long periods. >>> The warm air moving
inside will cause the product to run longer. Do not
open the doors too frequently.
The freezer or cooler door may be ajar. >>>
Check that the doors are fully closed.
The product may be set to temperature too low.
>>> Set the temperature to a higher degree
and wait for the product to reach the adjusted
temperature.
The cooler or freezer door washer may be dirty,
worn out, broken or not properly settled. >>>
Clean or replace the washer. Damaged / torn door
washer will cause the product to run for longer
periods to preserve the current temperature.
The freezer temperature is very
low, but the cooler temperature is
adequate.
The freezer compartment temperature is set
to a very low degree. >>> Set the freezer
compartment temperature to a higher degree and
check again.
38 /39 EN
Refrigerator / User Manual

Troubleshooting
The cooler temperature is very
low, but the freezer temperature is
adequate.
The cooler compartment temperature is set
to a very low degree. >>> Set the freezer
compartment temperature to a higher degree
and check again.
The food items kept in cooler
compartment drawers are frozen.
The cooler compartment temperature is set
to a very low degree. >>> Set the freezer
compartment temperature to a higher degree
and check again.
The temperature in the cooler or the
freezer is too high.
The cooler compartment temperature is set to
a very high degree. >>> Temperature setting
of the cooler compartment has an effect on the
temperature in the freezer compartment. Wait
until the temperature of relevant parts reach the
sufficient level by changing the temperature of
cooler or freezer compartments.
The doors were opened frequently or kept open
for long periods. >>> Do not open the doors too
frequently.
The door may be ajar. >>> Fully close the door.
The product may have been recently plugged in
or a new food item is placed inside. >>> This is
normal. The product will take longer to reach the
set temperature when recently plugged in or a
new food item is placed inside.
Large quantities of hot food may have been
recently placed into the product. >>> Do not
place hot food into the product.
Shaking or noise.
The ground is not level or durable. >>> If the
product is shaking when moved slowly, adjust
the stands to balance the product. Also make
sure the ground is sufficiently durable to bear
the product.
Any items placed on the product may cause
noise. >>> Remove any items placed on the
product.
The product is making noise of liquid
flowing, spraying etc.
The product’s operating principles involve liquid
and gas flows. >>> This is normal and not a
malfunction.
There is sound of wind blowing coming
from the product.
The product uses a fan for the cooling process.
This is normal and not a malfunction.
There is condensation on the product’s
internal walls.
Hot or humid weather will increase icing
and condensation. This is normal and not a
malfunction.
The doors were opened frequently or kept open
for long periods. >>> Do not open the doors too
frequently; if open, close the door.
The door may be ajar. >>> Fully close the door.
There is condensation on the product’s
exterior or between the doors.
The ambient weather may be humid, this is quite
normal in humid weather. >>> The condensation
will dissipate when the humidity is reduced.
The interior smells bad.
The product is not cleaned regularly. >>> Clean
the interior regularly using sponge, warm water
and carbonated water.
Certain holders and packaging materials may
cause odour. >>> Use holders and packaging
materials without free of odour.
The foods were placed in unsealed holders.
>>> Keep the foods in sealed holders. Microorganisms may spread out of unsealed food items
and cause malodour. Remove any expired or spoilt
foods from the product.
The door is not closing.
Food packages may be blocking the door. >>>
Relocate any items blocking the doors.
The product is not standing in full upright position
on the ground. >>> Adjust the stands to balance
the product.
The ground is not level or durable. >>> Make
sure the ground is level and sufficiently durable to
bear the product.
Refrigerator / User Manual
39/39 EN

Troubleshooting
The vegetable bin is jammed.
The food items may be in contact with the upper
section of the drawer. >>> Reorganize the food
items in the drawer.
If The Surface Of The Product Is Hot.
High temperatures may be observed between
the two doors, on the side panels and at
the rear grill while the product is operating.
This is normal and does not require service
maintenance!Be careful when touching these
areas.
A
If the problem persists after following
the instructions in this section, contact
your vendor or an Authorised Service. Do
not try to repair the product.
WARNING:
40 /39 EN
Refrigerator / User Manual

Lea este manual de usuario antes de utilizar el aparato.
A
A
Estimado cliente:
Esperamos que este aparato, que ha sido fabricado en plantas dotadas de la más
avanzada tecnología y sometido a los más estrictos procedimientos de control de
calidad, le preste un servicio eficaz.
Por lo tanto, lea detenidamente este manual de instrucciones antes de utilizar el
aparato y guardar el manual como referencia. Si entrega el aparato a otro propietario,
no olvide incluir el manual de usuario.
El manual del usuario le ayudará a usar el aparato de manera rápida y segura.
Lea el manual antes de instalar y poner en funcionamiento el aparato.
Asegúrese de haber leído las instrucciones de seguridad.
Conserve el manual en un sitio de fácil acceso, ya que podría necesitarlo en el
futuro.
Lea los otros documentos incluidos con el producto.
Recuerde que este manual de usuario también es aplicable a otros modelos. Las
diferencias entre los modelos se identificarán en el manual.
Explicación de los símbolos
En este manual se utilizan los siguientes símbolos:
Información importante o
C
consejos de utilidad.
A
B
INFORMATION
C
SUPPLIER’S NAME
A
Existe un riesgo de lesiones y
de daños a la propiedad.
Existe riesgo de descargas
eléctricas.
El embalaje del aparato se fabrica con materiales reciclables, de acuerdo
con nuestro Reglamento
Nacional sobre Medio
Ambiente.
.La información del modelo, tal como está almacenada en la
base de datos de productos, puede ser consultada en la
página web siguiente introduciendo el identificador del
MODEL IDENTIFIER
(*)
modelo (*) que se encuentra en la etiqueta de clasificación
energética.
https://eprel.ec.europa.eu/

Contenidos
1. Instrucciones de seguridad y
medio ambiente 3
1.1. Seguridad general . . . . . . . . . . . . . . . 3
1.1.2 Para los modelos con dispensador
de agua. . . . . . . . . . . . . . . . . . . . . . . 5
1.2. Uso previsto . . . . . . . . . . . . . . . . . . . . . 5
1.3. Seguridad para niños. . . . . . . . . . . . 6
1.4. Conformidad con la normativa WEEE
y eliminación del aparato al final
de su vida útil: . . . . . . . . . . . . . . . 6
1.5. Cumplimiento de la directiva
RoHS: . . . . . . . . . . . . . . . . . . . . . . . . . 6
1.6. Información de embalaje . . . . . . . . 6
2 Familiarizarse con el
electrodoméstico 7
3 Instalación 8
3.1. Ubicación adecuada para la
instalación . . . . . . . . . . . . . . . . . . . 8
3.2. Instalación de las cuñas de
plástico. . . . . . . . . . . . . . . . . . . . . . . 8
3.3. Ajuste de los pies . . . . . . . . . . . . . . . . 9
3.4. Conexión eléctrica . . . . . . . . . . . . . . . 9
3.5. Inversión de las puertas . . . . . . . .10
3.6. Inversión de las puertas . . . . . . . . 11
4 Preparación 12
4.1. Consejos para el ahorro de
energía . . . . . . . . . . . . . . . . . . . . . .12
4.2. Uso inicial . . . . . . . . . . . . . . . . . . . . . . . 13
5 Manejo del aparato 14
5.1. Botón de ajuste de la
temperatura . . . . . . . . . . . . . . . . 14
5.2. Congelación rápida . . . . . . . . . . . . . 14
5.3. Funci ón de vaca cion es . . . . . . . . .15
5.4. Panel indicador . . . . . . . . . . . . . . . . . 16
5.5. Panel indicador . . . . . . . . . . . . . . . . .20
5.6. Twi st I ce – ma tic . . . . . . . . . . . . . . .25
5.7. Huevera. . . . . . . . . . . . . . . . . . . . . . . . .26
5.8. Ven ti la d or . . . . . . . . . . . . . . . . . . . . . . .26
5.9. Cajón de frutas y verduras . . . . .26
5.10. Compartimento de
enfriamiento . . . . . . . . . . . . . . . .26
5.11. Mover el estante de la puerta . . 27
5.12. Contenedor de almacenamiento
deslizable . . . . . . . . . . . . . . . . . . .27
5.14. Icematic automático . . . . . . . .28
5.13. Blue light/HarvestFresh . . . .28
5.15. Compartimento para verduras
con control de humedad . . . .29
5.16. Descripción y limpieza del filtro
antiolores . . . . . . . . . . . . . . . . . . .30
5.17. Uso del dispensador de agua 3 1
5.18. Uso del dispensador de agua 3 1
5.19. Llenar el depósito del
dispensador de agua. . . . . . . .32
5.20. Limpieza del depósito de
agua . . . . . . . . . . . . . . . . . . . . . . . .33
5.21. Bandeja de goteo . . . . . . . . . . .34
5.22. HerbBox/HerbFresh (Cajón para
hierbas/Hierbas frescas) . . .34
5.23. Congelación de alimentos
frescos . . . . . . . . . . . . . . . . . . . . . . 35
5.24. Recomendaciones para la
conservación de alimentos
congelados. . . . . . . . . . . . . . . . . .36
5.25. Información sobre la
congelación . . . . . . . . . . . . . . . . .36
5.26. Colocar los alimentos . . . . . . .36
5.27. Aviso de puerta abierta . . . . .37
5.28. Cambio de la dirección de
apertura de la puerta . . . . . . . 37
5.29. Lámpara de iluminación . . . .37
6 Mantenimiento y limpieza 38
6.1. Cómo evitar malos olores. . . . . . .38
6.2. Protección de las superficies de
plástico . . . . . . . . . . . . . . . . . . . . .38
6.3. Vidrios de las puertas . . . . . . . . .39
7 Resolución de problemas 40
2 /43 ES
Frigorífico / Manual del usuario

1. Instrucciones de seguridad y medio ambiente
Esta sección proporciona las
instrucciones de seguridad
necesarias para evitar el riesgo
de lesión y daños materiales.
El incumplimiento de estas
instrucciones puede invalidar
cualquier tipo de garantía del
aparato.
Finalidad prevista
ADVERTENCIA:
A
A
A
Asegúrese de que
cuando el dispositivo
está en su custodia o
durante su montaje en el
alojamiento, los orificios
de ventilación no están
cerrados.
ADVERTENCIA:
Con el fin de acelerar
la operación de
derretimiento del hielo,
no utilice cualquier
dispositivo o aparato
mecánico que no es
recomendado por el
fabricante
ADVERTENCIA:
No dañe el circuito de
fluido refrigerante.
ADVERTENCIA:
A
Este dispositivo está diseñado
para ser utilizado en el hogar o
en las siguientes aplicaciones
similares:
- Con el fin de ser utilizado
en las cocinas para el personal
de las tiendas, oficinas y otros
lugares de trabajo;
- Con el fin de ser utilizado
por los clientes en casas de campo
y hoteles, moteles y otros lugares
de alojamiento:
- en entornos tales
pensiones;
- en lugares similares que no
ofrecen servicios de restauración
y no es al por menor.
1.1. Seguridad general
Este aparato no debe ser utilizado por personas
con discapacidades físicas, sensoriales y
mentales, sin el conocimiento y la experiencia
suficiente o por los niños. El aparato solo
puede ser utilizado por estas personas bajo
la supervisión y la instrucción de una persona
responsable de su seguridad. A los niños no se
les debe permitir jugar con este dispositivo.
En caso de mal funcionamiento, desconecte el
dispositivo.
No utilice dispositivos
eléctricos que no
estén recomendados
por el fabricante en
los compartimentos
del dispositivo para
la conservación de
alimentos.
Frigorífico / Manual del usuario
3 / 43 ES

Instrucciones para la seguridad y el medio ambiente
Después de desconectar, espere por lo
menos 5 minutos antes de conectar de
nuevo. Desenchufe el aparato cuando no
esté en uso. ¡No toque el enchufe con las
manos mojadas! No tire del cable para
enchufar para sacarlo de la toma de la
pared, hágalo tomándolo de la cabeza del
enchufe.
No enchufe el refrigerador si la toma de
corriente está floja.
Desenchufe el aparato durante la instalación,
el mantenimiento, limpieza y reparación.
Si el aparato no se utiliza durante un tiempo,
desenchufe el aparato y elimine cualquier
alimento en el interior.
No utilice vapor ni materiales de limpieza
al vapor para la limpieza del refrigerador
y el derretimiento del hielo en el interior.
¡El vapor podría contactar las zonas
electrificadas y causar un cortocircuito o una
descarga eléctrica!
¡No lave el aparato rociando ni vertiendo
agua sobre él! ¡Riesgo de descarga eléctrica!
Nunca utilice el producto si la sección
situada en la parte superior o posterior del
producto que tiene las placas de circuitos
impresos electrónicos en el interior está
abierta (cubierta de la placa del circuito
electrónico impreso) (1).
1
1
En caso de mal funcionamiento, no utilice el
aparato, ya que puede causar una descarga
eléctrica. Póngase en contacto con el
servicio técnico autorizado antes de hacer
cualquier cosa.
Conecte el aparato a una toma de tierra.
La puesta a tierra debe ser realizada por un
electricista calificado.
Si el aparato tiene un LED de iluminación y
requiere sustituirlo, póngase en contacto con
el servicio técnico autorizado para sustituirlo
o en caso de cualquier problema.
¡No toque la comida congelada con las
manos mojadas! ¡Se podría adherir a sus
manos!
No coloque líquidos en botellas ni latas en
el compartimento del congelador. ¡Podrían
estallar!
Coloque los líquidos en posición vertical
después cerrar bien la tapa.
No rocíe sustancias inflamables cerca del
aparato, ya que podría quemarse o explotar.
No guarde materiales ni aparatos con gases
inflamables (sprays, etc.) en el refrigerador.
No ponga recipientes que contengan líquido
encima del aparato. Salpicar agua en una
parte electrificada podría provocar descargas
eléctricas y riesgos de incendio.
La exposición del aparato a la lluvia, la nieve,
la luz directa del sol y el viento causarán un
peligro eléctrico. Cuando traslade el aparato,
no tire sujetando la manija de la puerta. El
mango se podría salir.
Tenga cuidado de no atrapar ninguna parte
de sus manos o de su cuerpo en cualquiera
de las partes móviles en el interior del
aparato.
No se pare ni se apoye en las puertas,
cajones y partes similares de la nevera. Esto
causará que el aparato se caiga hacia y dañe
sus partes.
Teng a cu id ad o de no t ro pe za r con e l ca bl e
de alimentación.
4 /43 ES
Frigorífico / Manual del usuario

Instrucciones para la seguridad y el medio ambiente
1.1.2 Para los modelos
con dispensador
de agua
La presión en la entrada de agua fría sera
a un máximo de 90 psi (620 kPa). Si la
presión del agua es superior a 80 psi (550
kPa), utilice una válvula limitadora de presión
en el sistema de red. Si usted no sabe cómo
controlar la presión del agua, pida la ayuda
de un plomero profesional.Si hay riesgo de
1.1.1 Aviso HC
Si el aparato dispone de un
sistema de refrigeración que
utilizan gas R600a, tenga
cuidado de no dañar el sistema
de refrigeración y su tubería
mientras se utiliza o mueva el
aparato. Este gas es inflamable.
Si el sistema de refrigeración
está dañado, mantenga el
aparato alejado de fuentes de
incendio y ventile la habitación
inmediatamente.
La etiqueta en la parte
interior izquierda indica
C
el tipo de gas utilizado
en el aparato.
golpe de ariete en la instalación, siempre
utilice un equipo de prevención contra
golpes de ariete en la instalación. Consulte
a un fontanero profesional si no está seguro
de que no hay un efecto del golpe de ariete
en la instalación.
No instale en la entrada de agua caliente.
Tome precauciones contra del riesgo de
congelación en las mangueras. El intervalo
de funcionamiento de la temperatura del
agua debe ser un mínimo de 33°F (0.6°C) y
un máximo de 100°F (38°C).
Solo use agua potable apta para beber.
1.2. Uso previsto
Este aparato está diseñado para uso en
el hogar. No es adecuado para un uso
comercial.
El aparato debe utilizarse para solamente
para almacenar alimentos y bebidas.
No guarde aparatos sensibles que
requieran temperatura controlada (vacunas,
medicamentos sensibles al calor, equipos
médicos, etc.) en el refrigerador.
El fabricante no asume ninguna
responsabilidad por los daños debidos al mal
uso o mal manejo.
Se proporcionarán piezas de recambio
originales durante 10 años, después de la
fecha de compra del producto.
Frigorífico / Manual del usuario
5 /43 ES

Instrucciones para la seguridad y el medio ambiente
1.3. Seguridad
para niños
Guarde los materiales de embalaje fuera del
alcance de los niños.
A los niños no se les debe permitir jugar con
el aparato.
Si la puerta del aparato usa una cerradura,
guarde la llave fuera del alcance de los niños.
1.4. Conformidad con
la normativa WEEE y
eliminación del aparato
al final de su vida útil:
Este producto es conforme con la directiva de la
UE sobre residuos de aparatos eléctricos y electrónicos (WEEE) (2012/19/UE). Este producto
incorpora el símbolo de la clasificación selectiva
para los residuos de aparatos eléctricos y electrónicos (WEEE).
Este símbolo indica que este producto
no debe eliminarse con otros desechos domésticos al final de su vida
útil. El dispositivo usado debe ser de-
vuelto al punto de recogida oficial
para el reciclaje de los dispositivos eléctricos y
electrónicos. Para encontrar estos sistemas de
recogida, por favor, póngase en contacto con las
autoridades locales o con el distribuidor donde
se compró el producto. Cada hogar desempeña
un papel importante en la recuperación y el reciclaje de los aparatos antiguos. La eliminación
adecuada de los aparatos usados ayuda a prevenir las posibles consecuencias negativas para el
medio ambiente y la salud humana.
1.6. Información
de embalaje
El embalaje del producto está fabricado con material reciclable de acuerdo con las normativas nacionales so-
bre medio ambiente. No se deshaga
del material de embalaje ni de los desechos domésticos o de otro tipo. Llévelos a los puntos de
recogida de material de embalaje designados
por las autoridades locales.
1.5. Cumplimiento de
la directiva RoHS:
El producto que ha adquirido es conforme con la
directiva de la UE sobre la restricción de sustancias peligrosas (RoHS) (2011/65/UE). No contiene ninguno de los materiales nocivos o prohibidos especificados en la directiva.
6 /43 ES
Frigorífico / Manual del usuario

2 Familiarizarse con el electrodoméstico
12
13
1.
Estante de la puerta del compartimento
11
8
5
congelador
2.
Botón de ajuste de la temperatura
3.
Contenedor de llenado del dispensador de agua
4.
Huevera
5.
Depósito del dispensador de agua
6.
Contenedor de almacenamiento bajo el estante
de la puerta
7.
Estante móvil
8.
Pies ajustables
9.
Cajón de frutas y verduras
1
9
10
3
9
7
6
2
4
5
10.
Compartimento de enfriamiento
11.
Bloqueo y tecla
12.
Estante para botellas
13.
Estante de vidrio del compartimento refrigerador
14.
Ventilador
15.
Estante del compartimento congelador
16.
Compartimento de producción de cubitos
17.
Compartimento congelador
18.
Compartimento frigorífico
*opcional:Las ilustraciones de este manual se proporcionan a modo de ejemplo
y podrían no corresponderse exactamente con su aparato. Si determinadas partes
C
no están presentes en el aparato que usted ha adquirido, indica que la figura
corresponde a otro modelo.
Frigorífico / Manual del usuario
7 / 43 ES

3 Instalación
3.1. Ubicación adecuada
para la instalación
Contacte con un Servicio Técnico
autorizado para la instalación del
aparato. Para preparar el aparato para su
uso, consulte la información en el manual
de instrucciones y asegúrese de que la
instalación eléctrica y la instalación de
agua sean apropiadas. En caso contrario,
llame a un electricista cualificado para la
realización de los trabajos necesarios.
ADVERTENCIA:El fabricante no
se hará responsable de los daños
derivados de la realización de
B
B
A
dichos procedimientos por parte
de personas no autorizadas.
ADVERTENCIA:El aparato no
debe estar enchufado durante la
instalación. De lo contrario, ¡podría
sufrir lesiones graves o mortales!.
ADVERTENCIA: Si el espacio
de la puerta de la estancia donde
vaya a colocar el producto es es
ajustado que impide el paso del
aparato, retire la puerta de la
habitación girándola hacia a un
lado. Si no funciona, contacte con
un servicio técnico autorizado.
eficiente, el aparato debe instalarse
en una zona que disponga de una
ventilación adecuada. Si va a colocar
el aparato en un hueco de la pared, no
olvide dejar una distancia mínima de 5
cm con respecto al techo y las paredes
laterales.
donde la temperatura pueda ser
inferior a -5°C.
3.2. Instalación de las
cuñas de plástico
Las cuñas de plástico que vienen con
el producto se utilizan para crear la
distancia para la circulación del aire entre
el aparato y la pared trasera.
1. Para ello, retire los tornillos del aparato
y utilice los que encontrará en la bolsa
de las cuñas.
2. Coloque las dos cuñas de plástico en la
cubierta de ventilación trasera, como
se muestra en la figura.
superficie lisa para evitar sacudidas.
inferior de 30 cm de fuentes de calor
como placas, hornos, radiadores y
estufas y una distancia no inferior a 5
cm de cualquier horno eléctrico.
húmedas o expuestas a la luz solar
directa.
8 /43 ES
Frigorífico / Manual del usuario

Instalación
3.3. Ajuste de los pies
Si el aparato no queda equilibrado
tras su instalación, ajuste las pies
frontales girándolos de la derecha a la
izquierda.
3.4. Conexión
eléctrica
ADVERTENCIA: No utilice
cables de extensión ni ladrones
A
B
C
para realizar la conexión
eléctrica.
ADVERTENCIA: Deje en
manos de un servicio técnico
autorizado la sustitución de un
cable de alimentación dañado.
En caso de que vaya a instalar
dos frigoríficos uno al lado del
otro, debe dejar una separación
no inferior a 4 cm entre ellos.
Nuestra empresa no se hará
responsable de daños provocados
por el uso del aparato sin una
toma de tierra conforme a las
normativas nacionales.
Tras la instalación, el enchufe del
cable de alimentación debe quedar
al alcance de la mano.
No use cables de extensión ni
múltiples tomacorrientes sin cable
entre el aparato y la toma de pared.
Advertencia de superficie
caliente
Las paredes laterales de su
producto están equipadas
con tubos de refrigerante
para mejorar el sistema de
refrigeración. El refrigerante
con altas temperaturas
puede fluir a través de estas
C
áreas, lo que resulta en
superficies calientes en las
paredes laterales. Esto es
normal y no necesita ningún
mantenimiento. Por favor,
tenga cuidado al tocar estas
áreas.
Frigorífico / Manual del usuario
9 /43 ES

Instalación
3.5. Inversión de las puertas
Proceder en orden numérico.
4
2
1
6
45 °
5
10
11
9
3
7
8
12
16
15
19
20
18
17
13
14
10 / 43 ES
Frigorífico / Manual del usuario

Instalación
3.6. Inversión de las puertas
Proceder en orden numérico.
4
2
1
6
45 °
5
10
11
9
3
7
8
12
16
15
19
21
20
18
21
13
Frigorífico / Manual del usuario
17
14
11 /43 ES

4 Preparación
4.1. Consejos para el
ahorro de energía
El aparato podría sufrir daños si se
conecta a sistemas de ahorro de
A
Para uso no empotrado: “este aparato
No deje las puertas del frigorífico
No introduzca alimentos o bebidas
No sobrecargue el frigorífico, pues se
Para poder almacenar la máxima
No bloquee el flujo de aire colocando
Use siempre los canastos/cajones que
energía, por lo que es arriesgado.
de refrigeración no está destinado a
ser utilizado como electrodoméstico
empotrado.
abiertas durante periodos largos de
tiempo.
calientes en el frigorífico.
reducirá la capacidad de enfriamiento
si se obstaculiza la circulación del aire
en el interior.
cantidad de alimentos en el
compartimento del congelador, debe
retirar el icematic, ubicado allí y que
puede ser retirado con la mano. El
volumen neto y el consumo energético
especificados en la placa de datos
del frigorífico se miden y se prueban
retirando el frigorífico. No retire los
estantes de dentro del compartimento
del congelador de la puerta del
compartimento del congelador.
Úselos siempre, pues facilitan el uso
del aparato y ayudan al consumo
energético eficiente.
alimentos a los lados del ventilador del
compartimento del congelador. Deje
una distancia mínima de 3 cm a los
lados de las paredes de la cobertura de
protección del ventilador.
se suministran con el compartimento
del congelador para obtener un
menor consumo de energía y mejores
condiciones de almacenamiento.
El contacto de los alimentos con
el sensor de temperatura en el
compartimento congelador puede
elevar el consumo de energía del
electrodoméstico. Por lo tanto, se
debe evitar todo contacto con el/los
sensor/es.
Según las características del
electrodoméstico, descongele
alimentos congelados en el
compartimento del frigorífico para
obtener un ahorro energético y
conservar la calidad de los alimentos.
No deje que los alimentos entren
en contacto con el sensor de
temperatura del compartimento del
frigorífico que aparece en la imagen
de más arriba.
Puesto que el aire caliente y
húmedo no penetra directamente
en su producto cuando las puertas
no están abiertas, su producto se
optimiza en condiciones suficientes
para proteger sus alimentos. Las
funciones y componentes como el
compresor, ventilador, calentador,
descongelador, iluminación, pantalla,
etc. funcionarán de acuerdo con las
necesidades de consumo mínimo de
energía en estas circunstancias.
12 /43 ES
Frigorífico / Manual del usuario

4 Preparación
4.2. Uso inicial
Antes de empezar a utilizar el frigorífico,
compruebe que se hayan realizado
todas las preparaciones indicadas en las
secciones "Instrucciones importantes
sobre seguridad" e "Instalación".
Mantenga el aparato en
funcionamiento durante 6 horas sin
alimentos en su interior y no abra
la puerta si no es estrictamente
necesario.
Se oye un ruido cada vez
que el compresor se pone en
C
C
funcionamiento. Los líquidos y los
gases contenidos en el sistema
de refrigeración pueden también
generar ruidos, incluso aunque el
compresor no esté funcionando, lo
cual es normal.
Es posible que las aristas
delanteras del aparato se
noten calientes al tacto. Esto
es normal. Estas zonas deben
permanecer calientes para evitar
la condensación.
En algunos modelos, el panel
de instrumentos se apaga
C
Frigorífico / Manual del usuario
automáticamente 5 minutos
después de que la puerta se haya
cerrado. Se reactivará cuando la
puerta se abra o cuando se pulse
cualquier tecla.
13 / 43 ES

5 Manejo del aparato
5.1. Botón de ajuste
de la temperatura
La temperatura interior del frigorífico cambia debido a
los siguientes motivos;
Temperatura de la estación.
Abrir la puerta con frecuencia y dejarla
abierta durante mucho tiempo.
Introducir en el frigorífico alimentos sin
esperar que su temperatura alcance la
temperatura ambiente
La ubicación del frigorífico en la
estancia (por ejemplo, que esté
expuesto a la luz solar)
Puede ajustar las variaciones de la
temperatura interior debidas, por
ejemplo, a la utilización del botón de
ajuste.
Los números alrededores del mando de control indican
los valores de temperatura en “°C”.
Si la temperatura ambiente es de 25°C, le
recomendamos que use el mando de control del
frigorífico a 4°C. Puede aumentar o disminuir este
valor como sea necesario en otras temperaturas
ambiente.
5.2. Congelación rápida
Si va a congelar grandes cantidades de
alimentos frescos, ponga el mando de
control en la posición de (
horas antes de depositar los alimentos
en el compartimento de congelación
rápida.
Se recomienda encarecidamente
mantener el mando de control en la
posición MAX durante por lo menos
24 horas para congelar la cantidad
máxima de alimentos correspondiente
a la capacidad de congelación. Ponga
especial cuidado en no mezclar
alimentos frescos y alimentos ya
congelados.
) máx. 24
C
*opcional:Las ilustraciones de este manual se proporcionan a modo de ejemplo
y podrían no corresponderse exactamente con su aparato. Si determinadas partes
no están presentes en el aparato que usted ha adquirido, indica que la figura
corresponde a otro modelo.
14 /43 ES
Frigorífico / Manual del usuario

Funcionamiento del aparato
Recuerde volver a situar el mando del
termostato en su posición previa una
vez los alimentos se hayan congelado.
5.3. Función de
vacaciones
Si las puertas del aparato no se
abren durante 12 horas tras poner el
termostato en la posición de máximo
calor, la función de vacaciones se
activará automáticamente.
Para cancelar la función, cambie los
ajustes del mando.
No se recomienda almacenar
alimentos en el compartimento
de más frío cuando la función de
vacaciones esté activa.
Cuando el ajuste haya finalizado,
podrá pulsar el termostato y
esconderlo.
Frigorífico / Manual del usuario
15 / 43ES

Funcionamiento del aparato
3
11
5.4. Panel indicador
El panel indicador le permite ajustar la temperatura y controlar as otras
funciones relacionadas con el aparato sin abrir sus puertas. Basta con pulsar las
inscripciones en los botones correspondientes para los ajustes de la función.
1
2
*10
*12
1. Apagón/Temperatura alta / luz de
advertencia de error
Esta luz ( ) se ilumina durante un
apagón, fallos de alta temperatura y
avisos de errores. Durante apagones
prolongados, parpadeará en el visor
la temperatura más alta registrada
que alcance el compartimento del
congelado Después de comprobar los
alimentos ubicados en el congelador
) , pulse el botón de apagado para
(
aclarar la advertencia.
2. Función de ahorro de energía (pantalla
apagada):
Si las puertas de la nevera se
*opcional:Las ilustraciones de este manual se proporcionan a modo de ejemplo
y podrían no corresponderse exactamente con su aparato. Si determinadas partes
C
no están presentes en el aparato que usted ha adquirido, indica que la figura
corresponde a otro modelo.
6
789
mantienen cerradas durante un
tiempo largo, la función de ahorro se
activa automáticamente y el símbolo
de ahorro de energía se ilumina. ( )
Si la función de ahorro de energía
está activa, todos los símbolos del
visor se apagarán excepto el símbolo
de energía. Cuando el modo de ahorro
de energía está activo, si se pulsa
cualquier botón o se abre la puerta,
la función de ahorro de energía se
cancelará y los símbolos en el visor
volverán a su estado normal.
45
16 / 43ES
Frigorífico / Manual del usuario

Funcionamiento del aparato
La función de ahorro de energía se
activará durante la entrega desde la
batería y no se puede cancelar.
3. Función de refrigeración rápida
El botón tiene dos funciones. Pulse
brevemente este botón para activar o
desactivar la función de enfriamiento
rápido. La luz de refrigeración rápida y
el aparato volverán a su configuración
habitual. (
C
C
C
C
)
Use la función de enfriamiento
rápido cuando desee
enfriar con rapidez los
alimentos depositados en el
compartimento frigorífico.
Si desea enfriar grandes
cantidades de alimentos
frescos, active esta función
antes de depositar los
alimentos en el aparato.
Si no cancela manualmente
la función, esta se cancelará
automáticamente transcurridas
ocho horas o bien una vez
el compartimento frigorífico
alcance la temperatura deseada.
Si pulsa el botón de
enfriamiento rápido
repetidamente a intervalos
breves, se activará la
protección del circuito
electrónico y el compresor
no se pondrá en marcha
inmediatamente.
En caso de corte del fluido
eléctrico, esta función no se
activará automáticamente al
restablecerse el suministro
eléctrico.
4. Botón de ajuste de la temperatura del
compartimento frigorífico
Pulse este botón para ajustar la
temperatura del compartimento
frigorífico a 8, 7, 6, 5, 4, 3, 2 y
8... respectivamente. Pulse este
botón para ajustar la temperatura
que desee para el compartimento
frigorífico. ( )
5. Función de Vacaciones:
Para activar la función de vacaciones,
pulse este botón (
3 segundos, y la luz del modo
de vacaciones (
Cuando la función de vacaciones
está activa, aparece "- -" en el
indicador de temperatura del
compartimento frigorífico y este
compartimento no enfría. Cuando
esta función está activa no es
adecuado conservar alimentos en
el compartimento frigorífico. El
resto de compartimentos seguirán
refrigerados a la temperatura
ajustada para ellos.
Para cancelar esta función, pulse
de nuevo el botón de la función de
Vacaciones.
6. Aviso de desconexión de la alarma:
En caso de apagón/alarma de alta
temperatura, pulse el botón de
desconexión de alarma
) para eliminar el aviso después
(
de comprobar los alimentos en el
compartimento del congelador.
) durante
) se activará.
Frigorífico / Manual del usuario
17 / 43ES

Funcionamiento del aparato
7. Bloqueo de teclas
Pulse el botón de bloqueo de teclas
( ) simultáneamente durante 3
segundos. Símbolo de bloqueo de
teclas
) se iluminará y el modo de bloqueo
(
de teclas se activará. Los botones no
funcionarán si el modo de bloqueo de
teclas está activo. Pulse el botón de
bloqueo de teclas simultáneamente
durante 3 segundos. El indicador
de bloqueo de teclas se apagará
y el modo de bloqueo de teclas se
cancelará.
Pulse el botón de bloqueo de teclas
para evitar modificar los ajustes de
temperatura del frigorífico (
8. Eco fuzzy
Pulse el botón Eco-Fuzzy y
manténgalo pulsado durante 1
segundos para activar la función
eco fuzzy. El frigorífico comenzará a
funcionar en el modo más económico
durante un mínimo de 6 horas y
el indicador de uso económico se
iluminará cuando esta función esté
activa. (
pulsado el botón Eco-Fuzzy y
manténgalo pulsado durante 3
segundos para activar la función eco
fuzzy.
Esta luz se iluminará después de 6
horas cuando la función eco fuzzy
esté activada.
9. Botón de ajuste de la temperatura del
compartimento congelador
Pulse este botón para ajustar la
temperatura del compartimento
congelador a -18,-19, -20,-21,-22,-
). Pulse y mantenga
).
23, -24, -18... respectivamente.
Pulse este botón para ajustar la
temperatura del compartimento del
frigorífico al valor deseado.
10. Indicador de apagado del
Icematic
Indica si el Icematic está encendido
o apagado.(
entonces significa que el icematica no
está en funcionamiento. Para activar
de nuevo el Icematic, mantenga
pulsado el botón de activación/
desactivación durante 3 segundos.
C
11. Función de congelado rápido/ botón de
encendido-apagado del icematic.
Pulse brevemente este botón para
activar o desactivar la función
de enfriamiento rápido. Cuando
active la función, el compartimento
congelador se enfriará hasta alcanzar
una temperatura inferior al valor
fijado.( )
Para activar o desactivar el Icematic,
mantenga el botón pulsado durante 3
segundos.
C
) Si está encendido,
El flujo de agua desde el
depósito se detendrá al
seleccionar esta función.
No obstante, podrá seguir
extrayendo del Icematic el
hielo ya fabricado.
Use la función de congelación
rápida cuando desee
congelar con rapidez los
alimentos depositados en el
compartimento frigorífico.
Si desea enfriar grandes
cantidades de alimentos
frescos, active esta función
antes de depositar los
alimentos en el aparato.
( )
18 / 43ES
Frigorífico / Manual del usuario

Funcionamiento del aparato
Si no cancela manualmente
la función de congelación
C
C
12. Indicador del modo ahorro
Indica que el aparato está
funcionando en el modo de eficiencia
energética. () Esta luz estará activada
si la temperatura del compartimento
del frigorífico está ajustada a -18 o
si el enfriamiento eficiente se está
llevando a cabo con la función EcoExtra.
C
rápida, ésta se cancelará
automáticamente transcurridas
cuatro horas o bien una vez
el compartimento frigorífico
alcance la temperatura
deseada.
En caso de corte del fluido
eléctrico, esta función no se
activará automáticamente al
restablecerse el suministro
eléctrico.
El indicador de uso económico
se desactiva al seleccionar las
funciones de enfriamiento
rápido o congelación rápida.
Frigorífico / Manual del usuario
19 / 43ES

Funcionamiento del aparato
5.5. Panel indicador
Los paneles indicadores pueden variar dependiendo del modelo de aparato.
Las funciones audiovisuales del panel indicador le ayudan a utilizar el aparato.
8
9
1
7
1. Indicador del compartimento
frigorífico
2. Indicador de error
3. Indicador de temperatura
4. Botón del modo vacaciones
5. Botón de ajuste de la temperatura
6. Botón de selección de compartimento
7. Indicador del compartimento
congelador
8. Indicador del modo ahorro
9. Indicador de la función de vacaciones
*opcional
2
6
3
45
C
*opcional:Las ilustraciones de este manual se proporcionan a modo
de ejemplo y podrían no corresponderse exactamente con su aparato.
Si determinadas partes no están presentes en el aparato que usted ha
adquirido, indica que la figura corresponde a otro modelo.
20 / 43ES
Frigorífico / Manual del usuario

Funcionamiento del aparato
1. Indicador del compartimento frigorífico
La luz del compartimento frigorífico
se enciende al ajustar la temperatura
del compartimento frigorífico.
2. Indicador de error
Este indicador se activa si su
frigorífico no enfría o suficiente
o en caso de fallo de un sensor.
Cuando este indicador se active,
el indicador de la temperatura del
compartimento congelador mostrará
"E" y el indicador de temperatura del
compartimento frigorífico mostrará
números, por ejemplo "1,2,3…". Estos
números proporcionan al personal de
mantenimiento información acerca
del error.
3. Indicador de temperatura
Indicador de temperatura del
compartimento frigorífico y
congelador.
4. Botón del modo vacaciones
Pulse el botón de vacaciones
durante 3 segundos para activar
esta función. Cuando la función
de vacaciones está activa, aparece
"- -" en el indicador de temperatura
del compartimento frigorífico y
este compartimento no enfría.
Cuando esta función está activa no
es adecuado conservar alimentos
en el compartimento frigorífico. El
resto de compartimentos seguirán
refrigerados a la temperatura
ajustada para ellos.
Para cancelar esta función, pulse de
nuevo el botón Vacaciones.
5. Botón de ajuste de la temperatura
Cambia la temperatura del
compartimento correspondiente en
un rango de entre -24 °C... -18 °C y 8
°C...1 °C.
6. Botón de selección de compartimento
Botón de selección: Pulse el botón
de selección de compartimento para
alternar entre el compartimento
frigorífico y el compartimento
congelador.
7. Indicador del compartimento congelador
La luz del compartimento frigorífico
se enciende al ajustar la temperatura
del compartimento congelador.
8. Indicador del modo ahorro
Indica que el frigorífico opera en
el modo de ahorro de energía.
Este indicador estará activo si la
temperatura del compartimento
congelador se fija en -18 ºC.
9. Indicador de la función de vacaciones
Indica que la función de vacaciones
está activa.
Frigorífico / Manual del usuario
21 / 43ES

Funcionamiento del aparato
*1
11
1. Economía
Este indicador se ilumina cuando
el compartimento congelador se
ajusta a -18 ºC, que es la posición de
funcionamiento más económica
( ). El indicador de uso económico
se desactiva al seleccionar las
funciones de enfriamiento rápido o
congelación rápida.
2. Indicador de temperatura alta / indicador
de aviso de error
Este indicador ( ) se ilumina durante
un apagón, fallos de alta temperatura
y avisos de errores.
3. Función de ahorro de energía (visor apagado)
Si las puertas de la nevera se
mantienen cerradas durante un
*opcional:Las ilustraciones de este manual se proporcionan a modo
de ejemplo y podrían no corresponderse exactamente con su aparato.
C
Si determinadas partes no están presentes en el aparato que usted ha
adquirido, indica que la figura corresponde a otro modelo.
2
910
3
*7.2
*7.1
tiempo largo, la función de ahorro de
energía se activa automáticamente
y el símbolo de ahorro de energía
se ilumina. Si la función de ahorro
de energía está activa, todos los
símbolos del visor se apagarán
excepto el símbolo de energía. Cuando
el modo de ahorro de energía está
activo, si se pulsa cualquier botón o se
abre la puerta, la función de ahorro de
energía se cancelará y los símbolos en
el visor volverán a su estado normal.
La función de ahorro de energía se
activará durante la entrega desde la
batería y no se puede cancelar.
4. Enfriamiento rápido
El indicador de refrigeración rápida se
encenderá ( ) y el valor del indicador
568
4
22 / 43ES
Frigorífico / Manual del usuario

Funcionamiento del aparato
de temperatura del compartimento
refrigerador se mostrará como
1 cuando se active la función de
refrigeración rápida. Para cancelar esta
función, pulse nuevamente el botón
de refrigeración rápida. El indicador
de congelación rápida se apagará
y el frigorífico volverá a sus valores
normales. Si no lo cancela, la función
de congelación rápida se anulará
automáticamente 1 hora más tarde. Si
desea congelar grandes cantidades de
alimentos frescos, pulse el botón de
congelación rápida antes de introducir
los alimentos en el compartimento
frigorífico.
5. Función de vacaciones
Para activar la función de vacaciones,
pulse el botón nº (4) (
3 segundos, y el indicador de
modo de vacaciones se activará.
Cuando la función de vacaciones
está activa, aparece "- -" en el
indicador de temperatura del
compartimento frigorífico y este
compartimento no enfría. Cuando
esta función está activa no es
adecuado conservar alimentos en
el compartimento frigorífico. El
resto de compartimentos seguirán
refrigerados a la temperatura
ajustada para ellos.
Para cancelar esta función, pulse de
nuevo el botón de la función de
Vacaciones.
6. Ajuste de temperatura del compartimento frigorífico
Cuando el botón nº. (5) podrá ajustar
la temperatura del compartimento
de la nevera a 8, 7, 6, 5, 4, 3 y 1
respectivamente.( ).
) durante
7. 1Función de ahorro de energía (pantalla
apagada):
Al pulsar este botón, el indicador de
ahorro de energía ( ) se iluminará
y la función de ahorro de energía
se activará ( ). Si la función de
ahorro de energía está activa, todos
los símbolos del visor se apagarán
excepto el símbolo de energía. Cuando
el modo de ahorro de energía está
activo, si se pulsa cualquier botón o se
abre la puerta, la función de ahorro de
energía se cancelará y los símbolos en
el visor volverán a su estado normal.
Si pulsa de nuevo este botón ( ), el
símbolo ahorro de energía se apagará
y la función de ahorro de energía no
estará activa.
7.2 Aviso de desconexión de la alarma:
En caso de apagón/alarma de alta
temperatura, pulse el botón de
desconexión de alarma
para eliminar el aviso después
de comprobar los alimentos en el
compartimento del congelador.
8. Bloqueo de teclas
Pulse el botón de bloqueo de teclas
( ) simultáneamente durante 3
segundos. Símbolo de bloqueo de
teclas
) se iluminará y el modo de bloqueo
(
de teclas se activará. Los botones no
funcionarán si el modo de bloqueo de
teclas está activo. Pulse el botón de
bloqueo de teclas simultáneamente
durante 3 segundos. El indicador
de bloqueo de teclas se apagará
y el modo de bloqueo de teclas se
cancelará.
Frigorífico / Manual del usuario
23 / 43ES

Funcionamiento del aparato
Pulse el botón de bloqueo de teclas
para evitar modificar los ajustes de
temperatura del frigorífico ( ).
9. Eco fuzzy
Pulse el botón Eco-Fuzzy y
manténgalo pulsado durante 1
segundos para activar la función
eco fuzzy. El frigorífico comenzará a
funcionar en el modo más económico
durante un mínimo de 6 horas y
el indicador de uso económico se
iluminará cuando esta función esté
activa. ( ). Pulse y mantenga
pulsado el botón Eco-Fuzzy y
manténgalo pulsado durante 3
segundos para activar la función eco
fuzzy.
Esta luz se iluminará después de 6
horas cuando la función eco fuzzy
esté activada.
10. Ajuste de temperatura del compartimento congelador
Se realiza un ajuste de temperatura
en el compartimento congelador.
Pulse el botón 9 para ajustar la
temperatura del compartimento
congelador a -18, -19, -20, -21, -22,
-23 y -24ºC, respectivamente.
11. Congelación rápida
Pulse el botón nº (10) Para un a
congelación rápida, indicador de
congelación rápida
) deberá activarse.
(
El indicador de congelación rápida
se ilumina cuando la función de
congelación rápida esté activa y el
visor del compartimento refrigerador
muestre -27. Para cancelar esta
función pulse de nuevo (
) el
botón de congelación rápida. El
indicador de congelación rápida
se apagará y el frigorífico volverá
a sus valores normales. Si no se
cancela manualmente, la función
de congelación rápida se anulará
automáticamente 24 horas más
tarde. Si desea congelar grandes
cantidades de alimentos frescos,
pulse el botón de congelación rápida
antes de introducir los alimentos en el
compartimento congelador.
24 / 43ES
Frigorífico / Manual del usuario

Funcionamiento del aparato
5.6. Twist Ice – matic
(Característica opcional)
Retire el depósito de agua girándolo
hacia la izquierda.
Abra a cobertura del depósito de agua
girándolo y añádale agua hasta la parte
inferior de la cubierta de éste.
Coloque el depósito de agua en su
sitio tal como se indica en la imagen
después de añadir agua y haberlo
colocado girándolo en la dirección de la
flecha. Vierta el agua a la bandeja para
hielo.
Cuando se haya formado hielo, gire la
bandeja para hielo para que el hielo
caiga desde el cajón para hielo.
Saque el cajón para hielo para extraer
los cubitos de hielo.
Tire de la cara frontal hacia usted para
lavar la bandeja para hielo y colóquelo
en los laterales de la zona interior y
colóquelo de nuevo empujándolo hacia
su sitio.
Tire de la cara frontal hacia usted para
lavar la bandeja para hielo y colóquelo
en los laterales de la zona interior y
colóquelo de nuevo empujándolo hacia
su sitio.
Frigorífico / Manual del usuario
25 / 43ES

Funcionamiento del aparato
5.7. Huevera
Puede instalar la huevera en la
puerta o el estante que desee. Si va a
colocarlo en los estantes del cuerpo,
se recomienda usar los estantes
inferiores más fríos.
No ponga la huevera en el
A
compartimento congelador
5.8. Ventilador
"El ventilador turbo está diseñado
para garantizar una distribución y
circulación homogéneas del aire frío
en el interior del su frigorífico. El tiempo de funcionamiento puede variar
según las propiedades del electrodoméstico.
En algunos modelos, el ventilador
funciona únicamente cuando lo hace
el compresor, mientras que en otros el
sistema de control determina su tiempo de funcionamiento de acuerdo con
las necesidades de enfriamiento.
5.9. Cajón de frutas
y verduras
El cajón de frutas y verduras de su
aparato está especialmente diseñado
para mantener la frescura de sus
vegetales sin que pierdan su humedad.
Con este fin, alrededor del cajón de
frutas y verduras se intensifica la
circulación de aire frío.
5.10. Compartimento
de enfriamiento
(Característica opcional)
Use este compartimento para
almacenar delicatesen que deban
almacenarse a temperaturas más
bajas o productos cárnicos que vaya a
consumir dentro de poco tiempo.
El compartimento refrigerador es el
lugar más frío del frigorífico, donde
podrá almacenar productos lácteos,
carnes, pescado y carne de ave de
corral en las mejores condiciones. No
almacene frutas ni verduras en este
compartimento.
26 / 43ES
Frigorífico / Manual del usuario

Funcionamiento del aparato
5.11. Mover el
estante de la puerta
(Característica opcional)
La estantería movible de la puerta
puede fijarse en 3 posiciones
diferentes.
Pulse los botones que se muestran
a los lados de la misma manera para
mover la estantería. La estantería
debe ser movible.
Mueva el estante hacia arriba o hacia
abajo.
Suelte los botones cuando la
estantería esté en la posición
deseada. Debe fijar la estantería en la
posición donde suelte los botones.
5.12. Contenedor
de almacenamiento
deslizable
(Característica opcional)
Este accesorio está diseñado para
incrementar el volumen útil de los
estantes de las puertas.
Le permite colocar con facilidad las
botellas, jarras y conservas de mayor
altura en el botellero inferior gracias
a su capacidad para desplazarse a
izquierda o derecha.
Frigorífico / Manual del usuario
27 / 43ES

Funcionamiento del aparato
5.13. Blue light/
HarvestFresh
*Puede no estar disponible en todos los modelos
Para Blue light,
Las frutas y verduras almacenadas
en los cajones que se iluminan con
una luz azul continúan su fotosíntesis
gracias al efecto de longitud de onda
de la luz azul y así preservarán su
contenido vitamínico.
Para HarvestFresh,
Las frutas y verduras almacenadas
en los cajones iluminados con la
tecnología HarvestFresh conservan
sus vitaminas durante más tiempo
gracias a los ciclos de luces azules,
verdes, rojas y oscuras, que simulan
un ciclo diurno.
Si abre la puerta del refrigerador
mientras que el ciclo de luz oscura
de HarvestFresh está funcionando, el refrigerador lo detectará
automáticamente y permitirá que la
luz azul, verde o roja ilumine el cajón
para su mayor comodidad. Después
de cerrar la puerta del refrigerador,
el ciclo oscuro se reanudará, para así
completar el ciclo diurno natural.
5.14. Icematic
automático
(Característica opcional)
El Icematic automático le permite
fabricar hielo en el frigorífico
fácilmente. Retire el depósito del
agua del compartimento frigorífico,
llénelo de agua y vuélvalo a colocar
para obtener hielo del sistema
Icematic.
Los primeros cubitos estarán
disponibles al cabo de unas dos
horas en la cubitera del sistema
Icematic ubicada en el compartimento
congelador.
Si llena por completo el depósito
de agua, podrá obtener
aproximadamente entre 60 y 70
cubitos de hielo.
Cambie el agua del depósito de agua
si ha estado allí durante 2-3 semanas.
28 / 43ES
Frigorífico / Manual del usuario

Funcionamiento del aparato
5.15. Compartimento
para verduras con
control de humedad
(FreSHelf)
(Característica opcional)
Los niveles de humedad de las frutas
y de las verduras se mantienen bajo
control con la función del cajón de
frutas y verduras con control de
humedad y se garantiza que los
alimentos se mantengan frescos por
más tiempo.
Le recomendamos colocar las verduras
de hoja, tales como lechuga, espinaca
y aquellas hortalizas sensibles a la
pérdida de humedad, en posición
horizontal en la medida de lo posible,
dentro del cajón, no sobre sus raíces en
posición vertical.
Mientras se guardan las frutas y
verduras, tenga en cuenta su peso
específico. Las frutas y verduras más
duras y pesadas deben colocarse
en el fondo del cajón y aquellas más
blandas y livianas deben ubicarse
arriba.
Nunca deje las hortalizas dentro
del cajón de frutas y verduras en
sus bolsas. Si las hortalizas se
dejan dentro de sus bolsas, se
descompondrán en un breve período
de tiempo. En caso de que no desee
que las frutas y verduras estén en
contacto entre sí por cuestiones de
higiene, utilice un papel perforado,
espuma u otros materiales de
embalaje similares en lugar de una
bolsa.
No coloque juntos peras,
albaricoques, melocotones, etc.
y manzanas, en particular, en el
mismo cajón que otras frutas y
verduras, ya que tienen un alto nivel
de generación de gas etileno. El gas
etileno emitido por estas frutas
puede ocasionar que las otras frutas
maduren más rápido y se echen a
perder en poco tiempo.
Frigorífico / Manual del usuario
29 / 43ES

Funcionamiento del aparato
Para los productos que tienen
el Icematic automático, se
C
puede oír cuando se esté
formando el hielo. Este sonido
es normal y en ningún caso
indica un fallo.
5.16. Descripción
y limpieza del
filtro antiolores
(Característica opcional)
El filtro antiolores evita la
proliferación de olores desagradables
en el interior del frigorífico.
1. Tire hacia abajo de la cubierta en
la que está instalado el filtro desde
la sección delantera y retírela, tal
como se muestra en la ilustración.
2. Deje el filtro expuesto a la luz solar
durante un día. El filtro se limpiará
en este período de tiempo.
3. Vuelva a colocar el filtro en su lugar.
El filtro antiolores debe
C
limpiarse una vez al año.
30 / 43ES
Frigorífico / Manual del usuario

Funcionamiento del aparato
5.17. Uso del
dispensador de agua
*opcional
Es normal que los primeros
C
C
1. Presione la palanca del dispensador
de agua con el vaso. Si está usando
un vaso blando de plástico, le será
más fácil empujar la palanca con la
mano.
2. Una vez haya llenado el vaso hasta
el nivel que desee, suelte la palanca.
C
vasos de agua servidos
por el dispensador estén
calientes.
Si no se usa el dispensador
de agua durante un periodo
de tiempo prolongado, no
consuma los primeros vasos
de agua.
Tenga en cuenta que
el caudal de agua que
suministra el dispensador
depende del recorrido de
la palanca. A medida que el
nivel del agua en su copa
o vaso llegue al borde,
reduzca suavemente la
presión ejercida sobre la
palanca con el fin de evitar
el rebosamiento. Si presiona
la palanca levemente el
agua goteará, es bastante
normal, no se trata de un
fallo.
5.18. Uso del
dispensador de agua
*opcional
Es normal que los primeros
C
C
1. Presione la palanca del dispensador
de agua con el vaso. Si está usando
un vaso blando de plástico, le será
más fácil empujar la palanca con la
mano.
2. Una vez haya llenado el vaso hasta
el nivel que desee, suelte la palanca.
vasos de agua servidos
por el dispensador estén
calientes.
Si no se usa el dispensador
de agua durante un periodo
de tiempo prolongado, no
consuma los primeros vasos
de agua.
Frigorífico / Manual del usuario
31 / 43ES

Funcionamiento del aparato
Tenga en cuenta que
C
el caudal de agua que
suministra el dispensador
depende del recorrido de
la palanca. A medida que el
nivel del agua en su copa
o vaso llegue al borde,
reduzca suavemente la
presión ejercida sobre la
palanca con el fin de evitar
el rebosamiento. Si presiona
la palanca levemente el
agua goteará, es bastante
normal, no se trata de un
fallo.
5.19. Llenar el
depósito del
dispensador de agua
El depósito de agua se encuentra
dentro de la bandeja de la puerta.
1. Abra la tapa del depósito.
2. Llene el depósito con agua potable.
3. Cierre la cubierta.
No vierta en el depósito
C
C
C
de agua ningún otro
líquido que no sea agua;
la bebidas tales como
los zumos de frutas,
bebidas carbonatadas o
bebidas alcohólicas no
son adecuadas para el
dispensador de agua.
El dispensador de agua
quedará dañado de
forma irreparable si se
utilizan dichos líquidos. La
garantía no cubre estos
usos. Algunas sustancias
químicas y aditivos que
contienen esos tipos de
bebidas/líquidos pueden
dañar el depósito de agua.
Utilice únicamente agua
potable limpia.
La capacidad del depósito
de agua es de 3 litros, no lo
llene excesivamente.
32 / 43ES
Frigorífico / Manual del usuario

Funcionamiento del aparato
5.20. Limpieza del
depósito de agua
1. Retire el depósito de llenado de
agua del interior de la rejilla de la
puerta.
2. Retire la rejilla de la puerta sujetando por ambos lados.
3. Sujete el depósito de agua por ambos lados y retírelo en un ángulo de
45°C.
4. Retire la tapa del depósito y limpie
el depósito.
Los componentes del
C
depósito de agua y del
dispensador de agua
no deben lavarse en el
lavavajillas.
Frigorífico / Manual del usuario
33 / 43ES

Funcionamiento del aparato
5.21. Bandeja de goteo
El agua que gotea durante el uso del
dispensador de agua se acumula en la
bandeja de derramamiento.
Retire el filtro de plástico tal y como
se muestra en la figura.
Enjuague el agua acumulada con un
trapo limpio y seco.
5.22. HerbBox/
HerbFresh (Cajón
para hierbas/
Hierbas frescas)
Retire el contenedor de película
plástica del HerbBox/HerbFresh+
Saque la película plástica de la bolsa
y póngala en el recipiente para la
película plástica como se muestra en
la imagen.
Vuelva a sellar el recipiente y vuelva
a colocarlo en la unidad HerbBox/
HerbFresh+.
Las secciones del HerbBoxHerbFresh+ son especialmente
ideales para el almacenamiento
de diversas hierbas que deben
mantenerse en condiciones
delicadas. Usted puede almacenar sus
hierbas sin empaque (perejil, eneldo,
etc) en esta sección horizontalmente
y mantenerlas frescas durante un
período mucho más largo.
La película deberá ser sustituida cada
seis meses.
34 / 43ES
Frigorífico / Manual del usuario

Funcionamiento del aparato
5.23. Congelación de
alimentos frescos
Para preservar la calidad de los
alimentos, debe congelarlos tan
pronto como sea posible cuando
los coloque en el compartimento
congelador. Utilice la función
de congelación rápida para esta
finalidad.
Puede guardar los alimentos
durante más tiempo en el
compartimento congelador cuando
los congele cuando estén frescos.
Envuelva los alimentos que vaya
a congelar y cierre el envase para
que quede hermético.
Asegúrese de envolver bien los
alimentos antes de colocarlos en
el congelador. Use contenedores
para congelador, láminas y papeles
antihumedad, bolsas de plástico
y otros materiales de embalaje
en vez de papeles de embalaje
tradicionales.
Etiquete cada paquete de
alimentos con la fecha antes de
congelarlos. De está manera,
podrá distinguir el frescor de cada
paquete de alimentos cada vez
que abra el congelador. Guarde
los alimentos congelados en la
parte frontal del compartimento
para asegurar que se consuman
primero.
El compartimento del
C
Consuma inmediatamente los
No congele cantidades demasiado
congelador se deshiela de
manera automática.
alimentos recién descongelados, y
no los vuelva a congelar.
grandes de una sola vez.
Ajuste del
compartimento
congelador
-18°C/4°F 4°C/40°F
-20/-4°F,-22/
-6°F o -24°C/-11°F
Congelación rápida 4°C/40°F
-18°C/4°F o más
frío
Frigorífico / Manual del usuario
Ajuste del
compartimento
frigorífico
4°C/40°F
2°C/37°F
Comentarios
Estos son los valores de uso
recomendados.
Se recomiendan estos valores cuando la
temperatura ambiente rebase los 30 ºC.
Se utiliza para congelar los alimentos
rápidamente. El aparato volverá a su
modo de funcionamiento previo una vez
finalizado el proceso.
Utilice estos ajustes si cree que el
compartimento frigorífico no está
suficientemente frío debido a las altas
temperaturas ambientales o por la
frecuente apertura y cierre de la puerta.
35 / 43ES

Funcionamiento del aparato
5.24. Recomendaciones para la
conservación de alimentos congelados
El compartimento no debe está a más de -18 °C.
1.
Coloque los paquetes de alimentos congelados en el congelador lo antes posible
tras su compra sin dejar que se descongelen.
2.
Compruebe si las fechas de consumo preferente y caducidad de los envases han
vencido o no antes de congelarlos.
3.
Asegúrese de que el envase de comida no esté dañado.
5.25. Información sobre la congelación
Las normas TSE 62552 exigen que el aparato congele al menos 4,5 kg de
alimentos a una temperatura ambiente de 32 ºC a una temperatura interior de
-18 ºC o inferior en menos de 24 horas por cada 100 litros (3,5 metros cúbicos)
de volumen del congelador.
Los alimentos sólo pueden conservarse durante periodos prolongados de
tiempo a temperaturas de -18 ºC o menos.
Los alimentos frescos pueden conservarse durante muchos meses en el
congelador a temperaturas de -18 ºC o menos.
No deje que los alimentos entren en contacto con alimentos previamente
congelados, con el fin de evitar que éstos puedan descongelarse parcialmente.
Hierva las verduras y drene el agua para almacenarla durante más tiempo
ya que estarán congeladas. Después de descargar el agua, colóquelos en
paquetes herméticos y colóquelos dentro del congelador. Alimentos tales
como plátanos, tomates, lechuga, huevos duros y patatas hervidas saladas no
son aptas para la congelación. Cuando estos alimentos estén congelados, su
valor nutricional y sabor pueden verse afectados negativamente. Esto podría
crear un riesgo para la salud humana.
5.26. Colocar los alimentos
Estantes del
compartimento
congelador
Estantes del
compartimento
frigorífico
Estantes de
la puerta del
compartimento
frigorífico
Alimentos congelados
diversos tales como
carnes, pescados,
helados, verduras, etc.
Alimentos en cazuelas,
platos cubiertos y
recipientes cerrados,
huevos (en recipientes
cerrados)
Alimentos o bebidas en
envases pequeños
36 / 43ES
Frigorífico / Manual del usuario

Funcionamiento del aparato
Cajón de frutas y
verduras
Compartimento
de alimentos
frescos
Verduras y frutas
Las delicatesen
(comida de desayuno,
productos cárnicos que
vayan a consumirse en
poco tiempo)
5.27. Aviso de
puerta abierta
(Característica opcional)
El frigorífico emitirá una señal
acústica de aviso cuando la puerta
del aparato permanezca abierta más
de un 1 minuto. Está advertencia
quedará silenciada cuando se cierre
la puerta o se pulse cualquiera de los
botones de la pantalla (si los hay).
La advertencia de puerta abierta
se da tanto en forma visual como
acústica. Si la advertencia prosigue
durante 10 minutos, las luces
interiores se apagarán.
5.28. Cambio de la
dirección de apertura
de la puerta
Puede cambiar la dirección de apertura de la puerta de su frigorífico en
función del lugar en donde lo use. Si
es necesario, or favor, llame al servicio
técnico más cercado.
La descripción anterior es una
información acerca del cambio de la
dirección de la puerta, deberá consultar la etiqueta de advertencia del lado
interior de la puerta.
5.29. Lámpara de
iluminación
Las luces LED se usan como lámparas
de iluminación. Contacte con un
servicio técnico autorizado en caso
de que haya algún problema con este
tipo de luz.
La(s) luz(ces) usadas en este aparato
no son aptas para la iluminación de las
habitaciones del hogar. El fin previsto
de la luz es ayudar al usuario a colocar
alimentos en el frigorífico/congelador
de una manera segura y cómoda.
Frigorífico / Manual del usuario
37 / 43ES

6 Mantenimiento y limpieza
La vida útil del aparato aumentará si lo
limpia regularmente.
ADVERTENCIA: Desenchufe
primero el aparato antes de
B
No use herramientas afiladas o
limpiarlo.
No utilice nunca para la limpieza
herramientas afiladas o abrasivas,
jabones, limpiadores domésticos,
detergentes ni ceras abrillantadoras.
Disuelva una cucharadita de
bicarbonato en medio cuarto de
agua. Empape un trapo en la solución
y escúrralo totalmente. Limpie el
interior del aparato con este paño y
luego séquelo totalmente.
Asegúrese de que no penetre agua en
el alojamiento de la lámpara ni otros
elementos eléctricos.
Utilice un paño húmedo para limpiar
la puerta. Para retirar la puerta y los
estantes, retire todos sus contenidos.
Retire los estantes de la puerta
tirando de ellos hacia arriba. Tras
limpiarlos, deslícelos de arriba hacia
abajo para su colocación.
Nunca use agentes de limpieza o agua
que contengan cloro para limpiar las
superficies exteriores y los cromados
del producto. ya que el cloro corroe
dichas superficies metálicas.
abrasivas, jabón, agentes de limpieza
domésticos detergentes, queroseno,
gasolina, barniz, etc. para eliminar
las huellas dactilares de las piezas de
plástico. Use agua tibia un un paño
suave para limpiarlo, y luego séquelo.
6.1. Cómo evitar
malos olores
Nuestros electrodomésticos no se
fabrican con materiales que puedan
producir olores. Sin embargo, una
conservación inadecuada de los
alimentos y la falta de limpieza de la
superficie interior del electrodoméstico
pueden dar lugar a un problema de
olores.
Por lo tanto, limpie el frigorífico con
bicarbonato disuelto en agua cada 15
días.
Conserve los alimentos en recipientes
cerrados. Los microorganismos que
proliferan en los envases no cubiertos
pueden causar malos olores.
Retire del frigorífico los alimentos
cuya fecha de caducidad haya vencido
y estén en mal estado.
6.2. Protección de las
superficies de plástico
Límpielos con agua caliente
inmediatamente, puesto que el aceite
podría dañar las superficies de plástico.
38 /43 ES
Frigorífico / Manual del usuario

Mantenimiento y limpieza
6.3. Vidrios de
las puertas
Retire la lámina protectora de los vidrios.
Hay una capa que reduce al mínimo
la formación de manchas y ayuda a
eliminarlas con facilidad, así como
la suciedad que pueda depositarse.
Los vidrios que no disponen de este
recubrimiento de protección pueden
verse sometidos a la acción persistente
de sustancias orgánicas o inorgánicas
presentes en el aire o el agua como
por ejemplo cal, sales minerales,
hidrocarburos sin quemar, óxidos de
metal y siliconas que pueden causar
con facilidad y rapidez manchas o daños
materiales. Resulta muy difícil mantener
el vidrio siempre limpio, a pesar de la
limpieza regular. En consecuencia, el
aspecto y la transparencia del vidrio
se deteriora. Los métodos y productos
de limpieza fuertes y corrosivos
intensificarán estos efectos y acelerarán
el proceso de deterioro.
Limpie siempre los vidrios con productos
de limpieza con base acuosa que no sean
alcalinos ni corrosivos.
Utilice siempre productos no alcalinos
ni corrosivos para la limpieza, a fin de
prolongar al máximo la vida útil de este
recubrimiento.
Son vidrios templados para incrementar
su resistencia frente a impactos y
roturas.
La superficie posterior de los vidrios
cuenta con una película de seguridad
que evita que cause daños a los objetos
circundantes en caso de rotura.
Frigorífico / Manual del usuario
39 /43 ES

7 Resolución de problemas
Consulte la siguiente lista antes de
llamar al servicio técnico. Si lo hace podrá
ahorrar tiempo y dinero. La lista incluye
las quejas más comunes que no tienen
relación con un problema de fabricación
ni con el material usado. Puede que
ciertas características mencionadas aquí
no sean de aplicación a este aparato.
El frigorífico no funciona.
El enchufe de alimentación no
está colocada correctamente.
>>> Enchúfelo para colocarlo
correctamente en la toma de
alimentación.
El fusible conectado a la toma de
corriente del aparato o el fusible
principal están fundidos. >>>
Compruebe los fusibles.
Condensación en la pared lateral
del compartimento frigorífico
(MULTIZONA, CONTROL DE FRÍO y
FLEXI ZONA).
El ambiente es demasiado frío. >>
No instale el aparato en ambientes
con una temperatura por debajo de
-5°C.
La puerta se abre con demasiada
frecuencia >>> Intente no abrir la
puerta tan a menudo.
El ambiente es demasiado húmedo.
>> No instale el aparato en
ambientes demasiado húmedos.
Los alimentos que contengan
líquidos están guardados en
recipientes no sellados. >>> Guarde
los alimentos que contengan
líquidos en recipientes sellados.
La puerta del aparato se ha dejado
abierta. >>> No deje la puerta del
aparato abierta durante mucho
tiempo.
El termostato está ajustado a
un nivel muy bajo. >>> Ajuste el
termostato a una temperatura
adecuado.
El compresor no funciona.
En caso de que haya un apagón
La descongelación está todavía
El aparato no está enchufado.
El ajuste de temperatura es
Se ha cortado el suministro eléctrico.
El ruido de funcionamiento del
frigorífico aumenta durante su uso.
Tales valores variarán en función de
El frigorífico está mucho tiempo
funcionando o se enciende con
demasiada frecuencia.
repentino o de desenchufar el cable
y enchufarlo de nuevo, la presión de
gas del sistema de refrigeración del
aparato no estará equilibrada, lo que
accionará la protección térmica del
compresor. El aparato se reiniciará
aproximadamente al cabo de 6
minutos. Si el aparato no se reinicia
después de este período, contacte
con el servicio técnico.
activo. >>> Esto es normal en un
congelador con descongelación
automática. La descongelación se
realiza periódicamente.
>>> Asegúrese de que el cable de
alimentación está enchufado.
incorrecto. >>> Seleccione el ajuste
de temperatura adecuado.
>>> El aparato seguirá funcionando
con normalidad una vez que el
suministro se haya restablecido.
las fluctuaciones de la temperatura
ambiente. Esto es perfectamente
normal, y no constituye una avería.
40 /43 ES
Frigorífico / Manual del usuario

Resolución de problemas
Puede que su nuevo aparato
sea más grande que el que tenía
anteriormente. Los aparatos más
grandes funcionarán durante más
tiempo.
Puede que la temperatura
ambiente sea alta. >>> El aparato
funcionará normalmente durante
largos períodos de tiempo con una
temperatura ambiente más alta.
Puede que el aparato se haya
enchufado recientemente o que se
haya colocado un nuevo alimento en
su interior. >>> El aparato tardará
más en alcanzar la temperatura
cuando haya sido enchufado
recientemente o cuando se coloque
un nuevo alimento en su interior.
Esto es normal.
Puede que se haya colocado
grandes cantidades de alimentos
calientes en el aparato.>>> No
coloque alimentos calientes en el
aparato.
Las puertas se han abierto
demasiado a menudo o se dejan
abiertas durante largos períodos de
tiempo. >>> El aire circulante en el
interior hará que el aparato funcione
durante más tiempo. No abra las
puertas con demasiada frecuencia.
Puede que el congelador o la
la puerta del congelador esté
entreabierta. >>> Compruebe
que las puertas estén totalmente
cerrados.
Puede que el aparato esté
configurado con una temperatura
demasiado baja. >>> Fije la
temperatura a un grado más alto y
espere a que el aparato alcance la
temperatura establecida.
Es posible que la junta de la puerta
del compartimento frigorífico o
congelador esté sucia, desgastada,
rota o no asentada correctamente.
>>> Limpie o sustituya la junta. Una
junta de puerta rota / dañada hará
que el aparato funcione durante
más tiempo para preservar la
temperatura actual.
La temperatura del frigorífico es
muy baja, pero la del congelador es
adecuada.
La temperatura del compartimento
congelador está fijada a un grado
muy bajo. >>> Fíjela a un grado más
alto y compruébelo de nuevo.
La temperatura del frigorífico es muy
baja, mientras que la del congelador
es adecuada.
La temperatura del compartimento
congelador está fijada a un grado
muy bajo. >>> Fíjela a un grado más
alto y compruébelo de nuevo.
Los alimentos depositados en
los cajones del compartimento
frigorífico están congelados.
La temperatura del compartimento
congelador está fijada a un grado
muy bajo. >>> Fíjela a un grado más
alto y compruébelo de nuevo.
La temperatura del congelador o del
frigorífico es demasiado alta.
Frigorífico / Manual del usuario
41 / 43 ES

Resolución de problemas
La temperatura del compartimento
congelador está fijada a un grado
muy bajo. >>> La temperatura
del compartimento refrigerador
incide en la temperatura del
compartimento congelador. Cambie
las temperaturas del frigorífico o el
congelador y espere hasta que la
temperatura de los compartimentos
correspondientes estén a un nivel
adecuado.
Las puertas se han abierto
demasiado a menudo o se dejan
abiertas durante largos períodos de
tiempo. >>> No abra las puertas con
demasiada frecuencia.
Puede que la puerta esté
entreabierta. >>> Cierre la puerta
totalmente.
Puede que el aparato se haya
enchufado recientemente o que se
haya colocado un nuevo alimento
en su interior. >>> Esto es normal.
El aparato tardará más en alcanzar
la temperatura cuando haya sido
enchufado recientemente o cuando
se coloque un nuevo alimento en su
interior.
Puede que se haya colocado
grandes cantidades de alimentos
calientes en el aparato.>>> No
coloque alimentos calientes en el
aparato.
Sacudidas o ruidos.
El suelo no está nivelado o estable.
>>> Si el aparato vibra, ajuste los
pies para equilibrarlo. Compruebe
además que el suelo sea lo
suficientemente firme para soportar
el aparato.
Cualquier elemento colocado en el
aparato puede provocar ruidos >>>
Retire cualquier elementos colocado
en el producto.
El aparato emite ruido del líquido en
circulación, pulverización, etc.
Los líquidos y gases fluyen en
función de los principios de
funcionamiento del frigorífico.>>>
Esto es normal y no es una avería.
El aparato emite un ruido de soplo de
viento.
El aparato usa un ventilador para
el proceso de refrigeración. Esto
es perfectamente normal, y no
constituye una avería.
Hay condensación en las paredes
internas del aparato.
El tiempo cálido y húmedo
favorece la formación de hielo
y la condensación. Esto es
perfectamente normal, y no
constituye una avería.
Las puertas se han abierto
demasiado a menudo o se dejan
abiertas durante largos períodos de
tiempo. >>> No abra las puertas con
demasiada frecuencia. Si las abre,
ciérrelas.
Puede que la puerta esté
entreabierta. >>> Cierre la puerta
totalmente.
Hay condensación en el exterior del
aparato o entre sus puertas.
Puede que haya humedad en el
aire; es algo bastante normal en
climas húmedos.>>> Cuando el
grado de humedad descienda, la
condensación desaparecerá.
El interior huele mal.
42 /43 ES
Frigorífico / Manual del usuario

Resolución de problemas
El producto no se limpia
regularmente. >>> Limpie el interior
regularmente con una esponja, agua
caliente y bicarbonato.
Ciertos recipientes y materiales de
embalaje pueden causar mal olor.
>>> Utilice recipientes y materiales
de embalaje libres de malos olores.
Los alimentos están guardados
en recipientes no sellados. >>>
Guarde los alimentos en recipientes
sellados. Los microorganismos
pueden propagarse fuera de los
recipientes de alimentos y causar
olores desagradables.
Retire cualquier alimentos caducado
o descompuesto del aparato.
La puerta no cierra.
Puede que los paquetes de comida
estén bloqueando la puerta. >>>
Recoloque los elementos que estén
bloqueando la puerta.
El aparato no está colocado en el
suelo en una posición totalmente
vertical. >>> Ajuste los soportes
para equilibrar el aparato.
El suelo no está equilibrado o no
es sólido. >>>Compruebe además
que el suelo esté nivelado y que
sea capaz de soportar el peso del
frigorífico.
El cajón de las verduras está atascado.
Puede que los alimentos estén en
contacto con la sección superior del
cajón. >>> Reorganice los alimentos
del cajón.
ADVERTENCIA: Si el problema
persiste después de seguir las
A
Frigorífico / Manual del usuario
instrucciones en este apartado,
contacte con un distribuidor o con
el servicio técnico autorizado. No
intente reparar el aparato.
43 / 43 ES

Frigorífico
Manual do Utilizador
RDNE455K30WN
PT
58 4738 0000/AA-2/2- PT

Caro Cliente,
A
A
Gostaríamos que aproveitasse a óptima eficiência do nosso produto, fabricado em modernas instalações
segundo controlos de qualidade meticulosos.
Para este propósito, ler integralmente o guia do utilizador antes de utilizar o produto e manter o guia
como fonte de referência. Se ceder este produto a outra pessoa, fornecer este guia em conjunto com o
produto.
O guia do utilizador assegura a utilização rápida e segura do produto.
Ler o guia do utilizador antes de instalar e operar com o produto.
Observar sempre as instruções de segurança aplicáveis.
Manter o guia do utilizador em local de fácil acesso para uso futuro.
Ler quaisquer outros documentos fornecidos com o produto.
Ter em mente que este guia do utilizador é aplicável a vários modelos do produto. O guia indica
claramente quaisquer variações de modelos diferentes.
Símbolos e Observações
No guia do utilizador são usados os símbolos seguintes:
Informações importantes e dicas
C
úteis.
Risco de vida e do equipamento.
A
Risco de choque eléctrico.
B
A embalagem do produto é
feita com materiais recicláveis,
de acordo com a Legislação
Ambiental Nacional.
INFORMATION
C
SUPPLIER’S NAME
A
MODEL IDENTIFIER
.A informação do modelo conforme memorizada na base de
dados do produto pode ser acedida entrando no seguinte
sítio web e através da busca do identicador do seu modelo
(*)
(*) que se encontra na etiqueta de classificação emergética.
https://eprel.ec.europa.eu/

1 Instruções de segurança e
ambientais 3
1.1. Segurança geral . . . . . . . . . . . . . . . . . 3
1.1.1 Advertência HC . . . . . . . . . . . . . . . . . 4
1.1.2 Para modelos com dispensador de água 4
1.2. Utilização prevista . . . . . . . . . . . . . . . . 5
1.3. Segurança das crianças . . . . . . . . . . . 5
1.4. Conformidade com a Directiva WEEE e
Eliminação de Resíduos: . . . . . . . . . . . 5
1.5. Cumprimento com a Directiva RoHS: . . 5
1.6. Informação de embalagem . . . . . . . . . 5
2 O seu aparelho 6
3 Instalação 7
3.1. Local de instalação apropriado . . . . . . 7
3.2. Instalar os calços de plástico . . . . . . . . 7
3.3. Ajustar os pés . . . . . . . . . . . . . . . . . . 7
3.4. Ligação elétrica . . . . . . . . . . . . . . . . . 8
3.5. Inverter as portas . . . . . . . . . . . . . . . . 9
3.6. Inverter as portas . . . . . . . . . . . . . . . 10
4 Preparação 11
4.1. Coisas a serem feitas para poupar
energia . . . . . . . . . . . . . . . . . . . . . . 11
4.2. Uso inicial . . . . . . . . . . . . . . . . . . . . 11
5 Operar com o produto 12
5.1. Botão de definição de temperatura . . 12
5.2. Congelar rápido . . . . . . . . . . . . . . . . 12
5.3. Função férias . . . . . . . . . . . . . . . . . . 13
5.4. Painel indicador . . . . . . . . . . . . . . . . 14
5.5. Painel indicador . . . . . . . . . . . . . . . . 16
5.6. Twist Icematic . . . . . . . . . . . . . . . . . 21
5.7. Recipiente para o gelo . . . . . . . . . . . 22
5.8. Suporte para ovos. . . . . . . . . . . . . . . 22
5.9. Ventilador. . . . . . . . . . . . . . . . . . . . . 22
5.10. Gaveta para vegetais . . . . . . . . . . . . 22
5.11. Compartimento refrigerador . . . . . . . 22
5.12. Mover a prateleira da porta . . . . . . . . 23
5.13. Recipiente de armazenamento
deslizante . . . . . . . . . . . . . . . . . . . . 23
5.14. Gaveta de vegetais com humidade
controlada . . . . . . . . . . . . . . . . . . . . 24
5.15. Blue light/HarvestFresh . . . . . . . . . . . 24
5.16. Icematic automático . . . . . . . . . . . . . 25
5.17. Descrição e limpeza do filtro de odores 26
5.18. HerbBox/HerbFresh. . . . . . . . . . . . . . 26
5.19. Utilizar a fonte de água fresca . . . . . . 27
5.20. Utilizar a fonte de água fresca . . . . . . 27
5.21. Encher o depósito do dispensador de
água . . . . . . . . . . . . . . . . . . . . . . . . 28
5.22. Limpar o depósito de água . . . . . . . 29
5.23. Tabuleiro para gotas de água. . . . . . . 29
5.24. Congelar alimentos frescos . . . . . . . . 30
5.25. Recomendações para preservar alimentos
congelados. . . . . . . . . . . . . . . . . . . . 30
5.26. Informação do congelador. . . . . . . . . 30
5.27. Colocar alimentos. . . . . . . . . . . . . . . 31
5.28. Botão para abrir a porta . . . . . . . . . . 31
5.29. Mudar a direção da abertura da porta 31
5.30. Lâmpada de iluminação . . . . . . . . . . 31
5.31. Recomendações para preservar alimentos
congelados. . . . . . . . . . . . . . . . . . . . 31
5.32. Informação do congelador. . . . . . . . . 32
5.33. Colocar alimentos. . . . . . . . . . . . . . . 32
5.34. Botão para abrir a porta . . . . . . . . . . 32
5.35. Mudar a direção da abertura da porta 32
5.36. Lâmpada de iluminação . . . . . . . . . . 32
6 Manutenção e limpeza 33
6.1. Evitar maus odores . . . . . . . . . . . . . . 33
6.2. Proteger superfícies de plástico . . . . 33
6.3. Vidros da Porta . . . . . . . . . . . . . . . . 33
7. Resolução de problemas 34
2/36 PT
Frigorífico / Manual do Utilizador

1 Instruções de segurança e ambientais
Esta secção fornece as instruções de segurança
necessárias para prevenir risco de lesões e danos
materiais. O não cumprimento destas instruções
invalidará todos os tipos de garantia do produto.
1.1. Segurança geral
AVISO:
Manter as aberturas de ventilação, na
caixa de proteção do aparelho ou na
estrutura embutida, sem obstruções.
ADVERTÊNCIA:
Não usar dispositivos mecânicos
nem outros meios para acelerar o
processo de descongelação, exceto
os recomendados pelo fabricante.
A
AVISO:
Não danificar o circuito de
refrigeração.
ADVERTÊNCIA:
Não usar aparelhos eléctricos no
interior dos compartimentos de
armazenamento de alimentos do
aparelho, a menos que sejam do tipo
recomendado pelo fabricante.
Este aparelho é destinado a ser usado em uso
doméstico e aplicações similares como
– zonas de cozinha em estabelecimentos
comerciais, escritórios ou outros ambientes
laborais;
– casas rurais e pelos clientes em hotéis, motéis e
outros ambientes de tipo residencial;
– ambientes de tipo alojamento e pequeno
almoço;
– utilizações de refeições e outros não-retalhistas
similares.
Este produto não deve ser usado por
pessoas com deficiências físicas, sensoriais
e mentais, sem conhecimento e experiência
Frigorífico / Manual do Utilizador
suficiente ou por crianças. O dispositivo
apenas pode ser usado por estas pessoas
sob supervisão e instrução de uma
pessoa responsável pela sua segurança.
As crianças não devem ser autorizadas a
brincar com este aparelho.
Em caso de mau funcionamento, desligue o
aparelho.
Depois de desligar, aguarde pelo menos 5
minutos antes de ligar novamente. Desligar
o produto quando não está em uso. Não
tocar na ficha com as mãos molhadas!
Não puxar pelo cabo para desligar, segurar
sempre pela ficha.
Não ligar o frigorífico se a tomada estiver
solta.
Desligar o produto durante a instalação,
manutenção, limpeza e reparação.
Se o produto não for usado por uns tempos,
desligar o produto e retirar quaisquer
alimentos do interior.
Não utilizar materiais de limpeza a vapor
ou vapor para limpar o frigorífico e derreter
o gelo no interior. O vapor pode entrar
em contacto com as áreas electrificadas e
causar curto-circuito ou choque eléctrico!
Não lavar o produto pulverizando-o ou
deitando água sobre o mesmo! Perigo de
choque eléctrico!
Nunca usar o produto se a secção
localizada na parte superior ou traseira
do seu produto com placas de circuitos
impressos electrónicos no interior estiver
aberta (tampa da placa de circuito
electrónico impresso) (1).
3/36 PT

Instruções de segurança e ambientais
1
1
Em caso de mau funcionamento, não
usar o produto, porque pode provocar um
choque eléctrico. Contactar a assistência
autorizada antes de fazer alguma coisa.
Ligar o produto a uma tomada com ligação
à terra. A ligação à terra deve ser feita por
um electricista qualificado.
Se o produto tem luz tipo LED, contactar
a assistência autorizada para substituir ou
em caso de quaisquer problemas.
Não tocar em alimentos congelados com
as mãos molhadas! Podem aderir às suas
mãos!
Não colocar líquidos em garrafas e latas
no compartimento de congelação. Podem
explodir!
Colocar os líquidos em posição vertical
depois de fechar a tampa firmemente.
Não pulverizar substâncias inflamáveis
perto do produto, podem incendiar ou
explodir.
Não manter no frigorífico materiais
inflamáveis e produtos com gás inflamável
(sprays, etc.).
Não colocar recipientes com líquidos em
cima do produto. Pulverizar água sobre
as partes eléctricas pode causar choque
eléctrico e risco de incêndio.
Expor o produto à chuva, neve, sol e
vento pode causar perigo eléctrico.
Quando recolocar o produto, não puxar
pelo puxador da porta. O puxador pode
soltar-se.
Ter cuidado para evitar prender qualquer
parte das suas mãos ou corpo em alguma
das partes móveis dentro do produto.
Não pisar ou apoiar-se nas portas, gavetas
e peças similares do frigorífico. Isto pode
causar avaria do produto e danificar as
partes.
Ter cuidado para não prender o cabo de
alimentação.
1.1.1 Advertência HC
Se o produto inclui um sistema de refrigeração
com gás R600a, ter cuidado para não danificar
o sistema de arrefecimento e a sua tubagem
durante a utilização e movimentação do produto.
O gás é inflamável. Se o sistema de refrigeração
estiver danificado, manter o produto longe de
fontes de ignição e ventilar imediatamente o
espaço onde o frigorífico se encontra.
A etiqueta no lado esquerdo
interior indica o tipo de gás usado
C
no produto.
1.1.2 Para modelos com
dispensador de água
A pressão para a entrada de água fria
deve ser no máximo de 90 psi (620 kPa).
Se a sua pressão de água exceder 80 psi
(550 kPa, utilize uma válvula limitadora de
4/36PT
Frigorífico / Manual do Utilizador

Instruções de segurança e ambientais
pressão no seu sistema de alimentação.
Se não sabe como verificar a sua pressão
de água, deve solicitar a ajuda de um
canalizador profissional.
Se existir o risco de o golpe de ariete
afetar a sua instalação, deve utilizar
sempre um equipamento de prevenção
do golpe de ariete na sua instalação. Deve
consultar os canalizadores profissionais
se não tiver a certeza se existe o efeito de
golpe de ariete na sua instalação.
Não instalar na entrada de água quente.
Deve tomar precauções relativamento
ao risco de congelamento nas tubagens.
O intervalo de funcionamento de
temperatura da água deve ser 33ºF
(0,6ºC) de mínimo e 100ºF (38ºC) de
máximo.
Usar apenas água potável.
1.2. Utilização prevista
Este produto é concebido para utilização
doméstica. Não está previsto para
utilização comercial.
O produto deve ser utilizado apenas para
armazenar alimentos e bebidas.
Não manter no frigorífico produtos
sensíveis que requerem temperaturas
controladas (vacinas, medicamentos
sensíveis ao calor, equipamentos
médicos, etc.).
O fabricante não assumes
responsabilidades por qualquer dano
devido a uso indevido ou inadequado.
O tempo de vida do produto é de 10 anos.
As peças sobresselentes necessárias
ao funcionamento do produto estarão
disponíveis durante o referido período de
tempo.
1.3. Segurança das crianças
Manter os materiais de embalagem fora
do alcance das crianças.
Não permitir que as crianças brinquem
com o produto.
Se a porta do produto incluir uma
fechadura, manter a chave fora do
alcance das crianças.
1.4. Conformidade
com a Directiva WEEE e
Eliminação de Resíduos:
Este produto está em conformidade com a
Directiva WEEE da UE (2012/19/EU). Este produto porta um símbolo de classificação para resíduos de equipamentos eléctricos e electrónicos
(WEEE).
clagem de dispositivos elétricos e eletrónicos.
Para encontrar estes sistemas de recolha, entre
em contacto com as autoridades locais ou com o
revendedor através do qual adquiriu o produto.
Todos desempenham um papel importante na recuperação e reciclagem de aparelhos velhos. A
eliminação correta de aparelhos usados ajuda a
prevenir potenciais efeitos negativos ao meio ambiente e à saúde humana.
1.5. Cumprimento com
a Directiva RoHS:
O produto que adquiriu está em conformidade
com a Directiva RoHS da UE (2011/65/EU). Ele
não contém materiais perigosos e proibidos especificados na Directiva.
1.6. Informação de embalagem
te com os resíduos domésticos ou outros tipos de
resíduos. Leve-os para os pontos de recolha de
materiais de embalagem designados pelas autoridades locais.
Este símbolo indica que o produto não
deve ser eliminado juntamente com o
lixo doméstico no fim da sua vida útil. O
dispositivo usado deve ser devolvido
num ponto de recolha oficial para reci-
A embalagem do produto é feita de
materiais recicláveis, de acordo com a
nossa legislação nacional. Não elimine
os materiais da embalagem juntamen-
Frigorífico / Manual do Utilizador
5/36 PT

2 O seu aparelho
17
*16
*16
*1
14
*15
14
*13
18
8
1.
Frigorífico - prateleira da porta do compartimento
2.
Botão de definição de temperatura
3.
Depósito de enchimento do dispensador de água
4.
Secção dos ovos
5.
Reservatório do dispensador de água
6.
Recipiente de armazenamento sob a prateleira da
*12
*11
*10
*9
porta
7.
Mover a prateleira da porta
8.
Pé ajustável
9.
Gaveta para vegetais
10.
Compartimento refrigerador
11.
Bloqueio e chave
*opcional:As figuras neste manual do utilizador são dadas como um exemplo e podem não coincidir
exatamente com o produto. Se as partes relevantes não estão disponíveis no produto que comprou, a
C
figura aplica-se a outros modelos.
*2
6/36 PT
*3
8
12.
Prateleira para garrafas
13.
Frigorífico - prateleira de vidro do compartimento
14.
Ventilador
15.
Prateleira do compartimento congelador
16.
Caixa de gelo / Compartimento para fazer gelo
17.
Compartimento congelador
18.
Compartimento frigorífico
*4
*5
*6
*7
Frigorífico / Manual do Utilizador

3 Instalação
3.1. Local de instalação apropriado
Contactar uma Assistência Autorizada para a instalação
do produto. De modo a preparar o produto para
utilização, consultar a informação no manual do
utilizador e assegurar que a instalação elétrica e a
instalação de água são apropriadas. Se não, chamar
um eletricista e técnico qualificados para realizarem
quaisquer arranjos necessários.
ADVERTÊNCIA: O fabricante não será
responsabilizado por danos que possam
B
B
A
para evitar sacudidelas.
de fontes de calor tais como fogões, núcleos de
aquecedores e fornos e pelo menos a 5 cm de fornos
elétricos.
mantido em locais húmidos.
à volta do seu produto de modo a alcançar um
funcionamento eficiente. Se o produto for colocado
num encaixe na parede, ter em atenção para deixar
pelo menos 5 cm de distância ao teto e paredes
laterais.
desça abaixo de -5°C.
surgir a partir de procedimentos realizados
por pessoas não autorizadas.
ADVERTÊNCIA: O produto não deve ser
ligado à tomada durante a instalação. Caso
contrário, há o risco de morte ou lesão
grave!
ADVERTÊNCIA: Se o afastamento da
porta da divisão onde o produto deve
ser colocado for tão apertado impeça
a passagem do produto, remover a
porta da divisão e passar o produto pela
porta girando-o para o seu lado; se isto
não funcionar, contactar a assistência
autorizada.
3.2. Instalar os calços de plástico
Os calços de plástico fornecidos com o produto são
usados para criar a distância para a circulação de ar
entre o produto e a parede de trás.
1.
Para instalar os calços, retirar os parafusos no
produto e usar os parafusos fornecidos em conjunto
com os calços.
2.
Inserir os 2 calços de plástico na tampa de ventilação
de trás como mostrado na figura.
3.3. Ajustar os pés
Se o produto ficar desequilibrado depois da instalação,
ajustar os pés da frente rodando-os para a esquerda ou
direita.
Frigorífico / Manual do Utilizador
7/36 PT

Instalação
3.4. Ligação elétrica
ADVERTÊNCIA:Não fazer ligações
através de cabos de extensão ou
A
B
C
fichas múltiplas.
ADVERTÊNCIA: O cabo de
alimentação danificado deve ser
substituído pelo Agente de Assistência
Autorizado.
Se dois refrigeradores são para ser
instalados lado a lado, deve haver pelo
menos 4 cm de distância entre eles.
A nossa empresa não será responsável por
quaisquer danos que possam ocorrer quando
o produto for usado sem ligação à terra e
elétrica em conformidade com os regulamentos
nacionais.
A ficha do cabo de alimentação deve ser de fácil
acesso após a instalação.
Sem cabos de extensão ou tomadas múltiplas
sem cabo entre o seu produto e a tomada da
parede.
Advertência de Superfície
Quente
As paredes laterais do seu
produto es´ão equipadas
com tubos refrigerantes
para melhorar o sistema de
refrigeração. O refrigerante
com altas temperaturas pode
A
fluir através destas áreas,
resultando em superfícies
quentes nas paredes laterais.
Isto é normal e não exige
qualquer reparação. Deve ter
cuidado quando tocar nestas
áreas.
8/36 PT
Frigorífico / Manual do Utilizador

Instalação
3.5. Inverter as portas
Seguir a ordem numérica.
4
2
1
6
45 °
5
10
11
9
3
7
8
12
16
15
19
20
18
17
13
Frigorífico / Manual do Utilizador
14
9 /36 PT

Instalação
3.6. Inverter as portas
Seguir a ordem numérica.
4
2
1
6
45 °
5
10
11
9
3
7
8
12
16
15
19
21
20
18
21
13
14
17
10/36 PT
Frigorífico / Manual do Utilizador

4 Preparação
4.1. Coisas a serem feitas
para poupar energia
Ligar o produto a sistemas eletrónicos de
poupança de energia é arriscado pois podem
A
Já que o ar quente e húmido não irá penetrar
Frigorífico / Manual do Utilizador
danificar o produto.
Para um aparelho de instalação independente:”este
frigorífico não se destina a ser usado como um
aparelho de encastrar.
Não deixar as portas do seu frigorífico abertas por
muito tempo.
Não colocar alimentos ou bebidas quentes no seu
frigorífico.
Não sobrecarregar o frigorífico, a capacidade de
arrefecimento falhará quando a circulação de ar interior
for impedida.
De modo a armazenar a quantidade máxima de
alimentos no compartimento frigorífico, o Icematic,
disponível no compartimento congelador e facilmente
removível à mão, deverá ser retirado. Os valores
declarados de volume líquido e consumo de energia
declarados na placa de dados de energia do seu
frigorífico são medidos e testados retirando o Icematic.
Não retirar as prateleiras do interior do compartimento
congelador e na porta do compartimento congelador
não devem ser removidas e devem ser sempre usadas
pois proporcionam facilidade de utilização e eficiência
no consumo de energia.
O fluxo de ar não deve ser bloqueado colocando
alimentos nas laterais do ventilador do compartimento
do congelador. Deve ser disponibilizada uma distância
mínima de 3 cm nas laterais da tampa protetora do
ventilador.
Os cestos/gavetas que são fornecidos com o
compartimento para os frescos têm de ser sempre
utilizados para um menor consumo de energia e para
melhores condições de armazenamento.
O contacto dos alimentos com o sensor de temperatura
no compartimento do congelador pode aumentar o
consumo de energia do aparelho. Assim deve ser
evitado qualquer contacto com o(s) sensor(es).
Dependendo das caraterísticas de seu produto,
o descongelamento de alimentos congelados no
compartimento frigorífico irá proporcionar a poupança
de energia e preservar a qualidade dos alimentos.
diretamente o seu produto enquanto as
portas não estiverem abertas, o seu produto
irá otimizar-se por si próprio para possuir
condições suficientes para proteger os seus
alimentos. As funções e os componentes
como o compressor, a ventoinha, o aquecedor,
o descongelador, a iluminação, o visor,
entre outros, funcionarão de acordo com as
necessidades para o consumo mínimo de
energia nestas circunstâncias.
Não permitir o contacto de alimentos com o sensor
de temperatura do compartimento frigorífico exibido
na figura abaixo.
4.2. Uso inicial
Antes de começar a usar o seu frigorífico, assegurar
que todos os preparativos são feitos de acordo com
as instruções nas secções "Instruções de segurança e
ambientais" e "Instalação".
Pôr o produto a trabalhar sem quaisquer alimentos
durante 6 horas e não abrir a porta, a menos que
absolutamente necessário.
Ouvirá um ruído quando o compressor arrancar.
Os líquidos e gases vedados no sistema de
C
C
C
11/36 PT
refrigeração podem também dar origem a
ruídos, mesmo se o compressor não estiver a
funcionar o que é perfeitamente normal.
As extremidades dianteiras do produto podem
ficar quentes. Isto é normal. Estas áreas
são concebidas para aquecer para evitar a
condensação.
Em alguns modelos, o painel de instrumentos
desliga automaticamente 5 minutos depois de
a porta ser fechada. Será reativado quando a
porta for aberta ou premida qualquer tecla.

5 Operar com o produto
5.1. Botão de definição
de temperatura
A temperatura interior do seu frigorífico altera-se
pelas seguintes razões:
Temperaturas sazonais,
Abertura frequente da porta e deixar a porta
aberta por períodos longos,
Alimentos postos no frigorífico sem arrefecer à
temperatura da divisão,
Localização do frigorífico na divisão (p.ex.
exposto à luz solar).
Deve ajustar a variação da temperatura
interior devido a tais razões usando o botão de
definição.
Os números à volta do botão de controlo
indicam os valores da temperatura em “°C”.
Se a temperatura ambiente for 25°C,
recomendamos que use o botão de controlo de
temperatura do seu frigorífico a 4°C. Este valor
deve ser aumentado ou diminuído se necessário
noutras temperaturas de ambiente.
5.2. Congelar rápido
Se foram congeladas grandes quantidades de
alimentos frescos, ajustar o botão de controlo de
temperatura para (
pôr os alimentos frescos no compartimento de
congelamento rápido.
É fortemente recomendado manter o botão nesta
posição pelos menos 24 horas para congelar
a quantidade máxima de alimentos frescos
declarados como capacidade de congelamento.
Ter especial cuidado para não misturar alimentos
congelados e alimentos frescos.
Lembrar de rodar o botão controlo de temperatura
de volta à sua posição anterior, uma vez os
alimentos congelados.
) máx. 24 horas antes de
C
*Opcional: As figuras neste manual do utilizador são esquemáticas e podem não coincidir
exatamente com o produto. Se as partes sujeitas não estão incluídas no produto que comprou,
então essas partes são válidas para outros modelos.
12/36 PT
Frigorífico / Manual do Utilizador

Operar com o produto
5.3. Função férias
Se as portas do produto não forem abertos
durante 12 horas após o botão de controlo de
temperatura ser mudado para o posição mais
quente, então a função de férias será ativada
automaticamente.
Para cancelar a função, mudar a definição do
botão.
Não é recomendado armazenar alimentos no
compartimento frigorífico quando a função de
férias está ativa.
Quando a operação de definição estiver
concluída, deve premir o botão de controlo
de temperatura e escondê-lo.
Frigorífico / Manual do Utilizador
13/36 PT

Operar com o produto
5.4. Painel indicador
Os painéis indicadores podem variar de acordo com o modelo do produto.
As funções áudio e vídeo do painel indicador irão ajudar na utilização do produto.
8
9
1. Indicador do compartimento frigorífico
2. Indicador do estado do erro
3. Indicador da temperatura
4. Botão da função férias
5. Botão de definição de temperatura
6. Botão de seleção de compartimento
7. Indicador do compartimento congelador
8. Indicador do modo económico
9. Indicador da função férias
*opcional
1
7
2
6
3
45
C
*Opcional: As figuras neste manual do utilizador são esquemáticas e podem não coincidir
exatamente com o produto. Se as partes sujeitas não estão incluídas no produto que comprou,
então essas partes são válidas para outros modelos.
14/36PT
Frigorífico / Manual do Utilizador

Operar com o produto
1. Indicador do compartimento frigorífico
A luz do compartimento do frigorífico iluminase quando a temperatura do compartimento
frigorífico é definida.
2. Indicador do estado do erro
Se o frigorífico não produz frio suficiente ou
no caso de falha do sensor, este indicador
é ativado. Quando o indicador é ativado,
é exibido “E” no indicador de temperatura
do compartimento congelador, e números
como “1,2,3...” são exibidos no indicador de
temperatura do compartimento frigorífico.
Estes números no indicador servem para
informar o pessoal da assistência sobre o erro.
3. Indicador da temperatura
Indica congelador, temperatura do
compartimento frigorífico.
4. Botão da função férias
Premir o botão férias durante 3 segundos
para ativar esta função. Quando a função
férias é ativada, “- -” é exibido no indicador
de temperatura do compartimento frigorífico
e não é realizado arrefecimento ativo no
compartimento frigorífico. Não é adequado
manter os alimentos no compartimento do
frigorífico quando esta função é ativada. Outros
compartimentos continuarão a ser arrefecidos
conforme a temperatura definida.
Para cancelar esta função premir de novo o
botão Férias.
5. Botão de definição de temperatura
Altera a temperatura do compartimento
relevante entre -24°C... -18°C e 8°C...1°C.
6. Botão de seleção de compartimento
Botão de seleção: Premir o botão de
seleção do compartimento para alterar entre
compartimentos frigorífico e congelador.
7. Indicador do compartimento congelador
A luz do compartimento do frigorífico iluminase quando a temperatura do compartimento
congelador é definida.
8. Indicador do modo económico
Indica que o frigorífico funciona em modo
de poupança de energia. Este visor será
ativado se a temperatura do compartimento
congelador for definida para -18°C.
9. Indicador da função férias
Indica que férias está ativada.
Frigorífico / Manual do Utilizador
15/36 PT
 Loading...