

Beko RCNE520E31ZM, RCNE520E31ZX, CNE520E20X, RCNE520E31ZB, RCNE520E20M User manual [EN,IT,PL]
...Page 1

RCNE520E31ZM
RCNE520E31ZX
RCNE520E20M
RCNE520E20B
RCNE520E20DS
CNE520E20X
RCNE520E31ZB
EN
IT PL
RCNE520E31DZX
RCNE520E20DB
Page 2
Please read this manual before using the product!
Dear Customer,
We'd like you to make the best use of our product, which has been manufactured in modern facilities
with care and meticulous quality controls.
Thus, we advice you to read the entire user manual before you use the product. In case the product
changes hands, do not forget to hand the guide to its new owner along with the product.
This guide will help you use the product quickly and safely.
• Please read the user guide carefully before installing and operating the product.
• Always observe the applicable safety instructions.
• Keep the user guide within easy reach for future use.
• Please read any other documents provided with the product.
Keep in mind that this user guide may apply to several product models. The guide clearly indicates any
variations of different models.
Important information and useful
C
tips.
Risk of life and property.
A
Risk of electric shock.
B
The product’s packaging is made of
recyclable materials, in accordance
with the National Environment
Legislation.
Page 3

1. Safety and environment instructions 3
1.1. General safety. . . . . . . . . . . . . . . . . . . . . . . 3
1.1.1 HC warning. . . . . . . . . . . . . . . . . . . . . . . . 5
1.1.2 For models with water dispenser . . . . . . . .5
1.2. Intended use. . . . . . . . . . . . . . . . . . . . . . . . 6
1.3. Child safety. . . . . . . . . . . . . . . . . . . . . . . . . 6
1.4. Compliance with WEEE Directive and Disposing
of the Waste Product . . . . . . . . . . . . . . . . . 6
1.5. Compliance with RoHS Directive . . . . . . . . . 7
1.6. Package information . . . . . . . . . . . . . . . . . .7
2 Your Refrigerator 8
3 Installation 9
3.1. Right place for installation . . . . . . . . . . . . . . 9
3.2. Attaching the plastic wedges. . . . . . . . . . . . 9
3.3. Adjusting the stands . . . . . . . . . . . . . . . . . . 9
3.4. Power connection . . . . . . . . . . . . . . . . . . .10
3.5. Reversing the doors . . . . . . . . . . . . . . . . .11
3.6. Reversing the doors . . . . . . . . . . . . . . . . .12
4 Preparation 13
4.1. What to do for energy saving. . . . . . . . . . . 13
4.2. First Use. . . . . . . . . . . . . . . . . . . . . . . . . . 13
5 Using the product 14
5.1. Temperature adjustment button. . . . . . . . . 14
5.2. Rapid freezing . . . . . . . . . . . . . . . . . . . . . 14
5.3. Vacation function . . . . . . . . . . . . . . . . . . . 15
5.4. Indicator panel . . . . . . . . . . . . . . . . . . . . . 16
5.5. Indicator panel . . . . . . . . . . . . . . . . . . . . . 18
5.6. Ice bucket. . . . . . . . . . . . . . . . . . . . . . . . . 20
5.7. Eggholder. . . . . . . . . . . . . . . . . . . . . . . . . 20
5.8. Fan. . . . . . . . . . . . . . . . . . . . . . . . . . . . . . 21
5.9. Vegetable bin. . . . . . . . . . . . . . . . . . . . . . 21
5.10. Zero degree compartment . . . . . . . . . . . . 21
5.11. HerbBox/HerbFresh . . . . . . . . . . . . . . . . .21
5.12. Moving door rack. . . . . . . . . . . . . . . . . . . 22
5.13. Sliding storage box . . . . . . . . . . . . . . . . .22
5.14. Moisture controlled vegetable bin. . . . . . . 23
5.15. Automatic ice machine . . . . . . . . . . . . . .23
5.16. Icematic and ice storage container . . . . . .24
5.17. Using the water dispenser . . . . . . . . . . . . 24
5.18. Filling the water dispenser's tank . . . . . . .25
5.19. Cleaning the water tank . . . . . . . . . . . . .26
5.20. Drip tray . . . . . . . . . . . . . . . . . . . . . . . . . 27
5.21. Freezing fresh food . . . . . . . . . . . . . . . . .28
5.22. Recommendations for storing frozen foods 28
5.23. Deep freezer details. . . . . . . . . . . . . . . . .29
5.24. Placing the food. . . . . . . . . . . . . . . . . . . . 29
5.25. Door open alert . . . . . . . . . . . . . . . . . . . . 29
5.26. Changing the opening direction of the door 29
5.27. Interior light . . . . . . . . . . . . . . . . . . . . . . . 29
6 Maintenance and cleaning 30
6.1. Avoiding bad odors . . . . . . . . . . . . . . . . . . 30
6.2. Protecting the plastic surfaces . . . . . . . . . 30
6.3. Door Glasses . . . . . . . . . . . . . . . . . . . . . 30
7 Troubleshooting 31
2 /33 EN
Refrigerator / User Guide
Page 4

1. Safety and environment instructions
This section provides the safety
instructions necessary to prevent
the risk of injury and material
damage. Failure to observe these
instructions will invalidate all
types of product warranty.
Intended use
WARNING:
Keep ventilation openings,
A
A
A
A
This appliance is intended to be
used in household and similar
in the appliance enclosure
or in the built-instructure,
clear of obstruction.
WARNING:
Do not use mechanical
devices or other means
to accelerate the
defrostingprocess, other
than those recommended
by the manufacturer.
WARNING:
Do not damage the
refrigerant circuit.
WARNING:
Do not use electrical
appliances inside the food
storage compartments
of the appliance, unless
they are of the type
recommended by the
manufacturer.
applications such as
– staff kitchen areas in shops,
offices and other working
environments;
– farm houses and by clients
in hotels, motels and other
residential type environments;
– bed and breakfast type
environments;
– catering and similar non-retail
applications.
1.1. General safety
• This product should not be
used by persons with physical,
sensory and mental disabilities,
without sufficient knowledge
and experience or by children.
The device can only be used by
such persons under supervision
and instruction of a person
responsible for their safety.
Children should not be allowed
to play with this device.
• In case of malfunction, unplug
the device.
• After unplugging, wait at least
5 minutes before plugging in
again.
• Unplug the product when not in
use.
• Do not touch the plug with wet
hands! Do not pull the cable to
plug off, always hold the plug.
Refrigerator / User Guide
3/33EN
Page 5
Safety and environment instructions
• Do not plug in the
refrigerator if the socket is
loose.
• Unplug the product during
• Do not wash the product by
installation, maintenance,
cleaning and repair.
• If the product will not be
• In case of malfunction, do
used for a while, unplug the
product and remove any food
inside.
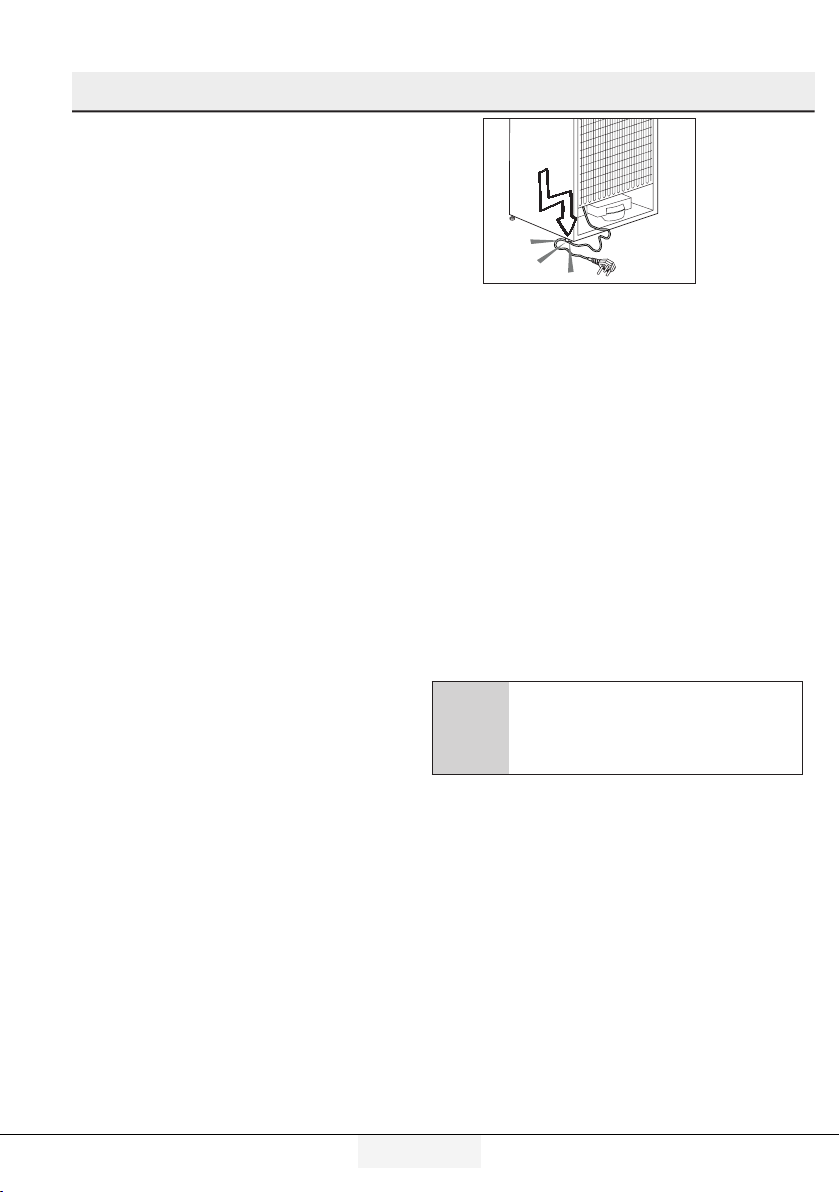
• Do not use the product when
the compartment with circuit
• Plug the product into an
cards located on the upper
back part of the product
(electrical card box cover) (1)
is open.
1
• If the product has LED
• Do not touch frozen food
• Do not place liquids in
1
• Do not use steam or
• Place liquids in upright
steamed cleaning materials
for cleaning the refrigerator
and melting the ice inside.
• Do not spray flammable
Steam may contact the
electrified areas and cause
short circuit or electric
shock!
spraying or pouring water on
it! Danger of electric shock!
not use the product, as it
may cause electric shock.
Contact the authorized
service before doing
anything.
earthed socket. Earthing
must be done by a qualified
electrician.
type lighting, contact the
authorized service for
replacing or in case of any
problem.
with wet hands! It may
adhere to your hands!
bottles and cans into the
freezer compartment. They
may burst out!
position after tightly closing
the lid.
substances near the product,
as it may burn or explode.
4 /33 EN
Refrigerator / User Guide
Page 6
Safety and environment instructions
• Do not keep flammable
materials and products with
flammable gas (sprays, etc.)
in the refrigerator.
• Do not place containers
holding liquids on top of the
product. Splashing water on
an electrified part may cause
electric shock and risk of
fire.
• Exposing the product to rain,
snow, sunlight and wind
will cause electrical danger.
When relocating the product,
do not pull by holding the
door handle. The handle may
come off.
• Take care to avoid trapping
any part of your hands or
1.1.1 HC warning
If the product comprises a
cooling system using R600a
gas, take care to avoid
damaging the cooling system
and its pipe while using and
moving the product. This gas
is flammable. If the cooling
system is damaged, keep the
product away from sources
of fire and ventilate the room
immediately.
body in any of the moving
parts inside the product.
• Do not step or lean on the
C
door, drawers and similar
parts of the refrigerator. This
will cause the product to fall
down and cause damage to
1.1.2 For models with
water dispenser
• Pressure for cold water
the parts.
• Take care not to trap the
power cable.
The label on the inner left
side indicates the type of
gas used in the product.
inlet shall be maximum 90
psi (6.2 bar). If your water
pressure exceeds 80 psi
(5.5 bar), use a pressure
limiting valve in your mains
system. If you do not know
how to check your water
pressure, ask for the help of
Refrigerator / User Guide
5/33EN
Page 7

Safety and environment instructions
a professional plumber.
• If there is risk of water
• Do not keep sensitive
hammer effect in your
installation, always
use a water hammer
prevention equipment in
your installation. Consult
• The manufacturer assumes
Professional plumbers if you
are not sure that there is no
water hammer effect in your
installation.
• Do not install on the hot
• Original spare parts will
water inlet. Take precautions
against of the risk of
freezing of the hoses. Water
temperature operating
interval shall be 33°F
1.3. Child safety
• Keep packaging materials
(0.6°C) minimum and 100°F
(38°C) maximum.
• Use drinking water only.
• Do not allow the children to
• If the product’s door
1.2. Intended use
• This product is designed for
home use. It is not intended
for commercial use.
• The product should be used
to store food and beverages
only.
1.4. Compliance with WEEE
Directive and Disposing
of the Waste Product
This product complies with EU WEEE
Directive (2012/19/EU). This product bears a
classification symbol for waste electrical and
electronic equipment (WEEE).
products requiring controlled
temperatures (vaccines,
heat sensitive medication,
medical supplies, etc.) in the
refrigerator.
no responsibility for any
damage due to misuse or
mishandling.
be provided for 10 years,
following the product
purchasing date.
out of children’s reach.
play with the product.
comprises a lock, keep the
key out of children’s reach.
6 /33 EN
Refrigerator / User Guide
Page 8

Safety and environment instructions
This product has been
manufactured with high quality
parts and materials which can be
reused and are suitable for
recycling. Do not dispose of the
waste product with normal
domestic and other wastes at the
end of its service life. Take it to the collection
center for the recycling of electrical and
electronic equipment. Please consult your local
authorities to learn about these collection
centers.
1.5. Compliance with
RoHS Directive
• This product complies with EU
WEEE Directive (2011/65/EU).
It does not contain harmful and
prohibited materials specified in
the Directive.
1.6. Package information
• Packaging materials of the product
are manufactured from recyclable
materials in accordance with our
National Environment Regulations.
Do not dispose of the packaging
materials together with the
domestic or other wastes. Take
them to the packaging material
collection points designated by the
local authorities.
Refrigerator / User Guide
7/33EN
Page 9
2 Your Refrigerator
*1
16
17
*15
*14
*5
13
*12
*11
*9
*10
*8
7
7
*3
*4
*5
*2
*4
*6
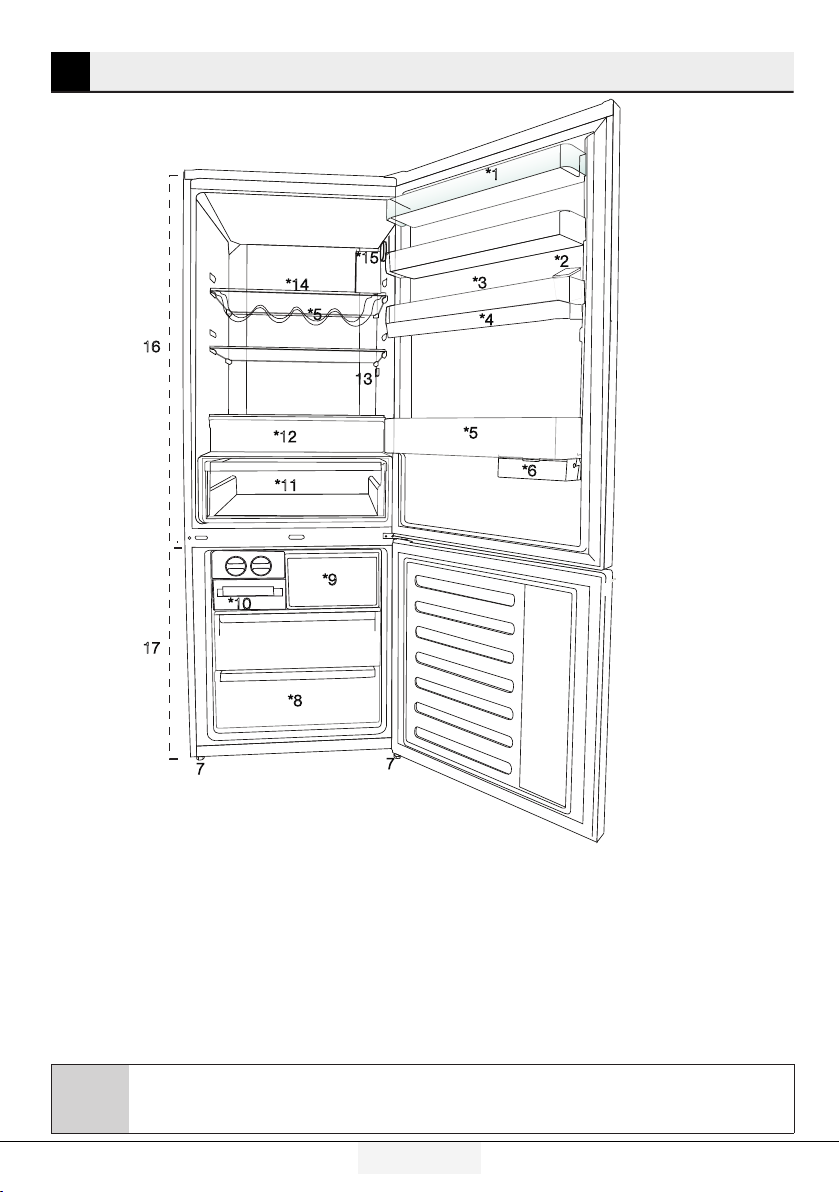
1. Cooler compartment door shelf
2. Water dispenser filling tank
3. Egg section
4. Water dispenser reservoir
5. Bottle shelf
6. Sliding storage box
7. Adjustable legs
8. Deep freezer compartment
9. Quick freeze compartment
*optional: Pictures given in this manual are given as example figures and they may not be exactly
the same as your product. If your product does not comprise the relevant parts, the information
C
pertains to other models.
10. Ice cube tray & Ice bank
11. Vegetable bin
12. Zero degree compartment
13. Interior light
14. Cooler compartment glass shelf
15. Temperature adjustment button
16. Cooler compartment
17. Freezer compartment
8 /33 EN
Refrigerator / User Guide
Page 10
3 Installation
3.1. Right place for installation
Contact the Authorized Service for the product's
installation. To ready the product for installation,
see the information in the user guide and make
sure the electric and water utilities are as required.
If not, call an electrician and plumber to arrange
the utilities as necessary.
WARNING: The manufacturer assumes
no responsibility for any damage caused
B
B
A
•Placetheproductonaflatsurfacetoavoid
vibration.
•Placetheproductatleast30cmawayfromthe
heater, stove and similar sources of heat and at
least 5 cm away from electric ovens.
•Donotexposetheproducttodirectsunlightor
keep in damp environments.
•Theproductrequiresadequateaircirculationto
function efficiently.
•Iftheproductwillbeplacedinanalcove,
remember to leave at least 5 cm distance
between the product and the ceiling and the
walls.
•Donotinstalltheproductinenvironmentswith
temperatures below -5°C.
by the work carried out by unauthorized
persons.
WARNING: The product’s power cable
must be unplugged during installation.
Failure to do so may result in death or
serious injuries!
WARNING: If the door span is too narrow
for the product to pass, remove the door
and turn the product sideways; if this does
not work, contact the authorized service.
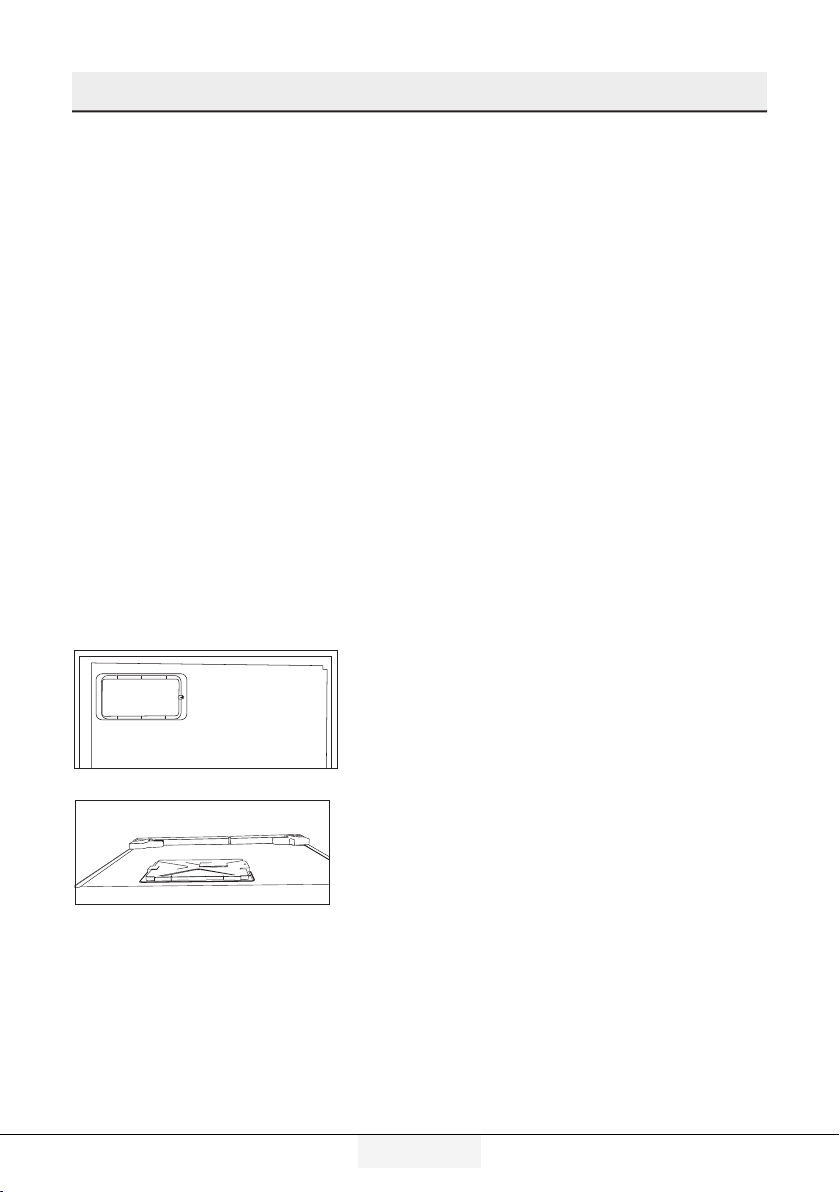
3.2. Attaching the plastic wedges
Use the plastic wedges in the provided with
the product to provide sufficient space for air
circulation between the product and the wall.
1.
To attach the wedges, remove the screws on the
product and use the screws provided with the wedges.
2.
Attach 2 plastic wedges on the ventilation cover as
shown in the figure.
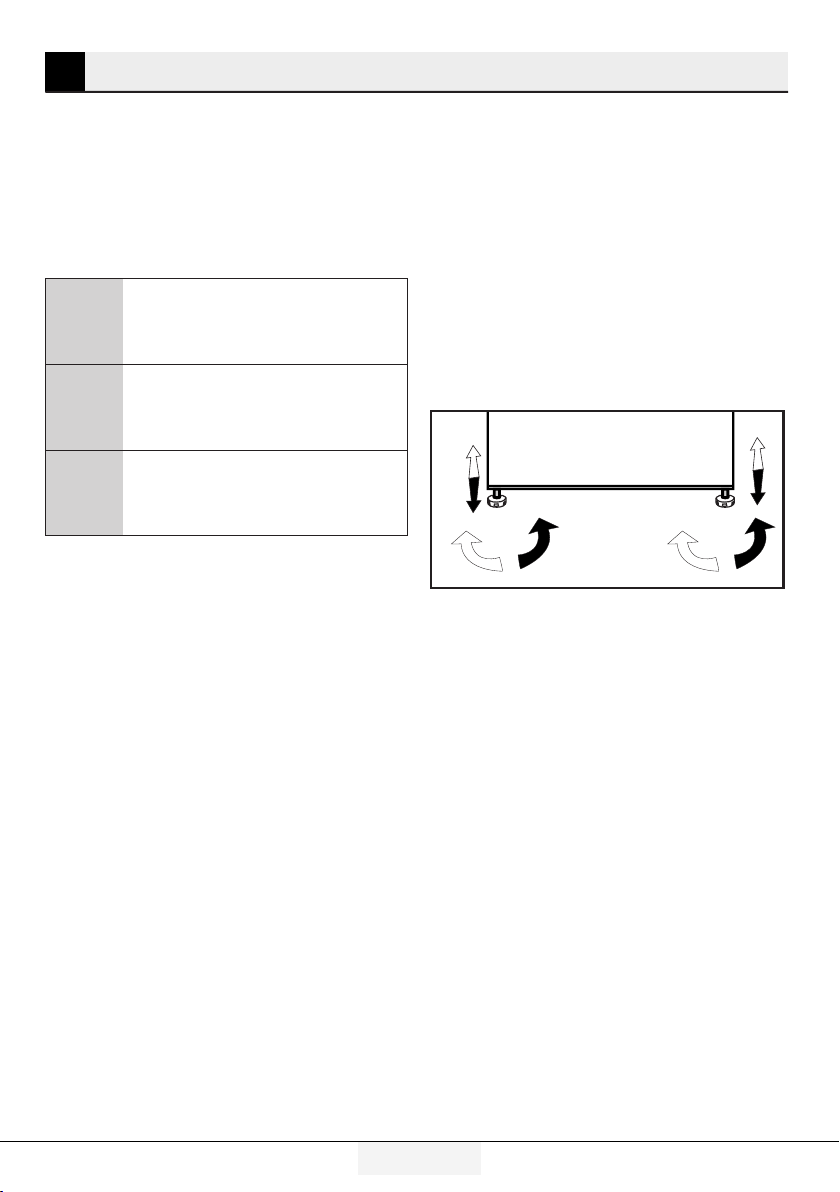
3.3. Adjusting the stands
If the product is not in balanced position, adjust the
front adjustable stands by rotating right or left.
Refrigerator / User Guide
9/33EN
Page 11
Installation
3.4. Power connection
WARNING: Do not use extension or multi
A
B
C
• Our firm will not assume responsibility for
• The power cable plug must be easily
• Connect the refrigerator to an earthed
• Do not use multi-group plug with or without
C
sockets in power connection.
WARNING: Damaged power cable must
be replaced by Authorized Service.
When placing two coolers in adjacent
position, leave at least 4 cm distance
between the two units.
any damages due to usage without earthing
and power connection in compliance with
national regulations.
accessible after installation.
socket with 220-240V/50 Hz voltage. The
plug must comprise a 10-16A fuse.
extension cable between the wall socket
and the refrigerator.
Hot Surface Warning!
Side walls of your product is equipped
with refrigerant pipes to improve the
cooling system. Refrigerant with high
temperatures may flow through these
areas, resulting in hot surfaces on the
side walls. This is normal and does not
need any servicing. Please pay attention
while touching these areas.
10 /33EN
Refrigerator / User Guide
Page 12
Installation
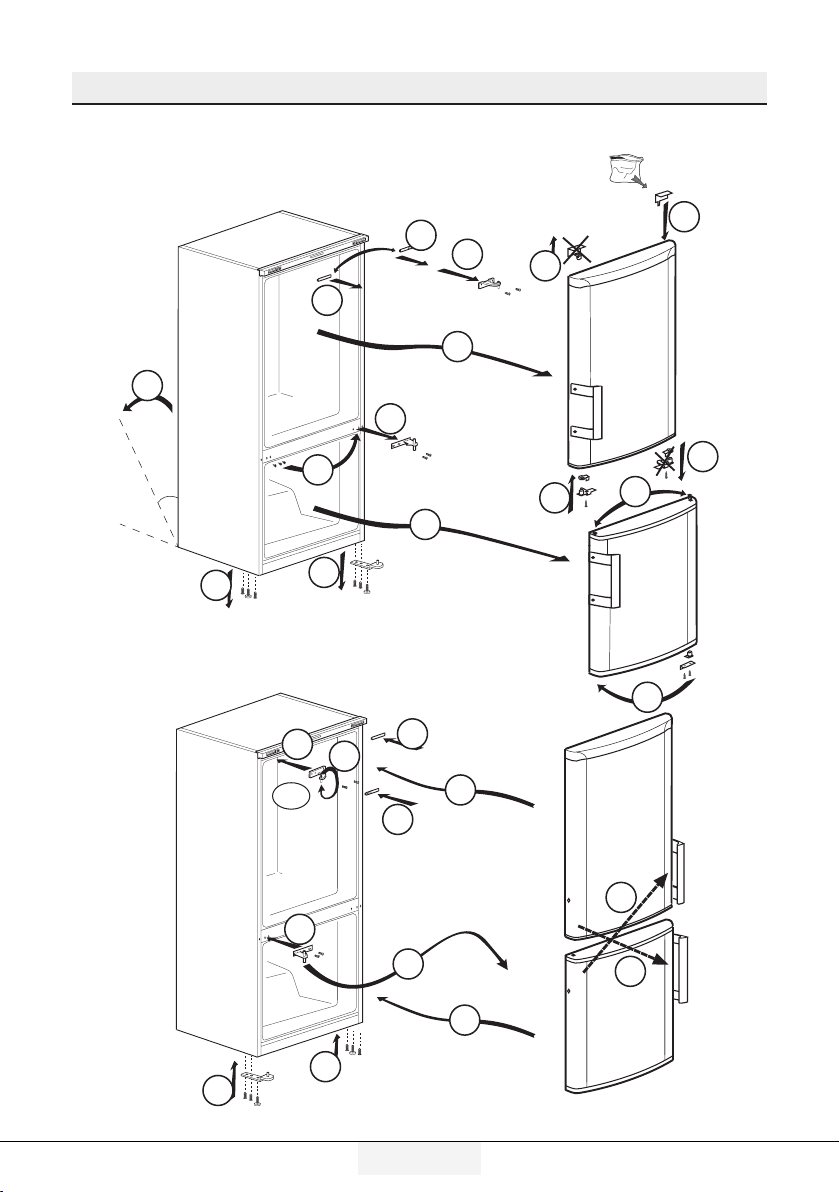
3.5. Reversing the doors
Proceed in numerical order .
4
10
5
10
4
2
7
1
11
45 ¡
6
12
13
3
8
9
14
18
180¡
17
19
22
19
15
Refrigerator / User Guide
23
16
21
11/33EN
24
24
20
Page 13
Installation
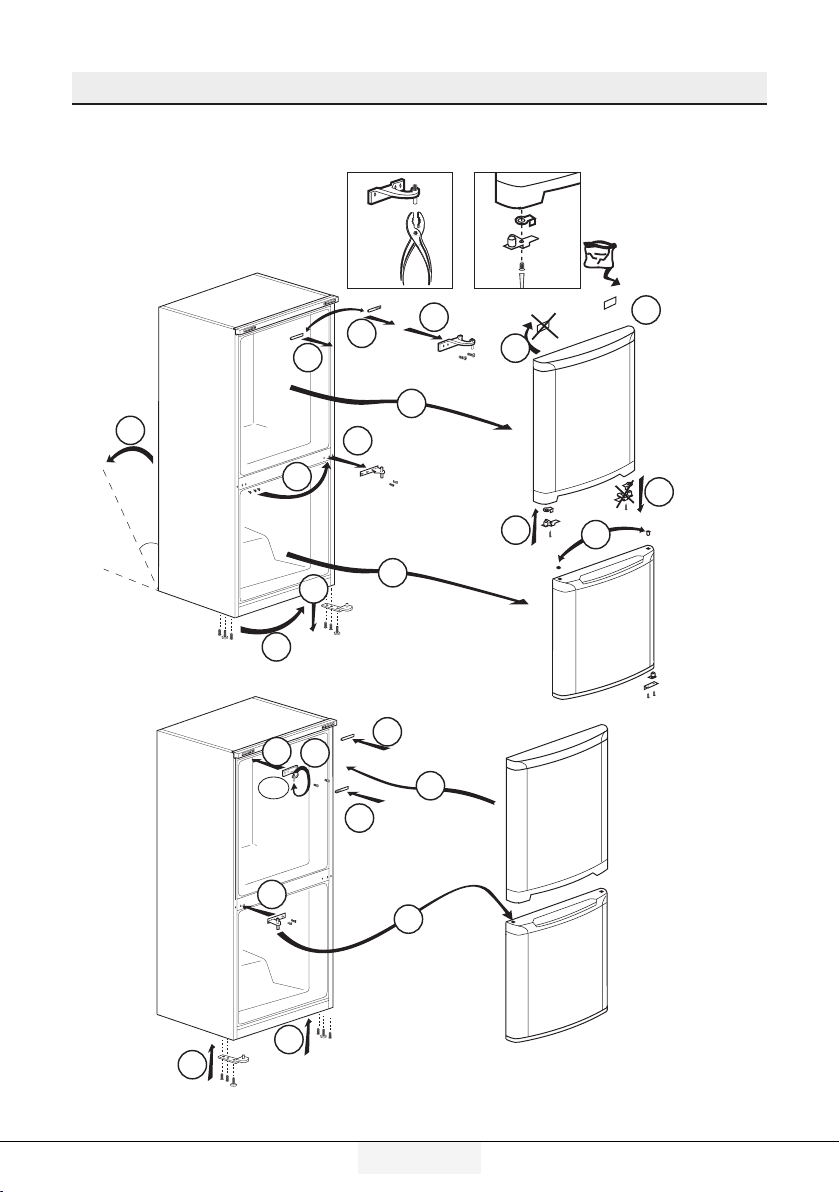
3.6. Reversing the doors
Proceed in numerical order .
2
45 °
10
12
180°
14
(8) (13)
1
1
1
7
20
6
5
11
13
9
4
3
20
8
15
20
19
16
17
18
12 /33EN
Refrigerator / User Guide
Page 14
4 Preparation
4.1. What to do for energy saving
Connecting the product to electronic
energy-saving systems is harmful, as it
A
• Do not keep the refrigerator doors open for
• Do not place hot food or beverages into the
• Do not overfill the refrigerator; blocking the
• In order to store the maximum amount of
• You should not block the airflow by putting food
• Depending on the product’s features;
• Food should be stored using the drawers in the
• Food packages should not be in direct contact
may damage the product.
long periods.
refrigerator.
internal air flow will reduce cooling capacity.
food into the cooler compartment of your
refrigerator, you should take out the upper
drawers and place it onto the glass rack.
The declared energy consumption of your
refrigerator was determined by taking out the
cooler, ice tray and upper drawers in a way that
will enable maximum storage. Using the below
drawer when storing is strongly recommended.
Energy saving function should be activated for
best energy consumption.
in front of the cooler fan. A space of minimum
3cm must be left in front of the protective fan
wire when placing food.
defrosting frozen foods in the cooler
compartment will ensure energy saving and
preserve food quality.
cooler compartment in order to ensure energy
saving and protect food in better conditions.
with the heat sensor located in the cooler
compartment. If they are in contact with the
sensor, energy consumption of the appliance
might increase.
• Make sure the foods are not in contact with
the cooler compartment temperature sensor
described below.
4.2. First Use
Before using your refrigerator, make sure the
necessary preparations are made in line with
the instructions in “Safety and environment
instructions” and “Installation” sections.
• Keep the product running with no food
inside for 6 and do not open the door, unless
absolutely necessary.
A sound will be heard when the
compressor is engaged. It is normal to
C
C
C
hear sound even when the compressor is
inactive, due to the compressed liquids and
gasses in the cooling system.
Front edges of the product might heat
up. This is normal. These areas are
designed to warm up in order to prevent
condensation.
In some models indicator panel turns off
automatically 5 minutes after the door
closes. It will be reactivated when the door
is open or any button is pressed.
Refrigerator / User Guide
13/33EN
Page 15
5 Using the product
5.1. Temperature adjustment button
Internal temperature of your refrigerator varies
depending on the following reasons:
• Seasonal temperatures,
•
Opening the door frequently and leaving it
open for long periods,
• Meals put into the refrigerator without being
cooled to room temperature,
• Location of the refrigerator in the room (e.g.
exposed to sunshine).
• Internal temperature varying due to these
factors can be adjusted via the adjustment
button.
Numbers around the adjustment button indicate
temperature degrees as “°C”.
If the ambient temperature is 20°C, it is recommended
to use the refrigerator temperature adjustment at
4°C. In other ambient temperatures this value can be
customised.
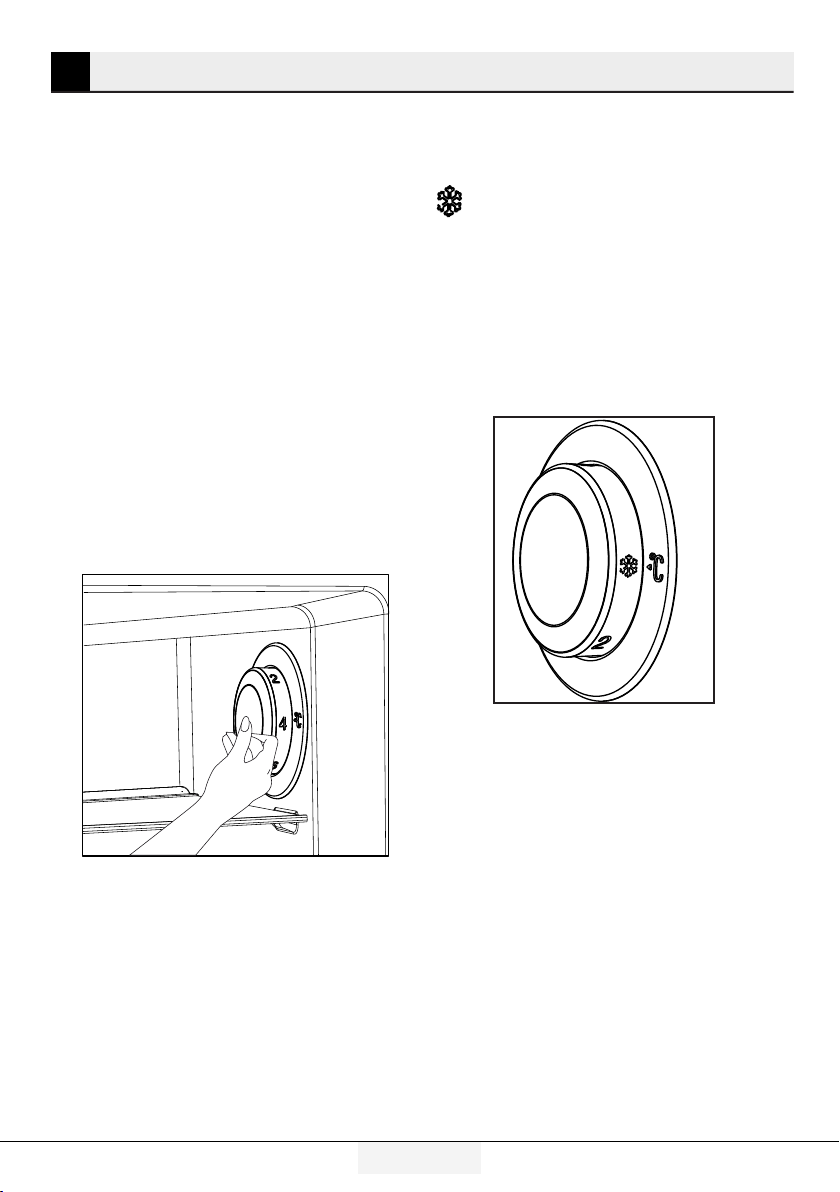
5.2. Rapid freezing
If you want to freeze large amounts of fresh food,
switch the temperature adjustment button to
) position before putting the food into the
(
quick freezing compartment.
It is recommended to keep the button at this
position for 24 hours to freeze maximum amount
of food indicated as the freezing capacity. Pay
special attention not to mix food stolen as frozen
and fresh food.
Remember to switch the temperature adjustment
button back to its previous position.
14 /33 EN
Refrigerator / User Guide
Page 16
Using the product
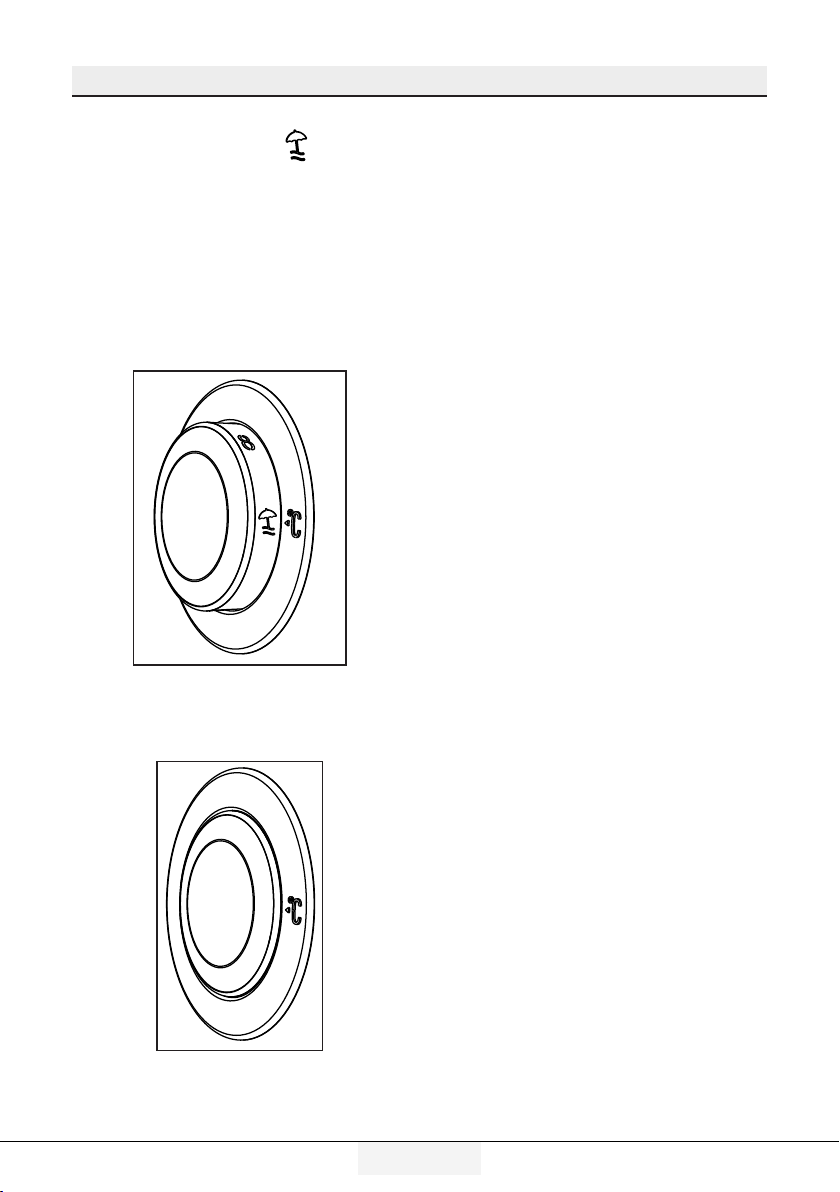
5.3. Vacation function
If doors of the product is not ( ) opened
for at least 12 hours after adjusting the
temperature setting button to the highest,
vacation function is automatically activated.
Button setting must be changed to cancel the
function.
It is not recommended to store food in the
cooler compartment when vacation function is
activated.
• After setting is completed, you can
conceal the temperature setting button by
pressing it inside.
Refrigerator / User Guide
15/33 EN
Page 17
Using the product
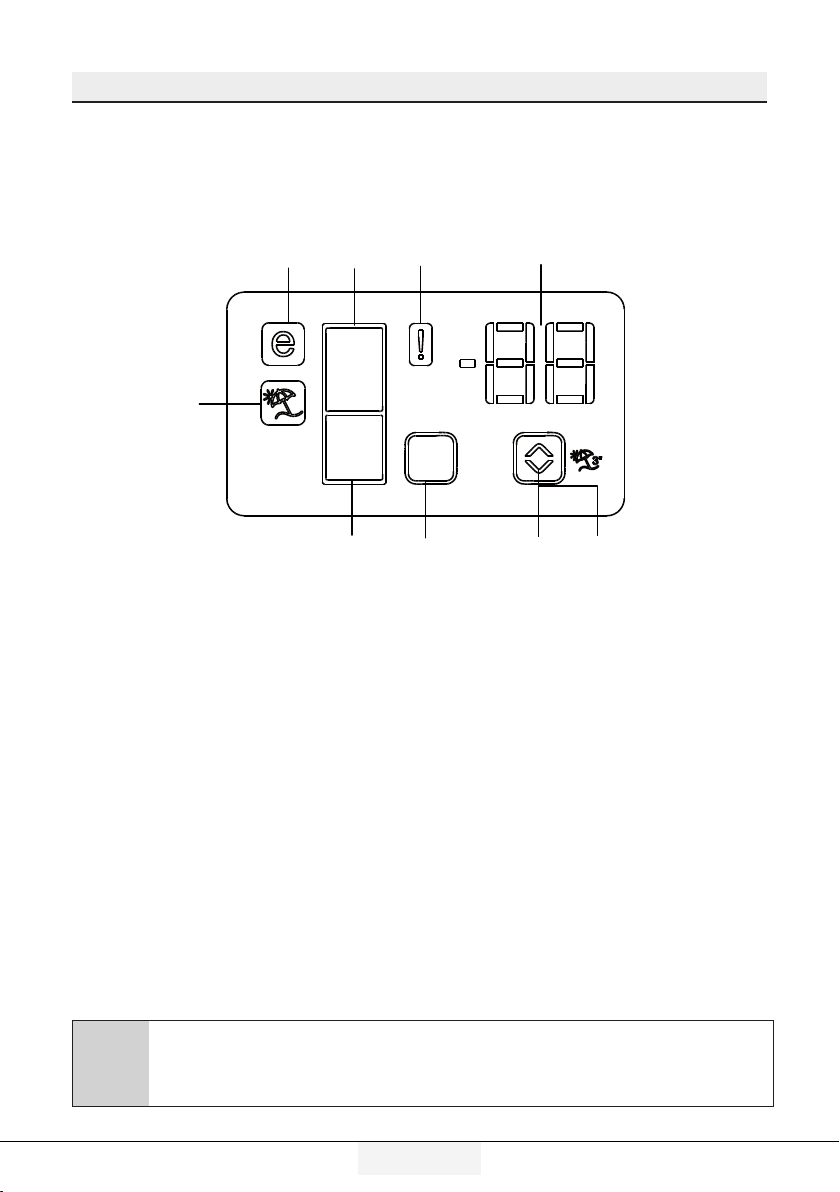
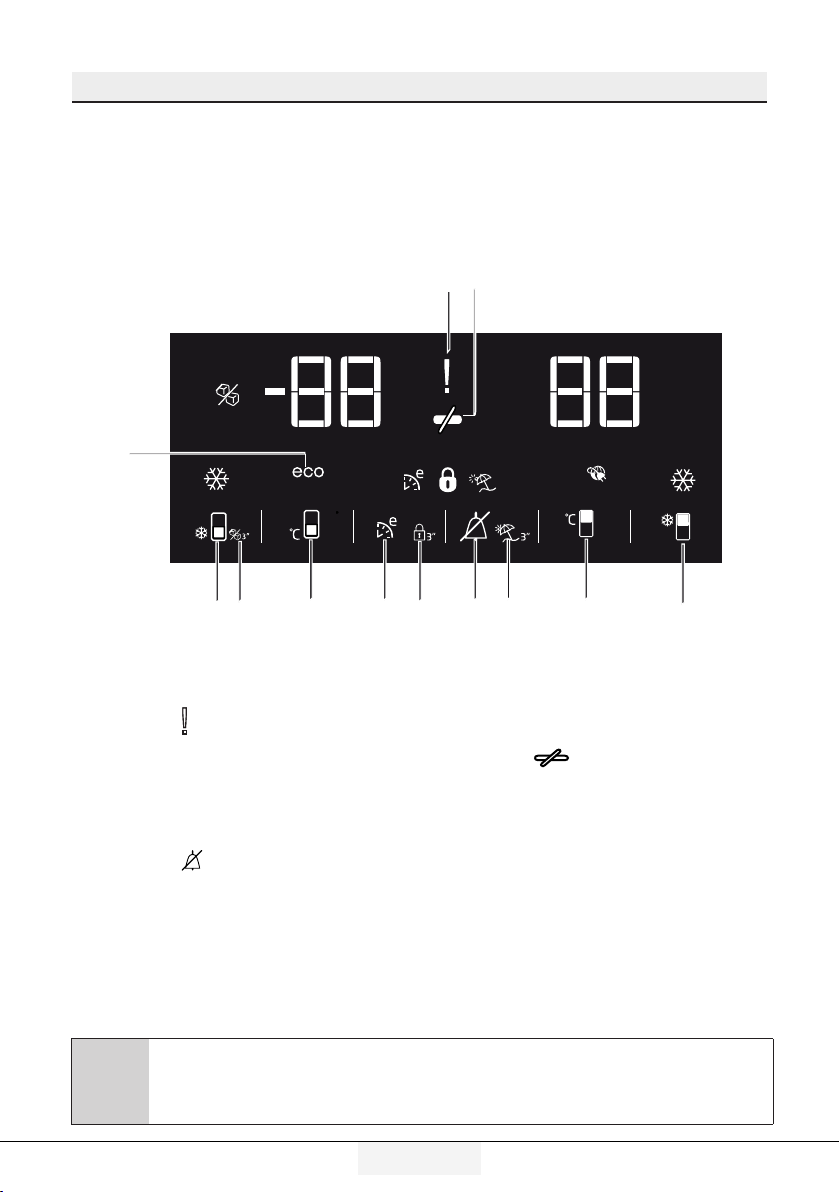
5.4. Indicator panel
Indicator panels may vary according to the product model.
Audio – visual functions on the indicator panel helps you in using your product.
8
1
2
3
9
7
1.
2.
3.
4.
5.
6.
7.
8.
9.
*optional
6
Fridge Compartment Indicator
Error status indicator
Temperature indicator
Vacation function button
Temperature setting button
Compartment selection button
Freezer compartment indicator
Economy mode indicator
Vacation function indicator
45
C
*Optional: The figures in this user guide are intended as drafts and may not perfectly match
your product. If your product does not comprise the relevant parts, the information pertains to
other models.
16 /33EN
Refrigerator / User Guide
Page 18

Using the product
1. Fridge compartment indicator
Fridge compartment light is illuminated while
the fridge compartment temperature is set.
2. Error status indicator
If your refrigerator does not perform enough
cooling or in case of a sensor fault, this
indicator is activated. When this indicator
is activated, “E” is displayed on the freezer
compartment temperature indicator, and
numbers such as “1,2,3...” are displayed on
the fridge compartment temperature indicator.
These numbers on the indicator inform service
personnel about the error.
3. Temperature indicator
Indicates freezer, fridge compartment
temperature.
4. Vacation function button
Press on Vacation Button for 3 seconds to
activate this function. When the vacation
function is activated, “- -” is displayed on the
fridge compartment temperature indicator
and no active cooling is performed on the
fridge compartment. It is not suitable to keep
the food in the fridge compartment when this
function is activated. Other compartments
shall be continued to be cooled as per their set
temperature.
To cancel this function press Vacation button
again.
5. Temperature setting button
Changes the temperature of the relevant
compartment between -24°C... -18°C and
8°C...1°C.
6. Compartment selection button
Selection button: Press compartment selection
button to switch between fridge and freezer
compartments.
7. Freezer compartment indicator
Fridge compartment light is illuminated while
the freezer compartment temperature is set.
8. Economy mode indicator
Indicates that the refrigerator operates
in energy saving mode. This display shall
be activated if the freezer compartment
temperature is set to -18°C.
9. Vacation function indicator
Indicates that vacation is activated.
Refrigerator / User Guide
17/33 EN
Page 19
Using the product
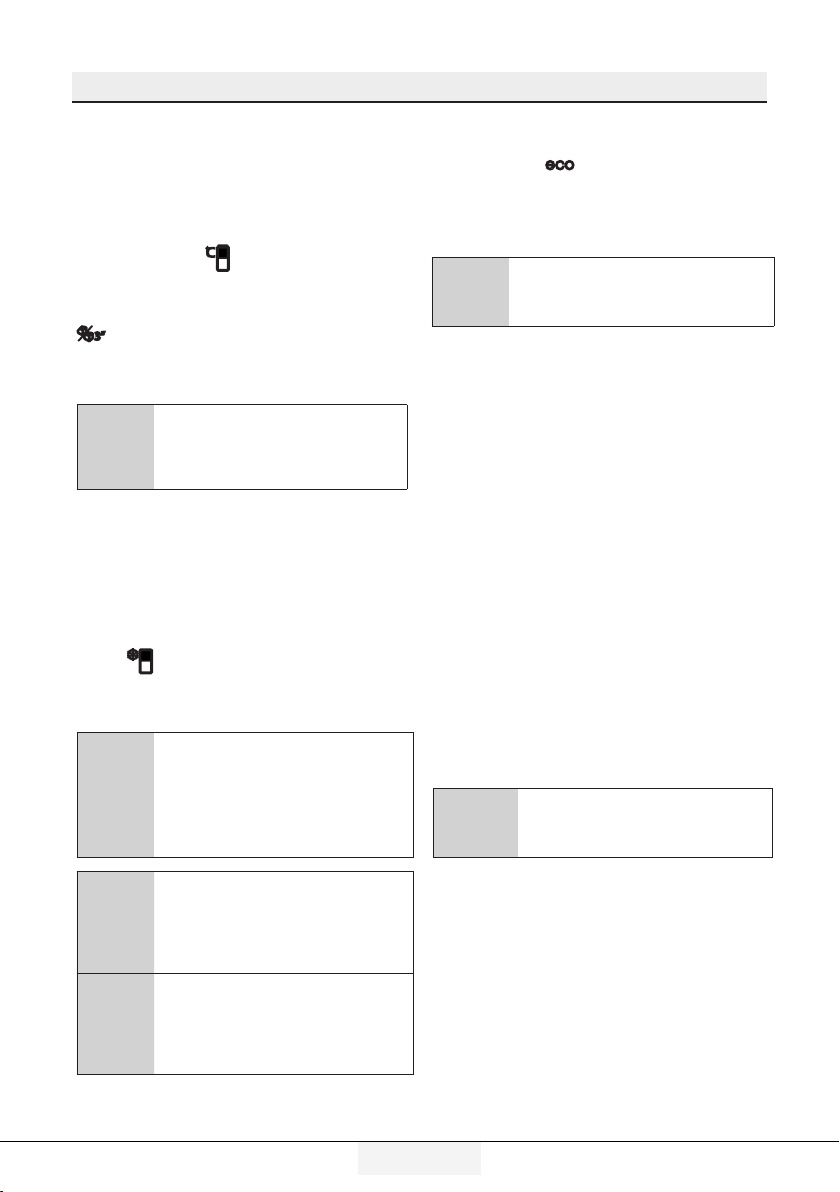
5.5. Indicator panel
Indicator panel allows you to set the temperature and control the other functions related to the
product without opening the door of the product. Just press the inscriptions on relevant buttons for
function settings.
1 2
12
*10
11
1. Power failure/High temperature / error
warning indicator
This indicator ( ) illuminates during power failure,
high temperature failures and error warnings.
During sustained power failures, the highest
temperature that the freezer compartment
reaches will flash on the digital display. After
checking the food located in the freezer
compartment (
clear the warning.
Please refer to "remedies advised for
troubleshooting" section on your manual if you
observe that this indicator is illuminated.
C
) press the alarm off button to
*Optional: The figures in this user guide are intended as drafts and may not perfectly match
your product. If your product does not comprise the relevant parts, the information pertains to
other models.
18 /33EN
6
789
2. Energy saving function (display off):
If the product doors are kept closed for a long
time energy saving function is automatically
activated and energy saving symbol is
illuminated. (
When energy saving function is activated,
all symbols on the display other than energy
saving symbol will turn off. When the Energy
Saving function is activated, if any button is
pressed or the door is opened, energy saving
function will be canceled and the symbols on
display will return to normal.
Energy saving function is activated during
delivery from factory and cannot be canceled.
45
)
Refrigerator / User Guide
3
Page 20

Using the product
3.Quick fridge function
The button has two functions. To activate or
deactivate the quick cool function press it
briefly. Quick Cool indicator will turn off and the
product will return to its normal settings. (
Use quick cooling function when you
want to quickly cool the food placed
C
C
C
C
4. Fridge compartment temperature
setting button
Press this button to set the temperature of the
fridge compartment to 8, 7,6, 5,4,3, 2, 8...
respectively. Press this button to set the fridge
compartment temperature to the desired value.
( )
5.Vacation Function
In order to activate vacation function, press
the this button (
vacation mode indicator (
When the vacation function is activated,
in the fridge compartment. If you want
to cool large amounts of fresh food,
activate this function before putting the
food into the product.
If you do not cancel it, quick cooling
will cancel itself automatically after 8
hours or when the fridge compartment
reaches to the required temperature.
If you press the quick cooling button
repeatedly with short intervals, the
electronic circuit protection will be
activated and the compressor will not
start up immediately.
This function is not recalled when
power restores after a power failure.
) for 3 seconds, and the
) will be activated.
“- -” is displayed on the fridge compartment
temperature indicator and no active cooling
is performed on the fridge compartment. It
is not suitable to keep the food in the fridge
)
compartment when this function is activated.
Other compartments shall be continued to be
cooled as per their set temperature.
To cancel this function press Vacation
function button again.
6. Alarm off warning:
In case of power failure/high temperature
alarm, after checking the food located in the
freezer compartment press the alarm off button
) to clear the warning.
(
7. Key lock
Press key lock button ( ) simultaneously for
3 seconds. Key lock symbol
) will light up and key lock mode will be
(
activated. Buttons will not function if the Key
lock mode is active. Press key lock button
simultaneously for 3 seconds again. Key lock
symbol will turn off and the key lock mode will
be exited.
Press the key lock button if you want to
prevent changing of the temperature setting of
the refrigerator (
8. Eco fuzzy
Press and hold eco fuzzy button for 1 seconds
to activate eco fuzzy function. Refrigerator will
start operating in the most economic mode at
least 6 hours later and the economic usage
indicator will turn on when the function is
active (
button for 3 seconds to deactivate eco fuzzy
function.
This indicator is illuminated after 6 hours when
eco fuzzy is activated.
). Press and hold eco fuzzy function
).
Refrigerator / User Guide
19/33 EN
Page 21
Using the product
9. Freezer compartment temperature
setting button
Press this button to set the temperature of the
freezer compartment to -18,-19,-20,-21, -22,
-23,-24, -18... respectively. Press this button
to set the freezer compartment temperature to
the desired value.
10. Icematic off indicator
Indicates whether the icematic is on or off. (
)If On, then the icematic is not operating.
To operate the icematic again press and hold
the On-Off button for 3 seconds.
C
11. Quick freeze function button/ icematic
on-off button
Press this button to activate or deactivate the
quick freezing function. When you activate
the function, the freezer compartment will be
cooled to a temperature lower than the set
value. (
To turn on and off the icematic press and hold
it for 3 seconds.
C
( )
Water flow from water tank will
stop when this function is selected.
However, ice made previously can be
taken from the icematic.
)
Use the quick freeze function when you
want to quickly freeze the food placed
in fridge compartment. If you want to
freeze large amounts of fresh food,
activate this function before putting the
food into the product.
12. Economic usage indicator
Indicates that the product is running in energyefficient mode. ( )This indicator will be
active if the Freezer Compartment temperature
is set to -18 or the energy efficient cooling is
being performed due to Eco-Extra function.
Economic usage indicator is turned
off when quick cooling or quick freeze
C
functions are selected.
5.6. Ice bucket
(Optional)
• Take the ice bucket from the freezer
compartment.
• Fill the ice bucket with water.
•
Place the ice bucket into the freezer
compartment.
• The ice will be ready after approximately
two hours. Take the ice bucket from
the freezer compartment and bend in
sightly over the holder that you are going
to serve. Ice will easily pour into
the serving holder.
5.7. Eggholder
You can put the eggholder on the door or body
rack of your choice. If you decide to put it on the
body rack, it is recommended to prefer the shelves
below as they are colder.
Do not put the eggholder into the
A
freezer compartment.
C
C
If you do not cancel it, Quick Freeze
will cancel itself automatically after 4
hours or when the fridge compartment
reaches to the required temperature.
This function is not recalled when
power restores after a power failure.
20 /33EN
Refrigerator / User Guide
Page 22
Using the product
5.8. Fan
Fan was designed to distribute circulate the
cold air inside your refrigerator homogeneously.
Operating time of the fan might vary depending
the features of your product.
While in some products fan only operates with
compressor, in others control system determines the operating time based on the need
for cooling.
5.9. Vegetable bin
(Optional)
Product’s vegetable bin is designed to keep
vegetables fresh by preserving humidity. For
this purpose, the overall cold air circulation is
intensified in the vegetable bin.
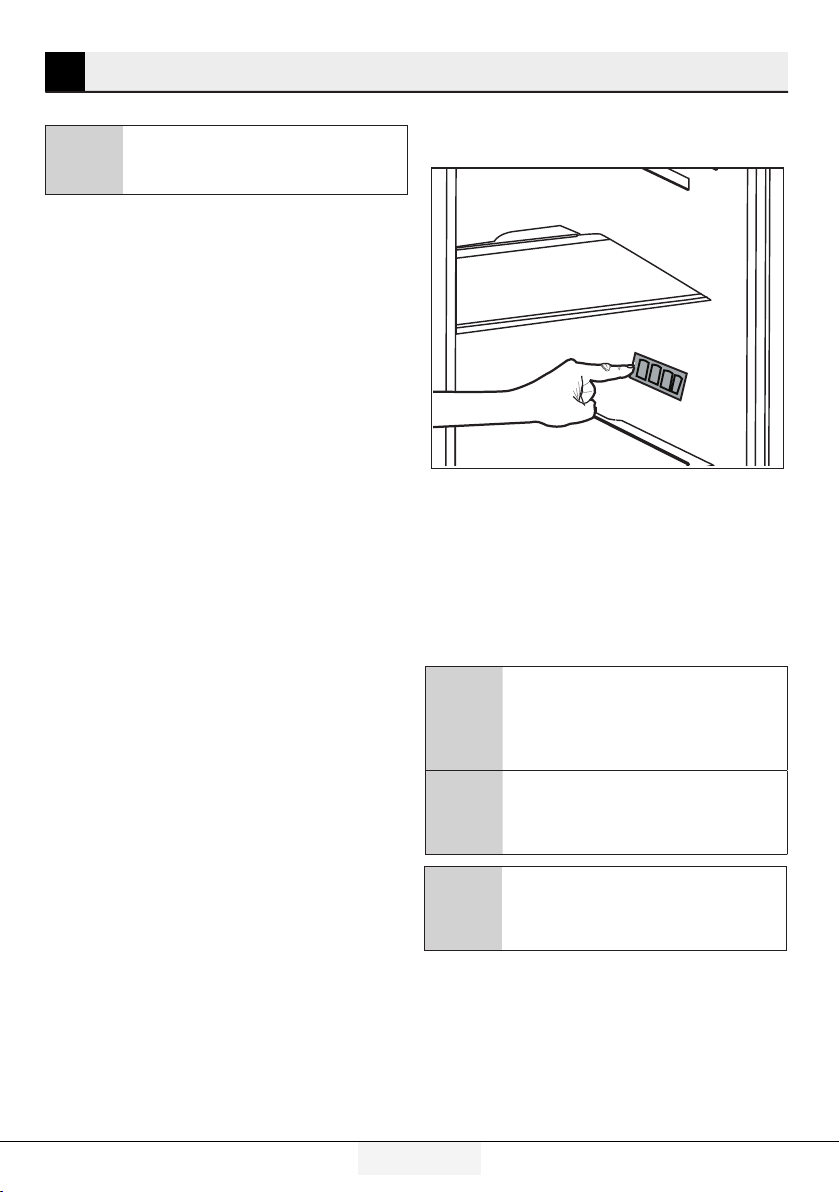
5.11. HerbBox/HerbFresh
Remove the film container from HerbBox/
HerbFresh+
Take the film out of the bag and put it into the
film container as shown in the image.
Seal the container again and replace it into
HerbBox/HerbFresh+ unit.
HerbBox-HerbFresh+ sections are especially
ideal for storage of various herbs that are
supposed to be kept in delicate conditions. You
can store your unbagged herbs (parsley, dill,
etc.) in this section horizontally and keep them
fresh for a much longer period.
The film shall be replaced in every six months.
5.10. Zero degree compartment
(Optional)
Use this compartment to keep delicatessen
at lower temperatures or meat products for
immediate consumption.
Zero degree compartment is the coolest place
where foods such as dairy products, meat,
fish and chicken can be stored in ideal storage
conditions. Vegetables and/or fruits should not
be stored in this compartment.
Refrigerator / User Guide
21/33 EN
Page 23

Using the product
5.12. Moving door rack
(Optional)
Moving door rack can be fixed in 3 different
positions.
In order to move the rack, push the buttons
on the side evenly. Rack will be movable.
Move the rack up or down.
When the rack is in the position that you
want, release the buttons. Rack will be
fixed again in the position where you have
released the buttons.
5.13. Sliding storage box
(Optional)
This accessory has been designed to increase
the usage volume of the door racks.
Thanks to its ability to move sideways, it
enables you to easily place long bottle, jar or
boxes that you put in the bottle rack below.
22 /33EN
Refrigerator / User Guide
Page 24
Using the product
5.14. Moisture controlled
vegetable bin
(Optional)
With moisture control feature, moisture rates
of vegetables and fruits are kept under control
and ensures a longer freshness period for
foods.
It is recommended to store leafed vegetables
such as lettuce and spinach and similar
vegetables prone to moisture loss not on
their roots but in horizontal position into the
vegetable bin as much as possible.
When placing the vegetables, place heavy and
hard vegetables at the bottom and light and
soft ones on the top, taking into account the
specific weights of vegetables.
Do not leave vegetables in the vegetable bin
in plastic bags. Leaving them in plastic bags
causes vegetables to rot in a short time. In
situations where contact with other vegetables
is not preferred, use packaging materials such
as paper that has a certain porosity in terms of
hygiene.
Do not put fruits that have a high ethylene gas
production such as pear, apricot, peach and
particularly apple in the same vegetable bin
with other vegetables and fruits. The ethylene
gas coming out of these fruits might cause
other vegetables and fruits to mature faster
and rot in a shorter period of time.
5.15. Automatic ice machine
(Optional)
Automatic ice machine enables you to easily
make ice in your refrigerator. In order to obtain
ice from the ice machine, take out the water
tank in the cooler compartment, fill it with
water and fix it back.
First ice will be ready in about 2 hours in the
ice machine drawer in the cooler compartment.
After placing the full water tank, you can obtain
about 60-70 cubes of ice until it is fully empty.
If the water in the tank has waited for 2-3
weeks, it should be changed.
In products with automatic ice
machine, you might hear a sound
C
when pouring the ice. This sound is
normal and is not a sign of failure.
Refrigerator / User Guide
23/33 EN
Page 25
Using the product
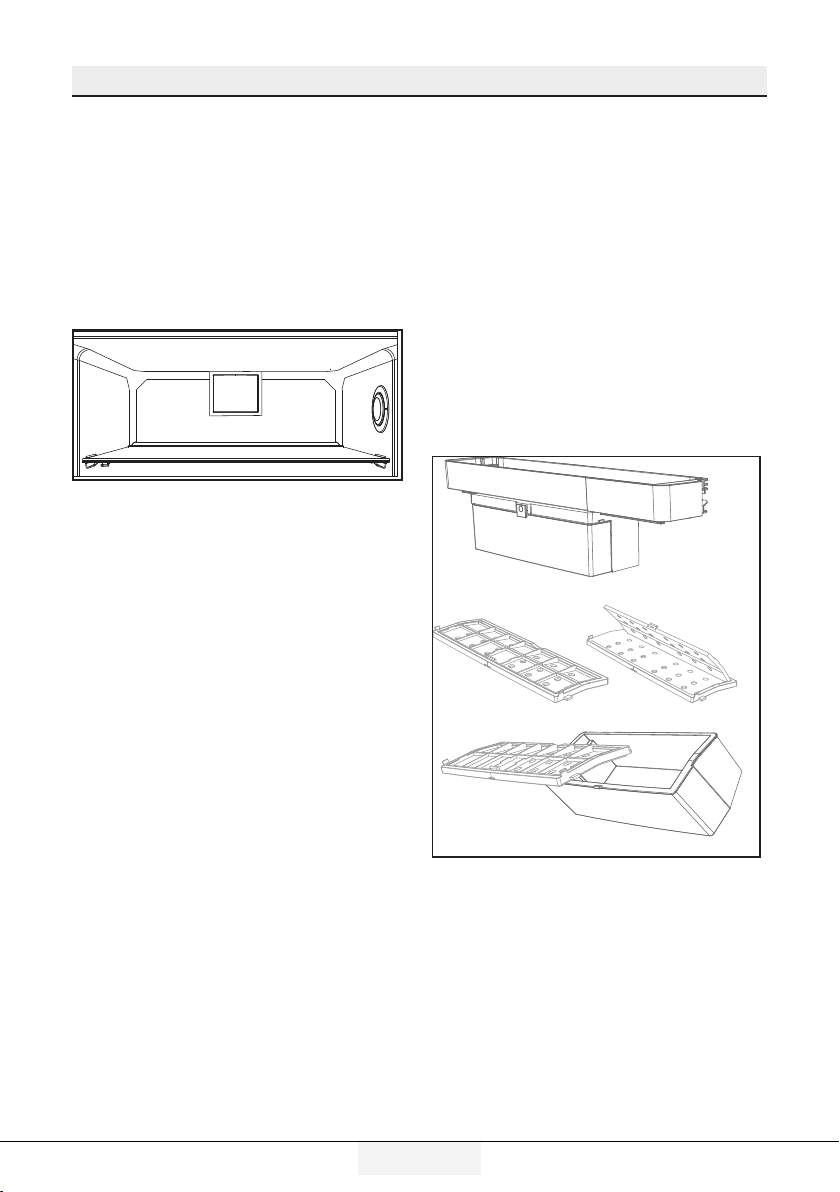
5.16. Icematic and ice
storage container
*optional
Using the Icematic
Fill the Icematic with water and place it into its
seat. Your ice will be ready approximately in
two hours. Do not remove the Icematic from its
seating to take ice.
Turn the knobs on the ice reservoirs clockwise
by 90 degrees.
Ice cubes in the reservoirs will fall down into
the ice storage container below.
You may take out the ice storage container and
serve the ice cubes.
If you wish, you may keep the ice cubes in the
ice storage container.
Ice storage container
Ice storage container is only intended for
accumulating the ice cubes. Do not put water
in it. Otherwise, it will break.
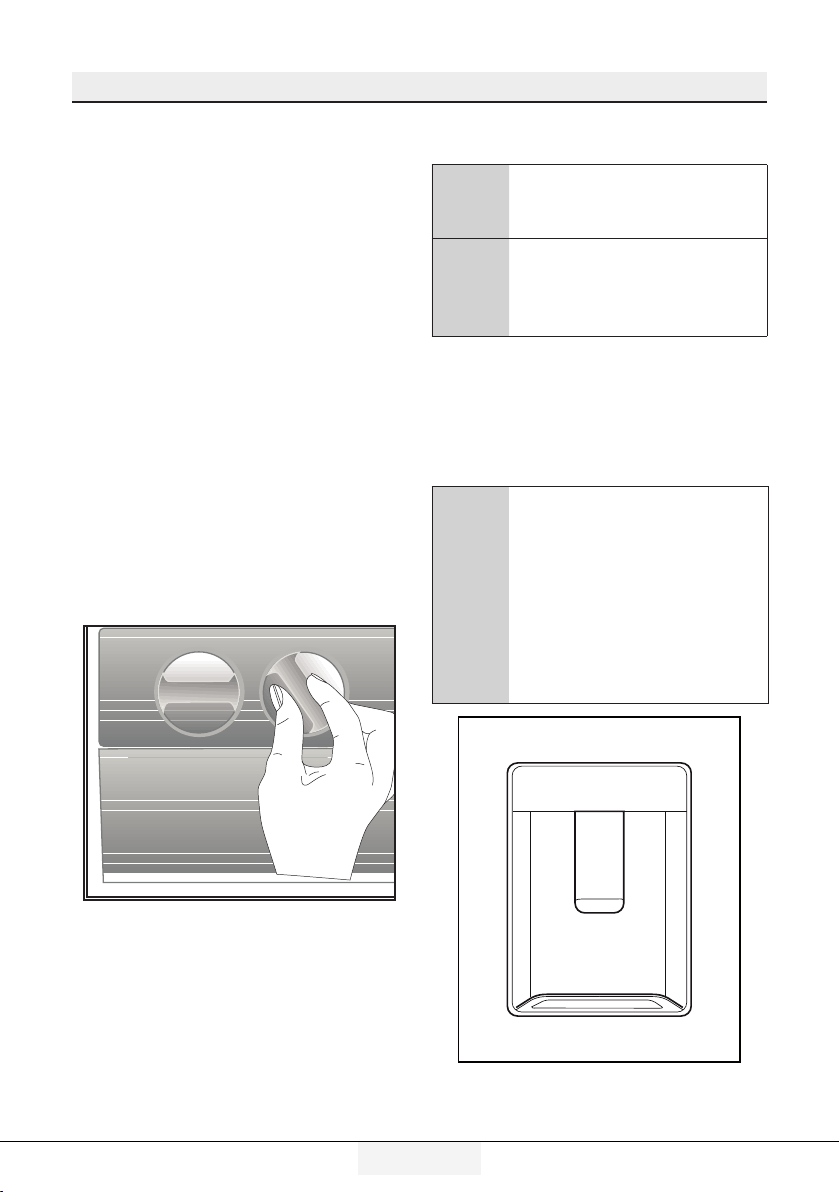
5.17. Using the water dispenser
*optional
It is normal for the first few glasses
C
C
1. Push in the lever of the water dispenser with
your glass. If you are using a soft plastic
cup, pushing the lever with your hand will be
easier.
2. After filling the cup up to the level you want,
release the lever.
C
of water taken from the dispenser
to be warm.
If the water dispenser is not used
for a long period of time, dispose
of first few glasses of water to
obtain fresh water.
Please note, how much water
flows from the dispenser depends
on how far you depress the lever.
As the level of water in your cup
/ glass rises, gently reduce the
amount of pressure on the lever to
avoid overflow. If you slightly press
the arm, the water will drip; this is
quite normal and not a failure.
24 /33EN
Refrigerator / User Guide
Page 26
Using the product
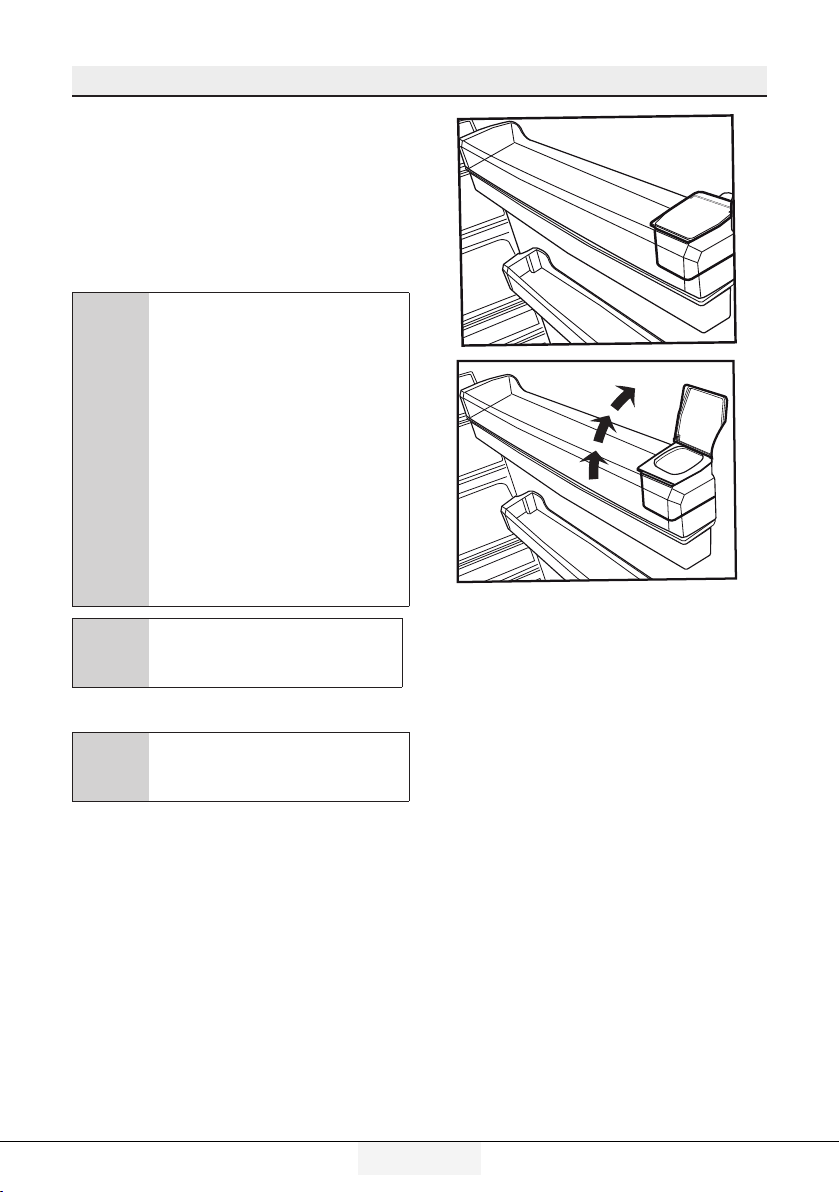
5.18. Filling the water
dispenser's tank
Water tank filling reservoir is located inside the
door rack.
1. Open the cover of the tank.
2. Fill the tank with fresh drinking water.
3. Close the cover.
Do not fill the water tank with
C
any other liquid except for water
such as fruit juices, carbonated
beverages or alcoholic drinks
which are not suitable to use
in the water dispenser. Water
dispenser will be irreparably
damaged if these kinds of liquids
are used. Warranty does not cover
such usages. Some chemical
substances and additives contained
in these kinds of drinks/liquids may
damage the water tank.
Use clean drinking water only.
C
Capacity of the water tank is 3
C
Refrigerator / User Guide
litres; do not overfill.
25/33 EN
Page 27
Using the product
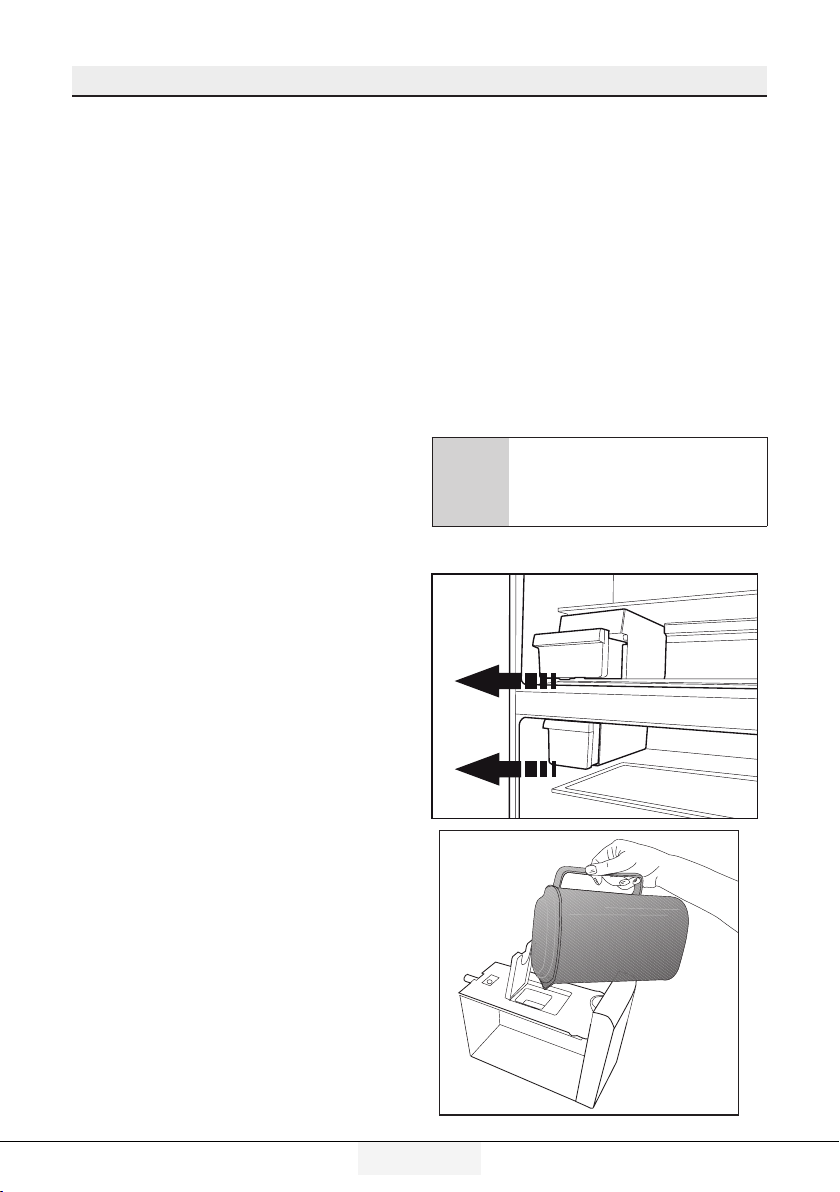
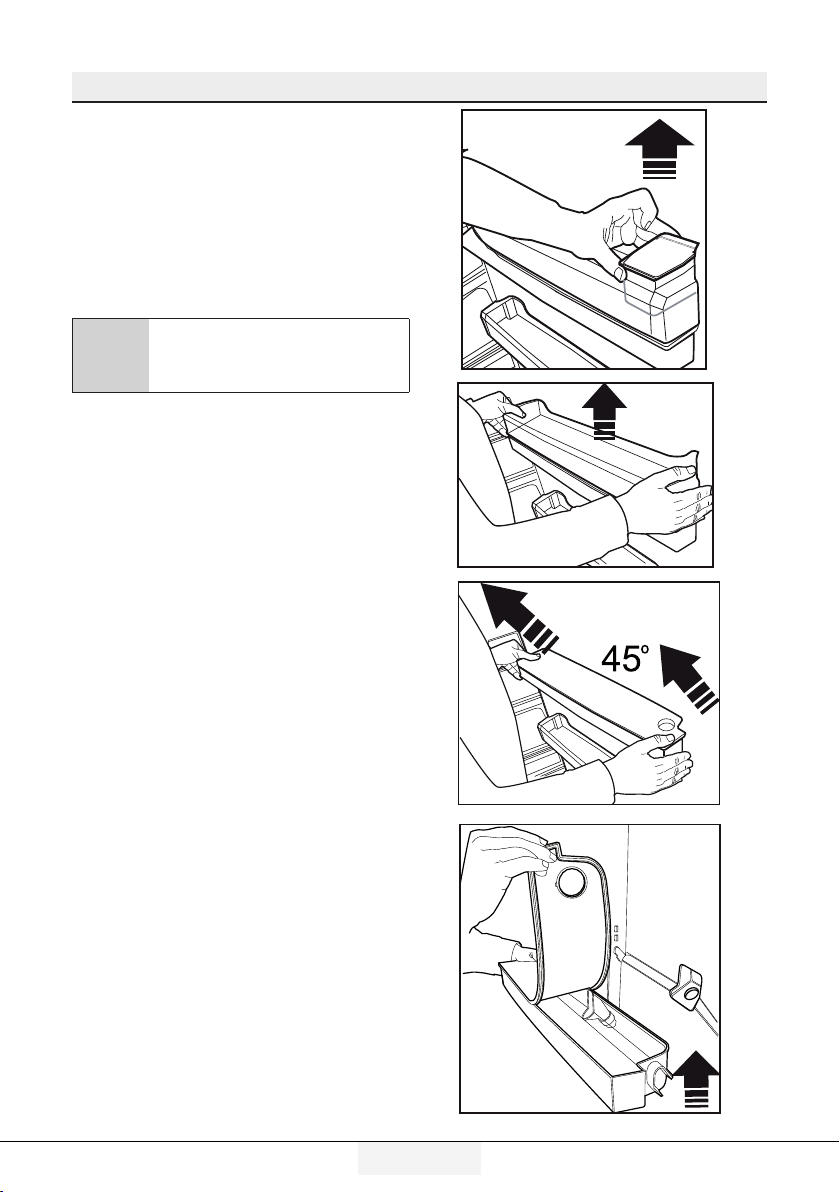
5.19. Cleaning the water tank
1. Remove the water filling reservoir inside the
door rack.
2. Remove the door rack by holding from both
sides.
3. Grab the water tank from both sides and remove it with an angle of 45°C.
4. Remove the cover of the water tank and clean the tank.
Components of the water tank
C
and water dispenser should not be
washed in dishwasher.
26 /33EN
Refrigerator / User Guide
Page 28
Using the product
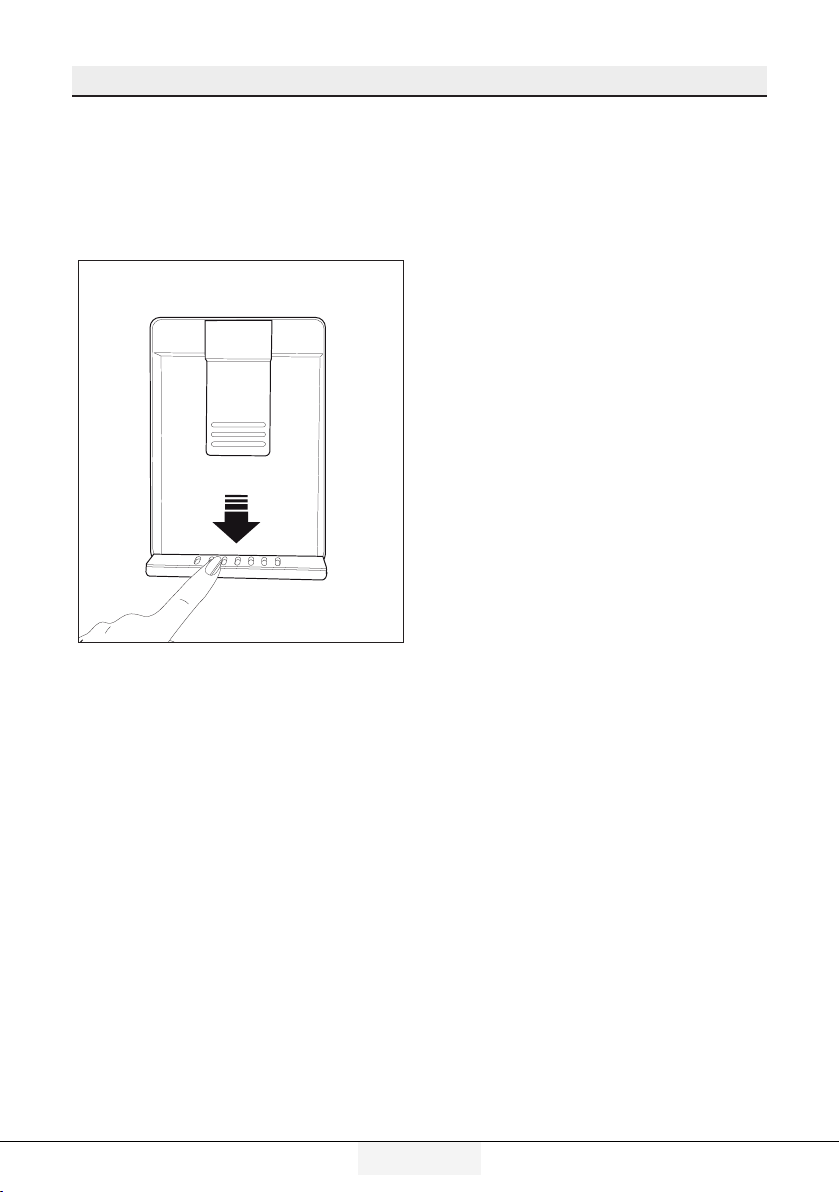
5.20. Drip tray
Water that dripped while using the water
dispenser accumulates in the spillage tray.
Remove the plastic filter as shown in the figure.
With a clean and dry cloth, remove the water
that has accumulated.
Refrigerator / User Guide
27/33 EN
Page 29
Using the product
5.21. Freezing fresh food
• To preserve food quality, the food items
placed in the freezer compartment must be
frozen as quickly as possible, use the rapid
freezing for this.
• Freezing the food items when fresh will
extend the storage time in the freezer
compartment.
• Pack the food items in air-tight packs and
seal tightly.
• Make sure the food items are packed
before putting in the freezer. Use freezer
holders, tinfoil and damp-proof paper,
plastic bag or similar packaging materials
instead of traditional packaging paper.
Ice in the freezing compartment thaws
C
automatically.
• Mark each food pack by writing the date on
the package before freezing. This will allow
you to determine the freshness of each
pack every time the freezer is opened. Keep
the earlier food items in the front to ensure
they are used first.
• Frozen food items must be used
immediately after defrosting and should not
be frozen again.
• Do not free large quantities of food at once.
5.22. Recommendations for
storing frozen foods
The compartment must be set to at least
-18°C.
1. Place the food items in the freezer as
quickly as possible to avoid defrosting.
2. Before freezing, check the “Expiry Date” on
the package to make sure it is not expired.
3. Make sure the food’s packaging is not
damaged.
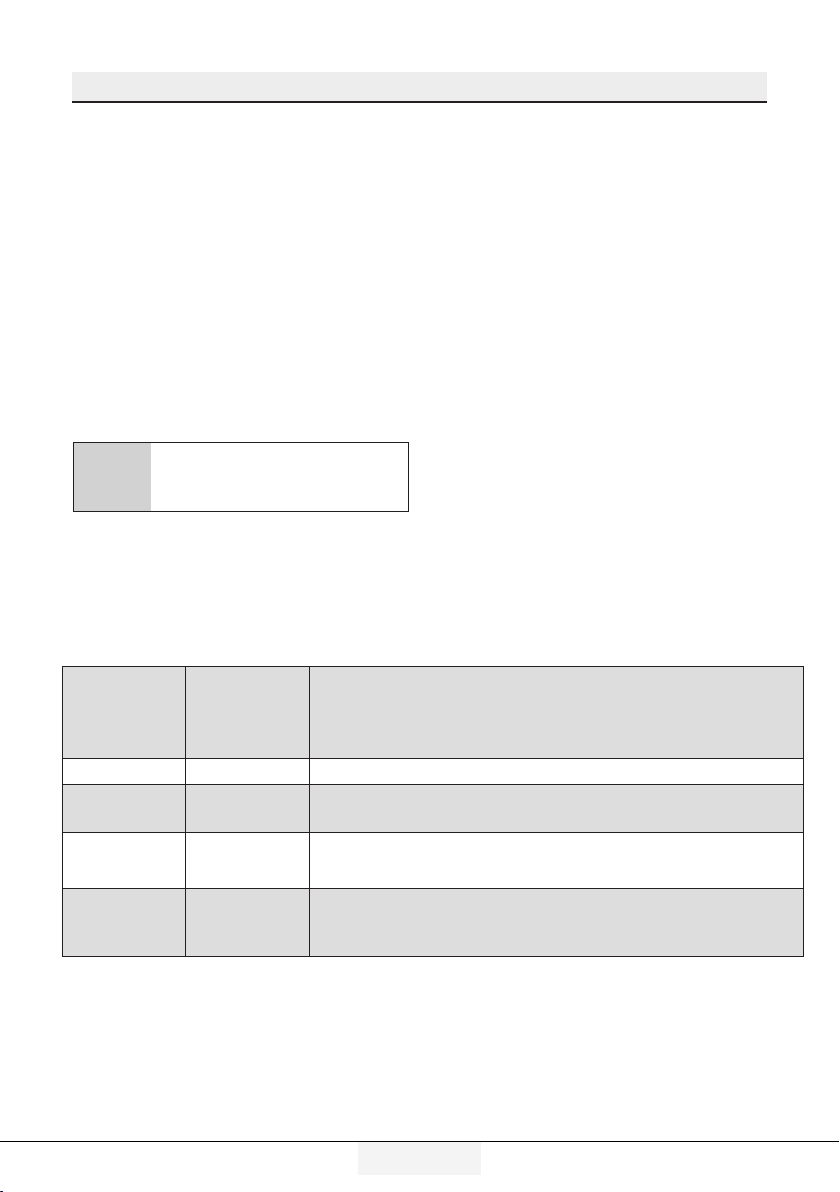
Freezer
Compartment
Temperature
Setting
-18°C 4°C This is the default, recommended setting.
-20,-22 or
-24°C
Quick Freeze 4°C
-18°C or colder 2°C
Cooler
Compartment
Temperature
Setting
4°C
Details
These settings are recommended for ambient temperatures
exceeding 30°C.
Use when you want to freeze your food in a short time. When the
process ends, the product will regain its position.
Use these settings if you believe the cooler compartment is not cold
enough due to ambient temperature or frequently opening the door.
28 /33EN
Refrigerator / User Guide
Page 30

Using the product
5.23. Deep freezer details
As per the IEC 62552 standards, the freezer
must have the capacity to freeze 4,5 kg of
food items at -18°C or lower temperatures
in 24 hours for each 100 litres of freezer
compartment volume.
Food items can only be preserved for extended
periods at or below temperature of -18°C .
You can keep the foods fresh for months (in
deep freezer at or below temperatures of 18°C
).
The food items to be frozen must not contact
the already-frozen food inside to avoid partial
defrosting.
Boil the vegetables and filter the water to
extend the frozen storage time. Place the food
in air-tight packages after filtering and place in
the freezer. Bananas, tomatoes, lettuce, celery,
boiled eggs, potatoes and similar food items
should not be frozen. In case this food rots,
only nutritional values and eating qualities will
be negatively affected. A rotting threatening
human health is not in question.
5.24. Placing the food
Freezer
compartment
shelves
Cooler
compartment
shelves
Cooler
compartment
door shelves
Vegetable bin Fruits and vegetables
Fresh food
compartment
Various frozen goods including
meat, fish, ice cream,
vegetables etc.
Food items inside pots, capped
plate and capped cases, eggs
(in capped case)
Small and packed food or
beverages
Delicatessen (breakfast food,
meat products to be consumed
in short notice)
5.25. Door open alert
(Optional)
An audible alert will be heard if the product's
door remains open for at least 1 minute. The
audible alert will stop when the door is closed
or any button on the display (if available) is
pressed.
Door open alert is indicated to the user both
audibly and visually. Interior lighting will turn of
if the warning continues for 10 min.
5.26. Changing the opening
direction of the door
You can change the direction of opening of
your refrigerator depending on the location
where you use it. When you need this, consult
the closest Authorized Service.
The explanation above is a general statement.
You should check the warning tag located inside the product package about the changeability of direction of the door.
5.27. Interior light
Interior light uses a LED type lamp. Contact the
authorized service for any problems with this
lamp.
Lamp(s) used in this appliance cannot be used
for house lighting. Intended use of this lamp is
to help the user place food into the refrigerator
/ freezer safely and comfortably.
Refrigerator / User Guide
29/33 EN
Page 31

6 Maintenance and cleaning
Service life of the product is increase if it is
regularly cleaned
WARNING: First unplug the product
B
•
•
•
•
•
• Do not use sharp, abrasive tools, soap,
6.1. Avoiding bad odors
Materials that may cause odor are not used in
the production of our appliances. However, due
to inappropriate food preserving conditions and
not cleaning the inner surface of the appliance as
required can bring forth the problem of odor.
Therefore, clean the refrigerator with carbonate
dissolved in water every 15 days.
•
before cleaning your refrigerator.
Never use any sharp and abrasive tools, soap,
household cleaners, detergent and wax polish
for cleaning.
Dissolve one teaspoon of carbonate in half liter
of water. Soak a cloth with the solution and
wrung it thoroughly. Wipe the interior of the
appliance with this cloth and the dry thoroughly.
Make sure that no water enters the lamp
housing and other electrical items.
Clean the door with a damp cloth. To remove
door and body shelves, remove all of its
contents. Remove door shelves by moving them
upwards. After cleaning, slide them from top to
bottom to install.
Never use cleaning agents or water that
contain chlorine to clean the outer surfaces and
chromium coated parts of the product. Chlorine
causes corrosion on such metal surfaces.
household cleaning agents, detergents,
kerosene, fuel oil, varnish etc. to prevent
removal and deformation of the prints on the
plastic part. Use lukewarm water and a soft
cloth for cleaning and then wipe it dry.
Keep the food in closed containers.
Microorganisms spreading out from uncovered
containers can cause unpleasant odours.
•
Never keep the food that have expired best
before dates and spoiled in the refrigerator.
6.2. Protecting the plastic surfaces
Clean with arm water immediately as the oil may
cause damage on the surface when it is poured on
plastic surfaces.
6.3. Door Glasses
Remove the protective foil on the glasses.
There is a coating on the surface of the glasses.
This coating minimizes the stain build-up and
helps to remove the possible stains and dirt
easily.Glasses that are not protected with such a
coating may be subject to persistent binding of air
or water based organic or inorganic dirt such as
limescale, mineral salts, unburned hydrocarbons,
metal oxides and silicones that can easily and
quickly cause stains or material damage. Keeping
the glass clean becomes too difficult despite the
regular cleaning. Consequently, the appearance
and the transparency of the glass deteriorates.
Harsh and corrosive cleaning methods and
compounds will intensify these defects and speed
up the deterioration process.
Water-based cleaning products that are not
alkaline and corrosive must be used for regular
cleaning purposes.
Non-alkaline and non-corrosive materials must
be used for cleaning so that the service life of this
coating lasts for a long time.
These glasses are tempered to increase their
durability against impacts and breaking.A safety
film is also applied to their rear surfaces as an
extra safety measure in order to prevent them from
causing damage to their surrounding in case of a
breakage.
*Alkali is a base that forms hydroxide ions (OH¯)
when it is dissolved in water.
Li (Lithium), Na (Sodium), K (Potassium) Rb
(Rubidium), Cs (Cesium) and artificial and
radioactive Fr (Fan-sium) metals are called ALKALI
METALS.
30 /33 EN
Refrigerator / User Guide
Page 32

7 Troubleshooting
Check this list before contacting the service. Doing so will save you time and money. This list includes
frequent complaints that are not related to faulty workmanship or materials. Certain features mentioned
herein may not apply to your product.
The refrigerator is not working.
• The power plug is not fully settled. >>> Plug it in to settle completely into the socket.
• The fuse connected to the socket powering the product or the main fuse is blown. >>> Check the
fuses.
Condensation on the side wall of the cooler compartment (MULTI ZONE, COOL, CONTROL and FLEXI ZONE).
• The environment is too cold. >>> Do not install the product in environments with temperatures
below -5°C.
• The door is opened too frequently >>> Take care not to open the product’s door too frequently.
• The environment is too humid. >>> Do not install the product in humid environments.
• Foods containing liquids are kept in unsealed holders. >>> Keep the foods containing liquids in
sealed holders.
• The product’s door is left open. >>> Do not keep the product’s door open for long periods.
• The thermostat is set to too low temperature. >>> Set the thermostat to appropriate temperature.
Compressor is not working.
• In case of sudden power failure or pulling the power plug off and putting back on, the gas pressure
in the product’s cooling system is not balanced, which triggers the compressor thermic safeguard.
The product will restart after approximately 6 minutes. If the product does not restart after this
period, contact the service.
• Defrosting is active. >>> This is normal for a fully-automatic defrosting product. The defrosting is
carried out periodically.
• The product is not plugged in. >>> Make sure the power cord is plugged in.
• The temperature setting is incorrect. >>> Select the appropriate temperature setting.
• The power is out. >>> The product will continue to operate normally once the power is restored.
The refrigerator's operating noise is increasing while in use.
• The product’s operating performance may vary depending on the ambient temperature variations.
This is normal and not a malfunction.
The refrigerator runs too often or for too long.
• The new product may be larger than the previous one. Larger products will run for longer periods.
• The room temperature may be high. >>> The product will normally run for long periods in higher
room temperature.
• The product may have been recently plugged in or a new food item is placed inside. >>> The
product will take longer to reach the set temperature when recently plugged in or a new food item
is placed inside. This is normal.
• Large quantities of hot food may have been recently placed into the product. >>> Do not place hot
food into the product.
• The doors were opened frequently or kept open for long periods. >>> The warm air moving inside
will cause the product to run longer. Do not open the doors too frequently.
• The freezer or cooler door may be ajar. >>> Check that the doors are fully closed.
• The product may be set to temperature too low. >>> Set the temperature to a higher degree and
wait for the product to reach the adjusted temperature.
• The cooler or freezer door washer may be dirty, worn out, broken or not properly settled. >>>
Clean or replace the washer. Damaged / torn door washer will cause the product to run for longer
periods to preserve the current temperature.
Refrigerator / User Guide
31/33EN
Page 33

Troubleshooting
The freezer temperature is very low, but the cooler temperature is adequate.
• The freezer compartment temperature is set to a very low degree. >>> Set the freezer
compartment temperature to a higher degree and check again.
The cooler temperature is very low, but the freezer temperature is adequate.
• The cooler compartment temperature is set to a very low degree. >>> Set the freezer
compartment temperature to a higher degree and check again.
The food items kept in cooler compartment drawers are frozen.
• The cooler compartment temperature is set to a very low degree. >>> Set the freezer
compartment temperature to a higher degree and check again.
The temperature in the cooler or the freezer is too high.
• The cooler compartment temperature is set to a very high degree. >>> Temperature setting of the
cooler compartment has an effect on the temperature in the freezer compartment. Wait until the
temperature of relevant parts reach the sufficient level by changing the temperature of cooler or
freezer compartments.
• The doors were opened frequently or kept open for long periods. >>> Do not open the doors too
frequently.
• The door may be ajar. >>> Fully close the door.
• The product may have been recently plugged in or a new food item is placed inside. >>> This is
normal. The product will take longer to reach the set temperature when recently plugged in or a
new food item is placed inside.
• Large quantities of hot food may have been recently placed into the product. >>> Do not place hot
food into the product.
Shaking or noise.
• The ground is not level or durable. >>> If the product is shaking when moved slowly, adjust
the stands to balance the product. Also make sure the ground is sufficiently durable to bear the
product.
• Any items placed on the product may cause noise. >>> Remove any items placed on the product.
The product is making noise of liquid flowing, spraying etc.
• The product’s operating principles involve liquid and gas flows. >>> This is normal and not a
malfunction.
There is sound of wind blowing coming from the product.
• The product uses a fan for the cooling process. This is normal and not a malfunction.
There is condensation on the product's internal walls.
• Hot or humid weather will increase icing and condensation. This is normal and not a malfunction.
• The doors were opened frequently or kept open for long periods. >>> Do not open the doors too
frequently; if open, close the door.
• The door may be ajar. >>> Fully close the door.
There is condensation on the product's exterior or between the doors.
• The ambient weather may be humid, this is quite normal in humid weather. >>> The condensation
will dissipate when the humidity is reduced.
The interior smells bad.
32 /33 EN
Refrigerator / User Guide
Page 34

Troubleshooting
• The product is not cleaned regularly. >>> Clean the interior regularly using sponge, warm water and
carbonated water.
• Certain holders and packaging materials may cause odour. >>> Use holders and packaging materials
without free of odour.
• The foods were placed in unsealed holders. >>> Keep the foods in sealed holders. Micro-organisms
may spread out of unsealed food items and cause malodour. Remove any expired or spoilt foods from the
product.
The door is not closing.
• Food packages may be blocking the door. >>> Relocate any items blocking the doors.
• The product is not standing in full upright position on the ground. >>> Adjust the stands to balance
the product.
• The ground is not level or durable. >>> Make sure the ground is level and sufficiently durable to
bear the product.
The vegetable bin is jammed.
• The food items may be in contact with the upper section of the drawer. >>> Reorganize the food
items in the drawer.
WARNING: If the problem persists after following the instructions in this section, contact
A
your vendor or an Authorised Service. Do not try to repair the product.
Refrigerator / User Guide
33/33EN
Page 35

Frigorifero
Manuale utente
EWWERQWEW
İT
Page 36

Gentile cliente,
ci piacerebbe che lei potesse raggiungere un livello di efficacia ottimale dal nostro prodotto, che è stato
realizzato in una struttura moderna, adottando controlli meticolosi a livello qualitativo.
A tal fine la invitiamo a leggere con attenzione il manuale dell'utente prima di iniziare a servirsi del
dispositivo. La invitiamo altresì a conservare il presente manuale per poterlo consultare in futuro Qualora
dovesse cedere il prodotto a terzi, consigliamo di accludere il presente manuale.
Il manuale dell’utente garantisce un utilizzo veloce e sicuro dell’apparecchiatura.
• Consigliamo di leggere il manuale dell’utente prima di installare e mettere in funzione l’apparecchiatura.
• Rispettare sempre le istruzioni di sicurezza applicabili.
• Consigliamo di tenere la guida dell’utente a portata di mano per poterla consultare in futuro.
• La invitiamo a leggere gli altri eventuali documenti forniti con l’apparecchiatura
Ricordi che questo manuale può riferirsi a diversi modelli. Il manuale indica chiaramente le eventuali
variazioni da un modello all'altro.
Simboli e note
Nel manuale sono utilizzati i seguenti simboli:
Informazioni importanti e consigli
C
utili.
Rischio di vita e proprietà.
A
B
Rischio di scosse elettriche.
L’imballaggio del prodotto è fatto
di materiali riciclabili, in conformità
con la Normativa Ambientale
Nazionale.
Page 37

1 Istruzioni relativamente a sicurezza e
ambiente 3
1.1. Norme di sicurezza generali. . . . . . . . . . . . . 3
1.1.1 Avvertenza HC
1.1.2 Per i modelli con la fontana d'acqua
1.2. Impiego conforme allo scopo previsto . . . . . 6
1.3. Sicurezza bambini. . . . . . . . . . . . . . . . . . . . 7
1.4. Conformità con la Direttiva WEEE e smaltimento
dei prodotti di scarico. . . . . . . . . . . . . . . . .7
1.5. Conformità con la direttiva RoHS . . . . . . . . . 7
1.6. Informazioni sull'imballaggio . . . . . . . . . . . . 7
. . . . . . . . . . . . . . . . . . . . . . 6
. . . . . . 6
2 Frigorifero 8
3. Installazione 9
3.1 Luogo idoneo per l’installazione. . . . . . . . . . . 9
3.2 Prima di avviare il frigorifero . . . . . . . . . . . .9
3.3 Collegamenti elettrici. . . . . . . . . . . . . . . . . 10
3.4 Regolazione dei piedini. . . . . . . . . . . . . . . .10
3.5 Inversione degli sportelli . . . . . . . . . . . . . .11
3.6 Inversione degli sportelli . . . . . . . . . . . . . .12
4 Preparazione 13
4.1 Cose da fare ai fini del risparmio energetico 13
4.2 Uso iniziale. . . . . . . . . . . . . . . . . . . . . . . . . 13
5 Utilizzo del frigorifero 14
5.1. Pulsante di impostazione della temperatura 14
5.2. Congelamento rapido . . . . . . . . . . . . . . . . 14
5.3. Funzione assenza . . . . . . . . . . . . . . . . . . . 15
5.4. Pannello dei comandi . . . . . . . . . . . . . . . . 16
5.5. Pannello dei comandi . . . . . . . . . . . . . . . . 18
5.6. Secchiello del ghiaccio. . . . . . . . . . . . . . . 21
(Questa funzione è opzionale). . . . . . . . . . 21
5.7. Scomparto per le uova . . . . . . . . . . . . . . . 21
5.8. Ventola. . . . . . . . . . . . . . . . . . . . . . . . . . .21
5.9. Cestino per verdure. . . . . . . . . . . . . . . . . . 21
(Questa funzione è opzionale). . . . . . . . . . 21
5.10. Scomparto zero gradi . . . . . . . . . . . . . . . 21
(Questa funzione è opzionale). . . . . . . . . . 21
5.11. Ripiano mobile sportello. . . . . . . . . . . . . . 22
5.12. Scomparto scorrevole per la conservazione 22
(Questa funzione è opzionale). . . . . . . . . . 22
5.13. Cestino per verdure a umidità controllata . 23
(Questa funzione è opzionale). . . . . . . . . . 23
5.14. Macchina del ghiaccio automatica . . . . . . 23
(Questa funzione è opzionale). . . . . . . . . . 23
5.15. Icematic e contenitore per conservare il
ghiaccio. . . . . . . . . . . . . . . . . . . . . . . . . . 24
(Questa funzione è opzionale) . . . . . . . . . . . . . . 24
5.16. Erogatore d’acqua
5.17. Uso dell’erogatore d’acqua
5.18. Pulizia del serbatoio dell’acqua . . . . . . . . 26
5.19. Vaschetta per l’acqua. . . . . . . . . . . . . . . .27
5.20. HerbBox/HerbFresh . . . . . . . . . . . . . . . . .27
5.21. Consigli per conservare alimenti surgelati 28
5.22. Dettagli congelatore. . . . . . . . . . . . . . . . . 28
5.23. Posizionamento degli alimenti. . . . . . . . . .29
5.24. Avvertenza sportello aperto. . . . . . . . . . . . 29
5.25. Cambiare la lampadina di illuminazione . . 29
. . . . . . . . . . . . . . . . . . 24
. . . . . . . . . . . . 25
6 Pulizia e manutenzione 30
6.1. Evitare i cattivi odori . . . . . . . . . . . . . . . . .30
6.2. Protezione delle superfici in plastica. . . . . .30
7 Risoluzione dei problemi 31
2 /33 IT
Frigorifero / Manuale dell’Utente
Page 38

1 Istruzioni relativamente a sicurezza e ambiente
Questa sezione fornisce le
istruzioni di sicurezza necessarie
per evitare il rischio di lesioni
e danni materiali. Il mancato
rispetto di queste istruzioni in
validare a tutti i tipi di garanzia
esistenti sul prodotto.
Uso previsto
AVVERTENZA:
Assicurarsi che i fori di
ventilazione non sono chiusi
A
A
A
Frigorifero / Manuale dell’Utente
quando il dispositivo è nella
sua custodia o quando
lo si inserisce nel suo
alloggiamento.
AVVERTENZA:
Non utilizzare alcun
dispositivo meccanico
o altri dispositivi per
accelerare il processo di
sbrinamento e seguire
solo i consigli del
fabbricante.
AVVERTENZA:
Non danneggiare il
circuito del liquido
refrigerante.
AVVERTENZA:
Non utilizzare apparecchi
elettrici non consigliati dal
A
Questo apparecchio é stato
progettato per applicazioni
domestiche e per la seguenti
applicazioni similari:
- Per essere utilizzato nelle
cucine del personale di negozi,
uffici e altri luoghi di lavoro;
- Per essere utilizzato dai
clienti negli alberghi e nelle case
di campagna, motel e altri luoghi
di alloggio.
- in ambienti tipo pensioni
- in luoghi simili che non
offrano servizi di ristorazione e
non siano di vendita al dettaglio.
1.1. Norme di
sicurezza generali
• Questo prodotto non dovrebbe
essere usato da persone
con disabilità a livello fisico,
sensoriale e mentale, da persone
senza un quantitativo sufficiente
di conoscenze ed esperienza
o ancora da bambini. Questa
persone potranno usare il
dispositivo unicamente sotto alla
3/33 IT
fabbricante all’interno dei
vani per la conservazione
degli alimenti.
Page 39

Istruzioni relativamente a sicurezza e ambiente
supervisione e alle istruzioni di
una persona responsabile della
loro sicurezza. Ai bambini non
dovrebbe essere consentito di
giocare con questo dispositivo.
• In caso di
malfunzionamento, scollegare
il dispositivo.
• Dopo aver scollegato
il dispositivo, attendere
almeno cinque minuti prima
di collegarlo nuovamente.
Scollegare il prodotto se non
viene usato. Non toccare la
presa con le mani umide!
Non tirare il cavo per eseguire
lo scollegamento, prenderlo
sempre per la spina.
• Non collegare il frigorifero
se la presa sembra essere
allentata.
• Scollegare il prodotto in fase
di installazione, manutenzione,
pulizia e riparazione.
• Qualora si preveda di non
utilizzare il prodotto per un
po’ di tempo, scollegarlo ed
estrarre gli eventuali elementi
contenuti al suo interno.
• Non usare vapore o
materiali detergenti a base
di vapore per la pulizia del
frigorifero e per lo scioglimento
del ghiaccio al suo interno.
Il vapore potrebbe entrare
in contatto con le aree
sotto tensione elettrica e
causare cortocircuiti o scosse
elettriche!
• Non lavare il prodotto
spruzzando o versando acqua
sullo stesso! Pericolo di scossa
elettrica!
• Non usare mai il prodotto
se la sezione che si trova sulla
parte superiore o posteriore
del prodotto, con le schede
dei circuiti elettronici stampati
all’interno, è aperta (copri
schede dei circuiti elettronici
stampati) (1).
1
1
4 /33IT
Frigorifero / Manuale dell’Utente
Page 40

Istruzioni relativamente a sicurezza e ambiente
• In caso di
malfunzionamento, non
usare il prodotto, dato che
potrebbe emettere scosse
elettriche. Contattare il
servizio autorizzato prima di
intervenire.
• Collegare il prodotto ha una
presa che disponga di messa a
terra. L’operazione di messa a
terra deve essere eseguita da
un elettricista qualificato.
• Qualora il prodotto
disponga di un’illuminazione
a LED, contattare l’assistenza
autorizzata per la sostituzione
oppure in caso di problemi.
• Non toccare alimenti
congelati con le mani bagnate!
Gli alimenti si potrebbero
attaccare alle mani!
• Nonna posizionare liquidi
in bottiglie o lattine all’interno
dello scomparto congelatore.
Potrebbero esplodere!
• Collocare i liquidi in
posizione verticale dopo aver
saldamente chiuso il tappo.
• Non spruzzare sostanze
infiammabili vicino al prodotto,
che potrebbe bruciare o
esplodere.
• Non conservare materiali
e prodotti infiammabili, con
gas infiammabile, come ad
esempio spray all’interno del
frigorifero.
• Non collocare contenitori
di liquidi sopra al prodotto. Gli
spruzzi su parti sotto tensione
potrebbero provocare scosse
elettriche e rischio di incendio.
• L’esposizione del prodotto
a pioggia, neve, sole e vento
potrebbe causare pericoli a
livello elettrico. Qualora sia
necessario spostare il prodotto,
non tirarlo per la maniglia della
porta. La maniglia si potrebbe
staccare.
• Evitare che parti delle mani
o del corpo restino impigliate
nei meccanismi mobili
all’interno del prodotto.
• Non incrinare o piegare
la porta, i cassetti e altre
componenti del frigorifero. Così
facendo il prodotto cadrà e
si potrebbero danneggiare le
componenti.
• Fare attenzione a
non bloccare il cavo di
alimentazione.
Frigorifero / Manuale dell’Utente
5/33 IT
Page 41

Istruzioni relativamente a sicurezza e ambiente
psi (5.5 bar), usare una valvola
di limitazione della pressione
nel sistema principale. Qualora
non si sappia come verificare
la pressione dell’acqua,
chiedere aiuto a un idraulico
1.1.1 Avvertenza HC
Qualora il prodotto sia dotato
di sistema di raffreddamento
che utilizza il gas R600a,
fare attenzione a evitare di
danneggiare il sistema di
raffreddamento e il relativo
tubo in fase di utilizzo e
spostamento del prodotto.
Questo gas è infiammabile.
Se viene danneggiato il
sistema di raffreddamento,
tenere il prodotto lontano da
fonti di fuoco e provvedere
immediatamente ad arieggiare
la stanza.
sul lato sinistro interno
indica il tipo di gas usato
C
1.1.2 Per i modelli con
la fontana d'acqua
• La pressione per l’ingresso
dell’acqua fredda dovrebbe
essere al massimo 90 psi
(6.2 bar). Qualora la pressione
dell’acqua superi il valore 80
nel prodotto.
professionista.
• In caso di rischio dell’effetto
“martello acqua” nel proprio
impianto, usare sempre una
strumentazione per evitare
l’effetto “martello d’acqua” nel
proprio impianto. Rivolgersi a
idraulici professionisti in caso
di dubbio relativamente alla
presenza o meno dell’effetto
“martello d’acqua” nel proprio
impianto.
• Non installare l’ingresso
dell’acqua calda. Prendere
precauzioni contro il rischio
di congelamento dei tubi. La
gamma di funzionamento
della temperatura dell’acqua
dovrebbe essere 33°F (0.6°C)
come minimo e 100°F (38°C)
al massimo.
• Utilizzare solo acqua
potabile.
1.2. Impiego conforme
allo scopo previsto
• Questo prodotto è stato
pensato per essere utilizzato in
6 /33IT
Frigorifero / Manuale dell’Utente
Page 42

Istruzioni relativamente a sicurezza e ambiente
ambito domestico. Non è stato
pensato per un uso di tipo
commerciale.
• Il prodotto dovrebbe essere
usato unicamente per la
conservazione di alimenti e
bevande.
• Non tenere prodotti
dedicati, che richiedano
temperature controllate, quali
ad esempio vaccini, farmaci
sensibili al calore, all’interno
del frigorifero.
• Il produttore non si assume
nessuna responsabilità per
gli eventuali danni causati da
un cattivo uso o da un uso
scorretto.
• I pezzi di ricambio originali
verranno forniti per 10 anni,
successivamente alla data di
acquisto del prodotto.
1.3. Sicurezza bambini
• Tenere gli imballaggi fuori
dalla portata dei bambini.
• Non permettere ai bambini
di giocare con il prodotto.
• Qualora la porta del
prodotto comprenda un
lucchetto, tenere la chiave
fuori dalla portata dei bambini.
1.4. Conformità con la
Direttiva WEEE e smaltimento
dei prodotti di scarico
Questo prodotto è conforme alla direttiva
WEEE dell’UE (2012/19/EU). Questo prodotto
è dotato di un simbolo di classificazione
per i prodotti elettrici ed elettronici di scarto
(WEEE).
Il prodotto è stato realizzato con
componenti e materiali di alta
qualità che possono essere
riutilizzati oltre che riciclati. Non
smaltire il prodotto con i normali
rifiuti domestici e altri rifiuti al
termine del suo ciclo di vita utile.
Portare il prodotto ha un centro di raccolta
per il riciclaggio della strumentazione
elettrica ed elettronica. Consigliamo di
rivolgersi alle autorità locali per ulteriori
informazioni su questi centri di raccolta.
1.5. Conformità con
la direttiva RoHS
• Questo prodotto è conforme alla direttiva
WEEE dell’UE (2011/65/EU). Non contiene
materiali dannosi e proibiti e indicati nella
Direttiva.
1.6. Informazioni sull'imballaggio
• I materiali che compongono l’imballaggio
del prodotto sono realizzati a partire da
materiali riciclabili in conformità con le nostre
Normative Ambientali Nazionali. Non smaltire
i materiali dell’imballaggio congiuntamente ai
rifiuti domestici o ad altri rifiuti. Portarli presso
i punti di raccolta imballaggi indicati dalle
autorità locali.
Frigorifero / Manuale dell’Utente
7/33 IT
Page 43

2 Frigorifero
*1
16
17
*15
*14
*5
13
*12
*11
*9
*10
*8
7
7
*3
*4
*5
*2
*4
*6
1. Ripiano sportello scomparto
Coolerraggruppamento
2. Contenitore riempimento erogatore acqua
3. Porta uova
4. Serbatoio erogatore acqua
5. Ripiano bottiglie
6. Contenitori scorrevoli per la conservazione
7. Piedini regolabili
8. Scomparto freezer
*Opzionale: Le figure in questo manuale utente sono schematiche, e potrebbero non corrispondere
esattamente al prodotto. Qualora il prodotto non contenga le parti descritte, l’informazione riguarda altri
C
modelli.
9. Scomparto Quick Freeze
10. Portaghiaccio & banca Ice
11. Cestino per verdure
12. Scomparto zero gradi
13. Luce interna
14. Ripiano di vetro scomparto Cooler
15. Pulsante di regolazione della temperatura
16. Scomparto Cooler
17. Scomparto freezer
8 /33 IT
Frigorifero / Manuale dell’Utente
Page 44

3. Installazione
3.1 Luogo idoneo per l’installazione
Rivolgersi al Servizio Autorizzato per l’installazione
del prodotto. Per rendere il prodotto pronto per essere installato, confrontare le informazioni nella guida dell’utente e accertarsi che i servizi elettrici e idrici siano presenti. In caso contrario contattare un elettricista e un idraulico per rendere questi servizi conformi ai requisiti.
AVVERTENZA: Il produttore non si
assume nessuna responsabilità per gli
B
B
A
A
eventuali danni causati dagli interventi
eseguiti da personale non autorizzato.
AVVERTENZA: Il cavo di alimentazi-
one del prodotto deve essere scollegato in fase di utilizzo. Il mancato rispetto
di queste istruzioni potrebbe provocare
morte o altre gravi lesioni!
AVVERTENZA: Qualora la porta sia
troppo stretta per consentire il passaggio del prodotto, togliere la porta e ruotarla; qualora ciò non funzioni, contattare il servizio autorizzato.
AVVERTENZA: Avvertenza
superficie calda
Le pareti laterali del prodotto
sono dotate di tubi refrigeranti
per migliorare il sistema di
raffreddamento. Il refrigerante
a temperature elevate potrebbe
scorrere in queste aree,
causando così superfici calde
sulle pareti laterali. Non si tratta
di un’anomalia di funzionamento
e non sono necessari interventi
di manutenzione. Fare attenzione
quando si toccano queste aree
• Il prodotto richiede una circolazione adeguata dell’aria per funzionare in modo efficace.
Qual’ora il prodotto venga posizionato in un padiglione estivo, ricordare di lasciare una distanza di almeno 5 cm fra il prodotto, il soffitto, e le pareti.
• Non installare il prodotto in ambienti con temperature inferiori ai 5°.
3.2 Prima di avviare il frigorifero
Controllare quanto segue prima di utilizzare il frigorifero:
1. Montare i 2 cunei in plastica come
illustrato sotto. I cunei in plastica servono
a mantenere la distanza che assicura la
circolazione dell’aria tra frigorifero e parete.
(L’immagine è creata per illustrare e non è identica
all’apparecchio).
2. Pulire la parte interna del frigorifero come
consigliato nella sezione “Manutenzione e pulizia”.
3. Collegare la spina del frigorifero alla presa
elettrica. Quando lo sportello del frigorifero è
aperto, la lampadina interna si accende.
4. Quando il compressore comincia a
funzionare, si sente un rumore. I liquidi e i gas
sigillati nel sistema refrigerante possono produrre
dei rumori, anche se il compressore non è in
funzione; questo è abbastanza normale.
5. I bordi anteriori del frigorifero possono
essere tiepidi. Questo è normale. Queste zone
sono progettate per essere tiepide per evitare la
condensazione.
• Collocare il prodotto su una superficie piana
per evitare le vibrazioni.
• Collocare il prodotto ad almeno a 30 cm dal
termosifone, dalla stufa e da altre fonti di calore e ad almeno 5 cm da eventuali forni elettrici.
• Non esporre il prodotto alla luce solare diretta o
conservare in ambienti umidi.
Frigorifero / Manuale dell’Utente
9/33 IT
Page 45

Installazione
3.3 Collegamenti elettrici
Collegare il frigorifero ad una presa di messa a terra
protetta da un fusibile della capacità appropriata.
Importante:
• Il collegamento deve essere conforme ai
regolamenti nazionali.
• La spina elettrica deve essere facilmente
accessibile dopo l’installazione.
• La sicurezza elettrica del frigorifero è ga-
rantita unicamente se il sistema di messa a
terra dell’apparecchiatura è conforme agli
standard.
• La tensione dichiarata sull’etichetta
che si trova nel lato interno a sinistra
dell’apparecchio deve essere pari alla tensione di rete
3.4 Regolazione dei piedini
Se il frigorifero non è in equilibrio:
è possibile bilanciare il frigorifero ruotando
i piedini anteriori come illustrato in figura.
L’angolo in cui i piedini sono più bassi quando
girati in direzione della freccia nera e rialzati
quando girati in direzione opposta. Un aiuto
per sollevare leggermente il frigorifero faciliterà
tale processo.
10 /32 IT
Frigorifero / Manuale dell’Utente
Page 46

Installazione
3.5 Inversione degli sportelli
Procedere in ordine numerico.
4
10
5
10
4
2
7
1
11
45 ¡
6
12
13
3
8
9
14
18
180¡
17
19
22
19
15
Frigorifero / Manuale dell’Utente
23
16
21
11/32 IT
24
24
20
Page 47

Installazione
3.6 Inversione degli sportelli
Procedere in ordine numerico.
(8) (13)
1
1
1
7
20
6
2
14
45 °
5
11
13
9
4
3
10
20
12
8
180°
15
20
19
16
17
18
12 /32 IT
Frigorifero / Manuale dell’Utente
Page 48

4 Preparazione
4.1 Cose da fare ai fini del ris-
parmio energetico
La connessione dell'apparecchio a sistemi elettronici di risparmio energetico
A
• Non lasciare lo sportello del frigorifero aperto
• Non mettere alimenti o bevande caldi nel fri-
• Non sovraccaricare il frigorifero; il blocco del
• Per conservare la quantità massima di alimen-
• Non bisogna bloccare il flusso dell’aria metten-
• A seconda delle caratteristiche
• Gli alimenti devono essere conservati nei cas-
• Le confezioni con gli alimenti non devono es-
• Assicurarsi che gli alimenti non siano in contat-
è rischiosa poiché potrebbe provocare
danni all'apparecchio.
per lunghi periodi.
gorifero.
flusso interno dell’aria riduce la capacità di
raffreddamento.
ti nello scomparto Cooler del frigorifero, bisogna estrarre i cassetti superiori e metterli sul ripiano di vetro. Il consumo energetico dichiarato per il frigorifero è stato stabilito estraendo lo scomparto Cooler, il vassoio del ghiaccio
e i cassetti superiori in modo da consentire la
conservazione massima. L’uso del cassetto inferiore è fortemente raccomandato. La funzione di risparmio energetico deve essere attivata
per un migliore consumo energetico.
do gli alimenti davanti alla ventola del Cooler.
Uno spazio di almeno 3 cm deve essere lasciato davanti alla griglia della ventola protettiva
quando si posizionano gli alimenti.
dell’apparecchio, scongelare nello scomparto
Cooler gli alimenti congelati assicura risparmio
energetico e conserva la qualità degli alimenti.
setti dello scomparto Cooler per assicurare risparmio energetico e proteggere gli alimenti in
condizioni migliori.
sere a contatto diretto con il sensore di calore
che si trova nello scomparto Cooler. Se sono in
contatto con il sensore, il consumo energetico
dell’apparecchio potrebbe aumentare.
to con il sensore della temperatura dello scomparto Cooler descritto sotto.
4.2 Uso iniziale
Prima di utilizzare il frigorifero, assicurarsi di eseguire le preparazioni necessarie in linea con le istruzioni delle sezioni “Istruzioni per sicurezza e ambiente” e “Installazione”.
• Tenere l’apparecchio in funzione senza alimenti
all’interno per 6 ore e non aprire lo sportello, a
meno che non sia assolutamente necessario.
Si sente un suono quando il compressore si innesca. È normale senti-
C
C
re il suono anche quando il compressore non è attivo, a causa dei liquidi e
dei gas compressi nel sistema di refrigerazione.
I bordi anteriori dell'apparecchio potrebbero riscaldarsi. Questo è normale.
Il riscaldamento di queste parti è concepito per impedire la condensa.
In alcuni modelli il pannello indicatore si spegne automaticamente 5 minu-
C
ti dopo la chiusura dello sportello. Si riattiva quando lo sportello viene aperto
o se viene premuto un pulsante.
Frigorifero / Manuale dell’Utente
13/33 IT
Page 49

5 Utilizzo del frigorifero
5.1. Pulsante di impostazione
della temperatura
La temperatura interna del frigorifero cambia per
le seguenti cause;
• Temperature stagionali,
• Apertura frequente dello sportello e sportello
lasciato aperto per lunghi periodi,
• Alimenti messi nel frigorifero senza lasciarli
prima raffreddare a temperatura ambiente,
• Posizionamento del frigorifero nella stanza
(per esempio, esposizione alla luce solare).
• Si può regolare la temperatura interna del frigorifero, che varia a causa di questi fattori, utilizzando il pulsante di impostazione.
• I numeri della manopola di controllo indicano i
valori di temperatura in “°C”.
• Se la temperatura ambiente è 25 °C, consigliamo di usare la manopola di controllo della temperatura del frigorifero sulla posizione 4°C. Questo
valore può essere aumentato o diminuito come
richiesto da altre temperature ambientali.
5.2. Congelamento rapido
Se è necessario congelare grosse quantità di
alimenti freschi, portare la manopola di controllo
) sulla posizione max. 24 ore prima di
(
mettere gli alimenti freschi nello scomparto di
congelamento rapido.
Si consiglia di tenere la manopola in questa
posizione per almeno 24 ore per congelare la
quantità massima di cibo fresco riportata come
capacità di congelamento. Fare attenzione a non
mescolare cibi congelati e cibi freschi.
Ricordare di riportare la manopola di controllo della
temperatura sulla posizione precedente quando gli
alimenti si sono congelati.
14 /33 IT
Frigorifero / Manuale dell’Utente
Page 50

Utilizzo del frigorifero
5.3. Funzione assenza
Se gli sportelli dell'apparecchio non sono
aperti per 12 ore dopo il posizionamento
della manopola di controllo della temperatura
sulla posizione più alta, allora si attiva
automaticamente la funzione assenza.
Per annullare questa funzione, modificare
l'impostazione della manopola.
Non si consiglia di conservare alimenti nello
scomparto più freddo quando è attiva la
funzione assenza.
• Quando l’operazione di impostazione è
completa, si può premere la manopola di controllo della temperatura e nasconderla.
Frigorifero / Manuale dell’Utente
15/33 IT
Page 51

Utilizzo del frigorifero
5.4. Pannello dei comandi
I pannelli degli indicatori possono variare secondo il modello del prodotto.
Il pannello degli indicatore aiuta ad usare il frigorifero con le relative funzioni audio e visive.
8
1
2
3
9
7
1.
Indicatore scomparto frigo
2.
Indicatore stato errore
3.
Indicatore temperatura
4.
Tasto Vacation
5.
Tasto di impostazione della temperatura
6.
Pulsante di selezione dello scomparto
7.
Indicatore scomparto freezer
8.
Indicatore modalità risparmio
9.
Indicatore funzione vacanza
6
45
C
*Opzionale: Le figure in questo manuale utente sono schematiche, e potrebbero non
corrispondere esattamente al prodotto. Qualora il prodotto non contenga le parti descritte,
l’informazione riguarda altri modelli.
16 /33 IT
Frigorifero / Manuale dell’Utente
Page 52

Utilizzo del frigorifero
1. Indicatore scomparto frigo
La luce dello scomparto frigo si accende
quando si regola la temperatura dello
scomparto frigo.
2. Indicatore stato errore
Se il frigo non raffredda in modo adeguato o
se c'è un guasto ai sensori, questo indicatore
sarà attivato. Quando questo indicatore è
attivo, l'indicatore della temperatura dello
scomparto freezer visualizza “E” e l'indicatore
della temperatura dello scomparto frigo
visualizza numeri come “1,2,3…”. Questi
numeri sull'indicatore forniscono informazioni
sull'errore al personale dell'assistenza.
3. Indicatore temperatura
Indica le temperature di scomparto frigo e
freezer.
4. Pulsante Vacation
Tenere premuto questo pulsante per 3 secondi
per attivare la funzione assenza. Premere
di nuovo questo pulsante per disattivare la
funzione selezionata.
5. Pulsante di impostazione della
temperatura
Cambia la temperatura dello scomparto
pertinente tra -24°C... -18°C e 8°C...1°C.
6. Scomparto frigo
Premere il pulsante di selezione scomparto
frigo per passare tra gli scomparti frigo e
freezer.
7. Indicatore scomparto freezer
La luce dello scomparto freezer si accende
quando si regola la temperatura dello
scomparto freezer.
8. Indicatore modalità Economy
Indica che il frigorifero è in funzione in modalità
a risparmio energetico. Questo indicatore
si attiva se la temperatura dello scomparto
freezer è impostata su -18 °C.
9.Indicatore funzione vacanza
Indica che la funzione vacanza è attiva.
Frigorifero / Manuale dell’Utente
17/33 IT
Page 53

Utilizzo del frigorifero
5.5. Pannello dei comandi
Il pannello con gli indicatori consente di impostare la temperatura e di controllare le altre funzioni collegate all’apparecchio senza aprire lo sportello dell’apparecchio. Basta premere le scritte sui
pulsanti pertinenti per l’impostazione delle funzioni.
1 2
12
*10
11
1. Indicatore di avvertenza errore di alimentazione / alta temperatura / errore
Questo indicatore ( ) si accende in caso di
problemi di alimentazione, di alta temperatura e
avvertenze di errore. Durante prolungata assenza
di alimentazione, la temperatura più elevata che
lo scomparto freezer raggiunge lampeggia sul
display digitale. Dopo aver controllare gli alimenti
che si trovano nello scomparto freezer (
premere il pulsante di disattivazione allarme per
annullare l'avvertenza.
Vedere la sezione "rimedi consigliati per la
ricerca e la risoluzione del problemi" del
manuale se si nota l'accensione di questo
indicatore.
*Opzionale: Le figure in questo manuale utente sono schematiche, e potrebbero non
corrispondere esattamente al prodotto. Qualora il prodotto non contenga le parti descritte,
C
l’informazione riguarda altri modelli.
789
)
18 /33 IT
6
2. Funzione risparmio energetico (display spento):
Se gli sportelli dell'apparecchio sono tenuti
chiusi a lungo, si attiva automaticamente
una funzione di risparmio energetico a lungo
termine e si accende il simbolo del risparmio
energetico. (
Quando la funzione di risparmio energetico è
attiva, tutti simboli sul display tranne quella
del risparmio energetico si spengono. Quando
la funzione risparmio energetico è attivata,
se viene premuto un pulsante o lo sportello
è aperto, si esce dalla modalità risparmio
energetico e i simboli sul display tornano
normali.
45
)
Frigorifero / Manuale dell’Utente
3
Page 54

Utilizzo del frigorifero
La funzione di risparmio energetico è attivata al
momento della consegna della fabbrica e non
può essere annullata.
3. Funzione Quick Fridge
Questo pulsante ha due funzioni. Per attivare o disattivare la funzione Quick Cool premerlo brevemente. L’indicatore Quick Cool si
spegnerà e l’apparecchio tornerà alle sue normali impostazioni. (
Usare la funzione Quick Cool quando si desidera raffreddare velocemen-
C
C
C
C
4. Pulsante di impostazione temperatura
scomparto frigo
Premere questo pulsante per impostare
la temperatura dello scomparto frigo
rispettivamente su 8, 7,6, 5,4,3, 2, 8...
Premere questo pulsante per impostare la
temperatura desiderata per lo scomparto frigo.
( )
te gli alimenti posti nello scomparto frigo. Se è necessario raffreddare grandi quantità di cibo fresco, attivare questa funzione prima di inserire il cibo
nel frigo.
Se non si annulla manualmente, la
funzione Quick Cool si annullerà automaticamente dopo 8 ore o quando lo
scomparto frigo ha raggiunto la temperatura richiesta.
Premendo il pulsante Quick Cool ripetutamente a brevi intervalli, il compressore non comincerà a funzionare immediatamente, in quanto il sistema di
protezione del circuito elettronico sarà
attivato.
Questa funzione non viene richiamata quando l'alimentazione si ripristina
dopo un'assenza di corrente.
)
5.Funzione assenza
Per attivare la funzione assenza, premere
questo pulsante (
l'indicatore della modalità Vacation (
attiva. Quando la funzione assenza è attiva, “-
-” si visualizza sull'indicatore della temperatura
dello scomparto frigo e non viene eseguito il
raffreddamento attivo nello scomparto frigo.
Non si possono conservare gli alimenti nello
scomparto frigo quando questa funzione è
attivata. Gli altri scomparti saranno ancora
raffreddati secondo la loro temperatura
impostata.
Per annullare questa funzione, premere di
nuovo il pulsante della funzione assenza.
6. Avvertenza disattivazione allarme:
In caso di allarme per assenza di
alimentazione/elevata temperatura, dopo
aver controllato gli alimenti che si trovano
nello scomparto freezer, premere il pulsante
di disattivazione allarme (
l'allarme.
7. Blocco tasti
Premere il pulsante di blocco tasti (
contemporaneamente per 3 secondi. Simbolo
blocco tasti
) si accende e si attiva la modalità blocco
(
tasti. I pulsanti non funzionano quando è attiva
la modalità blocco tasti. Premere di nuovo
il pulsante di blocco tasti per 3 secondi. Il
simbolo del blocco tasti si spegne e si esce
dalla modalità blocco tasti.
Premere il pulsante blocco tasti se si desidera
impedire la modifica dell'impostazione di
temperatura del frigorifero (
) per 3 secondi e
) si
) per annullare
)
).
Frigorifero / Manuale dell’Utente
19/33 IT
Page 55

Utilizzo del frigorifero
8. Eco Fuzzy
Tenere premuto il pulsante Eco Fuzzy per 1
secondo per attivare la funzione Eco Fuzzy.
Se viene attivata questa funzione, il frigo
comincia a funzionare con la modalità più
economica minimo 6 ore dopo e l'indicatore
di uso economico si accende (
premuto il pulsante Eco Fuzzy per 3 secondi
per disattivare la funzione Eco Fuzzy.
Questo indicatore si accende dopo 6 ore
quando si attiva la funzione Eco Fuzzy.
9. Pulsante di impostazione temperatura
scomparto freezer
Premere questo pulsante per impostare
la temperatura dello scomparto freezer
a -18,-19,-20,-21, -22, -23,-24, -18...,
rispettivamente. Premere questo pulsante per
impostare la temperatura desiderata per lo
scomparto freezer.
10. Indicatore disattivazione Icematic
Indica se Icematic è attivo o disattivato. (
) Se è attivo, l'Icematic non è in funzione. Per
attivare di nuovo l'Icematic tenere premuto il
pulsante On-Off per 3 secondi.
C
( )
Il flusso dell'acqua dal serbatoio
dell'acqua si arresta quando viene selezionata questa funzione. Il ghiaccio
preparato in precedenza, però, può
essere prelevato da Icematic.
). Tenere
Usare la funzione Quick Freeze quando
si desidera congelare velocemente gli
C
C
C
12. Indicatore uso economico
Indica che l'apparecchio è in funzione in
modalità a risparmio energetico. ( ) Questo
indicatore sarà attivo se la temperatura dello
scomparto freezer è impostata su -18 o se il
raffreddamento a risparmio energetico è attivo
grazie alla funzione Eco-Extra.
C
alimenti posti nello scomparto frigo. Se
è necessario congelare grandi quantità
di cibo fresco, attivare questa funzione
prima di inserire il cibo nel frigo.
Se non si annulla manualmente, la funzione Quick Freeze si annullerà automaticamente dopo 4 ore o quando lo
scomparto frigo ha raggiunto la temperatura richiesta.
Questa funzione non viene richiamata quando l'alimentazione si ripristina
dopo un'assenza di corrente.
L'indicatore dell'uso economico si spegne quando sono selezionate le funzioni
Quick Cool o Quick Freeze.
11. Pulsante funzione Quick Freeze/
Pulsante Icematic on-off
Premere questo pulsante per attivare o
disattivare la funzione Quick Freeze. Quando si
attiva la funzione, lo scomparto freezer viene
raffreddato a una temperatura inferiore rispetto
a quella impostata. ( )
Per attivare e disattivare l'Icematic, tenerlo
premuto per 3 secondi.
20 /33 IT
Frigorifero / Manuale dell’Utente
Page 56

Utilizzo del frigorifero
5.6. Secchiello del ghiaccio
5.9. Cestino per verdure
(Questa funzione è opzionale)
• Estrarre il secchiello del ghiaccio dallo
scomparto freezer.
• Riempire di acqua il secchiello del ghiaccio.
• Mettere il secchiello del ghiaccio nello
scomparto freezer.
• Il ghiaccio sarà pronto dopo due ore circa. Estrarre il secchiello del ghiaccio dallo
scomparto freezer e piegarlo
delicatamente sul contenitore in cui sarà
servito il ghiaccio. Il ghiaccio si versa facilmente nel contenitore.
5.7. Scomparto per le uova
È possibile installare il porta uova sul ripiano
desiderato della porta o del corpo.
Non porre mai il porta uova nello scomparto del
freezer
5.8. Ventola
La ventola è stata concepita per garantire la
circolazione dell’aria fredda all’interno del
frigorifero in modo omogeneo. Il tempo di
funzionamento della ventola potrebbe variare a
seconda delle caratteristiche dell’apparecchio.
Se in alcuni apparecchi la ventola funziona
solo con il compressore, in altri il sistema di
controllo determina il tempo di funzionamento
sulla base dell’esigenza di raffreddamento.
(Questa funzione è opzionale)
• Il cestino per verdure dell’apparecchio è
concepito per mantenere le verdure fresche, conservando l’umidità. A questo scopo,
la circolazione complessiva dell’aria fredda
è più intensa nel cestino delle verdure.
5.10. Scomparto zero gradi
(Questa funzione è opzionale)
Usare questo scomparto per conservare i prodotti di gastronomia a temperatura inferiore o la
carne per il consumo immediato.
Lo scomparto zero gradi è la parte più fredda in
cui conservare a condizioni ideali alimenti come
prodotti caseari, carne, pesce e pollo. Verdura
e/o frutta non devono essere conservate in questo scomparto.
Frigorifero / Manuale dell’Utente
21/33 IT
Page 57

Utilizzo del frigorifero
5.11. Ripiano mobile sportello
(Questa funzione è opzionale)
Il ripiano mobile dello sportello può essere
fissato in 3 diverse posizioni.
Per spostare il ripiano, premere in modo
uniforme i pulsanti ai lati. Il ripiano può essere
spostato.
Spostare il ripiano verso l'alto o verso il basso.
Quando il ripiano è nella posizione desiderata,
rilasciare i pulsanti. Il ripiano si fissa di nuovo
nella posizione in cui sono stati rilasciati i
pulsanti.
5.12. Scomparto scorrevole
per la conservazione
(Questa funzione è opzionale)
Questo accessorio è progettato per accrescere
il volume dei ripiani dello sportello.
Grazie alla sua capacità di spostarsi
lateralmente, consente di posizionare
facilmente bottiglie lunghe, barattoli o
contenitori che vengono posti nella rastrelliera
per bottiglie sotto.
22 /33 IT
Frigorifero / Manuale dell’Utente
Page 58

Utilizzo del frigorifero
5.13. Cestino per verdure
a umidità controllata
5.14. Macchina del
ghiaccio automatica
(Questa funzione è opzionale)
Con la funzione di controllo dell'umidità, i tassi
di umidità di verdura e frutta sono tenuti sotto
controllo e assicurano un periodo di freschezza
più lungo per gli alimenti.
Si raccomanda di conservare le verdure a
foglia come lattuga e spinaci e verdure simili
che rischiano la perdita di umidità non sulle
radici ma in posizione orizzontale nel cestino
per le verdure, per quanto possibile.
Quando si posizionano le verdure, mettere
le verdure pesanti e dure sul fondo e quelle
leggere e morbide sopra, tenendo conto del
peso specifico delle verdure.
Non lasciare le verdure nel cestino nei
sacchetti di plastica.
Lasciarle nei sacchetti di plastica provoca in
breve tempo il deterioramento delle verdure.
In situazioni in cui non si consiglia il contatto
con le altre verdure, utilizzare materiali di
imballaggio come carta con una certa porosità
per motivi di igiene.
Non mettere frutta con elevata emissione di
gas etilene come pere, albicocche, pesche e in
particolare mele nello stesso cestino di verdure
con altra verdura e frutta. Il gas etilene che
fuoriesce da questi frutti potrebbe provocare
all'altra frutta e verdura una maturazione e un
deterioramento più veloci.
(Questa funzione è opzionale)
La macchina del ghiaccio automatica
consente di preparare facilmente il ghiaccio
nel frigorifero. Per ottenere ghiaccio dalla
macchina, estrarre il serbatoio dell'acqua
nello scomparto Cooler, riempirlo con acqua e
riposizionarlo.
Il primo ghiaccio sarà pronto in circa 2 ore
nel cassetto della macchina che si trova nello
scomparto Cooler.
Dopo aver posizionato il serbatoio pieno
dell'acqua, si possono ottenere circa 60-70
cubetti di ghiaccio finché non si svuota del
tutto.
Se l'acqua è nel serbatoio da 2-3 settimane,
deve essere cambiata.
Nei prodotti dotati di macchina del
ghiaccio automatica, si potrebbe
C
sentire un suono quando si versa il
ghiaccio. Questo suono è normale e
non è un segno di guasto.
Frigorifero / Manuale dell’Utente
23/33 IT
Page 59

Utilizzo del frigorifero
5.15. Icematic e contenitore
per conservare il ghiaccio
Uso di Icematic
(Questa funzione è opzionale)
* Riempire Icematic con acqua e metterlo in
sede. Il ghiaccio sarà pronto in due ore circa.
Non rimuovere l’Icematic dalla sua sede per
prendere il ghiaccio.
* Ruotare le manopole in senso orario per 90
gradi.
I cubetti di ghiaccio cadono nel contenitore per
la conservazione del ghiaccio sotto.
* È possibile estrarre il contenitore per la conservazione del ghiaccio e servire i cubetti.
* Se lo si desidera, è possibile lasciare i cubetti nel contenitore per la conservazione del ghiaccio.
Contenitore per la conservazione del
ghiaccio
Il contenitore per la conservazione del ghiaccio ha solo lo scopo di conservare i cubetti di
ghiaccio. Non inserirvi dell’acqua, Altrimenti si
romperà.
5.16. Erogatore d’acqua
(in alcuni modelli)
L’erogatore dell’acqua è una funzione molto
utile per ottenere acqua fredda senza aprire lo
sportello del frigorifero. Dal momento che non
bisogna aprire con frequenza lo sportello del
frigorifero, si risparmia energia.
24 /33 IT
Frigorifero / Manuale dell’Utente
Page 60

Utilizzo del frigorifero
5.17. Uso dell’erogatore d’acqua
Premere il braccio dell’erogatore d’acqua col
bicchiere. L’erogatore smette di erogare quando viene rilasciato il braccio.
Quando si usa l’erogatore dell’acqua, il flusso
massimo può essere ottenuto premendo completamente il braccio. Ricordare che la quantità
del flusso dall’erogatore è soggetta al livello di
pressione sul braccio.
Quando il livello dell’acqua nel bicchiere/nel
contenitore aumenta, diminuire leggermente
la pressione sul braccio per evitare traboccamento. Se si preme delicatamente il braccio,
l’acqua gocciola; questo è normale e non è un
guasto.
Riempimento del serbatoio dell’erogatore
d’acqua
Il serbatoio per il riempimento dell’acqua si
trova all’interno della rastrelliera dello sportello.
Aprire il coperchio del serbatoio e riempire
di acqua potabile pulita. E poi chiudere il
coperchio.
Avvertenza!
• Non riempire il serbatoio d’acqua con
liquidi diversi dall’acqua, come succhi di
frutta, bevande gassate o bevande alcoliche
che non sono adatte per essere usate
nell’erogatore d’acqua. L’erogatore d’acqua
si danneggerebbe in modo irreparabile
a causa dell’uso di questi liquidi. La
garanzia non copre tali usi. Alcune sostanze
chimiche e alcuni additivi contenuti in
questo tipo di bevande/liquidi possono
danneggiare il materiale del serbatoio
d’acqua.
• Usare solo acqua potabile pulita e pura.
• La capacità del serbatoio dell’acqua è 3
litri; non riempire oltre.
Frigorifero / Manuale dell’Utente
25/33 IT
Page 61

Utilizzo del frigorifero
• Premere il braccio dell’erogatore d’acqua
con un bicchiere rigido. Se si usano
bicchieri di plastica usa e getta, spingere il
braccio con le dita da dietro il bicchiere.
5.18. Pulizia del serbatoio
dell’acqua
• Rimuovere il serbatoio di riempimento
dell’acqua dalla rastrelliera interna dello
sportello.
• Rimuovere la rastrelliera tenendo da
entrambi i lati.
• Afferrare il serbatoio dell’acqua da
entrambi i lati e rimuoverlo con un angolo
o
di 45
C.
• Pulire il serbatoio dell’acqua rimuovendone
il coperchio.
Importante:
I componenti del serbatoio dell’acqua e
dell’erogatore dell’acqua non devono essere
lavati in lavastoviglie.
26 /33 IT
Frigorifero / Manuale dell’Utente
Page 62

Utilizzo del frigorifero
5.19. Vaschetta per l’acqua
L’acqua che sgocciola durante l’uso dell’erogatore si accumula nell’apposita vaschetta.
Estrarre la vaschetta in plastica come mostrato
nella figura.
Con un panno asciutto e pulito, rimuovere
l’acqua accumulata.
ATTENZIONE: Collegare solo ad una linea
di acqua potabile.
5.20. HerbBox/HerbFresh
Togliere la custodia della pellicola dal HerbBox/
HerbFresh+.
Togliere la pellicola dal sacchetto e inserirla
nella custodia della pellicola come indicato in
figura.
Chiudere la custodia e inserirla nuovamente
nell’unita’ HerbBox/HerbFresh+.
Gli scomparti di HerbBox-HerbFresh+ sono
ideali per la conservazione delle specie di
erbe specialmente per quelle che devono
essere conservate in condizioni sensibili.
Potete conservare fresche le vostre verdure
(prezzemolo, aneto, ecc) che avete tolto dal
loro sacchetto in questo scomparto in posizione
orizzontale per un periodo piu’ lungo.
La pellicola deve essere sostituita ogni sei
mesi.
Frigorifero / Manuale dell’Utente
27/33 IT
Page 63

Utilizzo del frigorifero
Impostazione
Scomparto
Congelatore
-18°C 4°C Questa è l'impostazione predefinita è consigliata.
-20,-22 o -24°C 4°C
Congelamento rapido 4°C
-18°C o inferiore 2°C
5.21. Consigli per conservare
alimenti surgelati
Lo scomparto deve essere impostato a una
temperatura minima di -18°C.
1. Collocare gli alimenti all’interno del
congelatore quanto più rapidamente possibile
per evitare che si scongelino.
2. Prima del congelamento, verificare
la “data di scadenza” sulla confezione per
accertarsi del fatto che il prodotto non sia
scaduto.
3. Accertarsi che la confezione
dell’alimento non sia danneggiata.
Impostazione
Scomparto
Frigorifero
Descrizioni
Queste impostazioni sono consigliate per
temperature ambiente che superano i 30°C.
Servirsi di questa opzione per congelare alimenti in
un breve lasso di tempo; il dispositivo tornerà alle
impostazioni precedenti al termine del processo.
Servirsi di queste impostazioni qualora si ritenga
che lo scomparto frigorifero non sia abbastanza
freddo a causa della temperatura ambiente o a
causa delle frequenti aperture della porta.
Gli alimenti da congelare non devono entrare
in contatto con gli altri alimenti già congelati
all'interno del congelatore, per evitare uno
scongelamento parziale.
Bollire le verdure filtrare l'acqua per estendere
il tempo di conservazione congelato. Collocare
gli alimenti in sacchetti ermetici, dopo aver
eseguito il filtraggio e il posizionamento
all'interno del congelatore. Banane, pomodori,
lattuga, sedano, uova bollite, patate e altri
alimenti simili non dovrebbero essere congelati.
Congelando questi alimenti se ne ridurrà il
valore nutrizionale e la qualità alimentare; i
prodotti si potrebbero inoltre rovinare, il che
causa problemi a livello di salute.
5.22. Dettagli congelatore
Conformemente agli standard IEC 62552, Il
congelatore deve avere la capacità di consolare
4,5 chili di alimenti a una temperatura di
-18°C o inferiore, in 24 ore, per ogni 100 l
di volume di scomparto di congelamento. Gli
alimenti possono essere preservati solo per
lunghi periodi di tempo a temperature uguali
o inferiori a -18°. Sarà possibile conservare
gli alimenti freschi per mesi, all'interno del
congelatore a temperature uguali o inferiori a
-18°).
28 /33 IT
Frigorifero / Manuale dell’Utente
Page 64

Utilizzo del frigorifero
5.23. Posizionamento degli alimenti
Ripiani dello
scomparto
congelatore
Ripiani dello
scomparto
frigorifero
Ripiani della
porta scomparto
frigorifero
Cassetto verdura Frutta e verdura
Scomparto
alimenti freschi
Vari alimenti congelati
quali ad esempio carne,
pesce, gelato, verdura,
eccetera.
Alimenti all'interno
di pentole, vassoi
e contenitori, uova,
all'interno di una
confezione
Piccoli alimenti o
bevande
Prodotti gastronomici,
ad esempio colazione,
carne da consumare a
breve
5.24. Avvertenza sportello aperto
(Questa funzione è opzionale)
Un segnale di avvertenza audio viene emesso
quando lo sportello dell’apparecchio viene
lasciato aperto per almeno 1 minuto. Questa
avvertenza scompare quando lo sportello viene
chiuso o se viene premuto uno dei pulsanti del
display (se presenti).
5.25. Cambiare la lampadina
di illuminazione
Per cambiare lampadina/LED utilizzati per
illuminare il frigorifero, rivolgersi al Servizio
Assistenza Autorizzato.
La lampada (le lampade) usata (usate)
nell’apparecchiatura non è (sono) adatta
(adatte) per l’illuminazione domestica.
L’obiettivo previsto per questa lampada è quello
di assistere l’utente in fase di posizionamento
degli alimenti all’interno del frigorifero /
congelatore in modo sicuro e comodo.
Frigorifero / Manuale dell’Utente
29/33 IT
Page 65

6 Pulizia e manutenzione
Pulendo il prodotto a intervalli regolari sarà
possibile prolungare la durata di vita.
AVVERTENZA: Scollegare il frigorifero
B
• Non usare strumenti appuntiti e abrasivi,
sapone, materiali per pulire la casa, detergenti,
gas, gasolio, vernice e sostanze simili per gli
interventi di pulizia.
• Sciogliere un cucchiaino di bicarbonato in
acqua. Ammorbidire un panno in acqua, quindi
strizzarlo. Pulire il dispositivo con questo panno,
quindi asciugare completamente.
• Fare attenzione a tenere lontana l’acqua dalla
copertura delle lampade dalle altre componenti
elettriche.
• Pulire la porta con un panno bagnato. Togliere
tutti gli elementi all’interno per staccare la porta
ed i ripiani del telaio. Sollevare i ripiani della
porta verso l’alto per poterli rimuovere. Pulire
e asciugare i ripiani, poi fissare nuovamente in
posizione facendo scorrere da sopra.
• Non usare acqua cronica o prodotti detergenti
sulla superficie esterna del dispositivo e sulle
componenti rivestite in cromo del prodotto. Il cloro
provoca ruggine su queste superfici metalliche.
dalla corrente prima di eseguire la pulizia.
• Non usare strumenti affilati e abrasivi o
sapone, agenti detergenti domestici, detergenti,
gasolio, benzene, cera, ecc., altrimenti le
indicazioni sulle parti in plastica si toglieranno e si
verificherà deformazione. Usare acqua tiepida e
un panno morbido unicamente per le operazioni di
pulizia e asciugatura.
6.2. Protezione delle
superfici in plastica
L'olio rovesciato sulle superfici in plastica potrebbe
danneggiare la superficie, e deve essere pulito
immediatamente servendosi di acqua tiepida.
6.1. Evitare i cattivi odori
Il prodotto è stato realizzato senza materiali che
mettono cattivi odori. Osservare tuttavia gli alimenti
in sezioni non adeguate e pulire le superfici interne
in modo non consono potrebbe provocare cattivi
odori.
A tal fine consigliamo di pulire l’interno con acqua
gassata ogni 15 giorni.
• Tenere gli alimenti in contenitori sigillati.
I microrganismi potrebbero fuoriuscire dagli
alimenti non sigillati causando così cattivi odori.
• Non conservare alimenti scaduti e marci
all’interno del frigorifero.
30 /33 IT
Frigorifero / Manuale dell’Utente
Page 66

7 Risoluzione dei problemi
Controllare questo elenco prima di contattare l'assistenza clienti. Questa operazione vi consentirà di
risparmiare soldi. Questo elenco contiene le lamentele più frequenti che non riguardano problemi a
livello di manodopera o materiali. Alcune funzioni qui indicate potrebbero non essere valide per il vostro
prodotto.
Il frigorifero non funziona.
• La presa di corrente non è stata inserita correttamente. >>> Spingerla fino a inserirla completamente
nella presa.
• Il fusibile collegato alla presa che alimenta il prodotto, oppure il fusibile principale, è bruciato. >>>
Controllare i fusibili.
Condensa sulla parete laterale dello scomparto frigorifero (MULTI ZONE, COOL, CONTROL e
FLEXI ZONE).
• La porta viene aperta troppo spesso >>> Fare attenzione a non aprire eccessivamente la porta del
dispositivo.
• L’ambiente è troppo umido. >>> Non installare il prodotto in ambienti umidi.
• Gli alimenti che contengono liquidi vengono conservati in contenitori non sigillati. >>> Tenere gli
alimenti in contenitori sigillati.
• La porta viene lasciata aperta. >>> Non tenere aperte a lungo le porte del frigorifero.
• Il termostato è impostato su una temperatura troppo bassa. >>> Impostare il termostato su una
temperatura adeguata.
Il compressore non funziona.
• In caso di improvviso black out, o nel caso in cui la spina venga tolta e poi reinserita, la pressione del
gas nel sistema di raffreddamento del dispositivo non è equilibrata, il che fa scattare la protezione termica
del compressore. Il dispositivo si riavvierà dopo circa 6 minuti. Qualora il prodotto non si riavvia dopo
questo periodo, contattare l’assistenza.
• La modalità di scongelamento è attiva. >>>> Si tratta di una condizione normale per un frigorifero
con funzione di sbrinamento completamente automatica. Lo sbrinamento avviene a intervalli periodici.
• Il prodotto non è collegato. >>> Verificare che il cavo di alimentazione sia collegato.
• L’impostazione di temperatura non è corretta. >>> Selezionare l’impostazione di temperatura
adeguata.
• Assenza di corrente. >>> Il prodotto continuerà a funzionare normalmente quando viene ripristinata la
corrente elettrica.
Il rumore di funzionamento del frigorifero aumenta col passare del tempo.
• Le prestazioni operative del prodotto possono variare a seconda delle variazioni di temperatura
ambiente. Questa non è un’anomalia di funzionamento.
Il frigorifero funziona troppo spesso o troppo lungo.
Frigorifero / Manuale dell’Utente
31/33 IT
Page 67

Risoluzione dei problemi
• Il nuovo prodotto potrebbe essere più grande di quello precedente. I prodotti più grandi funzioneranno
più a lungo.
• La temperatura ambiente potrebbe essere alta. >>> Il prodotto funzionerà normalmente per lunghi
periodi di tempo con temperature superiori.
• Il prodotto potrebbe essere stato di recente collegato alla corrente, oppure al suo interno potrebbero
essere stati recentemente aggiunti vari alimenti. >>> Allo prodotto servirà più tempo per raggiungere la
temperatura impostata, se collegato di recente, oppure nel caso in cui vengano collocati nuovi elementi al
suo interno, Non si tratta di un’anomalia.
• Forse di recente sono state introdotte nel frigorifero grandi quantità di alimenti caldi. >>> Non mettere
alimenti caldi direttamente dentro al frigorifero.
• Le porte sono state aperte frequentemente o tenute aperte a lungo. >>> L’aria calda che si muove
all’interno provocherà un funzionamento più lungo. Non aprire le porte con troppa frequenza.
• Le porte del congelatore o del frigorifero potrebbero essere socchiuse. >>> Controllare che le porte
siano totalmente chiuse.
• Il prodotto potrebbe essere impostato su una temperatura troppo bassa, >>> Impostare la
temperatura su un livello più alto e attendere che il prodotto raggiunga la temperatura desiderata.
• La rondella della porta del frigorifero del congelatore potrebbe essere sporca, usurata, rotta o non
correttamente configurata, >>> Pulire e sostituire la rondella. Le rondelle consumate e usurate faranno
funzionare il prodotto più a lungo per conservare la temperatura attuale.
La temperatura del congelatore è molto bassa, ma la temperatura del frigorifero è corretta.
• La temperatura dello scomparto congelatore è impostata su un livello molto basso, >>> Impostare la
temperatura dello scomparto congelatore su un livello più alto, quindi eseguire un controllo.
La temperatura del frigorifero è molto bassa, ma la temperatura del congelatore è corretta.
• La temperatura dello scomparto frigorifero è impostata su un livello molto basso, >>> Impostare la
temperatura dello scomparto frigorifero su un livello più alto, quindi eseguire un controllo.
Gli alimenti conservati nei cassetti dello scomparto frigorifero sono congelati.
• La temperatura dello scomparto frigorifero è impostata su un livello molto basso, >>> Impostare la
temperatura dello scomparto congelatore su un livello più alto, quindi eseguire un controllo.
La temperatura nel vano frigorifero e congelatore è troppo alta.
• La temperatura dello scomparto frigorifero è impostata su un livello molto alto, >>> L’impostazione
della temperatura dello scomparto frigorifero influenza la temperatura dello scomparto del congelatore.
Modificare la temperatura dello scomparto congelatore o frigorifero e attendere che tutti gli scomparti
interessati raggiungano il livello di temperatura impostata.
• Le porte sono state aperte frequentemente o tenute aperte a lungo. >>> Non aprire le porte con
troppa frequenza.
• La porta potrebbe essere socchiusa. >>> Chiudere completamente la porta.
• Il prodotto potrebbe essere stato di recente collegato alla corrente, oppure al suo interno potrebbero
essere stati recentemente aggiunti vari alimenti. >>> Non si tratta di un’anomalia. >>> Allo prodotto
servirà più tempo per raggiungere la temperatura impostata, se collegato di recente, oppure nel caso in cui
vengano collocati nuovi elementi al suo interno.
• Forse di recente sono state introdotte nel frigorifero grandi quantità di alimenti caldi. >>> Non mettere
alimenti caldi direttamente dentro al frigorifero.
32 /33 IT
Frigorifero / Manuale dell’Utente
Page 68

Risoluzione dei problemi
Vibrazioni o rumore.
• Il pavimento non è in piano o resistente. >>> Se il prodotto vibra, quando viene spostato lentamente,
regolare i supporti per equilibrare il prodotto. Verificare inoltre che la superficie di appoggio sia
sufficientemente resistente per supportarne il peso.
• Gli eventuali oggetti collocati sul prodotto potrebbero essere fonte di rumore. >>> Togliere gli eventuali
elementi collocati sul prodotto.
Il prodotto emette rumori, come ad esempio liquido che scorre, spruzzo, eccetera
• I principi operativi del prodotto prevedono la presenza di flussi di liquidi e flussi di gas. >>> Questa
non è un’anomalia di funzionamento.
C'è un rumore, simile a un soffio, che proviene dal prodotto.
• Il prodotto si serve di una ventola per il processo di raffreddamento. Questa non è un’anomalia di
funzionamento.
Si è formata condensa sulle pareti interne del dispositivo.
• Le condizioni meteo calde o umide aumentano la formazione di ghiaccio e di condensa. Questa non è
un’anomalia di funzionamento.
• Le porte sono state aperte frequentemente o tenute aperte a lungo. >>> Non aprire le porte con
troppa frequenza; se la porta è aperta, chiuderla.
• La porta potrebbe essere socchiusa. >>> Chiudere completamente la porta.
Si è formata condensa sulla superficie esterna del dispositivo o fra le porte.
• Le condizioni ambientali potrebbero essere umide, e ciò è normale. >>> La condensa si dissipa
quando l’umidità viene ridotta.
L'interno emette cattivi odori.
• Il prodotto non viene pulito regolarmente. >>> Pulire la superficie interna a intervalli regolari
servendosi di spugna, acqua tiepida, e acqua gassata.
• Alcuni contenitori e imballaggi potrebbero emettere cattivi odori. >>> Servirsi di supporti imballaggi
che non emettano cattivi odori.
• Gli alimenti sono stati collocati all’interno di contenitori non sigillati. >>> Tenere gli alimenti in
contenitori sigillati. I microrganismi potrebbero fuoriuscire dagli alimenti non sigillati causando così cattivi
odori.
• Rimuovere gli eventuali alimenti scaduti o rovinati dal dispositivo.
La porta non si chiude correttamente.
• Le confezioni di cibo potrebbero bloccare la porta. >>> Trovare una nuova posizione per gli alimenti
che bloccano le porte.
• Il prodotto non è in posizione verticale, appoggiato per terra. >>> Regolare i supporti per l’equilibrio
del prodotto.
• Il pavimento non è in piano o resistente. >>> Verificare inoltre che la superficie di appoggio sia
sufficientemente resistente per supportarne il peso.
Il cassetto verdura si è inceppato.
• Gli alimenti potrebbero entrare in contatto con la sezione superiore cassetto. >>> Ri-organizzare gli
alimenti nel cassetto.
AVVERTENZA: Qualora il problema persista dopo aver seguito le istruzioni contenute in
A
Frigorifero / Manuale dell’Utente
questa selezione, contattare il proprio fornitore oppure un Servizio Autorizzato. Evitare in
ogni caso di riparare il prodotto.
33/33 IT
Page 69

Chłodziarka
Instrukcja użytkowania
EWWERQWEW
PL
Page 70

Drogi kliencie,
Chcemy, abyś mógł uzyskać optymalną efektywność naszego produktu, który został wyprodukowany w
nowoczesnym zakładzie i przy drobiazgowej kontroli jakości.
W tym celu prosimy przeczytać całą instrukcję obsługi przed użyciem produktu i przechowywać ją
do ewentualnego użycia w przyszłości. Jeśli ten produkt zostanie przekazany innej osobie, prosimy
przekazać tę instrukcję wraz z produktem.
Instrukcja obsługi zapewnia szybkie i bezpieczne korzystanie z produktu.
• Przed zainstalowaniem i rozpoczęciem korzystania z produktu należy przeczytać instrukcję obsługi.
• Należy zawsze przestrzegać mających zastosowanie instrukcji dotyczących bezpieczeństwa.
• Instrukcję obsługi należy mieć pod ręką, aby móc łatwo z niej korzystać.
• Prosimy przeczytać wszelkie inne dokumenty dostarczane wraz z produktem.
Należy pamiętać, że ta instrukcja obsługi może się odnosić do kilku modeli produktu. W instrukcji zostały
wyraźnie określone różnice między modelami.
Symbole i uwagi
W tej instrukcji obsługi są używane następujące symbole:
Ważne informacje i przydatne
C
wskazówki.
Zagrożenie dla życia i majątku.
A
B
Zagrożenie porażeniem
elektrycznym.
Opakowanie produktu jest wykonane z materiałów umożlwiających
recykling zgodnie z krajowymi
przepisami środowiskowymi.
Page 71

1 Instrukcje dotyczące bezpieczeństwa i
środowiska 3
1.1. Bezpieczeństwo ogólne. . . . . . . . . . . . . . . . 3
1.1.1 Ostrzeżenie HC
1.1.2 Dla modeli z wodotryskiem
1.2. Przeznaczenie. . . . . . . . . . . . . . . . . . . . . . . 6
1.3. Bezpieczeństwo dzieci. . . . . . . . . . . . . . . . . 6
1.4. Zgodność z dyrektywą WEEE i utylizacja
odpadowego produktu . . . . . . . . . . . . . . . . 6
1.5. Zgodność z dyrektywą RoHS . . . . . . . . . . . . 7
1.6. Informacje o opakowaniu. . . . . . . . . . . . . . . 7
. . . . . . . . . . . . . . . . . . . . . 5
. . . . . . . . . . . .5
2 Oto Twoja chłodziarka 8
3 Instalacja 9
3.1. Odpowiednie miejsce na instalację. . . . . . . . 9
3.2. Zakładanie klinów plastikowych . . . . . . . . . . 9
3.3. Regulacja nóżek . . . . . . . . . . . . . . . . . . . .10
3.4. Połączenie elektryczne . . . . . . . . . . . . . . . 10
3.5. Przekładanie drzwi . . . . . . . . . . . . . . . . . . 11
3.6. Przekładanie drzwi . . . . . . . . . . . . . . . . . . 12
4 Przygotowanie 13
4.1. Co zrobić, aby oszczędzać energię. . . . . . . 13
4.2. Pierwsze uruchomienie . . . . . . . . . . . . . . . 13
5 Użytkowanie chłodziarki 14
5.1. Przycisk regulacji temperatury. . . . . . . . . . 14
5.2. Szybkie zamrażanie . . . . . . . . . . . . . . . . . 14
5.3. Funkcja Vacation [Wakacje]. . . . . . . . . . . . 15
5.4. Panel wskaźników. . . . . . . . . . . . . . . . . . . 16
5.5. Panel wskaźników. . . . . . . . . . . . . . . . . . . 18
5.6. Pojemnik na lód . . . . . . . . . . . . . . . . . . . .20
5.7. Pojemnik na jajka . . . . . . . . . . . . . . . . . . .21
5.8. Wentylator . . . . . . . . . . . . . . . . . . . . . . . . 21
5.9. Pojemnik na warzywa . . . . . . . . . . . . . . . . 21
5.10. Komora o temperaturze zero
5.11. Ruchomy stelaż na drzwiach
5.12. Pojemnik przesuwany
5.13. HerbBox/HerbFresh
5.14. Pojemnik na warzywa z kontrolą wilgotności 23
5.15. Automatyczna maszyna do lodu
5.16. Kostkarka do lodu Icematic i pojemnik na
lód
. . . . . . . . . . . . . . . . . . . . . . . . . . . . . 24
5.17. Korzystanie z dozownika wody
5.18. Napełnianie zbiornika dozownika wodą
5.19. Czyszczenie zbiornika na wodę . . . . . . . . 26
5.20. Tacka na krople
5.21. Zamrażanie żywności świeżej . . . . . . . . . .28
5.22. Przechowywanie żywności mrożonej
5.23. Informacje o komorze głębokiego
zamrażania . . . . . . . . . . . . . . . . . . . . . . .28
5.24. Rozmieszczenie żywności. . . . . . . . . . . . .29
5.25. Alarm o otwartych drzwiach
5.26. Zmiana kierunku otwierania drzwi. . . . . . . 29
5.27. Oświetlenie wewnętrzne
. . . . . . . . . . . . . . . . . 22
. . . . . . . . . . . . . . . . . . . . 27
. . . . . . . . . . 21
. . . . . . . . . . 21
. . . . . . . . . . . . . . . 22
. . . . . . . . 23
. . . . . . . . . 24
. . . 25
. . . . . 28
. . . . . . . . . . . 29
. . . . . . . . . . . . . .29
6 Konserwacja i czyszczenie 30
6.1. Jak unikać nieprzyjemnych zapachów . . . . 30
6.2. Jak zabezpieczać powierzchnie plastykowe. 30
6.3. Szkło w drzwiach . . . . . . . . . . . . . . . . . . . 30
7 Rozwiązywanie problemów 31
2 / 33 PL
Lodówka / Instrukcja obsługi
Page 72

1 Instrukcje dotyczące bezpieczeństwa i środowiska
Ten rozdział zawiera instrukcje
dotyczące bezpieczeństwa
służące unikaniu obrażeń i szkód
materialnych. Nieprzestrzeganie
tych instrukcji spowoduje
unieważnienie wszelkich typów
gwarancji produktu.
Zamierzone przeznaczenie
• Urządzenie można używać
wyłącznie w gospodarstwie domowym oraz:
• na zapleczu kuchennych personelu w sklepach, biurach i w
innych miejscach pracy;
• w kuchniach wiejskich i przez
gości hotelowych, w motelach i
innych tego rodzaju miejscach;
• w pensjonatach serwujących
nocleg ze śniadaniem;
• cateringu i w innych tego rodzajach zastosowaniach niedetalicznych.
• Nie należy używać jej na dworze. Nie nadaje się do użytkowania
na dworze, nawet w miejscach
zadaszonych.
1.1. Bezpieczeństwo ogólne
• Produkt nie może być
używany przez osoby z
niepełnosprawnością fizyczną,
czuciową i umysłową, bez
wystarczającej wiedzy i
doświadczenia ani przez
Lodówka / Instrukcja obsługi
dzieci. Urządzenie może
być używane przez takie
osoby pod nadzorem i z
użyciem wskazówek osoby
odpowiedzialnej za ich
bezpieczeństwo. Dzieciom nie
wolno się bawić urządzeniem.
• W przypadku awarii urządzenie
należy odłączyć od zasilania.
• Po odłączeniu należy odczekać
przynajmniej 5 minut przed
jego ponownym podłączeniem.
Nieużywane urządzenie należy
odłączyć od zasilania. Nie
wolno dotykać wtyczki mokrymi
rękami! Nie wolno ciągnąć za
kabel, aby odłączyć zasilanie,
zawsze należy trzymać za wtyk.
• Lodówki nie wolno podłączać
do luźnego gniazda.
• Podczas instalacji, konserwacji,
czyszczenia i naprawy produkt
powinien być odłączony.
• Jeśli produkt nie będzie
używany przez dłuższy czas,
odłącz zasilanie i usuń całą
żywność ze środka.
• Do czyszczenia lodówki i
topienia lodu we wnętrzu
nie wolno używać pary ani
parowanych materiałów
czyszczących. Para może trafić
na powierzchnie elektryczne
i spowodować zwarcie lub
porażenie elektryczne!
3 / 33 PL
Page 73

Instrukcje dotyczące bezpieczeństwa i środowiska
• Nie wolno myć produktu,
spryskując go lub polewając
wodą! Zagrożenie
porażeniem elektrycznym!
• Nigdy nie korzystaj z
urządzenia, jeśli górna lub
tylna jego część, zawierająca
płytki obwodów drukowanych
jest otwarta (osłona płytki
obwodów drukowanych) (1).
• Produkt należy podłączyć
do uziemionego
gniazdka. Uziemienie
musi być wykonane
przez wykwalifikowanego
elektryka.
• Jeśli produkt ma oświetlenie
typu LED, w celu wymiany
lub usunięcia problemu
należy się skontaktować z
autoryzowanym serwisem.
• Nie wolno dotykać
zamrożonej żywności
mokrymi rękami! Może ona
1
przymarznąć do rąk!
• Do komory zamrażarki nie
wolno wkładać płynów w
butelkach ani w puszkach.
Mogą one wybuchnąć!
1
• Płyny należy stawiać pionowo
po dokładnym zamknięciu
pokrywki.
• W pobliżu produktu nie
wolno rozpryskiwać
• W przypadku awarii
nie wolno używać
produktu, ponieważ
może to spowodować
porażenie elektryczne.
Przed wykonaniem
jakichkolwiek czynności
należy skontaktować się a
autoryzowanym serwisem.
substancji łatwopalnych,
ponieważ mogą się one
zapalić lub wybuchnąć.
• W lodówce nie wolno
przechowywać materiałów
łatwopalnych ani produktów
z gazem łatwopalnym
(aerozoli itp.).
• Na produkcie nie wolno
kłaść pojemników z
4 / 33 PL
Lodówka / Instrukcja obsługi
Page 74

Instrukcje dotyczące bezpieczeństwa i środowiska
płynem. Zalanie wodą
części elektrycznej może
spowodować porażenie
elektryczne i pożar.
• Narażenie produktu na
deszcz, śnieg, bezpośrednie
promienie słoneczne i wiatr
spowoduje zagrożenie
elektryczne. Podczas
przemieszczania produktu
nie wolno ciągnąć za uchwyt
drzwiowy. Uchwyt może nie
1.1.1 Ostrzeżenie HC
Jeśli produkt zawiera układ
chłodzenia używający gazu
R600a, należy uważać, aby nie
uszkodzić układu chłodzenia i
jego rurki podczas używania i
przemieszczania produktu. Ten
gaz jest łatwopalny. W razie
uszkodzenia układu chłodzenia
należy trzymać produkt z dala
od źródeł ognia i natychmiast
przewietrzyć pomieszczenie.
wytrzymać.
• Należy uważać, aby uniknąć
pochwycenia ręki lub innej
części ciała przez ruchome
części wewnątrz produktu.
• Nie wolno stawać ani opierać
się o drzwi, szuflady ani
podobne części lodówki.
Spowoduje to przewrócenie
produktu i uszkodzenie
części.
• Należy uważać, aby nie
przytrzasnąć kabla zasilania.
C
1.1.2 Dla modeli z
wodotryskiem
• Maksymalnie dopuszczalne
Etykieta wewnątrz z lewej
strony wskazuje typ gazu
użyty w produkcie.
ciśnienie dla dopływu
zimnej wody wynosi 6,2
bara (90 psi). Jeśli ciśnienie
wody w Państwa instalacji
przekroczy 5,5 bara (80 psi),
należy zastosować zawór
ograniczający ciśnienie w
Państwa sieci wodociągowej.
Jeśli nie wiedzą Państwo
w jaki sposób sprawdzić
ciśnienie wody, prosimy
poprosić o pomoc
profesjonalnego hydraulika.
Lodówka / Instrukcja obsługi
5 / 33 PL
Page 75

Instrukcje dotyczące bezpieczeństwa i środowiska
• Jeśli w Państwa instalacji
występuje ryzyko uderzenia
wodnego, należy zawsze
stosować wyposażenie
zapobiegające przed
uderzeniem wodnym. Jeśli
nie mają Państwo pewności
co do występowania efektu
uderzenia wodnego w swojej
instalacji, prosimy zasięgnąć
porady u profesjonalnego
hydraulika.
• Nie podłączać do dopływu
ciepłej wody. Zachować
środki ostrożności przed
ryzykiem zamarznięcia
przewodów. Temperatura
robocza wody powinna
mieścić się w zakresie
od 0,6°C (33°F) do 38°C
(100°F).
• Należy używać tylko wody
pitnej.
1.2. Przeznaczenie
• Ten produkt jest
przeznaczony do użytku
domowego. Nie jest on
przeznaczony do użytku
komercyjnego.
• Produkt powinien być
używany jedynie do
przechowywania żywności i
napojów.
• W lodówce nie wolno
przechowywać produktów
wymagających temperatur
kontrolowanych
(szczepionek, leków
wrażliwych na ciepło,
materiałów medycznych itd.).
• Producent nie bierze na
siebie odpowiedzialności
za jakiekolwiek
uszkodzenia spowodowane
niepoprawnym
użytkowaniem lub obsługą.
• Oryginalne części zamienne
będą dostępne przez 10 lat
od daty zakupu produktu.
1.3. Bezpieczeństwo dzieci
• Materiały opakowaniowe
należy przechowywać poza
zasięgiem dzieci.
• Nie wolno pozwalać dzieciom
na zabawę produktem.
• Jeśli drzwi produktu
mają zamek, klucz należy
przechowywać poza
zasięgiem dzieci.
1.4. Zgodność z dyrektywą WEEE
i utylizacja odpadowego produktu
Ten produkt jest zgodny z Dyrektywą UE
WEEE (2012/19/UE). Ten produkt ma symbol
klasyfikacji zużytego sprzętu elektrycznego i
elektronicznego (WEEE).
6 / 33 PL
Lodówka / Instrukcja obsługi
Page 76

Instrukcje dotyczące bezpieczeństwa i środowiska
Ten produkt został
wyprodukowany z części i
materiałów wysokiej jakości, które
nadają się do powtórnego użytku i
recyklingu. Po zakończeniu okresu
użytkowania nie wolno wyrzucać
zużytego produktu wraz z
normalnymi odpadami domowymi
itp. Należy go dostarczyć do punktu odbioru
w celu przeprowadzenia recyklingu sprzętu
elektrycznego i elektronicznego. Informacje o
tych punktach odbioru można uzyskać od
władz lokalnych.
1.5. Zgodność z dyrektywą RoHS
• Ten produkt jest zgodny z Dyrektywą
UE WEEE (2011/65/UE). Nie zawiera on
szkodliwych ani zakazanych materiałów
wymienionych w dyrektywie.
1.6. Informacje o opakowaniu
• Materiały opakowaniowe są
wyprodukowane z materiałów nadających
się do recyklingu zgodnie z krajowymi
przepisami środowiskowymi. Materiałów
opakowaniowych nie należy wyrzucać wraz
z normalnymi odpadami domowymi itp.
Należy je dostarczyć do punktów odbioru
materiałów opakowaniowych wyznaczonych
przez władze lokalne.
Lodówka / Instrukcja obsługi
7 / 33 PL
Page 77

2 Oto Twoja chłodziarka
*1
16
17
*15
*14
*5
13
*12
*11
*9
*10
*8
7
7
*3
*4
*5
*2
*4
*6
1. Półka w drzwiach komory chłodziarki
2. Zbiornik dozownika wody
3. Miejsce na jajka
4. Zbiornik dozownika wody
5. Półka na butelki
6. Pojemnik przesuwany
7. Regulowane nóżki
8. Komora głębokiego zamrażania
9. Komora szybkiego zamrażania
10. Tacka na kostki lodu & zapas kostek lodu
*Opcjonalne: Rysunki w tej instrukcji obsługi są tylko szkicowe i mogą nie odpowiadać dokładnie
posiadanemu produktowi. Jeśli posiadany produkt nie zawiera odpowiednich części, informacje dotyczą
C
innych modeli.
11. Pojemnik na warzywa
12. Komora o temperaturze zero
13. Oświetlenie wewnętrzne
14. Szklana półka komory chłodzenia
15. Przycisk regulacji temperatury
16. Komora chłodzenia
17. Komora zamrażalnika
8 / 33 PL
Lodówka / Instrukcja obsługi
Page 78

3 Instalacja
3.1. Odpowiednie miejsce
na instalację
W sprawie instalacji produktu skontaktuj się z
autoryzowanym serwisem. Aby przygotować
produkt do instalacji, zapoznaj się z informacjami
w instrukcji użytkownika i sprawdź, czy
zasilanie elektryczne i dopływ wody są zgodne z
wymaganiami. Jeśli nie, skontaktuj się elektrykiem
i hydraulikiem, aby dokonać stosownych zmian.
OSTRZEŻENIE: Producent nie bierze
żadnej odpowiedzialności za szkody
B
B
A
•Abyuniknąćwibracji,chłodziarkęnależyustawić
na równej powierzchni.
•Zainstalujproduktyconajmniej30cmod
podgrzewacza, piecyka i podobnych źródeł
ciepła, oraz co najmniej 5 cm od kuchenek
elektrycznych.
•Nienarażajproduktunabezpośredniedziałanie
promieni słonecznych ani nie trzymaj go w
wilgotnym otoczeniu.
•Produktwymagaodpowiedniejcyrkulacji
powietrza, aby działać wydajnie.
spowodowane pracami wykonywanymi
przez osoby nieupoważnione.
OSTRZEŻENIE: Podczas instalacji kabel
zasilający produktu musi być odłączony
od sieci. W przeciwnym razie może to
skutkować śmiercią lub poważnymi
obrażeniami!
OSTRZEŻENIE: Jeśli drzwi są zbyt
wąskie, aby przenieść przez nie produkt,
zdejmij jego drzwiczki i obróć go na
bok; jeśli to nie pomoże, skontaktuj się z
autoryzowanym serwisem.
•Jeślichłodziarkamastaćwewnęcewścianie,
należy zwrócić uwagę, aby pozostawić co
najmniej 5 cm odstępu od sufitu i ścian.
•Nieinstalujchłodziarkiwmiejscu,gdzie
temperatura spada poniżej -5°C.
3.2. Zakładanie klinów plastikowych
Użyj klinów plastikowych dostarczonych wraz z
produktem, aby zapewnić wystarczająco dużo
miejsca na cyrkulację powietrza między produktem
a ścianą.
1.
Aby założyć kliny, wyjmij śruby z produktu i użyj śrub
dostarczonych w tej samej torebce, co kliny.
2.
Włóż 2 plastikowe kliny w tylną płytę wentylacyjną,
jak pokazano na rysunku.
Lodówka / Instrukcja obsługi
9 / 33 PL
Page 79

Instalacja
3.3. Regulacja nóżek
Jeśli produkt nie jest ustawiony równo,
wyreguluj przednie regulowane nóżki,
obracając je w prawo lub w lewo.
3.4. Połączenie elektryczne
OSTRZEŻENIE: Do podłączania zasilania
nie używaj przedłużacza ani wtyczki
A
B
C
C
wielokrotnej.
OSTRZEŻENIE: Wymianę uszkodzonego
przewodu zasilającego należy zlecić
autoryzowanemu serwisowi.
W przypadku umieszczenia dwóch
chłodziarek obok siebie należy zostawić
między nimi odstęp przynajmniej 4 cm.
• Nasza firma nie bierze odpowiedzialności
za jakiekolwiek szkody powstałe na skutek
używania bez uziemienia i korzystania z
połączenia elektrycznego niezgodnego z
przepisami krajowymi.
• Po instalacji wtyczka zasilania musi być
łatwo dostępna.
• Podłącz chłodziarkę do uziemionego
gniazdka o napięciu 220-240V/50 Hz.
Wtyczka musi mieć bezpiecznik 10-16 A.
• Nie używaj wtyczki wielokrotnej bez
przedłużacza ani z nim do połączenia
gniazdka w ścianie z chłodziarką.
Ostrzeżenie o gorącej powierzchni
W bocznych ściankach produktu
poprowadzone są przewody z chłodziwem
dla poprawy systemu chłodzenia. Czynnik
chłodniczy w wysokich temperaturach
może przepływać przez te obszary, co
może bardzo rozgrzać powierzchnie
ścianek bocznych. Jest to normalne i nie
wymaga żadnego serwisowania. Proszę
zachować ostrożność podczas dotykania
tych obszarów.
10 / 33 PL
Lodówka / Instrukcja obsługi
Page 80

Instalacja
3.5. Przekładanie drzwi
Postępuj w kolejności zgodnej z numeracją.
4
10
5
10
4
2
7
1
11
45 ¡
6
12
13
3
8
9
14
18
180¡
17
19
22
19
15
Lodówka / Instrukcja obsługi
23
16
21
11 / 33PL
24
24
20
Page 81

Instalacja
3.6. Przekładanie drzwi
Postępuj w kolejności zgodnej z numeracją..
(8) (13)
1
1
1
7
20
6
2
14
45 °
5
11
13
9
4
3
10
20
12
8
180°
15
20
19
16
17
18
12 / 33 PL
Lodówka / Instrukcja obsługi
Page 82

4 Przygotowanie
4.1. Co zrobić, aby
oszczędzać energię
Podłączanie produktu do elektronicznych
systemów oszczędzania energii jest
A
• Nie trzymaj chłodziarki otwartej przez dłuższy
• Nie wkładaj gorącej żywności ani napojów do
• Nie przepełniaj chłodziarki; zablokowanie
• Aby przechowywać maksymalną możliwą
• Nie należy blokować przepływu powietrza,
• W zależności od funkcji produktu; rozmrażanie
• Żywność należy przechowywać w szufladach
• Pojemniki z żywnością nie powinny stykać
• Upewnij się, że żywność nie styka się z
niebezpieczne, ponieważ może uszkodzić
produkt.
czas.
chłodziarki.
wewnętrznego przepływu powietrza zmniejsza
wydajność chłodzenia.
ilość żywności w komorze chłodzenia
chłodziarki, należy wyjąć górne szuflady i
umieścić żywność na półkach szklanych.
Deklarowane zużycie energii chłodziarki zostało
określone przy wyjęciu komory chłodzenia,
tacki na lód i górnych szuflad w sposób, który
umożliwia przechowywanie maksymalnej ilości
żywności. Korzystanie z dolnej szuflady do
przechowywania jest zdecydowanie zalecane.
Należy włączyć funkcję oszczędzania energii w
celu zoptymalizowania jej zużycia.
umieszczając żywność przed wentylatorem.
Wkładając żywność, należy zachować minimum
3 cm odstępu od osłony wentylatora.
zamrożonej żywności w komorze chłodzenia
zapewni oszczędność energii i zachowanie
jakości produktów spożywczych.
w komorze chłodzenia, aby zapewnić
oszczędność energii i lepsze warunki
przechowywania.
się bezpośrednio z czujnikiem temperatury
umieszczonym w komorze chłodzenia. Jeśli
stykają się one z czujnikiem, zużycie energii
przez urządzenie może wzrosnąć.
czujnikiem temperatury komory chłodzenia
opisanym poniżej.
4.2. Pierwsze uruchomienie
Przed użyciem chłodziarki wykonaj odpowiednie
przygotowania zgodnie z instrukcjami w sekcjach
„Instrukcje dotyczące bezpieczeństwa i ochrony
środowiska” i „Instalacja”.
• Zostaw produkt włączony bez żywności w
środku na 6 godzin i nie otwieraj drzwi, jeśli nie
jest to absolutnie konieczne.
Gdy zaczyna działać sprężarka, rozlega
się dźwięk. Nawet jeśli sprężarka jest
C
C
C
wyłączona, dźwięki są normalne z powodu
skompresowanych cieczy i gazów w
systemie chłodzenia.
Przednie krawędzie produktu mogą się
nagrzewać. Jest to całkiem normalne.
Te obszary zostały zaprojektowane, aby
się nagrzewać w celu zapobiegnięcia
kondensacji.
W niektórych modelach panel wskaźników
wyłącza się automatycznie po 5 minutach
od zamknięcia drzwi. Włącza się on
ponownie w momencie otwarcia drzwi lub
naciśnięcia dowolnego przycisku.
Lodówka / Instrukcja obsługi
13 / 33 PL
Page 83

5 Użytkowanie chłodziarki
5.1. Przycisk regulacji temperatury
Temperatura wewnątrz lodówki zależy od
następujących czynników:
• Różnice temperatur w różnych porach roku,
• Częste otwieranie drzwi i niezamykanie ich
przez dłuższy czas.
• Wkładanie do lodówki żywności bez
uprzedniego ochłodzenia jej do temperatury
pokojowej.
• Ustawienie lodówki w pokoju (np.
bezpośrednie oddziaływanie słońca).
• Temperaturę wewnątrz, zmieniającą się z
tych powodów, można wyregulować za pomocą
przycisku regulacji.
Liczby wokół przycisku regulacji oznaczają stopnie w
„°C”.
Jeśli temperatura otoczenia wynosi 20°C, zaleca się
ustawienie temperatury lodówki na 4°C. W przypadku
innej temperatury otoczenia można dostosować.
5.2. Szybkie zamrażanie
Jeśli chcesz zamrozić znaczne ilości świeżej
żywności, ustaw przycisk regulacji w pozycję (
przed włożeniem żywności do komory.
Aby zamrozić maksymalną ilość świeżej żywności
podawaną jako zdolność zamrażania, stanowczo
zaleca się ustawienie tego przycisku w pozycji
„FAST FREEZE” [SZYBKIE ZAMRAŻANIE] na
co najmniej 24 godziny. Zwróć uwagę, aby nie
pomieszać żywności zamrożonej i świeżej.
Pamiętaj, aby z powrotem przestawić przycisk
regulacji temperatury w poprzednią pozycję.
),
14 / 33 PL
Lodówka / Instrukcja obsługi
Page 84

Korzystanie z produktu
5.3. Funkcja Vacation [Wakacje]
Jeśli drzwi chłodziarki nie zostaną ( )
otwarte w ciągu co najmniej 12 godzin od
ustawienia przycisku regulacji temperatury na
najwyższa wartość, automatycznie włącza się
funkcja Vacation.
Aby ją wyłączyć, należy zmienić ustawienie
przycisku.
Nie zaleca się przechowywania żywności w
komorze chłodzenia, gdy włączona jest funkcja
Vacation.
• Po zakończeniu wprowadzania ustawień,
możesz ukryć przycisk regulacji temperatury,
wciskając go do wewnątrz.
Lodówka / Instrukcja obsługi
15 / 33 PL
Page 85

Korzystanie z produktu
5.4. Panel wskaźników
Panele wskaźników mogą się różnić w zależności od modelu produktu.
Funkcje dźwiękowe i optyczne panelu wskaźników pomagają korzystać z lodówki.
8
1
2
3
9
7
1.
Wskaźnik komory chłodziarki
2.
Wskaźnik stanu błędu
3.
Wskaźnik temperatury
4.
Przycisk funkcji wakacyjnej
5.
Przycisk regulacji temperatury
6.
Przycisk wyboru komory
7.
Wskaźnik komory chłodziarki
8.
Wskaźnik trybu oszczędzania
9.
Wskaźnik funkcji wakacyjnej
*opcjonalne
6
45
C
*Opcjonalne: Rysunki w tej instrukcji obsługi są tylko szkicowe i mogą nie odpowiadać
dokładnie posiadanemu produktowi. Jeśli posiadany produkt nie zawiera odpowiednich części,
informacje dotyczą innych modeli.
16 / 33 PL
Lodówka / Instrukcja obsługi
Page 86

Korzystanie z produktu
1. Wskaźnik komory chłodziarki
Lampka komory chłodziarki włącza się podczas
regulacji temperatury komory chłodziarki.
2. Wskaźnik stanu błędu
Ten czujnik się włączy, gdy lodówka nie
chłodzi odpowiednio lub w przypadku awarii
czujnika. Gdy wskaźnik jest aktywny, na
wskaźniku temperatury komory zamrażarki
będzie wyświetlana litera „B”, a na
wskaźniku temperatury komory chłodziarki
będą wyświetlane liczby „1, 2, 3...” itd.
Liczby na wskaźniku służą do informowania
przedstawicieli serwisu o błędzie.
3. Wskaźnik temperatury
Wskazuje temperaturę komory zamrażarki i
chłodziarki.
4.Przycisk funkcji wakacyjnej
Aby uaktywnić tę funkcje, naciśnij i przytrzymaj
przycisk Wakacje przez 3 sekundy. Gdy funkcja
wakacyjna jest aktywna, wskaźnik temperatury
komory chłodzenia będzie pokazywać znaki „-
-” i w komorze chłodzenia nie będzie aktywny
żaden proces chłodzenia. Ta funkcja nie nadaje
się do przechowywania żywności w komorze
chłodziarki. Inne komory pozostaną chłodzone
z ustawioną odpowiednią temperaturą w każdej
komorze.
Aby anulować tę funkcję, naciśnij ponownie
przycisk Wakacje (
5. Przycisk regulacji temperatury
Temperatura odpowiedniej komory wacha się w
zakresie -24°C..... -18°C i 8°C...1°C.
6. Przycisk wyboru komory
Przycisk wyboru komory lodówki umożliwia
przełączanie między komorą chłodziarki i
zamrażarki.
7. Wskaźnik komory chłodziarki
Lampka komory zamrażarki włącza się podczas
regulacji temperatury komory chłodziarki.
).
8. Wskaźnik trybu oszczędzania
Wskazuje, że lodówka pracuje w trybie
oszczędzania energii. Ten wskaźnik będzie
aktywny, gdy temperatura w komorze
zamrażarki zostanie ustawiona na -18°C.
9.Wskaźnik funkcji wakacyjnej
Wskazuje uaktywnienie funkcji wakacyjnej.
Lodówka / Instrukcja obsługi
17 / 33 PL
Page 87

Korzystanie z produktu
5.5. Panel wskaźników
Panel wskaźników umożliwia nastawianie temperatury i sterowanie innymi funkcjami produktu bez
otwierania drzwi. Po prostu naciśnij napisy na odpowiednich przyciskach, aby ustawić funkcje.
1 2
12
*10
11
1. Wskaźnik ostrzegawczy o awarii
zasilania/ wysokiej temperaturze
Wskaźnik ten ( ) zapala się w razie awarii
zasilania, zbyt wysokiej temperatury lub
ostrzeżeń o błędach. Podczas długotrwałych
przerw w zasilaniu, najwyższa temperatura
w zamrażarce będzie migać na wyświetlaczu
cyfrowym. Po sprawdzeniu produktów w komorze
zamrażalnika naciśnij przycisk wyłączania alarmu
) aby skasować to ostrzeżenie.
(
Jeśli zauważysz, że wskaźnik ten się
świeci, zajrzyj do rozdziału „Zalecane środki
rozwiązywania problemów” w tej instrukcji.
*Opcjonalne: Rysunki w tej instrukcji obsługi są tylko szkicowe i mogą nie odpowiadać dokładnie
posiadanemu produktowi. Jeśli posiadany produkt nie zawiera odpowiednich części, informacje dotyczą
C
innych modeli.
6
789
2. Funkcji oszczędzania energii
(wyświetlacz wyłączony)
Jeśli drzwiczki tego urządzenia są zamknięte
przez dłuższy czas, funkcja oszczędzania
energii uruchamia się automatycznie i zapala
się symbol oszczędzania energii. (
Gdy czynna jest funkcja oszczędzania
energii, gasną wszystkie inne symbole na
wyświetlaczu. Funkcja oszczędzania energii
wyłącza się za naciśnięciem dowolnego
przycisku lub za otwarciem drzwiczek, a
symbole na wyświetlaczu powracają do stanu
normalnego.
18 / 33 PL
45
Lodówka / Instrukcja obsługi
3
)
Page 88

Korzystanie z produktu
Funkcja oszczędzania energii jest uruchamiana
w czasie dostawy z fabryki i nie można jej
skasować.
3. Funkcja szybkiego chłodzenia
Przycisk ma dwie funkcje. Aby włączyć lub
wyłączyć funkcję szybkiego chłodzenia, naciśnij
go krótko. Wskaźnik „Quick Cool” zgaśnie i
ustawienia powrócą do normalnych wartości. (
)
Korzystaj z funkcji szybkiego
chłodzenia, kiedy chcesz szybko
C
C
C
C
4. Przycisk nastawienia temperatury w
komorze chłodzenia
Naciśnij ten przycisk, aby nastawić temperaturę
w komorze chłodzenia odpowiednio na 8,
7,6, 5,4,3, 2, 8… Naciśnij ten przycisk, aby
nastawić żądaną temperaturę w komorze
chłodzenia. ( )
schłodzić żywność umieszczoną w
komorze chłodzenia Jeśli schłodzona
ma być znaczna ilość świeżej
żywności, zaleca się uruchomienie tej
funkcji przed włożeniem żywności do
chłodziarki.
Jeśli nie wyłączysz szybkiego
chłodzenia, funkcja ta wyłączy się
automatycznie po 8 godzinach lub gdy
temperatura w komorze chłodzenia
osiągnie żądaną wartość.
Jeśli będziesz naciskać przycisk
szybkiego zamrażania Quick Freeze
kilkakrotnie co chwilę, uruchomi
się elektroniczne zabezpieczenie i
sprężarka nie zostanie bezzwłocznie
uruchomiona.
Funkcja ta nie zostanie wywołana
przy przywróceniu zasilania po jego
awaryjnym wyłączeniu.
5. Funkcja Vacation (Wakacje)
Aby wyłączyć funkcję Vacation naciśnij i
przez 3 sekundy przytrzymaj ten przycisk (
), a włączy się wskaźnik trybu Vacation (
). Gdy czynna jest funkcja opróżniania, na
wskaźniku temperatury w komorze chłodzenia
wyświetla się " - ", i komora ta nie jest
aktywnie chłodzona. Gdy ta funkcja ta jest
załączona, nie należy trzymać żywności w
komorze chłodzenia. Inne komory będą nadal
chłodzone odpowiednio do nastawionych w
nich temperaturach.
Aby wyłączyć tę funkcję, ponownie naciśnij
przycisk Vacation .
6. Wyłączanie alarmu:
W przypadku alarmu awarii zasilania / wysokiej
temperatury, po sprawdzeniu produktów
w komorze zamrażarki naciśnij przycisk
wyłączania alarmu (
ostrzeżenie.
7. Blokada przycisków
Naciśnij przycisk blokady przycisków [
sekundy. Symbol blokady przycisków
Zapali się (
przycisków. Przy załączonej blokadzie przyciski
nie działają. Ponownie naciśnij przycisk Key
Lock [Blokada przycisków] na 3 sekundy.
Ikonka blokady przycisków zgaśnie i blokada
wyłączy się.
Naciśnij przycisk blokady przycisków,
jeśli chcesz uniemożliwić zmianę ustawień
temperatury w chłodziarce (
8. Eco fuzzy
Naciśnij i przez 1 sekundę przytrzymaj przycisk
eco fuzzy, aby uruchomić funkcję oszczędnego
użytkowania eco fuzzy. Chłodziarka zostanie
uruchomiona w najbardziej oszczędnym trybie
co najmniej 6 godzin później, a gdy funkcja ta
jest aktywna zapali się wskaźnik oszczędnego
użytkowania (
) i włączy się tryb blokady
) aby skasować to
] na 3
).
). Naciśnij i przez 3 sekundy
Lodówka / Instrukcja obsługi
19 / 33 PL
Page 89

Korzystanie z produktu
przytrzymaj przycisk funkcji eco fuzzy, aby
wyłączyć funkcję oszczędnego użytkowania eco
fuzzy.
Wskaźnik ten zapala się po 6 godzinach, gdy
jest włączona jest funkcja eco fuzzy.
9. Przycisk nastawienia temperatury w
komorze zamrażalnika.
Naciśnij ten przycisk, aby nastawić temperaturę
w komorze zamrażalnika odpowiednio na -18,
-19, -20, -21, -22, -23, -24 oraz -18. Naciśnij
ten przycisk, aby nastawić żądaną temperaturę
w komorze zamrażalnika.
10. Wskaźnik wyłączenia Icematic
Wskazuje, czy kostkarka Icematic jest włączona
czy wyłączona. (
Icematic nie działa. Aby ponownie włączyć
Icematic, naciśnij i przytrzymaj przez 3 sekundy
przycisk wł.-wył.
Kiedy wybrana jest ta funkcja, woda
przestaje wypływać ze zbiornika.
C
11. Przycisk funkcji szybkiego
zamrażania / włączania wyłączania
Icematic
Aby włączyć lub wyłączyć funkcję szybkiego
zamrażania, naciśnij ten przycisk. Kiedy
włączysz tę funkcję, komora zamrażalnika
zostanie schłodzona do temperatury niższej niż
ustawiona wartość. ( )
Aby włączyć lub wyłączyć kostkarkę Icematic,
naciśnij ten przycisk i przytrzymaj go przez 3
sekundy.
Jednak już zrobiony lód można wybrać
z kostkarki Icematic.
)
) Jeśli jest aktywny,
Korzystaj z funkcji szybkiego
chłodzenia, kiedy chcesz szybko
C
C
C
12. Wskaźnik oszczędnego użytkowania
Wskazuje, że produkt działa w trybie
oszczędzania energii. ( ) Wskaźnik ten
będzie aktywny, jeśli temperaturę komory
zamrażania nastawiono na -18 stopni lub
zgodnie z funkcją Eco-Extra chłodzenie
przebiega w trybie energooszczędnym.
C
schłodzić żywność umieszczoną w
komorze chłodzenia Jeśli schłodzona
ma być znaczna ilość świeżej
żywności, zaleca się uruchomienie tej
funkcji przed włożeniem żywności do
chłodziarki.
Jeśli nie wyłączysz szybkiego
chłodzenia, funkcja ta wyłączy się
automatycznie po 4 godzinach lub gdy
temperatura w komorze chłodzenia
osiągnie żądaną wartość.
Funkcja ta nie zostanie wywołana
przy przywróceniu zasilania po jego
awaryjnym wyłączeniu.
Wskaźnik użytkowania oszczędnego
gaśnie, gdy zostanie wybrana funkcja
szybkiego chłodzenia lub szybkiego
zamrażania.
5.6. Pojemnik na lód
(Opcja)
• Wyjmij pojemnik na lód z komory
zamrażalnika.
• Wypełnij pojemnik na lód wodą.
• Włóż pojemnik na lód do komory
zamrażalnika.
• Lód będzie gotowy za ok. dwie
godziny. Wyjmij pojemnik na lód z komory
zamrażalnika i zegnij go lekko nad
pojemnikiem, w którym zamierzasz go podać.
Lód łatwo wypadnie do pojemnika.
20 / 33 PL
Lodówka / Instrukcja obsługi
Page 90

Korzystanie z produktu
5.7. Pojemnik na jajka
Pojemnik na jajka możesz umieścić na drzwiach
lub w głównej komorze. Jeśli zdecydujesz się
go umieścić w głównej komorze, zaleca się
korzystanie z dolnych półek, ponieważ jest tam
chłodniej.
Nie wkładaj pojemnika na jajka do
A
komory zamrażalnika.
5.8. Wentylator
Wentylator został zaprojektowany, aby
równomiernie rozprowadzać chłodne powietrze
we wnętrzu chłodziarki. Czas działania
wentylatora może się różnić w zależności od
własności chłodziarki.
W niektórych chłodziarkach wentylator działa
tylko wtedy, kiedy sprężarka, w innych system
sterowania określa czas działania w zależności
od zapotrzebowania.
Komora o temperaturze zero to najchłodniejsze
miejsce, gdzie możesz przechowywać artykuły
spożywcze takie jak nabiał, mięso, ryby i drób
w idealnych warunkach. W tej komorze nie
należy przechowywać warzyw ani owoców.
5.11. Ruchomy stelaż na drzwiach
(Opcja)
Ruchomy stelaż na drzwiach można
zamocować w 3 różnych pozycjach.
Aby przesunąć stelaż, naciśnij jednocześnie
przyciski z boku. Stelaż można przesunąć.
Przesuń stelaż w górę lub w dół.
Kiedy stelaż znajdzie się w żądanej pozycji,
zwolnij przyciski. Stelaż zostanie zamocowany
w pozycji, w jakiej zwolnisz przyciski.
5.9. Pojemnik na warzywa
(Opcja)
Pojemnik na warzywa został zaprojektowany,
aby utrzymać świeżość warzyw poprzez
zachowanie wilgotności. W tym celu
ogólna cyrkulacja zimnego powietrza jest
intensywniejsza w tym pojemniku.
5.10. Komora o temperaturze zero
(Opcja)
Używaj tej komory, aby przechowywać
delikatesy w niższych temperaturach lub
produkty mięsne do szybkiego spożycia.
Lodówka / Instrukcja obsługi
21 / 33 PL
Page 91

Korzystanie z produktu
5.12. Pojemnik przesuwany
(Opcja)
Ten element wyposażenia został
zaprojektowany, ab zwiększyć używalność
stelaży na drzwiach.
Dzięki możliwości przesuwania na boki, ułatwia
on ułożenie długiej butelki, słoika lub pudełek,
które wkładasz w uchwyt na butelki poniżej.
5.13. HerbBox/HerbFresh
Wyjmij woreczek foliowy z pojemnika HerbBox/
HerbFresh+.
Wyjmij folię z woreczka i włóż do ją do osłony
tak, jak pokazano na ilustracji.
Zamknij pojemnik i umieść go w części
HerbBox/HerbFresh+.
HerbBox/HerbFresh+ jest idealne do
przechowywania różnorakich, delikatnych
ziół, wymagających odpowiednich warunków.
W pojemniku tym możesz przechowywać na
poziomo zioła wyjęte z opakowań (pietruszka,
koperek, itp.), co zapewni im świeżość przez
znacznie dłuższy okres.
Folię należy wymieniać co pół roku.
22 / 33 PL
Lodówka / Instrukcja obsługi
Page 92

Korzystanie z produktu
5.14. Pojemnik na warzywa
z kontrolą wilgotności
(Opcja)
Funkcja kontroli wilgotności umożliwia
zachowanie odpowiedniej wilgotności warzyw
i owoców oraz zapewnia dłuższą świeżość
żywności.
Zaleca się w miarę możliwości przechowywanie
w pojemniku warzyw liściastych, jak sałata,
szpinak itp. w pozycji poziomej, a nie opartych
o korzeń, ze względu na utratę wilgotności.
Układając warzywa, ciężkie i twarde należy
układać na dole, a lekkie i miękkie na górze,
biorąc pod uwagę konkretną wagę warzyw.
Nie zostawiać w pojemniku warzyw w
plastikowych torebkach. Zostawienie ich w
plastikowej torebce spowoduje, że szybko
zgniją. W sytuacjach, kiedy styczność z innymi
warzywami jest niezalecana, używaj materiałów
opakowaniowych takich jak papier, które mają
pewną porowatość pozwalającą zachować
higienę.
Nie wkładaj owoców, które wydzielają dużo
gazowego etylenu, jak gruszki, morele,
brzoskwinie, a przede wszystkim jabłka, do
tego samego pojemnika na warzywa, co inne
warzywa i owoce. Gazowy etylen wydobywający
się z tych owoców może spowodować szybsze
dojrzewanie i gnicie pozostałych warzyw i
owoców.
5.15. Automatyczna
maszyna do lodu
(Opcja)
Automatyczna maszyna do lodu umożliwia
łatwe wytwarzanie lodu w chłodziarce. Aby
wytworzyć lód za pomocą maszyny do lodu,
wyjmij zbiornik wody z komory chłodzenia,
napełnij go wodą i włóż z powrotem.
Pierwszy lód powstanie po dwóch godzinach
w szufladzie na lód znajdującej się w komorze
chłodzenia.
Po włożeniu pełnego zbiornika wody możesz
uzyskać z niego 60-70 kostek lodu.
Jeśli woda w zbiorniku stała przez 2-3
tygodnie, należy ją wymienić.
W przypadku produktów z
automatyczną maszyną do lodu
C
możesz słyszeć dźwięk podczas
wysypywania lodu. Jest to zupełnie
normalne i nie świadczy o awarii.
Lodówka / Instrukcja obsługi
23 / 33 PL
Page 93

Korzystanie z produktu
5.16. Kostkarka do lodu
Icematic i pojemnik na lód
*opcja
Obsługa kostkarki do lodu Icematic
Napełnij Icematic wodą i włóż do obudowy. Lód
będzie gotowy za ok. dwie godziny. Nie wyjmuj
Icematic z obudowy, aby wyjąc lód.
Obróć pokrętła na zbiornikach lodu zgodnie z
ruchem wskazówek zegara o 90 stopni.
Kostki lodu w zbiornikach wypadną do
pojemnika na lód pod nimi.
Teraz możesz wyjąć pojemnik na lód i podać
kostki lodu.
Jeśli chcesz, możesz trzymać kostki lodu w tym
pojemniku.
Pojemnik na lód
Pojemnik na lód służy wyłącznie do
gromadzenia kostek lodu. Nie wlewaj do
nie go wody. W przeciwnym razie ulegnie
uszkodzeniu.
5.17. Korzystanie z
dozownika wody
*opcja
Pierwsze kilka szklanek wody z
C
C
1. Naciśnij szklanką dźwignię dozownika wody.
Jeśli korzystasz z miękkiego plastikowego
kubka, naciśnięcie dźwigni ręką będzie
łatwiejsze.
2. Po napełnieniu kubka do żądanego poziomu
puść dźwignię.
C
dozownika mogą być ciepłe i jest
to całkiem normalne.
Jeżeli dozownika wody nie używa
się przez dłuższy czas, wylewa się
pierwsze kilka szklanek wody, aby
uzyskać wodę świeżą.
Prosimy zwrócić uwagę, ze ilość
wody wypływającej z dozownika
zależy od tego, jak bardzo wciśnięto
dźwignię. W miarę jak podnosi się
poziom wody w kubku lub szklance
delikatnie zmniejszaj nacisk na
dźwignię, aby uniknąć przelania
się wody. Jeśli lekko nacisnąć
ramię, woda kapie, co jest całkiem
normalne i nie świadczy o awarii.
24 / 33 PL
Lodówka / Instrukcja obsługi
Page 94

Korzystanie z produktu
5.18. Napełnianie zbiornika
dozownika wodą
Zbiornik wody mieści się w stelażu na
drzwiach.
1. Otwórz pokrywę zbiornika.
2. Napełnij zbiornik świeżą wodą pitną.
3. Zamknij pokrywkę.
Nie napełniaj zbiornika na wodę
C
C
innym płynem niż woda, np. sokiem
owocowym, napojem gazowanym,
czy napojem alkoholowym, które
nie nadają się do stosowania
w zbiorniku na wodę. Użycie
płynu tego rodzaju spowoduje
trwałe uszkodzenie dozownika.
Użytkowania takiego nie obejmuje
gwarancja. Pewne zawarte
w takich płynach substancje
chemiczne i dodatki mogą
uszkodzić zbiornik na wodę.
Używaj tylko świeżej, czystej wody
pitnej.
Pojemność zbiornika na wodę
C
Lodówka / Instrukcja obsługi
wynosi 3 litry, nie należy jej
przekraczać.
25 / 33 PL
Page 95

Korzystanie z produktu
5.19. Czyszczenie
zbiornika na wodę
1. Wyjmij zbiornik na wodę ze stelaża na
drzwiach.
2. Wyjmij stelaż na drzwiach, trzymając go z
obu stron.
3. Chwyć zbiornik na wodę z obu stron i wyjmij
go pod kątem 45°C.
4. Zdejmij pokrywę zbiornika na wodę i
wyczyść go.
Elementów zbiornika i dozownika
C
nie należy myć w zmywarkach do
naczyń.
26 / 33 PL
Lodówka / Instrukcja obsługi
Page 96

Korzystanie z produktu
5.20. Tacka na krople
Woda, która kapie przy korzystaniu z dozownika
zbiera się w tacce na krople.
Wyjmij plastikowy filtr tak jak pokazano na
rysunku.
Wytrzyj zebraną wodę za pomocą czystej i
suchej ściereczki.
Lodówka / Instrukcja obsługi
27 / 33 PL
Page 97

Korzystanie z produktu
5.21. Zamrażanie żywności świeżej
• Aby zachować jakość żywności,
produkty spożywcze włożone do komory
zamrażalnika powinny zostać zamrożone
jak najszybciej. W tym celu użyj funkcji
szybkiego zamrażania.
• Zamrażanie świeżych produktów
spożywczych przedłuży ich czas
przechowywania w komorze zamrażalnika.
• Zapakuj produkty spożywcze w
hermetyczne opakowania i dobrze zamknij.
• Sprawdź, czy produkty są zapakowane
przed włożeniem ich do zamrażalnika.
Użyj pojemników do zamrażalnika, folii
aluminiowej, papieru pergaminowego,
woreczków plastikowych lub podobnych
materiałów opakowaniowych zamiast
tradycyjnego papieru do pakowania.
Lód w komorze zamrażania jest
C
Regulacja
temperatury
w komorze
zamrażalnika.
-18ºC 4°C To domyślne, zalecane ustawienie.
-20,-22 lub
-24°C
Quick Freeze 4°C
-18ºC lub
zimniej
rozmrażany automatycznie.
Regulacja
temperatury
w komorze
chłodzenia.
4°C
2°C
Te ustawienia są zalecane, jeśli temperatura otoczenia
przekracza 30°C.
Funkcji tej używa się do szybkiego zamrażania żywności. Kiedy
ten proces się zakończy, chłodziarka wróci do poprzedniego
ustawienia.
Użyj tych ustawień, jeśli uważasz, że w komorze chłodzenia nie
jest dostatecznie zimno z powodu temperatury otoczenia lub
częstego otwierania drzwiczek.
5.22. Przechowywanie
żywności mrożonej
Temperatura komory musi być ustawiona na co
najmniej -18°C.
1. Zamrożone produkty należy wkładać do
zamrażalnika możliwie jak najszybciej, aby
uniknąć rozmrożenia.
2. Przed zamrożeniem sprawdź datę
ważności na opakowaniu, aby mieć
pewność, że jest ona aktualna.
• Oznacz każde opakowanie przed
zamrożeniem, pisząc na nim datę.
Pozwoli Ci to określić świeżość każdego
opakowania za każdym otwarciem
zamrażalnika. Przechowuj wcześniej
włożone produkty spożywcze z przodu, aby
zostały użyte pierwsze.
• Zamrożone produkty należy zużyć zaraz
po rozmrożeniu i nie wolno ich zamrażać
ponownie.
• Nie należy zamrażać dużych ilości żywności
na raz.
Informacje
3. Sprawdź, że opakowanie żywności nie jest
uszkodzone.
5.23. Informacje o komorze
głębokiego zamrażania
Zgodnie ze standardem IEC 62552 zamrażalnik
musi mieć zdolność zamrożenia 4,5 kg
żywności w temperaturze -18°C lub niższej w
ciągu 24 godzin na każde 100 litrów objętości
komory zamrażalnika.
28 / 33 PL
Lodówka / Instrukcja obsługi
Page 98

Korzystanie z produktu
Produkty spożywcze można przechowywać
przez dłuższy czas tylko w temperaturze -18°C
lub niższej.
Możesz zachować świeżość żywności przez
kilka miesięcy (w komorze głębokiego
zamrażania w temperaturze -18°C lub niższej).
Produkty spożywcze, które mają zostać
zamrożone, nie mogą się stykać z już
zamrożonymi produktami, aby uniknąć ich
częściowego rozmrożenia.
Ugotuj warzywa i filtruj wodę, aby przedłużyć
czas przechowywania. Umieść żywność w
hermetycznych opakowaniach po filtrowaniu
i umieść w zamrażalniku. Banany, pomidory,
sałata, seler, gotowane jajka, ziemniaki i
podobne artykuły nie powinny być zamrażane.
Jeśli te artykuły zepsują się, wpłynie to
negatywnie tylko na wartości odżywcze i smak.
Zepsucie zagrażające zdrowiu ludzkiemu nie
wchodzi w grę.
5.24. Rozmieszczenie żywności
Półki w
komorze
zamrażalnika
Półki komory
chłodzenia
Półki na
drzwiach
komory
chłodzenia
Pojemnik na
warzywa
Komora na
żywność
świeżą
Różne mrożonki, np. mięso, ryby,
lody, warzywa itp.
Produkty spożywcze w
garnkach, na przykrytych
talerzach, zamkniętych
pudełkach, jajka (w zamkniętym
pudełku)
Małe i zapakowane produkty
spożywcze oraz napoje
Owoce i warzywa
Delikatesy (produkty
śniadaniowe, produkty mięsne
do szybkiego spożycia)
5.25. Alarm o otwartych drzwiach
(Opcja)
Jeśli drzwi chłodziarki będą otwarte przez
co najmniej minutę, rozlegnie się słyszalny
alarm. Alarm ten wyłączy się po zamknięciu
drzwi lub naciśnięciu dowolnego przycisku na
wyświetlaczu (jeśli dostępny).
Alarm o otwartych drzwiach jest prezentowany
użytkownikowi słyszalnie i wizualnie.
Oświetlenie wewnętrzne wyłączy się, jeśli
ostrzeżenie będzie trwało 10 min.
5.26. Zmiana kierunku
otwierania drzwi
Możesz zmienić kierunek otwierania
chłodziarki, w zależności od miejsca
użytkowania. Jeśli musisz to zrobić, skontaktuj
się z najbliższym autoryzowanym serwisem.
Powyższe wyjaśnienie to stwierdzenie ogólne.
Aby uzyskać informacje o możliwości zmiany
kierunku otwierania drzwi, sprawdź etykietę
ostrzegawczą wewnątrz opakowania produktu.
5.27. Oświetlenie wewnętrzne
Oświetlenie wewnętrzne korzysta z lampek
typu LED. W przypadku problemów z lampką
skontaktuj się z autoryzowanym serwisem.
Lampek używanych w tym urządzeniu nie
można użyć do oświetlania domu. Zgodne z
przeznaczeniem użycie tej lampki to pomoc
użytkownikowi w bezpiecznym i wygodnym
umieszczeniu żywności w chłodziarce/
zamrażalniku.
Lodówka / Instrukcja obsługi
29 / 33 PL
Page 99

6 Konserwacja i czyszczenie
Czas eksploatacji urządzenia wydłuża się, jeśli jest
ono regularnie czyszczone.
OSTRZEŻENIE: Przed czyszczeniem
B
•
•
•
•
•
• Nie używaj ostrych ani szorstkich narzędzi,
6.1. Jak unikać
nieprzyjemnych zapachów
Do wyrobu chłodziarek nie używa się materiałów
powodujące zapachy. Jednak w wyniku
niewłaściwego przechowywania żywności
i nieczyszczenia wnętrza chłodziarki mogą
powstawać nieprzyjemne zapachy.
A zatem co 15 dni czyść chłodziarkę roztworem
węglanu w wodzie.
•
chłodziarki odłącz ją od prądu.
Do czyszczenia nie wolno stosować żadnych
ostrych ani szorstkich narzędzi, mydła,
domowych środków czystości, detergentów, ani
wosku do polerowania.
Rozpuść łyżeczkę węglanu w pół litrze wody.
Namoczyć ściereczkę w roztworze i dokładnie
ją wyżmij. Przetrzyj wnętrze chłodziarki tą
ściereczką i dokładnie wytrzyj do sucha.
Dbaj, aby do obudowy lampki i innych urządzeń
elektrycznych nie dostała się woda.
Wyczyść drzwi wilgotną ściereczką. Aby wyjąć
półki z drzwi i wnętrza chłodziarki, opróżnij
je z całej zawartości. Wyjmij półki z drzwi,
przesuwając je w górę. Po oczyszczeniu, wsuń
je od góry do dołu, aby włożyć na miejsce.
Do czyszczenia powierzchni zewnętrznych i
chromowanych części produktu nie należy
używać ani środków czyszczących,ani wody
z zawartością chloru. Chlor powoduje korozję
takich powierzchni metalowych.
mydła, domowych środków czystości,
detergentów, nafty, oleju napędowego, lakieru
itp., aby zapobiec odpadnięciu i odkształceniu
plastikowych części. Do czyszczenia użyj letniej
wody i miękkiej ściereczki, a następnie wytrzyj
do sucha.
Żywność przechowuje się w zamkniętych
pojemnikach. Wydostające się z odkrytych
pojemników mikroorganizmy mogą powodować
nieprzyjemne zapachy.
•
W chłodziarce nie wolno przechowywać
żywności zepsutej ani takiej, której termin
przydatności do spożycia upłynął.
6.2. Jak zabezpieczać
powierzchnie plastykowe.
Wymyć od razu ciepłą wodą, ponieważ olej może
spowodować uszkodzenie plastikowej powierzchni.
6.3. Szkło w drzwiach
Zdejmij folię ochronną ze szkła.
Na powierzchni szkła znajduje się pokrycie.
To pokrycie ogranicza możliwość powstawania
plam i ułatwia usuwanie ewentualnych plam i
zabrudzeń. Szkło niechronione takim pokryciem
może ulec trwałemu zabrudzeniu organicznymi lub
nieorganicznymi związkami opartymi na powietrzu
lub wodzie, jak kamień, sole mineralne, niespalone
węglowodory, tlenki metali i silikony, które łatwo
i szybko powodują powstanie plam i szkody
materialne. Utrzymanie szkła w czystości staje
się zbyt trudne pomimo regularnego czyszczenia.
W konsekwencji pogarsza się wygląd i zmniejsza
przezroczystość szkła. Ostre i szorstkie metody
i środki czyszczące zwiększą te problemy i
przyśpieszą proces niszczenia.
Należy używać niezasadowych i łagodnych środków
czyszczących opartych na wodzie.
Do czyszczenia należy używać niezasadowych i
łagodnych środków czyszczących, aby wydłużyć
trwałość tej powłoki.
Szkło to hartuje się, aby zwiększyć odporność na
uderzenie i pęknięcie.
Na jego tylne powierzchnie nakłada się także folie
ochronne jako dodatkowe zabezpieczenie w celu
zapobieżenia szkodom w otoczeniu w przypadku
jego potłuczenia.
* Zasady to podstawa do tworzenia jonów
wodorotlenku (OH¯) po rozpuszczeniu w wodzie.
Li (lit), Na (sód), K (potas) Rb (rubid), Cs (cez) oraz
sztuczny i radioaktywny Fr (frans) są nazywane
METALAMI ALKALICZNYMI.
30 / 33 PL
Lodówka / Instrukcja obsługi
Page 100

7 Rozwiązywanie problemów
Przed skontaktowaniem się z serwisem należy sprawdzić tę listę. Umożliwi to zaoszczędzenie czasu
i pieniędzy. Ta lista zawiera często spotykane problemy niezwiązane z wadami jakości wykonania lub
materiałów. Pewne wymienione tutaj funkcje mogą nie dotyczyć posiadanego produktu.
Lodówka nie działa.
• Wtyk zasilania nie jest włożony do końca. >>> Dociśnij go do końca w gniazdku.
• Bezpiecznik podłączony do gniazda zasilającego produkt lub bezpiecznik główny jest przepalony.
>>> Sprawdź bezpieczniki.
Kondensacja na bocznej ściance komory chłodziarki (WIELOSTREFOWE, CHŁODZENIE, KONTROLA I STREFA
ELASTYCZNA).
• Drzwi są za często otwierane >>> Należy pamiętać, aby nie otwierać drzwi produktu za często.
• Środowisko jest za wilgotne. >>> Produktu nie należy instalować w wilgotnych środowiskach.
• Żywność zawierająca płyny jest przechowywana w nieszczelnych opakowaniach. >>> Żywność
zawierająca płyny należy przechowywać w zamkniętych opakowaniach.
• Drzwi produktu pozostały otwarte. >>> Nie wolno pozostawiać otwartych drzwi produktu przez
długi czas.
• Termostat jest ustawiony na za niską temperaturę. >>> Ustaw termostat na odpowiednią
temperaturę.
Sprężarka nie działa.
• W przypadku nagłej awarii zasilania lub wyciągnięcia kabla zasilającego z gniazda i podłączenia
go z powrotem ciśnienie gazu w układzie chłodzenia produktu jest niezrównoważone, co wyzwala
zabezpieczenie termiczne sprężarki. Produkt ponownie się uruchomi po około 6 minutach. Jeśli
produkt nie uruchomi się po tym czasie, skontaktuj się z serwisem.
• Odmrażanie jest aktywne. >>> To jest normalne w przypadku produktu z całkowicie
zautomatyzowanym odmrażaniem. Odmrażanie odbywa się okresowo.
• Produkt nie jest podłączony. >>> Upewnij się, że kabel zasilania jest podłączony.
• Nastawa temperatury jest niepoprawna. >>> Wybierz poprawną nastawę temperatury.
• Brak zasilania. >>> Po przywróceniu zasilania produkt będzie kontynuował normalną pracę.
Hałas pracy lodówki zwiększa się podczas używania.
• Wydajność robocza produktu może się zmieniać w zależności od zmian temperatury otoczenia. To
jest sytuacja normalna, a nie awaria.
Lodówka włącza się za często lub na zbyt długo.
Lodówka / Instrukcja obsługi
31 / 33 PL
 Loading...