

Page 1
RCNE520E30ZX
CNE520E32ZX
CNE520E30ZGB
EN
PL
SK
Page 2
Please read this manual before using the product!
Dear Customer,
We'd like you to make the best use of our product, which has been manufactured in modern facilities
with care and meticulous quality controls.
Thus, we advice you to read the entire user manual before you use the product. In case the product
changes hands, do not forget to hand the guide to its new owner along with the product.
This guide will help you use the product quickly and safely.
• Please read the user guide carefully before installing and operating the product.
• Always observe the applicable safety instructions.
• Keep the user guide within easy reach for future use.
• Please read any other documents provided with the product.
Keep in mind that this user guide may apply to several product models. The guide clearly indicates any
variations of different models.
Important information and useful
C
tips.
Risk of life and property.
A
Risk of electric shock.
B
The product’s packaging is made of
recyclable materials, in accordance
with the National Environment
Legislation.
Page 3

1 Safety and environment instructions 3
1.1. General safety. . . . . . . . . . . . . . . . . . . . . . . 3
1.1.1 HC warning. . . . . . . . . . . . . . . . . . . . . . . . 5
1.1.2 For models with water dispenser . . . . . . . . 5
1.2. Intended use. . . . . . . . . . . . . . . . . . . . . . . . 5
1.3. Child safety. . . . . . . . . . . . . . . . . . . . . . . . . 6
1.4. Compliance with WEEE Directive and Disposing
of the Waste Product . . . . . . . . . . . . . . . . . 6
1.5. Compliance with RoHS Directive . . . . . . . . . 6
1.6. Package information . . . . . . . . . . . . . . . . . .6
2 Your Refrigerator 7
3 Installation 8
3.1. Right place for installation . . . . . . . . . . . . . .8
3.2. Attaching the plastic wedges. . . . . . . . . . . . 8
3.3. Adjusting the stands . . . . . . . . . . . . . . . . . . 8
3.4. Power connection . . . . . . . . . . . . . . . . . . . .9
3.5. Reversing the doors . . . . . . . . . . . . . . . . .10
3.6. Reversing the doors . . . . . . . . . . . . . . . . .11
4 Preparation 12
4.1. What to do for energy saving. . . . . . . . . . .12
4.2. First Use. . . . . . . . . . . . . . . . . . . . . . . . . . 12
5 Using the product 13
5.1. Temperature adjustment button. . . . . . . . . 13
5.2. Rapid freezing . . . . . . . . . . . . . . . . . . . . . 13
5.3. Vacation function . . . . . . . . . . . . . . . . . . . 14
5.4. Indicator panel . . . . . . . . . . . . . . . . . . . . . 15
5.5. Indicator panel . . . . . . . . . . . . . . . . . . . . . 17
5.6. Indicator panel . . . . . . . . . . . . . . . . . . . . . 20
5.7. Ice bucket. . . . . . . . . . . . . . . . . . . . . . . . . 23
5.8. Eggholder. . . . . . . . . . . . . . . . . . . . . . . . . 23
5.9. Fan. . . . . . . . . . . . . . . . . . . . . . . . . . . . . . 23
5.10. Vegetable bin . . . . . . . . . . . . . . . . . . . . . 23
5.11. Zero degree compartment . . . . . . . . . . . . 23
5.12. Moving door rack. . . . . . . . . . . . . . . . . . . 24
5.13. Sliding storage box . . . . . . . . . . . . . . . . . 24
5.14. Moisture controlled vegetable bin . . . . . . . 25
5.15. Automatic ice machine . . . . . . . . . . . . . . 25
5.16. Icematic and ice storage container . . . . . .26
5.17. Using the water dispenser . . . . . . . . . . . .26
5.18. Filling the water dispenser's tank . . . . . . .27
5.19. Cleaning the water tank . . . . . . . . . . . . .28
5.20. Drip tray . . . . . . . . . . . . . . . . . . . . . . . . .29
5.21. Freezing fresh food . . . . . . . . . . . . . . . . .30
5.22. Recommendations for storing frozen foods 30
5.23. Deep freezer details. . . . . . . . . . . . . . . . . 31
5.24. Placing the food. . . . . . . . . . . . . . . . . . . . 31
5.25. Door open alert . . . . . . . . . . . . . . . . . . . . 31
5.26. Changing the opening direction of the door 31
5.27. Interior light. . . . . . . . . . . . . . . . . . . . . . .31
6 Maintenance and cleaning 32
6.1. Avoiding bad odors . . . . . . . . . . . . . . . . . .32
6.2. Protecting the plastic surfaces . . . . . . . . . 32
6.3. Door Glasses . . . . . . . . . . . . . . . . . . . . . 32
7 Troubleshooting 33
2 /35 EN
Refrigerator / User Guide
Page 4
1 Safety and environment instructions
This section provides the safety
instructions necessary to prevent
the risk of injury and material
damage. Failure to observe these
instructions will invalidate all
types of product warranty.
1.1. General safety
• This product should not be
used by persons with physical,
sensory and mental disabilities,
without sufficient knowledge
and experience or by children.
The device can only be used by
such persons under supervision
and instruction of a person
responsible for their safety.
Children should not be allowed
to play with this device.
• In case of malfunction, unplug
the device.
• After unplugging, wait at least
5 minutes before plugging in
again.
• Unplug the product when not in
use.
• Do not touch the plug with wet
hands! Do not pull the cable to
plug off, always hold the plug.
• Wipe the power plug’s tip with
a dry cloth before plugging in.
• Do not plug in the refrigerator if
the socket is loose.
• Unplug the product during
installation, maintenance,
cleaning and repair.
• If the product will not be used
for a while, unplug the product
and remove any food inside.
• Do not use the product when
the compartment with circuit
cards located on the upper
back part of the product
(electrical card box cover) (1) is
open.
1
1
• Do not use steam or steamed
cleaning materials for cleaning
the refrigerator and melting the
ice inside. Steam may contact
the electrified areas and cause
short circuit or electric shock!
• Do not wash the product by
spraying or pouring water on it!
Danger of electric shock!
Refrigerator / User Guide
3/35 EN
Page 5
Safety and environment instructions
• In case of malfunction, do
• Do not place containers
not use the product, as it
may cause electric shock.
Contact the authorized
service before doing
anything.
• Plug the product into an
• Exposing the product to rain,
earthed socket. Earthing
must be done by a qualified
electrician.
• If the product has LED
type lighting, contact the
authorized service for
replacing or in case of any
• Take care to avoid trapping
problem.
• Do not touch frozen food
with wet hands! It may
adhere to your hands!
• Do not place liquids in
• Do not step or lean on the
bottles and cans into the
freezer compartment. They
may burst out!
• Place liquids in upright
position after tightly closing
• Take care not to trap the
the lid.
• Do not spray flammable
substances near the product,
as it may burn or explode.
• Do not keep flammable
materials and products with
flammable gas (sprays, etc.)
in the refrigerator.
holding liquids on top of the
product. Splashing water on
an electrified part may cause
electric shock and risk of
fire.
snow, sunlight and wind
will cause electrical danger.
When relocating the product,
do not pull by holding the
door handle. The handle may
come off.
any part of your hands or
body in any of the moving
parts inside the product.
door, drawers and similar
parts of the refrigerator. This
will cause the product to fall
down and cause damage to
the parts.
power cable.
4 /35 EN
Refrigerator / User Guide
Page 6
Safety and environment instructions
1.1.1 HC warning
If the product comprises a
cooling system using R600a
gas, take care to avoid
damaging the cooling system
and its pipe while using and
moving the product. This gas
• Do not install on the hot
is flammable. If the cooling
system is damaged, keep the
product away from sources
of fire and ventilate the room
immediately.
The label on the inner
left side indicates the
C
type of gas used in the
product.
• Use drinking water only.
1.2. Intended use
• This product is designed for
1.1.2 For models with
water dispenser
• Pressure for cold water
• The product should be used
inlet shall be maximum 90
psi (6.2 bar). If your water
pressure exceeds 80 psi
• Do not keep sensitive
(5.5 bar), use a pressure
limiting valve in your mains
system. If you do not know
how to check your water
pressure, ask for the help of
a professional plumber.
• If there is risk of water
hammer effect in your
installation, always
use a water hammer
prevention equipment in
your installation. Consult
Professional plumbers if you
are not sure that there is no
water hammer effect in your
installation.
water inlet. Take precautions
against of the risk of
freezing of the hoses. Water
temperature operating
interval shall be 33°F
(0.6°C) minimum and 100°F
(38°C) maximum.
home use. It is not intended
for commercial use.
to store food and beverages
only.
products requiring controlled
temperatures (vaccines,
heat sensitive medication,
medical supplies, etc.) in the
refrigerator.
Refrigerator / User Guide
5/35 EN
Page 7
Safety and environment instructions
• The manufacturer assumes
no responsibility for any
damage due to misuse or
mishandling.
• The product’s bench life is
10 years. The spare parts
necessary for the product to
function will be available for
this period.
This product has been
manufactured with high quality
parts and materials which can be
reused and are suitable for
recycling. Do not dispose of the
waste product with normal
domestic and other wastes at the
end of its service life. Take it to the collection
center for the recycling of electrical and
electronic equipment. Please consult your
local authorities to learn about these
collection centers.
1.3. Child safety
• Keep packaging materials
out of children’s reach.
• Do not allow the children to
play with the product.
• If the product’s door
comprises a lock, keep the
key out of children’s reach.
1.4. Compliance with WEEE
Directive and Disposing
of the Waste Product
This product complies with EU WEEE
Directive (2012/19/EU). This product bears a
classification symbol for waste electrical and
electronic equipment (WEEE).
1.5. Compliance with
RoHS Directive
• This product complies with EU WEEE
Directive (2011/65/EU). It does not contain
harmful and prohibited materials specified
in the Directive.
1.6. Package information
• Packaging materials of the product are
manufactured from recyclable materials in
accordance with our National Environment
Regulations. Do not dispose of the
packaging materials together with the
domestic or other wastes. Take them to
the packaging material collection points
designated by the local authorities.
6 /35 EN
Refrigerator / User Guide
Page 8
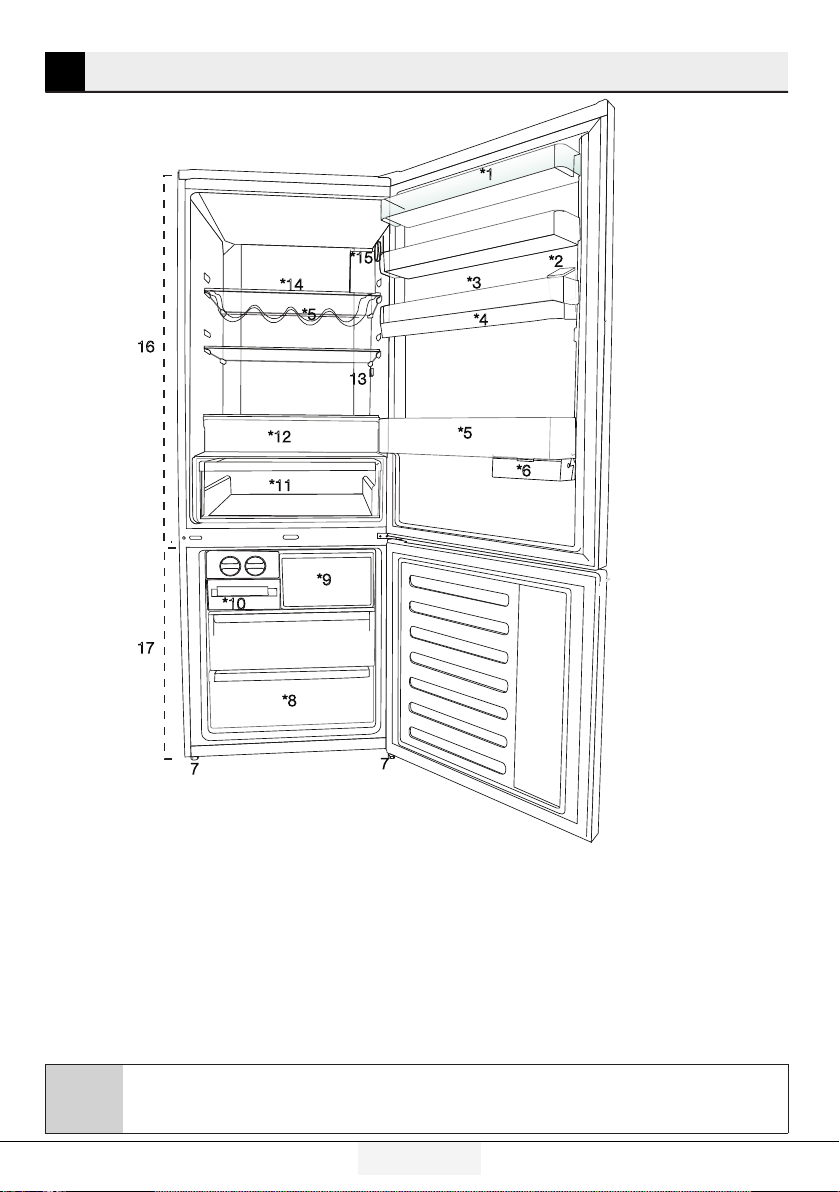
2 Your Refrigerator
*1
16
17
*15
*14
*5
13
*12
*11
*9
*10
*8
7
7
*3
*4
*5
*2
*4
*6
1. Cooler compartment door shelf
2. Water dispenser filling tank
3. Egg section
4. Water dispenser reservoir
5. Bottle shelf
6. Sliding storage box
7. Adjustable legs
8. Deep freezer compartment
9. Quick freeze compartment
*optional: Pictures given in this manual are given as example figures and they may not be exactly
the same as your product. If your product does not comprise the relevant parts, the information
C
Refrigerator / User Guide
pertains to other models.
10. Ice cube tray & Ice bank
11. Vegetable bin
12. Zero degree compartment
13. Interior light
14. Cooler compartment glass shelf
15. Temperature adjustment button
16. Cooler compartment
17. Freezer compartment
7/35 EN
Page 9
3 Installation
3.1. Right place for installation
Contact the Authorized Service for the product's
installation. To ready the product for installation,
see the information in the user guide and make
sure the electric and water utilities are as required.
If not, call an electrician and plumber to arrange
the utilities as necessary.
WARNING: The manufacturer assumes
no responsibility for any damage caused
B
B
A
•Placetheproductonaflatsurfacetoavoid
vibration.
•Placetheproductatleast30cmawayfromthe
heater, stove and similar sources of heat and at
least 5 cm away from electric ovens.
•Donotexposetheproducttodirectsunlightor
keep in damp environments.
•Theproductrequiresadequateaircirculationto
function efficiently.
•Iftheproductwillbeplacedinanalcove,
remember to leave at least 5 cm distance
between the product and the ceiling and the
walls.
•Donotinstalltheproductinenvironmentswith
temperatures below -5°C.
by the work carried out by unauthorized
persons.
WARNING: The product’s power cable
must be unplugged during installation.
Failure to do so may result in death or
serious injuries!
WARNING: If the door span is too narrow
for the product to pass, remove the door
and turn the product sideways; if this does
not work, contact the authorized service.
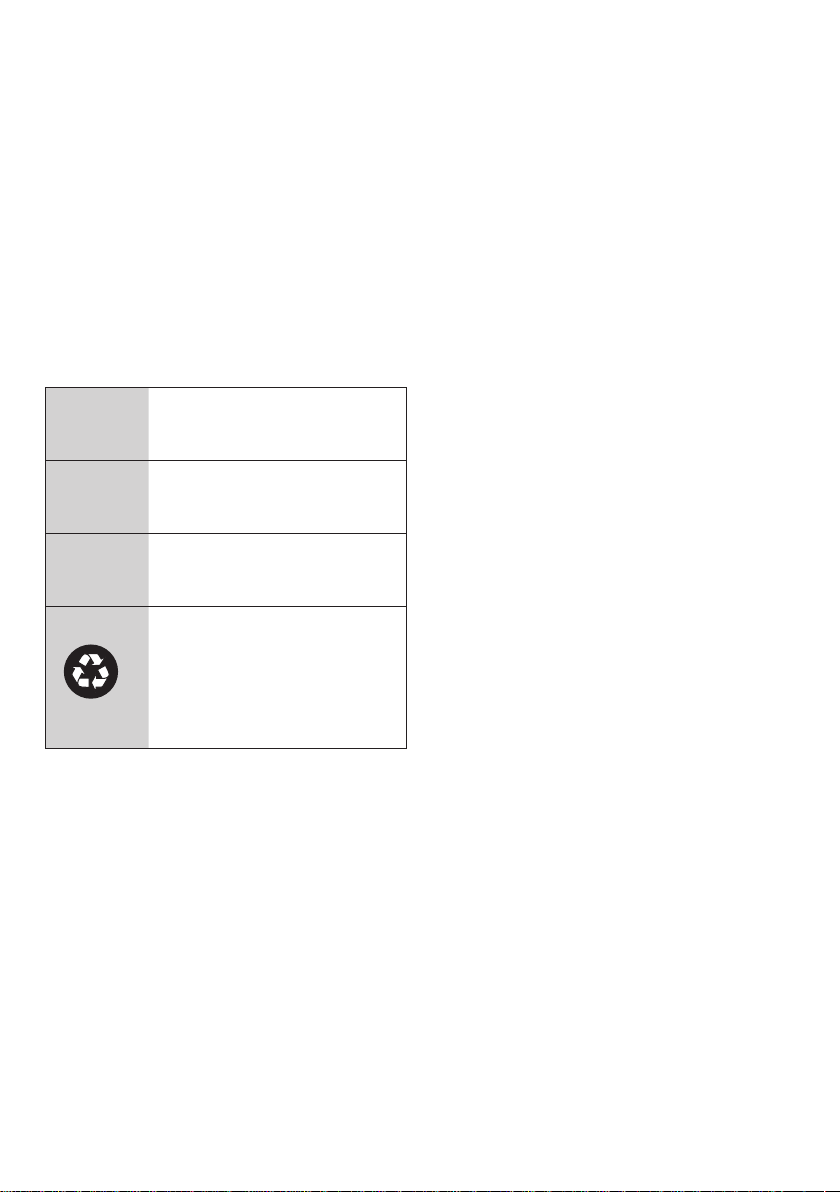
3.2. Attaching the plastic wedges
Use the plastic wedges in the provided with
the product to provide sufficient space for air
circulation between the product and the wall.
1.
To attach the wedges, remove the screws on the
product and use the screws provided with the wedges.
2.
Attach 2 plastic wedges on the ventilation cover as
shown in the figure.
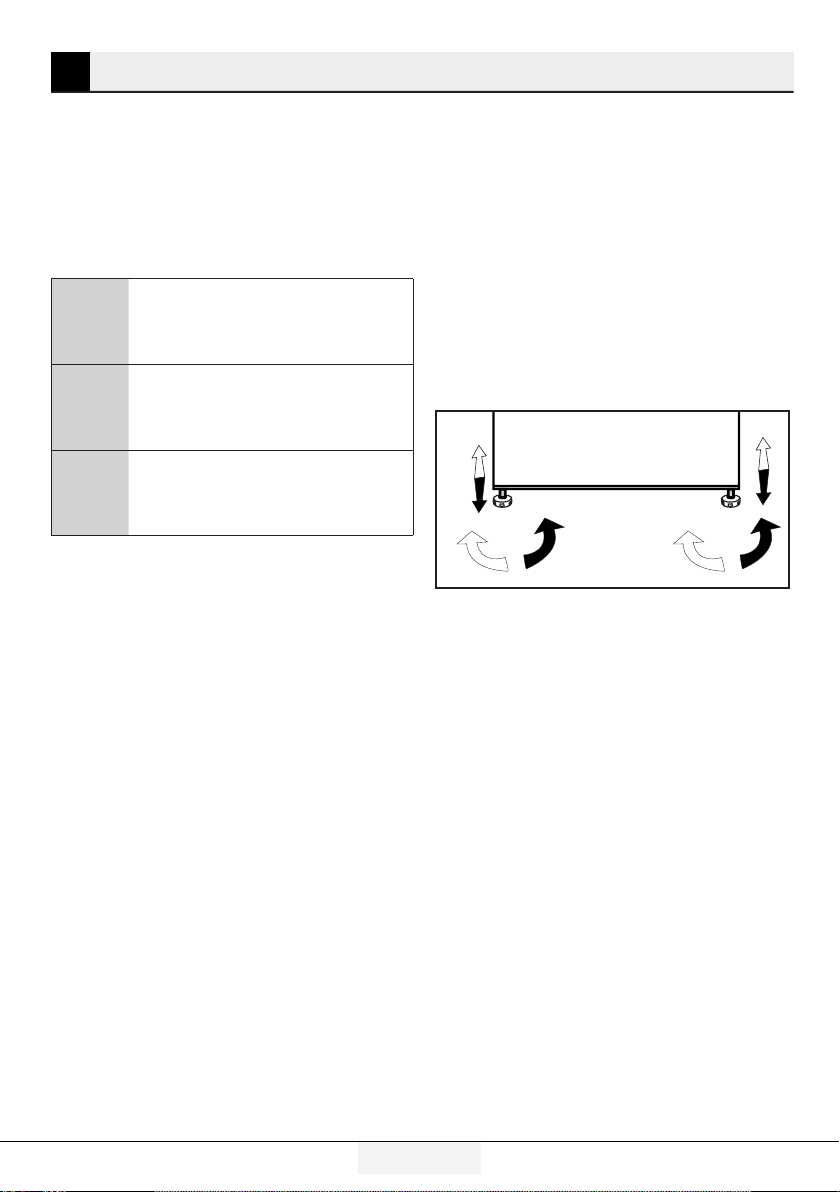
3.3. Adjusting the stands
If the product is not in balanced position, adjust the
front adjustable stands by rotating right or left.
8 /35 EN
Refrigerator / User Guide
Page 10

Installation
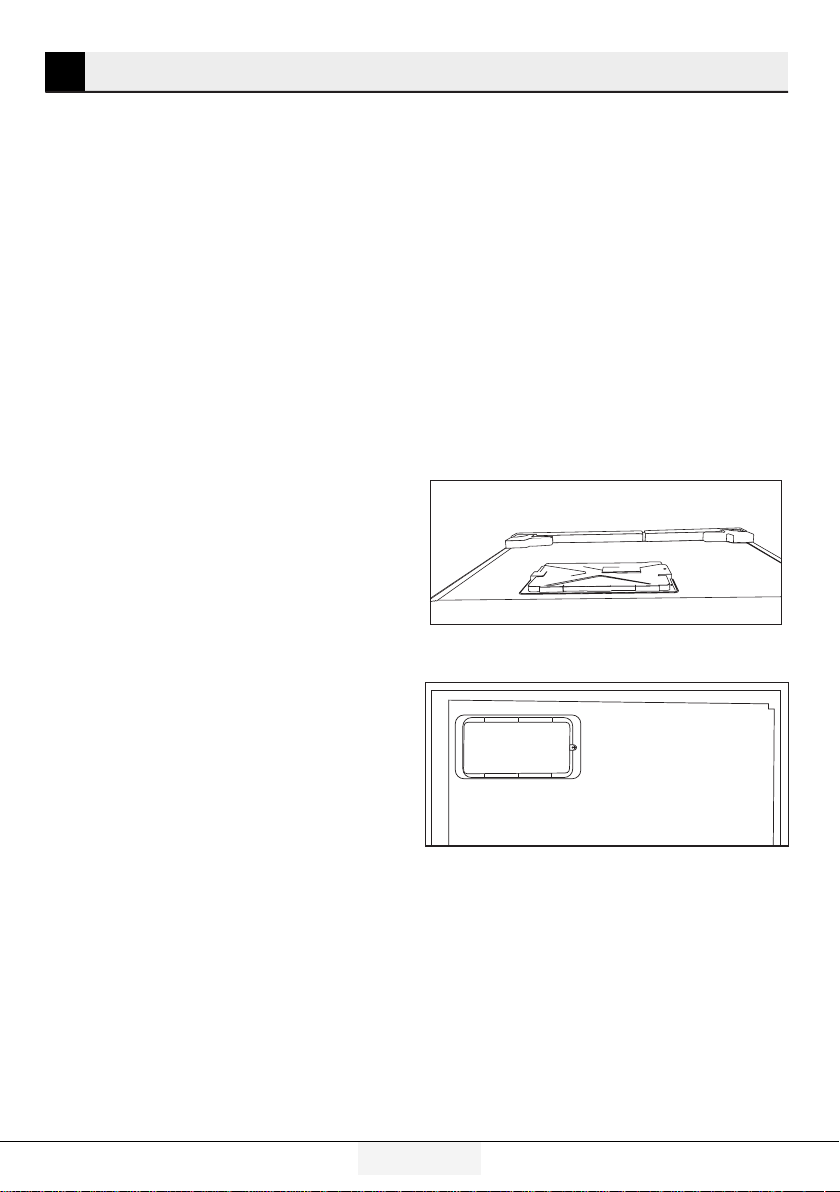
3.4. Power connection
WARNING: Do not use extension or multi
A
B
C
• Our firm will not assume responsibility for
• The power cable plug must be easily
• Connect the refrigerator to an earthed
• Do not use multi-group plug with or without
sockets in power connection.
WARNING: Damaged power cable must
be replaced by Authorized Service.
When placing two coolers in adjacent
position, leave at least 4 cm distance
between the two units.
any damages due to usage without earthing
and power connection in compliance with
national regulations.
accessible after installation.
socket with 220-240V/50 Hz voltage. The
plug must comprise a 10-16A fuse.
extension cable between the wall socket
and the refrigerator.
Refrigerator / User Guide
9/35 EN
Page 11
Installation
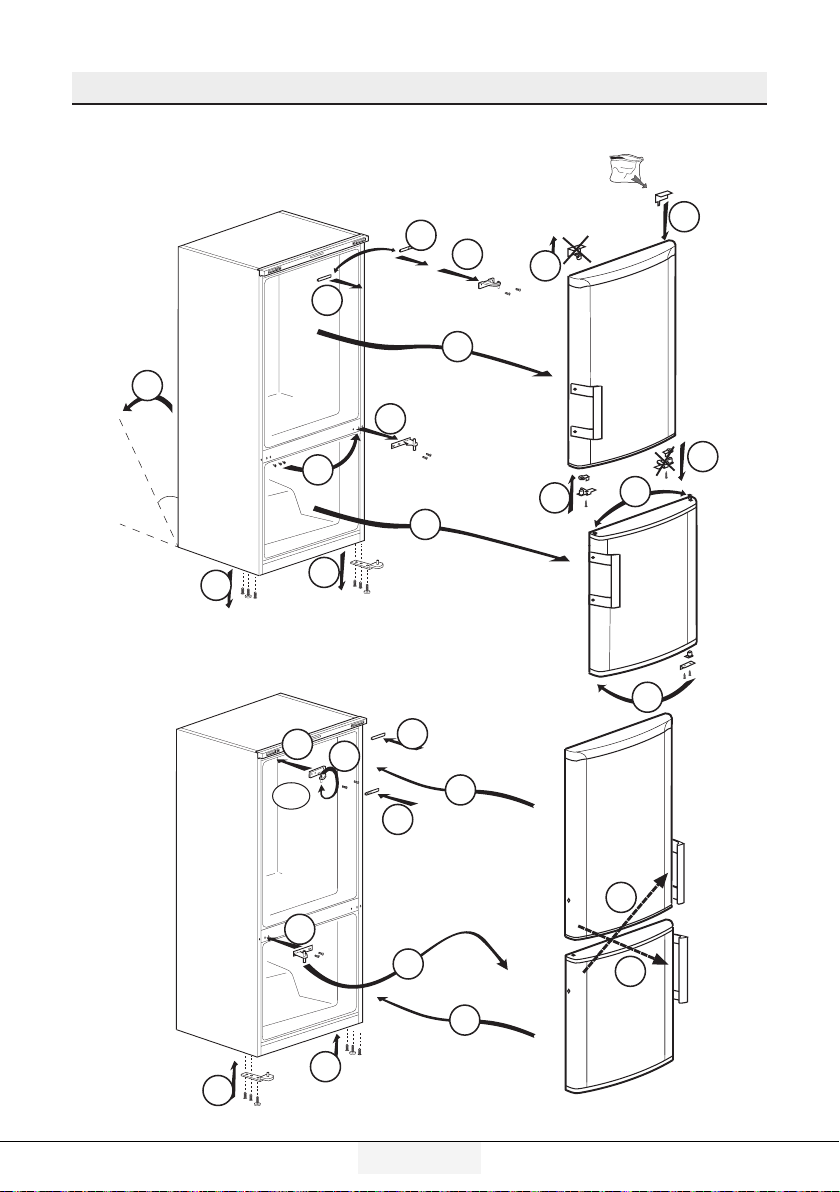
3.5. Reversing the doors
Proceed in numerical order .
4
10
5
10
4
2
7
1
11
45 ¡
6
12
13
3
8
9
14
18
180¡
17
19
22
19
15
23
16
21
10 /35 EN
24
24
20
Refrigerator / User Guide
Page 12

Installation
3.6. Reversing the doors
Proceed in numerical order .
2
45 °
10
12
180°
14
(8) (13)
1
1
1
7
20
6
5
11
13
9
4
3
20
8
15
20
19
Refrigerator / User Guide
16
18
17
11/35 EN
Page 13
4 Preparation
4.1. What to do for energy saving
Connecting the product to electronic
energy-saving systems is harmful, as it
A
• Do not keep the refrigerator doors open for
• Do not place hot food or beverages into the
• Do not overfill the refrigerator; blocking the
• In order to store the maximum amount of
• You should not block the airflow by putting food
• Depending on the product’s features;
• Food should be stored using the drawers in the
• Food packages should not be in direct contact
may damage the product.
long periods.
refrigerator.
internal air flow will reduce cooling capacity.
food into the cooler compartment of your
refrigerator, you should take out the upper
drawers and place it onto the glass rack.
The declared energy consumption of your
refrigerator was determined by taking out the
cooler, ice tray and upper drawers in a way that
will enable maximum storage. Using the below
drawer when storing is strongly recommended.
Energy saving function should be activated for
best energy consumption.
in front of the cooler fan. A space of minimum
3cm must be left in front of the protective fan
wire when placing food.
defrosting frozen foods in the cooler
compartment will ensure energy saving and
preserve food quality.
cooler compartment in order to ensure energy
saving and protect food in better conditions.
with the heat sensor located in the cooler
compartment. If they are in contact with the
sensor, energy consumption of the appliance
might increase.
• Make sure the foods are not in contact with
the cooler compartment temperature sensor
described below.
4.2. First Use
Before using your refrigerator, make sure the
necessary preparations are made in line with
the instructions in “Safety and environment
instructions” and “Installation” sections.
• Keep the product running with no food
inside for 6 and do not open the door, unless
absolutely necessary.
A sound will be heard when the
compressor is engaged. It is normal to
C
C
C
hear sound even when the compressor is
inactive, due to the compressed liquids and
gasses in the cooling system.
Front edges of the product might heat
up. This is normal. These areas are
designed to warm up in order to prevent
condensation.
In some models indicator panel turns off
automatically 5 minutes after the door
closes. It will be reactivated when the door
is open or any button is pressed.
12 /35 EN
Refrigerator / User Guide
Page 14
5 Using the product
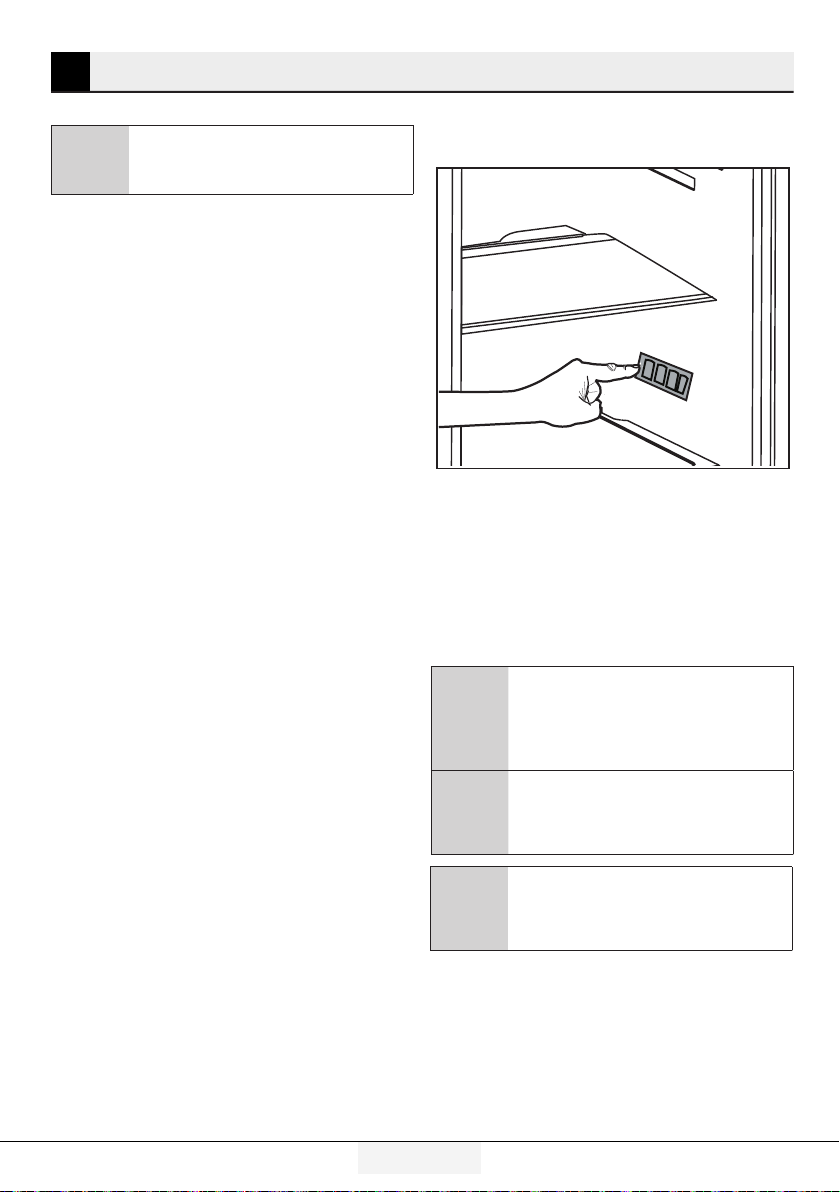
5.1. Temperature adjustment button
Internal temperature of your refrigerator varies
depending on the following reasons:
• Seasonal temperatures,
• Opening the door frequently and leaving it
open for long periods,
• Meals put into the refrigerator without being
cooled to room temperature,
• Location of the refrigerator in the room (e.g.
exposed to sunshine).
• Internal temperature varying due to these
factors can be adjusted via the adjustment
button.
Numbers around the adjustment button indicate
temperature degrees as “°C”.
If the ambient temperature is 20°C, it is recommended
to use the refrigerator temperature adjustment at
4°C. In other ambient temperatures this value can be
customised.
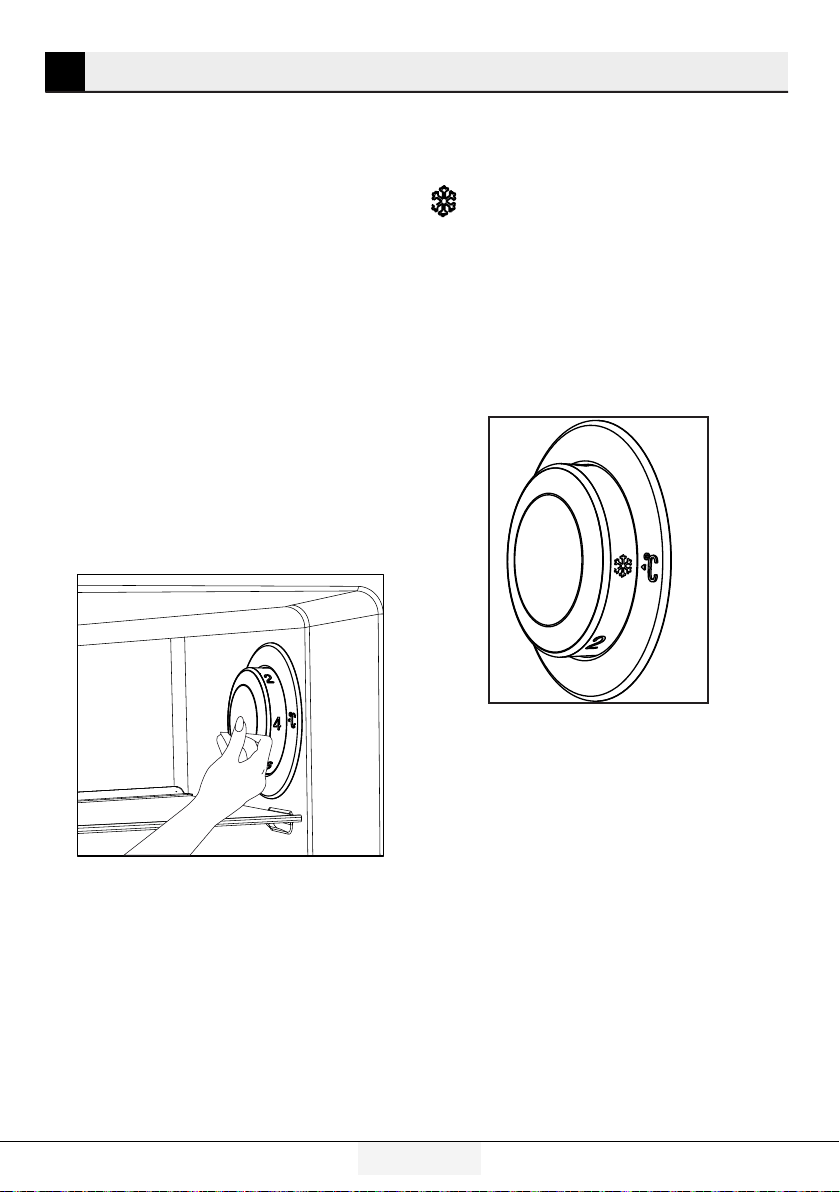
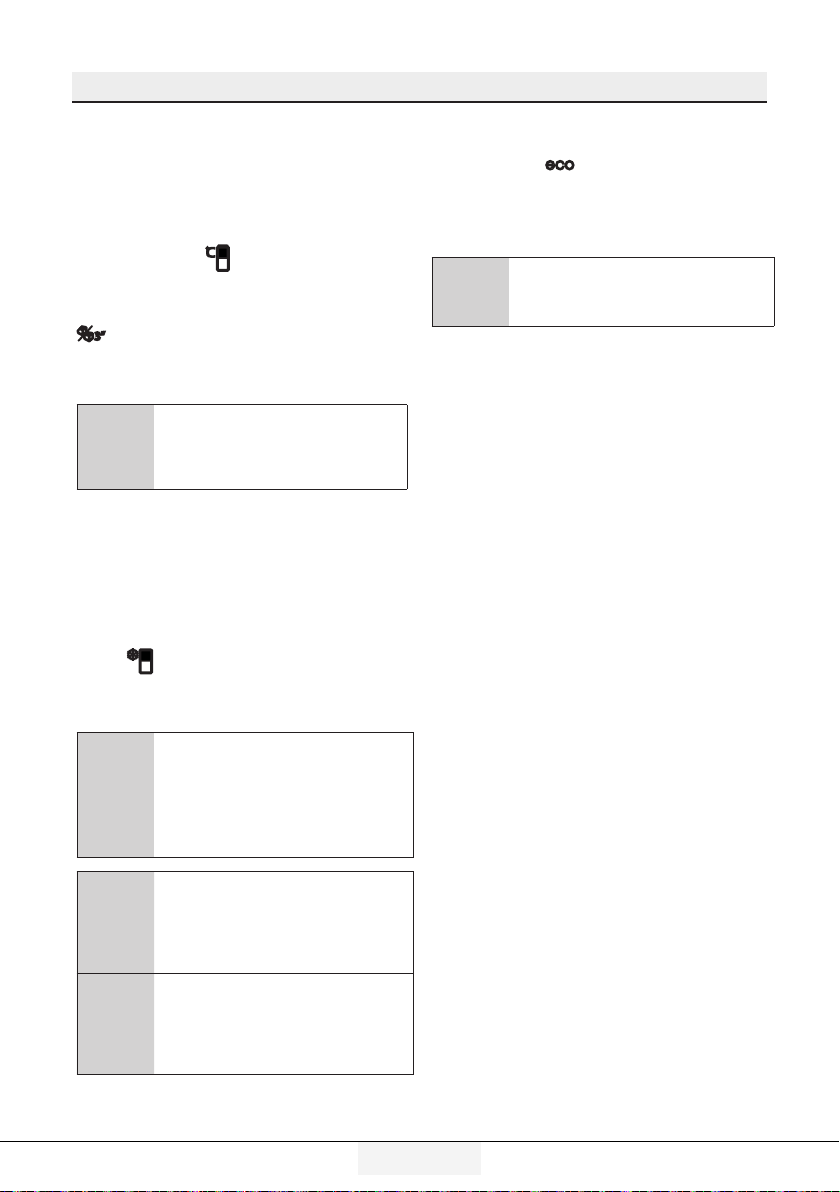
5.2. Rapid freezing
If you want to freeze large amounts of fresh food,
switch the temperature adjustment button to
( ) position before putting the food into the
quick freezing compartment.
It is recommended to keep the button at this
position for 24 hours to freeze maximum amount
of food indicated as the freezing capacity. Pay
special attention not to mix food stolen as frozen
and fresh food.
Remember to switch the temperature adjustment
button back to its previous position.
Refrigerator / User Guide
13/35 EN
Page 15
Using the product
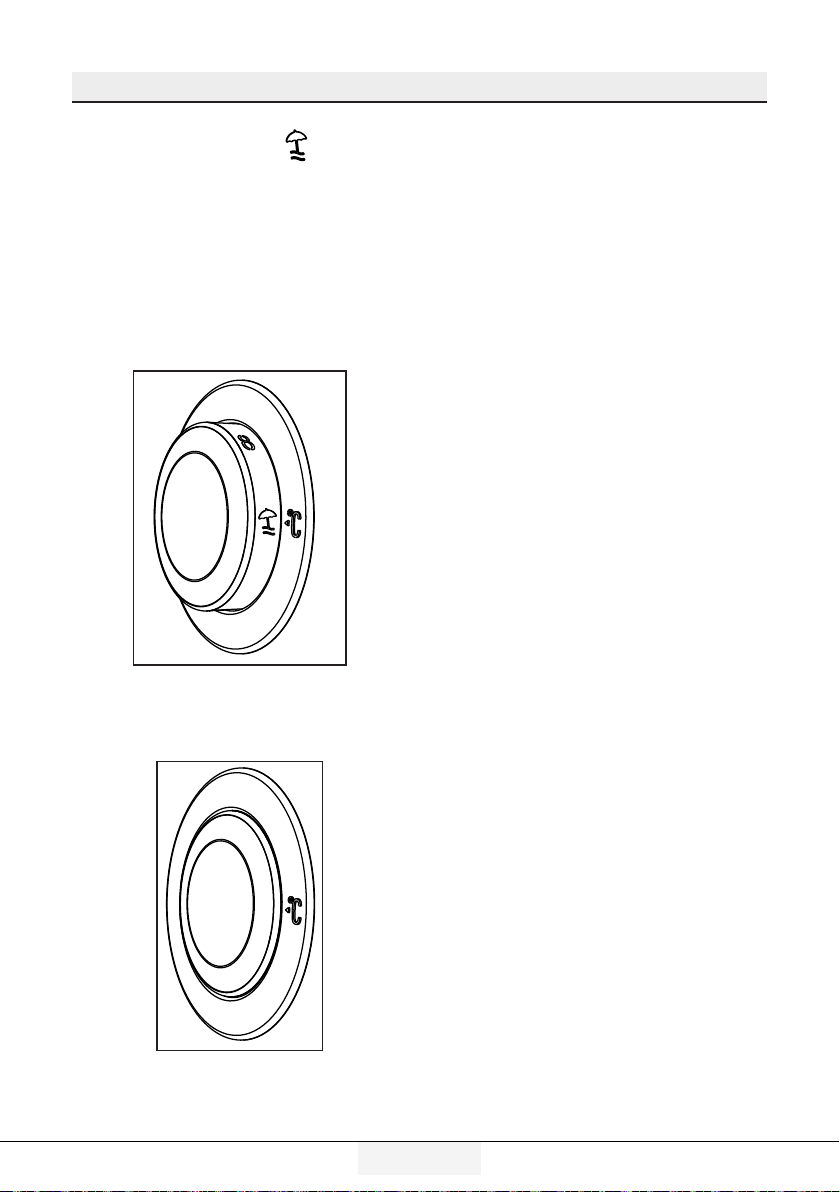
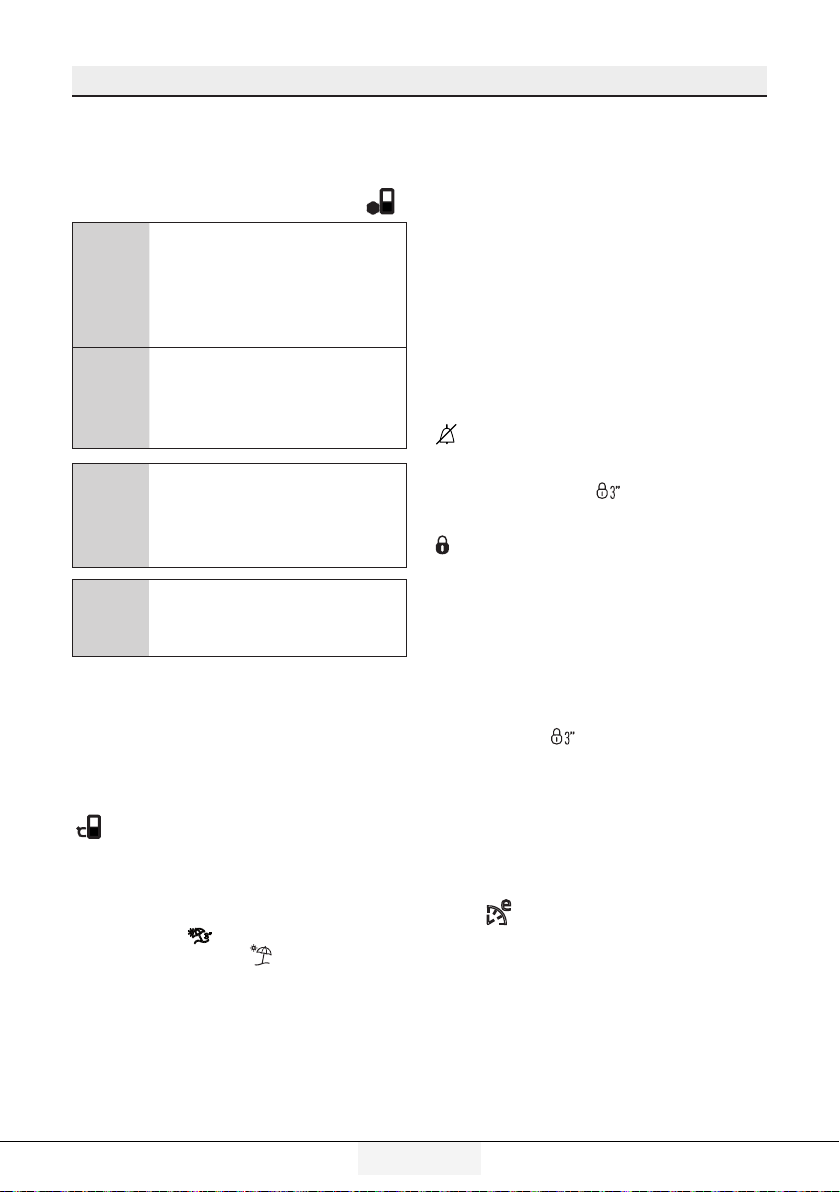
5.3. Vacation function
If doors of the product is not ( ) opened
for at least 12 hours after adjusting the
temperature setting button to the highest,
vacation function is automatically activated.
Button setting must be changed to cancel the
function.
It is not recommended to store food in the
cooler compartment when vacation function is
activated.
• After setting is completed, you can
conceal the temperature setting button by
pressing it inside.
14 /32EN
Refrigerator / User Guide
Page 16
Using the product
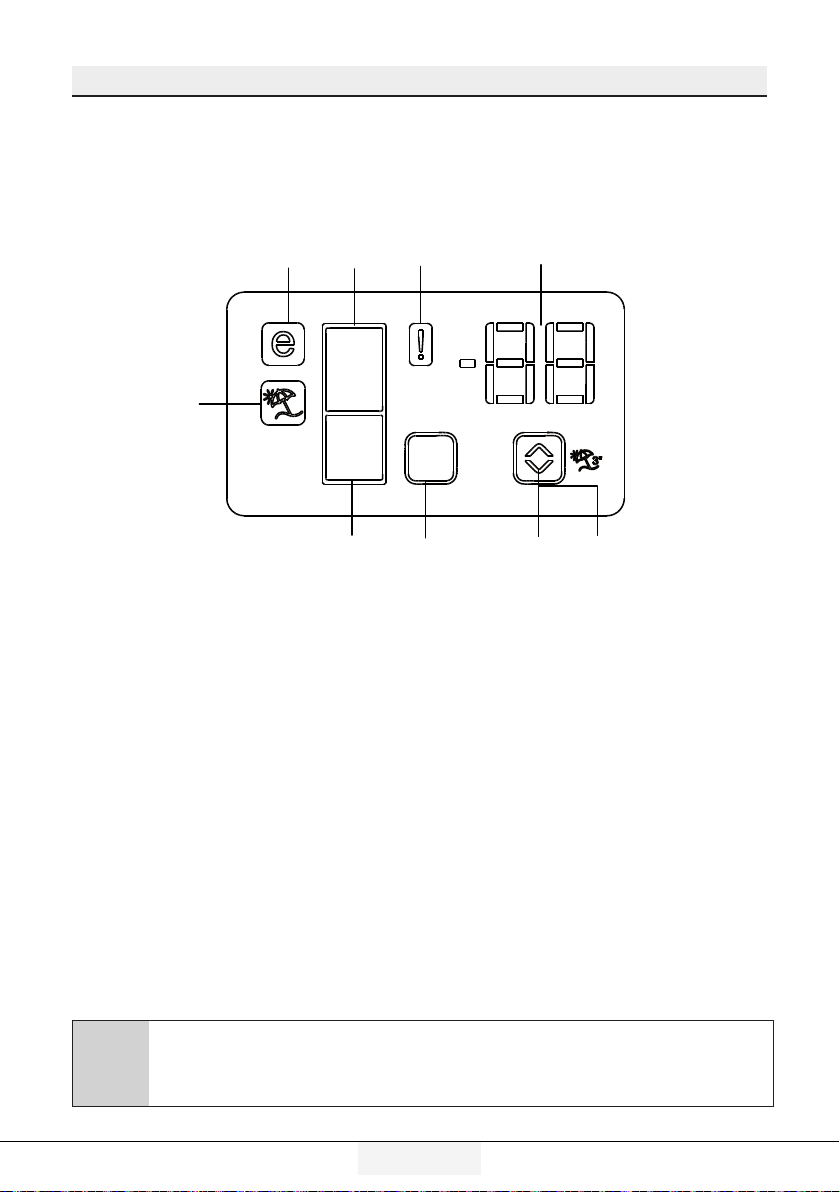
5.4. Indicator panel
Indicator panels may vary according to the product model.
Audio – visual functions on the indicator panel helps you in using your product.
8
1
2
3
9
7
1.
2.
3.
4.
5.
6.
7.
8.
9.
*optional
6
Fridge Compartment Indicator
Error status indicator
Temperature indicator
Vacation function button
Temperature setting button
Compartment selection button
Freezer compartment indicator
Economy mode indicator
Vacation function indicator
45
*Optional: The figures in this user guide are intended as drafts and may not perfectly match
your product. If your product does not comprise the relevant parts, the information pertains to
C
Refrigerator / User Guide
other models.
15/32EN
Page 17

Using the product
1. Fridge compartment indicator
Fridge compartment light is illuminated while
the fridge compartment temperature is set.
2. Error status indicator
If your refrigerator does not perform enough
cooling or in case of a sensor fault, this
indicator is activated. When this indicator
is activated, “E” is displayed on the freezer
compartment temperature indicator, and
numbers such as “1,2,3...” are displayed on
the fridge compartment temperature indicator.
These numbers on the indicator inform service
personnel about the error.
3. Temperature indicator
Indicates freezer, fridge compartment
temperature.
4. Vacation function button
Press on Vacation Button for 3 seconds to
activate this function. When the vacation
function is activated, “- -” is displayed on the
fridge compartment temperature indicator
and no active cooling is performed on the
fridge compartment. It is not suitable to keep
the food in the fridge compartment when this
function is activated. Other compartments
shall be continued to be cooled as per their set
temperature.
To cancel this function press Vacation button
again.
5. Temperature setting button
Changes the temperature of the relevant
compartment between -24°C... -18°C and
8°C...1°C.
6. Compartment selection button
Selection button: Press compartment selection
button to switch between fridge and freezer
compartments.
7. Freezer compartment indicator
Fridge compartment light is illuminated while
the freezer compartment temperature is set.
8. Economy mode indicator
Indicates that the refrigerator operates
in energy saving mode. This display shall
be activated if the freezer compartment
temperature is set to -18°C.
9. Vacation function indicator
Indicates that vacation is activated.
16 /32EN
Refrigerator / User Guide
Page 18
Using the product
3
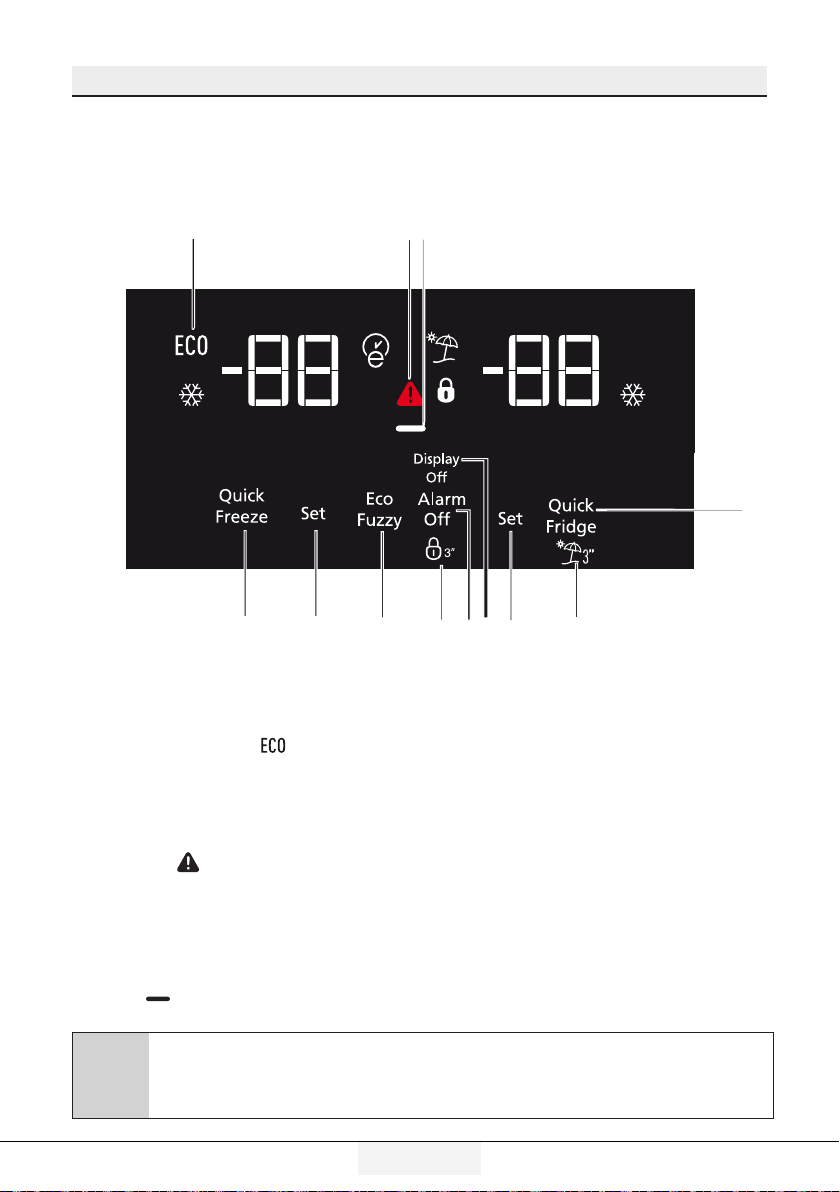
5.5. Indicator panel
Indicator panels may vary according to the product model.
Audio – visual functions on the indicator panel helps you in using your product.
1
11
1. Economy
This symbol is illuminated when the freezer
compartment is set to -18°C’ye as the most
economical setting value ( ). Economy indicator is turned off when quick cooling or quick
freeze functions are selected.
2. Power failure/High temperature / error
warning indicator
This indicator ( ) illuminates during power failure, high temperature failures and error warnings. During sustained power failures, the highest temperature that the freezer compartment
reaches will flash on the digital display. After
checking the food located in the freezer compartment ( ) press the alarm off button to
clear the warning.
*Optional: The figures in this user guide are intended as drafts and may not perfectly match
your product. If your product does not comprise the relevant parts, the information pertains to
C
other models.
910
2
7.1
7.2
Please refer to “remedies advised for troubleshooting” section on your manual if you observe
that this indicator is illuminated.
3. Energy saving function (display off)
If the product doors are kept closed for a long
time energy saving function is automatically
activated and energy saving symbol is illuminated.When energy saving function is activated,
all symbols on the display other than energy
saving symbol will turn off. When the Energy
Saving function is activated, if any button is
pressed or the door is opened, energy saving
function will be canceled and the symbols on
display will return to normal.
568
4
Refrigerator / User Guide
17/32EN
Page 19
Using the product
4. Quick cool
Quick cooling indicator
( ) is illuminated when quick cooling function
is activated and fridge compartment temperature indicator value is displayed as 1. To cancel
this function press Quick cooling button again.
Quick cooling indicator will turn off and refrigerator will return to its normal settings. Quick
cooling function is canceled automatically in 1
hour if you do not cancel it before. If you want
to cool large amounts of fresh food, press the
Quick cooling button before putting the food
into the fridge compartment.
5. Vacation function
In order to activate vacation function, press the
button no. (4) ( ) for 3 seconds, and the vacation mode indicator activates. When the vacation function is activated, “- -” is displayed
on the fridge compartment temperature indicator and no active cooling is performed on
the fridge compartment. It is not suitable to
keep the food in the fridge compartment when
this function is activated. Other compartments
shall be continued to be cooled as per their set temperature.To cancel this function press
Vacation function button again.
6. Fridge compartment temperature setting
When the button no. (5) is pressed, you may
set the temperature of the fridge compartment
to 8,7,6,5,4,3,2 and 1 respectively ( ).
7.1. Energy saving function (display off):
Energy saving symbol ( ) is illuminated and
Energy saving function is activated when you
press this button ( ). When energy saving
function is activated, all symbols on the display
other than energy saving symbol will turn off.
When the Energy Saving function is activated,
if any button is pressed or the door is opened,
energy saving function will be canceled and
the symbols on display will return to normal.
Energy saving symbol is turned off and energy
saving function is deactivated when you press
this button ( ) again.
7.2.Alarm off warning:
In case of power failure/high temperature
alarm, after checking the food located in the
freezer compartment press the alarm off button
to clear the warning.
8. Key lock
Press key lock button ( ) simultaneously for
3 seconds. Key lock symbol ( ) will light up
and key lock mode will be activated. Buttons
will not function if the Key lock mode is active.
Press key lock button simultaneously for 3 seconds again. Key lock symbol will turn off and
the key lock mode will be exited.
Press the key lock button if you want to pre-
vent changing of the temperature setting of the
refrigerator ( ).
9. Eco fuzzy
Press and hold eco fuzzy button for 1 seconds
to activate eco fuzzy function. Refrigerator will
start operating in the most economic mode at
least 6 hours later and the economic usage indicator will turn on when the function is active
( ). Press and hold eco fuzzy function button
for 3 seconds to deactivate eco fuzzy function.
This indicator is illuminated after 6 hours when
eco fuzzy is activated.
10. Freezer compartment temperature
setting
Temperature setting for freezer compartment
is performed here. When button no. 9 is pressed, you may set the temperature of the freezer compartment to -18, -19, -20, -21, -22,
-23 and -24 respectively.
11. Fast freeze
Press button no. (10) for fast freeze operation,
quick freeze indicator
( ) shall be activated.
Quick freeze indicator is illuminated when quick freeze function is activated and fridge compartment temperature indicator is displayed as
-27. To cancel this function press quick freeze
button ( ) again.
18 /32EN
Refrigerator / User Guide
Page 20

Using the product
Quick freeze indicator will turn off and refrigerator will return to its normal settings. Quick
freeze function is canceled automatically in 24
hour if you do not cancel it before. If you want
to freeze large amounts of fresh food, press the
quick freeze button before putting the food into
the freezer compartment.
Refrigerator / User Guide
19/32EN
Page 21
Using the product
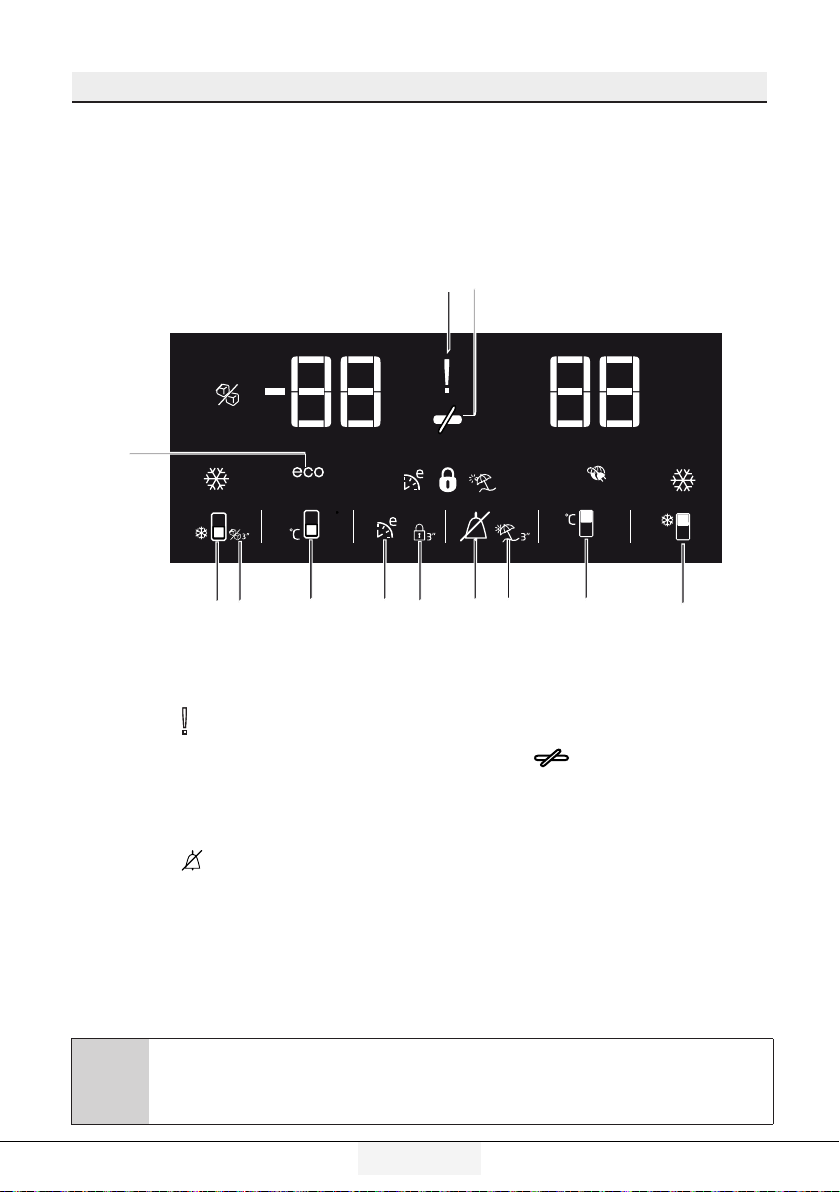
5.6. Indicator panel
Indicator panel allows you to set the temperature and control the other functions related to the
product without opening the door of the product. Just press the inscriptions on relevant buttons for
function settings.
1 2
12
*10
11
1. Power failure/High temperature / error
warning indicator
This indicator ( ) illuminates during power failure,
high temperature failures and error warnings.
During sustained power failures, the highest
temperature that the freezer compartment
reaches will flash on the digital display. After
checking the food located in the freezer
compartment ( ) press the alarm off button to
clear the warning.
Please refer to "remedies advised for
troubleshooting" section on your manual if you
observe that this indicator is illuminated.
*Optional: The figures in this user guide are intended as drafts and may not perfectly match
your product. If your product does not comprise the relevant parts, the information pertains to
C
other models.
20 /32EN
6
789
2. Energy saving function (display off):
If the product doors are kept closed for a long
time energy saving function is automatically
activated and energy saving symbol is
illuminated. ( )
When energy saving function is activated,
all symbols on the display other than energy
saving symbol will turn off. When the Energy
Saving function is activated, if any button is
pressed or the door is opened, energy saving
function will be canceled and the symbols on
display will return to normal.
Energy saving function is activated during
delivery from factory and cannot be canceled.
45
Refrigerator / User Guide
3
Page 22
Using the product
3.Quick fridge function
The button has two functions. To activate or
deactivate the quick cool function press it
briefly. Quick Cool indicator will turn off and the
product will return to its normal settings. ( )
Use quick cooling function when you
want to quickly cool the food placed
C
C
C
C
4. Fridge compartment temperature
setting button
Press this button to set the temperature of the
fridge compartment to 8, 7,6, 5,4,3, 2, 8...
respectively. Press this button to set the fridge
compartment temperature to the desired value.
( )
5.Vacation Function
In order to activate vacation function, press
the this button ( ) for 3 seconds, and the
vacation mode indicator ( ) will be activated.
When the vacation function is activated,
in the fridge compartment. If you want
to cool large amounts of fresh food,
activate this function before putting the
food into the product.
If you do not cancel it, quick cooling
will cancel itself automatically after 8
hours or when the fridge compartment
reaches to the required temperature.
If you press the quick cooling button
repeatedly with short intervals, the
electronic circuit protection will be
activated and the compressor will not
start up immediately.
This function is not recalled when
power restores after a power failure.
“- -” is displayed on the fridge compartment
temperature indicator and no active cooling
is performed on the fridge compartment. It
is not suitable to keep the food in the fridge
compartment when this function is activated.
Other compartments shall be continued to be
cooled as per their set temperature.
To cancel this function press Vacation
function button again.
6. Alarm off warning:
In case of power failure/high temperature
alarm, after checking the food located in the
freezer compartment press the alarm off button
( ) to clear the warning.
7. Key lock
Press key lock button ( ) simultaneously for
3 seconds. Key lock symbol
( ) will light up and key lock mode will be
activated. Buttons will not function if the Key
lock mode is active. Press key lock button
simultaneously for 3 seconds again. Key lock
symbol will turn off and the key lock mode will
be exited.
Press the key lock button if you want to
prevent changing of the temperature setting of
the refrigerator ( ).
8. Eco fuzzy
Press and hold eco fuzzy button for 1 seconds
to activate eco fuzzy function. Refrigerator will
start operating in the most economic mode at
least 6 hours later and the economic usage
indicator will turn on when the function is
active ( ). Press and hold eco fuzzy function
button for 3 seconds to deactivate eco fuzzy
function.
This indicator is illuminated after 6 hours when
eco fuzzy is activated.
Refrigerator / User Guide
21/32EN
Page 23
Using the product
9. Freezer compartment temperature
setting button
Press this button to set the temperature of the
freezer compartment to -18,-19,-20,-21, -22,
-23,-24, -18... respectively. Press this button
to set the freezer compartment temperature to
the desired value.( )
10. Icematic off indicator
Indicates whether the icematic is on or off. (
)If On, then the icematic is not operating.
To operate the icematic again press and hold
the On-Off button for 3 seconds.
Water flow from water tank will
stop when this function is selected.
C
11. Quick freeze function button/ icematic
on-off button
Press this button to activate or deactivate the
quick freezing function. When you activate
the function, the freezer compartment will be
cooled to a temperature lower than the set
value. ( )
To turn on and off the icematic press and hold
it for 3 seconds.
C
However, ice made previously can be
taken from the icematic.
Use the quick freeze function when you
want to quickly freeze the food placed
in fridge compartment. If you want to
freeze large amounts of fresh food,
activate this function before putting the
food into the product.
12. Economic usage indicator
Indicates that the product is running in energyefficient mode. ( )This indicator will be
active if the Freezer Compartment temperature
is set to -18 or the energy efficient cooling is
being performed due to Eco-Extra function.
Economic usage indicator is turned
off when quick cooling or quick freeze
C
functions are selected.
C
C
If you do not cancel it, Quick Freeze
will cancel itself automatically after 4
hours or when the fridge compartment
reaches to the required temperature.
This function is not recalled when
power restores after a power failure.
22 /32EN
Refrigerator / User Guide
Page 24
Using the product
5.7. Ice bucket
(Optional)
• Take the ice bucket from the freezer
compartment.
• Fill the ice bucket with water.
• Place the ice bucket into the freezer
compartment.
• The ice will be ready after approximately
two hours. Take the ice bucket from
the freezer compartment and bend in
sightly over the holder that you are going
to serve. Ice will easily pour into
the serving holder.
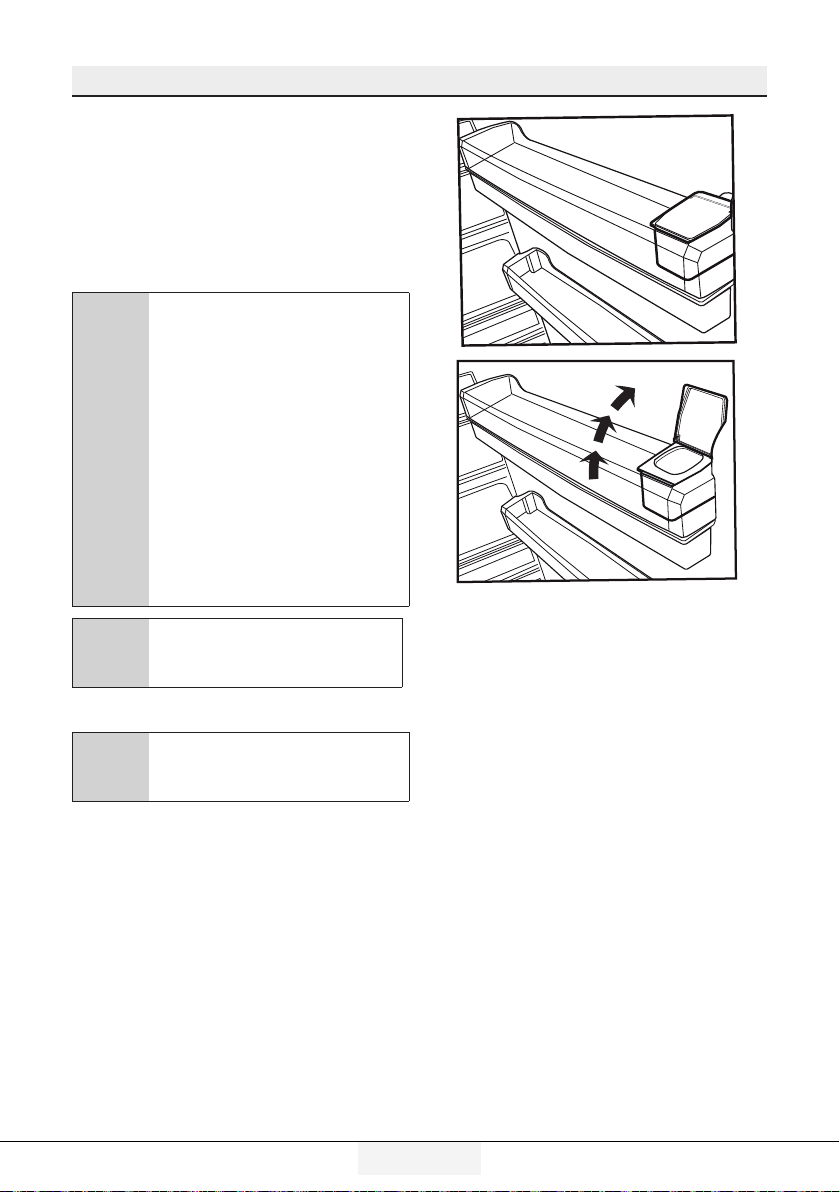
5.8. Eggholder
You can put the eggholder on the door or body
rack of your choice. If you decide to put it on the
body rack, it is recommended to prefer the shelves
below as they are colder.
Do not put the eggholder into the
A
freezer compartment.
5.9. Fan
Fan was designed to distribute circulate the
cold air inside your refrigerator homogeneously.
Operating time of the fan might vary depending
the features of your product.
While in some products fan only operates with
compressor, in others control system determines the operating time based on the need
for cooling.
5.10. Vegetable bin
(Optional)
Product’s vegetable bin is designed to keep
vegetables fresh by preserving humidity. For
this purpose, the overall cold air circulation is
intensified in the vegetable bin.
5.11. Zero degree compartment
(Optional)
Use this compartment to keep delicatessen
at lower temperatures or meat products for
immediate consumption.
Zero degree compartment is the coolest place
where foods such as dairy products, meat,
fish and chicken can be stored in ideal storage
conditions. Vegetables and/or fruits should not
be stored in this compartment.
Refrigerator / User Guide
23/32EN
Page 25
Using the product
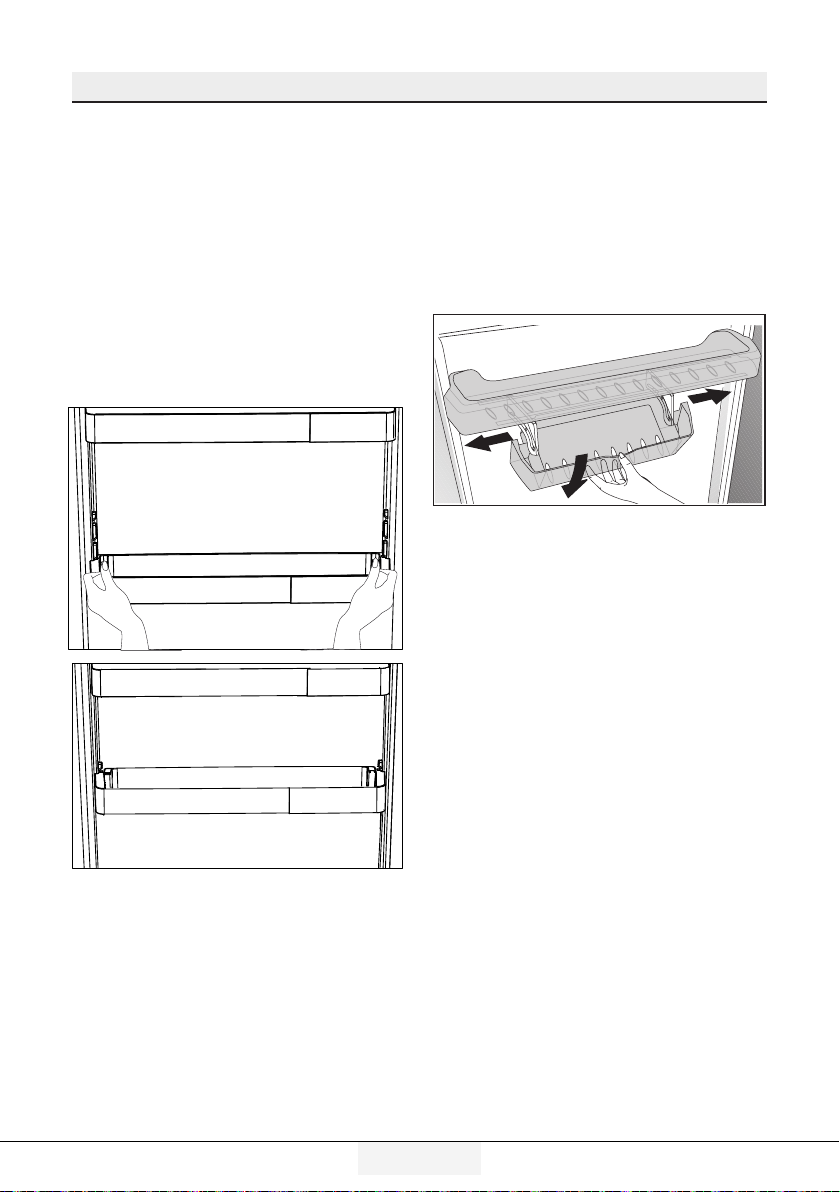
5.12. Moving door rack
(Optional)
Moving door rack can be fixed in 3 different
positions.
In order to move the rack, push the buttons
on the side evenly. Rack will be movable.
Move the rack up or down.
When the rack is in the position that you
want, release the buttons. Rack will be
fixed again in the position where you have
released the buttons.
5.13. Sliding storage box
(Optional)
This accessory has been designed to increase
the usage volume of the door racks.
Thanks to its ability to move sideways, it
enables you to easily place long bottle, jar or
boxes that you put in the bottle rack below.
24 /32EN
Refrigerator / User Guide
Page 26

Using the product
5.14. Moisture controlled
vegetable bin
(Optional)
With moisture control feature, moisture rates
of vegetables and fruits are kept under control
and ensures a longer freshness period for
foods.
It is recommended to store leafed vegetables
such as lettuce and spinach and similar
vegetables prone to moisture loss not on
their roots but in horizontal position into the
vegetable bin as much as possible.
When placing the vegetables, place heavy and
hard vegetables at the bottom and light and
soft ones on the top, taking into account the
specific weights of vegetables.
Do not leave vegetables in the vegetable bin
in plastic bags. Leaving them in plastic bags
causes vegetables to rot in a short time. In
situations where contact with other vegetables
is not preferred, use packaging materials such
as paper that has a certain porosity in terms of
hygiene.
Do not put fruits that have a high ethylene gas
production such as pear, apricot, peach and
particularly apple in the same vegetable bin
with other vegetables and fruits. The ethylene
gas coming out of these fruits might cause
other vegetables and fruits to mature faster
and rot in a shorter period of time.
5.15. Automatic ice machine
(Optional)
Automatic ice machine enables you to easily
make ice in your refrigerator. In order to obtain
ice from the ice machine, take out the water
tank in the cooler compartment, fill it with
water and fix it back.
First ice will be ready in about 2 hours in the
ice machine drawer in the cooler compartment.
After placing the full water tank, you can obtain
about 60-70 cubes of ice until it is fully empty.
If the water in the tank has waited for 2-3
weeks, it should be changed.
In products with automatic ice
machine, you might hear a sound
C
when pouring the ice. This sound is
normal and is not a sign of failure.
Refrigerator / User Guide
25/32EN
Page 27
Using the product
5.16. Icematic and ice
storage container
*optional
Using the Icematic
Fill the Icematic with water and place it into its
seat. Your ice will be ready approximately in
two hours. Do not remove the Icematic from its
seating to take ice.
Turn the knobs on the ice reservoirs clockwise
by 90 degrees.
Ice cubes in the reservoirs will fall down into
the ice storage container below.
You may take out the ice storage container and
serve the ice cubes.
If you wish, you may keep the ice cubes in the
ice storage container.
Ice storage container
Ice storage container is only intended for
accumulating the ice cubes. Do not put water
in it. Otherwise, it will break.
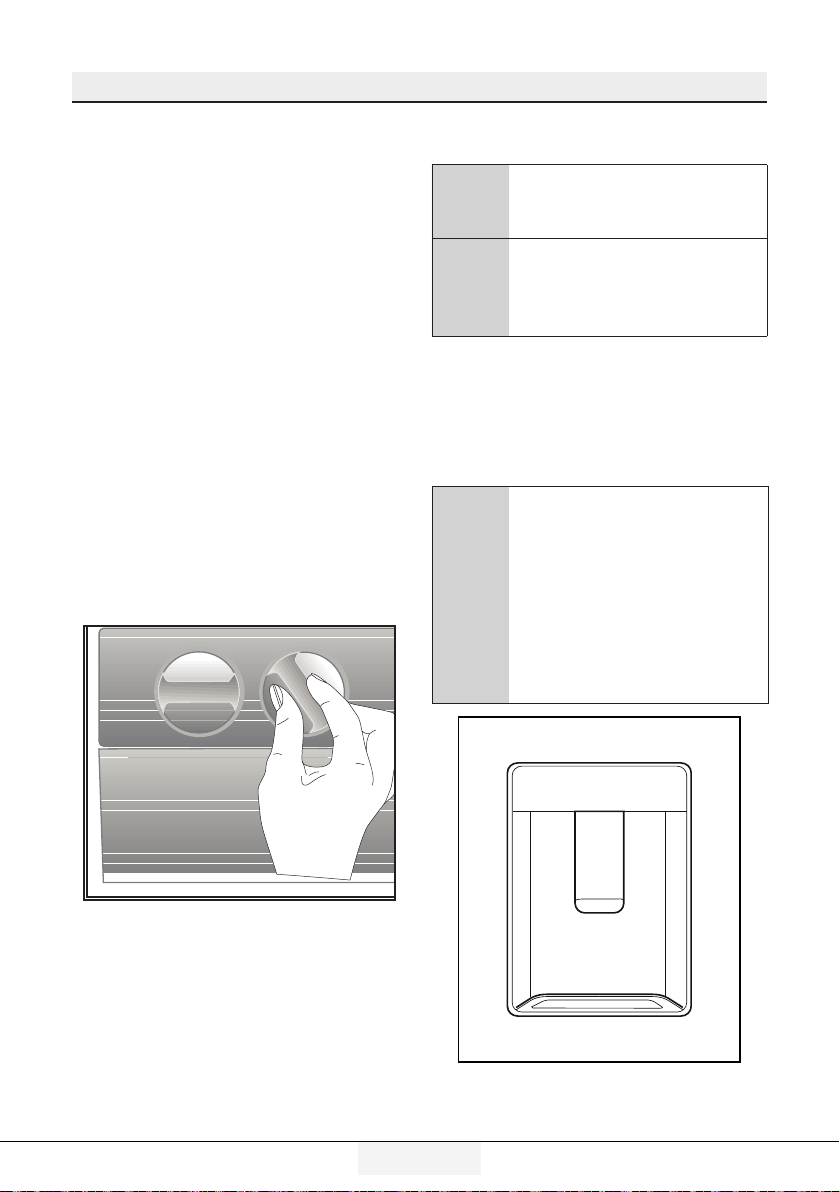
5.17. Using the water dispenser
*optional
It is normal for the first few glasses
C
C
1. Push in the lever of the water dispenser with
your glass. If you are using a soft plastic
cup, pushing the lever with your hand will be
easier.
2. After filling the cup up to the level you want,
release the lever.
C
of water taken from the dispenser
to be warm.
If the water dispenser is not used
for a long period of time, dispose
of first few glasses of water to
obtain fresh water.
Please note, how much water
flows from the dispenser depends
on how far you depress the lever.
As the level of water in your cup
/ glass rises, gently reduce the
amount of pressure on the lever to
avoid overflow. If you slightly press
the arm, the water will drip; this is
quite normal and not a failure.
26 /32EN
Refrigerator / User Guide
Page 28
Using the product
5.18. Filling the water
dispenser's tank
Water tank filling reservoir is located inside the
door rack.
1. Open the cover of the tank.
2. Fill the tank with fresh drinking water.
3. Close the cover.
Do not fill the water tank with
C
any other liquid except for water
such as fruit juices, carbonated
beverages or alcoholic drinks
which are not suitable to use
in the water dispenser. Water
dispenser will be irreparably
damaged if these kinds of liquids
are used. Warranty does not cover
such usages. Some chemical
substances and additives contained
in these kinds of drinks/liquids may
damage the water tank.
Use clean drinking water only.
C
Capacity of the water tank is 3
C
Refrigerator / User Guide
litres; do not overfill.
27/32EN
Page 29

Using the product
5.19. Cleaning the water tank
1. Remove the water filling reservoir inside the
door rack.
2. Remove the door rack by holding from both
sides.
3. Grab the water tank from both sides and remove it with an angle of 45°C.
4. Remove the cover of the water tank and clean the tank.
Components of the water tank
C
and water dispenser should not be
washed in dishwasher.
28 /32EN
Refrigerator / User Guide
Page 30
Using the product
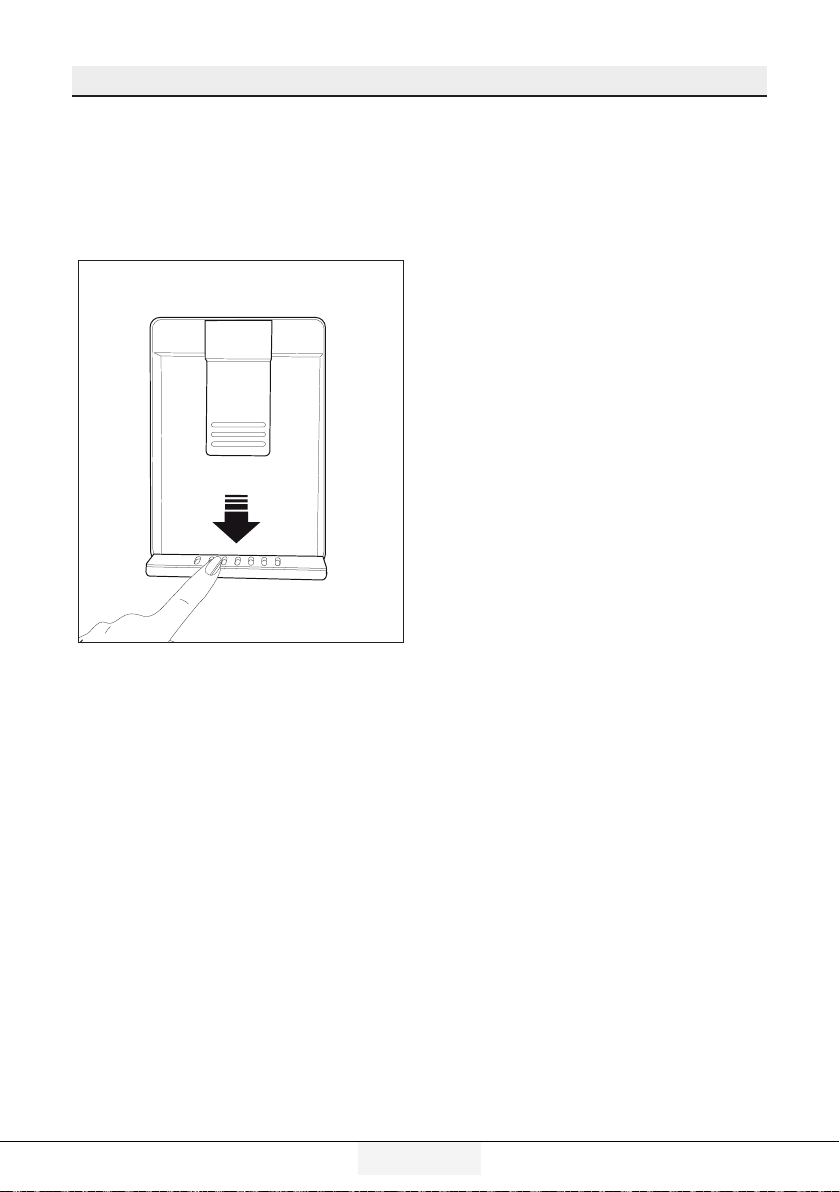
5.20. Drip tray
Water that dripped while using the water
dispenser accumulates in the spillage tray.
Remove the plastic filter as shown in the figure.
With a clean and dry cloth, remove the water
that has accumulated.
Refrigerator / User Guide
29/32EN
Page 31

Using the product
5.21. Freezing fresh food
• To preserve food quality, the food items
placed in the freezer compartment must be
frozen as quickly as possible, use the rapid
freezing for this.
• Freezing the food items when fresh will
extend the storage time in the freezer
compartment.
• Pack the food items in air-tight packs and
seal tightly.
• Make sure the food items are packed
before putting in the freezer. Use freezer
holders, tinfoil and damp-proof paper,
plastic bag or similar packaging materials
instead of traditional packaging paper.
Ice in the freezing compartment thaws
C
automatically.
• Mark each food pack by writing the date on
the package before freezing. This will allow
you to determine the freshness of each
pack every time the freezer is opened. Keep
the earlier food items in the front to ensure
they are used first.
• Frozen food items must be used
immediately after defrosting and should not
be frozen again.
• Do not free large quantities of food at once.
5.22. Recommendations for
storing frozen foods
The compartment must be set to at least
-18°C.
1. Place the food items in the freezer as
quickly as possible to avoid defrosting.
2. Before freezing, check the “Expiry Date” on
the package to make sure it is not expired.
3. Make sure the food’s packaging is not
damaged.
Freezer
Compartment
Temperature
Setting
-18°C 4°C This is the default, recommended setting.
-20,-22 or
-24°C
Quick Freeze 4°C
-18°C or colder 2°C
Cooler
Compartment
Temperature
Setting
4°C
Details
These settings are recommended for ambient temperatures
exceeding 30°C.
Use when you want to freeze your food in a short time. When the
process ends, the product will regain its position.
Use these settings if you believe the cooler compartment is not cold
enough due to ambient temperature or frequently opening the door.
30 /32EN
Refrigerator / User Guide
Page 32

Using the product
5.23. Deep freezer details
As per the IEC 62552 standards, the freezer
must have the capacity to freeze 4,5 kg of
food items at -18°C or lower temperatures
in 24 hours for each 100 litres of freezer
compartment volume.
Food items can only be preserved for extended
periods at or below temperature of -18°C .
You can keep the foods fresh for months (in
deep freezer at or below temperatures of 18°C
).
The food items to be frozen must not contact
the already-frozen food inside to avoid partial
defrosting.
Boil the vegetables and filter the water to
extend the frozen storage time. Place the food
in air-tight packages after filtering and place in
the freezer. Bananas, tomatoes, lettuce, celery,
boiled eggs, potatoes and similar food items
should not be frozen. In case this food rots,
only nutritional values and eating qualities will
be negatively affected. A rotting threatening
human health is not in question.
5.24. Placing the food
Freezer
compartment
shelves
Cooler
compartment
shelves
Cooler
compartment
door shelves
Vegetable bin Fruits and vegetables
Fresh food
compartment
Various frozen goods including
meat, fish, ice cream,
vegetables etc.
Food items inside pots, capped
plate and capped cases, eggs
(in capped case)
Small and packed food or
beverages
Delicatessen (breakfast food,
meat products to be consumed
in short notice)
5.25. Door open alert
(Optional)
An audible alert will be heard if the product's
door remains open for at least 1 minute. The
audible alert will stop when the door is closed
or any button on the display (if available) is
pressed.
Door open alert is indicated to the user both
audibly and visually. Interior lighting will turn of
if the warning continues for 10 min.
5.26. Changing the opening
direction of the door
You can change the direction of opening of
your refrigerator depending on the location
where you use it. When you need this, consult
the closest Authorized Service.
The explanation above is a general statement.
You should check the warning tag located inside the product package about the changeability of direction of the door.
5.27. Interior light
Interior light uses a LED type lamp. Contact the
authorized service for any problems with this
lamp.
Lamp(s) used in this appliance cannot be used
for house lighting. Intended use of this lamp is
to help the user place food into the refrigerator
/ freezer safely and comfortably.
Refrigerator / User Guide
31/32EN
Page 33

6 Maintenance and cleaning
Service life of the product is increase if it is
regularly cleaned
WARNING: First unplug the product
B
•
•
•
•
•
• Do not use sharp, abrasive tools, soap,
6.1. Avoiding bad odors
Materials that may cause odor are not used in
the production of our appliances. However, due
to inappropriate food preserving conditions and
not cleaning the inner surface of the appliance as
required can bring forth the problem of odor.
Therefore, clean the refrigerator with carbonate
dissolved in water every 15 days.
•
before cleaning your refrigerator.
Never use any sharp and abrasive tools, soap,
household cleaners, detergent and wax polish
for cleaning.
Dissolve one teaspoon of carbonate in half liter
of water. Soak a cloth with the solution and
wrung it thoroughly. Wipe the interior of the
appliance with this cloth and the dry thoroughly.
Make sure that no water enters the lamp
housing and other electrical items.
Clean the door with a damp cloth. To remove
door and body shelves, remove all of its
contents. Remove door shelves by moving them
upwards. After cleaning, slide them from top to
bottom to install.
Never use cleaning agents or water that
contain chlorine to clean the outer surfaces and
chromium coated parts of the product. Chlorine
causes corrosion on such metal surfaces.
household cleaning agents, detergents,
kerosene, fuel oil, varnish etc. to prevent
removal and deformation of the prints on the
plastic part. Use lukewarm water and a soft
cloth for cleaning and then wipe it dry.
Keep the food in closed containers.
Microorganisms spreading out from uncovered
containers can cause unpleasant odours.
•
Never keep the food that have expired best
before dates and spoiled in the refrigerator.
6.2. Protecting the plastic surfaces
Clean with arm water immediately as the oil may
cause damage on the surface when it is poured on
plastic surfaces.
6.3. Door Glasses
Remove the protective foil on the glasses.
There is a coating on the surface of the glasses.
This coating minimizes the stain build-up and
helps to remove the possible stains and dirt
easily.Glasses that are not protected with such a
coating may be subject to persistent binding of air
or water based organic or inorganic dirt such as
limescale, mineral salts, unburned hydrocarbons,
metal oxides and silicones that can easily and
quickly cause stains or material damage. Keeping
the glass clean becomes too difficult despite the
regular cleaning. Consequently, the appearance
and the transparency of the glass deteriorates.
Harsh and corrosive cleaning methods and
compounds will intensify these defects and speed
up the deterioration process.
Water-based cleaning products that are not
alkaline and corrosive must be used for regular
cleaning purposes.
Non-alkaline and non-corrosive materials must
be used for cleaning so that the service life of this
coating lasts for a long time.
These glasses are tempered to increase their
durability against impacts and breaking.A safety
film is also applied to their rear surfaces as an
extra safety measure in order to prevent them from
causing damage to their surrounding in case of a
breakage.
*Alkali is a base that forms hydroxide ions (OH¯)
when it is dissolved in water.
Li (Lithium), Na (Sodium), K (Potassium) Rb
(Rubidium), Cs (Cesium) and artificial and
radioactive Fr (Fan-sium) metals are called ALKALI
METALS.
32 /35 EN
Refrigerator / User Guide
Page 34

7 Troubleshooting
Check this list before contacting the service. Doing so will save you time and money. This list includes
frequent complaints that are not related to faulty workmanship or materials. Certain features mentioned
herein may not apply to your product.
The refrigerator is not working.
• The power plug is not fully settled. >>> Plug it in to settle completely into the socket.
• The fuse connected to the socket powering the product or the main fuse is blown. >>> Check the
fuses.
Condensation on the side wall of the cooler compartment (MULTI ZONE, COOL, CONTROL and FLEXI ZONE).
• The environment is too cold. >>> Do not install the product in environments with temperatures
below -5°C.
• The door is opened too frequently >>> Take care not to open the product’s door too frequently.
• The environment is too humid. >>> Do not install the product in humid environments.
• Foods containing liquids are kept in unsealed holders. >>> Keep the foods containing liquids in
sealed holders.
• The product’s door is left open. >>> Do not keep the product’s door open for long periods.
• The thermostat is set to too low temperature. >>> Set the thermostat to appropriate temperature.
Compressor is not working.
• In case of sudden power failure or pulling the power plug off and putting back on, the gas pressure
in the product’s cooling system is not balanced, which triggers the compressor thermic safeguard.
The product will restart after approximately 6 minutes. If the product does not restart after this
period, contact the service.
• Defrosting is active. >>> This is normal for a fully-automatic defrosting product. The defrosting is
carried out periodically.
• The product is not plugged in. >>> Make sure the power cord is plugged in.
• The temperature setting is incorrect. >>> Select the appropriate temperature setting.
• The power is out. >>> The product will continue to operate normally once the power is restored.
The refrigerator's operating noise is increasing while in use.
• The product’s operating performance may vary depending on the ambient temperature variations.
This is normal and not a malfunction.
The refrigerator runs too often or for too long.
• The new product may be larger than the previous one. Larger products will run for longer periods.
• The room temperature may be high. >>> The product will normally run for long periods in higher
room temperature.
• The product may have been recently plugged in or a new food item is placed inside. >>> The
product will take longer to reach the set temperature when recently plugged in or a new food item
is placed inside. This is normal.
• Large quantities of hot food may have been recently placed into the product. >>> Do not place hot
food into the product.
• The doors were opened frequently or kept open for long periods. >>> The warm air moving inside
will cause the product to run longer. Do not open the doors too frequently.
• The freezer or cooler door may be ajar. >>> Check that the doors are fully closed.
• The product may be set to temperature too low. >>> Set the temperature to a higher degree and
wait for the product to reach the adjusted temperature.
• The cooler or freezer door washer may be dirty, worn out, broken or not properly settled. >>>
Clean or replace the washer. Damaged / torn door washer will cause the product to run for longer
periods to preserve the current temperature.
Refrigerator / User Guide
33/35 EN
Page 35

Troubleshooting
The freezer temperature is very low, but the cooler temperature is adequate.
• The freezer compartment temperature is set to a very low degree. >>> Set the freezer
compartment temperature to a higher degree and check again.
The cooler temperature is very low, but the freezer temperature is adequate.
• The cooler compartment temperature is set to a very low degree. >>> Set the freezer
compartment temperature to a higher degree and check again.
The food items kept in cooler compartment drawers are frozen.
• The cooler compartment temperature is set to a very low degree. >>> Set the freezer
compartment temperature to a higher degree and check again.
The temperature in the cooler or the freezer is too high.
• The cooler compartment temperature is set to a very high degree. >>> Temperature setting of the
cooler compartment has an effect on the temperature in the freezer compartment. Wait until the
temperature of relevant parts reach the sufficient level by changing the temperature of cooler or
freezer compartments.
• The doors were opened frequently or kept open for long periods. >>> Do not open the doors too
frequently.
• The door may be ajar. >>> Fully close the door.
• The product may have been recently plugged in or a new food item is placed inside. >>> This is
normal. The product will take longer to reach the set temperature when recently plugged in or a
new food item is placed inside.
• Large quantities of hot food may have been recently placed into the product. >>> Do not place hot
food into the product.
Shaking or noise.
• The ground is not level or durable. >>> If the product is shaking when moved slowly, adjust
the stands to balance the product. Also make sure the ground is sufficiently durable to bear the
product.
• Any items placed on the product may cause noise. >>> Remove any items placed on the product.
The product is making noise of liquid flowing, spraying etc.
• The product’s operating principles involve liquid and gas flows. >>> This is normal and not a
malfunction.
There is sound of wind blowing coming from the product.
• The product uses a fan for the cooling process. This is normal and not a malfunction.
There is condensation on the product's internal walls.
• Hot or humid weather will increase icing and condensation. This is normal and not a malfunction.
• The doors were opened frequently or kept open for long periods. >>> Do not open the doors too
frequently; if open, close the door.
• The door may be ajar. >>> Fully close the door.
There is condensation on the product's exterior or between the doors.
• The ambient weather may be humid, this is quite normal in humid weather. >>> The condensation
will dissipate when the humidity is reduced.
The interior smells bad.
34 /35 EN
Refrigerator / User Guide
Page 36

Troubleshooting
• The product is not cleaned regularly. >>> Clean the interior regularly using sponge, warm water and
carbonated water.
• Certain holders and packaging materials may cause odour. >>> Use holders and packaging materials
without free of odour.
• The foods were placed in unsealed holders. >>> Keep the foods in sealed holders. Micro-organisms
may spread out of unsealed food items and cause malodour. Remove any expired or spoilt foods from the
product.
The door is not closing.
• Food packages may be blocking the door. >>> Relocate any items blocking the doors.
• The product is not standing in full upright position on the ground. >>> Adjust the stands to balance
the product.
• The ground is not level or durable. >>> Make sure the ground is level and sufficiently durable to
bear the product.
The vegetable bin is jammed.
• The food items may be in contact with the upper section of the drawer. >>> Reorganize the food
items in the drawer.
WARNING: If the problem persists after following the instructions in this section, contact
A
your vendor or an Authorised Service. Do not try to repair the product.
Refrigerator / User Guide
35/35 EN
Page 37

Chłodziarka
Instrukcja użytkowania
PL
EWWERQWEW
Page 38

Drogi kliencie,
Chcemy, abyś mógł uzyskać optymalną efektywność naszego produktu, który został wyprodukowany w
nowoczesnym zakładzie i przy drobiazgowej kontroli jakości.
W tym celu prosimy przeczytać całą instrukcję obsługi przed użyciem produktu i przechowywać ją
do ewentualnego użycia w przyszłości. Jeśli ten produkt zostanie przekazany innej osobie, prosimy
przekazać tę instrukcję wraz z produktem.
Instrukcja obsługi zapewnia szybkie i bezpieczne korzystanie z produktu.
• Przed zainstalowaniem i rozpoczęciem korzystania z produktu należy przeczytać instrukcję obsługi.
• Należy zawsze przestrzegać mających zastosowanie instrukcji dotyczących bezpieczeństwa.
• Instrukcję obsługi należy mieć pod ręką, aby móc łatwo z niej korzystać.
• Prosimy przeczytać wszelkie inne dokumenty dostarczane wraz z produktem.
Należy pamiętać, że ta instrukcja obsługi może się odnosić do kilku modeli produktu. W instrukcji zostały
wyraźnie określone różnice między modelami.
Symbole i uwagi
W tej instrukcji obsługi są używane następujące symbole:
Ważne informacje i przydatne
C
wskazówki.
Zagrożenie dla życia i majątku.
A
B
Zagrożenie porażeniem
elektrycznym.
Opakowanie produktu jest wykonane z materiałów umożlwiających
recykling zgodnie z krajowymi
przepisami środowiskowymi.
Page 39

1 Instrukcje dotyczące bezpieczeństwa i
środowiska 3
1.1. Bezpieczeństwo ogólne . . . . . . . . . . . . . . . . 3
1.1.1 Ostrzeżenie HC . . . . . . . . . . . . . . . . . . . . . 5
1.1.2 Dla modeli z wodotryskiem . . . . . . . . . . . . 5
1.2. Przeznaczenie. . . . . . . . . . . . . . . . . . . . . . . 6
1.3. Bezpieczeństwo dzieci. . . . . . . . . . . . . . . . . 6
1.4. Zgodność z dyrektywą WEEE i utylizacja
odpadowego produktu . . . . . . . . . . . . . . . . 7
1.5. Zgodność z dyrektywą RoHS . . . . . . . . . . . . 7
1.6. Informacje o opakowaniu. . . . . . . . . . . . . . . 7
2 Oto Twoja chłodziarka 8
3 Instalacja 9
3.1. Odpowiednie miejsce na instalację. . . . . . . . 9
3.2. Zakładanie klinów plastikowych . . . . . . . . . . 9
3.3. Regulacja nóżek . . . . . . . . . . . . . . . . . . . .10
3.4. Połączenie elektryczne . . . . . . . . . . . . . . . 10
3.5. Przekładanie drzwi . . . . . . . . . . . . . . . . . . 11
3.6. Przekładanie drzwi . . . . . . . . . . . . . . . . . . 12
4 Przygotowanie 13
4.1. Co zrobić, aby oszczędzać energię. . . . . . . 13
4.2. Pierwsze uruchomienie . . . . . . . . . . . . . . . 13
5 Użytkowanie chłodziarki 14
5.1. Przycisk regulacji temperatury. . . . . . . . . . 14
5.2. Szybkie zamrażanie . . . . . . . . . . . . . . . . . 14
5.3. Funkcja Vacation [Wakacje] . . . . . . . . . . . . 15
5.4. Panel wskaźników . . . . . . . . . . . . . . . . . . . 16
5.5. Panel wskaźników . . . . . . . . . . . . . . . . . . . 21
5.6. Pojemnik na lód . . . . . . . . . . . . . . . . . . . .24
5.7. Pojemnik na jajka . . . . . . . . . . . . . . . . . . .24
5.8. Wentylator . . . . . . . . . . . . . . . . . . . . . . . . 24
5.9. Pojemnik na warzywa . . . . . . . . . . . . . . . . 24
5.10. Komora o temperaturze zero . . . . . . . . . . 24
5.11. Ruchomy stelaż na drzwiach . . . . . . . . . . 25
5.12. Pojemnik przesuwany . . . . . . . . . . . . . . . 25
5.13. Pojemnik na warzywa z kontrolą wilgotności 26
5.14. Automatyczna maszyna do lodu . . . . . . . . 26
5.15. Kostkarka do lodu Icematic i pojemnik na
lód . . . . . . . . . . . . . . . . . . . . . . . . . . . . .27
5.16. Korzystanie z dozownika wody . . . . . . . . . 27
5.17. Napełnianie zbiornika dozownika wodą . . . 28
5.18. Czyszczenie zbiornika na wodę . . . . . . . . 29
5.19. Tacka na krople . . . . . . . . . . . . . . . . . . . . 30
5.20. Zamrażanie żywności świeżej . . . . . . . . . .31
5.21. Przechowywanie żywności mrożonej. . . . . 31
5.22. Informacje o komorze głębokiego
zamrażania . . . . . . . . . . . . . . . . . . . . . . .31
5.23. Rozmieszczenie żywności. . . . . . . . . . . . .32
5.24. Alarm o otwartych drzwiach . . . . . . . . . . . 32
5.25. Zmiana kierunku otwierania drzwi. . . . . . . 32
5.26. Oświetlenie wewnętrzne. . . . . . . . . . . . . . 32
6 Konserwacja i czyszczenie 33
6.1. Jak unikać nieprzyjemnych zapachów . . . .33
6.2. Jak zabezpieczać powierzchnie plastykowe. 33
6.3. Szkło w drzwiach . . . . . . . . . . . . . . . . . . . 33
7 Rozwiązywanie problemów 34
2 / 36 PL
Lodówka / Instrukcja obsługi
Page 40

1 Instrukcje dotyczące bezpieczeństwa i środowiska
Ten rozdział zawiera instrukcje
dotyczące bezpieczeństwa
służące unikaniu obrażeń i szkód
materialnych. Nieprzestrzeganie
tych instrukcji spowoduje
unieważnienie wszelkich typów
gwarancji produktu.
1.1. Bezpieczeństwo ogólne
• Produkt nie może być
używany przez osoby z
niepełnosprawnością fizyczną,
czuciową i umysłową, bez
wystarczającej wiedzy i
doświadczenia ani przez
dzieci. Urządzenie może
być używane przez takie
osoby pod nadzorem i z
użyciem wskazówek osoby
odpowiedzialnej za ich
bezpieczeństwo. Dzieciom nie
wolno się bawić urządzeniem.
• W przypadku awarii urządzenie
należy odłączyć od zasilania.
• Po odłączeniu należy odczekać
przynajmniej 5 minut przed
jego ponownym podłączeniem.
Nieużywane urządzenie należy
odłączyć od zasilania. Nie
wolno dotykać wtyczki mokrymi
rękami! Nie wolno ciągnąć za
kabel, aby odłączyć zasilanie,
zawsze należy trzymać za wtyk.
• Przed podłączeniem należy
wytrzeć wtyk zasilania suchą
szmatką.
• Lodówki nie wolno podłączać
do luźnego gniazda.
• Podczas instalacji, konserwacji,
czyszczenia i naprawy produkt
powinien być odłączony.
• Jeśli produkt nie będzie
używany przez dłuższy czas,
odłącz zasilanie i usuń całą
żywność ze środka.
• Do czyszczenia lodówki i
topienia lodu we wnętrzu
nie wolno używać pary ani
parowanych materiałów
czyszczących. Para może trafić
na powierzchnie elektryczne
i spowodować zwarcie lub
porażenie elektryczne!
• Nie wolno myć produktu,
spryskując go lub polewając
wodą! Zagrożenie porażeniem
elektrycznym!
• Nigdy nie korzystaj z
urządzenia, jeśli górna lub tylna
jego część, zawierająca płytki
obwodów drukowanych jest
otwarta (osłona płytki obwodów
drukowanych) (1).
Lodówka / Instrukcja obsługi
3 / 36 PL
Page 41

Instrukcje dotyczące bezpieczeństwa i środowiska
• Jeśli produkt ma oświetlenie
typu LED, w celu wymiany
lub usunięcia problemu
1
należy się skontaktować z
autoryzowanym serwisem.
• Nie wolno dotykać
zamrożonej żywności
mokrymi rękami! Może ona
przymarznąć do rąk!
1
• Do komory zamrażarki nie
wolno wkładać płynów w
butelkach ani w puszkach.
Mogą one wybuchnąć!
• Płyny należy stawiać
• W przypadku awarii
nie wolno używać
produktu, ponieważ
może to spowodować
porażenie elektryczne.
Przed wykonaniem
jakichkolwiek czynności
należy skontaktować się a
autoryzowanym serwisem.
• Produkt należy podłączyć
do uziemionego
gniazdka. Uziemienie
musi być wykonane
przez wykwalifikowanego
elektryka.
pionowo po dokładnym
zamknięciu pokrywki.
• W pobliżu produktu nie
wolno rozpryskiwać
substancji łatwopalnych,
ponieważ mogą się one
zapalić lub wybuchnąć.
• W lodówce nie wolno
przechowywać materiałów
łatwopalnych ani produktów
z gazem łatwopalnym
(aerozoli itp.).
• Na produkcie nie wolno
kłaść pojemników z
płynem. Zalanie wodą
części elektrycznej może
spowodować porażenie
elektryczne i pożar.
4 / 36 PL
Lodówka / Instrukcja obsługi
Page 42

Instrukcje dotyczące bezpieczeństwa i środowiska
• Narażenie produktu na
deszcz, śnieg, bezpośrednie
promienie słoneczne i wiatr
spowoduje zagrożenie
elektryczne. Podczas
przemieszczania produktu
nie wolno ciągnąć za uchwyt
drzwiowy. Uchwyt może nie
wytrzymać.
• Należy uważać, aby uniknąć
jego rurki podczas używania i
przemieszczania produktu. Ten
gaz jest łatwopalny. W razie
uszkodzenia układu chłodzenia
należy trzymać produkt z dala
od źródeł ognia i natychmiast
przewietrzyć pomieszczenie.
Etykieta wewnątrz z lewej
strony wskazuje typ gazu
C
użyty w produkcie.
pochwycenia ręki lub innej
części ciała przez ruchome
części wewnątrz produktu.
• Nie wolno stawać ani opierać
się o drzwi, szuflady ani
podobne części lodówki.
Spowoduje to przewrócenie
produktu i uszkodzenie
części.
• Należy uważać, aby nie
przytrzasnąć kabla zasilania.
1.1.2 Dla modeli z
wodotryskiem
• Maksymalnie dopuszczalne
ciśnienie dla dopływu
zimnej wody wynosi 6,2
bara (90 psi). Jeśli ciśnienie
wody w Państwa instalacji
przekroczy 5,5 bara (80 psi),
należy zastosować zawór
ograniczający ciśnienie w
Państwa sieci wodociągowej.
Jeśli nie wiedzą Państwo
w jaki sposób sprawdzić
ciśnienie wody, prosimy
poprosić o pomoc
profesjonalnego hydraulika.
• Jeśli w Państwa instalacji
1.1.1 Ostrzeżenie HC
Jeśli produkt zawiera układ
chłodzenia używający gazu
R600a, należy uważać, aby nie
uszkodzić układu chłodzenia i
występuje ryzyko uderzenia
wodnego, należy zawsze
stosować wyposażenie
zapobiegające przed
uderzeniem wodnym. Jeśli
Lodówka / Instrukcja obsługi
5 / 36 PL
Page 43

Instrukcje dotyczące bezpieczeństwa i środowiska
nie mają Państwo pewności
co do występowania efektu
uderzenia wodnego w swojej
instalacji, prosimy zasięgnąć
porady u profesjonalnego
hydraulika.
• Nie podłączać do dopływu
ciepłej wody. Zachować
środki ostrożności przed
ryzykiem zamarznięcia
przewodów. Temperatura
robocza wody powinna
mieścić się w zakresie
od 0,6°C (33°F) do 38°C
(100°F).
• Należy używać tylko wody
pitnej.
1.2. Przeznaczenie
• Ten produkt jest
przeznaczony do użytku
domowego. Nie jest on
przeznaczony do użytku
komercyjnego.
• Produkt powinien być
używany jedynie do
przechowywania żywności i
napojów.
• W lodówce nie wolno
przechowywać produktów
wymagających temperatur
kontrolowanych
(szczepionek, leków
wrażliwych na ciepło,
materiałów medycznych itd.).
• Producent nie bierze na
siebie odpowiedzialności
za jakiekolwiek
uszkodzenia spowodowane
niepoprawnym
użytkowaniem lub obsługą.
• Zakładana żywotność
produktu wynosi 10 lat.
Przez ten okres będą
dostępne części zapasowe
niezbędne do pracy
produktu.
1.3. Bezpieczeństwo dzieci
• Materiały opakowaniowe
należy przechowywać poza
zasięgiem dzieci.
• Nie wolno pozwalać dzieciom
na zabawę produktem.
• Jeśli drzwi produktu
mają zamek, klucz należy
przechowywać poza
zasięgiem dzieci.
6 / 36 PL
Lodówka / Instrukcja obsługi
Page 44

Instrukcje dotyczące bezpieczeństwa i środowiska
1.4. Zgodność z dyrektywą WEEE
i utylizacja odpadowego produktu
Ten produkt jest zgodny z Dyrektywą UE
WEEE (2012/19/UE). Ten produkt ma symbol
klasyfikacji zużytego sprzętu elektrycznego i
elektronicznego (WEEE).
Ten produkt został
wyprodukowany z części i
materiałów wysokiej jakości, które
nadają się do powtórnego użytku i
recyklingu. Po zakończeniu okresu
użytkowania nie wolno wyrzucać
zużytego produktu wraz z
normalnymi odpadami domowymi
itp. Należy go dostarczyć do punktu odbioru
w celu przeprowadzenia recyklingu sprzętu
elektrycznego i elektronicznego. Informacje o
tych punktach odbioru można uzyskać od
władz lokalnych.
1.5. Zgodność z dyrektywą RoHS
• Ten produkt jest zgodny z Dyrektywą
UE WEEE (2011/65/UE). Nie zawiera on
szkodliwych ani zakazanych materiałów
wymienionych w dyrektywie.
1.6. Informacje o opakowaniu
• Materiały opakowaniowe są
wyprodukowane z materiałów nadających
się do recyklingu zgodnie z krajowymi
przepisami środowiskowymi. Materiałów
opakowaniowych nie należy wyrzucać wraz
z normalnymi odpadami domowymi itp.
Należy je dostarczyć do punktów odbioru
materiałów opakowaniowych wyznaczonych
przez władze lokalne.
Lodówka / Instrukcja obsługi
7 / 36 PL
Page 45

2 Oto Twoja chłodziarka
*1
16
17
*15
*14
*5
13
*12
*11
*9
*10
*8
7
7
*3
*4
*5
*2
*4
*6
1. Półka w drzwiach komory chłodziarki
2. Zbiornik dozownika wody
3. Miejsce na jajka
4. Zbiornik dozownika wody
5. Półka na butelki
6. Pojemnik przesuwany
7. Regulowane nóżki
8. Komora głębokiego zamrażania
9. Komora szybkiego zamrażania
10. Tacka na kostki lodu & zapas kostek lodu
*Opcjonalne: Rysunki w tej instrukcji obsługi są tylko szkicowe i mogą nie odpowiadać dokładnie
posiadanemu produktowi. Jeśli posiadany produkt nie zawiera odpowiednich części, informacje dotyczą
C
innych modeli.
11. Pojemnik na warzywa
12. Komora o temperaturze zero
13. Oświetlenie wewnętrzne
14. Szklana półka komory chłodzenia
15. Przycisk regulacji temperatury
16. Komora chłodzenia
17. Komora zamrażalnika
8 / 36 PL
Lodówka / Instrukcja obsługi
Page 46

3 Instalacja
3.1. Odpowiednie miejsce
na instalację
W sprawie instalacji produktu skontaktuj się z
autoryzowanym serwisem. Aby przygotować
produkt do instalacji, zapoznaj się z informacjami
w instrukcji użytkownika i sprawdź, czy
zasilanie elektryczne i dopływ wody są zgodne z
wymaganiami. Jeśli nie, skontaktuj się elektrykiem
i hydraulikiem, aby dokonać stosownych zmian.
OSTRZEŻENIE: Producent nie bierze
żadnej odpowiedzialności za szkody
B
B
A
•Abyuniknąćwibracji,chłodziarkęnależyustawić
na równej powierzchni.
•Zainstalujproduktyconajmniej30cmod
podgrzewacza, piecyka i podobnych źródeł
ciepła, oraz co najmniej 5 cm od kuchenek
elektrycznych.
•Nienarażajproduktunabezpośredniedziałanie
promieni słonecznych ani nie trzymaj go w
wilgotnym otoczeniu.
•Produktwymagaodpowiedniejcyrkulacji
powietrza, aby działać wydajnie.
spowodowane pracami wykonywanymi
przez osoby nieupoważnione.
OSTRZEŻENIE: Podczas instalacji kabel
zasilający produktu musi być odłączony
od sieci. W przeciwnym razie może to
skutkować śmiercią lub poważnymi
obrażeniami!
OSTRZEŻENIE: Jeśli drzwi są zbyt
wąskie, aby przenieść przez nie produkt,
zdejmij jego drzwiczki i obróć go na
bok; jeśli to nie pomoże, skontaktuj się z
autoryzowanym serwisem.
•Jeślichłodziarkamastaćwewnęcewścianie,
należy zwrócić uwagę, aby pozostawić co
najmniej 5 cm odstępu od sufitu i ścian.
•Nieinstalujchłodziarkiwmiejscu,gdzie
temperatura spada poniżej -5°C.
3.2. Zakładanie klinów plastikowych
Użyj klinów plastikowych dostarczonych wraz z
produktem, aby zapewnić wystarczająco dużo
miejsca na cyrkulację powietrza między produktem
a ścianą.
1.
Aby założyć kliny, wyjmij śruby z produktu i użyj śrub
dostarczonych w tej samej torebce, co kliny.
2.
Włóż 2 plastikowe kliny w tylną płytę wentylacyjną,
jak pokazano na rysunku.
Lodówka / Instrukcja obsługi
9 / 36 PL
Page 47

Instalacja
3.3. Regulacja nóżek
Jeśli produkt nie jest ustawiony równo,
wyreguluj przednie regulowane nóżki,
obracając je w prawo lub w lewo.
3.4. Połączenie elektryczne
OSTRZEŻENIE: Do podłączania zasilania
nie używaj przedłużacza ani wtyczki
A
B
C
wielokrotnej.
OSTRZEŻENIE: Wymianę uszkodzonego
przewodu zasilającego należy zlecić
autoryzowanemu serwisowi.
W przypadku umieszczenia dwóch
chłodziarek obok siebie należy zostawić
między nimi odstęp przynajmniej 4 cm.
• Nasza firma nie bierze odpowiedzialności
za jakiekolwiek szkody powstałe na skutek
używania bez uziemienia i korzystania z
połączenia elektrycznego niezgodnego z
przepisami krajowymi.
• Po instalacji wtyczka zasilania musi być
łatwo dostępna.
• Podłącz chłodziarkę do uziemionego
gniazdka o napięciu 220-240V/50 Hz.
Wtyczka musi mieć bezpiecznik 10-16 A.
• Nie używaj wtyczki wielokrotnej bez
przedłużacza ani z nim do połączenia
gniazdka w ścianie z chłodziarką.
10 / 36 PL
Lodówka / Instrukcja obsługi
Page 48

Instalacja
3.5. Przekładanie drzwi
Postępuj w kolejności zgodnej z numeracją.
4
10
5
10
4
2
7
1
11
45 ¡
6
12
13
3
8
9
14
18
180¡
17
19
22
19
15
Lodówka / Instrukcja obsługi
23
16
21
11 / 36 PL
24
24
20
Page 49

Instalacja
3.6. Przekładanie drzwi
Postępuj w kolejności zgodnej z numeracją..
(8) (13)
1
1
1
7
20
6
2
14
45 °
5
11
13
9
4
3
10
20
12
8
180°
15
20
19
16
17
18
12 / 36 PL
Lodówka / Instrukcja obsługi
Page 50

4 Przygotowanie
4.1. Co zrobić, aby
oszczędzać energię
Podłączanie produktu do elektronicznych
systemów oszczędzania energii jest
A
• Nie trzymaj chłodziarki otwartej przez dłuższy
• Nie wkładaj gorącej żywności ani napojów do
• Nie przepełniaj chłodziarki; zablokowanie
• Aby przechowywać maksymalną możliwą
• Nie należy blokować przepływu powietrza,
• W zależności od funkcji produktu; rozmrażanie
• Żywność należy przechowywać w szufladach
• Pojemniki z żywnością nie powinny stykać
• Upewnij się, że żywność nie styka się z
niebezpieczne, ponieważ może uszkodzić
produkt.
czas.
chłodziarki.
wewnętrznego przepływu powietrza zmniejsza
wydajność chłodzenia.
ilość żywności w komorze chłodzenia
chłodziarki, należy wyjąć górne szuflady i
umieścić żywność na półkach szklanych.
Deklarowane zużycie energii chłodziarki zostało
określone przy wyjęciu komory chłodzenia,
tacki na lód i górnych szuflad w sposób, który
umożliwia przechowywanie maksymalnej ilości
żywności. Korzystanie z dolnej szuflady do
przechowywania jest zdecydowanie zalecane.
Należy włączyć funkcję oszczędzania energii w
celu zoptymalizowania jej zużycia.
umieszczając żywność przed wentylatorem.
Wkładając żywność, należy zachować minimum
3 cm odstępu od osłony wentylatora.
zamrożonej żywności w komorze chłodzenia
zapewni oszczędność energii i zachowanie
jakości produktów spożywczych.
w komorze chłodzenia, aby zapewnić
oszczędność energii i lepsze warunki
przechowywania.
się bezpośrednio z czujnikiem temperatury
umieszczonym w komorze chłodzenia. Jeśli
stykają się one z czujnikiem, zużycie energii
przez urządzenie może wzrosnąć.
czujnikiem temperatury komory chłodzenia
opisanym poniżej.
4.2. Pierwsze uruchomienie
Przed użyciem chłodziarki wykonaj odpowiednie
przygotowania zgodnie z instrukcjami w sekcjach
„Instrukcje dotyczące bezpieczeństwa i ochrony
środowiska” i „Instalacja”.
• Zostaw produkt włączony bez żywności w
środku na 6 godzin i nie otwieraj drzwi, jeśli nie
jest to absolutnie konieczne.
Gdy zaczyna działać sprężarka, rozlega
się dźwięk. Nawet jeśli sprężarka jest
C
C
C
wyłączona, dźwięki są normalne z powodu
skompresowanych cieczy i gazów w
systemie chłodzenia.
Przednie krawędzie produktu mogą się
nagrzewać. Jest to całkiem normalne.
Te obszary zostały zaprojektowane, aby
się nagrzewać w celu zapobiegnięcia
kondensacji.
W niektórych modelach panel wskaźników
wyłącza się automatycznie po 5 minutach
od zamknięcia drzwi. Włącza się on
ponownie w momencie otwarcia drzwi lub
naciśnięcia dowolnego przycisku.
Lodówka / Instrukcja obsługi
13 / 36 PL
Page 51

5 Użytkowanie chłodziarki
5.1. Przycisk regulacji temperatury
Temperatura wewnątrz lodówki zależy od
następujących czynników:
• Różnice temperatur w różnych porach roku,
• Częste otwieranie drzwi i niezamykanie ich
przez dłuższy czas.
• Wkładanie do lodówki żywności bez
uprzedniego ochłodzenia jej do temperatury
pokojowej.
• Ustawienie lodówki w pokoju (np.
bezpośrednie oddziaływanie słońca).
• Temperaturę wewnątrz, zmieniającą się z
tych powodów, można wyregulować za pomocą
przycisku regulacji.
Liczby wokół przycisku regulacji oznaczają stopnie w
„°C”.
Jeśli temperatura otoczenia wynosi 20°C, zaleca się
ustawienie temperatury lodówki na 4°C. W przypadku
innej temperatury otoczenia można dostosować.
5.2. Szybkie zamrażanie
Jeśli chcesz zamrozić znaczne ilości świeżej
żywności, ustaw przycisk regulacji w pozycję ( ),
przed włożeniem żywności do komory.
Aby zamrozić maksymalną ilość świeżej żywności
podawaną jako zdolność zamrażania, stanowczo
zaleca się ustawienie tego przycisku w pozycji
„FAST FREEZE” [SZYBKIE ZAMRAŻANIE] na
co najmniej 24 godziny. Zwróć uwagę, aby nie
pomieszać żywności zamrożonej i świeżej.
Pamiętaj, aby z powrotem przestawić przycisk
regulacji temperatury w poprzednią pozycję.
14 / 36 PL
Lodówka / Instrukcja obsługi
Page 52

Korzystanie z produktu
5.3. Funkcja Vacation [Wakacje]
Jeśli drzwi chłodziarki nie zostaną ( )
otwarte w ciągu co najmniej 12 godzin od
ustawienia przycisku regulacji temperatury na
najwyższa wartość, automatycznie włącza się
funkcja Vacation.
Aby ją wyłączyć, należy zmienić ustawienie
przycisku.
Nie zaleca się przechowywania żywności w
komorze chłodzenia, gdy włączona jest funkcja
Vacation.
• Po zakończeniu wprowadzania ustawień,
możesz ukryć przycisk regulacji temperatury,
wciskając go do wewnątrz.
Lodówka / Instrukcja obsługi
15 / 36 PL
Page 53

Korzystanie z produktu
5.4. Panel wskaźników
Panele wskaźników mogą się różnić w zależności od modelu produktu.
Funkcje dźwiękowe i optyczne panelu wskaźników pomagają korzystać z lodówki.
8
1
2
3
9
7
1.
Wskaźnik komory chłodziarki
2.
Wskaźnik stanu błędu
3.
Wskaźnik temperatury
4.
Przycisk funkcji wakacyjnej
5.
Przycisk regulacji temperatury
6.
Przycisk wyboru komory
7.
Wskaźnik komory chłodziarki
8.
Wskaźnik trybu oszczędzania
9.
Wskaźnik funkcji wakacyjnej
*opcjonalne
6
45
C
*Opcjonalne: Rysunki w tej instrukcji obsługi są tylko szkicowe i mogą nie odpowiadać
dokładnie posiadanemu produktowi. Jeśli posiadany produkt nie zawiera odpowiednich części,
informacje dotyczą innych modeli.
16 / 36 PL
Lodówka / Instrukcja obsługi
Page 54

Korzystanie z produktu
1. Wskaźnik komory chłodziarki
Lampka komory chłodziarki włącza się podczas
regulacji temperatury komory chłodziarki.
2. Wskaźnik stanu błędu
Ten czujnik się włączy, gdy lodówka nie
chłodzi odpowiednio lub w przypadku awarii
czujnika. Gdy wskaźnik jest aktywny, na
wskaźniku temperatury komory zamrażarki
będzie wyświetlana litera „B”, a na
wskaźniku temperatury komory chłodziarki
będą wyświetlane liczby „1, 2, 3...” itd.
Liczby na wskaźniku służą do informowania
przedstawicieli serwisu o błędzie.
3. Wskaźnik temperatury
Wskazuje temperaturę komory zamrażarki i
chłodziarki.
4.Przycisk funkcji wakacyjnej
Aby uaktywnić tę funkcje, naciśnij i przytrzymaj
przycisk Wakacje przez 3 sekundy. Gdy funkcja
wakacyjna jest aktywna, wskaźnik temperatury
komory chłodzenia będzie pokazywać znaki „-
-” i w komorze chłodzenia nie będzie aktywny
żaden proces chłodzenia. Ta funkcja nie nadaje
się do przechowywania żywności w komorze
chłodziarki. Inne komory pozostaną chłodzone
z ustawioną odpowiednią temperaturą w każdej
komorze.
Aby anulować tę funkcję, naciśnij ponownie
przycisk Wakacje ( ).
5. Przycisk regulacji temperatury
Temperatura odpowiedniej komory wacha się w
zakresie -24°C..... -18°C i 8°C...1°C.
6. Przycisk wyboru komory
Przycisk wyboru komory lodówki umożliwia
przełączanie między komorą chłodziarki i
zamrażarki.
7. Wskaźnik komory chłodziarki
Lampka komory zamrażarki włącza się podczas
regulacji temperatury komory chłodziarki.
8. Wskaźnik trybu oszczędzania
Wskazuje, że lodówka pracuje w trybie
oszczędzania energii. Ten wskaźnik będzie
aktywny, gdy temperatura w komorze
zamrażarki zostanie ustawiona na -18°C.
9.Wskaźnik funkcji wakacyjnej
Wskazuje uaktywnienie funkcji wakacyjnej.
Lodówka / Instrukcja obsługi
17 / 36 PL
Page 55

Korzystanie z produktu
3
1
11
1. Tryb „Economy” [Oszczędny]
Symbol ten zapala się, gdy zamrażalnik
ustawiony jest na -18°, jako najbardziej
oszczędne ustawienie ( ). Wskaźnik
użytkowania oszczędnego gaśnie, gdy zostanie
wybrana funkcja szybkiego chłodzenia lub
szybkiego zamrażania.
2. Wskaźnik ostrzegawczy o awarii
zasilania/ wysokiej temperaturze/ błędzie
Wskaźnik ten ( ) zapala się w razie awarii
zasilania, zbyt wysokiej temperatury lub
ostrzeżeń o błędach. Podczas długotrwałych
przerw w zasilaniu, najwyższa temperatura
w zamrażarce będzie migać na wyświetlaczu
cyfrowym. Po sprawdzeniu produktów w
komorze zamrażalnika naciśnij przycisk
wyłączania alarmu ( ), aby skasować to
ostrzeżenie.
Jeśli zauważysz, że wskaźnik ten się
świeci, zajrzyj do rozdziału „Zalecane środki
rozwiązywania problemów” w tej instrukcji.
910
2
7.1
7.2
3. Funkcja oszczędzania energii
(wyświetlacz wyłączony)
Jeśli drzwiczki urządzenia są zamknięte przez
dłuższy czas, funkcja oszczędzania energii
uruchamia się automatycznie i zapala się
symbol oszczędzania energii. Gdy czynna jest
funkcja oszczędzania energii, gasną wszystkie
inne symbole na wyświetlaczu oprócz symbolu
oszczędzania energii. Funkcja oszczędzania
energii wyłącza się za naciśnięciem
dowolnego przycisku lub za otwarciem
drzwiczek, a symbole na wyświetlaczu
powracają do stanu normalnego.
4. Przycisk „Quick Cool” [Szybkie
chłodzenie]
Wskaźnik szybkiego chłodzenia
Wskaźnik ( ) pali się, gdy włączona jest
funkcja szybkiego chłodzenia, a wskaźnik
temperatury w komorze chłodzenia wyświetla
się jako 1. Aby wyłączyć tę funkcję, ponownie
naciśnij przycisk „Quick cooling” [Szybkie
568
4
C
*Opcjonalne: Rysunki w tej instrukcji obsługi są tylko szkicowe i mogą nie odpowiadać
dokładnie posiadanemu produktowi. Jeśli posiadany produkt nie zawiera odpowiednich części,
informacje dotyczą innych modeli.
18 / 36 PL
Lodówka / Instrukcja obsługi
Page 56

Korzystanie z produktu
chłodzenie]. Wskaźnik „Quick cooling” zgaśnie
i chłodziarka powróci do swych normalnych
ustawień. Funkcja szybkiego chłodzenia jest
anulowana automatycznie po 1 godzinie, o ile
nie zostanie wcześniej anulowana. Jeśli chcesz
zamrozić znaczne ilości świeżej żywności,
naciśnij przycisk „Quick Freeze” przed włożeniem
jej do komory zamrażalnika.
5. Funkcja Vacation [Wakacje]
Aby włączyć funkcję Vacation naciśnij i przez
3 sekundy przytrzymaj przycisk nr (4) (
), a włączy się wskaźnik trybu Vacation. Gdy
włączona jest funkcja Vacation, na wskaźniku
temperatury w komorze chłodzenia wyświetla
się „ - ” i komora ta nie jest aktywnie chłodzona.
Gdy ta funkcja ta jest włączona, nie należy
trzymać żywności w komorze chłodzenia. Inne
komory będą nadal chłodzone odpowiednio do
nastawionych w nich temperatur. Aby anulować
tę funkcję, naciśnij ponownie przycisk Vacation
[Wakacje].
6. Regulacja temperatury w komorze
chłodziarki
Naciśnięcie przycisku nr (5) umożliwia ustawienie
temperatury w komorze chłodzenia odpowiednio
na 8,7,6,5,4,3,2 i 1 ( ).
7.1. Funkcji oszczędzania energii
(wyświetlacz wyłączony):
Po naciśnięciu tego przycisku ( ) zapala się
symbol oszczędności energii ( ) i uruchamia
się funkcja oszczędzania energii. Gdy czynna
jest funkcja oszczędzania energii, gasną
wszystkie inne symbole na wyświetlaczu.
Funkcja oszczędzania energii wyłącza się za
naciśnięciem dowolnego przycisku lub za
otwarciem drzwiczek, a symbole na wyświetlaczu
powracają do stanu normalnego. Za ponownym
naciśnięciem tego przycisku ( ) gaśnie symbol
i wyłącza się funkcja oszczędzania energii.
7.2.Ostrzeżenie o wyłączeniu alarmu:
W przypadku alarmu awarii zasilania/wysokiej
temperatury, po sprawdzeniu produktów w
komorze zamrażarki naciśnij przycisk wyłączania
alarmu, aby skasować to ostrzeżenie.
8. Blokada przycisków
Naciśnij przycisk blokady przycisków ( ) na 3
sekundy. Zapali się ikonka blokady przycisków
( ) i załączy się blokada. Przy załączonej
blokadzie przyciski nie działają. Ponownie
naciśnij przycisk Key Lock [Blokada przycisków]
na 3 sekundy. Ikonka blokady przycisków
zgaśnie i blokada wyłączy się.
Naciśnij przycisk blokady przycisków,
jeśli chcesz uniemożliwić zmianę ustawień
temperatury w chłodziarce ( ).
9. Eco fuzzy
Naciśnij i przez 1 sekundę przytrzymaj przycisk
eco fuzzy, aby uruchomić funkcję oszczędnego
użytkowania eco fuzzy. Chłodziarka zostanie
uruchomiona w najbardziej oszczędnym trybie
co najmniej 6 godzin później, a gdy funkcja ta
jest aktywna zapali się wskaźnik oszczędnego
użytkowania ( ). Naciśnij i przez 3 sekundy
przytrzymaj przycisk funkcji eco fuzzy, aby
wyłączyć funkcję oszczędnego użytkowania eco
fuzzy.
Wskaźnik ten zapala się po 6 godzinach, gdy
jest włączona jest funkcja eco fuzzy.
10. Regulacja temperatury w komorze
zamrażalnika
W tym miejscu można dokonać regulacji
temperatury komory zamrażalnika. Po
naciśnięciu przycisku nr 9 można nastawić
temperaturę w komorze zamrażalnika na
wartości -18, -19, -20, -21, -22, -23 i -24.
11. Szybkie zamrażanie
Naciśnij przycisk nr (10), aby włączyć szybkie
zamrażanie; włączy się wskaźnik
szybkiego zamrażania ( ).
Wskaźnik szybkiego zamrażania pali się, gdy
włączona jest funkcja szybkiego zamrażania, a
wskaźnik temperatury w komorze chłodzenia
wyświetla się jako -27. Aby wyłączyć tę
funkcję, ponownie naciśnij przycisk szybkiego
zamrażania ( ).
Lodówka / Instrukcja obsługi
19 / 36 PL
Page 57

Korzystanie z produktu
Wskaźnik „Quick freeze” zgaśnie i chłodziarka
powróci do swych normalnych ustawień.
Funkcja szybkiego zamrażania jest anulowana
automatycznie po 24 godzinach, o ile nie
zostanie wcześniej anulowana. Aby zamrozić
znaczne ilości świeżej żywności, naciśnij
przycisk szybkiego zamrażania przed
włożeniem jej do komory zamrażalnika.
20 / 36 PL
Lodówka / Instrukcja obsługi
Page 58

Korzystanie z produktu
5.5. Panel wskaźników
Panel wskaźników umożliwia nastawianie temperatury i sterowanie innymi funkcjami produktu bez
otwierania drzwi. Po prostu naciśnij napisy na odpowiednich przyciskach, aby ustawić funkcje.
1 2
12
*10
11
1. Wskaźnik ostrzegawczy o awarii
zasilania/ wysokiej temperaturze
Wskaźnik ten ( ) zapala się w razie awarii
zasilania, zbyt wysokiej temperatury lub
ostrzeżeń o błędach. Podczas długotrwałych
przerw w zasilaniu, najwyższa temperatura
w zamrażarce będzie migać na wyświetlaczu
cyfrowym. Po sprawdzeniu produktów w komorze
zamrażalnika naciśnij przycisk wyłączania alarmu
( ) aby skasować to ostrzeżenie.
Jeśli zauważysz, że wskaźnik ten się
świeci, zajrzyj do rozdziału „Zalecane środki
rozwiązywania problemów” w tej instrukcji.
*Opcjonalne: Rysunki w tej instrukcji obsługi są tylko szkicowe i mogą nie odpowiadać dokładnie
posiadanemu produktowi. Jeśli posiadany produkt nie zawiera odpowiednich części, informacje dotyczą
C
Lodówka / Instrukcja obsługi
innych modeli.
6
789
2. Funkcji oszczędzania energii
(wyświetlacz wyłączony)
Jeśli drzwiczki tego urządzenia są zamknięte
przez dłuższy czas, funkcja oszczędzania
energii uruchamia się automatycznie i zapala
się symbol oszczędzania energii. ( )
Gdy czynna jest funkcja oszczędzania
energii, gasną wszystkie inne symbole na
wyświetlaczu. Funkcja oszczędzania energii
wyłącza się za naciśnięciem dowolnego
przycisku lub za otwarciem drzwiczek, a
symbole na wyświetlaczu powracają do stanu
normalnego.
21 / 36 PL
45
3
Page 59

Korzystanie z produktu
Funkcja oszczędzania energii jest uruchamiana
w czasie dostawy z fabryki i nie można jej
skasować.
3. Funkcja szybkiego chłodzenia
Przycisk ma dwie funkcje. Aby włączyć lub
wyłączyć funkcję szybkiego chłodzenia, naciśnij
go krótko. Wskaźnik „Quick Cool” zgaśnie i
ustawienia powrócą do normalnych wartości. (
)
Korzystaj z funkcji szybkiego
chłodzenia, kiedy chcesz szybko
C
C
C
C
4. Przycisk nastawienia temperatury w
komorze chłodzenia
Naciśnij ten przycisk, aby nastawić temperaturę
w komorze chłodzenia odpowiednio na 8,
7,6, 5,4,3, 2, 8… Naciśnij ten przycisk, aby
nastawić żądaną temperaturę w komorze
chłodzenia. ( )
schłodzić żywność umieszczoną w
komorze chłodzenia Jeśli schłodzona
ma być znaczna ilość świeżej
żywności, zaleca się uruchomienie tej
funkcji przed włożeniem żywności do
chłodziarki.
Jeśli nie wyłączysz szybkiego
chłodzenia, funkcja ta wyłączy się
automatycznie po 8 godzinach lub gdy
temperatura w komorze chłodzenia
osiągnie żądaną wartość.
Jeśli będziesz naciskać przycisk
szybkiego zamrażania Quick Freeze
kilkakrotnie co chwilę, uruchomi
się elektroniczne zabezpieczenie i
sprężarka nie zostanie bezzwłocznie
uruchomiona.
Funkcja ta nie zostanie wywołana
przy przywróceniu zasilania po jego
awaryjnym wyłączeniu.
5. Funkcja Vacation (Wakacje)
Aby wyłączyć funkcję Vacation naciśnij i
przez 3 sekundy przytrzymaj ten przycisk (
), a włączy się wskaźnik trybu Vacation (
). Gdy czynna jest funkcja opróżniania, na
wskaźniku temperatury w komorze chłodzenia
wyświetla się " - ", i komora ta nie jest
aktywnie chłodzona. Gdy ta funkcja ta jest
załączona, nie należy trzymać żywności w
komorze chłodzenia. Inne komory będą nadal
chłodzone odpowiednio do nastawionych w
nich temperaturach.
Aby wyłączyć tę funkcję, ponownie naciśnij
przycisk Vacation .
6. Wyłączanie alarmu:
W przypadku alarmu awarii zasilania / wysokiej
temperatury, po sprawdzeniu produktów
w komorze zamrażarki naciśnij przycisk
wyłączania alarmu ( ) aby skasować to
ostrzeżenie.
7. Blokada przycisków
Naciśnij przycisk blokady przycisków [ ] na 3
sekundy. Symbol blokady przycisków
Zapali się ( ) i włączy się tryb blokady
przycisków. Przy załączonej blokadzie przyciski
nie działają. Ponownie naciśnij przycisk Key
Lock [Blokada przycisków] na 3 sekundy.
Ikonka blokady przycisków zgaśnie i blokada
wyłączy się.
Naciśnij przycisk blokady przycisków,
jeśli chcesz uniemożliwić zmianę ustawień
temperatury w chłodziarce ( ).
8. Eco fuzzy
Naciśnij i przez 1 sekundę przytrzymaj przycisk
eco fuzzy, aby uruchomić funkcję oszczędnego
użytkowania eco fuzzy. Chłodziarka zostanie
uruchomiona w najbardziej oszczędnym trybie
co najmniej 6 godzin później, a gdy funkcja ta
jest aktywna zapali się wskaźnik oszczędnego
użytkowania ( ). Naciśnij i przez 3 sekundy
22 / 36 PL
Lodówka / Instrukcja obsługi
Page 60

Korzystanie z produktu
przytrzymaj przycisk funkcji eco fuzzy, aby
wyłączyć funkcję oszczędnego użytkowania eco
fuzzy.
Wskaźnik ten zapala się po 6 godzinach, gdy
jest włączona jest funkcja eco fuzzy.
9. Przycisk nastawienia temperatury w
komorze zamrażalnika.
Naciśnij ten przycisk, aby nastawić temperaturę
w komorze zamrażalnika odpowiednio na -18,
-19, -20, -21, -22, -23, -24 oraz -18. Naciśnij
ten przycisk, aby nastawić żądaną temperaturę
w komorze zamrażalnika. )
10. Wskaźnik wyłączenia Icematic
Wskazuje, czy kostkarka Icematic jest włączona
czy wyłączona. ( ) Jeśli jest aktywny,
Icematic nie działa. Aby ponownie włączyć
Icematic, naciśnij i przytrzymaj przez 3 sekundy
przycisk wł.-wył.
Kiedy wybrana jest ta funkcja, woda
przestaje wypływać ze zbiornika.
C
11. Przycisk funkcji szybkiego
zamrażania / włączania wyłączania
Icematic
Aby włączyć lub wyłączyć funkcję szybkiego
zamrażania, naciśnij ten przycisk. Kiedy
włączysz tę funkcję, komora zamrażalnika
zostanie schłodzona do temperatury niższej niż
ustawiona wartość. ( )
Aby włączyć lub wyłączyć kostkarkę Icematic,
naciśnij ten przycisk i przytrzymaj go przez 3
sekundy.
Jednak już zrobiony lód można wybrać
z kostkarki Icematic.
Korzystaj z funkcji szybkiego
chłodzenia, kiedy chcesz szybko
C
C
C
12. Wskaźnik oszczędnego użytkowania
Wskazuje, że produkt działa w trybie
oszczędzania energii. ( ) Wskaźnik ten
będzie aktywny, jeśli temperaturę komory
zamrażania nastawiono na -18 stopni lub
zgodnie z funkcją Eco-Extra chłodzenie
przebiega w trybie energooszczędnym.
C
schłodzić żywność umieszczoną w
komorze chłodzenia Jeśli schłodzona
ma być znaczna ilość świeżej
żywności, zaleca się uruchomienie tej
funkcji przed włożeniem żywności do
chłodziarki.
Jeśli nie wyłączysz szybkiego
chłodzenia, funkcja ta wyłączy się
automatycznie po 4 godzinach lub gdy
temperatura w komorze chłodzenia
osiągnie żądaną wartość.
Funkcja ta nie zostanie wywołana
przy przywróceniu zasilania po jego
awaryjnym wyłączeniu.
Wskaźnik użytkowania oszczędnego
gaśnie, gdy zostanie wybrana funkcja
szybkiego chłodzenia lub szybkiego
zamrażania.
Lodówka / Instrukcja obsługi
23 / 36 PL
Page 61

Korzystanie z produktu
5.6. Pojemnik na lód
(Opcja)
• Wyjmij pojemnik na lód z komory
zamrażalnika.
• Wypełnij pojemnik na lód wodą.
• Włóż pojemnik na lód do komory
zamrażalnika.
• Lód będzie gotowy za ok. dwie
godziny. Wyjmij pojemnik na lód z komory
zamrażalnika i zegnij go lekko nad
pojemnikiem, w którym zamierzasz go podać.
Lód łatwo wypadnie do pojemnika.
5.7. Pojemnik na jajka
Pojemnik na jajka możesz umieścić na drzwiach
lub w głównej komorze. Jeśli zdecydujesz się
go umieścić w głównej komorze, zaleca się
korzystanie z dolnych półek, ponieważ jest tam
chłodniej.
Nie wkładaj pojemnika na jajka do
A
komory zamrażalnika.
5.9. Pojemnik na warzywa
(Opcja)
Pojemnik na warzywa został zaprojektowany,
aby utrzymać świeżość warzyw poprzez
zachowanie wilgotności. W tym celu
ogólna cyrkulacja zimnego powietrza jest
intensywniejsza w tym pojemniku.
5.10. Komora o temperaturze zero
(Opcja)
Używaj tej komory, aby przechowywać
delikatesy w niższych temperaturach lub
produkty mięsne do szybkiego spożycia.
Komora o temperaturze zero to najchłodniejsze
miejsce, gdzie możesz przechowywać artykuły
spożywcze takie jak nabiał, mięso, ryby i drób
w idealnych warunkach. W tej komorze nie
należy przechowywać warzyw ani owoców.
5.8. Wentylator
Wentylator został zaprojektowany, aby
równomiernie rozprowadzać chłodne powietrze
we wnętrzu chłodziarki. Czas działania
wentylatora może się różnić w zależności od
własności chłodziarki.
W niektórych chłodziarkach wentylator działa
tylko wtedy, kiedy sprężarka, w innych system
sterowania określa czas działania w zależności
od zapotrzebowania.
24 / 36 PL
Lodówka / Instrukcja obsługi
Page 62

Korzystanie z produktu
5.11. Ruchomy stelaż na drzwiach
(Opcja)
Ruchomy stelaż na drzwiach można
zamocować w 3 różnych pozycjach.
Aby przesunąć stelaż, naciśnij jednocześnie
przyciski z boku. Stelaż można przesunąć.
Przesuń stelaż w górę lub w dół.
Kiedy stelaż znajdzie się w żądanej pozycji,
zwolnij przyciski. Stelaż zostanie zamocowany
w pozycji, w jakiej zwolnisz przyciski.
5.12. Pojemnik przesuwany
(Opcja)
Ten element wyposażenia został
zaprojektowany, ab zwiększyć używalność
stelaży na drzwiach.
Dzięki możliwości przesuwania na boki, ułatwia
on ułożenie długiej butelki, słoika lub pudełek,
które wkładasz w uchwyt na butelki poniżej.
Lodówka / Instrukcja obsługi
25 / 36 PL
Page 63

Korzystanie z produktu
5.13. Pojemnik na warzywa
z kontrolą wilgotności
(Opcja)
Funkcja kontroli wilgotności umożliwia
zachowanie odpowiedniej wilgotności warzyw
i owoców oraz zapewnia dłuższą świeżość
żywności.
Zaleca się w miarę możliwości przechowywanie
w pojemniku warzyw liściastych, jak sałata,
szpinak itp. w pozycji poziomej, a nie opartych
o korzeń, ze względu na utratę wilgotności.
Układając warzywa, ciężkie i twarde należy
układać na dole, a lekkie i miękkie na górze,
biorąc pod uwagę konkretną wagę warzyw.
Nie zostawiać w pojemniku warzyw w
plastikowych torebkach. Zostawienie ich w
plastikowej torebce spowoduje, że szybko
zgniją. W sytuacjach, kiedy styczność z innymi
warzywami jest niezalecana, używaj materiałów
opakowaniowych takich jak papier, które mają
pewną porowatość pozwalającą zachować
higienę.
Nie wkładaj owoców, które wydzielają dużo
gazowego etylenu, jak gruszki, morele,
brzoskwinie, a przede wszystkim jabłka, do
tego samego pojemnika na warzywa, co inne
warzywa i owoce. Gazowy etylen wydobywający
się z tych owoców może spowodować szybsze
dojrzewanie i gnicie pozostałych warzyw i
owoców.
5.14. Automatyczna
maszyna do lodu
(Opcja)
Automatyczna maszyna do lodu umożliwia
łatwe wytwarzanie lodu w chłodziarce. Aby
wytworzyć lód za pomocą maszyny do lodu,
wyjmij zbiornik wody z komory chłodzenia,
napełnij go wodą i włóż z powrotem.
Pierwszy lód powstanie po dwóch godzinach
w szufladzie na lód znajdującej się w komorze
chłodzenia.
Po włożeniu pełnego zbiornika wody możesz
uzyskać z niego 60-70 kostek lodu.
Jeśli woda w zbiorniku stała przez 2-3
tygodnie, należy ją wymienić.
W przypadku produktów z
automatyczną maszyną do lodu
C
możesz słyszeć dźwięk podczas
wysypywania lodu. Jest to zupełnie
normalne i nie świadczy o awarii.
26 / 36 PL
Lodówka / Instrukcja obsługi
Page 64

Korzystanie z produktu
5.15. Kostkarka do lodu
Icematic i pojemnik na lód
*opcja
Obsługa kostkarki do lodu Icematic
Napełnij Icematic wodą i włóż do obudowy. Lód
będzie gotowy za ok. dwie godziny. Nie wyjmuj
Icematic z obudowy, aby wyjąc lód.
Obróć pokrętła na zbiornikach lodu zgodnie z
ruchem wskazówek zegara o 90 stopni.
Kostki lodu w zbiornikach wypadną do
pojemnika na lód pod nimi.
Teraz możesz wyjąć pojemnik na lód i podać
kostki lodu.
Jeśli chcesz, możesz trzymać kostki lodu w tym
pojemniku.
Pojemnik na lód
Pojemnik na lód służy wyłącznie do
gromadzenia kostek lodu. Nie wlewaj do
nie go wody. W przeciwnym razie ulegnie
uszkodzeniu.
5.16. Korzystanie z
dozownika wody
*opcja
Pierwsze kilka szklanek wody z
C
C
1. Naciśnij szklanką dźwignię dozownika wody.
Jeśli korzystasz z miękkiego plastikowego
kubka, naciśnięcie dźwigni ręką będzie
łatwiejsze.
2. Po napełnieniu kubka do żądanego poziomu
puść dźwignię.
C
dozownika mogą być ciepłe i jest
to całkiem normalne.
Jeżeli dozownika wody nie używa
się przez dłuższy czas, wylewa się
pierwsze kilka szklanek wody, aby
uzyskać wodę świeżą.
Prosimy zwrócić uwagę, ze ilość
wody wypływającej z dozownika
zależy od tego, jak bardzo wciśnięto
dźwignię. W miarę jak podnosi się
poziom wody w kubku lub szklance
delikatnie zmniejszaj nacisk na
dźwignię, aby uniknąć przelania
się wody. Jeśli lekko nacisnąć
ramię, woda kapie, co jest całkiem
normalne i nie świadczy o awarii.
Lodówka / Instrukcja obsługi
27 / 36 PL
Page 65

Korzystanie z produktu
5.17. Napełnianie zbiornika
dozownika wodą
Zbiornik wody mieści się w stelażu na
drzwiach.
1. Otwórz pokrywę zbiornika.
2. Napełnij zbiornik świeżą wodą pitną.
3. Zamknij pokrywkę.
Nie napełniaj zbiornika na wodę
C
C
innym płynem niż woda, np. sokiem
owocowym, napojem gazowanym,
czy napojem alkoholowym, które
nie nadają się do stosowania
w zbiorniku na wodę. Użycie
płynu tego rodzaju spowoduje
trwałe uszkodzenie dozownika.
Użytkowania takiego nie obejmuje
gwarancja. Pewne zawarte
w takich płynach substancje
chemiczne i dodatki mogą
uszkodzić zbiornik na wodę.
Używaj tylko świeżej, czystej wody
pitnej.
C
Pojemność zbiornika na wodę
wynosi 3 litry, nie należy jej
przekraczać.
28 / 36 PL
Lodówka / Instrukcja obsługi
Page 66

Korzystanie z produktu
5.18. Czyszczenie
zbiornika na wodę
1. Wyjmij zbiornik na wodę ze stelaża na
drzwiach.
2. Wyjmij stelaż na drzwiach, trzymając go z
obu stron.
3. Chwyć zbiornik na wodę z obu stron i wyjmij
go pod kątem 45°C.
4. Zdejmij pokrywę zbiornika na wodę i
wyczyść go.
Elementów zbiornika i dozownika
C
nie należy myć w zmywarkach do
naczyń.
Lodówka / Instrukcja obsługi
29 / 36 PL
Page 67

Korzystanie z produktu
5.19. Tacka na krople
Woda, która kapie przy korzystaniu z dozownika
zbiera się w tacce na krople.
Wyjmij plastikowy filtr tak jak pokazano na
rysunku.
Wytrzyj zebraną wodę za pomocą czystej i
suchej ściereczki.
30 / 36 PL
Lodówka / Instrukcja obsługi
Page 68

Korzystanie z produktu
5.20. Zamrażanie żywności świeżej
• Aby zachować jakość żywności,
produkty spożywcze włożone do komory
zamrażalnika powinny zostać zamrożone
jak najszybciej. W tym celu użyj funkcji
szybkiego zamrażania.
• Zamrażanie świeżych produktów
spożywczych przedłuży ich czas
przechowywania w komorze zamrażalnika.
• Zapakuj produkty spożywcze w
hermetyczne opakowania i dobrze zamknij.
• Sprawdź, czy produkty są zapakowane
przed włożeniem ich do zamrażalnika.
Użyj pojemników do zamrażalnika, folii
aluminiowej, papieru pergaminowego,
woreczków plastikowych lub podobnych
materiałów opakowaniowych zamiast
tradycyjnego papieru do pakowania.
Lód w komorze zamrażania jest
C
Regulacja
temperatury
w komorze
zamrażalnika.
-18ºC 4°C To domyślne, zalecane ustawienie.
-20,-22 lub
-24°C
Quick Freeze 4°C
-18ºC lub
zimniej
rozmrażany automatycznie.
Regulacja
temperatury
w komorze
chłodzenia.
4°C
2°C
Te ustawienia są zalecane, jeśli temperatura otoczenia
przekracza 30°C.
Funkcji tej używa się do szybkiego zamrażania żywności. Kiedy
ten proces się zakończy, chłodziarka wróci do poprzedniego
ustawienia.
Użyj tych ustawień, jeśli uważasz, że w komorze chłodzenia nie
jest dostatecznie zimno z powodu temperatury otoczenia lub
częstego otwierania drzwiczek.
5.21. Przechowywanie
żywności mrożonej
Temperatura komory musi być ustawiona na co
najmniej -18°C.
1. Zamrożone produkty należy wkładać do
zamrażalnika możliwie jak najszybciej, aby
uniknąć rozmrożenia.
2. Przed zamrożeniem sprawdź datę
ważności na opakowaniu, aby mieć
pewność, że jest ona aktualna.
Lodówka / Instrukcja obsługi
• Oznacz każde opakowanie przed
zamrożeniem, pisząc na nim datę.
Pozwoli Ci to określić świeżość każdego
opakowania za każdym otwarciem
zamrażalnika. Przechowuj wcześniej
włożone produkty spożywcze z przodu, aby
zostały użyte pierwsze.
• Zamrożone produkty należy zużyć zaraz
po rozmrożeniu i nie wolno ich zamrażać
ponownie.
• Nie należy zamrażać dużych ilości żywności
na raz.
Informacje
3. Sprawdź, że opakowanie żywności nie jest
uszkodzone.
5.22. Informacje o komorze
głębokiego zamrażania
Zgodnie ze standardem IEC 62552 zamrażalnik
musi mieć zdolność zamrożenia 4,5 kg
żywności w temperaturze -18°C lub niższej w
ciągu 24 godzin na każde 100 litrów objętości
komory zamrażalnika.
31 / 36 PL
Page 69

Korzystanie z produktu
Produkty spożywcze można przechowywać
przez dłuższy czas tylko w temperaturze -18°C
lub niższej.
Możesz zachować świeżość żywności przez
kilka miesięcy (w komorze głębokiego
zamrażania w temperaturze -18°C lub niższej).
Produkty spożywcze, które mają zostać
zamrożone, nie mogą się stykać z już
zamrożonymi produktami, aby uniknąć ich
częściowego rozmrożenia.
Ugotuj warzywa i filtruj wodę, aby przedłużyć
czas przechowywania. Umieść żywność w
hermetycznych opakowaniach po filtrowaniu
i umieść w zamrażalniku. Banany, pomidory,
sałata, seler, gotowane jajka, ziemniaki i
podobne artykuły nie powinny być zamrażane.
Jeśli te artykuły zepsują się, wpłynie to
negatywnie tylko na wartości odżywcze i smak.
Zepsucie zagrażające zdrowiu ludzkiemu nie
wchodzi w grę.
5.23. Rozmieszczenie żywności
Półki w
komorze
zamrażalnika
Półki komory
chłodzenia
Półki na
drzwiach
komory
chłodzenia
Pojemnik na
warzywa
Komora na
żywność
świeżą
Różne mrożonki, np. mięso, ryby,
lody, warzywa itp.
Produkty spożywcze w
garnkach, na przykrytych
talerzach, zamkniętych
pudełkach, jajka (w zamkniętym
pudełku)
Małe i zapakowane produkty
spożywcze oraz napoje
Owoce i warzywa
Delikatesy (produkty
śniadaniowe, produkty mięsne
do szybkiego spożycia)
5.24. Alarm o otwartych drzwiach
(Opcja)
Jeśli drzwi chłodziarki będą otwarte przez
co najmniej minutę, rozlegnie się słyszalny
alarm. Alarm ten wyłączy się po zamknięciu
drzwi lub naciśnięciu dowolnego przycisku na
wyświetlaczu (jeśli dostępny).
Alarm o otwartych drzwiach jest prezentowany
użytkownikowi słyszalnie i wizualnie.
Oświetlenie wewnętrzne wyłączy się, jeśli
ostrzeżenie będzie trwało 10 min.
5.25. Zmiana kierunku
otwierania drzwi
Możesz zmienić kierunek otwierania
chłodziarki, w zależności od miejsca
użytkowania. Jeśli musisz to zrobić, skontaktuj
się z najbliższym autoryzowanym serwisem.
Powyższe wyjaśnienie to stwierdzenie ogólne.
Aby uzyskać informacje o możliwości zmiany
kierunku otwierania drzwi, sprawdź etykietę
ostrzegawczą wewnątrz opakowania produktu.
5.26. Oświetlenie wewnętrzne
Oświetlenie wewnętrzne korzysta z lampek
typu LED. W przypadku problemów z lampką
skontaktuj się z autoryzowanym serwisem.
Lampek używanych w tym urządzeniu nie
można użyć do oświetlania domu. Zgodne z
przeznaczeniem użycie tej lampki to pomoc
użytkownikowi w bezpiecznym i wygodnym
umieszczeniu żywności w chłodziarce/
zamrażalniku.
32 / 36 PL
Lodówka / Instrukcja obsługi
Page 70

6 Konserwacja i czyszczenie
Czas eksploatacji urządzenia wydłuża się, jeśli jest
ono regularnie czyszczone.
OSTRZEŻENIE: Przed czyszczeniem
B
•
•
•
•
•
• Nie używaj ostrych ani szorstkich narzędzi,
6.1. Jak unikać
nieprzyjemnych zapachów
Do wyrobu chłodziarek nie używa się materiałów
powodujące zapachy. Jednak w wyniku
niewłaściwego przechowywania żywności
i nieczyszczenia wnętrza chłodziarki mogą
powstawać nieprzyjemne zapachy.
A zatem co 15 dni czyść chłodziarkę roztworem
węglanu w wodzie.
•
Lodówka / Instrukcja obsługi
chłodziarki odłącz ją od prądu.
Do czyszczenia nie wolno stosować żadnych
ostrych ani szorstkich narzędzi, mydła,
domowych środków czystości, detergentów, ani
wosku do polerowania.
Rozpuść łyżeczkę węglanu w pół litrze wody.
Namoczyć ściereczkę w roztworze i dokładnie
ją wyżmij. Przetrzyj wnętrze chłodziarki tą
ściereczką i dokładnie wytrzyj do sucha.
Dbaj, aby do obudowy lampki i innych urządzeń
elektrycznych nie dostała się woda.
Wyczyść drzwi wilgotną ściereczką. Aby wyjąć
półki z drzwi i wnętrza chłodziarki, opróżnij
je z całej zawartości. Wyjmij półki z drzwi,
przesuwając je w górę. Po oczyszczeniu, wsuń
je od góry do dołu, aby włożyć na miejsce.
Do czyszczenia powierzchni zewnętrznych i
chromowanych części produktu nie należy
używać ani środków czyszczących,ani wody
z zawartością chloru. Chlor powoduje korozję
takich powierzchni metalowych.
mydła, domowych środków czystości,
detergentów, nafty, oleju napędowego, lakieru
itp., aby zapobiec odpadnięciu i odkształceniu
plastikowych części. Do czyszczenia użyj letniej
wody i miękkiej ściereczki, a następnie wytrzyj
do sucha.
Żywność przechowuje się w zamkniętych
pojemnikach. Wydostające się z odkrytych
pojemników mikroorganizmy mogą powodować
nieprzyjemne zapachy.
•
W chłodziarce nie wolno przechowywać
żywności zepsutej ani takiej, której termin
przydatności do spożycia upłynął.
6.2. Jak zabezpieczać
powierzchnie plastykowe.
Wymyć od razu ciepłą wodą, ponieważ olej może
spowodować uszkodzenie plastikowej powierzchni.
6.3. Szkło w drzwiach
Zdejmij folię ochronną ze szkła.
Na powierzchni szkła znajduje się pokrycie.
To pokrycie ogranicza możliwość powstawania
plam i ułatwia usuwanie ewentualnych plam i
zabrudzeń. Szkło niechronione takim pokryciem
może ulec trwałemu zabrudzeniu organicznymi lub
nieorganicznymi związkami opartymi na powietrzu
lub wodzie, jak kamień, sole mineralne, niespalone
węglowodory, tlenki metali i silikony, które łatwo
i szybko powodują powstanie plam i szkody
materialne. Utrzymanie szkła w czystości staje
się zbyt trudne pomimo regularnego czyszczenia.
W konsekwencji pogarsza się wygląd i zmniejsza
przezroczystość szkła. Ostre i szorstkie metody
i środki czyszczące zwiększą te problemy i
przyśpieszą proces niszczenia.
Należy używać niezasadowych i łagodnych środków
czyszczących opartych na wodzie.
Do czyszczenia należy używać niezasadowych i
łagodnych środków czyszczących, aby wydłużyć
trwałość tej powłoki.
Szkło to hartuje się, aby zwiększyć odporność na
uderzenie i pęknięcie.
Na jego tylne powierzchnie nakłada się także folie
ochronne jako dodatkowe zabezpieczenie w celu
zapobieżenia szkodom w otoczeniu w przypadku
jego potłuczenia.
* Zasady to podstawa do tworzenia jonów
wodorotlenku (OH¯) po rozpuszczeniu w wodzie.
Li (lit), Na (sód), K (potas) Rb (rubid), Cs (cez) oraz
sztuczny i radioaktywny Fr (frans) są nazywane
METALAMI ALKALICZNYMI.
33 / 36 PL
Page 71

7 Rozwiązywanie problemów
Przed skontaktowaniem się z serwisem należy sprawdzić tę listę. Umożliwi to zaoszczędzenie czasu
i pieniędzy. Ta lista zawiera często spotykane problemy niezwiązane z wadami jakości wykonania lub
materiałów. Pewne wymienione tutaj funkcje mogą nie dotyczyć posiadanego produktu.
Lodówka nie działa.
• Wtyk zasilania nie jest włożony do końca. >>> Dociśnij go do końca w gniazdku.
• Bezpiecznik podłączony do gniazda zasilającego produkt lub bezpiecznik główny jest przepalony.
>>> Sprawdź bezpieczniki.
Kondensacja na bocznej ściance komory chłodziarki (WIELOSTREFOWE, CHŁODZENIE, KONTROLA I STREFA
ELASTYCZNA).
• Środowisko jest za zimne. >>> Produktu nie wolno instalować w miejscach o temperaturze poniżej
-5°C.
• Drzwi są za często otwierane >>> Należy pamiętać, aby nie otwierać drzwi produktu za często.
• Środowisko jest za wilgotne. >>> Produktu nie należy instalować w wilgotnych środowiskach.
• Żywność zawierająca płyny jest przechowywana w nieszczelnych opakowaniach. >>> Żywność
zawierająca płyny należy przechowywać w zamkniętych opakowaniach.
• Drzwi produktu pozostały otwarte. >>> Nie wolno pozostawiać otwartych drzwi produktu przez
długi czas.
• Termostat jest ustawiony na za niską temperaturę. >>> Ustaw termostat na odpowiednią
temperaturę.
Sprężarka nie działa.
• W przypadku nagłej awarii zasilania lub wyciągnięcia kabla zasilającego z gniazda i podłączenia
go z powrotem ciśnienie gazu w układzie chłodzenia produktu jest niezrównoważone, co wyzwala
zabezpieczenie termiczne sprężarki. Produkt ponownie się uruchomi po około 6 minutach. Jeśli
produkt nie uruchomi się po tym czasie, skontaktuj się z serwisem.
• Odmrażanie jest aktywne. >>> To jest normalne w przypadku produktu z całkowicie
zautomatyzowanym odmrażaniem. Odmrażanie odbywa się okresowo.
• Produkt nie jest podłączony. >>> Upewnij się, że kabel zasilania jest podłączony.
• Nastawa temperatury jest niepoprawna. >>> Wybierz poprawną nastawę temperatury.
• Brak zasilania. >>> Po przywróceniu zasilania produkt będzie kontynuował normalną pracę.
Hałas pracy lodówki zwiększa się podczas używania.
• Wydajność robocza produktu może się zmieniać w zależności od zmian temperatury otoczenia. To
jest sytuacja normalna, a nie awaria.
Lodówka włącza się za często lub na zbyt długo.
34 / 36 PL
Lodówka / Instrukcja obsługi
Page 72

Rozwiązywanie problemów
• Nowy produkt może być większy niż poprzedni. Większe produkty pracują dłużej.
• Temperatura w pomieszczeniu może być wysoka. >>> Produkt będzie normalnie działał przed
dłuższy czas przy wyższej temperaturze w pomieszczeniu.
• Produkt mógł zostać niedawno podłączony lub do środka została włożona nowa porcja żywności.
>>> Produkt będzie potrzebował więcej czasu na osiągnięcie ustawionej temperatury, jeśli został
niedawno podłączony lub do środka została włożona nowa porcja żywności. To jest normalne.
• Do produktu włożono ostatnio dużą ilość gorącej żywności. >>> Do produktu nie wolno wkładać
gorącej żywności.
• Drzwi były często otwierane lub były otwarte przez dłuższy czas. >>> Ciepłe powietrze
przedostające się do środka spowoduje wydłużenie pracy produktu. Nie należy za często otwierać
drzwi.
• Drzwi zamrażarki lub chłodziarki mogą być uchylone. >>> Sprawdź, czy drzwi są całkowicie
zamknięte.
• Produkt może mieć ustawioną za niską temperaturę. >>> Ustaw wyższą temperaturę i poczekaj aż
produkt ją osiągnie.
• Uszczelka drzwi chłodziarki lub zamrażarki może być zabrudzona, zużyta, uszkodzona lub
niepoprawnie ułożona. >>> Oczyść lub wymień uszczelkę. Uszkodzona/podarta uszczelka drzwi
spowoduje wydłużenie działania produktu w celu utrzymania bieżącej temperatury.
Temperatura zamrażarki jest bardzo niska, ale temperatura chłodziarki jest odpowiednia.
• Temperatura komory zamrażarki jest ustawiona bardzo nisko. >>> Ustaw wyższą temperaturę
komory zamrażarki i sprawdź ponownie.
Temperatura chłodziarki jest bardzo niska, ale temperatura zamrażarki jest odpowiednia.
• Temperatura komory chłodziarki jest ustawiona bardzo nisko. >>> Ustaw wyższą temperaturę
komory chłodziarki i sprawdź ponownie.
Żywność przechowywana w szufladach komory chłodziarki jest zamarznięta.
• Temperatura komory chłodziarki jest ustawiona bardzo nisko. >>> Ustaw wyższą temperaturę
komory zamrażarki i sprawdź ponownie.
Temperatura chłodziarki lub zamrażarki jest za wysoka.
• Temperatura komory chłodziarki jest ustawiona bardzo wysoko. >>> Nastawa temperatury komory
chłodziarki wpływa na temperaturę komory zamrażarki. Zmień temperaturę komory chłodziarki lub
zamrażarki i poczekaj aż odpowiednia komora osiągnie ustawiony poziom temperatury.
• Drzwi były często otwierane lub były otwarte przez dłuższy czas. >>> Nie należy za często otwierać
drzwi.
• Drzwi mogą być uchylone. >>> Całkowicie zamknij drzwi.
• Produkt mógł zostać niedawno podłączony lub do środka została włożona nowa porcja żywności.
>>> To jest normalne. Produkt będzie potrzebował więcej czasu na osiągnięcie ustawionej
temperatury, jeśli został niedawno podłączony lub do środka została włożona nowa porcja żywności.
• Do produktu włożono ostatnio dużą ilość gorącej żywności. >>> Do produktu nie wolno wkładać
gorącej żywności.
Wstrząsy lub hałas.
• Podłoże nie jest poziome lub wytrzymałe. >>> Jeśli produkt się kołysze podczas powolnego
przemieszczania, wyreguluj nóżki w celu zrównoważenia produktu. Upewnij się też, że podłoże jest
wystarczająco wytrzymałe i uniesie produkt.
• Wszelkie przedmioty umieszczone na produkcie mogą powodować hałas. >>> Zdejmij wszelkie
przedmioty umieszczone na produkcie.
Lodówka / Instrukcja obsługi
35 / 36 PL
Page 73

Rozwiązywanie problemów
Produkt wytwarza dźwięki przepływającego płynu, rozpryskiwania itd.
• Zasada działania produktu obejmuje przepływy płynu i gazu. >>> To jest sytuacja normalna, a nie
awaria.
Z produktu słychać odgłos dmuchającego wiatru.
• Produkt używa wentylatora w procesie chłodzenia. To jest sytuacja normalna, a nie awaria.
Na wewnętrznych ściankach produktu występuje kondensacja.
• Gorąca lub zimna pogoda zwiększy zalodzenie i kondensację. To jest sytuacja normalna, a nie
awaria.
• Drzwi były często otwierane lub były otwarte przez dłuższy czas. >>> Nie należy otwierać drzwi za
często, a jeśli są otwarte należy je zamknąć.
• Drzwi mogą być uchylone. >>> Całkowicie zamknij drzwi.
Na powierzchni zewnętrznej lub między drzwiami produktu występuje kondensacja.
• Pogoda może być wilgotna i to zjawisko jest normalne w takich warunkach. >>> Po zmniejszeniu
wilgotności kondensacja zniknie.
Nieprzyjemny zapach we wnętrzu.
• Produkt nie jest regularnie czyszczony. >>> Czyść wnętrze regularnie za pomocą gąbki, ciepłej
wody i wody z węglanem.
• Niektóre pojemniki i opakowania mogą wywoływać nieprzyjemne zapachy. >>> Należy używać
pojemników i opakowań z materiałów niewydzielających zapachów.
• Żywność została umieszczona w nieszczelnych opakowaniach. >>> Żywność należy przechowywać
w zamkniętych opakowaniach. Drobnoustroje mogą się rozprzestrzeniać z niezamkniętych
opakowań i powodować nieprzyjemne zapachy.
• Z produktu należy usunąć wszelką przeterminowaną i zepsutą żywność.
Drzwi się nie zamykają.
• Opakowania żywności mogą blokować drzwi. >>> Przesuń przedmioty blokujące drzwi.
• Produkt nie stoi całkowicie pionowo na ziemi. >>> Wyreguluj nóżki, aby zrównoważyć produkt.
• Podłoże nie jest poziome lub wytrzymałe. >>> Upewnij się, że podłoże jest poziome i wystarczająco
wytrzymałe oraz uniesie produkt.
Zaciął się pojemnik na warzywa.
• Żywność może się stykać z górną częścią szuflady. >>> Zmień ułożenie żywności w szufladzie.
OSTRZEŻENIE: Jeśli problem nie zniknie po wykonaniu instrukcji podanych w tym rozdziale,
A
skontaktuj się ze sprzedawcą lub autoryzowanym serwisem. Nie próbuj naprawiać produktu.
36 / 36 PL
Lodówka / Instrukcja obsługi
Page 74

Chladnička
Používateľská príručka
EWWERQWEW
SK
Page 75

Pred použitím produktu si pozorne prečítajte tento návod na obsluhu.
Vážení zákazníci,
Chceme Vám poskytnúť možnosť najlepšieho použitia nášho výrobku, ktorý bol vyrobený v
moderných zariadeniach so starostlivosťou a dôkladnou kontrolou kvality.
Tiež, pred použitím výrobku Vám odporúčame prečítať si celý návod na použitie. V prípade odpredaja
výrobku, nezabudnite odovzdať návod jeho novému majiteľovi spoločne s výrobkom.
Táto príručka vám pomôže aby ste mohli výrobok používať rýchlo a bezpečne.
• Pred inštaláciou a použitím výrobku si prosím pozorne prečítajte užívateľskú príručku.
• Vždy dodržujte platné bezpečnostné predpisy.
• Majte užívateľskú príručku v dosahu pre budúce použitie.
• Prečítajte si prosím všetky ďalšie dokumenty dodané s výrobkom.
Nezabúdajte, že táto Užívateľská príručka sa môže vzťahovať na viacero modelov výrobkov. Príručka
jasne ukáže všetky variácie rôznych modelov.
Dôležité informácie a užitočné tipy.
C
Ohrozenie života a majetku.
A
Riziko zranenia elektrickým
B
prúdom.
Obal tohto výrobku je vyrobený
z recyklovateľných materiálov, v
súlade s Národnou legislatívou pre
životné prostredie.
Page 76

1 Bezpečnostné pokyny a životné
prostredie 3
1.1. Všeobecná bezpečnosť . . . . . . . . . . . . . . . . 3
1.1.1 Varovanie HC. . . . . . . . . . . . . . . . . . . . . . . 5
1.1.2 Pre modely s dávkovačom vody . . . . . . . . . 5
1.2. Účel použitia. . . . . . . . . . . . . . . . . . . . . . . . 5
1.3. Bezpečnosť detí . . . . . . . . . . . . . . . . . . . . . 6
1.4. Súlad so smernicou WEEE a Odstránenie
odpadov výrobku . . . . . . . . . . . . . . . . . . . . 6
1.5. Súlad so smernicou RoHS . . . . . . . . . . . . . . 6
1.6. Informácie o balení . . . . . . . . . . . . . . . . . . . 6
2 Vaša chladnička 7
3 Inštalácia 8
3.1. Správne miesto pre inštaláciu . . . . . . . . . . . 8
3.2. Pripojenie plastových klinov. . . . . . . . . . . . . 8
3.3. Nastavenie stojanov . . . . . . . . . . . . . . . . . . 8
3.4. Pripojenie napájania . . . . . . . . . . . . . . . . . . 9
3.5. Obrátenie dverí. . . . . . . . . . . . . . . . . . . . . 10
3.6. Obrátenie dverí. . . . . . . . . . . . . . . . . . . . . 11
4 Príprava 12
4.1. Čo urobiť pre úsporu energie. . . . . . . . . . . 12
4.2. Prvé uvedenie do prevádzky . . . . . . . . . . .12
5 Tlačidlo pre Nastavenie teploty 13
5.1. Tlačidlo pre Nastavenie teploty. . . . . . . . . . 13
5.2. Rýchle zmrazovanie . . . . . . . . . . . . . . . . . 13
5.3. Funkcia Dovolenka . . . . . . . . . . . . . . . . . .14
5.4. Indikačný panel. . . . . . . . . . . . . . . . . . . . . 15
5.5. Indikačný panel. . . . . . . . . . . . . . . . . . . . . 17
5.6. Zásobník na ľad . . . . . . . . . . . . . . . . . . . .23
5.7. Držiak na vajíčka . . . . . . . . . . . . . . . . . . . . 23
5.8. Ventilátor . . . . . . . . . . . . . . . . . . . . . . . . .23
5.9. Zásobník na zeleninu . . . . . . . . . . . . . . . . 23
5.10. Oddelenia Nulového stupňa . . . . . . . . . . .23
5.11. Pohyblivý stojan vo dverách . . . . . . . . . . . 24
5.12. Posuvná odkladacia schránka . . . . . . . . . 24
5.13. Zásobník na zeleninu s kontrolou vlhkosti . 25
5.14. Automatický výrobník ľadu . . . . . . . . . . . . 25
5.15. Icematic a držiak na skladovanie ľadu. . . . 26
5.16. Používanie dávkovača na vodu . . . . . . . . . 26
5.17. Plnenie nádrže dávkovača na vodu. . . . . . 27
5.18. Čistenie nádrže na vodu . . . . . . . . . . . . .28
5.19. Odkvapkávacia miska. . . . . . . . . . . . . . . . 29
5.20. Zmrazovanie čerstvých potravín . . . . . . . . 30
5.21. Odporúčania pre skladovanie zmrazených
potravín. . . . . . . . . . . . . . . . . . . . . . . . . .30
5.22. Podrobnosti o mrazničke . . . . . . . . . . . . .31
5.23. Umiestnenie jedla . . . . . . . . . . . . . . . . . . 31
5.24. Upozornenie na otvorené dvere. . . . . . . . . 31
5.25. Zmena smeru otvárania dverí . . . . . . . . . .31
5.26. Vnútorné osvetlenie . . . . . . . . . . . . . . . . .31
6 Údržba a čistenie
32
6.1. Zabránenie vzniku nepríjemných pachov . . 32
6.2. Ochrana plastových povrchov . . . . . . . . . .32
6.3. Dverové sklá . . . . . . . . . . . . . . . . . . . . . . 32
7 Riešenie problémov 33
2 /35 SK
Chladnička / Uživatelská příručka
Page 77

1 Bezpečnostné pokyny a životné prostredie
Táto časť obsahuje bezpečnostné
pokyny nevyhnutné pre
zabránenie nebezpečenstvu
zranení a materiálnych škôd.
Nedodržaním týchto pokynov
zanikajú všetky typy záruky
výrobku.
1.1. Všeobecná bezpečnosť
• Tento produkt by nemali
používať osoby s telesným,
zmyslovým a mentálnym
postihnutím, osoby bez
dostatočných znalostí a
skúseností, alebo deti.
Zariadenie môžu tieto
osoby používať len pod
dohľadom a po poučení
osobou zodpovednou za ich
bezpečnosť. Nedovoľte deťom
hrať sa s týmto zariadením.
• V prípade poruchy prístroj
odpojte.
• Po odpojení počkajte najmenej
5 minút pred opätovným
pripojením. Odpojte výrobok,
keď sa nepoužíva. Nedotýkajte
sa zástrčky mokrými rukami!
Pri odpájaní neťahajte za kábel,
vždy uchopte zástrčku.
• Pred zasunutím dovnútra utrite
hrot sieťovej zástrčky suchou
handričkou.
• Nezapájajte chladničku, ak je
zásuvka uvoľnená.
• Pri inštalácii, údržbe, čistení a
opravách výrobok odpojte.
• Ak sa výrobok nebude dlhší čas
používať, odpojte ho a vyberte z
neho potraviny.
• Nepoužívajte paru alebo
čistiace prostriedky s parou pre
čistenie chladničky a topenia
ľadu vo vnútri. Para môže prísť
do styku s elektrifikovanými
oblasťami a spôsobiť skrat
alebo elektrický šok!
• Neumývajte výrobok striekaním
alebo polievaním vodou na
neho! Nebezpečenstvo úrazu
elektrickým prúdom!
• Nikdy nepoužívajte výrobok,
ak časť nachádzajúca sa na
hornej alebo zadnej strane
výrobku s elektronickou doskou
s plošným spojom vo vnútri
je otvorená (krycia doska
elektronických plošných spojov)
(1).
Chladnička / Uživatelská příručka
3/35 SK
Page 78

Bezpečnostné pokyny a životné prostredie
• Nedotýkajte sa mrazených
potravín mokrými rukami!
Môžu sa nalepiť na Vaše
1
ruky!
• Neklaďte do mrazničky
tekutiny vo fľašiach
a plechovkách. Môžu
vybuchnúť!
• Tekutiny umiestnite vo
1
vzpriamenej polohe a pevne
uzatvorte ich veko.
• Nestriekajte horľavé látky v
blízkosti výrobku, nakoľko
• V prípade jeho poruchy
výrobok nepoužívajte, pretože
by mohlo dôjsť k úrazu
elektrickým prúdom. Pred
tým, než čokoľvek urobíte,
sa obráťte na autorizovaný
servis.
• Výrobok zapájajte do
uzemnenej zásuvky.
Uzemnenie musí byť
vykonané kvalifikovaným
elektrikárom.
• Ak produkt má osvetlenie
typu LED, pre jeho
nahradenie alebo v prípade
akéhokoľvek problému sa
obráťte na autorizovaný
servis.
sa môže zapáliť alebo
explodovať.
• Nenechávajte horľavé
materiály a produkty s
horľavým plynom (spreje,
atď,) v chladničke.
• Neklaďte nádoby obsahujúce
kvapaliny na hornú časť
výrobku. Voda striekajúca na
elektrifikované časti môže
spôsobiť úraz elektrickým
prúdom a nebezpečenstvo
požiaru.
• Vystavenie produkt dažďu,
snehu, slnku a vetru
môže spôsobiť elektrické
nebezpečenstvo. Pri
premiestňovaní výrobku ho
neťahajte držaním za rukoväť
dverí. Rukoväť sa môže
odtrhnúť.
4 /35 SK
Chladnička / Uživatelská příručka
Page 79

Bezpečnostné pokyny a životné prostredie
• Dbajte na to, aby nedošlo
k zachyteniu akúkoľvek
časti vašich rúk či tela do
akýchkoľvek z pohybujúcich
sa častí vo vnútri výrobku.
• Nevyliezajte alebo sa
neopierajte o dvere, zásuvky
a podobné časti chladničky.
Môže to mať za následok
pád výrobku a spôsobiť
poškodenie dielov.
• Dávajte pozor, aby nedošlo k
privretiu napájacieho kábla.
1.1.1 Varovanie HC
Ak výrobok obsahuje chladiaci
systém v ktorom sa používa
plyn R600a, zabezpečte, aby
pri používaní a pohybovaní
spotrebiča nedošlo k
poškodeniu chladiaceho
systému a jeho potrubia.
Tento plyn je horľavý. Ak je
chladiaci systém poškodený,
zabezpečte, aby bolo zariadenie
mimo dosahu zdrojov ohňa a
okamžite vyvetrajte miestnosť.
1.1.2 Pre modely s
dávkovačom vody
• Tlak pre prívod studenej vody
musí byť maximálne 90 psi
(6,2 bar). Ak je váš tlak vody
vyšší ako 80 psi (5,5 bar),
použite vo vašej sieti ventil
na obmedzovanie tlaku. Ak
neviete, ako skontrolovať tlak
vody, požiadajte o pomoc
profesionálneho inštalatéra.
• Ak pri inštalácii existuje riziko
vodného rázu, vždy použite
preventívne zariadenia
proti vodnému rázu. Ak ste
si nie je istý, či vo Vašej
sieti je efekt vodného rázu,
poraďte sa s profesionálnym
inštalatérom.
• Neinštalujte na prívode
pre teplú vodu. Vykonajte
nevyhnutné opatrenia proti
riziku zamrznutia hadíc.
Prevádzkový interval teplota
vody musí byť medzi
minimálne 33 ° F (0,6 ° C) a
maximálne 100 ° F (38 ° C).
Štítok na vnútornej
• Používajte len pitnú vodu.
ľavej strane
1.2. Účel použitia
• Tento výrobok je určený
pre domáce použitie. Nie
C
označuje druh plynu
používaného v
produkte.
je určený pre komerčné
použitie.
Chladnička / Uživatelská příručka
5/35 SK
Page 80

Bezpečnostné pokyny a životné prostredie
• Spotrebič by mal byť
používaný iba pre
skladovanie potravín a
nápojov.
• Do chladničky neukladajte
citlivé produkty, ktoré si
vyžadujú riadené teploty
(očkovacie látky, lieky citlivé
na teplo, zdravotnícky
materiál, atď.).
• Výrobca nenesie žiadnu
• Nedovoľte deťom, aby sa s
výrobkom hrali.
• Ak je na dverách výrobku
zámok, kľúč držte mimo
dosahu detí.
1.4. Súlad so smernicou WEEE a
Odstránenie odpadov výrobku
Tento výrobok spĺňa požiadavky smernice
WEEE EÚ (2012/19/EU). Na tomto priodukte
je zobrazený symbol klasifikácie odpadu
elektrických a elektronických zariadení
(OEEZ).
zodpovednosť za prípadné
škody spôsobené
nesprávnym použitím alebo
nesprávnou manipuláciou.
• Životnosť výrobku je 10
rokov. Náhradné diely
potrebné pre funkčnosť
tohoto výrobku budú pre toto
obdobie k dispozícii.
1.3. Bezpečnosť detí
• Obalové materiály
uchovávajte mimo dosahu
detí.
domácimi a inými odpadmi. Odneste ho do
zberného centra pre recykláciu elektrických
a elektronických zariadení. Pre informácie o
týchto zberných stredisakách sa prosím
obráťte na miestne úrady.
1.5. Súlad so smernicou RoHS
• Tento výrobok spĺňa požiadavky
smernice WEEE EÚ (2011/65/EU).
Neobsahuje škodlivé a zakázané
látky uvedené v smernici.
1.6. Informácie o balení
• Obalové materiály výrobku sú
vyrobené z recyklovateľných
materiálov v súlade s našimi
národnými predpismi o životnom
prostredí. Nevyhadzujte obalové
materiály spolu s domácimi alebo
inými odpadmi. Vezmite ich do
zberných miest pre obalové
materiály určené miestnymi
orgánmi.
Tento výrobok bol vyrobený z
vysoko kvalitných materiálov a
komponentov, ktoré sa dajú
opätovne použiť a ktoré sú
vhodné pre recykláciu. Na konci
svojej životnosti spotrebič
nevyhadzujte spolu s bežnými
6 /35 SK
Chladnička / Uživatelská příručka
Page 81

2 Vaša chladnička
*1
16
17
*15
*14
*5
13
*12
*11
*9
*10
*8
7
7
*3
*4
*5
*2
*4
*6
1. Polica v dverách chladiacej časti
2. Plniaca nádrž dávkovača vody
3. Časť pre vajíčka
4. Zásobník dávkovača vody
5. Polica pre fľaše
6. Posuvná odkladacia schránka
7. Nastaviteľné nohy
8. Časť hlbokého mrazenia
9. Časť rýchleho mrazenia
*voliteľné: Obrázky uvedené v tejto príručke sú uvádzané ako príklad a nemusia sa
presne zhodovať s Vašim produktom. Ak váš výrobok neobsahuje príslušné časti, tieto
C
Chladnička / Uživatelská příručka
informácie sa vzťahujú na ostatné modely.
10. Zásobník na ľadové kocky a akumulovaný
ľad
11. Zásobník na zeleninu
12. Oddelenia Nulového stupňa
13. Vnútorné osvetlenie
14. Sklenená polica v chladiacej časti
15. Tlačidlo pre Nastavenie teploty
16. Chladiaci priestor
17. Mraziaci priestor
7/35 SK
Page 82

3 Inštalácia
3.1. Správne miesto pre inštaláciu
Pre inštaláciu výrobku sa obráťte na autorizovaný
servis. Pre prípravu výrobku pre inštaláciu
vyhľadajte informácie v užívateľskej príručke
a uistite sa, že sú k dispozícii požadované
elektrické a vodovodné nástroje. Ak nie, pre
usporiadanie týchto nástrojov podľa potreby sa
obráťte na elektrikára a vodoinštalatéra.
VAROVANIE: Výrobca nenesie žiadnu
zodpovednosť za škodu spôsobené
B
B
A
• Pre zabránenie vibráciám umiestnite výrobok
na rovný povrch.
• Umiestnite výrobok aspoň 30 cm od radiátorov,
pecí a podobných tepelných zdrojov a aspoň 5
cm od elektrických rúr.
• Nevystavujte výrobok priamemu slnečnému
žiareniu alebo ho neponechávajte vo vlhkom
prostredí.
• Výrobok pre svoje efektívne fungovanie
vyžaduje dostatočnú cirkuláciu vzduchu.
• Pokiaľ bude výrobok umiestnený vo výklenku,
nezabudnite nechať najmenej 5 cm odstup
medzi produktom, stropom a stenami.
• Neinštalujte výrobok v prostredí s teplotami
pod -5°C.
prácou vykonanou neoprávnenými
osobami.
VAROVANIE: V priebehu inštalácie
musí byť napájací kábel tohto výrobku
odpojený. Ak tak neurobíte, môže to mať
za následok smrť alebo vážne zranenie!
VAROVANIE: Ak je rozpätie dverí príliš
úzke pre prenesenie výrobku, odmontujte
dvere a otočte produkt na bok, ak to
nefunguje, obráťte sa na autorizovaný
servis.
3.2. Pripojenie plastových klinov
Použite plastové kliny dodané s produktom
pre zabezpečenie dostatočného priestoru pre
cirkuláciu vzduchu medzi výrobkom a stenou.
1.
Ak chcete pripojiť kliny, odstráňte skrutky na
výrobku a použite skrutky dodané s klinmi.
2.
Pripevnite 2 plastové kliny na kryt vetrania ako sú
zobrazené na obrázku.
3.3. Nastavenie stojanov
Ak výrobok nie je v rovnovážnej polohe, nastavte
predné nastaviteľné stojany ich otáčaním
smerom doprava alebo doľava.
8 /35 SK
Chladnička / Uživatelská příručka
Page 83

Inštalácia
3.4. Pripojenie napájania
VAROVANIE: Pre napájanie
nepoužívajte rozšírené alebo združené
A
B
C
• Naša spoločnosť nenesie zodpovednosť
• Zásuvka napájacieho kábla musí byť
• Pripojte chladničku k uzemnenej zásuvke
• Medzi zásuvkou a chladničkou
zásuvky.
VAROVANIE: Poškodený napájací
kábel musí byť vymenený autorizovaným
servisom.
Pri umiestnení dvoch chladničiek v
priľahlej pozícii, medzi dvoma jednotkami
nechajte vzdialenosť najmenej 4 cm.
za prípadné škody vzniknuté v dôsledku
použitia bez uzemnenia a pripojenia
napájania v nesúlade s vnútroštátnymi
predpismi.
ľahko prístupná aj po inštalácii.
s Elektrickým napätím 220-240V/50Hz.
Zástrčka musí obsahovať poistku 10-16A.
nepoužívajte rozdvojku alebo predlžovací
kábel.
Chladnička / Uživatelská příručka
9/35SK
Page 84

Inštalácia
3.5. Obrátenie dverí
Postupujte v číselnom poradí.
4
10
5
10
4
2
7
1
11
45 ¡
6
12
13
3
8
9
14
18
180¡
17
19
22
19
15
23
16
21
10 /35 SK
24
24
20
Chladnička / Uživatelská příručka
Page 85

Inštalácia
3.6. Obrátenie dverí
Postupujte v číselnom poradí.
2
45 °
10
12
180°
14
(8) (13)
1
1
1
7
20
6
5
11
13
9
4
3
20
8
15
20
16
17
19
Chladnička / Uživatelská příručka
18
11/35SK
Page 86

4 Príprava
4.1. Čo urobiť pre úsporu energie
Pripojenie výrobku k elektronickým
systémom pre úsporu energie je škodlivé,
A
• Nenechávajte dvere chladničky otvorené po
• Nevkladajte do chladničky horúce potraviny
• Nepreplňujte chladničku; blokovanie
• Aby ste mohli uchovávať maximálne
• Neblokujte prúdenie vzduchu tým, že
• V závislosti na funkciách tohto výrobku;
• Jedlo ukladajte pomocou použitia zásuviek v
• Balíky potravín nesmú byť v priamom
pretože môže dôjsť k poškodeniu
výrobku.
dlhšiu dobu.
alebo nápoje.
vnútorného toku vzduchu zníži chladiacu
kapacitu.
množstvo potravín v chladnejšom priestore
vašej chladničky, vyberte hornú zásuvku a
položte ju na sklenenú policu. Deklarovaná
spotreba energie chladničky bola určená po
vybratí chladiča, zásobníka na ľad a hornej
zásuvky, čo umožní vytvoriť maximálny
skladovací priestor. Pri skladovaní dôrazne
odporúčame použitie spodnej zásuvky. Pre
najlepšiu spotrebu energie aktivujte funkciu
úspory energie.
umiestnite jedlo pred ventilátor chladiča. Pri
umiestnení potravín je potrebné zabezpečiť
minimálne 3 cm priestor pred ochrannými
mrežami ventilátora.
rozmrazovanie zmrazených potravín v
chladnejšom priestore zaistí úsporu energie a
zachovanie kvality potravín.
chladiacom priestore, s cieľom zabezpečenia
úspory energie a ochrany potravín v lepších
podmienkach.
kontakte s čidlom tepla, nachádzajúceho
sa v chladiacom priestore. V prípade ak
sa dotýkajú čidla, môže sa zvýšiť spotreba
energie zariadenia.
• Uistite sa, že potraviny nie sú v kontakte
so snímačom teploty priestoru chladničky
popísaného nižšie.
4.2. Prvé uvedenie do prevádzky
Pred použitím chladničky sa uistite, že boli
vykonané všetky nevyhnutné prípravy v súlade s
pokynmi uvedenými v kapitolách “Bezpečnostné
pokyny a životné prostredie” a “Inštalácia”.
• Nechajte výrobok bežať bez jedla v jeho
vnútri po dobu 6 hodín a neotvárajte dvere, ak
to nie je nevyhnutné.
Keď sa kompresor zapne, budete počuť
zvuk. Je normálne počuť zvuk, aj keď
C
C
C
kompresor nie je aktívny, v dôsledku
stlačenej kvapaliny a plynov v chladiacom
systéme.
Predné hrany produktu sa môžu zahriať.
To je normálne. Tieto oblasti sú navrhnuté
tak, aby sa zahrial, s cieľom zabránenia
kondenzácie.
Pri niektorých modeloch sa panel
indikátora automaticky vypne po 5
minútach po zatvorení dverí. Znovu sa
aktivujú keď sa dvere otvoria alebo po
stlačení tlačidla.
12 /35 SK
Chladnička / Uživatelská příručka
Page 87

5 Tlačidlo pre Nastavenie teploty
5.1. Tlačidlo pre Nastavenie teploty
Vnútorná teplota chladničky sa môže meniť z
nasledujúcich dôvodov:
• Sezónne teploty,
• Časté otváranie dverí a ponechanie ich v
otvorenom stave po dlhšiu dobu.
• Uloženie jedál do chladničky bez ich
vychladnutia na izbovú teplotu.
• Umiestnenie chladničky v miestnosti (napr.
vystavenie slnečnému žiareniu).
• Vnútornú zmenu teploty v dôsledku týchto
faktorov je možné upraviť pomocou tlačidla
pre nastavenie.
Čísla okolo tlačidla pre nastavenie uvádzajú teplotné
stupne v “°C”.
Ak je okolitá teplota 20 °C, odporúčame používať
nastavenie teploty chladničky na teplotu 4 °C. V
prípade iných teplotách je možné túto hodnotu
prispôsobiť.
5.2. Rýchle zmrazovanie
Ak chcete zmraziť veľké množstvo čerstvých
potravín, pred uložením potravín do rýchleho
mraziaceho boxu prepnite tlačidlo pre nastavenie
teploty ( ).
Odporúča sa ponechať tlačidlo v tejto polohe
po dobu 24 hodín pre zmrazenie maximálneho
množstva potravín, ktoré je uvedené ako kapacita
mrazenia. Venujte pozornosť tomu, aby ste
pri skladovaní vzájomne nemiešali mrazené a
čerstvé potraviny.
Nezabudnite prepnúť tlačidlo pre nastavenie
teploty späť do pôvodnej polohy.
Chladnička / Uživatelská příručka
13/35 SK
Page 88

Tlačidlo pre Nastavenie teploty
5.3. Funkcia Dovolenka
Ak sa dvere výrobku ( ) neotvoria po dobu
najmenej 12 hodín po nastavení tlačidla
nastavenia teploty na najvyššiu hodnotu,
automaticky sa aktivuje funkcia Dovolenka.
Pre zrušenie funkcie je potrebné zmeniť
nastavenie tlačidiel.
Keď je aktivovaná funkcia Dovolenka,
neodporúča sa skladovať potraviny v
chladiacom priestore.
• Po dokončení nastavenia je možné ukryť
tlačidlo nastavenia teploty jeho stlačením
dovnútra.
14 /35 SK
Chladnička / Uživatelská příručka
Page 89

Tlačidlo pre Nastavenie teploty
5.4. Indikačný panel
Indikačné panely sa môžu líšiť v závislosti od typu modelu.
Pri používaní vášho produktu vám pomôžu audio - vizuálne funkcie, nachádzajúce sa na
indikačnom paneli.
8
1
2
3
9
7
1.
2.
3.
4.
5.
6.
7.
8.
9.
*voliteľné
6
Indikátor Chladiaceho oddielu
Indikátor Poruchového stavu
Indikátor teploty
Tlačidlo funkcie Dovolenka
Tlačidlo pre Nastavenie teploty
Tlačidlo pre voľbu Chladiaceho priestoru
Indikátor Mraziaceho priestoru
Indikátor Ekonomického režimu
Indikátor funkcie Dovolenka
45
*Voliteľné: Údaje uvedené v tejto používateľskej príručke sú určené ako koncepty
a nemusia byť v dokonalom súlade s Vašim výrobkom. Ak váš výrobok neobsahuje
C
Chladnička / Uživatelská příručka
príslušné časti, tieto informácie sa vzťahujú na ostatné modely.
15/35 SK
Page 90

Tlačidlo pre Nastavenie teploty
1. Indikátor chladiaceho oddielu
Pri nastavovaní teploty chladiaceho priestoru
bude svetlo chladničky svietiť.
2. Indikátor Poruchového stavu
Tento indikátor sa aktivuje, ak vaša
chladnička dostatočné nechladí alebo v
prípade poruchy snímača. Keď je tento
indikátor aktivovaný, na indikátore teploty
mrazničky sa zobrazí písmeno "E" a na
ukazovateli teploty chladničky sa zobrazia
číslice, ako napríklad "1,2,3 ...". Tieto čísla na
ukazovateli slúžia na informovanie servisného
personálu o poruche.
3. Indikátor teploty
Označuje teplotu mraziaceho a chladiaceho
priestoru.
4. Tlačidlo funkcie Dovolenka
Pre aktiváciu tejto funkcie stlačte tlačidlo
Dovolenka po dobu 3 sekúnd. Ak je
aktivovaná funkcia Dovolenka, na ukazovateli
teploty chladničky sa zobrazí "- -" a v časti
chladničky nebude aktívne chladenie. Keď je
táto funkcia aktívna, neodporúča sa skladovať
potraviny v chladiacom priestore. Ostatné
časti budú naďalej ochladzovat v súlade s ich
nastavenou teplotu.
Pre zrušenie tejto funkcie znova stlačte
tlačidlo Dovolenka.
5. Tlačidlo pre Nastavenie teploty
Mení teplotu príslušného priestoru medzi
-24°C ... -18°C a 8°C...1°C.
6. Tlačidlo pre voľbu Chladiaceho
priestoru
Tlačidlo pre voľbu: Stlačte tlačidlo pre výber
priestoru pre prepínanie medzi oddelením
chladničky a mrazničky.
7. Indikátor Mraziaceho priestoru
Pri nastavovaní teploty mraziaceho priestoru
bude svetlo chladničky svietiť.
8. Indikátor Ekonomického režimu
Signalizuje, že chladnička pracuje v
úspornom režime. Tento displej sa aktivuje, ak
je teplota mrazničky nastavená na -18 °C.
9. Indikátor funkcie Dovolenka
Ukazuje, že je aktivovaná funkcia Dovolenka.
16 /35 SK
Chladnička / Uživatelská příručka
Page 91

Tlačidlo pre Nastavenie teploty
5.5. Indikačný panel
Indikačný panel umožňuje nastaviť teplotu a ovládať ďalšie funkcie produktu bez otvorenia
dvierok produktu. Pre nastavenie funkcií stačí stlačiť nápisy na príslušných tlačidlách.
1 2
12
*10
11
1. Indikátor výpadku prúdu / vysokej teploty
/ poruchy
Tento indikátor ( ) sa rozsvieti pri výpadku
prúdu, vysokoteplotných poruchách a pri
varovaní na poruchy. Na digitálnom displeji
bud blikať najvyššia teplota, ktorú mraznička
dosiahla počas trvalého výpadku napájania.
Po kontrole potravín umiestnených v mraziacej
časti ( ), pre zrušenie upozornenia stlačte
tlačidlo zrušenia alarmu.
Ak sa rozsvieti tento indikátor, pozrite si časť
"Odporúčané opravné prostriedky pre riešenie
problémov".
*Voliteľné: Údaje uvedené v tejto používateľskej príručke sú určené ako koncepty
a nemusia byť v dokonalom súlade s Vašim výrobkom. Ak váš výrobok neobsahuje
C
Chladnička / Uživatelská příručka
príslušné časti, tieto informácie sa vzťahujú na ostatné modely.
17/35 SK
6
789
2. Funkcia úspory energie (vypnutý
displej):
Ak sú dvere produktu zatvorené dlhú dobu,
automaticky sa aktivuje funkcia úspory
energie a rozsvieti sa symbol úspory
energie. ( ) Keď je aktivovaná funkcia
úspory energie, vypnú sa všetky symboly
na displeji, okrem symbolu úspory energie.
Ak je aktivovaná funkcia pre úsporu energie,
ak stlačíte akékoľvek tlačidlo alebo otvoríte
dvere, funkcia úspory energie sa zruší a
symboly na displeji sa vrátia do normálu.
Funkcia Úspora energie sa aktivuje pri
expedícii z výroby, a nemôže byť zrušená.
45
3
Page 92

Tlačidlo pre Nastavenie teploty
3.Funkcia Rýchleho chladenia
Toto tlačidlo má dve funkcie. Ak chcete
aktivovať alebo deaktivovať funkciu rýchleho
chladenia stlačte toto tlačidlo krátko. Indikátor
Rýchleho chladenia sa vypne a produkt sa
vráti k normálnemu nastaveniu. ( )
Funkciu rýchleho chladenia použite,
keď chcete rýchlo ochladiť potraviny
C
C
C
C
4. Tlačidlo nastavenia teploty chladiacej
časti
Opakovane stlačte toto tlačidlo pre nastavenie
teploty chladničky na 8, 7,6, 5,4,3, 2, 8, ..., .
Stlačte toto tlačidlo pre nastavenie teploty v
chladničke na požadovanú hodnotu. ( )
5.Funkcia Dovolenka
Aby bolo možné aktivovať funkciu Dovolenka,
stlačte toto tlačidlo ( ) po dobu 3 sekúnd,
a aktivuje sa indikátor režimu Dovolenka (
). Ak je aktivovaná funkcia Dovolenka,
na ukazovateli teploty chladničky sa
umiestnené v chladničke. Ak chcete
ochladiť veľké množstvo čerstvých
potravín, aktivujte túto funkciu pred
uložením potravín do produktu.
Ak ju nezrušíte, rýchle chladenie
sa zruší automaticky po 8 hodinách
alebo ak teplota v chladiacej časti
klesne na požadovanú teplotu.
Ak opakovane stlačíte tlačidlo
rýchleho chladenia s krátkymi
intervalmi, aktivuje sa ochrana
elektronického obvodu a kompresor
sa nespustí okamžite.
Keď sa obnoví dodávka energie po
výpadku napájania, táto funkcia sa
neobnoví.
zobrazí "- -" a v časti chladničky nebude
aktívne chladenie. Keď je táto funkcia
aktívna, neodporúča sa skladovať potraviny
v chladiacom priestore. Ostatné časti
budú naďalej ochladzovat v súlade s ich
nastavenou teplotu.
Pre zrušenie tejto funkcie znova stlačte
tlačidlo funkcie Dovolenka.
6. Zrušenie alarmu:
V prípade alarmu výpadku prúdu/vysokej
teploty, po kontrole potravín umiestnených
v mraziacej časti ( ), pre zrušenie
upozornenia stlačte tlačidlo zrušenia alarmu.
7. Zámok tlačidiel
Podržte stlačené tlačidlo Zámku tlačidiel (
) súvisle po dobu 3 sekúnd. Rozsvieti sa
Symbol Uzavretia tlačidiel
( ) a režim Zámku tlačidiel sa aktivuje. Ak je
režim Zámok tlačidiel aktívny, tlačidlá nebudú
fungovať. Opäť podržte stlačené tlačidlo
Zámku tlačidiel ( ) súvisle po dobu 3 sekúnd.
Symbol Zámku tlačidiel sa vypne a vypne sa
tiež režim zámku tlačidiel.
Ak chcete zabrániť pozmeneniu nastavenia
teploty v chladničke ( ),, stlačte tlačidlo
zámok tlačidiel.
8. Eco Fuzzy
Stlačte a podržte tlačidlo Eco Fuzzy po dobu
1 sekundy pre aktiváciu funkcie Eco Fuzzy.
Chladnička začne pracovať v najprísnejšom
ekonomickom režime najmenej 6 hodín
neskôr a keď je funkcia aktívna, rozsvieti sa
indikátor ekonomického režimu ( ). Stlačte
a podržte tlačidlo Eco Fuzzy po dobu 3
sekúnd pre deaktiváciu funkcie Eco Fuzzy.
Tento indikátor sa rozsvieti po 6 hodinách,
keď bude funkcia Eco Fuzzy aktivovaná.
18 /35 SK
Chladnička / Uživatelská příručka
Page 93

Tlačidlo pre Nastavenie teploty
9. Tlačidlo nastavenia teploty mraziacej
časti
Opakovane stlačte toto tlačidlo pre nastavenie
teploty mrazničky na -18, -19, -20,-21, -22,
-18, ..., . Stlačte toto tlačidlo pre nastavenie
teploty v mrazničke na požadovanú hodnotu.
( )
10. Indikátor vypnutia Výrobníka ľadu
Icematic
Označuje, či je Výrobník ľadu Icematic
zapnutý alebo vypnutý. ( ) Ak svieti,
výrobník ľadu Icematic nie je v prevádzke. Pre
opätovné spustenie výrobníka ľadu Icematic
stlačte a podržte tlačidlo Zapnutia-Vypnutia
po dobu 3 sekundy.
Ak je táto funkcia zvolená, prietok
vody z vodnej nádrže sa zastaví.
C
11. Tlačidlo Rýchleho mrazenia/ Tlačidlo
Vypnutia-Zapnutia výrobníka ľadu Icematic
Stlačte toto tlačidlo pre aktiváciu alebo
deaktiváciu funkcie rýchleho zmrazenia. Pri
aktivácii tejto funkcie sa mrazničky ochladí
na teplotu nižšiu, ako je nastavená hodnota.
( ) Pre zapnutie a vypnutie výrobníka
ľadu Icematic ho stlačte a podržte po dobu 3
sekúnd.
C
Avšak, ľad ktorý bol vyrobený
predtým, je možné z výrobníka ľadu
Icematic vybrať.
Funkciu rýchleho mrazenia použite,
keď chcete rýchlo zmraziť potraviny
umiestnené v mrazničke. Ak chcete
zmraziť veľké množstvo čerstvých
potravín, aktivujte túto funkciu pred
uložením potravín do produktu.
Keď sa obnoví dodávka energie po
C
12. Indikátor ekonomického využitia
Označuje ak produkt beží v režime úspory
energie. ( )Tento ukazovateľ bude aktívny,
keď je teplota mrazničky nastavená na -18
alebo je energeticky úsporné chladenie
zapnuté prostredníctvom funkcie Eco-Extra.
C
výpadku napájania, táto funkcia sa
neobnoví.
Indikátor ekonomického použitia sa
vypne, keď je zvolená funkcia rýchleho
chladenia alebo rýchleho zmrazovania.
Ak ju nezrušíte, rýchle mrazenie sa
C
Chladnička / Uživatelská příručka
zruší automaticky po 4 hodinách
alebo ak teplota v mrazničke klesne
na požadovanú teplotu.
19/35 SK
Page 94

Tlačidlo pre Nastavenie teploty
3
1
11
1. Ekonomické použitie
2. Alarm Vysoká teplota / Závada
3. Funkcia úspory energie (vypnutie
displeja)
4. Rýchle chladenie
5. Funkcia Dovolenka
6. Nastavenie teploty v priestore
7. Úspora energie (vypnutie displeja) /
8. Zámok tlačidiel
9. Eco-fuzzy
10. Nastavenie teploty v priestore
11. Rýchle mrazenie
chladničky
Vypnutie alarmu
mrazničky
2
910
7.2
7.1
4
568
C
*Voliteľné: Údaje uvedené v tejto používateľskej príručke sú určené ako koncepty
a nemusia byť v dokonalom súlade s Vašim výrobkom. Ak váš výrobok neobsahuje
príslušné časti, tieto informácie sa vzťahujú na ostatné modely.
20 /35 SK
Chladnička / Uživatelská příručka
Page 95

Tlačidlo pre Nastavenie teploty
1. Ekonomické použitie
áto značka sa rozsvieti ak je teplota v priestore
mrazničky nastavená na -18 ° C, najúspornejší
nastavenie. ( ) Keď je vybraná funkcia
rýchleho chladenia alebo rýchleho mrazenia,
kontrolka ekonomického použitie zhasne.
2. Kontrolka výpadku napájania / vysokej
teploty / výstrahy na vysokú teplotu /
chybu:
Táto kontrolka ( ) sa rozsvieti v prípade
zlyhania teploty alebo spustenie chybových
alarmov. Ak uvidíte, že je táto kontrolka
rozsvietená, prečítajte si v tomto návode
na použitie časť „Odporúčaná riešenia
problémov“.
Táto kontrolka sa rozsvieti počas výpadku
napájania, pri zlyhaní pri vysokých teplotách a
upozorneniu na chybu. Počas pretrvávajúcej
výpadkov napájania sa najvyššia teplota, ktoré
mraznička dosiahne, rozbliká na digitálnom
displeji. Po kontrole potravín v mrazničke
stlačte tlačidlo vypnutia alarmu a upozornenie
vymažte.
Ak zistíte, že je táto kontrolka rozsvietená,
pozrite si časť "odporúčané postupy pri riešení
problémov".
3. Funkcia úspory energie (vypnutie
displeja)
Ak sú dvere produktu ponechané zatvorené
dlhú dobu, automaticky sa aktivuje funkcia
úspory energie a rozsvieti sa príslušný symbol.
Keď je funkcia úspora energie aktívna, všetky
ostatné symboly na displeji zhasnú. Keď je
aktivovaná funkcia úspory energie, ak stlačíte
akékoľvek tlačidlo alebo otvorte dvierka, režim
úspory energie sa ukončí a ikony na displeji sa
vráti do normálu.
Funkcia úspory energie sa aktivuje počas
doručenia z továrne a nemožno ju zrušiť.
4. Rýchle chladenie
Keď sa zapne funkcia rýchleho chladenia,
rozsvieti sa kontrolka rýchleho chladenia (
) a na kontrolke teploty v priestore mrazničky
sa zobrazí hodnota 1. Ďalším stlačením tlačidla
rýchleho chladenia túto funkciu zrušíte.
Ukazovateľ rýchleho chladenia zhasne a vráti
sa na normálne nastavenie. Funkcia rýchleho
chladenia sa automaticky zruší po uplynutí
1 hodiny, ak nie je zrušená užívateľom. Pri
chladení veľkého množstva čerstvých potravín
stlačte tlačidlo rýchleho chladenia ešte než
potraviny do chladničky vložíte.
5. Funkcia Dovolenka
Pre aktiváciu funkcie Dovolenka stlačte na
3 sekundy tlačidlo rýchleho chladenia; to
aktivuje kontrolku režimu Dovolenka ( ).
Keď sa aktivuje funkcia Dovolenka, kontrolka
teploty v priestore chladničky zobrazí popis "-"
a v priestore chladenia sa neaktivuje žiadny
proces chladenia. Táto funkcia nie je vhodná
na uchovávanie potravín v priestore chladničky.
Ostatné priestory zostanú vychladené na
zodpovedajúce nastavenú teplotu. Ak chcete
túto funkciu zrušiť, znova stlačte tlačidlo tejto
funkcie.
6. Nastavenie teploty v priestore
chladničky
Po stlačení tlačidla je možné teplotu v priestore
chladničky nastaviť na 8,7,6,5,4,3,2 a 1.
7. 1 Úspora energie (vypnutie displeja)
Stlačenie tohto tlačidla ( ) rozsvieti značku
úspory energie ( ) a aktivuje sa funkcia
úspory energie. Aktivácia funkcie úspory
energie vypne všetky ďalšie značky na displeji.
Ak je aktívna funkcia úspory energie, stlačenie
ľubovoľného tlačidla alebo otvorenie dverí
funkciu úspory energie deaktivuje a signály
na displeji sa vráti do normálneho nastavenia.
Chladnička / Uživatelská příručka
21/35 SK
Page 96

Tlačidlo pre Nastavenie teploty
Opakované stlačenie tohto tlačidla ( ) zhasne
značku úspory energie a funkcie úspory
energie sa deaktivuje.
7.2 Vypnutie alarmu
V prípade upozornenia na výpadok napájania,
vysokú teplotu, po kontrole potravín v
mrazničke stlačte tlačidlo vypnutia alarmu a
varovanie vymažte.
8. zámok tlačidiel
Súčasne stlačte tlačidlo vypnutie displeja, po
dobu 3 sekúnd. Rozsvieti sa značka zámku
tlačidiel a zámok tlačidiel sa aktivuje; tlačidlá
budú neaktívne do deaktivácie zámku tlačidiel.
Tlačidlo vypnutia displeja znova stlačte po
dobu 3 sekúnd. Značka zámku zhasne a režim
zámku tlačidiel bude deaktivovaný. Aby ste
predišli zmene nastavenia teploty chladničky,
stlačte tlačidlo vypnutia displeja.
9. Eco-fuzzy
Ak chcete zapnúť funkciu Eco-fuzzy, na 1
sekundu stlačte a podržte tlačidlo Eco-fuzzy. Ak
je táto funkcia aktívna, mraznička sa prepne do
úsporného režimu minimálne po 6 hodinách a
rozsvieti sa kontrolka ekonomického použitia.
Ak chcete funkciu Eco-fuzzy ( ) deaktivovať,
na 3 sekundy stlačte a podržte tlačidlo funkcie
Eco-fuzzy.
Keď je aktivovaná funkcia Eco-fuzzy, kontrolka
sa rozsvieti po uplynutí 6 hodín.
10. Nastavenie teploty v priestore
mrazničky
Teplota v priestore mrazničky je nastaviteľná.
Stlačenie tlačidla aktivuje možnosť nastavenia
teploty v priestore mrazničky na -18, -19, -20,
-21, -22, -23 a -24.
11. Rýchle mrazenie
Rýchle mrazenie spustíte stlačením tlačidla;
potom sa rozsvieti kontrolka rýchleho mrazenia
( ).
Keď sa zapne funkcia rýchleho chladenia,
rozsvieti sa kontrolka rýchleho mrazenia a
na kontrolke teploty v priestore mrazničky
sa zobrazí hodnota -27. Túto funkciu zrušíte
opakovaným stláčaním tlačidla Rýchle
mrazenie ( ). Ukazovateľ rýchleho mrazenia
zhasne a vráti sa na normálne nastavenie.
Funkcia rýchleho mrazenia sa automaticky
zruší po uplynutí 24 hodín, ak nie je zrušená
užívateľom. Pri mrazení veľkého množstva
čerstvých potravín stlačte tlačidlo rýchleho
mrazenia ešte než potraviny do mrazničky
vložíte.
22 /35 SK
Chladnička / Uživatelská příručka
Page 97

Tlačidlo pre Nastavenie teploty
5.6. Zásobník na ľad
(Voliteľné)
• Vyberte von nádobu na ľad z mrazničky.
• Naplňte nádobu na ľad vodou.
• Vložte nádobu na ľad do mrazničky.
• Ľad bude pripravený asi po dvoch
hodinách. Vezmite nádobu na ľad z
mrazničky a opatrne ju ohnite nad
držiakom, ktorý budete podávať. Ľad
ľahko vypadne do servírovacieho
držiaka.
5.7. Držiak na vajíčka
Držiak na vajíčka môžete ľubovolne umiestniť
na držiak vo dverách alebo v chladničke. Ak
ste sa rozhodli dať ju na držiak v chladničke,
odporúčame, aby ste použili nižšie police,
nakoľko sú chladnejšie.
Nedávajte držiak na vajíčka do
A
mrazničky.
5.8. Ventilátor
Ventilátor bol navrhnutý tak, aby zabezpečil
cirkuláciu chladného vzduchu vo vnútri
chladničky homogénne. Prevádzková doba
ventilátora sa môže líšiť v závislosti na funkciách vášho produktu.
5.9. Zásobník na zeleninu
(Voliteľné)
Zásobník na zeleninu produktu je navrhnutý tak,
aby zelenina zostala čerstvá pri zachovaní svojej
vlhkosti. Za týmto účelom je celková cirkulácia
chladného vzduchu v zásobníku na zeleninu
intenzívnejšia.
5.10. Oddelenia Nulového stupňa
(Voliteľné)
Použite tento priestor pre udržanie lahôdok alebo
mäsových výrobkov na okamžitú spotrebu pri
nižších teplotách.
Oddelenia Nulového stupňa je najlepšie miesto,
kde môžu byť uložené v ideálnych podmienkach
skladovania potraviny, ako sú mliečne výrobky,
mäso, ryby a kurča. Neskladujte zeleninu a/alebo
ovocie v tomto priestore.
Chladnička / Uživatelská příručka
23/35 SK
Page 98

Tlačidlo pre Nastavenie teploty
5.11. Pohyblivý stojan vo dverách
(Voliteľné)
Pohyblivý stojan vo dverách je možné
upevniť do 3 rôznych polôh.
Pre presun stojana, rovnomerne stlačte
bočné tlačidlá. So stojanom bude možné
pohybovať.
Posuňte stojan smerom nahor alebo nadol.
Keď je stojan v požadovanej pozícii,
uvoľnite tlačidlá. Po uvoľnení tlačidiel bude
stojan opäť pevný na svojej pozícii.
5.12. Posuvná odkladacia schránka
(Voliteľné)
Tento doplnok bol navrhnutý pre zvýšenie
objemu využitia dverných stojanov.
Vďaka svojej schopnosti pohybovania sa do
strán, vám umožní ľahko umiestniť dlhé fľaše,
poháre alebo krabice, ktoré ste vložili do
poličky pre fľaše nižšie.
24 /35 SK
Chladnička / Uživatelská příručka
Page 99

Tlačidlo pre Nastavenie teploty
5.13. Zásobník na zeleninu
s kontrolou vlhkosti
(Voliteľné)
Pomocou funkcie regulácie vlhkosti je vlhkosť
zeleniny a ovocia pod kontrolou a zabezpečí
sa tým dlhšia doba čerstvosti potravín.
Ako je to možné, odporúča sa skladovať
listovú zeleninu, ako je hlávkový šalát a
špenát a podobné zeleniny, náchylné na
stratu vlhkosti nie na svojich koreňoch, ale vo
vodorovnej polohe v zeleninovom koši.
Pri umiestňovaní zeleniny, uložte ťažkú a
tvrdú zeleninu na dno a ľahkú a mäkkú na
vrchol, s prihliadnutím na špecifické hmotnosti
zeleniny.
Nenechávajte zeleninu na zásobníku v
igelitových sáčkoch. Ponechanie v igelitových
sáčkoch spôsobí, že zelenina zhnije v krátkej
dobe. V situáciách, kde kontakt s ostatnou
zeleninou nie je vhodný, použite obalový
materiál, ako je papier, ktorý má určitú
pórovitosť v súlade s hygienou.
Nedávajte plody, ktoré majú vysokú produkciu
plynu etylénu, ako sú hrušky, marhule,
broskyne a najmä jablká do spoločného
zeleninového zásobníka s inou zeleninou a
ovocím. Plyn etylén vychádzajúci z týchto
plodov môže spôsobiť, že ostatná zelenina
a ovocie budú zrieť rýchlejšie a začnú hniť v
kratšom časovom období.
5.14. Automatický výrobník ľadu
(Voliteľné)
Automat ľad vám umožní ľahko vytvoriť
ľad v chladničke. Za účelom získania ľad z
výrobníka ľadu, vyberte nádržku na vodu z
chladiaceho priestoru, naplňte ju vodou a
dajte ju naspäť.
Prvý ľad bude vo výrobníku ľadu pripravený
asi za 2 hodiny v chladiacom priestore.
Po umiestnení plnej vodnej nádrže, kým sa
úplne nevyprázdni, môžete získať asi 60-70
kociek ľadu.
V prípade, že voda v nádrži bola dlhšie ako
2-3 týždne, vymeňte ju.
Pri produktoch s automatickým
výrobníkom ľadu, pri výrobe ľadu
C
môžete počuť zvuk. Tento zvuk je
normálny a nie je známkou poruchy.
Chladnička / Uživatelská příručka
25/35 SK
Page 100

Tlačidlo pre Nastavenie teploty
5.15. Icematic a držiak na
skladovanie ľadu
*voliteľné
Používanie výrobníka ľadu Icematic
Naplňte výrobník ľadu Icematic vodou a
umiestnite ho na jeho miesto. Váš ľad bude
pripravený asi po dvoch hodinách. Pre
vybratie ľadu neodstraňujte Icematic z jeho
miesta.
Otočte gombík na ľadovom zásobníku v
smere hodinových ručičiek o 90 stupňov.
Ľadové kocky v nádrži spadnú dolu do nižšie
umiestneného držiaka ľadu.
Následne môžete vybrať držiak ľadu a
podávať ľadové kocky.
Ak chcete, ľadové kocky môžete skladovať aj
v držiaku na ľad.
Držiak na skladovanie ľadu
Držiak na skladovanie ľadu je určený len pre
zbieranie kociek ľadu. Nedávajte do neho
vodu. V opačnom prípade sa zlomí.
5.16. Používanie dávkovača na vodu
*voliteľné
Je normálne, že prvých niekoľko
C
C
1. Zatlačte pohárom o páku dávkovača vody.
Ak používate mäkký plastový téglik, bude
jednoduchšie páku stlačiť rukou.
2. Po naplnení pohára po požadovanú
úroveň, uvoľnite páku.
C
pohárov vody odobraných z
dávkovača vody bude obvykle
teplých.
Ak sa dávkovač vody nepoužíval
dlhšiu dobu, aby ste získali čistú
vodu, prvé poháre vody vylejte.
Upozorňujeme, že z dávkovača
vytečie toľko vody, ako ďaleko
potlačíte páku. Keď hladina
vody vo Vašej šálke / pohári
stúpne, jemne znížte množstvo
tlaku na páku, aby ste zabránili
pretečeniu. Ak páku ľahko stlačíte,
bude kvapkať voda; to je úplne
normálne a nejde o poruchu.
26 /35 SK
Chladnička / Uživatelská příručka
 Loading...