


QWM84
Washing Machine
User's Manual
QWM84
Document Number
2820523669/ 09-10-13.(17:46)
Please read this user manual first!
Dear Customer,
Thank you for prefering an Beko product. We hope that you get the best results from your product which
has been manufactured with high quality and state-of-the-art technology. Therefore, please read this
entire user manual and all other accompanying documents carefully before using the product and keep
it as a reference for future use. If you handover the product to someone else, give the user manual as
well. Follow all warnings and information in the user manual.
Remember that this user manual is also applicable for several other models. Differences between
models will be identified in the manual.
Explanation of symbols
Throughout this user manual the following symbols are used:
Important information or useful hints
C
A
about usage.
Warning for hazardous situations with
regard to life and property.
B
Warning for electric shock.
Packaging materials of the product
are manufactured from recyclable
materials in accordance with our
National Environment Regulations.
Do not dispose of the packaging materials together with the domestic or other wastes. Take them to the
packaging material collection points designated by the local authorities.
This product was manufactured using the latest technology in environmentally friendly conditions.

TABLE OF CONTENTS
1 Important instructions for safety and
environment 4
1.1 General safety . . . . . . . . . . . . . . . . . . . . . . .4
1.2 Intended use . . . . . . . . . . . . . . . . . . . . . . . .5
1.3 Children's safety. . . . . . . . . . . . . . . . . . . . . .6
1.4 Package information. . . . . . . . . . . . . . . . . . . 6
1.5 Disposing of the waste product . . . . . . . . . . .6
1.6 Compliance with WEEE Directive. . . . . . . . . . 7
2 Your washing machine 8
2.1 Overview . . . . . . . . . . . . . . . . . . . . . . . . . . .8
2.2 Package Contents . . . . . . . . . . . . . . . . . . . .9
2.3 Technical specifications . . . . . . . . . . . . . . .10
3 Installation 11
3.1 Appropriate installation location. . . . . . . . . . 11
3.2 Removing packaging reinforcement . . . . . .11
3.3 Removing the transportation locks. . . . . . . .11
3.4 Connecting water supply. . . . . . . . . . . . . . .12
3.5 Connecting to the drain. . . . . . . . . . . . . . . .12
3.6 Adjusting the feet . . . . . . . . . . . . . . . . . . . .13
3.7 Electrical connection. . . . . . . . . . . . . . . . . . 14
4 Preparation 16
4.1 Sorting the laundry . . . . . . . . . . . . . . . . . . .16
4.2 Preparing laundry for washing. . . . . . . . . . . 17
4.3 Things to be done for energy saving . . . . . .17
4.4 Initial use . . . . . . . . . . . . . . . . . . . . . . . . . .18
4.5 Correct load capacity . . . . . . . . . . . . . . . . . 18
4.6 Loading the laundry . . . . . . . . . . . . . . . . . .18
4.7 Using detergent and softener . . . . . . . . . . . 19
4.8 Tips for efficient washing . . . . . . . . . . . . . . 21
5 Operating the product 22
5.1 Control panel . . . . . . . . . . . . . . . . . . . . . . .22
5.2 Display symbols . . . . . . . . . . . . . . . . . . . . .22
5.3 Preparing the machine . . . . . . . . . . . . . . . .23
5.4 Programme selection . . . . . . . . . . . . . . . . .23
5.5 Main programmes . . . . . . . . . . . . . . . . . . .23
5.6 Additional programmes . . . . . . . . . . . . . . .24
5.7 Special programmes. . . . . . . . . . . . . . . . . .25
5.8 Temperature selection. . . . . . . . . . . . . . . . . 25
5.9 Spin speed selection. . . . . . . . . . . . . . . . . .25
5.10 Programme and consumption table. . . . . . 26
5.11 Auxiliary function selection . . . . . . . . . . . .28
5.12 Time display. . . . . . . . . . . . . . . . . . . . . . . 29
5.13 Starting the programme . . . . . . . . . . . . . .30
5.14 Progress of programme . . . . . . . . . . . . . . 30
5.15 Loading door lock. . . . . . . . . . . . . . . . . . .30
5.16 Changing the selections after programme
has started . . . . . . . . . . . . . . . . . . . . . . .30
5.17 Child Lock . . . . . . . . . . . . . . . . . . . . . . . .31
5.18 Cancelling the programme . . . . . . . . . . . .31
5.19 Machine is in Rinse Hold mode . . . . . . . . .31
5.20 End of programme . . . . . . . . . . . . . . . . . .32
5.21 Your machine is equipped with a “Standby
Mode”. . . . . . . . . . . . . . . . . . . . . . . . . . .32
6 Quick User Guide 33
6.1 Preparing the machine . . . . . . . . . . . . . . . .33
6.2 Programme selection . . . . . . . . . . . . . . . . .33
6.3 Auxiliary function selection . . . . . . . . . . . . .33
6.4 Starting the programme . . . . . . . . . . . . . . .33
6.5 End of programme . . . . . . . . . . . . . . . . . . .33
6.6 Cancelling the programme . . . . . . . . . . . . . 33
6.7 Child Lock . . . . . . . . . . . . . . . . . . . . . . . . .33
7 Maintenance and cleaning 34
7.1 Cleaning the detergent drawer . . . . . . . . . . 34
7.2 Cleaning the loading door and the drum . . . 34
7.3 Cleaning the body and control panel . . . . . . 35
7.4 Cleaning the water intake filters . . . . . . . . .35
7.5 Draining remaining water and cleaning the
pump filter. . . . . . . . . . . . . . . . . . . . . . . . 35
8 Troubleshooting 37
9 BUILT-IN INSTALLATION 43
3 / EN

1 Important instructions for safety and environment
This section contains safety instructions that will help protect from risk of
personal injury or property damage. Failure to follow these instructions shall
void any warranty.
1.1 General safety
• This product can be used by children at and above 8 years old and by persons
whose physical, sensory or mental capabilities were not fully developed or
who lack experience and knowledge provided that they are supervised or
trained on the safe usage of the product and the risks it brings out. Children
must not play with the product. Cleaning and maintenance works should not
be performed by children unless they are supervised by someone.
• Never place the product on a carpet-covered floor. Otherwise, lack of airflow
beneath the machine will cause electrical parts to overheat. This will cause
problems with your product.
• If the product has a failure, it should not be operated unless it is repaired by
the Authorized Service Agent. There is the risk of electric shock!
• This product is designed to resume operating in the event of powering on after
a power interruption. If you wish to cancel the programme, see "Cancelling
the programme" section.
• Connect the product to a grounded outlet protected by a 13 A fuse. Do not
neglect to have the grounding installation made by a qualified electrician. Our
company shall not be liable for any damages that will arise when the product
is used without grounding in accordance with the local regulations.
• The water supply and draining hoses must be securely fastened and remain
undamaged. Otherwise, there is the risk of water leakage.
• Never open the loading door or remove the filter while there is still water in the
drum. Otherwise, risk of flooding and injury from hot water will occur.
• Do not force open the locked loading door. The loading door will be ready to
open just a few minutes after the washing cycle comes to an end. In case of
forcing the loading door to open, the door and the lock mechanism may get
damaged.
• Unplug the product when not in use.
• Never wash the product by spreading or pouring water onto it! There is the
risk of electric shock!
• Never touch the plug with wet hands! Never unplug by pulling on the cable,
always pull out by grabbing the plug.
4 / EN
Washing Machine /User’s Manual

Important instructions for safety and environment
• Use detergents, softeners and supplements suitable for automatic washing
machines only.
• Follow the instructions on the textile tags and on the detergent package.
• The product must be unplugged during installation, maintenance, cleaning
and repairing procedures.
• Always have the installation and repairing procedures carried out by the
Authorized Service Agent. Manufacturer shall not be held liable
for damages that may arise from procedures carried out by unauthorized
persons.
• If the supply cord is damaged, it must be replaced by the manufacturer, its
service agent or similary qualified persons in order to avoid a hazard.
• If the power cable is damaged, it must be replaced by the manufacturer,
after sales service or a similarly qualified person (preferably an electrician) or
someone designated by the importer in order to avoid possible risks.
• Place the product on a rigid, flat and level surface.
• Do not place it on a long-pile rug or similar surfaces.
• Do not place the product on a high platform or near the edge on a cascaded
surface.
• Do not place the product on the power cable.
• Never use sponge or scrub materials. These will damage the painted, chrome
plated and plastic surfaces.
1.2 Intended use
• This product has been designed for domestic use. It is not suitable for
commercial use and it must not be used out of its intended use.
• The product must only be used for washing and rinsing of laundry that are
marked accordingly.
• The manufacturer waives any responsibility arisen from incorrect usage or
transportation.
• The service life of your product is 10 years. During this period, original spare
parts will be available to operate the appliance properly.
Washing Machine /User’s Manual
5 / EN

Important instructions for safety and environment
1.3 Children's safety
• Packaging materials are dangerous to children. Keep packaging materials in a
safe place away from reach of the children.
• Electrical products are dangerous for the children. Keep children away from
the product when it is in use. Do not let them to tamper with the product. Use
child lock to prevent children from intervening with the product.
• Do not forget to close the loading door when leaving the room where the
product is located.
• Store all detergents and additives in a safe place away from the reach of
the children by closing the cover of the detergent container or sealing the
detergent package.
While washing the laundry at high temperatures, the loading
door glass becomes hot. Therefore, keep especially the
children away from the loading door of the machine while the
washing operation is in progress.
1.4 Package information
• Packaging materials of the product are manufactured from recyclable
materials in accordance with our National Environment Regulations. Do
not dispose of the packaging materials together with the domestic or other
wastes. Take them to the packaging material collection points designated by
the local authorities.
1.5 Disposing of the waste product
• This product has been manufactured with high quality parts and materials
which can be reused and are suitable for recycling. Therefore, do not dispose
the product with normal domestic waste at the end of its service life. Take it
to a collection point for the recycling of electrical and electronic equipment.
Please consult your local authorities to learn the nearest collection point. Help
protect the environment and natural resources by recycling used products. For
children's safety, cut the power cable and break the locking mechanism of the
loading door so that it will be non-functional before disposing of the product.
6 / EN
Washing Machine /User’s Manual
Important instructions for safety and environment
1.6 Compliance with WEEE Directive
This product complies with EU WEEE Directive (2012/19/EU).
This product bears a classification symbol for waste electrical
and electronic equipment (WEEE).
This product has been manufactured with high quality parts
and materials which can be reused and are suitable for
recycling. Do not dispose of the waste product with normal
domestic and other wastes at the end of its service life. Take
it to the collection center for the recycling of electrical and
electronic equipment. Please consult your local authorities to
learn about these collection centers.
Compliance with RoHS Directive:
The product you have purchased complies with EU RoHS Directive (2011/65/
EU). It does not contain harmful and prohibited materials specified in the
Directive.
Washing Machine /User’s Manual
7 / EN
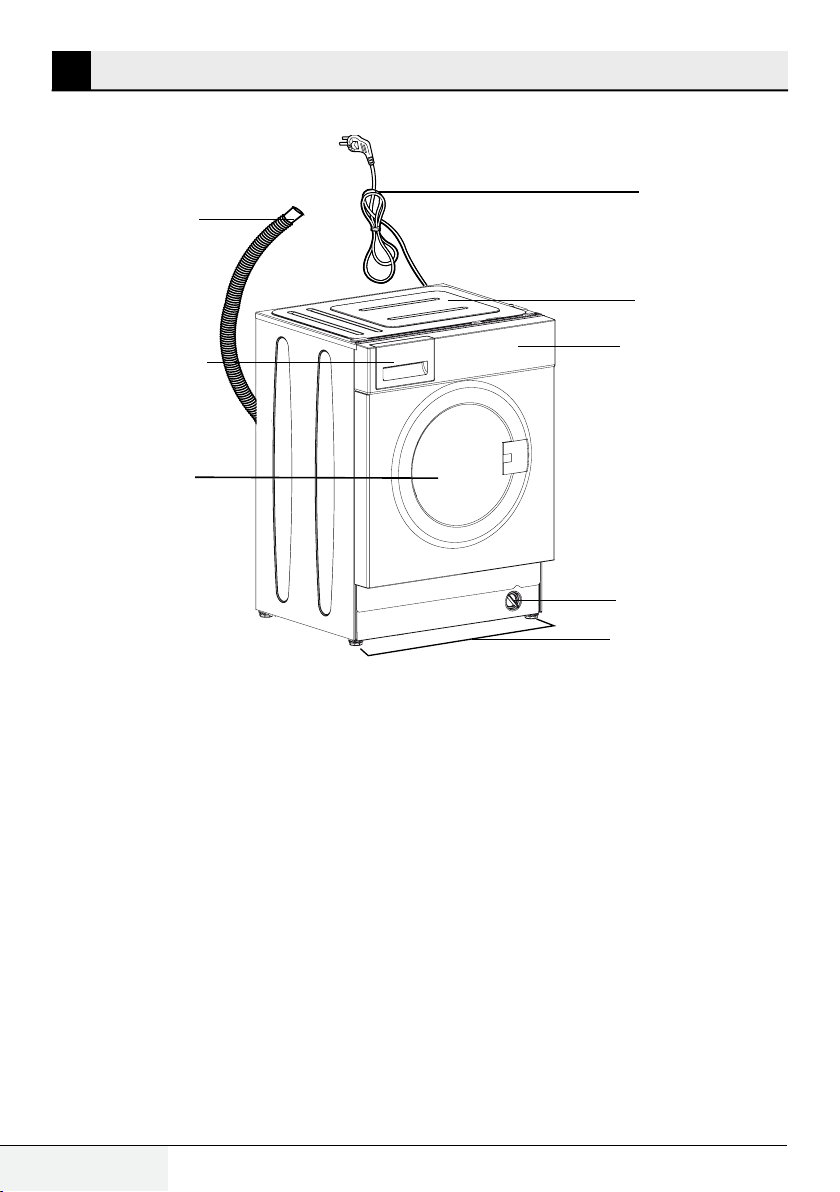
2 Your washing machine
2.1 Overview
8
1
2
1- Power cable
2- Top panel
3- Control panel
4- Filter cap
7
3
6
4
5
5- Adjustable feet
6- Loading door
7- Detergent drawer
8- Drain hose
8 / EN
Washing Machine /User’s Manual
Your washing machine
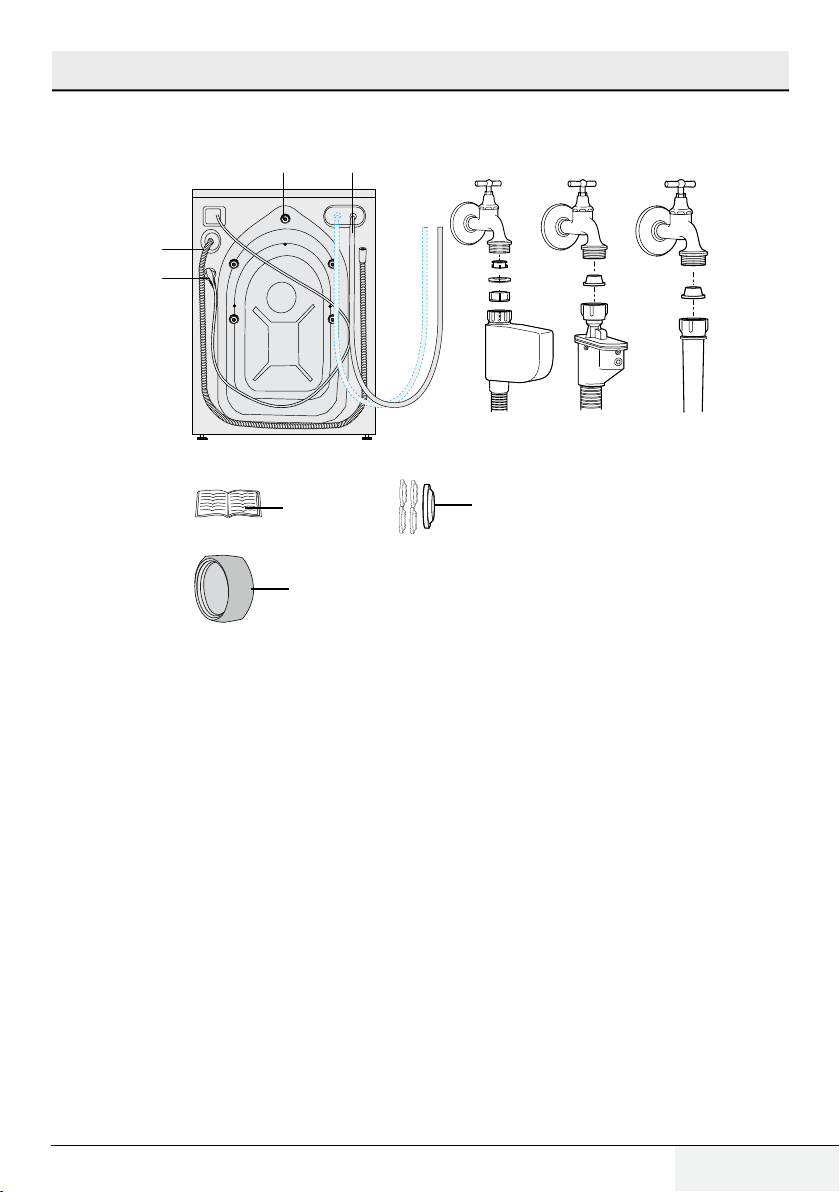
2.2 Package Contents
2
1
3 4
a b c
5
7
6
1- Power cable
2- Drain hose
3- Transportation safety bolts *
4- Mains water inlet hose (One of the following filter types is used for the mains hose connection.)
a- Electronical water shut-off
a- Mechanical water shut-off
c- Standard
5- User Manual
6- Blind plug**
7- Plastic plug group
* Number of transportation safety bolts may change depending on the model of your machine.
** This is supplied if your machine is equipped with double water inlet.
Washing Machine /User’s Manual
9 / EN
Your washing machine
2.3 Technical specifications
Models (EN)
Maximum dry laundry capacity (kg)
Height (cm)
Width (cm)
Depth (cm)
Net weight (±4 kg.)
Electrical input (V/Hz)
Total current (A)
Total power (W)
Spin speed (rpm/ min., max.)
Stand-by mode power (W)
Off-mode power (W)
Main model code
Single Water inlet / Double Water inlet
• Available
QWM84
8
82
60
54
72
230 V / 50Hz
10
2200
1400
1.00
0.20
8811
• / -
C
C
C
10 / EN
Technical specifications may be changed without prior notice to improve the quality of the product.
Figures in this manual are schematic and may not match the product exactly.
Values stated on the product labels or in the documentation accompanying it are obtained in laboratory
conditions in accordance with the relevant standards. Depending on operational and environmental
conditions of the product, these values may vary.
Washing Machine /User’s Manual
3 Installation
Refer to the nearest Authorised Service Agent for
installation of the product. To make the product
ready for use, review the information in the user
manual and make sure that the electricity, tap
water supply and water drainage systems are
appropriate before calling the Authorized Service
Agent. If they are not, call a qualified technician
and plumber to have any necessary arrangements
carried out.
Preparation of the location and electrical,
tap water and waste water installations
C
B
A
C
at the place of installation is under
customer's responsibility.
WARNING: Installation and electrical
connections of the product must be
carried out by the Authorized Service
Agent. Manufacturer shall not be held
liable for damages that may arise from
procedures carried out by unauthorized
persons.
WARNING: Prior to installation, visually
check if the product has any defects on
it. If so, do not have it installed. Damaged
products cause risks for your safety.
Make sure that the water inlet and
discharge hoses as well as the power
cable are not folded, pinched or crushed
while pushing the product into its place
after installation or cleaning procedures.
3.1 Appropriate installation location
• Place the machine on a rigid floor. Do not place
it on a long pile rug or similar surfaces.
• Total weight of the washing machine and the
dryer -with full load- when they are placed
on top of each other reaches to approx. 180
kilograms. Place the product on a solid and flat
floor that has sufficient load carrying capacity!
• Do not place the product on the power cable.
• Do not install the product at places where
temperature may fall below 0ºC.
• Place the product at least 1 cm away from the
edges of other furniture.
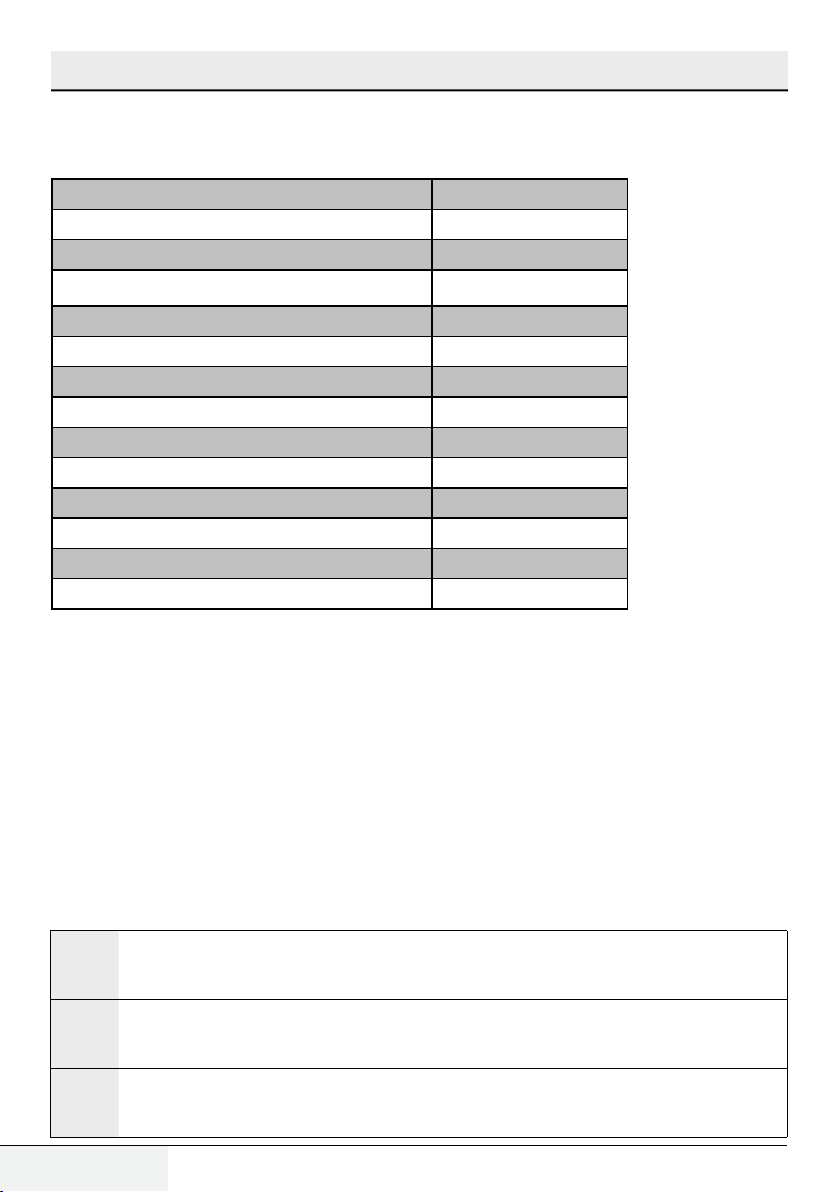
3.2 Removing packaging
reinforcement
Tilt the machine backwards to remove the
packaging reinforcement. Remove the packaging
reinforcement by pulling the ribbon.
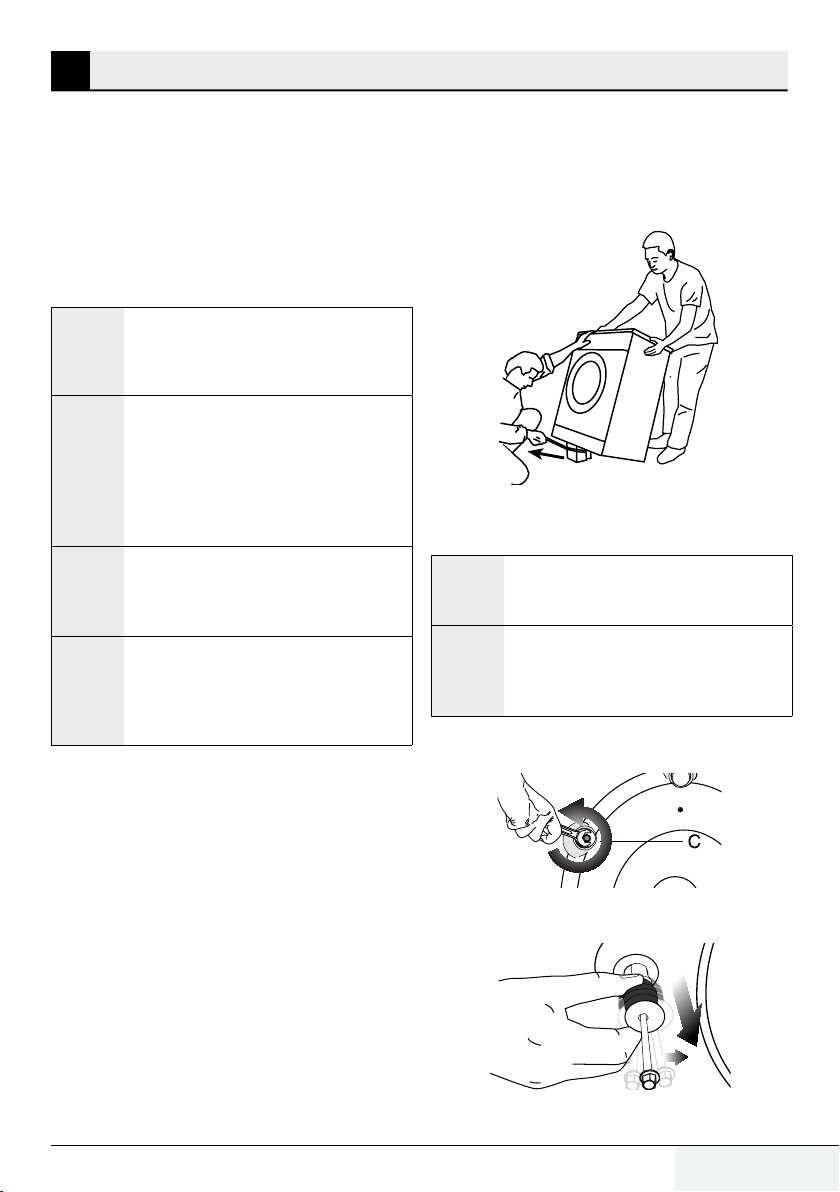
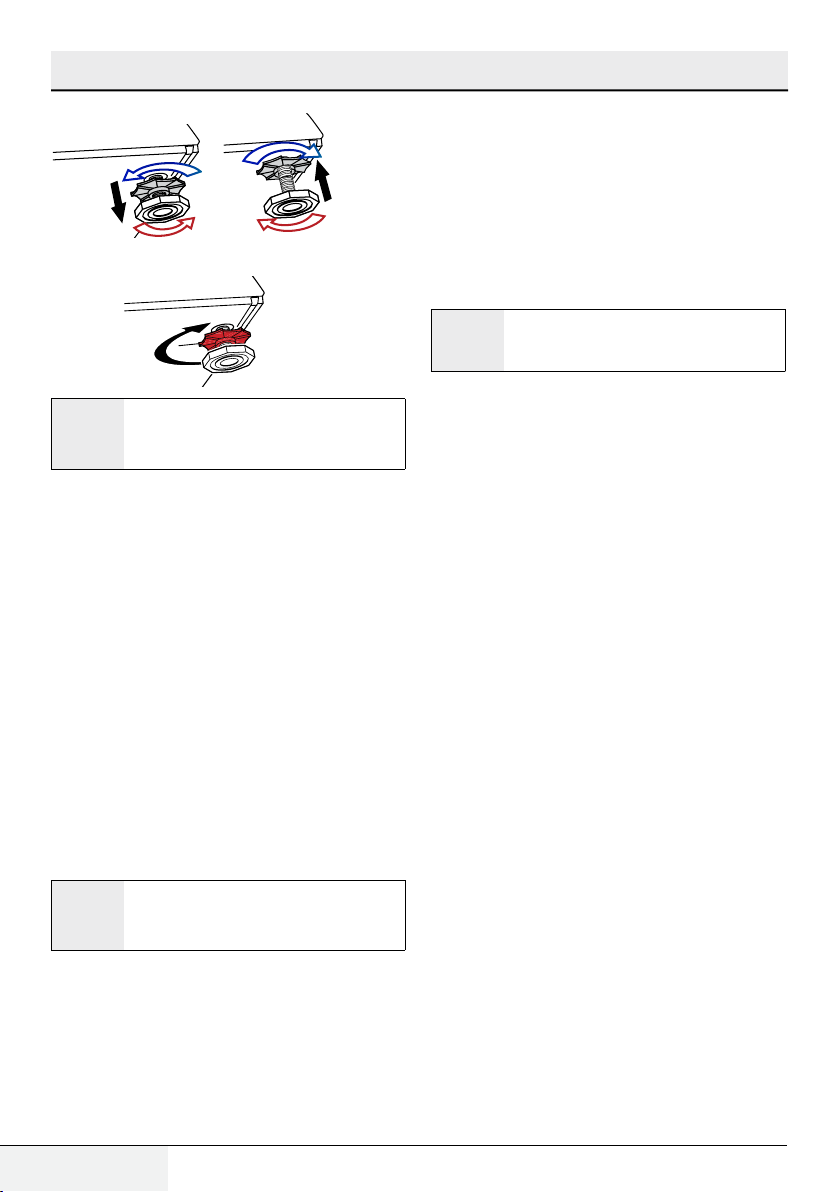
3.3 Removing the
transportation locks
WARNING: Do not remove the
A
A
1. Loosen all the bolts with a suitable spanner until
they rotate freely (C).
2. Remove transportation safety bolts by turning
them gently.
transportation locks before taking out the
packaging reinforcement.
WARNING: Remove the transportation
safety bolts before operating the washing
machine! Otherwise, the product will be
damaged.
Washing Machine /User’s Manual
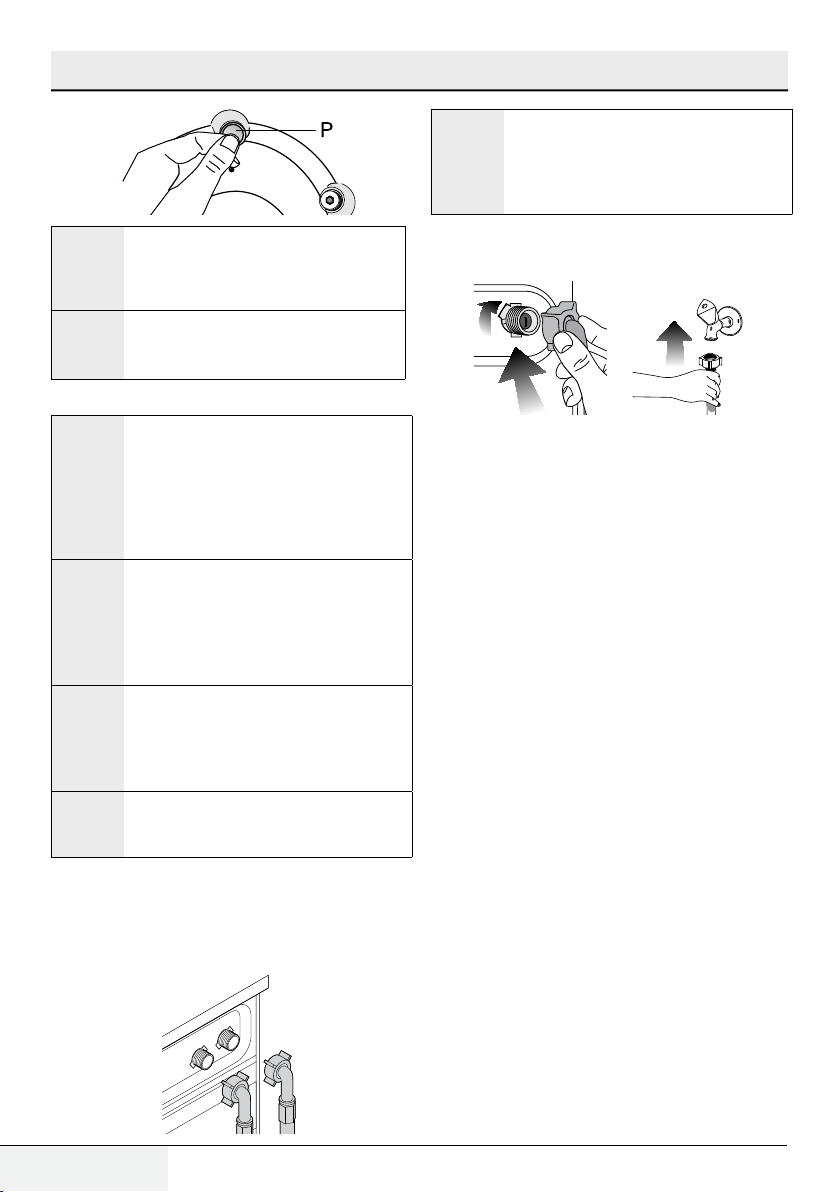
3. Attach the plastic covers supplied in the User
Manual bag into the holes on the rear panel. (P)
11 / EN
Installation
A
WARNING: Ensure that the cold and hot
water connections are made correctly when
installing the product. Otherwise, your
laundry will come out hot at the end of the
washing process and wear out.
Keep the transportation safety bolts in
a safe place to reuse when the washing
C
C
3.4 Connecting water supply
C
C
A
A
1. Connect the special hoses supplied with the
product to the water inlets on the product. Red
hose (left) (max. 90 ºC) is for hot water inlet,
blue hose (right) (max. 25 ºC) is for cold water
inlet.
machine needs to be moved again in the
future.
Never move the product without the
transportation safety bolts properly fixed
in place!
The water supply pressure required to run
the product is between 1 to 10 bars (0.1
– 1 MPa). It is necessary to have 10 – 80
liters of water flowing from the fully open
tap in one minute to have your machine run
smoothly. Attach a pressure reducing valve
if water pressure is higher.
If you are going to use the double waterinlet product as a single
unit, you must install the supplied stopper
to the hot water valve before operating the
product. (Applies for the products supplied
with a blind stopper group.)
WARNING: Models with a single water
inlet should not be connected to the hot
water tap. In such a case the laundry will
get damaged or the product will switch to
protection mode and will not operate.
WARNING: Do not use old or used water
inlet hoses on the new product. It may
cause stains on your laundry.
(cold) water-inlet
2. Tighten all hose nuts by hand. Never use a tool
when tightening the nuts.
3. Open the taps completely after making the
hose connection to check for water leaks at
the connection points. If any leaks occur, turn
off the tap and remove the nut. Retighten the
nut carefully after checking the seal. To prevent
water leakages and damages caused by them,
keep the taps closed when the machine is not
in use.
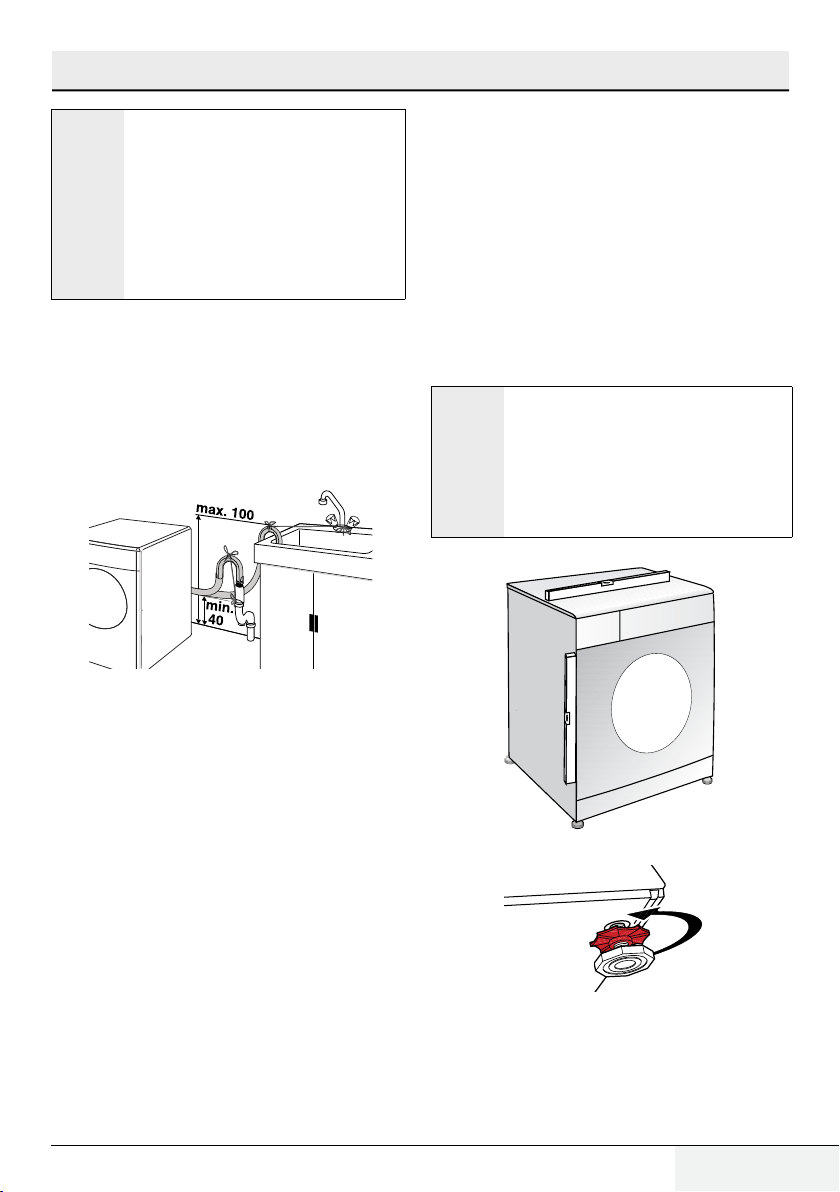
3.5 Connecting to the drain
• The end of the drain hose must be directly
connected to the wastewater drain or to the
washbasin.
• Drain hose shall be attached to a wall drain,
stand pipe or sink siphon connected to the foul
water drain, do not connect to surface water
drains.
12 / EN
Washing Machine /User’s Manual
Installation
WARNING: Your house will be flooded
A
• The hose should be attached to a height of at
least 40 cm, and 100 cm at most.
• In case the hose is elevated after laying it on
the floor level or close to the ground (less than
40 cm above the ground), water discharge
becomes more difficult and the laundry may
come out excessively wet. Therefore, follow the
heights described in the figure.
• To prevent flowing of dirty water back into the
machine and to allow for easy discharge, do not
immerse the hose end into the dirty water or do
not drive it in the drain more than 15 cm. If it is
too long, cut it short.
if the hose comes out of its housing
during water discharge. Moreover, there
is risk of scalding due to high washing
temperatures! To prevent such situations
and to ensure smooth water intake and
discharge of the machine, fix the end
of the discharge hose tightly so that it
cannot come out.
• The end of the hose should not be bent, it
should not be stepped on and the hose must
not be pinched between the drain and the
machine.
• If the length of the hose is too short, use it by
adding an original extension hose. Length of the
hose may not be longer than 3.2 m. To avoid
water leak failures, the connection between
the extension hose and the drain hose of the
product must be fitted well with an appropriate
clamp as not to come off and leak.
3.6 Adjusting the feet
WARNING: In order to ensure that
A
the product operates more silently and
vibration-free, it must stand level and
balanced on its feet. Balance the machine
by adjusting the feet. Otherwise, the
product may move from its place and
cause crushing and vibration problems.
Washing Machine /User’s Manual
1. Loosen the lock nuts on the feet by hand.
2. Adjust the feet until the product stands level
and balanced.
13 / EN
Installation
3. Tighten all lock nuts again by hand.
WARNING: Do not use any tools to
A
loosen the lock nuts. Otherwise, they will
get damaged.
3.7 Electrical connection
Connect the product to a grounded outlet
protected by a 13 A fuse. Our company shall not
be liable for any damages that will arise when the
product is used without grounding in accordance
with the local regulations.
• Connection must comply with national
regulations.
• Power cable plug must be within easy reach
after installation.
• If the current value of the fuse or breaker in the
house is less than 13 Amps, have a qualified
electrician install a 13 Amp fuse.
• The voltage specified in the "Technical
specifications" section must be equal to your
mains voltage.
• Do not make connections via extension cables
or multi-plugs.
WARNING: Damaged power cables
B
Electrical requirements
Before you insert the plug into the wall socket
make sure that the voltage and the frequency
shown in the rating label corresponds to your
must be replaced by the Authorized
Service Agents.
electricity supply.
We recommend that this appliance be connected
to the mains supply via a suitable switched and
fused socket in a readily accessible position.
Should the mains lead of the appliance become
damaged or need replacing at any time, it must be
replaced by a special purpose made mains lead
which can only be obtained from a Authorised
Service Agent.
WARNING: This appliance must be
B
If the fitted moulded plug is not suitable for your
socket, then the plug should be cut off and an
appropriate plug fitted.
Destroy the old plug, which is cut off as a plug
with a bared cord could cause a shock hazard if
inserted into a socket elsewhere in the house.
The moulded plug on this appliance incorporates a
13A fuse. Should the fuse need to be replaced an
ASTA approved BS1362 fuse of the same rating
must be used. Do not forget to refit the fuse cover.
In the event of losing the fuse cover, the plug must
not be used until a replacement fuse cover has
been fitted. Colour of the replacement fuse cover
must be the same colour as that visible on the pin
face of the plug. Fuse covers are available from
any good electrical store.
Important
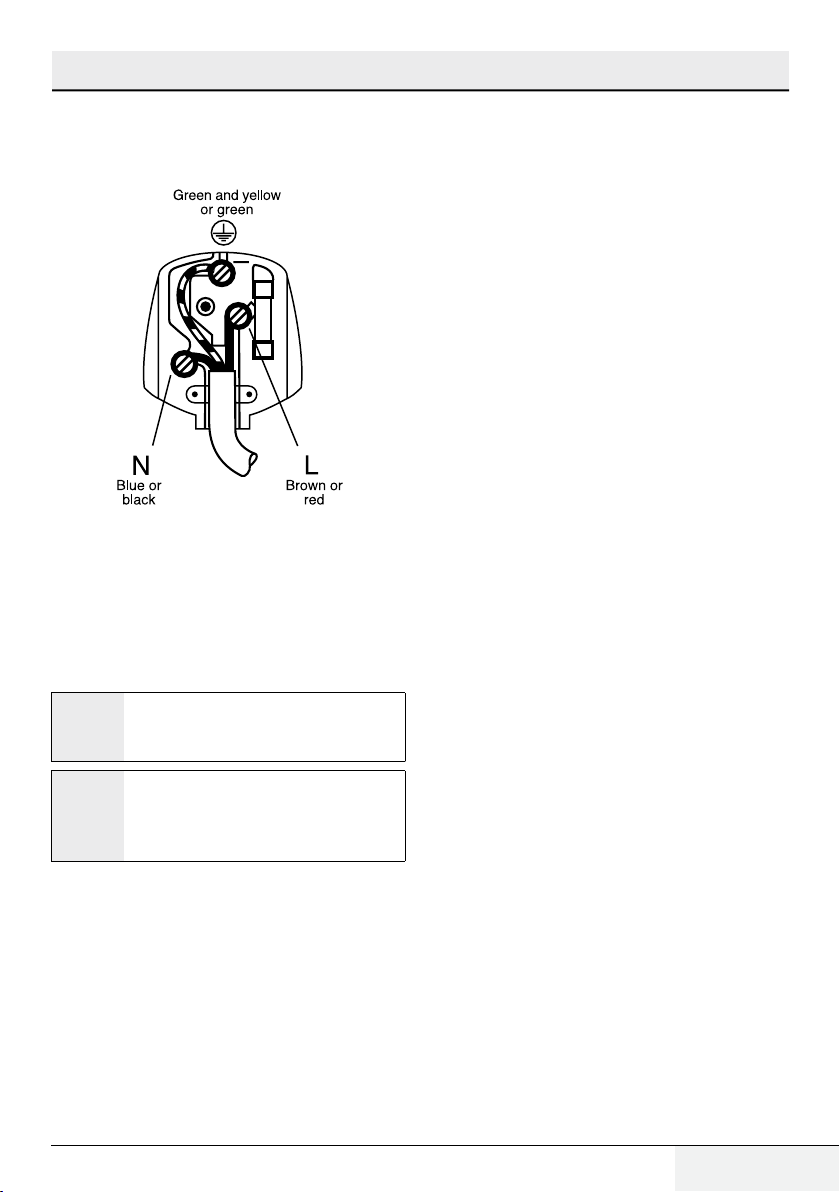
Fitting a different plug
As the colours of the wires in the mains lead
of this appliance may not correspond with the
coloured markings identifying the terminals on
your plug, proceed as follows:
1 Connect the green - yellow or green (earth) wire
to the terminal in the plug marked ‘E’ or with
the symbol f or coloured green and yellow or
green.
2 Connect the blue (neutral) wire to the terminal
in the plug marked ‘N’ or coloured black.
3 Connect the brown (live) wire to the terminal in
the plug marked ‘L’ or coloured red.
earthed
14 / EN
Washing Machine /User’s Manual
Installation
With the alternative plugs a 13A fuse must be
fitted either in the plug or adaptor or in the main
fuse box. If in doubt contact a qualified electrician.
Transportation of the product
1. Unplug the product before transporting it.
2. Remove water drain and water supply
connections.
3. Drain all water that has remained in the
product. See 7.5
4. Install transportation safety bolts in the reverse
order of removal procedure; see 3.3.
Never move the product without the
transportation safety bolts properly fixed
C
in place!
WARNING: Packaging materials are
A
Washing Machine /User’s Manual
dangerous to children. Keep packaging
materials in a safe place away from
reach of the children.
15 / EN
4 Preparation
4.1 Sorting the laundry
• Sort laundry according to type of fabric, colour,
and degree of soiling and allowable water
temperature.
• Always obey the instructions given on the
garment tags.
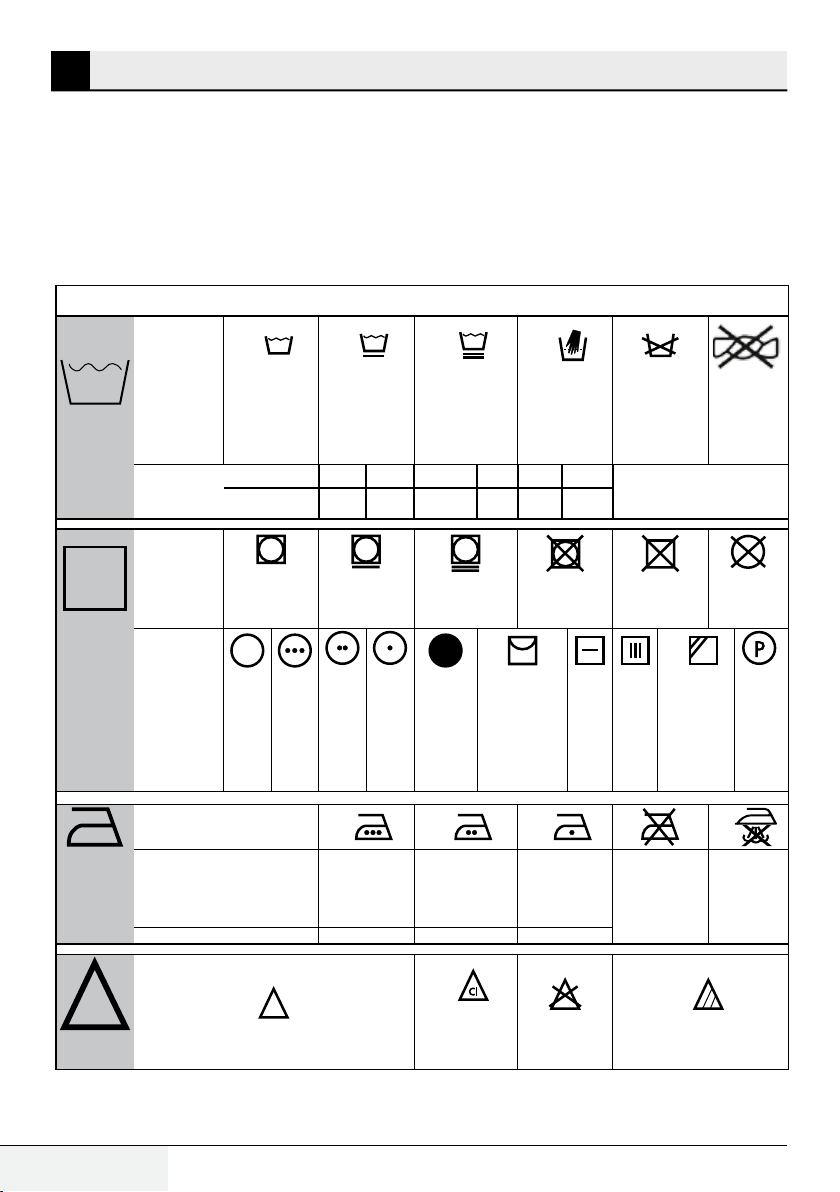
LAUNDRY WASH SYMBOLS
WASH
DRYING
IRON
Machine
Wash
Symbols
Water
Temperatures
Drying
Symbols
Drying
Settings
Iron -
Dry or Steam
Normal wash
Maximum
Symbol(s)
Suitable for
dryer
At any temperature
No Iron
950C 700C 600C 500C 400C 300C
No Iron
At high temperature
At medium
temperature
Iron at high
temperature
Delicate dry
At low temperature
Iron at medium
temperature
Sensitive-
Delicate
wash
Sensitive /
Without heating
Hand wash
Do not dry
with dryer
Hang to dry
Iron at low
temperature
Lay to dry
Not washable
Do not dry
Hang wet to dry
No Spin
Do not dry-
clean
Lay in shadow
to dry
Dry-cleanable
BLEACH
16 / EN
Maximum temperature
All bleaches are allowed
200 0C 150 0C 110 0C
Bleach (sodium
hypochlorite)
can be used
Bleach is not
allowed
Do not iron
Only bleaches without
chlorine are allowed
Washing Machine /User’s Manual
Iron without
steam

Preparation
4.2 Preparing laundry for washing
• Laundry items with metal attachments such as,
underwired bras, belt buckles or metal buttons
will damage the machine. Remove the metal
pieces or wash the clothes by putting them in a
laundry bag or pillow case.
• Take out all substances in the pockets such as
coins, pens and paper clips, and turn pockets
inside out and brush. Such objects may damage
the product or cause noise problem.
• Put small size clothes such as infant's socks
and nylon stockings in a laundry bag or pillow
case.
• Place curtains in without compressing them.
Remove curtain attachment items.
• Fasten zippers, sew loose buttons and mend
rips and tears.
• Wash “machine washable” or “hand washable”
labeled products only with an appropriate
programme.
• Do not wash colours and whites together. New,
dark coloured cottons release a lot of dye. Wash
them separately.
• Tough stains must be treated properly before
washing. If unsure, check with a dry cleaner.
• Use only dyes/colour changers and limescale
removers suitable for machine wash. Always
follow the instructions on the package.
• Wash trousers and delicate laundry turned
inside out.
• Keep laundry items made of Angora wool in the
freezer for a few hours before washing. This will
reduce pilling.
• Laundry that are subjected to materials such as
flour, lime dust, milk powder, etc. intensely must
be shaken off before placing into the machine.
Such dusts and powders on the laundry may
build up on the inner parts of the machine in
time and can cause damage.
4.3 Things to be done
for energy saving
Following information will help you use the
product in an ecological and energy-efficient
manner.
• Operate the product in the highest capacity
allowed by the programme you have selected,
but do not overload; see, "Programme and
consumption table".
• Always follow the instructions on the detergent
packaging.
• Wash slightly soiled laundry at low
temperatures.
• Use faster programmes for small quantities of
lightly soiled laundry.
• Do not use prewash and high temperatures for
laundry that is not heavily soiled or stained.
• If you plan to dry your laundry in a dryer, select
the highest spin speed recommended during
washing process.
• Do not use detergent in excess of the amount
recommended on the detergent package.
Washing Machine /User’s Manual
17 / EN
 Loading...