

Page 1

Built-in Hob
User Manual
Einbau-Kochfeld
Gebrauchsanleitung
Table de cuisson
encastrables
Manuel de l'utilisateur
Hll 64400 AT
Hll 64400 ATX
Page 2

Please read this manual first.
Dear Customer,
We would like you to obtain best performance with your product that has been
manufactured in modern facilities and passed through strict quality control
procedures.
Therefore, we advise you to read through this User Manual carefully before using
your product and keep it for future reference. If you hand over the product to
someone else, deliver the User Manual as well.
The User Manual will help you use the product in a fast and safe way.
• Read the User Manual before installing and operating the product.
• You must strictly observe the safety instructions.
• Keep this User Manual within easy reach for future reference.
• Also read other documents supplied with the product.
Remember that this User Manual may also be applicable for several other
models.
Differences between models are explicitly identified in the manual.
Explanation of symbols
Throughout this User Manual the following symbols are used:
El Important information or useful hints about usage.
Warning for hazardous situations with regard to life and property.
ziiWarning for electric shock.
ill^Warning for risk of fire.
^Warning for hot surfaces.
C€
Arcelik A.^.
Karaagac caddesi No:2-6
34445 SutIuce/lstanbul/TURKEY
Made in TURKEY
Page 3

Table of Contents
Q General information
Overview
Technical specifications
^ Important safety instructions 6
General safety
Intended use
Safety for children
Safety when working with electricity. 7
0 Installation...................................8
Before installation.............................8
Installation and connection
Disposal
Disposing of packaging material
Future Transportation
Disposing of the old product
..........................................
....................................
.........................................
.......................
...................
..................................
............................
..............
....
....................
..........
4
4
4
6
7
7
9
12
12
12
12
Q Preparation
Tips for saving energy
Initial use
First cleaning of the appliance.........13
^ How to use the hob
General information about cooking ....14
Using the hobs
Control panel..................................17
^ Maintenance and care
General information........................23
Cleaning the hob
Q Troubleshooting...........................25
..................................
....................
........................................
.......................
...............................
...................
............................
13
13
13
14
16
23
23
3 I EN
Page 4

Q General information
Overview
1 Induction cooking plate
2 Assembly clamp
3 Vitroceramic surface
4 Base cover
Technical specifications
Voltage / frequency 220-240 V-/380-415 V 2N ~ 50 Hz
Total power consumption max. 7200 W
Fuse min. 16 Ax 2/32 A
Cable type / section H05W-F 5x1,5 mm"" /3x2,5 mm""
Cable length
External dimensions (height / width / depth)
Installation dimensions (width / depth)
Burners
Rear left
Dimension
Power 2000/2300 W
Front left
Dimension
Power
Front right
Dimension 145mm
Power 1600/1800 W
Rear right
Dimension
Power
max. 2 m
55 mm/580 mm/510 mm
560 mm/490 mm
Induction cooking plate
180 mm
Induction cooking plate
180 mm
2000/2300 W
Induction cooking plate
Induction cooking plate
210 mm
2000/2300 W
4| EN
Page 5

no Technical specifications may be
changed without prior notice to
improve the quality of the
product.
[fl Figures in this manual are
schematic and may not exactly
match your product.
m Values stated on the product
labels or in the documentation
accompanying it are obtained in
laboratory conditions in
accordance with relevant
standards. Depending on
operational and environmental
conditions of the product, these
values may vary.
5 I EN
Page 6

Q Important safety instructions
This section contains safety •
instructions that wili help you avoid
risk of injury and damage. All
warranties will become void if you do
not follow these instructions.
General safety .
• This product is not intended to be
used by persons with physical,
sensory or mental disorders or •
unlearned or inexperienced people
(including children) unless they are
attended by a person who will be
responsible for their safety or who •
will instruct them accordingly for
use of the product.
Children must be supervised to
prevent them from tampering with •
the product.
• Connect the product to a
grounded outlet/line protected by
a fuse of suitable capacity as
stated in the "Technical
specifications" table. Have the
grounding installation made by a
qualified electrician while using the •
product with or without a
transformer. Our company shall
not be liable for any damages that
will arise due to using the product
without a grounding installation in
accordance with the local •
regulations.
• Do not operate the product if the
power cable or plug is damaged.
Call Authorized Service Agent. •
• Do not operate the product if it is
defective or has any visible
damage. •
Do not carry out any repairs or
modifications on the product.
However, you may remedy some
troubles that do not require any
repairs or modifications. See
Troubleshooting, page 25.
Never wash down the product with
water! There is the risk of electric
shock!
Never use the product when your
judgment or coordination is
impaired by the use of alcohol
and/or drugs.
Product must be disconnected
from the mains during installation,
maintenance, cleaning and repair
procedures.
Installation and repair procedures
must always be performed by
Authorized Service Agents.
Manufacturer shall not be held
responsible for damages arising
from procedures carried out by
unauthorized persons and may
void the warranty.
Be careful when using alcoholic
drinks in your dishes. Alcohol
evaporates at high temperatures
and may cause fire since it can
ignite when it comes into contact
with hot surfaces.
Do not heat closed tins and glass
jars in the oven. The pressure that
would build-up in the tin/jar may
cause it to burst.
Do not place any flammable
materials close to the product as
the sides become hot during use.
Keep all ventilation slots clear of
obstructions.
6 I EN
Page 7

• Make sure that the product
function knobs are switched off
after every use.
• Vapour pressure that build up due
to the moisture on the hob surface
or at the bottom of the pot can
cause the pot to move. Therefore,
make sure that the oven surface
and bottom of the pots are always
dry.
• Hotplates of your oven are
equipped with "Induction"
technology. Your induction hob
that provides both time and money
savings must be used with pots
suitable for induction cooking;
otherwise hotplates will not
operate.
about cooking, page 14, selecting
the pots.
m As induction hobs create a
magnetic field, they may cause
harmful impacts for people who
use devices such as insulin pump
or pacemaker.
[H Product must be installed by a
qualified person in accordance
with the regulations in force.
Otherwise, the warranty shall
become void.
Intended use
This product is designed for domestic
use. Commercial use is not admissible.
"CAUTION: This appliance is for
cooking purposes only. It must not be
used for other purposes, for example
room heating."
See.General information
The manufacturer shall not be liable for
any damage caused by improper use
or handling errors.
Safety for children
• Electrical and gas products are
dangerous to children. Keep
children away from the product
when it is operating and do not
allow them to play with the
product.
• Accessible parts of the appliance
will become hot whilst the
appliance is in use and until the
appliance has cooled, children
should be kept away.
• Do not store any items above the
appliance that children may reach.
• The packaging materials will be
dangerous for children. Keep the
packaging materials away from
children. Please dispose of all
parts of the packaging according
to environmental standards.
Safety when working with
electricity
Defective electric equipment is one of
the major causes of a fire at homes.
• Any work on electrical equipment
and systems may only be carried
out by authorised and qualified
persons.
• In case of any damage, switch off
the product and disconnect it from
the mains. To do this, turn off the
fuse at home.
• Make sure that fuse current is
compatible with the product.
7 I EN
Page 8

^ Installation
Refer to the nearest Authorised
Service Agent for installation of the
product. Make sure that the electric
and gas Installations are in place
before calling the Authorised Service
Agent to have the product ready for
operation. If not, call a qualified
electrician and fitter to have the
required arrangements made.
[f] Preparation of location and
electrical and gas installation for
the product is under customer’s
responsibility.
A The product must be installed in
accordance with all local gas
and/or electrical regulations.
A Prior to installation, visually
check if the product has any
defects on it. If so, do not have it
installed.
Damaged products cause risks
for your safety.
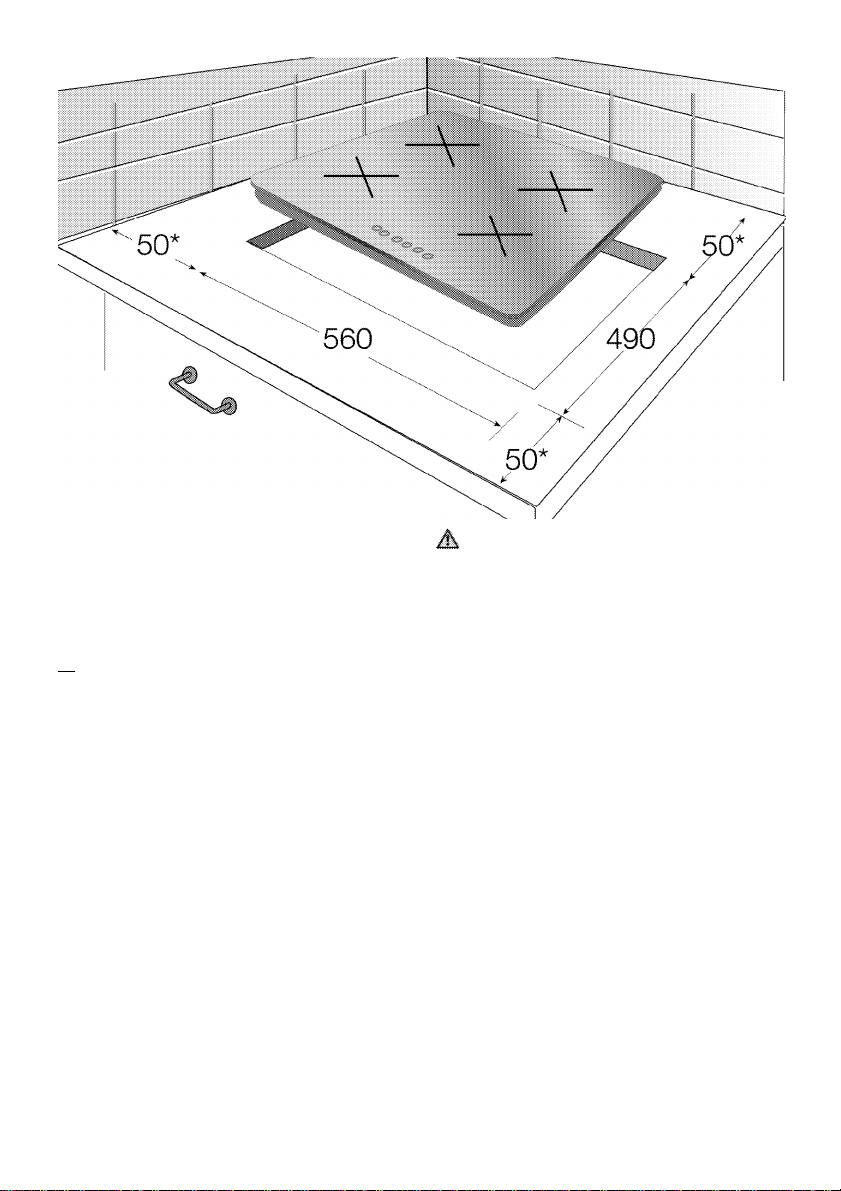
Before installation
The hob is designed for installation in a
commercial worktop. A safety distance
must be left between the appliance
and the kitchen walls and furniture.
See figure (values in mm).
• It can also be used in a free
standing position. Allow a
minimum distance of 750 mm
above the hob surface.
• (*) If a cooker hood is to be
installed above the cooker, refer to
cooker hood manufacturer'
instructions regarding installation
height (min 650 mm)
• Remove packaging materials and
transport locks.
• Surfaces, synthetic laminates and
adhesives used must be heat
resistant (100 °C minimum).
• The worktop must be aligned and
fixed horizontally.
• Cut aperture for the hob in
worktop as per installation
dimensions.
8 I EN
Page 9
min.
Installation and connection
• The product must be installed in
accordance with all local gas and
electrical regulations.
m Risk of broken glass!
Do not put the ceramic hob down
on a corner or edge.
Electrical connection
Connect the product to a grounded
outlet/line protected by a fuse of
suitable capacity as stated in the
"Technical specifications" table. Have
the grounding installation made by a
qualified electrician while using the
product with or without a transformer.
Our company shall not be liable for any
damages that will arise due to using
the product without a grounding
installation in accordance with the
local regulations.
Risk of electric shock, short
circuit or fire by unprofessional
Installation!
The appliance may be connected
to the mains supply only by an
authorized qualified person and
the appliance is only guaranteed
after correct installation.
Risk of electric shock, short
circuit or fire by damage of the
mains lead!
The mains lead must not be
clamped, bent or trapped or
come into contact with hot parts
of the appliance.
If the mains lead is damaged, it
must be replaced by a qualified
electrician.
Connection must comply with
national regulations.
The mains supply data must
correspond to the data specified
on the type label of the product.
9 I EN
Page 10
Type label is at the rear housing of
the product.
• Power cabie of your product must
comply with the values in
"Technicai specifications" table.
^ Risk of electric shock!
Before starting any work on the
eiectricai installation, please
disconnect the appiiance from
the mains supply.
Connecting the power cable
1. If it is not possible to disconnect all
poles in the supply power, a
disconnection unit with at least 3
mm contact clearance (fuses, line
safety switches, contactors) must
be connected and all the poles of
this disconnection unit must be
adjacent to (not above) the product
in accordance with lEE directives.
Failure to obey this instruction may
cause operational problems and
invalidate the product warranty.
Additional protection by a residual
current circuit breaker is
recommended.
If a cable is supplied with the
product:
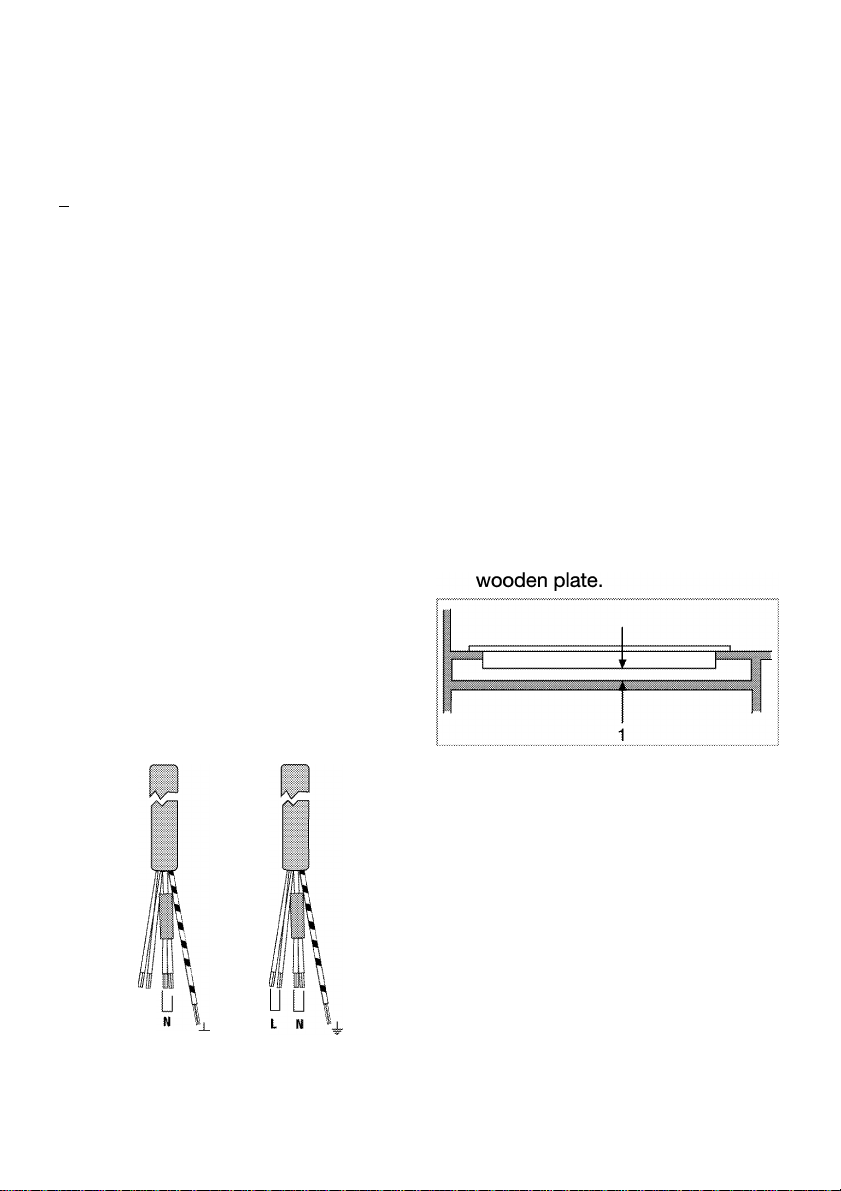
2. For single-phase connection, connect the wires as identified below:
• Brown/black cable = L (Phase)
• Blue/grey cable = N (Neutral)
• Green/yellow cable = (E)
(Ground)
3. For double-phase connection, connect the wires as identified below:
• Brown cable = L1 (Phase 1)
• Black cable = L2 (Phase 2)
• Blue/grey cable = N (Neutral)
• Green/yellow cable = (E) “
(Ground)
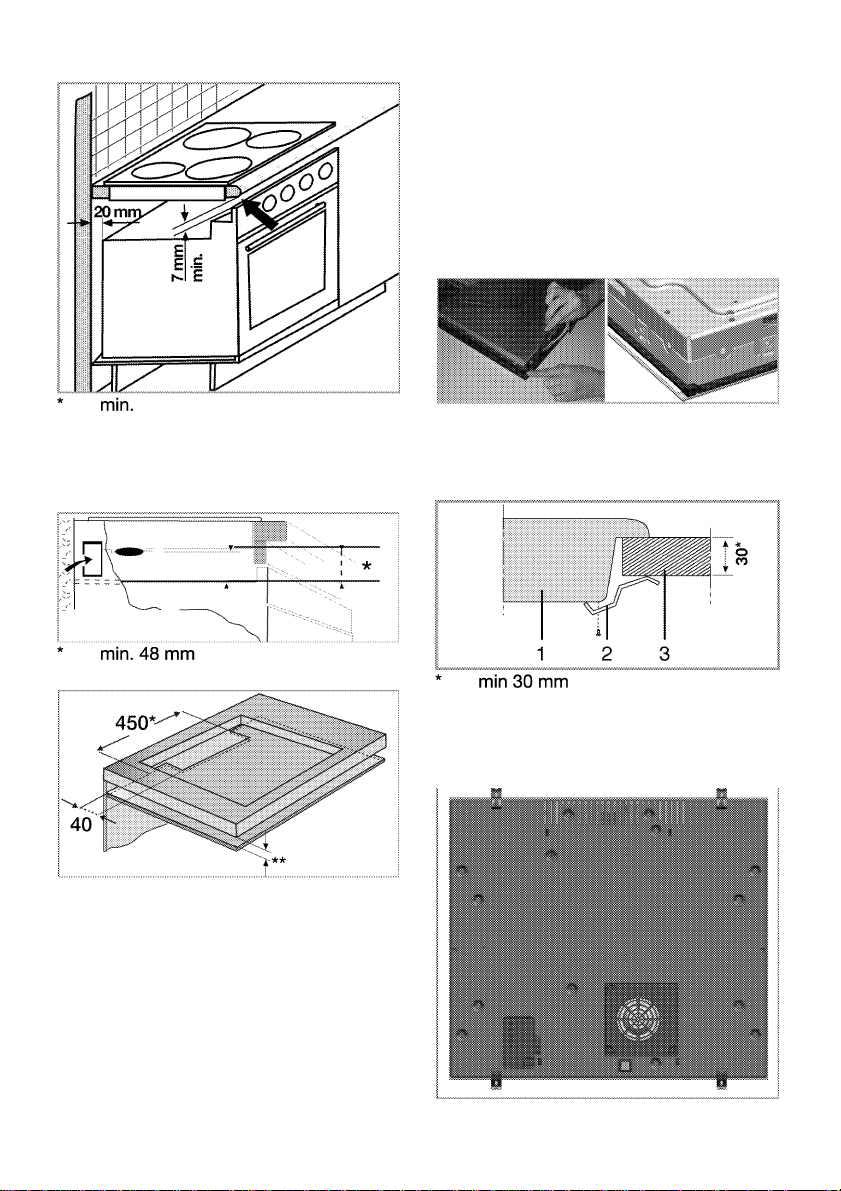
Installing the product
H If it is possible to touch the
bottom of the product since it is
installed onto a drawer, this
section must be covered with a
1 min. 48 mm
LU2
2N AC 380-415 V
m When installing the hob onto a
cabinet, a shelf must be installed
in order to separate the cabinet
from the hob as illustrated in the
above figure. This is not required
when installing onto a built-in
oven.
IN AC 220-240 V
10| EN
Page 11
If the oven is below:
from penetrating between the product
and the counter.
1. Prepare the surface of the counter
as shown in the figure.
2. Apply the sealing gasket provided
with the product to the edges of the
hob's lower housing that contact
with the counter as illustrated in
figure.
It is required to ieave a ventiiation
opening of minimum 180 cm^ at the
rear section of the furniture as
iiiustrated in the foiiowing figure.
If the board is below:
mm.
** Min. 48 mm
During instaliation of your induction
hob, piace the product parailei to the
instailation surface. Aiso, apply sealing
gasket to the parts of the hob
contacting the counter as described
below in order to prevent any liquid
3. Center the product in the counter.
4. Using the installation clamps
secure the hob by fitting through
the holes on the lower casing.
1 Hob
2 Installation clamp
3 Counter
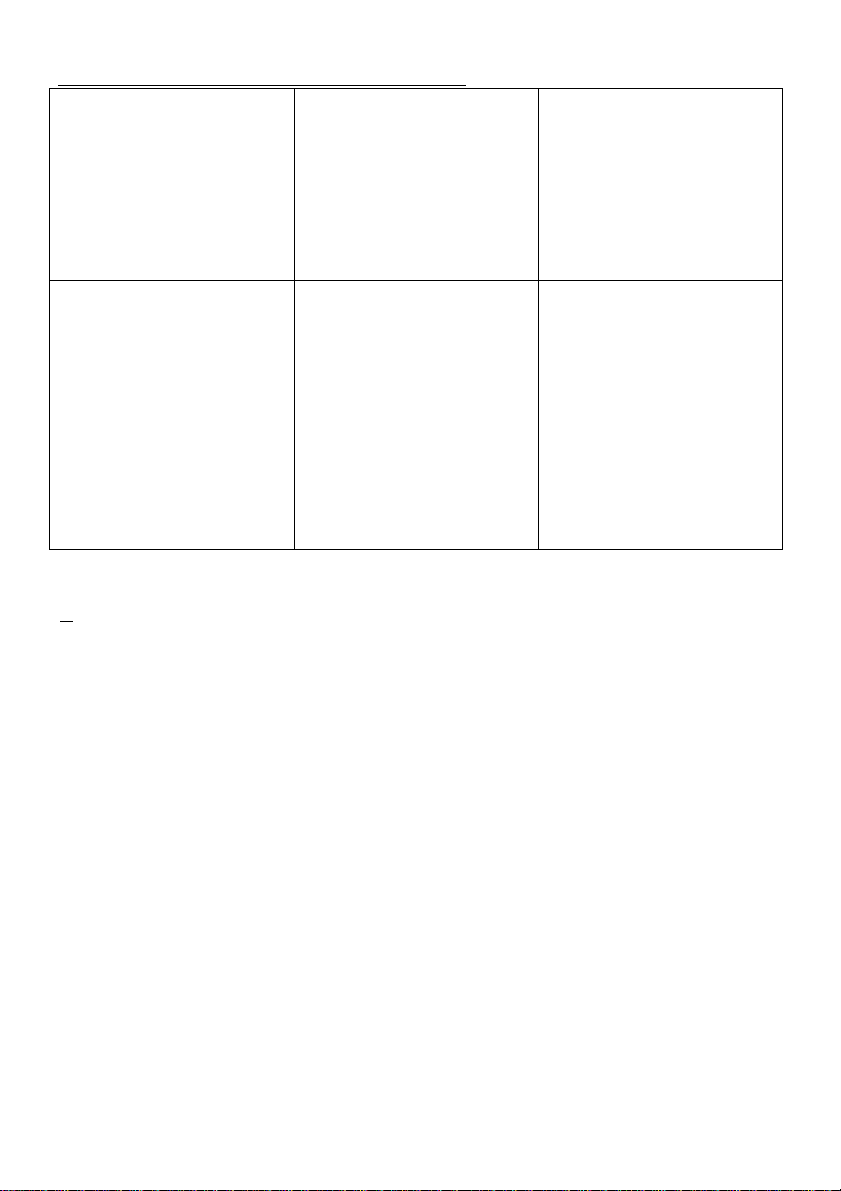
» Rear view (connection holes)
11 I EN
Page 12

no Making connections to different
hoies is not a good practice in
terms of safety since it can
damage the gas and electricai
system.
Final check
1. Piug in the power cable and switch
on the product's fuse.
2. Check the functions.
Disposal
Disposing of packaging material
Packaging materials are dangerous to
children. Keep packaging materials in
a safe place out of reach of children.
Packaging materials of the product are
manufactured from recyclable
materials. Dispose of them properly
and sort in accordance with recycled
waste instructions. Do not dispose of
them with normal domestic waste.
Future Transportation
• Keep the product's original carton
and transport the product in it.
Follow the instructions on the
carton. If you do not have the
original carton, pack the product in
bubble wrap or thick cardboard
and tape it securely.
• Do not use the door or handle to
lift or move the product.
m Do not place other items on the
top of the appliance. The
appliance must be transported
upright.
m Check the general appearance of
your product for any damages
that might have occurred during
transportation.
Disposing of the old product
Dispose of the old product in an
environmentally friendly manner.
This equipment bears the selective
sorting symbol for waste electrical and
electronic equipment (WEEE). This
means that this equipment must be
handled pursuant to European
Directive 2002/96/EC in order to be
recycled or dismantled to minimize its
impact on the environment. For further
information, please contact local or
regional authorities.
Electronic equipments not included in
the selective sorting process are
potentially dangerous for the
environment and human health due to
the presence of hazardous substances.
Refer to your local dealer or solid
waste collection centre in your area to
learn how to dispose of your product.
Before disposing of the product, cut
off the power cable plug and make the
door lock (if any) unusable to avoid
dangerous conditions to children.
12 I EN
Page 13

Q Preparation
Tips for saving energy
The following Information will help you
to use your appliance in an ecological
way, and to save energy:
• Defrost frozen dishes before
cooking them.
• Use pots/pans with cover for
cooking. If there is no cover,
energy consumption may increase
4 times.
• Select the burner which is suitable
for the bottom size of the pot to be
used. Always select the correct
pot size for your dishes. Larger
pots require more energy.
• Pay attention to use flat bottom
pots when cooking with electric
hobs.
Pots with thick bottom will provide
a better heat conduction. You can
obtain energy savings up to 1/3.
• Vessels and pots must be
compatible with the cooking zones.
Bottom of the vessels or pots must
not be smaller than the hotplate.
• Keep the cooking zones and
bottom of the pots clean. Dirt will
decrease the heat conduction
between the cooking zone and
bottom of the pot.
Initial use
First cleaning of the appliance
ni The surface may get damaged by
some detergents or cleaning
materials.
Do not use aggressive
detergents, cleaning
powder/cream or any sharp
objects.
1. Remove all packaging materials.
2. Wipe the surfaces of the appliance
with a damp cloth or sponge and
dry with a cloth.
13 I EN
Page 14

§ How to use the hob
General information about
cooking
A Risk of fire by overheated oii!
When you heat oil, do not leave It
unattended.
Never try to extinguish the fire
with water! When oil has caught
fire, immediately cover the pot or
pan with a lid. Switch off the hob
if safe to do so and phone the fire
service.
..
.................................
Before frying foods, always dry ^^e saucepan onto another
them well and gently place into the „ft
hot oil. Ensure cornplete thawing instead
of frozen foods before frying.
Do not cover the vessel you use
when heating oil. ■’’ips about glass ceramic hobs
Place the pans and saucepans in a * Glass ceramic surface is heatproof
manner so that their handles are affected by big
not over the hob to prevent temperature differences,
heating of the handles. Do not * Do not use the glass ceramic
place unbalanced and easily tilting surface as a place of storage or as
vessels on the hob. ® cutting board.
Do not place empty vessels and * Ds© only the saucepans and pans
saucepans on cooking zones that machined bottoms. Sharp
are switched on. They might get ®dges create scratches on the
damaged. surface.
Operating a cooking zone without * Do not use aluminum vessels and
a vessel or saucepan on it will saucepans. Aluminum damages
cause damage to the product. glass ceramic surface.
Turn off the cooking zones after
the cooking is complete.
As the surface of the product can
be hot, do not put plastic and
aluminum vessels on it.
Clean any melted such materials
on the surface immediately.
Such vessels should not be used
to keep foods either.
. cooking zone. When you want to
• Use flat bottomed saucepans or
vessels only.
• Put appropriate amount of food in
saucepans and pans. Thus, you
will not have to make any
unnecessary cleaning by
preventing the dishes from
overflowing.
Do not put covers of saucepans or
pans on cooking zones.
Place the saucepans in a manner
so that they are centered on the
Spills may damage
the glass ceramic
surface and cause
fire.
Do not use vessels
with concave or
convex bottoms.
14| EN
Page 15

Use only the
saucepans and
pans with flat
bottoms. They
ensure easier heat
transfer.
If the diameter of
the saucepan is
too small, energy
will be wasted.
Saucepan selection
For induction hobs, use oniy vesseis
suitabie for induction cooking.
Saucepan test
Use foliowing methods to test whether
your saucepan is compatible with the
induction hob or not.
1. Your saucepan is compatibie if its
bottom hoids magnet.
2. Your saucepan is compatibie if
"!=!"does not fiash when you piace
your saucepan on cooking zone
and start the hob.
You can use steei, teflon or aluminium
saucepans with special magnetic
bottom that contains labels or
warnings indicating that the saucepan
is compatible with induction cooking.
Glass and ceramic vessels, pots and
the stainless steel vessels with non
magnetic aluminium bottom should not
be used.
Saucepan recognition-focusing system
In induction cooking, only the area
covered by the vessel on the relevant
cooking zone is energised. The
diameter of the vessel's bottom is
recognised by the system and only this
area is heated automatically. Cooking
stops if the cooking vessel is lifted
from the cooking zone during cooking.
Selected cooking zone and "!=!"
symbol flashes alternately.
Safe use
Do not select high heating levels when
you will use a non-sticking (teflon)
saucepan with no oil or with very little
oil.
Do not put metal items such as forks,
knives or saucepan covers onto your
hob since they can get heated.
Never use aluminium folio for cooking.
Never place food items wrapped with
aluminium folio onto the cooking zone.
01 If there is an oven under your hob
and if it is running, sensors of the
hob can decrease the cooking
level or turn off the oven.
When the hob is running, keep
items with magnetic properties
such as credit cards or cassettes
away from the hob.
15 I EN
Page 16
Selecting cooking zone suitable to the vessel
Large cooking zone
0 21 cm
o
Large cooking zone
• Automatical iy fits to
the saucepan.
• Distributes the power
ideaiiy.
• Provides perfect heat
distribution. Used to
cook dishes such as
iarge crepes or iarge
fishes rare or very
rare.
Using the hobs
A Broken glass!
Do not let any objects fall onto
the hob. Even small objects (e.g.
salt shaker) may damage the
hob.
Do not use glass ceramic hobs
with cracks. Water may enter into
the cracks and cause a short
circuit.
If the surface is damaged in any
way (e. g. visibie cracks), switch
off the device immediateiy to
reduce the risk of an electric
shock.
Normal cooking zone
0 18 cm
o
Normal cooking zone
• Automatically fits to
the saucepan.
• Distributes the power
ideally.
• Provides perfect heat
distribution. Used for
all kinds of cookings.
Small cooking zone
0 14 cm
o
Small cooking zone
• Used for slow
cookings (sauces,
creams)
• Used to prepare
small portions or
portions based on
number of persons.
16| EN
Page 17
Control panel
Specifications
0 On / Off key
0 Temperature
setting/lncreasing timer
0 Temperature
setting/Decreasing timer
Keylock
©
H
H
Q
Q
m
m This product is controlled with a
m Always keep the control panel
Enable/disable timer
Front Left Cooking Zone
Selection key
Rear Left Cooking Zone
Selection key
Rear Right Cooking Zone
Selection key
Front Right Cooking Zone
Selection key
Graphics and figures are for
informational purposes only.
Actual displays and functions
may vary according to the model
of your hob.
touch control panel. Each
operation you make on your
touch control panel will be
confirmed by an audible signal.
clean and dry. Having damp and
soiled surface may cause
problems in the functions.
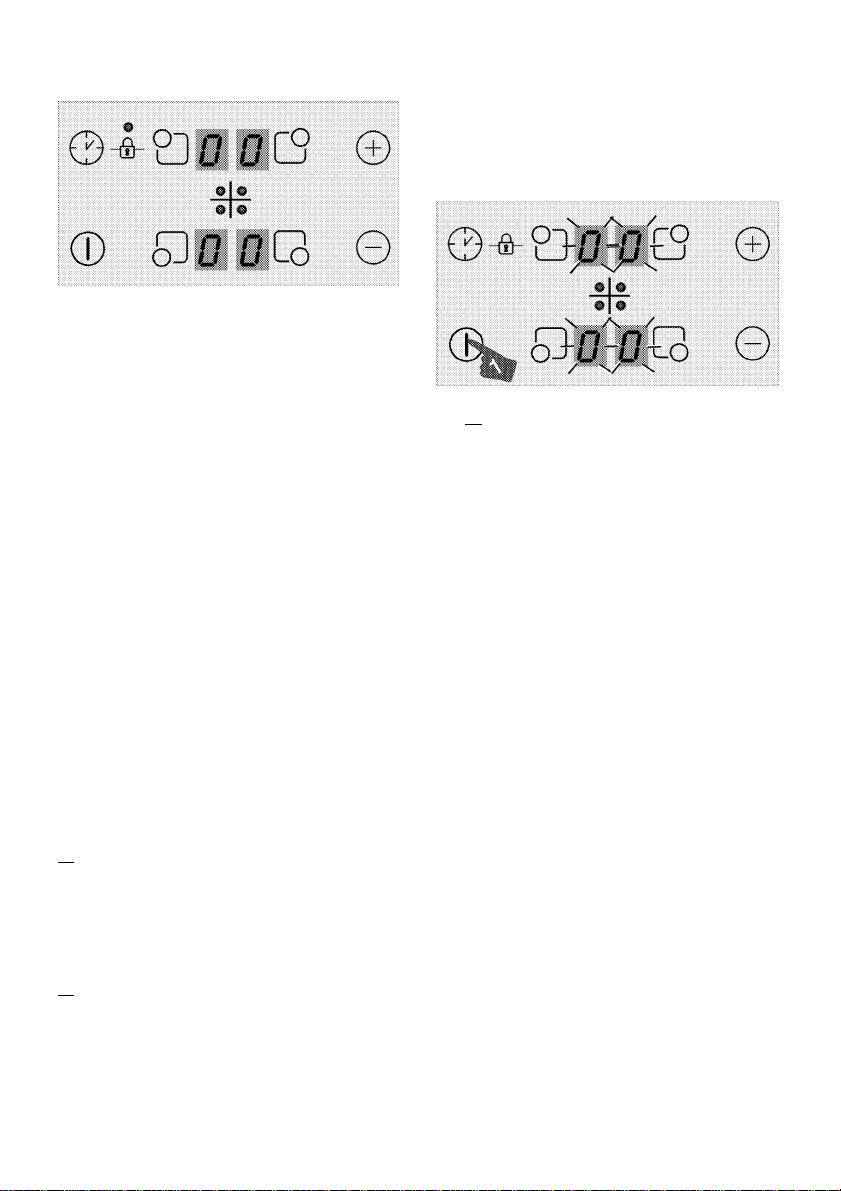
Turning on the hob
1. Touch the "©" button on the
control panel.
"0" icon appears on all cooking zone
displays.
[f] If no operation is performed
within 10 seconds, the hob
will automatically return to
Standby mode.
Turning off the hob
1. Touch the "©" button on the
control panel.
The hob will turn off and return to
Standby mode.
[|] "H" or "h" symbol that
appears on the cooking zone
display indicates that the
cooking zone is still hot. Do
not touch cooking zones.
Residuai heat indicator
"H" symbol that appears on the
cooking zone display indicates that the
hob is still hot and may be used to
keep a small amount of food warm.
This symbol will soon turn to "h"
symbol meaning less hot.
m When power is cut off, residual
heat indicator will not light up
and does not warn the user
against hot cooking zones.
17 I EN
Page 18
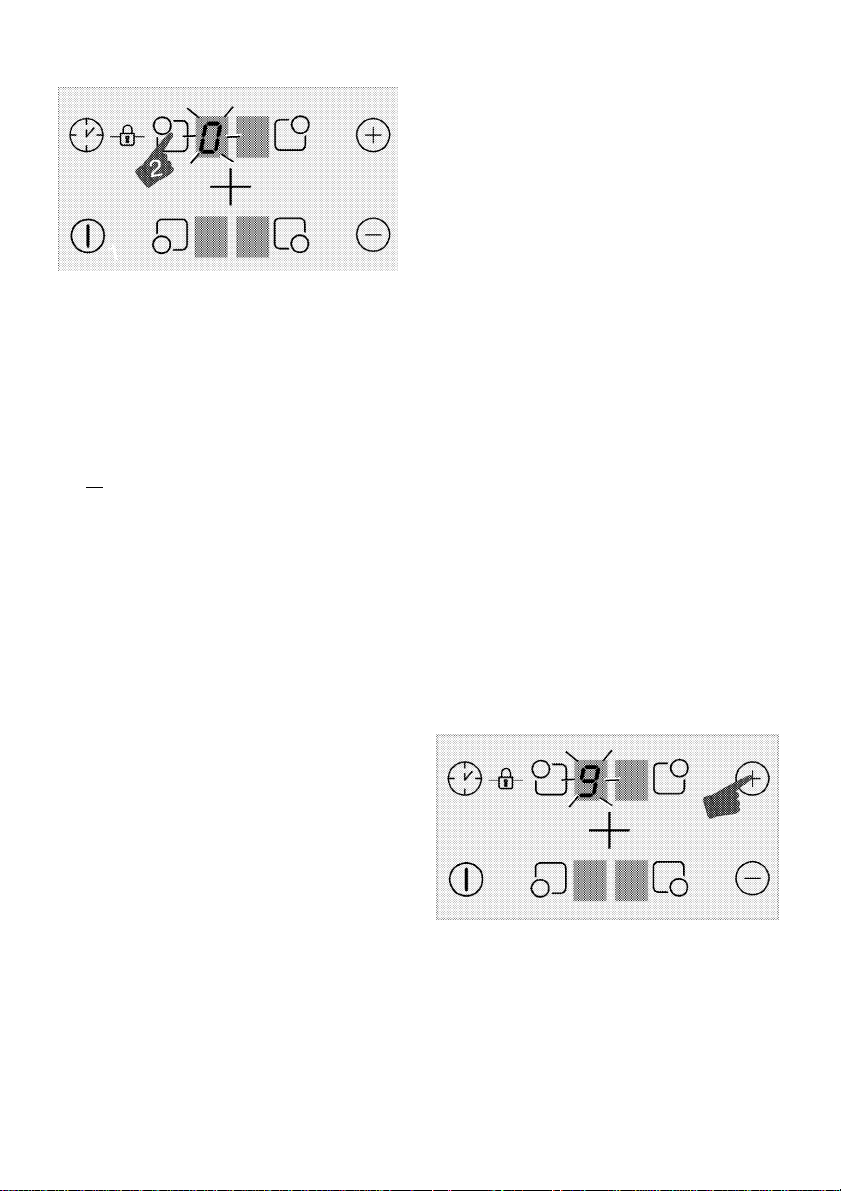
Turning on the cooking zones
1. Touch "©" button to turn on the
hob.
2. Touch the selection button of the
cooking zone you want to turn on.
"0" symbol appears on the cooking
zone display and the related display
illuminates more brightly.
m If no operation is performed
within 20 seconds, the hob
will automatically return to
Standby mode.
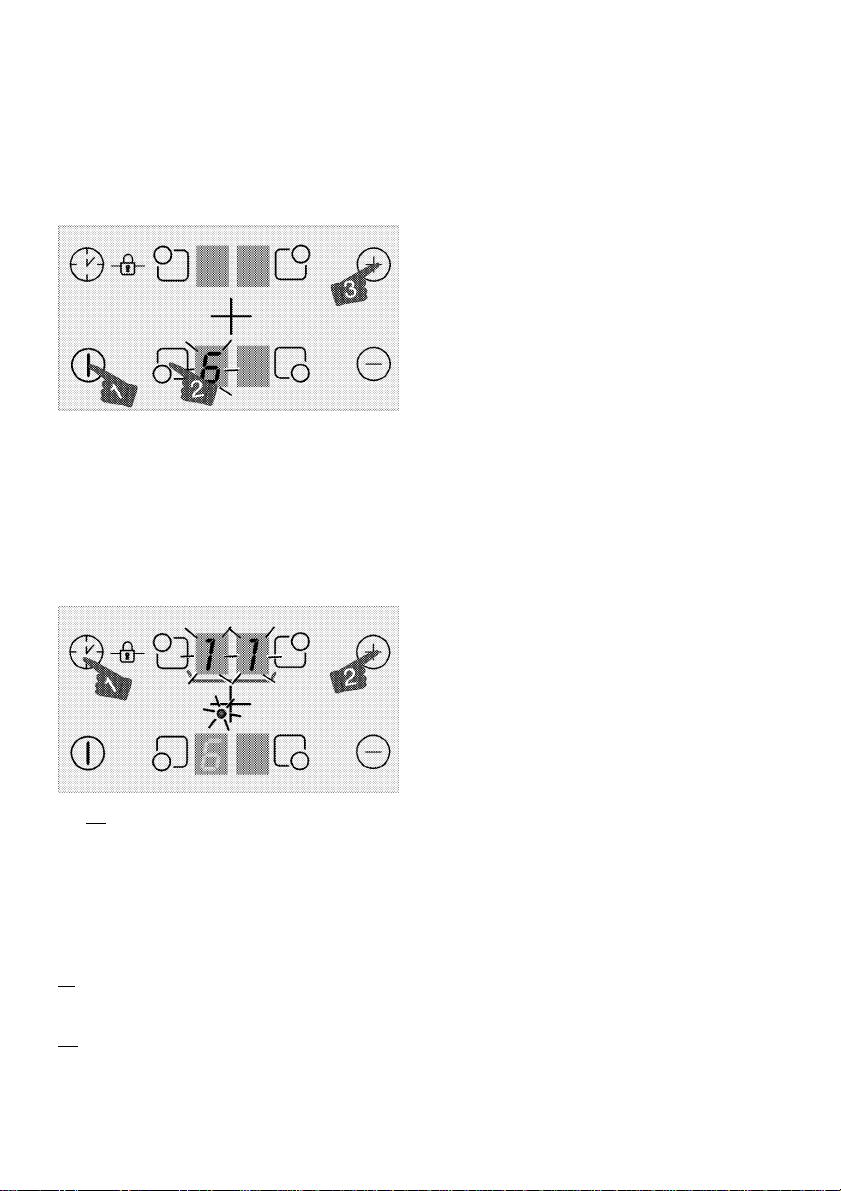
Setting the temperature ievei
Touch ,,
temperature level between "1 " and "9"
or "9" and "1".
Turning off the cooking zones:
A cooking zone can be turned off in 3
different ways:
0
„
or 'O" keys to set the
1 By dropping the temperature
ievei to "0“
You can turn the cooking zone off
by dropping the temperature
adjustment to "0" level.
2 By touching the relevant
cooking zone symbol "Q"
for a certain time
Turn on the cooking zone by
pressing relevant symbol "Q" for
a certain time to drop temperature
value to "0".
3 By using the turn-off on the
timer option for the desired
cooking zone
When the time is over, the timer will
turn off the cooking zone assigned
to it. "0" or "00" will appear on
related display.
When the time is over, an audible
alarm will sound. Touch any button
on the control panel to silence the
audible alarm.
Booster
It can be used "P" cooking position to
heat with high power level. But, it is
not recommended to cook in this
position for too long.
Booster is a function cannot be
equipped for all cooking zones.
Enabling the Booster function:
1. Touch "©" button to turn on the
hob.
2. Select the desired cooking zone by
touching the cooking zone
selection buttons.
3. Touch or "0" key firstly to
reach the level "9".
4. When the cooking zone is at level
"9", touch key once to set
cooking zone temperature to "P".
18| EN
Page 19

Disabling the Booster function:
• To disable the Booster function,
touch "
0
" key in order to set the
temperature to levei "9".
Booster function wiil be disabied
and the cooking zone wiii continue
operating at level "9".
• You can decrease the temperature
level by touching the "
you can switch it off completely by
decreasing the temperature level to
"0".
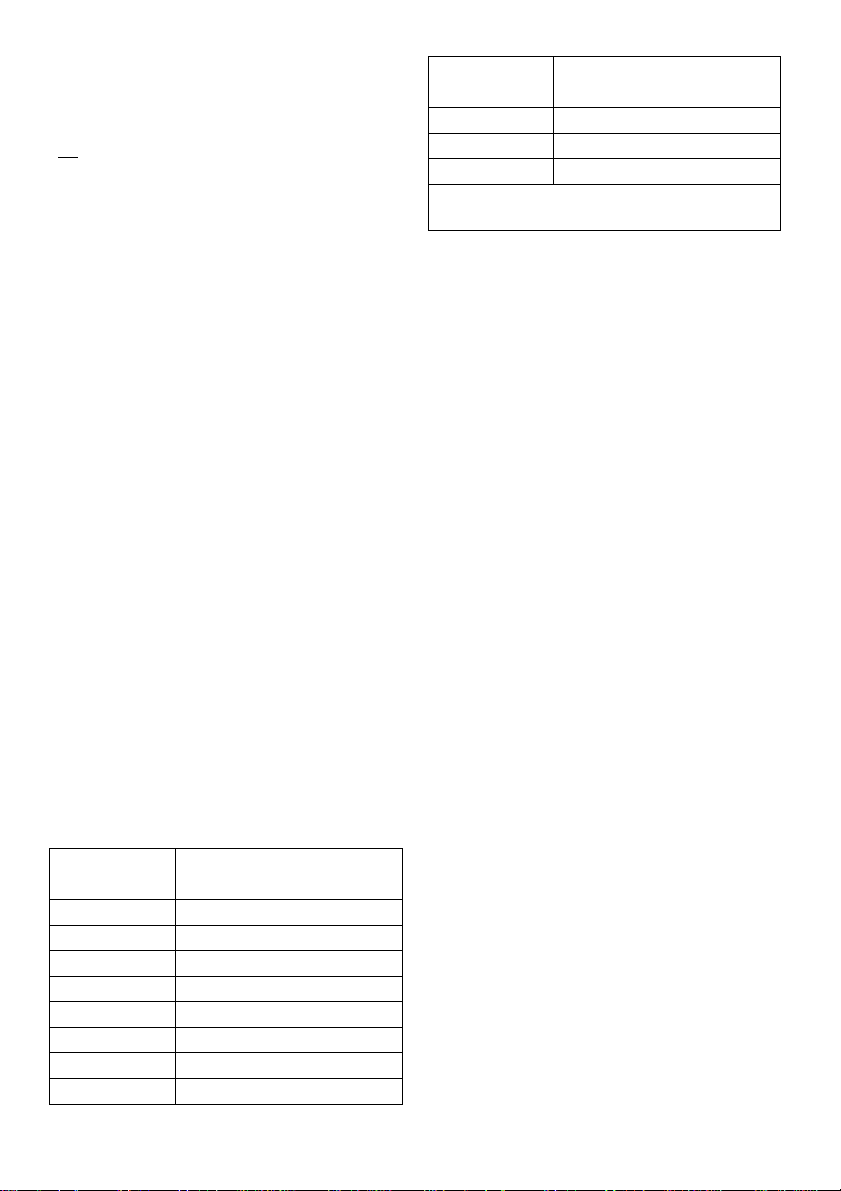
Keylock
You can activate the keylock to avoid
changing the functions by mistake
when the hob is operating.
Activating the keylock
1. Touch "©" button to turn on the
hob.
2. Touch
simultaneously to activate the
keylock.
0
" and "Q" keys
0
" key or
Deactivating the keylock
1. When the keylock is active, touch
0" and "0" keys simultaneously.
» Keylock will be de activated and the
dot on the symbol "Si" will disappear.
Childlock
You can protect the hob against being
operated unintentionally in order to
prevent children from turning on the
cooking zone. Child Lock can only be
activated and deactivated in Standby
mode.
Activating the childlock
1. Touch "©" button to turn on the
hob.
2. Touch
simultaneously After “bip” signal
touch © to activate the childlock.
» Childlock will be activated and "L"
symbol appears on all cooking zone
display.
Deactivating the childlock
0
" and 0" keys
0
» Keylock will be activated and the dot
on the symbol "iS" will light up.
m If you turn the hob off when the
keys are locked, the keylock will
be activated next time you turn
the hob on again. Key lock must
be deactivated in order to be able
to operate the hob.
1. When the keylock is active, touch
"©" button to turn on the hob.
2. Touch "0" and "0" keys
simultaneously After “bip” signal
touch 0 to deactivate the
childlock.
» Childlock will be deactivated and "L"
symbol disappears on all cooking zone
display.
Timer function
This function facilitates cooking for you.
It will not be neoessary to attend the
oven for the whole cooking period.
Cooking zone will be turned off
automatically at the end of the time
you have selected.
19 I EN
Page 20
Activating the timer
1. Touch "©" button to turn on the
hob.
2. Select the desired cooking zone by
touching the cooking zone
selection buttons.
3. Touch "©" or "0" keys to set the
desired temperature level.
4. Touch "
0
" button to turn the timer
on.
"00" symbol will illuminate on timer
display and decimal point will appear
on the selected cooking zone display.
[H Right rear and left rear
cooking zone displays serve
as timer display when the
timer is active.
5. Touch "©" or '©" keys to set the
desired time.
m The timer can only be set for the
cooking zones already in use.
[H Repeat the above procedures for
the other cooking zones for
which you wish to set the timer.
m Timer cannot be adjusted unless
the cooking zone and the
temperature value for the cooking
zone are selected.
m When the cooking zone for which
a timer was set is selected, you
can see the remaining time by
touching the "©" key again.
Deactivating the timer
Once the set time is over, the hob will
automatically turn off and give an
audible warning.
Press any key to silence the audio
warning.
Turning off the timers earlier
If you turn off the timer earlier, the hob
will carry on operating at the set
temperature until it is turned off.
1. Select the cooking zone you want
to turn off.
2. Touch "
0
" button to turn the timer
on.
3. Until "00" appears on the timer
screen, touch '©" to set the value
to "00".
Dot shaped light on the relevant
cooking zone display itself turns off
completely after having flashed for a
certain period of time and the timer is
cancelled.
Using induction cooking zones
safely and efficiently
Operating principles: Induction hob
heats directly the cooking vessel as a
feature of its operating principles.
Therefore, it has various advantages
when compared to other hob types. It
operates more efficiently and the hob
surface does not heat up.
20| EN
Page 21
Induction hob is equipped with
superior safety systems that wili
provide you maximum usage safety.
[H Your hob can be equipped with
induction cooking zones with a
diameter of 145,180, 210 mm
depending on the model. With
induction feature, each cooking
zone detects the diameter of
each vessel placed on them.
Energy builds up only where the
vessel contacts with the cooking
zone and thus, minimum energy
consumption is achieved.
Operation time constraints
The hob controi is equipped with an
operation time iimit. When one or more
cooking zones are left on, the cooking
zone wiil automaticaily be deactivated
after a certain period of time (see
Table-1). If there is a timer assigned to
the cooking zone, the timer display will
also turn off later.
Operation time limit depends on the
selected temperature level. Maximum
operation time is applied at this
temperature level.
The cooking zone may be restarted by
the user after it is turned off
automatically as described above.
Table-1: Operation time limits
Temperature
level
0 0
1 6
2
3 5
4
5
6
7
Operation time limit hour
6
5
4
1.5
1.5
21 I EN
Temperature
level
8
9 20 minutes
P (Booster)
(*) The hob will drop to level 9 after 5
minutes
Operation time limit hour
1.5
5 minutes (*)
Overheating protection
Your hob is equipped with some
sensors ensuring protection against
overheating. Following may be
observed in case of overheating:
• Active cooking zone may be
turned off.
• Selected level may drop. However,
this condition cannot be seen on
the indicator.
Overflow safety system
Your hob is equipped with overflow
safety system. If there is any overflow
that spills onto the control panel,
system will give error and the hob will
be automatically turned off.
Precise power setting
Induction hob reacts the commands
immediately as a feature of its
operating principles. It changes the
power settings very fast. Thus, you can
prevent a cooking pot (containing
water, milk and etc.) from overflowing
even if it was just about to overflow.
Operating noisy
Some noises may arise from the
induction hob. These sounds are
normal and a part of induction cooking.
• Noise becomes prominent in high
temperature levels.
• Alloy of the saucepan can cause
noise.
Page 22

In low levels, a regular on/off
sound can be heard because of
the operating principles.
Noise can be heard if an empty
saucepan Is heated. When you put
water or food In It, this sound will
clear away.
The noise of the fan that cools
electric system can be heard.
m If the surface of the touch control
panel is exposed to intense
vapor, entire control system may
become deactivated and give
error signal.
ni Keep the surface of the touch
control panel clean. Erroneous
operation may be observed.
22 I EN
Page 23

^ Maintenance and care
General information
Service life of the product will extend
and frequent problems will decrease if
the product is cleaned at regular
intervals.
A Risk of electric shock!
Switch off the electricity before
cleaning appliance to avoid an
electric shock.
^ Hot surfaces may cause burns!
Allow the appliance to cool down
before you clean it.
• Clean the product thoroughly after
each use. In this way it will be
possible to remove cooking
residues more easily, thus avoiding
these from burning the next time
the appliance is used.
• No special cleaning agents are
required for cleaning the product.
Use warm water with washing
liquid, a soft cloth or sponge to
clean the product and wipe it with
a dry cloth.
• Always ensure any excess liquid is
thoroughly wiped off after cleaning
and any spillage is immediately
wiped dry.
• Do not use cleaning agents that
contain acid or chloride to clean
the stainless or inox surfaces and
the handle. Use a soft cloth with a
liquid detergent (not abrasive) to
wipe those parts clean, paying
attention to sweep in one direction.
[II The surface may get damaged by
some detergents or cleaning
materials.
Do not use aggressive
detergents, cleaning
powder/cream or any sharp
objects.
m Do not use steam cleaners for
cleaning.
Cleaning the hob
Glass ceramic surfaces
Wipe the glass ceramic surface using a
piece of cloth dampened with cold
water in a manner as not to leave any
cleaning agent on it. Dry with a soft
and dry cloth. Residues may cause
damage on the glass ceramic surface
when using the hob for the next time.
Dried residues on the glass ceramic
surface should under no
circumstances be scraped with hook
blades, steel wool or similar tools.
Remove calcium stains (yellow stains)
by a small amount of lime remover
such as vinegar or lemon juice. You
can also use suitable commercially
available products.
If the surface is heavily soiled, apply
the cleaning agent on a sponge and
wait until it is absorbed well. Then,
clean the surface of the hob with a
damp cloth.
m Sugar-based foods such as thick
cream and syrup must be
cleaned promptly without waiting
the surface to cool down.
Otherwise, glass ceramic surface
may be damaged permanently.
23 I EN
Page 24

Slight color fading may occur on
coatings or other surfaces in time. This
will not affect operation of the product.
Color fading and stains on the glass
ceramic surface is a normal condition,
and not a defect.
24| EN
Page 25

Q Troubleshooting
Product etnite mertal noises w^ile heating and cooling.
When the metal parts are heated, they may expand and cause noise. This
is not a fault.
Product does not operate.
The mains fuse is defective or has tripped. »> Check fuses in the fuse box.
If necessary, replace or reset them.
If the display does not light up when you switch the hob on again. »>
Disconnect the appliance at the circuit breaker. Wait 20 seconds and then
reconnect it.
Product is not plugged into the (grounded) socket. »> Check the plug
connection.
Overheat protection is active. »> Allow your hob to cool down.
The cooking pot is not suitable. »> Check your pot.
y" symbol appears on the cooking zone display.
You have not placed the pot on the active cooking zone. »> Check if there
is a pot on the cooking zone.
Your pot is not compatible with induction cooking. »> Check if your
cooking pot is compatible with induction hob.
The cooking pot is not centered properly or the bottom surface of the pot is
not wide enough for the cooking zone. »> Choose a pot wide enough and
center the pot on the cooking zone properly.
Cooking pot or cooking zone is overheated. »> Allow them to cool down.
Selected cooking zone suddenly turns off during operation.
Cooking time for the selected cooking zone may be over. »> You may set
a new cooking time or finish cooking.
Overheat protection is active. »> Allow your hob to cool down.
An object may be covering the touch control panel. »> Remove the object
on the panel.
The pot does not get warm even tf the cooking zone Is on.
Your pot is not compatible with induction cooking. »> Check if your
cooking pot is compatible with induction hob.
The cooking pot is not centered properly or the bottom surface of the pot is
not wide enough for the cooking zone. »> Choose a pot wide enough and
center the pot on the cooking zone properly.__________________________
Consult the Authorised Service Agent or the dealer where you have
purchased the product if you can not remedy the trouble although you have
implemented the instructions in this section. Never attempt to repair a
defective product yourself.
__________________________________________________
____________________
25 I EN
Page 26

Bitte lesen Sie zuerst diese Anleitung.
Sehr geehrte Kundin, sehr geehrter Kunde,
Wir möchten, dass Sie mit der Leistung Ihres neuen Gerätes, das in modernen
Produktionsstätten hergesteiit wurde und strengste Quaiitätsprüfungen
durchlaufen hat, von Anfang an und auf lange Jahre rundum zufrieden sind.
Daher möchten wir Ihnen warm ans Herz legen, diese Bedienungsanleitung vor
dem ersten Einsatz Ihres neuen Gerätes aufmerksam durchzulesen. Bewahren
Sie die Anleitung auf, damit Sie später darin nachlesen können. Wenn Sie das
Gerät an jemand anderen weitergeben, vergessen Sie bitte nicht, die
Bedienungsanleitung ebenfalls weiterzugeben.
Die Bedienungsanleitung hilft Ihnen, Ihr Gerät schnell und sicher bedienen zu können.
• Lesen Sie die Bedienungsanleitung, bevor Sie das Gerät aufstellen und
benutzen.
• Halten Sie sich strikt an die Sicherheitshinweise.
• Bewahren Sie diese Bedienungsanleitung an einem gut erreichbaren Ort auf,
damit Sie bei Bedarf darin nachlesen können.
• Lesen Sie auch die restlichen Dokumente, die mit dem Gerät geliefert
wurden.
Bitte denken Sie daran, dass diese Bedienungsanleitung eventuell für
mehrere Mo-delle geschrieben wurde.
Unterschiede zwischen den Modellen werden in der Anleitung klar und
deutlich hervorgehoben.
Die Symbole
In dieser Anleitung nutzen wir die folgenden Symbole:
E Wichtige Informationen oder nützliche Tipps zum Gebrauch.
ziiWarnung vor gefährlichen Situationen, in denen es zu Verletzungen oder
Sachschäden kommen kann.
iiiiWarnung vor Stromschlägen.
^Warnung vor Brandgefahr.
^Warnung vor heißen Flächen.
Ar^elik A.ß.
Karaaga? caddesi No:2-6
34445 Sütlüce/Istanbul/TURKEY
C€
Made in TURKEY
Page 27

Inhaltsverzeichnis
Allgemeine Informationen
Geräteübersicht................................4
Technische Daten
2 Wichtige Sicherheitshinweises
Sicherheit, ailgemein
Bestimmungsgemäße Verwendung ..7
Wenn Kinder in der Nähe sind
Sicherheit beim Umgang mit
Elektrizität
Installation
Vor der Installation
Entsorgung.....................................13
Verpackungsmaterialien entsorgen. 13
Transport
Altgeräte entsorgen
........................................
............................
...................................
.....................................
...........................
........................
...............
........................
..........
4
6
8
9
9
13
13
Q Vorbereitungen
4
Tipps zum Energiesparen
Erste Inbetriebnahme.....................15
Erstreinigung des Gerätes
2 Bedienung Kochfeld..................16
Allgemeine Hinweise zum Kochen..16
Kochfeld verwenden
7
Bedienfeld
Pflege und Wartung
Allgemeine Hinweise
Kochfeld reinigen
Störungen beheben
............................
......................
......................................
.....................
......................
...........................
.....................
..............
.............
15
15
15
19
19
25
25
25
27
3IDE
Page 28

Q Allgemeine Informationen
Geräteübersicht
1 Induktionskochplatte
2 Montageklemme
3 Glaskeramikkochfeld
4 Basisabdeckung
Technische Daten
Spannung/Frequenz 220-240 V-/380-415 V 2N ~ 50 Hz
Leistungsaufnahme gesamt
Sicherung
Kabeltyp/Kabelquerschnitt
Kabellänge
Außenabmessungen (Höhe/Breite/Tiefe) 55 mm/580 mm/510 mm
Einbaumaße (Breite/Tiefe) 560 mm/490 mm
Kochzonen
Rear left
Abmessungen
Leistung 2000/2300 W
Front left
Abmessungen
Leistung
Front right
Abmessungen 145mm
Leistung 1600/1800 W
Rear right
Abmessungen
Leistung
max. 7200 W
min. 16 Ax 2/32 A
H05W-F 5x1,5 mm"" /3x2,5 mm""
max. 2 m
Induktionskochplatte
180 mm
Induktionskochplatte
180 mm
2000/2300 W
Induktionskochplatte
Induktionskochplatte
210 mm
2000/2300 W
4| DE
Page 29

nö Im Zuge der
Qualitätsverbesserung können
sich technische Daten ohne
Vorankündigung ändern.
[fl Die Abbildungen in dieser
Anleitung dienen iediglich der
Veranschaulichung und können
etwas vom tatsächlichen
Aussehen des Gerätes
abweichen.
in Angaben am Produkt oder in der
begieitenden Dokumentation
wurden unter Laborbedingungen
unter Berücksichtigung der
zutreffenden Richtiinien ermitteit.
Soiche Werte können je nach
Einsatzumgebung und
Nutzungsweise des Gerätes
abweichen.
5 I DE
Page 30

Wichtige Sicherheitshinweise
ln diesem Abschnitt finden Sie
wichtige Sicherheitshinweise, die dazu
beitragen, dass es nicht zu
Verietzungen und Sachschäden
kommt. Sämtliche Garantieleistungen
verfailen, fails Sie sich nicht an diese
Hinweise halten sollten.
Sicherheit, ailgemein
• Dieses Gerät darf nicht von
Personen bedient werden, die unter
körperlichen/geistigen
Behinderungen oder
Wahrnehmungsstörungen leiden
oder denen es an der nötigen
Erfahrung im Umgang mit soichen
Geräten mangeit; dazu zähien auch
Kinder. Eine Ausnahme kann
gemacht werden, wenn solche
Personen von einer
verantwortiichen Person
beaufsichtigt und gründiich in der
Bedienung des Gerätes unterwiesen
werden.
Kinder müssen grundsätziich gut im
Auge behalten werden, damit sie
nicht mit dem Gerät herumspielen.
• Schließen Sie das Gerät an eine
geerdete
Schutzkontaktsteckdose/Leitung an,
die mit einer Sicherung passender
Kapazität abgesichert wird schauen Sie sich dazu die
„Technische Daten“-Tabeile an.
Lassen Sie die Erdung in jedem Fali
von einem quaiifizierten Eiektriker
vornehmen oder überprüfen. Der
Herstelier haftet nicht bei Schäden,
die durch den Einsatz des Gerätes
ohne vorschriftsmäßige Erdung
entstehen.
Benutzen Sie das Gerät nicht, faiis
Netzkabei oder Netzstecker
beschädigt sein soiiten. Wenden Sie
sich an den autorisierten
Kundendienst.
Nutzen Sie das Gerät nicht, faiis es
nicht ordnungsgemäß funktioniert
oder sichtbare Beschädigungen
aufweist.
Versuchen Sie nicht, das Gerät
selbst zu reparieren oder zu
verändern. Allerdings lassen sich
vieie Probleme oder
Schwierigkeiten auch ohne
Reparatur oder professionellen
Beistand beheben. Siehe
Troubleshooting, Seite 27.
Waschen Sie das Gerät niemals mit
Wasser oder anderen Flüssigkeiten
ab! Es besteht Stromschlaggefahr!
Verzichten Sie auf die Nutzung des
Gerätes, wenn Ihr
Einschätzungsvermögen durch
Alkohol oder Drogen beeinträchtigt
sein sollte.
Bei Installation, Wartung, Reinigung
und Reparatur muss das Gerät stets
vollständig von der
Stromversorgung getrennt sein.
Installation und Reparaturen
müssen grundsätzlich vom
autorisierten Kundendienst
ausgeführt werden. Der Hersteller
haftet nicht für Schäden, die durch
Aktivitäten nicht autorisierter Dritter
entstehen; zudem kann dadurch die
Garantie erlöschen.
6| DE
Page 31

• Gehen Sie besonders vorsichtig vor,
wenn Sie aikoholhaltige Speisen
zu bereiten. Aikohoi verdampft bei
hohen Temperaturen und kann sich
beim Kontakt mit heißen
Gegenständen leicht entzünden.
• Erwärmen Sie keine Lebensmittel in
geschlossenen Behältern oder in
Gläsern im Ofen. Dadurch kann ein
Überdruck entstehen, der den
Behälter zum Platzen bringt.
• Achten Sie darauf, dass sich keine
brennbaren Gegenstände in der
Nähe des Gerätes befinden - die
Seitenflächen können sich im
Betrieb stark erhitzen.
• Halten Sie sämtliche
Belüftungsöffnungen stets frei.
• Vergessen Sie nicht, das Gerät nach
jedem Gebrauch abzuschalten.
• Durch Dampfbildung kann sich
zwischen Kochgeschirr und
Kochfeld ein Polster bilden, welches
das Kochgeschirr springen lässt.
Achten Sie daher darauf, dass
sowohl Kochfeld als auch die
Unterseite des Kochgeschirrs stets
trocken sind.
• Die Kochplatten Ihres Herdes
arbeiten mit der
Induktionstechnologie. Ihr
Induktionsherd spart Zeit und Geld;
allerdings müssen sie für
Induktionsherde geeignetes
Geschirr verwenden. Zur Auswahl
des richtigen Geschirrs lesen Sie
bitte Allgemeine Hinweise zum
Kochen, Seite 16 nach.
m Induktionsherde arbeiten mit
starken Magnetfeldern. Beachten
Sie daher, dass sich dadurch
Gefahren für Menschen ergeben
können, die Insulinpumpen oder
Herzschrittmacher verwenden.
m Das Gerät muss von einer
Fachkraft gemäß gültigen
Bestimmungen installiert werden.
Andernfalls erlischt die Garantie.
Bestimmungsgemäße
Verwendung
Dieses Gerät wurde für den reinen
Hausgebrauch entwickelt. Eine
gewerbliche Nutzung ist nicht zulässig.
"Achtung: Dieses Gerät dient
ausschließlich der Zubereitung von
Speisen. Es darf nicht zu anderen
Zwecken eingesetzt werden (z. B. zum
Beheizen des Raumes)."
Für Schäden, die durch
unsachgemäßen Gebrauch oder
falsche Bedienung verursacht werden,
haftet der Hersteller nicht.
Wenn Kinder in der Nähe sind
• Elektro- und Gasgeräte können
grundsätzlich eine Gefahr für Kinder
darstellen. Halten Sie Kinder im Betrieb
vom Gerät fern, achten Sie darauf,
dass Kinder nicht mit dem Gerät
spielen.
• Erreichbare Teile des Gerätes erhitzen
sich im Betrieb; Kinder sollten
ferngehalten werden, bis das Gerät
abgekühlt ist.
• Stellen Sie nichts auf das Gerät, nach
dem Kinder greifen könnten.
• Das Verpackungsmaterial kann für
Kinder gefährlich werden. Halten Sie
Verpackungsmaterialien von Kindern
7 I DE
Page 32

fern. Entsorgen Sie bitte alie
Verpackungsteiie umweitgerecht.
Sicherheit beim Umgang mit
Eiektrizität
Defekte Elektrogeräte gehören zu den
häufigsten Brandursachen in
Privathaushalten.
• Arbeiten an Elektrogeräten und anlagen dürfen nur von
autorisierten Elektrofachkräften
durchgeführt werden.
• Bei Störungen oder
Beschädigungen schalten Sie das
Gerät ab und trennen es
vollständig von der
Stromversorgung. Dazu schalten
Sie die entsprechende
Haussicherung ab.
• Achten Sie darauf, dass die
entsprechende Sicherung passend
für das Gerät dimensioniert ist.
8| DE
Page 33

Installation
Lassen Sie das Gerät vom
autorisierten Kundendienst in Ihrer
Nähe instaiiieren. Sorgen Sie dafür,
dass die nötigen elektrischen oder
Gasanschiüsse bereits vorbereitet sind,
bevor Sie das Gerät durch den
autorisierten Kundendienst
betriebsbereit machen lassen. Falls
noch etwas zu tun ist, wenden Sie sich
an einen guten Eiektriker oder
Instaliateur und iassen die
entsprechenden Vorbereitungen
ausführen.
[H Die Vorbereitung des
Aufsteilungsortes und der
elektrischen und Gasanschlüsse
ist Sache des Kunden.
A Die Installation des Gerätes muss
in Übereinstimmung mit
sämtlichen zutreffenden
Vorschriften zur Gas- und/oder
Elektroinstallation erfolgen.
^ Schauen Sie sich das Gerät vor
der Installation gut an,
überzeugen Sie sich davon, dass
es keine sichtbaren Defekte
aufweist. Falls doch, darf es nicht
installiert werden.
Beschädigte Geräte müssen
grundsätzlich als
Sicherheitsrisiko betrachtet
werden.
Vor der Installation
Das Kochfeld ist für den Einbau in eine
handelsübliche Küchenarbeitsplatte
vorgesehen. Zwischen Gerät und
angrenzenden Küchenwänden und möbeln muss ein Sicherheitsabstand
verbleiben. Siehe Abbildung (Angaben
in mm).
• Der Ofen kann auch freistehend
benutzt werden. Achten Sie auf
einen minimalen Abstand von 750
mm oberhalb des Kochfeldes.
• (*) Wenn eine Dunstabzugshaube
über dem Herd installiert werden
soll, beachten Sie die
Anweisungen des Herstellers zur
Installationshöhe (mindestens 650
mm Abstand).
• Verpackungsmaterial und
Transportsicherungen entfernen.
• Oberflächen, Kunststoffbeläge und
verwendete Kleber müssen
hitzebeständig sein (bis
mindestens 100 °C).
• Die Küchenarbeitsplatte muss
waagerecht ausgerichtet und
fixiert sein.
• Die Küchenarbeitsplatte
entsprechend den Einbaumaßen
ausschneiden.
9 I DE
Page 34

Min.
Einbauen und Anschließen
• Die Installation des Gerätes muss
in Übereinstimmung mit
sämtlichen zutreffenden
Vorschriften zur Gas- und/oder
Elektroinstallation erfolgen.
^ Glasbruchgefahr!
Das Glaskeramik-Kochfeld nicht
auf eine Ecke oder Kante
aufsetzen.
Elektrischer Anschluss
Schließen Sie das Gerät an eine
geerdete
Sch utzkontaktsteckdose/Leitung an,
die mit einer Sicherung passender
Kapazität abgesichert wird - schauen
Sie sich dazu die „Technische Daten“Tabelle an. Lassen Sie die Erdung in
jedem Fall von einem qualifizierten
Elektriker vornehmen oder überprüfen.
Der Hersteller haftet nicht bei Schäden,
die durch den Einsatz des Gerätes
ohne vorschriftsmäßige Erdung
entstehen.
A Stromschlag-, Kurzschluss-,
Brandgefahr durch nicht
fachgerechte Installation!
Das Gerät darf nur von einer
autorisierten Fachkraft an das
Stromnetz angeschlossen
werden. Der korrekte und sichere
Betrieb des Gerätes kann nur
nach ordnungsgemäßer
Installation gewährleistet werden.
10 I DE
Page 35

JSj Stromschlag-, Kurzschluss-,
Feuergefahr durch Beschädigung
des Netzkabels!
Das Netzkabel darf nicht
eingeklemmt, geknickt oder
gequetscht werden oder mit
heißen Geräteteilen in Berührung
kommen.
Falls das Netzkabel beschädigt
sein sollte, muss es von einem
qualifizierten Elektriker
ausgetauscht werden.
• Der Anschluss muss gemäß
nationaler Richtlinien erfolgen.
• Die Netzanschlussdaten müssen
mit den Angaben auf dem
Typenschild des Gerätes
übereinstimmen. Das Typenschild
befindet sich an der
Gehäuserückwand des Gerätes.
• Die Geräteanschlussieitung muss
den Spezifikationen und der
Leistungsaufnahme entsprechen;
siehe Technische Daten, Seite 4.
A Stromschlaggefahr!
Trennen Sie das Gerät von der
Stromversorgung, bevor Sie an
der Elektroinstaliation arbeiten.
Netzkabel anschließen
1. Falis der Netzanschluss nicht
vollständig getrennt werden kann,
muss ein Trennschaiter (Sicherung,
Netzschalter oder dergleichen) mit
mindestens 3 mm Kontaktabstand
zwischengeschaitet werden. Die
iEE-Vorschriften sind dabei
einzuhaiten. Bei Nichtbeachtung
kann es zu Betriebsstörungen und
zum Erlöschen der Garantie
kommen.
Wir empfehlen eine zusätzliche
Absicherung mit einem
Fehlerstromschutzschalter (FISchutzschalter).
Falls ein Netzkabel mit dem Gerät
geliefert wird:
2. Bei Einphasenanschluss erfolgt
der Anschluss wie nachstehend
beschrieben:
• Braunes/schwarzes Kabel = L
(Phase)
• Blaues/graues Kabel = N (Nullleiter)
• Grünes/gelbes Kabel = (E)
(Erde)
3. Bei Zweiphasenanschluss erfolgt
der Anschluss wie nachstehend
beschrieben:
• Braunes Kabel = LI (Phase 1)
• Schwarzes Kabel = L2 (Phase 2)
• Blaues/graues Kabel = N (Nullleiter)
• Grünes/gelbes Kabel = (E)
(Erde)
Gerät installieren
01 Falls die Unterseite des
Produktes bei instaiiation über
einer Schublade berührt werden
kann, muss dieser Bereich durch
eine Holzpiatte abgedeckt
werden.
11
DE
Page 36

1
48 mm Minimum
Wenn das Kochfeld über einem
m
Schrank instailiert wird, muss ein
Trennboden so angebracht
werden, dass er den Schrank
vom Kochfeld trennt (vgl.
Abbildung oben). Dies ist nicht
erforderiich, wenn Sie das Gerät
über einem Einbaubackofen
instaiiieren.
Wenn sich ein Backofen darunter
Wenn sich ein Trennboden darunter
befindet:
** 48 mm Minimum
Platzieren Sie das Ihr Kochfeld
während der Installation parallel zur
Installationsfläche. Bringen Sie zudem
wie nachstehend beschrieben an den
die Arbeitsplatte berührenden Tellen
des Kochfeldes Dichtungen an, damit
keine Flüssigkeiten zwischen Produkt
und Arbeitsplatte eindringen können.
1. Bereiten Sie die Arbeitsplatte wie in
der Abbildung gezeigt vor.
2. Bringen Sie die beim Produkt
mitgelieferte Dichtung an den die
Arbeitsplatte berührenden Kanten
des unteren Kochfeldgehäuses an
(vgl. Abbildung).
Haiten Sie unbedingt eine
Belüftungsöffnung von 180 cm^ an der
Rückseite des Möbels ein (vgl.
nachstehende Abbildung).
3. Zentrieren Sie das Produkt auf der
Arbeitsplatte.
4. Fixieren Sie das Kochfeld durch die
Aussparungen im Unterteil hindurch
mit den Montageklemmen.
12 I DE
Page 37

1 Kochfeld
2 Montageklemme
3 Arbeitsplatte
» Rückansicht (Anschlussöffnungen)
m Der Anschluss über mehrere
Öffnungen sollte vermieden
werden, da es unter Umständen
zu Beschädigungen des Gasund elektrischen Systems
kommen kann.
Endkontrolle
1. Stecken Sie die Anschlussleitung
ein, vergessen Sie die
Gerätesicherung nicht.
2. Funktion prüfen.
Entsorgung
Verpackungsmaterialien
entsorgen
Verpackungsmaterialien können für
Kinder gefährlich werden. Bewahren
Sie Verpackungsmaterialien an einem
sicheren Ort außerhalb der Reichweite
von Kindern auf.
Die Verpackung des Gerätes besteht
aus wiederverwertbaren Materialien.
Entsorgen Sie diese vorschriftsgemäß
und entsprechend sortiert. Entsorgen
Sie solche Materialien nicht mit dem
normalen Hausmüll.
Transport
• Bewahren Sie den Originalkarton
auf, falls Sie das Gerät künftig
transportieren müssen. Halten sich
an die Hinweise auf dem Karton.
Falls Sie den Originalkarton nicht
mehr besitzen sollten, verpacken
Sie das Gerät in Luftpolsterfolie
oder starken Karton, anschließend
gut mit Klebeband sichern.
• Missbrauchen Sie die Tür/den
Türgriff nicht zum Anheben oder
Bewegen des Gerätes.
m Keine sonstigen Gegenstände auf
dem Gerät abstellen. Das Gerät
muss aufrecht transportiert
werden.
01 Schauen Sie sich das Gerät nach
dem Transport gut an,
überzeugen Sie sich davon, dass
es nicht zu Beschädigungen
gekommen ist.
Altgeräte entsorgen
Entsorgen Sie Altgeräte grundsätzlich
auf umweltfreundliche Weise.
Dieses Gerät ist mit dem
Sammelsymbol für elektrische und
elektronische Altgeräte (WEEE)
gekennzeichnet. Das bedeutet, dass
13 I DE
Page 38

das Gerät nach den Vorgaben der
europäischen Direktive 2002/96/EC
recyceit und zerlegt werden muss,
damit die Umwelt möglichst wenig
beeinträchtigt wird. Weitere
Informationen erhalten Sie bei Ihrer
Stadtverwaltung.
Elektrogeräte, die nicht über spezielle
Sammelstellen entsorgt werden,
stellen durch das Vorhandensein
gefährlicher Substanzen eine
potentielle Gefahr für Umwelt und
Gesundheit dar.
Hinweise zur richtigen Entsorgung des
Gerätes erhalten Sie von Ihrem
Händler oder bei entsprechenden
Sammelstellen in Ihrer Nähe.
Bevor Sie das Gerät entsorgen,
schneiden Sie das Netzkabel ab und
machen die Türverriegelung (sofern
vorhanden) unbrauchbar, damit Kinder
nicht in Gefahr geraten.
14 I DE
Page 39

Vorbereitungen
Tipps zum Energiesparen
Mit den folgenden Hinweisen nutzen
Sie Ihr Gerät umweltbewusst und
energiesparend:
• Tauen Sie gefrorene Gerichte vor
der Zubereitung auf.
• Kochen Sie mit Deckel. Beim
Kochen ohne Deckel kann der
Energieverbrauch auf das
Vierfache ansteigen.
• Wählen Sie stets die zum
Bodendurchmesser des
Kochgeschirrs passende
Kochstelle. Entscheiden Sie sich
immer für Kochgeschirr in der
passenden Größe. Größeres
Kochgeschirr verbraucht mehr
Energie.
• Achten Sie darauf, beim Kochen
mit Elektroherden grundsätzlich
Kochgeschirr mit flachem Boden
zu verwenden.
Kochgeschirr mit dickem Boden
leitet die Wärme besser und
speichert diese eine Weile. Auf
diese Weise können Sie bis zu ein
Drittel Energie einsparen.
• Die Größe des Kochgeschirrs
muss grundsätzlich zur Kochzone
passen. Der Boden des
Kochgeschirrs darf nicht kleiner als
die Kochstelle sein.
• Halten Sie das Kochfeld und den
Boden des Kochgeschirrs sauber.
Verschmutzungen verschlechtern
die Wärmeübertragung zwischen
Kochfeld und Kochgeschirrboden.
Erste Inbetriebnahme
Erstreinigung des Gerätes
m Oberflächenbeschädigung durch
Reinigungsmittel und -geräte.
Keine scharfen Reinigungsmittel,
Scheuerpulver, -milch oder
spitzen Gegenstände verwenden.
1. Entfernen Sie sämtliches
Verpackungsmaterial.
2. Geräteoberflächen mit einem
feuchten Tuch oder Schwamm
abwischen und mit einem Tuch
trocknen.
15 I DE
Page 40

Bedienung Kochfeld
Allgemeine Hinweise zum
Kochen
Jk Feuergefahr durch überhitzte Öle
und Fette!
Öle und Fette nicht
unbeaufsichtigt erhitzen.
Auf keinen Fall mit Wasser
löschen! Falls Öle oder Fette
Feuer fangen, ersticken Sie die
Flammen durch sofortiges
Aufsetzen eines Deckels auf Topf
oder Pfanne. Schalten Sie den
Herd ab, sofern dies gefahrlos
möglich ist, rufen Sie nötigenfalls
die Feuerwehr.
• Vor dem Frittieren trocknen Sie die
Lebensmittel gründlich und lassen
sie langsam in das heiße Öl hinab.
Achten Sie darauf, dass gefrorene
Lebensmittel vor dem Frittieren
restlos aufgetaut sind.
• Decken Sie das Kochgeschirr beim
Frittieren nicht ab.
• Platzieren Sie das Kochgeschirr so
auf dem Kochfeld, dass dessen
Griffe oder Stiele nicht von
anderen Kochstellen erhitzt
werden. Stellen Sie keine Behälter
auf das Kochfeld, die zum Kippen
neigen.
• Stellen Sie kein leeres
Kochgeschirr auf eingeschaltete
Kochzonen. Es kann zu
Beschädigungen kommen.
• Wenn Sie eine Kochzone
verwenden, ohne Kochgeschirr
darauf zu platzieren, verursacht
dies Schäden am Gerät. Schalten
Sie die Kochzonen nach dem
Gebrauch aus.
• Da sich die Oberfläche des
Gerätes erhitzt, legen Sie niemals
Gegenstände aus Kunststoff oder
Aluminium darauf ab.
Entfernen Sie geschmolzene
Rückstände solcher Materialien
sofort von der Oberfläche.
Übrigens sollten Lebensmittel
grundsätzlich nicht in solchen
Gefäßen gelagert werden.
• Verwenden Sie ausschließlich
Kochgeschirr mit flachem Boden.
• Geben Sie die richtige Menge an
Lebensmitteln in das jeweilige
Kochgeschirr; nicht überfüllen.
Dadurch ersparen Sie sich
unnötige Reinigungsarbeit durch
überlaufende Speisen.
Legen Sie die Deckel des
Kochgeschirrs nicht auf den
Kochzonen ab.
Stellen Sie Kochgeschirr so auf
das Kochfeld, dass es exakt in der
Mitte der Kochzone steht. Wenn
Sie Kochgeschirr von einer
Kochzone zur nächsten bewegen
möchten, heben Sie das
Kochgeschirr an, anstatt es über
das Kochfeld zu schieben.
Tipps zu Glaskeramik-Kochfeldern
• Glaskeramik ist hitzefest und
beständig gegen starke
Temperaturdifferenzen.
• Missbrauchen Sie die Glaskeramik
nicht als Ablage oder als
Schneidbrett.
• Verwenden Sie ausschließlich
Kochgeschirr mit entsprechend
bearbeitetem Boden. Scharfe
Kanten verursachen Kratzer auf
der Oberfläche.
16 I DE
Page 41

Benutzen Sie kein Kochgeschirr
aus Aiuminium. Aiuminium
beschädigt die Giaskeramik.
Überlaufende
Speisen können
die Glaskeramik
beschädigen und
Brände
verursachen.
Kein Kochgeschirr
mit gewölbtem
Boden verwenden.
Ausschließlich
Kochgeschirr mit
ebenem Boden
verwenden.
Dadurch wird die
Hitze optimai
übertragen.
Bei Kochgeschirr
mit zu geringem
Durchmesser
verschwenden Sie
Energie.
Kochgeschirr wählen
Verwenden Sie bei Induktionsherden
nur Kochgeschirr, das zum Kochen mit
Induktion geeignet ist.
Kochgeschirr testen
Prüfen Sie anhand folgender
Methoden, ob Ihr Kochgeschirr mit
dem Induktionsherd kompatibel ist.
1. Ihr Kochgeschirr ist kompatibel,
wenn an dessen Unterseite ein
Magnet haften bleibt.
2. Ihr Kochgeschirr ist kompatibel,
wenn "!=!" nicht blinkt, sobald Sie
Ihr Kochgeschirr auf der Kochzone
abstellen und den Herd
einschalten.
Sie können Kochgeschirr aus Stahl,
Teflon oder Aluminium mit spezieller
magnetischer Unterseite verwenden,
an denen sich Angaben bzw.
Warnungen befinden, die darauf
hinweisen, dass das Kochgeschirr zum
Kochen mit Induktion eingesetzt
werden kann. Glas- und
Keramikkochgeschirr sowie Töpfe und
Edelstahlkochgeschirr ohne
magnetische Aluminiumunterseite
sollten nicht verwendet werden.
Kochgeschirrerkennungssystem
Beim Kochen mit Induktion wird nur
der Bereich aktiviert, der auf der
entsprechenden Kochzone durch das
Kochgeschirr abgedeckt ist. Der
Durchmesser der Unterseite des
Kochgeschirrs wird vom System
erkannt: ausschließlich dieser Bereich
wird automatisch erhitzt. Die Kochzone
wird deaktiviert, sobald das
Kochgeschirr von der Kochzone
heruntergenommen wird. Die
ausgewählte Kochzone und das "!=!"Symbol blinken abwechselnd.
Sichere Benutzung
Wählen Sie keine hohen
Temperaturenstufen, wenn Sie ein
antihaftbeschichtetes (Teflon)
Kochgeschirr ohne bzw. mit nur wenig
Öl verwenden.
Platzieren Sie keine metallischen
Gegenstände, wie z. B. Gabeln,
Messer oder Deckel von Kochgeschirr
auf der Kochstelle; andernfalls werden
diese erhitzt.
Verwenden Sie zum Kochen keinesfalls
Aluminiumfolie. Platzieren Sie niemals
in Aluminiumfolie eingewickelte
Lebensmittel auf der Kochzone.
17 I DE
Page 42

Falls sich unter Ihrem Kochfeld
ein Ofen befindet und dieser in
Betrieb ist, können die Sensoren
des Kochfeides die Kochstufe
verringern oder den Ofen
ausschalten.
Kochzone passend zum Kochgeschirr wählen
m Halten Sie Gegenstände mit
magnetischen Eigenschaften (z.
B. Kreditkarten oder Kassetten)
vom Kochfeid fern, soiange
dieses in Betrieb ist.
Große Kochzone
0 21 cm
Normale Kochzone
0 18 cm
Kleine Kochzone
0 14 cm
o
o
Große Kochzone Normale Kochzone Kleine Kochzone
• Passt sich automatisch • Passt sich • Ideal zum langsamen
an das Kochgeschirr automatisch an das Erhitzen (Saucen,
an. Kochgeschirr an. Rahmsaucen)
• Verteilt die Leistung • Verteilt die
ideai. Leistung ideal. kleiner Portionen
• Bietet perfekte • Bietet perfekte bzw. einer geringen
Hitzeverteiiung. Ideai
zur Zubereitung von
Gerichten, wie z. B.
großen
Pfannenkuchen, bzw.
zum leichten Anbraten
von großen Fischen.
o
Hitzeverteilung.
Ideal bei allerlei
Gerichte.
• Ideal zur Zubereitung
Anzahl an Portionen.
18 I DE
Page 43

Kochfeld verwenden
^ Lassen Sie keine Gegenstände
auf das Kochfeid falien. Seibst
kieine Gegenstände wie
Saizstreuer können das Kochfeld
beschädigen.
Verwenden Sie keine Kochfelder,
die gesprungen sind. Durch die
Sprünge kann Wasser eindringen
und einen gehörigen Kurzschluss
verursachen.
Falls Sie Beschädigungen der
Glaskeramik (z. B. sichtbare
Sprünge) bemerken sollten,
unterbrechen Sie sofort die
Stromversorgung, damit es nicht
zu Stromschlägen kommt.
Q
01 Sämtliche Abbildungen dienen
01 Das Produkt wird über ein
01 Halten Sie das Bedienfeld stets
Kochzonenauswahltaste:
Vorne rechts
lediglich der Veranschaulichung.
Das Aussehen Ihres Kochfeldes
kann je nach Modell etwas
abweichen.
Sensorbedienfeld bedient. Bei
jeder Berührung der
Sensortasten hören Sie einen
kurzen Quittungston.
sauber und trocken. Ein feuchtes
und/oder verschmutztes
Bedienfeld kann
Funktionsstörungen verursachen.
Bedienfeld
4QBHCS ©
© SD11C3 0
Spezifikationen
0 Ein-/Austaste
©
0
0 Timer de-Zaktivieren
0 Kochzonenauswahltaste:
cg
Temperaturstufe/Timer
(steigend)
Temperaturstufe/Timer
(fallend)
Tastensperre
Kochzonenauswahltaste:
Vorne links
Hinten links
Kochzonenauswahltaste:
Hinten rechts
Kochfeld einschalten
1. Berühren Sie die Ein-/Austaste
„©“ am Bedienfeld.
Das Symbol „0“ erscheint auf allen
Kochzonenanzeigen.
£9 ©
R ©
01 Falls innerhalb 10 Sekunden
keine Tasten betätigt werden,
wechselt das Kochfeld
automatisch wieder in den
Bereitschaftsmodus.
Kochfeld abschalten
1. Berühren Sie die Ein-/Austaste
„©“ am Bedienfeld.
19 I DE
Page 44

Das Kochfeld schaltet sich ab und
wechselt in den Bereitschaftsmodus.
m Wenn das Symboi „H“ oder
„h“ in der Kochzonenanzeige
erscheint, bedeutet dies, dass
die jeweilige Kochzone noch
heiß ist. Kochzone nicht
berühren!
Restwärmeanzeige
Das Symbol „H“ in der
Kochzonenanzeige signaiisiert, dass
die jeweiiige Kochsteiie noch heiß ist
und zum Warmhalten kleinerer Speisen
verwendet werden kann. Beim
Abkühien verwandeit sich das Symbol
in ein kleines „h“.
m Bei unterbrochener
Stromversorgung ieuchtet die
Restwärmeanzeige nicht, warnt
aiso auch nicht vor heißen
Kochstellen.
Kochzonen einschalten
© aiiC3 ©
1. Schalten Sie das Kochfeld mit der
Taste „©“ ein.
2. Berühren Sie die Auswahitaste der
Kochzone, die Sie einschalten
möchten.
Das Symbol „0“ erscheint in der
Kochzonenanzeige, die entsprechende
Anzeige ieuchtet heiler auf.
m Falls innerhalb 20 Sekunden
keine Tasten betätigt werden,
wechseit das Kochfeld
automatisch wieder in den
Bereitschaftsmodus.
Temperaturstufe einstellen
Stellen Sie die Temperatur mit den
Tasten „©“ / „0“ auf „1“ bis „9“ bzw.
„9“ bis „1“ ein.
Kochzonen abschalten:
Kochzonen lassen sich auf drei
unterschiedliche Weisen abschalten:
1 Durch Einstellen der
Temperaturstufe auf 0
Sie können die Kochzone
abschalten, indem Sie deren
Temperaturstufe auf „0“ einsteilen.
2 Durch längeres Berühren des
entsprechenden
Kochzonensymbols „0]“
Schalten Sie die Kochzone ein,
indem Sie das entsprechende
Symbol „Q“ gedrückt halten, bis
der Temperaturwert auf „0“ fällt.
3 Durch Timer-gesteuerte
Abschaltung der
ausgewählten Kochzone
Nach Ablauf der vorgegebenen Zeit
schaltet der Timer die ihm
zugewiesene Kochzone selbsttätig
0 oder 00 erscheinen in den
ab.
entsprechenden Anzeigen.
Nach Ablauf der Zeit erklingt ein
Signalton. Zum Abstellen des
Signaltons berühren Sie einfach eine
beliebige Taste am Bedienfeld.
Schneilheizen
Diese Funktion kann zum Erhitzen bei
hoher Leistungsstufe bei Kochposition
„P“ verwendet werden. Wir raten
20 I DE
Page 45

jedoch davon ab, längere Zeit in dieser
Position zu kochen.
Nicht aile Kochzonen sind mit einer
Schneilheizen-Funktion ausgestattet.
Schnellheizen-Funktion aktivieren:
Tastensperre
Mit der Tastensperre können Sie das
Kochfeld im Betrieb gegen
unabsichtliche Bedienung sperren.
Tastensperre einschalten
1. Schalten Sie das Kochfeld mit der
Taste „©“ ein.
2. Wählen Sie die gewünschte
Kochzone durch Berühren der
Kochzonenauswahltasten.
3. Wählen Sie zuerst mit oder
„0“ Stufe „9“.
4. Sobald die Kochzone bei Stufe
„9“ ist, stellen Sie die Temperatur
der Kochzone durch einmaliges
Berühren von „©“ auf „P“ ein.
Schnellheizen-Funktion ausschalten:
• Sie können die SchnellheizenFunktion ausschalten, indem Sie
die Temperatur durch Berühren
von „©“ auf Stufe „9“ einstellen.
Die Schnellheizen-Funktion wird
ausgeschaltet und die Kochzone
setzt den Betrieb bei Stufe „9“ fort.
• Sie können die Temperatur durch
Berühren von „©“ reduzieren bzw.
die Funktion vollständig
ausschalten, indem Sie die
Temperatur auf „0“ einstellen.
1. Schalten Sie das Kochfeld mit der
Taste ein.
2. Berühren Sie zum Aktivieren der
Tastensperre gleichzeitig „©“ und
„Q“.
» Die Tastensperre wird aktiviert, der
Punkt im Symbol „iS“ leuchtet auf.
m Falls Sie das Kochfeld bei aktiver
Tastensperre abschalten, bleibt
die Tastensperre auch beim
nächsten Einschalten des
Kochfeldes aktiv. Sie müssen die
Tastensperre zur Bedienung des
Kochfeldes aufheben.
Tastensperre ausschalten
1. Wenn die Tastensperre aktiv ist,
drücken Sie gleichzeitig die Tasten
„0“ und „Q‘.
» Die Tastensperre wird deaktiviert, der
Punkt im Symbol „l±l“ verschwindet.
Kindersicherung
Sie können das Kochfeld vor
unbeabsichtigtem Betrieb schützen
und dadurch z. B. verhindern, dass
Kinder die Kochzone(n) aktivieren. Die
Kindersicherung lässt sich nur im
DE
21
Page 46

Bereitschaftsmodus ein- und
ausschaiten.
Kindersicherung aktivieren
1. Schaiten Sie das Kochfeid mit der
Taste ein.
2. Berühren Sie gleichzeitig „
nach dem Signaiton berühren
Sie zum Aktivieren der
Kindersicherung ©.
» Die Kindersicherung wird aktiviert
und das Symboi „L“ erscheint in alien
Kochzonenanzeigen.
Kindersicherung ausschaiten
1. Wenn die Kindersicherung aktiv ist,
berühren Sie zum Einschalten des
Kochfeldes „®“.
2. Berühren Sie gleichzeitig „©“ und
: nach dem Signalton berühren
Sie zum Deaktivieren der
Kindersicherung ©.
» Die Kindersicherung wird deaktiviert
und das Symbol „L“ verschwindet aus
allen Kochzonenanzeigen.
Timerfunktionen
Diese praktische Funktion nimmt Ihnen
ein bisschen Kocharbeit ab. Sie
müssen bei der Zubereitung nicht
ständig in der Nähe des Kochfeldes
bleiben. Die Kochzone schaltet sich
am Ende der von Ihnen ausgewählten
Zeit automatisch aus.
Timer einschalten
1. Schalten Sie das Kochfeld mit der
Taste „®“ ein.
2. Wählen Sie die gewünschte
Kochzone durch Berühren der
Kochzonenauswahltasten.
0
“ und
3. Stellen Sie mit „©“ oder „©“ die
gewünschte Temperaturstufe ein.
4. Schalten Sie den Timer mit der
Taste „ 0“ ein.
Das Symbol „00“ leuchtet in der
Timeranzeige, der Dezimalpunkt
erscheint in der ausgewählten
Kochzonenanzeige.
[11 Wenn der Timer aktiv ist,
dienen die Anzeigen der
hinteren rechten und hinteren
linken Kochzone als
Timeranzeige.
5. Stellen Sie mit „©“ oder „©“ die
gewünschte Zeit ein.
m Der Timer kann nur bei bereits
aktiven Kochzonen verwendet
werden.
ü Wiederholen Sie die obigen
Schritte bei Bedarf mit weiteren
Kochzonen, für die Sie ebenfalls
einen Timer einstellen möchten.
22 I DE
Page 47

^ Der Timer kann erst dann
eingestellt werden, wenn zuvor
Kochzone und Temperaturstufe
ausgewählt wurden.
m Bei Auswahl der Kochzone,
deren Timer eingestellt ist,
können Sie durch erneutes
Berühren der Taste „0“ die
Restzeit anzeigen.
Timer ausschalten
Nach Ablauf der eingestellten Zeit
schaltet sich das Kochfeld
automatisch ab, ein Signalton erklingt.
Den Signalton können Sie durch
Berühren einer beliebigen Taste
abschalten.
Timer vorzeitig beenden
Bei vorzeitiger Abschaltung des Timers
arbeitet das Kochfeld mit der zuvor
eingestellten Temperaturstufe bis zum
Abschalten weiter.
1. Wählen Sie die Kochzone, die Sie
abschalten möchten.
2. Schalten Sie den Timer mit der
Taste „
0
“ ein.
3. Stellen Sie den auf „00“ ein, indem
Sie die Taste „
Timeranzeige zeigt schließlich
0
“ drücken; die
„00“ an.
Das punktförmige Licht in der
entsprechenden Kochzonenanzeige
erlischt vollständig, nachdem es eine
bestimmte Zeit geblinkt hat; der Timer
wird abgebrochen.
Induktionskochzonen sicher und
effizient verwenden
Funktionsweise: Als Merkmal seiner
Funktionsweise erhitzt das
Induktionskochfeld das Kochgeschirr
selbst. Daher bietet es im Vergleich zu
23
anderen Kochfeldarten verschiedene
Vorteile. Es arbeitet effizienter und die
Oberfläche des Kochfeldes erhitzt sich
nicht.
Induktionskochfelder sind mit
ausgezeichneten Sicherheitssystemen
ausgestattet, die beim Einsatz
maximale Sicherheit bieten.
01 Ihr Kochfeld ist je nach Modell
mit Induktionskochzonen mit
einem Durchmesser von 145,180
und 210 mm ausgestattet. Durch
das Induktionsmerkmal erkennt
jede Kochzone den Durchmesser
des darauf platzierten
Kochgeschirrs. Energie wird nur
dort erzeugt, wo das
Kochgeschirr mit der Kochzone
in Kontakt steht; dadurch wird ein
minimaler Energieverbrauch
erreicht.
Betriebszeitbegrenzung
Ihr Kochfeld ist mit einer praktischen
Betriebszeitbegrenzung ausgestattet.
Wenn Sie bei einer oder mehreren
Kochzonen das Abschalten vergessen
sollten, werden die Kochzonen nach
Ablauf einer bestimmten Zeit (siehe
Tabelle 1) automatisch abgeschaltet.
Falls die Kochzone mit einem Timer
arbeitet, wird auch die Timeranzeige
mit abgeschaltet.
Die Betriebszeitbegrenzung ist von der
ausgewählten Temperaturstufe
abhängig. Die maximale Betriebszeit
wird bei dieser Temperaturstufe
angewandt.
Nachdem eine Kochzone auf diese
Weise abgeschaltet wurde, kann sie
natürlich auch wieder eingeschaltet
werden.
DE
Page 48

Tabelle 1: Betriebszeitbegrenzungen
Temperaturstuf
e
0 0
1 6
2
3 5
4
5
6
7
8
9
P (Schnellheizen) 5 Minuten (*)
(*) Nach 5 Minuten schaltet das Kochfeld
auf Stufe 9 zurück.
Betriebszeitbegrenzun
g in Stunden
6
5
4
1,5
1,5
1,5
20 Minuten
Überhitzungsschutz
Ihr Kochfeld ist mit einigen Sensoren
ausgestattet, die einen guten Schutz
gegen Überhitzung bieten. Folgendes
gilt bei Überhitzung:
• Aktive Kochzonen können
abgeschaltet werden.
• Die Temperaturstufe kann
verringert werden. Dies wird
allerdings nicht angezeigt.
Überlaufsicherheitssystem
Ihr Kochfeld ist mit einem
Überlaufsicherheitssystem
ausgestattet. Falls überlaufende
Speisen auf das Bedienfeld gelangen,
gibt das System eine Fehlermeldung
aus und das Kochfeld schaltet sich ab.
Präzise Leistungseinstellungen
Ein Merkmal seiner Arbeitsweise ist,
dass das Induktionskochfeld
umgehend auf die Befehle reagiert. Es
ändert die Leistungseinstellungen sehr
schnell. Dadurch können Sie
verhindern, dass Speisen in einem
Kochgeschirr (Wasser, Milch etc.)
überkochen; selbst wenn dies kurz
bevorsteht.
Betriebsgeräusche
Das Induktionskochfeld gibt im Betrieb
Geräusche aus. Diese Geräusche sind
normal und beim Kochen mit Induktion
typisch.
• Je höher die Temperatur, desto
markanter das Geräusch.
• Die Legierung des Kochgeschirrs
kann Geräusche verursachen.
• Aufgrund der Funktionsweise wird
bei geringen Stufen ein reguläres
Geräusch beim Ein-ZAusschalten
ausgegeben.
• Wenn ein leeres Kochgeschirr
erhitzt wird, kann dies Geräusche
verursachen. Sobald Sie Wasser
oder Lebensmittel hineingeben,
verschwindet auch das Geräusch.
• Der Lüfter, der die Elektrik kühlt,
gibt Geräusche aus.
ni Falls das Bedienfeld starkem
Dampf ausgesetzt wird, kann
sich das Bedienfeld abschalten,
ein Fehlersignal ertönt.
m Halten Sie die Oberfläche des
Bedienfeldes sauber. Andernfalls
kann es zu Funktionsstörungen
kommen.
24 I DE
Page 49

Pflege und Wartung
Allgemeine Hinweise
Durch regelmäßiges Reinigen
verlängern Sie die Lebenserwartung
Ihres Gerätes und beugen
Fehlfunktionen vor.
Trennen Sie das Gerät von der
Stromversorgung, bevor Sie es
reinigen oder pflegen.
Es besteht Stromschlaggefahr!
^ Lassen Sie das Gerät vor dem
Reinigen gründlich abkühlen.
Verbrennungsgefahr durch heiße
Flächen!
• Reinigen Sie das Gerät nach
jedem Einsatz gründlich. Dadurch
lassen sich Speisereste leichter
entfernen und können sich beim
nächsten Einsatz des Ofens nicht
einbrennen.
• Zur Reinigung benötigen Sie keine
Spezialreiniger. Verwenden Sie am
besten warmes Wasser mit etwas
herkömmlichem Reiniger, ein
weiches Tuch oder einen
Schwamm. Anschließend mit
einem Tuch trocknen.
• Achten Sie stets darauf,
überschüssige und verschüttete
Flüssigkeiten nach der Reinigung
gründlich ab- bzw. aufzuwischen.
• Verzichten Sie auf
Reinigungsmittel, die Säuren oder
Chlor enthalten, wenn Sie
Edelstahl und Griffe reinigen.
Reinigen Sie diese Teile mit einem
weichen Tuch und etwas
Flüssigreiniger (kein Scheuermittel);
wischen Sie dabei am besten nur
in eine Richtung.
01 Oberflächenbeschädigung durch
Reinigungsmittel und -geräte.
Keine scharfen Reinigungsmittel,
Scheuerpulver, -milch oder
spitzen Gegenstände verwenden.
01 Benutzen Sie keine
Dampfreiniger zur Reinigung.
Kochfeld reinigen
Glaskeramik
Wischen Sie die Glaskeramik mit
einem mit kaltem Wasser
angefeuchteten Tuch sauber.
Anschließend mit einem weichen Tuch
trocknen. Achten Sie darauf, dass
keine Rückstände auf der Glaskeramik
verbleiben: andernfalls kann das
Kochfeld bei der nächsten Nutzung
beschädigt werden.
Versuchen Sie niemals, Rückstände
mit Messern, Stahlwolle und ähnlichen
Hilfsmitteln von der Glaskeramik zu
entfernen.
Entfernen Sie Kalkflecken (beige bis
gelbe Flecken) mit etwas Kalkentferner;
Essig oder Zitronensaft funktionieren
ebenfalls. Alternativ können Sie
entsprechende handelsübliche
Produkte verwenden.
Bei hartnäckigen Verschmutzungen
tragen Sie Reinigungsmittel mit einem
Schwamm auf und warten ab, bis das
Mittel richtig in den Schmutz
eingezogen ist. Anschließend wischen
Sie die Glaskeramik des Kochfeldes
mit einem feuchten Tuch sauber.
25
I
DE
Page 50

[3 stark zuckerhaltige Lebensmittel
müssen sofort entfernt werden,
bevor die Glaskeramik abkühlt.
Andernfalls kann die Glaskeramik
dauerhaft beschädigt werden.
Mit der Zeit kann es zu leichten
Farbveränderungen der Glaskeramik
und der Markierungen kommen. Die
Funktion des Gerätes wird dadurch
nicht beeinträchtigt.
Farbveränderungen und sonstige
leichte optische Veränderungen sind
bei Glaskeramik normal; es handelt
sich nicht um einen Defekt.
26 I DE
Page 51

Q Störungen beheben
Beim Aufheizen und Abkühien sind metaiiische Geräusche zu hören.
Wenn sich die Temperatur von Metallteilen ändert, dehnen sich diese aus oder
ziehen sich zusammen - dabei entstehen Geräusche. Dies ist kein Fehler.
Das Gerät funktioniert nicht.
Die Sicherung ist durchgebrannt oder ausgelöst. »> Kontrollieren Sie die
Sicherungen im Sicherungskasten. Bei Bedarf austauschen oder zurücksetzen.
Die Anzeige leuchtet beim erneuten Einschalten des Kochfeldes nicht auf. »>
Trennen Sie das Gerät am Schutzschalter. Warten Sie 20 Sekunden und
schließen es wieder an.
Das Gerät ist nicht richtig an die (geerdete) Steckdose angeschlossen. »>
Überprüfen Sie die Steckerverbindung.
Der Überhitzungsschutz ist aktiv. »> Lassen Sie das Kochfeld abkühlen.
Das Kochgeschirr ist nicht geeignet. »> Prüfen Sie Ihr Geschirr.
Das Symbol „Ir!“ erscheint in der Kochzonenanzeige.
Sie haben das Kochgeschirr nicht auf der aktiven Kochzone aufgestellt. »>
Prüfen Sie, ob sich ein Kochgeschirr auf der Kochzone befindet.
Ihr Kochgeschirr ist nicht zum Kochen mit Induktion geeignet. »> Prüfen Sie,
ob Ihr Kochgeschirr mit Induktionsherden kompatibel ist.
Das Kochgeschirr ist nicht richtig zentriert oder die Unterseite des
Kochgeschirrs ist nicht breit genug für die Kochzone. »> Wählen Sie ein
Kochgeschirr, das breit genug ist; zentrieren Sie es auf der Kochzone.
Kochgeschirr oder Kochzone sind überhitzt. »> Lassen Sie sie abkühlen.
Die ausgewählte Kochzone schaltet sich im Betrieb plötzlich ab.
Eventuell ist der Timer der ausgewählten Kochzone abgelaufen. »> Sie können
den Timer neu einstellen, das Kochen beenden oder die Kochstelle auf normale
Weise wieder einschalten.
Der Überhitzungsschutz ist aktiv. »> Lassen Sie das Kochfeld abkühlen.
Möglicherweise liegt ein Gegenstand auf dem Bedienfeld. »> Nehmen Sie den
störenden Gegenstand vom Bedienfeld herunter.
Das Kochgeschirr wird nicht gleichmäßig warm, wenn die Kochzone
eingeschaltet ist._______________________________________________________
Ihr Kochgeschirr ist nicht zum Kochen mit Induktion geeignet. »> Prüfen Sie,
ob Ihr Kochgeschirr mit Induktionsherden kompatibel ist.
Das Kochgeschirr ist nicht richtig zentriert oder die Unterseite des
Kochgeschirrs ist nicht breit genug für die Kochzone. »> Wählen Sie ein
Kochgeschirr, das breit genug ist; zentrieren Sie es auf der Kochzone.
Falls sich ein Problem nicht mit den obigen Hinweisen lösen lassen sollte, wenden
Sie sich bitte an den autorisierten Kundendienst oder an den Händler, bei dem Sie
das Gerät gekauft haben. Versuchen Sie niemals, ein defektes Gerät selbst zu
reparieren.
_____________________________
________________
__________
27 IDE
Page 52

Veuillez lire ce manuel avant de commencer.
Chère cliente, cher client,
Nous vous souhaitons d'obtenir ies meiiieures performances de cet appareil qui a
été fabriqué dans une usine moderne avant de subir des procédures de contrôie
de la qualité très strictes.
Par conséquent, nous vous conseiilons de lire attentivement ce Manuel d'utilisa
tion avant d'utiiiser i'appareii et de ie conserver afin de vous y référer à l'avenir. Si
vous cédez i'appareii à une tierce personne, n'oubliez pas de lui fournir le Manuel
d'utilisation également.
Le Manuel d'utilisation vous aidera à utiliser l'appareil rapidement et en toute sécurité.
• Lisez le Manuel d'utilisation avant d'installer et de démarrer l'appareil.
• Vous devez respecter scrupuleusement les instructions relatives à la sécurité.
• Conserver ce Manuel d'utilisation dans un endroit accessible pour vous y
référer à l'avenir.
• Lisez également les autres documents fournis avec l'appareil.
Souvenez-vous que ce Manuel d'utilisation peut également d'appliquer à plu
sieurs autres modèles.
Les différences entre les modèles sont clairement spécifiées dans le manuel.
Explication des symboles
Vous trouverez les symboles suivants dans ce Manuel d'utilisation :
El Informations importantes ou astuces utiles sur l'utilisation.
Æ. Avertissement de situations dangereuses relatives à la santé et aux biens.
Avertissement de risque de choc électrique.
A Avertissement de risque d'incendie.
Æx Avertissement de surfaces brûlantes.
C€
Arçelik A.Ç.
Karaagaç caddesi No:2-6
34445 Sütlüce/lstanbul/TURKEY
Mode in TURKEY
Page 53

Table des matières
Q Généralités
Vue d'ensemble................................4
Caractéristiques techniques.............4
.........................
4
^ Instructions de sécurité
importantes...........................6
Sécurité générale
Utilisation prévue
Sécurité des enfants
Sécurité lors de travaux électriques ..7
H Installation
Avant l'installation.............................8
Installation et branchement
Mise au rebut
Elimination des emballages
Déplacement ultérieur....................12
Mise au rebut de l'ancien appareil... 12
Q Préparations
.............................
.............................
........................
.........................
..............
.................................
...........
....................
6
7
7
8
9
12
12
13
Conseils pour faire des économies
d'énergie....................................13
Première utilisation
Premier nettoyage de l'appareil
........................
.....
13
13
S Utilisation de la table de
cuisson
Généralités concernant la cuisson.14
Utilisation des tables de cuisson
Bandeau de commande
.................................
.................
....
14
16
17
^ Maintenance et entretien.23
Généralités
Nettoyage de la table de cuisson
.....................................
...
23
23
Q Recherche et résolution des
pannes
.................................
25
3|FR
Page 54

Q Généralités
Vue d'ensemble
1 Plaque de cuisson à induction
2 Bride de montage
3 Surfacec vitrocéramique
4 Fond
Caractéristiques techniques
Tension/fréquence
Consommation d'énergie totale max. 7200 W
Fusible
Type de câble/section H05VV-F 5 X 1,5 mm^ / 3 x 2,5 mm^
Longueur de câble max. 2 m
Dimensions extérieures (hau-
teur/longueur/profondeur)
Dimensions d'installation (lon-
gueur/profondeur)
Brûleurs
Arrière gauche
Dimension
Puissance 2000/2300 W
Avant gauche
Dimension
Puissance 2000/2300 W
Avant droit
Dimension 145mm
Puissance
Arrière droit
Dimension
Puissance 2000/2300 W
220-240 V-/380-415 V 2N ~ 50 Hz
min. 16 Ax 2/32 A
55 mm/580 mm/510 mm
560 mm/490 mm
Induction cooking plate
180 mm
Induction cooking plate
180 mm
Induction cooking plate
1600/1800 W
Induction cooking plate
210 mm
4| FR
Page 55

0] Les caractéristiques techniques
peuvent changer sans avis préa
lable afin d'améliorer la qualité de
l'appareil.
Ë] Les illustrations comprises dans
ce manuel sont schématiques et
peuvent ne pas correspondre
exactement à l'appareil.
m Les valeurs mentionnées sur les
étiquettes de l'appareil ou dans la
documentation qui l'accompa
gnent sont obtenues dans des
conditions de laboratoire confor
mément aux normes correspon
dantes. En fonction des condi
tions de fonctionnement et de
l'environnement de l'appareil, ces
valeurs peuvent varier.
5 I FR
Page 56

Q Instructions de sécurité importantes
Ce chapitre contient les instructions de
sécurité qui vous aideront à éviter les
risques de blessure ou de dégâts.
Toutes les garanties sont nulles si vous
ne respectez pas ces instructions.
Sécurité générale
• Cet appareil n'est pas censé être
utilisé par des personnes ayant un
handicap physique, sensoriel ou
mental ou les personnes illettrées
ou inexpérimentées (notamment
les enfants) à moins qu'une per
sonne se tienne garante de leur
sécurité ou puisse leur apprendre à
utiliser l'appareil de manière adé
quate.
Les enfants doivent être surveillés
afin d'éviter qu'ils ne touchent l'ap
pareil.
• Branchez l'appareil à une ligne de
terre protégée par un fusible de
capacité suffisante tel qu'indiqué
dans le tableau "Caractéristiques
techniques". Faites installer la mise
à la terre par un électricien qualifié
lorsque vous utilisez l'appareil avec
ou sans transformateur Notre so
ciété ne sera pas tenue pour res
ponsable des dégâts qui survien
draient de l'utilisation de l'appareil
sans une Installation de mise à la
terre conforme aux réglementa
tions locales en vigueur.
• Ne faites pas fonctionner l'appareil
si le câble d'alimentation ou la
prise est endommagée. Appelez
un technicien autorisé.
• Ne faites pas fonctionner l'appareil
s'il est défectueux ou présente des
dégâts visibles.
• Ne réalisez pas de réparations ou
de modifications sur l'appareil.
6| FR
Vous pouvez toutefois résoudre
certains problèmes ne nécessitant
aucune réparation ou modification.
Reportez-vous à Troubleshooting,
page 25.
Ne lavez jamais l'appareil avec de
l'eau ! Vous risqueriez un choc
électrique I
Ne jamais utiliser l'appareil lorsque
le jugement ou la coordination est
affectée par l'alcool et/ou la drogue.
L'appareil doit être déconnecté de
l'alimentation pendant les procé
dures d'installation, d'entretien, de
nettoyage et de réparation.
Les procédures d'installation et de
réparation doivent toujours être ef
fectuées par des techniciens auto
risés. Le fabricant se sera pas tenu
pour responsable des dégâts con
sécutifs à des procédures réalisées
par des personnes non autorisées
et pourra annuler la garantie dans
ce cas.
Prenez garde lorsque vous utilisez
des boissons alcoolisées dans vos
plats. L'alcool s'évapore à tempé
ratures élevées et peut provoquer
un incendie étant donné qu'il peut
s'enflammer lorsqu'il entre en con
tact avec des surfaces chaudes.
Ne pas faire chauffer de boîtes de
conserves et de bocaux en verre
clos dans le four. La pression qui
s'accumulerait dans le bocal pour
rait le faire éclater.
Assurez-vous qu’aucune subs
tance inflammable ne soit placée à
proximité de l’appareil étant donné
que les côtés chauffent pendant
son utilisation.
Épargnez les ouvertures de venti
lation d'éventuelles obstructions.
Page 57

• Vérifiez que i'appareii est éteint
après chaque utiiisation.
• La pression de vapeur qui s'accumuie à cause de l'humidité à la sur
face de la table de cuisson ou sur
ie bas de ia casseroie peut faire
sautiiler la casserole. Toutefois,
assurez-vous que ia surface du
four et ie bas des casseroles sont
toujours secs.
• Les plaques chauffantes de votre
four sont équipées de la technolo
gie à "induction". Votre table de
cuisson à induction, qui vous per
met de faire des économies de
temps et d'argent, doit être utilisée
avec des casseroles appropriées
pour la cuisson à induction ou les
plaques chauffantes ne fonctionne
ront pas. Reportez-vous à Généra
lités concernant la cuisson,
page 14, sélection des casseroles.
[!] Les tables de cuisson à induction
créant un champ magnétique,
elles peuvent entraîner de graves
dommages aux personnes utili
sant des dispositifs tels qu'une
pompe à insuline ou un pacema
ker.
m Le produit doit être installé par
une personne qualifiée confor
mément à la réglementation en
vigueur. Dans le cas contraire, la
garantie n'est pas valable.
Utilisation prévue
Cet appareil est conçu pour un usage
domestique. L'utilisation commerciale
est interdite.
' ATTENTION : Cette appareil doit être
utilisé seulement à des fins de cuisson.
Il ne doit pas être utilisé à d’autres fins,
par exemple le chauffage de la pièce.'
Le fabricant ne saurait être tenu res
ponsable des dégâts causés par une
utilisation ou une manipulation incor
recte.
Sécurité des enfants
• Les appareils électriques et à gaz
sont dangereux pour les enfants.
Tenez les enfants à l'écart de l'ap
pareil lorsqu'il fonctionne et interdisez-leur de jouer avec.
• Les parties accessibles de
l’appareil deviendront chaudes au
cours de son utilisation et jusqu’à
ce qu’il refroidisse. Tenez les en
fants à distance.
• Ne rangez pas d’objets au-dessus
de l’appareil à portée des enfants.
• Les matériaux d’emballage peu
vent présenter un danger pour les
enfants. Gardez les matériaux
d'emballage hors de portée des en
fants. Veuillez jeter les pièces de
l'emballage en respectant les
normes écologiques.
Sécurité iors de travaux éiectriques
Un équipement électrique défectueux
est l'une des principales causes d'in
cendie domestique.
• Toutes les opérations sur des
équipements et des systèmes élec
triques ne peuvent être réalisées
que par des personnes habilitées
et qualifiées.
• En cas de dégâts, éteignez l'appa
reil et débranchez-le du secteur.
Pour ce faire, coupez le fusible
domestique.
• Vérifiez que la tension du fusible
est compatible avec l'appareil.
7 I FR
Page 58

3 Installation
Consultez le technicien autorisé le plus
proche pour l'installation de l'appareil.
Vérifiez que les Installations électriques
et pour le gaz existent avant de faire
appel à un technicien autorisé pour
mettre l'appareil en service. Dans le
cas contraire, faites appel à un électri
cien qualifié et pour prendre les dispo
sitions qui s'imposent.
Ë] La préparation de l'emplacement
et l'installation du gaz et de l'élec
tricité pour l'appareil sont sous la
responsabilité du client.
^ Installez l'appareil conformément
aux réglementations en matière
de gaz et d’électricité en vigueur
dans votre localité.
^ Avant l’installation, regardez si
l’appareil présente des défauts. Si
tel est le cas, ne le faites pas
installer.
Les appareils endommagés pré
sentent des risques pour votre
sécurité.
Avant l'installation
Cette table de cuisson est destinée à
être installée sur un plan de travail en
vente dans le commerce. Une distance
de sécurité doit être laissée entre l’ap
pareil et les parois de la cuisine et des
meubles. Voir le schéma (valeurs en
mm).
• Il peut aussi être utilisé en position
debout, de manière autonome.
Laissez une distance minimum de
750 mm au-dessus de la surface
de la table de cuisson.
• (*) S’il faut encastrer une hotte audessus de la cuisinière, reportezvous aux consignes du fabricant de
la hotte concernant la hauteur
d’installation (Min 650 mm)
• Retirez les matériaux d'emballage
et les sécurités de transport.
• Les surfaces, les feuilles laminées
synthétiques et les adhésifs doi
vent résister à la chaleur (jusqu'à
100 '=C min.).
• Le plan de travail doit être à niveau
et fixé horizontalement.
• Découpez une ouverture pour la
table de cuisson dans le plan de
travail en fonction des dimensions
d'installation.
8| FR
Page 59

Installation et branchement
Risque de bris de glace !!!
' Ne piacez pas ia tabie de cuisson
vitrocéramique sur un coin ou un
rebord.
• Avant de procéder à une éventueile
instaiiation, raccordez l’appareii con
formément aux réglementations en
matière de gaz et d’éiectricité en vi
gueur dans votre iocalité.
Raccordement électrique
Branchez i'appareil f une ligne de terre
protégée par un fusible de capacité
suffisante tel qu'indiqué dans le tableau
"Caractéristiques techniques". Faites
installer la mise f la terre par un électri
cien qualifié lorsque vous utilisez l'appa
reil avec ou sans transformateur Notre
société ne sera pas tenue pour respon
sable des dégâts qui surviendraient de
l'utilisation de l'appareil sans une instal
lation de mise f la terre conforme aux
réglementations locales en vigueur.
Une installation effectuée par des
personnes non professionnelles
vous expose f un risque d'électrocution, de court-circuit ou
d'incendie !
L'appareil ne doit çtre raccordé
au secteur que par une personne
qualifiée dûment habilitée. La
garantie de l’appareil ne sera
valable qu'aprcs une installation
correcte.
Un câble d'alimentation endom
magé présente un risque d'électrocution, de court-circuit ou
d'incendie !
Le câble d'alimentation ne doit
pas çtre serré, plié ou pincé ou
entrer en contact avec des
pieces chaudes de l'appareil.
Si le cordon d’alimentation est
endommagé, il doit çtre remplacé
par un technicien qualifié.
9 I FR
Page 60

• La connexion doit çtre conforme
aux régiementations nationales en
vigueur.
• Les valeurs de l'alimentation élec
trique doivent correspondre aux
valeurs figurant sur la plaque signalétique de l'appareil. La plaque
signalétique est sur le boitier ar
rière du produit.
• Le câble d'alimentation de l'appa
reil doit çtre conforme aux valeurs
du tableau "Caractéristiques tech
niques".
A Risque d'électrocution !
Avant d’effectuer tout travail sur
l'installation électrique, l’appareil
doit çtre débranché du réseau
d’alimentation électrique.
Branchement du câble d'alimenta
tion
1. S'il n'est pas possible de débran
cher tous les pôles de la prise
d'alimentation, une unité de sépara
tion avec au moins 3 mm de jeu (fu
sibles, interrupteurs de sûreté de la
ligne, contacteurs) doit çtre bran
chée et tous les pôles de cette uni
té doivent çtre f proximité (pas audessus) du produit en accord avec
les directives lEE. Le non respect
de cette consigne peut causer des
problèmes de fonctionnement et in
valider la garantie du produit.
Une protection supplémentaire par un
disjoncteur de courant résiduel est
recommandée.
Si un câble est fourni avec l'appareil :
U U
L N
[ ÏN ÄC 220-240 V|
2. Pour un branchement en phase
simple, branchez les fils comme
spécifié ci-dessous:
• Câble marron/noir = L (phase)
• Câble Bleu/gris = N (Neutre)
• Câble vert/jaune = (E) (Terre)
3. Pour un branchement en phase
double, branchez les fils comme
spécifié ci-dessous:
• Câble marron = L1 (phase 1)
• Câble noir = L2 (phase 2)
• Câble Bleu/gris = N (Neutre)
• Câble vert/jaune = (E) (Terre)
Installation du produit
S'il est possible de toucher le bas
du produit car il est installé sur
un tiroir, cette partie doit çtre
recouverte avec un plateau en
bois.
1 min. 48 mm
10 I FR
Page 61

no Quand vous installez la table de
cuisson sur un meuble encastré,
une étagère doit çtre installée
pour séparer le meuble de la
table comme illustré sur la figure
ci-dessus. Cela n'est pas néces
saire quand vous l'installer sur un
four encastré.
Si le fourjest en dessous:
Pendant l'installation de votre plaque f
induction, placez le produit parallèle
ment f la surface d'installation. Appli
quez aussi un joint d'étanchéité sur les
parties de la plaque en contact avec le
plan de travail, comme décrit cidessous pour empçcher tout liquide de
pénétrer entre le produit et le plan de
travail.
1. Préparez la surface du plan de travail
comme indiqué sur le schéma.
2. Appliquez le joint d'étanchéité fourni
avec le produit sur les coins du bas
de l'extérieur de la plaque qui sont
en contact avec le plan de travail
comme illustré sur la figure.
mm.
Il est nécessaire de laisser un espace
de ventilation d'au moins 180 cm^ dans
la partie basse du meuble comme illus
tré sur la figure suivante.
* min. 48 mm
Si la planche est en dessous:
mm.
Min. 48 mm
11 I FR
Positionnez l’appareil au centre du
plan de travail.
4. Utiliser les colliers d'installation sta
bilise la plaque en ajustant les trous
sur la partie inférieure.
Min. 30 mm
1
Table de cuisson
Collier de serrage
2
Plan de travail
3
Page 62

» Vue de derrière (orifices de rac
cord)
La réalisation des raccords dans
d'autres orifices n'est pas une
pratique recommandée en
termes de sécurité, car cela
pourrait endommager le circuit
de gaz ou le circuit électrique.
Vérification finale
1. Branchez le câble d'alimentation et
activez le fusible.
2. Vérifiez le fonctionnement.
Mise au rebut
Elimination des emballages
Les emballages sont dangereux pour
les enfants. Conservez les emballages
en lieu sûr à l'écart des enfants.
Les emballages de l'appareil sont fa
briqués à partir de matériaux recyclés.
Eliminez-les de manière appropriée et
triez-les en fonction des instructions de
recyclage des déchets. Ne les jetez
pas avec les déchets domestiques
normaux.
Déplacement ultérieur
• Conservez le carton d'origine de l'ap
pareil et utilisez-le pour déplacer le
produit. Suivez les instructions figu
12 I FR
rant sur le carton. SI vous n'avez plus
le carton original, emballez l'appareil
dans du film à bulles ou du carton
épais avec du ruban adhésif pour
maintenir le tout.
• N'utilisez pas la porte ou la poignée
pour soulever ou déplacer l'appareil.
m Ne posez pas d’autres objets sur
l’appareil. L’appareil doit être trans
porté en position debout.
Inspectez l'aspect général de l'ap
pareil pour déceler les dégâts po
tentiellement dus au transport.
Mise au rebut de l'ancien appareil
Mettez l'ancien appareil au rebut de ma
nière responsable envers l'environne
ment.
Ce produit porte le symbole de tri sélectif
correspondant aux déchets des équipe
ments électriques et électroniques
(DEEE). Cela signifie que ce produit doit
être manipulé conformément à la direc
tive européenne 2002/96/CE afin d'être
recyclé et démonté de manière à minimi
ser ses effets sur l’environnement. Pour
de plus amples informations, veuillez
contacter les autorités locales ou régio
nales.
Les produits électroniques qui ne sont
pas inclus dans le processus de tri sélec
tif sont potentiellement dangereux pour
l’environnement et la santé en raison de
la présence de substances dangereuses.
Consultez votre revendeur ou le centre
de collecte des déchets de votre région
pour vous renseigner sur la mise au re
but de votre appareil.
Avant de mettre l'appareil au rebut, sec
tionnez le câble d'alimentation et verrouil
lez la porte (le cas échéant) de manière à
le rendre Inutilisable et inoffensif pour les
enfants.
Page 63

Q Préparations
Conseils pour faire des éco
nomies d'énergie
Les conseils suivants vous permettront
d'utiliser votre appareii de façon écolo
gique et d'économiser ainsi de i'énergie :
• Décongeiez ies piats surgelés
avant de les cuire.
• Utiiisez des récipients munis de
couvercies. Sans couvercie, la
consommation d'énergie peut être
4 fois plus importante.
• Séiectionnez le brûleur le mieux
adapté à ia taiile du bas de ia casseroie utilisée. Séiectionnez tou
jours ia casseroie à ia taiiie ia pius
appropriée pour vos plats. Les
grandes casseroles nécessitent
davantage d'énergie.
• Veillez à utiliser des casseroles à
fond plat pour la cuisson sur une
table de cuisson électrique.
Les casseroles avec un fond épais
offrent une meilleure conduction de
la chaleur. Vous pouvez économi
ser jusqu'à 1/3 de l'énergie.
• Les récipients et casseroles doi
vent être compatibles avec les
zones de cuisson. Le fond des ré
cipients ou des casseroles ne doit
pas être plus petit que la plaque
chauffante.
• Veillez à ce que les zones de cuis
son et le fond des casseroles
soient toujours propres. La saleté
réduit la conduction de la chaleur
entre la zone de cuisson et le fond
de la casserole.
Première utilisation
Premier nettoyage de l'appareil
[0 La surface pourrait être endomma
gée par certains détergents ou pro
duits de nettoyage.
N'utilisez pas de détergents agres
sifs, de poudre/crèmes de net
toyage ou d'objets tranchants.
1. Retirez tous les matériaux d'embal
lage.
2. Essuyez les surfaces de l'appareil à
l’aide d’un chiffon humide ou d'une
éponge et terminez avec un chiffon.
13 I FR
Page 64

s utilisation de la table de cuisson
Généralités concernant la
cuisson
^ Risque d'incendie par huile sur
chauffée !
Lorsque vous chauffez de l'huile,
ne la laissez pas sans surveil
lance.
Ne tentez jamais d'éteindre un
incendie avec de l'eau ! Si de
l'huile s'enflamme, recouvrez
immédiatement la casserole ou la
poêle avec un couvercle. Etei
gnez la table de cuisson dès que
vous pouvez le faire en toute
sécurité et appelez le service de
lutte contre les incendies.
• Avant de faire frire des aliments, séchez-les toujours avant de les tremper
dans l'huile chaude. Assurez-vous que
les aliments surgelés soient bien dé
congelés avant de les faire frire.
• Ne couvrez pas le récipient lorsque
vous faites chauffer de l'huile.
• Disposez les poêles et casseroles de
manière à ce que leur poignée ne se
trouve pas au-dessus de la table de
cuisson afin d'éviter de faire chauffer
les poignées. Ne placez pas de réci
pients instables et pouvant se renver
ser facilement sur la table de cuisson.
• Ne placez pas de récipients et de cas
seroles vides sur les foyers qui sont al
lumés. Ils pourraient être endommagés.
• Faire chauffer un foyer en l'absence
d'un récipient ou d'une casserole peut
entraîner des dommages pour l'appa
reil. Arrêtez les foyers de cuisson une
fois la cuisson terminée.
• La surface de l'appareil peut être brû
lante, évitez donc de poser des réci
pients en plastique ou en aluminium
dessus.
Nettoyez immédiatement tout matériau
de ce type ayant fondu sur la surface
de l'appareil.
• N'utilisez que des casseroles à fond
• Placez la quantité de nourriture appro
Conseils concernant les plaques vitrocéramiques
• La surface vitrocéramique est à
• N'utilisez pas la surface vitrocéramique
• N'utilisez que des poêles et casseroles
• N’utilisez pas de récipients et casse
Evitez également d'utiliser ce type de
récipients pour y conserver de la nour
riture.
plat.
priée dans les casseroles utilisées.
Ainsi, vous n'aurez pas à effectuer un
nettoyage superflu en évitant que vos
plats ne débordent.
Ne posez pas les couvercles de vos
poêles et casseroles sur les foyers de
cuisson.
Placez les casseroles de manière à ce
qu'elles soient centrées sur le foyer de
cuisson. Lorsque vous voulez déplacer
la casserole sur un autre foyer de cuis
son, soulevez-la et placez-la sur le foyer
de cuisson souhaité au lieu de la faire
glisser.
l'épreuve de la chaleur et n'est pas sou
mise aux différences de températures
importantes.
comme lieu de rangement ou comme
planche à découper.
avec un fond usiné. Les bords tran
chants peuvent rayer la surface.
roles en aluminium. L'aluminium en
dommage la surface vitrocéramique.
14|FR
Page 65

Les débordements
peuvent endomma
ger la surface vitrocéramique et entraî
ner un risque d'in
cendie.
N'utilisez pas de
récipients avec un
fond creux ou incur
vé.
N'utilisez que des
poêles et casseroles
avec un fond plat.
They ensure easier
heat transfer.
Si le diamètre de la
casserole est trop
petit, vous gaspille
rez de l'énergie.
Choix de vos casseroles
Pour les tables à induction, n'utiiisez
que des récipients conçus pour la cuis
son à induction.
Testez vos casseroles
Les méthodes suivantes vous permet
tent de savoir si votre casserole est
compatible ou non avec la table à in
duction.
1. Votre casserole est compatible si
vous pouvez coller un aimant sur le
fond.
2. Votre casserole est compatible si
"l=!" ne clignote pas lorsque vous
placez la casserole sur un foyer de
cuisson et allumez la table de cuis
son.
Vous pouvez utiliser des casseroles en
acier, en Téflon ou en aluminium avec
un fond magnétique spécial mentionné
sur les étiquettes ou les avertisse
ments indiquant que la casserole est
compatible avec la cuisson à induction.
Les récipients en verre et en céra
mique, les cocottes et les casseroles
en acier inoxydable dont le fond en
aluminium n'est pas magnétique ne
devraient pas être utilisés.
Système permettant la reconnais
sance de la casserole
Dans la cuisson à induction, seule la
zone couverte par le récipient sur le
foyer adéquat est alimentée en énergie.
Le diamètre du fond du récipient est
reconnu par le système et seule cette
zone est chauffée automatiquement.
La cuisson s'arrête si le récipient de
cuisson est retiré du foyer pendant la
cuisson. Le foyer de cuisson sélection
né et le symbole "!=!" clignotent en al
ternance.
Utilisation sans danger
Ne sélectionnez pas de niveaux de
chauffe élevés lorsque vous utilisez
une casserole anti-adhésive (en Téflon)
sans huile ou avec très peu d'huile.
Ne posez pas d'ustensiles métalliques
tels que des fourchettes, couteaux ou
couvercles de casserole sur la table de
cuisson car ils pourraient chauffer.
N'utilisez jamais de papier aluminium
pour la cuisson. Ne placez jamais
d'aliments emballés dans du papier
aluminium sur le foyer de cuisson.
ni En cas de présence d'un four
sous la table de cuisson, et que le
four fonctionne, les capteurs de la
table de cuisson peuvent dimi
nuer le niveau de chauffe ou arrê
ter le four.
m Lorsque la plaque de cuisson
fonctionne, tenez les objets dotés
de propriétés magnétiques
(cartes de crédits, cassettes...) à
l'écart de la table de cuisson.
15 I FR
Page 66

Sélection du foyer de cuisson adapté au récipient
Grand foyer de cuisson
0 21 cm
O
Grand foyer de cuisson
• Il s'adapte automati
quement à la casse
role.
• L'énergie est répartie
de manière idéale.
• La répartition de la
chaleur est parfaite.
Permet de préparer
des plats comme de
grandes crêpes ou de
grands poissons à
point ou au bleu.
Utilisation des tables de cuis
son
Vitre cassée !
Ne laissez jamais d'objets tomber
sur la table de cuisson. Même de
petits objets (par exemple une
salière) peuvent endommager la
table de cuisson.
N'utilisez pas de tables vitrocéramiques présentant des fissures.
De l'eau peut pénétrer dans les
fissures et provoquer un courtcircuit.
Si la surface est endommagée
d'une manière quelconque (par
exemple fissures visibles), étei
gnez immédiatement l'appareil
pour réduire les risques d'électrocution.
Foyer de cuisson moyen
0 18 cm
O
Foyer de cuisson moyen
(normai)
• Il s'adapte automati
quement à la casse
role.
• L'énergie est répartie
de manière idéale.
• La répartition de la
chaleur est parfaite.
Utilisé pour tous les
types de cuissons.
Petit foyer de cuisson
0 14 cm
O
Petit foyer de cuisson
• Utilisé pour les cuis
sons lentes (sauces,
crèmes)
• Utilisé pour préparer
de petites portions ou
des portions en fonc
tion du nombre de
personnes.
16 I FR
Page 67

Bandeau de commande
©^QllCS ©
Caractéristiques techniques
0 Touche Marche/Arrçt
0 Réglage de la tempéra-
ture/Augmenter la minuterie
0 Réglage de la tempéra-
ture/Diminuer la minuterie
Verrouillage des touches
0 Activer/désactiver la minuterie
0 Touche de sélection du foyer avant
gauche
0 Touche de sélection du foyer ar
rière gauche
0 Touche de sélection du foyer ar
rière droit
rn Touche de sélection du foyer avant
droit
E] Les schémas et représentations
ont uniquement un but informatif.
Les écrans et fonctions réels
peuvent différer selon le modèle
de votre table de cuisson.
m Cet appareil est contrôlé par un
bandeau de commande tactile.
Chaque opération effectuée sur
votre bandeau de commande
tactile sera confirmée par un
signal sonore.
m Le bandeau de commande doit
toujours çtre propre et sec. Des
surfaces humides et souillées
peuvent entraîner des problèmes
de fonctionnement.
Allumage de la table de cuisson
1. Appuyez sur la touche "O" lorsque
la table de cuisson est en cours de
fonctionnement.
Le symbole "0" s'affiche sur l'écran du
foyer.
[il Si vous n'effectuez aucune opéra
tion dans les 10 secondes, la
table de cuisson revient automa
tiquement en mode Veille.
Arrçt de la table de cuisson
1. Appuyez sur la touche "©" lorsque
la table de cuisson est en cours de
fonctionnement.
La table de cuisson s'arrête et revient
en mode Veille.
m Le symbole"H" ou "h"qui apparaît
sur l'écran de la zone de cuisson
indique que la zone de cuisson est
encore chaude. Ne touchez pas les
foyers.
Voyant de chaleur résiduelle
Le symbole "H" qui apparaît sur
l'écran de la zone de cuisson indique
que la plaque est encore chaude et
peut çtre utilisée pour garder au chaud
17
|FR
Page 68

un peu de nourriture. Ce symbole pas
sera ensuite r "h" pour .indiquer une
chaleur moindre.
[H Lors d'une coupure de courant,
le voyant de chaleur résiduelle ne
s'allume pas et l'utilisateur ignore
que les foyers sont brûlants.
Allumage des foyers
1. Appuyez sur le bouton "©" pour
allumer la plaque.
2. Appuyez sur la touche de sélection
du foyer que vous souhaitez allu
mer.
Le symbole"0" appara'it sur l'écran de
la zone de cuisson et l'affichage s'al
lume de manière plus lumineuse.
m Si vous n'effectuez aucune
opération dans les 20 se
condes, la table de cuisson
revient automatiquement en
mode Veille.
Réglage du niveau de température
Appuyez sur les touches "©" ou "0"
pour régler le niveau de température
entre "1" et "9" ou "9" et "1".
Arrçt des foyers
Un foyer peut çtre arrçté de 3 manières
différentes :
1 En ramenant le niveau de
température f "0"
Vous pouvez arrêter le foyer en
ramenant le niveau de température
au niveau "0".
2 En appuyant sur le symbole
de la zone de cuisson con
cernée "uD" pendant un cer
tain temps
Allumez la zone de cuisson en ap
puyant sur le symbole en question
"Q" pendant un certain tmeps
pour faire baisser la température f
"0".
3 En utilisant l'option d'arrçt
de la minuterie pour le foyer
souhaité
Lorsque la durée de cuisson définie
est terminée, la minuterie arrçte le
foyer approprié. "0" ou "00" s'affi
chent sur l'écran concerné.
Lorsque la durée de cuisson définie
est terminée, une alerte sonore reten
tit. Appuyez sur n'importe quelle
touche du bandeau de commande
pour arrçter l'alerte sonore.
Booster
La position de cuisson"P" peut çtre
utilisée pour chauffer f un plus haut
niveau. Mais il n'est pas recommandé
de cuire sur cette position trop long
temps.
La fonction Booster ne peut pas çtre
activée pour tous les foyers.
Activation de la fonction Booster :
1. Appuyez sur le bouton "©" pour
allumer la plaque.
2. Sélectionnez le foyer souhaité en
appuyant sur les touches de sélec
tion de foyer.
3. Appuyez sur la touche "©" ou "©"
pour atteindre le niveau "9".
18 I FR
Page 69

®^OiiC3 0
4. Quand la zone de cuisson est au
niveau "9", appuyez sur la touche
"©" une fois pour régler la tempé
rature du foyer sur "P".
Désactivation de la fonction Boos
ter ;
• Pour désactiver la fonction Boos
ter "0" appuyez sur la touche
pour régler la température au ni
veau "9".
La fonction Booster sera désactivée
et le foyer continuera de fonctionner
au niveau "9".
• Vous pouvez diminuer ia température
en appuyant sur ia touche "0" ou
l'éteindre compictement en diminuant
la température au niveau "0".
Verrouillage des touches
Vous pouvez activer ie verrouiilage des
touches afin d'éviter de changer de fonc
tion accidenteilement iorsque la table de
cuisson fonctionne.
Activation du verrouillage des touches
1. Appuyez sur ie bouton pour
aliumer ia piaque.
2. Appuyez simultanément sur les
touches et " pour activer le
verrouillage.
» Le verrouillage sera activé et ie point
sur le symbole "â" s'allumera.
en Si vous arrêtez la table de cuisson
lorsque les touches sont verrouillées,
le verrouillage des touches est activé
lorsque vous rallumez la table de
cuisson. Le verrouiilage des touches
doit çtre désactivé afin de pouvoir
utiiiser ia table de cuisson.
Désactivation du verrouillage des touches
1. Quand ie verrouiilage des touches est
actif, appuyez sur les touches "©" et
simultanément.
» Le verrouillage sera activé et ie point
sur le symbole "lâ" disparaîtra.
Sécurité enfants
Vous pouvez protéger vos enfants en em
pêchant l'aliumage des foyers et l'utilisation
accidenteile de la table de cuisson. La
fonction « Verrouiilage enfants » peut uni
quement être activée/désactivée en mode
Veilie.
Activer le verrouillage enfants
1. Appuyez sur ie bouton "©" pour ailumer la plaque.
2. Appuyez simultanément sur les touches
"
0
" et "0". Apres le signal "bip", ap-
puyez sur
» Le verrouiiiage enfants sera activé et ie
symboie "L" apparaîtra sur l'écran de tous
les foyers.
0
pour activer ie verrouiiiage.
19|FR
Page 70

Désactiver le verrouillage enfants
1. Appuyez sur le bouton pour allu
mer la plaque.
2. Appuyez simultanément sur les touches
"
0
" et 0". Apres le signal "bip", ap
puyez sur
rouillage.
» Le verrouillage enfants sera désactivé et
le symbole "L" disparaîtra sur l'écran de
tous les foyers.
0
pour désactiver le ver-
Fonction Minuterie
Cette fonction vous facilite la cuisson. Il est
inutile de rester devant le four pendant
toute la durée de la cuisson. Le foyer
s'éteint automatiquement f la fin de la du
rée sélectionnée.
Activation de la minuterie
1. Appuyez sur le bouton pour allu
mer la plaque.
2. Sélectionnez le foyer souhaité en ap
puyant sur les touches de sélection de
foyer.
[il L'écran des foyers arrière gauche
et arrière droit servent d'écran de
minuterie quand la minuterie est
active.
5. Appuyez sur les touches ,0„
,0„
pour régler l'heure désirée.
m La minuterie peut uniquement çtre
réglée pour les foyers déjf allumés.
m Répétez les opérations ci-dessus
pour les autres foyers nécessitant
une minuterie.
[0 La minuterie ne peut pas §tre réglée
avant d'avoir sélectionné le foyer et la
valeur de la température de ce der
nier.
ou
3. Appuyez sur les touches "©" ou "0"
pour sélectionner le niveau de tempé
rature désiré.
4. Appuyez sur le bouton "©" pour allu
mer la minuterie.
Le symbole"00" s'allumera sur l'écran
de la minuterie et le chiffre décimal s'af
fichera sur l'écran du foyer sélectionné.
20|FR
[I] Quand le foyer pour lequel la minute
rie a été réglée est sélectionné, vous
pouvez voir le temps restant en ap
puyant f nouveau sur la touche "0".
Désactivation de la minuterie
Une fois la durée définie écoulée, la table
de cuisson s'arrête automatiquement et
émet un signal sonore.
Appuyez sur n'importe quelle touche
pour arrêter le signal sonore.
Arrçt anticipé des minuteries
Si vous arrêtez la minuterie avant son
terme, la table de cuisson continue de
fonctionner f la température définie jusqu'f ce que vous l'arrçtiez.
1. Sélectionnez le foyer f arrêter.
Page 71

2. Appuyez sur le bouton "©" pour
allumer la minuterie.
3. Jusqu'f ce que "00" apparaisse sur
l'écran de minuterie, appuyez sur
,,0„
pour régler la valeur sur "00".
Le point lumineux sur l'écran du foyer
concerné s'éteint complètement apres
avoir clignoté pendant un certain temps
et la minuterie est annulée.
Utilisation sûre et efficace des foyers f
induction
Principes de fonctionnement : La par
ticularité du fonctionnement de la table
de cuisson f induction est qu'elle chauffe
directement le récipient de cuisson. Par
conséquent, les avantages sont mul
tiples par rapport aux autres types de
table de cuisson. Elle est plus efficace et
la surface de la table de cuisson ne
chauffe pas.
La table de cuisson f induction est équi
pée de systèmes de sécurité de pointe
pour vous fournir une sécurité maximale
f l'utilisation.
01 Selon le modèle, votre table de cuis
son peut §tre équipée de foyers f
induction d'un diamètre de 145,180
et 210 mm. Avec l'induction, chaque
foyer détecte le diamètre du récipient
posé dessus. L'énergie se concentre
sur les points de contact du récipient
avec le foyer, ce qui permet de ré
duire la consommation énergétique.
Limites de durée de fonctionnement
La commande de la table de cuisson est
équipée d'une limite de durée de fonc
tionnement. Lorsque un ou plusieurs
foyers restent allumés, le foyer de cuis
son est automatiquement désactivé
après un certain temps (voir tableau 1). Si
une minuterie est assignée f un foyer,
l'écran de la minuterie s'éteint également
plus tard.
21
La limite de durée de fonctionnement
dépend du niveau de température sélec
tionné. Ce niveau de température re
quiert la durée de fonctionnement maxi
male.
Le foyer peut §tre redémarré par l'utilisa
teur après avoir été arrêté automatique
ment comme susmentionné.
Tableau-1 : Limites de durée de fonc
tionnement
Niveau de la
température
Limite de durée de
fonctionnement heure
0 0
1 6
2
3 5
4
5
6
7
8
9 20 minutes
P (Booster)
(*) La table de cuisson baissera au
niveau 9 après 5 minutes
6
5
4
1,5
1.5
1,5
5 minutes (*)
Protection contre la surchauffe
La table de cuisson est équipée de cap
teurs qui assurent la protection contre la
surchauffe. En cas de surchauffe, vous
pouvez remarquer ce qui suit :
• Le foyer actif peut çtre éteint.
• Le niveau sélectionné peut baisser.
Cependant, cet état ne se voit pas
sur l'indicateur.
Système de sécurité anti
débordement
Votre table de cuisson est équipée d'un
système de sécurité anti-débordement.
En cas de débordement pouvant se
répandre sur le bandeau de commande,
le système arrête la table de cuisson et
coupe l'alimentation immédiatement.
|FR
Page 72

Réglage précis de la puissance
Le fonctionnement de la table de cuisson
f induction entraîne une réponse immé
diate aux commandes. Elle peut changer
trcs rapidement de réglages de puis
sance. Ainsi, vous pouvez empêcher un
plat (avec de l'eau, du lait, etc), de dé
border mçme s'il était sur le point de
déborder.
Bruits de fonctionnement
La table de cuisson f induction peut
émettre de petits bruits. Ces bruits font
partie de la cuisson f induction et sont
tout f fat normaux.
• Le bruit peut çtre important f des
niveaux de température élevés.
• L'alliage d'une casserole peut géné
rer des bruits.
• A faible température, le fonctionne
ment de la plaque peut entraîner un
bruit f intervalles réguliers.
• Faire chauffer une casserole vide
peut générer des bruits. Si vous y
versez de l'eau ou une préparation
culinaire, le son s'évanouit.
• Vous pouvez entendre le bruit du
ventilateur qui refroidit le système
électrique.
m Si la surface du bandeau de com
mande tactile est soumise f une
source de vapeur intense, le système
de commande peut se désactiver et
renvoyer un signal d'erreur.
m La surface du bandeau de com
mande tactile doit toujours §tre
propre. Dans le cas contraire, le
fonctionnement pourrait s'en trouver
altéré.
22 I FR
Page 73

Maintenance et entretien
Généralités
Un nettoyage régulier de l'appareil en
rallongera la durée de vie et diminuera
l'apparition de problèmes.
^ Débranchez l'appareil de la prise
d'alimentation avant de commen
cer le nettoyage et l'entretien.
Vous risqueriez un choc élec
trique !
4sk Laissez l’appareil refroidir avant
de le nettoyer.
Les surfaces chaudes peuvent
brûler I
• Nettoyez l'appareil après chaque
utilisation. Il vous sera ainsi pos
sible d'ôter plus facilement les ré
sidus de nourriture éventuels, évi
tant ainsi qu'ils ne brûlent lors de
l'utilisation suivante.
• Aucun produit nettoyant particulier
n'est nécessaire pour nettoyer
l'appareil. Utilisez de l'eau tiède
avec du détergent, un chiffon doux
ou une éponge pour nettoyer l'ap
pareil et essuyez-le à l'aide d'un
chiffon sec.
• Veillez toujours à bien essuyer les
excès de liquide après le nettoyage
et essuyez immédiatement tout
déversement.
• N'utilisez pas de détergents conte
nant de l'acide ou du chlore pour
nettoyer les surfaces en acier
inoxydable et la poignée. Utilisez
un chiffon doux avec un détergent
liquide non abrasif pour nettoyer
ces parties, en prenant soin de tou
jours frotter dans le même sens.
m La surface pourrait être endom
magée par certains détergents ou
produits de nettoyage.
N'utilisez pas de détergents
agressifs, de poudre/crèmes de
nettoyage ou d'objets tranchants.
ïn N'utilisez pas de nettoyeurs à
vapeur pour le nettoyage.
Nettoyage de la table de cuis
son
Surfaces vitrocéramiques
Essuyez la surface vitrocéramique à
l'aide d'un chiffon humidifié à l'eau
froide pour ne pas laisser de traces du
produit de nettoyage. Séchez à l'aide
d'un chiffon doux et sec. Les résidus
peuvent endommager la surface vitro
céramique lors de l'utilisation suivante
de la table de cuisson.
Les résidus séchés sur la surface vi
trocéramique ne doivent en aucun cas
être grattés au moyen de lames à cro
chet, de laine d'acier ou d'outils simi
laires.
Eliminez les traces de calcaire (tâches
jaunâtres) avec un détartrant comme le
vinaigre ou le jus de citron. Vous pou
vez également utiliser les produits ap
propriés disponibles dans le commerce.
Si la surface est fortement souillée,
appliquez le produit de nettoyage avec
une éponge et attendez qu'il soit bien
absorbé. Nettoyez ensuite la surface
de la table de cuisson avec un chiffon
humide.
23 I FR
Page 74

[!] Les aliments sucrés, crèmes
épaisses et sirops par exemple,
doivent être nettoyés rapidement
avant que la surface ne refroi
disse. Dans le cas contraire, la
surface vitrocéramique peut être
endommagée de manière irrémé
diable.
Avec le temps, une légère décoloration
peut se produire sur les revêtements
ou d'autres surfaces. Cela n'affecte en
rien le fonctionnement du produit.
La surface vitrocéramique se décolore
et se tâche dans des conditions nor
males d'utilisation, il ne s'agit pas d'un
défaut.
24 I FR
Page 75

Q Recherche et résolution des pannes
Le four émet des bruits métalliques lors des phases de chauffage et de refroidis
sement.
ïïl Lorsque les pièces métalliques sont chauffées, elles peuvent se détendre et
émettre ces bruits. Cela n'est pas un défaut.
Le four ne fonctionne pas.
Le fusible d'alimentation est défectueux ou grillé. »> Vérifiez ies fusibies dans la
boîte f fusibles. Remplacez ou réactivez-les le cas échéant.
Si l'écran ne s'allume pas lorsque vous rallumez la table de cuisson. »> Débran
chez l'appareil au niveau du disjoncteur. Attendez 20 secondes et rebranchez-le.
L'appareil n'est pas relié f la prise de mise f la terre. »> Vérifiez le branchement de
la prise.
La protection contre le surchauffage fonctionne. »> Laissez votre table de cuisson
refroidir.
Le plat de cuisson n'est pas adapté. »> Vérifiez votre plat.
Le symbole Ij" s'affiche sur l'écran du foyer.
Vous n'avez pas placé le pot sur la zone de cuisson active. »> Vérifiez s'il y a un
plat sur la zone de cuisson.
Votre plat n'est pas compatible avec la cuisson r induction. »> Vérifiez si votre plat
est compatible avec la plaque f induction.
Le plat de cuisson n'est pas centré correctement ou le fond du plat n'est pas assez
large pour la zone de cuisson. »> Choisissez un plat assez large et centrez le plat
correctement sur la zone de cuisson.
Le plat de cuisson ou la zone de cuisson sont surchauffés. »> Laissez-les refroidir.
La zone de cuisson sélectionnée s'éteint subitement durant le fonctionnement.
La durée de cuisson pour la zone de cuisson sélectionnée est peut-çtre ache
vée. »> Vous pouvez régler une nouvelle durée de cuisson ou achever la cuisson.
La protection contre le surchauffage fonctionne. »> Laissez votre table de cuisson
refroidir.
Il se peut qu'un objet recouvre le bandeau de contrôle des touches. »> Enlevez
l'objet sur le bandeau.__________________________________________________
Le plat ne chauffe pas m^me si la zone de cuisson est allumée.
Votre plat n'est pas compatible avec la cuisson f induction. »> Vérifiez si votre plat
est compatible avec la plaque f induction.
Le plat de cuisson n'est pas centré correctement ou le fond du plat n'est pas assez
large pour la zone de cuisson. »> Choisissez un plat assez large et centrez le plat
correctement sur la zone de cuisson.
m Consultez le technicien autorisé ou le revendeur qui vous a vendu l'appareil si vous ne
parvenez pas f résoudre le problème après avoir suivi les instructions comprises dans
ce chapitre. N'essayez jamais de réparer un appareil défectueux vous-mçme.
_____________________
25|FR
Page 76

Part no: 185.2612.68/2-1
Rev: АА/14.06.2011
 Loading...