

Page 1
GN1416231ZX
EN DE ES
Page 2
Please read this manual before using the product!
Dear Customer,
We'd like you to make the best use of our product, which has been manufactured in modern facilities
with care and meticulous quality controls.
Thus, we advice you to read the entire user manual before you use the product. In case the product
changes hands, do not forget to hand the guide to its new owner along with the product.
This guide will help you use the product quickly and safely.
• Please read the user guide carefully before installing and operating the product.
• Always observe the applicable safety instructions.
• Keep the user guide within easy reach for future use.
• Please read any other documents provided with the product.
Keep in mind that this user guide may apply to several product models. The guide clearly indicates any
variations of different models.
Important information and useful
C
tips.
Risk of life and property.
A
Risk of electric shock.
B
The product’s packaging is made of
recyclable materials, in accordance
with the National Environment
Legislation.
Page 3
1. Safety and environment instructions 3
2 Your Refrigerator 6
2 Your Refrigerator 7
3 Installation 8
3.1 Appropriate location for installation . . . . . . . .8
3.2 Installing the plastic wedges . . . . . . . . . . . . .8
3.3 *Adjusting the feet . . . . . . . . . . . . . . . . . . . .9
3.4 Electric connection . . . . . . . . . . . . . . . . . . .10
4 Preparation 11
4.1 Things to be done for saving energy . . . . .11
4.2 Recommendations about the fresh food
compartment. . . . . . . . . . . . . . . . . . . . . .11
4.3 Initial use. . . . . . . . . . . . . . . . . . . . . . . . .12
5 Operating the product 13
5.1 Indicator panel . . . . . . . . . . . . . . . . . . . . . .13
5.2 Indicator panel. . . . . . . . . . . . . . . . . . . . .18
5.3 Freezing fresh food. . . . . . . . . . . . . . . . . . .20
5.4 Recommendations for preserving the frozen
food . . . . . . . . . . . . . . . . . . . . . . . . . . . .20
5.5 Deep-freeze information. . . . . . . . . . . . . . .20
5.6 Placing the food. . . . . . . . . . . . . . . . . . . . .21
5.7 Door open warning. . . . . . . . . . . . . . . . . . .21
5.8 Chiller compartment. . . . . . . . . . . . . . . . . .21
5.9 Crisper. . . . . . . . . . . . . . . . . . . . . . . . . . . .21
5.10 Humidity-controlled crisper. . . . . . . . . . . .21
(FreSHelf). . . . . . . . . . . . . . . . . . . . . . . . . . . . .21
5.11 Egg tray. . . . . . . . . . . . . . . . . . . . . . . . . .22
5.12 Movable Middle Section . . . . . . . . . . . . . .22
5.13 Cool Control Storage Compartment . . . . .22
5.14 Blue light . . . . . . . . . . . . . . . . . . . . . . . . .22
5.15 Odour filter. . . . . . . . . . . . . . . . . . . . . . . .22
5.16 Wine cellar compartment . . . . . . . . . . . . .23
5.17 Using internal water dispenser . . . . . . . . .25
5.18 Dispensing water . . . . . . . . . . . . . . . . . . .25
5.19 For using water dispenser. . . . . . . . . . . . .25
5.20 Icematic . . . . . . . . . . . . . . . . . . . . . . . . .26
5.21 Icematic and ice storage container . . . . . .26
6 Maintenance and cleaning 27
6.1 Avoiding bad odours. . . . . . . . . . . . . . . . . .27
6.2 Protecting the plastic surfaces . . . . . . . . . .27
7. Troubleshooting 28
2 / 29 EN
Refrigerator / User Manual
Page 4
1. Safety and environment instructions
This section provides the safety instructions
necessary to prevent the risk of injury and
material damage. Failure to observe these
instructions will invalidate all types of product
warranty.
Intended use
WARNING:
Keep ventilation openings, in
the appliance enclosure or in
A
A
A
A
the built-instructure, clear of
obstruction.
WARNING:
Do not use mechanical
devices or other means to
accelerate the defrosting
process, other than those
recommended by the
manufacturer.
WARNING:
Do not damage the refrigerant
circuit.
WARNING:
Do not use electrical
appliances inside the food
storage compartments of the
appliance, unless they are of
the type recommended by the
manufacturer.
and experience or by children. The device
can only be used by such persons under
supervision and instruction of a person
responsible for their safety. Children
should not be allowed to play with this
device.
• In case of malfunction, unplug the device.
• After unplugging, wait at least 5 minutes
before plugging in again.
• Unplug the product when not in use.
• Do not touch the plug with wet hands! Do
not pull the cable to plug off, always hold
the plug.
• Do not plug in the refrigerator if the
socket is loose.
• Unplug the product during installation,
maintenance, cleaning and repair.
• If the product will not be used for a while,
unplug the product and remove any food
inside.
• Do not use the product when the
compartment with circuit cards located
on the upper back part of the product
(electrical card box cover) (1) is open.
1
This appliance is intended to be used in
household and similar applications such as
– staff kitchen areas in shops, offices and
other working environments;
– farm houses and by clients in hotels,
motels and other residential type
environments;
– bed and breakfast type environments;
– catering and similar non-retail applications.
1.1. General safety
• This product should not be used by
persons with physical, sensory and mental
disabilities, without sufficient knowledge
3/ 29 EN
1
• Do not use steam or steamed cleaning
materials for cleaning the refrigerator and
melting the ice inside. Steam may contact
the electrified areas and cause short
circuit or electric shock!
• Do not wash the product by spraying or
pouring water on it! Danger of electric
shock!
Refrigerator / User Manual
Page 5
Important instructions regarding safety and environment
• In case of malfunction, do not use the
product, as it may cause electric shock.
Contact the authorised service before
doing anything.
• Plug the product into an earthed socket.
Earthing must be done by a qualified
electrician.
• If the product has LED type lighting,
contact the authorised service for
replacing or in case of any problem.
• Do not touch frozen food with wet hands!
It may adhere to your hands!
• Do not place liquids in bottles and cans
into the freezer compartment. They may
explode.
• Place liquids in upright position after
tightly closing the lid.
• Do not spray flammable substances near
the product, as it may burn or explode.
• Do not keep flammable materials and
products with flammable gas (sprays,
etc.) in the refrigerator.
• Do not place containers holding liquids on
top of the product. Splashing water on an
electrified part may cause electric shock
and risk of fire.
• Exposing the product to rain, snow,
sunlight and wind will cause electrical
danger. When relocating the product, do
not pull by holding the door handle. The
handle may come off.
• Take care to avoid trapping any part of
your hands or body in any of the moving
parts inside the product.
• Do not step or lean on the door, drawers
and similar parts of the refrigerator. This
will cause the product to fall down and
cause damage to the parts.
• Take care not to trap the power cable.
1.1.1 HC warning
If the product comprises a cooling system
using R600a gas, take care to avoid
damaging the cooling system and its pipe
while using and moving the product. This
gas is flammable. If the cooling system
is damaged, keep the product away from
sources of fire and ventilate the room
immediately.
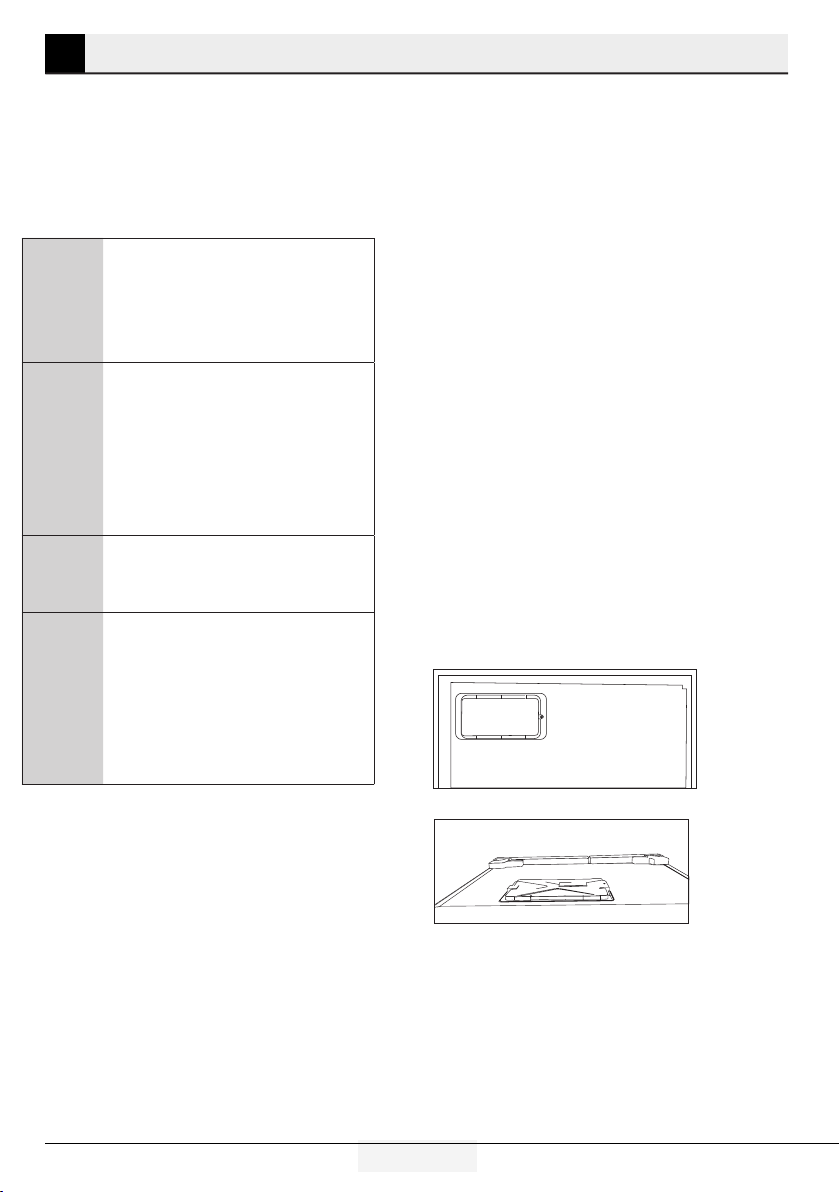
The label on the inner left side
indicates the type of gas used in
C
the product.
1.1.2 For models with
water dispenser
• Pressure for cold water inlet shall be
maximum 90 psi (6.2 bar). If your
water pressure exceeds 80 psi (5.5
bar), use a pressure limiting valve in
your mains system. If you do not know
how to check your water pressure, ask
for the help of a professional plumber.
• If there is risk of water hammer effect
in your installation, always use a water
hammer prevention equipment in
your installation. Consult Professional
plumbers if you are not sure that there
is no water hammer effect in your
installation.
• Do not install on the hot water inlet.
Take precautions against of the
risk of freezing of the hoses. Water
temperature operating interval shall
be 33°F (0.6°C) minimum and 100°F
(38°C) maximum.
• Use drinking water only.
4 / 29 EN
Refrigerator / User Manual
Page 6
Important instructions regarding safety and environment
1.2. Intended use
• This product is designed for home use.
It is not intended for commercial use.
• The product should be used to store
food and beverages only.
• Do not keep sensitive products
requiring controlled temperatures
(vaccines, heat sensitive medication,
1.6. Package information
Packaging materials of the product are
manufactured from recyclable materials in
accordance with our National Environment
Regulations. Do not dispose of the packaging
materials together with the domestic or other
wastes. Take them to the packaging material
collection points designated by the local authorities.
medical supplies, etc.) in the
refrigerator.
• The manufacturer assumes no
responsibility for any damage due to
misuse or mishandling.
• Original spare parts will be provided
for 10 years, following the product
purchasing date.
1.3. Child safety
• Keep packaging materials out of
children’s reach.
• Do not allow the children to play with
the product.
• If the product’s door comprises a lock,
keep the key out of children’s reach.
1.4. Compliance with WEEE Directive
and Disposing of the Waste Product
This product complies with EU WEEE
Directive (2012/19/EU). This product bears a
classification symbol for waste electrical and
electronic equipment (WEEE).
This product has been manufactured
with high quality parts and materials
which can be reused and are suitable
for recycling. Do not dispose of the
waste product with normal domestic
and other wastes at the end of its
service life. Take it to the collection
center for the recycling of electrical and electronic
equipment. Please consult your local authorities to
learn about these collection centers.
1.5. Compliance with RoHS Directive
• This product complies with EU WEEE Directive
(2011/65/EU). It does not contain harmful and
prohibited materials specified in the Directive.
5/ 29 EN
Refrigerator / User Manual
Page 7
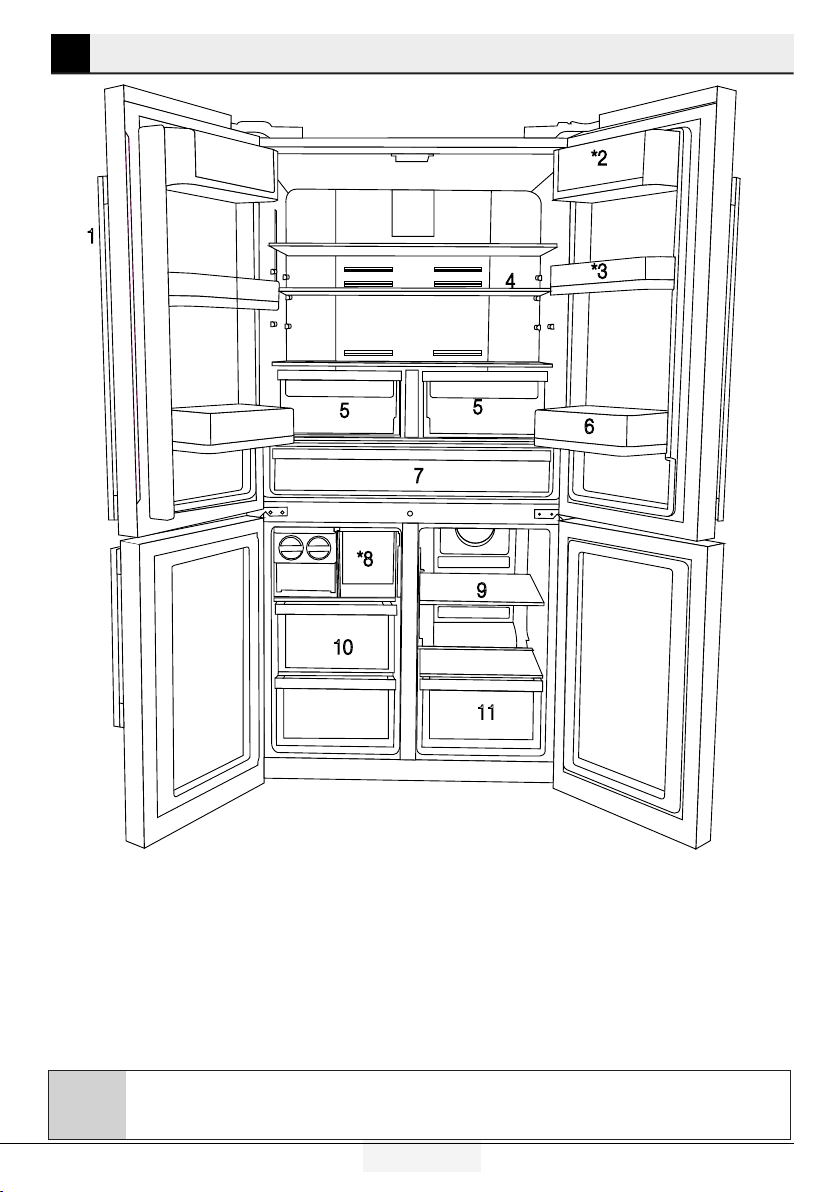
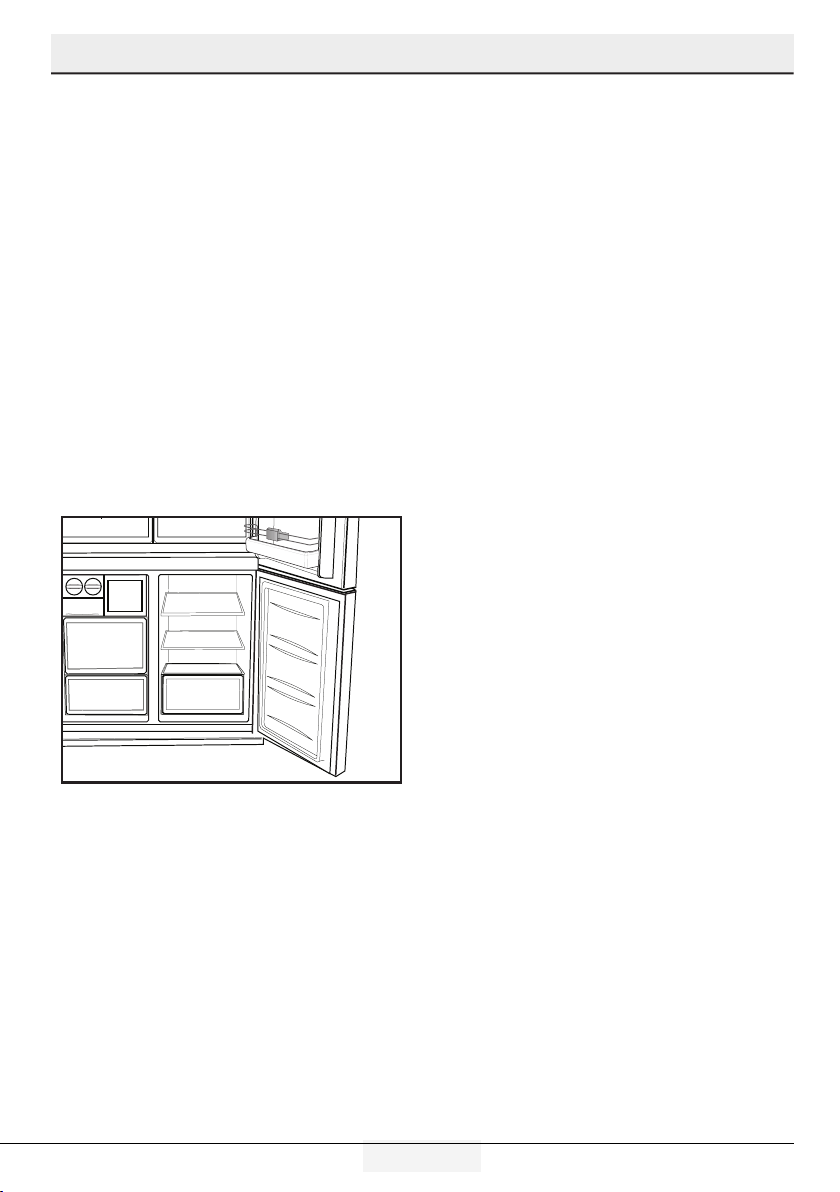
2 Your Refrigerator
1
*2
5
10
*8
4
5
7
9
11
*3
6
1- Control and indicator panel
2- Butter & Cheese section
3- 70 mm moving door shelf
4- Fridge compartment glass shelf
5- Fridge compartment crisper
6- Gallon door shelf
Figures in this user manual are schematic and may not match the product exactly. If the subject parts
are not included in the product you have purchased, then those parts are valid for other models.
C
7- Chiller compartment
8- Icebox drawer
9- Multizone compartment glass shelf/cooler
10- Freezer compartment drawers
11- Multizone Compartment's drawer
* OPTIONAL
6 / 29 EN
Refrigerator / User Manual
Page 8
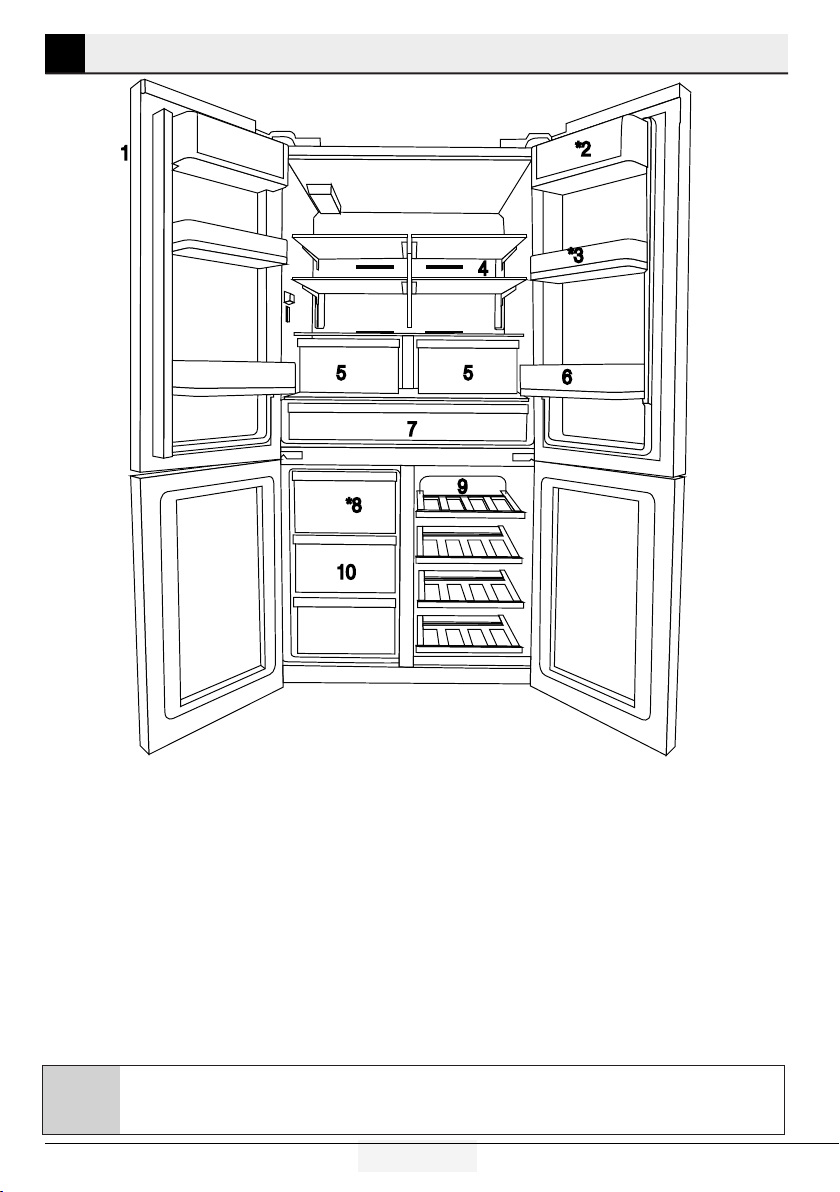
2 Your Refrigerator
1
4
5
*8
10
5
7
9
*2
*3
6
1- Control and indicator panel
2- Butter & Cheese section
3- 70 mm moving door shelf
4- Fridge compartment glass shelf
5- Fridge compartment crisper
6- Gallon door shelf
Figures in this user manual are schematic and may not match the product exactly. If the subject parts
are not included in the product you have purchased, then those parts are valid for other models.
C
7- Chiller compartment
8- Icebox drawer
9- Multizone compartment glass shelf/cooler
10- Freezer compartment drawers
* OPTIONAL
7/ 29 EN
Refrigerator / User Manual
Page 9
3 Installation
3.1 Appropriate location
for installation
Contact an Authorized Service for the installation
of the product. In order to prepare the product
for use, refer the information in the user manual
and ensure that electrical installation and water
installation are appropriate. If not, call a qualified
electrician and technician to have any necessary
arrangements carried out.
WARNING: Manufacturer shall not
be held liable for damages that may
B
B
A
arise from procedures carried out by
unauthorized persons.
WARNING: Product must not be plugged
in during installation. Otherwise, there is
the risk of death or serious injury!
WARNING: : If the door clearance of the
room where the product shall be placed is
so tight to prevent passing of the product,
remove the door of the room and pass the
product through the door by turning it to
its side; if this does not work, contact the
authorized service.
1.
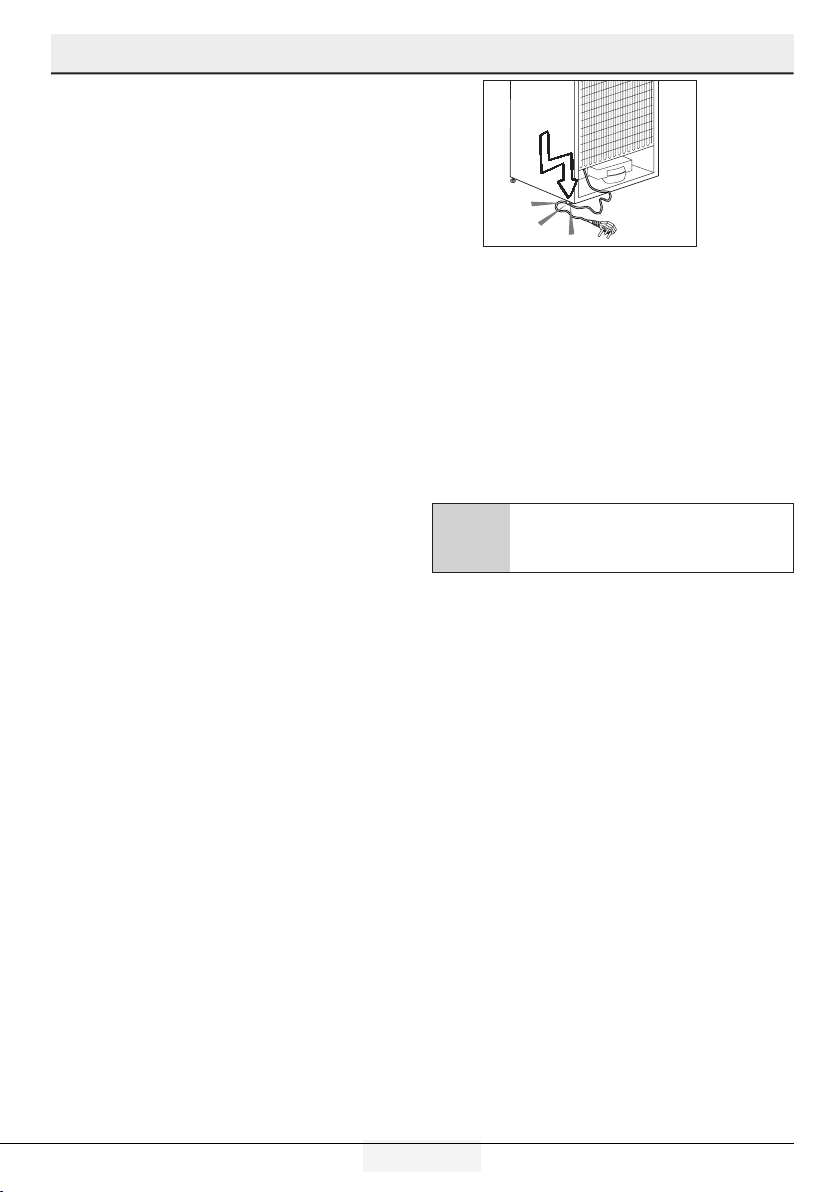
To install the wedges, remove the screws on the
product and use the screws supplied together with the
wedges.
2.
Insert the 2 plastic wedges onto the rear ventilation
cover as illustrated in the figure.
•Placetheproductonalevelfloorsurfaceto
prevent jolts.
•Installtheproductatleast30cmawayfrom
heat sources such as hobs, heater cores and
stoves and at least 5 cm away from electrical
ovens.
•Productmustnotbesubjectedtodirectsunlight
and kept in humid places.
•Appropriateairventilationmustbeprovided
around your product in order to achieve an
efficient operation. If the product is to be placed
in a recess in the wall, pay attention to leave at
least 5 cm distance with the ceiling and side
walls.
•Donotinstalltheproductinplaceswherethe
temperature falls below -5°C.
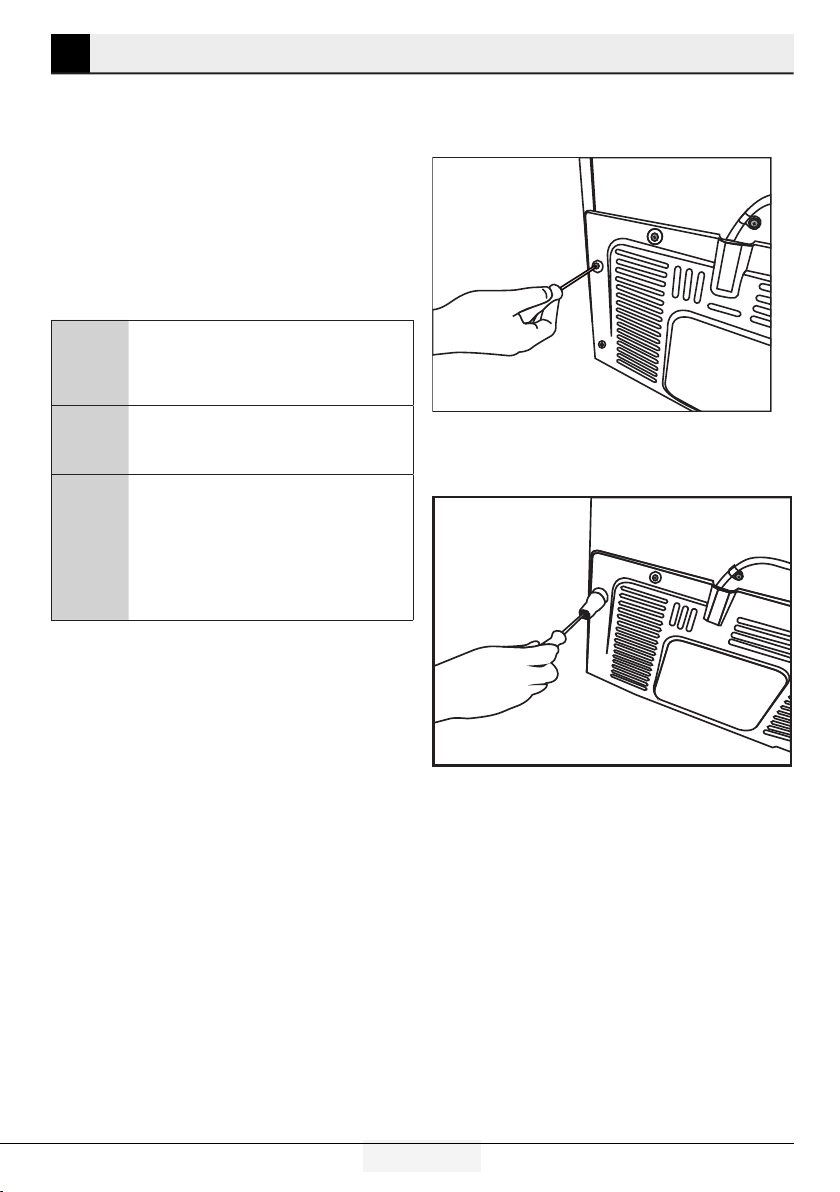
3.2 Installing the plastic wedges
Plastic wedges supplied with the product are
used to create the distance for the air circulation
between the product and the rear wall.
8 / 29 EN
Refrigerator / User Manual
Page 10
Installation
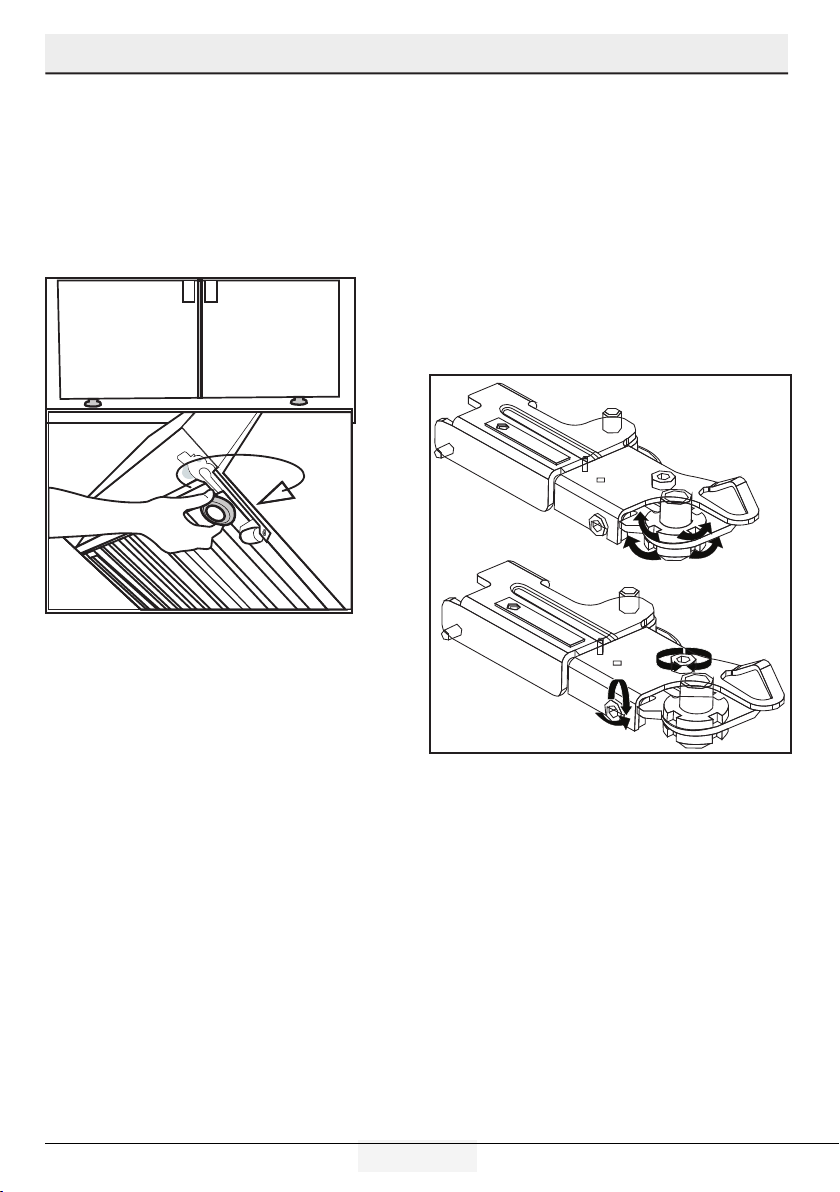
3.3 *Adjusting the feet
If the product stands unbalanced after installation,
adjust the feet on the front by rotating them to the
right or left.
*If your product does not have a wine
compartment or is not a glass door, your product
does not have adjustable stands, the product has
fixed stands.
To adjust the doors vertically,
Loosen the fixing nut located at the bottom.
Rotate the adjusting nut according to the position
of the door (clockwise/counter-clockwise).
Tighten the fixing nut in order to fix the position.
To adjust the doors horizontally,
Loosen the fixing nut located at the top.
Rotate the side adjusting nut according to the
position of the door (clockwise/counter-clockwise).
Tighten the fixing nut which is at the top in order to
fix the position.
adjusting nut
fixing nut
fixing nut
9/ 29 EN
adjusting nut
Refrigerator / User Manual
Page 11
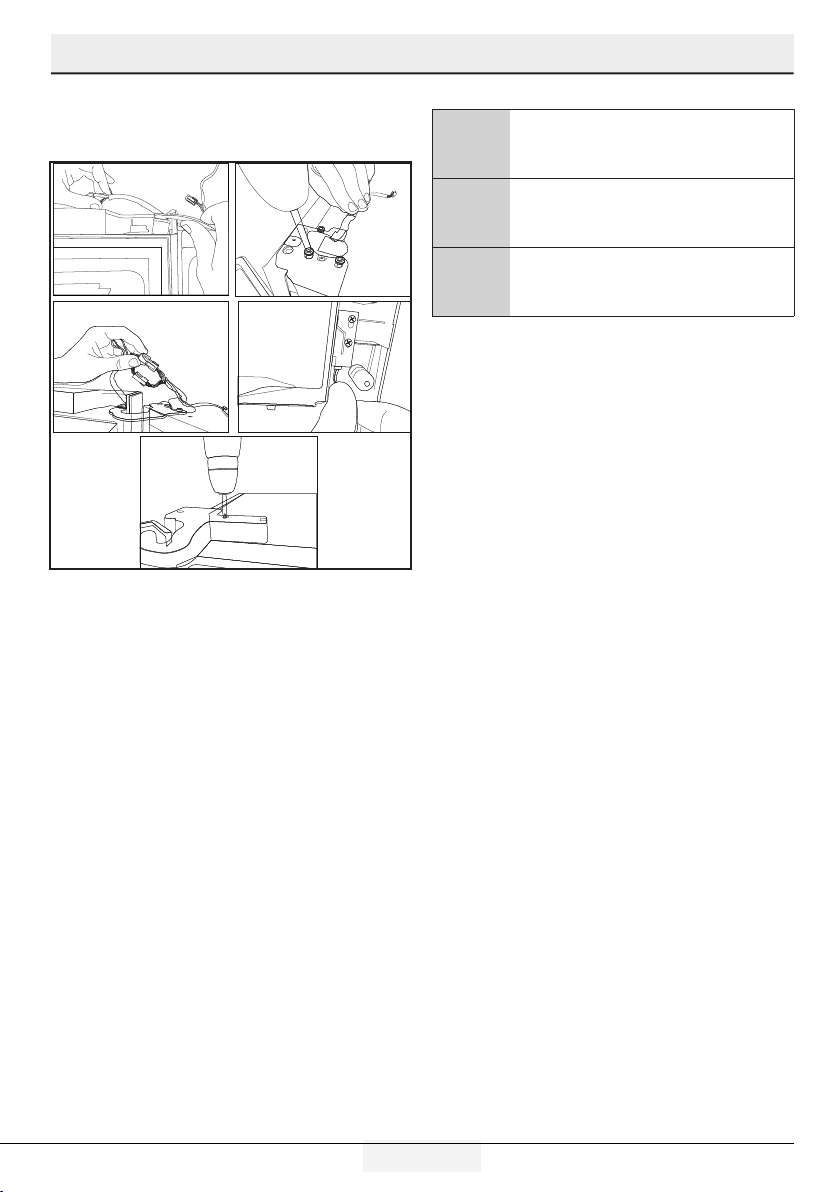
Installation
-Upper hinge group is fixed with 3 screws.
-The hinge cover is attached after the sockets are
installed.
- Then the hinge cover is fixed with two screws.
3.4 Electric connection
WARNING: Do not make connections via
A
B
C
• Our company shall not be liable for any
• Power cable plug must be within easy reach
• Connect your refrigerator to a grounded outlet
• Do not extension cords or cordless multiple
extension cables or multi-plugs.
WARNING: Damaged power cable must
be replaced by the Authorized Service
Agent.
If two coolers are to be installed side
by side, there should be at least 4 cm
distance between them.
damages that will arise when the product
is used without grounding and electrical
connection in accordance with the national
regulations.
after installation.
rated for a voltage value of 220-240V /50 Hz.
Outlet shall have 10 to 16A fuse.
outlets between your product and the wall
outlet.
10 / 29 EN
Refrigerator / User Manual
Page 12
4 Preparation
4.1 Things to be done for
saving energy
Connecting your refrigerator to systems
that save energy is dangerous as they may
A
• Do not leave the doors of your refrigerator open
• Do not put hot food or drinks in your
• Do not overload the refrigerator. Cooling
• Do not place the refrigerator in places subject
• Pay attention to store your food in refrigerator
• To be able store maximum food in the freezer
• Airflow should not be blocked by placing
• Thawing the frozen foods in the fridge
C
cause damage on the product.
for a long time.
refrigerator.
capacity will fall when the air circulation in the
refrigerator is hindered.
to direct sunlight. Install the product at least
30 cm away from heat sources such as hobs,
ovens, heater units and stoves and at least 5
cm away from electrical ovens.
in closed containers.
compartment of your refrigerator, the upper
drawer has to be removed and placed on top
of glass shelf. Power consumption stated for
your refrigerator has been determined after
removing the icematic and the upper drawers
as to allow maximum loading. It is strongly
recommended to use the lower drawers in the
freezer and the multizone compartment while
loading.
foods in front of the freezer and the multizone
compartment fans. Foods should be loaded by
leaving minimum 5 cm space in front of the
protective fan grid.
compartment both saves energy and reserves
the quality of the foods.
Temperature of the room where your
refrigerator is located should at least
be 10ºC /50°F. Operating your
refrigerator under cooler conditions is not
recommended with regard to its efficiency.
If two coolers are to be installed side
by side, there should be at least 4 cm
C
distance between them.
4.2 Recommendations about the
fresh food compartment
• Make sure that the food does not touch the
temperature sensor in fresh food compartment.
To allow the fresh food compartment to keep
its ideal storage temperature, the sensor must
not be hindered by food.
• Do not place hot foods or beverages inside the
product.
C
Inside of your refrigerator must be cleaned
thoroughly.
11/ 29 EN
Refrigerator / User Manual
Page 13
Preparation
4.3 Initial use
Before using the product, make sure that all
preparations have been made in accordance
with the instructions given in the "Important
instructions regarding safety and environment" and
"Installation" chapters.
• Clean the interior of the refrigerator as
recommended in the “Maintenance and
cleaning” section. Before you start the
refrigerator, make sure that the interior is dry.
• Plug the refrigerator in a grounded socket. The
interior illumination is lit when the door of the
refrigerator is opened.
• Operate the refrigerator for 6 hours without
placing any food in it and do not open its door
unless it is necessary.
You will hear a noise when the compressor
starts up. The liquids and gases sealed
C
C
within the refrigeration system may also
give rise to noise, even if the compressor is
not running and this is quite normal.
Front edges of the refrigerator may
feel warm. This is normal. These areas
are designed to be warm to avoid
condensation.
12 / 29 EN
Refrigerator / User Manual
Page 14

5 Operating the product
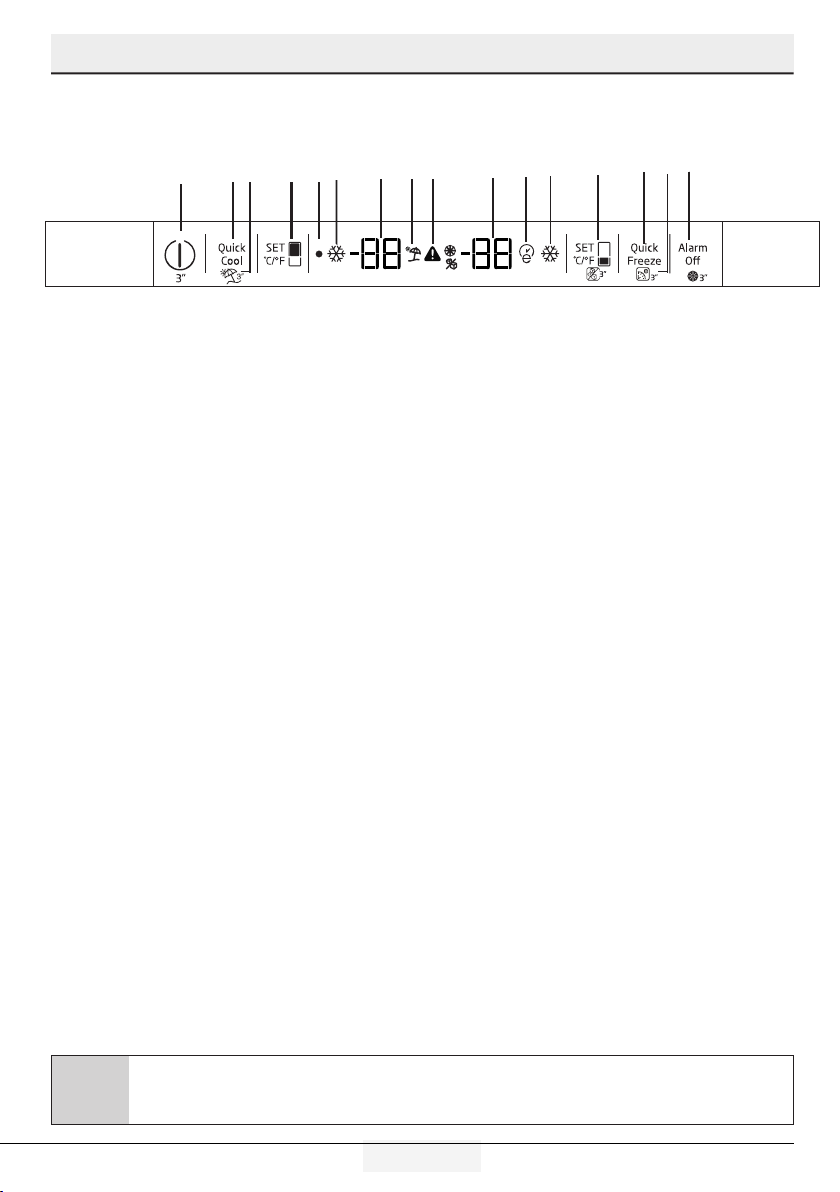
5.1 Indicator panel
Touch-controlled indicator panel allows you to set the temperature and control the other functions related
to the refrigerator without opening the door of the product. Just press the relevant buttons for function
settings.
2 3
1
4
5 6
9
10 11
33
32
31
30
Select
Select
3 “
*34.1
27
28
29
3 “
*34.2
7
19
20
*8
Quick FreezeQuick Cool
3 “
FN
OK
1718
Quick FreezeQuick Cool
3 “
FN
OK
12
13
14
15
16
C
26
*25
24
23
22
21
Figures in this user manual are schematic and may not match the product exactly. If the subject parts
are not included in the product you have purchased, then those parts are valid for other models.
13/ 29 EN
Refrigerator / User Manual
Page 15
Operating the product
1. Quick cooling function indicator
It turns on when the quick fridge function is
activated.
2. Fridge compartment temperature indicator
Temperature of the fridge compartment is shown;
it can be set to 8,7,6,5,4,3,2,1.
3. Fahrenheit indicator
It is a Fahrenheit indicator. When the Fahrenheit
indication is activated, the temperature set values
are shown in Fahrenheit and the relevant icon
turns on.
4. Key lock
Press key lock button simultaneously for 3 seconds. Key lock symbol
will light up and key lock mode will be activated.
Buttons will not function if the Key lock mode is
active. Press key lock button simultaneously for 3
seconds again. Key lock symbol will turn off and
the key lock mode will be exited.
Press the key lock button if you want to prevent
changing of the temperature setting of the
refrigerator.
5. Power failure/High temperature / error
warning
This indicator illuminates during power failure, high
temperature failures and error warnings. During
long-term power failures, the highest temperature
value that the freezer compartment reaches will
blink on the digital display. After checking the food
located in the freezer compartment, press the
alarm off button to clear the warning.
Please refer to "solutions recommended for
troubleshooting" section on your manual if you
observe that this indicator is illuminated.
6. Filter reset icon
This icon turns on when the filter needs to be
reset.
7. Temperature change cabin icon
Indicates the cabin whose temperature is to be
changed. When the temperature change cabin icon
starts flashing, it is understood that the relevant
cabin has been selected.
8. Joker freezer icon
Hover over the Joker freezer icon using the FN button; the
icon will start to flash. When you press the OK key, joker
cabin freezer icon turn on and operates as a freezer.
9. Freezer compartment temperature
indicator
Temperature of the fridge compartment is shown;
it can be set to -18, -19, -20, -21, -22, -23, -24.
10. Quick freeze function indicator
It turns on when the quick freeze function is
activated.
11. Fahrenheit indicator
It is a Fahrenheit indicator. When the Fahrenheit
indication is activated, the temperature set values
are shown in Fahrenheit and the relevant icon
turns on.
12. Quick freeze function button
Press this button to activate or deactivate the quick
freeze function. When you activate the function,
the freezer compartment will be cooled to a
temperature lower than the set value.
Use the quick freeze function when you
want to quickly freeze the food placed
C
C
C
13. Filter reset
The filter is reset when the quick freeze button is
pressed for 3 seconds. Filter reset icon goes off.
in freezer compartment. If you want
to freeze large amounts of fresh food,
activate this function before putting the
food into the product.
If you do not cancel it, Quick Freeze
will cancel itself automatically after 4
hours at the most or when the fridge
compartment reaches to the required
temperature.
This function is not recalled when
power restores after a power failure.
14 / 29 EN
Refrigerator / User Manual
Page 16
Operating the product
14. FN button
Using this key, you can switch between the
functions that you want to select. Upon pressing
this key, the icon, whose function is required to be
activated or deactivated, and this icon's indicator
starts flashing. The FN button gets deactivated if
not pressed for 20 seconds. You need to press this
button to change the functions again.
15. Celsius indicator
It is a Celsius indicator. When the Celsius indication
is activated, the temperature set values are shown
in Celsius and the relevant icon turns on.
16. OK button
After navigating the functions using the FN button,
when the function is cancelled via the OK button,
the relevant icon and the indicator flashes. When
the function is activated, it remains on. The
indicator continues to flash in order to show the
icon it is on.
17. Temperature change cabin icon
Indicates the cabin whose temperature is to be
changed. When the temperature change cabin icon
starts flashing, it is understood that the relevant
cabin has been selected.
18. Temperature change cabin icon
Indicates the cabin whose temperature is to be
changed. When the temperature change cabin icon
starts flashing, it is understood that the relevant
cabin has been selected.
19. Set increasing button
Select the relevant cabin with the select button;
the cabin icon representing the relevant cabin will
start to flash. If you press the set increasing button
during this process, the set value gets increased. If
you keep pressing it in a loop, the set value returns
to the beginning.
20. Temperature change cabin icon
Indicates the cabin whose temperature is to be
changed. When the temperature change cabin icon
starts flashing, it is understood that the relevant
cabin has been selected.
15/ 29 EN
21. Setting the Celsius and Fahrenheit
indicator
Hover over this key using the FN key and select
Fahrenheit and Celsius via the OK key. When
the relevant temperature type is selected, the
Fahrenheit and Celsius indicator turns on.
22. Ice machine off icon
Press the FN key (until it reaches the ice icon and
the lower line) to switch off the ice machine. The
ice machine off icon and the ice machine function
indicator start flashing when you hover over them,
thus you can understand whether the ice machine
will be turned on or off. When you press the OK
button, the ice machine icon lights continuously
and the Indicator continues to flash during this
process. If you do not press any button after 20
seconds, the icon and the indicator remains on.
Thus, the ice machine is switched off. In order to
switch on the ice machine again, hover over the
icon and the indicator; thus, both the ice machine
off icon and the indicator will start flashing. If you
do not press any button within 20 seconds, the
icon and the indicator will go off and thus the ice
machine will be switched on again.
Indicates whether the icematic is
C
C
23. Eco fuzzy function icon
Press the FN key (until it reaches the letter e
icon and the lower line) to activate the eco fuzzy.
When you hover over the eco fuzzy icon and the
eco fuzzy function indicator, they start flashing.
Thus, you can understand whether the eco fuzzy
function will be activated or deactivated. When you
press the OK button, the eco fuzzy function icon
lights continuously and the Indicator continues to
flash during this process. If you do not press any
button after 20 seconds, the icon and the indicator
remains on. Thus, the eco fuzzy function is
activated. In order to cancel the eco fuzzy function,
on or off.
Water flow from water tank
will stop when this function is
selected. However, ice made
previously can be taken from the
icematic.
Refrigerator / User Manual
Page 17

Operating the product
hover over the icon and the indicator again and
press the OK key. Thus, both the eco fuzzy function
icon and the indicator will start flashing. If you do
not press any button within 20 seconds, the icon
and the indicator will go off and the eco fuzzy
function will be cancelled.
24. Vacation function icon
Press the FN key (until it reaches the umbrella
icon and the lower line) to activate the vacation
function. When you hover over the vacation
function icon and the vacation function indicator,
they start flashing. Thus, you can understand
whether the vacation function will be activated or
deactivated. When you press the OK button, the
vacation function icon lights continuously and thus
the Vacation function is activated. The Indicator
continues to flash during this process. Press the
OK key to cancel the vacation function. Thus, both
the vacation function icon and the indicator will
start flashing and the vacation function will be
cancelled.
25. Joker fridge icon
When you select the joker fridge icon using the FN
button and press the OK key, the joker cabin turns
into a fridge cabin and operates as a cooler.
26. Celsius indicator
It is a Celsius indicator. When the Celsius indication
is activated, the temperature set values are shown
in Celsius and the relevant icon turns on.
27. Set decreasing function
Select the relevant cabin with the select button;
the cabin icon representing the relevant cabin
will start to flash. If you press the set decreasing
button during this process, the set value gets
decreased. If you keep pressing it in a loop, the set
value returns to the beginning.
28. Temperature change cabin icon
Indicates the cabin whose temperature is to be
changed. When the temperature change cabin icon
starts flashing, it is understood that the relevant
cabin has been selected.
29. Temperature change cabin icon
Indicates the cabin whose temperature is to be
changed. When the temperature change cabin icon
starts flashing, it is understood that the relevant
cabin has been selected.
30. Key lock
Press key lock button simultaneously for 3 seconds. Key lock symbol
will light up and key lock mode will be activated.
Buttons will not function if the Key lock mode is
active. Press key lock button simultaneously for 3
seconds again. Key lock symbol will turn off and
the key lock mode will be exited.
Press the key lock button if you want to prevent
changing of the temperature setting of the
refrigerator.
31.Select button
Use this button to select the cabin whose temperature you want to change. Switch between
the cabins by pressing this button. The selected
cabin can be understood from the cabin icons
(7,17,18,20,28,29). Whichever cabin icon is flashing, the cabin, whose temperature set value you
want to change, is selected. Then, you can change
the set value by pressing the cabin set value
decreasing button (27) and the cabin set value increasing button (19). If you do not press the select
button for 20 seconds, the cabin icons will go off.
You need to press this key to select a cabin again.
32. Alarm off warning
In case of power failure/high temperature
alarm, after checking the foods in the freezer
compartment, press the alarm off button to clear
the warning.
33. Quick cooling function button
The button has two functions. To activate or
deactivate the quick cool function, press it briefly.
Quick Cool indicator will turn off and the product
will return to its normal settings.
16 / 29 EN
Refrigerator / User Manual
Page 18
Operating the product
Use quick cooling function when you
want to quickly cool the food placed
C
C
C
C
34. 1 Joker temperature indicator
Temperature set values of the joker cabin are
displayed.
34. 2 Wine cooler compartment tempature
indicator
Tempature set values of the winecabin are displayed.
in the fridge compartment. If you want
to cool large amounts of fresh food,
activate this function before putting the
food into the product.
If you do not cancel it, quick cooling
will cancel itself automatically after 8
hours at the most or when the fridge
compartment reaches to the required
temperature.
If you press the quick cooling button
repeatedly with short intervals, the
electronic circuit protection will be
activated and the compressor will not
start up immediately.
This function is not recalled when
power restores after a power failure.
17/ 29 EN
Refrigerator / User Manual
Page 19
Operating the product
5.2 Indicator panel
Touch-control indicator panel allows you to set the temperature and control the other functions related
to the product without opening the door of the refrigerator. Just press the relevant buttons for function
settings.
12
7
1
2
4 5 6
3
9
8
11
10
14 15 16
13
1-On/Off function
Press the On/Off button for 3 seconds to turn off or
turn on the fridge.
2-Quick Fridge Function
When you press Quick Fridge button, the temperature of the compartment will be colder than the
adjusted values.
This function can be used for food placed in the
fridge compartment and required to be cooled
down rapidly.
If you want to cool large amounts of fresh food, it
is recommended to active this feature before putting the food into the fridge. Quick Fridge indicator
will remain lit when the Quick Fridge function is
enabled. To cancel this function press Quick Fridge
button again. Quick Fridge indicator will turn off
and return to its normal settings.
If you do not cancel it, Quick Fridge will cancel
itself automatically after 2 hours or when the fridge
compartment reaches to the required temperature.
This function is not recalled when power restores
after a power failure.
3-Vacation Function
Press the Quick Fridge\Vacation button for 3
seconds to activate Vacation function.”--” icon
comes on when the function is active. Function
is deactivated by pressing the same button for 3
seconds again or by pressing Fridge set button.
Figures in this user manual are schematic and may not match the product exactly. If the subject parts
are not included in the product you have purchased, then those parts are valid for other models.
C
When vacation mode is activated, set values does
not seem for fresh food cabin. Line is occured on
segments of fresh food.
When vacation mode is activated, tempature of
fresh food is hotter than 50 Fahrenheit degree(
10 celcius degree) so please do not keep foods
in fresh food cabinet. Tempature of freezer is not
affected.
4-Fridge Set Function
This function allows you to make the fridge compartment temperature setting. Press this button to
set the temperature of the fridge compartment to
8, 7, 6, 5, 4, 3, 2 or 1°C respectively.
5-Off Indicator
Off Indicator lits when the fridge is “Off” mode.
6-Quick Fridge Indicator
This icon lits when the Quick Fridge function is
active.
7-Fridge Compartment Temperature Setting
Indicator
Indicates the temperature set for the Fridge
Compartment.
8-Vacation Indicator
This icon lits when the Vacation function is active.
9-High Temperature Error / Warning
Indicator
This icon comes on during high temperature
failures and error warnings.
10-Freezer Compartment
Temperature Setting Indicator Indicates the temperature set for the Freezer Compartment.
18 / 29 EN
Refrigerator / User Manual
Page 20

Operating the product
11-Eco-Extra Indicator
Eco-Extra Indicator lits when the Eco Extra function
is active.
12-Quick Freeze Indicator
This indicator lits when the Quick Freezer function
is active.
13-Freezer Set Function
This function allows you to make the freezer compartment temperature setting. Press this button to
set the temperature of the freezer compartment to
0, -2, -4, -6, -8, -10 and -12 respectively.
14-Quick Freeze Function
Quick Freeze indicator turns on when the Quick
Freeze function is on. To cancel this function press
Quick Freeze button again. Quick Freeze indicator
will turn off and return to its normal settings. If
you do not cancel it, Quick Freeze will cancel itself
automatically after 4 hours or when the freezer
compartment reaches to the required temperature.
If you want to freeze large amounts of fresh food,
press the Quick Freeze button before putting the
food into the freezer compartment. If you press
the Quick Freeze button repeatedly with short
intervals, the electronic circuit protection will be
activated immediately.
This function is not recalled when power restores
after a power failure.
15-Eco-Extra (Special Economic Usage)
Function
Press the Quick Freeze\Eco Extra button for
3 seconds to activate the Eco Extra Function.
Refrigerator will start operating in the most
economic mode at least 6 hours later and the
economic usage indicator will turn on when the
function is active. Press the Quick Freeze button
for 3 seconds again to deactivate the Eco Fuzzy
Function.
16-Alarm Off
When the fridge door is opened for 2 minutes or
when there a sensor failure, a sound alarm turns
on. Alarm can be turned off by pressing “Alarm
Off” button.
Sensor failure alarm will not sound till power
failure. If you close the door and then open again
“Door open alarm” will be activated again after 2
minutes later .
19/ 29 EN
Refrigerator / User Manual
Page 21

Operating the product
Freezer
Compartment
Setting
-18°C 4°C This is the normal recommended setting.
-20, -22 or
-24°C
Quick Freeze 4°C
-18°C or colder 2°C
5.3 Freezing fresh food
• In order to preserve the quality of the food, it
shall be frozen as quickly as possible when it is
placed in the freezer compartment, use the fast
freezing feature for this purpose.
• You may store the food longer in freezer
compartment when you freeze them while they
are fresh.
• Pack the food to be frozen and close the
packing so that it would not allow entrance of
air.
• Ensure that you pack your food before putting
them in the freezer. Use freezer containers,
foils and moisture-proof papers, plastic
bags and other packing materials instead of
traditional packing papers.
• Label each pack of food by adding the date
before freezing. You may distinguish the
freshness of each food pack in this way when
you open your freezer each time. Store the food
frozen before in the front side of compartment
to ensure that they are used first.
• Frozen food must be used immediately after
they are thawed and they should not be refrozen.
• Do not freeze too large quantities of food at
one time.
Fridge
Compartment
Setting
4°C
Remarks
These settings are recommended when the ambient temperature
exceeds 30°C.
Use when you wish to freeze your food in a short time. Your product
will return to its previous mode when the process is over.
Use these settings if you think that your fridge compartment is not
cold enough because of the hot ambient conditions or frequent
opening and closing of the door.
5.4 Recommendations for
preserving the frozen food
Compartment shall be set to -18°C at least.
1. Put packages in the freezer as quickly as
possible after purchase without allowing the
to thaw.
2. Check whether the "Use By" and "Best
Before" dates on the packaging are expired or
not before freezing it.
3. Ensure that the package of the food is not
damaged.
5.5 Deep-freeze information
According to IEC 62552 standards, the product
shall freeze at least 4.5 kg of food at 25°C
ambient temperature to -18°C or lower within 24
hours for every 100-litres of freezer volume.
It is possible to preserve the food for a long time
only at -18°C or lower temperatures.
You can keep the freshness of food for many
months (at -18°C or lower temperatures in the
deep freeze).
Foods to be frozen should not be allowed to come
in contact with the previously frozen items to
prevent them from getting thawed partially.
20 / 29 EN
Refrigerator / User Manual
Page 22
Operating the product
Boil the vegetables and drain their water in order
to store vegetables for a longer time as frozen.
After draining their water, put them in air-proof
packages and place them inside the freezer. Food
such as bananas, tomatoes, lettuce, celery, boiled
eggs, potatoes are not suitable for freezing. When
these foods are frozen, only their nutritional value
and taste shall be affected negatively. They shall
not be spoiled so that they would create a risk for
human health.
5.6 Placing the food
Freezer
compartment
shelves
Refrigerator
compartment
shelves
Door shelves
of fridge
compartment
Crisper Vegetables and fruits
Fresh zone
compartment
Various frozen food such
as meat, fish, ice cream,
vegetables and etc.
Food in pans, covered plates
and closed containers, eggs (in
closed container)
Small and packaged food or
beverage
Delicatessen (breakfast food,
meat products that shall be
consumed in a short time)
5.7 Door open warning
(This feature is optional)
An audio warning signal will be given when the
door of your product is left open for 1 minute. This
warning will be muted when the door is closed or
any of the display buttons (if any) are pressed.
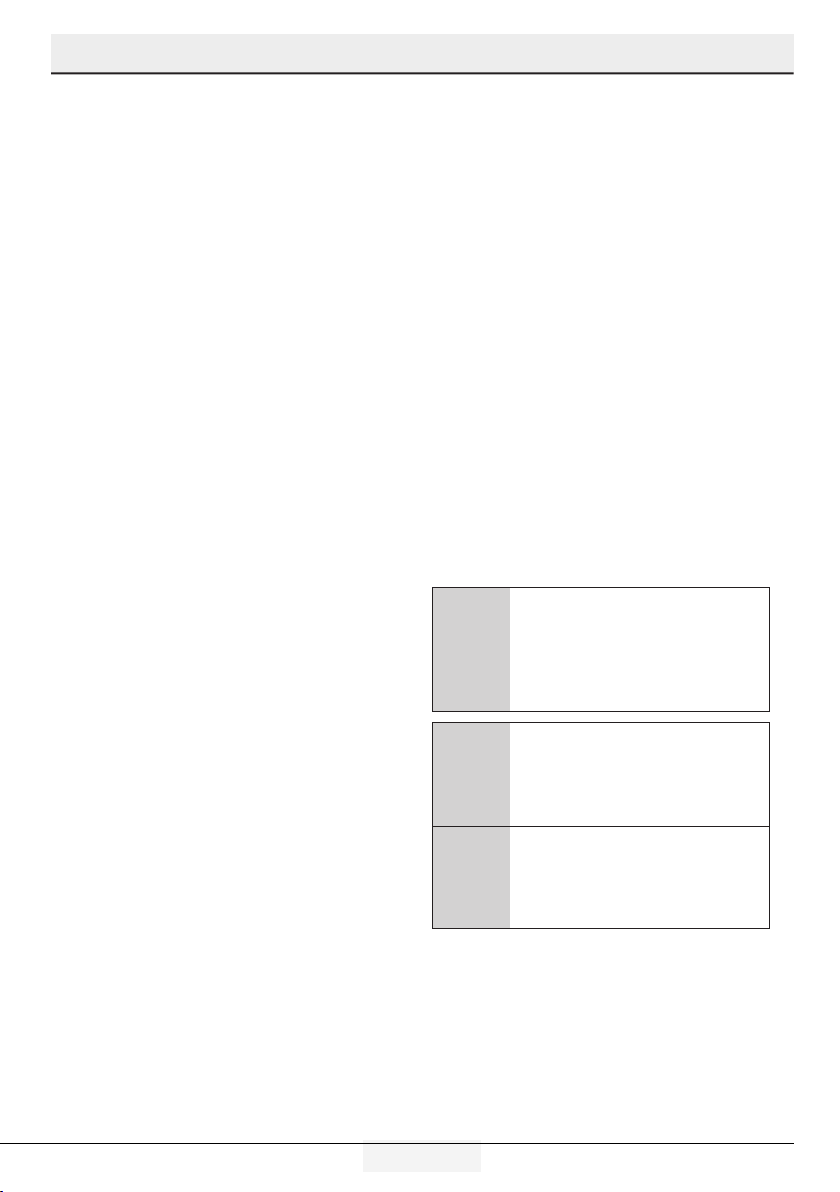
5.8 Chiller compartment
Chiller compartments allow you to prepare the food
for freezing. You can also use these compartments
to store your food at a temperature a few degrees
below the fridge compartment.
You can increase the inner volume of your
refrigerator by removing any of the chiller
compartments:
1. Pull the compartment towards yourself until it
stops.
2. Lift the compartment about 1 cm up and pull
towards yourself to remove it from its seating.
5.9 Crisper
Crisper of the refrigerator is designed specially
to keep the vegetables fresh without loosing their
humidity. For this purpose, cool air circulation is
intensified around the crisper in general. Remove
the door shelves that stand against the crisper
before removing the crisper.
5.10 Humidity-controlled crisper
(FreSHelf)
(This feature is optional)
Humidity rates of fruits and vegetables are kept
under control thanks to the humidity-controlled
crisper and thus the food is ensured to stay fresh
for a longer period.
We recommend that you place leafy vegetables
such as lettuce and spinach and vegetables sensitive to humidity loss as horizontally as possible
when putting them in the crisper; not in a horizontal position on their roots.
While the vegetables are being replaced, their specific weights should be taken into consideration.
Heavy and hard vegetables must be placed at the
bottom of the crisper and light and soft vegetables
must be on the upper part.
21/ 29 EN
Refrigerator / User Manual
Page 23
Operating the product
Never leave the vegetables in their plastic bags in
the crisper. If they are left in their plastic bags, this
will cause them to rot in a little while. If you not
prefer the vegetable to get in contact with other
vegetables for hygienic reasons, use perforated
paper or a similar material instead of plastic bags.
Do not place pears, apricots, peaches etc.,
especially those fruits that generate large amounts
of ethylene, in the same crisper with other fruits
and vegetables. The ethylene gas emitted by these
fruits cause other fruits to ripen sooner and to rot
in a shorter span of time.
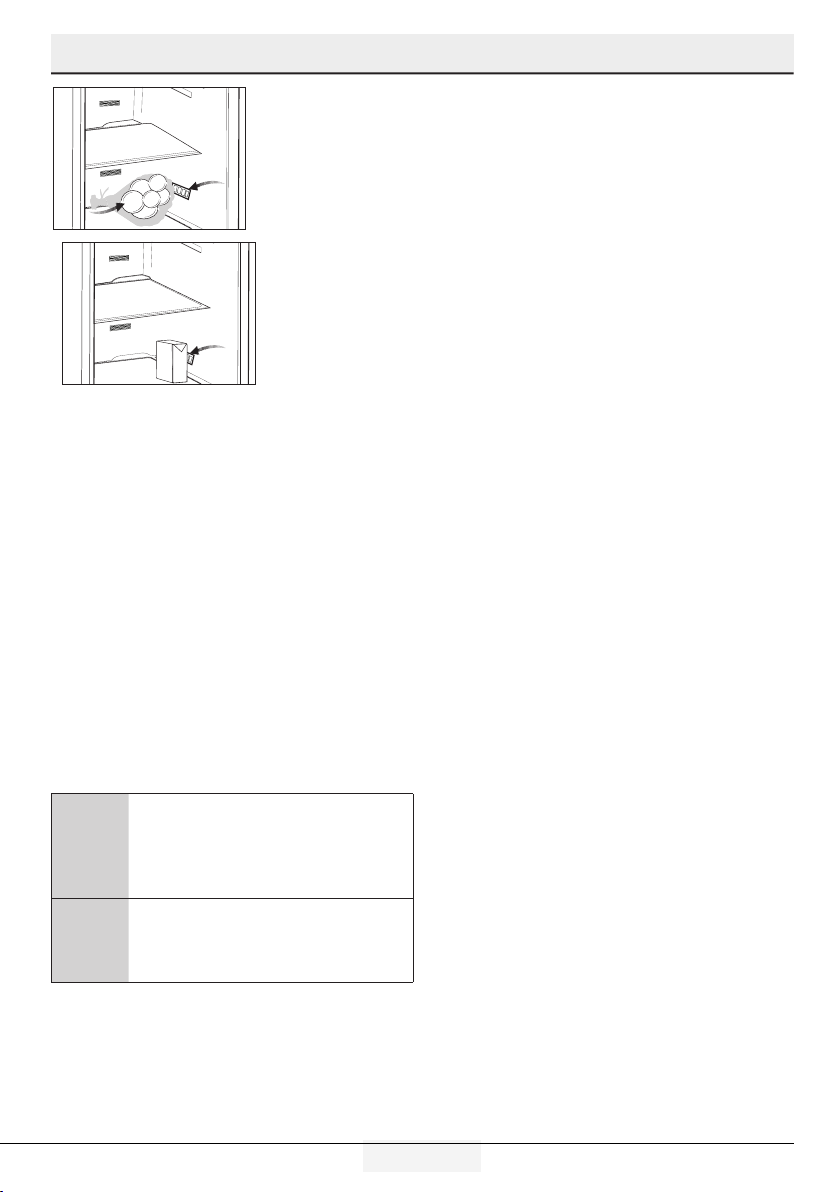
5.11 Egg tray
You can install the egg holder to the desired door
or body shelf.
Never keep the egg holder in the freezer
compartment.
5.12 Movable Middle Section
Movable middle section is intended to prevent
the cold air inside your refrigerator from escaping
outside.
1- Sealing is provided when the gaskets on the
door presses on the surface of the movable middle
section while the fridge compartment doors are
closed.
2- Another reason that your refrigerator is
equipped with a movable middle section is that it
increases the net volume of the fridge compartment. Standard middle sections occupy some
non-usable volume in the refrigerator.
3-Movable middle section is closed when the left
door of the fridge compartment is opened.
4-It must not be opened manually. It moves under
the guidance of the plastic part on the body while
the door is closed.
5.13 Cool Control Storage
Compartment
The Cool Control Storage Compartment of your
refrigerator may be used in any desired mode
by adjusting it to fridge (2/4/6/8 °C) or freezer
(-18/-20/-22/-24) temperatures. You can keep the
compartment at the desired temperature with the
Cool Control Storage Compartment's Temperature
Setting Button. The temperature of the Cool
Control Storage Compartment may be set to 0 and
10 degrees in addition to the fridge compartment
temperatures and to -6 degrees in addition to
the freezer compartment temperatures. 0 degree
is used to store the deli products longer, and -6
degrees is used to keep the meats up to 2 weeks
in an easily sliceable condition.
The feature of switching to a Fridge or Freezer
compartment is provided by a cooling element
located in the closed section (Compressor
Compartment) behind the refrigerator. During
operation of this element, sounds similar to the
sound of seconds heard from an analogue clock
may be heard. This is normal and is not fault
cause.
5.14 Blue light
(in some models)
Crisper of the refrigerator are illuminated with a
blue light. Foodstuff stored in the crisper continue
their photosynthesis by means of the wavelength
effect of blue light and thus, preserve their
freshness and increase their vitamin content.
5.15 Odour filter
Odour filter in the air duct of the fridge
compartment prevents build-up of unpleasant
odours in the refrigerator.
22 / 29 EN
Refrigerator / User Manual
Page 24
Operating the product
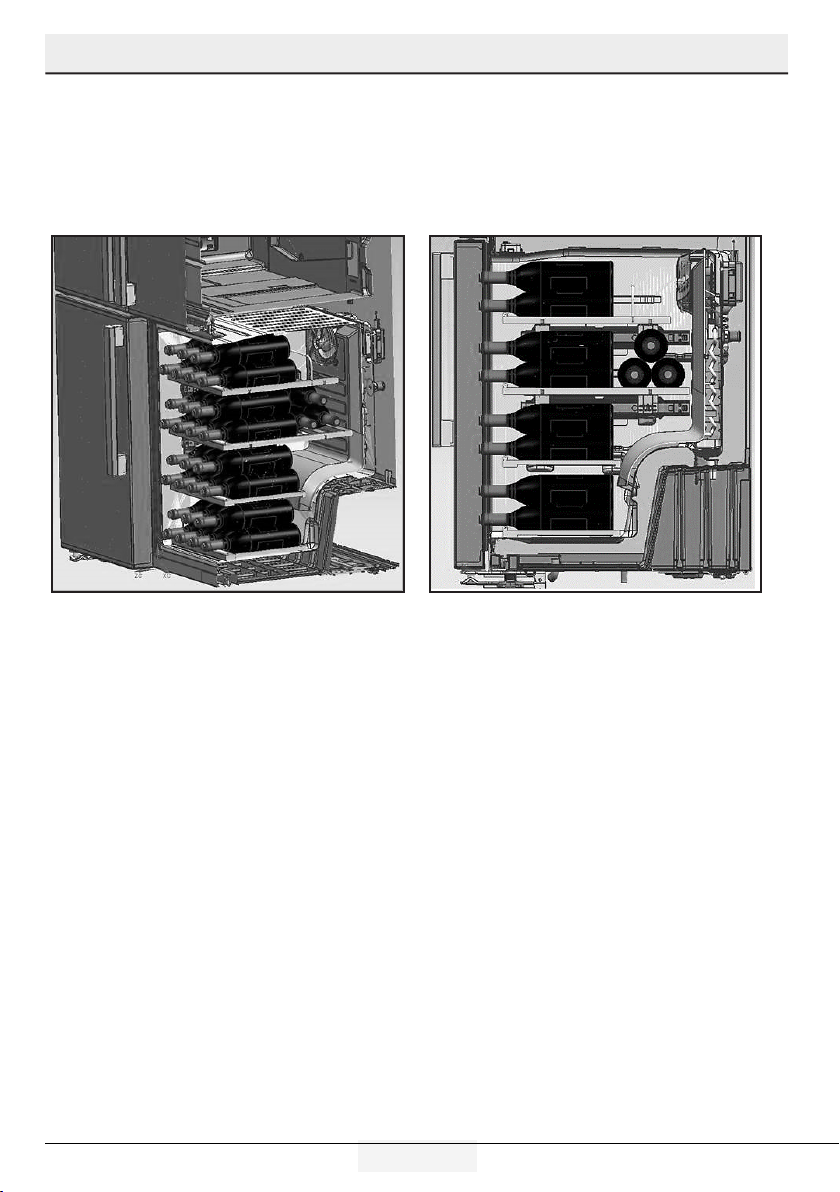
5.16 Wine cellar compartment
(This feature is optional)
1 – Fill your cellar compartment
Wine cellar was built to contain up to 28 front bottles + 3 bottles accessible using a telescopic rack.
These maximum quantities declared are given for information purpose only and correspond to tests
carried out with a “Bordelaise 75cl” standard bottle.
2- Suggested optimum service temperatures
Our advice: If you mix different types of wines, choose a 12 ° Celsius setting just like in a real cellar.
For white wines, which are to be served between 6 and 10 °, think of putting your bottles in the
refrigerator 1/2 hour before serving, the refrigerator will be able to maintain the bottles at the preferred
temperature. As regards red wines, they will heat up slowly at room temperature when serving.
16 -17°C Fine Bordeaux wines - Red
15 -16°C Fine Burgundy wines- Red
14 -16°C Grand crus (great growth) of dry white wines
11 -12°C Light,fruity and young red wines
10 -12°C Provence rosé wines, French wines
10 -12°C Dry white wines and red country wines
8 - 10°C White country wines
7 - 8°C Champagnes
6-°C Sweet white wines
23/ 29 EN
Refrigerator / User Manual
Page 25

Operating the product
3- Suggestions relating to the opening of a wine bottle before tasting:
White wines About 10 minutes before serving
Young red wines About10 minutes before serving
Thick and mature red wines About 30 to 60 minutes before serving
4- How long can an open bottle be preserved?
Unfinished bottles of wine must be cocked properly and can be preserved in a cold and dry place during
the following periods:
White wines Red wines
75 % full bottle 3 to 5 days 4 to 7 days
50 % full bottle 2 to 3 days 3 to 5 days
Less than 50 % 1 day 2 days
24 / 29 EN
Refrigerator / User Manual
Page 26
Operating the product
5.17 Using internal water dispenser
(in some models)
After connecting the refrigerator to a water source
or replacing the water filter, flush the water
system. Use a sturdy container to depress and
hold the water dispenser lever for 5 seconds,
then release it for 5 seconds. Repeat until water
begins to flow. Once water begins to flow, continue
depressing and releasing the dispenser paddle
(5 seconds on, 5 seconds off) until a total of 4
gal. (15L) has been dispensed. This will flush air
from the filter and water dispensing system, and
prepare the water filter for use. Additional flushing
may be required in some households. As air is
cleared from the system, water may spurt out of
the dispenser.
Allow 24 hours for the refrigerator to cool down
and chill water. Dispense enough water every week
to maintain a fresh supply.
After 5 minutes of continuous
dispensing, the dispenser will stop
dispensing water to avoid flooding.
C
To continue dispensing, press the
dispenser paddle again.
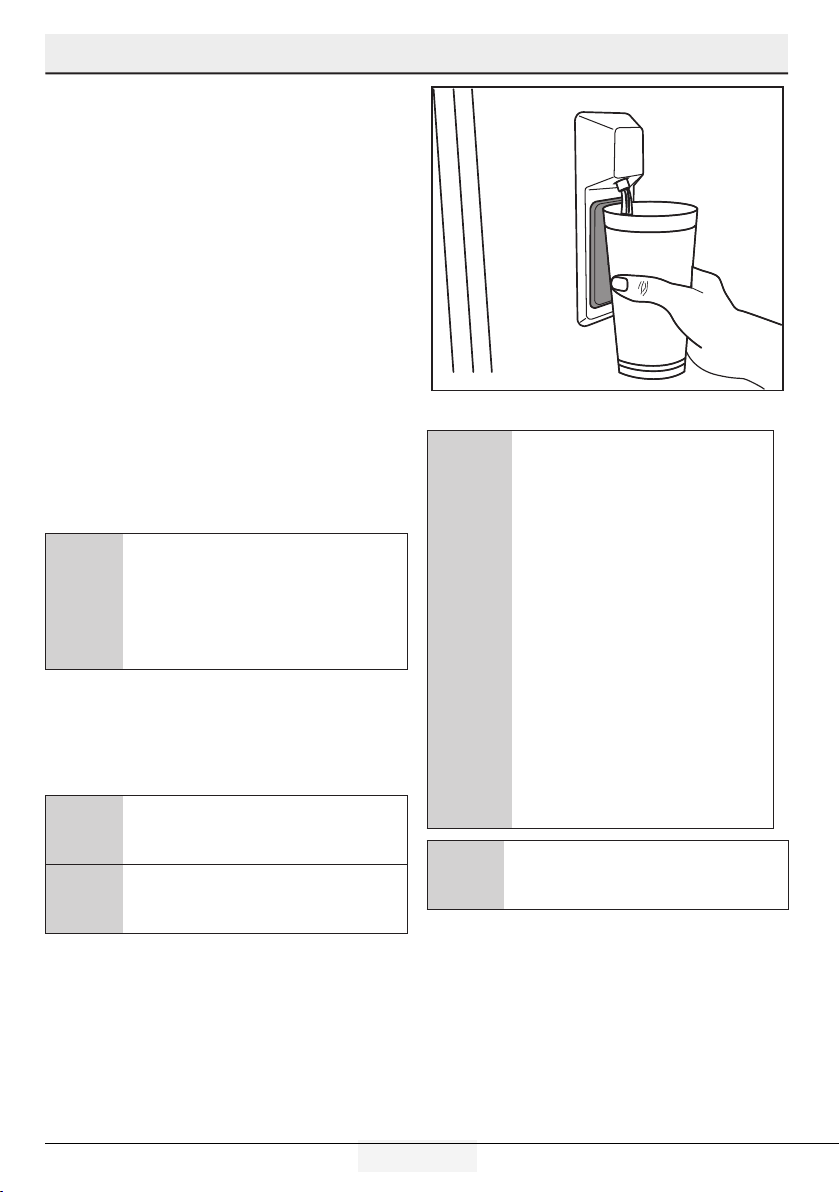
5.18 Dispensing water
Hold a container under the dispenser spout while
pressing the dispenser pad.
Release the dispenser pad to stop dispensing.
It is normal for the first few glasses of
water taken from the dispenser to be
C
C
warm.
If the water dispenser is not used for a long
period of time, dispose of first few glasses
of water to obtain fresh water.
5.19 For using water dispenser
Before using your fridge first time and
after replacing your water filter, water
dispenser may drip drops of water. To
prevent water dripping or leaking from
dispenser, please bleed the air from
the system by dispensing 5-6 gallons
(about 20 liter) of water through the
water dispenser before the first use
and every time after you change
A
C
the water filter. This will remove any
air trapped in the system and stop
the water dispenser from leaking.
Checking coupler position and the
straightness of water line at the back
of the unit will be required if there’s an
obstruction in water flow.
If your water dispenser is leaking just a few
drops of water after you have dispensed some
water, this is normal.
During initial use, you will have to wait
approximately 24 hours for the water to cool down.
Take out the glass a little while after you pull the
trigger.
25/ 29 EN
Refrigerator / User Manual
Page 27

Operating the product
5.20 Icematic
(in some models)
To get ice from the icematic, fill the water tank
in the fridge compartment with water up to the
maximum level.
Ice cubes in the ice drawer may stick to each
other and become a bulk due to hot and humid
air in approximately 15 days. This is normal. If you
cannot break the bulk apart, you can empty the ice
container and make ice again.
It is recommended to change the water
C
C
C
C
in the water tank if it remains in the
water tank for more then 2-3 weeks.
Strange noises you hear from the refrigerator at 120-minute intervals are the
sounds of ice-making and pouring. This
is normal.
If you do not want to make ice, press the Ice
off icon to stop the icematic to save energy
and prolong the service life of your refrigerator.
It is normal that a few drops of water drop
from the dispenser after you have taken water.
5.21 Icematic and ice
storage container
(in some models)
Using the Icematic
Fill the Icematic with water and place it into its
seat. Your ice will be ready approximately in two
hours. Do not remove the Icematic from its seating
to take ice.
Turn the knobs on the ice reservoirs clockwise by
90 degrees.
Ice cubes in the reservoirs will fall down into the
ice storage container below.
You may take out the ice storage container and
serve the ice cubes.
If you wish, you may keep the ice cubes in the ice
storage container.
Ice storage container
Ice storage container is only intended for
accumulating the ice cubes. Do not put water in it.
Otherwise, it will break.
26 / 29 EN
Refrigerator / User Manual
Page 28

6 Maintenance and cleaning
Cleaning your fridge at regular intervals will
extend the service life of the product.
B WARNING:
Unplug the product before cleaning it.
• Never use gasoline, benzene or
similar substances for cleaning
purposes.
• Never use any sharp and abrasive
tools, soap, household cleaners,
detergent and wax polish for
cleaning.
• For non-No Frost products,
water drops and frosting up to a
fingerbreadth occur on the rear wall
of the Fridge compartment. Do not
clean it; never apply oil or similar
agents on it.
• Only use slightly damp microfiber
cloths to clean the outer surface of
the product. Sponges and other types
of cleaning cloths may scratch the
surface
• Dissolve one teaspoon of bicarbonate in half litre of water. Soak
a cloth with the solution and wrung
it thoroughly. Wipe the interior of the
refrigerator with this cloth and the
dry thoroughly.
• Make sure that no water enters the
lamp housing and other electrical
items.
• If you will not use the refrigerator
for a long period of time, unplug it,
remove all food inside, clean it and
leave the door ajar.
• Check regularly that the door gaskets
are clean. If not, clean them.
• To remove door and body shelves,
remove all of its contents.
• Remove the door shelves by pulling
them up. After cleaning, slide them
from top to bottom to install.
• Never use cleaning agents or water
that contain chlorine to clean the
outer surfaces and chromium coated
parts of the product. Chlorine causes
corrosion on such metal surfaces.
6.1 Avoiding bad odours
• Materials that may cause odour
are not used in the production of
our refrigerators. However, due
to inappropriate food preserving
conditions and not cleaning the inner
surface of the refrigerator as required
can bring forth the problem of odour.
Pay attention to following to avoid
this problem:
• Keeping the refrigerator clean is
important. Food residuals, stains, etc.
can cause odour. Therefore, clean
the refrigerator with bi-carbonate
dissolved in water every few months.
Never use detergents or soap.
• Keep the food in closed containers.
Microorganisms spreading out from
uncovered containers can cause
unpleasant odours.
• Never keep the food that have passed
best before dates and spoiled in the
refrigerator.
6.2 Protecting the plastic surfaces
Do not put liquid oils or oil-cooked meals in your
refrigerator in unsealed containers as they damage
the plastic surfaces of the refrigerator. If oil is
spilled or smeared onto the plastic surfaces, clean
and rinse the relevant part of the surface at once
with warm water.
27/ 29 EN
Refrigerator / User Manual
Page 29

7. Troubleshooting
vivo
Check this list before contacting the service.
Doing so will save you time and money. This list
includes frequent complaints that are not related to
faulty workmanship or materials. Certain features
mentioned herein may not apply to your product.
The refrigerator is not working.
• The power plug is not fully settled. >>> Plug it in
to settle completely into the socket.
• The fuse connected to the socket powering the
product or the main fuse is blown. >>> Check the
fuses.
Condensation on the side wall of the cooler
compartment (MULTI ZONE, COOL, CONTROL
and FLEXI ZONE).
• The door is opened too frequently >>> Take care
not to open the product’s door too frequently.
• The environment is too humid. >>> Do not install
the product in humid environments.
• Foods containing liquids are kept in unsealed
holders. >>> Keep the foods containing liquids in
sealed holders.
• The product’s door is left open. >>> Do not keep
the product’s door open for long periods.
• The thermostat is set to too low temperature. >>>
Set the thermostat to appropriate temperature.
Compressor is not working.
• In case of sudden power failure or pulling the
power plug off and putting back on, the gas
pressure in the product’s cooling system is
not balanced, which triggers the compressor
thermic safeguard. The product will restart after
approximately 6 minutes. If the product does not
restart after this period, contact the service.
• Defrosting is active. >>> This is normal for a fullyautomatic defrosting product. The defrosting is
carried out periodically.
• The product is not plugged in. >>> Make sure the
power cord is plugged in.
• The temperature setting is incorrect. >>> Select
the appropriate temperature setting.
• The power is out. >>> The product will continue
to operate normally once the power is restored.
The refrigerator’s operating noise is increasing
while in use.
• The product’s operating performance may vary
depending on the ambient temperature variations.
This is normal and not a malfunction.
28 / 29 EN
The refrigerator runs too often or for too
long.
• The new product may be larger than the
previous one. Larger products will run for longer
periods.
• The room temperature may be high. >>> The
product will normally run for long periods in
higher room temperature.
• The product may have been recently plugged
in or a new food item is placed inside. >>>
The product will take longer to reach the set
temperature when recently plugged in or a new
food item is placed inside. This is normal.
• Large quantities of hot food may have been
recently placed into the product. >>> Do not
place hot food into the product.
• The doors were opened frequently or kept open
for long periods. >>> The warm air moving
inside will cause the product to run longer. Do
not open the doors too frequently.
• The freezer or cooler door may be ajar. >>>
Check that the doors are fully closed.
• The product may be set to temperature too low.
>>> Set the temperature to a higher degree
and wait for the product to reach the adjusted
temperature.
• The cooler or freezer door washer may be
dirty, worn out, broken or not properly settled.
>>> Clean or replace the washer. Damaged
/ torn door washer will cause the product to
run for longer periods to preserve the current
temperature.
The freezer temperature is very low, but the
cooler temperature is adequate.
• The freezer compartment temperature is set
to a very low degree. >>> Set the freezer
compartment temperature to a higher degree
and check again.
The cooler temperature is very low, but the
freezer temperature is adequate.
• The cooler compartment temperature is set
to a very low degree. >>> Set the freezer
compartment temperature to a higher degree
and check again.
The food items kept in cooler compartment
drawers are frozen.
Refrigerator / User Manual
Page 30

Troubleshooting
• The cooler compartment temperature is set
to a very low degree. >>> Set the freezer
compartment temperature to a higher degree and
check again.
The temperature in the cooler or the freezer is
too high.
• The cooler compartment temperature is set to
a very high degree. >>> Temperature setting
of the cooler compartment has an effect on the
temperature in the freezer compartment. Wait
until the temperature of relevant parts reach the
sufficient level by changing the temperature of
cooler or freezer compartments.
• The doors were opened frequently or kept open
for long periods. >>> Do not open the doors too
frequently.
• The door may be ajar. >>> Fully close the door.
• The product may have been recently plugged in
or a new food item is placed inside. >>> This is
normal. The product will take longer to reach the
set temperature when recently plugged in or a
new food item is placed inside.
• Large quantities of hot food may have been
recently placed into the product. >>> Do not
place hot food into the product.
Shaking or noise.
• The ground is not level or durable. >>> If the
product is shaking when moved slowly, adjust the
stands to balance the product. Also make sure the
ground is sufficiently durable to bear the product.
• Any items placed on the product may cause
noise. >>> Remove any items placed on the
product.
The product is making noise of liquid flowing,
spraying etc.
• The product’s operating principles involve liquid
and gas flows. >>> This is normal and not a
malfunction.
There is sound of wind blowing coming from
the product.
• The product uses a fan for the cooling process.
This is normal and not a malfunction.
There is condensation on the product’s
internal walls.
• Hot or humid weather will increase icing
and condensation. This is normal and not a
malfunction.
29/ 29 EN
• The doors were opened frequently or kept open
for long periods. >>> Do not open the doors too
frequently; if open, close the door.
• The door may be ajar. >>> Fully close the door.
There is condensation on the product’s
exterior or between the doors.
• The ambient weather may be humid, this is
quite normal in humid weather. >>> The
condensation will dissipate when the humidity is
reduced.
The interior smells bad.
• The product is not cleaned regularly. >>> Clean
the interior regularly using sponge, warm water
and carbonated water.
• Certain holders and packaging materials may
cause odour. >>> Use holders and packaging
materials without free of odour.
• The foods were placed in unsealed holders.
>>> Keep the foods in sealed holders. Microorganisms may spread out of unsealed food
items and cause malodour. Remove any expired
or spoilt foods from the product.
The door is not closing.
• Food packages may be blocking the door. >>>
Relocate any items blocking the doors.
• The product is not standing in full upright
position on the ground. >>> Adjust the stands
to balance the product.
• The ground is not level or durable. >>> Make
sure the ground is level and sufficiently durable
to bear the product.
The vegetable bin is jammed.
• The food items may be in contact with the upper
section of the drawer. >>> Reorganize the food
items in the drawer.
If The Surface Of The Product Is Hot.
• High temperatures may be observed between
the two doors, on the side panels and at
the rear grill while the product is operating.
This is normal and does not require service
maintenance!Be careful when touching these
areas.
A WARNING:
If the problem persists after following the
instructions in this section, contact your vendor
or an Authorised Service. Do not try to repair the
product.
Refrigerator / User Manual
Page 31

Kühlschrank
Bedienungsanleitung
EWWERQWEW
DE
Page 32

Bitte lesen Sie zuerst diese Anleitung!
Liebe Kundin, lieber Kunde,
Wir möchten, dass Sie optimale Effizienz von unserem Produkt erhalten, das in modernen Einrichtungen
mit sorgfältigen Qualitätskontrollen hergestellt wurde.
Bitte lesen Sie die Bedienungsanleitung zu diesem Zweck vor Benutzung des Produktes vollständig und
bewahren Sie sie zum Nachschlagen auf. Falls Sie das Produkt an eine andere Person weitergeben,
händigen Sie bitte auch diese Anleitung aus.
Die Bedienungsanleitung gewährleistet die schnelle und sichere Benutzung des Produktes.
• Bitte lesen Sie die Bedienungsanleitung, bevor Sie das Produkt aufstellen und bedienen.
• Halten Sie stets die zutreffenden Sicherheitshinweise ein.
• Bewahren Sie die Bedienungsanleitung zum künftigen Nachschlagen an einem leicht zugänglichen Ort
auf.
• Bitte lesen Sie alle anderen mit dem Produkt bereitgestellten Dokumente.
Beachten Sie, dass diese Bedienungsanleitung auf verschiedene Produktmodelle zutreffen kann. Die
Anleitung zeigt jegliche Abweichungen unterschiedener Modelle deutlich an.
Symbole und Anmerkungen
In der Bedienungsanleitung verwenden wir folgende Symbole:
Wichtige Informationen und nützli-
C
che Tipps.
Gefahr für Leib und Eigentum.
A
B
Stromschlaggefahr.
Die Produktverpackung
besteht gemäß nationalen
Umweltgesetzen aus recyclingfähigen Materialien.
Page 33

Inhalt
1 Hinweise zu Sicherheit und Umwelt 3
1.1 Allgemeine Sicherheitshinweise . . . . . . . . . 3
2 Ihr Kühlschrank 7
2 Ihr Kühlschrank 8
3 Installation 9
3.1 Geeignete Aufstellungsorte für das Gerät . . 9
3.2 Installation der Kunststoffkeile . . . . . . . . . . 9
3.3* Justierung der Füße. . . . . . . . . . . . . . . . 10
3.4 Elektrischer Anschluss. . . . . . . . . . . . . . . 11
4 Vorbereitung 12
4.1 Maßnahmen für den sparsamen
Energieverbrauch . . . . . . . . . . . . . . . . . 12
4.2 Empfehlungen zum Fach für frische
Lebensmittel . . . . . . . . . . . . . . . . . . . . 12
4.3 Vor der ersten Verwendung . . . . . . . . . . 13
5 Betrieb des Geräts 14
5.1 Anzeigetafel . . . . . . . . . . . . . . . . . . . . . . 14
5.2 Anzeigefeld . . . . . . . . . . . . . . . . . . . . . 19
5.3 Einfrieren frischer Lebensmittel . . . . . . . . 21
5.4 Empfehlungen für die bessere Haltbarkeit
gefrorener Lebensmittel . . . . . . . . . . . . 21
5.5 Angaben zur Tiefkühlung . . . . . . . . . . . . . 21
5.6 Einlegen von Lebensmitteln . . . . . . . . . . . 22
5.7 Warnton bei offener Tür. . . . . . . . . . . . . . 22
5.8 Beleuchtung im Innenraum . . . . . . . . . . . 22
5.9 Kältefach . . . . . . . . . . . . . . . . . . . . . . . . 22
5.10 Gemüsefach. . . . . . . . . . . . . . . . . . . . . 22
5.11 Gemüsefach mit kontrollierter
Luftfeuchtigkeit. . . . . . . . . . . . . . . . . . . 23
(FreSHelf) . . . . . . . . . . . . . . . . . . . . . . . . . . . 23
5.12 Eiereinsatz . . . . . . . . . . . . . . . . . . . . . . 23
5.13 Beweglicher Mittelbereich . . . . . . . . . . . 23
5.14 Kältekontrolliertes Aufbewahrungsfach 23
5.15 Blaues Licht . . . . . . . . . . . . . . . . . . . . . 24
5.16 Geruchsfilter. . . . . . . . . . . . . . . . . . . . . 24
5.17 Weinfach . . . . . . . . . . . . . . . . . . . . . . . 25
5.18 So benutzen Sie den internen
Wasserspender. . . . . . . . . . . . . . . . . . . 26
5.19 Wasser ausgeben . . . . . . . . . . . . . . . . . 26
5.20 Wasserspender verwenden . . . . . . . . . . 27
5.21 Eiswürfelspender . . . . . . . . . . . . . . . . . 27
5.22 Eisbereiter und Eisbehälter . . . . . . . . . . 27
6 Pflege und Reinigung 28
7. Problemlösung 29
2 / 31 DE
Kühlschrank/ Bedienungsanleitung
Page 34

1 Hinweise zu Sicherheit und Umwelt
Dieser Abschnitt bietet die zur Vermeidung
von Verletzungen und Materialschäden
erforderlichen Sicherheitsanweisungen.
Bei Nichtbeachtung dieser Anweisungen
erlöschen jegliche Garantieansprüche.
Bestimmungsgemäßer Einsatz
ACHTUNG:
Stellen Sie sicher, dass die
Entlüftungsöffnungen am
Aufstellort des Gerätes nicht
blockiert sind.
ACHTUNG:
Um den Auftauvorgang zu
beschleunigen, keine
anderen mechanischen
Geräte oder
Geräte verwenden, die nicht
A
vom Hersteller empfohlen
sind.
ACHTUNG:
Dem Kühlmittelkreislauf
keine Schäden zufügen.
ACHTUNG:
In den Lebensmittelaufbewahrungsfächern keine
Geräte
verwenden, die nicht vom
Hersteller empfohlen sind.
Dieses Gerät ist für die private Nutzung
oder für den Gebrauch bei folgenden
ähnliche Anwendungen konzipiert worden
- In Personalküchen in Geschäften, Büros
und anderen Arbeitsumgebungen;
- In Bauernhöfen, Hotels, Motels und
anderen Unterkünften, für den Gebrauch
der Kunden;
- Umgebungen mit Übernachtung und
Frühstück;
- Bei Catering und ähnliche Non-RetailAnwendungen.
1.1 Allgemeine Sicherheitshinweise
• Dieses Produkt darf nicht von Personen
mit körperlichen, sensorischen oder
mentalen Einschränkungen, einem
Mangel an Erfahrung und Wissen
oder von Kindern verwendet werden.
Das Gerät darf nur dann von solchen
Personen benutzt werden, wenn
diese von einer für ihre Sicherheit
verantwortlichen Person beaufsichtigt
werden oder angeleitet worden. Kinder
dürfen nicht mit diesem Gerät spielen.
• Ziehen Sie bei Fehlfunktionen den
Netzstecker des Gerätes.
• Warten Sie nach Ziehen des
Netzsteckers mindestens 5 Minuten,
bevor Sie ihn wieder anschließen.
• Ziehen Sie den Netzstecker, wenn Sie
das Gerät nicht nutzen.
• Berühren Sie den Netzstecker niemals
mit feuchten oder gar nassen Händen.
Ziehen Sie beim Trennen niemals am
Kabel, greifen Sie immer am Stecker.
• Wischen Sie den Netzstecker vor dem
Einstecken mit einem trockenen Tuch
ab.
• Schließen Sie den Kühlschrank nicht
an lose Steckdosen an.
• Das Gerät muss bei Aufstellung,
Wartungsarbeiten, Reinigung und bei
Reparaturen vollständig vom Stromnetz
getrennt werden.
• Falls das Produkt längere Zeit
nicht benutzt wird, ziehen Sie den
Netzstecker und nehmen Sie sämtliche
Lebensmittel aus dem Kühlschrank.
• Verwenden Sie das Produkt nicht,
wenn das Fach mit Leiterplatten im
unteren hinteren Bereich des Gerätes
(Abdeckung des Fachs mit der
elektrischen Karte) (1) geöffnet ist.
3 / 31 DE
Kühlschrank/ Bedienungsanleitung
Page 35

Wichtige Hinweise zur Sicherheit und zum Umweltschutz
1
1
• Benutzen Sie keine Dampfreiniger oder
ähnliche Gerätschaften zum Reinigen
oder Abtauen Ihres Gerätes. Der Dampf
kann in Bereiche eindringen, die unter
Spannung stehen. Kurzschlüsse oder
Stromschläge können die Folge sein!
• Lassen Sie niemals Wasser direkt
auf das Gerät gelangen; auch
nicht zum Reinigen! Es besteht
Stromschlaggefahr!
• Verwenden Sie das Produkt bei
Fehlfunktionen nicht; es besteht
Stromschlaggefahr! Wenden Sie
sich als erstes an den autorisierten
Kundendienst.
• Stecken Sie den Netzstecker des
Gerätes in eine geerdete Steckdose.
Die Erdung muss durch einen
qualifizierten Elektriker vorgenommen
werden.
• Falls das Gerät über eine LED-
Beleuchtung verfügt, wenden Sie
sich zum Auswechseln sowie im Falle
von Problemen an den autorisierten
Kundendienst.
• Berühren Sie gefrorene Lebensmittel
nicht mit feuchten Händen! Sie können
an Ihren Händen festfrieren!
• Geben Sie keine Flüssigkeiten
in Flaschen oder Dosen in den
Tiefkühlbereich. Sie können platzen!
• Geben Sie Flüssigkeiten in aufrechter
Position in den Kühlschrank; zuvor den
Deckel sicher verschließen.
• Sprühen Sie keine entflammbaren
Substanzen in die Nähe des Gerätes,
da sie Feuer fangen oder explodieren
könnten.
• Bewahren Sie keine entflammbaren
Materialien oder Produkte mit
entflammbaren Gasen (Sprays etc.) im
Kühlschrank auf.
• Stellen Sie keine mit Flüssigkeiten
gefüllten Behälter (z. B. Vasen) auf dem
Gerät ab. Falls Wasser oder andere
Flüssigkeiten an unter Spannung
stehende Teile gelangen, kann es zu
Stromschlägen oder Bränden kommen.
• Setzen Sie das Gerät keinem Regen,
Schnee, direkten Sonnenlicht oder
Wind aus; dies kann die elektrische
Sicherheit gefährden. Verschieben
Sie das Gerät nicht durch Ziehen an
den Türgriffen. Die Griffe könnten sich
lösen.
• Achten Sie darauf, dass weder Ihre
Hände noch andere Körperteile von
beweglichen Teilen im Inneren des
Gerätes eingeklemmt oder gequetscht
werden.
• Achten Sie darauf, nicht auf die Tür,
Schubladen oder ähnliche Teile des
Kühlschranks zu treten; lehnen Sie
sich nicht daran an. Andernfalls könnte
das Gerät umkippen, Teile könnten
beschädigt werden.
• Achten Sie darauf, das Netzkabel nicht
einzuklemmen.
4 / 31 DE
Kühlschrank/ Bedienungsanleitung
Page 36

Wichtige Hinweise zur Sicherheit und zum Umweltschutz
1.1.1 Wichtige Hinweise
zum Kältemittel
Wenn das Gerät über ein Kühlsystem mit
R600a-Gas verfügt, achten Sie darauf,
das Kühlsystem und den dazugehörigen
Schlauch während der Benutzung und
des Transports nicht zu beschädigen.
Dieses Gas ist leicht entflammbar.
Bei Beschädigungen des Kühlsystems
halten Sie das Gerät von potenziellen
Zündquellen (z. B. offenen Flammen) fern
und sorgen für eine gute Belüftung des
Raumes.
Das Typenschild an der linken
Innenwand des Kühlschranks
C
gibt die Art des im Gerät
verwendeten Gases an.
1.1.2 Modelle mit Wasserspender
• Der Druck für die Kaltwasserzufuhr
sollte maximal 90 psi (6,2 bar)
betragen. Wenn der Wasserdruck
in Ihrem Haushalt 80 psi (5,5 bar)
übersteigt, verwenden Sie bitte
ein Druckbegrenzungsventil in
Ihrem Leitungssystems. Sollten Sie
nicht wissen, wie der Wasserdruck
gemessen wird, ziehen Sie bitte einen
Fachinstallateur hinzu.
• Sollte für Ihr Leitungssystem das
Risiko eines Wasserschlags (Druckstoß)
bestehen, verwenden Sie stets eine
geeignete Druckstoßsicherung.
Wenden Sie sich bitte an einen
Fachinstallateur, falls Sie sich über
die Wasserschlaggefährdung in Ihrem
Leitungssystem nicht sicher sein sollten.
• Nutzen Sie niemals die
Warmwasserzufuhr für den
Einbau. Treffen Sie geeignete
Vorsichtsmaßnahmen zum Schutz
der Leitungen gegen mögliches
Einfrieren. Die für den Betrieb zulässige
Wassertemperatur liegt im Bereich von
mindestens 0,6°C (33°F) bis hin zu
maximal 38°C (100°F ).
• Nutzen Sie ausschließlich
Trinkwasser.
1.2 Bestimmungsgemäßer Einsatz
• Dieses Gerät ist für den Einsatz im
Haushalt vorgesehen. Er eignet sich nicht zum
kommerziellen Einsatz.
• Das Produkt sollte ausschließlich zum Lagern
von Lebensmitteln und Getränken verwendet
werden.
• Bewahren Sie keine empfindlichen
Produkte, die kontrollierte Temperaturen
erfordern (z. B. Impfstoffe, wärmeempfindliche
Medikamente,Sanitätsartikel etc.) im Kühlschrank
auf.
• Der Hersteller haftet nicht für jegliche
Schäden, die durch Missbrauch oder falsche
Handhabung entstehen.
• Originalersatzteile stehen für einen Zeitraum
von 10 Jahre beginnend mit dem Kaufdatum zur
Verfügung.
1.3 Sicherheit von Kindern
Bewahren Sie Verpackungsmaterialien
außerhalb der Reichweite von Kindern auf.
Lassen Sie Kinder nicht mit dem Gerät
spielen.
Falls das Gerät mit einer abschließbaren
Tür ausgestattet ist, bewahren Sie den
Schlüssel außerhalb der Reichweite von
Kindern auf.
1.4 Einhaltung von WEEE-Vorgaben
und Altgeräteentsorgung
Dieses Gerät erfüllt die Vorgaben
der EU-WEEE-Direktive (2012/19/
EU). Das Gerät wurde mit einem
Klassifizierungssymbol für elektrische
und elektronische Altgeräte (WEEE)
gekennzeichnet.
5 / 31 DE
Kühlschrank/ Bedienungsanleitung
Page 37

Wichtige Hinweise zur Sicherheit und zum Umweltschutz
Dieses Gerät wurde aus
hochwertigen Materialien
hergestellt, die
wiederverwendet und recycelt
werden können. Entsorgen Sie
das Gerät am Ende seiner
Einsatzzeit nicht mit dem regulären
Hausmüll. Bringen Sie das Gerät zu einer
Sammelstelle zum Recycling von
elektrischen und elektronischen Geräten.
Ihre Stadtverwaltung informiert Sie gerne
über geeignete Sammelstellen in Ihrer
Nähe.
1.5 Einhaltung von RoHS-Vorgaben
• Dieses Gerät erfüllt die Vorgaben der EUWEEE-Direktive (2011/65/EU). Es enthält keine
in der Direktive angegebenen gefährlichen und
unzulässigen Materialien.
1.6 Hinweise zur Verpackung
• Die Verpackungsmaterialien des Gerätes
worden gemäß nationalen Umweltschutz
bestimmungen aus recyclingfähigen
Materialien hergestellt. Entsorgen Sie
Verpackungsmaterialien nicht mit dem regulären
Hausmüll oder anderen Abfällen. Bringen
Sie Verpackungsmaterialien zu geeigneten
Sammelstellen; Ihre Stadtverwaltung berät Sie
gern.
6 / 31 DE
Kühlschrank/ Bedienungsanleitung
Page 38

2 Ihr Kühlschrank
1
*2
10
4
5
*8
5
7
9
11
*3
6
1- Bedien- und Anzeigefeld
2- Butter- & Käsefach
3- Bewegliche Türeinlage 70 mm
4- Glaszwischenboden für Kühlschrankfach
5- Glaszwischenboden für Gemüsefach
6- Getränkeeinsatz für die Tür
Die Abbildungen in dieser Bedienungsanleitung sind schematische Zeichnungen und stimmen mit dem
Gerät nicht exakt überein. Wenn dabei Teile dargestellt werden, die nicht zu dem von Ihnen gekauften
C
Gerät gehören, dann handelt es Komponenten für andere Modelle.
7- Kältefach
8- Eisbehältereinschub
9- Glaszwischenboden für Multizonenfach/ Kühler
10- Gefrierfacheinschübe
11- Einschub für Multizonenfach
* OPTIONAL (Je nach Modell)
7 / 31 DE
Kühlschrank/ Bedienungsanleitung
Page 39

2 Ihr Kühlschrank
1
4
5
5
*2
*3
6
7
9
*8
10
1- Bedien- und Anzeigefeld
2- Butter- & Käsefach
3- Bewegliche Türeinlage 70 mm
4- Glaszwischenboden für Kühlschrankfach
5- Glaszwischenboden für Gemüsefach
6- Getränkeeinsatz für die Tür
Die Abbildungen in dieser Bedienungsanleitung sind schematische Zeichnungen und stimmen mit dem
Gerät nicht exakt überein. Wenn dabei Teile dargestellt werden, die nicht zu dem von Ihnen gekauften
C
Gerät gehören, dann handelt es Komponenten für andere Modelle.
7- Kältefach
8- Eisbehältereinschub
9- Glaszwischenboden für Multizonenfach/ Kühler
10- Gefrierfacheinschübe
* OPTIONAL (Je nach Modell)
8 / 31 DE
Kühlschrank/ Bedienungsanleitung
Page 40

3 Installation
3.1 Geeignete Aufstellungsorte
für das Gerät
Kontaktieren Sie den zuständigen Kundendienst
für die Installation. Um das Gerät für die
Benutzung vorzubereiten, lesen Sie sich
zuerst entsprechenden Abschnitte in der
Bedienungsanleitung durch und stellen Sie sicher,
dass Ihre Elektro- und Wasserinstallationen den
Anforderungen entsprechen. Sollte diese nicht
der Fall sein, lassen Sie von einem qualifizierten
Techniker und Fachinstallateur die notwendigen
Arbeiten ausführen.
WARNUNG: Der Hersteller kann nicht
für Schäden haftbar gemacht werden, die
B
B
A
•StellenSiedasGerätaufeinerebenenFläche,
um einen unsicheren Stand und Kippeln zu
vermeiden.
•InstallierenSiedasGerätmitmindestens30
cm Abstand von Hitzequellen, wie beispielweise
Herden, Heizvorrichtungen und Öfen, sowie mit
mindestens 5 cm Abstand von Elektroöfen.
•DasGerätdarfwederdirekter
Sonneneinstrahlung ausgesetzt noch an
feuchten Plätzen aufgestellt werden.
•EsmussfürangemesseneLüftungumdas
Gerät herum gesorgt werden, um einen
einwandfreien Betrieb zu gewährleisten. Wenn
das Gerät in einer Wandnische aufgestellt wird,
achten Sie darauf, mindestens 5 cm Anstand zur
Decken und den Seitenwänden zu halten.
Ergebnis der von nicht befugten Personen
ausgeführten Arbeiten sind.
WARNUNG: Das Gerät darf während
der Installation nicht mit der Stromzufuhr
verbunden sein.Andernfalls besteht die
Gefahr von Unfällen mit Todesfolge oder
schweren Verletzungen!
WARNUNG: Wenn die geöffnete Tür
am Aufstellort nicht genug Raum hat,
müssen Sie diese abnehmen und auf die
andere Geräteseite umsetzen, wenn dabei
Probleme auftreten, wenden Sie sich bitte
an die zuständigen Kundendienst.
•StellenSiedenKühlschranknichtanOrtenauf,
an denen die Temperaturen unter den Wert von
-5 °C sinken können.
3.2 Installation der Kunststoffkeile
Die im Lieferumfang enthaltenen Kunststoffkeile
dienen zur Abstandssicherung für die freie
Luftzirkulation zwischen Gerätrückseite und der
Wand.
1.
Um die Keile zu befestigen, entfernen Sie die
Schrauben an den jeweiligen Gerätestellen und
verwenden die mit den Kunststoffkeilen gelieferten
Schrauben.
2.
Setzen Sie die 2 Kunststoffkeile auf der
rückseitigen Abdeckung ein, so wie in der Abbildung
gezeigt.
9 / 31 DE
Kühlschrank/ Bedienungsanleitung
Page 41

Installation
3.3* Justierung der Füße
Wenn das Gerät nach der Installation nicht
vollständig ausbalanciert ist, müssen die Füße
durch Drehen nach links bzw. rechts nachjustiert
werden.
*Falls Ihr Gerät kein Weinflaschenfach oder keine
Glastür hat, ist es nicht mit verstellbaren, sondern
mit festen Fächern ausgestattet.
Senkrechte Ausrichtung der Türen,
Lösen Sie die Fixiermutter, die sich auf der
Unterseite befindet.
Drehen Sie die Einstellmutter, um die Position
der Tür anzupassen (im Uhrzeigersinn/gegen den
Uhrzeigersinn).
Ziehen Sie die Fixiermutter, um die Position zu
korrigieren.
Waagerechte Ausrichtung der Türen,
Lösen Sie die Fixiermutter, die sich auf der
Oberseite befindet.
Drehen Sie die Einstellmutter, um die seitliche
Position der Tür anzupassen (im Uhrzeigersinn/
gegen den Uhrzeigersinn).
Ziehen Sie die Fixiermutter, die sich an der
Oberseite befindet, um die Position zu korrigieren.
10 / 31 DE
adjusting nut
fixing nut
fixing nut
adjusting nut
Kühlschrank/ Bedienungsanleitung
Page 42

Installation
- Obere Scharniergruppe wird mit 3 Schrauben
befestigt.
- Die Scharnierabdeckung wird angebracht,
nachdem die Steckdosen installiert sind.
- Dann wird die Scharnierabdeckung mit zwei
Schrauben befestigt.
3.4 Elektrischer Anschluss
WARNUNG: Stellen Sie keine
Verbindungen über Verlängerungskabel
A
B
C
• Unser Unternehmen kann nicht für Schäden
• Der Kabelstecker muss nach der Aufstellung
• Verbinden Sie Ihren über eine geerdete
• Setzen Sie keine Verlängerungsschnüre oder
oder Mehrfachstecker her.
WARNUNG: Ein beschädigtes Kabel darf
nur von einem Mitarbeiter des zuständigen
Kundendienst ausgetauscht werden.
Wenn zwei Kühlschränke nebeneinander
aufgestellt werden, muss zwischen
beiden mindestens ein Abstand von 4 cm
eingehalten werden.
haftbar gemacht werden, die auftreten,
wenn das Gerät ohne eine den örtlichen
Vorschriften entsprechende Erdung und
einen sachgerechten elektrischen Anschluss
betrieben wurde.
gut zugänglich sein.
Steckdose mit dem Stromnetz mit einem
Spannungswert 220-240V /50 Hz. Die
Steckdose muss über eine Sicherung von 10
bis 16 A verfügen.
Mehrfachsteckdosen für die Verbindung von
Gerät und Wandsteckdose ein.
11 / 31 DE
Kühlschrank/ Bedienungsanleitung
Page 43

4 Vorbereitung
4.1 Maßnahmen für den sparsamen
Energieverbrauch
Das ungeprüfte Anschließen des
Kühlschranks an Systeme zum
A
• Lassen Sie den Kühlschrank nicht über längere
• Stellen Sie keine heißen Lebensmittel oder
• Überlasten Sie das Gerät nicht. Das
• Stellen Sie den Kühlschrank nicht an Ort, die
• Achten Sie darauf, Ihre Lebensmittel in
• Um eine größtmögliche Lebensmittelmenge
• Der Luftstrom darf nicht dadurch behindert
• Das Auftauen tiefgekühlter Lebensmittel
Energiesparen ist gefährlich, da dies das
Gerät beschädigen kann.
Zeit hinweg geöffnet.
Getränke in den Kühlschrank.
Kühlvermögen verringert sich, wenn die
Luftzirkulation im Kühlschrank beeinträchtigt
ist.
der direkten Sonneneinstrahlung ausgesetzt
sind. Installieren Sie das Gerät mit mindestens
30 cm Abstand von Hitzequellen, wie
beispielweise Herden, Backöfen, Heizungen
und Öfen, sowie mit mindestens 5 cm Abstand
von Elektroöfen.
geschlossenen Behältern aufzubewahren.
im Gefrierfach Ihres Kühlschranks zu lagern,
muss der oberste Einschub herausgenommen
und auf einen Glaseinsatz gestellt werden.
Der für den Kühlschrank angegebene
Energieverbrauch wurde mit ausgebautem
Eisgerät und ohne die oberen Einschübe, um
eine maximale Beladung zu ermöglichen,
ermittelt. Es wird dringend empfohlen, im
Gefrierfach und im Multizonenfach die unteren
Einschübe zur Lagerung zu verwenden.
werden, dass man Lebensmittel vor die Lüfter
des Gefrierfachs und des Multizonenfachs
stellt. Die Lebensmittel sind so einzustellen,
dass mindestens 5 cm Abstand vor dem
Schutzgitter der Lüfter bestehen.
im Kühlfach hilft sowohl Energie zu sparen
und ist zugleich besonders schonend für die
Lebensmittel.
Die Temperatur des Raums, in dem
der Kühlschrank aufgestellt ist, muss
C
C
C
mindestens 10ºC /50°F betragen.
Hinsichtlich der Effizienz ist der
Einsatz des Kühlschrank mit kühleren
Umgebungstemperaturen nicht zu
empfehlen.
Der Innenraum des Kühlschranks ist
komplett zu reinigen.
Wenn zwei Kühlschränke nebeneinander
aufgestellt werden, muss zwischen
beiden mindestens ein Abstand von 4 cm
eingehalten werden.
4.2 Empfehlungen zum Fach
für frische Lebensmittel
• Achten Sie darauf, dass die Lebensmittel nicht
mit dem Temperatursensor im Fach für frische
Lebensmittel in Berührung kommen. Um
die ideale Lagerungstemperatur im Fach für
frische Lebensmittel aufrechtzuerhalten, darf
der Sensor nicht durch Lebensmittel verstellt
werden.
• Stellen Sie keine heißen Speisen oder Getränke
in den Kühlschrank.
12 / 31 DE
Kühlschrank/ Bedienungsanleitung
Page 44

Vorbereitung
4.3 Vor der ersten Verwendung
Achten Sie darauf, dass vor der Verwendung
des Geräts alle in der Bedienungsanleitung im
Abschnitt „Wichtige Hinweise zur Sicherheit
und zum Umweltschutz“ und den Kapiteln zur
Installation angeführten Sicherheitsmaßnahmen
ausgeführt wurden.
• Reinigen Sie den Innenraum des Kühlschranks
so wie im Abschnitt „Wartung und Säuberung“
empfohlen. Bevor Sie den Kühlschrank
einschalten, muss der Innenraum trocken sein.
• Verbinden Sie das Netzkabel des Kühlschranks
mit einer geerdeten Steckdose. Der
Innenbeleuchtung schaltet sich ein, wenn der
Kühlschrank geöffnet wird.
• Lassen Sie den Kühlschrank 6 Stunden lang
eingeschaltet laufen, bevor Sie Lebensmittel
hineinstellen und öffnen Sie in dieser Zeit
möglichst nicht die Gerätetür.
Sie hören ein Geräusch, wenn der
Kompressor sich einschaltet. Die im
C
C
geschlossenen Kühlsystem zirkulierenden
Flüssigkeiten und Gase können ebenfalls
zu diesen Geräuschen beitragen, wenn der
Kompressor nicht eingeschaltet ist. Das ist
vollkommen normal.
Die Vorderkanten des Kühlschranks
können sich warm anfühlen. Das ist
normal. Diese Bereiche erwärmen sich, um
Kondensierung zu vermeiden.
13 / 31 DE
Kühlschrank/ Bedienungsanleitung
Page 45

5 Betrieb des Geräts
5.1 Anzeigetafel
Das Bedienfeld mit Touchfunktion dient zur Einstellung der Temperatur und die Steuerung der
weiterer Kühlschrankfunktionen, ohne dass die Gerätetür geöffnet werden muss. Sie müssen nur die
entsprechenden Tasten zur Einstellung der Funktionen drücken.
2 3
1
4
5 6
9
10 11
33
32
31
30
Select
Select
3 “
3 “
*34.1
27
28
29
*34.2
7
19
20
*8
Quick FreezeQuick Cool
3 “
FN
OK
1718
Quick FreezeQuick Cool
3 “
FN
OK
12
13
14
15
16
C
26
*25
24
23
22
21
Die Abbildungen in dieser Bedienungsanleitung sind schematische Zeichnungen und stimmen mit dem
Gerät nicht exakt überein. Wenn dabei Teile dargestellt werden, die nicht zu dem von Ihnen gekauften
Gerät gehören, dann handelt es Komponenten für andere Modelle.
14 / 31 DE
Kühlschrank/ Bedienungsanleitung
Page 46

Produktbedienung
1. Anzeige der Schnellkühlfunktion
Diese schaltet sich ein, wenn die
Schnellkühlfunktion aktiviert ist.
2. Temperaturanzeige des Kühlschrankfachs
Die Temperatur im Kühlschrankfach wird
angezeigt, diese kann auf 8,7,6,5,4,3,2,1
eingestellt werden.
3. Anzeige in Fahrenheit
Diese Anzeige gibt die Temperatur in Fahrenheit
wieder. Wenn die Anzeige in Fahrenheit aktiviert
wird, werden die eingestellten Temperaturwerte
in Fahrenheit angezeigt und ein entsprechendes
Symbol leuchtet.
4. Tastensperre
Drücken Sie die Tastensperrtaste simultan für 3
Sekunden. Das Tastensperrsymbol
leuchtet auf und der Tastensperrmodus wird
aktiviert. Die Tasten reagieren dann nicht, solange
der Tastensperrmodus aktiviert bleibt. Drücken
Sie die Tastensperrtaste erneut simultan für 3
Sekunden. Das Tastensperrzeichen erlischt und der
Tastatursperrmodus wird abgestellt.
Drücken Sie die Tastensperrtaste,
wenn Sie verhindern möchten, dass die
Temperatureinstellung des Kühlschranks geändert
werden kann.
5. Stromausfall/Hohe Temperatur/
Fehlerwarnung
Diese Anzeige leuchtet im Falle von Stromausfall,
einer hohen Temperatur und sonstigen Fehlern
am Gerät auf. Während länger anhaltenden
Stromausfällen, wird die höchste Temperatur im
Gefrierfach aufblinkend auf dem Display angezeigt.
Drücken Sie nach der Prüfung des Lebensmittel im
Gefrierfach die Abstelltaste für die Alarmfunktion,
um die Warnung zu löschen.
Bitte lesen Sie auch den Abschnitt „Für die
Fehlerbehebung empfohlene Lösungen“ in der
Bedienungsanleitung, wenn diese Anzeige aufleuchten sollte.
6. Symbol „Filter zurücksetzen“
Diese Symbol schaltet sich, wenn der Filter zurückgesetzt werden muss.
7. Symbol Fach mit Temperaturänderung
Zeigt das Fach an, dessen Temperatur sich
gerade ändert. Wenn das Symbol Fach mit
Temperaturänderung zu blinken beginnt, bedeutet
das, dass das jeweilige Fach ausgewählt wurde.
8. Symbol für Zusatzgefrierfunktion
Fahren Sie über das Symbol für Zusatzgefrierfunktion
mit Hilfe der FN-Taste; dass Symbol beginnt nun zu
blinken. Wenn Sie die OK-Taste drücken, schaltet sich
das Symbol für die Gefrierfunktion im Zusatzfach ein,
das nun als Gefrierfach genutzt werden kann.
9. Temperaturanzeige des Gefrierfachs
Die Temperatur im Gefrierfachen wird angezeigt,
diese kann auf -18, -19, -20, -21, -22, -23, -24
eingestellt werden.
10. Anzeige der Schnellgefrierfunktion
Diese schaltet sich ein, wenn die
Schnellgefrierfunktion aktiviert ist.
11. Anzeige in Fahrenheit
Diese Anzeige gibt die Temperatur in Fahrenheit
wieder. Wenn die Anzeige in Fahrenheit aktiviert
wird, werden die eingestellten Temperaturwerte
in Fahrenheit angezeigt und ein entsprechendes
Symbol leuchtet.
12. Taste der Schnellgefrierfunktion
Drücken Sie diese Taste zur Aktivierung oder
Deaktivierung der Schnellgefrierfunktion. Wenn
Sie die Funktion aktivieren, wird das Gefrierfach
auf eine Temperatur unter dem eingestellten Wert
heruntergekühlt.
Verwenden Sie die
Schnellgefrierfunktion, wenn die in
C
das Gefrierfach gelegten Lebensmittel
schnell einfrieren möchten. Wenn
Sie größere Mengen an frischen
Lebensmitteln einfrieren möchten,
aktivieren Sie diese Funktion, bevor Sie
die Lebensmittel in das Gerät legen.
15 / 31 DE
Kühlschrank/ Bedienungsanleitung
Page 47

Produktbedienung
Wenn Sie diese nicht zuvor
ausschalten, stellt sich die
C
C
13. Filter zurücksetzen
Der Filter wird zurückgesetzt, wenn die Taste der
Schnellgefrierfunktion 3 Sekunden lang gedrückt
wird. Das Symbol „Filter zurücksetzen“ erlischt.
14. FN-Taste
Mit Hilfe dieser Taste können Sie zwischen den
Funktionen wechseln, die Sie einstellen möchten.
Durch das Drücken dieser Taste, wird das
Symbol der gewünschten Funktion aktiviert oder
deaktiviert, und das fängt an zu blinken. Die FNTaste deaktiviert sich, wenn sie 20 Sekunden lang
nicht gedrückt wird. Sie müssen diese Taste dann
erneut drücken, um die Funktionen zu ändern.
15. Temperaturanzeige in Celsius
Diese Anzeige gibt die Temperatur in Celsius
wieder. Wenn die Anzeige in Celsius aktiviert wird,
werden die eingestellten Temperaturwerte in
Celsius angezeigt und ein entsprechendes Symbol
leuchtet.
16. OK-Taste
Nach dem Navigieren durch die Funktionen mit
Hilfe der FN-Taste blinkt nach dem Abbruch der
Funktion durch die OK-Taste das entsprechende
Symbol auf und die Anzeige blinkt. Wenn di
Funktion aktiviert wurde, bleibt diese eingeschaltet.
Die Anzeige blinkt weiter, um zu zeigen, dass das
Symbol eingeschaltet ist.
17. Symbol Fach mit Temperaturänderung
Zeigt das Fach an, dessen Temperatur sich
gerade ändert. Wenn das Symbol Fach mit
Temperaturänderung zu blinken beginnt, bedeutet
das, dass das jeweilige Fach ausgewählt wurde.
Schnellgefrierfunktion automatisch
nach spätestens 4 Stunden ab oder
wenn das Gefrierfach die gewünschte
Temperatur erreicht hat.
Die Funktion aktiviert sich nicht erneut
selbständig nach dem Ende eines
Stromausfalls.
16 / 31 DE
18. Symbol Fach mit Temperaturänderung
Zeigt das Fach an, dessen Temperatur sich
gerade ändert. Wenn das Symbol Fach mit
Temperaturänderung zu blinken beginnt, bedeutet
das, dass das jeweilige Fach ausgewählt wurde.
19. Einstelltaste zur Erhöhung des Werts
Wählen Sie das Symbol für das entsprechende
Fach; diese Symbol fängt nun an zu blicken Wenn
Sie die Einstelltaste zur Erhöhung des Werts
während dieses Vorgangs drücken, erhöht sich
der eingestellte Wert. Wenn Sie diese ununterbrochen drücken, stellt der Wert wieder auf den
Ausgangswert zurück.
20. Symbol Fach mit Temperaturänderung
Zeigt das Fach an, dessen Temperatur sich
gerade ändert. Wenn das Symbol Fach mit
Temperaturänderung zu blinken beginnt, bedeutet
das, dass das jeweilige Fach ausgewählt wurde.
21. Einstellung der Celsius-und FahrenheitAnzeige
Fahren Sie über diese Taste mit Hilfe der FNTaste und wählen Sie Fahrenheit und Celsius
über die OK-Taste. Wenn die entsprechende
Temperaturanzeigeart ausgewählt wurde, schaltet
sich die Anzeige in Celsius und Fahrenheit ein.
22. Symbol „Eismaschine aus“
Drücken Sie die FN-Taste (bis diese das EisSymbol und die untere Linie erreicht), um
die Eismaschine auszuschalten. Das Symbol
„Eismaschine aus und die Anzeige für die
Eismaschinenfunktion beginnen zu blinken, wenn
Sie darüberfahren, sodass Sie sehen können, ob
die Eismaschine ein- oder ausgeschalten werden
soll. Wenn Sie die OK-Taste drücken, leuchtet
das Symbol der Eismaschine anhaltend und
die Anzeige blinkt weiter. Wenn Sie keine Taste
innerhalb von 20 Sekunden drücken, bleiben
Symbol und Anzeige eingeschaltet. So wird die
Eismaschine ausgeschaltet. Um die Eismaschine
erneut einzuschalten, fahren Sie über das Symbol
und die Anzeige, nun blinken sowohl das Symbol
„Eismaschine aus und die Anzeige dazu. Wenn Sie
keine Taste innerhalb von 20 Sekunden drücken,
schalten sich Symbol und Anzeige aus und die
Eismaschine schaltet sich wieder ein.
Kühlschrank/ Bedienungsanleitung
Page 48

Produktbedienung
Zeigt an, ob die Eismaschine ein-
C
C
23. Symbol der Eco Fuzzy-Funktion
Drücken Sie die FN-Taste (bis diese das Symbol
mit dem Buchstaben e und die untere Linie
erreicht), um die Eco Fuzzy-Funktion zu aktivieren.
Wenn Sie über das Eco Fuzzy-Symbol und die
Eco Fuzzy-Anzeige fahren, beginnen diese an zu
blinken. So können Sie sehen, on die Eco FuzzyFunktion aktiviert oder deaktiviert werden soll.
Wenn Sie die OK-Taste drücken, leuchtet das Eco
Fuzzy-Symbol anhaltend und die Anzeige blinkt
weiter. Wenn Sie keine Taste innerhalb von 20
Sekunden drücken, bleiben Symbol und Anzeige
eingeschaltet. So wird die Eco Fuzzy-Funktion
aktiviert. Um die Eco Fuzzy-Funktion abzubrechen,
fahren Sie erneut über das Symbol und die
Anzeige und drücken Sie die OK-Taste. Nun
beginnen sowohl die Eco Fuzzy-Funktion als auch
die Anzeige an zu blinken. Wenn Sie keine Taste
innerhalb von 20 Sekunden drücken, schalten
sich Symbol und Anzeige aus und die Eco FuzzyFunktion wird abgebrochen.
24. Symbol der Urlaubsfunktion
Drücken Sie die FN-Taste (bis diese das Symbol
mit dem Sonnenschirm und die untere Linie
erreicht), um die Urlaubsfunktion zu aktivieren.
Wenn Sie über das Urlaubsfunktionssymbol und
die Urlaubsfunktionsanzeige fahren, beginnen
diese an zu blinken. So können Sie sehen, on die
Urlaubsfunktion aktiviert oder deaktiviert werden
soll. Wenn Sie die OK-Taste drücken, leuchtet
das Urlaubsfunktionssymbol anhaltend und die
Urlaubsfunktion ist aktiviert. Die Anzeige blinkt
während dieses Vorgangs weiter. Drücken Sie die
OK-Taste, um die Urlaubsfunktion abzubrechen.
Nun beginnen sowohl das Symbol der
oder ausgestellt ist.
Der Wasserfluss vom Wassertank
stoppt, wenn diese Funktion
ausgewählt wurde. Jedoch kann
das zuvor hergestellte Eis aus der
Eismaschine weiter entnommen
werden.
Urlaubsfunktion als auch die Anzeige an zu blinken
und die Urlaubsfunktion wird abgebrochen.
25. Symbol für Zusatzkühlfunktion
Wenn Sie das Symbol für die Zusatzkühlfunktion
mit Hilfe der FN-Taste auswählen und die OKTaste drücken, schaltet das Zusatzfach in den
Kühlschrankbetrieb.
26. Temperaturanzeige in Celsius
Diese Anzeige gibt die Temperatur in Celsius
wieder. Wenn die Anzeige in Celsius aktiviert wird,
werden die eingestellten Temperaturwerte in
Celsius angezeigt und ein entsprechendes Symbol
leuchtet.
27. Einstelltaste zur Verringerung des Werts
Wählen Sie das Symbol für das entsprechende
Fach; diese Symbol fängt nun an zu blicken Wenn
Sie die Einstelltaste zur Verringerung des Werts
während dieses Vorgangs drücken, verringert
sich der eingestellte Wert. Wenn Sie diese
ununterbrochen drücken, stellt der Wert wieder auf
den Ausgangswert zurück.
28. Symbol Fach mit Temperaturänderung
Zeigt das Fach an, dessen Temperatur sich
gerade ändert. Wenn das Symbol Fach mit
Temperaturänderung zu blinken beginnt, bedeutet
das, dass das jeweilige Fach ausgewählt wurde.
29. Symbol Fach mit Temperaturänderung
Zeigt das Fach an, dessen Temperatur sich
gerade ändert. Wenn das Symbol Fach mit
Temperaturänderung zu blinken beginnt, bedeutet
das, dass das jeweilige Fach ausgewählt wurde.
30. Tastensperre
Drücken Sie die Tastensperrtaste simultan für 3
Sekunden. Das Tastensperrsymbol
leuchtet auf und der Tastensperrmodus wird
aktiviert. Die Tasten reagieren dann nicht, solange
der Tastensperrmodus aktiviert bleibt. Drücken
Sie die Tastensperrtaste erneut simultan für 3
Sekunden. Das Tastensperrzeichen erlischt und der
Tastatursperrmodus wird abgestellt.
Drücken Sie die Tastensperrtaste,
wenn Sie verhindern möchten, dass die
Temperatureinstellung des Kühlschranks geändert
werden kann.
17 / 31 DE
Kühlschrank/ Bedienungsanleitung
Page 49

Produktbedienung
1
2
3
4 5 6
7
8
9
10
11
12
13
14 15 16
31. Auswahltaste
Nutzen Sie diese Taste, um das Fach auswählen,
dessen Temperatur Sie ändern möchten. Schalten
Sie zwischen den Fächern, indem Sie diese Taste
drücken. Das ausgewählte Fach kann anhand
der Fachsymbole unterschieden werden (7, 17,
18, 20, 28, 29). Schalten Sie solange, bis das
Symbol des Fachs, dessen Temperatur Sie ändern
möchten, anfängt zu blinken. Dann können Sie den
eingestellten Wert mit Hilfe entweder der Taste zur
Verringerung des Temperaturwerts im Fach (27)
oder der Taste zur Erhöhung des Temperaturwerts
im Fach (19) ändern. Wenn die ausgewählte Taste
mehr als 20 Sekunden nicht drücken, schaltet sich
das Fachsymbol wieder aus. Sie müssen diese
Taste drücken, um erneut ein Fach auszuwählen.
32. Warnung Alarm aus
Drücken Sie im Falle eines Stromausfalls/
erhöhte Temperatur-Alarms nach der Prüfung des
Lebensmittel im Gefrierfach die Abstelltaste für die
Alarmfunktion, um die Warnung zu löschen.
33. Taste der Schnellkühlfunktion
Die Taste hat zwei Funktionen. Drücken
Sie zur Aktivierung oder Deaktivierung
der Schnellkühlfunktion diese kurz. Die
Schnellkühlanzeige schaltet sich dann aus und
das Gerät kehrt zu seinen normalen Einstellungen
zurück.
Verwenden Sie die
Schnellkühlfunktion, wenn die in
C
C
C
C
34. 1 Temperaturanzeige des Zusatzfachs
Die für das Zusatzfach eingestellten
Temperaturwerte werden angezeigt.
34. 2 Temperaturanzeige des Weinkühlfachs
Die für das Zusatzfach eingestellte Temperatur
wird angezeigt.
das Kühlschrankfach gelegten
Lebensmittel schnell abkühlen
möchten. Wenn Sie größere Mengen
an frischen Lebensmitteln abkühlen
möchten, aktivieren Sie diese
Funktion, bevor Sie die Lebensmittel in
das Gerät legen.
Wenn Sie diese nicht zuvor
ausschalten, stellt sich die
Schnellkühlfunktion automatisch nach
spätestens 8 Stunden ab oder wenn
das Kühlschrankfach die gewünschte
Temperatur erreicht hat.
Wenn Sie die Schnellkühltaste
wiederholt kurz nacheinander
drücken, wird der elektronische
Schaltkreisschutz aktiviert und der
Kompressor startet nicht sofort.
Die Funktion aktiviert sich nicht erneut
selbständig nach dem Ende eines
Stromausfalls.
18 / 31 DE
Kühlschrank/ Bedienungsanleitung
Page 50

Produktbedienung
5.2 Anzeigefeld
Das berührungsempfindliche Anzeigefeld ermöglicht Ihnen die Einstellung der Temperatur und die
Steuerung anderer Funktionen, ohne dass Sie die Tür des Kühlschranks öffnen müssen. Drücken Sie
einfach die entsprechenden Tasten zur Funktionseinstellung.
14 15 16
13
12
7
1
2
4 5 6
3
9
8
11
10
1 - Ein/Aus-Funktion
Drücken Sie die Ein-/Austaste zum Ein- oder
Ausschalten des Kühlschranks 3 Sekunden.
2 - Schnellkühlen
Wenn Sie die Schnellkühltaste drücken, wird die
Innentemperatur über den voreingestellten Wert
hinaus weiter abgesenkt.
Diese Funktion dient dazu, Lebensmittel, die im
Kühlbereich aufbewahrt werden, schnell herunterzukühlen.
Wenn Sie große Mengen Lebensmittel kühlen möchten, sollten Sie diese Funktion vor
dem Einlagern der Lebensmittel einschalten.
Die Schnellkühlanzeige leuchtet bei aktiver
Schnellkühlfunktion. Zum Abbrechen dieser
Funktion drücken Sie die Schnellkühltaste noch
einmal. Die Schnellkühlanzeige erlischt, die normalen Einstellungen werden wiederhergestellt.
Sofern Sie diese Funktion nicht vorzeitig abschalten, wird das Schnellkühlen beendet, sobald
die nötige Temperatur erreicht ist. Nach 2 Stunden
schaltet sich diese Funktion automatisch ab. Diese
Funktion wird nach einem Stromausfall nicht
automatisch wieder eingeschaltet.
3 - Urlaubsfunktion
Drücken Sie die Schnellkühlen/Urlaub-Taste zum
Aktivieren der Urlaubsfunktion 3 Sekunden. Das
Symbol „--“ erscheint, wenn die Funktion aktiv
ist. Die Funktion wird durch erneute 3-sekündige
Betätigung derselben Taste oder durch Drücken
der Kühlschrank-Einstelltaste deaktiviert.
Wenn die Urlaubsfunktion aktiviert ist, erscheint
eine Linie an den für den Kühlschrank eingestellten
Werten des Displays.
Wenn der Urlaubsmodus aktiv ist, beträgt
die Temperatur von frischen Lebensmitteln
mehr als 10 Grad Celsius; bitte bewahren Sie
frische Lebensmittel daher nicht im Fach für
frische Lebensmittel auf. Die Temperatur des
Tiefkühlbereichs wird dadurch nicht beeinflusst.
4 - Kühltemperatur einstellen
Mit dieser Funktion geben Sie die Temperatur des
Kühlbereiches vor. Durch mehrmaliges Drücken
dieser Taste stellen Sie die Kühlbereichtemperatur
auf 8, 7, 6, 5, 4, 3, 2 oder 1°C ein.
5 - Temperaturanzeige
Die Aus-Anzeige leuchtet auf, wenn der
Kühlschrank ausgeschaltet ist.
6 - Schnellkühlanzeige
Dieses Symbol leuchtet bei aktiver SchnellkühlenFunktion auf.
C
Die Abbildungen in dieser Bedienungsanleitung sind schematische Zeichnungen und stimmen mit dem
Gerät nicht exakt überein. Wenn dabei Teile dargestellt werden, die nicht zu dem von Ihnen gekauften
Gerät gehören, dann handelt es Komponenten für andere Modelle.
19 / 31 DE
Kühlschrank/ Bedienungsanleitung
Page 51

Produktbedienung
7 Kühlbereichtemperatureinstellungsanzeige
Zeigt die für den Kühlbereich eingestellte
Temperatur an.
8 - Urlaubsanzeige
Dieses Symbol leuchtet bei aktiver Urlaubsfunktion
auf.
9 - Hochtemperatur- / Fehler-Warnanzeige
Dieses Symbol signalisiert zu hohe
Innentemperaturen und sonstige Fehler.
10 - Tiefkühlbereich
Die Temperatureinstellungsanzeige zeigt die für
den Tiefkühlbereich eingestellte Temperatur an.
11 - Öko-Extra-Anzeige
Die Öko-Extra-Anzeige leuchtet, wenn die Funktion
Öko-Extra aktiv ist.
12 - Schnelltiefkühlanzeige
Diese Anzeige leuchtet bei aktiver
Schnellgefrierfunktion auf.
13 - Tiefkühltemperatur einstellen
Mit dieser Funktion geben Sie die Temperatur
des Tiefkühlbereiches vor. Durch mehrmaliges Drücken dieser Taste stellen Sie die
Tiefkühlbereichtemperatur auf 0 °, -2 °, -4 °, -6 °,
-8 °, -10 ° oder -12 ° ein.
14 - Schnellgefrieranzeige
Die Schnellgefrieranzeige leuchtet bei aktiver
Schnellgefrierfunktion auf. Zum Abbrechen dieser
Funktion drücken Sie die Schnellgefriertaste
noch einmal. Die Schnellgefrieranzeige erlischt,
die normalen Einstellungen werden wiederhergestellt. Sofern Sie diese Funktion nicht vorzeitig
abschalten, wird das Schnellgefrieren beendet,
sobald die nötige Temperatur erreicht ist. Nach 4
Stunden schaltet sich diese Funktion automatisch
ab.
Wenn Sie große Mengen frischer Lebensmittel
einfrieren möchten, drücken Sie die
Schnellgefriertaste, bevor Sie die Lebensmittel
in den Tiefkühlbereich geben. Sollten Sie die
Schnelltiefkühltaste mehrmals innerhalb kurzer
Zeit drücken, spricht sofort eine elektronische
Schutzschaltung an.
Diese Funktion wird nach einem Stromausfall nicht
automatisch wieder eingeschaltet.
15 - Öko-Extra (spezielle
Energiesparfunktion)
Zum Einschalten der Öko-Extra-Funktion
halten Sie die Schnellgefrier-/Öko-Extra-Taste
3 Sekunden lang gedrückt. Spätestens sechs
Stunden später arbeitet Ihr Kühlgerät besonders
ökonomisch; die Energiesparanzeige leuchtet.
Zum Abschalten der Öko-Fuzzy-Funktion halten
Sie die Schnellgefriertaste erneut 3 Sekunden lang
gedrückt.
16 - Alarm aus
Wenn die Kühlschranktür 2 Minuten geöffnet ist
oder ein Sensorfehler vorliegt, ertönt ein akustischer Alarm. Der Alarm kann mit der „Alarm
aus“-Taste abgeschaltet werden.
Der Sensorfehleralarm erklingt erst bei einem
Stromversorgungsfehler. Wenn Sie die Tür
schließen und wieder öffnen, wird der „Tür-offenAlarm“ nach weiteren 2 Minuten erneut aktiviert.
20 / 31 DE
Kühlschrank/ Bedienungsanleitung
Page 52

Produktbedienung
5.3 Einfrieren frischer Lebensmittel
• Um die Qualität der Lebensmittel zu bewahren,
sollten diese nach dem so schnell wie möglich
eingefroren, nachdem sie in das Gefrierfach
gelegt wurden. Verwenden Sie deshalb die
Schnellgefrierfunktion für diese Zwecke.
• Sie können Lebensmittel länger im Gefrierfach
lagern, wenn Sie diese im frischen Zustand
einfrieren.
• Verpacken Sie das Gefriergut und schließen Sie
die Verpackung, um das Eindringen von Luft zu
vermeiden.
• Stellen Sie sicher, dass die Lebensmittel
richtig verpackt sind, bevor Sie diese in
das Gefrierfach legen. Verwenden Sie
dazu zum Einfrieren geeignete Behälter,
Folien, feuchtigkeitsabweisendes Papier,
Kunststoffbeutel und weitere geeignete
Materialien statt einfachen Packpapiers.
• Beschriften Sie alle verpackten Lebensmittel
und vermerken Sie das Einfrierdatum. So
behalten Sie einen Überblick über Inhalt und
Haltbarkeit, jedes Mail, wenn Sie Tür des
Gefrierfachs öffnen. Bewahren Sie am längsten
gelagerten, tiefgekühlten Lebensmittel im
vorderen Teil des Fachs auf, damit diese zuerst
verbraucht werden.
• Eingefrorene Lebensmittel müssen nach dem
Auftauen unverzüglich verbraucht werden und
dürfen nicht erneut eingefroren werden.
5.4 Empfehlungen für die
bessere Haltbarkeit
gefrorener Lebensmittel
Das Gefrierfach sollte mindestens -18 °C kalt sein.
1. Legen Sie die eingepackten Lebensmittel so
rasch wie möglich in das Gefriergerät, um ein
Antauen zu verhindern.
2. Kontrollieren Sie die Angaben für
„Zu verbrauchen bis“ bzw. zum
Mindesthaltbarkeitsdatum, um festzustellen,
ob diese Fristen abgelaufen sind oder nicht.
3. Stellen Sie sicher, dass die Verpackungen
unbeschädigt sind.
5.5 Angaben zur Tiefkühlung
Gemäß dem IEC 62552-Normen soll das Gerät
mindestens 4,5 kg an Lebensmitteln bei einer
Umgebungstemperatur von 25°C auf -18°C
oder niedriger innerhalb von 24 Stunden für
jeweils jede Volumenmenge von 100 Litern des
Gefriergerätinhalts herabkühlen.
Es ist möglich, die Lebensmittel für einen längeren
Zeitraum bei Temperaturen von -18°C oder
niedriger aufzubewahren.
Sie können die Lebensmittel für viele Monate frisch
halten (bei Temperaturen von -18°C oder niedriger
im Gefriergerät).
Die noch einzufrierende Lebensmittel dürfen nicht
direkt auf bereits tiefgefühlte gelegt werden, um
deren teilweise Antauen zu verhindern.
Kochen Sie Gemüse und gießen Sie das
Kochwasser ab, um deren Aufbewahrungszeit im
tiefgekühlten Zustand zu verlängern. Legen Sie
diese nach dem Abgießen in luftdichte Behälter
und dann in das Gefriergerät. Lebensmittel wie
Bananen, Tomaten, Salat, Sellerie, gekochte Eier
und Kartoffeln sind zum Einfrieren nicht geeignet.
Wenn diese Lebensmittel eingefroren werden,
beeinträchtigt das deren Nährwert und Geschmack
negativ. Jedoch stellt ihr Verzehr in solchen Fällen
keine Gefahr für menschliche Gesundheit dar.
• Frieren Sie nicht zu große Mengen an
Lebensmitteln auf einmal ein.
21 / 31 DE
Kühlschrank/ Bedienungsanleitung
Page 53

Produktbedienung
Gefrierfa
cheinstellung
-18°C 4°C Das ist die normale, empfohlene Einstellung.
-20, -22 oder -24°C 4°C
Schnellgefrierfunktion 4°C
-18°C oder kälter 2°C
5.6 Einlegen von Lebensmitteln
Gefrierfa
cheinschübe
Kühlschran
kfacheinschübe
Türeinsätze des
Kühlfachs
Gemüsefach Gemüse und Obst
Fach für frische
Lebensmittel
Verschiedenes Gefriergut, wie
beispielsweise Fleisch, Fisch,
Eiscreme, Gemüse usw.
Lebensmittel in Kochtöpfen,
abgedeckten Tellern und
geschlossenen Behältern Eier
(im geschlossenen Behälter)
In kleinen Mengen verpackte
Lebensmittel oder Getränke
Feinkostprodukte
(Brotaufstriche,
Fleischprodukte für den
raschen Verbrauch)
5.7 Warnton bei offener Tür
(Diese Funktion ist optional)
Ein Warnton ist zu hören, wenn die Tür des Geräts
länger als 1 Minute offen gelassen wird. (Dieser
Warnton verstummt, wenn die Tür geschlossen
oder eine der Bedienfeldtasten (sofern vorhanden)
gedrückt wird.
5.8 Beleuchtung im Innenraum
Als Innenlampen werden LEB-Leuchten verwendet.
Kontaktieren Sie bei Problemen mit dem Geräts
mit dieser Lampe den zuständigen Kundendienst.
Kühlfac
heinstellung
Bemerkungen
Diese Einstellungen werden empfohlen, wenn die
Umgebungstemperaturen 30°C überschreiten.
Wird verwendet, um Lebensmittel in kürzester Zeit
einzufrieren. Das Gerät schaltet sich am Ende dieses
Vorgang in den vorherigen Normalbetrieb zurück.
Diese Einstellungen werden verwendet, wenn Sie
glauben, dass Ihr Kühlfach aufgrund der hohen
Umgebungstemperaturen und häufigen Öffnens und
Schließens der Tür nicht kalt genug ist.
Die in dieser Vorrichtung genutzte(n) Lampe(n) ist/
sind nicht für den Einsatz im Haushalt geeignet.
Der vorgesehene Zweck dieser Lampe besteht
darin, den Nutzer das Legen bzw. Herausnehmen
der Lebensmittel auf eine bequeme und
komfortable Weise zu erleichtern.
5.9 Kältefach
In den Kältefächern können Sie Lebensmittel
auf das Einfrieren vorbereiten. Sie können diese
Fächer zudem zur Lagerung von Lebensmitteln bei
einer Temperatur, die etwas unter der im Kühlfach
liegt, nutzen.
Sie können das Fassungsvermögen Ihres
Kühlschranks durch das Herausnehmen der
Kältefächer vergrößern.
1. Ziehen Sie das Fach in Ihre Richtung, wenn es
stoppt.
2. Heben Sie das Fach um 1 cm nach oben, und
ziehen es weiter in Ihre Richtung, um es aus
seiner Halterung herausheben.
5.10 Gemüsefach
Das Gemüsefach des Kühlschranks dient
zur Lagerung von Gemüse, ohne dass dies
austrocknet. Dazu ist die Zirkulation der Kühlluft
um das Gemüsefach im Allgemeinen intensiviert.
Entfernen Sie die Türeinsätze, die sich gegenüber
zum Gemüsefach finden, bevor Sie dieses
herausnehmen.
22 / 31 DE
Kühlschrank/ Bedienungsanleitung
Page 54

Produktbedienung
5.11 Gemüsefach mit kontrollierter
Luftfeuchtigkeit
(FreSHelf)
(Diese Funktion ist optional)
Das Gemüsefach mit kontrollierter Feuchtigkeit
dient dazu, ein Austrocknen des Obsts und
Gemüses zu verhindern, sodass dieses länger
frisch bleibt.
Wir empfehlen, dass Sie blattähnliche
Gemüsesorten, wie beispielsweise Salat und
Spinat wie auch empfindliche Gemüsesorten möglichst in waagerechter Position im Gemüsefach in
Bezug auf deren Wurzeln lagern.
Wenn Gemüse in den Kühlschrank gelegt wird,
ist dessen spezifisches Gewicht zu berücksichtigen. Schwere und feste Gemüsesorten sollten im
Gemüsefach nach unten gelegt werden, während
leichte und weichere Sorten oben auf diese gepackt werden sollten.
Legen Sie Gemüse niemals in Kunststofftüten
in das Gemüsefach. Wenn das Gemüse in der
Kunststofftüte bleibt, fängt es in kürzester Zeit zu
faulen an. Wenn Sie aus hygienischen Gründen
nicht wollen, dass eine Gemüsesorte mit einer
anderen in Kontakt kommt, verwenden Sie durchlässige Papiertüten oder vergleichbares Material
anstatt von Kunststofftüten.
Lagern Sie Birnen, Aprikosen, Pfirsich oder
sonstige Früchte, die größere Mengen an Ethylen
abgeben nicht zusammen mit anderem Obst oder
Gemüse im Gemüsefach. Das von diesen Früchten
abgegebene Ethylen beschleunigt die Reife anderer Obst- und Gemüsesorten und verkürzt so deren
Lagerungszeit, bevor diese zu faulen anfangen.
5.12 Eiereinsatz
Sie können den Eiereinsatz je nach Wunsch in
die Tür oder einen Zwischenboden im Innenraum
installieren.
Stellen Sie den Eiereinsatz niemals in das
Gefrierfach.
5.13 Beweglicher Mittelbereich
Der Bewegliche Mittelbereich soll dafür sorgen,
dass die kalte Luft im Kühlschrankinneren nicht
nach außen entweicht.
1- Die Versieglung wird gewährleistet, wenn die
Türdichtung gegen die Oberfläche des beweglichen
Mittelbereichs drücken, wenn die Kühlfachtüren
geschlossen sind.
2– Ein weiterer Grund für die Existenz des
beweglichen Mittelbereichs im Kühlschrank ist,
dass sich damit das Nettofassungsvermögen des
Kühlfachs erhöht.Die üblichen standardmäßigen
Mittelbereiche führen dazu, dass ein Teil des
Kühlschrankinnenraums nicht für die Lagerung von
Lebensmitteln zur Verfügung steht.
3-Der bewegliche Mittelbereich ist geschlossen,
wenn die linke Tür des Kühlfachs geöffnet wird.
4-Es darf nicht mit der Hand geöffnet werden. Es
öffnet sich, durch die Führung des Kunststoffteils,
wenn die Tür geschlossen wird.
5.14 Kältekontrolliertes
Aufbewahrungsfach
Das kältekontrollierte Aufbewahrungsfach Ihres
Kühlschranks kann in jedem gewünschten
Modus, durch die jeweilige Einstellung entweder als Kühlschrankfach (2/4/6/8 °C) oder als
Gefrierfach (-18/-20/-22/-24) verwendet werden.
Sie können die gewünschte Temperatur für dieses
Fach mit der entsprechenden Einstellungstaste
regulieren.Die Temperatur des kältekontrollieren
Aufbewahrungsfach kann entweder auf einen Wert
23 / 31 DE
Kühlschrank/ Bedienungsanleitung
Page 55

Produktbedienung
zwischen 0 und 10 als Erweiterung des Kühlfachs
oder auf einen Wert von -6 als Erweiterung des
Gefrierfachs eingestellt werden.0 Grad dienen
zur verlängerten Lagerung von Feinkostprodukten
und -6 Grad ermöglicht die Lagerung von Fleisch
für bis zu 2 Wochen in einem gut schneidbaren
Zustand.
Die Funktion zum Schalten auf Kühl- oder
Gefrierfachbetrieb wird durch ein Kühlelement
in dem geschlossenen Bereich ermöglicht
(Kompressorfach) auf der Kühlschrankrückseite
ermöglicht. Der Betrieb dieses Elementes erzeugt
ein dem Ticken einer analogen Uhr vergleichbares
Geräusch. Das ist normal und keine Zeichen für
eine Fehlfunktion.
5.15 Blaues Licht
(in einigen Modellen)
Das Gemüsefach im Kühlschrank wird mit
einem blauen Licht beleuchtet. Im Gemüsefach
aufbewahrte Lebensmittel werden durch
den Wellenlängeneffekt dazu gebracht, die
Fotosynthese fortzusetzen, sodass sie länger frisch
bleiben und ihr Vitamingehalt sich erhöht.
5.16 Geruchsfilter
Der Geruchsfilter in der Luftleitung des
Kühlschrankfachs verhindert die Bildung
unangenehmer Gerüche im Kühlschrank.
24 / 31 DE
Kühlschrank/ Bedienungsanleitung
Page 56

Produktbedienung
5.17 Weinfach
(Diese Funktion gibt es nur bei bestimmten Geräten.)
1 – Ihr Weinfach füllen
Das Weinfach wurde so gebaut, dass es bis zu 28 Flaschen vorne + 3 über ein Teleskopgestell
zugängliche Flaschen aufnehmen kann. Die angegebenen maximalen Mengen dienen nur als
Referenzwerte und entsprechen den mit einer Standardflasche „Bordelaise 75 cl“ durchgeführten Tests.
2- Empfohlene optimale Temperaturen
Unser Rat: Wenn Sie verschiedene Arten von Weinen kombinieren, wählen Sie 12 °C (typische Temperatur
in einem richtigen Keller). Bei Weißweinen, die bei 6 bis 10 ° serviert werden sollten, denken Sie bitte
daran, die Flaschen vor dem Servieren 1/2 Stunde in den Kühlschrank zu geben. Der Kühlschrank
kann die Flaschen auf die bevorzugte Temperatur herunterkühlen. Rotweine erwärmen sich bei
Zimmertemperatur nur langsam beim Servieren.
16 bis 17 °C Feine Bordeaux-Weine - rot
15 bis 16 °C Feine Burgunderweine - rot
14 bis 16 °C Grand-Crus (großes Gewächs) trockener Weißweine
11 bis 12 °C Leichte, fruchtige und junge Rotweine
10 bis 12 °C Provence-Rosé-Weine, französische Weine
10 bis 12 °C Trockene Weißweine und rote Landweine
8 bis 10 °C Weiße Landweine
7 bis 8 °C Champagner
6 °C Liebliche Weißweine
25 / 31 DE
Kühlschrank/ Bedienungsanleitung
Page 57

Produktbedienung
3- Empfehlungen zum Öffnen einer Weinflasche vor der Verkostung:
Weißweine Etwa 10 Minuten vor dem Servieren
Junge Rotweine Etwa 10 Minuten vor dem Servieren
Schwere, ausgereifte Rotweine Etwa 30 bis 60 Minuten vor dem Servieren
4- Wie lang kann eine geöffnete Flasche aufbewahrt werden?
Geöffnete Weinflaschen mit einem Korken verschlossen und maximal die folgende Anzahl Tage an einem
kühlen, trockenen Ort aufbewahrt werden:
Weißweine Rotweine
Dreiviertelvolle Flasche 3 bis 5 Tage 4 bis 7 Tage
Halbvolle Flasche 2 bis 3 Tage 3 bis 5 Tage
Weniger als halbvolle Flasche 1 Tag 2 Tage
5.18 So benutzen Sie den
internen Wasserspender
(bei bestimmten Modellen)
Spülen Sie das Wassersystem nach Anschluss
des Kühlschranks an eine Wasserversorgung
oder nach Auswechslung des Wasserfilters durch.
Halten Sie den Hebel des Wasserspenders 5
Sekunden mit einem festen Behälter gedrückt,
lassen Sie ihn dann 5 Sekunden los. Wiederholen
Sie den Vorgang, bis Wasser ausgegeben wird.
Sobald Wasser ausgegeben wird, wechseln Sie
kontinuierlich zwischen Gedrückthalten und
Loslassen (5 Sekunden ein, 5 Sekunden aus)
des Hebels, bis Sie insgesamt 15 Liter Wasser
entnommen haben. Dadurch strömt Luft aus
dem Filter und Wasserspendersystem und der
Wasserfilter wird für den Einsatz vorbereitet. In
einigen Haushalten ist möglicherweise weiteres
Durchspülen erforderlich. Sobald die Luft aus
dem System entwichen ist, kann Wasser aus dem
Wasserspender herausspritzen.
Warten Sie 24 Stunden, bis der Kühlschrank sich
und das Wasser abgekühlt hat. Entnehmen Sie
jede Woche genügend Wasser, damit es frisch
bleibt.
Nach 5 Minuten kontinuierlicher
Ausgabe stoppt der Wasserspender
die Wasserausgabe zur Verhinderung
einer Überschwemmung. Sie können
C
die Ausgabe fortsetzen, indem Sie
erneut den Hebel drücken.
5.19 Wasser ausgeben
Halten Sie einen Behälter unter den Ausguss des
Wasserspenders, während Sie den Hebel gedrückt
halten.
Zum Stoppen der Ausgabe lassen Sie den Hebel
los.
Das erste Wasser, das aus dem Spender
fließt, kann noch etwas warm sein. Dies
C
C
Nach dem ersten Einschalten müssen Sie etwa 24
Stunden abwarten, bis das Wasser abgekühlt ist.
Ziehen Sie das Glas heraus, kurz nachdem Sie den
Auslöser gezogen haben.
ist normal.
Falls der Wasserspender längere Zeit nicht
genutzt wurde, gießen Sie die ersten paar
Gläser Wasser weg, bis frisches Wasser
ausgegeben wird.
26 / 31 DE
Kühlschrank/ Bedienungsanleitung
Page 58

Produktbedienung
5.20 Wasserspender verwenden
Möglicherweise tropft vor der ersten
Inbetriebnahme Ihres Kühlschranks
und nach Auswechslung des
Wasserfilters etwas Wasser aus dem
Wasserspender. Damit kein Wasser
aus dem Wasserspender tropft oder
ausläuft, sollten Sie das System
entlüften, indem Sie ca. 20 Liter
A
C
5.21 Eiswürfelspender
(bei bestimmten Modellen)
Um Eiswürfel herzustellen, füllen Sie
den Wassertank im Kühlschrank bis zur
Höchststandmarke mit Wasser.
Die Eiswürfel im Eiswürfelfach können durch
Eindringen warmer feuchter Luft in den
Kühlschrank mit der Zeit (etwa 15 Tage)
miteinander verschmelzen und Klumpen bilden.
Das ist normal. Falls Sie die Eiswürfel nicht mehr
leicht trennen können, entleeren Sie besser den
Eisbehälter und stellen frisches Eis her.
Wasser über den Wasserspender
ausgeben. Dadurch wird jegliche
Luft aus dem System beseitigt und
der Wasserspender läuft nicht aus.
Prüfen Sie Anschlussposition und
Geradheit des Wasserschlauchs an
der Rückseite des Gerätes, falls der
Wasserfluss blockiert wird.
Es ist völlig normal, wenn der Wasserspender
nach der Ausgabe von etwas Wasser leicht
tropft.
Sie sollten nicht verbrauchtes Wasser
C
C
C
C
im Wassertank des Kühlschranks
spätestens nach 2 bis 3 Wochen
austauschen.
Das Eiswürfelherstellungssystem des
Kühlschranks kann alle 2 Stunden
leichte Geräusche erzeugen. Das ist
normal.
Wenn Sie keine Eiswürfel herstellen wollen,
betätigen Sie das Symbol „Kein Eis“. Damit
sparen Sie Energie und verlängern die
Lebensdauer Ihres Kühlschranks.
Es ist normal, dass nach der Entnahme von
Wasser ein paar Tropfen aus dem Spender
nachlaufen.
5.22 Eisbereiter und Eisbehälter
(bei bestimmten Modellen)
Füllen Sie den Eisbereiter mit Wasser, setzen Sie
ihn in seine Halterung. Ihr Eis ist nach etwa zwei
Stunden fertig. Zum Entnehmen des Eises nehmen
Sie den Eisbereiter nicht heraus.
Drehen Sie die Knöpfe daran um 90 ° im
Uhrzeigersinn.
Die Eiswürfel fallen in den darunter liegenden
Eiswürfelbehälter.
Sie können den Eisbehälter zum Servieren der
Eiswürfel herausnehmen.
Wenn Sie möchten, können Sie das Eis auch im
Eisbehälter aufbewahren.
Eisbehälter
Der Eisbehälter dient ausschließlich zum Sammeln
der Eiswürfel. Füllen Sie kein Wasser ein. Der
Behälter wird sonst platzen.
27 / 31 DE
Kühlschrank/ Bedienungsanleitung
Page 59

6. Pflege und Reinigung
Eine regelmäßige Reinigung erhöht die
Lebensdauer des Geräts.
HINWEIS: Trennen Sie Ihren
Kühlschrank vor der Reinigung
B
• Verwenden Sie zur Reinigung auf keinen Fall
scharfen oder spitzen Gegenstände, Seife,
Hausreinigungsmittel, Reinigungsmittel, Gas,
Benzin, Lack u. Ä.
• Bei nicht eisfreien Geräten bilden sich
Wassertropfen an der Rückwand des
Kühlfaches, die zu einer fingerdicken Eisschicht
gefrieren können. Nicht beseitigen, nicht
reinigen, niemals Öl oder andere Mittel
auftragen.
• Reinigen Sie die Außenflächen des Gerätes
nur mit einem leicht angefeuchteten
Mikrofasertuch. Schwämme und andere
Reinigungshilfen können die Oberfläche
verkratzen.
• Schütten Sie ein Teelöffel Karbonat in einen
halben Liter Wasser. Nehmen Sie ein Tuch,
tauchen Sie es in diese Flüssigkeit und wringen
Sie es gut kräftig. Wischen Sie mit diesem Tuch
das Innere des Geräts und trocknen Sie es
gründlich.
• Achten Sie darauf, dass das Gehäuse der
Leuchte und sonstige elektrischen Teile nicht
mit Wasser in Berührung kommen.
• Reinigen Sie die Tür mit einem feuchten Tuch.
Entnehmen Sie den Inhalt vom Innenraum
und den Türen. Entfernen Sie die Regale nach
oben hebend. Nach der Reinigung und dem
Trocknen legen Sie es wieder ein, indem Sie es
nach unten schieben.
• Verwenden Sie auf keinen Fall bei der
Reinigung der Außenfläche des Geräts und den
verchromten Teilen chlorhaltigem Wasser oder
Reinigungsmittel. Chlor führt bei dieser Art von
Oberflächen zur Verrostungen.
• Verwenden Sie keine spitzen oder scheuernde
Gegenstände, Seifen, Reinigungsmittel
bzw. Chemikalien, sowie auch kein Benzin,
keine Benzole bzw. Wachse usw. Andernfalls
werden die Einprägungen auf den Plasteteilen
möglicherweise beschädigt oder deformiert.
vom Netz.
Verwenden Sie warmes Wasser und einen
weichen Lappen zum anschließenden
Trockenreiben.
6.1. Vermeidung von
schlechtem Geruch
Bei der Herstellung Ihres Geräts wurden keinerlei
Materialien verwendet, die Geruch verursachen
könnten. Jedoch können aufgrund von
ungeeigneter Lagerung von Lebensmitteln und
unsachgemäßer Reinigung der Innenseite Gerüche
entstehen.
Zur Vermeidung dieses Problems reinigen Sie es
regelmäßig alle 15 Tage.
• Bewahren Sie die Speisen in geschlossenen
Behältern auf. Lebensmittel, die in offenen
Behältern aufbewahrt werden, können durch
die Verbreitung von Mikroorganismen Gerüche
verursachen.
• Keine Lebensmittel deren Aufbewahrungsdauer
abgelaufen ist im Kühlschrank aufbewahren.
6.2. Schutz von
Kunststoffoberflächen
Das Ausschütten von Öl kann den
Kunststoffoberflächen Schaden zufügen, daher
sollte hier mit lauwarmem Wasser gereinigt
werden.
28 / 31 DE
Kühlschrank/ Bedienungsanleitung
Page 60

7. Problemlösung
vivo
Bitte schauen Sie sich zunächst diese Liste an,
bevor Sie sich an den Kundendienst wenden.
Das kann Ihnen Zeit und Geld sparen. In der Liste
finden Sie Lösungsvorschläge für allgemeine
Probleme, die nicht durch Material- oder
Herstellungsfehler verursacht werden. Bestimmte
hierin erwähnte Funktionen und Merkmale treffen
möglicherweise nicht auf Ihr Produkt zu.
Der Kühlschrank schaltet sich nicht ein.
• Der Netzstecker ist nicht vollständig
eingesteckt. >>> Stecker vollständig in die
Steckdose einstecken.
• Die mit der Steckdose, die das Produkt mit
Strom versorgt, verbundene Sicherung oder
die Hauptsicherung ist durchgebrannt. >>>
Sicherungen prüfen.
Kondensation an den Seitenwänden des
Kühlbereiches (Multizone, Kühlkontrolle
und FlexiZone).
• Die Tür wird zu häufig geöffnet. >>> Darauf
achten, die Gerätetür nicht zu häufig zu
öffnen.
• Die Umgebungsfeuchtigkeit ist zu hoch. >>>
Produkt nicht in Umgebungen mit hoher
Luftfeuchtigkeit aufstellen.
• Lebensmittel mit hohem Flüssigkeitsgehalt
werden in nicht abgedichteten Behältern
aufbewahrt. >>> Lebensmittel mit hohem
Flüssigkeitsgehalt in abgedichteten Behältern
aufbewahren.
• Die Gerätetür wurde offen gelassen. >>>
Gerätetür nicht längere Zeit offen lassen.
• Das Thermostat ist auf eine zu geringe
Temperatur eingestellt. >>> Thermostat auf
eine geeignete Temperatur einstellen.
Der Kompressor läuft nicht.
• Wenn ein Stromausfall auftritt oder
der Netzstecker gezogen und wieder
angeschlossen wird, ist der Gasdruck im
Kühlsystem des Gerätes nicht ausgeglichen,
was den Temperaturschutz des Kompressors
auslöst. Das Produkt startet nach etwa 6
Minuten neu. Falls das Produkt nach diesem
Zeitraum nicht neu startet, wenden Sie sich
an den Kundendienst.
• Die Abtaufunktion ist aktiv. >>> Dies ist bei
einem vollautomatisch abtauenden Produkt
normal. Das Abtauen wird regelmäßig
durchgeführt.
• Das Gerät ist nicht an die Stromversorgung
angeschlossen. >>> Prüfen, ob das
Netzkabel angeschlossen ist.
• Die Temperatur ist nicht richtig eingestellt.
>>> Die geeignete Temperatureinstellung
wählen.
• Der Strom ist ausgefallen. >>> Sobald die
Stromversorgung wiederhergestellt ist, setzt
das Gerät den Betrieb fort.
Während der Benutzung nehmen die
Betriebsgeräusche des Kühlschranks zu.
• Die Betriebsleistung des Gerätes kann je
nach Umgebungstemperatur variieren. Dies
ist völlig normal und keine Fehlfunktion.
Der Kühlschrank arbeitet zu oft oder zu
lange.
29 / 31 DE
Kühlschrank/ Bedienungsanleitung
Page 61

Fehlerbehebung
• Ihr neues Gerät ist vielleicht etwas grö0er als sein
Vorgänger. Größere Produkte arbeiten länger.
• Die Umgebungstemperatur ist sehr hoch.
>>> Das Gerät arbeitet bei höheren
Umgebungstemperaturen normalerweise länger.
• Das Gerät wurde erst vor Kurzem angeschlossen
oder mit neuen Lebensmitteln beladen. >>>
Das Gerät benötigt mehr Zeit zum Erreichen der
eingestellten Temperatur, wenn es gerade erst
angeschlossen oder mit neuen Lebensmitteln
befüllt wurde. Dies ist völlig normal.
• Es wurden erst vor Kurzem große Mengen
warmer oder gar heißer Lebensmittel in das Gerät
gegeben. >>> Keine warmen oder gar heißen
Lebensmittel in das Gerät geben.
• Die Türen wurden häufig geöffnet oder längere Zeit
offen gelassen. >>> Da warme Luft in das Innere
strömt, muss das Gerät länger arbeiten. Türen
nicht zu häufig öffnen.
• Die Tür des Tiefkühl- oder Kühlbereichs steht
halb offen. >>> Prüfen, ob Türen vollständig
geschlossen sind.
• Das Gerät wurde auf eine zu geringe Temperatur
eingestellt. >>> Höhere Temperatur einstellen und
warten, bis das Gerät die eingestellte Temperatur
erreicht hat.
• Die Türdichtungen von Kühl- oder Gefrierbereich
sind verschmutzt, verschlissen, beschädigt oder
sitzen nicht richtig. >>> Dichtung reinigen oder
ersetzen. Beschädigte/verschlissene Dichtungen
sorgen dafür, dass das Produkt zum Halten der
aktuellen Temperatur länger arbeiten muss.
Die Temperatur im Tiefkühlbereich ist
sehr niedrig, während die Temperatur im
Kühlbereich angemessen ist.
• Die Tiefkühlbereichtemperatur ist sehr niedrig
eingestellt. >>> Tiefkühlbereichtemperatur
höher einstellen, Temperatur nach einer Weile
prüfen.
Die Temperatur im Tiefkühlbereich ist
sehr niedrig, während die Temperatur im
Kühlbereich angemessen ist.
• Die Kühlbereichtemperatur ist sehr niedrig
eingestellt. >>> Tiefkühlbereichtemperatur
höher einstellen, Temperatur nach einer Weile
prüfen.
Im Kühlbereich gelagerte Lebensmittel
frieren ein.
• Die Kühlbereichtemperatur ist sehr niedrig
eingestellt. >>> Tiefkühlbereichtemperatur
höher einstellen, Temperatur nach einer Weile
prüfen.
Die Temperatur im Kühl- oder
Tiefkühlbereich ist zu hoch.
• Die Kühlbereichtemperatur ist sehr hoch
eingestellt. >>> Die Kühlbereichtemperatur
beeinflusst die Tiefkühlbereichtemperatur.
Warten Sie, bis die entsprechenden Teile
das erforderliche Temperatur erreicht haben,
indem Sie die Temperatur des Kühl- oder
Tiefkühlbereichs ändern.
• Die Türen wurden häufig geöffnet oder
längere Zeit offen gelassen. >>> Türen nicht
zu häufig öffnen.
• Die Tür steht halb offen. >>> Tür vollständig
schließen.
• Das Gerät wurde erst kurz zuvor
angeschlossen oder es wurden neue
Lebensmittel hineingegeben. >>> Dies ist
völlig normal. Das Gerät benötigt mehr Zeit
zum Erreichen der eingestellten Temperatur,
wenn es gerade erst angeschlossen oder mit
neuen Lebensmitteln befüllt wurde.
• Es wurden erst vor Kurzem große Mengen
warmer oder gar heißer Lebensmittel in das
Gerät gegeben. >>> Keine warmen oder gar
heißen Lebensmittel in das Gerät geben.
Vibrationen oder Betriebsgeräusche.
• Der Boden ist nicht eben oder stabil. >>>
Falls das Produkt bei langsamem Bewegen
wackelt, müssen die Füße zum Ausgleichen
des Gerätes angepasst werden. Außerdem
darauf achten, dass der Untergrund
ausreichend stabil ist, das Gerät zu tragen.
• Jegliche auf dem Gerät abgelegten Dinge
können Geräusche verursachen. >>>
Jegliche auf dem Gerät abgelegten Dinge
entfernen.
Das Produkt macht Sprüh- oder
Fließgeräusche etc.
30 / 31 DE
Kühlschrank/ Bedienungsanleitung
Page 62

Fehlerbehebung
• Die Arbeitsweise des Gerätes beinhaltet
Flüssigkeits- und Gasströme. >>>Dies ist
völlig normal und keine Fehlfunktion.
Das Gerät macht windartige Geräusche.
• Das Produkt nutzt einen Lüfter zur Kühlung.
Dies ist völlig normal und keine Fehlfunktion.
Es befindet sich Kondenswasser an den
Innenwänden des Produktes.
• Bei heißen oder feuchten Wetterlagen treten
verstärkt Eisbildung und Kondensation auf.
Dies ist völlig normal und keine Fehlfunktion.
• Die Tür wurde häufig geöffnet oder längere
Zeit offen gelassen. >>> Tür nicht zu häufig
öffnen; Tür nicht offen stehen lassen.
• Die Tür steht halb offen. >>> Tür vollständig
schließen.
Es befindet sich Kondenswasser an der
Außenseite des Produktes oder zwischen
den Türen.
• Eventuell herrscht hohe Luftfeuchtigkeit; dies
ist je nach Wetterlage völlig normal. >>> Das
Kondenswasser verdunstet, wenn sich die
Luftfeuchtigkeit verringert.
Der Innenraum riecht unangenehm.
• Das Produkt wurde nicht regelmäßig
gereinigt. >>> Innenraum regelmäßig mit
einem Schwamm und warmem Wasser
und etwas in Wasser aufgelöstem Natron
reinigen.
• Bestimmte Verpackungsmaterialien
können Geräusche verursachen. >>>
Geruchsneutrale Halterungen und
Verpackungen verwenden.
• Lebensmittel wurde in offenen Behältern
in den Kühlschrank gestellt. >>>
Lebensmittel in sicher abgedichteten
Behältern aufbewahren. Andernfalls können
sich Mikroorganismen ausbreiten und
unangenehme Gerüche verursachen. Jegliche
abgelaufenen oder verdorbenen Lebensmittel
aus dem Gerät entfernen.
Die Tür lässt sich nicht schließen.
• Lebensmittelverpackungen blockieren die Tür.
>>> Inhalt so platzieren, dass die Tür nicht
blockiert wird.
• Das Gerät steht nicht vollständig aufrecht auf
dem Boden. >>> Füße zum Ausgleichen des
Gerätes anpassen.
• Der Boden ist nicht eben oder stabil. >>>
Darauf achten, dass der Untergrund eben und
ausreichend stabil ist, das Gerät zu tragen.
Das Gemüsefach klemmt.
• Die Lebensmittel berühren den oberen
Bereich der Schublade. >>> Lebensmittel in
der Schublade neu anordnen.
Wenn Die Produktoberfläche Heiss Ist.
• Die Bereiche zwischen den beiden Türen, an
den Seitenflächen und hinten am Grill können
im Betrieb sehr heiß werden. Dies ist völlig
normal und weist nicht auf eine Fehlfunktion
hin.Seien Sie sehr vorsichtig, wenn Sie diese
Bereiche berühren.
WARNUNG: Falls sich das Problem
nicht durch Befolgen der Anweisungen in
A
diesem Abschnitt beheben lässt, wenden
Sie sich an Ihren Händler oder ein
autorisiertes Kundencenter. Versuchen
Sie nicht, das Produkt zu reparieren.
31 / 31 DE
Kühlschrank/ Bedienungsanleitung
Page 63

Refrigerador
Manual del usuario
EWWERQWEW
ES
Page 64

¡Lea el Manual del usuario antes del uso!
Estimado cliente:
Esperamos que su producto, que ha sido producido en instalaciones modernas y ha sido comprobado
conforme a los procedimientos de control de calidad más meticulosos, le proporcione un servicio eficaz.
El Manual del usuario le ayudará a utilizar el producto de forma rápida y segura.
• Asegúrese de leer las instrucciones de seguridad.
• Guarde el manual en un lugar fácilmente accesible, ya que lo podrá necesitar más tarde.
• Lea todos los demás documentos suministrados con el producto.
• El fabricante se reserva el derecho a realizar modificaciones en el producto.
Recuerde que este Manual del usuario es también aplicable a varios otros modelos.
Explicación de los símbolos
Los siguientes símbolos se utilizan en la guía del usuario:
Información adicional o consejos útiles
C
A
sobre el uso.
Riesgo de lesiones y daños a la
propiedad.
Riesgo de descarga eléctrica.
B
Los materiales de embalaje del aparato
son fabricados a partir de materiales
reciclables, de acuerdo con nuestra
Reglamentación Nacional para el Medio
Ambiente.
Page 65

Contenido
1. Instrucciones de seguridad y medio
ambiente 3
2 Su frigorífico 6
2 Su frigorífico 7
3 Instalación 8
3.1 Ubicación adecuada para la instalación . . . 8
3.2 Instalación de las cuñas de plástico . . . . . . 8
3.3* Ajuste de las patas . . . . . . . . . . . . . . . . . 8
3.4 Conexión eléctrica . . . . . . . . . . . . . . . . . 9
4 Preparación 10
4.1 Cosas por hacer para ahorrar energía . . . 10
4.2 Recomendaciones sobre el compartimiento
de alimentos frescos. . . . . . . . . . . . . . . 10
4.3 Primer uso . . . . . . . . . . . . . . . . . . . . . . . 11
5 Operación del producto 12
5.1 Panel indicador. . . . . . . . . . . . . . . . . . . . 12
5.2 Panel indicador. . . . . . . . . . . . . . . . . . . . 17
5.3 Congelación de alimentos frescos . . . . . . 19
5.4 Recomendaciones para la preservación de los
alimentos congelados . . . . . . . . . . . . . . 19
5.5 Información de congelados . . . . . . . . . . . 19
5.6 Colocación de los alimentos. . . . . . . . . . . 20
5.7 Advertencia de puerta abierta . . . . . . . . . 20
5.8 Luz interior . . . . . . . . . . . . . . . . . . . . . . . 20
5.9 Compartimento frigorífico . . . . . . . . . . . . 21
5.10 Cajón para verduras . . . . . . . . . . . . . . . 21
5.11 Cajón de verduras con humedad
controlada . . . . . . . . . . . . . . . . . . . . . . 21
(FreSHelf) . . . . . . . . . . . . . . . . . . . . . . . . . . . 21
5.12 Bandeja para huevos. . . . . . . . . . . . . . . 21
5.13 Sección media móvil . . . . . . . . . . . . . . 22
5.14 Control de enfriar del compartimiento para
almacenamiento . . . . . . . . . . . . . . . . . 22
5.15 Luz azul . . . . . . . . . . . . . . . . . . . . . . . . 22
5.16 Filtro de olores . . . . . . . . . . . . . . . . . . . 22
5.17 Compartimento de bodega . . . . . . . . . . 23
5.18 Utilizar un dispensador de agua interno . 24
5.19 Dispensar agua. . . . . . . . . . . . . . . . . . . 24
5.20 Utilización del dispensador de agua . . . . 25
5.21 Icematic . . . . . . . . . . . . . . . . . . . . . . . 25
5.22 Icematic y contenedor de almacenamiento de
hielo . . . . . . . . . . . . . . . . . . . . . . . . . . 26
6. Limpieza y mantenimiento 27
7 Solución de problemas 28
2 / 30 ES
Frigorífico / Manual del usuario
Page 66

1. Instrucciones de seguridad y medio ambiente
Esta sección proporciona las instrucciones
de seguridad necesarias para evitar el
riesgo de lesión y daños materiales. El
incumplimiento de estas instrucciones
puede invalidar cualquier tipo de garantía
del aparato.
Finalidad prevista
ADVERTENCIA:
A
A
A
A
Este dispositivo está diseñado para ser
utilizado en el hogar o en las siguientes
aplicaciones similares:
- Con el fin de ser utilizado en las
cocinas para el personal de las tiendas,
oficinas y otros lugares de trabajo;
- Con el fin de ser utilizado por los
clientes en casas de campo y hoteles,
moteles y otros lugares de alojamiento:
- en entornos tales pensiones;
Asegúrese de que cuando
el dispositivo está en su
custodia o durante su
montaje en el alojamiento,
los orificios de ventilación no
están cerrados.
ADVERTENCIA:
Con el fin de acelerar la
operación de derretimiento
del hielo, no utilice
cualquier dispositivo o
aparato mecánico que no
es recomendado por el
fabricante
ADVERTENCIA:
No dañe el circuito de fluido
refrigerante.
ADVERTENCIA:
No utilice dispositivos
eléctricos que no
estén recomendados
por el fabricante en
los compartimentos
del dispositivo para la
conservación de alimentos.
- en lugares similares que no
ofrecen servicios de restauración y no es
al por menor.
1.1. Seguridad general
• Este aparato no debe ser utilizado
por personas con discapacidades
físicas, sensoriales y mentales, sin
el conocimiento y la experiencia
suficiente o por los niños. El aparato
solo puede ser utilizado por estas
personas bajo la supervisión y
la instrucción de una persona
responsable de su seguridad. A los
niños no se les debe permitir jugar con
este dispositivo.
• En caso de mal funcionamiento,
desconecte el dispositivo.
• Después de desconectar, espere por lo
menos 5 minutos antes de conectar de
nuevo. Desenchufe el aparato cuando
no esté en uso. ¡No toque el enchufe
con las manos mojadas! No tire del
cable para enchufar para sacarlo de la
toma de la pared, hágalo tomándolo de
la cabeza del enchufe.
• No enchufe el refrigerador si la toma
de corriente está floja.
• Desenchufe el aparato durante la
instalación, el mantenimiento, limpieza
y reparación.
• Si el aparato no se utiliza durante
un tiempo, desenchufe el aparato
y elimine cualquier alimento en el
interior.
• No utilice vapor ni materiales de
limpieza al vapor para la limpieza del
refrigerador y el derretimiento del
hielo en el interior. ¡El vapor podría
contactar las zonas electrificadas y
causar un cortocircuito o una descarga
eléctrica!
• ¡No lave el aparato rociando ni
vertiendo agua sobre él! ¡Riesgo de
3 / 30 ES
descarga eléctrica!
Frigorífico / Manual del usuario
Page 67

Instrucciones importantes respecto a la seguridad y el medio ambiente
• Nunca utilice el producto si la sección
situada en la parte superior o posterior
del producto que tiene las placas de
circuitos impresos electrónicos en el
interior está abierta (cubierta de la placa
del circuito electrónico impreso) (1).
• No ponga recipientes que contengan
líquido encima del aparato. Salpicar
agua en una parte electrificada podría
provocar descargas eléctricas y riesgos
de incendio.
• La exposición del aparato a la lluvia, la
nieve, la luz directa del sol y el viento
causarán un peligro eléctrico. Cuando
traslade el aparato, no tire sujetando
1
la manija de la puerta. El mango se
podría salir.
• Tenga cuidado de no atrapar ninguna
parte de sus manos o de su cuerpo en
1
• En caso de mal funcionamiento, no
utilice el aparato, ya que puede causar
una descarga eléctrica. Póngase
en contacto con el servicio técnico
autorizado antes de hacer cualquier
cualquiera de las partes móviles en el
interior del aparato.
• No se pare ni se apoye en las puertas,
cajones y partes similares de la nevera.
Esto causará que el aparato se caiga
hacia y dañe sus partes.
• Tenga cuidado de no tropezar con el
cable de alimentación.
cosa.
• Conecte el aparato a una toma de tierra.
La puesta a tierra debe ser realizada por
un electricista calificado.
• Si el aparato tiene un LED de
iluminación y requiere sustituirlo,
póngase en contacto con el servicio
técnico autorizado para sustituirlo o en
caso de cualquier problema.
• ¡No toque la comida congelada con las
manos mojadas! ¡Se podría adherir a
sus manos!
• No coloque líquidos en botellas ni latas
en el compartimento del congelador.
¡Podrían estallar!
• Coloque los líquidos en posición vertical
después cerrar bien la tapa.
• No rocíe sustancias inflamables cerca
del aparato, ya que podría quemarse o
explotar.
• No guarde materiales ni aparatos con
gases inflamables (sprays, etc.) en el
refrigerador.
1.1.1 Aviso HC
Si el aparato dispone de un sistema de
refrigeración que utilizan gas R600a,
tenga cuidado de no dañar el sistema
de refrigeración y su tubería mientras se
utiliza o mueva el aparato. Este gas es
inflamable. Si el sistema de refrigeración
está dañado, mantenga el aparato
alejado de fuentes de incendio y ventile la
habitación inmediatamente.
La etiqueta en la parte
interior izquierda indica el
C
4 / 30 ES
tipo de gas utilizado en el
aparato.
Frigorífico / Manual del usuario
Page 68

Instrucciones importantes respecto a la seguridad y el medio ambiente
1.1.2 Para los modelos con
dispensador de agua
• La presión en la entrada de agua fría
sera a un máximo de 90 psi (6.2 bar). Si
la presión del agua es superior a 80 psi
(5,5 bar), utilice una válvula limitadora
de presión en el sistema de red. Si
usted no sabe cómo controlar la presión
del agua, pida la ayuda de un plomero
profesional.Si hay riesgo de golpe de
ariete en la instalación, siempre utilice
un equipo de prevención contra golpes
de ariete en la instalación. Consulte a un
fontanero profesional si no está seguro
de que no hay un efecto del golpe de
ariete en la instalación.
• No instale en la entrada de agua
caliente. Tome precauciones contra del
riesgo de congelación en las mangueras.
El intervalo de funcionamiento de la
temperatura del agua debe ser un
mínimo de 33°F (0.6°C) y un máximo de
100°F (38°C).
• Solo use agua potable apta para beber.
1.3. Seguridad para niños
• Guarde los materiales de embalaje fuera
del alcance de los niños.
• A los niños no se les debe permitir jugar
con el aparato.
• Si la puerta del aparato usa una
cerradura, guarde la llave fuera del
alcance de los niños.
1.4. En cumplimiento de la Directiva
RAEE, y la eliminación del aparato
Este aparato cumple con la Directiva WEEE
(RAEE) de la UE (2012/19/EU). Este aparato lleva el
símbolo de clasificación de los equipos eléctricos y
electrónicos (WEEE/RAEE).
Este aparato ha sido fabricado con
piezas y materiales de alta calidad que
pueden ser reutilizados y son aptos
para el reciclaje. No deseche el aparato
de junto con los desechos domésticos
normales al final de su vida útil. Llévelo
al centro de recolección para reciclaje
de aparatos eléctricos y electrónicos. Consulte a las
autoridades locales para obtener información acerca
de estos centros de acopio.
1.5. En cumplimiento de
1.2. Uso previsto
• Este aparato está diseñado para uso en
el hogar. No es adecuado para un uso
comercial.
• El aparato debe utilizarse para
solamente para almacenar alimentos y
la Directiva RoHS
• El producto que ha adquirido es conforme con
la directiva de la UE sobre la restricción de
sustancias peligrosas (RoHS) (2011/65/UE). No
contiene ninguno de los materiales nocivos o
prohibidos especificados en la directiva.
bebidas.
• No guarde aparatos sensibles que
requieran temperatura controlada
(vacunas, medicamentos sensibles
al calor, equipos médicos, etc.) en el
refrigerador.
• El fabricante no asume ninguna
responsabilidad por los daños debidos al
mal uso o mal manejo.
• Se proporcionarán piezas de recambio
1.6. Información sobre el paquete
• Los materiales de embalaje del aparato son
fabricados a partir de materiales reciclables, de
acuerdo con nuestra Reglamentación Nacional
para el Medio Ambiente. No se deshaga de los
materiales de embalaje junto con los desechos
domésticos o de otro tipo. Llévelos a los
puntos de recolección de material de embalaje
designados por las autoridades locales.
originales durante 10 años, después de
la fecha de compra del producto.
5 / 30 ES
Frigorífico / Manual del usuario
Page 69

2 Su frigorífico
1
*2
5
10
*8
4
5
7
9
11
*3
6
1- Panel de control e indicador
2- Sección de mantequilla y queso
3- Estante de puerta en movimiento de 70 mm
4- Estante de cristal del compartimento frigorífico
5- Compartimento para verduras del frigorífico
6- Estante de la puerta con capacidad para galón
Las imágenes en este manual son esquemáticos y pueden no coincidir exactamente con su producto.
Si usted ha comprado las piezas que no se incluyen en el producto, entonces esas piezas son válidas
C
para otros modelos.
6 / 30 ES
7- Compartimento enfriador
8- Cajón de la caja de hielo
9- Estante de cristal del compartimento
multizonas
10- Cajones del congelador
11- Cajón del compartimento multizonas
* OPCIONAL
Frigorífico / Manual del usuario
Page 70

2 Su frigorífico
1
4
5
*8
10
5
7
9
*2
*3
6
1- Panel de control e indicador
2- Sección de mantequilla y queso
3- Estante de puerta en movimiento de 70 mm
4- Estante de cristal del compartimento frigorífico
5- Compartimento para verduras del frigorífico
6- Estante de la puerta con capacidad para galón
Las imágenes en este manual son esquemáticos y pueden no coincidir exactamente con su producto.
Si usted ha comprado las piezas que no se incluyen en el producto, entonces esas piezas son válidas
C
para otros modelos.
7 / 30 ES
7- Compartimento enfriador
8- Cajón de la caja de hielo
9- Estante de cristal del compartimento
multizonas
10- Cajones del congelador
* OPCIONAL
Frigorífico / Manual del usuario
Page 71

3 Instalación
3.1 Ubicación adecuada
para la instalación
Póngase en contacto con un servicio autorizado
para la instalación del producto. Con el fin de
preparar el producto para su uso, consulte la
información en el Manual del usuario y asegurarse
de que la instalación eléctrica y la instalación de
agua sean apropiadas. Si no es así, llame a un
electricista calificado y técnico para que realice las
instalaciones necesarias.
ADVERTENCIA: El fabricante no se hace
responsable de los daños que puedan
B
B
A
derivarse de los procedimientos llevados a
cabo por personas no autorizadas.
ADVERTENCIA: El producto no debe
estar enchufado durante la instalación. De
lo contrario, ¡existe el riesgo de muerte o
lesiones graves!
ADVERTENCIA: : Si la holgura de la
puerta de la habitación donde se colocará
el producto es tan apretado a prevenir
el paso del producto, retire la puerta de
la habitación y pase el producto a través
de la puerta girando a su lado; Si esto
no funciona, póngase en contacto con el
servicio técnico autorizado.
3.2 Instalación de las
cuñas de plástico
Las cuñas de plástico suministrados con el
producto se utilizan para crear la distancia para
la circulación del aire entre el producto y la pared
posterior.
1.
Para colocar las cuñas, quite los tornillos en el
aparato y utilice los tornillos provistos con las cuñas.
2.
Coloque 2 cuñas de plástico sobre la cubierta de la
ventilación trasera como se muestra en la figura.
•Coloqueelproductosobreunasuperficieplana
para evitar vibraciones.
•Instaleelproductoporlomenosa30cmde
distancia de fuentes de calor tales como placas,
centros del calentador, estufas y al menos a 5
cm de distancia de hornos eléctricos.
•Elproductonodebesersometidoalaluzdirecta
del sol y debe evitar mantenerse en lugares
húmedos.
•Laventilacióndeaireadecuadadebe
proporcionarse alrededor de su producto con
el fin de lograr un funcionamiento eficaz. Si
el producto se va a colocar en un hueco en la
pared, preste atención a dejar por lo menos
5 cm de distancia de las paredes de techo y
laterales.
•Noinstaleelproductoenambientescon
temperaturas inferiores a -5°C.
8 / 30 ES
3.3* Ajuste de las patas
Si el producto se encuentra desequilibrado
después de la instalación, ajuste las patas en la
parte frontal, haciéndolas girar hacia la derecha o
izquierda.
*Si su producto no cuenta con un compartimiento
de vino o no es una puerta de vidrio, su producto
no tiene soportes regulables, el producto tiene
soportes fijos.
Frigorífico / Manual del usuario
Page 72

Instalación
Para ajustar las puertas verticalmente,
Afloje la tuerca de fijación situada en la parte
inferior.
Gire la tuerca de ajuste de acuerdo con la posición
de la puerta (en sentido horario / antihorario).
Apriete la tuerca de fijación con el fin de fijar la
posición.
Para ajustar las puertas verticalmente,
Afloje la tuerca de fijación situada en la parte
superior.
Gire la tuerca de ajuste de acuerdo con la posición
de la puerta (en sentido horario / antihorario).
Apriete la tuerca de fijación en la parte superior
con el fin de fijar la posición.
El grupo de bisagras superior está fijado con 3
tornillos.
-La cubierta de la bisagra se acopla una vez
instalados los zócalos.
- A continuación, la cubierta de la bisagra se fija con
dos tornillos.
3.4 Conexión eléctrica
ADVERTENCIA: No haga conexiones a
través de cables de extensión o enchufes
A
B
C
múltiples.
ADVERTENCIA: Un cable de corriente
dañado deberá ser reemplazado por el
Servicio Autorizado.
Si dos enfriadores deben ser instalados al
lado del otro, no debe haber menos 4 cm
de distancia entre ellos.
adjusting nut
adjusting nut
fixing nut
fixing nut
• Nuestra empresa no será responsable de los
daños que se producirán si el producto es
utilizado sin conexión a tierra y la conexión
eléctrica de acuerdo con las regulaciones
nacionales.
• El enchufe del cable de alimentación debe ser
de fácil acceso después de la instalación.
• Conecte el frigorífico a una toma a tierra con
un valor de voltaje de 220-240V /50 Hz. La
corriente debe tener un fusible de 10 a 16 A.
• No utilice cables de extensión o múltiples
puntos de conexión inalámbricos entre su
producto y la toma de corriente.
9 / 30 ES
Frigorífico / Manual del usuario
Page 73

4 Preparación
4.1 Cosas por hacer para
ahorrar energía
La conexión de su frigorífico en sistemas
que ahorran energía es peligrosa, ya que
A
• No deje las puertas abiertas de su frigorífico
• No coloque alimentos ni bebidas calientes en
• No sobrecargue el frigorífico. La capacidad de
• No coloque el frigorífico en lugares expuestos
• Almacene los alimentos en el frigorífico en
• Para poder almacenar alimentos al máximo
• El flujo de aire no debe ser bloqueado
• La descongelación de los alimentos congelados
puede causar daños en el producto.
por mucho tiempo.
el interior de su frigorífico.
enfriamiento se caerá cuando la circulación del
aire en el frigorífico se vea obstaculizada.
a la luz solar directa. Instale el producto por
lo menos a 30 cm de distancia de fuentes de
calor tales como placas, centros del calentador,
estufas y al menos a 5 cm de distancia de
hornos eléctricos.
recipientes cerrados.
en el congelador de su frigorífico, los cajones
superiores tienen que ser removidos y
colocados en el cajón superior del estante de
vidrio. El consumo de energía indicado para
su frigorífico se ha determinado después de
retirar el icematic y los cajones superiores
para permitir la máxima carga. Se recomienda
encarecidamente el uso de los cajones
inferiores en el congelador y el compartimento
multizona durante la carga.
mediante la colocación de los alimentos en
frente del congelador y los ventiladores del
compartimiento de la zona de múltiple. Los
alimentos deben ser cargados al dejar el
espacio mínimo de 5 cm por delante de la
rejilla de ventilación de protección.
en el compartimento frigorífico ahorra energía
y conreserva la calidad de los alimentos.
La temperatura de la habitación donde
se encuentra el frigorífico debe ser de al
C
C
C
menos 10ºC /50°F. No se recomienda
el funcionamiento de su frigorífico en
condiciones más frías en lo que respecta a
su eficacia.
El interior del frigorífico deben estar bien
limpio.
Si dos enfriadores deben ser instalados al
lado del otro, no debe haber menos 4 cm
de distancia entre ellos.
4.2 Recomendaciones sobre
el compartimiento de
alimentos frescos
• Asegúrese de que la comida no toque el
sensor de temperatura en el compartimento
de alimentos frescos. Para permitir que
el compartimiento de alimentos frescos
mantenga su temperatura ideal de
almacenamiento, el sensor no debe verse
obstaculizado por los alimentos.
• No coloque alimentos ni bebidas calientes en
el frigorífico.
10 / 30 ES
Frigorífico / Manual del usuario
Page 74

Preparación
4.3 Primer uso
Antes de utilizar el producto, asegúrese de que se
hayan realizado todos los preparativos de acuerdo
con las instrucciones dadas en los capítulos
"Instrucciones importantes respecto a la seguridad
y el medio ambiente" e "Instalación".
• Limpie el interior del frigorífico como se
recomienda en la sección "Mantenimiento y
limpieza". Antes de encender el frigorífico,
asegúrese de que el interior está seco.
• Conecte la cafetera a una toma a tierra. La
iluminación interior se enciende cuando se
abre la puerta del frigorífico.
• Haga funcionar el frigorífico durante 6 horas
sin necesidad de colocar los alimentos en él y
no abra la puerta a menos que sea necesario.
Se escuchará un ruido cuando el
compresor cuando se pone en marcha.
C
C
Los líquidos y gases sellados dentro del
sistema de refrigeración también pueden
dar lugar a ruido, incluso si el compresor
no está funcionando y esto es bastante
normal.
Los bordes delanteros del frigorífico
pueden sentirse calientes. Esto es normal.
Estas áreas están diseñadas para ser
calientes para evitar la condensación.
11 / 30 ES
Frigorífico / Manual del usuario
Page 75

5 Operación del producto
5.1 Panel indicador
El panel indicador de control táctil le permite fijar la temperatura y controlar las otras funciones
relacionadas con el refrigerador sin necesidad de abrir la puerta del producto. Solo tiene que pulsar los
botones correspondientes para configurar la función.
2 3
1
4
5 6
9
10 11
33
32
31
30
Select
Select
3 “
3 “
*34.1
27
28
29
*34.2
7
19
20
*8
Quick FreezeQuick Cool
3 “
FN
OK
1718
Quick FreezeQuick Cool
3 “
FN
OK
12
13
14
15
16
C
26
*25
24
23
22
21
Las imágenes en este manual son esquemáticos y pueden no coincidir exactamente con su producto.
Si usted ha comprado las piezas que no se incluyen en el producto, entonces esas piezas son válidas
para otros modelos.
12 / 30 ES
Frigorífico / Manual del usuario
Page 76

Operación del producto
1. Indicador de función de enfriamiento
rápido
Se enciende cuando se activa la función de
enfriado rápido.
2. Indicador de temperatura del
compartimiento del refrigerador
Se muestra la temperatura del compartimento
del frigorífico, que se puede configurar en
8,7,6,5,4,3,2,1.
3. Indicador Fahrenheit
Es un indicador en Fahrenheit. Cuando se activa
el indicador Fahrenheit, los valores de ajuste de
temperatura se muestran en Fahrenheit y el icono
correspondiente se enciende.
4. Bloqueo de botones
Pulse el botón de bloqueo simultáneamente durante 3 segundos. El símbolo de bloqueo de botones
se iluminará y se activará el modo de bloqueo de
botones. Los botones no funcionarán si el modo
de bloqueo de botones está activo. Pulse el botón
de bloqueo de botones al mismo tiempo durante
3 segundos. El símbolo de bloqueo de botones
se apagará y el modo de bloqueo de botones se
cancelará.
Presione el botón de bloqueo de botones, si
desea evitar cambios en la configuración de la
temperatura del frigorífico.
5. Advertencia de Corte de corriente / Alta
temperatura / Error
Este indicador se ilumina durante un corte eléctrico, fallas de alta temperatura y avisos de error.
Durante los cortes de energía a largo plazo, el
valor más alto de temperatura del compartimiento congelador parpadeará en la pantalla digital.
Después de comprobar la comida situada en el
compartimento del congelador, presione el botón
de alarma para borrar la advertencia.
Por favor refiérase a "soluciones recomendadas
para la solución de problemas" en el manual si
observa que este indicador se ilumina.
6. Icono de reajuste del filtro
Este icono se enciende cuando el filtro necesita
ser restablecido.
7. Icono de cambio de la temperatura de la
cabina
Indica la cabina cuya temperatura se va a cambiar.
Cuando el icono de cambio de la temperatura de
la cabina comienza a parpadear, se entiende que
la cabina relevante ha sido seleccionada.
8. Icono de comodín en el congelador
Pase el ratón sobre el icono del congelador comodín con
el botón FN; el icono comenzará a parpadear. Cuando se
pulsa la botón OK, el icono de comodín de la cabina del
congelador se enciende y funciona como un congelador.
9. Indicador de temperatura del
compartimiento del congelador
Se muestra la temperatura del compartimento del
frigorífico, que se puede configurar en -18, -19,
-20, -21, -22, -23, -24.
10. Indicador de función de Quick Freeze
(congelamiento rápido)
Se enciende cuando se activa la función de Quick
Freeze.
11. Indicador Fahrenheit
Es un indicador en Fahrenheit. Cuando se activa
el indicador Fahrenheit, los valores de ajuste de
temperatura se muestran en Fahrenheit y el icono
correspondiente se enciende.
12. Botón de función de Quick Freeze
(congelamiento rápido)
Presione este botón para activar o desactivar la
función de Quick Freeze. Cuando activa la función,
el compartimento del congelador enfriará a un
valor menor a la temperatura fijada.
Utilice la función de Quick Freeze
cuando se desea congelar
C
C
rápidamente el alimento colocado en
el compartimiento del congelador. Si
desea congelar grandes cantidades
de alimentos frescos, active la función
antes de colocar los alimentos en el
producto.
Si no se cancela, Quick Freeze, se
cancelará automáticamente después
de 4 horas o cuando el compartimento
frigorífico llegue a la temperatura
requerida.
13 / 30 ES
Frigorífico / Manual del usuario
Page 77

Operación del producto
C
13. Reinicio del filtro
El filtro se restablece cuando se pulsa el botón
de Quick Freeze (congelación rápida) durante
3 segundos. El icono de reposición del filtro se
apaga.
14. Botón FN
El uso de este botón, puede cambiar entre las
funciones que desee seleccionar. Al pulsar este
botón, el icono, cuya función se requiere para
ser activado o desactivado, y el indicador de este
icono comenzarán a parpadear. El botón FN se
desactiva si no se pulsa durante 20 segundos.
Es necesario pulsar este botón para cambiar las
funciones de nuevo.
15. Indicador en Celsius (centígrados)
Es un indicador Celsius. Cuando se activa la
indicación en centígrados, los valores de ajuste de
temperatura se muestran en grados Celsius y el
icono correspondiente se enciende.
16. Botón OK
Después de navegar por las funciones con el
botón FN, cuando la función se cancela mediante
el botón Ok (Aceptar), el icono correspondiente
y el indicador parpadearán. Cuando se activa la
función, se mantiene encendido. El indicador sigue
parpadeando con el fin de mostrar el icono que
está encendido.
17. Icono de cambio de la temperatura de la
cabina
Indica la cabina cuya temperatura se va a cambiar.
Cuando el icono de cambio de la temperatura de
la cabina comienza a parpadear, se entiende que
la cabina relevante ha sido seleccionada.
18. Icono de cambio de la temperatura de la
cabina
Indica la cabina cuya temperatura se va a cambiar.
Cuando el icono de cambio de la temperatura de
la cabina comienza a parpadear, se entiende que
la cabina relevante ha sido seleccionada.
Esta función no se reactiva luego de
una falla de energía eléctrica.
14 / 30 ES
19. Botón para establecer el aumento
Seleccione la cabina correspondiente con el botón
de selección, el icono que representa cabina de la
cabina correspondiente empieza a parpadear. Si
pulsa el botón de aumento durante este proceso,
el valor ajustado se incrementará. Si sigue presionando cíclicamente, el valor de ajuste volverá al
principio.
20. Icono de cambio de la temperatura de la
cabina
Indica la cabina cuya temperatura se va a cambiar.
Cuando el icono de cambio de la temperatura de
la cabina comienza a parpadear, se entiende que
la cabina relevante ha sido seleccionada.
21. Ajuste del indicador de grados Celsius y
Fahrenheit
Pase el ratón sobre este botón usando el botón FN
y seleccione Fahrenheit y Celsius confirmando con
el botón OK. Cuando se selecciona el tipo de temperatura correspondiente, el indicador Fahrenheit y
Celsius se enciende.
22. Icono de máquina de hielo apagada
Pulse el botón FN (hasta que alcance el icono de
hielo y la línea inferior) para apagar la máquina
de hielo. El icono de la máquina de hielo apagada
y el indicador de función de la máquina de hielo
comienzan a parpadear cuando los toca, por lo
tanto se puede entender si la máquina de hielo se
enciende o se apaga. Cuando se pulsa el botón
Ok, el icono de la máquina de hielo se ilumina de
forma continua y el indicador sigue parpadeando
durante este proceso. Si no pulsa ningún botón
después de 20 segundos, el icono y el indicador
se encienden. Por lo tanto, la máquina de hielo se
apagará. Con el fin de encender la máquina de
hielo de nuevo, coloque el cursor sobre el icono
y el indicador; De este modo, tanto el icono de la
máquina de hielo como el indicador comenzarán
a parpadear. Si no pulsa ningún botón durante 20
segundos, el icono y el indicador se apagarán y
por lo tanto la máquina de hielo se encenderá de
nuevo.
Muestra si el icematic está
C
funcionando o no.
Frigorífico / Manual del usuario
Page 78

Operación del producto
El flujo del agua desde el
C
23. Icono de la función Eco fuzzy
Pulse el botón FN (hasta que alcance la letra y
el icono de hielo y la línea inferior) para activar
el eco fuzzy. Al tocar sobre el icono del eco fuzzy
y el indicador de la función eco fuzzy empiezan
a parpadear. Por lo tanto, se puede entender si
la función eco fuzzy se activa o se desactiva.
Cuando pulsa el botón OK, el icono de la función
se ilumina de forma continua y el indicador sigue
parpadeando durante este proceso.. Si no pulsa
ningún botón después de 20 segundos, el icono y
el indicador se encienden. Por lo tanto, se activa
la función eco fuzzy. Con el fin de cancelar la
función eco fuzzy, coloque el cursor sobre el icono
y el indicador de nuevo y pulse el botón OK. De
este modo, tanto el icono de la función eco fuzzy
y el indicador comienzan a parpadear. Si no pulsa
ningún botón durante 20 segundos, el icono y el
indicador se apagarán y por lo tanto la función eco
fuzzy se cancelará.
24. Icono de función de vacaciones
Pulse el botón FN (hasta que alcance la letra y
el icono de hielo y la línea inferior) para activar
la función de vacaciones. Al tocar sobre el icono
de la función de vacaciones y el indicador de
vacaciones, estas empiezan a parpadear. Por
lo tanto, se puede entender si la función de
vacaciones se activa o se desactiva. Cuando se
pulsa el botón Ok, el icono de las luces de función
temporal se activa de forma continua y por lo
tanto la función de vacaciones. El indicador sigue
parpadeando durante este proceso. Presione el
botón OK para cancelar la función de vacaciones.
De este modo, tanto el icono de la función de
vacaciones como el indicador comenzarán
a parpadear y la función de vacaciones será
cancelada.
contenedor de agua se detendrá
cuando se seleccione esta
función. Sin embargo, el hielo
hecho con anterioridad puede ser
tomado de la icematic.
15 / 30 ES
25. Icono de comodín en el frigorífico
Cuando se selecciona el icono comodín de
comodín en el frigorífico utilizando el botón FN y
pulsa el botón OK, la cabina comodín se convierte
en una cabina del frigorífico y funciona como un
enfriador.
26. Indicador en Celsius (centígrados)
Es un indicador Celsius. Cuando se activa la
indicación en centígrados, los valores de ajuste de
temperatura se muestran en grados Celsius y el
icono correspondiente se enciende.
27. Establecer la función decreciente
Seleccione la cabina correspondiente con el botón
de selección, el icono que representa cabina de
la cabina correspondiente empieza a parpadear.
Si pulsa el botón de disminución durante este
proceso, el valor ajustado se decrementará. Si
sigue presionando cíclicamente, el valor de ajuste
volverá al principio.
28. Icono de cambio de la temperatura de la
cabina
Indica la cabina cuya temperatura se va a cambiar.
Cuando el icono de cambio de la temperatura de
la cabina comienza a parpadear, se entiende que
la cabina relevante ha sido seleccionada.
29. Icono de cambio de la temperatura de la
cabina
Indica la cabina cuya temperatura se va a cambiar.
Cuando el icono de cambio de la temperatura de
la cabina comienza a parpadear, se entiende que
la cabina relevante ha sido seleccionada.
30. Bloqueo de botones
Pulse el botón de bloqueo simultáneamente durante 3 segundos. El símbolo de bloqueo de botones
se iluminará y se activará el modo de bloqueo de
botones. Los botones no funcionarán si el modo
de bloqueo de botones está activo. Pulse el botón
de bloqueo de botones al mismo tiempo durante
3 segundos. El símbolo de bloqueo de botones
se apagará y el modo de bloqueo de botones se
cancelará.
Presione el botón de bloqueo de botones, si
desea evitar cambios en la configuración de la
temperatura del frigorífico.
Frigorífico / Manual del usuario
Page 79

Operación del producto
31. Botón de selección
Utilice este botón para seleccionar la cabina cuya
temperatura desea cambiar. Cambie entre las
cabinas pulsando el botón. La cabina seleccionada
se puede entender a partir de los iconos de la cabina (7,17,18,20,28,29). Sea cual sea el icono de
la cabina que está parpadeando, la cabina, cuya
temperatura de valor establecido desea cambiar,
se seleccionará. A continuación, puede cambiar el
valor de ajuste pulsando el botón de disminución
de valor de ajuste de la cabina (27) y el botón
de aumento de valor de ajuste de la cabina (19).
Si no se pulsa el botón de selección durante 20
segundos, los iconos de la cabina se apagarán.
Es necesario pulsar este botón para cambiar las
funciones de nuevo.
32. Alarma de advertencia
En caso de fallo de alimentación / alarma de alta
temperatura, después de comprobar los alimentos
en el congelador, presione el botón de alarma para
borrar la advertencia.
33. Botón de función de Quick Cool
(enfriamiento rápido)
Este botón tienen dos funciones. Para activar
o desactivar la función de Quick Cool, pulse
brevemente. El indicador de Quick Cool
(enfriamiento rápido) se apagará y volverá a modo
normal.
Utilice la función de Quick Cool
cuando se desea congelar
C
C
rápidamente el alimento colocado en
el compartimiento del refrigerador. Si
desea enfriar grandes cantidades o
alimentos frescos, active la función
antes de colocar los alimentos en el
producto.
Si no se cancela, Quick Cool, se
cancelará automáticamente después
de 8 horas o cuando el compartimento
frigorífico llegue a la temperatura
requerida.
Si pulsa el botón de Quick Cool en
varias ocasiones con intervalos cortos,
C
C
34. 1 Indicador de temperatura
Se muestran los valores de ajuste de la cabina.
34.2 Indicador de temperatura del comodín
Se muestran los valores de ajuste de temperatura
de la cabina comodín.
se activará la protección de circuitos
electrónicos y el compresor no
arrancará de inmediato.
Esta función no se reactiva luego de
una falla de energía eléctrica.
16 / 30 ES
Frigorífico / Manual del usuario
Page 80

Operación del producto
5.2 Panel indicador
El panel indicador de control táctil le permite ajustar la temperatura y controlar las demás funciones
relacionadas con el aparato sin necesidad de abrir la puerta del frigorífico. Basta con pulsar el botón
correspondiente para ajustar la temperatura.
14 15 16
13
12
7
1
2
4 5 6
3
9
8
11
10
1-Función de encendido/apagado:
Mantenga pulsado el botón de encendido/apagado
durante 3 segundos para encender o apagar el
frigorífico.
2-Función de refrigeración rápida
Al pulsar el botón de refrigeración rápida, la
temperatura del compartimiento descenderá por
debajo del valor fijado.
Esta función puede utilizarse para enfriar con rapidez alimentos depositados en el compartimento
frigorífico.
Si desea enfriar grandes cantidades de alimentos frescos, se recomienda activar esta función
antes de depositar los alimentos en el frigorífico.
El indicador de refrigeración rápida permanecerá
encendido mientras la función de refrigeración
rápida esté activa. Para cancelar esta función
pulse nuevamente el botón de refrigeración rápida.
El indicador de refrigeración rápida se apagará y el
electrodoméstico volverá a sus valores normales.
Si no cancela manualmente la función de refrigeración rápida, ésta se cancelará automáticamente
transcurridas dos horas o bien una vez el compartimento frigorífico alcance la temperatura deseada.
En caso de corte del fluido eléctrico, esta función
no se activará automáticamente al restablecerse el
suministro eléctrico.
3-Función de vacaciones
Pulse el botón de refrigeración rápida/vacaciones
y manténgalo pulsado durante 3 segundos para
activar la función Vacaciones. El icono se iluminará
cuando la función esté activa. La función se
desactiva al volver a mantener el mismo botón
pulsado durante 3 segundos o al pulsar el botón
de ajuste del frigorífico.
Cuando se active la función de Vacaciones, aparecerá una línea en los valores de configuración
del frigorífico de la pantalla.
Cuando active el modo de vacaciones, la temperatura de los alimentos frescos será superior a los
50 grados Fahreinheit (10 grados centígrados). Por
lo tanto, no conserve los alimentos en el compartimento para alimentos frescos. La temperatura del
congelador no se verá afectada.
4- Botón de ajuste del frigorífico
Esta función le permite ajustar la temperatura
del compartimento frigorífico. Pulse este botón
para ajustar la temperatura del compartimento
frigorífico a 47, 45, 43, 41, 39, 37, 35 o 33 ºC
respectivamente.
5-Indicador de apagado
El indicador de apagado se ilumina cuando el
frigorífico está apagado.
C
Las imágenes en este manual son esquemáticos y pueden no coincidir exactamente con su producto.
Si usted ha comprado las piezas que no se incluyen en el producto, entonces esas piezas son válidas
para otros modelos.
17 / 30 ES
Frigorífico / Manual del usuario
Page 81

Operación del producto
6-Indicador de refrigeración rápida
Este icono se ilumina cuando función de refrigeración rápida está activa.
7-Indicador de ajuste de temperatura del
compartimento frigorífico
Indica la temperatura ajustada para el compartimento frigorífico.
8-Indicador de la función de vacaciones
Este icono se ilumina cuando función de vacaciones está activa.
9- Indicador de error de temperatura / aviso
de error
Este icono se enciende en caso de fallo de alta
temperatura o aviso de error.
10-Compartimento congelador
Indicador de ajuste de temperatura Indica la
temperatura ajustada para el compartimento
congelador.
11-Indicador eco-extra
El indicador de Eco-Extra se ilumina cuando la
función Eco Extra está activa.
12-Indicador de congelación rápida
Este icono se ilumina cuando función de congelación rápida está activa.
13-Función de ajuste del congelador
Esta función le permite ajustar la temperatura del
compartimento congelador. Pulse este botón para
ajustar la temperatura del compartimento congelador a 0, -2, -4, -6, -8, -10 y -12, respectivamente.
14-Indicador de congelación rápida
El indicador de congelación rápida se ilumina cuando la función de congelación rápida está activa.
Para cancelar esta función pulse de nuevo el botón
de congelación rápida. El indicador de congelación
rápida se apagará y el frigorífico volverá a sus
valores normales. Si no cancela manualmente la
función de congelación rápida, ésta se cancelará
automáticamente transcurridas cuatro horas o bien
una vez el compartimento congelador alcance la
temperatura deseada.
Si desea congelar grandes cantidades de alimentos frescos, pulse el botón de congelación rápida
antes de introducir los alimentos en el compartimento congelador. Si pulsa el botón de congelación rápida repetidamente a intervalos breves, se
activará inmediatamente la protección del circuito
electrónico.
En caso de corte del fluido eléctrico, esta función
no se activará automáticamente al restablecerse el
suministro eléctrico.
15- Función Eco-Fuzzy (modo especial de
ahorro)
Mantenga el botón de congelación rápida/Eco
Extra pulsado durante 3 segundos para activar
la función Eco Extra. El frigorífico comenzará a
funcionar en el modo más económico durante un
mínimo de 6 horas y el indicador de uso económico se iluminará cuando esta función esté activa.
Pulse de nuevo el botón de congelación rápida
y manténgalo pulsado durante 3 segundos para
desactivar la función Eco Fuzzy.
16- Desconexión de la alarma
Cuando la puerta del frigorífico se mantenga
abierta durante 2 minutos o en caso de corte del
fluido eléctrico, sonará una señal acústica. La
señal acústica puede apagarse pulsando el botón
"Desactivar señal acústica".
La señal acústica de fallo de sensor no sonará
hasta la interrupción de la corriente eléctrica. Si
cierra la puerta y la vuelve a abrir, la señal acústica
de puerta abierta se activará de nuevo 2 minutos
más tarde.
18 / 30 ES
Frigorífico / Manual del usuario
Page 82

Operación del producto
5.3 Congelación de alimentos frescos
• Con el fin de preservar la calidad de la comida,
se debe congelar lo más rápidamente posible
cuando se coloca en el compartimiento del
congelador, utilice la función de congelación
rápida para este propósito.
• Es posible almacenar el alimento en el
compartimiento del congelador cuando la
congela mientras están fresco.
• Empaque la comida a ser congelada y cierre el
embalaje de modo que no permita la entrada
de aire.
• Asegúrese de empaquetar los alimentos
antes de ponerlos en el congelador. Utilice
recipientes para congelar, láminas y papeles a
prueba de humedad, bolsas de plástico y otros
materiales de embalaje en lugar de papeles de
embalaje tradicionales.
• Etiquete cada paquete de alimentos y escriba
la fecha antes de proceder a la congelación.
Es posible distinguir la frescura de cada
paquete de alimentos de esta manera al
abrir el congelador cada vez. Guarde los
alimentos congelados en el lado frontal del
compartimento para asegurarse de que se
utilicen primero.
• La comida congelada debe ser utilizada
inmediatamente después de que se
descongela y no se debe volver a congelar.
• No congele grandes cantidades de alimentos
de una sola vez.
5.4 Recomendaciones para
la preservación de los
alimentos congelados
El compartimento deberá fijarse a -18 ° C, por lo
menos.
1. Coloque los paquetes en el congelador tan
pronto como sea posible después de la
compra, sin permitir que se descongelen.
2. Compruebe si la fecha de "Usar antes de" y
"Mejor consumase antes de" en el envase no
se haya cumplido antes de congelarlo.
3. Asegúrese de que el paquete de comida no
está dañado.
5.5 Información de congelados
De acuerdo con los estándares IEC 62552, el
producto que se congele al menos 4,5 kg de
comida en 25°C de temperatura ambiente a
-18°C o inferior dentro de las 24 horas por cada
100 litros de volumen del congelador.
Es posible conservar los alimentos durante mucho
tiempo sólo a -18°C o temperaturas más bajas.
Puede mantener la frescura de los alimentos
durante muchos meses (a -18°C o temperaturas
más bajas en el congelador).
Los alimentos que deben congelarse no se debe
permitir que entren en contacto con los objetos
previamente congelados para evitar que se
descongelen parcialmente.
Hierva las verduras y drene el agua con el fin de
guardar las verduras durante un tiempo más largo,
congeladas. Después de drenar el agua, póngalas
en paquetes a prueba de aire y coloquelas dentro
del congelador. Los alimentos como plátanos,
tomates, lechuga, apio, huevos cocidos y
patatas no son adecuados para la congelación.
Cuando estos alimentos se congelan, solo su
valor nutricional y el sabor se verán afectados
negativamente. No deben ser echados a perder
para que no puedan constituir un riesgo para la
salud humana.
19 / 30 ES
Frigorífico / Manual del usuario
Page 83

Operación del producto
Configuración del
congelador
-18°C 4°C Este es el ajuste predeterminado y recomendado.
-20, -22 o -24°C 4°C
Quick Freeze 4°C
-18°C o más frío 2°C
5.6 Colocación de los alimentos
Estantes del
congelador
Estantes del
frigorífico
Estantes de
la puerta del
compartimento
del frigorífico
Cajón de frutas
y verduras
Compartimento
de alimentos
frescos
Configuración
del frigorífico
Estos ajustes se recomiendan para temperaturas superiores
a 30°C.
Úselo cuando desee congelar su comida en poco tiempo. Su
aparato regresará a su estado previo cuando la operación
haya terminado.
Utilice esta configuración si usted piensa que el
compartimento frigorífico no está lo suficientemente frío
debido a las condiciones ambientales calientes o frecuente
apertura y cierre de la puerta.
Varios artículos congelados
como carne, pescado,
helados, vegetales, etc.
Los alimentos en sartenes,
platos cubiertos y
recipientes cerrados, huevos
(en recipiente cerrado)
Alimentos o bebidas
pequeños y embalados
Vegetales y frutas
Carnes frías (comida para el
desayuno, aparatos cárnicos
que se consumen en un
corto plazo)
Observaciones
5.8 Luz interior
La luz interior utiliza una lámpara tipo LED.
Póngase en contacto con el servicio técnico
autorizado para cualquier problema con esta
lámpara.
La lámpara(s) que se utiliza en este aparato no
es adecuada para la iluminación de una estancia
doméstica. El propósito de esta lámpara es ayudar
al usuario a colocar los alimentos en el frigorífico /
congelador en una manera segura y cómoda.
5.7 Advertencia de puerta abierta
(Esta función es opcional)
Se dará una señal de alarma acústica cuando la
puerta de su producto se deje abierta durante 1
minuto. Esta advertencia se silenciará cuando la
puerta esté cerrada o cualquiera de los botones de
la pantalla (si los hay) se presionen.
20 / 30 ES
Frigorífico / Manual del usuario
Page 84

Operación del producto
5.9 Compartimento frigorífico
Los compartimentos para enfriar permiten
preparar la comida para la congelación. También
pueden utilizar estos compartimentos para
almacenar los alimentos a una temperatura de
unos pocos grados por debajo del compartimento
del frigorífico.
Puede aumentar el volumen interior de su
frigorífico mediante la eliminación de cualquiera de
los compartimentos enfriadores:
1. Tire del compartimento hacia usted hasta que
se detenga.
2. Levante el compartimiento aproximadamente 1
cm hacia arriba y tire hacia usted para sacarlo
de su asiento.
5.10 Cajón para verduras
El cajón para frutas y verduras del refrigerador
está diseñado especialmente para mantener las
verduras frescas sin perder su humedad. Para
este propósito, la circulación del aire fresco se
intensifica alrededor del cajón para verduras en
general. Retire los estantes de la puerta que se
oponen al cajón antes de retirar el cajón.
5.11 Cajón de verduras con
humedad controlada
(FreSHelf)
(Esta función es opcional)
Las tasas de humedad de las frutas y verduras se
mantienen bajo control gracias a los cajones con
control de humedad y por lo tanto la comida está
garantizada para mantenerse fresca durante un
período más largo.
Recomendamos que coloque las verduras de
hoja como la lechuga y las espinacas, y verduras
sensibles a la pérdida de humedad lo más horizontalmente posible al ponerlas en el cajón, no en una
posición horizontal sobre sus raíces.
Mientras se van sustituyendo los vegetales, sus
pesos específicos se deben tomar en consideración. Los vegetales pesados y duros deben ser
colocados en la parte inferior del cajón de verduras
y los vegetales ligeros y suaves deben estar en la
parte superior.
Nunca deje las verduras en sus bolsas de plástico
en el cajón. Si se dejan en sus bolsas de plástico,
esto hará que se pudran dentro de un rato. Si
prefiere que la verdura no esté en ponerse con
otros vegetales por razones de higiene, utilice
papel perforado o un material similar en lugar de
bolsas de plástico.
No coloque las peras, albaricoques, melocotones, etc., especialmente los frutos que generan
grandes cantidades de etileno, en el mismo cajón
con otras frutas y verduras. El gas etileno emitido
por estas frutas causa que otras frutas maduren
más pronto y se pudran en un lapso de tiempo
más corto.
5.12 Bandeja para huevos
Puede instalar el soporte para huevos a la puerta
deseada o un estante dentro del cuerpo del
frigorífico.
Nunca ponga el soporte para huevos en el
compartimiento del congelador.
21 / 30 ES
Frigorífico / Manual del usuario
Page 85

Operación del producto
5.13 Sección media móvil
La sección media móvil pretende evitar que el aire
frío dentro de su frigorífico se escape.
1- El sellado se proporciona cuando las juntas en
las prensas de la puerta en la superficie de la sección media móvil de las puertas del compartimento
de refrigeración están cerradas.
2- Otra razón por la que su frigorífico está equipado con una sección media móvil es que aumenta
el volumen neto del compartimento del frigorífico.
Las secciones intermedias estándar ocupan algo
de volumen no utilizable en el refrigerador.
3-La sección media móvil está cerrada cuando la
puerta izquierda del compartimento de refrigeración se abre.
4-No se debe abrir manualmente. Se mueve
bajo la guía de la pieza de plástico en el cuerpo
mientras que la puerta está cerrada.
y a -6 grados, además de las temperaturas del
compartimiento congelador. 0 grados se utiliza
para almacenar los productos de carnes frías más
tiempo, y -6 grados se utiliza para mantener las
carnes hasta 2 semanas en una condición en la
que fácilmente se pueda rebanar.
La función de cambiar a un compartimiento
refrigerador o el congelador es proporcionada por
un elemento de refrigeración situado en la sección
cerrada (Compartimiento del compresor) detrás
del frigorífico. Durante el funcionamiento de este
elemento, se escucha un sonido similar al sonido
del segundero de un reloj analógico. Esto es
normal y no indica mal funcionamiento.
5.15 Luz azul
(en algunos modelos)
El cajón de frutas y verduras del frigorífico
se ilumina con una luz azul. Los alimentos
almacenados en el cajón continúan su fotosíntesis
por medio del efecto de la longitud de onda de
la luz azul y por lo tanto, preservan su frescura y
aumentan su contenido de vitaminas.
5.14 Control de enfriar del
compartimiento para
almacenamiento
El control de enfriar del compartimiento de almacenamiento de su frigorífico puede ser utilizado
en cualquier modo deseado ajustándolo a las
temperaturas del refrigerador (2/4/6/8 °C) o del
congelador (-18/-20/-22/-24). Puede mantener el
compartimiento a la temperatura deseada con el
botón de ajuste de control de enfriado del compartimiento de almacenamiento. La temperatura de
control de enfriado del compartimiento de almacenamiento puede ajustarse a 0 y 10 grados Además
de las temperaturas del compartimiento frigorífico
22 / 30 ES
5.16 Filtro de olores
El filtro de olores en el conducto de aire del
compartimento del frigorífico evita la acumulación
de olores desagradables en el refrigerador.
Frigorífico / Manual del usuario
Page 86

Operación del producto
5.17 Compartimento de bodega
(característica opcional)
1- Llene el compartimiento de la bodega
La bodega fue construida para albergar hasta 28 botellas frontales + 3 botellas accesibles utilizando un
bastidor telescópico. Estas cantidades máximas declaradas se indican solamente con fines informativos
y corresponden a ensayos realizados con una botella “Bordelesa 75cl”.
2- Temperaturas óptimas de servido recomendadas para algunos vinos
Nuestro consejo: Si mezcla distintos tipos de vinos, elija un ajuste de 12° centígrados como en una
bodega real. Para los vinos blancos, que se sirven entre 6 y 10 °, no olvide poner las botellas en la
nevera 1/2 hora antes de servir, el frigorífico será capaz de mantener las botellas a la temperatura
preferida. En cuanto a los tintos, se calentarán lentamente a temperatura ambiente antes de servirlos.
16 -17°C Buenos vinos de Burdeos - Tinto
15 -16°C Vuenos vinos de Borgoña- Tinto
14 -16°C Grand crus (gran crecimiento) de vinos blancos secos
11 -12°C Vinos tintos jóvenes ligeros y afrutados
10 -12°C Vinos rosados de Provenza, vinos franceses
10 -12°C Vinos blancos secos y vinos tintos del país
8 - 10°C Vinos blancos del país
7 - 8°C Cavas
6-°C Vinos blancos dulces
23 / 30 ES
Frigorífico / Manual del usuario
Page 87

Operación del producto
3- Consejos relacionados con el descorche de una botella antes de probarlo:
Vinos blancos Unos 10 minutos antes de servir
Vinos tintos jóvenes Unos 10 minutos antes de servir
Vinos tintos densos y maduros Alrededor de 30 a 60 minutos antes de servir
4 - ¿Cuánto tiempo se puede conservar una botella abierta?
Las botellas sin terminar deben cerrarse adecuadamente y pueden conservarse en un lugar frío y seco
durante los siguientes periodos:
Vinos blancos Vinos tintos
75% de la botella llena de 3 a 5 días de 4 a 7 días
50% de la botella llena de 2 a 3 días de 3 a 5 días
Menos del 50% 1 día 2 días
5.18 Utilizar un dispensador
de agua interno
(en algunos modelos)
Después de conectar el frigorífico a la fuente
de agua o sustituir el filtro de agua, enjuague
el sistema de agua. Use un recipiente robusto
y mantenga el dispensador de agua durante 5
segundos, luego suéltelo durante 5 segundos.
Repítalo hasta que el agua empiece a fluir. Una
vez que el agua empiece a fluir, siga pulsando y
soltando la paleta del dispensador (5 segundos
sí, 5 segundos no) hasta alcanzar un total de 4
galones (15L) dispensados. Descargue el aire
del filtro y el sistema de dispensación de agua, y
prepare el filtro para usarlo. Puede que se necesite
más enjuague en algunos hogares. Dado que el
aire se limpia en el sistema, puede que el agua
salga a chorros del dispensador.
Deje pasar 24 horas para que el frigorífico y el
agua se enfríen. Dispense agua suficiente cada
semana para mantener un suministro fresco.
Después de 5 minutos de
dispensación continua, el dispensador
dejará de dispensar agua para
evitar inundaciones. Para seguir
C
dispensando, pulse la paleta del
dispensador de nuevo.
5.19 Dispensar agua
Ponga un recipiente debajo del grifo dispensador
mientras pulsa la almohadilla del dispensador.
Suelte la paleta para detener la dispensación.
Es normal que los primeros vasos de
agua servidos por el dispensador estén
C
C
Durante el uso inicial, deberá esperar
aproximadamente 24 hasta que el agua se enfríe.
Retire el vaso un poco tras tirar del accionador.
calientes.
Si no se usa el dispensador de agua
durante un periodo de tiempo prolongado,
no consuma los primeros vasos de agua.
24 / 30 ES
Frigorífico / Manual del usuario
Page 88

Operación del producto
5.20 Utilización del
dispensador de agua
Antes de usar el refrigerador después
de sustituir el filtro de agua, el dispensador de agua puede soltar gotas
de agua. Para evitar que el agua
gotee o se filtre en el dispensador,
por favor purgue el aire del sistema
dispensando 5-6 galones (cerca de
20 litros) de agua a través del dispensador de agua antes del primer
uso y cada vez que cambie el agua
A
del filtro. Esto eliminará cualquier
aire atrapado en el sistema y haga
que deje de haber filtraciones en el
dispensador de agua. Será necesario
comprobar la posición del acoplador
y la rectitud de la línea de agua en
la parte posterior de la unidad si hay
una obstrucción del flujo de agua.
Los cubitos de hielo en el cajón de hielo pueden
pegarse unos con otros y convertirse en un
bloque debido al calor y a la humedad del aire
en aproximadamente 15 días. Esto es normal.
Si no puede separar el bloque, puede vaciar el
contenedor de hielo y volver a hacer hielo.
Se recomienda cambiar el agua en el
C
C
C
depósito de agua si ésta permanece en
el depósito de agua durante más de 2 o
3 semanas.
Los ruidos extraños que puede
escuchar provenientes del refrigerador
en intervalos de 120 minutos son los
sonidos de la formación y vertido del
hielo. Esto es normal.
Si no desea crear hielo, pulse el icono Ice off
(hielo apagado) para detener el icematic y
ahorrar energía y prolongar la vida útil de su
frigorífico.
Si el dispensador de agua filtra sólo unas
pocas gotas de agua después de haber
C
5.21 Icematic
(en algunos modelos)
Para obtener hielo del icematic, rellene el depósito
de agua en el compartimento frigorífico con agua
hasta el nivel máximo.
dispensado agua, esto es normal.
25 / 30 ES
C
Es normal que tras retirar el agua se
produzca un ligero goteo del dispensador.
Frigorífico / Manual del usuario
Page 89

Operación del producto
5.22 Icematic y contenedor de
almacenamiento de hielo
(en algunos modelos)
Uso del Icematic
* Llene el Icematic con agua y colóquelo en su
sitio. El hielo estará listo en unas dos horas. No
extraiga el Icematic de su sitio para sacar hielo.
* Gire los mandos situados sobre él 90 grados en
la dirección de las agujas del reloj.
Los cubitos de hielo de las celdas caerán al
contenedor de almacenamiento de hielo situado
debajo.
* Ahora puede retirar el contenedor de
almacenamiento de hielo y servir los cubitos.
* Si lo desea, puede dejar los cubitos en el
contenedor de almacenamiento de hielo.
Contenedor de almacenamiento de hielo
El contenedor de almacenamiento de hielo debe
utilizarse únicamente para almacenar cubitos de
hielo. No eche agua en el depósito, ya que podría
romperse.
26 / 30 ES
Frigorífico / Manual del usuario
Page 90

6. Limpieza y mantenimiento
Limpie el aparato con regularidad, esto prolongará
su vida útil.
ADVERTENCIA: Desconecte la
B
• No utilice herramientas afiladas ni abrasivas,
• En el caso de productos que no sean sin
• Utilice solo paños de microfibra ligeramente
• Derrita una cucharada de carbonato en agua.
• Tenga cuidado en mantener el agua lejos
• Limpie la puerta con un paño húmedo. Retire
• No use agua con cloro ni aparatos de limpieza
alimentación antes de limpiar el
refrigerador.
jabones, aparatos de limpieza de casa,
detergentes, gas, gasolina, barniz ni sustancias
similares para la limpieza.
escarcha, se pueden producir gotas de agua
y una capa de hielo en la pared trasera del
compartimento del frigorífico. No lo limpie,
nunca aplique aceite o agentes similares en el
mismo.
humedecidos para limpiar la superficie exterior
del producto. Las esponjas u otro tipo de paños
de limpieza pueden rayar la superficie.
Humedezca un trozo de tela en el agua y
escurra. Limpie el dispositivo con el paño y
seque a fondo.
de la cubierta de la lámpara y otras partes
eléctricas.
todos los elementos en el interior para separar
las puertas y estantes del mueble. Levante
los estantes de la puerta hasta desprenderlos
de su riel. Limpie y seque las estanterías, a
continuación, colóquelas de nuevo en su lugar
deslizándolas desde arriba.
en la superficie exterior y las piezas de
revestidas de cromo del aparato. El cloro
causará herrumbre en este tipo de superficies
metálicas.
6.1. Prevención del mal olor
El aparato se fabrica libre de cualquier material
oloroso. Sin embargo, mantener la comida en
secciones inadecuadas y una limpieza inadecuada
de las superficies internas puede causar mal olor.
Para evitar esto, limpie el interior con agua
carbonatada cada 15 días.
• Mantenga los alimentos en envases sellados.
Los microorganismos pueden propagarse fuera
de los alimentos no sellados y causar mal olor.
• No guarde alimentos caducados y en mal
estado en el refrigerador.
• No utilice herramientas afiladas y abrasivas
ni jabón, productos de limpieza domésticos,
detergentes, gasolina, benceno, cera, etc., de
lo contrario los sellos en las piezas de plástico
se caerán y deformarán. Use agua tibia y un
paño suave para limpiar y secar.
6.2. Protección de
superficies de plástico
El aceite derramado en las superficies de plástico
puede dañar la superficie y debe ser limpiado
inmediatamente con agua tibia.
27 / 30 ES
Frigorífico / Manual del usuario
Page 91

7 Solución de problemas
vivo
Revise esta lista antes de contactar con el servicio
técnico. Si lo hace, le ahorrará tiempo y dinero.
Esta lista incluye quejas frecuentes que no están
relacionados con la mano de obra ni materiales
defectuosos. Algunas funciones mencionadas en
este documento pueden no ser aplicables a su
aparato.
El refrigerador no está funcionando.
• El enchufe no está totalmente en la toma.
>>> Basta conectarlo para asentarlo por
completo en la toma.
• El fusible conectado a la toma de alimentación
del aparato o el fusible principal está fundido.
>>> Revise los fusibles.
Condensación en la pared lateral del
compartimento de enfriamiento (MULTI ZONA,
REFRIGERADOR, CONTROL y FLEXI ZONA).
• La puerta se abre con demasiada frecuencia
>>> Tenga cuidado de no abrir la puerta del
aparato con demasiada frecuencia.
• El medio ambiente es demasiado húmedo.
>>> No instale el aparato en ambientes
húmedos.
• Los alimentos que contienen líquidos se
mantienen en sus envases sin sellar. >>>
Mantenga los alimentos que contengan
líquidos en los envases sellados.
• La puerta del aparato se deja abierta. >>>
No mantenga la puerta del aparato abierta
durante largos periodos.
• El termostato está ajustado a una temperatura
demasiado baja. >>> Ajuste el termostato a
la temperatura adecuada.
El compresor no está funcionando.
• En caso de fallo de alimentación repentino
o tirando del enchufe de alimentación y
poniéndolo de nuevo, la presión del gas
en el sistema de refrigeración del aparato
no será equilibrada, lo que desencadena
la salvaguardia térmica del compresor.
El aparato se reiniciará después de
aproximadamente 6 minutos. Si el aparato no
se reinicia después de este período, póngase
en contacto con el servicio.
• La descongelación está activa. >>>
Esto es normal para un aparato de
descongelación completamente automático.
La descongelación se realiza periódicamente.
• El aparato no está enchufado >>> Asegúrese
de que el cable de alimentación esté
enchufado.
• El ajuste de la temperatura es incorrecto.
>>> Seleccione el ajuste de la temperatura
adecuado.
• No hay energía eléctrica. >>> El aparato
continuará funcionando con normalidad una
vez que se restablezca la alimentación.
El ruido de funcionamiento del refrigerador
aumenta mientras está en uso.
• El desempeño operativo del aparato puede
variar en función de las variaciones de la
temperatura ambiente. Esto es normal y no
indica mal funcionamiento.
El refrigerador funciona demasiado a menudo o
por demasiado tiempo.
La temperatura del congelador es muy baja, pero
la temperatura del refrigerador es adecuada.
• La temperatura del compartimento congelador
se establece a un grado muy bajo. >>>
Ajuste la temperatura del compartimento del
congelador a un grado más alto y vuelva a
intentarlo.
La temperatura del refrigerador es muy baja, pero
la temperatura del congelador es adecuada.
• La temperatura del compartimento congelador
se establece a un grado muy bajo. >>>
Ajuste la temperatura del compartimento del
refrigerador a un grado más alto y vuelva a
intentarlo.
28 / 30 ES
Frigorífico / Manual del usuario
Page 92

Solución de problemas
Los alimentos guardados en los cajones del
compartimento de refrigeración se congelan.
• La temperatura del compartimento congelador
se establece a un grado muy bajo. >>>
Ajuste la temperatura del compartimento del
congelador a un grado más alto y vuelva a
intentarlo.
La temperatura en el refrigerador o el congelador
es demasiado alta.
• La temperatura del compartimento del
congelador se establece a un grado muy
bajo. >>> El ajuste de temperatura del
compartimiento del refrigerador influye
en la temperatura del compartimiento del
congelador. Cambie la temperatura del
compartimento del refrigerador o congelador y
espere a que los compartimentos pertinentes
alcancen el nivel de temperatura ajustado.
• Las puertas se abren frecuentemente o se
mantienen abiertas durante largos períodos.
>>> No abra las puertas con demasiada
frecuencia.
• La puerta puede estar abierta. >>> Cierre la
puerta por completo.
• El aparato puede haber sido conectado
recientemente o un nuevo alimento fue
colocado en su interior. >>> Esto es
normal. El aparato tardará más en alcanzar
la temperatura fijada fue enchufado
recientemente o si un nuevo alimento se
coloca en el interior.
• Grandes cantidades de alimentos calientes
pueden haber sido colocados recientemente
en el aparato. >>> No coloque alimentos
calientes en el interior del aparato.
Ruido o agitación.
• El suelo no está nivelado o no es firme.
>>> Si el aparato está temblando cuando
se mueve lentamente, ajuste las patas para
equilibrar el aparato. También asegúrese de
que el suelo sea lo suficientemente resistente
para soportar el aparato.
• Cualquier artículo colocado sobre el aparato
pueden causar ruido. >>> Retire todos los
objetos colocados sobre el aparato.
El aparato está haciendo ruido de flujo de líquido,
rociado, etc.
• Los principios de funcionamiento del aparato
implican flujos de líquido y gas. >>> Esto es
normal y no indica mal funcionamiento.
Hay sonido del viento que sopla procedente del
aparato.
• El aparato utiliza un ventilador para el proceso
de enfriamiento. Esto es normal y no indica
mal funcionamiento.
Hay condensación en las paredes internas del
aparato.
• El clima caliente o húmedo aumentarán la
formación de hielo y de condensación. Esto es
normal y no indica mal funcionamiento.
• Las puertas se abren frecuentemente o se
mantienen abiertas durante largos períodos.
>>> No abra las puertas con demasiada
frecuencia, si están abiertas, ciérrelas.
• La puerta puede estar abierta. >>> Cierre la
puerta por completo.
Hay condensación en el exterior del aparato o
entre las puertas.
• Puede ser por que el clima ambiental
sea húmedo, esto es bastante normal en
ambientes húmedos. >>> La condensación
se disipará cuando se reduzca la humedad.
El interior huele mal.
• El aparato es limpiado regularmente.
>>> Limpie el interior con regularidad
utilizando una esponja, agua caliente y agua
carbonatada.
• Ciertos envases y materiales de embalaje
pueden causar olor. >>> Utilice envases y
materiales de embalaje que sean exentos de
olores.
• Los alimentos se colocan en envases no
selladas. >>> Mantenga los alimentos en
envases sellados. Los microorganismos
pueden propagarse fuera de los alimentos no
sellados y causar mal olor.
• Retire todos los alimentos caducados o en
mal estado del aparato.
La puerta no se cierra.
29 / 30 ES
Frigorífico / Manual del usuario
Page 93

Solución de problemas
• Los paquetes de alimentos pueden estar
bloqueando la puerta. >>> Cambie de lugar
los elementos que bloqueen las puertas.
• El aparato no está en posición vertical sobre la
base. >>> Ajuste los soportes para equilibrar
el aparato.
• El suelo no está nivelado o no es firme. >>>
Asegúrese de que el suelo esté nivelado y sea
lo suficientemente resistente para soportar el
aparato.
La bandeja de las vegetales se ha atascado.
• Los alimentos pueden estar en contacto con
la parte superior del cajón. >>> Reorganice
los alimentos en el cajón.
Sı la superfıcıe del producto está calıente.
• Pueden observarse altas temperaturas entre
las dos puertas, en los paneles laterales y en
la parrilla trasera mientras el producto esté
en funcionamiento. Se trata de algo normal y
no requiere mantenimiento del servicio.
ADVERTENCIA: Si el problema persiste
después de seguir las instrucciones de
A
esta sección, póngase en contacto con su
vendedor o un Servicio Autorizado. No trate
de reparar el aparato.
30 / 30 ES
Frigorífico / Manual del usuario
Page 94

www.beko.com.tr
www.beko.com
58 0181 0000/AB
1/3
EN-DE-ES
Page 95

GN1416231ZX
PT DA SV
Page 96

Frgorífco
Manual do Utilizador
EWWERQWEW
PT
Page 97

Leia este manual antes de utilizar o produto!
Caro cliente,
Gostaríamos que desfrutasse do nosso produto da melhor forma possível, tendo este sido fabricado em
instalações modernas com extremo cuidado e segundos os mais meticulosos controlos de qualidade.
Assim, aconselhamos a leitura do manual do utilizador na íntegra antes da utilização do produto.
Na eventualidade de o produto mudar de proprietário, deve entregar este guia ao novo proprietário
juntamente com o produto.
Este guia irá ajudar na utilização do produto de forma rápida e segura.
• Leia o guia do utilizador cuidadosamente antes de instalar e de utilizar o produto.
• Respeite sempre as instruções de segurança aplicáveis.
• Mantenha o guia do utilizador facilmente acessível para utilização futura.
• Leia quaisquer outros documentos fornecidos com o produto.
Tenha em atenção que este guia do utilizador pode ser aplicável a vários modelos do produto. Esta guia
indica claramente quaisquer variações de diferentes modelos.
Informações importantes e dicas
C
úteis.
Risco de vida e danos materiais.
A
Risco de choque elétrico.
B
A embalagem deste produto é
feita de materiais recicláveis de
acordo com a legislação ambiental
nacional.
Page 98

1 Instruções de segurança e
ambientais 3
2 O seu frigorífico 6
2 O seu frigorífico 7
5.17 Utilizar o dispensador de água interno. . . .25
5.18 Dispensador de água . . . . . . . . . . . . . . . .25
5.19 Para utilizar o dispensador de água. . . . . .25
5.20 Icematic . . . . . . . . . . . . . . . . . . . . . . . . .26
5.21 Icematic e reservatório de armazenamento de
gelo. . . . . . . . . . . . . . . . . . . . . . . . . . . . .26
3 Instalação 8
3.1 Localização adequada para instalação. . . . . .8
3.2 Instalar os calços plásticos . . . . . . . . . . . . . .8
3.3 *Ajustar os pés. . . . . . . . . . . . . . . . . . . . . . .8
3.4 Ligação elétrica . . . . . . . . . . . . . . . . . . . . .10
4 Preparação 11
4.1 Atitudes a adotar para poupança de energia 11
4.2 Recomendações sobre o compartimento para
alimentos frescos. . . . . . . . . . . . . . . . . . .11
4.3 Utilização inicial . . . . . . . . . . . . . . . . . . . .12
5 Utilizar o produto 13
5.1 Painel indicador . . . . . . . . . . . . . . . . . . . . .13
5.2 Painel indicador. . . . . . . . . . . . . . . . . . . .18
5.3 Congelar alimentos frescos. . . . . . . . . . . . .20
5.4 Recomendações para preservar os alimentos
congelados . . . . . . . . . . . . . . . . . . . . . . .20
5.5 Informação sobre congelação profunda. . . .20
5.6 Colocar os alimentos . . . . . . . . . . . . . . . . .21
5.7 Aviso de porta aberta . . . . . . . . . . . . . . . . .21
5.8 Compartimento de refrigeração. . . . . . . . . .21
5.9 Gaveta para vegetais e fruta . . . . . . . . . . . .21
5.10 Gaveta para vegetais e fruta com controlo da
humidade . . . . . . . . . . . . . . . . . . . . . . . .21
(FreSHelf). . . . . . . . . . . . . . . . . . . . . . . . . . . . .21
5.11 Bandeja para ovos . . . . . . . . . . . . . . . . . .22
5.12 Secção do meio movível . . . . . . . . . . . . .22
5.13 Compartimento de armazenamento de
controlo de frio . . . . . . . . . . . . . . . . . . . .22
5.14 Luz azul. . . . . . . . . . . . . . . . . . . . . . . . . .23
5.15 Filtro de odores . . . . . . . . . . . . . . . . . . . .23
5.16 Compartimento da garrafeira . . . . . . . . . .23
6 Manutenção e Limpeza 27
7 Resolução de problemas 28
2/30 PT
Frigorífico/Manual do Utilizador
Page 99

1 Instruções de segurança e ambientais
Esta secção fornece as instruções de segurança
necessárias para prevenir risco de lesões e danos
materiais. O não cumprimento destas instruções
invalidará todos os tipos de garantia do produto.
1.1. Segurança geral
AVISO:
Manter as aberturas de ventilação, na
caixa de proteção do aparelho ou na
estrutura embutida, sem obstruções.
ADVERTÊNCIA:
Não usar dispositivos mecânicos
nem outros meios para acelerar o
processo de descongelação, exceto
os recomendados pelo fabricante.
A
AVISO:
Não danificar o circuito de
refrigeração.
ADVERTÊNCIA:
Não usar aparelhos eléctricos no
interior dos compartimentos de
armazenamento de alimentos do
aparelho, a menos que sejam do tipo
recomendado pelo fabricante.
crianças. O dispositivo apenas pode ser usado
por estas pessoas sob supervisão e instrução de
uma pessoa responsável pela sua segurança.
As crianças não devem ser autorizadas a brincar
com este aparelho.
• Em caso de mau funcionamento, desligue o
aparelho.
• Depois de desligar, aguarde pelo menos 5
minutos antes de ligar novamente. Desligar o
produto quando não está em uso. Não tocar na
ficha com as mãos molhadas! Não puxar pelo
cabo para desligar, segurar sempre pela ficha.
• Não ligar o frigorífico se a tomada estiver solta.
• Desligar o produto durante a instalação,
manutenção, limpeza e reparação.
• Se o produto não for usado por uns tempos,
desligar o produto e retirar quaisquer alimentos
do interior.
• Não utilizar materiais de limpeza a vapor ou
vapor para limpar o frigorífico e derreter o gelo
no interior. O vapor pode entrar em contacto
com as áreas electrificadas e causar curtocircuito ou choque eléctrico!
• Não lavar o produto pulverizando-o ou deitando
água sobre o mesmo! Perigo de choque
eléctrico!
• Nunca usar o produto se a secção localizada na
parte superior ou traseira do seu produto com
placas de circuitos impressos electrónicos no
interior estiver aberta (tampa da placa de circuito
electrónico impresso) (1).
Este aparelho é destinado a ser usado em uso
doméstico e aplicações similares como
– zonas de cozinha em estabelecimentos comerciais,
escritórios ou outros ambientes laborais;
– casas rurais e pelos clientes em hotéis, motéis e
outros ambientes de tipo residencial;
– ambientes de tipo alojamento e pequeno almoço;
– utilizações de refeições e outros não-retalhistas
similares.
• Este produto não deve ser usado por pessoas
com deficiências físicas, sensoriais e mentais,
sem conhecimento e experiência suficiente ou por
3/30PT
1
1
Frigorífico/Manual do Utilizador
Page 100

Instruções importantes relativas à segurança e ao ambiente
• Em caso de mau funcionamento, não usar o
produto, porque pode provocar um choque
eléctrico. Contactar a assistência autorizada
antes de fazer alguma coisa.
• Ligar o produto a uma tomada com ligação à
terra. A ligação à terra deve ser feita por um
electricista qualificado.
• Se o produto tem luz tipo LED, contactar a
assistência autorizada para substituir ou em caso
de quaisquer problemas.
• Não tocar em alimentos congelados com as
mãos molhadas! Podem aderir às suas mãos!
• Não colocar líquidos em garrafas e latas no
compartimento de congelação. Podem explodir!
• Colocar os líquidos em posição vertical depois de
fechar a tampa firmemente.
• Não pulverizar substâncias inflamáveis perto do
produto, podem incendiar ou explodir.
• Não manter no frigorífico materiais inflamáveis e
produtos com gás inflamável (sprays, etc.).
• Não colocar recipientes com líquidos em cima
do produto. Pulverizar água sobre as partes
eléctricas pode causar choque eléctrico e risco
de incêndio.
• Expor o produto à chuva, neve, sol e vento pode
causar perigo eléctrico. Quando recolocar o
produto, não puxar pelo puxador da porta. O
puxador pode soltar-se.
• Ter cuidado para evitar prender qualquer parte
das suas mãos ou corpo em alguma das partes
móveis dentro do produto.
• Não pisar ou apoiar-se nas portas, gavetas e
peças similares do frigorífico. Isto pode causar
avaria do produto e danificar as partes.
• Ter cuidado para não prender o cabo de
alimentação.
1.1.1 Advertência HC
Se o produto inclui um sistema de refrigeração
com gás R600a, ter cuidado para não danificar
o sistema de arrefecimento e a sua tubagem
durante a utilização e movimentação do produto.
O gás é inflamável. Se o sistema de refrigeração
estiver danificado, manter o produto longe de
fontes de ignição e ventilar imediatamente o
espaço onde o frigorífico se encontra.
A etiqueta no lado esquerdo
interior indica o tipo de gás usado
C
no produto.
1.1.2 Para modelos com
dispensador de água
• A pressão para a entrada de água fria deve ser
no máximo de 90 psi (6,2 bar). Se a sua pressão
de água exceder 80 psi (5,5 bar), utilize uma
válvula limitadora de pressão no seu sistema de
alimentação. Se não sabe como verificar a sua
pressão de água, deve solicitar a ajuda de um
canalizador profissional.
• Se existir o risco de o golpe de ariete afetar
a sua instalação, deve utilizar sempre um
equipamento de prevenção do golpe de
ariete na sua instalação. Deve consultar os
canalizadores profissionais se não tiver a certeza
se existe o efeito de golpe de ariete na sua
instalação.
• Não instalar na entrada de água quente. Deve
tomar precauções relativamento ao risco de
congelamento nas tubagens. O intervalo de
funcionamento de temperatura da água deve
ser 33ºF (0,6ºC) de mínimo e 100ºF (38ºC) de
máximo.
• Usar apenas água potável.
1.2. Utilização prevista
• Este produto é concebido para utilização
doméstica. Não está previsto para utilização
comercial.
• O produto deve ser utilizado apenas para
armazenar alimentos e bebidas.
• Não manter no frigorífico produtos sensíveis que
requerem temperaturas controladas (vacinas,
medicamentos sensíveis ao calor, equipamentos
médicos, etc.).
4/30 PT
Frigorífico/Manual do Utilizador
 Loading...