

Page 1
GN1416221ZX
GN1426221ZDX
EN DE İT
Page 2
Please read this manual before using the product!
Dear Customer,
We'd like you to make the best use of our product, which has been manufactured in modern facilities
with care and meticulous quality controls.
Thus, we advice you to read the entire user manual before you use the product. In case the product
changes hands, do not forget to hand the guide to its new owner along with the product.
This guide will help you use the product quickly and safely.
• Please read the user guide carefully before installing and operating the product.
• Always observe the applicable safety instructions.
• Keep the user guide within easy reach for future use.
• Please read any other documents provided with the product.
Keep in mind that this user guide may apply to several product models. The guide clearly indicates any
variations of different models.
Important information and useful
C
tips.
Risk of life and property.
A
Risk of electric shock.
B
The product’s packaging is made of
recyclable materials, in accordance
with the National Environment
Legislation.
Page 3
1. Safety and environment instructions 3
2 Your Refrigerator 6
2 Your Refrigerator 7
3 Installation 8
3.1 Appropriate location for installation . . . . . . . .8
3.2 Installing the plastic wedges . . . . . . . . . . . . .8
3.3 *Adjusting the feet . . . . . . . . . . . . . . . . . . . .9
3.4 Electric connection . . . . . . . . . . . . . . . . . . .10
4 Preparation 11
4.1 Things to be done for saving energy . . . . .11
4.2 Recommendations about the fresh food
compartment. . . . . . . . . . . . . . . . . . . . . .11
4.3 Initial use. . . . . . . . . . . . . . . . . . . . . . . . .12
5 Operating the product 13
5.1 Indicator panel . . . . . . . . . . . . . . . . . . . . . .13
5.2 Indicator panel. . . . . . . . . . . . . . . . . . . . .18
5.3 Freezing fresh food. . . . . . . . . . . . . . . . . . .21
5.4 Recommendations for preserving the frozen
food . . . . . . . . . . . . . . . . . . . . . . . . . . . .21
5.5 Deep-freeze information. . . . . . . . . . . . . . .21
5.6 Placing the food. . . . . . . . . . . . . . . . . . . . .22
5.7 Door open warning. . . . . . . . . . . . . . . . . . .22
5.8 Chiller compartment. . . . . . . . . . . . . . . . . .22
5.9 Crisper. . . . . . . . . . . . . . . . . . . . . . . . . . . .22
5.10 Humidity-controlled crisper. . . . . . . . . . . .22
(FreSHelf). . . . . . . . . . . . . . . . . . . . . . . . . . . . .22
5.11 Egg tray. . . . . . . . . . . . . . . . . . . . . . . . . .23
5.12 Movable Middle Section . . . . . . . . . . . . . .23
5.13 Cool Control Storage Compartment . . . . .23
5.14 Blue light . . . . . . . . . . . . . . . . . . . . . . . . .23
5.15 Odour filter. . . . . . . . . . . . . . . . . . . . . . . .23
5.16 Wine cellar compartment . . . . . . . . . . . . .24
5.17 Using internal water dispenser . . . . . . . . .26
5.18 Dispensing water . . . . . . . . . . . . . . . . . . .26
5.19 For using water dispenser. . . . . . . . . . . . .26
5.20 Icematic . . . . . . . . . . . . . . . . . . . . . . . . .27
5.21 Icematic and ice storage container . . . . . .27
6 Maintenance and cleaning 28
6.1 Avoiding bad odours. . . . . . . . . . . . . . . . . .28
6.2 Protecting the plastic surfaces . . . . . . . . . .28
7. Troubleshooting 29
2 /29 EN
Refrigerator / User Manual
Page 4
1. Safety and environment instructions
This section provides the safety instructions necessary
to prevent the risk of injury and material damage.
Failure to observe these instructions will invalidate all
types of product warranty.
Intended use
WARNING:
Keep ventilation openings, in the
A
A
A
A
appliance enclosure or in the builtinstructure, clear of obstruction.
WARNING:
Do not use mechanical
devices or other means to
accelerate the defrosting process,
other than those recommended by
the manufacturer.
WARNING:
Do not damage the refrigerant
circuit.
WARNING:
Do not use electrical
appliances inside the food
storage compartments of the
appliance, unless they are of
the type recommended by the
manufacturer.
should not be allowed to play with this
device.
• In case of malfunction, unplug the device.
• After unplugging, wait at least 5 minutes
before plugging in again.
• Unplug the product when not in use.
• Do not touch the plug with wet hands! Do
not pull the cable to plug off, always hold
the plug.
• Do not plug in the refrigerator if the
socket is loose.
• Unplug the product during installation,
maintenance, cleaning and repair.
• If the product will not be used for a while,
unplug the product and remove any food
inside.
• Do not use the product when the
compartment with circuit cards located
on the upper back part of the product
(electrical card box cover) (1) is open.
1
This appliance is intended to be used in household
and similar applications such as
– staff kitchen areas in shops, offices and other
working environments;
– farm houses and by clients in hotels, motels and
other residential type environments;
– bed and breakfast type environments;
– catering and similar non-retail applications.
1.1. General safety
• This product should not be used by
persons with physical, sensory and mental
disabilities, without sufficient knowledge
and experience or by children. The device
can only be used by such persons under
supervision and instruction of a person
responsible for their safety. Children
1
• Do not use steam or steamed cleaning
materials for cleaning the refrigerator and
melting the ice inside. Steam may contact
the electrified areas and cause short
circuit or electric shock!
• Do not wash the product by spraying or
pouring water on it! Danger of electric
shock!
• In case of malfunction, do not use the
product, as it may cause electric shock.
Contact the authorised service before
doing anything.
3/29 EN
Refrigerator / User Manual
Page 5
Important instructions regarding safety and environment
• Plug the product into an earthed socket.
Earthing must be done by a qualified
electrician.
• If the product has LED type lighting,
contact the authorised service for
replacing or in case of any problem.
• Do not touch frozen food with wet hands!
It may adhere to your hands!
• Do not place liquids in bottles and cans
into the freezer compartment. They may
explode.
• Place liquids in upright position after
tightly closing the lid.
• Do not spray flammable substances near
the product, as it may burn or explode.
• Do not keep flammable materials and
products with flammable gas (sprays,
etc.) in the refrigerator.
• Do not place containers holding liquids on
top of the product. Splashing water on an
electrified part may cause electric shock
and risk of fire.
• Exposing the product to rain, snow,
sunlight and wind will cause electrical
danger. When relocating the product, do
not pull by holding the door handle. The
handle may come off.
• Take care to avoid trapping any part of
your hands or body in any of the moving
parts inside the product.
• Do not step or lean on the door, drawers
and similar parts of the refrigerator. This
will cause the product to fall down and
cause damage to the parts.
• Take care not to trap the power cable.
• When positioning the appliance, ensure the
supply cord is not trapped or damaged.
• Do not locate multiple portable socket-outlets
or portable power supplies at the rear of the
appliance.
1.1.1 HC warning
If the product comprises a cooling system using
R600a gas, take care to avoid damaging the
cooling system and its pipe while using and
moving the product. This gas is flammable. If the
cooling system is damaged, keep the product
away from sources of fire and ventilate the room
immediately.
The label on the inner left side
indicates the type of gas used in
C
the product.
1.1.2 For models with
water dispenser
• Pressure for cold water inlet shall be
maximum 90 psi (620 kPa). If your
water pressure exceeds 80 psi (550
kPa), use a pressure limiting valve in
your mains system. If you do not know
how to check your water pressure, ask
for the help of a professional plumber.
• If there is risk of water hammer effect
in your installation, always use a water
hammer prevention equipment in
your installation. Consult Professional
plumbers if you are not sure that there
is no water hammer effect in your
installation.
• Do not install on the hot water inlet.
Take precautions against of the
risk of freezing of the hoses. Water
temperature operating interval shall
be 33°F (0.6°C) minimum and 100°F
(38°C) maximum.
• Use drinking water only.
4 /29 EN
Refrigerator / User Manual
Page 6
Important instructions regarding safety and environment
1.2. Intended use
• This product is designed for home use.
It is not intended for commercial use.
• The product should be used to store
food and beverages only.
• Do not keep sensitive products
requiring controlled temperatures
(vaccines, heat sensitive medication,
medical supplies, etc.) in the
refrigerator.
• The manufacturer assumes no
responsibility for any damage due to
misuse or mishandling.
• Original spare parts will be provided
for 10 years, following the product
purchasing date.
1.3. Child safety
• Keep packaging materials out of
children’s reach.
• Do not allow the children to play with
the product.
• If the product’s door comprises a lock,
keep the key out of children’s reach.
1.4. Compliance with WEEE Directive
and Disposing of the Waste Product
This product complies with EU WEEE
Directive (2012/19/EU). This product bears a
classification symbol for waste electrical and
electronic equipment (WEEE).
This product has been manufactured
with high quality parts and materials
which can be reused and are suitable
for recycling. Do not dispose of the
waste product with normal domestic
and other wastes at the end of its
service life. Take it to the collection
center for the recycling of electrical and electronic
equipment. Please consult your local authorities to
learn about these collection centers.
1.5. Compliance with RoHS Directive
• This product complies with EU WEEE Directive
(2011/65/EU). It does not contain harmful and
prohibited materials specified in the Directive.
1.6. Package information
Packaging materials of the product are
manufactured from recyclable materials in
accordance with our National Environment
Regulations. Do not dispose of the packaging
materials together with the domestic or other
wastes. Take them to the packaging material
collection points designated by the local authorities.
5/29 EN
Refrigerator / User Manual
Page 7
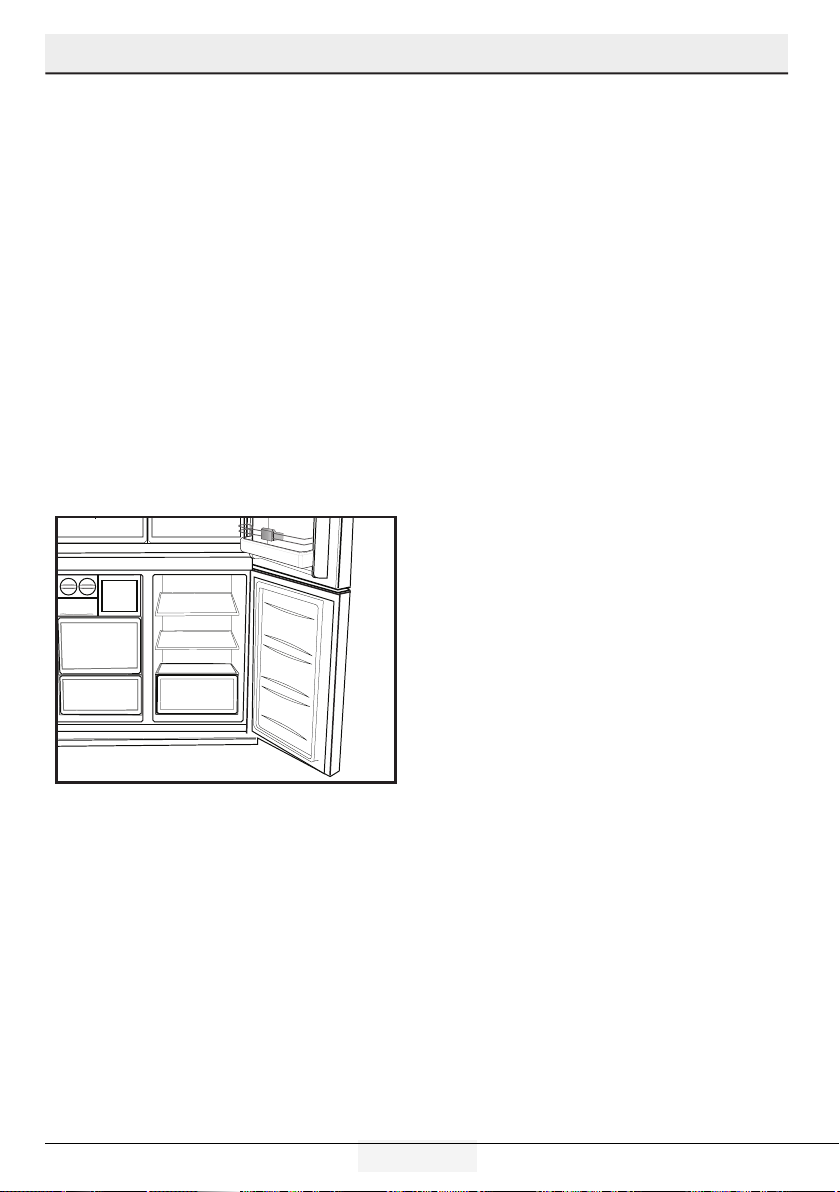
2 Your Refrigerator
1
*2
5
10
*8
4
5
7
9
11
*3
6
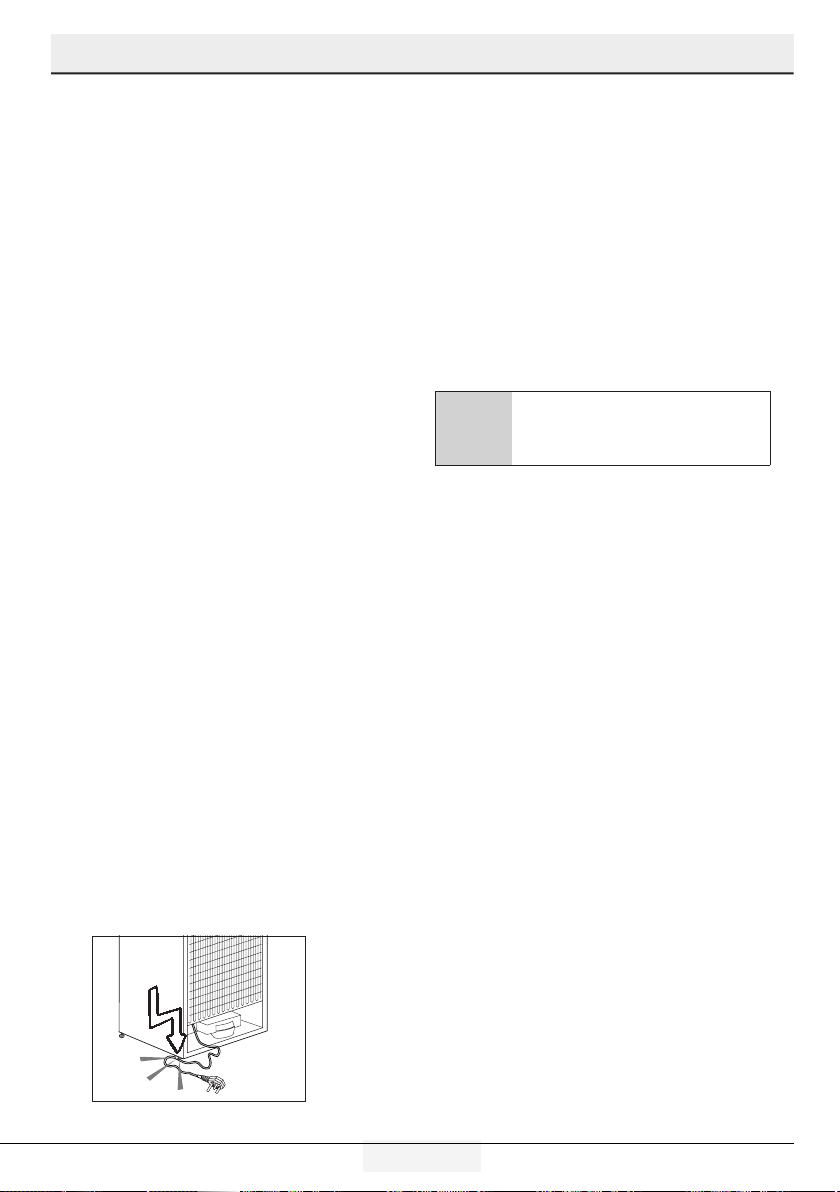
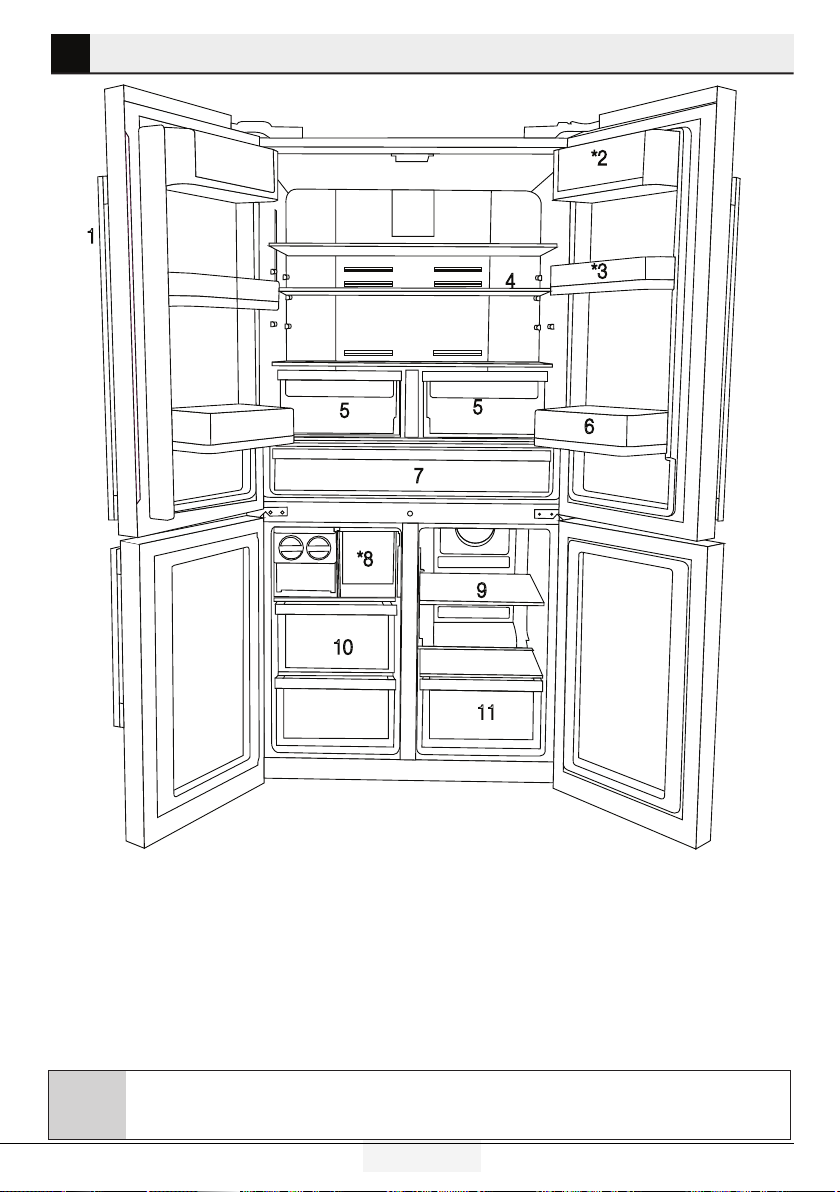
1- Control and indicator panel
2- Butter & Cheese section
3- 70 mm moving door shelf
4- Fridge compartment glass shelf
5- Fridge compartment crisper
6- Gallon door shelf
Figures in this user manual are schematic and may not match the product exactly. If the subject parts
are not included in the product you have purchased, then those parts are valid for other models.
C
7- Chiller compartment
8- Icebox drawer
9- Multizone compartment glass shelf/cooler
10- Freezer compartment drawers
11- Multizone Compartment's drawer
* OPTIONAL
6 /29 EN
Refrigerator / User Manual
Page 8
2 Your Refrigerator
1
4
5
*8
10
5
7
9
*2
*3
6
1- Control and indicator panel
2- Butter & Cheese section
3- 70 mm moving door shelf
4- Fridge compartment glass shelf
5- Fridge compartment crisper
6- Gallon door shelf
Figures in this user manual are schematic and may not match the product exactly. If the subject parts
are not included in the product you have purchased, then those parts are valid for other models.
C
7- Chiller compartment
8- Icebox drawer
9- Multizone compartment glass shelf/cooler
10- Freezer compartment drawers
* OPTIONAL
7/29 EN
Refrigerator / User Manual
Page 9
3 Installation
3.1 Appropriate location
for installation
Contact an Authorized Service for the installation
of the product. In order to prepare the product
for use, refer the information in the user manual
and ensure that electrical installation and water
installation are appropriate. If not, call a qualified
electrician and technician to have any necessary
arrangements carried out.
WARNING: Manufacturer shall not
be held liable for damages that may
B
B
A
arise from procedures carried out by
unauthorized persons.
WARNING: Product must not be plugged
in during installation. Otherwise, there is
the risk of death or serious injury!
WARNING: : If the door clearance of the
room where the product shall be placed is
so tight to prevent passing of the product,
remove the door of the room and pass the
product through the door by turning it to
its side; if this does not work, contact the
authorized service.
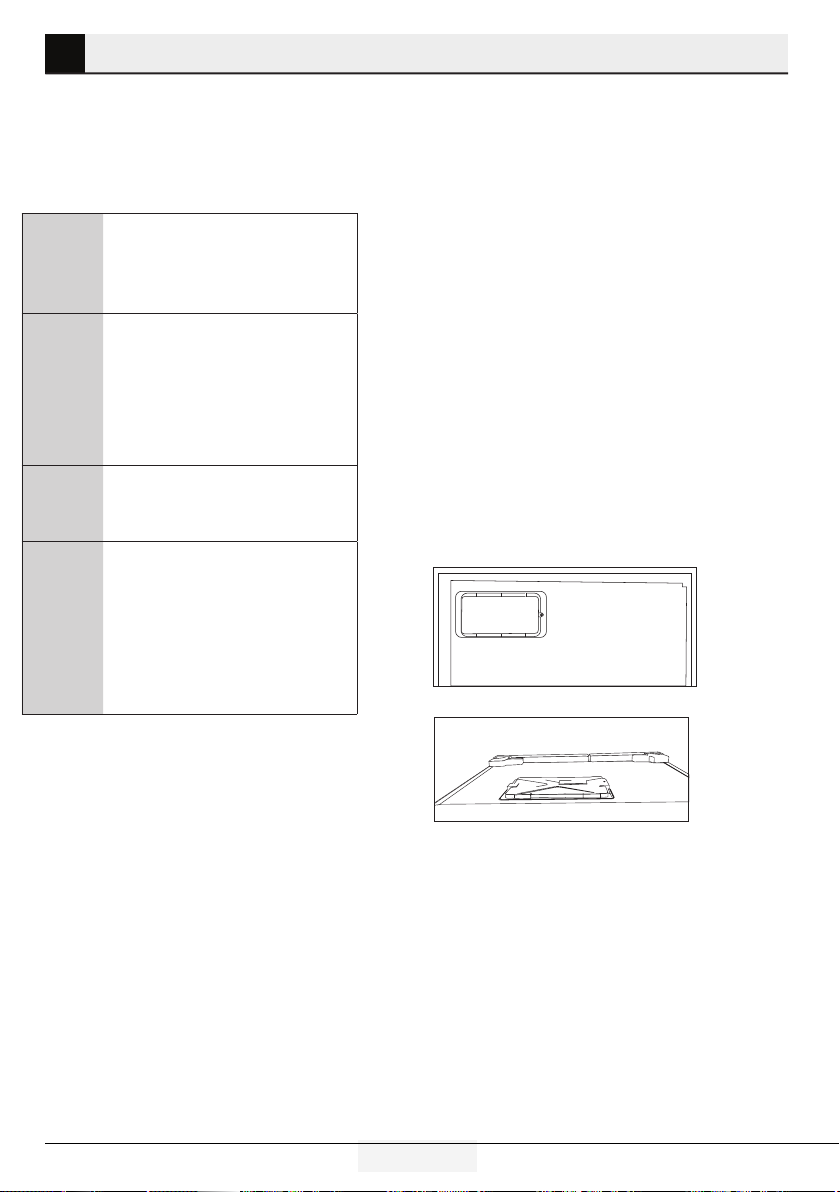
1.
To install the wedges, remove the screws on the
product and use the screws supplied together with the
wedges.
2.
Insert the 2 plastic wedges onto the rear ventilation
cover as illustrated in the figure.
•Placetheproductonalevelfloorsurfaceto
prevent jolts.
•Installtheproductatleast30cmawayfrom
heat sources such as hobs, heater cores and
stoves and at least 5 cm away from electrical
ovens.
•Productmustnotbesubjectedtodirectsunlight
and kept in humid places.
•Appropriateairventilationmustbeprovided
around your product in order to achieve an
efficient operation. If the product is to be placed
in a recess in the wall, pay attention to leave at
least 5 cm distance with the ceiling and side
walls.
•Donotinstalltheproductinplaceswherethe
temperature falls below -5°C.
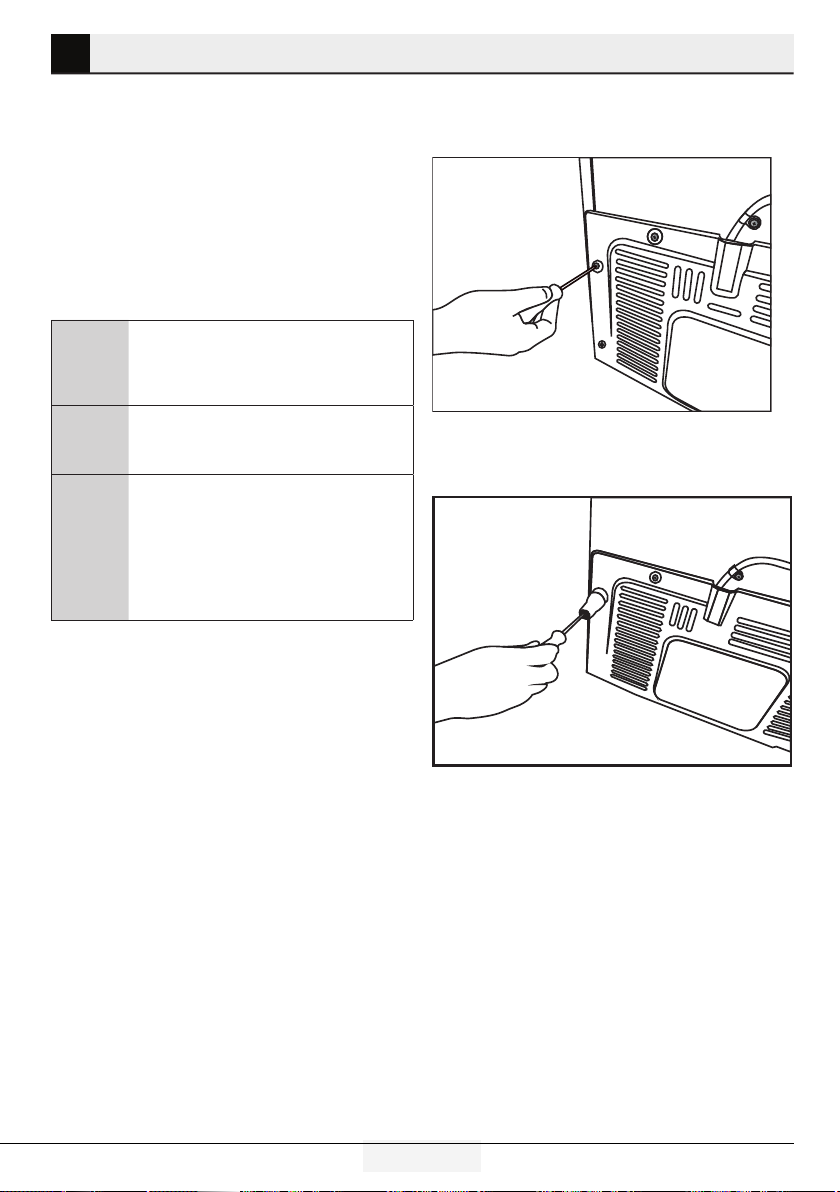
3.2 Installing the plastic wedges
Plastic wedges supplied with the product are
used to create the distance for the air circulation
between the product and the rear wall.
8 /29 EN
Refrigerator / User Manual
Page 10
Installation
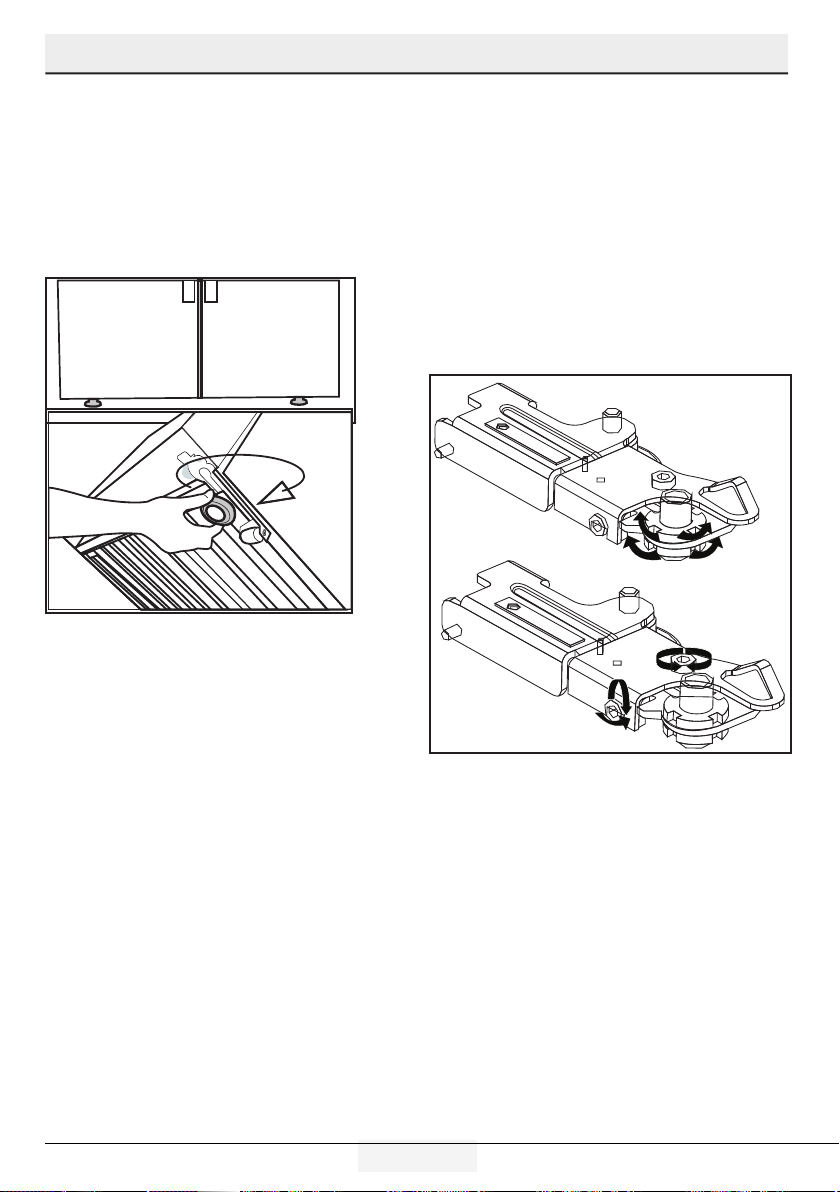
3.3 *Adjusting the feet
If the product stands unbalanced after installation,
adjust the feet on the front by rotating them to the
right or left.
*If your product does not have a wine
compartment or is not a glass door, your product
does not have adjustable stands, the product has
fixed stands.
To adjust the doors vertically,
Loosen the fixing nut located at the bottom.
Rotate the adjusting nut according to the position
of the door (clockwise/counter-clockwise).
Tighten the fixing nut in order to fix the position.
To adjust the doors horizontally,
Loosen the fixing nut located at the top.
Rotate the side adjusting nut according to the
position of the door (clockwise/counter-clockwise).
Tighten the fixing nut which is at the top in order to
fix the position.
adjusting nut
fixing nut
fixing nut
9/29 EN
adjusting nut
Refrigerator / User Manual
Page 11
Installation
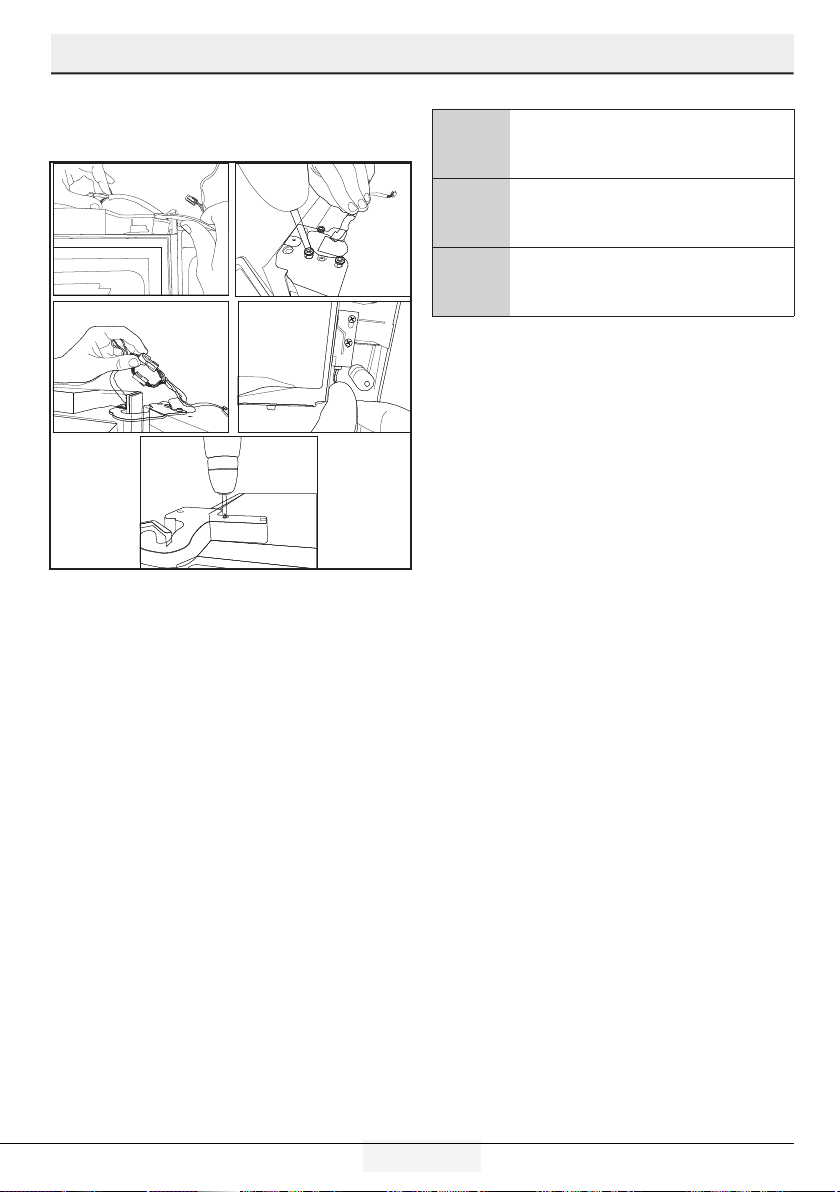
-Upper hinge group is fixed with 3 screws.
-The hinge cover is attached after the sockets are
installed.
- Then the hinge cover is fixed with two screws.
3.4 Electric connection
WARNING: Do not make connections via
A
B
C
• Our company shall not be liable for any
• Power cable plug must be within easy reach
• Do not extension cords or cordless multiple
extension cables or multi-plugs.
WARNING: Damaged power cable must
be replaced by the Authorized Service
Agent.
If two coolers are to be installed side
by side, there should be at least 4 cm
distance between them.
damages that will arise when the product
is used without grounding and electrical
connection in accordance with the national
regulations.
after installation.
outlets between your product and the wall
outlet.
10 /29 EN
Refrigerator / User Manual
Page 12
4 Preparation
4.1 Things to be done for
saving energy
Connecting your refrigerator to systems
that save energy is dangerous as they may
A
• Do not leave the doors of your refrigerator open
• Do not put hot food or drinks in your
• Do not overload the refrigerator. Cooling
• Do not place the refrigerator in places subject
• Pay attention to store your food in refrigerator
• To be able store maximum food in the freezer
• Airflow should not be blocked by placing
• Thawing the frozen foods in the fridge
C
cause damage on the product.
for a long time.
refrigerator.
capacity will fall when the air circulation in the
refrigerator is hindered.
to direct sunlight. Install the product at least
30 cm away from heat sources such as hobs,
ovens, heater units and stoves and at least 5
cm away from electrical ovens.
in closed containers.
compartment of your refrigerator, the upper
drawer has to be removed and placed on top
of glass shelf. Power consumption stated for
your refrigerator has been determined after
removing the icematic and the upper drawers
as to allow maximum loading. It is strongly
recommended to use the lower drawers in the
freezer and the multizone compartment while
loading.
foods in front of the freezer and the multizone
compartment fans. Foods should be loaded by
leaving minimum 5 cm space in front of the
protective fan grid.
compartment both saves energy and reserves
the quality of the foods.
Temperature of the room where your
refrigerator is located should at least
be
10ºC /50°F. Operating your
refrigerator under cooler conditions is not
recommended with regard to its efficiency.
If two coolers are to be installed side
by side, there should be at least 4 cm
C
distance between them.
4.2 Recommendations about the
fresh food compartment
• Make sure that the food does not touch the
temperature sensor in fresh food compartment.
To allow the fresh food compartment to keep
its ideal storage temperature, the sensor must
not be hindered by food.
• Do not place hot foods or beverages inside the
product.
C
Inside of your refrigerator must be cleaned
thoroughly.
11/29 EN
Refrigerator / User Manual
Page 13

Preparation
4.3 Initial use
Before using the product, make sure that all
preparations have been made in accordance
with the instructions given in the "Important
instructions regarding safety and environment" and
"Installation" chapters.
• Clean the interior of the refrigerator as
recommended in the “Maintenance and
cleaning” section. Before you start the
refrigerator, make sure that the interior is dry.
• Plug the refrigerator in a grounded socket. The
interior illumination is lit when the door of the
refrigerator is opened.
• Operate the refrigerator for 6 hours without
placing any food in it and do not open its door
unless it is necessary.
You will hear a noise when the compressor
starts up. The liquids and gases sealed
C
C
within the refrigeration system may also
give rise to noise, even if the compressor is
not running and this is quite normal.
Front edges of the refrigerator may
feel warm. This is normal. These areas
are designed to be warm to avoid
condensation.
12 /29 EN
Refrigerator / User Manual
Page 14
5 Operating the product
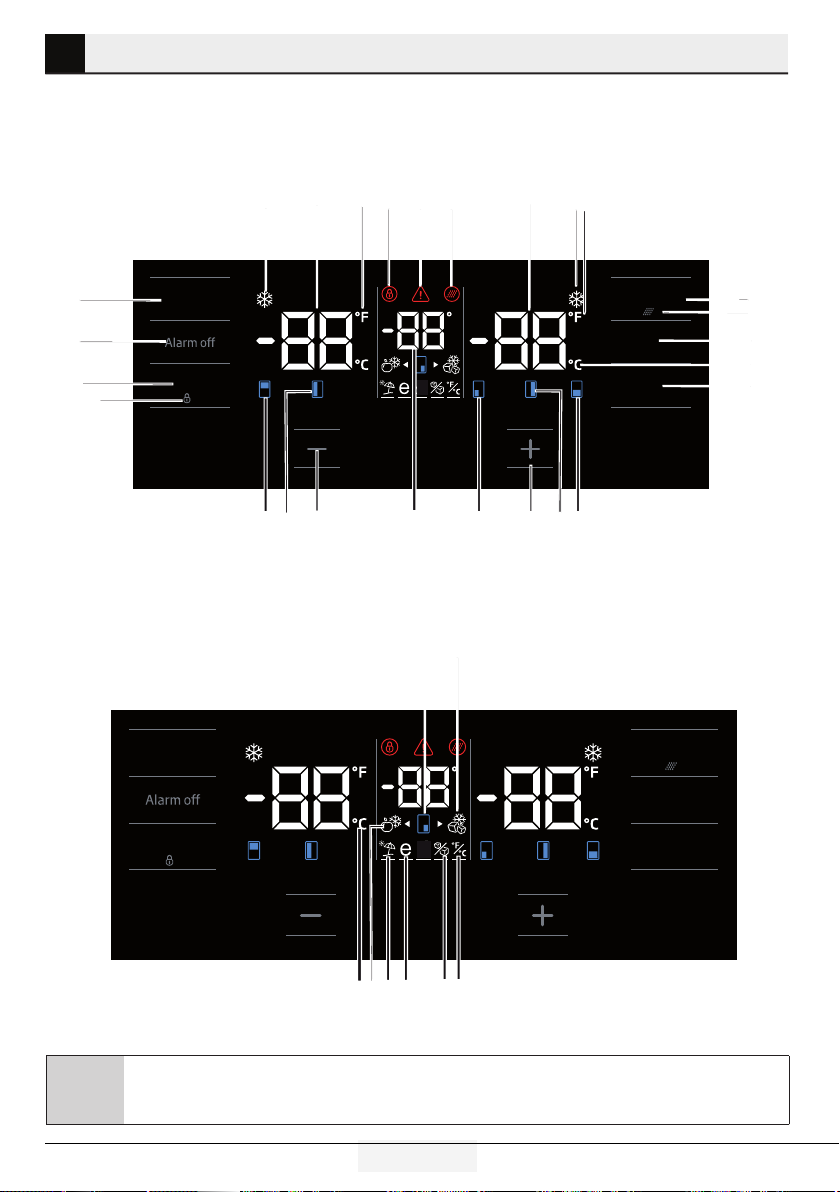
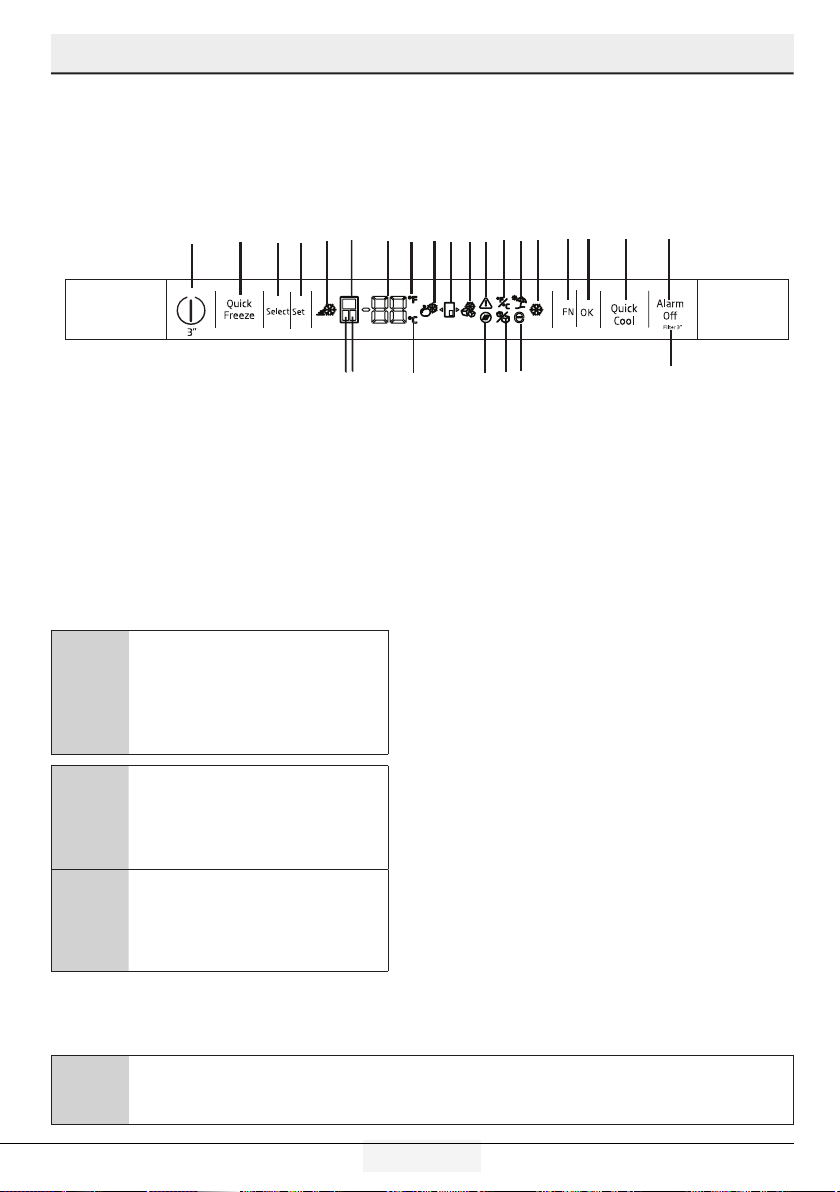
5.1 Indicator panel
Touch-controlled indicator panel allows you to set the temperature and control the other functions related
to the refrigerator without opening the door of the product. Just press the relevant buttons for function
settings.
2 3
1
33
32
31
30
Select
3 “
27
28
29
4
*34.1
5 6
*34.2
7
*8
9
10 11
Quick FreezeQuick Cool
3 “
FN
OK
20
19
1718
Quick FreezeQuick Cool
3 “
12
13
14
15
16
C
FN
Select
3 “
26
*25
24
23
22
21
OK
Figures in this user manual are schematic and may not match the product exactly. If the subject parts
are not included in the product you have purchased, then those parts are valid for other models.
13/29 EN
Refrigerator / User Manual
Page 15
Operating the product
1. Quick cooling function indicator
It turns on when the quick fridge function is
activated.
2. Fridge compartment temperature indicator
Temperature of the fridge compartment is shown;
it can be set to 8,7,6,5,4,3,2,1.
3. Fahrenheit indicator
It is a Fahrenheit indicator. When the Fahrenheit
indication is activated, the temperature set values
are shown in Fahrenheit and the relevant icon
turns on.
4. Key lock
Press key lock button simultaneously for 3 seconds. Key lock symbol
will light up and key lock mode will be activated.
Buttons will not function if the Key lock mode is
active. Press key lock button simultaneously for 3
seconds again. Key lock symbol will turn off and
the key lock mode will be exited.
Press the key lock button if you want to prevent
changing of the temperature setting of the
refrigerator.
5. Power failure/High temperature / error
warning
This indicator illuminates during power failure, high
temperature failures and error warnings. During
long-term power failures, the highest temperature
value that the freezer compartment reaches will
blink on the digital display. After checking the food
located in the freezer compartment, press the
alarm off button to clear the warning.
Please refer to "solutions recommended for
troubleshooting" section on your manual if you
observe that this indicator is illuminated.
6. Filter reset icon
This icon turns on when the filter needs to be
reset.
7. Temperature change cabin icon
Indicates the cabin whose temperature is to be
changed. When the temperature change cabin icon
starts flashing, it is understood that the relevant
cabin has been selected.
8. Joker freezer icon
Hover over the Joker freezer icon using the FN button; the
icon will start to flash. When you press the OK key, joker
cabin freezer icon turn on and operates as a freezer.
9. Freezer compartment temperature
indicator
Temperature of the fridge compartment is shown;
it can be set to -18, -19, -20, -21, -22, -23, -24.
10. Quick freeze function indicator
It turns on when the quick freeze function is
activated.
11. Fahrenheit indicator
It is a Fahrenheit indicator. When the Fahrenheit
indication is activated, the temperature set values
are shown in Fahrenheit and the relevant icon
turns on.
12. Quick freeze function button
Press this button to activate or deactivate the quick
freeze function. When you activate the function,
the freezer compartment will be cooled to a
temperature lower than the set value.
Use the quick freeze function when you
want to quickly freeze the food placed
C
C
C
13. Filter reset
The filter is reset when the quick freeze button is
pressed for 3 seconds. Filter reset icon goes off.
in freezer compartment. If you want
to freeze large amounts of fresh food,
activate this function before putting the
food into the product.
If you do not cancel it, Quick Freeze
will cancel itself automatically after 4
hours at the most or when the fridge
compartment reaches to the required
temperature.
This function is not recalled when
power restores after a power failure.
14 /29 EN
Refrigerator / User Manual
Page 16
Operating the product
14. FN button
Using this key, you can switch between the
functions that you want to select. Upon pressing
this key, the icon, whose function is required to be
activated or deactivated, and this icon's indicator
starts flashing. The FN button gets deactivated if
not pressed for 20 seconds. You need to press this
button to change the functions again.
15. Celsius indicator
It is a Celsius indicator. When the Celsius indication
is activated, the temperature set values are shown
in Celsius and the relevant icon turns on.
16. OK button
After navigating the functions using the FN button,
when the function is cancelled via the OK button,
the relevant icon and the indicator flashes. When
the function is activated, it remains on. The
indicator continues to flash in order to show the
icon it is on.
17. Temperature change cabin icon
Indicates the cabin whose temperature is to be
changed. When the temperature change cabin icon
starts flashing, it is understood that the relevant
cabin has been selected.
18. Temperature change cabin icon
Indicates the cabin whose temperature is to be
changed. When the temperature change cabin icon
starts flashing, it is understood that the relevant
cabin has been selected.
19. Set increasing button
Select the relevant cabin with the select button;
the cabin icon representing the relevant cabin will
start to flash. If you press the set increasing button
during this process, the set value gets increased. If
you keep pressing it in a loop, the set value returns
to the beginning.
20. Temperature change cabin icon
Indicates the cabin whose temperature is to be
changed. When the temperature change cabin icon
starts flashing, it is understood that the relevant
cabin has been selected.
15/29 EN
21. Setting the Celsius and Fahrenheit
indicator
Hover over this key using the FN key and select
Fahrenheit and Celsius via the OK key. When
the relevant temperature type is selected, the
Fahrenheit and Celsius indicator turns on.
22. Ice machine off icon
Press the FN key (until it reaches the ice icon and
the lower line) to switch off the ice machine. The
ice machine off icon and the ice machine function
indicator start flashing when you hover over them,
thus you can understand whether the ice machine
will be turned on or off. When you press the OK
button, the ice machine icon lights continuously
and the Indicator continues to flash during this
process. If you do not press any button after 20
seconds, the icon and the indicator remains on.
Thus, the ice machine is switched off. In order to
switch on the ice machine again, hover over the
icon and the indicator; thus, both the ice machine
off icon and the indicator will start flashing. If you
do not press any button within 20 seconds, the
icon and the indicator will go off and thus the ice
machine will be switched on again.
Indicates whether the icematic is
C
C
23. Eco fuzzy function icon
Press the FN key (until it reaches the letter e
icon and the lower line) to activate the eco fuzzy.
When you hover over the eco fuzzy icon and the
eco fuzzy function indicator, they start flashing.
Thus, you can understand whether the eco fuzzy
function will be activated or deactivated. When you
press the OK button, the eco fuzzy function icon
lights continuously and the Indicator continues to
flash during this process. If you do not press any
button after 20 seconds, the icon and the indicator
remains on. Thus, the eco fuzzy function is
activated. In order to cancel the eco fuzzy function,
on or off.
Water flow from water tank
will stop when this function is
selected. However, ice made
previously can be taken from the
icematic.
Refrigerator / User Manual
Page 17

Operating the product
hover over the icon and the indicator again and
press the OK key. Thus, both the eco fuzzy function
icon and the indicator will start flashing. If you do
not press any button within 20 seconds, the icon
and the indicator will go off and the eco fuzzy
function will be cancelled.
24. Vacation function icon
Press the FN key (until it reaches the umbrella
icon and the lower line) to activate the vacation
function. When you hover over the vacation
function icon and the vacation function indicator,
they start flashing. Thus, you can understand
whether the vacation function will be activated or
deactivated. When you press the OK button, the
vacation function icon lights continuously and thus
the Vacation function is activated. The Indicator
continues to flash during this process. Press the
OK key to cancel the vacation function. Thus, both
the vacation function icon and the indicator will
start flashing and the vacation function will be
cancelled.
25. Joker fridge icon
When you select the joker fridge icon using the FN
button and press the OK key, the joker cabin turns
into a fridge cabin and operates as a cooler.
26. Celsius indicator
It is a Celsius indicator. When the Celsius indication
is activated, the temperature set values are shown
in Celsius and the relevant icon turns on.
27. Set decreasing function
Select the relevant cabin with the select button;
the cabin icon representing the relevant cabin
will start to flash. If you press the set decreasing
button during this process, the set value gets
decreased. If you keep pressing it in a loop, the set
value returns to the beginning.
28. Temperature change cabin icon
Indicates the cabin whose temperature is to be
changed. When the temperature change cabin icon
starts flashing, it is understood that the relevant
cabin has been selected.
29. Temperature change cabin icon
Indicates the cabin whose temperature is to be
changed. When the temperature change cabin icon
starts flashing, it is understood that the relevant
cabin has been selected.
30. Key lock
Press key lock button simultaneously for 3 seconds. Key lock symbol
will light up and key lock mode will be activated.
Buttons will not function if the Key lock mode is
active. Press key lock button simultaneously for 3
seconds again. Key lock symbol will turn off and
the key lock mode will be exited.
Press the key lock button if you want to prevent
changing of the temperature setting of the
refrigerator.
31.Select button
Use this button to select the cabin whose temperature you want to change. Switch between
the cabins by pressing this button. The selected
cabin can be understood from the cabin icons
(7,17,18,20,28,29). Whichever cabin icon is flashing, the cabin, whose temperature set value you
want to change, is selected. Then, you can change
the set value by pressing the cabin set value
decreasing button (27) and the cabin set value increasing button (19). If you do not press the select
button for 20 seconds, the cabin icons will go off.
You need to press this key to select a cabin again.
32. Alarm off warning
In case of power failure/high temperature
alarm, after checking the foods in the freezer
compartment, press the alarm off button to clear
the warning.
33. Quick cooling function button
The button has two functions. To activate or
deactivate the quick cool function, press it briefly.
Quick Cool indicator will turn off and the product
will return to its normal settings.
16 /29 EN
Refrigerator / User Manual
Page 18
Operating the product
Use quick cooling function when you
want to quickly cool the food placed
C
C
C
C
34. 1 Joker temperature indicator
Temperature set values of the joker cabin are
displayed.
34. 2 Wine cooler compartment tempature
indicator
Tempature set values of the winecabin are displayed.
in the fridge compartment. If you want
to cool large amounts of fresh food,
activate this function before putting the
food into the product.
If you do not cancel it, quick cooling
will cancel itself automatically after 8
hours at the most or when the fridge
compartment reaches to the required
temperature.
If you press the quick cooling button
repeatedly with short intervals, the
electronic circuit protection will be
activated and the compressor will not
start up immediately.
This function is not recalled when
power restores after a power failure.
17/29 EN
Refrigerator / User Manual
Page 19
Operating the product
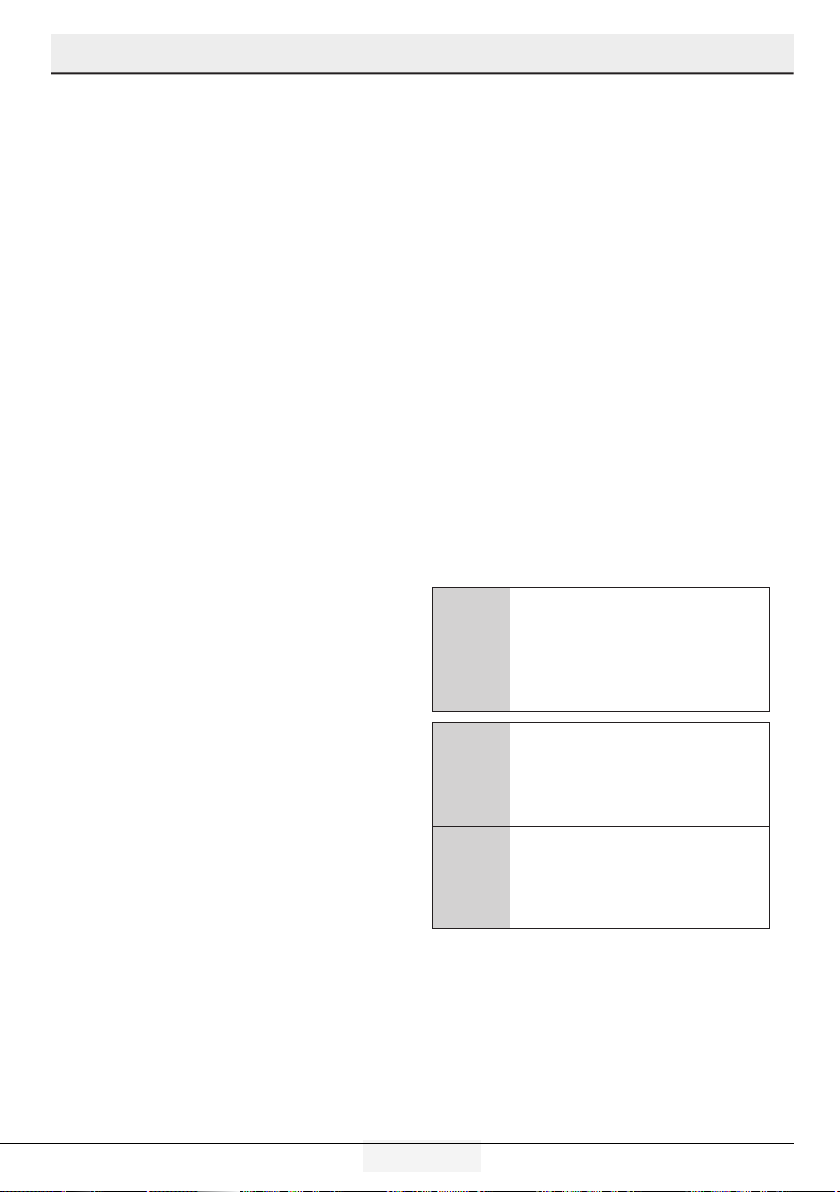
5.2 Indicator panel
Touch-control indicator panel allows you to set the temperature and control the other functions related to
the refrigerator. Just press the relevant buttons for function settings.
17
18 19
2
1
5
3
4
6
7
*9
8
13
10
12
*11
16
15
14
25
26
1-On/Off function
Press the On/Off button for 3 seconds to turn off or
turn on the fridge.
2. Quick freeze function button
Press this button to activate or deactivate the quick
freeze function. When you activate the function,
the freezer compartment will be cooled to a
temperature lower than the set value.
Use the quick freeze function when you
want to quickly freeze the food placed
C
C
C
in freezer compartment. If you want
to freeze large amounts of fresh food,
activate this function before putting the
food into the product.
If you do not cancel it, Quick Freeze
will cancel itself automatically after 4
hours at the most or when the fridge
compartment reaches to the required
temperature.
This function is not recalled when
power restores after a power failure.
24
21
22
23
*20
3.Select button
Use this button to select the cabin whose
temperature you want to change. Switch between
the cabins by pressing this button. The selected
cabin can be understood from the cabin icons (6,
25, 24 ). Whichever cabin icon is power on, the
cabin, whose temperature set value you want to
change, is selected. Then, you can change the set
value by pressing the cabin set value Temperature
Adjustment button (4)
4.Temperature Adjustment / Temperature
Decrease
When pressed, decreases the temperature of the
selected compartment.
5-Quick freeze Indicator
This icon lits when the Quick freeze function is
active.
6. Fridge compartment indicator
When this indicator is active, the temperate
of the fridge compartment is displayed on the
temperature value indicator.Fridge compartment
can be set to 8, 7, 6, 5, 4, 3, 2 or 1°C / 46, 45,
44, 43, 42, 41, 40,39,38,37,36,35,34 or 33°F by
pressing Temperature Adjustment button (4).
C
Figures in this user manual are schematic and may not match the product exactly. If the subject parts
are not included in the product you have purchased, then those parts are valid for other models.
18 /29 EN
Refrigerator / User Manual
Page 20

Operating the product
7. Temperature value indicator
Shows the temperature value of the selected
compartment.
8. Fahrenheit indicator
It is a Fahrenheit indicator. When the Fahrenheit
indication is activated, the temperature set values
are shown in Fahrenheit and the relevant icon
turns on.
9. Joker fridge icon
When you select the joker fridge icon using the FN
button (16) and press the OK button (17) the joker
cabin turns into a fridge cabin and operates as a
cooler.
10. Joker cabin icon
It shows joker cabin icon.
11. Joker freezer icon
When you select the joker freezer icon using the
FN button (16) and press the OK button (17) the
joker cabin turns into a freezer cabin and operates
as a freezer.
12. Power failure/High temperature / error
warning
This indicator illuminates during power failure, high
temperature failures and error warnings. During
long-term power failures, the highest temperature
value that the freezer compartment reaches will
blink on the digital display. After checking the food
located in the freezer compartment, press the
alarm off button (19) to clear the warning.
13.Setting the Celsius and Fahrenheit
indicator
Hover over this key using the FN key and select
Fahrenheit and Celsius via the OK key. When
the relevant temperature type is selected, the
Fahrenheit and Celsius indicator turns on.
14. Vacation function icon
Press the FN key (until it reaches the umbrella
icon) to activate the vacation function. When you
hover over the vacation function icon, it start
flashing. Thus, you can understand whether the
vacation function will be activated or deactivated.
When you press the OK button, the vacation
function indicator lights continuously and thus the
Vacation function is activated. Press the OK key
to cancel the vacation function. Thus, the vacation
function indicator will start flashing and the
vacation function will be cancelled.
15. Quick cooling function indicator
It turns on when the quick fridge function is
activated.
16. FN button
Using this key, you can switch between the
functions that you want to select. Upon pressing
this key, the icon, whose function is required to be
activated or deactivated, and this icon’s indicator
starts flashing. The FN button gets deactivated if
not pressed for 20 seconds. You need to press this
button to change the functions again.
17. OK button
After navigating the functions using the FN button,
when the function is cancelled via the OK button,
the relevant indicator flashes. When the function is
activated, it remains on. The indicator continues to
flash in order to show the icon it is on.
18. Quick cooling function button
The button has two functions. To activate or
deactivate the quick cool function, press it briefly.
Quick Cool indicator will turn off and the product
will return to its normal settings.
19. Alarm off warning
In case of power failure/high temperature
alarm, after checking the foods in the freezer
compartment, press the alarm off button to clear
the High temperature warning icon (12).
20. Filter reset
The filter is reset when the alarm off button (19) is
pressed for 3 seconds. Filter reset icon goes off.
21. Eco fuzzy function icon
Press the FN key (until it reaches the letter e
icon) to activate the eco fuzzy. When you hover
over the eco fuzzy icon it start flashing. Thus,
you can understand whether the eco fuzzy
function will be activated or deactivated. When
you press the OK button, the eco fuzzy function
icon lights continuously during this process. If you
do not press any button after 20 seconds, the
icon remains on. Thus, the eco fuzzy function is
19/29 EN
Refrigerator / User Manual
Page 21
Operating the product
activated. In order to cancel the eco fuzzy function,
hover over the icon again and press the OK key.
Thus, the eco fuzzy function icon will start flashing.
If you do not press any button within 20 seconds,
the icon will go off and the eco fuzzy function will
be cancelled.
22. Ice machine off icon
Press the FN key (until it reaches the ice icon) to
switch off the ice machine. The ice machine off
icon start flashing when you hover over it, thus you
can understand whether the ice machine will be
turned on or off. When you press the OK button,
the ice machine icon lights continuously during
this process. If you do not press any button after
20 seconds, the icon and the indicator remains on.
Thus, the ice machine is switched off. In order to
switch on the ice machine again, hover over the
icon. The ice machine off icon will start flashing. If
you press ok button, the icon will go off and thus
the ice machine will be switched on again.
Indicates whether the icematic is
C
C
23. Filter reset icon
This icon turns on when the filter needs to be
reset.
24. Celsius indicator
It is a Celsius indicator. When the Celsius indication
is activated, the temperature set values are shown
in Celsius and the relevant icon turns on.
25. Joker compartment indicator
When this indicator is active, the temperate of the
joker compartment is displayed on the temperature
value indicator. Joker compartment set values
change by pressing Temperature Adjustment
button (4).
on or off.
Water flow from water tank
will stop when this function is
selected. However, ice made
previously can be taken from the
icematic.
26. Freezer compartment indicator
When this indicator is active, the temperate of
the freezer compartment is displayed on the
temperature value indicator.Freezer compartment
can be set to -18, -19, -20, -21, -22, -23 and -24
°C /0, -2, -4, -6, -8, -10 and -12°F by pressing
Temperature Adjustment button (4).
20 /29 EN
Refrigerator / User Manual
Page 22

Operating the product
Freezer
Compartment
Setting
-18°C 4°C This is the normal recommended setting.
-20, -22 or
-24°C
Quick Freeze 4°C
-18°C or colder 2°C
5.3 Freezing fresh food
• In order to preserve the quality of the food, it
shall be frozen as quickly as possible when it is
placed in the freezer compartment, use the fast
freezing feature for this purpose.
• You may store the food longer in freezer
compartment when you freeze them while they
are fresh.
• Pack the food to be frozen and close the
packing so that it would not allow entrance of
air.
• Ensure that you pack your food before putting
them in the freezer. Use freezer containers,
foils and moisture-proof papers, plastic
bags and other packing materials instead of
traditional packing papers.
• Label each pack of food by adding the date
before freezing. You may distinguish the
freshness of each food pack in this way when
you open your freezer each time. Store the food
frozen before in the front side of compartment
to ensure that they are used first.
• Frozen food must be used immediately after
they are thawed and they should not be refrozen.
• Do not freeze too large quantities of food at
one time.
Fridge
Compartment
Setting
4°C
Remarks
These settings are recommended when the ambient temperature
exceeds 30°C.
Use when you wish to freeze your food in a short time. Your product
will return to its previous mode when the process is over.
Use these settings if you think that your fridge compartment is not
cold enough because of the hot ambient conditions or frequent
opening and closing of the door.
5.4 Recommendations for
preserving the frozen food
Compartment shall be set to -18°C at least.
1. Put packages in the freezer as quickly as
possible after purchase without allowing the
to thaw.
2. Check whether the "Use By" and "Best
Before" dates on the packaging are expired or
not before freezing it.
3. Ensure that the package of the food is not
damaged.
5.5 Deep-freeze information
According to IEC 62552 standards, the product
shall freeze at least 4.5 kg of food at 25°C
ambient temperature to -18°C or lower within 24
hours for every 100-litres of freezer volume.
It is possible to preserve the food for a long time
only at -18°C or lower temperatures.
You can keep the freshness of food for many
months (at -18°C or lower temperatures in the
deep freeze).
Foods to be frozen should not be allowed to come
in contact with the previously frozen items to
prevent them from getting thawed partially.
21/29 EN
Refrigerator / User Manual
Page 23
Operating the product
Boil the vegetables and drain their water in order
to store vegetables for a longer time as frozen.
After draining their water, put them in air-proof
packages and place them inside the freezer. Food
such as bananas, tomatoes, lettuce, celery, boiled
eggs, potatoes are not suitable for freezing. When
these foods are frozen, only their nutritional value
and taste shall be affected negatively. They shall
not be spoiled so that they would create a risk for
human health.
5.6 Placing the food
Freezer
compartment
shelves
Refrigerator
compartment
shelves
Door shelves
of fridge
compartment
Crisper Vegetables and fruits
Fresh zone
compartment
Various frozen food such
as meat, fish, ice cream,
vegetables and etc.
Food in pans, covered plates
and closed containers, eggs (in
closed container)
Small and packaged food or
beverage
Delicatessen (breakfast food,
meat products that shall be
consumed in a short time)
5.7 Door open warning
(This feature is optional)
An audio warning signal will be given when the
door of your product is left open for 1 minute. This
warning will be muted when the door is closed or
any of the display buttons (if any) are pressed.
5.8 Chiller compartment
Chiller compartments allow you to prepare the food
for freezing. You can also use these compartments
to store your food at a temperature a few degrees
below the fridge compartment.
You can increase the inner volume of your
refrigerator by removing any of the chiller
compartments:
1. Pull the compartment towards yourself until it
stops.
2. Lift the compartment about 1 cm up and pull
towards yourself to remove it from its seating.
5.9 Crisper
Crisper of the refrigerator is designed specially
to keep the vegetables fresh without loosing their
humidity. For this purpose, cool air circulation is
intensified around the crisper in general. Remove
the door shelves that stand against the crisper
before removing the crisper.
5.10 Humidity-controlled crisper
(FreSHelf)
(This feature is optional)
Humidity rates of fruits and vegetables are kept
under control thanks to the humidity-controlled
crisper and thus the food is ensured to stay fresh
for a longer period.
We recommend that you place leafy vegetables
such as lettuce and spinach and vegetables sensitive to humidity loss as horizontally as possible
when putting them in the crisper; not in a horizontal position on their roots.
While the vegetables are being replaced, their specific weights should be taken into consideration.
Heavy and hard vegetables must be placed at the
bottom of the crisper and light and soft vegetables
must be on the upper part.
22 /29 EN
Refrigerator / User Manual
Page 24
Operating the product
Never leave the vegetables in their plastic bags in
the crisper. If they are left in their plastic bags, this
will cause them to rot in a little while. If you not
prefer the vegetable to get in contact with other
vegetables for hygienic reasons, use perforated
paper or a similar material instead of plastic bags.
Do not place pears, apricots, peaches etc.,
especially those fruits that generate large amounts
of ethylene, in the same crisper with other fruits
and vegetables. The ethylene gas emitted by these
fruits cause other fruits to ripen sooner and to rot
in a shorter span of time.
5.11 Egg tray
You can install the egg holder to the desired door
or body shelf.
Never keep the egg holder in the freezer
compartment.
5.12 Movable Middle Section
Movable middle section is intended to prevent
the cold air inside your refrigerator from escaping
outside.
1- Sealing is provided when the gaskets on the
door presses on the surface of the movable middle
section while the fridge compartment doors are
closed.
2- Another reason that your refrigerator is
equipped with a movable middle section is that it
increases the net volume of the fridge compartment. Standard middle sections occupy some
non-usable volume in the refrigerator.
3-Movable middle section is closed when the left
door of the fridge compartment is opened.
4-It must not be opened manually. It moves under
the guidance of the plastic part on the body while
the door is closed.
5.13 Cool Control Storage
Compartment
The Cool Control Storage Compartment of your
refrigerator may be used in any desired mode
by adjusting it to fridge (2/4/6/8 °C) or freezer
(-18/-20/-22/-24) temperatures. You can keep the
compartment at the desired temperature with the
Cool Control Storage Compartment's Temperature
Setting Button. The temperature of the Cool
Control Storage Compartment may be set to 0 and
10 degrees in addition to the fridge compartment
temperatures and to -6 degrees in addition to
the freezer compartment temperatures. 0 degree
is used to store the deli products longer, and -6
degrees is used to keep the meats up to 2 weeks
in an easily sliceable condition.
The feature of switching to a Fridge or Freezer
compartment is provided by a cooling element
located in the closed section (Compressor
Compartment) behind the refrigerator. During
operation of this element, sounds similar to the
sound of seconds heard from an analogue clock
may be heard. This is normal and is not fault
cause.
5.14 Blue light
(in some models)
Crisper of the refrigerator are illuminated with a
blue light. Foodstuff stored in the crisper continue
their photosynthesis by means of the wavelength
effect of blue light and thus, preserve their
freshness and increase their vitamin content.
5.15 Odour filter
Odour filter in the air duct of the fridge
compartment prevents build-up of unpleasant
odours in the refrigerator.
23/29 EN
Refrigerator / User Manual
Page 25
Operating the product
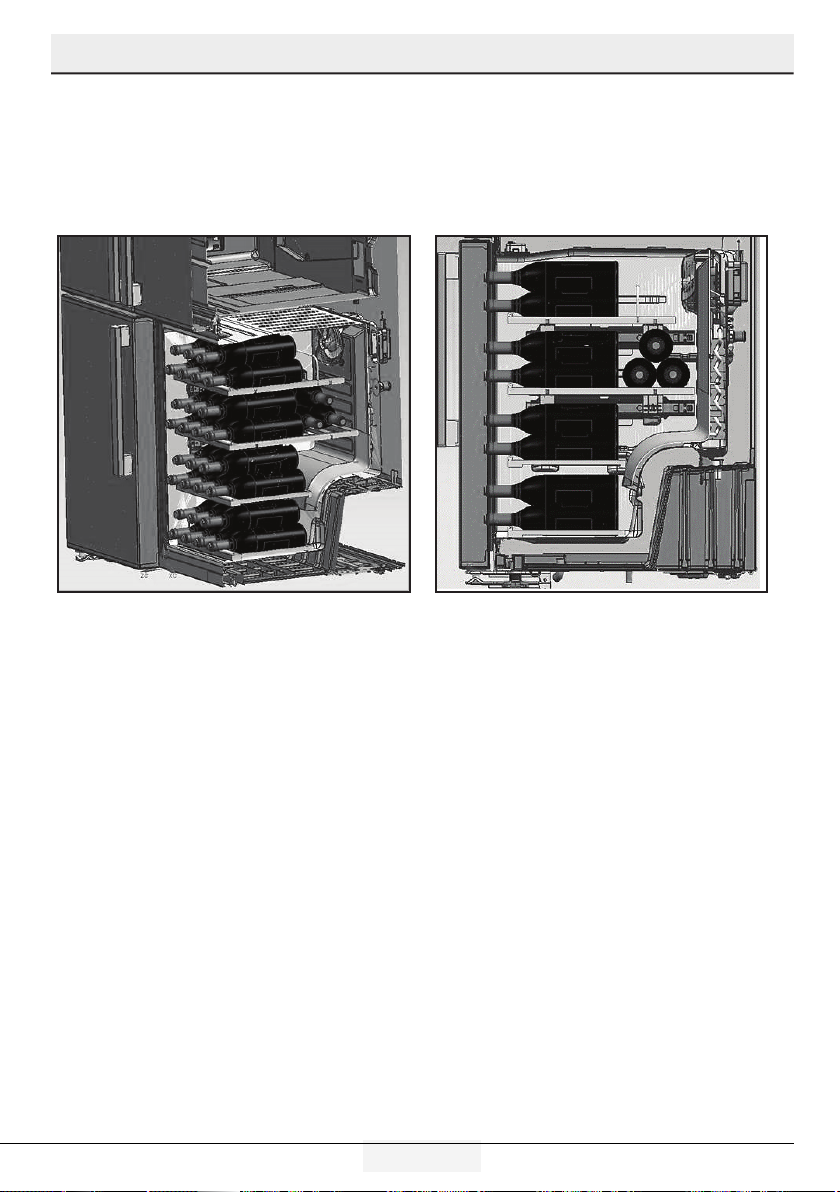
5.16 Wine cellar compartment
(This feature is optional)
1 – Fill your cellar compartment
Wine cellar was built to contain up to 28 front bottles + 3 bottles accessible using a telescopic rack.
These maximum quantities declared are given for information purpose only and correspond to tests
carried out with a “Bordelaise 75cl” standard bottle.
2- Suggested optimum service temperatures
Our advice: If you mix different types of wines, choose a 12 ° Celsius setting just like in a real cellar.
For white wines, which are to be served between 6 and 10 °, think of putting your bottles in the
refrigerator 1/2 hour before serving, the refrigerator will be able to maintain the bottles at the preferred
temperature. As regards red wines, they will heat up slowly at room temperature when serving.
16 -17°C Fine Bordeaux wines - Red
15 -16°C Fine Burgundy wines- Red
14 -16°C Grand crus (great growth) of dry white wines
11 -12°C Light,fruity and young red wines
10 -12°C Provence rosé wines, French wines
10 -12°C Dry white wines and red country wines
8 - 10°C White country wines
7 - 8°C Champagnes
6-°C Sweet white wines
24 /29 EN
Refrigerator / User Manual
Page 26

Operating the product
3- Suggestions relating to the opening of a wine bottle before tasting:
White wines About 10 minutes before serving
Young red wines About10 minutes before serving
Thick and mature red wines About 30 to 60 minutes before serving
4- How long can an open bottle be preserved?
Unfinished bottles of wine must be cocked properly and can be preserved in a cold and dry place during
the following periods:
White wines Red wines
75 % full bottle 3 to 5 days 4 to 7 days
50 % full bottle 2 to 3 days 3 to 5 days
Less than 50 % 1 day 2 days
25/29 EN
Refrigerator / User Manual
Page 27

Operating the product
5.17 Using internal water dispenser
(in some models)
After connecting the refrigerator to a water source
or replacing the water filter, flush the water
system. Use a sturdy container to depress and
hold the water dispenser lever for 5 seconds,
then release it for 5 seconds. Repeat until water
begins to flow. Once water begins to flow, continue
depressing and releasing the dispenser paddle
(5 seconds on, 5 seconds off) until a total of 4
gal. (15L) has been dispensed. This will flush air
from the filter and water dispensing system, and
prepare the water filter for use. Additional flushing
may be required in some households. As air is
cleared from the system, water may spurt out of
the dispenser.
Allow 24 hours for the refrigerator to cool down
and chill water. Dispense enough water every week
to maintain a fresh supply.
After 5 minutes of continuous
dispensing, the dispenser will stop
dispensing water to avoid flooding.
C
To continue dispensing, press the
dispenser paddle again.
5.19 For using water dispenser
Before using your fridge first time and
after replacing your water filter, water
dispenser may drip drops of water. To
prevent water dripping or leaking from
dispenser, please bleed the air from
the system by dispensing 5-6 gallons
(about 20 liter) of water through the
water dispenser before the first use
and every time after you change
A
C
the water filter. This will remove any
air trapped in the system and stop
the water dispenser from leaking.
Checking coupler position and the
straightness of water line at the back
of the unit will be required if there’s an
obstruction in water flow.
If your water dispenser is leaking just a few
drops of water after you have dispensed some
water, this is normal.
5.18 Dispensing water
Hold a container under the dispenser spout while
pressing the dispenser pad.
Release the dispenser pad to stop dispensing.
It is normal for the first few glasses of
water taken from the dispenser to be
C
C
During initial use, you will have to wait
approximately 24 hours for the water to cool down.
Take out the glass a little while after you pull the
trigger.
warm.
If the water dispenser is not used for a long
period of time, dispose of first few glasses
of water to obtain fresh water.
26 /29 EN
Refrigerator / User Manual
Page 28
Operating the product
5.20 Icematic
(in some models)
To get ice from the icematic, fill the water tank
in the fridge compartment with water up to the
maximum level.
Ice cubes in the ice drawer may stick to each
other and become a bulk due to hot and humid
air in approximately 15 days. This is normal. If you
cannot break the bulk apart, you can empty the ice
container and make ice again.
It is recommended to change the water
C
C
C
C
in the water tank if it remains in the
water tank for more then 2-3 weeks.
Strange noises you hear from the refrigerator at 120-minute intervals are the
sounds of ice-making and pouring. This
is normal.
If you do not want to make ice, press the Ice
off icon to stop the icematic to save energy
and prolong the service life of your refrigerator.
It is normal that a few drops of water drop
from the dispenser after you have taken water.
5.21 Icematic and ice
storage container
(in some models)
Using the Icematic
Fill the Icematic with water and place it into its
seat. Your ice will be ready approximately in two
hours. Do not remove the Icematic from its seating
to take ice.
Turn the knobs on the ice reservoirs clockwise by
90 degrees.
Ice cubes in the reservoirs will fall down into the
ice storage container below.
You may take out the ice storage container and
serve the ice cubes.
If you wish, you may keep the ice cubes in the ice
storage container.
Ice storage container
Ice storage container is only intended for
accumulating the ice cubes. Do not put water in it.
Otherwise, it will break.
27/29 EN
Refrigerator / User Manual
Page 29

6 Maintenance and cleaning
Cleaning your fridge at regular intervals will
extend the service life of the product.
B WARNING:
Unplug the product before cleaning it.
• Never use gasoline, benzene or
similar substances for cleaning
purposes.
• Never use any sharp and abrasive
tools, soap, household cleaners,
detergent and wax polish for
cleaning.
• For non-No Frost products,
water drops and frosting up to a
fingerbreadth occur on the rear wall
of the Fridge compartment. Do not
clean it; never apply oil or similar
agents on it.
• Only use slightly damp microfiber
cloths to clean the outer surface of
the product. Sponges and other types
of cleaning cloths may scratch the
surface
• Dissolve one teaspoon of bicarbonate in half litre of water. Soak
a cloth with the solution and wrung
it thoroughly. Wipe the interior of the
refrigerator with this cloth and the
dry thoroughly.
• Make sure that no water enters the
lamp housing and other electrical
items.
• If you will not use the refrigerator
for a long period of time, unplug it,
remove all food inside, clean it and
leave the door ajar.
• Check regularly that the door gaskets
are clean. If not, clean them.
• To remove door and body shelves,
remove all of its contents.
• Remove the door shelves by pulling
them up. After cleaning, slide them
from top to bottom to install.
• Never use cleaning agents or water
that contain chlorine to clean the
outer surfaces and chromium coated
parts of the product. Chlorine causes
corrosion on such metal surfaces.
6.1 Avoiding bad odours
• Materials that may cause odour
are not used in the production of
our refrigerators. However, due
to inappropriate food preserving
conditions and not cleaning the inner
surface of the refrigerator as required
can bring forth the problem of odour.
Pay attention to following to avoid
this problem:
• Keeping the refrigerator clean is
important. Food residuals, stains, etc.
can cause odour. Therefore, clean
the refrigerator with bi-carbonate
dissolved in water every few months.
Never use detergents or soap.
• Keep the food in closed containers.
Microorganisms spreading out from
uncovered containers can cause
unpleasant odours.
• Never keep the food that have passed
best before dates and spoiled in the
refrigerator.
6.2 Protecting the plastic surfaces
Do not put liquid oils or oil-cooked meals in your
refrigerator in unsealed containers as they damage
the plastic surfaces of the refrigerator. If oil is
spilled or smeared onto the plastic surfaces, clean
and rinse the relevant part of the surface at once
with warm water.
28 /29 EN
Refrigerator / User Manual
Page 30

7. Troubleshooting
vivo
Check this list before contacting the service.
Doing so will save you time and money. This list
includes frequent complaints that are not related to
faulty workmanship or materials. Certain features
mentioned herein may not apply to your product.
The refrigerator is not working.
• The power plug is not fully settled. >>> Plug it
in to settle completely into the socket.
• The fuse connected to the socket powering the
product or the main fuse is blown. >>> Check
the fuses.
Condensation on the side wall of the cooler
compartment (MULTI ZONE, COOL, CONTROL
and FLEXI ZONE).
• The door is opened too frequently >>>
Take care not to open the product’s door too
frequently.
• The environment is too humid. >>> Do not
install the product in humid environments.
• Foods containing liquids are kept in unsealed
holders. >>> Keep the foods containing liquids
in sealed holders.
• The product’s door is left open. >>> Do not
keep the product’s door open for long periods.
• The thermostat is set to too low temperature.
>>> Set the thermostat to appropriate
temperature.
Compressor is not working.
• In case of sudden power failure or pulling the
power plug off and putting back on, the gas
pressure in the product’s cooling system is
not balanced, which triggers the compressor
thermic safeguard. The product will restart after
approximately 6 minutes. If the product does not
restart after this period, contact the service.
• Defrosting is active. >>> This is normal for
a fully-automatic defrosting product. The
defrosting is carried out periodically.
• The product is not plugged in. >>> Make sure
the power cord is plugged in.
• The temperature setting is incorrect. >>>
Select the appropriate temperature setting.
• The power is out. >>> The product will continue
to operate normally once the power is restored.
The refrigerator’s operating noise is
increasing while in use.
29/29 EN
• The product’s operating performance may
vary depending on the ambient temperature
variations. This is normal and not a malfunction.
The refrigerator runs too often or for too
long.
• The new product may be larger than the
previous one. Larger products will run for longer
periods.
• The room temperature may be high. >>> The
product will normally run for long periods in
higher room temperature.
• The product may have been recently plugged
in or a new food item is placed inside. >>>
The product will take longer to reach the set
temperature when recently plugged in or a new
food item is placed inside. This is normal.
• Large quantities of hot food may have been
recently placed into the product. >>> Do not
place hot food into the product.
• The doors were opened frequently or kept open
for long periods. >>> The warm air moving
inside will cause the product to run longer. Do
not open the doors too frequently.
• The freezer or cooler door may be ajar. >>>
Check that the doors are fully closed.
• The product may be set to temperature too low.
>>> Set the temperature to a higher degree
and wait for the product to reach the adjusted
temperature.
• The cooler or freezer door washer may be
dirty, worn out, broken or not properly settled.
>>> Clean or replace the washer. Damaged
/ torn door washer will cause the product to
run for longer periods to preserve the current
temperature.
The freezer temperature is very low, but the
cooler temperature is adequate.
• The freezer compartment temperature is set
to a very low degree. >>> Set the freezer
compartment temperature to a higher degree
and check again.
The cooler temperature is very low, but the
freezer temperature is adequate.
• The cooler compartment temperature is set
to a very low degree. >>> Set the freezer
compartment temperature to a higher degree
and check again.
Refrigerator / User Manual
Page 31

Troubleshooting
The food items kept in cooler compartment
drawers are frozen.
• The cooler compartment temperature is set
to a very low degree. >>> Set the freezer
compartment temperature to a higher degree
and check again.
The temperature in the cooler or the freezer
is too high.
• The cooler compartment temperature is set to
a very high degree. >>> Temperature setting
of the cooler compartment has an effect on the
temperature in the freezer compartment. Wait
until the temperature of relevant parts reach the
sufficient level by changing the temperature of
cooler or freezer compartments.
• The doors were opened frequently or kept open
for long periods. >>> Do not open the doors too
frequently.
• The door may be ajar. >>> Fully close the door.
• The product may have been recently plugged in
or a new food item is placed inside. >>> This is
normal. The product will take longer to reach the
set temperature when recently plugged in or a
new food item is placed inside.
• Large quantities of hot food may have been
recently placed into the product. >>> Do not
place hot food into the product.
Shaking or noise.
• The ground is not level or durable. >>> If the
product is shaking when moved slowly, adjust
the stands to balance the product. Also make
sure the ground is sufficiently durable to bear
the product.
• Any items placed on the product may cause
noise. >>> Remove any items placed on the
product.
The product is making noise of liquid
flowing, spraying etc.
• The product’s operating principles involve liquid
and gas flows. >>> This is normal and not a
malfunction.
There is sound of wind blowing coming from
the product.
• The product uses a fan for the cooling process.
This is normal and not a malfunction.
There is condensation on the product’s
internal walls.
• Hot or humid weather will increase icing
and condensation. This is normal and not a
malfunction.
• The doors were opened frequently or kept open
for long periods. >>> Do not open the doors too
frequently; if open, close the door.
• The door may be ajar. >>> Fully close the door.
There is condensation on the product’s
exterior or between the doors.
• The ambient weather may be humid, this is
quite normal in humid weather. >>> The
condensation will dissipate when the humidity is
reduced.
The interior smells bad.
• The product is not cleaned regularly. >>> Clean
the interior regularly using sponge, warm water
and carbonated water.
• Certain holders and packaging materials may
cause odour. >>> Use holders and packaging
materials without free of odour.
• The foods were placed in unsealed holders.
>>> Keep the foods in sealed holders. Microorganisms may spread out of unsealed food
items and cause malodour. Remove any expired
or spoilt foods from the product.
The door is not closing.
• Food packages may be blocking the door. >>>
Relocate any items blocking the doors.
• The product is not standing in full upright
position on the ground. >>> Adjust the stands
to balance the product.
• The ground is not level or durable. >>> Make
sure the ground is level and sufficiently durable
to bear the product.
The vegetable bin is jammed.
• The food items may be in contact with the upper
section of the drawer. >>> Reorganize the food
items in the drawer.
If The Surface Of The Product Is Hot.
• High temperatures may be observed between
the two doors, on the side panels and at
the rear grill while the product is operating.
This is normal and does not require service
maintenance!Be careful when touching these
areas.
A WARNING:
If the problem persists after following the
instructions in this section, contact your vendor
or an Authorised Service. Do not try to repair the
product.
30 /29 EN
Refrigerator / User Manual
Page 32

Kühlschrank
Bedienungsanleitung
EWWERQWEW
DE
Page 33

Bitte lesen Sie zuerst diese Anleitung!
Liebe Kundin, lieber Kunde,
Wir möchten, dass Sie optimale Effizienz von unserem Produkt erhalten, das in modernen Einrichtungen
mit sorgfältigen Qualitätskontrollen hergestellt wurde.
Bitte lesen Sie die Bedienungsanleitung zu diesem Zweck vor Benutzung des Produktes vollständig und
bewahren Sie sie zum Nachschlagen auf. Falls Sie das Produkt an eine andere Person weitergeben,
händigen Sie bitte auch diese Anleitung aus.
Die Bedienungsanleitung gewährleistet die schnelle und sichere Benutzung des Produktes.
• Bitte lesen Sie die Bedienungsanleitung, bevor Sie das Produkt aufstellen und bedienen.
• Halten Sie stets die zutreffenden Sicherheitshinweise ein.
• Bewahren Sie die Bedienungsanleitung zum künftigen Nachschlagen an einem leicht zugänglichen Ort
auf.
• Bitte lesen Sie alle anderen mit dem Produkt bereitgestellten Dokumente.
Beachten Sie, dass diese Bedienungsanleitung auf verschiedene Produktmodelle zutreffen kann. Die
Anleitung zeigt jegliche Abweichungen unterschiedener Modelle deutlich an.
Symbole und Anmerkungen
In der Bedienungsanleitung verwenden wir folgende Symbole:
Wichtige Informationen und nützli-
C
che Tipps.
Gefahr für Leib und Eigentum.
A
B
Stromschlaggefahr.
Die Produktverpackung
besteht gemäß nationalen
Umweltgesetzen aus recyclingfähigen Materialien.
Page 34

Inhalt
1. Hinweise zu Sicherheit und Umwelt 3
1.1 Allgemeine Sicherheitshinweise . . . . . . . . . 3
2 Ihr Kühlschrank 7
2 Ihr Kühlschrank 8
3 Installation 9
3.1 Geeignete Aufstellungsorte für das Gerät . . 9
3.2 Installation der Kunststoffkeile . . . . . . . . . . 9
3.3* Justierung der Füße. . . . . . . . . . . . . . . . 10
3.4 Elektrischer Anschluss. . . . . . . . . . . . . . . 11
4 Vorbereitung 12
4.1 Maßnahmen für den sparsamen
Energieverbrauch . . . . . . . . . . . . . . . . . 12
4.2 Empfehlungen zum Fach für frische
Lebensmittel . . . . . . . . . . . . . . . . . . . . 12
4.3 Vor der ersten Verwendung . . . . . . . . . . 13
5 Betrieb des Geräts 14
5.1 Anzeigetafel . . . . . . . . . . . . . . . . . . . . . . 14
5.2 Anzeigefeld . . . . . . . . . . . . . . . . . . . . . 19
5.3 Einfrieren frischer Lebensmittel . . . . . . . . 22
5.4 Empfehlungen für die bessere Haltbarkeit
gefrorener Lebensmittel . . . . . . . . . . . . 22
5.5 Angaben zur Tiefkühlung . . . . . . . . . . . . . 22
5.6 Einlegen von Lebensmitteln . . . . . . . . . . . 23
5.7 Warnton bei offener Tür. . . . . . . . . . . . . . 23
5.8 Beleuchtung im Innenraum . . . . . . . . . . . 23
5.9 Kältefach . . . . . . . . . . . . . . . . . . . . . . . . 23
5.10 Gemüsefach. . . . . . . . . . . . . . . . . . . . . 23
5.11 Gemüsefach mit kontrollierter
Luftfeuchtigkeit. . . . . . . . . . . . . . . . . . . 24
(FreSHelf) . . . . . . . . . . . . . . . . . . . . . . . . . . . 24
5.12 Eiereinsatz . . . . . . . . . . . . . . . . . . . . . . 24
5.13 Beweglicher Mittelbereich . . . . . . . . . . . 24
5.14 Kältekontrolliertes Aufbewahrungsfach 24
5.15 Blaues Licht . . . . . . . . . . . . . . . . . . . . . 25
5.16 Geruchsfilter. . . . . . . . . . . . . . . . . . . . . 25
5.17 Weinfach . . . . . . . . . . . . . . . . . . . . . . . 26
5.18 So benutzen Sie den internen
Wasserspender. . . . . . . . . . . . . . . . . . . 27
5.19 Wasser ausgeben . . . . . . . . . . . . . . . . . 27
5.20 Wasserspender verwenden . . . . . . . . . . 28
5.21 Eiswürfelspender . . . . . . . . . . . . . . . . . 28
5.22 Eisbereiter und Eisbehälter . . . . . . . . . . 28
6 Pflege und Reinigung 29
7. Problemlösung 30
2 / 32 DE
Kühlschrank/ Bedienungsanleitung
Page 35

1. Hinweise zu Sicherheit und Umwelt
Dieser Abschnitt bietet die zur Vermeidung von
Verletzungen und Materialschäden erforderlichen
Sicherheitsanweisungen. Bei Nichtbeachtung
dieser Anweisungen erlöschen jegliche
Garantieansprüche.
Bestimmungsgemäßer Einsatz
ACHTUNG:
Stellen Sie sicher, dass die
Entlüftungsöffnungen am Aufstellort
des Gerätes nicht blockiert sind.
ACHTUNG:
Um den Auftauvorgang zu
beschleunigen, keine anderen
mechanischen Geräte oder
Geräte verwenden, die nicht
A
Dieses Gerät ist für die private Nutzung oder
für den Gebrauch bei folgenden ähnliche
Anwendungen konzipiert worden
- In Personalküchen in Geschäften, Büros und
anderen Arbeitsumgebungen;
- In Bauernhöfen, Hotels, Motels und anderen
Unterkünften, für den Gebrauch der Kunden;
- Umgebungen mit Übernachtung und Frühstück;
- Bei Catering und ähnliche Non-RetailAnwendungen.
vom Hersteller empfohlen sind.
ACHTUNG:
Dem Kühlmittelkreislauf
keine Schäden zufügen.
ACHTUNG:
In den Lebensmittelaufbewahrungsfächern keine Geräte
verwenden, die nicht vom
Hersteller empfohlen sind.
beaufsichtigt werden oder angeleitet
worden. Kinder dürfen nicht mit
diesem Gerät spielen.
• Ziehen Sie bei Fehlfunktionen den
Netzstecker des Gerätes.
• Warten Sie nach Ziehen des
Netzsteckers mindestens 5 Minuten,
bevor Sie ihn wieder anschließen.
• Ziehen Sie den Netzstecker, wenn Sie
das Gerät nicht nutzen.
• Berühren Sie den Netzstecker
niemals mit feuchten oder gar nassen
Händen. Ziehen Sie beim Trennen
niemals am Kabel, greifen Sie immer
am Stecker.
• Wischen Sie den Netzstecker vor dem
Einstecken mit einem trockenen Tuch
ab.
• Schließen Sie den Kühlschrank nicht
an lose Steckdosen an.
• Das Gerät muss bei Aufstellung,
Wartungsarbeiten, Reinigung und
bei Reparaturen vollständig vom
Stromnetz getrennt werden.
• Falls das Produkt längere Zeit
nicht benutzt wird, ziehen Sie
den Netzstecker und nehmen Sie
sämtliche Lebensmittel aus dem
Kühlschrank.
• Verwenden Sie das Produkt nicht,
wenn das Fach mit Leiterplatten im
unteren hinteren Bereich des Gerätes
(Abdeckung des Fachs mit der
elektrischen Karte) (1) geöffnet ist.
1.1 Allgemeine Sicherheitshinweise
• Dieses Produkt darf nicht von
Personen mit körperlichen,
sensorischen oder mentalen
Einschränkungen, einem Mangel
an Erfahrung und Wissen oder
von Kindern verwendet werden.
Das Gerät darf nur dann von
solchen Personen benutzt werden,
wenn diese von einer für ihre
Sicherheit verantwortlichen Person
3 / 32 DE
1
1
Kühlschrank/ Bedienungsanleitung
Page 36

Wichtige Hinweise zur Sicherheit und zum Umweltschutz
• Benutzen Sie keine Dampfreiniger
oder ähnliche Gerätschaften
zum Reinigen oder Abtauen
Ihres Gerätes. Der Dampf kann in
Bereiche eindringen, die unter
Spannung stehen. Kurzschlüsse oder
Stromschläge können die Folge sein!
• Lassen Sie niemals Wasser direkt
auf das Gerät gelangen; auch
nicht zum Reinigen! Es besteht
Stromschlaggefahr!
• Verwenden Sie das Produkt bei
Fehlfunktionen nicht; es besteht
Stromschlaggefahr! Wenden Sie
sich als erstes an den autorisierten
Kundendienst.
• Stecken Sie den Netzstecker
des Gerätes in eine geerdete
Steckdose. Die Erdung muss durch
einen qualifizierten Elektriker
vorgenommen werden.
• Falls das Gerät über eine LEDBeleuchtung verfügt, wenden Sie
sich zum Auswechseln sowie im Falle
von Problemen an den autorisierten
Kundendienst.
• Berühren Sie gefrorene Lebensmittel
nicht mit feuchten Händen! Sie
können an Ihren Händen festfrieren!
• Geben Sie keine Flüssigkeiten
in Flaschen oder Dosen in den
Tiefkühlbereich. Sie können platzen!
• Geben Sie Flüssigkeiten in aufrechter
Position in den Kühlschrank; zuvor
den Deckel sicher verschließen.
• Sprühen Sie keine entflammbaren
Substanzen in die Nähe des Gerätes,
da sie Feuer fangen oder explodieren
könnten.
• Bewahren Sie keine entflammbaren
Materialien oder Produkte mit
entflammbaren Gasen (Sprays etc.) im
Kühlschrank auf.
• Stellen Sie keine mit Flüssigkeiten
gefüllten Behälter (z. B. Vasen) auf
dem Gerät ab. Falls Wasser oder
andere Flüssigkeiten an unter
Spannung stehende Teile gelangen,
kann es zu Stromschlägen oder
Bränden kommen.
• Setzen Sie das Gerät keinem Regen,
Schnee, direkten Sonnenlicht oder
Wind aus; dies kann die elektrische
Sicherheit gefährden. Verschieben
Sie das Gerät nicht durch Ziehen an
den Türgriffen. Die Griffe könnten
sich lösen.
• Achten Sie darauf, dass weder Ihre
Hände noch andere Körperteile
von beweglichen Teilen im Inneren
des Gerätes eingeklemmt oder
gequetscht werden.
• Achten Sie darauf, nicht auf die
Tür, Schubladen oder ähnliche Teile
des Kühlschranks zu treten; lehnen
Sie sich nicht daran an. Andernfalls
könnte das Gerät umkippen, Teile
könnten beschädigt werden.
• Achten Sie darauf, das Netzkabel
nicht einzuklemmen.
• Achten Sie beim Aufstellen des
Gerätes darauf, dass das Netzkabel
nicht eingeklemmt oder anderweitig
beschädigt wird.
• Platzieren Sie nicht mehrere
Mehrfachsteckdosen oder Netzteile
hinter dem Gerät.
4 / 32 DE
Kühlschrank/ Bedienungsanleitung
Page 37

Wichtige Hinweise zur Sicherheit und zum Umweltschutz
1.1.1 Wichtige Hinweise
zum Kältemittel
Wenn das Gerät über ein Kühlsystem mit R600aGas verfügt, achten Sie darauf, das Kühlsystem
und den dazugehörigen Schlauch während
der Benutzung und des Transports nicht zu
beschädigen. Dieses Gas ist leicht entflammbar.
Bei Beschädigungen des Kühlsystems halten Sie
das Gerät von potenziellen Zündquellen (z. B.
offenen Flammen) fern und sorgen für eine gute
Belüftung des Raumes.
mindestens 0,6°C (33°F) bis hin zu
maximal 38°C (100°F ).
• Nutzen Sie ausschließlich Trinkwasser.
1.2 Bestimmungsgemäßer Einsatz
• Dieses Gerät ist für den Einsatz im
Haushalt vorgesehen. Er eignet sich
nicht zum kommerziellen Einsatz.
• Das Produkt sollte ausschließlich
zum Lagern von Lebensmitteln und
Getränken verwendet werden.
• Bewahren Sie keine empfindlichen
Produkte, die kontrollierte
Das Typenschild an der linken
Innenwand des Kühlschranks
C
gibt die Art des im Gerät
verwendeten Gases an.
1.1.2 Modelle mit Wasserspender
• Der Druck für die Kaltwasserzufuhr
sollte maximal 90 psi (620 kPa)
betragen. Wenn der Wasserdruck
in Ihrem Haushalt 80 psi (550 kPa)
übersteigt, verwenden Sie bitte
ein Druckbegrenzungsventil in
Ihrem Leitungssystems. Sollten Sie
nicht wissen, wie der Wasserdruck
gemessen wird, ziehen Sie bitte einen
Fachinstallateur hinzu.
• Sollte für Ihr Leitungssystem das Risiko
eines Wasserschlags (Druckstoß)
Temperaturen erfordern (z. B.
Impfstoffe, wärmeempfindliche
Medikamente,Sanitätsartikel etc.) im
Kühlschrank auf.
• Der Hersteller haftet nicht für jegliche
Schäden, die durch Missbrauch oder
falsche Handhabung entstehen.
• Originalersatzteile stehen für einen
Zeitraum von 10 Jahre beginnend mit
dem Kaufdatum zur Verfügung.
1.3 Sicherheit von Kindern
Bewahren Sie Verpackungsmaterialien außerhalb
der Reichweite von Kindern auf.
Lassen Sie Kinder nicht mit dem Gerät spielen.
Falls das Gerät mit einer abschließbaren Tür
ausgestattet ist, bewahren Sie den Schlüssel
außerhalb der Reichweite von Kindern auf.
bestehen, verwenden Sie stets eine
geeignete Druckstoßsicherung.
Wenden Sie sich bitte an einen
Fachinstallateur, falls Sie sich über
die Wasserschlaggefährdung in Ihrem
Leitungssystem nicht sicher sein
sollten.
• Nutzen Sie niemals die
Warmwasserzufuhr für den
Einbau. Treffen Sie geeignete
Vorsichtsmaßnahmen zum Schutz
der Leitungen gegen mögliches
Einfrieren. Die für den Betrieb zulässige
Wassertemperatur liegt im Bereich von
1.4 Einhaltung von WEEE-Vorgaben
und Altgeräteentsorgung
Dieses Gerät erfüllt die Vorgaben der EUWEEE-Direktive (2012/19/EU). Das Gerät wurde mit
einem Klassifizierungssymbol für elektrische und
elektronische Altgeräte (WEEE) gekennzeichnet.
Dieses Gerät wurde aus hochwertigen
Materialien hergestellt, die
wiederverwendet und recycelt werden
können. Entsorgen Sie das Gerät am
Ende seiner Einsatzzeit nicht mit dem
regulären Hausmüll. Bringen Sie das
Gerät zu einer Sammelstelle zum Recycling von
5 / 32 DE
Kühlschrank/ Bedienungsanleitung
Page 38

Wichtige Hinweise zur Sicherheit und zum Umweltschutz
elektrischen und elektronischen Geräten.
Ihre Stadtverwaltung informiert Sie gerne über
geeignete Sammelstellen in Ihrer Nähe.
1.5 Einhaltung von RoHS-Vorgaben
• Dieses Gerät erfüllt die Vorgaben der EUWEEE-Direktive (2011/65/EU). Es enthält keine
in der Direktive angegebenen gefährlichen und
unzulässigen Materialien.
1.6 Hinweise zur Verpackung
• Die Verpackungsmaterialien des Gerätes
worden gemäß nationalen Umweltschutz
bestimmungen aus recyclingfähigen
Materialien hergestellt. Entsorgen Sie
Verpackungsmaterialien nicht mit dem
regulären Hausmüll oder anderen Abfällen.
Bringen Sie Verpackungsmaterialien
zu geeigneten Sammelstellen; Ihre
Stadtverwaltung berät Sie gern.
6 / 32 DE
Kühlschrank/ Bedienungsanleitung
Page 39

2 Ihr Kühlschrank
1
*2
5
10
*8
4
5
7
9
11
*3
6
1- Bedien- und Anzeigefeld
2- Butter- & Käsefach
3- Bewegliche Türeinlage 70 mm
4- Glaszwischenboden für Kühlschrankfach
5- Glaszwischenboden für Gemüsefach
6- Getränkeeinsatz für die Tür
Die Abbildungen in dieser Bedienungsanleitung sind schematische Zeichnungen und stimmen mit dem
Gerät nicht exakt überein. Wenn dabei Teile dargestellt werden, die nicht zu dem von Ihnen gekauften
C
Gerät gehören, dann handelt es Komponenten für andere Modelle.
7- Kältefach
8- Eisbehältereinschub
9- Glaszwischenboden für Multizonenfach/ Kühler
10- Gefrierfacheinschübe
11- Einschub für Multizonenfach
* OPTIONAL (Je nach Modell)
7 / 32 DE
Kühlschrank/ Bedienungsanleitung
Page 40

2 Ihr Kühlschrank
1
4
5
5
*2
*3
6
7
9
*8
10
1- Bedien- und Anzeigefeld
2- Butter- & Käsefach
3- Bewegliche Türeinlage 70 mm
4- Glaszwischenboden für Kühlschrankfach
5- Glaszwischenboden für Gemüsefach
6- Getränkeeinsatz für die Tür
Die Abbildungen in dieser Bedienungsanleitung sind schematische Zeichnungen und stimmen mit dem
Gerät nicht exakt überein. Wenn dabei Teile dargestellt werden, die nicht zu dem von Ihnen gekauften
C
Gerät gehören, dann handelt es Komponenten für andere Modelle.
7- Kältefach
8- Eisbehältereinschub
9- Glaszwischenboden für Multizonenfach/ Kühler
10- Gefrierfacheinschübe
* OPTIONAL (Je nach Modell)
8 / 32 DE
Kühlschrank/ Bedienungsanleitung
Page 41

3 Installation
3.1 Geeignete Aufstellungsorte
für das Gerät
Kontaktieren Sie den zuständigen Kundendienst
für die Installation. Um das Gerät für die
Benutzung vorzubereiten, lesen Sie sich
zuerst entsprechenden Abschnitte in der
Bedienungsanleitung durch und stellen Sie sicher,
dass Ihre Elektro- und Wasserinstallationen den
Anforderungen entsprechen. Sollte diese nicht
der Fall sein, lassen Sie von einem qualifizierten
Techniker und Fachinstallateur die notwendigen
Arbeiten ausführen.
WARNUNG: Der Hersteller kann nicht
für Schäden haftbar gemacht werden, die
B
B
A
•StellenSiedasGerätaufeinerebenenFläche,
um einen unsicheren Stand und Kippeln zu
vermeiden.
•InstallierenSiedasGerätmitmindestens30
cm Abstand von Hitzequellen, wie beispielweise
Herden, Heizvorrichtungen und Öfen, sowie mit
mindestens 5 cm Abstand von Elektroöfen.
•DasGerätdarfwederdirekter
Sonneneinstrahlung ausgesetzt noch an
feuchten Plätzen aufgestellt werden.
•EsmussfürangemesseneLüftungumdas
Gerät herum gesorgt werden, um einen
einwandfreien Betrieb zu gewährleisten. Wenn
das Gerät in einer Wandnische aufgestellt wird,
achten Sie darauf, mindestens 5 cm Anstand zur
Decken und den Seitenwänden zu halten.
Ergebnis der von nicht befugten Personen
ausgeführten Arbeiten sind.
WARNUNG: Das Gerät darf während
der Installation nicht mit der Stromzufuhr
verbunden sein.Andernfalls besteht die
Gefahr von Unfällen mit Todesfolge oder
schweren Verletzungen!
WARNUNG: Wenn die geöffnete Tür
am Aufstellort nicht genug Raum hat,
müssen Sie diese abnehmen und auf die
andere Geräteseite umsetzen, wenn dabei
Probleme auftreten, wenden Sie sich bitte
an die zuständigen Kundendienst.
•StellenSiedenKühlschranknichtanOrtenauf,
an denen die Temperaturen unter den Wert von
-5 °C sinken können.
3.2 Installation der Kunststoffkeile
Die im Lieferumfang enthaltenen Kunststoffkeile
dienen zur Abstandssicherung für die freie
Luftzirkulation zwischen Gerätrückseite und der
Wand.
1.
Um die Keile zu befestigen, entfernen Sie die
Schrauben an den jeweiligen Gerätestellen und
verwenden die mit den Kunststoffkeilen gelieferten
Schrauben.
2.
Setzen Sie die 2 Kunststoffkeile auf der
rückseitigen Abdeckung ein, so wie in der Abbildung
gezeigt.
9 / 32 DE
Kühlschrank/ Bedienungsanleitung
Page 42

Installation
3.3* Justierung der Füße
Wenn das Gerät nach der Installation nicht
vollständig ausbalanciert ist, müssen die Füße
durch Drehen nach links bzw. rechts nachjustiert
werden.
*Falls Ihr Gerät kein Weinflaschenfach oder keine
Glastür hat, ist es nicht mit verstellbaren, sondern
mit festen Fächern ausgestattet.
Senkrechte Ausrichtung der Türen,
Lösen Sie die Fixiermutter, die sich auf der
Unterseite befindet.
Drehen Sie die Einstellmutter, um die Position
der Tür anzupassen (im Uhrzeigersinn/gegen den
Uhrzeigersinn).
Ziehen Sie die Fixiermutter, um die Position zu
korrigieren.
Waagerechte Ausrichtung der Türen,
Lösen Sie die Fixiermutter, die sich auf der
Oberseite befindet.
Drehen Sie die Einstellmutter, um die seitliche
Position der Tür anzupassen (im Uhrzeigersinn/
gegen den Uhrzeigersinn).
Ziehen Sie die Fixiermutter, die sich an der
Oberseite befindet, um die Position zu korrigieren.
10 / 32 DE
adjusting nut
fixing nut
fixing nut
adjusting nut
Kühlschrank/ Bedienungsanleitung
Page 43

Installation
- Obere Scharniergruppe wird mit 3 Schrauben
befestigt.
- Die Scharnierabdeckung wird angebracht,
nachdem die Steckdosen installiert sind.
- Dann wird die Scharnierabdeckung mit zwei
Schrauben befestigt.
3.4 Elektrischer Anschluss
WARNUNG: Stellen Sie keine
Verbindungen über Verlängerungskabel
A
B
C
• Unser Unternehmen kann nicht für Schäden
• Der Kabelstecker muss nach der Aufstellung
• Setzen Sie keine Verlängerungsschnüre oder
oder Mehrfachstecker her.
WARNUNG: Ein beschädigtes Kabel darf
nur von einem Mitarbeiter des zuständigen
Kundendienst ausgetauscht werden.
Wenn zwei Kühlschränke nebeneinander
aufgestellt werden, muss zwischen
beiden mindestens ein Abstand von 4 cm
eingehalten werden.
haftbar gemacht werden, die auftreten,
wenn das Gerät ohne eine den örtlichen
Vorschriften entsprechende Erdung und
einen sachgerechten elektrischen Anschluss
betrieben wurde.
gut zugänglich sein.
Mehrfachsteckdosen für die Verbindung von
Gerät und Wandsteckdose ein.
11 / 32 DE
Kühlschrank/ Bedienungsanleitung
Page 44

4 Vorbereitung
4.1 Maßnahmen für den sparsamen
Energieverbrauch
Das ungeprüfte Anschließen des
Kühlschranks an Systeme zum
A
• Lassen Sie den Kühlschrank nicht über längere
• Stellen Sie keine heißen Lebensmittel oder
• Überlasten Sie das Gerät nicht. Das
• Stellen Sie den Kühlschrank nicht an Ort, die
• Achten Sie darauf, Ihre Lebensmittel in
• Um eine größtmögliche Lebensmittelmenge
• Der Luftstrom darf nicht dadurch behindert
• Das Auftauen tiefgekühlter Lebensmittel
Energiesparen ist gefährlich, da dies das
Gerät beschädigen kann.
Zeit hinweg geöffnet.
Getränke in den Kühlschrank.
Kühlvermögen verringert sich, wenn die
Luftzirkulation im Kühlschrank beeinträchtigt
ist.
der direkten Sonneneinstrahlung ausgesetzt
sind. Installieren Sie das Gerät mit mindestens
30 cm Abstand von Hitzequellen, wie
beispielweise Herden, Backöfen, Heizungen
und Öfen, sowie mit mindestens 5 cm Abstand
von Elektroöfen.
geschlossenen Behältern aufzubewahren.
im Gefrierfach Ihres Kühlschranks zu lagern,
muss der oberste Einschub herausgenommen
und auf einen Glaseinsatz gestellt werden.
Der für den Kühlschrank angegebene
Energieverbrauch wurde mit ausgebautem
Eisgerät und ohne die oberen Einschübe, um
eine maximale Beladung zu ermöglichen,
ermittelt. Es wird dringend empfohlen, im
Gefrierfach und im Multizonenfach die unteren
Einschübe zur Lagerung zu verwenden.
werden, dass man Lebensmittel vor die Lüfter
des Gefrierfachs und des Multizonenfachs
stellt. Die Lebensmittel sind so einzustellen,
dass mindestens 5 cm Abstand vor dem
Schutzgitter der Lüfter bestehen.
im Kühlfach hilft sowohl Energie zu sparen
und ist zugleich besonders schonend für die
Lebensmittel.
Die Temperatur des Raums, in dem
der Kühlschrank aufgestellt ist, muss
C
C
C
mindestens
Hinsichtlich der Effizienz ist der
Einsatz des Kühlschrank mit kühleren
Umgebungstemperaturen nicht zu
empfehlen.
Der Innenraum des Kühlschranks ist
komplett zu reinigen.
Wenn zwei Kühlschränke nebeneinander
aufgestellt werden, muss zwischen
beiden mindestens ein Abstand von 4 cm
eingehalten werden.
10ºC /50°F betragen.
4.2 Empfehlungen zum Fach
für frische Lebensmittel
• Achten Sie darauf, dass die Lebensmittel nicht
mit dem Temperatursensor im Fach für frische
Lebensmittel in Berührung kommen. Um
die ideale Lagerungstemperatur im Fach für
frische Lebensmittel aufrechtzuerhalten, darf
der Sensor nicht durch Lebensmittel verstellt
werden.
• Stellen Sie keine heißen Speisen oder Getränke
in den Kühlschrank.
12 / 32 DE
Kühlschrank/ Bedienungsanleitung
Page 45

Vorbereitung
4.3 Vor der ersten Verwendung
Achten Sie darauf, dass vor der Verwendung
des Geräts alle in der Bedienungsanleitung im
Abschnitt „Wichtige Hinweise zur Sicherheit
und zum Umweltschutz“ und den Kapiteln zur
Installation angeführten Sicherheitsmaßnahmen
ausgeführt wurden.
• Reinigen Sie den Innenraum des Kühlschranks
so wie im Abschnitt „Wartung und Säuberung“
empfohlen. Bevor Sie den Kühlschrank
einschalten, muss der Innenraum trocken sein.
• Verbinden Sie das Netzkabel des Kühlschranks
mit einer geerdeten Steckdose. Der
Innenbeleuchtung schaltet sich ein, wenn der
Kühlschrank geöffnet wird.
• Lassen Sie den Kühlschrank 6 Stunden lang
eingeschaltet laufen, bevor Sie Lebensmittel
hineinstellen und öffnen Sie in dieser Zeit
möglichst nicht die Gerätetür.
Sie hören ein Geräusch, wenn der
Kompressor sich einschaltet. Die im
C
C
geschlossenen Kühlsystem zirkulierenden
Flüssigkeiten und Gase können ebenfalls
zu diesen Geräuschen beitragen, wenn der
Kompressor nicht eingeschaltet ist. Das ist
vollkommen normal.
Die Vorderkanten des Kühlschranks
können sich warm anfühlen. Das ist
normal. Diese Bereiche erwärmen sich, um
Kondensierung zu vermeiden.
13 / 32 DE
Kühlschrank/ Bedienungsanleitung
Page 46

5 Betrieb des Geräts
5.1 Anzeigetafel
Das Bedienfeld mit Touchfunktion dient zur Einstellung der Temperatur und die Steuerung der
weiterer Kühlschrankfunktionen, ohne dass die Gerätetür geöffnet werden muss. Sie müssen nur die
entsprechenden Tasten zur Einstellung der Funktionen drücken.
2 3
1
4
5 6
9
10 11
33
32
31
30
Select
Select
3 “
3 “
*34.1
*34.2
20
27
28
29
*8
7
19
Quick FreezeQuick Cool
3 “
FN
OK
1718
Quick FreezeQuick Cool
3 “
FN
OK
12
13
14
15
16
C
26
*25
24
23
22
21
Die Abbildungen in dieser Bedienungsanleitung sind schematische Zeichnungen und stimmen mit dem
Gerät nicht exakt überein. Wenn dabei Teile dargestellt werden, die nicht zu dem von Ihnen gekauften
Gerät gehören, dann handelt es Komponenten für andere Modelle.
14 / 32 DE
Kühlschrank/ Bedienungsanleitung
Page 47

Produktbedienung
1. Anzeige der Schnellkühlfunktion
Diese schaltet sich ein, wenn die
Schnellkühlfunktion aktiviert ist.
2. Temperaturanzeige des Kühlschrankfachs
Die Temperatur im Kühlschrankfach wird
angezeigt, diese kann auf 8,7,6,5,4,3,2,1
eingestellt werden.
3. Anzeige in Fahrenheit
Diese Anzeige gibt die Temperatur in Fahrenheit
wieder. Wenn die Anzeige in Fahrenheit aktiviert
wird, werden die eingestellten Temperaturwerte
in Fahrenheit angezeigt und ein entsprechendes
Symbol leuchtet.
4. Tastensperre
Drücken Sie die Tastensperrtaste simultan für 3
Sekunden. Das Tastensperrsymbol
leuchtet auf und der Tastensperrmodus wird
aktiviert. Die Tasten reagieren dann nicht, solange
der Tastensperrmodus aktiviert bleibt. Drücken
Sie die Tastensperrtaste erneut simultan für 3
Sekunden. Das Tastensperrzeichen erlischt und der
Tastatursperrmodus wird abgestellt.
Drücken Sie die Tastensperrtaste,
wenn Sie verhindern möchten, dass die
Temperatureinstellung des Kühlschranks geändert
werden kann.
5. Stromausfall/Hohe Temperatur/
Fehlerwarnung
Diese Anzeige leuchtet im Falle von Stromausfall,
einer hohen Temperatur und sonstigen Fehlern
am Gerät auf. Während länger anhaltenden
Stromausfällen, wird die höchste Temperatur im
Gefrierfach aufblinkend auf dem Display angezeigt.
Drücken Sie nach der Prüfung des Lebensmittel im
Gefrierfach die Abstelltaste für die Alarmfunktion,
um die Warnung zu löschen.
Bitte lesen Sie auch den Abschnitt „Für die
Fehlerbehebung empfohlene Lösungen“ in der
Bedienungsanleitung, wenn diese Anzeige aufleuchten sollte.
6. Symbol „Filter zurücksetzen“
Diese Symbol schaltet sich, wenn der Filter zurückgesetzt werden muss.
7. Symbol Fach mit Temperaturänderung
Zeigt das Fach an, dessen Temperatur sich
gerade ändert. Wenn das Symbol Fach mit
Temperaturänderung zu blinken beginnt, bedeutet
das, dass das jeweilige Fach ausgewählt wurde.
8. Symbol für Zusatzgefrierfunktion
Fahren Sie über das Symbol für Zusatzgefrierfunktion
mit Hilfe der FN-Taste; dass Symbol beginnt nun zu
blinken. Wenn Sie die OK-Taste drücken, schaltet sich
das Symbol für die Gefrierfunktion im Zusatzfach ein,
das nun als Gefrierfach genutzt werden kann.
9. Temperaturanzeige des Gefrierfachs
Die Temperatur im Gefrierfachen wird angezeigt,
diese kann auf -18, -19, -20, -21, -22, -23, -24
eingestellt werden.
10. Anzeige der Schnellgefrierfunktion
Diese schaltet sich ein, wenn die
Schnellgefrierfunktion aktiviert ist.
11. Anzeige in Fahrenheit
Diese Anzeige gibt die Temperatur in Fahrenheit
wieder. Wenn die Anzeige in Fahrenheit aktiviert
wird, werden die eingestellten Temperaturwerte
in Fahrenheit angezeigt und ein entsprechendes
Symbol leuchtet.
12. Taste der Schnellgefrierfunktion
Drücken Sie diese Taste zur Aktivierung oder
Deaktivierung der Schnellgefrierfunktion. Wenn
Sie die Funktion aktivieren, wird das Gefrierfach
auf eine Temperatur unter dem eingestellten Wert
heruntergekühlt.
Verwenden Sie die
Schnellgefrierfunktion, wenn die in
C
das Gefrierfach gelegten Lebensmittel
schnell einfrieren möchten. Wenn
Sie größere Mengen an frischen
Lebensmitteln einfrieren möchten,
aktivieren Sie diese Funktion, bevor Sie
die Lebensmittel in das Gerät legen.
15 / 32 DE
Kühlschrank/ Bedienungsanleitung
Page 48

Produktbedienung
Wenn Sie diese nicht zuvor
ausschalten, stellt sich die
C
C
13. Filter zurücksetzen
Der Filter wird zurückgesetzt, wenn die Taste der
Schnellgefrierfunktion 3 Sekunden lang gedrückt
wird. Das Symbol „Filter zurücksetzen“ erlischt.
14. FN-Taste
Mit Hilfe dieser Taste können Sie zwischen den
Funktionen wechseln, die Sie einstellen möchten.
Durch das Drücken dieser Taste, wird das
Symbol der gewünschten Funktion aktiviert oder
deaktiviert, und das fängt an zu blinken. Die FNTaste deaktiviert sich, wenn sie 20 Sekunden lang
nicht gedrückt wird. Sie müssen diese Taste dann
erneut drücken, um die Funktionen zu ändern.
15. Temperaturanzeige in Celsius
Diese Anzeige gibt die Temperatur in Celsius
wieder. Wenn die Anzeige in Celsius aktiviert wird,
werden die eingestellten Temperaturwerte in
Celsius angezeigt und ein entsprechendes Symbol
leuchtet.
16. OK-Taste
Nach dem Navigieren durch die Funktionen mit
Hilfe der FN-Taste blinkt nach dem Abbruch der
Funktion durch die OK-Taste das entsprechende
Symbol auf und die Anzeige blinkt. Wenn di
Funktion aktiviert wurde, bleibt diese eingeschaltet.
Die Anzeige blinkt weiter, um zu zeigen, dass das
Symbol eingeschaltet ist.
17. Symbol Fach mit Temperaturänderung
Zeigt das Fach an, dessen Temperatur sich
gerade ändert. Wenn das Symbol Fach mit
Temperaturänderung zu blinken beginnt, bedeutet
das, dass das jeweilige Fach ausgewählt wurde.
Schnellgefrierfunktion automatisch
nach spätestens 4 Stunden ab oder
wenn das Gefrierfach die gewünschte
Temperatur erreicht hat.
Die Funktion aktiviert sich nicht erneut
selbständig nach dem Ende eines
Stromausfalls.
16 / 32 DE
18. Symbol Fach mit Temperaturänderung
Zeigt das Fach an, dessen Temperatur sich
gerade ändert. Wenn das Symbol Fach mit
Temperaturänderung zu blinken beginnt, bedeutet
das, dass das jeweilige Fach ausgewählt wurde.
19. Einstelltaste zur Erhöhung des Werts
Wählen Sie das Symbol für das entsprechende
Fach; diese Symbol fängt nun an zu blicken Wenn
Sie die Einstelltaste zur Erhöhung des Werts
während dieses Vorgangs drücken, erhöht sich
der eingestellte Wert. Wenn Sie diese ununterbrochen drücken, stellt der Wert wieder auf den
Ausgangswert zurück.
20. Symbol Fach mit Temperaturänderung
Zeigt das Fach an, dessen Temperatur sich
gerade ändert. Wenn das Symbol Fach mit
Temperaturänderung zu blinken beginnt, bedeutet
das, dass das jeweilige Fach ausgewählt wurde.
21. Einstellung der Celsius-und FahrenheitAnzeige
Fahren Sie über diese Taste mit Hilfe der FNTaste und wählen Sie Fahrenheit und Celsius
über die OK-Taste. Wenn die entsprechende
Temperaturanzeigeart ausgewählt wurde, schaltet
sich die Anzeige in Celsius und Fahrenheit ein.
22. Symbol „Eismaschine aus“
Drücken Sie die FN-Taste (bis diese das EisSymbol und die untere Linie erreicht), um
die Eismaschine auszuschalten. Das Symbol
„Eismaschine aus und die Anzeige für die
Eismaschinenfunktion beginnen zu blinken, wenn
Sie darüberfahren, sodass Sie sehen können, ob
die Eismaschine ein- oder ausgeschalten werden
soll. Wenn Sie die OK-Taste drücken, leuchtet
das Symbol der Eismaschine anhaltend und
die Anzeige blinkt weiter. Wenn Sie keine Taste
innerhalb von 20 Sekunden drücken, bleiben
Symbol und Anzeige eingeschaltet. So wird die
Eismaschine ausgeschaltet. Um die Eismaschine
erneut einzuschalten, fahren Sie über das Symbol
und die Anzeige, nun blinken sowohl das Symbol
„Eismaschine aus und die Anzeige dazu. Wenn Sie
keine Taste innerhalb von 20 Sekunden drücken,
schalten sich Symbol und Anzeige aus und die
Eismaschine schaltet sich wieder ein.
Kühlschrank/ Bedienungsanleitung
Page 49

Produktbedienung
Zeigt an, ob die Eismaschine ein-
C
C
23. Symbol der Eco Fuzzy-Funktion
Drücken Sie die FN-Taste (bis diese das Symbol
mit dem Buchstaben e und die untere Linie
erreicht), um die Eco Fuzzy-Funktion zu aktivieren.
Wenn Sie über das Eco Fuzzy-Symbol und die
Eco Fuzzy-Anzeige fahren, beginnen diese an zu
blinken. So können Sie sehen, on die Eco FuzzyFunktion aktiviert oder deaktiviert werden soll.
Wenn Sie die OK-Taste drücken, leuchtet das Eco
Fuzzy-Symbol anhaltend und die Anzeige blinkt
weiter. Wenn Sie keine Taste innerhalb von 20
Sekunden drücken, bleiben Symbol und Anzeige
eingeschaltet. So wird die Eco Fuzzy-Funktion
aktiviert. Um die Eco Fuzzy-Funktion abzubrechen,
fahren Sie erneut über das Symbol und die
Anzeige und drücken Sie die OK-Taste. Nun
beginnen sowohl die Eco Fuzzy-Funktion als auch
die Anzeige an zu blinken. Wenn Sie keine Taste
innerhalb von 20 Sekunden drücken, schalten
sich Symbol und Anzeige aus und die Eco FuzzyFunktion wird abgebrochen.
24. Symbol der Urlaubsfunktion
Drücken Sie die FN-Taste (bis diese das Symbol
mit dem Sonnenschirm und die untere Linie
erreicht), um die Urlaubsfunktion zu aktivieren.
Wenn Sie über das Urlaubsfunktionssymbol und
die Urlaubsfunktionsanzeige fahren, beginnen
diese an zu blinken. So können Sie sehen, on die
Urlaubsfunktion aktiviert oder deaktiviert werden
soll. Wenn Sie die OK-Taste drücken, leuchtet
das Urlaubsfunktionssymbol anhaltend und die
Urlaubsfunktion ist aktiviert. Die Anzeige blinkt
während dieses Vorgangs weiter. Drücken Sie die
OK-Taste, um die Urlaubsfunktion abzubrechen.
Nun beginnen sowohl das Symbol der
oder ausgestellt ist.
Der Wasserfluss vom Wassertank
stoppt, wenn diese Funktion
ausgewählt wurde. Jedoch kann
das zuvor hergestellte Eis aus der
Eismaschine weiter entnommen
werden.
Urlaubsfunktion als auch die Anzeige an zu blinken
und die Urlaubsfunktion wird abgebrochen.
25. Symbol für Zusatzkühlfunktion
Wenn Sie das Symbol für die Zusatzkühlfunktion
mit Hilfe der FN-Taste auswählen und die OKTaste drücken, schaltet das Zusatzfach in den
Kühlschrankbetrieb.
26. Temperaturanzeige in Celsius
Diese Anzeige gibt die Temperatur in Celsius
wieder. Wenn die Anzeige in Celsius aktiviert wird,
werden die eingestellten Temperaturwerte in
Celsius angezeigt und ein entsprechendes Symbol
leuchtet.
27. Einstelltaste zur Verringerung des Werts
Wählen Sie das Symbol für das entsprechende
Fach; diese Symbol fängt nun an zu blicken Wenn
Sie die Einstelltaste zur Verringerung des Werts
während dieses Vorgangs drücken, verringert
sich der eingestellte Wert. Wenn Sie diese
ununterbrochen drücken, stellt der Wert wieder auf
den Ausgangswert zurück.
28. Symbol Fach mit Temperaturänderung
Zeigt das Fach an, dessen Temperatur sich
gerade ändert. Wenn das Symbol Fach mit
Temperaturänderung zu blinken beginnt, bedeutet
das, dass das jeweilige Fach ausgewählt wurde.
29. Symbol Fach mit Temperaturänderung
Zeigt das Fach an, dessen Temperatur sich
gerade ändert. Wenn das Symbol Fach mit
Temperaturänderung zu blinken beginnt, bedeutet
das, dass das jeweilige Fach ausgewählt wurde.
30. Tastensperre
Drücken Sie die Tastensperrtaste simultan für 3
Sekunden. Das Tastensperrsymbol
leuchtet auf und der Tastensperrmodus wird
aktiviert. Die Tasten reagieren dann nicht, solange
der Tastensperrmodus aktiviert bleibt. Drücken
Sie die Tastensperrtaste erneut simultan für 3
Sekunden. Das Tastensperrzeichen erlischt und der
Tastatursperrmodus wird abgestellt.
Drücken Sie die Tastensperrtaste,
wenn Sie verhindern möchten, dass die
Temperatureinstellung des Kühlschranks geändert
werden kann.
17 / 32 DE
Kühlschrank/ Bedienungsanleitung
Page 50

Produktbedienung
31. Auswahltaste
Nutzen Sie diese Taste, um das Fach auswählen,
dessen Temperatur Sie ändern möchten. Schalten
Sie zwischen den Fächern, indem Sie diese Taste
drücken. Das ausgewählte Fach kann anhand
der Fachsymbole unterschieden werden (7, 17,
18, 20, 28, 29). Schalten Sie solange, bis das
Symbol des Fachs, dessen Temperatur Sie ändern
möchten, anfängt zu blinken. Dann können Sie den
eingestellten Wert mit Hilfe entweder der Taste zur
Verringerung des Temperaturwerts im Fach (27)
oder der Taste zur Erhöhung des Temperaturwerts
im Fach (19) ändern. Wenn die ausgewählte Taste
mehr als 20 Sekunden nicht drücken, schaltet sich
das Fachsymbol wieder aus. Sie müssen diese
Taste drücken, um erneut ein Fach auszuwählen.
32. Warnung Alarm aus
Drücken Sie im Falle eines Stromausfalls/
erhöhte Temperatur-Alarms nach der Prüfung des
Lebensmittel im Gefrierfach die Abstelltaste für die
Alarmfunktion, um die Warnung zu löschen.
33. Taste der Schnellkühlfunktion
Die Taste hat zwei Funktionen. Drücken
Sie zur Aktivierung oder Deaktivierung
der Schnellkühlfunktion diese kurz. Die
Schnellkühlanzeige schaltet sich dann aus und
das Gerät kehrt zu seinen normalen Einstellungen
zurück.
Verwenden Sie die
Schnellkühlfunktion, wenn die in
C
C
C
C
34. 1 Temperaturanzeige des Zusatzfachs
Die für das Zusatzfach eingestellten
Temperaturwerte werden angezeigt.
34. 2 Temperaturanzeige des Weinkühlfachs
Die für das Zusatzfach eingestellte Temperatur
wird angezeigt.
das Kühlschrankfach gelegten
Lebensmittel schnell abkühlen
möchten. Wenn Sie größere Mengen
an frischen Lebensmitteln abkühlen
möchten, aktivieren Sie diese
Funktion, bevor Sie die Lebensmittel in
das Gerät legen.
Wenn Sie diese nicht zuvor
ausschalten, stellt sich die
Schnellkühlfunktion automatisch nach
spätestens 8 Stunden ab oder wenn
das Kühlschrankfach die gewünschte
Temperatur erreicht hat.
Wenn Sie die Schnellkühltaste
wiederholt kurz nacheinander
drücken, wird der elektronische
Schaltkreisschutz aktiviert und der
Kompressor startet nicht sofort.
Die Funktion aktiviert sich nicht erneut
selbständig nach dem Ende eines
Stromausfalls.
18 / 32 DE
Kühlschrank/ Bedienungsanleitung
Page 51

Produktbedienung
5.2 Anzeigefeld
Das berührungsempfindliche Anzeigefeld ermöglicht Ihnen die Einstellung der Temperatur und die
Steuerung anderer Funktionen, ohne dass Sie die Tür des Kühlschranks öffnen müssen. Drücken Sie
einfach die entsprechenden Tasten zur Funktionseinstellung.
17
18 19
2
1
5
3
4
6
7
*9
8
13
10
12
*11
16
15
14
25
26
1 - Ein/Aus-Funktion
Drücken Sie zum Ein- oder Ausschalten des
Kühlschranks 3 Sekunden lang die Ein-/Austaste.
2. Schnellgefriertaste
Mit dieser Taste schalten Sie die
Schnellgefrierfunktion ein und aus. Wenn diese
Funktionen aktiv ist, wird der Tiefkühlbereich
besonders stark (tiefer als bis zur eingestellten
Temperatur) gekühlt.
Sie können diese Schnellgefrierfunktion
nutzen, um Lebensmittel im
C
C
C
Tiefkühlbereich besonders schnell
einzufrieren. Wenn Sie große Mengen
frischer Lebensmittel einfrieren
möchten, sollten Sie diese Funktion
schon vor dem Einlagern der
Lebensmittel einschalten.
Sofern Sie diese Funktion nicht
vorzeitig abschalten, wird das
Schnellgefrieren beendet, sobald
die nötige Temperatur erreicht ist,
spätestens jedoch nach 4 Stunden.
Diese Funktion wird nach einem
Stromausfall nicht automatisch wieder
eingeschaltet.
24
21
22
23
*20
3. Auswahltaste
Verwenden Sie diese Taste, um das Fach
auszuwählen, dessen Temperatur Sie ändern
möchten. Wechseln Sie durch Drücken dieser
Taste zwischen den Fächern. Das gewählte Fach
ist an den Fachsymbolen (6, 25, 24) zu erkennen.
Unabhängig davon, welches Fachsymbol
eingeschaltet ist, wird das Fach ausgewählt,
dessen Temperatursollwert Sie ändern möchten.
Anschließend können Sie den Sollwert durch
Drücken der Temperatureinstelltaste (4) ändern.
4. Temperatureinstellung / Temperatur
verringern
Verringert bei Betätigung die Temperatur des
ausgewählten Fachs.
5. Schnelltiefkühlanzeige
Dieses Symbol leuchtet bei aktiver
Schnellgefrierfunktion auf.
6. Kühlfachanzeige
Wenn diese Anzeige aktiv ist, wird die Temperatur
des Kühlfachs auf der Temperaturwertanzeige
angezeigt. Der Kühlbereich kann durch Drücken
der Temperatureinstelltaste (4) auf 8, 7, 6, 5, 4, 3,
2 oder 1 °C (46, 45, 44, 43, 42, 41, 40, 39, 38,
37, 36, 35, 34 oder 33 °F ) eingestellt werden.
C
Die Abbildungen in dieser Bedienungsanleitung sind schematische Zeichnungen und stimmen mit dem
Gerät nicht exakt überein. Wenn dabei Teile dargestellt werden, die nicht zu dem von Ihnen gekauften
Gerät gehören, dann handelt es Komponenten für andere Modelle.
19 / 32 DE
Kühlschrank/ Bedienungsanleitung
Page 52

Produktbedienung
7. Temperaturanzeige
Zeigt den Temperaturwert des ausgewählten
Fachs.
8. Fahrenheit-Anzeige
Dies ist die Fahrenheit-Anzeige. Wenn die
Fahrenheit-Anzeige aktiviert ist, werden die
Temperatureinstellwerte in Fahrenheit angezeigt
und das entsprechende Symbol leuchtet.
9. Symbol des Joker-Fachs als Kühlfach
Wenn Sie das Joker-Kühlbereich-Symbol mit der
FN-Taste (16) auswählen und die OK-Taste (17)
drücken, wird das variable Kühl- oder Gefrierfach
zum Kühlfach und arbeitet im Kühl- statt im
Gefriermodus.
10. Symbol des Joker-Fachs
Zeigt das Joker-Fach-Symbol
11. Symbol des Joker-Fachs als Gefrierfach
Wenn Sie das Joker-Kühlbereich-Symbol mit der
FN-Taste (16) auswählen und die OK-Taste (17)
drücken, wird das variable Kühl- oder Gefrierfach
zum Gefrierfach und arbeitet im Gefrier- statt im
Kühlmodus.
12. Stromausfall-/Hochtemperatur-/FehlerWarnung
Diese Anzeige leuchtet bei einem Stromausfall,
zu hohen Innentemperaturen und sonstigen
Fehlern. Bei längeren Stromausfällen blinkt in der
digitalen Anzeige der höchste Temperaturwert,
den der Tiefkühlbereich erreicht. Drücken Sie nach
Kontrolle der Lebensmittel im Tiefkühlbereich zum
Aufheben der Warnung die Alarm-aus-Taste (19).
13. Wechsel der Celsius- und FahrenheitAnzeige
Rufen Sie mit der FN-Taste diese Taste auf
und wählen Sie mit der OK-Taste Fahrenheit
oder Celsius aus. Wenn die gewünschte
Temperatureinheit ausgewählt ist, leuchtet die
entsprechende Fahrenheit- oder Celsius-Anzeige
auf.
14. Urlaubsfunktionssymbol
Drücken Sie zum Aktivieren der Urlaubsfunktion
die FN-Taste (bis sie das Sonnenschirmsymbol
erreicht). Wenn Sie das Symbol der Urlaubsfunktion
hervorheben, beginnt es zu blinken. Daran
erkennen Sie, dass die Urlaubsfunktion
jetzt aktiviert oder deaktiviert werden kann.
Wenn Sie die OK-Taste drücken, leuchtet das
Urlaubsfunktionssymbol kontinuierlich, was
anzeigt, dass diese Funktion jetzt aktiv ist. Drücken
Sie die OK-Taste erneut, um die Urlaubsfunktion
abzubrechen. Anschließend beginnt die
Anzeige der Urlaubsfunktion zu blinken und die
Urlaubsfunktion wird abgebrochen.
15. Schnellkühlfunktionsanzeige
Leuchtet bei aktiver Schnellkühlen-Funktion.
16. FN-Taste
Mit dieser Taste können Sie zwischen den
Funktionen wechseln, die Sie auswählen möchten.
Durch Drücken dieser Taste beginnen das Symbol
und der Anzeigewert der Funktion, die aktiviert
oder deaktiviert werden soll, zu blinken. Die FNTaste wird deaktiviert, wenn sie 20 Sekunden lang
nicht gedrückt wird. Sie müssen diese Taste erneut
drücken, um die Funktionsänderung wieder zu
aktivieren.
17. OK-Taste
Nach Durchlaufen der Funktionen mit der FNTaste und Deaktivieren einer Funktion mit der
OK-Taste blinkt die entsprechende Anzeige.
Wenn die Funktion aktiviert ist, bleibt die Anzeige
eingeschaltet. Die Anzeige blinkt weiterhin, um das
Symbol anzuzeigen, das hervorgehoben ist.
18. Schnellkühltaste
Diese Taste erfüllt zwei Funktionen. Zum Ein- und
Ausschalten der Schnellkühlfunktion drücken Sie
die Taste einmal kurz. Die Schnellkühlanzeige
erlischt, der Kühlschrank arbeitet wieder mit
normalen Einstellungen.
19. Alarm-aus-Warnung
Bei einem Stromausfall/Temperaturalarm
drücken Sie nach Prüfen der Lebensmittel im
Tiefkühlbereich die Alarm-aus-Taste, um das
Hochtemperatur-Warnsymbol (12) auszuschalten.
20. Filterrücksetzung
Der Filter wird zurückgesetzt, wenn die Alarm-AusTaste (19) 3 Sekunden lang gedrückt wird. Das
Symbol zum Zurücksetzen des Filters erlischt.
20 / 32 DE
Kühlschrank/ Bedienungsanleitung
Page 53

Produktbedienung
21. Öko-Fuzzy-Funktionssymbol
Drücken Sie die FN-Taste (bis der Buchstaben
e erreicht ist), um die Öko-Fuzzy-Funktion zu
aktivieren. Wenn Sie das Öko-Fuzzy-Symbol
erreichen, beginnt es zu blinken. Daran erkennen
Sie, dass die Öko-Fuzzy-Funktion jetzt aktiviert
oder deaktiviert werden kann. Wenn Sie die
OK-Taste drücken, leuchtet das Symbol für die
Öko-Fuzzy-Funktion während dieses Vorgangs
kontinuierlich. Wenn Sie dann 20 Sekunden
lang keine Taste drücken, bleibt das Symbol
eingeschaltet. Die Öko-Fuzzy-Funktion ist dann
aktiviert. Um die Öko-Fuzzy-Funktion abzubrechen,
heben Sie erneut ihr Symbol hervor und drücken
die OK-Taste. Damit beginnt das Symbol der ÖkoFuzzy-Funktion zu blinken. Wenn Sie nun innerhalb
von 20 Sekunden keine Taste drücken, erlischt
das Symbol und die Öko-Fuzzy-Funktion wird
deaktiviert.
22. Eisbereiter-aus-Anzeige
Drücken Sie die FN-Taste (bis das Eissymbol
erreicht ist), um den Eisbereiter auszuschalten.
Das Eisbereiter-aus-Symbol beginnt zu blinken,
wenn Sie es hervorheben, um anzuzeigen, dass
der Eisbereiter jetzt ein- oder ausgeschaltet wird.
Wenn Sie dann die OK-Taste drücken, leuchtet
das Eisbereiter-Symbol während dieses Vorgangs
kontinuierlich. Wenn Sie dann 20 Sekunden lang
keine Taste drücken, bleiben das Symbol und die
Anzeige eingeschaltet. Dies zeigt an, dass der
Eisbereiter abgeschaltet ist. Um den Eisbereiter
wieder einzuschalten, markieren Sie das Symbol.
Das Eisbereiter-aus-Symbol beginnt zu blinken.
Wenn Sie nun die OK-Taste drücken, erlischt
das Symbol und der Eisbereiter wird wieder
eingeschaltet.
Zeigt an, ob die Eisbereiter-
C
Funktion ein- oder ausgeschaltet
ist.
Nach Ausschalten dieser Funktion
C
23. Symbol Filterrücksetzung
Dieses Symbol leuchtet auf, wenn der Filter ersetzt
werden muss.
24. Celsius-Anzeige
Dies ist die Celsius-Anzeige. Wenn die
Celsius-Anzeige aktiviert ist, werden die
Temperatureinstellwerte in Celsius angezeigt und
das Celsius-Symbol leuchtet dauerhaft.
25. Joker-Fach-Anzeige
Wenn diese Anzeige aktiv ist, wird die Temperatur
des Joker-Kühl-/Tiefkühlbereichs in der
Temperaturanzeige angezeigt. Der Sollwert des
Joker-Fachs wechselt durch Drücken der Taste
Temperatureinstellung (4).
26. Tiefkühlbereichanzeige
Wenn diese Anzeige aktiv ist, wird die Temperatur
des Tiefkühlfachs auf der Temperaturwertanzeige
angezeigt. Der Tiefkühlbereich kann durch Drücken
der Temperatureinstelltaste (4) auf -18, -19, -20,
-21, -22, -23 oder -24 °C (0, -2, -4, -6, -8, -10
oder -12°F) eingestellt werden.
wird ihr kein Wasser mehr aus
dem Tank zugeführt. Bereits
bereitetes Eis kann aber nach
wie vor aus dem Eisbereiter
entnommen werden.
21 / 32 DE
Kühlschrank/ Bedienungsanleitung
Page 54

Produktbedienung
5.3 Einfrieren frischer Lebensmittel
• Um die Qualität der Lebensmittel zu bewahren,
sollten diese nach dem so schnell wie möglich
eingefroren, nachdem sie in das Gefrierfach
gelegt wurden. Verwenden Sie deshalb die
Schnellgefrierfunktion für diese Zwecke.
• Sie können Lebensmittel länger im Gefrierfach
lagern, wenn Sie diese im frischen Zustand
einfrieren.
• Verpacken Sie das Gefriergut und schließen Sie
die Verpackung, um das Eindringen von Luft zu
vermeiden.
• Stellen Sie sicher, dass die Lebensmittel
richtig verpackt sind, bevor Sie diese in
das Gefrierfach legen. Verwenden Sie
dazu zum Einfrieren geeignete Behälter,
Folien, feuchtigkeitsabweisendes Papier,
Kunststoffbeutel und weitere geeignete
Materialien statt einfachen Packpapiers.
• Beschriften Sie alle verpackten Lebensmittel
und vermerken Sie das Einfrierdatum. So
behalten Sie einen Überblick über Inhalt und
Haltbarkeit, jedes Mail, wenn Sie Tür des
Gefrierfachs öffnen. Bewahren Sie am längsten
gelagerten, tiefgekühlten Lebensmittel im
vorderen Teil des Fachs auf, damit diese zuerst
verbraucht werden.
• Eingefrorene Lebensmittel müssen nach dem
Auftauen unverzüglich verbraucht werden und
dürfen nicht erneut eingefroren werden.
5.4 Empfehlungen für die
bessere Haltbarkeit
gefrorener Lebensmittel
Das Gefrierfach sollte mindestens -18 °C kalt sein.
1. Legen Sie die eingepackten Lebensmittel so
rasch wie möglich in das Gefriergerät, um ein
Antauen zu verhindern.
2. Kontrollieren Sie die Angaben für
„Zu verbrauchen bis“ bzw. zum
Mindesthaltbarkeitsdatum, um festzustellen,
ob diese Fristen abgelaufen sind oder nicht.
3. Stellen Sie sicher, dass die Verpackungen
unbeschädigt sind.
5.5 Angaben zur Tiefkühlung
Gemäß dem IEC 62552-Normen soll das Gerät
mindestens 4,5 kg an Lebensmitteln bei einer
Umgebungstemperatur von 25°C auf -18°C
oder niedriger innerhalb von 24 Stunden für
jeweils jede Volumenmenge von 100 Litern des
Gefriergerätinhalts herabkühlen.
Es ist möglich, die Lebensmittel für einen längeren
Zeitraum bei Temperaturen von -18°C oder
niedriger aufzubewahren.
Sie können die Lebensmittel für viele Monate frisch
halten (bei Temperaturen von -18°C oder niedriger
im Gefriergerät).
Die noch einzufrierende Lebensmittel dürfen nicht
direkt auf bereits tiefgefühlte gelegt werden, um
deren teilweise Antauen zu verhindern.
Kochen Sie Gemüse und gießen Sie das
Kochwasser ab, um deren Aufbewahrungszeit im
tiefgekühlten Zustand zu verlängern. Legen Sie
diese nach dem Abgießen in luftdichte Behälter
und dann in das Gefriergerät. Lebensmittel wie
Bananen, Tomaten, Salat, Sellerie, gekochte Eier
und Kartoffeln sind zum Einfrieren nicht geeignet.
Wenn diese Lebensmittel eingefroren werden,
beeinträchtigt das deren Nährwert und Geschmack
negativ. Jedoch stellt ihr Verzehr in solchen Fällen
keine Gefahr für menschliche Gesundheit dar.
• Frieren Sie nicht zu große Mengen an
Lebensmitteln auf einmal ein.
22 / 32 DE
Kühlschrank/ Bedienungsanleitung
Page 55

Produktbedienung
Gefrierfa
cheinstellung
-18°C 4°C Das ist die normale, empfohlene Einstellung.
-20, -22 oder -24°C 4°C
Schnellgefrierfunktion 4°C
-18°C oder kälter 2°C
5.6 Einlegen von Lebensmitteln
Gefrierfa
cheinschübe
Kühlschran
kfacheinschübe
Türeinsätze des
Kühlfachs
Gemüsefach Gemüse und Obst
Fach für frische
Lebensmittel
Verschiedenes Gefriergut, wie
beispielsweise Fleisch, Fisch,
Eiscreme, Gemüse usw.
Lebensmittel in Kochtöpfen,
abgedeckten Tellern und
geschlossenen Behältern Eier
(im geschlossenen Behälter)
In kleinen Mengen verpackte
Lebensmittel oder Getränke
Feinkostprodukte
(Brotaufstriche,
Fleischprodukte für den
raschen Verbrauch)
5.7 Warnton bei offener Tür
(Diese Funktion ist optional)
Ein Warnton ist zu hören, wenn die Tür des Geräts
länger als 1 Minute offen gelassen wird. (Dieser
Warnton verstummt, wenn die Tür geschlossen
oder eine der Bedienfeldtasten (sofern vorhanden)
gedrückt wird.
5.8 Beleuchtung im Innenraum
Als Innenlampen werden LEB-Leuchten verwendet.
Kontaktieren Sie bei Problemen mit dem Geräts
mit dieser Lampe den zuständigen Kundendienst.
Kühlfac
heinstellung
Bemerkungen
Diese Einstellungen werden empfohlen, wenn die
Umgebungstemperaturen 30°C überschreiten.
Wird verwendet, um Lebensmittel in kürzester Zeit
einzufrieren. Das Gerät schaltet sich am Ende dieses
Vorgang in den vorherigen Normalbetrieb zurück.
Diese Einstellungen werden verwendet, wenn Sie
glauben, dass Ihr Kühlfach aufgrund der hohen
Umgebungstemperaturen und häufigen Öffnens und
Schließens der Tür nicht kalt genug ist.
Die in dieser Vorrichtung genutzte(n) Lampe(n) ist/
sind nicht für den Einsatz im Haushalt geeignet.
Der vorgesehene Zweck dieser Lampe besteht
darin, den Nutzer das Legen bzw. Herausnehmen
der Lebensmittel auf eine bequeme und
komfortable Weise zu erleichtern.
5.9 Kältefach
In den Kältefächern können Sie Lebensmittel
auf das Einfrieren vorbereiten. Sie können diese
Fächer zudem zur Lagerung von Lebensmitteln bei
einer Temperatur, die etwas unter der im Kühlfach
liegt, nutzen.
Sie können das Fassungsvermögen Ihres
Kühlschranks durch das Herausnehmen der
Kältefächer vergrößern.
1. Ziehen Sie das Fach in Ihre Richtung, wenn es
stoppt.
2. Heben Sie das Fach um 1 cm nach oben, und
ziehen es weiter in Ihre Richtung, um es aus
seiner Halterung herausheben.
5.10 Gemüsefach
Das Gemüsefach des Kühlschranks dient
zur Lagerung von Gemüse, ohne dass dies
austrocknet. Dazu ist die Zirkulation der Kühlluft
um das Gemüsefach im Allgemeinen intensiviert.
Entfernen Sie die Türeinsätze, die sich gegenüber
zum Gemüsefach finden, bevor Sie dieses
herausnehmen.
23 / 32 DE
Kühlschrank/ Bedienungsanleitung
Page 56

Produktbedienung
5.11 Gemüsefach mit kontrollierter
Luftfeuchtigkeit
(FreSHelf)
(Diese Funktion ist optional)
Das Gemüsefach mit kontrollierter Feuchtigkeit
dient dazu, ein Austrocknen des Obsts und
Gemüses zu verhindern, sodass dieses länger
frisch bleibt.
Wir empfehlen, dass Sie blattähnliche
Gemüsesorten, wie beispielsweise Salat und
Spinat wie auch empfindliche Gemüsesorten möglichst in waagerechter Position im Gemüsefach in
Bezug auf deren Wurzeln lagern.
Wenn Gemüse in den Kühlschrank gelegt wird,
ist dessen spezifisches Gewicht zu berücksichtigen. Schwere und feste Gemüsesorten sollten im
Gemüsefach nach unten gelegt werden, während
leichte und weichere Sorten oben auf diese gepackt werden sollten.
Legen Sie Gemüse niemals in Kunststofftüten
in das Gemüsefach. Wenn das Gemüse in der
Kunststofftüte bleibt, fängt es in kürzester Zeit zu
faulen an. Wenn Sie aus hygienischen Gründen
nicht wollen, dass eine Gemüsesorte mit einer
anderen in Kontakt kommt, verwenden Sie durchlässige Papiertüten oder vergleichbares Material
anstatt von Kunststofftüten.
Lagern Sie Birnen, Aprikosen, Pfirsich oder
sonstige Früchte, die größere Mengen an Ethylen
abgeben nicht zusammen mit anderem Obst oder
Gemüse im Gemüsefach. Das von diesen Früchten
abgegebene Ethylen beschleunigt die Reife anderer Obst- und Gemüsesorten und verkürzt so deren
Lagerungszeit, bevor diese zu faulen anfangen.
5.12 Eiereinsatz
Sie können den Eiereinsatz je nach Wunsch in
die Tür oder einen Zwischenboden im Innenraum
installieren.
Stellen Sie den Eiereinsatz niemals in das
Gefrierfach.
5.13 Beweglicher Mittelbereich
Der Bewegliche Mittelbereich soll dafür sorgen,
dass die kalte Luft im Kühlschrankinneren nicht
nach außen entweicht.
1- Die Versieglung wird gewährleistet, wenn die
Türdichtung gegen die Oberfläche des beweglichen
Mittelbereichs drücken, wenn die Kühlfachtüren
geschlossen sind.
2– Ein weiterer Grund für die Existenz des
beweglichen Mittelbereichs im Kühlschrank ist,
dass sich damit das Nettofassungsvermögen des
Kühlfachs erhöht.Die üblichen standardmäßigen
Mittelbereiche führen dazu, dass ein Teil des
Kühlschrankinnenraums nicht für die Lagerung von
Lebensmitteln zur Verfügung steht.
3-Der bewegliche Mittelbereich ist geschlossen,
wenn die linke Tür des Kühlfachs geöffnet wird.
4-Es darf nicht mit der Hand geöffnet werden. Es
öffnet sich, durch die Führung des Kunststoffteils,
wenn die Tür geschlossen wird.
5.14 Kältekontrolliertes
Aufbewahrungsfach
Das kältekontrollierte Aufbewahrungsfach Ihres
Kühlschranks kann in jedem gewünschten
Modus, durch die jeweilige Einstellung entweder als Kühlschrankfach (2/4/6/8 °C) oder als
Gefrierfach (-18/-20/-22/-24) verwendet werden.
Sie können die gewünschte Temperatur für dieses
Fach mit der entsprechenden Einstellungstaste
regulieren.Die Temperatur des kältekontrollieren
Aufbewahrungsfach kann entweder auf einen Wert
24 / 32 DE
Kühlschrank/ Bedienungsanleitung
Page 57

Produktbedienung
zwischen 0 und 10 als Erweiterung des Kühlfachs
oder auf einen Wert von -6 als Erweiterung des
Gefrierfachs eingestellt werden.0 Grad dienen
zur verlängerten Lagerung von Feinkostprodukten
und -6 Grad ermöglicht die Lagerung von Fleisch
für bis zu 2 Wochen in einem gut schneidbaren
Zustand.
Die Funktion zum Schalten auf Kühl- oder
Gefrierfachbetrieb wird durch ein Kühlelement
in dem geschlossenen Bereich ermöglicht
(Kompressorfach) auf der Kühlschrankrückseite
ermöglicht. Der Betrieb dieses Elementes erzeugt
ein dem Ticken einer analogen Uhr vergleichbares
Geräusch. Das ist normal und keine Zeichen für
eine Fehlfunktion.
5.15 Blaues Licht
(in einigen Modellen)
Das Gemüsefach im Kühlschrank wird mit
einem blauen Licht beleuchtet. Im Gemüsefach
aufbewahrte Lebensmittel werden durch
den Wellenlängeneffekt dazu gebracht, die
Fotosynthese fortzusetzen, sodass sie länger frisch
bleiben und ihr Vitamingehalt sich erhöht.
5.16 Geruchsfilter
Der Geruchsfilter in der Luftleitung des
Kühlschrankfachs verhindert die Bildung
unangenehmer Gerüche im Kühlschrank.
25 / 32 DE
Kühlschrank/ Bedienungsanleitung
Page 58

Produktbedienung
5.17 Weinfach
(Diese Funktion gibt es nur bei bestimmten Geräten.)
1 – Ihr Weinfach füllen
Das Weinfach wurde so gebaut, dass es bis zu 28 Flaschen vorne + 3 über ein Teleskopgestell
zugängliche Flaschen aufnehmen kann. Die angegebenen maximalen Mengen dienen nur als
Referenzwerte und entsprechen den mit einer Standardflasche „Bordelaise 75 cl“ durchgeführten Tests.
2- Empfohlene optimale Temperaturen
Unser Rat: Wenn Sie verschiedene Arten von Weinen kombinieren, wählen Sie 12 °C (typische Temperatur
in einem richtigen Keller). Bei Weißweinen, die bei 6 bis 10 ° serviert werden sollten, denken Sie bitte
daran, die Flaschen vor dem Servieren 1/2 Stunde in den Kühlschrank zu geben. Der Kühlschrank
kann die Flaschen auf die bevorzugte Temperatur herunterkühlen. Rotweine erwärmen sich bei
Zimmertemperatur nur langsam beim Servieren.
16 bis 17 °C Feine Bordeaux-Weine - rot
15 bis 16 °C Feine Burgunderweine - rot
14 bis 16 °C Grand-Crus (großes Gewächs) trockener Weißweine
11 bis 12 °C Leichte, fruchtige und junge Rotweine
10 bis 12 °C Provence-Rosé-Weine, französische Weine
10 bis 12 °C Trockene Weißweine und rote Landweine
8 bis 10 °C Weiße Landweine
7 bis 8 °C Champagner
6 °C Liebliche Weißweine
26 / 32 DE
Kühlschrank/ Bedienungsanleitung
Page 59

Produktbedienung
3- Empfehlungen zum Öffnen einer Weinflasche vor der Verkostung:
Weißweine Etwa 10 Minuten vor dem Servieren
Junge Rotweine Etwa 10 Minuten vor dem Servieren
Schwere, ausgereifte Rotweine Etwa 30 bis 60 Minuten vor dem Servieren
4- Wie lang kann eine geöffnete Flasche aufbewahrt werden?
Geöffnete Weinflaschen mit einem Korken verschlossen und maximal die folgende Anzahl Tage an einem
kühlen, trockenen Ort aufbewahrt werden:
Weißweine Rotweine
Dreiviertelvolle Flasche 3 bis 5 Tage 4 bis 7 Tage
Halbvolle Flasche 2 bis 3 Tage 3 bis 5 Tage
Weniger als halbvolle Flasche 1 Tag 2 Tage
5.18 So benutzen Sie den
internen Wasserspender
(bei bestimmten Modellen)
Spülen Sie das Wassersystem nach Anschluss
des Kühlschranks an eine Wasserversorgung
oder nach Auswechslung des Wasserfilters durch.
Halten Sie den Hebel des Wasserspenders 5
Sekunden mit einem festen Behälter gedrückt,
lassen Sie ihn dann 5 Sekunden los. Wiederholen
Sie den Vorgang, bis Wasser ausgegeben wird.
Sobald Wasser ausgegeben wird, wechseln Sie
kontinuierlich zwischen Gedrückthalten und
Loslassen (5 Sekunden ein, 5 Sekunden aus)
des Hebels, bis Sie insgesamt 15 Liter Wasser
entnommen haben. Dadurch strömt Luft aus
dem Filter und Wasserspendersystem und der
Wasserfilter wird für den Einsatz vorbereitet. In
einigen Haushalten ist möglicherweise weiteres
Durchspülen erforderlich. Sobald die Luft aus
dem System entwichen ist, kann Wasser aus dem
Wasserspender herausspritzen.
Warten Sie 24 Stunden, bis der Kühlschrank sich
und das Wasser abgekühlt hat. Entnehmen Sie
jede Woche genügend Wasser, damit es frisch
bleibt.
Nach 5 Minuten kontinuierlicher
Ausgabe stoppt der Wasserspender
die Wasserausgabe zur Verhinderung
einer Überschwemmung. Sie können
C
die Ausgabe fortsetzen, indem Sie
erneut den Hebel drücken.
5.19 Wasser ausgeben
Halten Sie einen Behälter unter den Ausguss des
Wasserspenders, während Sie den Hebel gedrückt
halten.
Zum Stoppen der Ausgabe lassen Sie den Hebel
los.
Das erste Wasser, das aus dem Spender
fließt, kann noch etwas warm sein. Dies
C
C
Nach dem ersten Einschalten müssen Sie etwa 24
Stunden abwarten, bis das Wasser abgekühlt ist.
Ziehen Sie das Glas heraus, kurz nachdem Sie den
Auslöser gezogen haben.
ist normal.
Falls der Wasserspender längere Zeit nicht
genutzt wurde, gießen Sie die ersten paar
Gläser Wasser weg, bis frisches Wasser
ausgegeben wird.
27 / 32 DE
Kühlschrank/ Bedienungsanleitung
Page 60

Produktbedienung
5.20 Wasserspender verwenden
Möglicherweise tropft vor der ersten
Inbetriebnahme Ihres Kühlschranks
und nach Auswechslung des
Wasserfilters etwas Wasser aus dem
Wasserspender. Damit kein Wasser
aus dem Wasserspender tropft oder
ausläuft, sollten Sie das System
entlüften, indem Sie ca. 20 Liter
A
C
5.21 Eiswürfelspender
(bei bestimmten Modellen)
Um Eiswürfel herzustellen, füllen Sie
den Wassertank im Kühlschrank bis zur
Höchststandmarke mit Wasser.
Die Eiswürfel im Eiswürfelfach können durch
Eindringen warmer feuchter Luft in den
Kühlschrank mit der Zeit (etwa 15 Tage)
miteinander verschmelzen und Klumpen bilden.
Das ist normal. Falls Sie die Eiswürfel nicht mehr
leicht trennen können, entleeren Sie besser den
Eisbehälter und stellen frisches Eis her.
Wasser über den Wasserspender
ausgeben. Dadurch wird jegliche
Luft aus dem System beseitigt und
der Wasserspender läuft nicht aus.
Prüfen Sie Anschlussposition und
Geradheit des Wasserschlauchs an
der Rückseite des Gerätes, falls der
Wasserfluss blockiert wird.
Es ist völlig normal, wenn der Wasserspender
nach der Ausgabe von etwas Wasser leicht
tropft.
Sie sollten nicht verbrauchtes Wasser
C
C
C
C
im Wassertank des Kühlschranks
spätestens nach 2 bis 3 Wochen
austauschen.
Das Eiswürfelherstellungssystem des
Kühlschranks kann alle 2 Stunden
leichte Geräusche erzeugen. Das ist
normal.
Wenn Sie keine Eiswürfel herstellen wollen,
betätigen Sie das Symbol „Kein Eis“. Damit
sparen Sie Energie und verlängern die
Lebensdauer Ihres Kühlschranks.
Es ist normal, dass nach der Entnahme von
Wasser ein paar Tropfen aus dem Spender
nachlaufen.
5.22 Eisbereiter und Eisbehälter
(bei bestimmten Modellen)
Füllen Sie den Eisbereiter mit Wasser, setzen Sie
ihn in seine Halterung. Ihr Eis ist nach etwa zwei
Stunden fertig. Zum Entnehmen des Eises nehmen
Sie den Eisbereiter nicht heraus.
Drehen Sie die Knöpfe daran um 90 ° im
Uhrzeigersinn.
Die Eiswürfel fallen in den darunter liegenden
Eiswürfelbehälter.
Sie können den Eisbehälter zum Servieren der
Eiswürfel herausnehmen.
Wenn Sie möchten, können Sie das Eis auch im
Eisbehälter aufbewahren.
Eisbehälter
Der Eisbehälter dient ausschließlich zum Sammeln
der Eiswürfel. Füllen Sie kein Wasser ein. Der
Behälter wird sonst platzen.
28 / 32 DE
Kühlschrank/ Bedienungsanleitung
Page 61

6 Pflege und Reinigung
Eine regelmäßige Reinigung erhöht die
Lebensdauer des Geräts.
HINWEIS: Trennen Sie Ihren
Kühlschrank vor der Reinigung
B
vom Netz.
Reinigungsmittel bzw. Chemikalien, sowie auch
kein Benzin, keine Benzole bzw. Wachse usw.
Andernfalls werden die Einprägungen auf den
Plasteteilen möglicherweise beschädigt oder
deformiert. Verwenden Sie warmes Wasser und
einen weichen Lappen zum anschließenden
Trockenreiben.
• Verwenden Sie zur Reinigung auf keinen
Fall scharfen oder spitzen Gegenstände, Seife,
Hausreinigungsmittel, Reinigungsmittel, Gas,
Benzin, Lack u. Ä.
• Bei nicht eisfreien Geräten bilden sich
Wassertropfen an der Rückwand des Kühlfaches,
die zu einer fingerdicken Eisschicht gefrieren
können. Nicht beseitigen, nicht reinigen, niemals
Öl oder andere Mittel auftragen.
• Reinigen Sie die Außenflächen des
Gerätes nur mit einem leicht angefeuchteten
Mikrofasertuch. Schwämme und andere
Reinigungshilfen können die Oberfläche
verkratzen.
• Schütten Sie ein Teelöffel Karbonat in einen
halben Liter Wasser. Nehmen Sie ein Tuch,
tauchen Sie es in diese Flüssigkeit und wringen
Sie es gut kräftig. Wischen Sie mit diesem Tuch
das Innere des Geräts und trocknen Sie es
gründlich.
• Achten Sie darauf, dass das Gehäuse der
Leuchte und sonstige elektrischen Teile nicht mit
Wasser in Berührung kommen.
• Reinigen Sie die Tür mit einem feuchten
Tuch. Entnehmen Sie den Inhalt vom Innenraum
und den Türen. Entfernen Sie die Regale nach
oben hebend. Nach der Reinigung und dem
Trocknen legen Sie es wieder ein, indem Sie es
nach unten schieben.
• Verwenden Sie auf keinen Fall bei der
Reinigung der Außenfläche des Geräts und den
verchromten Teilen chlorhaltigem Wasser oder
Reinigungsmittel. Chlor führt bei dieser Art von
Oberflächen zur Verrostungen.
• Verwenden Sie keine spitzen oder
scheuernde Gegenstände, Seifen,
6.1. Vermeidung von
schlechtem Geruch
Bei der Herstellung Ihres Geräts wurden keinerlei
Materialien verwendet, die Geruch verursachen
könnten. Jedoch können aufgrund von
ungeeigneter Lagerung von Lebensmitteln und
unsachgemäßer Reinigung der Innenseite Gerüche
entstehen.
Zur Vermeidung dieses Problems reinigen Sie es
regelmäßig alle 15 Tage.
• Bewahren Sie die Speisen in geschlossenen
Behältern auf. Lebensmittel, die in offenen
Behältern aufbewahrt werden, können durch
die Verbreitung von Mikroorganismen Gerüche
verursachen.
• Keine Lebensmittel deren
Aufbewahrungsdauer abgelaufen ist im
Kühlschrank aufbewahren.
6.2. Schutz von
Kunststoffoberflächen
Das Ausschütten von Öl kann den
Kunststoffoberflächen Schaden zufügen, daher
sollte hier mit lauwarmem Wasser gereinigt
werden.
29 / 32 DE
Kühlschrank/ Bedienungsanleitung
Page 62

7. Problemlösung
vivo
Bitte schauen Sie sich zunächst diese Liste an,
bevor Sie sich an den Kundendienst wenden.
Das kann Ihnen Zeit und Geld sparen. In der Liste
finden Sie Lösungsvorschläge für allgemeine
Probleme, die nicht durch Material- oder
Herstellungsfehler verursacht werden. Bestimmte
hierin erwähnte Funktionen und Merkmale treffen
möglicherweise nicht auf Ihr Produkt zu.
Der Kühlschrank schaltet sich nicht ein.
• Der Netzstecker ist nicht vollständig eingesteckt.
>>> Stecker vollständig in die Steckdose
einstecken.
• Die mit der Steckdose, die das Produkt mit
Strom versorgt, verbundene Sicherung oder
die Hauptsicherung ist durchgebrannt. >>>
Sicherungen prüfen.
Kondensation an den Seitenwänden des
Kühlbereiches (Multizone, Kühlkontrolle und
FlexiZone).
• Die Tür wird zu häufig geöffnet. >>> Darauf
achten, die Gerätetür nicht zu häufig zu öffnen.
• Die Umgebungsfeuchtigkeit ist zu hoch. >>>
Produkt nicht in Umgebungen mit hoher
Luftfeuchtigkeit aufstellen.
• Lebensmittel mit hohem Flüssigkeitsgehalt
werden in nicht abgedichteten Behältern
aufbewahrt. >>> Lebensmittel mit hohem
Flüssigkeitsgehalt in abgedichteten Behältern
aufbewahren.
• Die Gerätetür wurde offen gelassen. >>>
Gerätetür nicht längere Zeit offen lassen.
• Das Thermostat ist auf eine zu geringe
Temperatur eingestellt. >>> Thermostat auf
eine geeignete Temperatur einstellen.
Der Kompressor läuft nicht.
• Wenn ein Stromausfall auftritt oder der
Netzstecker gezogen und wieder angeschlossen
wird, ist der Gasdruck im Kühlsystem
des Gerätes nicht ausgeglichen, was den
Temperaturschutz des Kompressors auslöst. Das
Produkt startet nach etwa 6 Minuten neu. Falls
das Produkt nach diesem Zeitraum nicht neu
startet, wenden Sie sich an den Kundendienst.
• Die Abtaufunktion ist aktiv. >>> Dies ist bei
einem vollautomatisch abtauenden Produkt
normal. Das Abtauen wird regelmäßig
durchgeführt.
• Das Gerät ist nicht an die Stromversorgung
angeschlossen. >>> Prüfen, ob das Netzkabel
angeschlossen ist.
• Die Temperatur ist nicht richtig eingestellt. >>>
Die geeignete Temperatureinstellung wählen.
• Der Strom ist ausgefallen. >>> Sobald die
Stromversorgung wiederhergestellt ist, setzt das
Gerät den Betrieb fort.
Während der Benutzung nehmen die
Betriebsgeräusche des Kühlschranks zu.
• Die Betriebsleistung des Gerätes kann je nach
Umgebungstemperatur variieren. Dies ist völlig
normal und keine Fehlfunktion.
Der Kühlschrank arbeitet zu oft oder zu lange.
30 / 32 DE
Kühlschrank/ Bedienungsanleitung
Page 63

Fehlerbehebung
• Ihr neues Gerät ist vielleicht etwas grö0er als sein
Vorgänger. Größere Produkte arbeiten länger.
• Die Umgebungstemperatur ist sehr hoch. >>> Das
Gerät arbeitet bei höheren Umgebungstemperaturen
normalerweise länger.
• Das Gerät wurde erst vor Kurzem angeschlossen oder
mit neuen Lebensmitteln beladen. >>> Das Gerät
benötigt mehr Zeit zum Erreichen der eingestellten
Temperatur, wenn es gerade erst angeschlossen oder
mit neuen Lebensmitteln befüllt wurde. Dies ist völlig
normal.
• Es wurden erst vor Kurzem große Mengen warmer
oder gar heißer Lebensmittel in das Gerät gegeben.
>>> Keine warmen oder gar heißen Lebensmittel in
das Gerät geben.
• Die Türen wurden häufig geöffnet oder längere Zeit
offen gelassen. >>> Da warme Luft in das Innere
strömt, muss das Gerät länger arbeiten. Türen nicht
zu häufig öffnen.
• Die Tür des Tiefkühl- oder Kühlbereichs steht halb
offen. >>> Prüfen, ob Türen vollständig geschlossen
sind.
• Das Gerät wurde auf eine zu geringe Temperatur
eingestellt. >>> Höhere Temperatur einstellen und
warten, bis das Gerät die eingestellte Temperatur
erreicht hat.
• Die Türdichtungen von Kühl- oder Gefrierbereich sind
verschmutzt, verschlissen, beschädigt oder sitzen
nicht richtig. >>> Dichtung reinigen oder ersetzen.
Beschädigte/verschlissene Dichtungen sorgen
dafür, dass das Produkt zum Halten der aktuellen
Temperatur länger arbeiten muss.
Die Temperatur im Tiefkühlbereich ist
sehr niedrig, während die Temperatur im
Kühlbereich angemessen ist.
• Die Tiefkühlbereichtemperatur ist sehr niedrig
eingestellt. >>> Tiefkühlbereichtemperatur höher
einstellen, Temperatur nach einer Weile prüfen.
Die Temperatur im Tiefkühlbereich ist
sehr niedrig, während die Temperatur im
Kühlbereich angemessen ist.
• Die Kühlbereichtemperatur ist sehr niedrig
eingestellt. >>> Tiefkühlbereichtemperatur höher
einstellen, Temperatur nach einer Weile prüfen.
Im Kühlbereich gelagerte Lebensmittel frieren
ein.
• Die Kühlbereichtemperatur ist sehr niedrig
eingestellt. >>> Tiefkühlbereichtemperatur höher
einstellen, Temperatur nach einer Weile prüfen.
Die Temperatur im Kühl- oder Tiefkühlbereich
ist zu hoch.
• Die Kühlbereichtemperatur ist sehr hoch
eingestellt. >>> Die Kühlbereichtemperatur
beeinflusst die Tiefkühlbereichtemperatur. Warten
Sie, bis die entsprechenden Teile das erforderliche
Temperatur erreicht haben, indem Sie die
Temperatur des Kühl- oder Tiefkühlbereichs
ändern.
• Die Türen wurden häufig geöffnet oder längere
Zeit offen gelassen. >>> Türen nicht zu häufig
öffnen.
• Die Tür steht halb offen. >>> Tür vollständig
schließen.
• Das Gerät wurde erst kurz zuvor
angeschlossen oder es wurden neue Lebensmittel
hineingegeben. >>> Dies ist völlig normal. Das
Gerät benötigt mehr Zeit zum Erreichen der
eingestellten Temperatur, wenn es gerade erst
angeschlossen oder mit neuen Lebensmitteln
befüllt wurde.
• Es wurden erst vor Kurzem große Mengen
warmer oder gar heißer Lebensmittel in das Gerät
gegeben. >>> Keine warmen oder gar heißen
Lebensmittel in das Gerät geben.
Vibrationen oder Betriebsgeräusche.
• Der Boden ist nicht eben oder stabil. >>>
Falls das Produkt bei langsamem Bewegen
wackelt, müssen die Füße zum Ausgleichen des
Gerätes angepasst werden. Außerdem darauf
achten, dass der Untergrund ausreichend stabil
ist, das Gerät zu tragen.
• Jegliche auf dem Gerät abgelegten Dinge
können Geräusche verursachen. >>> Jegliche auf
dem Gerät abgelegten Dinge entfernen.
Das Produkt macht Sprüh- oder
Fließgeräusche etc.
• Die Arbeitsweise des Gerätes beinhaltet
Flüssigkeits- und Gasströme. >>>Dies ist völlig
normal und keine Fehlfunktion.
31 / 32 DE
Kühlschrank/ Bedienungsanleitung
Page 64

Fehlerbehebung
Das Gerät macht windartige Geräusche.
• Das Produkt nutzt einen Lüfter zur Kühlung.
Dies ist völlig normal und keine Fehlfunktion.
Es befindet sich Kondenswasser an den
Innenwänden des Produktes.
• Bei heißen oder feuchten Wetterlagen treten
verstärkt Eisbildung und Kondensation auf. Dies ist
völlig normal und keine Fehlfunktion.
• Die Tür wurde häufig geöffnet oder längere
Zeit offen gelassen. >>> Tür nicht zu häufig
öffnen; Tür nicht offen stehen lassen.
• Die Tür steht halb offen. >>> Tür vollständig
schließen.
Es befindet sich Kondenswasser an der
Außenseite des Produktes oder zwischen den
Türen.
• Eventuell herrscht hohe Luftfeuchtigkeit;
dies ist je nach Wetterlage völlig normal. >>>
Das Kondenswasser verdunstet, wenn sich die
Luftfeuchtigkeit verringert.
Der Innenraum riecht unangenehm.
• Das Produkt wurde nicht regelmäßig gereinigt.
>>> Innenraum regelmäßig mit einem Schwamm
und warmem Wasser und etwas in Wasser
aufgelöstem Natron reinigen.
• Bestimmte Verpackungsmaterialien können
Geräusche verursachen. >>> Geruchsneutrale
Halterungen und Verpackungen verwenden.
• Lebensmittel wurde in offenen Behältern in
den Kühlschrank gestellt. >>> Lebensmittel in
sicher abgedichteten Behältern aufbewahren.
Andernfalls können sich Mikroorganismen
ausbreiten und unangenehme Gerüche
verursachen. Jegliche abgelaufenen oder
verdorbenen Lebensmittel aus dem Gerät
entfernen.
Die Tür lässt sich nicht schließen.
• Lebensmittelverpackungen blockieren die
Tür. >>> Inhalt so platzieren, dass die Tür nicht
blockiert wird.
• Das Gerät steht nicht vollständig aufrecht
auf dem Boden. >>> Füße zum Ausgleichen des
Gerätes anpassen.
• Der Boden ist nicht eben oder stabil. >>>
Darauf achten, dass der Untergrund eben und
ausreichend stabil ist, das Gerät zu tragen.
Das Gemüsefach klemmt.
• Die Lebensmittel berühren den oberen
Bereich der Schublade. >>> Lebensmittel in der
Schublade neu anordnen.
Wenn Die Produktoberfläche Heiss Ist.
• Die Bereiche zwischen den beiden Türen, an
den Seitenflächen und hinten am Grill können im
Betrieb sehr heiß werden. Dies ist völlig normal
und weist nicht auf eine Fehlfunktion hin.Seien Sie
sehr vorsichtig, wenn Sie diese Bereiche berühren.
WARNUNG: Falls sich das
Problem nicht durch Befolgen der
A
Anweisungen in diesem Abschnitt
beheben lässt, wenden Sie sich an
Ihren Händler oder ein autorisiertes
Kundencenter. Versuchen Sie nicht,
das Produkt zu reparieren.
32 / 32 DE
Kühlschrank/ Bedienungsanleitung
Page 65

Frigorifero
Manuale utente
EWWERQWEW
İT
Page 66

Gentile cliente,
ci piacerebbe che lei potesse raggiungere un livello di efficacia ottimale dal nostro prodotto, che è stato
realizzato in una struttura moderna, adottando controlli meticolosi a livello qualitativo.
A tal fine la invitiamo a leggere con attenzione il manuale dell'utente prima di iniziare a servirsi del
dispositivo. La invitiamo altresì a conservare il presente manuale per poterlo consultare in futuro.Qualora
dovesse cedere il prodotto a terzi, consigliamo di accludere il presente manuale.
Il manuale dell’utente garantisce un utilizzo veloce e sicuro dell’apparecchiatura.
• Consigliamo di leggere il manuale dell’utente prima di installare e mettere in funzione
l’apparecchiatura.
• Rispettare sempre le istruzioni di sicurezza.
• Consigliamo di tenere la guida dell’utente a portata di mano per poterla consultare in futuro.
• La invitiamo a leggere gli altri eventuali documenti forniti con l’apparecchiatura
Ricordi che questo manuale può riferirsi a diversi modelli. Il manuale indica chiaramente le eventuali
variazioni da un modello all'altro.
Simboli e note
Nel manuale sono utilizzati i seguenti simboli:
Informazioni importanti e consigli
C
utili.
Rischio di vita e proprietà.
A
B
Rischio di scosse elettriche.
L’imballaggio del prodotto è fatto
di materiali riciclabili, in conformità
con la Normativa Ambientale
Nazionale.
Page 67

1. Istruzioni relative a sicurezza e
ambiente 2
2 Il vostro frigorifero 5
2 Il vostro frigorifero 6
3 Installazione 7
3.1 Posizione adeguata per l’installazione. . . . . 7
3.2 Installazione dei cunei in plastica . . . . . . . . 7
3.3* Regolazione dei piedini . . . . . . . . . . . . . . 7
3.4 Collegamento elettrico. . . . . . . . . . . . . . . . 9
4 Preparazione 10
4.1 Suggerimenti per risparmiare energia . . 10
4.2 Consigli sullo scomparto alimenti freschi 10
4.3 Uso iniziale. . . . . . . . . . . . . . . . . . . . . . 11
5 Funzionamento del prodotto 12
5.1 Pannello indicatore . . . . . . . . . . . . . . . . . 12
5.2 Pannello indicatore . . . . . . . . . . . . . . . . 17
5.3 Congelamento di alimenti freschi . . . . . . . 20
5.4 Consigli per il consolidamento di alimenti
congelati . . . . . . . . . . . . . . . . . . . . . . . 20
5.5 Informazioni Deep-freeze. . . . . . . . . . . . . 20
5.6 Posizionamento degli alimenti . . . . . . . . . 21
5.7 Avvertenza apertura porta . . . . . . . . . . . . 21
5.8 Scomparto del congelatore . . . . . . . . . . . 21
5.9 Scomparto verdura . . . . . . . . . . . . . . . . . 21
5.10 Scomparto verdura, con umidità controllata 21
(Ripiani alimenti freschi) . . . . . . . . . . . . . . . . 21
5.11 Vassoio portauova. . . . . . . . . . . . . . . . . 22
5.12 Sezione centrale mobile . . . . . . . . . . . . 22
5.13 Scomparto di conservazione con controllo del
freddo . . . . . . . . . . . . . . . . . . . . . . . . 22
5.14 Luce blu. . . . . . . . . . . . . . . . . . . . . . . . 23
5.15 Filtro odori . . . . . . . . . . . . . . . . . . . . . . 23
5.16 Vano cantina. . . . . . . . . . . . . . . . . . . . . 23
5.17 Uso del distributore d’acqua interno. . . . 25
5.18 Erogazione di acqua . . . . . . . . . . . . . . . 25
5.19 Per usare il distributore dell'acqua . . . . . 25
5.20 Icematic e contenitore per conservare il
ghiaccio. . . . . . . . . . . . . . . . . . . . . . . . 26
5.21 Icematic . . . . . . . . . . . . . . . . . . . . . . . 26
6. Pulizia e manutenzione 27
7. Risoluzione dei problemi 28
1 /29 İT
Frigorifero / Manuale dell’utente
Page 68

1. Istruzioni relative a sicurezza e ambiente
Questa sezione fornisce le istruzioni di
sicurezza necessarie per evitare il rischio di
lesioni e danni materiali. Il mancato rispetto
di queste istruzioni invalida tutti i tipi di
garanzia esistenti sul prodotto.
Uso previsto
AVVERTENZA:
Assicurarsi che i fori di
ventilazione non siano chiusi
quando il dispositivo è nella
sua custodia o quando
lo si inserisce nel suo
alloggiamento.
AVVERTENZA:
Non utilizzare alcun dispositivo
meccanico o altri dispositivi
per accelerare il processo di
sbrinamento e seguire solo i
consigli del fabbricante.
A
AVVERTENZA:
Non danneggiare il circuito del
liquido refrigerante.
AVVERTENZA: Non utilizzare
apparecchi elettrici non
consigliati dal fabbricante
all’interno dei vani per la
conservazione degli alimenti.
AVVERTENZA: Non
conservare sostanze
esplosive come aerosol con
gas propellenti infiammabili
nell’apparecchio.
Questo apparecchio é stato progettato per
applicazioni domestiche e per la seguenti
applicazioni similari:
- Per essere utilizzato nelle cucine
del personale di negozi, uffici e altri luoghi
di lavoro;
- Per essere utilizzato dai clienti
negli alberghi e nelle case di campagna,
motel e altri luoghi di alloggio.
- in ambienti tipo pensioni
- in luoghi simili che non offrano
servizi di ristorazione e non siano di
vendita al dettaglio.
1.1 Norme di sicurezza generali
• Questo prodotto non dovrebbe essere
usato da persone con disabilità a livello
fisico, sensoriale e mentale, da persone
senza un quantitativo sufficiente
di conoscenze ed esperienza e da
bambini. Queste persone potranno
usare il dispositivo unicamente sotto
la supervisione e le istruzioni di
una persona responsabile della loro
sicurezza. Ai bambini non dovrebbe
essere consentito di giocare con questo
dispositivo.
• In caso di malfunzionamento,
scollegare il dispositivo.
• Dopo aver scollegato il dispositivo,
attendere almeno cinque minuti prima
di collegarlo nuovamente. Scollegare
il prodotto se non viene usato. Non
toccare la presa con le mani umide!
Non tirare il cavo per eseguire lo
scollegamento; prenderlo sempre per
la spina.
• Non collegare il frigorifero se la presa
sembra essere allentata.
• Scollegare il prodotto in fase di
installazione, manutenzione, pulizia e
riparazione.
• Qualora si preveda di non utilizzare
il prodotto per un po’ di tempo,
scollegarlo ed estrarre gli eventuali
elementi contenuti al suo interno.
• Non usare vapore o materiali detergenti
a base di vapore per la pulizia del
frigorifero e per lo scioglimento del
ghiaccio al suo interno. Il vapore
potrebbe entrare in contatto con le
aree sotto tensione elettrica e causare
cortocircuiti o scosse elettriche!
• Non lavare il prodotto spruzzando o
versando acqua sullo stesso! Pericolo
di scossa elettrica!
• Non usare mai il prodotto se la sezione
che si trova sulla parte superiore
2 / 29 İT
Frigorifero / Manuale dell’utente
Page 69

Istruzioni importanti relativamente alla sicurezza e all’ambiente
o posteriore del prodotto, con le
schede dei circuiti elettronici stampati
all’interno, è aperta (coprire schede dei
circuiti elettronici stampati) (1).
1
1
• In caso di malfunzionamento, non usare
il prodotto, dato che potrebbe emettere
scosse elettriche. Contattare il servizio
autorizzato prima di intervenire.
• Collegare il prodotto a una presa che
disponga di messa a terra. L’operazione
di messa a terra deve essere eseguita
da un elettricista qualificato.
• Qualora il prodotto disponga di
un’illuminazione a LED, contattare
l’assistenza autorizzata per la
sostituzione.
• Non toccare alimenti congelati con le
mani bagnate! Gli alimenti si potrebbero
attaccare alle mani!
• Non posizionare liquidi in bottiglie
o lattine all’interno dello scomparto
congelatore. Potrebbero esplodere!
• Collocare i liquidi in posizione verticale
dopo aver saldamente chiuso il tappo.
• Non spruzzare sostanze infiammabili
vicino al prodotto.Potrebbero bruciare o
esplodere!
• Non conservare materiali e prodotti
infiammabili, come ad esempio spray,
all’interno del frigorifero.
• Non collocare contenitori di liquidi sopra
al prodotto. Gli spruzzi su parti sotto
tensione potrebbero provocare scosse
elettriche e rischio di incendio.
3 /29 İT
• L’esposizione del prodotto a pioggia,
neve, sole e vento potrebbe causare
pericoli a livello elettrico. Qualora sia
necessario spostare il prodotto, non
tirarlo per la maniglia della porta. La
maniglia si potrebbe staccare.
• Evitare che parti delle mani o del corpo
restino impigliate nei meccanismi
mobili all’interno del prodotto.
• Non calpestare o appoggiarsi a
porta, cassetti e altre componenti del
frigorifero. Cosi facendo il prodotto
potrebbe cadere e si potrebbe
danneggiare.
• Fare attenzione a non bloccare il cavo
di alimentazione.
1.1.1 Avvertenza HC
Qualora il prodotto sia dotato di sistema di
raffreddamento che utilizza il gas R600a,
fare attenzione ad evitare di danneggiare
il sistema di raffreddamento e il relativo
tubo in fase di utilizzo e spostamento
del prodotto. Questo gas è infiammabile.
Se viene danneggiato il sistema di
raffreddamento, tenere il pr
odotto lontano da fonti di calore e
provvedere immediatamente ad arieggiare
la stanza.
Sul lato sinistro interno
è indicato il tipo di gas
C
utilizzato nel prodotto.
1.1.2 Per i modelli con
la fontana d'acqua
• La pressione di ingresso dell’acqua
fredda dovrebbe essere al massimo
90 psi (620 kPa). Qualora la pressione
dell’acqua superi il valore 80 psi (550
kPa), utilizzare una valvola di limitazione
della pressione nel sistema principale.
Frigorifero / Manuale dell’utente
Page 70

Istruzioni importanti relativamente alla sicurezza e all'ambiente
Qualora non si sappia come verificare
la pressione dell’acqua, chiedere aiuto
a ad un idraulico professionista.
• In caso di rischio dell’effetto ‘colpo
d’ariete’ nel proprio impianto, usare la
strumentazione adatta per ridurre la
probabilità di accadimento. Rivolgersi a
idraulici professionisti in caso di dubbio
relativamente alla presenza o meno
dell’effetto ‘colpo d’ariete’ nel proprio
impianto.
• Non installare l’ingresso dell’acqua
calda. Prendere precauzioni contro
il rischio di congelamento dei tubi.
La gamma di funzionamento della
temperatura dell’acqua dovrebbe
essere 33°F (0.6°C) come minimo e
100°F (38°C) al massimo.
• Utilizzare solo acqua potabile.
1.2 Impiego conforme
allo scopo previsto
• Questo prodotto è stato pensato per
essere utilizzato in ambito domestico.
Non è stato pensato per un uso di tipo
commerciale.
• Il prodotto dovrebbe essere utilizzato
unicamente per la conservazione di
alimenti e bevande.
• Non tenere prodotti dedicati, che
richiedano temperature controllate,
quali ad esempio vaccini, farmaci
sensibili al calore, all’interno del
frigorifero.
• Il produttore non si assume nessuna
responsabilità per gli eventuali danni
causati da un cattivo utilizzo o da un
uso scorretto.
• I pezzi di ricambio originali verranno
forniti per 10 anni, successivamente
alla data di acquisto del prodotto.
• Non permettere ai bambini di giocare
con il prodotto.
• Qualora la porta del prodotto
comprenda un lucchetto, tenere la
chiave fuori dalla portata dei bambini.
1.4 Conformità con la Direttiva WEEE
e smaltimento dei prodotti di scarico
Questo prodotto è conforme alla direttiva
WEEE dell’UE (2012/19/EU). Questo prodotto è
dotato di un simbolo di classificazione per i prodotti
elettrici ed elettronici di scarto (WEEE).
Il prodotto è stato realizzato con
componenti e materiali di alta qualità
che possono essere riutilizzati oltre
che riciclati. Non smaltire il prodotto
con i normali rifiuti domestici e altri
rifiuti al termine del suo ciclo di vita
utile. Portare il prodotto a un centro di
raccolta per il riciclaggio della strumentazione
elettrica ed elettronica. Consigliamo di rivolgersi
alle autorità locali per ulteriori informazioni su
questi centri di raccolta.
1.5 Conformità con la direttiva RoHS
• Questo prodotto è conforme alla direttiva WEEE
dell’UE (2011/65/EU). Non contiene materiali
dannosi e proibiti, indicati nella Direttiva.
1.6 Informazioni sull'imballaggio
• I materiali che compongono l’i imballo del
prodotto sono realizzati a partire da materiali
riciclabili in conformità con le Normative
Ambientali Nazionali. Non smaltire i materiali
dell’im imballo congiuntamente ai rifiuti
domestici o ad altri rifiuti. Portarli presso i punti
di raccolta imballaggi indicati dalle autorità
locali.
1.3 Sicurezza bambini
• Tenere gli imballaggi fuori dalla portata
dei bambini.
4 / 29 İT
Frigorifero / Manuale dell’utente
Page 71

2 Il vostro frigorifero
1
*2
5
10
*8
4
5
7
9
11
*3
6
1- Pannello di controllo e indicatori
2- Sezione burro e formaggio
3- Ripiano porta mobile, 70 mm
4- Ripiano in vetro, scomparto del frigorifero
5- Scomparto verdura, scomparto del frigorifero
6- Ripiano della porta, gallone
I dati contenuti nel presente manuale dell’utente sono schematici, che potrebbero non corrispondere
alla perfezione al prodotto. Qualora le parti indicate non siano incluse nel prodotto da lei acquistato,
C
significa che sono valide per altri modelli.
7- Scomparto di raffreddamento
8- Cassetto del congelatore
9- Ripiano in vetro dello scomparto multizona/
raffreddatore
10- Cassetti dello scomparto congelatore
11- Cassetto dello scomparto multi-zona
* OPZIONALE
5 /29 İT
Frigorifero / Manuale dell’utente
Page 72

2 Il vostro frigorifero
1
4
5
*8
10
5
7
9
*2
*3
6
1- Pannello di controllo e indicatori
2- Sezione burro e formaggio
3- Ripiano porta mobile, 70 mm
4- Ripiano in vetro, scomparto del frigorifero
5- Scomparto verdura, scomparto del frigorifero
6- Ripiano della porta, gallone
I dati contenuti nel presente manuale dell’utente sono schematici, che potrebbero non corrispondere
alla perfezione al prodotto. Qualora le parti indicate non siano incluse nel prodotto da lei acquistato,
C
significa che sono valide per altri modelli.
7- Scomparto di raffreddamento
8- Cassetto del congelatore
9- Ripiano in vetro dello scomparto multizona/
raffreddatore
10- Cassetti dello scomparto congelatore
* OPZIONALE
6 / 29 İT
Frigorifero / Manuale dell’utente
Page 73

3 Installazione
3.1 Posizione adeguata per
l’installazione
Contattare l’Assistenza autorizzata per procedere
all’installazione del prodotto. Per preparare il
prodotto per l’uso rimandiamo alle informazioni nel
manuale dell’utente; inoltre, verificare che tutti gli
impianti, elettrici e idrici, siano adeguati. In caso
contrario, consigliamo di rivolgersi a un elettricista
e a un tecnico qualificati per l'esecuzione degli
eventuali interventi necessari.
AVVERTENZA: Il produttore non verrà
ritenuto responsabile degli eventuali danni
B
B
A
che potrebbero derivare da procedure
eseguite da persone non autorizzate.
AVVERTENZA: Il prodotto non deve
essere collegato alla presa di corrente in
fase di installazione. In caso contrario, si
potrebbe correre il rischio di morte o grave
lesione!
AVVERTENZA: : Qualora lo spazio
di apertura della porta della stanza
in cui verrà installato il prodotto sia
tanto stretto da impedire il passaggio
dell’elettrodomestico, togliere la porta
della stanza e far passare il prodotto
girandolo di lato; qualora questa opzione
non sia percorribile, contattare il servizio
autorizzato.
3.2 Installazione dei cunei in plastica
I cunei in plastica forniti in dotazione col prodotto
vengono usati per creare la distanza che consenta
la circolazione dell’aria fra il prodotto e la parete
posteriore.
1.
Per fissare i cunei, togliere le viti sul prodotto e
usare le viti fornite in dotazione con i cunei.
2.
Inserire i due cunei in plastica sulla copertura di
ventilazione posteriore, come indicato nell'immagine.
•Collocareilprodottosuunasuperficieinpiano
per evitare scosse.
•Lasciareunadistanzadialmeno30cmdafonti
di calore come piani cottura, forni, radiatori e
fornelli e una distanza di almeno 5 cm da forni
elettrici.
•Ilprodottonondeveessereespostodirettamente
alla luce solare o conservato in luoghi umidi.
•Garantireunaventilazioneadeguatanelle
immediate vicinanze del prodotto al fine di
garantirne il corretto funzionamento. Qualora il
prodotto debba essere posizionato in un incasso
nella parete, si prega di lasciare almeno 5 cm di
distanza dal soffitto e dalle pareti laterali.
•Noninstallareilprodottoincuilatemperatura
scende al di sotto dei -5°C.
7 /29 İT
3.3* Regolazione dei piedini
Se il prodotto non è in equilibrio successivamente
all’installazione, regolare i piedini sulla parte
anteriore ruotandoli verso destra o verso sinistra.
* Se il prodotto non ha uno scomparto per il vino
o non ha uno sportello di vetro, esso non ha i
supporti regolabili ma fissi.
Frigorifero / Manuale dell’utente
Page 74

Installazione
Per regolare le porte in verticale,
Allentare il dado di fissaggio che si trova sulla
parte inferiore.
Ruotare il dado di regolazione conformemente alla
posizione della porta (in senso orario/anti-orario).
Serrare il dado di fissaggio per regolare la
posizione.
Per regolare le porte in orizzontale,
Allentare il dado di fissaggio che si trova sulla
parte superiore.
Ruotare il dado di regolazione laterale a seconda
della posizione della porta (senso orario/antiorario).
Serrare il dado di fissaggio che si trova sulla parte
superiore per fissare la posizione.
8 / 29 İT
adjusting nut
fixing nut
fixing nut
adjusting nut
Frigorifero / Manuale dell’utente
Page 75

Installazione
-Il gruppo cerniera superiore è fissato con 3 viti.
-Il copri-cerniera viene fissato dopo aver installato
le prese.
-Quindi, il copri-cerniera viene fissato con due viti.
3.4 Collegamento elettrico
AVVERTENZA: Non eseguire
collegamenti tramite prolunghe o multi-
A
B
C
• La nostra azienda non sarà responsabile di
• Il cavo di corrente deve essere a portata dopo
• Non inserire altri elementi quali ad esempio
prese.
AVVERTENZA: I cavi di alimentazione
danneggiati vanno sostituiti dagli Agenti di
Servizio Autorizzati.
Qualora debbano essere installati due
dispositivi di raffreddamento fianco a
fianco, lasciare una distanza di almeno 4
cm fra di loro.
eventuali danni che deriveranno dall'uso del
prodotto senza messa a terra e collegamenti
elettrici in conformità con le normative locali.
l'installazione.
prolunghe o ciabatte multi-presa fra il
dispositivo e la presa di corrente a parete.
9 /29 İT
Frigorifero / Manuale dell’utente
Page 76

4 Preparazione
4.1 Suggerimenti per
risparmiare energia
Collegare il proprio frigorifero a sistemi per
il risparmio dell’energia è pericoloso, in
A
• Non lasciare aperte le porte del frigorifero per
• Non mettere alimenti o bevande calde
• Non sovraccaricare il frigorifero. La capacità di
• Non mettere il frigorifero in luoghi direttamente
• Prestare attenzione quando vengono conservati
• Per ottimizzare lo spazio di conservazione
• Il flusso dell’aria non dovrebbe essere bloccato
• Lo scongelamento di alimenti congelati
quanto potrebbero danneggiare il prodotto.
periodi di tempo troppo lunghi.
all’interno del frigorifero.
raffreddamento diminuisce se viene ostacolato
il ricircolo dell'aria all’interno del frigorifero.
sposti alla luce solare. Lasciare una distanza
di almeno 30 cm da fonti di calore come piani
cottura, forni, radiatori e fornelli e una distanza
di almeno 5 cm da forni elettrici.
alimenti nel frigorifero all’interno di contenitori
chiusi.
di cibo nello scomparto del congelatore del
frigorifero, è necessario rimuovere il cassetto
superiore e collocarlo sul ripiano in vetro
superiore. Il consumo di corrente indicato per
il frigorifero è stato determinato dopo aver tolto
la macchina del ghiaccio e i cassetti superiori
per consentire un livello di caricamento
massimo. Consigliamo caldamente di usare i
cassetti inferiori del congelatore e lo scomparto
multi-zona in fase di caricamento.
mettendo alimenti davanti al congelatore e
davanti alle ventole dello scomparto multizona. Gli alimenti vanno caricati lasciando uno
spazio minimo di 5 minuti davanti alla griglia
della ventola di protezione.
all’interno dello scomparto del frigorifero
consente sia di risparmiare energia che di
mantenere la qualità degli alimenti.
La temperatura della stanza in cui va
installato il frigorifero dovrebbe essere
C
C
C
indicativamente di
del frigorifero a temperature più basse
non è consigliato al fine di evitare cali
prestazionali.
L’interno del frigorifero va pulito
completamente.
Qualora debbano essere installati due
dispositivi di raffreddamento fianco a
fianco, lasciare una distanza di almeno 4
cm fra di loro.
10ºC /50°F. L’uso
4.2 Consigli sullo scomparto
alimenti freschi
• Verificare che gli alimenti non tocchino il
sensore della temperatura nello scomparto
alimenti freschi. Per fare in modo che lo
scomparto alimenti freschi mantenga la
temperatura di conservazione ideale, il sensore
non deve essere ostacolato dalla presenza di
cibi.
• Non mettere alimenti o bevande calde
all’interno del prodotto.
10 / 29 İT
Frigorifero / Manuale dell’utente
Page 77

Procedimento
4.3 Uso iniziale
Prima di iniziare a usare il dispositivo, verificare
che tutti i preparativi siano stati fatti in conformità
con le istruzioni fornite nei capitoli “Istruzioni
importanti relativamente alla sicurezza e
all'ambiente” e “Installazione”.
• Pulire l’interno del frigorifero conformemente a
quanto consigliato nella sezione “Manutenzione
e pulizia”. Prima di accendere il frigorifero,
verificare che l’interno sia asciutto.
• Collegare il frigorifero a una presa dotata
di messa a terra. L’illuminazione interna si
accende all’apertura della porta del frigorifero.
• Lasciare in funzione il frigorifero per 6 ore
senza collocare alimenti al suo interno, e
non aprire la porta a meno che ciò non sia
strettamente necessario.
Si sentirà un rumore quando si avvia il
compressore. I liquidi e i gas all’interno
C
C
del sistema di refrigerazione potrebbero
creare rumori, anche se il compressore
non funziona; non si tratta di un’anomalia
di funzionamento.
Le estremità anteriori del frigorifero
potrebbero surriscaldarsi. Non si tratta di
un'anomalia di funzionamento. Queste aree
sono state progettate per essere calde ed
evitare la condensa.
11 /29 İT
Frigorifero / Manuale dell’utente
Page 78

5 Funzionamento del prodotto
5.1 Pannello indicatore
Il pannello indicatore controllato da touch consente di impostare la temperatura oltre che di controllare
le altre funzioni legate al frigorifero senza aprire la porta del prodotto. Sarà sufficiente premere i pulsanti
giusti per le impostazioni della funzione.
2 3
1
33
32
31
30
Select
3 “
27
28
29
4
*34.1
5 6
*34.2
7
*8
9
10 11
Quick FreezeQuick Cool
3 “
FN
OK
20
19
1718
Quick FreezeQuick Cool
3 “
12
13
14
15
16
C
FN
Select
3 “
26
*25
24
23
22
21
OK
I dati contenuti nel presente manuale dell’utente sono schematici, che potrebbero non corrispondere
alla perfezione al prodotto. Qualora le parti indicate non siano incluse nel prodotto da lei acquistato,
significa che sono valide per altri modelli.
12 / 29 İT
Frigorifero / Manuale dell’utente
Page 79

Funzionamento del prodotto
1. Indicatore funzione raffreddamento rapido
Si attiva quando viene attivata la funzione di
raffreddamento rapido.
2. Indicatore della temperatura dello
scomparto frigorifero
Viene visualizzata la temperatura dello
scomparto frigorifero; può essere impostata su
8,7,6,5,4,3,2,1.
3. Indicatore Fahrenheit
Si tratta di un indicatore Fahrenheit. Quando
l’indicazione Fahrenheit viene attivata, i valori
di temperatura impostati vengono visualizzati in
Fahrenheit e l’icona pertinente di accende.
4. Blocco tasto
Premere contemporaneamente il blocco tasti per 3
secondi. Il simbolo blocco tasti
si accende e la modalità blocco tasti viene attivata.
I pulsanti non funzionano se la modalità blocco
tasti è arriva. Premere nuovamente, e contemporaneamente, il pulsante di blocco per 3 secondi.
Il simbolo di blocco si disattiva e si esce dalla
modalità blocco tasti.
Premere il pulsante di blocco tasti qualora si
desideri impedire la variazione dell’impostazione di
temperatura del frigorifero.
5. Guasto alimentazione / Temperatura eleva-
ta / Avvertenza errore
Questo indicatore si illumina durante il guasto
di corrente, durante i guasti temperatura elevata e durante le avvertenze di errore. Durante i
guasti di temperatura a lungo termine, il valore
di temperatura più alto che lo scomparto congelatore raggiunge lampeggia sul display digitale.
Dopo aver controllato gli alimenti nello scomparto
congelatore, premere il pulsante allarme off per
eliminare l'avvertenza.
Rimandiamo alla sezione “Soluzioni consigliate per
la risoluzione dei problemi” del proprio manuale
qualora si noti che questo indicatore è illuminato.
6. Icona di reset filtro
Questa icona si accende quando è necessario
procedere al reset del filtro.
7. Icona cabina cambio temperatura
Indica la cabina la cui temperatura deve essere
modificata. Quando l’icona cabina cambio temperatura inizia a lampeggiare, si capisce che è stata
selezionata la cabina pertinente.
8. Icona congelatore Joker
Passare sull’icona congelatore Joker usando il pulsante
FN; l’icona inizia a lampeggiare. Quando viene premuto
il tasto OK, l’icona congelatore cabina joker si accende e
il dispositivo funziona come congelatore.
9. Indicatore della temperatura dello
scomparto congelatore
Viene visualizzata la temperatura dello scomparto
del frigorifero; può essere impostata su -18, -19,
-20, -21, -22, -23, -24.
10. Indicatore funzione congelamento rapido
Si attiva quando viene attivata la funzione di
congelamento rapido.
11. Indicatore Fahrenheit
Si tratta di un indicatore Fahrenheit. Quando
l’indicazione Fahrenheit viene attivata, i valori
di temperatura impostati vengono visualizzati in
Fahrenheit e l’icona pertinente di accende.
12. Pulsante funzione congelamento rapido
Premere questo pulsante per arrivare o disattivare
la funzione di congelamento rapido. Quando viene
attivata la funzione, lo scomparto congelatore
viene raffreddato fino a una temperatura inferiore
rispetto al valore impostato.
Usare la funzione di congelamento
rapido quando si desidera congelare
C
C
rapidamente gli alimenti collocati
nello scomparto del congelatore. Se si
desidera congelare grandi quantitativi
di cibo fresco, attivare questa funzione
prima di mettere gli alimenti all’interno
del prodotto.
Qualora non venga annullata, la
funzione di Congelamento rapido si
annulla automaticamente dopo 4 ore
al massimo o quando lo scomparto
frigorifero raggiunge la temperatura
richiesta.
13 /29 İT
Frigorifero / Manuale dell’utente
Page 80

Funzionamento del prodotto
Questa funzione non viene richiamata
C
13. Reset filtro
Il filtro viene resettato quando il pulsante di
congelamento rapido viene premuto per 3 secondi.
L’icona di reset filtro si spegne.
14. Pulsante FN
Usando questo tasto sarà possibile alternare fra
le diverse funzioni che si desidera selezionare.
Premendo questo tasto, l’icona, che richiede
l’attivazione o la disattivazione della funzione, inizia
a lampeggiare. Il pulsante FN si disattiva se non
viene premuto per 20 secondi. Sarà necessario
premere questo pulsante per modificare
nuovamente le funzioni.
15. Indicatore Celsius
Si tratta di un indicatore Celsius. Quando
l’indicazione Celsius viene attivata, i valori di
temperatura impostati vengono visualizzati in
Celsius Fahrenheit e l’icona pertinente di accende.
16. Pulsante OK
Dopo essersi spostati fra le funzioni usando il
pulsante FN, quando la funzione viene annullata
tramite il pulsante OK, l’icona pertinente e
l’indicatore lampeggia. Quando la funzione viene
attivata, rimane accesa. L’indicatore continua a
lampeggiare per indicare che l’icona è attiva.
17. Icona cabina cambio temperatura
Indica la cabina la cui temperatura deve essere
modificata. Quando l’icona cabina cambio temperatura inizia a lampeggiare, si capisce che è stata
selezionata la cabina pertinente.
18. Icona cabina cambio temperatura
Indica la cabina la cui temperatura deve essere
modificata. Quando l’icona cabina cambio temperatura inizia a lampeggiare, si capisce che è stata
selezionata la cabina pertinente.
quando la corrente viene ripristinata in
seguito a un black-out.
19. Pulsante di impostazione “aumento”
Selezionare la cabina pertinente col pulsante di
selezione; l’icona della cabina che rappresenta la
cabina pertinente inizia a lampeggiare. Premendo
questo pulsante “aumento” durante il processo, il
valore impostato aumenta. Se si continua a premerlo, il valore impostato torna al valore iniziale.
20. Icona cabina cambio temperatura
Indica la cabina la cui temperatura deve essere
modificata. Quando l’icona cabina cambio temperatura inizia a lampeggiare, si capisce che è stata
selezionata la cabina pertinente.
21. Impostazione dell’indicatore Celsius e
Fahrenheit
Passare sopra a questo tasto col tasto FN e
selezionare Fahrenheit e Celsius tramite il tasto
OK. Quando viene selezionato il tipo di temperatura
pertinente, l’indicatore Fahrenheit e Celsius si
attiva.
22. Icona macchina del ghiaccio spenta
Premere il pulsante FN (fino a che non raggiunge
l’icona e la riga inferiore) per spegnere la
macchina del ghiaccio. L’icona della macchina del
ghiaccio e l’indicatore funzione della macchina
del ghiaccio inizia a lampeggiare quando ci si
passa sopra; sarà quindi possibile capire se la
macchina del ghiaccio è accesa o spenta. Quando
viene premuto il tasto OK, l’icona della macchina
del ghiaccio lampeggia in modalità continua a
l’indicatore continua a lampeggiare durante questo
processo. Se non viene premuto nessun pulsante
per 20 secondi, l’icona e l’indicatore restano
accesi. La macchina del ghiaccio viene quindi
spenta. Per accendere nuovamente la macchina
del ghiaccio, passare sull’icona e sull’indicatore;
in questo modo sia l’icona macchina del ghiaccio
spenta e l’indicatore iniziano a lampeggiare. Se
non viene premuto nessun pulsante entro 20
secondi, l’icona e l’indicatore si spengono, e
quindi la macchina del ghiaccio viene nuovamente
accesa.
14 / 29 İT
C
Indica se la macchina del ghiaccio
è accesa o spenta.
Frigorifero / Manuale dell’utente
Page 81

Funzionamento del prodotto
Il flusso dell'acqua dal serbatoio
C
23. Icona funzione Eco fuzzy
Premere il tasto FN (fino a che non raggiunge
l’icona della lettera E e la riga inferiore) per
attivare la funzione eco fuzzy. Quando si passa
sull’icona eco fuzzy e sull’indicatore funzione eco
fuzzy, iniziano a lampeggiare. Sarà così possibile
capire quando la funzione eco fuzzy è attivata
o disattivata. Quando viene premuto il tasto
OK, l’icona della funzione eco fuzzy lampeggia
in modalità continua a l’indicatore continua a
lampeggiare durante questo processo. Se non
viene premuto nessun pulsante per 20 secondi,
l’icona e l’indicatore restano accesi. La funzione
eco fuzzy è quindi attivata. Per annullare la
funzione eco fuzzy, passare nuovamente sull’icona
e sull’indicatore e premere il tasto OK. Quindi, sia
l’icona funzione eco fuzzy che l’indicatore iniziano
a lampeggiare. Se non viene premuto nessun
pulsante entro 20 secondi, l’icona e l’indicatore
si spengono, e quindi la funzione eco fuzzy viene
disattivata.
24. Icona funzione vacanza
Premere il tasto FN (fino a che non raggiunge
l’icona dell’ombrello e la riga inferiore) per
attivare la funzione vacanza. Quando si passa
sull’icona funzione vacanza e sull’indicatore
funzione vacanza, iniziano a lampeggiare. Sarà
così possibile capire quando la funzione vacanza
è attivata o disattivata. Quando viene premuto
il tasto OK, le spie dell’icona funzione vacanza
sono sempre accese, il che significa che la
funzione vacanza è attivata. L’indicatore continua a
lampeggiare durante questo processo. Premere il
tasto OK per annullare la funzione vacanza. Quindi
sia l’icona funzione vacanza e il relativo indicatore
inizieranno a lampeggiare e la funzione vacanza
verrà annullata.
dell’acqua si interrompe quando
viene selezionata questa funzione.
Sarà tuttavia possibile estrarre il
ghiaccio prodotto in precedenza
dalla macchina del ghiaccio.
25. Icona frigorifero Joker
Quando viene selezionata l’icona frigorifero Joker
usando il pulsante FN e quando viene premuto
il tasto OK, la cabina Joker si trasforma in una
cabina frigorifero e funziona come un frigorifero.
26. Indicatore Celsius
Si tratta di un indicatore Celsius. Quando
l’indicazione Celsius viene attivata, i valori di
temperatura impostati vengono visualizzati in
Celsius Fahrenheit e l’icona pertinente di accende.
27. Pulsante di impostazione “diminuzione”
Selezionare la cabina pertinente col pulsante di
selezione; l’icona della cabina che rappresenta la
cabina pertinente inizia a lampeggiare. Premendo
questo pulsante “diminuzione” durante il processo,
il valore impostato diminuisce. Se si continua
a premerlo, il valore impostato torna al valore
iniziale.
28. Icona cabina cambio temperatura
Indica la cabina la cui temperatura deve essere
modificata. Quando l’icona cabina cambio temperatura inizia a lampeggiare, si capisce che è stata
selezionata la cabina pertinente.
29. Icona cabina cambio temperatura
Indica la cabina la cui temperatura deve essere
modificata. Quando l’icona cabina cambio temperatura inizia a lampeggiare, si capisce che è stata
selezionata la cabina pertinente.
30. Blocco tasto
Premere contemporaneamente il blocco tasti per 3
secondi. Il simbolo blocco tasti
si accende e la modalità blocco tasti viene attivata.
I pulsanti non funzionano se la modalità blocco
tasti è arriva. Premere nuovamente, e contemporaneamente, il pulsante di blocco per 3 secondi.
Il simbolo di blocco si disattiva e si esce dalla
modalità blocco tasti.
Premere il pulsante di blocco tasti qualora si
desideri impedire la variazione dell’impostazione di
temperatura del frigorifero.
15 /29 İT
Frigorifero / Manuale dell’utente
Page 82

Funzionamento del prodotto
31.Pulsante di selezione
Usare questo pulsante per selezionare la cabina
della quale si desidera modificare la temperatura.
Spostarsi fra le varie cabine premendo questo pulsante. Sarà possibile identificare le cabine selezionate grazie alle relative icone (7,17,18,20,28,29).
L’icona della cabina che lampeggia, della quale
si vuole modificare il valore, viene selezionata.
Sarà quindi possibile modificare il valore impostato premendo il pulsante di diminuzione valore
impostato cabina (27) e il pulsante di aumento
valore impostato cabina (19). Qualora non venga
premuto il pulsante di selezione per 20 secondi,
le icona della cabina si spengono. Sarà necessario
premere questo tasto per selezionare nuovamente
una cabina.
32. Avvertenza allarme spento
In caso di black-out / allarme temperatura elevata,
dopo aver controllato gli alimenti nello scomparto
congelatore, premere il pulsante allarme off per
eliminare l'avvertenza.
33. Pulsante funzione raffreddamento rapido
Questo pulsante ha due funzioni: per attivare o
disattivare la funzione di raffreddamento rapido,
premerlo per alcuni secondi. L’indicatore di
raffreddamento rapido si spegne e il prodotto torna
alle normali impostazioni.
Usare la funzione di raffreddamento
rapido quando si desidera raffreddare
C
C
rapidamente gli alimenti collocati
nello scomparto del frigorifero. Se si
desidera raffreddare grandi quantitativi
di cibo fresco, attivare questa funzione
prima di mettere gli alimenti all’interno
del prodotto.
Qualora non venga annullata, la
funzione di raffreddamento rapido si
annulla automaticamente dopo 8 ore
al massimo o quando lo scomparto
frigorifero raggiunge la temperatura
richiesta.
Se il pulsante di raffreddamento rapido
viene premuto ripetutamente, a brevi
C
C
34. 1 Indicatore temperatura Joker
Vengono visualizzati i valori di temperatura indicati
della cabina joker.
34. Indicatore della temperatura dello
scomparto raffreddamento vini
Vengono visualizzati i valori impostati della cabina
vini
intervalli di tempo, verrà attivata la
protezione elettronica del circuito
e il compressore non si avvierà
immediatamente.
Questa funzione non viene richiamata
quando la corrente viene ripristinata in
seguito a un black-out.
16 / 29 İT
Frigorifero / Manuale dell’utente
Page 83

Funzionamento del prodotto
5.2 Pannello indicatore
Il pannello indicatore controllato da touch consente di impostare la temperatura oltre che di controllare le
altre funzioni legate al dispositivo senza aprire la porta del frigorifero. Sarà sufficiente premere i pulsanti
giusti per le impostazioni della funzione.
17
18 19
2
1
5
3
4
6
7
*9
8
13
10
12
*11
16
15
14
25
26
1-Funzione accensione/spegnimento:
Premere il pulsante di accensione/spegnimento
per 3 secondi per spegnere o accendere il
frigorifero.
2. Pulsante funzione Quick Freeze
Premere questo pulsante per attivare o disattivare
la funzione Quick Freeze. Quando si attiva la
funzione, lo scomparto freezer viene raffreddato
a una temperatura inferiore rispetto a quella
impostata.
Usare la funzione Quick Freeze quando
si desidera congelare velocemente gli
C
C
C
C
alimenti posti nello scomparto freezer.
Se è necessario congelare grandi
quantità di cibo fresco, attivare questa
funzione prima di inserire il cibo nel
frigo.
Se non si annulla manualmente, la
funzione Quick Freeze si annullerà
automaticamente dopo 4 ore al
massimo o quando lo scomparto frigo
ha raggiunto la temperatura richiesta.
Questa funzione non viene richiamata
quando l'alimentazione si ripristina
dopo un'assenza di corrente.
I dati contenuti nel presente manuale dell’utente sono schematici, che potrebbero non corrispondere
alla perfezione al prodotto. Qualora le parti indicate non siano incluse nel prodotto da lei acquistato,
significa che sono valide per altri modelli.
24
21
22
23
*20
3.Pulsante Select
Utilizzare questo pulsante per selezionare
lo scomparto a cui si desidera modificare la
temperatura. Passa da uno scomparto all’altro
premendo questo pulsante. Lo scomparto
selezionato è identificabile mediante le icone
scomparto (6, 25, 24). Qualunque icona scomparto
sia accesa, viene selezionato lo scomparto il
cui valore di impostazione della temperatura si
desidera modificare. Quindi è possibile modificare
il valore di impostazione premendo il valore
di impostazione dello scomparto Pulsante di
regolazione della temperatura (4)
4.Regolazione della temperatura/Diminuzione
della temperatura
Se premuto, diminuisce la temperatura dello
scomparto selezionato.
5- Indicatore Quick Freeze
Questa icona si accende quando la funzione Quick
Freeze è attiva.
6. Indicatore scomparto frigo
Quando questo indicatore è attivo, la temperatura
dello scomparto frigo viene visualizzata
sull’indicatore di valore della temperatura. Lo
scomparto frigo può essere impostato su 8, 7, 6,
5, 4, 3, 2 o 1°C / 46, 45, 44, 43, 42, 41, 40, 39,
38, 37, 36, 35, 34 o 33°F premendo il Pulsante di
regolazione della temperatura (4).
17 /29 İT
Frigorifero / Manuale dell’utente
Page 84

Funzionamento del prodotto
7. Indicatore di valore della temperatura
Mostra il valore della temperatura dello scomparto
selezionato.
8. Indicatore Fahrenheit
È un indicatore Fahrenheit Quando viene attivata
l’indicazione Fahrenheit, i valori di impostazione
della temperatura sono indicati in Fahrenheit e la
relativa icona si accende.
9. Icona frigo jolly
Quando si seleziona l’icona frigo jolly utilizzando
il pulsante FN (16) e si preme il pulsante OK (17),
lo scomparto jolly diventa uno scomparto frigo e
opera come cooler.
10. Icona scomparto jolly
Mostra l’icona scomparto jolly.
11. Icona freezer jolly
Quando si seleziona l’icona freezer jolly utilizzando
il pulsante FN (16) e si preme il pulsante OK (17),
lo scomparto jolly diventa uno scomparto freezer e
opera come tale.
12. Avvertenza errore di alimentazione / alta
temperatura / errore
Questo indicatore si accende in caso di
problemi di alimentazione, di alta temperatura
e avvertenze di errore. Durante una prolungata
assenza di alimentazione, il valore della
temperatura più elevato che lo scomparto
freezer raggiunge lampeggia sul display digitale.
Dopo aver controllato gli alimenti che si trovano
nello scomparto freezer, premere il pulsante
di disattivazione allarme (19) per annullare
l'avvertenza.
13.Impostazione dell’indicatore Celsius e
Fahrenheit
Portare il cursore sopra questo tasto utilizzando il
tasto FN e selezionare Fahrenheit e Celsius tramite
il tasto OK. Quando viene selezionato il tipo di
temperatura pertinente, l’indicatore Fahrenheit e
Celsius si accende.
14. Icona funzione assenza
Premere il tasto FN (finché non raggiunge l’icona
ombrello) per attivare la funzione assenza. Quando
si porta il cursore sull’icona funzione assenza,
inizia a lampeggiare. Pertanto è possibile capire
18 / 29 İT
se la funzione assenza sarà attivata o disattivata.
Quando si preme il pulsante OK, l’indicatore di
funzione assenza si illumina con luce fissa e
pertanto si attiva la funzione assenza. Premere
il tasto OK per cancellare la funzione assenza.
Pertanto, l’indicatore funzione assenza inizierà a
lampeggiare e la funzione assenza sarà cancellata.
15. Indicatore funzione Quick Cool
Si accende quando la funzione Quick Fridge viene
attivata.
16. Pulsante FN
Utilizzando questo tasto, è possibile passare
tra le funzioni che si desidera selezionare.
Premendo questo tasto, l’indicatore dell’icona,
la cui funzione deve essere attivata o disattivata,
inizia a lampeggiare. Il pulsante FN si disattiva se
non viene premuto per 20 secondi. È necessario
premere questo pulsante per modificare
nuovamente le funzioni.
17. Pulsante OK
Dopo aver navigato tra le funzioni utilizzando
il pulsante FN, quando la funzione viene
cancellata mediante il pulsante OK, l’indicatore
pertinente lampeggia. Quando la funzione viene
disattivata, rimane accesa. L’indicatore continua a
lampeggiare per mostrare che l’icona è accesa.
18. Pulsante funzione Quick Cool
Questo pulsante ha due funzioni. Per attivare
o disattivare la funzione Quick Cool, premerlo
brevemente. L’indicatore Quick Cool si spegnerà
e l'apparecchio tornerà alle sue normali
impostazioni.
19. Avvertenza disattivazione allarme
In caso di allarme per assenza di alimentazione/
elevata temperatura, dopo aver controllato gli
alimenti che si trovano nello scomparto freezer,
premere il pulsante di disattivazione allarme per
annullare l’icona di avvertenza Alta temperatura
(12).
20. Reimpostazione filtro
Il filtro viene ripristinato quando il pulsante
disattivazione allarme (19) viene premuto per 3
secondi. L’icona reimpostazione filtro si spegne.
Frigorifero / Manuale dell’utente
Page 85

Funzionamento del prodotto
21. Icona funzione Eco Fuzzy
Premere il tasto FN (finché non raggiunge l’icona
lettera e) per attivare la funzione Eco Fuzzy.
Quando si porta il cursore sull’icona Eco Fuzzy,
inizia a lampeggiare. Pertanto è possibile capire
se la funzione Eco Fuzzy sarà attivata o disattivata.
Quando si preme il pulsante OK, l’icona funzione
Eco Fuzzy si illumina con luce fissa durante
questo processo. Se non si preme alcun tasto
dopo 20 secondi, l’icona rimane accesa. Pertanto,
la funzione Eco Fuzzy viene disattivata. Al fine
di cancellare la funzione Eco Fuzzy, portare il
cursore nuovamente sull’icona e premere il tasto
OK. Pertanto, l’icona funzione Eco Fuzzy inizierà a
lampeggiare. Se non si preme alcun pulsante entro
20 secondi, l’icona si spegnerà e la funzione Eco
Fuzzy sarà cancellata.
22. Icona off macchina del ghiaccio
Premere il tasto FN (finché non raggiunge
l’icona ghiaccio) per disattivare la macchina del
ghiaccio. L’icona off macchina del ghiaccio inizia
a lampeggiare quando vi si porta sopra il cursore,
pertanto è possibile capire se la macchina del
ghiaccio verrà attivata o disattivata. Quando
si preme il pulsante OK, l’icona macchina del
ghiaccio si illumina con luce fissa durante questo
processo. Se non si preme alcun tasto dopo
20 secondi, l’icona e l’indicatore rimangono
accesi. Pertanto, la macchina del ghiaccio
viene disattivata. Al fine di attivare nuovamente
la macchina del ghiaccio, portare il cursore
sull’icona. L’icona off macchina del ghiaccio
inizierà a lampeggiare. Se si preme il pulsante OK,
l’icona si spegnerà e pertanto la macchina del
ghiaccio sarà nuovamente attivata.
23. Icona reimpostazione filtro
Questa icona si accende quando il filtro deve
essere reimpostato.
24. Indicatore Celsius
È un indicatore Celsius. Quando viene attivata
l’indicazione Celsius, i valori di impostazione della
temperatura sono indicati in Celsius e la relativa
icona si accende.
25. Indicatore scomparto jolly
Quando questo indicatore è attivo, la temperatura
dello scomparto jolly viene visualizzata
sull’indicatore di valore della temperatura. I valori
di impostazione dello scomparto jolly cambiano
premendo il Pulsante di regolazione della
temperatura (4).
26. Indicatore scomparto freezer
Quando questo indicatore è attivo, la temperatura
dello scomparto freezer viene visualizzata
sull’indicatore di valore della temperatura. Lo
scomparto freezer può essere impostato su -18,
-19, -20, -21, -22, -23 and -24 °C /0, -2, -4,
-6, -8, -10 e -12°F premendo il Pulsante di
regolazione della temperatura (4).
C
C
Indica se Icematic è attivo o
disattivato.
Il flusso dell'acqua dal serbatoio
dell'acqua si arresta quando viene
selezionata questa funzione. Il
ghiaccio preparato in precedenza,
però, può essere prelevato da
Icematic.
19 /29 İT
Frigorifero / Manuale dell’utente
Page 86

Funzionamento del prodotto
Impostazione
dello
scomparto
congelatore
-18°C 4°C Questa è la normale impostazione consigliata.
-20, -22 o
-24°C
Congelamento
rapido
-18°C o
inferiore
5.3 Congelamento di alimenti freschi
• Al fine di mantenere la qualità degli alimenti,
congelarli quanto più rapidamente possibile
se vengono messi nello scomparto del
congelatore; usare a tal fine la funzione di
congelamento rapido.
• Sarà possibile conservare gli alimenti più a
lungo nello scomparto del congelatore quando
vengono congelati mentre sono freschi.
• Confezionare gli alimenti da congelare e
chiudere la confezione in modo tale da
impedire l’ingresso di aria.
• Verificare di confezionare gli alimenti prima
di metterli nel congelatore. Usare contenitori,
pellicole e carta anti-umidità, borse in
plastica e altri materiali da imballaggio adatti
per essere usati nel congelatore anziché la
normale carta da imballaggio.
• Etichettare gli alimento aggiungendo la data
prima di metterli all’interno del congelatore.
Così facendo sarà possibile riconoscere la
freschezza di ogni alimento all’apertura del
congelatore. Conservare gli alimenti congelati
più vecchi nella parte anteriore dello scomparto
per essere certi del fatto che vengano usati
prima.
• Gli alimenti surgelati vanno usati subito dopo
essere stati scongelati, non ricollocarli in
congelatore.
• Non congelare grandi quantità di alimenti in
una sola volta.
Impostazione
dello
scomparto
frigorifero
4°C
4°C
2°C
Consigli
Queste impostazioni sono consigliate quando la temperatura
ambiente supera i 30°C.
Usare quando si desidera congelare alimenti in modo rapido. Il
prodotto tornerà alla modalità precedente al termine del processo.
Servirsi di queste impostazioni qualora si ritenga che lo scomparto
frigorifero non sia abbastanza freddo, a causa dell'elevata
temperatura ambiente, o a causa di troppe aperture e chiusure della
porta.
5.4 Consigli per il consolidamento
di alimenti congelati
Lo scomparto verrà impostato come minimo su
-18°C.
1. Mettere le confezioni nel congelatore quanto
più rapidamente possibile dopo l’acquisto,
evitando che si scongelino.
2. Controllare che non siano state oltrepassate
le date "usare entro" e "da consumarsi
preferibilmente entro il" indicate sulla
confezione.
3. Verificare che la confezione degli alimenti non
sia danneggiata.
5.5 Informazioni Deep-freeze
Conformemente agli standard IEC 62552, il
prodotto congela almeno 4,5 kg di alimenti a
una temperatura ambiente di 25°C, a -18°C o
temperatura inferiore, entro 24 ore per ogni 100
litri di volume di congelamento.
Sarà possibile conservare gli alimenti a lungo solo
a -18°C o a temperature inferiori.
Sarà possibile tenere freschi gli alimenti per
molti mesi (a -18°C o temperature inferiori nello
scomparto deep freeze).
20 / 29 İT
Frigorifero / Manuale dell’utente
Page 87

Funzionamento del prodotto
Non consentire che gli alimenti da considerare
entrino in contatto con articoli precedentemente
congelati al fine di evitarne lo scongelamento
parziale.
Bollire le verdure e scolare l’acqua per conservare
le verdure surgelate più a lungo. Dopo aver estratto
l’acqua, metterle in confezioni a tenuta e metterle
nel congelatore. Gli alimenti quali ad esempio
banane, insalata, sedano, uova bollite e patate non
sono adatte per essere congelate. Quando questi
alimenti sono surgelati, solo il loro valore nutritivo
e il gusto ne subiranno le conseguenze. Non
marciscono e quindi non costituiscono un rischio
per la salute umana.
5.6 Posizionamento degli alimenti
Ripiani dello
scomparto
congelatore
Ripiani dello
scomparto
del frigorifero
Ripiani della
porta dello
scomparto
del frigorifero
Scomparto
verdura
Scomparto
zona fresca
Vari alimenti, quali ad esempio
carne, pesce, gelato, verdura,
eccetera.
Alimenti in padelle, vassoi
coperti e contenitori chiusi, uova
(in contenitori chiusi)
Piccoli alimenti o bevande
Verdura e frutta
Prodotti gastronomici, (ad
esempio colazione, carne da
consumare a breve)
5.7 Avvertenza apertura porta
(Questa funzione è opzionale)
Verrà emesso un segnale di avvertimento audio
quando la porta del prodotto viene lasciata aperta
per 1 minuto. Questa avvertenza verrà disattivata
quando viene chiusa la porta o quando qualcuno
dei pulsanti display viene premuto.
5.8 Scomparto del congelatore
Gli scomparti del congelatore consentono di
preparare gli alimenti per il congelamento. Sarà
inoltre possibile utilizzare questi scomparti per
conservare gli alimenti a una temperatura di alcuni
gradi al di sotto rispetto alla temperatura dello
scomparto frigorifero.
Sarà possibile aumentare il volume interno
del frigorifero rimuovendo uno qualsiasi degli
scomparti di raffreddamento:
1. Tirare lo scomparto verso di sé fino a che non si
ferma.
2. Sollevare lo scomparto di circa 1 cm,
quindi tirarlo verso di sé per toglierlo
dall’alloggiamento.
5.9 Scomparto verdura
Lo scomparto verdura del frigorifero è stato
progettato appositamente per conservare le
verdure fresche senza che perdano la loro umidità.
A tal fine, l'intensificazione dell'aria fresca viene
intensificata all'interno di questo scomparto.
Rimuovere i ripiani delle porte che bloccano
lo scomparto verdura, prima di procedere alla
rimozione dello stesso.
5.10 Scomparto verdura, con
umidità controllata
(Ripiani alimenti freschi)
(Questa funzione è opzionale)
I valori di umidità di frutta e verdura vengono tenuti
sotto controllo grazie allo scomparto verdura con
umidità controllata, e quindi gli alimenti rimangono
freschi più a lungo.
Consigliamo di mettere le verdure a foglie come
ad esempio l’insalata e gli spinaci e le verdure
sensibili alle perdite di umidità, in orizzontale, ove
possibile, quando vengono messe nel cassetto
verdura; sicuramente non posizionarle in orizzontale facendole appoggiare sulle radici.
In fase di spostamento delle verdure, prendere
in considerazione i loro pesi specifici. Le verdure
pesanti e dure vanno collocate sulla parte inferiore
21 /29 İT
Frigorifero / Manuale dell’utente
Page 88

Funzionamento del prodotto
dello scomparto verdura, mentre quelle leggere e
morbide devono trovarsi sulla parte superiore.
Non lasciare mai le verdure nei loro sacchetti in
plastica all’interno dello scomparto verdura. Se
vengono lasciati nei sacchetti in plastica, dopo
poco marciranno. Qualora non si desideri che le
verdure entrino in contatto con altre verdure per
motivi igienici, usare carta perforata o un materiale
simile al posto delle borse in plastica.
Non mettere pere, albicocche, pesche, ecc. in
particolar modo tutti quei frutti che generano elevati quantitativi di etilene, all’interno dello stesso
scomparto verdura con altra frutta e verdura. Il gas
di etilene emesso da questi frutti causa la maturazione più rapida di altri frutti e li fa anche marcire
in meno tempo.
5.11 Vassoio portauova
Sarà possibile installare il contenitore delle uova
sulla porta desiderata o direttamente sulla struttura
principale del frigorifero.
Non tenere mai il vassoio portauova nello
scomparto del congelatore.
5.12 Sezione centrale mobile
La sezione centrale mobile è stata pensata per
evitare che l’aria fredda all’interno del frigorifero
fuoriesca.
1- Viene garantita la tenuta d'aria quando le guarnizioni sulla porta premono sulla superficie della
sezione centrale amovibile, mentre le porte dello
scomparto frigorifero sono chiuse.
2- Un altro motivo per cui il frigorifero è dotato di
una sezione centrale mobile è il fatto che aumenta
il volume netto dello scomparto frigorifero. Le
sezioni centrali standard occupano del volume
non-utilizzabile all’interno del frigorifero.
3-La sezione centrale mobile viene chiusa quando
viene aperta la porta sinistra dello scomparto del
frigorifero..
4-Non deve essere aperta manualmente. Si sposta
sotto alla guida della componente in plastica sul
corpo mentre la porta è chiusa.
5.13 Scomparto di conservazione
con controllo del freddo
Lo Scomparto di conservazione con controllo del
freddo del frigorifero può essere usato in qualsiasi
modalità desiderata regolandolo in base alle temperature del frigorifero (2/4/6/8 °C) o del congelatore (-18/-20/-22/-24). Sarà possibile tenere lo
scomparto alla temperatura desiderata mediante il
pulsante di impostazione temperatura dello scomparto di conservazione con controllo del freddo. La
temperatura dello scomparto di conservazione con
controllo del freddo può essere impostata su 0 e
10 gradi oltre alle temperature dello scomparto del
frigorifero, e su -6 gradi oltre alle temperature dello scomparto del congelatore. 0 gradi viene usata
per conservare i prodotti di gastronomia più a
lungo, -6 gradi viene usata per conservare la carne
fino a 2 settimane in condizioni che consentano di
tagliarla con facilità.
La funzione di passare da scomparto Frigorifero
a scomparto Congelatore viene fornita da un
elemento di raffreddamento che si trova nella
sezione chiusa (scomparto del compressore)
dietro al frigorifero. Durante il funzionamento
di questo elemento, si potrebbe avvertire un
suono simile al ticchettio dei secondi tipico di un
orologio analogico. Tutto è normale, non si tratta di
un’anomalia di funzionamento.
22 / 29 İT
Frigorifero / Manuale dell’utente
Page 89

Funzionamento del prodotto
5.14 Luce blu
(in alcuni modelli)
Lo scomparto verdura del frigorifero è illuminato da una luce blu. Gli alimenti conservati nello scomparto
verdura continuano la loro fotosintesi tramite l'effetto lunghezza d'onda della luce blu e conservano
quindi la loro freschezza aumentando il contenuto vitaminico.
5.15 Filtro odori
Il filtro odori nella tubazione dell'aria dello scomparto frigorifero evita la formazione di odori spiacevoli
all'interno del frigorifero stesso
5.16 Vano cantina
(Questa funzione è opzionale)
1 – Riempimento del vano cantina
Il vano cantina è stato costruito in modo da contenere 28 bottiglie davanti + 3 bottiglie accessibili
utilizzando un ripiano telescopico. Queste quantità massime dichiarate sono date solo a fini informativi e
corrispondono ai test effettuati con una bottiglia standard di “Bordelaise 75cl”.
2- Temperature suggerite per un servizio ottimale
Il nostro consiglio: se si mescolano tipi diversi di vino, scegliere un’impostazione di 12 ° Celsius, proprio
come in una vera cantina. Per i vini bianchi, che devono essere serviti tra 6 e 10 °, pensare di mettere
le bottiglie nel frigorifero 1/2 ora prima di servire il vino, il frigorifero potrà mantenere le bottiglie alla
temperatura preferita. Per quanto riguarda i rossi, essi si riscaldano lentamente a temperatura ambiente
quando vengono serviti.
16 - 17°C Delicati Bordeaux - Rossi
15 - 16°C Delicati Burgundy - Rossi
14 - 16°C Grand crus' di vini bianchi secchi'
11 - 12°C Vini rossi novelli, leggeri e fruttati
23 /29 İT
Frigorifero / Manuale dell’utente
Page 90

Funzionamento del prodotto
10 - 12°C Vini 'Provence rosé', vini francesi
10 - 12°C Vini bianchi secchi e vini rossi nazionali
8 - 10°C Vini bianchi nazionali
7 - 8°C Champagne
6-°C Vini bianchi dolci
3- Suggerimenti relativi all’apertura di una bottiglia di vino prima di assaggiarlo:
Vini bianchi Circa 10 minuti prima di servirli
Vini rossi novelli Circa 10 minuti prima di servirli
Vini rossi corposi e maturi Circa 30 to 60 minuti prima di servirli
4- Quanto tempo può essere conservato un vino aperto?
Le bottiglie di vino non terminate devono essere chiuse in modo corretto e possono essere conservate in
un ambiente freddo e asciutto per i seguenti periodi:
Bianchi Rossi
75 % dell’intera
bottiglia
50 % dell’intera
bottiglia
Meno di 50 % 1 giorno 2 giorni
3 fino a 5 giorni 4 fino a 7 giorni
2 fino a 3 giorni 3 fino a 5 giorni
24 / 29 İT
Frigorifero / Manuale dell’utente
Page 91

Funzionamento del prodotto
5.17 Uso del distributore
d’acqua interno
(in alcuni modelli)
Dopo aver collegato il frigorifero a una fonte
idrica o dopo aver sostituito il filtro dell’acqua,
lavare l’impianto idrico. Usare un contenitore
resistente per premere e tenere premuta la leva
del distributore per 5 secondi, quindi rilasciarla
per 5 secondi. Ripetere fino a che l’acqua non
inizia a scorrere. Quanto l’acqua inizia a scorrere,
continuare a premere e rilasciare la leva del
dispenser (5 secondi ON, 5 secondi off) fino a
che non saranno stati erogati in totale 4 galloni
(15 litri). In questo modo verrà spurgata l’aria dal
filtro e dal sistema di erogazione dell’acqua; il
filtro dell’acqua sarà pronto per essere utilizzato.
Potrebbero essere necessarie alcune operazioni di
pulizia in alcune case. Mentre l'aria viene eliminata
dal sistema, l’acqua potrebbe fuoriuscire dal
distributore.
Lasciar passare 24 ore: in questo periodo di
tempo il frigorifero si raffredderà e l’acqua verrà
rinfrescata. Erogare acqua a sufficienza ogni
settimana per mantenere una fornitura idrica
sempre fresca.
Dopo 5 minuti di erogazione continua,
il dispenser interromperà l’erogazione
di acqua per evitare fuoriuscite
eccessive. Per continuare l’erogazione,
C
premere nuovamente la leva del
dispenser.
5.18 Erogazione di acqua
Tenere un contenitore sotto all’ugello del dispenser
mentre viene premuto il cuscinetto del dispenser
stesso.
Rilasciare il cuscinetto del dispenser per
interrompere l’erogazione.
È normale che i primi bicchieri di acqua
C
C
Durante le fasi di utilizzo iniziale, sarà necessario
attendere 24 ore prima che l'acqua si raffreddi.
Togliere il bicchiere alcuni secondi dopo aver
premuto la levetta.
presi dall'erogatore siano tiepidi.
Se la fontana d'acqua non viene usata a
lungo, non bere i primi bicchieri per poi
ottenere acqua pulita.
5.19 Per usare il distributore
dell'acqua
Prima di iniziare a usare il frigorifero,
e dopo aver sostituito il filtro
dell’acqua, il dispenser potrebbe
perdere delle gocce di acqua. Per
evitare gocciolamenti o perdite
dal dispenser, spurgare l’aria
dall’impianto facendo fuoriuscire 5-6
galloni (circa 20 litri) di acqua dal
distributore prima di iniziare a usare
il dispositivo, nonché ogni volta che
viene sostituito il filtro dell’acqua.
A
In questo modo verrà eliminata
l'eventuale acqua intrappolata nel
sistema e si interromperanno le
perdite dal distributore. Controllare
la posizione dell’accoppiatore e
verificare che il tubo dell’acqua sia
dritto sulla parte posteriore dell’unità
fino a quando necessario, qualora vi
sia un'ostruzione nel flusso di acqua.
25 /29 İT
Frigorifero / Manuale dell’utente
Page 92

Funzionamento del prodotto
Se il distributore perde solo alcune gocce di
acqua, dopo un’erogazione, non si tratta di
C
un’anomalia di funzionamento.
5.20 Icematic e contenitore per
conservare il ghiaccio
(in alcuni modelli)
* Riempire Icematic con acqua e metterlo in
sede. Il ghiaccio sarà pronto in due ore circa. Non
rimuovere l’Icematic dalla sua sede per prendere
il ghiaccio.
* Ruotare le manopole in senso orario per 90
gradi.
I cubetti di ghiaccio cadono nel contenitore per la
conservazione del ghiaccio sotto.
* È possibile estrarre il contenitore per la
conservazione del ghiaccio e servire i cubetti.
* Se lo si desidera, è possibile lasciare i cubetti nel
contenitore per la conservazione del ghiaccio.
Contenitore per la conservazione del ghiaccio
Il contenitore per la conservazione del ghiaccio ha
solo lo scopo di conservare i cubetti di ghiaccio.
Non inserirvi dell’acqua, Altrimenti si romperà.
5.21 Icematic
(in alcuni modelli)
Per ottenere ghiaccio da icematic, riempire
d’acqua il serbatoio nel frigorifero riempiendo fino
al massimo livello.
I cubetti di ghiaccio nello scomparto del ghiaccio
possono attaccarsi gli uni agli altri e creare un
accumulo a causa dell’aria calda e umida nel
corso di circa 15 giorni. Questo è normale. Se
non è possibile rompere l’accumulo, svuotare il
contenitore del ghiaccio e preparare nuovamente
il ghiaccio.
Si raccomanda di cambiare l’acqua
C
C
C
nel serbatoio dell’acqua se resta
nel serbatoio stesso per più di 2-3
settimane.
I rumori anomali provenienti dal
frigorifero a intervalli di 120 minuti
sono generati dal processo di creazione
e versamento del ghiaccio. Questo è
normale.
Se non si vuole preparare il ghiaccio,
premere l’icona Ice off per arrestare la
icematic e risparmiare energia ed estendere
la vita utile del proprio frigorifero.
26 / 29 İT
C
È normale che qualche goccia d’acqua
scenda dall’erogatore dopo che l’acqua è
stata estratta.
Frigorifero / Manuale dell’utente
Page 93

6. Pulizia e manutenzione
Pulendo il prodotto a intervalli regolari sarà
possibile prolungare la durata di vita.
AVVERTENZA: Scollegare il
frigorifero dalla corrente prima di
B
• Non usare strumenti appuntiti e abrasivi,
• Per i prodotti non-No Frost, si verifica la
• Utilizzare solo panni umidi in microfibra per
• Sciogliere un cucchiaino di bicarbonato in
• Fare attenzione a tenere lontana l’acqua dalla
• Pulire la porta con un panno bagnato. Togliere
eseguire la pulizia.
sapone, materiali per pulire la casa, detergenti,
gas, gasolio, vernice e sostanze simili per gli
interventi di pulizia.
formazione di gocce di acqua e ghiaccio fino
allo spessore di un dito sulla parete posteriore
dello scomparto frigo. Non pulire; non applicare
mai olio né agenti simili.
pulire la superficie esterna del prodotto.
Spugne e altri tipi di panni per la pulizia
possono graffiare la superficie.
acqua. Ammorbidire un panno in acqua, quindi
strizzarlo. Pulire il dispositivo con questo
panno, quindi asciugare completamente.
copertura delle lampade dalle altre componenti
elettriche.
tutti gli elementi all’interno per staccare la
porta ed i ripiani del telaio. Sollevare i ripiani
della porta verso l’alto per poterli rimuovere.
Pulire e asciugare i ripiani, poi fissare
nuovamente in posizione facendo scorrere da
sopra.
• Non usare cloro cronica o prodotti detergenti
sulla superficie esterna del dispositivo e sulle
componenti rivestite in cromo del prodotto.
Il cloro provoca ruggine su queste superfici
metalliche.
6.1. Evitare i cattivi odori
Il prodotto è stato realizzato senza materiali
che emettono cattivi odori. Cosservare tuttavia
gli alimenti in sezioni non adeguate e pulire le
superfici interne in modo non consono potrebbe
provocare cattivi odori.
A tal fine consigliamo di pulire l’interno con acqua
gassata ogni 15 giorni.
• Tenere gli alimenti in contenitori sigillati. I
microrganismi potrebbero fuoriuscire dagli
alimenti non sigillati causando così cattivi
odori.
• Non conservare alimenti scaduti e marci
all’interno del frigorifero.
• Non usare strumenti affilati e abrasivi
o sapone, agenti detergenti domestici,
detergenti, gasolio, benzene, cera, ecc.,
altrimenti le indicazioni sulle parti in plastica si
toglieranno e si verificherà deformazione. Usare
acqua tiepida e un panno morbido unicamente
per le operazioni di pulizia e asciugatura.
6.2. Protezione delle
superfici in plastica
L'olio rovesciato sulle superfici in plastica potrebbe
danneggiare la superficie, e deve essere pulito
immediatamente servendosi di acqua tiepida.
27 /29 İT
Frigorifero / Manuale dell’utente
Page 94

7. Risoluzione dei problemi
vivo
Controllare questo elenco prima di contattare
l'assistenza clienti. Questa operazione vi
consentirà di risparmiare soldi. Questo elenco
contiene i problemi più frequenti che non a livello
di manodopera o materiali. Alcune funzioni qui
indicate potrebbero non essere valide per il vostro
prodotto.
Il frigorifero non funziona.
• La presa di corrente non è stata inserita
correttamente. >>> Spingerla fino a inserirla
completamente nella presa.
• Il fusibile collegato alla presa che alimenta
il prodotto, oppure il fusibile principale, è
bruciato. >>> Controllare i fusibili.
Condensa sulla parete laterale dello
scomparto frigorifero (MULTI ZONE, COOL,
CONTROL e FLEXI ZONE).
• La porta viene aperta troppo spesso >>> Fare
attenzione a non aprire eccessivamente la
porta del dispositivo.
• L’ambiente è troppo umido. >>> Non installare
il prodotto in ambienti umidi.
• Gli alimenti che contengono liquidi vengono
conservati in contenitori non sigillati. >>>
Tenere gli alimenti in contenitori sigillati.
• La porta viene lasciata aperta. >>> Non tenere
aperte a lungo le porte del frigorifero.
• Il termostato è impostato su una temperatura
troppo bassa. >>> Impostare il termostato su
una temperatura adeguata.
Il compressore non funziona.
• In caso di improvviso black out, o nel
caso in cui la spina venga tolta e poi
reinserita, la pressione del gas nel sistema
di raffreddamento del dispositivo non è
equilibrata, il che fa scattare la protezione
termica del compressore. Il dispositivo si
riavvierà dopo circa 6 minuti. Qualora il
prodotto non si riavvia dopo questo periodo,
contattare l’assistenza.
• La modalità di scongelamento è attiva.
>>>> Si tratta di una condizione normale
per un frigorifero con funzione di sbrinamento
completamente automatica. Lo sbrinamento
avviene a intervalli periodici.
• Il prodotto non è collegato. >>> Verificare che
il cavo di alimentazione sia collegato.
• L’impostazione di temperatura non è corretta.
>>> Selezionare l’impostazione di temperatura
adeguata.
• Assenza di corrente. >>> Il prodotto
continuerà a funzionare normalmente quando
viene ripristinata la corrente elettrica.
Il rumore di funzionamento del frigorifero
aumenta col passare del tempo.
• Le prestazioni operative del prodotto
possono variare a seconda delle variazioni
di temperatura ambiente. Questa non è
un’anomalia di funzionamento.
Il frigorifero funziona troppo spesso o troppo
lungo.
28 / 29 İT
Frigorifero / Manuale dell’utente
Page 95

Guida alla risoluzione dei problemi
• Il nuovo prodotto potrebbe essere più grande
di quello precedente. I prodotti più grandi
funzioneranno più a lungo.
• La temperatura ambiente potrebbe essere alta.
>>> Il prodotto funzionerà normalmente per lunghi
periodi di tempo con temperature superiori.
• Il prodotto potrebbe essere stato di recente collegato
alla corrente, oppure al suo interno potrebbero
essere stati recentemente aggiunti vari alimenti.
>>> Allo prodotto servirà più tempo per raggiungere
la temperatura impostata, se collegato di recente,
oppure nel caso in cui vengano collocati nuovi
elementi al suo interno, Non si tratta di un’anomalia.
• Forse di recente sono state introdotte nel frigorifero
grandi quantità di alimenti caldi. >>> Non mettere
alimenti caldi direttamente dentro al frigorifero.
• Le porte sono state aperte frequentemente o tenute
aperte a lungo. >>> L’aria calda che si muove
all’interno provocherà un funzionamento più lungo.
Non aprire le porte con troppa frequenza.
• Le porte del congelatore o del frigorifero potrebbero
essere socchiuse. >>> Controllare che le porte
siano totalmente chiuse.
• Il prodotto potrebbe essere impostato su una
temperatura troppo bassa, >>> Impostare la
temperatura su un livello più alto e attendere che il
prodotto raggiunga la temperatura desiderata.
• La rondella della porta del frigorifero del congelatore
potrebbe essere sporca, usurata, rotta o non
correttamente configurata, >>> Pulire e sostituire la
rondella. Le rondelle consumate e usurate faranno
funzionare il prodotto più a lungo per conservare la
temperatura attuale.
La temperatura del congelatore è molto
bassa, ma la temperatura del frigorifero è
corretta.
• La temperatura dello scomparto congelatore
è impostata su un livello molto basso, >>>
Impostare la temperatura dello scomparto
congelatore su un livello più alto, quindi
eseguire un controllo.
La temperatura del frigorifero è molto bassa,
ma la temperatura del congelatore è corretta.
• La temperatura dello scomparto frigorifero
è impostata su un livello molto basso, >>>
Impostare la temperatura dello scomparto
frigorifero su un livello più alto, quindi eseguire
un controllo.
Gli alimenti conservati nei cassetti dello
scomparto frigorifero sono congelati.
• La temperatura dello scomparto frigorifero
è impostata su un livello molto basso, >>>
Impostare la temperatura dello scomparto
congelatore su un livello più alto, quindi
eseguire un controllo.
La temperatura nel vano frigorifero e
congelatore è troppo alta.
• La temperatura dello scomparto frigorifero
è impostata su un livello molto alto, >>>
L’impostazione della temperatura dello
scomparto frigorifero influenza la temperatura
dello scomparto del congelatore. Modificare
la temperatura dello scomparto congelatore o
frigorifero e attendere che tutti gli scomparti
interessati raggiungano il livello di temperatura
impostata.
• Le porte sono state aperte frequentemente o
tenute aperte a lungo. >>> Non aprire le porte
con troppa frequenza.
• La porta potrebbe essere socchiusa. >>>
Chiudere completamente la porta.
• Il prodotto potrebbe essere stato di recente
collegato alla corrente, oppure al suo interno
potrebbero essere stati recentemente aggiunti
vari alimenti. >>> Al prodotto servirà più
tempo per raggiungere la temperatura
impostata, se collegato di recente, oppure nel
caso in cui vengano collocati nuovi elementi al
suo interno.
• Di recente sono state introdotte nel frigorifero
grandi quantità di alimenti caldi. >>> Non
mettere alimenti caldi direttamente dentro al
frigorifero.
Vibrazioni o rumore.
29 /29 İT
Frigorifero / Manuale dell’utente
Page 96

Guida alla risoluzione dei problemi
• Il pavimento non è in piano o resistente. >>>
Se il prodotto vibra, quando viene spostato
lentamente, regolare i supporti per equilibrare
il prodotto. Verificare inoltre che la superficie
di appoggio sia sufficientemente resistente per
supportarne il peso.
• Gli eventuali oggetti collocati sul prodotto
potrebbero essere fonte di rumore. >>>
Togliere gli eventuali elementi collocati sul
prodotto.
Il prodotto emette rumori, come ad esempio
liquido che scorre, spruzzo, eccetera
• I principi operativi del prodotto prevedono la
presenza di flussi di liquidi e flussi di gas. >>>
Questa non è un’anomalia di funzionamento.
C'è un rumore, simile a un soffio, che
proviene dal prodotto.
• Il prodotto si serve di una ventola per il
processo di raffreddamento. Questa non è
un’anomalia di funzionamento.
Si è formata condensa sulle pareti interne del
dispositivo.
• Le condizioni meteo calde o umide aumentano
la formazione di ghiaccio e di condensa.
Questa non è un’anomalia di funzionamento.
• Le porte sono state aperte frequentemente o
tenute aperte a lungo. >>> Non aprire le porte
con troppa frequenza; se la porta è aperta,
chiuderla.
• La porta potrebbe essere socchiusa. >>>
Chiudere completamente la porta.
Si è formata condensa sulla superficie
esterna del dispositivo o fra le porte.
• Le condizioni ambientali potrebbero essere
umide, e ciò è normale. >>> La condensa si
dissipa quando l’umidità viene ridotta.
L'interno emette cattivi odori.
• Il prodotto non viene pulito regolarmente. >>>
Pulire la superficie interna a intervalli regolari
servendosi di spugna, acqua tiepida, e acqua
gassata.
• Alcuni contenitori e imballaggi potrebbero
emettere cattivi odori. >>> Servirsi di
imballaggi che non emettano cattivi odori.
• Gli alimenti sono stati collocati all’interno
di contenitori non sigillati. >>> Tenere gli
alimenti in contenitori sigillati. I microrganismi
potrebbero fuoriuscire dagli alimenti non
sigillati causando così cattivi odori.
• Rimuovere gli eventuali alimenti scaduti o
rovinati dal dispositivo.
La porta non si chiude correttamente.
• Le confezioni di cibo potrebbero bloccare la
porta. >>> Trovare una nuova posizione per gli
alimenti che bloccano le porte.
• Il prodotto non è in posizione verticale,
appoggiato per terra. >>> Regolare i supporti
per l’equilibrio del prodotto.
• Il pavimento non è in piano o resistente. >>>
Verificare che la superficie di appoggio sia
sufficientemente resistente per supportarne il
peso.
Il cassetto verdura si è inceppato.
• Gli alimenti potrebbero entrare in contatto
con la sezione superiore cassetto. >>> Riorganizzare gli alimenti nel cassetto.
Se La Superficie Del Prodotto È Bollente.
• Quando il prodotto è in funzione, possono
essere osservate alte temperature tra i due
sportelli, sui pannelli laterali e sul grill posteriore.
. Ciò è normale e non richiede manutenzione!
AVVERTENZA: Qualora il
problema persista dopo aver
A
seguito le istruzioni contenute
in questa selezione, contattare
il proprio fornitore oppure un
Servizio Autorizzato. Evitare in ogni
caso di riparare il prodotto.
30 / 29 İT
Frigorifero / Manuale dell’utente
Page 97

www.beko.com.tr
www.beko.com
58 0180 0000/AF
1/4
EN-DE-İT
Page 98

GN1416221ZX
GN1426221ZDX
FR NL NO
Page 99

Réfrigérateur
Manuel d'utilisation
EWWERQWEW
FR
Page 100

Veuillez d’abord lire ce manuel d’utilisation !
Chère cliente, cher client,
Nous espérons que votre produit, qui a été fabriqué dans des usines modernes et vérifié au terme des
procédures de contrôle de qualité les plus méticuleuses, vous aidera efficacement.
Le présent manuel vous permettra d'utiliser votre appareil rapidement et en toute sécurité.
• Veillez à lire les instructions de sécurité.
• Gardez le manuel dans un endroit facilement accessible, car vous pourriez en avoir besoin plus tard.
• Lisez également la documentation fournie avec le produit.
• Le fabricant se réserve le droit d’effectuer des modifications sur l’appareil.
N'oubliez pas que ce manuel d'utilisation s'applique aussi à plusieurs autres modèles d'appareils.
Explication des symboles
Les symboles suivants sont utilisés dans ce manuel d’utilisation :
Informations importantes ou astuces
C
A
utiles.
Risque de blessure et de dommages
matériels.
Risque d'électrocution.
B
Les matériaux d'emballage de cet appareil sont fabriqués à partir de matériaux recyclables, conformément à nos
réglementations nationales en matière
d'environnement.
 Loading...