

Page 1
Dryer
User Manual
Szárító
Használat útmutató
Uscător
Manual de utlzare
DF7412GAW
EN
2960312496_EN/161019.1411
HU RO
Page 2
Please read this user manual first!
Dear Customer,
Thank you for prefering a Beko product.
We hope that your product which has been
manufactured with high quality and technology
will give you the best results. We advise you
to read through this manual and the other
accompanying documentation carefully
before using your product and keep it for
future reference. If you transfer the product
to someone else, give its manual as well. Pay
attention to all details and warnings specified
in the user manual and follow the instructions
given therein.
Use this user manual for the model indicated on
the cover page.
WARNING!
• Warning against hot surfaces.
WARNING!
• Warning against scalding hazard.
NOTE
C
• Important information or useful hints about
usage.
• Read the instructions.
Explanation of symbols
Throughout this user manual the following
symbols are used:
DANGER!
B
• Warning against electric shock.
DANGER!
• Warning against fire hazard.
WARNING!
A
• Warning for hazardous situations with regard
to life and property.
Packaging materials of the product
are manufactured from recyclable
materials in accordance with our
National Environment Regulations.
Do not dispose of the packaging wastes with
the domestic waste or other wastes, discard
them to the dedicated collection points
designated by the local authorities.
This product was manufactured using the latest technology in environmentally friendly conditions.
Page 3
1 Important instructions for
safety and environment
NOTE
C
• This section contains safety
instructions that will help protect
from risk of personal injury or
property damage. Failure to follow
these instructions shall void any
warranty.
1.1 General safety
WARNING!
A
This appliance can be used by
children aged from 8 years and
above and persons with reduced
physical, sensory or mental
capabilities or lack of experience
and knowledge if they have been
given supervision or instruction
concerning use of the appliance
in a safe way and understand the
hazards involved. Children shall not
play with the appliance. Cleaning
and user maintenance shall not
be made by children without
supervision.
Children of less than 3 years should
be kept away unless continously
supervised.
• Adjustable feet should not be
removed. The gap between the
dryer and the floor should not be
reduced with materials such as
carpet, wood and tape. This will
cause problems with the dryer.
A
WARNING!
Always have the installation and
repairing procedures carried
out by the Authorized Service.
Manufacturer shall not be held
liable for damages that may arise
from procedures carried out by
unauthorized persons.
• Never wash the dryer by spraying
or pouring water onto it! There is
the risk of electric shock!
For the products with a steam
function:
WARNING!
A
• Use only distilled water or water
condensed in the water tank of the
machine in steam programs. Do
not use mains water or additives.
When using condensed water in the
water tank, it should be filtered and
cleared of fibres.
• Do not open the door when steam
programs are running. Hot water
may be expelled.
• Before putting laundry in a steam
program, stains on it should be
removed.
• You may only put laundry that is not
dirty or stained but permeated with
unpleasant odour in steam (odour
removal) program.
• Do not use any dry cleaning sets
or additional materials in a steam
program or in any program.
Dryer / User Manual
3
Page 4
1.1.1 Electrical safety
DANGER!
B
• Electrical safety instructions
should be followed while electrical
connection is made during the
installation.
• Connect the dryer to a grounded
outlet protected by a fuse at the
value specified on the type label.
Have the grounding installation
performed by a qualified electrician.
Our company shall not be liable for
any damages that will arise when
the dryer is used without grounding
in accordance with the local
regulations.
• The voltage and allowed fuse
protection is stated on the type label
plate.
• The voltage specified on the type
label must be equal to your mains
voltage.
• Unplug the dryer when it is not in
use.
• Unplug the dryer from the mains
during installation, maintenance,
cleaning and repair works.
• Do not touch the plug with wet
hands! Never unplug by pulling
on the cable, always pull out by
grabbing the plug.
WARNING!
A
• The appliance must not be
supplied through an external
switching device, such as a timer,or
connected to a circuit that is
regularly switched on and off by
utility.
B
DANGER!
• Do not use extension cords, multiplugs or adaptors to connect the
dryer to power supply in order to
decrease the risk of fire and electric
shock.
• Power cable plug must be easily
accessible after installation.
• Damaged mains cable should be
changed notifying the Authorized
Service.
• If the dryer is faulty, it must not be
operated unless it is repaired by an
authorized service agent! There is
the risk of electric shock!
1.1.2 Product safety
DANGER!
• Superheating of the clothes inside
of the dryer can occur if you cancel
the programme or in the event of
a power failure whilst the dryer is
running, this concentration of heat
can cause self-combustion and fire
so always activate the ventilation
programme to cool down or quickly
remove all laundry from the dryer in
order to hang them up and dissipate
the heat.
WARNING!
A
• Ensure that the air inlet of the dryer
is open and it is well-ventilated.
• Product contains R290 refrigerant.
• R290 is an environment-friendly, but
flammable refrigerant.
• Keep the product away from
potential heat sources that may
cause it to ignite.
4
Dryer / User Manual
Page 5
DANGER!
Points to be taken into
consideration for fire hazard:
Below specified laundry or items
must not be dried in the dryer
considering fire hazard.
• Unwashed laundry items
• Items soiled with oil, acetone,
alcohol, fuel oil, kerosene, stain
removers, turpentine, paraffin,
paraffin removers, petrol, wax or
wax removers must be washed in
hot water with plenty of detergent
before being dried in the dryer.
For this reason especially the items
containing the above specified
stains must be washed very well,
to do this use adequate detergent
and choose a high washing
temperature.
Below specified laundry or
items must not be dried in the
dryer due to the fire hazard:
• Garments or pillows bolstered with
rubber foam (latex foam), shower
bonnets, water resistant textiles,
materials with rubber reinforcement
and rubber foam pads.
Clothing cleaned with industrial
chemicals.
Items such as lighter, match,
coins, metal parts, needle etc. may
damage the drum set or may lead
to functional problems. Therefore
check all the laundry that you will
load into your dryer.
A
WARNING!
Never stop your dryer before the
programme completes. If you must
do this, remove all laundry quickly
and lay them out to dissipate the
heat.
DANGER!
• Clothes that are washed
inadequately may ignite on their
own and even may ignite after
drying ends.
• You must provide enough ventilation
in order to prevent gases exiting
from devices operating with other
types of fuels including the naked
flame from accumulating in the
room due to the back fire effect.
WARNING!
A
• Underwear that contains metal
reinforcements should not be dried
in the dryer. Dryer may be damaged
if metal reinforcements come loose
and break off during drying.
NOTE
C
• Use softeners and similar products
in accordance with the instructions
of their manufacturers.
Always clean the lint filter before or
after each loading. Never operate
the dryer without the lint filter
installed.
Dryer / User Manual
5
Page 6

A
WARNING!
• Never attempt to repair the dryer
by yourself. Do not perform any
repair or replacement procedures
on the product even if you know
or have the ability to perform the
required procedure unless it is
clearly suggested in the operating
instructions or the published service
manual. Otherwise, you will be
putting your life and others’ lives in
danger.
• There must not be a lockable, sliding
or hinged door that may block the
opening of the loading door in the
place where your dryer is to be
installed.
• Install your dryer at places suitable
for home use. (Bathroom, closed
balcony, garage etc.)
• Make sure that pets do not enter the
dryer. Check the inside of the dryer
before operating it.
• Do not lean on the loading door of
your dryer when it is open, otherwise
it may fall over.
• The lint must not be allowed to
accumulate around the tumble dryer
• The tumble dryer is not to be used if
industrial chemicals have been used
for cleaning.
• Fabric softeners, or similar products.
should be used as specified by the
fabric softener instructions.
• Exhaust air must not be discharged
into a flue which is used for
exhausting fumes from appliances
burning gas or other fuels.
1.2 Mounting over a washing machine
• A fixing device should be used between
the two machines when installing the
dryer above a washing machine. The
fitting device must be installed by the
authorized service agent.
• Total weight of the washing machine
and the dryer -with full load- when
they are placed on top of each other
reaches to approx. 180 kilograms. Place
the products on a solid floor that has
sufficient load carrying capacity!
WARNING!
A
• Washing machine cannot be placed on
the dryer. Pay attention to the above
warnings during the installation on your
washing machine.
Installation Table for Washing Machine and Dryer
Washing Machine Depth
Dryer
Depth
62 cm
60 cm
54 cm
54 cm
60 cm
1.3 Intended use
• Dryer has been designed for domestic
• Use the dryer only for drying laundry that
• The manufacturer waives any
• The service life of the dryer that you
1.4 Child safety
• Packaging materials are dangerous for
• Electrical products are dangerous for the
Can be installed Cannot be
installed
Can be
installed Cannot be installed
use. It is not suitable for commercial
use and it must not be used out of its
intended use.
are marked accordingly.
responsibility arisen from incorrect usage
or transportation.
purchased is 10 years. During this period,
original spare parts will be available to
operate the dryer properly.
the children. Keep packaging materials
away from children.
children. Keep children away from the
product when it is operating. Do not let
< 50 cm
6
Dryer / User Manual
Page 7
them tamper with the dryer. Use the childproof lock in order to prevent the children
to tamper with the dryer.
NOTE
C
Child-proof lock is on the control panel.
(See Child lock)
• Keep loading door closed even when the
dryer is not in use.
1.5 Compliance with the WEEE
regulation and disposing of the waste
product
This product complies with EU
WEEE Directive (2012/19/EU). This
product bears a classification
symbol for waste electrical and
electronic equipment (WEEE).
This product has been
manufactured with high quality
parts and materials which can be reused and
are suitable for recycling. Do not dispose of
the waste product with normal domestic and
other wastes at the end of its service life. Take
it to the collection center for the recycling of
electrical and electronic equipment. Please
consult your local authorities to learn about
these collection centers.
DANGER!
• R290 is an flammable refrigerant. Thus,
ensure that the system and the pipes
are not harmed during operation and
handling.
• Keep the product away from potential
heat sources that may cause it to ignite in
case of damage.
• Do not dispose of the product by putting
it in fire.
1.6 Compliance with RoHS Directive:
The product you have purchased complies
with EU RoHS Directive (2011/65/EU). It does
not contain harmful and prohibited materials
specified in the Directive.
1.7 Package information
Packaging materials of the product are
manufactured from recyclable materials in
accordance with our National Environment
Regulations. Do not dispose of the packaging
materials together with the domestic or other
wastes. Take them to the packaging material
collection points designated by the local
authorities.
1.8 Technical Specifications
EN
Height (Min. / Max.) 84,7 cm / 86,6 cm*
Width 59,7 cm
Depth 50,8 cm
Capacity (max.) 7 kg**
Net weight (± 4 kg) 42 kg
Voltage
See type label***Rated power input
Model code
* Min. height: Height with adjustable feet are
closed.
Max. height: Height with adjustable feet are
opened maximum.
** Dry laundry weight before washing.
*** Type label is located behind the loading
door.
NOTE
C
• Technical specifications of the dryer are
subject to specification without notice to
improve the quality of the product.
• Figures in this manual are schematic and
may not match the product exactly.
• Values stated on markers on the dryer
or in the other published documentation
accompanying with the dryer are
obtained in laboratory in accordance with
the relevant standards. Depending on
operational and environmental conditions
of the dryer, these values may vary.
Dryer / User Manual
7
Page 8
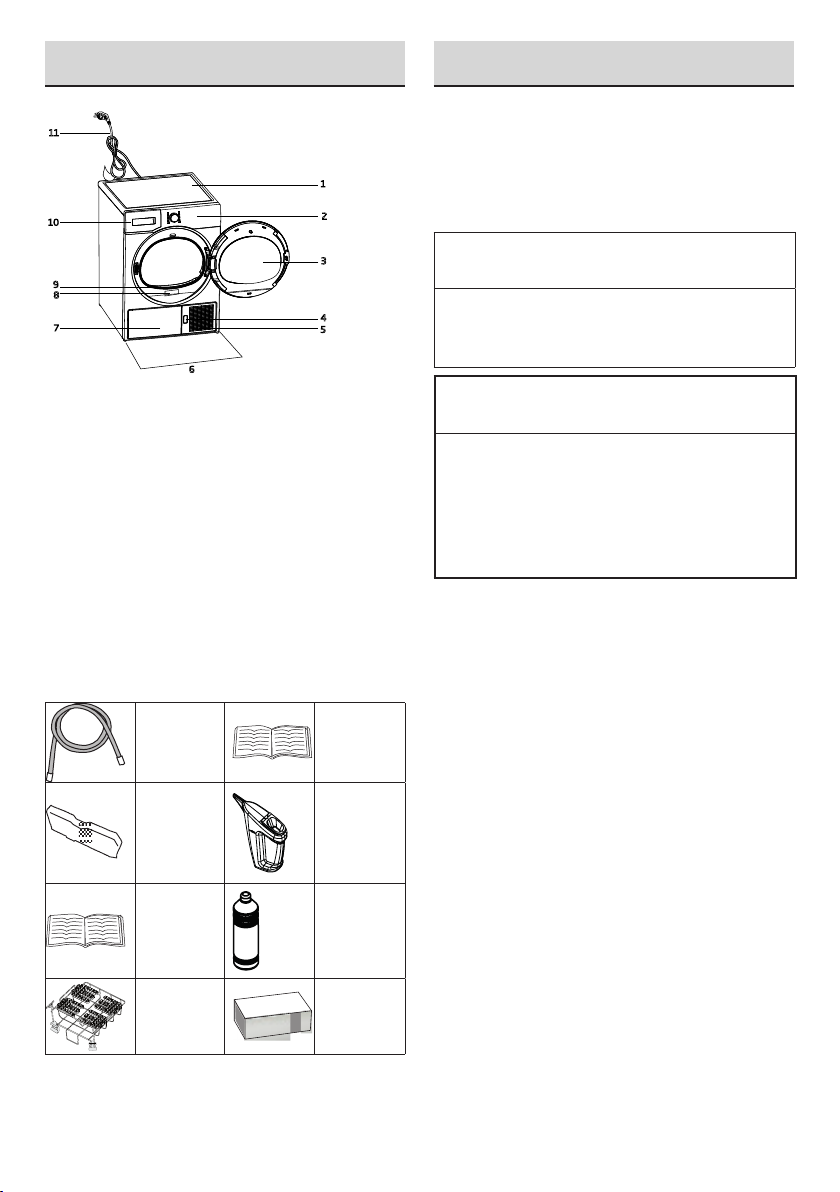
2 Your Dryer
11
10
1
2
3
4
5
6
7
8
9
3 Installation
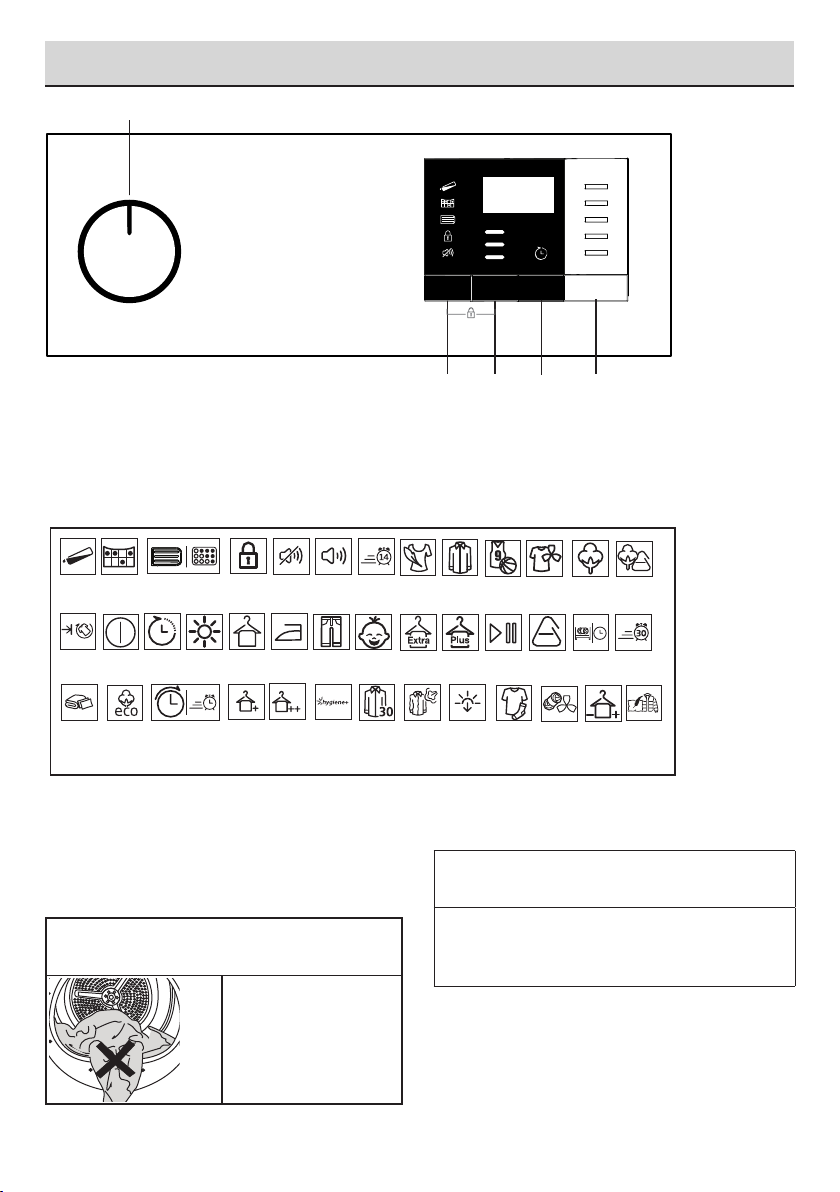
2.1 Overview
1. Top panel
2. Control panel
3. Loading door
4. Kick plate opening button
5. Ventilation grids
6. Adjustable legs
7. In models where the tank is placed below,
the water tank is inside the toe board
8. Type label
9. Lint filter
10. Water tank drawer (in models where the
tank is placed above)
11. Power cord
2.2 Package Contents
1. Water
drain
hose *
2. Filter
drawer
spare
sponge*
3. User
*It can be supplied with your machine
depending on its model.
8
Manual
4. Drying
basket*
5. Drying
basket
user
manual*
6. Water
Filling
Container*
7. Pure
Water*
8.
Fragrance
Capsules
Group*
Before the calling the nearest Authorized
Service for the installation of the dryer, ensure
that electrical installation and water drain is
appropriate referring to the user’s manual.
If they are not suitable, contact a qualified
electrician and technician to make necessary
arrangements.
NOTE
C
• Preparation of the dryer’s location
as well as the electrical and waste
water installations is under customer’s
responsibility.
WARNING!
A
• Prior to installation, visually check if the
dryer has any defects on it. If the drier
is damaged, do not have it installed.
Damaged products cause risks for your
safety.
• Let your dryer wait for 12 hours before
starting to use it.
3.1 Appropriate installation location
Install the dryer on a stable and level surface.
Dryer is heavy. Do not move it by yourself.
• Operate your dryer in a well ventilated,
dust-free environment.
• The gap between the dryer and the
surface should not be reduced by the
materials such as carpet, wood and tape.
• Do not cover the ventilation grills of the
dryer.
• There must not be a lockable, sliding or
hinged door that may block the opening
of the loading door in the place where
your dryer is to be installed.
• Once the dryer is installed, it should stay
at the same place where its connections
have been made. When installing the
dryer, make sure that its rear wall does
not touch anywhere (tap, socket, etc.).
• Place the dryer at least 1 cm away from
the edges of other furniture.
• Your dryer can be operated at
temperatures between +5°C and +35°C.
If the operating conditions fall outside
of this range, operation of the dryer will
be adversely affected and it can get
damaged.
Dryer / User Manual
Page 9

• The rear surface of the tumble dryer shall
be placed against a wall.
DANGER!
B
Do not place the dryer on the power cable.
* Ignore following warning if your
product’s system does not contains
R290.
DANGER!
• Dryer contains R290 refrigerant.*
• R290 is an environment-friendly, but
flammable refrigerant.*
• Ensure that the air inlet of the dryer is
open and it is well-ventilated.*
• Keep potential flame sources away from
the dryer.*
3.2 Removing the transportation
safety assembly
3.3 Connecting to the drain
You can directly drain accumulated water
through the water drain hose supplied with
the product instead of periodically draining the
water collected in the water tank.
Connecting the water drain hose
1
3 4
3 Connect one end of the drain hose
supplied with the dryer to the connection
point from where you removed the hose of
the product in previous step.
2
1-2 Pull hose at
the behind of
the dryer by
hand in order
to disconnect
it from where it
is connected.
Do not use
any tools to
remove the
hose.
4 Connect the other end of the drain hose
directly to the wastewater drain or to the
washbasin.
A
WARNING!
• Remove the
transportation
safety assembly
before using the
dryer for the first
time.
• If the door swing
side of your
appliance can
be modified, see
the reversible
door mounting
instructions.
NOTE
C
• Water drain hose should be attached to a
height of maximum 80 cm.
• Make sure that the water drain hose is not
stepped on and it is not folded between
the drain and the machine.
• If there is an accessories pack supplied
with your product, please see the detailed
description.
3.4 Adjusting the feet
• Turn the feet to
left or right until
the dryer stands
level and firmly.
Dryer / User Manual
9
Page 10

3.5 Transportation of the dryer
Drain all water that has remained in the dryer.
If direct water drain connection is made, then
remove the hose connections.
A
WARNING!
• We recommend carrying the dryer in
upright position. If it is not possible to
carry the machine in the upright position,
we recommend carrying it by tilting
towards the right side when looked from
the front.
3.6 Warnings about sounds
NOTE
C
• Water collected during operation is
pumped to water tank. It is normal to
hear pumping noise during this process.
3.7 Changing the illumination lamp
In case an illumination lamp is used in your
laundry dryer.To change the Bulb/LED used
for illumination of your tumble dryer, call your
Authorized Service.The lamp(s) used in this
appliance is not suitable for household room
illumination. The intended purpose of this
lamp is to assist the user to place laundry in
the tumble dryer in a comfortable way. The
lamps used in this appliance have to withstand
extreme physical conditions such as vibrations
and temperatures above 50 °C
• It is normal to
hear a metallic
noise from the
compressor
sometimes during
operation.
10
Dryer / User Manual
Page 11
4 Preparation
4.1 Laundry suitable for drying in the
dryer
Always obey the instructions given on the
garment tags. Dry only the laundry having a
label stating that they are suitable for drying in
a dryer.
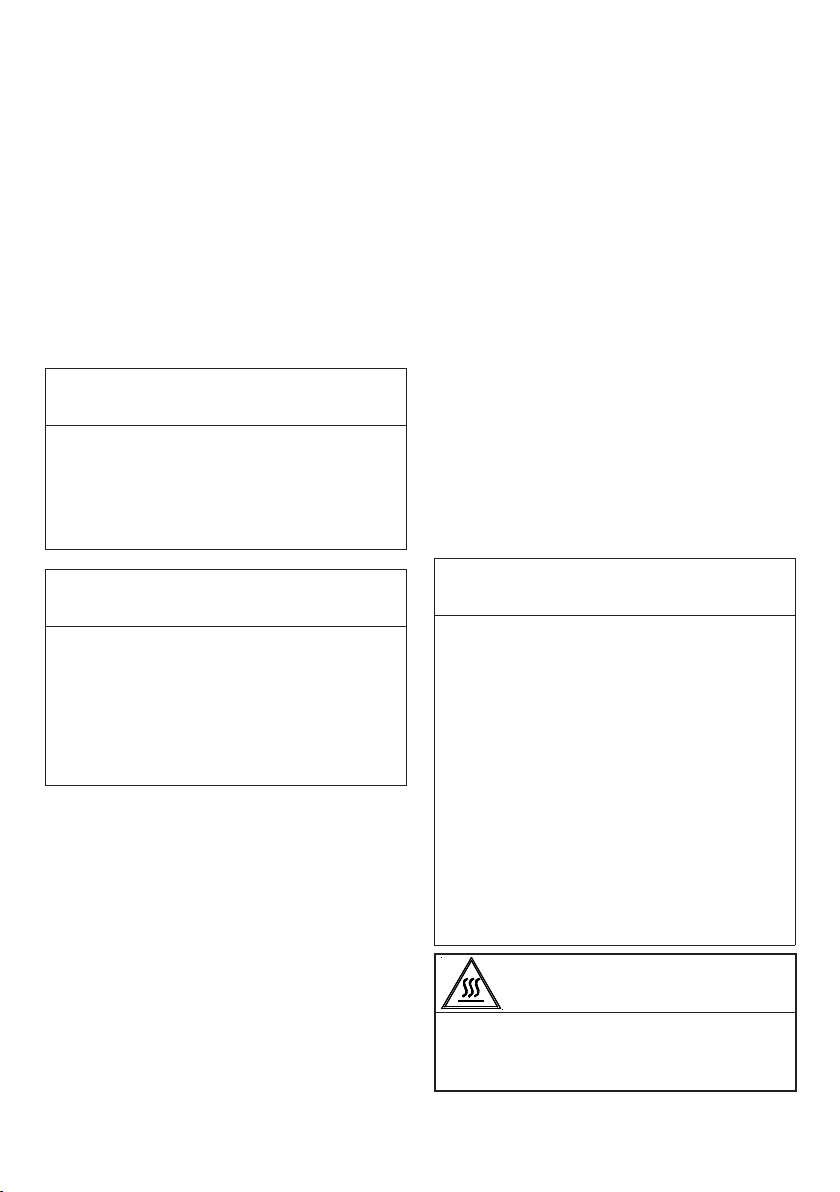
4.2 Laundry not suitable for drying in
the dryer
Do not dry
Items with this symbol
dried in the dryer.
NOTE
C
• Delicate embroidered fabrics, woollen,
silk garments, delicate and valuable
fabrics, airtight items and tulle curtains
are not suitable for machine drying.
4.3 Preparing laundry for drying
• Laundry may be tangled with each other
after washing. Separate the laundry items
before placing them into the dryer.
• Dry garments having metal accessories
such as zippers, inside out.
• Fasten the zippers, hooks and buckles
and button sheets.
4.4 Things to be done for energy
saving
• Spin your laundry at the highest speed
possible when washing them. Thus,
the drying time is shortened and energy
consumption is reduced.
• Sort out the laundry depending on their
type and thickness. Dry the same type of
laundry together. For example thin kitchen
towels and tableclothes dries earlier than
thick bathroom towels.
• Follow the instructions in the user manual
for programme selection.
• Do not open the loading door of the
machine during drying unless necessary.
If you must open the loading door, do not
keep it open for a long time.
• Do not add wet laundry while the dryer is
in operation
• For models with a condenser unit: clean
with dryer
should not be
the condenser once in a month or after
every 30 operations regularly. .
• Clean the filter periodically.Read the
Maintenance and cleaning of filters for
detalied information.
• For models with flue unit: comply with the
flue connection instructions and clean the
flue.
• During the drying process, air the room
well where your tumble dryer is operating.
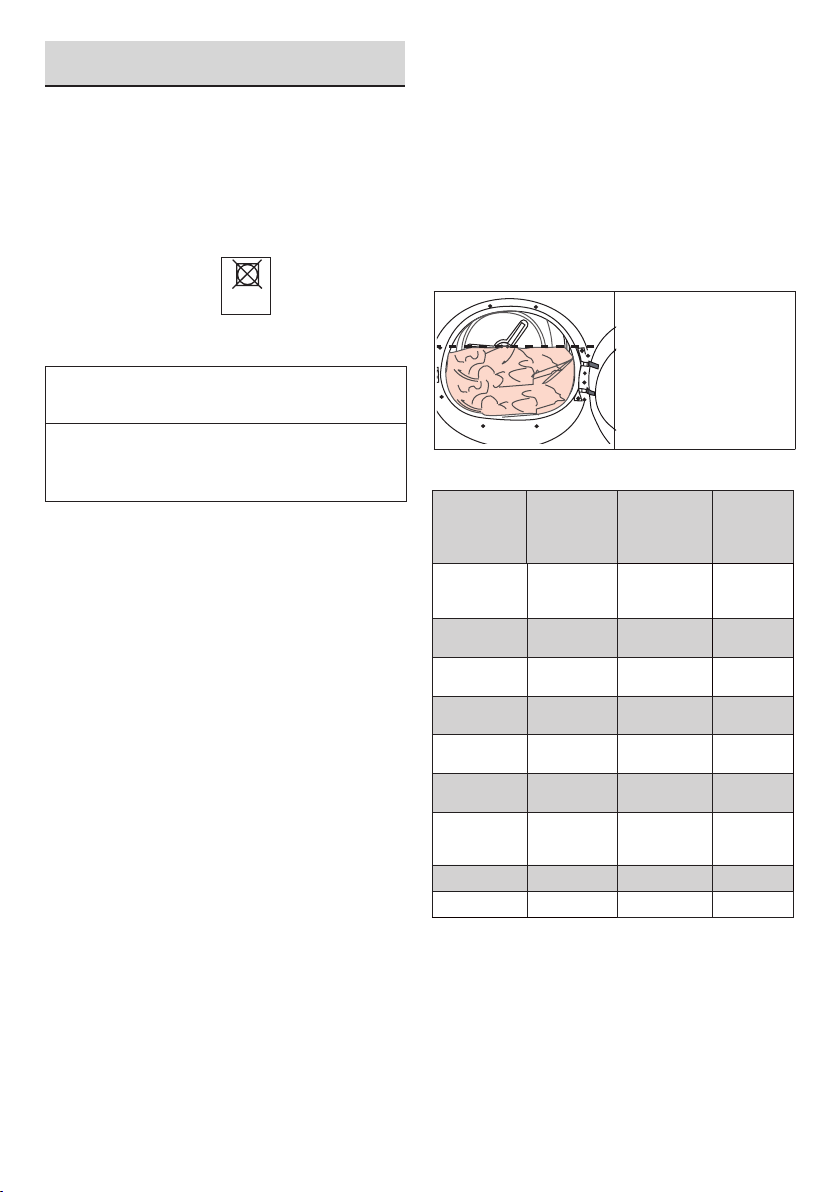
4.5 Correct load capacity
Follow the instructions
in the “Programme
selection and
consumption table”.
Do not load more than
the capacity values
stated in the table.
Following weights are given as examples.
Laundry
Cotton
quilt covers
(double)
Cotton quilt
covers (single)
Bed sheets
(double)
Bed sheets
(single)
Large
tablecloths
Small
tablecloths
Tea napkins 100
Bath towels 700 T-Shirts 125
Hand towels 350
Approximate
weights (g)*
1500 Blouses 150
1000 Cotton shirts 300
500 Shirts 250
350
700 Dresses 350
250 Jeans 700
Laundry
Cotton
dresses
Handkerchiefs
(10 pieces)
*Dry laundry weight before washing.
Approximate
weights (g)*
500
100
Dryer / User Manual
11
Page 12
5 Operating the product
1
5.1 Control Panel
1. On/Off/Program selection button
2. Start/Stand-by button
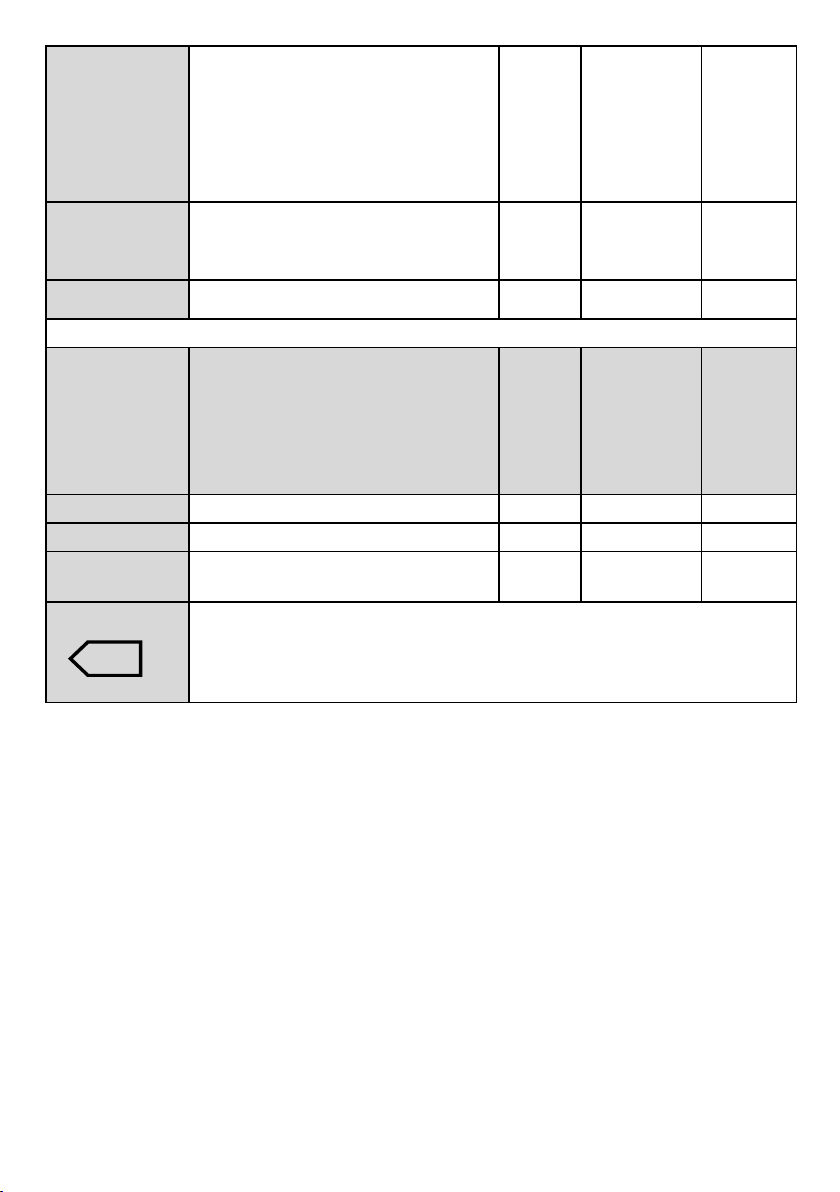
5.2 Symbols
3
4
5
2
3. End Time button
4. Drying Level Button
5. Buzzer volume/Time programs selection
button
Tank
full
End/anti-
creasing
Bedding/
Duvet
Filter
cleaning
On/O
Cottons Eco
Filter drawer /
Heat exchanger
cleaning
Timer
Delay
Express
Drying
Child-proof
lock
Cupboard
Dry
Dryness
Level+
Mute
Iron Dry
Dryness
Level++
Volume up
Jeans
Hygiene
(BabyProtect+)
Express
14’
BabyProtect
Shirt 30'
5.3. Preparation of drying machine
• Plug the drying machine.
• Open the loading door.
• Place the laundry to the drying machine
without jamming them.
• Push and close the loading door.
WARNING!
A
• Ensure that no
laundry is jammed
to the loading
door.
Delicates
Shirts
Sport
Extra dry
Refreshment
Cupboard
dry plus
Low
temperature
select
Start
pause
cancel
Daily
Freshen Up
Synthetics
Wool Refresh
Cottons
Drying Rack/
TimeDry
Dryness
Level
Mix
Express
30’
DownWear
Select the desired program using the On/Off/
Program selection knob, the machine will turn
on.
NOTE
C
• Selecting a program using the On/Off/
Program selection button does not mean
that the program started. Press the Start
/ Stand-by button to start the program.
12
Dryer / User Manual
Page 13

5.4 Program selection and consumption chart
EN
Programmes Programme Description
Cottons Iron Dry
Cottons Eco
Cottons Cupboard Dry
Cottons Extra Dry
Synthetics Iron Dry
Synthetics Cupboard
Dry
Timer Proggammes
Freshen Up
Gentle Care / Shirts
Jeans
Outdoor/Sports
Mix(Daily)
You may dry your cotton laundry to be ironed in
this program to have them slightly damp for ease
of ironing. (Shirt, T-shirt, tablecloth, etc.)
You may dry all your cotton laundry in this
program. (T-shirt, pants, pyjamas, baby clothes,
underwear, linen, etc.) You can put your laundry in
the wardrobe without ironing.
You may use this program for extra dryness in
thick laundry such as pants, tracksuit. You can
put your laundry in the wardrobe without ironing.
You may dry your thick cotton laundry in this
program such as towels, bathrobe, etc. You can
put your laundry in the wardrobe without ironing.
You may dry your synthetic laundry to be ironed
in this program to have them slightly damp for
ease of ironing. (Shirt, T-shirt, tablecloth, etc.)
You may dry all your synthetic laundry in this
program. (Shirt, T-shirt, underwear, tablecloth,
etc.) You can put your laundry in the wardrobe
without ironing.
You may select from time programmes between
10 and 160 minutes to achieve the desired drying
level at low temperature. In this programme,
tumble drier’s operation lasts for the set time
independently from the dryness of laundry.
Ventilates for 10 minutes without blowing hot air.
You can ventilate the cotton and linen clothes
that have been enclosed for a long time with this
program to remove their odour. You can use this
program to ventilate and soften wool laundry that
can be washed in a washing machine. Do not
use for full drying.
It dries the shirts in a more sensitive manner, and
causes less creasing and easier ironing.
You may dry denim pants, skirts, shirts or jackets
in this program.
Use it to dry your clothes made of synthetics,
cotton or mixed fabrics or waterproof products
such as functional jacket, raincoat etc. Turn them
inside out prior to drying.
You can dry both cotton and synthetic laundry
with this programme.Sports and fitness clothes
may be dried with this program.
(rpm)
Capacity (kg)
7 1000 145
7 1000 179
7 1000 204
7 1000 214
3,5 800 55
3,5 800 70
- - -
- - 10
1,5 1200 50
4 1200 140
2 1000 130
4 1000 125
Spin speed in
washing machine
(minutes)
Drying Time
Dryer / User Manual
13
Page 14
It is a long-term program that you can use for the
clothes (baby clothes, towels, underwear, etc.
Hygiene +
Downwear
Daily Express
Energy consumption values
Programmes Capacity (kg)
Cottons Eco * 7 1000 60% 1,75
Cottons Iron dry 7 1000 60% 1,40
Synthetics cupboard
dry
cotton) you require hygeine. Hygiene is provided
with high temperature. It is especially suitable for
durable fabrics. ((This program is identified and
approved by England’s “The British Foundation”
(Allergy UK).))
You can dry your clothes such as coats and
jackets with feathers and fibers which have a
label that can be dried in the dryer. Please dry
inside out.
Use this program to have 2 shirts ready for
ironing.
3,5 800 40% 0,65
"Cottons Eco programme" used at full and partial load is the standard drying programme to
which the information in the label and the fiche relates, that this programme is suitable for drying
normal wet Cottons laundry and that it is the most efficient programme in terms of energy
consumption for Cottons.
5 800 195
- 800 100
0,5 1200 30
machine (rpm)
Spin speed in washing
remaining humidity
Approximate amount of
Energy consumption
value kWh
* : Energy Label standard program (EN 61121:2012) All values in the table are determined
according to EN 61121:2012 standard. Consumption values may vary from the values in the chart
depending on laundry type, wringing speed, ambient conditions and voltage levels.
14
Dryer / User Manual
Page 15

Allergy UK is the brand of the
British Allergy Association. Seal
of Approval is created to guide
people that require
recommendation about a
product that the related
product restricts / reduces / eliminates the
allergens or reduces the allergen content
significantly in the ambient where allergy
patients exist. It aims to provide assurance
that the products are tested scientifically or
examined in a way to provide measurable
results.
5.5 Auxiliary functions
Buzzer / time
Drying machine makes an audible warning
when the program is completed. If you don’t
want the machine to make an audible warning,
press the “Buzzer / Time” button. When you
press the Buzzer/Time button, a light will
illuminate and no audible warning will be made
when the program ends.
NOTE
C
• You can select this function before or
after the program starts.
Buzzer/Time button is used to adjust program
duration while the Rack/Time programs are
selected.
Drying Level
Drying Level button is used for adjusting to
desired dryness level. Program duration may
change depending on the selection.
NOTE
C
• You can activate this function only prior
to start of program.
End time
You can delay the end time of the program up
to 24 hours with End time function.
1. Open the loading door and place the
laundry.
2. Select the drying program.
3. Press the End Time selection button and
set the delay time you wish. End Time
LED will illuminate. (When pressed and
hold the button, End Time proceeds nonstop).
4. Press the Start / Stand-by button. End
Time countdown starts. “:” Separator in
the middle of displayed delay time flashes.
NOTE
C
• You can add or remove laundry within
end time. Displayed time is the sum of
normal drying time and end time. End
Time LED will turn off at the end of
countdown, drying starts and drying LED
will illuminate.
Changing the end time
If you want to change the duration during the
countdown:
Cancel the program by turning the On/Off/
Program selection knob. Select the program
you want and repeat the End Time selection
process.
Cancelling the end time function
If you want to cancel the end time countdown
and start the program immediately:
Cancel the program by turning the On/Off/
Program selection knob. Select the program
you want and press the Start/Stand-by button.
5.6 Warning indicators
NOTE
C
• Warning indicators may vary depending
on the model of your dryer.
Filter cleaning
When the program is completed, the warning
indicator for filter cleaning turns on.
Water tank
When the program is completed, the warning
indicator to empty the water tank turns on.
If the water tank fills up while the program
continues, the warning indicator starts flashing
and the machine goes into stand-by. In this
case, empty the water tank and start the
program by pressing the Start / Stand-by
button. Warning indicator turns off and program
resumes.
Filter drawer /Heat exchanger cleaning
When the programme is finished, the cleaning
symbol of the heat exchanger or filter drawer
may light up.
5.7 Starting the program
Press the Start/Stand-by button to start the
program.
Start/Stand-by and Drying indicators will
illuminate to indicate that program started.
Dryer / User Manual
15
Page 16
5.8 Child Lock
The drying machine has a child lock which
prevents the program flow from being
interrupted when the buttons are pressed
during a program. When the child lock is
activated, all buttons on the panel except
the On/Off/Program selection knob are
deactivated.
Press the Drying Level and Buzzer buttons
simultaneously for 3 buttons to activate the
child lock.
The child lock has to be deactivated to be
able to start a new program after the current
program is finished or to be able to interfere
with the program. To deactivate the child lock,
keep the same buttons pressed for 3 seconds.
NOTE
C
• When the child lock is activated, the child
lock warning indicator on the screen
turns on.
• Child lock deactivates when the drying
machine is turned off and on by the On/
Off/Cancel knob.
5.9 Changing the program after it is
started
You can change the program you selected to
dry your laundry with a different program after
the drying machine starts running
• For instance, select Extra Dry program
by turning the On/Off/Program selection
knob to select Extra Dry instead of Iron
Dry.
• Press the Start/Stand-by button to start
the program.
Adding and removing clothes during
stand-by
If you want to add or remove clothes to/from
the drying machine after the drying program
starts:
• Press the Start/Stand-by button to put
the drying machine in Stand-by state. The
drying operation stops.
• Open the loading door while in Standby state, and close the door after you
remove or add laundry.
• Press the Start/Stand-by button to start
the program.
NOTE
C
• When the drying machine runs and
the child lock is active, it beeps twice
when the program selection knob is
turned. If the child lock is deactivated
without returning the program selection
knob to its previous position, program
will terminate due to the change in the
program selection knob position.
16
NOTE
C
• Adding laundry after the drying operation
starts may cause the dried laundry inside
the machine to mix with wet laundry and
leave the laundry damp at the end of
operation.
• Adding or removing laundry during drying
may be repeated as many times as you
wish. But this operation continuously
interrupts the drying operation, and thus
increases program duration and energy
consumption. So, it is recommended to
add laundry before the program starts.
• If a new program is selected by turning
the program selection knob while the
drying machine is in stand-by, the
running program terminates.
WARNING!
• Do not touch the inner surface of the
drum while adding or removing clothes
during a continuing program. The drum
surface is hot.
Dryer / User Manual
Page 17
5.10 Cancelling the program
If you want to cancel the program and
terminate the drying operation for any reason
after the drying machine starts running, turn
the On/Off/Cancel knob, the program will be
cancelled.
A
WARNING!
• The inside of the drying machine shall
be extremely hot when you cancel the
program during machine operation, so
run the refresh program to allow it to cool
down.
5.11 End of program
When the program ends, the Fibre Filter
Cleaning and Water Tank warning symbols
on the program observation indicator turn on.
Loading door may be opened and the dryer
machine becomes ready for another run.
Bring the On/Off/Program selection knob to
On/Off position to turn the drying machine off.
NOTE
C
• If the laundry is not removed after the
program is completed, the wrinkle
prevention function activates for 2 hours
to prevent the laundry inside the machine
to get wrinkled. The program tumbles
the laundry with 10-minute intervals to
prevent them from wrinkling.
Dryer / User Manual
17
Page 18
6 Maintenance and cleaning
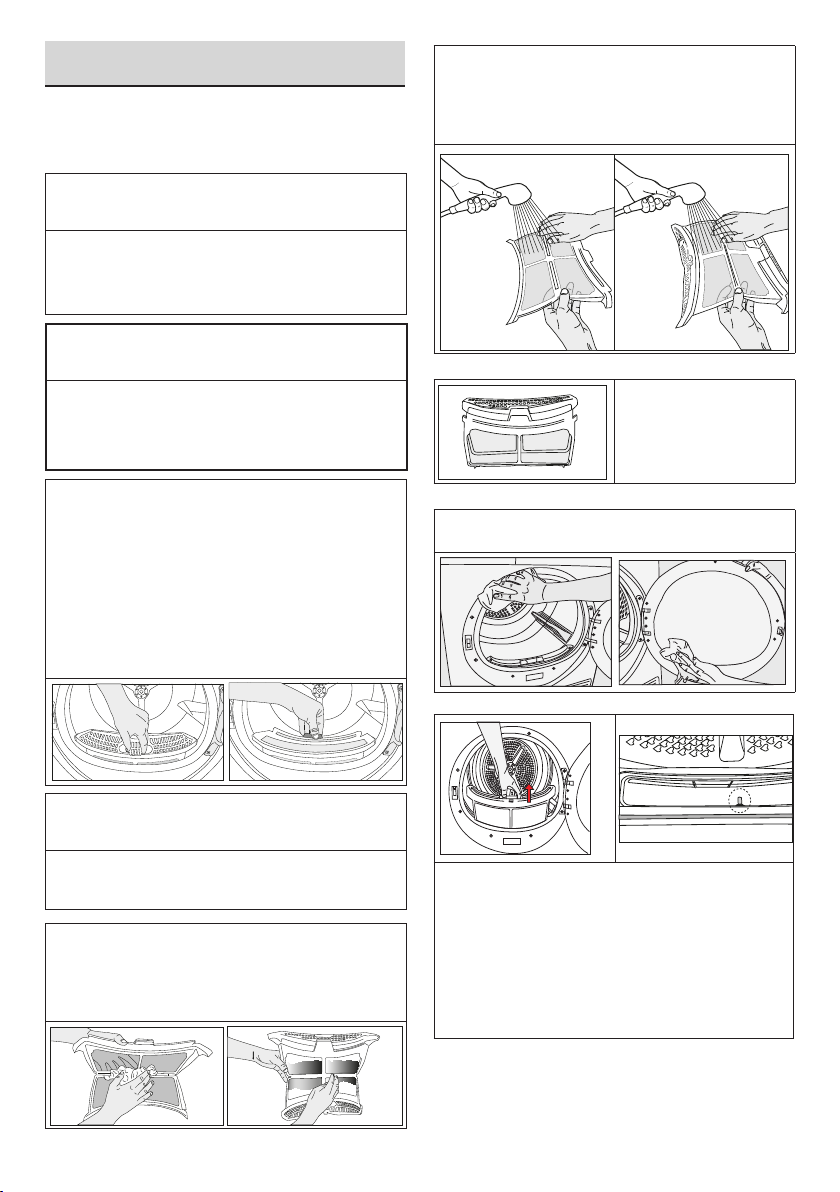
6.1 Loading Door Inner Surface
The hair and fibres that are separated from the
laundry during drying process is collected by
the Fibre Filter.
NOTE
C
• Fibres are formed during wearing and
washing clothes.
• You can clean the filter slot with a
vacuum cleaner.
• Clean both filters under water running in
reverse direction of fibre accumulation
or with a soft brush. Dry the filter before
placing it back.
A
WARNING!
• After each drying cycle, clean the fibre
filter and the inner surface of the loading
door.
To clean the fibre filter:
• Open the loading door.
• Hold the first part (inner filter) of the two
part fibre filter and remove it by pulling it
upwards.
• Collect the hair, fibres and cotton balls with
hand or with a soft cloth.
• Remove the second part (outer filter) by
pulling it upwards.
NOTE
C
• Ensure that hair, fibre and cotton balls do
not fall into the slot where the filters are
installed.
• Open both fibre filters (inner and outer
filters) remove the hair, fibre, cotton balls
with your damp hand or a vacuum cleaner
or a cloth.
• Insert the fibre filters
on one another and
place it back in its
place.
• Clean the loading door interior and its
washer with a soft damp cloth.
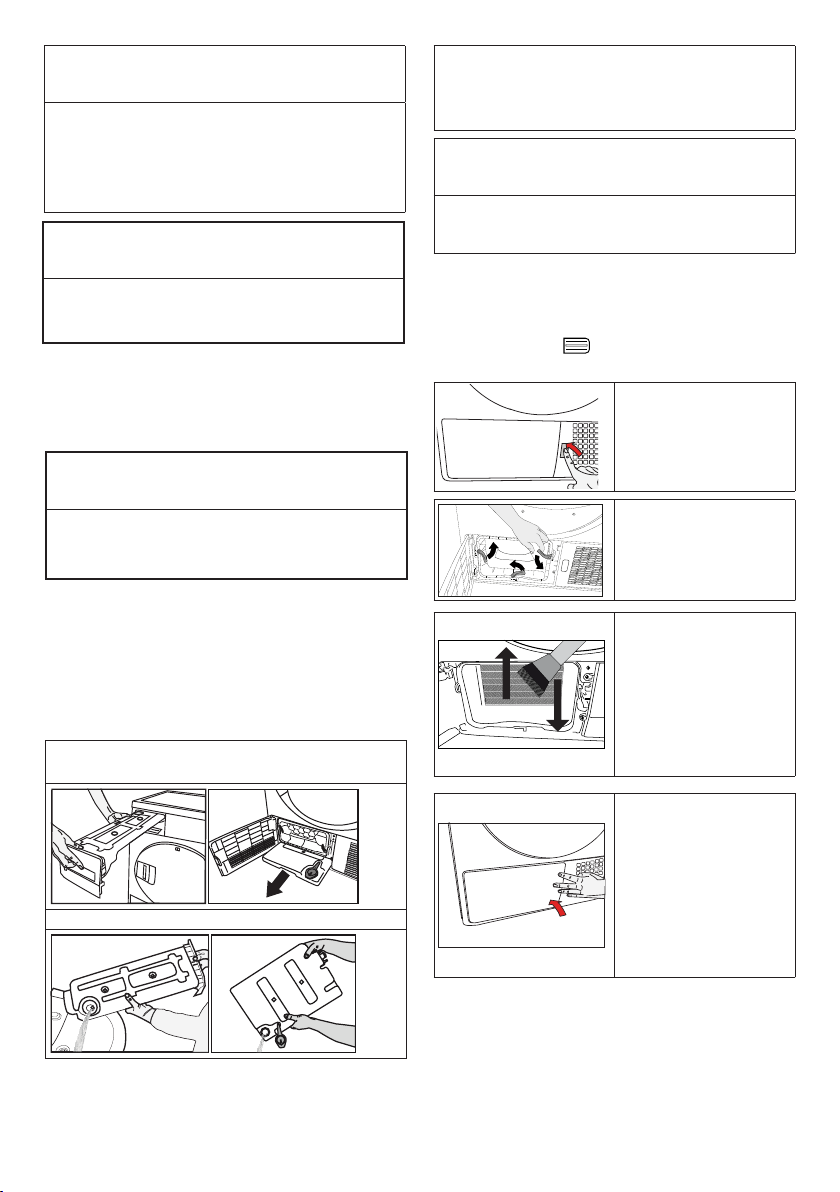
6.2 Cleaning the sensors
• There are temperature sensor in the
dryer that detect whether the laundry is
dry or not.
To clean the sensors:
• Open the loading door of the dryer.
• Remove the lint filter by pulling it up.
• Clean the sensor with your hand if any
fluff accumulation on it.
18
Dryer / User Manual
Page 19
NOTE
C
• Clean the sensor 4 times a year.
• Do not use metal tools when cleaning the
sensor.
• Allow the machine to cool down if it is still
hot due the drying process.
WARNING!
A
• Never use solvents, cleaning agents or
similar substances for cleaning due to the
risk of fire and explosion!
6.3 Draining the water tank
Dampness of the laundry is removed and
condensed during drying process and the
water that arise accumulates in the water tank.
Drain the water tank after each drying cycle.
• If there is lint accumulation in the funnel
of the water tank, clean it under running
water.
• Place the water tank into its seat.
NOTE
C
• If the direct water draining is used as an
option, there is no need to empty the
water tank.
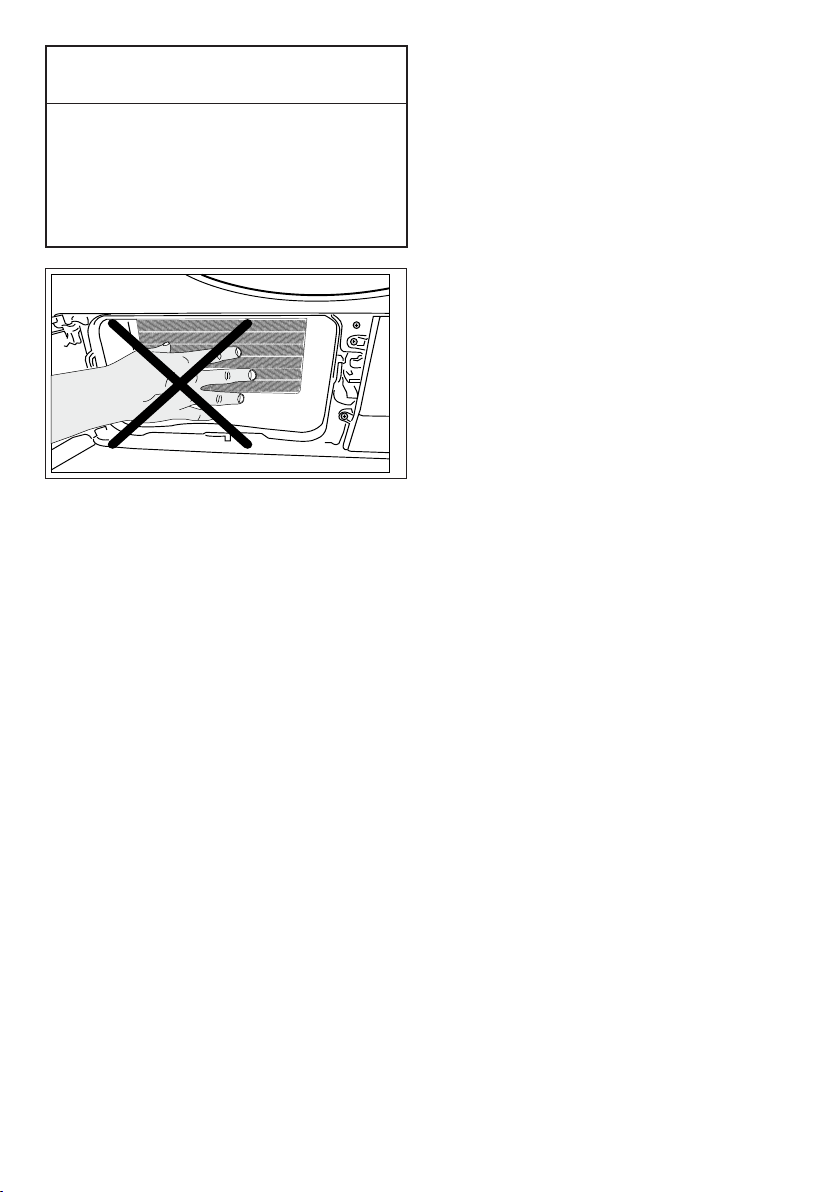
6.4 Cleaning the evaporator
The hair and fibres that are not caught by the
fibre filter goes to the fins of the evaporator
behind the toe board and accumulates here.
If the evaporator” ” icon is flashing or in 3
month periods, clean the evaporator.
• Open the toe
board by pressing
on it.
A
WARNING!
• Condensed water is not drinkable!
• Never remove the water tank when the
program is running!
If you forget to drain the water tank, the
machine will stop during the subsequent drying
cycles when the water tank is full and the Water
Tank warning symbol will flash. If this is the
case, drain the water tank and press Start /
Pause button to resume the drying cycle.
To drain the water tank:
1. Remove the water tank in the drawer
or container carefully.
2. Drain the water in the tank.
• To open the air
routing door, move
the release latch.
• Clean the fibres
on the evaporator
with a damp cloth
/ vacuum cleaner
with a brush by
moving upwards
and downwards.
• After the cleaning
process is
completed, place
the air router door
to its place, move
the latches to close
it and close the toe
board.
Dryer / User Manual
19
Page 20
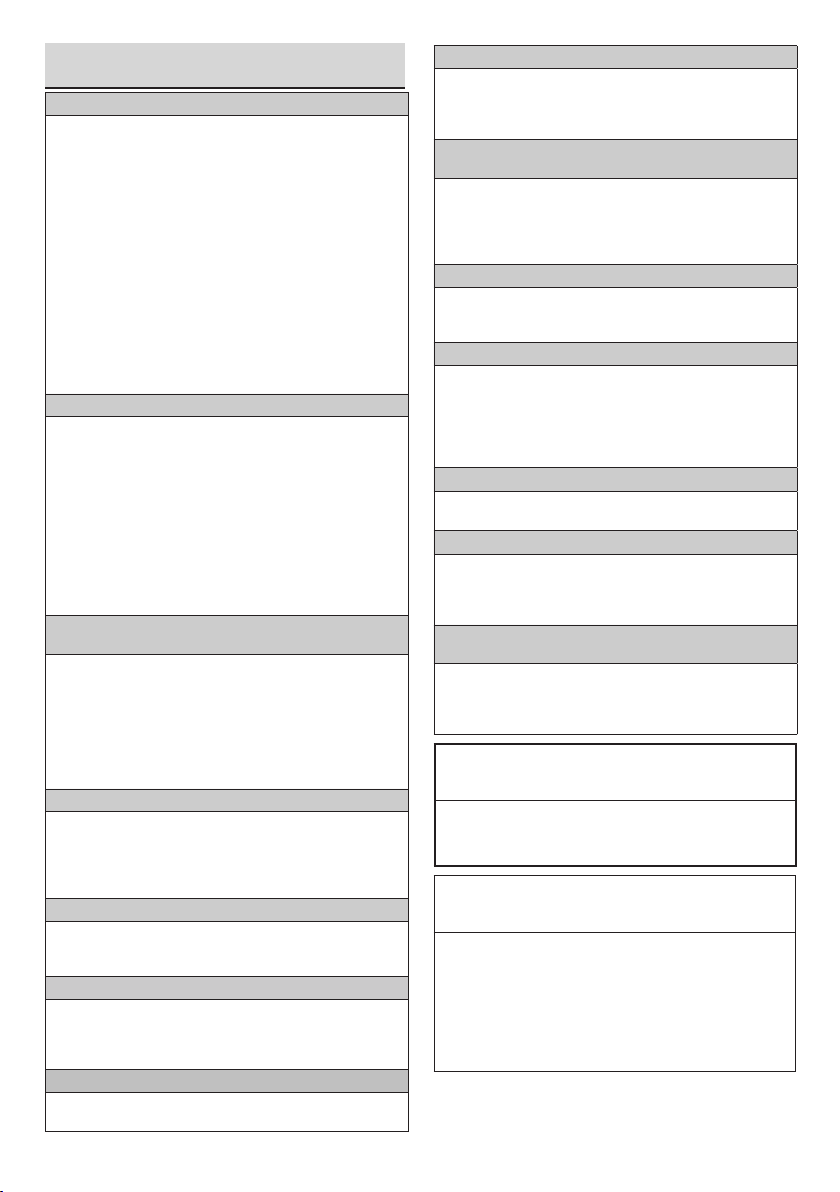
A
WARNING!
• You can clean by hand, provided you wear
protective gloves. Do not try to clean with
bare hands. Evaporator fins may damage
your hands.
• Cleaning by left to right movements may
damage the evaporator fins. This may lead
to drying issues.
20
Dryer / User Manual
Page 21
7 Troubleshooting
Drying operation takes too long.
Fibre filter (interior and exterior filter) pores may be clogged.
>>> Wash the fibre filters with warm water and dry.
Evaporator front side may be clogged. >>> Clean the front
side of the evaporator.
The ventilation grills in front of the machine may be closed.
>>> Remove any object in front of the ventilation grills that
blocks air.
Ventilation may be inadequate because the are the
machine is installed in is too small. >>> Open the door
or windows to prevent the room temperature from rising
very high.
A lime layer may have accumulated on the humidity
sensor. >>> Clean the humidity sensor.
Excessive amount of laundry might be loaded. >>> Do not
load the drying machine excessively.
Laundry might not have been wrung adequately. >>>
Perform a higher speed wringing on the washing machine.
Clothes come out damp after drying.
A program not suitable for the laundry type may have been
used.>>> Check the maintenance labels on the clothes
and select a program suitable for the clothes’ type or use
time programs as extra.
Fibre filter (interior and exterior filter) pores may be clogged.
>>> Wash the filters with warm water and dry.
Evaporator front side may be clogged. >>> Clean the front
side of the evaporator.
Excessive amount of laundry might be loaded. >>> Do not
load the drying machine excessively.
Laundry might not have been wrung adequately. >>>
Perform a higher speed wringing on the washing machine.
Drying machine does not turn on or program cannot be
started. Drying machine does not run after it is configured.
Power plug might be unplugged. >>> Make sure the
power cord is plugged in.
Loading door might be open. >>> Ensure that the loading
door is properly closed.
A program might not be set or Start / Pause /Cancel
button might not be pressed. >>> Check that the program
is set and it is not in Pause position..
Child lock may be activated. >>> Turn off the child lock.
Program terminated prematurely for no reason.
Loading door might be closed completely. >>> Ensure
that the loading door is properly closed.
There might be a power outage. >>> Press the Start /
Pause / Cancel button to start the program.
Water tank may be full. >>> Empty the water tank.
Clothes have shrunk, hardened or spoiled.
A program not suitable with the laundry type might have
been used. >>> Check the maintenance labels on the
clothes and select a program suitable for the clothes.
Water drips from the loading door.
Fibres might have gathered on the inner sides of the
loading door and the loading door gasket. >>> Clean the
inner surfaces of the loading door and the loading door
gasket surfaces.
Loading door opens by itself.
Loading door might be closed completely. >>> Push the
loading door until the closing sound is heard.
Water tank warning symbol is on/flashing.
Water tank may be full. >>> Empty the water tank.
Water discharge hose might have collapsed. >>> If the
product is connected directly to the water drain check the
water discharge hose.
The lighting inside the drying machine does not turn on. (In
models with lamp)
The drying machine might not have been turned on using
On/Off button. >>> Check that the drying machine is
turned on.
Lamp might be malfunctioning. >>> Contact Authorized
Service to replace the lamp.
Anti-crease icon is lit.
Anti-Crease mode that prevents the laundry in the drier
to crease may be activated. >>> Turn the drier off and
remove the laundry.
Fibre filter cleaning icon is lit.
Fibre filter (interior and exterior filter) may be unclean. >>>
Wash the filters with warm water and dry..
A layer may be formed on the fibre filter pores that leads to
clogging. >>> Wash the filters with warm water and dry.
Fibre filters may not be inserted. >>> Insert the interior and
exterior filters to their places.
An audible warning is heard from the machine
Fibre filters may not be inserted. >>> Insert the interior and
exterior filters to their places.
Evaporator warning icon is flashing.
Evaporator front side may be clogged with fibres. >>>
Clean the front side of the evaporator.
Fibre filters may not be inserted. >>> Insert the interior and
exterior filters to their places.
The lighting inside the drying machine turns on. (In models
with lamp)
If the drying machine is plugged to the power outlet, the
On/Off button is pressed and the door is open; the light
turns on. >>> Unplug the drying machine or bring the On/
Off button to Off position.
WARNING!
A
• If the problem persists after following the
instructions in this section, contact your vendor
or an Authorized Service. Never try to repair your
product yourself.
NOTE
C
• In an event that you encounter an issue on any part
on your appliance, you can ask for a replacement
by contacting the authorized service with the
appliance model number.
• Operating the appliance with non-authentic parts
may lead the appliance to malfunction.
• Manufacturer and distributor are not liable for
malfunctions resulting from using non-authentic
parts.
Dryer / User Manual
21
Page 22

PRODUCT FICHE
Complying Commission Delegated Regulation (EU) No 392/2012
Supplier name or trademark
Model name
Rated capacity (kg)
Type of Tumble Dryer
Energy efficiency class
Annual Energy Consumption (kWh)
(1)
(2)
Type of Control
Energy consumption of the standard cotton programme at full load (kWh)
Energy consumption of the standard cotton programme at partial load (kWh)
Power consumption of the off-mode for the standart cotton programme at full load, P
Power consumption of the left-on mode for the standart cotton programme at full load, P
The duration of the left on mode (min)
Standard cotton programme
Programme time of the standard cotton programme at full load, T
Programme time of the standard
Weighted programme time of the standard cotton programme at full and partial load (T
Condensation efficiency class
Average condensation efficiency of the standard cotton programme at full load, C
Average condensation efficiency of the standard cotton programme at partial load, C
Weighted condensation efficiency of the standard cotton programme at full load and partial load, C
Sound power level for the standard cotton programme at full load
Built-in
(3)
cotton programme at partial load, T
(4)
(min)
dry
(min)
dry1/2
(5)
(W)
O
(W)
L
)
t
dry
dry1/2
t
Air Vented
Condenser
Automatic
Non-automatic
BEKO
DF7412GAW
7188301100
7.0
-
A++
212,0
-
1,75
0,96
0,50
1,00
30
-
179
107
138
B
81%
81%
81%
65
-
: Yes - : No
(1) Scale from A+++ (most efficient) to D (least efficient)
(2) Energy consumption based on 160 drying cycles of the standard cotton programme at full and partial load, and the consumption of
the low-power modes. Actual energy consumption per cycle will depend on how the appliance is used.
(3) "Cotton cupboard dry programme" used at full and partial load is the standard drying programme to which the information in the
label and the fiche relates, that this programme is suitable for drying normal wet cotton laundry and that it is the most efficient
programme in terms of energy consumption for cotton
(4) Scale from G (lest efficient) to A (most efficient)
(5) Weighted average value — L
expressed in dB(A) re 1 pW
WA
22
Dryer / User Manual
Page 23

Page 24

Kérjük, először olvassa el a
használati útmutatót!
Kedves Vásárló!
Köszönjük, hogy egy Beko terméket választott.
Reméljük, hogy az ön által megvásárolt,
korszerű körülmények között gyártott gép a
legjobb eredményt nyújtja majd önnek. Azt
tanácsoljuk, hogy az első használat előtt
alaposan olvassa végig ezt a használati
útmutatót és a kísérő dokumentumokat, majd
tartsa azt meg a továbbiakban is. Ha másnak
adná át a terméket, mellékelje a használati
útmutatót is. Ügyeljen az útmutatóban található
részletekre és a figyelmeztetésekre, és kövesse
azokat.
Ezt a használati útmutatást a fedlapján látható
modellhez használja.
• Olvassa el a használati útmutatót.
Jelmagyarázat
A használati útmutatóban a következő jelzések
fordulnak elő:
VESZÉLY!
B
• Áramütéssel kapcsolatos figyelmeztetés.
FIGYELMEZTETÉS!
• Forró felületekkel kapcsolatos figyelmeztetés.
FIGYELMEZTETÉS!
• Figyelmeztetés a leforrázás veszélyére
MEGJEGYZÉS
C
• Fontos információk, illetve a használattal
kapcsolatos hasznos útmutatók.
A termék csomagolóanyagait,
a nemzeti környezetvédelmi
szabályzásnak megfelelően
újrahasznosítható anyagokból
gyártottuk.
Ne dobja ki a csomagolóanyagokat háztartási
vagy más hulladékkal együtt, azokat a helyi
hatóságok által kijelölt csomagolóanyag
gyűjtőpontoknál dobja ki.
VESZÉLY!
• Tűzveszéllyel kapcsolatos figyelmeztetés.
FIGYELMEZTETÉS!
A
• A veszélyes helyzetekkel kapcsolatos
figyelmeztetések, tekintettel az élet- és
vagyonbiztonságra.
Ez a termék a legmodernebb technolóogik felhasználásával készült, környezetbarát körülmények között.
24
Szárító /Használati útmutató
Page 25

1 Fontos utasítások a biztonság és környezet kapcsán
MEGJEGYZÉS
C
• Ez a fejezet olyan biztonsági
információkat tartalmaz, melyek
segítenek megelőzni a személyi
sérülések és az anyagi károk
kockázatát. Az előírások figyelmen
kívül hagyása a garancia
elvesztésével jár.
1.1 General safety
FIGYELMEZTETÉS!
A
• A készülék használható 8 éves
és ennél nagyobb gyermekek
által, valamint csökkentett
fizikális, érzékelési vagy mentális
készségekkel rendelkező személyek
által, vagy tapasztalattal és tudással
nem rendelkező személyek által,
ha őket a biztonságukért felelős
személy a készülék használatával
kapcsolatban tájékoztatással vagy
iránymutatással látta el. Ne hagyja
a gyermekeket a készülékkel
játszani. A tisztítási és karbantartási
műveleteket gyermekek felügyelet
nélkül nem végezhetik.
• Ha a gyermekek nincsenek
folyamatos felügyelet alatt, tartsa
távol a 3 éven aluli gyermekeket.
• Az állítható lábat nem szabad
eltávolítani. A szárító és a padló
közötti távolságot nem szabad
olyan anyagokkal csökkenteni,
mint pl. a szőnyeg, fa vagy a
szerelőszalag. Ez problémákat okoz
a szárítónál.
A
FIGYELMEZTETÉS!
• A beszerelési és javítási munkákat
mindig bízza Szakszervizre. A
gyártó nem vállal felelősséget
azokért a károkért, melyek
képzetlen személy által végzett
javítási munkák következtében
következnek be.
• Soha ne tisztítsa úgy a szárítót,
hogy vizet permetez vagy borít rá!
Ezzel áramütés veszélyének teszi ki
magát
Gőzölő funkcióval rendelkező
termékek esetében:
FIGYELMEZTETÉS!
A
• Csak desztillált vizet vagy a gép
víztartályában lecsapódott vizet
használja a gőzölős programokkal.
Ne használjon vezetékes vizet vagy
adalékanyagokat. A víztartályban
összegyűlt víz használata során
szűrje meg és távolítsa el belőle a
szálakat.
• A gőzölő program üzeme közben
ne nyissa ki az ajtót. Forró víz
csapódhat ki.
• Mielőtt gőzölő programot állít be a
ruhának, távolítsa el a foltokat.
• Csak olyan ruhákhoz állítsa be a
gőzölő programot, amelyek nem
piszkosak vagy foltosak, csak
valamilyen kellemetlen szag járja át
őket (szageltávolító).
• Sem a gőzölő, sem más program
során ne használjon vegytisztító
szereket vagy kiegészítő anyagokat.
Szárító /Használati útmutató
25
Page 26

1.1.1 Electrical safety
VESZÉLY!
B
•
Az elektromos biztonsági
utasításokat a beszerelés
során az elektromos
csatlakozással kapcsolatban
követni kell.
•
A berendezést tilos külső
kapcsoló berendezésen
keresztül csatlakoztatni, mint
amilyenek az időzítő, vagy
olyan áramkörre kapcsolni,
amelyet egy berendezés
rendszeresen bekapcsol és
kikapcsol.
• Az olajjal, acetonnal, alkohollal,
fűtőolajjal, kerozinnal, folteltávolító
szerekkel, terpentinnel, paraffinnal,
paraffin eltávolító szerekkel,
benzinnel, viasszal vagy viaszos
eltávolító szerekkel szennyezett
tárgyakat bő vízzel kell lemosni,
mielőtt a szárítóban szárítanák.
• A feszültség és a megengedett
biztosítékos védelem adatait a
típuscímke lemezen találja.
• A típuscímkén látható feszültségnek
meg kell egyeznie a hálózati
feszültséggel.
• Ha nincs használatban a szárító,
áramtalanítsa.
• Telepítés, karbantartás, tisztítás és
javítási munkálatok közben, húzza ki
a szárítót a hálózati csatlakozóból.
B
VESZÉLY!
• Nedves kézzel ne érintse meg a
csatlakozót! Az áramtalanítást soha
ne a zsinór húzásával végezze,
mindig a csatlakozónál fogva húzza
ki.
• Az áramütés és tűz kockázatának
csökkentése érdekében, a szárítót
ne csatlakoztassa hosszabbítókkal,
többdugaszos aljzatokkal vagy
adapterekkel az elektromos
hálózathoz.
• A gép beszerelése után a
tápkábel dugójának könnyen
hozzáférhetőnek kell lennie.
•
A sérült tápkábelt a
szakszerviz értesítésével le
kell cserélni.
•
Ha a készülék
meghibásodása esetén,
a javítás szakszervizzel
való elvégzéséig nem
üzemeltethető! Ezzel
áramütés veszélyének teszi
ki magát!
1.1.2 Termék biztonság
FIGYELMEZTETÉS!
A
• Győződjön meg arról, hogy a szárító
levegő bemenete nyitva van, és jól
szellőzik.
• A termék R290 hűtőközeget
tartalmaz.
• Az R290 egy környezetbarát, de
gyúlékony hűtőközeg.
• Tartsa távol a terméket olyan
potenciális hőforrásoktól, amelyek
meggyulladhatnak.
26
Szárító /Használati útmutató
Page 27

VESZÉLY!
VESZÉLY!
A tűzveszéllyel kapcsolatosan
megfontolandó pontok:
• A meghatározott mosott cikkeken
kívül, más nem szárítható a
szárítóban, tűzveszély miatt.
• Mosatlan ruhaneműk
• A olajjal, acetonnal, alkohollal,
gázolajjal, kerozinnal,
folteltávolítóval, terpentinnel,
parafinnal vagy parafin-eltávolítóval
szennyezett ruhaneműt a szárítás
előtt forró, oldószeres vízben kell
lemosni.
• Ezért, főleg az olyan anyagokat
melyekben a fent meghatározott
foltok vannak, alaposan ki kell
mosni, ahhoz megfelelő mosószert
kell használni, magas mosási
hőmérsékleten.
Az alább meghatározott
mosott cikkeken kívül, más
nem szárítható a szárítóban,
tűzveszély miatt:
• Gumihabbal (latex hab) bevont
ruhák vagy párnák, fürdőköpenyek,
vízálló textíliák, gumi erősítéssel
ellátott anyagok és gumihab
betétek.
• Ipari kemikáliákkal tisztított ruházat.
• Az olyan tárgyak, mint az öngyújtó,
gyufa, aprópénz, fém alkatrészek,
tű, stb. károsíthatják a dobot
vagy működési problémákhoz
vezethetnek. Ezért, ellenőrizze a
ruhát, amit a szárítóba kíván tenni.
• Soha ne állítsa meg a szárítót
mielőtt a program befejeződne.
Ha mégis így kell tennie, távolítsa
el a ruhát gyorsan, és fektesse le
azokat hogy eloszlassa a hőt.A nem
megfelelően mosott ruhák maguktól
meggyulladhatnak, még az után is,
hogy a szárítás befejeződött.
• Gondoskodnia kell a megfelelő
szellőztetésről annak érdekében,
hogy az eltérő üzemanyagokkal (pl.
nyílt lánggal) üzemelő gépek által
kibocsátott gázok ne gyűljenek fel
a helységben az utógyújtás hatás
miatt.
Szárító /Használati útmutató
A
FIGYELMEZTETÉS!
• Fémrészeket is tartalmazó alsónemű
nem szárítható.a szárítóban. A
szárítógép meghibásodásához
vezethet, ha a szárítás alatt a fém
részek meglazulnak és letörnek.
27
Page 28

MEGJEGYZÉS
C
• Az öblítőket és hasonló termékeket
a gyártó útmutatásai szerint
használja.
• Az egyes betöltések előtt vagy
után mindig tisztítsa meg a szűrőt.
A szárítót soha ne használja
bolyhszűrő nélkül.
1.2 Mounting over a washing machine
• Ha a készüléket a mosógép felett kívánja
használni, akkor a két gép között rögzítő
eszközt kell alkalmazni. A rögzítő eszközt
szakképzett személynek kell beszerelnie.
• Ha a mosógép és a szárítógép egymásra
van helyezve, teljes töltet esetén
körülbelül 180 kg-ot nyomnak együtt. A
készülékeket olyan, egyenletes talajra
helyezze, mely megfelelő teherbírással
rendelkezik!
A
FIGYELMEZTETÉS!
• Soha ne próbálja saját maga
megjavítani a terméket. Hacsak
a használati útmutató vagy a
szervizkönyv kifejezetten ezt
nem javasolja, ne kíséreljen meg
semmiféle javítási vagy cserélési
műveletet a terméken, még akkor
sem, ha tudja, hogy azt hogyan kell
kivitelezni. Ellenkező esetben saját
és mások életét veszélyezteti.
• Ahol a szárítót beszerelik, nem lehet
olyan zárható, toló, vagy zsanéros
ajtó, mely akadályozhatja a betöltő
ajtó kinyitását.
• Olyan helyre szerelje be a
szárítót ami megfelel az otthoni
használatnak. (Fürdőszoba, zárt
balkon, garázs, stb.)
• Ügyeljen arra, hogy a háziállatok ne
másszanak bele a szárító. Használat
előtt ellenőrizze a szárító dobját.
• Ne támaszkodjon a szárító betöltő
ajtajára amikor az nyitva van, mert az
leeshet.
• Ne hagyja, hogy sok szösz gyűljön
össze a szárítógép körül.
A
FIGYELMEZTETÉS!
• A mosógépet nem szabad a
szárítóra helyezni. A mosógépre való
felszerelésekor, figyeljen oda a fent leírt
utasításokra.
Beszerelési táblázat a mosógéphez és a
szárítóhoz
Szárítógép
mélysége
54cm Beszerelhető
60cm Beszerelhető
1.3 Rendeltetésszerű használat
• A szárítót otthoni használatra
tervezték. Kereskedelmi célra valamint
a rendeltetésétől eltérő módon nem
használható.
• A szárítót csak olyan ruhanemű
szárításához használhatja, melyen ez
megfelelően jelezve van.
• A gyártó elhárítja a helytelen használatból
vagy szállításból származó felelősséget.
• Az Ön által megvásárolt szárító
élettartama 10 év. Ez idő alatt a szárító
megfelelő működtetéséhez elérhetőek
lesznek az eredeti pótalkatrészek..
1.4 Gyermek biztonsá
• A csomagolóanyagok veszélyesek
a gyermekek számára. A
csomagolóanyagokat tartsa távol a
Mosógép mélysége
62cm
60cm
Nem
beszerelhető
54cm
< 50cm
Nem beszerelhető
28
Szárító /Használati útmutató
Page 29

gyermekektől.
• Az elektromos berendezések veszélyesek
a gyermekekre nézve. Ha a gép működik,
a gyermekeket ne engedje a közelébe!
Ne hagyja, hogy játsszanak a szárítóval!
Használjon gyerekbiztos zárat, hogy
elkerülje azt, hogy a gyermekek a
szárítóval játsszanak.
MEGJEGYZÉS
C
A gyerekbiztos zár a vezérlőpanelen található.
(Lásd Gyerekzár)
• Tartsa zárva a betöltőajtót még akkor is,
amikor nem használja a szárítót.
1.5 Megfelelés a WEEE előírásnak és
a termék leselejtezése
A termék megfelel az uniós WEEEirányelv (2012/19/EU)
követelményeinek. A terméken
megtalálható az elektromos és
elektronikus hulladékok
besorolására vonatkozó szimbólum
(WEEE).
A terméket magas minőségű alkatrészekből
és anyagokból állították elő, amelyek
ismételten felhasználhatók és alkalmasak az
újrahasznosításra. A hulladék terméket annak
élettartamának végén ne a szokásos háztartási
vagy egyéb hulladékkal együtt selejtezze le.
Vigye el azt egy az elektromos és elektronikus
berendezések újrahasznosítására szakosodott
begyűjtőhelyre. A begyűjtőhelyek kapcsán
kérjük, tájékozódjon a helyi hatóságoknál.
VESZÉLY!
• Az R290 egy gyúlékony hűtőközeg. Ezért
győződjön meg róla, hogy a rendszer és
a csövek nem sérültek-e a működés és a
kezelés során.
• Tartsa távol a terméket olyan potenciális
hőforrásoktól, amelyek sérülés esetén
meggyulladhatnak.
• Ne dobja a terméket tűzbe.
1.6 Az RoHS-irányelvnek való
megfelelés:
Az Ön által megvásárolt termék megfelel
az uniós RoHS-irányelv (2011/65/EU)
követelményeinek. A termék nem tartalmaz
az irányelvben meghatározott káros vagy tiltott
anyagokat.
1.7 Csomagolási információ
A termék csomagolóanyagai, a nemzeti
környezetvédelmi előírásokkal összhangban,
újrahasznosítható anyagokból készültek. A
csomagolóanyagokat ne a háztartási vagy
egyéb hulladékokkal együtt dobja ki! Vigye el
azokat a helyi hatóságok által e célból kijelölt
csomagolóanyag-begyűjtő pontokra.
1.8 Műszaki Specifikációk
HU
Magasság (min. /
max.)
Szélesség 59,7 cm
Mélység 50,8 cm
Kapacitás (max.) 7 kg**
Nettó súly (± 4 kg) 42 kg
Feszültség
Névleges bemeneti
teljesítmény
Modellkód
* Min. magasság: Magasság zárt
beállítólábakkal.
Max. magasság: Magasság maximálisan
nyitott beállítólábakkal.
** Száraz szennyes súly mosás előtt.
*** A típuscímke a betöltõajtó mögött található.
84,7 cm / 86,6 cm*
Lásd a
típuscímkét***
MEGJEGYZÉS
C
• A szárító műszaki jellemzői előzetes
értesítés nélkül megváltozhatnak a
minőség fejlesztése érdekében.
• A jelen használati utasításban található
értékek csak sematikus adatok, így
elképzelhető, hogy nem egyeznek száz
százalékban a termékkel.
• A szárító címkéin vagy a
dokumentumokon feltüntetett értékek
laboratóriumi körülmények között
kerültek meghatározásra, a vonatkozó
szabványok szem előtt tartása mellett.
A szárító működési és környezeti
körülményektől függően az értékek
eltérőek lehetnek.
Szárító /Használati útmutató
29
Page 30

2 Az Ön szárítógépe
3 Üzembe helyezés
2.1 Áttekintése
11
1
10
9
8
7
6
2
3
4
5
1. Felső panel
2. Vezérlőpanel
3. Betöltőajtó
4. Védőlemez nyitó gomb
5. Szellőzőrácsok
6. állítható lábak
7. Azokban a modellekben, amelyekben a
tartály alul található, a víztartály a talplemezen
belül van
8. Típusjelölő címke
9. Bolyhszűrő
10. Víztartály-fiók (azokban a modellekben,
amelyekben a tartály felül található)
11. Tápkábel
2.2 A csomag tartalma
1. Víz
leeresztő cső
2. Szűrőfiók
pót- szivacs *
3. Használati
útmutató
4. Szárítókosár*
*A modelltől függően, tartozéka lehet a
gépének.
30
5. Szárítógép
használati
utasítás*
6. Víztöltő
tartály*
7. Tiszta víz*
8.
Illatkapszula
csoport*
Mielőtt az Önhöz legközelebbi szakszervizt
kihívná a szárítógép bekötése céljából,
győződjön meg, hogy az elektromos
csatlakozás és a csatornabekötés megfelel
a használati útmutatóban meghatározott
követelményeknek. Ha nem megfelelőek, hívjon
képesített villany-, illetve vízvezeték szerelőt a
szükséges csatlakozás kialakítása érdekében.
MEGJEGYZÉS
C
• A szárítógép helyének előkészítése,
valamint az elektromos és
csatornahálózati bekötés a fogyasztó
felelőssége.
FIGYELMEZTETÉS!
A
• Telepítés előtt szemrevételezéssel
győződjön meg, hogy a szárítógép nem
sérült. Ha a szárító sérült, ne végeztesse
el a bekötését. A sérült termék
használata balesetveszélyes lehet.
• A szárítógép használata előtt várjon 12
órát.
3.1 Megfelelő elhelyezés
A szárítót stabil, egyenletes felszínen helyezze
el.
A szárítógép nehéz. Ne mozgassa egyedül.
• A szárítógépet jól szellőző, pormenntes
helyiségben használja.
• A szárítógép és a talaj közötti hézagot
tilos kitölteni pl. szőnyeggel, fával vagy
szalaggal.
• Ne takarja el a szárítógépe
szellőzőnyílásait.
• A telepítés helyszínén nem lehet olyan
zárható tolóajtó vagy zsanéros ajtó, amely
akadályozza a gép töltőajtajának nyitását.
• A szárítógép telepítését követően a
gépet azon a helyen kell hagyni, ahol a
bekötést elvégezték. A gép telepítésekor
győződjön meg, hogy annak hátfala nem
ér semmihez (csap, aljzat stb.).
• Helyezze a szárítógépet legalább 1 cm
távolságra más berendezési tárgyaktól.
• Az Ön szárítógépét +5°C és +35°C
közötti hőmérséklettartományban lehet
működtetni. Ettől eltérő körülmények
Szárító /Használati útmutató
Page 31

esetén az üzemeltetés a gépet
károsíthatja.
• A szárítógép hátfalát állítsa a falhoz.
VESZÉLY!
B
A gépet ne állítsa rá a tápkábelre.
* Hagyja figyelmen kívül a következő
figyelmeztetést, ha a termék
rendszere nem tartalmaz R290-et
VESZÉLY!
• A szárító R290 hűtőközeget tartalmaz.*
• Az R290 egy környezetbarát, de
gyúlékony hűtőközeg.*
• Győződjön meg arról, hogy a szárító
levegő bemenete nyitva van, és jól
szellőzik.*
• Tartsa távol a potenciális lángforrásokat a
szárítótól.*
3.2 A szállítási biztosító szerelvények
eltávolítása
FIGYELMEZTETÉS!
A
• A szárítógép első
használata előtt a
szállítási biztosító
szerelvényeket el
kell távolítani.
• Amennyiben az
ajtó nyílásiránya
meg fordítható,
ehhez kövesse
a az ajtó
szerelésére
vonatkozó
utasításokat.
3.3 Csatornabekötés
A víztartályban összegyűlt víz időszakos ürítése
helyett a vizet a termékkel kapott tömlőn
keresztül közvetlenül is ürítheti.
A vízleeresztő tömlő csatlakoztatása
1
3 4
3 A szárítógéppel kapott leeresztő tömlő
egyik végét csatlakoztassa ahhoz a
csatlakozási ponthoz, ahonnan az előző
pontban levette.
4 A leeresztő tömlő másik végét
csatlakoztassa közvetlenül a
csatornahálózati csonkra, vagy a
mosdókagylóhoz.
2
1-2 Kézzel húzza
át a tömlőt a
szárító mögött,
lecsatlakoztatva
a rögzítési
helyéről.
A tömlő
levételéhez
ne használjon
szerszámot.
MEGJEGYZÉS
C
• A leeresztő tömlő csatlakoztatási
magassága max. 80 cm lehet.
• Ügyeljen, hogy a leeresztő tömlőre ne
lépjenek, és az ne szoruljon be a gép és a
szerelvény közé.
• Amennyiben a termékhez tartozék
csomagot is mellékeltek, lásd a részletes
leírást.
3.4 A lábak beállítása
• A lábak jobbra vagy
balra forgatásával
állítsa a szárítógépet
stabil vízszintes
helyzetbe.
Szárító /Használati útmutató
31
Page 32

3.5 A szárítógép szállítása
Ürítsen ki minden vizet, ami esetleg a gépben
maradt.Ha a gép közvetlenül a csatornabekötő
csonkra van csatlakoztatva, csatlakoztassa azt
le.
A
• Javasoljuk, hogy a szárítógépet csak
3.6 Hangokra vonatkozó
figyelmeztetések
C
• A működés közben összegyűlt vizet a
3.7 A megvilágító izzó cseréje
Ha az Ön készülékében van megvilágítás,
az izzó/LED cseréje érdekében hívja a
szakszervizt. A szárítógépben használt izzó
szokásos háztartási célokra nem használható.
A megvilágítás célja, hogy a szárítógép
töltését megkönnyítse, kényelmesebbé tegye.
A készülékben használt izzó szélsőséges
körülményeknek is ellenáll, pl. rezgéseknek és
az 50°C-nál magasabb hőmérsékletnek is.
FIGYELMEZTETÉS!
függőleges helyzetben mozgassák. Ha
nem lehetséges a függőleges helyzetben
való mozgatás, akkor javasoljuk, hogy az
elölnézetből jobb kéz felőli oldala felé döntsék
meg.
MEGJEGYZÉS
• A működés
közben a
kompresszor
irányából jövő
időnkénti fémes
zaj normális
jelenség.
gép a víztartályba szivattyúzza. E folyamat
során a szivattyúzás zaja normális
jelenség.
32
Szárító /Használati útmutató
Page 33

4 Előkészítés
4.1 Gépi szárításra alkalmas
ruhaneműk
Mindig tartsa be a ruhanemű címkéjén
megadott utasításokat. Csak olyan ruhát
szárítson, amely rendelkezik a szárítóban való
szárításra alkalmságot igazoló címkével.
4.2 Gépi szárításra nem alkalmas
ruhaneműk
Ne szárítsa
Az ezzel a szimbóolummal
ruhaneműt ne szárítsa szárítóban
C
• A finom hímzett anyagok, a gyapjú,
selyem ruhák, a finom és értékes
anyagok, a légzáró anyagok és a
tüll függönyök nem alkalmasak gépi
szárításra.
4.3 A ruhák előkészítése a szárításra
• A mosást követően a ruhanemű
összegubancolódhat. Mielőtt a szárítóba
helyezi őket, csoportosítsa a ruhaneműt.
• Szárítsa a fém részeket tartalmazó
ruhaneműt kifordítva (pl. cipzár).
• Zárja be a cipzárakat, kampókat, csatokat
és gombokat.
4.4 Teendők az energiatakarékosság
jegyében
• Centrifugáláskor mindig a lehető
legmagasabb sebességfokozatot
használja. Ily módon a szárítási idő
lerövidíthető, az energiafogyasztás pedig
csökkenthető.
• A ruhákat típus és vastagság szerint
válogassa. Az azonos típusú ruhaneműt
együtt szárítsa. Például, a vékony anyagú
konyharuhák és asztalterítők gyorsabban
száradnak, mint a vastagabb törölközők.
• A megfelelő program kiválasztását illetően
tekintse meg a használati útmutatót.
• Szárítás közben ne nyissa ki a gép betöltő
ajtaját, csak ha feltétlenül szükséges. Ha
mindenképp ki kell nyitnia, csak a lehető
legrövidebb ideig tartsa nyitva.
szárítógépben
MEGJEGYZÉS
ellátott
• Működése közben ne adjon hozzá vizes
ruhát a szárítóhoz
• Kondenzátor egységgel rendelkező
modellek esetében: havonta egyszer vagy
minden 30. használatot követően tisztítsa
meg a kondenzátort.
• Hőszivattyú egységgel rendelkező
modellek esetében: tisztítsa rendszeresen
a szűrőfiókot, amikor szemmel láthatóan
összegyűlt a szösz, vagy amikor a
szűrőfiók-tisztítás jelzőfény felvillan.
• Kürtős modellek esetében: kövesse
a kürtő csatlakoztatására vonatkozó
utasításokat, és tisztítsa ki a kürtőt.
• A szárítási folyamat során jól szellőztesse
ki a helyiséget, ahol a szárítógép működik.
4.5 Helyes ruhamennyiség
Kövesse a
“Programválasztás
és fogyasztási
táblázat” részben
leírt előírásokat.
Ne adagoljon a
táblázatban megadott
kapacitás értéknél
több ruhaneműt.
Az alábbi súlyok példaként szerepelnek:
Szennyes
Pamut
paplanhuzat
(dupla)
Pamut
paplanhuzat
(szimpla)
Lepedő (dupla) 500 Ingek 250
Lepedő
(szimpla)
Nagy
asztalterítő
Kis asztalterítő 250 Farmer 700
Szalvéta 100
Törölköző 700 Póló 125
Kéztörlő 350
Körülbelüli
súly (g)*
1500 Blúz 150
1000 Pamut ing 300
350 Pamut ruha 500
700 Ruha 350
Szennyes
Zsebkendő
(10 db)
*Száraz szennyes súly mosás előtt..
Körülbelüli
súly (g)*
100
Szárító /Használati útmutató
33
Page 34

5 A termék használata
1
5.1 Kezelőpanel
1. Be/Ki/Program választógomb
2. Start/Bekapcsolva gomb
3. Idő vége gomb
5.2. Szimbólumok
3
4
5
2
4. Szárítás szint gomb
5. Berregés hangereje / Időprogramok
kiválasztása gomb
Tartály
tele
Vége/gyűrődés-
mentesítés
Ágynemű /
Toll
Szűrő
tisztítása
Be/Ki
Pamut Eko
Szűrőók / Hőcserélő
Időzítő
késleltetés
tisztítása
Expressz
Szárazság
szint
Gyerekbiztos
zár
Szekrény
száraz
Szárítási
szint+
Némítás
Vasaló
száraz
Szárítási
szint++
Hangerő fel
Farmer
Higiéna
(BabyProtect+)
Expressz
14'
BabyProtect
Ingek 30'
5.3. A szárítógép előkészítése
• Dugja be a szárítógépet.
• Nyissa ki a betöltőajtót.
• Helyezze a ruhát a szárítógépbe, anélkül,
hogy teletömné.
• Nyomja be és zárja be a betöltőajtót.
FIGYELMEZTETÉS!
A
• Győződjön meg
róla, hogy a ruhák
nem torlaszolják
el a betöltőajtót.
Finom
textíliák
Extra
száraz
Felüdítés
Ingek
Szekrény
száraz +
Alacsony
hőmérséklet
Sportruházat
Indítás-megs
zakítás,
visszavonás
Napi
Felfrissítés
Szintetikus
Gyapjú
felfrissítése
Pamut
Szárító
állvány
/ időzített szárítás
Szárítási
szint
Kevert
Expressz
30'
Toll
A Be/Ki/Program kiválasztása gomb
segítségével válassza ki a kívánt programot,
majd a gép bekapcsol.
MEGJEGYZÉS
C
• Az, hogy a Be/Ki/program kiválasztása
gomb segítségével kiválaszt egy
programot, nem jelenti azt, hogy a
program elindult. A program elindításához
nyomja meg az Indítás/Bekapcsolva
gombot.
34
Szárító /Használati útmutató
Page 35

5.4 Programkiválasztás és fogyasztási táblázat
HU
Programok A programok leírása
Pamut, vasalásra
kész
Pamut Eko
Pamut,
szekrényszáraz
Pamut, extra száraz
Szintetikus,
vasalásra kész
Szintetikus,
szekrényszáraz
Időzítő programok
Frissítés (Gyapjú
frissítés)
Finom textíliák / Ing
Farmer
Szabadidő / Sport
(Goretex)
Vegyes(Napi)
A vasalandó pamut ruhaneműt száríthatja
ezzel a programmal, hogy az egyszerűbb
vasalás érdekében egy kicsit nyirkosak
legyenek. (ingek, pólók, abroszok stb.)
Ezzel a programmal az összes pamut
ruhaneműt száríthatja. (ingek, nadrágok,
pizsamák, csecsemőruhák, fehérnemű,
ágynemű stb.) A szekrénybe helyezés előtt
nincs szükség vasalásra.
Ezt a programot vastag ruhaneműk, pl.
nadrágok, tréningruhák extra szárításhoz
használhatja. A szekrénybe helyezés előtt
nincs szükség vasalásra.
Ezzel a programmal vastag pamut
ruhaneműket száríthat, mint pl. törölközők,
köntös stb. A szekrénybe helyezés előtt
nincs szükség vasalásra.
A vasalandó szintetikus ruhaneműt
száríthatja ezzel a programmal, hogy az
egyszerűbb vasalás érdekében egy kicsit
nyirkosak legyenek. (ingek, pólók, abroszok
stb.)
Ezzel a programmal az összes szintetikus
ruhaneműt száríthatja. (Ingek, pólók,
alsónemű, abroszok stb.) A szekrénybe
helyezés előtt nincs szükség vasalásra.
A 10 és 160 perc közötti időprogramok
közül választhat a kívánt szárítási szint
alacsony hőmérsékleten történő eléréséhez.
Ebben a programban a szárítógép
működése a ruhanemű szárazságától
függetlenül a beállított ideig tart.
Forró levegő befúvása nélkül 10 percig
szellőztet. A programnak köszönhetően
kiszellőztetheti a hosszú ideig zárt helyen
tartott ruhákat, megszabadítva azokat
a kellemetlen szagoktól. Használja ezt a
programot mosógépben mosható gyapjú
ruhanemű szelőztetéséhez és lágyításához.
Ne használja teljes szárításhoz.
Ez sokkal érzékenyebben szárítja, és
kevésbé gyűri meg az ingeket, így
megkönnyíti a vasalást.
Ezzel a programmal farmernadrágokat,
-szoknyákat, -ingeket vagy -kabátokat
száríthat.
Szárítsa meg a szintetikus, pamut vagy
vegyes textíliákból vagy vízálló anyagból
készült ruháit, például funkcionális
dzsekiket, esőkabátokat stb.. A szárítás
előtt fordítsa ki őket.
Ezzel a programmal pamut és szintetikus
ruhát is száríthat.Ezzel a programmal a
sport- és fitnesz ruhákat száríthat.
forgási
(ford/perc)
sebessége
A mosódob
Kapacitás (kg)
7 1000 145
7 1000 179
7 1000 204
7 1000 214
3,5 800 55
3,5 800 70
- - -
- - 10
1,5 1200 50
4 1200 140
2 1000 130
4 1000 125
(perc)
Szárítási idő
Szárító /Használati útmutató
35
Page 36

Ez egy hosszú távú program, amely a
higiéniát igénylő ruhákhoz (bébi ruhák,
Higiéna
(BabyProtect+)
Toll
Expressz 30'
Energiafogyasztási értékek
törülközők, fehérneműk, stb.) használatos,
ahol magasabb higiéniára van szükség. A
higiéniát magas hőmérséklettel éri el ((Ezt a
programot az angol "The British Foundation"
(Allergy UK) azonosítja és hagyja jóvá.))
A szárítóban azokat a ruháit, például
tollal és szállal bélelt kabátjait, dzsekijeit
száríthatja, melyek címkéje engedélyezi a
szárítóban történő szárítást. Kérjük, szárítsa
kifordítva!
Használja ezt a programot 2 ing vasalásra
előkészítéséhez.
5 800 195
- 800 100
0,5 1200 30
Programok Kapacitás (kg)
Pamut Eko* 7 1000 60% 1,75
Pamut, vasalásra
kész
Szintetikus,
szekrényszáraz
A teljes és részleges terhelés mellett használt "Pamut Eko program" egy szabványos
szárítási program, a címkén és a lapon szereplő információk alapján ez a program
alkalmas a normál nedves pamut ruhanemű szárítására, és ez a leghatékonyabb
energiafogyasztású program a pamut ruhaneműk számára.
7 1000 60% 1,40
3,5 800 40% 0,65
perc)
sebessége (ford/
A mosódob forgási
kb.
Maradék
nedvességtartalom
értékek kWh
Energiafogyasztási
* : Energy Label szabványos program (EN 61121: 2012) A táblázat összes értékét az EN 61121:
2012 szabvány határozza meg. Ezek az értékek a ruhanemű típusa, a centrifugálási sebesség,
a környezeti viszonyok vagy a feszültségingadozás függvényében eltérhetnek a táblázatban
megadott értékektől.
Az Allergy UK a British Allergy
Association márkája. A
„jóváhagyás pecsétjét” úgy
alakították ki, hogy olyan
emberek számára jelentsen
iránymutatást, akik olyan
termékre vonatkozó ajánlást követelnek
5.5 Kiegészítő funkciók
Berregés / idő
A szárítógép a program végeztével hangjelzést
bocsát ki. Ha nem akarja, hogy a jelzés hangos
legyen, nyomja meg a „Berregés / idő” gombot.
A Berregés / idő gomb megnyomásakor egy
jelzőfény villan fel, és nem hallható hangjelzés a
program befejeződésekor.
meg, hogy a kapcsolódó termék az allergiás
betegek környezetében korlátozza /
csökkenti / megszünteti az allergéneket vagy
csökkenti az allergén tartalmat. Célja annak
biztosítása, hogy a termékeket
tudományosan megvizsgálják vagy
megvizsgálják oly módon, hogy mérhető
eredményeket biztosítsanak.
C
• Ez a funkció vagy a program elindulása
A Berregés / idő gomb segítségével állíthatja
be a program időtartama alatt a Szárító rekesz/
Időszárító programokat.
MEGJEGYZÉS
előtt vagy az után aktiválható.
36
Szárító /Használati útmutató
Page 37

Nedvesség szint gomb
A Nedvesség szint beállító gombot a
nedvesség szintjének beállítására használhatja.
A program ideje függ a választástól.
MEGJEGYZÉS
C
• Ezt a funkciót csak a program
megkezdése előtt aktiválhatja.
Befejezési idő
Az idő vége funkció segítségével a
program végének idejét akár 24 órával
elhalaszthatja.
1. Nyissa ki a betöltőajtót és helyezze be a
ruhaneműt.
2. Állítsa be a szárítási programot.
3. Nyomja meg Befejezés idejének
kiválasztása gombot a kívánt késleltetés
beállításához. A Befejezés idő LED világít.
(Ha lenyomja és tartja a gombot, az Idő
vége non-stop folyamatban lesz).
4. Nyomja le a Indítás/Bekapcsolva
gombot. A Befejezési idő visszaszámlálása
elindul. “:” A kijelzett késleltetett idő közepén
található elválasztóvonal villog.
MEGJEGYZÉS
C
• Az idő lejárta előtt hozzáteheti és kiveheti
a ruhaneműt. A kijelzett idő a normál
szárítási idő és az Idő vége összege. A
Befejezési idő LED a leszámolás végén
kikapcsol, megkezdődik a szárítás és
felvillan a szárítás LED.
Az Idő vége megváltoztatása
Amennyiben a visszaszámlálás alatt szeretné
megváltoztatni a késleltetés idejét, akkor:
Törölje a programot a Be/Ki/Program
kiválasztása gomb segítségével. Válassza
ki a kívánt programot, majd ismételje meg a
Befejezési idő kiválasztása folyamatot.
Idő vége funkció törlése
Amennyiben törölni szeretné az Idő vége
funkciót és azonnal el szeretné indítani a
programot:
Törölje a programot a Be/Ki/Program
kiválasztása gomb segítségével. Válassza ki a
kívánt programot, majd nyomja meg a Start/
Készenlét gombot.
5.6 Figyelmeztető jelzések
MEGJEGYZÉS
C
• A figyelmeztető jelzések az adott
szárítógép modelltől függően eltérőek
lehetnek.
Bolyhszűrő tisztítása
A program végeztével bekapcsol a
szűrőtisztítás figyelmeztető jelzés.
Víztartály
A program végeztével bekapcsol a víztartály
leeresztése figyelmeztető jelzés.
Ha a víztartály a program közben telik meg,
a figyelmeztető jelzés villogni kezd és a
gép készenléti üzemmódba vált. Ebben
az esetben engedje le a tartályt, majd a
program elindításához nyomja meg az Indítás/
Bekapcsolva gombot. A figyelmeztető
szimbólum eltűnik és a program újra elindul.
Szűrőfiók / Hőcserélő tisztítása
Amikor a program befejeződik, a hőcserélő
vagy a szűrőfiók tisztítását jelző fény világíthat.
5.7 A program indítása
A program elindításához nyomja meg az
Indítás/Bekapcsolva gombot.
A Start / Készenléti és Száradási jelzőfények
világítani fognak, jelezve, hogy a program
elindult.
5.8 Gyerekzár
A szárítógép gyerekzárral rendelkezik annak
érdekében, hogy a gombok lenyomásával ne
lehessen megváltoztatni az aktuális programot.
Amennyiben a gyerekzár aktív, a panelen
lévő összes gomb, a Be/Ki/Programválasztás
gombok kivételével inaktívvá válik.
A gyerekzár aktiválásához nyomja meg
egyszerre a Nedvesség szint és a Berregés
gombot, majd tartsa 3 másodpercig nyomva.
A program végeztével új program elindításához,
illetve a program megszakításához a
gyerekzárat fel kell oldani. A gyerekzár
feloldásához tartsa nyomva ugyanazokat a
gombokat 3 másodpercen át.
MEGJEGYZÉS
C
• Ha a gyerekzár aktív, a kijelzőn bekapcsol
a gyerekzár figyelmeztető jelzés.
• Ha a gépet be vagy kikapcsolja a Be/Ki/
Törlés gombbal, a gyerekzár kikapcsol.
Szárító /Használati útmutató
37
Page 38

MEGJEGYZÉS
C
• Miközben a szárítógép működik és a
gyerekzár aktív, kétszer sípol, amikor a
programválasztó gombot elfordítja. Ha
a gyerekzárat úgy kapcsolja ki, hogy
a programválasztó gombot nem állítja
vissza korábbi helyzetébe, a program
a programválasztó gomb állásának
módosítása miatt leáll.
5.9 A program módosítása indítás
után
• A szárítógép elindítása után módosíthatja
a kiválasztott a szárítási programot egy
másik programra.
• Például, válassza az Extra száraz
programot a Be/Ki/programválasztó
gomb Vasalás-szárazból Extra száraz
állásba való elfordításával.
• A program elindításához nyomja meg az
Indítás/Bekapcsolva gombot.
Ruhanemű hozzáadása és eltávolítása
bekapcsolt állapotban
• Ruhanemű hozzáadásához, illetve
kivételéhez a szárítási program elindulását
követően:
• A szárítógép készenléti üzemmódba
állításához nyomja meg a Start/Készenlét
gombot. A szárítási folyamat leáll.
• Nyissa ki a betöltőajtót Készenlét
üzemmódban, töltse be vagy vegye ki a
ruhákat, majd csukja vissza az ajtót.
• A program elindításához nyomja meg az
Indítás/Bekapcsolva gombot.
MEGJEGYZÉS
C
• A szárítás megkezdése után hozzáadott
ruhanemű azt eredményezheti, hogy
a gépben lévő, már megszáradt ruhák
összekeverednek a vizes ruhákkal, így
a szárítási folyamat végén a ruhanemű
nedves marad.
MEGJEGYZÉS
C
• A ruhanemű hozzáadását és
eltávolítását a szárítás ideje alatt
akármennyiszer megismételheti. De
ezzel többször megszakítja a szárítási
folyamatot és növeli a programidőt és
az energiafogyasztást is. A ruhanemű
hozzáadása ezért a szárítási program
elindulása előtt javasolt.
• Ha a berendezés készenléti állapotában
a programválasztó gombbal új programot
választ, a folyamatban lévő program
megszakad.
FIGYELMEZTETÉS!
• Ha a program futása közben adagol vagy
vesz ki ruhát, a dob belső felszínét ne
érintse meg. A dob felszíne ugyanis forró.
5.10 Program törlése
Ha bármilyen okból szeretné a szárítást leállítani
és a programot törölni azután, hogy a gép
elindult, nyomja meg a Be/Ki/Törlés gombot, és
a program törlődik.
FIGYELMEZTETÉS!
A
• Amennyiben a programot a berendezés
működése közben állítja le, a berendezés
belseje rendkívül forró lehet, ezért
kapcsolja be a szellőztetés programot,
hogy lehűtse.
5.11 Program vége
Ha a program véget ér, a Bolyhszűrő
tisztítása és a Víztartály figyelmeztető jelzések
kigyulladnak. A betöltőajtó kinyitható, és a gép
készen áll a következő szárítási ciklusra.
A szárítógép kikapcsolásához állítsa a Be/Ki/
Programválasztás gombot Be/Ki állásba.
MEGJEGYZÉS
C
• Amennyiben a program végeztével nem
üríti ki a ruhákat, a gyűrődés-megelőző
funkció 2 órára aktívvá válik, ezzel
megakadályozva, hogy a gépben lévő
ruhák összegyűrődjenek. A program 10
perces intervallumokban megforgatja a
ruhákat, így megelőzve a gyűrődést.
38
Szárító /Használati útmutató
Page 39

6 Karbantartás és tisztítás
6.1 Betöltőajtó belső felület
A szárítási folyamat során kiválasztott hajat,
szőröket és szöszöket a szöszszűrő gyűjti
össze.
MEGJEGYZÉS
C
• A szöszök a ruhák viselése és mosása
során keletkeznek.
• A szűrő nyílását porszívóval tisztíthatja.
• Tisztítsa meg minkét szűrőt folyóvíz alatt,
a szösz felgyűlésével ellentétes irányban,
vagy egy puha kefe használatával. Szárítsa
meg a szűrőt, mielőtt visszahelyezné.
A
FIGYELMEZTETÉS!
• Minden szárítási ciklust követőn tisztítsa
ki a szöszszűrőt és a betöltő ajtó belső
felületét.
A szöszszűrő tisztításához:
• Nyissa ki a betöltőajtót.
• Tartsa a két részes szöszszűrő első részét
(a belső szűrőt), és vegye ki felfelé kihúzva
azt.
• Kezével vagy puha ronggyal gyűjtse
össze a szöszöket, bolyhokat és
pamutgombócokat.
• Vegye ki a második részt (a külső szűrőt)
felfelé kihúzva azt.
MEGJEGYZÉS
C
• Ügyeljen, hogy haj, szőrök, szöszök és
pamutgombócok ne essenek a nyílásba,
ahova a szűrőt kell behelyezni.
• Nyissa ki mindkét szöszszűrőt (a belső és
a külső szűrőt), távolítsa el a hajat, szöszt,
pamutgombócokat nedves kézzel vagy
porszívóval vagy egy ruhával.
• Helyezze a két
szöszszűrőt
egymásra, és
helyezze vissza
azokat a helyükre.
• Tisztítsa meg a betöltő ajtó belsejét és az
alátétet nedves puha ruhával.
Szárító /Használati útmutató
39
Page 40

6.2 Az érzékelők tisztítása
• A szárítóban hőmérséklet-érzékelő
található, amely megállapítja, hogy a
ruhanemű száraz vagy sem.
Az érzékelők tisztítása:
• Nyissa ki a szárító betöltési ajtaját.
• A szöszszűrő eltávolításához húzza ki
azt.
• Tisztítsa meg az érzékelőt a kezével, ha a
bolyhok felhalmozódnak rajta.
Amennyiben a víztartályt elfelejti leereszteni,
a gép a következő szárítási ciklusok során,
amikor a víztartály teli van, leáll, a Víztartály
telítettségét jelző fény pedig villog. Amennyiben
ez az eset áll elő, eressze le a víztartályt, majd
nyomja meg a Start / Pause gombot, a szárítási
ciklus folytatásához.
A víztartály leeresztéséhez:
1. Óvatosan emelje ki a víztartályt a
fiókból vagy a tartójából.
2. Öntse ki a vizet a tartályból.
C
MEGJEGYZÉS
• Tisztítsa évente 4 alkalommal a
szenzorok fém felületeit.
• A szenzorok fém felületeinek tisztítása
során ne használjon fém eszközöket.
• Várja meg, amíg a gép lehűl, ha az még
meleg a szárítást követően.
FIGYELMEZTETÉS!
A
• A tisztítás során soha ne használjon
oldószereket, tisztítószereket és hasonló
anyagokat, tűz- és robbanásveszély
miatt!
6.3 A víztartály leeresztése
A szárítási folyamat során a ruhákban lévő
nedvességet a gép eltávolítja és kondenzálja,
a meglévő víz a víztartályban gyűlik össze.
Minden szárítási ciklus után engedje le a vizet.
FIGYELMEZTETÉS!
A
• A kondenzvíz nem iható!
• Program közben soha ne távolítsa el a
víztartályt!
• Amennyiben a víztartály tölcsérében
szöszök gyűltek fel, folyó víz alatt tisztítsa
meg azt.
• Helyezze vissza a víztartályt.
MEGJEGYZÉS
C
• Amennyiben lehetősége van közvetlen
vízleeresztésre, nem szükséges ürítenie a
víztartályt.
6.4 A párologtató tisztítása
Azok a szőrök és szöszök, amit a szöszszűrő
nem fog fel, a párologtató lamellái közé
kerülnek, a biztonsági rács mögött, és ott
gyűlnek össze. Tisztítsa ki a párologtatót
negyedévenként, vagy amikor a párologtató ”
” ikon villogó jelzést ad.
• Nyissa ki a
biztonsági
rácsot annak
megnyomásával.
• A légterelő ajtó
megnyitásához
mozgassa az oldó
reteszt.
40
Szárító /Használati útmutató
Page 41

• Távolítsa el a
párologtatóról
a szöszöket
nedves ruhával
vagy porszívóval
kefés előtét
alkalmazásával,
a porszívófej
fel- és lefelé való
mozgatásával.
• A tisztítás
elvégzését követően
helyezze a légterelő
ajtaját a helyére,
zárja a reteszt,
és zárja vissza a
biztonsági rácsot.
A
FIGYELMEZTETÉS!
• A tisztítást kézzel is végezheti, amennyiben
védőkesztyűt visel. Ne próbálja meg
csupasz kézzel végezni a tisztítást. A
párologtató lamellái megsérthetik a kezét.
• A balról jobbra való mozdulattal végzett
tisztítás kárt okozhat a párologtató
lamelláiban. Ez szárítási problémákat
eredményezhet.
Szárító /Használati útmutató
41
Page 42

7 Hibaelhárítás
A szárítási művelet túl hosszan tart.
Szöszszűrő (belső és külső szűrő) pórusai
eltömődhettek. >>> Mossa ki a szöszszűrőket
meleg vízzel, és szárítsa meg.
A párologtató elülső oldala eltömődhetett. >>>
Tisztítsa meg a párologtató elülső oldalát.
A gép elején található szellőzőrácsok zárva
lehetnek. >>> Távolítson el minden tárgyat a
szellőzőrács elől, ami akadályozhatja a levegő
útját.
Lehetséges, hogy a szellőzés nem megfelelő,
ugyanis a hely, ahová a gépet beszerelték, túl
kicsi. >>> Nyissa ki az ajtót vagy az ablakokat,
hogy megakadályozza, hogy a hőmérséklet túl
magasra emelkedjen a helyiségben.
A nedvesség-érzékelőn vízkőréteg rakódhatott le.
>>> Tisztítsa meg a nedvesség érzékelőt.
Lehet, hogy túl sok ruhát töltött be. >>> Ne töltse
túl a szárítógépet.
Lehet, hogy a ruhák nincsenek megfelelően
kicentrifugázva. >>> Kapcsolja nagyobb
fordulatszámra a centrifugát a mosógépen.
A ruhák a szárítást követően is nedvesek.
Lehetséges, hogy nem a ruhatípusnak megfelelő
programot használt.>>> Ellenőrizze a ruhák
kezelésre vonatkozó címkéit, majd válasszon
a ruhatípusnak megfelelő programot, vagy
kiegészítésül használjon más időprogramot.
Szöszszűrő (belső és külső szűrő) pórusai
eltömődhettek. >>> Mossa ki a szűrőket meleg
vízzel, és szárítsa meg.
A párologtató elülső oldala eltömődhetett. >>>
Tisztítsa meg a párologtató elülső oldalát.
Lehet, hogy túl sok ruhát töltött be. >>> Ne töltse
túl a szárítógépet.
Lehet, hogy a ruhák nincsenek megfelelően
kicentrifugázva. >>> Kapcsolja nagyobb
fordulatszámra a centrifugát a mosógépen.
A szárítógép nem kapcsol be, vagy a program
nem indul el. A szárítógép nem működik a
konfigurálást követően.
Lehetséges, hogy a kábel ki van húzva. >>>
Ellenőrizze, hogy a tápkábel be van-e dugva.
A betöltőajtó félig nyitva van. >>> Győződjön meg
róla, hogy a betöltőajtó biztosan be van-e zárva.
A programot nem lehet beállítani, vagy a Start/
Szünet/Töröl gombot nem lehet megnyomni. >>>
Ellenőrizze, hogy a programot beállította-e, és
nem Szünet módban van.
Lehetséges, hogy a gyerekzár aktív. >>>
Kapcsolja ki a gyerekzárat.
A program idő előtt ok nélkül megszakadt.
Lehetséges, hogy a betöltőajtó teljesen be
van csukva. >>> Győződjön meg róla, hogy a
betöltőajtó biztosan be van-e zárva.
Lehetséges, hogy áramkimaradás van. >>> A
program elindításához nyomja meg az Indítás/
Szünet/Törlés gombot.
Lehet, hogy a víztartály megtelt. >>> Eressze le a
víztartályt.
A ruhák összementek, megkeményedtek vagy
tönkrementek.
Lehetséges, hogy nem az adott ruháknak
megfelelő programot használt. >>> Ellenőrizze a
ruhán található címkét, és az anyagnak megfelelő
programot válasszon.
A betöltőajtón víz csepeg.
Lehetséges, hogy a betöltőajtó belső oldalán és
a betöltőajtó tömítésén szálak gyűltek fel. >>>
Tisztítsa meg a betöltőajtó belső felületét és az
ajtó tömítéseit.
A betöltőajtó magától kinyílik.
Lehetséges, hogy a betöltőajtó teljesen be van
csukva. >>> Tolja be a betöltőajtót, amíg a
becsukódást jelző hangot nem hallja.
A Víztartály figyelmeztető jelzés világít/villog.
Lehet, hogy a víztartály megtelt. >>> Eressze le a
víztartályt.
Lehetséges, hogy a vízleeresztő tömlő
tönkrement. >>> Ha a készülék közvetlenül
csatlakozik a vízleeresztőhöz, ellenőrizze a tömlőt.
A szárítógépen belüli világítás nem kapcsol fel.
(Lámpával ellátott modellek esetén)
Lehet, hogy a szárítógépet nem kapcsolták be a
Be/Ki gombbal. >>> Győződjön meg róla, hogy a
szárítógépet bekapcsolta.
Lehetséges, hogy a lámpa meghibásodott. >>> A
lámpa cseréje érdekében vegye fel a kapcsolatot a
Hivatalos Szervizzel.
A gyűrődésmentes ikon világít.
A ruhák gyűrődését megakadályozó
gyűrődésmentes üzemmód aktiválva lehet. >>>
Kapcsolja ki a szárítót és vegye ki a ruhákat.
A szöszszűrő tisztítására figyelmeztető ikon világít.
Szöszszűrő (belső és külső szűrő) szennyezett
lehet. >>> Mossa ki a szűrőket meleg vízzel, és
szárítsa meg.
A szöszszűrő pórusain lepedék képződhetett, ami
eltömődést okoz. >>> Mossa ki a szűrőket meleg
vízzel, és szárítsa meg.
Lehet, hogy a szöszszűrők nincsenek behelyezve.
>>> Helyezze be a belső és a külső szűrőt a
helyére.
42
Szárító /Használati útmutató
Page 43

Figyelmeztető hangjelzést ad a gép
Lehet, hogy a szöszszűrők nincsenek behelyezve.
>>> Helyezze be a belső és a külső szűrőt a
helyére.
A párologtató figyelmeztető ikonja villog.
A párologtató elülső oldala szösszel
eltömődhetett. >>> Tisztítsa meg a párologtató
elülső oldalát.
Lehet, hogy a szöszszűrők nincsenek behelyezve.
>>> Helyezze be a belső és a külső szűrőt a
helyére.
A szárítógépen belüli világítás felkapcsol.
(Lámpával ellátott modellek esetén)
Ha a szárítógép a hálózatra van csatlakoztatva,
a Be/Ki kapcsolót megnyomják, és az ajtó nyitva
van, akkor a világítás felkapcsolódik. >>> Húzza
ki a hálózati csatlakozót, vagy állítsa a Be/Ki
kapcsolót "Ki" állásba.
A
FIGYELMEZTETÉS!
• Amennyiben a probléma a jelen
fejezetben közölt útmutatások követése
után is fennáll, vegye fel a kapcsolatot
eladójával vagy a Hivatalos szervizzel.
Soha ne próbálja egyedül megjavítani a
készüléket.
MEGJEGYZÉS
C
• Amennyiben a berendezés bármely
alkatrészét illetően problémával
találkozik, a hivatalos szerviztől kérheti
annak cseréjét, megadva a készülék
modellszámát.
• Amennyiben a berendezést nem eredeti
alkatrészekkel használja, az hibás
működést eredményezhet.
• A gyártót és a forgalmazót semmilyen
felelősség nem terheli a nem eredeti
alkatrészekkel történő használatból eredő
hibákért.
Szárító /Használati útmutató
43
Page 44

WA
TERMÉKISMERTETŐ ADATLAP
Megfelel a Bizottság 392/2012 sz. (EU) felhatalmazáson alapuló rendeletének
A forgalmazó neve vagy márkája
A típus neve
Névleges kapacitás (kg)
Forgódobos szárítógép típus
Energiahatékonysági osztály
Éves energiafelhasználás (kWh)
(1)
(2)
Vezérlés típusa
Energiafelhasználás teljes töltetű normál pamutprogram esetén (kWh)
Energiafelhasználás féltöltetű normál pamutprogram esetén (kWh)
Energiafogyasztás kikapcsolt üzemmódban teljes töltetű normál pamutprogramhoz, P
Energiafogyasztás kikapcsolt üzemmódban teljes töltetű normál pamutprogramhoz, P
A bekapcsolva hagyott üzemmód időtartama (perc)
Normál pamut program
A teljes töltetű normál pamutprogram programidejeT
A részleges töltetű normál pamutprogram programideje, T
A teljes és részleges töltetű normál pamutprogram súlyozott programideje (T
Kondenzációhatékonysági osztály
Átlagos kondenzáció hatékonyság standard pamut program esetén, teljes adag, C
Átlagos kondenzáció hatékonyság standard pamut program esetén, részleges adag, C
(3)
(perc)
száraz
(perc)
száraz 1/2
(4)
dry
BEKO
DF7412GAW
7188301100
7.0
Légbefúvásos
Kondenzátor
-
A++
212,0
Automatikus
Nem-automatikus
(W)
O
(W)
L
)
t
dry1/2
-
1,75
0,96
0,50
1,00
30
179
107
138
B
81%
81%
A teljes és féltöltetű normál pamutprogram súlyozott kondenzációhatékonysági osztálya,C
A teljes töltetű normál pamutprogram hangteljesítményszintje
(5)
t
Beépített
: Igen - : Nem
(1) A+++-tól (leghatékonyabb) D-ig (legkevésbé hatékony) terjedő skála
(2) Az energiafelhasználás 160 teljes és részleges töltetű normál pamutprogram szárítási ciklusán alapul, alacsony energiaszintű teljesítmény fokozaton.
Az aktuális energiafelhasználás/ciklus a készülék alkalmazási módjától függ.
(3) “A teljes és a részleges töltet melletti „Szekrényszáraz pamutprogram” az a normál nedves pamut ruhaneműk szárítására alkalmas standard
szárítóprogram, amelyre a címkén és a termékismertető adatlapon megadott adatok vonatkoznak, és amely a pamut ruhaneműk esetében az
energiafogyasztás szempontjából a leghatékonyabb.
(4) G-től (legkevésbé hatékony) A-ig (leghatékonyabb) terjedő skála
(5) Súlyozott átlagos érték — L
B(A)-ban kifejezve 1 pW-ra vonatkoztatva
81%
65
-
Page 45

Page 46

Vă rugăm să citiţi mai întâi acest
manual de utilizare!
Stimate client,
Vă mulţumim pentru alegerea produselor
Beko. Sperăm că produsul nostru, fabricat
la standarde de înaltă calitate şi tehnologie,
vă va oferi cele mai bune rezultate. Vă
recomandăm să citiţi cu atenţie acest manual
şi alte documentaţii suplimentare înainte de a
utiliza produsul dumneavoastră şi să le păstraţi
pentru referinţe ulterioare. Dacă oferiţi acest
produs altei persoane, oferiţi-i şi manualul
aferent. Acordaţi atenţie tuturor detaliilor şi
avertismentelor specificate în manualul de
utilizare şi respectaţi instrucţiunile prezentate în
acesta.
Utilizaţi manualul de utilizare pentru modelul
indicat pe copertă.
• Citiţi instrucţiunile.
Explicaţia simbolurilor
Următoarele simboluri sunt utilizate în cuprinsul
acestui manual de utilizare:
AVERTISMENT!
• Avertizare privind riscul de arsuri
REȚINEȚI
C
• Informaţii importante sau sfaturi utile despre
utilizare.
• Ambalajele produsului sunt
fabricate din materiale
reciclabile în conformitate cu
Reglementările naţionale privind
mediul.
Nu eliminaţi deşeurile de ambalaje împreună cu
deşeurile menajere sau alte deşeuri, eliminaţi-le
la punctele de colectare speciale, desemnate
de autorităţile locale.
B
PERICOL!
• Avertisment împotriva electrocutării.
PERICOL!
• Avertisment împotriva pericolului de incendiu.
AVERTISMENT!
A
• Avertismente privind situaţii periculoase pentru
viaţă şi proprietate.
AVERTISMENT!
• Avertisment împotriva suprafeţelor fierbinţi.
Acest produs a fost fabricat folosind cea mai recentă tehnologie în condiții prietenoase cu mediul înconjurător.
46
Uscător / Manual de utilizare
Page 47

1 Instrucţiuni importante de securitate şi mediu
REȚINEȚI
C
• Această secţiune conţine
instrucţiuni de securitate care vă
vor ajuta la protecţia împotriva
riscului de rănire sau deteriorarea a
proprietăţii. Nerespectarea acestor
instrucţiuni va anula orice garanţie.
1.1 Informaţii generale
privind securitatea
AVERTISMENT!
A
• Acest echipament poate fi utilizat
de copii cu vârsta de peste 8 ani
şi persoane cu capacitate fizică,
senzorială sau mentală redusă
sau care nu au experienţă şi nu
sunt familiarizate cu echipamentul
dacă acestea sunt supravegheate
sau li se oferă instrucţiuni privind
utilizarea echipamentului într-o
manieră sigură şi înţeleg pericolele
implicate. Copiii nu trebuie să se
joace cu echipamentul. Curăţarea şi
operaţiunile de întreţinere realizate
de utilizator nu vor fi realizate de
copii nesupravegheaţi.
• Nu permiteţi copiilor cu vârsta sub
3 ani accesul la aparat cu excepţia
cazului în care sunt în permanent
supravegheaţi.
• Picioarele reglabile nu trebuie
îndepărtate. Spaţiul liber dintre
uscător şi podea nu trebuie redus
cu materiale precum covoare,
lemn sau bandă. Acest lucru
cauzează probleme în funcţionarea
uscătorului.
A
AVERTISMENT!
• Instalarea şi procedurile de reparare
trebuie efectuate întotdeauna
de către Personalul autorizat de
service. Producătorul nu va fi
răspunzător pentru daunele care pot
apărea din efectuarea procedurilor
de către persoane neautorizate.
• Nu spălaţi niciodată uscătorul prin
pulverizarea sau picurarea apei
pe echipament! Există pericol de
electrocutare!
1.1.1 Securitatea electrică
PERICOL!
B
• Securitatea electrică
Instrucţiunile privind securitatea
electrică trebuie respectate în
timpul efectuării racordării la
reţeaua electrică în momentul
instalării.
• Aparatul nu trebuie alimentat
printr-un dispozitiv de
conectare, cum ar fi un
comutator temporizat, sau
conectat la un circuit care este
activat sau dezactivat regulat de
serviciul public utilitar.
• Conectaţi uscătorul la o priză
cu împământare protejată de o
siguranţă la valoarea specificată pe
etichetă. Instalarea împământării
trebuie efectuată de către un
electrician calificat. Societatea
noastră nu va fi răspunzătoare
pentru nicio daună care poate
apărea în momentul în care
uscătorul este utilizat fără
împământare, în conformitate cu
regulamentele locale.
Uscător / Manual de utilizare
47
Page 48

B
PERICOL!
• Tensiunea şi protecţia permisă
a siguranţei sunt specificate pe
etichetă.
• Tensiunea specificată pe etichetă
trebuie să fie egală cu tensiunea
sursei dumneavoastră principale de
alimentare. Scoateţi uscătorul din
priză când nu îl utilizaţi.
• Deconectaţi uscătorul de la sursa
principală de alimentare în timpul
instalării, operaţiunilor de întreţinere,
curăţare şi reparaţie.
• Nu atingeţi priza dacă aveţi mâinile
umede! Nu deconectaţi niciodată
aparatul prin smulgerea cablului,
întotdeauna prindeţi de fişă atunci
când scoateţi cablul.
• Nu utilizaţi prelungitoare, blocuri
multipriză sau adaptoare pentru
conectarea uscătorului la sursa
de alimentare, pentru a permite
scăderea riscului de incendiu sau de
electrocutare.
• Fişa cablului de alimentare trebuie
să fie uşor accesibilă după instalare.
• Cablul principal deteriorat
trebuie înlocuit, notificând
Personalul autorizat de service.
• Dacă uscătorul este defect,
acesta nu trebuie utilizat decât
dacă a fost reparat de către
un agent autorizat de service!
Există pericol de electrocutare!
1.1.2 Securitatea produsului
AVERTISMENT!
A
• Asigurați-vă că admisia de aer a
uscătorului este deschisă şi bine
ventilată.
• Produsul conține agent frigorific
R290.
• Produsul conține agent frigorific
R290.
• Țineți produsul departe de posibile
surse de căldură care pot provoca
aprinderea.
PERICOL!
• Puncte de luat în considerare în
cazul pericolului de incendiu:
Următoarele tipuri de rufe sau
articole nu trebuie uscate în uscător,
având în vedere pericolul de
incendiu.
• Rufe nespălate
• Articolele pătate cu ulei, acetonă,
alcool, păcură, cherosen, soluţii de
îndepărtare a petelor, terebentină,
parafină sau soluţii de îndepărtare
a parafinei, trebuie spălate în apă
caldă cu mult detergent înainte de a
fi uscate în uscător.
Din acest motiv, în special articolele
care prezintă petele specificate
anterior trebuie spălate foarte bine,
iar pentru acest lucru trebuie să
utilizaţi detergentul adecvat şi să
selectaţi o temperatură ridicată de
spălare.
• Următoarele rufe sau articole
specificate nu trebuie uscate în
uscător din cauza pericolului de
incendiu:
48
Uscător / Manual de utilizare
Page 49

PERICOL!
• Articole de îmbrăcăminte sau
perne întărite cu spumă de cauciuc
(spumă latex), bonete de duş,
materiale textile rezistente la apă,
materiale cu întăritură din cauciuc şi
perniţe din spumă de cauciuc.
• Articole de îmbrăcăminte curăţate
cu substanţe chimice industriale.
• Articole precum brichete, chibrite,
monede, piese din metal, ace,
etc. pot deteriora ansamblul
tamburului sau pot duce la
probleme de funcţionare. De
aceea, verificaţi toate rufele spălate
pe care le încărcaţi în uscătorul
dumneavoastră.
• Nu opriţi niciodată uscătorul
înainte de finalizarea programului.
Dacă trebuie să faceţi acest lucru,
îndepărtaţi rapid toate rufele spălate
şi întindeţi-le pentru a elimina
căldura.
• Articolele de îmbrăcăminte care
au fost spălate neadecvat se pot
autoaprinde, chiar şi după finalizarea
procesului de uscare.
• Trebuie să furnizaţi o ventilare
suficientă pentru a preveni
acumularea în cameră a gazelor
emise de dispozitivele care
funcţionează cu alte tipuri de
combustibil, inclusiv flacără
deschisă, din cauza efectului de
aprindere inversă.
A
AVERTISMENT!
• Lenjeria care conţine întărituri din
metal nu trebuie uscată în uscător.
Uscătorul se poate deteriora dacă
întăriturile din metal se slăbesc şi se
rup în timpul procesului de uscare.
REȚINEȚI
C
• Utilizaţi balsamuri de rufe şi
produse similare în conformitate
cu instrucţiunile producătorilor
acestora.
• Întotdeauna curăţaţi filtrul de scame
înainte sau după fiecare încărcare.
Nu operaţi niciodată uscătorul fără a
avea filtrul de scame instalat.
AVERTISMENT!
A
• Nu încercaţi niciodată să reparaţi
dumneavoastră uscătorul. Nu
efectuaţi nicio reparaţie sau
procedură de înlocuire pe produs
chiar dacă ştiţi sau aveţi capacitatea
de a efectua procedurile necesare,
doar dacă se specifică clar
acest lucru în instrucţiunile de
funcţionare sau în manualul de
service publicat. Altfel, vă puneţi
viaţa dumneavoastră şi a celorlaţi în
pericol.
• Nu trebuie să existe nicio uşă
blocabilă, culisantă sau batantă care
ar putea bloca deschiderea uşii de
încărcare în locaţia în care uscătorul
dumneavoastră va fi instalat.
• Instalaţi uscătorul dumneavoastră
în locaţii adecvate pentru utilizare
casnică. (Baie, balcon închis, garaj,
etc.)
Uscător / Manual de utilizare
49
Page 50

A
AVERTISMENT!
• Asiguraţi-vă că animalele de casă
nu intră în uscător. Verificaţi interiorul
uscătorului înainte de a-l porni.
• Nu vă aplecaţi pe uşa de încărcare
a uscătorului dumneavoastră atunci
când este deschisă; aceasta ar
putea cădea.
• Nu se va permite acumularea
scamelor în jurul uscătorului.
1.2 Montajul pe o maşină de spălat
• Se va utiliza un dispozitiv de fixare între
cele două maşini în momentul instalării
uscătorului peste o maşină de spălat.
Dispozitivul de fixare trebuie instalat de către
un agent autorizat de service.
• Greutatea totală a maşinii de spălat şi a
uscătorului - în sarcină completă - în locaţia
în care sunt montate una peste alta trebuie
să atingă aproximativ 180 de kilograme.
Aşezaţi produsele pe o suprafaţă solidă care
are o capacitate suficientă de susţinere a
sarcinii!
AVERTISMENT!
A
• Maşina de spălat nu poate fi aşezată pe
uscător. Acordaţi atenţie avertismentelor
anterioare în timpul instalării pe maşina
dumneavoastră de spălat.
Masa de instalare pentru maşina de spălat şi
uscător
Adâncimea maşinii de spălat
Adâncimea
uscătorului
62cm
60cm
54cm
60cm
Poate fi instalat.
Poate fi
instalat.
54cm
Nu poate fi instalat.
< 50cm
Nu poate fi
instalat.
1.3 Domeniul de utilizare
• Uscătorul este conceput pentru utilizare
casnică. Nu este adecvat pentru utilizare
comercială şi nu trebuie utilizat în alte
scopuri decât utilizarea recomandată.
• Utilizaţi uscătorul doar pentru uscarea
rufelor marcate special în acest sens.
• Producătorul nu îşi asumă nicio răspundere
care poate apărea din utilizarea sau
transportul incorect.
• Durata de funcţionare a uscătorului pe
care l-aţi achiziţionat este de 10 ani.
În timpul acestei perioade, piesele de
schimb originale vor fi disponibile pentru
funcţionarea adecvată a uscătorului.
1.4 Siguranţa copiilor
• Ambalajele sunt periculoase pentru copii.
Nu lăsaţi ambalajele la îndemâna copiilor.
Produsele electrice sunt periculoase
pentru copii. Nu lăsaţi copii în apropierea
produsului care este în funcţiune. Nu
permiteţi copiilor să umble la uscător.
Utilizaţi un sistem de închidere securizat
pentru copii pentru a-i împiedica să umble
la uscător.
REȚINEȚI
C
• Sistemul de închidere securizat pentru copii
se află pe panoul de control. (Consultaţi
secţiunea Sistem de închidere securizat
pentru copii)
• Menţineţi uşa de încărcare închisă chiar şi
atunci când uscătorul nu este în funcţiune.
50
Uscător / Manual de utilizare
Page 51

1.5 Conformitate cu Directiva WEEE
şi depozitarea la deşeuri a produsului
uzat:
Acest produs respectă Directiva UE
WEEE (2012/19/UE). Produsul
este marcat cu un simbol de
clasificare pentru deşeuri electrice
şi electronice (WEEE).
Acest produs a fost fabricat
folosind piese şi materiale de
înaltă calitate, care pot fi refolosite şi reciclate.
Nu depozitaţi produsul uzat împreună cu
gunoiul menajer la sfârşitul duratei sale de
funcţionare. Duceţi-l la un centru de colectare
pentru reciclarea echipamentelor electrice şi
electronice. Luaţi legătura cu autorităţile locale
pentru a afla informaţii despre aceste centre de
colectare.
PERICOL!
• R290 este un agent frigorific inflamabil.
Astfel, asigurați-vă că sistemul şi țevile nu
sunt avariate în timpul operării şi manevării.
• Țineți produsul departe de posibile surse
de căldură care pot provoca aprinderea în
caz de avarii.
• Nu casați produsul dându-i foc.
1.6 Conformitate cu Directiva RoHS:
Produsul pe care l-aţi achiziţionat respectă
Directiva UE RoHS (2011/65/UE). Nu conţine
materiale dăunătoare şi interzise specificate în
Directivă.
1.7 Informaţii despre ambalaj
Ambalajul produsului este produs din materiale
reciclabile, conform reglementărilor noastre
naţionale de mediu. Nu depozitaţi ambalajul
împreună cu gunoiul menajer sau cu alte
deşeuri. Depozitaţi-l în punctele de colectare a
ambalajelor amenajate de autorităţile locale.
1.8 Specificaţii tehnice
RO
Înălţime (Min. / Max.) 84,7 cm / 86,6 cm*
Lăţime 59,7 cm
Adâncime 50,8 cm
Capacitate (max.) 7 kg**
Greutate netă (± 4 kg) 42 kg
Tensiune
Putere nominală de
intrare
Cod model
* Înălţime min.: Înălţimea cu picioarele reglabile
închise.
Înălţime max.: Înălţimea cu picioarele
reglabile deschise la nivelul maxim.
**Greutatea rufelor uscate înainte de spălare.
*** Eticheta cu tipul aparatului se află în spatele
uşii de încărcare.
Consultaţi eticheta***.
REȚINEȚI
C
• Specificaţiile tehnice ale uscătorului sunt
supuse modificărilor fără o notificare
prealabilă pentru a îmbunătăţi calitatea
produsului.
• Imaginile din acest manual de utilizare sunt
schematice şi pot să nu corespundă exact
produsului dumneavoastră.
• Valorile specificate pe marcajele de pe
uscător sau din alte documentaţii publicate
care însoţesc uscătorul sunt obţinute în
laborator în conformitate cu standardele
relevante. Aceste valori pot varia în funcţie
de condiţiile de operare şi de mediu ale
uscătorului.
Uscător / Manual de utilizare
51
Page 52

2 Uscătorul dumneavoastră
2.1 Prezentare generală
11
1
10
9
8
7
6
2
3
4
5
1. Panoul superior
2. Panoul de comandă
3. Uşa de încărcare
4. Butonul de deschidere a plăcii de protecţie
5. Grătare de ventilare
6. Picioare reglabile
7. Placa de protecţie
8. Eticheta
9. Filtru de scame
10. Sertarul rezervorului de apă
11. Cablul de alimentare
2.2 Conţinutul ambalajului
1. Furtun
pentru
scurgerea
apei*
5. Manual
de
utilizare al
tamburului
de uscare*
2. Burete
de schimb
pentru
sertarul
filtrului*
3. Manual
de utilizare
4. Tambur
de uscare*
6.
Recipientul
de umplere
cu apă*
7. Apă
pură*
8. Unitatea
pentru
pastile de
parfum*
*Poate fi furnizat împreună cu maşina
dumneavoastră în funcţie de modelul acesteia.
52
Uscător / Manual de utilizare
Page 53

3 Instalare
Înainte de a telefona celui mai apropiat Centru
de service pentru instalarea uscătorului,
asiguraţi-vă că instalaţia electrică şi reţeaua
de scurgere a apei sunt corespunzătoare
conform manualului de utilizare.Dacă acestea
nu sunt adecvate, contactaţi un electrician
şi un tehnician calificaţi pentru a realiza
modificările necesare.
REȚINEȚI
C
• Clientul este răspunzător pentru pregătirea
locaţiei uscătorului, precum şi pentru
instalaţiile electrice şi de scurgere a apei
menajere.
AVERTISMENT!
A
• Înainte de instalare, verificaţi vizual dacă
uscătorul are defecte. Dacă uscătorul
este deteriorat, acesta nu trebuie instalat.
Produsele deteriorate cauzează riscuri
asupra securităţii dumneavoastră.
• Aşteptaţi 12 ore înainte de a porni uscătorul
pentru utilizare.
3.1 Locaţia potrivită pentru instalare
Instalaţi uscătorul pe o suprafaţă stabilă şi
plană.
Uscătorul este greu. Nu mutaţi uscătorul
singuri.
• Utilizaţi uscătorul într-un mediu bine
ventilat şi fără praf.
• Spaţiul liber dintre uscător şi podea
nu trebuie redus cu materiale precum
covoare, lemn sau bandă.
• Nu acoperiţi grătarele de ventilare ale
uscătorului.
• Nu trebuie să existe nicio uşă blocabilă,
culisantă sau batantă care ar putea bloca
deschiderea uşii de încărcare în locaţia
în care uscătorul dumneavoastră va fi
instalat.
• După instalarea uscătorului, acesta
trebuie să rămână în acelaşi loc în care
s-au realizat racordurile. La instalarea
uscătorului, asiguraţi-vă că peretele din
spate al acestuia nu atinge nimic (robinet,
priză, etc.).
• Aşezaţi uscătorul la cel puţin 1 cm de
marginile altor corpuri de mobilier.
• Uscătorul dumneavoastră poate funcţiona
la temperaturi între +5°C şi +35°C. În
cazul în care condiţiile de funcţionare
nu sunt cuprinse în acest interval,
funcţionarea uscătorului poate fi afectată
şi acesta se poate deteriora.
• Suprafaţa din spate a uscătorului va fi
aşezată pe un perete.
PERICOL!
B
• Nu aşezaţi uscătorul pe cablul de
alimentare.
* Ignorați următorul avertisment dacă
sistemul produsului dvs. nu conține
R290
PERICOL!
• Uscătorul conține agent frigorific R290.*
• R290 este un agent frigorific prietenos cu
mediul, dar inflamabil.*
• Asigurați-vă că admisia de aer a uscătorului
este deschisă şi bine ventilată.*
• Asigurați-vă că admisia de aer a uscătorului
este deschisă şi bine ventilată.*
3.2 Îndepărtarea ansamblul de
securitate în transport
AVERTISMENT!
A
Îndepărtaţi ansamblul
de securitate în
transport înainte de
a utiliza uscătorul
pentru prima dată.
Uscător / Manual de utilizare
53
Page 54

3.3 Racordarea la reţeaua de
scurgere
Puteţi scurge apa acumulată direct prin
furtunul de scurgere a apei furnizat cu
produsul, în locul scurgerii periodice a apei
colectate în rezervor.
Racordarea furtunului de scurgere a apei
1-2 Trageţi
1
3 4
3 Conectaţi un capăt al furtunului de
scurgere furnizat cu uscătorul la punctul
de racordare de unde aţi îndepărtat
furtunul produsului în pasul anterior.
4Conectaţi capătul celălalt al furtunului de
scurgere direct la reţeaua de scurgere a
apei menajere sau la chiuvetă.
2
manual furtunul
în spatele
uscătorului
pentru a-l
deconecta
din locaţia de
racordare. Nu
utilizaţi nicio
unealtă pentru
a îndepărta
furtunul.
REȚINEȚI
C
• Furtunul de scurgere a apei trebuie ataşat
la o înălţime de maxim 80 cm.
• Asiguraţi-vă că furtunul de scurgere a apei
nu este călcat şi nu are pliuri între reţeaua
de scurgere şi maşină.
• Dacă împreună cu produsul vi s-a furnizat
şi un pachet cu accesorii, vă rugăm să citiți
descrierea detaliată.
3.4 Reglarea picioarelor
• Rotiţi picioarele
către stânga sau
dreapta până ce
uscătorul este
aşezat la nivel
şi fix.
3.5 Transportul uscătorului
Scoateţi uscătorul din priză înainte de a-l
transporta.
Scurgeţi toată apa care a rămas în uscător.
Dacă s-a realizat o racordare directă la
reţeaua de scurgere a apei, atunci îndepărtaţi
racordurile furtunului
AVERTISMENT!
A
• Recomandăm să transportaţi uscătorul în
poziţie dreaptă. Dacă nu este posibil acest
lucru, vă recomandăm transportul acestuia
prin înclinarea maşinii către partea dreaptă,
privind maşina din faţă.
3.6 Avertismente privind sunetele
REȚINEȚI
C
• Este normal să
auziţi uneori un
zgomot metalic din
compresor în timpul
funcţionării.
• Apa colectată în timpul funcţionării este
pompată către rezervorul de apă. Este
normal să auziţi zgomotul de pompare în
timpul procesului.
3.7 Înlocuirea lămpii de iluminare
În cazul utilizării unei lămpi de iluminare în
uscătorul dumneavoastră
Pentru a înlocui becul/LED-ul utilizat pentru
iluminare în uscătorul dumneavoastră, apelaţi
la Centrul autorizat de service local.
Lampa (lămpile) utilizate în acest aparat
nu este (sunt) corespunzătoare pentru
iluminarea unei camere. Scopul recomandat
al acestei lămpi este de a asista utilizatorul
în aşezarea rufelor în uscător într-un mod
confortabil.‘’Becurile folosite în acest aparat
trebuie să reziste la condiţii fizice extreme
precum vibraţiile şi temperaturile de peste 50
°C.’’
54
Uscător / Manual de utilizare
Page 55

4 Pregătirea
4.1 Rufe corespunzătoare pentru
uscarea în uscător
Urmați întotdeauna instrucțiunile oferite pe
etichetele vestimentare. Uscați la uscător doar
rufele care au o etichetă care le indică ca fiind
potrivite pentru uscare în uscător.
4.2 Rufe necorespunzătoare pentru
uscarea în uscător
A nu se usca în
Articolele cu acest simbol nu
uscate în Uscător.
REȚINEȚI
C
• Materialele brodate delicate, lâna, articolele
din mătase, materialele delicate şi fine,
articolele ermetice şi perdelele din tul nu
sunt corespunzătoare pentru uscător.
4.3 Pregătirea rufelor pentru uscare
• Rufele pot fi încâlcite după spălare.
Separaţi articolele înainte de a le aşeza în
uscător.
• Uscaţi articolele care au accesorii din
metal, precum fermoare, pe dos.
• Închideţi fermoarele, cărligele şi
cataramele şi butonii.
4.4 Modalităţi de reducere a
consumului de energie electrică
• Informaţiile următoare vă vor ajuta să
utilizaţi uscătorul într-o manieră ecologică
şi eficientă din punct de vedere al energiei
electrice.
• Stoarceţi rufele la viteza cea mai mare
posibilă în momentul în care le spălaţi.
Astfel, timpul de uscare este redus, iar
consumul de energie electrică este redus.
• Sortaţi rufele în funcţie de tipul şi
grosimea acestora. Uscaţi acelaşi tip de
rufe împreună. De exemplu, prosoapele
de bucătărie subţiri şi feţele de masă se
usucă mai rapid decât prosoapele de
baie.
• Urmaţi instrucţiunile din manualul de
utilizare pentru selectarea programelor.
• Nu deschideţi uşa de încărcare a maşinii
în timpul procesului de uscare decât
dacă este necesar. Dacă trebuie neapărat
uscător.
trebuie
să deschideţi uşa de încărcare, nu o
menţineţi deschisă timp îndelungat.
• Pentru modelele cu condensator: curățați
condensatorul o dată pe lună sau tot la
30 de cicluri de funcționare.
• Pentru modelele cu pompă de căldură:
curăţaţi sertarul filtrului periodic când
există o acumulare vizibilă de puf sau
când indicatorul de curățare al sertarului
filtrului se iluminează.
• Pentru modelele cu coş de fum:
respectați instrucțiunile pentru coşul de
fum şi curățați-l.
• În timpul ciclului de uscare, aerisiți bine
încăperea unde este amplasat uscătorul
dvs. de rufe.
4.5 Sarcina corectă
Urmaţi instrucţiunile
din secţiunea
„Selectarea
programului şi tabelul
de consum”. Nu
încărcaţi mai mult
decât valorile de
sarcină specificate în
tabel.
Următoarele valori de greutate sunt oferite
drept exemplu.
Rufe
Cuverturi din
bumbac (duble)
Cuverturi din
bumbac (simple)
Aşternuturi
(duble)
Aşternuturi
(simple)
Feţe de masă
mari
Feţe de masă
mici
Şerveţele 100
Prosoape de
baie
Prosoape de
mână
*Greutatea rufelor uscate înainte de spălare.
Approximate
weights (g)*
1500 Bluze 150
1000
500 Cămăşi 250
350
700 Rochii 350
250 Blugi 700
700 Tricouri 125
350
Rufe Approximate
Cămăşi din
bumbac
Rochii din
bumbac
Batiste (10
bucăţi)
300
500
100
Uscător / Manual de utilizare
55
Page 56

5 Operarea produsului
1
5.1. Panoul de comandă
3
4
5
2
1. Buton de selectare On/Off/Program
(Pornit/Oprit/Program)
2. Buton Start/Stand by (Pornire/Pauză)
5.2 Simboluri
Rezervor
Anti Cute
Curăţare
ltru
Activare/
Dezactivare
Curăţarea
ltru sertar /Condensator
Temporizator
Xpress Bumbac EcoAşternuturi
Uscarea
Blocare pentru
protecţia
copiilor
Uscat
pentru
împăturire
Nivel de
uscare+
Semnal
sonor
Călcare
uscată
Nivel de
uscare++
Anulare cu
avertizare
sonoră
Blugi
Igienă
(BabyProtect+)
Xpress 14
Protecţie
bebeluşi
Xpress 30
5.3. Pregătirea uscătorului
Cuplați uscătorul.
Deschideţi uşa de încărcare.
Puneți rufele în uscător fără a umple exagerat.
Împingeţi şi închideţi uşa de încărcare.
AVERTISMENT!
A
• Asigurați-vă că
rufele nu sunt
presate pe uşa de
încărcare.
3. Buton Sfârşitul programului
4. Butonul Nivel de uscare
5. Volum sonor/Butonul de selectare a timpului
programelor
Rufe
Cămăşi
Sport
Împrospătare
Bumbac
Raft
uscare/Programe
temporizare
Uscăciune
Nivel
Mix
Xpress 30
Fulgi
delicate
Uscare
extra
Reîmprospătare
Uscat pentru
împăturire
plus
Temperatura
scazuta
Start
Pauză
Anulare
Zilnic
Sintetice
Împrospătar
e lână
Atunci când selectaţi programul dorit folosind
butonul de selecţie On/Off/Program (Pornit/
Oprit/Program), maşina va porni.
REȚINEȚI
C
• Selectarea unui program folosind
butonul de selectare On/Off/Program
(Pornit/Oprit/Program) nu înseamnă că
programul a început. Apăsaţi butonul
Start/Stand-by (Start/Pauză) pentru a
începe programul.
56
Uscător / Manual de utilizare
Page 57

5.4 Selectarea programelor şi tabelul de consum
RO
Programe Descriere program
Uscare bumbac pentru
călcare
Bumbac Eco
Uscare bumbac pentru
împăturire
Uscare extra bumbac
Uscare sintetice pentru
călcare
Uscare sintetice pentru
împăturire
Programe temporizare
Refresh (Wool Refresh)
Îngrijire delicată/ Cămăşi
Blugi
Exterior/Sporturi (Goretex)
Mix(Zilnic)
Puteţi usca rufele din bumbac pentru călcare în
acest program pentru a fi uşor umede, gata de
călcare. (cămaşă, tricou, faţă de masă etc.)
Puteţi usca toate rufele dvs. din bumbac în
acest program. (tricouri, pantaloni, pijamale,
haine de bebeluşi, lenjerie intimă, pânză etc.)
Puteţi pune rufele în dulap fără călcare.
Puteți folosi acest program pentru o uscare
superioară a rufelor groase cum ar fi pantaloni,
treninguri. Puteți să vă puneți rufele în şifonier
fără a le călca.
Puteţi usca rufele din bumbac gros în acest
program precum prosoapele, halatele etc.
Puteţi pune rufele în dulap fără călcare.
Puteţi usca rufele din materiale sintetice pentru
călcare în acest program pentru a fi uşor
umede, gata de călcare. (cămaşă, tricou, faţă
de masă etc.)
Puteţi usca toate rufele dvs. din materiale
sintetice în acest program. (cămaşă, tricou,
pantaloni, lenjerie intimă, fațăde masă etc.)
Puteţi pune rufele în dulap fără călcare.
Puteți selecta programele de timp între 10 şi
160 de minute, pentru a atinge la temperaturi
scăzute nivelul de uscare dorit. În cadrul
acestui program, funcționarea uscătorului
cu tambur se întinde pe durata setată
independent de nivelul de uscare a rufelor.
Se ventilează preț de 10 minute fără a sufla
aer cald. Puteți ventila bumbacul şi hainele de
pânză care au fost închise o vreme îndelungată
cu acest program pentru a îndepărta mirosul.
Puteți folosi acest program pentru a ventila şi
înmuia lâna lrufelor din lână care pot fi spălate
într-o maşină de spălat. Nu folosiți pentru
uscare completă.
Usucă cămăşile într-un mod mai delicat şi nu
şifonează foarte mult, necesitând mai puțină
călcare
Puteţi usca pantalonii, rochiile, cămăşile sau
hainele din denim în acest program.
Folosiți-l pentru a usca hainele făcute din
sintetice, bumbac say materiale amestecate
sau produse rezistente la apă precum jachetele
funcționale, pelerine etc. Întoarceți-lempe dos
înainte de uscare.
Puteți usca cu acest program atât rufe din
bumbac, cât şi sintetice.Hainele de sport şi
fitness pot fi uscate cu acest program.
(rpm)
Capacitate (kg)
7 1000 145
7 1000 179
7 1000 204
7 1000 214
3,5 800 55
3,5 800 70
- - -
- - 10
1,5 1200 50
4 1200 140
2 1000 130
4 1000 125
Viteza de stoarcere
în maşina de spălat
(minute)
Timp de uscare
Uscător / Manual de utilizare
57
Page 58

Igienă (BabyProtect+)
Fulgi
E un prfogram pe termen lung pe care îl puteți
folosi pentru haine (haine de copii, prosoape,
lenjerie intimă, etc.) care necesită igienă
specială. Igiena e oferită prin temperatura mare
((Acest program este identificat şi aprobat de
“The British Foundation” din Anglia (Allergy
UK).))
Puteţi usca haine precum paltoane şi sacouri
cu pene şi fibre care au eticheta că pot fi
uscate în uscător. Uscaţi pe dos.
5 800 195
- 800 100
Xpress 30
Valori ale consumului de energie
Programe Capacitate (kg)
Bumbac Eco* 7 1000 60% 1,75
Uscare bumbac pentru
călcare
Uscare sintetice pentru
împăturire
Folosiți acest program pentru a avea 2 cămăşi
gata de călcat
7 1000 60% 1,40
3,5 800 40% 0,65
“Programul de iscare bumbac Eco” folosit la capacitate maximă şi parţială este programul
de uscare standard la care se referă informaţiile de pe etichetă şi din fişa tehnică, adică
acest program este adecvat pentru uscarea lenjeriei de bumbac normală udă şi că este cel
mai eficient program în termeni de consum de energie pentru bumbac.
0,5 1200 30
spălat (rpm)
în maşina de
Viteza de stoarcere
Cantitatea
aproximativă de
Valoarea
umezeală rămasă
consumului de
* : Cadrul privind directiva de etichetare energetică (EN 61121:2012) Toate valorile din tabel sunt
determinate conform directivei EN 61121:2012. Valorile de consum pot varia în tabel în funcţie de
tipul de rufe, viteza de rotaţie, condiţiile ambientale şi schimbările în tensiune.
energie kWh
58
Uscător / Manual de utilizare
Page 59

Allergy UK este o marcă a
British Allergy Association.
Ștampila de aprobare este
creată pentru a-i ghida pe
oamenii care necesitp o
recomandare despre un
produs pe care produsul respectiv în
interzice / reduce / elimină alergenii sau
reduce conținutul alergenic în mod
semnificativ în mediul în care există pacienții
cu alergii. Are ca scop să ofere asigurări pe
care produsele sunt testate în mod ştiințific
sau examinate astfel încât să ofere rezultate
măsurabile.
5.5 Funcţii auxiliare
Buzzer (Sonor) / timp
Uscătorul emite o avertizare sonoră atunci
când programul este terminat. Dacă nu doriți
să se emită un semnal sonor, apăsați butonul
„Buzzer/Time” ( Sonor/Timp). Când apăsați
butonul Buzzer/Time (Sonor/Timp), se va
aprinde un led iar la sfârşitul programului nu se
va emite nici un sunet.
REȚINEȚI
C
• Puteţi selecta această funcţie înainte sau
după pornirea programului.
Butonul Buzzer/Time (Sonor/Timp) este folosit
pentru a regla durata programului când se
selectează programele Rack/Time.
Nivel de uscare
Butonul de selectare a nivelului de uscare este
folosit pentru reglarea nivelului de uscare dorit.
Durata programului poate varia în funcţie de
selecţie.
care o doriți. Ledul End Time se va ilumina.
(Când este apăsat şi ţinut apăsat butonul,
funcția End Time (Sfârşitul programului) este
activată non-stop).
4. Apăsaţi butonul Start / Stand-by (Start/
Pauză). Începe numărătoarea inversă pentru
Sfârşitul programului. “:” Separatorul din
mijlocul intervalului de temporizare afişat
clipeşte.
REȚINEȚI
C
• Puteţi adăuga sau îndepărta rufe în
intervalul de temporizare. Timpul afişat
este suma dintre timpul normal de uscare
şi timpul de finalizare. Ledul End Time
(Sfârşitul programului) se va stinge la
finalul numărători inverse, uscarea va
începe iar ledul indicator al uscării se va
ilumina.
Schimbarea timpului de finalizare
Dacă doriţi să schimbaţi durata în timpul
numărătorii inverse:
Anulaţi programul rotind butonul de selecţie
On/off/program (Pornit/Oprit/Program).
Selectați programul dorit şi repetați procedura
de selectare a Sfârşitului de program.
Anularea funcţiei Sfârşitul programului
Dacă doriţi să anulaţi numărătoarea inversă a
sfârşitului de program şi să începeţi programul
imediat:
Anulaţi programul rotind butonul de selecţie
On/off/program (Pornit/Oprit/Program).
Selectați programul dorit şi apăsați butonul
Start / Stand-by (Start/Pauză).
5.6 Indicatoare avertizare
REȚINEȚI
C
• Puteţi activa această funcţie doar înainte
de începerea programului.
Sfârşitul programului
Puteţi prelungi durata programului cu până
la 24 de ore cu funcţia End Time (Sfârşitul
programului).
1. Deschideţi uşa de încărcare şi introduceți
rufele.
2. Selectaţi programul de uscare.
3. Apăsați butonul de selectare End Time
(Sfârşitul programului) şi alegeți amânarea pe
Uscător / Manual de utilizare
REȚINEȚI
C
• Puteţi activa această funcţie doar înainte
de începerea programului.
REȚINEȚI
C
• Indicatoarele de avertizare pot diferi în
funcţie de modelul uscătorului dvs.
Curăţarea filtrului
Atunci când programul este terminat,
indicatorul de avertizare pentru curăţarea filtrului
se aprinde.
59
Page 60

Rezervorul de apă
Dacă rezervorul de apă se umple în timp
ce programul funcţionează, indicatorul de
avertizare începe să clipească iar maşina intră
în stand-by. În acest caz, goliţi apa din rezervor
şi porniţi programul apăsând butonul Start /
Pause (Start/Pauză). indicatorul de avertizare se
stinge iar programul este reluat.
5.7 Pornirea programului
Apăsaţi butonul Start/Stand-by (Start/Pauză)
pentru a începe programul.
Indicatoarele Start/Stand-by (Start/Pauză) şi
Drying (Uscare) se vor ilumina pentru a arăta că
programul a început.
5.8. Blocare de siguranță pentru copii
Maşina are o funcţie de siguranţă pentru copii
ce face ca fluxul programului maşinii să nu fie
afectat dacă sunt apăsate butoanele în timpul
funcționării. Atunci când funcţia de blocare
de siguranță pentru copii este activată, toate
butoanele de pe panou, cu excepţia butonului
On/Off/Program sunt dezactivate.
Apăsați butoanele Nivel de uscare şi Buzzer
simultan pentru 3 secunde pentru a activa
blocarea de siguranță pentru copii.
Blocarea de siguranță pentru copii trebuie să
fie dezactivată pentru a putea porni un nou
program după ce se termină programul curent
sau pentru a putea interveni în programul
curent. Pentru a dezactiva blocarea de
siguranță pentru copii, țineți apăsat aceleaşi
butoane timp de 3 secunde.
REȚINEȚI
C
• Atunci când blocarea de siguranță pentru
copii este activată, indicatorul funcției de
blocare de pe ecran se aprinde.
• Blocarea de siguranță pentru copii se
dezactivează atunci când uscătorul este
oprit şi repornit folosind butonul On/Off/
Cancel (Pornire/Oprire/Anulare).
REȚINEȚI
C
• Atunci când uscătorul funcționează iar
blocarea de siguranță pentru copii este
activată, la rotirea comutatorului de
selectare se vor auzi două bipuri. Dacă
blocarea de siguranță pentru copii este
dezactivată fără a readuce comutatorul
de selectare în poziția sa anterioară,
programul va lua sfârşit datorită
modificării poziției comutatorului de
selectare a programelor.
5.9 Schimbarea programului după
pornire
Puteţi schimba programul selectat pentru a
usca rufele dvs. cu un program diferit după ce
maşina începe să funcționeze.
De exemplu, selectați programul Extra Dry
(Foarte uscat) rotind comutatorul de selectare
On/Off/Program (Pornit/Oprit/Program)pentru
a selecta Extra Dry în loc de Iron Dry (Uscare
normală).
Apăsaţi butonul Start/Stand-by (Start/Pauză)
pentru a începe programul.
Adăugarea şi scoaterea hainelor în modul
stand-by
Dacă doriţi să adăugaţi sau să scoateţi haine
în/din uscător după începerea programului de
uscare:
Apăsaţi butonul Start/Stand-by (Start/Pauză)
pentru a aduce uscătorul în modul Stand-by.
Operaţiunea de uscare se opreşte.
Deschideţi uşa de încărcare în timpul modului
Stand-by (Pauză) şi închideţi uşa după ce aţi
adăugat sau scos rufe.
Apăsaţi butonul Start/Stand-by (Start/Pauză)
pentru a începe programul.
Atunci când blocarea de siguranță pentru copii
este activată:
Atunci când uscătorul funcționează, sau este
în standby, simbolurile indicatoare nu se vor
schimba la modificarea poziției comutatorului
de selectare.
60
Uscător / Manual de utilizare
Page 61

REȚINEȚI
C
• Adăugarea de rufe după ce operaţiunea
de uscare a început poate face ca
rufele uscate din interiorul maşinii să se
amestece cu rufele ude şi să rămână
umede după terminarea operaţiunii.
• Adăugarea sau îndepărtarea rufelor poate
fi repetată de câte ori doriţi. Dar această
operaţiune întrerupe în mod constant
operaţiunea de uscare şi ar face ca
durata programului să se prelungească
şi să mărească consumul de energie.
Astfel, este recomandat să adăugaţi rufe
înainte de începerea programului.
• Dacă este selectat un nou program
prin schimbarea poziţiei comutatorului
de selectare a programelor în timp
ce uscătorul este în modul stand-by,
programul în derulare ia sfârşit.
AVERTISMENT!
• Nu atingeţi suprafaţa interioară a
tamburului atunci când adăugaţi sau
scoateţi rufe în timpul unui program
în derulare. Suprafaţa tamburului este
fierbinte.
5.11 Terminarea programului
Când programul se încheie, LED-urile Ultimul/
Anti-şifonare şi Avertismentul pentru curățarea
filtrului de pe indicatorul urmăririi programului se
va ilumina. Uşa de încărcare poate fi deschisă
iar uscătorul este gata pentru un nou ciclu.
Aduceți comutatorul de selectare On/Off/
Program (Pornit/Oprit/Program) în poziția On/
Off pentru a opri uscătorul.
REȚINEȚI
C
• Dacă rufele nu sunt scoase după ce
programul este terminat, se va activa
funcția de prevenire a şifonării timp de
2 ore pentru a evita şifonarea rufelor în
interiorul uscătorului. Programul va roti
rufele la intervale de 10 minute pentru a
preveni şifonarea.
5.10 Anularea programului
Dacă doriţi să anulaţi programul şi să încheiaţi
operaţiunea de uscare din orice motiv după
ce uscătorul începe să funcționeze, rotiți
comutatorul de selectare On/Off/Cancel (Pornit/
Oprit/Anulare) iar programul va fi anulat.
AVERTISMENT!
A
• Interiorul uscătorului va fi extrem de
încins atunci când anulaţi programul
în timpul funcţionării maşinii, deci rulaţi
programul de ventilare pentru a-i permite
să se răcească.
Uscător / Manual de utilizare
61
Page 62

6 Întreținerea şi curățarea
6.1 Suprafața interioară a uşii de
încărcare
Părul şi scamele care sunt separate de rufe
în timpul procesului de uscare este strâns de
Filtrul de scame.
NOTĂ
C
• Scamele se formează în timpul purtării şi
spălării hainelor.
• Puteți curăța compartimentul filtrului de
scame cu un aspirator.
• Curățați ambele filtrele sub jetul de apă în
direcție inversă a acumulării scamelor sau
cu o perie moale. Uscați filtrul înainte de
a-l pune la loc.
A
AVERTISMENT!
• După fiecare ciclu de uscare, curățați
filtrul de scame şi suprafața interioară a
uşii de încărcare.
Petru a curăța filtrul de scame:
• Deschideți uşa de încărcare.
• Țineți prima parte (filtrul interior) al filtrului
de scame format din două părți şi
îndepărtați-l trăgând în sus.
• Curățați părul, scamele şi resturile de
bumbac manual sau cu o cârpă moale.
• Îndepărtați a doua parte (filtrul exterior)
trăgându-l în sus.
NOTĂ
C
• Asigurați-vă că părul, scamele şi resturile
de bumbac nu cad în fanta în care sunt
instalate filtrele.
• Deschideți ambele filtrele de scame
(filtrele interioare şi exterioare) îndepărtați
părul, scamele, resturile de bumbac cu
mâna umedă, un aspirator sau o cârpă.
• Introduceți filtrele
de scame unul în
altul şi puneți-le
la loc.
• Curățați interiorul uşii de încărcare şi
spălătorul cu o cârpă moale şi umedă.
62
Uscător / Manual de utilizare
Page 63

6.2 Curățarea senzorilor
• Există senzor de temperatură în uscător
care detectează dacă rufele sunt sau nu
uscate
• Pentru a curăța senzorii:
• Deschideți uşa de încărcare a
uscătorului.
• Scoateți filtrul de scame trăgând în sus.
• Curățați senzorul cu mâna dacă are
acumulare de scame pe el.
NOTĂ
C
• Curățați senzorul de 4 ori pe an.
• Nu folosiți instrumente metalice atunci
când curățați senzorul.
• Permiteți maşinii să se răcească dacă
este încă încinsă din cauza procesului de
uscare.
A
AVERTISMENT!
• Apa condensată nu este potabilă!
• Nu îndepărtați niciodată rezervorul de
apă atunci când programul rulează!
Dacă uitați să goliți rezervorul de apă, maşina
se va opri în timpul ciclurilor de uscare
ulterioare atunci când rezervorul de apă este
plin şi simbolul de avertizare Rezervor Apă
clipeşte. În acest caz, goliți rezervorul de apă
şi apăsați butonul Start / Pause pentru a relua
ciclul de uscare.
Golirea rezervorului de apă:
1. Scoateți cu grijă rezervorul de apă
din sertar sau suport.
2. Goliți apa din rezervor.
A
AVERTIZARE!
• Nu folosiți niciodată solvenți, agenți de
curățare sau substanțe similare pentru
curățare din cauza riscului de foc sau
explozie!
AVERTISMENT!
A
• Nu folosiți niciodată solvenți, agenți de
curățare sau substanțe similare pentru
curățare din cauza riscului de foc sau
explozie!
6.3 Golirea rezervorului de apă
Umezeala rufelor este îndepărtată şi
condensată în timpul procesului de uscare şi
apa care creşte se acumulează în rezervorul de
apă. Goliți rezervorul de apă după fiecare ciclu
de uscare.
Uscător / Manual de utilizare
• Dacă există acumulare de scame în
pâlnia rezervorului de apă, curățați-o sub
apă curentă.
• Amplasați rezervorul de apă la locul său.
NOTĂ
C
• Dacă aveți opțiunea de scurgere directă
a apei, nu e nevoie să goliți rezervorul de
apă.
6.4 Curățarea evaporatorului
Părul şi fibrele care nu sunt prinse de filtrul
de scame se acumulează în nervurile
evaporatorului din spatele plintei. Dacă
pictograma evaporator” ” clipeşte sau într-o
perioadă de 3 luni, curățați evaporatorului.
• Deschideți plinta
apăsând pe ea.
63
Page 64

• Pentru a deschide
uşa de rutare a
aerului, mişcați
mecanismul de
eliberare.
• Curățați scamele
pe evaporator cu
o cârpă umedă
/ cu un aspirator
cu o perie printr-o
mişcare în sus şi
în jos.
• După încheierea
procesului de
curățare, puneți
uşa de rutare
a aerului la
locul ei, mutați
mecanismele
pentru a o închide
şi închideți plinta.
A
AVERTISMENT!
• Puteți curăța manual, cu condiția să purtați
mănuşi protectoare. Nu încercați să curățați
cu mâinile goale Nervurile evaporatorului vă
pot vătăma mâinile
• Curățarea cu mişcări la stânga şi la dreapta
poate avaria nervurile evaporatorului. Acest
lucru poate duce la probleme de uscare.
64
Uscător / Manual de utilizare
Page 65

7 Depanare
Operațiunea de uscare durează prea mult.
Porii filtrului de scame (filtrul interior şi exterior) poate fi
înfundat. >>> Spălați filtrele de scame cu apă caldă şi
uscați-le.
Partea din față a evaporatorului poate fi înfundată. >>>
Curățați partea din față a evaporatorului.
Grilele de aerisire din partea din față a maşinii ar putea
fi obstrucționate. >>> Îndepărtați orice obiecte din fața
grilelor de aerisire ce blochează fluxul de aer.
Ventilarea ar putea fi insuficientă datorită faptului că
spațiul în care este instalată maşina este prea mic. >>>
Deschideți uşa sau fereastra pentru a evita creşterea
excesivă a temperaturii în cameră
Posibilă acumulare de calcar pe senzorul de umiditate.
>>> Curățați senzorul de umiditate.
Încărcare excesivă cu rufe. >>> Nu încărcați uscătorul
excesiv.
Este posibil ca rufele să nu fi fost centrifugate în mod
adecvat. >>> Efectuați o centrifugare la turație mai mare.
Hainele sunt umede după uscare.
Este posibil să se fi folosit un program necorespunzător
pentru tipul de rufe.>>> Verificați etichetele de întreținere
de pe haine şi selectați un program corespunzător cu tipul
de haine sau folosiți suplimentar un program de durată.
Porii filtrului de scame (filtrul interior şi exterior) poate fi
înfundat. >>> Spălați filtrele de scame cu apă caldă şi
uscați-le.
Partea din față a evaporatorului poate fi înfundată. >>>
Curățați partea din față a evaporatorului.
Încărcare excesivă cu rufe. >>> Nu încărcați uscătorul
excesiv.
Este posibil ca rufele să nu fi fost centrifugate în mod
adecvat. >>> Efectuați o centrifugare la turație mai mare.
Uscătorul nu porneşte sau un program nu poate fi pornit.
Uscătorul nu porneşte după ce este programat.
Cablul de alimentare ar putea fi deconectat. >>> Asigurațivă de conectarea cablului de alimentare.
Uşa de încărcare ar putea fi deschisă. >>> Asigurați-vă că
uşa de încărcare este bine închisă.
Un program ar putea să nu fie setat sau butonul Start /
Pause / Cancel (Start/Pauză/Anulare) ar putea să nu fie
apăsat. >>> Verificați ca programul să fie setat
şi să nu fie pe poziția de Pauză.
Blocarea de siguranță pentru copii ar putea fi activată. >>>
Dezactivați blocarea de siguranță pentru copii.
Programul a fost întrerupt fără motiv.
Este posibil ca uşa de încărcare să nu fi fost închisă bine.
>>> Asigurați-vă că uşa de încărcare este bine închisă.
Ar putea exista o întrerupere de curent. >>> Apăsați
butonul Start/Pause/Cancel (Start/Pauză/Anulare) pentru a
începe programul.
E posibil ca rezervorul de apă să fie plin. >>> Goliți
rezervorul de apă.
Hainele s-au micşorat, s-au întărit sau s-au deteriorat.
Este posibil să se fi folosit un program necorespunzător cu
tipul de haine. >>> Verificați etichetele de întreținere de pe
haine şi selectați un program adecvat tipului acestora.
Scurgeri de apă de la uşa de încărcare.
S-au acumulat scame pe suprafețele interne ale uşii de
încărcare şi pe garnitura uşii de încărcare. >>> Curățați
suprafețele interioare ale uşii de încărcare şi pe cele ale
garniturii uşii de încărcare.
Uşa de încărcare se deschide singură.
Este posibil ca uşa de încărcare să nu fi fost închisă bine.
>>> Apăsați uşa de încărcare până ce se aude sunetul de
închidere.
Simbolul de avertizare rezervor apă se aprinde sau
clipeşte.
E posibil ca rezervorul de apă să fie plin. >>> Goliți
rezervorul de apă.
Furtunul de golire a apei poate fi defect. >>> Dacă
produsul este conectat direct la rețeaua de scurgerea
menajeră, verificați furtunul de scurgere a apei.
Lumina din interiorul uscătorului nu se aprinde. (La
modelele cu lămpi)
Este posibil ca uscătorul să nu fi fost pornit folosind
butonul On/Off (Pornire/Oprire). >>> Asigurați-vă că
uscătorul este pornit.
E posibil ca lampa să nu funcționeze. >>> Contactați un
Service Autorizat pentru a înlocui lampa.
Pictograma de antişifonare e aprinsă.
Este posibil să fi activat modul de antişifonare care
împiedică rufele din uscător să se şifoneze. >>> Opriți
uscătorul şi scoateți rufele.
Pictograma de curățare a filtrului de scame este aprinsă.
Filtrul de scame (filtrul interior şi exterior) poate fi murdar.
>>> Spălați filtrele de scame cu apă caldă şi uscați-le.
Se poate forma un strat pe porii filtrului de scame care
duce la înfundare. >>> Spălați filtrele de scame cu apă
caldă şi uscați-le.
Este posibil ca filtrele de scame să nu fie introduse. >>>
Introduceți filtrele interior şi exterior la locurile lor.
O avertizare sonoră se aude din maşină.
Este posibil ca filtrele de scame să nu fie introduse. >>>
Introduceți filtrele interior şi exterior la locurile lor.
Pictograma de avertizare a evaporatorului clipeşte.
Partea din față a evaporatorului poate fi înfundată cu
scame. >>> Curățați partea din față a evaporatorului.
Este posibil ca filtrele de scame să nu fie introduse. >>>
Introduceți filtrele interior şi exterior la locurile lor.
Lumina din interiorul uscătorului se aprinde. (La modelele
cu lămpi)
Dacă uscătorul este conectat la priză, butonul On/Off
(Pornit/Oprit) este apăsat şi uşa se deschide; lumina
se aprinde. >>> Scoateți din priză uscătorul sau treceți
butonul On/Off (Pornit/Oprit) în poziția Off (Oprit).
Uscător / Manual de utilizare
65
Page 66

A
AVERTISMENT!
• Dacă problema persistă după ce ați urmat
instrucțiunile din acest capitol, contactați
distribuitorul dvs. sau un centru de service
autorizat. Nu încercați niciodată să vă reparați
singur aparatul.
NOTĂ
C
• În cazul în care întâmpinați o problemă de orice fel
la aparat, puteți solicita înlocuirea contactând un
service autorizat cu numărul de model al aparatului.
• Operarea aparatului cu părți neautentice poate
duce la defectarea aparatului.
• Producătorul şi distribuitorul nu răspund de
defectele care rezultă părțile neautentice.
66
Uscător / Manual de utilizare
Page 67

FIȘĂ PRODUS
REGULAMENTUL DELEGAT (UE) NR. 392/2012 AL COMISIEI
Nume furnizor și marcă înregistrată
Denumire model
Capacitate nominală (kg)
Tip uscător
Clasa eficienţei consumului de energie
Consum anual de energie (kWh)
(1)
(2)
Tip Control
Consum energie program bumbac standard la încărcare maximă (kWh)
Consum energie program bumbac standard la încărcare maximă parţială (kWh)
Consumul de energie al modului off (oprit) pentru programul standard pentru bumbac la capacitate maximă, P (W)
Consumul de energie al modului left-on (lăsat pornit) pentru programul standard pentru bumbac la capacitate maximă, P (W)
Durata modului lăsat pornit (min)
Program bumbac standard
Timp program bumbac standard la încărcare maximă, T (min)
Timp program bumbac standard la încărcare parţială, T
Timp program ponderat bumbac standard la încărcare maximă și încărcare parţială (T )
Clasa eficienţei condensării
Eficienţă condensare medie program bumbac standard la încărcare parţială, C
Eficienţă condensare medie program bumbac standard la încărcare parţială, C
(3)
dry
(min)
dry1/2
t
(4)
dry
dry1/2
Ventilat
Condensator
Automat
Neautomat
O
L
BEKO
DF7412GAW
7188301100
7.0
-
A++
212,0
-
1,75
0,96
0,50
1,00
30
-
179
107
138
B
81%
81%
Eficenţă ponderată program bumbac standard la încărcare maximă și încărcare parţială, C
Nivel putere sunet program bumbac standard la încărcare maximă
Integrat
: Da - : Nu
(5)
t
81%
65
-
(1) Scara de la A+++ (cea mai mare eficienţă) la D (cea mai mică eficienţă)
(2) Consum energie pe baza a 160 cicluri de uscare a programului bumbac standard la încărcare maximă și parţială, și consumul modurilor cu putere redusă. Consumul de
energie real per ciclu va depinde de modul de folosire al aparatului.
(3) "Programul de iscare bumbac pentru dulap" folosit la capacitate maximă și parţială este programul de uscare standard la care se referă informaţiile de pe etichetă și din fișa
tehnică, adică acest program este adecvat pentru uscarea lenjeriei de bumbac normală udă și că este cel mai eficient program în termeni de consum de energie pentru bumbac.
(4) Scara de la G (cea mai mică eficienţă) la A (cea mai mare eficienţă)
(5) Valoare ponderată medie — L exprimată în dB(A) re 1 pW
Uscător / Manual de utilizare
WA
67
Page 68

 Loading...