

Page 1

Washing Machine
D1 5061 B
D1 5062 B
D1 5081 B
D1 5081 BS
D1 5082 B
D1 5101 B
D1 5102 B
D1 5102 BS
Page 2

Please read this manual first!
Dear Customer,
We hope that your product which has been manufactured in modern facilities and
passed through a strict quality control procedure will give you the best results.
Therefore, we advise you to read through this manual carefully before using your
product and keep it for future reference.
This operation manual will…
…help you use your machine in a fast and safe way.
• Please read the Operation Manual before installing and starting your machine.
• Particularly follow the instructions related to safety.
• Keep this Operating Manual within easy reach. You may need it in the future.
• Please read all additional documents supplied with this machine.
Please note that this Operating Manual may be applicable for several other models.
Differences between models will be identified in the manual.
Explanation of symbols
Throughout this Operation Manual the following symbols are used:
C Important information or useful hints about usage.
A Warning for hazardous situations with regard to life and property.
B Warning for supply voltage.
Page 3

TABLE OF CONTENTS
1 Your Washing Machine 4
Overview 4
Specifications 5
2 Warnings 6
General Safety 6
First Use 6
Intended use 6
Safety instructions 7
If there are children in your house... 7
3 Installation 8
Removing packaging reinforcement 8
Opening the transportation locks 8
Appropriate installation location 8
Adjusting the feet 8
Connecting to the water supply. 9
Connecting to the drain 9
Electrical connection 10
Destroying the packaging material 10
Disposing of the old machine 10
4 Initial preparations for
washing 11
Sorting the laundry 11
Preparing clothes for washing 11
Correct load capacity 11
Loading door 12
Detergents and softeners 12
Changing the program after the
program has started 19
Child-proof lock 20
Ending the program through
canceling 20
End of Program 20
6 Quick instructions for
daily use 21
7 Cleaning and care 23
Detergent drawer 23
The loading door and the drum 23
Body and control panel 23
Inlet water filters 23
Draining any remaining water and
cleaning the pump filter 24
8 Troubleshooting 26
5 Selecting a Program and
Operating Your Machine 14
Control panel 14
Turning the machine on 15
Program selection 15
Spin Speed selection 16
Program selection and consumption
table 17
Auxiliary functions 18
Starting the Program 18
Progressing a program 18
Page 4
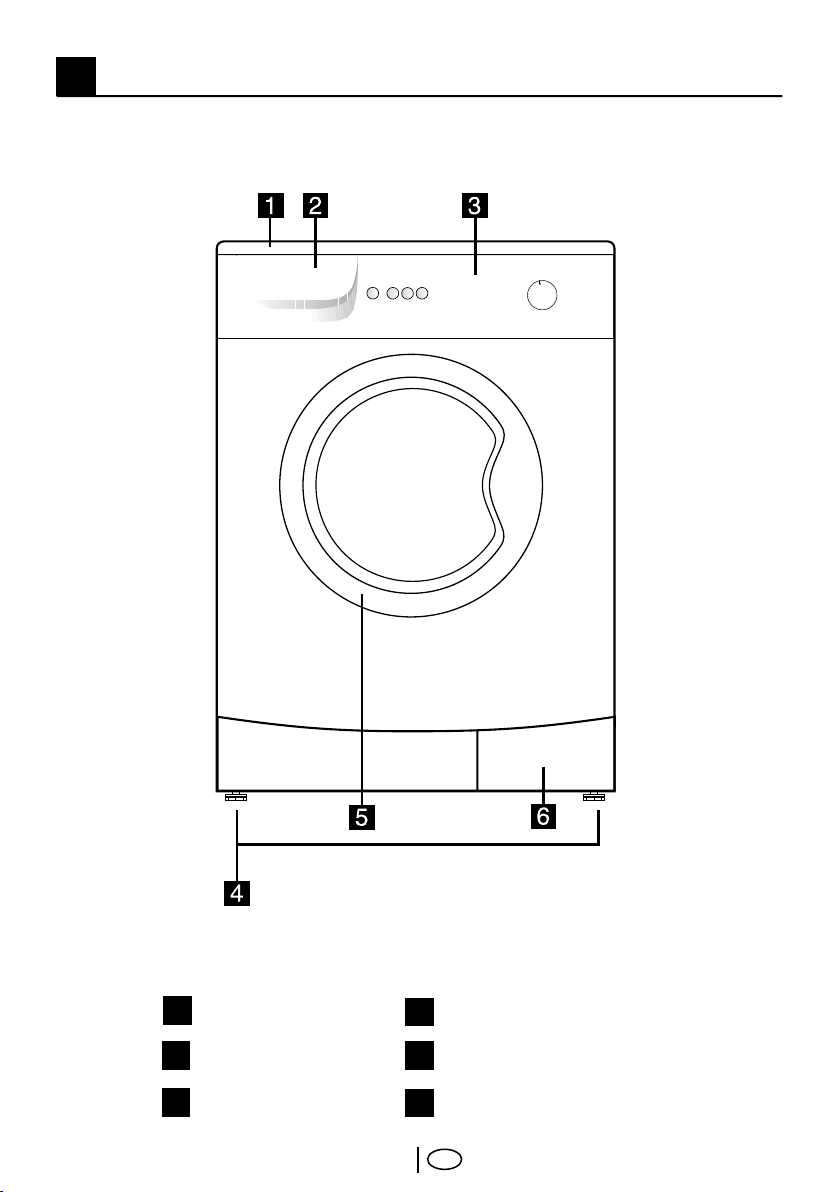
1 Your Washing Machine
Overview
Figure 1
1
Top Lid
2
Detergent Drawer
3
Control Panel
4
Height-adjustable Feet
5
Loading Door
6
Filter Cap
EN
4
Page 5
Specifications
Models
Maximum dry laundry capacity (kg)
Height (cm)
Width (cm)
Depth (cm)
Net Weight (kg)
Electricity (V/Hz.)
Total Current (A)
Total Power (W)
Spinning cycle (rpm max.)
D1 5061 B
D1 5081 B
D1 5081 BS
D1 5101 B
D1 5062 B
D1 5082 B
D1 5102 B
5 5 5 5 5 5 5 5
84 84 84 84 84 84 84 84
60 60 60 60 60 60 60 60
55 55 55 55 55 55 55 55
61 62 62 62 61 62 62 62
220-240 V / 50hz
10 10 10 10 10 10 10 10
2100-2500
600 800 800 1000 600 800 1000 1000
D1 5102 BS
Specifications of this appliance may change without notice to improve the quality of
the product. Figures in this manual are schematic and may not match your product
exactly.
Values stated on the machine labels or in the documentation accompanying it are
obtained in laboratory in accordance with the relevant standards. Depending on
operational and environmental conditions of the appliance, values may vary.
EN
5
Page 6

2 Warnings
Please read the following information.
Otherwise, there may be the risk of
personal injury or material damage.
Moreover, any warranty and reliability
commitment will become void.
General Safety
• Never place your machine on a
carpet covered floor. Otherwise,
lack of airflow from below of your
machine may cause electrical
parts to overheat. This may cause
problems with your washing
machine.
• If the power cable or mains plug is
damaged you must call Authorized
Service for repair.
• Check water hoses for wear. Do
not use old/used water inlet hoses.
These may cause stains on your
laundry.
• Fit the drain hose into the discharge
housing securely to prevent any
water leakage and to allow machine
to take in and discharge water as
required. It is very important that the
water intake and drain hoses are not
folded, squeezed, or broken when
the appliance is pushed into place
after it is installed or cleaned.
• Your washing machine is designed
to continue operating in the event
of a power interruption. You cannot
cancel any program by pressing
the “On/Off button.” Your machine
will not resume its program when
the power restores. Press the
“Start/Pause/Cancel” button for
3 seconds to cancel the program
(See, Canceling a Program)
• There may be some water in your
machine when you receive it. This is
from the quality control process and
is normal. It is not harmful to your
machine.
• Some problems you may encounter
may be caused by the infrastructure.
Press "Start/Pause/Cancel" button
for 3 seconds to cancel the program
set in your machine before calling
the authorized service.
First Use
• To prepare your machine for
washing, carry out your first washing
process without loading your
machine and with detergent under
“Cottons 90°C” program.
• Ensure that the cold and hot water
connections are made correctly
when installing your machine.
Otherwise, your laundry may come
out hot at the end of the washing
process and may wear out.
• If the current fuse or circuit breaker
is less than 16 Amperes, please
have a qualified electrician install a
16 Ampere fuse or circuit breaker.
• While using with or without a
transformer, do not neglect to have
the grounding installation laid by a
qualified electrician. Our company
shall not be liable for any damages
that may arise when the machine is
used on a line without grounding.
• To make your machine ready for
use, please be sure that the tap
water supply and water drainage
systems are appropriate before
calling the authorized service. If they
are not, call a qualified plumber to
have any necessary arrangements
carried out.
Intended use
• This product has been designed for
home use.
• The appliance may only be used for
washing and rinsing of textiles that
are marked accordingly.
• Only detergents, softeners and
supplements suitable for washing
machines may be used.
• Observe the care instructions
labeled on textile products and
any other instructions given by
EN
6
Page 7

companies that produce detergents
for your machine.
Safety instructions
• This appliance must be connected
to an earthed outlet protected by a
fuse of suitable capacity.
• The supply and draining hoses must
always be securely fastened and
remain in an undamaged state.
• Fit the draining hose to a washbasin
or bathtub securely before starting
up your machine. There may be a
risk of being scalded due to high
washing temperatures!
• Never open the loading door or
remove the filter while there is still
water in the drum. Otherwise, there
may be the risk of flooding and
possible injury due to the hot water.
• Never force to open the locked
loading door! The loading door will
be ready to open just a few minutes
after the washing cycle comes to an
end.
• Unplug the machine when it is not in
use.
• Never wash down the appliance
with a water hose! There is the risk
of electric shock! Always disconnect
from the mains by unplugging before
cleaning.
• Never touch the plug with wet
hands. Never unplug by pulling
on the cable, always pull out from
the plug only. Do not operate the
machine if the power cord or plug is
damaged.
• Never attempt to repair the machine
yourself. Otherwise, you may be
putting yours and other's lives in
danger.
• For malfunctions that cannot
be solved by information in the
operating manual:
Turn off the machine, unplug it, turn
off the water tap and contact an
authorized service agent.
If there are children in your house...
• Electrical appliances may be
dangerous for the children. Keep
children away from the machine
when it is operating. Do not let them
tamper with the machine.
• Close the loading door when you
leave the area where the machine is
located.
• Store all detergents in a safe place
out of reach of the children.
EN
7
Page 8
3 Installation
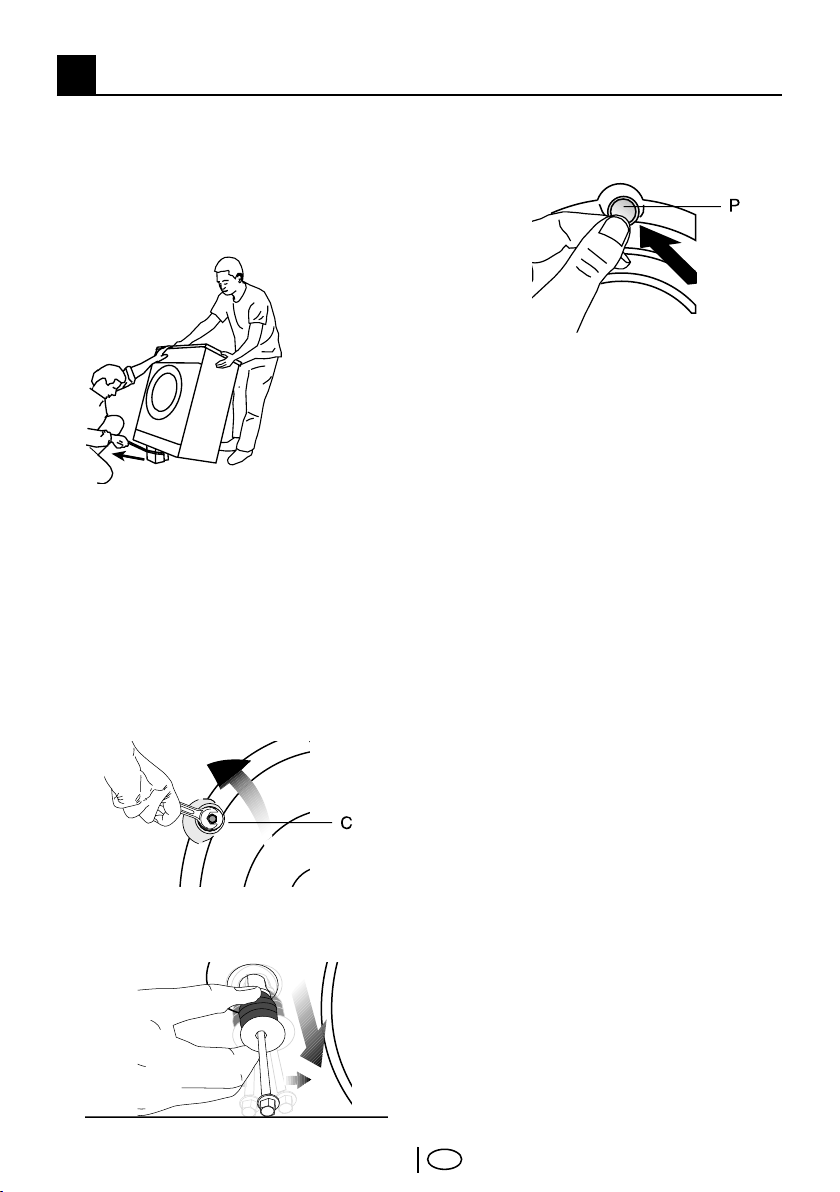
Removing packaging reinforcement
Tilt the machine to remove the
packaging reinforcement. Remove the
packaging reinforcement by pulling the
ribbon.
Opening the transportation locks
C Transportation safety bolts must
be removed before operating the
washing machine! Otherwise, the
machine will be damaged!
1. Loosen all the bolts with a spanner
until they rotate freely (“C”)
2. Remove transportation safety bolts
by turning them gently.
3. Fit the covers (supplied in the bag
with the Operation Manual) into the
holes on the rear panel. (“P”)
C Keep the transportation safety
bolts in a safe place to reuse when
the washing machine needs to be
moved again in the future.
C Never move the appliance without
the transportation safety bolts
properly fixed in place!
Appropriate installation location
Install the appliance in environments
which have no risk of freezing, in a
stable and level position.
C The floor must be capable of
carrying the load on it!
C If the washing machine and a drier
are placed on top of each other,
their approximate weight together
may reach 180 kg when they are
full.
Important:
• Do not place the appliance on top of
the power cable.
• Keep at least 1cm distance from the
edges of other furniture.
• Place the machine on a firm surface;
do not position it on a long pile rug
or suchlike surfaces.
Adjusting the feet
C Do not use any tools to loosen the
lock nuts. Otherwise, they can be
damaged.
1. Manually (by hand) loosen the lock
nuts on the feet.
2. Adjust them until the machine
stands level and firmly.
EN
8
Page 9
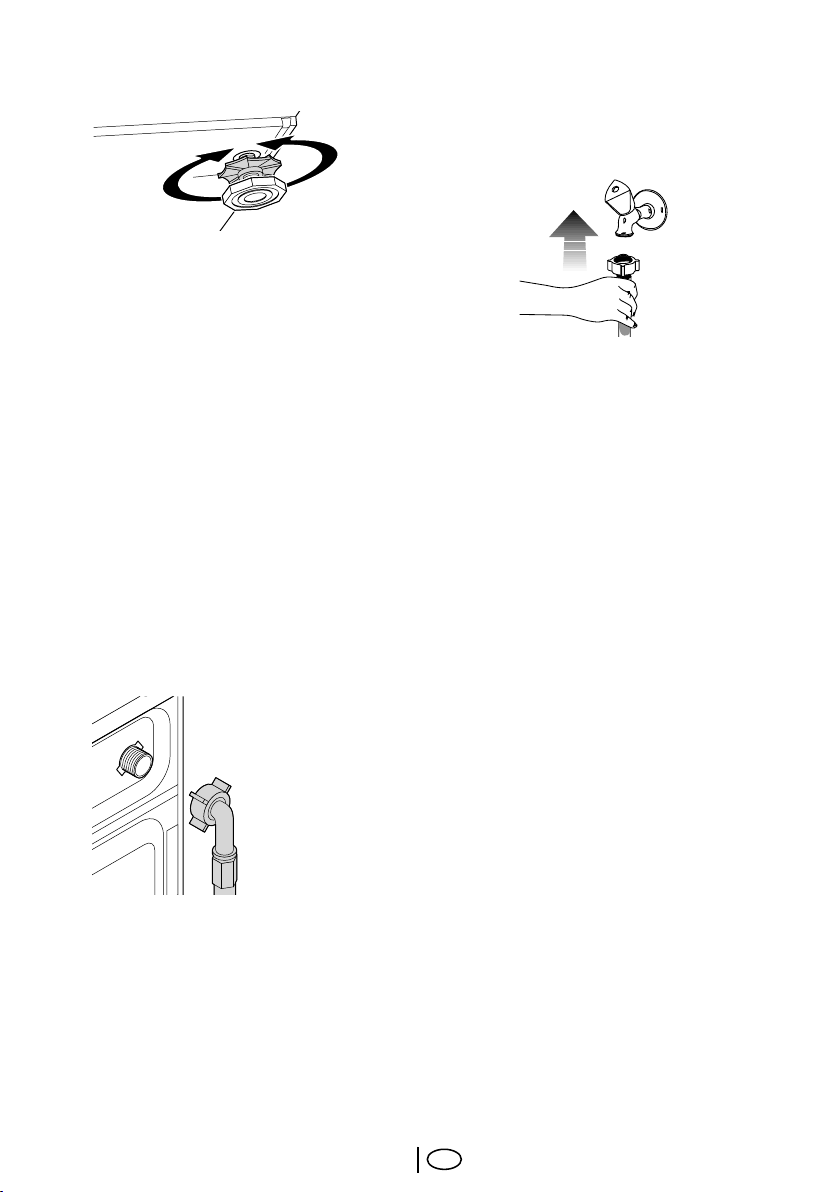
3. Important: Tighten all lock nuts up
again.
Connecting to the water supply.
Important:
• The water supply pressure required
to run the machine must be 1-10
bar (0,1 – 10 MPa). (Practically, it
is necessary to have 10 – 80 liters
of water flowing from the tap in
one minute to have your machine
run smoothly.) Attach a pressurereducing valve if the water pressure
is higher.
• Connect the special hoses supplied
with the machine to the water intake
valves on the machine. The hose
bearing the “red” sign (90°C max)
is the hot water inlet and the hose
bearing the “blue” sign (25°C max) is
for the cold water inlet.
to the tap and the elbowed end
must be attached to the machine.
Tighten the nuts of the hose well by
hand; never use wrenches to tighten
the nuts.
• Open the taps completely after
making the hose connection to
check if there is any water leakage
at the connection points. Turn off
the tap and remove the nut in case
of any leakage. Retighten the nut
carefully after checking the seal.
To prevent any water leakage and
any other damage to be caused by
it, keep the taps closed when the
machine is not in use.
• Models with a single water inlet
should not be connected to the
hot water tap. Laundry may be
damaged or the appliance may
switch to protection mode and not
work.
• In order to prevent water leakage
that may occur at the connection
points, there are rubber seals (4
seals for the models with double
water inlet and 2 seals for other
models) attached to the hoses.
These seals should be used at the
tap and machine connection ends of
the hoses. The plain end of the hose
fitted with a filter must be attached
When returning the appliance to its
place after maintenance or cleaning,
care should be taken not to fold,
squeeze or block the hoses.
Connecting to the drain
The water discharge hose can be
attached to the edge of a washbasin or
bathtub. The drain hose should be firmly
fitted into the drain as to not get out of
its housing.
Important:
• The end of the drain hose can
be directly connected to the
wastewater drain or to the
washbasin. The fitting must
alwasy be secured in all types of
EN
9
Page 10
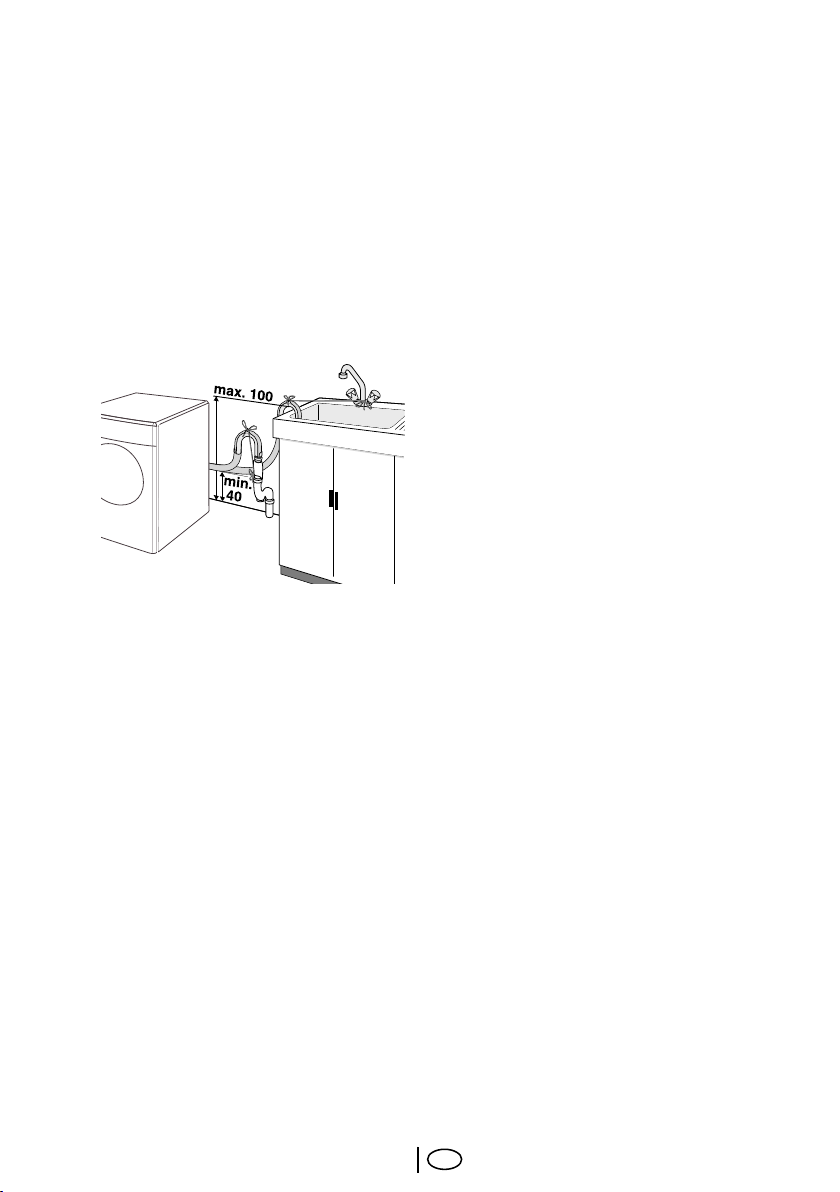
connections. Your house may be
flooded if the hose gets out of its
housing during water discharging.
• The hose should be attached to a
height of at least 40 cm, and 100
cm at most.
• In case the hose is elevated
after laying it on the floor level or
close to the ground (less than
40 cm above the ground), water
discharge becomes more difficult
and the laundry may come out wet.
Therefore, the heights described in
the figure should be followed.
• To prevent dirty water refilling the
machine, and to allow for easy
discharge, the end of the hose
must not be submerged in the drain
water. The end of the hose must be
able to take in air. The hose should
be pushed into the drainage for
more than 15 cm. If it is too long
you may have it shortened.
• The end of the hose should not be
bent, it should not be stepped on
and it must not be folded between
the drain and the machine.
• the length of the hose is too short,
you may add an extension hose
to the original section. The length
of the hose must not be longer
than 3.2 m after coming out of the
machine. To avoid water leakage
failures, the connection between the
extension hose and the drain hose
of the product must be fitted well
with an appropriate clamp as not to
come off and leak.
Electrical connection
Connect the machine to an earthed
outlet protected by a fuse of suitable
capacity.
Important:
• Connection should comply with
national regulations.
• Power cord plug must be within
easy reach after installation.
• The voltage and the allowed fuse
protection are specified in the
section “Technical Specifications”.
• The specified voltage must be equal
to your mains voltage.
• Connection via extension cords or
multi-plugs should not be made.
B A damaged power cable must be
replaced by a qualified electrician.
B The appliance must not be operated
unless it is repaired! There is the risk
of electric shock!
Destroying the packaging material
Packaging material can be dangerous to
children. Keep the packaging materials
out of reach of children or dispose
them by classifying according to
waste directives. Do not dispose them
together with normal domestic wastes.
Packaging materials of your machine are
manufactured from recyclable materials.
Disposing of the old machine
Dispose of your old appliance in an
environmental friendly manner.
• You may refer to your local agent or
solid waste collection center in your
municipality to learn how to dispose
of your machine.
Before disposing of your old washing
machine, cut off the mains plug and
make the door lock unusable.
10
EN
Page 11
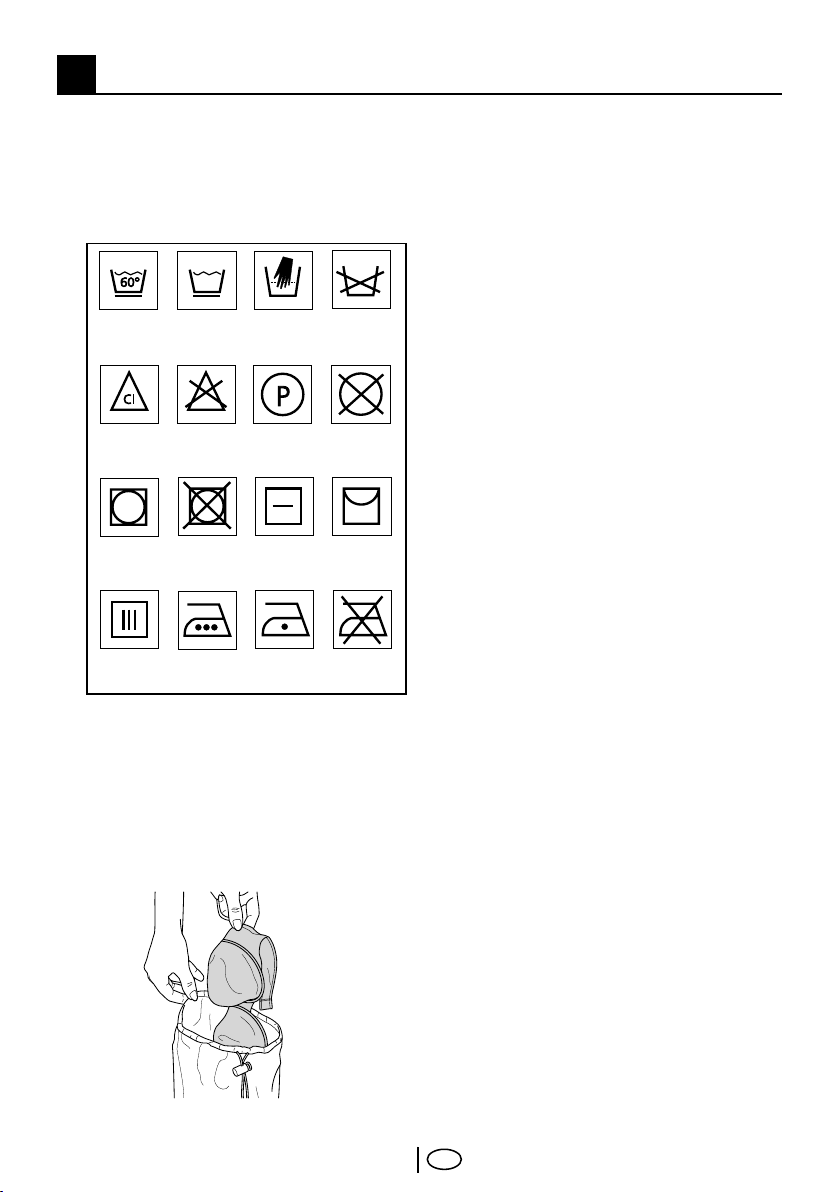
Suitable for
drier
Do not dry
with drier
Can be ironed
with hot iron
Can be
ironed with
warm iron
Dry on a
hanger
Do not iron
Washing water
temperature
Do not use
bleach
Bleach can be
used
Non machine-
washable
Hang without
spinning
Do not
dry-clean
Dry
horizontally
Do not wash
Dry-cleanable
Wash with
sensitive, short
programs.
4 Initial preparations for washing
Sorting the laundry
• Sort the laundry according to type
of fabric, color, and degree of soiling
and permissible water temperature.
Always follow the advice on the
garment labels.
Preparing clothes for washing
Laundry items with metal attachments
such as, bras, belt buckles and metal
buttons will damage the machine.
Remove metal attachments or place the
items in a clothing bag, pillow case, or
something similar.
• Empty pockets and remove all
foreign objects such as coins, pens
and paper clips. If possible, turn
pockets out and brush.
• Place small items like infants’
socks and nylon stockings, etc.
in a laundry bag, pillow case or
something similar. This will also save
your laundry from getting lost.
• Place curtains in the machine with
care. Remove curtain rails and
pullers.
• Fasten zippers, sew loose buttons
and mend rips and tears.
• Wash “machine washable” or “hand
washable” labeled products only
with an appropriate program.
• Do not wash colors and whites
together. New, dark colored cottons
may release a lot of dye. Wash them
separately.
• Tough stains must be treated
properly before washing. If you are
not sure, check with a dry cleaner.
• Use only dyes/color changers and
lime removers suitable for machine
wash. Always follow the instructions
on the packaging.
• Wash trousers and delicate clothes
turned inside out.
• Keep laundry items made of Angora
wool in the freezer for a few hours
before washing. This will reduce
pilling.
Correct load capacity
• The maximum load capacity
depends on the type of laundry, the
degree of soiling and the washing
program you wish to use.
C The machine adjusts the amount of
water according to the amount of
laundry placed inside.
C Please follow the information in the
"Program Selection Table". Washing
results will degrade when the
machine is overloaded.
11
EN
Page 12

Following weights are given as
examples.
Laundry type Weight (gr.)
Bathrobe 1200
Napkin 100
Duvet cover 700
Bed Sheet 500
Pillowcase 200
Tablecloth 250
Towel 200
Evening gown 200
Underclothing 100
Men’s coveralls 600
Men’s shirt 200
Men’s pajamas 500
Blouse 100
Loading door
The door is locked during program
operation. The door can be opened after
some time following the program end.
• Open the loading door.
• Place laundry items loosely in the
machine.
• Push the loading door until it clicks
into place tightly. Ensure that no
items are caught in the door.
Detergents and softeners
Detergent drawer
The detergent drawer is composed of
three compartments:
The detergent dispenser may be in two
different types according to the model of
your machine.
- (I) for prewash
- (II) for main wash
- (III) siphon
– ( ) for softener
Detergent, softener and other
cleaning agents
Add detergent and softener before
starting the washing program.
Never open the detergent dispenser
drawer while the washing program is
running!
When using a program without prewash, no detergent should be put
into the pre-wash compartment
(Compartment no. I).
A program without pre-wash should
not be selected if a detergent bag or
a dispensing ball is going to be used.
You can place the detergent bag or
the dispensing ball directly among the
laundry in your machine.
Choosing the detergent type
The type of detergent to be used
depends on the type and color of fabric.
• Use different detergents for colored
and white clothes.
• Wash woolens with a special
detergent specifically for woolens.
• Use only detergents manufactured
specifically for washing machines.
Detergent quantity
The amount of washing detergent to
be used depends on the amount of
laundry, the degree of soiling and water
hardness.
• Do not use amounts exceeding
the quantities recommended on
the package to avoid problems
of excessive foam, poor rinsing,
financial savings and finally,
environmental protection.
• Use small amounts of detergent at a
suitable measure for small amounts
of laundry or for only slightly soiled
laundry.
• Use exact measures for highly
concentrated detergents.
12
EN
Page 13

Detergent
quantity
for prewashing
for main
washing
with hard water
1/2 measure
1 measure
an additional
1/2 measure
Softener
Put the softener into the softener
compartment of the detergent
dispenser.
• Use the proportions recommended
on the packet.
• Never exceed the (> max <) level
marking; otherwise, the softener will
be wasted without being used.
• If the softener has lost its fluidity,
dilute dense softener with water
before placing it in the detergent
drawer.
Liquid detergent
When using liquid or gel washing
detergents, please note the following:
• The liquid detergent may leave
stains on your laundry if time delay
feature is selected.
• Do not use liquid detergent if you
want to wash using the time delay
feature.
• Do not use liquid detergent for the
main wash in a cycle with pre-wash.
• Use the detergent manufacturer's
measuring cup and follow the
instructions on the package.
for washing machines and always
follow the instructions on the
package.
Starch
• Add liquid starch, powder starch
or the dyestuff into the softener
compartment as instructed on the
package.
• Never use fabric softener and starch
together in the same washing cycle.
• Wipe the inside of the drum after
using starch.
Eliminating lime formation
• When required, use only appropriate
lime removers developed specifically
13
EN
Page 14

5 Selecting a Program and Operating Your Machine
Control panel
Figure 2
7
13
9
8
12
7 - On/Off Button
8 - Door Indicator
9 - Program Follow-up Indicator
10 - Child-proof Lock Indicator
11 - Spin Speed Adjustment Knob
12 - Program Selection Knob
13 - Time Delay Key
14 - Auxiliary Function Keys
15 - Start/Pause/Cancel Button
10
11
14
EN
Page 15

Turning the machine on
You can prepare the machine for
program selection by pressing the
the “On/Off” button. When the “On/
Off” button is pressed, the “Lid” light
illuminates indicating that the door is
unlocked. Press the “On/Off” button
again to shut down the machine.
C Pressing the “On/Off” button does
not necessarily mean that the
program has started. Press "Start/
Pause/Cancel" button to start the
program.
Program selection
Select the appropriate program from the
program table and the following washing
temperature table according to type,
amount and degree of soiling of the
laundry. Select the desired program with
the program selection button.
C Each of these main programmes
comprise of a complete washing
process, including washing, rinsing
and, if required, spin cycles.
Normally soiled, white
cottons and linens. (Ex.:
90˚C
60˚C
40˚C30°CCold
C Programs are limited with the
highest spin speed appropriate for
that particular type of cloth.
C Sort the laundry according to type
of fabric, color, degree of soiling and
permissible water temperature when
coffee table covers,
tablecloths, towels, bed
sheets)
Normally soiled, fade proof
colored linens, cottons
or synthetic clothes
(Ex.: shirts, nightgowns,
pajamas) and lightly soiled
white linen clothes (Ex.:
underwear)
For delicate clothes (Ex.:
lace curtains), blended
clothes including synthetics
and woolens.
choosing a program.
C Always select the lowest required
temperature. Higher temperature
means higher power consumption.
C For further program details, see,
“Program Selection Table”
Main programs
Depending on the type of textile, the
following main programs are available:
•Cottons
You can wash your durable clothes with
this program. Washes with vigorous
washing movements in a longer
washing cycle. It is recommended for
your cotton items (such as bed sheets,
duvet and pillowcase sets, bathrobes,
underclothing, etc.).
•Synthetics
You can wash your less durable clothes
on this program. Washes with gentler
washing movements and in shorter
washing cycles. It is recommended for
your synthetic clothes (such as shirts,
blouses, synthetic/cotton blended
garments, etc.). For curtains and lace,
using the “Synthetic 40” program with
pre-wash and anti-creasing functions
selected is recommended. Detergent
should not be put in the pre-wash
compartment. Less detergent should be
put in the main wash compartment as
loose knit fabrics (lace) foam too much
due to its meshed structure.
•Delicates
You can wash your delicate clothes
on this program. It has more sensitive
washing movements and does not make
intermediate spinning compared to the
synthetic program. It must be used for
clothes for which sensitive washing is
recommended.
•Woolens
You can wash your machine-washable
woolen garments on this program. Wash
by selecting the proper temperature
according to the labels of your clothes.
It is recommended to use appropriate
detergents for woolens.
•Hand Wash
You can wash your woolen/delicate
15
EN
Page 16

clothes that bear “not machinewashable” labels for which hand wash
is recommended on this program. It
washes the laundry with very tender
washing movements without damaging
your clothes.
Additional programs
For special cases, there are also extra
programs available:
C Additional programs may differ
according to the features of your
machine.
• Super
This program washes for a longer period
at 40°C and gives the same result as the
"Cottons 60°C" program, thus it saves
energy. It is suitable for clothes for which
you cannot use the "Cottons 60 °C"
program.
• Mini
This program is used to quickly wash
(30 minutes) a small amount of lightly
soiled cotton garments.
Special programs
For specific applications, you can select
any of the following programs:
• Rinse
This program is used when you want to
rinse or starch separately.
• Pump+spin
This program spins with maximum
possible rpm in the default setting after
the water drains from the machine.
C You should use a lower spin speed
for delicate laundries.
speed selection knob, the machine will
spin in the maximum possible rpm in the
default setting of the selected program.
Spin Speed selection
You can have your clothes spun at
the maximum rpm selection on your
machine by using the selection knob in
models equipped with an rpm selection
knob. In order to protect your clothes,
your machine will not spin above 800
rpm on synthetic programs and 600 rpm
on woolens program. Furthermore, if
you want to skip the spin cycle and take
your clothes out, turn the rpm selection
knob to “no spin” position.
In machines not equipped with a spin
16
EN
Page 17

Program selection and consumption table
Programme
Max. Load (kg)
Cottons 90 5 155 45 1.70
Cottons 60** 5 140 45 0.95
Cottons 40 5 150 45 0.65
Super 40 5 180 45 0.65
Synthetics 60 2.5 120 55 0.90
Synthetics 40 2.5 125 55 0.55
Delicate 30 2 85 60 0.40
Woollens 40 1.5 75 60 0.40
Hand wash 30 1 55 50 0.21
Mini 30 2.5 30 40 0.16
Water
Programme
Duration (~min)
Consumption (l)
Energy
Prewash
Rinse Plus
Rinse Hold
Consumption (kWh)
Spin speed
• • • • • •
• • • • • •
• • • • • •
• • •
• • • • • •
• • • • • •
• • • • •
• • • • •
• • •
• • •
No Spin
reduction
No Heat
• : Selectable
* : Automatically selected, not cancellable.
**: Energy Label programme (EN 60456)
Water and power consumption and programme duration may differ from the table
shown, subject to changes in water pressure, water hardness and temperature,
ambient temperature, type and amount of laundry, selection of auxiliary functions,
and fluctuations in the supply voltage.
C The auxiliary functions in the table may differ according to the model of your
machine.
EN
17
Page 18

Auxiliary functions
Auxiliary function selection keys
• Desired auxiliary function depending
on the program is selected.
• Some combinations cannot be
selected together.
• Warning signal on the selected
auxiliary function will light up.
Auxiliary function buttons may differ
according to the model of your machine.
Auxiliary function selection
If an auxiliary function that should not
be selected together with a previously
selected function is chosen, the first
selected function will be cancelled and
the last auxiliary function selection will
remain active.
Auxiliary function that is not compatible
with the program cannot be selected.
(see, “Program Selection Table”)
Pre-wash
A pre-wash is only worthwhile for heavily
soiled laundry. Without pre-wash you
save energy, water, detergent and time.
C Pre-wash without detergent is
recommended for lace and curtains.
Less detergent should be put in the
main wash compartment as loose
knit fabrics (lace) foam too much
due to its meshed structure.
Rinse Plus
With this function, you can increase the
number of current rinsing steps. Thus,
sensitive skins’ risk of being affected by
the remainder detergent on the clothes
will be decreased.
Rinse hold
If you do not want to unload your
clothes immediately after the cotton,
synthetics, woolen and delicate fabrics
program, you may release your clothes
inside the machine in the last rinsing
water by pressing the rinse hold button
in order to prevent your clothes become
wrinkled. After this process you may
spin your laundry by pressing “Start/
Pause/Cancel” button or you may end
the program by pressing “Start/Pause/
Cancel” button for 3 sec.
• In the machines equipped with spin
speed selection knob or button, you
can spin by selecting the desired
spin speed and press "Start/Pause/
Cancel" button.
• As for machines not equipped with
a spin speed selection knob, you
can end the program without a
spin cycle by pressing the “Start/
Pause/Cancel” button and draining
the water. If you wish your clothes
be spun, you can spin them by
selecting “pump+spin” program.
Reducing Speed
You may use the speed reduction button
whenever you wish to spin your clothes
below the maximum spin speed. When
speed reduction button is pressed, spin
speed will be at the minimum rpm given
on the panel.
No spin
You may use this program if you do not
want to spin your clothes at the end of
cottons, synthetics, woolen or delicate
programs.
No Heat
If you wish to wash your clothes in cold
water, you can use this program.
Starting the Program
1. Press "Start/Pause/Cancel" button
to start the program.
2. “Start/Pause/Cancel” button will
light up to indicate that the program
has started.
3. The door is locked and the “Lid”
light fades.
Progressing a program
Progress of a running program is shown
through the program follow-up indicator.
• At the beginning of every program
step, the relevant indicator lamp will
light up and light of the completed
step will turn off. The symbol that is
lit up at the far right of the series of
symbols indicates the step that is
being carried out.
18
EN
Page 19

The “Wash” light on the program
follow-up indicator illuminates when
“Start/Pause/Cancel” button is pressed
after selecting the washing program.
The “Program finished” lamp illuminates
and the “Wash” light will fade when the
program comes to an end. The “Lid”
light flashes. Meanwhile, the door will
stay locked for your safety and when it
is safe to open, the “Lid” and “Program
Finished” lights remain on.
You can put your machine into “Pause”
mode by pressing the "Start/Pause/
Cancel" button when it is operating.
In this case, the “Start/Pause/Cancel”
light will flash. Some changes in
program settings can be made in pause
mode (See. Changing a Program)
and if “Pause” mode is entered at an
appropriate step of the program, the
adding laundry function may be used.
(See, Adding and taking out laundry).
Press "Start/Pause/Cancel" button
again to return to the “Wash” mode
from “Pause” mode. In this case the
“Start/Pause/Cancel” button will light
up continuously and the machine will
resume operating from the step it was
paused.
•If the machine is not spinning, the
program may be in rinse hold mode
or the automatic spin correction
system has been activated because
of unbalanced distribution of laundry
in the machine.
Changing the program after the program has started
You can use this feature after your
machine has started to wash different
textile groups in the same batch
of clothes under higher or lower
temperatures.
For example;
Press and hold the “Start/Pause/Cancel”
button for 3 seconds to “Cancel” the
program in order to select “Cottons
40” program instead of “Cottons 60”
program.
Select the “Cottons 40” program by
rotating the program knob.
Press "Start/Pause/Cancel" button to
start the program.
C The program which is selected
first will go on even if the program
selection button is moved and
another program mode is selected
while the machine is operating.
You must cancel the ongoing
program in order to change the
washing program. (See, Canceling a
Program)
Selecting or cancelling an auxiliary
function/temperature/spin speed
1. Press the “Start/Pause/Cancel”
button to switch the machine to
“Pause” mode.
2. Change the auxiliary function’s
temperature and spin speed.
Press "Start/Pause/Cancel" button to
start the program.
C The selection to be made must be
appropriate. For example, if your
machine is on the main wash cycle,
you may select additional rinse
auxiliary function, but you cannot
select pre-wash.
C The spin speed and temperature
which are selected first will keep on
being valid even if the position of the
spin speed or temperature selection
knob is changed. Press the “Start/
Pause/Cancel” button and switch
the machine to “Pause” mode in
order to change the spin speed or
temperature. New spin speed or
temperature can be selected.
Adding/removing laundry in standby
mode
If you want to add more laundry into the
machine after the washing cycle has
started, put the machine into “Pause”
mode by pressing the "Start/Pause/
Cancel" button. The “Lid” lamp on the
program follow-up indicator will light up
19
EN
Page 20

steadily after 1-2 minutes if the water
level in the machine is suitable. Laundry
may be added or taken out by opening
the door. If the “Lid” lamp does not
light up continuously at the end of this
time, the water level in the machine
is not suitable and laundry cannot be
added. You can resume the program
by pressing the “Start/Pause/Cancel”
button again.
Child-proof lock
There is a childproof lock to prevent
any program interruption because of
pressing the keys while the program is
on. In order to activate the childproof
lock, press on the 1st and 2nd
auxiliary function keys from the left
simultaneously for 3 seconds after
the washing program has started.
1st auxiliary function light will flash
continuously.
To start a new program after the
program is over or to interfere the
program, childproof lock should be
deactivated. To deactivate the childproof lock, press the same buttons for
3 sec.
Ending the program through canceling
The program which is selected first will
keep on going even if the position of the
program selection button is changed. A
new program can be selected or started
after “Program is cancelled” in order to
change the washing program.
To cancel any selected program;
• Press “Start/Pause/Cancel” button
for 3 seconds. The machine starts
to discharge the water. “Wash” and
“Program Finished” lights will light
up.
• "Start/Pause/Cancel" and “Wash”
lights will go off after discharging
process is over and the “Lid” light
will start flashing.
• “Lid” lamp will light up continuously
when the door is unlocked. You can
select and start a new program.
• If the program is cancelled in the
middle of the process, “Wash”
and “Program Finished” lights will
light up. The machine can drain
all the water or can take in water
for 3 times at most to cool down
the clothes and complete draining
process.
• When the water discharging process
is completed, the “Wash” light will
go off, “Program Finished” light
will light up and the “Lid” light will
continuously flash until the door
is unlocked. You can make a new
program selection when the “Lid”
light is illuminated continuously.
End of Program
The “Program Finished” lamp on the
program follow-up indicator will light up
when the program comes to an end.
The lid is unlocked 2 minutes later, the
“Program Finished” and “Lid” lamps will
light up continuously. The machine is
now ready for a second cycle.
If any key is pressed when the machine
is at the end of the program or if
the position of the selection knob is
changed, the “Program Finished” light
will go off and only the “Lid” lamp will
remain as lit. Meanwhile, if the door is
still locked, the “Lid” light will continue
flashing until the door is opened.
Press the “On/Off” button to shut down
the machine.
20
EN
Page 21

6 Quick instructions for daily use
Preparation
1. Turn the tap on completely. Check if
the hoses are connected tightly.
2. Place the laundry in the machine.
3. Add detergent and softener.
Starting
1. Press the “On/Off” button.
2. Select the programme and the
temperature.
3. If required (according to your
machine’s model):
– select any auxiliary function,
– adjust the spin speed,
– set the time delay,
4. Close the loading door.
5. Press Start/Pause/Cancel button.
C Machine allows adding more laundry
during a later step only if the water
level is low enough to open the
loading door or if the temperature in
the machine is low enough.
In order to add laundry after the start-up
of the program:
1. Press Start/Pause/Cancel button.
Wait until the door is allowed
to open. “Lid” lamp will light up
continuously when the door is
allowed to open.
2. Open the loading door and put in
more laundry.
3. Close the loading door.
4. Press Start/Pause/Cancel button.
Canceling a program
• Press “Start/Pause/Cancel” button
for 3 seconds. The machine starts
to discharge the water. “Wash” and
“Program Finished” lights will light
up.
• "Start/Pause/Cancel" and “Wash”
lights will go off after discharging
process is over and the “Lid” light
will start flashing.
• If the program is cancelled in the
middle of the process, “Wash”
and “Program Finished” lights will
light up. The machine can drain
all the water or can take in water
for 3 times at most to cool down
the clothes and complete draining
process. When water discharging
process is completed, “Wash” light
will go off, “Program Finished” light
will light up and the “Lid” light will
continuously flash until the door
is allowed to be opened. You can
make a new program selection when
the “Lid” light is lit continuously.
Adding more laundry
You may add more laundry into the
machine at the beginning of washing.
Program is in rinse hold mode
C After the machine fills with water in
the final rinse step, clothes can be
soaked in the machine as long as
desired.
When it reaches this position while the
machine is running, the “Start/Pause/
Cancel” light will flash.
In the machines equipped with spin
speed selection knob, you can spin by
selecting the desired spin speed and
press "Start/Pause/Cancel" button.
As for machines not equipped with a
spin speed selection knob, you can
end the program without spinning by
pressing the “Start/Pause/Cancel”
button to drain the water. You may spin
your clothes whenever you wish to by
selecting the spin program.
Re-spinning the laundry
The control system for an unbalanced
load can pause the spinning in cases
when the distribution of the laundry in
the drum is not balanced.
If you want to re-spin the clothes:
1. Rearrange the previously placed
clothes in machine.
2. Select Spin+Pump program.
21
EN
Page 22

3. Set the spin speed if spin speed
adjustment is available on your
machine.
4. Press “Start/Pause/Cancel” button.
After the program is finished
1. “Program finished” lamp will light
up on the program follow-up
indicator. The lid can be opened
after 2 minutes when the “Program
Finished” and “Lid” lamps light up
continuously.
2. Press the On/Off button to shut
down the machine.
3. Turn the water tap off.
4. Eliminate any folding of the rubber
seal on the loading door and check
for impurities.
5. Leave the loading door and
detergent drawer open to dry.
22
EN
Page 23

7 Cleaning and care
Detergent drawer
Remove any powder residue buildup in
the drawer. To do this;
1. Press the dotted point on the
siphon in the softener compartment
and pull towards you until the
compartment is removed from the
machine.
C If more than a normal amount of
water and softener mixture starts to
gather in the softener compartment,
the siphon must be cleaned.
2. Wash the dispenser drawer
and the siphon with plenty of
lukewarm water in a washbasin.
Wear protective gloves or use an
appropriate brush to avoid touching
the residues in the drawer when
cleaning.
3. Replace the drawer into its housing
after cleaning. Check if the siphon
is in its original location.
The loading door and the drum
After each wash:
• Check if there are any foreign
substances in the drum.
• Open the hole in the bellow with the
aid of a toothpick if it is clogged.
C Foreign metal substances in your
machine can cause rust stains. In
such cases:
Clean the drum with a stainless steel
cleaning agent. Never use steel wool
or wire wool.
Body and control panel
When necessary:
• Wipe the exterior panels of your
machine with soapy water or mild
detergent. Dry it with a soft cloth.
• Use only a soft and damp cloth to
clean the control panel.
C Never use a sponge or scrubbing
material. These will damage the
painted and plastic parts.
Inlet water filters
There is a filter at the end of each
water intake valve at the back side of
the machine and also at the end of
each water intake hose where they
are connected to the tap. These filters
prevent the foreign substances and dirt
in the water to enter into the machine.
Filters should be cleaned as they get
dirty.
• Close the taps.
• Remove the nuts of the water intake
hoses to clean the surfaces of the
filters on the water intake valves with
an appropriate brush.
• If the filters are very dirty, you can
pull them out by means of pliers and
clean them.
• Take out the filters on the flat
ends of the water intake hoses
together with the gaskets and clean
thoroughly under streaming water.
• Replace the gaskets and filters
carefully to their places and tighten
the hose nuts by hand.
23
EN
Page 24

Draining any remaining water and cleaning the pump filter
Filter system in your machine prevents
solid items such as buttons, coins and
fabric fibers clogging the pump propeller
during discharging of the washing
water. Thus, a good water discharger is
achieved and the pump life is extended.
• If your machine fails to drain the
water, the pump filter may be
clogged. You may have to clean
it every 2 years or whenever it is
plugged. Water must be drained off
to clean the pump filter.
In addition, water may have to be
drained off completely in the following
cases:
• before transporting the machine
(e.g. when moving house)
• when there is the danger of frost
In order to clean the dirty filter and
discharge the water;
1- Unplug the machine to cut off the
supply power.
A There may be water at 90°C in the
machine. Therefore, the filter must
be cleaned only after the inside
water is cooled down to avoid
hazard of scalding.
2- Open the filter cap. The filter cap
may be composed of one or two pieces
according to the model of your machine.
If it is composed of two pieces, press
the tab on the filter cap downwards and
pull the piece out towards yourself.
If it is composed of one piece, hold it
from both sides and open it by pulling
out.
3- An emergency drain hose is supplied
with some of our models. Others are not
supplied with this item.
If your product is supplied with an
emergency drain hose, do the following
as shown in the figure below:
• Pull out the pump outlet hose from
its housing.
• Place a large container at the end of
the hose. Drain the water off into the
container by pulling out the plug at
the end of the hose. If the amount
of water to be drained off is greater
than the volume of the container,
replace the plug, pour the water out,
then resume the draining process.
• After draining process is completed,
replace the plug into the end of the
24
EN
Page 25

hose and fit the hose back into its
place.
If your product is not supplied with an
emergency drain hose, do the following
as shown in the figure below:
• Place a large container in front of the
filter to receive water flowing from
the filter.
• Loosen pump filter (anticlockwise)
until water starts to flow out of it.
Direct the flowing water into the
container you have placed in front
of the filter. You can use a piece of
cloth to absorb any spilled water.
• When there is no water left, turn the
pump filter until it is completely loose
and remove it.
• Clean any residues inside the filter
as well as fibers, if any, around the
propeller region.
• If your product has a water jet
feature, be sure to fit the filter into
its housing in the pump. Never force
the filter while replacing it into its
housing. Fit the filter fully into its
housing; otherwise, water may leak
from the filter cap.
4- Close the filter cap.
Close the two-piece filter cap of your
product by pushing the tab on it.
Close the one-piece filter cap of your
product by fitting the tabs on the bottom
into their positions and pushing the
upper part of it.
25
EN
Page 26
8 Troubleshooting
Problem Cause Explanation / Suggestion
Program
cannot be
started or
selected.
Water in the
machine.
There is water
coming from
the bottom of
the machine.
Machine does
not fill with
water.
Machine does
not discharge
water.
Machine
vibrates or
shakes.
Machine
stopped
shortly after
the program
started.
Machine may have
switched to self
protection mode due to
an infrastructure problem
(such as line voltage,
water pressure, etc.).
There may be some water
in your machine when you
receive it. This is from the
quality control process
and is normal.
There might be problems
with hoses or the pump
filter.
Tap may be turned off. Open the inlet water taps fully.
Water inlet hose might be
bent.
Water inlet filter might be
clogged.
The loading door may be
ajar.
Water outlet hose might
be clogged or twisted.
Pump filter may be
clogged.
Machine feet might have
not adjusted.
Transportation safety
bolts might have not been
removed.
There may be a small
amount of laundry in the
machine.
The machine may be
overloaded or the clothes
may be distributed
unevenly.
There machine might be
touching a solid surface
Machine can stop
temporarily due to low
voltage.
Reset your machine by pressing “Start/Pause/
Cancel” button for 3 seconds. (see, Canceling
a Program)
It is not harmful to your machine.
Be sure the seals of the water inlet hoses are
securely fitted.
Tightly attach the drain hose to the tap.
Make sure that the pump filter is completely
closed.
Flatten the water intake hose.
Clean the water intake filter.
Close the loading door.
Clean or flatten the hose.
Clean the pump filter.
Adjust the machine feet.
Remove the transportation safety bolts.
Add more laundry to the machine.
Reduce the amount of laundry in the machine
or balance the load by hand.
Ensure that nothing touches the machine.
It will resume operating when the voltage is
back to the normal level.
26
EN
Page 27

The water
being taken
in is directly
discharged.
No water can
be seen in
the machine
during
washing.
The door is
jammed.
Machine fills
with water
when a
process is
cancelled.
Washing time
takes longer
than the time
specified in the
manual
Improper position of the
drain hose.
This is not a problem. The
water level is not visible
from the outside of the
machine.
Water level might be
above the lower level of
the door.
Machine might be heating
up the water or it may be
at the spinning cycle.
Due to an electrical
mechanism, the door can
only be opened a few
minutes after the program
has stopped.
Inside of machine may be
hot.
Water pressure may be
low.
Supply voltage may be
low.
Input temperature of
water may be low.
There may be an
imbalance of laundry in
the machine.
Number of rinses and/or
amount of rinse water
might have increased.
Connect the water draining hose as described
in the operation manual.
Run either the “Pump” or “Spin” program.
Wait until the process is over.
Wait until the process is over.
For safety reasons, water should be cycled in
and out a couple times.
The machine will wait until there is a sufficient
amount of water, which may lengthen the
washing time to avoid poor washing results
due to insufficient water.
Washing time is lengthened to avoid poor
washing results when the supply voltage is
low.
Cycle time lengthens to heat up the water
when the input water is cold. Also, washing
time can be lengthened to avoid poor washing
results.
The automatic spin correction system might
have been activated due to the unbalanced
distribution of the laundry in the drum.
The laundry in the drum may be clustered
(bundled laundry in a bag). Laundry should be
rearranged and re-spun.
No spinning is performed when the laundry is
not evenly distributed in the drum to prevent
any damage to the machine and to its
environment.
Water amount is increased to obtain a
better rinse and a rinse cycle is added when
necessary.
27
EN
Page 28
It continuously
washes.
Remaining
time does not
count down.
It continuously
spins.
Remaining
time does not
count down.
It did not spin.
In the case of a paused
countdown while taking in
water:
Timer will not countdown
until the machine is filled
with the correct amount
of water.
In the case of a paused
countdown at the heating
step:
Time will not count
down until the selected
temperature for the
program is reached
In the case of a paused
countdown at the
spinning step:
There may be an
imbalance of laundry in
the machine.
There may be an
imbalance of laundry in
the machine.
There may be an
imbalance of laundry in
the machine. Therefore,
the program might have
been completed without
spinning.
The machine will not
spin if the water has not
completely drained.
The machine will wait until there is a sufficient
amount of water to avoid poor washing results
due to lack of water. Then the timer will start
to count down.
The automatic spin correction system might
have been activated due to the unbalanced
distribution of the laundry in the drum.
The laundry in the drum may be clustered
(bundled laundry in a bag). Laundry should be
rearranged and re-spun.
No spinning is performed when the laundry is
not evenly distributed in the drum to prevent
any damage to the machine and to its
environment.
- Check the filter.
- Check the drain hose.
28
EN
Page 29
Washing
performance is
poor:
Laundry turns
gray
Washing
performance is
poor:
Stain could not
be removed,
not cleaned.
Laundry
could not be
whitened.
Washing
performance is
poor:
Oily stains
appear on
laundry.
Washing
performance is
poor:
Bad odor
Color of the
clothes faded.
- Using insufficient
amount of detergent for a
long time,
- Washing at low
temperatures for a long
time,
- Using insufficient
amount of detergent for
hard waters (soil can stick
to the laundry),
- Using excessive amount
of detergent (detergent
can stick to the laundry).
Insufficient amount of
detergent used.
Excessive laundry loaded
into machine
Wrong program and
temperature might have
been selected.
Improper detergent may
have been used.
Wrong type of detergent
used.
Oily accumulations on the
drum may have stuck to
the laundry.
Oily accumulations on the
drum may have stuck to
the laundry.
Excessive laundry might
have been loaded in.
Detergent may have
gotten damp.
A higher temperature
might have been selected.
- Use the recommended amount of detergent
appropriate for water hardness and the
laundry.
- Select the proper temperature for the
laundry to be washed.
- If the water hardness is high, using an
insufficient amount of detergent can cause
laundry to turn gray over time.
- It is difficult to eliminate such grayness once
it occurs.
Use recommended amount of detergent
appropriate for the laundry.
Do not load the machine in excess.
Select the proper program and temperature
for the laundry to be washed.
Put the detergent in the correct compartment.
Do not mix detergent with bleaching agents.
Such odors and bacteria layers may be
formed on the drum as a result of continuous
washing at lower temperatures and/or in short
programs. Leave the detergent dispenser
drawer as well as the loading door of the
machine ajar after each washing. Thus, a
humid environment favorable for bacteria
cannot be created inside the machine.
Machine must be operated empty either at
60°C or 90°C program with detergent every 6
months.
Machine must be operated empty either at
60°C or 90°C program with detergent every 6
months.
Do not overload the machine.
Store detergent in a closed and dry place. Do
not keep them under high temperatures.
Select the proper program and temperature
according to the type and soiling degree of the
laundry.
29
EN
Page 30

It does not
rinse well.
Clothes
stiffened.
Clothes do not
smell like the
softener.
The amount, brand and
storage conditions of the
detergent used might not
be appropriate.
Detergent might have
been put in the wrong
compartment.
Machine filter may be
clogged.
Drain hose may be folded. Check the drain hose.
Intermediate spins may be
skipped.
Insufficient amount of
detergent used.
The detergent may have
been placed into the
wrong compartment; the
detergent may be mixed
with the softener.
Insufficient amount of
detergent used.
The detergent may have
been placed into the
wrong compartment; the
detergent may be mixed
with the softener.
Store detergent in a closed and dry place. Do
not keep them under high temperatures.
If detergent is put in the prewash
compartment although prewash cycle is not
selected, the machine can take this detergent
during rinsing or softener step.
Check the filter.
There may be an imbalance of laundry in the
machine.
The laundry in the drum may be clustered
(bundled laundry in a bag). Laundry should be
rearranged and re-spun.
No spinning is performed when the laundry is
not evenly distributed in the drum to prevent
any damage to the machine and to its
environment.
If the water hardness is higher, using
insufficient amount of detergent can cause
the laundry to become stiff in time. Use
appropriate amount of detergent according to
the water hardness.
If detergent is put in the prewash
compartment although prewash cycle is not
selected, the machine can take this detergent
during rinsing or softener step.
Softener should not come into contact with
detergent when being added.
Wash and clean the drawer with hot water.
30
EN
Page 31

Detergent
residue in the
dispensing
drawer.
There is
detergent left
on the laundry.
Machine does
work. No light
is on.
The machine
did not start
There is too
after the
much foam.
program was
selected and
the 'Start/
Pause/Cancel'
button was
pressed.
“Washing”
and "Start/
Pause/Cancel"
lights are
flashing after
the program is
started.
The “Lid” light is
flashing.
Detergent may have been
put in wet dispenser
drawer.
Detergent may have
gotten damp.
Water pressure might be
low
The detergent in the main
wash compartment might
have gotten wet while
taking in the prewash
water..
Detergent might be mixed
with the bleaching agent.
Excessive laundry might
have been loaded in.
Wrong program and
temperature might have
been selected.
Wrong detergent may
have been used.
You may not be using
proper detergent for
automatic washing
machines.
Excessive amount of
detergent may have been
The plug might not be
used.
plugged in the mains outlet.
Too much detergent may
Fuse may have blown. Fuse should be checked.
have been used for a
Electricity may be cut off. Power should be checked.
small amount of lightly
soiled laundry.
The “On/Off” button might
have not been pressed.
Detergent may have been
stored improperly.
Type of material being
washed (lace items will
cause excessive foam due
The front door may be ajar.
to their meshed structure).
Detergent might have
been put in the wrong
compartment.
Water may have been cut
off.
Softener being released
early.
It shows the safety period
until the door lock is
opened.
Dry the detergent drawer before putting in
detergent.
Store detergent in a closed and dry place. Do
not keep them under high temperatures.
The detergent dispenser outlet (holes) may
have a problem.
There might be problems with the detergent
dispenser valves.
Softener should not come into contact with
detergent when being added.
Do not load the machine in excess.
Select the proper program and temperature
for the laundry to be washed.
Use wool detergents for woolens.
Use only automatic washing machine
detergents in your washing machine.
Use only sufficient amount of detergent.
Plug should be checked.
Use only sufficient amount of detergent.
This button must be pressed.
Store detergent in a closed and dry location.
Do not store in excessively hot places.
Use smaller amounts of detergent for lace
items.
If you put detergent in the prewash
compartment although you have not selected
a prewash cycle, the machine can take this
detergent during rinsing or softener step.
You can restart your machine by pressing
You may have added too much softener.
the "Start/Pause/Cancel" button for a short
The detergent dispenser might be
time after ensuring that the water is not cut
problematic. Water may be siphoned (pulling
off.
the softener into the washer early) during the
fill or rinse cycles.
There might be problems with the valves.
For your safety, the front door can only
be opened 2 minutes after the program is
completed. The “Lid” light will flash during
this period.
31
EN
Page 32

 Loading...