

Beko CS 6914 APW User Manual

CS 6914 APW

Please read this manual first!
Recycling
Dear Customer,
We hope that your product, which has been produced in a 1st-class
manufacturing facility and checked under the most meticulous quality control
procedures, will provide you with years of good service.
For this, we recommend you to carefully read the entire manual of your product
before using it and keep it at hand for future reference.
This manual
• Will help you use your appliance quickly and safely.
• Read the manual before installing and operating your product.
• Follow the instructions, especially those for safety.
• Keep the manual in an easily accessible place as you may need it later.
• Besides, read also the other documents provided with your product.
Please note that this manual may be valid for other models as well.
Symbols and their descriptions
This instruction manual contains the following symbols:
C Important information or useful usage tips.
A Warning against dangerous conditions for life and property.
B Warning against electric voltage.
This product is supplied with the selective sorting symbol for waste electrical
and electronic equipment (WEEE).
This means that this product must be handled pursuant to European Directive
2002/96/EC in order to be recycled or dismantled to minimise its impact on
the environment. For further information, please contact your local or regional
authorities.
Electronic products not included in the selective sorting process are potentially
dangerous for the environment and human health due to the presence of
hazardous substances.

1 Your refrigerator 4
2 Warnings 5
ELECTRICAL REQUIREMENTS ......... 6
WARNING! THIS APPLIANCE MUST BE
EARTHED .......................................... 6
ENERGY SAVING TIPS ......................7
3 Installation 8
Points to be considered when re-
transporting your refrigerator .............8
Before operating your refrigerator ...... 8
Electric connection ............................ 8
Disposing of the packaging ...............9
Disposing of your old refrigerator ....... 9
Placing and Installation ...................... 9
TRANSPORTATION INSTRUCTIONS 10
INSTALLATION INSTRUCTIONS ...... 10
REPLACING THE INTERIOR LIGHT
BULB .............................................12
REVERSING THE DOORS ............... 13
Reversing the doors ........................15
4 Before operating 16
Final Check .....................................16
5 Using your refrigerator 17
TEMPERATURE CONTROL AND
ADJUSTMENT ................................. 17
SUGGESTED ARRANGEMENT OF
FOOD IN THE FRIDGE/FREEZER .... 18
STORING FROZEN FOOD ............... 19
FREEZING FRESH FOOD ................19
MAKING ICE CUBES ....................... 20
DEFROSTING .................................. 20
6 Maintenance and
cleaning 21
7 Do’s and Don’ts 22
EN
3
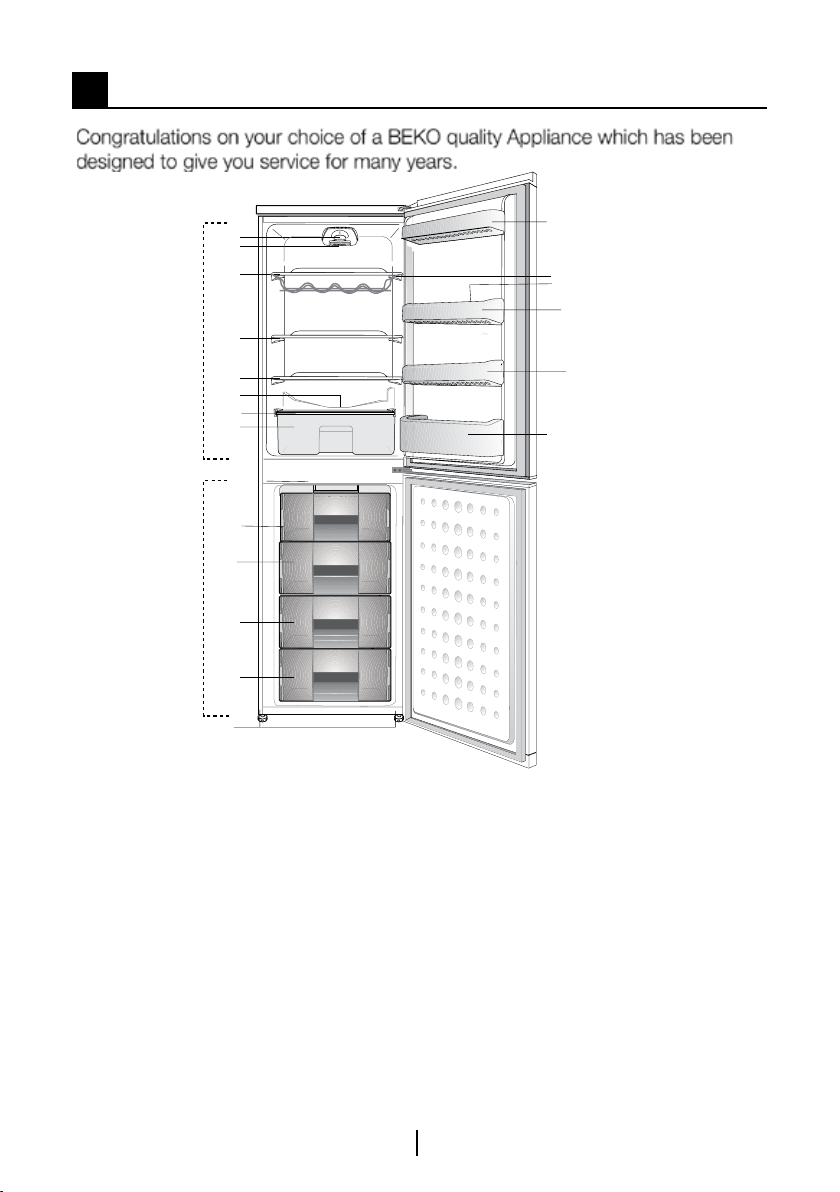
1 Your refrigerator
1
2
3
3
13
3
4
5
6
7
8
8
14
8
8
9
1. Thermostat knob
2. Interior Light
3. Adjustable body shelves
4. Defrost water collection
channel - Drain tube
5. Crisper cover
6. Crisper
7. Icebank tray
8. Deep-freeze compartment
10
12
11
10
10
10
9. Adjustable front feet
10. Fridge compartment door
shelves
11. Egg holders
12. Wine rack
13. Fridge compartment
14. Freezer compartment
C Figures that take place in this instruction manual are schematic and may not
correspond exactly with your product. If the subject parts are not included in the
product you have purchased, then it is valid for other models.
EN
4

2 Warnings
•DO NOT connect your appliance to
the electricity supply until all packing
and transit protectors have been
removed.
• Leave to stand for at least 4
hours before switching on to allow
compressor oil to settle if transported
horizontally.
• If you are discarding an old
refrigerator with a lock or latch fitted
to the door, disable the lock/latch,
ensure that it is left in a safe condition
to prevent the entrapment of young
children.
• This fridge/freezer must only be used
for its intended purpose i.e the storing
and freezing of edible foodstuff.
• Do not dispose of the appliance on a
fire. At BEKO, the care and protection
of our environment is an ongoing
commitment. This appliance which
is among the latest range introduced
is particularly environment friendly.
Your appliance contains non CFC /
HFC natural substances in the cooling
system (Called R600a) and in the
insulation (Called cyclopentane) which
are potentially flammable if exposed
to fire. Therefore, take care not to
damage, the cooling circuit / pipes of
the appliance in transportation and in
use. In case of damage do not expose
the appliance to fire or potential
ignition source and immediately
ventilate the room where the appliance
is situated.
• We suggest you contact your local
authority for disposal information and
facilities available.
• See Installation Instructions on on
page 8 for information on suitable
location.
• To obtain the best possible
performance and trouble free operation
from your appliance it is very important
to carefully read these instructions.
• On delivery, check to make sure that
the product is not damaged and that
all the parts and accessories are in
perfect condition.
• Ensure that the plug remains readily
accessible. Do not use multiple
adapter bar or extension cable.
• Failure to observe these instructions
may invalidate your right to free service
during the guarantee period.
• Keep ventilation openings, in the
appliance enclosure or in the built-in
structure, clear of obstruction.
• Do not use mechanical devices
or other means to accelerate the
defrosting process, other than those
recommended by the manufacturer.
• Do not damage the refrigerant circuit.
• Do not use electrical appliances
inside the food storage compartments
of the appliance, unless they are
of the type recommended by the
manufacturer.
• We suggest you keep these
instructions in a safe place for easy
reference.
• This appliance is not intended for use
by persons (including children) with
reduced physical, sensory or mental
capabilities, or lack of experience
and knowledge, unless they have
been given supervision or instruction
concerning use of the appliance by a
person responsible for their safety.
• Children should be supervised to
ensure that they do not play
with the appliance.
EN
5
ELECTRICAL
REQUIREMENTS
Before you insert the plug into the wall
socket make sure that the voltage and
the frequency shown on the rating
plate inside the appliance corresponds
to your electricity supply.
Rating label is on the left hand side of
fridge inner liner.
We recommend that this appliance be
connected to the mains supply via a
suitable switched and fused socket.
The appliance must be positioned so
that the plug is accessible.
Should the mains lead of the appliance
become damaged or should it need
replacing at any time, it must be
replaced by a special purpose made
mains lead which can only be obtained
from a BEKO Authorised Service
Agent.
WARNING! THIS APPLIANCE
MUST BE EARTHED
If the fitted moulded plug is not
suitable for your socket, then the plug
should be cut off and an appropriate
plug fitted. Destroy the old plug which
is cut off as a plug with bared cord
could cause a shock hazard if inserted
into a socket elsewhere in the house.
The moulded plug on this appliance
incorporates a 13 A fuse. Should
the fuse need to be replaced an
ASTABEAB approved BS 1362 fuse
of the same rating must be used. Do
not forget to refit the fuse cover. In the
event of losing the fuse cover the plug
must not be used until a replacement
fuse cover has been fitted. Colour
of the replacement fuse cover must
be the same colour as that visible on
the pin face of the plug. Fuse covers
are available from any good electrical
store.
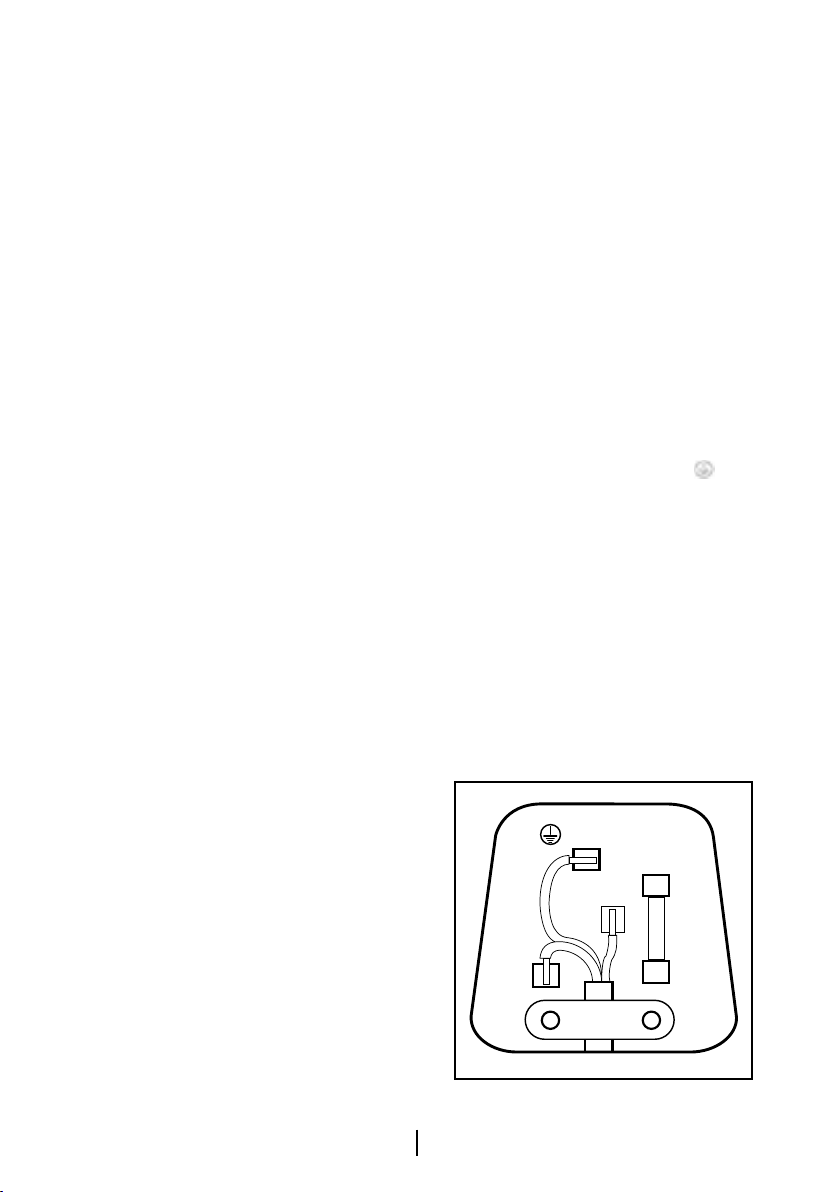
IMPORTANT! FITTING A
DIFFERENT PLUG
As the colours of the wires in the
mains lead of this appliance may
not correspond with the coloured
markings identifying the terminals in
your plug proceed as follows: (See
diagram).
1. Connect the green-yellow or green
(Earth) wire to the terminal in the plug
marked ‘E’ or with the symbol
or
coloured green and yellow or green.
2. Connect the blue (Neutral) wire to
the terminal in the plug marked ‘N’ or
coloured black.
3. Connect the brown (Live) wire to
the terminal in the plug marked ‘L’ or
coloured red.
With alternative plugs a 13 A fuse must
be fitted either in the plug or adaptor
or in the main fuse box. If in doubt
contact a qualified electrician.
GREEN &
YELLOW
GREEN
N
BLUE
OR
BLACK
OR
6mm.
L
32mm.
BROWN
OR
RED
22mm.
6mm.
CORD GRIP
12mm.
6mm.
FUSE
FITTED WITH
CARTRIDGE FUSE
FIT BS 1362 REPLACEMENT
BS 1362 13A FUSE ALWAYS
EN
6

ENERGY SAVING TIPS
1- Ensure your appliance is installed in
a well ventilated area.
2- Ensure the time between buying
chilled/frozen food and placing them in
your appliance is kept to a minimum,
particularly in summer. We recommend
you use a cool bag or a special carrier
bag to carry frozen food.
3- Do not leave the door (s) of your
appliance open longer than necessary
and ensure they are closed properly
after each opening.
4- Defrost frozen food in the fridge
compartment, so that frozen food acts
as an ice pack to assist cooling in the
fridge.
EN
7

3 Installation
BPlease remember that the
manufacturer shall not be held liable if
the information given in the instruction
manual is not observed.
Points to be considered
when re-transporting your
refrigerator
1.Your refrigerator must be emptied and
cleaned prior to any transportation.
2.Shelves, accessories, crisper and etc.
in your refrigerator must be fastened
securely by adhesive tape against any
jolt before repackaging.
3.Packaging must be adequate and the
rules of transportation printed on the
package must be followed.
Please do not forget…
Every recycled material is an
indispensable source for the nature
and for our national resources.
If you wish to contribute to recycling
the packaging materials, you can
get further information from the
environmental bodies or local
authorities.
Before operating your
refrigerator
Before starting to use your refrigerator
check the following:
1.Is the interior of the refrigerator dry and
can the air circulate freely in the rear
of it?
2.Please install the 2 plastic wedges
as illustrated in the figure. Plastic
wedges will provide the required
distance between your refrigerator
and the wall in order to allow the air
circulation. (The illustrated figure is
only an example and does not match
exactly with your product.)
3.Clean the interior of the refrigerator as
recommended in the “Maintenance
and cleaning” section.
4.Plug the refrigerator into the wall outlet.
When the fridge door is open, the
fridge compartment interior light will
come on.
5.You will hear a noise as the
compressor starts up. The liquid and
gases sealed within the refrigeration
system may also give rise to noise,
even if the compressor is not running
and this is quite normal.
6.Front edges of the refrigerator may feel
warm. This is normal. These areas
are designed to be warm to avoid
condensation
Electric connection
Connect your product to a grounded
socket which is being protected by a
fuse with the appropriate capacity.
Important:
• The connection must be in compliance
with national regulations.
• The power cable plug must be easily
accessible after installation.
• The specified voltage must be equal to
your mains voltage.
• Extension cables and multiway plugs
must not be used for connection.
BA damaged power cable must be
replaced by a qualified electrician.
BProduct must not be operated before
it is repaired! There is danger of
electric shock!
EN
8
 Loading...