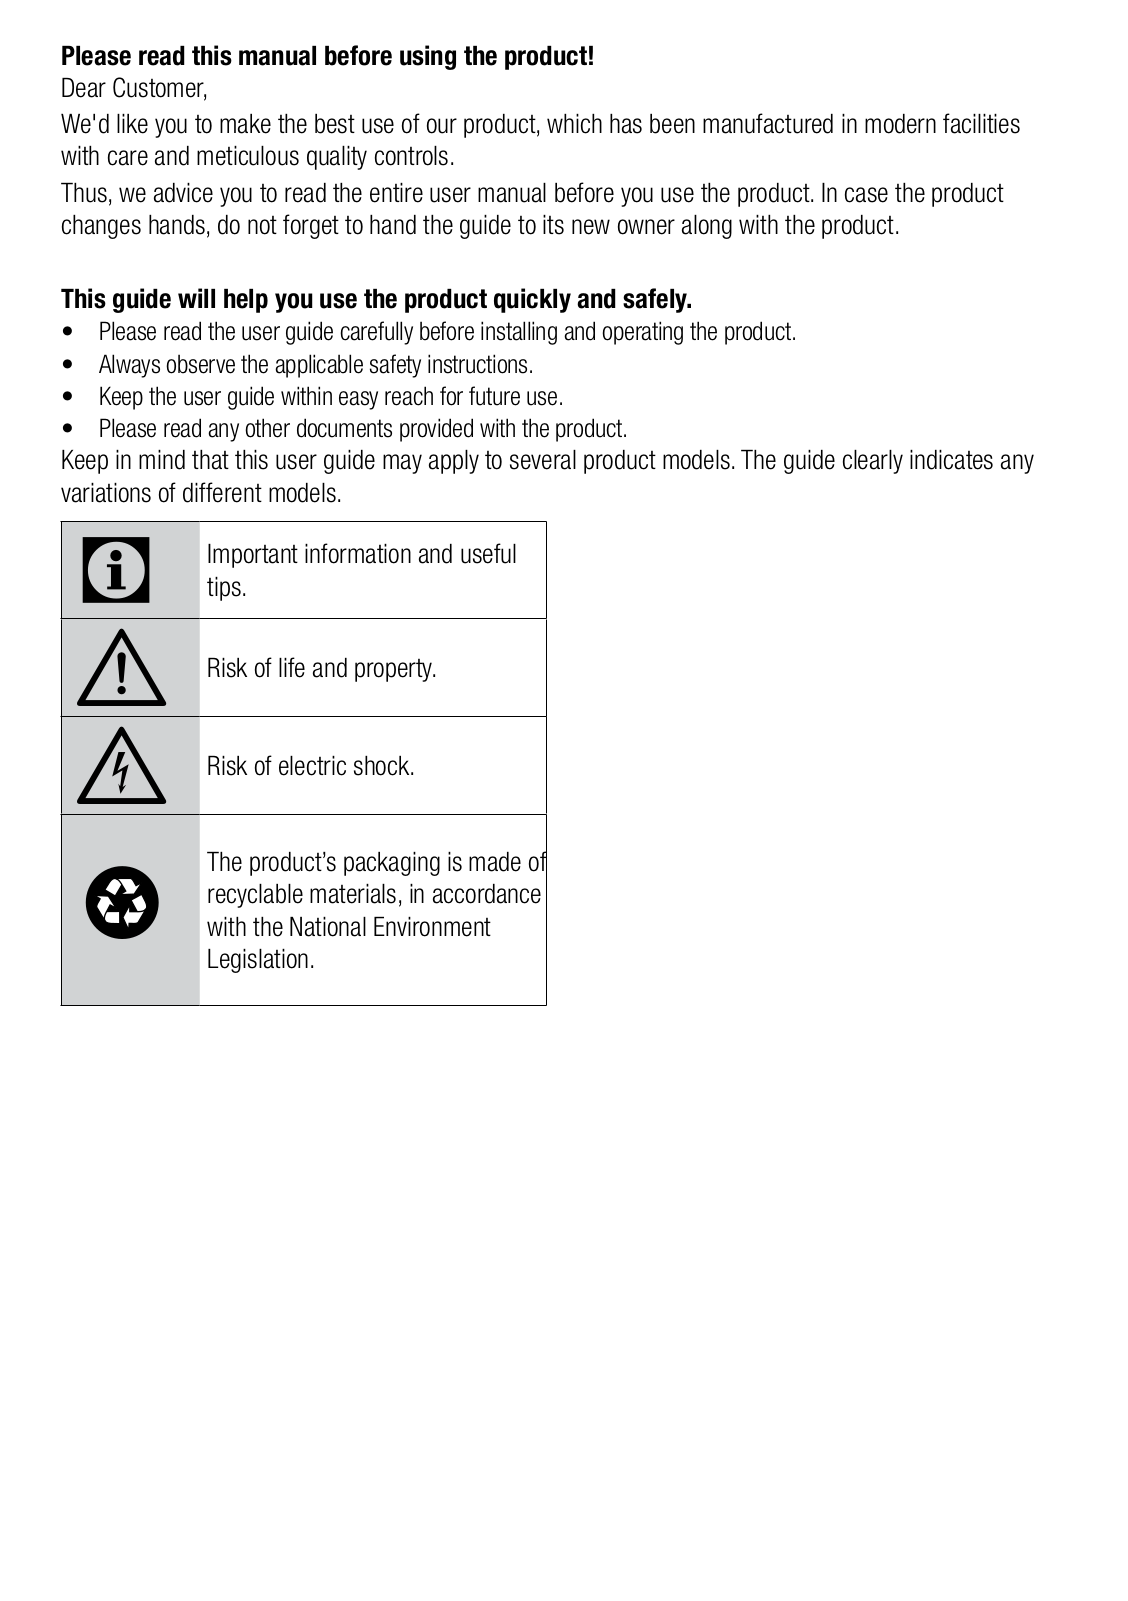
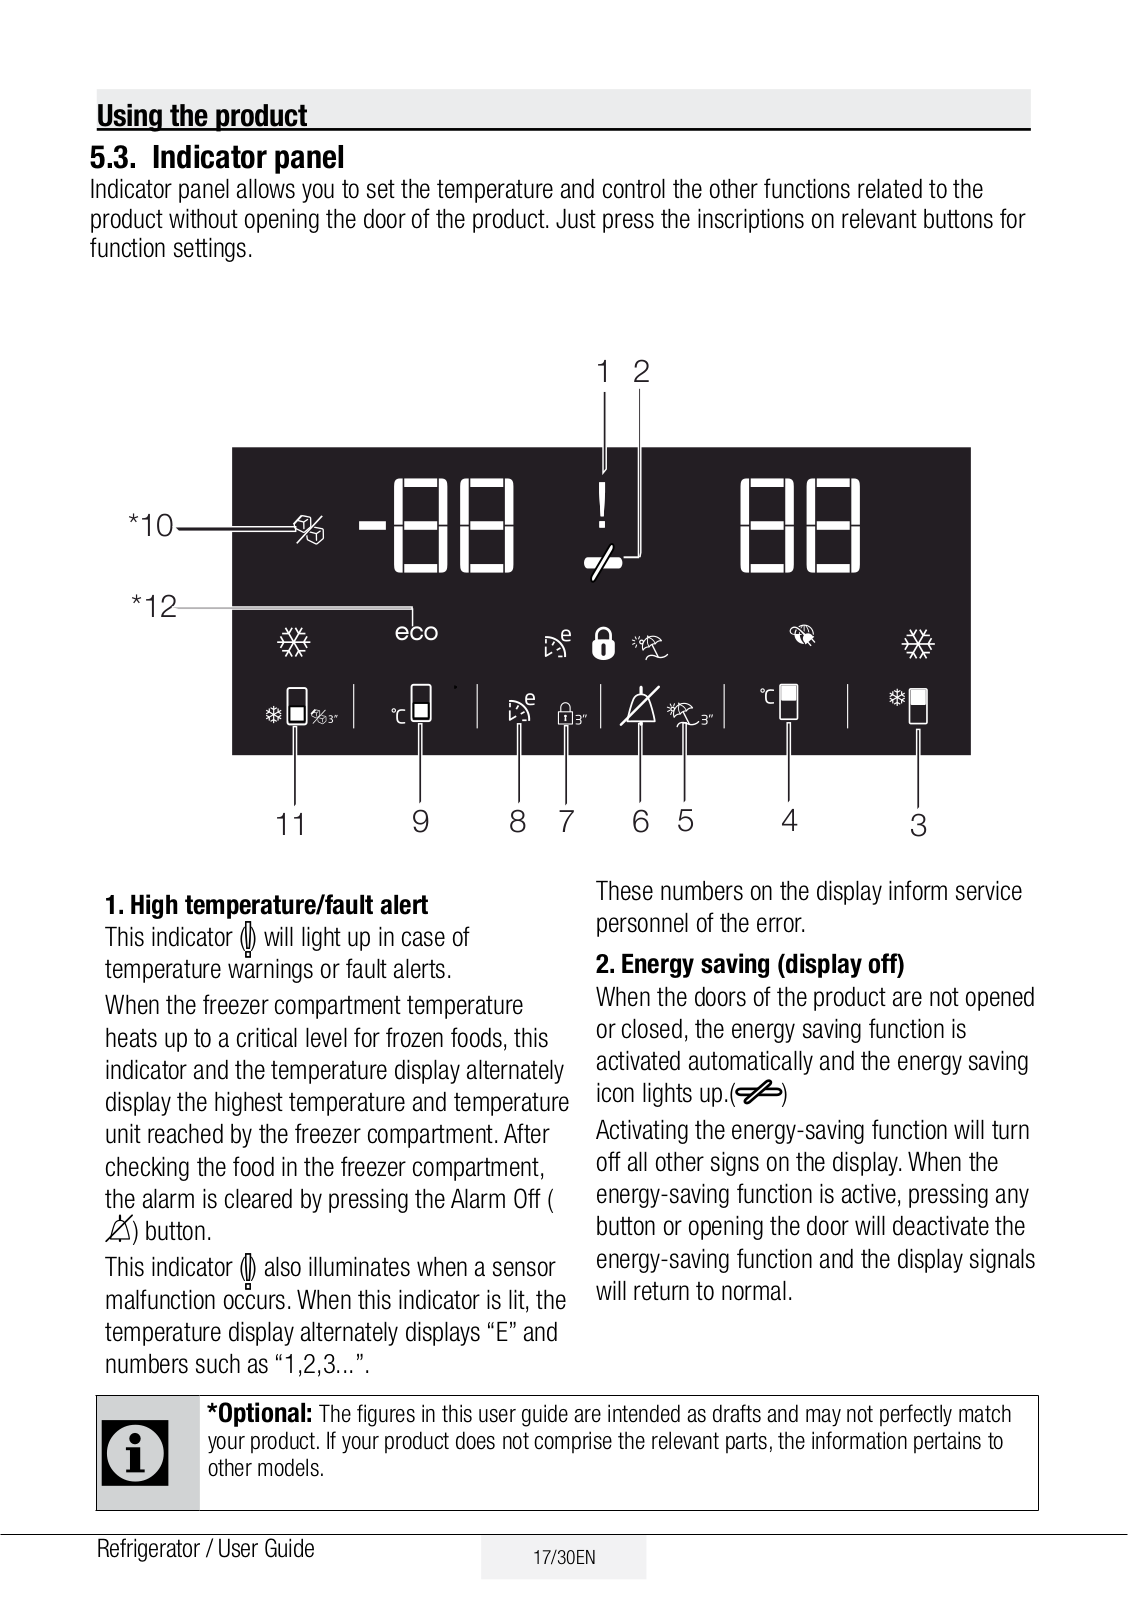
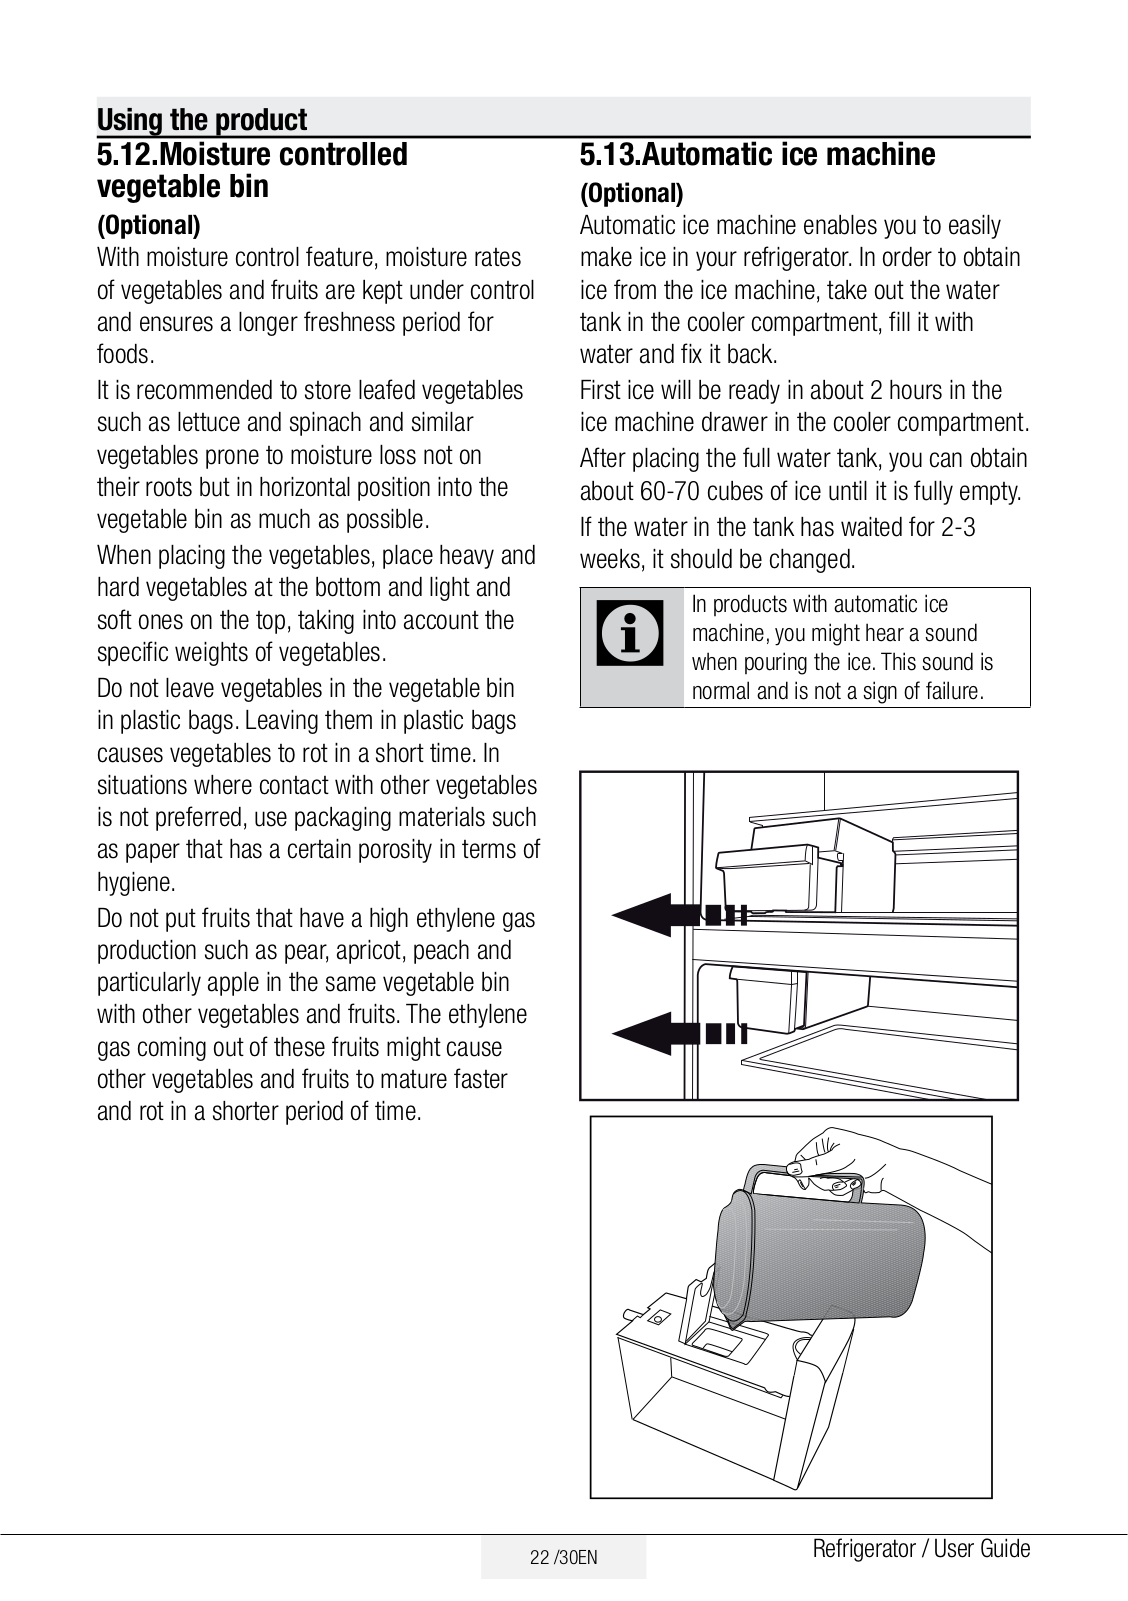
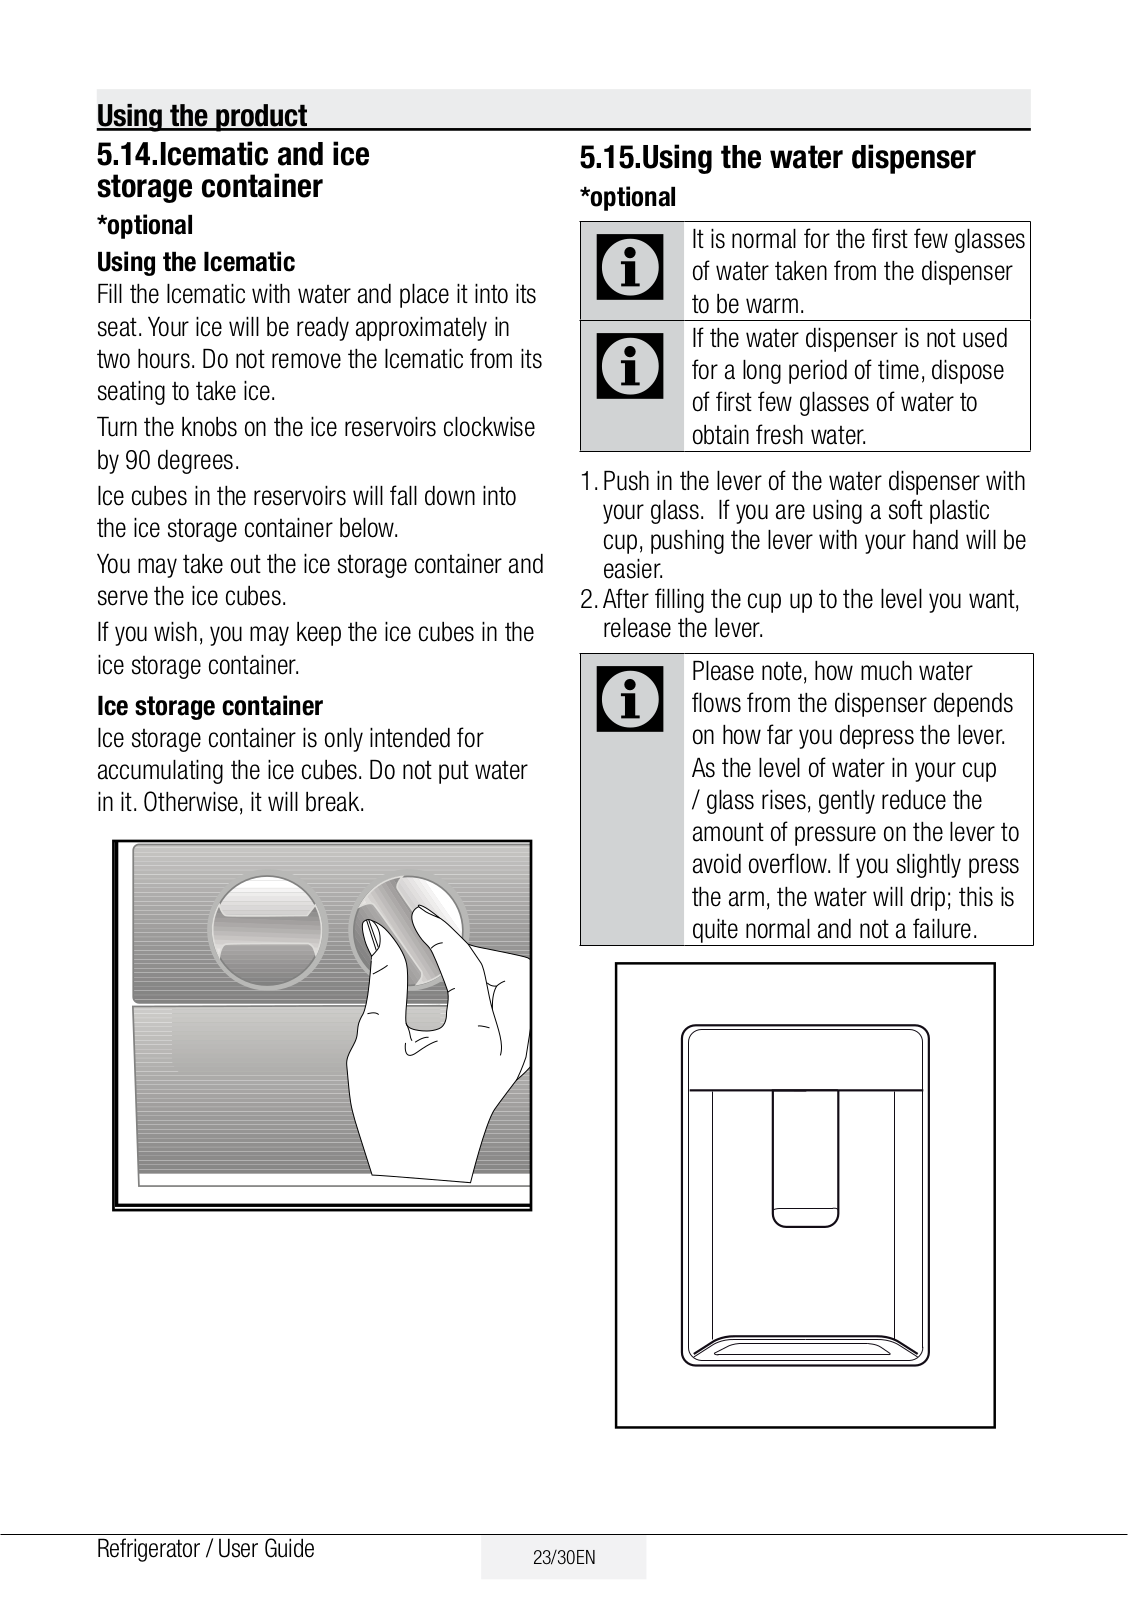
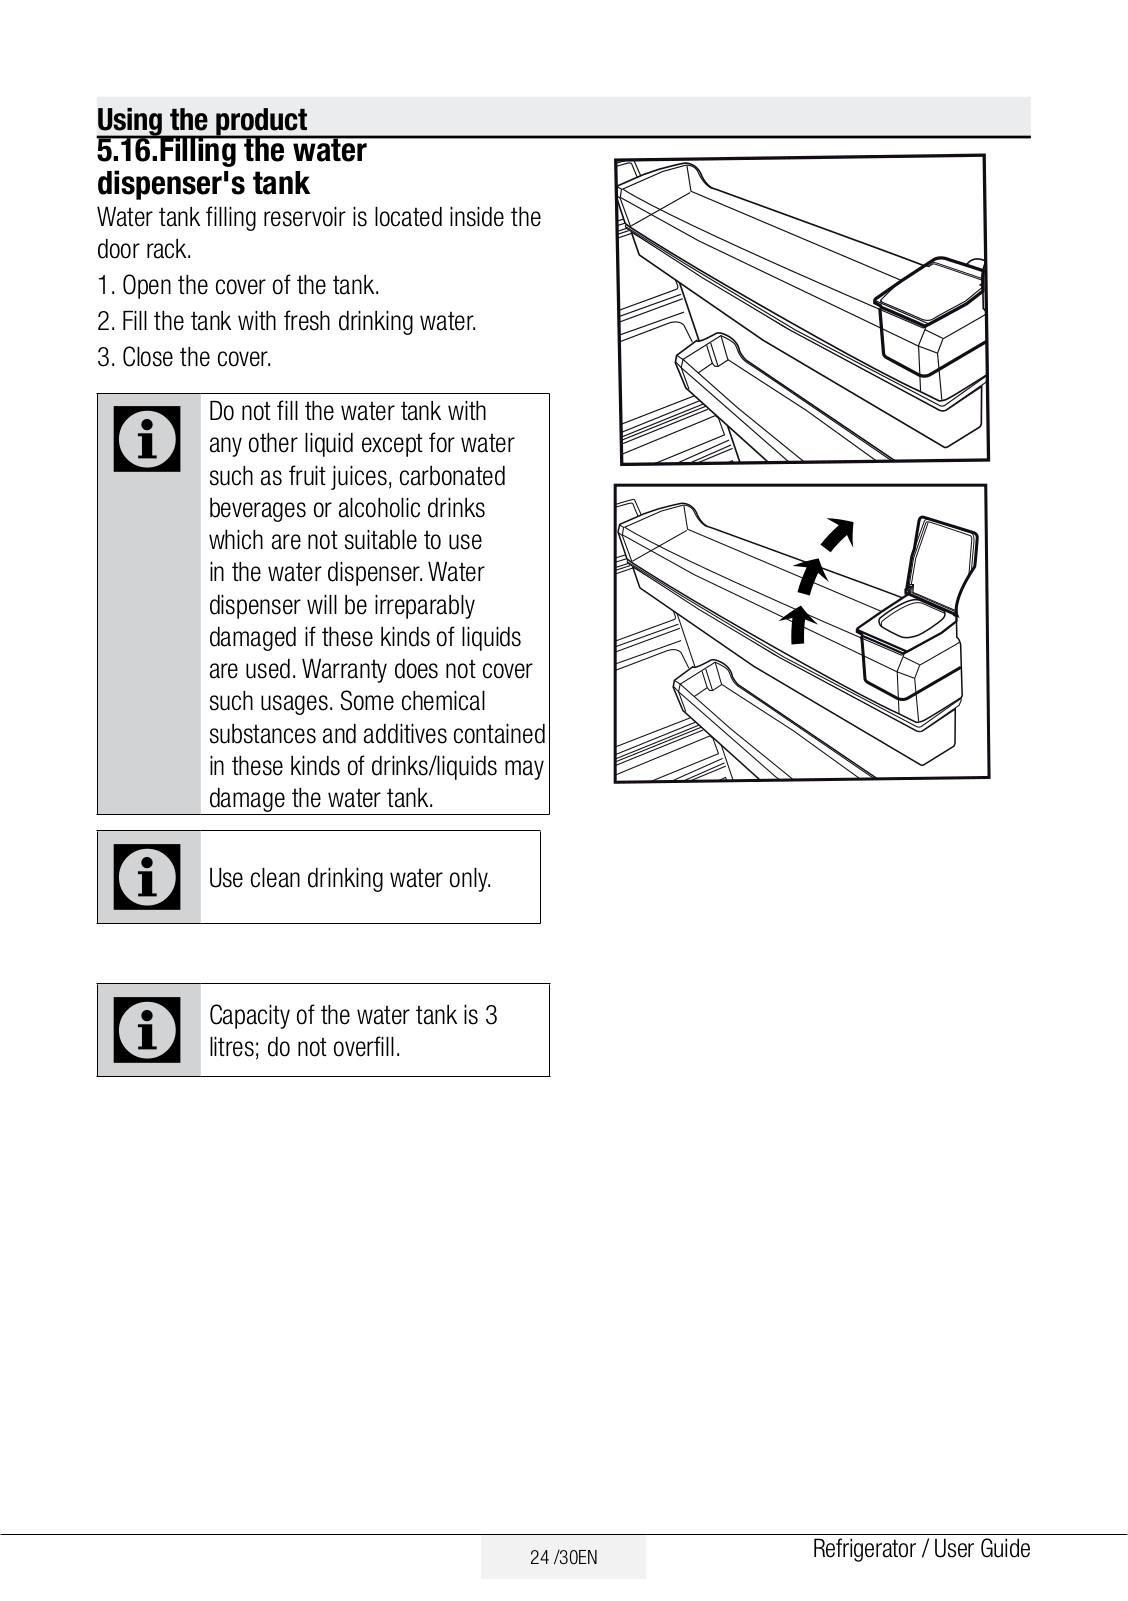
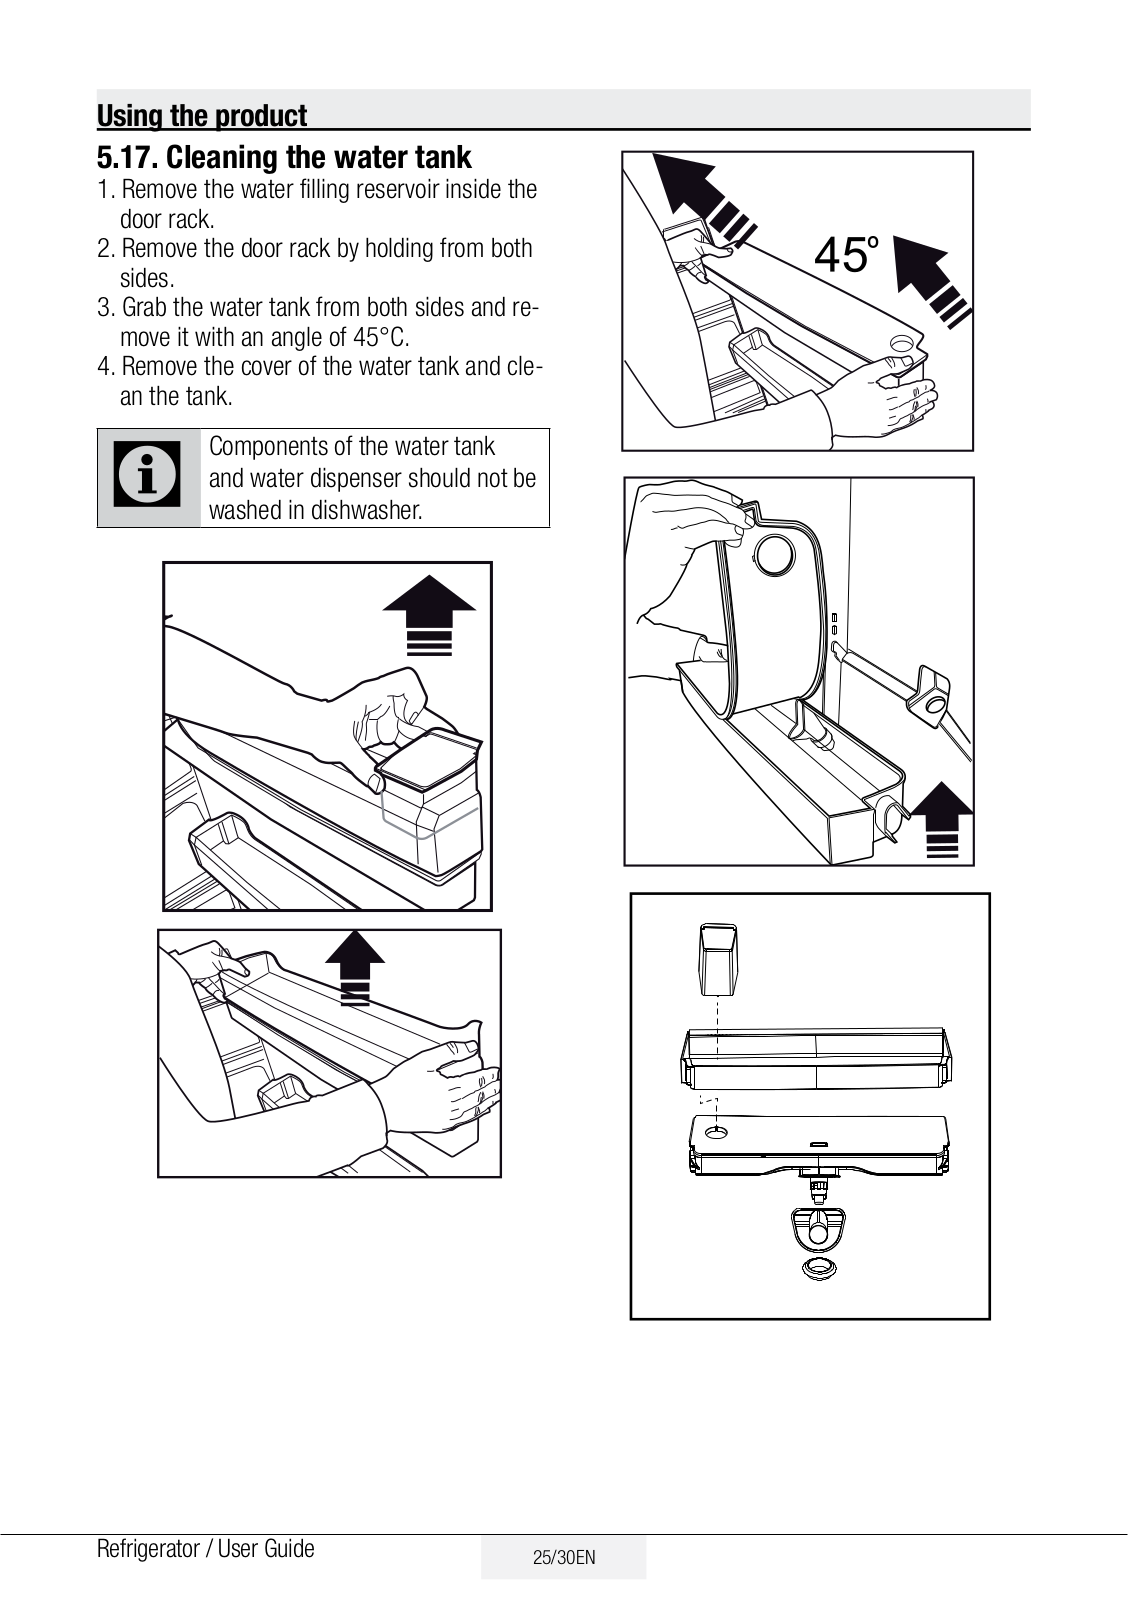
Refrigerator
User Manual
Chłodziarka
Instrukcja użytkowania
Ψυγείο
Εγχειρίδιο Χρήστη
CNE520E23ZDX-CNE520E32ZX
EN/PL/EL
57 6330 0000/AT - EN-PL-EL
Please read this manual before using the product!
Dear Customer,
We'd like you to make the best use of our product, which has been manufactured in modern facilities with care and meticulous quality controls.
Thus, we advice you to read the entire user manual before you use the product. In case the product changes hands, do not forget to hand the guide to its new owner along with the product.
This guide will help you use the product quickly and safely.
•Please read the user guide carefully before installing and operating the product.
•Always observe the applicable safety instructions.
•Keep the user guide within easy reach for future use.
•Please read any other documents provided with the product.
Keep in mind that this user guide may apply to several product models. The guide clearly indicates any variations of different models.
C Important information and useful tips.
A Risk of life and property.
B Risk of electric shock.
The product’s packaging is made of recyclable materials, in accordance with the National Environment Legislation.
1. Safety and environment instructions3
1.1. General safety . . . . . . . . . . . . . . . . . . . . . . 3 1.1.1 HC warning . . . . . . . . . . . . . . . . . . . . . . . 5 1.1.2 For models with water dispenser. . . . . . . . 5 1.2. Intended use . . . . . . . . . . . . . . . . . . . . . . . 5 1.3. Child safety . . . . . . . . . . . . . . . . . . . . . . . . 5
1.4. Compliance with WEEE Directive and Disposing of the Waste Product. . . . . . . . . . . . . . . . . 6
1.5. Compliance with RoHS Directive . . . . . . . . . 6 1.6. Package information . . . . . . . . . . . . . . . . . 6
2 |
Your Refrigerator |
7 |
|
|
|
3 |
Installation |
8 |
3.1. Right place for installation. . . . . . . . . . . . . . 8 3.2. Attaching the plastic wedges . . . . . . . . . . . 8 3.3. Adjusting the stands. . . . . . . . . . . . . . . . . . 8 3.4. Power connection . . . . . . . . . . . . . . . . . . . 9 3.5. Reversing the doors . . . . . . . . . . . . . . . . . 10 3.6. Reversing the doors . . . . . . . . . . . . . . . . . 11
4 Preparation |
12 |
4.1. What to do for energy saving . . . . . . . . . . 12 4.2. First Use . . . . . . . . . . . . . . . . . . . . . . . . . 12
5 Using the product |
13 |
5.1. Temperature adjustment button . . . . . . . . 13 5.2. Rapid freezing . . . . . . . . . . . . . . . . . . . . . 13 5.3. Vacation function . . . . . . . . . . . . . . . . . . . 14 5.4. Indicator panel . . . . . . . . . . . . . . . . . . . . . 15 5.5. Indicator panel . . . . . . . . . . . . . . . . . . . . . 17 5.6. Ice bucket . . . . . . . . . . . . . . . . . . . . . . . . 19 5.7. Eggholder . . . . . . . . . . . . . . . . . . . . . . . . 20 5.8. Fan . . . . . . . . . . . . . . . . . . . . . . . . . . . . . 20 5.9. Vegetable bin . . . . . . . . . . . . . . . . . . . . . 20 5.10. Zero degree compartment. . . . . . . . . . . . 20 5.11. HerbBox/HerbFresh. . . . . . . . . . . . . . . . . 20 5.12. Moving door rack . . . . . . . . . . . . . . . . . . 21 5.13. Sliding storage box . . . . . . . . . . . . . . . . . 21 5.14. Moisture controlled vegetable bin . . . . . . 22 5.15. Automatic ice machine . . . . . . . . . . . . . . 22 5.16. Icematic and ice storage container . . . . . 23 5.17. Using the water dispenser . . . . . . . . . . . . 23 5.18. Filling the water dispenser's tank. . . . . . . 24 5.19. Cleaning the water tank . . . . . . . . . . . . 25 5.20. Drip tray . . . . . . . . . . . . . . . . . . . . . . . . . 26 5.21. Freezing fresh food . . . . . . . . . . . . . . . . . 27 5.22. Recommendations for storing frozen foods 27 5.23. Deep freezer details . . . . . . . . . . . . . . . . 28 5.24. Placing the food . . . . . . . . . . . . . . . . . . . 28 5.25. Door open alert. . . . . . . . . . . . . . . . . . . . 28 5.26. Changing the opening direction of the door28 5.27. Interior light . . . . . . . . . . . . . . . . . . . . . . 28
6 |
Maintenance and cleaning |
29 |
6.1 Avoiding bad odours . . . . . . . . . . . . . . . . . |
29 |
|
6.2 Protecting the plastic surfaces . . . . . . . . . |
29 |
|
7. |
Troubleshooting |
30 |
|
2 /30 EN |
Refrigerator / User Guide |
|
|
|
|
|
|
1. |
Safety and environment instructions |
|
|
This section provides the safety instructions necessary to prevent the risk of injury and material damage. Failure to observe these instructions will invalidate all types of product warranty.
Intended use
WARNING:
AKeep ventilation openings, in the appliance enclosure or in the builtinstructure, clear of obstruction.
WARNING:
Do not use mechanical
Adevices or other means to accelerate the defrosting process, other than those recommended by the manufacturer.
AWARNING:
Do not damage the refrigerant circuit.
WARNING:
Do not use electrical Aappliances inside the food
storage compartments of the appliance, unless they are of the type recommended by the manufacturer.
This appliance is intended to be used in household and similar applications such as
–staff kitchen areas in shops, offices and other working environments;
–farm houses and by clients in hotels, motels and other residential type environments;
–bed and breakfast type environments;
–catering and similar non-retail applications.
1.1. General safety
•This product should not be used by persons with physical, sensory and mental disabilities, without sufficient knowledge and experience or by
children. The device can only be used by such persons under supervision and instruction of a person responsible for their safety. Children should not be allowed to play with this device.
•In case of malfunction, unplug the device.
•After unplugging, wait at least 5 minutes before plugging in again.
•Unplug the product when not in use.
•Do not touch the plug with wet hands! Do not pull the cable to plug off, always hold the plug.
•Do not plug in the refrigerator if the socket is loose.
•Unplug the product during installation, maintenance, cleaning and repair.
•If the product will not be used for a while, unplug the product and remove any food inside.
•Do not use the product when the compartment with circuit cards located on the upper back part of the product (electrical card box cover) (1) is open.
1
1 |
•Do not use steam or steamed cleaning materials for cleaning the refrigerator and melting the ice inside. Steam may contact the electrified areas and cause short circuit or electric shock!
•Do not wash the product by spraying or pouring water on it! Danger of electric shock!
Refrigerator / User Guide |
3/30EN |
|
Safety and environment instructions
• In case of malfunction, do not use |
• |
Take care not to trap the power |
|||
the product, as it may cause electric |
|
cable. |
|||
shock. Contact the authorised |
|
|
|
|
|
|
|
|
|
||
service before doing anything. |
|
|
|
|
|
• Plug the product into an earthed |
|
|
|
|
|
socket. Earthing must be done by a |
|
|
|
|
|
qualified electrician. |
|
|
|
|
|
• If the product has LED type lighting, |
|
|
|
|
|
contact the authorised service for |
|
|
|
|
|
replacing or in case of any problem. |
|
|
|
|
|
|
|
|
|
||
• Do not touch frozen food with wet |
|
When positioning the appliance, |
|||
hands! It may adhere to your hands! |
• |
||||
• Do not place liquids in bottles and |
|
ensure the supply cord is not trapped |
|||
cans into the freezer compartment. |
|
or damaged. |
|||
• |
Do not locate multiple portable |
||||
They may explode. |
|
socket-outlets or portable power |
|||
• Place liquids in upright position after |
|
||||
|
supplies at the rear of the appliance. |
||||
tightly closing the lid. |
|
||||
• |
Children aged from 3 to 8 years |
||||
• Do not spray flammable substances |
|||||
near the product, as it may burn or |
|
are allowed to load and unload |
|||
explode. |
|
refrigerating appliances. |
|||
• Do not keep flammable materials |
• |
To avoid contamination of food, |
|||
and products with flammable gas |
|||||
|
please respect the following |
||||
(sprays, etc.) in the refrigerator. |
|
||||
|
instructions: |
||||
• Do not place containers holding |
|
||||
liquids on top of the product. |
• |
Opening the door for long periods |
|||
Splashing water on an electrified |
|
can cause a significant increase of |
|||
part may cause electric shock and |
|
the temperature in the |
|||
risk of fire. |
|
||||
• |
compartments of the appliance. |
||||
• Exposing the product to rain, |
|||||
• |
Clean regularly surfaces that can |
||||
snow, sunlight and wind will cause |
|||||
electrical danger. When relocating |
|
come in contact with food and |
|||
the product, do not pull by holding |
|
accessible drainage systems. |
|||
the door handle. The handle may |
• |
Clean water tanks if they have not |
|||
come off. |
|||||
|
been used for 48 h; flush the water |
||||
• Take care to avoid trapping any part |
|
||||
|
system connected to a water |
||||
of your hands or body in any of the |
|
||||
moving parts inside the product. |
• |
supply if water has not been drawn |
|||
• Do not step or lean on the door, |
|
for 5 days. |
|||
drawers and similar parts of the |
|
|
|
|
|
refrigerator. This will cause the |
|
|
|
|
|
product to fall down and cause |
|
|
|
|
|
damage to the parts. |
|
|
|
|
|
4 /30EN |
Refrigerator / User Guide |
Safety and environment instructions
• Store raw meat and fish in suitable |
• |
If there is risk of water hammer effect |
||
containers in the refrigerator, so that |
|
in your installation, always use a |
||
it is not in contact with or drip onto |
|
water hammer prevention equipment |
||
other food. |
|
in your installation. Consult |
||
|
Professional plumbers if you are not |
|||
• Two-star frozen-food compartments |
|
|||
|
sure that there is no water hammer |
|||
are suitable for storing pre-frozen |
|
|||
|
effect in your installation. |
|||
food, storing or making icecream |
• |
Do not install on the hot water inlet. |
||
and making ice cubes. |
|
Take precautions against of the |
||
• One-, twoand three-star |
|
risk of freezing of the hoses. Water |
||
|
temperature operating interval shall |
|||
compartments are not suitable for |
|
|||
|
be 33°F (0.6°C) minimum and 100°F |
|||
the freezing of fresh food. |
|
|||
|
(38°C) maximum. |
|||
• If the refrigerating appliance is |
• |
Use drinking water only. |
||
left empty for long periods, switch |
1.2. Intended use |
|||
off, defrost, clean, dry, and leave |
• |
This product is designed for home |
||
the door open to prevent mould |
|
use. It is not intended for commercial |
||
developing within the appliance. |
|
use. |
||
• |
The product should be used to store |
|||
1.1.1 HC warning |
||||
|
food and beverages only. |
|||
If the product comprises a cooling system |
• |
Do not keep sensitive products |
||
using R600a gas, take care to avoid damaging |
|
requiring controlled temperatures |
||
the cooling system and its pipe while using and |
|
(vaccines, heat sensitive medication, |
||
moving the product. This gas is flammable. |
|
medical supplies, etc.) in the |
||
If the cooling system is damaged, keep the |
|
refrigerator. |
||
product away from sources of fire and ventilate |
• |
The manufacturer assumes no |
||
the room immediately. |
|
responsibility for any damage due to |
||
|
|
|
misuse or mishandling. |
|
C |
The label on the inner left side |
• |
||
theindicatesproduct.the type of gas used in |
Original spare parts will be provided |
|||
|
for 10 years, following the product |
|||
|
|
|
purchasing date. |
|
|
|
|
1.1.2 For models with water dispenser
•Pressure for cold water inlet shall be maximum 90 psi (620 kPa). If your water pressure exceeds 80 psi (550 kPa), use a pressure limiting valve in your mains system. If you do not know how to check your water pressure, ask for the help of a professional plumber.
1.3.Child safety
•Keep packaging materials out of children’s reach.
•Do not allow the children to play with the product.
•If the product’s door comprises a lock, keep the key out of children’s reach.
Refrigerator / User Guide |
5/30EN |
|
|
|
|
Safety and environment instructions
1.4. Compliance with WEEE Directive and Disposing
of the Waste Product
This product complies with EU WEEE Directive (2012/19/EU). This product bears a classification symbol for waste electrical and electronic equipment (WEEE).
This product has been
manufactured with high quality parts and materials which can be
reused and are suitable for recycling. Do not dispose of the
waste product with normal domestic and other wastes at the
end of its service life. Take it to the collection center for the recycling of electrical and electronic equipment. Please consult your local authorities to learn about these collection centers.
1.5. Compliance with RoHS Directive
• This product complies with EU WEEE Directive (2011/65/EU). It does not contain harmful and prohibited materials specified in the Directive.
1.6. Package information
Packaging materials of the product are manufactured from recyclable materials in accordance with our National Environment Regulations. Do not dispose of the packaging materials together with the domestic or other wastes. Take them to the packaging material collection points designated by the local authorities.
|
6 /30EN |
Refrigerator / User Guide |
2 Your Refrigerator
|
|
|
*1 |
|
*15 |
|
*2 |
|
*14 |
|
*3 |
|
*5 |
|
*4 |
|
|
|
|
|
16 |
|
|
|
13 |
|
|
|
*12 |
|
*5 |
|
*11 |
|
*6 |
|
|
|
|
|
*9 |
|
|
|
*10 |
|
|
|
17 |
|
|
|
*8 |
|
|
|
7 |
7 |
|
|
|
|
|
1. |
Cooler compartment door shelf |
10. |
Ice cube tray & Ice bank |
2. |
Water dispenser filling tank |
11. |
Vegetable bin |
3. |
Egg section |
12. |
Zero degree compartment |
4. |
Water dispenser reservoir |
13. |
Interior light |
5. |
Bottle shelf |
14. |
Cooler compartment glass shelf |
6. |
Sliding storage box |
15. |
Temperature adjustment button |
7. |
Adjustable legs |
16. |
Cooler compartment |
8. |
Deep freezer compartment |
17. |
Freezer compartment |
9. |
Quick freeze compartment |
|
|
|
*optional: Pictures given in this manual are given as example figures and they may not be exactly |
||
|
the same as your product. If your product does not comprise the relevant parts, the information |
||
Cpertains to other models. |
|
|
Refrigerator / User Guide |
7/30EN |
|
3 Installation
3.1. Right place for installation
Contact the Authorized Service for the product's installation. To ready the product for installation, see the information in the user guide and make sure the electric and water utilities are as required. If not, call an electrician and plumber to arrange the utilities as necessary.
BWARNING: The manufacturer assumes no responsibility for any damage caused by the work carried out by unauthorized persons.
BWARNING: The product’s power cable must be unplugged during installation. Failure to do so may result in death or serious injuries!
AWARNING: If the door span is too narrow for the product to pass, remove the door and turn the product sideways; if this does not work, contact the authorized service.
•Place the product on a flat surface to avoid vibration.
•Place the product at least 30 cm away from the heater, stove and similar sources of heat and at least 5 cm away from electric ovens.
•Do not expose the product to direct sunlight or keep in damp environments.
•The product requires adequate air circulation to function efficiently.
•If the product will be placed in an alcove, remember to leave at least 5 cm distance between the product and the ceiling and the walls.
•Do not install the product in environments with temperatures below -5°C.
3.2. Attaching the plastic wedges
Use the plastic wedges in the provided with the product to provide sufficient space for air circulation between the product and the wall.
1.To attach the wedges, remove the screws on the product and use the screws provided with the wedges.
2.Attach 2 plastic wedges on the ventilation cover as shown in the figure.
3.3. Adjusting the stands
If the product is not in balanced position, adjust the front adjustable stands by rotating right or left.
|
8 /30 EN |
Refrigerator / User Guide |
|
|
|
|
|
|
Installation
3.4. Power connection
AWARNING: Do not use extension or multi sockets in power connection.
BWARNING: Damaged power cable must be replaced by Authorized Service.
CWhen placing two coolers in adjacent position, leave at least 4 cm distance between the two units.
•Our firm will not assume responsibility for any damages due to usage without earthing and power connection in compliance with national regulations.
•The power cable plug must be easily accessible after installation.
•Do not use multi-group plug with or without extension cable between the wall socket and the refrigerator.
Hot Surface Warning!
Side walls of your product is equipped with refrigerant pipes to improve the
Ccooling system. Refrigerant with high temperatures may flow through these areas, resulting in hot surfaces on the side walls. This is normal and does not need any servicing. Please pay attention while touching these areas.
Refrigerator / User Guide |
9/30EN |
|
|
|
|
Installation
3.5. Reversing the doors
Proceed in numerical order . |
1 |
9 |
|
|
9 |
|
3 |
|
6 |
2 |
10 |
|
||
|
|
|
5 |
11 |
12 |
45 |
4 |
|
|
|
8
7
13
21
16
19
|
20 |
18 |
20 |
|
15
14
|
10 /30 EN |
Refrigerator / User Guide |
|
|
|
Installation
3.6. Reversing the doors
Proceed in numerical order . |
(8) |
|
(13) |
|
|
|
|
|
|
7 |
20 |
|
|
|
|
|
1 |
1 |
|
|
|
|
|
2 |
|
6 |
|
|
5 |
|
|
|
|
|
|
14 |
|
11 |
|
|
|
|
|
45° |
|
13 |
9 |
|
|
|
|
|
|
4 |
|
10 |
|
|
|
12 |
8 |
20 |
|
|
|
||
180° |
|
15 |
|
|
|
20 |
|
16
18
17
19
Refrigerator / User Guide |
11/30EN |
|
|
|
|
4 Preparation
4.1. What to do for energy saving
AConnecting the product to electronic energy-saving systems is harmful, as it may damage the product.
•Do not keep the refrigerator doors open for long periods.
•Do not place hot food or beverages into the refrigerator.
•Do not overfill the refrigerator; blocking the internal air flow will reduce cooling capacity.
•In order to store the maximum amount of food into the cooler compartment of your refrigerator, you should take out the upper drawers and place it onto the glass rack.
The declared energy consumption of your refrigerator was determined by taking out the cooler, ice tray and upper drawers in a way that will enable maximum storage. Using the below drawer when storing is strongly recommended. Energy saving function should be activated for best energy consumption.
•You should not block the airflow by putting food in front of the cooler fan. A space of minimum 3cm must be left in front of the protective fan wire when placing food.
•Since hot and humid air will not directly penetrate into your product when the doors are not opened, your product will optimize itself in conditions sufficient to protect your food. Functions and components such as compressor, fan, heater, defrost, lighting, display and so on will operate according to the needs to consume minimum energy under these circumstances.
•Depending on the product’s features; defrosting frozen foods in the cooler compartment will ensure energy saving and preserve food quality.
•Food should be stored using the drawers in the cooler compartment in order to ensure energy saving and protect food in better conditions.
•Food packages should not be in direct contact with the heat sensor located in the cooler compartment. If they are in contact with the sensor, energy consumption of the appliance might increase.
•Make sure the foods are not in contact with the cooler compartment temperature sensor described below.
4.2. First Use
Before using your refrigerator, make sure the necessary preparations are made in line with the instructions in “Safety and environment instructions” and “Installation” sections.
•Keep the product running with no food inside for 6 and do not open the door, unless absolutely necessary.
CA sound will be heard when the compressor is engaged. It is normal to hear sound even when the compressor is inactive, due to the compressed liquids and gasses in the cooling system.
CFront edges of the product might heat up. This is normal. These areas are designed to warm up in order to prevent condensation.
CIn some models indicator panel turns off automatically 5 minutes after the door closes. It will be reactivated when the door is open or any button is pressed.
|
12 /30 EN |
Refrigerator / User Guide |
|
|
|
|
|
|
5 Using the product
5.1. Temperature adjustment button
Internal temperature of your refrigerator varies depending on the following reasons:
•Seasonal temperatures,
•Opening the door frequently and leaving it open for long periods,
•Meals put into the refrigerator without being cooled to room temperature,
•Location of the refrigerator in the room (e.g. exposed to sunshine).
•Internal temperature varying due to these factors can be adjusted via the adjustment button.
Numbers around the adjustment button indicate temperature degrees as “°C”.
If the ambient temperature is 20°C, it is recommended to use the refrigerator temperature adjustment at 4°C. In other ambient temperatures this value can be customised.
5.2 Fast Freezing
If you want to freeze large amounts of fresh food,
switch the temperature adjustment button to ( ) position before putting the food into the quick freezing compartment.
It is recommended to keep the button at this position for 24 hours to freeze maximum amount of food indicated as the freezing capacity. Pay special attention not to mix food stolen as frozen and fresh food.
Remember to switch the temperature adjustment button back to its previous position.
Refrigerator / User Guide |
13/30EN |
|
Using the product
5.3 Holiday Function
The Holiday function will be activated after the temperature adjustment button is set to Holiday ( ) which is the hottest position.
It is not recommended to store food in the refrigerator compartment when the holiday function is active.
Button setting must be changed to cancel the function.
• After setting is completed, you can conceal the temperature setting button by pressing it inside.
|
14 /30EN |
Refrigerator / User Guide |
|
|
|
|
|
|
Using the product
5.2. Indicator panel
Indicator panels may vary according to the product model.
Audio – visual functions on the indicator panel helps you in using your product.
8 |
|
|
|
|
1 |
|
2 |
|
|
3 |
|
|
|
|
|
|
||||||||||||||
|
|
|
|
|
|
|
|
|
|
|
|
|
|
|
|
|
|
|
|
|
|
|
|
|
|
|
|
|
|
|
|
|
|
|
|
|
|
|
|
|
|
|
|
|
|
|
|
|
|
|
|
|
|
|
|
|
|
|
|
|
|
|
|
|
|
|
|
|
|
|
|
|
|
|
|
|
|
|
|
|
|
|
|
|
|
|
|
|
|
|
|
|
|
|
|
|
|
|
|
|
|
|
|
|
|
|
|
|
|
|
|
|
|
|
|
|
|
|
|
|
|
|
|
|
|
|
|
|
|
|
|
|
|
|
|
|
|
|
|
|
|
|
|
|
|
|
|
|
|
|
|
|
|
|
9
7 |
6 |
5 |
4 |
1.Cooler compartment indicator
2.Error status indicator
3.Temperature adjustment indicator
4.Holiday function button (press button 5 for 3s)
5.Temperature adjustment button
6.Compartment selection button
7.Cooler compartment indicator
8.Economy mode indicator
9.Vacation function indicator
C *Optional: The figures in this user guide are intended as drafts and may not perfectly match your product. If your product does not comprise the relevant parts, the information pertains to other models.
Refrigerator / User Guide |
15/30EN |
|
Using the product
*optional
1. Cooler compartment indicator
If you want to set the temperature of the cooler compartment, select the cooler compartment indicator with button 6.
2. Error status indicator
This indicator() will light up in case of temperature warnings or fault alerts.
When the freezer compartment temperature heats up to a critical level for frozen foods, this indicator and the temperature display alternately display the highest temperature and temperature unit reached by the freezer compartment. Check the food in the freezer compartment. This display is automatically switched off when the freezer compartment temperature has cooled to a sufficient level.
This indicator () also illuminates when a sensor malfunction occurs. When this indicator is lit, the temperature display alternately displays “E” and numbers such as “1,2,3 ...”.
These numbers on the display inform service personnel of the error.
3.Temperature adjustment indicator
Shows the set temperature of the cooler and freezer compartment.
4.Vacation function button
Press the temperature adjustment button 5 for 3 seconds to activate the vacation function. When the Vacation
function is active ( ) indicator lits, when the cooler compartment is selected, temperature indicator displays the inscription "- -" and no cooling process will be active in the cooling compartment. This function is not suitable to keep food in the cooler compartment. The freezer compartment will continue to cool according to the set temperature.
To cancel this function, press the temperature adjustment button 5 again for 3 s.
5.Temperature adjustment button
It is used to adjust the temperature of the selected compartment. The freezer
compartment can be changed between -18°C
...- 24°C and the cooling compartment 8°C ...
1°C.
6.Compartment selection button
Use the compartment selection button ( ) to toggle between the cooler and freezer compartments.
7. Cooler compartment indicator
If you wish to set the freezer compartment temperature, select the freezer compartment display with button 6.
8. Economy mode indicator
Indicates that the refrigerator is operating in energy saving mode. This indicator () will be active if the temperature of the freezer compartment is set to -18°C.
9. Vacation function indicator
Indicates that the vacation function ( ) is active.
|
16 /30EN |
Refrigerator / User Guide |
|
|
|
|
|
|
Using the product
5.3. Indicator panel
Indicator panel allows you to set the temperature and control the other functions related to the product without opening the door of the product. Just press the inscriptions on relevant buttons for function settings.
1 2
*10
*12
11 |
9 |
8 |
7 |
6 |
5 |
4 |
3 |
1. High temperature/fault alert
This indicator () will light up in case of temperature warnings or fault alerts.
When the freezer compartment temperature heats up to a critical level for frozen foods, this indicator and the temperature display alternately display the highest temperature and temperature unit reached by the freezer compartment. After checking the food in the freezer compartment, the alarm is cleared by pressing the Alarm Off ( ) button.
This indicator () also illuminates when a sensor malfunction occurs. When this indicator is lit, the temperature display alternately displays “E” and numbers such as “1,2,3...”.
These numbers on the display inform service personnel of the error.
2. Energy saving (display off)
When the doors of the product are not opened or closed, the energy saving function is activated automatically and the energy saving icon lights up.( )
Activating the energy-saving function will turn off all other signs on the display. When the energy-saving function is active, pressing any button or opening the door will deactivate the energy-saving function and the display signals will return to normal.
C *Optional: The figures in this user guide are intended as drafts and may not perfectly match your product. If your product does not comprise the relevant parts, the information pertains to other models.
Refrigerator / User Guide |
17/30EN |
|
Using the product
The energy-saving function is an active function at the factory defaults and cannot be cancelled.
3. Rapid cooling function
Press and release the button () to activate the quick cooling function.
The quick cooling indicator ) will light and the coolant compartment temperature setting will be set to 1°C.
To cancel the rapid cooling function, press and release the button () again. The rapid cooling indicator will turn off and the product will return to its normal settings.
CIf the quick cooling function is not cancelled, it is automatically
cancelled after 1 hour.
CThis function is not remembered after a power failure.
4. Cooler compartment temperature setting button
When this button () is pressed, the refrigerant compartment temperature can be set to 8, 7, 6, 5, 4, 3, 2, 1, 8... respectively. Press this button to set the refrigerant compartment temperature to the desired value.
5. Vacation Function
To activate the vacation function, press the Alarm Off button 6 for 3 seconds. Vacation function function is active ( ) indicator lits, the cooler compartment temperature indicator displays the inscription "- -" and no cooling process will be active in the
cooling compartment. In this function, it is not appropriate to keep your food in the refrigerator compartment. The freezer compartment
will continue to cool according to the set temperature.
To cancel this function, press press the Alarm Off button 6 for 3 seconds.
6. Alarm off button
When the high temperature warning is given, the alarm is cleared by pressing the Alarm Off () button after checking the food in the freezer compartment.
7. Key lock
Press the Eco fuzzy button 8 for 3 seconds to activate the key lock. When the key lock is activated, the () indicator lights and the buttons do not work.
To deactivate the key lock, press the Eco fuzzy button 8 for 3 seconds, the () indicator turns off and the buttons start operating again.
If you wish to avoid changing the temperature setting of the refrigerator, press the Eco fuzzy
button 8 for 3 seconds.
8. Eco-fuzzy
Press and release the eco fuzzy button to activate the eco fuzzy function. The economic use indicator () will light up after the function is activated. The freezer compartment will start operating in economical mode .after 6 hours. To deactivate the eco fuzzy function, press and release the eco fuzzy function button.
9. Freezer compartment temperature setting button
By pressing this button the freezer compartment temperature can be adjusted to -18, -19, -20, -21, -22, -23, -24, -18 ...
respectively. To set the freezer compartment temperature
to the desired value, press this button ().
10. Ice maker off indicator
Shows the ice making status of ice maker. If the ) indicator is lit, the ice maker does not make ice.
|
18 /30EN |
Refrigerator / User Guide |
|
|
|
|
|
|
Using the product
|
When this function is selected, water |
CThis function is not remembered after |
|||
|
intake from the water tank will stop. |
||||
CHowever, previously made ice in the |
|||||
|
ice maker can be removed. |
|
a power failure. |
||
|
|
|
|
||
11. Quick freeze function button/ice ma- |
12. Economic use indicator |
||||
ker on-off switch |
|
||||
To activate or deactivate the quick freeze |
|
Indicates that the product works energy |
|||
function, press and release this button ( |
). |
efficient. When the freezer compartment |
|||
When the function is activated, the quick freeze |
temperature is set to -18 or when energy- |
||||
efficient cooling is performed |
|||||
indicator |
) lights up. |
|
|||
|
with the Eco Fuzzy function, |
||||
The freezer compartment temperature displays |
|||||
this indicator ( |
) lights. |
||||
as -27. |
|
|
|||
The freezer compartment is cooled to a lower |
When quick cooling and quick freeze |
||||
value than the set temperature. |
|
functions are selected, economic use |
|||
If you want to freeze large amounts of fresh |
|
Cindicator will go off. |
|||
food, press the quick freeze button before |
|
5.4. Ice bucket |
|||
|
(Optional) |
|
|||
putting food into the freezer compartment. |
|
|
|||
To stop the ice making process of the ice |
|
• Take the ice bucket from the freezer |
|||
|
compartment. |
|
|||
maker, press and hold the quick freeze button |
|
||||
• Fill the ice bucket with water. |
|||||
11 for 3 seconds, the ( ) indicator will light |
• Place the ice bucket into the freezer |
||||
up and the ice making will stop after you have |
|||||
spilled the ice that has been made inside the |
compartment. |
|
|||
• The ice will be ready after approximately |
|||||
ice maker. |
|
|
|||
|
|
two hours. Take the ice bucket from |
|||
Press and hold the fast freeze button 11 for 3 |
|||||
the freezer compartment and bend in |
|||||
seconds to make the ice maker start making |
|||||
sightly over the holder that you are going |
|||||
ice again, and the ( ) indicator will turn off |
|||||
to serve. Ice will easily pour into |
|||||
and ice maker will start making ice. |
|
||||
|
the serving holder. |
||||
|
|
|
|||
|
Use the quick freeze function when you |
|
|
||
|
want to quickly freeze food you put in |
|
|
||
Cthe freezer compartment. If you want |
|
|
|||
|
to freeze large amounts of fresh food, |
|
|
||
|
activate the function before placing the |
|
|
||
|
food in the product. |
|
|
|
|
|
If the quick freeze function |
|
|
|
|
Cis not cancelled, it is automatically |
|
|
|
||
|
cancelled after 1 hour. |
|
|
|
Refrigerator / User Guide |
19/30EN |
|
|
Using the product |
|
|
5.5. Eggholder |
5.9. HerbBox/HerbFresh |
You can put the eggholder on the door or body |
Remove the film container from HerbBox/ |
|
rack of your choice. If you decide to put it on the |
HerbFresh+ |
body rack, it is recommended to prefer the shelves Take the film out of the bag and put it into the |
||
below as they are colder. |
film container as shown in the image. |
|
|
||
Do not put the eggholder into the |
Seal the container again and replace it into |
|
HerbBox/HerbFresh+ unit. |
||
Afreezer compartment. |
||
HerbBox-HerbFresh+ sections are especially |
||
5.6. Fan |
||
ideal for storage of various herbs that are |
||
Fan was designed to distribute circulate the |
supposed to be kept in delicate conditions. You |
|
cold air inside your refrigerator homogeneously. |
can store your unbagged herbs (parsley, dill, |
|
Operating time of the fan might vary depending |
etc.) in this section horizontally and keep them |
|
the features of your product. |
fresh for a much longer period. |
|
While in some products fan only operates with |
The film shall be replaced in every six months. |
|
compressor, in others control system deter- |
|
|
mines the operating time based on the need |
|
|
for cooling. |
|
5.7. Vegetable bin
(Optional)
Product’s vegetable bin is designed to keep vegetables fresh by preserving humidity. For this purpose, the overall cold air circulation is intensified in the vegetable bin.
5.8. Zero degree compartment
(Optional)
Use this compartment to keep delicatessen at lower temperatures or meat products for immediate consumption.
Zero degree compartment is the coolest place where foods such as dairy products, meat, fish and chicken can be stored in ideal storage conditions. Vegetables and/or fruits should not be stored in this compartment.
|
20 /30EN |
Refrigerator / User Guide |
|
|
|
|
|
|
Using the product
5.10.Moving door rack
(Optional)
Moving door rack can be fixed in 3 different positions.
In order to move the rack, push the buttons on the side evenly. Rack will be movable.
Move the rack up or down.
When the rack is in the position that you want, release the buttons. Rack will be fixed again in the position where you have released the buttons.
5.11.Sliding storage box
(Optional)
This accessory has been designed to increase the usage volume of the door racks.
Thanks to its ability to move sideways, it enables you to easily place long bottle, jar or boxes that you put in the bottle rack below.
Refrigerator / User Guide |
21/30EN |
|
Using the product |
|
|
|
|
|
|
|
|
|
|
|
|
|
5.12.Moisture controlled |
5.13.Automatic ice machine |
||||||||||||
vegetable bin |
(Optional) |
||||||||||||
(Optional) |
Automatic ice machine enables you to easily |
||||||||||||
With moisture control feature, moisture rates |
make ice in your refrigerator. In order to obtain |
||||||||||||
of vegetables and fruits are kept under control |
ice from the ice machine, take out the water |
||||||||||||
and ensures a longer freshness period for |
tank in the cooler compartment, fill it with |
||||||||||||
foods. |
water and fix it back. |
||||||||||||
It is recommended to store leafed vegetables |
First ice will be ready in about 2 hours in the |
||||||||||||
such as lettuce and spinach and similar |
ice machine drawer in the cooler compartment. |
||||||||||||
vegetables prone to moisture loss not on |
After placing the full water tank, you can obtain |
||||||||||||
their roots but in horizontal position into the |
about 60-70 cubes of ice until it is fully empty. |
||||||||||||
vegetable bin as much as possible. |
If the water in the tank has waited for 2-3 |
||||||||||||
When placing the vegetables, place heavy and |
|||||||||||||
weeks, it should be changed. |
|||||||||||||
hard vegetables at the bottom and light and |
|
|
|
|
|
|
|
|
|
|
|
|
|
|
C |
In products with automatic ice |
|||||||||||
soft ones on the top, taking into account the |
|
||||||||||||
|
machine, you might hear a sound |
||||||||||||
specific weights of vegetables. |
|
||||||||||||
|
when pouring the ice. This sound is |
||||||||||||
Do not leave vegetables in the vegetable bin |
|
|
normal and is not a sign of failure. |
||||||||||
in plastic bags. Leaving them in plastic bags |
|
|
|
|
|
|
|
|
|
|
|
|
|
causes vegetables to rot in a short time. In |
|
|
|
|
|
|
|
|
|
|
|
|
|
situations where contact with other vegetables |
|
|
|
|
|
|
|
|
|
|
|
|
|
|
|
|
|
|
|
|
|
|
|
|
|
||
is not preferred, use packaging materials such |
|
|
|
|
|
|
|
|
|
|
|
|
|
as paper that has a certain porosity in terms of |
|
|
|
|
|
|
|
|
|
|
|
|
|
hygiene. |
|
|
|
|
|
|
|
|
|
|
|
|
|
Do not put fruits that have a high ethylene gas |
|
|
|
|
|
|
|
|
|
|
|
|
|
|
|
|
|
|
|
|
|
|
|
|
|
||
|
|
|
|
|
|
|
|
|
|
|
|
||
production such as pear, apricot, peach and |
|
|
|
|
|
|
|
|
|
|
|
|
|
particularly apple in the same vegetable bin |
|
|
|
|
|
|
|
|
|
|
|
|
|
with other vegetables and fruits. The ethylene |
|
|
|
|
|
|
|
|
|
|
|
|
|
gas coming out of these fruits might cause |
|
|
|
|
|
|
|
|
|
|
|
|
|
|
|
|
|
|
|
|
|
|
|
|
|
||
other vegetables and fruits to mature faster |
|
|
|
|
|
|
|
|
|
|
|
|
|
and rot in a shorter period of time. |
|
|
|
|
|
|
|
|
|
|
|
|
|
|
|
|
|
|
|
|
|
|
|
|
|
||
|
|
|
|
|
|
|
|
|
|
|
|
|
|
|
|
|
|
|
|
|
|
|
|
|
|
|
|
|
|
|
|
|
|
|
|
|
|
|
|
|
|
22 /30EN |
Refrigerator / User Guide |
|
|
|
|
|
|
Using the product
5.14.Icematic and ice storage container
*optional
Using the Icematic
Fill the Icematic with water and place it into its seat. Your ice will be ready approximately in two hours. Do not remove the Icematic from its seating to take ice.
Turn the knobs on the ice reservoirs clockwise by 90 degrees.
Ice cubes in the reservoirs will fall down into the ice storage container below.
You may take out the ice storage container and serve the ice cubes.
If you wish, you may keep the ice cubes in the ice storage container.
Ice storage container
Ice storage container is only intended for accumulating the ice cubes. Do not put water in it. Otherwise, it will break.
5.15.Using the water dispenser
*optional
CIt is normal for the first few glasses of water taken from the dispenser to be warm.
CIf the water dispenser is not used for a long period of time, dispose of first few glasses of water to obtain fresh water.
1.Push in the lever of the water dispenser with your glass. If you are using a soft plastic cup, pushing the lever with your hand will be easier.
2.After filling the cup up to the level you want, release the lever.
CPlease note, how much water flows from the dispenser depends on how far you depress the lever. As the level of water in your cup / glass rises, gently reduce the
amount of pressure on the lever to avoid overflow. If you slightly press the arm, the water will drip; this is quite normal and not a failure.
Refrigerator / User Guide |
23/30EN |
|
Using the product
5.16.Filling the water dispenser's tank
Water tank filling reservoir is located inside the door rack.
1.Open the cover of the tank.
2.Fill the tank with fresh drinking water.
3.Close the cover.
CDo not fill the water tank with any other liquid except for water such as fruit juices, carbonated beverages or alcoholic drinks which are not suitable to use
in the water dispenser. Water dispenser will be irreparably damaged if these kinds of liquids are used. Warranty does not cover such usages. Some chemical substances and additives contained in these kinds of drinks/liquids may damage the water tank.
CUse clean drinking water only.
CCapacity of the water tank is 3 litres; do not overfill.
|
24 /30EN |
Refrigerator / User Guide |
|
|
|
|
|
|
Using the product
5.17. Cleaning the water tank
1.Remove the water filling reservoir inside the door rack.
2.Remove the door rack by holding from both sides.
3.Grab the water tank from both sides and remove it with an angle of 45°C.
4.Remove the cover of the water tank and clean the tank.
CComponents of the water tank and water dispenser should not be washed in dishwasher.
Refrigerator / User Guide |
25/30EN |
|
Using the product
5.18.Drip tray
Water that dripped while using the water dispenser accumulates in the spillage tray.
Remove the plastic filter as shown in the figure.
With a clean and dry cloth, remove the water that has accumulated.
|
26 /30EN |
Refrigerator / User Guide |
|
|
|
|
|
|
Using the product
5.19.Freezing fresh food |
• Mark each food pack by writing the date on |
||
• To preserve food quality, the food items |
the package before freezing. This will allow |
||
placed in the freezer compartment must be |
you to determine the freshness of each |
||
frozen as quickly as possible, use the rapid |
pack every time the freezer is opened. Keep |
||
freezing for this. |
the earlier food items in the front to ensure |
||
• Freezing the food items when fresh will |
they are used first. |
||
extend the storage time in the freezer |
• Frozen food items must be used |
||
compartment. |
immediately after defrosting and should not |
||
• Pack the food items in air-tight packs and |
be frozen again. |
||
seal tightly. |
• Do not free large quantities of food at once. |
||
• Make sure the food items are packed |
5.20.Recommendations for |
||
before putting in the freezer. Use freezer |
|||
holders, tinfoil and damp-proof paper, |
storing frozen foods |
||
plastic bag or similar packaging materials |
The compartment must be set to at least |
||
instead of traditional packaging paper. |
-18°C. |
||
|
|
1. Place the food items in the freezer as |
|
C |
Ice in the freezing compartment thaws |
||
quickly as possible to avoid defrosting. |
|||
automatically. |
2. Before freezing, check the “Expiry Date” on |
||
|
|
the package to make sure it is not expired. |
|
|
|
||
|
|
3. Make sure the food’s packaging is not |
|
|
|
damaged. |
Freezer |
Cooler |
|
|
Compartment |
Compartment |
Details |
|
Temperature |
Temperature |
||
|
|||
Setting |
Setting |
|
|
-18°C |
4°C |
This is the default, recommended setting. |
|
-20,-22 or |
4°C |
These settings are recommended for ambient temperatures |
|
-24°C |
exceeding 30°C. |
||
|
|||
Quick Freeze |
4°C |
Use when you want to freeze your food in a short time. When the |
|
process ends, the product will regain its position. |
|||
|
|
||
|
|
|
|
-18°C or colder |
2°C |
Use these settings if you believe the cooler compartment is not cold |
|
enough due to ambient temperature or frequently opening the door. |
|||
|
|
||
|
|
|
Refrigerator / User Guide |
27/30EN |
|
Using the product
5.21.Deep freezer details
As per the IEC 62552 standards, the freezer must have the capacity to freeze 4,5 kg of food items at -18°C or lower temperatures in 24 hours for each 100 litres of freezer compartment volume.
Food items can only be preserved for extended periods at or below temperature of -18°C . You can keep the foods fresh for months (in deep freezer at or below temperatures of 18°C ).
The food items to be frozen must not contact the already-frozen food inside to avoid partial defrosting.
Boil the vegetables and filter the water to extend the frozen storage time. Place the food in air-tight packages after filtering and place in the freezer. Bananas, tomatoes, lettuce, celery, boiled eggs, potatoes and similar food items should not be frozen. In case this food rots, only nutritional values and eating qualities will be negatively affected. A rotting threatening human health is not in question.
5.22.Placing the food
Freezer |
Various frozen goods including |
|
compartment |
meat, fish, ice cream, |
|
shelves |
vegetables etc. |
|
Cooler |
Food items inside pots, capped |
|
compartment |
plate and capped cases, eggs |
|
shelves |
(in capped case) |
|
Cooler |
Small and packed food or |
|
compartment |
||
beverages |
||
door shelves |
||
|
||
Vegetable bin |
Fruits and vegetables |
|
Fresh food |
Delicatessen (breakfast food, |
|
meat products to be consumed |
||
compartment |
||
in short notice) |
||
|
5.23.Door open alert
(Optional)
An audible alert will be heard if the product's door remains open for at least 1 minute. The audible alert will stop when the door is closed or any button on the display (if available) is pressed.
Door open alert is indicated to the user both audibly and visually. Interior lighting will turn of if the warning continues for 10 min.
5.24.Changing the opening direction of the door
You can change the direction of opening of your refrigerator depending on the location where you use it. When you need this, consult the closest Authorized Service.
The explanation above is a general statement. You should check the warning tag located inside the product package about the changeability of direction of the door.
5.25.Interior light
Interior light uses a LED type lamp. Contact the authorized service for any problems with this lamp.
Lamp(s) used in this appliance cannot be used for house lighting. Intended use of this lamp is to help the user place food into the refrigerator / freezer safely and comfortably.
|
28 /30EN |
Refrigerator / User Guide |
|
|
|
|
|
|
6 Maintenance and cleaning
Cleaning your fridge at regular intervals will extend the service life of the product.
BWARNING:
Unplug the product before cleaning it.
•Never use gasoline, benzene or similar substances for cleaning purposes.
•Never use any sharp and abrasive tools, soap, household cleaners, detergent and wax polish for cleaning.
•For non-No Frost products, water drops and frosting up to a
fingerbreadth occur on the rear wall of the Fridge compartment. Do not clean it; never apply oil or similar agents on it.
•Only use slightly damp microfiber cloths to clean the outer surface of the product. Sponges and other types of cleaning cloths may scratch the surface
•Dissolve one teaspoon of bicarbonate in half litre of water. Soak a cloth with the solution and wrung it thoroughly. Wipe the interior of the refrigerator with this cloth and the dry thoroughly.
•Make sure that no water enters the lamp housing and other electrical items.
•If you will not use the refrigerator for a long period of time, unplug it, remove all food inside, clean it and leave the door ajar.
•Check regularly that the door gaskets are clean. If not, clean them.
•To remove door and body shelves, remove all of its contents.
•Remove the door shelves by pulling them up. After cleaning, slide them from top to bottom to install.
•Never use cleaning agents or water that contain chlorine to clean the outer surfaces and chromium coated parts of the product. Chlorine causes corrosion on such metal surfaces.
6.1Avoiding bad odours
•Materials that may cause odour are not used in the production of our refrigerators. However, due to inappropriate food preserving
conditions and not cleaning the inner surface of the refrigerator as required can bring forth the problem of odour. Pay attention to following to avoid this problem:
•Keeping the refrigerator clean is important. Food residuals, stains, etc. can cause odour. Therefore, clean the refrigerator with bi-carbonate dissolved in water every few months. Never use detergents or soap.
•Keep the food in closed containers. Microorganisms spreading out from uncovered containers can cause unpleasant odours.
•Never keep the food that have passed best before dates and spoiled in the refrigerator.
6.2Protecting the plastic surfaces
Do not put liquid oils or oil-cooked meals in your refrigerator in unsealed containers as they damage the plastic surfaces of the refrigerator. If oil is spilled or smeared onto the plastic surfaces, clean and rinse the relevant part of the surface at once with warm water.
Refrigerator / User Guide |
29/30EN |
|