

Page 1

Asciugatrice
Manuale Utente
Dryer
User Manual
İT
EN
BT3103IS
2960313814/ İT/ EN/ / 26/07/23 09:39
Page 2
1 Vi invitiamo a leggere questa gui-
da!...................................................
2 Istruzioni per la sicurezza ............ 4
2.1 Uso previsto................................... 4
2.2 Sicurezza dei bambini, delle persone vulnerabili e degli animali
domestici .......................................
2.3 Sicurezza elettrica......................... 5
2.4 Sicurezza durante il trasporto ...... 6
2.5 Sicurezza durante l’installazione.. 6
2.6 Sicurezza durante l’utilizzo........... 8
2.7 Sicurezza durante la manutenzio-
ne e pulizia.....................................
2.8 Sicurezza illuminazione ................ 11
3 Istruzioni per l'ambiente .............. 11
3.1 Rispetto dei regolamenti RAEE e
smaltimento dei rifiuti...................
3.2 Informazioni per l’imballaggio...... 11
3.3 Conformità alle norme e informazioni sui test Dichiarazione di
conformità UE................................
4 Specifiche tecniche ...................... 13
5 Aspetto generale........................... 14
5.1 Fornitura......................................... 14
6 Primo utilizzo................................. 15
7 Installazione .................................. 15
7.1 Posto giusto per l’installazione .... 15
7.2 Rimozione del gruppo di sicurezza usato per la spedizione del
prodotto .........................................
7.3 Collegamento dell’acqua .............. 16
7.4 Regolazione dei piedini ................. 17
7.5 Spostare l'asciugatrice.................. 17
7.6 Avvisi relativi al rumore................. 17
7.7 Sostituzione della lampadina ....... 17
8 Preparazione ................................. 18
8.1 Bucato adatto per l'asciugatura in
asciugatrice ...................................
8.2 Biancheria non adatta per l'asciu-
gatura in asciugatrice ...................
8.3 Preparare il bucato da asciugare . 18
8.4 Cosa fare per il risparmio energe-
tico..................................................
10
11
12
16
18
18
18
8.5 Capacità di carico corretta............ 19
9 Funzionamento del prodotto........ 20
3
9.1 Pannello di controllo...................... 20
9.2 Simboli............................................ 20
9.3 Preparazione dell’asciugatrice...... 20
9.4 Selezione programma e schema
4
del consumo...................................
9.5 Funzioni ausiliarie.......................... 23
9.6 Indicatori di avviso......................... 24
9.7 Avvio del programma .................... 25
9.8 Blocco bambini .............................. 25
9.9 Modifica del programma dopo
che è stato avviato.........................
9.10 Cancellazione del programma...... 26
9.11 Fine del programma ...................... 26
9.12 Caratteristica odore....................... 26
9.13 Funzione SteamCure per la rimo-
zione degli odori e delle pieghe ....
10 Manutenzione e pulizia ................. 27
10.1 Filtri in fibra (filtri interni ed esterni) / Pulizia della superficie inter-
na dell’oblò di caricamento...........
10.2 Pulire il sensore ............................. 29
10.3 Svuotare il serbatoio dell'acqua.... 29
10.4 Pulire il condensatore.................... 30
11 Risoluzione dei problemi .............. 32
12 Voucher informazioni sul prodot-
to .....................................................
21
25
26
27
36
IT / 2
Page 3
1Vi invitiamo a leggere questa guida!
Caro cliente,
Grazie per aver scelto un prodotto Beko . Ci auguriamo che possa ottenere la massima efficienza da questo prodotto che è stato realizzato con alta qualità e tecnologia all'avanguardia. Assicurarsi di leggere e comprendere interamente questa guida e la documentazione supplementare prima di utilizzare il prodotto.
Osservare tutte le avvertenze e le informazioni qui contenute. In questo modo sarà possibile proteggere sia voi che il vostro prodotto da potenziali danni.
Conservare il manuale utente. Qualora il prodotto venga ceduto a terzi, consegnare anche
questo manuale.
Simboli nel manuale utente e sulla macchina:
Pericolo che può causare morte o lesioni.
Leggere il manuale utente.
Informazioni importanti e suggerimenti utili sull’utilizzo.
Materiale infiammabile, avviso pericolo di incendio.
IT
EN
Attenzione al pericolo di radiazioni UV.
L'imballaggio del prodotto è fatto di materiali riciclabili, in conformità con la Normativa Ambientale
Nazionale.
Attenzione alle superfici calde.
Attenzione al pericolo elettrico.
AVVISO
Pericolo che può causare danni materiali al prodotto o all'area circostante.
Questo prodotto è stato realizzato in strutture moderne e rispettose dell'ambiente, senza
danneggiare la natura.
IT / 3
Page 4

2 Istruzioni per la sicurezza
• Questa sezione include le informazioni necessarie ad evitare il rischio di lesioni personali o danni materiali. La nostra azienda non è da ritenersi
responsabile per il verificarsi di
danni causati dall’inosservanza delle presenti istruzioni.
• Far eseguire sempre i lavori di
installazione e riparazione dal
produttore, da un centro assistenza autorizzato o da una
persona indicata dall'importatore
• Utilizzare solo ricambi e accessori originali.
• Non riparare o sostituire alcun
componente del prodotto a
meno che non sia chiaramente
specificato nel manuale utente.
• Non apportare modifiche tecniche al prodotto.
2.1 Uso previsto
• Il prodotto è progettato unicamente per uso domestico. Non
è stato pensato per un uso di
tipo commerciale.
• Il prodotto non è stato pensato
per essere usato all’esterno.
• Non installare o far funzionare
il prodotto dove il congelamento è una possibilità e/o dove
può essere vulnerabile agli elementi esterni. L'acqua congelata nella pompa o nei tubi può
causare danni.
• Il prodotto può essere utilizzato solo per asciugare e ventilare il bucato che è lavato con
acqua e asciugatrice in modo
sicuro.
2.2 Sicurezza dei bambini, delle persone vulnerabili e degli animali
domestici
• Questo prodotto può essere
utilizzato da bambini dagli 8
anni in su e da persone con capacità fisiche, sensoriali o
mentali limitate o prive di
esperienza e conoscenza se
sono sotto supervisione o hanno ricevuto istruzioni sull'uso
sicuro del prodotto e sui pericoli ad esso connessi. I bambini non devono manomettere
l'apparecchiatura. Le operazioni di pulizia e la manutenzione
non devono essere eseguite
dai bambini a meno che non
siano sorvegliati.
• I bambini di età inferiore ai 3
anni devono essere tenuti lontani dal prodotto a meno che
non siano costantemente sorvegliati.
IT / 4
Page 5
• I dispositivi elettrici sono pericolosi per i bambini e gli animali domestici. I bambini e gli
animali domestici non devono
giocare con il prodotto, salirci
sopra o entrare al suo interno.
• Tenere l’oblò del prodotto chiuso anche quando non è in funzione.
• Le operazioni di pulizia e di
manutenzione da parte
dell’utente non devono essere
eseguite dai bambini, a meno
che non siano sorvegliati.
• Tenere i materiali di imballaggio lontano dalla portata dei
bambini. Sussiste un rischio di
lesioni e soffocamento.
• Tenere lontano dai bambini
tutti gli additivi usati con il prodotto.
• Prima di smaltire il prodotto,
tagliare il cavo di alimentazione e distruggere l’oblò di caricamento per la sicurezza dei
bambini.
2.3 Sicurezza elettrica
• Il prodotto non deve essere
collegato durante le operazioni
di installazione, manutenzione,
pulizia, riparazione e trasporto.
• Se il cavo di alimentazione è
danneggiato, deve essere sostituito da una persona indicata dal produttore, da un centro
assistenza autorizzato o
dall’importatore al fine di evitare potenziali pericoli.
• Non infilare il cavo di alimentazione sotto il prodotto o sul retro del prodotto. Non appoggiare oggetti pesanti sul cavo
di alimentazione.
• Il cavo di alimentazione non
deve essere attorcigliato,
schiacciato e non deve entrare
in contatto con nessuna fonte
di calore.
• Non utilizzare prolunghe, multiprese o adattatori per azionare
il prodotto.
• Il prodotto non deve essere alimentato tramite un interruttore
esterno come ad esempio un
timer. Non deve inoltre essere
collegato ad un circuito che
viene regolarmente aperto e
chiuso servendosi di un utensile.
• La spina deve essere facilmente accessibile. Se ciò non è
possibile, sull'impianto elettrico deve essere disponibile un
meccanismo che soddisfi la
regolamentazione in ambito
elettrico e che scolleghi tutti i
terminali dalla rete elettrica
(fusibile, interruttore, interruttore principale, ecc.).
• Non toccare la spina con le
mani bagnate.
IT / 5
IT
EN
Page 6
• Quando si scollega l'apparecchio, non tenere in mano il cavo di alimentazione, ma la spina.
2.4 Sicurezza durante il trasporto
• Scollegare il prodotto, svuotare
il serbatoio dell'acqua e, se
presenti, rimuovere le connessioni di scarico dell'acqua prima del trasporto.
• Il prodotto è pesante, non maneggiarlo da soli.
• Adottare le dovute precauzioni
contro i rischi di caduta e ribaltamento del prodotto. Non far
cadere il prodotto durante il
trasporto.
• Non usare le parti sporgenti
del prodotto (come ad esempio l’oblò di caricamento) per
spostare il prodotto stesso.
• Spostare il prodotto in posizione verticale. Se non può essere
spostato in posizione verticale,
trasportarlo inclinandolo sul lato destro guardandolo da davanti.
2.5 Sicurezza durante l’installazione
• Per preparare il prodotto all'installazione, assicurarsi che
l'impianto elettrico e lo scarico
dell'acqua siano corretti con-
trollando le informazioni indicate nel manuale d'uso. Se il
prodotto non è adatto all'installazione, contattare un elettricista e un idraulico qualificati
per riorganizzare le utenze secondo necessità. Queste operazioni sono a carico del cliente.
• Questo prodotto è progettato
per essere utilizzato ad altitudini fino a 2000 metri sul livello
del mare.
• Controllare che non vi siano
danni al prodotto prima di installarlo. Non far installare il
prodotto se è danneggiato.
• Non rimuovere i piedini regolabili.
• Posizionare il prodotto su una
superficie pulita, piana e resistente con l’aiuto dei piedini regolabili.
• Lo spazio tra il prodotto e il pavimento non deve essere ridotto da materiali quali ad esempio tappeti, pezzi di legno e fasce. I fori di ventilazione sotto
alla base del prodotto non devono essere ostruiti da un tappeto.
• Il prodotto deve essere installato in modo tale da non ostruire i fori di ventilazione.
IT / 6
Page 7

• Installare il prodotto in un ambiente privo di polvere e dotato
di una buona ventilazione.
• Non installare il prodotto in
prossimità di materiali infiammabili ed esplosivi e non tenere materiali infiammabili ed
esplosivi vicino al prodotto
quando è in funzione.
• Il prodotto non deve essere installato dietro ad una porta,
una porta scorrevole dove
l’oblò di caricamento non può
essere completamente aperto,
oppure dietro a una porta incernierata dove la cerniera del
prodotto è rivolta verso le cerniere della porta.
• Installare il prodotto in un luogo in cui la manutenzione periodica e la pulizia possano essere fatte in modo facile.
• Posizionare il prodotto con la
superficie posteriore rivolta
verso la parete. (Per i modelli
con riscaldamento).
• Mentre si posiziona il prodotto,
assicurarsi che la parete posteriore non entri in contatto
con nessuna sporgenza (un rubinetto dell'acqua, una presa
elettrica, ecc.).
• Posizionare il prodotto lasciando almeno 1 cm di spazio tra il
prodotto e i bordi del mobile.
• Seguire le indicazioni per il collegamento del condotto specificate nel manuale. (per i modelli con condotto).
• L'aria di scarico non deve essere diretta verso il condotto
che viene utilizzato per scaricare i fumi dei dispositivi che
consumano gas o altri combustibili. (per i modelli con condotto).
• Il tubo di ventilazione non deve
essere collegato ad una stufa
o a una canna fumaria. (per i
modelli con condotto).
• Collegare il prodotto a una presa con messa a terra protetta
da un fusibile appropriato in linea con il tipo e i tassi di corrente specificati. Chiedere a un
elettricista esperto di impostare i dispositivi di messa a terra.
Non utilizzare il prodotto senza
una messa a terra conforme
alle normative regionali/nazionali.
• Collegare il prodotto a una presa con messa a terra conforme ai valori di tensione, corrente e frequenza specificati nella
targhetta di identificazione.
• Non collegare il prodotto a prese allentate, rotte, sporche o
piene di grasso, o a prese che
fuoriescono dalla mascherina
o prese che sono a rischio di
contatto con l'acqua.
IT
EN
IT / 7
Page 8
• Sarà necessario usare il nuovo
set di tubi forniti con il prodotto. Non riutilizzare set di tubi
vecchi. Non collegare attacchi
ai tubi.
• Posizionare il cavo di alimentazione e i tubi flessibili in modo
tale che non ci sia rischio di inciampare.
• Assicurarsi che il tubo non scivoli o si pieghi se si scarica direttamente l'acqua dal bucato
generata dalla condensazione
dell'umidità. In caso contrario,
possono verificarsi problemi di
perdite di acqua.
• Non lavare l'asciugatrice con il
tubo.
• Per utilizzare il prodotto sopra
ad una lavatrice, è necessario
utilizzare un'apertura di fissaggio tra due prodotti. Far installare l'apertura di fissaggio dal
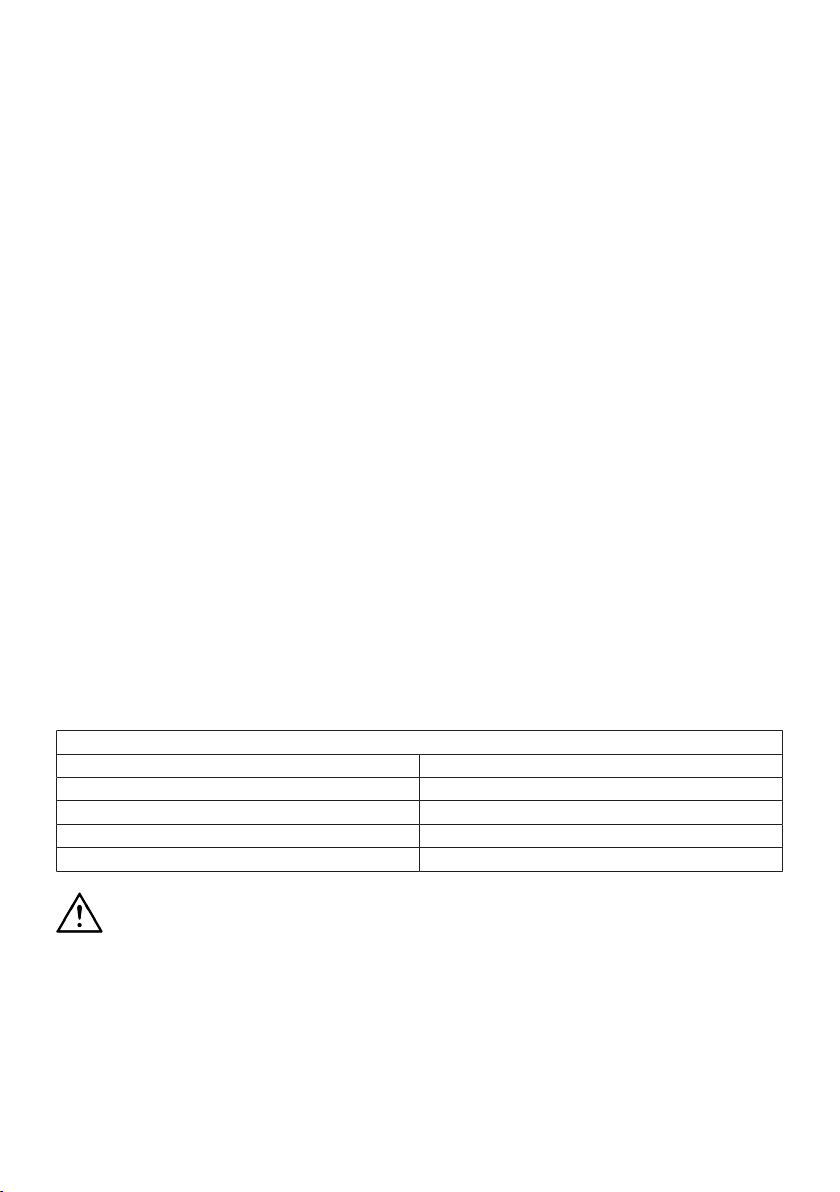
Tavolo di installazione adatto per lavatrice e asciugatrice
Tipo di kit di connessione Dimensioni profondità (DM: Asciugatura, WM: Lavatrice)
Plastica - 54/60 cm con/senza arco 60cm DM --> WM≥50 cm / 54 cm DM --> WM≥45 cm
Plastica - 46 cm con/senza arco 46 cm DM --> WM≥54 cm
Con ripiani - 60 cm 60cm DM --> WM≥50cm
Con ripiani - 54cm 54cm DM --> WM≥45cm
produttore, da un centro assistenza autorizzato o da una
persona indicata dall'importatore.
• Non utilizzare il prodotto senza
fissarlo al pavimento, ad esempio su un tavolo o all'interno di
un armadio. Se utilizzato senza fissaggio, può spostarsi e
cadere nel tempo, danneggiando persone o cose che sono
nelle vicinanze. Il piano portante deve essere solido e stabile.
• Quando il prodotto viene posizionato sulla lavatrice, il loro
peso combinato (quando sono
pieni) potrebbe essere di circa
180 kg. Posizionare i prodotti
su un pavimento robusto in
grado di supportare una quantità di carico adeguata.
• La lavatrice non può essere
messa sopra all'asciugatrice.
2.6 Sicurezza durante l’utilizzo
• Il peso massimo del bucato
asciutto prima del lavaggio è
specificato nella sezione “Specifiche tecniche”.
• Non asciugare i capi non lavati
nell'asciugatrice.
• Non lavare a macchina indumenti asciutti esposti a sostanze come olio, acetone, alcol, petrolio, cherosene, smacchiatori, trementina, olio per
IT / 8
Page 9

massaggi, esplosivi e combustibili, cera d'api e solventi per
cera d'api, anche se sono stati
lavati.
• Se vengono utilizzati prodotti
chimici industriali per la pulizia, l'asciugatrice non deve essere utilizzata.
• Usare ammorbidente o prodotti simili come indicato nelle
istruzioni dell'ammorbidente.
• La schiuma di gomma (schiuma di lattice), le cuffiette per la
doccia, i tessuti resistenti
all'acqua, i materiali e i vestiti
con supporto in gomma, i cuscini con imbottiture in schiuma di gomma non devono essere asciugati in una asciugatrice.
• Filati e lanugine che penzolano
dalle parti riempite e danneggiate possono disperdersi nella macchina e danneggiarla
durante il processo di asciugatura. Controlla le cuciture del
bucato che si sta per asciugare.
• Gli articoli con lacca per capelli, residui di prodotti per capelli
o materiali simili non devono
essere asciugati in una asciugatrice.
• Svuotare le tasche dei vestiti e
rimuovere oggetti come fiammiferi e accendini.
• Non arrestare l'asciugatrice
prima del completamento del
ciclo di asciugatura se non si è
in grado di estrarre rapidamente tutti i capi e disporli in modo
tale da dissipare il calore.
• L'ultima parte del ciclo di
asciugatura avviene senza riscaldamento (ciclo di raffreddamento) al fine di garantire
che gli articoli vengano tenuti a
una temperatura che non li
danneggi.
• Gli ammorbidenti per il bucato
o prodotti simili devono essere
usati in linea con le istruzioni
dell'ammorbidente per il bucato.
• Non utilizzare l'asciugatrice
senza il filtro in fibra.
• Non permettere l'accumulo di
fibre intorno all'asciugatrice.
• Non azionare l'asciugatrice
con un filtro in fibra danneggiato. In caso contrario, la macchina potrebbe essere danneggiata dalla lanugine raccolta e
le prestazioni di asciugatura
della macchina potrebbero essere compromesse.
• Pulire i filtri in fibra dopo ogni
processo di asciugatura.
• Dopo aver lavato i filtri in fibra,
asciugarli. Non utilizzare filtri
bagnati.
IT
EN
IT / 9
Page 10

• Per evitare il ritorno di fiamma
del gas nell’ambiente in cui si
usano dispositivi che consumano altri combustibili, comprese le fiamme libere, è necessario prevedere una ventilazione adeguata (per i modelli
con condotto).
• Non utilizzare il prodotto insieme a riscaldatori come stufe a
carbone e stufe a gas e un camino. Il flusso d'aria può far incendiare il condotto (per i modelli con condotto).
• Non appoggiarsi o sedersi
sull’oblò di caricamento quando è aperto, il prodotto potrebbe ribaltarsi.
• Non salire sul prodotto.
• Non mettere una sorgente di
fiamma (candele, sigarette,
ecc.) sul prodotto o nelle immediate vicinanze. Non tenere
sostanze infiammabili/esplosive.
• Non toccare il tamburo mentre
gira.
• Durante il funzionamento, la
parete posteriore del prodotto
diventerà molto calda. Non
toccare retro del prodotto durante l'asciugatura o immediatamente dopo il processo di
asciugatura (Per i modelli con
riscaldamento)
• Non toccare la superficie interna del tamburo in fase di aggiunta o estrazione degli indumenti mentre un programma è
in esecuzione. La superficie
del tamburo è calda.
• Non premere i pulsanti con oggetti appuntiti come ad esempio: forchette, coltelli, unghie,
ecc.
• Non utilizzare il prodotto se è
difettoso o danneggiato. Scollegare il prodotto (o disattivare
il fusibile a cui è collegato) e
chiamare il produttore, un
agente dell’assistenza autorizzato o una persona specificata
dall'importatore.
• Scollegare il prodotto se non
viene usato.
2.7 Sicurezza durante la manutenzione e pulizia
• Non lavare il prodotto spruzzando o versandoci acqua sopra. Non usare un pulitore a
pressione, un pulitore a vapore,
un tubo o una pistola a pressione per pulire il prodotto.
• Non utilizzare utensili affilati o
abrasivi per pulire il prodotto.
• Non usare materiali come detergenti domestici, saponi, detersivi, gas, benzina, solventi,
alcool, cera, ecc. per pulire il
prodotto.
IT / 10
Page 11
• Il filtro in fibra deve essere pulito frequentemente. Dopo ogni
ciclo di asciugatura, pulire il filtro in fibra e la superficie interna dell’oblò di caricamento.
• Pulire l'accumulo di fibre sulle
alette dell'evaporatore dietro il
cassetto del filtro con un aspirapolvere. Si può pulire a mano, purché si indossino guanti
protettivi. Non cercare di pulire
a mani nude. Le alette dell’evaporatore possono danneggiare
le mani (per i prodotti con
pompa di calore).
• A causa del pericolo di incendio e di esplosione, non utilizzare soluzioni, materiali di puli-
3 Istruzioni per l'ambiente
zia, lana d'acciaio o materiali e
strumenti simili per pulire i
sensori.
• Pulire il condotto (Per i modelli
con condotto).
• Non bere acqua condensata.
L'acqua condensata non è potabile. Questa acqua può nuocere agli uomini e agli animali
se bevuta.
2.8 Sicurezza illuminazione
• Contattare un centro assistenza autorizzato quando è necessario sostituire il LED/la
lampadina utilizzati per l'illuminazione (per i prodotti con illuminazione).
IT
EN
3.1 Rispetto dei regolamenti RAEE e smaltimento dei rifiuti
Questo prodotto non contiene i
materiali pericolosi e proibiti indicati nel "Regolamento sul
controllo dei rifiuti di apparecchiature elettriche ed elettroni-
che" pubblicato dal Ministero
dell'ambiente e dell'urbanizzazione della
Repubblica di Turchia. Conforme alla direttiva RAEE. Questo prodotto è stato fabbricato con componenti e materiali di alta
qualità riciclabili e riutilizzabili. Pertanto,
non smaltire questo prodotto con rifiuti domestici e di altro tipo al termine del suo ciclo di vita. Portarlo presso un punto di raccolta per apparecchiature elettriche ed elettroniche. Sarà possibile informarsi in merito a questi punti di raccolta presso la propria amministrazione locale. Sarà possibile
contribuire alla protezione dell’ambiente e
delle risorse naturali consegnando i prodotti usati per farli riciclare.
Anche l'R290 è un refrigerante infiammabile. Accertarsi quindi che il
sistema e i tubi non vengano danneggiati in fase di funzionamento e
di trasporto. Tenere il prodotto lontano da possibili fonti di calore, altrimenti potrebbe prendere fuoco
se danneggiato. Non smaltire il prodotto gettandolo nel fuoco.
3.2 Informazioni per l’imballaggio
L'imballaggio del prodotto è realizzato con
materiali riciclabili in conformità con la legislazione nazionale. Non smaltire i rifiuti di
imballaggio con i rifiuti domestici o altri rifiuti, smaltirli nelle aree di raccolta degli imballaggi specificate dalle autorità locali.
IT / 11
Page 12
3.3 Conformità alle norme e informa-
zioni sui test Dichiarazione di
conformità UE
Le fasi di sviluppo, produzione e
vendita di questo prodotto vengono
condotte in conformità con le regole per la sicurezza sicurezza specificate in tutte le relative istruzioni
dell'Unione Europea
IT / 12
Page 13
4 Specifiche tecniche
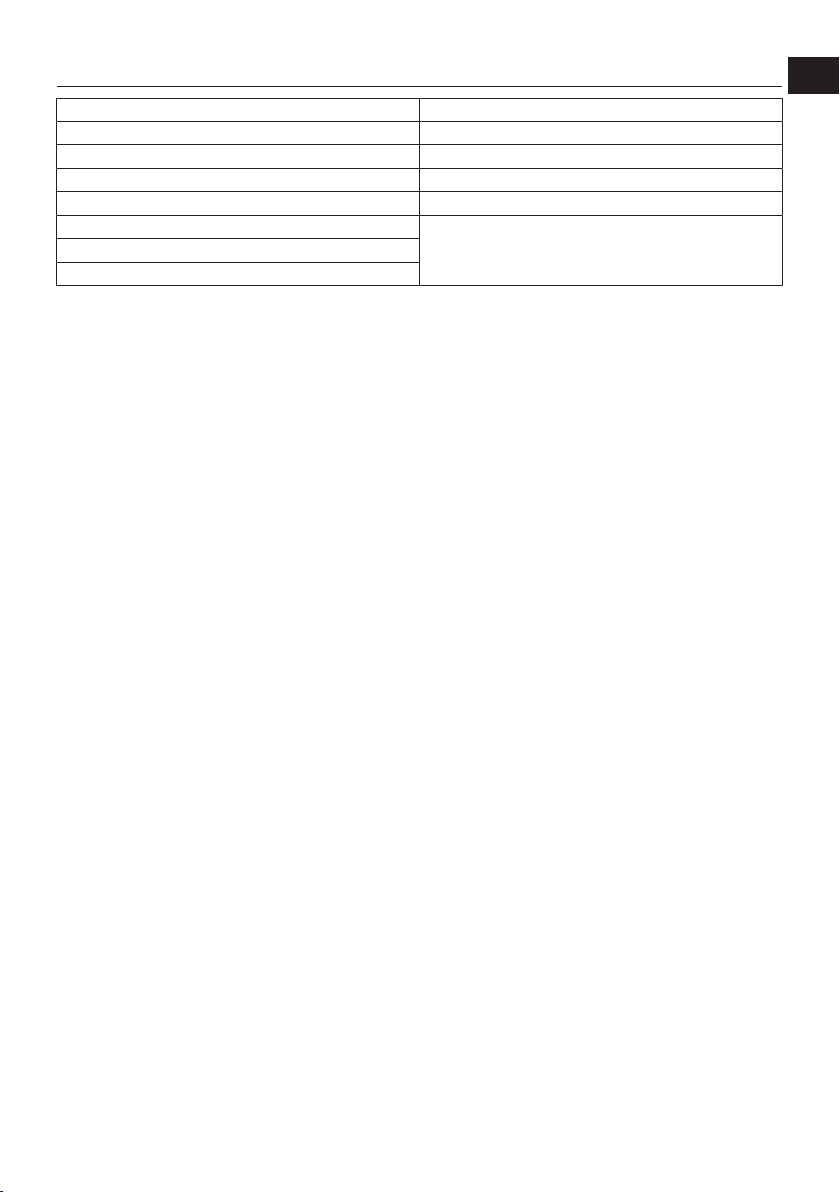
Altezza (regolabile) (cm) 84,6 * / 86,6 **
Larghezza (cm) 59.8
Profondità (cm) 67.2
Capacità (max.) (kg) 10***
Peso netto (±10%) (kg) 48
Tensione
Vedere l’etichetta del tipo****Alimentazione
Codice del modello principale
* Altezza minima: Altezza con i piedini regolabili chiusi.
** Altezza massima: Altezza con i piedini regolabili aperti alla massima altezza.
*** Peso del bucato asciutto prima del lavaggio.
**** L’etichetta del tipo si trova sotto lo sportello dell'asciugatrice.
Al fine di migliorare la qualità dell'asciugatrice, le specifiche tecniche possono essere modificate senza preavviso.
Le figure in questo manuale sono schematiche e potrebbero non corrispondere esattamente al prodotto.
I valori forniti nei simboli riportati sull'asciugatrice o sui suoi documenti di accompagnamento sono valori ottenuti nell'ambiente di laboratorio in conformità con i rispettivi standard. Questi valori possono differire a seconda dell'uso e delle condizioni ambientali
dell'asciugatrice.
IT
EN
IT / 13
Page 14

5 Aspetto generale
1
2
3
4
5
6
7
8
9
10
11
1 Tavolo superiore 2 Pannello di controllo
3 Etichetta del tipo 4 Maniglia di apertura dello zoccolo
5 Griglie di ventilazione 6 Gambe regolabili
7 Per i modelli con serbatoio situato in
basso, il serbatoio dell'acqua si trova
all'interno dello zoccolo
9 Oblò di caricamento 10 Cavo di alimentazione
11 Cassetto del serbatoio dell'acqua
(per i modelli con il serbatoio in alto)
5.1 Fornitura
: Manuale d'uso
: Spugna cassetto filtro*
: Gruppo della capsula odore*
: Tubo di scarico dell'acqua*
*L’accessorio opzionale può non essere disponibile nel prodotto.
8 Filtro in fibra
: Cestello di asciugatura*
: Panno filtrante*
: Contenitore dell’acqua*
: Spazzola*
IT / 14
Page 15
6 Primo utilizzo
Rimuovere la pellicola protettiva e l'etichetta pubblicitaria adesiva se disponibile nel
prodotto.
Tuttavia, non rimuovere le etichette
(ad esempio l'etichetta del tipo) che
appaiono dopo l'apertura del coperchio.
7 Installazione
Dopo che il dispositivo è stato installato
• utilizzare la macchina per la prima volta
in base al manuale utente.
IT
EN
Leggere come prima cosa le "Istruzioni di sicurezza".
Prima di consultare il servizio autorizzato
più vicino per l'installazione dell'asciugatrice, vedere le informazioni nel manuale
d'uso e assicurarsi che le utenze elettriche
e dell'acqua siano conformi alle richieste.
Se il prodotto non è adatto all'installazione,
contattare un elettricista e un idraulico qualificati per riorganizzare le utenze secondo
necessità.
È responsabilità del cliente preparare il luogo in cui l'asciugatrice deve essere collocata e anche l'installazione dell'alimentazione
e delle acque di scarico.
Controllare che non ci siano danni
sull'asciugatrice prima di installarla. Se l'asciugatrice è danneggiata,
non farla installare. I prodotti danneggiati causano un rischio per la
sicurezza dell’utente. Attendere 12
ore prima di azionare l’asciugatrice
dopo l’installazione iniziale.
7.1 Posto giusto per l’installazione
Il prodotto include un agente refrigerante e se il prodotto viene utilizzato subito dopo il suo trasporto,
potrebbe danneggiarsi. Dopo ogni
spostamento, il prodotto deve essere lasciato riposare per 12 ore.
• Installare l'asciugatrice su una superficie
piana e stabile.
• L’asciugatrice è pesante. Non spostarla
da soli.
• Far funzionare l'asciugatrice in un ambiente privo di polvere con una buona
ventilazione.
• Lo spazio tra l'asciugatrice e il pavimento
non deve essere ridotto da materiali quali
ad esempio tappeti, pezzi di legno e fasce.
• Non bloccare le griglie di ventilazione
dell'asciugatrice.
• Non ci devono essere porte che possono
essere bloccate, porte scorrevoli o porte
incernierate vicino all'ambiente di installazione dell'asciugatrice che possono
bloccare l’apertura dell’oblò di caricamento.
• Una volta che l'asciugatrice è installata,
le connessioni devono rimanere stabili.
Dopo aver posizionato l'asciugatrice, assicurarsi che la parete posteriore non entri in contatto con alcuna estrusione (un
rubinetto dell'acqua, una presa elettrica,
ecc.).
• Posizionare l'asciugatrice con almeno 1
cm di spazio tra il prodotto e i bordi dei
mobili.
• L’asciugatrice è adatta ad essere utilizzata tra +5 °C e +35 °C. Se utilizzata al di
fuori di questo range di temperatura, il
suo funzionamento potrebbe essere
compromesso e danneggiato.
• L'asciugatrice non deve essere posizionata con il lato posteriore contro una parete.
IT / 15
Page 16
Non appoggiare l'asciugatrice sul
suo cavo di alimentazione.
Ignorare questo avviso se il sistema del prodotto non contiene
R290*. L’asciugatrice usa gas refrigerante R290*. L'R290 è un gas refrgierante ecologico ma infiammabile. Assicurarsi che la presa d'aria
dell'asciugatrice sia aperta e ben
ventilata. Tenere lontano dall'asciugatrice eventuali fonti di accensione.
7.2 Rimozione del gruppo di sicurezza
usato per la spedizione del prodotto
Togliere il gruppo di sicurezza usato per la
spedizione del prodotto prima di iniziare a
usare il prodotto.
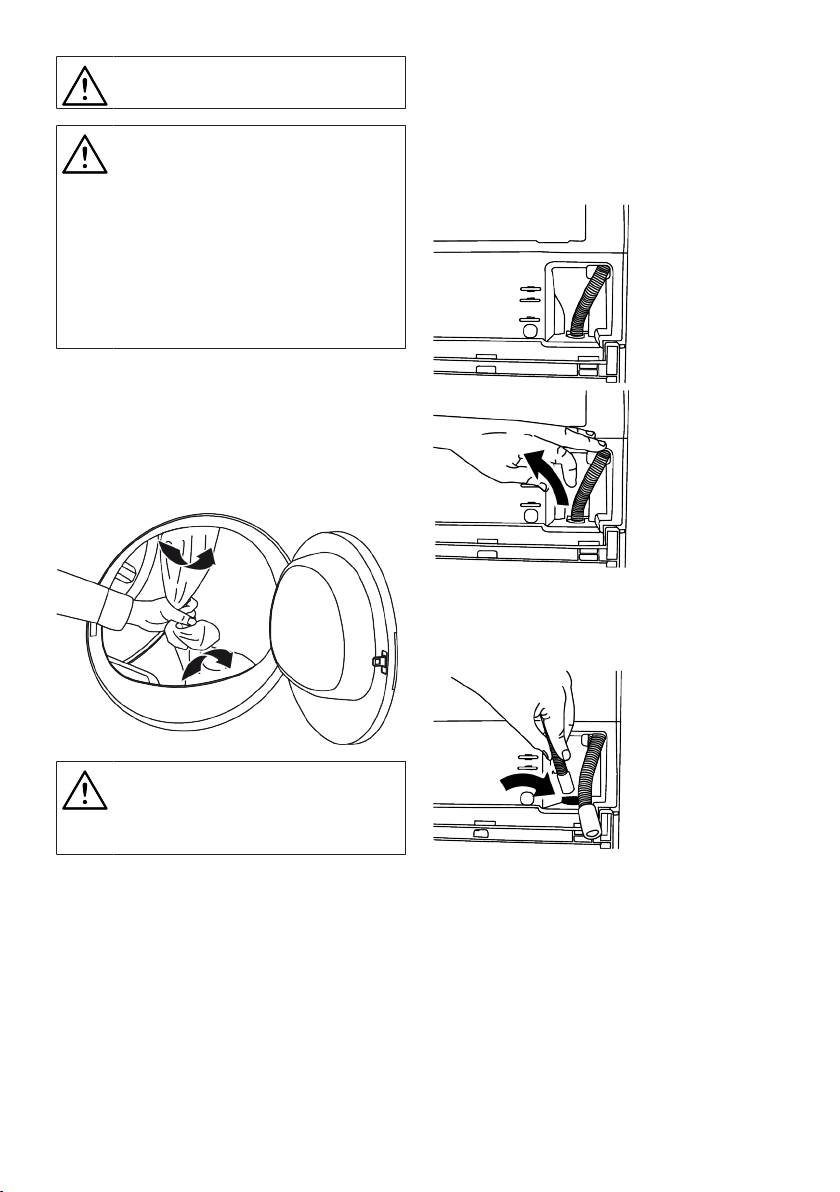
Collegamento del tubo di scarico
dell'acqua
1. Tirare manualmente l'estremità del tubo
dietro l'asciugatrice dal punto in cui è
collegato. Non usare un attrezzo per rimuovere il tubo.
2. Inserire un'estremità del tubo di scarico
dell'acqua fornito con l'asciugatrice nel
punto in cui è stato rimosso il tubo
dell'asciugatrice.
Non lasciare un accessorio o qualsiasi parte del gruppo di sicurezza
usato per la spedizione del prodotto all'interno del tamburo.
7.3 Collegamento dell’acqua
Invece di scaricare periodicamente l'acqua
accumulata nel serbatoio dell'acqua, è possibile scaricarla direttamente tramite il tubo
di scarico dell'acqua fornito con l'asciugatrice.
3. Fissare l'altra estremità del tubo di scarico dell'acqua direttamente allo scarico
delle acque reflue o ad un lavandino.
IT / 16
Page 17
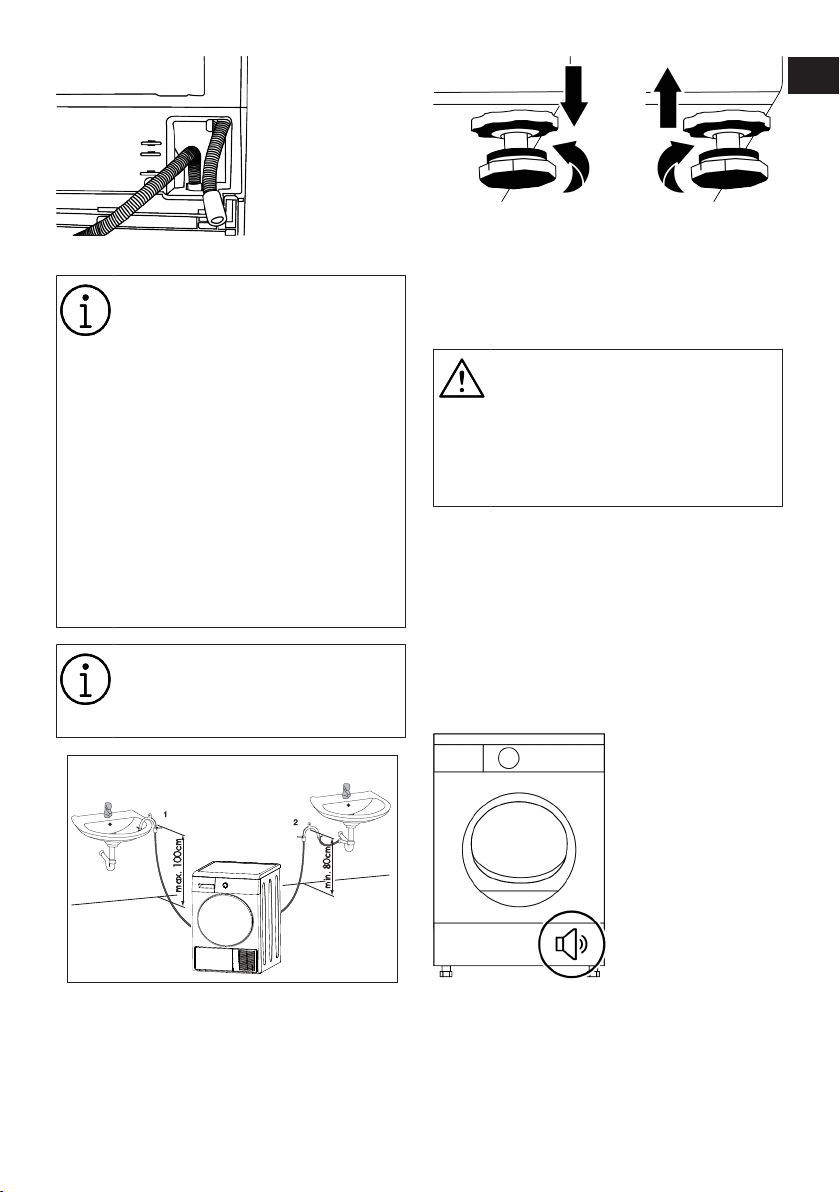
Fissare il tubo di scarico dell’acqua
ad un’altezza massima di 80 cm.
Assicurarsi che il tubo di scarico
dell'acqua non sia attorcigliato,
schiacciato o premuto tra lo scarico e l'asciugatrice.
Il collegamento del tubo deve essere fatto in modo tale che non fuoriesca dalla sua sede. L'acqua fuoriuscita può causare danni.
Non allungare il tubo di scarico
dell'acqua.
Controllare che l’acqua fluisca ad
un tasso adeguato. La linea di scarico non deve essere chiusa o
ostruita.
Se l’accessorio viene fornito in dotazione con un pack di accessori,
invitiamo a consultare le istruzioni
dettagliate.
IT
EN
7.5 Spostare l'asciugatrice
• Scaricare completamente l'acqua
nell'asciugatrice.
• Se il prodotto è collegato tramite scarico
diretto, togliere i collegamenti del tubo.
Si consiglia di spostare l'asciugatrice in posizione verticale. Se non
può essere spostato in posizione
verticale, trasportarlo inclinandolo
sul lato destro guardandolo da davanti. Attendere 12 ore prima di
mettere in funzione l'asciugatrice.
7.6 Avvisi relativi al rumore
Mentre il prodotto è in funzione, è normale
che di tanto in tanto provenga un rumore
metallico dal compressore.
L'acqua che si accumula durante il funzionamento del prodotto viene pompata nel
serbatoio dell'acqua tramite la pompa. È
normale sentire suoni di pompaggio dal
prodotto durante questa operazione.
7.4 Regolazione dei piedini
Finché l'asciugatrice non è stabile e fissa,
regolare i piedini ruotandoli a sinistra e a
destra.
7.7 Sostituzione della lampadina
Se l’asciugatrice ha la lampada di illuminazione del tamburo;
Consultare il servizio autorizzato per sostituire la lampadina/LED utilizzata nell'illuminazione dell'asciugatrice. La lampadina di
IT / 17
Page 18
questo prodotto non è adatta all'illuminazione domestica. L'uso previsto di questa
lampada è quello di garantire il caricamento sicuro del bucato nell'asciugatrice. Le
8 Preparazione
lampade utilizzate in questo apparecchio
devono essere resistenti a condizioni fisiche pesanti come ad esempio temperature
superiori a 50°C.
Leggere come prima cosa le "Istruzioni di sicurezza"!
8.1 Bucato adatto per l'asciugatura in asciugatrice
Il bucato non sicuro per l'asciugatrice può
danneggiare l'apparecchio e il bucato stesso durante l'asciugatura. Attenersi alle
istruzioni sulle etichette del bucato da
asciugare. Asciugare solo la biancheria con
le etichette “sicura in lavatrice” scegliendo i
programmi adatti.
8.2 Biancheria non adatta per l'asciugatura in asciugatrice
• Gli indumenti intimi con supporti metallici
non devono essere asciugati in asciugatrice. Se questi supporti metallici si allentano e si strappano dall'indumento, potrebbero danneggiare la macchina.
• Tessuti delicati ricamati, indumenti di la-
na e seta, indumenti fabbricati con tessuti delicati e pregiati, indumenti non traspiranti e tende di tulle non devono essere
asciugati nell'asciugatrice.
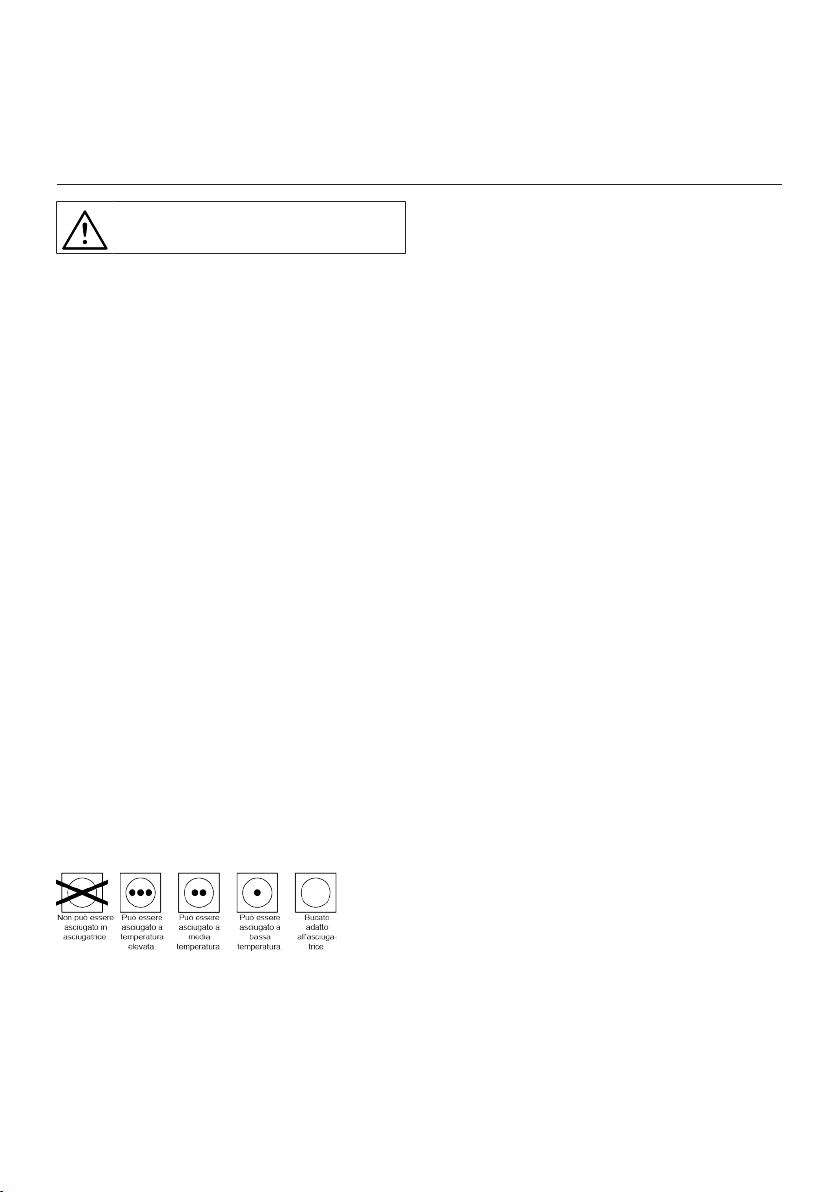
• Attenzione ai simboli di asciugatura ri-
portati sull'etichetta della biancheria.
Asciugare la biancheria con l'etichetta o il
simbolo che indica che è adatta all'asciugatura nell'asciugatrice.
8.3 Preparare il bucato da asciugare
Oggetti quali ad esempio monete, parti metalliche, aghi, chiodi, viti, pietre ecc. possono danneggiare il gruppo di tamburi del pro-
dotto o causare problemi di funzionamento. Controllare quindi tutto il bucato che
verrà caricato sul prodotto.
• Asciugare il bucato con accessori metallici come le cerniere girandole al contrario.
• Chiudere le cerniere, i ganci e le chiusure,
abbottonare i bottoni delle coperture, legare le cinture di tessuto e le cinture del
grembiule.
8.4 Cosa fare per il risparmio energe-
tico
Usare il ciclo di torcitura massim possibile
mentre si lava il bucato. Sarà pertanto possibile ridurre il periodo di asciugatura oltre
che il consumo di energia. Ordinare il bucato in base al tipo e allo spessore. Asciugare
insieme gli stessi tipi di bucato. Per esempio, gli asciugamani da cucina e le tovaglie
si asciugano più velocemente degli asciugamani da bagno.
• Seguire le indicazioni contenute nel manuale utente per la scelta del programma.
• Durante l'asciugatura non aprire l’oblò di
caricamento qualora ciò non sia necessario. Qualora sia necessario aprire l’oblò
di caricamento, non tenerlo aperto troppo
a lungo.
• Non aggiungere bucato bagnato mentre
l'asciugatrice funziona.
• Pulire il filtro in fibra prima e dopo ogni
sessione di asciugatura.
• Per i modelli a condensazione, assicurarsi di pulire il condensatore regolarmente
almeno una volta al mese o dopo ogni 30
sessioni di asciugatura.
• Accertarsi che i filtri siano puliti. Fare riferimento alla sezione manutenzione e pulizia per dettagli.
IT / 18
Page 19
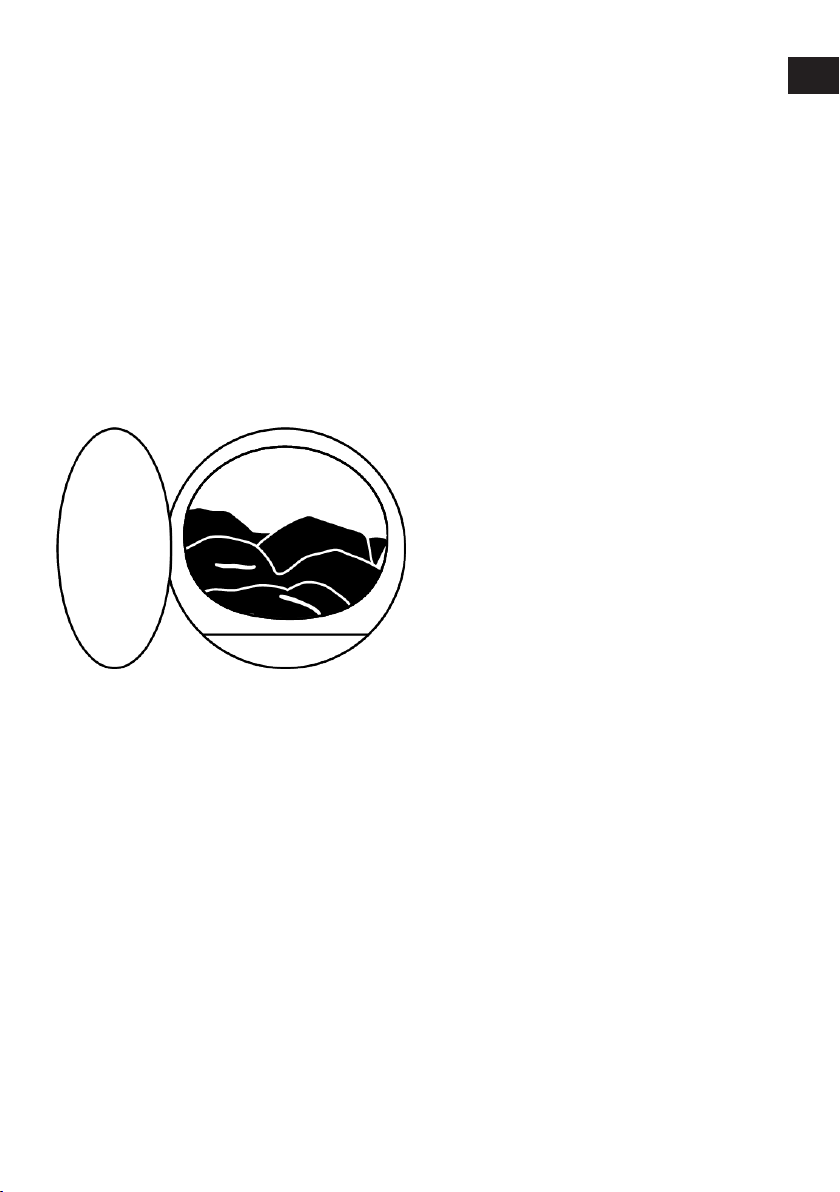
• Per i modelli con canna fumaria, seguire
le regole di collegamento della canna fumaria specificate nelle guide e pulire la
canna fumaria.
• Durante la sessione di asciugatura, ventilare adeguatamente l'ambiente in cui si
trova l'asciugatrice.
• Sui modelli con pompa di calore, controllare il condensatore almeno ogni sei mesi e pulitelo se è sporco.
• Se si utilizza un filtro ecologico, non è necessario pulire il filtro dopo ogni ciclo.
Quando l'icona dell'ambiente è accesa
sullo schermo, cambiare il panno del filtro.
8.5 Capacità di carico corretta
Se il bucato all’interno della macchina supera la capacità di carico massima, potrebbe non funzionare come previsto e potrebbe causare danni materiali o danneggiare il
prodotto. Per ogni programma, attenersi alla capacità massima di carico. Di seguito è
possibile vedere la biancheria ed il suo peso approssimativo.
Set copripiumino: 1000-1500 g
Lenzuolo: 350-500 g
Tovaglia: 250-700 g
Asciugamani: 350-700 g
Abiti: 350-500 g
Jeans: 500-700 g
T-shirt: 125-200 g
Camicetta: 150-250 g
Maglia: 200-300 g
IT
EN
IT / 19
Page 20

9 Funzionamento del prodotto
1 2 3 4 5 6 7 8
9.1 Pannello di controllo
1 Pulsante On/Off/Selezione program-
ma.
3 Pulsante di selezione della luce del
cestello e della prevenzione delle rughe.
5 Pulsante di selezione bassa tempera-
tura.
7 Pulsante di selezione dell'ora di fine. 8 Pulsante selezione Avvio/Standby.
2 Pulsante di selezione livello di asciu-
gatura
4 Avviso acustico e pulsante di selezio-
ne del blocco bambini.
6 Pulsante di selezione del programma
orario.
9.2 Simboli
9.3 Preparazione dell’asciugatrice
• Collegare l’asciugatrice
• Aprire l’oblò di caricamento.
• Mettere il bucato nell’asciugatrice senza
riempirla eccessivamente.
IT / 20
Page 21
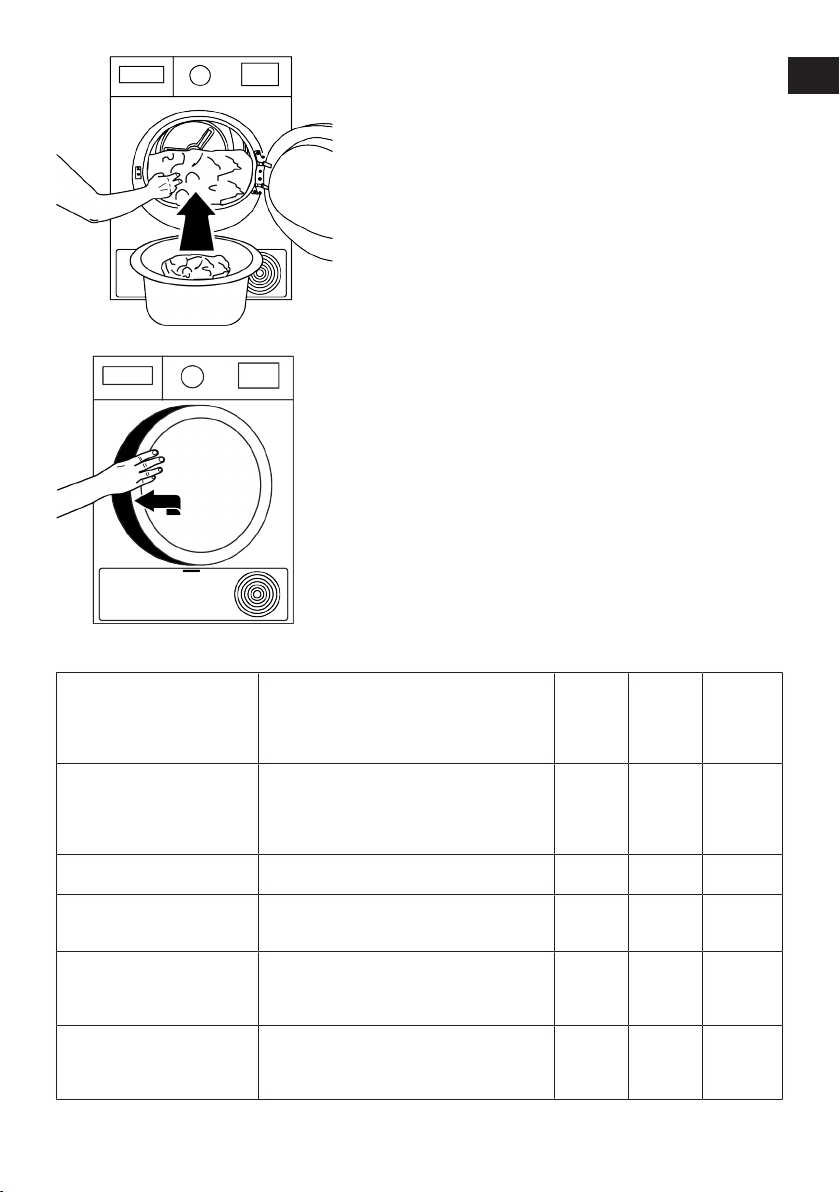
• Verificare che non vi sia bucato impigliato nell’oblò.
• Non chiudere l’oblò di caricamento con
forza.
• Quando si seleziona il programma desiderato utilizzando il pulsante di selezione
del programma Acceso/Spento, la macchina si accenderà.
• Selezionare un programma usando il pulsante di selezione del programma Acceso/Spento non significa che il programma è stato avviato. Per avviare il pro-
• Premere e chiudere l’oblò di caricamento.
gramma, premere il pulsante Start/Standby.
9.4 Selezione programma e schema del consumo
IT
EN
Programmi Definizione del programma
Con questo programma è possibile asciugare i
Cotone / Cottons
Cotone Eco / Cottons Eco
Cotone pronto da stirare / Cottons Iron dry
Sintetici / Synthetics
Mix (Quotidiano) / Mix(Daily)
tessuti di cotone resistenti al calore. Si deve
selezionare un'impostazione di asciugatura
adeguata allo spessore del bucato da asciugare e al livello di asciugatura desiderato.
Asciuga i tessuti di cotone mono-strato e casual nel modo più economico.
I tessuti in cotone a strato singolo, usati quotidianamente, vengono asciugati come leggermente umidi, pronti per essere stirati.
Con questo programma si possono asciugare
tutti i tessuti sintetici. Si deve scegliere un'impostazione di asciugatura adatta al livello di
asciugatura desiderato.
Usarlo per asciugare il bucato sintetico e di
cotone che non mescolano i colori. Sport - gli
indumenti di fitness possono essere asciugati
con questo programma.
IT / 21
Velocità di
Capacità
(kg)
centrifuga
della lavatrice (giri/
min)
10 1000 230
10 1000 220
10 1000 160
6 800 100
6 1000 175
Tempo di
asciugatura (min)
Page 22

Lana / Wool protect
Notte / Night
Delicati / Gentle Care
Programmi a tempo/SteamCure / Time Programmes/Steamcure
Jeans
Sport / Outdoor/Sports
Piumino / Duvet/Downwear
Camicie / Shirts
Xpress / Super Xpress / Daily
Express
Asciugatura Hygiene / Hygienic Drying
Refresh Hygiene / Hygienic Refresh
Valori di consumo energia
Utilizzare per asciugare in modo sicuro il bucato in lana che può essere lavato in lavatrice
con un'etichetta che dice asciugabile
nell'asciugatrice.
Con questo programma, il livello minimo di rumore e suono viene emesso nell'ambiente di
lavoro. In questo programma puoi asciugare
tranquillamente i tuoi capi in cotone o sintetici
misti.
Sarà possibile asciugare i vestiti delicati adatti
all'asciugatura o i vestiti che sono raccomandati per il lavaggio a mano (camicette di seta,
biancheria sottile ecc.) a basse temperature.
È possibile selezionare i programmi con timer
da 10 minuti a 160 minuti per raggiungere il livello di asciugatura finale desiderato a bassa
temperatura. In questo programma, l'asciugatrice asciuga per il tempo impostato indipendentemente dal livello di asciugatura della
biancheria. SteamCure è una funzione rinfrescante che aiuta a stirare il bucato asciutto
poco consumato e mira a ridurre gli odori presenti nell'aria (sigarette, cibo, ecc.).
Utilizzare per asciugare capi in denim centrifugati ad alta velocità in lavatrice.
Con questo programma puoi asciugare i tuoi
prodotti tessili funzionali multistrato e impermeabili/antivento realizzati in tessuti sintetici,
di cotone o misti utilizzati per attività all'aperto
e sport all'aperto.
Sarà possibile asciugare i tessuti imbottiti di
piume e fibre che si asciugano in asciugatrice
in un unico pezzo. In questo programma è
possibile asciugare trapunte, cuscini e cappotti matrimoniali in un unico pezzo. Girare i vestiti come cappotti e giacche al contrario per
asciugarli.
Asciuga camicie e capi delicati e provoca meno sgualciture, per una stiratura facile.
Usare questo programma per preparare 2 camicie pronte per la stiratura.
È il programma in cui puoi asciugare i tuoi prodotti tessili lavati che desideri fornire con
maggiore igiene (vestiti per bambini, biancheria intima, asciugamani, ecc.). Fornisce un'elevata igiene per i tuoi tessuti grazie all'elevato
effetto termico.
È possibile utilizzare questo programma per
fornire igiene alla biancheria asciutta poco
consumata che non si desidera lavare. Fornisce un'elevata igiene per i tuoi tessuti asciutti
grazie all'elevato effetto termico.
5 1000 148
8 1200 240
4 1000 80
- - -
4 1200 130
2 1000 135
- 800 165
1,5 1200 50
0,5 1200 30
5 800 200
1,5 - 120
IT / 22
Page 23
Velocità di
Programmi Capacità (kg)
Cotone Eco* / Cottons Eco* 10 1000 60% 1,78
Cotone Pronto Stiro / Cottons
Iron dry
Sintetici Pronto Stiro / Synthe-
tics cupboard dry
Il “Programma di asciugatura economica del cotone” è un programma di asciugatura standard che può essere utilizzato a pieno o a metà carico e dove le informazioni sono fornite sull'etichetta del prodotto o sulla ricevuta. Questo programma è il
più efficiente in termini di consumo energetico per l'asciugatura di normali carichi
di cotone bagnato.
Se si asciugano regolarmente al massimo 10 kg di bucato di cotone, per evitare
che l'asciugatrice si fermi durante un programma a causa del riempimento completo del serbatoio dell'acqua, si raccomanda di collegare il tubo di scarico dell'acqua.
(Vedere "Collegamento del tubo di scarico dell'acqua")
*Programma standard etichette energetica EN 61121 Tutti i valori nella tabella sono determinati secondo la norma
EN 61121. I valori di consumo possono variare rispetto ai valori nella tabella a seconda del tipo di bucato, della velocità di centrifuga, delle condizioni ambientali e dei livelli di tensione.
10 1000 60% 1,50
6 800 40% 0,80
centrifuga
della lavatrice (giri/
min)
Umidità rimasta valore indicativo.
Valore del
consumo di
energia
kWh
IT
EN
9.5 Funzioni ausiliarie
Allergy UK è il marchio della British
Allergy Foundation. Il Sigillo di Approvazione è stato creato per guidare le persone che chiedono un
consiglio in merito al fatto che il
prodotto riduce significativamente
la quantità di allergeni in un ambiente in cui sono presenti persone
allergiche o che il prodotto limita/riduce/elimina gli allergeni. Lo scopo
è quello di fornire la prova che i prodotti sono stati scientificamente testati o analizzati per ottenere risultati misurabili.
Livello di asciugatura
Il pulsante del livello di asciugatura è usato
per regolare l’asciugatura desiderata. La
durata del programma può variare a seconda della selezione.
Sarà possibile attivare questa funzione solo prima dell’avvio del programma.
Prevenzione delle pieghe
È possibile attivare e disattivare la funzione
di prevenzione delle pieghe premendo il
pulsante di selezione di prevenzione delle
pieghe. Se non si toglie il bucato immediatamente dopo il completamento del programma, si potrà usare la funzione di prevenzione delle pieghe per evitare che il bucato si raggrinzisca.
Avviso acustico
L'asciugatrice emette un segnale acustico
quando il programma è terminato. Premere
il pulsante "Avviso acustico" se non si desidera un avviso acustico. Quando si preme il
pulsante di avviso acustico, la luce si spegne e non suona al termine del programma.
Sarà possibile selezionare questa
funzione prima dell’avvio del programma o dopo l'avvio del programma.
Bassa temperatura
Sarà possibile attivare questa funzione solo
prima dell’avvio del programma. Se si desidera asciugare la biancheria a bassa temperatura, è possibile attivare questa funzione. Una volta attivata, il programma sarà
esteso.
IT / 23
Page 24
Tempo di fine
Sarà possibile ritardare la durata di fine del
programma fino a un massimo di 24 ore
grazie alla funzione durata fine.
1. Aprire l’oblò a mettere il bucato all’interno.
2. Selezionare il programma di asciugatura.
3. Premere il pulsante End Time (Tempo di
fine) e impostare il tempo di partenza ritardata desiderato. Il LED del tempo di
fine si accende. (Quando il pulsante viene premuto continuamente, il tempo di
fine procede senza interruzioni).
4. Premere il pulsante Avvio / Pausa. Inizia
il conteggio alla rovescia del tempo di fine. Il simbolo “:” nella parte centrale del
tempo di ritardo visualizzato lampeggia.
Sarà possibile aggiungere o togliere
il bucato entro il tempo di fine. Il
tempo visualizzato è la somma del
tempo di asciugatura normale e del
tempo di fine. Il LED tempo di fine
si spegne al termine del conto alla
rovescia, l’asciugatura inizia e il
LED di asciugatura si accende.
Modifica dell’ora di fine
Per modificare la durata durante il conto alla rovescia:
1. Annullare il programma attivando il pulsante di selezione On/Off/Programma
dopo aver premuto il pulsante di selezione Avvio/Standby.
2. Selezionare il programma desiderato e
ripetere il processo di selezione dell'ora
di fine.
Annullamento della funzione dell’ora di fine
Per annullare il conto alla rovescia del tempo di fine e avviare immediatamente il programma:
1. Annullare il programma attivando il pulsante di selezione On/Off/Programma
dopo aver premuto il pulsante di selezione Avvio/Standby.
2. Selezionare il programma desiderato e
premere il pulsante Start/Standby.
Quando si attiva la funzione dell'ora
di fine nell'asciugatrice, la macchina ruota periodicamente per prevenire le grinze e l'odore di umidità.
Durante la fase di prevenzione delle
pieghe verrà attivata solo l'alimentazione del motore. Inoltre, se non
si apre il coperchio della macchina
o non si effettuano interventi, la
funzione anti-pieghe si attiverà al
termine del programma
Luce del cestello.
Premendo questo pulsante è possibile accendere e spegnere la luce del cestello. La
luce si accende quando si preme il pulsante
e si spegne dopo un certo tempo.
9.6 Indicatori di avviso
Le spie di avvertenza possono variare a seconda del modello di
asciugatrice che si possiede.
Pulizia del filtro
Al termine del programma la spia per la pulizia del filtro si accende.
Serbatoio dell'acqua
Se il serbatoio dell'acqua si riempie mentre
il programma è in corso, l’indicatore di avvertenza inizia a lampeggiare e la macchina
passa in modalità stand-by. In questo caso,
svuotare il serbatoio dell'acqua e avviare il
programma premendo il pulsante Start/
Stand-by. La spia di avvertenza si spegne e
il programma riprende.
Pulizia del cassetto filtro/scambiatore di
calore
Il simbolo di avvertenza lampeggia a intervalli periodici a ricordare che il cassetto filtro deve essere pulito.
IT / 24
Page 25
9.7 Avvio del programma
Premere il pulsante Start/Stand-by per avviare il programma.
Le spie Start/Stand-by e Asciugatura si illuminano ad indicare che il programma è iniziato.
9.8 Blocco bambini
L’asciugatrice è dotata di un blocco bambini che impedisce l’interruzione del flusso di
programma quando vengono premuti dei
pulsanti in fase di funzionamento. Quando
il blocco bambini è attivato, tutti i pulsanti
del pannello tranne il pulsante di selezione
On/Off programma sono disattivati.
1. Premere il pulsante Avviso Acustico per
3 secondi per attivare il blocco bambini.
2. Quando il blocco bambini viene attivato,
la spia di avvertenza del blocco bambini
sullo schermo si accende.
Quando il Blocco Bambini è attivo;
mentre l’asciugatrice è in funzione oppure
in modalità stand-by, i simboli indicatori
non cambiano se viene modificata la posizione del pulsante di selezione programma.
1. Il blocco bambini deve essere disattivato per poter avviare un nuovo programma dopo che il programma corrente finisce o per poter interferire col programma.
2. Per disattivare il blocco bambini, tenere
premuti gli stessi pulsanti per 3 secondi
di nuovo.
9.9 Modifica del programma dopo che è stato avviato
Dopo che l’asciugatrice inizia a funzionare,
è possibile modificare il programma selezionato per l'asciugatura del bucato con un
programma diverso.
1. Ad esempio, girare il pulsante di selezio-
ne del programma On/Off/ per selezionare il programma Extra Dry per scegliere il programma Extra Dry invece di Stiro
dopo aver premuto il pulsante di selezione Avvio/Standby.
2. Premere il pulsante Start/Stand-by per
avviare il programma.
Aggiungere e togliere indumenti durante la
fase di stand-by.
Per aggiungere o rimuovere indumenti in/
dall’asciugatrice dopo che è iniziato il programma di asciugatura:
1. Premere il pulsante Start/Stand-by per
mettere l’asciugatrice in modalità Standby. La fase di asciugatura si interrompe.
2. Aprire l’oblò di caricamento mentre si
trova in Stand-by, quindi chiudere l’oblò
dopo aver tolto o aggiunto il bucato.
3. Premere il pulsante Start/Stand-by per
avviare il programma.
IT
EN
Quando l'asciugatrice è in funzione
e il blocco bambini è attivo, se si gira il pulsante di selezione del programma, si sente un doppio bip. Se
il blocco bambini viene disattivato
prima che il pulsante di selezione
del programma venga riportato nella sua posizione originale, il programma verrà terminato poiché il
pulsante di selezione del programma è spostato.
IT / 25
Page 26

L’aggiunta di bucato dopo l’inizio
della fase di asciugatura potrebbe
causare il mescolamento del bucato asciutto all’interno dell’asciugatrice col bucato umido e lasciare
quindi tutto il bucato leggermente
umido al termine della funzione.
L’aggiunta o la rimozione di bucato
in fase di asciugatura può essere ripetuta tutte le volte necessarie, a
seconda delle proprie preferenze.
Ma questa operazione interrompe
continuamente l’operazione di
asciugatura aumentando così la durata del programma e il consumo di
energia. Consigliamo quindi di aggiungere il bucato prima dell'inizio
del programma. Qualora venga selezionato un nuovo programma ruotando il pulsante di selezione del
programma mentre l’asciugatrice è
in modalità stand-by, il programma
in corso si interrompe.
Non toccare la superficie interna
del tamburo in fase di aggiunta o
estrazione degli indumenti mentre
un programma è in fase di esecuzione. La superficie del tamburo è
calda.
9.10 Cancellazione del programma
Se si desidera annullare il programma e
concludere l'operazione di asciugatura per
qualsiasi motivo dopo che l’asciugatrice ha
iniziato a funzionare, ruotare il pulsante di
selezione del programma Acceso/Spento/
dopo aver premuto il pulsante di selezionare Avvio/Standby; e il programma verrà annullato.
L’interno dell’asciugatrice è molto
caldo quando viene annullato il programma in fase di funzionamento,
quindi avviare il programma “Refresh” per consentirne il raffreddamento.
9.11 Fine del programma
Al termine del programma, i LED di Avviso
fine/prevenzione pieghe e Avviso pulizia filtro in fibra sull'indicatore di follow-up del
programma si accendono. L’oblò di carico
può essere aperto e l'asciugatrice è pronta
per un'altra operazione.
Ruotare il pulsante di selezione del programma On/Off/ in posizione On/Off per
spegnere l'asciugatrice.
Se la modalità di prevenzione delle
pieghe è attiva e il bucato non viene
rimosso al termine del programma,
la funzione di prevenzione delle pieghe si attiva per 2 ore per evitare
che il bucato all'interno della macchina si stropicci. Il programma gira il bucato a intervalli di 10 minuti
per evitare che si stropicci.
9.12 Caratteristica odore
Se l’asciugatrice ha la funzione odori, leggere il manuale utente ProScent per utilizzare questa funzione.
9.13 Funzione SteamCure per la rimo-
zione degli odori e delle pieghe
SteamCure è una funzione rinfrescante che
aiuta a stirare il bucato asciutto poco consumato e mira a ridurre gli odori presenti
nell'aria (sigarette, cibo, ecc.).
Si consiglia di lavare gli indumenti per rimuovere gli odori che possono essere assorbiti dai vestiti, come il profumo, il deodorante e l'odore di sudore.
Non asciugare prodotti che contengono accessori appuntiti e duri e pelle.
Riempire il serbatoio dell’acqua
Una paletta blu nella macchina esegue il
processo di irrorazione con acqua del bucato.
Se la paletta è in alto, è possibile ruotare
manualmente il cestello per portarlo nella
posizione più bassa e riempire con acqua.
IT / 26
Page 27

Prima di utilizzare il programma Steamcure, il livello massimo di acqua nel contenitore di riempimento deve essere inserito manualmente nella paletta.
Per la rimozione delle grinze si deve utilizzare l'acqua del rubinetto o l'acqua potabile.
Alcune gocce d'acqua che possono traboccare dalla paletta durante il riempimento
non causeranno alcun problema.
Non utilizzare additivi o agenti decalcificanti.
Non utilizzare prodotti chimici liquidi e prodotti chimici che possono
essere sciolti con i liquidi.
Avvio del programma
L'aletta dovrebbe essere portata nella posizione più bassa e riempita d'acqua fino
all'area contrassegnata con il contenitore di
riempimento. È necessario selezionare il
programma SteamCure.
Quando si seleziona il programma, il tempo
indicato sullo schermo apparirà come 10
minuti. Il programma orario viene impostato sull'ora desiderata premendo il pulsante
di selezione e premendo il pulsante Start/
Standy-By.
Per un'efficace rimozione degli odori,
si consiglia di utilizzare 1-6 capi di abbigliamento asciutti per 50 minuti.
Questa funzione non pulisce i vestiti, ma riduce gli odori e le pieghe e permette di indossarli di nuovo.
IT
EN
10 Manutenzione e pulizia
Leggere come prima cosa le "Istruzioni di sicurezza"!
Se viene pulito regolarmente, la durata del
prodotto sarà estesa e i problemi comuni
saranno ridotti.
10.1 Filtri in fibra (filtri interni ed
esterni) / Pulizia della superficie
interna dell’oblò di caricamento
I capelli e le fibre che si separano dal bucato durante il processo di asciugatura vengono raccolti dal filtro per le fibre.
Dopo ogni ciclo di asciugatura, pulire il filtro in fibra e la superficie interna dell’oblò di
caricamento.
IT / 27
Page 28
L’ asciugatrice ha 2 filtri in fibra,
uno posto all'interno dell'altro. Non
utilizzare il prodotto senza i filtri in
fibra.
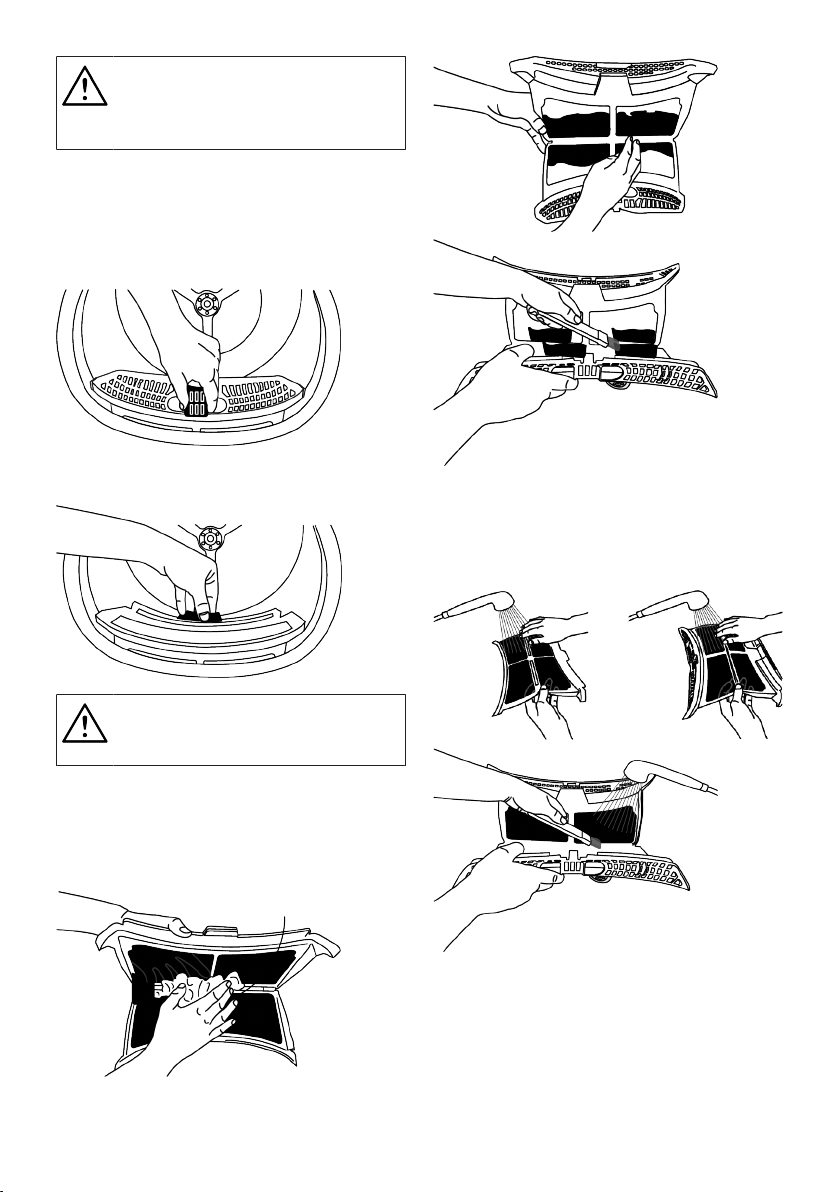
Per pulire i filtri in fibra:
1. Aprire l’oblò di caricamento.
2. Tenere la prima parte (filtro interno) del
filtro in fibra in due parti e rimuoverlo tirandolo verso l'alto.
3. Rimuovere la seconda parte (filtro esterno) tirandola verso l'alto.
Verificare che capelli, fibre e batuffoli di cotone non cadano nella fessura dove sono installati i filtri.
4. Aprire entrambi i filtri di fibre (esterno e
interno) e rimuovere le fibre con le mani
o con la spazzola sul deflettore d'aria.
Sarà possibile pulire i capelli nei filtri
con un aspirapolvere.
5. Pulire entrambi i filtri sotto l'acqua corrente in senso inverso all'accumulo di fibre o con una spazzola morbida. Asciugare i filtri prima di ricollocarlo in posizione.
6. Inserire i filtri in fibra l'uno sull'altro e ricollocarli al loro posto.
IT / 28
Page 29
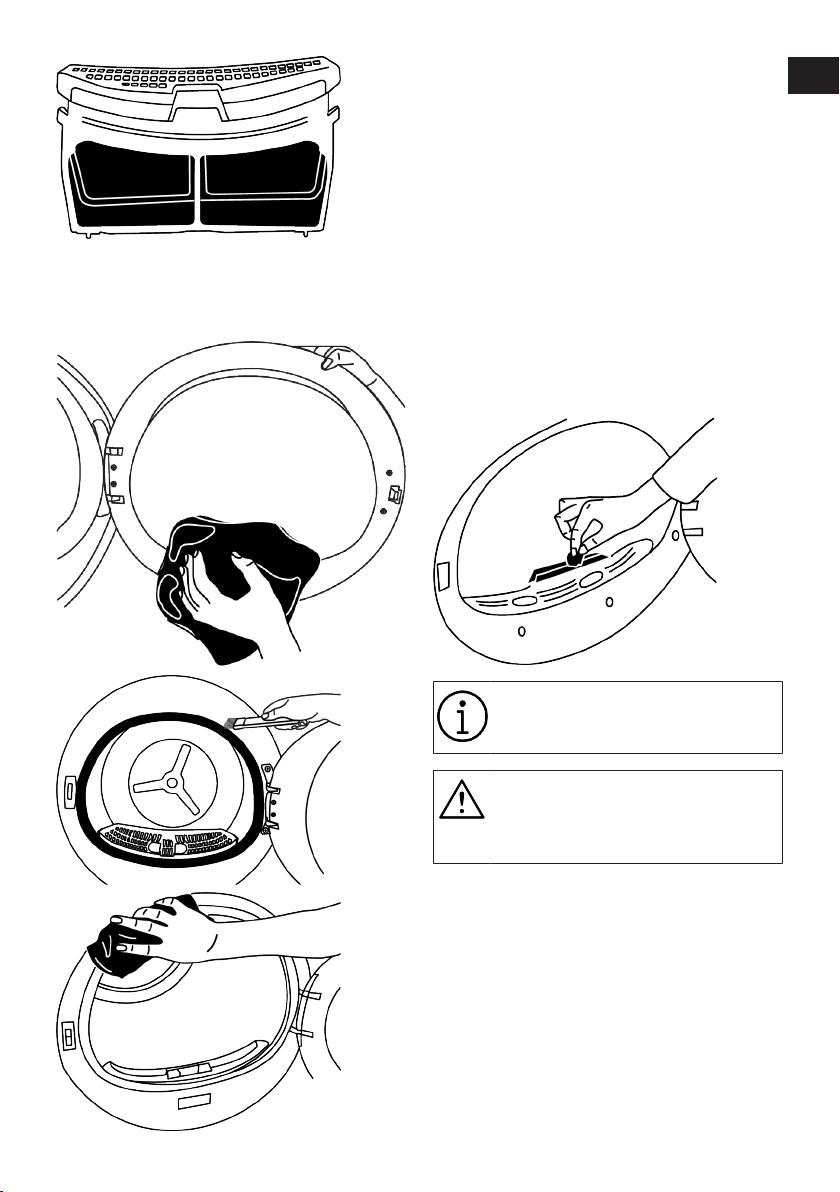
7. Pulire tutte le superfici interne dell’oblò
di caricamento e la guarnizione con un
panno morbido e umido o con la spazzola sul deflettore d'aria.
10.2 Pulire il sensore
L'asciugatrice è dotata di sensori di umidità
che rilevano se il bucato è asciutto o meno.
Per pulire i sensori:
1. Aprire l’oblò di caricamento dell'asciugatrice.
2. Se la macchina è ancora calda a causa
dell'operazione di asciugatura, attendere
che si raffreddi.
3. Pulire le superfici metalliche del sensore
con un panno morbido inumidito con
aceto e poi asciugare.
4. Pulire le superfici metalliche del sensore
4 volte all'anno.
IT
EN
Non utilizzare strumenti metallici
per pulire le superfici metalliche dei
sensori.
A causa del pericolo di incendio e
di esplosione, non utilizzare soluzioni, materiali di pulizia o strumenti simili per pulire i sensori.
10.3 Svuotare il serbatoio dell'acqua
Durante l'asciugatura, l'umidità viene rimossa dal bucato e condensata, poi l'acqua si
accumula nel serbatoio dell'acqua. Svuotare il serbatoio dell'acqua dopo ogni sessione di asciugatura.
IT / 29
Page 30

L'acqua condensata non è acqua
potabile!
Non rimuovere mai il serbatoio
dell'acqua mentre è in corso un programma!
Se si dimentica di svuotare il serbatoio
dell'acqua, durante le successive sessioni
di asciugatura la macchina smetterà di funzionare quando il serbatoio dell'acqua si
riempie completamente e l'icona di avviso
del serbatoio dell'acqua lampeggerà. In
questo caso svuotare il serbatoio dell'acqua e per continuare l'operazione di asciugatura, premere il pulsante Avvio/Standby.
Per scaricare il serbatoio dell'acqua:
1. Estrarre con attenzione il serbatoio
dell'acqua dal suo cassetto.
2. Rimuovere l'acqua nel serbatoio dell'acqua.
3. Se si accumulano fibre nell'imbuto del
serbatoio dell'acqua, rimuoverle sotto
l'acqua corrente.
4. Rimettere in posizione il serbatoio
dell'acqua.
Se si utilizza l'opzione di scarico diretto, non è necessario scaricare il
serbatoio dell'acqua.
10.4 Pulire il condensatore
I capelli e le fibre che non sono raccolti dal
filtro in fibra si accumulano sulla superficie
metallica del condensatore dietro il deflettore dell'aria. Queste fibre devono essere
pulite in modo regolare.
Se l'icona della pulizia del condensatore
lampeggia, controllare la superficie metallica. Pulire le fibre se presenti. Deve essere
controllato almeno ogni 6 mesi.
1. Aprire lo zoccolo tirando la sua maniglia.
IT / 30
Page 31

2. Spostare i fermi per aprire il coperchio
del deflettore d'aria.
3. Tirare la spazzola verso sinistra per toglierla. È possibile utilizzare la spazzola
per la pulizia per pulire la fibra accumulata sul filtro, sulla superficie metallica
del condensatore e sulla porta di carico.
La spazzola per la pulizia si trova
all'interno della borsa del manuale.
Prendere la spazzola dalla borsa
contenente la documentazione e inserirla al suo posto sul deflettore
d'aria per riporla.
Pulire la fibra sulla superficie metallica del
condensatore con un panno umido o la
spazzola sul deflettore dell'aria in direzione
alto-basso. Non pulire nella direzione sinistra - destra poiché danneggerebbe le piastre metalliche del condensatore.
Per la pulizia si può usare anche un’aspirapolvere con spazzola. Se l'aspirapolvere
non dispone di una spazzola, sconsigliamo
di usarla per la pulizia del condensatore
Dopo aver pulito il filtro, lo sportello e il
condensatore, trascinare la spazzola verso
destra e bloccarla al suo posto.
IT
EN
Dopo aver completato il processo di pulizia,
rimettere il coperchio del deflettore dell'aria
in posizione, chiudere i fermispostandoli e
chiudere lo zoccolo base.
IT / 31
Page 32

Si può pulire a mano, purché si indossino guanti protettivi. Non cercare di pulire a mani nude. Le alette
del condensatore possono danneggiare le mani. La pulizia da sinistra
a destra può danneggiare le alette
del condensatore. Questo può portare a problemi di asciugatura.
Qualora si accumulino fibre sul coperchio
della ventola e sullo zoccolo, rimuoverle
con un panno.
Non mettere un peso sullo zoccolo quando
è aperto.
Quando il coperchio del deflettore
dell'aria viene rimosso, è normale
avere acqua nella sezione di plastica davanti al condensatore.
11 Risoluzione dei problemi
L’operazione di asciugatura richiede troppo tempo.
• I pori del filtro in fibra (filtro interno ed
esterno) possono essere ostruiti. >>> Lavare i filtri in fibra con acqua calda e
asciugare.
• Il lato anteriore del condensatore potreb-
be essere ostruito. >>> Pulire il lato anteriore del condensatore.
Non usare materiali abrasivi o lana
d'acciaio per pulire il tamburo.
• Le griglie di ventilazione davanti alla
macchina potrebbero essere chiuse. >>>
Rimuovere qualsiasi oggetto davanti alle
griglie di ventilazione che blocca l'aria.
• La ventilazione può essere inadeguata
perché l'ambiente cui è installata la macchina è troppo piccolo. >>> Aprire la porta o le finestre per evitare che la temperatura ambiente aumenti troppo.
IT / 32
Page 33

• Se presente un sensore di umidità, si potrebbe essere accumulato uno strato di
calcare sul sensore dell’umidità. >>> Pulire il sensore dell’umidità.
• Potrebbe essere stato caricato troppo
bucato. >>> Non sovraccaricare eccessivamente l'asciugatrice.
• Il bucato potrebbe non essere stato centrifugato in modo adeguato. >>> Eseguire
una torcitura ad velocità sulla lavatrice.
Gli indumenti sono ancora umidi dopo
l’operazione di asciugatura.
• Potrebbe essere stato utilizzato un programma non adatto al tipo di bucato.>>>
Controllare le etichette di manutenzione
sui capi e selezionare un programma
adatto al tipo di bucato o utilizzare programmi a tempo extra.
• I pori del filtro in fibra (filtro interno ed
esterno) possono essere ostruiti. >>> Lavare i filtri con acqua calda e asciugare.
• Il lato anteriore del condensatore potrebbe essere ostruito. >>> Pulire il lato anteriore del condensatore.
• Potrebbe essere stato caricato troppo
bucato. >>> Non sovraccaricare eccessivamente l'asciugatrice.
• Il bucato potrebbe non essere stato centrifugato in modo adeguato. >>> Eseguire
una torcitura ad velocità sulla lavatrice.
L'asciugatrice non si accende oppure non è
possibile avviare il programma. L'asciugatrice non funziona dopo essere stata configurata.
• L’alimentazione potrebbe essere scollegata. >>> Verificare che il cavo di alimentazione sia collegato.
• L’oblò di caricamento potrebbe essere
aperto. >>> Controllare che l’oblò di caricamento sia chiuso correttamente.
• Un programma potrebbe non essere impostato o il pulsante Avvio/Standby potrebbe non essere premuto. >>> Controllare che il programma sia stato impostato e che non sia in posizione di Standby.
• Il blocco bambini potrebbe essere attivato. >>> Disattivare il blocco bambini.
Il programma si è interrotto prematuramente senza un motivo.
• L’oblò di caricamento potrebbe non essere chiuso correttamente. >>> Controllare
che l’oblò di caricamento sia chiuso correttamente.
• Ci potrebbe essere un’interruzione
dell’alimentazione. >>> Premere il pulsante Start / Standby / Cancel per avviare il
programma.
• Il serbatoio dell'acqua potrebbe essere
pieno. >>> Svuotare del serbatoio dell'acqua.
Gli indumenti si sono sgualciti, induriti o
rovinati.
• Potrebbe essere stato usato un programma non adatto al tipo di bucato. >>> Controllare le etichette di manutenzione sugli
indumenti e selezionare un programma
adatto agli indumenti stessi.
Gocciola acqua dall’oblò di caricamento.
• Le fibre si potrebbero essere accumulate
sulle suprefici interne dell’oblò di caricamento e sulle superfici della guarnizione
dell’oblò di caricamento. >>> Pulire le superfici interne dell’oblò di caricamento e
le superfici dell’oblò di caricamento.
L’oblò di caricamento si apre da solo.
• L’oblò di caricamento potrebbe non essere chiuso correttamente. >>> Spingere
l’oblò di caricamento fino a che non si
sente un suono di chiusura.
Il simbolo di avvertenza del serbatoio
dell'acqua è acceso/lampeggiante.
• Il serbatoio dell'acqua potrebbe essere
pieno. >>> Svuotare del serbatoio dell'acqua.
• Il tubo di scarico dell’acqua potrebbe essersi piegato. >>> Se il prodotto è collegato direttamente allo scarico dell'acqua,
controllare il tubo flessibile di scarico
dell'acqua.
L'illuminazione all'interno dell'asciugatrice
non si accende (nei modelli con luce).
• L'asciugatrice potrebbe non essere stata
accesa con il pulsante On/Off. >>> Controllare che l'asciugatrice sia accesa.
IT
EN
IT / 33
Page 34

• La lampada potrebbe non funzionare correttamente. >>> Contattare l’Assistenza
Autorizzata per procedere alla sostituzione della lampada
L'icona o la luce di prevenzione delle grinze/pieghe è accesa.
• Può essere attivata la modalità Anti-Piega che impedisce al bucato nell'asciugatrice di sgualcirsi. >>> Spegnere l'asciugatrice e togliere il bucato.
L'icona della pulizia del filtro in fibra è accesa
• Il filtro in fibra (filtri interni ed esterni) potrebbe essere sporco. >>> Lavare i filtri
con acqua calda e asciugare.
• Sui pori del filtro in fibra si può formare
uno strato che porta all'intasamento. >>>
Lavare i filtri con acqua calda e asciugare.
• Sui pori del filtro in fibra (filtri interni ed
esterni) si può formare uno strato che
porta all'intasamento. Lavare i filtri con
acqua calda e asciugare.
• I filtri in fibra potrebbero non essere stati
inseriti. >>> Inserire i filtri interni ed esterni in posizione.
• Il tessuto filtrante ecologico potrebbe
non essere installato sulla parte in plastica e la parte anteriore del condensatore
potrebbe essere ostruita.>>>Installare il
filtro ecologico sulla parte in plastica e
posizionarlo nell'alloggiamento del filtro.
• Il filtro ecologico potrebbe non essere
stato sostituito anche se il simbolo di avvertenza è acceso. >>> Sostituire il filtro.
Viene emesso un segnale acustico dalla
macchina.
• I filtri in fibra potrebbero non essere stati
inseriti. >>> Inserire i filtri interni ed esterni in posizione.
• I filtri della macchina potrebbero non essere stati installati.>>> Installare i filtri in
fibra (interni ed esterni) o il filtro ecologico nel loro alloggiamento.
L'icona di avvertenza del condensatore
lampeggia.
• Il lato anteriore del condensatore può essere intasato da fibre. >>> Pulire il lato
anteriore del condensatore.
• I filtri in fibra potrebbero non essere stati
inseriti. >>> Inserire i filtri interni ed esterni in posizione.
L'illuminazione all'interno dell'asciugatrice
si accende (nei modelli con luce).
• Se l'asciugatrice è collegata alla presa di
corrente, si preme il pulsante On/Off e lo
sportello è aperto; la luce si accende. >>>
Scollegare l'asciugatrice o portare il pulsante On/Off in posizione Off.
Il simbolo del vapore lampeggia (Nei prodotti con funzione vapore).
• Potrebbe non esserci abbastanza acqua
nella macchina per il programma. >>>
Eseguire in un programma senza la funzione del ciclo vapore.
I programmi Vapore non si avviano. (Nei
prodotti con funzione vapore)
• Potrebbe non esserci acqua a sufficienza
nella macchina per il programma >>>
Eseguire un programma senza funzione
vapore.
Il livello di pieghe non diminuisce nel programma pieghe (nei prodotti con funzione
vapore)
• La quantità di bucato potrebbe essere superiore a quella consigliata. >>>Caricare
la quantità di bucato desiderata.
• Il tempo di applicazione del vapore potrebbe essere basso. >>> Selezionare un
tempo più lungo per l'applicazione del vapore.
• Al termine del programma, il bucato potrebbe essere rimasto a lungo nella macchina. >>>Alla fine del programma, rimuovere immediatamente la biancheria e
appenderla a una corda.
IT / 34
Page 35
L'odore nel bucato non diminuisce nel programma di deodorizzazione (nei prodotti
con funzione di deodorizzazione).
• La quantità di bucato potrebbe essere superiore a quella consigliata. >>>Caricare
la quantità di bucato desiderata.
• Il tempo di applicazione del vapore potrebbe essere basso. >>> Selezionare un
tempo più lungo per l'applicazione del vapore
L'icona Wi-Fi lampeggia continuamente
(per i modelli dotati della funzione HomeWhiz).
Il prodotto potrebbe non essere connesso
alla rete wireless. >>>Collegarsi alla rete seguendo le istruzioni. Potrebbe essersi verificato un problema sulla rete a cui è connesso il prodotto. >>>Controllare. Il prodotto potrebbe non connettersi alla rete a causa della vicinanza.
Se vedi "F L t" sullo schermo, controlla i
passaggi seguenti.
• I filtri potrebbero essere sporchi. >>> Pulire i filtri interno ed esterno o sostituire il
filtro ecologico.
• Nell'area dell’oblò, se si utilizzano i doppi
filtri interno ed esterno. >>> Assicurarsi
che entrambi i filtri siano installati.
• Se si utilizza la funzione di filtro ecologico, assicurarsi che il tessuto del filtro sia
attaccato alla parte in plastica. >>>Inserire il tessuto filtrante nella parte in plastica se non è inserito.
• Il lato anteriore del condensatore potrebbe essere sporco. >>> Aprire e controllare
la zona di calcio e assicurarsi che sia pulita.
• Consultare la sezione Manutenzione e
pulizia.
Se si riscontra un problema con
qualsiasi parte del tuo dispositivo,
puoi richiedere una sostituzione
consultando il servizio autorizzato
più vicino con il numero di modello
del dispositivo.
IT
EN
Qualora il problema persista dopo
aver seguito le istruzioni contenute
in questa selezione, contattare il
proprio fornitore oppure un Servizio
Autorizzato. Non cercare mai riparare da soli il prodotto.
IT / 35
Page 36
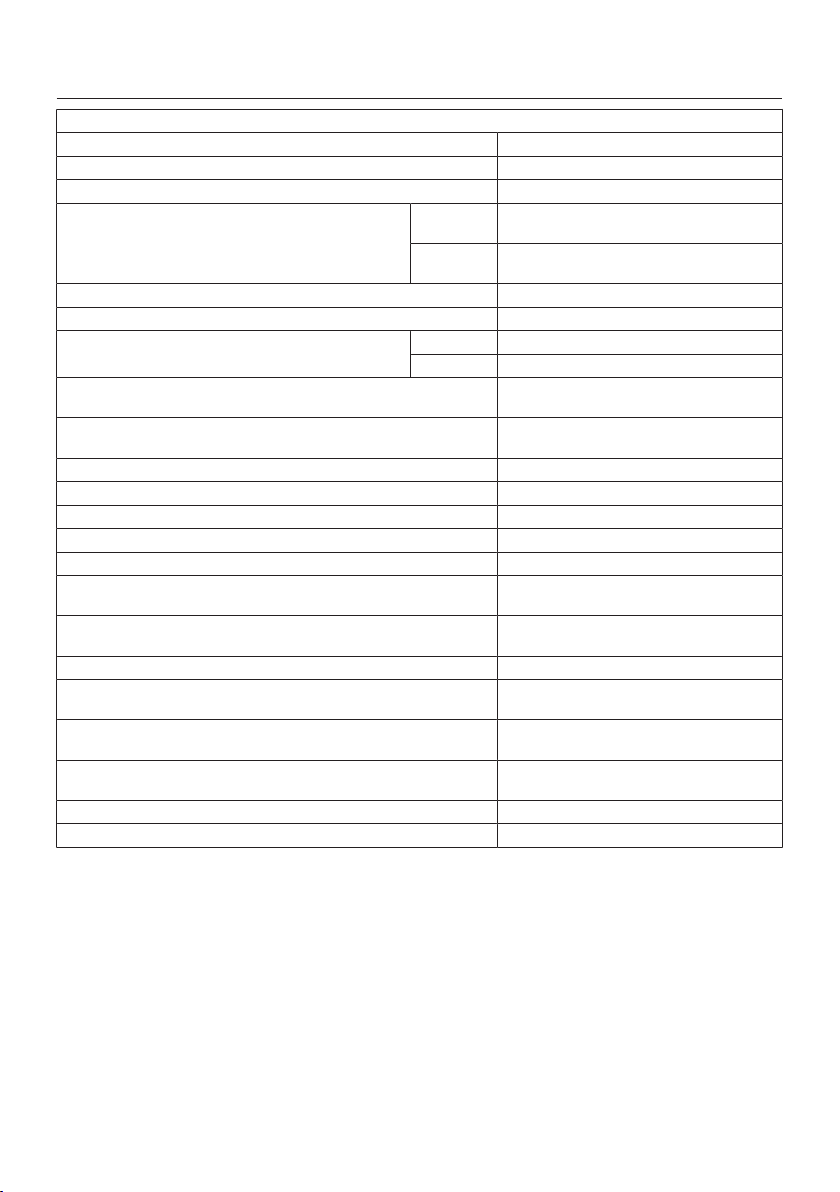
12 Voucher informazioni sul prodotto
È conforme al regolamento statutario della Commissione (UE) n. 392/2012.
Nome o marchio del fornitore BEKO
Nome modello 7188288720-BT3103IS
Capacità normale (kg) 10.0
Con condot-
Tipo asciugatrice
Classe efficienza energetica (1) A+++
Consumo energetico annuo (kWh) (2) 210.6
Tipo di controllo
Consumo energetico (kWh) nel programma cotone standard a pieno
carico
Consumo energetico (kWh) nel programma cotone standard a carico
parziale
Consumo energetico in “Modalità chiusa” PO (W) 0,50
Consumo energetico in “Modalità On ” P L (W) 1.00
Durata modalità “On” (min) 30
Programma cotone standard (3) •
Durata del programma cotone standard a pieno carico, Tdry (min) 220
Durata del programma cotone standard a carico parziale, Tdry 1/2
(min)
Durata ponderata del programma cotone standard a carico parziale e
pieno (T t)
Classe efficienza condensazione (4) A
Efficienza di condensazione media del programma cotone standard a
pieno carico, Cdry
Efficienza di condensazione media del programma cotone standard a
carico parziale, C asciutto1/2
Efficienza di condensazione ponderata del programma cotone stan-
dard a carico pieno e parziale, C t
Livello volume prodotto (5) 63
Uso sottobanco -
to
Con conden-
satore
automatico •
Manuale -
• Sì / - No
(1) Dalla classe di efficienza A+++ (rendimento massimo) a D (rendimento minimo)
(2) Nel programma standard per guardaroba in cotone, è il valore del consumo energetico
calcolato tenendo conto delle modalità a bassa potenza basate su 160 cicli di asciugatura
in condizioni di pieno e mezzo carico. Il valore del consumo energetico per ciclo reale dipende dall'utilizzo dell'asciugatrice.
(3 ) “Programma guardaroba cotone” è un programma di asciugatura standard che può essere utilizzato a pieno o mezzo carico e le cui informazioni sono fornite sull'etichetta del
prodotto o sullo scontrino. Questo programma è il più efficiente in termini di consumo
energetico per l'asciugatura di normali carichi di cotone bagnato.
(4) Dalla classe di efficienza G (rendimento minimo) ad A (rendimento massimo)
(5) Valore medio ponderato — L WA unità dB(A) è espresso con re 1 pW.
-
•
1.78
0.93
125
166
91%
91%
91%
IT / 36
Page 37

Page 38
Table of Contents
1 Please read this guide before!..... 39
2 Safety Instructions........................ 40
2.1 Intended Use.................................. 40
2.2 Safety of Children, Vulnerable
Persons and Pets ..........................
2.3 Electrical Safety............................. 41
2.4 Transporting Safety....................... 41
2.5 Installation Safety.......................... 42
2.6 Usage Safety.................................. 44
2.7 Maintenance and Cleaning Safety 46
2.8 Lighting Safety............................... 46
3 Environmental instructions.......... 47
3.1 Compliance with the WEEE Regu-
lations and Waste Disposal ..........
3.2 Packaging Information.................. 47
3.3 Standard Conformity and Test In-
formation EU Declaration of Con-
formity............................................
4 Technical Specifications .............. 48
5 General Appearance..................... 49
5.1 Scope of Delivery........................... 49
6 First Operation .............................. 50
7 Installation ..................................... 50
7.1 Right Place for Installation ........... 50
7.2 Removing the Shipping Safety
Group..............................................
7.3 Water Connection.......................... 51
7.4 Adjusting the Legs......................... 52
7.5 Moving the Drying Machine .......... 52
7.6 Warnings Regarding the Noise..... 52
7.7 Replacing the Lighting Bulb.......... 52
8 Preparation.................................... 53
8.1 Laundry Suitable for Drying in
Drying Machine..............................
8.2 Laundry Not Suitable for Drying in
Drying Machine..............................
8.3 Preparing the Laundry to Be Dried 53
8.4 What to Do for Energy Saving....... 53
8.5 Correct Load Capacity .................. 54
9 Running the Product .................... 54
9.1 Control Panel ................................. 54
9.2 Symbols ......................................... 54
9.3 Preparation of Drying Machine..... 55
40
47
47
51
53
53
9.4 Program Selection and Consump-
tion Chart........................................
9.5 Auxiliary Functions ........................ 57
9.6 Warning Indicators......................... 58
9.7 Starting the Program ..................... 58
9.8 Child Lock....................................... 58
9.9 Changing the Program After It Is
Started ............................................
9.10 Cancelling the Program................. 59
9.11 End of Program.............................. 59
9.12 Odour Feature ................................ 60
9.13 SteamCure Odour and Wrinkle
Removal Function..........................
10 Maintenance and Cleaning........... 61
10.1 Fiber Filters (internal and external
filters) / Cleaning of the Interior
Surface of the Loading Door .........
10.2 Cleaning the Sensor....................... 62
10.3 Emptying the Water Tank.............. 63
10.4 Cleaning the Condenser ................ 63
11 Troubleshooting ............................ 65
12 Product Information Voucher....... 69
55
59
60
61
EN / 38
Page 39

1Please read this guide before!
Dear Customer,
Thank you for choosing Beko product. We hope you get the best efficiency from this
product which has been manufactured with high quality and state of the art technology.
Please make sure you read and understand this guide and supplementary documentation
fully before using the product.
Observe all warnings and information herein. Therefore you can protect both yourself and
your product against potential damages.
Keep the user’s manual. Include this guide with the product if you hand it over to someone
else.
Symbols in the user manual and on your machine:
Danger that may result with death or injury.
Read the user’s manual.
Important information and useful hints about usage.
Flammable material, warning of fire hazard.
IT
EN
Warning against UV Radiation hazard.
The product's packaging is made of recyclable materials, in accordance with the National Environment Legislation.
Warning against hot surfaces.
Warning against electrical hazard.
NOTICE
Danger that may cause material damage on the product or surrounding area.
This product has been manufactured at modern facilities respectful to the environment
without harming the nature.
EN / 39
Page 40
2 Safety Instructions
• This section includes the information necessary to prevent the risk of personal injury
or material damage. Our company shall not be held responsible for damages that may occur if these instructions are not
observed.
• Always have the installation
and repair work carried out by
the manufacturer, an authorized service centre or a person
recommended by the importer
• Use original spare parts and
accessories only.
• Do not repair or replace any
component of the product unless it is clearly specified in the
user’s manual.
• Do not make technical modifications on the product.
2.1 Intended Use
• Product is designed only for
household use. It is not intended for commercial use.
• The product is not designed
for outdoor use.
• Do not install or operate the
product in areas where freezing is a possibility and/or
areas vulnerable to external ef-
fects. Water frozen in the
pump or the hoses may cause
damages.
• Product can only be used to
dry and ventilate laundry which
are washed with water and drying machine safe.
2.2 Safety of Children, Vulnerable Persons and Pets
• This product may be used by
children aged 8 years and
older and persons with underdeveloped physical, sensory or
mental capabilities or lack of
experience and knowledge if
they have been given supervision or instruction concerning
safe use of the product and
the hazards involved. Children
should not tamper with the
device. Cleaning and maintenance should not be carried out
by children unless they are supervised.
• Children under 3 years of age
should be kept away from the
product unless they are constantly supervised.
• Electrical products are dangerous for children and pets. Children and pets should not play
with, climb on or get inside the
product.
EN / 40
Page 41
• Keep the loading door of the
product closed even when not
operated.
• Cleaning and user maintenance operations should not be
performed by children unless
supervised.
• Keep the packaging materials
away from children. There is
risk of injury and suffocation.
• Keep all additives used with
the product away from children.
• Before disposing of the
product, cut the power cord
and destroy the loading door
for the safety of children.
2.3 Electrical Safety
• The product must not be
plugged in during installation,
maintenance, cleaning, repair
and transportation.
• If the power cable is damaged,
it must be replaced by a person designated by the manufacturer, authorized service
centre or importer in order to
avoid potential hazards.
• Do not tuck the power cord under the product or to the rear
of the product. Do not put
heavy items on the power
cord.
• Power cord should not be
kinked, pinched and should not
come in contact with any heat
source.
• Do not use an extension cord,
multi-plug or adaptor to operate the product.
• The product should not be
powered via an external switch
such as a timer or should not
be connected to a circuit that
is regularly opened and closed
with a tool.
• The plug should be easily accessible. If this is not possible,
a mechanism that complies
with the electrical legislation
and that disconnects all terminals from the mains (fuse,
switch, main switch, etc.)
should be available on the
electrical installation.
• Do not touch the plug with wet
hands.
• When unplugging the appliance, don’t hold the power
cord, but the plug.
2.4 Transporting Safety
• Unplug the product, empty the
water tank and if any, remove
the water drain connections
prior to transport.
• This product is heavy, do not
handle it by yourself.
IT
EN
EN / 41
Page 42
• Take required precautions
against the risks of falling and
tipping of the product. Do not
crash or drop the product
when transporting.
• Do not use the extruding parts
of the product (such as the
loading door) to move the
product.
• Move the product in upright
position. If it cannot be moved
in upright position, transport
via tilting to the right side when
viewed from the front.
2.5 Installation Safety
• To make the product ready for
installation, ensure that the
electrical installation and water drain are appropriate by
checking the information in the
user’s manual. If it is not suitable for installation, call a qualified electrician and plumber to
make the necessary arrangements. These operations shall
be undertaken by the customer.
• This product is designed for
use at altitudes up to 2000
metres above sea level.
• Check for any damage on the
product before installing it. Do
not have the product installed
if it is damaged.
• Do not ever remove the adjustable legs.
• Place the product on a clean,
level and hard surface and balance with the help of the adjustable legs.
• The gap between the product
and the floor should not be reduced via materials such as
rugs, pieces of wood and
bands. The ventilation holes
under the base of the product
should not be clogged with a
rug.
• The product should be installed in such a way so as not
to clog the ventilation holes.
• Install the product in an environment free of dust with good
ventilation.
• Do not install the product in
close proximity to flammable
and explosive materials and do
not keep flammable and explosive materials near the
product when it is in operation.
• The product should not be installed behind a lockable door,
or a door with bolt where the
product loading door cannot
be completely opened, or a
hinged door where the product
hinge is faced against the
door’s hinges.
EN / 42
Page 43

• Install the product in a place
where periodic maintenance
and cleaning can be done with
ease.
• Place the product with its back
surface facing the wall. (For
models with heating).
• While placing the product, ensure that the back wall does
not come in contact with any
extrusion (a water tap, electrical outlet etc.).
• Place the product with at least
1 cm space between the
product and the furniture
edges.
• Follow the flue connection
rules specified in the manual.
(For models with flue).
• The discharged air should not
be directed to a flue which is
used to discharge the smoke
of devices that use gas or
other fuels. (For models with
flue).
• The ventilation hose should
not be connected to a heating
stove or a chimney flue. (For
models with flue).
• Plug the product to a grounded
outlet protected with an appropriate fuse in align with the
specified type and current
rates. Have an expert electrician set grounding equipment.
Do not use the product without
a grounding conforming with
regional/national regulations.
• Plug the product in a grounded
socket that conforms with the
voltage, current and frequency
values specified in the type label.
• Do not plug the product to
loose, broken, dirty, greasy
sockets or sockets that have
come out of their seats or
sockets with a risk of water
contact.
• The new hose sets supplied
with the product should be
used. Do not re-use the old
hose sets. Do not make attachments to the hoses.
• Place the power cord and
hoses in such a way so as not
to cause a risk of tripping over.
• Make sure that the hose does
not slip or fold if you directly
drain the water from the laundry that is generated by the
condensation of the moisture.
Otherwise, water leaking problem may occur.
• Do not wash the dryer with
hose.
• To use the product on top of a
washing machine, a fixing
aperture should be used
between two products. Have
the fixing aperture installed by
IT
EN
EN / 43
Page 44
the manufacturer, an authorized service centre or a person
specified by the importer.
• Do not use the product without
fixing it on floor-high ground,
such as on a table or cabinet
interior. When used without fixation, it can move and fall over
time, damaging living things in
the environment or the objects
• When the product is placed on
the washing machine, their
combined weight when full
could be around 180 kg. Place
the products on a sturdy floor
with an adequate load carrying
capacity.
• Washing machine cannot be
placed on top of the drying machine.
around it. The carrier floor
must be solid and stable.
Suitable Instalment Table for Washing Machine and Drying Machine
Connection Kit Type Depth Size (DM: Drying Machine, WM: Washing Machine)
Plastic - 54/60 cm with/without arch 60cm DM --> WM≥50 cm / 54 cm DM --> WM≥45 cm
Plastic - 46 cm with/without arch 46 cm DM --> WM≥54 cm
With Shelves - 60 cm 60cm DM --> WM≥50cm
With Shelves - 54cm 54cm DM --> WM≥45cm
2.6 Usage Safety
• The maximum weight of dry
laundry prior to washing is specified in “Technical Specifications” section.
• Do not dry the unwashed items
in the drying machine.
• Do not machine dry clothes exposed to substances like oil,
acetone, alcohol, petroleum,
kerosene, stain remover, turpentine, massage oil, explosives and combustibles,
beeswax and beeswax remover, even if they have been
washed.
• If industrial chemicals are utilized for cleaning, the drying
machine should not be used.
• Softener or similar products
should be used as written in
the softener instruction.
• Rubber foam (latex foam),
shower bonnets, water resistant textiles, rubber supported
materials, clothes with rubber
foam pads, and pillows should
not be dried in the drying machine.
• Yarn and fluffs dangling from
filled and damaged parts can
be dispersed in the machine
and damage your machine in
EN / 44
Page 45

the drying process. Check the
seams of the laundry you are
going to dry.
• The items with hair spray, with
residue of hair product or similar materials should not be
dried in the drying machine.
• Empty the pockets of the
clothes and remove all items
such as matches and lighters.
• Do not stop the drying machine before the completion of
the drying cycle if you won’t be
able to remove all the items
rapidly and to lay them down in
such a way that heat will be
dissipated.
• The last part of the drying machine cycle is conducted
without heating (cooling cycle)
in order to ensure that the
items are kept at a temperature that will not harm the
items.
• Laundry softeners or similar
products should be used in
align with the laundry softener
instructions.
• Do not use the drying machine
without the fiber filter.
• Do not allow fiber to accumulate around the drying machine.
• Do not operate the dryer with a
damaged fiber filter. Otherwise, the machine may be
damaged by the collected fluff
and your machine's drying performance may be adversely affected.
• Clean the fiber filters after
each drying process.
• After washing the fiber filters,
dry them. Do not use filters
wet.
• To prevent back flow of gas to
the room from the devices that
consume other fuels, including
open fire, appropriate ventilation should be provided (For
models with flue).
• Do not operate the product together with heaters such as
coal stove and gas heater and
a chimney. Airflow can cause
the flue to catch fire (For models with flue).
• Do not lean or sit on the loading door when it is open, the
product may tip over.
• Do not get on the product.
• Do not place a source of flame
(burning candles, cigarettes,
etc.) on the product or in the vicinity of it. Do not keep flammable/explosive substances.
• Do not touch the drum as it revolves.
• During operation, the back wall
of the product becomes very
hot. Do not touch the back of
the product during drying or
IT
EN
EN / 45
Page 46
immediately after the completion of drying (For models with
heating).
• Do not touch the inner surface
of the drum while adding or removing clothes during a continuing programme. The drum
surface is hot.
• Do not press the buttons with
sharp objects such as forks,
knives, with your nails etc.
• Do not operate the faulty or
damaged product. Unplug the
product (or turn off the fuse to
which it is connected) and call
the manufacturer, an authorized service agent or a person
specified by the importer.
• Unplug the product when not
in use.
2.7 Maintenance and Cleaning Safety
• Do not wash the product by
spraying or pouring water on it.
Do not use a pressure cleaner,
steam cleaner, hose or pressurised gun to clean the
product.
• Do not use sharp or abrasive
tools to clean the product.
• Do not use materials such as
household cleaning agents,
soaps, detergents, gas, gasoline, thinner, alcohol, wax, etc.
to clean the product.
• The fiber filter should be frequently cleaned. After each
drying cycle, clean the fiber filter and the inner surface of the
loading door.
• Clean the accumulated fiber
on the fins of the evaporator
behind the filter drawer with a
vacuum cleaner. You can clean
by hand, provided you wear
protective gloves. Do not try to
clean with bare hands. Evaporator fins may damage your
hands (for products with heat
pump).
• Due to fire and explosion hazard, do not use solutions,
cleaning materials, steel wool
or similar materials and tools
to clean sensors.
• Clean the flue (For models with
flue).
• Do not drink the condensed
water. Condensed water is not
potable water. This water can
harm human and animal health
if drunk.
2.8 Lighting Safety
• Contact an authorized service
when you need to replace the
LED/bulb used for lighting (for
products with lighting).
EN / 46
Page 47

3 Environmental instructions
3.1 Compliance with the WEEE Regulations and Waste Disposal
This product does not contain
the dangerous and prohibited
materials indicated in the "Regulation on The Control of
Waste Electrical and Electronic
Equipment” published by Ministry of Environment and Urbanisation of
the Republic of Turkey. Complies with
WEEE Regulation. This product was manufactured from recyclable and reusable high
quality parts and materials. Therefore, do
not dispose of this product with domestic
and other wastes at the end of its life cycle.
Take it to a collection point for recycling of
electrical and electronic equipment. You
can ask your local administration about
these collection points. Help protect the environment and natural resources by delivering the used products for recycling.
Also R290 is a flammable refrigerant. Therefore ensure that the system and pipes are not damaged
during operation and transportation. Keep the product away from
possible heat sources, otherwise it
may catch fire if damaged. Do not
dispose of the product by throwing
it into fire.
3.3 Standard Conformity and Test Information EU Declaration of Conformity
The development, manufacturing
and sales phases of this product is
conducted in conformity with the
safety rules specified in all related
instructions of the European Union
IT
EN
3.2 Packaging Information
The product's packaging is made of recyclable materials in accordance with the National Legislation. Do not dispose of the
packaging waste with the household waste
or other wastes, deliver it to the packaging
collection areas specified by local authorities.
EN / 47
Page 48
4 Technical Specifications
Height (adjustable) (cm) 84,6 * / 86,6 **
Width (cm) 59.8
Depth (cm) 67.2
Capacity (max.) (kg) 10***
Net weight (±10%) (kg) 48
Voltage
See the type label****Power
Main Model Code
* Min. height: Height with the adjustable legs closed.
** Max. height: Height with the adjustable legs opened at maximum height.
*** Weight of dry laundry before washing.
**** Type label is under the door on the drying machine.
In order to increase the drying machine’s quality, the technical specifications may be
changed without prior notice.
Figures in this manual are schematic and may not exactly match the product.
The values provided in the symbols on the drying machine or its accompanying documents
are values obtained in the laboratory environment in accordance with the respective standards. These values may differ depending on the use and ambient conditions of the drying
machine.
EN / 48
Page 49
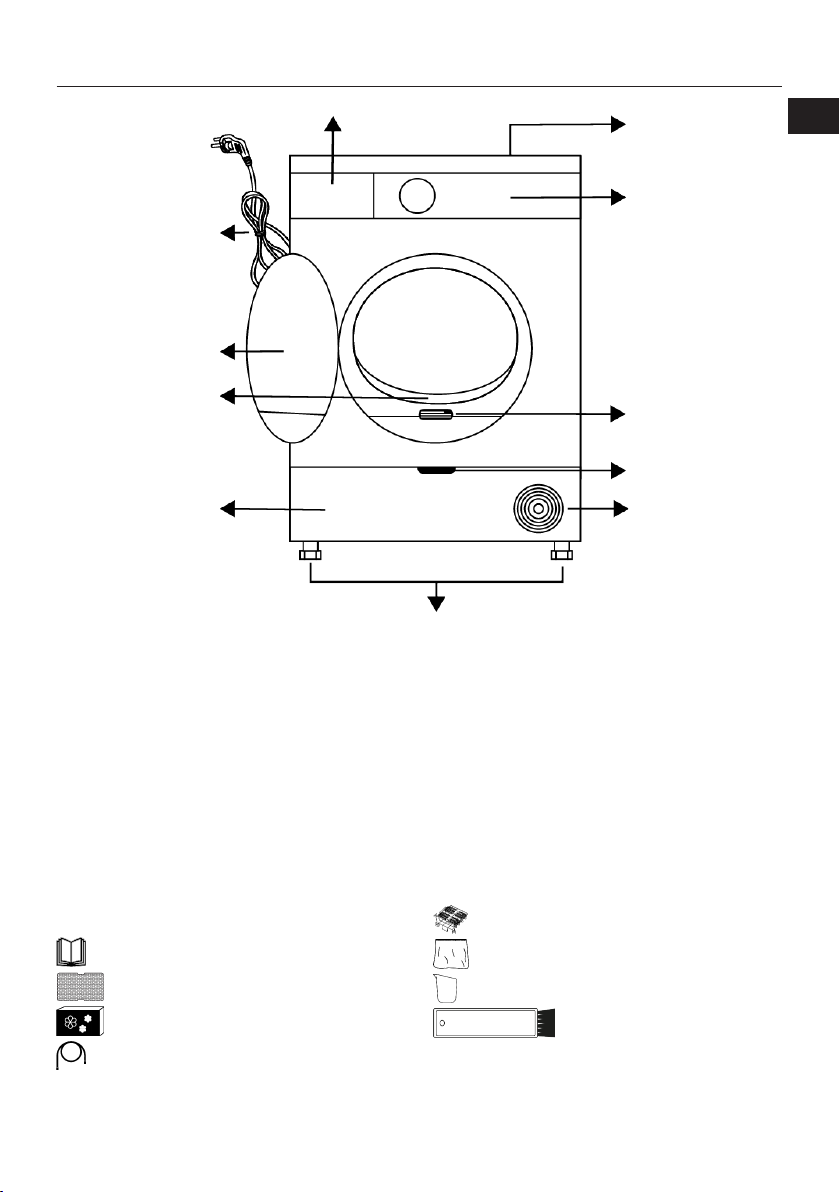
5 General Appearance
1
2
3
4
5
6
7
8
9
10
11
1 Upper table 2 Control Panel
3 Type label 4 Kickplate opening handle
5 Ventilation grills 6 Adjustable legs
7 For the models with tank located at
the bottom, the water tank is inside
the kickplate
9 Loading door 10 Power cord
11 Water tank drawer (for models with
the tank on top)
5.1 Scope of Delivery
: User’s Manual
: Filter drawer sponge*
: Odour capsule group*
: Water discharge hose*
*The optional accessory may not be available in the product.
8 Fiber filter
: Drying basket*
: Filter cloth*
: Water container*
: Brush*
IT
EN
EN / 49
Page 50
6 First Operation
Remove the protective foil and adhesive advertising label if available in your product.
However, please do not remove the
labels (e.g. type label) that appear
after the lid is opened.
7 Installation
After the device is installed
• operate the machine for the first time ac-
cording to user’s manual.
Read the “Safety Instructions” first.
Before consulting the nearest Authorized
Service for installing the drying machine,
see the information in the user guide and
make sure the electric and water utilities
are as required. If it is not suitable for installation, call a qualified electrician and
plumber to make the necessary arrangements.
It is customer's responsibility to prepare
the location the drying machine shall be
placed on and also have power and waste
water installation prepared.
Check for any damages on the drying machine before installing it. If
drying machine is damaged, do not
get it installed. Damaged products
cause a risk for your safety. Wait
for 12 hours before operating your
dryer after initial installation.
7.1 Right Place for Installation
NOTE: The product includes a cooling
agent and if the product is operated right
after it is transported, it may get damaged.
After each time the product is moved, it
shall be left to rest for 12 hours.
• Install the drying machine on a flat and
stable surface.
• Dryer machine is heavy. Do not move it
by yourself.
• Operate the drying machine in an environment free of dust with good ventilation.
• The gap between the drying machine and
the floor should not be reduced via materials such as rugs, pieces of wood and
bands.
• Do not block the ventilation grilles of the
drying machine.
• There shall not be doors that can be
locked, sliding doors or hinged doors
near the installation environment of the
drying machine that may block the loading door to be opened.
• Once the drying machine is installed, the
connections must stay stable. While placing the drying machine, ensure that the
back wall does not come in contact with
any extrusion (a water tap, electrical outlet etc.).
• Place the drying machine with at least 1
cm space between the product and the
furniture edges.
• Your drying machine is suitable to be operated between +5 °C and +35 °C. If operated outside this temperature range, your
drying machine’s operation may be compromised and get damaged.
• The drying machine should be placed
with the back side facing a wall.
Do not place the drying machine on
its power cord.
EN / 50
Page 51
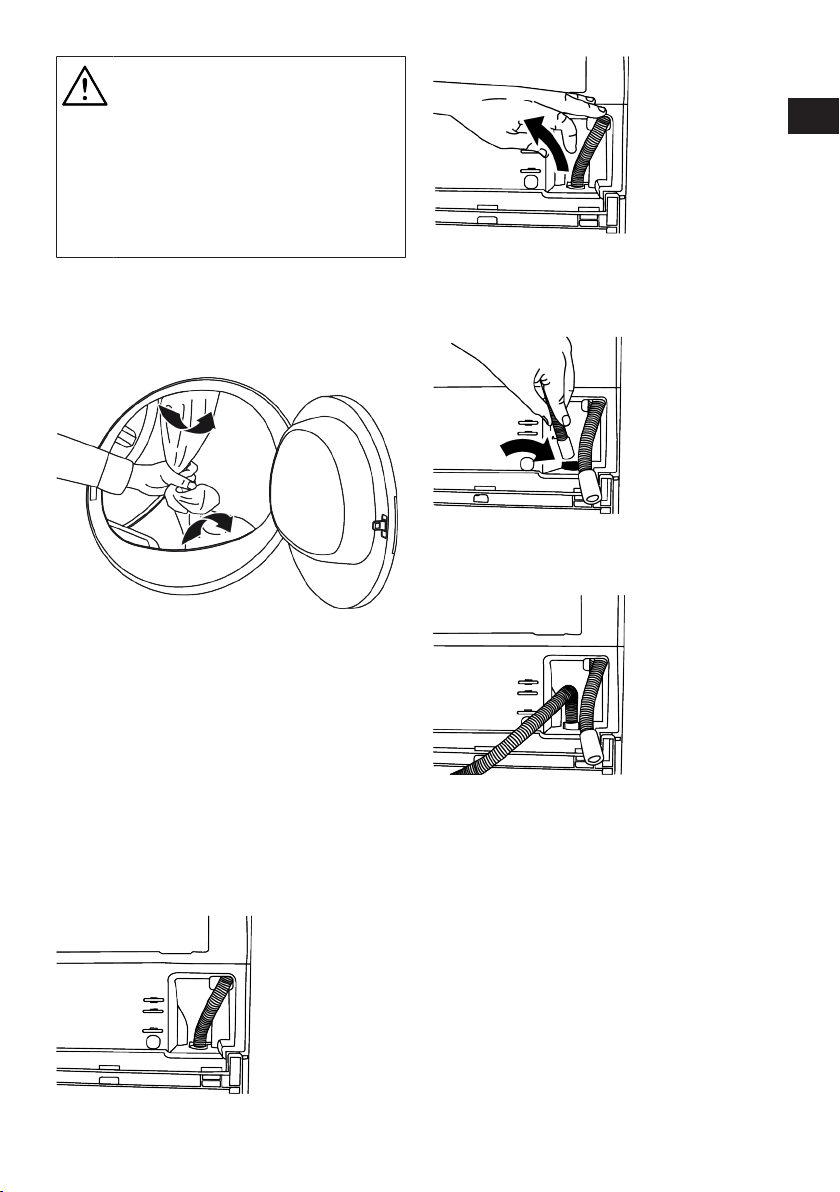
Ignore this warning if the product
system does not contain R290*.
The dryer has R290 refrigerant gas.
R290 is an environmentally friendly
but flammable cooling gas. Make
sure the air intake of the dryer is
open and well ventilated. Keep possible flame sources away from the
dryer.
7.2 Removing the Shipping Safety Group
Remove the shipping safety group prior to
first use of the product.
NOTE: Do not leave an accessory or any
parts of the shipping safety group inside
the drum.
IT
EN
2. Insert one end of the water discharge
hose supplied with the drying machine
to where you have removed the hose of
the drying machine.
3. Fix the other end of the water discharge
hose directly to waste water drainage or
a sink.
7.3 Water Connection
Instead of periodically draining the water
accumulated in the water tank, you can discharge it directly via the water discharge
hose supplied with the drying machine.
Connecting the water drainage hose
1. Manually pull the end of the hose behind
the dryer from where it is connected. Do
not use a tool to remove the hose.
EN / 51
Page 52
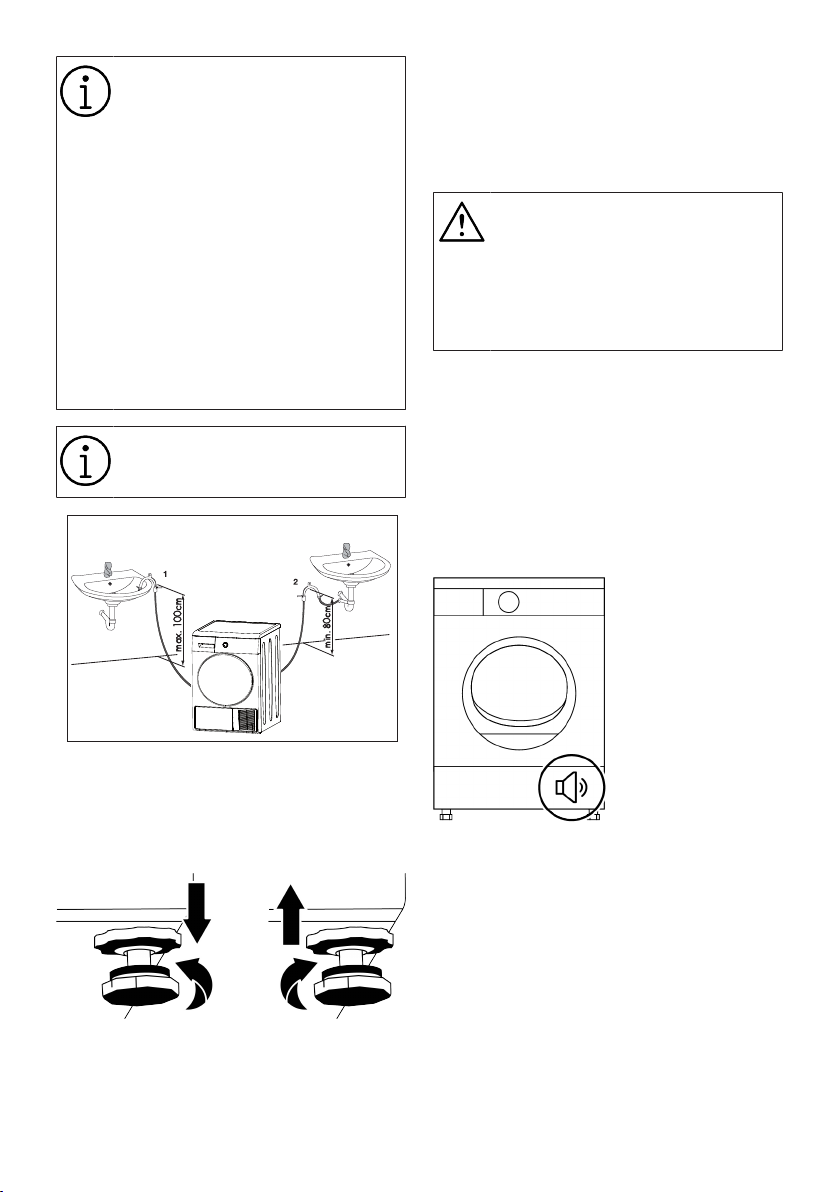
Fix the water discharge hose at a
maximum height of 80 cm.
Ensure that the water discharge
hose does not get kinked, collapsed
or pressed on between the discharge and the drying machine.
Hose connection should be made
in such a way that it won’t come
out of its location. Leaked water
may cause damage.
Do not extend the water drainage
hose.
Check whether the water flows at
an adequate rate or not. The drainage line should not be closed or
clogged.
If an accessory package is provided
with your product, check the detailed instructions.
7.5 Moving the Drying Machine
• Drain the water in the drying machine
completely.
• If the product is connected via direct discharge, remove the hose connections.
The drying machine is recommended to be moved in upright position. If it cannot be moved in upright position, transport via tilting to
the right side when viewed from the
front. Wait for 12 hours prior to operating the drying machine.
7.6 Warnings Regarding the Noise
While the product is being operated, it is
normal for a metallic noise to come from
the compressor from time to time.
The water that accumulates while the
product is being operated, is pumped to the
water tank via the pump. It is normal to
hear pumping sounds from the product during this operation.
7.4 Adjusting the Legs
Until the drying machine stands level and
sturdy, adjust the legs by turning them left
and right.
7.7 Replacing the Lighting Bulb
If your drying machine has drum lighting
lamp;
Consult the authorized service to replace
the bulb/LED used in lighting your drying
machine. The bulb in this product is not
suitable for home lighting. The intended
use of this lamp is to ensure safely loading
the laundry to the drying machine. The
EN / 52
Page 53

lamps used in this appliance should be resistant to inappropriate physical conditions
such as temperatures over 50 °C.
8 Preparation
IT
EN
Read the “Safety Instructions” first!
8.1 Laundry Suitable for Drying in Drying Machine
Laundry that are not drying machine safe
may damage the appliance and the laundry
during drying. Follow the instructions on
the labels of the laundry to be dried. Only
dry the laundry with the “drying machine
safe” labels by choosing the suitable programs.
8.2 Laundry Not Suitable for Drying in Drying Machine
• Undergarments with metal supports
should not be dried in drying machine. If
these metal supports get loose and
ripped from the garment, they may damage the machine.
• Delicate embroidery textiles, woollen and
silk garments, garments manufactured
from delicate and valuable textiles, non
breathing garments and tulle curtains
should not be dried in drying machine.
• Pay attention to the drying symbols on
the label on the laundry. Dry laundry with
the label or symbol that says it is suitable
for drying in the dryer.
8.3 Preparing the Laundry to Be Dried
Items such as coins, metal parts, needles,
nails, screws, stones etc. may damage the
drum group of the product or may cause
functional operation issues. Therefore
check all laundry that will be loaded to the
product.
• Dry the laundry with metal accessories
such as zippers by turning them inside
out.
• Close the zippers, hooks and clasps, button up the covers’ buttons, tie textile
belts and apron belts.
8.4 What to Do for Energy Saving
Use the highest possible spinning cycle as
you wash the laundry. Therefore you can reduce the drying period and reduce energy
consumption. Sort the laundry based on
their types and thickness. Dry same types
of laundry together. For instance thin kitchen towels and table cloths dry faster than
thick bathroom towels.
• Follow the recommendations in the
user’s manual for program selection.
• During drying do not open the loading
door unless necessary. If you are required to open the loading door, do not
keep it open for too long.
• Do not add wet laundry as the drying machine operates.
• Clean the Fiber Filter before and after
each drying session.
• For models with condensation, be sure to
clean the condenser regularly at least
once a month or after 30 drying sessions.
• Make sure the filters are clean. Refer to
maintenance and cleaning section for details.
• For models with flue, follow the flue connection rules specified in the guides and
clean the flue.
• During drying session, properly ventilate
the environment where the drying machine is located.
• In models with heat pump, check the condenser at least every six months and
clean it if it is dirty.
EN / 53
Page 54
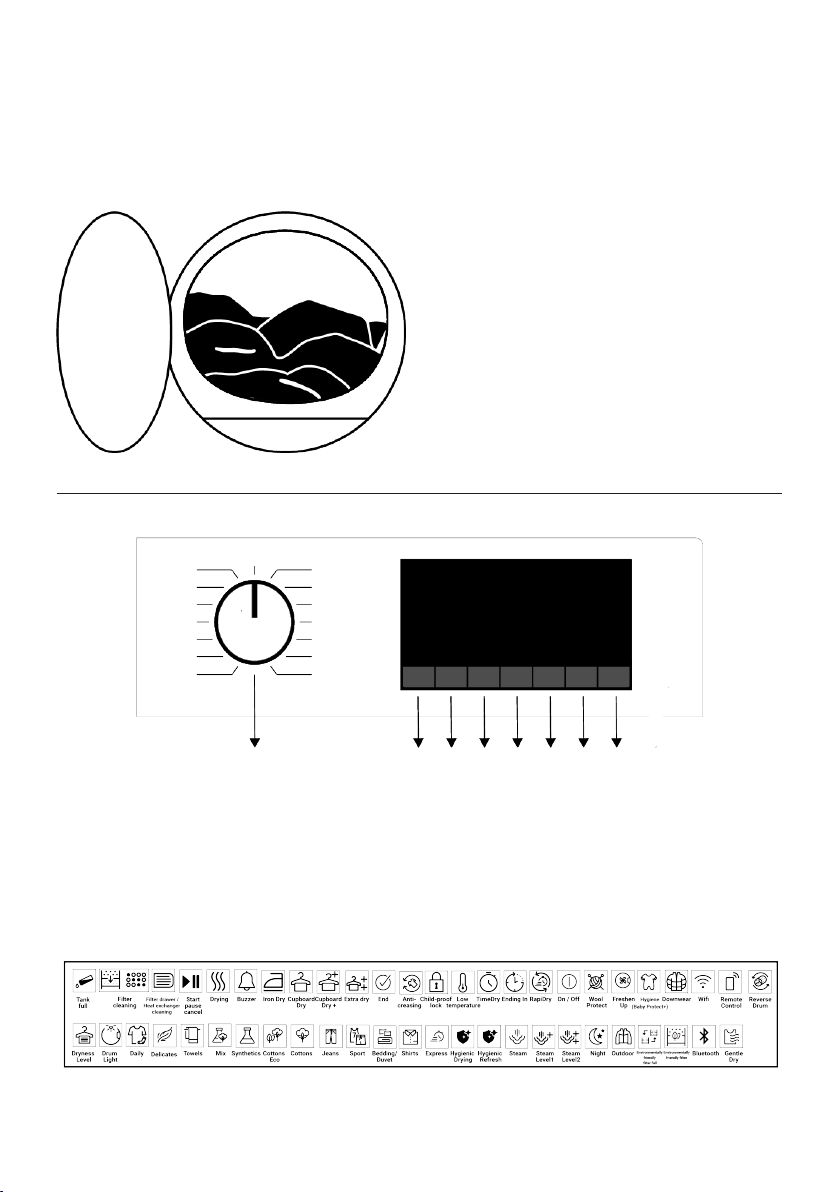
• If you are using environment friendly fil-
1 2 3 4 5 6 7 8
ter, you are not required to clean the filter
after every cycle. When the environment
friendly icon is lit on the screen, change
the filter cloth.
8.5 Correct Load Capacity
9 Running the Product
9.1 Control Panel
If the laundry in the product exceed maximum loading capacity, it may not operate
as intended and may cause material damage or product damage. For each program,
follow the maximum loading capacity. Below you can see the laundry and their approximate weight.
Duvet Cover Set: 1000-1500 g
Flat Sheet: 350-500 g
Table Cover: 250-700 g
Towel: 350-700 g
Dress: 350-500 g
Denim Trousers: 500-700 g
T-shirt: 125-200 g
Blouse: 150-250 g
Shirt: 200-300 g
1 On/Off/Programme selection button. 2 Dryness level selection button.
3 Drum light and wrinkle prevention se-
lection button.
5 Low temperature selection button. 6 Time program selection button.
7 End time selection button. 8 Start / Standby selection button.
4 Audible warning and child lock selec-
tion button.
9.2 Symbols
EN / 54
Page 55
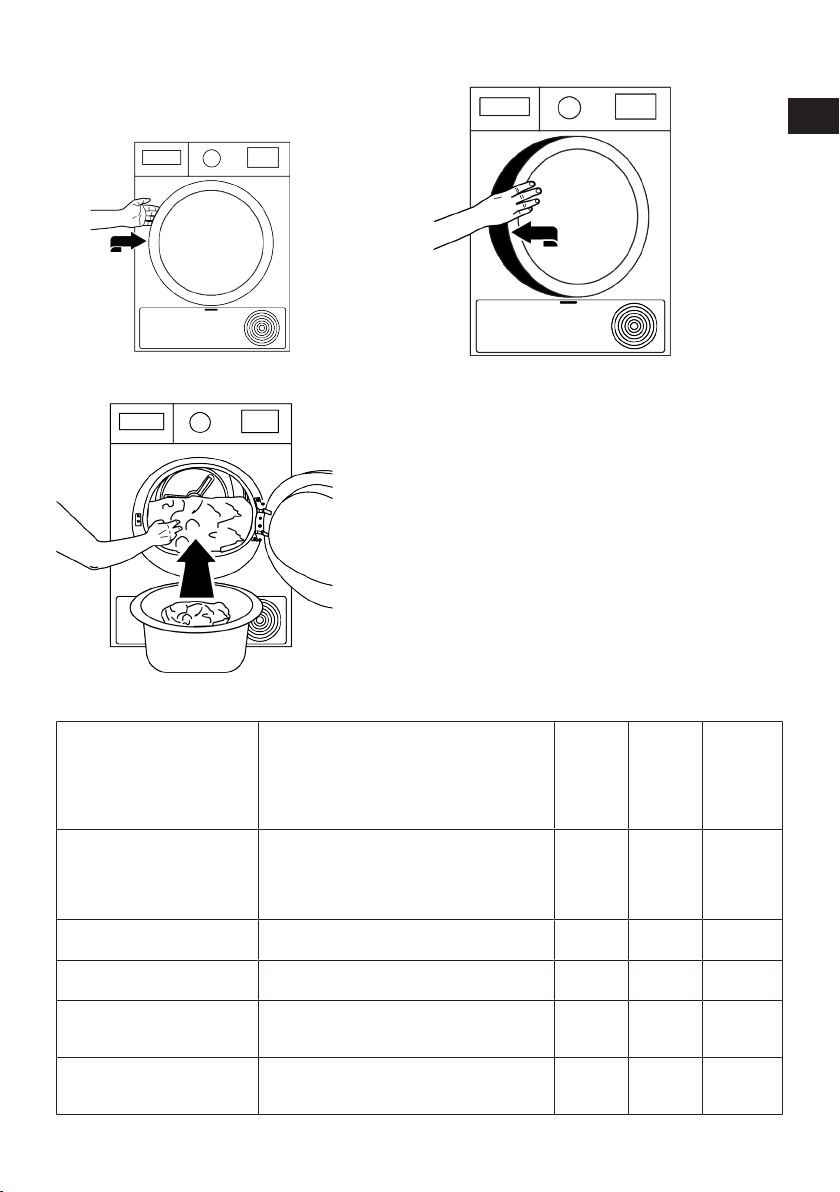
9.3 Preparation of Drying Machine
• Plug the drying machine.
• Open the loading door.
• Push and close the loading door.
IT
EN
• Place the laundry in the drying machine
without jamming them.
• Ensure that no laundry is jammed to the
loading door.
• Do not close the loading door with force.
• Select the desired program by using On/
Off program selection button and the machine will turn on.
• Selecting the program with the On/Off
program selection button does not mean
that the program will get started. Press
Start / Standby button to start the program.
9.4 Program Selection and Consumption Chart
Programs Program Definition
You can dry your heat-resistant cotton textiles
Cotone / Cottons
Cotone Eco / Cottons Eco
Cotone pronto da stirare / Cottons Iron dry
Sintetici / Synthetics
Mix (Quotidiano) / Mix(Daily)
with this program. A drying setting suitable for
the thickness of the products to be dried and
the desired level of dryness should be selected.
It dries single layer, casual cotton textiles in
the most economical way.
Single layer, daily used cotton textiles are
dried as slightly damp, ready to be ironed.
You can dry all your synthetic textiles with this
program. A drying setting suitable for the level
of dryness you desire should be selected.
Use it to dry the synthetic and cotton laundry
that do not bleed colour together. Sports - fitness garments can be dried with this program.
Spin
Capacity
(kg)
speed of
the washing machine
(rpm)
10 1000 230
10 1000 220
10 1000 160
6 800 100
6 1000 175
Drying
Time (min)
EN / 55
Page 56
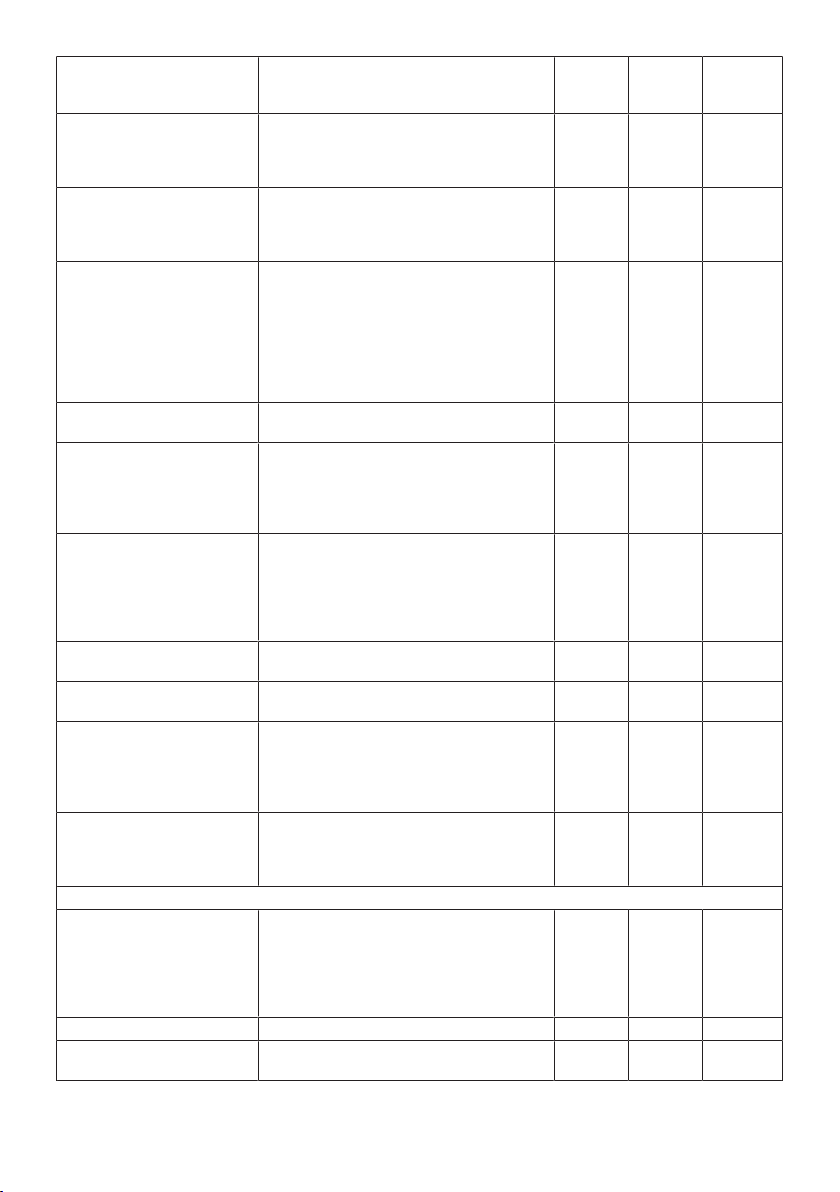
Lana / Wool protect
Notte / Night
Delicati / Gentle Care
Programmi a tempo/SteamCure / Time Programmes/
Steamcure
Jeans
Sport / Outdoor/Sports
Piumino / Duvet/Downwear
Camicie / Shirts
Xpress / Super Xpress / Daily
Express
Asciugatura Hygiene / Hygienic Drying
Refresh Hygiene / Hygienic Refresh
Energy consumption values
Programs Capacity (kg)
Cotone Eco* / Cottons Eco* 10 1000 60% 1,78
Cotone Pronto Stiro / Cottons
Iron dry
Use to safely dry woollen laundry that can be
washed in the washing machine with a label
that says dryable in the dryer.
With this program, the minimum degree of
noise and sound is emitted into the working
environment. In this program you can quietly
dry your cotton or mixed synthetic clothes.
You can dry your delicate clothes suitable for
drying or clothes that are recommended for
hand wash (silk blouses, thin underwear etc.)
in low temperatures.
You can select the timer programs from 10
minutes to 160 minutes to achieve the desired
final drying level under low temperature. In
this program, the dryer dries for the time set
regardless of the dryness of the laundry.
SteamCure is a refresher function that helps
ironing in under-worn dry laundry and aims to
reduce airborne (cigarettes, food, etc.) odours.
Use to dry denim clothes spun in the high
speed in the washing machine.
You can dry your multilayered and water/windproof functional textile products made of synthetic, cotton or mixed fabrics used for outdoor activities and outdoor sports in this program.
You can dry your feather filled and fiber filled
textiles that are drying machine safe in one
piece. In this program you can dry double size
quilts, pillows and coats in single piece. Turn
clothes such as coats, jackets inside out for
drying.
Dries shirts and delicate garments and causes
less wrinkles for easy ironing.
Use this program to get 2 shirts ready for ironing.
It is the program in which you can dry your
washed textile products you want to provide
with extra hygiene (baby clothes, underwear,
towels, etc.). It provides high hygiene for your
textiles via high heat effect.
You can use this program to provide hygiene
to your under-worn dry laundry that you do not
want to wash. It provides high hygiene for your
dry textiles via high heat effect.
10 1000 60% 1,50
5 1000 148
8 1200 240
4 1000 80
- - -
4 1200 130
2 1000 135
- 800 165
1,5 1200 50
0,5 1200 30
5 800 200
1,5 - 120
Spin
speed of
the washing machine
(rpm)
Approx.
humidity
left
Energy consumption
value kWh
EN / 56
Page 57
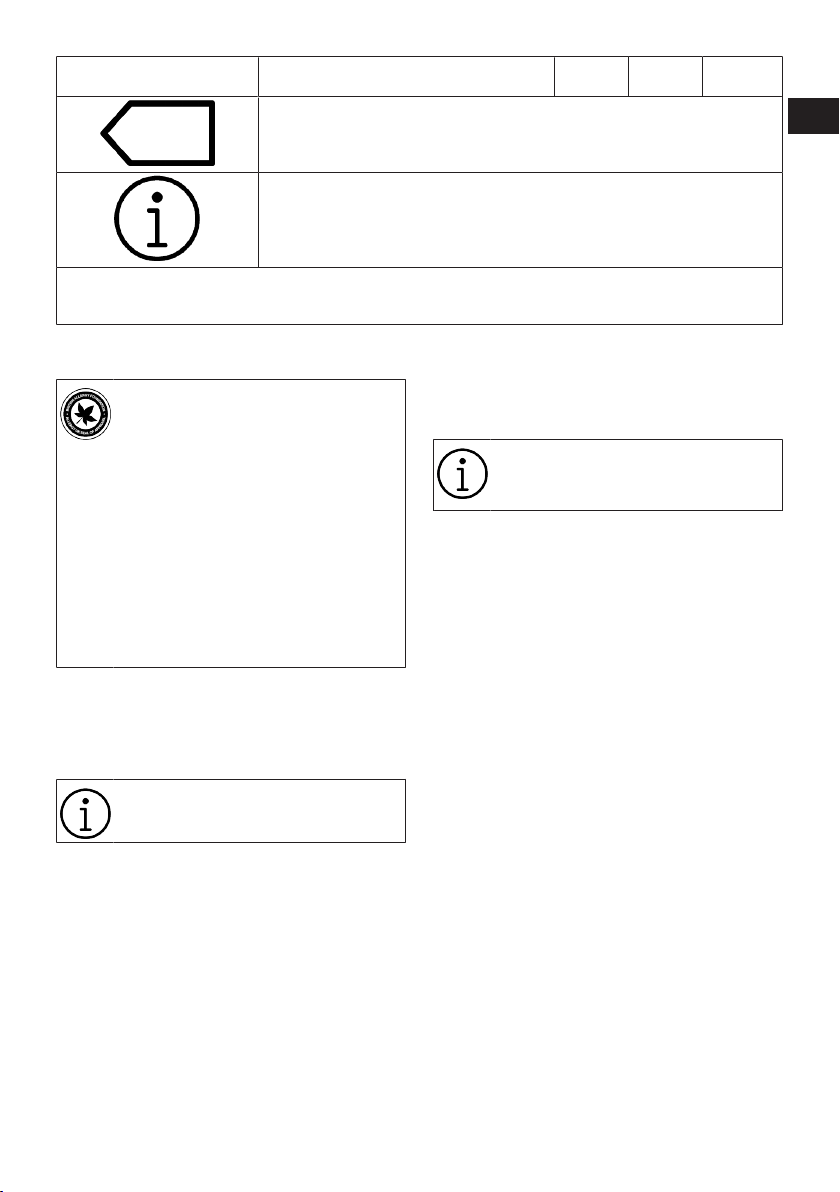
Sintetici Pronto Stiro / Synthetics cupboard dry
“Cotton Economic Dryness program” is a standard drying program that may be utilized with full or half load and where the information is provided on the product label
or the receipt. This program is the most efficient one in terms of energy consumption for drying normal wet cotton loads.
If you are regularly drying a maximum 10 kg of cotton laundry, in order to prevent
the drying machine to stop operation during a program due to water tank being
filled completely, it is recommended to connect the water discharge hose. (See
“Connecting the water drainage hose)
*Energy Label standard programme EN 61121 All the values in the table are determined according to the EN 61121
standard. Consumption values may vary from the values in the chart depending on laundry type, spin speed, ambient conditions and voltage levels.
6 800 40% 0,80
IT
EN
9.5 Auxiliary Functions
Allergy UK is the trademark of the
British Allergy Foundation. The Seal
of Approval has been created to
guide people requesting an advice
that the product significantly reduces the amount of the allergens
in the environment where allergic
people are present or the product
restricts/reduces/eliminates the allergens. Its purpose is to provide
evidence that the products have
been scientifically tested or analysed to yield measurable results.
Dryness Level
Dryness level button is used for adjusting
the desired dryness level. Program time
may change depending on the selection.
You can activate this function only
prior to operation of program.
Wrinkle Prevention
You can turn on and off the wrinkle prevention function by pressing the wrinkle prevention selection button. If you will not take
the laundry out immediately after the programme has been completed, you may use
Wrinkle prevention function to prevent
wrinkling of your laundry.
Audible Warning
Drying machine makes an audible warning
when the program is completed. Press the
“Audible Warning” button if you do not want
audible warning. When you press the audible warning button, its light goes off and it
does not sound when the program is completed.
You can select this function before
the program starts or after the program has started.
Low Temperature
You can activate this function only prior to
operation of program. If you want to dry
your laundry at a lower temperature, you
can activate this function. Once activated,
the program will be extended.
End Time
You can delay the end time of the program
up to 24 hours with end time function.
1. Open the loading door and place the
laundry.
2. Select the drying program.
3. Press the End Time selection button and
set the delay time you wish. End Time
LED turns on. (When the button is continuously pressed, End Time proceeds
non-stop).
4. Press the Start / Pause button. End
Time countdown begins. The “:” sign in
the middle of displayed delay time
flashes.
EN / 57
Page 58
You can add or remove laundry
within end time. Displayed time is
the sum of normal drying time and
end time. End Time LED turns off at
the end of countdown, the drying
starts and the drying LED turns on.
Changing the End Time
If you want to change the duration during
the countdown:
1. Cancel the program by turning On / Off /
Program selection button after pressing
the Start / Standby selection button.
2. Select the desired program and repeat
the End Time selection process.
Cancelling the End Time Function
If you want to cancel the end time countdown and start the program immediately:
1. Cancel the program by turning On / Off /
Program selection button after pressing
the Start / Standby selection button.
2. Select the desired program and press
the Start / Standby button.
When you activate the end time
function in your dryer, your machine
rotates periodically to prevent
wrinkles and the odour of moisture.
Only the engine power supply will
be activated during the wrinkle prevention phase. In addition, if you do
not open the lid of your machine or
make any interventions, the antiwrinkle function will be activated
after the program is finished.
Drum Light
You can turn on and off the drum light by
pressing this button. The light turns on
when the button is pressed and turns off
after a certain time.
9.6 Warning Indicators
Warning indicators may vary depending on the model of your drying machine.
Filter cleaning
When the program is completed, the warning indicator for filter cleaning turns on.
Water tank
If the water tank fills up while the program
is continuing, the warning indicator starts
flashing and the machine goes to standby.
In this case, empty the water tank and start
the program by pressing the Start / Standby
button. Warning indicator turns off and program resumes.
Cleaning of filter drawer/heat exchanger
Warning symbol flashes periodically to remind that filter drawer must be cleaned.
9.7 Starting the Program
Press the Start/Standby button to start the
program.
Start/Standby and Drying indicators turn on
to show that program has started.
9.8 Child Lock
The drying machine has a child lock which
prevents the program flow from being affected when the buttons are pressed during
a program. When the Child Lock is activated, all buttons on the panel except the
On/Off program selection button are deactivated.
1. Press the Audible Warning button for 3
seconds in order to activate the child
lock.
2. When the Child Lock is activated, the
child lock warning indicator on the
screen turns on.
When the child lock is active;
When the drying machine operates or is in
standby state the indicator symbols will not
change upon changing the position of the
program selection button.
1. The child lock has to be deactivated to
be able to start a new program after the
current program is finished or to be able
to interfere with the current program.
EN / 58
Page 59
2. To deactivate the child lock, keep the
same button pressed for 3 seconds
again.
When the drying machine is operated and the child lock is active, if
the program selection button is
turned, a double beeping noise will
be heard. If the child lock is deactivated before the program selection
button is turned to its original place,
the program will be terminated because the program selection button
will be displaced.
9.9 Changing the Program After It Is
Started
You can change the program you selected
to dry your laundry with a different program
after the drying machine starts running.
1. For example, turn the On/Off/Program
Selection button to select the Extra Dry
program in order to select the Extra Dry
program instead of Ironing Dryness
after pressing the Start / Standby selection button.
2. Press the Start/Standby button to start
the program.
Adding and removing clothes during
standby state
If you want to add or remove clothes to/
from the drying machine after the drying
program has started:
1. Press the Start/Standby button to put
the drying machine in Standby state.
The drying operation stops.
2. Open the loading door while in Standby
state, and close the door after you remove or add laundry.
3. Press the Start/Standby button to start
the program.
Adding laundry after the drying operation starts may cause the dried
laundry inside the drying machine
to mix with wet laundry and leave
the laundry damp at the end of operation.
Adding or removing laundry during
drying may be repeated as many
times as you wish. But this operation continuously interrupts the drying operation and thus increases
program time and energy consumption. So, it is recommended to add
laundry before the program starts.
If a new program is selected by
turning the program selection button while the drying machine is in
standby state the running program
terminates.
Do not touch the inner surface of
the drum while adding or removing
clothes during a continuing program. The drum surface is hot.
9.10 Cancelling the Program
If you want to cancel the program and terminate the drying operation for any reason
after the drying machine starts running,
turn the On/Off/Program Selection button
after pressing the Start / Standby selection
button; and the program terminates.
The inside of the drying machine
shall be extremely hot when you
cancel the program during machine
operation, so run the refreshing program to allow it to cool down.
9.11 End of Program
When the program ends, the LEDs of End/
Wrinkle Prevention and Fiber Filter Cleaning
Warning on the program follow-up indicator
turn on. Loading door can be opened and
drying machine is ready for another operation.
Turn the On/Off/Program Selection button
to On/Off position in order to turn the drying machine off.
EN / 59
IT
EN
Page 60

If the wrinkle prevention mode is
active and the laundry is not removed after the program is completed, the wrinkle prevention function activates for 2 hours to prevent
the laundry inside the machine to
get wrinkled. The program turns the
laundry with 10-minute intervals to
prevent them from wrinkling.
9.12 Odour Feature
If your drying machine has odour feature,
read the ProScent user’s manual to use this
feature.
9.13 SteamCure Odour and Wrinkle
Removal Function
SteamCure is a refresher function that
helps ironing in under-worn dry laundry and
aims to reduce airborne (cigarettes, food,
etc.) odours.
It is recommended to wash the clothes in
order to remove the odours that can be absorbed by the clothes such as perfume, deodorant and sweat odour.
Do not dry products containing sharp and
hard accessories and leather.
Filling the water tank
A blue paddle in the machine performs the
watering process of the laundry.
If the paddle is on the top, you can turn the
drum manually to bring it to the lower position and fill the water.
Before using the Steamcure program, the
maximum level of water in the filling container must be manually filled into the
paddle.
Tap or drinking water should be used for
wrinkle removal.
A few drops of water that may overflow
from the paddle during filling will not cause
a problem.
Do not use additives or descaling
agents.
Do not use liquid chemicals and
chemicals that can be dissolved
with liquids.
Starting the Program
The wing should be brought to the lower
position and should be filled with water up
to the marked area with the filling container. The SteamCure program must be
selected.
When you select the program, the screen
time will appear as 10 minutes. The time
program is set to the desired time by pressing the selection button and the Start/
Standy-By button is pressed.
For an effective odour removal,
it is recommended to operate 1-6 pieces of
dry clothing for 50 minutes.
This function does not clean clothes, it reduces the odours and wrinkles and allows
you to wear them again.
EN / 60
Page 61

10 Maintenance and Cleaning
IT
Read the “Safety Instructions” first!
If it is cleaned regularly, the life of the
product will be extended and common
problems will be reduced.
10.1 Fiber Filters (internal and ex-
ternal filters) / Cleaning of the
Interior Surface of the Loading
Door
The hair and fibers that are separated from
the laundry during drying process is collected by the Fiber Filter.
After each drying cycle, clean the fiber filter
and the inner surface of the loading door.
NOTE: Your drying machine has 2 fiber filters with one placed inside the other. Do
not operate the product without the fiber filters.
To clean the fiber filters:
1. Open the loading door.
2. Hold the first part (inner filter) of the two
part fiber filter and remove it by pulling it
upwards.
Ensure that hair, fiber and cotton
balls do not fall into the open slot
where the filters are installed.
4. Open both of the fiber filters (outer and
inner filters) and remove the fibers with
your hands or with the brush on the air
deflector. You can also clean the hair in
the filters with a vacuum cleaner.
EN
3. Remove the second part (outer filter) by
pulling it upwards.
5. Clean both filters under running water in
reverse direction of fiber accumulation
with your hand or with a soft brush. Dry
the filters before placing them back.
EN / 61
Page 62
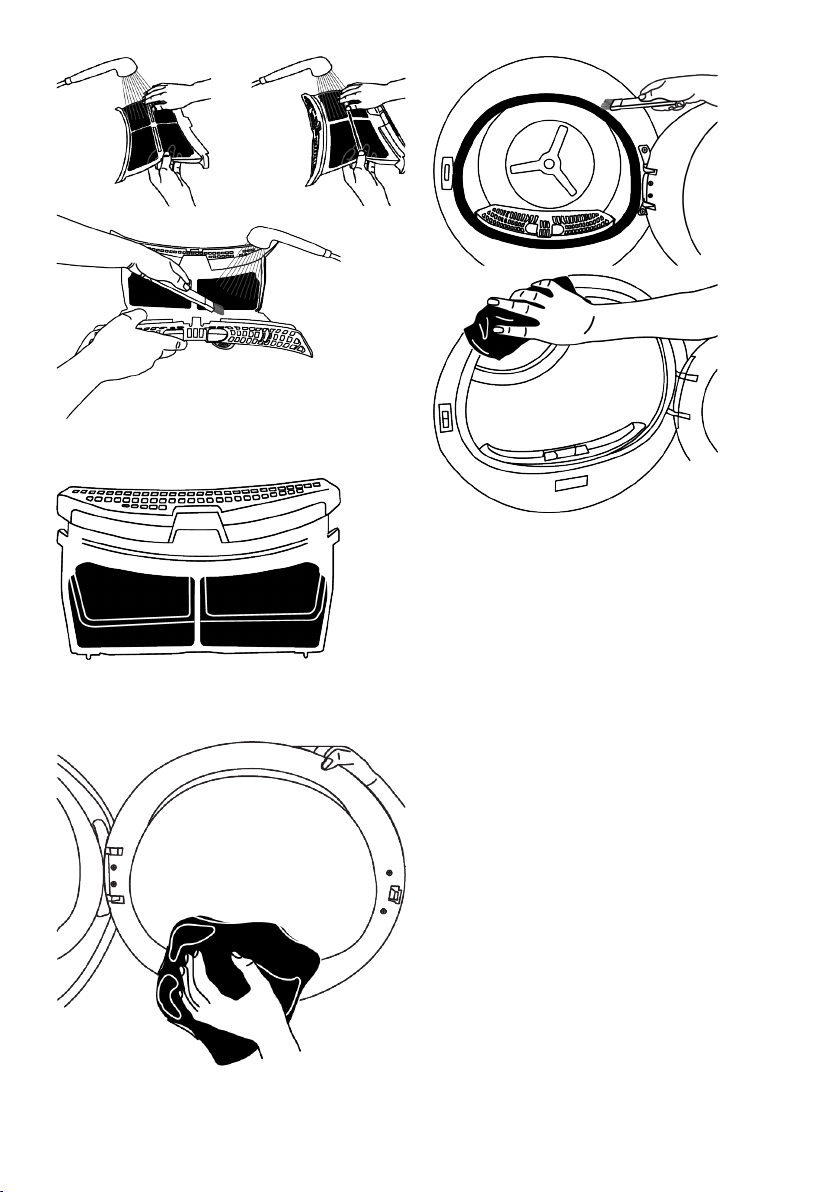
6. Insert the fiber filters on one another
and place them back in their place.
7. Clean all the inner surfaces of the loading door and its gasket with a soft damp
cloth or the brush on the air deflector.
10.2 Cleaning the Sensor
The drying machine has humidity sensors
that detect whether the laundry is dry or
not.
To clean the sensors:
1. Open the drying machine loading door.
2. If the machine is still hot due to drying
operation, wait until it cools.
3. Clean the metal surfaces of the sensor
with a soft cloth dampened with vinegar
and then dry.
4. Clean the metal surfaces of the sensor 4
times a year.
EN / 62
Page 63
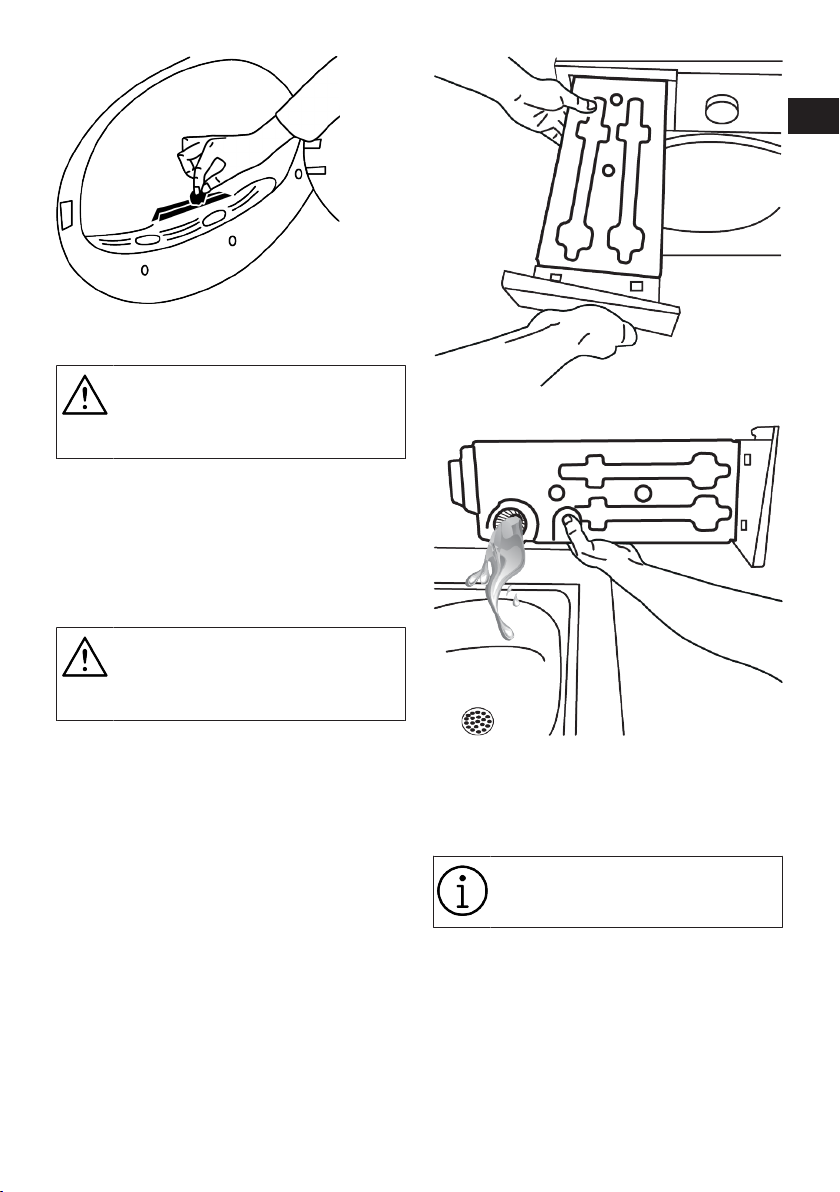
NOTE: Do not use metal tools to clean the
sensor’s metal surfaces.
Due to fire and explosion hazard,
do not use solutions, cleaning materials or similar materials to clean
sensors.
10.3 Emptying the Water Tank
During drying, the moisture is removed
from the laundry and condensed, then the
water is accumulated in the water tank.
Empty the water tank after each drying session.
Condensed water is not potable water!
Do not ever remove the water tank
while the program is running!
If you forget to empty the water tank, during
the next drying sessions the machine will
stop operating when the water tank completely fills and a Water Tank warning icon
will blink. In this case empty the water tank
and to continue drying operation, press the
Start / Standby button.
To drain the water tank:
1. Pull the water tank out from its drawer
carefully.
IT
EN
2. Remove the water in the water tank.
3. If fiber is accumulated in the funnel on
the water tank, remove it under running
water.
4. Place back the water tank.
If direct discharge option is used,
water tank is not required to be
drained.
10.4 Cleaning the Condenser
The hair and the fiber that are not collected
by the fiber filter accumulates on the metal
surface of the condenser behind the air deflector. These fibers should be cleaned regularly.
EN / 63
Page 64
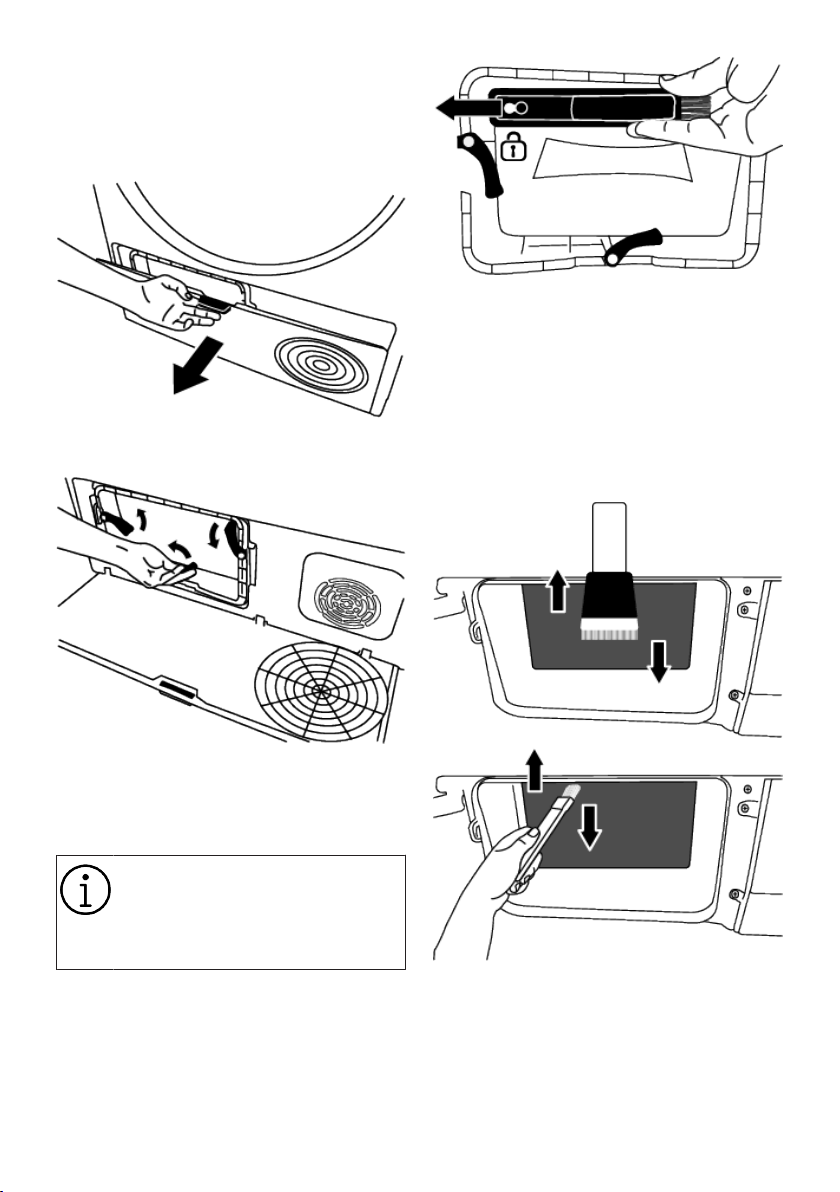
If the condenser cleaning icon is blinking,
check the metal surface. Clean the fiber, if
there is any. It must be checked at least
every 6 months.
1. Open the kickplate by pulling its handle.
2. Move the latches to open the air deflector lid.
Clean the fiber on the metal surface of the
condenser with damp cloth or with the
brush on the air deflector in up - down direction. Do not clean in left - right direction
since it will damage the metal plates of the
condenser.
You can also use a vacuum cleaner with a
brush for cleaning. If the vacuum cleaner
does not have a brush, it is not recommended to be used for condenser cleaning
3. Pull the brush to the left to remove it.
You can use the cleaning brush to clean
the fiber accumulated on filter, metal
surface of condenser and loading door.
The cleaning brush is inside the
manual bag. You can get your
brush from the manual bag and insert it to its place on the air deflector to store it.
After cleaning the filter, door and the condenser, drag the brush to the right and lock
it in its place.
EN / 64
Page 65
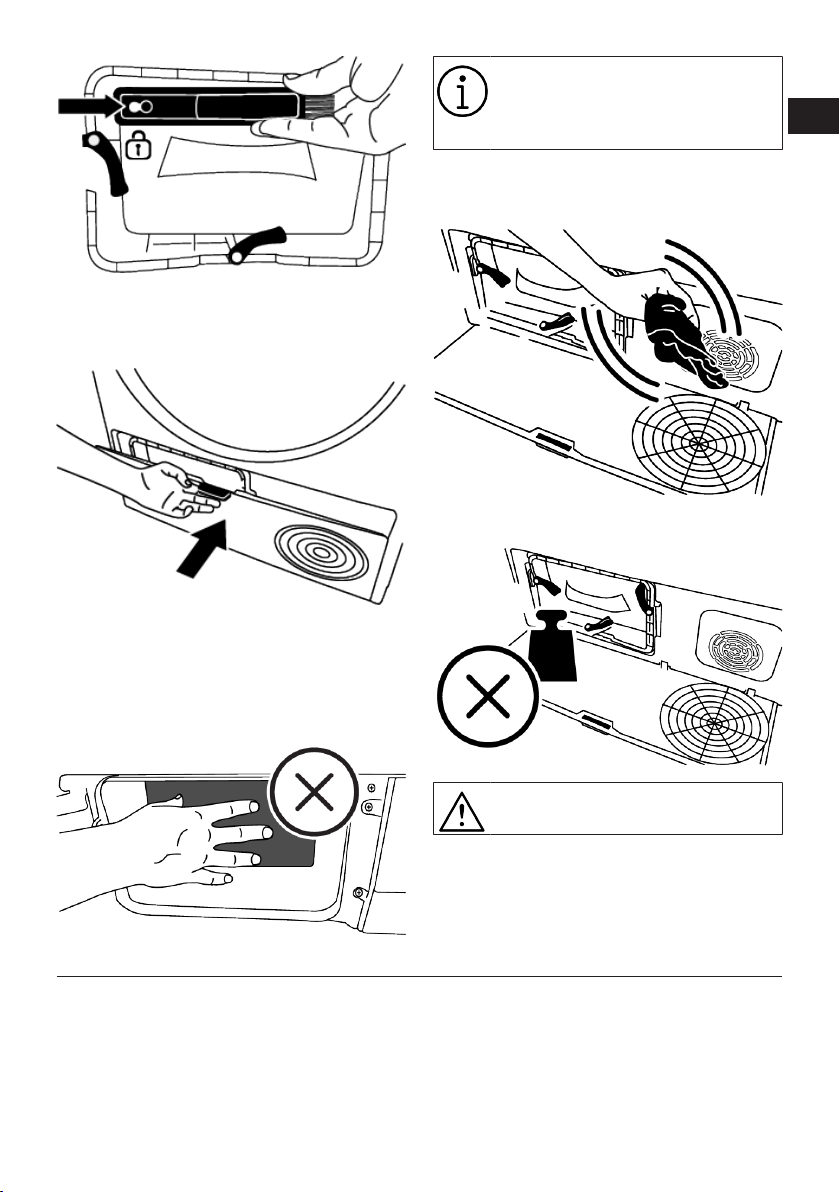
After the cleaning process is completed,
place the air deflector cover to its place,
close the latches by moving them and
close the kickplate.
NOTE: You can clean by hand, provided
you wear protective gloves. Do not try to
clean with bare hands. The condenser fins
may damage your hands. Cleaning from
left to right may damage the condenser
fins. This may lead to drying issues.
When the air deflector cover is removed, it is normal to have water at
the plastic section in front of the
condenser.
If you see fiber accumulation on the fan
cover and the kickplate, remove it with a
cloth.
Do not put weight on the kickplate when it
is open.
IT
EN
11 Troubleshooting
Drying operation takes too long.
• Fiber filter (interior and exterior filters)
pores may be clogged. >>> Wash the
fiber filters with warm water and dry.
Do not use abrasive materials or
steel wool to clean the drum.
• Front side of the condenser may be
clogged. >>> Clean the front side of the
condenser.
• The ventilation grills in front of the machine may be closed. >>> Remove any
object in front of the ventilation grills that
blocks ventilation.
EN / 65
Page 66

• Ventilation may be inadequate because
the area where the machine is installed is
too small. >>> Open the door or windows
to prevent the room temperature from
rising too much.
• If there is a humidity sensor, a lime layer
may have accumulated on the humidity
sensor. >>> Clean the humidity sensor.
• Excessive amount of laundry might be
loaded. >>> Do not load the drying machine excessively.
• Laundry might not have been spun adequately. >>> Perform a higher speed
spinning on the washing machine.
Clothes come out damp after drying.
• A program not suitable for the laundry
type may have been used.>>> Check the
maintenance labels on the clothes and
select a program suitable for the clothes'
type or use extra time programs.
• Fiber filter (interior and exterior filters)
pores may be clogged. >>> Wash the filters with warm water and dry.
• Front side of the condenser may be
clogged. >>> Clean the front side of the
condenser.
• Excessive amount of laundry might be
loaded. >>> Do not load the drying machine excessively.
• Laundry might not have been spun adequately. >>> Perform a higher speed
spinning on the washing machine.
Drying machine does not turn on or program cannot be started. Drying machine
does not run after it is configured.
• Power plug might be unplugged. >>>
Make sure the power plug is plugged in.
• Loading door might be open. >>> Make
sure that the loading door is properly
closed.
• A program might not be set or Start /
Standby button might not be pressed.
>>> Make sure that the program is set
and it is not in Standby position.
• Child lock may be activated. >>> Turn off
the child lock.
Program terminated prematurely for no
reason.
• Loading door might not be closed properly. >>> Make sure that the loading door
is properly closed.
• There might be a power outage. >>>
Press the Start / Standby / Cancel button
to start the program.
• Water tank may be full. >>> Empty the
water tank.
Clothes have shrunk, hardened or spoiled.
• A program not suitable with the laundry
type might have been used. >>> Check
the maintenance labels on the clothes
and select a program suitable for the
clothes.
Water drips from the loading door.
• Fibers might have gathered on the inner
surfaces of the loading door and on the
surfaces of the loading door gasket. >>>
Clean the inner surfaces of the loading
door and the loading door gasket surfaces.
Loading door opens by itself.
• Loading door might not be closed properly. >>> Push the loading door until the
closing sound is heard.
Water tank warning symbol is on/flashing.
• Water tank may be full. >>> Empty the
water tank.
• Water discharge hose might have folded.
>>> If the product is connected directly to
the water discharge check the water discharge hose.
The lighting inside the drying machine
does not turn on (in models with lamp).
• The drying machine might not have been
turned on by the On/Off button. >>>
Check that the drying machine is turned
on.
• Lamp might be malfunctioning. >>> Contact Authorized Service to replace the
lamp
EN / 66
Page 67

Anti-Crease icon or light is lit.
• Anti-Crease program that prevents the
laundry in the dryer from creasing may be
activated. >>> Turn the drier off and remove the laundry.
Fiber filter cleaning icon is lit
• Fiber filter (interior and exterior filters)
may be unclean. >>> Wash the filters with
warm water and dry.
• A layer may be formed in the fiber filter
pores that leads to clogging. >>> Wash
the filters with warm water and dry.
• A layer may be formed in the fiber filter
(inner and outer filters) pores that leads
to clogging. Wash the filters with warm
water and dry.
• Fiber filters may not be inserted. >>> Insert the interior and exterior filters to
their places.
• Environmentally-friendly filter cloth may
not be installed on the plastic part and
the front of the condenser may have
been clogged.>>>Install the environmentally-friendly filter to the plastic part and
place it in the filter housing.
• Environmentally-friendly filter may not
have been replaced although the warning
symbol is illuminated. >>> Replace your
filter.
An audible warning is heard from the machine.
• Fiber filters may not be inserted. >>> Insert the interior and exterior filters to
their places.
• Filters of the machine may not have been
installed.>>> Install the fiber filters (internal and external) or the environmentally-friendly filter to their housing.
Condenser warning icon is flashing.
• Condenser front side may be clogged
with fibers. >>> Clean the front side of
the condenser.
• Fiber filters may not be inserted. >>> Insert the interior and exterior filters to
their places.
The lighting inside the drying machine
turns on (in models with lamp).
• If the drying machine is plugged to the
power outlet, the On/Off button is
pressed and the door is open; the light
turns on. >>> Unplug the drying machine
or bring the On/Off button to Off position.
The steam symbol is flashing (In products
with steam function).
• There may not be enough water in the
machine for the program. >>> Run in a
program without cycle steam function.
Steam programs aren't starting. (In
products with steam function)
• There may not be enough water in the
machine for the program >>> Run in a
program without cycle steam function.
Wrinkle level does not decrease in the
wrinkle program (In products with steam
function)
• The amount of laundry maybe higher
than recommended. >>>Load desired
amount of laundry.
• The time of steam application may be
low. >>> Select longer time for steam application.
• At the end of the program, laundry might
have been left in the machine for a long
time. >>>At the end of the program, immediately remove the laundry and hang
them on a rope.
The odour in the laundry does not decrease
in the deodorization program (In products
with deodorization function).
• The amount of laundry maybe higher
than recommended. >>>Load desired
amount of laundry.
• The time of steam application may be
low. >>> Select longer time for steam application
Wi-Fi icon flashes continuously (for models featuring HomeWhiz Function).
The product may not be connected to the
wireless network. >>>Connect to the network following the instructions. There may
be a problem on the network where the
IT
EN
EN / 67
Page 68

product is connected. >>>Check it. The
product may not be connecting to the network due to proximity.
If you see "F L t" on the screen, check the
steps below.
• The filters may be dirty. >>> Clean the inner and outer filters or replace the ecofriendly filter.
• In the door area, if you are using the inner
and outer dual filters. >>> Make sure that
both filters are installed.
• If you are using the eco-friendly filter feature, make sure that the filter cloth is attached to the plastic part. >>>Insert the
filter cloth into the plastic part if it is not
inserted.
• Front side of the condenser may be dirty.
>>> Open and check the kick zone and
make sure it is clean.
• Check out the Maintenance and Cleaning
section.
If the problem persists after following the instructions in this section,
contact your vendor or an Authorized Service. Never try to repair
your product yourself.
If you experience a problem with
any part of your device, you can request a replacement by consulting
the nearest authorised service with
the device model number.
EN / 68
Page 69

12 Product Information Voucher
It complies with the Statutory Commission Regulation (EU) No 392/2012.
Supplier name or trademark BEKO
Model name 7188288720-BT3103IS
Normal capacity (kg) 10.0
With flue -
Drying Machine type
Energy efficiency class (1) A+++
Annual Energy Consumption (kWh) (2) 210.6
Control type
Energy consumption (kWh) in standard cotton program at full load 1.78
Energy consumption (kWh) in standard cotton program at partial load 0.93
Energy consumption in "Closed Mode” PO (W) 0,50
Energy consumption in "On" mode P L (W) 1.00
"On" mode duration (min) 30
Standard Cotton program (3) •
Duration of standard cotton program at full load, Tdry (min) 220
Duration of standard cotton program at partial load, Tdry 1/2 (min) 125
Weighted duration of standard cotton program at partial and full load
(T t)
Condensation efficiency class (4) A
Average condensation efficiency of standard cotton program at full
load, Cdry
Average condensation efficiency of standard cotton program at par-
tial load, C dry1/2
Weighted condensation efficiency of standard cotton program at full
and partial load, C t
Product volume level (5) 63
Under-the-counter use -
• Yes / - No
(1) From Efficiency class A+++ (highest yield) to D (lowest efficiency)
(2) In the standard cotton wardrobe program, it is the energy consumption value calculated
by taking into account low power modes based on 160 drying cycles under full and half
load conditions. The energy consumption value per real cycle depends on the use of the
dryer.
(3 ) “Cotton wardrobe program” is a standard drying program that may be utilized with full
or half load and where the information is provided on the product label or the receipt. This
program is the most efficient one in terms of energy consumption for drying normal wet
cotton loads.
(4) From efficiency class G (lowest efficiency) to A (highest efficiency)
(5) Weighted average value — L WA unit dB(A) is expressed with re 1 pW.
With condenser
Automatic •
Manual -
•
166
91%
91%
91%
IT
EN
EN / 69
Page 70

Page 71

Page 72

 Loading...