

Page 1

MAEN844D, 2014-02
DT150
Installation Manual
English
Page 2

Foreword
© Beijer Electronics AB, MAEN844D, 2014-02
The information in this document is subject to change without notice and is provided as available at the time
of printing. Beijer Electronics AB reserves the right to change any information without updating this publication. Beijer Electronics AB assumes no responsibility for any errors that may appear in this document.
Read the entire installation manual prior to installing and using this equipment.
Only qualified personnel may install, operate or repair this equipment. Beijer Electronics AB is not responsible for modified, altered or renovated equipment.
Because the equipment has a wide range of applications, users must acquire the appropriate knowledge to use
the equipment properly in their specific applications.
Persons responsible for the application and the equipment must themselves ensure that each application is in
compliance with all relevant requirements, standards and legislation in respect to configuration and safety.
Only parts and accessories manufactured according to specifications set by Beijer Electronics AB may be
used.
BEIJER ELECTRONICS AB SHALL NOT BE LIABLE TO ANYONE FOR ANY DIRECT, INDIRECT,
SPECIAL, INCIDENTAL OR CONSEQUENTIAL DAMAGES RESULTING FROM THE INSTALLATION, USE OR REPAIR OF THIS EQUIPMENT, WHETHER ARISING IN TORT, CONTRACT, OR
OTHERWISE. BUYER'S SOLE REMEDY SHALL BE THE REPAIR, REPLACEMENT, OR REFUND
OF PURCHASE PRICE, AND THE CHOICE OF THE APPLICABLE REMEDY SHALL BE AT THE
SOLE DISCRETION OF BEIJER ELECTRONICS AB.
DT150 Installation Manual
Foreword
The DT150 industrial monitor is a TFT-LCD touch screen monitor, designed to
be mounted in a cabinet and connected to an industrial PC.
The monitor is optimized for a maximum resolution of 1024 x 768 pixels when
the full display area of the module is used.
This manual explains how to install the monitor.
Please see www.hmi.beijerelectronics.com for further information.
Beijer Electronics, MAEN844D
Page 3

Foreword
Beijer Electronics, MAEN844D
Page 4

Contents
Contents
1 Safety Precautions................................................................................... 5
1.1 General ........................................................................................5
1.2 During Use..................................................................................6
1.3 Service and Maintenance.............................................................. 6
1.4 Dismantling and Scrapping..........................................................6
2 Installation.............................................................................................. 7
2.1 Space Requirements.....................................................................7
2.2 Installation Process....................................................................... 7
3 Technical Data...................................................................................... 11
3.1 The On Screen Display Menu....................................................12
3.2 Operation Messages ................................................................... 15
3.3 Video Input Timing...................................................................15
3.4 Audio Support ........................................................................... 15
3.5 Calibrate the Touch Screen ........................................................16
4 Chemical Resistance ............................................................................. 17
4.1 Metal Casing.............................................................................. 17
4.2 Touch Screen and Overlay .........................................................18
5 Drawings ..............................................................................................21
5.1 DT1151 Outline .......................................................................21
Beijer Electronics, MAEN844D
Page 5

Contents
Beijer Electronics, MAEN844D
Page 6

Safety Precautions
1 Safety Precautions
Both the installer, owner, and operator of the monitor must read and understand
this installation manual.
1.1 General
– Only qualified personnel may install or operate the monitor.
– The monitor must be installed according to the installation instructions.
– The monitor is designed for stationary installation on a plane surface, where
the following conditions are fulfilled:
no high explosive risks
no strong magnetic fields
no direct sunlight
no large, sudden temperature changes
– Never allow fluids, metal filings or wiring debris to enter any openings in the
monitor. This may cause fire or electrical shock.
– The monitor fulfills the requirements of EMC directive 2004/108/EC.
– Storing the monitor where the temperature is lower or higher than recom-
mended in this manual can cause the LCD display liquid to congeal or become isotopic.
– The LCD display liquid contains a powerful irritant. In case of skin contact,
wash immediately with plenty of water. In case of eye contact, hold the eye
open, flush with plenty of water and get medical attention.
– The supplier is not responsible for modified, altered or reconstructed equip-
ment.
– Use only parts and accessories manufactured according to specifications of the
supplier.
– Peripheral equipment must be appropriate for the application and location.
– The figures in this manual serves an illustrative purpose. Because of the many
variables associated with any particular installation, the supplier cannot assume responsibility for actual use based on the figures.
– The supplier neither guarantees that the monitor is suitable for your particu-
lar application, nor assumes responsibility for your product design, installation or operation.
Beijer Electronics, MAEN844D 5
Page 7

Safety Precautions
1.2 During Use
– Keep the monitor clean.
– Emergency stop and other critical safety functions may never be controlled
from the monitor.
– Do not use force or sharp objects on the display surface.
1.3 Service and Maintenance
– Only qualified personnel should carry out repairs.
– The agreed warranty applies.
– Before carrying out any cleaning or maintenance operations, disconnect the
equipment from the electrical supply.
– Clean the display and surrounding front cover with a soft cloth and mild de-
tergent.
1.4 Dismantling and Scrapping
– The monitor or parts thereof shall be recycled according to local regulations.
– The following components contain substances that might be hazardous to
health and the environment: electrolytic capacitor and display.
6 Beijer Electronics, MAEN844D
Page 8
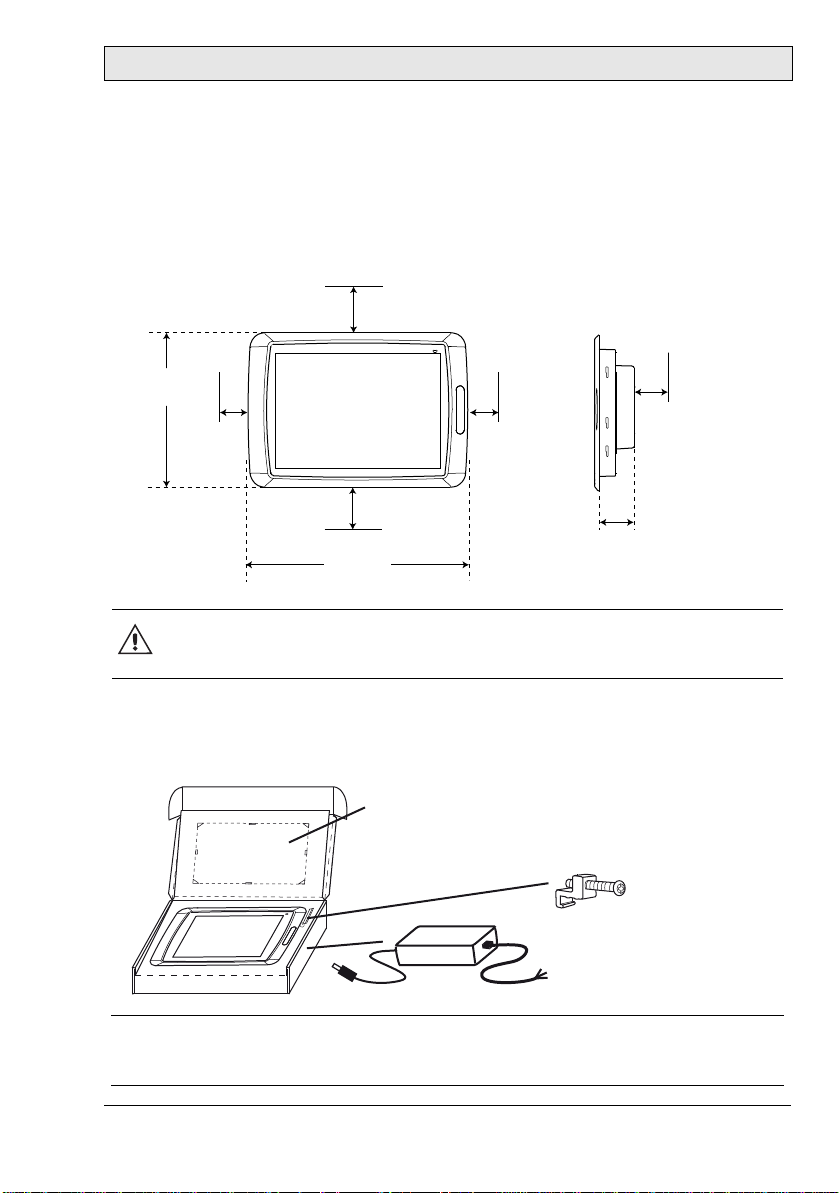
2Installation
25 mm
45 mm
50 mm
304 mm
398 mm
50 mm
(2.0 inch)
50 mm
(2.0 inch)
(1.77 inch)
(1.0 inch)
25 mm
(1.0 inch)
(11.97 inch)
(15.67 inch)
(1.97 inch)
o(+
GXe\cZlkflk*,,%,o)./%,dd
(+%'o('%0-`eZ_
o(
8:&;:
2.1 Space Requirements
Installation plate thickness: 1.5 - 9.0 mm (0.06 - 0.35 inch)
Space requirements when installing DT150:
Caution:
The openings on the enclosure are for air convection.
Do not cover these openings.
Installation
2.2 Installation Process
1. Unpack and check the delivery. If anything is damaged, notify the supplier.
Note:
Place the monitor on a stable surface during installation. Dropping it or letting it
fall may cause damage.
Beijer Electronics, MAEN844D 7
Page 9

Installation
x14
0.5 - 1.0 Nm
2. Place the panel cut out where the monitor is to be situated, draw along the
outer sides of the holes and cut according to the markings.
3. Secure the monitor in position, using all the fastening holes and the provided brackets and screws:
8 Beijer Electronics, MAEN844D
Page 10

4. Connect the cables in the specified order.
A
B
Caution
Use only shielded signal cables.
Separate high voltage cables from signal and supply cables.
Caution:
The monitor must be brought to ambient temperature before it is
started up. If condensation forms, ensure that the monitor is dry before connecting it to the power outlet.
Monitor
115/230 V AC
Installation
Ground connected
power cord
12 V DC
-
A
AC/DC Adaptor
+
VGA/DVI
B
Industrial PC
5. Carefully remove the laminated film over the monitor display, to avoid
static electricity that could damage the monitor.
Beijer Electronics, MAEN844D 9
Page 11

Installation
10 Beijer Electronics, MAEN844D
Page 12

Technical Data
3Technical Data
Parameter DT150
Front panel, W x H x D 398 x 304 x 6 mm
Mounting depth 50 mm
Front panel seal IP 66
Rear panel seal IP 20
Front panel material Touch screen: Polyester on glass *, 1 million finger touch
operations.
Overlay: Autotex F157 or F207.
Powder-coated aluminum.
Reverse side material Powder-coated alu-zink.
Touch interface Drivers are available at
www.microchip.com/pagehandler/en-us/technology/
tsharc/home.html#driversmanuals
or at www.beijerelectronics.com/Support
Screen setup Via rear membrane keyboard.
Video interface VGA and DVI.
Weight 4 kg
Rated voltage 12 V DC ± 5%
Power consumption at
rated voltage
Display TFT-LCD XGA. 1024 x 768 pixels, 16,7 million colors.
Active area of display,
W x H
External power supply Input: 100 - 240 V AC, 50/60 Hz, 1.1 A.
Ambient temperature 0 ° to +50 °C
Storage temperature -20 ° to +70 °C
Relative humidity 5 - 85% non-condensed
CE The monitor conforms with the essential protection
DNV Yes
2.25 A (27 W) max.
CCFL backlight lifeti me at the ambient temperature of +25
°C: >35,000 h.
304.1 x 228.1 mm
Output: 12 V DC, 4 A, 5.5/2.5 mm female DC connector.
requirements of the directive 2004/108/EC .
Noise tested according to EN61000-6 - 3 emission and
EN61000-6-2 immunity.
Beijer Electronics, MAEN844D 11
Page 13

Technical Data
Parameter DT150
* See section 4 Chemical Resistance
3.1 The On Screen Display Menu
The On Screen Display (OSD) menu makes it easy to adjust monitor settings.
The buttons for accessing the OSD menu are located on the rear side of the
monitor. Some of the OSD buttons have multiple functions (a hot key option),
listed below.
Usually, the display is configured by the automatic display configuration when
pressing the Down Arrow button.
If advanced configuration is needed, the Menu button displays other options.
The - and + buttons are used for navigation, and the Menu button is used to
select.
The OSD buttons and their function are described below:
Button Function
Menu Opens the OSD menu and works as Select and
Deselect button.
Down Arrow Return or Exit in the OSD menu. Automatic display
- Decrease/left key Brightness decrease
+ Increase/right key Brightness increase
VGA/DVI Source select (VGA or DVI) Power Turns on/off the monitor. -
12 Beijer Electronics, MAEN844D
Alternative
function
-
configuration
Page 14

Technical Data
3.1.1 On Screen Menu Descriptions
This section describes the accessible sub menus and their functions.
Main Menu Sub Menu Function
Input Source A RGB Change input signal source to Analog RGB
DVI Change input signal source to DVI
Exit Go back to main menu
Main Menu Sub Menu Function
Picture Brightness Adjust brightness of the screen
Contrast Adjust distinction (ratio of luminance between
black and white)
Blacklevel Adjust black level
Sharpness Adjust sharpness of pictures
Exit Go back to main menu
Main Menu Sub Menu Function
Color Temperature User: Red, green and blue colors can be adjusted
Warm: Red-tinged screen
Normal: Green-tinged screen
Cool: Blue-tinged screen
Auto Color
(A-RGB only)
Exit Go back to main menu
Color automatically set from strange input signal
Beijer Electronics, MAEN844D 13
Page 15

Technical Data
Main Menu Sub Menu Function
Image Control
Avaliable mode:
Analog RGB
Main Menu Sub Menu Function
Tool OSD Control Time Out: Set the duration time of the OSD
Auto Auto configuration of geometry.
Width Adjust horizontal size of the screen by increasing
or decreasing the number of picture elements
Phase Adjust phase of screen, used when noise or over-
lapped lines are shown on the screen
H Position Move screen horizontally
V Position Move screen vertically
Exit Go back to main menu
menu (OSD turn-off time)
H Position: Adjust horizontal position of OSD
Menu by value
V Position: Adjust vertical position of OSD Menu
by value
Reset Reset to initial setup (factory settings)
Reset Color Initial color
Reset Position Initial position
Mute
(Audio Option)
Volume
(Audio Option)
Exit Go back to main menu
Set sound on or off
Adjust the volume of sound
14 Beijer Electronics, MAEN844D
Page 16

Technical Data
3.2 Operation Messages
The following operation messages will be displayed under different
circumstances:
Operation
message
AUTO TRACKING Auto Tracking (analog RGB mode):
Executes auto function
NO SIGNAL Self diagnostics (analog RGB mode):
No input signal after power-on with power switch.
The message will disappear after 10 seconds of activity of
input signal.
NO SUPPORT Out of Range:
The input signal exceeds the supported range.
Explanation
3.3 Video Input Timing
The following vertical refresh rate is recommended:
Mode Refresh rate
1024 x 768 pixels 60~75 Hz
Sync.: H/V separated TTL
3.4 Audio Support
The industrial monitor has a built in stereo amplifier that can be controlled either via the OSD interface or the OSD buttons on the rear side. The monitor is
equipped with one audio input port and one speaker out port.
Parameter Specification
Maximum output 2 x 2W @ 8 Ω
Note:
The industrial monitor does not include built-in speakers.
Beijer Electronics, MAEN844D 15
Page 17

Technical Data
3.5 Calibrate the Touch Screen
The industrial monitor has a built in touch screen. This is not operational when
shipped from the supplier and must be installed. Instructions and drivers for installation of the touch screen function are available at:
www.hmi.beijerelectronics.com
16 Beijer Electronics, MAEN844D
Page 18

Chemical Resistance
4 Chemical Resistance
4.1 Metal Casing
The frame and casing material is powder-coated aluminum. This powder paint
withstands exposure to the following chemicals without visible change:
Acetic acid 10% Phosphoric acid 4%
Citric acid 10% Phosphoric acid 10%
Diesel Sea water
Distilled water Sodium chloride 2%
Edible oil Sodium chloride 20%
Fuel oil Sulphuric acid 20%
Hydrogen peroxide 3% Tap water
The powder paint shows limited resitance to the following chemicals at room
temperature:
Butanol Nitric acid 3%
Hydrochloric acid 5% Nitric acid 10%
Isopropyl alcohol Phosphoric acid 43%
Na-hypochlorite 10% Turpentine
Note:
If exposure to any of the above chemicals is demanded, it is recommended to first
test the chemical on an “invisble” spot of the metal casing.
The powder paint shows little or no resistance to the following chemicals at
room temperature:
Acetic acid, conc. Methyl-ethyl ketone Toluene
Acetone Nitric acid 30% Trichlorethylene
Ammonia 5% Phenol Xylene
Ammonia, conc. Sodium hydroxide 5% 97 octan unleaded petrol
Ethyl acetate Sodium hydroxide 30% 98 octan leaded petrol
Beijer Electronics, MAEN844D 17
Page 19

Chemical Resistance
4.2 Touch Screen and Overlay
4.2.1 Autotex F157/F207
Autotex F157 or F207 covers the overlay surrounding the touch screen.
Solvent Resistance
Autotex F157/F207 withstands exposure of more than 24 hours duration under
DIN 42 115 Part 2 to the following chemicals without visible change:
Acetonitrile
Ajax / Vim in solution Ethanol Potassium ferricyanide
Alkalicarbonate solution
Ammonia (<40%)
Acetic acid (<50%)
Ariel powder in solution
1
Bleach
Castor oil Methanol T richloroacetic acid (<50%)
Caustic soda (<40%)
Cutting oil Paraffin oil
Cyclohexanol
Diacetone alcohol
1
Extremely faint glossing of the texture was noted.
1
1
Diesel Downey / Lenor
1
Glycerine Potassium hydroxide
Glycol Pure Turpentine
Gumption
1
Hydrochloric acid (<36%) Sulfuric acid (<10%)
Linseed oil Tomato ketchup
Nitric acid (<10%) White Spirit
Persil powder in solution
Petroleum spirit
1
1
Phosphoric acid (<30%)
(<30%)
SBP 60/95
Windex
1
Wisk
1
-
1
1
Autotex withstands DIN 42 115 Part 2 exposure of up to 1 hour duration to glacial acetic acid without visible change.
Autotex is not resistant to high pressure steam at over 100 °C or the following
chemicals:
Concentrated mineral acids Benzyl alcohol
Concentrated caustic solution Methylene chloride
Outdoor Use
In common with all polyester based films Autotex F157/F207 is not suitable for
use in conditions of long term exposure to direct sunlight.
18 Beijer Electronics, MAEN844D
Page 20

Chemical Resistance
4.2.2 Touch Screen Surface
The touch screen surface on the monitor withstands exposure to the following
solvents without visible change:
Solvents Time
Acetone 10 minutes
Isopropanol 10 minutes
Toluene 5 hours
4.2.3 Autoflex EB
It is recommended to use the Autoflex EB touch display protection film, that
can be ordered from Beijer Electronics.
Solvent Resistance
Autoflex EB withstands exposure to the same chemicals as Autotex F157 or
F207 according to section Autotex F157/F207.
Outdoor Use
In common with all polyester based films Autoflex EB is not suitable for use in
conditions of long term exposure to direct sunlight.
Beijer Electronics, MAEN844D 19
Page 21

Chemical Resistance
20 Beijer Electronics, MAEN844D
Page 22

5Drawings
5.1 DT150 Outline
Drawings
Beijer Electronics, MAEN844D 21
Page 23

Drawings
22 Beijer Electronics, MAEN844D
Page 24

Head office
Beijer Electronics AB
Box 426
201 24 Malmö, Sweden
www.beijerelectronics.com / +46 40 358600
 Loading...