


Synthesizers and Samplers
MS-1-BK /
MS-1-BU / MS-1-RD
Analog Synthesizer with 32 Full-Size Keys,
3340 VCO with 4 Simultaneous Waveforms,
VCF, NovaMod FM Sources, 32-Step Sequencer,
Arpeggiator and Live Performance Kit
User Support Bulletin
Introduction
The unit is carefully calibrated at the factory. The performance may change over time or due to environmental changes,
and the following recalibration procedures can be used to bring it back to its factory settings.
Equipment required
1. A multimeter (with 1 mv resolution)
2. A 3.5 mm cable (mono or stereo should be ne)
985-40000-01104 Rev.A
2021-02-03
Condential, for internal use only. Not to be reproduced.
page 1 of 5
Synthesizers and Samplers
MS-1-BK /
MS-1-BU / MS-1-RD
Preparation
Make sure your MS-1 has been powered on for at least 30 minutes, and that it is situated in a place where the
temperature will not change drastically during calibration.
Remove all unused cables from the MS-1.
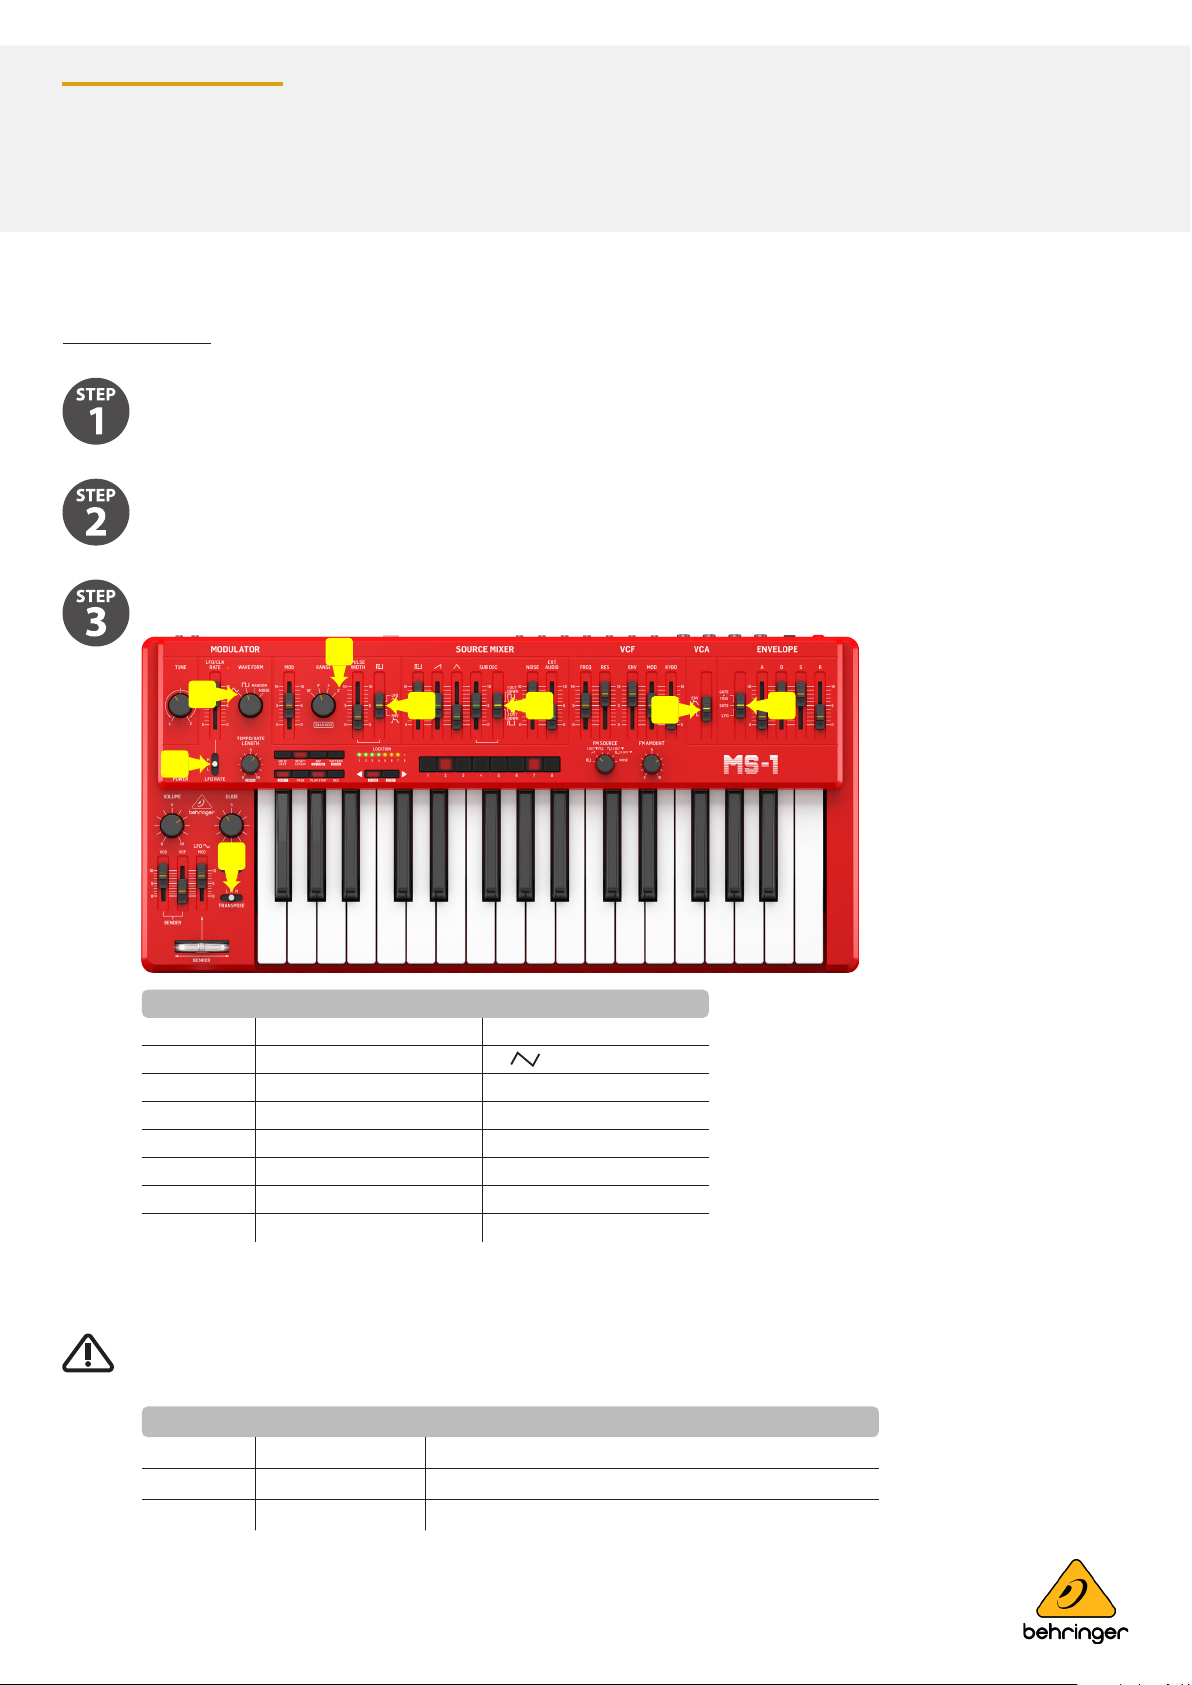
Set the controls 1 to 8 to the position shown in the right hand column of this table.
Set all the other faders, knobs and switches shown in the photo.
4
2
1
3
No. Control Set to
1 LFO RATE M
2 WAVE FORM
3 GLIDE M
4 RANGE 2’
5 MAIN
6 SUB OSC 2 OCT DOWN
7 VCA GAT E
8 ENVELOPE GAT E
5 6
7
8
Calibration Procedure
Follow all steps in the order in which they are presented.
No. CV type Description
1 Internal CV Calibrates the internal CV
2 Output CV Tunes the CV output
3 External CV Compensate oscillator oset for external CV in
page 2 of 5page 2 of 5

Synthesizers and Samplers
MS-1-BK /
MS-1-BU / MS-1-RD
Internal CV Calibration
Press “KYBD + STEP” then power on device. All the sequencer LEDs will light up.
Press “Shift + STEP1” to start Internal CV calibration.
Wait for calibration to nish.
All of the sequencer LEDs will light up in sequence after this has nished.
Output CV Calibration
In this mode, these buttons have new functions:
There are four test modes A / B / C / D to be calibrated. Their target voltage is 0V / 1V / 3V / 5V respectively.
Button Name Function
HOLD/REST Select test mode A
RESET/ACCENT Select test mode B
ARP/SETEND Select test mode C
PATTERN/BANK Select test mode D
SHIFT —
PAG E —
PLAY/STOP —
REC Save
Button Name Function
STEP1 Select X1 (about ±1 mV)
STEP2 Select X2 (about ±4.5 mV)
STEP4 Select X3 (about ±9 mV)
STEP4 Select X4 (about ±45 mV)
STEP5 —
STEP6 —
STEP7 —
STEP8 —
page 3 of 5page 3 of 5
KYBD Decrease
STEP Increase

Synthesizers and Samplers
MS-1-BK /
MS-1-BU / MS-1-RD
Connect the Multimeter to CV Out as shown below.
Carry out the Internal CV Calibration before starting this Output CV calibration.
Press “Shift + STEP2” to enter user Output CV calibration mode.
Press “HOLD/REST” to select test mode A. You will need to watch the multimeter to adjust the output voltage.
Press “KYBD” or “STEP” to adjust the CV value until it is close to target level “0V”.
(Press “STEP1” “STEP2” “STEP3” or “STEP4” to select the incremental adjustment size “X1” “X2” “X3” or “X4”)
Press “RESET/ACCENT” to select test mode B.
Press “KYBD” or “STEP” to adjust the CV value until it is close to target level “1V”.
Press “ARP/SETEND” to select test mode C.
Press “KYBD” or “STEP” to adjust the CV value until it is close to target level “3V”.
Press “PATTERN/BANK” to select test mode D.
Press “KYBD” or “STEP” to adjust the CV value until it is close to target level “5V”.
Press “REC” to save and nish Output CV calibration.
page 4 of 5page 4 of 5

Synthesizers and Samplers
MS-1-BK /
MS-1-BU / MS-1-RD
External CV Calibration
Complete Output CV calibration, then connect the CV out jack to the CV in jack with a 3.5mm cable.
Press “Shift + STEP3” to start External CV calibration.
Wait for the calibration to nish, this is indicated by all of the sequencer LEDs will light up in sequence.
Calibration is nished. Reboot the MS-1.
End of Procedure
Music Tribe accepts no liability for any loss which may be suered by any person who relies either wholly or in part upon any description, photograph, or statement contained herein.
Technical specications, appearances and other information are subject to change without notice. All trademarks are the property of their respective owners. Midas, Klark Teknik,
Lab Gruppen, Lake, Tannoy, Turbosound, TC Electronic, TC Helicon, Behringer, Bugera, Oberheim, Auratone and Coolaudio are trademarks or registered trademarks of Music Tribe Global
Brands Ltd. © Music Tribe Global Brands Ltd. 2021 All rights reserved.
Condential, for internal use only. Not to be reproduced.
 Loading...