

Page 1
MONITOR SPEA KERS 1C
1
PRODUCT M ANUAL
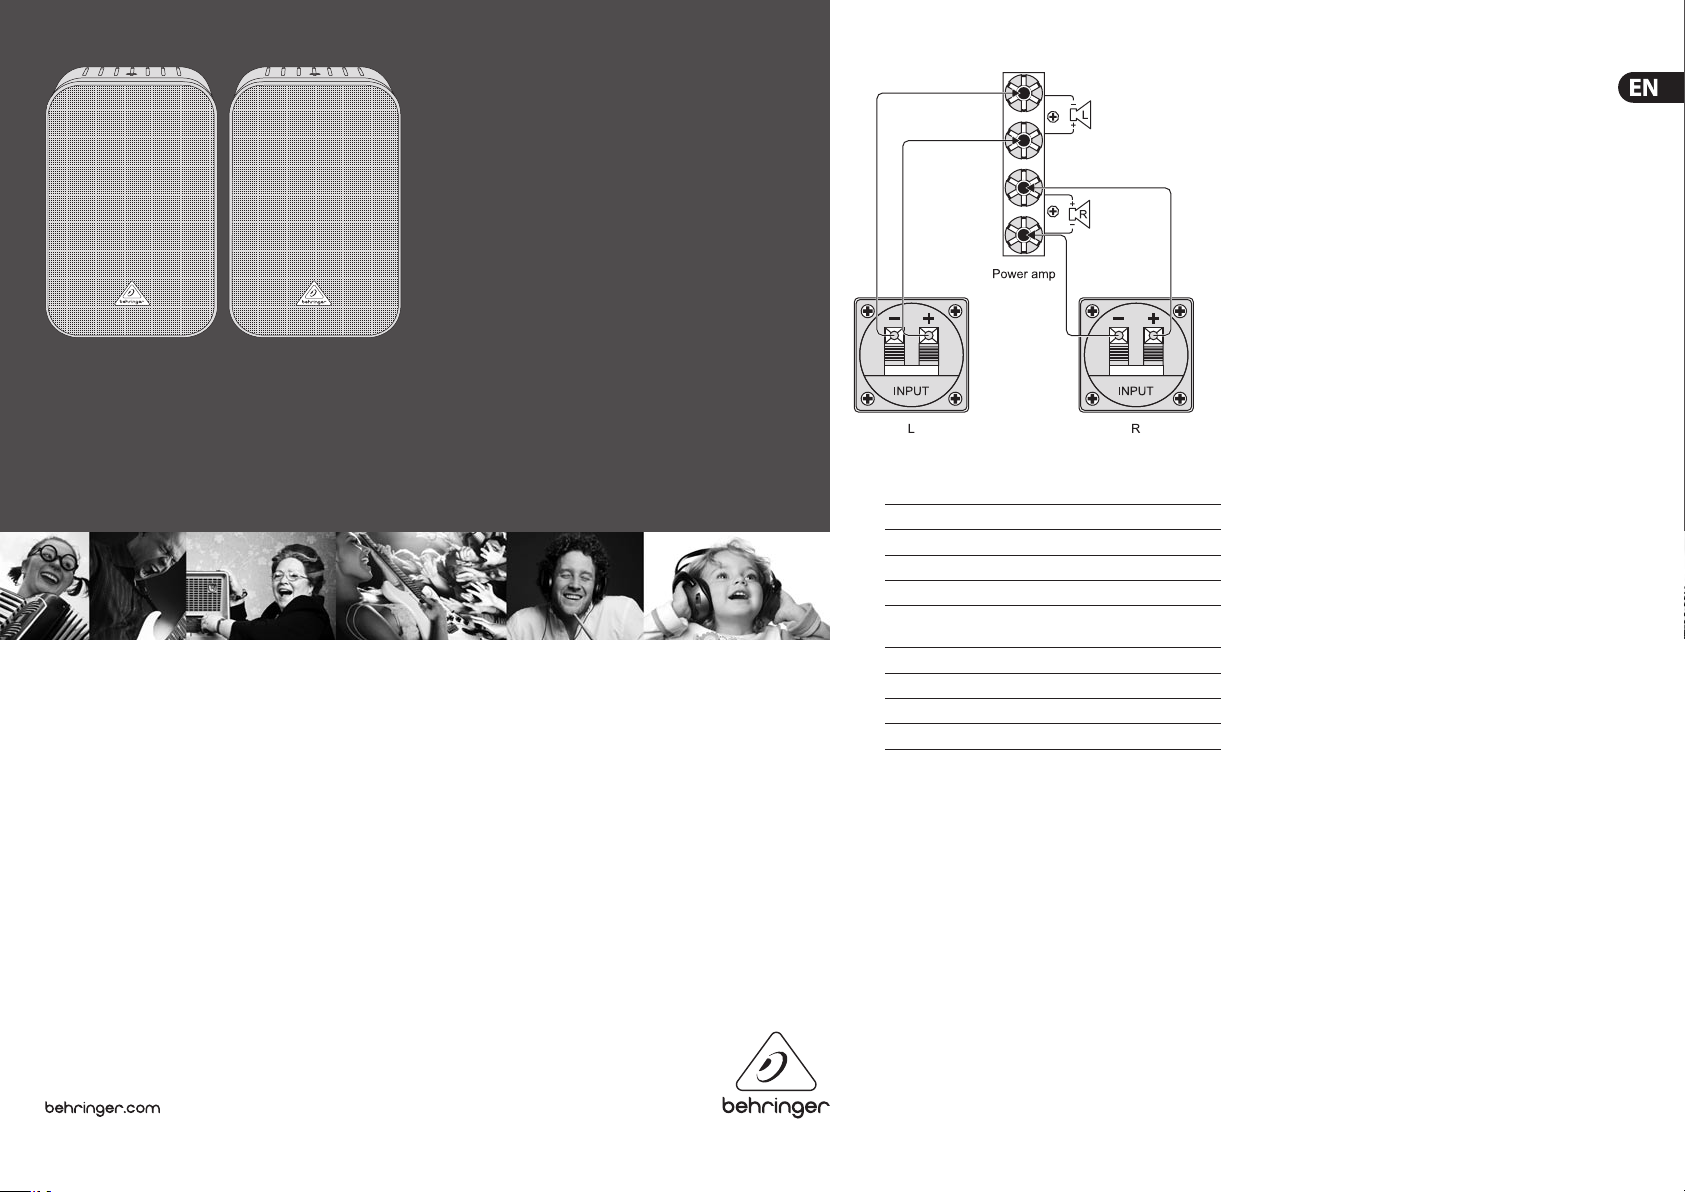
Wiring
The MONITOR 1C is capable of producing extreme volumes. Please note ◊
that high sound pressures may cause temporary or even permanent
hearing damage. Be careful to select a suitable volume.
Always mute your amp before connecting the speakers. Use loudspeaker cables with
a diameter of up to 4 mm (AWG 6).
Connect your MONITOR 1C to the amplier as shown in the illustration:
Press the connector clamps on the back of the speaker and insert the bare end
of the loudspeaker cable, paying attention to correct polarity. Let go of the connector
to secure the cable. Connect the second loudspeaker the same way.
Make sure that bare wire ends never touch the open end of another ◊
speaker cable, speaker connectors or metal parts of your amp.
If you let your Monitor 1C loudspeakers run at or near their power limit, ◊
the integrated protective circuitry may temporarily disconnect the
tweeters. Lower the volume to allow the tweeter to automatically
come online again. In this case, there is no danger of causing
permanent damage. If you turn up treble on your amplifier,
the protective circuitry may intervene.
Product Manual
MONITOR SPEAKERS 1C
Ultra-Compact Monitor Speakers
Specications
Connector type Clip terminal
Wire diameter < 4 mm
Power capacity 25 W RMS, 100 W Peak
Impedance 4 Ω
Frequency range 60 Hz to 23 kHz (-10 dB)
Nominal sound pressure level (SPL) 86 dB*W/m (program, bandwidth
100-5000 Hz on axis, full space)
Max. short term acoustic output 112 dB @ 1m (on axis, half space)
Tweeter ½"
Woofer 5 ½"
Crossover frequency 5000 Hz
BEHRINGER is constantly striving to maintain the highest professional standards. As a result of these
eorts, modications may be made from time to time to existing products without prior notice.
Specications and appearance may dier from those listed or illustrated.
Important Safety Instructions
Read the se instruc tions.(1)
Keep these instructions.(2)
Heed all warnings.(3)
Follow all instructions.(4)
Do not use this apparatus near water.(5)
Clean only with dry cloth.(6)
Be sure to mount your speakers on a solid, stable and level base or stand. (7)
Vibrating oors do not provide reliable support for speaker enclosures or stacks.
Do not install near any heat sources such as radiators, heat registers, stoves, (8)
or other apparatus (including ampliers) that produce heat.
Only use attachments/accessories specied by the manufacturer.(9)
Use only with the cart, stand, tripod, bracket, or table specied (10)
by the manufacturer, or sold with the apparatus. When a cart is used,
use caution when moving the cart/device combination to avoid injury
from stumbling.
Refer all service to qualied service personnel. Service is required when (11)
the unit has been damaged in any way, liquid has been spilled or objects
have fallen into the apparatus, the unit has been exposed to rain or moisture,
does not operate normally, or has been dropped.
Do not block any ventilation openings. Install in accordance with the (12)
manufacturer’s instructions.
A50-00000-30002
Page 2

2 MONITOR SPEA KERS 1C
PRODUCT M ANUAL
Anschluss
Die MONITOR 1C können extreme Laut stärken produzieren. ◊
Beachten Sie bitte, dass ein hoher Schalldruck das Gehör nicht nur
schnell ermüdet, sondern auch permanent schädigen kann.
Achten Sie stets auf eine angemessene Lautstärke.
Schalten Sie den Verstärker stumm, bevor Sie die Verbin dun gen her stellen.
Verwenden Sie Lautsprecherkabel mit Querschnitten bis 4 mm.
Verkabeln Sie die MONITOR 1C wie in der Abbildung gezeigt mit dem Verstärker.
Önen Sie hierzu die Anschlussklemmen an der Rückseite des Lautsprechers und
schieben Sie die abisolierten Enden des Laut sprecher kabels gleichpolig in die frei
gewordenen Önungen. Lassen Sie die Klemmen wieder los, so dass sie die
Kabelenden aufnehmen. Verkabeln Sie den zweiten Lautsprecher nach dem
selben Schema.
Die abisolierten Enden der Lautsprecher kabel dürfen nicht das offene ◊
Ende eines anderen Lautsprecherkabels, andere Lautsprecher klemmen
oder Metall teile des Verstärkers berühren.
Wenn Sie die Monitor 1C dauerhaft im Bereich der maximalen ◊
Leistungs aufnahme betreiben, kann die integrierte Schutzschaltung
den Hochtöner vorrüber gehend abschalten. Reduzieren Sie die
Lautstärke, damit sich der Hochtöner von selbst wieder einschaltet.
Eine Beschädigung liegt in diesem Fall nicht vor. Sollten Sie an Ihrem
Verstärker eine Höhenanhebung vorgenommen haben, kann die
Schutzschaltung auch schon bei geringerer Gesamt laut stärke auslösen.
Wichtige Sicherheitshinweise
Lesen Sie d iese Hinweis e.(1)
Bewahren Sie diese Hinweise auf.(2)
Beachten Sie alle Warnhinweise.(3)
Befolgen Sie alle Bedienungshinweise.(4)
Betreiben Sie das Gerät nicht in der Nähe von Wasser.(5)
Reinigen Sie das Gerät mit einem trockenen Tuch.(6)
Bevor Sie Ihre Boxen aufstellen, muss stets geprüft werden, ob der (7)
Untergrund wirklich fest ist. Ein Untergrund, der leicht vibriert, ist für
Lautsprecher zu unsicher, deshalb: Boxen grundsätzlich nur auf festem,
ebenem Untergrund aufstellen.
Stellen Sie das Gerät nicht in der Nähe von Wärme quellen auf. (8)
Solche Wärmequellen sind z. B. Heizkörper, Herde oder andere Wärme
erzeugende Geräte (auch Verstärker).
Verwenden Sie nur Zusatzgeräte/Zubehörteile, die laut Hersteller (9)
geeignet sind.
Verwenden Sie nur Wagen, Standvorrichtungen, Stative, Halter oder Tische, (10)
die vom Hersteller benannt oder im Lieferumfang des Geräts enthalten sind.
Falls Sie einen Wagen benutzen, seien Sie vorsichtig beim Bewegen der
Wagen-Gerätekombination, um Verletzungen durch Stolpern zu vermeiden.
Alle Wartungsarbeiten dürfen nur von qualiziertem Service-Personal (11)
ausgeführt werden. Eine Wartung ist notwendig, wenn das Gerät in
irgendeiner Weise beschädigt wurde, Gegenstände oder Flüssigkeit in das
Geräteinnere gelangt sind, das Gerät Regen oder Feuchtigkeit ausgesetzt
wurde, das Gerät nicht ordnungs gemäß funktioniert oder auf den Boden
gefallen ist.
Bitte achten Sie darauf, dass durch die Önungen keine Gegenstände oder (12)
Flüssigkeit in das Gehäuse innere gelangen können.
Câblage
Les MONITOR 1C’s peuvent générer des volumes sonores extrêmes. ◊
Sachez qu’un fort niveau de pression acoustique fatigue rapidement
l’ouïe et peut même l’endommager de façon irrémédiable. Veillez donc
à travailler à des puissances raisonnables.
Eteignez l’amplicateur avant de réaliser le câblage. Utilisez du câble haut-parleur
de section inférieure ou égale à 4 mm.
Raccordez les MONITOR 1C à l’amplicateur comme indiqué sur l’illustration.
Pour ce faire, ouvrez les bornes du panneau arrière des moniteurs et glissez-y les
extrémités dénudées du câble en respectant les polarités. Relâchez les bornes an
qu’elles mordent sur les extrémités du câble. Faites de même pour le second moniteur.
Veillez à ce que les extrémités dénudées des câbles haut-parleur ◊
ne soient jamais en contact avec un autre câble haut-parleur,
un autre bornier ou le châssis métallique de l’ampli de puissance.
Le circuit de protection interne des Monitor 1C peut désactiver ◊
momentanément le tweeter des moniteurs lorsque vous les utilisez
durablement à un volume proche de leur puissance maximale.
Dans ce cas, réduisez le volume sonore et le tweeter sera réactivé
automatiquement. Il ne s’agit donc pas ici d’une panne ou d’un défaut
de vos Monitor 1C. Le système de protection des moniteurs peut se
déclencher à faible volume si vous avez augmenté le niveau des hautes
fréquences sur l’amplificateur.
Consignes de Securite
Lisez ce s consignes.(1)
Conservez ces consignes.(2)
Respectez tous les avertissements.(3)
Respectez toutes les consignes d’utilisation.(4)
N’utilisez jamais l’appareil à proximité d’un liquide.(5)
Nettoyez l’appareil avec un chion sec.(6)
Avant de placer vos enceintes, contrôlez systématiquement que le sol est (7)
réellement ferme. Un sol qui vibre facilement est trop incertain pour pouvoir
y monter les enceintes.
Ne placez pas l’appareil à proximité d’une source de chaleur telle qu’un (8)
chauage, une cuisinière ou tout appareil dégageant de la chaleur
(y compris un ampli de puissance).
Utilisez exclusivement des accessoires et des appareils supplémentaires (9)
recommandés par le fabricant.
Utilisez exclusivement des chariots, des diables, des présentoirs, des pieds et (10)
des surfaces de travail recomman dés par le fabricant ou livrés avec le produit.
Déplacez précautionneusement tout chariot ou diable chargé pour éviter
d’éventuelles blessures en cas de chute.
Les travaux d’entretien de l’appareil doivent être eectués uniquement par (11)
du personnel qualié. Aucun entretien n’est nécessaire sauf si l’appareil est
endommagé de quelque façon que ce soit, si un liquide ou un objet a pénétré
à l’intérieur du châssis, si l’appareil a été exposé à la pluie ou à l’humidité,
s’il ne fonctionne pas correctement ou à la suite d’une chute.
Veillez à ne jamais laisser pénétrer d’objet ou de liquide par les ouvertures (12)
du boîtier.
Cableado
Los MONITOR 1C’s son capaces de producir volúmenes extremos. ◊
Por favor recuerde que las presiones sonoras no solo dañan
temporalmente su sentido auditivo, sino que pueden causar daños
permanentes. Tenga cuidado al seleccionar el volumen adecuado.
Debe silenciar siempre su amplicador antes de establecer una conexión.
Use cables de altavoz con un diámetro de hasta 4 mm.
Conecte su MONITOR 1C al amplicador tal como se muestra en la ilustración.
Para hacer esto, presione las abrazaderas que se encuentran en la parte trasera del
altavoz e inserte el extremo desnudo del cable de altavoz, prestando atención a que
lo hace con la polaridad correcta. Sepárese del conector para asegurar el cable.
Conecte el segundo altavoz de la misma forma.
Asegúrese de que los extremos desnudos de los cables no tocan nunca ◊
el extremo del otro cable de altavoz, a los conectores del altavoz o a las
partes metálicas de su amplificador.
Si deja que los altavoces de su Monitor 1C funcionen cerca o a su límite ◊
de potencia, los circuitos de protección integrados pueden inutilizar
temporalmente los tweeters. Reduzca el volumen para permitir que
el tweeter vuelva a estar operativo. En este caso, no corre el riesgo
de causar una daño permanente. Si ha conectado treble en su
amplificador, los circuitos de protección pueden intervenir
incluso en niveles de volumen general más bajos.
Instrucciones Detalladas de Seguridad
Lea las ins truccione s.(1)
Conserve estas instrucciones.(2)
Preste atención a todas las advertencias.(3)
Siga todas las instrucciones.(4)
No use este aparato cerca del agua.(5)
Limpie este aparato con un paño seco.(6)
Antes de instalar los baes, siempre se debe comprobar si la base es realmente (7)
rme. Un suelo que vibra ligeramente, no es seguro para el apilamiento de los
baes, por tanto: instalar los baes fundamental mente sólo en bases rmes
y planas.
No instale este equipo cerca de fuentes de calor tales como radiadores, (8)
acumuladores de calor, cocinas u otros aparatos (incluyendo amplicadores)
que puedan producir calor.
Use únicamente los dispositivos o accesorios especicados por el fabricante.(9)
Use únicamente con la carretilla, plataforma, trípode, soporte o mesa (10)
especicados por el fabricante o suministrados junto con el equipo.
Si utiliza una carretilla, tenga cuidado cuando mueva el equipo para evitar
daños producidos por un excesivo temblor.
Confíe las reparaciones a servicios técnicos cualicados. Se requiere (11)
mantenimiento siempre que la unidad se haya dañado, se haya derramado
líquido o hayan caído objetos dentro del equipo, cuando se haya expuesto el
aparato a la humedad o lluvia, cuando no funcione normalmente o cuando se
haya dejado caer.
No bloquee las aberturas de ventilación. Instale el equipo de acuerdo con las (12)
instrucciones del fabricante.
Collegamento
I MONITOR 1C’s sono in grado di produrre livelli sonori estremi. ◊
Non dimenticare che una pressione sonora alta non solo affatica
rapidamente l’udito, ma può anche danneggiarlo in modo permanente.
Rendete muto l’amplicatore prima di eettuare i collegamenti. Utilizzate cavo per
altoparlanti con sezione massima di 4 mm.
Cablate il MONITOR 1C con l’amplicatore come mostrato nella gura. A questo scopo
aprite i morsetti sul retro dell’altoparlante ed introducete le estremità spelate del cavo
dell’amplicatore nelle aperture ora libere rispettando la polarità. Rilasciate i morsetti
in modo che essi serrino le estremità del cavo. Cablate il secondo altoparlante nello
stesso modo.
Fare in modo che le estremità spelate dei cavi dell’amplificatore ◊
non tocchino i terminali scoperti di un altro cavo dell’altoparlante,
altre connessioni dell’altoparlante o parti in metallo dell’amplificatore.
Se fate funzionare a lungo il Monitor 1C con il massimo assorbimento ◊
di potenza, il circuito di protezione integrato può temporaneamente
disattivare il tweeter. Abbassate il livello sonoro, in modo che il tweeter
si riattivi automaticamente. In questo caso non sussiste danneggiamento.
Se sul vostro amplificatore avete aumentato i toni alti, il circuito di
protezione può scattare anche con livelli sonori complessivi di
scarsa entità.
Importanti Istruzioni di Sicurezza
Legger e queste istr uzioni.(1)
Conservare queste istruzioni.(2)
Fare attenzione a tutti gli avvertimenti.(3)
Seguire tutte le istruzioni.(4)
Non usare questo dispositivo vicino all’acqua.(5)
Pulire solo con uno stronaccio asciutto.(6)
Prima di montare le casse, occorre sempre vericare se il basamento (7)
è davvero stabile. Un pavimento che vibra leggermente, non è sicuro per
impilare le casse. Pertanto, montare le casse soltanto su un basamento
assolutamente stabile e piano.
Non installare nelle vicinanze di fonti di calore come radiatori, caloriferi, (8)
stufe o altri apparecchi (compreso amplicatori) che producono calore.
Usare solo dispositivi opzionali/accessori specicati dal produttore.(9)
Usare solo con carrello, supporto, cavalletto, sostegno o tavola specicate (10)
dal produttore o acquistati con l’apparecchio. Quando si usa un carrello,
prestare attenzione, muovendo il carrello/la combinazione di apparecchi,
a non ferirsi.
Per l’assistenza tecnica rivolgersi a personale qualicato. L’assistenza tecnica (11)
è necessaria nel caso in cui l’unità sia danneggiata, rovesciamento di liquidi
od oggetti caduti nell’apparecchio, esposizione alla pioggia o all’umidità,
anomalie di funzionamento o cadute dell’apparecchio.
Non bloccare alcuna fessura di ventilazione. Installare conformemente alle (12)
istruzioni del produttore.
Page 3

3 MONITOR SPE AKERS 1C
PRODUCT M ANUAL
Под Лючение
MONITOR SPEAKERS 1C могут воспроизводить звук с очень ◊
большой громкостью. Примите к сведению, что сильное звуковое
давление может не только утомить, но и серьезно повредить слух.
Всегда придерживайтесь умеренной громкости.
Всегда перед подсоединением отключайте звук усилителя.
Используйте соединительный кабель с диаметром до 4 мм.
Подключите MONITOR SPEAKERS 1C к усилителю как показано на рисунке.
Отожмите соединительные клеммы на тыльной панели динамика
и вставьте туда зачищенные концы кабелей, строго соблюдая полярность.
Отпустите зажимы так, чтобы они зафиксировали концы кабелей в отверстиях.
Таким же образом подключите второй динамик.
Зачищенные концы соединительного кабеля не должны ◊
соприкасаться с оголенными концами другого кабеля,
соединительными клеммами другого динамика или
металлическими частями усилителя.
Длительная эксплуатация MONITOR SPEAKERS 1C в пределах ◊
максимально допустимой мощности может привести к тому,
что встроенная система защиты временно отключит
высокочастотный твитер. При этом мониторы не повреждаются.
Чтобы твитер снова включился, уменьшите громкость.
Если АЧХ усилителя имеет подъем в области высоких частот,
подобное отключение может произойти и при более низком
уровне громкости.
Важные у Азания по Техни е Безопасности
Прочит айте эти указ ания.(1)
Сохраните эти указания.(2)
Выполняйте эти указания.(3)
Следуйте всем инструкциям по обслуживанию.(4)
Не пользуйтесь прибором в непосредственной близости от воды.(5)
Протирайте прибор сухой тряпкой:(6)
аждый раз перед установкой Вашей акустической системы необходимо (7)
проверять стабильность основы. Даже слегка колеблющаяся поверхность
небезопасна, поэтому устанавливайте акустическую систему только
на устойчивую, ровную поверхность.
Не располагайте прибор рядом с источниками тепла. Источниками тепла (8)
являются, например, радиаторы отопления, электропечи
и другие излучающие тепло приборы (в том числе усилители).
Применяйте только рекомендованные производи-телем дополнительные (9)
приборы/принадлежности.
Используейте только указанные производителем или входящие в (10)
объём поставки тележки, стойки, штативы, крепления или столы.
Если Вы пользуетесь тележкой, то при перевозке прибора соблюдайте
осторожность, постарайтесь не споткнуться и не получить травму.
Поручайте выполнение работ по обслуживанию прибора (11)
только квалифицированному персоналу сервисной службы.
Обслуживание требуется, например, при повреждении прибора,
попадании внутрь прибора посторон-них предметов или жидкости,
если прибор был оставлен под дождём или во влажной среде,
упал на пол или плохо работает.
Проследите за тем, чтобы через отверстия внутрь корпуса не попали (12)
предметы или жидкость.
Podlaczenie Podlaczenie
GLOSNIKI MONITOROWE 1C sa w stanie generowac dzwiek ◊
o bardzo wysokim natezeniu. Nalezy pamietac, ze wysokie cisnienie
akustyczne nie tylko szybko meczy sluch, ale takze moze go trwale
uszkodzic. Nalezy zawsze zwrócic uwage na odpowiednia glosnosc.
Przed podlaczaniem glosników nalezy wyciszyc wzmacniacz. Nalezy uzywac kabli
glosnikowych o przekroju do 4 mm.
Polaczyc GLOSNIKI MONITOROWE 1C ze wzmacniaczem, jak pokazano na ilustracji.
W tym celu otworzyc zaciski przylaczowe z tylu glosnika i w odsloniete otwory
zacisków wsunac odizolowane konce kabli glosnikowych jednakowymi biegunami.
Zwolnic zaciski blokujac w ten sposób konce kabli. Podlaczyc drugi glosnik zgodnie
z tym samym schematem.
Odizolowane koncówki kabli glosnikowych nie moga dotykac ◊
odizolowanej koncówki innego kabla glosnikowego, innych zlaczy
glosników lub czesci metalowych wzmacniacza.
Gdy GLOSNIKI MONITOROWE 1C stale pracuja w zakresie maksymalnego ◊
poboru mocy, zintegrowany uklad ochronny moze przejsciowo
wylaczyc glosnik wysokotonowy. Aby glosnik wysokotonowy ponownie
samoczynnie sie wlaczyl, nalezy zredukowac glosnosc. Taka sytuacja
nie oznacza uszkodzenia. W przypadku wzmocnienia zakresu wysokich
tonów na wzmacniaczu uklad ochronny moze zadzialac juz przy mniejszej
calkowitej glosnosci.
Wskazówki Dotyczace Bezpieczenstwa:
Prosze p rzeczy tac ponizs ze wskazówk i.(1)
Prosze przechowywac niniejsza instrukcje.(2)
Nalezy przestrzegac wszystkich wskazówek ostrzegawczych.(3)
Nalezy postepowac zgodnie z instrukcja obslugi.(4)
Urzadzenia nie wolno uzywac w poblizu wody.(5)
Urzadzenie mozna czyscic wylacznie sucha szmatka.(6)
Przed ustawianiem glosników nalezy zawsze sprawdzic, czy podloze jest (7)
wystarczajaco mocne. Lekko wibrujace podloze jest zbyt niebezpieczne dla
glosników, dlatego: glosniki nalezy ustawic tylko na mocnym, plaskim podlozu.
Nie stawiac urzadzenia w poblizu zródel ciepla takich, jak grzejniki, piece lub (8)
urzadzenia produkujace cieplo (np. wzmacniacze).
Uzywac wylacznie sprzetu dodatkowego i akcesoriów zgodnie (9)
z zaleceniami producenta.
Uzywac jedynie zalecanych przez producenta lub znajdujacych sie w zestawie (10)
wózków, stojaków, statywów, uchwytów i stolów. W przypadku poslugiwania
sie wózkiem nalezy zachowac szczególna ostroznosc w trakcie przewozenia
zestawu, aby uniknac niebezpieczenstwa potkniecia sie i zranienia.
Wykonywanie wszelkich napraw nalezy zlecac jedynie wykwalikowanym (11)
pracownikom serwisu. Przeprowadzenie przegladu technicznego staje sie
konieczne, jesli urzadzenie zostalo uszkodzone w jakikolwiek sposób,
jesli do wnetrza urzadzenia dostaly sie przedmioty lub ciecz, jesli urzadzenie
wystawione bylo na dzialanie deszczu lub wilgoci, jesli urzadzenie nie
funkcjonuje poprawnie oraz kiedy spadlo na podloge.
Zwracac uwage na to, aby przez otwory do wnetrza obudowy nie mogly dostac (12)
sie zadne przedmioty obce ani ciecze.
Aansluiten
De MONITOR 1C zijn in staat, extreme volumes te produceren. Let op, ◊
hoge geluidsdruk vermoeit het gehoor niet alleen sneller, maar kan het
ook permanent beschadigen.
Schakel de versterker op mute alvorens over te gaan tot het herstellen van de
verbindingen. Gebruik luidsprekerkabels met een diameter tot 4 mm.
Sluit met kabels de MONITOR 1C op de versterker aan, zoals dit in de afbeelding wordt
getoond. Hiervoor opent u de aansluitklemmen aan de achterzijde van de luidspreker
en schuift u de geïsoleerde uiteinden van de gelijkpolige luidsprekerkabel in de vrij
gekomen openingen. Laat de klemmen weer los zodat de kabeluiteinden vast blijven
zitten. Volg hetzelfde schema voor het bekabelen van de tweede luidspreker.
Let er verder op, dat de gestripte uiteinden van de luidsprekerkabels niet ◊
in aanraking komen met het open einde van een ander luidsprekerkabel,
andere luid-spreker-aansluitingen of metalen delen van de versterker.
Wanneer de MONITOR 1C geruime tijd binnen het bereik van het ◊
maximale opnamevermogen functioneert kan de geïntegreerde
beveiligings-schakelaar de hoge frequentie-tonen tijdelijk uitschakelen.
Verlaag het volume zodat de hoge frequentie-tonen zich vanzelf weer
activeren. In deze gevallen is er geen sprake van schade. Indien u op de
versterker een versterking van de hoge frequentie-tonen heeft ingesteld,
kan de beveiligings-schakelaar al bij een geringere totale geluidssterkte
geactiveerd worden.
Belangrijke Veiligheidsvoorschriften
Lees dez e voorschri ften.(1)
Bewaar deze voorschriften.(2)
Neem alle waarschuwingen in acht.(3)
Volg alle voorschriften op.(4)
Gebruik dit apparaat niet in de buurt van water.(5)
Reinig het uitsluitend met een droge doek.(6)
Voordat u uw boxen opstelt, moet steeds worden gegarandeerd, (7)
of de ondergrond werkelijk stevig is. Een vloer, die licht trilt, is voor
een box te onzeker, daarom: boxen principieel alleen op stevige,
vlakke ondergrond opstellen.
Het apparaat mag niet worden geplaatst in de buurt van radiatoren, (8)
warmte-uitlaten, kachels of andere zaken (ook versterkers)
die warmte afgeven.
Gebruik uitsluitend door de producent gespeci-ceerd toebehoren (9)
c.q. onderdelen.
Gebruik het apparaat uitsluitend in combinatie met de wagen, het statief, (10)
de driepoot, de beugel of tafel die door de producent is aangegeven, of die in
combinatie met het apparaat wordt verkocht. Bij gebruik van een wagen dient
men voorzichtig te zijn bij het verrijden van de combinatie wagen/apparaat
en letsel door vallen te voorkomen.
Laat alle voorkomende reparaties door vakkundig en bevoegd personeel (11)
uitvoeren. Reparatiewerkzaamheden zijn nodig als het toestel op enige wijze
beschadigd is geraakt, als er vloeistof of voorwerpen in terecht zijn gekomen,
als het aan regen of vochtigheid heeft blootgestaan, niet normaal functioneert
of wanneer het is gevallen.
Let erop geen van de ventilatie-openingen te bedekken. Plaats en installeer (12)
het volgens de voor-schriften van de fabrikant.
Asennus
MONITOR 1Cit kykenevät tuottamaan äärimmäisiä äänenvoimakkuuksia. ◊
Huomatkaa, että korkea äänenpaine ei ainoastaan väsytä korvaa
nopeasti, vaan saattaa myös aiheuttaa pysyviä vaurioita.
Vaimentakaa vahvistin ennen liitäntöjä. Liitännöissä tulee käyttää maksimissaan
4 mm:n paksuista kaiutinkaapelia.
Yhdistäkää MONITOR 1C vahvistimeen oheisen kuvan mukaan. Avatkaa tätä varten
kaiuttimen takapuolella olevat liittimet ja työntäkää kaiutinkaapelin avoimet päät
samanapaisesti vapaisiin aukkoihin. Päästäkää liittimistä irti, niin että kaapelin päät
ovat liittimissä. Yhdistäkää toinen kaiuttimista saman kaavan mukaisesti.
Huolehtikaa siitä, ettei kaiutinkaapelin kuoritut päät kosketa ◊
toisen kaiutinkaapelin avointa päätä, muita kaiutinliitoksia tai
vahvistimen metalliosia.
Kun käytätte MONITOR 1C:tä jatkuvasti maksimitehon alueella, ◊
voi sisään rakennettu suojakytkentä sammuttaa korkeiden äänten
kaiuttimen väliaikaisesti. Vaimentakaa äänentoistoa, jotta korkeiden
äänten kaiutin kytkeytyisi päälle itsestään. Tässä tapauksessa ei ole
kyse laitteen vioittumisesta. Jos olette nostaneet vahvistiminne
korkeiden äänien rajaa, voi suojakytkentä laueta jo
pienemmälläkin äänenvoimakkuudella.
Tärkeitä Turvallisuusohjeita
Lukekaa nä mä ohjeet.(1)
Säilyttäkää nämä ohjeet.(2)
Huomioikaa kaikki varoitukset.(3)
Seuratkaa kaikkia ohjeita.(4)
Älkää käyttäkö tätä laitetta veden läheisyydessä.(5)
Puhdistakaa ainoastaan kuivalla liinalla. (6)
Ennenkuin pinoat kaappeja täytyy aina tarkistaa, onko alusta todella kestävä. (7)
Helposti tärisevä perusta, on kaappipinolle liian epävarma. Aseta kaapit siksi
todellakin vain lujalle, tasaiselle alustalle.
Älkää asentako lämpölähteiden, kuten lämpöpatterien, uunien tai muiden (8)
lämpöä tuottavien laitteiden (mukaan-lukien vahvistinten), lähelle.
Käyttäkää ainoastaan valmistajan mainitsemia kiinnityksiä / lisälaitteita.(9)
Käyttäkää ainoastaan valmistajan mainitseman tai laitteen (10)
mukana myydyn cartin, seisontatuen, kolmijalan, kannattimen tai
pöydän kanssa. Cartia käytettäessä tulee cart/laite-yhdistelmää
siirrettäessä varoa kompastu-masta itse laitteeseen ja näin aiheutuvaa
mahdollista vahingoittumista.
Antakaa kaikki huolto valtuutettujen huollon ammattilaisten tehtäväksi. (11)
Huoltoa tarvitaan, kun yksikkö on jotekin vaurioitunut, esimerkiksi kun
virtajohto tai –pistoke on vaurioitunut, nestettä on roiskunut laitteelle
tai laitteen päälle on pudonnut jotakin, yksikkö on altistunut sateelle tai
kosteudelle, se ei toimi tavanomaisesti tai on päässyt putoamaan.
Älkää peittäkö tuuletusaukkoja. Asentakaa valmistajan antamien (12)
ohjeiden mukaisesti.
Page 4

4 MONITOR SPEA KERS 1C
PRODUCT M ANUAL
Anslutning
MONITOR 1C producerar extrema volymer. Tänk på att ett högt ljudtryck ◊
inte bara tröttar ut hörseln, utan även kan skada den permanent.
Ställ ner förstärkaren (“mute”) innan du ansluter förbindelserna.
Använd högtalarkablar med ett maximalt tvärsnitt på 4 mm.
Anslut MONITOR 1C med förstärkaren enligt bilden. Öppna anslutningsklämmorna
på högtalarens baksida och skjut in de isolerade ändarna på högtalarkabeln i de fria
öppningarna. Släpp klämmorna igen så att kabeländarna tas upp. Anslut den andra
högtalaren enligt samma princip.
Se till att de avisolerade ändarna på högtalar-kablarna inte berör en ◊
öppen ände på en annan högtalarkabel, andra högtalaranslutningar
eller metalldelar på förstärkaren.
Om man vill använda MONITOR 1C permanent i det maximala ◊
prestationsområdet är det möjligt att den integrerade skyddskopplingen
tillfälligt kopplar av diskantelementet. Om du sänker volymen kopplas
diskantelementet till automatiskt. I det här fallet har ingenting tagit
skada. Om du har utfört en höjdangivelse på förstärkaren kan
skydds-kopplingen även lösas ut vid lägre volym.
Viktiga Säkerhetsanvisningar
Läs des sa anvisninga r.(1)
Spara dessa anvisningar.(2)
Följ alla varningar.(3)
Följ alla anvisningar.(4)
Använd inte apparaten i närheten av vatten.(5)
Rengör endast med torr trasa.(6)
Innan du ställer upp boxarna, måste du kontrollera, att underlaget (7)
verkligen är stabilt. Ett underlag som lätt kommer i vibration, är alltför osäker
för att bygga upp ett högtalartorn. Boxar ska alltid placeras på ett jämnt och
stabilt underlag.
Installera aldrig intill värmekällor som värmeelement, varmluftsintag, (8)
spisar eller annan utrustning som avger värme (inklusive förstärkare).
Använd endast tillkopplingar och tillbehör som angetts av tillverkaren.(9)
Använd endast med vagn, stativ, trefot, hållare eller bord som angetts (10)
av tillverkaren, eller som sålts tillsammans med apparaten. Iakttag särkskild
försiktighet med vagn när apparaten/vagnen yttas.
Låt kvalicerad personal utföra all service. Service är nödvändig när apparaten (11)
har skadats, vätska eller främmande föremål har kommit in i apparaten,
eller när den har fallit i golvet.
Blockera inte ventilationsöppningarna. Installera enligt (12)
tillverkarens anvisningar.
Tilslutning
MONITOR 1C kan producere ekstreme lydstyrker. Vær venligst opmærksom ◊
på, at et højt lydtryk ikke kun hurtigt gør øret træt, men også kan
beskadige det permanent.
Stil forstærkeren på mute, før forbindelserne etableres. Brug højtalerkabler med
tværsnit på op til 4 mm.
Forbind MONITOR 1C med forstærkeren som vist på billedet.
Åbn tilslutningsklemmerne på højtalerens bagside, og stik de asolerede
ender af højtalerkablet unipolar ind i de frie åbninger. Slip klemmerne igen,
så de indeholder kabelenderne. Slut kablerne til den anden højtaler efter
det samme skema.
Vær opmærksom på, at de afisolerede ender på højtalerkablerne ikke ◊
rører den åbne ende af et andet højtalerkabel, andre højtalertilslutninger
eller metaldele på forstærkeren.
Hvis MONITOR 1C i længere tid anvendes i området for maksimalt ◊
effektforbrug, kan den integrerede sikkerheds-afbrydelse
forbigående slukke for diskanthøjtaleren. Skru ned for lydstyrken,
så diskant-højtaleren tændes automatisk igen. I dette tilfælde er der
ikke tale om en fejl. Hvis du har skruet op for diskanten på din forstærker,
kan sikkerheds-afbrydelsen også udløses ved lavere samlet lydstyrke.
Vigtige Sikkerhedsanvisninger
Læs diss e anvisninge r.(1)
Opbevar disse anvisninger.(2)
Ret Dem efter alle advarsler.(3)
Følg alle anvisninger.(4)
Anvend ikke dette apparat i nærheden af vand.(5)
Brug kun en tør klud ved rengøring.(6)
Før du stiller dine bokse op, skal du altid afprøve, om underlaget nu også (7)
er tilstrækkelig fast. Et underlag, der vibrerer let, er for usikkert til stabling
af boksene, og boksene bør derfor kun anbringes på et fast, plant underlag.
Må ikke installeres i nærheden af varmekilder såsom radiatorer, varmespjæld, (8)
komfurer eller andre apparater (inkl. forstærkere). der frembringer varme.
Benyt alene tilslutningsenheder/tilbehør som angivet af fabrikanten.(9)
Når apparatet benyttes med vogn, stativ, trefod, konsol eller bord, skal det (10)
være med sådanne, som er anvist af fabrikanten eller som sælges sammen
med apparatet. Når der benyttes vogn, skal der udvises forsigtighed,
når kombinationen vogn/apparat yttes, så De undgår at komme til
skade ved at snuble.
Al service skal foretages af faguddannet personale. Service er påkrævet, (11)
når enheden på nogen måde er blevet beskadiget, hvis der er blevet spildt
væsker eller der er faldet genstande ned i apparatet, hvis enheden har været
udsat for regnvejr eller fugtighed, ikke fungerer normalt eller er blevet tabt.
Tildæk ikke ventilationsåbninger. Installation foretages i over-ensstemmelse (12)
med fabrikantens anvisninger.
Ligação
Os altifalantes MONITOR 1C têm capacidade para produzir volumes ◊
de som extremamente altos. Lembre-se, que uma elevada pressão
acústica não só cansa rapidamente os ouvidos, como também lhes
pode causar danos irreparáveis.
Suprima o som do amplicador antes de estabelecer as ligações. Utilize cabos para
altifalantes com secções transversais até 4 mm.
Ligue os cabos do MONITOR 1C com os do amplicador como mostra a gura.
Para este efeito abra os bornes de ligação na parte de trás do altifalante e insira
as extremidades descascadas do cabo do altifalante com a mesma polaridade nas
aberturas livres. Largue novamente os bornes de modo a que quem a segurar as
extremidades do cabo. Ligue os cabos do segundo altifalante de acordo com
o mesmo esquema.
Tenha atenção para que as extremidades isoladas dos cabos de ◊
altifalante não toquem na extremidade exposta de um outro cabo de
altifalante, nem noutras ligações de altifalantes ou em peças metálicas
do amplificador.
Se operar o MONITOR 1C permanentemente na gama de consumo ◊
de potência máxima, o circuito protector integrado poderá desligar
temporariamente o altifalante de agudos. Reduza o volume de som para
que o altifalante de agudos se volte a ligar. Não estamos perante uma
danificação neste caso. Caso tenha efectuado uma elevação dos altos no
seu amplificador, o circuito protector também poderá disparar com um
volume de som geral mais reduzido.
Instruções de Segurança Importantes
Leia est as instruçõ es.(1)
Guarde estas instruções.(2)
Preste atenção a todos os avisos.(3)
Siga todas as instruções.(4)
Não utilize este dispositivo perto de água.(5)
Limpe apenas com um pano seco.(6)
Antes de instalar as caixas de altifalantes, deve vericar sempre se a superfície (7)
é realmente estável. Um pavimento que vibre ligeiramente, não é seguro
para o empilhamento das caixas de altifalantes, por isso: instale as caixas de
altifalantes somente em superfícies estáveis e planas.
Não instale perto de quaisquer fontes de calor tais como radiadores, bocas de (8)
ar quente, fogões de sala ou outros aparelhos (incluindo amplicadores)
que produzam calor.
Utilize apenas ligações/acessórios especicados pelo fabricante.(9)
Utilize apenas com o carrinho, estrutura, tripé, suporte, ou mesa especicados (10)
pelo fabricante ou vendidos com o dispositivo. Quando utilizar um carrinho,
tenha cuidado ao mover o conjunto carrinho/dispositivo para evitar danos
provocados pela terpidação.
Qualquer tipo de reparação deve ser sempre efectuado por pessoal qualicado. (11)
É necessária uma reparação sempre que a unidade tiver sido de alguma forma
danicada, na eventualidade de líquido ter sido derramado ou objectos terem
caído para dentro do dispositivo; no caso da unidade ter estado exposta à chuva
ou à humidade; se esta não funcionar normalmente, ou se tiver caído.
Não obstrua as entradas de ventilação. Instale de acordo com as instruções (12)
do fabricante.
Σένδεση
Τα ηχεία MONITOR 1C μπορούν να παράγουν ιδιαίτερα ακραίες εντάσεις ◊
ήχου. Παρακαλούμε να λάβετε υπόψη ότι η υψηλή ηχητική πίεση δεν
κουράζει μόνο γρήγορα την ακοή σας, αλλά μπορεί επίσης να της
προκαλέσει μόνιμες βλάβες.
Απενεργοποιήστε τον ενισχυτή, πριν πραγματοποιήσετε τις συνδέσεις.
Χρησιμοποιήστε καλώδιο ηχείων με διάμετρο έως 4 mm.
Εκτελέστε τη διαδικασία καλωδίωσης του MONITOR 1C με τον ενισχυτή, όπως
παρουσιάζεται στην εικόνα. Ανοίξτε τα κλιπ συνδέσεων στην πίσω πλευρά του ηχείου
και ωθήστε τα απογυμνωμένα άκρα του καλωδίου ηχείων στους ανάλογους πόλους
των ελεύθερων ανοιγμάτων. Απελευθερώστε τα κλιπ, ώστε να εφαρμόσουν στα άκρα
του καλωδίου. Εκτελέστε τη διαδικασία καλωδίωσης του δεύτερου ηχείου σύμφωνα
με την ίδια διάταξη.
Βεβαιωθείτε ότι τα απογυμνωμένα άκρα των καλω-δίων των ηχείων ◊
δεν έρχονται σε επαφή με το απογυμνωμένο άκρο ενός άλλου καλωδίου
ηχείου, με άλλες συνδέσεις ηχείων ή με τα μεταλλικά τμήματα
του ενισχυτή.
Εάν το MONITOR 1C λειτουργεί συνεχώς στην περιοχή της μέγιστης ◊
ισχύος εισόδου, το ενσωματωμένο κύκλωμα προστασίας ενδέχεται
να διακόψει προσωρινά τη λειτουργία των ηχείων υψηλών συχνοτήτων.
Μειώστε την ένταση του ήχου, ώστε να ενεργοποιηθούν αυτόματα τα
ηχεία υψηλών συχνοτήτων. Σε αυτήν την περίπτωση δεν υπάρχει κάποια
βλάβη. Εάν έχετε προβεί σας σε αύξηση των υψηλών συχνοτήτων του
ενισχυτή σας, τότε το κύκλωμα προστασίας θα διακόψει τη λειτουργία
ακόμη και σε χαμηλότερη συνολική στάθμη έντασης ήχου.
Σημαντι ες Οδηγιες Ασφαλειας
Διαβάσ τε τις παρούσ ες οδηγίες.(1)
Φυλάξτε τις παρούσες οδηγίες.(2)
Προσέξτε όλες τις προειδοποιήσεις.(3)
Τηρήστε όλες τις οδηγίες.(4)
Μην χρησιμοποιείτε αυτή τη συσκευή κοντά σε νερό.(5)
Για τον καθαρισμό χρησιμοποιήστε μόνο ένα στεγνό πανί.(6)
Πριν τοποθετήσετε τα ηχεία σας, πρέπει πάντα να ελέγχετε αν είναι πραγματικά (7)
σταθερό το υπέδαφος. Το δάπεδο που δονείται εύκολα, είναι πολύ ασταθές
για το στοίβαγμα των ηχείων, γι’ αυτό τοποθετείτε τα ηχεία μόνο σε σταθερό,
επίπεδο υπέδαφος.
Μην τοποθετείτε τη συσκευή κοντά σε πηγές θερμότητας, όπως π.χ. καλοριφέρ, (8)
θερμοσυσσωρευτές, σόμπες ή λοιπές συσκευές (ακόμη και ενισχυτές)
που παράγουν θερμότητα.
Χρησιμοποιήστε αποκλειστικά πρόσθετα εξαρτήματα/αξεσουάρ που (9)
προβλέπονται από τον κατασκευαστή.
Η συσκευή επιτρέπεται να χρησιμοποιείται με καροτσάκι, βάση, τρίποδο, (10)
βραχίονα ή πάγκο που προβλέπεται από τον κατασκευαστή ή που διατίθεται
μαζί με τη συσκευή. Εάν χρησιμοποιείτε καροτσάκι, πρέπει να είστε προσεκτικοί
όταν μετακινείτε το συγκρότημα καροτσάκι/συσκευή, για να αποφύγετε τυχόν
τραυμα-τισμούς λόγω εμποδίων.
Για τις εργασίες επισκευής πρέπει οπωσδήποτε να απευθύνεστε σε (11)
εξειδικευμένο προσωπικό. Σέρβις απαιτείται όταν η μονάδα έχει υποστεί
ζημιά, όπως π.χ. ζημιά στο καλώδιο τροφοδοσίας ή το φις, εάν πέσουν υγρά
ή ξένα αντικείμενα μέσα στη συσκευή, εάν η μονάδα εκτεθεί σε βροχή
ή υγρασία, εάν δεν λειτουργεί σωστά ή πέσει στο έδαφος.
Μη φράζετε τα ανοίγματα εξαερισμού. Η εγκατάσταση πρέπει να (12)
πραγματοποιείται σύμφωνα με τις οδηγίες του κατασκευαστή.
Page 5

5 MONITOR SPE AKERS 1C
PRODUCT M ANUAL
接続
MONITOR 1C◊◊ ◊は極度に高い音量を出すことが出来ます。◊高い音圧で
の使用によって一時的、◊または恒久的な聴覚障害をきたす場合が
ありますので、◊適切な音量での使用を常に心がけてください。
接続を行う前に必ずアンプをミュートしてください。 接続には直径
4 mm (AWG 6 ) 程度のスピーカーケーブルを使用してください。
図で示されたように MONITOR 1C をアンプと接続します。 そのためには、
まずスピーカーの背面部にある端子の留め金を押し、ここにスピーカー
ケーブルの端子を極性に注意しながら正しく接続します。 留め金を再
び離しケーブルを固定します。 2 台目のスピーカーも同様にして接続し
てくだ さい 。
裸のワイヤ端末が、他のスピーカーケーブルやスピーカー接続、◊◊◊
アンプの銀部に触れないようにお気をつけ下さい。
MONITOR 1C◊◊ ◊スピーカーを出力限界までドライブさせると、◊
内蔵◊された保護回路が一時的にツイータを使用不能にします。◊
ツイータを再び作動させるためには音量を下げてください。◊この
場合、◊ツイータが故障することはありません。◊アンプのトレブルを
上げると、全体の音量がそれほど高くなくとも保護回◊路が作動し
てしまうことが あります。
安全にお使いいただくために
取 扱説 明 書 を通 してご覧 くださ い。(1)
取扱説明書を大切に保管してください。(2)
警告に従ってください。(3)
指示に従ってください。(4)
本機を水の近くで使用しないでください。(5)
お手入れの際は常に乾燥した布巾を使ってください。(6)
本機は、 取扱説明書の指示に従い、 適切な換気を妨げない場所に(7)
設置してください。
本機は、 電気ヒーターや温風機器、 ストーブ、 調理台やアンプとい(8)
った熱源から離して設置してください。
付属品は本機製造元が指定したもののみをお使いください。(9)
カート、 スタンド、 三脚、 ブラケット、 テーブルなどは、 本機製造元(10)
が指定したもの、 もしくは本機の付属品となるもののみをお使いく
ださい。 カートを使用しての運搬の際は、 器具の落下による怪我に
十分ご注意ください。
電源コードまたはプラグが損傷した場合、 本気内部に異物や水が(11)
入った場合、 雨や水分で濡れた場合、 本機が正しく作動しない場
合、 もしくは本機を落下させてしまった場合は、 当社指定のサービ
ス技術者に修理をご依頼ください。
ボックスを設置する前に床がボックスの重さに耐えられるかどうか(12)
を必ず確認してください。 ステージ構造物等の振動しやすい床面は
ボックスの積み重ねの際に不安定な場合があります。 ボックスは必
ず、 平坦かつ丈夫な土台の上に設置してください。
接线
MONITOR 1C◊◊ ◊的音量极大。◊请注意高声压可能会暂或永久性损坏听
力。◊切记使用时音量要合适。
连接音箱前请将功放调至静音。 连接时需要直径为 4 mm (AWG 6 )
的音箱线。
MONITOR 1C 与功放的连接方法如上所示。 按下音箱背面的连接夹并插
入音箱线的裸端, 插入时注意正负极。 固定好线。 用相同方法连接第二
台音箱。
注意音箱线的裸线端不可碰到另一条音箱线的◊◊◊ OPEN END,◊音箱接口
或功放的金属部分。
若◊◊◊ MONITOR 1C◊音箱在功率极限或接近功率极限下工作,◊集成保护
电路便可能会暂时切断与高音单元的连接。◊调低音量以便高音单
元可自动重新使用。◊这样,◊便不会有永久损坏听力的可能。◊若打开
功放的调音,◊保护电路大总音量较低时可能会产生干扰。
重要的安全请明
请阅读这些说明。(1)
请妥善保存这些说明。(2)
请注意所有的警示。(3)
请遵守所有的说明。(4)
请不要在靠近水的地方使用本产品。(5)
请使用干布清洁本品。(6)
请将音箱放置在牢固稳定及水平的地上或支架上。 震动的地面不(7)
适合摆放音箱。
请勿将音箱安装在热源附近如暖气片, 炉子或其他产生热量的设(8)
备 (包括放大器)
请只使用厂家指定的附属设备及配件。(9)
请只使用厂家指定或与设备一同出售的手推车, 架子, 三角架, 支架(10)
或桌子。使用手推车来搬运设备时请安全放置设备以免手推车 /
设备倾倒而受伤。
所有的维修需要专业人员进行。 当设备损坏时便需要维修, 如液体(11)
流入或异物落入本设备, 设备被雨淋或受潮, 操作不当或被摔坏。
请勿堵塞通风口。 安装产品时请遵照厂家的说明。(12)
Warranty
Warranty§ 1
This lim ited warra nty is vali d only if you pu rchased t he produc t from a BEHR INGER (1)
author ized deale r in the count ry of purc hase. A list o f authori zed dealer s can be foun d
on BEHRIN GER’s websit e behringe r. com unde r “Where to Bu y“, or you can con tact the
BEHRING ER oce clos est to you.
MUSIC Group* warrants the mechanical and electronic components of this product to be (2)
free of defects in material and workmanship if used under normal operating conditions for a
period of one (1) year from the original date of purchase (see the Limited Warranty terms in
§ 4 below), unless a longer minimum warranty period is mandated by applicable local laws.
If the product shows any defects within the specied warranty period and that defect is not
excluded under § 4, MUSIC Group shall, at its discretion, either replace or repair the product
using suitable new or reconditioned product or parts. In case MUSIC Group decides to
replace the entire product, this limited warranty shall apply to the replacement product for
the remaining initial warranty period, i.e., one (1) year (or otherwise applicable minimum
warranty period) from the date of purchase of the original product.
Upon validation of the warranty claim, the repaired or replacement product will be returned (3)
to the user freight prepaid by MUSIC Group.
Warranty claims other than those indicated above are expressly excluded. (4)
PLEASE RETAIN YOUR SALES RECEIPT. IT IS YOUR PROOF OF PURCHASE COVERING YOUR LIMITED
WARRANTY. THIS LIMITED WARRANTY IS VOID WITHOUT SUCH PROOF OF PURCHASE.
Online registration§ 2
Please do remember to register your new BEHRINGER equipment right after your purchase at
behringer. com under “Support” and kindly read the terms and conditions of our limited warranty
carefully. Registering your purchase and equipment with us helps us process your repair claims
quicker and more eciently. Thank you for your cooperation!
Return materials authorization§ 3
To obtain wa rranty s ervice, p lease cont act the re tailer fr om whom the eq uipment (1)
was purc hased. Sho uld your BEH RINGER deal er not be loca ted in your vi cinity,
you may con tact the BE HRINGER dis tributo r for your co untry lis ted under “ Support ”
at behri nger. com. If your count ry is not li sted, plea se check if y our proble m can be
dealt wi th by our “Onl ine Suppor t” whic h may also be fo und under “S upport ” at
behrin ger. com. Al ternati vely, please s ubmit an onl ine warran ty claim at b ehringe r. com
BEFORE r eturning t he produc t. All inqu iries mus t be accompa nied by a desc ription o f the
proble m and the ser ial number o f the produc t. After v erifyi ng the prod uct’s war ranty
eligib ility wit h the origi nal sales re ceipt, MUSI C Group will t hen issue a Re turn Mate rials
Author ization (“ RMA”) numb er.
Subsequently, the product must be returned in its original shipping carton, together with (2)
the return authorization number to the address indicated by MUSIC Group.
Shipments without freight prepaid will not be accepted. (3)
Warranty exclusions§ 4
This lim ited warra nty does n ot cover cons umable par ts inclu ding, but no t limited to, (1)
fuses a nd batter ies. Wher e applicab le, MUSIC Gro up warrant s the valve s or meters
contai ned in the pr oduct to be f ree from d efect s in material a nd workma nship for a
perio d of ninety (9 0) days from da te of purcha se.
This limited warranty does not cover the product if it has been electronically or mechanically (2)
modied in any way. If the product needs to be modied or adapted in order to comply
with applicable technical or safety standards on a national or local level, in any country
which is not the country for which the product was originally developed and manufactured,
this modication/adaptation shall not be considered a defect in materials or workmanship.
This limited warranty does not cover any such modication/adaptation, regardless of
whether it was carried out properly or not. Under the terms of this limited warranty,
MUSIC Group shall not be held responsible for any cost resulting from such
a modication/adaptation.
This limited warranty covers only the product hardware. It does not cover technical (3)
assistance for hardware or software usage and it does not cover any software products
whether or not contained in the product. Any such software is provided “AS IS” unless
expressly provided for in any enclosed software limited warranty.
Technical specications and appearance are subject to change without notice. The information contained herein is correct at the time of printing. All trademarks are the property of their respective owners. MUSIC Group accepts no liability for any loss which may be suered by any person who relies either
wholly or in part upon any description, photograph or statement contained herein. Colors and specications may vary slightly from product. BEHRINGER products are sold through authorized dealers only. Distributors and dealers are not agents of MUSIC Group and have absolutely no authority to bind
MUSIC Group by any express or implied undertaking or representation. This manual is copyrighted. No part of this manual may be reproduced or transmitted in any form or by any means, electronic or mechanical, including photocopying and recording of any kind, for any purpose, without the express written
permission of MUSIC Group IP Ltd. ALL RIGHTS RESERVED. © 2011 MUSIC Group IP Ltd. Trident Chambers, Wickhams Cay, P.O. Box 146, Road Town, Tortola, British Virgin Islands
This limited warranty is invalid if the factory-applied serial number has been altered or (4)
removed from the product.
Free inspections and maintenance/repair work are expressly excluded from this limited (5)
warranty, in particular, if caused by improper handling of the product by the user.
This also applies to defects caused by normal wear and tear, in particular, of faders,
crossfaders, potentiometers, keys/buttons, guitar strings, illuminants and similar parts.
Damage/defects caused by the following conditions are not covered by this (6)
limited warranty:
improper handling, neglect or failure to operate the unit in compliance with •
the instructions given in BEHRINGER user or service manuals;
connection or operation of the unit in any way that does not comply with the •
technical or safety regulations applicable in the country where the product
is used;
damage/defects caused by acts of God/Nature (accident, fire, flood, etc) •
or any other condition that is beyond the control of MUSIC Group.
Any repair or opening of the unit carried out by unauthorized personnel (user included) (7)
will void the limited warranty.
If an inspection of the product by MUSIC Group shows that the defect in question is not (8)
covered by the limited warranty, the inspection costs are payable by the customer.
Products which do not meet the terms of this limited warranty will be repaired exclusively (9)
at the buyer’s expense. MUSIC Group or its authorized service center will inform the buyer
of any such circumstance. If the buyer fails to submit a written repair order within 6 weeks
after notication, MUSIC Group will return the unit C.O.D. with a separate invoice for freight
and packing. Such costs will also be invoiced separately when the buyer has sent in a written
repair order.
Authorized BEHRINGER dealers do not sell new products directly in online auctions. (10)
Purchases made through an online auction are on a “buyer beware” basis. Online auction
conrmations or sales receipts are not accepted for warranty verication and MUSIC Group
will not repair or replace any product purchased through an online auction.
Warranty transferability§ 5
This limited warranty is extended exclusively to the original buyer (customer of authorized retail
dealer) and is not transferable to anyone who may subsequently purchase this product. No other
person (retail dealer, etc.) shall be entitled to give any warranty promise on behalf of MUSIC Group.
Claim for damage§ 6
Subject only to the operation of mandatory applicable local laws, MUSIC Group shall have no
liability to the buyer under this warranty for any consequential or indirect loss or damage of any
kind. In no event shall the liability of MUSIC Group under this limited warranty exceed the invoiced
value of the product.
Limitation of liability§ 7
This limited warranty is the complete and exclusive warranty between you and MUSIC Group.
It supersedes all other written or oral communications related to this product. MUSIC Group provides
no other warranties for this product.
Other warranty rights and national law§ 8
This lim ited warra nty does n ot exclude o r limit the bu yer’s stat utory ri ghts as (1)
a consum er in any way.
The limited warranty regulations mentioned herein are applicable unless they constitute an (2)
infringement of applicable mandatory local laws.
This warranty does not detract from the seller’s obligations in regard to any lack of (3)
conformity of the product and any hidden defect.
Amendment§ 9
Warranty service conditions are subject to change without notice. For the latest warranty terms
and conditions and additional information regarding MUSIC Group’s limited warranty, please see
complete details online at behringer. com.
* MUSIC Group Macao Commercial Oshore Limited of Rue de Pequim No. 202-A, Macau Finance Centre 9/J, Macau, including all
MUSIC Group companies
 Loading...