

Page 1

Quick Start Guide
VIRTUALIZER 3D
FX2000
High-Performance 3D Multi-Engine Eects Processor
V 5 .0
Page 2

2 VIRTUALIZER 3D FX2000 Quick Start Guide 3
8. No instale este equipo cerca de fuentes de calor
los recursos naturales. Para más información acerca del
deben ser siempre eliminadas en un punto limpio y nunca
9. Do not defeat the safety purpose of the polarized
20. Please keep the environmental aspects of battery
This apparatus may be used in tropical and moderate
Microphones and Coolaudio are trademarks or registered
Important Safety
Instructions
Terminals marked with this symbol carry
electrical current of sucient magnitude
to constitute risk of electric shock.
Use only high-quality professional speaker cables with
¼" TS or twist-locking plugs pre-installed. Allother
installation or modication should be performed only
by qualiedpersonnel.
This symbol, wherever it appears,
alertsyou to the presence of uninsulated
dangerous voltage inside the
enclosure-voltage that may be sucient to constitute a
risk ofshock.
This symbol, wherever it appears,
alertsyou to important operating and
maintenance instructions in the
accompanying literature. Please read the manual.
Caution
To reduce the risk of electric shock, donot
remove the top cover (or the rear section).
No user serviceable parts inside. Refer servicing to
qualied personnel.
Caution
To reduce the risk of re or electric shock,
do not expose this appliance to rain and
moisture. The apparatus shall not be exposed to dripping
or splashing liquids and no objects lled with liquids,
suchas vases, shall be placed on the apparatus.
Caution
These service instructions are for use
by qualied service personnel only.
Toreduce the risk of electric shock do not perform any
servicing other than that contained in the operation
instructions. Repairs have to be performed by qualied
servicepersonnel.
1. Read these instructions.
2. Keep these instructions.
3. Heed all warnings.
4. Follow all instructions.
5. Do not use this apparatus near water.
6. Clean only with dry cloth.
7. Do not block any ventilation openings. Install in
accordance with the manufacturer’s instructions.
8. Do not install near any heat sources such as
radiators, heat registers, stoves, or other apparatus
(including ampliers) that produce heat.
or grounding-type plug. A polarized plug has two blades
with one wider than the other. A grounding-type plug
has two blades and a third grounding prong. The wide
blade or the third prong are provided for your safety. Ifthe
provided plug does not t into your outlet, consult an
electrician for replacement of the obsolete outlet.
10. Protect the power cord from being walked on or
pinched particularly at plugs, convenience receptacles,
and the point where they exit from the apparatus.
11. Use only attachments/accessories specied by
themanufacturer.
12. Use only with the
cart, stand, tripod, bracket,
or table specied by the
manufacturer, orsold with
the apparatus. When a cart
is used, use caution when
moving the cart/apparatus
combination to avoid
injury from tip-over.
13. Unplug this apparatus during lightning storms or
when unused for long periods of time.
14. Refer all servicing to qualied service personnel.
Servicing is required when the apparatus has been
damaged in any way, such as power supply cord or plug
is damaged, liquid has been spilled or objects have fallen
into the apparatus, the apparatus has been exposed
to rain or moisture, does not operate normally, or has
beendropped.
15. The apparatus shall be connected to a MAINS socket
outlet with a protective earthing connection.
16. Where the MAINS plug or an appliance coupler is
used as the disconnect device, the disconnect device shall
remain readily operable.
17. Correct disposal of this
product: This symbol indicates
that this product must not be
disposed of with household
waste, according to the WEEE
Directive (2012/19/EU) and
your national law. This product
should be taken to a collection center licensed for the
recycling of waste electrical and electronic equipment
(EEE). The mishandling of this type of waste could have
a possible negative impact on the environment and
human health due to potentially hazardous substances
that are generally associated with EEE. At the same time,
your cooperation in the correct disposal of this product
will contribute to the ecient use of natural resources.
For more information about where you can take your
waste equipment for recycling, please contact your local
city oce, or your household waste collection service.
18. Do not install in a conned space, such as a book
case or similar unit.
19. Do not place naked ame sources, such as lighted
candles, on the apparatus.
disposal in mind. Batteries must be disposed-of at a
battery collection point.
21.
climates up to 45°C.
LEGAL DISCLAIMER
Music Tribe accepts no liability for any loss which may
be suered by any person who relies either wholly or in
part upon any description, photograph, or statement
contained herein. Technical specications, appearances
and other information are subject to change without
notice. All trademarks are the property of their
respective owners. Midas, Klark Teknik, Lab Gruppen,
Lake, Tannoy, Turbosound, TC Electronic, TC Helicon,
Behringer, Bugera, Oberheim, Auratone, Aston
trademarks of Music Tribe Global Brands Ltd. © Music
Tribe Global Brands Ltd. 2021 All rights reserved.
LIMITED WARRANTY
For the applicable warranty terms and conditions
and additional information regarding Music Tribe’s
Limited Warranty, please see complete details online at
musictribe.com/warranty.
Instrucciones de
seguridad
Las terminales marcadas con este símbolo
transportan corriente eléctrica de
magnitud suciente como para constituir
un riesgo de descarga eléctrica. Utilice solo cables de
altavoz profesionales y de alta calidad con conectores
TS de 6,3 mm o de bayoneta prejados. Cualquier otra
instalación o modicación debe ser realizada únicamente
por un técnico cualicado.
Este símbolo, siempre que aparece,
leadvierte de la presencia de voltaje
peligroso sin aislar dentro de la caja;
estevoltaje puede ser suciente para constituir un riesgo
dedescarga.
Este símbolo, siempre que aparece,
leadvierte sobre instrucciones operativas
y de mantenimiento que aparecen en la
documentación adjunta. Por favor, lea el manual.
Atención
Para reducir el riesgo de descarga
eléctrica, no quite la tapa (o la parte
posterior). No hay piezas en el interior del equipo que
puedan ser reparadas por el usuario. Si es necesario,
póngase en contacto con personal cualicado.
Atención
Para reducir el riesgo de incendio o
descarga eléctrica, no exponga este
aparato a la lluvia, humedad o alguna otra fuente que
pueda salpicar o derramar algún líquido sobre el aparato.
Nocoloque ningún tipo de recipiente para líquidos sobre
el aparato.
Atención
Las instrucciones de servicio deben
llevarlas a cabo exclusivamente personal
cualicado. Para evitar el riesgo de una descarga eléctrica,
no realice reparaciones que no se encuentren descritas
en el manual de operaciones. Lasreparaciones deben ser
realizadas exclusivamente por personalcualicado.
1. Lea las instrucciones.
2. Conserve estas instrucciones.
3. Preste atención a todas las advertencias.
4. Siga todas las instrucciones.
5. No use este aparato cerca del agua.
6. Limpie este aparato con un paño seco.
7. No bloquee las aberturas de ventilación. Instale el
equipo de acuerdo con las instrucciones del fabricante.
tales como radiadores, acumuladores de calor, estufas u
otros aparatos (incluyendo amplicadores) que puedan
producir calor.
9. No elimine o deshabilite nunca la conexión a tierra
del aparato o del cable de alimentación de corriente.
Unenchufe polarizado tiene dos polos, uno de los cuales
tiene un contacto más ancho que el otro. Una clavija con
puesta a tierra dispone de tres contactos: dos polos y la
puesta a tierra. El contacto ancho y el tercer contacto,
respectivamente, son los que garantizan una mayor
seguridad. Si el enchufe suministrado con el equipo no
concuerda con la toma de corriente, consulte con un
electricista para cambiar la toma de corriente obsoleta.
10. Coloque el cable de suministro de energía de manera
que no pueda ser pisado y que esté protegido de objetos
alados. Asegúrese de que el cable de suministro de
energía esté protegido, especialmente en la zona de la
clavija y en el punto donde sale del aparato.
11. Use únicamente los dispositivos o accesorios
especicados por el fabricante.
12. Use únicamente la
carretilla, plataforma,
trípode, soporte o mesa
especicados por el
fabricante o suministrados
junto con el equipo.
Altransportar el equipo,
tenga cuidado para evitar
daños y caídas al tropezar con algún obstáculo.
13. Desenchufe el equipo durante tormentas o si no va a
utilizarlo durante un periodo largo.
14. Confíe las reparaciones únicamente a servicios
técnicos cualicados. La unidad requiere mantenimiento
siempre que haya sufrido algún daño, si el cable de
suministro de energía o el enchufe presentaran daños,
sehubiera derramado un líquido o hubieran caído objetos
dentro del equipo, si el aparato hubiera estado expuesto
a la humedad o la lluvia, si ha dejado de funcionar de
manera normal o si ha sufrido algún golpe o caída.
15. Al conectar la unidad a la toma de corriente eléctrica
asegúrese de que la conexión disponga de una unión
atierra.
16. Si el enchufe o conector de red sirve como único
medio de desconexión, éste debe ser accesiblefácilmente.
17. Cómo debe deshacerse de
este aparato: Este símbolo indica
que este aparato no debe ser
tratado como basura orgánica,
según lo indicado en la Directiva
WEEE (2012/19/EU) y a las
normativas aplicables en su país.
En lugar de ello deberá llevarlo al punto limpio más
cercano para el reciclaje de sus elementos eléctricos/
electrónicos (EEE). Al hacer esto estará ayudando a
prevenir las posibles consecuencias negativas para el
medio ambiente y la salud que podrían ser provocadas
por una gestión inadecuada de este tipo de aparatos.
Además, el reciclaje de materiales ayudará a conservar
reciclaje de este aparato, póngase en contacto con el
Ayuntamiento de su ciudad o con el punto limpio local.
18. No instale esta unidad en un espacio muy reducido,
tal como encastrada en una librería o similar.
19. No coloque objetos con llama, como una vela
encendida, sobre este aparato.
20. Tenga presentes todas las advertencias relativas
al reciclaje y correcta eliminación de las pilas. Las pilas
con el resto de la basura orgánica.
21. Puede usar este aparato en lugares con climas
tropicales y moderados que soporten temperaturas de
hasta 45°C.
NEGACIÓN LEGAL
Music Tribe no admite ningún tipo de responsabilidad
por cualquier daño o pérdida que pudiera sufrir
cualquier persona por conar total o parcialmente en
la descripciones, fotografías o armaciones contenidas
en este documento. Las especicaciones técnicas,
imágenes y otras informaciones contenidas en este
documento están sujetas a modicaciones sin previo
aviso. Todas las marcas comerciales que aparecen
aquí son propiedad de sus respectivos dueños. Midas,
Klark Teknik, Lab Gruppen, Lake, Tannoy, Turbosound,
TC Electronic, TC Helicon, Behringer, Bugera, Oberheim,
Auratone, Aston Microphones y Coolaudio son marcas
comerciales o marcas registradas de Music Tribe
Global Brands Ltd. © Music Tribe Global Brands Ltd.
2021 Reservados todos los derechos.
GARANTÍA LIMITADA
Si quiere conocer los detalles y condiciones aplicables
de la garantía así como información adicional sobre la
Garantía limitada de Music Tribe, consulte online toda la
información en la web musictribe.com/warranty.
Page 3

4 VIRTUALIZER 3D FX2000 Quick Start Guide 5
Erdungskontakt dient Ihrer Sicherheit. Falls das
19. Stellen Sie keine Gegenstände mit oenen
Fotos oder Aussagen verlassen haben. Technische Daten,
Turbosound, TC Electronic, TC Helicon, Behringer, Bugera,
8. Ne placez pas l’appareil à proximité d’une source
dangereuses généralement associées à ces équipements.
Consignes de sécurité
Les points repérés par ce symbole portent
une tension électrique susante pour
constituer un risque d’électrocution.
Utilisez uniquement des câbles d’enceintes professionnels
de haute qualité avec ches Jack mono 6,35 mm ou ches
à verrouillages déjà installées. Touteautre installation ou
modication doit être eectuée uniquement par un
personnel qualié.
Ce symbole avertit de la présence d’une
tension dangereuse et non isolée à
l’intérieur de l’appareil - elle peut
provoquer des chocs électriques.
Attention
Ce symbol signale les consignes
d’utilisation et d’entre ! Tien importantes
dans la documentation fournie. Lisez les consignes de
sécurité du manuel d’utilisation de l’appareil.
Attention
Pour éviter tout risque de choc électrique,
ne pas ouvrir le capot de l’appareil ni
démonter le panneau arrière. L’intérieur de l’appareil
ne possède aucun élément réparable par l’utilisateur.
Laissertoute réparation à un professionnel qualié.
Attention
Pour réduire les risques de feu et de choc
électrique, n’exposez pas cet appareil à la
pluie, à la moisissure, aux gouttes ou aux éclaboussures.
Ne posez pas de récipient contenant un liquide sur
l’appareil (un vase par exemple).
Attention
Ces consignes de sécurité et d’entretien
sont destinées à un personnel qualié.
Pouréviter tout risque de choc électrique, n’eectuez
aucune réparation sur l’appareil qui ne soit décrite par le
manuel d’utilisation. Les éventuelles réparations doivent
être eectuées uniquement par un technicien spécialisé.
1. Lisez ces consignes.
2. Conservez ces consignes.
3. Respectez tous les avertissements.
4. Respectez toutes les consignes d’utilisation.
5. N’utilisez jamais l’appareil à proximité d’un liquide.
6. Nettoyez l’appareil avec un chion sec.
7. Veillez à ne pas empêcher la bonne ventilation
de l’appareil via ses ouïes de ventilation. Respectezles
consignes du fabricant concernant l’installation
del’appareil.
de chaleur telle qu’un chauage, une cuisinière ou tout
appareil dégageant de la chaleur (y compris un ampli
depuissance).
9. Ne supprimez jamais la sécurité des prises bipolaires
ou des prises terre. Les prises bipolaires possèdent deux
contacts de largeur diérente. Leplus large est le contact
de sécurité. Les prises terre possèdent deux contacts plus
une mise à la terre servant de sécurité. Si la prise du bloc
d’alimentation ou du cordon d’ali-mentation fourni ne
correspond pas à celles de votre installation électrique,
faites appel à un électricien pour eectuer le changement
de prise.
10. Installez le cordon d’alimentation de telle façon
que personne ne puisse marcher dessus et qu’il soit
protégé d’arêtes coupantes. Assurez-vous que le cordon
d’alimentation est sufsamment protégé, notamment au
niveau de sa prise électrique et de l’endroit où il est relié à
l’appareil; cela est également valable pour une éventuelle
rallonge électrique.
11. Utilisez exclusivement des accessoires et des
appareils supplémentaires recommandés par lefabricant.
12. Utilisez
exclusivement des
chariots, des diables,
desprésentoirs, despieds
et des surfaces de
travail recommandés
par le fabricant ou
livrés avec le produit.
Déplacezprécautionneusement tout chariot ou diable
chargé pour éviter d’éventuelles blessures en cas dechute.
13. Débranchez l’appareil de la tension secteur en cas
d’orage ou si l’appareil reste inutilisé pendant une longue
période de temps.
14. Les travaux d’entretien de l’appareil doivent
être eectués uniquement par du personnel qualié.
Aucunentretien n’est nécessaire sauf si l’appareil est
endommagé de quelque façon que ce soit (dommagessur
le cordon d’alimentation ou la prise par exemple), siun
liquide ou un objet a pénétré à l’intérieur du châssis, si
l’appareil a été exposé à la pluie ou à l’humidité, s’il ne
fonctionne pas correctement ou à la suite d’une chute.
15. L’appareil doit être connecté à une prise secteur
dotée d’une protection par mise à la terre.
16. La prise électrique ou la prise IEC de tout appareil
dénué de bouton marche/arrêt doit rester accessible
enpermanence.
17. Mise au rebut appropriée de
ce produit: Ce symbole indique
qu’en accord avec la directive DEEE
(2012/19/EU) et les lois en vigueur
dans votre pays, ce produit ne
doit pas être jeté avec les déchets
ménagers. Ce produit doit être
déposé dans un point de collecte agréé pour le recyclage
des déchets d’équipements électriques et électroniques
(EEE). Une mauvaise manipulation de ce type de déchets
pourrait avoir un impact négatif sur l’environnement
et la santé à cause des substances potentiellement
En même temps, votre coopération dans la mise au
rebut de ce produit contribuera à l’utilisation ecace
des ressources naturelles. Pour plus d’informations
sur l’endroit où vous pouvez déposer vos déchets
d’équipements pour le recyclage, veuillez contacter votre
mairie ou votre centre local de collecte des déchets.
18. N’installez pas l’appareil dans un espace conné tel
qu’une bibliothèque ou meuble similaire.
19. Ne placez jamais d’objets enammés, tels que des
bougies allumées, sur l’appareil.
20. Gardez à l’esprit l’impact environnemental lorsque
vous mettez des piles au rebus. Les piles usées doivent
être déposées dans un point de collecte adapté.
21. Cet appareil peut être utilisé sous un climat tropical
ou modéré avec des températures de 45°C maximum.
DÉNI LÉGAL
Music Tribe ne peut être tenu pour responsable
pour toute perte pouvant être subie par toute
personne se ant en partie ou en totalité à toute
description, photographie ou armation contenue
dans ce document. Les caractéristiques, l’apparence
et d’autres informations peuvent faire l’objet de
modications sans notication. Toutes les marques
appartiennent à leurs propriétaires respectifs. Midas,
Klark Teknik, Lab Gruppen, Lake, Tannoy, Turbosound,
TC Electronic, TC Helicon, Behringer, Bugera, Oberheim,
Auratone, Aston Microphones et Coolaudio sont
des marques ou marques déposées de Music Tribe
Global Brands Ltd. © Music Tribe Global Brands Ltd.
2021 Tous droits réservés.
GARANTIE LIMITÉE
Pour connaître les termes et conditions de garantie
applicables, ainsi que les informations supplémentaires
et détaillées sur la Garantie Limitée de Music Tribe,
consultez le site Internet musictribe.com/warranty.
Wichtige
Sicherheitshinweise
Vorsicht
Die mit dem Symbol markierten
Anschlüsse führen so viel Spannung,
dassdie Gefahr eines Stromschlags besteht.
Verwenden Sie nur hochwertige, professionelle
Lautsprecherkabel mit vorinstallierten 6,35 mm
MONO-Klinkensteckern oder Lautsprecherstecker
mit Drehverriegelung. Alle anderen Installationen
oder Modikationen sollten nur von qualiziertem
Fachpersonal ausgeführt werden.
Achtung
Um eine Gefährdung durch Stromschlag
auszuschließen, darf die Geräteabdeckung
bzw. Geräterückwand nicht abgenommen werden.
ImInnern des Geräts benden sich keine vom Benutzer
reparierbaren Teile. Reparaturarbeiten dürfen nur von
qualiziertem Personal ausgeführt werden.
Achtung
Um eine Gefährdung durch Feuer bzw.
Stromschlag auszuschließen, darf dieses
Gerät weder Regen oder Feuchtigkeit ausgesetzt werden
noch sollten Spritzwasser oder tropfende Flüssigkeiten
in das Gerät gelangen können. Stellen Sie keine mit
Flüssigkeit gefüllten Gegenstände, wie z. B. Vasen,
aufdasGerät.
Achtung
Die Service-Hinweise sind nur durch
qualiziertes Personal zu befolgen.
Umeine Gefährdung durch Stromschlag zu vermeiden,
führen Sie bitte keinerlei Reparaturen an dem Gerät
durch, die nicht in der Bedienungsanleitung beschrieben
sind. Reparaturen sind nur von qualiziertem
Fachpersonaldurchzuführen.
1. Lesen Sie diese Hinweise.
2. Bewahren Sie diese Hinweise auf.
3. Beachten Sie alle Warnhinweise.
4. Befolgen Sie alle Bedienungshinweise.
5. Betreiben Sie das Gerät nicht in der Nähe vonWasser.
6. Reinigen Sie das Gerät mit einem trockenen Tuch.
7. Blockieren Sie nicht die Belüftungsschlitze. Beachten
Sie beim Einbau des Gerätes die Herstellerhinweise.
8. Stellen Sie das Gerät nicht in der Nähe von
Wärmequellen auf. Solche Wärmequellen sind z. B.
Heizkörper, Herde oder andere Wärme erzeugende Geräte
(auch Verstärker).
9. Entfernen Sie in keinem Fall die
Sicherheitsvorrichtung von Zweipol- oder geerdeten
Steckern. Ein Zweipolstecker hat zwei unterschiedlich
breite Steckkontakte. Ein geerdeter Stecker hat zwei
Steckkontakte und einen dritten Erdungskontakt.
Derbreitere Steckkontakt oder der zusätzliche
mitgelieferte Steckerformat nicht zu Ihrer Steckdose
passt, wenden Sie sich bitte an einen Elektriker, damit die
Steckdose entsprechend ausgetauscht wird.
10. Verlegen Sie das Netzkabel so, dass es vor
Tritten und scharfen Kanten geschützt ist und nicht
beschädigt werden kann. Achten Sie bitte insbesondere
im Bereich der Stecker, Verlängerungskabel und an
der Stelle, an der das Netzkabel das Gerät verlässt,
aufausreichendenSchutz.
11. Das Gerät muss jederzeit mit intaktem Schutzleiter
an das Stromnetz angeschlossen sein.
12. Sollte der Hauptnetzstecker oder eine
Gerätesteckdose die Funktionseinheit zum Abschalten
sein, muss diese immer zugänglich sein.
13. Verwenden Sie nur Zusatzgeräte/Zubehörteile,
dielaut Hersteller geeignet sind.
14. Verwenden
Sie nur Wagen,
Standvorrichtungen,
Stative, Halter oder Tische,
die vom Hersteller benannt
oder im Lieferumfang
des Geräts enthalten
sind. Falls Sie einen
Wagen benutzen, seien Sie vorsichtig beim Bewegen
der Wagen- Gerätkombination, umVerletzungen durch
Stolpern zuvermeiden.
15. Ziehen Sie den Netzstecker bei Gewitter oder wenn
Sie das Gerät längere Zeit nicht benutzen.
16. Lassen Sie alle Wartungsarbeiten nur von
qualiziertem Service-Personal ausführen. EineWartung
ist notwendig, wenn das Gerät in irgendeiner Weise
beschädigt wurde (z. B. Beschädigung des Netzkabels oder
Steckers), Gegenstände oder Flüssigkeit in das Geräteinnere
gelangt sind, das Gerät Regen oder Feuchtigkeit ausgesetzt
wurde, das Gerät nicht ordnungsgemäß funktioniert oder
auf den Boden gefallen ist.
17. Korrekte Entsorgung
dieses Produkts: Dieses
Symbol weist darauf hin, das
Produkt entsprechend der
WEEE Direktive (2012/19/EU)
und der jeweiligen nationalen
Gesetze nicht zusammen mit
Ihren Haushaltsabfällen zu entsorgen. DiesesProdukt
sollte bei einer autorisierten Sammelstelle für
Recycling elektrischer und elektronischer Geräte (EEE)
abgegeben werden. Wegen bedenklicher Substanzen,
diegenerell mit elektrischen und elektronischen Geräten
in Verbindung stehen, könnte eine unsachgemäße
Behandlung dieser Abfallart eine negative Auswirkung
auf Umwelt und Gesundheit haben. Gleichzeitig
gewährleistet Ihr Beitrag zur richtigen Entsorgung dieses
Produkts die eektive Nutzung natürlicher Ressourcen.
Fürweitere Informationen zur Entsorgung Ihrer Geräte
bei einer Recycling-Stelle nehmen Sie bitte Kontakt zum
zuständigen städtischen Büro, Entsorgungsamt oder zu
Ihrem Haushaltsabfallentsorgerauf.
18. Installieren Sie das Gerät nicht in einer beengten
Umgebung, zum Beispiel Bücherregal oder ähnliches.
Flammen, etwa brennende Kerzen, auf das Gerät.
20. Beachten Sie bei der Entsorgung von Batterien
den Umweltschutz-Aspekt. Batterien müssen bei einer
Batterie-Sammelstelle entsorgt werden.
21. Dieses Gerät ist in tropischen und gemäßigten
Klimazonen bis 45° C einsetzbar.
HAFTUNGSAUSSCHLUSS
Music Tribe übernimmt keine Haftung für Verluste,
die Personen entstanden sind, die sich ganz oder
teilweise auf hier enthaltene Beschreibungen,
Erscheinungsbild und andere Informationen können
ohne vorherige Ankündigung geändert werden. Alle
Warenzeichen sind Eigentum der jeweiligen Inhaber.
Midas, Klark Teknik, Lab Gruppen, Lake, Tannoy,
Oberheim, Auratone, Aston Microphones und Coolaudio
sind Warenzeichen oder eingetragene Warenzeichen
der Music Tribe Global Brands Ltd. © Music Tribe Global
Brands Ltd. 2021 Alle Rechte vorbehalten.
BESCHRÄNKTE GARANTIE
Die geltenden Garantiebedingungen und zusätzliche
Informationen bezüglich der von Music Tribe gewährten
beschränkten Garantie nden Sie online unter
musictribe.com/warranty.
Page 4

6 VIRTUALIZER 3D FX2000 Quick Start Guide 7
9. Non escludere la sicurezza fornita dalla spina
20. Per lo smaltimento delle batterie, tenere in
registrati di Music Tribe Global Brands Ltd. © Music Tribe
de duas palhetas e um terceiro dente de ligação à terra.
19. Não coloque fontes de chama, tais como velas
que possa ser sofrida por qualquer pessoa que dependa,
Instruções de Segurança
Importantes
Aviso!
Terminais marcados com o símbolo
carregam corrente elétrica de magnitude
suciente para constituir um risco de choque elétrico.
Use apenas cabos de alto-falantes de alta qualidade
com plugues TS de ¼" ou plugues com trava de torção
pré-instalados. Todas as outras instalações e modicações
devem ser efetuadas por pessoasqualicadas.
Este símbolo, onde quer que o encontre,
alerta-o para a leitura das instruções de
manuseamento que acompanham o
equipamento. Por favor leia o manual de instruções.
Atenção
De forma a diminuir o risco de choque
eléctrico, não remover a cobertura
(ouasecção de trás). Não existem peças substituíveis por
parte do utilizador no seu interior. Para esse efeito recorrer
a um técnico qualicado.
Atenção
Para reduzir o risco de incêndios ou
choques eléctricos o aparelho não deve ser
exposto à chuva nem à humidade. Além disso, não deve
ser sujeito a salpicos, nem devem ser colocados em cima
do aparelho objectos contendo líquidos, tais como jarras.
Atenção
Estas instruções de operação devem ser
utilizadas, em exclusivo, por técnicos de
assistência qualicados. Para evitar choques eléctricos
não proceda a reparações ou intervenções, que não as
indicadas nas instruções de operação, salvo se possuir as
quali-cações necessárias. Para evitar choques eléctricos
não proceda a reparações ou intervenções, que não as
indicadas nas instruções de operação. Só o deverá fazer se
possuir as qualicações necessárias.
1. Leia estas instruções.
2. Guarde estas instruções.
3. Preste atenção a todos os avisos.
4. Siga todas as instruções.
5. Não utilize este dispositivo perto de água.
6. Limpe apenas com um pano seco.
7. Não obstrua as entradas de ventilação. Instale de
acordo com as instruções do fabricante.
8. Não instale perto de quaisquer fontes de calor tais
como radiadores, bocas de ar quente, fogões de sala
ou outros aparelhos (incluindo amplicadores) que
produzam calor.
9. Não anule o objectivo de segurança das chas
polarizadas ou do tipo de ligação à terra. Uma cha
polarizada dispõe de duas palhetas sendo uma mais larga
do que a outra. Uma cha do tipo ligação à terra dispõe
A palheta larga ou o terceiro dente são fornecidos para
sua segurança. Se a cha fornecida não encaixar na sua
tomada, consulte um electricista para a substituição da
tomada obsoleta.
10. Proteja o cabo de alimentação de pisadelas ou
apertos, especialmente nas chas, extensões, e no local
de saída da unidade. Certique-se de que o cabo eléctrico
está protegido. Verique particularmente nas chas, nos
receptáculos e no ponto em que o cabo sai doaparelho.
11. O aparelho tem de estar sempre conectado à rede
eléctrica com o condutor de protecção intacto.
12. Se utilizar uma cha de rede principal ou uma
tomada de aparelhos para desligar a unidade de
funcionamento, esta deve estar sempre acessível.
13. Utilize apenas ligações/acessórios especicados
pelofabricante.
14. Utilize apenas com
o carrinho, estrutura,
tripé, suporte, ou mesa
especicados pelo
fabricante ou vendidos
com o dispositivo.
Quandoutilizar um
carrinho, tenha cuidado ao
mover o conjunto carrinho/dispositivo para evitar danos
provocados pela terpidação.
15. Desligue este dispositivo durante as trovoadas
ou quando não for utilizado durante longos períodos
detempo.
16. Qualquer tipo de reparação deve ser sempre
efectuado por pessoal qualicado. É necessária uma
reparação sempre que a unidade tiver sido de alguma
forma danicada, como por exemplo: no caso do cabo
de alimentação ou cha se encontrarem danicados;
naeventualidade de líquido ter sido derramado ou
objectos terem caído para dentro do dispositivo; no caso
da unidade ter estado exposta à chuva ou à humidade;
seesta não funcionar normalmente, ou se tiver caído.
17. Correcta eliminação deste
produto: este símbolo indica que
o produto não deve ser eliminado
juntamente com os resíduos
domésticos, segundo a Directiva
REEE (2012/19/EU) e a legislação
nacional. Este produto deverá
ser levado para um centro de recolha licenciado para a
reciclagem de resíduos de equipamentos eléctricos e
electrónicos (EEE). O tratamento incorrecto deste tipo
de resíduos pode ter um eventual impacto negativo
no ambiente e na saúde humana devido a substâncias
potencialmente perigosas que estão geralmente
associadas aos EEE. Ao mesmo tempo, a sua colaboração
para a eliminação correcta deste produto irá contribuir
para a utilização eciente dos recursos naturais. Paramais
informação acerca dos locais onde poderá deixar o seu
equipamento usado para reciclagem, é favor contactar
os serviços municipais locais, a entidade de gestão de
resíduos ou os serviços de recolha de resíduosdomésticos.
18. Não instale em lugares connados, tais como
estantes ou unidades similares.
acesas, sobre o aparelho.
20. Favor, obedecer os aspectos ambientais de descarte
de bateria. Baterias devem ser descartadas em um ponto
de coletas de baterias.
21. Esse aparelho pode ser usado em climas tropicais e
moderados até 45°C.
LEGAL RENUNCIANTE
O Music Tribe não se responsabiliza por perda alguma
seja de maneira completa ou parcial, de qualquer
descrição, fotograa, ou declaração aqui contidas.
Dados técnicos, aparências e outras informações estão
sujeitas a modicações sem aviso prévio. Todas as
marcas são propriedade de seus respectivos donos.
Midas, Klark Teknik, Lab Gruppen, Lake, Tannoy,
Turbosound, TC Electronic, TC Helicon, Behringer,
Bugera, Oberheim, Auratone, Aston Microphones
e Coolaudio são marcas ou marcas registradas do
Music Tribe Global Brands Ltd. © Music Tribe Global
Brands Ltd. 2021 Todos direitos reservados.
GARANTIA LIMITADA
Para obter os termos de garantia aplicáveis e condições e
informações adicionais a respeito da garantia limitada do
Music Tribe, favor vericar detalhes na íntegra através do
website musictribe.com/warranty.
Informazioni importanti
Attenzione
I terminali contrassegnati da questo
simbolo conducono una corrente elettrica
di magnitudine suciente a costituire un rischio di scossa
elettrica. Utilizzare solo cavi per altoparlanti professionali
di alta qualità con jack sbilanciati da 6,35mm. o connettori
con blocco a rotazione. Tutte le altre installazioni o
modiche devono essere eseguite esclusivamente da
personale qualicato.
Attenzione
Questo simbolo, ovunque appaia, avverte
della presenza di una tensione pericolosa
non isolata all'interno dello chassis, tensione che può
essere suciente per costituire un rischio di scossa
elettrica.
Attenzione
Questo simbolo, ovunque appaia, segnala
importanti istruzioni operative e di
manutenzione nella documentazione allegata. Si invita a
leggere il manuale.
Attenzione
Per ridurre il rischio di scosse elettriche,
non rimuovere il coperchio superiore
(o la sezione posteriore). All'interno non ci sono parti
riparabili dall'utente. Per la manutenzione rivolgersi a
personale qualicato.
Attenzione
Per ridurre il rischio di incendi o scosse
elettriche, non esporre questo apparecchio
a pioggia e umidità. L'apparecchio non deve essere
esposto a gocciolio o schizzi di liquidi e nessun oggetto
contenente liquidi, come vasi, deve essere collocato
sull'apparecchio.
Attenzione
Queste istruzioni di servizio sono destinate
esclusivamente a personale qualicato.
Per ridurre il rischio di scosse elettriche non eseguire
interventi di manutenzione diversi da quelli contenuti
nel manuale di istruzioni. Le riparazioni devono essere
eseguite da personale di assistenza qualicato.
1. Leggere queste istruzioni.
2. Conservare queste istruzioni.
3. Prestare attenzione a tutti gli avvisi.
4. Applicare tutte le istruzioni.
5. Non utilizzare questo dispositivo vicino l'acqua.
6. Pulire esclusivamente con un panno asciutto.
7. Non bloccare le aperture di ventilazione. Installare in
conformità con le istruzioni del produttore.
8. Non installare vicino a fonti di calore come
radiatori, termoregolatori, stufe o altri apparecchi
(inclusi amplicatori) che producono calore.
polarizzata o con messa a terra. Una spina polarizzata ha
due lame, una più larga dell'altra. Una spina con messa a
terra ha due lame e un terzo polo di messa a terra. La lama
larga o il terzo polo sono forniti per la vostra sicurezza.
Se la spina fornita non si adatta alla presa, consultare un
elettricista per la sostituzione della presa obsoleta.
10. Proteggere il cavo di alimentazione dal calpestio
o essere schiacciato in particolare alle spine, prese di
corrente e il punto in cui esce dall'apparecchio.
11. Utilizzare esclusivamente dispositivi/accessori
specicati dal produttore.
12. Utilizzare solo
carrelli, supporti, treppiedi,
stae o tavoli indicati dal
produttore o venduti con
l'apparecchio. Utilizzando
un carrello, prestare
attenzione quando si
sposta la combinazione
carrello/apparecchio per evitare lesioni dovute al
ribaltamento.
13. Scollegare questo apparecchio durante i temporali o
se non è utilizzato per lunghi periodi di tempo.
14. Per tutte le riparazioni rivolgersi a personale
qualicato. La manutenzione è necessaria quando
l'apparecchio è danneggiato in qualsiasi modo, come
danneggiamento del cavo di alimentazione o della spina,
versamento di liquido o oggetti caduti nell'apparecchio,
se l'apparecchio è stato esposto a pioggia o umidità, se
non funziona normalmente o è caduto.
15. L'apparecchio deve essere collegato a una presa di
corrente elettrica con messa a terra di protezione.
16. Se la spina o una presa del dispositivo è utilizzata
come dispositivo di disconnessione, deve essere
facilmente utilizzabile.
17. Smaltimento corretto di
questo prodotto: questo simbolo
indica che questo dispositivo non
deve essere smaltito insieme
ai riuti domestici, secondo
la Direttiva RAEE (2012/19 /
UE) e la vostra legislazione
nazionale. Questo prodotto deve essere portato in un
centro di raccolta autorizzato per il riciclaggio di riuti
di apparecchiature elettriche ed elettroniche (RAEE).
La cattiva gestione di questo tipo di riuti potrebbe avere
un possibile impatto negativo sull'ambiente e sulla salute
umana a causa di sostanze potenzialmente pericolose
che sono generalmente associate alle apparecchiature
elettriche ed elettroniche. Nello stesso tempo la vostra
collaborazione al corretto smaltimento di questo prodotto
contribuirà all'utilizzo eciente delle risorse naturali. Per
ulteriori informazioni su dove è possibile trasportare le
apparecchiature per il riciclaggio vi invitiamo a contattare
l'ucio comunale locale o il servizio di raccolta dei
riuti domestici.
18. Non installare in uno spazio ristretto, come in una
libreria o in una struttura simile.
19. Non collocare sul dispositivo fonti di amme libere,
come candele accese.
considerazione gli aspetti ambientali. Le batterie devono
essere smaltite in un punto di raccolta delle batterie
esauste.
21. Questo apparecchio può essere usato in climi
tropicali e temperati no a 45°C.
DISCLAIMER LEGALE
Music Tribe non si assume alcuna responsabilità per
eventuali danni che possono essere subiti da chiunque
si adi in tutto o in parte a qualsiasi descrizione,
fotograa o dichiarazione contenuta qui. Speciche
tecniche, aspetti e altre informazioni sono soggette
a modiche senza preavviso. Tutti i marchi sono di
proprietà dei rispettivi titolari. Midas, Klark Teknik,
Lab Gruppen, Lake, Tannoy, Turbosound, TC Electronic,
TC Helicon, Behringer, Bugera, Oberheim, Auratone,
Aston Microphones e Coolaudio sono marchi o marchi
Global Brands Ltd. 2021 Tutti i diritti riservati .
GARANZIA LIMITATA
Per i termini e le condizioni di garanzia applicabili e le
informazioni aggiuntive relative alla garanzia limitata
di Music Tribe, consultare online i dettagli completi su
musictribe.com/warranty.
Page 5

8 VIRTUALIZER 3D FX2000 Quick Start Guide 9
9. Maak de veiligheid waarin door de polarisatie-
van de natuurlijke hulpbronnen. Voormeer informatie
10. Förlägg elkabeln så, att det inte är möjligt att
nns här. Tekniska specikationer, utseenden och annan
För tillämpliga garantivillkor och ytterligare information
Belangrijke
veiligheidsvoorschriften
Waarschuwing
Aansluitingen die gemerkt zijn met
het symbool voeren een zodanig hoge
spanning dat ze een risico vormen voor elektrische
schokken. Gebruik uitsluitend kwalitatief hoogwaardige,
in de handel verkrijgbare luidsprekerkabels die
voorzien zijn van ¼"TS stekkers. Laat uitsluitend
gekwaliceerd personeel alle overige installatie- of
modicatiehandelingen uitvoeren.
Dit symbool wijst u altijd op belangrijke
bedienings - en onderhoudsvoorschriften
in de bijbehorende documenten.
Wijvragen u dringend de handleiding te lezen.
Attentie
Verwijder in geen geval de bovenste
afdekking (van het achterste gedeelte)
anders bestaat er gevaar voor een elektrische schok.
Het apparaat bevat geen te onderhouden onderdelen.
Reparatiewerkzaamheden mogen uitsluitend door
gekwaliceerd personeel uitgevoerd worden.
Attentie
Om het risico op brand of elektrische
schokken te beperken, dient u te
voorkomen dat dit apparaat wordt blootgesteld aan regen
en vocht. Het apparaat mag niet worden blootgesteld aan
neerdruppelend of opspattend water en er mogen geen
met water gevulde voorwerpen – zoals een vaas – op het
apparaat worden gezet.
Attentie
Deze onderhoudsinstructies zijn
uitsluitend bedoeld voor gekwaliceerd
onderhoudspersoneel. Omelektrische schokken te
voorkomen, mag u geen andere onderhoudshandelingen
verrichten dan in de bedieningsinstructies vermeld staan.
Reparatiewerkzaamheden mogen alleen uitgevoerd
worden door gekwaliceerd onderhoudspersoneel.
1. Lees deze voorschriften.
2. Bewaar deze voorschriften.
3. Neem alle waarschuwingen in acht.
4. Volg alle voorschriften op.
5. Gebruik dit apparaat niet in de buurt van water.
6. Reinig het uitsluitend met een droge doek.
7. Let erop geen van de ventilatie-openingen
te bedekken. Plaats en installeer het volgens de
voor- schriften van de fabrikant.
8. Het apparaat mag niet worden geplaatst in de buurt
van radiatoren, warmte-uitlaten, kachels of andere zaken
(ook versterkers) die warmte afgeven.
of aardingsstekker wordt voorzien, niet ongedaan.
Eenpolarisatiestekker heeft twee bladen, waarvaner
een breder is dan het andere. Een aardingsstekker heeft
twee bladen en een derde uitsteeksel voor de aarding.
Het bredere blad of het derde uitsteeksel zijn er voor
uw veiligheid. Mocht de geleverde stekker niet in uw
stopcontact passen, laat het contact dan door een
elektricien vervangen.
10. Om beschadiging te voorkomen, moet de
stroomleiding zo gelegd worden dat er niet kan worden
over gelopen en dat ze beschermd is tegen scherpe
kanten. Zorg zeker voor voldoende bescherming aan de
stekkers, de verlengkabels en het punt waar het netsnoer
het apparaat verlaat.
11. Het toestel met altijd met een intacte aarddraad aan
het stroomnet aangesloten zijn.
12. Wanneer de stekker van het hoofdnetwerk of een
apparaatstopcontact de functionele eenheid voor het
uitschakelen is, dient deze altijd toegankelijk te zijn.
13. Gebruik uitsluitend door de producent
gespeci- ceerd toebehoren c.q. onderdelen.
14. Gebruik het apparaat
uitsluitend in combinatie
met de wagen, hetstatief,
de driepoot, de beugel of
tafel die door de producent
is aangegeven, of die
in combinatie met het
apparaat wordt verkocht.
Bij gebruik van een wagen dient men voorzichtig te zijn bij
het verrijden van de combinatie wagen/apparaat en letsel
door vallen te voorkomen.
15. Bij onweer en als u het apparaat langere tijd niet
gebruikt, haalt u de stekker uit het stopcontact.
16. Laat alle voorkomende reparaties door vakkundig en
bevoegd personeel uitvoeren. Reparatiewerk-zaamheden
zijn nodig als het toestel op enige wijze beschadigd is
geraakt, bijvoorbeeld als de hoofd-stroomkabel of -stekker
is beschadigd, als er vloeistof of voorwerpen in terecht
zijn gekomen, als het aan regen of vochtigheid heeft
bloot-gestaan, niet normaal functioneert of wanneer het
is gevallen.
17. Correcte afvoer van dit
product: dit symbool geeft aan
dat u dit product op grond van
de AEEA-richtlijn (2012/19/EU)
en de nationale wetgeving van
uw land niet met het gewone
huishoudelijke afval mag
weggooien. Dit product moet na aoop van de nuttige
levensduur naar een ociële inzamelpost voor afgedankte
elektrische en elektronische apparatuur (AEEA) worden
gebracht, zodat het kan worden gerecycleerd. Vanwege
de potentieel gevaarlijke stoen die in elektrische en
elektronische apparatuur kunnen voorkomen, kan een
onjuiste afvoer van afval van het onderhavige type
een negatieve invloed op het milieu en de menselijke
gezondheid hebben. Eenjuiste afvoer van dit product is
echter niet alleen beter voor het milieu en de gezondheid,
maar draagt tevens bij aan een doelmatiger gebruik
over de plaatsen waar u uw afgedankte apparatuur kunt
inleveren, kunt u contact opnemen met uw gemeente of
de plaatselijkereinigingsdienst.
18. Installeer niet in een kleine ruimte, zoals een
boekenkast of iets dergelijks.
19. Plaats geen open vlammen, zoals brandende
kaarsen, op het apparaat.
20. Houd rekening met de milieuaspecten van het
afvoeren van batterijen. Batterijen moeten bij een
inzamelpunt voor batterijen worden ingeleverd.
21. Dit apparaat kan worden gebruikt in tropische en
gematigde klimaten tot 45 ° C.
WETTELIJKE ONTKENNING
Music Tribe aanvaardt geen aansprakelijkheid voor enig
verlies dat kan worden geleden door een persoon die
geheel of gedeeltelijk vertrouwt op enige beschrijving,
foto of verklaring hierin. Technische specicaties,
verschijningen en andere informatie kunnen zonder
voorafgaande kennisgeving worden gewijzigd. Alle
handelsmerken zijn eigendom van hun respectievelijke
eigenaren. Midas, Klark Teknik, Lab Gruppen, Lake,
Tannoy, Turbosound, TC Elec tronic, TC Helicon, B ehringer,
Bugera, Oberheim, Auratone, Aston Microphones
en Coolaudio zijn handelsmerken of gedeponeerde
handelsmerken van Music Tribe Global Brands Ltd.
© Music Tribe Global Brands Ltd. 2021 Alle rechten
voorbehouden.
BEPERKTE GARANTIE
Voor de toepasselijke garantievoorwaarden en
aanvullende informatie met betrekking tot de beperkte
garantie van Music Tribe, zie de volledige details online
op musictribe.com/warranty.
Viktiga
säkerhetsanvisningar
Varning
Uttag markerade med symbolen leder
elektrisk strömstyrka som är tillräckligt
stark för att utgöra en risk för elchock. Använd endast
högkvalitativa, kommersiellt tillgängliga högtalarkablar
med förhandsinstallerade ¼"TS-kontakter. All annan
installering eller modikation bör endast utföras av
kompetent personal.
Den här symbolen hänvisar till viktiga
punkter om användning och underhåll i
den medfölljande dokumentationen.
Varvänlig och läs bruksanvisningen.
Försiktighet
Minska risken för elektriska stötar genom
att aldrig ta av höljet upptill på apparaten
(eller ta av baksidan). Inuti apparaten nns det inga delar
som kan repareras av användaren. Endastkvalicerad
personal får genomföra reparationer.
Försiktighet
För att minska risken för brand och
elektriska stötar ska apparaten skyddas
mot regn och fukt. Apparaten går inte utsättas för
dropp eller spill och inga vattenbehållare som vaser etc.
fårplaceras på den.
Försiktighet
Serviceinstruktionen är enbart avsedd
för kvalicerad servicepersonal. Föratt
undvika risker genom elektriska stötar, genomför inga
reparationer på apparaten, vilka inte är beskrivna i
bruksanvisningen. Endast kvalicerad fackpersonal får
genomföra reparationerna.
1. Läs dessa anvisningar.
2. Spara dessa anvisningar.
3. Beakta alla varningar.
4. Följ alla anvisningar.
5. Använd inte apparaten i närheten av vatten.
6. Rengör endast med torr trasa.
7. Blockera inte ventilationsöppningarna.
Installeraenligt tillverkarens anvisningar.
8. Installera aldrig intill värmekällor som
värme- element, varmluftsintag, spisar eller annan
utrustning som avger värme (inklusive förstärkare).
9. Ändra aldrig en polariserad eller jordad kontakt.
Enpolariserad kontakt har två blad – det ena bredare än
det andra. En jordad kontakt har två blad och ett tredje
jordstift. Det breda bladet eller jordstiftet är till för din
säkerhet. Omden medföljande kontakten inte passar i ditt
uttag, skadu kontakta en elektriker för att få uttaget bytt.
trampa på den och att den är skyddad mot skarpa kanter
och inte kan skadas. Ge i synnerhet akt på områdena
omkring stickkontakterna, förlängningskablarna
och på det ställe, där elkabeln lämnar apparaten,
ärtillräckligtskyddade.
11. Apparaten måste alltid vara ansluten till elnätet
med intakt skyddsledare.
12. Om huvudkontakten, eller ett apparatuttag,
fungerar som avstängningsenhet måste denna alltid
varatillgänglig.
13. Använd endast tillkopplingar och tillbehör som
angetts av tillverkaren.
14. Använd endast
med vagn, stativ, trefot,
hållareeller bord som
angetts av tillverkaren,
ellersom sålts tillsammans med apparaten.
Om du använder en
vagn, var försiktig, när du
föryttar kombinationen vagn-apparat, för att förhindra
olycksfall genom snubbling.
15. Dra ur anslutningskontakten und åskväder eller när
apparaten inte ska användas under någon längre tid.
16. Låt kvalicerad personal utföra all service. Serviceär
nödvändig när apparaten har skadats, t.ex.när en elkabel
eller kontakt är skadad, vätska eller främmande föremål
har kommit in i apparaten, eller när den har fallit i golvet.
17. Kassera produkten på rätt
sätt: den här symbolen indikerar
att produkten inte ska kastas i
hushållssoporna, enligt WEEE
direktivet (2012/19/EU) och
gällande, nationell lagstiftning.
Produkten ska lämnas till ett
auktoriserat återvinningsställe för elektronisk och
elektrisk utrustning (EEE). Om den här sortens avfall
hanteras på fel sätt kan miljön, och människors hälsa,
påverkas negativt på grund av potentiella risksubstanser
som ofta associeras med EEE. Avfallshanteras produkten
däremot på rätt sätt bidrar detta till att naturens
resurser används på ett bra sätt. Kontakta kommun,
ansvarig förvaltning eller avfallshanteringsföretag för
mer information om återvinningscentral där produkten
kanlämnas
18. Installera inte i ett trångt utrymme,
t.ex. i en bokhylsa eller liknande enhet.
19. Placera inte källor med öppen eld, t.ex. tända ljus,
på apparaten.
20. Tänk på miljöaspekterna vid kassering av batterier.
Batterier måste kasseras på ett batteriuppsamlingsställe.
21. Denna apparat kan användas i tropiska och måttliga
klimat upp till 45 ° C.
FRISKRIVNINGSKLAUSUL
Music Tribe tar inget ansvar för någon förlust som kan
drabbas av någon person som helt eller delvis förlitar
sig på någon beskrivning, fotogra eller uttalande som
information kan ändras utan föregående meddelande.
Alla varumärken tillhör respektive ägare. Midas,
Klark Teknik, Lab Gruppen, Lake, Tannoy, Turbosound,
TC Electronic, TC Helicon, Behringer, Bugera, Oberheim,
Auratone, Aston Microphones och Coolaudio är
varumärken eller registrerade varumärken som tillhör
Music Tribe Global Brands Ltd. © Music Tribe Global
Brands Ltd. 2021 Alla Rättigheter reserverade.
BEGRÄNSAD GARANTI
om Music Tribes begränsade garanti, se fullständig
information online på musictribe.com/warranty.
Page 6

10 VIRTUALIZER 3D FX2000 Quick Start Guide 11
8. Nie stawiać urządzenia w pobliżu źródeł ciepła
zdrowie człowieka z powodu potencjalnych substancji
prawidłową utylizację niniejszego produktu przyczynia się
Aston Microphones i Coolaudio są znakami towarowymi
Ważne informacje o
bezpieczeństwie
Uwaga
Terminale oznaczone symbolem
przenoszą wystarczająco wysokie
napięcie elektryczne, aby stworzyć ryzyko porażenia
prądem. Używaj wyłącznie wysokiej jakości fabrycznie
przygotowanych kabli z zainstalowanymi wtyczkami
¼"TS. Wszystkie inne instalacje lub modykacje powinny
być wykonywane wyłącznie przez wykwalikowany
personel techniczny.
Ten symbol informuje o ważnych
wskazówkach dotyczących obsługi i
konserwacji urządzenia w dołączonej
dokumentacji. Proszę przeczytać stosowne informacje w
instrukcji obsługi.
Uwaga
W celu wyeliminowania zagrożenia
porażenia prądem zabrania się
zdejmowania obudowy lub tylnej ścianki urządzenia.
Elementy znajdujące się we wnętrzu urządzenia nie mogą
być naprawiane przez użytkownika. Naprawy mogą być
wykonywane jedynie przez wykwalikowanypersonel.
Uwaga
W celu wyeliminowania zagrożenia
porażenia prądem lub zapalenia się
urządzenia nie wolno wystawiać go na działanie deszczu
i wilgotności oraz dopuszczać do tego, aby do wnętrza
dostała się woda lub inna ciecz. Nie należy stawiać na
urządzeniu napełnionych cieczą przedmiotów takich jak
np. wazony lub szklanki.
Uwaga
Prace serwisowe mogą być wykonywane
jedynie przez wykwalikowany personel.
W celu uniknięcia zagrożenia porażenia prądem nie należy
wykonywać żadnych manipulacji, które nie są opisane
w instrukcji obsługi. Naprawywykonywane mogą być
jedynie przez wykwalikowany personeltechniczny.
1. Proszę przeczytać poniższe wskazówki.
2. Proszę przechowywać niniejszą instrukcję.
3. Należy przestrzegać wszystkich wskazówek
ostrzegawczych.
4. Należy postępować zgodnie z instrukcją obsługi.
5. Urządzenia nie wolno używać w pobliżu wody.
6. Urządzenie można czyścić wyłącznie suchąszmatką.
7. Nie zasłaniać otworów wentylacyjnych.
Wczasie podłączania urządzenia należy przestrzegać
zaleceńproducenta.
takich, jak grzejniki, piece lub urządzenia produkujące
ciepło (np. wzmacniacze).
9. W żadnym wypadku nie należy usuwać
zabezpieczeń z wtyczek dwubiegunowych oraz wtyczek
z uziemieniem. Wtyczka dwubiegunowa posiada
dwa wtyki kontaktowe o różnej szerokości. Wtyczka z
uziemieniem ma dwa wtyki kontaktowe i trzeci wtyk
uziemienia. Szerszy wtyk kontaktowy lub dodatkowy
wtyk uziemienia służą do zapewnienia bezpieczeństwa
użytkownikowi. Jeśli format wtyczki urządzenia nie
odpowiada standardowi gniazdka, proszę zwrócić się do
elektryka z prośbą o wymienienie gniazda.
10. Kabel sieciowy należy ułożyć tak, aby nie był
narażony na deptanie i działanie ostrych krawędzi, co
mogłoby doprowadzić do jego uszkodzenia. Szczególną
uwagę zwrócić należy na odpowiednią ochronę miejsc w
pobliżu wtyczek i przedłużaczy oraz miejsce, w którym
kabel sieciowy przymocowany jest do urządzenia.
11. Urządzenie musi być zawsze podłączone do sieci
sprawnym przewodem z uziemieniem.
12. Jeżeli wtyk sieciowy lub gniazdo sieciowe w
urządzeniu pełnią funkcję wyłącznika, to muszą one być
zawsze łatwo dostępne.
13. Używać wyłącznie sprzętu dodatkowego i
akcesoriów zgodnie z zaleceniami producenta.
14. Używać
jedynie zalecanych
przez producenta
lub znajdujących
się w zestawie
wózków, stojaków,
statywów, uchwytów
i stołów. Wprzypadku
posługiwania się wózkiem należy zachować szczególną
ostrożność w trakcie przewożenia zestawu, aby uniknąć
niebezpieczeństwa potknięcia się i zranienia.
15. W trakcie burzy oraz na czas dłuższego nieużywania
urządzenia należy wyjąć wtyczkę z gniazdka sieciowego.
16. Wykonywanie wszelkich napraw należy zlecać
jedynie wykwalikowanym pracownikom serwisu.
Przeprowadzenie przeglądu technicznego staje się
konieczne, jeśli urządzenie zostało uszkodzone w
jakikolwiek sposób (dotyczy to także kabla sieciowego
lub wtyczki), jeśli do wnętrza urządzenia dostały się
przedmioty lub ciecz, jeśli urządzenie wystawione było
na działanie deszczu lub wilgoci, jeśli urządzenie nie
funkcjonuje poprawnie oraz kiedy spadło na podłogę.
17. Prawidłowa utylizacja
produktu: Ten symbol wskazuje,
że tego produktu nie należy
wyrzucać razem ze zwykłymi
odpadami domowymi,
tylko zgodnie z dyrektywą
w sprawie zużytego sprzętu
elektrycznego i elektronicznego (WEEE) (2012/19/EU)
oraz przepisami krajowymi. Niniejszy produkt należy
przekazać do autoryzowanego punktu zbiórki zużytego
sprzętu elektrycznego i elektronicznego. Niewłaściwe
postępowanie z tego typu odpadami może wywołać
szkodliwe działanie na środowisko naturalnej i
niebezpiecznych zaliczanych jako zużyty sprzęt
elektryczny i elektroniczny. Jednocześnie, Twój wkład w
do oszczędnego wykorzystywania zasobów naturalnych.
Szczegółowych informacji o miejscach, w których można
oddawać zużyty sprzęt do recyklingu, udzielają urzędy
miejskie, przedsiębiorstwa utylizacji odpadów lub
najbliższy zakład utylizacji odpadów.
18. Nie instaluj w ograniczonej przestrzeni, takiej jak
półka na książki lub podobny zestaw.
19. Nie stawiaj na urządzeniu źródeł otwartego ognia,
takich jak zapalone świece.
20. Należy pamiętać o środowiskowych aspektach
utylizacji baterii. Baterie należy utylizować w punkcie
zbiórki baterii.
21. To urządzenie może być używane w klimacie
tropikalnym i umiarkowanym do 45 ° C.
ZASTRZEŻENIA PRAWNE
Music Tribe nie ponosi odpowiedzialności za
jakiekolwiek straty, które mogą ponieść osoby, które
polegają w całości lub w części na jakimkolwiek opisie,
fotograi lub oświadczeniu zawartym w niniejszym
dokumencie. Specykacje techniczne, wygląd i inne
informacje mogą ulec zmianie bez powiadomienia.
Wszystkie znaki towarowe są własnością ich
odpowiednich właścicieli. Midas, Klark Teknik,
Lab Gruppen, Lake, Tannoy, Turbosound, TC Electronic,
TC Helicon, Behringer, Bugera, Oberheim, Auratone,
lub zastrzeżonymi znakami towarowymi rmy
Music Tribe Global Brands Ltd. © Music Tribe Global
Brands Ltd. 2021 Wszystkie prawa zastrzeżone.
OGRANICZONA GWARANCJA
Aby zapoznać się z obowiązującymi warunkami
gwarancji i dodatkowymi informacjami dotyczącymi
ograniczonej gwarancji Music Tribe, zapoznaj się ze
wszystkimi szczegółami w trybie online pod adresem
musictribe.com/warranty.
Page 7
12 VIRTUALIZER 3D FX2000 Quick Start Guide 13
INPUTS 1
FX2000
X1622USB
FX2000
412H-BK
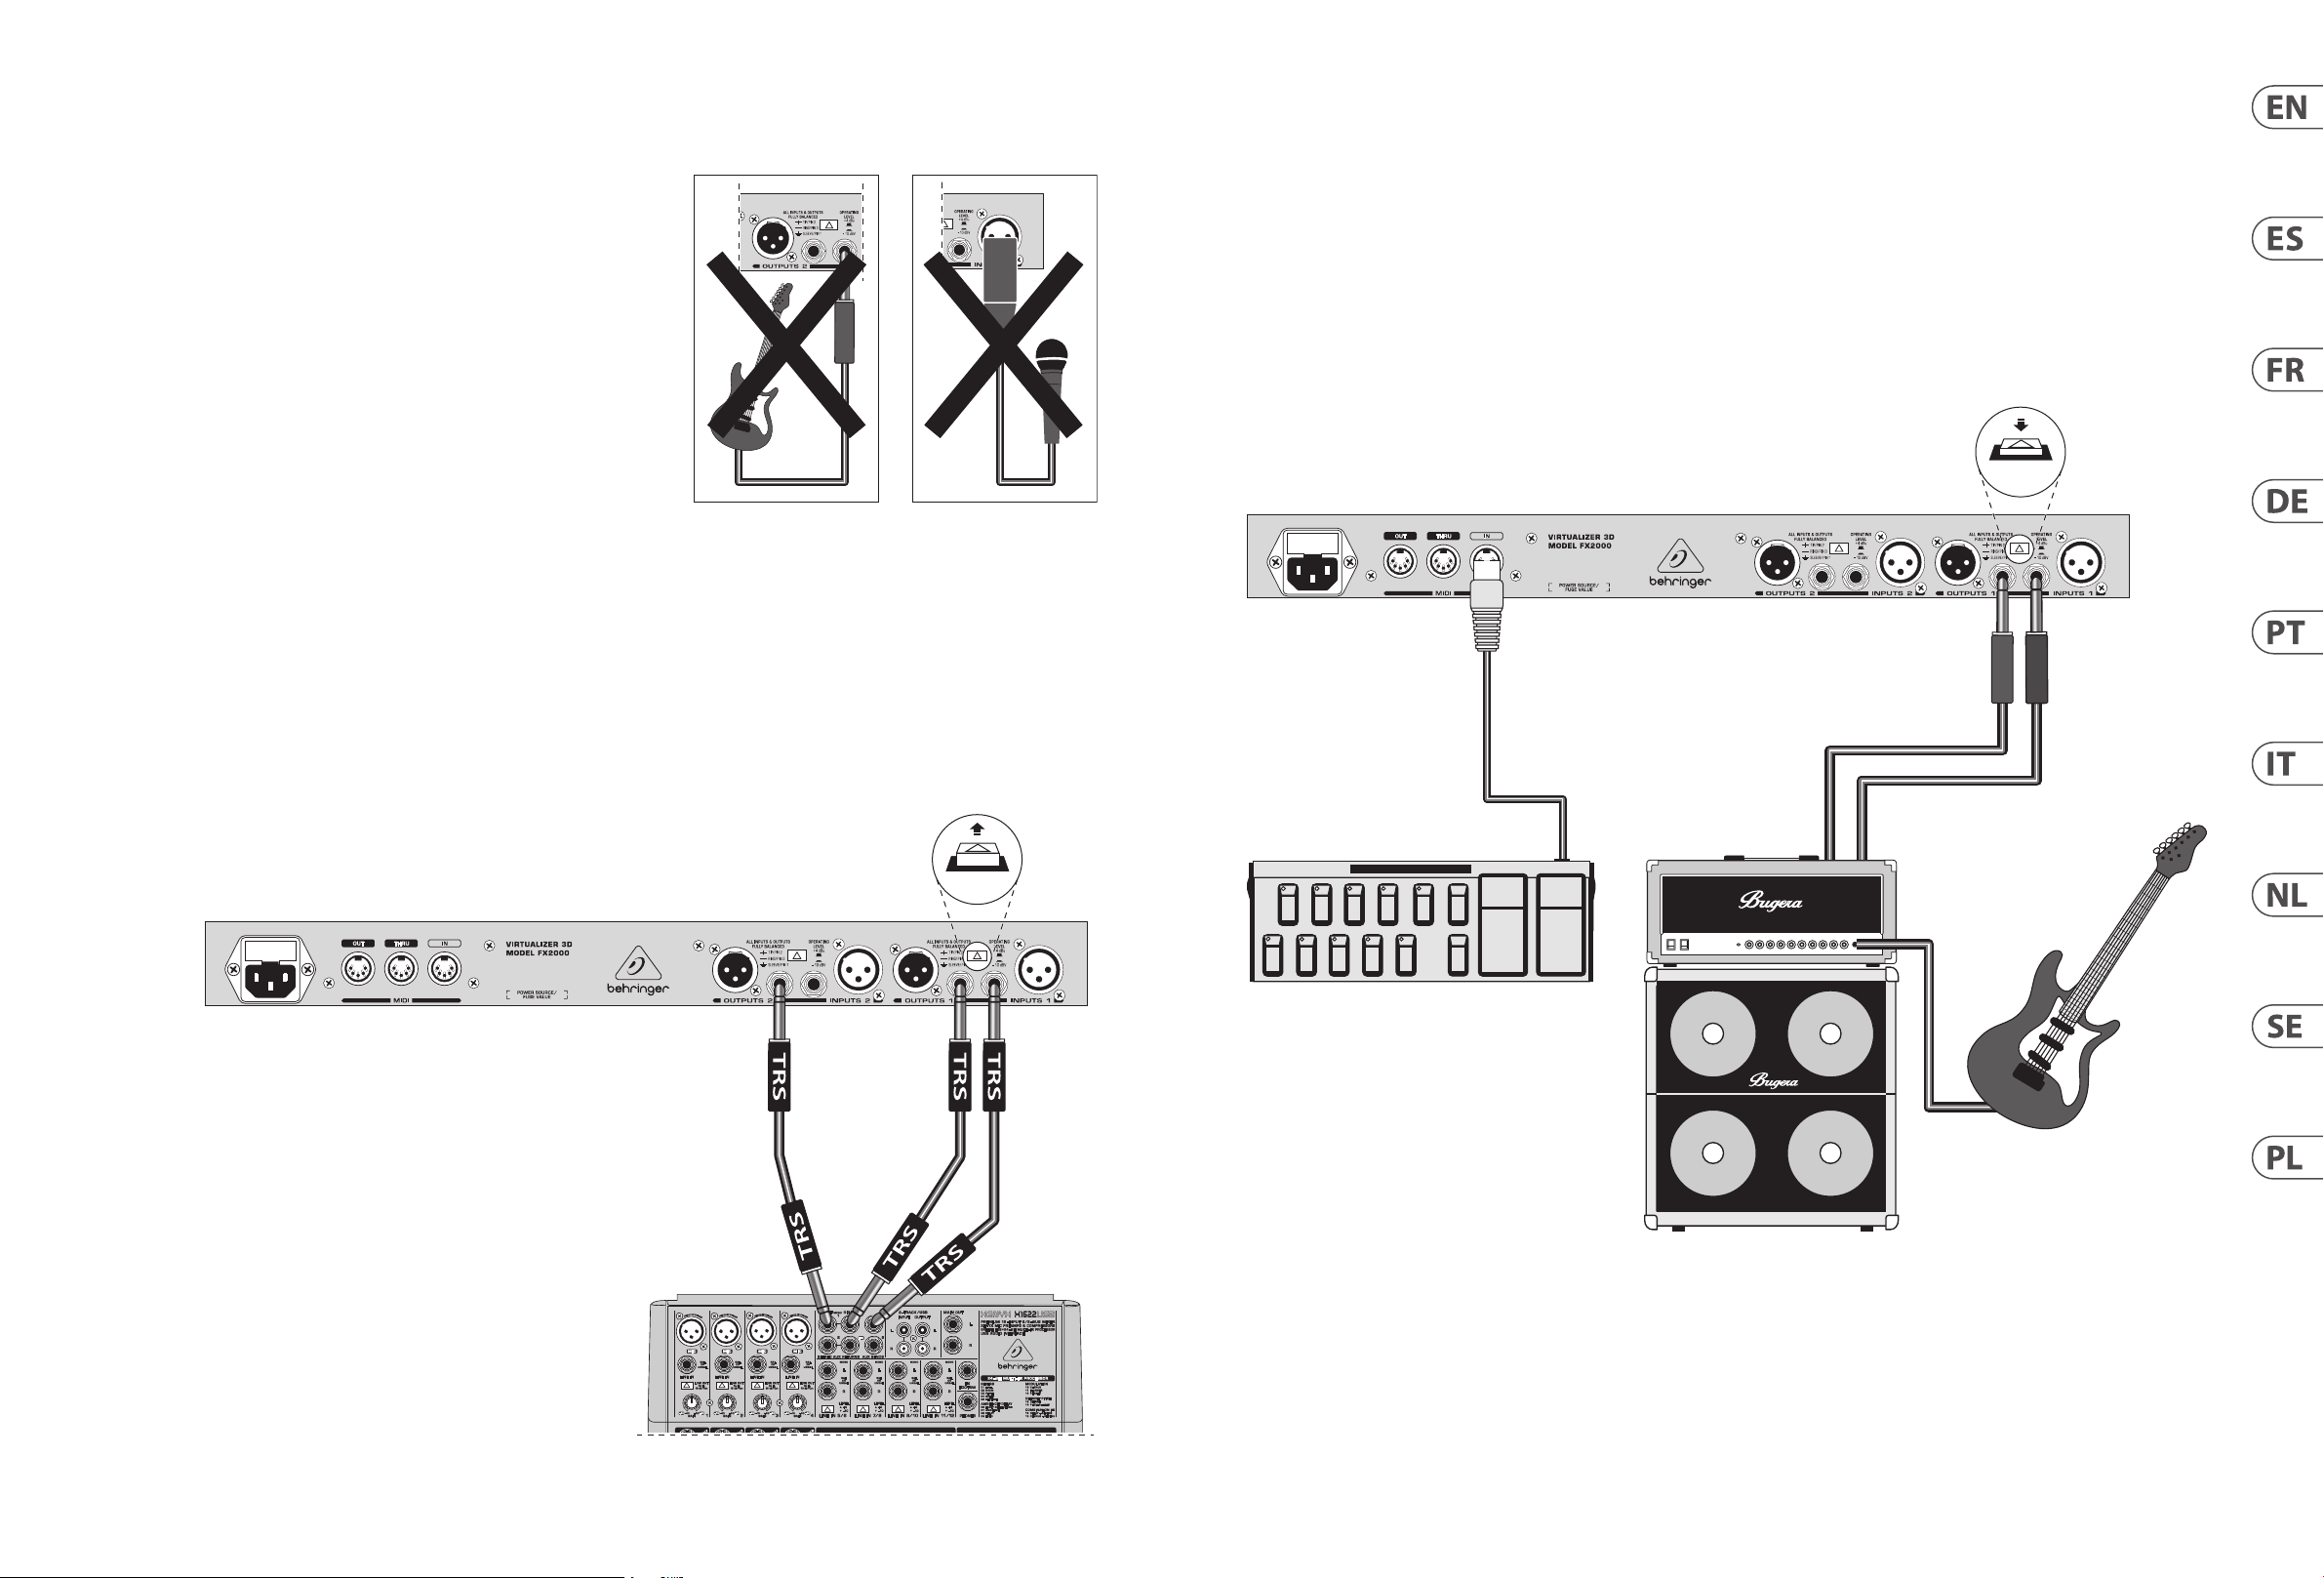
VIRTUALIZER 3D FX2000 Hook-up
Step 1: Hook-Up
(EN)
Paso 1: Conexión
(ES)
Etape 1 : Connexions
(FR)
Schritt 1: Verkabelung
(DE)
Passo 1: Conexões
(PT)
Passo 1: Allacciare
(IT)
Stap 1: Aansluiten
(NL)
Steg 1: Anslutning
(SE)
Krok 1: Podłączeni
(PL)
Exter nal effec ts processor w ith mixing bo ard
Procesad or de efectos y m esa de mezclas e xterior es
Processeu r d'effet s externe e t console de mixa ge
Exter ner Effek tprozessor mi t Mischpult
Processad or de efeitos e xternos co m mesa de mixag em
Processor e di effett i esterno con mi xer
Externe effectenprocessor met mengpaneel
Exter n effektp rocessor med b landbräda
Zewnętrz ny procesor efe któw z mikse rem
FX2000 in g uitar amp ef fects loo p
FX2000 en b ucle de efecto s de amplif icador de gui tarra
FX2000 en b oucle d'ef fet sur un amp li guitare
FX2000 in der Effekt-Schleife eines Gitarrenverstärkers
FX2000 no ci rcuito de efei to do amplif icador da gui tarra
Processor e di effett i esterno con mi xer
Externe effectenprocessor met mengpaneel
Exter n effektp rocessor med b landbräda
Zewnętrz ny procesor efe któw z mikse rem
-10 dBV
REAR Panel
RETURN SEND
1990
+4 dBu
FCB1010
REAR Panel
AUX RETURNS
AUX SEND
Page 8
14 VIRTUALIZER 3D FX2000 Quick Start Guide 15
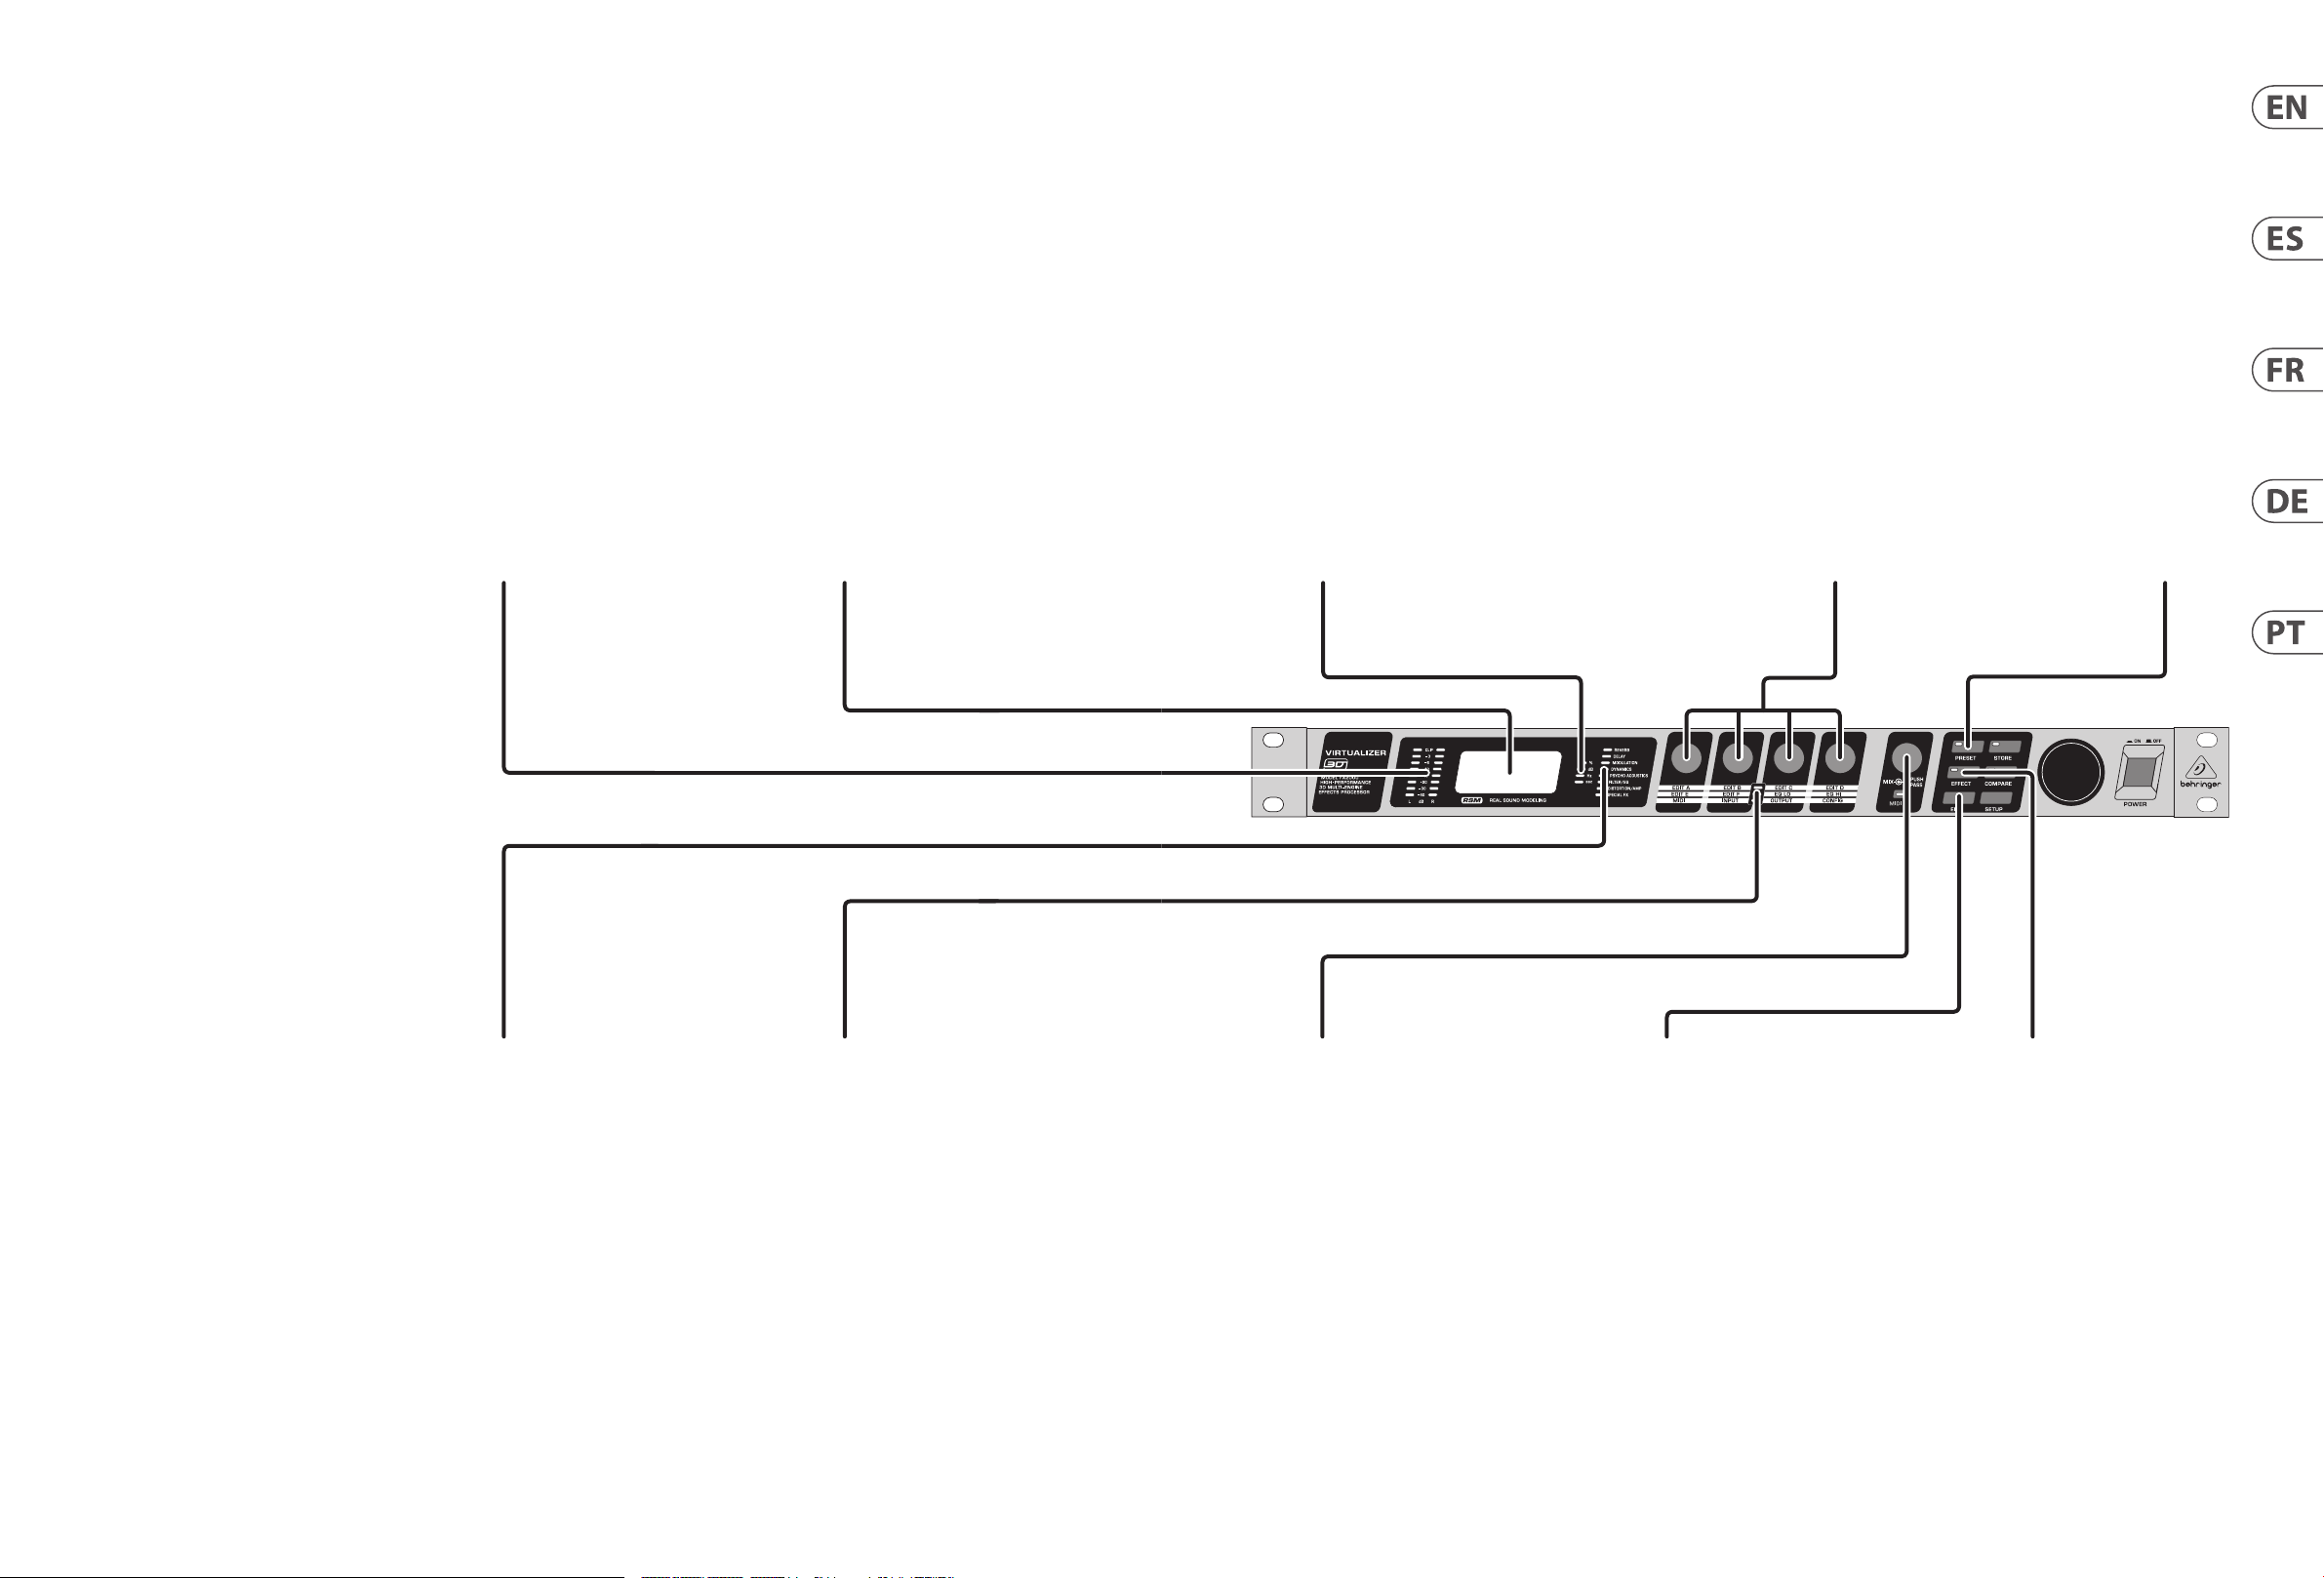
VIRTUALIZER 3D FX2000 Controls
Step 2: Controls
(EN)
Paso 2: Controles
(ES)
Etape 2 : Réglages
(FR)
Schritt 2:
(DE)
Bedienelemente
Passo 2: Controles
(PT)
LEVEL METERS display t he
signal leve l relative to the
setti ng of the OPERATING
LEVEL but ton on the
rearpanel .
MEDIDORES DE NIVEL le
muestr an el nivel de señal
en relació n con el ajuste del
botón OPER ATING LE VEL del
panel trasero.
Les AFFICHEURS DE NIV EAU
indiquent le niveau du
signal et re latif au sélect eur
OPERATING LEV EL de la
facearr ière.
LEVEL METERS zeigen
den Signalpegel in Bezug
auf die Einstellungen der
OPERATING LEV EL-Taste auf
der Rück wandan.
LEVEL METERS exibe o n ível
de sinal rela tivo do ajuste do
botão OPERATING LEVEL no
painel traseiro.
DISPL AY shows the ee ct
name, parameter name,
and param eter value of the
current p reset.
PANTALLA en ella aparece e l
nombre de l efecto, asícomo
el nombre y e l valor de
parámetro del preset activo.
L'É CR AN ac he le nom de
l'eet, du pa ramètre, etla
valeur de paramètre du
Presetco urant.
DISPL AY zeigt den Name n
des Eek ts, den Namen des
Paramete rs und den Wert
des Parame ters der aktue llen
Voreinstellung an.
DISPL AY exibe o nome d o
efeito, nom e do parâmetro
e valor do par âmetro da
programa atual.
STATU S LEDs indicate the
type of v alue that may
current ly be edited. You may
set the val ue of an eect
paramet er (%), adjus t the
amplitu de or threshold of
an eec t (dB), modi fy a
freque ncy (Hz), or modify a
time parameter (sec).
LEDs de ESTADO le in dican
el tipo del v alor que puede
ser edit ado en ese momento.
Puede ajus tar el valor de un
parámet ro de efecto (%),
laamplitu d o el umbral de
un efec to (dB), mod icar una
frecu encia (Hz) o cambiar un
parámetro de tiempo (sec).
Les Leds de STATUT indiquent
le type d e valeur qui peut
être édi té. Vous pouvez
modier un paramètre
d'eet (%), régler l'ampl itude
ou le seuil d'un e et (dB),
modier une fréquence (Hz),
ou modier un paramètre
temporel(secondes).
STATU S LEDs geben
den Typ des Wert s an,
dermöglic herweise
gegenwärtig editiert werden
kann. Siekönn en den Wert
eines Eek t-Parameters (%)
einstellen, die Amplitude oder
die Schwell e eines Eekts
(dB) justieren, eineFrequenz
(Hz) modizieren oder
einen Zeitparameter
(s)modizieren.
Os LEDs do STATUS indic am
o tipo de valo r que deve
ser edit ado no momento.
Poderá congurar o valor de
um parâme tro de efeito (%).
Ajuste a amp litude ou o ponto
de início de u m efeito (dB),
modique uma frequência,
ou altere um p arâmetro de
tempo (seg.).
EDIT KNOBS adjust
various eect
parameters, EQsettings,
MIDIfunc tions and INPUT/
OUTPUTcongurations.
MANDOS EDIT le perm iten
ajustar los distintos
parámetros de efectos,
valores EQ , funcionesMIDI
y conguraciones de
ENTRADA/SALIDA.
Les bouto ns EDIT règlent
divers paramètres d'eets,
d'EQ, de fon ctions MIDI
et de congurations
d'ENTRÉES/SORTIES.
Mit den EDIT-Knöpfen
werden verschiedene EektParameter, EQ-Einstellungen,
MIDI-Funktionen
und INPUT/OUTPUTKongurationenjustiert.
Os BOTÕES GIRATÓRIOS
EDIT ajustam v ários
parâmetros de efeito,
congurações do
EQ, funçõ esda MIDI
e congura ções da
ENTRADA/SAÍDA.
PRESET button enab les
the JOG WHEEL t o scroll
through the 200 presets.
El botón PRESET le
permite u sar la RUEDA
JOG para ir p asando por
los 200 pre sets.
La touche PRESET per met
d'utilise r la MOLETTE
pour fair e déler les
200Prese ts.
Die PRESET-Tast e
ermögli cht es dem
JOG-WHEEL2 00
Voreinstellungen
anzuwählen.
O botão PRESET habili ta
o JOG WHEEL ro lar através
das 200 programações.
EFFECT GR OUP LEDs
indicate t he category of t he
currenteect.
LEDs de GRUPO DE E FECTOS
indican la c ategoría del
efec toactivo.
Leds de GRO UPE D'EFFET
indiquan t la catégorie de
l'eet courant.
EFFECT GR OUP LEDs
geben die K ategorie des
gegenwärtigen Eekts an.
Os LEDs do EFFECT G ROUP
indicam a c ategoria do
efeitoatual.
EDIT LEDs indicate which
paramet ers are adjusted by
the EDIT KNO BS.
LEDs de EDICION le
indican c uales son los
parámet ros ajustados p or los
MANDOSEDIT.
Les Leds EDIT indiquent
les paramètres aectés au
boutons ED IT.
EDIT LEDs geben an,
welchePar ameter durch die
EDIT-Knöpfe justiert werden.
Os LEDs do EDIT i ndicam
quais são o s parâmetros
ajustad os pelos BOTÕES
GIRATÓRIOS EDIT.
MIX knob adjus ts the
wet/dry m ix of the output
signal. Setting the knob
fully clo ckwise allows t he
process or to aect the en tire
input sign al. Press the MIX
knob to byp ass the processo r.
El mando MIX le pe rmite
ajustar l a mezcla húmedo/
seco de la se ñal de salida.
Ajuste es te mando
complet amente a la derecha
para que el p rocesador afe cte
a toda la señal d e entrada.
Pulse el man do MIX para
anular o dejar e n bypass
elproces ador.
Le bouton MIX rè gle le
dosage signal traité/signal
non trait é du signal de
sorti e. En position maxi male,
leproces seur traite la
totalité d u signal d'entrée.
Appuyezsu r MIX pour
bypasse r leprocesseur.
Mit dem MIX-Knopf
wird der Wet/Dry-Mix
des Ausgangssignals
(Anteilzw ischen Eekt- und
trockenem Signal) justiert.
Drücken Si e den MIX-Knopf
um den Proze ssor zu
umgehen (Bypass-Funktion).
O botão giratório MIX ajusta o
mix wet/dr y do sinal de saída.
Ajustar o b otão giratório
totalmente no sentido horário
permite q ue o processador
afete o sina l de entrada por
completo. P ressione o botão
giratór io para contornar
oprocess ador.
EDIT butto n selects the
funct ion of the EDIT KNOBS.
The EDIT LEDs i ndicate
which functions are
active. S eeGetting Star ted
fordeta ils.
El botón EDIT le pe rmite
elegir la f unción de los
MANDOS EDIT. Los pi lotos
EDIT le indic an qué funcione s
están ac tivas. Vea la secci ón
de Puest a en marcha para
másdetal les.
La touche ED IT sélectionne
la fonct ion des boutons EDI T.
Les Leds EDI T indique la
fonct ion active. Consul tezla
secti on de mise en œuvre
pour de plu s amples détails.
Mit der EDIT-Ta ste
wird die Funktion der
EDIT-Knöpfe ausgewählt.
Die EDIT-LEDs g eben an,
welche Funktionen aktiv
sind. Siehe „ ErsteSchrit te“
fürEinzelheiten.
O botão EDIT seleciona
a função d os BOTÕES
GIRATÓRIOS EDIT. Os LED s do
EDIT indic am quais funções
estão at ivas. Consulte o Guia
Rápido para mais detalhes.
EFFECT bu tton enables
the JOG WHEEL t o scroll
through t he 71 basic
eec talgorithms.
El botón EFFEC T hace que
pueda us ar la RUEDA JOG
para ir pas ando por los 71
algorit mos básicos deefe ctos.
La touche E FFECT permet
d'utilise r le MOLETTE
pour fair e déler les 71
algorit hmes d'eets debas e.
Die EFFECT-Taste ermöglicht
es dem JOG -WHEEL 71
grundlegende EektAlgorithmen anzuwählen.
O botão EFFEC T habilita o
JOGWHEEL ro lar através
dos 71 algor itmos de
efeitobá sico.
Page 9
16 VIRTUALIZER 3D FX20 00 Quick Start Guide 17
VIRTUALIZER 3D FX2000 Controls
Passo 2: Controlli
(IT)
Stap 2: Bediening
(NL)
Steg 2: Kontroller
(SE)
Krok 2: Sterowanica
(PL)
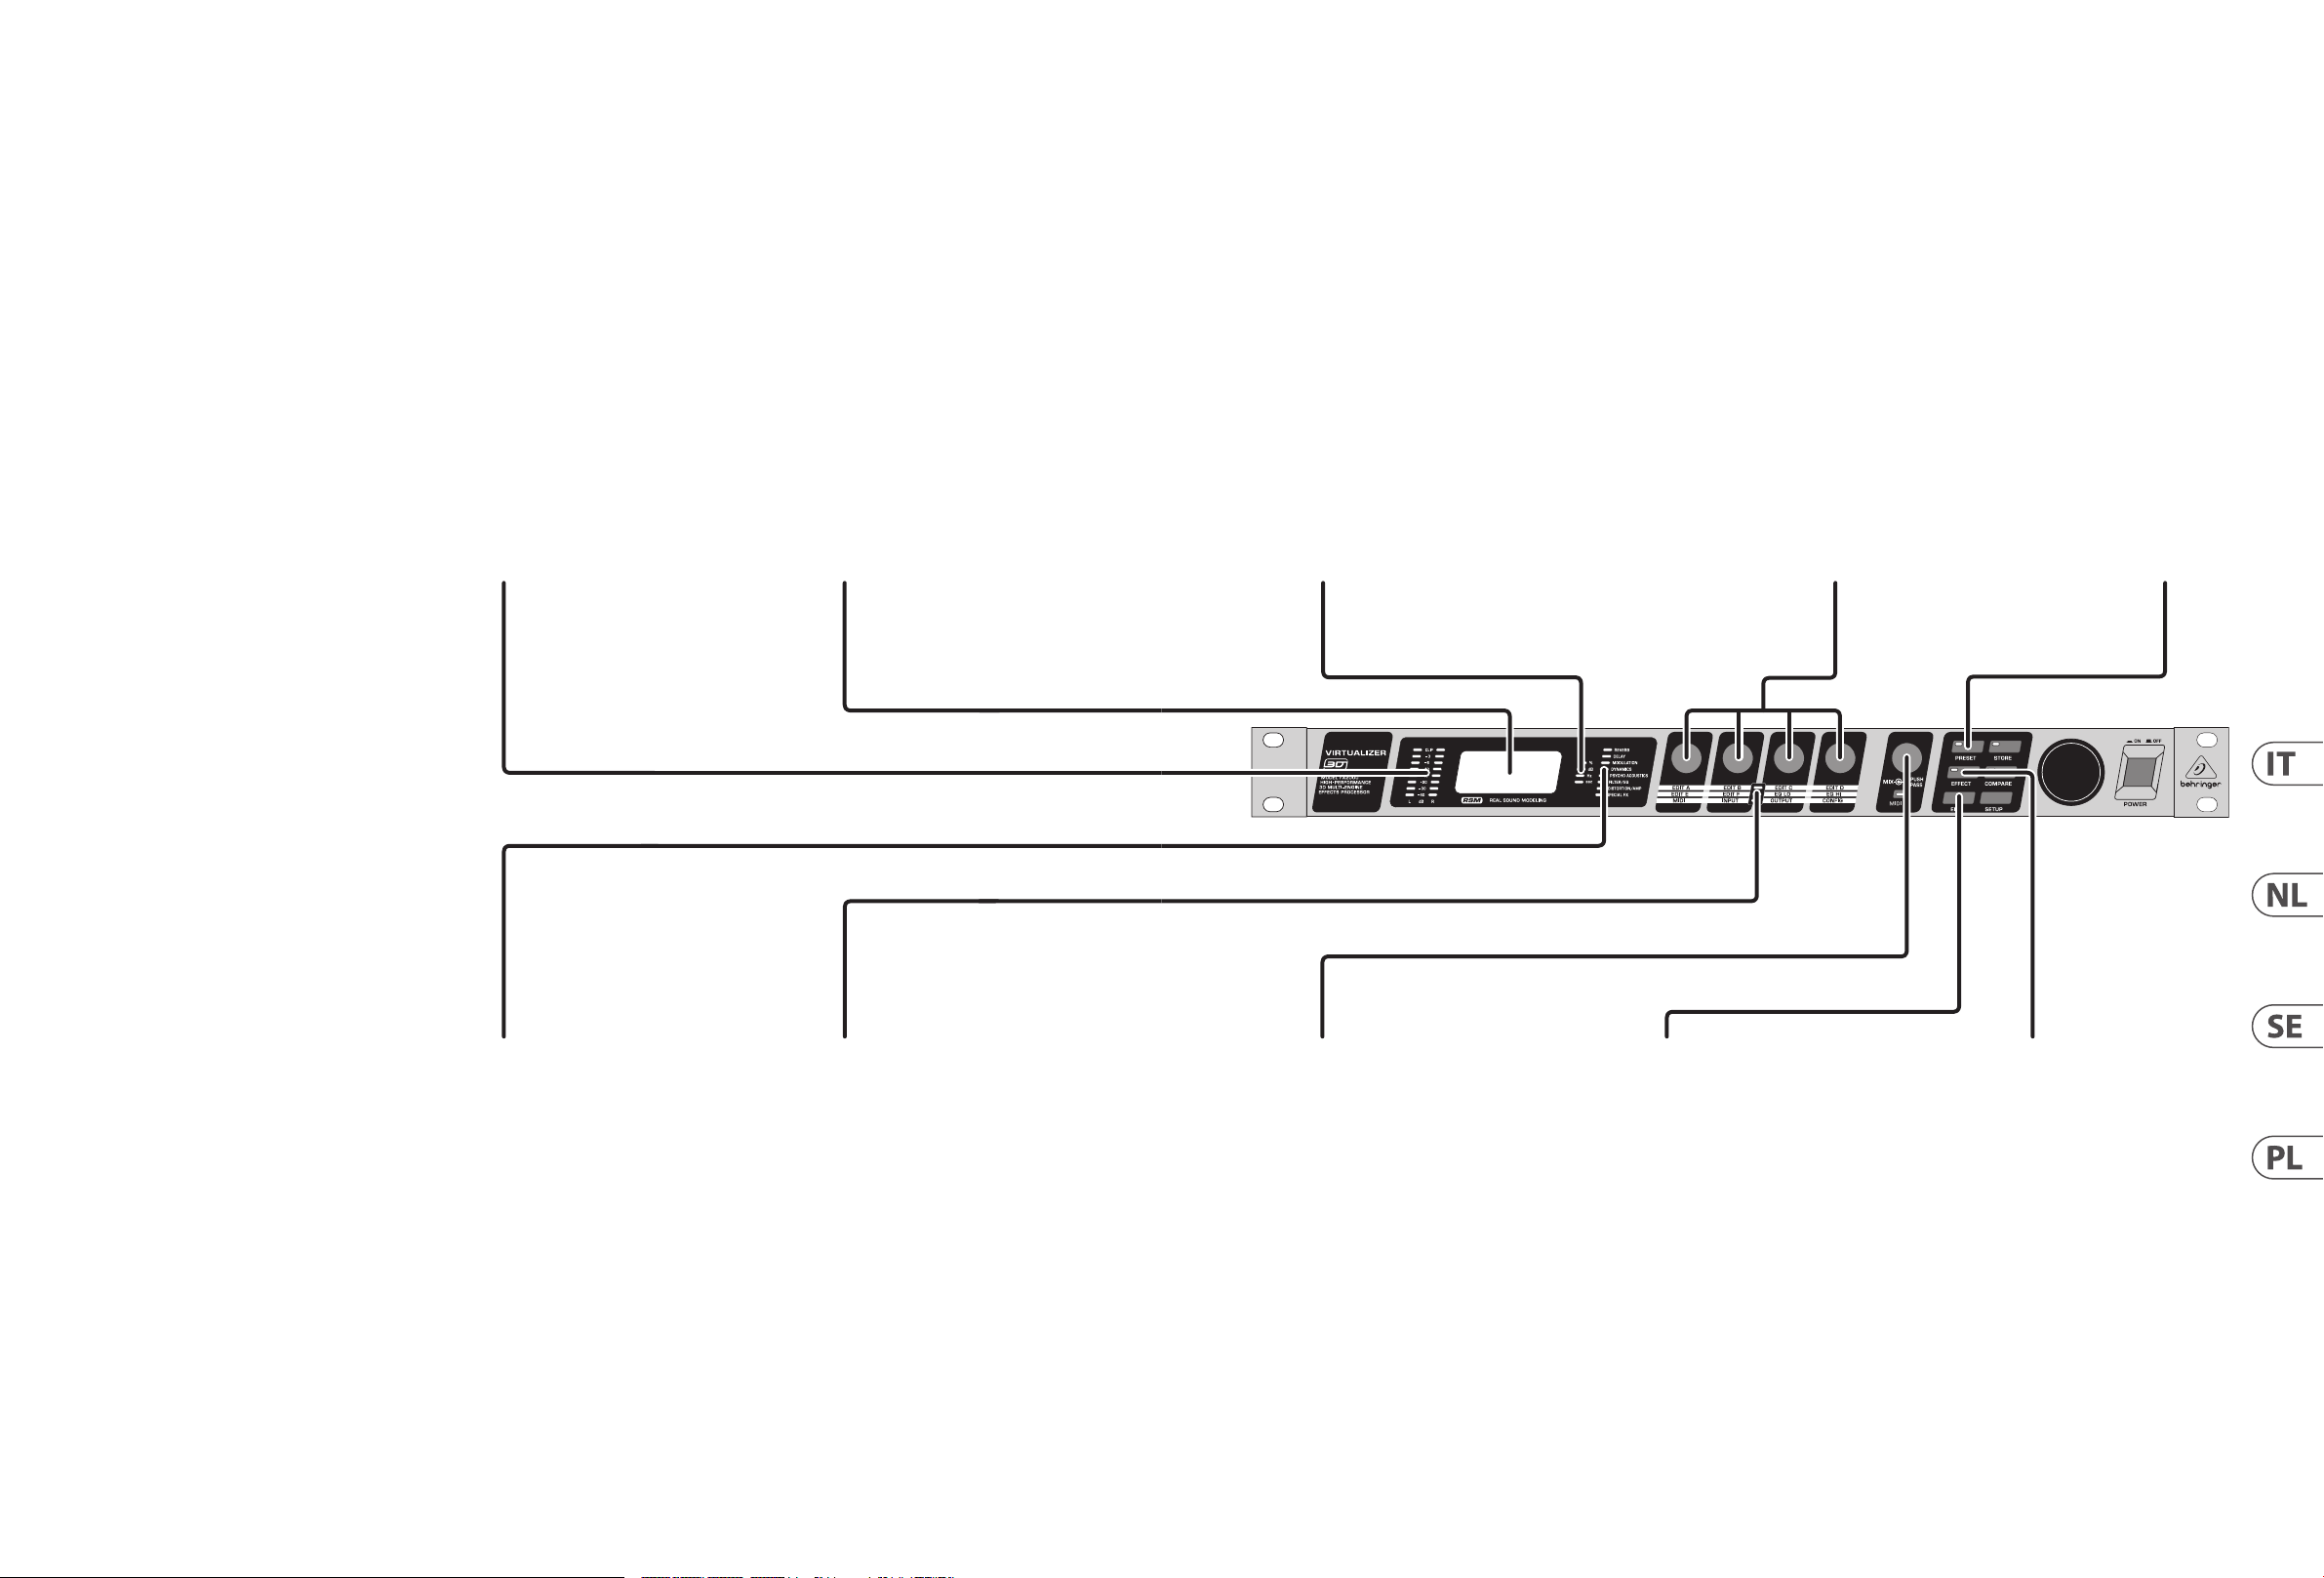
I LEVEL METERS visualizzano
il livello de l segnale relativo
all'impostazione del pulsante
OPERATING LEV EL sul
pannello posteriore.
LEVEL METERS geven he t
signaalni veau weer ten
opzichte v an de instelling van
de OPERATING LE VEL-kno p op
het achterpaneel.
LEVEL METERS visar
signalnivån i förhållande
till inställningen för
OPERATING LEVEL-knappen
på bakpanelen.
LEVEL METERS wyświetlają
poziom sygnału w odniesieniu
do ustawi enia przycisk u
POZIOMU OPERACYJNEGO na
panelu tylnym.
DISPL AY mostra il nome
dell'eetto, il nome del
paramet ro e il valore del
parametro del preset corrente.
DISPL AY toont de
eectnaam, parameternaam
en parameterwaarde van de
huidige preset.
DISPL AY visar eektnamnet,
parameternamnet och
parametervärdet för den
aktuella förinställningen.
DISPL AY pokazuje na zwę
efektu, nazwę parametru i
wartość parametru
aktualnego presetu.
STATU S LEDs indicano il
tipo di valo re che può essere
attualmente modicato.
È possibile impostare il valore
di un param etro di eett o (%),
regolar e l'ampiezza o la sog lia
di un eet to (dB), modicare
una frequenza (Hz), oppure
modicare un parametro
temporale (sec).
STATU S-LED s geven
het typ e waarde aan dat
momenteel kan worden
bewerk t. U kunt de waarde
van een ee ctparamete r (%)
instelle n, de amplitude of
drempel v an een eect (dB)
aanpassen, een frequentie
(Hz) wijzigen, of wijzig een
tijdparameter (sec).
STATU S LEDs anger vilken typ
av värde som f ör närvarand e
kan redig eras. Du kan ställ a in
värdet på en eektparameter
(%), justera ampli tuden eller
tröskeln f ör en eekt (dB),
ändra en f rekvens (Hz), eller
ändra en tidsparameter (sek).
STATU S LEDs wskazują
rodzaj w artości, któ ra może
być aktualnie edytowana.
Możesz ustawić wartość
parametru efektu (%),
dostosować amplitudę lub
próg efe ktu (dB), zmodykow ać
częstotliwość (Hz),
lub zmodykuj parametr
czasu (sek.).
EDIT KNOBS regolano
vari parametri degli eetti,
impostazioni EQ, funzioni
MIDI e congurazioni
INPUT / OUTPUT.
EDIT KNOBS passen
verschillende
eectparameters, EQinstellingen, MIDI-functies
en INPUT / OUTPUTconguraties aan.
EDIT KNOPPAR justerar
olika eektparametrar, EQinställningar, MIDI-funktioner
och INPUT / OUTPUTkongurationer.
EDIT KNOBS regulują
różne parametry efektów,
ustawie nia EQ, funkcje MIDI i
konguracje WEJŚĆ / WYJŚĆ.
Il pulsante PRESET
consente a lla JOG WHEEL
di scorre re i 200 preset.
Met de PRESET-knop kan
het JOG WHEE L door de
200 presets scrollen.
PRESET-knappen gör de t
möjligt f ör JOG WHEEL att
bläddra ig enom de 200
förinställningarna.
Przycisk PRESET
umożliwi a JOG WHEEL
przewij anie 200 presetó w.
EFFECT GR OUP LEDs
indicar e la categoria
dell'eetto corrente.
EFFECT GR OUP LEDs geven
de categorie van het huidige
eect aan.
EFFECT GR OUP LEDs
anger kate gorin för den
aktuella eek ten.
EFFECT GR OUP LEDs wskazują
kategorię aktualnego efek tu.
EDIT LEDs indicano quali
parametri sono regolati dalle
MANOPOLE EDIT.
EDIT LEDs geven a an
welke param eters worden
aangepas t door de EDIT
KNOPPEN.
EDIT LEDs lyser vilka
parametrar som justeras
av EDIT KNOPPAR.
EDIT LEDs wskazują,
które parametry są
regulowane EDIT KNOBS.
La manopo la MIX regola il
mix wet / dr y del segnale in
uscita. L'impostazione della
manopola completamente
in senso or ario consente
al proces sore di eett uare
l'intero se gnale in ingresso.
Premere la m anopola MIX per
bypassare il processore.
MIX-knop pas t de natte
/ droge mix v an het
uitgangssignaal aan.
Door de kn op volledig met
de klok mee t e draaien,
kan de proc essor het volled ige
ingangssignaal beïnvloeden.
Druk op de MI X-knop om de
processor te omzeilen.
MIX-ratten j usterar den
våta / torr a blandningen
av utsigna len. Genom att
ställa ra tten helt medur s
kan proce ssorn påverka
hela insign alen. Tryck på
MIX-rat ten för att krin ggå
processorn.
Pokrętło MIX reguluje
mokry / s uchy miks sygnał u
wyjśc iowego. Całkowit e
ustawie nie pokrętła w
prawo pozwala procesorowi
wpł ywać na cały s ygnał
wejściowy. Naciśnij pokrętło
MIX, aby omin ąć procesor.
Il pulsante EDIT selez iona la
funzione delle MANOPOLE
EDIT. I LED EDIT indic ano quali
funzio ni sono attive. Veder e
la Guida int roduttiva pe r
i dettagli.
EDIT-knop sele cteert de
funct ie van de EDIT-KNOPPEN.
De EDIT-leds g even aan welke
funct ies actief zij n. Zie Aan de
slag voor de tails.
EDIT-knappen väljer
funktionen EDIT KNAPPAR.
EDIT-lysdioderna indikerar
vilka funktioner som är
aktiva . Se Komma igång för
mer information.
Przycisk EDYC JA służy do
wybor u funkcji EDIT KNO BS.
EDIT LEDs wsk azują,
które f unkcje są akt ywne.
Aby uzyskać szczegółowe
informacje, zobacz
Pierwsze kroki.
Il pulsante EFFECT
consente a lla JOG WHEEL di
scorrer e i 71 algoritmi di bas e
degli eetti.
Met de EFFEC T-knop kan
het JOG WHEE L door de 71
basiseectalgorit men scrollen.
EFFECT-kn appen gör det
möjligt f ör JOG WHEEL
att bläddra igenom
de 71 grundläggande
eektalgoritmerna.
Przycisk EFFEC T umożliwia
JOG WHEEL pr zewijanie
przez 71 po dstawowych
algorytmów efektów.
Page 10
18 VIRTUALIZER 3D FX20 00 Quick Start Guide 19
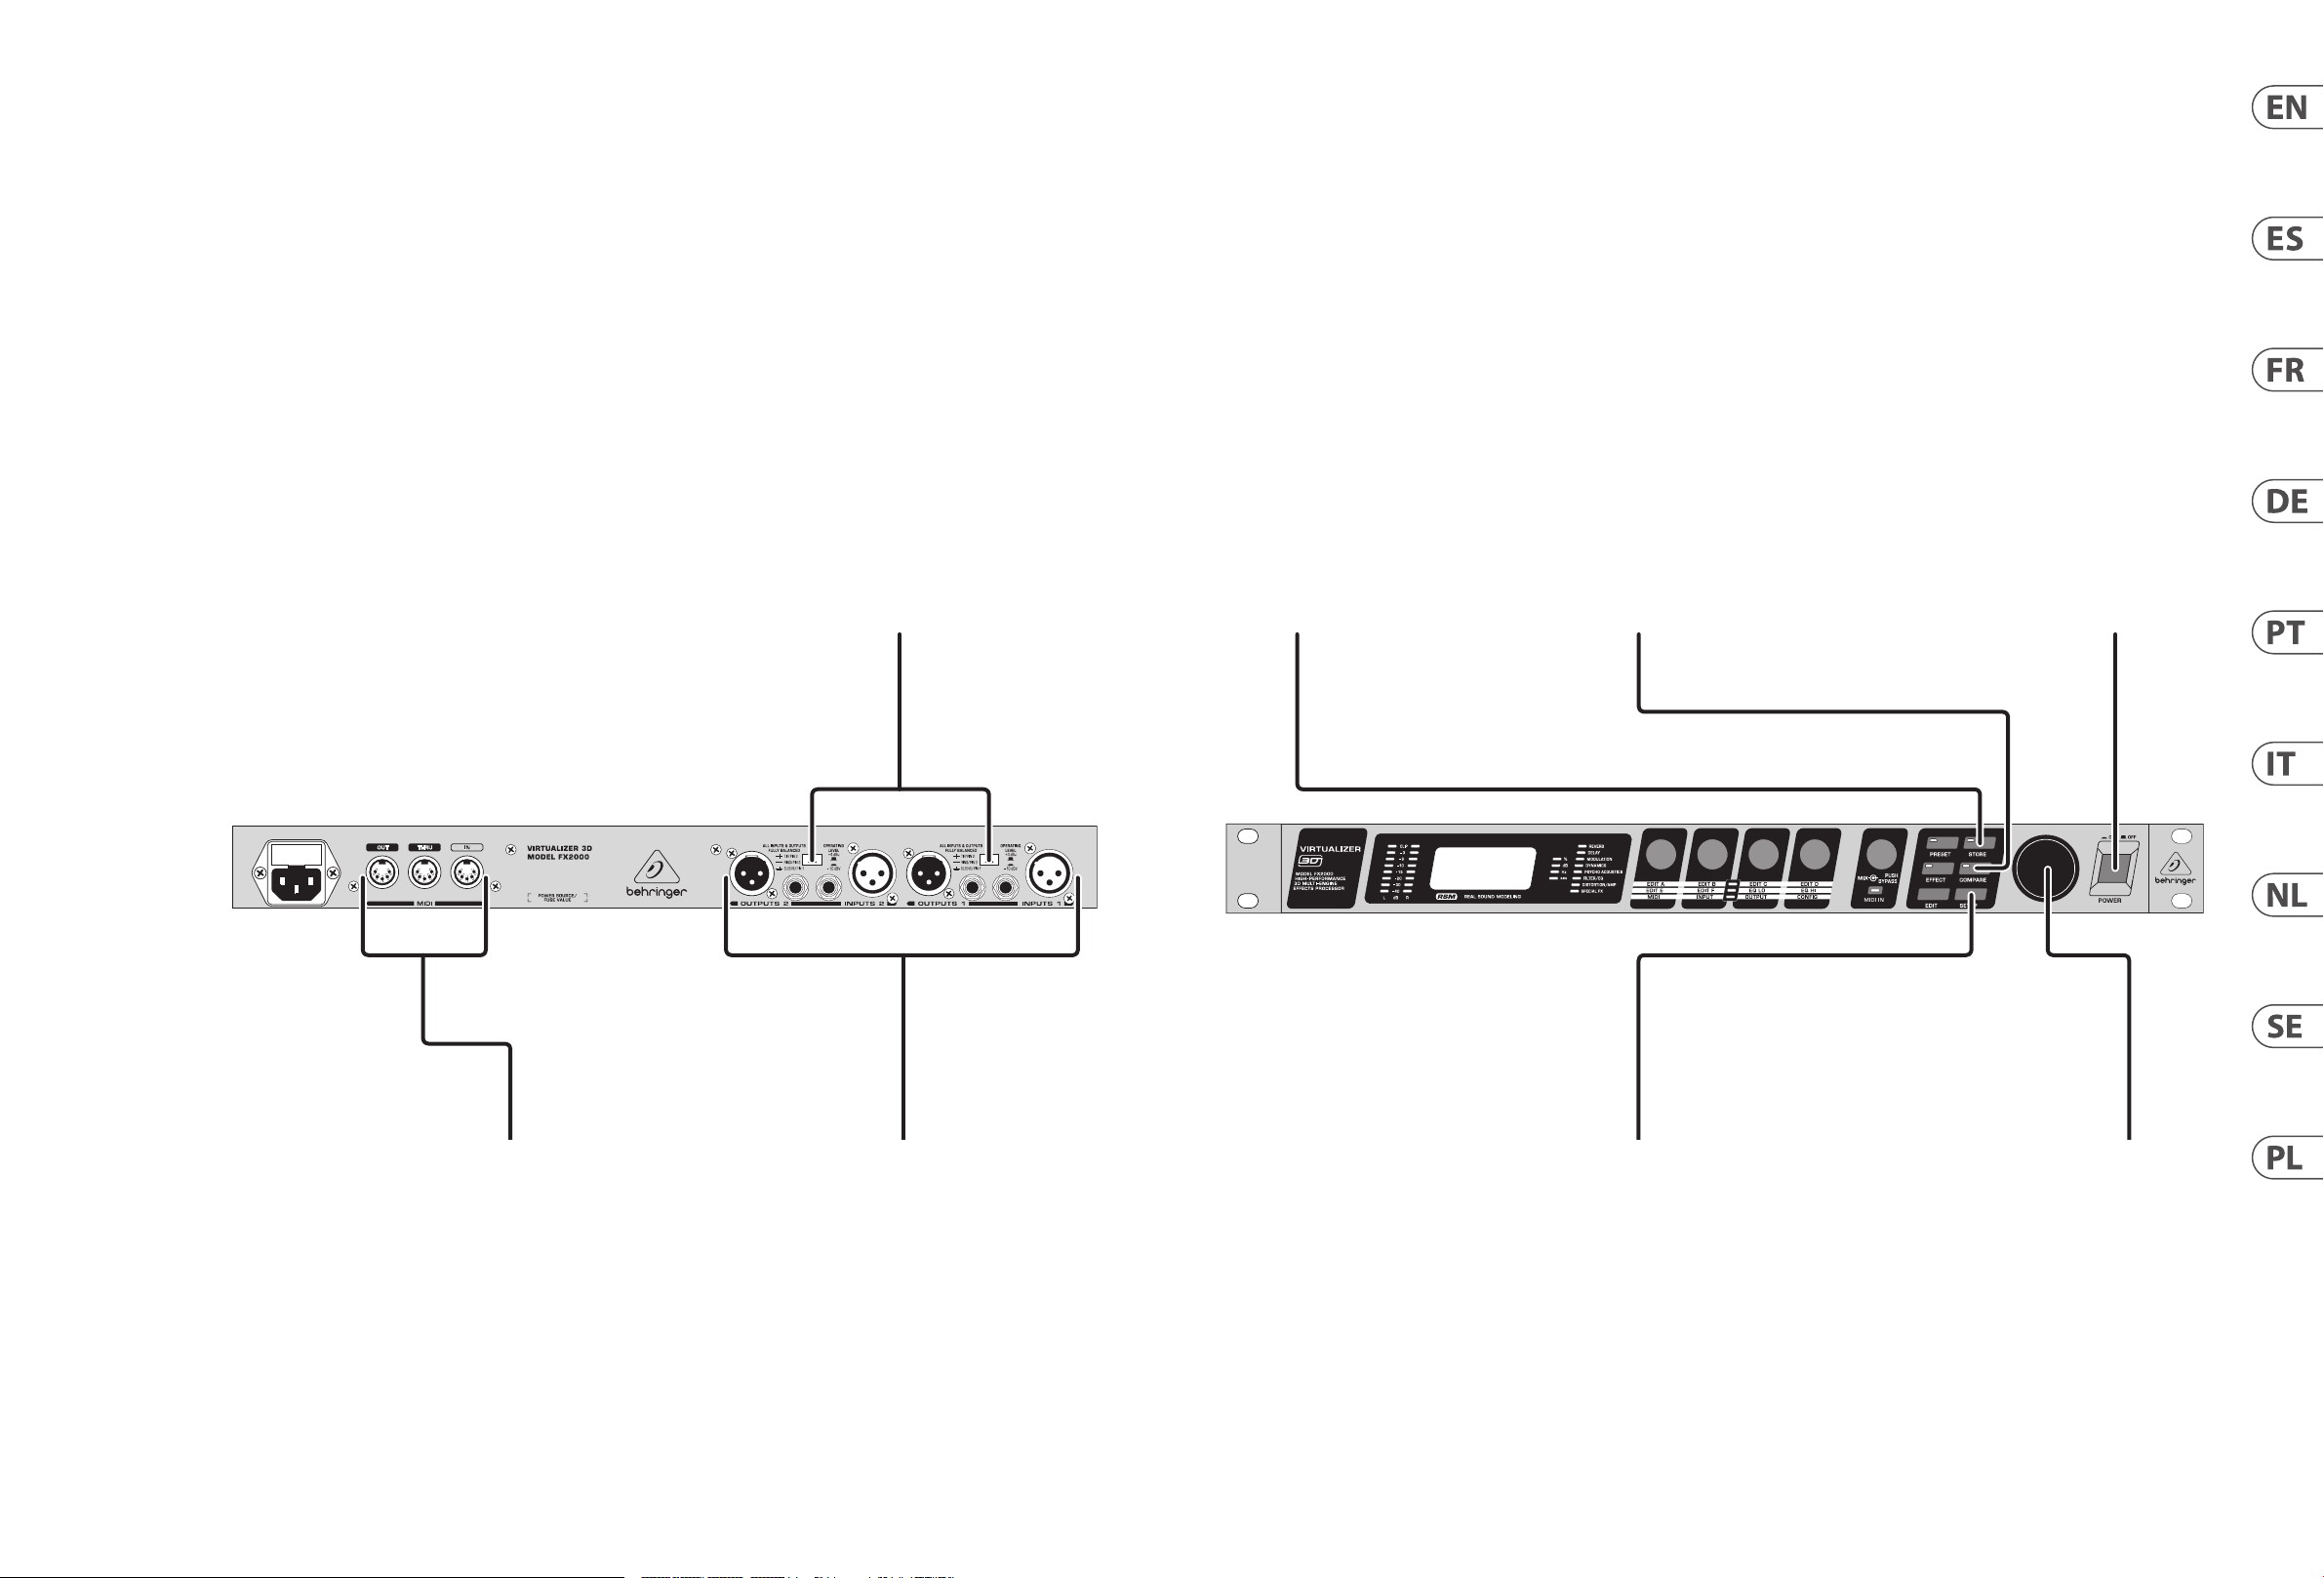
VIRTUALIZER 3D FX2000 Controls
Step 2: Controls
(EN)
POWER butt on turns the unit
on and o.
Paso 2: Controles
(ES)
Etape 2 : Réglages
(FR)
Schritt 2:
(DE)
Bedienelemente
Passo 2: Controles
(PT)
Passo 2: Controlli
(IT)
Stap 2: Bediening
(NL)
OPERATING LEVEL button
switche s between -10 dBV
and +4 dBu, all owing the
FX200 0 to operating in it s
optimal r ange.
El botón OPERATING LEVEL
le permit e cambiar entre los
ajustes -10 dBV y +4 dBu,
para que el F X2000 funci one
en su rango óp timo.
La touche O PERATING LEVEL
sélectionne le niveau de
travail du F X2000 sur -10 dBV
ou +4 dBu, en f onction de
l'environnement d'utilisation.
Mit der OPERATING LEVELTaste können Sie zwischen
-10 dBV und +4dBu
umschalten, wodurch es
dem FX20 00 ermöglicht w ird,
inseinem optimalen Bereich
zuarbeit en.
O botão OPERATING LEVEL
regula ent re -10 dBV e
+4 dBu, per mitindo que
o FX200 0 opere em seu
alcancemá ximo.
Il pulsante OPERATING
LEVEL commu ta tra -10
dBV e +4 dBu, con sentendo
all'FX20 00 di funzionar e nella
sua gamma ottimale.
OPERATING LEVEL-knop
schakelt t ussen -10 dBV
en +4 dBu, waa rdoor de
FX200 0 in zijn optimale
bereik kan werken.
OPERATING LEVEL-knappen
växlar mellan -10 dBV och
+4 dBu, vilke t gör att
FX200 0 kan fungera i sit t
optimala intervall.
Przycisk POZIOMU
OPER ACYJNEGO przełącza
pomiędz y -10 dBV a +4 dB u,
umożliwiając FX200 0 pracę
w optymalnym zakresie
STORE butto n saves
an altered p reset to a
desiredl ocation.
El botón STORE le p ermite
almacenar un p reset que haya
modic ado en la posición
quequiera.
La touche S TORE sauvegarde
un Preset sur l'emplacement
mémoire sélectionné.
Mit der STORE-Taste wird
eine geänderte Voreinstellung
an einem gewünschten
Ortges peichert.
O botão STORE salva uma
programação alterada para
um local de sejado.
Il pulsante STORE salva
un prese t modicato nella
posizione desiderata.
STORE-knop sl aat een
gewijzig de preset op een
gewenste l ocatie op.
STORE-knapp en sparar en
ändrad förinställning till
önskad plats.
Przycisk STORE zapisuje
zmieniony p reset w
wybranym miejscu.
COMPA RE button allows
you to temporarily restore an
altered preset’s settings to
compare yo ur changes to your
original sound.
El botón CO MPARE le permite
restaurar temporalmente
los ajuste s de un preset
modicado para que pueda
comparar s us cambios con el
sonido original.
La touche C OMPARE vous
permet d e revenir de façon
temporaire aux anciens
réglage s d'un Preset’ po ur
comparer votre signal en
fonction des deux réglages.
Mit der CO MPARE-Ta ste
können Sie die geänderten
Einstellungen temporär
wieder aufrufen, um die
Bearbeitungen mit den
Originaleinstellungen
zuvergleichen.
O botão CO MPARE lhe permite
restaurar temporariamente
as congurações de um
programa alterado para
comparar suas alterações com
o seu som or iginal.
Il pulsante COM PARE
consente di ripristinare
temporaneamente le
impostazioni di un preset
modicato per confrontare le
modiche al suono originale.
Met de CO MPARE-knop kun
je de instellingen van een
gewijzigde preset tijd elijk
herstellen om je wijzigingen
te vergelijken met je originele
geluid.
COMPA RE-knappen låter dig
tillfälligt åters tälla en ändrad
förinställnings inställningar
för att jämföra dina ändringar
med ditt ursprungliga ljud.
Przycisk PORÓWNAJ
umożliwia tymczasowe
przywrócenie zmienionych
ustawie ń wstępnych w
celu porów nania zmian z
oryginalnym dźwiękiem.
El botón POWER enciende y
apaga es taunidad.
L'interrupteur POWER pla ce le
processeur hors/sous tension.
POWER knappe n stängar av
och tänder på enheten.
POWER knop sc hakelt het
apparaat aan en uit.
Il pulsante POWER accend e e
spegne l'unità.
AAN / UIT-knop ze t het
apparaat aan en uit.
POWER-knap pen slår på och
stänger av enheten.
Przycisk POWER włą cza i
wyłącza urządzenie.
Steg 2: Kontroller
(SE)
Krok 2: Sterowanica
(PL)
MIDI IN, MIDI OUT, and MIDI
THRU connectors transmi t
and receiv e MIDI commands.
Los conectores MIDI IN, MIDI
OUT y MIDI THRU transmiten
y reciben l as órdenes MIDI.
Les connec teurs MIDI IN,
MIDI OUT et MIDI THRU
transme ttent er reçoiven t les
messag es MIDI.
Über die MIDI IN-, MIDI OUT-
und MIDI THRU-Buchsen
werden MIDI-Befehle
empfangen und gesendet.
Os conec tores MIDI IN,
MIDI OUT, e MIDI THRU
transmi tem e recebem
comandos d a MIDI.
I connet tori MIDI IN,
MIDI OUT, e MIDI THRU
trasmettono e ricevono
comandi MIDI.
MIDI IN-, MIDI OUT- en
MIDI THRU-connector en
verzenden en ontvangen
MIDI-opdrachten.
MIDI IN, MIDI OUT och
MIDI THRU-kontakter sänder
och tar emot MIDI-kommandon.
Złącza MIDI IN, MIDI OUT
i MIDI THRU prze syłają i
odbierają polecenia MIDI.
INPUT and OUTPUT
connections are available
as balance d ¼"TRS a nd
XLRjack s.
Las conexiones de ENTRADA
y SALIDA están disponibles
en clavijas b alanceadas TRS
de 6,3 mm y XLR.
Les connex ions INPUT et
OUTPUT sont disponibles
aux formats symétriques Jack
stéréo 6,35 mm e t XLR.
INPUT- und OUTPUTVerbindungen sind als
symmetrische 6,3 mm
Klinken- und XLRBuchsenverfügbar.
Conexões d e ENTRADA E
SAÍDA estão disponíveis
como tomadas jacks
balancead as TRS e XLR de ¼".
I collegam enti INPUT e
OUTPUT sono disponibili
come jack TR S e XLR da
¼" bilanciati.
INPUT- en OUTPUTaansluitingen zijn bes chikbaar
als gebalan ceerde ¼" TRS- en
XLR-aansluitingen.
INPUT- och OUTPUTanslutningar nns som
balanserade ¼" TRS- och
XLR-uttag.
Połąc zenia WEJŚCIA i
WYJŚ CIA są dostępne j ako
zbalansowane gniazda jack
6,3 mm TRS i XLR .
SETUP butto n enters Setup
Mode, enabling the EDIT
KNOBS to sel ect categor ies
within MIDI, INPUT, OUTPUT,
and CONFIGURATION.
El botón SETUP le da
acceso al mo do Setup o de
conguración, en el que podrá
usar los MA NDOS DE EDICION
para elegir categoría dentro
de MIDI, INPUT, OUTPUT
yCONFIGURATION.
La touche SE TUP ache le
mode de conguration Setup,
ce qui permet de modier
les fonctions aectées aux
boutons EDIT et sélectionner
les catégories dans les
menus MIDI, INPUT, OUTPUT
etCONFIGURATIO N.
Mit der SETUP-Taste können
Sie den Setup-Modus
anwählen, wodurch es den
EDIT-Knöpfen ermöglicht
wird, Veränderungen in den
Kategorien MIDI, INPUT,
OUTPUT und CONFIGURATION
vorzunehmen.
O botão SETUP entra no Modo
Conguração, permitindo que
os BOTÕES GIR ATÓRIOS EDIT
selecionem as categorias entre
a MIDI, ENTRADA, SAÍDA E
CONFIGUR AÇÃO.
Il pulsante SETUP entra in
modalità Setup, consentendo
alle MANOPOLE EDIT di
selezionare le categorie in
MIDI, INPUT, OUTPUT
e CONFIGURATION.
De SETUP-knop ac tiveert de
Setup-modus, waardoor de
EDIT-KNOPPEN categorieën
kunnen selecteren binnen
MIDI, INPUT, OUTPUT
en CONFIGURATION.
SETUP-knapp en går in i
inställningsläge, vilket gör
det möjlig t för EDIT KNAPPAR
att välja kategorier inom
MIDI, INPUT, OUTPUT och
CONFIGURATION.
Przycisk SETUP wchodzi w
tryb konguracji, umożliwiając
POKRĘTŁO M EDYCJI wybór
kategorii w ramach MIDI,
WEJŚCIA, WYJŚCIA i
KONFIGURACJI.
JOG WHEEL scrolls through
preset s and adjusts
parametervalues.
RUEDA JOG le p ermite
desplaz arse por los dist intos
preset s, así como ajustar
valores de parámetros.
La MOLETTE f ait déler les
Presets et règle les valeurs
desparamètres.
Mit dem JOG-WHEEL
(großen Daten-Rad) können
Sie Prese ts auswählen und
Parameterwerte justieren.
O JOG WHEEL rola atravé s dos
program as e ajusta os valor es
do parâmetro.
JOG WHEEL scorre i pr eset e
regola i val ori dei parame tri.
JOG WHEEL scrollt
door pres ets en past
parameterwaarden aan.
JOG WHEEL rullar genom
förinställningar och justerar
parametervärden.
JOG WHEEL prze wija
presety i dostosowuje
wartości parametrów.
Page 11
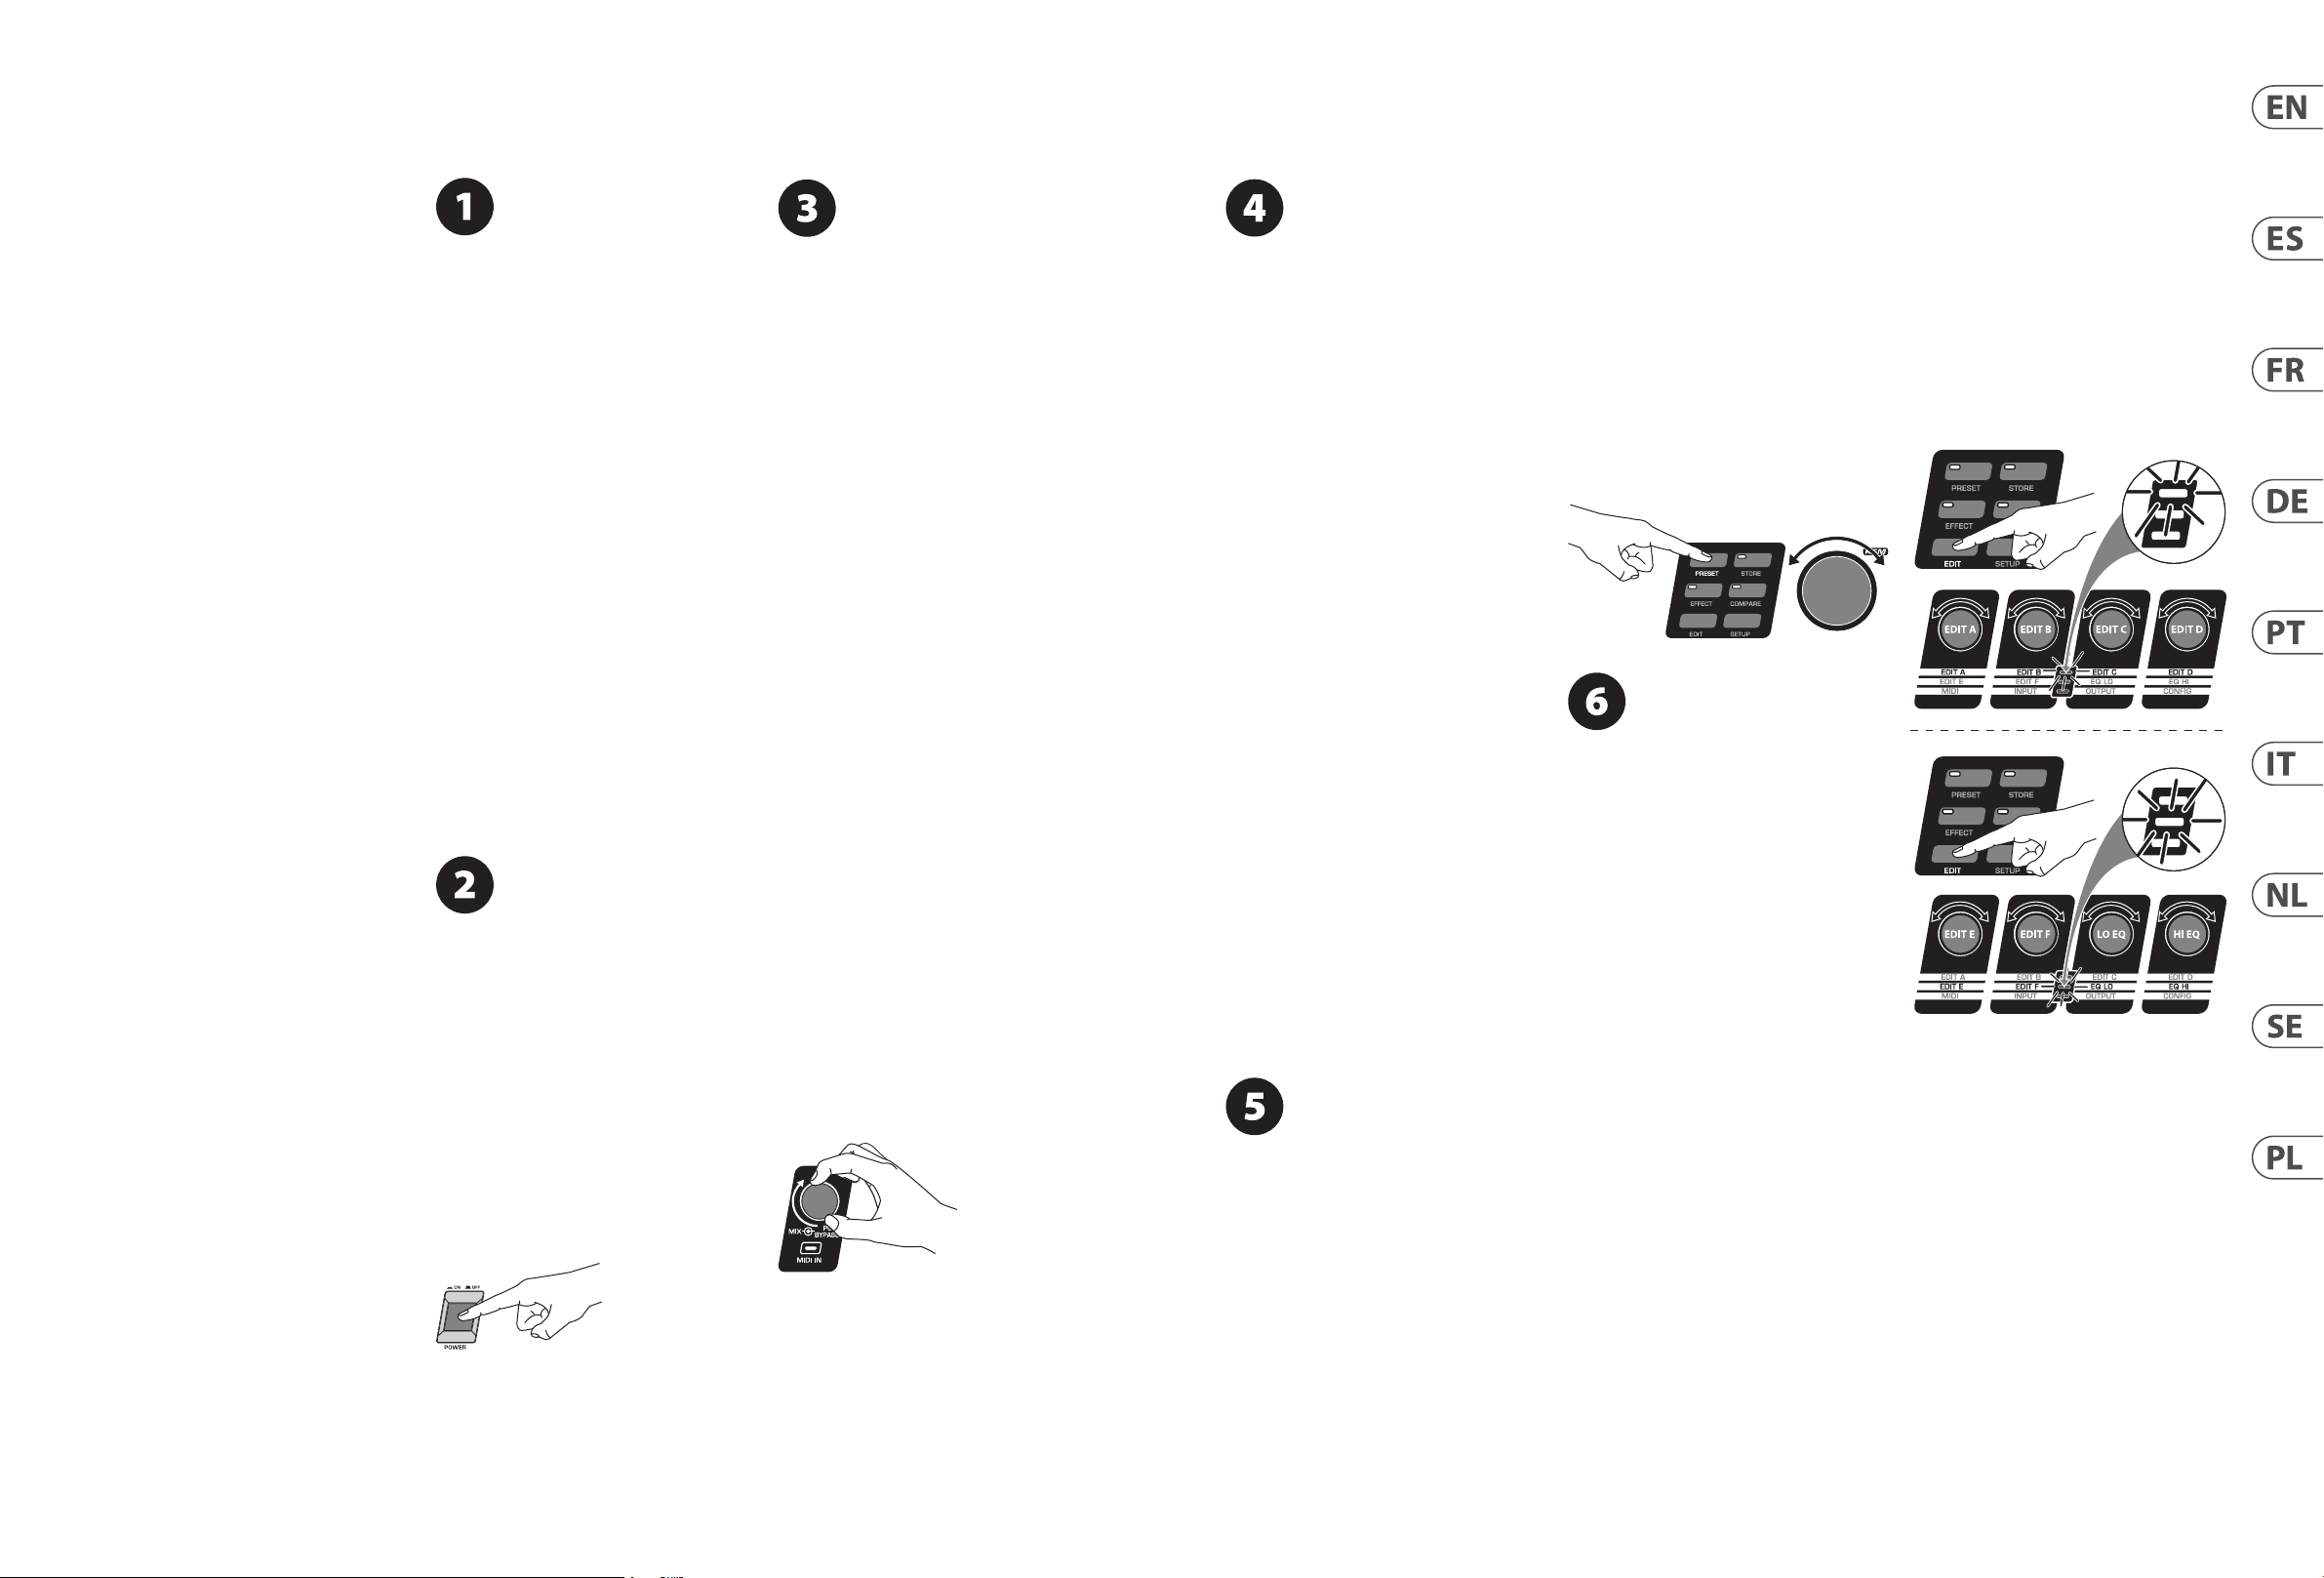
20 VIRTUALIZER 3D FX2000 Quick Start Guide 21
VIRTUALIZER 3D FX2000 Getting started
Step 3: Getting
(EN)
started
Paso 3: Puesta
(ES)
en marcha
Etape 2 :Mise
(FR)
en oeuvre
Schritt 2:
(DE)
Erste Schritte
Passo 2: Primeiros
(PT)
Passos
Passo 2: Iniziare
(IT)
Stap 2: Aan de slag
(NL)
Steg 2: Komma
(SE)
igång
Krok 2: Pierwsze
(PL)
kroki
(EN) Make all audio, MIDI and power
connections to the FX2000. Leave the
power for all devices o!
(ES) Realice todas las conexiones audio, MIDI y
eléctricas en el FX2000. ¡Deje todas las unidades
apagadas por el momento!
(FR) Contrôlez toutes les connexions audio, MIDI et
secteur au FX2000. Laissez tous les équipements
hors tension !
(DE) Schließen Sie alle Audio-, MIDI- und
Stromverbindungen an das FX2000 an. Lassen Sie
den Strom aller Geräte ausgeschaltet!
(PT) Execute todas as conexões de áudio, da MIDI
e energia para o FX2000. Deixe a força de todos os
dispositivos desligados!
(IT) Eettua tutti i collegamenti audio, MIDI e di
alimentazione all'FX2000. Lascia l'alimentazione per
tutti i dispositivi spenta!
(NL) Maak alle audio-, MIDI- en stroomaansluitingen
naar de FX2000. Laat de stroom voor alle
apparaten uitstaan!
(SE) Gör alla ljud-, MIDI- och strömanslutningar
till FX2000. Lämna strömmen för alla enheter från!
(PL) Wykonaj wszystkie połączenia audio, MIDI i
zasilania do FX2000. Pozostaw zasilanie wszystkich
urządzeń w yłączone!
(EN) Power up the FX2000, followed by
otherdevices.
(ES) Encienda primero el FX2000 y
después el resto de dispositivos.
(FR) Placez le FX2000 sous tension, suivi des
autreséquipements.
(DE) Schalten Sie das FX2000 und dann die anderen
Geräteein.
(PT) Turbine o FX2000, depois de outrosdispositivos.
(IT) Accendi l'FX2000, seguito da altri dispositivi.
(NL) Schakel de FX2000 in, gevolgd door andere
apparaten.
(SE) Starta FX2000, följt av andra enheter.
(PL) Włącz FX2000, a następnie inne urządzenia.
(EN) Turn the MIX knob up to adjust how
“wet” or intense the eect is on the
signal. If using the processor with a
mixing board, set the MIX knob fully clockwise.
(ES) Suba el mando MIX (gírelo a la derecha)
paraajustar lo "húmedo" o intenso que será el
efecto en la señal. Si está usando el procesador con
una mesa de mezclas, ajuste este mando MIX en so
topederecho.
(FR) Tournez le bouton MIX en fonction de l'intensité
de l'eet souhaitée. Si vous utilisez le processeur
avec une console de mixage, réglez le bouton MIX
aumaximum.
(DE) Drehen Sie den MIX-Knopf nach rechts, um den
Anteil des Eektsignals einzustellen. Wenn Sie den
Prozessor mit einem Mischpult benutzen, drehen Sie
den MIX-Knopf bis zum Anschlag im Uhrzeigersinn.
(PT) Aumente botão giratório MIX para ajustar
quão “wet” ou intenso o efeito está no sinal. Se
usar o processador com uma mesa de mixagem,
ajuste o botão giratório MIX completamente no
sentidohorário.
(IT) Ruotare la manopola MIX verso l'alto per
regolare quanto "umido" o intenso è l'eetto sul
segnale. Se si utilizza il processore con un mixer,
impostare la manopola MIX completamente in senso
orario.
(NL) Draai de MIX-knop omhoog om in te stellen hoe
"nat" of intens het eect op het signaal is. Als u de
processor met een mengpaneel gebruikt, draait u de
MIX-knop helemaal met de klok mee.
(SE) Vrid upp MIX-ratten för att justera hur ”våt”
eller intensiv eekten är på signalen. Om du
använder processorn med ett blandbräda, ställ in
MIX-ratten helt medurs.
(PL) Obróć pokrętło MIX do góry, aby ustawić
„mokry” lub intensywny efekt na sygnale. Jeśli
używasz procesora z płytą miksującą, ustaw
pokrętło MIX całkowicie w prawo.
(EN) Adjust the Send and Return levels on
your amplier or mixer if necessary.
Makesure the LEVEL METERS on the front
panel do not reach the red CLIP LEDs.
(ES) Ajuste si es necesario los niveles de envío y retorno
de su amplicador o mesa de mezclas. Asegúresede
que en los MEDIDORES DE NIVEL del panel f rontal
nunca se lleguen a iluminar los pilotos rojos CLIP.
(FR) Réglez les niveaux de départ et de retour d'eets
de votre amplicateur ou de votre console de mixage.
Veillez à ce que les Leds CLIP d'écrêtage des AFFICHEURS
DE NIVEAU de la face avant ne s'allument pas.
(DE) Nach Bedar f justieren Sie die Send- und Return-
Pegel Ihres Verstärkers oder Mixers. Stellen Sie
sicher, dass die LEVEL METERS auf der Vorderwand
die roten CLIP-LEDs nicht erreichen.
(PT) Ajuste os níveis de Envio e Retorno em seu
amplicador ou mixer, senecessário. Certique-se
de que os LEVEL METERS no painel dianteiro não
alcancem os LEDs vermelhos doCLIP.
(IT) Se necessario, regola i livelli di mandata e
ritorno sul tuo amplicatore o mixer. Assicurarsi che
i MISURATORI DI LIVELLO sul pannello anteriore non
raggiungano i LED rossi CLIP.
(NL) Pas indien nodig de Send- en Return-niveaus op
uw versterker of mixer aan. Zorg ervoor dat de LEVEL
METERS op het voorpaneel niet bij de rode CLIP LED's
komen.
(SE) Justera skicka och returnera nivåerna på
din förstärkare eller mixer vid behov. Se till att
NIVÅMÄTARE på frontpanelen inte når de röda CLIPlysdioderna.
(PL) W razie potrzeby dostosuj poziomy wysyłania
i powrotu na wzmacniaczu lub mikserze. Upewnij
się, że MIERNIKI POZIOMU na panelu przednim nie
sięgają do czerwonych diod CLIP.
(EN) To select a preset, press the PRESET
button, then turn the JOG WHEEL to scroll
through the available presets.
(ES) Para elegir un preset, pulse el botón PRESET
y gire la RUEDA JOG para ir pasando por los
presetsdisponibles.
(FR) Pour Sélectionner un Preset, appuyez sur la
touche PRESET, puis tournez la MOLETTE pour faire
déler les Presets.
(DE) Um eine Voreinstellung zu wählen, drücken Sie
die PRESET-Taste, dann drehen Sie das JOG-WHEEL
um ein Preset auszuwählen.
(PT) Para selecionar um programa, pressioneo botão
PRESET, depois gire o JOG WHEELpara rolar através
dos programasdisponíveis.
(IT) Per selezionare un preset, premere il pulsante
PRESET, quindi ruotare la JOG WHEEL per scorrere i
preset disponibili.
(NL) Om een preset te selecteren, drukt u op de
PRESET-knop en draait u vervolgens aan het JOG
WHEEL om door de beschikbare presets te bladeren.
(SE) För att välja en förinställning, tryck på PRESET-
knappen och vrid sedan JOGHJULET för att bläddra
bland tillgängliga förinställningar.
(PL) Aby wybrać ustawienie wstępne, naciśnij
przycisk PRESET, a następnie obracaj JOG WHEEL, aby
przewijać dostępne ustawienia wstępne.
(EN) To edit the preset, press the EDIT
button, then rotate the EDIT KNOBS to
adjust parameters A-D. Press the EDIT
button again to access parameters E and F and the
LOand HIEQ.
(ES) Si quiere modicar el preset, pulse el botón EDIT
y gire los MANDOS EDIT para ajustar los parámetros
A-D. Pulse de nuevo el botón EDIT para acceder a los
parámetros E y F y a la ecualización LO y HI EQ.
(FR) Pour éditer le Preset, appuyez sur la touche
EDIT, puistournez les boutons EDIT pour modier les
paramètres A-D. Appuyez à nouveau sur la touche
EDIT pour accéder aux paramètres E et F et aux ltres
d'égalisation LO et HI.
(DE) Um die Voreinstellung zu editieren, drücken Sie
die EDIT-Taste und drehen Sie dann die EDIT-Knöpfe
um die Parameter A–D zu justieren. Drücken Sie die
EDIT-Taste wieder, um die Parameter E und F und
LOund HI EQ zu ändern.
(PT) Para editar um programa, pressione o botão
EDIT, depois gire os BOTÕES GIRATÓRIOS EDIT para
ajustar os parâmetros A-D. Pressione o botão EDIT
novamente para acessar os parâmetros E & F, e o
LO& HI EQ.
(IT) Per modicare il preset, premere il pulsante
EDIT, quindi ruotare le MANOPOLE EDIT per regolare i
parametri A-D. Premere nuovamente il pulsante EDIT
per accedere ai parametri E e F e LO e HI EQ.
(NL) Om de preset te bewerken, drukt u op de
EDIT-knop en draait u aan de EDIT-KNOPPEN om de
parameters A-D aan te passen. Druk nogmaals op de
EDIT-knop om toegang te krijgen tot parameters E
en F en de LO en HI EQ.
(SE) För att redigera förinställningen, tryck på
EDIT-knappen och vrid sedan på EDIT KNAPPAR för
att justera parametrarna A-D. Tryck på EDIT-knappen
igen för att komma till parametrarna E och F och LO
och HI EQ.
(PL) Aby edytować preset, naciśnij przycisk EDYCJA,
a następnie obracaj POKRĘTŁAMI EDYCJI, aby
dostosować parametry A-D. Naciśnij ponownie
przycisk EDIT, aby uzyskać dostęp do parametrów E i
F oraz LO i HI EQ.
Page 12
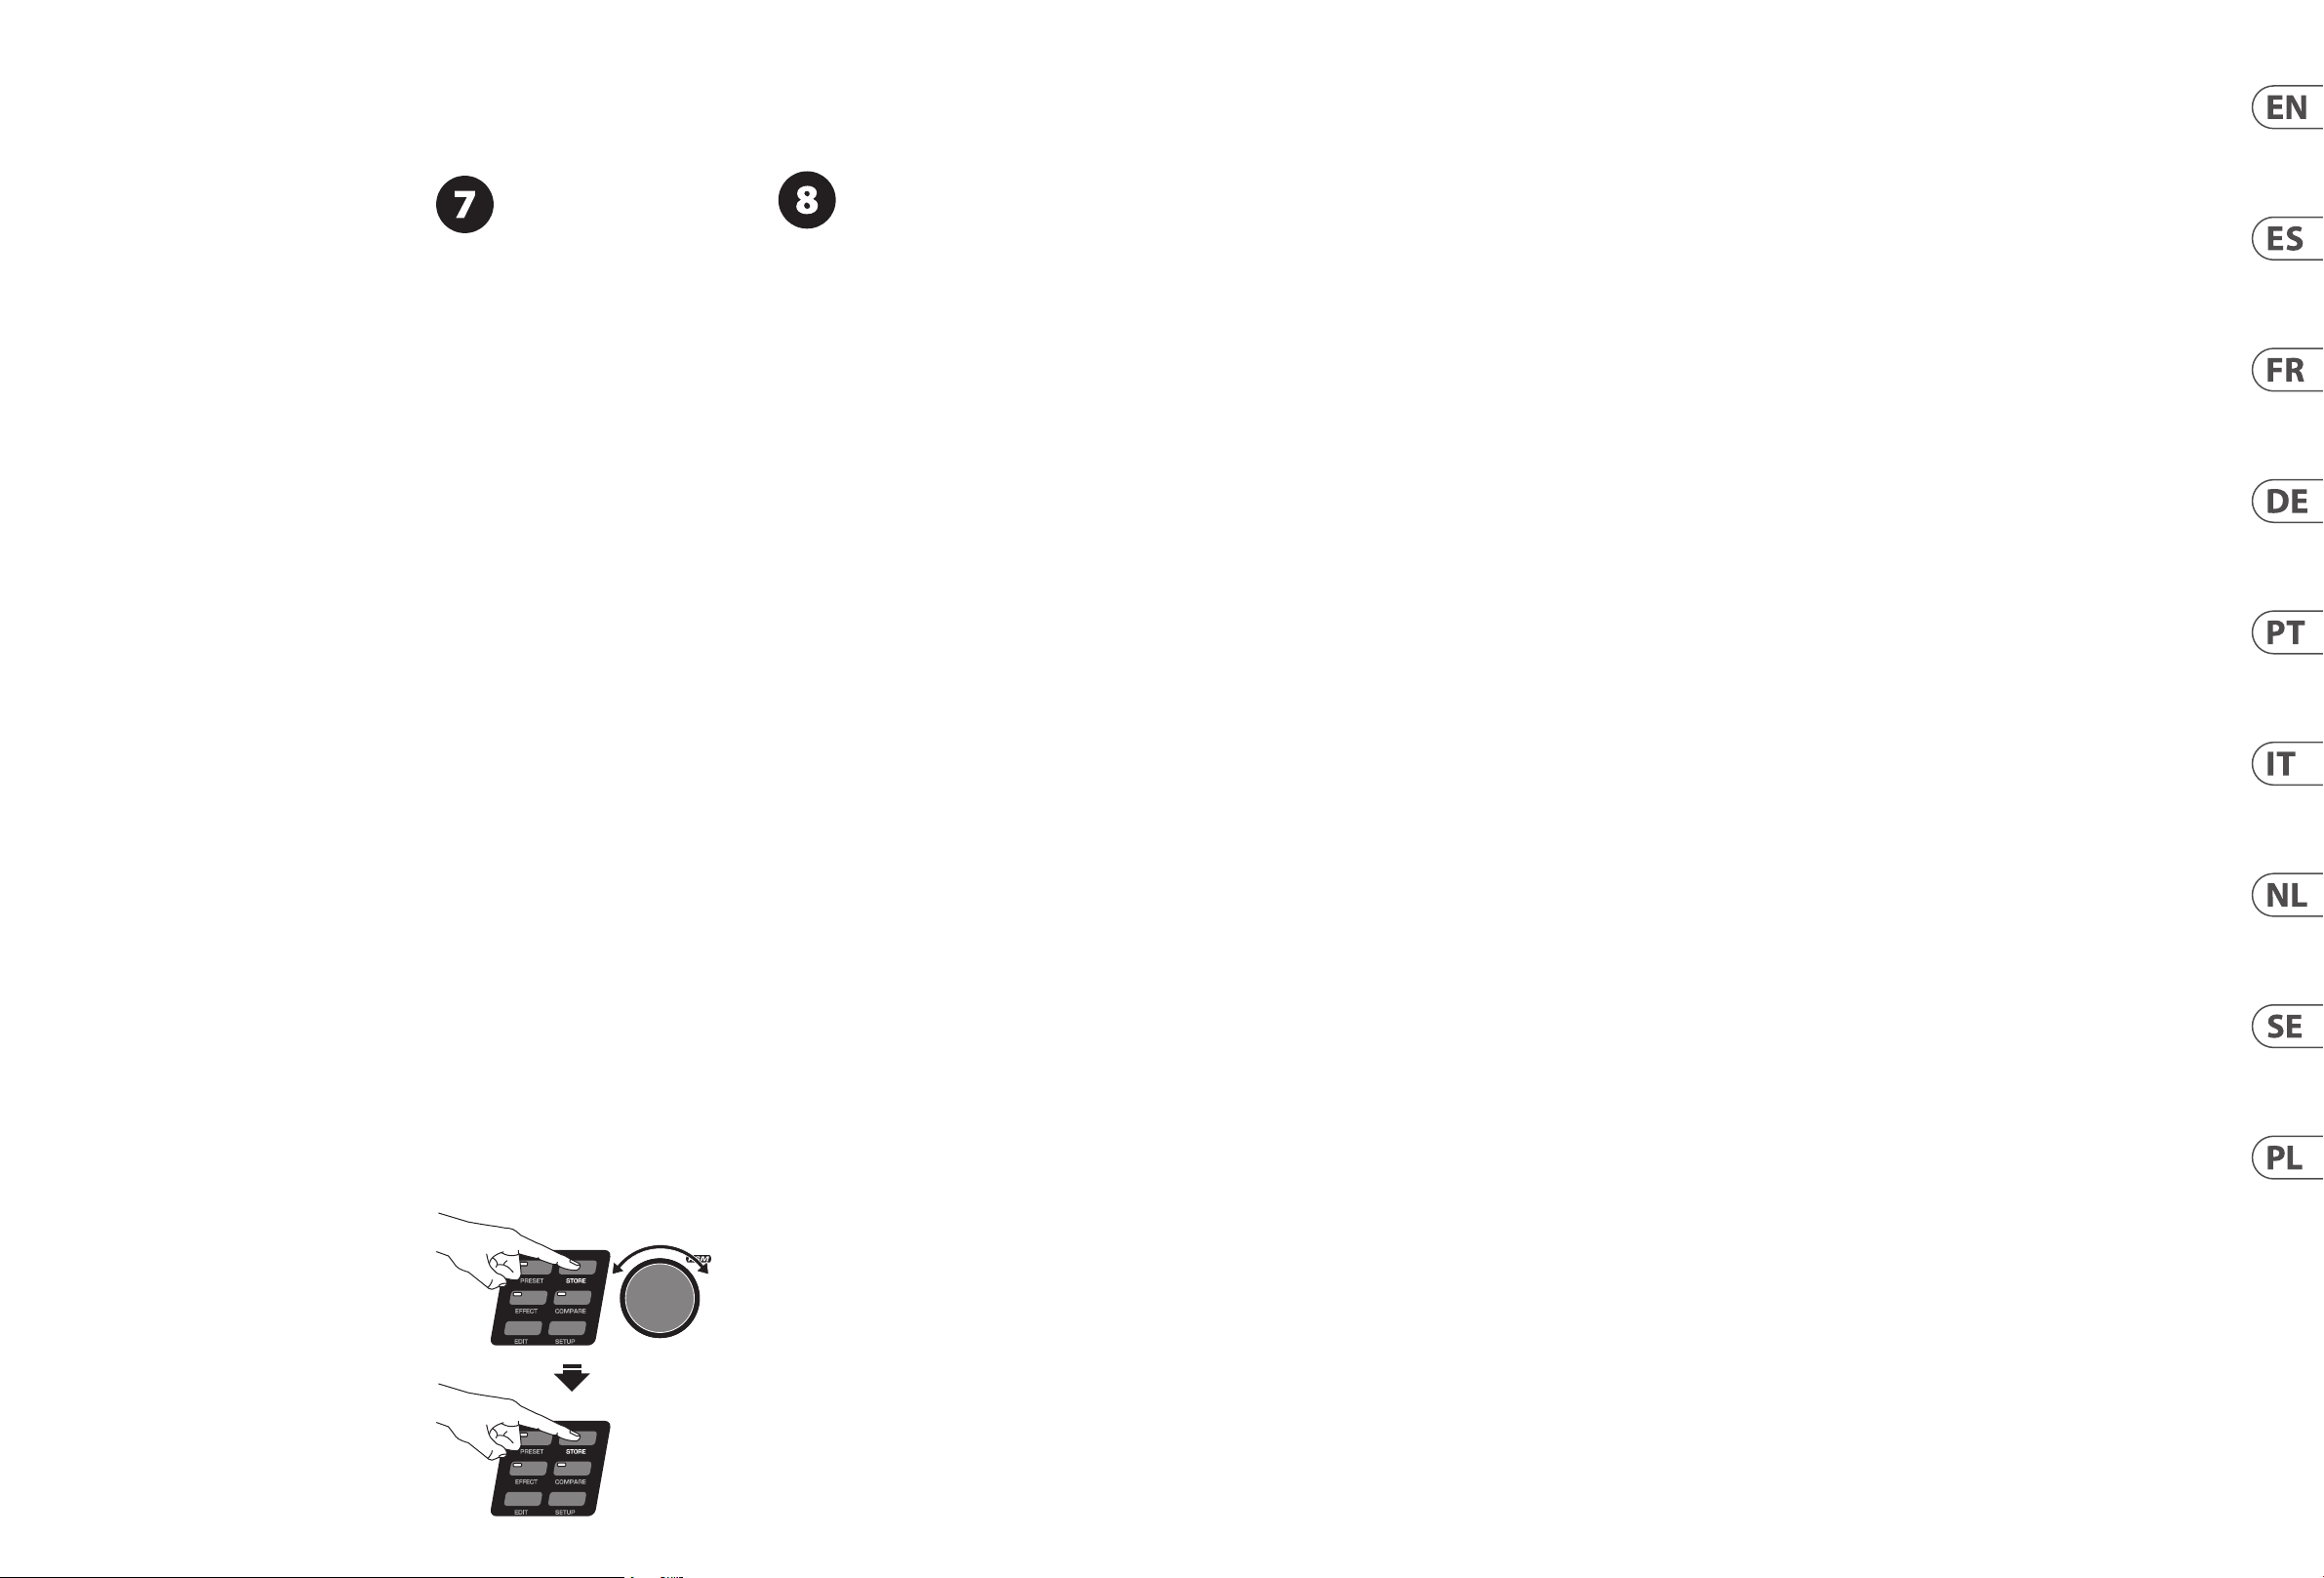
22 VIRTUALIZER 3D FX2000 Quick Start Guide 23
VIRTUALIZER 3D FX2000 Getting started
Step 3: Getting
(EN)
started
Paso 3: Puesta
(ES)
en marcha
Etape 2 :Mise
(FR)
en oeuvre
Schritt 2:
(DE)
Erste Schritte
Passo 2: Primeiros
(PT)
Passos
Passo 2: Iniziare
(IT)
Stap 2: Aan de slag
(NL)
Steg 2: Komma
(SE)
igång
Krok 2: Pierwsze
(PL)
kroki
(EN) To save an altered preset, press the
STORE button. Rotate the JOG WHEEL to
select a user preset location, then press
the STORE button again to conrm.
(ES) Si quiere guardar un preset modicado,
pulseel botón STORE. Gire la RUEDA JOG para
elegir una posición de preset de usuario y vuelva a
pulsar STORE de nuevo para conrmar el proceso
dealmacenamiento.
(FR) Pour sauvegarder un Preset édité, appuyez sur la
touche STORE. Tournez la MOLETTE pour sélectionner
un emplacement mémoire utilisateur, puis appuyez
à nouveau sur la touche STORE pour conrmer
lasauvegarde.
(DE) Um eine geänderte Voreinstellung zu speichern,
drücken Sie die STORE-Taste. DrehenSie das JOGWHEEL um einen vom Benutzer voreingestellten Ort
zu wählen, unddrücken Sie dann wieder die STORETaste, um die Auswahl zubestätigen.
(PT) Para salvar um programa alterado, pressioneo
botão STORE. Gire o JOG WHEEL para selecionar um
local para o programa do usuário, depoispressione
novamente o botão STORE paraconrmar.
(IT) Per salvare un preset modicato, premere
il pulsante STORE. Ruotare la JOG WHEEL per
selezionare una posizione preimpostata dall'utente,
quindi premere nuovamente il pulsante STORE per
confermare.
(NL) Om een gewijzigde preset op te slaan, drukt u
op de STORE-knop. Draai het JOG WHEEL om een
door de gebruiker ingestelde locatie te selecteren en
druk vervolgens nogmaals op de STORE-knop om te
bevestigen.
(EN) Log on to behringer.com to
download the full manual for more
details on the FX2000’s functionality.
(ES) Descárguese el manual de instrucciones
completo del FX2000 a través de nuestra página
web behringer.com si quiere más información acerca
de sus distintas funciones.
(FR) Connectez-vous au site Internet
behringer.com pour télécharger le mode
d'emploidétaillé duFX2000.
(DE) Besuchen Sie unsere Internet-Seite
behringer.com, umdie ganze Bedienungsanleitung
herunterzuladen, dieweitere Einzelheiten über die
Funktionalität des FX2000 enthält.
(PT) Acesse o behringer.com para baixar o manual
completo para mais detalhes sobre as funções
doFX2000.
(IT) Accedi a behringer.com per scaricare il manuale
completo per maggiori dettagli sulle funzionalità di
FX2000.
(NL) Log in op behringer.com om de volledige
handleiding te downloaden voor meer informatie
over de functionaliteit van
de FX2000.
(SE) Logga in på behringer.com för att ladda ner
hela manualen för mer information om FX2000s
funktionalitet.
(PL) Zaloguj się na behringer.com, aby pobrać pełną
instrukcję i uzyskać więcej informacji na temat
funkcji FX2000.
(SE) För att spara en ändrad förinställning, tryck på
STORE-knappen. Vrid JOGHJULET för att välja en
användarförinställd plats och tryck sedan på STOREknappen igen för att bekräfta.
(PL) Aby zapisać zmieniony preset, naciśnij
przycisk STORE. Obróć JOG WHEEL, aby wybrać
zaprogramowaną lokalizację użytkownika, a
następnie naciśnij ponownie przycisk STORE,
aby potwierdzić.
Page 13

24 VIRTUALIZER 3D FX2000 Quick Start Guide 25
VIRTUALIZER 3D FX2000 Preset Chart
Internal Presets (Factory Settings)
No. EFFECT No. EFFECT No. EFFEC T No. EFFECT
I.001 CATHEDRAL OF CO LOGNE I.026 MEDIUM DELAY I.051 PANNING I.076 HE AVY M ETAL
I.002 CONCERT CATHEDRAL I.027 OLD TAPE I.052 COMPRESSOR I.077 FUZZ BOX
I.003 BIG PLATE I.028 BIG TA PE I.053 EXPANDER I.078 RADIO SPEAKER
I.004 DARK PLATE I.029 PING PONG I.054 GATE I.079 BAD SPEAKER
I.005 SMALL CHAMBER I.030 CHAOS I.055 ANALOG COMPR./LIMITER I.080 ROBOTIZER
I.006 DRUM CLOSET I.031 STE REO CHORUS I.056 ULTRAMIZER I.081 AM-RADIO
I.007 BRIGHT ROOM I.032 ANALOG CHORUS I.057 DENOISER I.082 OLD RECORD PL AYER
I.008 AM BIENT ROOM I.033 VINTAGE CHORUS I.058 DE-E SSER I.083 VI NTAGE TAPE
I.009 L ARGE HALL I.03 4 ULTRA CHORUS I.059 WAVE DESIGNER I.084 SAMPL ER
I.010 CONCERT HALL I.035 STEREO FLANGER I.060 E XCITER I.085 VO CODER
I.0 11 LIVE STUDIO I.036 VINTAGE FLANGER I.061 ULTRAFEX I.086 VOICE C ANCELER
I.012 DRY STUDIO I. 037 JET S TREAM FLANGER I.062 ULT RABA SS I.087 RESONATOR
I.013 ARENA I.038 STEREO PHASER I.063 SUBBASS I.088 CHORUS & RE VERB 1
I.014 GAR AGE I.039 RETRO PHASER I.06 4 STEREO IMAGER I.08 9 CHORUS & REVERB 2
I.015 GUI TAR AMP SPRING I.040 WILD PHASER I.065 ULTRA WIDE I.0 90 FLANGER & REV ERB 1
I.016 STUDIO SPRI NG I. 041 VINTAGE PHASER I.066 HEADPHONE EXTEND ER I.091 FLANGER & REV ERB 2
I.0 17 BI G DRUMS I.042 DUAL PHASER I.0 67 SPEAKER EX TENDER I.092 LESLIE & REVERB
I.018 NICE AMBIENCE I.043 ROTARY SPEAKER I.068 AUTO FILTER I.0 93 PITCH & REVERB
I.019 REFLEC TING ROOM I.044 B3 LESLIE I.069 LFO FILTER I.094 DELAY & REVERB
I.020 VOI CE WIDENER I.0 45 STEREO PITCH SHIFTER I.070 PARAMETRIC EQ I.095 TREMOLO & REVERB
I.021 BASS DRUM EXTENDER I.046 M AJOR 7 I.071 GRAPHIC EQ I.096 PHASER & REVERB
I.022 PHIL'S DRUMS I .047 IT 'S JAZZ I.072 VOCAL SPEAK ER I.097 CHOR US & DELAY
I.023 SHORT REVERSE I.048 R EAL CHORUS! I.073 TUBE AMP I.0 98 FLANGER & DELAY
I.024 M EDIUM REVERSE I.049 V IBR ATO I .074 CRUNCH I.099 PITCH & DELAY
I.025 SHORT DELAY I.050 TREMOLO I.075 BLUE S I .100 TREMOLO & DELAY
User Presets (Factory Settings)
No. EFFECT No. EFFECT No. EFFEC T No. EFFECT
U.001 DYNA CHORUS U.026 UNDER THE BRIDGE U.051 SOF T WAH WAH U.0 76 DISTORTION
U.002 METALLIC FLANGER U. 027 BASS EQ U.052 SOFT CH ORUS REVERSE U.077 ROBOT
U.003 GATED AMBIENCE U.0 28 BLUE'S GROOVE U.053 FAT GUITAR U.078 ULTRAMAXXX
U.004 CHORUS RO OM U.0 29 SPACE FLANGER U.054 4 SPACE FX U.079 PH IL'S SNARE
U.005 TAPE ECHO & ROOM U.030 GOLD VERB U.055 FAT TY U.0 80 WIDE
U.006 QUART ROOM U.0 31 80S DIGITAL U.056 SPAC ER U.08 1 AMBIENCE
U.007 CRAZ Y MUSIC BOX U.032 ARPEGGIATOR VCF U.057 SYNTH HEAVEN U.082 P LATE AU
U.008 OLD GRAMOPHONE U.033 VALVE PREAMP U.058 JEAN GLIT TER U.083 EMPTY LIVING ROOM
U.009 CRUNCH BOX U.0 34 NE AR FIELD WIDE! U.059 SOFT TUB E U. 084 EC HO PL AY
U.010 AUTO WAH U.035 PING PO NG PAN U. 060 DRUMZZZ U.085 STA GE
U.0 11 FILTER GROOVE U.036 S UBWOOFER ROOM U.061 PERC COMPRESSION U. 086 BIG CATHEDRAL
U.012 S PACE RA DIO U.0 37 MODULIZ Z U.062 INDUST RIALIZER U.087 ETERNITY
U.013 BUBBLE DRUMS U. 038 RECORDING STUDIO U. 063 STRAN GE GLIDE 140 U.088 NICE HALL
U.014 BRICK WALL U.039 FLANGERUS U.064 SQ UARE AT 140 U.089 REVERSE TREMOLO
U.015 ARPEGGIATOR U.040 CHE AP SPRING U.0 65 SQUARE BREATH 140 U.0 90 REVERSE
U.016 STA CCATO U.0 41 BR ITISH SOLO U.066 PITCH CHORUS U.091 VOCAL CHOR US
U.0 17 THE VOICE U.042 JAZZ C LUB U. 067 CHORUS 2 U.092 SMO OTH VOCAL FX
U.018 PSEUDO STEREO U.043 SMALL SPEAKER U.068 SOFT METALLIZER U.0 93 FATTY VO ICE CHORUS
U.019 ROOM PHA SER U.044 AUDIOTORIUM U.069 PHASER U.094 VOICE EQ
U.020 COMPUTER GAME U.045 DE-NOIZ U.070 FLANGER IN BACKGROUND U.095 PHONE VOICE
U.021 THE FINAL MIX U. 046 MINOR 7 U.0 71 HARD FL ANGER U. 096 VOICE COMPRESSOR
U.022 BASS CHORUS U.047 BALLAD TREMOLO U.072 SOFT FL ANGER U.097 EMPTY AR ENA (VOICE)
U.023 LIVE ROOM U.04 8 TRANCE U.07 3 DEL AY 137 16TH U.098 PANOMOLO
U.024 IN THE CLOSE T U.04 9 DISCO SOUND U.0 74 VINTAGE PICKING U.099 D ISTORTED VOCAL
U.025 SYMPHONIC U.050 DUO REVERBRO U.075 DELAY STEREO 137 U.10 0 MOUNTAIN ECHOES
Page 14
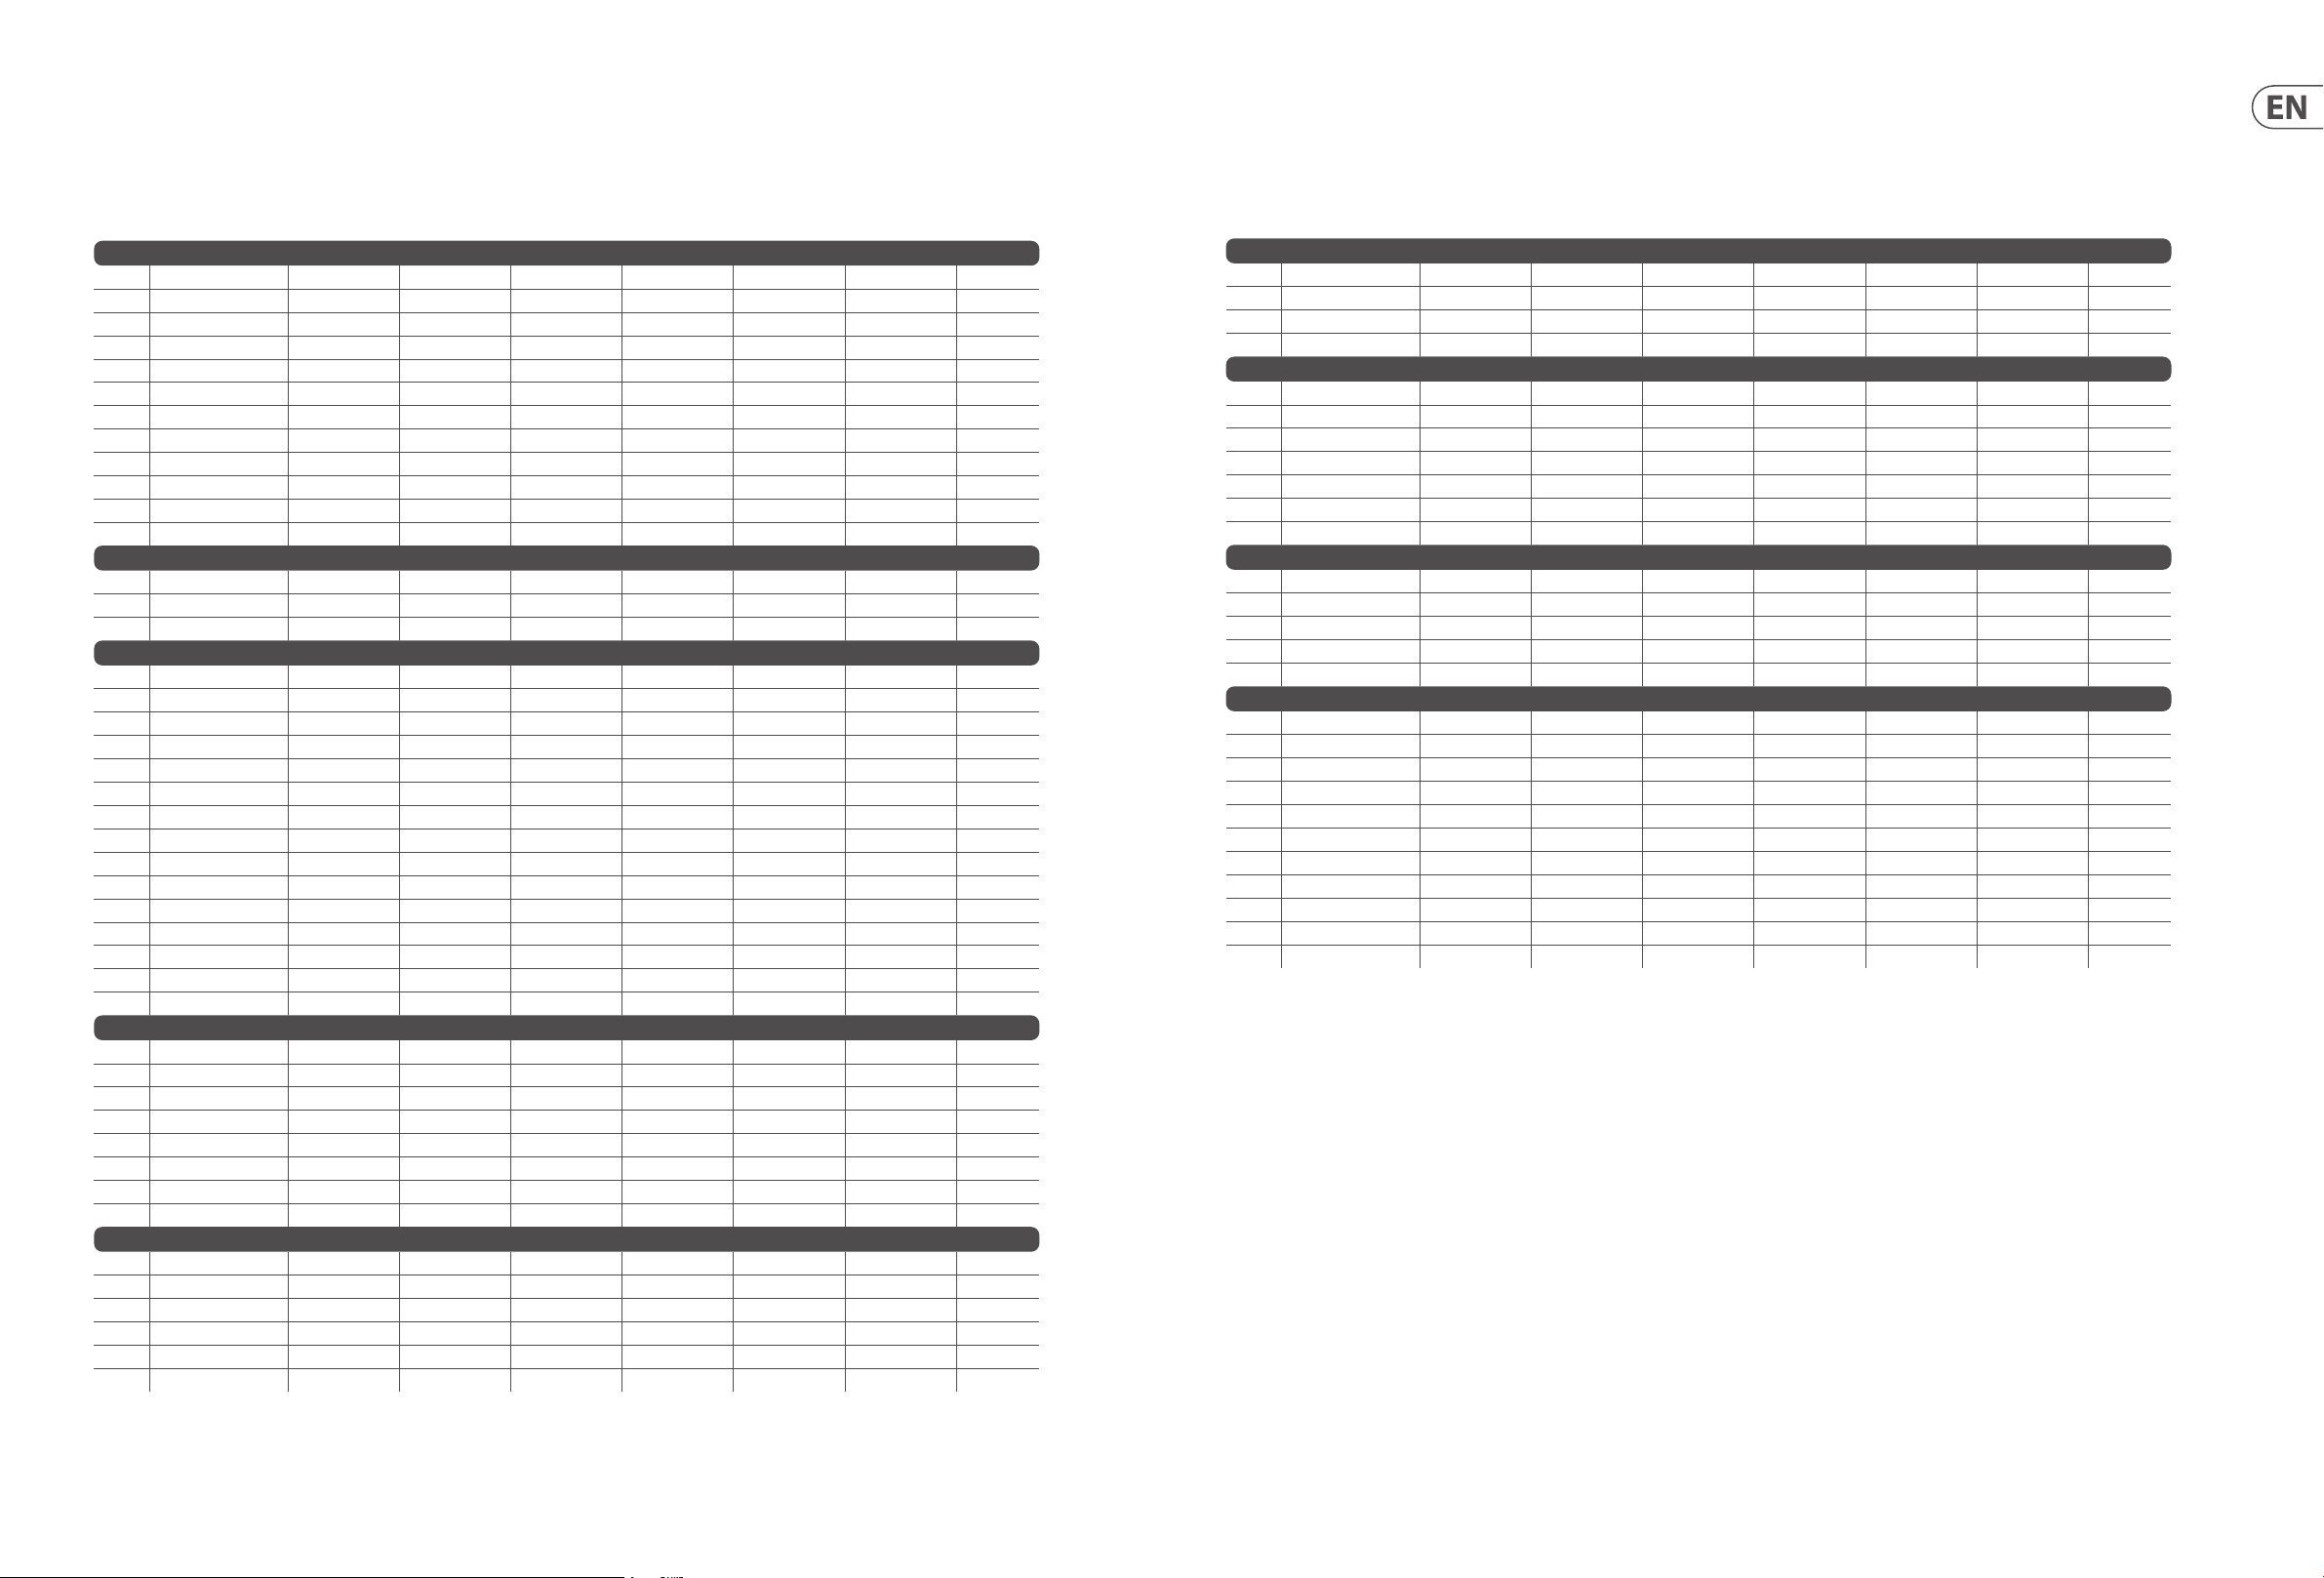
26 VIRTUALIZER 3D FX2000 Quick Start Guide 27
VIRTUALIZER 3D FX2000 Preset Chart
Eect Algorithms and Parameters
Name Edit A Edit B Edit C Edit D Edit E Edit F Mix
Reverbs
1 Cathedral Pre-Delay Decay Hi Dec. Damping ER / Re v. Bal. Low Cut Rev. Mod. Mix
2 Gold Pla te Pre-Delay Dec ay Hi Dec. Damping Low Cut Shv. Damping Diusion Mix
3 Small Hall Pre-Delay Decay Hi Dec. Damping Size Shv. Damping Low Cut Mix
4 Room Pre-Delay Decay Hi Dec. Damping Size Shv. Damping Di usion Mix
5 Concer t Pre-Delay Decay Hi Dec. Damping Bass Mul. Shv. Damping Rev. Mod. Mix
6 Stu dio Pre-Delay Decay Hi Dec. Damping Spread Shv. Damping Diusion Mix
7 Stage Pre-Delay Decay Hi Dec. Damping Size Shv. Damping ER / Rev. Bal. Mix
8 Spring Reverb Pre-Delay Dec ay Hi Dec. Damping Metal Res o. Hi Cu t Diusion Mix
9 Ambience Pre-Delay Decay Hi Dec. Damping Size Low Cut Di usion Mix
10 Early Reections Pre-Delay Size Wall Damping Re ections Stereo Width Diusion Mi x
11 Gate d Reverb Pre-Delay Dec ay Hi Dec. Damping Density Low Cut Diusion Mix
12 Reverse Reverb Pre-Delay Dec ay Hi Dec. Damping Density Low Cut Diusion Mix
Delay
13 Stereo Delay Delay Le ft Coarse Delay Left Fine Delay Right C oarse Delay Right Fine Feedback Left Feedback Right Mix
14 Tap e Ech o Delay Left Delay Right Feedback Damping Feedback HP Feedback LP Mix
15 Ping Pong Delay Left Delay Right Feedback Left Feedback Right Feed. Delay L Feed. Dela y R Mix
Modulation
16 Stereo Chorus Speed Depth Delay Stereo Phas e LFO Wave Damping Mix
17 Analog Chorus Speed Depth Delay Stereo Spread — — Mix
18 Vintage Chorus Speed Depth Delay Damping — — Mi x
19 Ultra Chorus Speed Depth Delay Wideness Stereo Spread Damping Mix
20 Stereo Flanger Speed Depth Feedback Delay Stereo Phase Feedback LP Mix
21 Vintage Flanger Speed Depth Feedback Delay — — Mix
22 Jet Stream Flanger Speed Depth Feedback Delay — — Mix
23 Stere o Phaser Speed Depth Feedback Stereo Phas e Mode — Mix
24 Vintage Phaser Speed Depth Feedback Base — — Mix
25 D ual Phaser Speed Depth Feedback Base — — Mix
26 Leslie Speed Drum Depth Horn Depth Drive Balance — Mix
27 Pitch Shifter Semitones 1 Ce nts 1 Semitones 2 Cen ts 2 Semitones 3 Cen ts 3 Mix
28 Vibrato Speed Depth Wave Auto M od. — — Mix
29 Tre molo Speed Depth Wave Aut o Mod. — — Mix
30 Auto Panning Speed Depth Wav e Auto Mod. — — Mi x
Dynam ics
31 Compressor Ratio Thre shold Makeup-Gain Soft Knee Attack Releas e Mix
32 Exp ander Ratio Threshold Makeup-Gain SoftKnee Attack Releas e Mix
33 Gate Hold Threshold Attack Release Range — Mix
34 Analog Compr./Lim. Ratio Thre shold Makeup-Gain Limiter Thresh. Att ack Release Mix
35 Ultramizer Density R ange Speed Split Frequency Stereo F X Enhancer Freq. B and
36 Denoiser LP-Frequen cy LP-Dep th LP-Speed Gate Threshold Gate Hold Gate Resp. Mix
37 De-Esser Ratio Threshold Makeup-Gain Frequency Attac k Release Band
38 Wave Designer Attack Left Release Left Attack Right Release Right Gain Lef t Gain Right Mix
Psycho Accoustic
39 Exciter Frequency Filter-Q Harmonics Timbre Harmon. Kick — Mix
40 Enhancer High Freq High Gain Bass Width Bass Gain Mid Q Mid Gain Gain
41 Ultra Bass Subbass Freq. Subbass Level Harmon. Freq. Harmon. Level Harm. Densit y Bass Gain Mix
42 Stereo Imager Spread MS- Balance Spread Mode Gain Stere o Bal. Mono Balance Mix
43 Ultra Wide Center Spread X-Over Frequ. Gain — — Mix
44 Binauralizer Center Space Mode Gain Spk. Distance Spk.Compens. Mix
Name Edit A Edit B Edit C Edit D Edit E Edit F Mix
Filter/EQ
45 Auto Filter Bas e Freq. Depth Type Resonance Attac k Release Mix
46 LFO Filter Base Freq. Depth Ty pe Resonance Speed Wave Mix
47 Parametric EQ Gain 1 Freq. 1 Q 1 Gain 2 Freq. 2 Q 2 Gain
48 Graphic EQ 200 Hz 400 Hz 800 Hz 1.6 k Hz 3.2 kHz 6.4 kHz Gain
Distortion/Amp Simulation
49 Vocal Distortion Distortion Delay Gain Delay Flanger Level Ty pe Flanger Speed Mix
50 Tube Distortion Drive Pre HP Pre LP Damp Tube Sele ct Mid EQ Mix
51 G uitar Amp In Gai n Drive Presence Gain Cabinet Type Mid EQ Mix
52 Tri F uzz In Gain Low- Fuzz Mid-Fuzz Hi-Fuzz Drive Hi Damp Mix
53 Speaker Simulation Ty pe EQ-Gain EQ-Freq. EQ-Q — — Mix
54 Ring Modulator Speed Depth Carr ier Freq. Ton e Mode Slewing Mix
55 Lo Fi Bit Resolution Ton e Buzz Level Noise Gain Noise HP Noise LP Mix
Special FX
56 Vinylizer Speed Clicks Level Scratch Level Noise Level Ton e Noise Freq. Mix
57 Sampler Re c/Stop Play/Stop Speed Mode Rec Ga in O verdub Gain Mix
58 Vocoder Sensitivity Mode At tack Release Frequency Resonance Mix
59 Voice Canceler Bass Freq. MS-Balance Tr eble Pan Gain — — Mix
60 Resonator Speed Depth Carrier Freq. Feedback Mode Slewing Mix
Combination
61 Cho rus & Reverb Speed Depth Delay Reverb Mix Decay Hi Damp Mi x
62 Flanger & Reverb Speed Depth Feedback Reverb Mix Dec ay Hi Damp Mix
63 Leslie & Reverb Speed Depth Doppler Reverb Mix Dec ay Hi Damp Mix
64 Pitch Shi fter & Reverb Semitones Cents High Cu t Reverb Mix Decay Hi Damp Mi x
65 Delay & Reverb Delay Feedback Type Reverb Mix D ecay Hi Damp Mix
66 Tremolo &Reverb Speed Depth Auto Mod. Reverb Mix Decay Hi Damp Mix
67 Pha ser & Reverb Speed Depth Feedback Reverb Mix D ecay Hi Damp Mix
68 Chorus & Delay Speed Depth Mo d. Delay Delay Mix Delay Time De lay Feedb. Mix
69 Flang er & Delay Speed Depth Feedback Delay Mix D elay Time Delay Feedb. Mix
70 Pi tch Shifter & Delay Semitones Cents Hi gh Cut Delay Mix De lay Time Delay Feedb. Mix
71 Tremolo & De lay Speed Depth Auto Mod. Delay Mix D elay Time Delay Feedb. Mix
Page 15
28 VIRTUALIZER 3D FX2000 Quick Start Guide 29
Specications
Analog Inputs
Connectors XLR and ¼" TRS
Typ e RF ltered, servo-balanced input stage
Impedance 80 k balanced
Nominal Operating Level -10 dBV or +4 dBu (selectable)
Max. Input Level +15 dBu at +4 dBu nominal level, +1 dBV at -10 dBV nominal level
Analog Outputs
Connectors XLR and ¼" TRS
Typ e Electronically ser vo-balanced output stage
Impedance 80 balanced
Max. Output Level +15 dBu at +4 dBu nominal level, +1 dBV at -10 dBV nominal level
System Specications
Bandwidth 20 Hz to 20 kHz, +/- 3 dB
SNR 91 dB unweighted 20 Hz to 20 kHz
THD 0.018% ty p. @ +4 dBu, 1 kHz, 0 dBu input, gain 1
Crosstalk < -76 dB
MIDI Interface
Typ e 5-pin DIN-socket IN / OUT / THRU
Digital Processing
Converters 24-bit Sigma-Delta, 64/128-times oversampling
Sampling Rate 46. 875 kHz
Display
Typ e 4-digit 14 segment alpha-numeric LED-Display
Power Supply
Voltage
USA/Canada 120 V~, 60 Hz
Europe/U.K./Australia 230 V~, 50 Hz
Japan 100 V~, 50 - 60 Hz
General export model 120/230 V~, 50 - 60 Hz
Fuse 100 - 120 V~: T 200 mA H 250 V 20 0 - 240 V~: T 100 mA L 250 V
Power Consumption 15 Watts max.
Mains Connection Standard IEC receptacle
Physical
Dimensions (H x W x D) 1.75 x 19 x 8.5" / 44.5 x 483 x 217 mm
Net Weight approx. 4.2 lbs / 1.9 kg
Shipping Weight approx. 7 lbs / 3.2 kg
Other important information
Important information
1. Register online. Please register your new
Music Tribe equipment right after you purchase it by
visiting musictribe.com. Registering your purchase using
our simple online form helps us to process your repair
claims more quickly and eciently. Also, read the terms
and conditions of our warranty, if applicable.
2. Malfunction. Should your Music Tribe
Authorized Reseller not be located in your vicinity,
you may contact the Music Tribe Authorized Fulller for
your country listed under “Support” at musictribe.com.
Should your country not be listed, please check if your
problem can be dealt with by our “Online Support” which
may also be found under “Support” at musictribe.com.
Alternatively, please submit an online warranty claim at
musictribe.com BEFORE returning the product.
3. Power Connections. Before plugging the
unit into a power socket, please make sure you are using
the correct mains voltage for your particular model.
Faulty fuses must be replaced with fuses of the same type
and rating without exception.
Aspectos importantes
1. Registro online. Le recomendamos que
registre su nuevo aparato Music Tribe justo después de
su compra accediendo a la página web musictribe.com.
El registro de su compra a través de nuestro sencillo
sistema online nos ayudará a resolver cualquier
incidencia que se presente a la mayor brevedad posible.
Además, aproveche para leer los términos y condiciones de
nuestra garantía, si es aplicable en su caso.
2. Averías. En el caso de que no exista un distribuidor
Music
Tribe en las inmediaciones, puede ponerse en
contacto con el distribuidor
que encontrará dentro del apartado “Support” de nuestra
página web musictribe.com. En caso de que su país no
aparezca en ese listado, acceda a la sección “Online Support”
(que también encontrará dentro del apartado “Support”
de nuestra página web) y compruebe si su problema aparece
descrito y solucionado allí. De forma alternativa, envíenos a
través de la página web una solicitud online de soporte en
periodo de garantía ANTES de devolvernos el aparato.
3. Conexiones de corriente. Antes de enchufar
este aparato a una salida de corriente, asegúrese de que dicha
salida sea del voltaje adecuado para su modelo concreto.
En caso de que deba sustituir un fusible quemado, deberá
hacerlo por otro de idénticas especicaciones, sin excepción.
Music
Tribe de su país,
1. Enregistrez-vous en ligne. Prenez le
temps d’enregistrer votre produit Music Tribe aussi vite
que possible sur le site Internet musictribe.com. Le fait
d’enregistrer le produit en ligne nous permet de gérer
les réparations plus rapidement et plus ecacement.
Prenez également le temps de lire les termes et conditions
de notre garantie.
2. Dysfonctionnement. Si vous n’avez pas
de revendeur Music Tribe près de chez vous, contactez le
distributeur Music Tribe de votre pays : consultez la liste
des distributeurs de votre pays dans la page “Support”
de notre site Internet musictribe.com. Si votre pays n’est
pas dans la liste, essayez de résoudre votre problème avec
notre “aide en ligne” que vous trouverez également dans
la section “Support” du site musictribe.com. Vous pouvez
également nous faire parvenir directement votre demande
de réparation sous garantie par Internet sur le site
musictribe.com AVANT de nous renvoyer le produit.
3. Raccordement au secteur. Avant de relier
cet équipement au secteur, assurez-vous que la tension
secteur de votre région soit compatible avec l’appareil.
Veillez à remplacer les fusibles uniquement par des
modèles exactement de même taille et de même valeur
électrique — sans aucune exception.
1. Online registrieren. Bitte registrieren Sie
Ihr neues Music Tribe-Gerät direkt nach dem Kauf auf der
website musictribe.com. Wenn Sie Ihren Kauf mit unserem
einfachen online Formular registrieren, können wir Ihre
Reparaturansprüche schneller und ezienter bearbeiten.
Lesen Sie bitte auch unsere Garantiebedingungen,
falls zutreend.
2. Funktionsfehler. Sollte sich kein Music Tribe
Händler in Ihrer Nähe benden, können Sie den
Music Tribe Vertrieb Ihres Landes kontaktieren, der auf
musictribe.com unter „Support“ aufgeführt ist. Sollte Ihr
Land nicht aufgelistet sein, prüfen Sie bitte, ob Ihr Problem
von unserem „Online Support“ gelöst werden kann, den
Sie ebenfalls auf musictribe.com unter „Support“ nden.
Alternativ reichen Sie bitte Ihren Garantieanspruch
online auf musictribe.com ein, BEVOR Sie das
Produkt zurücksenden.
3. Stromanschluss. Bevor Sie das Gerät an
eine Netzsteckdose anschließen, prüfen Sie bitte, ob Sie
die korrekte Netzspannung für Ihr spezielles Modell
verwenden. Fehlerhafte Sicherungen müssen ausnahmslos
durch Sicherungen des gleichen Typs und Nennwerts
ersetzt werden.
Informations importantes
Weitere wichtige
Informationen
Outras Informações
Importantes
1. Registre-se online. Por favor, registre seu
novo equipamento Music Tribe logo após a compra
visitando o site musictribe.com Registrar sua compra
usando nosso simples formulário online nos ajuda a
processar seus pedidos de reparos com maior rapidez e
eciência. Além disso, leia nossos termos e condições de
garantia, caso seja necessário.
2. Funcionamento Defeituoso.
Caso seu fornecedor Music Tribe não esteja localizado
nas proximidades, você pode contatar um distribuidor
Music Tribe para o seu país listado abaixo de “Suporte”
em musictribe.com. Se seu país não estiver na lista,
favor checar se seu problema pode ser resolvido com o
nosso “Suporte Online” que também pode ser achado
abaixo de “Suporte”em musictribe.com. Alternativamente,
favor enviar uma solicitação de garantia online em
musictribe.com ANTES da devolução do produto.
3. Ligações. Antes de ligar a unidade à tomada,
assegure-se de que está a utilizar a voltagem correcta para
o modelo em questão. Os fusíveis com defeito terão de
ser substituídos, sem qualquer excepção, por fusíveis do
mesmo tipo e corrente nominal.
Informazioni importanti
1. Registratevi online. Vi invitiamo a registrare
il nuovo apparecchio Music Tribe subito dopo averlo
acquistato visitando musictribe.com. La registrazione
dell'acquisto tramite il nostro semplice modulo online ci
consente di elaborare le richieste di riparazione in modo
più rapido ed eciente. Leggete anche i termini e le
condizioni della nostra garanzia, qualora applicabile.
2. Malfunzionamento. Nel caso in cui il
rivenditore autorizzato Music Tribe non si trovi nelle vostre
vicinanze, potete contattare il Music Tribe Authorized
Fulller per il vostro paese, elencato in “Support”
@ musictribe.com. Se la vostra nazione non è elencata,
controllate se il problema può essere risolto tramite il
nostro “Online Support”che può anche essere trovato sotto
“Support” @ musictribe.com. In alternativa, inviate una
richiesta di garanzia online su musictribe.com PRIMA di
restituire il prodotto.
3. Collegamento all’alimentazione.
Prima di collegare l'unità a una presa di corrente,
assicuratevi di utilizzare la tensione di rete corretta
per il modello specico. I fusibili guasti devono essere
sostituiti, senza eccezioni, con fusibili dello stesso tipo e
valore nominale.
Page 16
30 VIRTUALIZER 3D FX2000 Quick Start Guide 31
Other important information
Belangrijke informatie
1. Registreer online. Registreer uw nieuwe
Music Tribe-apparatuur direct nadat u deze hebt gekocht
door naar musictribe.com te gaan. Door uw aankoop
te registreren via ons eenvoudige online formulier,
kunnen wij uw reparatieclaims sneller en eciënter
verwerken. Lees ook de voorwaarden van onze garantie,
indien van toepassing.
2. Storing. Mocht uw door Music Tribe
geautoriseerde wederverkoper niet bij u in de buurt zijn
gevestigd, dan kunt u contact opnemen met de door Music
Tribe Authorized Fulller voor uw land vermeld onder
“Support” op musictribe.com. Als uw land niet in de lijst
staat, controleer dan of uw probleem kan worden opgelost
door onze "Online Support", die u ook kunt vinden onder
"Support" op musictribe.com. U kunt ook een online
garantieclaim indienen op musictribe.com VOORDAT u het
product retourneert.
3. Stroomaansluitingen. Voordat u het
apparaat op een stopcontact aansluit, moet u ervoor
zorgen dat u de juiste netspanning voor uw specieke
model gebruikt. Defecte zekeringen moeten zonder
uitzondering worden vervangen door zekeringen van
hetzelfde type en dezelfde waarde.
Viktig information
1. Registrera online. Registrera din nya Music
Tribe-utrustning direkt efter att du köpt den genom
att besöka musictribe.com. Att registrera ditt köp med
vårt enkla onlineformulär hjälper oss att behandla dina
reparationsanspråk snabbare och mer eektivt. Läs också
villkoren i vår garanti, om tillämpligt.
2. Fel. Om din Music Tribe-auktoriserade återförsäljare
inte nns i din närhet kan du kontakta Music Tribe
Authorized Fulller för ditt land listat under “Support” på
musictribe.com. Om ditt land inte är listat, kontrollera om
ditt problem kan hanteras av vår “Onlinesupport” som
också nns under “Support” på musictribe.com. Alternativt
kan du skicka in ett online-garantianspråk på musictribe.
com INNAN du returnerar produkten.
3. Strömanslutningar. Innan du ansluter
enheten till ett eluttag, se till att du använder rätt
nätspänning för just din modell. Felaktiga säkringar
måste bytas ut mot säkringar av samma typ och
märkning utan undantag.
1. Zarejestrować online. Zarejestruj swój
nowy sprzęt Music Tribe zaraz po zakupie na stronie
musictribe.com. Zarejestrowanie zakupu za pomocą
naszego prostego formularza online pomaga nam szybciej
i efektywniej rozpatrywać roszczenia dotyczące naprawy.
Przeczytaj również warunki naszej gwarancji, jeśli dotyczy.
2. Awaria. Jeśli Twój autoryzowany sprzedawca
Music Tribe nie znajduje się w pobliżu, możesz
skontaktować się z autoryzowanym dostawcą Music Tribe
dla swojego kraju, wymienionym w sekcji „Wsparcie” na
stronie musictribe.com. Jeśli Twojego kraju nie ma na
liście, sprawdź, czy Twój problem może zostać rozwiązany
przez nasze „Wsparcie online”, które można również
znaleźć w sekcji „Wsparcie” na stronie musictribe.com.
Alternatywnie, prześlij zgłoszenie gwarancyjne online na
musictribe.com PRZED zwrotem produktu.
3. Połączenia zasilania. Przed podłączeniem
urządzenia do gniazdka sieciowego upewnij się, że
używasz odpowiedniego napięcia sieciowego dla danego
modelu. Wadliwe bezpieczniki należy bez wyjątku
wymienić na bezpieczniki tego samego typu i wartości.
Ważna informacja
FEDERAL COMMUNICATIONS
COMMISSION COMPLIANCE
INFORMATION
VIRTUALIZER 3D FX2000
Responsible Party Name: Music Tribe Commercial NV Inc.
Address: 5270 Procyon Street,
Las Vegas NV 89118,
United States
Phone Number: +1 702 800 8290
VIRTUALIZER 3D FX2000
This equipment has been tested and found to comply with the limits for a Class B
digital device, pur suant to part 15 of the FCC Rules. These limits are designed
to provide reasonable protection against harmful interference in a residential
installation. This equipment generates, uses and can radiate radio frequency
energy and, if not installed and used in accordance with the instruc tions, may cause
harmful interference to radio communications. However, there is no guarantee that
interference will not occur in a particular installation. If this equipment does cause
harmful interference to radio or television reception, which can be determined
by turning the equipment o and on, the user is encouraged to try to correct the
interference by one or more of the following measures:
• • Reorient or relocate the receiving antenna.
• • Increase the separation between the equipment and receiver.
• • Connect the equipment into an outlet on a circuit dierent from that to which the
receiver is connected.
• • Consult the dealer or an experienced radio/TV technician for help.
This device complies with Part 15 of the FCC rules. Operation is subject to the
following two conditions:
(1) this device may not cause harmful interference, and
(2) this device must accept any inter ference received, including inter ference that may
cause undesired operation.
Important information:
Changes or modications to the equipment not expressly approved by Music Tribe
can void the user’s authority to use the equipment.
Hereby, Music Tribe declares that this product is in compliance with Directive
2014/35/EU,Directive 2014/30/EU, Directive 2011/65/EU and Amendment 2015/863/
EU, Directive 2012/19/EU, Regulation 519/2012 REACH SVHC and Directive
19 07/2 00 6/E C.
Full text of EU DoC is available at https://community.musictribe.com/
EU Representative: Music Tribe Brands DK A/S
Address: Ib Spang Olsens Gade 17, DK - 8200 Aarhus N, Denmark
Page 17

We Hear You
 Loading...