

Page 1
OPERATION & MAINTENANCE INSTRUCTIONS
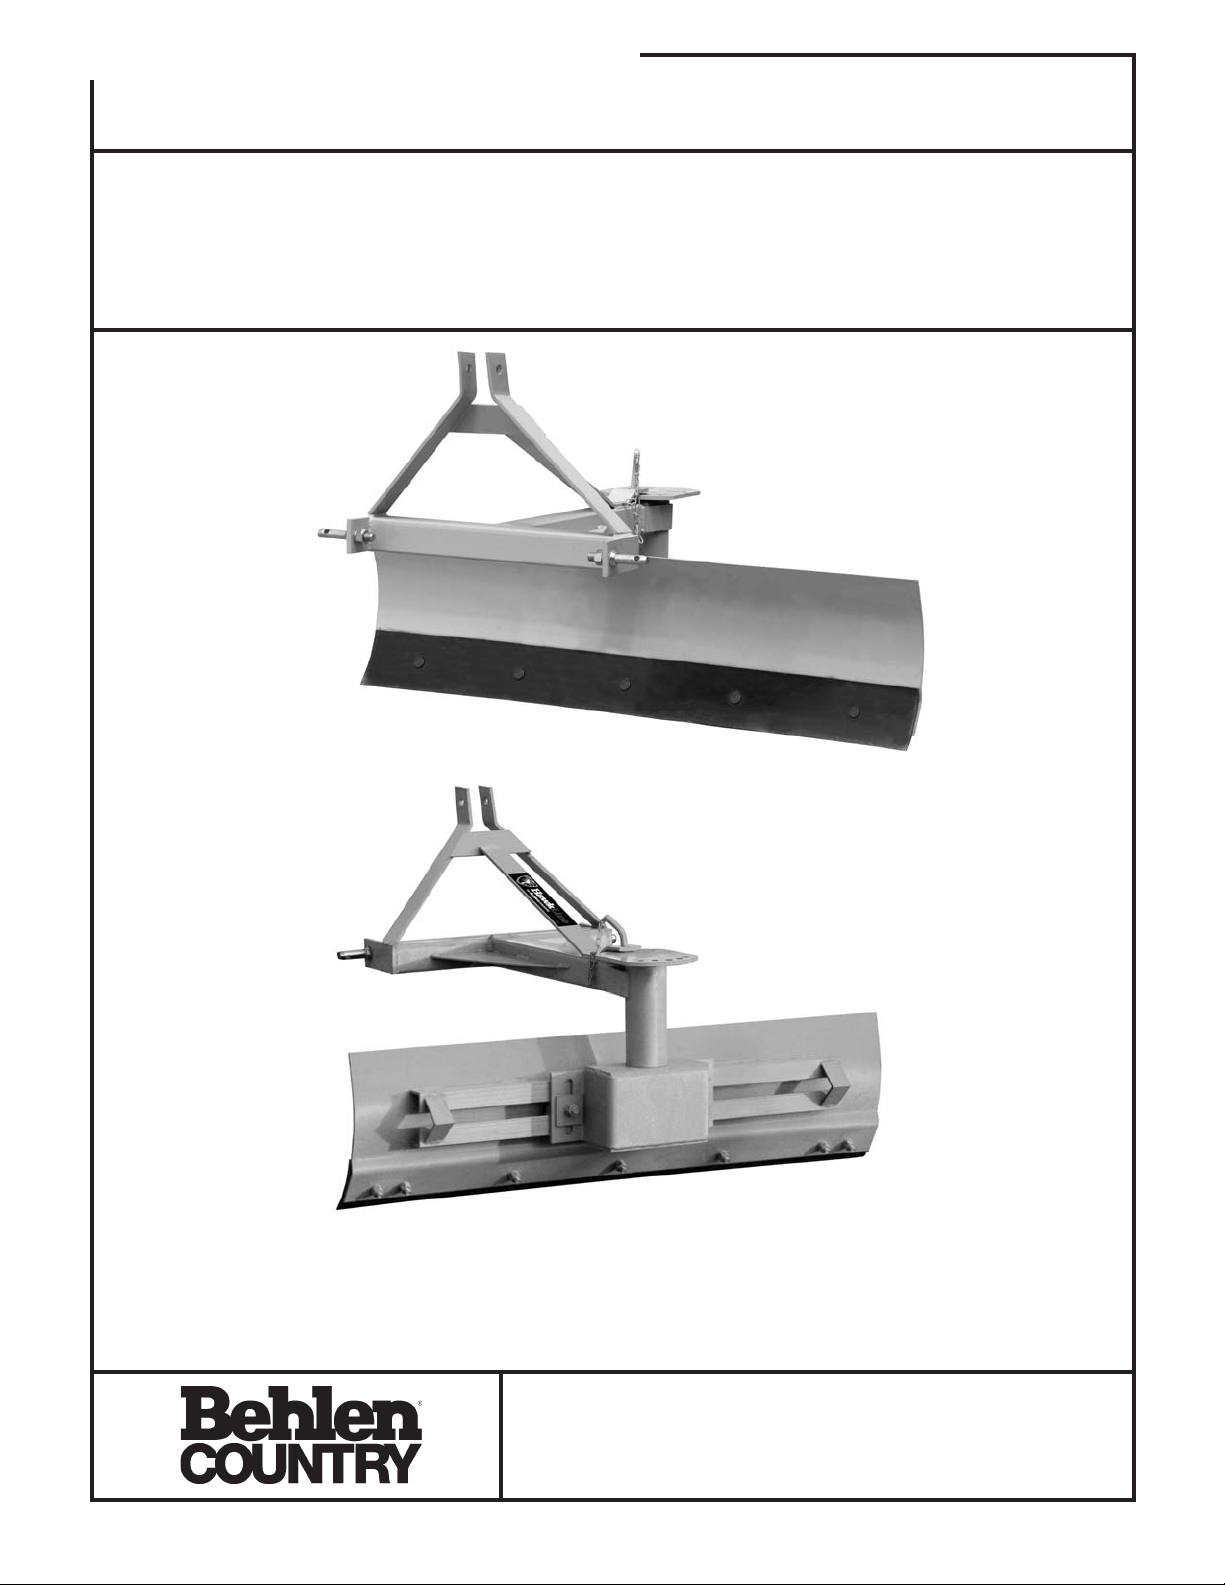
Hardware Kit
Grader Blades
THANK YOU FOR PURCHASING THIS PRODUCT
Congratulations on your purchase.
equipment to landowners for more than 70 years. Our 3-Point Equipment will provide many years
of service when maintained by the operator and used in accordance with the capabilities of the
product. For questions about this product, or for parts inquiries, please contact our Customer
Behlen Country has been in the business of providing quality
Service Center listed below
.
80900210
Fixed
Adjustable
STATEMENT OF POLICY
It is the policy of Behlen Country to improve its products where it is possible and practical to do so.
Behlen Country reserves the right to make changes or improvements in design and construction at
any time, without incurring the obligation to make these changes on previously manufactured units.
CUSTOMER SERVICE CENTER
PO Box 569
Columbus, NE
68602-0569
F-20828 TECHNICAL INFORMATION 70157 1-10-11
Ph: 1-800-447-2751
Fax: (402) 563-7447
www.behlencountry.com
Page 2
OPERATION & MAINTENANCE INSTRUCTIONS
CAUTION
For safe operation, read rules and
instructions carefully
The following safety precautions should be
thoroughly understood before attempting to
begin the assembly of this machine.
1. Select an area for assembly that is clean and
free of debris which might cause persons
working on the
2. Do NOT lift heavy parts or assemblies. Use a
crane, jack, tackle, fork trucks or other
mechanical devices.
3. Preview the assembly instructions in your
operator’s manual before proceeding further.
4. If the assembly instructions call for parts or
assemblies to be blocked up, use only blocking
material that is in good condition and is capable
of handling the weight of the assembly to be
blocked. Also insure that the blocking material is
on a clean, dry surface.
5. NEVER
under blocked up assemblies if at all possible.
6. After completing assembly, thoroughly
inspect the machine to be sure that all nuts,
bolts, hydraulic fittings or any other fastened
assemblies have been thoroughly tightened.
7. Before operating the machine, thoroughly
READ and UNDERSTAND the operation section
of your operator’s manual.
assembly to trip.
put hands, or any part of the body,
.
IMPORTANT SAFETY
INFORMATION
Please stay alert for these signs.
THIS SAFETY ALERT SYMBOL
identifies important safety
warning messages. Carefully read
each warning message that
follows. Failure to understand and
obey safety warnings or
recognize a safety hazard, could result in an
injury or death to you or others around you. The
operator is ultimately responsible for the safety
of himself, as well as others, in the operating
area of the Grader Blade.
WARNING
This safety sign denotes a POTENTIAL hazard. If
the situation is not avoided it MAY result in
INJURY.
CAUTION
This safety sign denotes a hazard exists that, if
not avoided, CAN lead to SERIOUS INJURY or
DEATH if proper precautions are not taken.
DANGER
This safety sign denotes an IMMINENTLY
hazardous situation. If situation is not avoided, it
WILL result in SERIOUS INJURY or DEATH.
8. Before operating, READ the maintenance
section of your operator’s manual to be sure that
any parts requiring lubrication are serviced to
avoid any possible damage.
9. Before operating equipment - If you have any
questions regarding the proper assembly or
operation, contact your Behlen Country dealer or
representative.
F-20829 1-10-11
To the Owner/Operator/Dealer
All implements with moving parts are potentially
hazardous. There is no substitution for a
cautious, safety-minded operator who
recognizes the potential hazards and follows
reasonable safety practices. The manufacturer
had designed this implement to be used with all
its safety equipment properly attached to
minimize the chance of accidents.
Page 3
OPERATION & MAINTENANCE INSTRUCTIONS
BEFORE YOU START!!
Read the safety messages on the implement
and as shown in the manual. Observe the
rules of safety and common sense!
Important Safety Information
Working with unfamiliar equipment can lead to
careless injuries. Read this manual and the
manual for your tractor before assembly or
operating, to acquaint yourself with both
machines. It is the Owner/Operator’s
responsibility, if this machine is used by any
person other than yourself, or is loaned or
rented, to make certain prior to operating:
1. The operator’s manual is read and
understood.
2. Safety issues are understood and followed,
and proper usage is understood.
The use of this equipment is subject to certain
hazards which cannot be protected against by
mechanical means or product design. All
operators of this equipment must read and
understand this entire manual, paying particular
attention to safety and operating instructions,
prior to use. If there is something in this manual
you do not understand, ask your dealer or
manufacturer, to explain it to you. Improper use
can occur on machines that are loaned out or
rented to someone who has not read the
owner’s manual and is not familiar with a Grader
Blade.
Safety
Information
This Grader Blade was designed
for one-man operation from the
tractor seat. Most accidents occur
because of neglect or
carelessness. It is the responsibility
of the operator to see that no one is within
twenty-five feet (25’) of the blade when it is in
operation. Do not operate the implement with
another person near, or in contact with, any part
of the Grader Blade. Serious personal injury or
death may result if any attempt is made to assist
operation by hand.
Only properly trained people
should operate this machine.
It is always recommended the
tractor be equipped with a
Rollover Protection System
(ROPS) and a seat belt that is
used. Always stop the PTO,
set break, shut off the tractor engine, remove the
tractor key, and allow implement to come to a
complete stop before dismounting tractor. Never
leave equipment unattended with tractor
running.
The use of this equipment is subject
to certain hazards which cannot be
protected against by mechanical
means or production design. All
operators of this equipment must
read and understand this entire manual, paying
particular attention to safety and operating
instructions, prior to using. If there is something
in this manual you do not understand, ask your
supervisor, or your dealer, to explain it to you.
Please remember it is important that you read
and heed the safety signs on the Grader Blade,
and the safety rules set forth herein. Clean or
replace all safety stickers if they can not be
clearly read and understood. They are there for
your safety as well as the safety of others. The
safe use of this machine is strictly up to you, the
operator.
All things with moving parts are potentially
hazardous. There is no substitute for a
cautious, safety-minded operator who
recognizes potential hazards and follows
reasonable safety practices. The
manufacturer has designed this implement
to be used with all its safety equipment
properly attached, to minimize the chance
of accidents. Study this manual to make
sure you have all the safety equipment
attached.
When maneuvering close to buildings or
passing through narrow areas, be sure to
allow sufficient clearance for the
implement and tractor. NEVER
tractor and implement under trees with low
hanging limbs. Operators can be knocked
off tractor and run over by implement.
This Grader Blade is only designed for
speeds less than 5 mph. Reduce speed
on rough surfaces.
operate
F-20830 1-10-11
Page 4
OPERATION & MAINTENANCE INSTRUCTIONS
When the use of hand tools is required
to perform any part of assembly,
installation, adjustment, maintenance,
repairing, removal or moving the blade,
be sure the tools used are designed
and recommended by the tool
manufacturer for that specific task.
Personal protection equipment
including hard hats, safety glasses,
safety shoes, and gloves are
recommended during assembly,
installation, operation, adjustments,
maintenance, repairing, removal, or
moving the Grader Blade, DO NOT
ALLOW long hair, loose fitting clothing
or jewelry to be around moving parts.
Always use two people to handle heavy,
unwieldy components during assembly,
installation, removal, or moving the
Grader Blade.
Never place any part of your body
where it would be in danger, if
movement should occur during
assembly, installation, operation,
maintenance, repairing, removal or
moving the Grader Blade.
Never place yourself between the
tractor and Grader Blade while
implement is in operation. When
removing, or adjusting equipment, be
sure your body is never under the
blade.
A heavy load can cause instability of the
tractor. Use extreme care during travel.
Slow down on turns and watch out for
bumps. The tractor may need front
counter-weights to counter-balance the
weight of the Grader Blade.
Never use alcoholic beverages or drugs
which can hinder alertness or
coordination while operating this
equipment. Consult your doctor about
operating this machine while taking
prescription and some over-the-counter
medications.
DO NOT
ALLOW RIDERS on the Grader
Blade or tractor at any time. There is
NO safe place for any riders. NEVER
ALLOW CHILDREN TO OPERATE OR
BE AROUND BLADE.
Before you operate the Grader Blade, check
over all pins, bolts and connections to be
sure all are securely in place. Replace any
damaged or worn parts immediately.
Consult local utility companies to make
certain there are no buried gas lines,
electrical cables, etc., in the work area before
beginning operation.
Do NOT
allow anyone who is not familiar with
the safety rules and operation instructions to
use this Grader Blade.
Never replace any bolt with any length other
than what is specified in this manual. A
longer, or protruding fastener is more likely to
grab loose clothing or gloves which can
result in serious injury or death.
Watch for hidden hazards on the terrain
during operation.
Turn curves or go up or down hills only at a
low speed and at a gradual steering angle.
Make certain that at least 20% of the tractor's
weight is on the front wheels to maintain safe
steering. Slow down on rough or uneven
surfaces, and loose gravel.
Check that all hardware is properly installed.
Always tighten all bolts to proper torque.
Make sure attachment is properly secured,
adjusted and in good operating condition.
Where replacement parts are necessary for
periodic maintenance and servicing, genuine
factory replacement parts must be used to
restore your equipment to original
specifications. The manufacturer will not be
responsible for the use of unapproved parts
and/or accessories and the damages that can
result in their use.
Keep alert and watch the front as well as the
rear when working with equipment. DO NOT
operate close to ditches or creeks. Be careful
to avoid catching implement on stumps or
other immovable objects.
Make adjustments to implement only when it
is attached to a tractor and blocked up.
Always keep all persons and children away
from area when performing adjustments,
service or maintenance. Worn edges can
seriously affect the Grader Blade's operation.
Check for wear before each use and replace
as necessary.
F-20831 1-10-11
Page 5
OPERATION & MAINTENANCE INSTRUCTIONS
Know your controls and how to stop your
tractor, engine, and implement quickly in
an emergency.
Do not operate the Grader Blade without
checking that all movable parts are in
good working order. always use care
when operating Grader Blade.
Mounting
1. Back tractor up to the Grader Blade making
sure that the lift arms of tractor are on the
outside of the lift points on the Grader Blade.
2. Slide lifting arms of tractor over lift pins on the
Grader Blade.
Instructions
Tractor Requirements and
Preparation
The Grader Blade is designed to fit Category 1
tractors equipped with a standard 3-Point hitch.
Behlen Country carries sub-compact, standard,
medium and heavy duty adjustable Grader
Blades. Note:
very short lift arms or 5/8” diameter (Cat 0) lift
arm ball ends. The Sub-compact Grader Blade
will fit these tractors if equipped with the Cat 0
pull pins. The pins need to be installed on the
inside of the 3-Point frame.
Check the tractor’s 3-Point hydraulic lift system.
It should operate up and down smoothly and
have enough power to lift the Grader Blade.
Refer to your tractor’s operators manual or
dealer for any adjustments necessary to put the
3-Point hydraulic lift system in good working
order. (I & T shop manuals will list most
specifications and adjustment instructions —
available from most farm equipment dealers).
Check the shield over the PTO stub shaft. Make
sure it is in good condition and bolted securely
to the tractor. Purchase a new shield if the old
shield is damaged or missing.
Some Category 0 tractors have
3. Use lynch pins (customer supplied) to secure
implement to the tractor.
4. Connect top link (customer supplied) from the
tractor to the top center lifting point of the
Grader Blade and insert hitch pin (customer
supplied).
5. Make any adjustments necessary to level the
blade from side to side. On Adjustable models
change the blade angle as desired.
CAUTION
When using blade in reverse position, extra
care should be taken not
dirt or debris. Tractor lift arms and the Grader
Blade are not
in this position. Ramming backwards can also
dislodge operator from seat and/or tractor
controls, resulting in serious injury or death.
built to take high impact loads
to ram into piles of
Preparation
Procedure
•
Thoroughly read and understand your
Operator's Manuals.
Smaller size tractors may need front counter
weights to counter-balance the weight of the
Grader Blade. It is recommended that the tractor
be equipped with a Rollover Protection System
(ROPS) and a seat belt that is used.
•
Before beginning operation, contact your local
Utility Company to make certain there are no
gas lines, electrical cables, etc., in the work
area.
•
Check for ditches, stumps, holes, or other
obstacles that could cause the tractor to roll.
CAUTION
•
Be sure tractor tires and rims are in good
A heavy load can cause instability in driving a
tractor. Make sure the front of the tractor is
properly counter-balanced with weights.
Always drive slowly, especially around turns.
An unstable tractor could steer badly and
possibly tip over, causing injury or death.
F-20832 1-10-11
condition. Inflate tires to proper air pressure.
•
All persons should be at least twenty-five feet
(25') away during operation. Clear the area of
helpers, bystanders, and especially children.
Page 6
OPERATION & MAINTENANCE INSTRUCTIONS
Do NOT allow anyone to stand between the
•
hitch and blade.
It is only recommended that tractors with wide
•
front axles use the Grader Blade. Tricycle front
wheel arrangements are inherently unstable
and can cause rollover accidents.
Check the tractor master shield over the PTO
•
stub shaft. Make sure it is in good condition
and fastened securely to the tractor.
Make sure all safety stickers are installed and
•
in good condition. Replace if damaged.
Do NOT allow riders. There is no safe place
•
for anyone to ride or sit on tractor or
implement.
Check that all equipment is properly installed
•
and securely attached to the tractor.
Operation
If you have any questions regarding the
proper operation of this Grader Blade,
contact your dealer or the manufacturer.
The Grader Blade is designed for a wide range
of applications: casting, side ditching, leveling,
terracing, bulldozing and snow removal. The
blade may be angled to windrow debris to the
side for removal. It is the responsibility of the
operator to see that no one else is within
twenty-five feet (25’) of the tractor when it is
started.
Speed of the tractor should not exceed 5
•
mph.
When you are turning, lift the unit from the
•
ground.
Pass diagonally through sharp dips and avoid
•
sharp drops to prevent “hanging up” the
tractor and blade.
Watch for hidden hazards on the terrain
•
during operation.
DANGER
DO NOT TAKE A DITCH AT 90° (straight on)!
Always go in at an angle or damage may
occur.
CAUTION
Before dismounting power unit or performing
any adjustments to the Grader Blade, make
sure to disengage power to equipment, lower
3-Point hitch and all raised components to
the ground, operate valve levers to release
any hydraulic pressure, set parking break,
stop engine, remove key and allow implement
to come to a complete stop before
dismounting tractor. Never leave equipment
unattended with tractor running.
It is essential that everyone involved in the
operation, transportation, maintenance, and
storage of this equipment be aware,
concerned, prudent and properly trained in
safety.
•
Set tractor blades.
•
Take tractor out of gear. Shift to “Park” (if
applicable).
•
Grader Blade should be level when operating.
•
Adjust top link so implement is flat on level
surface.
•
Before operation make sure all adjustments
have been made to the blade for desired
operation.
•
Lower blade to ground and start moving
forward. Your speed will be determined by the
condition of the soil. You may need to use
less or more angle depending on the job.
F-20833 1-10-11
The moldboard blade is sharp. Exercise
extreme caution when working around or near
the blade. Failure to stay clear of the blade
can result in serious injury.
Stop power unit and equipment
IMMEDIATELY upon striking an obstruction.
Turn off engine, remove key, inspect, and
repair any damage before resuming
operation. Never leave the seat of the tractor
while engine is engaged.
DANGER
CAUTION
Page 7
OPERATION & MAINTENANCE INSTRUCTIONS
Adjustable Grader
Blades
Adjustable Grader blades have tilt, angle and
offset capabilities. To make adjustments, loosen
bolts, make the necessary changes, and
retighten all nuts securely. The lift arms on the
tractor can be used for additional adjustments
(see below).
Fixed Grader Blades
Casting
The blade should be angled horizontally - only
enough to allow material to slide along it easily.
The vertical angle (tilt) of the blade must be set
to suit conditions. This is controlled by the lift
arm leveling assembly (turnbuckle) on the
tractor 3-Point hitch.
Side Ditching
The horizontal angle should be at its sharpest.
This is obtained by removing the shift pin and
turning the moldboard so that the last hole in the
circle plate is in line with the shift pin hole, then
replace the shift pin. It is suggested that the
blade be set in an offset position and then use
the shorter blade side to be the cutting side. This
reduces the load movement on the end of the
blade.
Terracing
Use a combination of ditching, casting, and
leveling. The first cut is into the hillside in the
ditching position. Continue until the terrace is at
the proper depth, then switch to the casting
position until the terrace width is established. It
may be necessary to use the leveling position to
complete the job.
Bulldozing
When bulldozing, the blade is in the reverse
position. Depending on the job, the casting, side
ditching, 0° leveling position may be used. Snow
removal can also be done with the blade in this
position (blade in reverse cutting edge away
from the tractor).
WARNING
When using blade in a reverse position, use
extra care - DO NOT
snow piles! Tractor lift arms are not equipped
to take high impact loads in this position.
RAM BLADE into dirt or
Grading
Grading is a combination of casting, side
ditching, and leveling. Snow removal can also
be done with the blade in this position.
CAUTION
The vertical angle of the blade (tilt) is adjusted
by means of the adjustment turnbuckles on the
tractors 3-Point hitch. For the sharpest angle,
lengthen the center link on the tractor as far as
possible. Also, lower the adjustable leveling
turnbuckle as far as possible.
Watch for hidden obstructions, like buried
pipes, rocks, concrete piers or uneven slabs
of concrete when operating the Grader Blade
as damage to the unit can occur. This is
especially true with snow removal.
Maintenance
Leveling
The blade should be straight across, (i.e. 90° ) to
the line of travel of the tractor, in other words 0°
horizontal angle. There should be a 0° vertical
angle, the lift arms on the tractor’s 3-Point hitch
should be parallel to the ground.
The cutting pitch of the blade should be the
opposite of that used in the side ditching and
casting, with the cutting edge behind the top
edge of the moldboard. This adjustment is made
with the tractor center link.
F-20834 1-10-11
Before servicing the Grader Blade, engage
the parking break or place the transmission in
“PARK”, shut off tractor, and remove key.
1. Make certain any safety and instruction decals
are attached to the Grader Blade 3-Point
hitch. If they are lost, damaged, or painted
over, order replacements from Behlen
Country at 1-800-447-2751.
2. Telescoping parts must be kept clean and
lubricated.
Page 8
OPERATION & MAINTENANCE INSTRUCTIONS
3. Clean unit of dirt and debris to minimize
rusting and wear.
4. Keep all shields in place. Order new shields if
damaged or missing.
Cleaning
And Storage
5. Keep cutting edges sharp. Sharp cutting
edges work easier and better. Check more
often if working in rocky soil conditions.
Blades are reversible. If blade edge becomes
dull, unbolt it, reverse cutting edge and
reattach securely.
6. Replace any worn or damaged parts
immediately.
7. Check all bolts and nuts to make sure they are
tight.
8. NEVER
place any part of the body underneath
equipment or between movable parts even
when the engine is turned off. Servicing this
Grader Blade does not require going
underneath.
go underneath equipment. Never
Transportation Guidelines
Unit should be lifted as high as the tractor will
allow being sure the unit is clear of the ground
when transporting.
Care should be taken that at least 20% of tractor
weight should be on the front tires. A safe speed
should be maintained during transportation.
Tractor weight ballast may be needed to even
out weight to maintain proper steering.
Do NOT
gravel road while transporting. Damage to the
unit can occur.
When transporting on roadways always use a
Safety Sign, and drive in a manner to allow other
vehicles to pass you safely.
lower unit to pavement, blacktop or
After Each Use
Remove large debris such as clumps of dirt,
•
grass, crop residue, etc. from machine.
Inspect machine and replace worn or
•
damaged parts
Replace any safety decals that are missing or
•
not readable.
Before Extended Storage
Follow cleaning instructions from above.
•
Wash implement using low-pressure water
•
spray.
Be careful when spraying near scratched or
•
torn safety decals or near edges of decals as
water spray can peel decals off surface.
Spraying near chipped or scratched paint can
also cause paint to peel more.
•
Inspect machine for worn or damaged parts
and replace any missing safety stickers.
•
Sand down scratches and edges where paint
is missing and repaint to prevent rust.
•
Store the unit in a shed or under tarpaulin to
protect from the weather. The blade should be
resting on boards or some other object. Keep
out of soil when storing.
•
Store in clean, dry place away from human
activity or livestock.
CAUTION
When traveling on public roads, whether at
night or during the day, use accessory light
and devices for adequate warning to
operators of other vehicles. Comply with all
federal, state, and local laws.
F-20835 1-10-11
Page 9

OPERATION & MAINTENANCE INSTRUCTIONS
Trouble-shooting
Guide
If you have any questions regarding the
proper operation of this Grader Blade contact
your dealer or the manufacturer.
PROBLEM:
BLADE WILL NOT PENETRATE SOIL
Possible Solutions:
Cutting edge dull; replace cutting edge.
•
Blade too straight; increase 3-Point hitch top
•
link length.
Soil too hard; loosen soil with scarifiers or
•
disc. Wait for rain.
Tractor may be too large, use smaller tractor
•
or one that is heavy weighted and has four
wheel drive. Preferably use tractor of
recommended horsepower. Slow down and
use extra care.
PROBLEM: UNABLE TO HOLD LEVEL GRADE
Possible Solutions:
Tractor draft control lifting blade. Set tractor
•
draft control.
Soil too hard, use scarifiers.
•
Grader Blade
models available:
PROBLEM:
MOLDBOARD DIGGING IN TOO MUCH
Possible Solutions:
Blade pitch excessive; shorten top link.
•
•
Ground too soft; install skid shoes or wait for
drier soil.
PROBLEM: 3-POINT FRAME BENT
Possible Solutions:
•
Avoid hitting hidden objects in backfill position
or ramming backwards at high speed into
hard piles of soil. Use slow speed when soil
conditions are unknown.
•
Tractor may be too large, use smaller tractor.
Always backfill at slow speed. Preferably use
tractor of recommended horsepower. Slow
down and use extra care.
PROBLEM: BENT MOLDBOARD
GB48SC - 4' Sub-Compact Grader -
angle & reverse
GB60SC - 5' Sub-Compact Grader -
angle & reverse
GB48SD - 4' Standard Grader - angle & reverse
GB60SD - 5' Standard Grader - angle & reverse
GB72SD - 6' Standard Grader - angle & reverse
GB84SD - 7' Standard Grader - angle & reverse
GB60 - 5' Grader - angle & reverse
GB72 - 6' Grader - angle & reverse
GB84 - 7' Grader - angle & reverse
GB60HD-ADJ - 5' Grader -
angle, offset, tilt & reverse
GB72HD-ADJ - 6' Grader -
angle, offset, tilt & reverse
GB84HD-ADJ - 7' Grader -
angle, offset, tilt & reverse
GB96HD-ADJ - 8' Grader -
angle, offset, tilt & reverse
Possible Solutions:
•
Small curve is normal from welding; can be
removed but will not affect blade operation.
•
Hitting hidden objects; Know soil conditions,
use caution.
F-20836 1-10-11
Page 10

OPERATION & MAINTENANCE INSTRUCTIONS
Safety
Precautions
Most accidents occur because of neglect or
carelessness. Avoid needless accidents by
following all of the safety precautions listed
below.
Machinery should be operated only by those
•
who are responsible and are authorized to do
so.
Stop the engine, lower all equipment, lock the
•
brakes, and remove the ignition key before
dismounting tractor.
Never stand between tractor and implement
•
while tractor is being backed to a hitch. Loose
fitting clothing should not be worn, to avoid
catching on various parts.
Detach implement in an area where children
•
normally do not play.
Avoid driving too close to the edge of ditches
•
or creeks.
Do not transport implement on public roads
•
without reflectors and slow moving vehicle
emblem in daylight and with approved
warning lights at night and other periods of
poor visibility.
Due to the width of some implements, use
•
extra caution on highways, farm roads, and
when approaching gates.
Always be sure the implement is in the proper
•
position for transporting.
Keep alert and watch the front, as well as the
•
rear, when working with the implement.
WARRANTY
This unit carries a 1 year warranty, with the
exception of wear parts. Dated proof of
purchase required on all claims.
When performing adjustments or
•
maintenance on an implement, lower it to the
ground or block it securely at a workable
height.
•
Only a qualified operator should be permitted
on the tractor when in operation; no riders
allowed.
•
Make certain everyone is in the clear before
starting tractor or raising / lowering
equipment.
•
Operate the tractor and implement only while
seated in the driver’s seat.
•
Reduce speed when transporting mounted
implements to avoid bouncing and
momentary loss of steering control.
•
A heavy load can cause instability of the
tractor. Use extreme caution during road
travel. Slow down on turns and watch for
bumps. Tractor may need front
counter-weights to counter-balance the
weight of the implement.
•
Reduce speed on hillsides or curves to avoid
possibility of tipping.
F-20837 1-10-11
Page 11
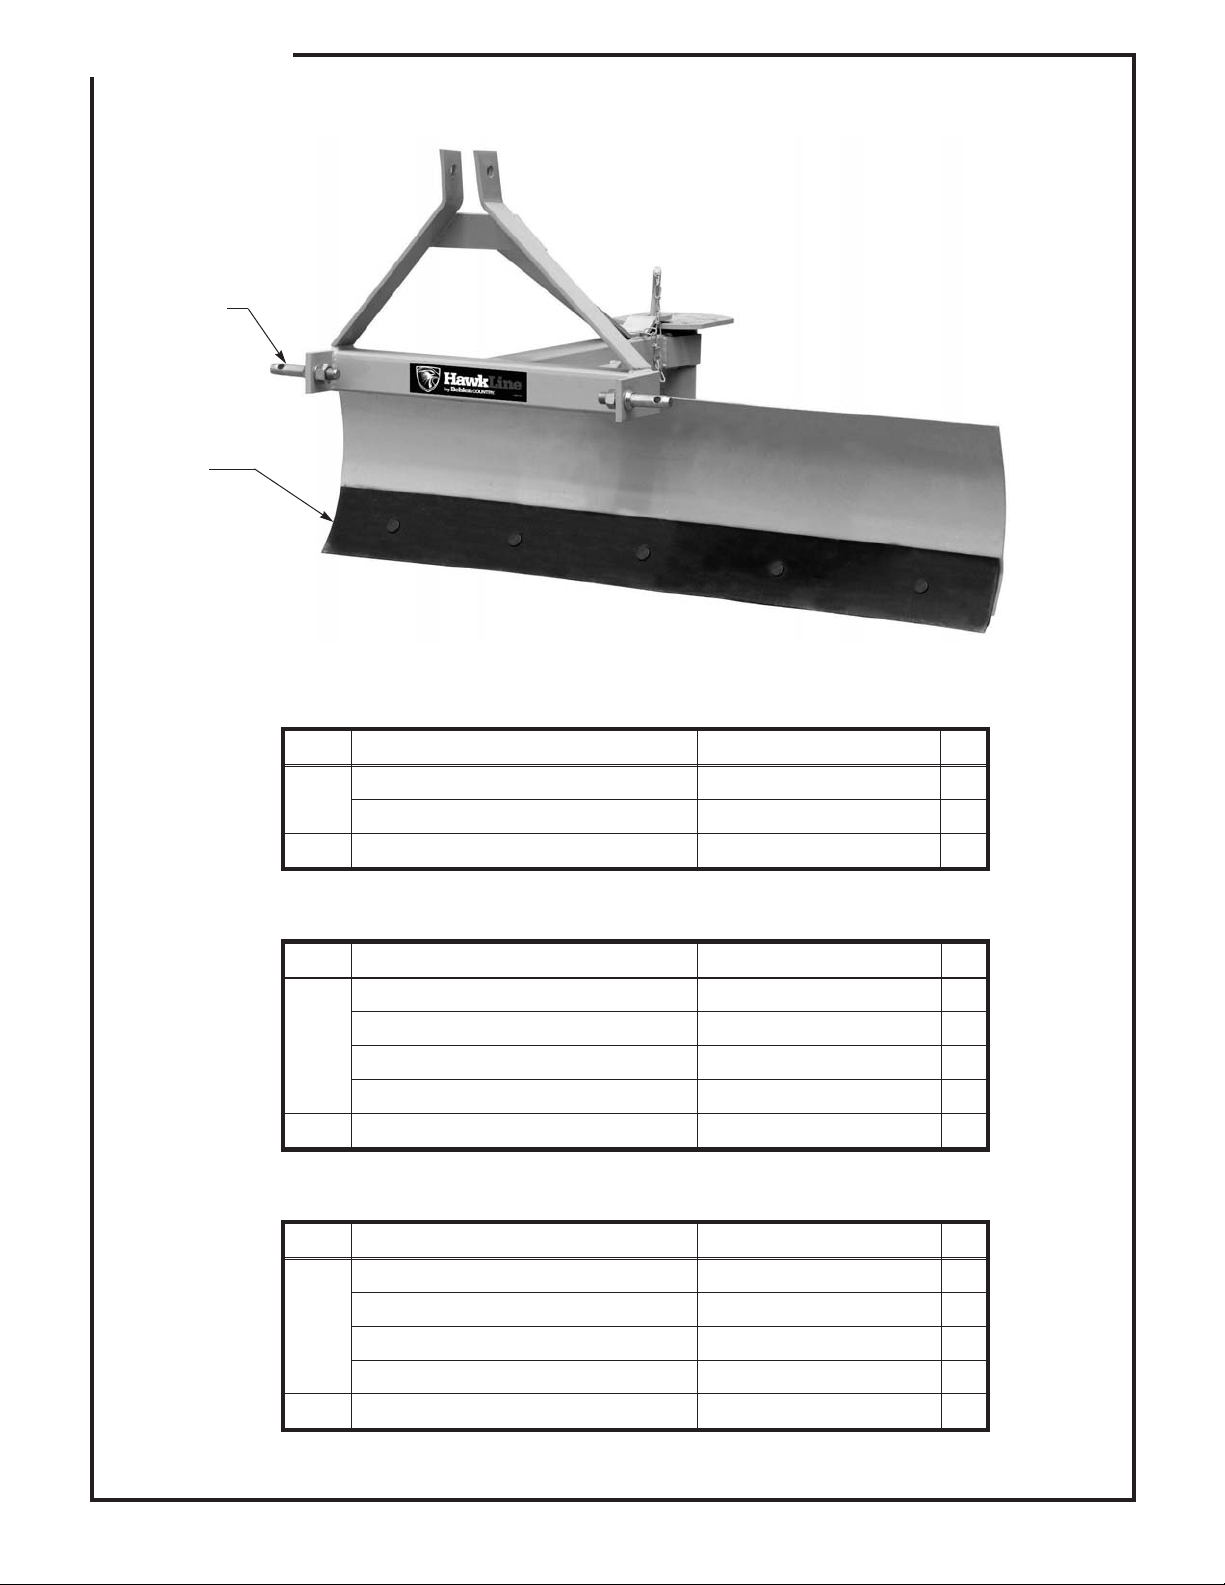
PARTS LISTING
2
1
Rear Blade Sub Compact
No. Description Part No. Qty
4' Cutting Edge 3018377 1
1
5' Cutting Edge 3018378 1
2 Cat. 1 Lift Pin 3018352 2
Rear Blade Standard Duty
No. Description Part No. Qty
4' Cutting Edge 80625150 not painted 1
5' Cutting Edge 80625180 not painted 1
1
6' Cutting Edge 80625290 not painted 1
7' Cutting Edge 80625400 not painted 1
2 Cat. 1 Lift Pin 3018352 2
Rear Blade Medium and Heavy Duty Adjustable
No. Description Part No. Qty
5' Cutting Edge 3018378 1
6' Cutting Edge 3018379 1
1
7' Cutting Edge 3018380 1
8' Cutting Edge 3018381 1
2 Cat. 1 Lift Pin 3018352 2
F-20838 1-10-11
 Loading...