

Page 1
Elements of Lifestyle
Bedienungsanleitung
Instruction Manual
Mode d‘ emploi
Gebruiksaanwijzing
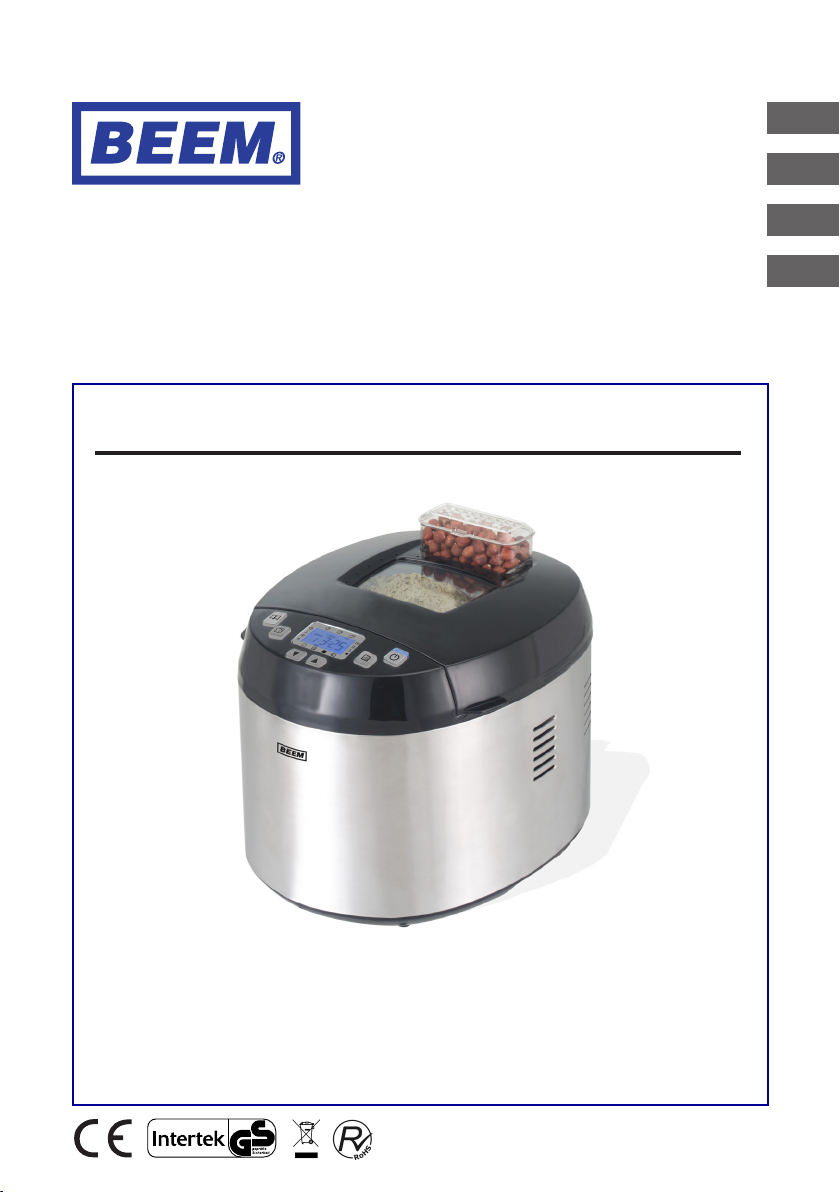
MULTI-BACK TOPCLASS 3 in 1
DE
EN
FR
NL
Brotbackautomat
Bread maker
Machine à pain automatique
Broodbakautomaat
Modell B7.001
Page 2

BEEM - Elements of Lifestyle
DE
EN
FR
NL
Bedienungsanleitung ...............................................................3
Instruction Manual ..................................................................41
Mode d‘ emploi .......................................................................79
Gebruiksaanwijzing ..............................................................117
BEEM Blitz-Elektro-Erzeugnisse Manufaktur Handels-GmbH
Dieselstraße 19-21
61191 Rosbach v.d.H.
Germany
Internet: www.beem.de
© 2011 by BEEM GmbH
Druckfehler vorbehalten.
Subject to printing error.
Sous réserve d‘erreurs d‘impression.
Drukfouten voorbehouden.
Page 3

Inhaltsverzeichnis
Vorwort. . . . . . . . . . . . . . . . . . . . . . . . . . . . . . . . . . . . . . . . . . . . . . . 5
Informationen zu dieser Bedienungsanleitung . . . . . . . . . . . . . . 5
Urheberrecht ...........................................5
Warnhinweise ..........................................6
Bestimmungsgemäße Verwendung . . . . . . . . . . . . . . . . . . . . . . . . . 7
Haftungsbeschränkung ...................................7
Sicherheit ............................................8
Grundlegende Sicherheitshinweise . . . . . . . . . . . . . . . . . . . . . . . . .8
Gefahr durch elektrischen Strom . . . . . . . . . . . . . . . . . . . . . . . . . . . 9
Verbrennungsgefahr .....................................9
Inbetriebnahme .......................................10
Sicherheitshinweise . . . . . . . . . . . . . . . . . . . . . . . . . . . . . . . . . . . . 10
Auspacken . . . . . . . . . . . . . . . . . . . . . . . . . . . . . . . . . . . . . . . . . . . 10
Lieferumfang und Transportinspektion ......................11
Entsorgung der Verpackung ..............................11
Anforderungen an den Aufstellort ..........................12
Elektrischer Anschluss . . . . . . . . . . . . . . . . . . . . . . . . . . . . . . . . . . 12
Geräteübersicht . . . . . . . . . . . . . . . . . . . . . . . . . . . . . . . . . . . . . . .13
Backform sowie Knet-/Rührhaken einsetzen und entnehmen . . . .13
Vor dem ersten Gebrauch ................................16
Bedienfeld und Anzeige . . . . . . . . . . . . . . . . . . . . . . . . . . . . . . . . .17
DE
Bedienung und Betrieb . . . . . . . . . . . . . . . . . . . . . . . . . . . . . . . . 19
Sicherheitshinweise . . . . . . . . . . . . . . . . . . . . . . . . . . . . . . . . . . . . 19
Prinzipielle Gerätebedienung . . . . . . . . . . . . . . . . . . . . . . . . . . . . . 20
Zeitschaltuhr ..........................................24
Warmhaltefunktion . . . . . . . . . . . . . . . . . . . . . . . . . . . . . . . . . . . . .25
Zutatenspender ........................................26
BEEM - Elements of Lifestyle
3
Page 4

4
BEEM - Elements of Lifestyle
DE
Reinigung und Pege ..................................28
Sicherheitshinweise . . . . . . . . . . . . . . . . . . . . . . . . . . . . . . . . . . . . 28
Reinigung . . . . . . . . . . . . . . . . . . . . . . . . . . . . . . . . . . . . . . . . . . . . 28
Störungsbehebung ....................................30
Sicherheitshinweise . . . . . . . . . . . . . . . . . . . . . . . . . . . . . . . . . . . . 30
Störungsursachen und -behebung .........................30
Hinweise zur Lagerung/Entsorgung ......................31
Lagerung .............................................31
Entsorgung ...........................................31
Anhang .............................................31
Technische Daten ......................................31
Tabelle der Backzeiten . . . . . . . . . . . . . . . . . . . . . . . . . . . . . . . . . .32
Zertizierungen ........................................36
Ersatzteile und weiteres Zubehör ..........................36
Garantie, Service und Reparaturen . . . . . . . . . . . . . . . . . . . . . . . . 36
EG-Konformitätserklärung . . . . . . . . . . . . . . . . . . . . . . . . . . . . . . .39
Index ...............................................40
Page 5

5
Vorwort
BEEM - Elements of Lifestyle
DE
Vorwort
Sehr geehrte Kundin, sehr geehrter Kunde,
mit dem Kauf des MULTI-BACK TOPCLASS 3 in 1 Brotbackauto-
maten haben Sie sich für ein Qualitätsprodukt von BEEM entschieden. Mit dem MULTI-BACK TOPCLASS 3 in 1 Brotbackautomaten
können Sie problemlos verschiedene Brotsorten herstellen. Darüber
hinaus können Sie mit dem MULTI-BACK TOPCLASS 3 in 1 leckere
Marmeladen, Nudeln, Pizzateige und Kuchen zubereiten.
Lesen Sie die hier enthaltenen Informationen, damit Sie mit Ihrem
Gerät schnell vertraut werden und seine Funktionen in vollem Umfang nutzen können.
Ihr Gerät dient Ihnen viele Jahre lang, wenn Sie es sachgerecht
behandeln und pegen.
Wir wünschen Ihnen viel Freude beim Gebrauch.
Ihre BEEM Blitz-Elektro-Erzeugnisse Manufaktur
Informationen zu dieser Bedienungsanleitung
Diese Bedienungsanleitung ist Bestandteil des Brotbackautomaten
MULTI-BACK TOPCLASS 3 in 1 (nachfolgend als Gerät bezeichnet) und gibt Ihnen wichtige Hinweise für die Inbetriebnahme, die
Sicherheit, den bestimmungsgemäßen Gebrauch und die Pege des
Gerätes.
Die Bedienungsanleitung muss ständig in der Nähe des Gerätes
verfügbar sein. Sie ist von jeder Person zu lesen und anzuwenden,
die mit der Bedienung, Störungsbehebung und/oder Reinigung des
Gerätes beauftragt ist.
Bewahren Sie diese Bedienungsanleitung auf und geben Sie diese
mit dem Gerät an Nachbesitzer weiter.
Urheberrecht
Dieses Dokument ist urheberrechtlich geschützt.
Jede Vervielfältigung bzw. jeder Nachdruck, auch auszugsweise, sowie die Wiedergabe der Abbildungen, auch im veränderten Zustand,
ist nur mit schriftlicher Zustimmung des Herstellers gestattet.
Page 6
6
Informationen zu dieser Bedienungsanleitung
BEEM - Elements of Lifestyle
DE
Warnhinweise
In der vorliegenden Bedienungsanleitung werden folgende Warnhinweise verwendet:
GEFAHR
Ein Warnhinweis dieser Gefahrenstufe kennzeichnet eine
drohende gefährliche Situation.
Falls die gefährliche Situation nicht vermieden wird, kann dies zum
Tod oder zu schweren Verletzungen führen.
Die Anweisungen in diesem Warnhinweis befolgen, um die ►
Gefahr des Todes oder schwerer Verletzungen von Personen
zu vermeiden.
WARNUNG
Ein Warnhinweis dieser Gefahrenstufe kennzeichnet eine
mögliche gefährliche Situation.
Falls die gefährliche Situation nicht vermieden wird, kann dies zu
Verletzungen führen.
Die Anweisungen in diesem Warnhinweis befolgen, um Verlet- ►
zungen von Personen zu vermeiden.
ACHTUNG
Ein Warnhinweis dieser Gefahrenstufe kennzeichnet einen
möglichen Sachschaden.
Falls die Situation nicht vermieden wird, kann dies zu Sachschäden
führen.
Die Anweisungen in diesem Warnhinweis befolgen, um Sach- ►
schäden zu vermeiden.
HINWEIS
Ein Hinweis kennzeichnet zusätzliche Informationen, die den ►
Umgang mit dem Gerät erleichtern.
Page 7

7
Informationen zu dieser Bedienungsanleitung
BEEM - Elements of Lifestyle
DE
Bestimmungsgemäße Verwendung
Dieses Gerät ist für den nicht-gewerblichen Gebrauch in geschlossenen Räumen zum Backen von verschiedenen Broten und Kuchen
sowie zum Herstellen von Teigen, Nudeln und Marmelade bestimmt.
Eine andere oder darüber hinausgehende Benutzung gilt als nicht
bestimmungsgemäß.
WARNUNG
Gefahr durch nicht bestimmungsgemäße Verwendung!
Von dem Gerät können bei nicht bestimmungsgemäßer Verwendung und/oder andersartiger Nutzung Gefahren ausgehen.
Das Gerät ausschließlich bestimmungsgemäß verwenden. ►
Die in dieser Bedienungsanleitung beschriebenen Vorgehens- ►
weisen einhalten.
Ansprüche jeglicher Art wegen Schäden aus nicht bestimmungsgemäßer Verwendung sind ausgeschlossen.
Das Risiko trägt allein der Betreiber.
Achten Sie bei gewerblicher Nutzung auf eine Änderung der Garantiezeit.
Haftungsbeschränkung
Alle in dieser Bedienungsanleitung enthaltenen technischen Informa-
tionen, Daten und Hinweise für die Installation, Betrieb und Pege
entsprechen dem letzten Stand bei Drucklegung.
Aus den Angaben, Abbildungen und Beschreibungen in dieser Anleitung können keine Ansprüche hergeleitet werden.
Der Hersteller übernimmt keine Haftung für Schäden aufgrund von
Nichtbeachtung der Anleitung, nicht bestimmungsgemäßer Verwendung, unsachgemäßen Reparaturen, unerlaubt vorgenommener
Veränderungen oder Verwendung nicht zugelassener Ersatzteile.
Page 8

8
Sicherheit
BEEM - Elements of Lifestyle
DE
Sicherheit
Dieses Gerät entspricht den vorgeschriebenen Sicherheitsbestimmungen. Ein unsachgemäßer Gebrauch kann jedoch zu Personenund Sachschäden führen.
Beachten Sie für einen sicheren Umgang mit dem Gerät die folgenden grundlegenden Sicherheitshinweise sowie die in den einzelnen
Kapiteln separat aufgeführten Hinweise.
Grundlegende Sicherheitshinweise
Kontrollieren Sie das Gerät vor der Verwendung auf äußere ■
sichtbare Schäden. Nehmen Sie ein beschädigtes Gerät nicht in
Betrieb.
Kinder müssen beaufsichtigt werden, um sicherzustellen, dass ■
sie nicht mit dem Gerät spielen.
Das Gerät während des Betriebes nicht unbeaufsichtigt lassen. ■
Ziehen Sie die Anschlussleitung immer am Netzstecker aus der ■
Steckdose, nicht an der Anschlussleitung.
Dieses Gerät ist nicht dafür bestimmt, durch Personen (ein- ■
schließlich Kinder) mit eingeschränkten physischen, sensorischen
oder geistigen Fähigkeiten oder mangels Erfahrung und/oder
mangels Wissen benutzt zu werden, es sei denn, sie werden
durch eine für ihre Sicherheit zuständige Person beaufsichtigt
oder erhielten von ihr Anweisungen, wie das Gerät zu benutzen
ist.
Verwenden Sie dieses Gerät nicht zusammen mit einer externen ■
Zeitschaltuhr oder einem separaten Fernwirksystem.
Lassen Sie Reparaturen am Gerät nur von autorisierten Fach- ■
händlern oder vom Werkskundendienst durchführen. Durch
unsachgemäße Reparaturen können erhebliche Gefahren für den
Benutzer entstehen. Zudem erlischt der Garantieanspruch.
Eine Reparatur des Gerätes während der Garantiezeit darf nur ■
von einem vom Hersteller autorisierten Kundendienst vorgenommen werden, sonst besteht bei Schäden und nachfolgenden
Schäden kein Garantieanspruch mehr.
Defekte Bauteile dürfen nur gegen Original-Ersatzteile ausge- ■
tauscht werden. Nur bei diesen Teilen ist gewährleistet, dass die
Sicherheitsanforderungen erfüllt werden.
Page 9
9
Sicherheit
BEEM - Elements of Lifestyle
DE
Gefahr durch elektrischen Strom
GEFAHR
Lebensgefahr durch elektrischen Strom!
Beim Kontakt mit unter Spannung stehenden Leitungen
oder Bauteilen besteht Lebensgefahr!
Beachten Sie die folgenden Sicherheitshinweise, um eine Gefährdung durch elektrischen Strom zu vermeiden:
Benutzen Sie das Gerät nicht, wenn die Netzleitung oder der ►
Netzstecker beschädigt sind. Lassen Sie vor der Weiterbenutzung des Gerätes eine neue Anschlussleitung durch eine
autorisierte Fachkraft installieren.
Öffnen Sie auf keinen Fall das Gehäuse des Gerätes. Werden ►
spannungsführende Anschlüsse berührt und der elektrische und
mechanische Aufbau verändert, besteht Stromschlaggefahr.
Tauchen Sie das Gerät oder den Netzstecker niemals in Wasser ►
oder andere Flüssigkeiten.
Verbrennungsgefahr
WARNUNG
Der Backautomat wird während des Betriebes sehr heiß!
Beachten Sie die folgenden Sicherheitshinweise, um sich nicht zu
verbrennen.
Öffnen Sie das Gerät nicht während des Backvorgangs. ►
Benutzen Sie Topfhandschuhe, um die Backform aus dem ►
Gerät zu nehmen.
Lassen Sie das Gerät vor jeder Reinigung abkühlen. ►
Page 10
10
Inbetriebnahme
BEEM - Elements of Lifestyle
DE
Inbetriebnahme
Sicherheitshinweise
WARNUNG
Bei der Inbetriebnahme des Gerätes können Personen- und
Sachschäden auftreten!
Beachten Sie die folgenden Sicherheitshinweise, um die Gefahren
zu vermeiden:
Verpackungsmaterialien dürfen nicht zum Spielen verwendet ►
werden. Es besteht Erstickungsgefahr.
Beachten Sie die Hinweise zu den Anforderungen an den ►
Aufstellort sowie zum elektrischen Anschluss des Gerätes, um
Personen- und Sachschäden zu vermeiden.
Auspacken
Entnehmen Sie das Gerät, alle Zubehörteile, die Bedienungsan-
leitung, die Kurzanleitung und das Rezeptbuch aus dem Karton.
Entfernen Sie vor dem Erstgebrauch alle Verpackungsmateriali-
en und Schutzfolien vom Gerät und den Zubehörteilen.
HINWEIS
Entfernen Sie nicht das Typenschild und eventuelle Warn- ►
hinweise.
Page 11
11
Inbetriebnahme
BEEM - Elements of Lifestyle
DE
Lieferumfang und Transportinspektion
Das Gerät wird standardmäßig mit folgenden Komponenten geliefert:
Brotbackautomat ●
Brotbackform mit Knethaken ●
Kuchenbackform mit Rührhaken ●
Zutatenspender ●
Messbecher ●
Messlöffel ●
Bedienungsanleitung ●
Kurzanleitung ●
Rezeptbuch ●
HINWEIS
Prüfen Sie die Lieferung auf Vollständigkeit und auf sichtbare ►
Schäden. Melden Sie eine unvollständige oder beschädigte
Lieferung umgehend Ihrem Lieferanten/Händler.
Entsorgung der Verpackung
Die Verpackung schützt das Gerät vor Transportschäden. Die Verpackungsmaterialien sind nach umweltverträglichen und entsorgungstechnischen Gesichtspunkten ausgewählt und deshalb recyclebar.
Die Rückführung der Verpackung in den Materialkreislauf spart
Rohstoffe und verringert das Abfallaufkommen. Entsorgen Sie nicht
mehr benötigte Verpackungsmaterialien gemäß den örtlich geltenden
Vorschriften.
HINWEIS
Heben Sie – wenn möglich – die Originalverpackung während ►
der Garantiezeit des Gerätes auf, um das Gerät im Garantiefall ordnungsgemäß verpacken zu können. Transportschäden
führen zum Erlöschen des Garantieanspruchs.
Page 12

12
Inbetriebnahme
BEEM - Elements of Lifestyle
DE
Anforderungen an den Aufstellort
Für einen sicheren und fehlerfreien Betrieb des Gerätes muss der
Aufstellort folgende Voraussetzungen erfüllen:
Stellen Sie das Gerät auf eine trockene, ebene und hitzebestän- ■
dige Unterlage.
Stellen Sie das Gerät nicht in einer heißen, nassen oder sehr ■
feuchten Umgebung oder in der Nähe von brennbarem Material
auf.
Wählen Sie den Aufstellort so, dass Kinder nicht an die heißen ■
Oberächen des Gerätes gelangen können.
Die verwendete Steckdose muss leicht zugänglich sein, um im ■
Notfall das Gerät schnell vom Stromkreis trennen zu können.
Elektrischer Anschluss
Für einen sicheren und fehlerfreien Betrieb des Gerätes sind beim
elektrischen Anschluss folgende Hinweise zu beachten:
Vergleichen Sie vor dem Anschließen des Gerätes die Anschluss- ■
daten (Spannung und Frequenz) auf dem Typenschild mit denen
Ihres Elektronetzes. Diese Daten müssen übereinstimmen, damit
keine Schäden am Gerät auftreten. Im Zweifelsfall fragen Sie
Ihren Elektrofachhändler.
Vergewissern Sie sich, dass die Netzleitung unbeschädigt ist und ■
nicht über heiße Oberächen und/oder scharfe Kanten verlegt
wird.
Die Netzleitung darf nicht straff gespannt sein, geknickt werden ■
oder in Kontakt mit dem heißen Gerät kommen.
Verlegen Sie die Netzleitung so, dass keine Stolpergefahr be- ■
steht.
Die elektrische Sicherheit des Gerätes ist nur dann gewährleistet, ■
wenn es an ein vorschriftsmäßig installiertes Schutzleitersystem angeschlossen wird. Der Betrieb an einer Steckdose ohne
Schutzleiter ist verboten. Lassen Sie im Zweifelsfall die Hausinstallation durch eine Elektro-Fachkraft überprüfen.
Der Hersteller übernimmt keine Verantwortung für Schäden, die
durch einen fehlenden oder unterbrochenen Schutzleiter verursacht werden.
Page 13
13
Inbetriebnahme
BEEM - Elements of Lifestyle
DE
Geräteübersicht
1 Bedienfeld und Anzeige 6 Knethaken
2 Deckel 7 Kuchenbackform
3 Sichtfenster 8 Rührhaken
4 Zutatenspender 9 Messlöffel
5 Brotbackform 10 Messbecher
Backform sowie Knet-/Rührhaken einsetzen und entnehmen
HINWEIS
Wenn in dieser Anleitung von „Backformen“ die Rede ist, so ►
bezieht sich dieser Ausdruck sowohl auf die Brotbackform als
auch auf die Kuchenbackform. Zur besseren Lesbarkeit wurde
darauf verzichtet, immer beide Formen zu erwähnen. Nur wenn
es sich ausschließlich um eine bestimmte Backform handelt,
wird diese auch so genannt.
Page 14
14
Inbetriebnahme
BEEM - Elements of Lifestyle
DE
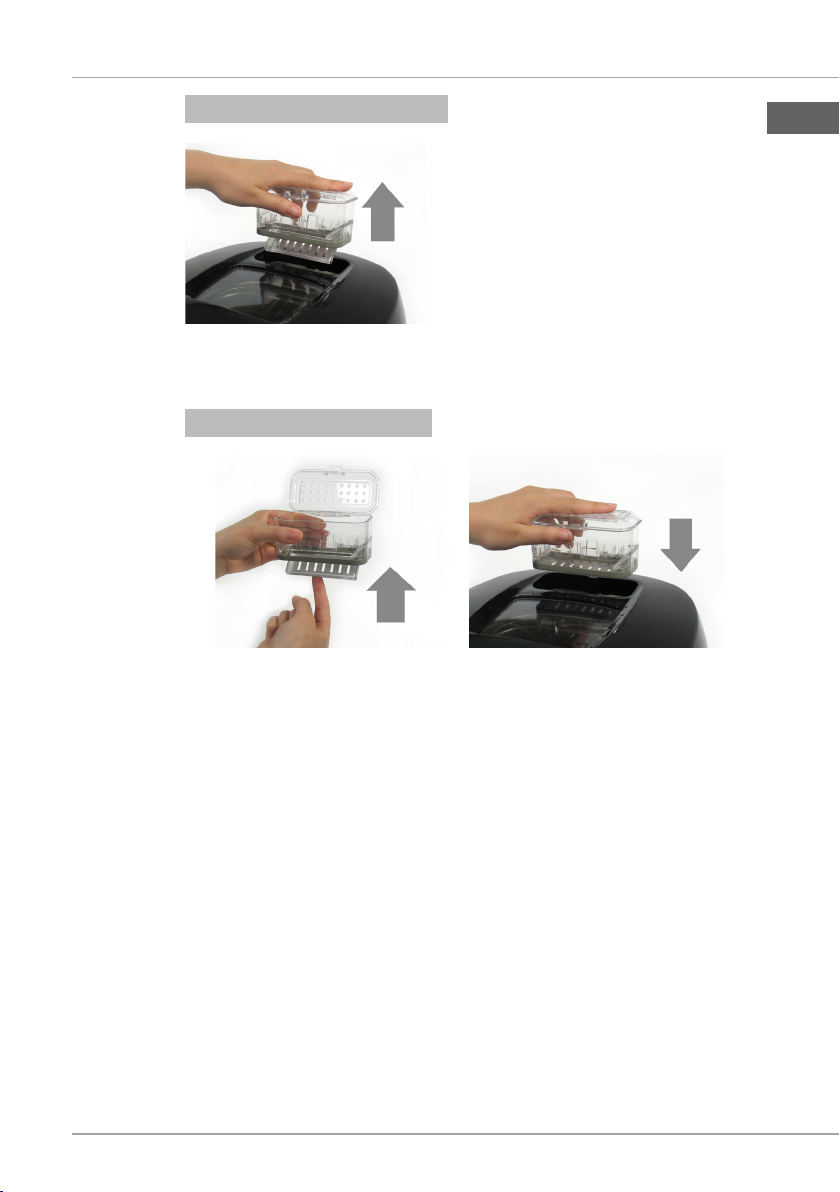
Knet-/Rührhaken einsetzen
Setzen Sie den Knet-/Rührhaken auf den Drehstift, der sich in
der Bodenmitte der Backform bendet. Haken und Stift haben
Abachungen und passen nur zusammen, wenn diese Stellen
übereinander liegen. Der Drehstift wird auf der Unterseite der
Backform von einer Flügelmutter gehalten.
Knet-/Rührhaken entnehmen
Halten Sie mit einer Hand die Flügelmutter auf der Unterseite der
Backform und mit der anderen den Knet-/Rührhaken fest.
Ziehen Sie den Knet-/Rührhaken mit einer leichten Drehbewe-
gung vom Drehstift ab, wobei Sie die Flügelmutter gleichzeitig in
die andere Richtung drehen.
HINWEIS
Sie können den Knet-/Rührhaken nach dem letzten Knetvor- ►
gang des gewählten Backprogramms entnehmen, damit er beim
Backen kein Loch im Brot hinterlässt.
Bestäuben Sie dazu ihre Hände mit etwas Mehl und heben Sie
den Brotteig an, um den Knet-/Rührhaken nach oben aus der
Backform herauszuziehen.
Page 15
15
Inbetriebnahme
BEEM - Elements of Lifestyle
DE
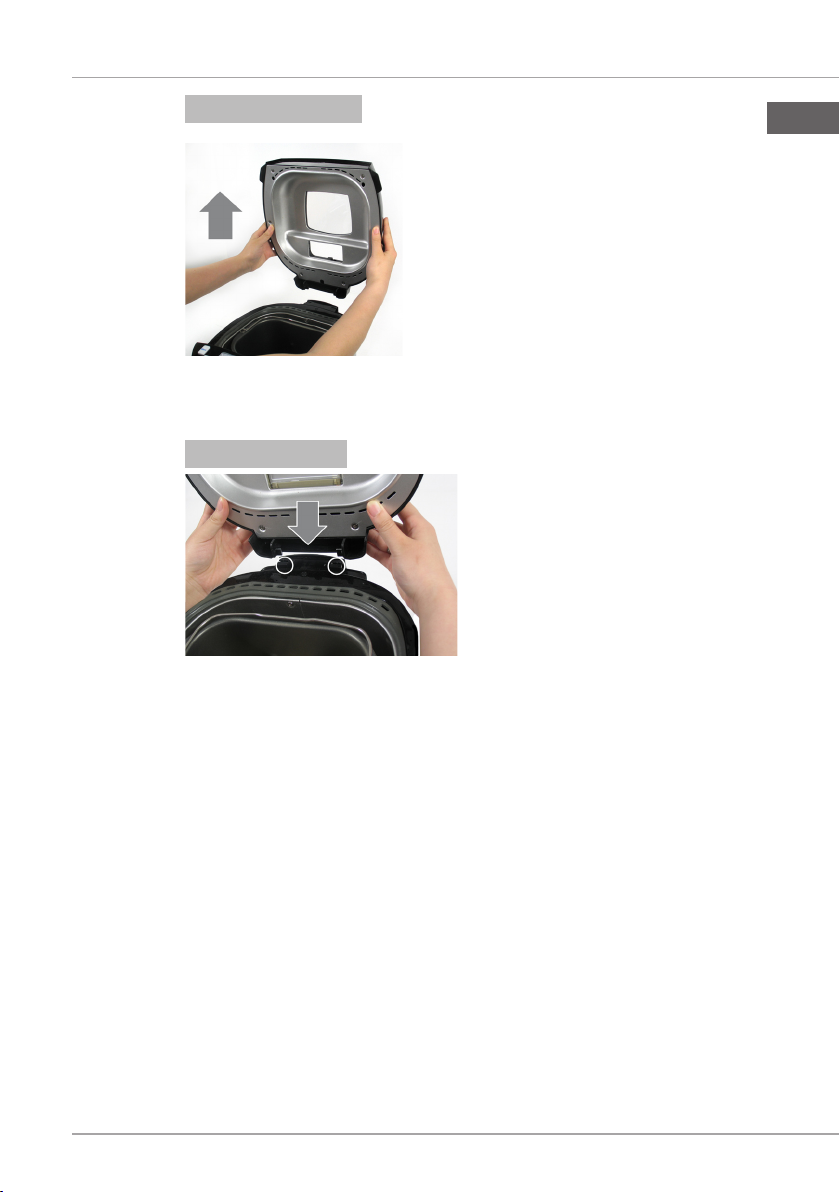
Backform einsetzen
Stecken Sie zunächst den Knet-/Rührhaken auf den Drehstift der
Backform.
Setzen Sie die Backform leicht gedreht in das Gerät.
Drehen Sie die Backform im Uhrzeigersinn, bis sie einrastet.
Backform entnehmen
Öffnen Sie den Gerätedeckel.
Drehen Sie die Backform am Griff gegen den Uhrzeigersinn bis
zum Anschlag.
Heben Sie die Backform aus dem Gerät.
WARNUNG
Verbrennungsgefahr!
Ofen, Backform und Heizspirale werden während des Betriebes sehr heiß!
Benutzen Sie Topfhandschuhe, um die Backform am Ende des ►
Backvorgangs aus dem Gerät zu entnehmen.
Page 16

16
Inbetriebnahme
BEEM - Elements of Lifestyle
DE
Vor dem ersten Gebrauch
ACHTUNG
Gefahr von Schäden an Gerät, Einzelteilen oder AntihaftBeschichtung!
Weder das Gerät selbst noch eines der Einzelteile in die Spül- ►
maschine geben.
Verwenden Sie zum Reinigen von Ofenraum, Formen und ►
Knethaken niemals scharfe Gegenstände oder scheuernde Reinigungsmittel, um die Antihaft-Beschichtung nicht zu zerstören.
Versichern Sie sich, dass sämtliches Verpackungsmaterial aus
und von dem Gerät entfernt wurde (Schutzfolien etc.).
Prüfen Sie, dass alle Teile vorhanden sind (siehe Kapitel Liefer-
umfang und Transportinspektion).
Entnehmen Sie die Backform aus dem Gerät sowie die Knet-/
Rührhaken (siehe Kapitel Backform sowie Knet-/Rührhaken
einsetzen und entnehmen).
Wischen Sie das Gerät innen und außen mit einem feuchten
Tuch ab (nur ein mildes Reinigungsmittel verwenden).
Waschen Sie alle anderen Einzelteile (Pos. 4 - 10 in der Geräte-
übersicht) in heißem Wasser ab, dem Sie ein mildes Reinigungsmittel zugesetzt haben.
Trocknen Sie das Gerät und die Einzelteile gründlich ab und
lassen Sie sie an der Luft nachtrocknen.
Page 17
17
Inbetriebnahme
BEEM - Elements of Lifestyle
DE
Bedienfeld und Anzeige
HINWEIS
Drücken Sie die im Folgenden beschriebenen Tasten mehrmals, ►
um alle Einstellmöglichkeiten zu testen. Jedem Tastendruck
folgt ein Signalton. Beobachten Sie die Anzeige, sie ändert sich
mit jedem Tastendruck.
Jede Kombination von Programm, Bräunungsgrad und Gewicht ►
wird automatisch mit der passenden Backzeit angezeigt.
■ : Mit dieser Taste wählen Sie aus den elf voreingestellten
Programmen aus. Das eingestellte Programm wird im Display
unter Menu angezeigt (Backprogramm 1 - 11).
■ : Mit dieser Taste stellen Sie das Gewicht des fertigen Brotes
ein. Sie können zwischen drei unterschiedlichen Größen wählen:
= 540g, = 680g oder = 900g. Im Display zeigt ein
Strich unter dem eingestellten Gewicht Ihre Wahl.
■ : Mit dieser Taste können Sie für die Programme 1 - 4 zwi-
schen drei Bräunungsgraden wählen: = hell, = mittel,
= dunkel. Zudem haben Sie die Möglichkeit, in den Back-
programmen 1, 2 oder 3 die Backzeit mit der Einstellung
zu verkürzen. Im Display zeigt ein Strich über dem eingestellten
Bräunungsgrad Ihre Wahl.
■ : Mit dieser Taste starten Sie das eingestellte Programm. Zum
Stoppen des Vorgangs müssen Sie diese Taste für etwa zwei
Sekunden gedrückt halten.
Page 18
18
Inbetriebnahme
BEEM - Elements of Lifestyle
DE
■ / : Mit diesen Tasten können Sie die Zeitschaltuhr
des Gerätes in 10-Minuten-Schritten erhöhen bzw. verringern.
Beachten Sie, dass die eingestellte Zeit anzeigt, wann der Backvorgang beendet ist. Es ist eine maximale Einstellung von 15
Stunden möglich.
Beispiel: Im Display zeigt die Zeitschaltuhr 6:30. Das bedeutet,
dass der Backvorgang in 6 Stunden und 30 Minuten
abgeschlossen ist.
Wenn Sie die Programmierung mit der -Taste
starten, läuft die Zeitschaltuhr (Timer) rückwärts. Ihr
Brot wird in 6 Stunden und 30 Minuten fertig sein.
Weiterhin stellen Sie über diese Tasten die Backzeit für Menü 10
ein.
Nach Anschluss des Gerätes an die Stromversorgung erscheint auf
dem Display folgende Grundeinstellung:
Links und rechts des Displays sind die einzelnen Phasen der Backprogramme aufgeführt. Nach Betätigung der -Taste zeigt Ihnen
ein Dreieck am linken oder rechten Displayrand an, in welcher Phase
sich das Backprogramm bendet.
Zeitschaltuhr (Falls
Startverzögerung aktiv)
Vorheizen des Backautomaten
Kneten des Teiges
Ruhen des Teiges Ende des Programms
Aufgehen des Teiges
Backen des Teiges
Warmhalten des fertigen
Produktes
Page 19
19
Bedienung und Betrieb
BEEM - Elements of Lifestyle
DE
Bedienung und Betrieb
In diesem Kapitel erhalten Sie wichtige Hinweise zur Bedienung des
Gerätes.
Sicherheitshinweise
GEFAHR
Lebensgefahr durch elektrischen Strom!
Stellen Sie sicher, dass das Gerät vollkommen trocken ist, ►
bevor Sie es benutzen.
WARNUNG
Verbrennungsgefahr!
Ofen, Backform und Heizspirale werden während des Betriebes sehr heiß!
Berühren Sie keine Teile des Innenraumes, wenn das Gerät in ►
Betrieb ist.
Benutzen Sie Topfhandschuhe, um die Backform am Ende des ►
Backvorgangs aus dem Gerät zu entnehmen.
WARNUNG
Verletzungsgefahr durch Knet-/Rührhaken!
Knet- bzw. Rührhaken werden von einem kräftigen Motor
bewegt!
Greifen Sie nicht in die Backform, wenn das Gerät in Betrieb ist. ►
Page 20
20
Bedienung und Betrieb
BEEM - Elements of Lifestyle
DE
Prinzipielle Gerätebedienung
HINWEIS
Backvorschläge nden Sie im beigefügten Rezeptbuch. ►
Entnehmen Sie die Backform aus dem Gerät und stecken Sie
ggf. den Knet- bzw. Rührhaken auf den Drehstift im Boden der
Backform (siehe Kapitel Backformen sowie Knet-/Rührhaken
einsetzen und entnehmen).
Füllen Sie die abgemessenen Backzutaten in die Backform.
Richten Sie sich dabei nach den Zubereitungshinweisen im
Rezeptbuch oder nach den Angaben auf der Verpackung der
gewählten Brotbackmischung.
HINWEIS
Zum Abmessen der Backzutaten können Sie den mitgelieferten ►
Messbecher bzw. -löffel verwenden. Für Flüssigkeiten stellen
Sie den Messbecher auf eine ebene Unterlage und kontrollieren
Sie den Füllstand auf Augenhöhe.
Setzen Sie die Backform in das Gerät (siehe Kapitel Backfor-
men sowie Knet-/Rührhaken einsetzen und entnehmen).
Schließen Sie den Deckel.
Stecken Sie den Netzstecker in eine Steckdose.
Wählen Sie mit der Taste das passende Backprogramm.
Stellen Sie mit der Taste das Brotgewicht ein.
Wählen Sie mit der Taste den Bräunungsgrad der Brotkrus-
te.
Wenn Sie den Backvorgang verzögert starten wollen, stellen Sie
mit den Tasten und die Zeitspanne ein, nach der
das Brot fertig sein soll.
Drücken Sie die Taste , um das Programm zu starten.
HINWEIS
Sobald Sie ► gedrückt haben, sind alle anderen Tastenfunkti-
onen blockiert.
Page 21
21
Bedienung und Betrieb
BEEM - Elements of Lifestyle
DE
Das Gerät beginnt nun, das gewählte Backprogramm abzuarbeiten.
Den Fortschritt des Backvorgangs zeigt Ihnen das Dreieck am linken
bzw. rechten Displayrand an.
HINWEIS
Sie können den Ablauf eines Programms abbrechen, indem Sie ►
die -Taste für ca. zwei Sekunden gedrückt halten.
Nach dem Ablauf der Backzeit erfolgt mehrmals ein Signalton. Die
Warmhaltephase beginnt (nur Menü 1-6, 10 und 11).
HINWEIS
Sie können die Backform auch während der Warmhaltephase ►
aus dem Gerät nehmen. Beenden Sie dazu den Programmab-
lauf, indem Sie die -Taste für ca. zwei Sekunden gedrückt
halten und ziehen Sie den Netzstecker aus der Steckdose.
Am Ende des Programms zeigt das Display die gewählte Aus-
gangsposition. Entnehmen Sie die Backform mit Topfhandschuhen aus dem Gerät. Lassen Sie das Brot oder den Kuchen etwas
abkühlen, bevor Sie das Backwerk aus der Form nehmen.
HINWEIS
Entnehmen Sie den Knet-/Rührhaken nach dem Backen aus ►
dem Brot, bevor Sie das Brot anschneiden.
Sie können den Knet-/Rührhaken auch schon nach dem letzten ►
Knetvorgang des gewählten Backprogramms entnehmen, damit
er beim Backen kein Loch im Brot hinterlässt.
Bestäuben Sie dazu ihre Hände mit etwas Mehl und heben Sie
den Brotteig an, um den Knet-/Rührhaken nach oben aus der
Backform herauszuziehen.
Weitere Tipps für ein optimales Backergebnis nden Sie im ►
beigefügten Rezeptbuch.
Page 22

22
Bedienung und Betrieb
BEEM - Elements of Lifestyle
DE
Backprogramme
Sie können mit der Taste zwischen 11 voreingestellten Programmen wählen:
Menü 1 - Basic
Zubereitung von Mischbrot. Sie können Zutaten ergänzen, um den
Geschmack zu verbessern, z.B. Kürbiskerne, Speck oder geröstete
Zwiebeln. Dieses Programm wird am häugsten verwendet.
Menü 2 - Weißbrot
Zum Backen von Weißbrot. Die klassische Variante ist das Weizenbrot, ein leichtes Brot mit knuspriger Kruste.
Menü 3 - Vollkornbrot
Vollkornbrote werden u. a. aus geschrotetem oder gemahlenem
Vollkorngetreide hergestellt. Das Programm beginnt mit Vorheizen, d.
h. die Zutaten werden vor dem Kneten erwärmt.
HINWEIS
Um die Menüs 1, 2 oder 3 zu verkürzen, wählen Sie mit der ►
Taste die Einstellung . In diesem Fall sollte das zuge-
gebene Wasser lauwarm sein.
Menü 4 – Süßes Brot
Süße Brote werden häug mit Milch hergestellt und können mit
Zutaten wie Schokoladenraspeln, Rosinen oder Nüssen verfeinert
werden.
Menü 5 - Kurzbackprogramm
Mit diesem Programm können sie die Backzeit von Misch- und Weißbrot verkürzen. So dauert beispielsweise ein Mischbrot mit Menü 1
und den Einstellungen und 3 Stunden und 25 Minuten, mit
dem Menü 5 dagegen nur 1 Stunde und 20 Minuten. Eingespart wird
die Zeit bei den Ruhephasen des Teiges. Daher wird empfohlen,
bei diesem Menü die benötigten Flüssigkeiten vorab zu erwärmen.
Bei Verwendung von kalten Flüssigkeiten kann der Teig nicht richtig
aufgehen. Ist die Flüssigkeit zu heiß, kann die Hefe nicht wirken.
Page 23
23
Bedienung und Betrieb
BEEM - Elements of Lifestyle
DE
Menü 6 - Glutenfreies Brot
Für das Backen von glutenfreien Backwaren mit glutenfreien Mehlen
oder Mehlmischungen.
Menü 7 - Pizzateig
Zum Kneten von Pizzateig. Füllen Sie alle Zutaten in die Brotbackform und das Gerät stellt einen glatten Pizzateig her. Sie müssen ihn
nur noch ausrollen, belegen und backen.
Menü 8 - Nudelteig
Das Programm stellt in kürzester Zeit einen gleichmäßigen Nudelteig
her.
Menü 9 - Marmelade
Zubereitung von Marmelade. Mit diesem Programm können Sie individuelle Marmeladen herstellen. Sie müssen die heiße Marmelade
nur noch in die Gläser füllen.
Menü 10 - Backen ohne Kneten
Nur zum Backen von fertigem Teig, der Teig wird bei diesem Pro-
gramm nicht geknetet. Die Backzeit kann mit den Tasten und
variiert werden (1:10; 1:20; 1:30). Sie können das Programm
jederzeit unterbrechen, indem Sie die -Taste für zwei Sekunden
gedrückt halten.
Menü 11 – Kuchen
Zum Herstellen von Rührkuchen. Verwenden Sie hierzu die Kuchenbackform mit dem Rührhaken.
HINWEIS
Die einzelnen Zeitangaben für jedes Programm entnehmen Sie ►
der Tabelle im Anhang.
Rezepte für Brote, Kuchen, Nudeln, Teige und Marmelade ►
nden Sie in unserem Rezeptbuch.
Falls Sie Brot oder andere Backwaren mit fertigen Back- ►
mischungen herstellen, folgen Sie den Backanweisungen auf
der Packung.
Page 24
24
Bedienung und Betrieb
BEEM - Elements of Lifestyle
DE
Zeitschaltuhr
HINWEIS
Der Timer kann für alle Menüs verwendet werden, außer für ►
Menü 10 (Backen ohne Kneten). Dort kann man die Backzeit
mit den Tasten und verändern (1:10; 1:20; 1:30).
Wählen Sie zuerst das gewünschte Menü (Taste ), das
Brotgewicht (Taste ) sowie den Bräunungsgrad (Taste ).
Beispiel: Sie haben folgende Einstellung gewählt:
Menü 1, Brotgewicht , Bräunungsgrad .
Die Zeitangabe zeigt 3:25 an.
Stellen Sie nun mit den Tasten und die gewünschte
Backverzögerung ein. Mit jedem Tastendruck verändert sich die
Anzeige um 10 Minuten. Sie können eine Zeitspanne von maximal 15 Stunden (inklusive Backzeit) einstellen.
Beispiel: Mit jedem Tastendruck verändert sich die
Zeitangabe auf dem Display: 3:25 – 3:30 – 3:40 –
3:50 – 4:00 etc. Wenn Sie möchten, dass Ihr Brot in 6
Stunden fertig ist, drücken Sie die -Taste, bis
das Display 6:00 anzeigt.
Starten Sie die Programmierung mit der Taste . Der Doppel-
punkt im Display blinkt und die eingestellte Zeit läuft rückwärts
ab. Das Backprogramm startet automatisch, wenn der Beginn
der Backzeit erreicht ist.
Beispiel: Die Zeitanzeige steht auf 6:00, der Doppelpunkt
blinkt. Wenn die Einstellung 3:25 erreicht ist, schaltet
sich das Backprogramm automatisch ein.
Page 25
25
Bedienung und Betrieb
BEEM - Elements of Lifestyle
DE
Nach Ablauf der eingestellten Zeitspanne ist das Brot fertig, Sie
können die Backform entnehmen.
Beispiel: Nach 6 Stunden, inkl. Backprogramm, ist das Brot
HINWEIS
Bei warmer oder schwüler Witterung kann das Brot bei einer ►
Verzögerung von mehr als zwei Stunden zu schnell aufgehen.
Um zu vermeiden, dass die Hefe zu früh aufgeht, geben Sie ►
das Mehl zuletzt in die Form, formen Sie eine kleine Mulde und
legen Sie die Hefe dort hinein.
Stellen Sie keine langen Verzögerungszeiten ein, wenn Sie ►
leicht verderbliche Lebensmittel (Milch, Eier etc.) verarbeiten.
Warmhaltefunktion
Die Warmhaltefunktion verhindert, dass beispielsweise das Brot
Feuchtigkeit zieht. Nach Ablauf der Programme 1-6 sowie 10 und 11
wird das fertige Produkt für eine bestimmte Zeit warm gehalten. Das
Display zeigt „0:00“ an und es ertönt ein Signalton in Intervallen.
Wenn Sie das fertige Brot währende der Warmhaltephase herausnehmen möchten, schalten Sie das Gerät ab, indem Sie die
-Taste für zwei Sekunden gedrückt halten.
fertig. Das Display springt auf 0:00, die Warmhaltephase beginnt. Sie können das Brot entnehmen oder
Sie lassen das Brot während der Warmhaltephase
noch im Gerät. Wenn diese abgelaufen ist, springt
das Display zurück in die ursprüngliche Einstellung:
Menü 1, Brotgewicht , Bräunungsgrad , 3:25.
HINWEIS
Wie lange diese Warmhaltezeiten sind, entnehmen Sie bitte aus ►
der Tabelle mit den einzelnen Programmphasen im Anhang.
Page 26

26
Bedienung und Betrieb
BEEM - Elements of Lifestyle
DE
Zutatenspender
Mit dem Zutatenspender können trockene Zutaten wie Kürbiskerne
oder Rosinen gegen Ende des Knetvorgangs zum Teig gegeben
werden. Die Bodenklappe des Spenders öffnet sich automatisch bei
den Backprogrammen 1-7. Das Öffnen der Klappe wird durch deutlich hörbare Klackgeräusche und mehrere Signaltöne signalisiert.
Der Zutatenspender öffnet sich nicht bei den Backprogrammen 8–11
(Nudelteig, Marmelade, Backen ohne Kneten, Kuchen).
HINWEIS
Zu welchem Zeitpunkt sich der Zutatenspender bei den einzel- ►
nen Programmen öffnet, entnehmen Sie bitte der Tabelle im
Anhang.
Achten Sie darauf, den Spender nicht zu überfüllen, sonst verkei- ■
len sich die Zutaten und fallen nicht in die Backform. Halten Sie
sich bei den Füllmengen an die Angaben in den Rezepten.
Kleine Zutaten wie Sesam können durch das Bodengitter des ■
Spenders fallen. Für solche Zutaten öffnen Sie kurz den Deckel
des Backautomaten und geben Sie die Körner direkt in die Backform, wenn der Signalton für die Öffnung des Spenders ertönt.
Verfahren Sie genauso bei Zutaten, die schmelzen oder verkle- ■
ben können (Schokolade, Käse, Fruchtstücke etc.).
Reinigen Sie den Spender nach jedem Gebrauch. Auch Ver- ■
schmutzungen können verhindern, dass sich die Bodenklappe
des Spenders öffnet.
HINWEIS
Das Gerät signalisiert mit kurzen Signaltönen, wann sich die ►
Bodenklappe des Spenders öffnet. Zu diesem Zeitpunkt können
Sie den Deckel des Backautomaten kurz öffnen und die Zutaten
auch direkt in die Backform geben.
Nach Beendigung des Backvorgangs ziehen Sie den Zutaten-
spender nach oben aus dem Gerät, reinigen Sie ihn, drücken
Sie die Bodenklappe zu und stecken Sie den Spender wieder ins
Gerät.
Page 27
27
Bedienung und Betrieb
BEEM - Elements of Lifestyle
DE
Zutatenspender entnehmen
Zum Entnehmen des Zutatenspenders ziehen Sie ihn mit etwas
Kraft nach oben aus dem Gerät.
Zutatenspender einsetzen
Um den Spender einzusetzen, schließen Sie zunächst mit leich-
tem Druck die Bodenklappe, bis sie einrastet.
Drücken Sie den Zutatenspender in das Gerät, bis er hörbar
einrastet.
Page 28

28
Reinigung und Pege
BEEM - Elements of Lifestyle
DE
Reinigung und Pege
In diesem Kapitel erhalten Sie wichtige Hinweise zur Reinigung und
Pege des Gerätes.
Sicherheitshinweise
WARNUNG
Beachten Sie die folgenden Sicherheitshinweise, bevor Sie mit der
Reinigung beginnen:
Ziehen Sie vor der Reinigung des Geräts den Netzstecker aus ►
der Steckdose.
Warten Sie, bis das Gerät abgekühlt ist, bevor Sie mit der Reini- ►
gung beginnen.
Tauchen Sie das Gerät oder den Netzstecker niemals in Wasser ►
oder andere Flüssigkeiten.
ACHTUNG
Gefahr von Schäden an Gerät, Einzelteilen oder AntihaftBeschichtung!
Weder das Gerät selbst noch eines der Einzelteile sind für die ►
Spülmaschine geeignet.
Verwenden Sie zum Reinigen von Ofenraum, Formen und ►
Knethaken niemals scharfe Gegenstände oder scheuernde Reinigungsmittel, um die Antihaft-Beschichtung nicht zu zerstören.
Reinigung
Reinigen Sie das Gerät nach jedem Gebrauch. Zur einfachen ■
Reinigung kann der Deckel des Gerätes abgenommen werden
(siehe nachfolgendes Kapitel Deckel entnehmen).
Wischen Sie das Gerät und den Innenraum des Gehäuses mit ■
einem feuchten Tuch ab.
Die anderen benutzten Einzelteile können Sie in heißem Was- ■
ser abwaschen, dem Sie ein mildes Reinigungsmittel zugesetzt
haben.
Lassen Sie das Gerät einige Zeit nachtrocknen. ■
Setzen Sie nach der Reinigung den Deckel wieder ein (siehe ■
nachfolgendes Kapitel Deckel einsetzen).
Page 29
29
Reinigung und Pege
BEEM - Elements of Lifestyle
DE
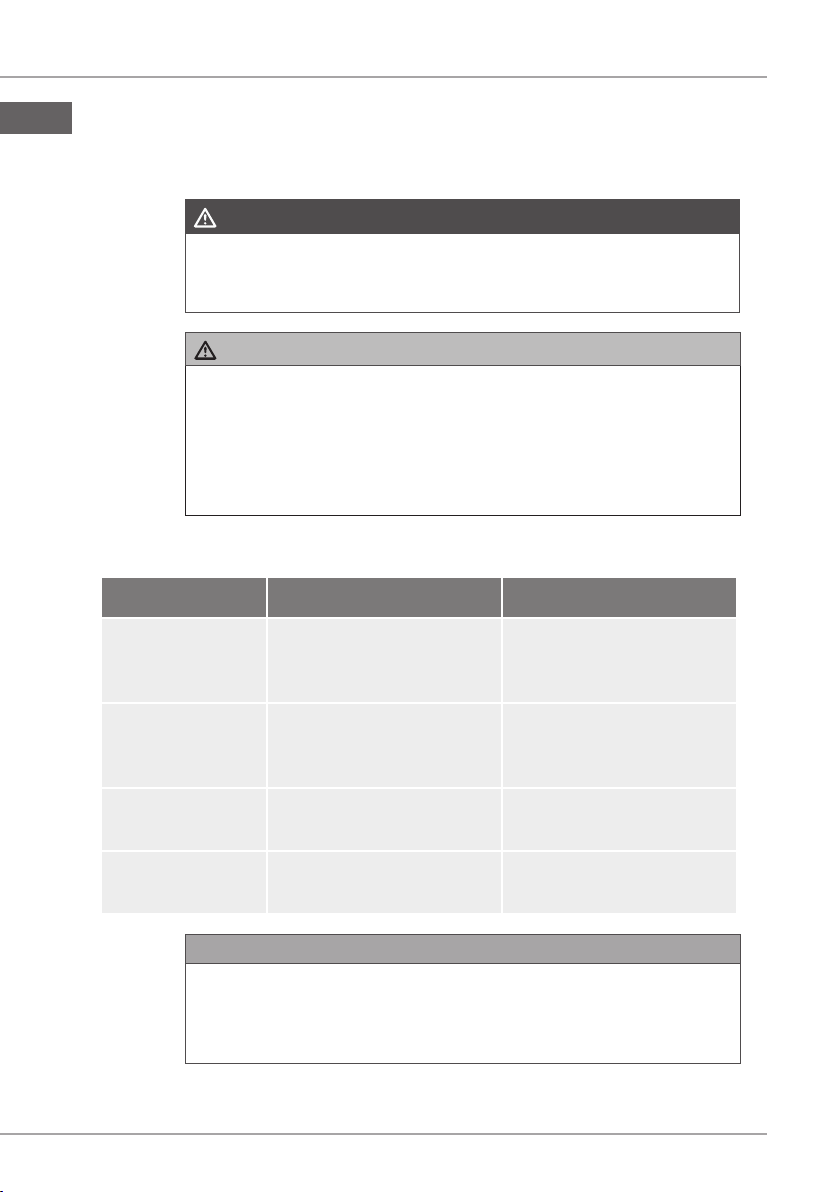
Deckel entnehmen
Stellen Sie den Deckel senkrecht und ziehen Sie ihn nach oben
vom Gerät ab.
Deckel einsetzen
Halten Sie den Deckel senkrecht und drücken Sie die Rastnasen
des Deckels in die Aussparungen des Gehäuses (siehe Markierungen Abbildung oben).
Page 30
30
Störungsbehebung
BEEM - Elements of Lifestyle
DE
Störungsbehebung
Sicherheitshinweise
GEFAHR
Lebensgefahr durch elektrischen Strom!
Ziehen Sie den Netzstecker aus der Steckdose, bevor Sie mit ►
der Störungsbehebung beginnen.
WARNUNG
Gefahr durch unsachgemäße Reparaturen!
Durch unsachgemäße Reparaturen können erhebliche Gefahren
für den Benutzer und Schäden am Gerät entstehen.
Reparaturen an Elektrogeräten dürfen nur vom Werkskun- ►
dendienst oder von Fachleuten durchgeführt werden, die vom
Hersteller geschult sind.
Störungsursachen und -behebung
Fehler Mögliche Ursache Behebung
Warten Sie, bis das Gerät
Display zeigt E00. Gerät ist zu kalt.
Zimmertemperatur angenommen hat.
Gerät ist nach dem letzten
Display zeigt E01.
Display zeigt EEE. Temperatursensor offen. Kundendienst anrufen.
Display zeigt
HHH.
HINWEIS
Backvorgang noch zu
warm.
Kurzschluss im Temperatursensor.
Wenn Sie mit den vorstehend genannten Schritten das Problem ►
nicht lösen können, wenden Sie sich bitte an den Kundendienst.
Bei Problemen, die das Backergebnis betreffen, beachten Sie ►
bitte die Hinweise im beigefügten Rezeptbuch.
Warten Sie, bis das Gerät
abgekühlt ist.
Kundendienst anrufen.
Page 31

31
Hinweise zur Lagerung/Entsorgung
BEEM - Elements of Lifestyle
DE
Hinweise zur Lagerung/Entsorgung
Lagerung
Sollten Sie das Gerät längere Zeit nicht benötigen, reinigen Sie es
wie im Kapitel Reinigung und Pege beschrieben. Bewahren Sie
das Gerät und alle Zubehörteile an einem trockenen, sauberen und
frostfreien Ort auf. Schützen Sie das Gerät vor direkter Sonneneinstrahlung.
Entsorgung
Dieses Produkt darf innerhalb der Europäischen Union nicht im normalen Hausmüll entsorgt werden.
Entsorgen Sie das Gerät gemäß der Elektro- und Elektronik Altgeräte
EG-Richtlinie 2002/96/EC-WEEE (Waste Electrical and Electronic
Equipment). Bei Rückfragen wenden Sie sich bitte an die für die
Entsorgung zuständige kommunale Behörde.
Anhang
Technische Daten
Modell
Typnummer B7.001
MULTI-BACK TOPCLASS 3 in 1
Brotbackautomat
Betriebsspannung 230 VAC
Netzfrequenz 50 Hz
Leistungsaufnahme 650 W
Abmessungen
Gewicht ca. 5,7 kg
Schutzklasse I
Schutzart IP X0
310 x 290 x 380 mm
(H x B x T)
Page 32

32
Anhang
BEEM - Elements of Lifestyle
DE
Menü 1. Basic
Tabelle der Backzeiten
Gewicht
Bräunungsgrad
- - - - - - - - - - - 5 min 5 min 5 min 5min 5 min 5 min 5 min 5 min 5 min 5 min 5 min 5 min
5 min 5 min 5 min 5 min 5 min 5 min 5 min 5 min 5 min 5 min 5 min 5 min
20 min 20 min 20 min 20 min 20 min 20 min 20 min 20 min 20 min 20 min 20 min 20 min
Vorheizen
Kneten
Ruhen
Kneten
40 min 40 min 40 min 40 min 40 min 40 min 40 min 40 min 40 min 15 min 15 min 15 min
Aufgehen
10 s 10 s 10 s 10 s 10 s 10 s 10 s 10 s 10 s 10 s 10 s 10 s
Kneten
25 min 25 min 25 min 25 min 25 min 25 min 25 min 25 min 25 min 9 min 9 min 9 min
Aufgehen
10 s 10 s 10 s 10 s 10 s 10 s 10 s 10 s 10 s 10 s 10 s 10 s
Kneten
50 min 50 min 50 min 50 min 50 min 50 min 50 min 50 min 50 min 30 min 30 min 30 min
Aufgehen
46 min 51 min 58 min 48 min 53 min 60 min 53 min 58 min 65 min 48 min 53 min 60 min
Backen
Programmdauer (h:min) 3:11 3:16 3:23 3:13 3:18 3:25 3:18 3:23 3:30 2:12 2:17 2:24
1 h 1 h 1 h 1 h 1 h 1 h 1 h 1 h 1 h 1 h 1 h 1 h
Warmhalten
Zutatenspender öffnet sich bei
2:51 2:56 3:03 2:53 2:58 3:05 2:58 3:03 3:10 1:52 1:57 2:04
15:00 15:00 15:00 15:00 15:00 15:00 15:00 15:00 15:00 15:00 15:00 15:00
(h:min)
Max. Verzögerung des
Programmablaufs (h:min)
Page 33

33
Anhang
BEEM - Elements of Lifestyle
DE
- - - - - - - - - - - 5 min 5 min 5 min 5 min 5 min 5 min 5 min 5 min 5 min 5 min 5 min 5 min
5 min 5 min 5 min 5 min 5 min 5 min 5 min 5 min 5 min 5 min 5 min 5 min
20 min 20 min 20 min 20 min 20 min 20 min 20 min 20 min 20 min 20 min 20 min 20 min
Menü 2. Weißbrot
Gewicht
Bräunungsgrad
Vorheizen
Kneten
Ruhen
Kneten
39 min 39 min 39 min 39 min 39 min 39 min 39 min 39 min 39 min 30 min 30 min 30 min
Aufgehen
10 s 10 s 10 s 10 s 10 s 10 s 10 s 10 s 10 s 10 s 10 s 10 s
Kneten
31 min 31 min 31 min 31 min 31 min 31 min 31 min 31 min 31 min 15 min 15 min 15 min
Aufgehen
10 s 10 s 10 s 10 s 10 s 10 s 10 s 10 s 10 s 5 s 5 s 5 s
Kneten
60min 60min 60min 60min 60min 60min 60min 60min 60min 30min 30min 30min
Aufgehen
48min 50 min 53 min 50 min 52 min 55 min 55min 57 min 60 min 50 min 52 min 55 min
Backen
Programmdauer (h:min) 3:28 3:30 3:33 3:30 3:32 3:35 3:35 3:37 3:40 2:35 2:37 2:40
1 h 1 h 1 h 1 h 1 h 1 h 1 h 1 h 1 h 1 h 1 h 1 h
Warmhalten
3:08 3:10 3:13 3:10 3:12 3:15 3:15 3:17 3:20 2:15 2:17 2:20
15:00 15:00 15:00 15:00 15:00 15:00 15:00 15:00 15:00 15:00 15:00 15:00
(h:min)
Max. Verzögerung des
Programmablaufs (h:min)
Zutatenspender öffnet sich bei
Page 34

34
Anhang
BEEM - Elements of Lifestyle
DE
Menü 3. Vollkornbrot
Gewicht
Bräunungsgrad
30 min 30 min 30 min 30 min 30 min 30 min 30 min 30 min 30 min 5 min 5 min 5 min
Vorheizen
5 min 5 min 5 min 5 min 5 min 5 min 5 min 5 min 5 min 5 min 5 min 5 min
Kneten
5 min 5 min 5 min 5 min 5 min 5 min 5 min 5 min 5 min 5 min 5 min 5 min
Ruhen
15 min 15 min 15 min 15 min 15 min 15 min 15 min 15 min 15 min 15 min 15 min 15 min
Kneten
49 min 49 min 49 min 49 min 49 min 49 min 49 min 49 min 49 min 24 min 24 min 24 min
Aufgehen
10 s 10 s 10 s 10 s 10 s 10 s 10 s 10 s 10 s 10 s 10 s 10 s
Kneten
Backen
Programmdauer (h:min) 3:43 3:45 3:48 3:45 3:47 3:50 3:50 3:52 3:55 2:30 2:32 2:35
1 h 1 h 1 h 1 h 1 h 1 h 1 h 1 h 1 h 1 h 1 h 1 h
Warmhalten
Zutatenspender öffnet sich bei
2:58 3:00 3:03 3:00 3:02 3:05 3:05 3:07 3:10 2:10 2:12 2:15
15:00 15:00 15:00 15:00 15:00 15:00 15:00 15:00 15:00 15:00 15:00 15:00
(h:min)
Max. Verzögerung des
Programmablaufs (h:min)
26 min 26 min 26 min 26 min 26 min 26 min 26 min 26 min 26 min 11 min 11 min 11 min
Aufgehen
10 s 10 s 10 s 10 s 10 s 10 s 10 s 10 s 10 s 10 s 10 s 10 s
Kneten
45 min 45 min 45 min 45 min 45 min 45 min 45 min 45 min 45 min 35 min 35 min 35 min
Aufgehen
48 min 50 min 53 min 50 min 52 min 55 min 55 min 57 min 60 min 50 min 52 min 55 min
Page 35

35
Anhang
BEEM - Elements of Lifestyle
DE
11. Ku-
chen
10. Ba-
cken
9. Marme-
lade
8. Nudel-
teig
7. Pizza-
teig
6. Glu-
tenfreies
Brot
Backen des Teiges
Warmhalten des fertigen Produkts
- - - - -
5. Kurz-
backpro-
gramm
4. Süßes Brot
Gewicht
Menü
- - - - - - - - - -
Vorheizen
5 min 5 min 5 min 5 min 5 min 5 min 3 min 5 min - 5 min
Kneten
5min 5min 5min - - 5min - - - -
Ruhen
20 min 20 min 20 min 15 min 10 min 20 min 11 min 10 min - 15 min
Kneten
39 min 39 min 39 min 12 min - 60 min - - - -
Aufgehen
10 s 10 s 10 s - - - - - - -
Kneten
26 min 26 min 26 min - - - - - - -
Aufgehen
5 s 5 s 5 s - - - - - - -
Kneten
52 min 52 min 52 min - 60 min - - - - -
Aufgehen
50 min 55 min 60 min 48 min 55 min - - 70 min 60 -90 min 75 min
Backen
Programmdauer (h:min) 3:17 3:22 3:27 1:20 2:10 1:30 0:14 1:25 1:00-1:30 1:35
1 h 1 h 1 h 1 h 1 h - - - 1 h 22 min
Warmhalten
2:57 3:02 3:07 1:10 2:05 1:10 - - - -
15:00 15:00 15:00 15:00 15:00 15:00 15:00 15:00 - 15:00
(h:min)
Max. Verzögerung des
Programmablaufs (h:min)
Zutatenspender öffnet sich bei
Ruhen des Teiges
Aufgehen des Teiges
Vorheizen des Backautomaten
Kneten des Teiges
Page 36

36
Anhang
BEEM - Elements of Lifestyle
DE
Zertizierungen
Symbol Bedeutung
Das Gerät B7.001 ist geprüft und
zertiziert durch Intertek.
Das Gerät entspricht den einschlägigen EU-Richtlinien (siehe
Konformitätserklärung).
Dieses Gerät entspricht den
Richtlinien zur Beschränkung
der Verwendung bestimmter gefährlicher Substanzen in Elektround Elektronikgeräten (RoHS).
Dieses Gerät entspricht den Bestimmungen der Richtlinie über
Elektro- und Elektronikaltgeräte.
Ersatzteile und weiteres Zubehör
Pos.* Artikelnr.
4 900 566 001 Zutatenspender
5, 6 900 566 006 Brotbackform mit Knethaken
7, 8 900 566 011 Kuchenbackform mit Rührhaken
Bezeichnung
9, 10 900 566 016 Messlöffel und Messbecher
* laut Skizze in der Gerätebeschreibung
Garantie, Service und Reparaturen
Dies ist ein Qualitätsprodukt von BEEM und wurde nach den neuesten Fabrikationsmethoden hergestellt.
Wir garantieren für die einwandfreie Beschaffenheit dieses Qualitätsprodukts. Innerhalb der Garantiezeit beheben wir kostenlos alle
Material- oder Fabrikationsfehler.
Für dieses Produkt beträgt die Garantiezeit 2 Jahre.
Bei einer gewerblichen oder gleichzustellenden Nutzung, z.B.
in Hotels, Pensionen oder Gemeinschaftsanlagen, oder wenn der
Kunde kein Verbraucher im Sinne des Bürgerlichen Gesetzbuchs ist,
beträgt die Garantiezeit 6 Monate. Der Gewährleistungsausschluss
bleibt hiervon unberührt.
Page 37

37
Anhang
BEEM - Elements of Lifestyle
DE
Gewährleistungsausschluss: Ausgeschlossen von der Garantie
sind insbesondere Mängel, die durch unsachgemäße Handhabung,
Nichtbeachten der Bedienungsanleitung sowie der Sicherheitshinweise, Gewaltanwendung, Veränderungen, eigene Reparaturversuche
und Reparaturversuche unqualizierter Dritter verursacht sind. Ebenso Mängel, die auf normalem Verschleiß beruhen.
Soweit wir zur Gewährleistung gesetzlich verpichtet sind, werden
wir – unter Ausschluss des Rechts auf Wandlung oder Minderung –
nach unserer Wahl entweder kostenlos nachbessern oder kostenlos
Ersatz leisten. Gelingt die Nachbesserung trotz mehrerer Versuche
nicht oder ist auch der Ersatzgegenstand mit einem von uns zu vertretenden Mangel behaftet, so ist der Kunde zur Herabsetzung des
Preises oder nach seiner Wahl zur Rückgängigmachung des Vertrages berechtigt. Durch Inanspruchnahme der Garantie verlängert
sich diese nicht. Für Wandlung (Um- und Austausch), Rückgabe
des Geräts (Rücktritt vom Kaufvertrag) oder Minderung des Kaufpreises ist zunächst immer der Händler zuständig, bei dem Sie das
Produkt erworben haben. Dies gilt insbesondere für die Rückgabe
oder für Minderungsansprüche, da diese unter Berücksichtigung des
Kaufpreises geregelt werden müssen. Eine Kaufpreisrückerstattung
bei Rückgabe oder eine Gutschrift bei Minderung kann nur über den
Händler abgewickelt werden, bei dem Sie die Ware käuich erworben
haben.
Sollten sich wider Erwarten Mängel herausstellen, versuchen Sie erst
eine telefonische Klärung. Schlägt dies fehl, senden Sie bitte das
sorgfältig verpackte Gerät an Ihren Händler oder an die unten angegebene Kundendienstadresse. Geben Sie dabei Ihre vollständige Adresse, Typ- und Modellnummer sowie die Seriennummer des Geräts
an. Diese nden Sie auf dem Typenschild am Gerät. Beschreiben
Sie bitte möglichst ausführlich die aufgetretenen Mängel oder Fehler.
Dem Produkt oder der Ersatzteilbestellung ist eine maschinell erstellte sowie datierte Kaufquittung oder Rechnung beizulegen. Ohne
eine maschinell erstellte Kaufquittung oder Rechnung kann keine
Garantieleistung erbracht werden, weder für Reparaturen, noch für
Ersatzteile oder andere Ansprüche.
Page 38

38
Anhang
BEEM - Elements of Lifestyle
DE
Außerhalb Deutschlands und insbesondere in Nicht-EU-Ländern
sollten Sie den Artikel an Ihren Händler oder den dort ansässigen
Vertreiber senden. Auskünfte können Sie, vorzugsweise per E-Mail,
bei der unten angegebenen Kundendienstadresse einholen.
Reparaturen, die nicht der Garantie unterliegen, können Sie, gegen
individuelle Berechnung, ebenfalls vom Kundendienst durchführen
lassen – außerhalb Deutschlands von Ihrem Händler, bei dem Sie die
Ware erworben haben, oder einer Servicestelle, falls vorhanden.
Verschleißteile und Verbrauchsmaterial können Sie bei Ihrem
Händler oder der angegebenen Kundendienstadresse bestellen.
Außerhalb Deutschlands wenden Sie sich in erster Linie an Ihren
Händler oder den dort zuständigen Vertreiber.
Für Produktinformationen, Zubehörbestellungen oder Fragen zur
Serviceabwicklung kontaktieren Sie Ihren Händler oder den angegebenen Kundendienst. Außerhalb Deutschlands und insbesondere in
Nicht-EU-Ländern, setzen Sie sich zunächst mit Ihrem Händler oder
dem Vertreiber in Verbindung.
Nutzen Sie auch das Internet. Auf unserer Website
www.beem.de nden Sie Zubehör und Ersatzteile sowie Bedienungsanleitungen in verschiedenen Sprachen. Außerdem
weitere Produktinformationen.
Page 39
39
Anhang
BEEM - Elements of Lifestyle
DE
EG-Konformitätserklärung
Name/Anschrift des Herstellers: BEEM Blitz-Elektro-Erzeugnisse
Manufaktur Handels-GmbH
Dieselstraße 19-21
D-61191 Rosbach v.d.H.
Wir erklären, dass die Produkte
Fabrikat: Brotbackautomat
MULTI-BACK TOPCLASS 3 in 1
Typ: B7.001
den folgenden einschlägigen Bestimmungen entspricht:
EG-Richtlinie 2006/95/EG elektrische Betriebsmittel zur Verwendung innerhalb bestimmter Spannungsgrenzen,
EG-Richtlinie 2004/108/EG Elektromagnetische Verträglichkeit.
Folgende harmonisierte Normen wurden ganz oder teilweise angewandt:
EN 60335-2-9:2003+A1:04+A2:06+A12:07
EN 60335-1:2002+A11,A1:04+A12, A2:06+A13:08
EN 62233:2008
EN 55014-1:2006
EN 55014-2:1997+A1:2001
EN 61000-3-2:2006
EN 61000-3-3:1995+A1:2001+A2:2005
Rosbach, den 15.04.2010
________________________________________
Bijan Mehshat
(Rechtsverbindliche Unterschrift des Ausstellers)
Page 40

Index
DE
Index
A
Anzeige.....................17
Aufstellort ...................12
Auspacken ..................10
B
Backprogramme ..............22
Backvorgang.................20
Backzeiten ..................32
Bedienfeld...................17
Bedienung...................19
Beschädigtes Gerät ............8
Bestimmungsgemäße Verwendung 7
Betrieb .....................19
Bräunungsgrad ...............17
Brotgewicht ..................17
E
EG-Konformitätserklärung ......39
Elektrischer Anschluss .........12
Entsorgung ..................31
Entsorgung der Verpackung ..... 11
Ersatzteile ...................36
G
Garantie ....................36
Gefahr durch Strom ............9
Geräteelemente ..............13
Grundlegende Sicherheitshinweise 8
H
Haftungsbeschränkung..........7
I
Inbetriebnahme...............10
Inhaltsverzeichnis ..............3
L
Lagerung....................31
Lieferumfang.................11
N
Nachbesitzer..................5
R
Reinigung ...................28
Reparaturen .................36
Rührhaken entnehmen/einsetzen. 13
S
Service .....................36
Sicherheit ....................8
Störungsbehebung ............30
T
Technische Daten .............31
Transportinspektion ...........11
U
Urheberrecht..................5
V
Verbrennungsgefahr ............9
Verpackung.................. 11
Vor dem ersten Gebrauch.......16
W
Warmhalten..................25
Warnhinweise .................6
Z
Zeitschaltuhr .................24
Zertizierungen ...............36
Zubehör ....................36
Zutatenspender...............26
K
Knethaken entnehmen/einsetzen . 13
40
BEEM - Elements of Lifestyle
Page 41

Table of Contents
Introduction ..........................................43
Details of this instruction manual ........................43
Copyright ............................................43
Warning statements . . . . . . . . . . . . . . . . . . . . . . . . . . . . . . . . . . . .44
Intended use ..........................................45
Disclaimer ............................................45
Safety ...............................................46
Fundamental safety precautions ...........................46
Electric shock hazard . . . . . . . . . . . . . . . . . . . . . . . . . . . . . . . . . . . 47
Danger of burns . . . . . . . . . . . . . . . . . . . . . . . . . . . . . . . . . . . . . . . 47
Initial use ............................................48
Safety tips ............................................48
Unpacking ............................................48
Scope of supply and transport inspection ....................49
Disposal of the packaging ................................49
Demands on the installation location . . . . . . . . . . . . . . . . . . . . . . . 50
Electrical connection ....................................50
Appliance overview .....................................51
Inserting and removing baking form and dough hook/agitator . . . . 51
Before using for the rst time . . . . . . . . . . . . . . . . . . . . . . . . . . . . .54
Control panel and display ................................55
EN
Operation and function . . . . . . . . . . . . . . . . . . . . . . . . . . . . . . . . 57
Safety tips ............................................57
Basic operation of the appliance ...........................58
Timer ................................................62
Holding function . . . . . . . . . . . . . . . . . . . . . . . . . . . . . . . . . . . . . . . 63
Ingredients dispenser ...................................64
BEEM - Elements of Lifestyle
41
Page 42

42
BEEM - Elements of Lifestyle
EN
Cleaning and care .....................................66
Safety tips ............................................66
Cleaning . . . . . . . . . . . . . . . . . . . . . . . . . . . . . . . . . . . . . . . . . . . . . 66
Troubleshooting . . . . . . . . . . . . . . . . . . . . . . . . . . . . . . . . . . . . . .68
Safety tips ............................................68
Faults - causes and remedies .............................68
Information on storage/disposal .........................69
Storage ..............................................69
Disposal . . . . . . . . . . . . . . . . . . . . . . . . . . . . . . . . . . . . . . . . . . . . . 69
Annex ...............................................69
Technical data .........................................69
Table of baking times . . . . . . . . . . . . . . . . . . . . . . . . . . . . . . . . . . .70
Certications ..........................................74
Spare parts and other accessories .........................74
Guarantee, service and repairs ...........................74
EC Declaration of Conformity .............................77
Index ...............................................78
Page 43

43
Introduction
BEEM - Elements of Lifestyle
EN
Introduction
Dear customer,
With the purchase of the MULTI-BACK TOPCLASS 3 in 1 Bread
Maker, you have chosen a quality product from BEEM. The MULTI-
BACK TOPCLASS 3 in 1 Bread Maker allows you to easily make
various types of bread. In addition you can use the MULTI-BACK
TOPCLASS 3 in 1 to make tasty jams, pastas, pizza doughs and
cakes.
Please read the information below to become familiar with your appliance fast and make a full use of its functions.
Your appliance will serve your needs for many years to come provided you handle it and maintain with due care.
We would like to wish you much pleasure while using it.
Your BEEM Blitz-Elektro-Erzeugnisse Manufaktur
Details of this instruction manual
This instruction manual forms an integral part of the MULTI-BACK
TOPCLASS 3 in 1 Bread Maker (hereinafter referred to as "appli-
ance") and contains important information for the commissioning,
safety, intended use and care of the appliance.
The instruction manual has to be kept near the unit at all times. It
must be read and observed by all persons entrusted with operation,
troubleshooting and/or cleaning of the appliance.
Keep this instruction manual in a safe place and pass it on with the
unit to any future owners.
Copyright
This document is copyrighted.
Any duplication or reprinting, in whole or in part, as well as reproduc-
tion of the illustrations even in modied form is only permitted with
the written approval of the manufacturer.
Page 44

44
Details of this instruction manual
BEEM - Elements of Lifestyle
EN
Warning statements
The following warnings are used in the present instruction manual:
DANGER
A warning of this category draws attention to an impending
dangerous situation.
If the dangerous situation is not avoided, it may lead to serious
injury or even death.
Follow the instructions in this warning to avoid the danger of ►
serious injury or even death.
WARNING
A warning statement for this safety risk class indicates a
potentially dangerous condition.
If the dangerous condition is not prevented, it will cause injury.
Follow the instructions in the warning message in order to pre- ►
vent injuries of people.
CAUTION
A warning statement for this safety risk class indicates a
damage risk.
If the dangerous condition is not prevented, it will cause damage to
objects.
Follow the instructions in the warning message in order to pre- ►
vent such damage.
NOTE
A note contains additional tips to facilitate the use of the appli- ►
ance.
Page 45

45
Details of this instruction manual
BEEM - Elements of Lifestyle
EN
Intended use
This appliance is intended for non-commercial use in closed rooms
for baking different types of bread and cake and for making doughs,
pastas and jams.
Use in any other or further way is not considered an intended use.
WARNING
Danger from use for other than the intended purpose!
If not used for its intended purpose and/or used in any other way,
the appliance may be or become a source of danger.
No claims of any kind will be accepted for damage or injury resulting
from use of the machine for other than its intended purpose.
The risk has to be borne solely by the machine owner.
If used commercially, please observe the conditions of the modied
warranty period.
Disclaimer
All technical information, data and instructions on installation, operation and care of the appliance contained in this instruction manual
represent the latest status at the time of printing.
No claims can be derived from the information, illustrations and descriptions in this instruction manual.
The manufacturer assumes no liability for damage or injury resulting
from failure to observe the instruction manual, use for other than the
intended purpose, unprofessional repairs, unauthorised modications
or use of non-approved spare parts.
Use the machine only for its intended purpose. ►
Observe the procedures described in this instruction manual. ►
Page 46

46
Safety
BEEM - Elements of Lifestyle
EN
Safety
This unit complies with the prescribed safety regulations. Improper
use can, however, result in personal injury and/or appliance damage.
For safe use of the appliance, observe the following fundamental
safety precautions and the precautions described separately in the
individual sections.
Fundamental safety precautions
Check up the appliance for visible outside damage. Do not use a ■
damaged appliance.
Children must be supervised to ensure that they do not play with ■
the appliance.
Do not leave the appliance unattended during operation. ■
Always pull the mains lead out of the plug socket at the plug, not ■
at the mains lead.
This appliance is not intended for use by persons (including ■
children) with restricted physical, sensory or mental capabilities or
with insufcient experience and/or knowledge unless they are supervised by a person responsibly for their safety or have received
instructions from such a person in the use of the appliance.
Do not use this appliance in conjunction with an external timer or ■
a separate remote control system.
All repair of the appliance must be provided by authorized quali- ■
ed service and/or manufacturer's customer service staff only.
Unqualied repairs result in considerable danger for the user. In
addition, the warranty will be void.
Repairs to the appliance during the warranty period may only be ■
carried out by service centres authorised by the manufacturer as
the warranty will otherwise be voided in the event of damage or
subsequent damage.
Faulty parts must be replaced with original spare parts only. Only ■
such parts can ensure that safety requirements will be honoured.
Page 47

47
Safety
BEEM - Elements of Lifestyle
EN
Electric shock hazard
DANGER
Electric shock hazard!
Contact with live leads or components poses a risk of serious injury or even death!
Observe the following safety precautions to avoid any electric
shock hazard:
Do not use the appliance if the mains lead or plug is damaged. ►
Before using the appliance again, have a new mains lead in-
stalled by a qualied electrician.
On no account should the housing of the unit be opened. ►
Electric shock hazard if live connections are touched and/or the
electrical and mechanical conguration is changed.
Never immerse the appliance or the mains plug in water or ►
other liquids.
Danger of burns
WARNING
The bread maker becomes very hot during operation!
Observe the following safety precautions to avoid burning yourself.
Do not open the appliance during the baking process. ►
Wear oven gloves when removing the baking form from the ►
appliance.
Before any cleaning, make sure to cool down the appliance. ►
Page 48

48
Initial use
BEEM - Elements of Lifestyle
EN
Initial use
Safety tips
WARNING
Persons may be injured or material damage may be caused
during commissioning of the appliance!
Observe the following safety precautions to avoid any danger:
Packaging must never be used to play with. A risk of asphyxia- ►
tion is involved.
Observe the information on the demands on the installation lo- ►
cation and on the electrical connection of the appliance to avoid
personal injury and material damage.
Unpacking
Remove the appliance, all accessory parts, the instruction
manual, the quick-start guide and the recipe book from the box.
Remove all packaging materials and protective foils from the ap-
pliance and the accessories before using them for the rst time.
NOTE
Do not remove the rating plate or any warning signs on the ►
appliance.
Page 49

49
Initial use
BEEM - Elements of Lifestyle
EN
Scope of supply and transport inspection
As standard, the appliance is delivered with the following parts:
Bread Maker ●
Bread baking form with dough hook ●
Cake baking form with agitator ●
Ingredients dispenser ●
Measuring cup ●
Measuring spoon ●
Operating instructions ●
Quick-start guide ●
Recipe book ●
NOTE
Check if delivered complete and with no visible defects. Report ►
an incomplete or damaged delivery to your supplier/dealer immediately.
Disposal of the packaging
The packaging protects the appliance from transport damage. The
packaging material was chosen in consideration of the aspects of
environmental friendliness and disposal technology involved, and
thus is recyclable.
Recycling the packaging material for further use allows to save
raw materials and reduces the waste generation. When no longer
required, dispose of the packaging materials in accordance with the
local regulations in force.
NOTE
Keep the original packaging, if possible, during the warranty ►
period in order to be able to pack the appliance properly in the
event of a warranty claim. Transport damage will lead to a void
warranty.
Page 50

50
Initial use
BEEM - Elements of Lifestyle
EN
Demands on the installation location
For safe and trouble-free operation of the appliance, the installation
location has to satisfy the following requirements:
Place the appliance on a dry, at and heat-resistant surface. ■
Do not place the appliance in a hot, wet or very humid environ- ■
ment or in the vicinity of inammable materials.
Select the installation location such that children cannot touch the ■
hot surfaces of the appliance.
The plug socket used must be easily accessible in order to be ■
able to disconnect the appliance from the electric circuit quickly in
the event of an emergency.
Electrical connection
For safe and trouble-free operation of the appliance, the following
instructions have to be observed for the electrical connection:
Before connecting the appliance, compare the connection data ■
(voltage and frequency) on the rating plate with those of your
mains power supply. The data must correspond in order to avoid
damage to the appliance. If in doubt, ask your electrical appliance
retailer.
Ensure that the mains lead is undamaged and is not laid over hot ■
surfaces and/or sharp edges.
The mains lead must not be strained, kinked or come into contact ■
with the hot appliance.
Lay the mains lead in such a way that it does not pose a tripping ■
hazard.
The electrical safety of the appliance is only assured when it is ■
connected to a properly installed protective earth (PE) conductor system. Connection to a plug socket without PE conductor is
forbidden. If in doubt, have the house installation checked by a
qualied electrician. The manufacturer assumes no liability for
injury or damage caused by a missing or interrupted protective
earth conductor.
Page 51

51
Initial use
BEEM - Elements of Lifestyle
EN
Appliance overview
1 Control panel and display 6 Dough hook
2 Cover 7 Cake baking form
3 Window 8 Agitator
4 Ingredients dispenser 9 Measuring spoon
5 Bread baking form 10 Measuring cup
Inserting and removing baking form and dough hook/agitator
NOTE
When the term "baking form" is used in this manual, the term ►
refers to both the bread baking form and the cake baking form.
For conciseness, the mention of both forms has been deliberately avoided. The form in question is only mentioned specically when instructions refer only to this particular form.
Page 52

52
Initial use
BEEM - Elements of Lifestyle
EN
Inserting dough hook/agitator
Press the dough hook/agitator onto the driving pin in the middle
of the baking form base. Hook and pin have at surfaces and
only t together when these surfaces are aligned. The driving pin
is held by a wing nut on the underside of the baking form.
Removing dough hook/agitator
Hold the wing nut on the underside of the baking form rmly with
one hand and the dough hook/agitator rmly with the other.
Pull the dough hook/agitator off the driving pin with a slight turn-
ing movement while turning the wing nut in the opposite direction
at the same time.
NOTE
You can remove the dough hook/agitator after the last knead- ►
ing cycle of the selected baking programme so that it does not
leave a hole in the bread after baking.
Coat your hands with a little our and lift out the bread dough
in order to be able to pull the dough hook/agitator up out of the
baking form.
Page 53

53
Initial use
BEEM - Elements of Lifestyle
EN
Inserting the baking form
First press the dough hook/agitator onto the driving pin of the
baking form.
Lower the baking form into the appliance so that it is not quite
straight.
Then turn the baking form in clockwise direction until it locks.
Removing the baking form
Open the appliance cover.
Turn the baking form at the handle in anti-clockwise direction as
far as it will go.
Lift the baking form out of the appliance.
WARNING
Danger of burns!
Housing, baking form and heater coil become very hot during operation!
Wear oven gloves when removing the baking form from the ap- ►
pliance at the end of the baking programme.
Page 54

54
Initial use
BEEM - Elements of Lifestyle
EN
Before using for the rst time
CAUTION
Danger of damage to the appliance, individual parts or nonstick coating!
Do not wash the appliance or any of the individual parts in a ►
dish washer.
Never use sharp objects or abrasive cleaning agents to clean ►
the inside of the bread maker, the forms or the dough hook/agitator in order to avoid damaging the non-stick coating.
Ensure that all packaging materials have been removed from the
appliance (protective lms, etc.).
Check that all parts are present (see section Scope of supply
and transport inspection).
Remove the baking form from the appliance together with the
dough hook/agitator (see section Inserting and removing bak-
ing form and dough hook/agitator).
Wipe the inside and outside of the appliance with a damp cloth
(use only a mild detergent).
Wash all the other individual parts (items 4 - 10 in the appliance
overview) in hot water with a little added mild detergent.
Dry the appliance and the individual parts thoroughly and allow
them to dry completely in the air.
Page 55

55
Initial use
BEEM - Elements of Lifestyle
EN
Control panel and display
NOTE
Press the buttons described below several times to try out all ►
the setting possibilities. Each press of a button is followed by an
acoustic signal. Observe the display; it changes at every press
of the button.
Each combination of programme, degree of browning and ►
weight is automatically displayed with the corresponding baking
time.
■ : This button is used to select from the eleven preset pro-
grammes. The set programme is shown in the displayed under
Menu (baking programme 1 - 11).
■ : This button is used to set the weight of the nished bread.
You can choose from three different sizes: = 540g,
= 680g or = 900g. A line under the set weight on the
display indicates your choice.
■ : This button allows you to choose between three degrees of
browning for programmes 1 - 4: = light, = medium,
= dark. In addition, you can shorten the baking time in bak-
ing programmes 1, 2 or 3 with the setting . A line above the
selected degree of browning indicates your choice.
■ : This button is used to start the selected programme. To stop
the programme, hold this button depressed for about two seconds.
Page 56

56
Initial use
BEEM - Elements of Lifestyle
EN
■ / : These buttons are used to increase or decrease
the appliance timer settings in 10 minute steps. Note that the displayed time indicates when the baking process will be completed.
A maximum setting of 15 hours is possible.
Example: On the display, the timer shows 6:30. This means that
the baking programme will be nished in 6 hours and
30 minutes.
When you start the programme with the button,
the timer starts to run down. Your bread will be ready
in 6 hours and 30 minutes.
These buttons are also used to set the baking time for menu 10.
When the appliance is connected to the power supply, the following
basic setting appears on the display:
The individual phases of the baking programmes are depicted to the
left and right of the display. When the button is pressed, a trian-
gle on the left or right side of the display indicates the momentary
phase of the baking programme.
Timer (if starting delay
is active)
Preheating of the bread
maker
Kneading of the dough
Resting of the dough End of the programme
Rising of the dough
Baking of the dough
Holding the nished
product
Page 57

57
Operation and function
BEEM - Elements of Lifestyle
EN
Operation and function
This section contains important information on the operation of the
appliance.
Safety tips
Electric shock hazard!
Danger of burns!
Housing, baking form and heater coil become very hot during operation!
Risk of injury from dough hook/agitator!
Dough hook and agitator are driven by a powerful motor!
DANGER
Ensure that the appliance is completely dry before use. ►
WARNING
Do not touch any parts inside the appliance when the appliance ►
is in operation.
Wear oven gloves when removing the baking form from the ap- ►
pliance at the end of the baking programme.
WARNING
Do not reach into the baking form when the appliance is in opera- ►
tion.
Page 58

58
Operation and function
BEEM - Elements of Lifestyle
EN
Basic operation of the appliance
NOTE
Baking tips can be found in the recipe book supplied. ►
Remove the baking form from the appliance and if necessary
push the dough hook/agitator onto the driving pin in the base of
the baking form (see section Inserting and removing baking
form and dough hook/agitator).
Pour the measured baking ingredients into the baking form. Ori-
entate yourself here to the baking instructions in the recipe book
or on the packaging of the selected bread baking mixture.
NOTE
You can use the measuring cup and measuring spoon supplied ►
for measuring the baking ingredients. For liquids, place the
measuring cup on a at surface and check the lling level at eye
level.
Place the baking form into the appliance (see section Inserting
and removing baking form and dough hook/agitator).
Close the lid.
Insert the plug into a mains socket.
Select the desired baking programme with button .
Set the bread weight with button .
Select the degree of browning of the bread crust with button .
If you do not wish to start the baking programme immediately, set
the time after which the bread should be nished with the buttons
and .
Press button to start the programme.
NOTE
As soon as you press ► , all other button functions are
blocked.
Page 59

59
Operation and function
BEEM - Elements of Lifestyle
EN
The appliance now starts to perform the selected baking programme.
The progress of the baking program is indicated by the triangle on
the left or right side of the display.
NOTE
You can interrupt a programme by holding the ► button
pressed for about two seconds.
At the end of the baking time, an acoustic signal sounds several
times. The holding phase starts (menus 1-6, 10 and 11 only).
NOTE
You can also take the baking form out of the appliance during ►
the holding time. To do this, terminate the programme by hold-
ing the button pressed for about two seconds and pull the
mains plug out of the plug socket.
At the end of the programme, the display shows the selected
starting position. Lift the baking form out of the appliance using
oven gloves. Allow the bread or cake to cool down slightly before
removing from the form.
NOTE
Pull the dough hook/agitator out of the bread after baking be- ►
fore cutting the bread.
You can also remove the dough hook/agitator after the last ►
kneading cycle of the selected baking programme so that it
does not leave a hole in the bread after baking.
Coat your hands with a little our and lift out the bread dough
in order to be able to pull the dough hook/agitator up out of the
baking form.
Further tips on an optimum baking result can be found in the ►
recipe book supplied.
Page 60

60
Operation and function
BEEM - Elements of Lifestyle
EN
Baking programmes
You can select from 11 preset baking programmes using the button :
Menu 1 - Basic
Baking of brown bread. You can add other ingredients to improve the
taste, e.g. pumpkin seeds, bacon or roasted onions. This is the most
frequently used programme.
Menu 2 - White bread
Baking of white bread. The classic variant is wheat bread, a light
bread with a crisp crust.
Menu 3 - Wholemeal bread
Wholemeal bread is made i.a. from crushed or ground wholemeal
cereal. The programme starts with preheating, i.e. the ingredient are
warmed before kneading.
NOTE
To shorten the menus 1, 2 or 3, select the setting ► with the
button . In this case the water added should be lukewarm.
Menu 4 – Sweet bread Sweet breads are frequently made with milk
and can contain ingredient such as chocolate shavings, raisins or
nuts for added taste.
Menu 5 - Accelerated baking programme
This programme allows you to shorten the baking time for brown
and white bread. For example, a brown bread with menu 1 and the
settings and takes 3 hours and 25 minutes, with menu 5
on the other hand only 1 hour and 20 minutes. The time is saved on
the resting phases of the dough. We therefore recommend that the
liquids used are heated in advance for this menu. If cold liquids are
used, the dough cannot rise properly. If the liquid is too hot, the yeast
cannot function.
Page 61

61
Operation and function
BEEM - Elements of Lifestyle
EN
Menu 6 - Gluten-free bread
For baking gluten-free products using gluten-free ours or our
blends.
Menu 7 - Pizza dough
For kneading pizza dough. Pour all the ingredients into the bread
baking form and the appliance produces a smooth pizza dough. You
then only have to roll it out, add the toppings and bake.
Menu 8 - Pasta dough
The programme produces a smooth pasta dough in a minimum of
time.
Menu 9 - Jam
Preparation of jams. This programme allows you to produce individual jams. You then just have to pour the hot jam into the jars.
Menu 10 - Baking without kneading
Only for baking ready-mixed doughs; the dough is not kneaded in this
programme. The baking time can be varied with the buttons
and (1:10; 1:20; 1:30). You can interrupt the programme at any
time by holding the button pressed for two seconds.
Menu 11 – Cake
For making sponge cake. Use the cake baking form with the agitator
for this programme.
NOTE
The individual times for each programme can be found in the ►
table in the Annex.
Recipes for bread, cakes, pasta, doughs and jams can be found ►
in our recipe book.
If you wish to make bread or other bakeries using ready-to-use ►
baking mixes, follow the baking instructions on the package.
Page 62

62
Operation and function
BEEM - Elements of Lifestyle
EN
Timer
NOTE
The timer can be used for all menus except menu 10 (baking ►
without kneading). There the baking time can be changed with
buttons and (1:10; 1:20; 1:30).
First select the desired menu (button ), the
(button ) and the degree of browning (button ).
Example: You have selected the following setting:
Menu 1, bread weight , degree of browning .
The baking time shows 3:25.
Now set the desired delay time for the start of baking with but-
tons and . Each press of the button changes the
displayed time by 10 minutes. You can set a maximum time of 15
hours (including baking time).
Example: At every press of button , the displayed time
changes: 3:25 – 3:30 – 3:40 – 3:50 – 4:00 etc. If you
want your bread to be nished in 6 hours, press the
button until 6:00 is displayed.
Start the programmed time with button . The two dots in the
display ash and the set time starts to run down. The baking
programme starts automatically when the start of the baking time
is reached.
bread weight
Example: The displayed time is 6:00, the two dots are ashing.
When the setting 3:25 is reached, the baking programme starts automatically.
Page 63
63
Operation and function
BEEM - Elements of Lifestyle
EN
At the end of the set time, the bread is nished and the baking
form can be removed from the appliance.
Example: After 6 hours incl. baking programme, the bread is
NOTE
In warm or humid weather, the dough may rise too quickly with ►
a delay time of more than two hours.
To prevent the yeast rising too early, add the our to the form ►
last, form a small hollow in the our and place the yeast into the
hollow.
Do not set long delay times if you are working with perishable ►
foodstuffs (milk, eggs, etc.).
Holding function
The holding function prevents, for example, the bread from absorb-
ing moisture. At the end of programmes 1-6, 10 and 11 the nished
product is kept warm for a given time. The display shows "00:00" and
an acoustic signal sounds intermittently.
If you wish to take the bread out of the appliance during the holding
time, switch off the appliance by holding the button pressed for
two seconds.
nished. The display changes to 00:00, the holding
phase starts. You can take the bread out of the appliance or leave it in the appliance to keep warm during
the holding phase. At the end of the holding phase,
the display returns to the original setting: Menu 1,
bread weight , degree of browning , 3:25.
NOTE
For details of the holding time, refer to the table with the indi- ►
vidual programme phases in the Annex.
Page 64

64
Operation and function
BEEM - Elements of Lifestyle
EN
Ingredients dispenser
The ingredients dispenser allows you to add dry ingredients such as
pumpkin seeds or raisins to the dough towards the end of the knead-
ing process. The bottom ap of the dispenser opens automatically
during baking programmes 1-7. The opening of the ap is signalled
by a clearly audible clicking and several acoustic signals. The ingredients dispenser does not open during baking programmes 8–11
(pasta dough, jam, baking without kneading, cake).
NOTE
For details of the time when the ingredients dispenser opens in ►
the individual programmes, refer to the table in the Annex.
Take care not to overll the dispenser, as otherwise the ingre- ■
dients may become wedged and not drop into the baking form.
Observe the instructions in the recipes for the quantities.
Small ingredients such as sesame seeds can drop through the ■
grille in the bottom of the dispenser. For such ingredients, open
the cover of the bread maker briey and add the seeds directly to
the baking form when the acoustic signal for the opening of the
dispenser sounds.
Proceed in the same way for ingredients that can melt or stick ■
(chocolate, cheese, pieces of fruit, etc.).
Clean the dispenser after every use. Soiling can also prevent the ■
ap in the bottom of the dispenser from opening.
NOTE
The appliance indicates with short acoustic signals when the ►
ap in the bottom of the dispenser opens. At this point you can
also open the cover of the bread maker briey and add the
ingredients directly to the baking form.
At the end of the baking process, pull the ingredients dispenser
up out of the appliance, clean it, press the ap in the base closed
and install the dispenser in the appliance again.
Page 65

65
Operation and function
BEEM - Elements of Lifestyle
EN
Removing the ingredients dispenser
To remove the ingredients dispenser, pull it up rmly out of the
appliance.
Inserting the ingredients dispenser
To insert the dispenser, rst close the base ap with slight pres-
sure until it locks.
Then press the ingredients dispenser into the appliance until it
engages audibly.
Page 66

66
Cleaning and care
BEEM - Elements of Lifestyle
EN
Cleaning and care
This section contains important information on cleaning and care of
the appliance.
Safety tips
WARNING
Observe the following safety precautions before starting to clean
the appliance:
Always pull the plug out of the plug socket before cleaning the ►
appliance.
Wait until the appliance has cooled down before you start to ►
clean it.
Never immerse the appliance or the mains plug in water or ►
other liquids.
CAUTION
Danger of damage to the appliance, individual parts or nonstick coating!
Neither the appliance nor any of the individual parts are suitable ►
for washing in a dish washer.
Never use sharp objects or abrasive cleaning agents to clean ►
the inside of the bread maker, the forms or the dough hook/agitator in order to avoid damaging the non-stick coating.
Cleaning
Clean the appliance after every use. For simple cleaning, the ■
cover of the appliance can be removed (see following section
Removing the cover).
Wipe down the appliance and the inside of the housing using a ■
damp cloth.
The other individual parts used can be washed in hot water with a ■
little added mild detergent.
Allow the appliance to dry completely for some time. ■
After cleaning, t the cover again (see following section ■ Fitting
the cover).
Page 67

67
Cleaning and care
BEEM - Elements of Lifestyle
EN
Removing the cover
Position the cover upright and pull it upwards off the appliance.
Fitting the cover
Hold the cover upright and press the lugs of the cover into the
recesses of the housing (see marks in gure above).
Page 68

68
Troubleshooting
BEEM - Elements of Lifestyle
EN
Troubleshooting
Safety tips
DANGER
Electric shock hazard!
Pull the plug out of the mains socket before starting trouble- ►
shooting.
WARNING
Danger caused by unqualied repairs!
Unqualied repairs can pose considerable dangers for the user and
serious damage to the appliance.
Repairs to electrical appliances may only be carried out by the ►
works after-sales service or by specialists trained by the manufacturer.
Faults - causes and remedies
Fault Possible cause Remedy
Display shows
E00.
Display shows
E01.
Appliance is too cold.
Appliance is still too warm
after the last baking programme.
Wait until the appliance
has reached room temperature.
Wait until the appliance
has cooled down.
Display shows
EEE.
Display shows
HHH.
Temperature sensor open. Call After-sales Service.
Short-circuit in temperature
sensor.
NOTE
If you cannot resolve the problem with the steps described ►
above, please contact after-sales service.
For problems relating to the baking result, please refer to the ►
notes in the recipe book supplied.
Call After-sales Service.
Page 69

69
Information on storage/disposal
BEEM - Elements of Lifestyle
EN
Information on storage/disposal
Storage
If you do not intend to use the appliance for a longer period of time,
clean it as described in chapter Cleaning and care. Store the appliance and all the accessories in a dry, clean and frost-free place.
Protect the appliance from direct sunlight.
Disposal
Within the European Union, this product must not be disposed of in
the domestic refuse.
Dispose of the appliance in accordance with the EU Directive
2002/96/EU-WEEE (Waste Electrical and Electronic Equipment).
For additional queries, please contact the local authority in charge of
waste disposal.
Annex
Technical data
Model
Type number B7.001
Operating voltage 230 VAC
Bread Maker
MULTI-BACK TOPCLASS 3 in 1
Mains frequency 50 Hz
Power consumption 650 W
Dimensions
Approximate weight 5.7 kg
Protection class I
Type of protection IP X0
310 x 290 x 380 mm
(H x W x D)
Page 70

70
Annex
BEEM - Elements of Lifestyle
EN
Menu 1. Basic
Degree of browning
Table of baking times
Weight
- - - - - - - - - - - 5 min 5 min 5 min 5 min 5 min 5 min 5 min 5 min 5 min 5 min 5 min 5 min
Preheating
5 min 5 min 5 min 5 min 5 min 5 min 5 min 5 min 5 min 5 min 5 min 5 min
Kneading
Resting
20 min 20 min 20 min 20 min 20 min 20 min 20 min 20 min 20 min 20 min 20 min 20 min
Kneading
40 min 40 min 40 min 40 min 40 min 40 min 40 min 40 min 40 min 15 min 15 min 15 min
Rising
Baking
Total programme time (h:min) 3:11 3:16 3:23 3:13 3:18 3:25 3:18 3:23 3:30 2:12 2:17 2:24
1 h 1 h 1 h 1 h 1 h 1 h 1 h 1 h 1 h 1 h 1 h 1 h
Holding
Ingredients dispenser opens at
10 s 10 s 10 s 10 s 10 s 10 s 10 s 10 s 10 s 10 s 10 s 10 s
Kneading
25 min 25 min 25 min 25 min 25 min 25 min 25 min 25 min 25 min 9 min 9 min 9 min
Rising
10 s 10 s 10 s 10 s 10 s 10 s 10 s 10 s 10 s 10 s 10 s 10 s
Kneading
50 min 50 min 50 min 50 min 50 min 50 min 50 min 50 min 50 min 30 min 30 min 30 min
Rising
46 min 51 min 58 min 48 min 53 min 60 min 53 min 58 min 65 min 48 min 53 min 60 min
2:51 2:56 3:03 2:53 2:58 3:05 2:58 3:03 3:10 1:52 1:57 2:04
15:00 15:00 15:00 15:00 15:00 15:00 15:00 15:00 15:00 15:00 15:00 15:00
(h:min)
run (h:min)
Max. delay in the programme
Page 71

71
Annex
BEEM - Elements of Lifestyle
EN
- - - - - - - - - - - 5 min 5 min 5 min 5 min 5 min 5 min 5 min 5 min 5 min 5 min 5 min 5 min
5 min 5 min 5 min 5 min 5 min 5 min 5 min 5 min 5 min 5 min 5 min 5 min
20 min 20 min 20 min 20 min 20 min 20 min 20 min 20 min 20 min 20 min 20 min 20 min
Menu 2. White bread
Weight
Preheating
Degree of browning
Kneading
Resting
Kneading
39 min 39 min 39 min 39 min 39 min 39 min 39 min 39 min 39 min 30 min 30 min 30 min
Rising
10 s 10 s 10 s 10 s 10 s 10 s 10 s 10 s 10 s 10 s 10 s 10 s
Kneading
31 min 31 min 31 min 31 min 31 min 31 min 31 min 31 min 31 min 15 min 15 min 15 min
Rising
10 s 10 s 10 s 10 s 10 s 10 s 10 s 10 s 10 s 5 s 5 s 5 s
Kneading
60 min 60 min 60 min 60 min 60 min 60 min 60 min 60 min 60 min 30 min 30 min 30 min
Rising
48 min 50 min 53 min 50 min 52 min 55 min 55 min 57 min 60 min 50 min 52 min 55 min
Baking
Total programme time (h:min) 3:28 3:30 3:33 3:30 3:32 3:35 3:35 3:37 3:40 2:35 2:37 2:40
1 h 1 h 1 h 1 h 1 h 1 h 1 h 1 h 1 h 1 h 1 h 1 h
3:08 3:10 3:13 3:10 3:12 3:15 3:15 3:17 3:20 2:15 2:17 2:20
15:00 15:00 15:00 15:00 15:00 15:00 15:00 15:00 15:00 15:00 15:00 15:00
(h:min)
Holding
(h:min)
Ingredients dispenser opens at
Max. delay in the programme run
Page 72

72
Annex
BEEM - Elements of Lifestyle
EN
Menu 3. Wholemeal bread
Weight
Degree of browning
5 min 5 min 5 min 5 min 5 min 5 min 5 min 5 min 5 min 5 min 5 min 5 min
30 min 30 min 30 min 30 min 30 min 30 min 30 min 30 min 30 min 5 min 5 min 5 min
Preheating
5 min 5 min 5 min 5 min 5 min 5 min 5 min 5 min 5 min 5 min 5 min 5 min
Kneading
Resting
15 min 15 min 15 min 15 min 15 min 15 min 15 min 15 min 15 min 15 min 15 min 15 min
Kneading
49 min 49 min 49 min 49 min 49 min 49 min 49 min 49 min 49 min 24 min 24 min 24 min
Rising
10 s 10 s 10 s 10 s 10 s 10 s 10 s 10 s 10 s 10 s 10 s 10 s
Kneading
Baking
Total programme time (h:min) 3:43 3:45 3:48 3:45 3:47 3:50 3:50 3:52 3:55 2:30 2:32 2:35
1 h 1 h 1 h 1 h 1 h 1 h 1 h 1 h 1 h 1 h 1 h 1 h
2:58 3:00 3:03 3:00 3:02 3:05 3:05 3:07 3:10 2:10 2:12 2:15
15:00 15:00 15:00 15:00 15:00 15:00 15:00 15:00 15:00 15:00 15:00 15:00
(h:min)
Holding
(h:min)
Ingredients dispenser opens at
Max. delay in the programme run
26 min 26 min 26 min 26 min 26 min 26 min 26 min 26 min 26 min 11 min 11 min 11 min
Rising
10 s 10 s 10 s 10 s 10 s 10 s 10 s 10 s 10 s 10 s 10 s 10 s
Kneading
45 min 45 min 45 min 45 min 45 min 45 min 45 min 45 min 45 min 35 min 35 min 35 min
Rising
48 min 50 min 53 min 50 min 52 min 55 min 55 min 57 min 60 min 50 min 52 min 55 min
Page 73

73
Annex
BEEM - Elements of Lifestyle
EN
11. Cake
10. Bak-
9. Jams
8. Pasta
7. Pizza
6. Gluten-
5. Ac-
celerated
ing
dough
dough
- - - - -
free bread
baking
programme
Baking of the dough
Holding the nished product
Resting of the dough
Rising of the dough
- - - - - - - - - -
4. Sweet bread
Menu
Weight
5 min 5 min 5 min 5 min 5 min 5 min 3 min 5 min - 5 min
Preheating
Kneading
5 min 5 min 5 min - - 5 min - - - -
Resting
20 min 20 min 20 min 15 min 10 min 20 min 11 min 10 min - 15 min
Kneading
39 min 39 min 39 min 12 min - 60 min - - - -
Rising
10 s 10 s 10 s - - - - - - -
Kneading
26 min 26 min 26 min - - - - - - -
Rising
5 s 5 s 5 s - - - - - - -
Kneading
52 min 52 min 52 min - 60 min - - - - -
Rising
50 min 55 min 60 min 48 min 55 min - - 70 min 60 -90 min 75 min
Baking
Total programme time (h:min) 3:17 3:22 3:27 1:20 2:10 1:30 0:14 1:25 1:00-1:30 1:35
1 h 1 h 1 h 1 h 1 h - - - 1 h 22 min
2:57 3:02 3:07 1:10 2:05 1:10 - - - -
15:00 15:00 15:00 15:00 15:00 15:00 15:00 15:00 - 15:00
(h:min)
Holding
(h:min)
Ingredients dispenser opens at
Max. delay in the programme run
Preheating of the bread maker
Kneading of the dough
Page 74

74
Annex
BEEM - Elements of Lifestyle
EN
Certications
Symbol Meaning
The appliance B7.001 has been
tested and certied by Intertek.
The appliance conforms to the
relevant EU Directives (see Declaration of Conformity).
This appliance conforms to the
Directives on the Restriction of
Hazardous Substances in Electrical and Electronic Appliances
(RoHS).
This appliance conforms to the
provisions of the Waste Electrical and Electronic Equipment
Directive (WEEE).
Spare parts and other accessories
Item* Article No.
4 900 566 001 Ingredients dispenser
5, 6 900 566 006 Bread baking form with dough hook
7, 8 900 566 011 Cake baking form with agitator
9, 10 900 566 016 Measuring spoon and measuring cup
* according to the drawing in the description of the appliance
Designation
Guarantee, service and repairs
This is a quality product from BEEM and was produced using the latest manufacturing methods.
We guarantee the perfect condition of this quality product. We will
remedy any faults due to material aws or manufacturing faults free
of charge within the warranty period.
The warranty period for this product is two years.
For commercial or equivalent use, e.g. in hotels, guest houses or
communal premises, or if the customer is not a consumer as dened
by the German Civil Code, the warranty period is 6 months. This
does not infringe the warranty disclaimer.
Page 75

75
Annex
BEEM - Elements of Lifestyle
EN
Warranty disclaimer: The warranty does not cover faults caused in
particular by improper use, failure to observe instructions in the in-
struction manual and safety precautions, use of force, modications,
unauthorised attempted repairs and attempted repairs by unqualied
third parties. Faults caused by normal wear are also excluded.
If we are obliged by law to provide a warranty, we will comply with
such obligation – to the exclusion of the right to cancellation or price
reduction – and at our discretion, repair or replace the product free
of charge. Should the remedy fail despite several attempts or should
the replacement product exhibit faults attributable to us, the customer
shall be entitled – at his/her discretion – to reduce the purchase
price or to cancel the contract of purchase. Claims under warranty
do not prolong the warranty period. For exchange or return of the
appliance (withdrawal from the purchase contract) or reduction of
the purchase price, the rst contact is always the dealer from whom
you purchased the product. This particularly applies to returning the
appliance or the claim for reductions as these have to be settled with
respect to the purchase price. Refunding the purchase price or a
credit note in the event of a reduction of the purchase price can only
be handled by the retailer from whom you purchased the appliance.
Should - contrary to expectations - faults occur, please try to re-
solve the matter by telephone rst. Should this not be successful,
please send the carefully packed appliance to your retailer or to the
customer service address shown below. Please state your complete address, type and model number and the serial number of the
appliance. This information can be found on the rating plate of the
appliance. Please describe the fault or defect in as much detail as
possible. The product or spare part order should be accompanied by
a printed and dated receipt of purchase or invoice. Without a printed
receipt of purchase or invoice, no services under warranty can be
provided, whether for repairs, spare parts or other claims.
Page 76

76
Annex
BEEM - Elements of Lifestyle
EN
Outside Germany and in particular in non-EU countries, you should
send the article to your dealer or the local distributor. Information can
be obtained – preferably by e-mail – from the After-sales Service address indicated below.
Repairs not covered by the warranty can also be performed against
individual payment by customer service - outside Germany by the retailer from whom you purchased the appliance or by a service centre,
if available.
Replacement parts and consumables can be ordered from your
retailer or the stated customer service address. Please contact rst
your dealer or the local distributor if you live outside Germany.
For product information, accessory orders or questions on service
handling, please contact your retailer or the stated customer service
address. Outside Germany and in particular in non-EU countries,
please contact your retailer or the local distributor rst.
You can also use the Internet. You will nd accessories and
spare parts, as well as instruction manuals in various languages
on our website www.beem.de. In addition you will nd further
product information.
Page 77

77
Annex
BEEM - Elements of Lifestyle
EN
EC Declaration of Conformity
Name/address of manufacturer: BEEM Blitz-Elektro-Erzeugnisse
Manufaktur Handels-GmbH
Dieselstrasse 19-21
D-61191 Rosbach v.d.H.
We hereby declare that the product
Model: Bread Maker
MULTI-BACK TOPCLASS 3 in 1
Type: B7.001
conforms to the following relevant regulations:
EU Directive 2006/95/EU Electrical devices for use within certain voltage
limits,
EU Directive 2004/108/EU Electromagnetic Compatibility.
The following harmonised standards were applied in whole or in part:
EN 60335-2-9:2003+A1:04+A2:06+A12:07
EN 60335-1:2002+A11,A1:04+A12, A2:06+A13:08
EN 62233:2008
EN 55014-1:2006
EN 55014-2:1997+A1:2001
EN 61000-3-2:2006
EN 61000-3-3:1995+A1:2001+A2:2005
Rosbach, 15 April 2010
________________________________________
Bijan Mehshat
(Legally binding signature of the issuer)
Page 78

Index
Index
EN
A
Accessories .................74
Appliance elements ...........51
B
Baking process ...............58
Baking programmes ...........60
Baking times .................70
Before using for the rst time ....54
Bread weight.................55
C
Certications .................74
Cleaning ....................66
Control panel ................55
Copyright ...................43
D
Damaged appliance ...........46
Danger of burns ..............47
Degree of browning ...........55
Disclaimer ...................45
Display .....................55
Disposal ....................69
Disposal of the packaging.......49
E
EC Declaration of Conformity ....77
Electrical connection...........50
Electric shock hazard ..........47
F
Fundamental safety precautions..46
G
Guarantee...................74
H
Holding .....................63
I
Ingredients dispenser ..........64
Initial use....................48
Installation location ............50
Intended use .................45
N
New owner ..................43
O
Operation ...................57
P
Packaging ...................49
R
Removing/inserting agitator .....51
Removing/inserting dough hook ..51
Repairs .....................74
S
Safety ......................46
Scope of supply ..............49
Service .....................74
Spare parts ..................74
Storage .....................69
T
Table of Contents .............41
Technical data ................69
Timer.......................62
Transport inspection ...........49
Troubleshooting ..............68
U
Unpacking...................48
W
Warning statements ...........44
78
BEEM - Elements of Lifestyle
Page 79

Table des matières
Avant-propos .........................................81
Informations relatives à la présente notice d'utilisation ......81
Droits d'auteur .........................................81
Avertissements ........................................82
Utilisation conforme . . . . . . . . . . . . . . . . . . . . . . . . . . . . . . . . . . . .83
Limitation de la responsabilité ............................83
Sécurité . . . . . . . . . . . . . . . . . . . . . . . . . . . . . . . . . . . . . . . . . . . . . 84
Consignes de sécurité fondamentales . . . . . . . . . . . . . . . . . . . . . . 84
Risques issus du courant électrique ........................85
Risques de brûlure . . . . . . . . . . . . . . . . . . . . . . . . . . . . . . . . . . . . . 85
Mise en service .......................................86
Consignes de sécurité . . . . . . . . . . . . . . . . . . . . . . . . . . . . . . . . . .86
Déballage . . . . . . . . . . . . . . . . . . . . . . . . . . . . . . . . . . . . . . . . . . . . 86
Etendue de la livraison et inspection du transport . . . . . . . . . . . . . 87
Elimination de l'emballage . . . . . . . . . . . . . . . . . . . . . . . . . . . . . . . 87
Conditions requises sur le lieu de montage . . . . . . . . . . . . . . . . . .88
Branchement électrique . . . . . . . . . . . . . . . . . . . . . . . . . . . . . . . . .88
Plan de l'appareil ......................................89
Mise en place et enlèvement de la
cuve et du crochet mélangeur/pétrisseur . . . . . . . . . . . . . . . . . . . . 89
Avant la première utilisation . . . . . . . . . . . . . . . . . . . . . . . . . . . . . . 92
Panneau de commande et afchage . . . . . . . . . . . . . . . . . . . . . . . 93
FR
Utilisation_et fonctionnement ...........................95
Consignes de sécurité . . . . . . . . . . . . . . . . . . . . . . . . . . . . . . . . . .95
Règles d'utilisation fondamentales de l'appareil ...............96
MInuterie ............................................100
Fonction maintien au chaud . . . . . . . . . . . . . . . . . . . . . . . . . . . . . 101
Distributeur d'ingrédients . . . . . . . . . . . . . . . . . . . . . . . . . . . . . . . 102
BEEM - Elements of Lifestyle
79
Page 80

80
BEEM - Elements of Lifestyle
FR
Nettoyage et entretien . . . . . . . . . . . . . . . . . . . . . . . . . . . . . . . . 104
Consignes de sécurité . . . . . . . . . . . . . . . . . . . . . . . . . . . . . . . . .104
Nettoyage ...........................................104
Dépannage .........................................106
Consignes de sécurité . . . . . . . . . . . . . . . . . . . . . . . . . . . . . . . . .106
Cause des pannes et remède ............................106
Indications relatives au rangement / élimination ...........107
Rangement ..........................................107
Elimination . . . . . . . . . . . . . . . . . . . . . . . . . . . . . . . . . . . . . . . . . .107
Annexe .............................................107
Données techniques ...................................107
Tableau des temps de cuisson ...........................108
Agréments ..........................................112
PIèces de rechange et autres accessoires ..................112
Garantie, service Après-ventes et réparations . . . . . . . . . . . . . . . 11 2
Déclaration de conformité CE ............................115
Index ..............................................116
Page 81

81
Avant-propos
BEEM - Elements of Lifestyle
FR
Avant-propos
Chère cliente, cher client,
En achetant avec la machine à pain automatique MULTI-BACK
TOPCLASS 3 in 1 vous avez opté pour un produit de qualité de
la marque BEEM. La machine à pain automatique MULTI-BACK
TOPCLASS 3 in 1 vous permet de produire sans problème différentes sortes de paine. En outre, MULTI-BACK TOPCLASS 3 in 1 vous
permet de préparer de délicieuses contures, nouilles, pâtes à pizza
et gâteaux.
Veuillez lire ici les informations ci-dessous an de vous habituer
rapidement à votre appareil et de pouvoir proter au mieux de toutes
ses fonctions.
Si vous le traitez et si vous l'entretenez correctement, votre appareil
vous servira pendant de nombreuses années.
Nous vous souhaitons bien du plaisir lors de son utilisation.
Votre BEEM Blitz-Elektro-Erzeugnisse Manufaktur
Informations relatives à la présente notice d'utilisation
La présente notice d'utilisation fait partie intégrante de la machine
à pain automatique MULTI-BACK TOPCLASS 3 in 1 (désignée
ci-après comme l'appareil) ; elle vous donne des indications importantes pour la mise en service, la sécurité, l'utilisation conforme et
l'entretien de l'appareil.
La notice d'utilisation doit toujours être disponible à proximité de l'appareil. Elle doit être lue et appliquée par chaque personne chargée
d'utiliser, de réparer et/ou de nettoyer l'appareil.
Conservez la présente notice d'utilisation et remettez-la avec l'appa-
reil à son propriétaire ultérieur.
Droits d'auteur
Le présent document est soumis à la protection des droits d'auteur.
Toute reproduction ou impression ultérieure, même partielle ainsi que
la retranscription d'illustrations, même à l'état modié, est seulement
possible sur autorisation écrite du fabricant.
Page 82

82
Informations relatives à la présente notice d'utilisation
BEEM - Elements of Lifestyle
FR
Avertissements
La présente notice d'utilisation utilise les avertissements suivants :
DANGER
Un avertissement de ce type désigne une situation dangereuse menaçante.
Si la situation dangereuse ne peut pas être évitée, ceci peut entraîner des blessures graves ou mortelles.
Respectez les instructions de cet avertissement an d'éviter ►
tout risque de blessures graves ou mortelles des personnes.
AVERTISSEMENT
Un avertissement de ce type désigne une situation dangereuse possible.
Si la situation dangereuse ne peut pas être évitée, ceci peut entraîner des blessures.
Respectez les instructions de cet avertissement an d'éviter ►
toutes blessures de personnes.
ATTENTION
Un avertissement de ce type désigne un dommage matériel
possible.
Si la situation ne peut pas être évitée, ceci peut entraîner des
dommages matériels.
Respectez les instructions de cet avertissement an d'éviter ►
tout dommage matériel.
INDICATION
Une indication désigne les informations supplémentaires facili- ►
tant le maniement de l'appareil.
Page 83

83
Informations relatives à la présente notice d'utilisation
BEEM - Elements of Lifestyle
FR
Utilisation conforme
Cet appareil est prévu pour une utilisation à caractère non commercial dans des locaux fermés pour la cuisson de différentes sortes de
pain et de gâteaux et pour la réalisation de pâtes, nouilles et contures.
Toute autre utilisation ou toute utilisation dépassant ce cadre est
considérée comme non conforme.
AVERTISSEMENT
Danger en cas d'utilisation non conforme !
En cas d'utilisation non conforme, et/ou autre, l'appareil peut présenter des dangers.
L'appareil doit uniquement être utilisé de manière conforme. ►
Respecter les procédures décrites dans la présente notice ►
d'utilisation.
Les réclamations de tout type pour cause de dommages survenus
suite à une utilisation non conforme sont exclues.
Seul l'utilisateur en assume les risques.
En cas d'utilisation à titre commercial, veuillez noter une modication
de la période de garantie.
Limitation de la responsabilité
Toutes les informations techniques, données et indications gurant
dans la présente notice d'utilisation et relatives à l'installation, au
fonctionnement et à l'entretien correspondent à l'état le plus récent
des connaissances lors de l'impression.
Les indications, illustrations et descriptions de la présente notice ne
peuvent donner lieu à aucune revendication de quelque type que ce
soit.
Le fabricant décline toute responsabilité pour les dommages surve-
nus en cas de non-respect de la présente notice, d'utilisation non
conforme, de réparations inappropriées, de modications non autorisées ou d'utilisation de pièces de rechange interdites.
Page 84

84
Sécurité
BEEM - Elements of Lifestyle
FR
Sécurité
Le présent appareil répond aux dispositions de sécurité prescrites.
Un emploi inapproprié peut toutefois entraîner des dégâts corporels
et matériels.
Pour un maniement sûr de l'appareil, veuillez respecter les consignes
de sécurité fondamentales suivantes ainsi que les indications gurant
séparément dans les différents chapitres :
Consignes de sécurité fondamentales
Avant d'utiliser l'appareil, veuillez le contrôler pour vérier qu'il ne ■
présente aucun dommage apparent. Ne mettez pas en service un
appareil endommagé.
Il convient de surveiller les enfants an d'assurer qu'ils ne jouent ■
pas avec l'appareil.
Pendant le fonctionnement de l'appareil, ne le laissez pas sans ■
surveillance.
Débranchez toujours le câble de branchement en tirant sur la ■
surface de préhension de la che et non sur le câble de branche-
ment.
Cet appareil n'est pas destiné à être utilisé par des personnes (y ■
compris enfants) ayant des capacités physiques, sensorielles ou
mentales limitées, trop peu d'expérience et/ou de savoir, à moins
qu'elles ne soient sous la surveillance d'une personne responsa-
ble de leur sécurité ou reçoivent des instructions de cette dernière
sur le mode d'utilisation de l'appareil.
N'utilisez pas cet appareil avec une minuterie externe ou un sys- ■
tème de télétransmission séparé.
Ne faites réparer l'appareil que par un vendeur spécialisé agréé ■
ou par le service après-ventes de l'usine. Des réparations
inappropriées peuvent entraîner des risques considérables pour
l'utilisateur. Par ailleurs, le droit de garantie perd son effet.
Pendant la période de garantie, toute réparation de l'appareil doit ■
uniquement être effectuée par un service Après-ventes autorisé
par le fabricant, faute de quoi les droits de garantie perdent leur
effet pour les dommages immédiats et consécutifs en résultant.
Les composants défectueux doivent uniquement être remplacés ■
par des pièces de rechange originales. Le respect des exigences
de sécurité est uniquement garanti avec ces pièces.
Page 85

85
Sécurité
BEEM - Elements of Lifestyle
FR
Risques issus du courant électrique
DANGER
Danger de mort causé par le courant électrique !
Il y a danger de mort en cas de contact avec des lignes ou
des composants sous tension.
Pour éviter tous risques causés par le courant électrique, veuillez
respecter les consignes de sécurité suivantes :
N'utilisez pas l'appareil lorsque le câble d'alimentation ou la ►
che sont endommagés. Avant de continuer à utiliser l'appareil, faites installer un nouveau câble de raccordement par un
électricien.
N'ouvrez en aucun cas le boîtier de l'appareil. Si vous touchez ►
des pièces sous tension et si vous modiez le montage électrique et mécanique, il y a risque d'électrocution.
Ne plongez jamais l'appareil ou la che réseau dans de l'eau ou ►
dans d'autres liquides.
Risques de brûlure
AVERTISSEMENT
Pendant son fonctionnement, l'appareil de cuisson devient
très chaud.
Pour ne pas risquer de vous brûler, veuillez respecter les consignes de sécurité suivantes.
N'ouvrez pas l'appareil pendant son fonctionnement. ►
Utilisez des maniques pour sortir la cuve de l'appareil. ►
Laissez refroidir l'appareil avant chaque nettoyage. ►
Page 86

86
Mise en service
BEEM - Elements of Lifestyle
FR
Mise en service
Consignes de sécurité
AVERTISSEMENT
A la mise en service de l'appareil, des dommages corporels
et matériels peuvent se produire.
Pour éviter tous risques, veuillez respecter les consignes de sécurité suivantes :
Les matériaux d'emballage ne doivent pas être utilisés pour ►
jouer. Il y a risque d'étouffement.
Respectez les indications relatives aux conditions requises sur ►
le lieu de montage et celles relatives au branchement électrique
de l'appareil an d'éviter tous risques de dommages corporels
et matériels.
Déballage
Retirez l'appareil, tous les accessoires, la notice d'utilisation, la
notice abrégée et le livre de recettes du carton.
Avant la première utilisation, retirez de l'appareil et des accessoi-
res tous les matériaux d'emballage et lms de protection.
INDICATION
Ne retirez pas la plaque signalétique ni les avertissements ►
éventuels.
Page 87

87
Mise en service
BEEM - Elements of Lifestyle
FR
Etendue de la livraison et inspection du transport
En version standard, l'appareil est livré avec les composants suivants :
Machine à pain automatique ●
Cuve à pain avec crochet pétrisseur ●
Cuve à gateau avec crochet mélangeur ●
Distributeur d'ingrédients ●
Gobelet gradué ●
Cuillère de dosage ●
Notice d'utilisation ●
Notice abrégée ●
Livre de recettes ●
INDICATION
Contrôlez la livraison pour en vérier l'intégralité et l'absence ►
de dommages visibles. Signalez dans les plus brefs délais une
livraison incomplète ou endommagée à votre fournisseur/commerçant.
Elimination de l'emballage
L'emballage protège l'appareil contre les dommages dus au transport. Les matériaux d'emballage sont sélectionnés selon des aspects
écologiques et techniques d'élimination, c'est pourquoi ils sont
recyclables.
La remise en circulation de l'emballage dans le circuit de matériel
économise des matières premières et elle réduit la production de
déchets. Eliminez les matériaux d'emballage non nécessités conformément aux directives locales en vigueur.
INDICATION
Si possible, conservez l'emballage original pendant la période ►
de garantie de l'appareil an de pouvoir l'emballer de manière
conforme en cas de garantie. Tous dommages survenus pen-
dant le transport entraînent l'extinction du droit de garantie.
Page 88

88
Mise en service
BEEM - Elements of Lifestyle
FR
Conditions requises sur le lieu de montage
An que l'appareil fonctionne de manière sûre et sans défaut, le lieu
de montage doit remplir les conditions préalables suivantes :
Placez l'appareil sur une surface de travail sèche, plane et résis- ■
tante à la chaleur.
Ne placez pas l'appareil dans un environnement chaud, humide, ■
mouillé ou à proximité de matières inammables.
Choisissez le lieu de montage de manière à ce que les enfants ■
ne puissent pas accéder aux surfaces très chaudes de l'appareil.
La prise utilisée doit être facile d'accès pour pouvoir débrancher ■
rapidement l'appareil en cas d'urgence.
Branchement électrique
An que l'appareil fonctionne de manière sûre et sans défaut, il
convient de respecter les consignes suivantes lors du branchement
électrique :
Avant de brancher l'appareil, comparez les données de bran- ■
chement (tension et fréquence) sur la plaque signalétique avec
celles de votre réseau électrique. Pour qu'aucun dommage ne se
produise sur l'appareil, ces données doivent être identiques. En
cas de doute, consultez votre vendeur d'appareils électriques.
Assurez-vous que le câble électrique ne soit pas endommagé, ni ■
posé sur des surfaces très chaudes et/ou des arêtes vives.
Il est interdit de tendre le câble électrique, de le plier ou de le ■
mettre en contact avec l'appareil très chaud.
Posez le câble électrique de manière à ce que personne ne ris- ■
que de trébucher dessus.
La sécurité électrique de l'appareil est uniquement garantie ■
lorsque celui-ci est branché à un conducteur de protection installé
conformément aux directives. Le fonctionnement sur une prise
de courant sans conducteur de protection est interdit. En cas de
doute, faites contrôler l'installation domestique par un électricien.
Le fabricant décline toute responsabilité des dommages entraînés par l'absence ou le non-branchement d'un conducteur de
protection.
Page 89

89
Mise en service
BEEM - Elements of Lifestyle
FR
Plan de l'appareil
1 Panneau de commande et
afchage
2 Couvercle 7 Cuve à gâteau
3 Voyant 8 Crochet mélangeur
4 Distributeur d'ingrédients 9 Cuillère de dosage
5 Cuve à pain 10 Gobelet doseur
6 Crochet pétrisseur
Mise en place et enlèvement de la cuve et du crochet mélan-
geur/pétrisseur
INDICATION
Dans cette notice d'utilisation, le terme "cuves" désigne tant les ►
cuves à pain que les cuves à gâteaux. Pour en faciliter la lec-
ture nous avons renoncé à mentionner les deux cuves à la fois.
Ce n'est que lorsqu'il s'agit d'une cuve spécique que celle-ci a
été été spéciquement désignée.
Page 90

90
Mise en service
BEEM - Elements of Lifestyle
FR
Mise en place du crochet pétrisseur/mélangeur
Placez le crochet pétrisseur/mélangeur sur la broche qui se
trouve au centre du fond de la cuve. Le crochet et la broche ont
des méplats et ne vont ensemble que si ces endroits sont super-
posés. La broche est tenue sur le côté inférieur de la cuve par un
écrou à oreilles
Enlever le crochet pétrisseur/mélangeur
Retenez avec une main l'écrou à oreilles sur le côté inférieur de
la cuve et avec l'autre le crochet pétrisseur/mélangeur.
Retirez le crochet pétrisseur/mélangeur de la broche en effec-
tuant un léger mouvement de rotation tout en faisant tourner
l'écrou à oreilles dans l'autre sens.
INDICATION
Vous pouvez enlever le crochet pétrisseur/mélangeur après ►
la dernière opération de pétrissage du programme de cuisson
sélectionné pour éviter qu'il ne laisse un trou dans le pain.
Pour ce faire, saupoudrez vos mains de farine et soulevez la
pâte pour sortir par le haut le crochet pétrisseur/mélangeur de
la cuve.
Page 91

91
Mise en service
BEEM - Elements of Lifestyle
FR
Mise en place de la cuve
Enchez tout d'abord le crochet pétrisseur/mélangeur sur la
broche de la cuve.
Insérez la cuve dans l'appareil en le tournant légèrement.
Tournez la cuve en sens horaire jusqu'à ce qu'il encliquette.
Enlever la cuve.
Ouvrez le couvercle de l'appareil.
Tournez la cuve contre le sens horaire jusqu'à la butée en agis-
sant sur la poignée.
Sortez la cuve de l'appareil par le haut.
AVERTISSEMENT
Risques de brûlure !
Pendant le fonctionnement, le four, la cuve et la spirale de
chauffage deviennent très chauds!
Utilisez des maniquettes pour sortir la cuve de l'appareil après ►
la n de la cuisson.
Page 92

92
Mise en service
BEEM - Elements of Lifestyle
FR
Avant la première utilisation
ATTENTION
Risque d'endommagement de l'appareil, des pièces détachées ou du revêtement antiadhésif.
Ne pas mettre l'appareil ni l'une des pièces détachées dans le ►
lave-vaisselle.
Pour nettoyer l'espace du four, les cuves et crochets pétris- ►
seurs, n'utilisez jamais des objets transchants ou des détergents abrasifs afin de ne pas détruire le revêtement antiadhésif.
Assurez-vous que tout le matériel d'emballage ait été sorti de
l'appareil (lms protecteurs etc.).
Vériez si toutes les pièces sont présentes (voir étendue de la
livraison et inspection du transport).
Sortez la cuve de l'appareil ainsi que les crochets pétrisseurs/
mélangeurs (voir chapitre Mise en place et enlèvement crochet pétrisseur/mélangeur).
Nettoyez l'appareil avec un chiffon humide à l'intérieur et à l'exté-
rieur (n'utiliser qu'un nettoyant doux).
Lavez les autres pièces détachées (Pos. 4 - 10 dans le plan de
l'appareil) dans de l'eau chaude à laquelle vous avez ajouté un
détergent doux.
Nettoyez ensuite soigneusement l'appareil et les pièces déta-
chées et laissez-les sécher dénitivement à l'air.
Page 93
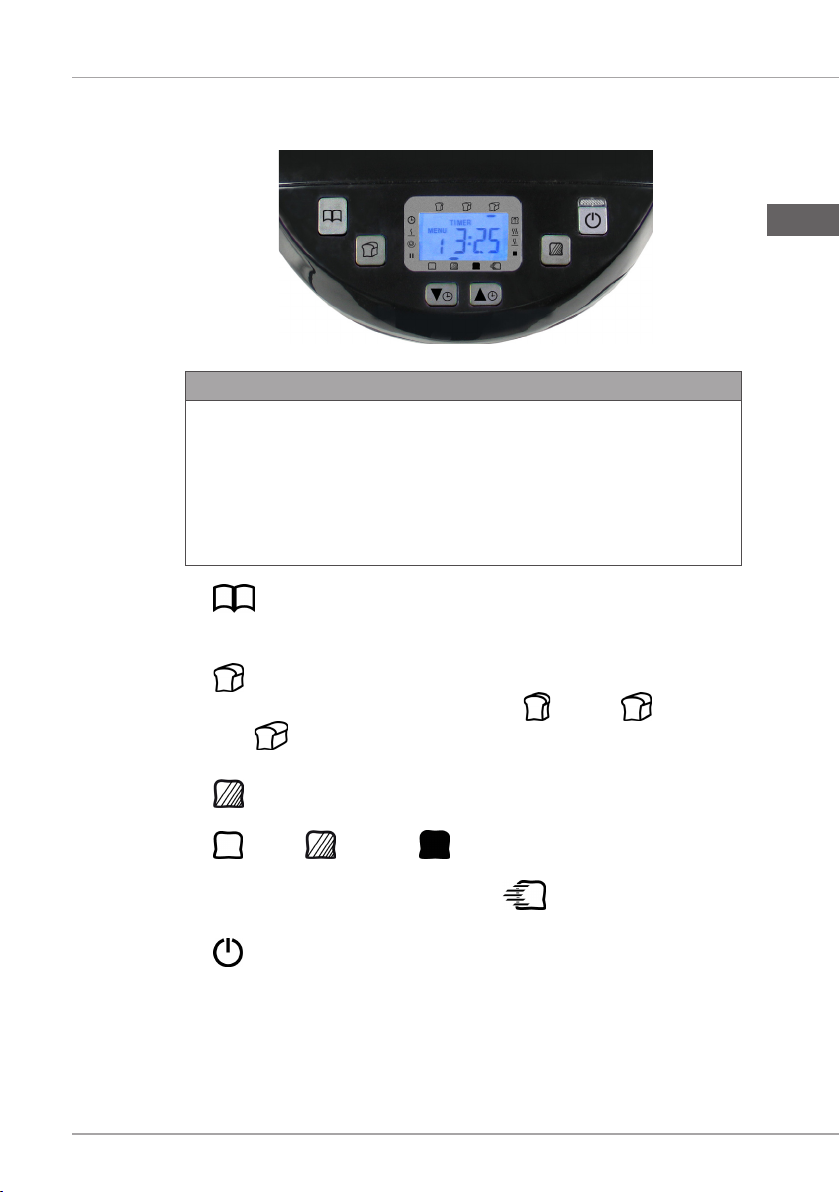
93
Mise en service
BEEM - Elements of Lifestyle
FR
Panneau de commande et afchage
INDICATION
Appuyez plusieurs fois sur les touches décrites par la suite pour ►
tester les possibilités de réglage. A chaque pression de touche
un signal sonore retentit. Observer l'afchage, il change à chaque pression de touche.
Chaque combinaison de programme, de degré de brunissement ►
et de poids est afchée automatiquement avec le temps de
cuisson approprié.
■ : Cette touche vous permet de sélectionner parmi les onze
programmes paramétrés. Le programme réglé est afché à
l'écran sous Menu (Programme de cuisson 1 - 11).
■ : Cette touche vous permet de régler le poids du pain ni.
Vous pouvez choisir parmi trois tailles: = 540g, = 680g
oder = 900g. Sur l'écran, un trait en dessous du poids réglé
indique votre choix.
■ : Cette touche vous permett de choisir entre trois degrés de
brunissement dans les programmes de cuisssons 1 - 4 :
= clair, = moyen, = foncé. En outre, vous avez la
possibilité de raccourcir le temps de cuisson dans les programmes 1, 2 ou 3 en utilisant le réglage . Sur l'écran, un trait
au-dessus du degré de brunissement réglé indique votre choix.
■ : Appuyez sur cette touche pour démarrer le programme
réglé. Pour arrêter l'opération, vous devez maintenir la touche
appuyée pendant environ deux secondes.
Page 94

94
Mise en service
BEEM - Elements of Lifestyle
FR
■ / : A l'aide de ces touches, vous pouvez augmenter
ou réduire le temps réglé sur la minuterie par intervalles de 10
minutes. Veuillez noter que le temps réglé indique le moment où
la cuisson est terminée. Un réglage maximum de 15 heures est
possible.
Exemple: La minuterie afche 6:30 sur l'écran. Cela signie que
la cuisson est termée en 6 heures et 30 minutes.
Lorsque vous démarrez la programmation à l'aide de
la touche - la minuterie (timer) compte à rebours.
Votre pain sera terminé en 6 heures et 30 minutes.
En outre, ces touches vous permettent de régler le temps de
cuisson pour le menu 10.
Après le branchement de l'appareil à l'alimentation, le réglage de
base suivant est afché sur l'écran:
Les phases individuelles des programmes de cuisson sont indiquées
à gauche et à droite de l'écran Après l'actionnement de la touche
un triangle sur le côté gauche ou droit du bord de l'afchage vous
indique dans quelle phase le programme de cuisson se trouve.
Minuterie (lorsque la
temporisation du démarrage est active)
Préchauffage de l'appareil de cuisson automatique.
Pétrissage de la pâte
Repos de la pâte Fin du programme
Levage de la pâte
Cuisson de la pâte
Maintien à chaud du
produit ni
Page 95

95
Utilisation_et fonctionnement
BEEM - Elements of Lifestyle
FR
Utilisation_et fonctionnement
Ce chapitre vous fournit des indications importantes pour l'utilisation
de l'appareil.
Consignes de sécurité
DANGER
Danger de mort causé par le courant électrique !
Assurez-vous que l'appareil soit parfaitement sec avant de ►
l'utiliser.
AVERTISSEMENT
Risques de brûlure !
Pendant le fonctionnement, le four, la cuve et la spirale de
chauffage deviennent très chauds!
Ne touchez pas les parties se trouvant à l'intérieur de l'appareil ►
lorsque celui-ci est en service.
Utilisez des maniquettes pour sortir la cuve de l'appareil après ►
la n de la cuisson.
AVERTISSEMENT
Risque de blessure par les crochets pétrisseurs/mélangeurs!
Les crochets pétrisseurs/mélangeurs sont mus par un
moteur puissant.
Ne mettez pas les mains dans la cuve lorsque l'appareil fonctionne. ►
Page 96

96
Utilisation_et fonctionnement
BEEM - Elements of Lifestyle
FR
Règles d'utilisation fondamentales de l'appareil
INDICATION
Vous trouverez des suggestions de cuisson dans le livre de ►
recettes ci-joint.
Sortez la cuve de l'appareil et enchez éventuellement le crochet
pétrisseur ou mélangeur sur la broche sur le fond de la cuve (voir
chapitre Mise en place et enlèvement crochet pétrisseur/mélangeur).
Remplissez les ingrédients de cuisson dans la cuve. Suivez les
instructions de préparation contenues dans le livre de recettes
ou les indications contenues sur l'emballage du mélange à cuisson de pain.
INDICATION
Pour le dosage des ingrédients pour cuisson vous pouvez utili- ►
ser le gobelet doseur et la cuillère de dosage. Pour les liquides,
mettez le gobelet doseur sur une surface plane et contrôlez le
niveau de remplissage à hauteur de l'oeil.
Placez la cuve dans l'appareil (voir chapitre Mise en place et
enlèvement crochet pétrisseur/mélangeur).
Fermez le couvercle.
Branchez la che réseau dans une prise.
Sélectionnez le programme de cuisson approprié avec la
touche .
Réglez le poids du pain avec la touche .
Sélectionnez le degré de brunissement de la croûte de pain à
l'aide de al touche .
Lorsque vous souhaitez démarrer la cuisson à retardement,
réglez le laps de temps où le pain devra être terminé avec les
touches et .
Appuyez sur la touche pour démarrer le programme..
INDICATION
Dès que vous pressé ► toutes les autres fonctions de tou-
ches sont bloquées.
Page 97

97
Utilisation_et fonctionnement
BEEM - Elements of Lifestyle
FR
Maintenant, l'appareil commence à prendre en charge le programme
de cuisson sélectionné. Le triangle sur le bord droit ou gauche de
l'écran vous montre l'état d'avancement du programme de cuisson.
INDICATION
Vous pouvez interrompre le programme en maintenant la tou- ►
che -appuyée pendant env. 2 secondes.
Un signal sonore retentit après l'écoulement du temps de cuisson. La
phase de maintien au chaud commence (seulement pour les menus
1-6, 10 et 11).
INDICATION
Vous pouvez aussi sortir la cuve de l'appareil pendant la phase ►
de maintien au chaud. Pour ce faire, terminez le déroulement
de programme en maintenant la touche appuyée pendant
env. 2 secondes et débranchez la che réseau de la prise.
A la n du programme, l'écran afche la position de départ
souhaitée. Utilisez de maniques pour sortir la cuve de l'appareil.
Laissez un peu refroidir le pain ou le gâteau avant de sortir le
produit cuit de la cuve.
INDICATION
Sortez le crochet pétrisseur/mélangeur du pain après la cuisson ►
avant de couper le pain.
Vous pouvez déjà enlever le crochet pétrisseur/mélangeur ►
après la dernière opération de pétrissage du programme de
cuisson sélectionné pour éviter qu'il ne laisse un trou dans le
pain. Pour ce faire, saupoudrez vos mains de farine et soulevez
la pâte pour sortir par le haut le crochet pétrisseur/mélangeur
de la cuve.
Pour plus de conseils concernant un résultat de cuisson opti- ►
mal, veuillez vous reporter au livre de recettes ci-joint.
Page 98

98
Utilisation_et fonctionnement
BEEM - Elements of Lifestyle
FR
Programmes de cuisson
La touche vous permet de sélectionner parmi les onze programmes paramétrés:
Menu 1 - Basic
Préparation de pain bis. Vous pouvez compléter les ingrédients pour
améliorer le goût du pain, p.ex. en ajoutant des graines de courge,
du lard ou des oignons frits. C'est le programme le plus utilisé.
Menu 2 - Pain blanc
Pour la cuisson de pain blanc. La variante classique est le pain au
froment, un pain léger avec une croûte croustillante.
Menu 3 - Pain complet
Les pains complets sont réalisés entre autres à base de céréales
complètes égrugées ou moulues. Le programme commence par le
préchauffage, c-à-d. les ingrédients sont réchauffés avant le pétrissage.
INDICATION
Pour raccourcir les menus 1, 2 ou 3 sélectionnez à l'aide de ►
la touche le réglage . Dans ce cas, l'eau ajoutée doit
être tiède.
Menu 4 – Pain sucré
Les pains sucrés sont souvent duavec du lait et peuvent être rafnés
avec des ingrédients tels que du chocolat râpé, des raisins secs ou
des noix.
Menu 5 - Programme de cuisson rapide
Ce programme permet de raccourcir le temps de cuisson du pain bis
et du pain blanc. Ainsi, la production d'un pain bis avec le menu 1 et
les réglages et dure 3 heures 25 minutes. Par contre, avec
le menu 5 elle ne dure que 1 heure et 20 minutes. On économise le
temps entre les phases de repos de la pâte. Pour cette raison, il est
recommandé de préchauffer les liquides dans le cas de ce menu. En
cas d'utilisation de liquides froids, la pâte ne se lève pas correctement. Si le liquide est trop chaud, la levure ne peut pas agir.
Page 99

99
Utilisation_et fonctionnement
BEEM - Elements of Lifestyle
FR
Menu 6 - Pain sans gluten.
Pour la cuisson de pains et gâteaux sans gluten avec des farines ou
mélanges de farine sans gluten.
Menu 7 - Pâte à pizza
Pour le pétrissage de pâte à pizza. Versez tous les ingrédients dans
la cuve à pain et l'appareil produit une pâte à pizza lisse. Il ne vous
reste plus qu'à la rouler, la garnir et la cuire.
Menu 8 - Pâte à nouilles
En très peu de temps, la machine fabrique une pâte à nouilles homo-
gène.
Menu 9 - Conture
Préparation de conture. Ce programme vous permet de réaliser des
contures individuelles. Il vous suft de remplir la conture chaude
dans les verres.
Menu 10 - Cuisson sans pétrissage
Ne sert qu'à la cuisson d'une pâte nie. La pâte n'est pas pétrie dans
ce programme. Le temps de cuisson se laisse varier à l'aide des
touches et (1:10; 1:20; 1:30). Vous pouvez interrompre
le programme à tout moment en maintenant la touche appuyée
pendant 2 secondes.
Menu 11 – Gâteau
Pour la réalisation de gâteau battu. A cet effet, utilisez la cuve à
gâteau avec le crochet pétrisseur
INDICATION
Les temps individuels indiqués pour chaque programme gurent ►
au tableau dans l'annexe.
Dans notre livre de recettes, vous trouverez des recettes de ►
pain, de nouilles, de pâtes et de contures.
Lorsque vous fabriquez du pain ou de la pâtisserie avec des ►
mélanges préfabriqués, suivez les instructions de cuisson sur
l'emballage.
Page 100

100
Utilisation_et fonctionnement
BEEM - Elements of Lifestyle
FR
MInuterie
INDICATION
La minuterie peut être utilisée pour tous les menus à l’exception ►
du menu 10 (cuisson sans pétrissage). Ici, l'on peut modier le
temps de cuisson à l'aide des touches et (1:10;
1:20; 1:30).
Sélectionnez d'abord le menu souhaité (touche ), le
du pain (touche ) et le degré de brunissement (touche ).
Exemple: Vous avez sélectionné le réglage suivant:
Menu 1, poids du pain , degré de brunissement
.
L'afchage du temps indique 3:25.
Avec les touches et réglez le temps de démarrage
souhaité. A chaque pression de touche, l'afchage change de 10
minutes. Vous pouvez régler un intervalle de temps maximum de
15 heures (y compris le temps de cuisson).
Exemple: A chaque pression de touche l'afchge du
temps change sur l'écran: 3:25 – 3:30 – 3:40 – 3:50
– 4:00 etc. Si vous souhaitez que le pain soit terminé
après 6 heures, poussez sur la touche jusqu'à
ce que l'écran afche 6:00.
Démarrez la programmation en appuyant sur la touche . Le
double point clignote sur l'afchage et le temps écoulé s'afche
sous forme de compte à rebours. Le programme de cuisson
démarre automatiquement à l'atteinte du temps de cuisson.
Exemple L'afchage du temps est sur 6:00, le double point
clignote. Le programme de cuisson démarre automatiquement à l'atteinte du réglage 3:25.
poids
 Loading...