

Page 1
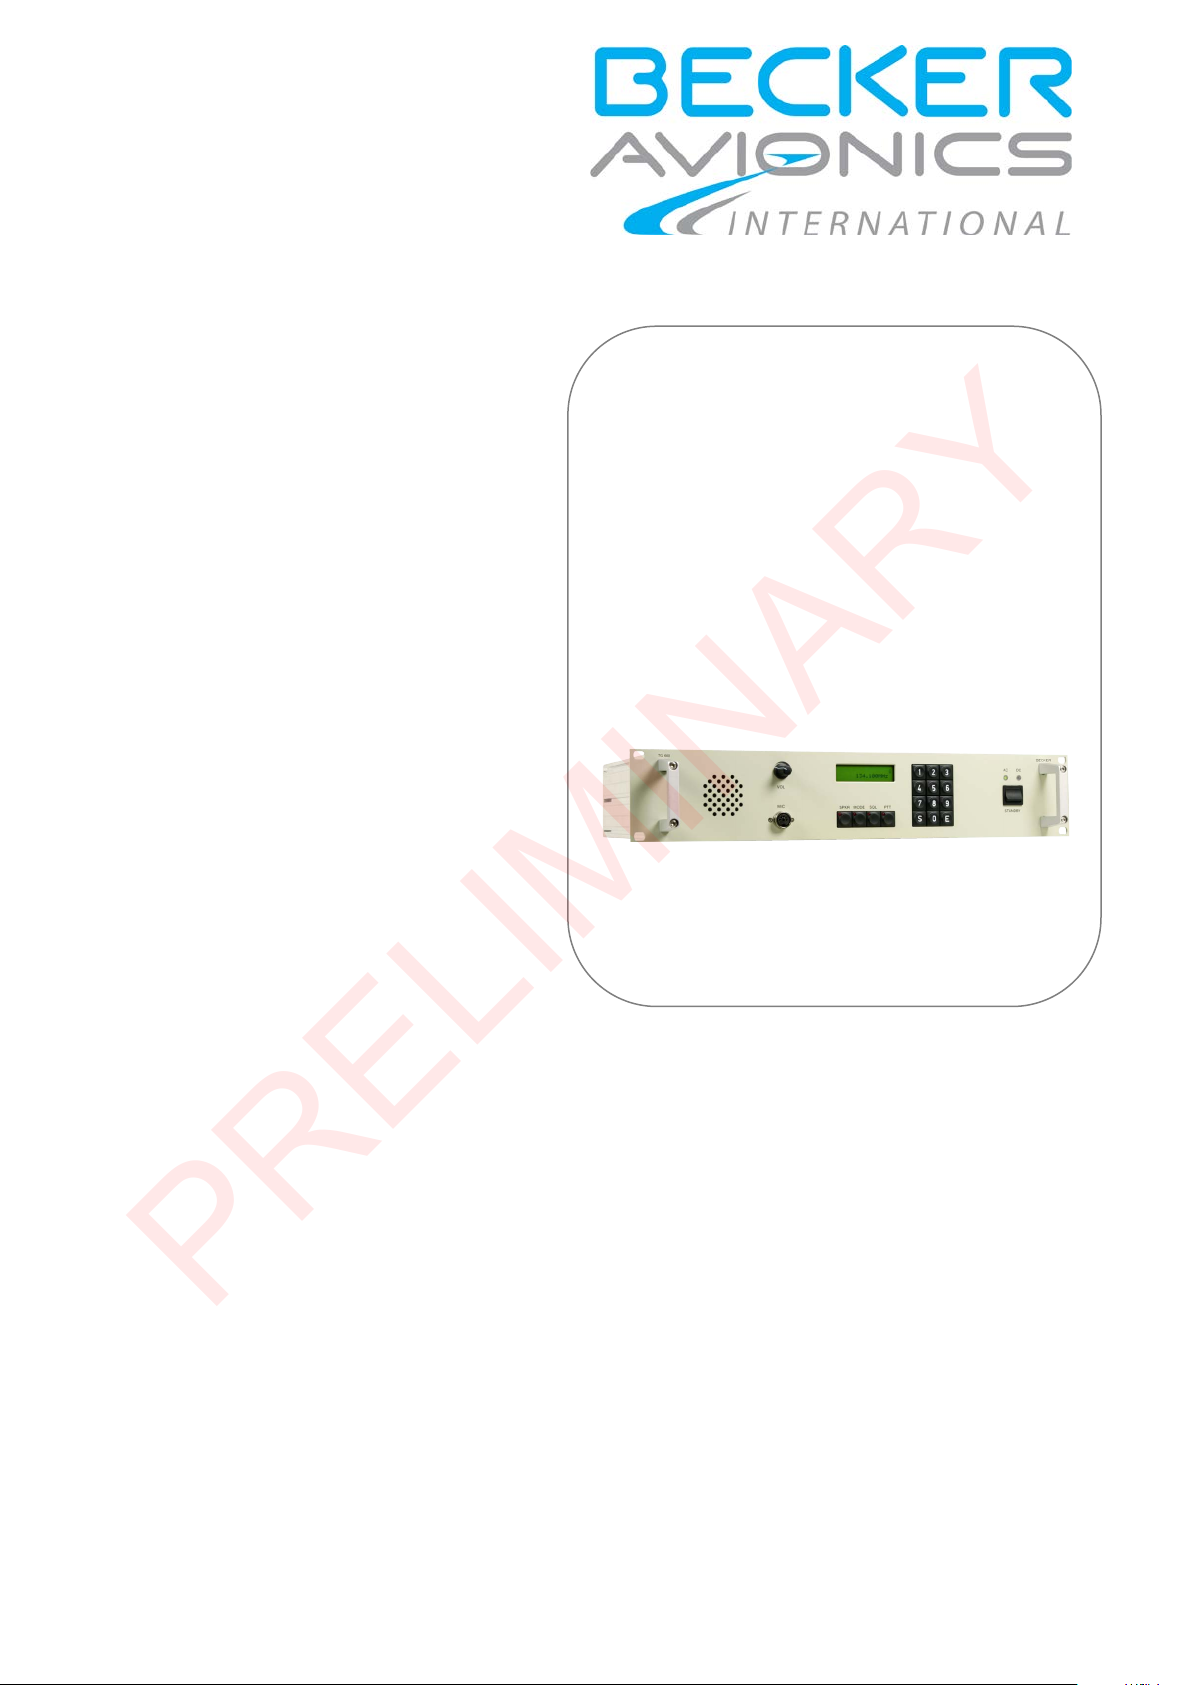
VHF-Ground Station
PRELIMINARY
TG660
Installation and Operation
Manual DV17900.03
Issue 03 March 2017
Article-No. 0639.583-071
Becker Avionics GmbH • Baden-Airpark B108 • 77836 Rheinmünster • Germany
+49 (0) 7229 / 305-0 • Fax +49 (0) 7229 / 305-217
http://www.becker-avionics.com • E-mail: [email protected]
Becker Avionics Inc. • 10376 USA Today Way • Miramar FL 33025 • USA
+1 (954) 450-3137 • Fax +1 (954) 450-3206
http://www.beckerusa.com • E-mail: info@beckerusa.com
Page 2

Installation a nd Operation
Germany:
Becker Avionics GmbH
PRELIMINARY
Approved Production and Maintenance Organisation
Certificates see: http://www.becker-avionics.com/company-about/ →Certificates
Baden-Airpark B108
77836 Rheinmünster (Germany)
Tel.: + 49 (0) 7229 / 305-0
Fax: + 49 (0) 7229 / 305-217
Internet: www.bec
il: info@becker-avionics.com
Ema
Sales:
Email: [email protected]
Customer Service:
Email: [email protected]
USA: Becker Avionics Inc.
10376 USA Today Way
Miramar, FL 33025, (USA)
Tel.: + 1 (954) 450 3137
Fax: + 1 (954) 450 3206
Internet: www.beckerusa.com
Email: info@beckerusa.com
Sales:
Email: sales@beckerusa.com,
Customer Service:
Email: support@beckerusa.com
ker-avionics.com
,
Contact Data for Brazil and China:
FAILURE OR IMPROPER SELECTION OR IMPROPER USE OF THE PRODUCTS DESCRIBED
HEREIN OR RELATED ITEMS CAN CAUSE DEATH, PERSONAL INJURY AND PROPERTY
DAMAGE.
• This document and other information from Becker Avionics GmbH provide product or system
options for further investigation by users having technical knowledge.
• The user is responsible for making the final selection of the system and components. The user
has to assure that all performance, endurance, maintenance, safety requirements of the
application are met and warnings be observed.
For this the user has to include all aspects of the application to be compliant with the applicable
industry standards and the requirements of the responsible aviation authority. The product
documentations from Becker Avionics GmbH have to be observed.
• To the extent that Becker Avionics GmbH provide component or system options based upon data
or specifications provided by the user, the user is responsible for determining that such data and
specifications are suitable and sufficient for all applications and reasonably foreseeable uses of
the components or systems.
China
Email: [email protected]
Brazil:
Email: [email protected]
WARNING - USER RESPONSIBILITY
Term definiti on: User in the sense of user, installer, installation company.
2 TG660 DV17900.03 Issue 03 March 2017
Page 3

Preface
design depends on variant
PRELIMINARY
Dear Customer,
Installation and Operation
Thank you for pur
product and we are confident that it will meet your expectations.
For development and m anufacturing of our product, the guidelines for highest quality and reliability
have been borne in m ind, supplemented by selection of high quality material, res ponsible production
and testing in accordance to the ISO 9001 and DIN EN 9100 standards.
Our competent customer support department will respond on any technical question you may have.
Please do not hesitate to contact us at any time.
VHF-Ground S
chasing a Becker Avionics product. We are pleased that you have chosen our
tation
TG660
DV17900.03 Issue 03 March 2017 TG660 3
Page 4

Installation and Operation
Document: DV17900.03/ issue 03 Article Number 0639.583-071
PRELIMINARY
List of Effective Pages and Changes
Only technical relevant modifications are described in this table.
Cover Page 03/2017
Introduction 03/2017
Chapter 1 –5 03/2017
Issue Page No.:
03
1-60 all Changed: Editorial adjustments.
-- all Added: Descriptions
--
--
--
--
--
--
--
--
Section /
Chapter
all
Description
Added: Desc
about 50 W variant.
riptions about
25
W
variant.
--
--
--
--
--
© 2017 by Becker Avion
ics GmbH / all rights reserved
4 TG660 DV17900.03 Issue 03 March 2017
Page 5

Installation and Operation
PRELIMINARY
Table of Contents
1. General Description .................................................................................................................... 11
1.1. Introduction.................................................................................................................................. 12
1.2. Purpose of Equipment ................................................................................................................. 13
1.3. Variants Overview ....................................................................................................................... 13
1.3.1. Software Status ................................................................................................................. 13
1.4. Scope of Functionality ................................................................................................................. 14
1.4.1. Microphone Inputs ............................................................................................................ 14
1.4.2. Audio Outputs ................................................................................................................... 14
1.4.3. Side Tone Output .............................................................................................................. 14
1.4.4. HMI.................................................................................................................................... 14
1.4.5. Loudspeaker ..................................................................................................................... 14
1.4.6. Rear Panel ........................................................................................................................ 14
1.4.7. Self-Test ............................................................................................................................ 14
1.4.8. Options .............................................................................................................................. 15
1.5. Safety-Conscious Utilization ....................................................................................................... 15
1.6. Restriction for Use ....................................................................................................................... 15
1.7. Technical Data ............................................................................................................................ 16
1.7.1. General Characteristics .................................................................................................... 16
1.7.2. Receiver Data ................................................................................................................... 16
1.7.3. Transmitter Data ............................................................................................................... 17
1.7.4. Audio Output Data ............................................................................................................ 17
1.7.5. Dimensions & Weight........................................................................................................ 18
1.7.6. Certifications ..................................................................................................................... 18
1.8. Order Code.................................................................................................................................. 19
1.8.1. TG660 ............................................................................................................................... 19
1.8.2. Accessories ....................................................................................................................... 19
1.8.3. Spare Parts ....................................................................................................................... 20
2. Installation .................................................................................................................................... 21
2.1. Limitations ................................................................................................................................... 21
2.2. Packaging, Transport, Storage ................................................................................................... 21
2.2.1. Packaging Material and Transport .................................................................................... 22
2.3. Device Assignment ..................................................................................................................... 22
2.3.1. Scope of Delivery .............................................................................................................. 22
2.3.2. Additional Required Equipment ........................................................................................ 22
2.3.3. Type Plate ......................................................................................................................... 23
2.4. Mounting Requirements .............................................................................................................. 24
2.4.1. Grounding ......................................................................................................................... 24
2.4.2. Radio Frequency Radiation .............................................................................................. 24
2.4.3. Antenna Installation .......................................................................................................... 24
2.4.4. Lightning Protection .......................................................................................................... 25
2.5. Dimensions.................................................................................................................................. 25
2.5.1. TG660 ............................................................................................................................... 25
2.6. Connector Pin Assignments ........................................................................................................ 26
2.6.1. Connector MIC (Front) ...................................................................................................... 27
2.6.2. Connector Remote Control (Rear) .................................................................................... 27
2.6.3. Connector Record/DF (Rear) ............................................................................................ 28
2.6.4. Connector LINE / AUX (Rear) ........................................................................................... 29
2.6.5. Connector EXT. DC (Rear) ............................................................................................... 30
2.6.6. Connector AC/Line Power Sup ply (Rear) ......................................................................... 30
2.6.7. Reflectometer / RF Po wer Mon itor ................................................................................... 31
2.7. Wiring .......................................................................................................................................... 31
2.7.1. Microphone Connection .................................................................................................... 31
2.7.2. Record/DF Connection ..................................................................................................... 31
2.7.3. LINE / AUX Connection .................................................................................................... 32
2.7.4. Auxiliary Voltage Output ................................................................................................... 33
2.8. Configuration via PC ................................................................................................................... 34
2.8.1. Preparing the PC .............................................................................................................. 34
2.8.2. Operating via PC ............................................................................................................... 35
2.9. Post Installation Check ................................................................................................................ 36
DV17900.03 Issue 03 March 2017 TG660 5
Page 6

Installation and Operation
PRELIMINARY
2.9.1. Mechanical Installation and Wiring Check ........................................................................ 36
2.9.2. Power Supply .................................................................................................................... 36
2.9.3. Receiver / Transmitter Operation...................................................................................... 36
2.9.4. Antenna Check.................................................................................................................. 36
3. Operating Instructions ............................................................................................................... 37
3.1. Device Description ...................................................................................................................... 37
3.1.1. Device Assignment ........................................................................................................... 37
3.1.2. Packing, Transport, Storage ............................................................................................. 37
3.1.3. Scope of Delivery .............................................................................................................. 37
3.1.4. Type Plate ......................................................................................................................... 37
3.1.5. Controls and Indications.................................................................................................... 38
3.2. Start up ....................................................................................................................................... 39
3.2.1. Power ON ......................................................................................................................... 40
3.2.2. Power on Built In Test (PBIT) ........................................................................................... 40
3.3. Operating .................................................................................................................................... 41
3.3.1. Keypad .............................................................................................................................. 41
3.3.2. SPKR Key ......................................................................................................................... 42
3.3.3. Mode Key .......................................................................................................................... 42
3.3.4. SQL Key............................................................................................................................ 43
3.3.5. PTT Key ............................................................................................................................ 43
3.3.6. Storage Procedure ............................................................................................................ 44
3.4. Operating via PC ........................................................................................................................ 45
3.4.1. Interface RoIP .................................................................................................................. 45
3.4.2. Menus ............................................................................................................................... 46
3.5. Selectable Frequencies .............................................................................................................. 47
4. Certificates .................................................................................................................................. 49
4.1. Certificate-Info ............................................................................................................................. 49
4.2. BAF Approval - GT6201 .............................................................................................................. 50
4.3. EC Declaration of Conformity – GT6201-05-R ............................................................................ 52
4.4. EC Declaration of Conformity – GT6201-10-R ............................................................................ 54
4.5.
5. Index.............................................................................................................................................. 58
Figure 1: System: TG660 with "Radio over IP" (RoIP) Option.................................................................................15
Figure 2: Type Plate (Example)...............................................................................................................................23
Figure 3: N-Surge-Suppressor: Lightning protection ...............................................................................................25
Figure 4: TG660 – Dimensions ...............................................................................................................................25
Figure 5: TG660 Front Interface ..............................................................................................................................26
Figure 6: TG660 Rear Interface ..............................................................................................................................26
Figure 7: TG660 - Connector MIC (Front) ...............................................................................................................27
Figure 8: TG660 - Connector Remote Control (Rear) .............................................................................................27
Figure 9: TG660 - Connector Record/DF (Rear).....................................................................................................28
Figure 10: TG660 - Connector LINE / AUX (Rear) .................................................................................................. 29
Figure 11: TG660 - Connector EXT. DC (Rear) ......................................................................................................30
Figure 12: TG660 - Connector AC/Line Power Supply (Rear).................................................................................30
Figure 13: PC configuration: LAN network ..............................................................................................................34
Figure 14: PC configuration: IP-address, sub net mask ..........................................................................................35
Figure 15: TG660 – Control s and Indications..........................................................................................................38
Figure 16: TG660 – Display after power on.............................................................................................................40
Figure 17: TG660 – PBIT, 1.Step ............................................................................................................................40
Figure 18: TG660 – PBIT, 2.Step ............................................................................................................................40
Figure 19: TG660 – PBIT, 3.Step ............................................................................................................................40
Figure 20: TG660 – PBIT, 4.Step ............................................................................................................................40
Figure 21: TG660 – PBIT, 5.Step ............................................................................................................................41
Figure 22: TG660 – PBIT, 6.Step ............................................................................................................................41
Figure 23: Interface: TG660 Radio over IP..............................................................................................................45
Figure 24: System page1 - Radio Settings..............................................................................................................46
Approval - Telecommunication Office Italy ..... ............................................................................ 56
6 TG660 DV17900.03 Issue 03 March 2017
Page 7

List of Abbreviations
List of Abbreviations
AC
Advisory Circular
AF
Audio Frequency
AUX
Auxiliary
BAF
Bundesaufsichtsamt für Flugsicherung (Federal Supervisory Authority for Air
DC
Direct Current
ETSI
European Telecommunication Standards Institute
FAA
Federal Aviation Administration
GND
Ground
HMI
Human Machinery Interface
I&O
Installation & Operation
ICAO
International Civil Aviation O r ganizat io n
LCD
Liquid Crystal Display
M&R
Maintenance & Repair
PBIT
Power-On Built In Test
PTT
Push to Talk
RX
Receive
SPKR
Speaker (Loudspeaker)
SQL
Squelch
TX
Transmit
VHF
Very High Frequency
VSWR
Voltage Standing Wave Ratio
Units
A
Ampere
mA
Milliampere
°C
Degree Celsius
cm
Centimetre
dBm
Power Ratio In Decibel
dB
Decibel
g
Gram
kg
Kilogram
kHz
Kilohertz
MHz
Megahertz
mm
Millimetre
Ohm (Ω)
Resistance
PRELIMINARY
Alternating Current
Navigation Services)
Installation and Operation
Units
DV17900.03 Issue 03 March 2017 TG660 7
Page 8
Installation and Operation
Units
s
Second
V
Volt
mV
Millivolt
W
Watt
mW
Milliwatt
"
Inch
°
Angular degree
Indicates a hazardous situation which, if not avoided, will result in death or
Indicates a hazardous situation which, if not avoided, could result in death or
Indicates a hazardous situation which, if not avoided, could result in minor or
Is used to address practices not related to physical injury.
Safety instructions (or equivalent) signs indicate specific safety-related
The packaging material is inflammable, if it is disposed of improperly by
Material
Suitable for recycling
Disposal
Metal
yes
no
Plastics
yes
no
Circuit boards
no
yes
PRELIMINARY
General Safety Definitions
serious injury.
serious injury.
moderate injury.
instructions or procedures.
Disposal
burning, toxic fumes may develop.
This product contains m ater
the EC directive for dangerous disposal material. We recommend disposing of the respective materials
in accordance with the respecti vely valid env ironmental laws. The following table states the materials
suitable for recycling and the materials which have to be disposed of separately.
ials that fall under the special disp osal regulation, which corresponds to
Dispose of the circuit boards:
• Disposal via a technical waste dump which is allowed to take on e.g. electrolytic
aluminium capacitors. Do under no circumstances dump the circuit boards with normal
waste dump.
8 TG660 DV17900.03 Issue 03 March 2017
Page 9

Installation and Operation
DO NOT throw the unit in munic ipal waste. This product has been designed to
DO NOT throw the batter y in municipal waste. The s ym bol of the crossed out
atteries can be disposed free of charge is
The user is responsible for protective covers and/or additional safety measures
PRELIMINARY
enable proper reuse of parts and rec ycling. Check local r egulations for dis posal
of electronic products.
wheeled bin indicates that the battery should not be placed in municipal waste.
Information about where old b
available at your local authorities.
Warranty Conditions
User Conversions and Changes are Not Permitted
Any change made by the u ser excludes any liabilit y on our part (excluding th e work described in th is
manual).
• The device must not be opened.
• Do not make any modifications to the device, except for those described in the manual.
• Make connections to the inputs, outputs and interfaces only in the manner described in
the manual.
• Fix the devices according to the mounting instructions.
We cannot provide any guarantee for other mounting methods.
Conditions of Utilization
General introductory notes
With this device you boug ht a product which was manufactured and tested bef ore delivery with the
utmost care.
Please take your tim e to read the follo wing notes which you ought to follo w closely during ins tallation
and operation.
Unless, all claim s under the warranty will becom e void and a reduced service lif e or even damages
must be expected.
in order to prevent damages to persons and electric accidents.
Additional
Please refer to "Safety-Conscious Utilization", page 15.
Non Warranty Clause
We checked the co nte nts o f this publication for compliance with the as soc ia ted h ar d a nd s of t ware. We
can, however, not exclude discrepancies and do therefore not accept any liability for the exact
compliance. The information in this publication is regularl y checked, neces sary co rrections wil l be part
of the subsequent publications.
Conditions of Utilization
DV17900.03 Issue 03 March 2017 TG660 9
Page 10

Installation and Operation
PRELIMINARY
Blank
10 TG660 DV17900.03 Issue 03 March 2017
Page 11

General Descri pt ion
PRELIMINARY
Introduction
1. General Description
In this chapter you can read about:
Introduction.................................................................................................................................. 12
1.1.
1.2. Purpose of Equipment ................................................................................................................. 13
1.3. Variants Overview ....................................................................................................................... 13
1.3.1. Software Status ................................................................................................................. 13
1.4. Scope of Functionality ................................................................................................................. 14
1.4.1. Microphone Inputs ............................................................................................................ 14
1.4.2. Audio Outputs ................................................................................................................... 14
1.4.3. Side Tone Output .............................................................................................................. 14
1.4.4. HMI.................................................................................................................................... 14
1.4.5. Loudspeaker ..................................................................................................................... 14
1.4.6. Rear Panel ........................................................................................................................ 14
1.4.7. Self-Test ............................................................................................................................ 14
1.4.8. Options .............................................................................................................................. 15
1.4.8.1. Internal Battery ...................................................................................................... 15
1.4.8.2. Radio over IP "RoIP" ............................................................................................. 15
1.5. Safety-Conscious Utilization ....................................................................................................... 15
1.6. Restriction for Use ....................................................................................................................... 15
1.7. Technical Data ............................................................................................................................ 16
1.7.1. General Characteristics .................................................................................................... 16
1.7.2. Receiver Data ................................................................................................................... 16
1.7.3. Transmitter Data ............................................................................................................... 17
1.7.4. Audio Output Data ............................................................................................................ 17
1.7.5. Dimensions & Weight........................................................................................................ 18
1.7.6. Certifications ..................................................................................................................... 18
1.8. Order Code.................................................................................................................................. 19
1.8.1. TG660 ............................................................................................................................... 19
1.8.2. Accessories ....................................................................................................................... 19
1.8.3. Spare Parts ....................................................................................................................... 20
This manual desc
label on your device shows the information for identification purposes (see "Type Plate", page 23).
Before starting operation of the unit(s) please read this manual carefully, with particular attention to the
description referring to your device(s).
ribes the operation a nd installation of the TG660-XX VHF-Ground Stations. The ID
DV17900.03 Issue 03 March 2017 TG660 11
Page 12
General Descri pt ion
DV17900.03
General
X
Installation
X
Operation
X
Theory of Operation
N/A
Maintenance and Repair
N/A
Illustrated Parts List
N/A
Modification and Changes
N/A
Circuit Diagrams
N/A
Certifications
X
Attachments
N/A
PRELIMINARY
Introduction
1.1. Introduction
TG660 is a VHF-transceiver. Depe nding on the variant, the TG660 is c apable of deliver ing 6 W, 10 W
or 50 W power (RF-carrier) to an external antenna.
TG660 features:
• Voltage control: TG660 po wer supp l y logic is oper ati n g with AC-power by default. After
AC-power failed, the logic automatically switches over to external DC-power. The moment
AC-power becomes available the logic returns back to AC-power source.
• Battery (option for 6 W and 10 W variants): An optional internal 12 VDC rechargeable
battery inside the TG660 provide power to continue operation with reduced RF power 6 W
over a certain time if AC and external DC supply voltage fail at the same time.
• Radio over IP (option): This option allows the TG660 to be connected to a Local Area
Network and the radio communication is performed over IP. In addition this option
provides remote monitoring and control capabilities via a PC and a web browser
• TG660 has a user-fr iendly HMI; all main components are on the front panel.
o 2-line 16 character liquid-crystal display (LCD)
The selected frequency and operating status of the equipment, displayed on the
LCD, inform about the current operating mode.
o Several cont rol elements (rotating knob and buttons),
enables the user to change operating modes or operating frequency. Standby
switch selected to “Standby” partially shuts down the TG660 internal power supply.
Some power supply circuits continue listening to the “Standby Switch” to repower
the unit at any time.
• The “ON/OFF” switch, located on the rear panel, disconnects from AC supply completely.
• TG660 VHF transceiver is protected against jammed transmit button or short circuit on the
PTT line.
• TG660 VHF transceiver is protected against antenna mismatch.
For further descript
The manual “Installation and Operation (I&O) contains the following sections:
Section
ions we are using the term TG660 instead writing the complete model number.
I&O
12 TG660 DV17900.03 Issue 03 March 2017
Page 13

1.2. Purpose of Equipment
PRELIMINARY
• TG660 is a fixed station for voice communications in the VHF frequency range of
118.000...136.990 MHz with 25 kHz / 8.33 kHz channel spacing.
• TG660 is useable on airports with different scale as a main transceiver, or as a standby
unit, as well as for special tasks within the scope of air traffic control.
• Designed for mounting in 19" rack systems, or in ATC desks.
• Operating with AC supply voltage from 100...230 V or with 24 VDC.
1.3. Variants Overview
Within the part number, the meaning of "-XX " is:
TG
660 - XX
Identifier
General Descri pt ion
Purpose of Equipment
Model Number
RF Output Power
05= ≥ 6 W
10= ≥ 10 W
25= ≥ 25 W
50= ≥ 50 W
*
Available
Battery option and RoIP option, details see "Options" page 15.
1.3.1. Software Status
Descriptions see "Type Plate", page 23.
options:
DV17900.03 Issue 03 March 2017 TG660 13
Page 14

General Descri pt ion
PRELIMINARY
Scope of Functionality
1.4. Scope of Functionality
1.4.1. Microphone Inputs
Several microphone inputs are available for:
• Standard microphone unbalanced, DC coupled and providing power supply for the mike.
• Dynamic mike input balanced.
• Symmetrical balanced input.
These microphone in puts connect to a dynamic volum e compressor inside of the remote contro lled
transceiver, which k eeps the m odulati on voltage c ons tant ≥ 80% over a wide m ike signa l input vo ltage
range.
1.4.2. Audio Outputs
TG660 has different outputs:
• Headphone output
• Speaker output
• Line out
• Voice recorder
1.4.3. Side Tone Output
In transmit mode, the side tone signal is routed to the line and phone output.
1.4.4. HMI
The TG660 HMI pro vides a LC Displa y, a keypad, various function switches and the volume control
and also operation with Web Browser via IP ( see "Radio over IP "RoIP", pag e 15).
1.4.5. Loudspeaker
The loudspeaker, located behind the front panel, switch off automatically during TX. This avoids
acoustic coupling between loudspeaker and the microphone, which can cause acoustical feedback.
1.4.6. Rear Panel
TG660 rear panel layout:
• Terminal for ground connection.
• AC power connector with integrated ON/OFF switch and safety fuse.
• Fuse 1 (DC extern input
• Fuse 2 (internal battery if installed) or Power Amplifier for TG660-25 or TG660-50.
• DC extern socket (STAKEI 2 connector).
• LAN socket (RJ45).
• Remote connector (D-Sub9pin).
• Record / DF connector (D-Sub15pin).
• LINE / AUX connector (D-Sub25pin).
• Antenna connection (N-Type).
• TG660-50 (Reflectometer)
).
1.4.7. Self-Test
After power "ON" a s ystem self-test is perform ed. Detected errors show up on the dis play otherwise
the unit changes into the last used operation mode.
14 TG660 DV17900.03 Issue 03 March 2017
Page 15
General Descri pt ion
• The installation may be carried out only by authorized personnel.
",
The product is to be used inside the declared limits.
-Frequency selection
-Channel selection
-Status monitoring
-Configuration
RemoteMonitoring& Control
VoiceCommunication
TG660
with RoIP opt ion
LAN
Local Area Network)
PRELIMINARY
Safety-Consci ous Uti l i z ation
1.4.8. Options
Following options are available with all TG660 variants and all combinations.
1.4.8.1. Internal Battery
An optional internal 12 VDC battery (recharge able) inside the TG660 (onl y 6 W and 10 W variants)
provide power supply to contin ue operation over a certain t ime if AC and external DC supply voltage
fail at the same time.
Please note the TG660 functionality will be limited during operation in battery mode :
• Reduced RF power 6 W.
• Limited remote operation available.
1.4.8.2. Radio over IP "RoIP"
The RoIP (Radio over IP) opti on provides the p ossibility to con nect the desk top control heads via th e
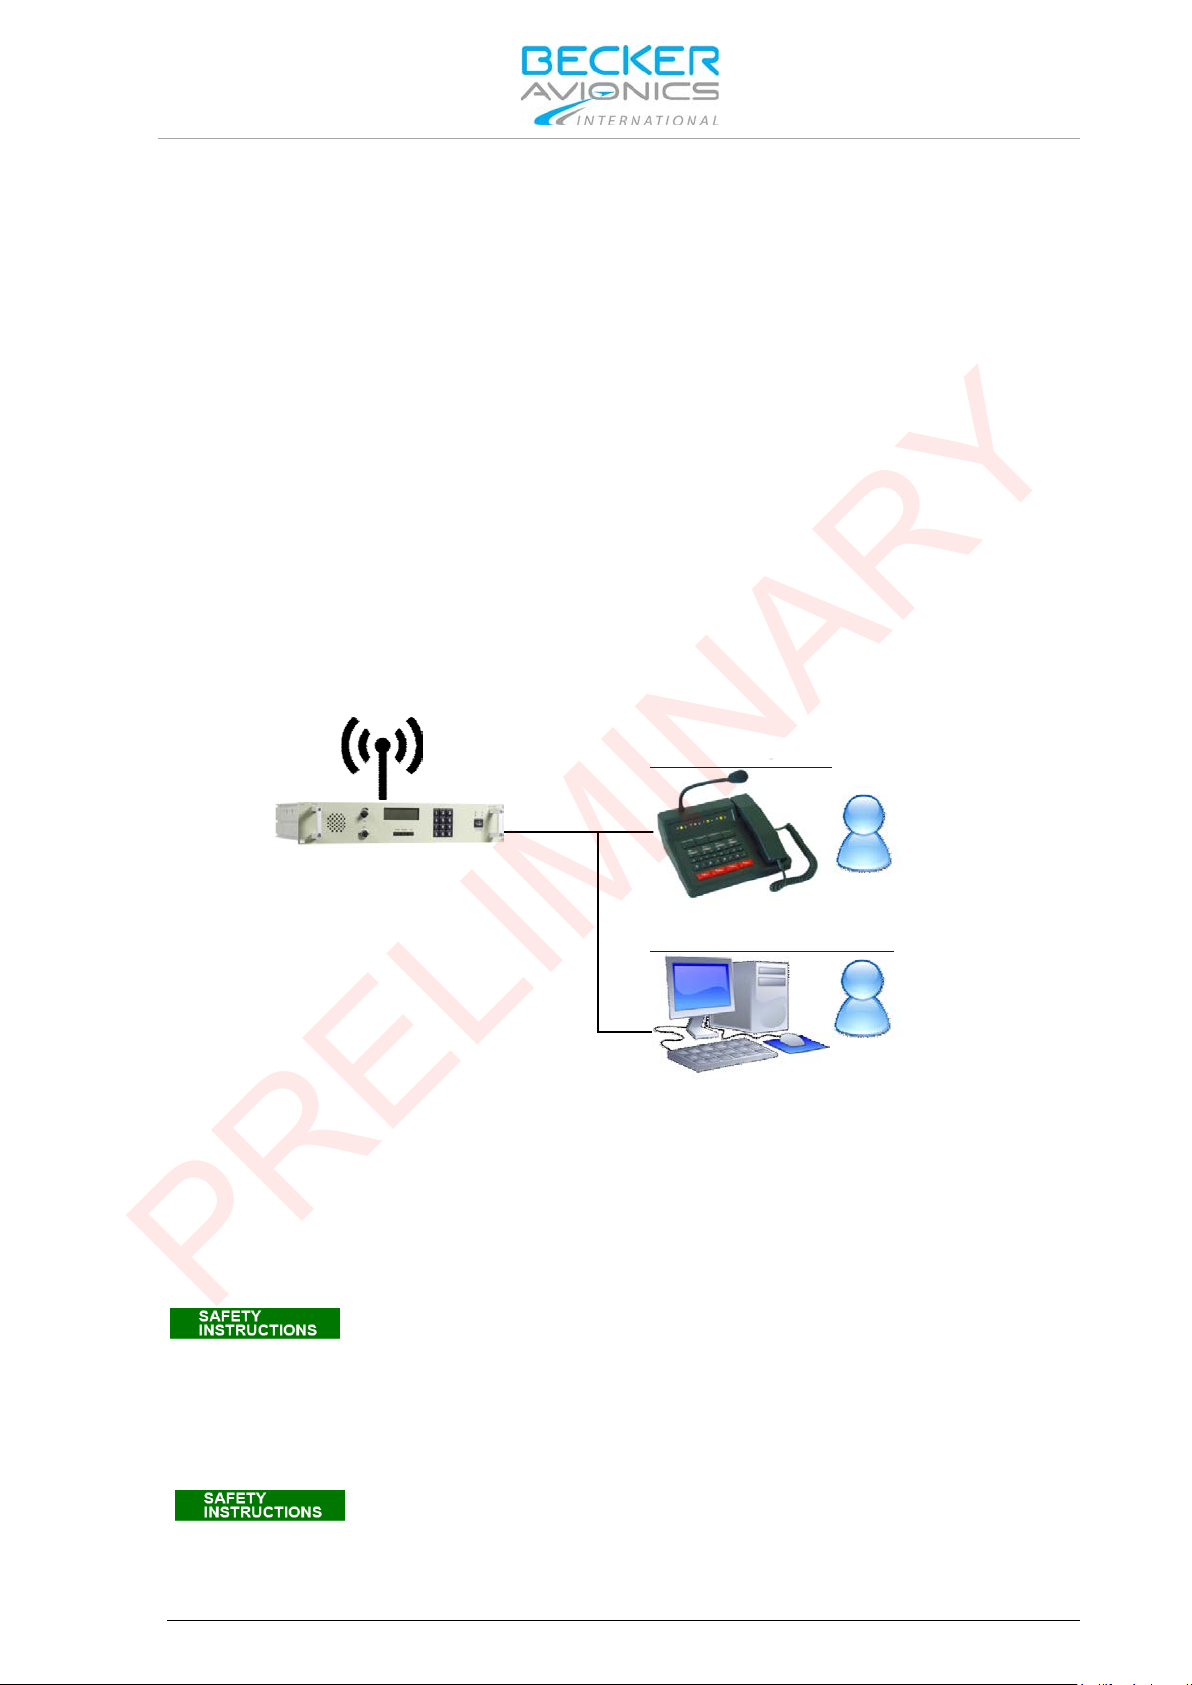
local area network (LAN) to the r adios . Thus com m on infras tructur e can b e use d and a lm ost unlim ited
distances can be bridged . As audio data an d contro l data are trans form ed to TCP/IP over Ethernet no
degradation of voice quality is present. Furthermore, connections via the Internet can be used.
Beside the voice communication also control signals are transferred via the LAN and thus provide
Remote Control & Monitoring functionality to the user. The configuration of the TG660 may be
changed via a web interface.
Figure 1: Sys
tem: TG660 with "Radio over IP" (RoIP) Option
1.5. Safety-Conscious Utilization
For safe operation of the product the following notes have to be observed:
1.6. Restriction for Use
DV17900.03 Issue 03 March 2017 TG660 15
The country regulations always have to be observed.
• Use the product only within the specified conditions , see "Technical Data
page 16.
Page 16
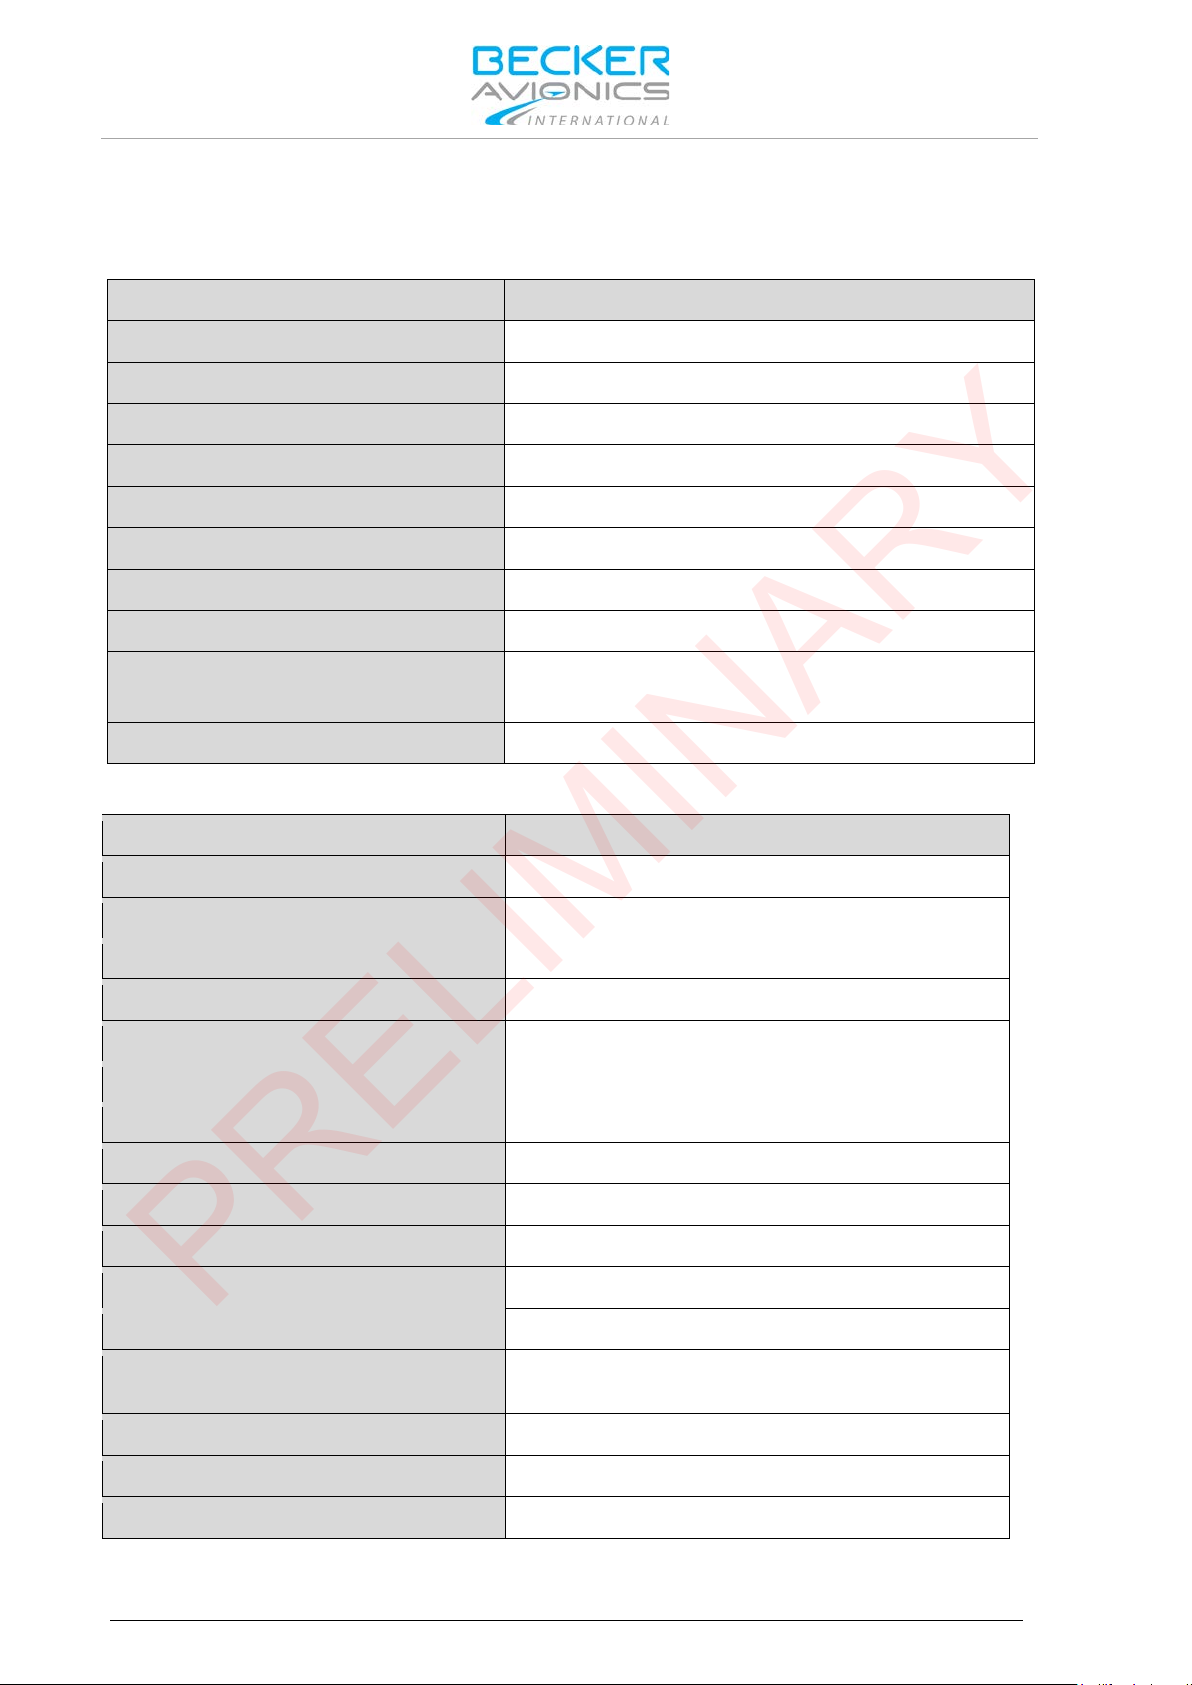
General Descri pt ion
TG660
Specifications
Power supply (AC)
100...230 V ±10%, 50... 60 Hz
Power supply (DC external)
24 V (21...29.8 VDC)
Frequency range
118.000...136.990 MHz
Channel spacing
8.33 / 25 kHz automatically selected
Modulation type
AM, 6K80A3EJN (25 kHz) & 5K00A3EJN (8.33 kHz)
Warm up time
5 s
Duty cycle
RX/TX: 4:1
Voice recorder output
-6 dBm, +3 / -12 dB @600 Ω, balanced
Temperature range
Operating: -20....+55 °C
Humidity
48 h, 50 °C, 95% relative humidity, without condensation
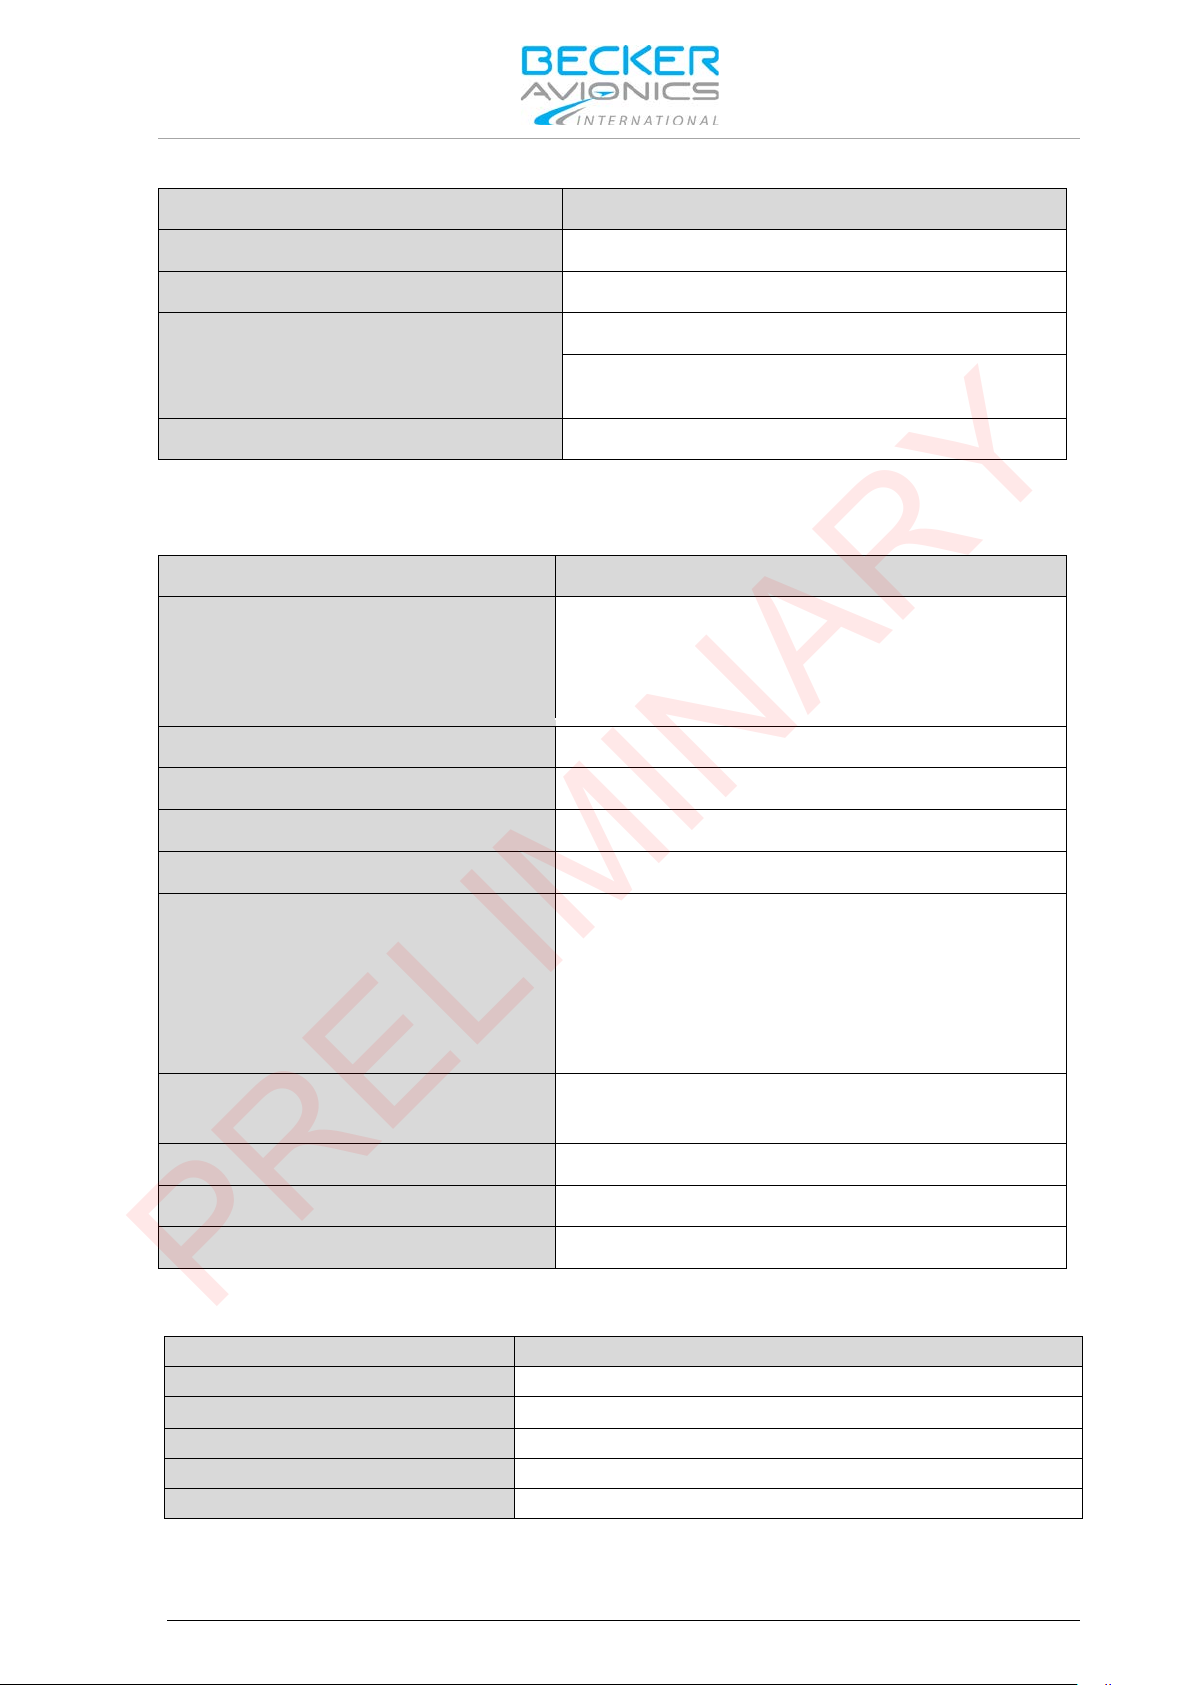
TG660 Receiver Data
Specifications
Sensitivity (Mod. de pth 30 %) :
-101 dBm for 12 dB SINAD
Effective bandwidth:
8.33 kHz channel spacing
± 2.8 kHz
25 kHz channel spacing
± 8.5 kHz
Audio frequency response
8.33 kHz channel spacing
-4 dB / +2 dB 350...2500 Hz relative to 1000 Hz
25 kHz channel spacing
-4 dB / +2 dB 300...3400 Hz relative to 1000 Hz
Adjacent channel rejection
≥ 60 dB
Spurious response rejection
≥ 70 dB
Inter-modulation response rejection
≥ 70 dB
Blocking or desensitisation
≥ 80 dB
Cross modulation rejection
≥ 80 dB
Squelch operation
6 dB (S+N)/N up to 12 dB, adjustable by software
Audio noise
≥ 40 dB (S+N)/N @-13 dBm
RF-input level range
-101 dBm RF level 10 dBm
RF-dynamic range
6 dB AF variation for 100 dB RF variation
PRELIMINARY
Technical Data
1.7. Technical Data
1.7.1. General Characteristics
1.7.2. Receiver Data
Storage: -55....+85 °C
16 TG660 DV17900.03 Issue 03 March 2017
setting, override level -85 dBm
Page 17
TG660 Receiver Data
Specifications
AF-AGC for 30% m 90%
1.5 dB AF-Level variation
AF-line output level
-20...10 dBm, adjustable
AF-line output impedance
600 Ω +/- 10%, balanced
Local headphone output power
≥ 1.5 V @600 Ω, unbalanced, volume control via front
Ext./int. speaker power
≥ 4 W sinus @4 Ω, volume control via front panel
1.7.3. Transmitter Data
TG660 Transmitter Data
Specifications
Carrier power
TG660-05: ≥ 6 W
PRELIMINARY
General Descri pt ion
Technical Data
panel
TG660-10: ≥ 10 W
TG660-25: ≥ 25 W
TG660-50: ≥ 50 W
Frequency stability ≤ 1 ppm
Protection of the transmitter VSWR = 6 without any damage
Modulation depth
Modulation distortion ≤ 10%
Audio frequency response
8.33 kHz channel spacing -4 dB / +2 dB in band 350...2500 Hz relative to 1000 Hz
25 kHz channel spacing -4 dB / +2 dB in band 300...3400 Hz relative to 1000 Hz
Adjacent channel power 50 dB (8.33 kHz),
AF-Line input level -20...10 dBm adjustable
AF-Line input impedance 600 Ω ± 10%, balanced
Local Mike sensitivity (dyn.) 2...1 mV @200 Ω, balanced
1.7.4. Audio Output Data
TG660 Specifications
Output power headphone 100 mW @600 Ω
Output power loudspeaker
Output level nominal LINE_OUT AF zero (0) dBm @600 Ω
Output level headphone, speaker adjustable with volume potenti ometer (-30...0 dBm)
Output level voice recorder – 6 dBm @600 Ω balanced
≥ 85%
≤ -25 dB above 3200 Hz
≤ -25 dB above 5000 Hz
60 dB (25 kHz)
≥ 4 W sin@4 Ω
DV17900.03 Issue 03 March 2017 TG660 17
Page 18
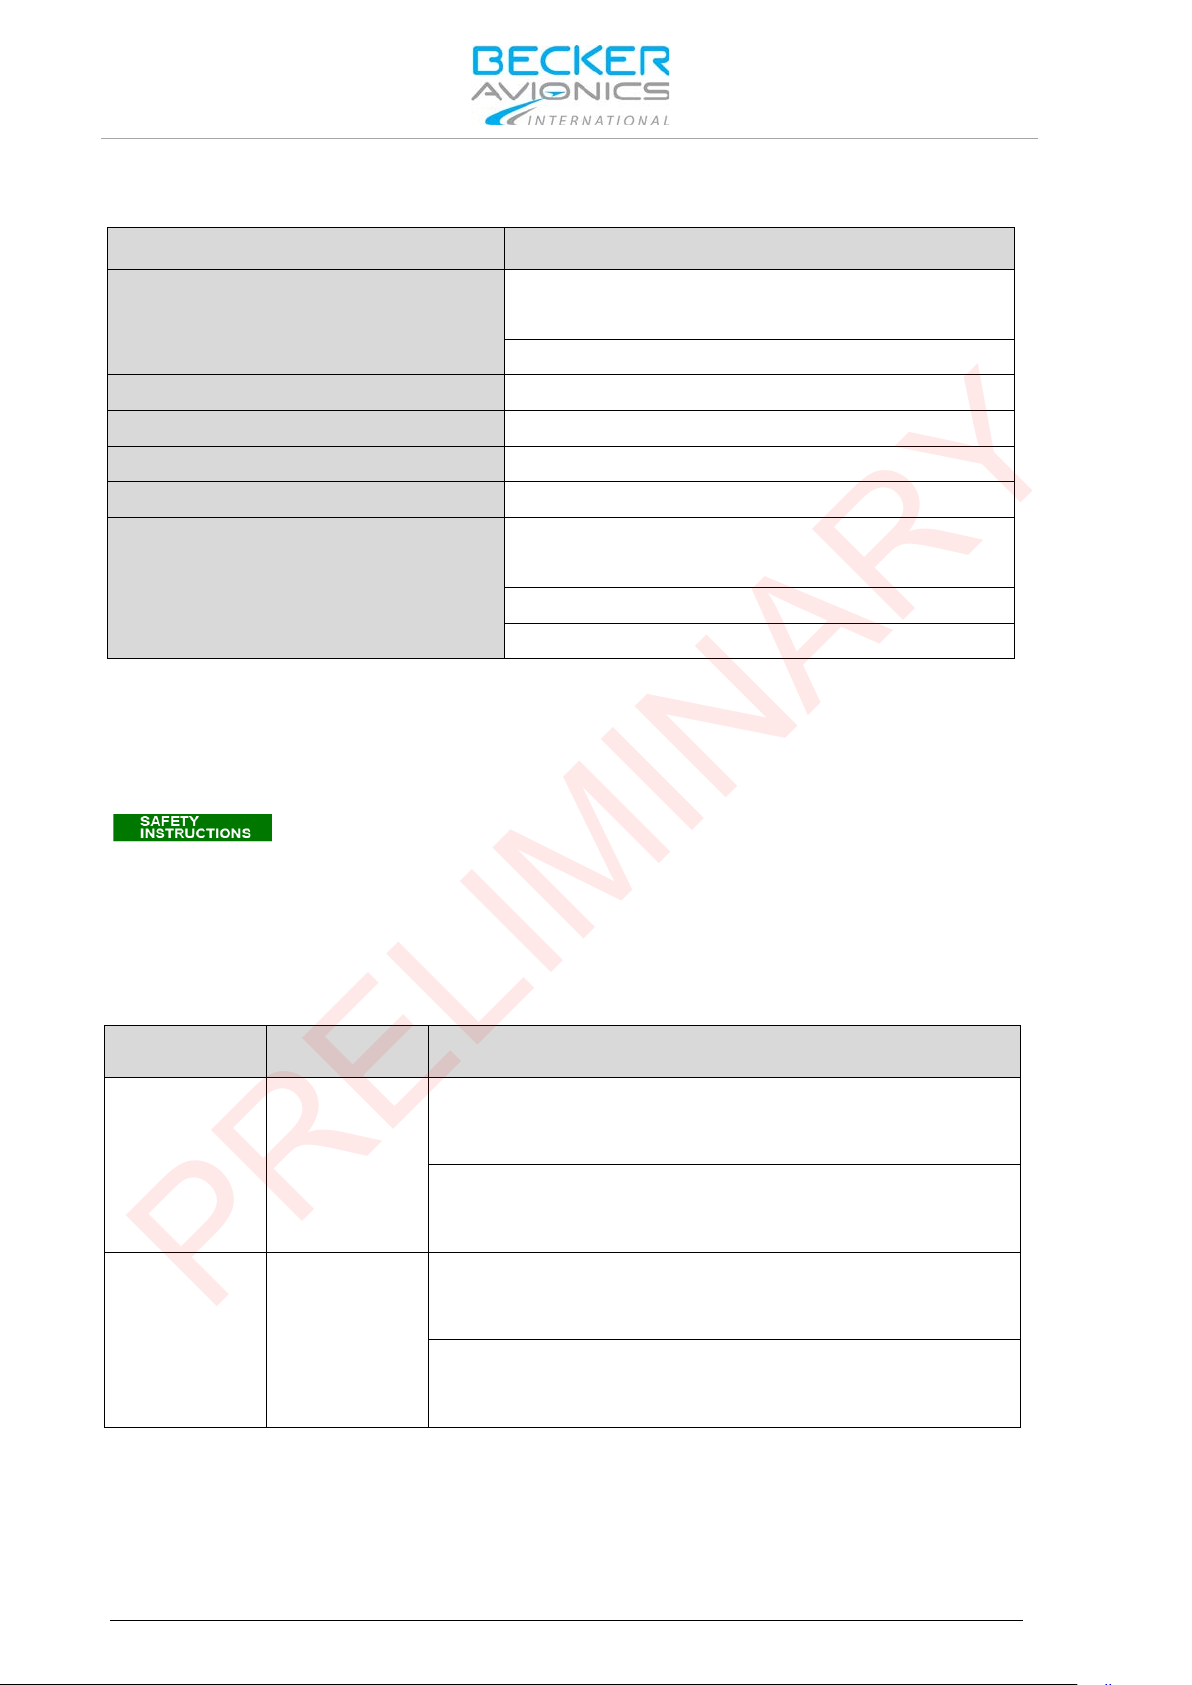
General Descri pt ion
TG660
Specifications
Dimensions HxW
case only:
86.5 x 428 mm (3.40 x 16.85 inch)
complete unit 19":
88.1 x 482.6 mm (3.47 x 19 inch)
Mounting depth
280 mm (11.02 inch)
Mounting
in 19"rack systems or in ATC desks
Material
Aluminium housing
Surface treatment
Front plate powder coated RAL 7032
Weight
TG660-05, TG660-10
4.5 kg (9.92 lbs)
TG660-05, TG660-10 with internal battery
6.5 kg (14.33 lbs)
TG660-50
6.5 kg (14.33 lbs)
Unauthorized changes or modifications to TG660 (GT6201-XX-R) may void the
BAF - German Federal Supervisory Office for
Ministero Sviluppo Econom ic o –
BAF - German Federal Supervisory Office for
Ministero Sviluppo Econom ic o –
PRELIMINARY
Technical Data
1.7.5. Dimensions & Weight
1.7.6. Certifications
Certifications/Approvals applies only to the transceivers GT6201-05-R and GT6201-10-R, used inside
the TG660-50,TG660-10 (details see "Certificates", page 49).
compliance to the required regulatory agencies and authorization for continued
equipment usage.
GT6201 meets the requirem
Part Number Article Number Approval
GT6201-05-R 0641.073-923
GT6201-10-R 0641.081-923
ents of ETSI EN 300 676 regulations.
Air Navigation Services
D-0030/2014
Dipartimento per le Comunicazioni
Registro ufficiale, Prot.n. 0041697-02/07/2014
Air Navigation Services
D-0030/2014
Dipartimento per le Comunicazioni
Registro ufficiale, Prot.n. 0041697-02/07/2014
TG660-50 meets the requi
18 TG660 DV17900.03 Issue 03 March 2017
rements of ETSI EN 300 676 regulations.
Page 19
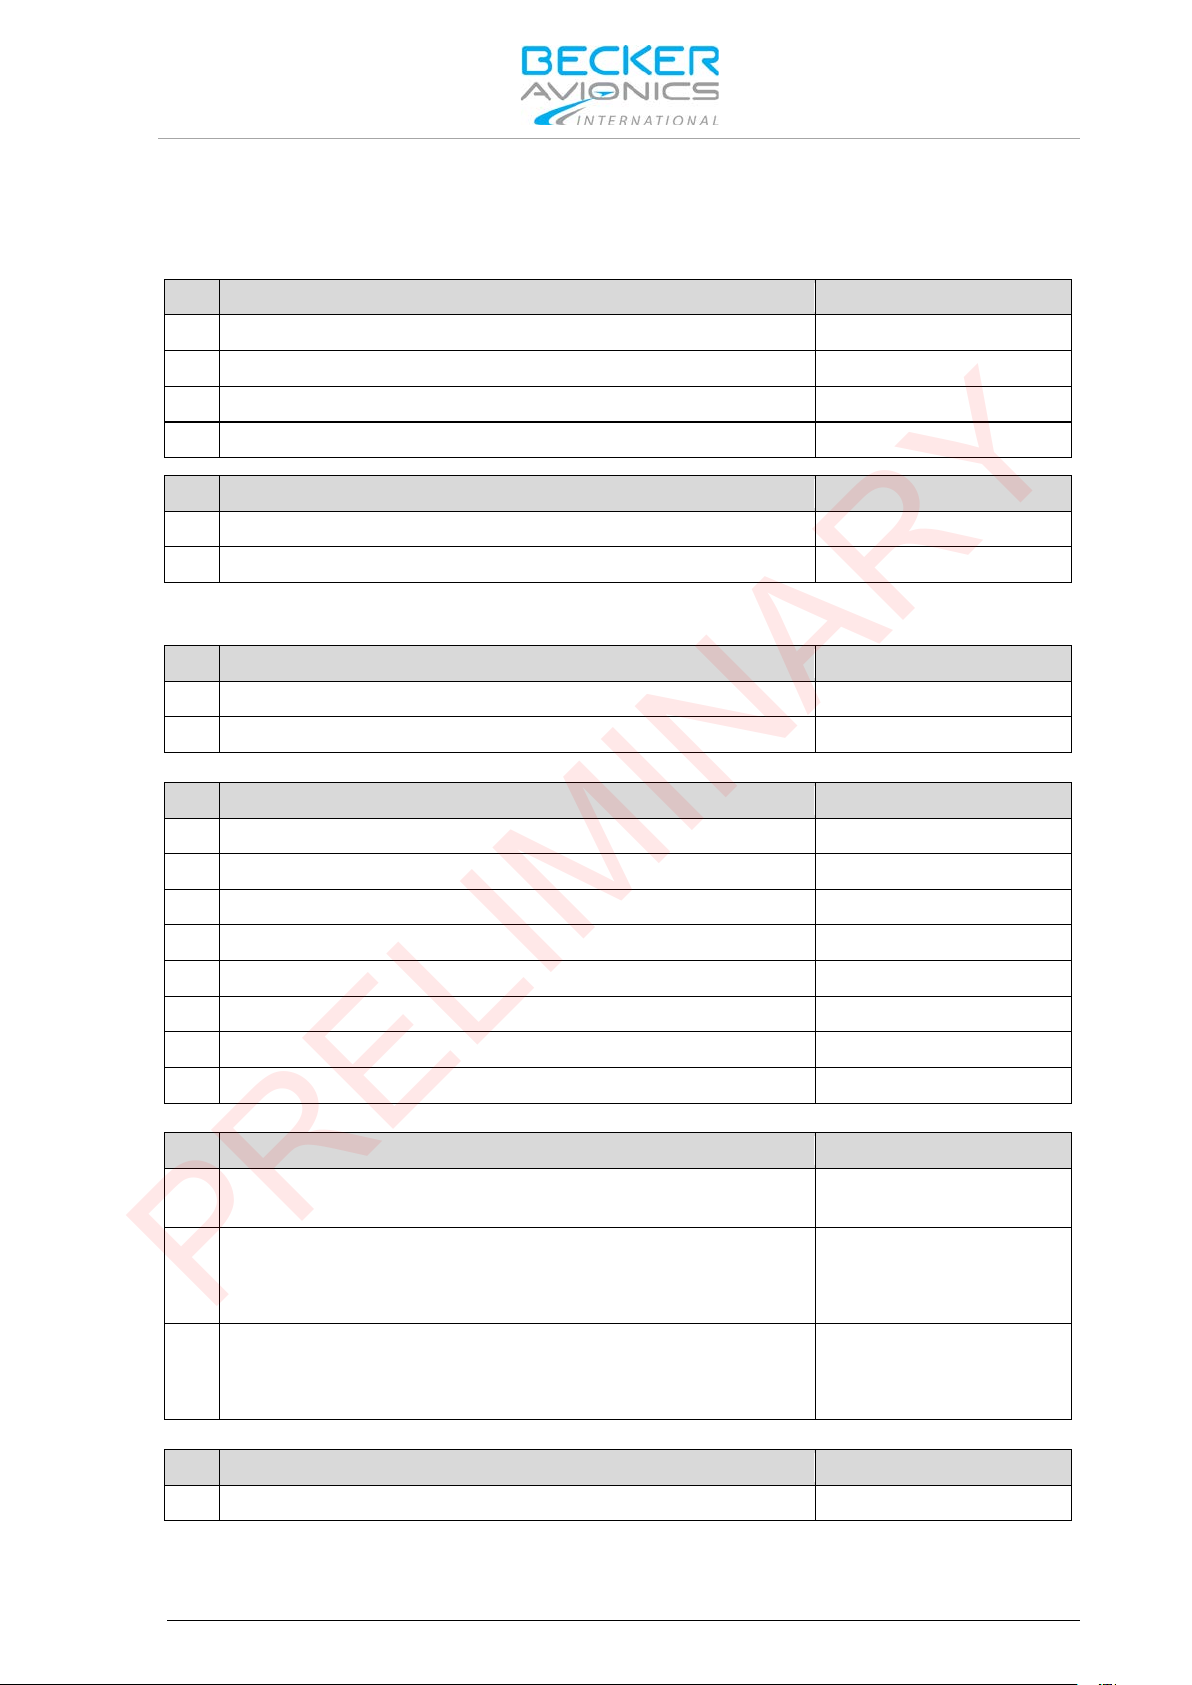
General Descri pt ion
Qty
Device
1
TG660-05, 19" Unit, ≥ 6 Watt RF Power Output
Article No. 0635.367.926
1
TG660-10, 19" Unit, ≥ 10 Watt RF Power Output
Article No. 0635.375.926
1
Qty
Antenna, additional equipment
1
1A049, Antenna
Article-No. 0812.064-952
1
N-Surge Suppressor (lightning, overvoltage protection)
Article-No. 0600.891-277
Qty
Cable connector
1
24 V cable connector
Article-No. 0724.890-277
1
N-Type antenna connector for RG213/214 coaxial cable
Article-No. 0716.502-277
1
D-sub 9pin (male), soldering version
Article-No. 0344.699-277
1
D-sub 15pin (male), soldering version
Article-No. 0726.303-277
1
D-sub 25pin (male), soldering version
Article-No. 0584.940-954
1
D-sub 9pin (male), crimp version
Article-No. 0820.970-277
1
D-sub 15pin (male), crimp version
Article-No. 0812.803-227
1
D-sub 25pin (male), crimp version
Article-No. 0584.983-954
Qty
Headsets, microphone
1
1PM012, Dynamic microphone with cable and 5-pole
Article-No. 0344.214-951
1
1PH028, Headset,
Article-No. 0860.557-951
1
1PH032, Headset,
Article-No. 0653.853-951
Qty
Available Documentation
1
TG660 Installation and Operation Manual, English
Article-No. 0639.583-071
PRELIMINARY
Order Code
1.8. Order Code
1.8.1. TG660
TG660-25, 19" Unit, ≥ 25 Watt RF Power Output Article No. 0654.132-926
1 TG660-50, 19" Unit, ≥ 50 Watt RF Power Output Article No. 0649.252.926
Qty Options
1 Internal battery option (12 V) Article-No. 0640.131-958
1 Radio over IP "RoIP" option Article-No. 0640.141-958
1.8.2. Accessories
DIN connector
• Dynamic microphone, 200 Ω
• Headphone 300 Ω, 5-pin DIN connector
• Dynamic microphone, 200 Ω
• Headphone 600 Ω, 5-pin DIN connector
DV17900.03 Issue 03 March 2017 TG660 19
Page 20

General Descri pt ion
Qty
Battery
1
Battery, 12 V, 3.5 Ah, rechargeable
Article-No. 0647.454-391
Qty
Fuse
1
Fuse 2.5 A (internal batt ery)
Article-No. 0647.659-392
1
Fuse 1.6 A (external DC power supply)
Article-No. 0762.751-392
PRELIMINARY
Order Code
1.8.3. Spare Parts
20 TG660 DV17900.03 Issue 03 March 2017
Page 21

Installation
Unauthorized changes or modifications may void the compliance to the required
PRELIMINARY
Limitations
2. Installation
This manual must be available close to the device during the performance of all tasks.
The installation of TG660 depends on the location and its equipment. Therefore, this section only
provides general inform ation.
Careful planning should be applied to achieve the desir ed per f ormance and reliability from the product.
Any deviations from the installation instructions prescribed in this document are under own
responsibility.
In this chapter you can read about:
Limitations ................................................................................................................................... 21
2.1.
2.2. Packaging, Transport, Storage ................................................................................................... 21
2.2.1. Packaging Material and Transport .................................................................................... 22
2.3. Device Assignment ..................................................................................................................... 22
2.3.1. Scope of Delivery .............................................................................................................. 22
2.3.2. Additional Required Equipment ........................................................................................ 22
2.3.3. Type Plate ......................................................................................................................... 23
2.4. Mounting Requirements .............................................................................................................. 24
2.4.1. Grounding ......................................................................................................................... 24
2.4.2. Radio Frequency Radiation .............................................................................................. 24
2.4.3. Antenna Installation .......................................................................................................... 24
2.4.4. Lightning Protection .......................................................................................................... 25
2.5. Dimensions.................................................................................................................................. 25
2.5.1. TG660 ............................................................................................................................... 25
2.6. Connector Pin Assignments ........................................................................................................ 26
2.6.1. Connector MIC (Front) ...................................................................................................... 27
2.6.2. Connector Remote Control (Rear) .................................................................................... 27
2.6.3. Connector Record/DF (Rear) ............................................................................................ 28
2.6.4. Connector LINE / AUX (Rear) ........................................................................................... 29
2.6.5. Connector EXT. DC (Rear) ............................................................................................... 30
2.6.6. Connector AC/Line Power Sup ply (Rear) ......................................................................... 30
2.6.7. Reflectometer / RF Po wer Mon itor ................................................................................... 31
2.7. Wiring .......................................................................................................................................... 31
2.7.1. Microphone Connection .................................................................................................... 31
2.7.2. Record/DF Connection ..................................................................................................... 31
2.7.3. LINE / AUX Connection .................................................................................................... 32
2.7.4. Auxiliary Voltage Output ................................................................................................... 33
2.8. Configuration via PC ................................................................................................................... 34
2.8.1. Preparing the PC .............................................................................................................. 34
2.8.2. Operating via PC ............................................................................................................... 35
2.9. Post Installation Check ................................................................................................................ 36
2.9.1. Mechanical Installation and Wiring Check ........................................................................ 36
2.9.2. Power Supply .................................................................................................................... 36
2.9.3. Receiver / Transmitter Operation ...................................................................................... 36
2.9.4. Antenna Check ................................................................................................................. 36
2.1. Limitations
• TG660 is designed for mounting in 19" rack systems, or in ATC desks.
regulatory agencies and authorization for continued equipment usage.
2.2. Packaging, Transport, Storage
Visually inspect the package contents for signs of transport damage.
DV17900.03 Issue 03 March 2017 TG660 21
Page 22

Installation
The packaging material is i nflam m able, if it is dispos ed of im properl y by burning,
PRELIMINARY
Device Assign m ent
2.2.1. Packaging Material and Transport
toxic fumes may develop.
The packaging materia l can be
packaging may lead to transport damages.
Make sure to transport the device always in a safe manner and with the aid of suitable lifting
equipment if necess ary. Do nev er use th e elec tric c onnect ions f or lifting. Befor e the tr anspor t, a cl ean,
level surface should be prepared to place the device on. The electric connections may not be
damaged when placing the device.
First Device Checkup
• Check the device for signs of transport damages.
• Please verify if the indications on the type plate correspond to your purchase order.
• Check if the equipment is complete ("Scope of Delivery", page 22).
Storage
If you do not wish to mount and insta ll the de vice im medi atel y, mak e sure to stor e it in a dr y and clean
environment. Make sure that the device is not stored near strong heat sources and that no metal
chippings can get into the device.
kept and reused in the cas e of a return shipment. Improper or f aulty
2.3. Device Assignment
This manual is valid for the following devices and its options
• TG660-05
• TG660-10
• TG660-25
• TG660-50
2.3.1. Scope of Delivery
• Manuals
o Installation & Operation
• Device in accordance with your order
• Device accessories
o Mains cord (AC connection)
o Cable connector 24 V
o Fuse 5x20 T 2.5 A
o Fuse 5x20 T 1.6 A
2.3.2. Additional Required Equipment
• Antenna
• N-Surge Suppressor (recommended)
• Mounting material
• Connector kits
• Cable harness
• Microphone
• Headphone or speaker
Details see "Accessories
", page 19.
22 TG660 DV17900.03 Issue 03 March 2017
Page 23
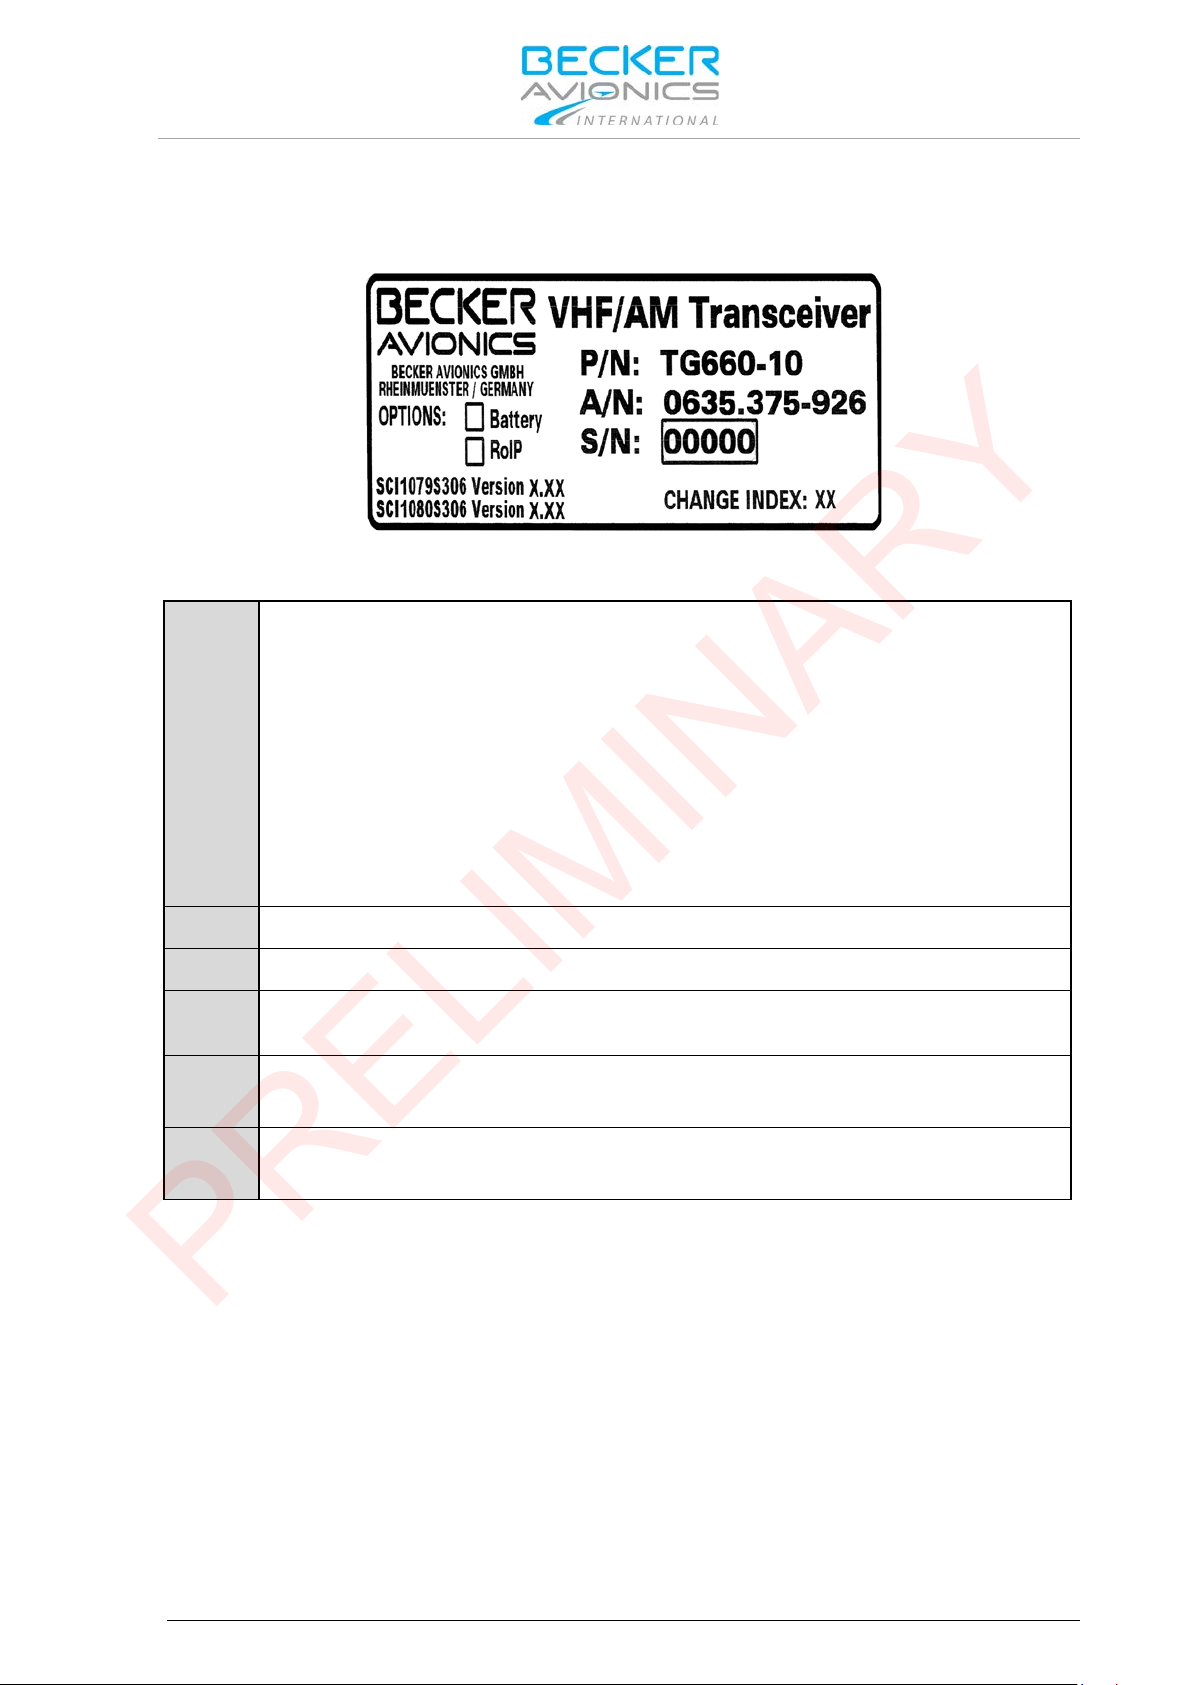
2.3.3. Type Plate
PN:
SN:
Unique number of the particular device
AN:
Article number
Change
Number of changes/modifications
Software
Compliance and Certifications
PRELIMINARY
The device type is defined by the type plate (on the housing):
Example:
Installation
Device Assignment
Explanation:
Example Type designation: TG660-10
TG660: 19" VHF Ground Transceiver Station
Variants:
-05: 6 Watt Transceiver
-10: 10 Watt Transceiver
-25: 25 Watt Transceiver
-50: 50 Watt Transceiver
Options:
Battery: Internal battery option
RoIP: Radio over IP option
Index:
Corresponding to the displayed version
Figure 2: Type Plate (Ex
ample)
Corresponding to the displayed text and logos
DV17900.03 Issue 03 March 2017 TG660 23
Page 24

Installation
• The installation may be carried out only by an authorized personnel. The
• The device must not be opened.
• When performing maintenance/installation work, always disconnect the
Make sure that the grounding contact area is adequate and that the connection has
The station may become a cause of radio frequency radiation hazard if installation
• For safety reasons the antenna system should be installed only by
PRELIMINARY
Mounting Requirements
2.4. Mounting Requirements
For safe operation of the product the following notes have to observed:
country regulations always have to be observed.
• Use the product only within the specified conditions , see "Technical
Data", page 16.
• TG660 generates only limited heating, thus requiring no specific cooling
system. However, consider sufficient space for convection at installations
in a rack or a controller desk.
system from the power supply grid (mains voltage).
• Stay always in a sufficient distance to the antenna avoiding been exposed
to higher RF radiation during TX operation.
2.4.1. Grounding
TG660 must be connected to the grounding point of the building.
The grounding terminal is located on the rear side, of the TG660 (marked grounding symbol).
• Connect this terminal directly to the next potential equalisation rail or grounding point of
the building.
2
• Wire cross section: recommended 6 mm
low resistance and low inductance. Never use a grounding point on paint-coated
surfaces!
2.4.2. Radio Frequency Radiation
Use only antenna system s which are qualified for operatio n in ATC mobile comm unications service.
And for which the rad io frequency radiatio n hazard awareness o perations and m aintenance persona l
is provided.
incorrectly, not grounded, or if used with unapproved antenna systems.
2.4.3. Antenna Installation
, coloured green/yellow.
qualified personnel.
• Correct installation and grounding of the antenna system is an essential
precondition for trouble free operation of the VHF ground station.
24 TG660 DV17900.03 Issue 03 March 2017
Page 25
Installation
design depends on variant
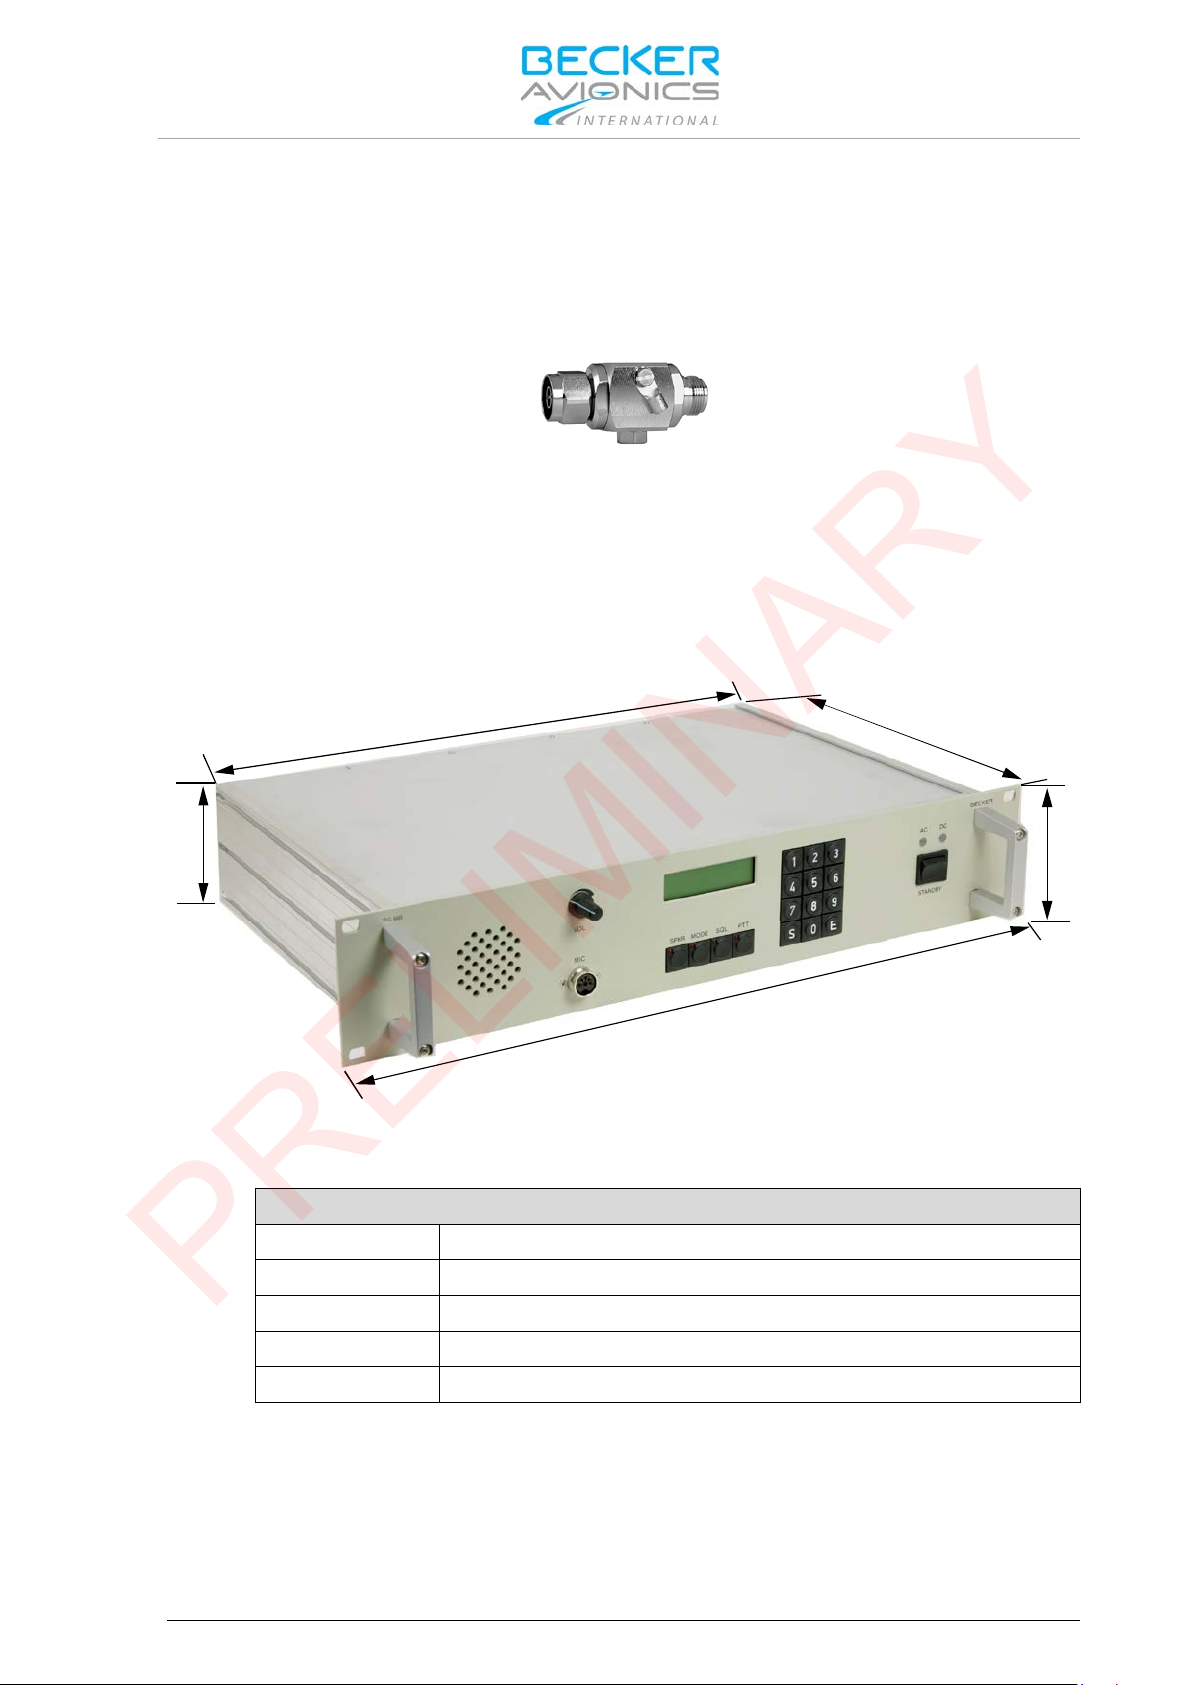
Dimensions TG660
H1 (height)
86.5 mm (3.40 inch)
W1 (width)
482.6 mm (19 inch)
H2 (height)
88.1 mm (3.47 inch)
W2 (width)
428 mm (16.85 inch)
D (depth)
280 mm (11.02 inch)
H2
H1
W2
W1
D
PRELIMINARY
Dimensions
2.4.4. Lightning Protection
Install a lightning protec tion elem ent in the a ntenna c oaxial c abling to pro tect th e statio n from lightnin g
strike or static discharge at the antenna.
• Connect the grounding terminal of the lightning protection element to the potential
equalisation rail of the building or any other low impedance ground.
• Use an adequately sized cable.
2.5. Dimensions
2.5.1. TG660
Figure 3
: N-Surge-Suppressor: Lightning protection
Dimensions mm (in ch)
DV17900.03 Issue 03 March 2017 TG660 25
Figure 4
: TG660 – Dimensions
Page 26
Installation
design depends on variant
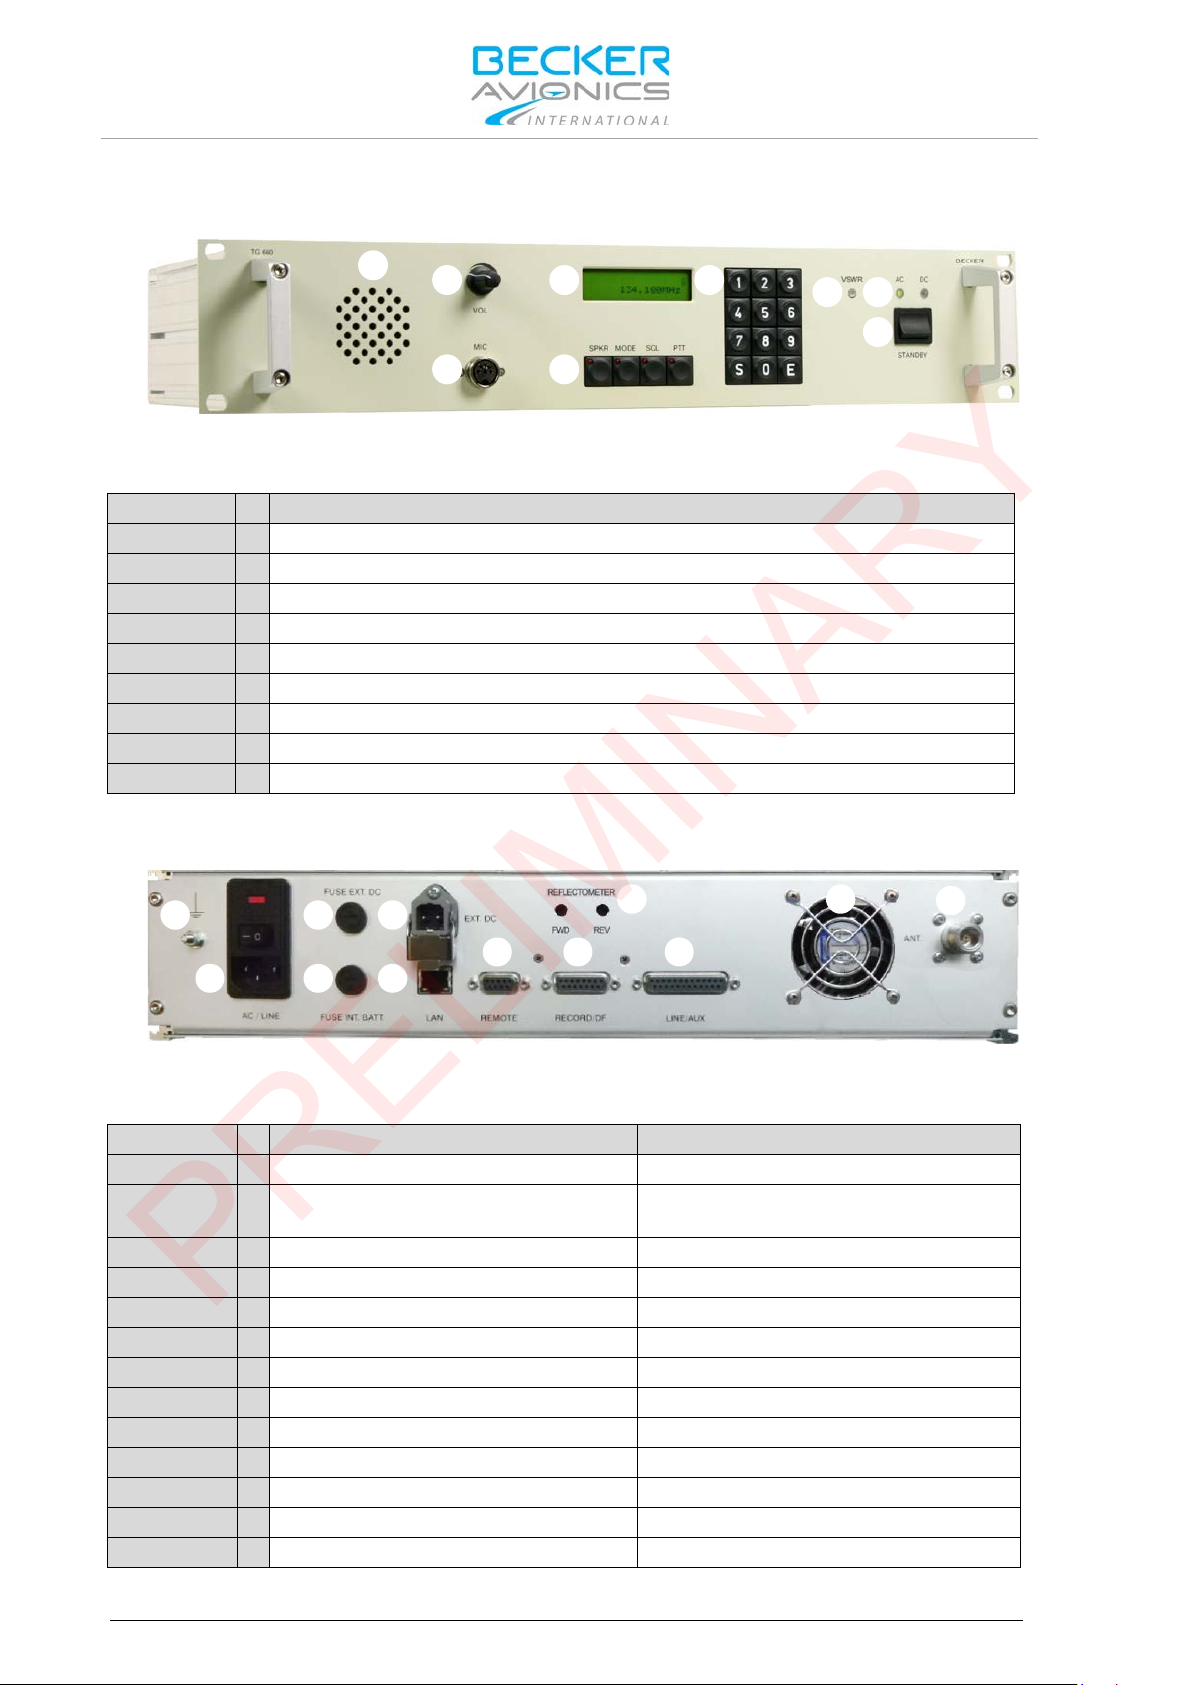
Variant
Function
all
A
Loudspeaker
all
B
Volume
all
C
Microphone
all
D
Display
all
E
Keys+LEDs: SPKR , MO D E , SQL, PTT
all
F
Key block: numbers and functions
all
G
AC/DC LEDs
all
H
Standby switch
TG660-50
I
VSWR LED (antenna mismatching = lights up)
design depends on variant
Variant
Function
Type
all
1
Ground terminal
M4 screw with nut
all
2
AC connector, ON/OFF switch + LED
Main plug power supply (integrated
all
3
Fuse external DC power supply
see "Spare Parts", page 20
TG660-05, -10
4
Fuse internal battery
see "Spare Parts", page 20
TG660-50
4
Power amplifier (PA)
all
5
DC extern connector
STAKEI 2
all
6
LAN connector
RJ45
all
7
Remote connector
D-sub 9pin (female)
all
8
Record/DF connector
D-sub 15pin (female)
all
9
LINE/AUX connector
D-sub 25pin (female)
all
10
Antenna
N-Type
TG660-50
11
FWD. REV (Reflectometer)
Potentiometer (factory calibration only)
TG660-50
12
Fan
A
B
C
D
E
F
H
G
I
1
2
3
4
5
6
7 8
9
10
11
12
PRELIMINARY
Connector Pin Assi gnments
2.6. Connector Pin Assignments
Figure 5: TG660 Fr
ont Interface
26 TG660 DV17900.03 Issue 03 March 2017
Figure 6: TG660 Rear Int
erface
ON/OFF switch and safety fuse)
Page 27
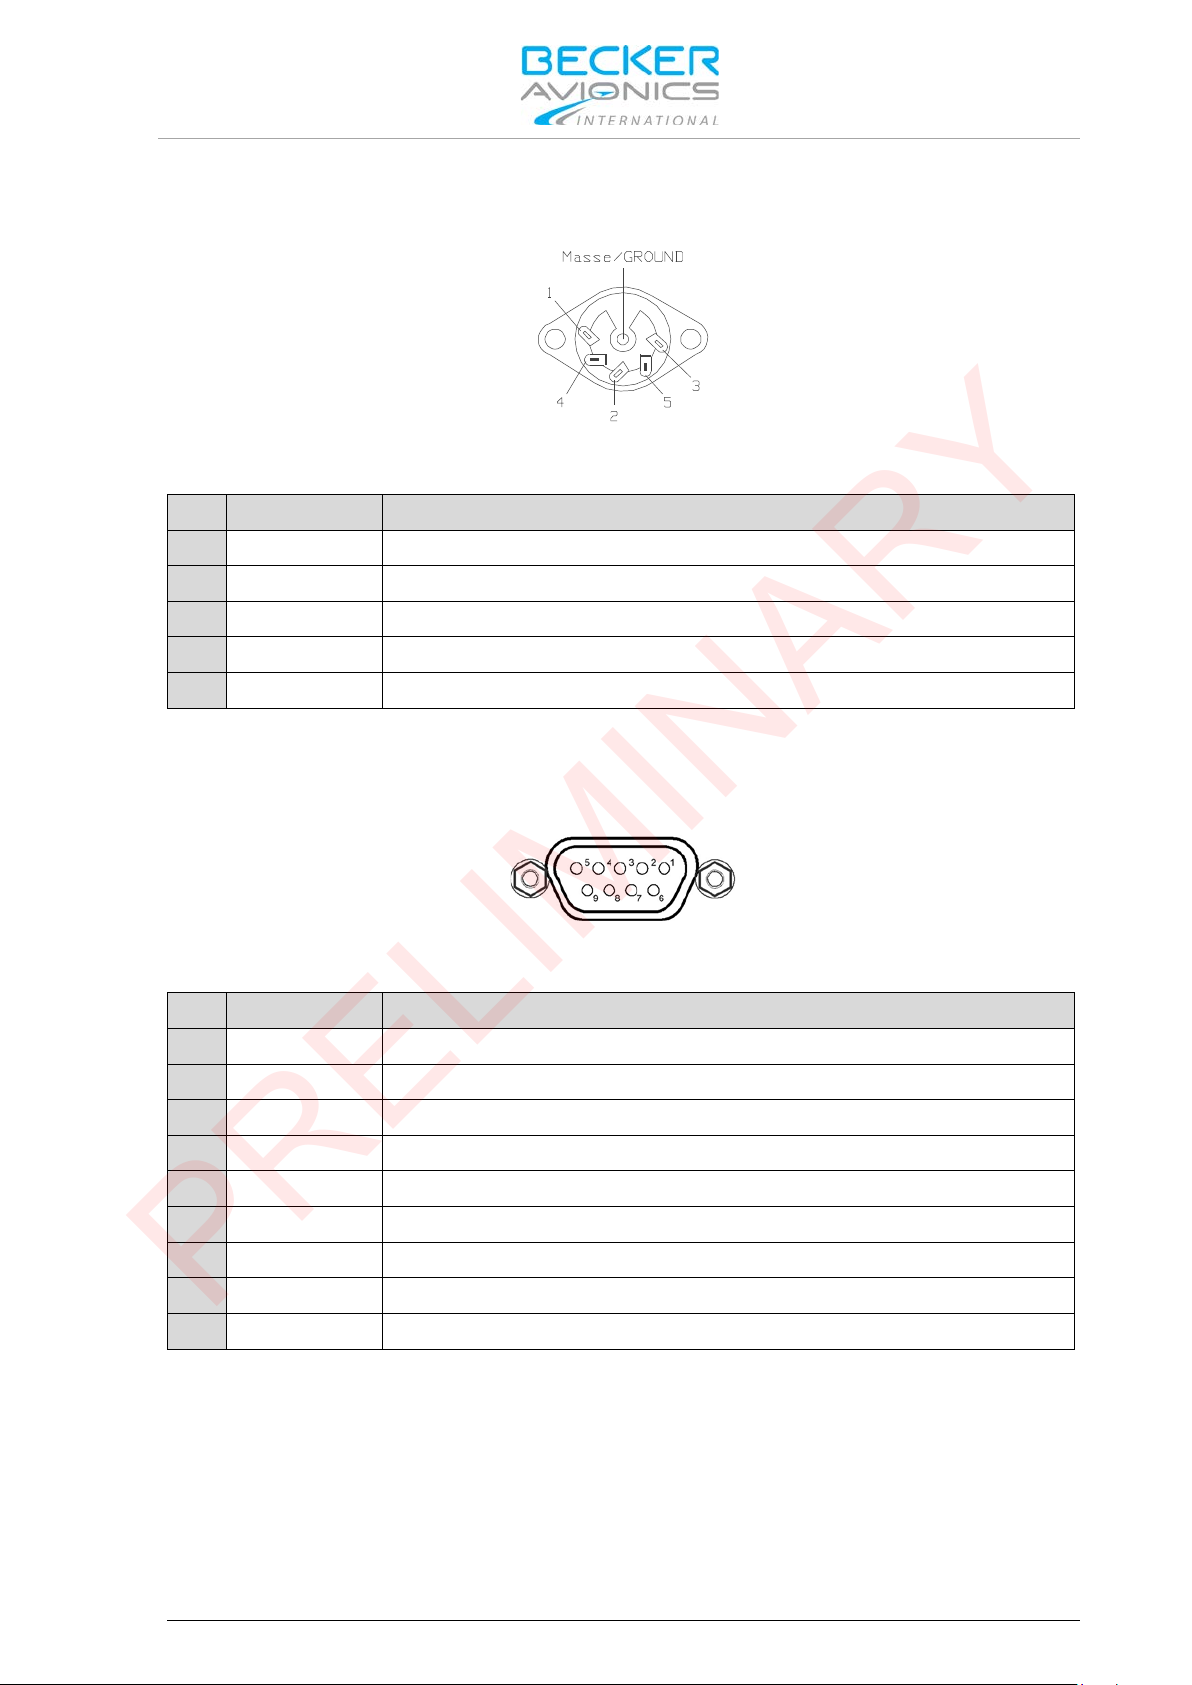
2.6.1. Connector MIC (Front)
Pin
Name
Description
1
GND
AF Signal Ground, Mike Shield and Return for PTT
2
MIKE HI
Microphone AF Signal HI
3
HEADPHONE
Headphones AF Signal HI
4
MIKE LO
Microphone AF Signal LO
5
PTT
PTT Switch Input
Pin
Name
Description
1
RX-
RS422 Data line
2
TX-
RS422 Data line
3
RX+
RS422 Data line
4
TX+
RS422 Data line
5
Shield
GND
6
NC
not connected
7
NC
not connected
8
NC
not connected
9
NC
not connected
PRELIMINARY
Installation
Connector Pin Assignments
Figure 7:
2.6.2. Connector Remote Control (Rear)
Figure 8:
TG660 - Connector MIC (Front)
TG660 - Connector Remote Control (Rear)
DV17900.03 Issue 03 March 2017 TG660 27
Page 28

Installation
Pin
Name
Description
1
DF_BL (HI)
DF Blank (HI)
2
DF_BL (LO)
DF Blank (LO)
3
GND
Ground
4
VR_Out (HI)
Voice Recorder out (HI)
5
VR_Out (LO)
Voice Recorder out (LO)
6
GND
Ground
7
NC
Not connected
8
VR_Act (HI)
Voice recorder control active (HI)
9
VR_Act (LO)
Voice recorder control active (LO)
10
NC
not connected
11
NC
not connected
12
NC
not connected
13
NC
not connected
14
NC
not connected
15
NC
not connected
PRELIMINARY
Connector Pin Assignments
2.6.3. Connector Record/DF (Rear)
Figure 9: TG660 -
Connector Record/DF (Rear)
28 TG660 DV17900.03 Issue 03 March 2017
Page 29

2.6.4. Connector LINE / AUX (Rear)
Pin
Name
Description
1
DC Out
Auxiliary voltage output 12 V, max 1 A
2
DC GND
Auxiliary voltage ground
3
Line Out (HI)
AF output 0 dBm 600 Ω
4
Line Out (LO)
AF output 0 dBm 600 Ω
5
PTT Line (HI)
PTT activation
6
SQL Line (HI)
Squelch output HI
7
Line IN (HI)
AF input 0 dBm 600 Ω
8
Line IN (LO)
AF input 0 dBm 600 Ω
9
Line IN (C)
AF input transformers centre connection
10
RX_AGC
Receiver audio gain control output
11
Mike EXT (HI)
External microphone input D yn/Elec tr et
12
Mike EXT (LO)
External microphone input D yn/Elec tr et
13
Chassis
Chassis ground
14
PTT Line (LO)
PTT activation LO
15
SQL Line (LO)
Squelch output LO
16
Line Out (C)
Line Out transformer centre connection
17
PTT ext. (HI)
External PTT HI
18
PTT ext. (LO)
External PTT LO
19
NC
not connected
20
AF GND
AF ground
21
SPK (HI)
Loudspeaker signal
22
SPK GND
Loudspeaker ground
23
Error (HI)
Error detection, potential-free
24
Error (LO)
Error detection, potential-free
25
Chassis
Chassis ground
PRELIMINARY
Installation
Connector Pin Assignments
Figure 10:
TG660 - Connector LINE / AUX (Rear)
DV17900.03 Issue 03 March 2017 TG660 29
Page 30
Installation
The TG660 power supply logic operates with AC power by default. After AC power
24 V
NC
GND
PRELIMINARY
Connector Pin Assignments
2.6.5. Connector EXT. DC (Rear)
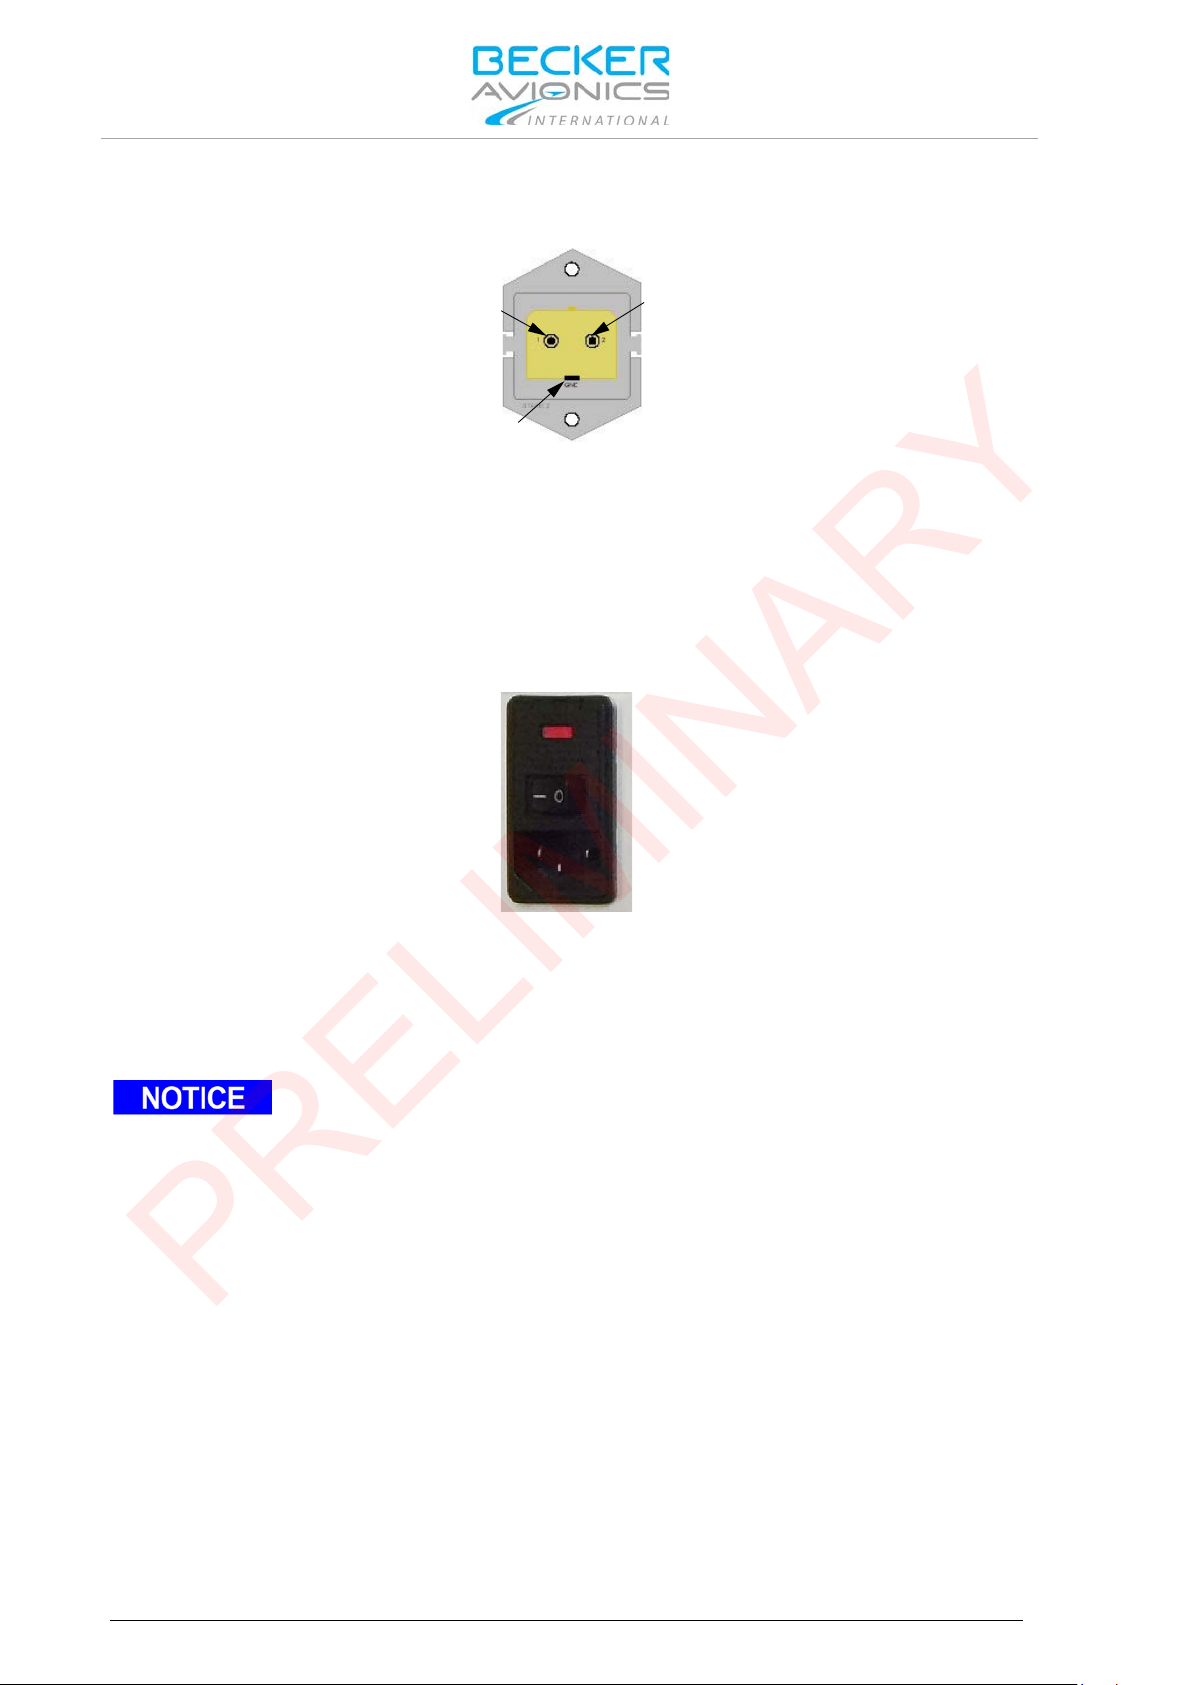
Figure 11: TG660 - Connector EXT. DC (Rear)
• Connect the 24 VDC
• Use a cable of ≥1.5 mm
2.6.6. Connector AC/Line Power Supply (Rear)
Figure 12: TG660 - C
• The AC/Line panel prov
• Additionally an ON/OFF switch to disconnect AC power from all TG660 circuits.
supply cable to this socket.
2
.
onnector AC/Line Power Supply (Rear)
ides a socket to connect 220V/115V.
failed, the logic automatically switches over to DC power. The moment AC power
becomes available the logic returns back to AC power source.
An optional internal 12 VDC rechargeable battery, installed inside the TG660,
provides the power to continue operation of the TG660 in case AC and DC supply
voltage would fail at the same time. During battery operation the TX power of a
10 W transceiver will be reduced to 6 W (emergency operation).
In battery mode the TG660 will operate for around 4 h (duty cycle 20%), if the
battery is fully loaded. However, the operational time is strongly dependent on its
30 TG660 DV17900.03 Issue 03 March 2017
utilization.
The capacity of the battery is reduced over its lifetime, which depends on various
factors (e.g. number of cycles, storage/operating temperature, etc.).
Check the operational time of the battery regulary to ensure that the capacity of the
battery is sufficient for its application. Otherwise the battery needs to be replaced.
Page 31

Installation
Installation of the unit varies according to mounting location and equipment design.
PRELIMINARY
Wiring
2.6.7. Reflectometer / RF Power Monitor
RF power monitor is continuously monitoring the forward and reflected power. In case of antenna
mismatch the VSWR LED lights up (LED at the front panel). The RF power monitor limits are
calibrated at the factory.
If VSWR LED lights up – please check antenna cabeling.
2.7. Wiring
It is therefore only possible to provide general guidelines in this section.
2.7.1. Microphone Connection
2.7.1.1.
The microphone connection "MIC" is foreseen connecting dynamic micr ophones by default, carbon
microphone operation available from configuration only.
The signals "MIKE (HI)" and "MIKE (LO)" are the balanced AF inputs of the TG660
Input impedance 200 Ω,
nominal input voltage 10 mV.
MIKE (HI) Pin 2 Microphone AF signal
MIKE (LO) Pin 4 Microphone AF signal
2.7.1.2. External Microphone (LINE AUX )
The TG660 allows the con nection of an external microphone (connec tor LINE / AUX). If respectivel y
configured the microphone amplifier can operate with both, standard carbon- or dynamic mike.
Microphone Selection
The microphone t ype can selected v ia the web bro wser connection. Adjustment of in put levels and
priority for connected microphones also provided.
Standard (carbon) Microphone
For operation with standard microphone (carbon) the station has a balanced input with input
resistance 150 Ω and nominal sensitivity 250 mV. 12 VDC power for standard microphones provided
via a feed resistor 470 Ω.
Mike Connector (MIC)
Dynamic Microphone
For operation with dynamic microphone, the station has a balanced input with an impedance of 200 Ω
input resistance and a nominal sensitivity of 2 mV.
2.7.2. Record/DF Connection
2.7.2.1.
TX side tone and RX AF signals from the ground station are present at this output.
The output is galvanically decoupled from housing and internal signal ground.
Nominal load resistance 600 Ω
Nominal output level 547 mV @600 Ω
VR_OUT (HI) Pin 4 Audio to Voice Recorder
VR_OUT (LO) Pin 5 Audio to Voice Recorder
DV17900.03 Issue 03 March 2017 TG660 31
AF Output to Voice Recorder
Page 32

Installation
PRELIMINARY
Wiring
2.7.2.2. Voice Recorder Control
This signal provides control of the voice recorder.
Maximum switching current 20 mA. Voltage drop at 20 mA not more than 1 V.
Maximum switching voltage +65 V (optically-isolated contact)
The switch closes, either if TX is active or if RX squelch is open. This means, both transmit and
receive signals are recorded if a voice recorder is connected.
VR_ACT (HI) Pin 8 Voice Recorder Activation Control
VR_OUT (LO) Pin 5 Voice Recorder Activation Control
2.7.2.3. Direction Finder Blank-Out
The switching output provides automatic control to blank-out during transmit the Direction Finder
(blanks out Direction Finder during transmission).
The switch (optically-isolated contact) is closed if TX is active.
Maximum switching current 20 mA. Voltage drop at 20 mA not more than 1 V.
Maximum switching voltage +65 V
DF_BL (HI) Pin 1 DF Blanking Signal
DF_BL (LO) Pin 2 DF Blanking Signal
2.7.3. LINE / AUX Connection
2.7.3.1.
"PTT LINE" (HI/LO ) - (optically decoup led PTT input, active @12 V ±1 V). If 12 VDC applied to this
input, TX activates and TX modulation input of the transceiver switches internally to "LINE IN" input.
PTT LINE (HI) Pin 5 PTT connection, HI
PTT LINE (LO) Pin 14 PTT connection, LO
2.7.3.2. External Speaker
TG660 allows c onnectio n of an ext ernal loudspeak er. The ex ternal loudspe aker m ust be connected to
pin 21 "SPK HI" (+) and pin 22 "S PK GND " ( -) of the "LINE AUX" connector. The cable len gth b etween
speaker and connector shall be ≤ 3 m.
The output is not galvanically decoupled. The "SPKR" (GND) lead connects internally to signal ground.
The output "SPKR" (HI) ha s coupling c apacitor, c onnected int ernall y, in series. T he max output power
is 3 W at 4 Ω.
2.7.3.3. Headphone
Connect only headphones with an im pedance of 600 Ω and a nominal o utput power of 100 mW to the
headphone output on the front plate. This output is not galvanically decoupled.
The "VOL" knob on the front panel allows c on trol of audio lo udn es s.
Phone Pin 3 Headphones AF signal
GND Pin 1 Signal ground
PTT
32 TG660 DV17900.03 Issue 03 March 2017
Page 33

Installation
PRELIMINARY
Wiring
2.7.3.4. LINE IN / LINE OUT
"LINE IN" input is a balanced AF input.
An AF transformer decouples galvanically from housing and internal signal ground.
Nominal load resistance 600 Ω
Nominal output level 0 dBm @600 Ω
PTT control and CALL indication provided by using the centre tap without additional control lines.
LINE IN (HI) Pin 7 AF Signal from Communication Equipment
LINE IN (LO) Pin 8 AF Signal from Communication Equipment
LINE IN (C) Pin 9 Centre Tap of "LINE_IN" input
The LINE OUT output is a balanced AF output.
The "RX AF" signal from the station is present at this output.
By an AF transformer "LINE OUT" signal galvanically decouples from housing and internal signal
ground.
Nominal load resistance 600 Ω
Nominal output level 0 dBm @600 Ω
LINE OUT (HI) Pin 3 AF Signal from Communication Equipment
LINE OUT (LO) Pin 4 AF Signal Communication Equipment
LINE OUT (C) Pin 16 Centre Tap of "LINE OUT" output
2.7.3.5. SQL - LINE
The "SQL LINE" (HI/LO) is an optical-isolated switching control line.
The signal HI/LO indicates the presence of received RF signal.
RX squelch is open if the switch is closed. This signal provides indication of a call on remote
communication equipment.
Maximum switching current 20 mA. Voltage drops at 20mA not more than 1 V
Maximum switching voltage 65 V
SQL LINE (HI) Pin 6 CALL Indicator
SQL LINE (LO) Pin 18 CALL Indicator
2.7.3.6. Input PTT MIKE_EXT (HI/LO)
"PTT MIKE_EXT" (HI/LO) - (optically decoupled PTT input, active @12 V ±1 V). If 12 VDC applied to
this input, TX activates and TX modulation input of the transceiver switches internally to "MIKE_EXT"
input.
PTT ext. (HI) Pin 17 PTT for external MIKE
PTT ext. (LO) Pin 18 PTT for external MIKE
2.7.4. Auxiliary Voltage Output
The auxiliary volta ge output is suitable for sup ply the optical isolated appl ications (connector LINE /
AUX).
Output voltage 12 V @1 A max.
DC out Pin 1 Auxiliary voltage output 12 V, max 1 A
DC GND Pin 2 Auxiliary voltage ground
DV17900.03 Issue 03 March 2017 TG660 33
Page 34
Installation
PRELIMINARY
Configur at ion via PC
2.8. Configuration via PC
The access for configuration and operation of one or several TG660 via PC is provided by a web
browser based solution, no local software installation is required.
2.8.1. Preparing the PC
To be able to access the web interface of the TG660, a PC has to be configured properly.
Ex factory, the network address of the TG660 is as follows:
• IP address: 192.168.16.191
• Subnet mask: 255.255.255.0
The configuration of
following examples are for Win7. If you encounter a ny network problems, you might have to contact
your local network administr ator. If you do not know t he IP addres s of your TG660 you can restart the
radio to display the IP address in LCD.
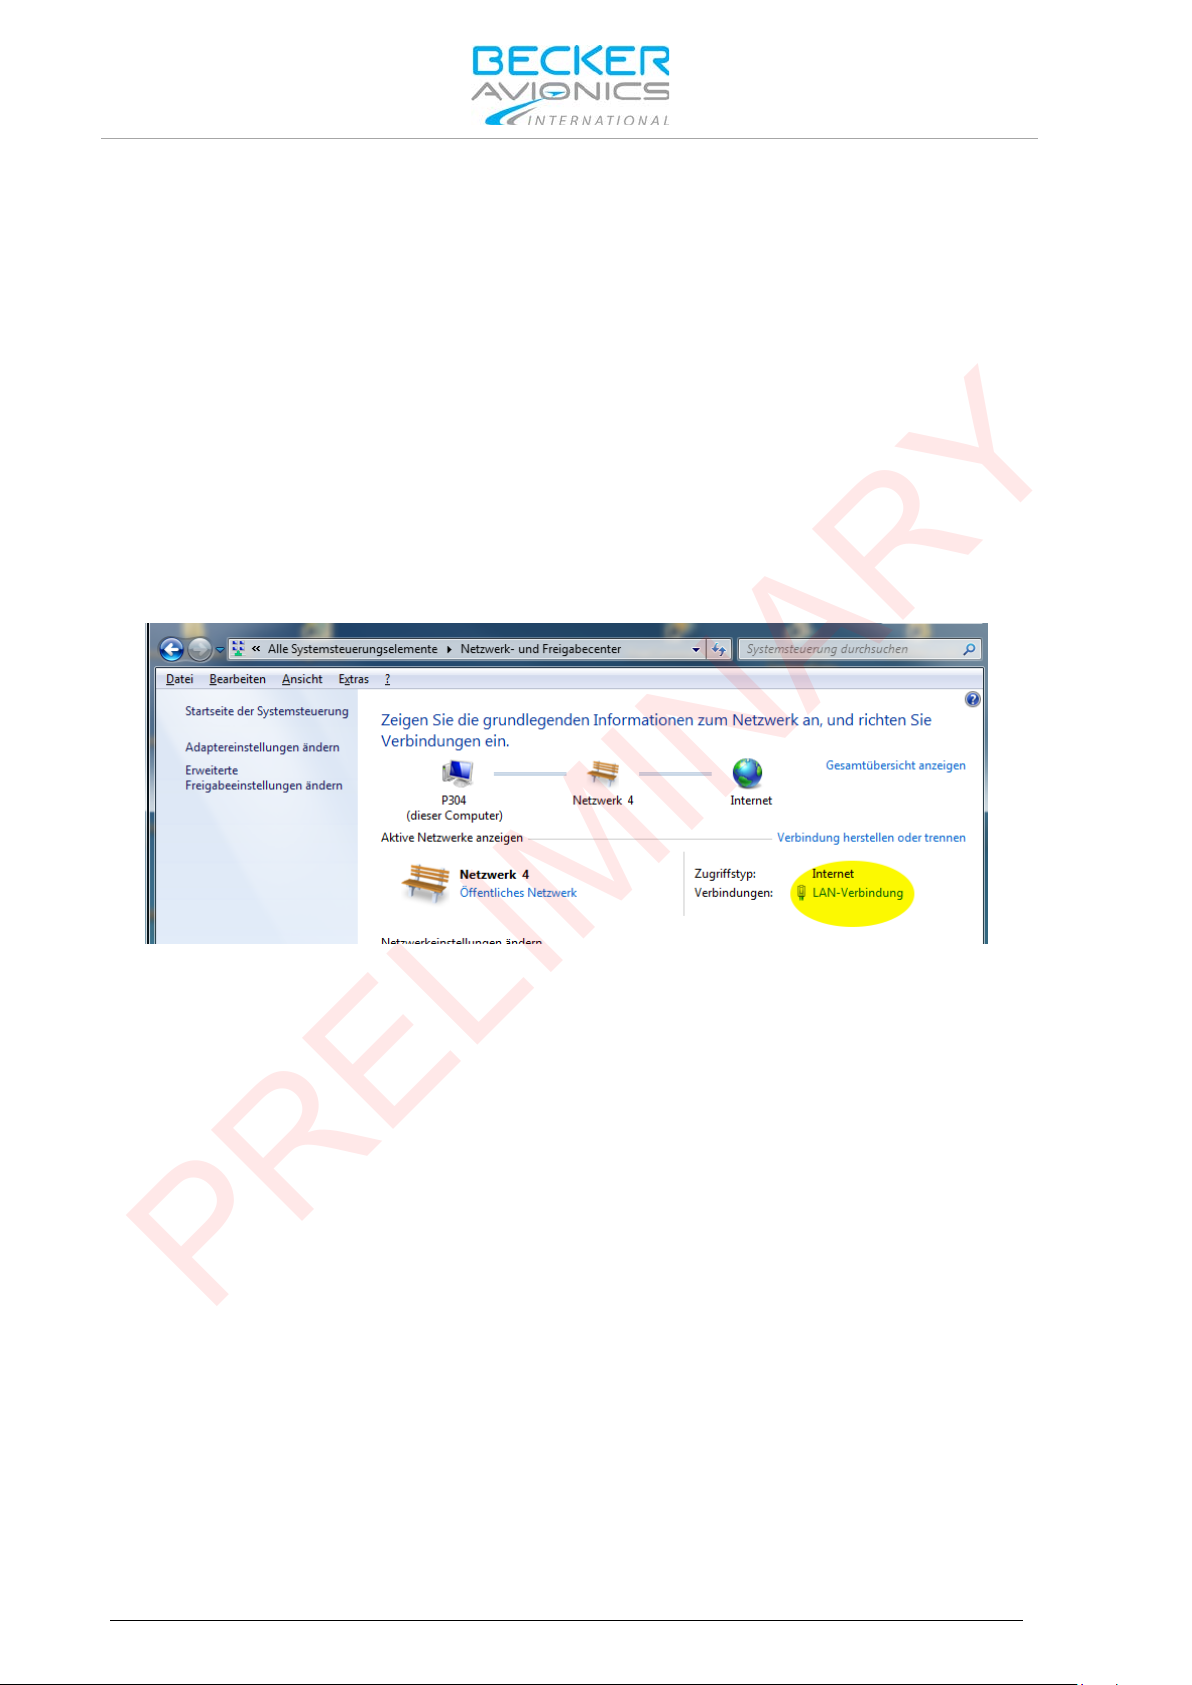
• Open Control Panel (via the "Start" menu) and choose "View network status and tasks"
(via "Network and Internet").
• On the following screen click on "LAN connection" (highlighted yellow).
• On the next screen "LAN connection status", click on "Properties" (you need administrator
rights here), to get to the window "Properties of LAN connection".
• Choose "TCP/IP(v4)" and again click on "Properties".
• On screen "Properties of TCP/IP(v4)" choose "Advanced..." and click "Add..." in the
IP adress area.
the network settings work s similarly under W indows XP, Vis ta, 7, 8 and 10. The
Figure 13: PC configuration: LAN network
34 TG660 DV17900.03 Issue 03 March 2017
Page 35

Installation
PRELIMINARY
Configur at ion via PC
• In the appearing input screen (see image) the first three numbers of the IP address must
be chosen analogously to the TG660 address.
o Each IP may only appear once in a given network, the fourth number must be
different from the TG660 (0-254, not 191).
• The subnet mask is set to 255.255.255.0 as for the TG660.
• Confirm your input with "Add" and
• Close all previously opened screens with "OK" or "Close".
Figure 14: PC configuration: IP-address, sub net mask
In case the fi
skip the previous steps , but you have to tak e c are that no ot her dev ice w ith the I P 191 ( 4th n um ber) is
connected to the network during configuration. In more sophis ticated network architect ures the range
192.168.16.XXX could also be already used in another network segment.
This kind of problem s can be complete ly avoided if TG660 and PC are co nnected to a to a sep arate
network hub or switch, which is solely used for that purpose.
2.8.2. Operating via PC
For details about operating via PC please see "Operating via PC", page 45.
rst 3 numbers of your PC's standard IP address are already 192.168.16.XXX, you can
DV17900.03 Issue 03 March 2017 TG660 35
Page 36

Installation
PRELIMINARY
Post Installation Check
2.9. Post Installation Check
Once the unit is installed completely a test procedure to verify system functionality. Ensure compliance
with authority required procedures. The following chapter below provides guidance for such tests.
2.9.1. Mechanical Installation and Wiring Check
• Verify all cables are securely fixed and shields connected properly to signal ground.
• Verify all screws are tight, check if all connections are mechanically secured.
2.9.2. Power Supply
• Check the external DC connection and confirm correct polarity.
2.9.3. Receiver / Transmitter Operation
• Perform a voice communication test. This test might be positive, if carried out close to the
corresponding radio-station, even if the antenna cable is broken or short-circ u ited. It will
not be possible to establish communication over a distance of 5 to 10 km in this case.
• Speak loud to the microphone and keep it always close to the lips, otherwise ambient
noise can be intrusive and make understanding difficult.
• Use only microphones or headsets, which are suitable for ground-stations. Incoming
radiation on the equipment antenna can affect the integrated amplifier of the microphone
(feedback). This is noticeable in the station by whistling and/or heavy distortion. The
described disturbances can occur in different ways on different transmit channels.
• Transmit buttons can stick, or TX line is short circuited thus causing continuous carrier
signal on the active channel. Therefore ensure that the display (sign “
when the “TX” button was released.
”) disappeared
2.9.4. Antenna Check
• Check the VSWR (voltage standing wave ratio) over the complete frequency band (e.g. by
using a VHF Reflection-Coefficient Meter).
The VSWR ratio should be less than 2:1 and is not acceptable when exceeding 3:1.
36 TG660 DV17900.03 Issue 03 March 2017
Page 37

Operating Instructions
PRELIMINARY
Device Description
3. Operating Instructions
In this chapter you can read about:
Device Description ...................................................................................................................... 37
3.1.
3.1.1. Device Assignment ........................................................................................................... 37
3.1.2. Packing, Transport, Storage ............................................................................................. 37
3.1.3. Scope of Delivery .............................................................................................................. 37
3.1.4. Type Plate ......................................................................................................................... 37
3.1.5. Controls and Indications ................................................................................................... 38
3.1.5.1. User Interface ........................................................................................................ 38
3.1.5.2. Description of Displayed Information ..................................................................... 39
3.2. Start up ........................................................................................................................................ 39
3.2.1. Power ON ......................................................................................................................... 40
3.2.2. Power on Built In Test (PBIT) ........................................................................................... 40
3.3. Operating..................................................................................................................................... 41
3.3.1. Keypad .............................................................................................................................. 41
3.3.2. SPKR Key ......................................................................................................................... 42
3.3.3. Mode Key .......................................................................................................................... 42
3.3.3.1. Channel Mode ....................................................................................................... 42
3.3.3.2. Status of Supply Voltages ..................................................................................... 43
3.3.4. SQL Key ............................................................................................................................ 43
3.3.5. PTT Key ............................................................................................................................ 43
3.3.6. Storage Procedure ............................................................................................................ 44
3.4. Operating via PC ......................................................................................................................... 45
3.4.1. Interface RoIP ................................................................................................................... 45
3.4.2. Menus ............................................................................................................................... 46
3.5. Selectable Frequencies ............................................................................................................... 47
3.1. Device Description
TG660 is a fixed station for voice communications in the VHF frequency range of
118.000...136.990 MHz with 25 kHz / 8.33 kHz channel spacing.
3.1.1. Device Assignment
This manual is valid for the following devices:
• See page 22
3.1.2. Packing, Transport, Storage
• See page 21
3.1.3. Scope of D
• See page 22
3.1.4. Type Pl
• See page 23
elivery
ate
DV17900.03 Issue 03 March 2017 TG660 37
Page 38
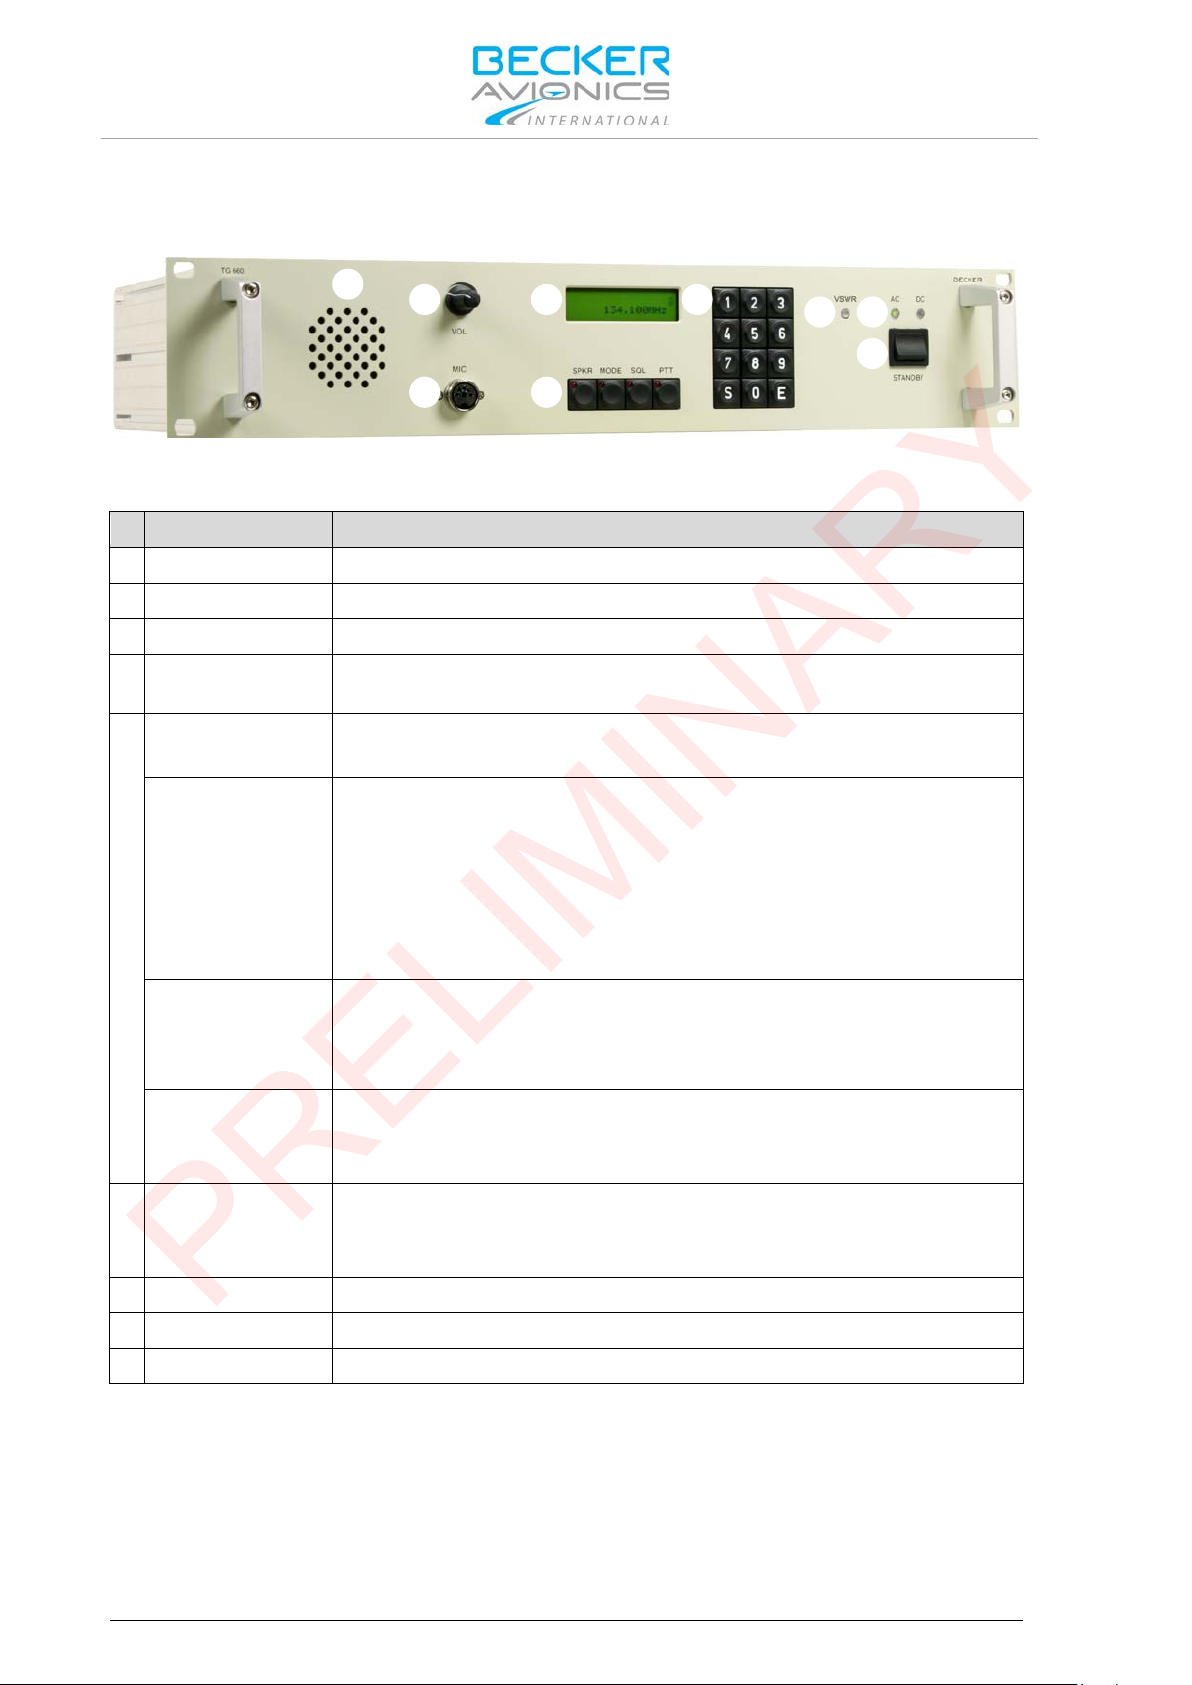
Operating Instructions
Description
Function
A
Loudspeaker
Internal loudspeaker
B
VOL (knob)
Adjustment of loudspeaker volume.
C
MIC (connector)
Connection of a dynamic hand mike or a head set.
D
Display
LCD output device to display information, see "Description of Displayed
E
SPKR (key+LED)
Switching "ON/OFF" the internal and external loudspeaker.
MODE (key+LED)
Selection of modes:
SQL (key+LED)
Switching "ON/OFF" the squelch function. Access to the SQL threshold
PTT (key+LED)
Switching from voice reception mode to transmit mode.
F
Numerical keypad
Use key "E" to confirm ke ypad entries .
G
AC / DC LEDs
Indicate which supply voltage is avai lable.
H
STANDBY (switch)
Switching "ON/OFF" the TG660.
I
VSWR LED
Indicates antenna mismatching (TG660-50 only)
A
B
C
D
E
F
H
GI
PRELIMINARY
Device Description
3.1.5. Controls and Indications
3.1.5.1.
User Interface
Figure 15: TG660 –
Information", page 39.
LED: Lights up when the internal speaker is enabled.
Controls and Indications
• Normal operating mode (frequency selection via keypad)
• Channel mode (selection of predefined channels)
• Several long presses on the “MODE” key show the status of
different supply voltages (e.g. radio, DC-internal and optional
battery).
LED: Lights up when the system self test detects an error.
settings.
LED: Lights up during receive of a signal.
LED is blinking when SQL is disabled.
LED: Lights up during the transmit mode.
LED is blinking until keying interrupts .
Use key "S" for storage operations.
Use keys "0...9" for numerical inputs.
The device detects a:
"Long press": when pressing a key for at least 1 second.
"Short press": any pressing below 1 second.
38 TG660 DV17900.03 Issue 03 March 2017
Page 39
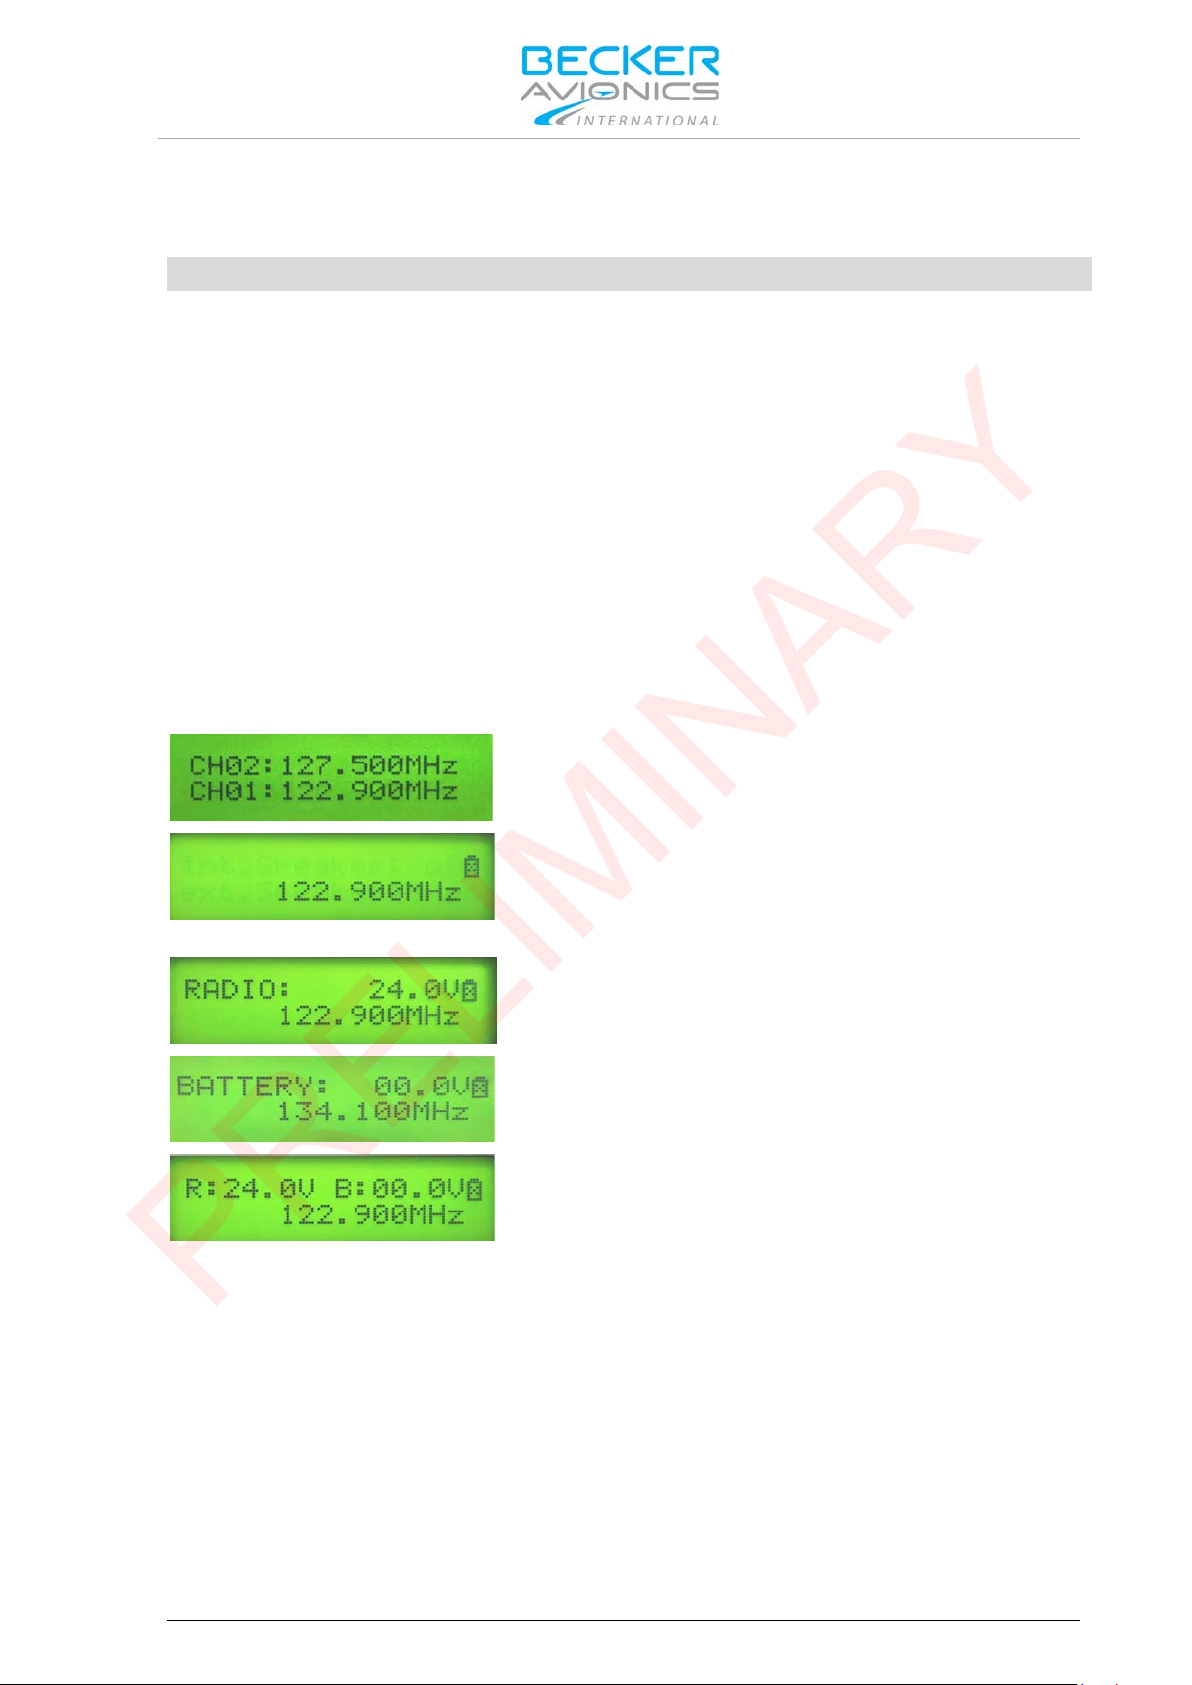
3.1.5.2. Description of Displayed Information
Indication / Information
Description
in lower line
Shows:
in upper line
Shows:
Symbol:
Shows:
Symbol:
Shows:
Symbol: battery
Shows:
Examples:
Shown is:
Shown is:
Shown is:
Shown is:
Shown is:
PRELIMINARY
The display can show various information and symbols in two lines.
• Active transmit/receive frequency
• Internal DC supply voltage and optional batt er y volta g e
(if a battery is installed, otherwise shows 00.0 V)
• Transmit mode (PTT active)
• Receive signal detected
• Battery voltage status
The ‘X’ in the battery symbol indicates no battery option installed.
Not shown on configuration pages.
Operating Instructions
Start up
3.2. Start up
• Preset frequency (first row).
• Active transmit/receive frequency (second row).
• Active transmit/receive frequency
• Status of the battery
The ‘X’ in the battery symbol indicates no battery option installed.
• Radio Voltage
• Active transmit/receive frequency
• Voltage of the internal battery (optional battery).
• Active transmit/receive frequency
• Radio power supply voltage
• Voltage of the internal battery
• Active transmit/receive frequency
The TG660 power supply logic is operating with AC-power by default.
After AC power failed, the logic automatically switches over to DC power. The moment AC power
becomes available the logic returns back to AC power source.
An optional intern al 12 VDC battery inside the T G660, if installed, co uld provide power for continued
operation over a certain time if AC and DC supply voltage would fail at the same time.
After a changeover from AC to DC power or vice-versa, the station is operable with the same functions
and settings as before.
DV17900.03 Issue 03 March 2017 TG660 39
Page 40
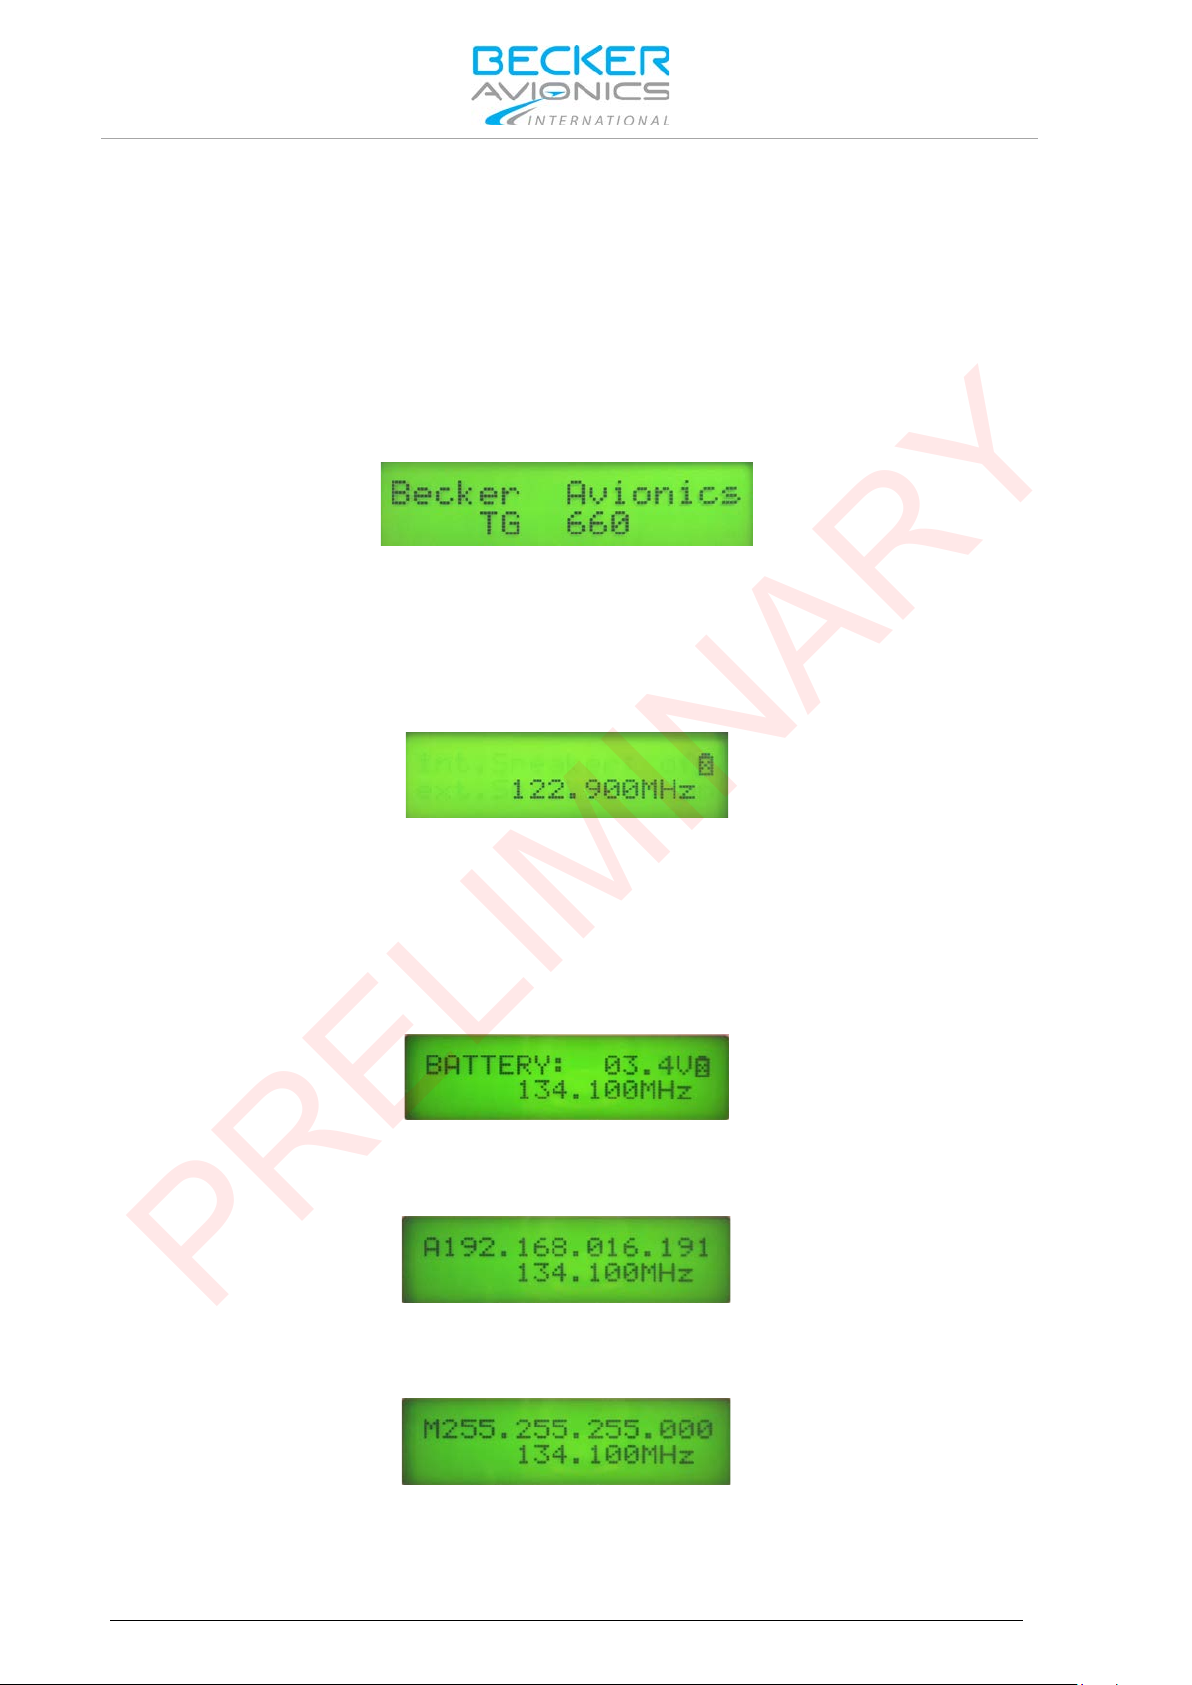
Operating Instructions
PRELIMINARY
Start up
3.2.1. Power ON
Use STANDBY switch to power ON the TG660.
• The Logo "Becker Avionics" is displayed for 2 s.
• LED "AC" and "DC" lights up depending on power supply source.
3.2.2. Power on Built In Test (PBIT)
• PBIT starts a displ a y dim ming test from minimum to maximum brightness.
• After the dimming test "Becker Avionics and TG660" appears for 2 s on the display.
Figure 16: TG660 – D
• PBIT starts the next test; various steps run through from first to final step in a 2 s interv al.
1.Step: The top l
• The bottom line shows the last used frequency.
2.Step: Shows a sample of the top line with the last used mode after a power cycle.
• Depending on customers last used mode different information can appear.
• The top line shows the status of the optional internal battery, if installed.
• If not installed, the battery symbol is crossed out.
o During battery
ine can show different infor mation.
Figure 17: TG660 – P
detection voltage counts do wn until 0 volts.
Figure 18: TG660 – P
isplay after power on
BIT, 1.Step
BIT, 2.Step
3.Step: Shows figures of the IP address in the top line.
Figure 19: TG660 – PBIT, 3.Step
4.Step: Shows figures of the subnet mask in the top line.
Figure 20: TG660 – P
40 TG660 DV17900.03 Issue 03 March 2017
BIT, 4.Step
Page 41
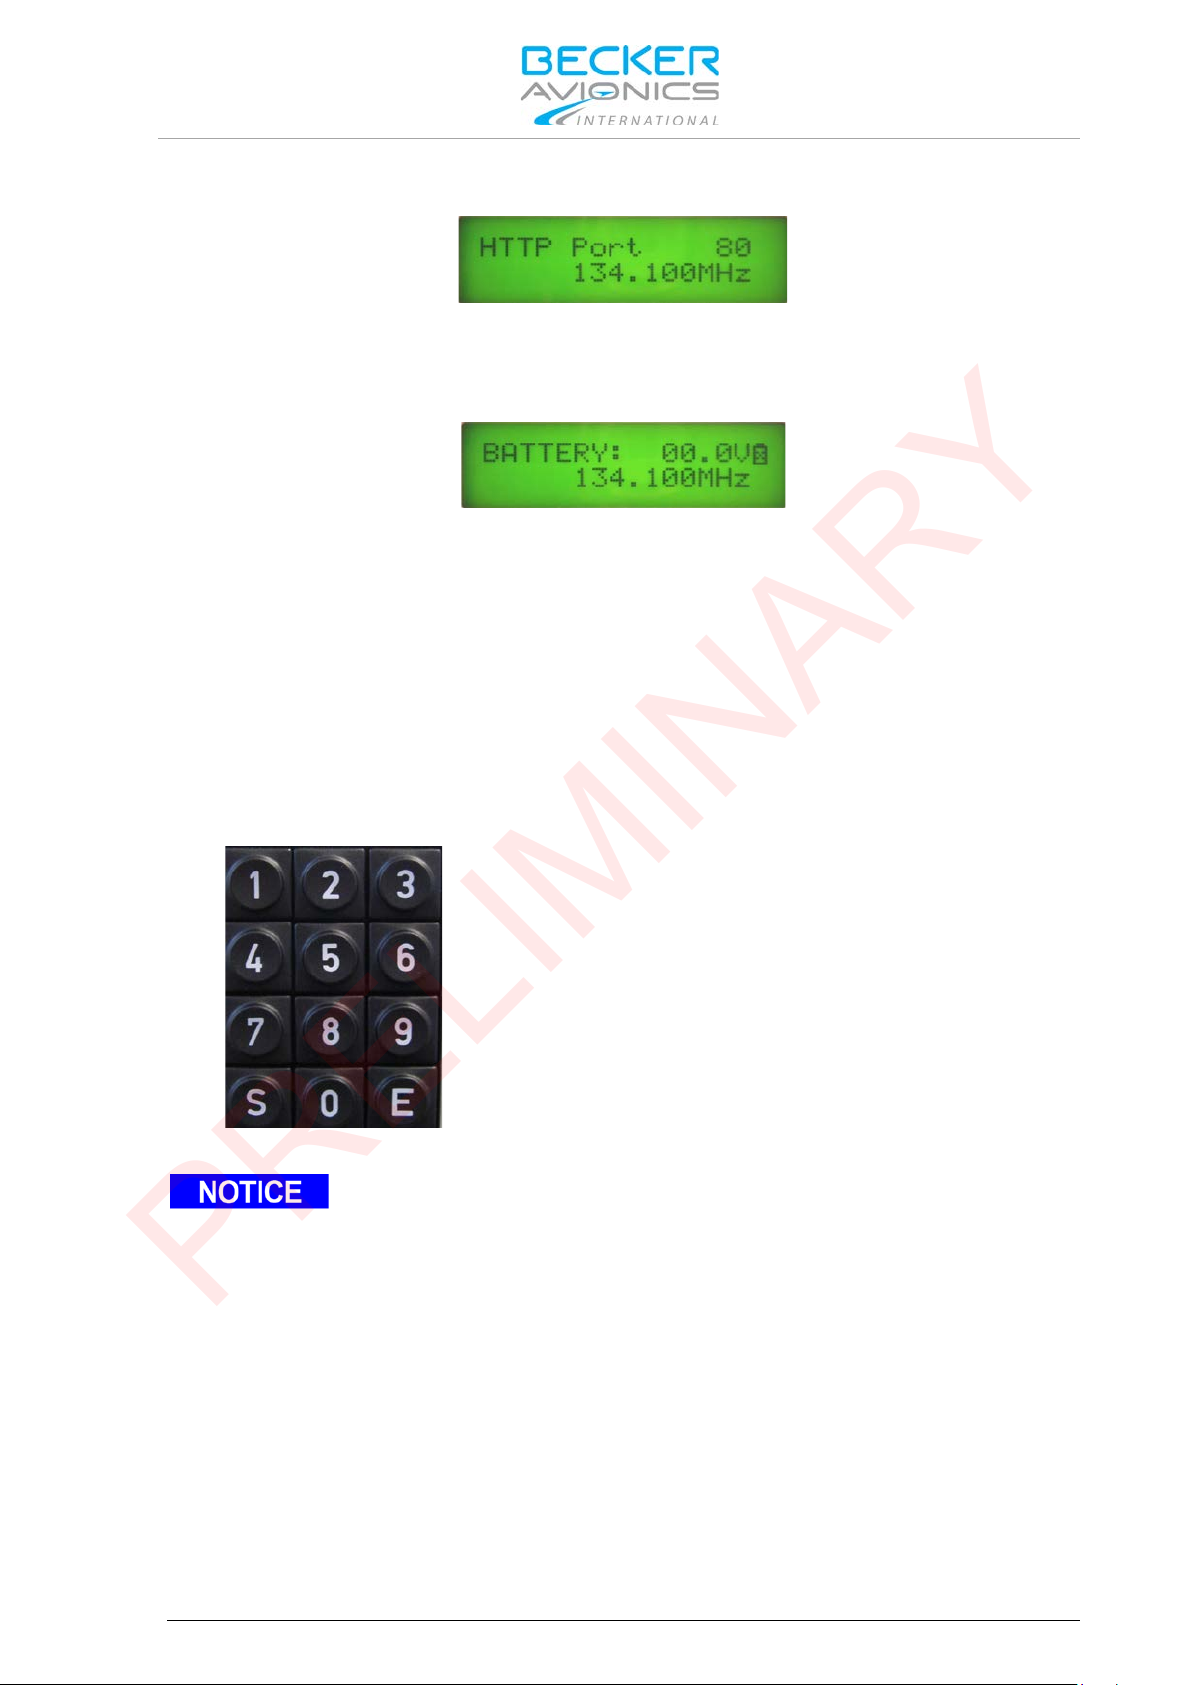
5.Step: Shows the port number in the top line
Use keypad for changing the frequency.
Only 25 / 8.33 kHz frequencies are accepted (details see "Selectable Frequencies"
PRELIMINARY
Operating Instructions
Operating
Figure 21:
6.Step: Shows the display in last used mode which become active after the PBIT is
completed successful.
Figure 22:
Note: After successful PBIT the unit comes back to the setting before powered off.
3.3. Operating
3.3.1. Keypad
TG660 – PBIT, 5.Step
TG660 – PBIT, 6.Step
• Type in all 6 digits of the desired frequency
• Confirm the input with key "E"
page 47.
If the frequency is not included in the 25 / 8.33 kHz channel spacing the upper line
blinks.
DV17900.03 Issue 03 March 2017 TG660 41
Page 42
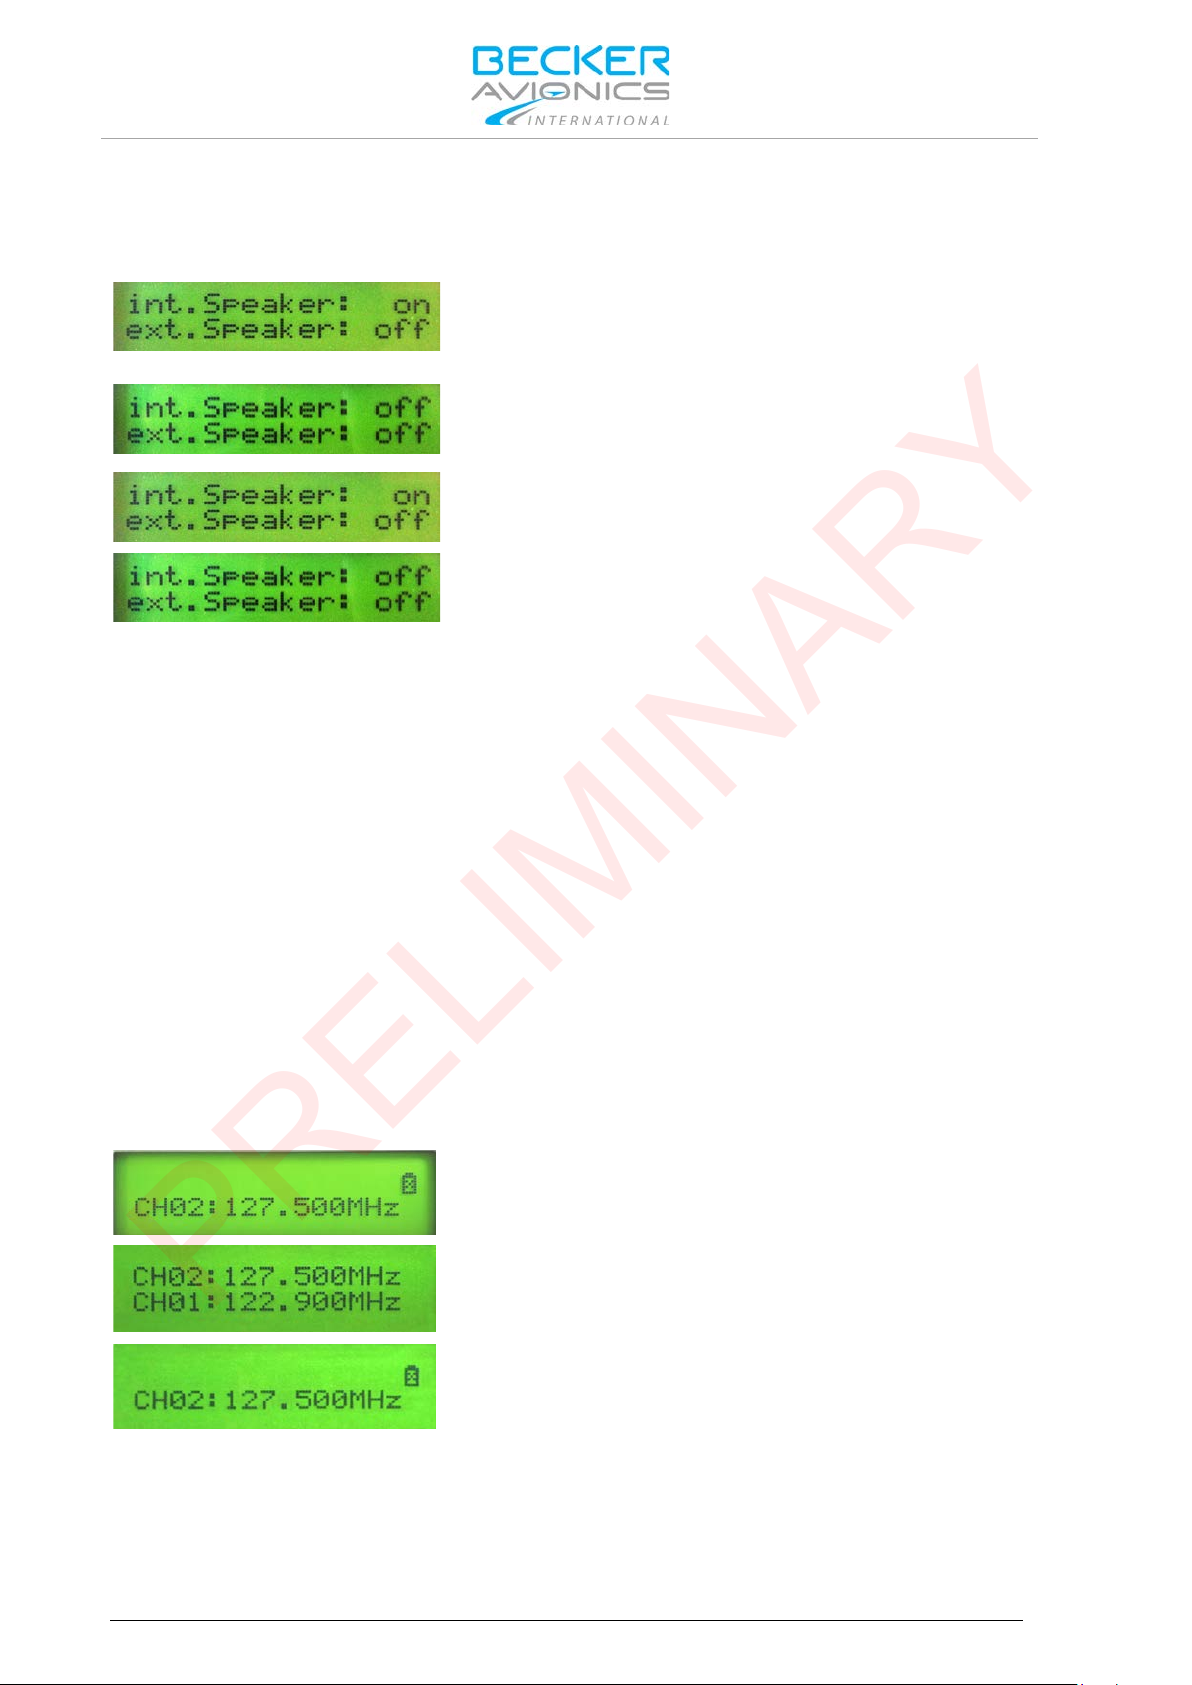
Operating Instructions
Press SPKR key 1st time (short press).
Press SPKR key 2nd time (short press).
Note:
Press MODE key (short press).
• Type in the desired channel number e.g. 02.
PRELIMINARY
Operating
3.3.2. SPKR Key
Switching "ON/OFF" the internal and external loudspeakers. SPKR key LED lights up when the
internal speaker is enabled.
• Internal speaker is switched on
• SPKR key LED is on
• Internal speaker is switched off
• SPKR key LED is off
Press SPKR key (long press).
• External speaker is switched on
Press SPKR key again (long press).
• External speaker is switched off
• It is also possible to switch on both, internal and external
speaker.
• The status of the external and internal speaker is shown
for approx. 1 s.
• The internal loudspeaker switch off automatically during
TX. This avoids acoustic coupling between loudspeaker
and microphone, which can cause acoustical feedback.
3.3.3. Mode Key
Selection of modes:
• Normal operating mode (frequency selection via keypad).
• Channel mode (selection of predefined channels).
• Status of different supply voltages (e.g. rad io, D C-internal and optional battery).
3.3.3.1. Channe l Mode
• A channel input field is generated.
Note: the editable field appears after input of the first digit.
• Confirm the input with key "E".
• The frequency is stored in channel "CH02".
• After pressing key "E" the display shows the "new" stored
channel frequency.
42 TG660 DV17900.03 Issue 03 March 2017
Page 43

3.3.3.2. Status of Supply Voltages
Press MODE key 1st time (long press).
Press MODE key 2nd time (long press).
Press MODE key 3rd time (long press).
Symbol:
Press SQL key (short press).
Press SQL key (long press)
Symbol:
Press PTT key (press and hold).
Note:
PRELIMINARY
The upper line of the display changes.
Shown is:
The upper line of the display changes.
Shown is:
The upper line of the display changes.
Shown is:
Operating Instructions
Operating
• Radio Voltage
• Voltage of the internal battery (optional battery).
• Radio power supply voltage
• Voltage of the internal battery.
3.3.4. SQL Key
Switching "ON/OFF" the squelch function to suppress the sound of channel noise. Adjustment of the
SQL threshold settings.
• Switches the SQL function "ON/OFF".
SQL function "ON":
• LED is on during receive of a signal.
Symbol is displayed.
SQL function "OFF":
• LED is blinking.
• Activates the SQL threshold setting function.
• Next short press returns the TG660 into the previous
mode.
3.3.5. PTT Key
Press PTT key (Press-to-Talk) to switch from voice reception mode to transmit mode.
DV17900.03 Issue 03 March 2017 TG660 43
• Activates the transmit mode.
• PTT key pressed: LED is on. Symbol is displayed.
• Ready to transmit messages.
• PTT key not press ed: LED is blinking.
• If transmit mode is "activated" for more than 2 minutes,
the transmitter shuts down automatically.
Page 44
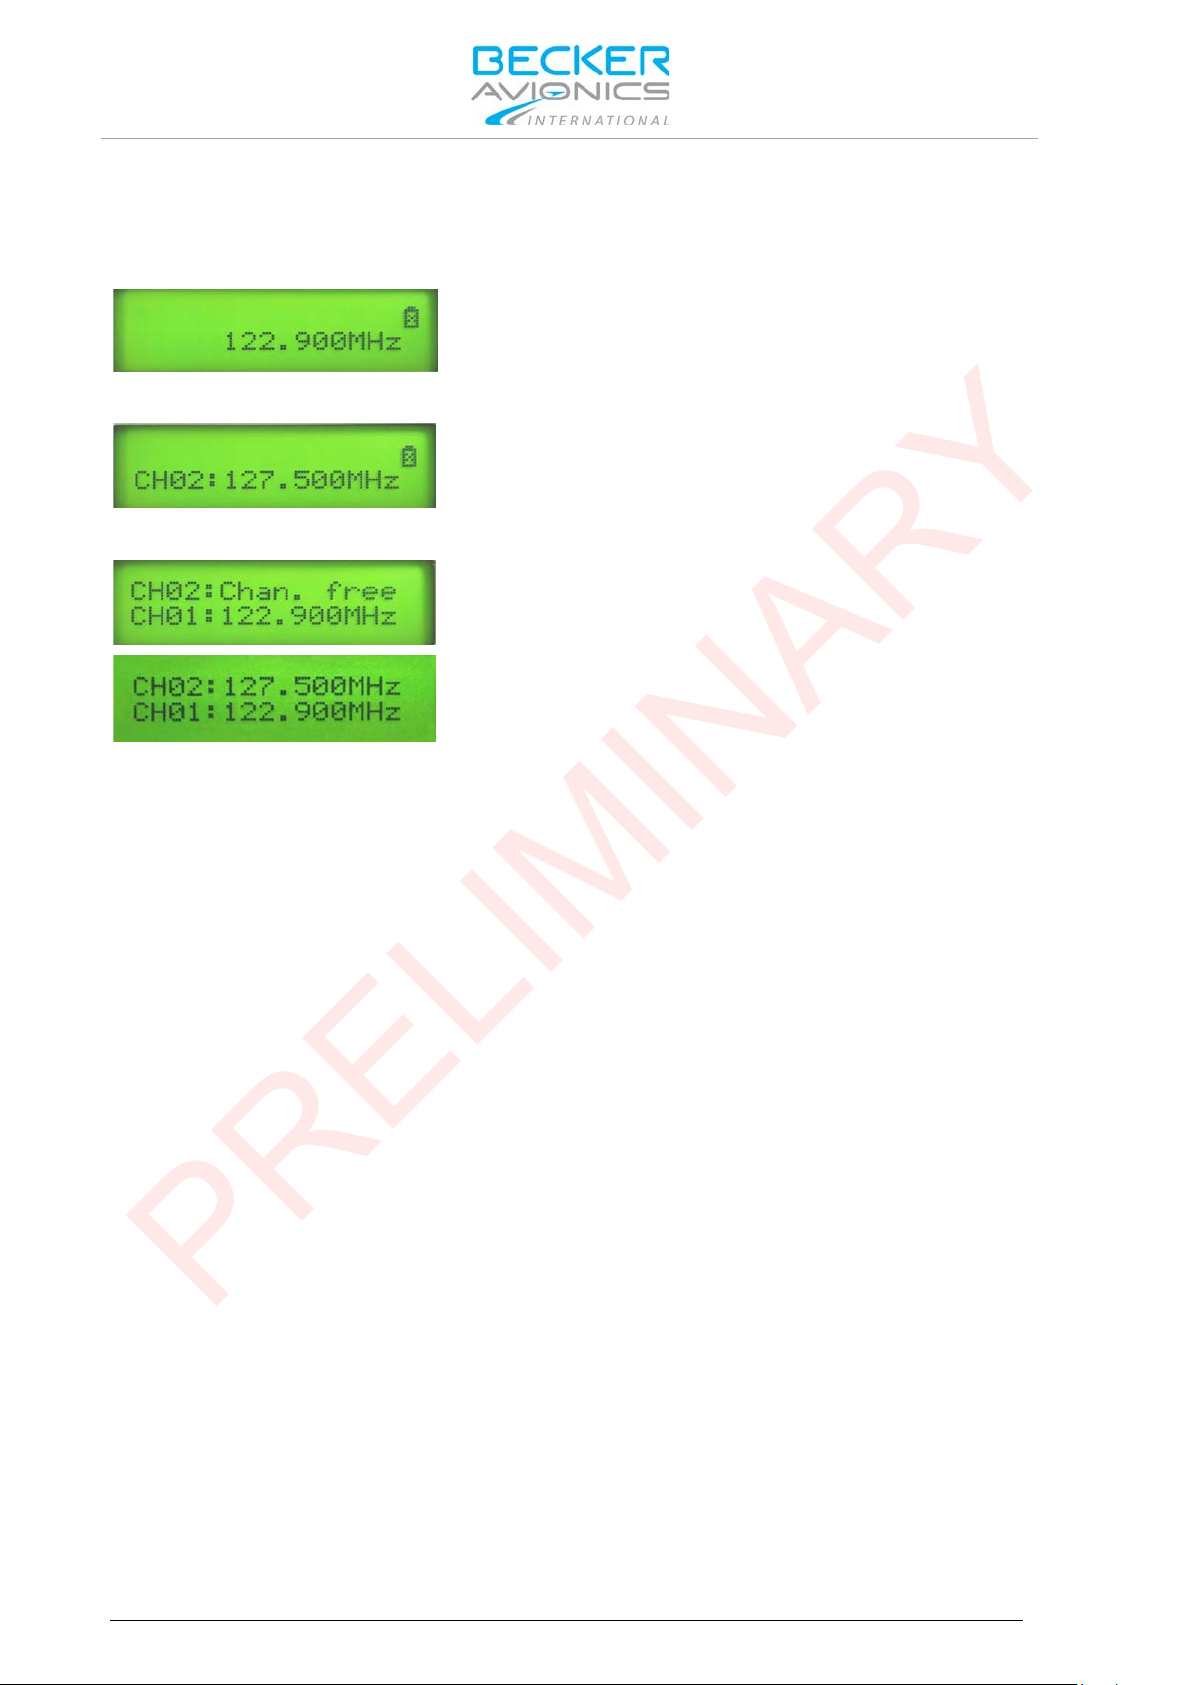
Operating Instructions
• Type in the desired channel number e.g. 02.
Channel02 free
PRELIMINARY
Operating
3.3.6. Storage Procedure
Non-volatile memory for storing:
• 99 channels are available for the manually storage of frequencies.
Press key "S" to get in "Standard Mode".
• The indicated frequency is provided to store.
Channel02 already used
Note: the editable field appears after input of the first digit.
Overwrites already used channels with the new frequency!
• Press key "E" to confirm the input.
• The frequency is stored in channel "CH02"
"Chan. free" behind the channel number identifies vacant
channel numbers.
• Confirm the input with key "E"
• The frequency is stored in channel "CH02"
44 TG660 DV17900.03 Issue 03 March 2017
Page 45
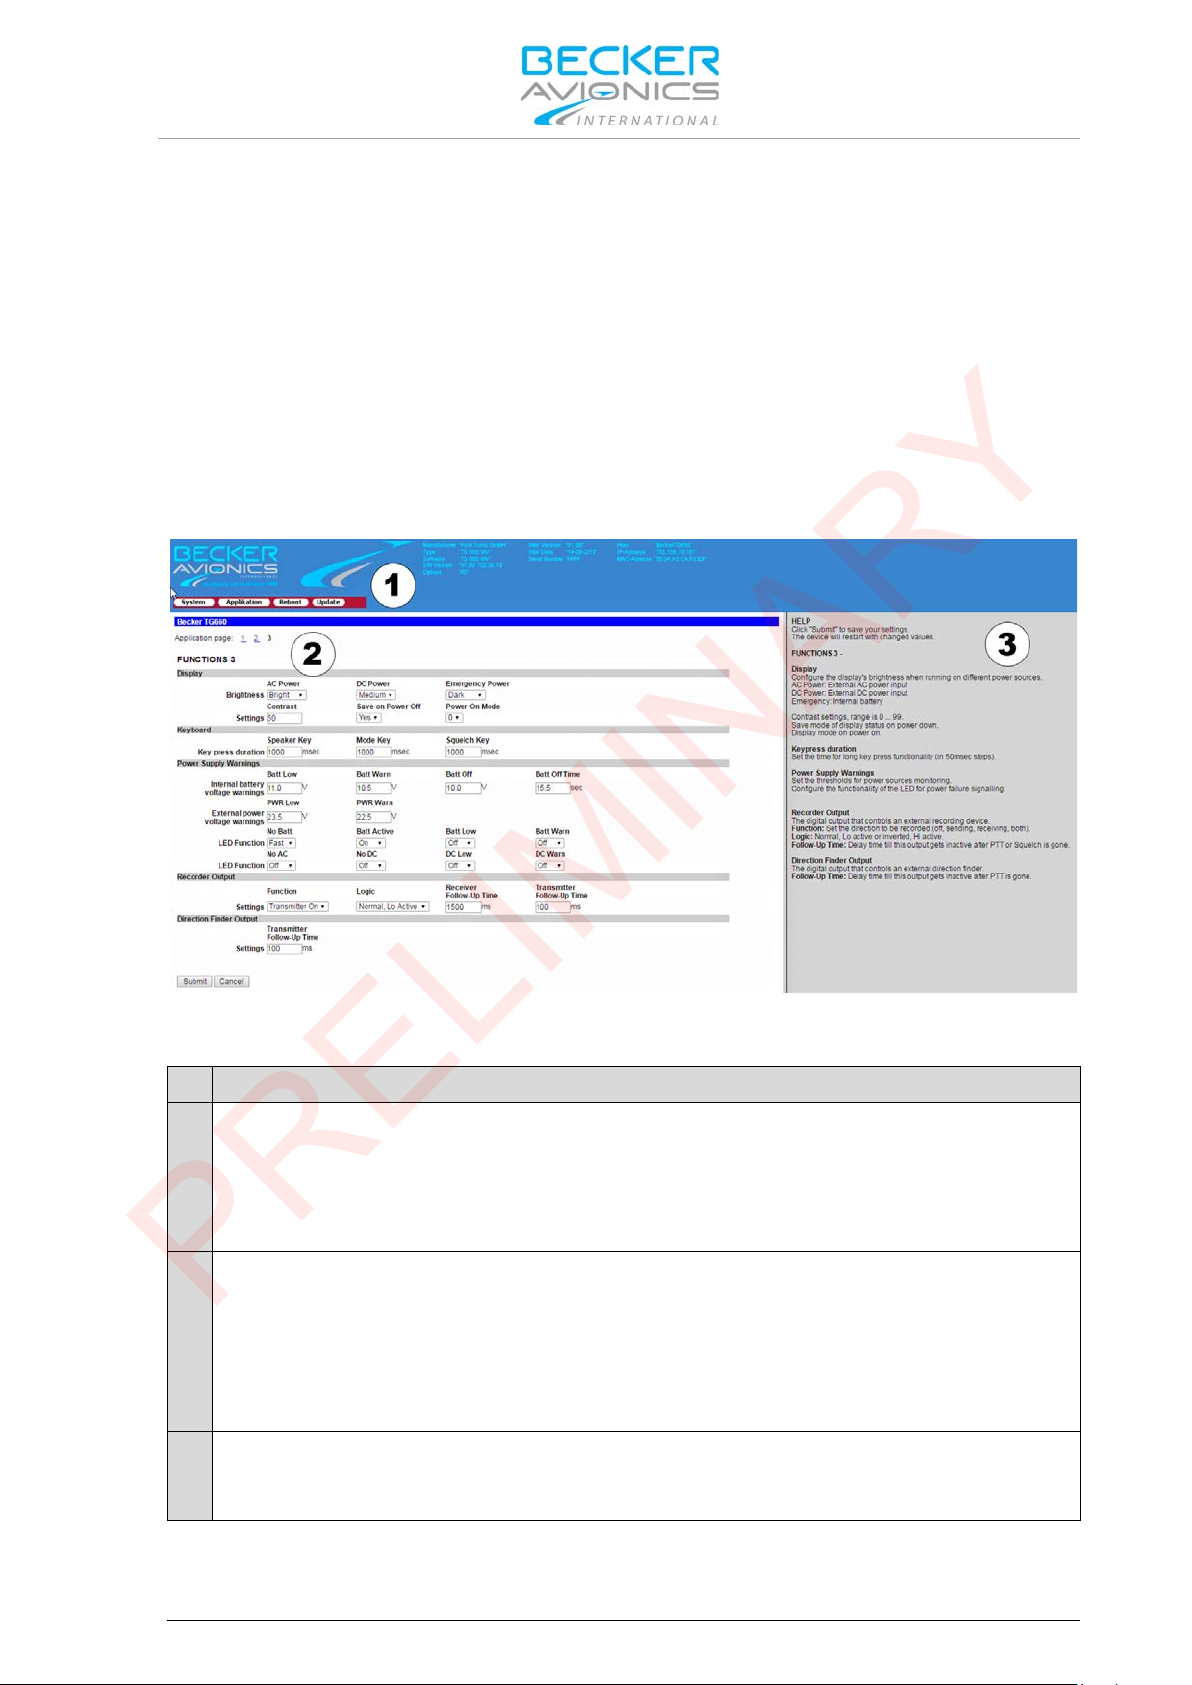
Operating Instructions
The interface consists of 3 basic parts:
1
Header (blue) includes information about:
2
Functions, settings (white) provides information/operations about:
3
Description (gray) includes information about:
PRELIMINARY
Operati ng vi a PC
3.4. Operating via PC
3.4.1. Interface RoIP
Each TG660 in the application mus t have a separate IP address and can op erate and be c onfigured
via PC.
First steps:
• Open the web browser on the PC.
• Type in the IP address and call up the web interface.
• Login with user name and password.
Default: User name: tg660
Password: radio
• Ready to operate with the called TG660.
Figure 23:
• Web interface tool, version, network settings, ...
• Device type, IP address, ...
• Menu bar (System, Application, Reboot, Update)
• System settings
• Applications
• Reboot process
• Update process
• Support and instructions according to the called menu page.
Interface: TG660 Radio over IP
DV17900.03 Issue 03 March 2017 TG660 45
Page 46
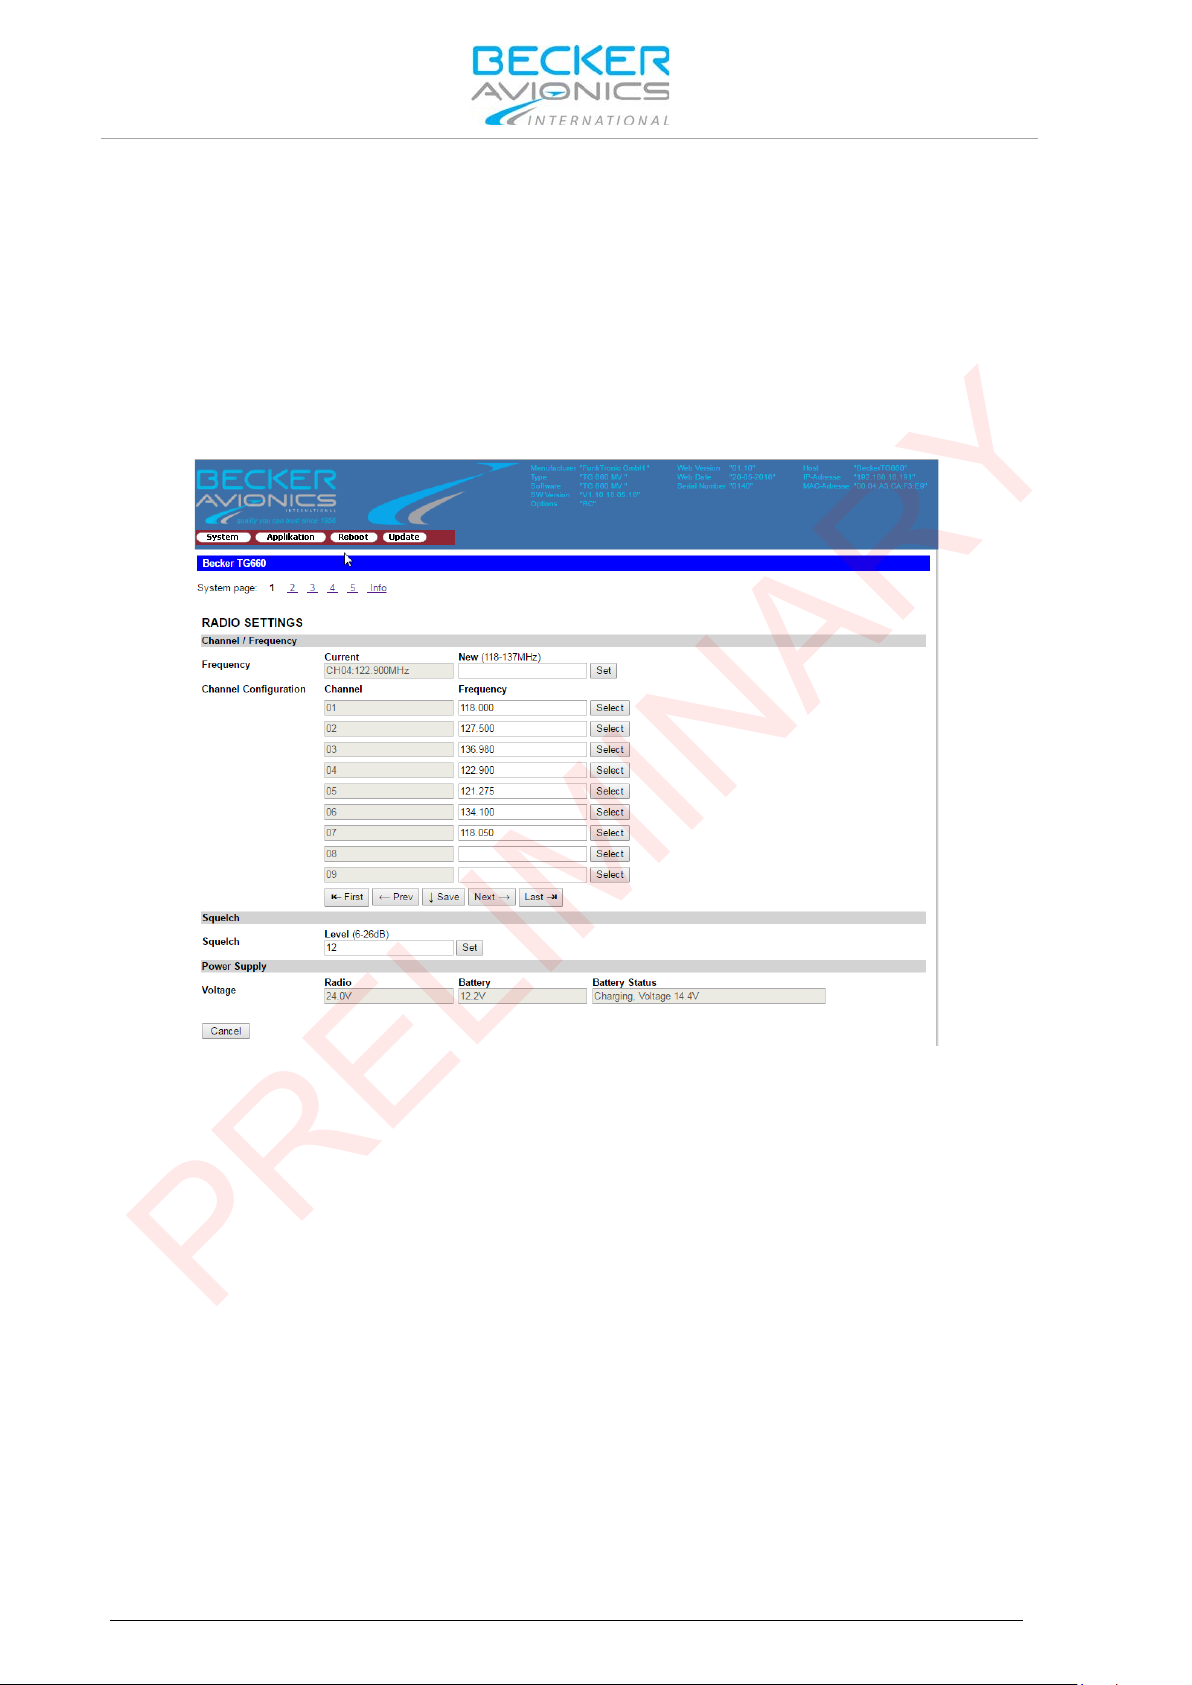
Operating Instructions
PRELIMINARY
Operati ng vi a PC
3.4.2. Menus
The menu "System" consists of three pages + Info
• Page1: This page is used for radio settings (frequencies, channels, squelch).
• Page2: This page is used for global network settings.
• Page3: This page is used for settings for remote console connections.
• Page4: This page shows current status of radio.
• Page5: This page is used for security settings.
• Page Info: This page provides information about the selected connection and debug,
syslog messages.
Figure 24: System page1 - Radio Settings
The menu "Ap
• Page1: This page is used for PTT sources, priority and monitoring
• Page2: This page is used for AF level settings.
• Page3: This page is used for configurations for display brightness, key press duration,
The menu "Re
• "Reboot": reboots the device. All settings will be reinitialized.
• "Factory defaults": Device will be reset to factory default settings and rebooted.
The menu "Up
• "Upload": use this function for updates of the web configuration interface.
Note: New releas
46 TG660 DV17900.03 Issue 03 March 2017
plication" consists of three pages
threshold for warnings, ....
boot" consists of one page
date" consists of one page
Updates are only necessary if they are requested from Becker Avionics.
es of this software are provided by Becker Avionics, also how to
proceed uploading the files.
Page 47

Operating Instructions
118.000
118.0000 MHz
25 kHz
118.005
118.0000 MHz
8.33 kHz
118.010
118.0083 MHz
8.33 kHz
118.015
118.0166 MHz
8.33 kHz
118.025
118.0250 MHz
25 kHz
118.030
118.0250 MHz
8.33 kHz
118.035
118.0333 MHz
8.33 kHz
118.040
118.0416 MHz
8.33 kHz
118.050
118.0500 MHz
25 kHz
118.055
118.0500 MHz
8.33 kHz
118.060
118.0583 MHz
8.33 kHz
118.065
118.0666 MHz
8.33 kHz
118.075
118.0750 MHz
25 kHz
118.080
118.0750 MHz
8.33 kHz
118.085
118.0833 MHz
8.33 kHz
118.090
118.0916 MHz
8.33 kHz
118.100
118.1000 MHz
25 kHz
...
...
...
136.975
136.9750 MHz
25 kHz
136.990
136.9916 MHz
8.33 kHz
PRELIMINARY
Select a ble Frequencies
3.5. Selectable Frequencies
The table shows the relation between the real operating frequency and the selected frequency
according to international standards. (refer to: ED-23C, chapter 1.3.2, or ICAO).
Channel Name Channel Frequency Channel Spacing
DV17900.03 Issue 03 March 2017 TG660 47
Page 48

Operating Instructions
PRELIMINARY
Select a ble Frequencies
Blank
48 TG660 DV17900.03 Issue 03 March 2017
Page 49

Certificates
PRELIMINARY
Certificate-Info
4. Certificates
In this chapter you can read about:
Certificate-Info ............................................................................................................................. 49
4.1.
4.2. BAF Approval - GT6201 .............................................................................................................. 50
4.3. EC Declaration of Conformity – GT6201-05-R ........................................................................... 52
4.4. EC Declaration of Conformity – GT6201-10-R ........................................................................... 54
4.5. Approval - Telecommunication Office Italy ................................................................................. 56
4.1. Certificate-Info
For detailed information about approvals and certification please seeCertifications, page 18.
DV17900.03 Issue 03 March 2017 TG660 49
Page 50
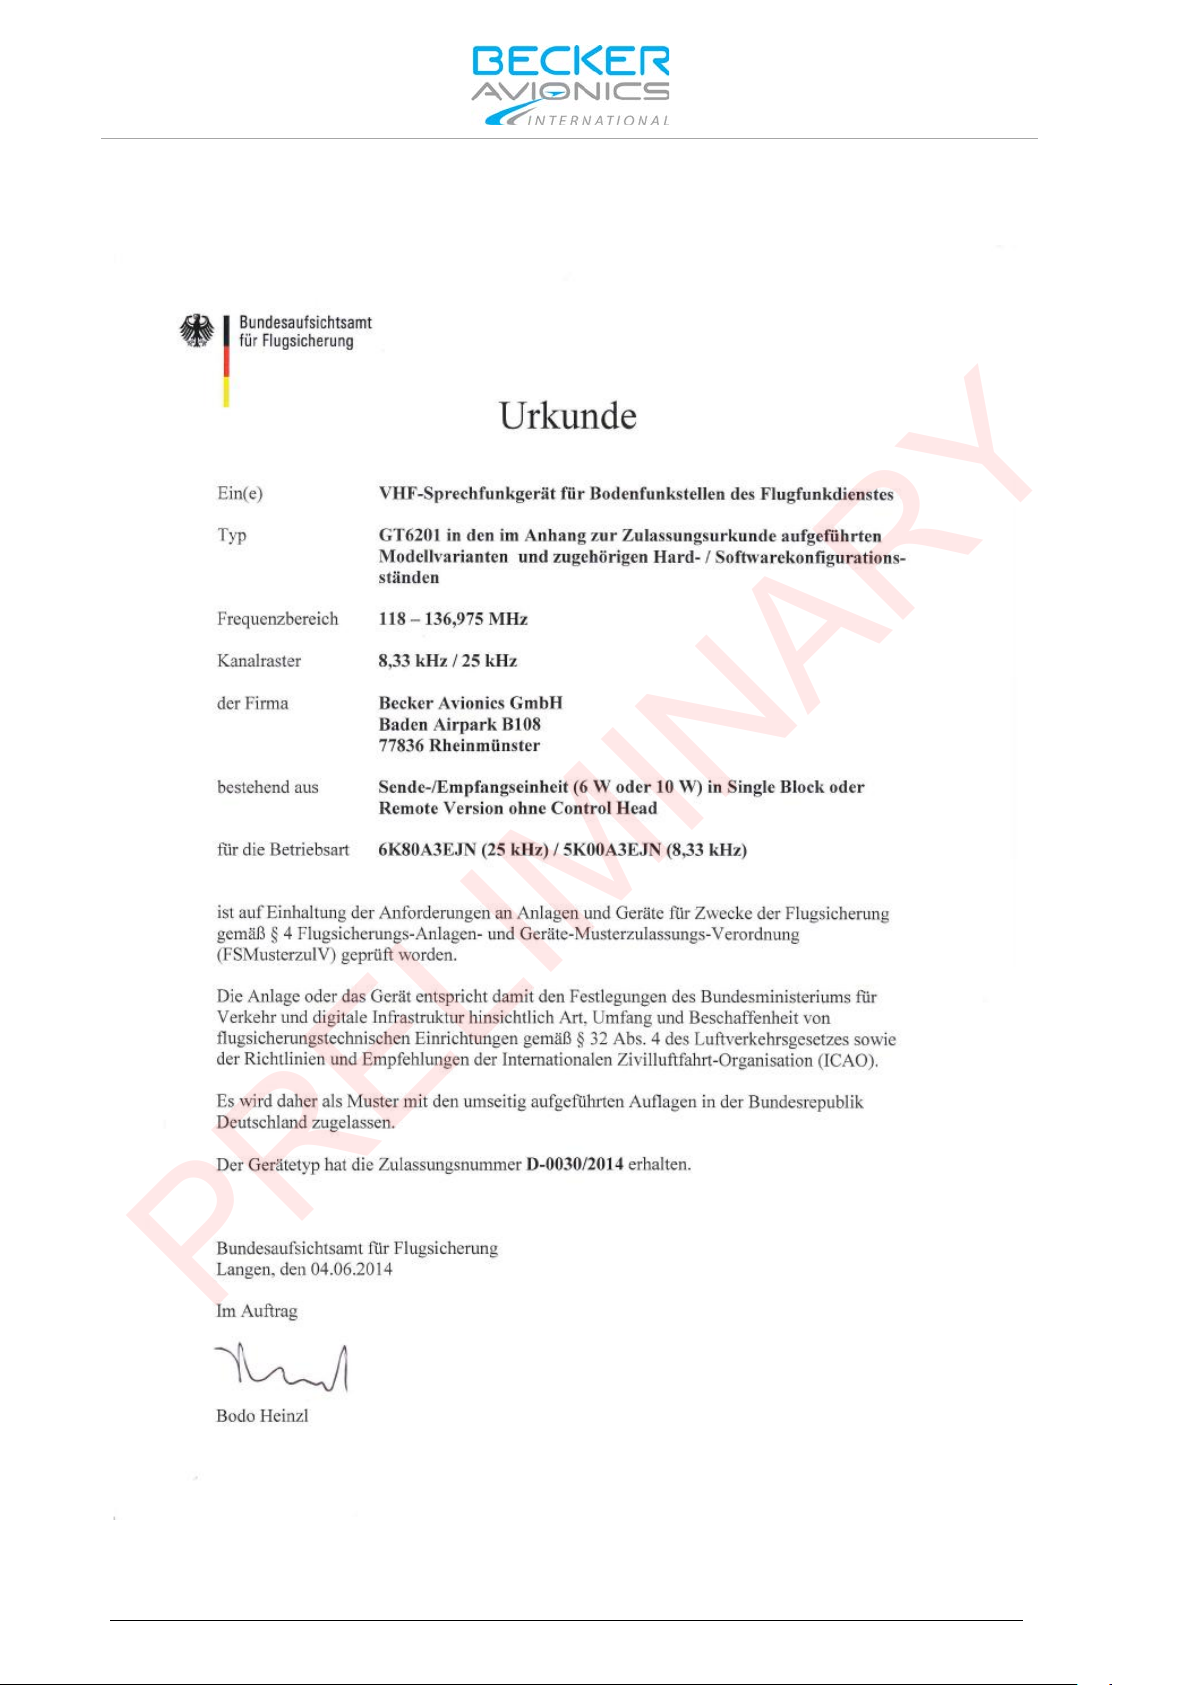
Certificates
PRELIMINARY
BAF Approval - GT6201
4.2. BAF Ap p r oval - GT6201
50 TG660 DV17900.03 Issue 03 March 2017
Page 51
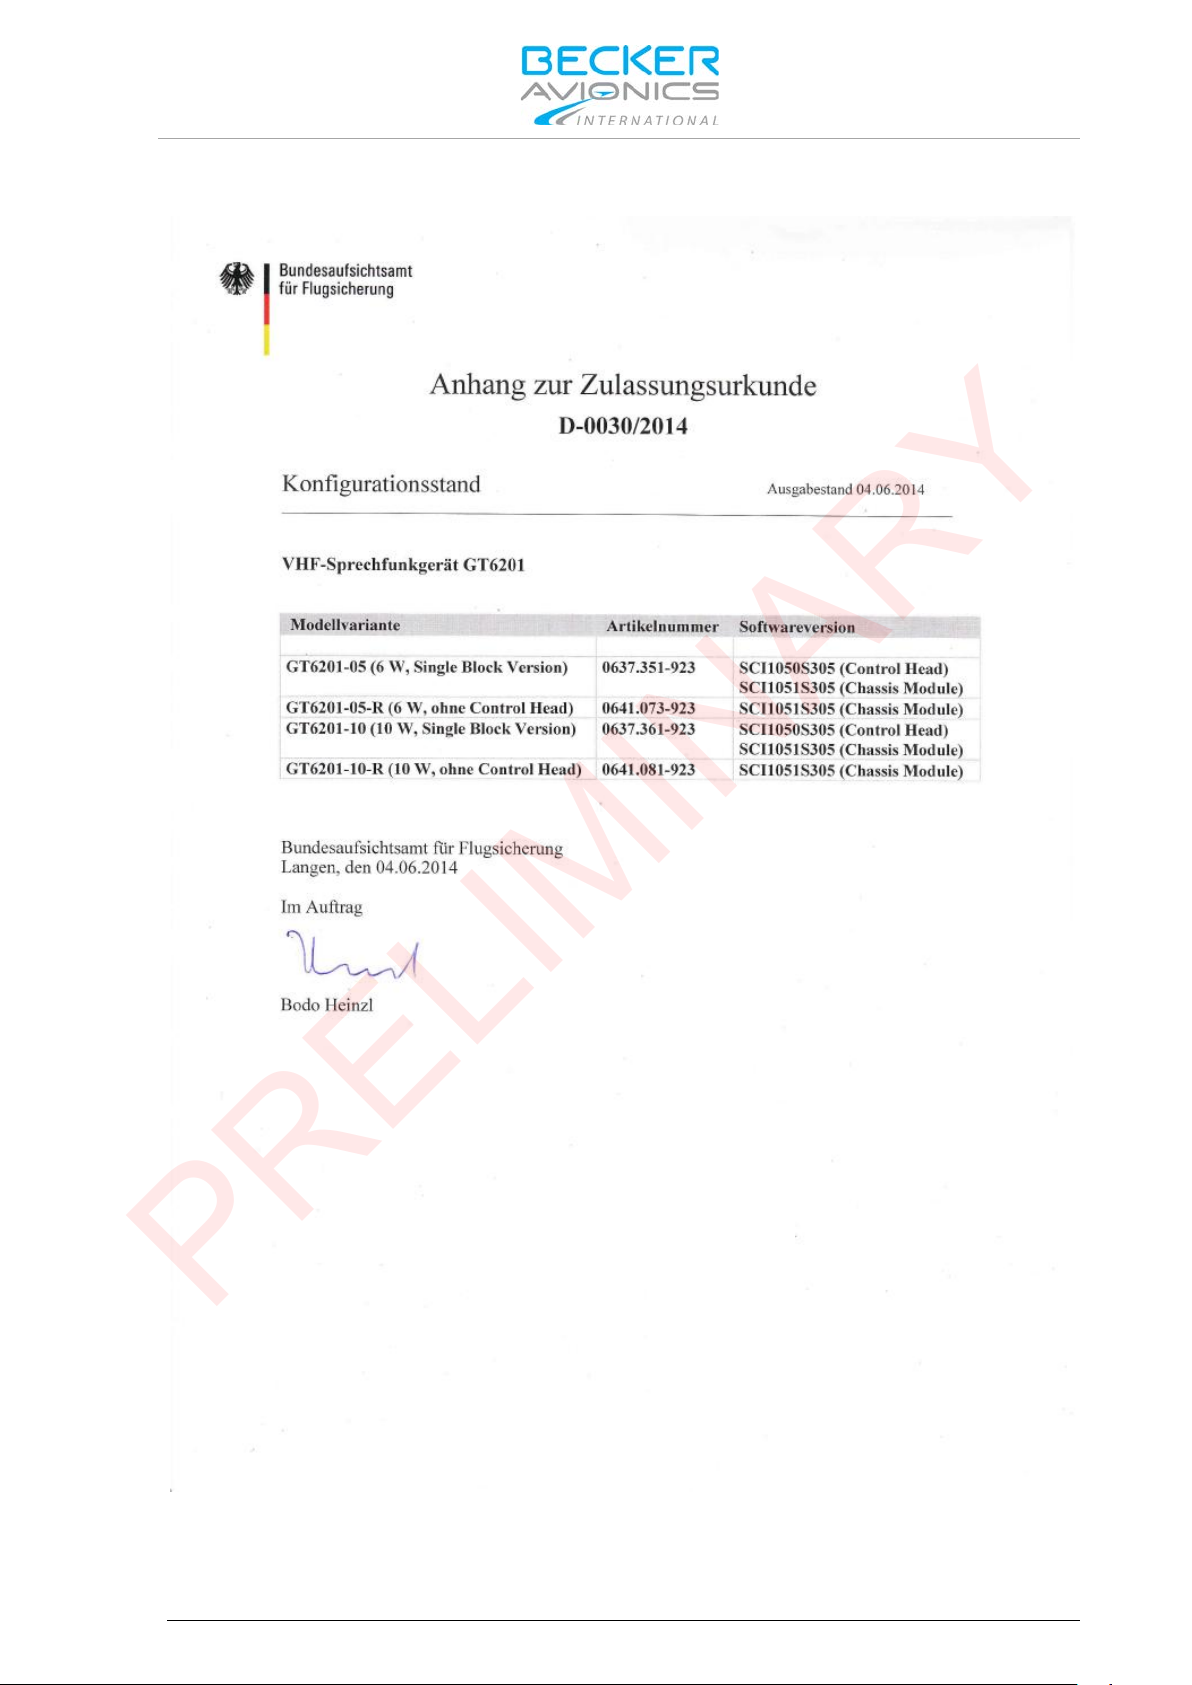
Certificates
PRELIMINARY
BAF Approval - GT6201
DV17900.03 Issue 03 March 2017 TG660 51
Page 52
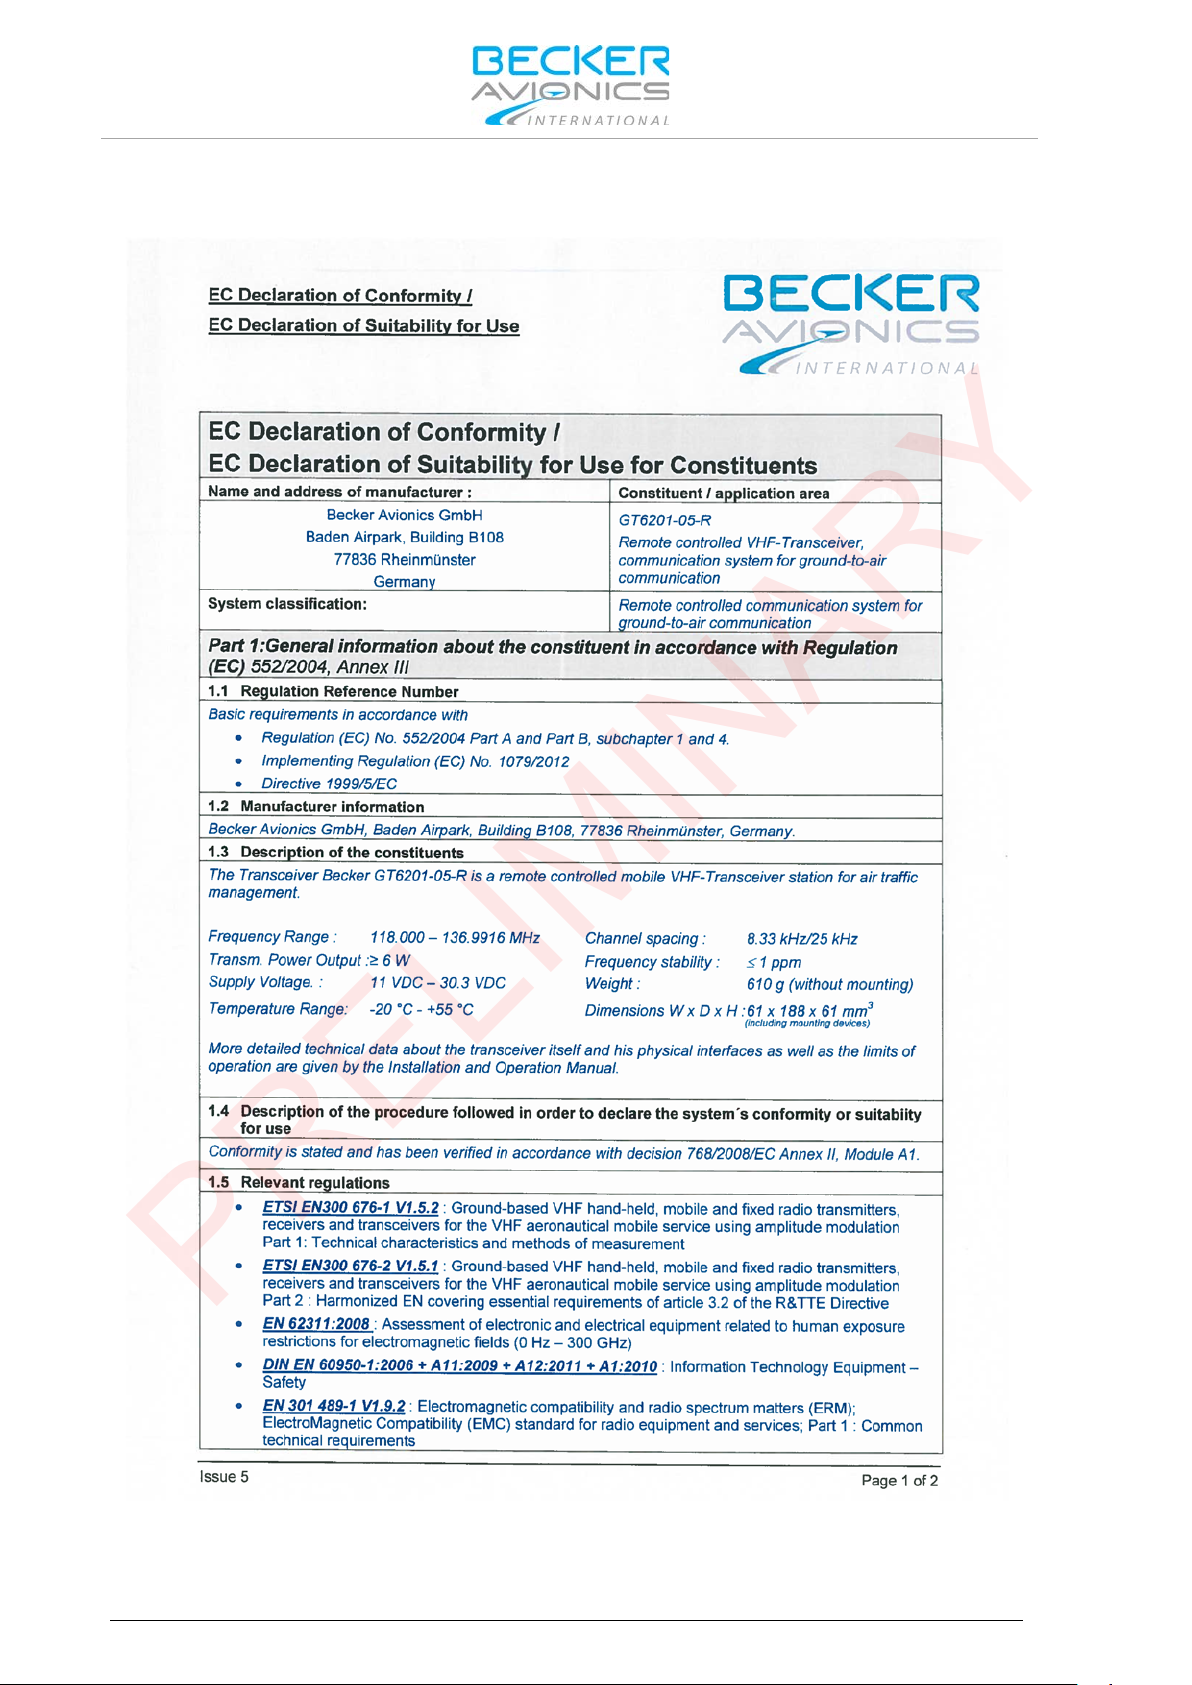
Certificates
PRELIMINARY
EC Declaration of Conformity – GT6201-05-R
4.3. EC Declaration of Conformity – GT6201-05-R
52 TG660 DV17900.03 Issue 03 March 2017
Page 53

Certificates
PRELIMINARY
EC Declaration of Conformity – GT6201-05-R
DV17900.03 Issue 03 March 2017 TG660 53
Page 54
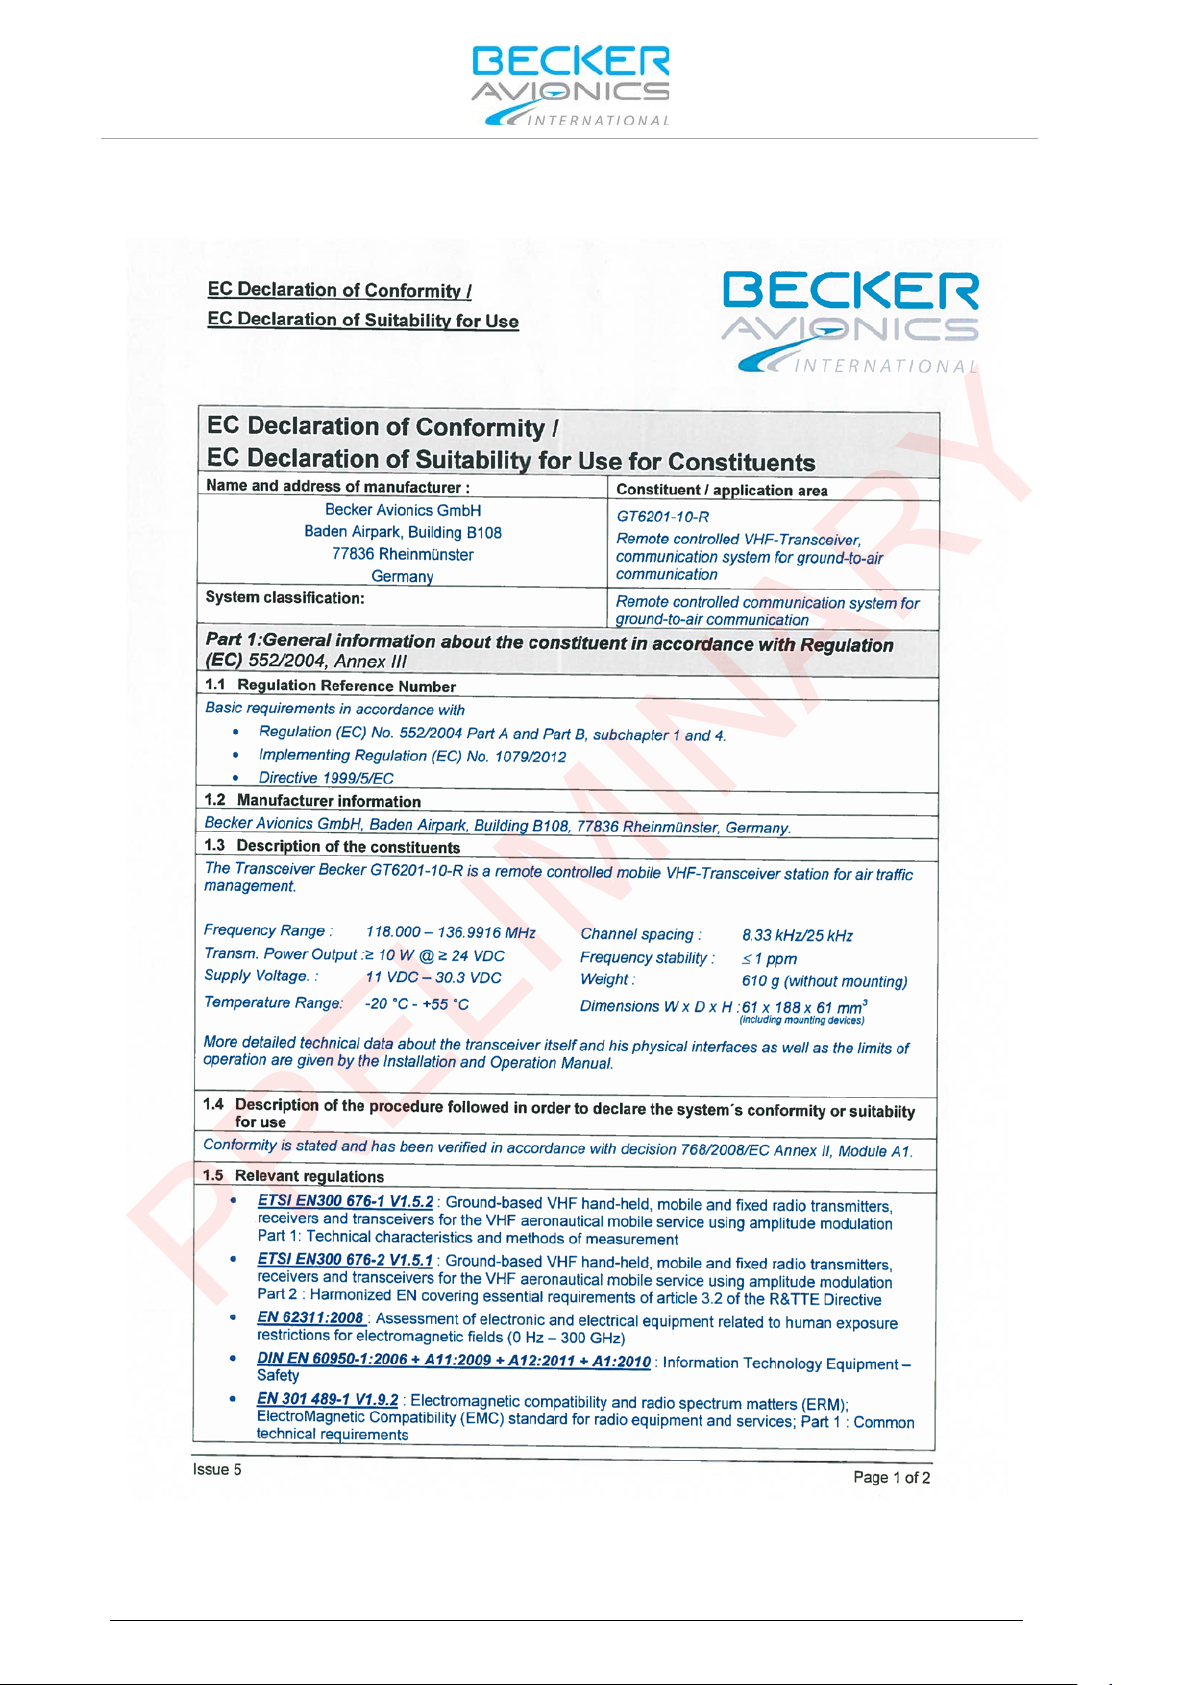
Certificates
PRELIMINARY
EC Declaration of Conformity – GT6201-10-R
4.4. EC Declaration of Conformity – GT6201-10-R
54 TG660 DV17900.03 Issue 03 March 2017
Page 55

Certificates
PRELIMINARY
EC Declaration of Conformity – GT6201-10-R
DV17900.03 Issue 03 March 2017 TG660 55
Page 56

Certificates
PRELIMINARY
Approval - Telecommunication Office Italy
4.5. Approval - Telecommunication Office Italy
56 TG660 DV17900.03 Issue 03 March 2017
Page 57

Certificates
PRELIMINARY
Blank
DV17900.03 Issue 03 March 2017 TG660 57
Page 58

Index
PRELIMINARY
5. Index
Abbreviations .................................................. 7
Accessories ............................................ 19, 20
Additional Conditions of Utilization ................. 9
Additional Required Equipment .................... 22
Certificates .................................................... 49
Conditions of Utilization .................................. 9
Connector Pin Assignments ......................... 27
Controls and Indications ............................... 38
Device Assignment ................................. 22, 37
Dimensions ................................................... 25
General Description ...................................... 11
Grounding ..................................................... 24
Installation ..................................................... 21
Instandhaltungsbetrieb ................................... 2
Interface RoIP ............................................... 45
Keypad .......................................................... 41
LAN connection ............................................ 34
Lightning Protection ...................................... 25
List of Abbreviations ....................................... 7
Long press .................................................... 38
Mode Key ...................................................... 42
Mounting ....................................................... 24
Non Warranty Clause ...................................... 9
N-Surge-Suppressor ..................................... 25
Operation Instructions ................................... 37
Packaging, transport, storage ....................... 21
Produktionsbetrieb .......................................... 2
PTT Key ........................................................ 43
Purpose of Equipment .................................. 13
Radiation ....................................................... 24
Safety Definitions ............................................ 8
Selectable Frequencies ................................ 47
Short press .................................................... 38
SPKR Key ..................................................... 42
SQL Key ........................................................ 43
Start up .......................................................... 39
Status of Supply Voltages ............................. 43
Storage Procedure ........................................ 44
Type Plate ..................................................... 23
Units ................................................................ 7
User Interface ................................................ 38
Variants Overview ................................... 13, 14
Warranty Cond
itions ....................................... 9
We reserve the right to make technical changes.
The data correspond to the current status at the time of printing.
© 2017 by Becker Avionics GmbH / all rights reserved
*** End of the Docum
58 TG660 DV17900.03 Issue 03 March 2017
ent ***
 Loading...