

Page 1
Installation Guide
Installation Guide
Contents
Prior to installation . . . . . . . . . . . . . . . . . . . . . . . . . . . . . . . . . . . . . . . . . . . . . . . . . . . . . . . . . . . . .2
Symbols used in the installation guide . . . . . . . . . . . . . . . . . . . . . . . . . . . . . . . . . . . . . . . . . . . . . .2
Safety instructions . . . . . . . . . . . . . . . . . . . . . . . . . . . . . . . . . . . . . . . . . . . . . . . . . . . . . . . . . . . . .3
Installation instructions . . . . . . . . . . . . . . . . . . . . . . . . . . . . . . . . . . . . . . . . . . . . . . . . . . . . . . . . .4
Connection diagram for the navigation system . . . . . . . . . . . . . . . . . . . . . . . . . . . . . . . . . . . . . . . 5
Installation of the GPS antenna . . . . . . . . . . . . . . . . . . . . . . . . . . . . . . . . . . . . . . . . . . . . . . . . . . . 6
Installation of the microphone . . . . . . . . . . . . . . . . . . . . . . . . . . . . . . . . . . . . . . . . . . . . . . . . . . . . 9
Connection of the reverse signal . . . . . . . . . . . . . . . . . . . . . . . . . . . . . . . . . . . . . . . . . . . . . . . . . .12
Connection of the speed signal (GAL) from the speedometer/ tachometer . . . . . . . . . . . . . . . . . . 13
Installation/ Removal of the Traffic Pro. . . . . . . . . . . . . . . . . . . . . . . . . . . . . . . . . . . . . . . . . . . . .16
Commissioning and calibration . . . . . . . . . . . . . . . . . . . . . . . . . . . . . . . . . . . . . . . . . . . . . . . . . . . 17
Service mode . . . . . . . . . . . . . . . . . . . . . . . . . . . . . . . . . . . . . . . . . . . . . . . . . . . . . . . . . . . . . . . . .20
Connections . . . . . . . . . . . . . . . . . . . . . . . . . . . . . . . . . . . . . . . . . . . . . . . . . . . . . . . . . . . . . . . . . . 24
Prior to installation
Before starting installation, please read this installation guide carefully. In particular, please pay attention to the safety and
installation instructions.
Symbols used in the installation guide
G denotes instructions which are important for your safety and the safety of others.
denotes instructions which are important for the installation and function of the unit.
2
Page 2

Safety instructions
G Incorrect installation
Incorrect installation may result in damage to the unit or to the vehicle. Specialist knowledge and skills are required to
install the unit and its components. We strongly recommend that you have the unit installed by a specialist workshop.
G Risk of injury
Installing the components incorrectly may lead to injuries in the event of a road traffic accident or render safety
devices ineffective. Please refer to the instructions provided by the vehicle manufacturer.
G Damage to the airbag
Installing the components in the wrong location may damage the airbag or impair its operation. Do not install the
components within the operating range of the airbag.
G Risk of injury due to loose connection
Connect the components so that they cannot come loose in the event of a collision or sudden braking.
Installation Guide
3
Page 3
Installation Guide
Installation instructions
Damage due to polarity reversal or short-circuit
Incorrect cable connections and short-circuits can seriously damage the unit.
Disconnect the vehicle battery before installing the unit.
In order to avoid short-circuits and malfunctions, install the cables so that they cannot be pinched, kinked, chafed
or detached.
Before installation, park the vehicle in a safe and level place and remove the ignition key.
In order to avoid malfunctions, it is absolutely essential to observe the relevant cable cross-section when using
branch connections/cable connectors.
In order to avoid short-circuits and any associated risk of fire, cables which have to be cut must be properly
insulated.
4
Page 4
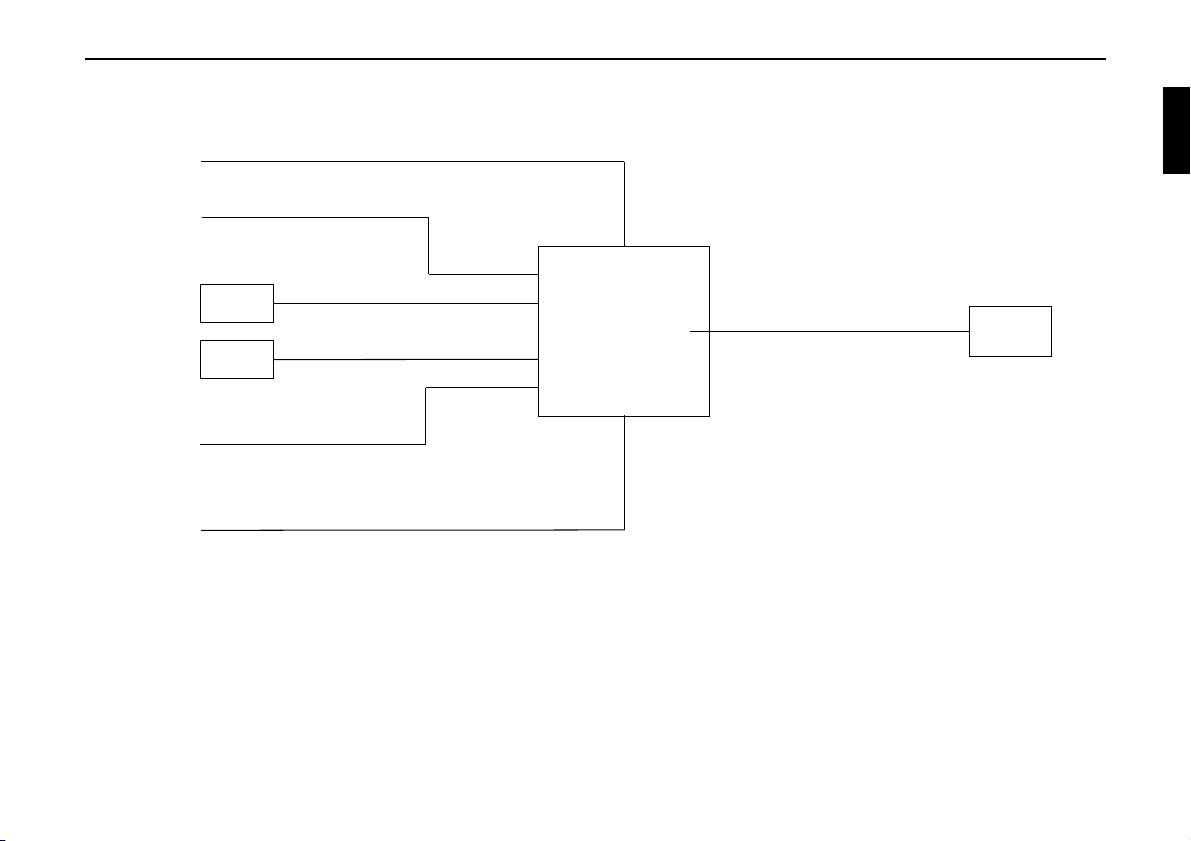
Connection diagram for the navigation system
Radio aerial
Speedometer/speedometer cable signal
Installation Guide
GPS antenna
Traffic Pro
Microphone
Reverse signal
Power supply
Note: Connection options are described in detail on Page 24.
Sound system/
loudspeaker
5
Page 5

Installation Guide
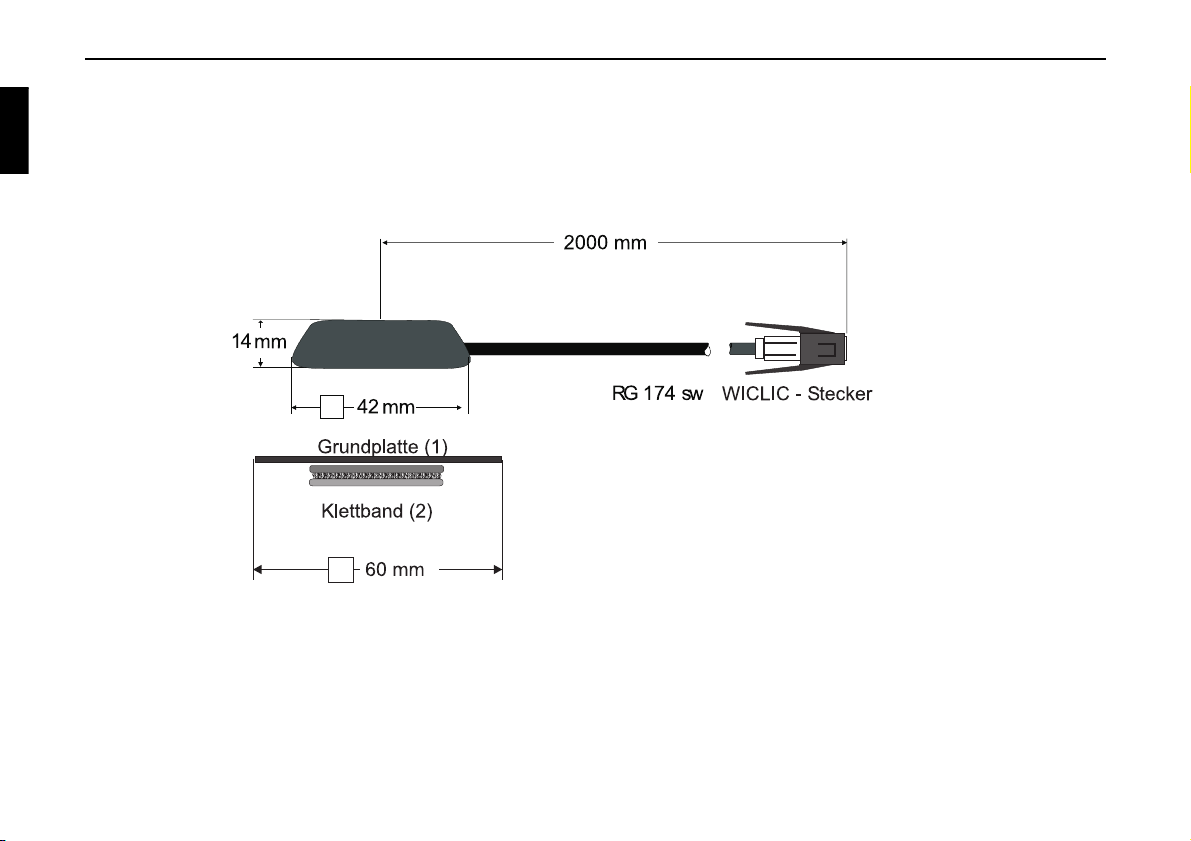
Installation of the GPS antenna
G Risk of injury
People with pacemakers should avoid proximity to the magnetic antenna and should not carry the antenna on their
person, as this may affect the function of the pacemaker.
Keep the magnetic antenna away from data storage media (disks, credit cards, magnetic cards etc.) and electronic
and precision engineering equipment, as this may cause data to be deleted.
Do not use the antenna in areas at risk of explosion.
The antenna is to be affixed in such a manner that it cannot detach in the event of a collision or sudden braking.
Possible installation positions
• Outside the vehicle
a. Attach the antenna to a flat, pre-washed metal surface.
b. Then guide the antenna cable into the vehicle interior.
G Risk of injury
The maximum vehicle speed for the antenna if magnetically attached is 180 km/h. The antenna must be removed or
specially secured at higher speeds.
The antenna is not suitable for car-wash facilities.
6
Page 6
• Inside the vehicle
The GPS antenna is not suitable for installation in vehicles with anti-glare windows (metalised thermo-glass or
metal foil (can be seen on the window label - SIGLA SOL, SIGLA CHROM, SIGLA, KOOL-OF, SUNGATE,
etc.) and vehicles with fine-meshed heating wires in the windows.
Information on installation position
When selecting the installation position, ensure that the antenna has a clear view in all directions, and that it is
not covered by the windscreen wipers. Obstructions caused by the bonnet, window crossbeams and roof should
be avoided as far as possible.
Concealed installation beneath the vehicle console is not permitted.
Installation on the vehicle side windows is not permissible.
The antenna cable should not run parallel to other cables in the vehicle.
The antenna cable should be routed via the shortest distance from the navigation system to the antenna. The
excess cable should be attached directly below the antenna.
Installation Guide
7
Page 7
Installation Guide
a. Secure the antenna to the base plate (1) with magnets.
b. Remove protective strip from top of adhesive tape (2) and stick to the centre of the base plate underside.
c. Remove protective strip from bottom of adhesive tape (2) and stick the antenna and base plate onto the vehicle
console beneath the windscreen at the installation position.
8
Page 8

Installation Guide
Installation of the microphone
The microphone should be placed in the vehicle to allow optimal recognition of the speaker’s voice. Possible positions in
the vehicle for the microphone can be seen in the following diagram.
The installation position should be as far away from the loudspeakers, and as near to the speaker, as possible. If problems occur, different positions should be tested. In order to pick up as little background noise as possible, the microphone has a narrow pick-up angle and must consequently be directed towards the driver.
A: Optimal installation position
B: Alternative installation position
C: Speaking direction on microphone
D: Adhesive strip for affixing to smooth surfaces
E: Screw for fastening the screw-on plate
F: Screw-on plate for affixing to rough or uneven surfaces.
Affixing the hands-free microphone to a flat and smooth surface can be accomplished with the adhesive strip D
(Clean adhesion surfaces).
9
Page 9

Installation Guide
If the microphone is to be affixed to a rough or uneven surface, the screw-on plate F should be affixed first with the screw E.
(To avoid risk of damage to any cables installed underneath or other vehicle components, please pay attention to screw
length.)
Subsequently, affix the microphone to the screw-on plate F with the adhesive strip D. The connection of the hands-free
microphones takes place in socket C of the Traffic Pro.
In order to avoid short-circuits and malfunctions, install the cables so that they cannot be pinched, kinked,
chafed or detached.
10
Page 10

Connecting a microphone to the Traffic Pro
a. Connection without CD changer
For connection of the microphone to a Traffic Pro without CD changer, the enclosed blue socket must be
connected as described below. Before connection, remove protective cap A from both contacts.
b. Connection with CD changer
For connection of the microphone to a Traffic Pro with CD changer , the enclosed blue socket must be connected
with the two leads as described below. Before connection, remove protective cap A from both contacts.
Caution!
Once the contacts have been inserted into the blue plug housing, a special tool is required to remove them.
Connection of the blue plug housing
Socket C
Socket C3
13
A
Installation Guide
Pin Colour Function
13 white NF
14 yellow Earth
14
11
Page 11

Installation Guide
Connection of the reverse signal
Pick-up points for the reverse signal vary from vehicle to vehicle.
If you are in any doubt, please contact your vehicle manufacturer or authorised specialist workshop.
If the switch on the gearbox or shift linkage is accessible:
• Connect a separate lead to the activated contact.
Connect lead to socket A, pin 2.
Low - level = earth, high - level 12 V - 16 V
If the switch is not accessible:
• Check which lead is routed to the reversing lamp. Then, if necessary,
remove the inner cover for the reversing light.
Connect a separate lead to the activated lead of the reversing lamp
and connect to socket A pin 2.
A
Reverse
signal
12
Page 12

Connection of the speed signal (GAL) from the speedometer/ tachometer
G Accident hazard
Incorrectly connected wiring may result in damage to or destruction of vehicle components and safety devices.
If you are in any doubt, please contact your vehicle manufacturer or authorised specialist workshop.
Electronic speedometer
• Remove the signal from the speedometer, extend and connect to
socket A pin 1.
Installation Guide
Depending on the vehicle equipment, the lead for the GAL signal
is usually connected to the DIN - ISO plug of the car radio.
The assignment of the DIN - ISO plug may vary depending on
the vehicle type.
• Minimum requirement for the signal:
0 Hz - 4 kHz/square-wave signal (no inductive sensor)
Low level < 1.5 V, High level 5 V - 16 V
If you do not know the exact installation position/location of the
speed signal, please consult the vehicle manufacturer.
GAL signal
A
13
Page 13

Installation Guide
Mechanical speedometer with built-in speed sensor in the speedometer cable
• Remove the signal from the speed sensor, extend and connect to
socket A pin 1.
• Minimum requirement for the signal:
0 Hz - 4 kHz/square-wave signal (no inductive sensor)
Low level < 1.5 V, High level 5 V - 16 V
If you do not know the exact installation position/location of the
speed signal, please consult the vehicle manufacturer.
Mechanical speedometer without speed sensor in the speedometer cable
A speed sensor must be built into the speedometer cable to generate a
digital signal.
The VDO Adapter 2152.30300000 or a vehicle-specific adapter that
fulfils the minimum requirements can be used. The VDO speed sensor
is suitable for direct installation on the gearbox (no further installation
parts required) or in the speedometer cable (in conjunction with
additional universal installation parts).
If the sealed speedometer cable is released, a correct display
cannot be guaranteed. Incorrect installation leads to improper
functioning of the navigation system or of the speedometer.
GAL signal
A
14
Page 14

Installing the speed sensor directly on the gearbox
• Release the speedometer cable and screw speed sensor onto
gearbox. Screw released speedometer cable onto the speed sensor
and connect the wires.
Cable connections for the speed sensor
Brown - earth (terminal 31)
Black - power supply (terminal 15), 9 - 16V, 30 mA
Blue/red - signal for socket A pin 1
Installation Guide
GAL signal
Installing the speed sensor in the speedometer cable
In this case, please contact your dealer or VDO representative.
A
15
Page 15

Installation Guide
Installation/ Removal of the Traffic Pro
• Installation:
The Traffic Pro features an integrated universal bracket for
DIN installation slots. An installation frame is not required.
The Traffic Pro is inserted into the installation slot and secured
with the slides supplied.
To install, complete all electrical connections. Remove the
control panel. Then push the Traffic Pro into the installation slot.
Subsequently, insert slides into the openings on the front of the
Traffic Pro as far as the first detent position (Fig. A). Now lock the
radio in by pulling on both slides as shown in Fig. B. Subsequently,
remove the slides.
A
B
16
The installation angle of the Traffic Pro must not exceed 0° - 35°
(vertical).
• Removal:
To remove the Traffic Pro, it must first be unlocked. To do this,
remove the control panel and push in both slides as far as the
second detent position as shown in Figure A . Then take hold of
the Traffic Pro on both sides and pull it out (Fig. C). Next, remove
the slides by pressing the springs on the right and left sides of the
Traffic Pro.
If the Traffic Pro was previously installed in another vehicle,
it may be necessary to adjust the springs on the unit before
installationTraffic Pro. To adjust the springs, insert slide as shown
in Fig. D and subsequently adjust as shown in Fig. E (Gently press
slide in the direction of 1 while at the same time moving the slide
in the direction of 2).
D
C
2
E
1
Page 16

Commissioning and calibration
• For commissioning and calibration, you must switch on the vehicle
ignition. Switch on the Traffic Pro and enter the code (see the
operation guide for a detailed description).
The vehicle must be parked outdoors, ensuring that it has a clear
view in all directions (not in the immediate vicinity of buildings).
Installation Guide
•Press .
Navigation is activated.
• If the navigation CD has not yet been inserted, you will be
prompted to insert it.
• “German”, the Traffic Pro default language, is loaded.
Following loading, you can select a different language as described
in the operation guide.
• The adjacent display appears after the language installation.
You must now wait for sufficient GPS reception.
This procedure (first reception of the necessary GPS data) may
take a few minutes. The unit must remain switched on for the entire
duration of this procedure. The vehicle must not be moved. If, after
approximately 10 minutes, the unit has not switched to the next
display, the parked position (clear view in all directions as far as
possible) or the installation location of the GPS antenna must be
checked. You can also call up the GPS information and check
whether the values displayed there have changed (see the
description in GPS information - GPS function test on page 23).
2001
8001
8002
8003
17
Page 17

Installation Guide
Once sufficient GPS reception can be assured, the Traffic Pro
switches to the next display.
• You are prompted to take a calibration journey.
Carry out the calibration journey.
During the journey, the speed signal (GAL) is automatically
adapted to the vehicle-specific data and the gyro sensor is
automatically adapted to the installation position of the unit.
The distance to be covered depends on the type of vehicle and the
local conditions.
The basic requirement for a calibration journey is: driving
200 - 300 metres in a straight line, then turning by at least
60 degrees and then driving 200- 300 metres in a straight line
again, and turning again.
The direction you turn is of no significance. If these conditions
cannot be fulfilled due to the road or the fact that you do not
always have optimum GPS reception, this will not lead to a
poorer calibration, but will simply mean the time and distance
necessary for the calibration ride will be longer.
8004
18
Page 18

Installation Guide
• The Navigation menu appears to indicate that calibration has been
completed successfully.
The navigation system is only ready for operation on completion
of the calibration journey. Final precision is only achieved after a
further journey.
• For correct navigation on routes with time-dependent traffic
guidance, the time should be set correctly as described in the
operation guide under “Settings” in Navigation mode.
Old
version
19
Page 19

Installation Guide
Service mode
In Service mode, various functions can be checked in detail and the
calibration can be modified.
• Switch on the unit (see operation guide).
Enter code (see operation guide).
• Press and at the same time.
The Service menu appears.
Turn the rotary control/push button to select one of the following
options:
•
6WDWXVRIFDOLEUDWLRQUXQ - Calibration journey display
•
'HOHWHFDOLEUDWLRQ - Function for deleting the calibration
•
6HQVRUV - Sensor function test
•
*36,QIR - GPS function test
•
9HUVLRQ - Display of software module versions
•
'HPRPRGH - Switch demo mode on/off
Confirm your selection by pressing the rotary control/push button .
8005
20
Page 20

Calibration journey status - Calibration journey display
6WDWXVRIFDOLEUDWLRQUXQ in the Service menu.
Select
The calibration status (e.g.
6WDWXV), type of positioning (e.g. '),;),
the road along which the vehicle is currently travelling (if available),
the current geographical position, the height above sea level
(if available) and the number of satellites received are displayed.
Delete calibration - Function for deleting the calibration
If the Traffic Pro is removed from one vehicle and installed in another,
it must be calibrated. However, to do so, the current calibration data
must be deleted.
Select
'HOHWHFDOLEUDWLRQ in the Service menu.
Select
<HV (delete calibration) or 1R (maintain calibration).
Installation Guide
8006
8007
21
Page 21

Installation Guide
Sensors - Sensor function test
6HQVRUV in the Service menu.
Select
• Move the vehicle several metres forwards or backwards for the
speed signal function test.
The number value behind :KHHO must increase (also at low
speed).
The number value behind
:KHHO should not increase when the
vehicle is in neutral or when the accelerator is pressed while the
vehicle is parked.
• Engage the reverse gear for the reverse signal function test.
The number value behind %DFNZDUGV must jump from to
( to ).
• Drive round a bend to test the function of the internal sensors.
The value behind *<52 must change.
8008
22
Page 22

GPS information - GPS function test
*36,QIR in the Service menu.
Select
Installation Guide
When functionality and GPS reception are working correctly, the
number of satellites received (e.g.
of positioning currently possible (e.g.
), the date and time and the type
'),;) are displayed.
For successful and fast calibration, a minimum of ' ),; is
required. A certain amount of time may be required to reach this
value (do not move the vehicle during this period).
Version - The software module versions are displayed
When the vehicle is being serviced, information about the unit can be
accessed here.
Select
9HUVLRQ in the Service menu.
Demo mode - Switch demo mode on/off
Demo mode is intended for demonstration purposes. A fixed location
is given to the unit (Ittersbach, Im Stockmädle).
Select
'HPRPRGH in the Service menu.
Press the rotary control/push button to activate ( ) or deactivate
( ) Demo mode.
A destination can now be entered as described in the operation guide
even if the unit has not been calibrated.
8009
8010
8011
23
Page 23

Installation Guide
Connections
C1
C2
C3
B
Antenna
socket
Socket A
1 Speed signal (GAL)
2 Reversing lamp signal
3 Telephone mute/clearing function
4 Permanent positive (Terminal 30)
5 Control output for automatic antenna/amplifier
6 Illumination (Terminal 58)
7 Switched positive (Terminal 15)
8 Earth (Terminal 31)
Socket B
1 Loudspeaker right rear +
2 Loudspeaker right rear 3 Loudspeaker right front +
4 Loudspeaker right front 5 Loudspeaker left front +
6 Loudspeaker left front 7 Loudspeaker left rear +
8 Loudspeaker left rear -
24
A
GPS
antenna
Socket C1
1 LineOut left rear
2 LineOut right rear
3AF Earth
4 LineOut left front
5 LineOut right front
6 Subwoofer LineOut
Socket C2
7-12 Specific connection for Becker CD changer
Socket C3
13 NF - Hands-free microphone
14 Earth - Hands-free microphone
15-17 Specific connection for Becker CD changer
18 CD AF earth (AUX)
19 CD AF left (AUX)
20 CD AF right (AUX)
 Loading...