

Page 1

Centronic TimeControl
TC445-II
de
Montage- und Betriebsanleitung
Zeitschaltuhr im Handsender mit Display
Wichtige Informationen für:
• den Monteur / • die Elektrofachkraft / • den Benutzer
Bitte entsprechend weiterleiten!
Diese Originalanleitung ist vom Benutzer aufzubewahren.
en
Assembly and Operating Instructions
Timer in the hand-held transmitter with display
Important information for:
• Fitters / • Electricians / • Users
Please forward accordingly!
These instructions must be kept safe for future reference.
fr
Notice de montage et d’utilisation
Horloge dans la télécommande avec écran
Informations importantes pour:
• l'installateur / • l'électricien / • l'utilisateur
À transmettre à la personne concernée!
L'original de cette notice doit être conservée par l'utilisateur.
nl
Montage- en gebruiksaanwijzing
Schakelklok in handzender met display
Belangrijke informatie voor:
• de monteur / • de elektricien / • de gebruiker
Aan de betreffende personen doorgeven!
De gebruiker dient deze originele gebruiksaanwijzing te bewaren.
4034 630 206 0d18.12.2017310316
Becker-Antriebe GmbH
Friedrich-Ebert-Straße 2-4
35764 Sinn/Germany
www.becker-antriebe.com
Page 2

Inhaltsverzeichnis
Allgemeines............................................................................................. 3
Gewährleistung........................................................................................ 4
Sicherheitshinweise ................................................................................. 4
Bestimmungsgemäße Verwendung ........................................................... 5
Anzeigen- und Tastenerklärung................................................................. 6
Funktionserklärung .................................................................................. 8
Einlernen des Funks ................................................................................14
Inbetriebnahme ......................................................................................15
Werkseinstellung.....................................................................................15
Programmierung.....................................................................................16
Montage Wandhalterung .........................................................................24
Batteriewechsel......................................................................................25
Reinigung...............................................................................................25
Technische Daten ...................................................................................26
Was tun wenn...?.....................................................................................27
Vereinfachte EU-Konformitätserklärung....................................................28
2-de
Page 3
Allgemeines
Der Sender ist kompatibel zu allen Empfängern der Becker Centronic Steuerungspalette.
Mit den 5 Sendekanälen können Produkte wie Rollladen- und Sonnenschutzanlagen, Lichtsteuerungen und Funksteckdosen gesteuert werden.
Neben den 5 Einzel- Sendekanälen besitzt dieser Sender noch 1 Zentral- Sendekanal welcher die Sendekanäle 1-5 anspricht.
Der vom Werk mit aktuellem Datum und Uhrzeit (MEZ) ausgelieferte Sender
steuert die Antriebe morgens zur programmierten Schaltzeit und abends zur
Astrozeit (Sonnenuntergang).
Über die Einstellung Zwischenposition können pro Kanal 2 unterschiedliche
Positionen bei Rollladen- oder Sonnenschutzanwendungen sowie 2 unterschiedliche Helligkeitsstufen bei einer Lichtsteuerung abgerufen werden (Szenensteuerung).
Eine einfache Bedienung zeichnet dieses Gerät aus.
Beachten Sie bitte bei der Installation sowie bei der Einstellung des Gerätes
die vorliegende Montage- und Betriebsanleitung.
Erklärung Piktogramme
VORSICHT
ACHTUNG
VORSICHT kennzeichnet eine Gefahr, die
zu Verletzungen führen kann, wenn sie
nicht vermieden wird.
ACHTUNG kennzeichnet Maßnahmen zur
Vermeidung von Sachschäden.
Bezeichnet Anwendungstipps und andere
nützliche Informationen.
3-de
Page 4
Gewährleistung
Bauliche Veränderungen und unsachgemäße Installationen entgegen dieser
Anleitung und unseren sonstigen Hinweisen können zu ernsthaften Verletzungen von Körper und Gesundheit der Benutzer, z.B. Quetschungen, führen,
sodass bauliche Veränderungen nur nach Absprache mit uns und unserer Zustimmung erfolgen dürfen und unsere Hinweise, insbesondere in der vorliegenden Montage- und Betriebsanleitung, unbedingt zu beachten sind.
Eine Weiterverarbeitung der Produkte entgegen deren bestimmungsgemäßen
Verwendung ist nicht zulässig.
Endproduktehersteller und Installateur haben darauf zu achten, dass bei Verwendung unserer Produkte alle, insbesondere hinsichtlich Herstellung des
Endproduktes, Installation und Kundenberatung, erforderlichen gesetzlichen
und behördlichen Vorschriften, insbesondere die einschlägigen aktuellen
EMV-Vorschriften, beachtet und eingehalten werden.
Sicherheitshinweise
Allgemeine Hinweise
• Bitte bewahren Sie die Anleitung auf!
• Nur in trockenen Räumen verwenden.
• Verwenden Sie nur unveränderte Originalteile des Steuerungsherstellers.
• Halten Sie Kinder von Steuerungen fern.
• Beachten Sie Ihre landesspezifischen Bestimmungen.
• Verbrauchte Batterien fachgerecht entsorgen. Batterien nur durch iden-
tischen Typ (siehe Technische Daten) ersetzen.
VORSICHT
• Halten Sie Personen aus dem Fahrbereich der Anlagen
fern.
• Wird die Anlage durch einen oder mehrere Sender ge-
steuert, muss der Fahrbereich der Anlage während des
Betriebes einsehbar sein.
• Gerät enthält verschluckbare Kleinteile.
4-de
Page 5

Bestimmungsgemäße Verwendung
Der Sender in der vorliegenden Anleitung darf ausschließlich im Innenbereich
für die Ansteuerung von Centronic kompatiblen Funk-Antrieben und FunkSteuerungen verwendet werden.
• Bitte beachten Sie, dass Funkanlagen nicht in Bereichen mit erhöhtem
Störungsrisiko betrieben werden dürfen (z. B. Krankenhäuser, Flughäfen).
• Die Fernsteuerung ist nur für Geräte und Anlagen zulässig, bei denen eine Funktionsstörung im Sender oder Empfänger keine Gefahr für Personen, Tiere oder Sachen ergibt oder dieses Risiko durch andere Sicherheitseinrichtungen abgedeckt ist.
• Der Betreiber genießt keinerlei Schutz vor Störungen durch andere Fernmeldeanlagen und Endeinrichtungen (z. B. auch durch Funkanlagen, die
ordnungsgemäß im gleichen Frequenzbereich betrieben werden).
• Funkempfänger nur mit vom Hersteller zugelassenen Geräten und Anlagen verbinden.
• Achten Sie darauf, dass die Steuerung nicht im Bereich
metallischer Flächen oder magnetischer Felder installiert
und betrieben wird.
• Funkanlagen, die auf der gleichen Frequenz senden, kön-
nen zur Störung des Empfangs führen.
• Es ist zu beachten, dass die Reichweite des Funksignals
durch den Gesetzgeber und die baulichen Maßnahmen
begrenzt ist.
5-de
Page 6
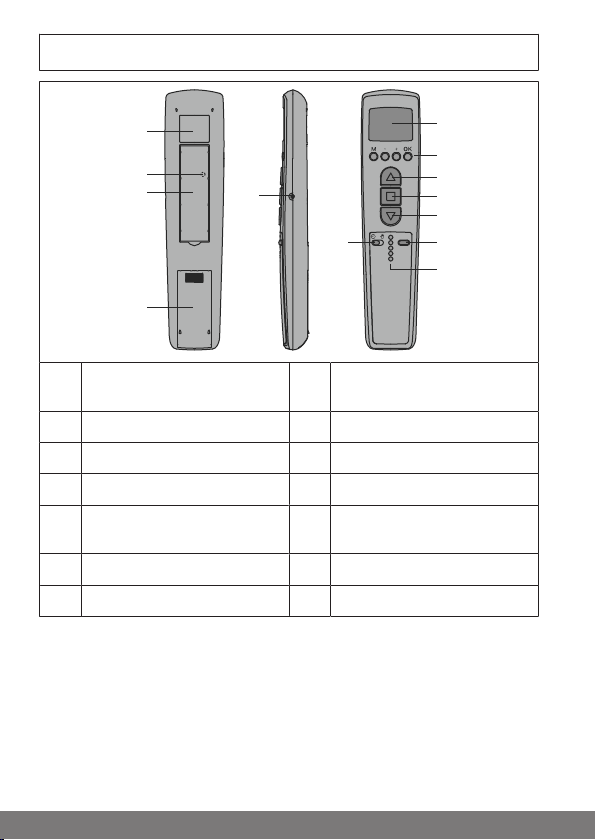
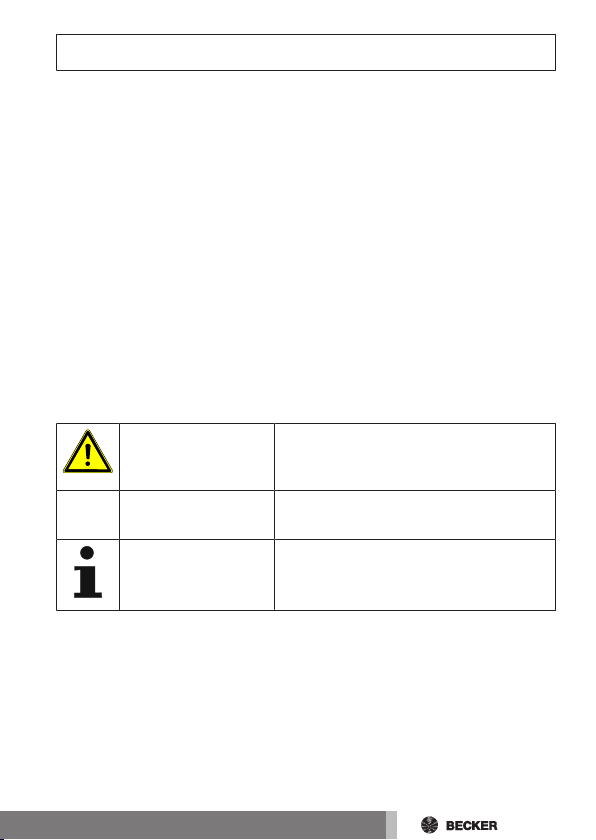
Anzeigen- und Tastenerklärung
3
1
2
6
7
4
5
9
8
Display
1
Menü-Tastenblock
2
AUF-Taste
3
STOPP-Taste
4
AB-Taste
5
Kanalwahltaste
6
Kanalkontrollleuchten
7
6-de
Hand- / Automatik- Schie-
8
beschalter
Einlerntaste
9
Batteriefach
10
Beschriftungsfeld
11
RESET-Taste (hinter dem Be-
12
schriftungsfeld)
Typenschild
13
Page 7
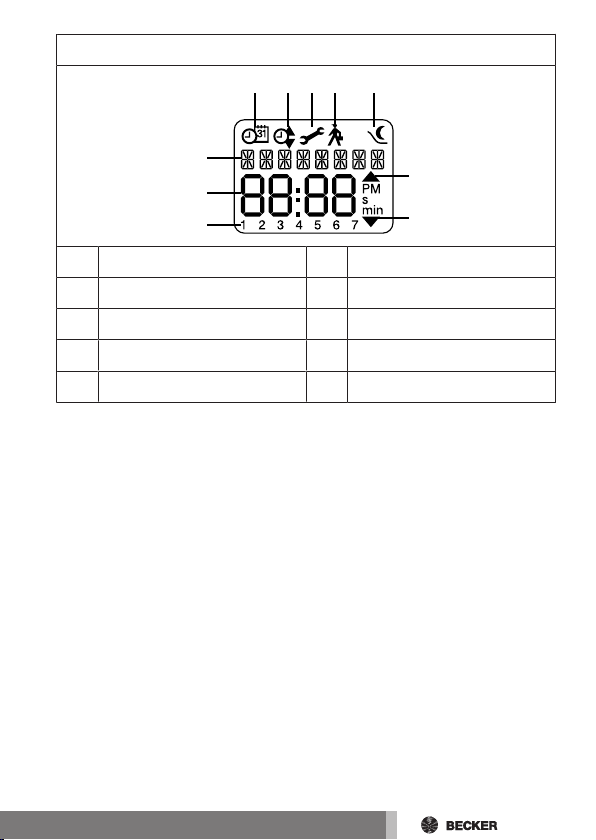
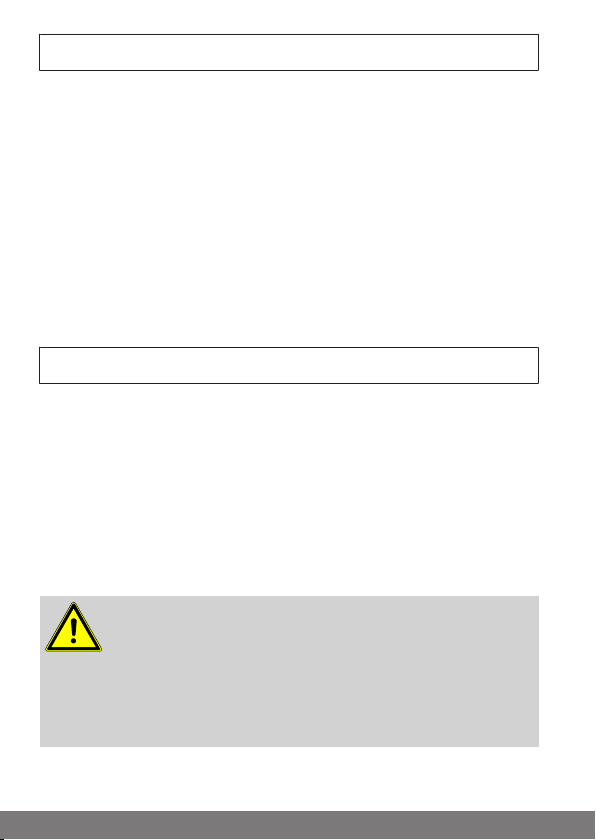
Displaysymbolik
1
2
3
4
5
6 7 8 9 10
Auffahrt
1
Abfahrt
2
Wochentage (Mo.-So.)
3
Ziffernanzeige
4
Textzeile
5
6
7
8
9
10
Uhr/Datum
Programm
Einstellung
Funktion
Astro-Abend
7-de
Page 8
Funktionserklärung
Rollladen-Auswahl
Bei der Rollladen-Funktion fährt der Rollladen nach Betätigung einer Fahrtaste
in Selbsthaltung.
Jalousie-Auswahl
Bei der Jalousie-Funktion fährt die Jalousie im Tippbetrieb, um eine genaue
Positionierung der Lamellen zu ermöglichen. Drücken Sie eine Fahrtaste länger als 1 Sekunde, fährt die Jalousie in Selbsthaltung.
Nach Anfahren der programmierten Zwischen- und Endlagenposition wird automatisch eine Wendung der Lamellen durchgeführt (wenn die Wendeposition
programmiert wurde).
Hand/Auto Schiebeschalter
In der Schiebeschalterstellung werden nur manuelle Fahrbefehle ausgeführt
(z. B.: AUF, STOPP, AB per Tastendruck).
In der Schiebeschalterstellung werden automatische Fahrbefehle ausgeführt (z. B. Zeit, Astrofunktion,...).
Die aktuelle Einstellung wird im Display angezeigt.
Kanal
Der Kanal eines Senders kann in einen oder mehrere Empfänger eingelernt
werden. Die Ansteuerung eines Empfängers ist ein Individualbefehl, die mehrerer Empfänger ein Gruppenbefehl.
Zentralbefehl
Wählt man alle Kanäle des Senders an, kann man alle zugeordneten Empfänger/-gruppen gleichzeitig ansteuern.
Kanalwahltaste
Mit der Kanalwahltaste können bis zu 5 Kanäle ausgewählt werden. Angezeigt
werden die einzelnen Kanäle durch das Aufleuchten der zugehörigen Kanalkontrollleuchte. Leuchten alle Kanalkontrollleuchten gleichzeitig, kann der
Zentralbefehl eingelernt bzw. abgesetzt werden.
Den eingelernten Kanal können Sie auf dem Beschriftungsfeld unter der Klarsichtfolie notieren.
8-de
Page 9

Kanalkontrollleuchten
Ein Funksignal wird durch das Aufleuchten der zugehörigen Kanalkontrollleuchte signalisiert.
Die Sendeleistung bzw. die Funkreichweite wird durch Abnahme der Batterieleistung reduziert. Leuchtet die Kanalkontrollleuchte bei Tastendruck nicht
mehr, muss die Batterie gewechselt werden.
Betriebsmodus
Sie sehen im Display die Uhrzeit und den akt. Betriebsmodus z.B. URLAUB.
OK-Taste
Durch Drücken der OK-Taste im Menü, werden die aktuell angezeigten Werte
gespeichert.
+/- Tasten
Folgende Bedienungen sind über + und - möglich:
• Menü ->Wert verändern
• Auto-Betrieb ->Informationen abfragen:
∙ + Taste ->Nächste automatische Schaltzeit
∙ - Taste ->Nächste automatische Schaltzeit
∙ - Taste und OK Taste halten -> Astrozeit
MENUE-Taste
Durch Drücken der MENUE-Taste gelangen Sie in die Menüübersicht oder in
den Betriebsmodus.
Es erfolgt keine Speicherung des aktuell angezeigten Wertes.
RESET-Taste
Durch Drücken der RESET-Taste (mit einem Kugelschreiber oder Ähnlichem)
wird das Gerät in die Werkseinstellung zurückgesetzt.
Ausnahme: Menüpunkt Funktion, Sprachauswahl und Stadtauswahl.
Sender bleibt im Empfänger eingelernt.
Menü Uhrzeit/Datum
UHR/DAT
In diesem Menü stellen Sie die Uhrzeit und das Datum ein.
9-de
Page 10
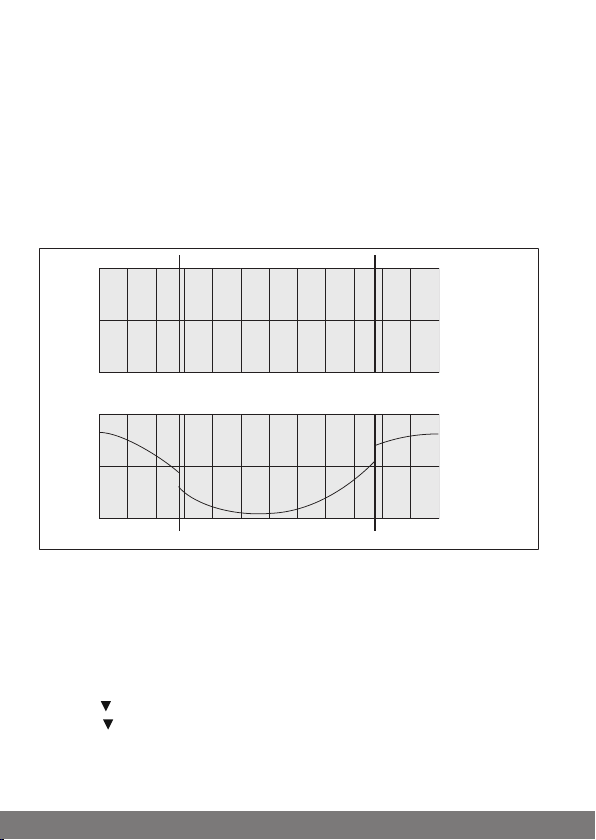
Menü Programm
05:00 Uhr
07:00 Uhr
09:00 Uhr
15:00 Uhr
18:30 Uhr
22:00 Uhr
Winterzeit Sommerzeit Winterzeit
Winterzeit Sommerzeit Winterzeit
Sonnenaufgang
Sonnenuntergang
Jan. Feb. Mar. Apr. Mai. Jun. Jul. Aug. Sep. Okt. Nov. Dez.
PROGRAMM
Im Menü PROGRAMM haben Sie die Möglichkeit, zwei verschiedene Funktionen einzustellen:
• Astro Abend (1-5 und 6,7)
• Individuell (1-5 und 6,7)
ASTRO ABEND
Steuert die Auffahrt nach der eingestellten Schaltzeit.
Abfahrt nach Astrofunktion.
INDIVIDUELL
Steuert die Auf- und Abfahrt nach den von Ihnen eingestellten Schaltzeiten.
SPERRZEIT
Verhindert ein zu frühes Abfahren des Rollladens durch die ASTROABEND
Funktion.
Beispiel:
Astrozeit : 17:00
Sperrzeit : 18:00
Der Rollladen fährt nicht vor 18:00 ab.
10-de
Page 11
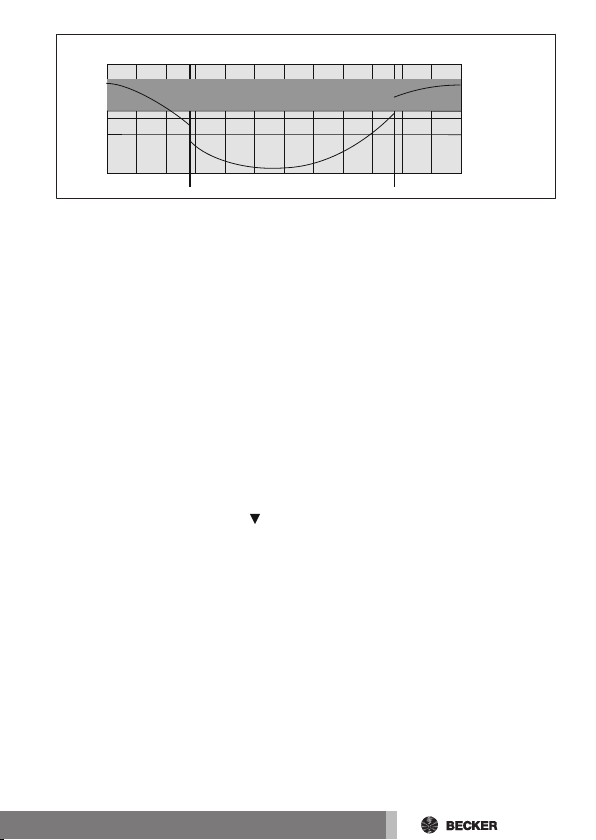
Winterzeit
Sommerzeit
Winterzeit
Jan. Feb.
Mär.
Apr. Mai Jun. Jul. Aug. Sep. Okt. Nov. Dez.
Sonnenuntergang
15:00 Uhr
18:30 Uhr
22:00 Uhr
Sperrzeit
SCHALTZEIT
Automatische Auf- und Abfahrzeiten für Rollladen und Jalousie in allen eingelernten Empfängern.
Bei der Displayanzeige --:-- (zwischen der Uhrzeit 23:59 und 00:00) wird die
Schaltzeit nicht ausgeführt.
Menü Einstellungen
EINSTELLUNG
Im Menü EINSTELLUNG haben Sie folgende Möglichkeiten:
• URLAUB
• ZWISCHENPOSITION
• LUEFTUNG/WENDUNG
• PROG (ENDLAGE, ZWISCHENPOSITION, LUEFTUNG/WENDUNG)
• Sprachauswahl (DEUTSCH)
• ASTROVERSCHIEBUNG
• Städteauswahl (KASSEL)
• LAENGE (Erscheint nur bei EXPERT-MOD ON)
• BREITE (Erscheint nur bei EXPERT-MOD ON)
• ZEITZONE (Erscheint nur bei EXPERT-MOD ON)
• SO/WI (Automatische Sommer-/Winterzeitumstellung)
Um Einstellungen vornehmen zu können, drücken Sie die OK-Taste so oft, bis
Sie zu Ihrem gewünschten Menüpunkt kommen.
11-de
Page 12

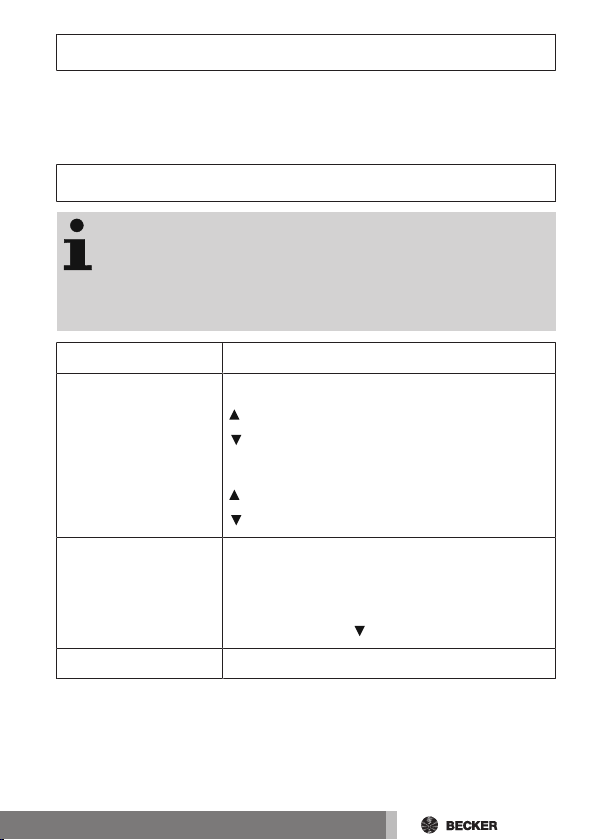
URLAUB
15:00 Uhr
18:30 Uhr
22:00 Uhr
Winterzeit Sommerzeit Winterzeit
Sonnenuntergang
Astro-Verschiebung
Jan. Feb. Mar. Apr. Mai. Jun. Jul. Aug. Sep. Okt. Nov. Dez.
Schließen z.B. 1 Stunde
vor Sonnenuntergang bei
Astroverschiebung von -1 h
Die Urlaubsfunktion simuliert ein bewohntes Haus, während Sie im Urlaub
sind.
Ist die Funktion aktiv (ON), fährt der Rollladen /Jalousie zeitversetzt zu den
programmierten Zeiten (max.+ 30 Min.).
ENDLAGE
Als Endlage wird der Punkt beschrieben, an dem sich der Rollladen/Jalousie in
der oberen oder unteren Position befindet.
ZWISCHENPOSITION
Die Zwischenposition ist eine frei wählbare Position des Rollladens/Jalousie,
zwischen der oberen und unteren Endlage. Diese Position kann nach der Programmierung aus der oberen Position angefahren werden.
Dazu drücken Sie die AB-Taste zweimal kurz nacheinander.
LUEFTUNG/WENDUNG
Die Lüftungs-/Wendeposition ist eine frei wählbare Position des Rollladens/
Jalousie, zwischen der unteren und oberen Endlage. Mit dieser Funktion können Sie den Rollladen aus der unteren Endlage soweit wieder auffahren, bis
die Lüftungsschlitze geöffnet sind. Bei der Jalousie erfolgt die Lamellenwendung.
Dazu drücken Sie die AUF-Taste zweimal kurz nacheinander.
Sprachauswahl (DEUTSCH)
Hier können Sie Ihre Landessprache auswählen.
ASTROVERSCHIEBUNG
Durch die Einstellung der Astroverschiebung kann die Astrozeit verschoben
werden (max. +/- 120 Min.).
12-de
Page 13

Städteauswahl
(KASSEL bei Spracheinstellung DEUTSCH)
Die Städteauswahl ist wichtig für die Astrofunktion. Wählen Sie an dieser Stelle
die Stadt aus, die Ihrem Standort am nächsten ist.
LAENGE/BREITE/ZEITZONE (nur bei EXPERTEN
MODUS ON)
Ihre Koordinaten ermitteln Sie z. B. mit Hilfe eines Atlas.
SO/WI
SO/WI bezeichnet die automatische Sommer-/Winterzeitumschaltung. Werkseinstellung ist ON; das Gerät passt sich automatisch an.
Menü Funktion
Dieser Modus ist nur für ausgebildetes Fachpersonal bestimmt.
Im Menü FUNKTION haben Sie die Möglichkeit, folgende Funktionen einzustellen:
• ROLLLADEN/JALOUSIE (Auswahl des Behanges)
• EXPERTEN MODUS
• ERSTINBETRIEBNAHME (nur Anzeige)
EXPERTEN MODUS
Ist Ihnen die Städteauswahl (EXPERTEN MODUS OFF) zu ungenau, können
Sie eine Feineinstellung über den Längen- und Breiten-Grad einstellen (EXPERTEN MODUS ON).
13-de
Page 14

Einlernen des Funks
1) Mastersender einlernen
a) Empfänger in Lernbereitschaft bringen
Unter Mastersender versteht man den ersten in einen Empfänger eingelernten Sender. Im Gegensatz zu weiteren hinzugelernten Sendern ermöglicht der Mastersender u.a. das
Einstellen der Endlagen (bei Antrieben mit integr. Funkempfänger) und das Hinzulernen oder Löschen weiterer Sender.
Mastersender können alle Sender sein, die eine separate
AUF-, STOPP-, AB-Taste und eine Einlerntaste haben.
Beachten Sie die Montage- und Betriebsanleitung des Empfängers.
Bedienen Sie die Einlerntaste am Sender mit einem geeigneten zylindrischen Werkzeug (z. B. Kugelschreiber).
• Schalten Sie die Spannungsversorgung des Empfängers aus und nach 5
Sekunden wieder ein.
oder
• Betätigen Sie die Einlerntaste bzw. den Funkschalter des Empfängers.
Der Empfänger befindet sich nun für 3 Minuten in Lernbereitschaft.
b) Mastersender einlernen
Drücken Sie die Einlerntaste des Mastersenders innerhalb der Lernbereitschaft, bis der Empfänger das erfolgreiche Einlernen quittiert.
Damit ist der Einlernvorgang beendet.
2) weitere Sender einlernen
1. Drücken Sie die Einlerntaste des Mastersenders, bis der Empfänger
quittiert.
2. Drücken Sie nun die Einlerntaste des neuen Senders, bis der Empfänger
quittiert.
3. Jetzt drücken Sie die Einlerntaste des neu einzulernenden Senders noch
einmal.
4. Der Empfänger quittiert das erfolgreiche Einlernen.
14-de
Page 15
Inbetriebnahme
Mit dem ersten Tastendruck „wecken“ Sie die Steuerung auf. Sie können nun
mit den +/- Tasten die Sprache wählen und diese mir der OK Taste übernehmen. Die Steuerung befindet sich im Automatikmodus.
Werkseinstellung
Durch Drücken der RESET-Taste (mit einem Kugelschreiber
oder Ähnlichem) wird die Steuerung in die Werkseinstellung
zurückgesetzt.
Ausnahme: Menü Funktion, Sprachauswahl und Stadtauswahl.
Der Sender bleibt im Empfänger eingelernt.
UHR/DAT: aktuelle MEZ und aktuelles Datum
PROGRAMM:
ASTRO ABEND ->
EINSTELLUNG: URLAUB OFF
FUNKTION: ROLLLADEN
Schaltzeiten Montag-Freitag (1-5)
07:00 Uhr,
ASTRO ABEND
Schaltzeiten Samstag, Sonntag (6,7)
08:00 Uhr,
ASTRO ABEND
ENDLAGE
SO/WI ON
Astroverschiebung + 15 min.
15-de
Page 16
Programmierung
UHR/DAT PROGRAMM EINSTELLUNGAUTO
FUNKTION UHR/DAT
AUTO
UHR/DAT UHRZEIT JAHRAUTO
MONAT TAG UHR/DAT
AUTO
Alle nun folgenden Programmiermöglichkeiten sind für alle
5-Kanäle gleich wirksam.
Menüübersicht
1. Drücken Sie die MENUE-Taste UHR/DAT erscheint.
2. Um weitere Menüs auszuwählen, drücken Sie die +/- Tasten.
3. Drücken Sie die MENUE-Taste, um in den Betriebsmodus zu gelangen.
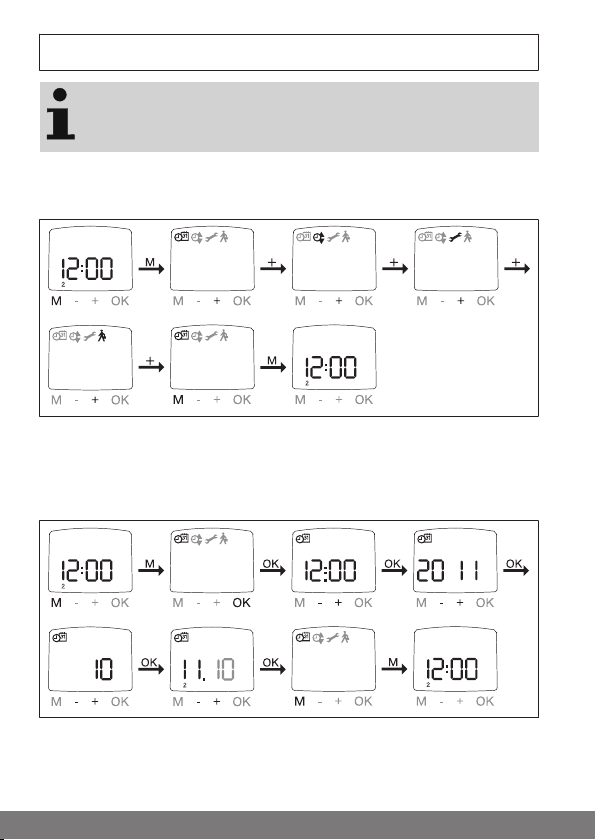
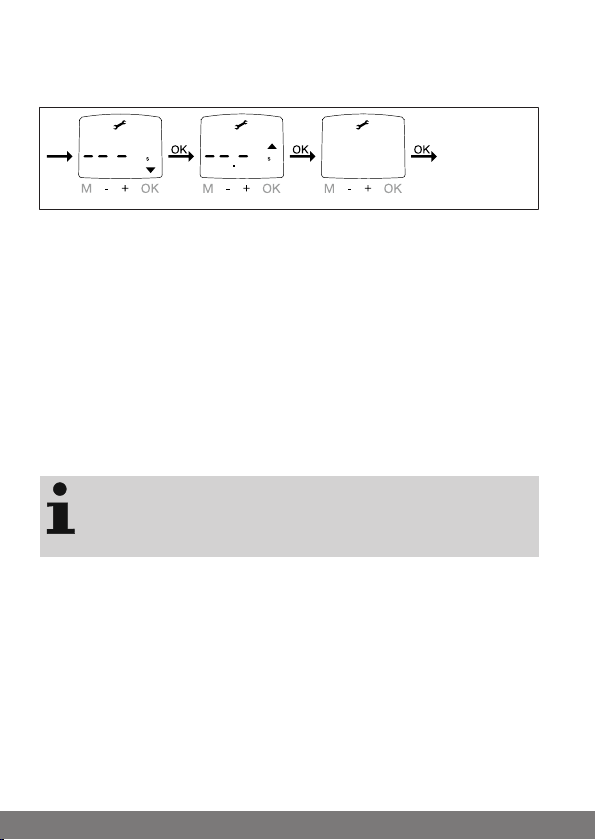
UHR/DAT (Uhrzeit und Datum einstellen)
1. Drücken Sie die MENUE-Taste, UHR/DAT erscheint.
2. Mit OK kommen Sie in den Menüpunkt Uhrzeit.
3. Stellen Sie jetzt mit der +/- Tasten die aktuelle Uhrzeit ein.
4. Ist die Uhrzeit eingestellt, bestätigen Sie mit OK.
16-de
Page 17
5. Verfahren Sie mit der Einstellung JAHR, MONAT und TAG wie oben be-
AUTO PROGRAMM
ASTRO ABEND
SCHALTZEIT
SPERRZEIT SCHALTZEIT SPERRZEIT PROGRAMM
AUTO
schrieben. UHR/DAT erscheint.
6. Drücken Sie die MENUE-Taste, um in den Betriebsmodus zu gelangen.
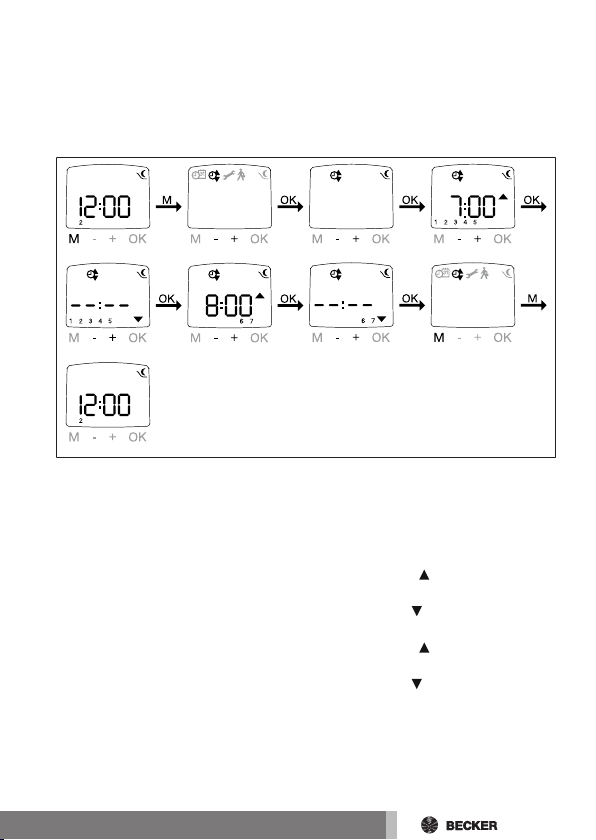
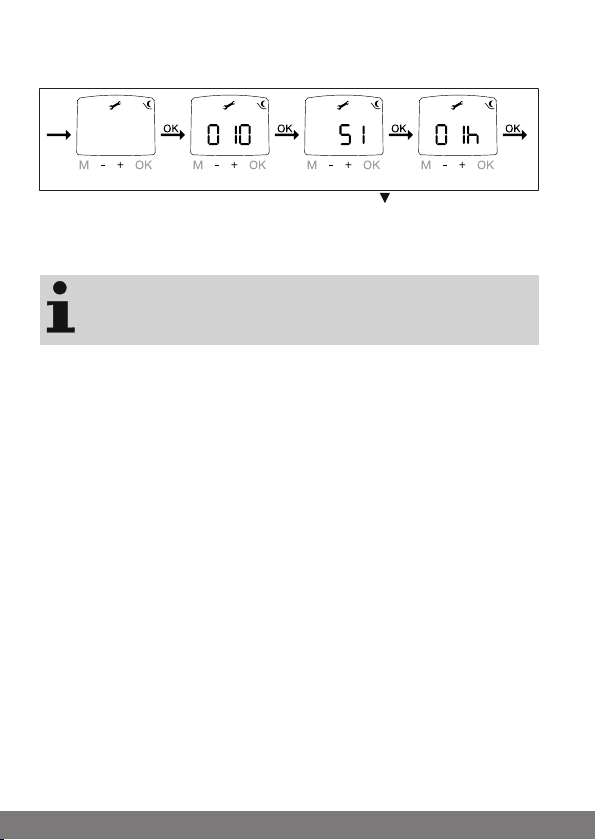
PROGRAMM
ASTRO ABEND (Auffahrt -> Schaltzeit, Abfahrt -> Sonnenuntergang)
1. Drücken Sie die MENUE-Taste.
2. Um das Menü PROGAMM auszuwählen, drücken Sie die + Taste bis
PROGAMM erscheint.
3. Bestätigen Sie mit OK.
4. + Taste erneut drücken, bis ASTRO ABEND erscheint.
5. Bestätigen Sie mit OK.
6. Mit den +/- Tasten stellen Sie jetzt die SCHALTZEIT von Montag - Freitag (1-5) ein. Bestätigen Sie jede Eingabe mit OK.
7. Mit den +/- Tasten stellen Sie jetzt die SPERRZEIT von Montag - Freitag (1-5) ein. Bestätigen Sie jede Eingabe mit OK.
8. Mit den +/- Tasten stellen Sie jetzt die SCHALTZEIT von Samstag,
Sonntag (6,7) ein. Bestätigen Sie jede Eingabe mit OK.
9. Mit den +/- Tasten stellen Sie jetzt die SPERRZEIT von Samstag,
Sonntag (6,7) ein. Bestätigen Sie jede Eingabe mit OK. PROGRAMM erscheint.
10. Drücken Sie die MENUE-Taste, um in den Betriebsmodus zu gelangen.
17-de
Page 18
PROGRAMM
AUTO PROGRAMM INDIVIDUELL SCHALTZEIT
SCHALTZEIT SCHALTZEIT SCHALTZEIT PROGRAMM
AUTO
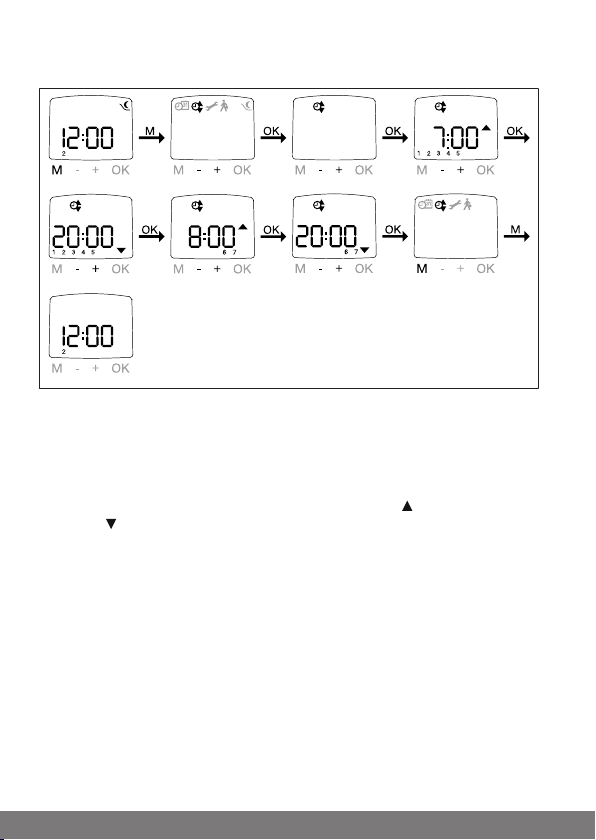
INDIVIDUELL (Auf-/Abfahrt -> Schaltzeiten)
1. Drücken Sie die MENUE-Taste.
2. Um das Menü PROGRAMM auszuwählen, drücken Sie die + Taste bis
PROGRAMM erscheint.
3. Bestätigen Sie mit OK.
4. + Taste erneut drücken, bis INDIVIDUELL erscheint.
5. Bestätigen Sie mit OK.
6. Mit den +/- Tasten stellen Sie jetzt die SCHALTZEIT und die SCHALTZEIT von Montag - Freitag (1-5) und Samstag, Sonntag (6,7) ein. Bestätigen Sie jede Eingabe mit OK.
7. Drücken Sie die MENUE-Taste, um in den Betriebsmodus zu gelangen.
18-de
Page 19
EINSTELLUNG
AUTO
EINSTELLUNG
URLAUB
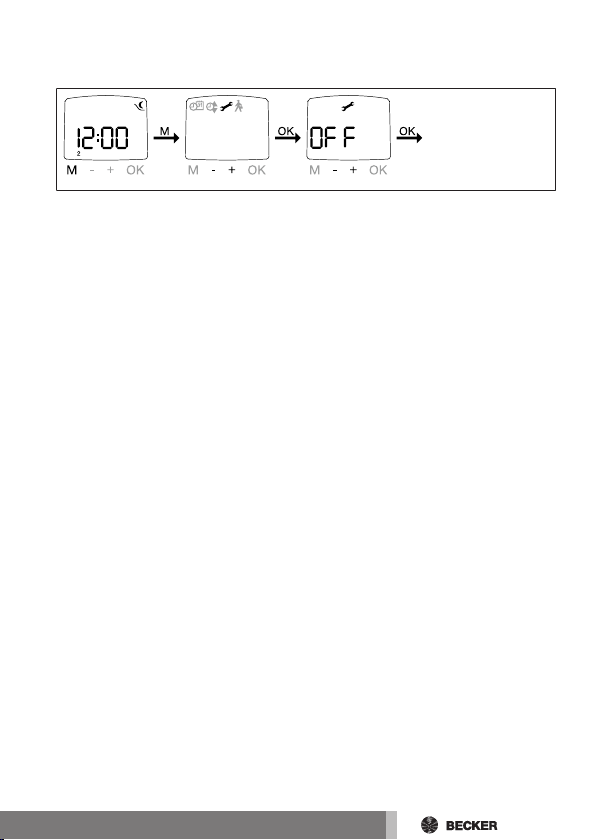
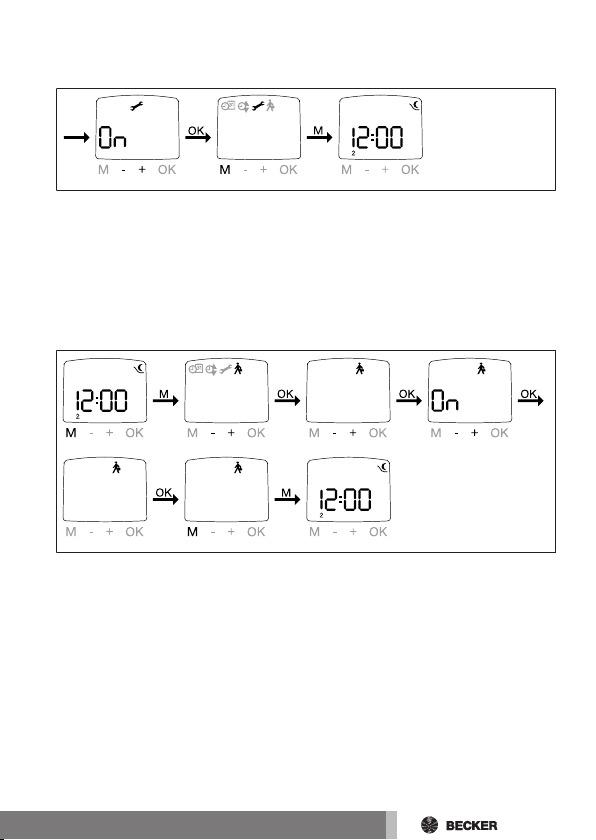
URLAUB (Urlaub OFF/ON)
1. Drücken Sie die MENUE-Taste.
2. Um das Menü EINSTELLUNG auszuwählen, drücken Sie die + Taste bis
EINSTELLUNG erscheint.
3. Bestätigen Sie mit OK. URLAUB ON/OFF erscheint.
4. Mit der +/- Taste können sie die Urlaubsfunktion auf ON oder OFF stellen.
5. Bestätigen Sie Ihre Auswahl mit OK.
6. Die Funktion URLAUB ist jetzt eingestellt.
7. Zur weiteren Programmierung im Menü EINSTELLUNG lesen Sie bitte
weiter.
19-de
Page 20
EINSTELLUNG
ZWISCHENPOSITION
LUEFTUNG
PROG
ENDLAGE
ZWISCHENPOSITION, LUEFTUNG/WENDUNG, Prog ENDLAGE (Zeit/
Lageprogrammierung)
1. Sie haben die Funktion URLAUB bestätigt. ZWISCHENPOSITION erscheint.
2. Mit der +/- Taste können Sie die Fahrzeit zur ZWISCHENPOSITION einstellen. Die Angabe der Fahrzeit erfolgt in Sekunden oder Sie fahren die
ZWISCHENPOSITION mit der AB-/AUF-Taste aus der oberen Endlage an.
3. Bestätigen Sie mit OK. LUEFTUNG/WENDUNG erscheint.
4. Mit der +/- Taste können Sie die Fahrzeit zur LUEFTUNG/WENDUNG einstellen. Die Angabe der Fahrzeit erfolgt in Sekunden oder Sie fahren die
LUEFTUNG/WENDUNG mit der AUF-/AB -Taste aus der unteren Endlage
an.
5. Sie haben den Menüpunkt LUEFTUNG/WENDUNG bestätigt. PROG ENDLAGE erscheint.
6. Mit der +/- Taste können Sie zwischen PROG ENDLAGE, PROG ZWISCHENPOSITION und PROG LUEFTUNG/WENDUNG auswählen.
Mit dieser Auswahl legen Sie fest, welche Position der Behang zur eingestellten Schaltzeit aus der oberen Endlage anfährt. Die Lüftung/Wendung wird erst mit Ablauf der jeweiligen Laufzeit angefahren.
7. Bestätigen Sie Ihre Auswahl mit OK.
8. Die Funktion PROG ENDLAGE ist jetzt eingestellt.
9. Zur weiteren Programmierung im Menü EINSTELLUNG lesen Sie bitte
weiter.
20-de
Page 21

EINSTELLUNG
DEUTSCH
ASTROVERSCHIEBUNG
DEUTSCH/ASTROVERSCHIEBUNG (Sprachauswahl, Astroverschiebung)
1. Sie haben die Funktion PROG ENDLAGE bestätigt. DEUTSCH erscheint.
2. Mit der +/- Taste können Sie die gewünschte Sprache einstellen.
3. Bestätigen Sie Ihre Sprachauswahl mit OK.
4. ASTROVERSCHIEBUNG erscheint.
5. Mit der +/- Taste können Sie die gewünschte Astroverschiebung einstellen (max. +/- 120 Min.)
6. Bestätigen Sie mit OK.
7. Die Funktion ASTROVERSCHIEBUNG ist jetzt eingestellt.
8. Zur weiteren Programmierung im Menü EINSTELLUNG lesen Sie bitte
weiter.
21-de
Page 22
EINSTELLUNG
KASSEL LAENGE BREITE ZEITZONE
(Städteauswahl, EXPERTEN MODUS (LAENGE, BREITE, ZEITZONE)
1. Sie haben die Funktion ASTROVERSCHIEBUNG bestätigt. Stadtauswahl (KASSEL) erscheint.
2. Mit der +/- Taste können Sie die nächstgelegene Stadt einstellen.
3. Betätigen Sie mit OK.
Diese Dialogfenster werden nur angezeigt, wenn im Funktionsmenü der EXPERTEN MODUS auf ON steht.
4. LAENGE erscheint. (Wenn Sie eine genauere Bestimmung ihres Standortes wünschen, können Sie diesen über die Längen-/ und Breitengrade
einstellen.)
5. Mit der +/- Taste können Sie den gewünschten LAENGE-ngrad einstellen.
6. Bestätigen Sie mit OK. BREITE erscheint.
7. Mit der +/- Taste können Sie den gewünschten BREITE-ngrad einstellen.
8. Bestätigen Sie mit OK. ZEITZONE erscheint.
9. Mit der +/- Taste können Sie die gewünschte ZEITZONE in der Sie sich
befinden einstellen. Bestätigen Sie mit OK.
10. Die Funktion ZEITZONE ist jetzt eingestellt.
11. Zur weiteren Programmierung im Menü EINSTELLUNG lesen Sie bitte
weiter.
22-de
Page 23
EINSTELLUNG
SO/WI
EINSTELLUNG
AUTO
AUTO FUNKTION ROLLLADEN
EXPERTEN MODUS
ERSTINBETRIEBNAHME
FUNKTION AUTO
SO/WI (Automatische Sommer-/Winterzeitumstellung)
1. Sie haben die Funktion ZEITZONE bestätigt. SO/WI erscheint.
2. Mit der +/- Taste können Sie SO/WI ein- oder ausschalten.
3. Bestätigen Sie Ihre Auswahl mit OK.
4. Drücken Sie die MENUE-Taste, um in den Betriebsmodus zu gelangen.
FUNKTION
ROLLLADEN/JALOUSIE, ERSTINBETRIEBNAHME (Auswahl des Behanges, Datum der Erstinbetriebnahme)
1. Drücken Sie die MENUE-Taste.
2. Um das Menü FUNKTION auszuwählen, drücken Sie die + Taste bis
FUNKTION erscheint.
3. Bestätigen Sie mit OK. ROLLLADEN/JALOUSIE erscheint.
4. Mit der +/- Taste können Sie zwischen Rollladen/Jalousie auswählen.
5. Bestätigen Sie mit OK. EXPERTEN MODUS OFF/ON erscheint.
6. Mit der +/- Taste können Sie die gewünschte Einstellung auswählen.
7. Bestätigen Sie Ihre Auswahl mit OK. ERSTINBETRIEBNAHME erscheint.
8. Bestätigen Sie mit OK. FUNKTION erscheint.
9. Drücken Sie die MENUE-Taste, um in den Betriebsmodus zu gelangen.
23-de
Page 24
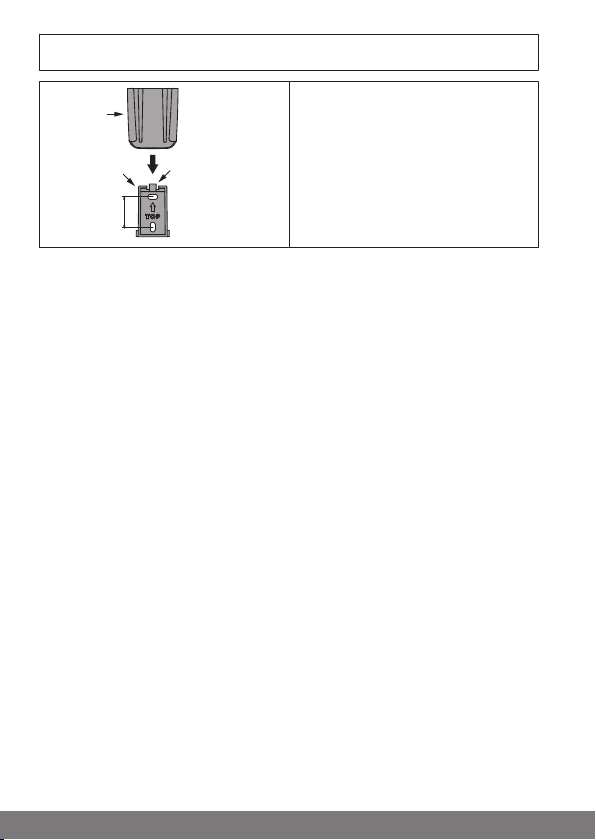
Montage Wandhalterung
Entriegelung
Wandhalterbefestigungsplatte
Wandhalter
26
• Prüfen Sie vor der Montage an
der gewünschten Montageposition die einwandfreie Funktion
von Sender und Empfänger.
• Befestigen Sie die Halterung
mit den zwei beigelegten
Schrauben an der Wand.
24-de
Page 25
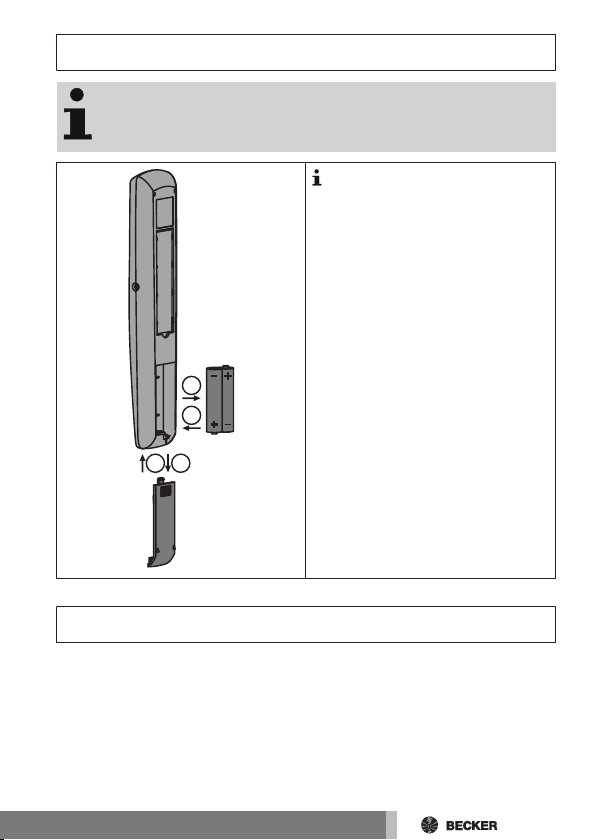
Batteriewechsel
14
2
3
Den entsprechenden Batterietyp entnehmen Sie bitte aus
dem Kapitel „Technische Daten“.
Wechseln Sie die Batterien innerhalb einer Minute und drücken
Sie dabei keine Tasten.
1. Öffnen Sie die Abdeckung des
Batteriefachs.
2. Entnehmen Sie die Batterien.
3. Legen Sie die neuen Batterien
lagerichtig ein.
4. Schließen Sie die Abdeckung des
Batteriefachs.
Reinigung
Reinigen Sie das Gerät nur mit einem geeigneten Tuch. Verwenden Sie keine
Reinigungsmittel, die die Oberfläche angreifen können.
25-de
Page 26
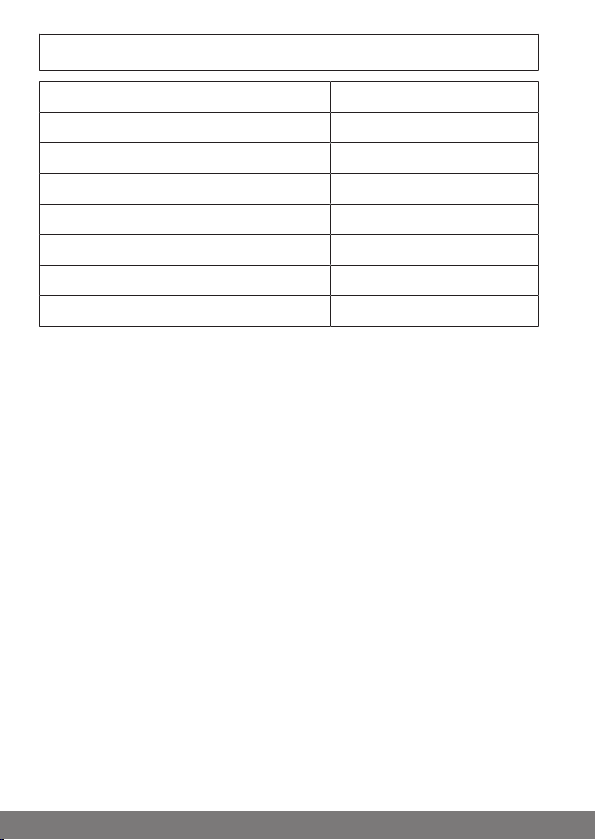
Technische Daten
Nennspannung 3 V DC
Batterietyp LR03 (AAA)
Schutzart IP 20
Zulässige Umgebungstemperatur -10 bis +55 °C
Laufzeit Rollladen 2 Min.
Laufzeit Jalousie 3 Min.
Abgestrahlte maximale Sendeleistung ≤ 25 mW
Funkfrequenz 868,3 MHz
Die maximale Funkreichweite beträgt am und im Gebäude bis zu 25 m und im
freien Feld bis zu 350 m.
26-de
Page 27
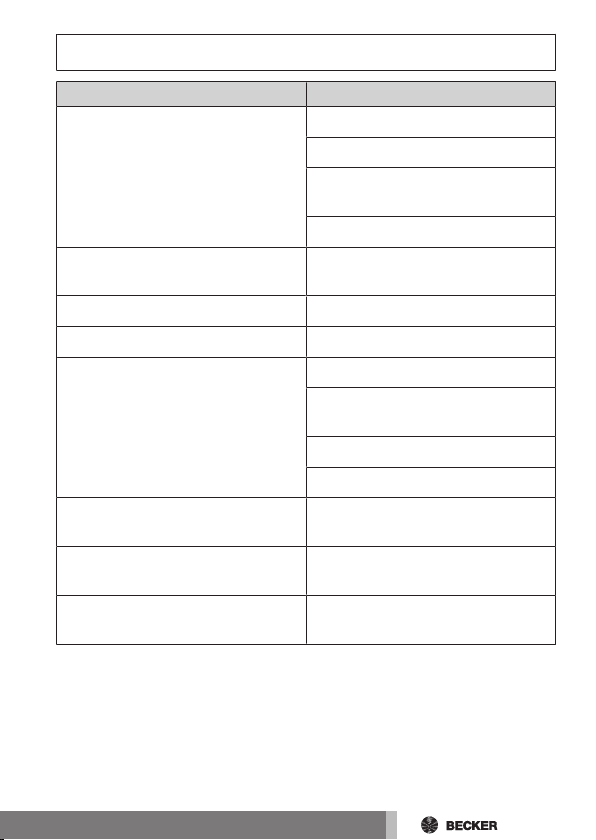
Was tun wenn...?
Problem Abhilfe
Antrieb läuft nicht. Neue Batterien einlegen.
Batterien richtig einlegen.
Entfernung zum Empfänger verringern.
Sender einlernen.
Nach Batteriewechsel keine Reaktion des Senders.
Im Display erscheint BATTERIE. Neue Batterien einlegen.
Gewünschter Antrieb läuft nicht. Richtigen Kanal anwählen.
Astroprogramm schaltet nicht genau.
Der Sender führt die eingestellten
Schaltbefehle nicht aus.
Der Sender führt die eingestellten
Schaltbefehle ungenau aus.
Rollladen fährt nicht in die Endlage. Endlagenposition im Menü EINSTEL-
RESET-Taste drücken.
Einstellungen prüfen.
Richtiges Datum einstellen.
Richtige Stadt oder exakten Breiten-/Längengrad einstellen.
Urlaubsfunktion ausschalten.
Astroverschiebung anpassen.
Stellen Sie den Schiebeschalter auf
Automatikbetrieb.
Urlaubsfunktion ausschalten.
LUNG PROG ENDLAGE einstellen.
27-de
Page 28

Vereinfachte EU-Konformitätserklärung
Hiermit erklärt Becker-Antriebe GmbH, dass diese Funkanlage der Richtlinie
2014/53/EU entspricht.
Der vollständige Text der EU-Konformitätserklärung ist unter der folgenden Internetadresse verfügbar:
www.becker-antriebe.de/ce
Technische Änderungen vorbehalten.
28-de
Page 29

29-de
Page 30

Table of contents
General..................................................................................................31
Warranty ................................................................................................32
Safety instructions ..................................................................................32
Intended use ..........................................................................................33
Explanation of displays and buttons..........................................................34
Explanation of functions ..........................................................................36
Programming the transmitter ...................................................................42
Commissioning.......................................................................................43
Factory setting........................................................................................43
Programming .........................................................................................44
Installing the wall bracket.........................................................................51
Changing batteries..................................................................................52
Cleaning.................................................................................................52
Technical data ........................................................................................53
What to do if...?.......................................................................................54
Simplified EU declaration of conformity.....................................................55
30-en
Page 31

General
The transmitter is compatible with all receivers in the Becker Centronic range
of control units.
Products such as roller shutter and sun protection systems, light controls and
remote-controlled sockets can be operated using the five transmission channels.
In addition to the five individual transmission channels, this transmitter also
has one central transmission channel which operates transmission channels
1-5.
The transmitter is already set with the current date and time (CET) on delivery
and controls the drives in the morning at the programmed switching time and
in the evening at Astro time (sunset).
Using the intermediate position setting, two different positions per channel
can be called up for roller shutter or sun protection applications and two different levels of brightness per channel for a lighting control (“light scene” control).
This device is exceptionally easy to use.
Please observe these Assembly and Operating Instructions when installing
and setting up the equipment.
Explanation of pictograms
CAUTION
ATTENTION
CAUTION indicates a hazardous situation
which, if not avoided, could result in injury.
ATTENTION indicates measures that must
be taken to avoid damage to property.
Denotes user tips and other useful information.
31-en
Page 32

Warranty
Structural modifications and incorrect installation which are not in accordance
with these and our other instructions can result in serious injuries, e.g., crushing of limbs. Therefore, structural modifications may only be carried out with
our prior approval and strictly in accordance with our instructions, particularly
the information contained in these Assembly and Operating Instructions.
Any further processing of the products which does not comply with their intended use is not permitted.
The end product manufacturer and fitter have to ensure that all the relevant
current statutory, official and, in particular, EMC regulations are adhered to
during utilisation of our products, especially with regard to end product manufacture, installation and customer advice.
Safety instructions
General information
• Please keep the instructions safe!
• Only use in dry rooms.
• Only use unmodified original parts from the control unit manufacturer.
• Keep children away from control units.
• Observe all pertinent country-specific regulations.
• Dispose of exhausted batteries properly. Only replace batteries with the
identical type (see Technical data).
Caution
• Keep people out of the system’s range of travel.
• If the system is controlled by one or more transmitters,
the system’s range of travel must always be visible during
operation.
• Device contains small parts that can be swallowed.
32-en
Page 33

Intended use
The transmitter described in these instructions must only be used indoors for
the operation of Centronic-compatible radio drives and radio control units.
• Please note that radio-controlled systems may not be used in areas with
a high risk of interference (e.g. hospitals, airports).
• The remote control is intended solely for use with equipment and systems in which malfunctions in the transmitter or receiver would not pose
any risk to persons, animals or property, or which contain safety devices
to eliminate such risks.
• The operator is not protected from interference from other telecommunications systems and terminal equipment (e.g. even from radio-controlled systems which are properly operated in the same frequency
range).
• Only connect radio receivers to devices and systems approved by the
manufacturer.
• Ensure that the control unit is not installed or operated
close to metal surfaces or magnetic fields.
• Radio-controlled systems transmitting on the same fre-
quency may cause reception interference.
• Note that the range of the radio signal is limited by legis-
lation as well as by design.
33-en
Page 34

Explanation of displays and buttons
3
1
2
6
7
4
5
9
8
Display
1
Menu keypad
2
UP button
3
STOP button
4
DOWN button
5
Channel selection button
6
Channel indicator lamps
7
34-en
Manual/Automatic slide switch
8
Programming button
9
Battery compartment
10
Labelling field
11
RESET button (behind the la-
12
belling field)
Type plate
13
Page 35

Display symbols
1
2
3
4
5
6 7 8 9 10
Upward travel
1
Downward travel
2
Days of week (Mon – Sun)
3
Digital display
4
Text field
5
6
7
8
9
10
Time/date
Program
Setting
Function
Astro evening
35-en
Page 36

Explanation of functions
Roller shutter selection
With the roller shutter function, the roller shutter runs in maintained operation
mode after a travel button is pressed.
Venetian blind selection
With the venetian blind function, the venetian blind runs in touch mode to facilitate precise positioning of the laths. If you press a travel button for longer than
1second, the venetian blind runs in maintained operation mode.
After moving to the programmed intermediate and end positions, the laths
automatically tilt (if the tilt position was programmed).
Manual/Automatic slide switch
In slide switch position , only manual drive commands can be performed
(e.g. UP, STOP, DOWN via button actuation).
In slide switch position , automatic drive commands can be performed (e.g.
time, Astro function, etc.).
The current setting is shown on the display.
Channel
The channel of a transmitter can be programmed into one or more receivers.
One receiver is operated through an individual command, several receivers
through a group command.
Central command
If all the channels of the transmitter are selected, it is possible to operate all of
the assigned receivers/groups simultaneously.
Channel selection button
Up to 5channels can be selected using the channel selection button. The individual channels are indicated by the corresponding channel indicator lamp
lighting up. If all of the channel indicator lamps light up simultaneously, the
central command can be programmed or transmitted.
You can make a note of the programmed channel in the labelling field underneath the transparent film.
36-en
Page 37

Channel indicator lamps
A radio signal is indicated by the corresponding channel indicator lamp lighting up.
The transmission strength and the radio range decrease as battery power declines. If the channel indicator lamp no longer lights up when a button is
pressed, the battery must be replaced.
Operating mode
On the display, you see the time and the current operating mode e.g. HOLIDAY.
OK button
The displayed values are saved by pressing the OK button in the menu.
+/- buttons
The following operations are possible via + and -:
• Menu ->Modify value
• Automatic mode ->Retrieve information:
∙ + button ->Next automatic switching time
∙ - button ->Next automatic switching time
∙ Hold - button and OK button -> Astro time
MENU button
By pressing the MENU button, you access the menu overview or Operating
mode.
The displayed value is not saved.
RESET button
By pressing the RESET button (with a ballpoint pen or similar), the unit is reset
to its factory settings.
Exception: Function, Language selection and City selection menu items.
Transmitter remains programmed in receiver.
Time/Date menu
TIME/DATE
In this menu, you can set the time and date.
37-en
Page 38

Program menu
05:00
07:00
09:00
15:00
18:30
22:00
Winter time Summer time Winter time
Winter time Summer time Winter time
Sunrise
Sunset
Jan. Feb. Mar. Apr. May Jun. Jul. Aug. Sep. Oct. Nov. Dec.
PROGRAM
In the PROGRAM menu, you can set two different functions:
• Astro evening (1–5 and 6,7)
• Individual (1–5 and 6,7)
ASTRO EVENING
Controls opening according to the set switching time.
Closing according to the Astro function.
INDIVIDUAL
Controls opening and closing according to the switching times set by you.
BLOCKING TIME
Prevents the roller shutter from closing too early due to the ASTRO EVENING
function.
Example:
Astro time : 17:00
Blocking time : 18:00
The roller shutter does not close before 18:00.
38-en
Page 39

Winter time
Summer time
Winter time
Sunset
15:00
18:30
22:00
Blocking time
Jan. Feb.
Mar.
Apr. Jun. Jul. Aug. Sep. Oct. Nov. Dec.May
SWITCHING TIME
Automatic opening and closing times for roller shutter and venetian blind in all
programmed receivers.
When --:-- is shown on the display (between 23:59 and 00:00), the switching
time is not executed.
Settings menu
SETTING
In the SETTING menu, you have the following options:
• HOLIDAY
• INTERMEDIATE POSITION
• VENTILATION/TILT
• PROG (END POSITION, INTERM POS, VENT/TILT)
• Language selection (ENGLISH)
• ASTRO SHIFT
• City selection (LONDON)
• LONGITUDE (Appears only with EXPERT MODE ON)
• LATITUDE (Appears only with EXPERT MODE ON)
• TIME ZONE (Appears only with EXPERT MODE ON)
• SUMMER/WINTER (Automatic summer/winter time adjustment)
To carry out settings, press the OK button repeatedly until you come to the desired menu item.
39-en
Page 40

HOLIDAY
15:00
18:30
22:00
Winter time Summer time Winter time
Sunset
Astro shift
Jan. Feb. Mar. Apr. May Jun. Jul. Aug. Sep. Oct. Nov. Dec.
Close e.g. 1 hour
before sunset with
Astro shift of -1 h
The holiday function simulates an occupied house while you are on holiday.
If the function is active (ON), the roller shutter/venetian blind operates in a
staggered fashion at the programmed times (max. + 30 min.).
END POSITION
When the roller shutter/venetian blind is in the upper or lower position, this is
described as an end position.
INTERMEDIATE POSITION
The intermediate position is any roller shutter/venetian blind position of your
choosing, situated between the upper and lower end position. Once programmed, this position can be travelled to from the upper position.
To do so, press the DOWN button briefly twice in succession.
VENTILATION/TILT
The ventilation/tilt position is any roller shutter/venetian blind position of your
choosing, situated between the upper and lower end position. This function allows you to open the roller shutter from the lower end position until the ventilation slots are opened. With the venetian blind, the laths tilt.
To do so, press the UP button briefly twice in succession.
Language selection (ENGLISH)
Here you can select your own language.
ASTRO SHIFT
The Astro time can be shifted (max. +/- 120 min.) by setting the Astro shift.
40-en
Page 41

City selection
(LONDON if selected language is ENGLISH)
City selection is important for the Astro function. Select the city nearest your
location.
LONGITUDE/LATITUDE/TIME ZONE (only with EXPERT
MODE ON)
Find out your coordinates; e.g. using an atlas.
SUMMER/WINTER
SUMMER/WINTER denotes the automatic summer/winter time adjustment.
Factory setting is ON; the unit adapts automatically.
Function menu
This mode is only intended for trained, specialist personnel.
In the FUNCTION menu you can set the following functions:
• ROLLER SHUTTER/VENETIAN BLIND (Selection of the shading solution)
• EXPERT MODE
• INITIAL OPERATION (display only)
EXPERT MODE
If city selection (EXPERT MODE OFF) is too imprecise for you, you can set the
exact location using degrees of latitude and longitude (EXPERT MODE ON).
41-en
Page 42

Programming the transmitter
1) Programming the master transmitter
a) Readying the receiver for programming
The master transmitter refers to the very first transmitter
programmed in a receiver. In contrast to subsequently programmed transmitters, the master transmitter enables,
among other things, the setting of limit positions and the
programming or deleting of further transmitters. Any transmitter that has separate UP, STOP, DOWN buttons and a programming button can be a master transmitter.
Follow the Assembly and Operating Instructions for the receiver.
Operate the programming button on the transmitter using a
suitable cylindrical tool (e.g. a ballpoint pen).
• Switch off the power supply to the receiver for 5 seconds, then switch it
back on
or
• Operate the programming button or the radio switch of the receiver.
The receiver is now in programming mode for 3 minutes.
b) Programming the master transmitter
Press the programming button on the master transmitter while in programming mode until the receiver confirms that programming has been successful.
The programming process is now complete.
2) Programming additional transmitters
1. Press the programming button of the master transmitter until the receiver confirms.
2. Then press the programming button of the new transmitter until the receiver confirms.
3. Now press the programming button of the new transmitter again.
4. The receiver confirms successful programming.
42-en
Page 43

Commissioning
You "wake up" the control unit the first time you press the button. Now you can
choose the language with the +/- buttons and apply your selection by pressing
OK. The control unit is in Auto mode.
Factory setting
By pressing the RESET button (with a ballpoint pen or similar), the control unit is reset to its factory settings.
Exception: Function, Language selection and City selection
menus.
Transmitter remains programmed in receiver.
TIME/DATE: Current CET and current date
PROGRAM:
ASTRO EVENING ->
SETTING: HOLIDAY OFF
FUNCTION: ROLLER SHUTTER
Switching times Monday–Friday (1–5)
07:00,
ASTRO EVENING
Switching times Saturday, Sunday (6,7)
08:00,
ASTRO EVENING
END POSITION
SUMMER/WINTER ON
Astro shift + 15 min.
43-en
Page 44

Programming
TIME/DATE PROGRAM SETTINGAUTO
FUNCTION TIME/DATE
AUTO
TIME/DATE TIME YEARAUTO
MONTH DAY TIME/DATE
AUTO
All of the following programming options are equally effective for all five channels.
Menu overview
1. Press the MENU button, TIME/DATE appears.
2. To select additional menus, press the +/- buttons.
3. Press the MENU button to switch to Operating mode.
TIME/DATE (setting the time and date)
1. Press the MENU button, TIME/DATE appears.
2. Press OK to go to the Time menu item.
3. Now set the current time using the +/- buttons.
4. Once the time is set, confirm with OK.
44-en
Page 45

5. To set the YEAR, MONTH and DAY, proceed as described above. TIME/
AUTO PROGRAM
ASTRO EVENING SWITCHING TIME
BLOCKING TIME SWITCHING TIME BLOCKING TIME
PROGRAM
AUTO
DATE appears.
6. Press the MENU button to switch to Operating mode.
PROGRAM
ASTRO EVENING (upward travel -> switching time, downward travel ->
sunset)
1. Press the MENU button.
2. To select the PROGRAM menu, press the + button until PROGRAM appears.
3. Confirm with OK.
4. Press the + button again until ASTRO EVENING appears.
5. Confirm with OK.
6. You now set the SWITCHING TIME from Monday–Friday (1–5) using
the +/- buttons. Confirm each setting with OK.
7. You now set the BLOCKING TIME from Monday–Friday (1–5) using the
+/- buttons. Confirm each setting with OK.
8. You now set the SWITCHING TIME for Saturday, Sunday (6,7) using the
+/- buttons. Confirm each setting with OK.
9. You now set the BLOCKING TIME for Saturday, Sunday (6,7) using the
+/- buttons. Confirm each setting with OK. PROGRAM appears.
10. Press the MENU button to switch to Operating mode.
45-en
Page 46

PROGRAM
AUTO PROGRAM INDIVIDUAL
SWITCHING TIME
SWITCHING TIME SWITCHING TIME SWITCHING TIME
PROGRAM
AUTO
INDIVIDUAL (upward/downward travel -> switching times)
1. Press the MENU button.
2. To select the PROGRAM menu, press the + button until PROGRAM appears.
3. Confirm with OK.
4. Press the + button again until INDIVIDUAL appears.
5. Confirm with OK.
6. You now adjust the SWITCHING TIME and the SWITCHING TIME
from Monday–Friday (1–5) and Saturday, Sunday (6,7) using the +/- buttons. Confirm each setting with OK.
7. Press the MENU button to switch to Operating mode.
46-en
Page 47

SETTING
AUTO SETTING HOLIDAY
HOLIDAY (Holiday OFF/ON)
1. Press the MENU button.
2. To select the SETTING menu, press the + button until SETTING appears.
3. Confirm with OK. HOLIDAY ON/OFF appears.
4. You can switch the holiday function to ON or OFF using the +/- buttons.
5. Confirm your selection with OK.
6. The HOLIDAY function is now set.
7. For details on further programming in the SETTING menu, please continue reading.
47-en
Page 48

SETTING
INTERMEDIATE
POSITION
VENTILATION
PROG
END POSITION
INTERMEDIATE POSITION, VENTILATION/TILT, Prog END POSITION
(time/position programming)
1. You have confirmed the HOLIDAY function. INTERMEDIATE POSITION
appears.
2. You can set the INTERMEDIATE POSITION running time using the +/button. The running time is given in seconds or you move to the INTERMEDIATE POSITION from the upper limit position using the UP/DOWN
button.
3. Confirm with OK. VENTILATION/TILT appears.
4. You can set the VENTILATION/TILT running time using the +/- button.
The running time is given in seconds or you move to VENTILATION/TILT
from the lower limit position using the UP/DOWN button.
5. You have confirmed the VENTILATION/TILT menu item. PROG END POSITION appears.
6. You can choose between PROG END POSITION, PROG INTERM POS and
PROG VENT/TILT using the +/- button.
Your selection determines which position the shading solution moves to from the upper limit position at the set switching time. Ventilation/tilt is only started once the relevant running time has elapsed.
7. Confirm your selection with OK.
8. The PROG END POSITION function is now set.
9. For details on further programming in the SETTING menu, please continue reading.
48-en
Page 49

SETTING
ENGLISH ASTRO SHIFT
ENGLISH/ASTRO SHIFT (Language selection, Astro shift)
1. You have confirmed the PROG END POSITION function. ENGLISH appears.
2. You can set the desired language using the +/- button.
3. Confirm your language selection with OK.
4. ASTRO SHIFT appears.
5. You can set the desired Astro shift using the +/- button (max. +/- 120
min.)
6. Confirm with OK.
7. The ASTRO SHIFT function is now set.
8. For details on further programming in the SETTING menu, please continue reading.
49-en
Page 50

SETTING
LONDON LONGITUDE LATITUDE TIME ZONE
SUMMER/WINTER
SETTING AUTO
(City selection, EXPERT MODE (LONGITUDE, LATITUDE, TIME ZONE)
1. You have confirmed the ASTRO SHIFT function . City selection (LONDON) appears.
2. You can set the nearest city using the +/- button.
3. Confirm with OK.
This interactive window only appears if EXPERT MODE is set
to ON in the Function menu.
4. LONGITUDE appears. (If you want to determine your location more precisely, you can set it using degrees of latitude and longitude.)
5. You can set the desired degree of LONGitude using the +/- button.
6. Confirm with OK. LATITUDE appears.
7. You can set the desired degree of LATitude using the +/- button.
8. Confirm with OK. TIME ZONE appears.
9. You can set your TIME ZONE using the +/- buttons. Confirm with OK.
10. The TIME ZONE function is now set.
11. For details on further programming in the SETTING menu, please continue reading.
SETTING
SUMMER/WINTER (Automatic summer/winter time adjustment)
1. You have confirmed the TIME ZONE function. SUMMER/WINTER appears.
2. You can turn SUMMER/WINTER on or off using the +/- buttons.
3. Confirm your selection with OK.
4. Press the MENU button to switch to Operating mode.
50-en
Page 51

FUNCTION
AUTO FUNCTION
ROLLER SHUTTER
EXPERT MODE
INITIAL OPERATION
FUNCTION AUTO
Unlocking mechanism
Wall bracket
mounting
plate
Wall bracket
26
ROLLER SHUTTER/VENETIAN BLIND, INITIAL OPERATION (Selection of
the shading solution, date of initial operation)
1. Press the MENU button.
2. To select the FUNCTION menu, press the + button until FUNCTION appears.
3. Confirm with OK. ROLLER SHUTTER/VENETIAN BLIND appears.
4. You can choose between roller shutter/venetian blind using the +/- buttons.
5. Confirm with OK. EXPERT MODE OFF/ON appears.
6. You can select the desired setting using the +/- buttons.
7. Confirm your selection with OK. INITIAL OPERATION appears.
8. Confirm with OK. FUNCTION appears.
9. Press the MENU button to switch to Operating mode.
Installing the wall bracket
• Before installation in the desired installation position,
check that the transmitter and
receiver are functioning properly.
• Fix the bracket to the wall with
the two screws enclosed.
51-en
Page 52

Changing batteries
14
2
3
You will find the appropriate battery type in the "Technical
data" chapter.
Change the batteries within a
minute and do not press any buttons in the process.
1. Open the cover of the battery
compartment.
2. Take out the batteries.
3. Insert the new batteries correctly.
4. Close the cover on the battery
compartment.
Cleaning
Only clean the device with a suitable cloth. Do not use aggressive cleaning
agents that may damage the surface.
52-en
Page 53

Technical data
Rated voltage 3 V DC
Battery type LR03 (AAA)
Degree of protection IP20
Permissible ambient temperature -10 to +55°C
Roller shutter running time 2 min.
Venetian blind running time 3 min.
Maximum emitted transmission output ≤ 25 mW
Radio frequency 868.3 MHz
The maximum transmitter range on and in the building is up to 25m, and up to
350m in the open.
53-en
Page 54

What to do if...?
Problem Remedy
Drive is not functioning. Insert new batteries.
Insert batteries correctly.
Reduce distance from receiver.
Program transmitter.
No reaction from transmitter after
changing batteries.
BATTERY appears on the display. Insert new batteries.
Desired drive is not functioning. Select correct channel.
Astro program is not switching accurately.
The transmitter does not carry out
the set switching commands.
The transmitter does not carry out
the set switching commands accurately.
Roller shutter does not travel to limit
position.
Press the RESET button.
Check the settings.
Set correct date.
Set correct city or exact degree of
latitude/longitude.
Switch off holiday function.
Adjust Astro shift.
Set the slide switch to Automatic
mode.
Switch off holiday function.
Set the limit position in the PROG
END POSITION SETTING menu.
54-en
Page 55

Simplified EU declaration of conformity
Becker-Antriebe GmbH hereby declares that this radio control system complies with Directive 2014/53/EU.
The full text of the EU declaration of conformity is available at the following
web address:
www.becker-antriebe.com/ce
Subject to technical changes without notice.
55-en
Page 56

Sommaire
Généralités.............................................................................................57
Garantie.................................................................................................58
Consignes de sécurité.............................................................................58
Utilisation conforme ................................................................................59
Description des affichages et des touches ................................................60
Description du fonctionnement ................................................................62
Programmation radio ..............................................................................68
Mise en service.......................................................................................69
Réglage usine.........................................................................................69
Programmation.......................................................................................70
Montage du support mural.......................................................................78
Remplacement des piles .........................................................................79
Nettoyage ..............................................................................................79
Caractéristiques techniques ....................................................................80
Que faire si... ..........................................................................................81
Déclaration de conformité UE simplifiée....................................................82
56-fr
Page 57

Généralités
L’émetteur est compatible avec tous les récepteurs de la gamme de commandes Becker Centronic.
Dotée de 5canaux émetteurs, la télécommande vous permet de commander
des produits comme des systèmes de protections solaires/de volets roulants,
des éclairages et des prises radiocommandées.
Outre les 5canaux émetteurs individuels, cet émetteur dispose également
d’un canal émetteur central agissant sur les canaux1 à 5.
L’émetteur, dont la date et l’heure actuelles (HEC) sont réglées à l’usine,
commande les moteurs le matin à l’horaire de commutation programmé et le
soir à l’heure astro (coucher du soleil).
Le réglage de la position intermédiaire permet de sélectionner deuxpositions
différentes par canal pour les applications de volets roulants ou de protections
solaires, ainsi que deuxniveaux de luminosité différents pour les éclairages
(commande de scénario).
Cet appareil se caractérise par une utilisation simple.
Veuillez respecter la présente notice de montage et d’utilisation pour l’installation ainsi que pour le réglage de l’appareil.
Explication des pictogrammes
PRUDENCE
ATTENTION
PRUDENCE signale un risque pouvant entraîner des blessures s'il n'est pas évité.
ATTENTION signale des mesures à
prendre pour éviter des dommages matériels.
Indique des conseils d’utilisation et autres
informations utiles.
57-fr
Page 58

Garantie
Toute modification du moteur et toute installation inappropriée allant à l’encontre de cette notice et de nos autres consignes peuvent causer des blessures corporelles graves ou représenter un risque pour la santé des utilisateurs, par ex. des contusions. C’est pourquoi, toute modification de la
construction ne peut être effectuée qu’après nous en avoir informés et après
obtention de notre accord. Nos consignes, notamment celles mentionnées
dans la présente notice de montage et d’utilisation, doivent être respectées
impérativement.
Toute modification des produits allant à l’encontre de leur utilisation conforme
n’est pas autorisée.
Lorsqu’ils utilisent nos produits, les fabricants des produits finis et les installateurs doivent impérativement tenir compte et respecter toutes les dispositions
légales et administratives nécessaires, en particulier les dispositions relatives
à la compatibilité électromagnétique actuellement en vigueur, notamment en
ce qui concerne la production du produit fini, l’installation et le service clientèle.
Consignes de sécurité
Remarques générales
• Veuillez conserver la présente notice!
• À utiliser uniquement dans des locaux secs.
• Utilisez uniquement des pièces d’origine du fabricant de commandes
n’ayant subi aucune modification.
• Tenez les enfants à l’écart des commandes.
• Respectez les directives spécifiques de votre pays.
• Éliminez les piles usagées de manière conforme. Remplacez les piles
uniquement par des piles de type identique (voir caractéristiques techniques).
Prudence
• Veillez à ce que personne ne se tienne dans la zone de dé-
ploiement des installations.
58-fr
Page 59

• Lorsque l’installation est pilotée par un ou plusieurs
émetteurs, la zone de déploiement de l’installation doit
être visible pendant le fonctionnement.
• L’appareil contient des petites pièces susceptibles d’être
avalées.
Utilisation conforme
L’émetteur décrit dans la présente notice est conçu uniquement pour une installation en intérieur et pour le pilotage de moteurs et de récepteurs compatibles avec Centronic.
• Sachez qu’il est interdit d’utiliser les installations radio dans des zones
où le risque de perturbations est élevé (par ex. hôpitaux, aéroports).
• La commande à distance n’est autorisée que pour les appareils et installations pour lesquels une perturbation fonctionnelle dans l’émetteur ou
dans le récepteur ne constitue aucun danger pour les personnes, les
animaux ou les choses ou pour lesquels ce risque est éliminé grâce à
d’autres dispositifs de sécurité.
• L’exploitant n’est en aucun cas protégé contre les perturbations provoquées par d’autres installations de télécommunication et de dispositifs
terminaux (par ex. par des installations radio qui sont utilisées de manière conforme dans la même plage de fréquence).
• Combinez les récepteurs radio uniquement avec des appareils et des
installations autorisés par le fabricant.
• Veillez à ce que la commande ne soit pas installée ni utili-
sée à proximité de surfaces métalliques ou de champs
magnétiques.
• Les installations radio qui émettent sur la même fré-
quence peuvent causer une perturbation de la réception.
• Sachez que la portée du signal radio est limitée par la lé-
gislation et par les mesures relatives à la construction.
59-fr
Page 60

Description des affichages et des touches
3
1
2
6
7
4
5
9
8
Écran
1
Bloc de touches du menu
2
Touche MONTÉE
3
Touche ARRÊT
4
Touche DESCENTE
5
Touche de sélection de ca-
6
naux
Témoins de contrôle du canal
7
60-fr
Curseur manuel/automatique
8
Touche de programmation
9
Compartiment à piles
10
Champ d’identification
11
Touche RESET (derrière le
12
champ d’identification)
Plaque signalétique
13
Page 61

Symboles d’affichage
1
2
3
4
5
6 7 8 9 10
Montée
1
Descente
2
Jours de la semaine (lu.-di.)
3
Affichage des chiffres
4
Ligne de texte
5
6
7
8
9
10
Heure/date
Programme
Réglage
Fonction
Astro soir
61-fr
Page 62

Description du fonctionnement
Sélection du volet roulant
Lors du fonctionnement comme volet roulant, le volet roulant se déplace en
autoentretien lors de l’actionnement d’une touche de déplacement.
Sélection du store vénitien
Lors du fonctionnement comme store vénitien, le store vénitien se déplace en
mode pas à pas pour permettre le positionnement exact des lames. Maintenez
enfoncée une touche de déplacement pendant plus de 1seconde pour déplacer le store vénitien en autoentretien.
Après le déplacement vers les positions intermédiaire et de fin de course programmées, les lames s’inversent automatiquement (lorsque la position d’inversion a été programmée).
Curseur manuel/automatique
Lorsque le curseur est placé sur « », seuls les ordres de déplacement manuels sont exécutés (par ex.: MONTÉE, ARRÊT, DESCENTE par actionnement
d’une touche).
Lorsque le curseur est placé sur « », les ordres de déplacement automatiques sont exécutés (par ex. heure, fonction astro, ...).
Le réglage actuel s’affiche à l’écran.
Canal
Le canal d’un émetteur peut être programmé dans un ou plusieurs récepteurs.
La commande d’un récepteur est un ordre individuel, la commande de plusieurs récepteurs est un ordre groupé.
Ordre centralisé
En choisissant tous les canaux de l’émetteur, vous pouvez commander simultanément tous les récepteurs/groupes affectés.
Touche de sélection du canal
La touche de sélection de canaux permet de sélectionner jusqu’à 5canaux.
Les différents canaux sont indiqués par l’allumage des témoins de contrôle
correspondants. Si tous les témoins de contrôle de canaux s’allument simultanément, l’ordre centralisé peut être programmé ou désactivé.
62-fr
Page 63

Vous pouvez noter le canal programmé sur le champ d’identification en dessous du film transparent.
Témoins de contrôle du canal
Le témoin de contrôle du canal correspondant s’allume lorsqu’un signal radio
est émis.
La diminution de la puissance des piles entraîne une diminution de la puissance d’émission et de la portée radio. Si le témoin de contrôle du canal ne
s’allume plus lorsque la touche est actionnée, la pile doit être remplacée.
Mode d’exploitation
L’heure et le mode de fonctionnement actuel, par ex. VACANCES, sont affichés à l’écran.
Touche OK
Appuyez sur la touche OK dans le menu pour enregistrer les valeurs actuellement affichées.
Touches +/-
Les touches + et - permettent d’exécuter les commandes suivantes:
• Menu -> Modifier la valeur
• Fonctionnement automatique -> Consulter les informations:
∙ Touche + -> Prochain horaire de commutation automatique
∙ Touche - -> Prochain horaire de commutation automatique
∙ Touche - et touche OK -> heure astro
Touche MENU
Appuyez sur la touche MENU pour accéder à l’aperçu du menu ou au mode de
fonctionnement.
La valeur actuellement affichée n’est alors pas enregistrée.
Touche RESET
En actionnant la touche RESET (avec un stylo ou un objet similaire), les réglages usine de l’appareil sont réinitialisés.
Exception: option de menu Fonction, sélection de la langue et sélection de la
ville.
L’émetteur reste programmé dans le récepteur.
63-fr
Page 64

Menu heure/date
05h00
07h00
09h00
15h00
18h30
22h00
Heure d’hiver Heure d’été Heure d’hiver
Heure d’hiver Heure d’été Heure d’hiver
Lever du soleil
Coucher du soleil
Jan. Fév. Mars Avr. Mai Juin Juil. Août Sep. Oct. Nov. Déc.
HEURE/DATE
Vous pouvez régler l’heure et la date dans ce menu.
Menu Programme
PROGRAMME
Le menu PROGRAMME vous offre la possibilité de régler deuxfonctions différentes:
• Astro soir (1-5 et 6,7)
• Individuel (1-5 et 6,7)
ASTRO SOIR
Commande la montée selon l’horaire de commutation réglé.
Descente selon la fonction astro.
INDIVIDUEL
Actionne la montée et la descente selon les horaires de commutation que vous
avez réglés.
HEURE DE BLOCAGE
Permet d’éviter que le volet roulant ne descende trop tôt en raison de la fonction ASTRO SOIR.
Exemple:
64-fr
Page 65

Heure astro : 17h00
Heure d’hiver
Heure d’été
Heure d’hiver
Jan. Fév.
Mars
Avr.. Mai Juin Juil. Août Sep. Oct. Nov. Déc..
Coucher du soleil
15h00
18h30
22h00
Heure de blocage
Heure de blocage : 18h00
Le volet roulant ne descend pas avant 18h00.
HORAIRE DE COMMUTATION
Heures de montée et de descente automatiques du volet roulant et du store
vénitien dans tous les récepteurs programmés.
Lorsque l’écran affiche --:-- (entre 23h59 et 00h00), l’horaire de commutation
n’est pas exécuté.
Menu Réglages
RÉGLAGE
Les possibilités suivantes s’offrent à vous dans le menu RÉGLAGE:
• VACANCES
• POS. INTERM
• AÉRATION/INVERSION
• PROG (POSITION FINALE, POS. INTERM, AÉRATION/INVERSION)
• Sélection de la langue (FRANCE)
• DÉCALAGE ASTRO
• Sélection de la ville (PARIS)
• LONGITUDE (ne s’affiche que lorsque le mode EXPERT est en position
ON)
• LATITUDE (ne s’affiche que lorsque le mode EXPERT est en position ON)
Pour pouvoir procéder à des réglages, appuyez sur la touche OK plusieurs fois
jusqu’à l’atteinte de l’option de menu souhaitée.
• FUSEAU HORAIRE (ne s’affiche que lorsque le mode EXPERT est en position ON)
• ÉTÉ/HIVER (passage automatique à l’heure d’été et d’hiver)
65-fr
Page 66

VACANCES
15h00
18h30
22h00
Heure d’hiver Heure d’été Heure d’hiver
Coucher du soleil
Décalage astro
Jan. Fév. Mars Avr. Mai Juin Juil. Août Sep. Oct. Nov. Déc.
Fermez par ex. 1heure
avant le coucher du soleil avec
un décalage astro de -1h
La fonction vacances simule une maison habitée lorsque vous êtes en vacances.
Lorsque la fonction est activée (ON), le volet roulant/store vénitien se déplace
en différé aux heures programmées (+30minutes maxi.).
POSITION FINALE
La fin de course désigne la position dans laquelle le volet roulant/store vénitien se trouve lorsqu’il est en position supérieure ou inférieure.
POS. INTERM
La position intermédiaire est une position du volet roulant/store vénitien, à
choisir librement entre les positions de fin de course supérieure et inférieure.
Une fois la programmation de cette position effectuée, il est possible de l’atteindre à partir de la position de fin de course supérieure.
Pour cela, appuyez deux fois de suite brièvement sur la touche DESCENTE.
AÉRATION/INVERSION
La position aération/inversion est une position du volet roulant/store vénitien,
à choisir librement entre les positions de fin de course supérieure et inférieure. Cette fonction permet d’ouvrir le volet roulant depuis la position de fin
de course inférieure, de manière à ouvrir les fentes d’aération. Dans le cas
des stores vénitiens, les lames sont inversées.
Pour cela, appuyez deux fois de suite brièvement sur la touche MONTÉE.
Sélection de la langue (FRANÇAIS)
Vous pouvez sélectionner ici votre langue.
DÉCALAGE ASTRO
Le réglage du décalage astro permet de décaler l’heure astro (+/- 120minutes maxi.).
66-fr
Page 67

Sélection de la ville
(PARIS avec le réglage de langue FRANCE)
La sélection de la ville est importante pour la fonction astro. Sélectionnez ici la
ville la plus proche de votre localité.
LONGITUDE/LATITUDE/FUSEAU HORAIRE (uniquement
lorsque le MODE EXPERT est en position ON)
Vous pouvez calculer vos coordonnées par ex. à l’aide d’un atlas.
ÉTÉ/HIVER
ÉTÉ/HIVER désigne le passage automatique à l’heure d’été et d’hiver. Le réglage usine est sur ON; l’appareil s’adapte automatiquement.
Menu Fonction
Ce mode n’est conçu que pour des personnes qualifiées et formées.
Le menu FONCTION vous offre la possibilité de régler les fonctions suivantes:
• VOLET ROULANT/STORE VÉNITIEN (sélection du tablier/de la toile)
• MODE EXPERT
• 1-IÈRE MISE EN SERVICE (uniquement affichage)
MODE EXPERT
Si la sélection de la ville (MODE EXPERT OFF) est trop imprécise, vous pouvez
régler votre localité avec plus de précision en indiquant les degrés de longitude et de latitude (MODE EXPERT ON).
67-fr
Page 68

Programmation radio
1) Programmation de l’émetteur maître
a) Mise en mode de programmation du récepteur
L’émetteur maître est le premier émetteur programmé dans
un récepteur. Contrairement aux autres émetteurs programmés, l’émetteur maître permet entre autres le réglage des
positions de fin de course (pour les moteurs avec récepteur
radio intégré) et la programmation ou l’effacement d’autres
émetteurs. Tous les émetteurs munis de touches MONTÉE,
ARRÊT, DESCENTE séparées et d’une touche de programmation peuvent être émetteur maître.
Respectez la notice de montage et d’utilisation du récepteur.
Actionnez les touches de programmation de l’émetteur à
l’aide d’un outil cylindrique approprié (par ex. stylo).
• Coupez le courant du récepteur puis remettez-le sous tension après
5secondes.
ou
• Actionnez la touche de programmation ou le commutateur radio du récepteur.
Le récepteur se trouve maintenant en mode de programmation pendant 3minutes.
b) Programmation de l’émetteur maître
Appuyez sur la touche de programmation de l’émetteur maître en mode de
programmation, jusqu’à acquittement par le récepteur de la réussite de la
programmation.
Le processus de programmation est ainsi terminé.
2) Programmation d’autres émetteurs
1. Appuyez sur la touche de programmation de l’émetteur maître jusqu’à
acquittement par le récepteur.
2. Appuyez ensuite sur la touche de programmation du nouvel émetteur
jusqu’à acquittement par le récepteur.
3. Appuyez maintenant une nouvelle fois sur la touche de programmation
du nouvel émetteur que vous souhaitez programmer.
4. Le récepteur acquitte la programmation avec succès.
68-fr
Page 69

Mise en service
Pour «réveiller» la commande, actionnez une touche. Vous pouvez maintenant sélectionner la langue à l’aide des touches +/- et confirmer en appuyant
sur la touche OK. La commande se trouve en mode automatique.
Réglage usine
En actionnant la touche RESET (avec un stylo ou un objet similaire), les réglages usine de la commande sont réinitialisés.
Exception: menu Fonction, sélection de la langue et sélection de la ville.
L’émetteur reste programmé dans le récepteur.
HEURE/DATE: HEC actuelle et date actuelle
PROGRAMME:
ASTRO SOIR ->
RÉGLAGE: VACANCES OFF
FONCTION: VOLET ROULANT
Horaires de commutation du lundi au vendredi
(1-5)
07h00,
ASTRO SOIR
Horaires de commutation le samedi et le dimanche (6, 7)
08h00,
ASTRO SOIR
POSITION FINALE
ÉTÉ/HIVER ON
Décalage astro + 15 minutes.
69-fr
Page 70

Programmation
HEURE/DATE PROGRAMME REGLAGEAUTO
FONCTION HEURE/DATE
AUTO
Toutes les possibilités de programmation suivantes sont effectives de la même manière pour l’ensemble des 5canaux.
Aperçu du menu
1. Appuyez sur la touche MENU; HEURE/DATE apparaît.
2. Pour sélectionner des menus supplémentaires, appuyez sur les
touches+/-.
3. Appuyez sur la touche MENU pour accéder au mode de fonctionnement.
70-fr
Page 71

HEURE/DATE (régler l’heure et la date)
HEURE/DATE HEURE ANNEEAUTO
MOIS JOUR HEURE/DATE
AUTO
1. Appuyez sur la touche MENU; HEURE/DATE apparaît.
2. En appuyant sur la touche OK, vous accédez à l’option de menu Heure.
3. Réglez maintenant l’heure actuelle à l’aide des touches+/-.
4. Lorsque l’heure est réglée, confirmez en appuyant sur la touche OK.
5. Procédez comme décrit ci-dessus pour régler l’ANNÉE, le MOIS et le
JOUR. HEURE/DATE s’affiche.
6. Appuyez sur la touche MENU pour accéder au mode de fonctionnement.
71-fr
Page 72

PROGRAMME
AUTO PROGRAMME
ASTRO SOIR
HORAIRE DE
COMMUTATION
HEURE DE
BLOCAGE
HORAIRE DE
COMMUTATION
HEURE DE
BLOCAGE
PROGRAMME
AUTO
ASTRO SOIR (montée -> horaire de commutation, descente -> coucher
du soleil)
1. Appuyez sur la touche MENU.
2. Pour sélectionner le menu PROGRAMME, appuyez sur la touche+ jusqu’à ce que PROGRAMME apparaisse.
3. Confirmez en appuyant sur OK.
4. Appuyez de nouveau sur la touche +, jusqu’à ce que ASTRO SOIR s’affiche.
5. Confirmez en appuyant sur OK.
6. Les touches +/- vous permettent maintenant de régler L’HORAIRE DE
avec OK.
COMMUTATION de lundi à vendredi (1-5). Confirmez chaque entrée
7. Les touches +/- vous permettent maintenant de régler L’HEURE DE BLOCAGE de lundi à vendredi (1-5). Confirmez chaque entrée avec OK.
8. Les touches +/- vous permettent maintenant de régler L’HORAIRE DE
COMMUTATION de samedi et dimanche (6, 7). Confirmez chaque entrée avec OK.
9. Les touches +/- vous permettent maintenant de régler L’HEURE DE BLOCAGE de samedi et dimanche (6, 7). Confirmez chaque entrée avec
OK. PROGRAMME apparaît.
10. Appuyez sur la touche MENU pour accéder au mode de fonctionnement.
72-fr
Page 73

PROGRAMME
AUTO PROGRAMME INDIVIDUEL
HORAIRE DE
COMMUTATION
HORAIRE DE
COMMUTATION
HORAIRE DE
COMMUTATION
HORAIRE DE
COMMUTATION
PROGRAMME
AUTO
INDIVIDUEL (montée/descente -> horaires de commutation)
1. Appuyez sur la touche MENU.
2. Pour sélectionner le menu PROGRAMME, appuyez sur la touche+ jusqu’à ce que PROGRAMME apparaisse.
3. Confirmez en appuyant sur OK.
4. Appuyez de nouveau sur la touche +, jusqu’à ce que INDIVIDUEL s’affiche.
5. Confirmez en appuyant sur OK.
6. Les touches +/- vous permettent maintenant de régler L’HORAIRE DE
COMMUTATION et L’HORAIRE DE COMMUTATION de lundi à ven-
avec OK.
7. Appuyez sur la touche MENU pour accéder au mode de fonctionnement.
dredi (1-5) et de samedi et dimanche (6, 7). Confirmez chaque entrée
73-fr
Page 74

RÉGLAGE
AUTO RÉGLAGE VACANCES
POS. INTERM AÉRATION
PROG
POS. FINALE
VACANCES (vacances OFF/ON)
1. Appuyez sur la touche MENU.
2. Pour sélectionner le menu RÉGLAGE, appuyez sur la touche+ jusqu’à ce
que RÉGLAGE apparaisse.
3. Confirmez en appuyant sur OK. VACANCES ON/ OFF apparaît.
4. Les touches+/- vous permettent de régler la fonction vacances sur ON
ou OFF.
5. Confirmez votre sélection avec OK.
6. La fonction VACANCES est maintenant réglée.
7. Pour poursuivre la programmation dans le menu RÉGLAGE, veuillez
poursuivre la lecture.
RÉGLAGE
POS. INTERM, AÉRATION/INVERSION, PROG POS. FINALE (programmation de l’heure/de la position)
1. Vous avez confirmé la fonction VACANCES. POS. INTERM apparaît.
2. Les touches +/- vous permettent de régler l’horaire de déplacement vers
la POS. INTERM. L’indication de l’horaire de déplacement se fait en secondes ou vous déplacez la POS. INTERM avec la touche DESCENTE/
MONTÉE en partant de la position de fin de course supérieure.
3. Confirmez en appuyant sur OK. AÉRATION/INVERSION apparaît.
4. Les touches +/- vous permettent de régler l’horaire de déplacement vers
la position AÉRATION/INVERSION. L’indication de l’horaire de déplacement se fait en secondes ou vous déplacez la position AÉRATION/INVERSION avec la touche DESCENTE/MONTÉE en partant de la position
de fin de course inférieure.
5. Vous avez confirmé l’option de menu AÉRATION/INVERSION. PROG
POS. FINALE apparaît.
74-fr
Page 75

6. Les touches +/- vous permettent de sélectionner PROG POS. FINALE,
FRANCE
DÉCALAGE ASTRO
PROG POS. INTERM et PROG AÉRATION/INVERSION.
Cette sélection vous permet de déterminer vers quelle position le tablier/la toile se déplace en partant de la position de
fin de course supérieure à l’horaire de commutation réglé.
L’aération/l’inversion ne sera atteinte qu’après écoulement
du temps de fonctionnement correspondant.
7. Confirmez votre sélection avec OK.
8. La fonction PROG POS. FINALE est maintenant réglée.
9. Pour poursuivre la programmation dans le menu RÉGLAGE, veuillez
poursuivre la lecture.
RÉGLAGE
FRANCE/DÉCALAGE ASTRO (sélection de la langue, décalage astro)
1. Vous avez confirmé la fonction PROG POS. FINALE. FRANCE apparaît.
2. Les touches +/- vous permettent de régler la langue souhaitée.
3. Confirmez votre sélection de la langue avec OK.
4. DÉCALAGE ASTRO apparaît.
5. Les touches +/- vous permettent de régler le décalage astro souhaité
(+/- 120minutes maxi.).
6. Confirmez en appuyant sur OK.
7. La fonction DÉCALAGE ASTRO est maintenant réglée.
8. Pour poursuivre la programmation dans le menu RÉGLAGE, veuillez
poursuivre la lecture.
75-fr
Page 76

RÉGLAGE
PARIS LONGITUDE LATITUDE
FUSEAU HORAIRE
(Sélection de la ville, MODE EXPERT (LONGITUDE, LATITUDE, FUSEAU
HORAIRE))
1. Vous avez confirmé la fonction DÉCALAGE ASTRO . Sélection de la ville
(PARIS) apparaît.
2. Les touches +/- vous permettent de régler la ville la plus proche.
3. Confirmez en appuyant sur OK.
Ces boîtes de dialogue n’apparaissent que lorsque le MODE
EXPERT est en position ON dans le menu Fonction.
4. LONGITUDE apparaît. (Si vous souhaitez que votre localité soit déterminée avec plus de précision, vous pouvez la régler en indiquant les degrés
de longitude et de latitude.)
5. Les touches +/- vous permettent de régler le degré de LONGITUDE souhaité.
6. Confirmez en appuyant sur OK. LATITUDE apparaît.
7. Les touches +/- vous permettent de régler le degré de LATITUDE souhaité.
8. Confirmez en appuyant sur OK. FUSEAU HORAIRE apparaît.
9. Les touches+/- vous permettent de sélectionner le FUSEAU HORAIRE
souhaité dans lequel vous vous situez. Confirmez en appuyant sur OK.
10. La fonction FUSEAU HORAIRE est maintenant réglée.
11. Pour poursuivre la programmation dans le menu RÉGLAGE, veuillez
poursuivre la lecture.
76-fr
Page 77

RÉGLAGE
ÉTÉ/HIVER RÉGLAGE AUTO
AUTO FONCTION
VOLET ROULANT
MODE EXPERT
1IÈRE MISE EN SERVICE
FONCTION AUTO
ÉTÉ/HIVER (passage automatique à l’heure d’été et d’hiver)
1. Vous avez confirmé la fonction FUSEAU HORAIRE. ÉTÉ/HIVER apparaît.
2. Les touches+/- vous permettent d’activer ou de désactiver ÉTÉ/HIVER.
3. Confirmez votre sélection avec OK.
4. Appuyez sur la touche MENU pour accéder au mode de fonctionnement.
FONCTION
VOLET ROULANT/STORE VÉNITIEN, 1-IÈRE MISE EN SERVICE (sélection du tablier/de la toile, date de la première mise en service)
1. Appuyez sur la touche MENU.
2. Pour sélectionner le menu FONCTION, appuyez sur la touche+ jusqu’à
ce que FONCTION apparaisse.
3. Confirmez en appuyant sur OK. VOLET ROULANT/STORE VÉNITIEN apparaît.
4. Les touches+/- vous permettent de sélectionner volet roulant/store vénitien.
5. Confirmez en appuyant sur OK. MODE EXPERT OFF/ON apparaît.
6. Les touches+/- vous permettent de sélectionner le réglage souhaité.
7. Confirmez votre sélection avec OK. 1-IÈRE MISE EN SERVICE apparaît.
8. Confirmez en appuyant sur OK. FONCTION apparaît.
9. Appuyez sur la touche MENU pour accéder au mode de fonctionnement.
77-fr
Page 78

Montage du support mural
Déverrouillage
Plaque de
fixation pour
support mural
Support mural
26
• Avant de les monter dans les
positions souhaitées, assurezvous du bon fonctionnement de
l’émetteur et du récepteur.
• Fixez le support au mur à l’aide
des deux vis fournies.
78-fr
Page 79

Remplacement des piles
14
2
3
Le type de pile correspondant est indiqué dans le chapitre
«Caractéristiques techniques».
Remplacez les batteries dans
un laps de temps d’une minute en
veillant à n’appuyer sur aucune
touche.
1. Ouvrez le cache du compartiment
des piles.
2. Retirez les piles.
3. Placez les nouvelles piles dans la
bonne position.
4. Fermez le cache du compartiment
des piles.
Nettoyage
Nettoyez l’appareil uniquement avec un chiffon adapté. N’utilisez pas de produits de nettoyage qui risqueraient d’attaquer la surface.
79-fr
Page 80

Caractéristiques techniques
Tension nominale 3VCC
Type de piles LR03 (AAA)
Indice de protection IP20
Température ambiante admissible -10 à +55°C
Temps de fonctionnement du volet roulant 2minutes
Temps de fonctionnement du store vénitien 3minutes
Puissance d’émission maximale émise ≤ 25 mW
Fréquence radio 868,3MHz
La portée radio maximale peut aller jusqu’à 25m en intérieur et jusqu’à 350m
en extérieur.
80-fr
Page 81

Que faire si...
Problème Comment y remédier
Le moteur ne fonctionne pas. Placez de nouvelles piles.
Placez les piles correctement.
Réduisez la distance du récepteur.
Programmez l’émetteur.
Aucune réaction de l’émetteur après
changement des piles.
PILE apparaît à l’écran. Placez de nouvelles piles.
Le moteur souhaité ne fonctionne
pas.
Le programme astro ne commute
pas avec précision.
L’émetteur n’exécute pas les ordres
de commutation réglés.
L’émetteur exécute les ordres de
commutation réglés de manière inexacte.
Le volet roulant ne se déplace pas
dans la position de fin de course.
Appuyer sur la touche RESET.
Vérifier les réglages.
Sélectionnez le bon canal.
Réglez la date correcte.
Réglez la ville ou les degrés de longitude et latitude exacts corrects.
Désactivez la fonction vacances.
Adaptez le décalage astro.
Réglez le curseur sur Fonctionnement automatique.
Désactivez la fonction vacances.
Réglez la position de fin de course
dans le menu RÉGLAGE PROG POS.
FINALE.
81-fr
Page 82

Déclaration de conformité UE simplifiée
La société Becker-AntriebeGmbH atteste par la présente que cette installation radio satisfait aux exigences de la directive 2014/53/UE.
Le texte intégral de la déclaration de conformité UE est disponible sur Internet
à l’adresse suivante:
www.becker-antriebe.com/ce
Sous réserve de modifications techniques.
82-fr
Page 83

83-fr
Page 84

Inhoudsopgave
Algemeen...............................................................................................85
Garantieverlening ...................................................................................86
Veiligheidsaanwijzingen...........................................................................86
Doelmatig gebruik...................................................................................87
Verklaring van lampjes en toetsen ............................................................88
Functiebeschrijving .................................................................................90
Draadloze besturing programmeren.........................................................96
Ingebruikname .......................................................................................97
Fabrieksinstelling....................................................................................97
Programmering ......................................................................................98
Montage wandhouder ...........................................................................105
Batterijen vervangen .............................................................................106
Schoonmaken ......................................................................................106
Technische gegevens ........................................................................... 107
Wat doen, wanneer...?...........................................................................108
Vereenvoudigde EU-verklaring van overeenstemming..............................109
84-nl
Page 85

Algemeen
De zender is compatibel met alle ontvangers van het Becker Centronic besturingsprogramma.
Met de 5zendkanalen kunnen producten als rolluiken en zonweringen, lichtbesturingen en draadloze stopcontacten worden bestuurd.
Naast de 5afzonderlijke zendkanalen heeft deze zender nog 1centraal zendkanaal dat de zendkanalen1-5 aanspreekt.
De door de fabriek met actuele datum en tijd (MET) geleverde zender bestuurt
de buismotoren 's morgens op de geprogrammeerde schakeltijd en 's avonds
op de Astro-tijd (zonsondergang).
Via de instelling tussenpositie kunnen per kanaal 2verschillende posities bij
rolluiken of zonweringen evenals 2verschillende helderheidsstanden bij een
lichtbesturing worden opgevraagd (scènebesturing).
Dit apparaat kenmerkt zich door een eenvoudige bediening.
Neem bij de installatie evenals bij de instelling van het apparaat goed nota van
deze montage- en gebruiksaanwijzing.
Verklaring pictogrammen
VOORZICHTIG
OPGELET
VOORZICHTIG markeert een gevaar dat
tot letsel kan leiden, wanneer dit niet
wordt vermeden.
OPGELET markeert maatregelen voor het
vermijden van materiële schade.
Duidt op gebruikstips en andere nuttige
informatie.
85-nl
Page 86

Garantieverlening
Constructieve wijzigingen en ondeskundige installatie die in strijd zijn met deze
gebruiksaanwijzing en andere instructies onzerzijds, kunnen leiden tot ernstig
lichamelijk letsel van de gebruiker en kunnen een ernstig risico vormen voor
diens gezondheid, zoals kneuzingen. Constructieve wijzigingen mogen derhalve uitsluitend na overleg met ons en met onze toestemming plaatsvinden,
waarbij onze instructies en vooral de instructies in de voorliggende montageen gebruiksaanwijzing beslist in acht moeten worden genomen.
Afwijkend gebruik, toepassingen en/of verwerking van de producten die in
strijd is met het bedoelde gebruik, is niet toegestaan.
De fabrikant van het eindproduct en de installateur dienen erop te letten dat bij
gebruik van onze producten aan alle noodzakelijke wettelijke en officiële voorschriften aandacht wordt besteed en dat deze worden opgevolgd. Dit betreft
de fabricage van het eindproduct, de installatie en het advies aan de klant en
geldt vooral voor de daarop betrekking hebbende actuele EMC-voorschriften.
Veiligheidsaanwijzingen
Algemene aanwijzingen
• Bewaar deze gebruiksaanwijzing!
• Gebruik het apparaat uitsluitend in droge ruimten.
• Gebruik uitsluitend ongewijzigde originele onderdelen van de besturings-
fabrikant.
• Houd kinderen uit de buurt van besturingen.
• Neem de bepalingen in acht die specifiek voor uw land van toepassing
zijn.
• Voer verbruikte batterijen correct af. Vervang batterijen uitsluitend door
batterijen van hetzelfde type (zie Technische gegevens).
Voorzichtig
• Houd personen uit de buurt van het bewegingsgebied van
de installaties.
• Wanneer de installatie door één of meerdere zenders
wordt bestuurd, dan moet het bewegingsgebied van de
installatie gedurende de bediening zichtbaar zijn.
• Apparaat bevat kleine delen die kunnen worden ingeslikt.
86-nl
Page 87

Doelmatig gebruik
De zender in deze gebruiksaanwijzing mag uitsluitend binnen worden gebruikt
voor de aansturing van Centronic compatibele draadloze buismotoren en
draadloze besturingen.
• Let erop dat draadloze installaties niet in gebieden met een verhoogd risico op storingen gebruikt mogen worden (bijv. ziekenhuizen, luchthavens).
• De afstandsbediening is uitsluitend toegestaan voor apparaten en installaties waarbij een functiestoring in de zender of ontvanger geen gevaar
voor personen, dieren of goederen oplevert of waar dit risico door andere veiligheidsvoorzieningen is afgedekt.
• De gebruiker geniet geen enkele bescherming tegen storingen door andere telecommunicatie-installaties en eindapparatuur (bijv. ook door
draadloze installaties die volgens de regels in hetzelfde frequentiebereik
werken).
• Verbind draadloze ontvangers uitsluitend met door de fabrikant goedgekeurde apparaten en installaties.
• Let erop dat de besturing niet in het bereik van metalen
oppervlakken of magnetische velden wordt geïnstalleerd
en gebruikt.
• Draadloze installaties die op dezelfde frequentie zenden,
kunnen aanleiding geven tot storing van de ontvangst.
• Houd er rekening mee dat de reikwijdte van het radiosig-
naal door de wetgever en door bouwkundige maatregelen
is beperkt.
87-nl
Page 88

Verklaring van lampjes en toetsen
3
1
2
6
7
4
5
9
8
Display
1
Menu-toetsenblok
2
OP-toets
3
STOP-toets
4
NEER-toets
5
Kanaalkeuzetoets
6
Kanaalcontrolelampjes
7
88-nl
Schuifschakelaar hand/auto-
8
matisch
Programmeertoets
9
Batterijvak
10
Tekstveld
11
RESET-toets (achter het
12
tekstveld)
Typeplaatje
13
Page 89

Displaysymbolen
1
2
3
4
5
6 7 8 9 10
Omhoog lopen
1
Omlaag lopen
2
Weekdagen (ma-zo)
3
Cijferindicatie
4
Tekstregel
5
6
7
8
9
10
Tijd/datum
Programma
Instelling
Functie
Astro avond
89-nl
Page 90

Functiebeschrijving
Rolluikkeuze
Bij de rolluik-functie loopt het rolluik na bediening van een bewegingstoets in
zelfvergrendeling.
Jaloeziekeuze
Bij de jaloezie-functie loopt de jaloezie in tipbedrijf om een nauwkeurige plaatsing van de lamellen mogelijk te maken. Als u langer dan 1seconde op een
bewegingstoets drukt, dan loopt de jaloezie in zelfvergrendeling.
Na het aanlopen van de geprogrammeerde tussen- en eindpositie wordt automatisch een kanteling van de lamellen uitgevoerd (wanneer de kantelpositie
geprogrammeerd werd).
Schuifschakelaar hand/auto
In de schuifschakelaarstand worden alleen handmatige commando's uitgevoerd (bijv.: OP, STOP, NEER bij drukken op de toets).
In de schuifschakelaarstand worden automatische commando's uitgevoerd
(bijv. tijd, Astro-functie, ...).
De actuele instelling verschijnt op het display.
Kanaal
Het kanaal van een zender kan in één of meerdere ontvangers worden geprogrammeerd. De aansturing van één ontvanger is een individueel commando,
die van meerdere ontvangers een groepscommando.
Centraal commando
Als alle kanalen van de zender worden gekozen, kunnen alle toegewezen ontvangers/ontvangergroepen tegelijkertijd worden aangestuurd.
Kanaalkeuzetoets
Met de kanaalkeuzetoets kunnen maximaal 5 kanalen worden geselecteerd.
De afzonderlijke kanalen worden aangeduid door het oplichten van het bijbehorende kanaalcontrolelampje. Als alle kanaalcontrolelampjes tegelijkertijd
branden, dan kan het centrale commando worden geprogrammeerd resp. gegeven.
Het geprogrammeerde kanaal kunt u noteren op het tekstveld onder de transparantie folie.
90-nl
Page 91

Kanaalcontrolelampjes
Een radiosignaal wordt gesignaleerd door het oplichten van het bijbehorende
kanaalcontrolelampje.
Het zendvermogen of de reikwijdte van het radiosignaal wordt door afnemen
van het batterijvermogen gereduceerd. Als het kanaalcontrolelampje bij indrukken van een toets niet meer oplicht, dan moet de batterij worden vervangen.
Gebruiksmodus
U ziet op het display de tijd en de actuele gebruiksmodus bijv. VAKANTIE.
OK-toets
Door op de OK-toets in het menu te drukken worden de actueel getoonde
waarden opgeslagen.
+/- toetsen
De volgende bedieningen zijn via + en - mogelijk:
• Menu -> waarde veranderen
• Auto-modus ->informatie opvragen:
∙ + toets -> volgende automatische schakeltijd
∙ - toets -> volgende automatische schakeltijd
∙ - toets en OK-toets vasthouden -> Astro-tijd
MENU-toets
Door op de MENU-toets te drukken komt u in het menu-overzicht of in de gebruiksmodus.
De actueel getoonde waarde wordt niet opgeslagen.
RESET-toets
Door op de RESET-toets te drukken (met een balpen o.i.d.) wordt het apparaat teruggezet naar de fabrieksinstelling.
Uitzondering: menupunt Functie, Taalkeuze en Locatiekeuze.
Zender blijft in ontvanger geprogrammeerd.
Menu Tijd/datum
TIJD/DAT
In dit menu stelt u de tijd en de datum in.
91-nl
Page 92

Menu Programma
5:00 uur
7:00 uur
9:00 uur
15:00 uur
18:30 uur
22:00 uur
Wintertijd Zomertijd Wintertijd
Wintertijd Zomertijd Wintertijd
Zonsopkomst
Zonsondergang
jan. feb. mrt. apr. mei juni juli aug. sept. okt. nov. dec.
PROGRAMMA
In het menu PROGRAMMA kunt u twee verschillende functies instellen:
• Astro avond (1-5 en 6,7)
• Individueel (1-5 en 6,7)
ASTRO AVOND
Bestuurt het omhooglopen volgens de ingestelde schakeltijd.
Omlaaglopen volgens Astro-functie.
INDIVIDUEEL
Bestuurt het omhoog- en omlaaglopen volgens de door u ingestelde schakeltijden.
SPERTIJD
Verhindert een te vroeg omlaaglopen van het rolluik door de ASTRO AVONDfunctie.
Voorbeeld:
Astro-tijd : 17:00
Spertijd : 18:00
Het rolluik loopt niet vóór 18:00 omlaag.
92-nl
Page 93

Wintertijd
Zomertijd
Wintertijd
jan. feb.
maart
apr. mei juni juli aug. sep. okt. nov . dec .
Zonsondergang
15:00 uur
18:30 uur
22:00 uur
Spertijd
SCHAKELTIJD
Automatische tijden voor omhoog- en omlaaglopen voor rolluiken en jaloezieën in alle geprogrammeerde ontvangers.
Bij de displayweergave --:-- (tussen de tijd 23:59 en 00:00) wordt de schakeltijd niet uitgevoerd.
Menu Instellingen
INSTELLING
In het menu INSTELLING heeft u de volgende mogelijkheden:
• VAKANTIE
• TUSSENPOSITIE
• VENTILATIE/KANTELING
• PROG (EINDSTAND, TUSSENPOSITIE, VENTILATIE/KANTELING)
• Taalkeuze (NEDERLANDS)
• ASTROVERSCHUIVING
• Locatiekeuze (Amsterdam)
• LENGTEGRAAD (verschijnt alleen bij EXPERT-MOD ON)
• BREEDTEGRAAD (verschijnt alleen bij EXPERT-MOD ON)
• TIJDZONE (verschijnt alleen bij EXPERT-MOD ON)
• ZO/WI (automatisch omschakelen zomer-/wintertijd)
Om instellingen uit te kunnen voeren, drukt u zo vaak op de OK-toets tot u bij
het gewenste menupunt komt.
VAKANTIE
De vakantiefunctie simuleert een bewoond huis, terwijl u op vakantie bent.
Als de functie actief (ON) is, loopt het rolluik/de jaloezie met uitgestelde tijd op
de geprogrammeerde tijden (max. + 30min.).
93-nl
Page 94

EINDSTAND
15:00 uur
18:30 uur
22:00 uur
Wintertijd Zomertijd Wintertijd
Zonsondergang
Astro-verschuiving
jan. feb. mrt. apr. mei juni juli aug. sept. okt. nov. dec.
Sluiten bijv. 1 uur
voor zonsondergang bij
astroverschuiving van -1 u
Als eindstand wordt het punt beschreven waarop het rolluik/de jaloezie zich in
de bovenste of onderste positie bevindt.
TUSSENPOSITIE
De tussenpositie is een vrij te kiezen positie van rolluik/jaloezie, tussen de bovenste en onderste eindpositie. Deze positie kan na de programmering vanuit
de bovenste positie worden aangelopen.
Hiervoor drukt u twee keer kort achter elkaar op de NEER-toets.
VENTILATIE/KANTELING
De ventilatie-/kantelpositie is een vrij te kiezen positie van rolluik/jaloezie, tussen de onderste en bovenste eindpositie. Met deze functie kunt u het rolluik
vanuit de onderste eindpositie zover weer omhoog laten lopen tot de ventilatiesleuven geopend zijn. Bij de jaloezie worden de lamellen gekanteld.
Hiervoor drukt u twee keer kort achter elkaar op de OP-toets.
Taalkeuze (NEDERLANDS)
Hier kunt u uw landstaal kiezen.
ASTROVERSCHUIVING
Door de instelling van de astroverschuiving kan de Astro-tijd worden verschoven (max. +/- 120min.).
Locatiekeuze
(Amsterdam bij taalinstelling NEDERLANDS)
De locatiekeuze is belangrijk voor de Astro-functie. Kies hier de stad die het
dichtstbij uw locatie ligt.
94-nl
Page 95

LENGTEGRAAD/BREEDTEGRAAD/TIJDZONE (alleen bij
EXPERT MODUS ON)
Uw coördinaten bepaalt u bijv. met behulp van een atlas.
ZO/WI
Met ZO/WI wordt het automatisch omschakelen tussen zomer- en wintertijd
aangeduid. Fabrieksinstelling is ON: het apparaat past zich automatisch aan.
Menu Functie
Deze modus is uitsluitend bestemd voor geschoold personeel.
In het menu FUNCTIE kunt u de volgende functies instellen:
• ROLLUIK/JALOEZIE (keuze van rolluikpantser/zonwering)
• EXPERT MODUS
• EERSTE INGEBRUIKNAME (alleen weergave)
EXPERT MODUS
Als de locatiekeuze (EXPERT MODUS OFF) voor u te onnauwkeurig is, kunt u
uw keuze verfijnen door de lengte- en breedtegraad in te stellen (EXPERT MODUS ON).
95-nl
Page 96

Draadloze besturing programmeren
1) Masterzender programmeren
a) Ontvanger in de programmeermodus zetten
Met de masterzender wordt de eerste in een ontvanger geprogrammeerde zender bedoeld. In tegenstelling tot andere
erbij geprogrammeerde zenders is het met de masterzender
o.a. mogelijk de eindposities in te stellen (bij buismotoren
met geïntegreerde draadloze ontvanger) en andere zenders
bij te programmeren of te wissen. Masterzenders kunnen alle zenders zijn die een aparte OP-, STOP-, NEER-toets en
een programmeertoets hebben.
Neem goed nota van de montage- en gebruiksaanwijzing van
de ontvanger.
Bedien de programmeertoets op de zender met een geschikt
cilindrisch gereedschap (bijv. balpen).
• Schakel de spanningsvoorziening van de ontvanger uit en na 5seconden
weer in.
of
• Bedien de programmeertoets of de zwarte schakelaar (antennesymbool)
van de ontvanger.
De ontvanger bevindt zich nu gedurende 3minuten in de programmeermodus.
b) Masterzender programmeren
Druk binnen de programmeermodus op de programmeertoets van de masterzender tot de ontvanger het succesvol programmeren bevestigt.
Daarmee is het programmeren beëindigd.
2) Verdere zenders programmeren
1. Druk op de programmeertoets van de masterzender tot de ontvanger dit
bevestigt.
2. Druk nu op de programmeertoets van de nieuwe zender tot de ontvanger
dit bevestigt.
3. Druk nu nog eens op de programmeertoets van de nieuw te programmeren zender.
4. De ontvanger bevestigt het succesvol programmeren.
96-nl
Page 97

Ingebruikname
Door de eerste keer op een toets te drukken maakt u de besturing 'wakker'. U
kunt nu met de +/- toetsen de taal kiezen en deze met de OK-toets overnemen. De besturing bevindt zich in de automatische modus.
Fabrieksinstelling
Door op de RESET-toets te drukken (met een balpen o.i.d.)
wordt de besturing teruggezet naar de fabrieksinstelling.
Uitzondering: menu Functie, Taalkeuze en Locatiekeuze.
De zender blijft in ontvanger geprogrammeerd.
TIJD/DAT: actuele tijd (MET) en datum
PROGRAMMA:
ASTRO AVOND ->
INSTELLING: VAKANTIE OFF
FUNCTIE: ROLLUIKEN
schakeltijden maandag-vrijdag (1-5)
07:00 uur,
ASTRO AVOND
schakeltijden zaterdag, zondag (6,7)
08:00 uur,
ASTRO AVOND
EINDSTAND
ZO/WI ON
Astroverschuiving + 15 min.
97-nl
Page 98

Programmering
TIJD/DAT PROGRAMMA INSTELLINGAUTO
FUNCTIE TIJD/DAT
AUTO
TIJD/DAT TIJD JAARAUTO
MAAND DAG TIJD/DAT
AUTO
Alle nu volgende programmeermogelijkheden zijn voor alle
5kanalen gelden.
Menu-overzicht
1. Druk op de MENU-toets, TIJD/DAT verschijnt.
2. Om verdere menu's te selecteren, drukt u op de +/- toetsen.
3. Druk op de MENU-toets, om in de gebruiksmodus te komen.
TIJD/DAT (tijd en datum instellen)
1. Druk op de MENU-toets, TIJD/DAT verschijnt.
2. Met OK komt u in het menupunt Tijd.
3. Stel nu de actuele tijd in met de +/- toetsen.
4. Als de tijd is ingesteld, bevestigt u met OK.
98-nl
Page 99

5. Ga met de instelling JAAR, MAAND en DAG hetzelfde te werk als hierbo-
AUTO PROGRAMMA
ASTRO AVOND
SCHAKELTIJD
SPERTIJD
SCHAKELTIJD
SPERTIJD PROGRAMMA
AUTO
ven beschreven. TIJD/DAT verschijnt.
6. Druk op de MENU-toets, om in de gebruiksmodus te komen.
PROGRAMMA
ASTRO AVOND (omhooglopen -> schakeltijd, omlaaglopen -> zonsondergang)
1. Druk op de MENU-toets.
2. Om het menu PROGRAMMA te selecteren, drukt u op de + toets tot PROGRAMMA verschijnt.
3. Bevestig met OK.
4. Druk opnieuw op + toets tot ASTRO AVOND verschijnt.
5. Bevestig met OK.
6. Met de +/- toetsen stelt u nu de SCHAKELTIJD van maandag - vrijdag
(1-5) in. Bevestig elke invoer met OK.
7. Met de +/- toetsen stelt u nu de SPERTIJD van maandag - vrijdag (1-5)
in. Bevestig elke invoer met OK.
8. Met de +/- toetsen stelt u nu de SCHAKELTIJD van zaterdag, zondag
(6,7) in. Bevestig elke invoer met OK.
9. Met de +/- toetsen stelt u nu de SPERTIJD van zaterdag, zondag (6,7)
in. Bevestig elke invoer met OK. PROGRAMMA verschijnt.
10. Druk op de MENU-toets, om in de gebruiksmodus te komen.
99-nl
Page 100

PROGRAMMA
AUTO PROGRAMMA INDIVIDUEEL
SCHAKELTIJD
SCHAKELTIJD SCHAKELTIJD SCHAKELTIJD
PROGRAMMA
AUTO
INDIVIDUEEL (omhoog-/omlaaglopen -> schakeltijden)
1. Druk op de MENU-toets.
2. Om het menu PROGRAMMA te selecteren, drukt u op de + toets tot PROGRAMMA verschijnt.
3. Bevestig met OK.
4. Druk opnieuw op + toets tot INDIVIDUEEL verschijnt.
5. Bevestig met OK.
6. Met de +/- toetsen stelt u nu de SCHAKELTIJD en de SCHAKELTIJD
van maandag - vrijdag (1-5) en zaterdag, zondag (6,7) in. Bevestig elke
invoer met OK.
7. Druk op de MENU-toets, om in de gebruiksmodus te komen.
100-nl
 Loading...