

Page 1
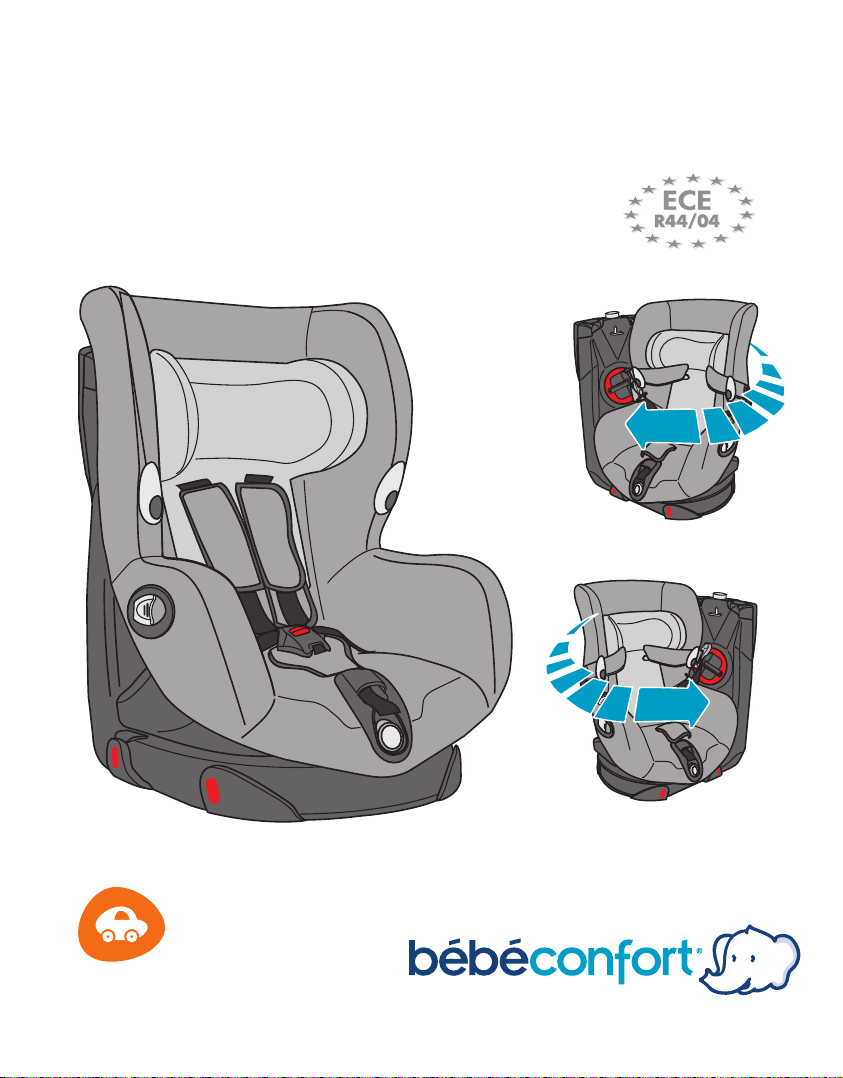
Axiss
GR. 1
9 - 18 Kg
www.bebeconfort.com
Page 2
FR -EN - DE
FR - Mode d’emploi pages 2 à 16 / Garantie page 17
EN – User instructions pages 2 to 16 / Warranty page 17
NOTICE D’UTILISATION - USER GUIDE
FR • SOMMAIRE
• IMPORTANT, pages 3/5/9/10.
• Pour pivoter l’assise, page 6.
• Pour Installer le siège face à la route GROUPE 1, pages 7/8.
• Pour retirer le siège, page 11.
• Pour ajuster la hauteur du harnais, pages 12.
• Pour installer votre enfant dans le siège, pages 13.
• Pour désinstaller votre enfant dans le siège, pages 14.
• Pour régler l’inclinaison du siège, page 14.
• Entretien et déhoussage, page 15/16.
• Garantie, page 17.
• IMPORTANT INFORMATION, pages 4/5/9/10.
• Swivelling the seat, page 6.
• Installing the GROUP 1 seat facing the front, pages 7/8.
• Removing the seat, page 11.
• Adjusting the harness height, page 12.
• Placing your child in the seat, page 13.
• Removing your child from the seat, page 14.
• Adjusting the seat angle, page 14.
• Maintenance and seat cover removal, pages 15-16.
• Warranty, page 17.
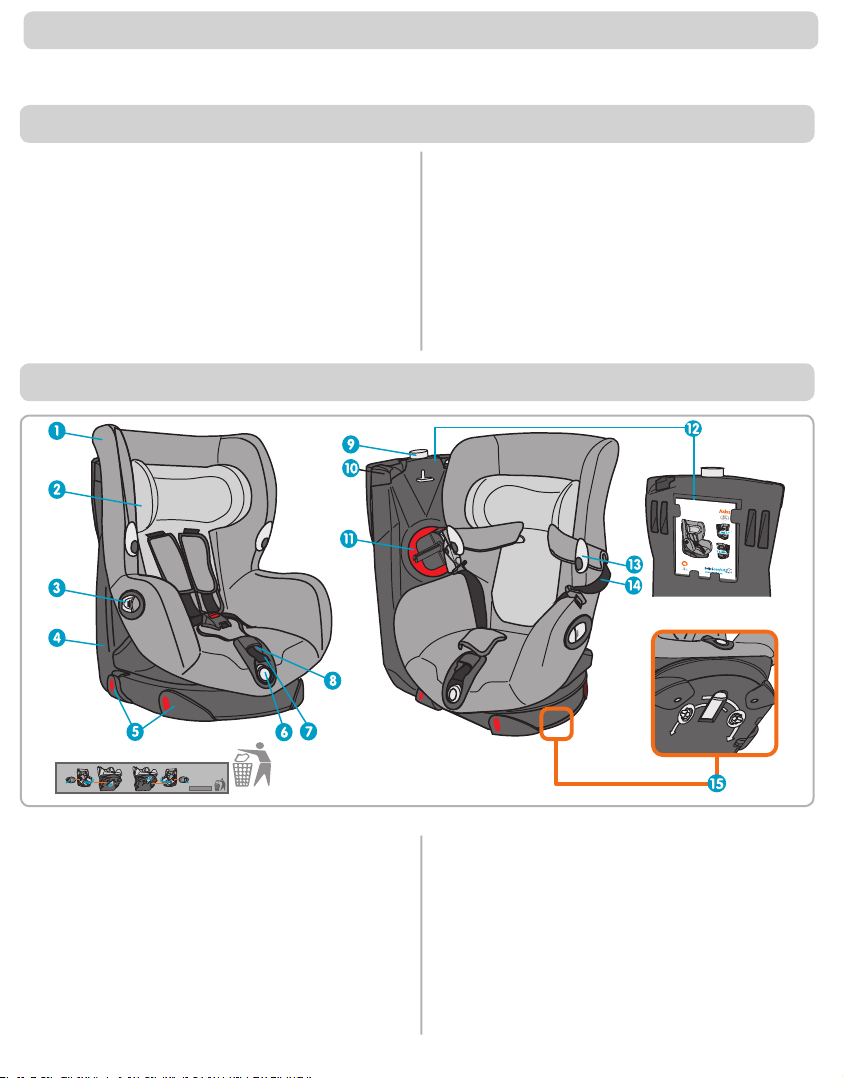
DESCRIPTION
EN • CONTENTS
FR EN
1 - Confection.
2 - Têtière réglable.
3 - Manette pour pivoter le siège.
4 - Base.
5 - Guides de ceinture abdominale (du véhicule).
6 - Bouton de réglage d’inclinaison de l’assise.
7 - Sangle de réglage harnais.
8 - Loquet de réglage harnais.
9 - Témoin de verrouillage de l‘assise.
10 - Guide ceinture (du véhicule) diagonale.
11 - Tendeur de (du véhicule) ceinture diagonale.
12 - Compartiment de rangement de la notice.
13 - Support harnais.
14 - Harnais 5 points.
15 - Curseur (choisissez de pivoter l’assise à droite ou à gauche).
2
1 - Upholstery
2 - Adjustable headrest
3 - Lever to swivel the seat.
4 - Base.
5 - Slots for vehicle lap safety belt.
6 - Seat angle adjustment knob.
7 - Harness adjustment strap.
8 - Harness adjustment clip.
9 - “Seat Locked” indicator.
10 - Slot for vehicle shoulder belt.
11 - Shoulder belt tension adjuster
12 - Instruction booklet storage compartment
13 - Harness support.
14 - 5 point harness.
15 - Direction lever (to select whether to swivel the seat left or right).
Page 3
IMPORTANT
(
)
FR
• Les produits Bébé Confort ont été conçus et testés avec
soin pour la sécurité et le confort de votre bébé. N’utilisez
que des accessoires vendus ou approuvés par Bébé
Confort. L’utilisation d’autres accessoires peut s’avérer
dangereuse.
• Nous vous conseillons de lire attentivement cette notice et
de manipuler votre produit avant de l’utiliser.
• Conservez toujours la notice pour une utilisation ultérieure,
un espace de rangement a été prévu à cet effet au dos
du siège.
SYSTEME UNIVERSEL AVEC CEINTURE 3 POINTS
•
Modèle homologué
• Pour le groupe 1 (enfants de 9 à 18 Kg) le siège sera
monté face à la route aux places arrière du véhicule.
• Le siège sera monté face à la route. Ne jamais installer ce
siège dos à la route.
• La responsabilité du fabricant ne saurait être engagée,
que dans le cadre de l’attribution du Règlement Européen
(R44). Cette homologation n’exclut pas la prudence et le
respect du code de la route.
• Après avoir installé votre enfant, assurez-vous que la ceinture
du véhicule soit correctement tendue en tirant sur la sangle.
Assurez-vous également que la sangle ne se vrille pas.
ENFANT
• Ne laissez jamais votre enfant sans surveillance.
• Même minimes, les chocs subits par un véhicule peuvent
transformer l’enfant en un véritable projectile.
• Pour votre sécurité et celle de votre enfant, installez-le
toujours dans le siège pour enfant quel que soit le trajet
que vous avez à effectuer.
• Veiller à ce que les sangles sous-abdominales soient portées
aussi bas que possible, pour bien maintenir le bassin.
• La température à l’intérieur d’un véhicule peut être très
élevée, notamment après une longue exposition au soleil.
Il est fortement recommandé, dans ces conditions, de
recouvrir le siège auto d’un tissu ou autre qui empêchera
les fixations du harnais, et plus particulièrement les pièces
métalliques, de chauffer et de brûler l’enfant.
AUTRES INSTRUCTIONS
• Ce dispositif de retenue pour enfants est efficace
uniquement lors du respect des instructions d’utilisation.
• Attachez toujours le dispositif de retenue pour enfants
même lorsque l’enfant n’y est pas installé.
• L’utilisateur doit toujours veiller à ce que les bagages
et autres objets susceptibles de causer des blessures à
l’occupant du siège en cas de choc soient solidement
arrimés.
• Ne placez jamais d’objets lourds sur la tablette arrière, afin
d’éviter les projections en cas d’accident.
• Les éléments rigides et les pièces en matière plastique d’un
dispositif de retenue pour enfants doivent être situés et
installés de telle manière qu’ils ne puissent pas, dans les
conditions normales d’utilisation du véhicule, se coincer
sous un siège mobile ou dans la porte du véhicule.
• Vérifiez toujours si une partie du siège ou du harnais n’est
pas coincée sous un siège ou dans la porte du véhicule.
• Le siège doit impérativement être remplacé après un
accident.
• Ne modifiez jamais la construction ou les matériaux du
siège et de la ceinture sans avoir consulté le fabricant.
• N’utilisez pas le dispositif de retenue pour enfants sans
la housse. Ne pas remplacer la housse du siège par une
autre housse que celle recommandée par le constructeur,
car elle intervient directement dans le comportement du
dispositif de retenue.
• Les sièges rabattables doivent toujours être verrouillés.
• Après l’achat veillez à installer votre siège dans votre
véhicule. Si vous rencontrez des difficultés d’installation
dues à la longueur de la ceinture de sécurité du véhicule
contactez immédiatement votre distributeur.
• Il est conseillé à l’usager de se mettre en rapport avec
le distributeur ou le fabricant du système de retenue
pour enfants, s’il a un doute sur l’installation ou
l’utilisation correctes du système.
OK
NO
NO
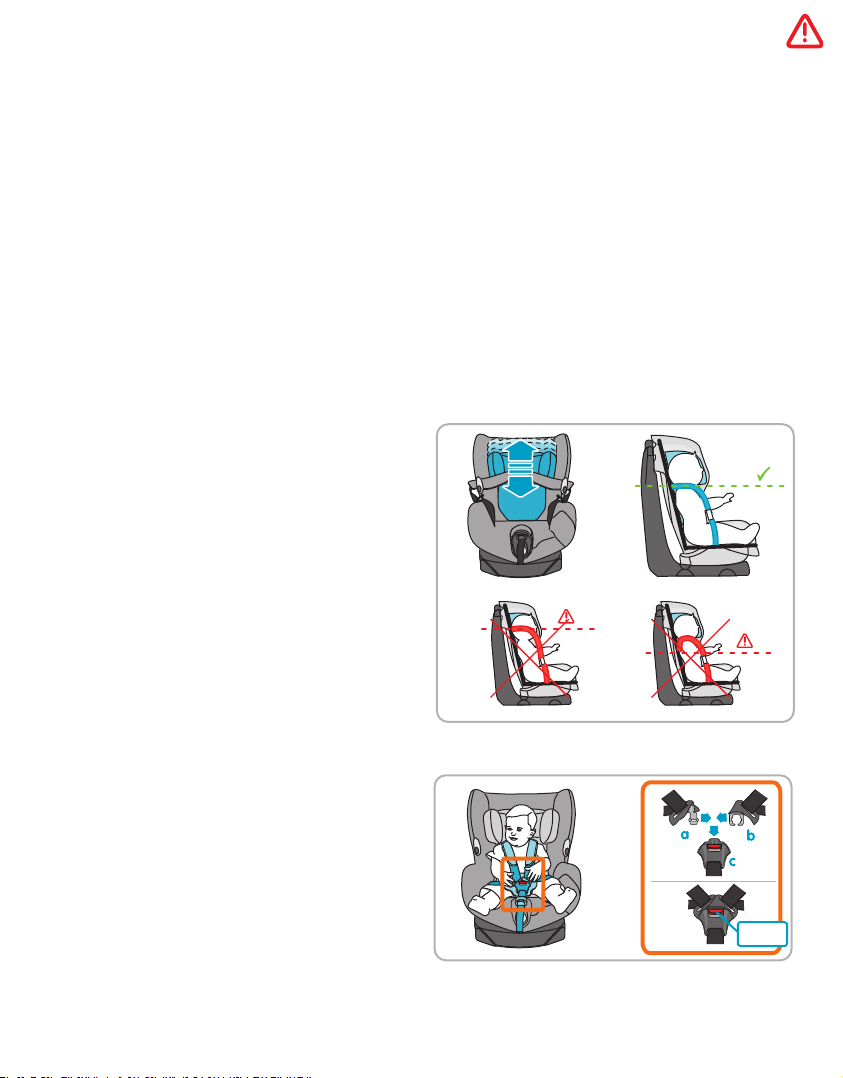
Il est nécessaire d’adapter le harnais
à la taille de votre enfant (page 12).
CLICK!
Pour une installation correcte de votre enfant
dans le siège AXISS, il est nécessaire de consulter
le scénario d’installation page 13.
3
Page 4

(
)
EN
IMPORTANT
• All Bébé Confort products have been carefully designed
and tested for your baby’s safety and comfort. Use only
accessories sold or approved by Bébé Confort.
• Using other accessories may prove to be dangerous.
• Please read these instructions carefully and make yourself
familiar with the child seat before using it.
• Always keep the instruction booklet for later use; a
storage place behind the seat back has been provided for
this purpose.
UNIVERSAL SYSTEM WITH A 3 POINT SEAT-BELT
• Approved model
• For Group 1 (babies from 9 to 18 kg ): the child seat must
be fitted in a forward-facing position on the rear seats of
the vehicle.
• The child seat must be installed facing forwards. Never
install this child seat facing backwards.
• The manufacturer’s liability is limited to what is covered
under European Regulation (R44). This approval does not
remove the necessity for care and following the Highway
Code.
• After putting the child in the car seat, ensure that the car
seat belt is sufficiently taut by pulling the belt. Ensure also
that the belt does not become twisted.
THE CHILD
• Never leave a child unsupervised.
•
Even gentle impact on a vehicle can turn a child into a
projectile.
• For your own safety and that of your child, always put the child
• Ensure that the straps under the stomach lie as low as
•
The temperature inside a vehicle may become very high,
OTHER INSTRUCTIONS
• This child restraint is effective only if the instructions for
• Always fasten the child restraint even when the child is not
• The user must always check that any luggage and other
objects likely to cause injury to the occupant of the car
• Never place heavy objects on the rear parcel shelf, to avoid
• The rigid parts and the plastic sections of a child restraint
conditions, become trapped under a moving seat or in the
• Always check that no part of the seat or the harness is
• It is essential that the car seat be replaced after an
• Never modify the construction or the materials of the car
in the child car seat, however short your journey may be.
possible, to properly support the pelvis.
particularly after a long period of exposure to the sun. It is
strongly recommended, under such conditions, to cover
the seat of the car with a piece of material or something
equivalent to prevent the harness fixings, and in particular
the metal parts, from becoming hot and burning the child.
use are respected.
sitting in it.
seat in the case of impact are properly secured.
the danger of projectiles in the event of an accident.
should be positioned and installed in such a way that
they cannot, when the vehicle is being used under normal
vehicle door.
trapped under a seat or in the vehicle door.
accident.
4
seat or the seat belt without consulting the manufacturer.
•
Do not use the child restraint device without the cover. Do
not replace the seat cover with a cover other than that
recommended by the manufacturer, because it will have a
direct effect on the functioning of the child restraint.
• Folding seats must always be locked in place
• After purchasing, install the seat in your vehicle. If you
encounter any installation problems due to the length of
the vehicle seat belt, contact your distributor immediately
(prior to use).
• If in any doubt about the correct installation or use of the
system, the user is advised to contact the distributor or the
manufacturer of the child restraining device system.
OK
NO
NO
The harness should be adjusted to the size of the child.
To place your child correctly in the AXISS seat, you
must refer to the appropriate illustrations on page 13.
(page 12)
CLICK!
Page 5
IMPORTANT - WARNING
(
)
FR - EN
Sens Direction
Face à la route Facing forwards
* Le siège doit être placé sur la banquette arrière du véhicule
ou exceptionnellement à l’avant selon la législation en
vigueur dans le pays d’utilisation.
(en France : selon les conditions énoncées dans le décret n°
91-1321 du 27-12-1991)
Ce dispositif est
seulement utilisable
sur les véhicules
approuvés équipés
de ceintures de
sécurité 3 points /
statiques / à enrouleur,
homologuées,
conformément au
règlement CEE N°16 /
ONU ou d’une norme
équivalente.
Avancez le siège
passager avant pour
que l’enfant ne le
heurte pas.
Places Position
Arrières * Rear seats *
Groupe 1 Group 1
9 à 18 kg 9 to18 kg
* The child seat must be placed on the rear seat of the
vehicle or exceptionally on the front seat depending on the
current legislation in the country of use.
OK
OK
NO
NO
This device should be
used only in approved
vehicles equipped
with 3 point/static/
inertia reel seat-belts
that are approved in
accordance with EEC/
UN regulation N° 16
or other equivalent
standard.
Move the front
passenger seat
forward so that the
child does not hit it.
ATTENTION :
toujours verrouiller le
siège en position face
à la route avant de
rouler.
IMPORTANT:
CLICK!
OK
NO
Always lock the seat
in the forward-facing
position before setting
off.
5
Page 6
FR - EN
(
)
(
)
(
)
(
)
1
2
1
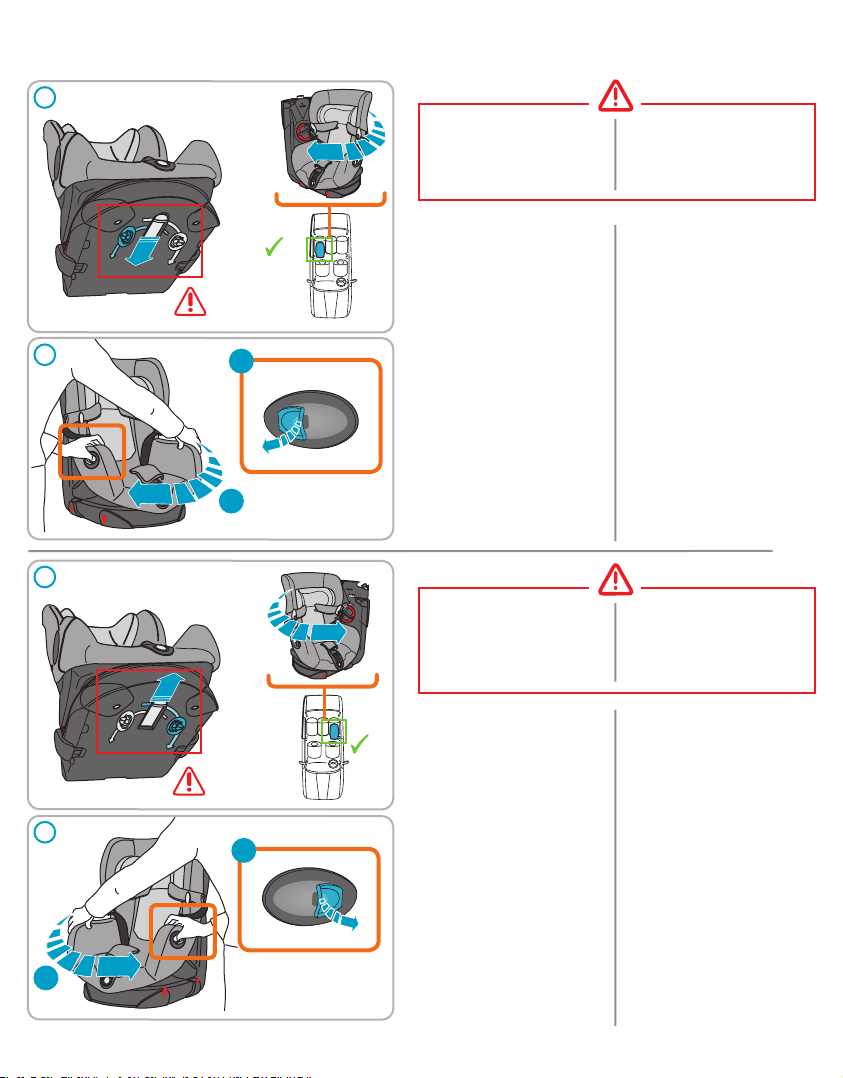
POUR PIVOTER L’ASSISE - SWIVELLING THE SEAT
Le sens de rotation
du siège doit
impérativement se faire du
côté de la portière
du véhicule.
Sous la base de votre siège
Axiss, vous trouverez un
OK
a
b
curseur permettant de choisir
le côté vers lequel il sera
possible de pivoter l’assise.
POUR PIVOTER L’ASSISE
VERS LA DROITE
1 - Poussez le curseur vers
l’arrière, pour une rotation
de l’assise vers la droite.
2 - Actionnez la poignée,
puis tout en la
maintenant en position
de déverrouillage
saisissez l’assise avec
l’autre main pour la
tourner vers vous.
Le sens de rotation
du siège doit
impérativement se faire du
côté de la portière
du véhicule.
The Axiss car seat must at
all times be rotated towards
the vehicle door which is
nearest to it
Beneath the base of your
Axiss seat, you will find a
lever which will allow you to
select the side towards which
you can swivel the seat.
TO SWIVEL THE SEAT TO
THE RIGHT
1 - Push the lever backwards
to swivel the seat to the
right.
2 - Grasp the handle, then,
while holding it in the
unlocked position, take
hold of the seat with
the other hand to turn it
towards you.
The Axiss car seat must
at all times be rotated
towards the vehicle door
which is nearest to it
POUR PIVOTER L’ASSISE
VERS LA GAUCHE
OK
1 - Tirez le curseur vers
l’avant, pour une rotation
de l’assise vers la
gauche.
2
a
2 - Actionnez la poignée,
puis tout en la
maintenant en position
de déverrouillage,
saisissez l’assise avec
l’autre main pour la
tourner vers vous.
TO SWIVEL THE SEAT
TO THE LEFT
1 - Pull the lever forwards to
swivel the seat to the left.
2 - Grasp the handle, then,
while holding it in the
unlocked position, take
hold of the seat with
the other hand to turn it
towards you.
b
6
Page 7
CLICK!
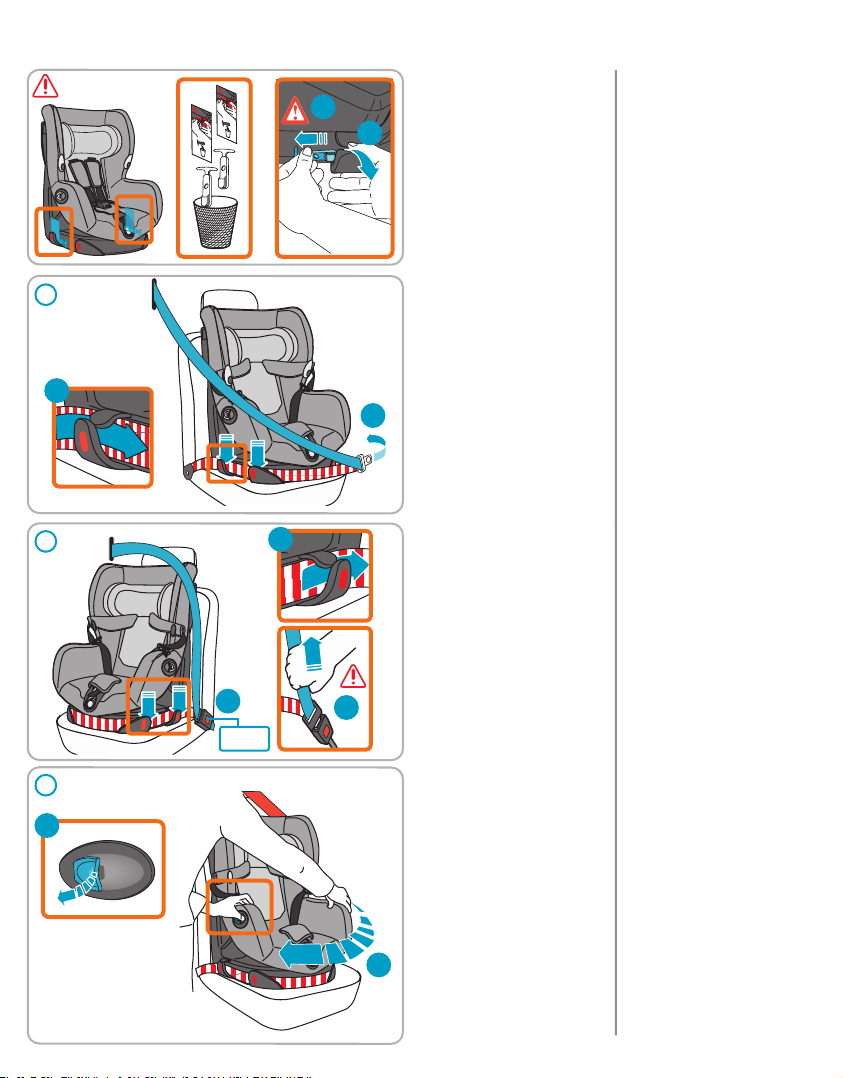
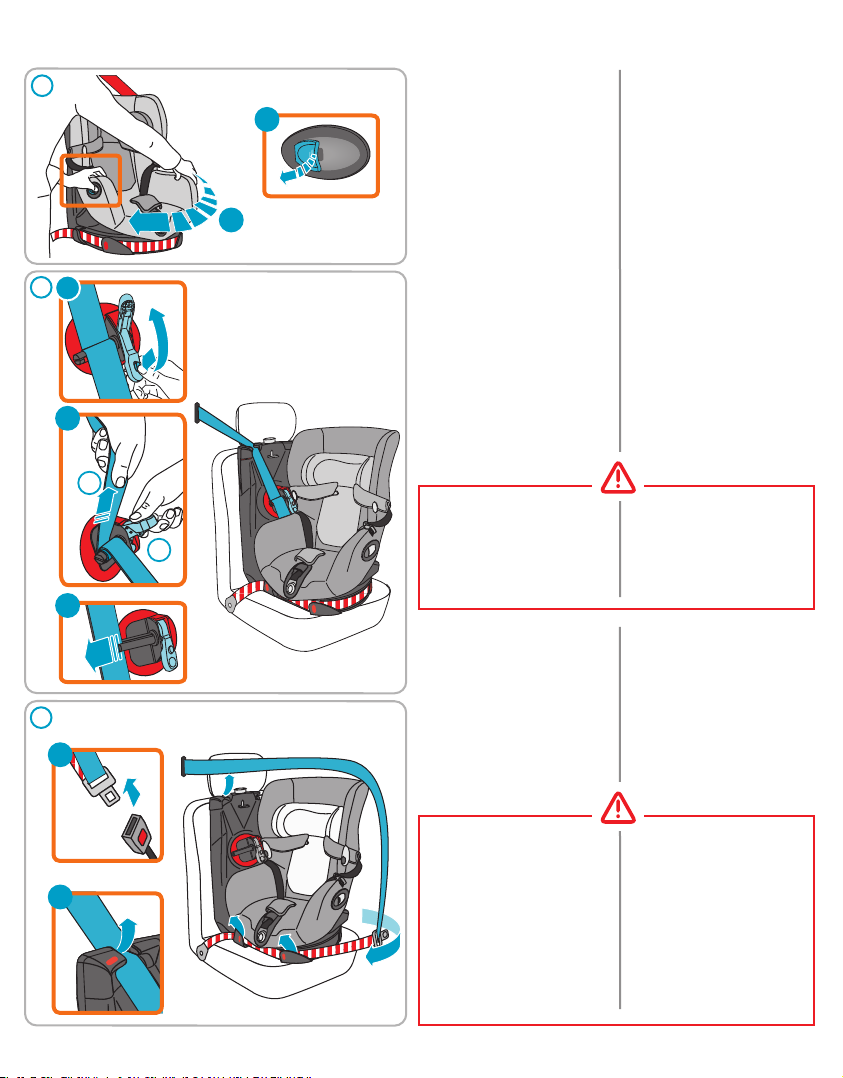
INSTALLATION FACE A LA ROUTE - FORWARD-FACING INSTALLATION FR - EN
ATTENTION !
Lors de la première
b
1
a
utilisation de votre Axiss, il
est important de contrôler
a
que les cales protégeant
les guides-sangle dans
l’emballage ont bien été
retirées, si elles ne l’ont pas
été retirez-les.
LE SIÈGE SERA MONTÉ
FACE À LA ROUTE
1 - Passez la partie
abdominale de la
ceinture derrière les
deux-guides sangle (a)
côté portière, puis (b)
autour du siège.
IMPORTANT!
Before using your Axiss for
the first time, it is important
to check that the wedges
from the packaging to
protect the strap-guides
have been removed, and
if they are still in place,
remove them.
THE SEAT MUST BE
INSTALLED FACING
FORWARDS
1 - Pass the lap safety belt
behind the two strap
guides (a) first the side
closest to the door, then
(b) around the seat.
b
2 - Passez la partie
abdominale de la ceinture
dans les deux guidessangle (a) au pourtour
du socle. Bouclez la
ceinture de sécurité (b) et
tendez-la.
IMPORTANT: Vérifiez que
la partie abdominale de la
ceinture est bien tendue
et qu’elle passe bien à
plat derrière les 4 guidessangle.
b
CLICK!
a
c
2
2 - Pass the lap safety belt
through the two strap
guides (a) around the rim
of the base. Fasten the
seat belt and tighten it.
IMPORTANT: make sure that
the lap strap, is well tightened,
that it lies flat all around the
base, and that it is definitely
behind the 4 strap guides.
3
a
3 - Faites pivoter l’assise
du siège vers vous, en
actionnant la manette (a).
Tout en maintenant le
déverrouillage, saisissez
avec l’autre main
l’accoudoir opposé et
(b) faites pivoter l’assise
vers vous.
ATTENTION : le
curseur sous la base
b
aura préalablement été
positionné selon le côté
de rotation choisi (voir
page 6).
3 - Swivel the seat of the
unit towards you while
operating the lever (a).
While holding it in the
unlocked position, take
hold of the armrest
farther away from you
and (b) swivel the seat
towards you.
IMPORTANT: the lever
under the base must
first be positioned to suit
the desired direction of
rotation (see page 6).
7
Page 8
CLICK!
FR - EN
(
)
(
)
(
)
(
)
(
)
(
)
INSTALLATION
FACE A LA ROUTE - FORWARD-FACING INSTALLATION
4
5
a
a
b
b
6
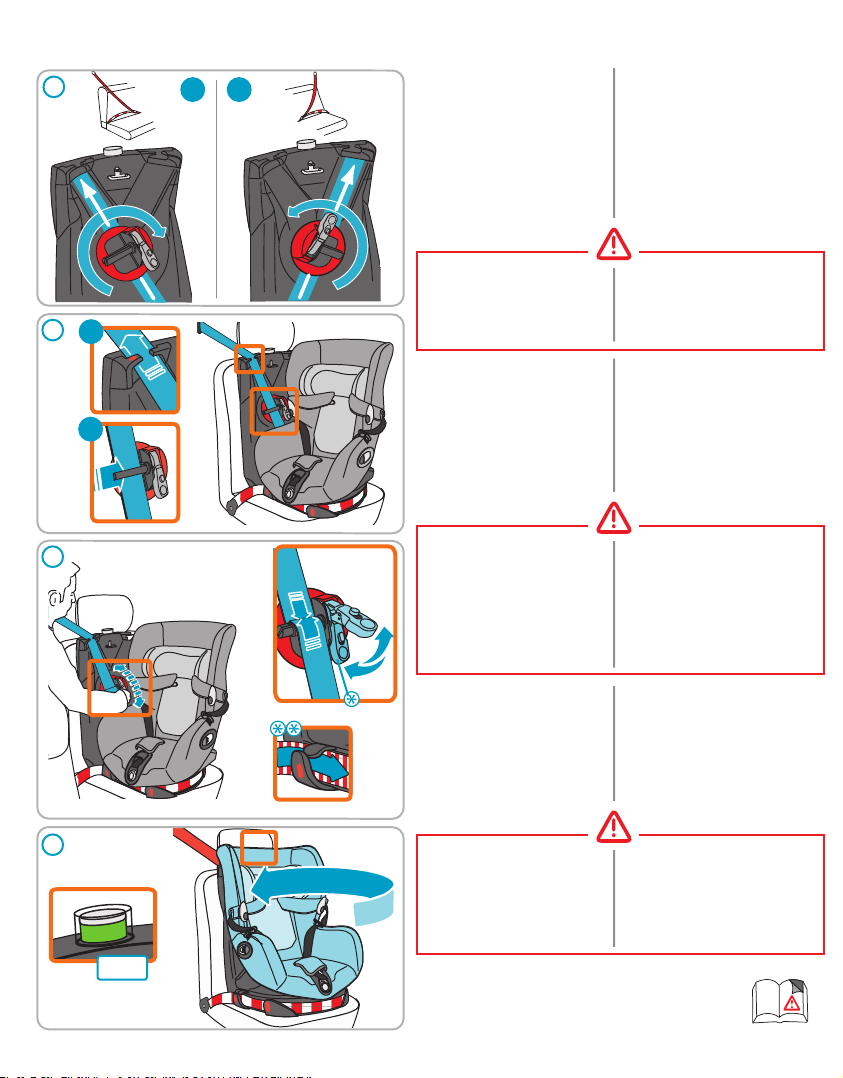
4 - Pivotez le tendeur au
maximum jusqu’à la
butée franche.
5 - (a) Passez la ceinture
dans le guide-sangle
situé en haut du socle.
(b)Glissez la ceinture
dans la fente de l’axe
du tendeur.
IMPORTANT: Vérifiez qu’il
n’y ait pas de jeu dans
la partie abdominale
de la ceinture en tirant
légèrement sur celle-ci.
6 - Actionnez plusieurs
fois de bas en haut la
manette du tendeur
(ne pas appuyer sur
le bouton situé sur la
manette), la ceinture
s’enroule sur l’axe
jusqu’à ce qu’elle soit
fermement tendue.
IMPORTANT : en position
finale la manette doit être
rabattue.
IMPORTANT: Certains
véhicules ne permettent
pas le maintien de la sangle
dans le passant latéral
côté portière. Cela n’a pas
d’incidence sur la sécurité.
4 - Twist the tension
adjuster round until it
cannot move any further.
5 - (a) Pass the belt through
the strap guide located
at the top of the base.
(b) Slide the belt through
slot in the tensioner
spindle.
IMPORTANT: Make sure
there is no slack in the lap
section of the belt by gently
pulling on it.
6 - Moving the lever upward
several times (but do not
push the button on the
lever), the belt will wind
around the spindle until
it is stretched tight.
IMPORTANT: in the final
position, the handle must
be turned down.
IMPORTANT: Some
vehicles do not maintain
the strap in the strap guide
on the side closest to the
door. This has no impact
on safety.
8
7 - Pivotez l’assise, un témoin
vert apparaît sur le haut
du socle pour indiquer le
verrouillage de l’assise,
face à la route.
7
CLICK!
IMPORTANT: même
inoccupé, il est vivement
conseillé de verrouiller le
siège Axiss en position
face à la route lorsque vous
roulez.
7 - Turn the seat. A green
indicator will appear at the
top of the base to indicate
that the seat is locked in
the forward-facing position.
IMPORTANT: even when
not in use, it is advisable to
lock the Axiss seat in the
forward-facing position for
driving.
Page 9

IMPORTANT - WARNING
FR - EN
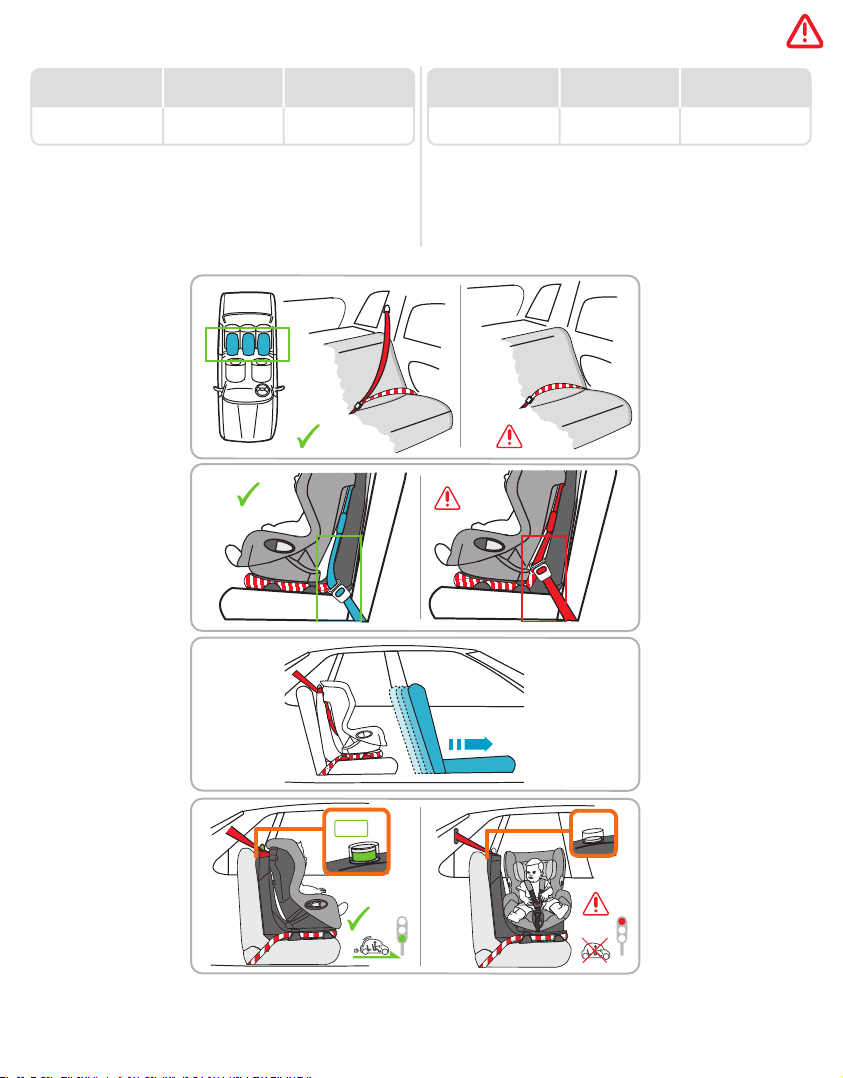
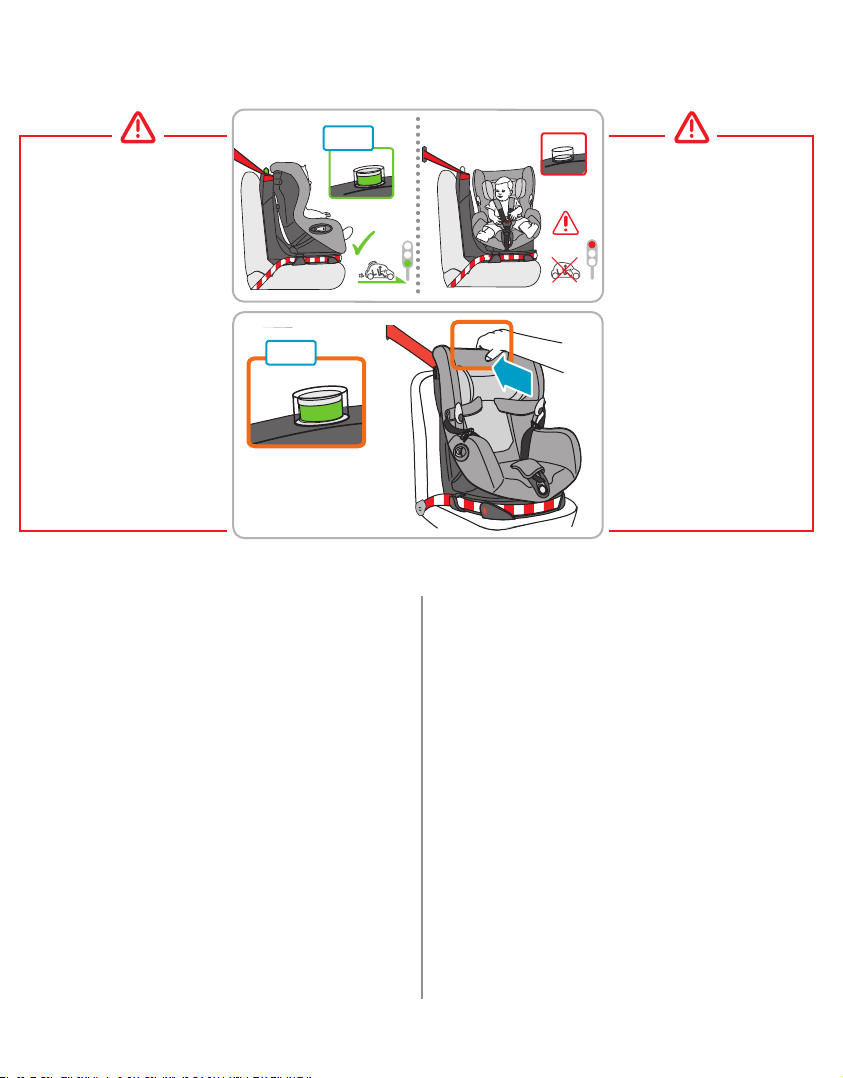
Vérifiez l’installation correcte du siège.
Le passage correct de la ceinture est très important pour la
sécurité de votre enfant. La ceinture du véhicule doit être
fixée le long des marquages/repères rouges sur le siège
Axiss Bébé Confort.
Consulter aussi l’étiquette située sur le côté du siège
Axiss Bébé Confort. N’utilisez jamais un autre passage de
ceinture que celui indiqué.
OK OK
NO NO
IMPORTANT Check that the child seat is properly installed.
It is important for your child’s safety that you fit the belt
correctly. The vehicle belt must be fixed along the red
markings/ positioning points on the Axiss BébéConfort
seat. Please also read the label on the side of the Axiss
Bébé Confort seat. Never fit the belt in any way other than
as shown.
OK
NO
9
Page 10
FR - EN
(
)
(
)
(
)
(
)
ATTENTION : vous avez
terminé l’installation de
votre siège Axiss, vérifiez ou
corrigez les points suivants:
ATTENTION : lorsque l’enfant
est installé dans le siège Axiss,
l’assise doit être verrouillée en
position face à la route avant
de rouler.
ATTENTION : Vérifiez que la
ceinture est bien bouclée, et
qu’elle n’est pas vrillée.
IMPORTANT - IMPORTANT
CLICK!
OK
CLICK!
NO
IMPORTANT: After you have
finished installing your child
restraint seat, check the
following points and correct as
required.
IMPORTANT: when the child
is seated in the Axiss seat, the
seat must be locked in the
forward-facing position before
setting off.
IMPORTANT: The belt is
securely fastened and is not
twisted.
ATTENTION : pour faciliter le
verrouillage de l’assise (témoin
vert) dans certains véhicules, il
peut être nécessaire d’exercer
une pression en haut de
l’assise
Votre siège n’est pas stable:
• Ajustez en hauteur l’appui-tête de votre véhicule. En
aucun cas l’appui-tête ne doit être en contact avec votre
siège Axiss.
• Si possible et si nécessaire, ajuster l’inclinaison de
votre banquette véhicule pour assurer un contact avec
l’embase.
Vous trouvez difficile de faire pivoter l’assise et/ou de
verrouiller l’assise en position face route (indicateur vert).
• Vérifiez votre installation:
• La ceinture doit passer dans tous les guides sangles,
• Il ne doit pas y avoir de mou dans la partie ventrale de la
ceinture,
• Aucune partie de la ceinture n’est en contact avec une
partie tournante de l’assise
• La ceinture est trop fortement serrée,
• La géométrie de la banquette véhicule apporte des
contraintes,
• Si possible, ajuster l’inclinaison de votre banquette
véhicule pour assurer un contact avec l’embase,
• Vérifiez qu’aucun corps étranger ne gêne la rotation.
Si les difficultés persistent, contacter votre revendeur.
WARNING : to enable the
seat to lock into position
(green indicator), in some
vehicles
it may be necessary to exert
pressure on the top of the
seat.
If the seat is not stable:
• Adjust the height of your vehicle’s head rest. The head
rest must never be in contact with the Axiss seat.
• If possible and if necessary, adjust the angle of your
vehicle seat to ensure it is in contact with the base.
If you are finding it hard to swivel the seat or to secure the
seat in the forward-facing position (green indicator).
• Check the fitting:
• The seatbelt must pass through all the strap guides,
• There should be no slack in the lap section of the seatbelt,
• Make sure no part of the seatbelt is in contact with a
movable part of the seat,
• Is the seatbelt fastened too tightly?
• Does the shape of the vehicle seat create any obstacles?
• If possible, adjust the angle of your vehicle seat to ensure
it is in contact with the base,
• Make sure nothing is in the way, preventing rotation.
If the problem cannot be resolved, please contact your
dealer.
10
Page 11
POUR RETIRER LE SIÈGE AXISS - REMOVING OF THE AXISS SEAT FR - EN
(
)
(
)
(
)
(
)
1
a
1 - Tirez sur la manette (a)
tout en pivotant (b)
l’assise vers vous.
1 - Pull on the handle (a)
whilst turning the seat (b)
towards you.
b
a
2
1
b
2 - (a)Appuyez sur le
bouton (1) et basculez
la manette au maximum,
(b) tout en appuyant sur
le bouton (1) et tirez sur
la ceinture (2) afin de
la dérouler de l’axe. (c)
Vous pouvez maintenant
retirer la ceinture de
l’axe.
2
IMPORTANT: il n’est
pas possible de dérouler
1
la ceinture de l’axe si la
manette du tendeur n’est
pas basculée au maximum.
c
2 - (a) Push button (1) and
push the lever as far
as possible (b), while
holding in the button
(1) and pull on the belt
(2) to unwind it from the
spindle. (c) Now you can
remove the belt from the
spindle.
IMPORTANT: It is not
possible to unwind the
belt from the spindle if the
tension adjustment lever
has not been pushed all
the way.
3
a
b
3 - Déverrouillez la ceinture
de sécurité (a), puis
dégagez-la du guidesangle haut (b) et des
guides-sangle situés sur
le pourtour du socle.
IMPORTANT: même si
l’enfant n’y est pas installé,
le siège Axiss doit toujours
être correctement maintenu
par la ceinture de sécurité.
S’il ne l’était pas, il pourrait
se transformer en véritable
projectile et être un danger
pour les occupants du
véhicule.
3 - Undo the safety belt (a)
then detach it from the
top strap guide (b) and
the strap guides located
on the outside of the
base.
IMPORTANT: Even if the
child is not seated in it, the
Axiss seat must always be
properly restrained by the
seat belt. If it were not, it
could actually become a
projectile and present a
danger for the occupants of
the vehicle.
11
Page 12

FR - EN
AJUSTER LA HAUTEUR DU HARNAIS - ADJUSTING THE HARNESS HEIGHT
NO
NO
Il est nécessaire d’adapter
le harnais à la taille de
votre enfant. * Les bretelles
OK
du harnais doivent être
positionnées juste à la
hauteur des épaules de
l’enfant.
It is necessary to adjust
the harness to your child’s
height. * The harness straps
must be positioned just at
the height of the child’s
shoulders.
1
2
3
1 - Basculez la têtière vers
l’avant.
2 - Faites glisser la têtière,
vers le haut ou vers le
bas en fonction de la
taille de l’enfant.
3 - Appuyez sur la têtière
pour verrouiller la
position sélectionnée.
1 - Tip the headrest
forwards.
2 - Slide the headrest up
or down, according to
the size of the child.
Push on the headrest to
lock it into the selected
position.
3 - Push on the headrest
to lock it into the chosen
position.
12
12
Page 13

8
PUSH
PUSH
INSTALLATION
DE L’ENFANT -
PLACING THE CHILD IN THE CHILD SEAT
FR - EN
1
1 - Appuyez sur l’ajusteur
(a) tout en tirant (b) sur
les bretelles du harnais
(saisir les bretelles et
non les protections de
bretelles).
1 - Push on adjuster (a) while
pulling on the harness
straps (b) (holding the
straps and not the strap
protectors).
a
b
2
a
b
3
2 - Installez votre enfant
dans le siège, décrochez
les bretelles du harnais.a
3 - Assemblez les parties
(a) et (b) du fermoir, puis
insérez le dans la boucle
(c) jusqu’à l’obtention
d’un Click!.
2 - Place your child
in the seat and unhook
the harness straps.
3 - Connect parts (a) and (b)
of the clasp, then insert
it in the buckle (c)
until it clicks.
CLICK!
4 - Tirez sur la sangle de
4
réglage des bretelles
afin d’ajuster le harnais à
votre enfant.
Pour information ne
laissez pas plus de
l’épaisseur d’un doigt
entre le harnais et
l’enfant.
4 - Pull on the harness
tightening strap to adjust
the harness to fit your
child. There should be no
more than a finger’s width
between the harness and
the child.
13
13
Page 14

FR - EN
DESINSTALLATION DE L’ENFANT - REMOVING THE CHILD
POUR DETACHER L’ENFANT
TO REMOVE THE CHILD
1
1 - Appuyez sur l’ajusteur
(a) tout en tirant (b) sur
les bretelles du harnais
(saisir les bretelles et
b
non les protections de
bretelles).
1 - Push on adjuster (a) while
pulling on the harness
straps (b) (holding the
straps and not the strap
protectors).
a
PUSH
2
PUSH
2 - Appuyez sur le bouton
rouge de la boucle
du harnais pour la
déverrouiller, suspendez
les bretelles du harnais.
2 - Push the red button on
the harness buckle to
unlock it; hang up the
harness straps.
INCLINAISON DE L’ASSISE - ADJUSTING OF THE SEAT RECLINING ANGLE
PUSH
POUR RÉGLER
L’INCLINAISON DE
L’ASSISE
- Appuyez sur le bouton
situé à l’avant de l’assise
tirez vers le haut ou
poussez vers le bas,
lorsque la position désirée
est atteinte relâchez le
bouton.
TO ADJUST THE
RECLINING ANGLE OF
THE SEAT
- Press the button situated
at the front of the seat.
Pull seat upwards or
push downwards. Once
the desired position is
reached, release the
button.
14
8
1
Page 15

DEHOUSSAGE - REMOVING THE SEAT COVER
FR - EN
Entretien
Confection
• Avant le lavage consulter l’étiquette de composition du textile cousue
sur la confection, vous y retrouverez les symboles de lavage propre
à l’élément à laver.
Pictogrammes de lavage :
Lavage en machine 30°
Lavage à la main seulement
Ne pas utiliser de Javel (Chlore)
Coque
• Nettoyer la coque à l’aide d’un chiffon humide.
Pas de séchage en tambour
Pas de repassage
Aucun nettoyage à sec
.
1
a
b
2
a
c
PUSH
b
Care
Fabric
• Before cleaning, check the label sewn into the fabric, you will find the
wash symbols indicating the washing method for each item.
Washing symbols :
Machine wash 30 °
Hand wash only
Do not use bleach (Chlorine)
Shell
• Clean the shell using a damp cloth.
POUR ENLEVER
LA HOUSSE DE L’ASSISE
• Avant démontage, veillez
à bien noter la manière
dont les différentes parties
sont montées afin de tout
remonter correctement.
1 - Faites pivoter l’assise.
2 - Déverrouillez la boucle
du harnais (a) puis
appuyez sur l’ajusteur
(b) tout en tirant au
maximum sur les
bretelles (c) du harnais
(saisir les bretelles et
non les protections de
bretelles).
Do not tumble dry
Do not iron
Do not dry clean
TO REMOVE
THE SEAT COVER
• Before dismantling, be
sure to pay close attention
to the way the different
parts are assembled, so as
to be able to reassemble
them properly.
1 - Swivel the seat.
2 - Unfasten the harness
buckle (a), then push
down on adjuster (b)
while pulling out the
harness straps (c) as far
as possible (holding the
straps and not the strap
protectors).
3
a
b
3 - Décrochez les bretelles
du harnais de la plaque,
au dos de l’assise. A
partir de l’avant de
l’assise tirez sur les
bretelles pour les libérer
des protège-bretelles.
3 - Unfasten the harness
straps from the plate
behind the seat back.
From the front of the
seat, pull the straps free
from the strap protectors.
15
Page 16

FR - EN
4
DEHOUSSAGE - REMOVING THE SEAT COVER
a
b
x 2
c
4 - Faites passer la housse
par-dessus les carters (a)
et (b). Faites (c) glisser
à travers les fentes de
la housse les fermoirs
et la boucle du harnais.
Retirez la housse.
4 - Pull the seat cover over
the casings (a) and (b).
Slide (c) the harness
clasp and buckle through
the slits in the seat cover.
Remove the seat cover.
5
a
b
OK
NO
c
b
a
5 - Faites passez les protège-
bretelles à travers les
fentes.
IMPORTANT : ne retirez
jamais les parties en
polystyrène ou mousse
situées sous la housse, elles
interviennent directement
dans l’efficacité du siège
Axiss.
- Lors du remontage
veillez à ce que les
bretelles du harnais ne
soient pas vrillées et passent
bien à plat dans les fermoirs
(a) du harnais. Vérifiez que
les bretelles passent bien
sous la barre au dos de
l’assise. Testez le bon
fonctionnement du harnais
avant d’installer votre enfant,
si vous avez un doute
contacter votre revendeur.
POUR SEULEMENT
RETIRER LA HOUSSE DE
LA TETIERE.
Déclippez l’axe métallique
(b) au dos de l’assise puis
retirez l’axe pour libérer
les boucles des sangles
des protège-bretelles. (c) A
partir de l’avant de l’assise
retirez les protège-bretelles.
Vous pouvez maintenant
déhousser la têtière.
5 - Pass the strap protectors
through the slits of the
seat cover as you remove
it.
IMPORTANT: Never remove
the polystyrene or foam parts
located under the seat cover:
they contribute directly to
the effectiveness of the Axiss
seat.
- During reassembly make
sure that the harness straps
are not twisted and are
completely flat as they pass
through the harness clasps (a).
Check that the straps pass
properly under the bar on the
seat back. Test the proper
functioning of the harness
before placing your child in the
seat. If you have any doubts,
please contact your retailer.
TO REMOVE THE
HEADREST SEAT COVER
ONLY.
Unclip the metal clip (b) on
the back of the seat, then
remove the clip to free the
strap buckles from the strap
protectors. (c) From the front
of the seat, remove the strap
protectors. Now you can
remove the headrest seat
cover.
16
Page 17

GARANTIE
Notre garantie de 24 mois reflète notre confiance dans la qualité supérieure de notre conception, ingénierie, production et la
performance du produit. Nous garantissons que ce produit a été fabriqué conformément aux exigences de sécurité et normes
de qualité actuelles européennes applicables à ce produit, et que ce produit est, au moment de l’achat, exempt de défaut de
matériau et de fabrication.
Notre garantie de 24 mois couvre tous les défauts de matériau et de fabrication pour une utilisation dans des conditions
normales et conformément à la notice. Pour demander des réparations ou des pièces de rechange sous garantie pour des
défauts de matériau et de fabrication, vous devez présenter la preuve d’un achat effectué dans les 24 mois précédant la
demande de service.
Notre garantie de 24 mois ne couvre pas les dommages causés par l’usure normale, les accidents, l’utilisation abusive, la
négligence ou les conséquences d’un non-respect de la notice. Des exemples d’usure normale comprennent des roues et
des tissus usés par l’utilisation régulière et la décomposition naturelle de couleurs et des matériaux au fil du temps et par une
utilisation prolongée.
Que faire en cas de défauts :
Si des problèmes ou des défauts surviennent, le meilleur choix pour un service rapide est de consulter votre revendeur. Notre
garantie de 24 mois est reconnue par eux (1). Vous devez présenter la preuve d’un achat effectué dans les 24 mois précédant
la demande de service. Cela est plus facile si vous obtenez l’approbation au préalable de votre demande de service par le
Service Bébé Confort. En principe, nous payons le transport et le fret de retour pour des demandes de service sous garantie.
Les dommages qui ne sont pas couverts par notre garantie peuvent être traités à un tarif raisonnable.
Cette Garantie est conforme à la Directive européenne 99/44/EG du 25 mai 1999.
(1) Les produits achetés auprès de détaillants ou de revendeurs qui ôtent ou changent les étiquettes ou les numéros
d’identifications sont considérés comme non autorisés. Aucune garantie ne s’applique à ces produits puisque l’authenticité de
ces produits ne peut pas être vérifiée.
WARRANTY
Our 24 months warranty reflects our confidence in the high quality of our design, engineering, production and product
performance. We confirm that this product was manufactured in accordance with the current European safety
requirements and quality standards which are applicable to this product, and that this product is free from defects on
materials and workmanship at the time of purchase.
Our 24 months warranty covers all manufacturing defects in materials and workmanship when used in normal conditions
and in accordance with our user manual. To request repairs or spare parts under warranty for defects in materials and
workmanship you must present your proof of purchase, made within the 24 months preceding the service request.
Our 24 months warranty does not cover damage caused by normal wear and tear, accidents, abusive use, negligence or
the consequence of failing to comply with the user manual. Examples of normal wear and tear include wheels and fabric
worn down by regular use and the natural breakdown of colors and materials over extended period of time and use.
What to do in case of defects:
Should problems or defects arise, your first point of contact is your Bébé Confort dealer or retailer. Our 24 months
Warranty is recognized by them (1). You must present your proof of purchase, made within the 24 months preceding the
service request. It is easiest if you get your service request pre-approved by Bébé Confort Service. In principle, we pay for
shipment and for return freight connected to service requests under the warranty. Damage not covered by our warranty or
on products outside of warranty can be handled at a reasonable fee.
This Warranty is in compliance with to European Directive 99/44/EG of 25 May 1999.
(1) Products purchased from retailers or dealers that remove or change labels or identification numbers are considered
unauthorized. Products purchased from unauthorized retailers are also considered unauthorized. No warranty applies to
these products since the authenticity of these products cannot be ascertained.
17
Page 18

18
Page 19

DE - Gebrauchsanweisung Seite 19 - 32 / Garantie Seite 33
GEBRAUCHSANLEITUNG
DE • ZUSAMMENFASSUNG
• EINBAU IN FAHRTRICHTUNG, Seiten 20/21/25/26.
• Schwenken des Sitzoberteils, Seite 22.
• Einbau des Kindersitzes in Fahrtrichtung GRUPPE 1, Seiten 23/24.
• Herausnehmen des Kindersitzes, Seite 27.
• Einstellen der Höhe des Gurtes, Seite 28.
• So setzen Sie ihr Kind in den Kindersitz, Seite 29.
• So nehmen Sie ihr Kind aus dem Kindersitz, Seite 30.
• Einstellung der Sitzneigung, Seite 30.
• Pflege und Abnehmen des Bezuges, Seite 31/32.
• Garantie, Seite 33.
BESCHREIBUNG
DE
1 - Konfektion.
2 - Verstellbare Kopfstütze.
3 - Hebel zum Schwenken des Sitzes.
4 - Basis
.
5 - Führungen des Beckengurtes (des Fahrzeuges).
6 - Knopf zur Einstellung der Sitzneigung.
7 - Einstellgurt des 5-Punkt-Gurtes.
8 - Einstellschnappschloß des 5-Punkt-Gurtes.
9 - Verriegelungsanzeige der Sitzfläche.
10 - Führung des Diagonalgurtes (des Fahrzeugs).
11 - Gurtspanner des Dreipunktgurtes (des Fahrzeugs).
12 - Aufbewahrungsfach für die Beschreibung.
13 - Haken zur Befestigung des Fünfpunktgurtes.
14 - Fünfpunktgurt.
15 - Wählhebel (dient zum Schwenken des Sitzoberteils nach rechts
oder links).
19
Page 20

(
)
DE
WICHTIG
WICHTIG
• Die Produkte von Bébé Confort wurden für die Sicherheit und
den Komfort Ihres Kindes mit großer Sorgfalt entwickelt und
geprüft. Benutzen Sie ausschließlich Zubehör, das von Bébé
Confort verkauft oder gutgeheißen wurde. Die Verwendung
von Fremdzubehör kann gefährlich sein.
• Wir empfehlen Ihnen, diese Gebrauchsanweisung
aufmerksam durchzulesen und das Produkt vor der ersten
Verwendung probeweise zu handhaben.
• Bewahren Sie diese Anleitung immer gut auf, ein
Aufbewahrungsfach ist auf der Rückseite des Sitzes
angebracht.
UNIVERSELLES SYSTEM MIT 3-PUNKT-GURT DES
FAHRZEUGS
• Genehmigtes Modell
• Der Kindersitz AXISS der Gruppe 1 (Kinder von 9 bis 18 kg)
ist auf dem Rücksitz mit Blick in Fahrtrichtung anzubringen.
• Diesen Kinderautositz immer vorwärts gerichtet einbauen.
Niemals rückwärts gerichtet.
• Die Verantwortung wird vom Hersteller einzig im
Rahmen der Obliegenheit der Europäischen Verordnung
(R44) übernommen. Diese technische Genehmigung
schließt weder Vorsicht noch das Einhalten der
Straßenverkehrsordnung aus.
• Nachdem Sie Ihr Kind im Sitz angeschnallt haben
vergewissern Sie sich, dass der Fahrzeuggurt korrekt
gespannt ist indem Sie an ihm ziehen. Prüfen Sie ebenfalls,
dass der Fahrzeuggurt nicht verdreht ist.
KIND
• Lassen Sie Ihr Kind nie unbeaufsichtigt.
• Auch der kleinste Aufprall des Fahrzeugs kann Ihr Kind
in ein Geschoss verwandeln.
• Zu Ihrer eigenen Sicherheit und der Ihres Kindes transportieren
Sie Ihr Kind immer korrekt angeschnallt im befestigten Autositz,
auch wenn Sie nur eine kurze Strecke fahren.
• Achten Sie darauf, dass die Beckengurte am Bauch so weit
unten wie möglich anliegen, damit das Becken gut gestützt
wird.
• Die Temperatur im Fahrzeuginneren kann besonders
nach längerer Sonneneinstrahlung sehr hoch sein. Unter
diesen Umständen ist es vorteilhaft, den Kindersitz mit
einem Tuch oder ähnlichem Material abzudecken, um zu
verhindern, dass sich die Befestigungen des Gurtsystems, im
Besonderen die metallischen Bestandteile, erhitzen und das
Kind dadurch Verbrennungen erleidet.
ANDERE WICHTIGE HINWEISE
• Dieses Kinderrückhaltesystem ist nur dann effizient, wenn die
Gebrauchsanweisung beachtet wird.
• Befestigen Sie das Kinderrückhaltesystem immer, auch wenn
kein Kind darin sitzt.
• Achten Sie darauf, dass Gepäckstücke und sonstige
Gegenstände, welche die Insassen bei einem Unfall
verletzten könnten, sicher verstaut sind.
• Legen Sie niemals schwere Gegenstände auf die Hutablage
um zu vermeiden, dass diese bei einem Unfall nach vorne
geschleudert werden.
• Die starren Teile des Kinderrückhaltesystems sowie jene aus
Kunststoff müssen so platziert bzw. befestigt werden, dass
sie unter normalen Benutzungsbedingungen des Fahrzeugs
nicht unter dem Kinderautositz oder in der Fahrzeugtür
eingeklemmt werden können.
• Achten Sie immer darauf, dass kein Teil des Kinderautositzes
oder des Hosenträgergurtes unter dem Sitz oder in der
Fahrzeugtür eingeklemmt ist.
• Der Kindersitz muss nach einem Unfall unbedingt
ausgetauscht/ersetzt werden.
• Ändern Sie nie Bauweise oder Material des Sitzes oder des
Hosenträgergurtes ohne vorher den Hersteller dazu befragt
zu haben.
• Verwenden Sie das Kinderrückhaltesystem nicht ohne
den Sitzbezug. Ersetzen Sie den Bezug nie durch ein
vom Hersteller nicht empfohlenes Fabrikat, denn er ist ein
wichtiger Bestandteil des Rückhaltesystems.
• Herunterklappbare Sitze müssen immer entsprechend
befestigt / eingerastet sein.
• Installieren Sie den Autositz nach Ankauf in Ihrem Auto.
Sollte es aufgrund der Länge des Auto-Sicherheitsgurtes zu
Schwierigkeiten beim Einbauen kommen kontaktieren Sie
bitte Ihren Fachhändler.
• Es wird empfohlen, mit dem Fachgeschäft des
Kinderrückhaltesystems Kontakt aufzunehmen, wenn
Zweifel beim Sitzeinbau oder beim richtigen Gebrauch des
Sitzes herrschen.
OK
NO
NO
Der Hosenträgergurt muss durch das Einstellen
der Schultergurte an die Größe des Kindes angepasst
Damit Ihr Kind im Autositz Axiss korrekt angeschnallt
wird, beachten Sie unbedingt Seite 29 dieser
Gebrauchsanweisung („Anschnallen des Kindes“).
werden.(Seite 28)
CLICK!
20
Page 21

WICHTIG
(
)
DE
Einbaurichtung
vorwärts gerichtet
* Dieser Sitz muss auf der Rückbank des Fahrzeugs platziert werden bzw. in Ausnahmefällen auf dem Beifahrersitz gemäß
der Gesetzgebung, die im jeweiligen Land in Kraft ist.
OK
OK
NO
Rückbank *
NO
Plätze
Gruppe 1
9 bis 18 kg
Dieses Kinderrückhaltesystem darf nur
in zugelassenen Fahrzeugen eingebaut
werden, die mit der EU-Verordnung Nr. 16 /
UNO oder anderen gleichwertigen Normen
entsprechenden 3-Punkt-Sicherheitsgurten mit
oder ohne Aufrollautomatik, ausgerüstet sind.
Schieben Sie den Beifahrersitz nach vorne,
damit sich das Kind nicht daran stoßen kann.
CLICK!
OK
ACHTUNG : Den Sitz immer vor Antritt der
Fahrt in Fahrtrichtung verriegeln.
NO
21
Page 22

DE
(
)
(
)
(
)
(
)
1
2
SCHWENKEN DES SITZOBERTEILS
Die Richtung, in die der Sitz gedreht wird, um das Kind
hineinzusetzen, muss Richtung Autotür sein.
Unter der Sitzfläche des Sitzes „Axiss“ befindet sich
ein Wählhebel, mit dem Sie die Schwenkrichtung des
OK
a
Sitzoberteils auswählen können.
SCHWENKEN DES SITZOBERTEILS NACH RECHTS
1 - Um das Sitzoberteil nach rechts zu schwenken,
drücken Sie den Hebel nach hinten.
2 - Betätigen Sie den Hebel, halten Sie ihn in der
Entriegelungsposition und drehen Sie das Sitzoberteil mit
der anderen Hand zu sich her.
b
1
Die Richtung, in die der Sitz gedreht wird, um das Kind
hineinzusetzen, muss Richtung Autotür sein.
22
DE
SCHWENKEN DES SITZOBERTEILS NACH LINKS
1 - Um das Sitzoberteil nach links zu schwenken,
ziehen Sie den Hebel nach vorn.
OK
2
a
2 - Betätigen Sie den Hebel, halten Sie ihn
in der Entriegelungsposition und drehen Sie
das Sitzoberteil mit der anderen Hand zu sich her.
b
Page 23

EINBAU IN FAHRTRICHTUNG
CLICK!
ACHTUNG !
b
a
Vor der ersten Verwendung Ihres Autositzes Axiss ist
es wichtig zu kontrollieren, ob die Plastikkeile, die die
Gurtführungen
in der Verpackung schützen, entfernt wurden.
Sollten diese noch nicht entfernt worden sein ist es
an der Zeit dies jetzt zu tun.
DE
1
DER KINDERSITZ MUSS IN FAHRTRICHTUNG
EINGEBAUT WERDEN
1 - Führen Sie den unteren Teil des Sicherheitsgurtes durch
die beiden Gurtführungen an der Türseite (a), dann um
den Sitz herum (b).
a
b
2 - Führen Sie den unteren Teil des Sicherheitsgurtes durch
die beiden Gurtführungen (a) am Umfang des Unterteils.
Schließen Sie den Sicherheitsgurt und ziehen Sie ihn
fest an.
WICHTIG: Überzeugen Sie sich, dass der untere Teil
des Sicherheitsgurtes fest gespannt ist, dass er sicher
am Umfang des Unterteils anliegt und sicher in die 4
Gurtführungen eingeführt ist.
3 - Schwenken Sie das Oberteil des Sitzes zu sich her,
indem Sie den -Hebel betätigen.
Während Sie die Entriegelung gedrückt halten, ergreifen
Sie mit der anderen Hand die gegenüberliegende
Armlehne und schwenken Sie (b) das Sitzoberteil zu sich
her.
ACHTUNG : Der Wählhebel unter der Sitzfläche
ist vorher je nach gewählter Schwenkrichtung entsprechend
eingestellt worden (siehe Seite 22).
b
CLICK!
a
c
2
3
a
b
23
Page 24

DE
CLICK!
(
)
(
)
(
)
(
)
EINBAU IN FAHRTRICHTUNG
4
a
b
4 - Schwenken Sie den Spanner maximal bis zum Anschlag.
a
5
5 - (a) Führen Sie den Sicherheitsgurt durch die Gurtführung,
die sich oben am Unterteil befindet. (b) Lassen Sie den
Sicherheitsgurt in den Schlitz der Spannachse gleiten.
WICHTIG: Überprüfen Sie, dass der Gurt im Bauchteil kein
Spiel hat, indem Sie leicht daran ziehen.
b
6
7
6 - Bewegen Sie den Hebel des Gurtspanners einige Male hin
und her, bis der Gurt fest gespannt ist (drücken Sie nicht
auf den Knopf des Gurtspanners).
WICHTIG: Wenn der Gurt gespannt ist, muss der Hebel
heruntergeklappt sein
WICHTIG: Bei manchen Fahrzeugen kann es sein, dass der
untere Teil des Fahrzeuggurtes aus der seitlichen hinteren
Gurtführung herausrutscht, wenn er gespannt wird. Die
Sicherheit wird dadurch auf jeden Fall nicht beeinträchtigt.
7 - Schwenken Sie das Sitzoberteil, und es erscheint oben am
Unterteil ein grünes Signal, das anzeigt, ob das Oberteil in
Fahrtrichtung eingerastet ist
24
CLICK!
WICHTIG: Auch wenn der Sitz nicht benutzt wird, raten
wir dringend, den Sitz während der Fahrt in Fahrtrichtung
eingerastet zu lassen.
Page 25

WICHTIG
Vergewissern Sie sich, dass der Sitz richtig eingebaut ist.
Der Verlauf des Autogurts ist von größter Wichtigkeit für die Sicherheit Ihres Kindes. Der Autogurt muss entlang der roten
Markierungen an den Bébé Confort Axiss montiert werden. Siehe diesbezüglich auch den Sticker an der Seite des Bébé
Confort Axiss. Wenden Sie niemals einen anderen als den vorgeschriebenen Gurtverlauf an!
OK OK
NO NO
DE
OK
NO
25
Page 26

DE
(
)
(
)
ACHTUNG : Sie haben nun den Einbau
Ihres Kindersitzes Axiss abgeschlossen,
Prüfen bzw. korrigieren Sie nun noch
folgende Punkte.
ACHTUNG : Wenn Ihr Kind im Kindersitz
„Axiss“ sitzt, muss der Sitz immer vor Antritt
der Fahrt in Fahrtrichtung verriegelt werden.
ACHTUNG : Vergewissern Sie sich, dass der
Gurt straff angezogen ist, und dass er nicht
verdreht ist.
ACHTUNG : Zur leichteren Verriegelung
der Sitzfläche (grüner Anzeiger) kann es in
bestimmten Fahrzeugen erforderlich sein,
oben auf die Sitzfläche zu drücken.
EINBAU IN FAHRTRICHTUNG
CLICK!
CLICK!
OK
NO
Ihr Sitz ist nicht stabil :
• Stellen Sie die Höhe der Kopfstütze Ihres Fahrzeugs ein. Die Kopfstütze darf in keinem Fall mit Ihrem Axiss-Sitz in
Berührung kommen.
• Wenn möglich und notwendig, stellen Sie die Neigung der Fahrzeugbank ein, um den Kontakt mit dem Sockel
sicherzustellen.
Sie haben Schwierigkeiten beim Drehen des Sitzes und/oder beim Verriegeln des Sitzes in Fahrtrichtung (grüner Anzeiger).
Überprüfen Sie die Anbringung des Sitzes:
• Der Gurt muss durch alle Gurtführungen gefädelt sein.
• Der Gurt muss im Bauchbereich fest angezogen sein.
• Der Gurt berührt an keiner Stelle ein drehbares Teil des Sitzes.
• Der Gurt ist zu fest angezogen.
• Es kommt zu Einschränkungen aufgrund der Geometrie der Fahrzeugbank.
• Wenn möglich, stellen Sie die Neigung der Fahrzeugbank ein, um den Kontakt mit dem Sockel sicherzustellen.
• Überprüfen Sie, dass kein Fremdkörper die Drehbewegung behindert.
Falls die Schwierigkeiten weiterhin bestehen, kontaktieren Sie Ihren Händler.
26
Page 27

HERAUSNEHMEN DES KINDERSITZES AXISS
(
)
(
)
(
)
(
)
DE
1
1 - Drücken Sie auf den -Knopf (a) und drehen Sie dabei den
Sitz zu Ihnen (b).
a
b
a
2
1
b
2
1
2 - (a) Drücken Sie auf den Knopf (1) und kippen Sie den
Handgriff auf „Maximum“, während Sie den Knopf (1)
gedrückt halten ziehen Sie am Sicherheitsgurt (2), um
ihn von der Achse abzurollen. (c) Sie können nun den
Sicherheitsgurt von der Achse abnehmen.
WICHTIG: es ist nicht möglich, den Sicherheitsgurt von der
Achse abzunehmen, wenn der Hebel des Spanners nicht
auf „Maximum“ gestellt ist.
c
3
a
b
3 - Entriegeln Sie den Sicherheitsgurt (a) und lösen Sie ihn
dann aus der Gurtführung (b) und aus den rund um den Sitz
befindlichen Gurtbändern.
WICHTIG: auch wenn der Sitz nicht benutzt wird, muss der
Kindersitz „Axiss“ immer korrekt mit dem Sicherheitsgurt
befestigt sein. Wenn dies nicht der Fall ist, kann der
Kindersitz sich in ein gefährliches Geschoss verwandeln
und eine ernsthafte Gefahr für die Insassen des Fahrzeugs
darstellen.
27
Page 28

DE
EINSTELLEN DER HÖHE DES FÜNFPUNKTGURTES
Es ist unbedingt erforderlich, dass Sie den Fünfpunktgurt an
die Größe Ihres Kindes anpassen. * Die Schulterriemen des
OK
Gurtes müssen an die Schulterhöhe des Kindes angepasst
werden.
NO
NO
1
2
3
1 - Kippen Sie die Kopfstütze nach vorn.
2 - Schieben Sie die Kopfstütze nach oben oder unten, bis
sie an die Größe des Kindes angepasst ist.
3 - Drücken Sie auf die Kopfstütze, bis sie in der
gewünschten Position einrastet.
28
28
Page 29

HINEINSETZEN DES KINDES
8
PUSH
PUSH
DE
1
1 - Drücken Sie auf die Schließe (a) und ziehen Sie an den
Schulterriemen des Fünfpunktgurtes (ziehen Sie an den
Gurten und nicht an deren Bezügen).
a
b
2
a
3
b
2 - Setzen Sie Ihr Kind in den Kindersitz, und nehmen Sie die
Schultergurte aus den Haken.
3 - Nehmen Sie die Teile (a) und (b) des Verschlusses und
stecken Sie diese dann in die Schließe (c), bis Sie ein
deutliches „Klick“ vernehmen.
CLICK!
4
4 - Ziehen Sie an den Einstellgurten der Schultergurte, um den
Fünfpunktgurt an Ihr Kind anzupassen.
Zur Information: Lassen Sie nicht mehr als eine Fingerbreite
Spiel zwischen dem Gurt und Ihrem Kind.
29
Page 30

DE
HERAUSNEHMEN DES KINDES
1
ÖFFNEN DES GURTES
1 - Drücken Sie auf die Schließe (a) und ziehen Sie an den
Schulterriemen des Fünfpunktgurtes (ziehen Sie an den
Gurten und nicht an deren Bezügen).
b
a
PUSH
2
PUSH
2 - Drücken Sie auf den roten Knopf der Schließe des
Fünfpunktgurtes, um ihn zu entriegeln, und nehmen Sie
die Schulterriemen ab.
NEIGUNG DES SITZOBERTEILS
EINSTELLEN DER NEIGUNG DES SITZOBERTEILS
- Drücken Sie auf den Knopf, der sich auf der Vorderseite
der Sitzfläche befindet und ziehen Sie ihn nach oben
oder schieben Sie ihn nach unten, bis die gewünschte
PUSH
Sitzposition erreicht ist, lassen Sie ihn dann los.
30
8
1
Page 31

ABNEHMEN DES BEZUGES
Pflege
Bezug
Beachten Sie vor dem Reinigen das unter dem Bezug aufgenähte Etikett mit der Zusammensetzung des Stoffes. Darauf befinden sich ebenfalls
die Waschsymbole.
Pflegehinweise (Piktogramme)
30 º Waschmaschinenfest
Nur Handwäsche
Nicht bleichen (Chlor)
Schale
Reinigen Sie die Schale mit einem feuchten Lappen.
a
b
a
Nicht schleudern
Nicht bügeln
Keine Trockenreinigung
ABNEHMEN DES BEZUGES DES SITZOBERTEILS
• Bevor Sie mit dem Abziehen beginnen, notieren Sie sich
bitte, wie die einzelnen Teile angebracht sind, um diese
wieder korrekt anbringen zu können.
1 - Schwenken Sie die Sitzfläche.
2 - Entriegeln Sie die Schließe des Fünfpunktgurtes
(a). Drücken Sie dann auf den Einstellknopf der
Schulterriemen des Fünfpunktgurtes und ziehen sie auf
Maximum heraus (ziehen Sie an den Gurten und nicht an
deren Bezügen).
DE
c
PUSH
b
a
b
3 - Hängen Sie die Schulterriemen aus ihrer Halterung auf der
Rückseite des Sitzoberteils. Ziehen Sie die Schulterriemen
nach vorne aus ihren Schutzbezügen.
31
Page 32

ABNEHMEN DES BEZUGES
4
a
b
x 2
4 - Nehmen Sie die Gummizüge (a) des Überzuges ab.
Ziehen Sie den Überzug über die Verkleidungen (b) und
(c). Schieben Sie die Verschlüsse und die Schließe des
Gurtes durch die Schlitze im Bezug. Nehmen Sie den
Überzug ab.
c
5 - Ziehen Sie die Gummizüge des Überzuges über die
5
a
b
OK
Kopfstütze ab, ziehen Sie die Schutzbezüge der
Schultergurte durch die Schlitze des Überzuges.
WICHTIG: entfernen Sie niemals die Teile aus Polystyren
oder Schaumstoff, die sich unter dem Bezug befinden, diese
sind ein wichtiger Bestandteil der Effizienz des Kindersitzes
„Axiss“.
Achten Sie beim Wiederanbringen des Bezuges darauf,
dass die Schultergurte nicht verdreht sind, und dass sie
flach in den Verschlüssen (a) des Fünfpunktgurtes anliegen.
Vergewissern Sie sich, dass die Schultergurte gut unter der
Leiste auf der Rückseite des Oberteils geführt sind. Prüfen
Sie die Funktion des Fünfpunktgurtes gründlich, bevor Sie
Ihr Kind anschnallen. Wenn Sie Bedenken haben, nehmen
Sie bitte Kontakt zum Fachhandel auf.
32
NO
c
b
SIE WOLLEN NUR DEN ÜBERZUG DER KOPFSTÜTZE
ABNEHMEN
- Klippen Sie den Metallstab (b) auf der Rückseite des
Sitzes los, ziehen Sie dann den Stab heraus, um die
Schnallen der Spanngurte der Schultergurt-Schutzbezüge
freizubekommen. (c) Ziehen Sie die SchultergurtSchutzbezüge von der Vorderseite des Sitzes her ab. Sie
können den Überzug der Kopfstütze nun abnehmen.
a
Page 33

GARANTIE
Unsere 24-Monats-Garantie zeigt, wie groß unser Vertrauen in die hohe Qualität unserer Design-, Technik-,
Produktions- und Produktleistung ist. Wir garantieren, dass dieses Produkt gemäß den aktuellen europäischen
Sicherheitsanforderungen und Qualitätsstandards hergestellt wurde, die auf dieses Produkt Anwendung finden und dass
dieses Produkt zum Zeitpunkt des Kaufes frei von Material- und Verarbeitungsmängeln ist.
Unsere 24-Monats-Garantie erstreckt sich auf Material- und Verarbeitungsmängel bei Verwendung unter normalen
Bedingungen und gemäß unserem Benutzerhandbuch. Zur Anforderung von Reparaturen oder Ersatzteilen im Rahmen der
Garantie aufgrund von Material- und Verarbeitungsmängeln ist der Nachweis zu erbringen, dass der Kauf innerhalb von 24
Monate vor dieser Service-Anforderung erfolgt ist.
Unsere 24-Monats-Garantie erstreckt sich nicht auf Schäden aufgrund von normalem Verschleiß, Unfällen,
missbräuchlicher Verwendung, Fahrlässigkeit oder der Nichtbefolgung des Benutzerhandbuches. Beispiele für normalen
Verschleiß sind die Abnutzung von Rädern und Gewebe durch regelmäßige Nutzung und die natürliche Farb- und
Materialabschwächung über einen längeren Zeitraum und eine längere Nutzungsdauer.
Was im Falle von Mängeln zu tun ist:
Falls Probleme oder Mängel auftreten, sollten Sie sich für schnellen Service am besten an Ihren [Marke] Händler wenden.
Unsere 24-Monats-Garantie wird dort anerkannt (1). Dazu ist ein Nachweis zu erbringen, dass der Kauf innerhalb von
24 Monaten vor der Service-Anforderung erfolgt ist. Am einfachsten ist es, Ihre Service-Anforderung vorab vom [Marke]
Kundenservice genehmigen zu lassen. Wir übernehmen grundsätzlich die Kosten für Versand und Rücksendung im
Zusammenhang mit Service-Anforderungen im Rahmen der Garantie. Schäden, die von der Garantie ausgeschlossen sind,
können gegen eine angemessene Gebühr behoben werden.
Diese Garantie entspricht der Europäischen Richtlinie 99/44/EG vom 25. Mai 1999.
(1) Produkte, bei denen die Etiketten oder Identifikationsnummern entfernt oder geändert wurden, gelten als nicht
zugelassen. Für diese Produkte wird keine Garantie gewährt, da die Echtheit dieser Produkte nicht feststellbar ist.
33
Page 34

34
Page 35

35
Page 36

IMPORTANT - WARNING - WICHTIG
FR
La sécurité des enfants en voiture est essentielle. Plus que pour tout autre produit, un dispositif de retenue (nacelle ou siège auto) ne supporte pas l’erreur. Dos ou
face à la route, un siège doit parfaitement maintenir le corps de l’enfant, être confortable et simple à installer pour les parents. Depuis son origine, Bébé Confort se
préoccupe de la sécurité des enfants et conçoit des sièges parfaitement adaptés et conformes aux dernières réglementations européennes.
Ce dispositif est seulement utilisable sur les véhicules approuvés équipés de ceintures de sécurité 3 points/statiques/à enrouleur, homologuées, conformément au
règlement N°�16 de la CEE/ONU ou d’une norme équivalente.
NOTE POUR L’UTILISATEUR :
1 - Ceci est un dispositif de retenue pour enfants de la catégorie “universel”. Il est homologué conformément au règlement N° 44, série 04 d’amendement, pour un
usage général sur les véhicules, et peut être adapté à la plupart des sièges de véhicules.
2 - Le dispositif sera vraisemblablement correctement monté sur le véhicule si le constructeur de celui-ci spécifie, dans le manuel du véhicule, que ce dernier peut
recevoir des dispositifs de retenue pour enfants “universels” pour ce groupe d’âge.
3 - Ce dispositif de retenue pour enfants a été classé comme “universel” en vertu de prescriptions plus rigoureuses que celles qui étaient appliquées aux modèles
antérieurs qui ne portent pas cette étiquette.
4 - En cas de doute, consulter le fabriquant ou le revendeur du dispositif de retenue pour enfants.
EN
Child safety in a car is paramount. More so than with any other product, a restraining device (carrycot or car seat) must be properly fitted. Facing or with its back
to the road, a seat should support the child’s body perfectly, be comfortable and simple for parents to install. From the very beginning, Bébé Confort has been
concerned about child safety, and designs eminently suitable seats in accordance with the latest European regulations.
This device should only be used in approved vehicles which are equipped with 3 point/static/inertia-reel seat belts, approved in accordance with UN/EEC regulation
N°16 or other equivalent standard.
NOTES FOR THE USER:
1 - This is a “universal” child restraint mechanism. It is certified under the 04 amendment series to regulation N° 44 for general use in vehicles and may be adapted
to most vehicle seats.
2 - The device will in all likelihood be correctly mounted on the vehicle, if the manufacturer of the vehicle specifies, in the vehicle’s manual, that it can take “universal”
child restraint systems for that age group.
3 - This child restraint has been classified as “universal” under more stringent specifications than those applied to previous models not bearing this label.
4 - In case of doubt, consult the manufacturer or retailer of the child restraint.
DE
Das Wichtigste ist die Sicherheit Ihrer Kinder im Auto. Mehr als für jedes andere Produkt gilt : ein Rückhaltesystem (Wanne, Babyschale oder Autositz) verzeiht
keinen Fehler. Rückwärts gerichtet oder vorwärts gerichtet, ein Autositz muss den Körper Ihres Kindes tadellos stützen, komfortabel sein und für die Eltern einfach
zu installieren. Von Anbeginn an macht sich Bébé Confort über die Sicherheit Ihrer Kinder Gedanken und entwickelt Autositze, die den neuesten europäischen
Regelungen entsprechen. Dieses Rückhaltesystem darf nur in zugelassenen Fahrzeugen verwendet werden, die mit entsprechend der Verordnung Nr. 16 der EU/
UNO oder einer gleichwertigen Norm geprüften Sicherheitsgurten (3-Punkt/statisch/mit Aufrollern) ausgerüstet sind.
GEBRAUCHSHINWEISE :
1 - Dies ist ein Kinderrückhaltesystem der Kategorie « universell «. Es ist entsprechend der Verordnung Nr. 44.04 für einen allgemeinen Gebrauch in Fahrzeugen
zugelassen und lässt sich auf den meisten Fahrzeugsitzen installieren.
2 - Dies ist eine universelle Rückhaltevorrichtung für Kinder. Gemäss Verordnung Nr. 44 Änderungsreihe 4 ist sie für eine generelle Verwendung in Fahrzeugen
bestätigt und kann auf der Mehrheit der Fahrzeugsitze angebracht werden.
3 - Dieses Kinderrückhaltesystem wurde gemäß strengerer Anforderungen als derjenigen, die auf vorhergehende Modelle angewandt wurden, die dieses Etikett
nicht tragen, als « universell « eingestuft.
4 - Wenden Sie sich im Zweifelsfall an den Hersteller oder Verkäufer des Kinderrückhaltesystems.
DOREL FRANCE S.A.
Z.I. - 9 bd du Poitou
BP 905
49309 Cholet Cedex
FRANCE
DOREL BELGIUM
BITM Brussels International Trade Mart
Atomiumsquare 1, BP 177
1020 Brussels
BELGIQUE / BELGIE
DOREL (U.K). LTD
Hertsmere House,
Shenley Road,
Borehamwood
Hertfordshire WD6 1TE
UNITED KINGDOM
DOREL GERMANY
Augustinusstraße 11 b
D-50226 Frechen-Königsdorf
DEUTSCHLAND
www.bebeconfort.com
DOREL NETHERLANDS
Postbus 6071
5700 ET HELMOND
NEDERLAND
DOREL ITALIA S.P.A.
a Socio Unico
Via Verdi, 14
24060 Telgate (Bergamo)
ITALIA
DOREL HISPANIA, S.A.
C/Pare Rodés n°26 - Torre A 4°
Edificio Del Llac Center
08208 Sabadell (Barcelona)
ESPA—A
DOREL PORTUGAL
Artigos para Bebé, Lda.
Rua Pedro Dias, 25
4480-614 Rio Mau
Vila do Conde
PORTUGAL
DOREL JUVENILE
SWITZERLAND S.A.
Chemin de la Colice 4
1023 CRISSIER
SWITZERLAND / SUISSE
DOREL POLSKA
Ul. Legnicka 84/86
41-503 CHORZOW
POLAND
..0528955
 Loading...