


POLAR

™
INSTRUCTION MANUAL
VISIBLE BEAM ROTARY
LASER LEVEL
AUTOMATIC HORIZONTAL & VERTICAL


For trouble-free use of this scientic instrument, please
read this instruction manual carefully and keep it for
future reference.
Place of Purchase : .......................................
Date of Purchase : ............./............/ ............
www.bearscienticproducts.com
— 1 —
Thank you for purchasing the model POLAR LASER

Contents
Instrument accessories .................................................. Page 3
Chapter 1. Cautions ....................................................................... Page 4
Chapter 2. Introduction ................................................................... Page 5
Chapter 3. Instrument operation ..................................................... Page 8
Chapter 4. Battery .......................................................................... Page 12
Chapter 5. Remote control .............................................................. Page 14
Chapter 6. Accuracy checking & adjustment .................................... Page 15
Chapter 7. Outdoor receiver ........................................................... Page 24
Chapter 8. Care & maintenance ...................................................... Page 25
Chapter 9. Specifications ................................................................ Page 26
Chapter 10. Optional accessories ..................................................... Page 27
— 2 —

Instrument accessories
Standard Accessories:
1. Instrument
2. Carry Case
3. Instruction Manual
4. Red Laser Target
5. Remote Control
6. Internal Ni-MH Battery Pack
7. Battery Charger
Optional Accessories: (see page 27)
1. Genno Rod B-Genno
2. Wallmount B-WM
3. Outdoor Receiver & Clamp
— 3 —

— 4 —
1. Cautions
1. The Polar is clasified as a Class 2M/2a laser product according
to United States Government Code of Federal Regulations CFR21.
2. Avoid direct eye exposure to the laser beam.
3. When moving the instrument please turn off the power.
4. Push the buttons on the front of the Polar or the remote control with the base
of your nger not sharp ngernails.
5. When the Laser is not being used for periods greater than 2 months please
remove the batteries from the unit to avoid possible corrosion.

2. Introduction
2.1. Housing Nomenclature
— 5 —
Laser head
Control panel
Charging port
Laser window
Rubberized
Handle
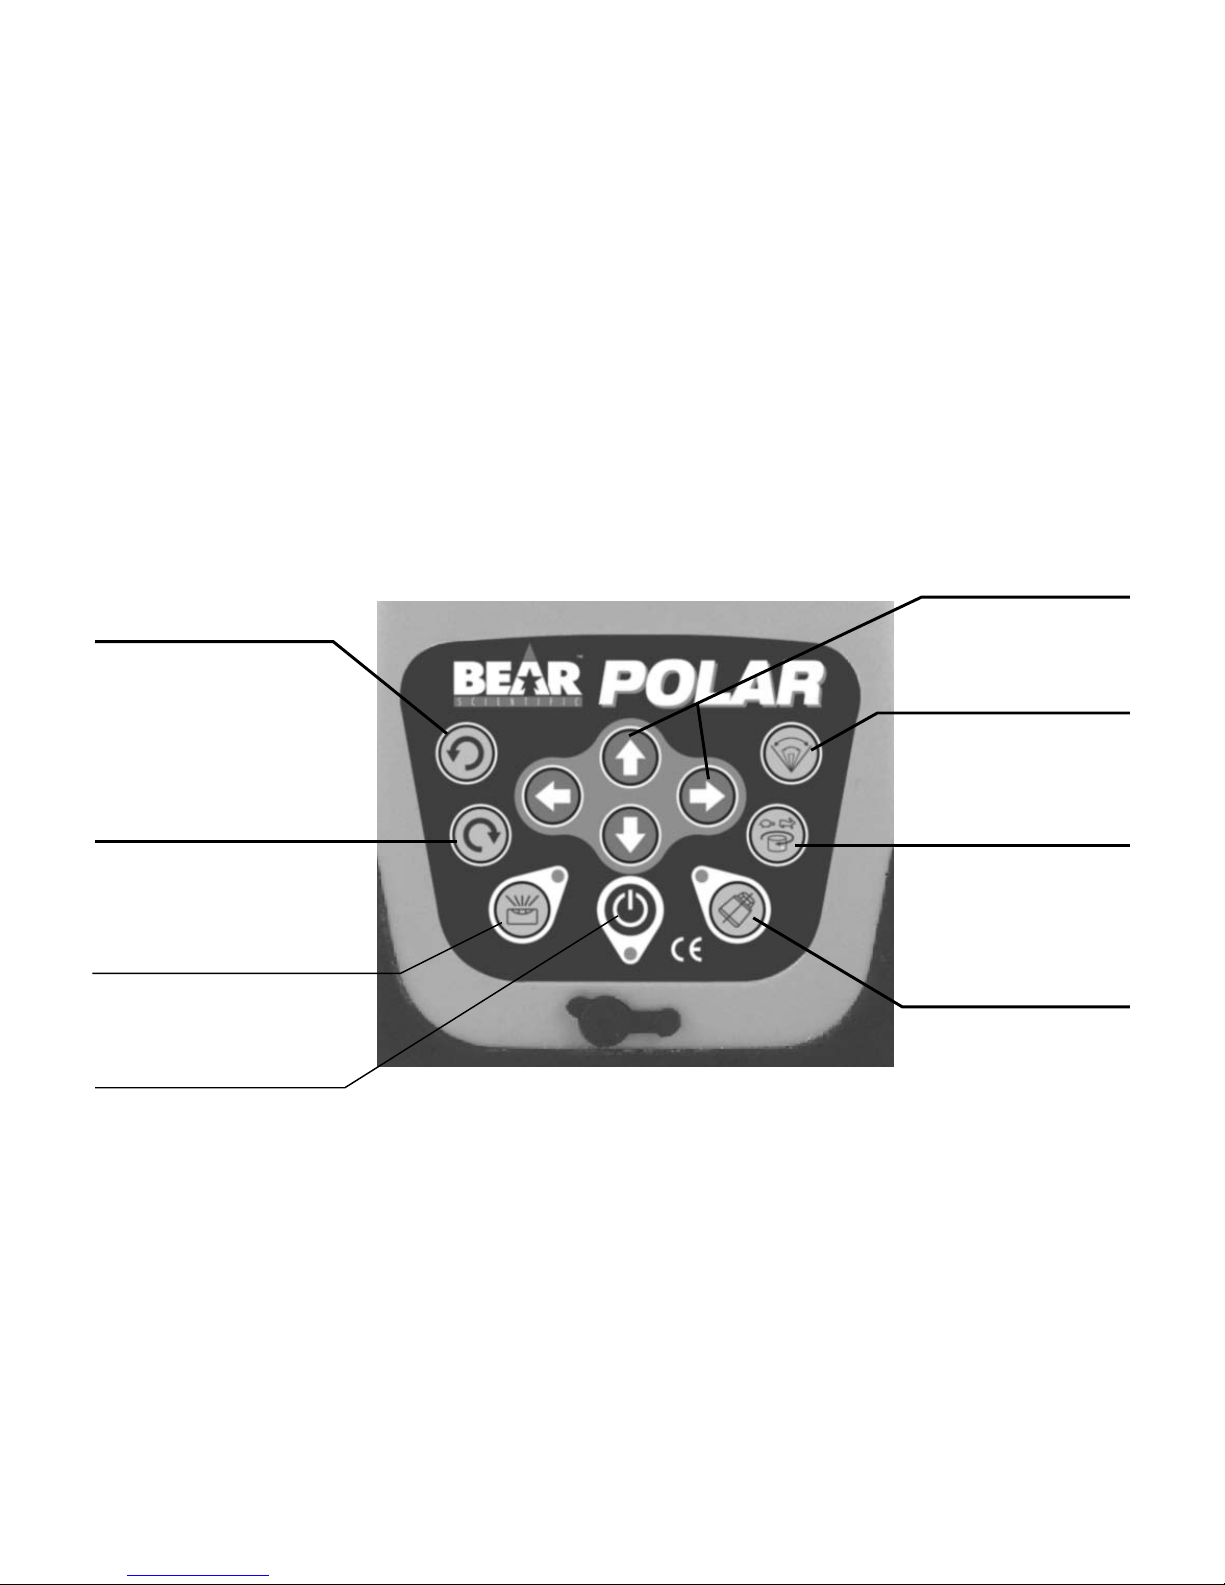
2.2. Control Panel Nomenclature
— 6 —
Laser head position
anti-clockwise
Laser head position
clockwise
Auto/manual
Power (ON/OFF)
Manual grades X & Y
Scanning mode
Rotation speed
Anti-drift mode

2.3 Control Panel Operation
1. Beam Position: Rotates the beam clockwise or anti-clockwise when
the laser head is set to a stationary dot or is in scan mode.
2. Auto/Manual: Toggles the laser between auto leveling mode and
manual mode (for set-up of manual slopes).
3. Power (ON/OFF): Switches the unit on or off.
4. Manual Grade: Drives a manual grade into the laser head when the
unit is in manual mode. (see 3.7)
5. Beam Scan: Puts the beam into scan mode and is used to cycle
through the preset scan angles (0°, 10°, 45°, 90°, 180°, 0°).
6. Rotation Speed: Puts the beam into rotation mode and is used to
cycle through the preset rotation speeds (0, 60, 120, 300, 600, 0 rpm).
(Note: When using a receiver use 600rpm)
7. Anti-Drift: Activates the anti-drift system (see 3.6).
— 7 —

3. Instrument Operation
3.1 Horizontal Leveling:
• Place the Polar on the floor, countertop or mount it to a tripod or wallmount
- suggest a flat head tripod is used.
• Press the power button and allow up to 60 seconds for the unit to level.
While leveling, the laser beam will flash. Once it has finished leveling it will
stop flashing and the beam will begin to rotate.
• The laser beam and auto/manual LED will flash if the instrument is set up
outside its self-leveling range of ±5°.
3.2 Vertical Leveling:
• Place the Polar on the floor or countertop using the built in trivet points or
alternatively mount to a vertical mount (B-WM) and attach to a tripod.
• Press the power button and allow up to 60 seconds for the unit to level.
While leveling, the laser beam will flash. Once it has finished leveling it will
stop flashing and the beam will begin to rotate.
• The laser beam and auto/manual LED will flash if the instrument is set up
outside its self-leveling range of ±5°.
— 8 —
 Loading...