


750
Beachcomber 750, 725, 720, 715, 580 Owner's Manual
...
BEACHCOMBER HOT TUB
OWNER’S GUIDE
Beachcomber. The Hybrid Hot Tub Company™

Your hot tub is an investment in your health and happiness. This
Owner’s Guide is intended to give you instructions on the basic
operation of your hot tub. For the most up-to-date and current statistics
on Beachcomber Hot Tubs, refer to our website. You can also find
all Beachcomber Owner’s Guides online. Visit our website at:
www.beachcomberhottubs.com
Record Important details of your new Beachcomber Hot Tub
MODEL NUMBER: DATE OF PURCHASE:
HOT TUB SERIAL NUMBER: STORE NAME:
GUARANTEE NUMBER: STORE PHONE:
Table of Contents
Important Safety Instructions ........................................................................................ 4
Beachcomber Hot Tub Components Overview ............................................................... 8
Basic Hot Tub Configurations .......................................................................................9
Starting Up your Beachcomber Hot Tub for the First Time ................................................9
LEEP Portable Equipment Configuration Diagrams ........................................................ 10
Hybrid3 Edition Equipment Configuration Diagrams ..................................................... 11
700 Series (Europe Only) ET-7 Topside Control Panel Operating Instructions ................... 12
700 Series ET-70 Topside Control Panel Operating Instructions ...................................... 15
500 Series ET-55 Topside Control Panel Operating Instructions
...................................... 17
300 Series ET-50 Topside Control Panel Operating Instructions ...................................... 19
Operation of Hot Tub Features ...................................................................................21
Everlite 4 Operating Instructions ................................................................................. 23
Everlite 6 Operating Instructions ................................................................................. 23
Important Safety Instructions ...................................................................................... 24
Hot Tub Water Care and Maintenance ....................................................................... 25
Filter Care and Maintenance ..................................................................................... 27
Heatshield Care and Maintenance ............................................................................. 27
Draining your Beachcomber Hot Tub ..........................................................................28
Vacation Instructions .................................................................................................28
Winter Operation Information .................................................................................... 29
Winter Shutdown Procedures ..................................................................................... 29
Diagnostic Display Messages and Troubleshooting Guide .............................................30
The Beachcomber Guarantee .................................................................................... 32
The Beachcomber Premium Guarantee........................................................................34
Hot Tub Specifications and Details..............................................................................36
Power Guard Heatshield Specifications and Details ...................................................... 37
More Information ..................................................................................................... 37
Beachcomber Hot Tub Care and Maintenance Record ..................................................38
This Owner’s Guide is for hot tubs manufactured from November 1st, 2009.
Congratulations
4 Beachcomber Hot Tub Owner’s Guide www.beachcomberhottubs.com 5
IMPORTANT SAFETY INSTRUCTIONS
READ AND FOLLOW ALL INSTRUCTIONS
AVOIDING THE RISK TO CHILDREN
WARNING: To reduce the risk of injury, do not permit children to use this product unless they are closely supervised at all times
DANGER: Risk of Accidental Drowning
• Extreme caution must be exercised to prevent unauthorized access by children. To avoid accidents, ensure that children
cannot use this hot tub or spa unless they are supervised at all times
AVOIDING THE RISK OF ELECTROCUTION:
WARNING: For outdoor use only. This unit is not intended for indoor use.
• A wire connector is provided on this unit to connect a minimum 8 AWG (8.4 mm²) solid copper conductor between this
unit and any metal equipment, metal enclosures of electrical equipment, metal water pipe or conduit within 5 feet (1.5m)
of the unit.
DANGER: Risk of injury
• For cord connected units: a) Replace damaged cord immediately. b) Do not bury cord. c) Connect to a grounded,
grounding type receptacle only.
DANGER: Risk of Electric Shock.
• Install at least 5 feet (1.5m) from all metal surfaces. As an alternative, a hot tub or spa may be installed within 5 feet of
metal surfaces if each metal surface is permanently connected by a minimum 8 AWG (8.4 mm²) of solid copper conductor
to the wire connector on the terminal box that is provided for this purpose.
• Do not permit any electrical appliance, such as a light, telephone, radio or television, within 5 feet (1.5m) of a hot tub or spa.
AVOIDING THE RISK OF INJURY:
DANGER: Risk of Injury. The suction fittings in this hot tub or spa are sized to match the specific water flow created by the
pump. Should the need arise to replace the suction fittings or the pump, be sure that the flow rates are compatible.
Never operate a hot tub or spa if the suction fittings are broken or missing. Never replace a suction fitting with one rated
less than the flow rate marked on the original suction fitting.
WARNING: To reduce the risk of injury:
• The water in a hot tub or spa should never exceed 40°C (104°F). Water temperatures between 38°C (100°F) and 40°C
are considered safe for a healthy adult. Lower water temperatures are recommended for young children and when hot tub
or spa use exceeds 10 minutes. Prolonged immersion in a hot tub or spa may be injurious to your health.
• Since excessive water temperatures have a high potential for causing fetal damage during the early months of pregnancy,
pregnant or possibly pregnant women should limit hot tub or spa water temperatures to 38°C (100°F). Pregnant or
possibly pregnant women should consult a physician before using a hot tub or spa.
• Before entering a hot tub or spa, the user should measure the water temperature with an accurate thermometer since the
tolerance of water temperature-regulating devices varies.
• The use of alcohol, drugs or medication before or during hot tub or spa use may lead to unconsciousness with the
possibility of drowning.
• Obese persons and persons with a history of heart disease, low or high blood pressure, circulatory system problems or
diabetes should consult a physician before using a hot tub or spa. Persons with infectious diseases should not use a hot
tub or spa.
• Persons using medication should consult a physician before using a hot tub or spa since some medication may induce
drowsiness while other medication may affect heart rate, blood pressure, and circulation.
IMPORTANT SAFETY INSTRUCTIONS
READ AND FOLLOW ALL INSTRUCTIONS
• Do not enter a hot tub or spa immediately following strenuous exercise.
• To avoid injury, exercise care when entering or exiting the hot tub or spa.
ELECTRICAL EQUIPMENT:
When using this electrical equipment, basic safety precautions should always be followed including the following:
• A green colored terminal, or terminal marked G, GR, Ground, Grounding or the international grounding symbol
is located inside the supply terminal box or compartment. To reduce the risk of electric shock, this terminal must be
connected to the grounding means provided in the electrical supply service panel with a continuous copper wire
equivalent in size to the circuit conductors supplying this equipment.
• At least two lugs marked “BONDING LUGS” are provided on the external surface or on the inside of the supply terminal
box or compartment. To reduce the risk of electric shock, connect the local common bonding grid in the area of the hot
tub or spa to these terminals with an insulated or bare copper conductor not smaller than No. 6 AWG
• All field installed metal components such as rails, ladders, drains or other similar hardware within 3 meters / 9.84 feet of
the hot tub or spa shall be bonded to the equipment grounding bus with copper conductors not smaller than No. 6 AWG
• There are no user serviceable parts within the management system. The high voltage can cause injury or death.
• The hot tub or spa must be hooked up to a Ground Fault Circuit Interrupter (G.F.C.I.) by a licensed electrician.
• Use the test button on your G.F.C.I monthly to ensure it is working properly.
• CAUTION: Wiring Connected in this box must be rated at 300V.
AUDIO COMPONENTS:
When using audio components, basic safety precautions should always be followed including the following:
• CAUTION: Risk of Electric Shock. Do not leave compartment door open.
• CAUTION: Risk of Electric Shock. Replace components only with identical components.
• Do not operate the audio controls while inside the hot tub or spa.
• WARNING: Prevent Electrocution. Do not connect any auxiliary components (for example cable, additional speakers,
headphones, additional audio/video components, etc) to the system.
• These units are not provided with an outdoor antenna; when provided, it should be installed in accordance with Article
810 of the National Electrical Code, ANSI/NFPA 70.
• Do not service this product yourself as opening or removing covers may expose you to dangerous voltage or other risk of
injury. Refer all servicing to qualified personnel.
• When the power supply connections or power supply cord(s) are damaged; if water is entering the audio/video
compartment or any electrical equipment compartment area; if the protective shields or barriers are showing signs of
deterioration; or if there are signs of other potential damage to the unit, turn off the unit and refer servicing to a qualified
service personnel.
• This unit should be subjected to periodic routine maintenance (for example, once every 3 months) to make sure that the
unit is operating properly.
SAFETY SIGN INSTALLATION:
• Each Beachcomber Hot Tub is shipped with a Safety Sign in the owner’s package.
• This Safety Sign is to be permanently located where visible to the users of this hot tub or spa. It is important that all users,
both frequent and occasional, are aware of this sign and its warning.
• Additional or replacement copies of this sign can be obtained from Beachcomber Hot Tubs by calling 1-800-663-6557.
SAVE THESE INSTRUCTIONS

6 Beachcomber Hot Tub Owner’s Guide www.beachcomberhottubs.com 7
IMPORTANT SAFETY INSTRUCTIONS
READ AND FOLLOW ALL INSTRUCTIONS
I WARNING: CHILDREN SHOULD NOT USE SPAS OR HOT TUBS WITHOUT ADULT SUPERVISION.
I WARNING: DO NOT USE SPAS OR HOT TUBS UNLESS ALL SUCTION GUARDS ARE INSTALLED TO PREVENT BODY AND
HAIR ENTRAPMENT.
I WARNING: PEOPLE USING MEDICATIONS AND/OR HAVING AN ADVERSE MEDICAL HISTORY SHOULD CONSULT A
PHYSICIAN BEFORE USING A SPA OR HOT TUB.
I WARNING: PEOPLE WITH INFECTIOUS DISEASES SHOULD NOT USE A SPA OR HOT TUB.
I WARNING: TO AVOID INJURY, EXERCISE CARE WHEN ENTERING OR EXITING THE SPA OR HOT TUB.
I WARNING: DO NOT USE DRUGS OR ALCOHOL BEFORE OR DURING THE USE OF A SPA OR HOT TUB TO AVOID
UNCONSCIOUSNESS AND POSSIBLE DROWNING.
I WARNING: PREGNANT OR POSSIBLY PREGNANT WOMEN SHOULD CONSULT A PHYSICIAN BEFORE USING A SPA
OR HOT TUB.
I WARNING: WATER TEMPERATURE IN EXCESS OF 38 °C CAN BE INJURIOUS TO YOUR HEALTH.
I WARNING: BEFORE ENTERING THE SPA OR HOT TUB, MEASURE THE WATER TEMPERATURE WITH AN ACCURATE
THERMOMETER.
I WARNING: DO NOT USE A SPA OR HOT TUB IMMEDIATELY FOLLOWING STRENUOUS EXERCISE.
I WARNING: PROLONGED IMMERSION IN A SPA OR HOT TUB CAN BE INJURIOUS TO YOUR HEALTH.
I WARNING: DO NOT PERMIT ELECTRIC APPLIANCES (SUCH AS A LIGHT, TELEPHONE, RADIO, OR TELEVISION) WITHIN
1.5 M OF THIS SPA OR HOT TUB.
CAUTION: MAINTAIN WATER CHEMISTRY IN ACCORDANCE WITH MANUFACTURER’S INSTRUCTIONS.
Use the temperature adjustment keys on the control panel to adjust and select a water temperature. Refer to the temperature
adjustment instructions for your topside control panel type. Always check the temperature of the water before entry with an
accurate thermometer. Recommended time in water at 100°F / 38°C is 10 minutes.
WATER TEMPERATURE MAY NEED TO BE DECREASED FOR CHILDREN OR THE ELDERLY. PROLONGED IMMERSION IN HOT
WATER MAY INDUCE HYPERTHERMIA.
AVOIDING THE RISK OF HYPERTHERMIA:
The causes, symptoms, and effects of hyperthermia may be described as follows. Hyperthermia occurs when the internal
temperature of the body reaches a level several degrees above the normal body temperature of 37 °C. The symptoms of
hyperthermia include drowsiness, lethargy, and an increase in the internal temperature of the body.
THE EFFECTS OF HYPERTHERMIA INCLUDE:
• Unawareness of impending hazard; • Physical inability to exit spa;
• Failure to perceive heat; • Fetal damage in pregnant women; and
• Failure to recognize the need to exit spa; • Unconsciousness and danger of drowning.
I WARNING: THE USE OF ALCOHOL OR DRUGS CAN GREATLY INCREASE THE RISK OF FATAL HYPERTHERMIA IN HOT TUBS
AND SPAS.
IMPORTANTES DIRECTIVES DE SÉCURITÉ
LISEZ ET SUIVEZ TOUTES LES DIRECTIVES SUIVANTES
I AVERTISSEMENT: NE PAS LAISSER LES ENFANTS UTILISER UNE CUVE DE RELAXATION SANS SURVEILLANCE
I AVERTISSEMENT: POUR ÉVITER QUE LES CHEVEUX OU UNE PARTIE DU CORPS PUISSENT ÊTRE ASPIRÉS, NE PAS UTILISER
UNE CUVE DE RELAXATION SI LES GRILLES DE PRISE D’ASPIRATION NE SONT PAS TOUTES EN PLACE
I AVERTISSEMENT: LES PERSONNES QUI PRENNENT DES MÉDICAMENTS ET (OU) ONT DES PROBLÈMES DE SANTÉ
DEVRAIENT CONSULTER UN MÉDECIN AVANT D’UTILISER UNE CUVE DE RELAXATION
I AVERTISSEMENT: LES PERSONNES ATTEINTES DE MALADIES INFECTIEUSES NE DEVRAIENT PAS UTILISER UNE CUVE DE
RELAXATION
I AVERTISSEMENT: POUR ÉVITER DES BLESSURES, USER DE PRUDENCE EN ENTRANT DANS UNE CUVE DE RELAXATION ET
EN SORTANT
I AVERTISSEMENT: POUR ÉVITER L’ÉVANOUISSEMENT ET LA NOYADE ÉVENTUELLE, NE PRENDRE NI DROGUE NI ALCOOL
AVANT D’UTILISER UNE CUVE DE RELAXATION NI QUAND ON S’Y TROUVE
I AVERTISSEMENT: LES FEMMES ENCEINTES, QUE LEUR GROSSESSE SOIT CONFIRMÉE OU NON, DEVRAIENT CONSULTER
UN MÉDECIN AVANT D’UTILISER UNE CUVE DE RELAXATION
I AVERTISSEMENT: IL PEUT ÊTRE DANGEREUX POUR LA SANTÉ DE SE PLONGER DANS DE L’EAU À PLUS DE 38 °C
I AVERTISSEMENT: AVANT D’UTILISER UNE CUVE DE RELAXATION, MESURER LA TEMPÉRATURE DE L’EAU À L’AIDE D’UN
THERMOMÈTRE PRÉCIS
I AVERTISSEMENT: NE PAS UTILISER UNE CUVE DE RELAXATION IMMÉDIATEMENT APRÈS UN EXERCICE FATIGANT
I AVERTISSEMENT: L’UTILISATION PROLONGÉE D’UNE CUVE DE RELAXATION PEUT ÊTRE DANGEREUSE POUR LA SANTÉ
I AVERTISSEMENT: NE PAS PLACER D’APPAREIL ÉLECTRIQUE (LUMINAIRE, TÉLÉPHONE, RADIO, TÉLÉVISEUR, ETC) À MOINS
DE 1.5 M DE CETTE CUVE DE RELAXATION
ATTENTION : LA TENEUR DE L’EAU EN MATIÈRES DISSOUTES DOIT ÊTRE CONFORME AUX DIRECTIVES DU FABRICANT.
Utilisez les touches de réglage de la température sur le panneau de commande pour régler et sélectionnez une température
d’eau. Référez aux instructions de réglage de la température pour votre panneau de commande. Vérifiez toujours la
température de l’eau à l’aide d’un thermomètre avant d’entrer dans le hot tub. Durée recommandée lorsque la température
de l’eau est de 100°F / 38°C est 10 minutes.
IL PEUT ÊTRE NÉCESSAIRE DE RÉDUIRE LA TEMPÉRATURE DE L’EAU POUR LES ENFANTS OU LES PERSONNES ÂGÉES.
L’IMMERSION PROLONGÉE DANS L’EAU CHAUDE PEUT PROVOQUER L’HYPERTHERMIE.
HYPERTHERMIE:
Les causes, symptômes et effets de l’hyperthermie peuvent être décrits comme suit. L’hyperthermie survient lorsque la
température interne du corps atteint un niveau de plusieurs degrés au-dessus de la température normale de 37 °C. Les
symptômes de l’hyperthermie comprennent la somnolence, la léthargie et une augmentation de la température interne du
corps. Les effets de l’hyperthermie comprennent
LES EFFETS :
• inconscience d’un danger imminent; • inaptitude physique à sortir du spa;
• incapacité de percevoir la chaleur; • lésions du fœtus chez la femme enceinte; et
• incapacité de reconnaitre la nécessite de sortir du spa; • évanouissement et danger de noyade.
I AVERTISSEMENT: LA CONSOMMATION D’ALCOOL OU DE DROGUE AUGMENTE CONSIDÉRABLEMENT LES RISQUES
D’HYPERTHERMIE MORTELLE DANS UNE CUVE DE RELAXATION.
8 Beachcomber Hot Tub Owner’s Guide www.beachcomberhottubs.com 9
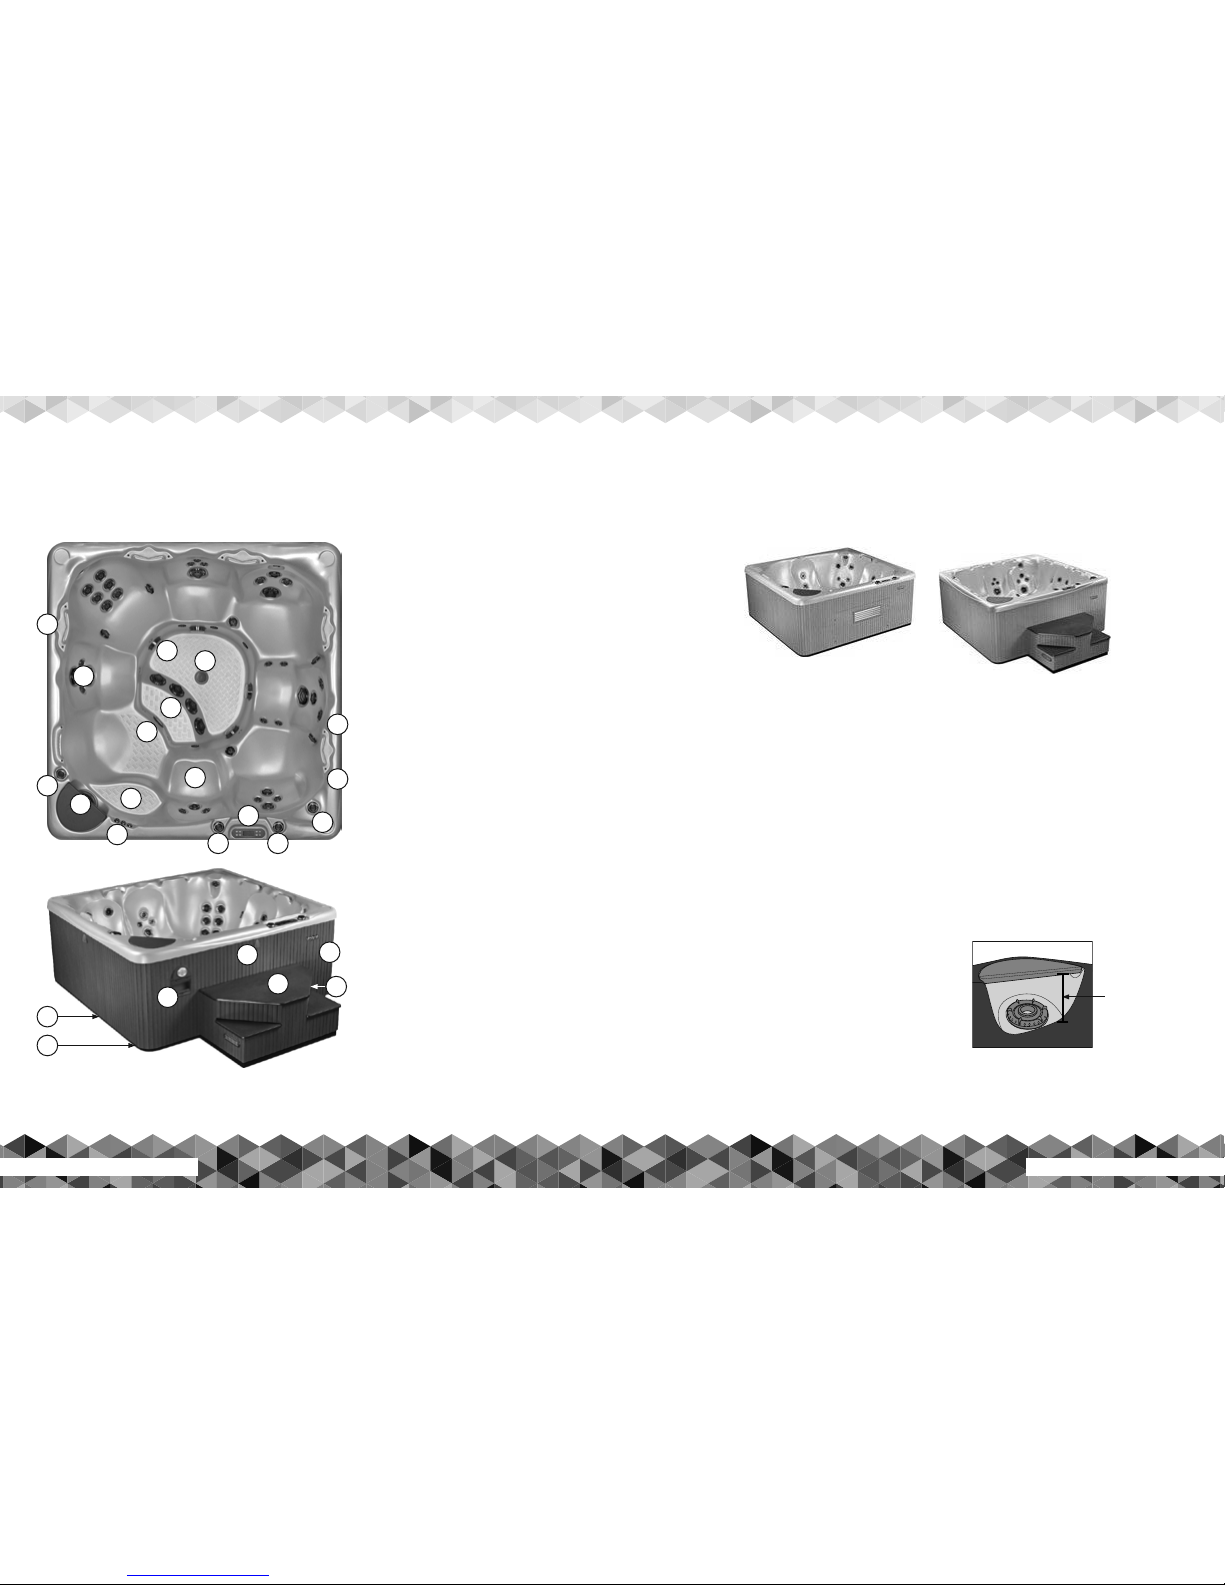
Beachcomber Hot Tub Components Overview
Familiarize yourself with the components of your personal Beachcomber Hot Tub. Some of these features shown
may be optional at extra cost and are shown here for the safety and convenience of our worldwide customers.
For Hybrid3 Edition Hot Tubs, the external pumping and heating equipment arrives in its own separate Hybrid3 Equipment Box. The
equipment must be hooked up to the hot tub using the separate instructions provided in the Hybrid3 Equipment Box. For either LEEP or
Hybrid3 hot tubs, electrical connections must be performed by a qualified electrician. After the proper electrical connections have been
performed to your proper standard codes, the qualified installer must follow these steps:
1. Check all union fittings on the Hybrid3 or LEEP pumping and heating equipment to ensure gaskets are in place with a tight fit. Hand-
tightening is sufficient. If leaking is noted at these fittings, the gasket may be missing, not seated properly or the fitting may not be tight
enough. Unscrew the union and check.
2. Open all knife valves. Fill the hot tub with water from a garden hose. You can place the hose directly in the hot tub, or attach it to the
drain/fill valve located down by the pumps, to fill from the bottom. We recommended running water through the garden hose to
waste for 10 seconds, before filling the hot tub to ensure fresh water from the hose source.
3. Fill the hot tub to the half way mark on the skimmer opening as shown.
For Hush Pump equipped hot tubs, the level can be lowered to one third
up the skimmer opening, allowing for more displacement if the hot tub is
subjected to use by more than the recommended number of people for
that model. Do not allow the water to go below this level.
4. Open the air bleed valve to release any air trapped in the external plumbing
(see equipment configuration diagrams in this guide). There is one air bleed
valve on the model 321 hot tub, and all 300, 500 and 700 series hot tubs
equipped with the Hush Pump.
5. With the air bled from the system, you can now turn on the power at the GFCI. Once the control panel is on, use the instructions on the
following pages to complete your start up. Refer to the instructions for the control panel that matches your system.
Water Level
Normal water level
is half way up the
skimmer opening.
Starting Up your Beachcomber Hot Tub
for the First Time
Beachcomber manufactures hot tubs in two configurations: the Hybrid3 Edition featuring the equipment outside of the hot tub cavity under a
safety step, and the LEEP Portable which features the equipment tucked inside the hot tub cabinetry behind an access door.
Basic Hot Tub Configurations
The LEEP Portable Hot Tub
The Hybrid3 Edition Hot Tub
1
2
3
4
5
6 6
8
9
10
11
12
13
14
C
A
B
D
E
G
F
15
7
2
1. Molded Cup Holder Handgrips
2. Eclipse Lighting Fixtures
3. Roman Arch Waterfall Control Valve
4. Filter Lid for Micro-filter and Skimmer Basket
5. Roman Arch Waterfall Jets
6. Air Injection Controls
7. Energy Saver Management System
Topside Control Pad
8. Reflex Foot Massage RFM Control Valve
9. Beachcomber FlexJets
10. Safety Textured Steps for Easy Hot Tub Access
11. Cooling Seat
12. Hot Tub Inter nal Light
13. Reflex Foot Massage RFM Jets
14. VGB Approved Suction Fittings
15. Gravity Floor Drain
A. Perma-Seal Foundation (on hot tub bottom)
B. Electrical Conduit Access (on both sides)
C. Quintessential Surround Sound QSS System
D. Garden Everlight Fixture (on all four sides)
E. SafeAxiss Safety Step (Hybrid3 Edition only)
F. Enviroskirt Cabinetr y
G. Energy Saver Management System
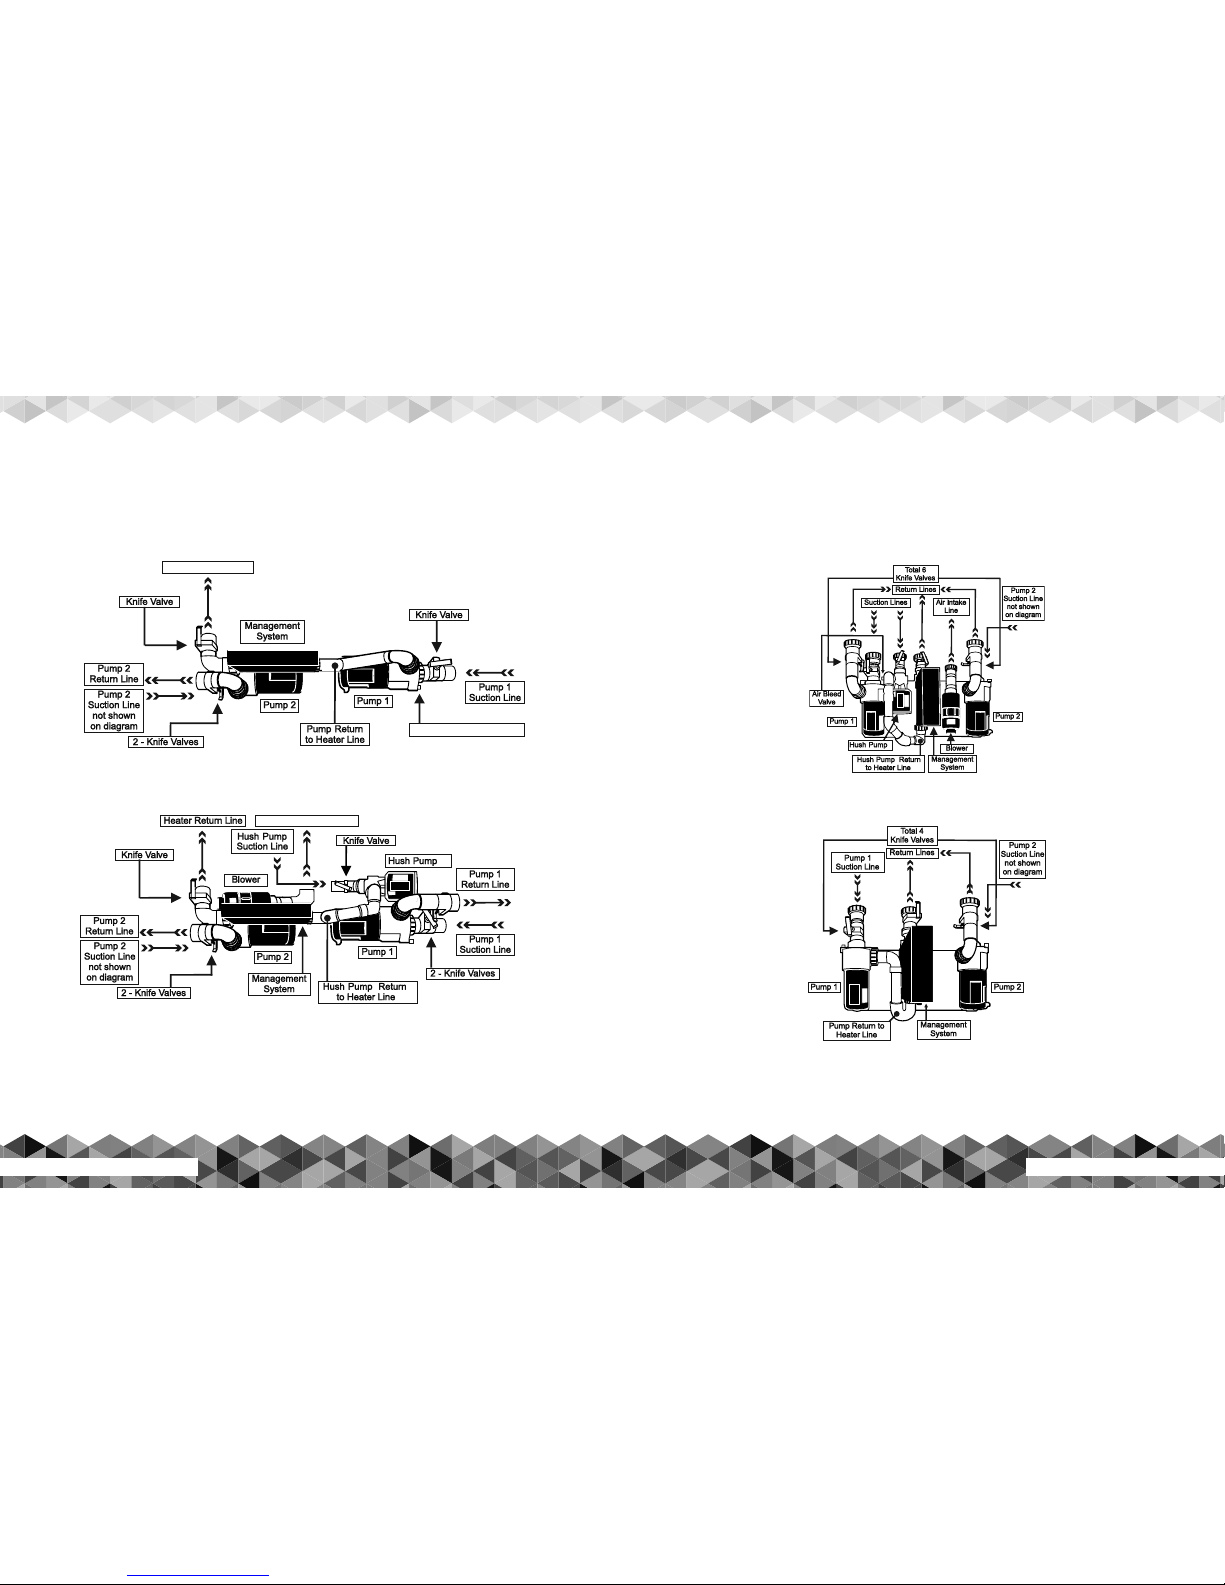
10 Beachcomber Hot Tub Owner’s Guide www.beachcomberhottubs.com 11
Blower Air Intake Line
Original LEEP Portable Hot Tub, Hush Pump™ & Turbo Version
™
™
™
Original LEEP Portable Hot Tub, 2 Speed Pump Version
Air Bleed Valve (321 Only)
Heater Return Line
Hybrid3 Edition Hot Tub,
2 Speed Pump Version
Hybrid3 Edition Hot Tub,
Hush Pump™ & Turbo Version
™
™
LEEP Portable Equipment Configuration Diagrams Hybrid3 Edition Equipment Configuration Diagrams
Use these diagrams for component location on all Beachcomber LEEP Portable models.
See Beachcomber Hot Tub Specifications and Details on page 36 for Electrical Requirements.
Use these diagrams for component location on all Beachcomber Hybrid3 Edition models.
See Beachcomber Hot Tub Specifications and Details on page 36 for Electrical Requirements.
Please Note: Your hot tub may or may not be equipped with features shown in this Owner’s Guide. Beachcomber makes continual
changes, upgrades and improvements; if you need more specific information on your hot tub, please call your local Beachcomber
store, or use the contact information in this guide.

12 Beachcomber Hot Tub Owner’s Guide www.beachcomberhottubs.com 13
Start Up
When your hot tub is first activated, it will go into priming mode
(after displaying some configuration information). The priming
mode will last up to 4 minutes; then circulation will start, then heat
icon will come on for 6 seconds, and then flicker for 90 seconds.
Then heater will come on to heat water to set temperature. It is
recommended that priming mode be allowed to finish, preventing
any pumps from operating dry. If you are positive all pumps are
primed you can exit priming mode early by pressing
or .
Temperature Adjustment
Temp range is: 80°F - 104°F / 26.0°C – 40.0°C The factory
pre-set temperature is set at 100°F / 37.5°C. The last measured
temperature is constantly displayed on the LCD. See edit menu in
Owner’s Guide to select F° or C°. Note: On non Hush Pump hot
tubs, the current water temperature will only be displayed if the 2
speed filter pump has been running for two minutes.
Warm / Cool
Press the or button twice to display the set temperature.
Each time either button is pressed again, the set temperature will
increase or decrease depending on which button is pressed. After
three seconds, the LCD will automatically display the last measured
water temperature.
Heating Modes
To change to the desired heating mode, press to enter mode
programming, press to cycle through to desired mode (LCD
flashes until confirmed), then press to confirm selection.
There are 3 Heating Modes – Standard, Economy and Sleep
Modes.
Standard Mode maintains the set temperature at all times. Note
that the last measured hot tub temperature displayed is current
only when the pump has been running for at least 2 minutes. The
STANDARD icon will display until the mode is changed.
Economy Mode heats the hot tub to the set temperature only
during filter cycles. The ECONOMY icon will display until mode
is changed. Pressing
1 while in Economy mode puts the hot
tub in Standard-In-Economy mode, which operates the same as
Standard Mode, then reverts to Economy Mode automatically after
1 hour. Use this mode to activate the heater if using the hot tub
when not in filter cycle. During this time, a press of the
button
will revert to Economy Mode immediately.
Sleep Mode heats the hot tub within 20°F / 11°C of the set
temperature only during filter cycles. The SLEEP icon will display
until mode is changed. Use this mode when going on holidays.
Massage 1
Press 1 button once to turn pump 1 on to low speed, press
1 again for the pump’s high speed, and once more to turn off
the pump. Low speed turns off automatically after 2 hours and high
speed turns off automatically after 15 minutes. Massage pump 1
comes on for a 1 minute purge at the start of each filter cycle.
Massage 2
Press 2 button once to turn pump 2 on to low speed, press
2 again for the pump’s high speed, and once more to turn off
the pump. Low speed and high speed turn off automatically after
15 minutes. Massage pump 2 comes on for a 1 minute purge at
the start of each filter cycle.
Turbo (optional)
Press the button to turn Turbo on and off. Turbo will
automatically turn off after 15 minutes. Turbo comes on for a 10
second purge at the start of each filter cycle.
Light
Press the button to turn the hot tub light on, press again to turn
off. Light will automatically turn off after 3 hours.
Standby Mode
Pressing or followed by 2 will turn off all hot tub
functions temporarily. SbY will appear on your display. This is
helpful when changing a Microfilter cartridge. Press any button
to exit standby mode. Note: If hot tub is in a heat cycle when
standby is selected the 2 speed pump or Hush Pump will run for
approximately 15 seconds.
700 Series (Europe Only)
ET-7 Topside Control Panel Operating Instructions
Time of Day and Filter Cycles Setting
On all systems, the 2 speed filter pump or Hush Pump and ozone
generator will run during filtration. There are two filter cycles
per day. The start/end times of each cycle are programmable.
Programming filter times on Hush Pump equipped hot tubs are used
to tell the system how many hours a day to turn the heater on when
in Economy mode.
To Program:
1. Press
then .
2. Use the and buttons to adjust the time of day in hours,
press the again to adjust the time in minutes. Use the and
buttons to adjust the minutes. Press to enter new time.
3. You will see PROGRAM, FILTER 1 (F1), START TIME appears on
the display. Press
or to choose the filter start time hour.
Enter the hour by pressing .
4. Press or to choose the filter start time minutes. Each
press will change the start time by 5 minutes. Enter the minutes by
pressing
.
5. Press to see the PROGRAM, FILTER 1(F1),
end TIME. Adjust the time as done above.
6. Press
to see the PROGRAM, FILTER 2(F2), START TIME.
Proceed as above.
7. Press
to see PROGRAM, FILTER 2(F2),
end TIME. Adjust the time as done above.
8. The time that now appears allows you to turn your hot tub light
on automatically. Adjust time as done above.
9. Program the time you want your light to turn off.
10. Press
will enter the new filter cycle times into the system
and display the current water temperature.
Panel Inversion
Press the or button, followed by the or button
to change the numbers in the display to read upside down. Press
the same sequence to set back.
Locking The Panel
Press , 1 then within 3 seconds. When locked, the PL
indicator light will light up. All buttons are frozen except the
button. To unlock the panel, press , 1 then .
Locking the Set Temperature
Press or then , 1 and within 3 seconds
to activate the lock. The TL indicator light will light up when
temperature is locked. To unlock the set temperature, press
or
then , 1 and .
Periodic Reminder Messages
(press the button to reset a displayed reminder message)
rPH: Test and adjust pH chemical levels as per Beachcomber
instructions. Reminder is every 7 days.
rCL: Remove, clean, and reinstall Microfilter as per Beachcomber
instructions. Reminder is every 30 days.
rt9: Test & reset GFCI as per Beachcomber instructions. Reminder
is every 30 days.
rdr: Drain and refill hot tub as per Beachcomber instructions.
Reminder is every 90 days.
rCO: Clean and condition Heatshield as per Beachcomber
instructions. Reminder is every 180 days.
rCH: Install new Microfilter. Reminder is every 365 days.
To suppress reminders, refer to the user edit menu.
Diagnostic Display Messages
OHH or OHS: Overheat-DO NOT ENTER HOT TUB
ICE: Potential Freeze
SnA: Hot tub is shut down
Snb: Hot tub is shut down
SnS: Sensor out of balance
HFL: Could indicate flow problem
LF: Persistent low flow problems
dr: Inadequate water detected
drY: Inadequate water detected
Pr: Hot tub in priming mode
-- : Temperature unknown
-: Temperature not current or in Economy or Sleep mode.
PLEASE REFER TO TROUBLE SHOOTING GUIDE FOR A
COMPLETE EXPLANATION OF DIAGNOSTIC MESSAGES.
USER EDIT MENU
This feature is available on 700 Series hot tubs that have the
Energy Saver Management System remote installed. There are
three selections in the User Edit Menu:
1. Suppress Reminders: This SST2 system will display a number
of reminders prompting you to perform certain maintenance
tasks. If you do not want these reminders to be displayed, you
can suppress them.
2. Temperature Display: You can change your temperature
display from Fahrenheit to Celsius.
 Loading...