

Page 1

For In Vitro Diagnostic Use
bdbiosciences.com
Part No. 642241 Rev. A
June 2007
BD FACSCanto
Flow Cytometer
Reference Manual
BD Biosciences
2350 Qume Drive
San Jose, CA 95131-1807
USA
Tel (877) 232-8995
Fax (800) 325-9637
[email protected]
Asia Pacific
Tel (65) 6-861-0633
Fax (65) 6-860-1590
Brazil
Tel (55) 11-5185-9995
Fax (55) 11-5185-9895
Japan
Nippon Becton Dickinson Company, Ltd.
Toll Free 0120-8555-90
Fax 81-24-593-5761
Canada
Toll Free (888) 259-0187
Tel (905) 542-8028
Fax (888) 229-9918
[email protected]
Mexico
Toll Free 01-800-236-2543
Tel (52) 55 5999 8296
Fax (52) 55 5999 8288
Page 2

© 2007, Becton, Dickinson and Company. All rights reserved. No part of this publication may be reproduced,
transmitted, transcribed, stored in retrieval systems, or translated into any language or computer language, in any
form or by any means: electronic, mechanical, magnetic, optical, chemical, manual, or otherwise, without prior
written permission from BD Biosciences.
The information in this guide is subject to change without notice. BD Biosciences reserves the right to change its
products and services at any time to incorporate the latest technological developments. Although this guide has been
prepared with every precaution to ensure accuracy, BD Biosciences assumes no liability for any errors or omissions,
nor for any damages resulting from the application or use of this information. BD Biosciences welcomes customer
input on corrections and suggestions for improvement.
BD FACSDiva software © Becton, Dickinson and Company. This software is the property of Becton, Dickinson and
Company. Each sale of a stored unit of this software grants the purchaser a nontransferable, nonexclusive, personal
license. This software may not be duplicated, reproduced, or copied in any form or by any means whatsoever, except
as otherwise permitted by law.
BD FACSCanto clinical software © Becton, Dickinson and Company. This software is the property of Becton,
Dickinson and Company. Each sale of a stored unit of this software grants the purchaser a nontransferable,
nonexclusive, personal license. This software may not be duplicated, reproduced, or copied in any form or by any
means whatsoever, except as otherwise permitted by law.
BD, BD logo, and all other trademarks are property of Becton, Dickinson and Company.
Cy™ is a trademark of Amersham Biosciences Corp. Cy™ dyes are subject to proprietary rights of Amersham
Biosciences Corp. and Carnegie Mellon University and are made and sold under license from Amersham Biosciences
Corp. only for research and in vitro diagnostic use. Any other use requires a commercial sublicense from Amersham
Biosciences Corp., 800 Centennial Avenue, Piscataway, NJ 08855-1327, USA.
JDS Uniphase is a trademark of JDS Uniphase, Inc.
Microsoft and Windows are registered trademarks of Microsoft Corporation.
Sapphire is a trademark and Coherent is a registered trademark of COHERENT, INC.
Teflon is a registered trademark of E.I. du Pont de Nemours and Company.
All other company and product names might be trademarks of the respective companies with which they are
associated.
Patents
PerCP: US 4,876,190
APC-Cy7: US 5,714,386
Page 3

FCC Information
WARNING: Changes or modifications to this unit not expressly approved by the party responsible for compliance
could void the user’s authority to operate the equipment.
NOTICE: This equipment has been tested and found to comply with the limits for a Class A digital device, pursuant
to Part 15 of the FCC Rules. These limits are designed to provide reasonable protection against harmful interference
when the equipment is operated in a commercial environment. This equipment generates, uses, and can radiate radio
frequency energy and, if not installed and used in accordance with the instruction manual, can cause harmful
interference to radio communications. Operation of this equipment in a residential area is likely to cause harmful
interference in which case the user will be required to correct the interference at his or her own expense.
Shielded cables must be used with this unit to ensure compliance with the Class A FCC limits.
This Class A digital apparatus meets all requirements of the Canadian Interference-Causing Equipment Regulations.
Cet appareil numérique de la classe A respecte toutes les exigences du Réglement sur le matériel brouilleur du
Canada.
Notice
BD Biosciences delivers software and workstations that are intended for running the cytometers supplied by
BD Biosciences. It is the responsibility of the buyer/user to ensure that all added electronic files including software
and transport media are virus free. If the workstation is used for Internet access or purposes other than those specified
by BD Biosciences, it is the buyer/user’s responsibility to install and maintain up-to-date virus protection software.
BD Biosciences does not make any warranty with respect to the workstation remaining virus free after installation.
BD Biosciences is not liable for any claims related to or resulting from buyer/user's failure to install and maintain
virus protection.
History
Revision Date Change Made
336928 Rev. A 1/04 Initial release
337969 Rev. A 4/04 Updated for CE IVD release
338619 Rev. A 9/04 Updated for BD FACSDiva software v4.1
343370 Rev. A 9/05 Updated for BD FACSCanto clinical software v2.0 and the Opticon LG2 Imager barcode reader
640801 Rev. A 5/06 Updated for BD FACSDiva software v5.0 and BD FACSCanto clinical software v2.1
642241 Rev. A 6/07 Updated for BD FACSDiva software v6.0
Page 4

Page 5

Contents
About This Manual ix
Conventions . . . . . . . . . . . . . . . . . . . . . . . . . . . . . . . . . . . . . . . . . . . . . . . . . x
Technical Assistance . . . . . . . . . . . . . . . . . . . . . . . . . . . . . . . . . . . . . . . . . . . xi
Chapter 1: Introduction 13
Intended Use . . . . . . . . . . . . . . . . . . . . . . . . . . . . . . . . . . . . . . . . . . . . . . . . . 14
System Components . . . . . . . . . . . . . . . . . . . . . . . . . . . . . . . . . . . . . . . . . . . 14
Flow Cytometer . . . . . . . . . . . . . . . . . . . . . . . . . . . . . . . . . . . . . . . . . . . 15
Fluidics Cart . . . . . . . . . . . . . . . . . . . . . . . . . . . . . . . . . . . . . . . . . . . . . . 25
Computer Workstation . . . . . . . . . . . . . . . . . . . . . . . . . . . . . . . . . . . . . 28
BD FACS Loader (Optional) . . . . . . . . . . . . . . . . . . . . . . . . . . . . . . . . . 28
Barcode Reader (Optional) . . . . . . . . . . . . . . . . . . . . . . . . . . . . . . . . . . . 30
System Requirements . . . . . . . . . . . . . . . . . . . . . . . . . . . . . . . . . . . . . . . . . . 31
Chapter 2: BD FACS Loader Option 33
Loader Components . . . . . . . . . . . . . . . . . . . . . . . . . . . . . . . . . . . . . . . . . . . 34
Using the Loader . . . . . . . . . . . . . . . . . . . . . . . . . . . . . . . . . . . . . . . . . . . . . . 36
Changing Operational Modes . . . . . . . . . . . . . . . . . . . . . . . . . . . . . . . . 39
Maintaining the Loader . . . . . . . . . . . . . . . . . . . . . . . . . . . . . . . . . . . . . . . . 43
Cleaning External Surfaces . . . . . . . . . . . . . . . . . . . . . . . . . . . . . . . . . . . 43
v
Page 6

Chapter 3: Barcode Reader Option 45
Installing and Using the Barcode Reader . . . . . . . . . . . . . . . . . . . . . . . . . . . . 46
Cleaning the Barcode Reader . . . . . . . . . . . . . . . . . . . . . . . . . . . . . . . . . . . . 48
Barcode Symbologies . . . . . . . . . . . . . . . . . . . . . . . . . . . . . . . . . . . . . . . . . . . 49
1D Barcode Symbologies . . . . . . . . . . . . . . . . . . . . . . . . . . . . . . . . . . . . 49
2D Barcode Symbologies . . . . . . . . . . . . . . . . . . . . . . . . . . . . . . . . . . . . 50
Chapter 4: Maintenance 51
Scheduled Maintenance . . . . . . . . . . . . . . . . . . . . . . . . . . . . . . . . . . . . . . . . . 52
Emptying the Waste Container . . . . . . . . . . . . . . . . . . . . . . . . . . . . . . . . 54
Purging the Fluidics Filters . . . . . . . . . . . . . . . . . . . . . . . . . . . . . . . . . . . 57
Decontaminating the Fluidics System (Long Clean) . . . . . . . . . . . . . . . . 59
Replacing the Air Filter . . . . . . . . . . . . . . . . . . . . . . . . . . . . . . . . . . . . . . 60
Replacing Fluidics Filters . . . . . . . . . . . . . . . . . . . . . . . . . . . . . . . . . . . . 63
Unscheduled Maintenance . . . . . . . . . . . . . . . . . . . . . . . . . . . . . . . . . . . . . . . 66
Changing a Cubitainer . . . . . . . . . . . . . . . . . . . . . . . . . . . . . . . . . . . . . . 68
Removing an Air Lock . . . . . . . . . . . . . . . . . . . . . . . . . . . . . . . . . . . . . . 72
Cleaning External Surfaces . . . . . . . . . . . . . . . . . . . . . . . . . . . . . . . . . . . 75
Removing Bubbles from the Flow Cell . . . . . . . . . . . . . . . . . . . . . . . . . . 76
Cleaning the Flow Cell . . . . . . . . . . . . . . . . . . . . . . . . . . . . . . . . . . . . . . 77
Purging the Bubble Filter . . . . . . . . . . . . . . . . . . . . . . . . . . . . . . . . . . . . 78
Decontaminating the Fluidics System for Storage . . . . . . . . . . . . . . . . . . 80
Replacing the Bal Seal . . . . . . . . . . . . . . . . . . . . . . . . . . . . . . . . . . . . . . . 80
Resetting the Cytometer Circuit Breaker . . . . . . . . . . . . . . . . . . . . . . . . . 84
Reconnecting the Ethernet and RS232 Cables . . . . . . . . . . . . . . . . . . . . . 85
Reconnecting the Fluidics Cart Tubing . . . . . . . . . . . . . . . . . . . . . . . . . . 85
Replacing the Fluidics Level Sensors . . . . . . . . . . . . . . . . . . . . . . . . . . . . 88
Replacing the Fluidics Cart Fuses . . . . . . . . . . . . . . . . . . . . . . . . . . . . . . 91
vi BD FACSCanto Flow Cytometer Reference Manual
Page 7

Chapter 5: Troubleshooting 95
Cytometer Troubleshooting . . . . . . . . . . . . . . . . . . . . . . . . . . . . . . . . . . . . . 96
Fluidics Cart Troubleshooting . . . . . . . . . . . . . . . . . . . . . . . . . . . . . . . . . . . 101
Loader Troubleshooting . . . . . . . . . . . . . . . . . . . . . . . . . . . . . . . . . . . . . . . . 102
Appendix A: Technical Overview 105
Flow Cytometry . . . . . . . . . . . . . . . . . . . . . . . . . . . . . . . . . . . . . . . . . . . . . . 106
Fluidics System . . . . . . . . . . . . . . . . . . . . . . . . . . . . . . . . . . . . . . . . . . . . . . . 106
Optics System . . . . . . . . . . . . . . . . . . . . . . . . . . . . . . . . . . . . . . . . . . . . . . . . 109
Light Scatter . . . . . . . . . . . . . . . . . . . . . . . . . . . . . . . . . . . . . . . . . . . . . . 111
Fluorescence . . . . . . . . . . . . . . . . . . . . . . . . . . . . . . . . . . . . . . . . . . . . . . 112
Optical Filters . . . . . . . . . . . . . . . . . . . . . . . . . . . . . . . . . . . . . . . . . . . . 113
Detectors . . . . . . . . . . . . . . . . . . . . . . . . . . . . . . . . . . . . . . . . . . . . . . . . 115
Detector Arrays . . . . . . . . . . . . . . . . . . . . . . . . . . . . . . . . . . . . . . . . . . . 115
Spillover . . . . . . . . . . . . . . . . . . . . . . . . . . . . . . . . . . . . . . . . . . . . . . . . . 118
Electronics System . . . . . . . . . . . . . . . . . . . . . . . . . . . . . . . . . . . . . . . . . . . . 120
Pulses . . . . . . . . . . . . . . . . . . . . . . . . . . . . . . . . . . . . . . . . . . . . . . . . . . . 121
Pulse Measurements . . . . . . . . . . . . . . . . . . . . . . . . . . . . . . . . . . . . . . . . 122
Appendix B: Supplies and Replacement Parts 127
Cytometer Supplies . . . . . . . . . . . . . . . . . . . . . . . . . . . . . . . . . . . . . . . . . . . . 128
Installation Kit . . . . . . . . . . . . . . . . . . . . . . . . . . . . . . . . . . . . . . . . . . . . 128
Other Replacement Parts . . . . . . . . . . . . . . . . . . . . . . . . . . . . . . . . . . . . 129
Bar Code Reader Parts . . . . . . . . . . . . . . . . . . . . . . . . . . . . . . . . . . . . . . 129
Consumables . . . . . . . . . . . . . . . . . . . . . . . . . . . . . . . . . . . . . . . . . . . . . . . . 130
Cytometer Setup . . . . . . . . . . . . . . . . . . . . . . . . . . . . . . . . . . . . . . . . . . . 130
Reagents . . . . . . . . . . . . . . . . . . . . . . . . . . . . . . . . . . . . . . . . . . . . . . . . . 130
Labware . . . . . . . . . . . . . . . . . . . . . . . . . . . . . . . . . . . . . . . . . . . . . . . . . 131
Contents vii
Page 8

Appendix C: Technical Specifications 133
Cytometer Specifications . . . . . . . . . . . . . . . . . . . . . . . . . . . . . . . . . . . . . . . . 134
Environment . . . . . . . . . . . . . . . . . . . . . . . . . . . . . . . . . . . . . . . . . . . . . . 135
Performance . . . . . . . . . . . . . . . . . . . . . . . . . . . . . . . . . . . . . . . . . . . . . . 135
Optics . . . . . . . . . . . . . . . . . . . . . . . . . . . . . . . . . . . . . . . . . . . . . . . . . . . 135
Fluidics . . . . . . . . . . . . . . . . . . . . . . . . . . . . . . . . . . . . . . . . . . . . . . . . . . 137
Signal Processing . . . . . . . . . . . . . . . . . . . . . . . . . . . . . . . . . . . . . . . . . . . 137
Fluidics Cart Specifications . . . . . . . . . . . . . . . . . . . . . . . . . . . . . . . . . . . . . . 138
Capacity . . . . . . . . . . . . . . . . . . . . . . . . . . . . . . . . . . . . . . . . . . . . . . . . . 138
Loader Specifications . . . . . . . . . . . . . . . . . . . . . . . . . . . . . . . . . . . . . . . . . . 139
Index 141
viii BD FACSCanto Flow Cytometer Reference Manual
Page 9

About This Manual
This manual contains reference information about the BD FACSCanto™ flow
cytometer and BD FACS™ Loader. Operating instructions are contained in the
BD FACSCanto Instructions for Use.
Most cytometer functions are controlled by BD FACSCanto™ clinical software
and BD FACSDiva™ software. BD FACSCanto clinical software contains
modules for dedicated clinical applications with automatic gating algorithms,
while BD FACSDiva software is non–application specific. You can use either
software to perform cytometer quality control. Each software package has its
own reference manual, provided on the documentation CD.
BD Biosciences recommends that first-time users of this cytometer take
advantage of operator training offered with the sale of every new cytometer.
The BD FACSCanto Flow Cytometer Reference Manual assumes you have a
working knowledge of basic Microsoft® Windows® operation. If you are not
familiar with the Windows operating system, refer to the documentation
provided with your computer.
ix
Page 10
Conventions
The following tables list conventions used in this manual. Table 1 lists symbols
that are used in this manual or on safety labels to alert you to a potential hazard.
Text and keyboard conventions are shown in Table 2.
Tabl e 1 Hazard symbols
Symbol Meaning
CAUTION: hazard or unsafe practice that could result in material damage,
data loss, minor or severe injury, or death
Electrical danger
Laser radiation
Biological risk
a. Although these symbols appear in color on the cytometer, they are in black and white throughout this
reference manual; their meaning remains unchanged.
Tabl e 2 Text and keyboard conventions
Convention Use
; Tip
NOTICE
Italics Book titles and new or unfamiliar terms
a
Features or hints that can save time or prevent difficulties
Provides information that supplements the topic material
> Menu selection
For example, “select File > Print” means select Print from the File
menu.
Ctrl-X Press the indicated keys simultaneously
For example, Ctrl-P means hold down the Control key while
pressing the letter p.
x BD FACSCanto Flow Cytometer Reference Manual
Page 11

Technical Assistance
For technical questions or assistance in solving a problem:
• Read the section of the manual specific to the operation you are
performing.
• See Chapter 5, Troubleshooting.
If additional assistance is required, contact your local BD Biosciences technical
support representative or supplier.
When contacting BD Biosciences, have the following information available:
• product name, part number, and serial number
• software version number
•error messages
• details of system performance
For cytometer support within the US, call (877) 232-8995.
For support within Canada, call (888) 259-0187.
Customers outside the US and Canada, contact your local BD representative or
distributor.
About This Manual xi
Page 12

xii BD FACSCanto Flow Cytometer Reference Manual
Page 13

1
Introduction
The BD FACSCanto system uses a fixed-optics design and advanced digital
electronics to support multicolor analysis of up to six fluorescent markers and
two scatter parameters per assay.
The cytometer does not require special facilities—it plugs into a standard wall
outlet, uses air-cooled lasers, and provides its own air pressure and vacuum for
the fluidics and waste. You can prepare samples on the BD FACS™ Sample Prep
Assistant II and import the sample prep worklist.
For further automation, use BD FACSCanto clinical software and the BD FACS
Loader for sample acquisition. Alternatively, use BD FACSDiva software for
more flexibility in acquisition and analysis.
See the following for more information:
• Intended Use on page 14
• System Components on page 14
• System Requirements on page 31
13
Page 14
Intended Use
The BD FACSCanto system is intended for use as an In Vitro Diagnostic device
for identification and enumeration of lymphocyte subsets in human cells in
suspension for flow cytometry.
System Components
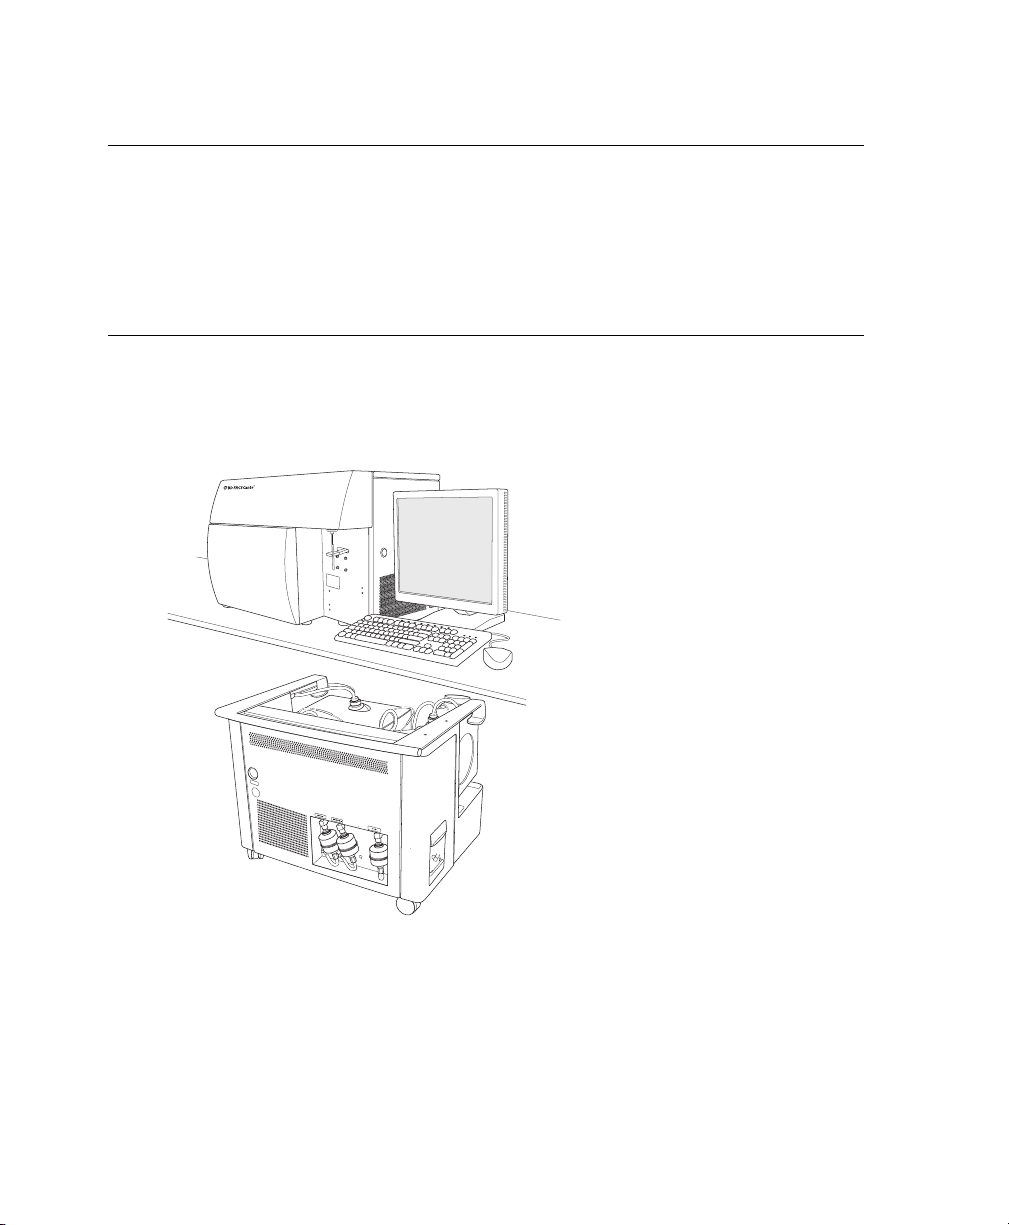
The BD FACSCanto system consists of a benchtop flow cytometer, a selfcontained fluidics cart, and the BD FACSCanto workstation.
System options include an automated sample loader and a barcode reader.
For a description of system components, see:
• Flow Cytometer on page 15
• Fluidics Cart on page 25
14 BD FACSCanto Flow Cytometer Reference Manual
Page 15
• Computer Workstation on page 28
• BD FACS Loader (Optional) on page 28
• Barcode Reader (Optional) on page 30
Flow Cytometer
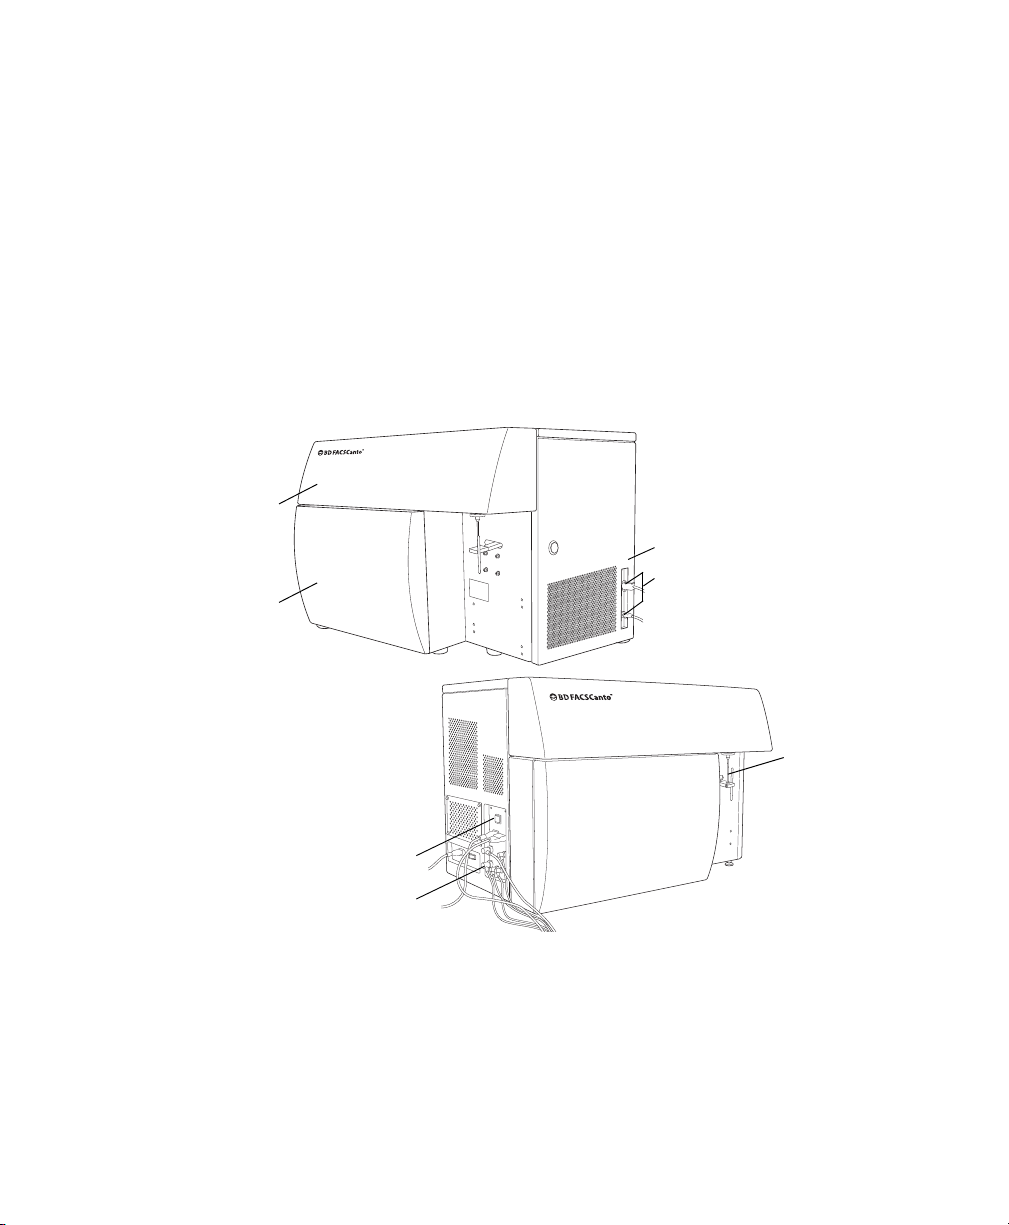
Cytometer power is controlled by the power button. All other cytometer and
fluidics cart functions are controlled by BD FACSCanto clinical software and
BD FACSDiva software (provided with the cytometer).
flow cell
access door
side door
data ports
optics
access door
sample
injection
tube
power button
fluidics cart
connections
The BD FACSCanto flow cytometer consists of a fluidics subsystem, an optics
subsystem, and an electronics subsystem. For a more in-depth discussion of
Chapter 1: Introduction 15
Page 16
fluidics, optics, electronics, and flow cytometry, see the Technical Overview on
page 105.
Fluidics
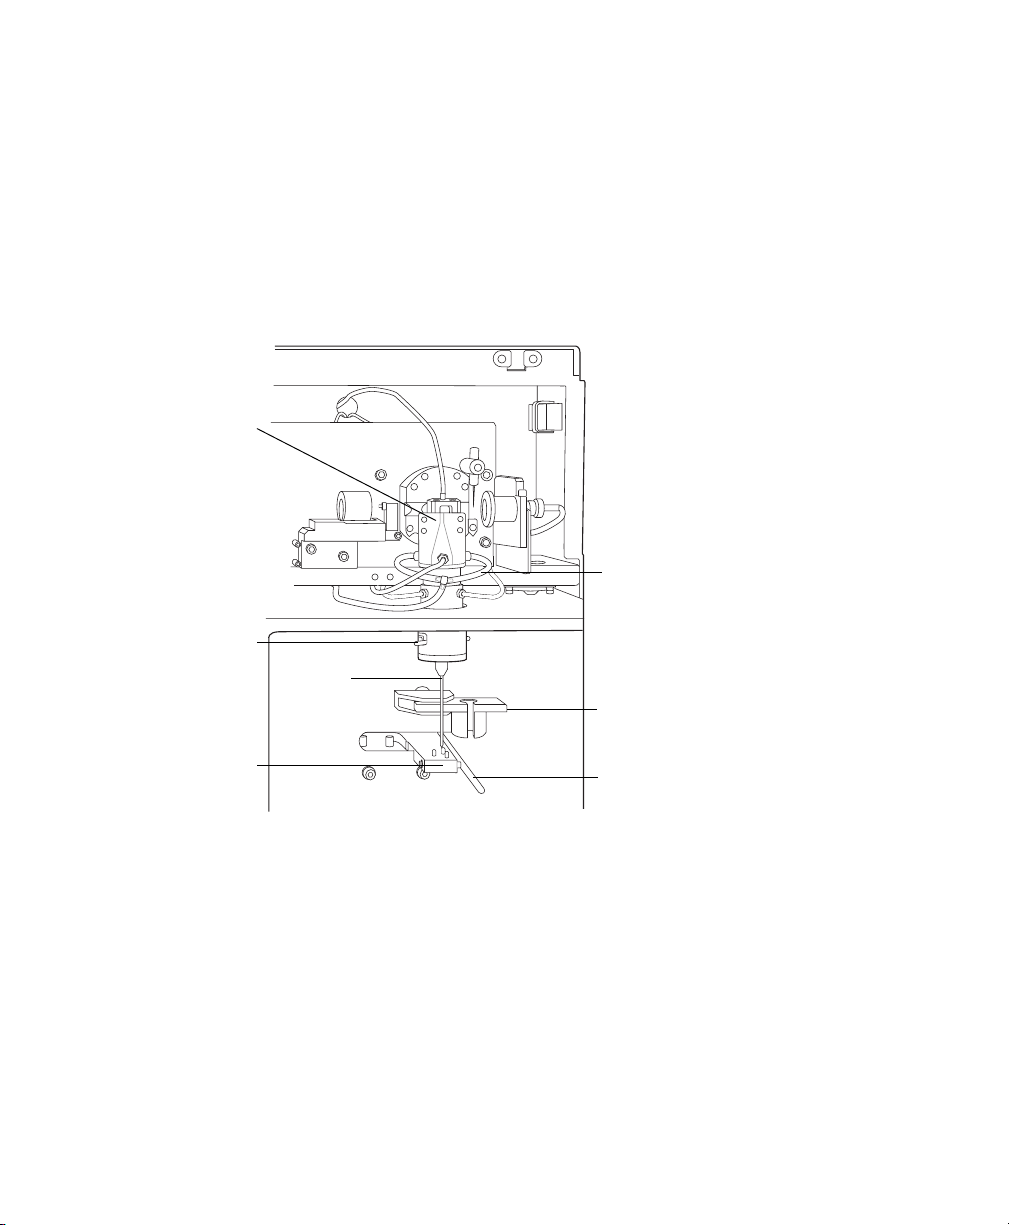
The fluidics system consists of the sample injection tube (SIT), the aspirator arm,
the flow cell, a pressurized interior reservoir, and a network of tubing that
provides sheath and cleaning fluids to and removes waste from the flow cell.
flow cell
tubing
adapter lever
sample
injection
tube (SIT)
tube guide
(Loader option only)
aspirator arm
16 BD FACSCanto Flow Cytometer Reference Manual
aspirator arm bar
Page 17

The following table briefly describes these components.
flow cell where laser beam intercepts particles
tubing brings sheath and cleaning fluids to and aspirates waste from flow cell
SIT hollow metal tube that brings sample to flow cell
adapter lever lever used to change SIT from manual to automatic loading
aspirator arm movable waste aspiration port
aspirator arm
bar
tube guide helps guide tube onto the SIT (Loader operation only)
metal bar used to push aspirator arm away from SIT during manual
loading
When you install tubes onto the SIT, a pump within the fluidics cart pressurizes
the interior reservoir (plenum), which then provides sheath fluid to the flow cell.
At the same time, the sample tube is pressurized and sample is pushed up the SIT
and into the flow cell.
When you remove tubes from the SIT, the cytometer cleans the SIT by flushing
sheath solution down the inside and outside of the tube. The flushed sheath
solution is aspirated by the aspirator arm.
To activate SIT cleaning, push the aspirator arm all the way to the left when you
manually unload a tube. When you are using the Loader, SIT cleaning occurs
automatically.
Do not leave a tube of distilled water on the SIT between sample tubes, or during
or after daily shutdown.
Chapter 1: Introduction 17
Page 18
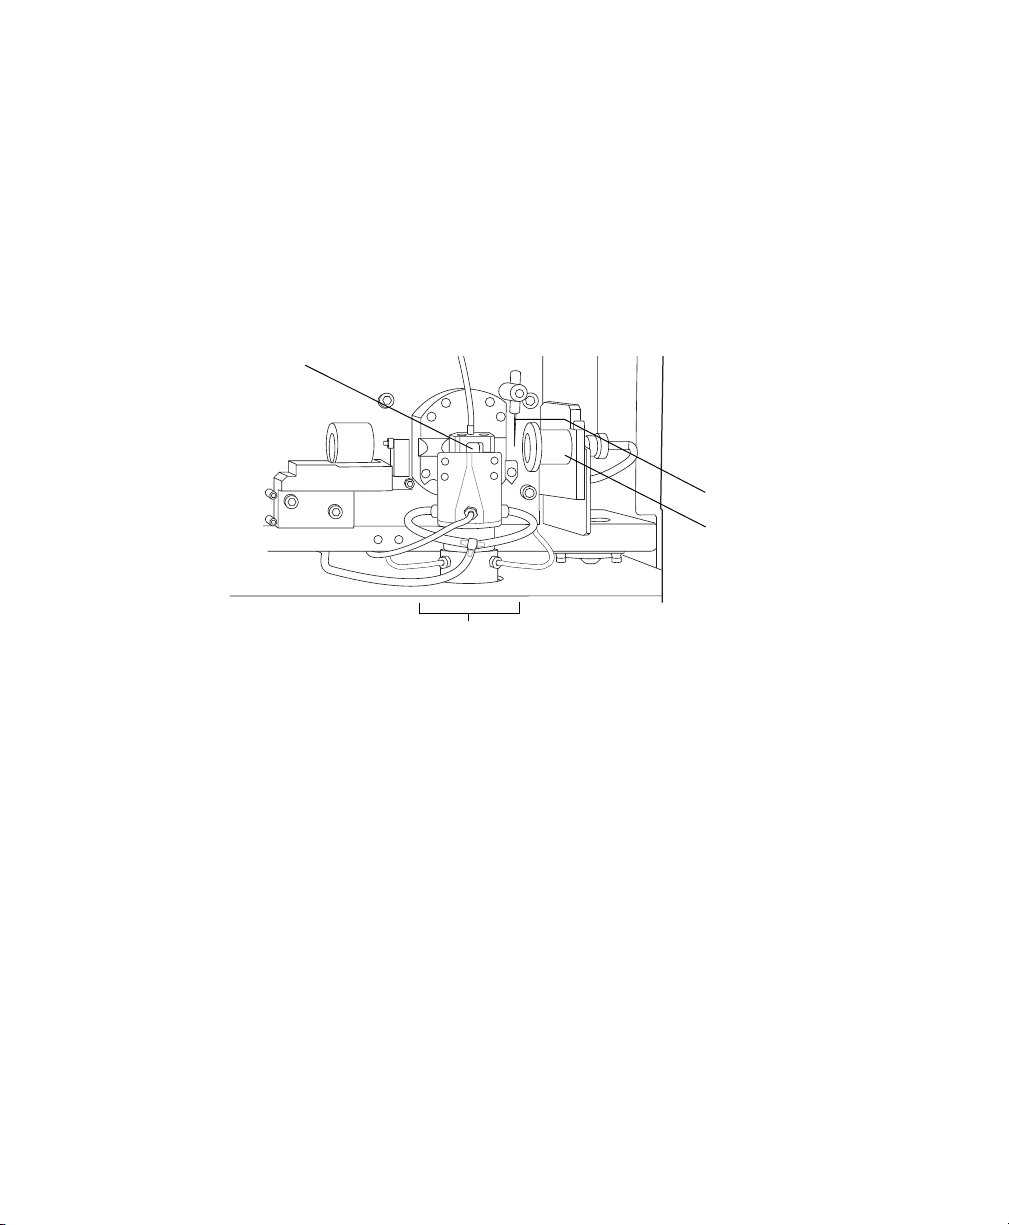
Flow Cell
Once the sample moves into the flow cell, particles move in single file past the
laser beams. The scattered and emitted light from these particles provides
information about their size, shape, granularity, and fluorescence properties.
The flow cell is beneath the flow cell access door. For more information, see
Fluidics System on page 106.
Figure 1-1 Flow cell
where lasers intercept
sample stream
obscuration bar
FSC diode
flow cell
Optics
The optics system in the BD FACSCanto cytometer is composed of both
excitation optics and collection optics. Excitation optics bring light to the flow
cell. Collection optics gather the light signals emitted or scattered by the particles.
Excitation Optics
The excitation optics consist of lasers, fiber optic cables, beam-shaping prisms,
and an achromatic focusing lens, as shown in Figure 1-2 on page 20.
18 BD FACSCanto Flow Cytometer Reference Manual
Page 19

The BD FACSCanto cytometer uses low-powered air-cooled and solid state lasers
that do not have special power and cooling requirements.
Laser
Coherent® Sapphire™
Solid State
JDS Uniphase™ HeNe
Air Cooled
Wavelength
(nm)
488 (blue) FITC, PE, PerCP,
633 (red) APC, APC-Cy7
Commonly Used Fluorochromes
PerCP-Cy™5.5, PE-Cy™7
Chapter 1: Introduction 19
Page 20
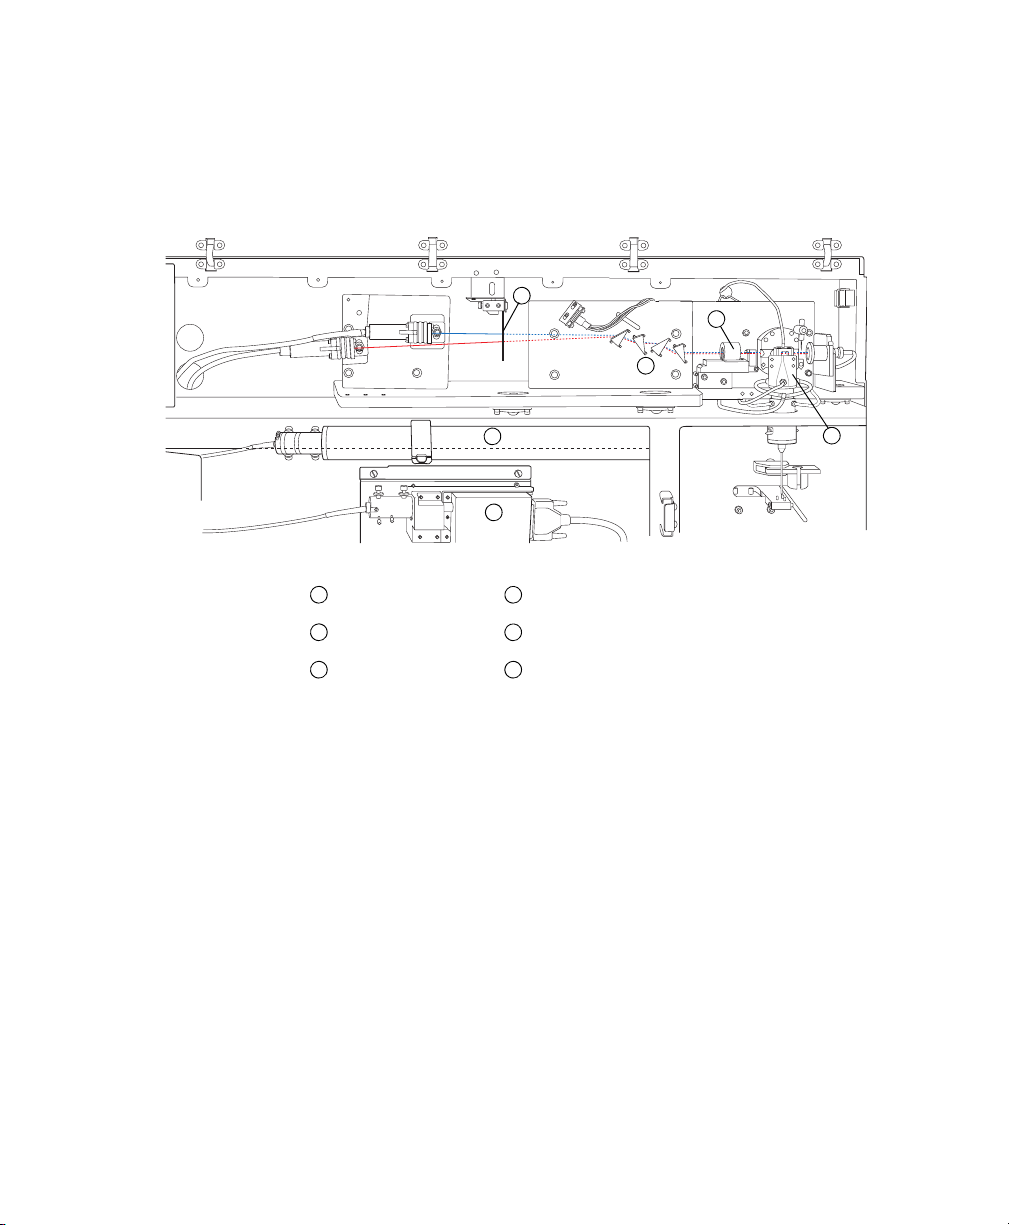
Fiber optic cables direct the laser light onto beam-shaping prisms, which in turn
transmit the laser light to a focusing lens. The lens directs the laser light onto the
sample stream within the flow cell (Figure 1-2). See also Figure A-3 on page 110.
Figure 1-2 Optical pathway
1
3
2
5
6
interlock flow cell
1
prisms red He-Ne laser
2 5
focusing lens blue solid-state laser
3 6
4
When the flow cell access door opens, an interlock shutters the laser light and
blocks its pathway for safety reasons.
4
20 BD FACSCanto Flow Cytometer Reference Manual
Page 21
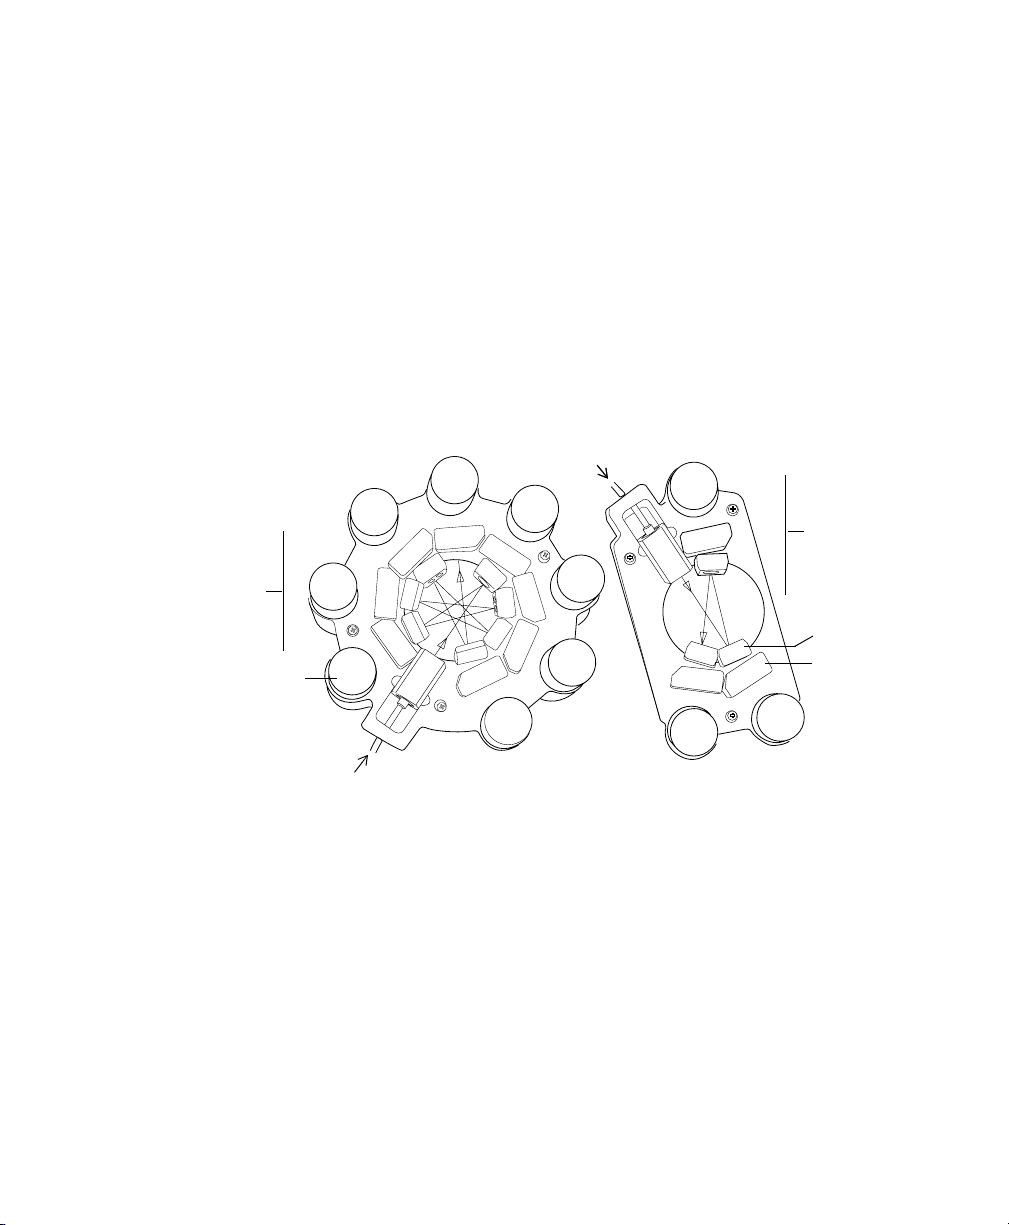
Collection Optics
From the flow cell, laser light is routed to the collection optics, which efficiently
gather the signals emitted and scattered from each particle. The BD FACSCanto
collection optics include two detector arrays, which consist of photomultiplier
tubes (PMTs) arranged in one octagon and one trigon (Figure 1-3).
The octagon contains five PMTs and detects light from the 488-nm (blue) laser.
One PMT in the octagon collects side scatter (SSC) signals.
The trigon contains two PMTs and detects light from the 633-nm (red) laser.
Figure 1-3 Octagon and trigon detector arrays
red-laser
A
585/42
488/10
E
signal
C
B
660/20
trigon
longpass
A
mirror
bandpass
filter
735LP
780/60
C
octagon
PMT
H
F
780/60
735LP
D
502LP
530/30
655LP
670LP
B
556LP
G
blue-laser
signal
Chapter 1: Introduction 21
Page 22

When light arrives at an array, a longpass mirror (filter) transmits the highest
wavelengths to the first PMT in the series and reflects lower wavelengths to the
next PMT. Similarly, the next PMT’s longpass mirror transmits the next highest
wavelengths and reflect lower wavelengths, and so on around the array. A
bandpass filter (or additional longpass mirror) in front of each PMT further
screens unwanted light.
A
D
B
Fiber
E
In addition to the PMT detectors, a photodiode collects the stronger forward
scatter signals. The obscuration bar prevents excess laser light from entering this
diode (Figure 1-1 on page 18).
For additional descriptions of detector arrays, mirrors, and filters, see Optics
System on page 109.
22 BD FACSCanto Flow Cytometer Reference Manual
Page 23

At installation, the octagon and trigon arrays have the filter and mirror
combinations shown in Table 1-1.
Table 1-1 Octagon and trigon optical filters
Detector Array
(Laser)
Octagon
(488-nm blue laser)
Trigon
(633-nm red laser)
PMT
Position
A 735 780/60 PE-Cy7
B 655 670 PerCP-Cy5.5 or
C 556 585/42 PE
D 502 530/30 FITC
Eblank
Fblank
Gblank
H— blank
A 735 780/60 APC-Cy7
B blank 660/20 APC
LP Mirror
optical holder
optical holder
optical holder
BP Filter or
LP Mirror
488/10 SSC
blank
optical holder
blank
optical holder
optical holder
Intended Dye
PerCP
—
—
—
Blank optical holders do not contain optical filters. They are used in the octagon
and trigon to prevent unwanted light from interfering with fluorescence signal.
Chapter 1: Introduction 23
Page 24
Electronics
The electronics system converts optical signals to electronic signals and digitizes
them for computer analysis. The photodiode and PMTs generate signals
proportional to the amount of light they detect. The cytometer’s onboard
electronics amplifies and then converts the signals from continuous voltage
values (analog) into discrete values (digital). Upon amplification and digital
conversion, fluorescent light signals from consistently prepared and stained
particles characteristically fall into certain channels, thus allowing analysis.
On the BD FACSCanto, electronic system components consist of power controls
and connectors along with processing boards in the card cage. This section
describes only the user-accessible power panel. For more information, see
Electronics System on page 120.
Power Panel
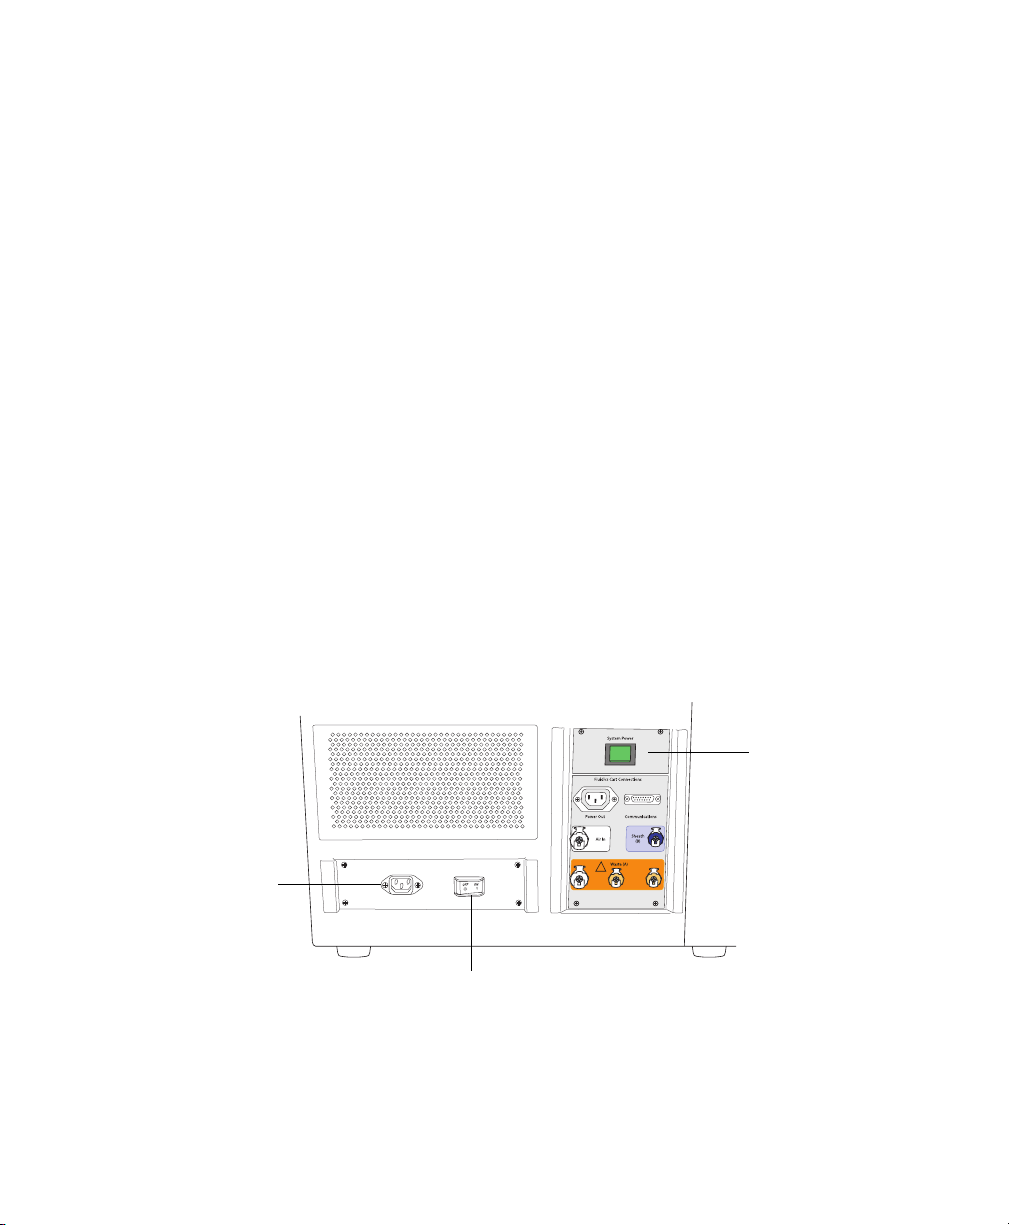
Power to the cytometer, lasers, and fluidics cart is supplied by a power cord from
the cytometer plugged directly into a standard electrical outlet. BD recommends
using an uninterrupted power supply (UPS) unit to maintain cytometer power
during a power outage. The system power button turns on the cytometer and
fluidics cart, and powers the lasers (Figure 1-4).
Figure 1-4 Flow cytometer power panel
system AC power
cord plugs in here
system circuit breaker
The system circuit breaker is located next to the AC power cord. The breaker will
need to be reset if there is a power surge in the laboratory.
24 BD FACSCanto Flow Cytometer Reference Manual
system power
button
Page 25
Fluidics Cart
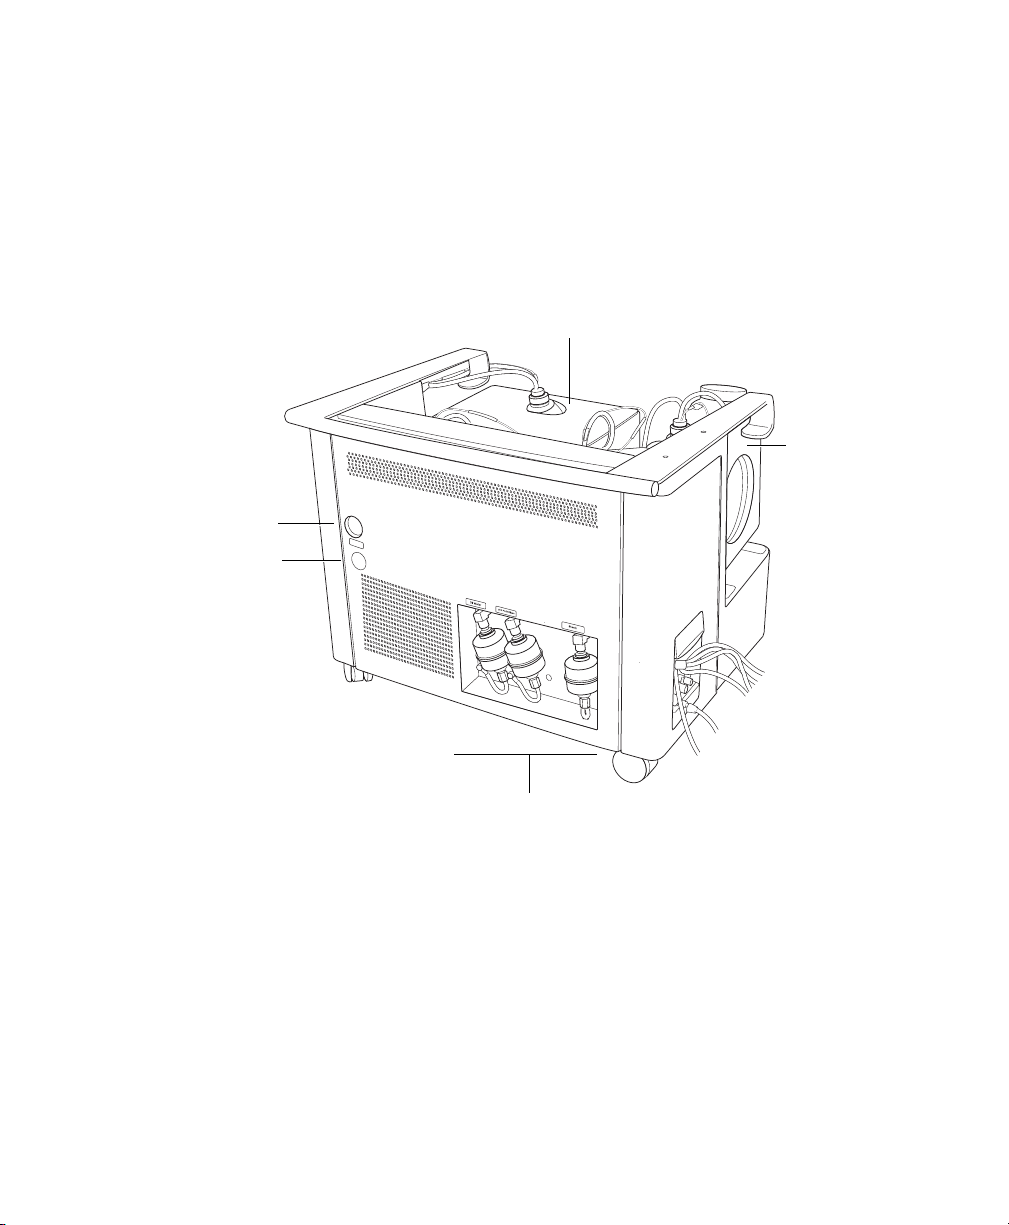
The fluidics cart provides filtered sheath and cleaning fluids to the cytometer, and
collects system waste products (Figure 1-5). The cart supplies the required air
pressure and vacuum, which eliminates the need for an external source (although
the cart can be hooked up to an in-house air source).
Figure 1-5 Fluidics cart
cubitainer
10-L waste
container
pressure
gauge
door access
knob
filters
Chapter 1: Introduction 25
Page 26
Containers and Ports
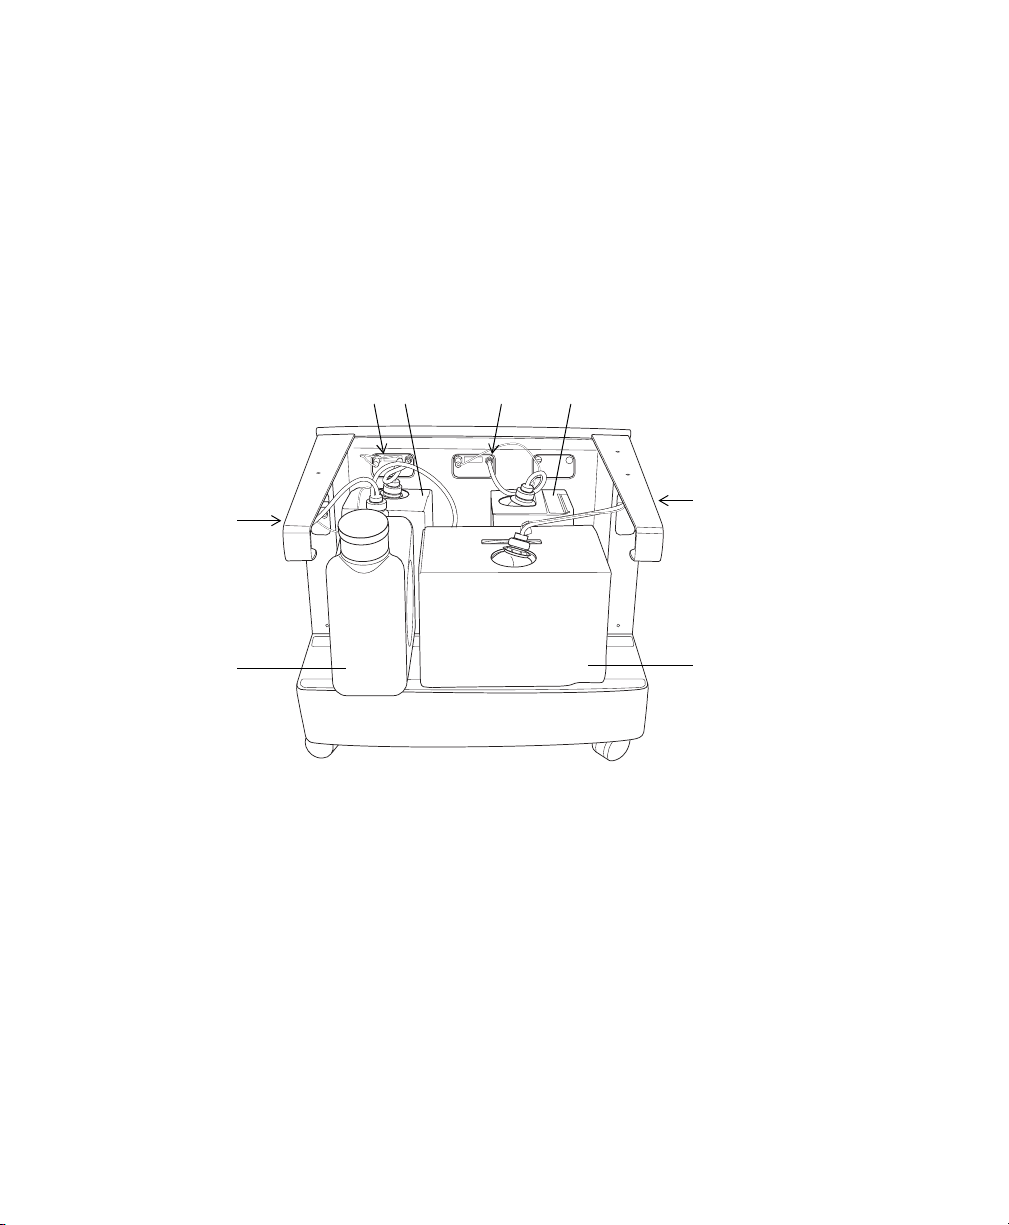
The fluidics cart holds a 10-L waste container, a 20-L BD FACSFlow™
cubitainer, a 5-L BD FACS shutdown solution cubitainer, and a 5-L
BD FACSClean solution cubitainer.
Use the waste container provided with the system; do not substitute other
containers.
Figure 1-6 Fluidics cart containers and ports
BD FACS™ shutdown
solution port and cubitainer
waste port
BD™ FACSClean port and
cubitainer
BD FACSFlow™ port
waste tank
BD FACSFlow cubitainer
Each solution has its own non-interchangeable fluid port and level-sensor
connection. Fluid level alarms occur within BD FACSCanto clinical software and
BD FACSDiva software.
26 BD FACSCanto Flow Cytometer Reference Manual
Page 27
Controls
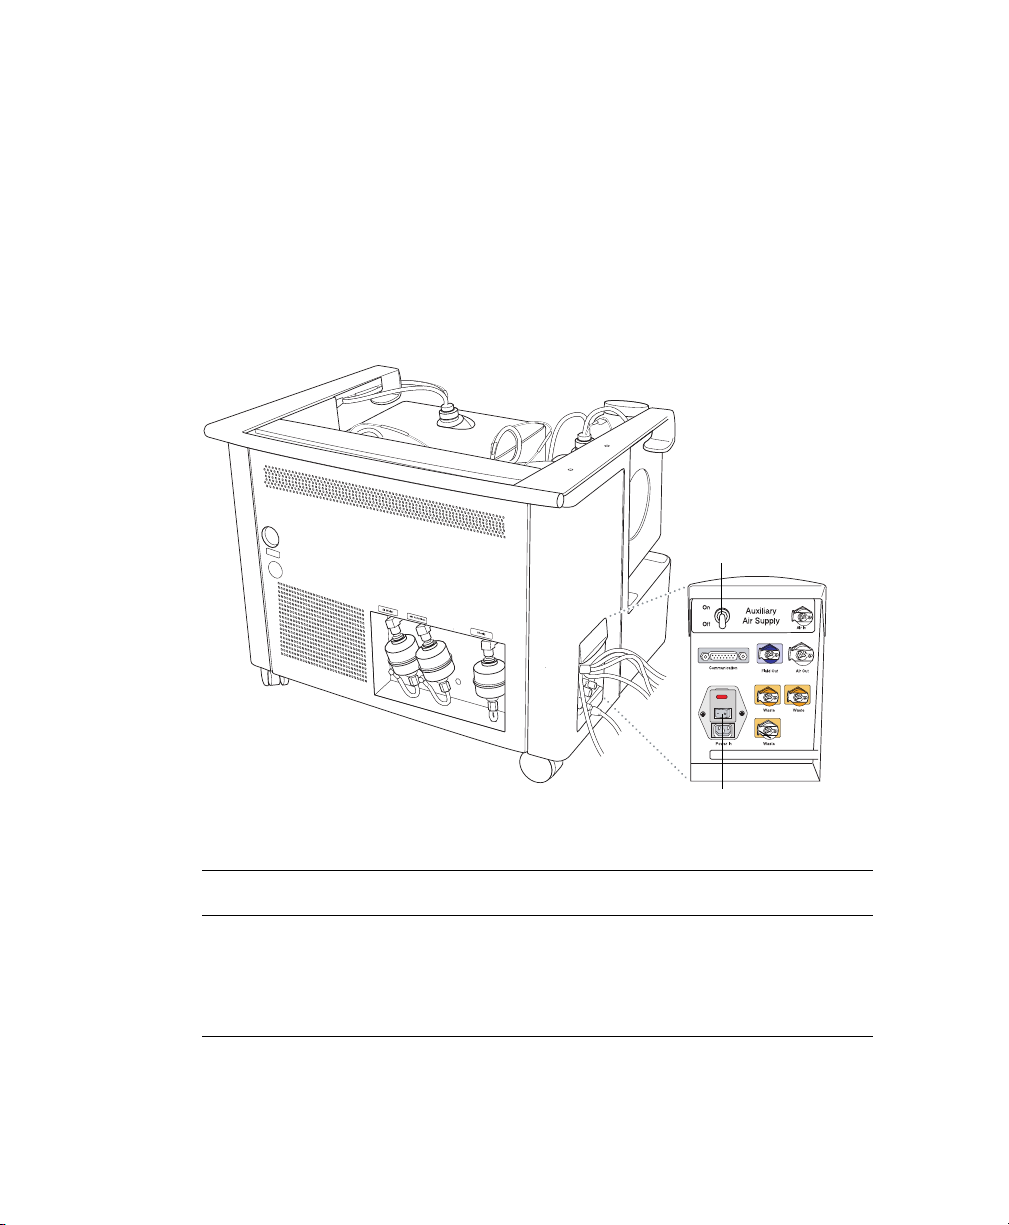
The fluidics cart connects to the flow cytometer unit by way of cables and tubing.
When you turn on the power to the cytometer, the fluidics cart powers on also.
Under ordinary circumstances, you do not need to adjust any of the switches on
the cart’s power panel. Leave the auxiliary air supply switch off unless the cart
has been attached to an in-house air supply by BD Biosciences service personnel
(see Table 1-2 for details). Leave the cart circuit breaker on at all times.
Figure 1-7 Fluidics cart panel
auxiliary air supply
switch, off
cart circuit breaker, on
Table 1-2 Auxiliary air supply switch positions
Position Air Source What This Means
Off Cart air The cart is providing its own air
pressure and vacuum.
On House air The cart is hooked up to the
building’s air pressure and vacuum.
Chapter 1: Introduction 27
Page 28

Powering Off
To turn off the fluidics cart (and the cytometer, as well), press the system power
button. Normally during cart shutdown, you hear a hiss, and a small amount of
condensed water will discharge.
Computer Workstation
The workstation consists of a computer compatible with Microsoft Windows XP
Professional operating system, a flat-screen monitor, and an optional printer.
BD FACS Loader (Optional)
The BD FACS Loader automatically introduces prepared samples to the
cytometer. The Loader is controlled by BD FACSCanto clinical software or
BD FACSDiva software. It can be added to your system at any time. The Loader
consists of:
•a drawer
• a cover
• three optical sensors
• an electronics module
•a tube lifter
• a 40-tube carousel
For more information, see BD FACS Loader Option on page 33.
28 BD FACSCanto Flow Cytometer Reference Manual
Page 29
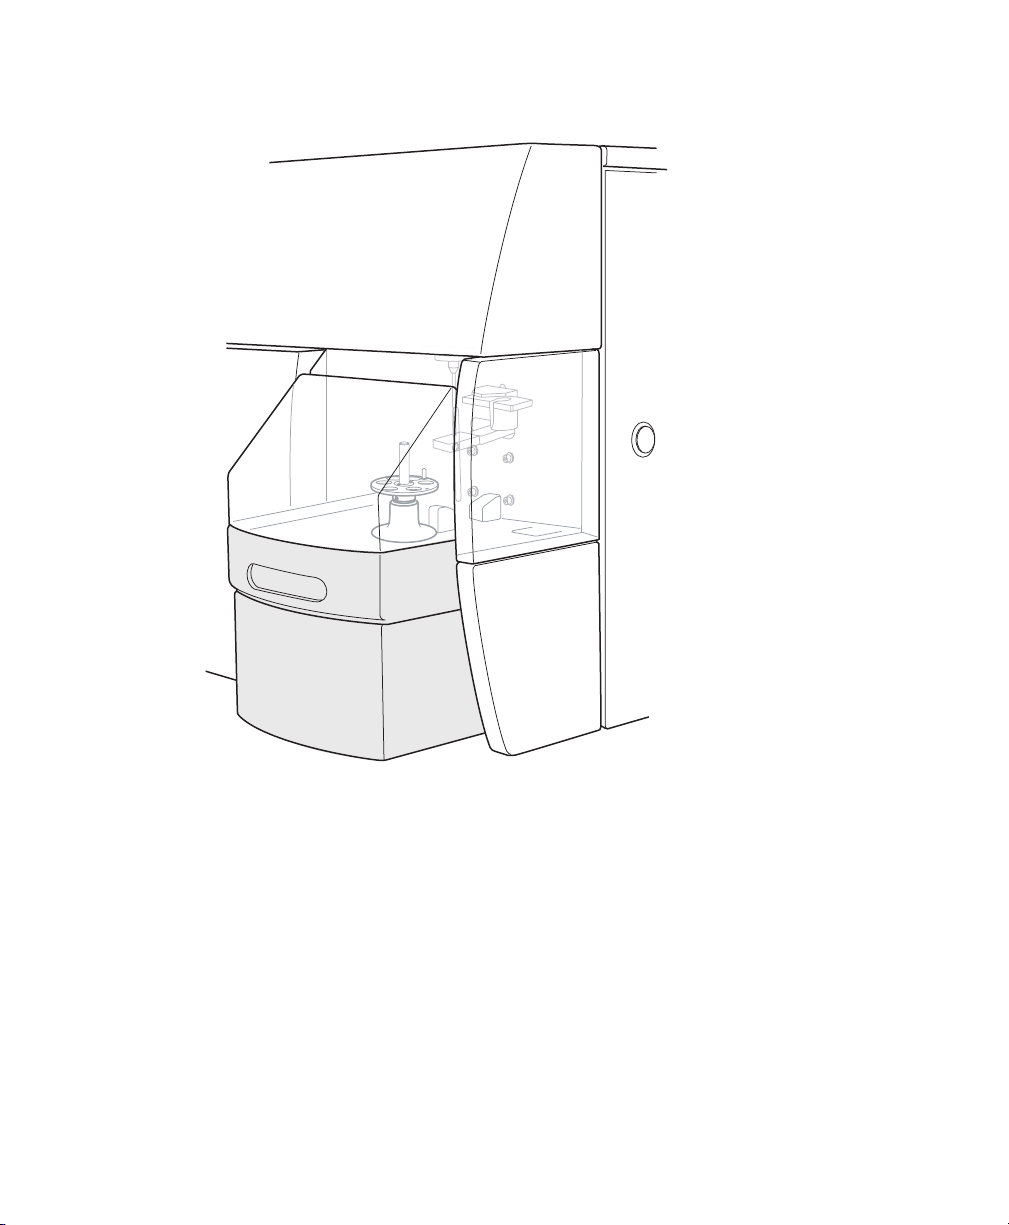
Figure 1-8 BD FACS Loader
Chapter 1: Introduction 29
Page 30
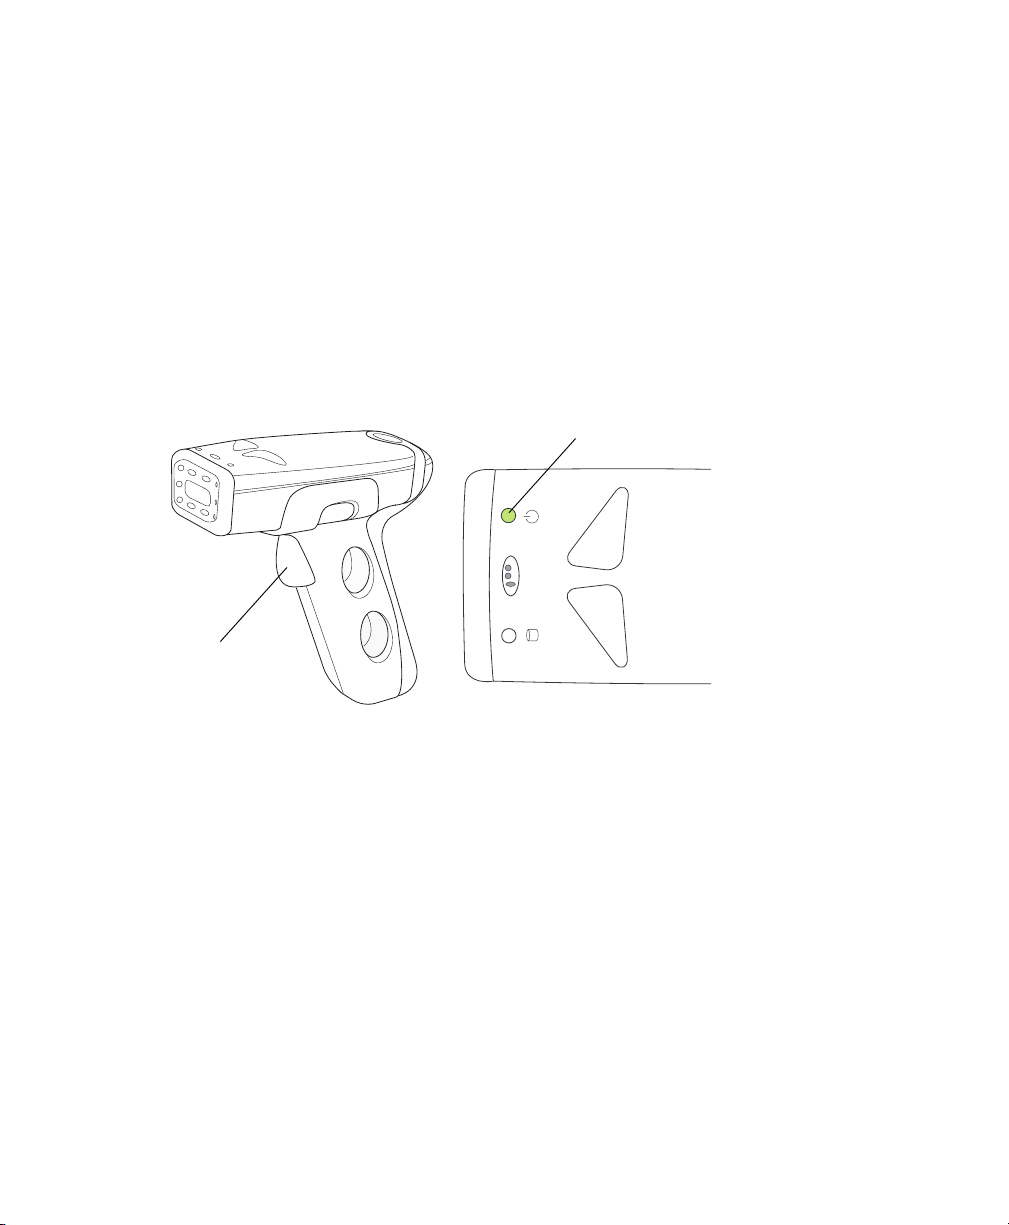
Barcode Reader (Optional)
The Opticon LG2 Imager is a hand-held barcode reader that plugs into the USB
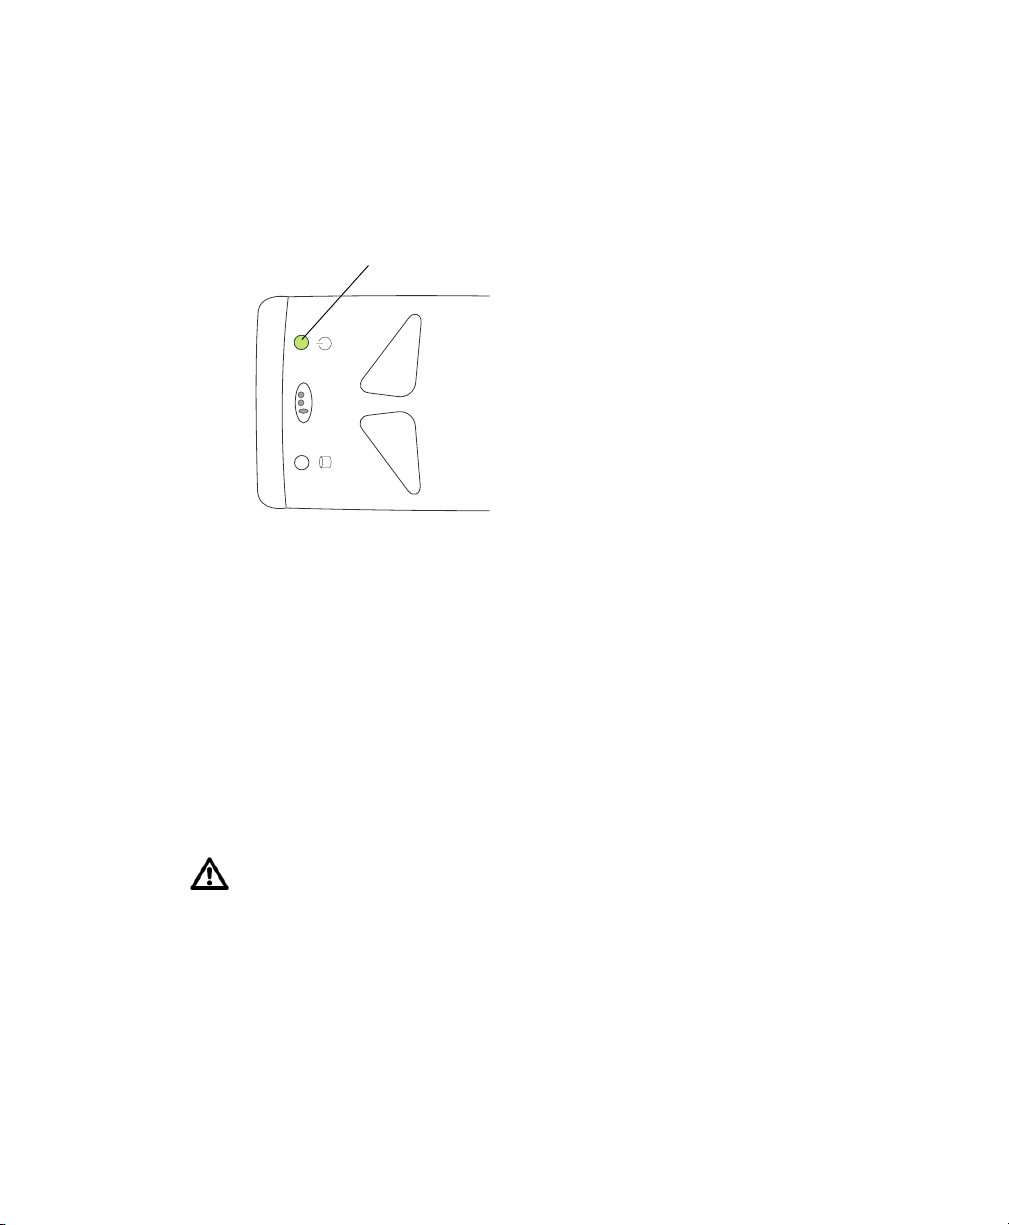
port on the BD FACSCanto computer workstation. A green light on the top of
the barcode reader indicates that it is connected to the USB port and ready to use.
The barcode reader reads most barcode standards, including Codabar, Code 128,
Code 39 with checksum, and PDF417. It reads information from the BD FACS™
7-color setup beads label into BD FACSCanto clinical software, and also reads
coded patient information into a worklist.
Figure 1-9 Typical barcode reader (example)
ready light
trigger
view from top
For information on installing and using the barcode reader with the
BD FACSCanto, see Installing and Using the Barcode Reader on page 46. For
detailed information including how to program the barcode reader for other
barcode standards, refer to the information supplied by the manufacturer.
30 BD FACSCanto Flow Cytometer Reference Manual
Page 31

System Requirements
Software
Both included software packages must be installed:
• BD FACSCanto clinical software v2.1
Do not read FCS files created with v2.0 or v2.1 into previous versions of
BD FACSCanto clinical software. Previous versions will show incorrect results.
• BD FACSDiva software v6.0
NOTICE BD FACSCanto clinical software v2.0 can be used to operate the
BD FACSCanto system with BD FACSDiva™ software v5.0 installed.
However, to use BD FACSDiva™ software v6.0, BD FACSCanto clinical
software v2.1 must be installed.
Workstation
BD FACSCanto workstation purchased through BD Biosciences
Compatible Tubes
• 12 x 75-mm polystyrene test tubes (BD Falcon™ tubes)
• 12 x 75-mm BD Trucount™ tubes
• BD FACS™ 7-color setup bead tubes
Bulk Fluids
• BD FACSFlow solution
• BD™ FACSClean solution
• BD FACS™ shutdown solution
Chapter 1: Introduction 31
Page 32

• full-strength bleach (waste tank)
Fluids Required for External Cleaning
• BD FACSClean solution
• Deionized (DI) water
Setup Beads
BD FACS 7-color setup beads for use with BD FACSCanto clinical software
32 BD FACSCanto Flow Cytometer Reference Manual
Page 33

BD FACS Loader Option
This chapter contains the following information:
• Loader Components on page 34
• Using the Loader on page 36
• Maintaining the Loader on page 43
2
33
Page 34
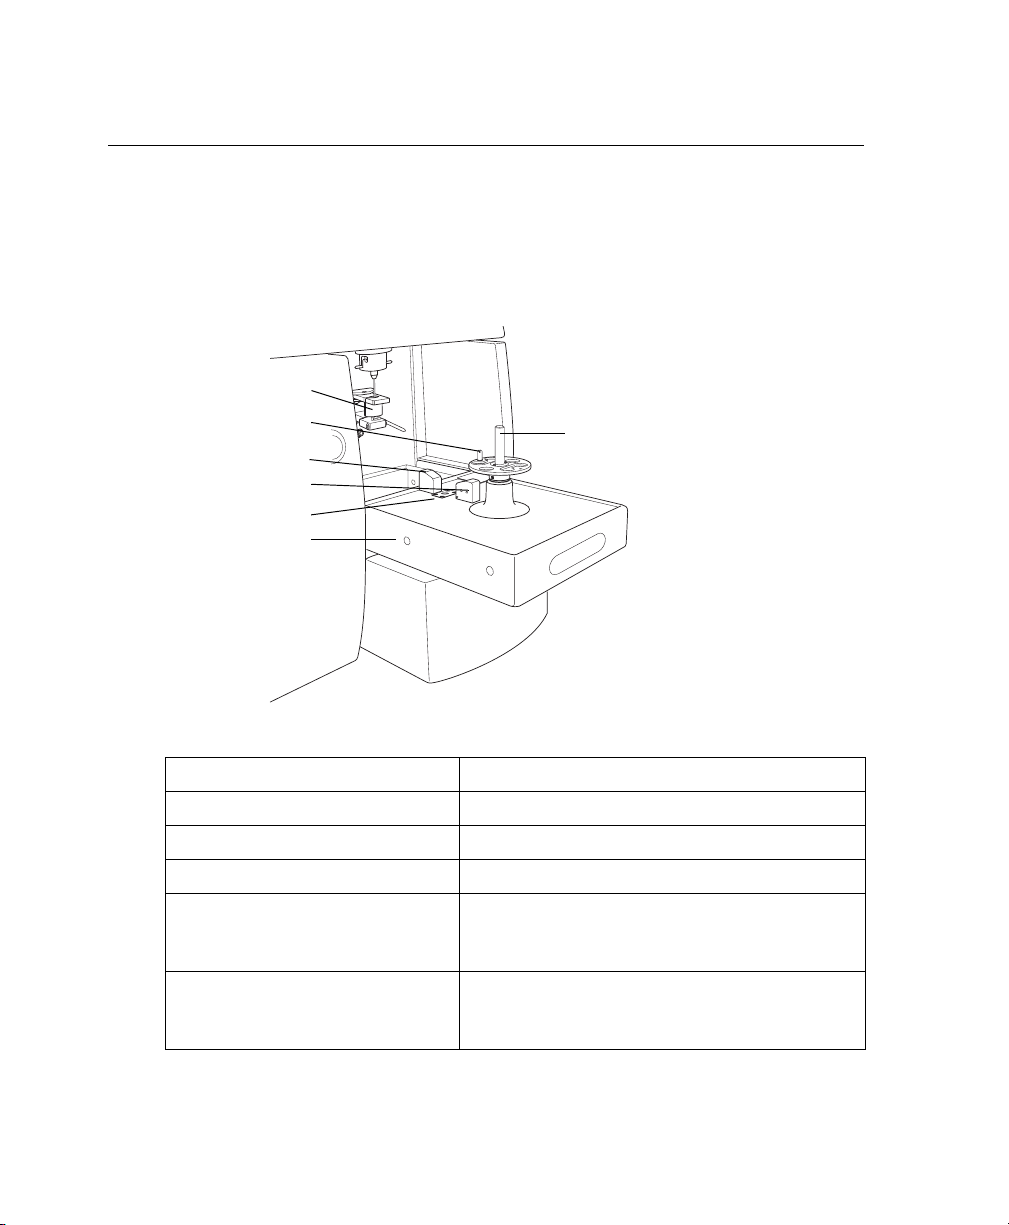
Loader Components
The Loader is mounted directly on the flow cytometer. The device consists of a
drive system, tube lifter mechanism, spindle, and optical sensors, all of which are
attached to a sliding drawer. A cover fits over the drawer to protect you from
moving parts during operation. Table 2-1 provides a brief description of Loader
components.
tube guide
alignment guide pin
tube optical sensor
carousel optical sensor
tube lifter
drawer
center spindle
Table 2-1 Loader components
tube guide guides tubes during lifting to ensure a proper seal
alignment guide pin aligns the carousel and keeps it in place
carousel optical sensor reads the carousel ID
tube optical sensor scans the carousel to verify tube locations and
match the associated worklist, and verifies a tube
is in place before activating the tube lifter
tube lifter a stainless steel rod that lifts the sample tube
from the carousel to the sample injection tube
(SIT)
34 BD FACSCanto Flow Cytometer Reference Manual
Page 35
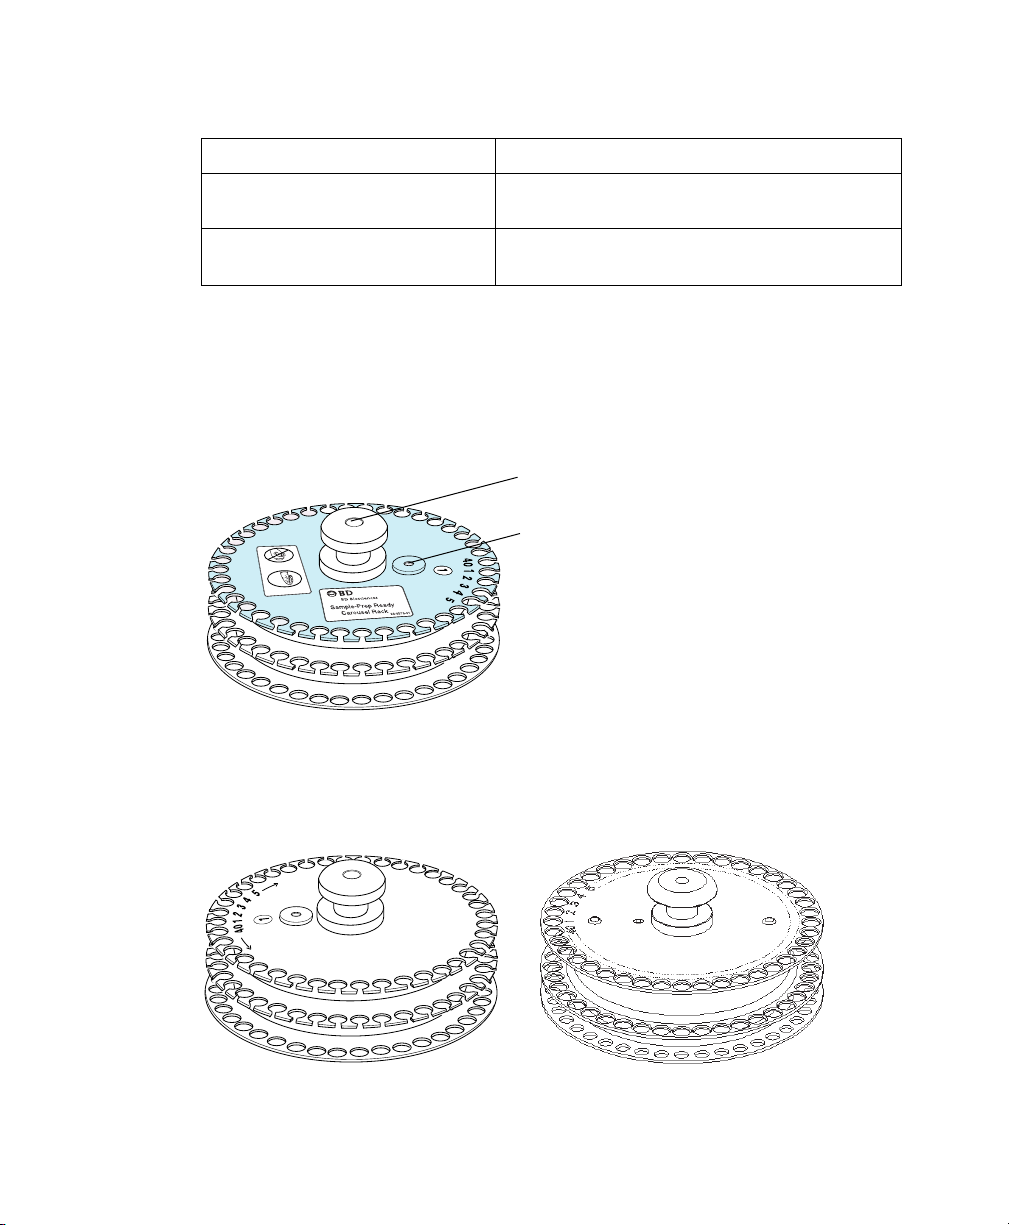
Table 2-1 Loader components (continued)
drawer holds the carousel; slides out for easy access
center spindle the axis around which the carousel spins; insert
the carousel onto the Loader here
drive system the motor that rotates the carousel (not visible
from exterior)
Carousel
The carousel accommodates up to forty 12 x 75-mm tubes. Each carousel has a
unique ID printed on top and on an optically read label inside.
Figure 2-1 Sample-Prep Ready carousel
spindle hole
alignment hole
The Loader is compatible with both the green-tinted carousels labeled “SamplePrep Ready” and the traditional gray Loader carousels (Figure 2-2).
Figure 2-2 Compatible carousels
Sample-Prep Ready carousel traditional gray carousel
Chapter 2: BD FACS Loader Option 35
Page 36
Not all manufactured 12 x 75-mm tubes have been checked for proper
functionality on the Loader. BD Biosciences has validated only disposable,
12 x 75-mm BD Falcon polystyrene test tubes, BD Trucount tubes, and
BD FACS 7-color setup bead tubes.
Using the Loader
The Loader operates by software commands only. Commands can be issued with
either BD FACSCanto clinical software or BD FACSDiva software. For
instructions on running samples with the Loader, refer to the BD FACSCanto
Instructions for Use.
This section explains how to set up the cytometer for acquisition with the Loader.
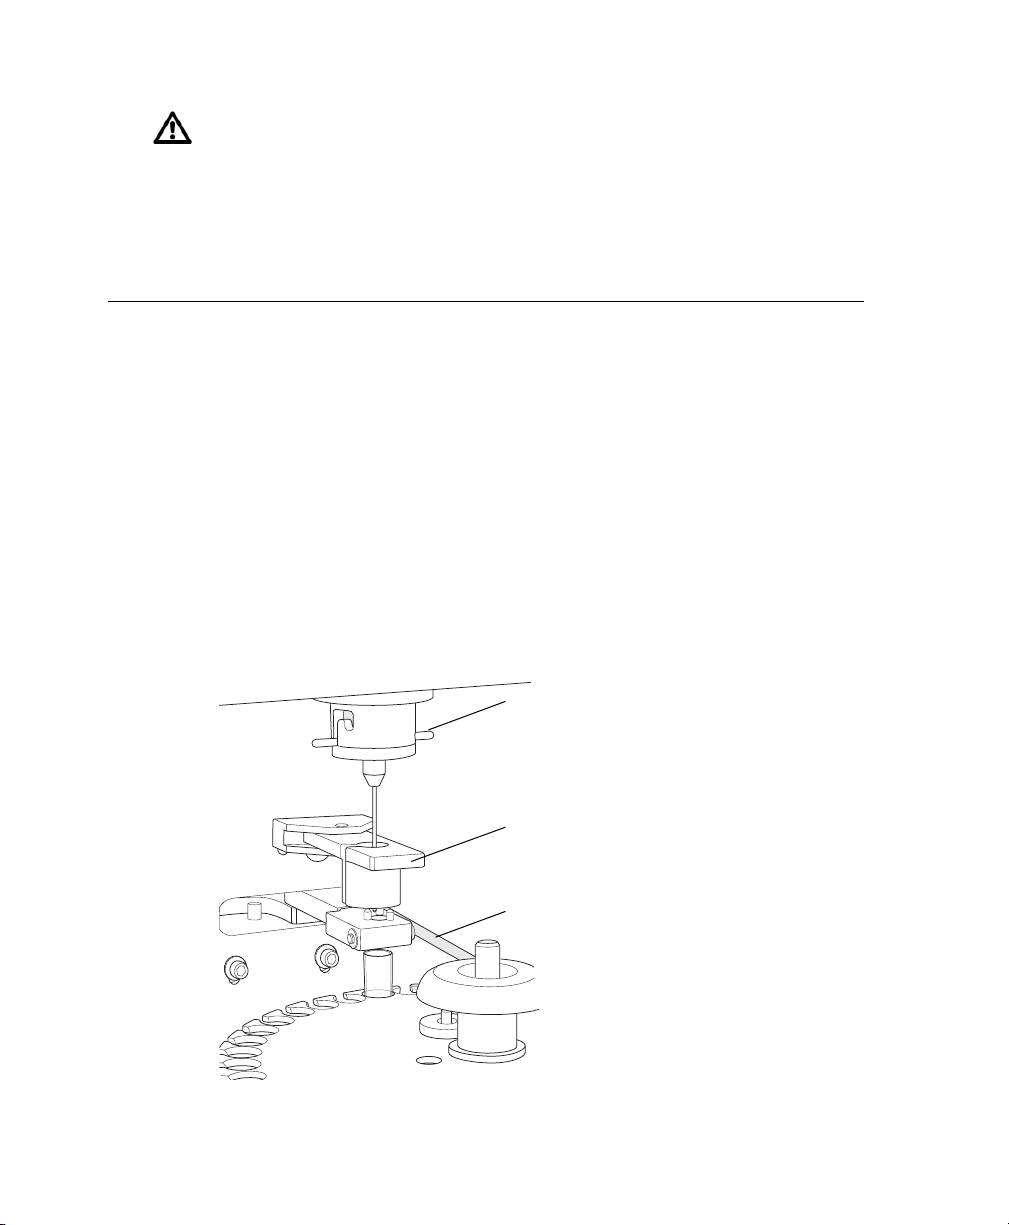
1 Verify that the cytometer is set up for automatic loading.
The adapter lever should be in the lowest position, the tube guide should be
forward, and the aspirator arm bar should be horizontal (Figure 2-3). For
detailed instructions, see Changing to Automatic Loading on page 41.
Figure 2-3 Automatic loading setup
adapter lever
tube guide
aspirator arm bar
36 BD FACSCanto Flow Cytometer Reference Manual
Page 37
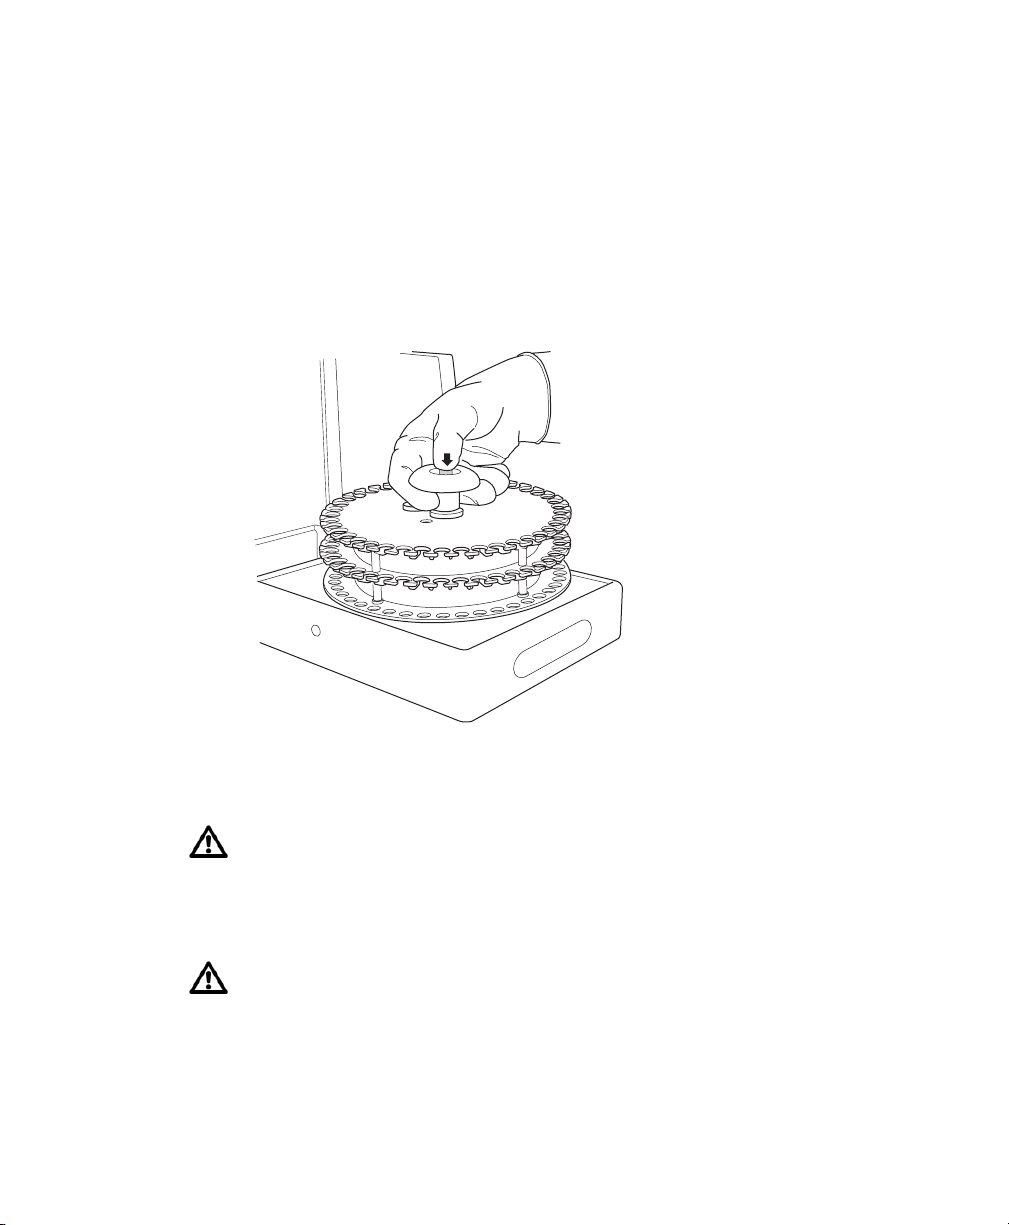
2 If needed, remove the carousel from the Loader:
• Open the Loader cover.
• Pull out the Loader drawer.
• Place your thumb on the center spindle, and press down with your
thumb while gently pulling up on the carousel handle with two fingers,
as shown.
3 Vortex the sample tubes and place them uncapped in the carousel(s)
according to the worklist.
For accurate results, match the tubes to those listed on the printed worklist
(BD FACSCanto clinical software) or the Carousel Assignment tab
(BD FACSDiva software). Print a copy of tube assignments and use the
printout as a guide when filling each carousel.
To prevent binding during loading, make sure label thickness per tube is
less than three labels. Flatten labels completely before placing a tube in the
carousel.
Chapter 2: BD FACS Loader Option 37
Page 38
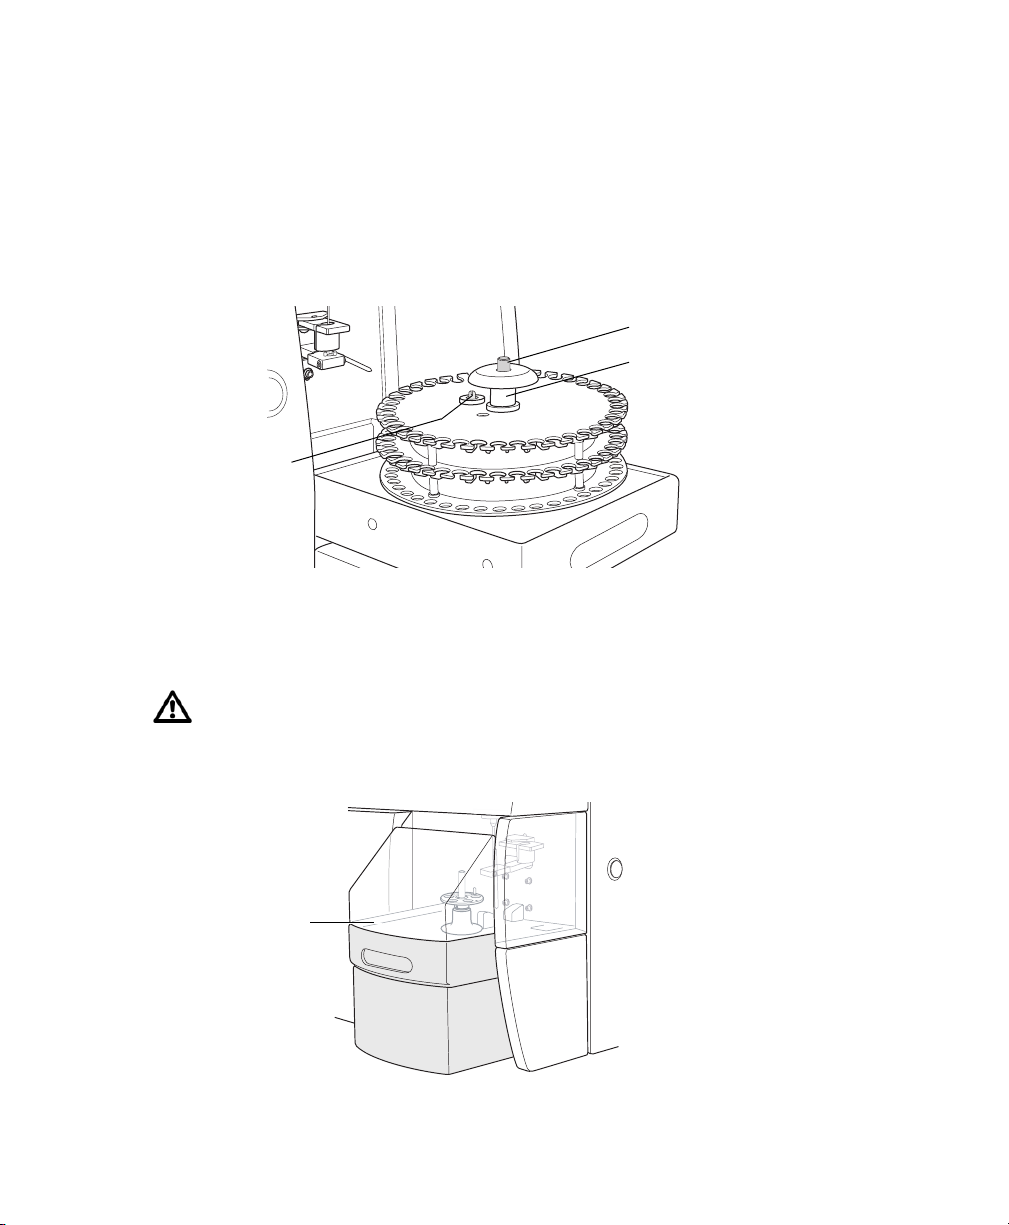
4 Install the first carousel to be acquired on the Loader.
Position the spindle hole in the handle over the center spindle of the Loader
drawer. Rotate the carousel until the alignment guide pin fits into the small
alignment hole at the top of the carousel. Press down firmly to seat the
carousel.
Figure 2-4 Seating the carousel in the Loader
spindle
handle
alignment pin
5 Close the Loader drawer completely, and install the Loader cover.
The Loader scans and positions the carousel at tube 1.
To run the Loader, the cover must be in place on the drawer. Tubes will not
be loaded if the cover is off. The currently running tube will be unloaded if
the cover is removed during a run.
Loader cover
38 BD FACSCanto Flow Cytometer Reference Manual
Page 39
Changing Operational Modes
Performing a few simple steps allows you to change from automatic loading to
manual loading. See the following sections for instructions.
• Changing to Manual Loading (on this page)
• Changing to Automatic Loading on page 41
Changing to Manual Loading
To change to manual mode, follow these steps.
Handle all biological specimens and materials as if capable of transmitting
infection. Dispose of waste using proper precautions and in accordance
with local regulations. Wear suitable protective clothing, eyewear, and
gloves.
Materials
personal protective equipment
Procedure
1 Remove the Loader cover.
2 Pull out the drawer.
3 Remove any carousel in the Loader.
Chapter 2: BD FACS Loader Option 39
Page 40
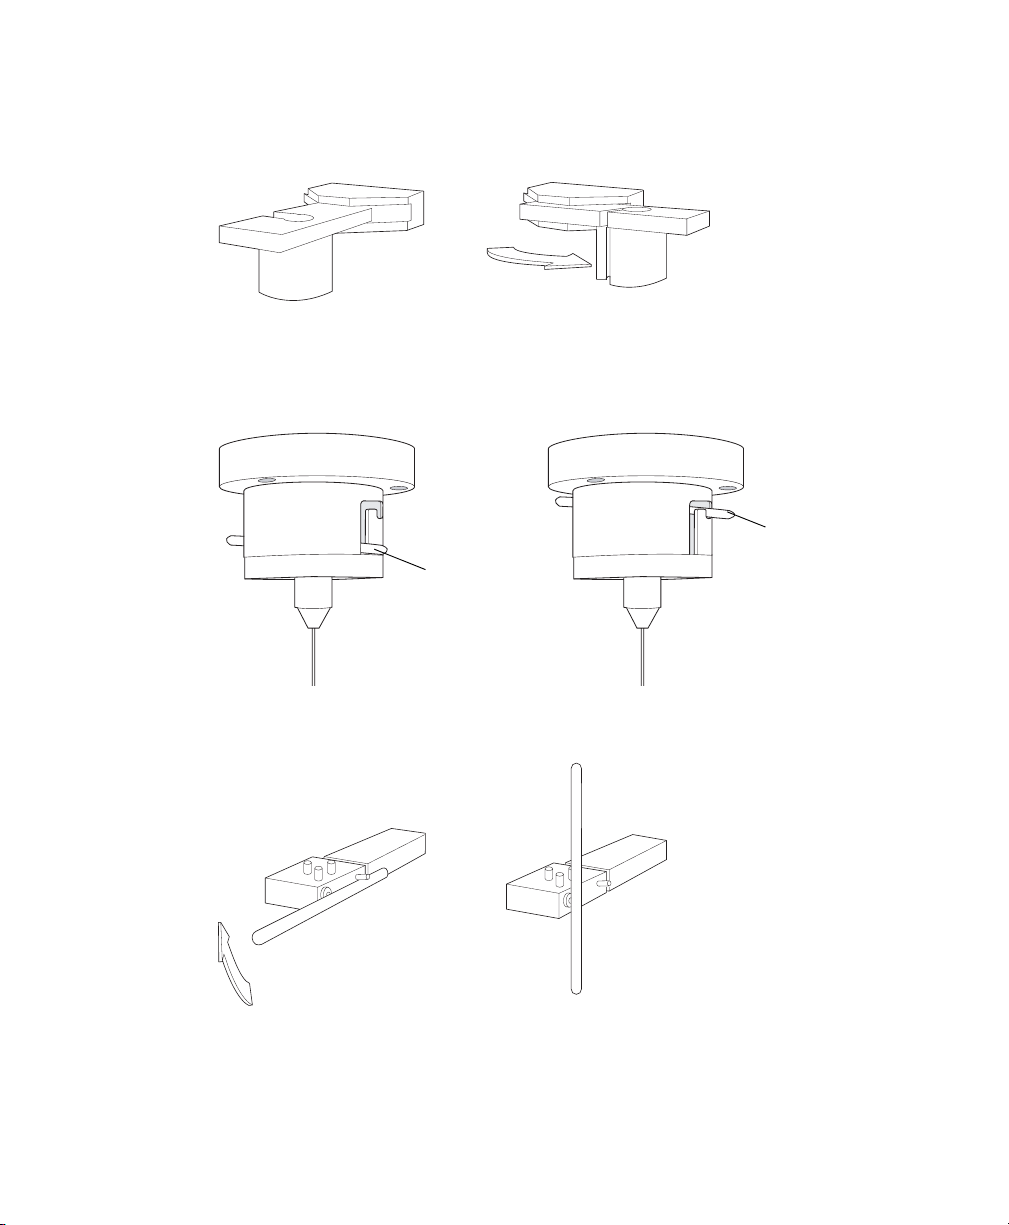
4 Move the tube guide arm all the way back and away from you (in manual
mode, you do not need the tube guide arm).
automatic mode
manual mode
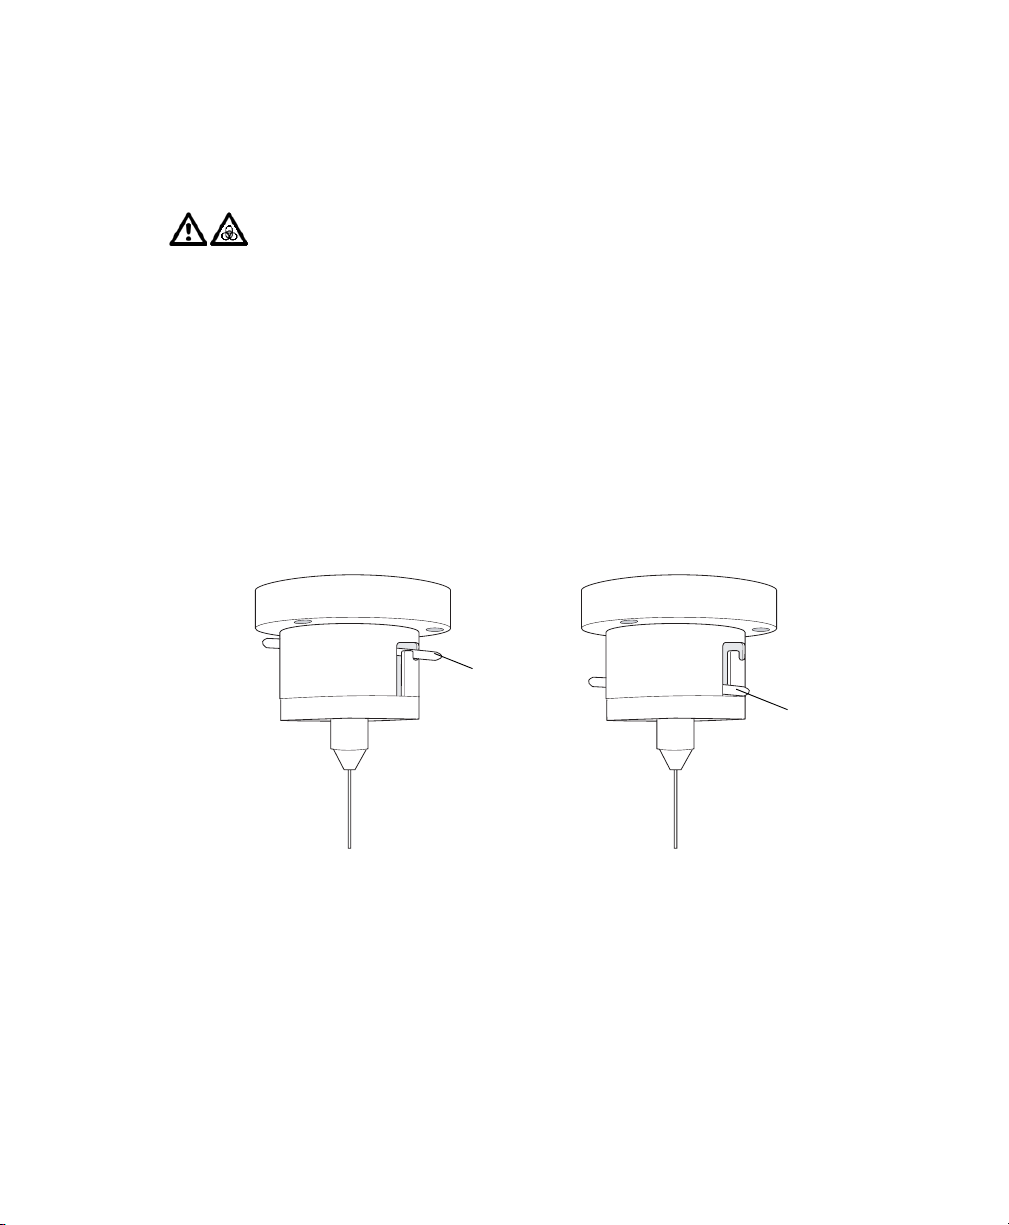
5 Lift the adapter lever and rotate it into the highest position, as shown in the
following figure.
adapter lever,
manual mode
adapter lever,
automatic mode
6 (Optional) Rotate the aspirator arm bar vertically.
automatic mode manual mode
You are ready to load tubes manually.
40 BD FACSCanto Flow Cytometer Reference Manual
Page 41
Changing to Automatic Loading
To change from manual loading to automatic loading, follow these steps.
Handle all biological specimens and materials as if capable of transmitting
infection. Dispose of waste using proper precautions and in accordance
with local regulations. Wear suitable protective clothing, eyewear, and
gloves.
Materials
personal protective equipment
Procedure
1 Lift the adapter lever and rotate it into the automatic mode position, as
shown in the following figure.
adapter lever,
manual mode
adapter lever,
automatic mode
Chapter 2: BD FACS Loader Option 41
Page 42
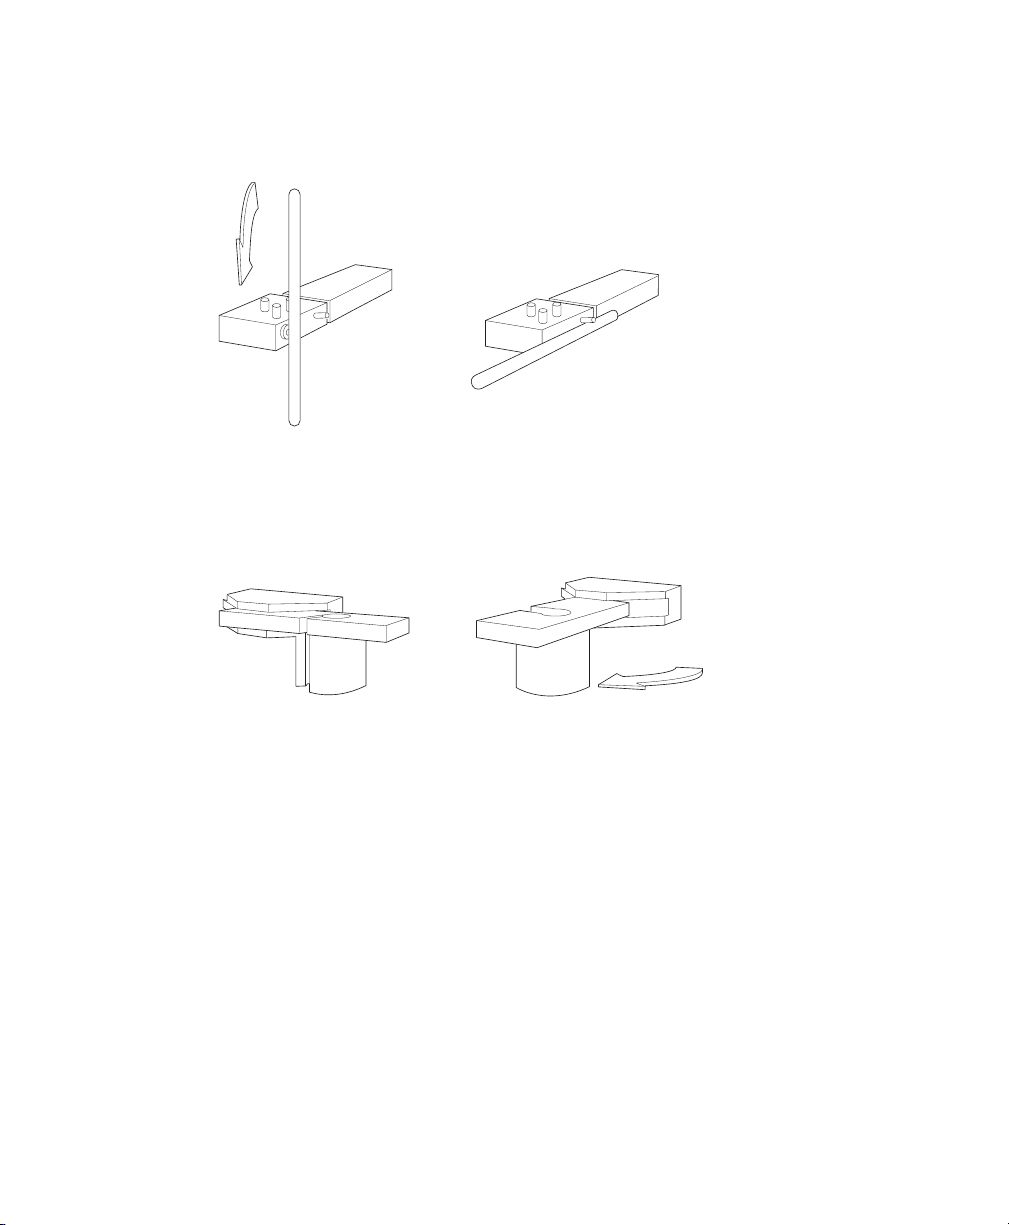
2 Rotate the aspirator arm bar to the horizontal position until it reaches the
stop pin.
automatic modemanual mode
3 Move the tube guide arm all the way forward.
The tube guide arm is needed only when using the Loader.
manual mode
automatic mode
4 Pull out the drawer.
You are ready to load tubes automatically.
42 BD FACSCanto Flow Cytometer Reference Manual
Page 43
Maintaining the Loader
This section explains the cleaning procedure you should follow to keep your
Loader in good condition.
Cleaning External Surfaces
To keep the Loader free from salt buildup, wipe down all external surfaces that
have been exposed to sheath fluid.
All cytometer surfaces that come in contact with biological specimens can
transmit potentially fatal disease. Use universal precautions when cleaning
cytometer surfaces. Wear suitable protective clothing and gloves.
To prevent damage, do not use isopropyl alcohol or ethanol on any Loader
surfaces.
Materials
• BD FACSClean solution
•DI water
• clean, lint-free cloths or disposable wipes
Chapter 2: BD FACS Loader Option 43
Page 44

Procedure
To avoid potential shock, always switch off the power and unplug the AC
power cord before you begin cleaning.
1 Switch off the cytometer power and unplug the AC power cord from the
wall socket.
2 Wipe all accessible surfaces with BD FACSClean solution.
Ensure that the optical sensors are cleaned. Saline deposits can develop on
the sensors, causing tubes in the carousel to be missed.
3 Wet a fresh cloth with DI water and wipe all exposed surfaces to prevent
corrosion.
4 Wipe all exposed surfaces with a clean, dry cloth.
44 BD FACSCanto Flow Cytometer Reference Manual
Page 45

Barcode Reader Option
This chapter contains the following information:
• Installing and Using the Barcode Reader on page 46
• Cleaning the Barcode Reader on page 48
• Barcode Symbologies on page 49
3
45
Page 46

Installing and Using the Barcode Reader
To prevent laser injury, do not stare into the reader or aim it at another
person’s eyes while the trigger is depressed.
NOTICE The Opticon LG2 Imager2D barcode reader available for the
BD FACSCanto is capable of reading both 1D and 2D barcode symbologies. See
Barcode Symbologies on page 49.
The BD FACSCanto system supports only two uses of the 2D barcode reader:
• reading information from the BD FACS 7-color setup beads label into
BD FACSCanto clinical software (2D barcode symbology)
• reading coded patient information from sample tube labels into a worklist
(1D barcode symbology)
NOTICE The barcode reader supplied with the BD FACS™ Sample Prep
Assistant II (SPA II) is a 1D reader that cannot read information from
BD FACS 7-color setup beads. Use only the Opticon LG2 Imager 2D barcode
reader for reading information from the BD FACS 7-color setup beads label into
BD FACSCanto clinical software.
NOTICE Contact BD Biosciences before changing default barcode settings.
46 BD FACSCanto Flow Cytometer Reference Manual
Page 47
1 Plug the barcode reader into the USB port on the back of your computer.
The reader turns on automatically.
2 Make sure the green light on top of the reader is illuminated:
green light
3 In BD FACSCanto clinical software, navigate to the fields for which
information can be scanned.
• Lot information for BD FACS 7-color setup beads is scanned into the
Setup Lot Information dialog from the setup values label supplied with
the setup bead kit (NOT from the lot number on the setup bead tubes).
• Patient information is scanned from sample labels into the worklist ID
field.
4 Locate the barcode on the label of BD FACS 7-color setup beads kit, or on
the patient sample.
For accurate results, do not photocopy or enlarge the barcodes that are
included with the reagent. Scan the barcodes exactly as they are provided.
; Tip To make it easier to use, an optional stand is available for the barcode
reader. See Bar Code Reader Parts on page 129.
Chapter 3: Barcode Reader Option 47
Page 48
5 Aim the barcode reader at the center of the barcode. The barcode reader
has two focal lengths, 4 and 9 inches:
• For reading BD FACS 7-color setup bead labels, hold the barcode
reader 9 inches from the labels.
• For reading patient information from sample tube labels, hold the
barcode reader 4 inches from the labels.
6 Press and hold the trigger on the barcode reader until you hear a beep.
If the reader does not beep, adjust your distance from the barcode while
continuing to hold the trigger.
; Tip To obtain a reading, keep the bar code reader aimed at the center of
the label. Do NOT sweep across the label.
7 Compare software field values with the setup beads or sample label.
Cleaning the Barcode Reader
To prevent laser injury, do not stare into the reader or aim it at another
person’s eyes while the trigger is depressed.
For best performance, keep the front window of the barcode reader clean. Do not
touch the window directly, and wipe it only with a soft, non-abrasive cloth
moistened with one of the following:
• isopropyl alcohol
• ethyl alcohol (denatured grade)
Do not use BD FACSClean solution (or bleach) to clean or disinfect the
barcode reader.
48 BD FACSCanto Flow Cytometer Reference Manual
Page 49
Barcode Symbologies
Although data entry using barcodes is generally more reliable than manual data
entry, it is not guaranteed to be 100% accurate. To increase accuracy when using
the barcode reader, enabling checksums is recommended.
Using barcode symbologies without checksums increases the likelihood of
incorrect information transfer, including sample ID assignments. This can
result in a mismatch of sample IDs and sample results.
By default, the barcode reader has checksums enabled. We recommend you
do not disable checksums, or use barcode symbologies without checksums.
1D Barcode Symbologies
BD Biosciences has evaluated the following 1D barcode symbologies for use with
the BD FACSCanto flow cytometer, and has these recommendations:
Barcode Symbology Recommendation
Code 128 Preferred.
Code 39 Acceptable if barcode labels are printed with the checksum
digit. By default, the barcode reader recognizes the checksum
digit when reading the Code 39 symbology. However, if labels
are printed without a checksum digit, contact your BD service
representative for instructions on disabling the checksum
feature.
Codabar The barcode reader does not support the checksum feature
when reading the Codabar symbology.
Chapter 3: Barcode Reader Option 49
Page 50

2D Barcode Symbologies
BD Biosciences has evaluated 2D barcode symbology to read the target values of
BD FACS 7-color setup beads when using BD FACSCanto clinical software. 2D
barcode symbology is required to read all target values with one scan.
For information on installing and using the barcode readInstalling and Using the
Barcode Reader on page 46er with the BD FACSCanto system, see Installing and
Using the Barcode Reader on page 46. For detailed information including how to
program the barcode reader for other barcode standards, refer to the information
supplied by the manufacturer.
50 BD FACSCanto Flow Cytometer Reference Manual
Page 51

4
Maintenance
The BD FACSCanto system requires basic preventive maintenance to preserve
cytometer reliability. This section explains the procedures you should follow to
keep your cytometer in good condition.
• Scheduled Maintenance on page 52
• Unscheduled Maintenance on page 66
51
Page 52

Scheduled Maintenance
For optimal cytometer functioning, perform the following maintenance
according to the recommended schedule.
Procedure Description and Location Frequency
Fluidics startup Replaces BD FACS shutdown
solution with BD FACSFlow
solution
Refer to the BD FACSCanto
Instructions for Use.
Fluidics shutdown Replaces BD FACSFlow
solution with
BD FACS shutdown solution
Refer to the BD FACSCanto
Instructions for Use.
Wipe down SIT and
aspirator arm
Empty the waste See Emptying the Waste
Purge fluid filters Removes air from fluid filters,
Change the waste tank
cap
Prevents saline deposit buildup
Refer to the BD FACSCanto
Instructions for Use.
Container on page 54.
ensuring they will not dry out
See Purging the Fluidics Filters
on page 57.
See step 6 on page 56 (in
Emptying the Waste Container
procedure).
Daily
Daily
Daily
Daily and as needed
Weekly
Monthly
52 BD FACSCanto Flow Cytometer Reference Manual
Page 53

Procedure Description and Location Frequency
Decontaminate fluidics
(Long Clean)
Replace the air filter Ensures proper cytometer
Replace fluid filters Keeps fluids free of particulates
Schedule preventative
maintenance by BD
service
Decontaminates the internal
sheath path with
BD FACSClean solution, then
rinses with BD FACS shutdown
solution
See Decontaminating the
Fluidics System (Long Clean) on
page 59.
performance
See Replacing the Air Filter on
page 60.
See Replacing Fluidics Filters on
page 63.
— Every 6 months
Monthly and before
service calls
Every 6 months
Every 6 months or when
increased debris observed
in FSC vs SSC plots
Chapter 4: Maintenance 53
Page 54
Emptying the Waste Container
All biological specimens and materials coming into contact with them can
transmit potentially fatal disease. To prevent exposure to biohazardous
agents, expose waste container contents to bleach (10% of total volume)
before disposal. Dispose of waste in accordance with local regulations. Use
proper precaution and wear suitable protective clothing, eyewear, and
gloves.
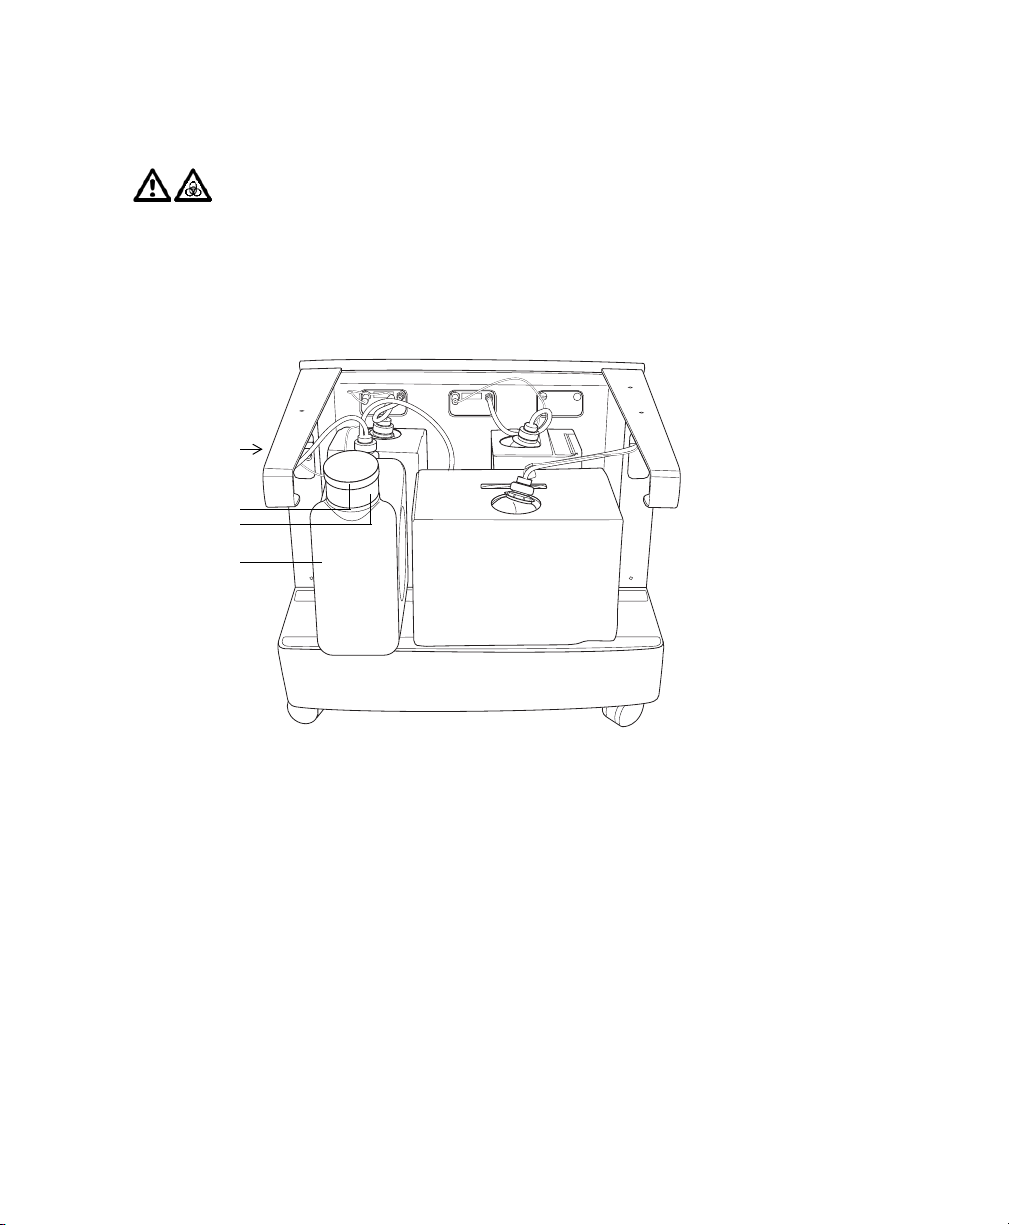
waste port
disposable
waste cap
trap
waste tank
1 Ensure the cytometer is not acquiring events.
54 BD FACSCanto Flow Cytometer Reference Manual
Page 55
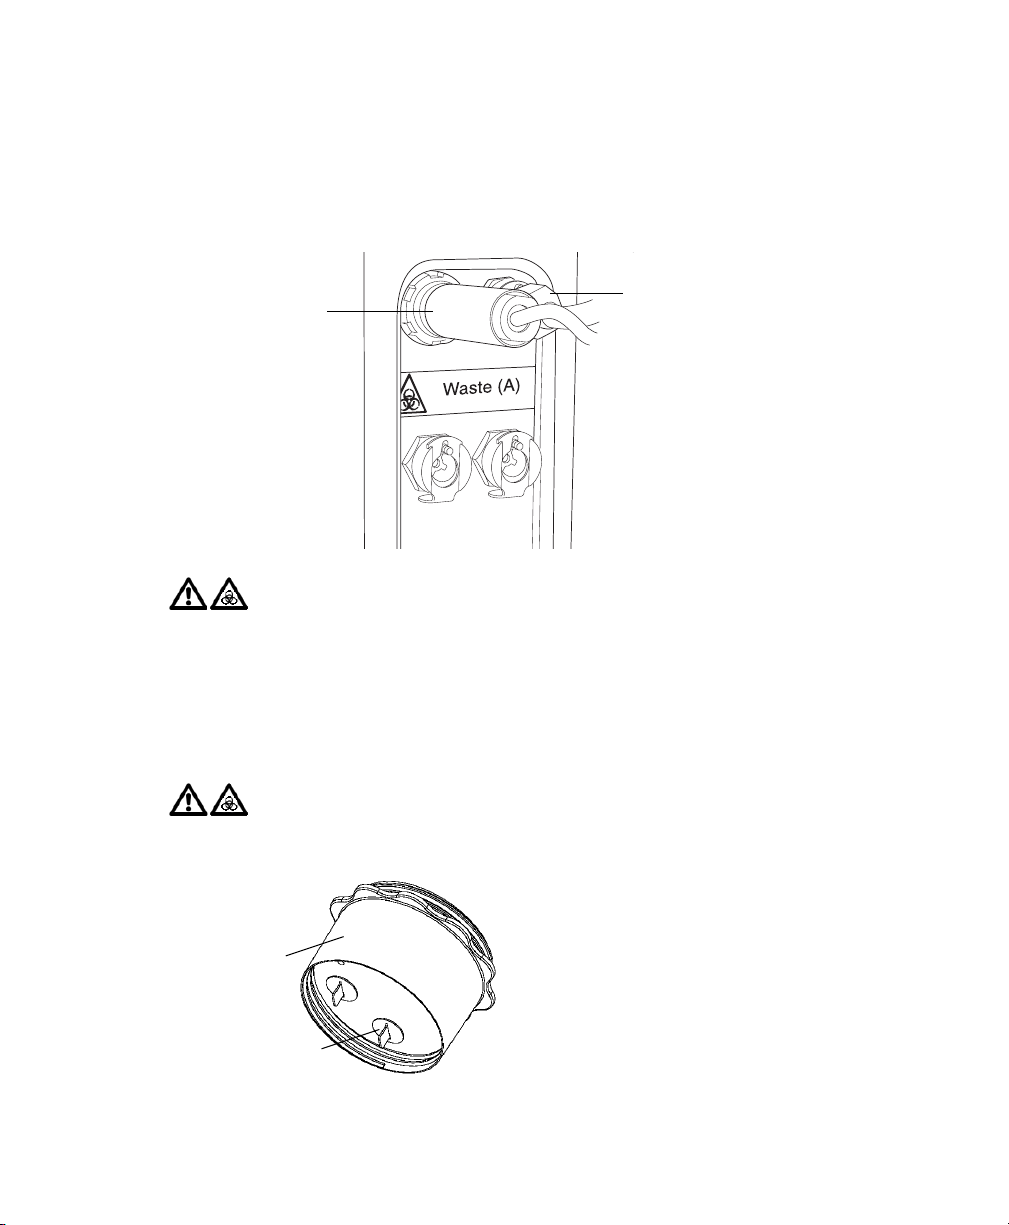
2 Detach the waste container’s sensor and fluid line.
• Pull the sensor straight out.
• Press the metal clip on the fluid line.
waste fluid line
sensor
The waste tank can become pressurized when the cytometer is running.
Always disconnect the tank from the fluidics cart before you empty it. Wait
at least 30 seconds for pressure to dissipate before you remove the waste
cap or level sensor cap.
with metal clip
3 Remove the disposable waste cap and attached trap from the container.
Place the assembly on the bench label-side up.
Do not wet the cap. If you see liquid inside the trap, remove the drain plug
and fully drain the liquid before you replace the plug.
trap
drain plug
Chapter 4: Maintenance 55
Page 56

4 Empty the bleach-exposed waste.
5 Add approximately 1 L of bleach to the empty waste container (10 L
container).
6 If one month has passed since the last cap change:
• Detach the cap from the trap.
• Replace it with a new cap.
• Write the date on the cap label.
Waste (A)
338677 Rev A
To prevent tank overpressurization, do not overtighten the trap or attached
filter cap. Tighten each component only until it is hand-tight. Do not use
sealants such as Teflon® tape or other adhesives.
space for date
7 Screw the cap assembly onto the tank and hand-tighten until it is fully
closed.
8 Re-attach the sensor and fluid lines.
56 BD FACSCanto Flow Cytometer Reference Manual
Page 57

Purging the Fluidics Filters
Once a week, purge air from all fluid filters by opening the bleeder valve on the
top of each filter, one at a time. This ensures that the filters will not dry out.
NOTICE The cytometer must be on (system pressurized) during this procedure.
Materials
• paper towels
• proper protective equipment
Procedure
1 Run the Prime After Tank Refill for all fluids to ensure fluid lines are
primed.
See Priming Fluidics Lines on page 71.
2 Place a few paper towels beneath the filter to be purged to absorb any fluid
leakage.
Chapter 4: Maintenance 57
Page 58
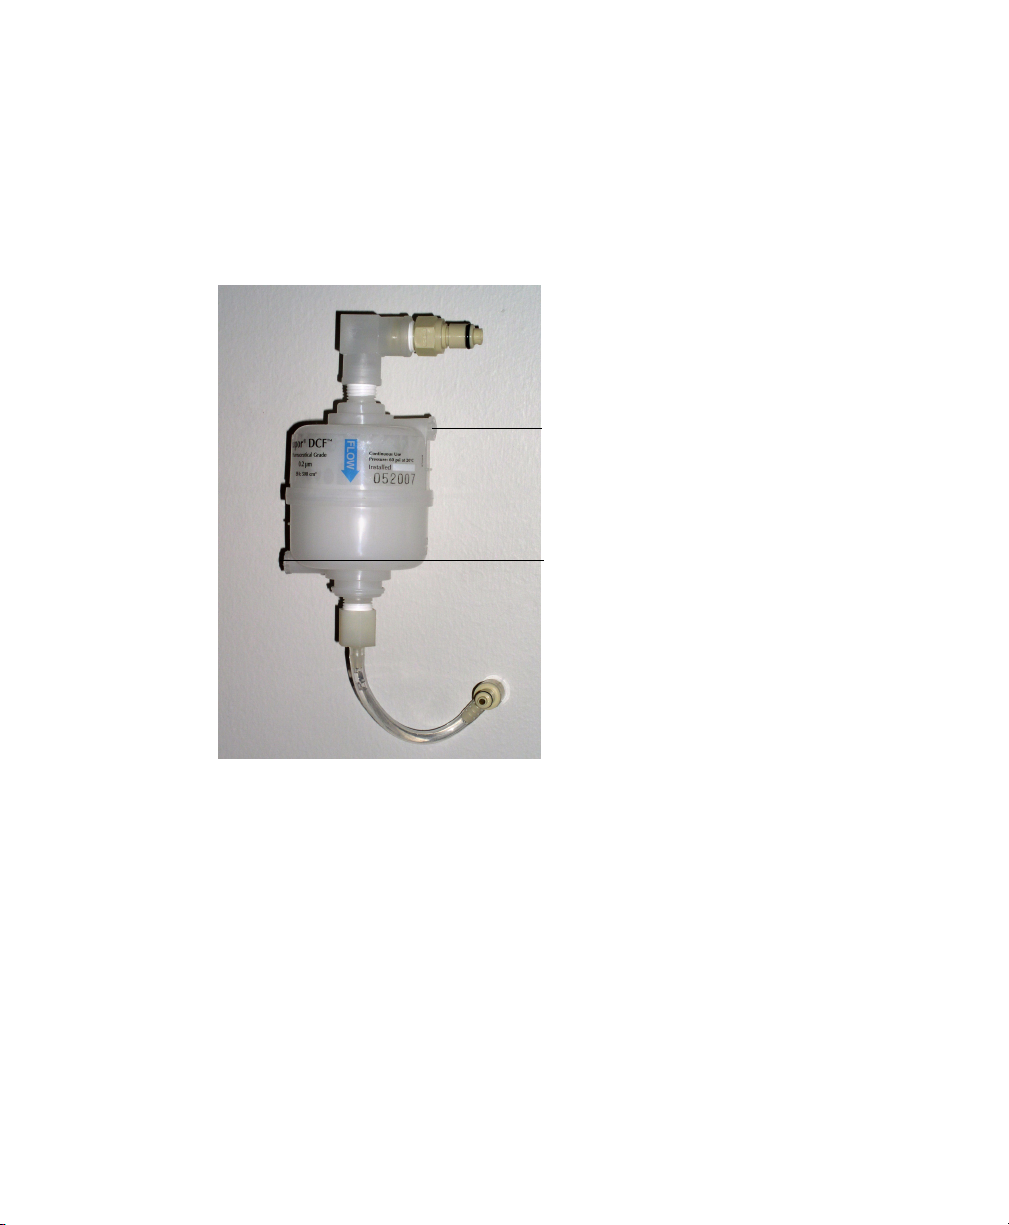
3 Loosen the bleeder valve near the top of the filter by turning it
counterclockwise.
NOTICE Do not loosen the bottom bleeder valve. Ensure it is tightened.
; Tip Do not completely unscrew the valve. If you do, it will come off.
loosen this
bleeder valve
DO NOT loosen
this bleeder valve
4 Wait until fluid seeps out.
Fluid should seep from the open valve within 30 seconds. If no fluid
appears, make sure the corresponding cubitainer is not empty or detached
from the cart. If the cubitainer contains fluid and the fluid lines are
attached and primed, the filter might be airlocked. See Removing an Air
Lock on page 72.
5 Close the valve by turning it clockwise.
6 Repeat steps 2 through 5 with the remaining filters.
58 BD FACSCanto Flow Cytometer Reference Manual
Page 59
Decontaminating the Fluidics System (Long Clean)
Use the Long Clean command to decontaminate the internal sheath path with
BD FACSClean solution solution. After decontamination, the lines are rinsed
with BD FACS shutdown solution.
NOTICE This procedure takes 75 minutes to complete.
Materials
• undiluted bleach (for waste tank)
• BD FACSClean solution (approximately 275 mL)
• BD FACS shutdown solution (approximately 1,100 mL)
Procedure
1 Check all fluid levels; empty the waste if needed.
2 Select Cytometer > Cleaning Modes > Long Clean.
A confirmation dialog displays.
3 Click OK to continue. Once you have begun the Long Clean, you cannot
abort the process.
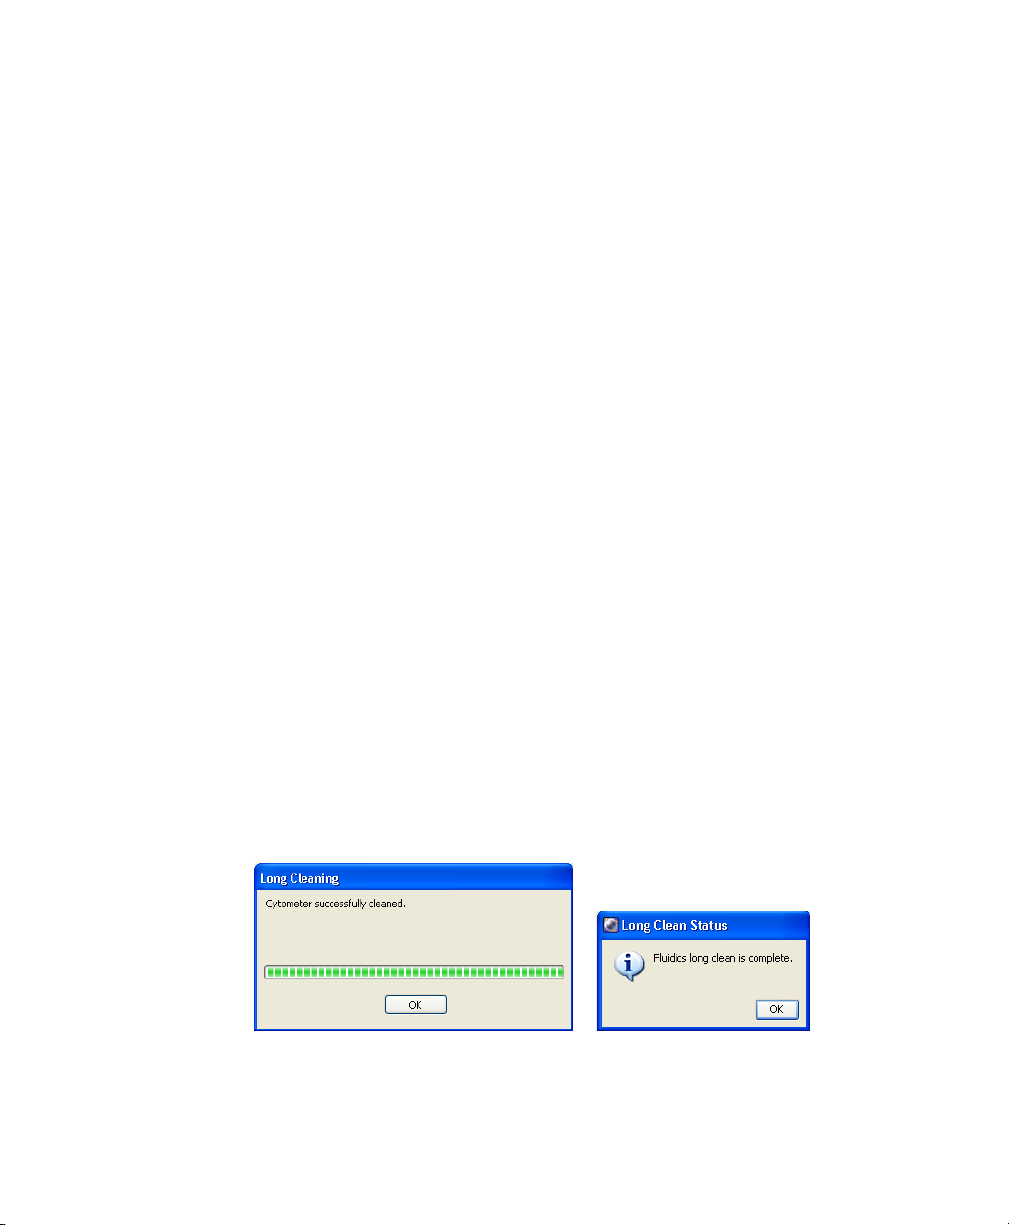
A completion message displays when the cleaning cycle finishes.
Figure 4-1 Long Clean completion message
BD FACSCanto clinical software
BD FACSDiva software
Chapter 4: Maintenance 59
Page 60

4 Click OK.
If the completion message does not display after 90 minutes, verify there
are no error messages in the Status tab of the Cytometer window. If the
cleaning mode fails, see Fluidics Cart Troubleshooting on page 101.
5 Select to shut down or continue.
• To shut down, select Cytometer > Fluidics Shutdown.
Repeat Fluidics Shutdown twice more.
Quit the software and turn off the power to the cytometer.
• To continue, select Cytometer > Fluidics Startup.
Repeat Fluidics Startup twice more.
BD FACS shutdown solution can lyse cells. The Fluidics Startup
procedure removes BD FACS shutdown solution from the interior
reservoir and fluid lines and replaces it with BD FACSFlow solution.
; Tip If setup fails after a long clean, repeat Fluidics Startup until setup
passes.
Replacing the Air Filter
The BD FACSCanto cytometer has an air filter located in the side door. Replace
the filter every 6 months to ensure proper cytometer performance.
Materials
Replacement filter (see Other Replacement Parts on page 129 for ordering)
Procedure
1 Turn off the cytometer power.
2 Open the side door.
• Press the black button; a handle will pop out.
60 BD FACSCanto Flow Cytometer Reference Manual
Page 61
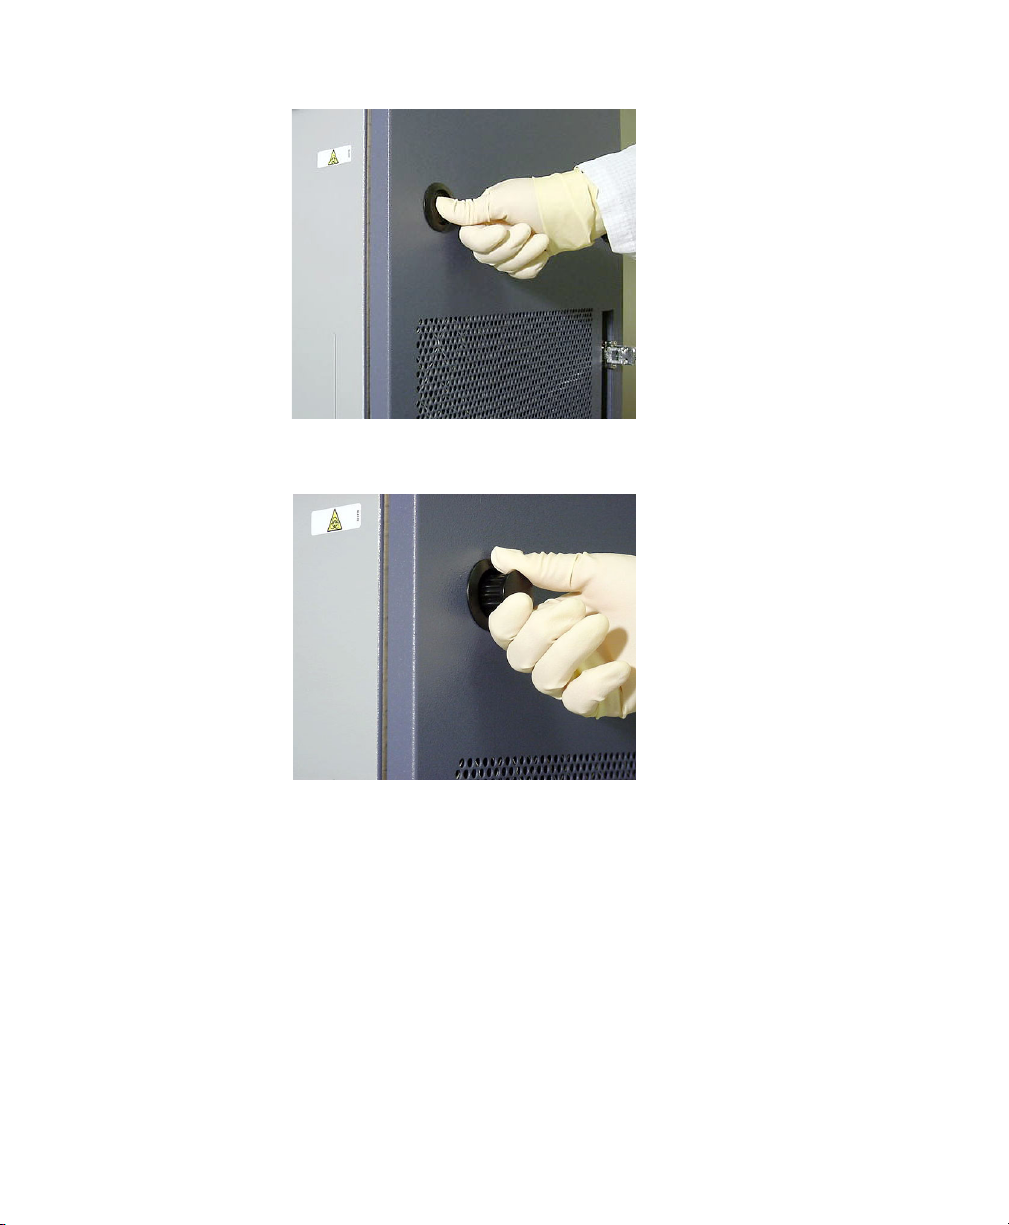
• Twist the handle and pull.
3 On the door’s interior, turn the pegs along the upper edge of the filter and
remove the old filter.
Chapter 4: Maintenance 61
Page 62
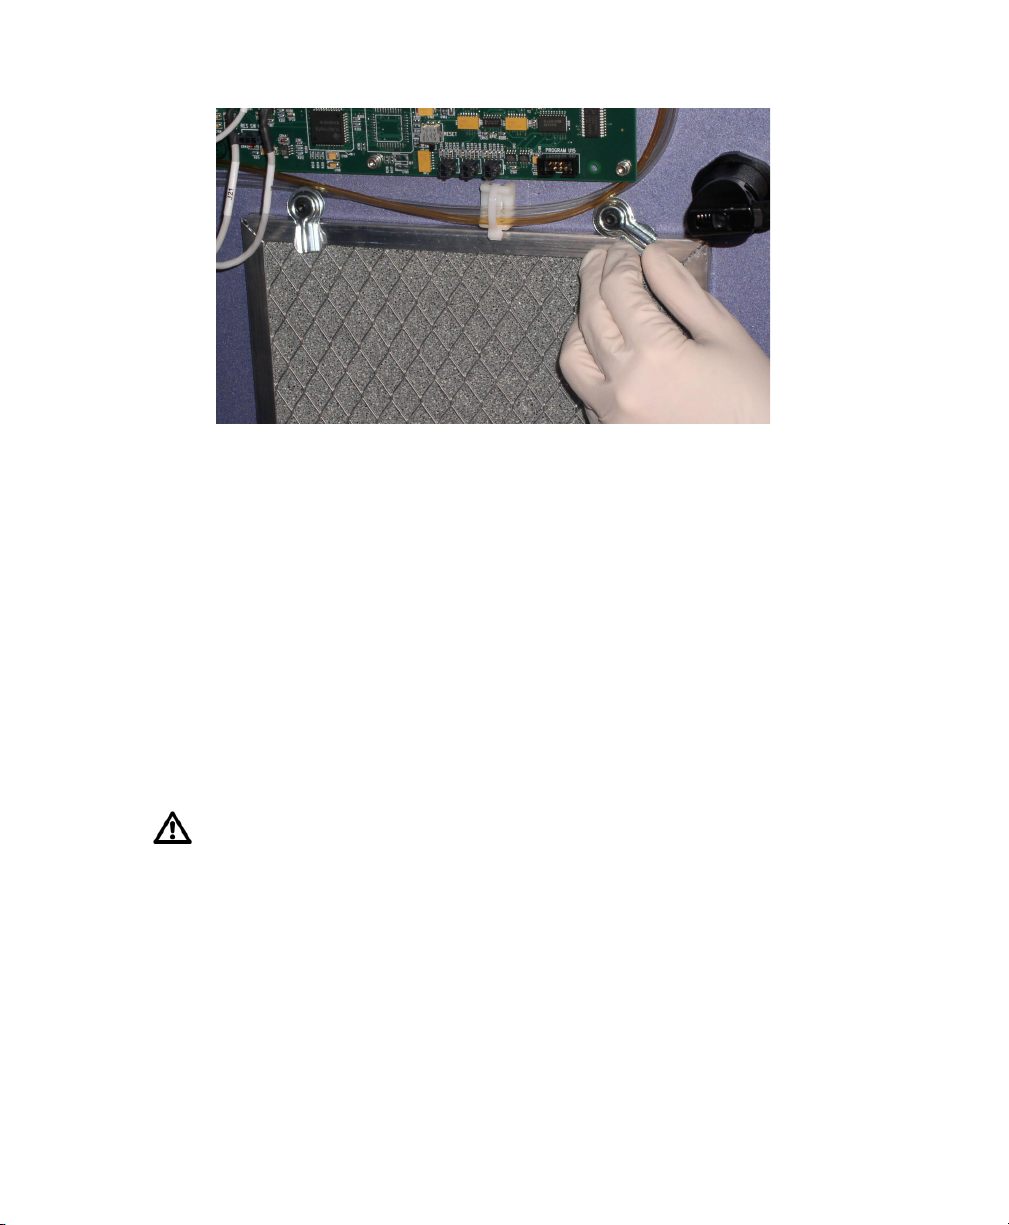
Dispose of the old filter. It cannot be reused.
4 Install a new filter, making sure the arrow on top of the filter points in
toward the cytometer (arrow indicates direction of air flow).
5 Turn the pegs to hold the filter in place.
6 Close the side door:
• Twist the handle while closing door.
• Push door closed until the door latches.
• Push the handle in to latch the handle.
To avoid cytometer damage, do not close the door on any tubing or wires.
62 BD FACSCanto Flow Cytometer Reference Manual
Page 63
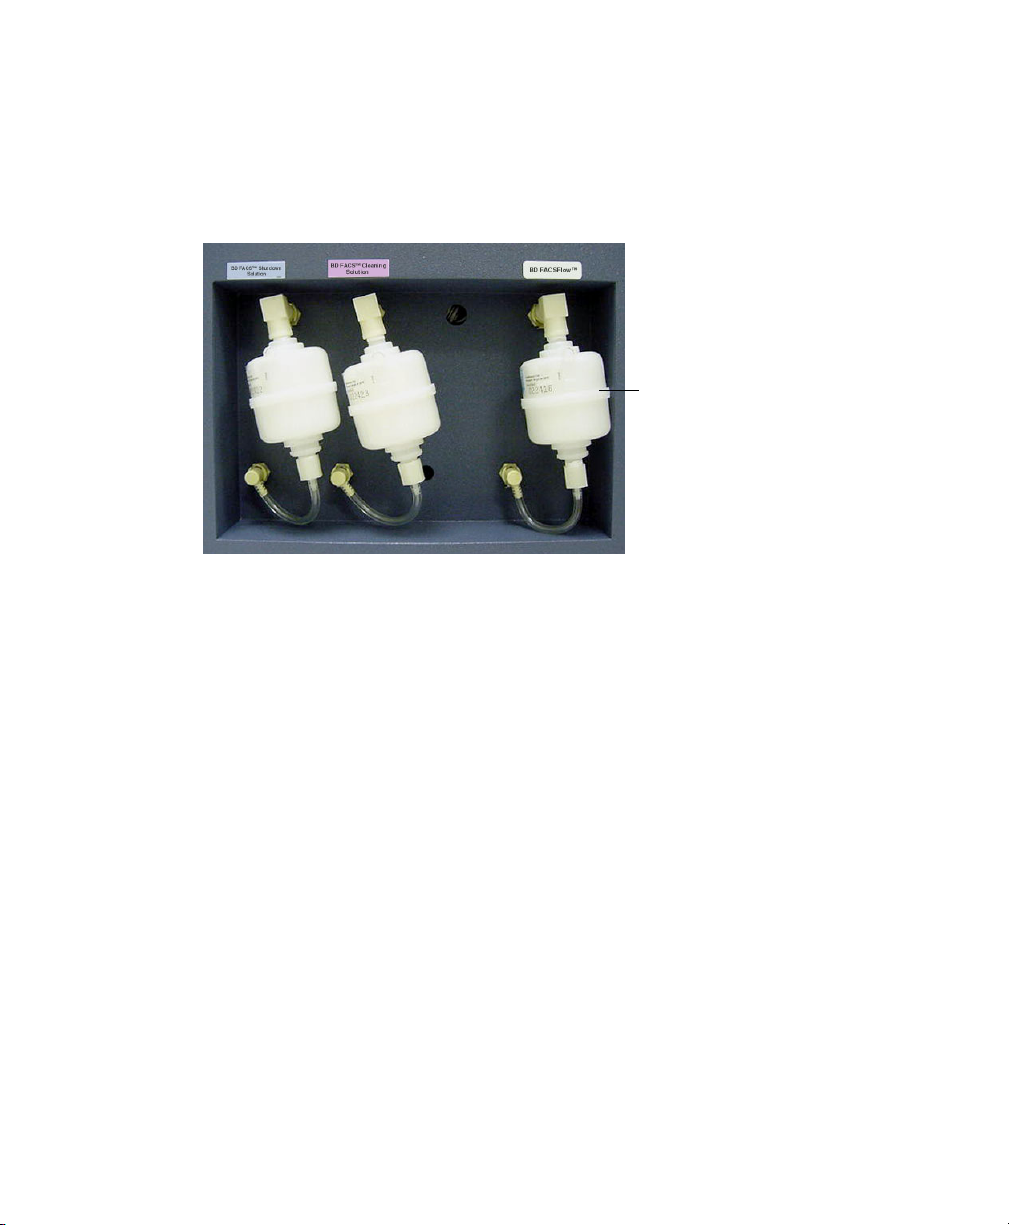
Replacing Fluidics Filters
Change the fluid filters when you see increased debris in FSC vs SSC plots, or
every 6 months.
filter
Materials
• replacement filter(s)—see Installation Kit on page 128 for ordering
• paper towels
• proper protective equipment
• felt tip pen
Chapter 4: Maintenance 63
Page 64
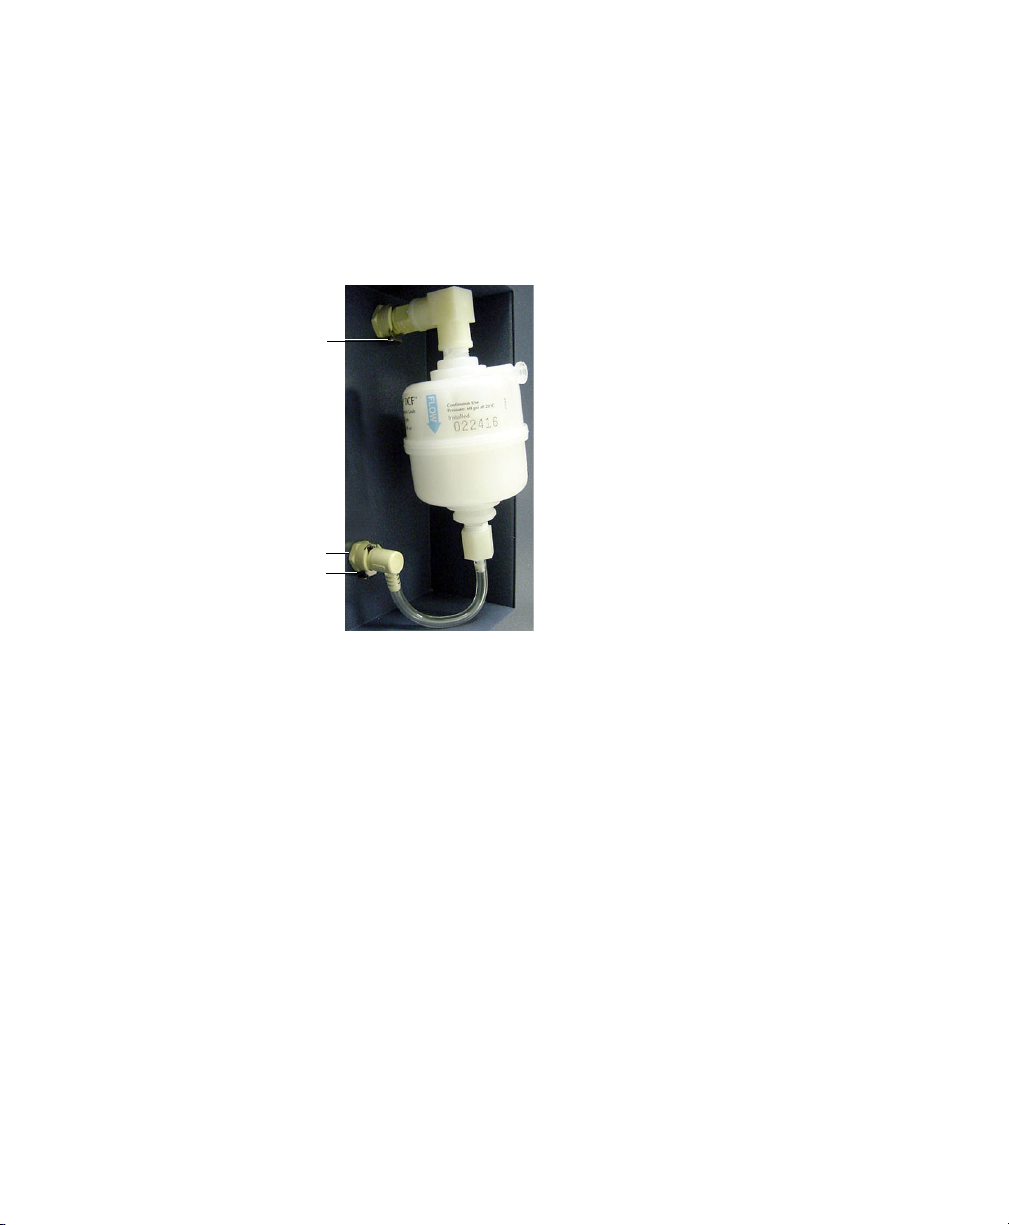
Procedure
1 Place a few paper towels beneath the filter to collect drips.
2 Remove the filter by pressing the tabs on each quick-disconnect coupling.
Figure 4-2 Removing the filter
metal tab
quick-disconnect
coupling
metal tab
3 Position the new filter and connect the couplings.
; Tip Write today’s date on the filter so you will know when to replace it.
64 BD FACSCanto Flow Cytometer Reference Manual
Page 65
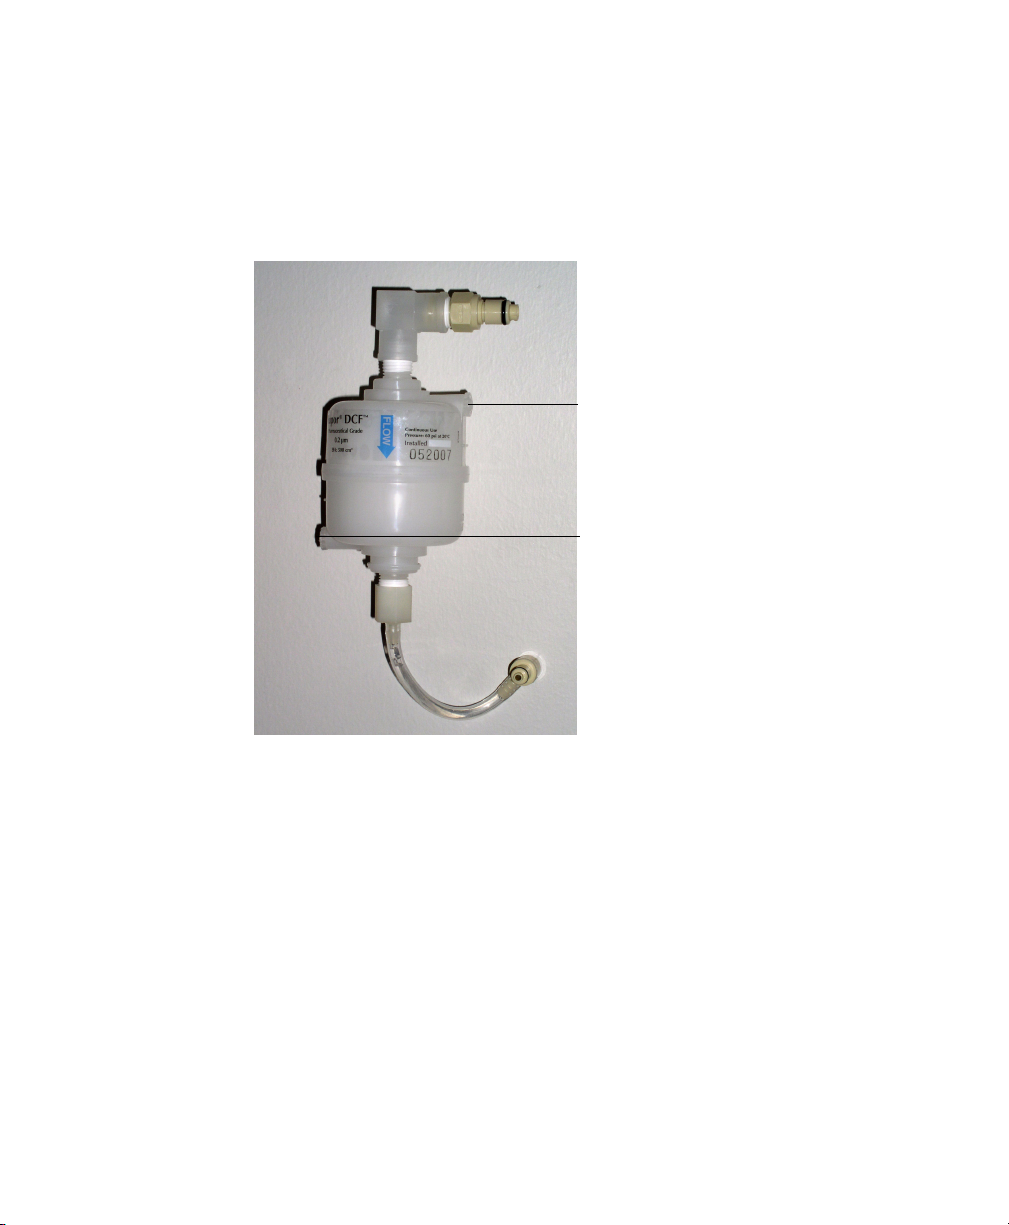
4 Loosen the top bleeder valve by turning it counterclockwise.
NOTICE Do not loosen the bottom bleeder valve. Ensure it is tightened.
; Tip Do not completely unscrew the valve. If you do, it will come off.
loosen this
bleeder valve
DO NOT loosen
this bleeder valve
5 Wait until fluid seeps out.
Fluid should seep from the open valve within 30 seconds. If no fluid
appears, ensure the corresponding cubitainer is not empty or detached from
the cart. If the cubitainer contains fluid and the fluid lines are attached and
primed, the filter might be airlocked. See Removing an Air Lock on
page 72.
6 Close the valve by turning it clockwise.
Repeat the procedure for other fluid filters to be replaced.
Chapter 4: Maintenance 65
Page 66

Unscheduled Maintenance
Perform these maintenance procedures as needed.
Procedure Description and Location Frequency
Replace cubitainers See Changing a Cubitainer on
page 68.
Prime fluid lines Removes air from fluid lines
See Priming Fluidics Lines on
page 71.
Remove an air lock Removes air from filter and
restores flow of fluid
See Removing an Air Lock on
page 72.
Clean external surfaces Keeps surfaces free from saline
deposit buildup after exposure
to sheath fluid
See Cleaning External Surfaces
on page 75.
De-gas Flow Cell Removes bubbles from the flow
cell
See Removing Bubbles from the
Flow Cell on page 76.
Clean Flow Cell Runs BD FACSClean solution
through the SIT and flow cell
See Cleaning the Flow Cell on
page 77.
As needed
Whenever a fluidics line
is disconnected to change
a cubitainer or perform
other maintenance
When fluidics are not
functioning properly
(flow cell will not fill, or
there is backflush into
sample tube)
As needed
As needed during daily
startup
When poor optical
performance indicates
additional cleaning is
needed
Bubble Filter Purge Removes air from the bubble
filter
See Purging the Bubble Filter on
page 78.
66 BD FACSCanto Flow Cytometer Reference Manual
If fluidics run dry, or
when CVs are poor
Page 67

Procedure Description and Location Frequency
Decontaminate the
fluidics system for
storage
Replace the Bal seal Replaces worn Bal seal
Reset the cytometer
circuit breaker
Reattach Ethernet and
RS232 cables
Reconnect fluidics cart
tubing
Replace fluidics level
sensors
Replace fluidics cart fuses See Replacing the Fluidics Cart
Cleans out the fluidics lines with
BD FACSClean solution, then
fills them with
BD FACS shutdown solution
See Decontaminating the
Fluidics System for Storage on
page 80.
See Replacing the Bal Seal on
page 80.
See Resetting the Cytometer
Circuit Breaker on page 84.
See Reconnecting the Ethernet
and RS232 Cables on page 85.
See Reconnecting the Fluidics
Cart Tubing on page 85.
See Replacing the Fluidics Level
Sensors on page 88.
Fuses on page 91.
Before long-term storage
When the seal becomes
worn or cracked (sample
tubes will not pressurize)
After the circuit breaker
is tripped
When a cable is
disconnected
As needed
When instructed to by a
BD Biosciences service
representative
When cart will not
function because of power
surge or other electrical
event
Chapter 4: Maintenance 67
Page 68
Changing a Cubitainer
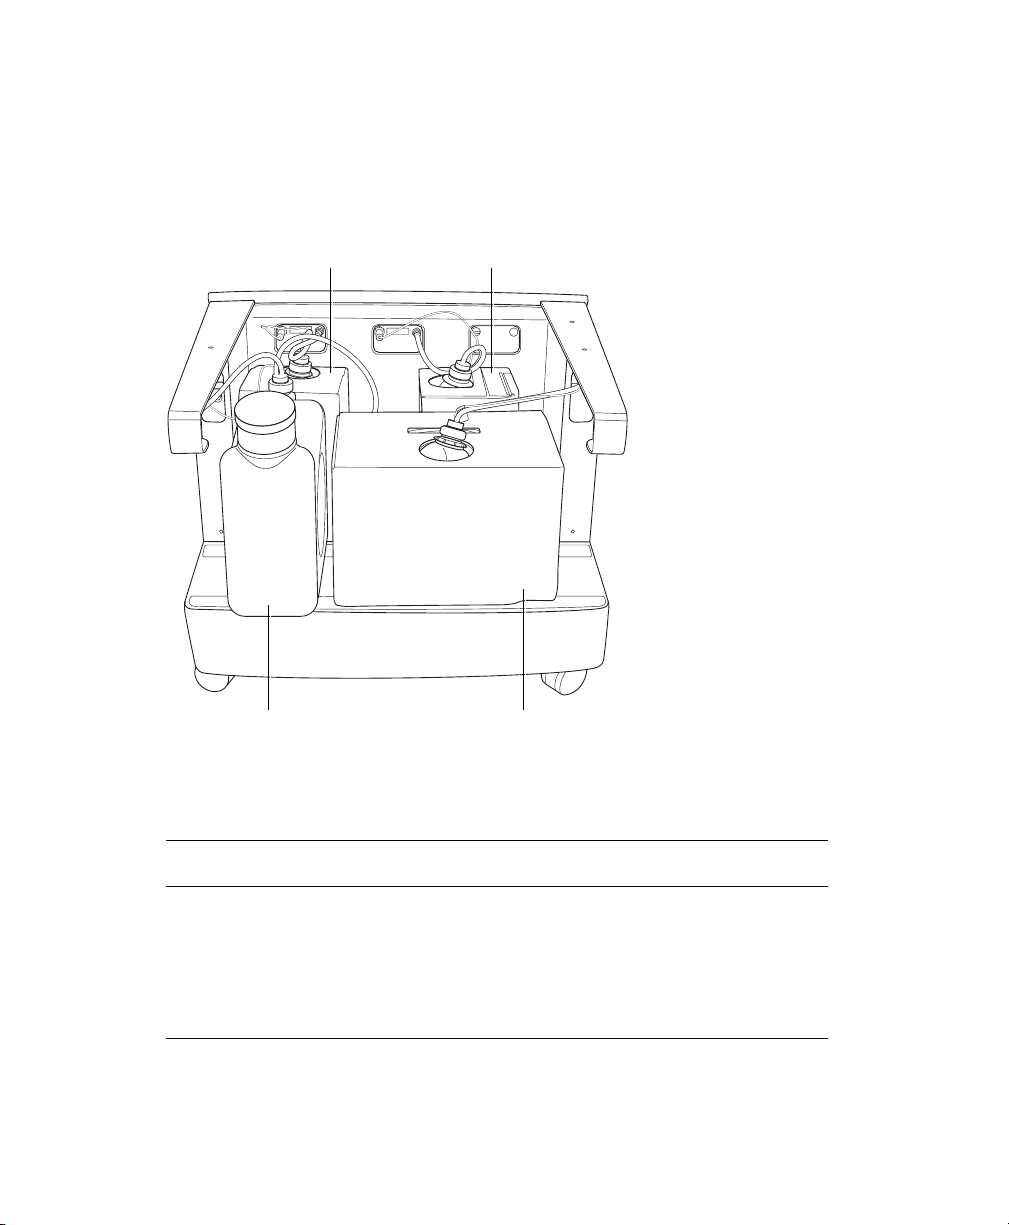
Three fluidics cubitainers (disposable boxes of approved fluids) and a waste
container fit onto the cart in the following configuration:
BD FACS shutdown solution
waste container
BD FACSClean solution
BD FACSFlow solution
Each cubitainer and the waste tank has its own color-coded port. Connect
containers to the following ports:
Container Port Label Port Color
waste Waste (A) orange-red
BD FACSFlow solution BD FACSFlow blue
BD FACS shutdown solution BD FACS Shutdown Solution green
BD FACSClean solution BD FACS Cleaning Solution green
68 BD FACSCanto Flow Cytometer Reference Manual
Page 69
Procedure
1 Ensure the cytometer is not acquiring events.
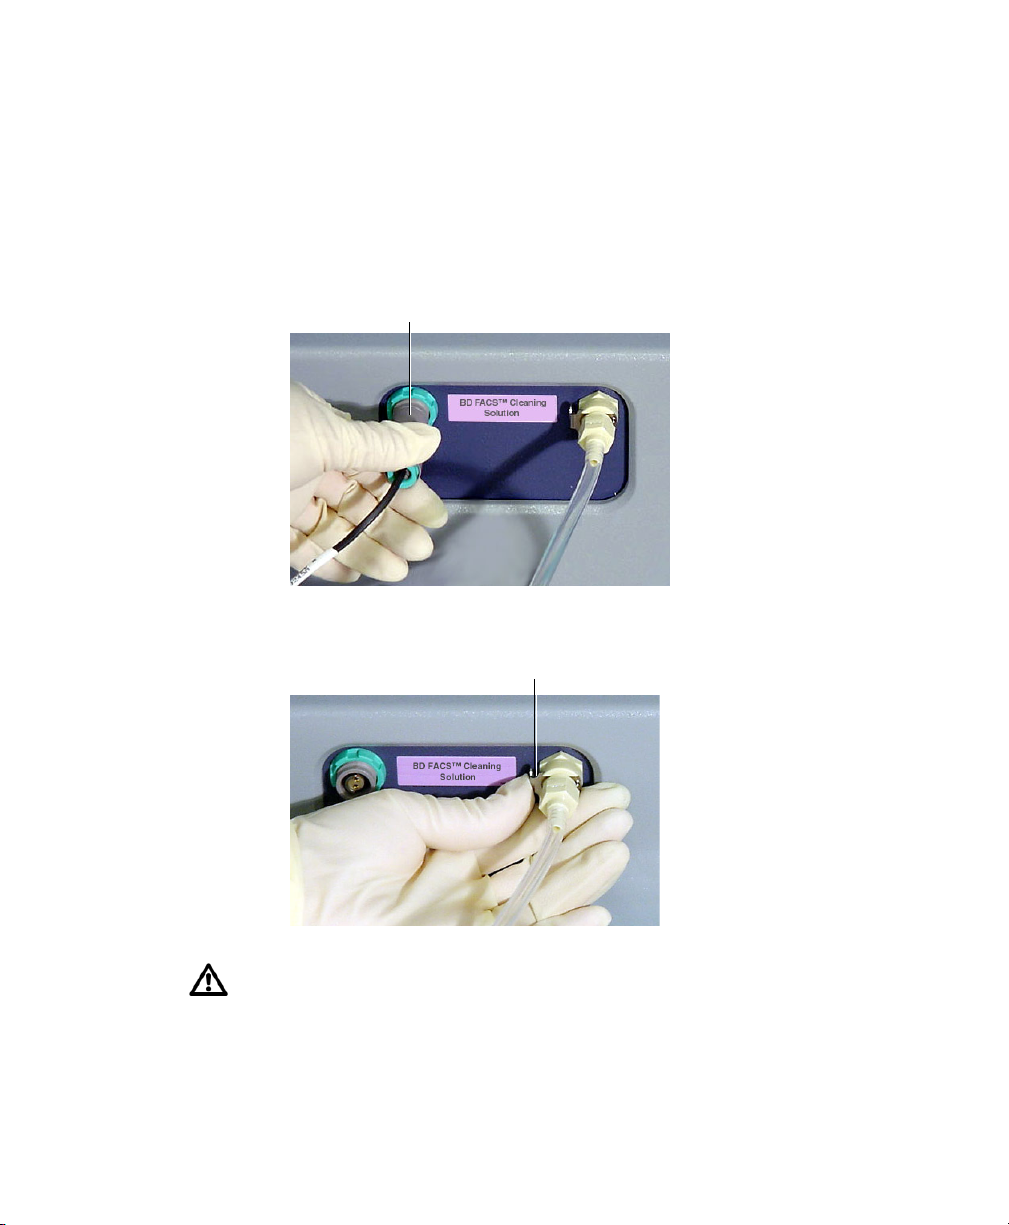
2 Detach the sensor and fluid line from the cart.
• Pull the sensor straight out.
sensor
• Press the metal clip on the fluid line.
metal clip
You could damage the sensor line if you leave it connected while changing a
cubitainer.
3 Unscrew the cap on the cubitainer.
Chapter 4: Maintenance 69
Page 70
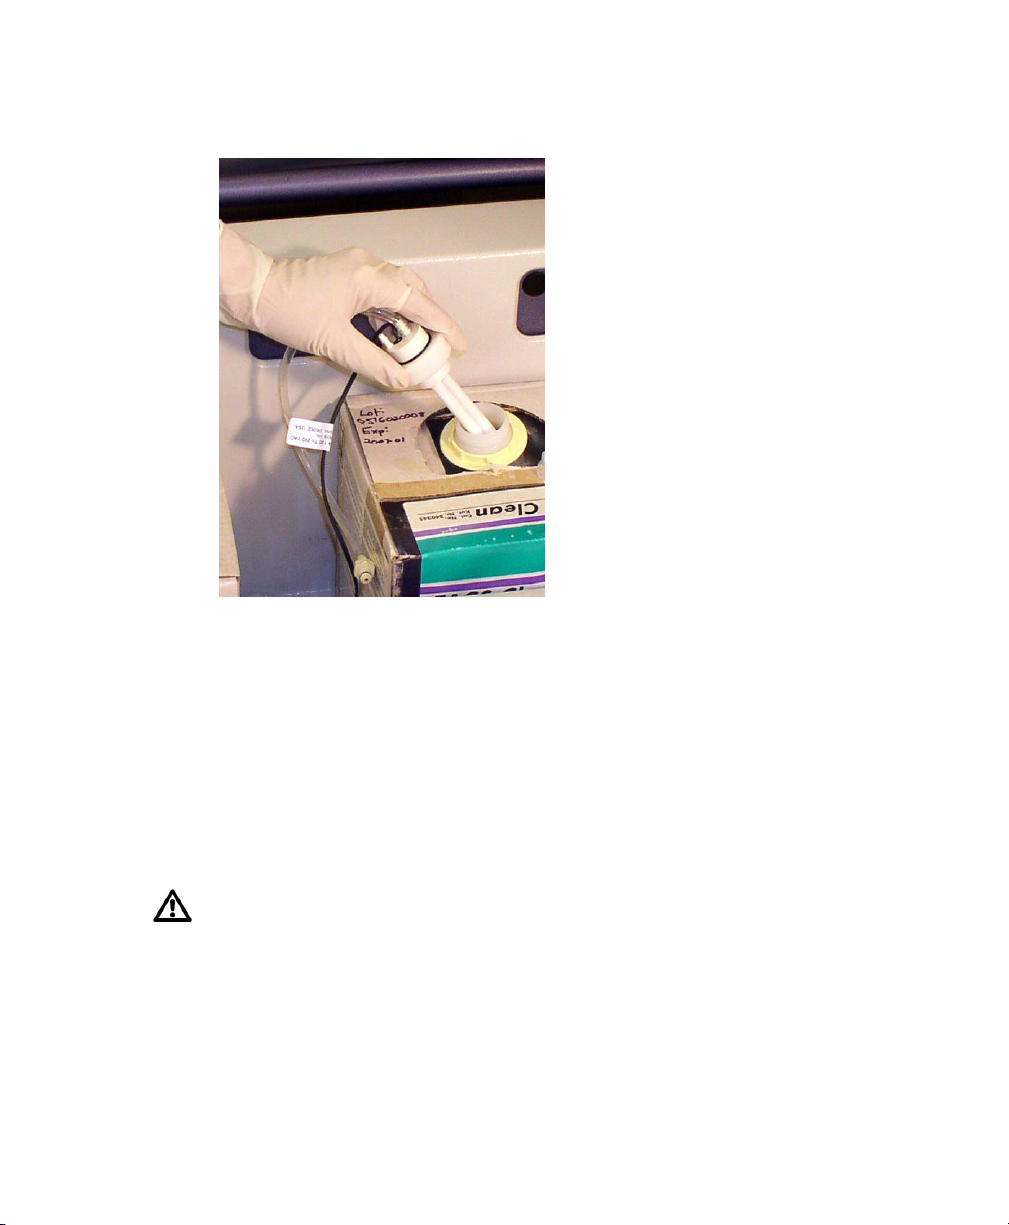
4 Remove the cap and sensor assembly and set it aside.
I
5 Put a new cubitainer onto the fluidics cart.
6 Replace the cap assembly and hand-tighten it until it is fully closed.
7 Reattach the sensor line and fluid line to the cart.
• To attach the sensor line, gently rotate until the connection aligns, and
then push.
• To attach the fluid line, push the coupling into the port until it clicks.
To ensure that the appropriate solutions are dispensed, match the label on
the container to the port on the fluidics cart.
8 Prime the fluidics.
Important: Continue with the procedure in Priming Fluidics Lines on
page 71.
70 BD FACSCanto Flow Cytometer Reference Manual
Page 71
Priming Fluidics Lines
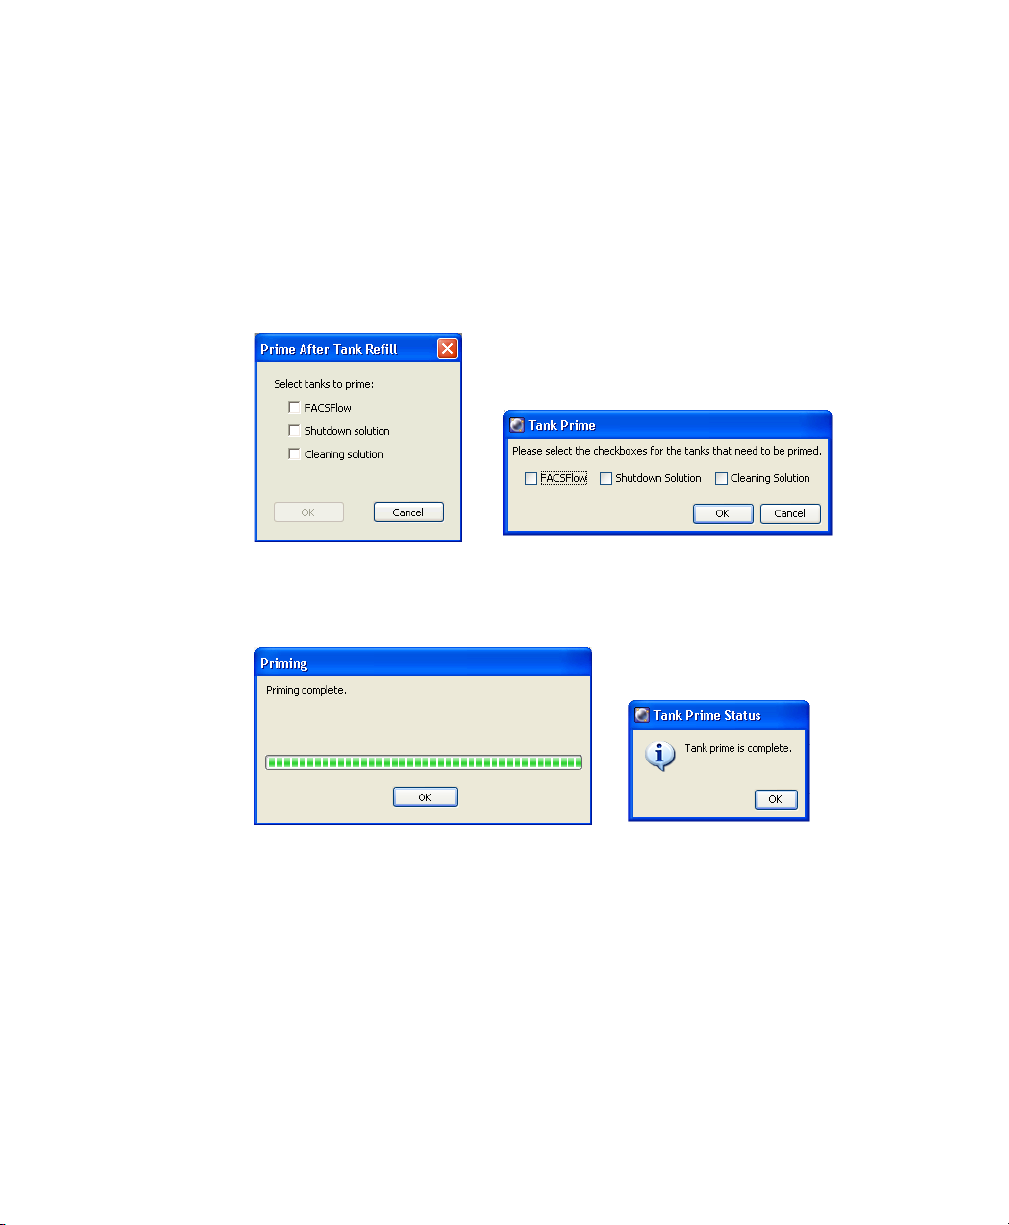
Use the Prime After Tank Refill command to remove air from the fluid lines after
you change a cubitainer or detach the fluidics lines for other maintenance.
1 Select Cytometer > Cleaning Modes > Prime After Tank Refill.
2 Select the checkboxes for the cubitainers you changed; click OK.
BD FACSDiva softwareBD FACSCanto clinical software
3 Click OK when the completion message displays.
BD FACSCanto clinical software
BD FACSDiva software
Chapter 4: Maintenance 71
Page 72
Removing an Air Lock
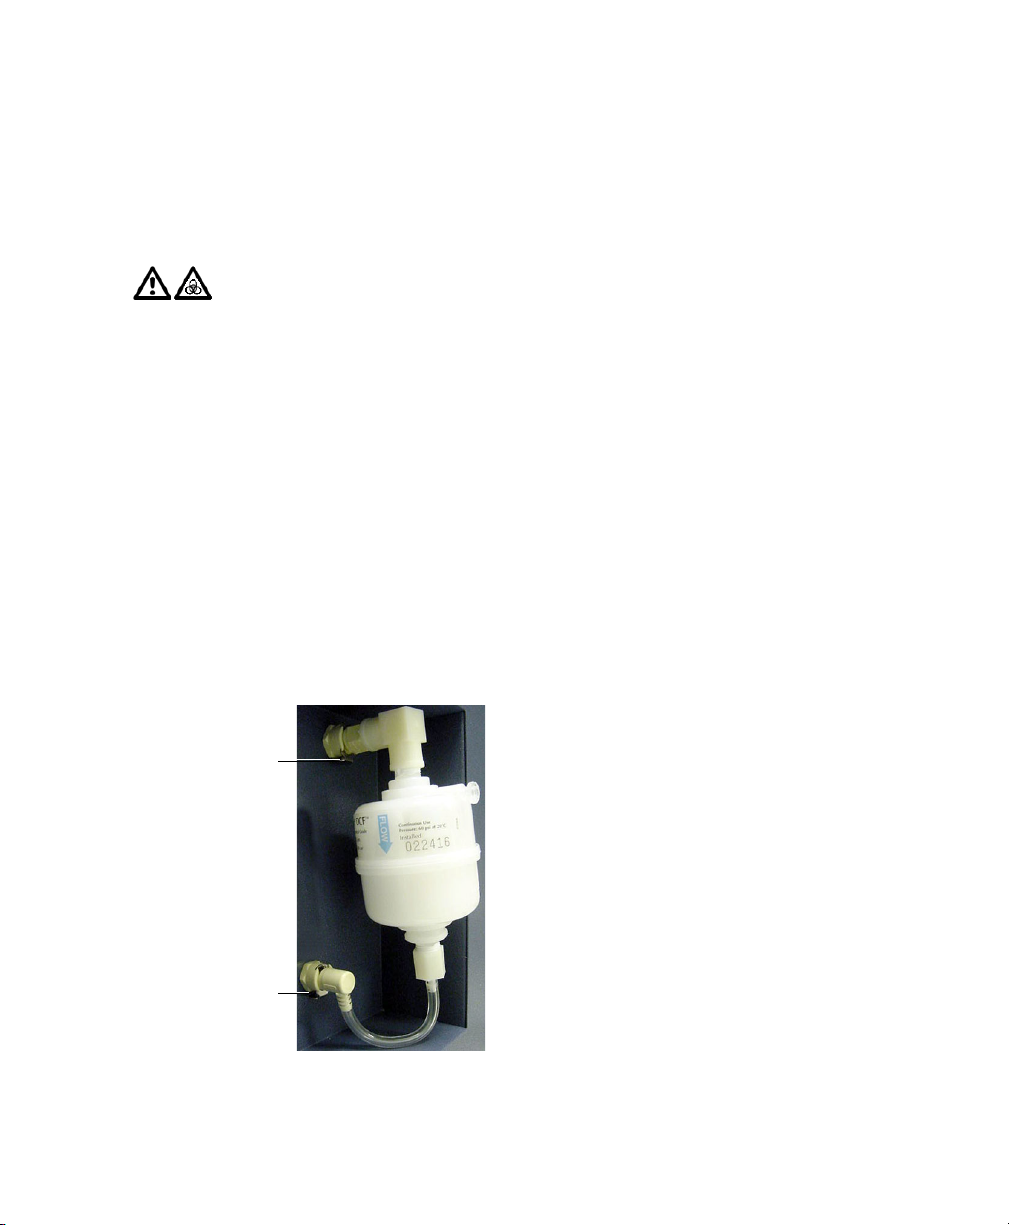
If too much air gets into the sheath filter, it becomes impermeable to fluid and an
air lock can develop. Although it is most likely to occur for the sheath filter, an
air lock can develop in any of the fluidics filters.
All cytometer surfaces that come in contact with biological specimens can
transmit potentially fatal disease. Use universal precautions when cleaning
cytometer surfaces. Wear suitable protective clothing and gloves.
Materials
• paper towels
• bypass tubing
Procedure
1 Place a few paper towels beneath the air-locked filter to collect drips.
2 Remove the filter by pressing the metal tabs.
Figure 4-3 Removing a filter
metal tab
metal tab
72 BD FACSCanto Flow Cytometer Reference Manual
Page 73
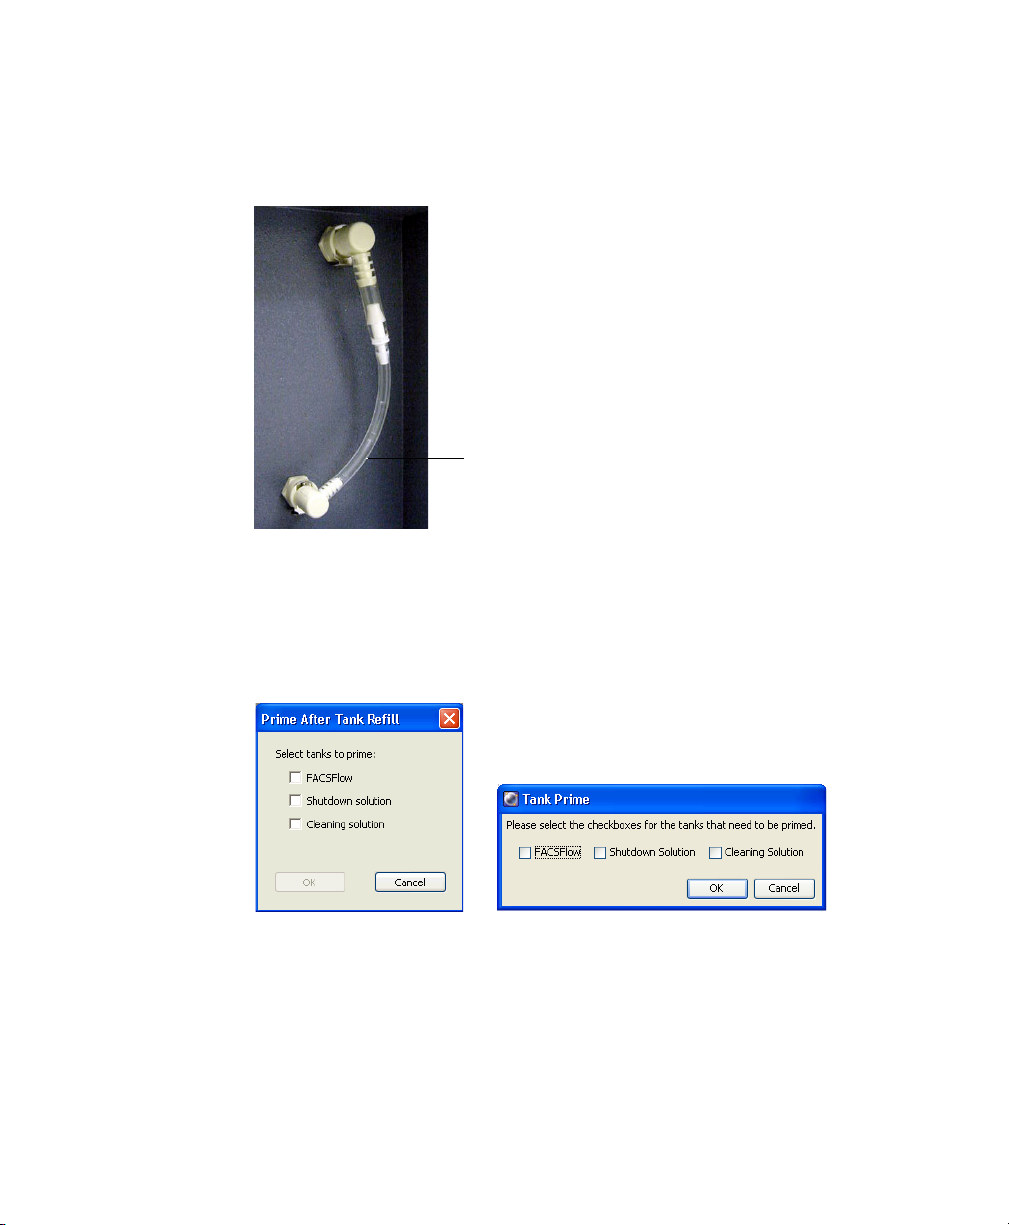
3 Install bypass tubing in place of the filter.
Push the tubing into each quick-disconnect port until you hear a click.
bypass tubing,
installed
4 Select Cytometer > Cleaning Modes > Prime After Tank Refill.
5 Select the checkbox that corresponds to the filter you have bypassed.
6 Click OK.
BD FACSCanto clinical software
BD FACSDiva software
7 When the prime finishes, remove the bypass tubing.
8 Reattach the filter to the fluidics cart.
9 Repeat the Prime After Tank Refill command.
Chapter 4: Maintenance 73
Page 74
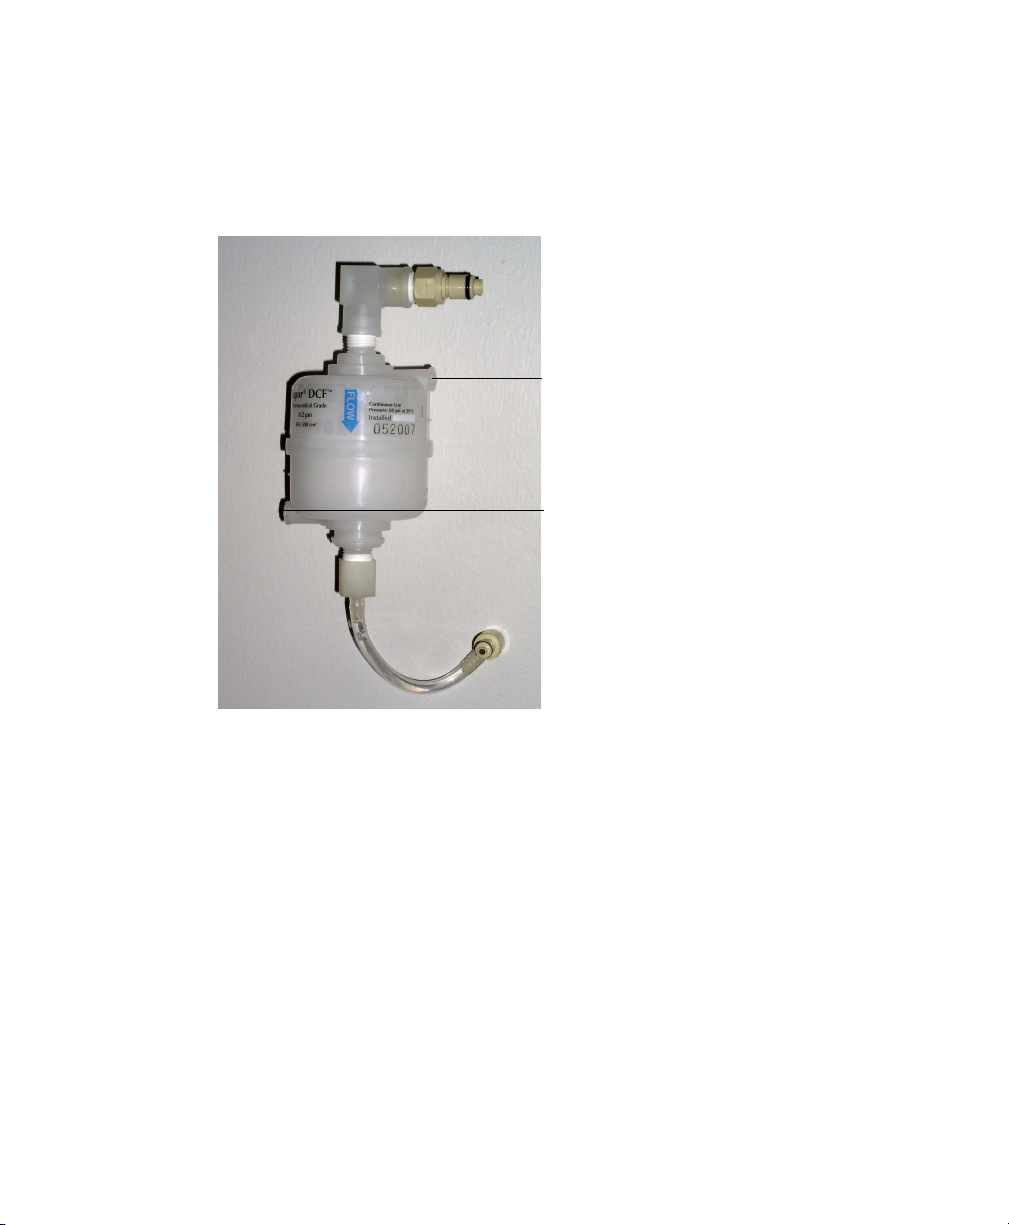
10 Open the bleeder valve and wait for fluid to seep out. Close the valve.
If no fluid seeps out, repeat steps 9 and 10.
Figure 4-4 Bleeder valve
loosen this
bleeder valve
DO NOT loosen
this bleeder valve
74 BD FACSCanto Flow Cytometer Reference Manual
Page 75
Cleaning External Surfaces
To prevent salt buildup, wipe down all external cytometer surfaces that have
been exposed to sheath fluid.
NOTICE Over time, saline deposits may develop on the interior surface of the
SIT Bal seal retainer, causing an incomplete SIT flush between samples. If this
occurs, you might need to remove and clean the retainer with DI water. See
Figure 4-5 on page 80 and steps 4, 7, and 8 of the Replacing the Bal Seal
procedure that starts on page 80.
NOTICE Do not use BD FACSClean solution or bleach to clean or disinfect the
barcode reader. See Cleaning the Barcode Reader on page 48.
All cytometer surfaces that come in contact with biological specimens can
transmit potentially fatal disease. Use universal precautions when cleaning
cytometer surfaces. Wear suitable protective clothing and gloves.
To prevent damage, do not use isopropyl alcohol or ethanol on any
cytometer or fluidics cart surface.
Materials
• BD FACSClean solution
•DI water
• clean, lint-free cloths or disposable wipe
Chapter 4: Maintenance 75
Page 76
Procedure
1 Switch off the cytometer power and unplug the AC power cord.
To avoid potential shock, always switch off the power and unplug the AC
power cord before you begin cleaning.
2 Wipe all accessible surfaces with BD FACSClean solution.
3 Wet a fresh cloth with DI water and wipe all bleach-exposed surfaces to
prevent corrosion.
4 Wipe all exposed surfaces with a clean, dry cloth.
Removing Bubbles from the Flow Cell
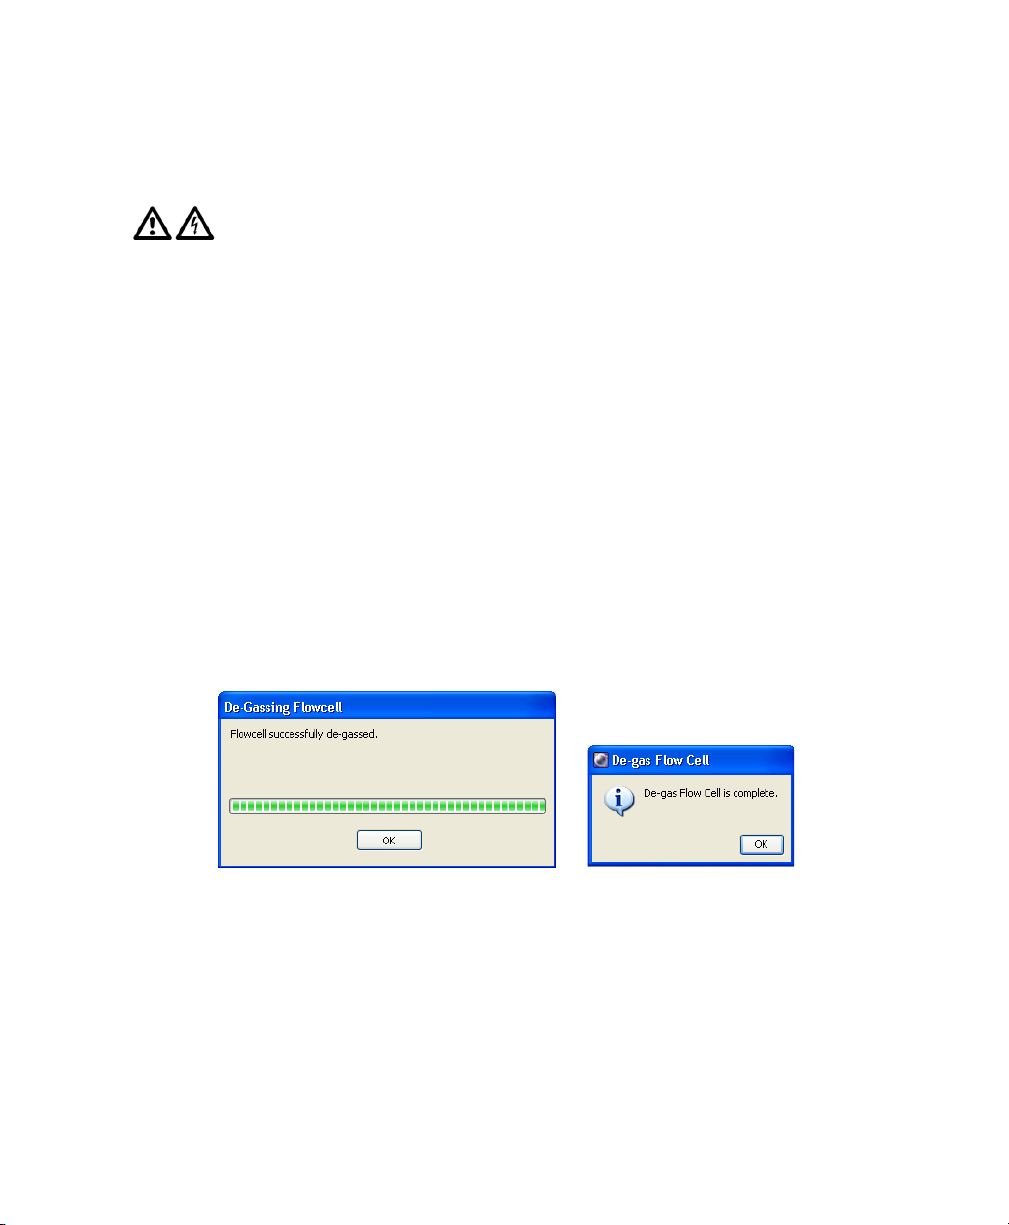
Use the De-gas Flow Cell command to remove bubbles from the flow cell.
1 Select Cytometer > Cleaning Modes > De-gas Flow Cell.
2 Click OK when the completion message displays.
BD FACSCanto clinical software
BD FACSDiva software
3 Check the flow cell for bubbles.
If you still see bubbles, repeat the process.
76 BD FACSCanto Flow Cytometer Reference Manual
Page 77
Cleaning the Flow Cell
Use the Clean Flow Cell command to run a tube of BD FACSClean solution
through the SIT and flow cell. After the procedure is complete, the cleaning fluid
remains in the SIT and flow cell until you run fluidics startup or shutdown.
Perform this procedure when poor optical performance indicates that additional
cleaning is needed.
Materials
• 3 mL of BD FACSClean solution
• one 12 x 75-mm polystyrene BD Falcon tube
Procedure
1 Select Cytometer > Cleaning Modes > Clean Flow Cell.
2 If you have a Loader, remove the carousel.
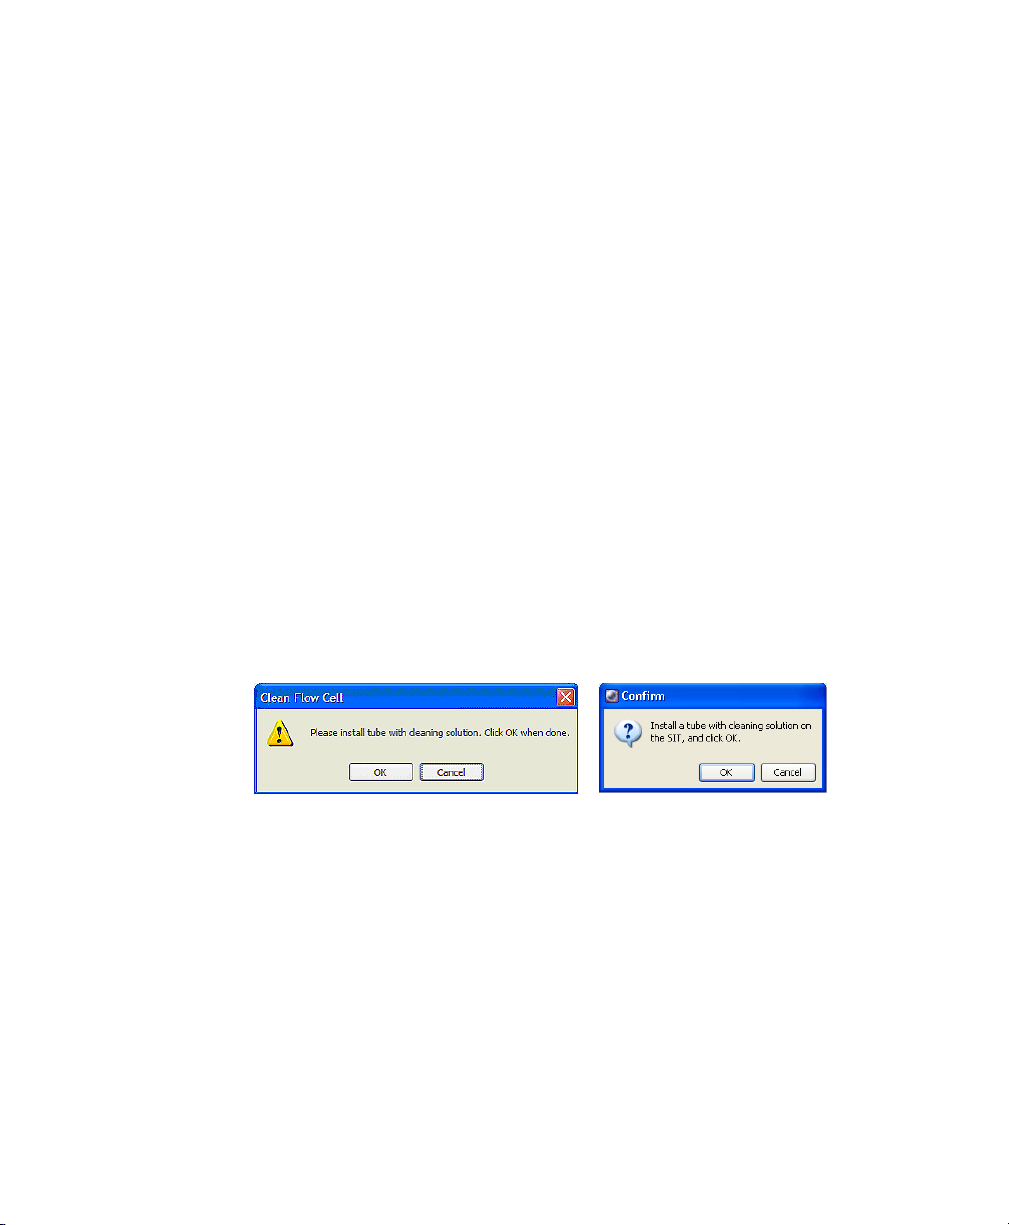
3 When prompted, manually install a tube containing approximately 3 mL of
BD FACSClean solution onto the SIT, and click OK.
BD FACSCanto clinical software
BD FACSDiva software
Chapter 4: Maintenance 77
Page 78
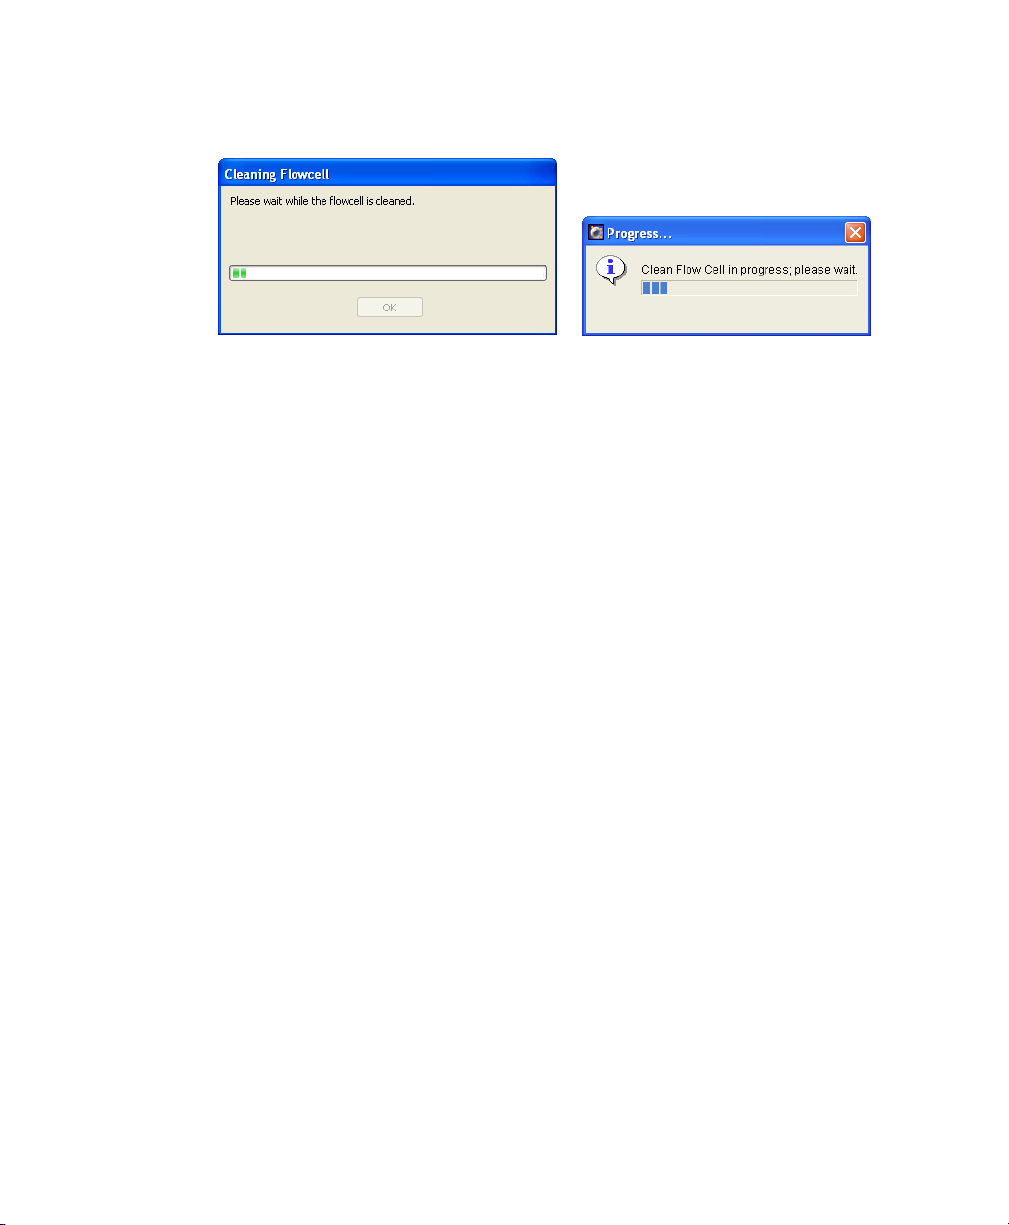
A progress message displays during the cleaning.
BD FACSCanto clinical software
BD FACSDiva software
4 After the completion message displays, wait 5 minutes.
Waiting allows the BD FACSClean solution to dissolve deposits in the flow
cell cuvette.
5 Click OK.
6 Remove the tube from the SIT.
7 Clear BD FACSClean solution from the flow cell and fluidics lines:
• Before running setup or samples, run Fluidics Startup.
• If you are shutting down without running more samples, run Fluidics
Shutdown.
Purging the Bubble Filter
The bubble filter sits between the fluidics tanks and reservoirs and the flow cell
and ensures that the flow cell remains bubble-free. However, should the fluidics
run dry, you might need to remove air from the bubble filter. Poor CVs might
indicate a need to purge the bubble filter.
1 Select Cytometer > Cleaning Modes > Bubble Filter Purge.
78 BD FACSCanto Flow Cytometer Reference Manual
Page 79
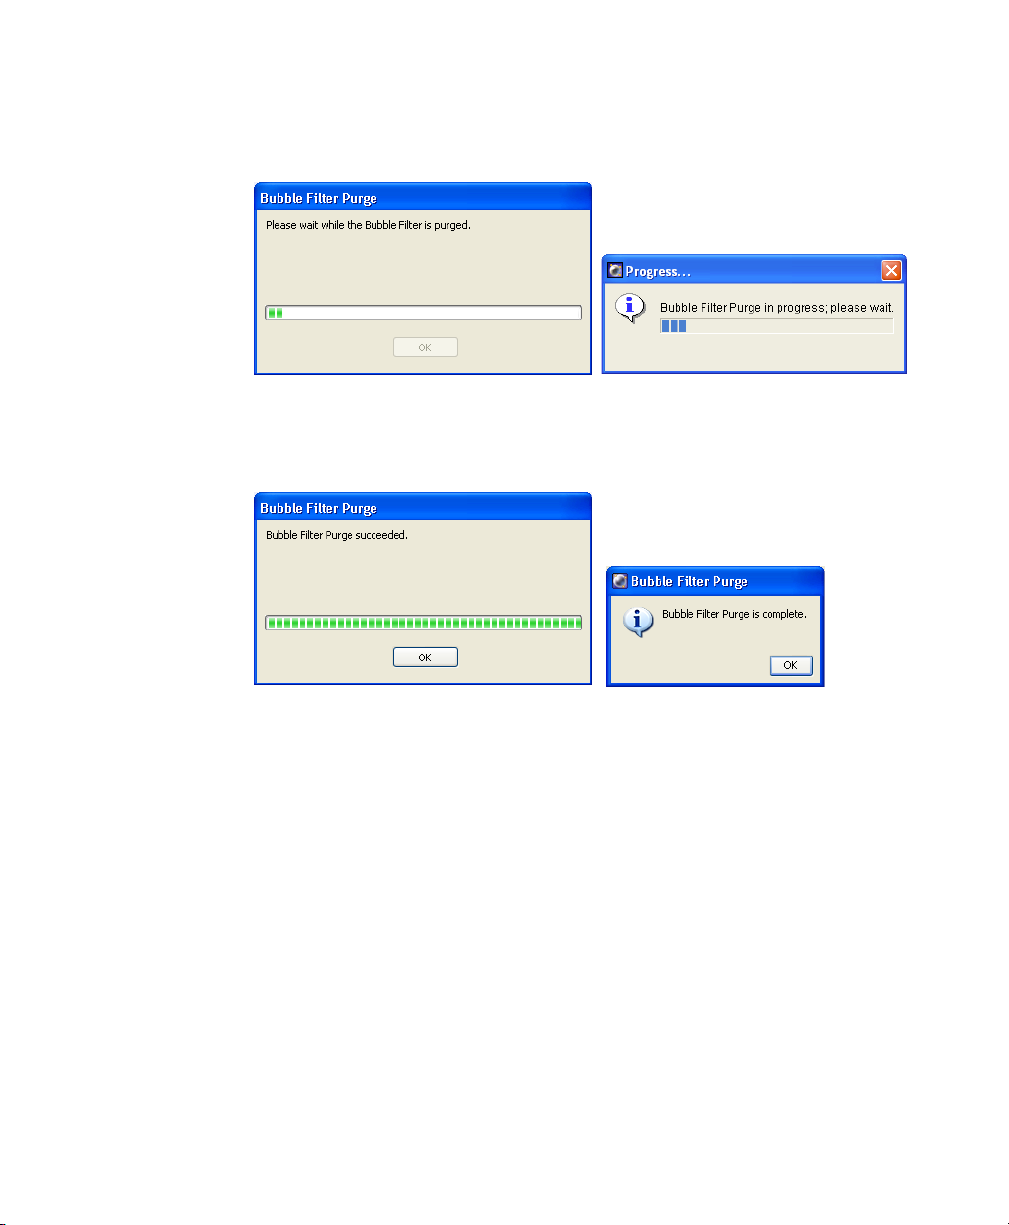
2 A dialog indicates Bubble Filter Purge progress. Wait until the purge
finishes.
BD FACSCanto clinical software
BD FACSDiva software
3 Click OK when the completion message is displayed.
BD FACSCanto clinical software
BD FACSDiva software
4 Repeat steps 1 through 3 until bubble-free liquid enters the flow cell from
the bubble filter.
5 When finished, select Cytometer > Cleaning Modes > De-gas Flow Cell.
Chapter 4: Maintenance 79
Page 80
Decontaminating the Fluidics System for Storage
If your cytometer is to be taken out of operation, perform the following
procedure to clean out the fluidics lines and fill them with BD FACS shutdown
solution.
1 Perform steps 1 through 4 in Decontaminating the Fluidics System (Long
Clean) on page 59.
2 Run fluidics shutdown.
3 Shut down the software and turn off the power to the cytometer.
Replacing the Bal Seal
The Bal seal is a Teflon ring that allows the sample tube to pressurize. Over time,
this seal becomes worn or cracked and requires replacement. Replace the seal
when persistent sample tube pressure errors occur.
Over time, saline deposits may develop on the interior surface of the SIT Bal seal
retainer, causing an incomplete SIT flush between samples. Therefore, you should
always rinse the retainer in DI water when you replace a Bal seal.
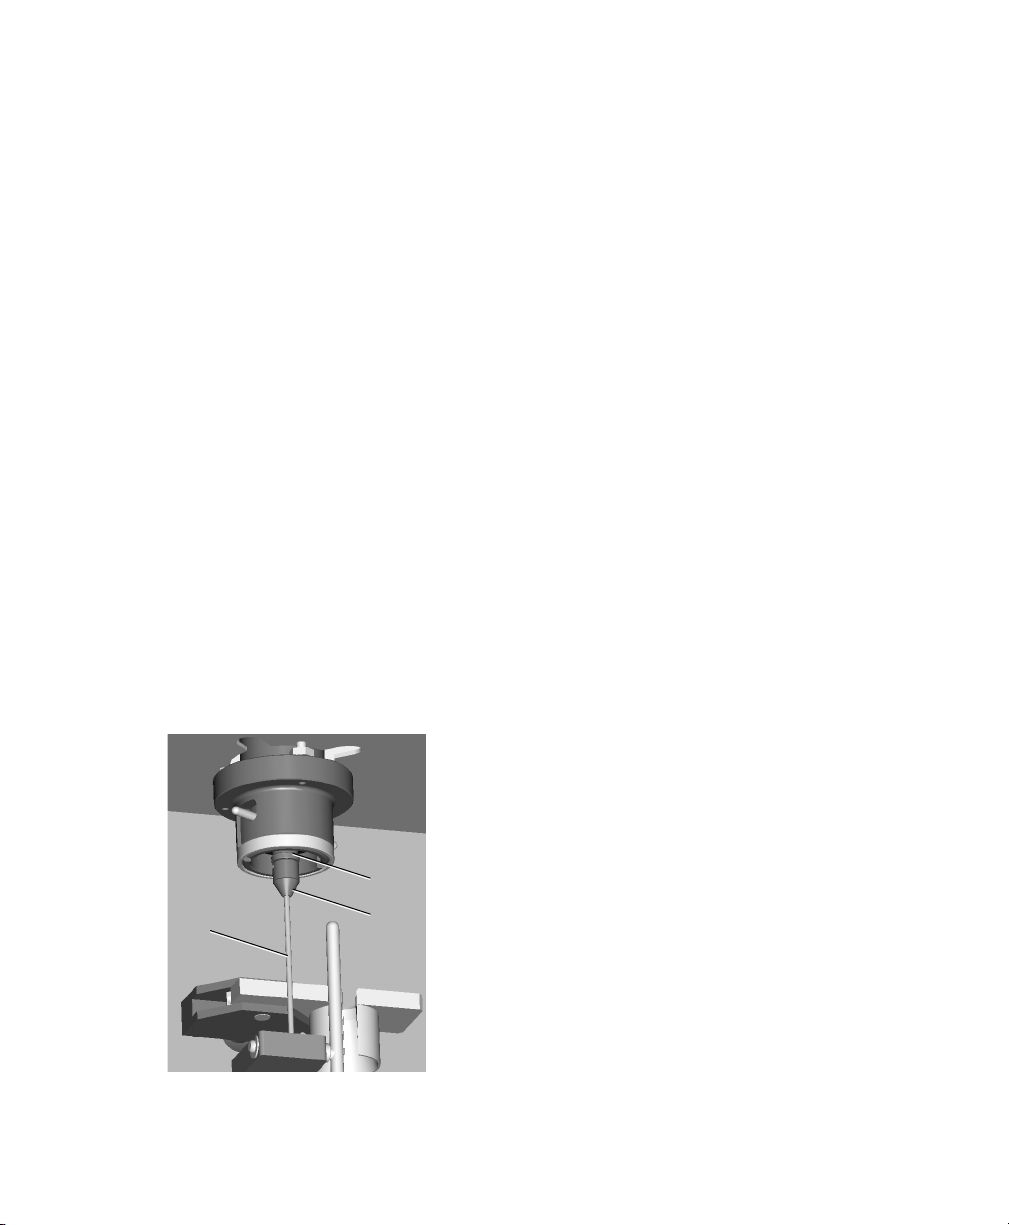
Figure 4-5 Bal seal and retainer
Bal seal
SIT
80 BD FACSCanto Flow Cytometer Reference Manual
retainer
Page 81

Materials
• proper protective equipment
• replacement Bal seal
•DI water
Procedure
1 Turn off the cytometer.
2 If you have a Loader, follow these steps:
• Remove the Loader cover.
• Pull out the drawer.
• Remove any carousel.
• Change the cytometer from automatic to manual mode (see Changing
to Manual Loading on page 39).
If you do not change the cytometer’s mode, you will not be able to
access the Bal seal.
Chapter 4: Maintenance 81
Page 82
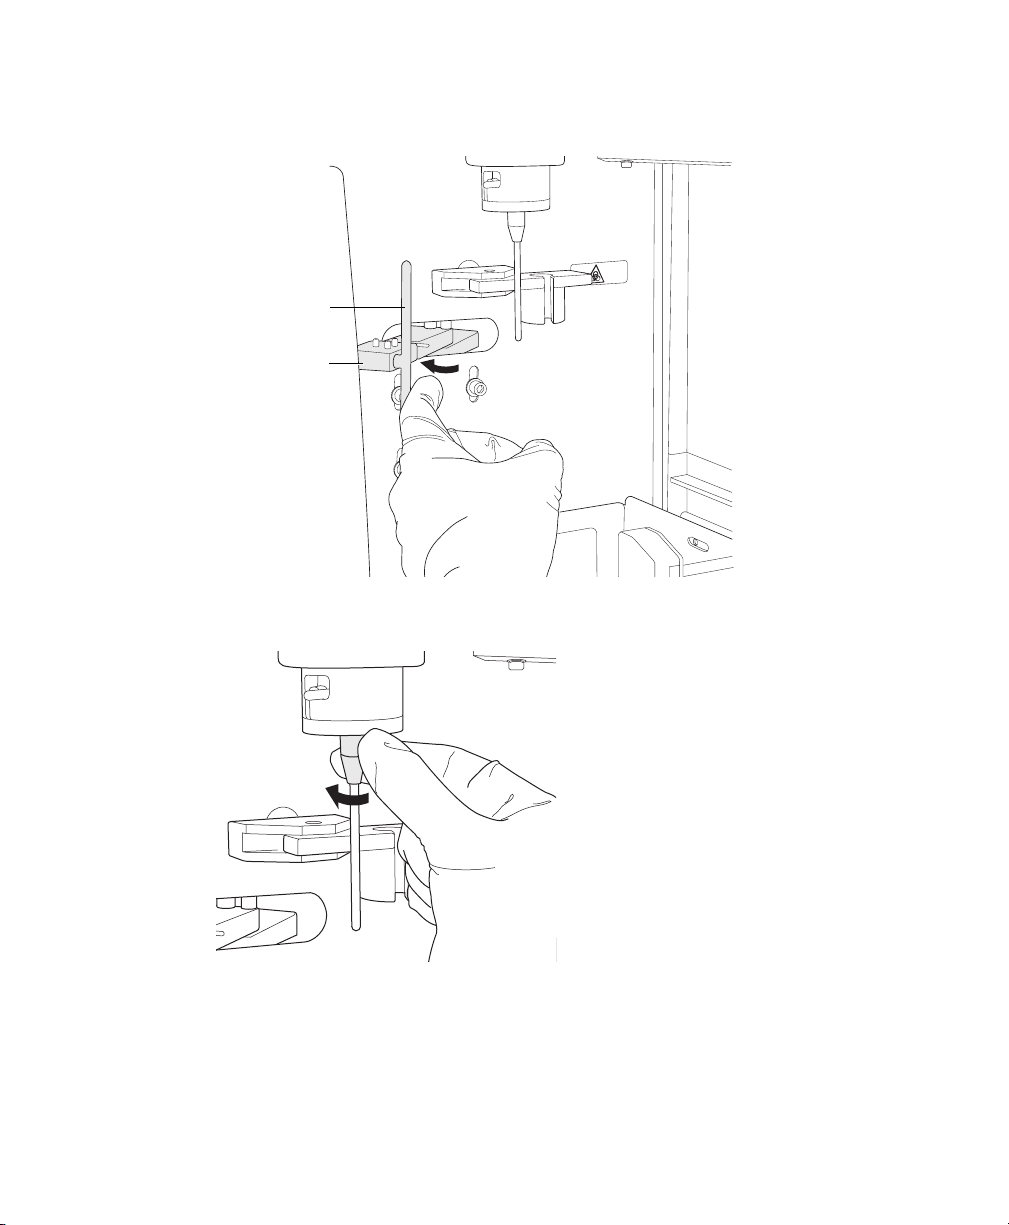
3 Move the aspirator arm to the left and hold it.
aspirator arm bar
aspirator arm
4 Remove the retainer from the SIT by turning it in the direction shown.
82 BD FACSCanto Flow Cytometer Reference Manual
Page 83
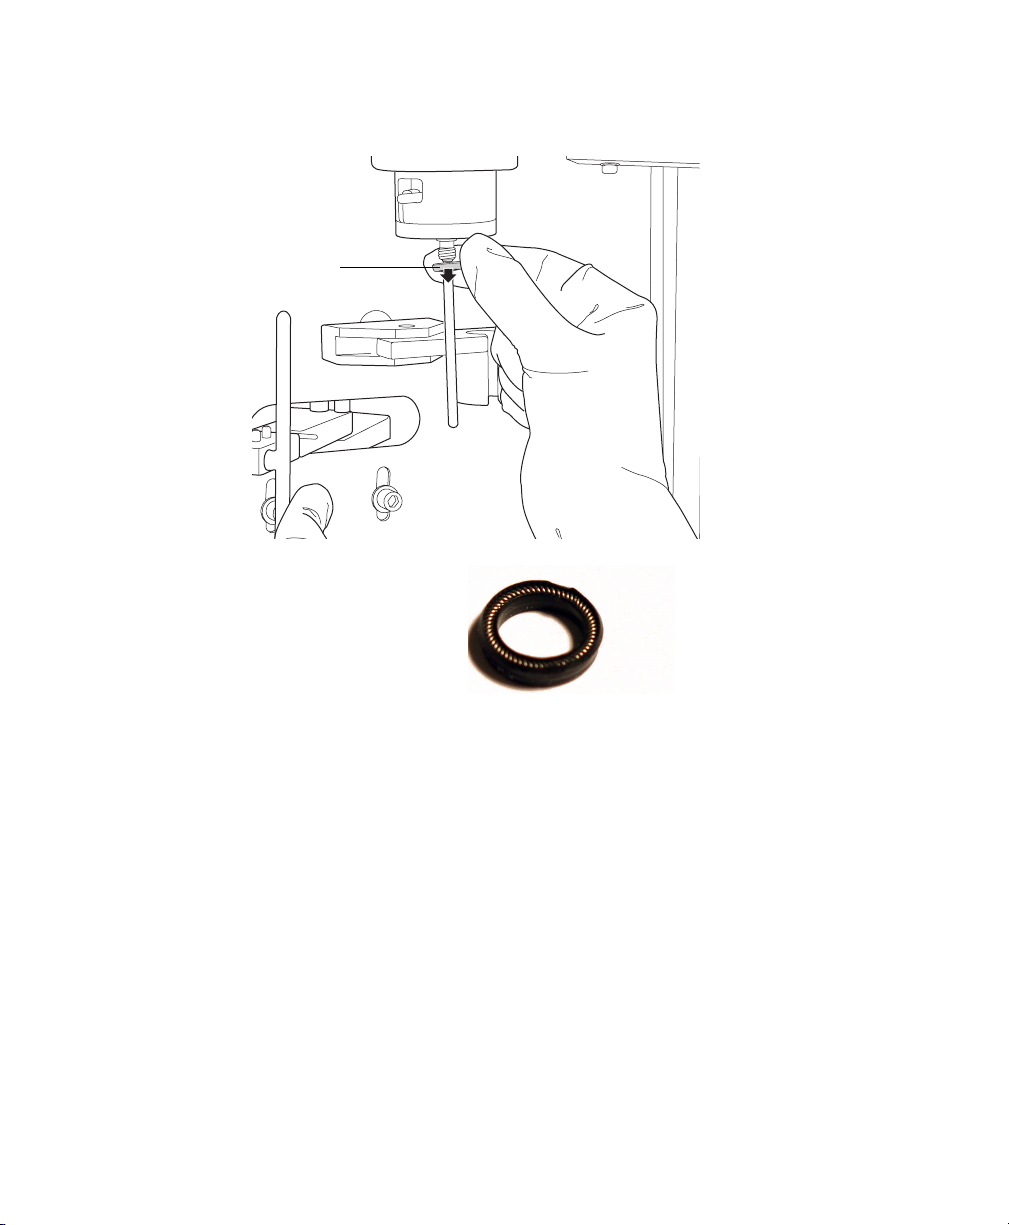
5 Remove the Bal seal by pulling it off with your fingers.
Bal seal
6 Install the new Bal seal
spring-side up.
Chapter 4: Maintenance 83
Page 84
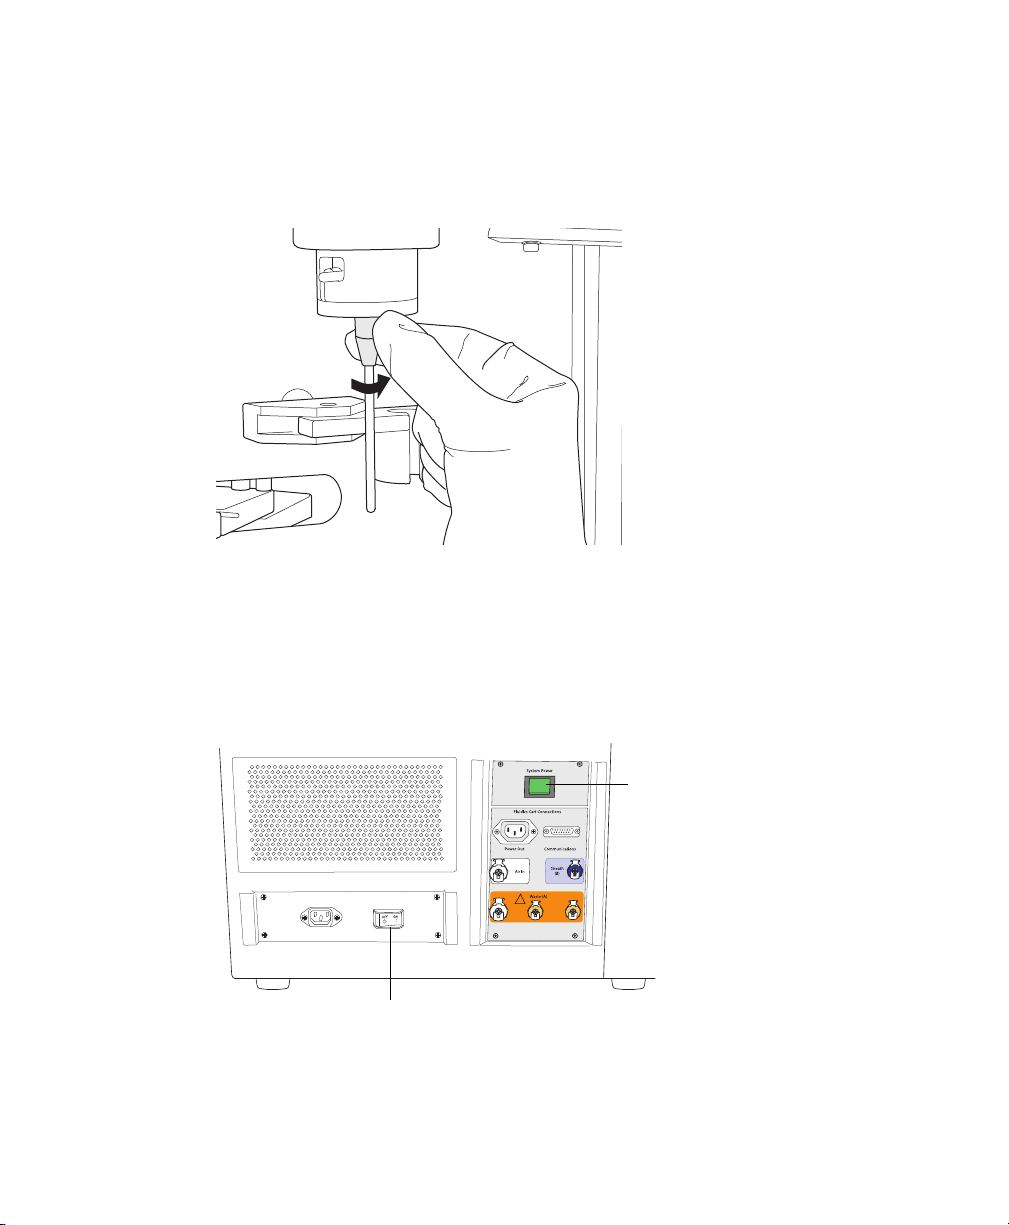
7 Rinse the retainer in DI water to remove saline deposits before replacing it
on the SIT.
8 Reinstall the retainer over the SIT and tighten in the direction shown.
9 Test by manually loading a tube onto the SIT and running fluid.
Resetting the Cytometer Circuit Breaker
1 Toggle the cytometer circuit breaker switch to on.
cytometer circuit breaker, on
2 If it is off, turn on the cytometer main power.
84 BD FACSCanto Flow Cytometer Reference Manual
main power
button
Page 85
Reconnecting the Ethernet and RS232 Cables
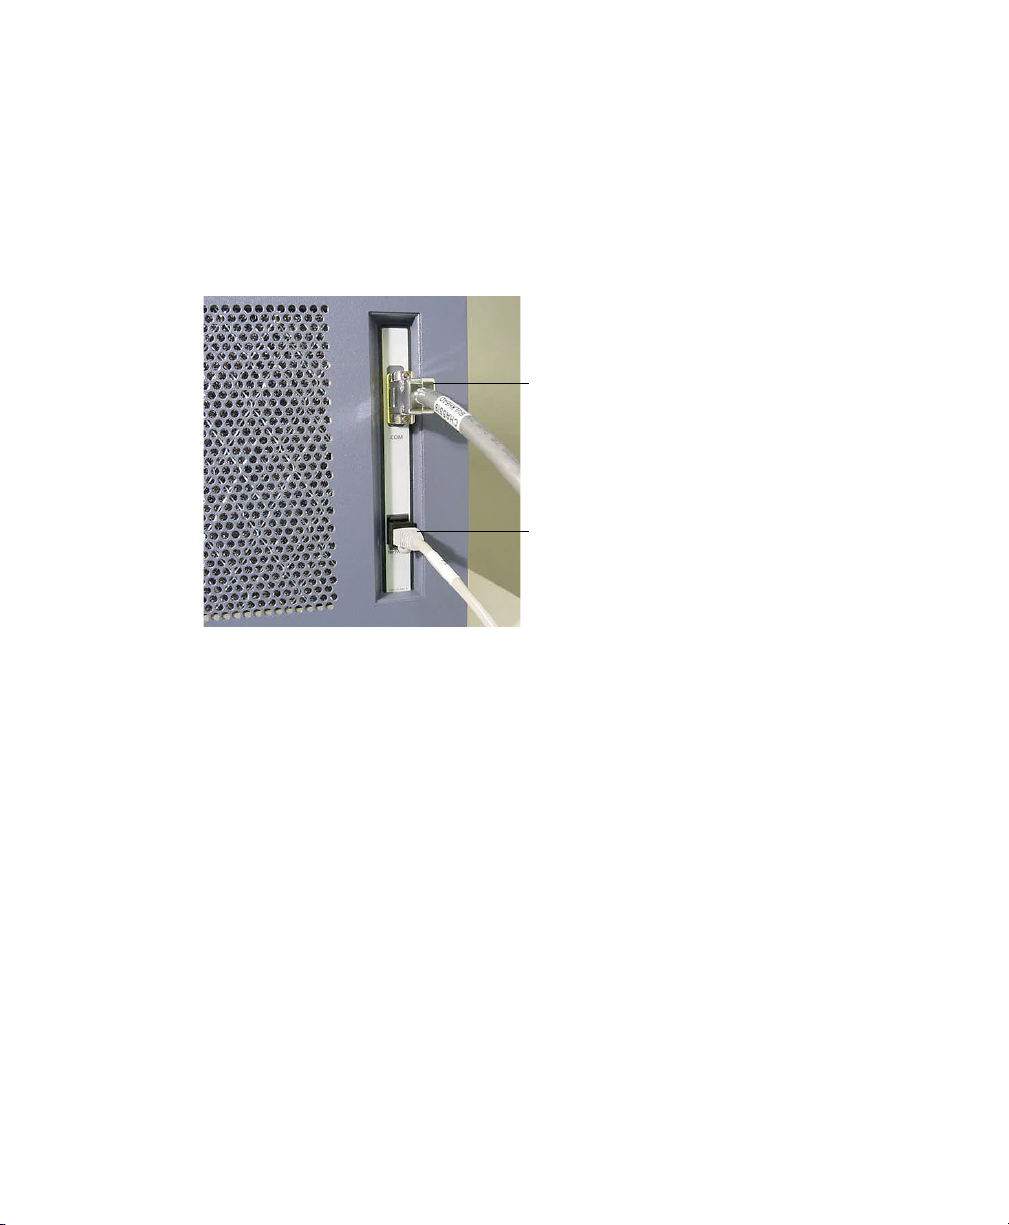
The cytometer connects to and communicates with the workstation through
Ethernet and RS232 network cables. If these cables should become disconnected,
use the following diagram to reconnect them.
Figure 4-6 Ethernet and RS232 network cable
RS232 cable
Ethernet cable
Both cables connect to ports on the PC workstation. As the make and model of
the workstation might vary, refer to the documentation that came with your
system for information.
Reconnecting the Fluidics Cart Tubing
Should any plugs, cords, or tubings become accidentally disconnected, use the
following diagrams to reconnect the fluidics cart to the cytometer (Figure 4-7 on
page 86).
; Tip The ports and connectors are color coded.
Chapter 4: Maintenance 85
Page 86
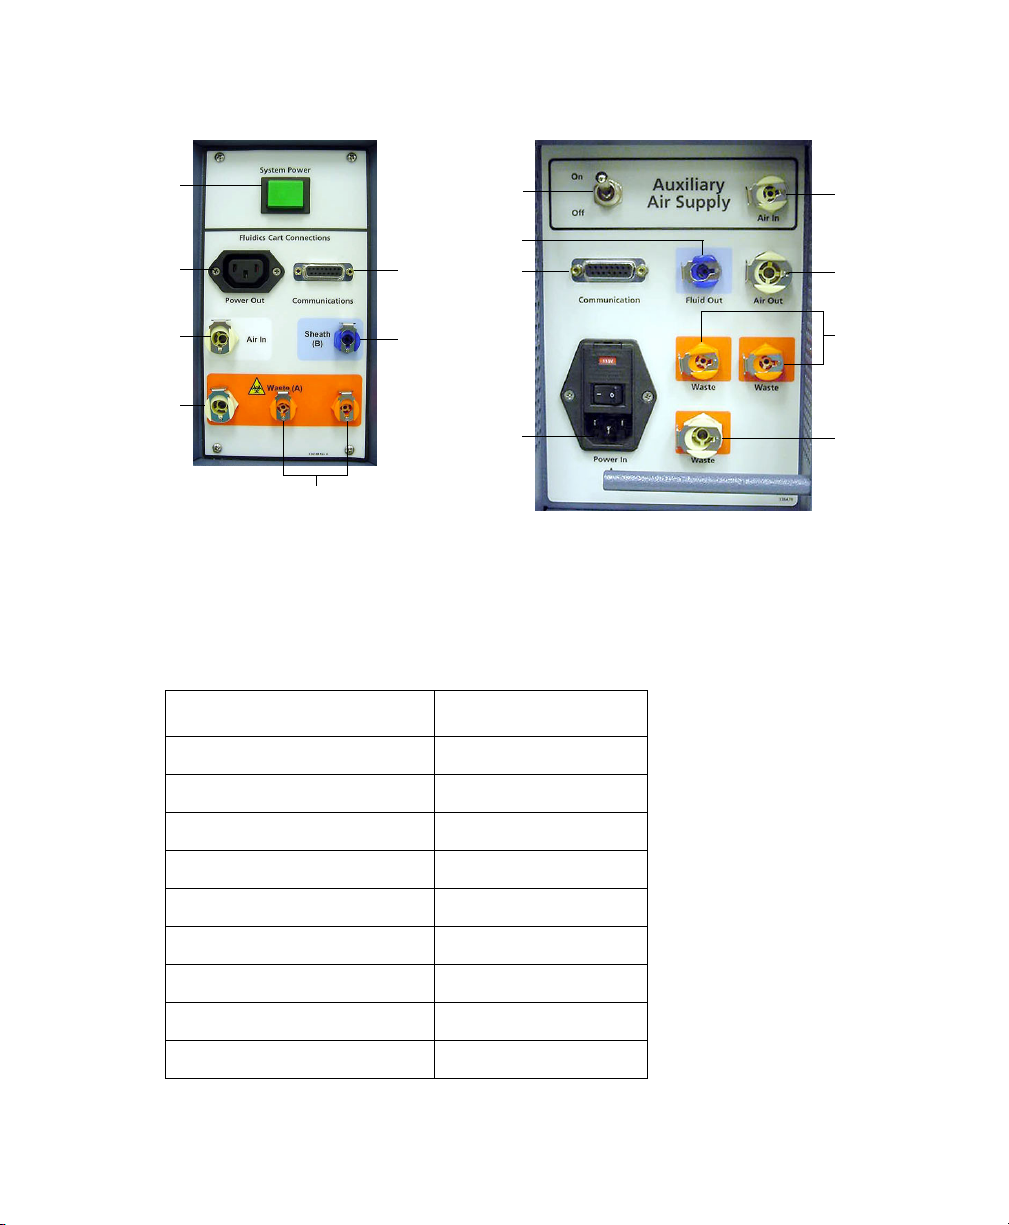
Figure 4-7 Cytometer and fluidics cart ports
a
b
c
d
g
cytometer ports fluidics cart ports
e
f
h
i
j
k
Cytometer ports and their corresponding fluidics cart ports are listed in
Table 4-1. For example, ensure the tubing for f. Sheath (B) connects to the port
labeled i. Fluid Out. Table 4-2 on page 87 lists port functions.
Table 4-1 Correspondence of cytometer ports to fluidics cart ports
Port or Button on Cytometer Port on Fluidics Cart
a. System Power —
l
m
n
o
b. Power Out k. Power In
c. Air In m. Air Out
d. Was t e (A) o. Was t e
e. Communications j. Communication
f. Sheath (B) i. Fluid Out
g. Wa s t e (A) n . Wa ste
— h. On/Off
—l. Air In
86 BD FACSCanto Flow Cytometer Reference Manual
Page 87

Do not plug the fluidics cart power cord into a wall outlet. Plug the cord
into the cytometer only. This ensures proper electrical grounding and
protects against electrical shock or damage to the cytometer.
Table 4-2 Function of ports, buttons, and switches
Port or Switch Additional Information
a. System Power Powers both cytometer and fluidics cart
b. Power Out Connects to fluidics cart
c. Air In 70±5 psi
d. Waste (A) Waste out (aspirated)
e. Communications Data port
f. Sheath (B) BD FACSFlow solution port
g. Waste (A) Waste out (non-aspirated)
h. On/Off Auxiliary air supply switch. Keep in off
position unless connected to house air.
i. Fluid Out BD FACSFlow solution port
j. Communication Data port
k. Power In Connects to cytometer. Do not connect to
wall outlet
l. Auxiliary Air In There will be no tubing on this port unless
connected to house air.
m. Air Out Sends compressed air to cytometer
n. Waste Waste in (non-aspirated)
o. Waste Waste in (aspirated)
Chapter 4: Maintenance 87
Page 88
Replacing the Fluidics Level Sensors
Replace the fluidics level sensors when instructed to do so by a BD Biosciences
service representative. Before you replace a sensor, try rinsing it with DI water.
If you are changing the sensor on the waste tank, use proper precaution and
wear suitable protective clothing, eyewear, and gloves. All biological
specimens, and materials coming into contact with them, can transmit
potentially fatal disease.
The waste tank can become pressurized when the cytometer is running.
Always disconnect the tank from the fluidics cart and wait at least 30
seconds for pressure to dissipate before you remove the level sensor cap.
Materials
• replacement fluidics sensor probe—see Other Replacement Parts on
page 129 for ordering
• proper protective equipment
88 BD FACSCanto Flow Cytometer Reference Manual
Page 89
Procedure
1 Ensure that the cytometer is not acquiring events.
2 Detach the sensor and fluid line from the cart.
3 Unscrew the cap on the cubitainer.
4 Remove the level sensor assembly and discard into a suitable receptacle.
Chapter 4: Maintenance 89
Page 90
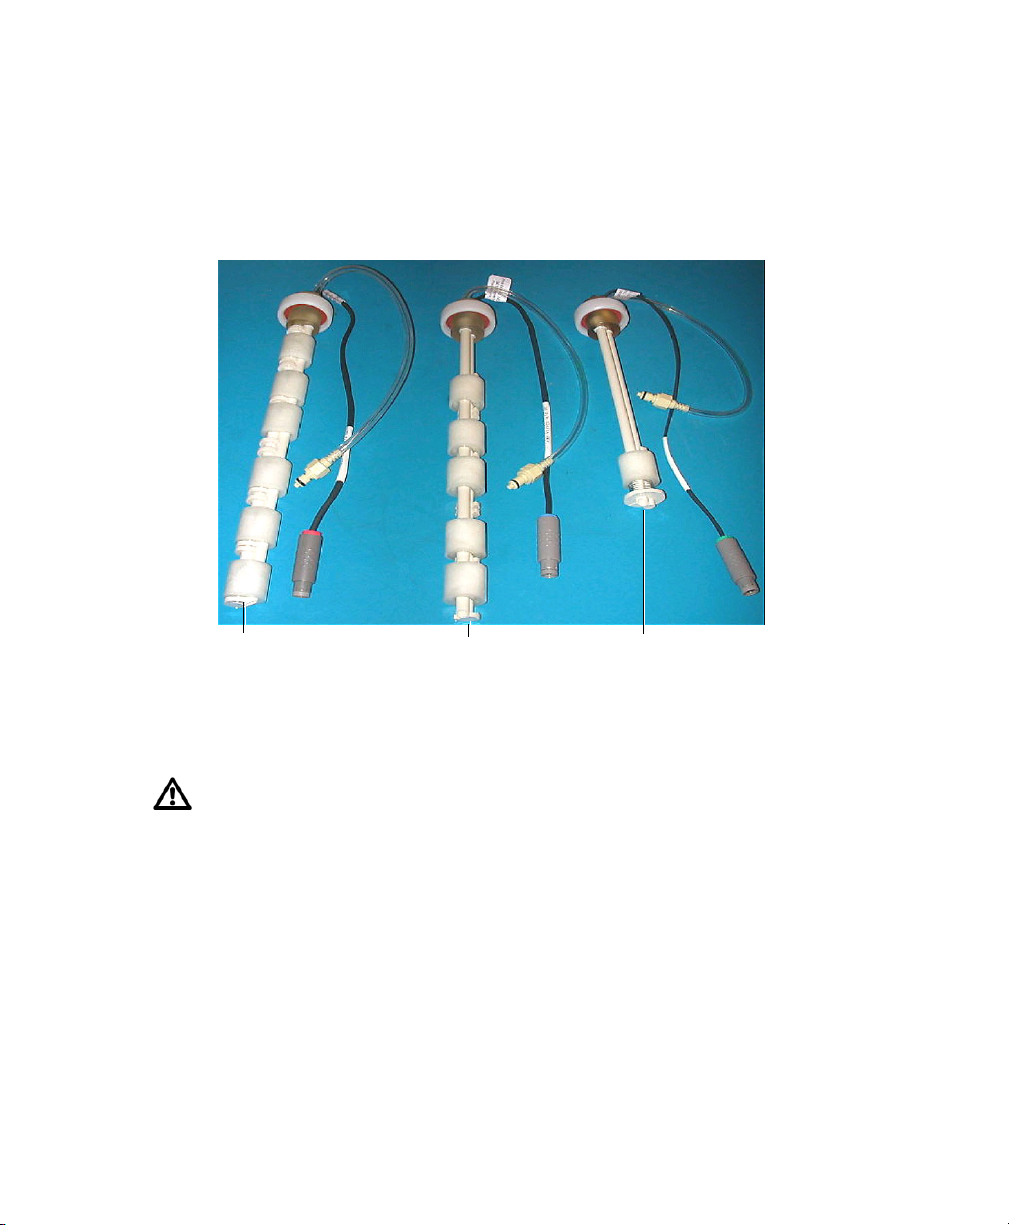
5 Put a new level sensor assembly on the cubitainer or tank. Hand-tighten the
cap until it is fully closed.
6 Ensure use of the correct assembly (Figure 4-8).
Figure 4-8 Level sensor assemblies
waste level sensor
(red connector)
BD FACSFlow level sensor
(blue connector)
7 Reattach the sensor line and fluidics lines.
To ensure that the appropriate solutions are dispensed, make sure the label
on the container matches the labeled port on the fluidics cart.
8 If you replaced any level sensors (other than the waste sensor), prime the
affected fluidics lines.
Important: Continue with the procedure in Priming Fluidics Lines on
page 71.
90 BD FACSCanto Flow Cytometer Reference Manual
BD FACSClean solution and
BD FACS shutdown solution
level sensor (green connector)
Page 91
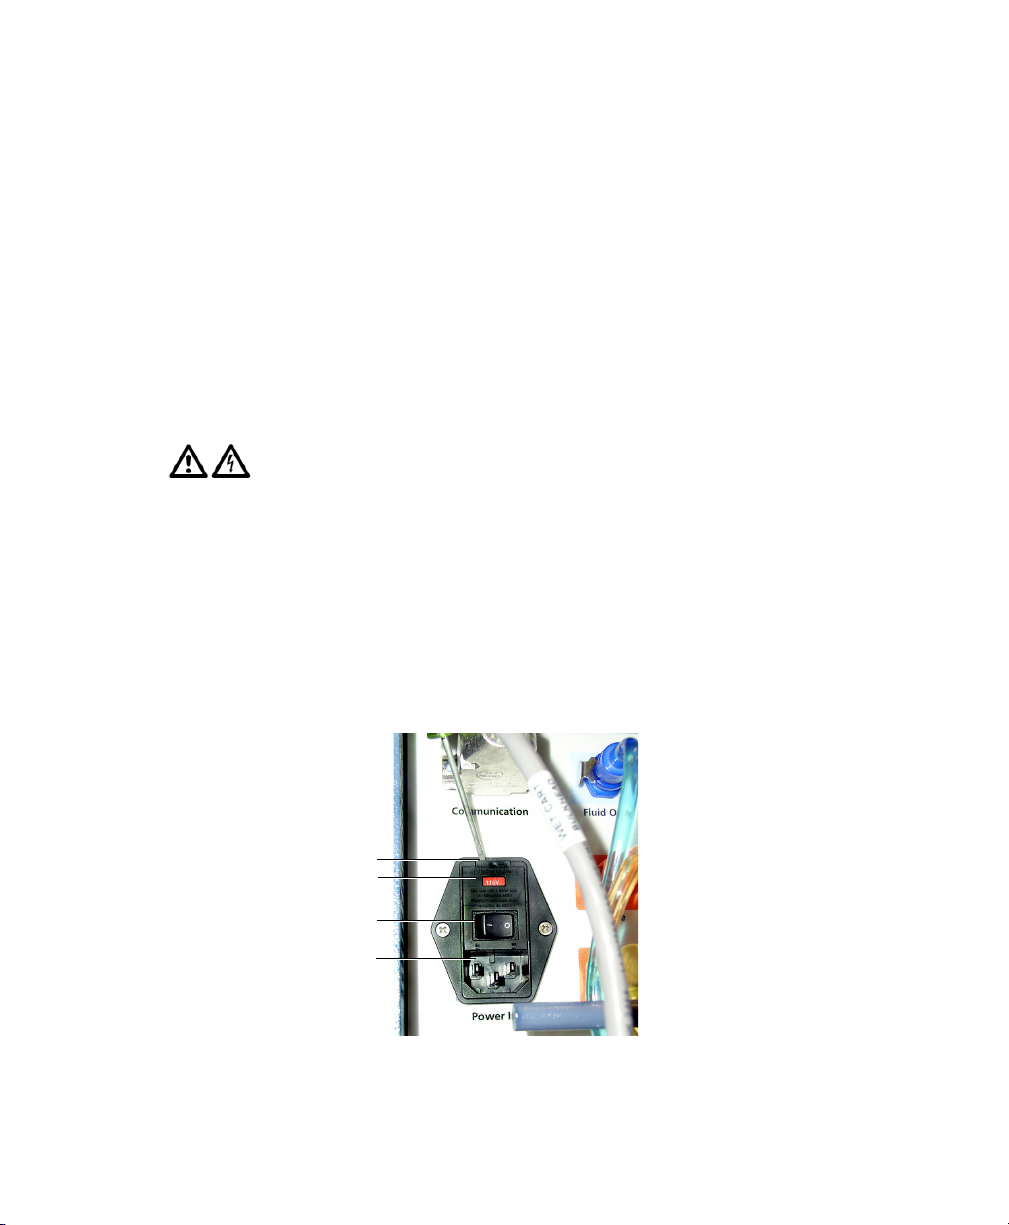
Replacing the Fluidics Cart Fuses
Power surges and other electrical events could cause a fuse to blow. Use the
following procedure to replace the fuses.
Materials
• two replacement fuses (see Installation Kit on page 128 for ordering)
• small screwdriver
Removing the Old Fuses
To protect against shock, always turn off the cytometer and unplug the
power cord before performing this procedure.
1 Shut down the cytometer and turn off the cytometer power.
2 Unplug the power cord from the wall outlet and the fluidics cart.
Removing the plug allows easier access to the fuse door.
3 Insert a small screwdriver into the slot and gently pry the fuse door open.
slot for screwdriver
fuse access door
circuit breaker
empty socket,
plug removed
Chapter 4: Maintenance 91
Page 92
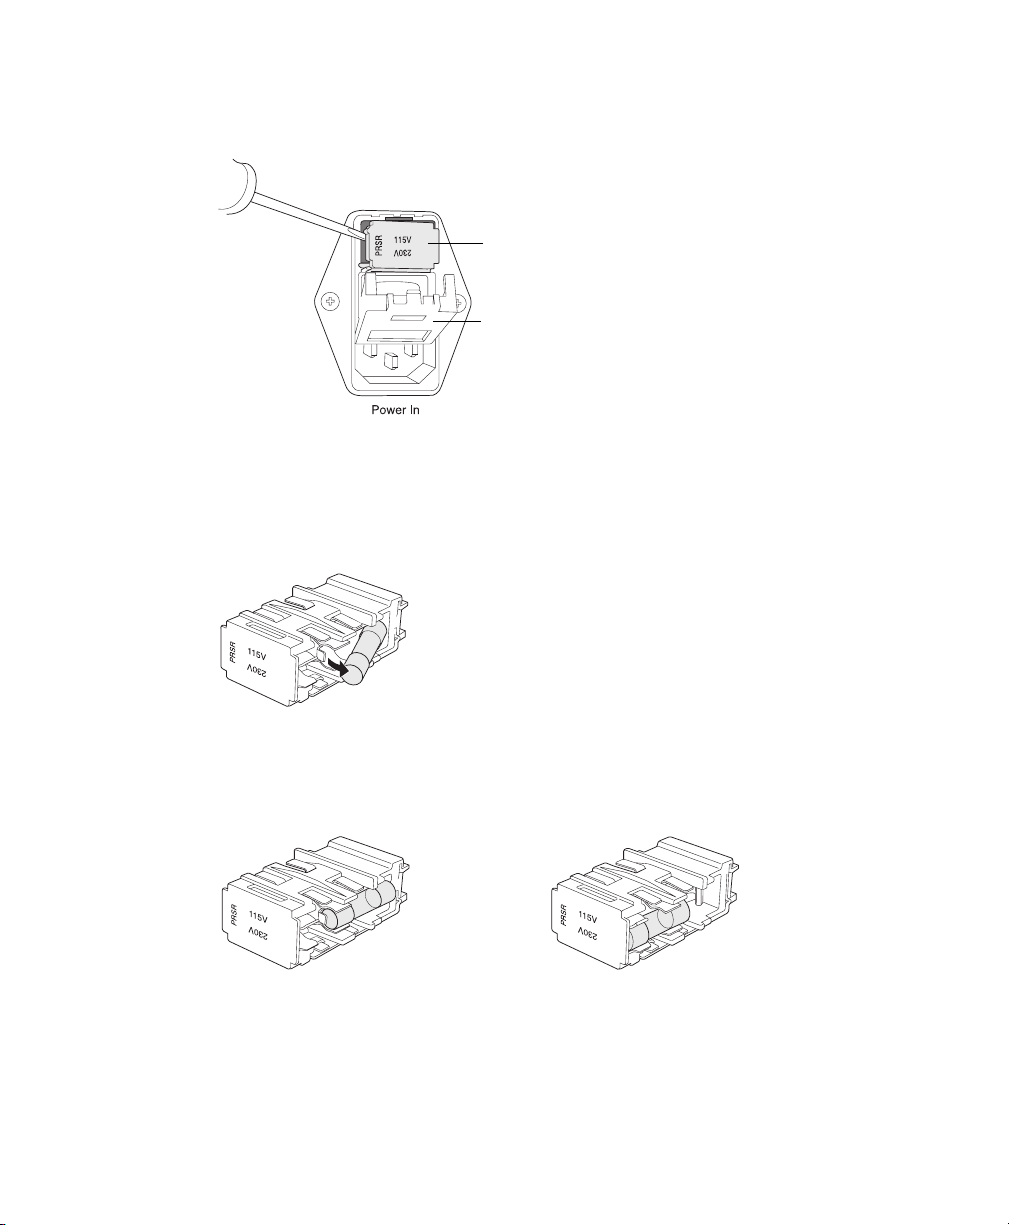
4 Gently pry out the fuse drawer until you can grip it.
fuse drawer
fuse door
5 Remove the fuse drawer, and remove and dispose of the old fuses.
; Tip Note the positions of the old fuses before you remove them. Duplicate
these positions with the new fuses.
6 Replace both fuses.
Make sure the fuse sits as shown:
right wrong
92 BD FACSCanto Flow Cytometer Reference Manual
Page 93
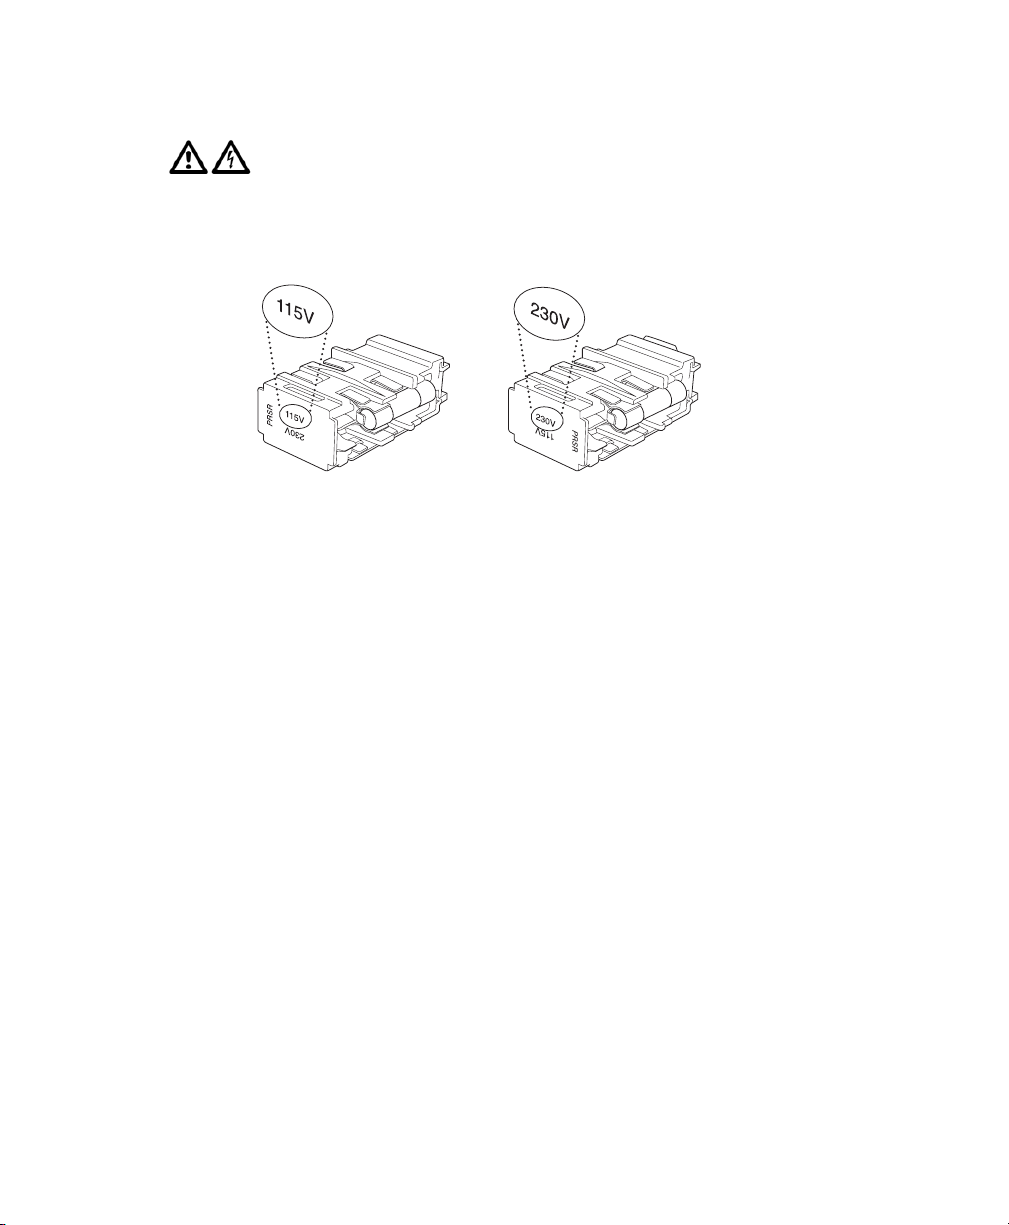
For protection against risk of fire, replace fuses only with those provided by
BD Biosciences.
7 Make sure the text for your area’s voltage is right-side up.
8 Slide the drawer back into the cytometer until it snaps into place.
9 Close the fuse access door.
10 Reconnect the power cord to the fluidics cart.
11 Plug the cytometer power cord into the wall outlet and switch on the power.
Chapter 4: Maintenance 93
Page 94

94 BD FACSCanto Flow Cytometer Reference Manual
Page 95

5
Troubleshooting
The tips in this section can help you troubleshoot issues that might arise when
using this cytometer. For software troubleshooting, refer to the BD FACSCanto
Clinical Software Reference Manual, the BD FACSDiva Software Reference
Manual, or the BD FACSCanto Instructions for Use.
If you need additional assistance, contact BD Biosciences. Refer to our website,
bdbiosciences.com, for up-to-date contact information.
Troubleshooting suggestions can be found under the following topics:
• Cytometer Troubleshooting on page 96
• Fluidics Cart Troubleshooting on page 101
• Loader Troubleshooting on page 102
95
Page 96

Cytometer Troubleshooting
Observation Possible Causes Recommended Solutions
Flow cell will not fill Air in bubble filter Run the Bubble Filter Purge
command at least once (you might
need to run it several times).
When finished, run De-gas Flow
Cell. See Purging the Bubble Filter
on page 78.
Fluidics cart power off Turn on the power to the fluidics
cart by resetting the fluidics cart
circuit breaker switch (Figure 1-7
on page 27). Always use the
cytometer power button, located
on the left side of the cytometer, to
turn the system off and on.
No pressure in the plenum • Check air tubing connections.
• Check air tubing for kinks.
Sheath line disconnected
1 Check cubitainer-to-fluidics
2 Check tubing for kinks.
BD FACSFlow cubitainer
empty
Air in BD FACSFlow filter
(fluidics cart)
Air lock in BD FACSFlow
filter (on fluidics cart)
Replace the BD FACSFlow
cubitainer. See Changing a
Cubitainer on page 68.
Purge air from the filter. See
Purging the Fluidics Filters on
page 57.
See Removing an Air Lock on
page 72.
96 BD FACSCanto Flow Cytometer Reference Manual
cart, and fluidics cart–tocytometer connections. See
Reconnecting the Fluidics Cart
Tubing on page 85.
Page 97

Cytometer Troubleshooting (continued)
Observation Possible Causes Recommended Solutions
Flow cell will not fill
(continued)
Fluidics pressure errors Air lock in filter • Check the filter in the fluidics
Fluid backfill into
sample tube
No air pressure in cart • If the cart is attached to an
auxiliary air supply, switch on
auxiliary air.
• If the cart is not attached to an
auxiliary air supply, switch off
auxiliary air.
cart. Verify the bottom bleeder
valve on the filter is fully
tightened. Open the top bleeder
valve. If no fluid leaks out,
remove the air lock as
described in Removing an Air
Lock on page 72.
Cracked tube • Transfer sample to new tube.
• Make sure you are using
appropriate tubes. See System
Requirements on page 31.
Bal seal improperly installed
or worn
Air lock in BD FACSFlow
filter
Reinstall or replace the Bal seal.
See Replacing the Bal Seal on
page 80.
See Removing an Air Lock on
page 72.
Liquid leakage around
cytometer base
QC fails after Long
Clean
Interior valve failure
Residual BD FACSClean
solution in lines
1 Turn off the cytometer power.
2 Clean up the liquid, using
proper precautions.
3 Call BD Biosciences.
Run Fluidics Startup to flush the
system with sheath fluid. Repeat
until QC passes.
Chapter 5: Troubleshooting 97
Page 98

Cytometer Troubleshooting (continued)
Observation Possible Causes Recommended Solutions
Cytometer on, but no
response to software
commands
Software does not
connect to cytometer
Bad keyboard or mouse
connection
Communication failure
(Ethernet error) between
computer and cytometer
Check keyboard or mouse
connections to computer. Refer to
the documentation that came with
your workstation.
1 Turn off the computer and the
cytometer.
2 Reseat the Ethernet cable,
located on the right side of the
flow cytometer. See Figure 4-6
on page 85.
3 Turn on the cytometer, then the
computer.
4 Using hyperterminal, type
reboot. Verify that VxWorks
launches and no errors are
reported.
BD FACSDiva software
running at same time as
BD FACSCanto clinical
software
Cytometer power is off Turn power on.
Internal firmware error Cycle power on cytometer.
Quit the software you are not
using or put the software in
Standby.
Cytometer and fluidics
cart will not turn on
Power cords disconnected
from wall socket or cytometer
Cytometer circuit breaker
tripped
Blown fuse in cytometer
controller
Reconnect the power cord to the
wall socket or the cytometer.
Switch on the cytometer circuit
breaker, followed by the
cytometer power (if off).
Turn off the cytometer main
power and call BD Biosciences.
98 BD FACSCanto Flow Cytometer Reference Manual
Page 99

Cytometer Troubleshooting (continued)
Observation Possible Causes Recommended Solutions
Tube does not load, or
sample tube does not fit
snugly on SIT
Higher than expected
CVs for some (brightest)
populations during DNA
analysis
Improper sample tube used Use Falcon brand 12 x 75-mm
polystyrene test tubes,
BD Trucount tubes, or BD FACS
7-color setup bead tubes. See
System Requirements on page 31.
Bal seal improperly installed
or worn
Defective or cracked tube • Transfer sample to new tube.
Bal seal improperly installed
or worn
Adapter lever in incorrect
position for manual loading
Possible pre-amp nonlinearity with very bright
signals
Reinstall or replace the Bal seal.
See Replacing the Bal Seal on
page 80.
• Make sure you are using
appropriate tubes. See System
Requirements on page 31.
Reinstall or replace the Bal seal.
See Replacing the Bal Seal on
page 80.
Make sure the lever is in the
manual loading position. Modify
the cytometer appropriately. See
Changing to Manual Loading on
page 39.
Set G
at channel 25,000 or less.
diploid population peak
0/G1
>20% difference
between Measured and
Reference laser power
BD FACSDiva software
not launching
Flow cell access door open Close the door completely.
Cytometer.dat file not found • Install saved cytometer.dat file,
or
• call BD Biosciences for
assistance.
Chapter 5: Troubleshooting 99
Page 100

Cytometer Troubleshooting (continued)
Observation Possible Causes Recommended Solutions
Fluid leaking from SIT or
aspirator arm
Remove tube sequence not
followed correctly, cytometer
still in acquisition mode
Interior valve failure or leak
Waste line to fluidics cart
disconnected
Perform the tube removal
sequence again, even if a tube is
no longer on the SIT.
1 Turn off the cytometer power.
2 Clean up the liquid, using
proper precautions.
3 Call BD Biosciences.
1 Turn off the cytometer power.
2 Clean up the liquid, using
proper precautions.
3 Check that waste lines are
securely plugged in.
4 Turn on the cytometer power.
100 BD FACSCanto Flow Cytometer Reference Manual
 Loading...