


SimplexTM 100
User’s Guide Guía del usario Manuel d’utilisation
574-143
Simplex 100
User’s Guide
Guía del usuario
Manuel d’utilisation
2000 Simplex Time Recorder Co.
All specifications and other information were current as of publication, and are subject to change without notice.
Al imprimirse esta publicación, la información y todas las especificaciones incluidas en este manual estaban al día y están sujetas a cambios sin previo aviso.
Toutes les spécifications et autres informations étaient effectives au moment de la publication de ce manuel, elles peuvent être modifiées sans préavis.
574-143
Rev D
IMPORTANT
Upon unpacking the Simplex 100, inspect the contents of the carton for shipping damage. If damage is apparent, immediately file a claim with the carrier and notify Simplex. DO NOT INSTALL ANY Simplex 100 THAT APPEARS DAMAGED.
WARNING
This equipment generates, uses, and can radiate radio frequency energy and if not installed and used in accordance with the instruction manual, may cause interference to radio communications. It has been tested and found to comply with the limits for a Class A computing device pursuant to Subpart J of Part 15 of FCC Rules, which are designed to provide reasonable protection against such interference when operated in a commercial environment. Operation of this equipment in a residential area is likely to cause interference in which case the user at his own expense will be required to take whatever measures may be required to correct the interference.
CAUTION
ELECTRICAL HAZARD
Disconnect electrical power when making any internal adjustments or repairs. Servicing should be performed by qualified Simplex Representatives.
CAUTION
Danger of explosion if battery is incorrectly replaced. Replace only with the same or equivalent type recommended by the manufacturer. Discard used batteries according to the manufacturer’s instructions.

TABLE OF CONTENTS
TABLE OF CONTENTS |
|
|
Introduction .................................................................................................................... |
|
1 |
Safety Instructions.......................................................................................................... |
|
2 |
Parts Checklist ............................................................................................................... |
|
3 |
Installation ...................................................................................................................... |
|
4 |
To Remove the Cover .......................................................................................... |
|
4 |
To Change the Ribbon ......................................................................................... |
5 |
|
To Remove the Ribbon Cartridge............................................................... |
5 |
|
To Install the Ribbon Cartridge................................................................... |
5 |
|
To Set the Print Margin ........................................................................................ |
5 |
|
To Mount on Wall ................................................................................................. |
|
6 |
To Connect Power................................................................................................ |
|
6 |
Programming ................................................................................................................. |
|
7 |
Simplex 100 s Default’ |
Programmed Parameters................................................. |
8 |
To Set the 12/24 Hour Format ............................................................................. |
8 |
|
To Set the Time.................................................................................................... |
|
9 |
To Set the Date .................................................................................................... |
|
9 |
To Set the Print Order Format............................................................................ |
10 |
|
To Set the Print Date Format ............................................................................. |
11 |
|
To Set the Print Time Format............................................................................. |
12 |
|
To Set the Print Comment.................................................................................. |
13 |
|
To Print Numbering ............................................................................................ |
|
14 |
To Set the Repeat Option................................................................................... |
14 |
|
To Set the Starting Number ............................................................................... |
15 |
|
To Change Daylight Saving Time (DST) Ahead ................................................ |
15 |
|
To Change Daylight Saving Time (DST) Back................................................... |
16 |
|
To Set the Language.......................................................................................... |
|
17 |
To Set an Alarm ................................................................................................. |
|
18 |
To Set the Print Direction ................................................................................... |
19 |
|
To Set the Print Activation.................................................................................. |
20 |
|
To Set the Print Justification .............................................................................. |
20 |
|
To Set the Display Orientation ........................................................................... |
21 |
|
Optional Features......................................................................................................... |
|
22 |
Battery Back-Up ................................................................................................. |
|
22 |
Master Clock Connections ................................................................................. |
22 |
|
Operation ..................................................................................................................... |
|
25 |
Manual Operation............................................................................................... |
|
25 |
Automatic Operation .......................................................................................... |
|
25 |
Combination & Either Operation......................................................................... |
25 |
|
Time Card Operation.......................................................................................... |
|
25 |
Maintenance................................................................................................................. |
|
26 |
Avoid Rough Treatment ..................................................................................... |
26 |
|
Cleaning ............................................................................................................. |
|
26 |
Troubleshooting ........................................................................................................... |
|
26 |
Declaration of Conformity ............................................................................................ |
|
25 |
|
i |
|
.

INTRODUCTION
INTRODUCTION
Congratulations on the purchase of your new Simplex Time Clock / Time & Date Stamp. We suggest you read this manual carefully to become familiar with our product and its many features. The manual explains, in simple steps, how to program, operate, and maintain your new Simplex 100. We recommend that you retain this guide for further reference.
The Simplex 100 is a full-featured, premium product that provides businesses with the ability to track time in one of two modes: as a time clock or as a time & date stamp. It features an assortment of user-selectable print formats and time displays, as well as the ability to number documents. The Simplex 100 also incorporates a wide array of premium features such as the ability to customize comments, interface with a master clock, and ring bells.
Simplex 100 (Wall-Mounted)
1

SAFETY INSTRUCTIONS
SAFETY INSTRUCTIONS
Always follow basic safety precautions when using this product to reduce risk of injury, fire, or electric shock.
1.Read and understand all instructions in the user’s guide.
2.Observe all warnings and instructions marked on the product.
3.Unplug this product from wall outlets before cleaning.
4.Do not use this product near water or when you are wet. If the product comes in contact with any liquids, unplug the line cord immediately. Do not plug the product back in until it has been dried thoroughly.
5 Install the product securely on a stable surface. Serious damage may result if the product falls.
6.Install this product in a protected location where no one can step on or trip over the cord. Do not place objects on the cord that may cause damage or abrasion.
7.If this product does not operate normally, see the Troubleshooting section of this publication.
SAVE THESE INSTRUCTIONS
2

PARTS CHECKLIST
PARTS CHECKLIST
Remember to save your sales receipt, and make sure your Simplex 100 package includes the items listed below:
•Simplex 100 Clock
•Wall-Mounting Template
•AC Power Adaptor
•Ribbon Cartridge
•2 black release keys
•50 TrueAlign Time Cards
Make sure you have a plug near the place you’ve chosen to install the Simplex 100. Simplex offers a complete line of accessories for your clock including ribbon cartridges, time cards, and batteries to make any replacement of parts quick, safe, and inexpensive. Ask for them where you purchased your clock.
3
INSTALLATION
INSTALLATION
Place all box contents on a smooth dry, surface for installation. The Simplex 100 comes with holes for wall mounting and rubber feet for locating it on a table or desk top. If you are locating it on a table or desk, you can simply set it on the surface. If you are mounting the Simplex 100 on a wall, refer to the To Mount on a Wall section of this publication. DO NOT APPLY POWER AT THIS TIME!
Caution! Do not install the Simplex 100 in places subject to high humidity and dust, in places
subject to strong vibrations, in areas exposed to direct sunlight, or in places subject to temperatures below 23° F (-5° C) or above 113° F (45° C).
Note: If the Simplex 100 is to sit on a desk rather than to mount on a wall, remove the cover, install the ribbon cartridge, set the print margin, and apply power using the following instructions.
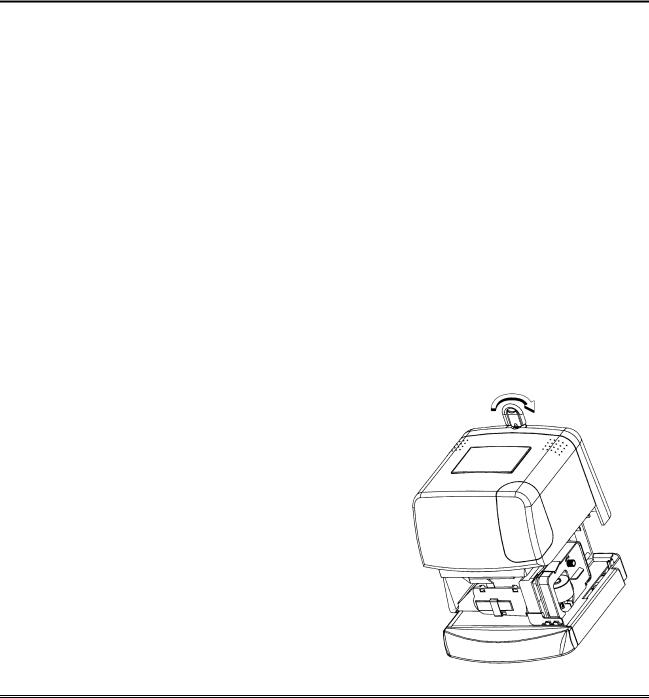
To Remove the Cover
Removing the Cover
1.Insert the black release key into the cover and turn the key clockwise a quarter turn.
2.Firmly grasp the cover and lift up and away from the clock.
Note: Be sure to remove the release key before replacing the cover on the clock.
4

INSTALLATION
To Change the Ribbon
Note: The ribbon cartridge does not come installed. Use the following to install the cartridge before using the Simplex 100.
To Remove the Ribbon Cartridge
1.Unlock and remove the cover.
2.Grasp the ribbon cartridge by its tab and pull it straight out the side of the Simplex 100.
To Install the Ribbon Cartridge
Installing the Ribbon
1.Unpack a ribbon cartridge.
2.Rotate the knob on the ribbon cartridge clockwise to remove all ribbon slack.
3.Slide the cartridge’s exposed ribbon under the print head. Then snap the ribbon cartridge into place while ensuring that the ribbon is fully seated.
4.Temporarily apply power to the clock (refer to
the To Connect Power section of this publication) to take a test print on a clean sheet of paper.
• Ensure that the imprint is complete and smudge-free.
To Set the Print Margin
Note: Set the Print Margin before wall mounting the Simplex 100.
1.Using a piece of paper, determine where you want the leading edge of the imprint placed with respect to the card/document edge.
2.Set the trigger stop (located under the base of the clock) to the desired depth.
3.Temporarily apply power to the clock (refer to the To Connect Power section of this publication) to test the Print Margin.
Setting the Margin
5
INSTALLATION
To Mount on Wall
Note: Do not mount the Simplex 100 directly to plasterboard, paneling, brick, or concrete block. Rather, using appropriate fasteners, secure a board to the wall and then mount the Simplex 100 to the board.
1.At a height convenient for all members of the work force and within 6 ft. of a power outlet, use the mounting template to mark the points where the mounting screws for the Simplex 100 are to be installed.
2.Leaving 3/16 in. of screw shank exposed, screw two #8 panhead mounting screws (not supplied) into place.
3.Hang the Simplex 100 from the mounting screws.
4.Screw a third #8 mounting screw (not supplied) into the lower left-side hole of the base and tighten to the wall.
To Connect Power
Connect the power cable to the clock by removing the cover, passing the cable up the channel in the rear of the unit, and plugging the adapter into the circular connector.
•Plug the AC adapter into the power outlet.
Caution! Do not hold the clock when applying power. The Simplex 100 performs a self-test which includes cycling the printhead.
You are now ready to set up and program the Simplex 100 (refer to the Programming section of this publication).
Note: Be sure to remove the release key before replacing the cover on the clock.
6

PROGRAMMING
PROGRAMMING
To program the Simplex 100, insert and turn the black release key clockwise a quarter turn. Carefully remove the cover. Use the programming label information (shown below) to program the Simplex 100.
•Press the CHANGE button to start the programming mode flashing arrow appears.
•Press the CHANGE button to change a setting setting begins to flash.
•Press the ACCEPT button to accept a setting flashing arrow moves to the next option.
•Continue these steps until all settings are programmed.
•To exit programming at any time, press and hold the ACCEPT button until the programming arrow disappears.
Note 1: The programming arrow proceeds clockwise around the display.
Note 2: Any changes made to the program will be saved. To correct any mistakes, you must start the programming mode again.
Press CHANGE to enter programming mode.
Press CHANGE to change setting. Press ACCEPT to accept setting. 
 PRINT FORMAT
Reset Switch
|
|
|
0. No Print |
|
|
|
|
|
|
|
|
|
|
|
1.12 HOUR, |
|
|
|
|
|
|
C |
|
|
|
|
|
minutes |
|
|
|
|
|
|
|
|
N=Number |
MMM=Month |
|
|
|
|
|
|
H |
||
|
2.12 HOUR, |
|
|
|
|
|
|
||||
|
D=Date |
DD=Date |
tenths |
|
|
|
|
|
|
A |
|
|
T=Time |
YY=Year |
3.12 HOUR, |
0.No Print |
|
|
|
0.CONSTANT |
N |
||
|
C=Comment |
0.No Print |
|
|
|
||||||
|
|
|
hundredths |
1.RCVD |
|
|
|
1.ONE |
|
G |
|
|
|
|
1.MMMDDYY |
4. 12 HOUR, |
|
|
|
|
|||
|
|
|
2.SENT |
|
|
|
2.TWO |
|
|||
|
|
1.NDTC |
|
|
|
|
E |
||||
|
|
2.DDMMMYY |
min., sec. |
|
|
|
|
||||
|
|
3.IN |
0.No Print |
|
3.THREE |
|
|||||
|
|
2.NTDC |
3.YYMMMDD |
5. 24 HOUR, |
|
|
|
||||
|
|
4.OUT |
1. 1 DIGIT |
|
4.FOUR |
|
|
||||
|
|
3.NCDT |
4.MMMDD |
minutes |
|
|
A |
||||
|
|
5.FAXED |
2. 2 DIGITS |
5.FIVE |
|
||||||
|
|
4.NCTD |
6.24 HOUR, |
|
|||||||
|
|
5.DD |
6.FILED |
3. 3 DIGITS |
6.SIX |
|
C |
||||
|
|
5.CNDT |
6.DAY |
tenths |
|
||||||
|
|
7.24 HOUR, |
7.PAID |
4. 4 DIGITS |
7.SEVEN |
|
C |
||||
|
|
6.CNTD |
7.DAYDD |
|
|||||||
|
|
hundredths |
8.custom |
5. 5 DIGITS |
8.EIGHT |
|
E |
||||
|
|
7.CDTN |
8.MM/DD/YY |
|
|||||||
|
|
8. 24 HOUR, |
= exit |
6. 6 DIGITS |
9.NINE |
|
|||||
|
|
8.CTDN |
|
P |
|||||||
|
|
9.DD/MM/YY |
min., sec. |
|
|
|
|
|
|
||
|
PRINT ORDER |
DATE |
TIME |
COMMENT |
NUMBER |
|
REPEAT |
|
T |
||
Time in |
DATE |
|
|
: |
|
FR |
STARTING |
||||
|
|
|
NUMBER |
||||||||
12-Hour Format |
|
AM |
|
||||||||
|
|
|
|
||||||||
|
TIME |
|
|
AHEAD |
|
||||||
|
|
|
|
Daylight |
|||||||
|
|
22 |
|
||||||||
|
12 / 24 |
|
|
|
|
|
Saving |
||||
|
|
|
|
|
BACK |
Time |
|||||
Date |
HOUR |
8 18 |
|
|
|
|
|
||||
|
|
|
|
|
|
|
|
|
|
|
|
|
DISPLAY |
ALARM |
LANGUAGE |
Day of |
|||||||
|
ORIENTATION |
ACTIVATION |
DIRECTION |
|
|
1.ENGLISH |
|||||
|
JUSTIFICATION |
|
|
the Week |
|||||||
|
1.TABLE MOUNT |
1.BACK |
1.MANUAL |
1.RIGHT |
|
|
2.SPANISH |
||||
|
|
|
|
|
|||||||
|
2.WALL MOUNT |
|
|
3.FRENCH |
|
|
|||||
|
2.FRONT |
2.AUTOMATIC |
2.LEFT |
|
|
|
|
||||
|
|
|
|
|
4.PORTUGUESE |
|
|||||
|
|
|
|
3.COMBINATION |
|
|
|
||||
|
|
|
|
|
|
5.GERMAN |
|
|
|||
|
|
|
|
4. EITHER |
|
|
|
|
|
||
|
|
|
|
|
|
|
6.ITALIAN |
|
|
||
|
|
|
|
|
|
|
|
7.DUTCH |
|
|
|
|
|
|
|
|
|
|
|
8.ROMAN |
|
|
|
|
|
|
|
|
|
|
|
9.COMMON |
|
|
|
7

PROGRAMMING
Simplex 100’s Default Programmed Parameters |
|
|
||||
|
|
Description |
|
Setting |
|
|
|
|
12/24-Hour Format |
|
12 |
|
|
|
|
Time |
08:00:00 |
|
|
|
|
|
Date |
|
Sept. 11, ‘95 |
|
|
|
|
Print Order |
|
NDTC (Number, Date, Time, Comment) |
|
|
|
|
Print Date |
|
MMMDDYY (Month, Day, Year) |
|
|
|
|
Print Time |
|
12-Hour, Minutes |
|
|
|
|
Print Comment |
|
No Print |
|
|
|
|
Print Number |
|
No Print |
|
|
|
|
Print Repeat |
|
ONE |
|
|
|
|
Print Starting Number |
0 |
|
|
|
|
|
Daylight Saving Time (DST) AHEAD |
|
No |
|
|
|
|
Daylight Saving Time (DST) BACK |
|
No |
|
|
|
|
Language |
|
English |
|
|
|
|
Alarm (Bell Schedule) |
|
None |
|
|
|
|
Print Direction |
|
Right |
|
|
|
|
Print Activation |
|
Manual |
|
|
|
|
Print Justification |
|
Front |
|
|
|
|
Display Orientation |
|
Table |
|
|
|
|
Custom Comment |
|
None |
|
|
|
Sample Print with Default Parameters: |
SEP11‘95 AM 8:00 |
|
|||
|
|
|
|
|
|
|
|
|
|
|
|
|
|
To Set the 12/24 HOUR Format
A.Press CHANGE once.
•The programming arrow appears next to 12/24 HOUR.
B.Press CHANGE to select 12 or 24-hour format.
DATE |
12 |
||||
HOUR |
|||||
TIME |
|
|
|
|
|
12 / 24 |
|
|
|
|
|
|
|
|
|
|
|
|
|
|
|
|
|
|
|
|
|
|
|
Programming Arrow
C. Press ACCEPT to set the format. |
|
• Programming arrow moves to the next option (go to Step C of |
To).Set the TIME |
8

PROGRAMMING
To Set the TIME
Note: Time is set in the 24-hour format.
A.Press CHANGE once.
B.Press ACCEPT until the programming arrow appears next to TIME.
C.Press CHANGE once.
• The hour begins to blink.
Press CHANGE until the desired hour is shown.
Press ACCEPT to set the hour shown.
•The minutes begin to blink.
Press CHANGE until desired minutes are shown.
D. Press ACCEPT to set the minutes shown. |
|
• The programming arrow moves to the next option (go to Step C of |
To). Set the DATE |
To Set the DATE
A.Press CHANGE once.
B.Press ACCEPT until the programming arrow appears next to DATE.
C.Press CHANGE once.
• The year begins to blink.
Press CHANGE until the desired year is shown.
Press ACCEPT to set the year shown.
•The month begins to blink.
Press CHANGE until the desired month is shown.
Press ACCEPT to set the month shown.
•The date begins to blink.
Press CHANGE until the desired date is shown.
D. Press ACCEPT to set the date shown. |
|
• The programming arrow moves to the next option (go to Step C of |
To Set the Print Or |
Format). |
|
9

PROGRAMMING
To Set the Print Order Format
To select the order for printer output of the numbering , date, time and comment, choose the number on the display which corresponds to the desired format.
Note: The Simplex 100 is capable of printing 20 characters.
N = Number
D = Date
T = Time
C = Comment
Order |
|
Examples |
|
|
Options |
|
|
|
|
1. NDTC |
|
1 |
OCT09 AM 8:18 RCVD |
|
2. NTDC |
1 |
AM 8:18 OCT09 RCVD |
||
3. NCDT |
|
1 |
RCVD |
OCT09 AM 8:18 |
4. NCTD |
1 |
RCVD |
AM 8:18 OCT09 |
|
5. CNDT |
|
RCVD 1 |
OCT09 AM 8:18 |
|
6. CNTD |
|
RCVD 1 |
AM 8:18 OCT09 |
|
7. CDTN |
|
RCVD OCT09 AM 8:18 1 |
||
8. CTDN |
|
RCVD AM |
8:18 OCT09 1 |
|
A. |
Press CHANGE once. |
|
B. |
Press ACCEPT until the programming arrow appears below |
ORDER. |
C.Press CHANGE once.
•The PRINT ORDER option begins to blink. Using the examples above, choose a print order format.
|
Press CHANGE until the desired option number is displayed. |
|
|
D. |
Press ACCEPT to set the PRINT ORDER option shown on the display. |
|
|
• |
The programming arrow moves to the next option (go to Step C of |
To Set the Print Date |
|
|
Format). |
|
|
Note: When choosing programming settings, ensure that the number of characters selected does not exceed a total of 20 (see the illustration below).
|
|
|
Number of Characters Used for this Selection |
||
|
|
|
|
|
|
DATE |
|
1 |
08 |
|
|
|
|
|
|||
TIME |
|
|
|
||
HOUR |
17 |
|
|
||
12 / 24 |
|
|
|
|
|
|
|
|
|
|
|
Total Characters Used for Printing
10

PROGRAMMING
To Set the Print Date Format
Select the print date format by choosing the number on the display which corresponds to the desired format. As each format number is shown on the display, the number of printed character positions used is shown in the upper right-corner of the display. The total number of characters used for printing is shown in the lower left-corner of the display. You can eliminate any item in the print order option by selecting the “0” (No Print) option for that selection.
|
|
Order Options |
Line Format |
|
|
Number of |
|
|
|
|
|
|
|
|
Characters |
|
|
0. No Print |
|
|
|
|
0 |
|
|
1. MMMDDYY |
month, date, year |
|
AUG25’94 |
8 |
|
|
|
2. DDMMMYY |
date, month, year |
|
25AUG’94 |
|
8 |
|
|
3. YYMMMDD |
year, month, date |
|
’94AUG25 |
8 |
|
|
|
4. MMMDD |
month, date |
|
AUG25 |
|
5 |
|
|
5. DD |
date |
25 |
2 |
||
|
|
6. DAY |
day |
|
MO |
|
2 |
|
|
7. DAYDD |
day, date |
|
MO25 |
4 |
|
|
|
8. MM/DD/YY |
month/date/year |
|
08/25/94 |
|
9 |
|
|
9. DD/MM/YY |
date/month/year |
25/08/94 |
9 |
||
A. |
Press CHANGE once. |
|
|
|
|
|
|
B. |
Press ACCEPT until the programming arrow appears below |
|
DATE |
||||
C.Press CHANGE once.
• The DATE option begins to blink. Using the examples above, choose a print date format.
Press CHANGE until the desired option number is displayed.
D. Press ACCEPT to set the PRINT DATE FORMAT |
option shown on the display. |
|
• The programming arrow moves to the next option (go to Step C of |
To Set the Print Tim |
|
Format).
11

PROGRAMMING
To Set the Print Time Format
Select the print time format by choosing the number on the display which corresponds to the desired format. As each format number is shown on the display, the number of printed character positions used is shown in the upper right-corner of the display. The total number of characters used for printing is shown in the lower left-corner of the display.
Line Format |
|
|
Number of |
|
|
|
|
|
Characters |
12 hour, minutes |
|
PM 2:47 |
|
6 |
12 hour, tenths |
|
PM 2.8 |
5 |
|
12 hour, hundredths |
|
PM 2.78 |
|
6 |
12 hour, minutes, seconds |
|
PM 2:47:45 |
9 |
|
24 hour, minutes |
|
14:47 |
|
5 |
24 hour, tenths |
14.8 |
4 |
||
24 hour, hundredths |
|
14.78 |
|
5 |
24 hour, minutes, seconds |
14:47:45 |
8 |
||
A. Press CHANGE once.
B. Press ACCEPT until the programming arrow appears below |
TIME. |
C.Press CHANGE once.
• The TIME option begins to blink. Using the examples above, choose a print time format.
Press the CHANGEbutton until the desired option number is displayed.
D. Press ACCEPT to set the PRINT TIME FORMAT |
option shown on the display. |
|
• The programming arrow moves to the next option (go to Step C of |
To Set the Print |
|
Comment).
12

PROGRAMMING
To Set the Print Comment
Select a preprogrammed comment by choosing the number corresponding to the desired selection.
Order Options |
||
0. |
No Print |
- |
1. |
RCVD |
RCVD |
2. |
IN |
IN |
3. |
OUT |
OUT |
4. |
PAID |
PAID |
5. |
SENT |
SENT |
6. |
FAXED |
FAXED |
7. |
FILED |
FILED |
8. |
Custom |
A thru Z ,0 thru 9and, a space |
A. Press CHANGE once.
B. Press ACCEPT until the programming arrow appears below |
COMMENT. |
C.Press CHANGE once.
• The COMMENT option begins to blink. Using the examples above, choose a comment.
Press CHANGE until the desired option number is displayed.
D. Press ACCEPT to set the COMMENT option shown on the display. |
|
• The programming arrow moves to the next option (go to Step C of |
To Set Print |
Numbering). |
|
To create a custom comment, select the custom option and then spell out the desired comment from the available characters. The available characters are 0 through 9, A through Z and _ (space).
A character is selected by pressing CHANGE until the desired character is displayed. Press ACCEPT to select the displayed character at which time the selected character will move to the
left and the next character can be selected. To exit, press CHANGE until an asterisk ( ) appears on the display and then press ACCEPT .
13

PROGRAMMING
To Print Numbering
You can print a number by using this option. The amount of digits for this number is definable between 0 and 6, the number of times that number is repeated is definable between 0 (fixed) and 9, and the starting number between 0 and 999999.
A. |
Press CHANGE once. |
|
|
B. |
Press ACCEPT until the programming arrow appears below |
NUMBER. |
|
C. |
|
|
|
Press CHANGE once. |
|
|
|
|
• The NUMBER option begins to blink. |
|
|
|
Press CHANGE until the desired option number is displayed. |
|
|
|
|
|
|
D. |
Press ACCEPT to set the COMMENT option shown on the display. |
|
|
|
• The programming arrow moves to the next option (go to Step C of |
To Set the Repeat |
|
|
Option). |
|
|
Note: Selecting a “0” for the PRINT NUMBER code disables the REPEAT and STARTING NUMBER options and moves the programming arrow to the AHEAD option next to DST (Daylight Saving Time).
To Set the Repeat Option
When selecting the Numbering option in the previous step, the programming arrow appears below the REPEAT option. The number of times that a number is repeated is definable between 0 (prints the starting number constantly) and 1 through 9 (prints the starting number once through nine times and then begins to print consecutively).
A. Press CHANGE once.
B. Press ACCEPT until the programming arrow appears below |
REPEAT. |
C.Press CHANGE once.
• The REPEAT option begins to blink.
|
Press CHANGE until the desired option number is displayed. |
|
|
D. |
Press ACCEPT to set the REPEAT option shown on the display. |
|
|
• |
The programming arrow moves to the next option (go to Step C of |
To Set the Starting |
|
|
Number). |
|
|
14 |
|
|
|

PROGRAMMING
To Set the Starting Number |
|
|
After selecting the |
REPEAToption in the previous step, the programming arrow appears next to |
|
STARTING NUMBER. Select from 0 through |
999999. |
|
A.Press CHANGE once.
B.Press ACCEPT until the programming arrow appears next to STARTING NUMBER.
C. Press CHANGE once.
• The STARTING NUMBER begins to blink.
Press CHANGE until the desired number is displayed.
D. Press ACCEPT to set the STARTING NUMBER shown on the display. |
|
|
• The programming arrow moves to the next option (go to Step C of |
To Change Dayligh |
|
Saving Time [DST] AHEAD). |
|
|
|
|
|
|
|
|
To Change Daylight Saving Time (DST) AHEAD
Use the following steps to set the day(at 2:00 AM) on which the Simplex 100 will set the time ahead one hour to DST.
A.Press CHANGE once.
B.Press ACCEPT until the programming arrow appears next to AHEAD.
C. Press CHANGE once.
• The week number begins to blink.
Press CHANGE until the desired number (1st, 2nd, 3rd, 4th, or last week of the month) is displayed.
Press ACCEPT to set the number shown.
•The month begins to blink.
Press CHANGE until the desired month is shown.
Press ACCEPT to set the month shown.
•The day begins to blink.
Press CHANGE until the desired day of the week is shown.
D. Press ACCEPT to set the DST AHEAD options shown on the display. |
|
• The programming arrow moves to the next option (go to Step C of |
To Change Dayligh |
Saving Time [DST] BACK). |
|
|
15 |
PROGRAMMING
To Change Daylight Saving Time (DST) BACK
Use the following steps to set the day (at 2:00 AM) on which the Simplex 100 will set the time back to normal.
A.Press CHANGE once.
B.Press ACCEPT until the programming arrow appears next to BACK.
C. Press CHANGE once.
• The week number begins to blink.
Press CHANGE until the desired number (1st, 2nd, 3rd, 4th, or last week of the month) is displayed.
Press ACCEPT to set the number shown.
•The month begins to blink.
Press CHANGE until the desired month is shown.
Press ACCEPT to set the month shown.
•The day begins to blink.
Press CHANGE until the desired day of the week is shown.
D. Press ACCEPT to set the DST BACK options shown on the display. |
|
|
|
• |
The programming arrow moves to the next option (go to Step C of |
To Set). the Languag |
|
Note: |
To turn off the DST option, reprogram the DST option to display all dashes. |
|
|
|
|
|
|
|
|
|
|
16

PROGRAMMING
To Set the Language
Set the language for printed text by choosing the number corresponding to the desired language setting. The English, Spanish, and French languages and their print formats are shown below.
Month Printing Table
Language |
|
|
|
|
|
|
|
|
|
|
|
|
English |
JAN |
FEB |
MAR |
APR |
MAY |
JUN |
JUL |
AUG |
SEP |
OCT |
NOV |
DEC |
Spanish |
ENE |
FEB |
MAR |
ABR |
MAY |
JUN |
JUL |
AGO |
SEP |
OCT |
NOV |
DIC |
French |
JAN |
FEV |
MAR |
AVR |
MAI |
JUN |
JUL |
AOU |
SEP |
OCT |
NOV |
DEC |
Day Printing Table |
|
|
|
|
|
|
|
|
|
|
Language |
Sunday |
Monday |
Tuesday |
Wednesday |
Thursday |
Friday |
Saturday |
|||
English |
SU |
MO |
TU |
|
|
WE |
TH |
FR |
SA |
|
Spanish |
DO |
LU |
MA |
|
|
MI |
JU |
VI |
SA |
|
French |
DI |
LU |
MA |
|
|
ME |
JE |
VE |
SA |
|
Comment Printing Table |
|
|
|
|
|
|
|
|
|
|
Language |
|
|
|
|
|
|
|
|
|
|
English |
RCVD |
SENT |
IN |
OUT |
|
FAXED |
FILED |
PAID |
|
|
Spanish |
REC |
ENV |
ENT |
SAL |
|
FAX |
ARCH |
PAG |
|
|
French |
RECU |
EXPED |
ENT |
SOR |
|
FAXE |
ENREG |
PAYE |
|
|
A.Press CHANGE once.
B.Press ACCEPT until the programming arrow appears next to LANGUAGE.
C. Press CHANGE once.
• The LANGUAGE option begins to blink. Using the examples above, choose a starting number.
Press the CHANGEbutton until the desired number is displayed.
D. Press ACCEPT to set the LANGUAGE option shown on the display. |
|
• The programming arrow moves to the next option (go to Step C of |
To). Set an Alarm |
17

PROGRAMMING
To Set an Alarm
Use the following steps to set the Simplex 100 to ring up to 24 alarms (or bells) at a specified time during the day or night.
A.Press CHANGE once.
B.Press ACCEPT until the programming arrow appears above ALARM.
C. Press CHANGE once.
• The first ALARM option begins to blink.
Press CHANGE again.
•The hours begin to blink.
Press CHANGE until the desired hour is displayed.
Press ACCEPT to set the hour shown.
•The minutes begin to blink.
Press CHANGE until the desired minute is displayed.
Press ACCEPT to set the minutes shown.
• The next alarm option begins to blink. Use the steps above to set additional alarms.
D.Press ACCEPT to set the alarms.
• The programming arrow moves to the next option (go to Step C of |
To Set the Print |
|
Direction). |
|
|
|
|
|
|
|
|
18

PROGRAMMING
To Set the Print Direction
Select right or left-side printing by choosing the number which corresponds with the desired operation.
Example:
1. Print Right |
2. Print Left |
|
|
|
|
INSERTED EDGE → |
|
←INSERTED EDGE |
|
|
|
|
|
|
JAN15 94AM 11:30 |
JAN15 94 AM 11:30 |
|
|
|
|
|
|
|
A.Press CHANGE once.
B.Press ACCEPT until the programming arrow appears above PRINT DIRECTION.
C. Press CHANGE once.
•The PRINT DIRECTION option begins to blink. Using the examples above, choose a print direction.
Press CHANGE until the desired number is displayed.
D. Press ACCEPT to set the PRINT DIRECTION |
option shown on the display. |
|
• The programming arrow moves to the next option (go to Step C of |
To Set the Print |
|
Activation).
19

PROGRAMMING
To Set the Print Activation
The Simplex 100 has four settings for print activation: MANUAL, AUTOMATIC, COMBINATION, and EITHER. Refer to the Operation section of this publication for more information on these different print activation methods.
A.Press CHANGE once.
B.Press ACCEPT until the programming arrow appears above PRINT ACTIVATION.
C. Press CHANGE once.
• The PRINT ACTIVATION option begins to blink.
Press CHANGE until the desired option number is displayed.
D. |
Press ACCEPT to set the PRINT ACTIVATION |
option shown on the display. |
|
• |
The programming arrow moves to the next option (go to Step C of |
To Set the Print |
|
Justification).
To Set the Print Justification
Print justification defines the location of printed information to be set to the front or back of the 20 character print field. When printing less than 20 characters, select the Front setting.
A.Press CHANGE once.
B.Press ACCEPT until the programming arrow appears above PRINT JUSTIFICATION.
C. Press CHANGE once.
• The PRINT JUSTIFICATION option begins to blink.
Press the CHANGEbutton until the desired number is displayed.
D. Press ACCEPT to set the PRINT JUSTIFICATION option shown on the display. |
|
• The programming arrow moves to the next option (go to Step C of |
To Set the Display |
Orientation). |
|
Note: Make a sample print to ensure that the setting you’ve selected is right for your printing needs.
20

PROGRAMMING
To Set the Display Orientation
You must program the Simplex 100’s display to display its information based on how it is mounted. Use the following steps to set the orientation of the display.
A.Press CHANGE once.
B.Press ACCEPT until the programming arrow appears above DISPLAY ORIENTATION.
C. Press CHANGE once.
• The DISPLAY ORIENTATION option begins to blink.
Press the CHANGEbutton until the desired number is displayed.
D.Press ACCEPT to set the DISPLAY ORIENTATION option shown on the display.
• The programming arrow disappears and the Simplex 100 displays the current time.
Note: When you have finished programming the Simplex 100, remove the release key from the cover, then snap the cover back into place on the clock.
21

OPTIONAL FEATURES
OPTIONAL FEATURES
Battery Back-Up
Installing the Battery
Using one of the black release keys, unlock and remove the cover; then use the following steps to install the Simplex 100 s Battery’ Back-Up feature.
1.With the cable facing out from the clock, slide the battery pack into the space provided.
2.Pass the battery cable up the channel in the rear of the unit, and plug the connector onto the battery pins (the connector is keyed for proper installation).
3.Remove the release key and then snap the cover into place.
Master Clock & Bell Ringer Connections
The Simplex 100 series clock includes a 4-position, removable terminal block used to interface to Master Clock and Signal devices. Use the following illustrations and information to install the Master Clock connections to the S100 series clock. This series of clocks is capable of receiving 24 VDC Synchronous Master Clock signals without the Bell/Sync option.
Signal Specifications |
|
|
Signal OUT |
........12 VDC @ 50ma maximum |
|
(Thirty-two Simplex 100 loads) |
||
Signal IN....... |
9 - 30 VDC |
|
Wire Type........ |
22 AWG Copper Wire |
|
Max. Wire Length........ |
(10 000 feet) |
|
Terminal Block Connections
 Signal IN -
 Signal IN +
 Signal OUT -
 Signal OUT +
Note: You can use the S100 series clock as a Master Clock or a Bell Ringer, but it cannot act as both.
22

OPTIONAL FEATURES
The S100 series clock can operate in the following master clock configurations:
SLAVE - The S100 series clock receives 24 VDC Simplex 58th-Minute corrections from a master clock.
Master OUT + 
Clock
OUT -
IN + Simplex
100
IN - Slave
SLAVE - The S100 series clock receives 115VAC Simplex 58th-Minute corrections from a master clock
|
|
|
|
|
|
|
Master 115VAC |
|
Simplex |
|
|
IN+ |
Simplex |
Clock |
|
Bell/Sync. |
|
|
100 |
|
|
Option |
|
IN - |
Slave |
||
SYNC. |
|
|
||||
|
|
|
|
|
|
|
|
|
|
|
|
|
|
MASTER - The S100 series clock transmits 58th-minute corrections.
Simplex |
OUT+ |
|
IN+ |
Simplex |
100 as |
|
|
|
100 |
Master |
OUT- |
|
IN- |
Slave |
|
|
|
|
|
23

OPTIONAL FEATURES
MASTER/ SLAVE - The S100 series clock receives and retransmits Simplex 58th-Minute corrections in daisy chain configuration.
Master |
|
|
|
|
|
|
|
|
|
|
|
|
|
|
|
|
|
|
|
|
|
|
|
Clock |
|
|
Simplex 100 |
|
Simplex 100 |
|
|
Simplex 100 |
|||
or |
OUT+ |
|
IN+ |
OUT+ |
|
IN+ |
OUT+ |
|
IN+ |
OUT+ |
|
Simplex |
|
|
|
|
|
|
|
|
|
|
|
100 |
OUT- |
|
IN- |
OUT- |
|
IN- |
OUT- |
|
IN- |
OUT- |
|
|
|
|
|
|
|
|
|
|
|
|
|
Note: In the daisy chain configuration, there is a one second delay between each clock in the chain.
MASTER/ SLAVE - The S100 seies clock receives and retransmits Simplex 58th-Minute corrections in parallel configuration.
Master |
|
|
|
|
|
|
|
|
|
|
|
|
|
|
|
|
|
|
|
|
|
|
|
Clock |
|
|
Simplex |
100 |
|
Simplex |
100 |
Simplex 100 |
|||
or |
OUT+ |
|
IN+ |
|
IN+ |
|
|
IN+ |
|
|
|
Simplex |
|
|
|
|
|
|
|
|
|
|
|
100 |
OUT- |
|
IN- |
|
IN- |
|
|
|
|
|
|
|
|
|
|
|
|
|
|
|
|
|
|
24
 Loading...